


Languages
Pages
Legal


Copyright Mark Severin, 2016 1
A Flames of War Variant designed for large, multi-player games using MicroArmor
(1/285 or 6mm) figures.
By Mark “Extra Crispy” Severin

Copyright Mark Severin, 2016 2
Contents INTRODUCTION.................................................................................... 4
DON’T BE “THAT GUY” ........................................................................... 4
GAME TURNS [p.31] ............................................................................. 5
Revised Turn Sequence ....................................................................... 5
PHASES [New Rules] ............................................................................. 5
Determine Phases: ............................................................................. 5
Phasing Back: .................................................................................... 6
Multi-Player Games: ........................................................................... 6
Think Ahead: ..................................................................................... 6
Keeping Track of Activations: .............................................................. 6
INITIATIVE [New Rule].......................................................................... 7
Scenario Specific Initiative: ................................................................. 7
The Starting Step ................................................................................. 7
HIDDEN MOVEMENT [Optional Rule] ....................................................... 7
Scout Markers: .................................................................................. 7
Using Scout Markers: ......................................................................... 7
Dummy Markers: ............................................................................... 7
Spotting Rules: .................................................................................. 8
Moving Unit Markers: ......................................................................... 8
Unmasking:....................................................................................... 8
OPPORTUNITY FIRE [New Rule] .............................................................. 8
MOVEMENT [p.34] ................................................................................ 9
Moving Your Platoons [p.40]: .............................................................. 9
Dismounting [p.47]: ........................................................................... 9
Tank Riders [p.46]: ............................................................................ 9
COMMAND [p. 63] .............................................................................. 10
SHOOTING [p.72] ............................................................................... 10
Shooting Sequence [p.72]: ............................................................... 10
Concealment [p.85]: ........................................................................ 10
Going To Ground [p.90]: ................................................................... 10
PLATOON MOTIVATION TESTS [p.173] .................................................. 11
ARTILLERY [p.122] ............................................................................. 11

Copyright Mark Severin, 2016 3
Artillery Observers [p.127]: .............................................................. 11
Friendly Fire [p.133]: ....................................................................... 12
ASSAULTS [p. 141] ............................................................................. 12
Charge Into Contact [p.145]: ............................................................ 12
Defensive Fire [p.151-3]: .................................................................. 12
MORALE [p. 172] ................................................................................ 12
Company Morale [p.175]: ................................................................. 12
AIRCRAFT [p.178] .............................................................................. 12
Anti-Aircraft Fire [p.181]: ................................................................. 13
Attacking With Aircraft [p.185]: ......................................................... 13
SPECIALISTS [p.192]: ........................................................................ 13
Reconnaissance [p. 194]: ................................................................. 13
Eyes and Ears [p.195]: ..................................................................... 13
Cavalry [p.202]: .............................................................................. 13
BUNKERS [p. 214] .............................................................................. 13

Copyright Mark Severin, 2016 4
INTRODUCTION You will need the main Flames of War 3rd Edition rulebook to use these rules.
The numbers in the chapters refer to the pages in the paperback rule book. All rules are in place unless specifically changed, modified or dropped herein.
Flames of AwesomeSauce is a modification of the base Flames of War rules designed for large, multi-player games using MicroArmor (1/285 or 6mm)
figures. It can be used with any other scale as is of course. It was originally
titled “Flames of Epic” but that became confusing because many gamers thought it was a WW2 version of “Epic: Armageddon” the science fiction
game from Games Workshop. I like that game too, so I may write Flames of Epic some day, but that’s another project!
A second change I make to the game is to switch to half-inches (you can use
centimeters if that is easier). All of my stands are half size (cut length and width in half) and do the same for the various templates. I make my “small”
bases very slightly oversized at 15x15mm as true half scale just makes the m too darn tiny! I have some rulers marked in half inches so I don’t have to
do any math. This makes my 4x6 table effectively 8 x 12. With this you can now play the “long” way. Further, now you can actually game a fighting
withdrawal. There is room and space to fall back to a new position! And fast tanks are now especially deadly. No more putting a big cat on a hill and
sweeping the field. Tigers and Panther will actually have to maneuver!
This mod includes a new two-Phase turn sequence and an optional hidden
movement rule. I recommend using movement trays in the game as much as possible. Old CDs are a great resource. Put each platoon on a tray. It will
take some gentlemanly behavior with regard to “is that platoon in cover?” What I do it is this: move the platoon on the tray. Then remove the tray and
deploy each stand, but only when necessary. So if the platoon is just in the open and is shot at, leave it on the tray. But if it is near cover, remove the
tray and deploy so it is clear which stands are in LOS, which are concealed, etc.
DON’T BE “THAT GUY” Although the major change is just the turn sequence (and optional hidden movement), that leads to a lot of different situations and decisions. It makes
for a better game I think. But it requires more of the players too. It is NOT a game for the uber-competitive. So I always invoke the “Don’t be a jerk” rule
at the beginning of each battle.

Copyright Mark Severin, 2016 5
GAME TURNS [p.31]
Revised Turn Sequence 1. Roll for Phases [1-3 = Phase 1, 4-6 = Phase 2]
2. Roll for initiative (may not apply on turn 1) 3. Both players make all rolls for:
a. Air support b. Reserves
c. Company Morale 4. Player who wins initiative moves first in each Phase and is called the
First Player, his opponent is the Second Player. 5. First player moves one Phase 1 platoon. Each platoon follows the
sequence from the rule book: a. Move
b. Shoot
c. Assault d. OPTIONAL, NOT YET PLAY TESTED: Allow option of shoot then
move or move then shoot. Possibly only allow option for Phase 1 units? Phase 2 must move then shoot?
6. The First Player then moves all of his remaining Phase 1 platoons as above.
7. The Second Player now moves all his Phase 1 platoons, as above. 8. Both players test Platoon Morale for any required units.
9. The First Player now chooses a Phase 2 platoon. Each platoon follows the sequence from the rule book:
a. Move b. Shoot
c. Assault 10. The First Player completes moving all of his Phase 2 platoons as
above.
11. The second Player now moves with all his Phase 2 platoons as above.
12. Both players test Platoon Morale for any units that require it.
PHASES [New Rules] Unlike the standard game, platoons move in one of two phases. There are,
in effect, two mini turns within each turn.
Determine Phases: Whether units are Phase 1 or Phase 2 is determined
randomly. Unless a scenario indicates otherwise, it is a 50/50 split
whether a unit is Phase 1 or 2. Roll one die for each platoon. If the roll is odd it is Phase 1. If the roll is even, it is Phase 2. As you roll, mark

Copyright Mark Severin, 2016 6
each platoon with a Phase Marker. A simple counter with a 1 on one
side and a 2 on the other works quite well. I have washers flocked with one big green tuft for Phase 1 and two tufts for Phase 2 to
enhance the look of the game.
One way to adjust a scenario is to change the Phase odds. For example, in an early war game you may have the German player be
Phase 1 on a 1-4 and Phase 2 on a 5-6, reflecting their training and doctrinal advantages. Likewise, in late war games you may make the
Germans Phase 1 only on a 1 or 2 and phase 2 on a 3-6.
It is also possible to modify this for specific units (commandos for example, may be phase 1 on a 1-5, or even allowed to choose their
Phase). If playing multi-player games, certain forces may have differing Phases. For example home guard or militia type forces may
be 1-2/3-6 while regulars are 50/50.
Phasing Back: Any units (except aircraft) that are Phase 1 may “Phase
Back” to Phase 2. Simply select the platoon, and announce you are
“Phasing Back.” Replace the platoon’s Phase 1 marker with a Phase 2 marker. This allows a unit to await developments but does hand the
initiative to your opponent….
Multi-Player Games: If like me you normally play large games with
multiple player per side, simply have each player activate their platoons as usual. The entire side should move at the same time. So if
you have 4 German players, in their Phase 1 all 4 should activate platoons, move, shoot, etc. Normally your players will end up paired
off but occasionally one player may shoot or assault forces of two different opposing players. Just take your time in these situations. The
mechanics are still very fast and we find the game flows quite well even with very large battles.
Think Ahead: Although simple in execution, this change in game
structure requires you to really think ahead. You have to activate shooting platoons before assaulting platoons to pin your enemy. You
have to think about when you call artillery as the template may be in your way later in the turn (friendly fire is a bad thing).
Keeping Track of Activations: We find the simplest way to keep track of
who has activated already and who has not is as follows: as a platoon
activates remove its Phase marker.

Copyright Mark Severin, 2016 7
INITIATIVE [New Rule] Each turn, roll one D6 for each side (re-roll ties). The high roller will move
first in each Phase and is called the First Player in these rules.
Scenario Specific Initiative: One way to adjust a scenario for specific
instances is to adjust the initiative roll. For example, if you are gaming an assault on prepared positions, you might give the attacker a +1 to
his die roll. Or if you have one side with superior local knowledge and
intel, you might let them win ties. Likewise, you can mimic poor command with a -1 to the initiative die roll, possibly in combination
with a change to the Phasing odds.
The Starting Step Each side now carries out their starting step. As noted on the QRS, some are carried out in initiative order (deploying Ambushes for example) and some
are simultaneous (Bog checks).
HIDDEN MOVEMENT [Optional Rule] I often like to introduce hidden movement in to my games as even a simple “dummy counters” system creates quite a nice amount of fog of war.
Scout Markers: In order to use hidden movement you will need some
scout markers. You will need these in three varieties: tanks, foot and
other. Each marker should have an ID on it (a number or letter or whatever). You will need one marker for each platoon in your force. An
AFV platoon gets a tank marker. Infantry platoons get a foot marker.
All other platoon types get an “other” marker. To make a marker I use a single model on an oversized base. For German tank makers I use all
Tigers and Panthers. For Soviets all JS2s. For foot markers, infantry figures. For “other” I use trucks.
Using Scout Markers: Units under a Scout Marker may not fire or
assault. Roll for Phases for each marker treating them as a platoon.
They are bound by normal movement rates. You may move a “dummy” any speed you wish but that may give the game away
(hmmm..the scout marker just moved 3)’…I’m pretty sure it’s a dummy). Scout markers may not use Double Time movement.
Dummy Markers: Each side should have some “dummy” markers in
their mix. Having about 25-50% of the markers be dummies works

Copyright Mark Severin, 2016 8
well. Simply keep a piece of paper that indicates which markers are
real units and which are dummies.
Spotting Rules: In order to detect whether an enemy marker is a real
unit or not it must be spotted. In order to spot, one of your platoons must “fire” at the enemy marker. A platoon may only spot one enemy
marker in a turn and may not fire at any other targets. You must score 2 hits to reveal the marker. All normal shooting rules apply (rate of
fire, concealment, cover, long range, etc.). Unit Markers save on a 5+. If you score 2 hits remove the marker. If it represents a real unit,
deploy that unit on the table. The fire has no effect on the unmasked unit.
Exception: Recon units do not “fire” – they make a skill check. If
successful, the Scout Marker is unmasked (there is no save roll).
ALL scout markers (even dummies) may attempt to spot once per
turn. They fire with 4 dice regardless of what unit (if any) they represent.
Moving Unit Markers: A unit marker moves just as a normal platoon of
its type. It pays terrain costs as normal. If it requires a bog check, the
bog check affects the entire platoon.
Unmasking: Scout Markers are “unmasked” in a few ways. First, the
owning player may choose to unmask. They do so as part of their normal movement. Simply remove the scout maker and put the
appropriate platoon on the table. Second, they may be spotted by an enemy platoon. Third, if an enemy platoon (NOT a scout marker) is
within 12” and has a clear line of sight to the scout marker, the marker is removed and the real unit (if any) is immediately deployed.
A moving unit unmasks enemy scout markers immediately and may continue moving after doing so.
OPPORTUNITY FIRE [New Rule] A unit that neither moves nor fires in its turn may instead be placed on Opportunity Fire.
Units that neither move nor shoot may be marked with an Opportunity
Fire marker. At any point during the enemy’s turn (Phase 1 or Phase 2) the unit may fire. The player interrupts the enemy turn, declares
the fire, and resolves it immediately. All normal firing rules apply,
including cover, saves, etc. Note that you put complete platoons on Op

Copyright Mark Severin, 2016 9
Fire and they fire as such. You cannot put part of a platoon on
Opportunity Fire. A platoon on Op Fire gets one shot. You may fire at more than one target but all fire happens at the same time. After
resolving the fire, remove the Op Fire marker.
Depending on the scenario you are playing, you may allow units of one or both sides to start the game with an OpFire marker.
Note: A unit given an Op Fire marker retains it until it either takes an
Op Fire, moves or shoots. In theory, a unit could go on OpFire on turn 1, have no target and keep that same Op Fire marker until the end of
the game!
Units with an OpFire marker may not conduct assaults. If they are the target of an assault, they may fire at the moment the assault is
declared. This is in ADDITION to defensive fire.
MOVEMENT [p.34]
Except that you move in two phases, all movement rules remain in effect as written with the following notes/changes/clarifications:
Moving Your Platoons [p.40]: As stated, move each team in the first
platoon before moving on to the next. Once you have started moving
the second platoon, you may not go back to adjust the moves of any
prior platoons.
Dismounting [p.47]: Passengers may dismount at any time. If they
dismount prior to the transports moving, they may move and fight normally. Otherwise they must remain stationary and have a ROF as if
moving.
Tank Riders [p.46]: Passengers are temporarily treated as part of the
transporting platoon. They move, fire and assault with that platoon if they are riding. They may dismount in either their platoon’s own phase
or the tank’s.
Examples: 1. A Sherman platoon is carrying two infantry teams. Neither the tank nor
the infantry platoon has moved yet. The US player decides to move the
tanks, but want to dismount the infantry. He places the infantry stands
adjacent to the tanks, then moves, shoots and assaults with the
Shermans. Later in the turn he decides to move that infantry platoon. The
dismounted infantry may move, shoot and assault as normal.

Copyright Mark Severin, 2016 10
2. A Tankovy company of T-34s is carrying 12 infantry stands of company A.
The Soviet player moves Company A, but opts not to dismount the
infantry from the tanks. These stands may not fire or assault in this
phase. Later in the game, he decides to move the T-34s. But as they are
headed into a tank fight the infantry are just so much meat. He dismounts
the infantry, placing them adjacent to the T-34s prior to moving the
tanks. The tanks may move shoot, assault as normal. The infantry may
not move, shoot or assault as their company has already done so.
COMMAND [p. 63] All command rules are as written.
SHOOTING [p.72]
Again, shooting remains as normal except that you shoot with an active platoon rather than with your entire force.
Shooting Sequence [p.72]: You will need to mark enemy platoons with
the number of hits you inflict in order to keep track of pin results. (You
could also use a paper roster) For example, you may shoot with your first platoon and cause 3 hits. Later in the turn you may target the
same enemy platoon. You now need just 2 more hits to pin the enemy platoon. We find very small d6 work just fine for this purpose.
Concealment [p.85]: If targeting an enemy infantry team that has not
yet moved, it is automatically considered concealed. If concealed it
may still move, shoot or assault later in the turn.
Going To Ground [p.90]: When targeting an enemy infantry team that
has not yet moved in the current turn the defending player may
declare that platoon as “Gone to Ground.” However, if he declares it so, it may not move, shoot or assault later in the turn. Exception:
Platoons that moved double time in the prior turn may not be considered GtG under this rule.
Examples:
1. Russian Team A is firing at the German platoon. Only enemy teams 1 and
2 are eligible targets (in range, LOS, field of fire). Because every eligible
target is concealed by the hedge, the Russian will need to add 1 to his
required “To-Hit” roll. If the German platoon has not yet moved the
German player also has the option of declaring the platoon “Gone to
Ground”
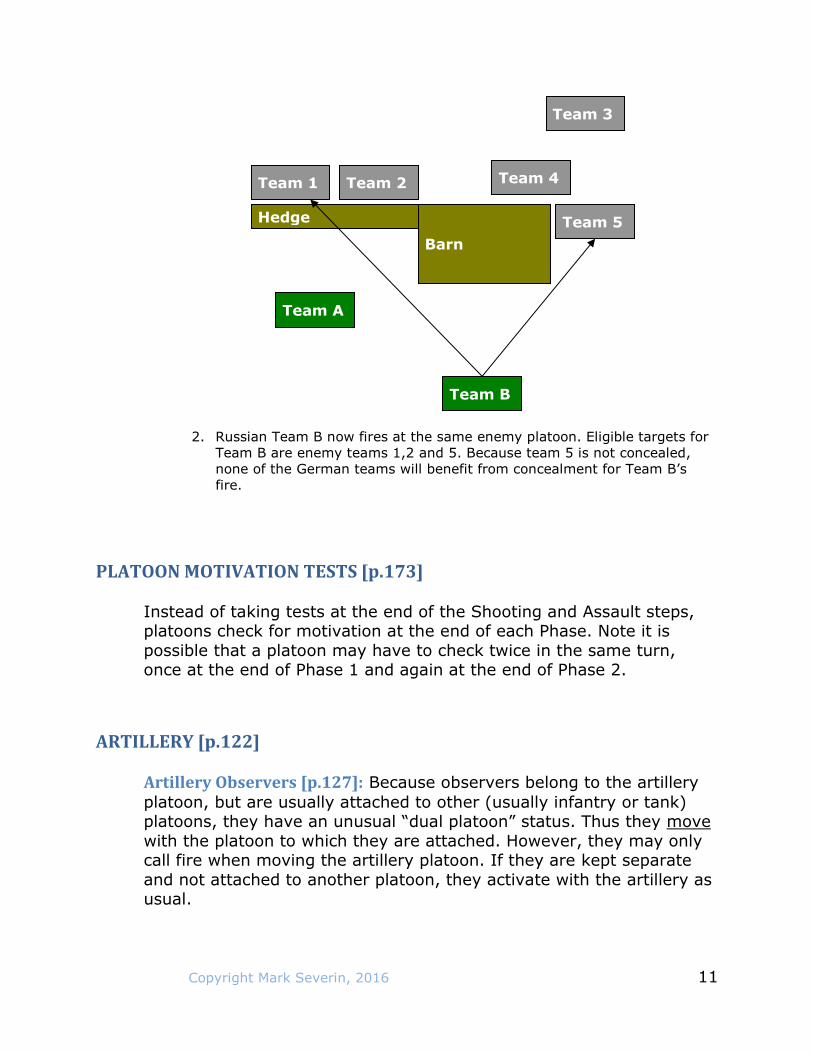
Copyright Mark Severin, 2016 11
2. Russian Team B now fires at the same enemy platoon. Eligible targets for
Team B are enemy teams 1,2 and 5. Because team 5 is not concealed,
none of the German teams will benefit from concealment for Team B’s
fire.
PLATOON MOTIVATION TESTS [p.173]
Instead of taking tests at the end of the Shooting and Assault steps, platoons check for motivation at the end of each Phase. Note it is
possible that a platoon may have to check twice in the same turn, once at the end of Phase 1 and again at the end of Phase 2.
ARTILLERY [p.122]
Artillery Observers [p.127]: Because observers belong to the artillery
platoon, but are usually attached to other (usually infantry or tank) platoons, they have an unusual “dual platoon” status. Thus they move
with the platoon to which they are attached. However, they may only call fire when moving the artillery platoon. If they are kept separate
and not attached to another platoon, they activate with the artillery as usual.
Team A
Team 2
Team 3
Team 1 Team 4
Team 5
Barn
Hedge
Team B

Copyright Mark Severin, 2016 12
Friendly Fire [p.133]: Once a bombardment is resolved, the template
should remain on the table (alternatively you may simply mark the
aiming points to make for a better looking table). Any friendly team that moves through the template or ends its move within 4” of the
template is subject to the friendly fire rules [p.82]. Having an elevated template on “legs” is very handy (you can make one or buy one from
Litko.net).
ASSAULTS [p. 141] Assaults are carried out in the normal Phases, rather than being a separate
Phase all their own. As a result, you really have to think ahead when planning assaults. Also, keep in mind that in regular FoW your opponent
does not react to you. In FoA you may set up an assault only to have your enemy move away before you can charge. The Phases really change the
tactics you must use to win. Or you may find the platoon you wanted to assault with gets pinned before it can move!
Charge Into Contact [p.145]: Keep in mind the 4” charge is in addition
to your normal movement.
Defensive Fire [p.151-3]: Defending teams fire at full ROF even if they
moved prior to being assaulted.
MORALE [p. 172] Play all morale rules as normal except that you check platoon morale at the end of each phase, instead of at the end of the turn.
Company Morale [p.175]: In large multi-player games I typically have more than one company involved. I do not use these rules as the game usually sorts itself out.
AIRCRAFT [p.178] Aircraft are played as normal but they have a Phase, just like any other unit.
Roll for aircraft entry during the Starting Step. If aircraft arrive, roll for their Phase just like any other unit. Aircraft may NOT “Phase Back.”

Copyright Mark Severin, 2016 13
Anti-Aircraft Fire [p.181]: Anti-Aircraft units have a Phase like any
other. It is possible for an AA unit to have been activated and thus be
unable to react to the presence of an enemy aircraft.
Attacking With Aircraft [p.185]: As with artillery, after an aircraft
attack, leave the template on the table. Any team moving through the template – whether friendly or enemy – may also be hit, if the aircraft
ranged in.
SPECIALISTS [p.192]: Most specialist rules need no modification.
Reconnaissance [p. 194]: The disengage rules works as normal but the
owing player should keep the Phases in mind. Recon may only do so once – so if you disengage in Phase 1, an enemy platoon may catch up
with you in Phase 2!
Eyes and Ears [p.195]: In addition to revealing an enemy platoon that
has gone to ground, if using the optional hidden movement rules, they may reveal a Scout Marker.
Cavalry [p.202]: Although a horse is not a huge height, mounted troops
better than foot troops. If using the optional hidden movement rules,
they Spot as normal, but get +1 to their Spotting dice.
BUNKERS [p. 214] Bunkers roll for Phases as normal, and may use Op Fire like any other unit.
Top Related