


Languages
Pages
Legal

Part No. 84372
770MAX Multiparameter
Analyzer/Transmitter
Instruction Manual
©Mettler-Toledo Thornton, Inc. 2007
No part of this manual may be reproduced or transmitted in any form or by any means, electronic or mechanical, including photocopying (other than where specifically noted), for any purpose without the express written permission of Mettler-Toledo Inc.
U.S. Government Restricted Rights: This documentation is furnished with Restricted Rights.
METTLER TOLEDO THORNTON RESERVES THE RIGHT TO MAKE REFINEMENTS OR CHANGES WITHOUT NOTICE.
This document contains proprietary information, which is protected by copyright. All rights are reserved. No part of this document may be photocopied (other than where specifically noted), reproduced or translated, into another language without the prior written consent of Mettler-Toledo Thornton, Inc.
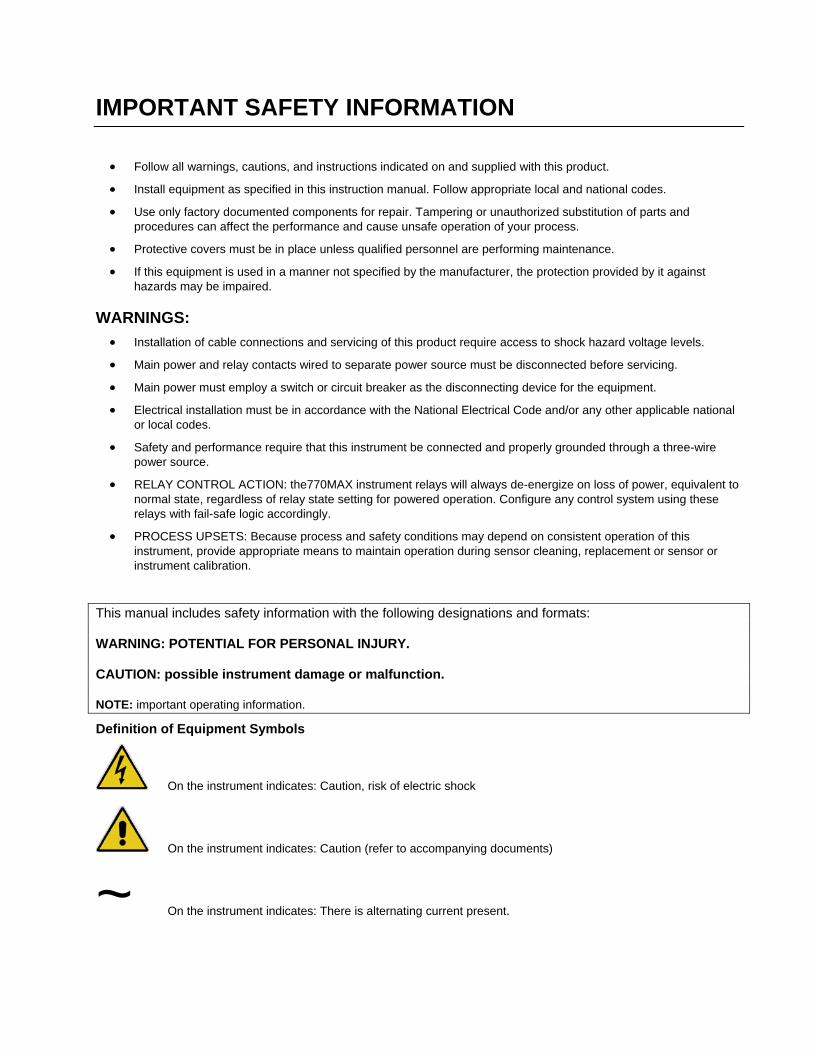
IMPORTANT SAFETY INFORMATION
• Follow all warnings, cautions, and instructions indicated on and supplied with this product.
• Install equipment as specified in this instruction manual. Follow appropriate local and national codes.
• Use only factory documented components for repair. Tampering or unauthorized substitution of parts and procedures can affect the performance and cause unsafe operation of your process.
• Protective covers must be in place unless qualified personnel are performing maintenance.
• If this equipment is used in a manner not specified by the manufacturer, the protection provided by it against hazards may be impaired.
WARNINGS: • Installation of cable connections and servicing of this product require access to shock hazard voltage levels.
• Main power and relay contacts wired to separate power source must be disconnected before servicing.
• Main power must employ a switch or circuit breaker as the disconnecting device for the equipment.
• Electrical installation must be in accordance with the National Electrical Code and/or any other applicable national or local codes.
• Safety and performance require that this instrument be connected and properly grounded through a three-wire power source.
• RELAY CONTROL ACTION: the770MAX instrument relays will always de-energize on loss of power, equivalent to normal state, regardless of relay state setting for powered operation. Configure any control system using these relays with fail-safe logic accordingly.
• PROCESS UPSETS: Because process and safety conditions may depend on consistent operation of this instrument, provide appropriate means to maintain operation during sensor cleaning, replacement or sensor or instrument calibration.
This manual includes safety information with the following designations and formats: WARNING: POTENTIAL FOR PERSONAL INJURY. CAUTION: possible instrument damage or malfunction. NOTE: important operating information.
Definition of Equipment Symbols
On the instrument indicates: Caution, risk of electric shock
On the instrument indicates: Caution (refer to accompanying documents)
~ On the instrument indicates: There is alternating current present.

TABLE OF CONTENTS
CHAPTER 1: INTRODUCTION .....................................................................................................................1 CHAPTER 2: INSTALLING THE 770MAX....................................................................................................2 Unpacking................................................................................................................................2 Instrument Description.............................................................................................................2 Instrument Installation..............................................................................................................3
Panel Mount .......................................................................................................................3 Pipe Mount .........................................................................................................................4 Wall Mount and Rear Cover ...............................................................................................4
Connections.............................................................................................................................4 Input Power ........................................................................................................................4 Smart Sensor Connections ................................................................................................5 Ferrite Bead Installation .....................................................................................................5 Pulse Flow Sensor Connections ........................................................................................5 Other Connections .............................................................................................................6
Initial Start-Up..........................................................................................................................7 Display Contrast Adjustment ..............................................................................................7
CHAPTER 3: GETTING STARTED...............................................................................................................8 Operating Modes .....................................................................................................................8
Measure Mode ...................................................................................................................8 Menu Mode ........................................................................................................................8
Using the Display and Keypad.................................................................................................8 Display ...............................................................................................................................8 Keypad ...............................................................................................................................9 Data Entry ..........................................................................................................................9
CHAPTER 4: USING MENUS .....................................................................................................................11 Introduction............................................................................................................................11 Main Menu.............................................................................................................................11
Access..............................................................................................................................11 Exit ...................................................................................................................................11
Measurements Menu.............................................................................................................11 Measurement ...................................................................................................................11 Sensor Input.....................................................................................................................12 Units .................................................................................................................................12 Name................................................................................................................................12 Multiplier...........................................................................................................................12
Adder................................................................................................................................13 Averaging .........................................................................................................................13 Compensation ..................................................................................................................13 STC (pH only) ..................................................................................................................13 IP (pH only) ......................................................................................................................13 Temp Source....................................................................................................................13 Pressure Source ..............................................................................................................13 Resolution ........................................................................................................................13 Max PSI (pressure only)...................................................................................................13 Pipe ID (flow only) ............................................................................................................13 External Flow Reset .........................................................................................................13 TDS Factor.......................................................................................................................13 Tank Height......................................................................................................................14 Area..................................................................................................................................14 TOC Measurement...........................................................................................................14
Messages ..............................................................................................................................15 Calibrate Menu ......................................................................................................................15 Analog Outputs......................................................................................................................15 Setpoints................................................................................................................................17 Relays....................................................................................................................................18 Discrete Outputs....................................................................................................................18 Display Setup ........................................................................................................................18 Security..................................................................................................................................19 Diagnostics ............................................................................................................................19 RS232 Setup .........................................................................................................................19 Network .................................................................................................................................20 Reset .....................................................................................................................................20 Tech Support .........................................................................................................................20 Set Hold Time........................................................................................................................20 Other Menus..........................................................................................................................20
Set Date/Time ..................................................................................................................20 Software Revs..................................................................................................................20 View Total Flow................................................................................................................20 Print Configuration ...........................................................................................................20 Smart Sensors .................................................................................................................20 Set Unit Name..................................................................................................................21 Lost Passwords................................................................................................................21 Service Only.....................................................................................................................21
CHAPTER 5: MAKING MEASUREMENTS.................................................................................................22 Introduction............................................................................................................................22
Displaying Measurements ................................................................................................22 Sensor Constants.............................................................................................................22
Temperature Compensation.............................................................................................22 Resistivity/Conductivity ..........................................................................................................22
Temperature Compensation.............................................................................................23 Dissolved Oxygen..................................................................................................................23 Dissolved Ozone ...................................................................................................................23 TOC.......................................................................................................................................24 pH..........................................................................................................................................24
Temperature Compensation.............................................................................................24 Isopotential Point..............................................................................................................24 Solution Temperature Coefficient .....................................................................................24
Temperature ..........................................................................................................................25 Pressure ................................................................................................................................25 Flow.......................................................................................................................................25 ORP.......................................................................................................................................25 Tank Level (Volume) .............................................................................................................25 Derived Measurements..........................................................................................................26
Difference.........................................................................................................................26 Ratio.................................................................................................................................26 % Rejection ......................................................................................................................26 % Recovery......................................................................................................................26 Deionization Capacity - grains, ppmG..............................................................................27 Watts or Volt-Amps (VA) ..................................................................................................27 Power Plant Calculated Parameters ................................................................................27
CHAPTER 6: CALIBRATING AND VERIFYING.........................................................................................29 Access ...................................................................................................................................29 Sensor Calibration .................................................................................................................29
Calib. Overviews for Each Parameter ..............................................................................29 Calibration Procedure.......................................................................................................31 pH Grab Sample or Comparison Cal................................................................................32
Analog Output Calibration......................................................................................................32 Meter Calibration ...................................................................................................................32 CHAPTER 7: MAINTENANCE & TROUBLESHOOTING ...........................................................................33 Maintenance ..........................................................................................................................33 Troubleshooting Checklist .....................................................................................................33 pH Sensor Diagnostics ..........................................................................................................34 Diagnostic Menu....................................................................................................................34 CHAPTER 8: ACCESSORIES AND SPARE PARTS .................................................................................36 APPENDIX A: SETUP PARAMETERS.........................................................................................................38
APPENDIX B: PULSE FLOW INPUT SETUP ..............................................................................................39 Wiring ....................................................................................................................................39 Pulse Flow Input Accessories................................................................................................45 Calibration Constants for Pulse Input Flow Sensors..............................................................46 SPECIFICATIONS ................................................................................................................48 770MAX Model Numbering....................................................................................................49 RATINGS ..............................................................................................................................50 WARRANTY..........................................................................................................................51
Chapter 1 Introduction 1
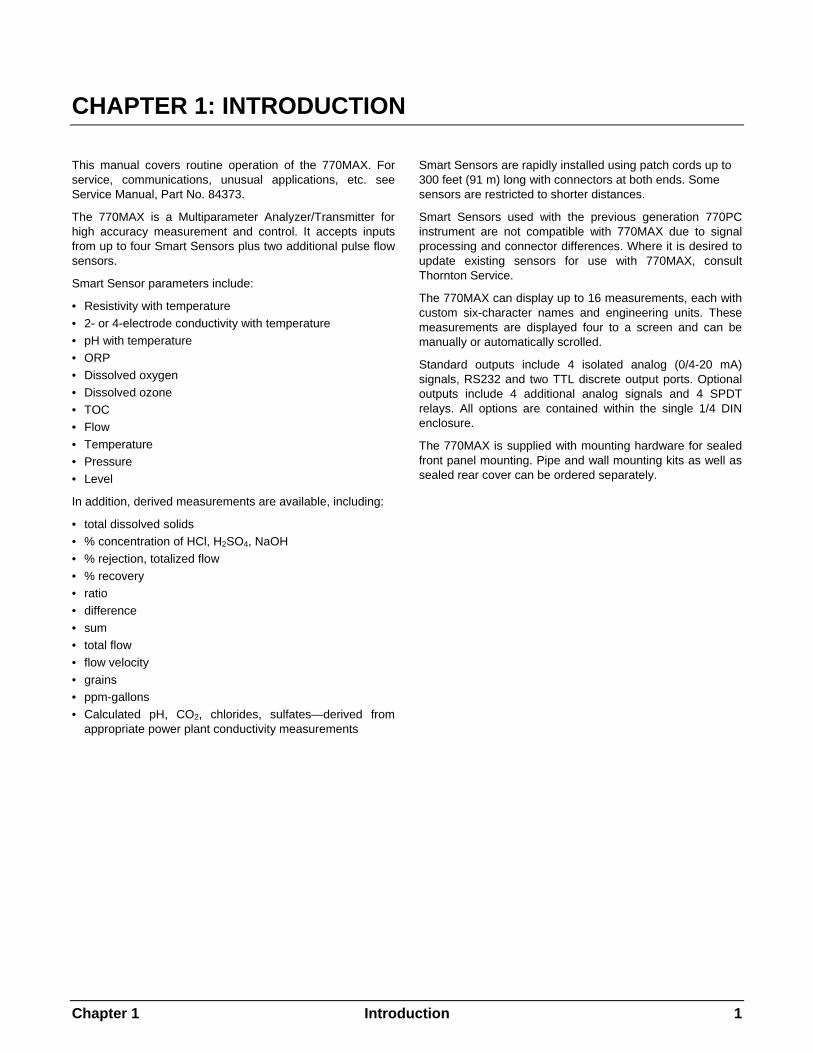
CHAPTER 1: INTRODUCTION
This manual covers routine operation of the 770MAX. For service, communications, unusual applications, etc. see Service Manual, Part No. 84373.
The 770MAX is a Multiparameter Analyzer/Transmitter for high accuracy measurement and control. It accepts inputs from up to four Smart Sensors plus two additional pulse flow sensors.
Smart Sensor parameters include:
• Resistivity with temperature • 2- or 4-electrode conductivity with temperature • pH with temperature • ORP • Dissolved oxygen • Dissolved ozone • TOC • Flow • Temperature • Pressure • Level
In addition, derived measurements are available, including:
• total dissolved solids • % concentration of HCl, H2SO4, NaOH • % rejection, totalized flow • % recovery • ratio • difference • sum • total flow • flow velocity • grains • ppm-gallons • Calculated pH, CO2, chlorides, sulfates—derived from
appropriate power plant conductivity measurements
Smart Sensors are rapidly installed using patch cords up to 300 feet (91 m) long with connectors at both ends. Some sensors are restricted to shorter distances.
Smart Sensors used with the previous generation 770PC instrument are not compatible with 770MAX due to signal processing and connector differences. Where it is desired to update existing sensors for use with 770MAX, consult Thornton Service.
The 770MAX can display up to 16 measurements, each with custom six-character names and engineering units. These measurements are displayed four to a screen and can be manually or automatically scrolled.
Standard outputs include 4 isolated analog (0/4-20 mA) signals, RS232 and two TTL discrete output ports. Optional outputs include 4 additional analog signals and 4 SPDT relays. All options are contained within the single 1/4 DIN enclosure.
The 770MAX is supplied with mounting hardware for sealed front panel mounting. Pipe and wall mounting kits as well as sealed rear cover can be ordered separately.
2 Installing the 770MAX Chapter 2
CHAPTER 2: INSTALLING THE 770MAX
UNPACKING Carefully unpack the 770MAX, the carton should contain:
• 770MAX instrument • mounting screws, 4 • 770MAX Instruction Manual • panel mounting gasket
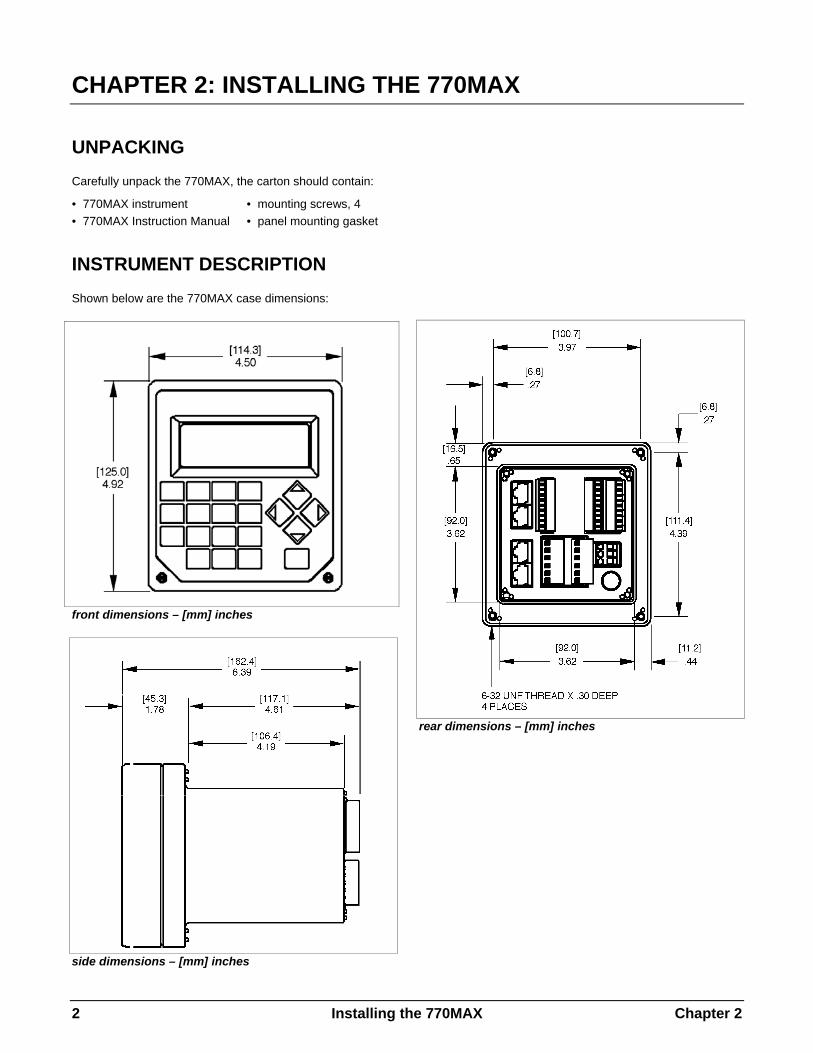
INSTRUMENT DESCRIPTION Shown below are the 770MAX case dimensions:
front dimensions – [mm] inches
side dimensions – [mm] inches
rear dimensions – [mm] inches
Chapter 2 Installing the 770MAX 3
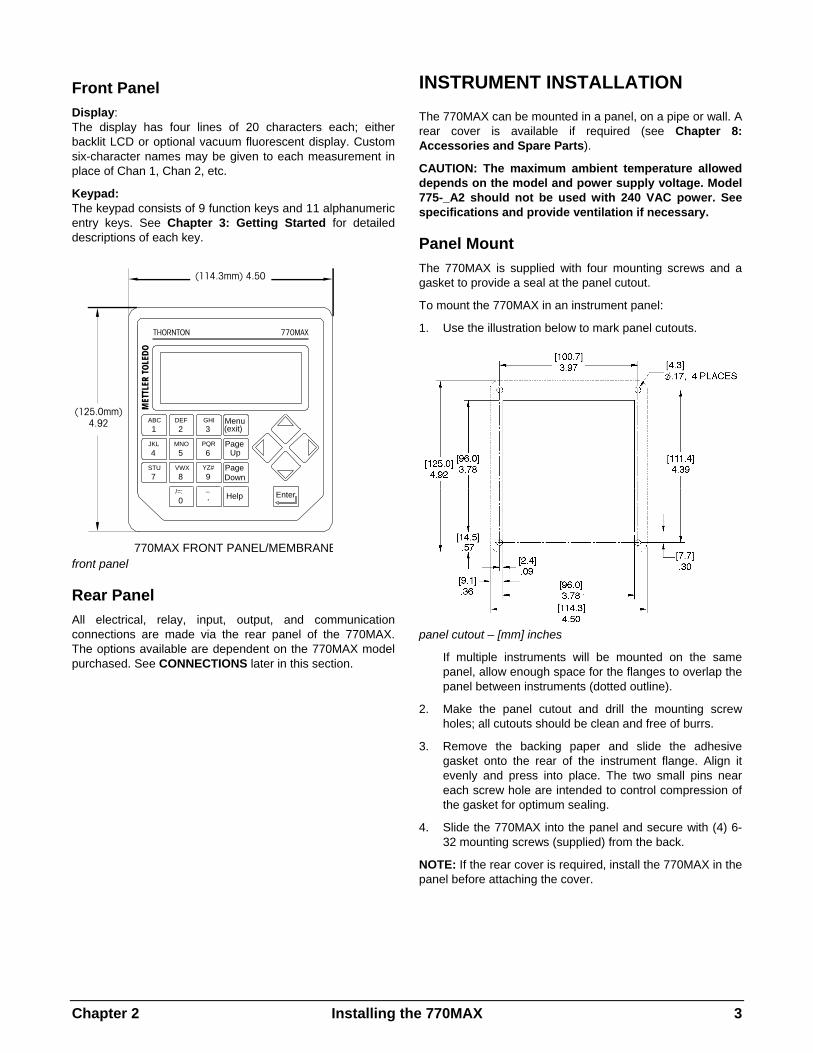
Front Panel Display: The display has four lines of 20 characters each; either backlit LCD or optional vacuum fluorescent display. Custom six-character names may be given to each measurement in place of Chan 1, Chan 2, etc.
Keypad: The keypad consists of 9 function keys and 11 alphanumeric entry keys. See Chapter 3: Getting Started for detailed descriptions of each key.
(114.3mm) 4.50
(125.0mm)4.92
770MAX FRONT PANEL/MEMBRANE
770MAXTHORNTON
Help/=:0
_. Enter
PageDown
(exit)
Page
Menu
STU7
4
1
JKL
ABC
VWX8
5
YZ#9
6
2
MNO
DEF3
PQR
GHI
Up
front panel
Rear Panel All electrical, relay, input, output, and communication connections are made via the rear panel of the 770MAX. The options available are dependent on the 770MAX model purchased. See CONNECTIONS later in this section.
INSTRUMENT INSTALLATION The 770MAX can be mounted in a panel, on a pipe or wall. A rear cover is available if required (see Chapter 8: Accessories and Spare Parts).
CAUTION: The maximum ambient temperature allowed depends on the model and power supply voltage. Model 775-_A2 should not be used with 240 VAC power. See specifications and provide ventilation if necessary.
Panel Mount The 770MAX is supplied with four mounting screws and a gasket to provide a seal at the panel cutout.
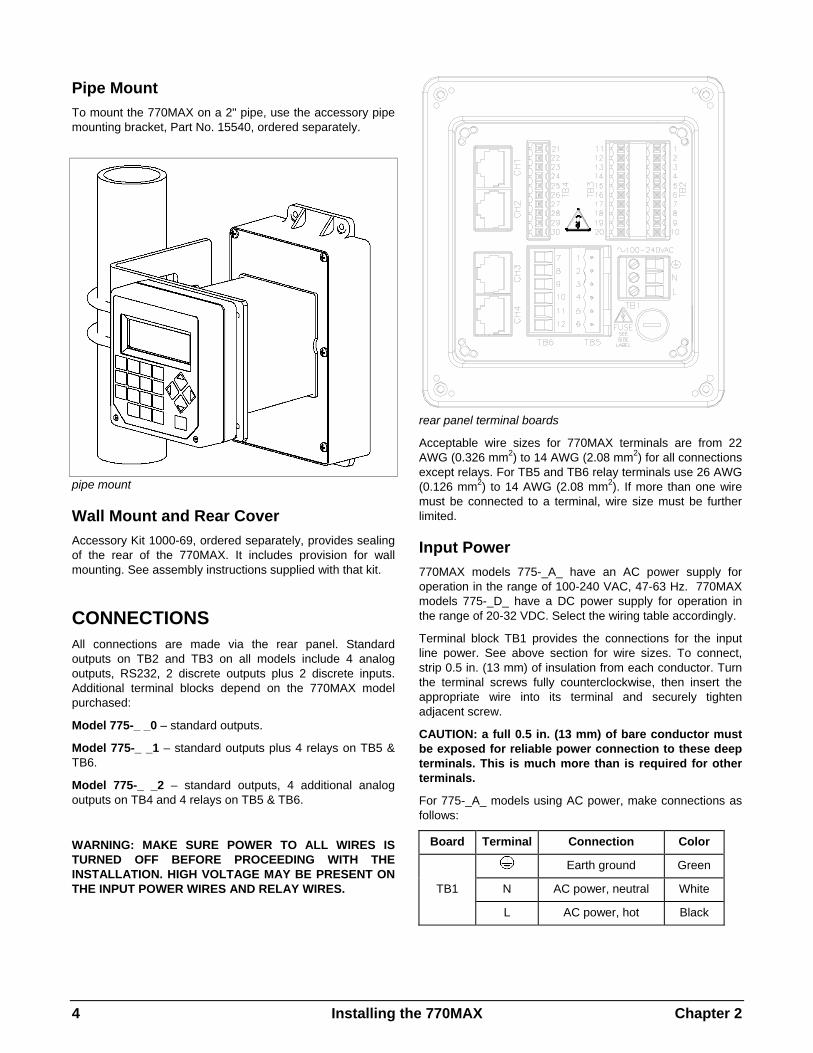
To mount the 770MAX in an instrument panel:
1. Use the illustration below to mark panel cutouts.
panel cutout – [mm] inches
If multiple instruments will be mounted on the same panel, allow enough space for the flanges to overlap the panel between instruments (dotted outline).
2. Make the panel cutout and drill the mounting screw holes; all cutouts should be clean and free of burrs.
3. Remove the backing paper and slide the adhesive gasket onto the rear of the instrument flange. Align it evenly and press into place. The two small pins near each screw hole are intended to control compression of the gasket for optimum sealing.
4. Slide the 770MAX into the panel and secure with (4) 6-32 mounting screws (supplied) from the back.
NOTE: If the rear cover is required, install the 770MAX in the panel before attaching the cover.
4 Installing the 770MAX Chapter 2
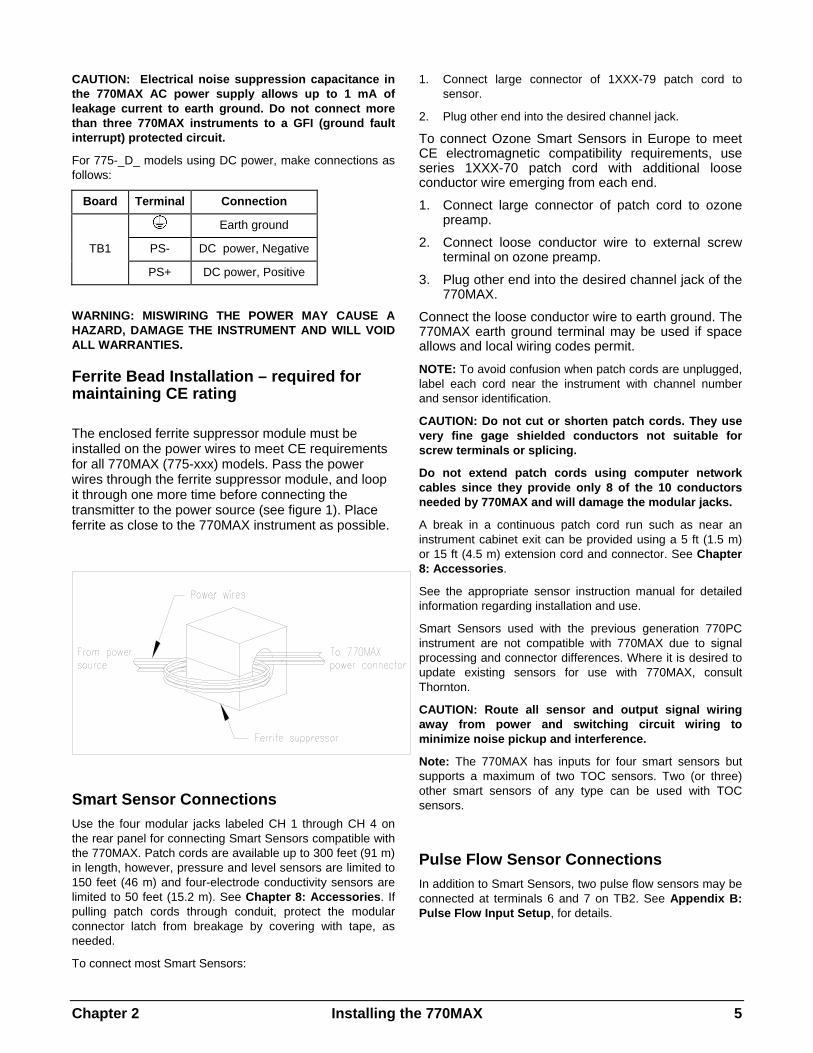
Pipe Mount To mount the 770MAX on a 2" pipe, use the accessory pipe mounting bracket, Part No. 15540, ordered separately.
pipe mount
Wall Mount and Rear Cover Accessory Kit 1000-69, ordered separately, provides sealing of the rear of the 770MAX. It includes provision for wall mounting. See assembly instructions supplied with that kit.
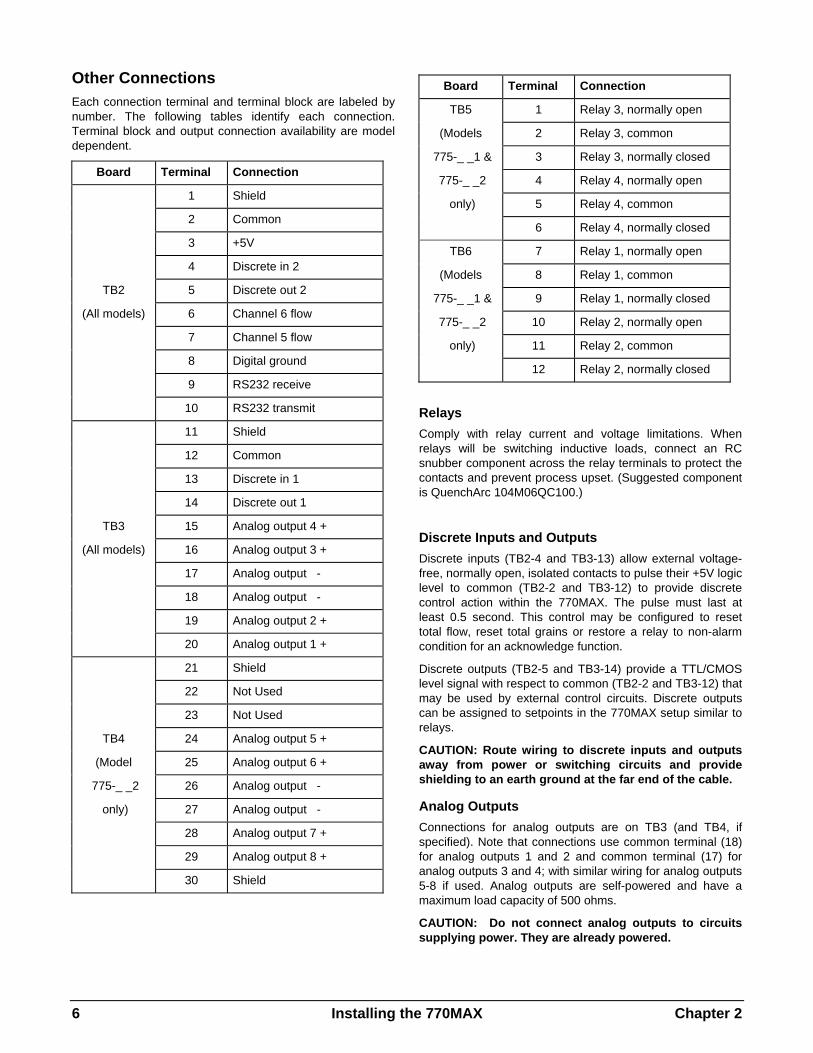
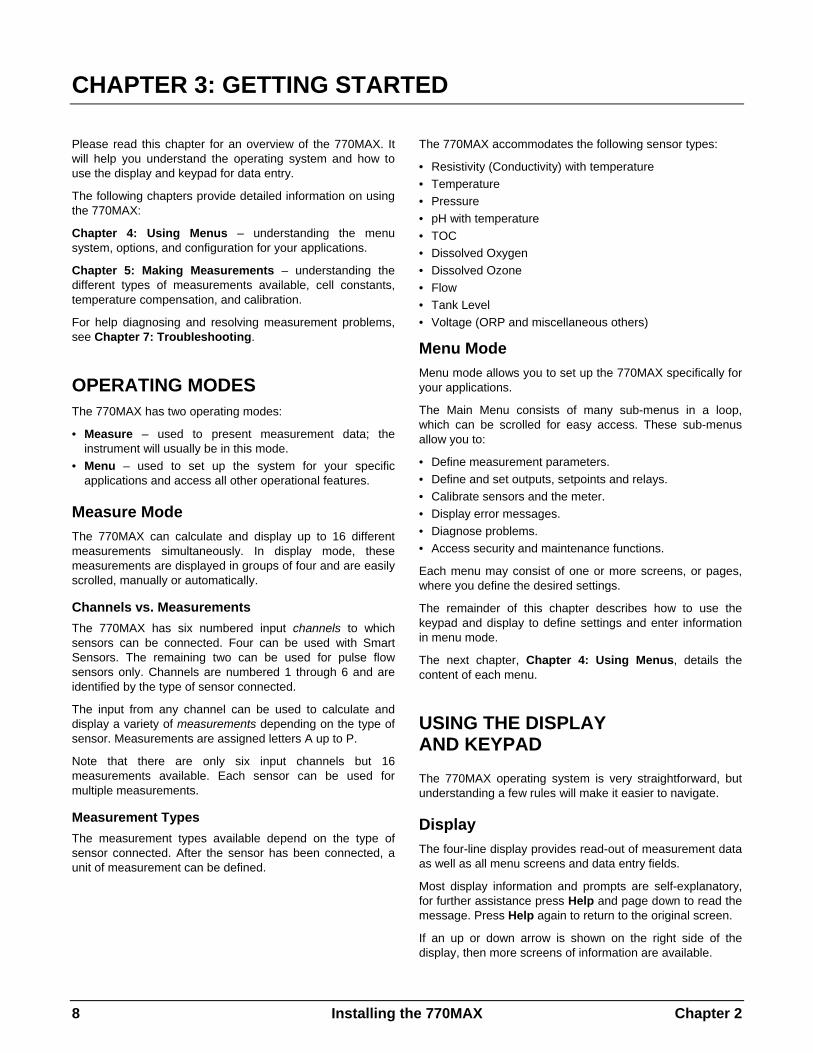
CONNECTIONS All connections are made via the rear panel. Standard outputs on TB2 and TB3 on all models include 4 analog outputs, RS232, 2 discrete outputs plus 2 discrete inputs. Additional terminal blocks depend on the 770MAX model purchased:
Model 775-_ _0 – standard outputs.
Model 775-_ _1 – standard outputs plus 4 relays on TB5 & TB6.
Model 775-_ _2 – standard outputs, 4 additional analog outputs on TB4 and 4 relays on TB5 & TB6.
WARNING: MAKE SURE POWER TO ALL WIRES IS TURNED OFF BEFORE PROCEEDING WITH THE INSTALLATION. HIGH VOLTAGE MAY BE PRESENT ON THE INPUT POWER WIRES AND RELAY WIRES.
rear panel terminal boards
Acceptable wire sizes for 770MAX terminals are from 22 AWG (0.326 mm2) to 14 AWG (2.08 mm2) for all connections except relays. For TB5 and TB6 relay terminals use 26 AWG (0.126 mm2) to 14 AWG (2.08 mm2). If more than one wire must be connected to a terminal, wire size must be further limited.
Input Power 770MAX models 775-_A_ have an AC power supply for operation in the range of 100-240 VAC, 47-63 Hz. 770MAX models 775-_D_ have a DC power supply for operation in the range of 20-32 VDC. Select the wiring table accordingly.
Terminal block TB1 provides the connections for the input line power. See above section for wire sizes. To connect, strip 0.5 in. (13 mm) of insulation from each conductor. Turn the terminal screws fully counterclockwise, then insert the appropriate wire into its terminal and securely tighten adjacent screw.
CAUTION: a full 0.5 in. (13 mm) of bare conductor must be exposed for reliable power connection to these deep terminals. This is much more than is required for other terminals.
For 775-_A_ models using AC power, make connections as follows:
Board Terminal Connection Color
Earth ground Green
TB1 N AC power, neutral White
L AC power, hot Black
Chapter 2 Installing the 770MAX 5
CAUTION: Electrical noise suppression capacitance in the 770MAX AC power supply allows up to 1 mA of leakage current to earth ground. Do not connect more than three 770MAX instruments to a GFI (ground fault interrupt) protected circuit.
For 775-_D_ models using DC power, make connections as follows:
Board Terminal Connection
Earth ground
TB1 PS- DC power, Negative
PS+ DC power, Positive
WARNING: MISWIRING THE POWER MAY CAUSE A HAZARD, DAMAGE THE INSTRUMENT AND WILL VOID ALL WARRANTIES.
Ferrite Bead Installation – required for maintaining CE rating The enclosed ferrite suppressor module must be installed on the power wires to meet CE requirements for all 770MAX (775-xxx) models. Pass the power wires through the ferrite suppressor module, and loop it through one more time before connecting the transmitter to the power source (see figure 1). Place ferrite as close to the 770MAX instrument as possible.
Smart Sensor Connections Use the four modular jacks labeled CH 1 through CH 4 on the rear panel for connecting Smart Sensors compatible with the 770MAX. Patch cords are available up to 300 feet (91 m) in length, however, pressure and level sensors are limited to 150 feet (46 m) and four-electrode conductivity sensors are limited to 50 feet (15.2 m). See Chapter 8: Accessories. If pulling patch cords through conduit, protect the modular connector latch from breakage by covering with tape, as needed.
To connect most Smart Sensors:
1. Connect large connector of 1XXX-79 patch cord to sensor.
2. Plug other end into the desired channel jack.
To connect Ozone Smart Sensors in Europe to meet CE electromagnetic compatibility requirements, use series 1XXX-70 patch cord with additional loose conductor wire emerging from each end.
1. Connect large connector of patch cord to ozone preamp.
2. Connect loose conductor wire to external screw terminal on ozone preamp.
3. Plug other end into the desired channel jack of the 770MAX.
Connect the loose conductor wire to earth ground. The 770MAX earth ground terminal may be used if space allows and local wiring codes permit.
NOTE: To avoid confusion when patch cords are unplugged, label each cord near the instrument with channel number and sensor identification.
CAUTION: Do not cut or shorten patch cords. They use very fine gage shielded conductors not suitable for screw terminals or splicing.
Do not extend patch cords using computer network cables since they provide only 8 of the 10 conductors needed by 770MAX and will damage the modular jacks.
A break in a continuous patch cord run such as near an instrument cabinet exit can be provided using a 5 ft (1.5 m) or 15 ft (4.5 m) extension cord and connector. See Chapter 8: Accessories.
See the appropriate sensor instruction manual for detailed information regarding installation and use.
Smart Sensors used with the previous generation 770PC instrument are not compatible with 770MAX due to signal processing and connector differences. Where it is desired to update existing sensors for use with 770MAX, consult Thornton.
CAUTION: Route all sensor and output signal wiring away from power and switching circuit wiring to minimize noise pickup and interference.
Note: The 770MAX has inputs for four smart sensors but supports a maximum of two TOC sensors. Two (or three) other smart sensors of any type can be used with TOC sensors.
Pulse Flow Sensor Connections In addition to Smart Sensors, two pulse flow sensors may be connected at terminals 6 and 7 on TB2. See Appendix B: Pulse Flow Input Setup, for details.
6 Installing the 770MAX Chapter 2
Other Connections Each connection terminal and terminal block are labeled by number. The following tables identify each connection. Terminal block and output connection availability are model dependent.
Board Terminal Connection
1 Shield
2 Common
3 +5V
4 Discrete in 2
TB2 5 Discrete out 2
(All models) 6 Channel 6 flow
7 Channel 5 flow
8 Digital ground
9 RS232 receive
10 RS232 transmit
11 Shield
12 Common
13 Discrete in 1
14 Discrete out 1
TB3 15 Analog output 4 +
(All models) 16 Analog output 3 +
17 Analog output -
18 Analog output -
19 Analog output 2 +
20 Analog output 1 +
21 Shield
22 Not Used
23 Not Used
TB4 24 Analog output 5 +
(Model 25 Analog output 6 +
775-_ _2 26 Analog output -
only) 27 Analog output -
28 Analog output 7 +
29 Analog output 8 +
30 Shield
Board Terminal Connection
TB5 1 Relay 3, normally open
(Models 2 Relay 3, common
775-_ _1 & 3 Relay 3, normally closed
775-_ _2 4 Relay 4, normally open
only) 5 Relay 4, common
6 Relay 4, normally closed
TB6 7 Relay 1, normally open
(Models 8 Relay 1, common
775-_ _1 & 9 Relay 1, normally closed
775-_ _2 10 Relay 2, normally open
only) 11 Relay 2, common
12 Relay 2, normally closed
Relays Comply with relay current and voltage limitations. When relays will be switching inductive loads, connect an RC snubber component across the relay terminals to protect the contacts and prevent process upset. (Suggested component is QuenchArc 104M06QC100.)
Discrete Inputs and Outputs Discrete inputs (TB2-4 and TB3-13) allow external voltage-free, normally open, isolated contacts to pulse their +5V logic level to common (TB2-2 and TB3-12) to provide discrete control action within the 770MAX. The pulse must last at least 0.5 second. This control may be configured to reset total flow, reset total grains or restore a relay to non-alarm condition for an acknowledge function.
Discrete outputs (TB2-5 and TB3-14) provide a TTL/CMOS level signal with respect to common (TB2-2 and TB3-12) that may be used by external control circuits. Discrete outputs can be assigned to setpoints in the 770MAX setup similar to relays.
CAUTION: Route wiring to discrete inputs and outputs away from power or switching circuits and provide shielding to an earth ground at the far end of the cable.
Analog Outputs Connections for analog outputs are on TB3 (and TB4, if specified). Note that connections use common terminal (18) for analog outputs 1 and 2 and common terminal (17) for analog outputs 3 and 4; with similar wiring for analog outputs 5-8 if used. Analog outputs are self-powered and have a maximum load capacity of 500 ohms.
CAUTION: Do not connect analog outputs to circuits supplying power. They are already powered.
Chapter 2 Installing the 770MAX 7
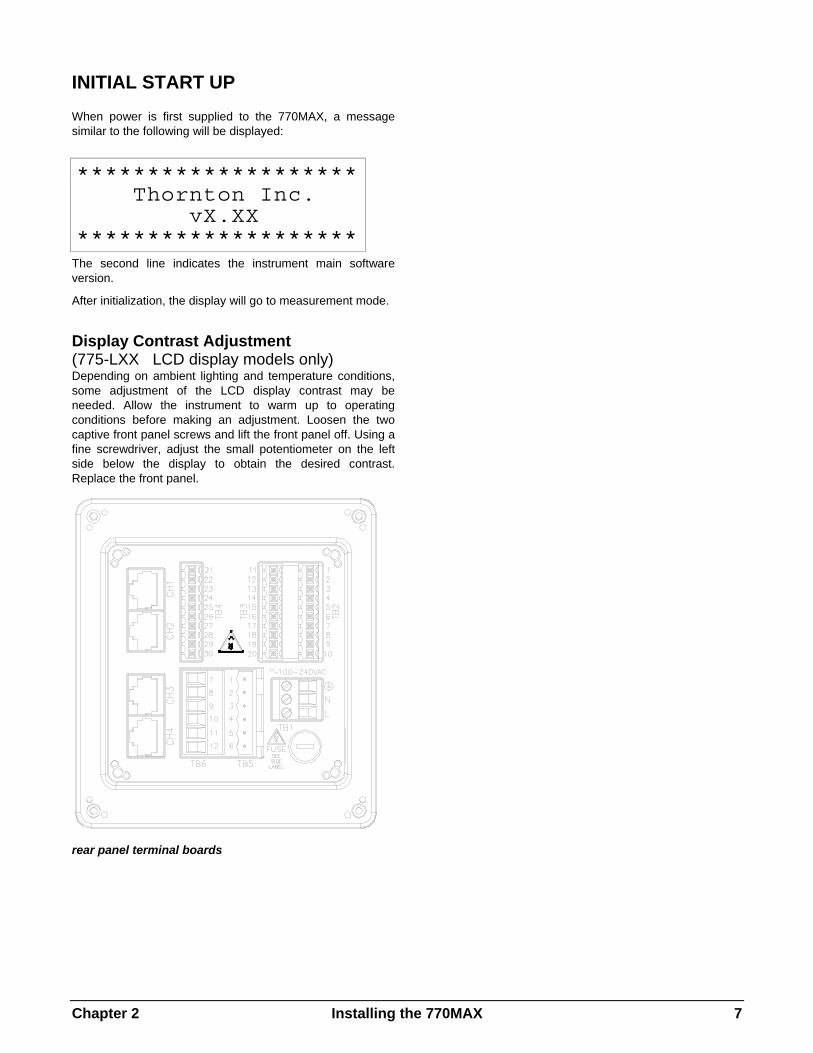
INITIAL START UP When power is first supplied to the 770MAX, a message similar to the following will be displayed:
******************** Thornton Inc. vX.XX ********************
The second line indicates the instrument main software version.
After initialization, the display will go to measurement mode.
Display Contrast Adjustment (775-LXX LCD display models only) Depending on ambient lighting and temperature conditions, some adjustment of the LCD display contrast may be needed. Allow the instrument to warm up to operating conditions before making an adjustment. Loosen the two captive front panel screws and lift the front panel off. Using a fine screwdriver, adjust the small potentiometer on the left side below the display to obtain the desired contrast. Replace the front panel.
rear panel terminal boards
8 Installing the 770MAX Chapter 2
CHAPTER 3: GETTING STARTED
Please read this chapter for an overview of the 770MAX. It will help you understand the operating system and how to use the display and keypad for data entry.
The following chapters provide detailed information on using the 770MAX:
Chapter 4: Using Menus – understanding the menu system, options, and configuration for your applications.
Chapter 5: Making Measurements – understanding the different types of measurements available, cell constants, temperature compensation, and calibration.
For help diagnosing and resolving measurement problems, see Chapter 7: Troubleshooting.
OPERATING MODES The 770MAX has two operating modes:
• Measure – used to present measurement data; the instrument will usually be in this mode.
• Menu – used to set up the system for your specific applications and access all other operational features.
Measure Mode The 770MAX can calculate and display up to 16 different measurements simultaneously. In display mode, these measurements are displayed in groups of four and are easily scrolled, manually or automatically.
Channels vs. Measurements The 770MAX has six numbered input channels to which sensors can be connected. Four can be used with Smart Sensors. The remaining two can be used for pulse flow sensors only. Channels are numbered 1 through 6 and are identified by the type of sensor connected.
The input from any channel can be used to calculate and display a variety of measurements depending on the type of sensor. Measurements are assigned letters A up to P.
Note that there are only six input channels but 16 measurements available. Each sensor can be used for multiple measurements.
Measurement Types The measurement types available depend on the type of sensor connected. After the sensor has been connected, a unit of measurement can be defined.
The 770MAX accommodates the following sensor types:
• Resistivity (Conductivity) with temperature • Temperature • Pressure • pH with temperature • TOC • Dissolved Oxygen • Dissolved Ozone • Flow • Tank Level • Voltage (ORP and miscellaneous others)
Menu Mode Menu mode allows you to set up the 770MAX specifically for your applications.
The Main Menu consists of many sub-menus in a loop, which can be scrolled for easy access. These sub-menus allow you to:
• Define measurement parameters. • Define and set outputs, setpoints and relays. • Calibrate sensors and the meter. • Display error messages. • Diagnose problems. • Access security and maintenance functions.
Each menu may consist of one or more screens, or pages, where you define the desired settings.
The remainder of this chapter describes how to use the keypad and display to define settings and enter information in menu mode.
The next chapter, Chapter 4: Using Menus, details the content of each menu.
USING THE DISPLAY AND KEYPAD The 770MAX operating system is very straightforward, but understanding a few rules will make it easier to navigate.
Display The four-line display provides read-out of measurement data as well as all menu screens and data entry fields.
Most display information and prompts are self-explanatory, for further assistance press Help and page down to read the message. Press Help again to return to the original screen.
If an up or down arrow is shown on the right side of the display, then more screens of information are available.
Chapter 3 Getting Started 9
A flashing value in the display mode indicates a setpoint for that measurement has been exceeded. A high alarm condition is indicated by > after the value. A low alarm condition is indicated by <. A flashing arrow → in the lower right corner indicates that a measurement not currently being displayed has exceeded a setpoint.
A flashing dot between the measurement letter and the channel number indicates a defective Smart Sensor is connected to that channel (Smart communication has been lost). Example display:
A Chan1 1.234 µS/cm B Chan1 25.23 °C C Chan2 35.71 GPM D Chan3 8.96 pH →
Keypad The keypad consists of 9 function keys and 11 alphanumeric entry keys.
Menus (exit) Press Menus to access the menu mode. Press again to exit the menu mode.
Page Up/Page Down Press Page Down to move to the next screen of information (if any). Press Page Up to move to the previous screen of information (if any). Additional screens are indicated by an up or down arrow on the right side of display.
When finished with a data entry screen, press Page Down to go to the next one.
Help Press Help to view more information or instructions regarding the current screen or data entry field.
Press Page Up or Down as necessary to view the entire message. Press Help again to return to the original screen.
Enter Press Enter to select a menu option, to select an option from a list, to complete an alphanumeric entry, or move to the next data entry field.
Arrows The four arrow keys function as follows:
• Up – press to view the next item in a list of options. • Down – press to view the previous item in a list of options. • Left – press to move the cursor left in a line of text or
numbers (may also move cursor to the previous field). • Right – press to move the cursor right in a line of text or
numbers (may also move cursor to the next field).
Alphanumeric keys The alphanumeric keys are multi-functional. For example, the "1" key can be used to type the letters "A, B, C" in either upper or lower case, as well as the numeral "1."
Repetitive presses of the same key produce the different entries. Using the "1" key as an example: • first press = A • second press = B • third press = C • fourth press = a • fifth press = b • sixth press = c • seventh press = 1 then the sequence repeats. Notes:
The "0" key will yield the following characters: / = : ( ) 0
The "-" key will yield the following characters:. - + ^ _ ! $
If another letter from the same key is desired, the right arrow must be used to move the cursor to the next position in the data entry field.
When a different key is pressed, the cursor automatically moves to the next position.
If a lower case letter is selected, the next key pressed will begin the sequence with the lower case.
The up and down arrow keys can be used to scroll through the entire alphabet.
If the 770MAX is expecting a numeric entry, the first press will yield the number on the key.
NOTE: When many measurements (display lines) are used, response of the display to pressing keys may be slower.
Data Entry In menu mode, each line of the display presents an option followed by a data entry field.
If a colon (:) follows the field name, use the up/down arrow keys to scroll through a list of options.
If an equal sign (=) follows the field name, use the alphanumeric keys to enter the required information. (See Alphanumeric Keys above.) In most cases, numbers are entered as a four digit number followed by a units multiplier. The units multipliers are:
• n (nano) = multiply value by 0.000,000,001 (10-9) • µ (micro) = multiply value by 0.000,001 (10-6) • m (milli) = multiply value by 0.001 (10-3) • _ (units) = multiply value by 1 • K (kilo) = multiply value by 1,000 (103) • M (mega) = multiply value by 1,000,000 (106)
10 Getting Started Chapter 3
When the desired option is selected or the alphanumeric entry complete, press Enter to move the cursor to the next field. (When the last field on a screen has been completed, pressing Enter will return the cursor to the top of the screen.)
If the menu consists of more than one screen of fields, press Page Down to continue.
Chapter 4 Using Menus 11
CHAPTER 4: USING MENUS
INTRODUCTION After installation is complete, use the menu system to set up the 770MAX for your applications.
First, set up the Measurement Menu for each measurement. Then go through the rest of the menus to set any outputs, setpoints, relays and other functions as necessary. Menu selections are automatically saved as you make them, although on exiting menus you can restore previous settings.
If desired, photocopy the Measurement Parameters Record form provided in Appendix A to record the menu options selected.
After all menu options have been set, return to display mode to view measurement readings.
MAIN MENU The Main Menu is used for all instrument functions except the actual display of measurements. The following sub-menus are available from the Main Menu:
• Measurements – define measurement parameters (sensor, units, custom name, temperature compensation, calibration constants, etc.).
• Messages – display any messages or problems encountered for each measurement channel.
• Calibrate – perform sensor, meter, or analog output calibration.
• Analog Outputs – assign outputs to measurements, as well as scaling analog outputs.
• Setpoints – define values, type (high, low, USP, and total flow reset) and assigned relay or digital output.
• Relays – define relay control action. • Display Setup – customize display. • Security – enable password protection. • Diagnostic – access a series of diagnostic testing
routines. • RS232 Setup – format the digital data output parameters. • Network – set up information for connection to network. • Reset – return settings to default values or reset total flow. • Tech Support – telephone and facsimile numbers for
assistance. • Set Hold Time – freeze the current relay and analog
outputs. • Other Menus – access to less commonly used menus.
Set Date/Time – enter date and time. Software Revs – display revision of installed software. View Total Flow – display total flow measurements with high resolution. Print Config – print current setup information.
Smart Sensors – save, clear, or edit smart sensor data in sensor's memory. Set Unit Name – enter descriptive name for this instrument. Lost Passwords – retrieve lost passwords. Service Only – for use by Thornton Service personnel only.
Access To access the Main Menu, press Menus. If security is active, a prompt for a password will appear.
Press the up or down arrow key to step through the sub-menus. Press Enter to select a menu.
NOTE: Access to menu functions can be password protected for security. If you are locked out, you can still review settings but not change them. Press any alphanumeric key as the (wrong) password and press Enter to review menu settings.
Exit After completing all data entry for one menu option:
• Press Page Up until you return to the Main Menu to select another menu option; or
• Press Menus twice to save settings, exit the menu system and return to display mode.
• If no keys are pressed for 5 minutes, the Measure mode will resume automatically and settings will be saved.
To exit menus and discard any changes made:
• Press Menus once and then press 1 to exit the menu system, revert to the prior menu settings, and return to display mode.
MEASUREMENTS MENU The Measurements Menu is used to set up the parameters for each measurement.
Install all sensors before using this menu; Smart Sensor data will be read by the 770MAX and automatically entered into the system as appropriate.
For detailed information regarding specific measurements, see Chapter 5: Making Measurements.
Measurement Sixteen different measurements may be defined in system memory. Each measurement you define will be identified by a letter (A through P), which will become a line on the display in the normal measuring mode.
12 Using Menus Chapter 4
When a Smart Sensor is first connected, the 770MAX automatically assigns to it the next one or two available measurements, depending on the type of sensor. Measurements may all be reassigned as required for the application, including additional measurements of secondary parameters such as temperature, total flow, readout in different units, etc.
After entering the Measurements Menu, use the up/down arrow keys to select the desired letter, then press Enter to continue with the measurement setup. Complete all setup for one measurement before starting another.
To set up the next measurement, press Page Up until you return to the initial measurement screen and then select another letter to define the new measurement.
Sensor Input Use the up/down arrow keys to select the input channel (1 through 6) where the desired sensor is connected, then press Enter.
If a Smart Sensor is connected to that channel, the sensor type and calibration data will be read by 770MAX. Then you may continue with selecting units, measurement name, etc. Remember that Channels 5 and 6 can be used for pulse flow sensors only.
Units The available units of measure are determined by the type of sensor defined for the channel. Following are the available units for each type:
Resistivity (Conductivity) Flow • resistivity in ohm-cm • GPM • conductivity in S/cm or S/m • gallons • °C or °F • m3/hr • total dissolved solids • Hz • %HCl • m3 • %NaOH • liter • %H2SO4 • liter/min • ppb or ppm Cl* • feet/second • ppb or ppm SO4* Temperature Pressure • °C • PSI • °F • kPascal • mmHg Tank Level • bars • gallons • kg/cm • m3 • inches • liter • feet • PSI • inches Dissolved Ozone • feet g/L • % full ppb ppm
pH Dissolved Oxygen • pH • g/L • volts • ppb • °C • ppm • °F • %sat • mmHg TOC • bar • gC/L (gramCarbon/Liter (nano, micro, milli) Voltage (ORP) • ppm C • volts • ppb C • amps • ppt C (parts per trillion)
Also, the following comparative units can be defined in conjunction with input from a second sensor:
• ratio • grains • difference • ppm-Gallons • % rejection • Calculated pH* • % recovery • CO2*
* Cl, SO4, Calculated pH and CO2 units are applicable only to measurements on power plant samples appropriately conditioned to obtain these parameters. See Chapter 5: Making Measurements for details.
If ratio or difference is selected, press the up arrow to return to the Sensor Input field and select the two channels for comparison. Then continue with the remainder of the Measurements Menu.
Some units require secondary selections. The most common is the units multiplier. For example, if Resistivity is selected, an appropriate units multiplier must also be selected (i.e., M = mega = 1,000,000. K = kilo = 1,000. m = milli = 0.001. u = micro = 0.000001, or none).
Name Each measurement can be given a custom name for easier identification (up to six alphanumeric or symbol characters). If a name is not entered, the measurement will be identified by the measurement letter and sensor channel. When a name is first entered, it is automatically duplicated to all other measurements using the same sensor channel. These may be overwritten as desired.
Note: See Chapter 3: Getting Started for instructions in using the alphanumeric keys.
Multiplier This calibration constant (also known as cell constant, slope or span) is pre-programmed into all Smart Sensors and automatically read by the 770MAX. If a Smart Sensor is connected to this channel, no change should be made; just press Enter to continue to the next field.
If the Multiplier stored in the Smart Sensor has been changed from the factory setting, a caret '^' will be displayed after the Multiplier and Adder.
Chapter 4 Using Menus 13
If a pulse input flow sensor is connected, enter the appropriate multiplier factor and then press Enter. See Appendix B of this manual or the sensor manual for its calibration factor in pulses per gallon. See Chapter 6: Calibrating and Verifying for calibration instructions.
Note: This multiplier value is a calibration constant unique to the sensor. It is not the same as a units multiplier, which indicates the factor of ten by which the displayed readings must be multiplied (e.g., 2 K = 2000).
Adder This calibration constant (zero or offset) is also pre-programmed into all Smart Sensors, and automatically read by the 770MAX. If a Smart Sensor is connected to this channel, no entry is required; just press Enter to continue to the next field.
If the Adder stored in the Smart Sensor has been changed from the factory setting, a caret '^' will be displayed after Adder and Multiplier.
Averaging Averaging, or filtering, stabilizes measurement readings in applications with rapidly changing parameters or noisy signals. The following options are available: none, low, medium, high, or special.
The higher the averaging, the longer the response time to changes in the measurement.
For most measurements, special averaging is recommended. Special averaging uses high averaging for small changes, but will respond quickly if a large change is detected.
Compensation Resistivity, conductivity, and pH measurements are normally temperature compensated to display equivalent values at 25 °C.
The following types of temperature compensation routines are available: standard, cation, glycol 1, glycol 50, alcohol, linear 2.00%, Light 84, standard 75 or none. For more information regarding temperature compensation see Chapter 5: Making Measurements.
The source of the temperature measurement may be from the sensor's built-in temperature sensor or some other source. This information can be entered in a later field.
STC (high purity pH only) The solution temperature coefficient (STC) allows selection of temperature compensation for the ionization of pure water. This is in addition to the conventional (Nernst) temperature compensation, which is always active.
STC is useful for pure water samples with a conductivity of less than 30 µS/cm where the changing ionization of water is significant. It references the pH to 25°C. In all other applications, leave the STC value at zero. See Chapter 5: Making Measurements.
IP (special pH sensors only) The isopotential point (IP) should be left at 7.0 pH for conventional pH electrodes.
Temp Source The following options are available for the source of the temperature used for temperature compensation: this channel, fixed, or other channels.
This channel (This Ch) uses the sensor's built-in temperature sensor.
Fixed uses the same value (usually 25°C) for all calculations.
If the temperature sensor is located on another channel, use the up arrow to scroll through the channels and select the desired one.
Pressure Source For barometric pressure compensation of dissolved oxygen calibration only, the following options are available: This Channel, Fixed, other channels.
Resolution Resolution is the number of digits that will be displayed to the right of the decimal point.
The available options are: auto, 1, .1, .01, and .001.
Max PSI (pressure & level only) Enter the full scale pressure value for this sensor.
Pipe ID (flow only) Flow velocity measurements in ft/sec require the inside diameter of the pipe (in which the sensor is installed) for calculations. Enter the precise inside diameter in inches.
External Flow Reset (flow only) If it is desired to reset the flow totalizer from external contacts, select Discrete Input #1 or #2. Connect the external contacts to the appropriate discrete input terminals identified in Chapter 2: Installing the 770MAX.
NOTE: The contacts must be isolated and voltage-free.
TDS Factor (conductivity/resistivity only) Total Dissolved Solids (TDS) is another useful way to measure and display conductivity/resistivity data. The default setting of 1.0 for the TDS Factor provides conversion to sodium chloride at approximately 0.5 ppm per uS/cm. For more information on TDS, refer to Chapter 5: Making Measurements.
14 Using Menus Chapter 4
Tank Height (level only) Enter the full scale tank height in feet for a level measurement. Level measurement is linear, for straight-sided tanks only.
Area (level only) Enter the cross-sectional area of the tank in square feet to allow a level measurement to compute volume units.
TOC (Total Organic Carbon) Measurement
Access to TOC Menus The following Measurement Menu items are for 5000TOC Sensor setup ONLY. To access these menus, press Menu, scroll to ‘Measurements’, and press Enter. Select the Measurement letter (A,B,C,…P) for the TOC measurement of which you wish to access these unique menus. After the TOC Measurement letter is selected, press Page Down to access the 3rd screen of the TOC measurements menu. There are three operations that can be performed through this menu. The first line of this menu allows the user to set the sample flowrate through the sensor. The Second line allows the user to turn the UV Lamp in the sensor On or Off. On the third line the user will see the message ‘Push 5 for TOC menu’. Once the “5” key is pushed the “Page Down” or “Page Up” keys can be used to access the unique TOC menus. For more information on making TOC measurements with the 770MAX refer to Chapter 5 of this manual. Detailed operational instructions for the 5000TOC sensor are included in the 5000TOC Sensor instruction manual, 84445.
Set Flow Rate (TOC only) Setting the flowrate for the TOC sensor is a requirement at sensor startup. Setting this menu item to ‘yes’ changes the function of the four LEDs on the front of the TOC sensor allowing them to be used as a flow rate indicator. All four LEDs light when the flow rate is set to the optimum value. Acceptable operation is achieved when all 4 LEDs are lit. The Set Flow Rate menu item MUST be set to “no” once the flow rate has been properly adjusted. See the 5000TOC Sensor instruction manual 84445 for details of how to set the flow rate through the sensor.
UV Lamp (TOC only) This menu option allows the user to turn the UV lamp in the 5000TOC sensor on or off. This is a convenient means to control the UV lamp. Please note the UV lamp switch at the sensor can over-ride this switch if the sensor key lock function is off.
Lamp Time/Reset/ Limit (TOC only) The UV lamp in the 5000TOC Sensor is rated for 4500 hours of normal usage. The 770MAX will display an error message when the lamp operating time has exceeded the set limit (default Lamp Limit is 4500 hours). A new lamp should be installed at this time, refer to the 5000TOC Sensor instruction manual, 84445, for details of how to do this.
To view time remaining on the UV lamp, set the lamp limit or reset the date, access the TOC menus as described above. Press Page Down until the lamp parameters are displayed. The Lamp Remain value is the number of hours remaining until reaching the Lamp Limit. The Lamp Remain value cannot be directly adjusted or changed. When a new lamp is installed, enter the current date into the Lamp Reset field on the second line of the display. When this new date is entered, the Lamp Remain value will automatically reset to the Lamp Limit value.
The Lamp Limit is the number of hours for the lamp to operate before the 770MAX warns that the lamp may be wearing out. The user can set the Lamp Limit from 400 to 9999 hours. The factory default setting is 4500 hours.
NOTE: The UV lamp should be turned off when not making TOC measurements in order to save lamp life.
Auto Start (TOC only) To view or set the Auto Start feature, access the TOC menus. Press Page Down until the Auto Start option appears. If Auto Start is set to ‘yes’ the TOC sensor will automatically start to make TOC measurements at power up. Auto start can be set to ‘no’ so that the user can prevent the automatic startup of the TOC sensor after a power shutdown or failure. The factory default setting is ‘No’.
Rinse Time (TOC only) To view or set the Rinse Time feature, access the TOC menus. Press Page Down until the Rinse Time option appears. The Rinse Time is the time at start up (initial connection to a 770MAX, 770MAX system reset or 770MAX power reset) the sensor will have sample water flowing through it before it starts making TOC measurements. The rinse time can be set from 1 to 999 minutes. To set the Rinse Time, scroll to the value next to ‘Rinse Time’ and enter the number of minutes you desire. The factory default setting is 15 minutes.
Auto Balance (TOC only) The 5000TOC Sensor is capable of automatically balancing the two conductivity sensors to make them read identically when the UV light is off. This assures accurate TOC measurements. The user can: • Turn the auto balance on or off • Set the time interval for the auto balance to occur • Set the tolerance for balancing the sensors • View the time until the next Auto balance • Set a hold ‘outputs’ so the analog outputs and relays are
held in their present states while an auto balance occurs • Perform an immediate auto balance To view or set the Auto Balance features, access the TOC menus. Press Page Down until the Auto Balance features appear. The Auto Balance can be enabled or disabled by selecting ‘yes’ or ‘no’. The Auto Balance Time interval can set from 24 to 4000 hours. The Auto Balance Limit can be set from 0% to 20%. The Auto Balance Limit is the maximum percentage difference allowed between the two
Chapter 4 Using Menus 15
conductivity sensor readings when the lamp is off and the sensor is in Auto Balance mode.
In the next screen, the time until the next Auto Balance is displayed. This value cannot be directly adjusted or changed. The user can indirectly change this value if they change the Auto Balance Time interval. The Auto Balance Hold function allows the user to hold all relays and analog outputs and displayed measurements at the current state or value during an Auto Balance cycle. You may also select to perform an Auto Balance immediately if ‘AutoBal Now’ is set to ‘Yes’. The factory default values for the Autobalance functions are as follows: AutoBal: Yes, AutoBal Time: 4500 hr, AutoBal Limit: 7%, AutoBal Hold: Yes, AutoBal Now: No.
Sensor Key Lock (TOC only) To view or set the Sensor Key Lock feature, access the TOC menus. Press Page Down until the Sensor Key Lock option appears. This function can be used to avoid inadvertently turning the UV lamp off under normal operating conditions. Use the Up/Down arrow keys to toggle between ‘Yes’ and ‘No’ and press Enter to save the change. Selecting ‘Yes’ will prevent the lamp from being turned off at the sensor. The factory default value is ‘No’.
Conductivity Limit (TOC only) To view or set the Conductivity Limit feature, access the TOC menus. Press Page Down until the Conductivity Limit option appears. This function is used to set a limit for the conductivity value measured by the 5000TOC Sensor that when exceeded will generate an error condition, notifying the user that the recommended conductivity operating limit has been surpassed. The factory default setting is 2.0 µS/cm
Over-ride Limit (TOC only) To view or set the Over-ride Limit feature, access the TOC menus. Press Page Down until the Over-ride Limit option appears. This function is used to prevent an error condition from happening when the Conductivity Limit for the 5000TOC Sensor is exceeded. If set to yes, there will be no error condition if the sample water to the 5000TOC Sensor is measured above the set limit. If set at ‘No’ an Error condition will occur. The factory default setting is ‘No’.
Status The status fields are for display only, to verify measurement and sensor information.
Reading Displays the latest reading for this measurement, it will be updated every few seconds.
Sensor S/N Displays the sensor’s serial number as stored in the Smart Connector (Smart Sensors only).
Cal Date Displays the sensor's most recent calibration date.
MESSAGES Select a measurement letter to display any diagnostic system messages for that measurement. These can be helpful in troubleshooting.
When using the 770MAX in conjunction with the 5000TOC Sensor, the MESSAGES menu display will be different. There will be three options in the View Messages menu, as follows:
1 – Current Messages
2 – Messages History
3 – Clear History
In item 1, select a measurement letter to display any diagnostic system messages for that measurement. If the measurement selected is TOC and the message is related to a Fault or Error condition, the message will be preceded with the letter F (for Fault) or E (for Error).
Item 2, Message History, allows the user to view the last six messages associated with the selected measurement.
Item 3, Clear History, allows the user to clear the Current Messages and the Messages History for the selected measurement.
CALIBRATE MENU The Calibrate Menu is used to calibrate the sensors, the analog outputs or the meter. For detailed calibration instructions, see Chapter 6: Calibrating and Verifying.
The 770MAX meter components are factory calibrated within specifications. It is not normally necessary to re-calibrate.
Best sensor performance is normally obtained by using the factory-documented cell constants already stored in Smart Sensor memory. However, pH sensors require periodic re-calibration; see your sensor instruction manual for recommendations.
To perform calibration of any component, accurate and precise standards are required.
ANALOG OUTPUTS The Analog Outputs Menu is used to assign analog outputs to measurements and define any necessary options.
Four or eight analog outputs are provided, depending on the model purchased. Each output can be programmed to operate as a normal (i.e., linear), bi-linear, auto-range, or logarithmic output. Outputs can be programmed to activate a relay or digital output (auto-range only), and to send either a minimum or maximum value if a sensor failure is detected.
See Chapter 2: Installing the 770MAX for connection information.
16 Using Menus Chapter 4
Analog # Use the up/down arrow keys to select the desired output (1 through 4 or 8), then press Enter to continue with setup for that output. Complete all setup for one output before starting another.
To set up the next output, press Page Up until you return to the initial analog output screen and then select another analog output number.
Measurement Use the up/down arrow keys to select the letter of the measurement that will use this analog output, then press Enter.
Scaling Type The following types of output scaling are available: normal, bi-linear, auto-range, and logarithmic.
Normal scaling provides a linear 4 mA (or 0 mA) to 20 mA output. Low and high measurement values can be entered to correspond to those outputs.
Bi-linear scaling provides two scaling ranges for a single linear strip chart: usually a wide measurement range at the high end of the scale, and a narrower range with high resolution at the low end.
In addition to entering low and high values, a mid-range scaling value must be defined. For example, a user in the power industry may want to monitor condensate. Measurements are normally in the range of 0-1 µS/cm but during a condenser leak, a range of up to 10 µS/cm is desirable. Settings for the low, mid and high values might be 0, 1 and 11 µS/cm, to give convenient plotting on a 10-division strip chart.
Auto-Range scaling provides two ranges of output and allows a control (relay or discrete output) to be activated. It is designed to work with a PLC or two points of a multipoint strip chart recorder to meet the same needs as bi-linear scaling above.
Two separate settings are used, one for the high limit of the high range and one for the high limit of the low range, for the single 0/4-20 mA signal. The low value is always zero.
Auto-range scaling also allows activation of a relay while on the high range for a logic signal or for actual switching of the signal through double throw contacts. At the cross-over point, a ~2% hysteresis prevents jumping back and forth between ranges.
For the power industry example above, with rising conductivity, the 0/4-20 mA signal would go from 0-100% for 0-1 µS/cm, jump to 10% and activate the relay when just above 1 µS/cm, then go 10-100% for 1-10 µS/cm. Thus both 0-1 and 0-10 µS/cm ranges may be recorded on the same chart using a single signal.
Logarithmic scaling provides an output for use with logarithmic chart paper. A high value and the number of decades must be entered. The low value is defined by the
other two settings. For example, a high value of 1000 µS/cm with 3 decades would give a range of 1–10–100–1000 µS/cm. Do not use logarithmic scaling with parameters that may have negative values such as ORP, temperature or pH.
Low Value (signal level) Select 4 mA or 0 mA as the low value of the output signal.
0/4 mA (scaling limit) Enter the measurement value that will correspond to 4 mA (or 0 mA).
IMPORTANT: Be sure to select the appropriate units multiplier (M = mega = 1,000,000. K = kilo = 1,000. m = milli = 0.001. u = micro = 0.000001, or none) e.g., M for megohm-cm or u for µS/cm.
Whenever the measurement is less than or equal to this number, the output signal will be set to its minimum value.
If the output scaling type is auto-range, the low value is always zero.
Note: Output signals can be "inverted" by setting the minimum value higher than the maximum. For example, to obtain an inverted 1-7 pH signal for control of caustic feed, set the 0/4 mA limit to 7 and the 20 mA limit to 1.
Mid (Bi-linear scaling only) Enter the measurement value that will correspond to the middle of the range (10 or 12 mA). Then select the appropriate units multiplier (M = mega = 1,000,000. K = kilo = 1,000. m = milli = 0.001. u = micro = 0.000001, or none).
20 mA (scaling limit) Enter the measurement value that will correspond to 20 mA. Then select the appropriate units multiplier.
Whenever the measurement is greater than or equal to this number, the output signal will be set to its maximum value.
Num of Decades (logarithmic scaling only) Select the number of decades for the scale, from 1 to 6 (e.g., 1 to 100 is two decades).
When using range 2, activate: (auto-range only) Use the up/down arrow keys to select the relay or discrete output to activate when the high limit of the low range has been exceeded, then press Enter.
On fault set If the sensor or measurement fails, the system can failsafe to either the minimum (min) or maximum (max) signal level.
Calibrated Displays the output's most recent calibration date.
Chapter 4 Using Menus 17
Current Out Displays the actual current (mA) being output.
SETPOINTS The Setpoints Menu is used to define measurement limits or alarm conditions. You can set high and low limits for any measurements, plus USP and EP limits for conductivity and a reset limit for total flow measurements.
When the measurement value is higher than a high setpoint or lower than a low setpoint, an alarm condition exists. Setpoint alarm conditions are indicated by a flashing measurement reading when in display mode. Also, a relay or digital output can be activated when a setpoint is exceeded.
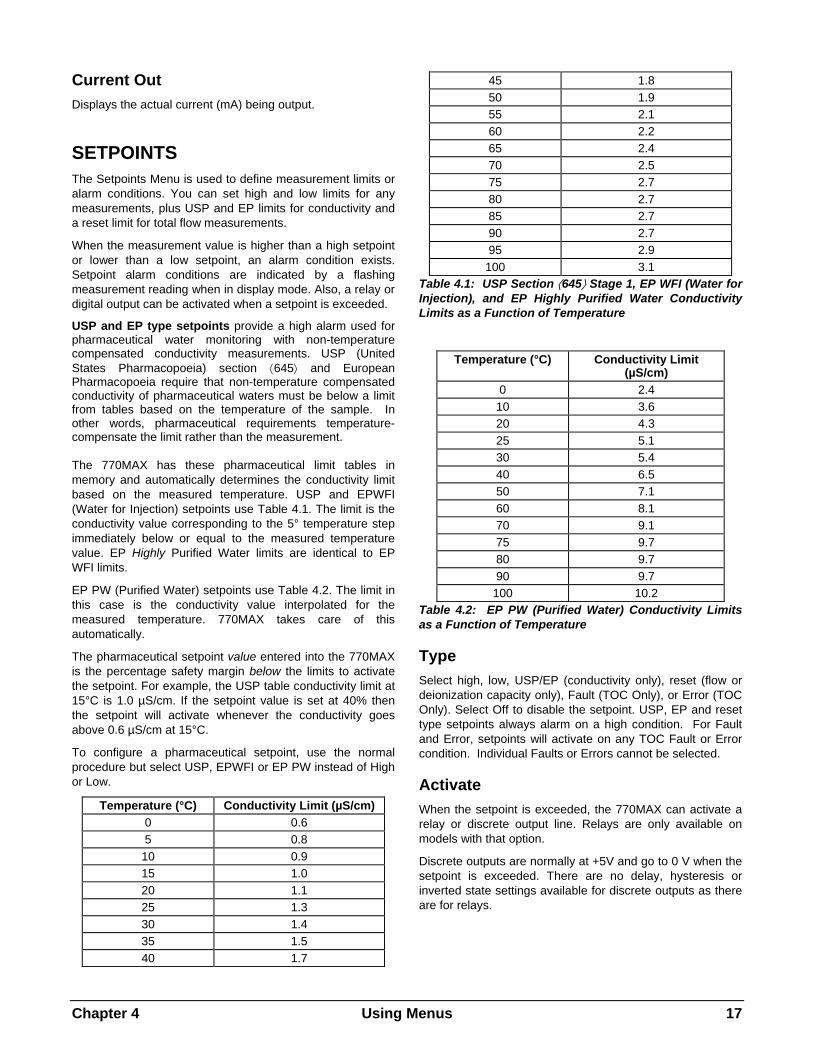
USP and EP type setpoints provide a high alarm used for pharmaceutical water monitoring with non-temperature compensated conductivity measurements. USP (United States Pharmacopoeia) section ⟨645⟩ and European Pharmacopoeia require that non-temperature compensated conductivity of pharmaceutical waters must be below a limit from tables based on the temperature of the sample. In other words, pharmaceutical requirements temperature-compensate the limit rather than the measurement. The 770MAX has these pharmaceutical limit tables in memory and automatically determines the conductivity limit based on the measured temperature. USP and EPWFI (Water for Injection) setpoints use Table 4.1. The limit is the conductivity value corresponding to the 5° temperature step immediately below or equal to the measured temperature value. EP Highly Purified Water limits are identical to EP WFI limits.
EP PW (Purified Water) setpoints use Table 4.2. The limit in this case is the conductivity value interpolated for the measured temperature. 770MAX takes care of this automatically.
The pharmaceutical setpoint value entered into the 770MAX is the percentage safety margin below the limits to activate the setpoint. For example, the USP table conductivity limit at 15°C is 1.0 µS/cm. If the setpoint value is set at 40% then the setpoint will activate whenever the conductivity goes above 0.6 µS/cm at 15°C.
To configure a pharmaceutical setpoint, use the normal procedure but select USP, EPWFI or EP PW instead of High or Low.
Temperature (°C) Conductivity Limit (µS/cm) 0 0.6 5 0.8 10 0.9 15 1.0 20 1.1 25 1.3 30 1.4 35 1.5 40 1.7
45 1.8 50 1.9 55 2.1 60 2.2 65 2.4 70 2.5 75 2.7 80 2.7 85 2.7 90 2.7 95 2.9
100 3.1 Table 4.1: USP Section ⟨645⟩ Stage 1, EP WFI (Water for Injection), and EP Highly Purified Water Conductivity Limits as a Function of Temperature
Temperature (°C) Conductivity Limit (µS/cm)
0 2.4 10 3.6 20 4.3 25 5.1 30 5.4 40 6.5 50 7.1 60 8.1 70 9.1 75 9.7 80 9.7 90 9.7
100 10.2 Table 4.2: EP PW (Purified Water) Conductivity Limits as a Function of Temperature
Type Select high, low, USP/EP (conductivity only), reset (flow or deionization capacity only), Fault (TOC Only), or Error (TOC Only). Select Off to disable the setpoint. USP, EP and reset type setpoints always alarm on a high condition. For Fault and Error, setpoints will activate on any TOC Fault or Error condition. Individual Faults or Errors cannot be selected.
Activate When the setpoint is exceeded, the 770MAX can activate a relay or discrete output line. Relays are only available on models with that option.
Discrete outputs are normally at +5V and go to 0 V when the setpoint is exceeded. There are no delay, hysteresis or inverted state settings available for discrete outputs as there are for relays.

18 Using Menus Chapter 4
On fault set If a fault is detected due to over-range or disconnected sensor, the 770MAX can allow the setpoint to be active or disable the setpoint. Select Off to disable the setpoint when there is a fault detected.
On error set THIS FUNCTION IS AVAILABLE ONLY FOR TOC MEASUREMENTS WHEN A 5000TOC SENSOR IS CONNECTED TO THE 770MAX. If an error is detected, the 770MAX can allow the setpoint to be active or disable the setpoint. Select Off to disable the setpoint when there is an error detected. See 5000TOC Sensor manual, 84445, for details regarding error conditions.
Status Displays the elapsed time (hours:minutes:seconds) since this setpoint was activated.
RELAYS Relays can be programmed to activate when a setpoint is exceeded (see SETPOINTS above). Delay times and hysteresis values can be entered to "fine tune" the use of relays.
The relays available depend on the 770MAX model purchased. See Chapter 2: Installing the 770MAX for connection information.
If relays are not available on your instrument, an error message will be displayed when this menu is accessed.
Relay # Use the up/down arrow keys to select the desired relay (1 through 4), then press Enter to continue with setup for that relay. Complete all setup for one relay before starting another.
To set up the next relay, press Page Up until you return to this screen and then select another relay number.
Delay A time delay requires the setpoint to be exceeded continuously for a specified length of time before activating the relay. Enter the delay time in seconds.
If the condition disappears before the delay period is over, the relay will not be activated.
Hysteresis A hysteresis value requires the measurement to return within the setpoint value by a specified percentage before the relay is deactivated.
For a high setpoint, the measurement must decrease more than the indicated percentage below the setpoint value
before the relay is deactivated. With a low setpoint, the measurement must rise at least this percentage above the setpoint value before the relay is deactivated. For example, a high setpoint is set at 100 and the measurement is currently above this value so the setpoint is exceeded and the relay is activated. If the hysteresis value is 10%, then the measurement must fall below 90 before the relay is deactivated.
Enter a percentage value. (Hysteresis does not function with USP and EP sepoints with resistivity measurement.)
State Relay contacts are in normal state until the associated setpoint is exceeded, then the relay is activated and the contacts change.
Select Inverted to reverse the normal operation (i.e., contacts are in abnormal state until the setpoint is exceeded).
Ext Clear To allow use of an external “acknowledge” pushbutton to deactivate a 770MAX relay powering an alarm circuit, discrete inputs may be used. An external input line (from the pushbutton) connected to Discrete in #1 or #2 can be used to clear (deactivate) the relay if it has been activated. The available options are: disabled, Discrete In #1, or Discrete In #2.
Select disabled if the input line is not used for this purpose.
Type … Displays the type of relay installed.
Relay is … Displays the current status of the relay.
DISCRETE OUTPUTS Discrete outputs are normally at 0 V and go to +5 V when a setpoint is exceeded.
DISPLAY SETUP The Display Setup Menu is used to define how measurements are displayed.
Scrolling In display mode, measurements are displayed four per screen. To define how additional screens of measurements are viewed, the following options are available: manual, auto, and locked.
Manual allows you to scroll through the measurements by pressing the up/down arrow or page up/down keys.
Chapter 4 Using Menus 19
Auto changes the measurements displayed approximately every five seconds.
Locked prevents users from changing the display with the arrow and page keys.
Measurements Measurements can be displayed in alphabetical order (by measurement letter) or in a user defined order. Select Custom to choose the order of display.
Display Setup (custom measurements only)
Display line X For each line of the display, select the desired measurement letter, and then press Enter.
SECURITY The Security Menu is used to prevent unauthorized changing of parameters. Users can be locked out of all menu functions, locked out of calibration only, or locked out of all menus except calibration. Without the correct numeric password, the user will only be able to view the menus.
A master password is required to change any passwords, lockout options, or to enable/disable the security program. Two user passwords can be defined.
The initial master and user passwords are set to a default of 00000.
Go to … Use the up/down arrow keys to select the desired security option, then press Enter. The available options are: Change Lockout, Change Password, and Lockout Status.
To select another option after completing any of these options, press Page Up to return to this screen and select.
Change Lockout Enter the master password to change any of the security lockout options.
Lockout If lockout is enabled, users must enter their password to gain access to the menus. If disabled, no passwords will be required.
User 1 Select the desired lockout for User 1. The available lockout options are: Lockout All, Lock Cal Only, and Open Cal Only.
User 2 Select the desired lockout for User 2.
Change Password Use to change any of the passwords.
Which password to change Select the desired user or master password.
Master Pass Enter the master password to proceed.
New password Enter a new 5 character password and press Enter. You will then be prompted to re-enter the password to confirm it.
Lockout Status The status fields are for display only.
Lockout is Displays whether security lockout is disabled or enabled.
User 1 Displays current lockout option for User 1.
User 2 Displays current lockout option for User 2.
Time since last access in menus Displays the elapsed time since the menus were last accessed by any user.
DIAGNOSTICS The Diagnostic Menu is used to run a series of diagnostic testing routines to verify the operation of system components, including: meter, sensors, analog output, serial port, network, display, keypad, flow channels, inputs and outputs.
Use the up/down arrow keys to select a component to test, then press Enter. The indicated test will be performed and the results displayed. Press Enter to perform the next test.
To test another component, press Page Up to return to the Diagnostic Menu and select the next component.
NOTE: Some diagnostic tests may interrupt normal operation (such as analog outputs).
For detailed information regarding diagnostic tests, see Chapter 7: Troubleshooting.
RS232 SETUP The RS232 Menu is used to format the data output communication parameters (baud, parity, etc.).
For detailed digital communications information, see the 770MAX Service Manual, Part No. 84373.
20 Using Menus Chapter 4
NETWORK The Network Menu will be used to set up a network connection address and type when this function becomes available.
RESET The Reset Menu is used to clear user programming and return most settings to their default values; for the entire system, for single measurements, or total flow readings by channel.
Use the up/down arrow keys to select the desired option to reset, then press Enter. The available options are: System, Measurements, and Totalizers.
System A system reset will:
• Clear and disable all relays, setpoints, and analog outputs. • Clear all measurements. • Set the serial port to 38.4K baud and even parity. The
data output is turned off. • Turn off display scrolling and set the display order to
automatic. • Read Smart sensors and set up measurement channels
(as if you plugged in a new sensor).
It will not change the unit number. Press Page Down to reset the system.
Measurements A measurement reset will reset a channel to its default modes and clear all setpoints, relays and analog outputs that apply to that channel.
Select the channel to reset, then press Enter.
Totalizers A totalizer reset will clear the total flow or deionization capacity reading for a channel and set it to zero.
Select the channel to reset, then press Enter.
This may also be done by remote contacts.
TECH SUPPORT Displays the telephone, e-mail and facsimile numbers for Thornton Technical Support.
SET HOLD TIME Use a hold time to freeze the relay and analog outputs so that alarms are not triggered during calibration or other service procedures. Normal relay and analog output operation resumes when the set period has elapsed or when the hold time is reset to zero.
Enter a hold time in minutes (1 to 99), then press Enter.
OTHER MENUS The Other Menu is used to access less commonly used features, including:
• Set Date/Time • Software Revisions • View Total Flow • Print Configuration • Smart Sensors • Set Unit Name • Lost Passwords • Service Only
Set Date/Time Use to enter the correct date and time. Note that the internal clock does not run when power is off. It is only a convenience for setting the dates of calibration.
Time Enter time in hours, minutes and seconds (hh:mm:ss).
Date Enter date in month, day and year format (mm/dd/yy).
Software Revs Displays the engineering revision numbers of the currently installed system circuit boards (main, measurement, display option).
View Total Flow Displays any total flow measurements by channel.
Use the up/down arrow keys to select the channel to display, then press Enter.
Print Configuration A computer or printer can be used to record all setup information. If a device is connected to the RS232 output, press Enter to print.
See 770MAX Service Manual 84373 for connection information.
Smart Sensors The Smart Sensors Menu is used to save, clear, or edit data stored in the Smart Sensors' memory.
Use the up/down arrow keys to select the desired option, then press Enter.
Save Data Select the channel to which the desired Smart Sensor is connected then press Enter to save.
Chapter 4 Using Menus 21
Clear Data This function restores factory sensor calibration data, replacing any user calibration. Select the channel to which the desired Smart Sensor is connected then press Enter to clear.
Edit Data This option is for use by Thornton Service Personnel only and requires a service password.
Set Unit Name This feature is especially useful when more than one unit is used. Enter the name or location of this unit (up to 20 characters).
The unit name is displayed whenever exiting menus and appears in configuration printout, calibrator certificate, etc.
Lost Passwords To recover lost passwords, record the codes displayed on screen and then call Customer Service for assistance.
Service Only These are service password protected functions for use by Thornton Service Personnel only.
22 Making Measurements Chapter 5
CHAPTER 5: MAKING MEASUREMENTS
INTRODUCTION After all menu options have been set, measurement readings are viewed in the display mode. If measurements have not been set up using the menus, default values will be used to calculate and display readings. Available measurement types and units are given in Chapter 4: Using Menus.
See the appropriate sensor manual for complete sensor installation and use instructions.
NOTE: Smart Sensors used with the previous generation 770PC instrument are not compatible with 770MAX due to signal processing and connector differences. Where it is desired to update existing sensors for use with 770MAX, consult Thornton.
Displaying Measurements To return to display mode from menu mode, press Menus twice to exit the menu system and return to display. If the 770MAX is left in menu mode, it will automatically default to display mode after 5 minutes of inactivity.
770MAX can calculate and display up to 16 different measurements, in groups of four. Scroll through measurements one at a time by using the up/down arrow keys or in groups of four by using the page up/down keys. Alternatively, the display can be configured to automatically scroll through the measurements in any convenient order. See DISPLAY SETUP in Chapter 4: Using Menus for available options.
Flashing measurements indicate a setpoint has been exceeded. A flashing arrow → in the lower right corner indicates that a setpoint has been exceeded for a measurement that is not currently displayed.
A flashing dot after the measurement letter indicates a defective Smart Sensor is connected to that channel (Smart communication has been lost).
Averaging (filtering) of measurements may be momentarily suspended. Press Enter in the normal display mode. An asterisk will appear briefly in the lower right corner and all measurements will be updated once with no averaging. Averaging resumes with subsequent updates.
Sensor Constants Each sensor is defined by a set of calibration constants, also known as sensor constants. The two constants, multiplier and adder, are used to derive an accurate measurement from the sensor’s output signal. The multiplier is also known as slope or span. The adder is also known as the offset or zero point.
When using Smart Sensors, these constants are stored in the Smart Sensor’s memory and automatically read by the 770MAX. If using a pulse input flow sensor, consult the
sensor instruction manual for guidance in entering these values.
These constants are re-calculated during calibration. See Chapter 6: Calibrating and Verifying for calibration instructions.
NOTE: The calibration constant “multiplier” is a value unique to an individual sensor. It is not the same as a units multiplier, which indicates the factor of ten by which the displayed readings must be multiplied (e.g., 2 K = 2000).
Temperature Compensation Resistivity, conductivity and pH readings can be compensated for changes in temperature. For example, the resistivity of pure water at 25°C is 18.18 Megohm-cm. However, at 30°C its resistivity is 14.08 Megohm-cm. Temperature compensation will adjust the reading to a constant temperature (usually 25°C), and the value of pure water will always be 18.18 Megohm-cm.
The source of the temperature measurement may be from the sensor's built-in temperature sensor, a sensor connected to another channel, or a manually entered fixed value.
Generally, best results are achieved by using the built-in temperature sensor because it is immersed in the same environment.
Temperature compensation details are provided in the appropriate measurement sections later in this chapter.
RESISTIVITY/CONDUCTIVITY The measured resistivity (or conductivity) of a solution can be displayed in terms of:
• resistivity in ohm-cm • conductivity in S/cm or S/m • total dissolved solids (TDS) • %HCl • %NaOH • %H2SO4 • % rejection
Resistivity is expressed in ohm-centimeters (Ω-cm), which is the reciprocal of conductivity.
Conductivity is expressed in siemens per centimeter (S/cm) or siemens per meter (S/m). Be careful to select the desired units as they can be confused easily.
These measurements can be displayed with a unit multiplier in front of the units (i.e., M = mega = 1,000,000. K = kilo = 1,000. m = milli = 0.001. u = micro = 0.000001, or none).
Total Dissolved Solids (TDS) may be inferred and displayed based on conductivity/resistivity data. TDS is the concentration of sodium chloride (or other conductive
Chapter 5 Making Measurements 23
substance) corresponding to the measured conductivity. Salinity is the same as TDS, specifically for sodium chloride. Both are given in units of parts per billion (ppb), parts per million (ppm) or parts per thousand (ppk, as abbreviated on 770MAX).
The default setting of 1.0 for the TDS Factor provides conversion based on the conductivity of sodium chloride at 0.462 ppm per µS/cm, with non-linear corrections at very low and very high conductivities. The TDS factor may be changed to provide conversion for other substances. It is a multiplier on the sodium chloride conversion. Values for other materials are given in the table below (normalized to NaCl). These values adjust the TDS value for the actual conductivity of the materials in the table. Different values are needed for measurements involving ion exchange calculations—see below.
Material TDS factor
KCl 1.0786 CaCl2 0.8839 CaCO3 0.8407 NaOH 0.3480
Total Dissolved Solids for ion exchange calculations are based on the conductivity and weight of the materials present expressed as their ion exchange equivalent as calcium carbonate. Because this conversion varies with each application, it should be determined on an individual basis. For a defined composition of neutral minerals with conductivity the same as sodium chloride, a TDS factor of 0.856 will give readout as ppm NaCl expressed as CaCO3. For conditions of strong base exchange, a TDS factor of 0.435 will give readout as ppm NaOH expressed as CaCO3. These are also the types of conversions used for Di-Cap™ deionization capacity monitoring described later in the flow section.
% HCl, % NaOH, % H2SO4 settings allow the respective concentrations to be inferred from conductivity and read out directly as percent by weight. This function must be used in applications having only the chemical and pure water present. Conductivity is only a quantitative measurement and cannot tell if there are other conductive materials present.
Temperature Compensation The following types of temperature compensation routines are available for resistivity/conductivity measurements: standard, standard 75, cation, glycol 1, glycol 50, alcohol, linear 2.00%, Light 84, or none.
Standard compensation includes compensation for non-linear high purity effects as well as conventional neutral salt impurities and conforms to ASTM standards D1125 and D5391.
Standard 75 compensation is the Standard compensation routine referenced to 75°C. This compensation may be preferred when measuring Ultrapure Water at an elevated
temperature. [Note: Resistivity of Ultrapure water compensated to 75°C is 2.4818 Mohm-cm]
Cation compensation is used in power industry applications for specific conductivity using ammonia or ETA (ethanolamine) water treatment and cation conductivity measurements with acidic samples. It takes into account the effects of temperature on the dissociation of pure water in the presence of these bases and acids.
Glycol 1 compensation matches the temperature characteristics of 100% ethylene glycol. Compensated measurements may go well above 18 Mohm-cm.
Glycol 50 compensation matches the temperature characteristics of 50% ethylene glycol in water. Compensated measurements using this solution may go above 18 Mohm-cm.
Alcohol compensation provides for the temperature characteristics of a 75% solution of isopropyl alcohol in pure water. Compensated measurements using this solution may go above 18 Mohm-cm.
Linear compensation adjusts the reading by a factor expressed as a “% per °C” (deviation from 25°C). Use only if sample stream has a well-characterized linear temperature coefficient. The factory default setting is 2.00%/°C.
Light 84 compensation matches the high purity water research results of Dr. T.S. Light published in 1984. Use only if your institution has standardized on that work.
DISSOLVED OXYGEN The measurement of dissolved oxygen concentration can be displayed in units of:
gO2 grams per liter, g/L
ppmO2 parts per million = mg/L
ppbO2 parts per billion = µg/L
%sat percent saturation
Sensors for dissolved oxygen come pre-calibrated for zero offset. The user should perform a simple calibration using air as the reference prior to use. Automatic corrections for temperature and barometric pressure are provided. The barometric pressure may be displayed as another measurement in units of mmHg or bar. For diagnostic purposes, the senor output in voltage or current (depending on sensor type) may also be displayed.
DISSOLVED OZONE The measurement of dissolved ozone concentration can be displayed in units of:
gO3 grams per liter, g/L
ppmO3 parts per million = mg/L
ppbO3 parts per billion = µg/L
24 Making Measurements Chapter 5
Perform zero and span calibrations after connecting the ozone sensor and allowing it to become fully polarized. Automatic correction for temperature is provided. For diagnostic purposes, the senor output in current may also be displayed.
TOTAL ORGANIC CARBON (TOC) The measured TOC (total organic carbon) of a solution can be displayed in units of gC/L (nano-, micro- or milli-), ppmC, ppbC or pptC (parts per trillion). The conductivity/resistivity and temperature of the sample can also be displayed by setting up another measurement for those parameters.
With the 5000TOC Sensor, TOC is determined by measuring conductivity before and after a high-intensity UV light exposure, which oxidizes organic constituents to carbon dioxide in the sample. The difference in conductivity before and after the oxidation is used to determine the TOC concentration. The system can be configured to automatically balance the conductivity sensors at a set time interval or on demand.
Under normal operating conditions, the 5000TOC Sensor is continuously relaying information to and from the 770MAX. The 770MAX display also acts as a status indicator for the sensor. If the display screen is set to display a measurement from the 5000TOC Sensor, under normal operating conditions the display will show the usual measurement letter, name and value. If the 5000TOC Sensor is in any mode other than measurement mode, such as Rinsing, Autobalance, TOC Off, Error or Fault, then this status is displayed by flashing alternately with the six characters of the measurement name.
The six-character 5000TOC status indicators are as follows:
UV OFF Flashes when the UV lamp is turned off at the sensor
Rinse Flashes when the sensor is in Rinse mode
Autbal Flashes when the sensor is in the Auto-balance mode
Error Flashes when an Error condition exists with the TOC sensor
Fault Flashes when a Fault condition exists with the TOC sensor
If an ERROR or FAULT condition is displayed on the measurement screen, the user can go to the Messages screen to retrieve more information regarding the cause of the condition.
The 770MAX will notify the user if the UV lamp has exceeded its default lifetime displaying this state as an ‘Error’. The 770MAX will also notify the user if any of the sensor’s operating parameters are out of tolerance and will shut down the sensor under adverse operating conditions , displaying this state as a ‘Fault’. LEDs on the sensor also indicate error and fault conditions. In an error condition the sensor will still operate but the measured TOC may not be accurate. In a fault condition the sensor cannot make
measurements. Messages displayed in the 770MAX describe the fault or error cause for efficient trouble-shooting.
PH The measured pH of a solution can be displayed in terms of pH units or volts.
Due to aging in the process, pH sensors require re-calibration after a period of time. The stability of the sensor depends on the nature of the sample solution, pressure, temperature, etc. For this reason, calibration intervals should be based on experience with the particular application. See Chapter 6: Calibrating and Verifying for calibration instructions.
Temperature Compensation Conventional Nernst temperature compensation is always in effect to correct for the varying output of all pH electrodes with temperature. If no temperature sensor is available, or temperature compensation is not desired, select a fixed temperature as the temperature source.
Isopotential Point Most sensors have a zero potential, or isopotential point (IP), of pH 7.0. Special purpose electrodes with a zero potential at values other than 7.0 will have this identified in their instruction manuals. A different IP setting will allow proper temperature compensation of these special electrodes.
Solution Temperature Coefficient For high purity pH measurements, the solution temperature coefficient (STC) compensates for the ionization of pure water. This is in addition to the conventional (Nernst) temperature compensation, which is always active.
STC is useful for pure water samples with a conductivity of less than 30 µS/cm where the changing ionization of water is significant. It references the pH to 25°C.
In all other applications, leave the STC value at zero.
For ammonia, phosphate and/or amine-treated power plant samples, the STC should be set to 0.033 pH/°C.
For pure makeup water or boiling water reactor samples, the STC should be 0.016 pH/°C.
The appropriate values for other pure water compositions may be determined by developing temperature vs. pH data for the particular sample with STC set at zero. The negative slope of this data becomes the STC value.
Chapter 5 Making Measurements 25
TEMPERATURE The measured temperature of a solution can be displayed in units of:
• °C • °F A temperature sensor is usually incorporated into a pH or conductivity/resistivity sensor. This temperature sensor can be used for temperature compensation and/or temperature readout.
To display temperature values as well as using them for compensation, set up one measurement for the primary parameter (e.g., resistivity or pH) and another for the temperature readout.
PRESSURE The measured pressure of a solution can be displayed in terms of:
• PSI • kPascal • mmHg • bars • kg/cm2 • inches • feet
The maximum pressure reading for the sensor is pre-programmed into all Smart Sensors and automatically read by the 770MAX.
For tank level measurements, see TANK LEVEL. For difference and ratio measurements see DERIVED MEASUREMENTS.
FLOW The measured flow of a solution can be displayed in terms of:
• gallons • m3 • liter • Hz • GPM • m3/hr • liter/min • feet/second • % recovery • ratio • difference • ppm-Gallons • grains
Smart Sensors for flow can be installed on channels 1 through 4. Pulse type, non-Smart Sensors for flow can be
installed only on channels 5 and 6 and require entry of their calibration factors in pulses per gallon as the measurement Multiplier.
Flow measurements require the inside diameter of the pipe for flow velocity calculations. In some applications, calibration of flow sensors is required for specific piping installations. See Chapter 6: Calibrating and Verifying for calibration instructions.
Totalized Flow is expressed in volume (gallons, m3 or liters). After a measurement with total flow units has been defined, 770MAX will keep a running total of the volume flowing past the sensor. There are three ways to clear the total flow value and reset it to zero:
1. Use the Reset Menu (see Chapter 4: Using Menus).
2. If external reset is enabled (see Measurement Menu in Chapter 4: Using Menus), then total flow will be cleared when the discrete input line is momentarily pulsed low. (See Chapter 2: Installing for terminal connections).
3. Configure a total flow or deionization capacity setpoint as a reset type, with its value at the desired point for reset.
Flow Rate is expressed in volume per unit time.
Flow Velocity is expressed in feet per second.
Percent Recovery can be calculated as the flow ratio of pure water output to feedwater input through a Reverse Osmosis membrane. For set up, see DERIVED MEASUREMENTS later in this chapter.
Deionization capacity in ppm-gallons can be inferred by measuring the flow rate and mineral concentration entering a deionization bed; with results displayed in units of ppm-gallons. For set up, see DERIVED MEASUREMENTS later in this chapter.
Flow measurement in terms of Hertz can be used as a diagnostic tool to verify operation of pulse-type flow sensors.
ORP This measurement type is used to measure oxidation reduction (redox) potentials or any other sensor output in volts. No special settings or calibration are normally required.
TANK LEVEL (VOLUME) The level of solution inside a tank is measured with a tank level sensor mounted on the tank. Measurements can be displayed in units of:
• gallons • m3 • liter • PSI • inches
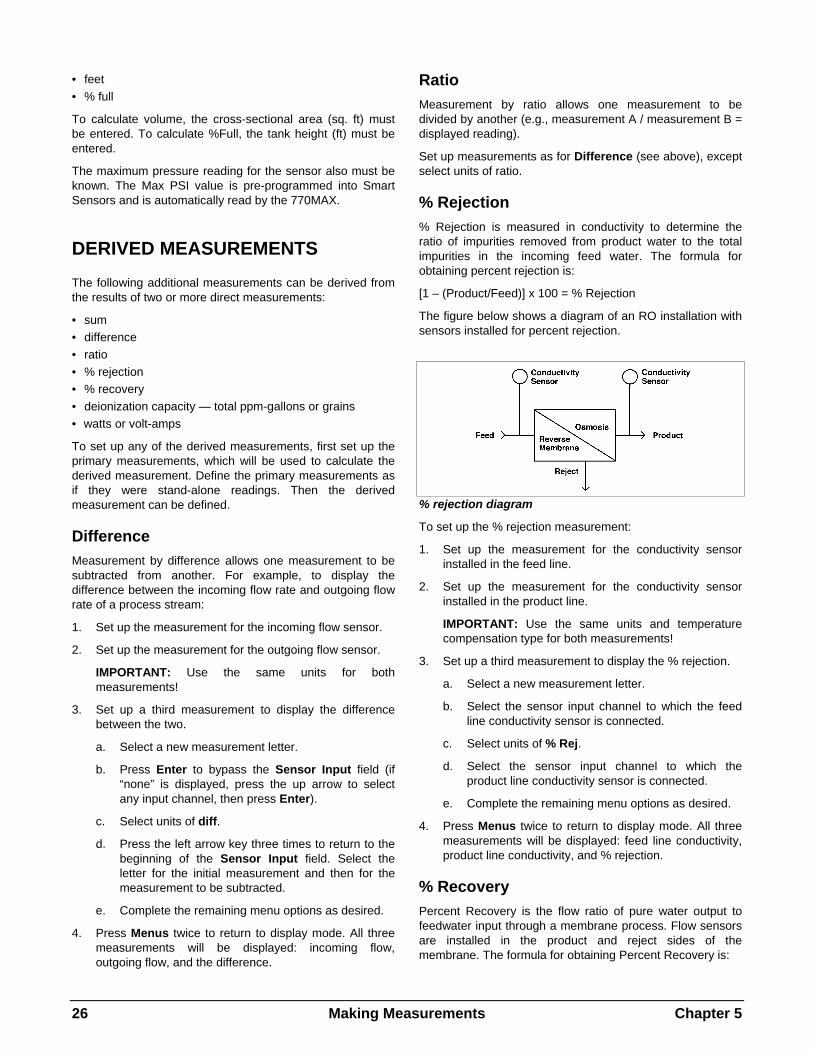
26 Making Measurements Chapter 5
• feet • % full
To calculate volume, the cross-sectional area (sq. ft) must be entered. To calculate %Full, the tank height (ft) must be entered.
The maximum pressure reading for the sensor also must be known. The Max PSI value is pre-programmed into Smart Sensors and is automatically read by the 770MAX.
DERIVED MEASUREMENTS The following additional measurements can be derived from the results of two or more direct measurements:
• sum • difference • ratio • % rejection • % recovery • deionization capacity — total ppm-gallons or grains • watts or volt-amps
To set up any of the derived measurements, first set up the primary measurements, which will be used to calculate the derived measurement. Define the primary measurements as if they were stand-alone readings. Then the derived measurement can be defined.
Difference Measurement by difference allows one measurement to be subtracted from another. For example, to display the difference between the incoming flow rate and outgoing flow rate of a process stream:
1. Set up the measurement for the incoming flow sensor.
2. Set up the measurement for the outgoing flow sensor.
IMPORTANT: Use the same units for both measurements!
3. Set up a third measurement to display the difference between the two.
a. Select a new measurement letter.
b. Press Enter to bypass the Sensor Input field (if “none” is displayed, press the up arrow to select any input channel, then press Enter).
c. Select units of diff.
d. Press the left arrow key three times to return to the beginning of the Sensor Input field. Select the letter for the initial measurement and then for the measurement to be subtracted.
e. Complete the remaining menu options as desired.
4. Press Menus twice to return to display mode. All three measurements will be displayed: incoming flow, outgoing flow, and the difference.
Ratio Measurement by ratio allows one measurement to be divided by another (e.g., measurement A / measurement B = displayed reading).
Set up measurements as for Difference (see above), except select units of ratio.
% Rejection % Rejection is measured in conductivity to determine the ratio of impurities removed from product water to the total impurities in the incoming feed water. The formula for obtaining percent rejection is:
[1 – (Product/Feed)] x 100 = % Rejection
The figure below shows a diagram of an RO installation with sensors installed for percent rejection.
% rejection diagram
To set up the % rejection measurement:
1. Set up the measurement for the conductivity sensor installed in the feed line.
2. Set up the measurement for the conductivity sensor installed in the product line.
IMPORTANT: Use the same units and temperature compensation type for both measurements!
3. Set up a third measurement to display the % rejection.
a. Select a new measurement letter.
b. Select the sensor input channel to which the feed line conductivity sensor is connected.
c. Select units of % Rej.
d. Select the sensor input channel to which the product line conductivity sensor is connected.
e. Complete the remaining menu options as desired.
4. Press Menus twice to return to display mode. All three measurements will be displayed: feed line conductivity, product line conductivity, and % rejection.
% Recovery Percent Recovery is the flow ratio of pure water output to feedwater input through a membrane process. Flow sensors are installed in the product and reject sides of the membrane. The formula for obtaining Percent Recovery is:
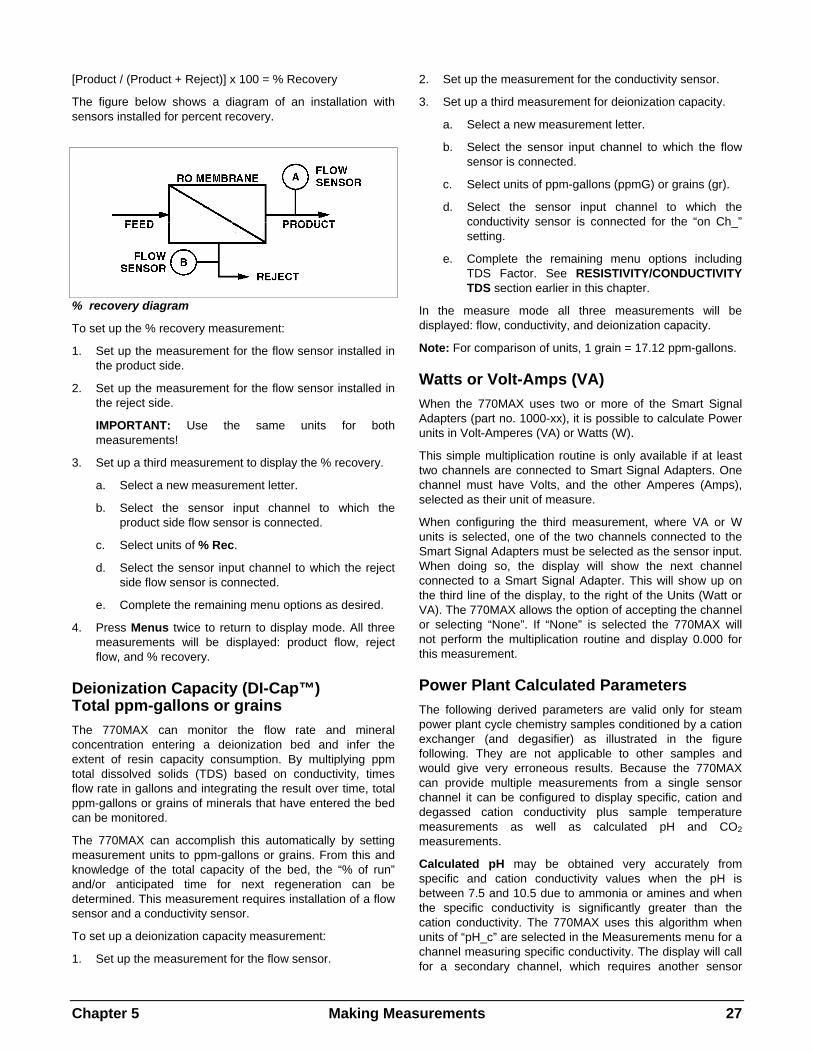
Chapter 5 Making Measurements 27
[Product / (Product + Reject)] x 100 = % Recovery
The figure below shows a diagram of an installation with sensors installed for percent recovery.
% recovery diagram
To set up the % recovery measurement:
1. Set up the measurement for the flow sensor installed in the product side.
2. Set up the measurement for the flow sensor installed in the reject side.
IMPORTANT: Use the same units for both measurements!
3. Set up a third measurement to display the % recovery.
a. Select a new measurement letter.
b. Select the sensor input channel to which the product side flow sensor is connected.
c. Select units of % Rec.
d. Select the sensor input channel to which the reject side flow sensor is connected.
e. Complete the remaining menu options as desired.
4. Press Menus twice to return to display mode. All three measurements will be displayed: product flow, reject flow, and % recovery.
Deionization Capacity (DI-Cap™) Total ppm-gallons or grains The 770MAX can monitor the flow rate and mineral concentration entering a deionization bed and infer the extent of resin capacity consumption. By multiplying ppm total dissolved solids (TDS) based on conductivity, times flow rate in gallons and integrating the result over time, total ppm-gallons or grains of minerals that have entered the bed can be monitored.
The 770MAX can accomplish this automatically by setting measurement units to ppm-gallons or grains. From this and knowledge of the total capacity of the bed, the “% of run” and/or anticipated time for next regeneration can be determined. This measurement requires installation of a flow sensor and a conductivity sensor.
To set up a deionization capacity measurement:
1. Set up the measurement for the flow sensor.
2. Set up the measurement for the conductivity sensor.
3. Set up a third measurement for deionization capacity.
a. Select a new measurement letter.
b. Select the sensor input channel to which the flow sensor is connected.
c. Select units of ppm-gallons (ppmG) or grains (gr).
d. Select the sensor input channel to which the conductivity sensor is connected for the “on Ch_” setting.
e. Complete the remaining menu options including TDS Factor. See RESISTIVITY/CONDUCTIVITY TDS section earlier in this chapter.
In the measure mode all three measurements will be displayed: flow, conductivity, and deionization capacity.
Note: For comparison of units, 1 grain = 17.12 ppm-gallons.
Watts or Volt-Amps (VA) When the 770MAX uses two or more of the Smart Signal Adapters (part no. 1000-xx), it is possible to calculate Power units in Volt-Amperes (VA) or Watts (W).
This simple multiplication routine is only available if at least two channels are connected to Smart Signal Adapters. One channel must have Volts, and the other Amperes (Amps), selected as their unit of measure.
When configuring the third measurement, where VA or W units is selected, one of the two channels connected to the Smart Signal Adapters must be selected as the sensor input. When doing so, the display will show the next channel connected to a Smart Signal Adapter. This will show up on the third line of the display, to the right of the Units (Watt or VA). The 770MAX allows the option of accepting the channel or selecting “None”. If “None” is selected the 770MAX will not perform the multiplication routine and display 0.000 for this measurement.
Power Plant Calculated Parameters The following derived parameters are valid only for steam power plant cycle chemistry samples conditioned by a cation exchanger (and degasifier) as illustrated in the figure following. They are not applicable to other samples and would give very erroneous results. Because the 770MAX can provide multiple measurements from a single sensor channel it can be configured to display specific, cation and degassed cation conductivity plus sample temperature measurements as well as calculated pH and CO2 measurements.
Calculated pH may be obtained very accurately from specific and cation conductivity values when the pH is between 7.5 and 10.5 due to ammonia or amines and when the specific conductivity is significantly greater than the cation conductivity. The 770MAX uses this algorithm when units of “pH_c” are selected in the Measurements menu for a channel measuring specific conductivity. The display will call for a secondary channel, which requires another sensor
28 Making Measurements Chapter 5
Cation Exchanger
NH4+, OH-, Na+, H+, Cl-, HCO3
-
H+, Cl-, CO2, HCO3-, OH-
R–H+
R–NH4+
R–Na+
Specific Conductivity
Cation Conductivity
Degas Unit
CO2
H+, Cl-, OH-
Degassed Cation Conductivity
measuring cation conductivity on the same sample. Set the temperature compensation mode to “Ammonia” and “Cation” for the specific and cation conductivity measurements, respectively.
Note that if operation goes outside the recommended conditions, a glass electrode pH measurement is needed to obtain an accurate value. The 770MAX can be configured for both kinds of pH measurement when appropriate sensors are provided. It can also be configured with an alarm on the difference between them as a diagnostic. The calculated pH can provide a good standard for one-point trim calibration of the electrode pH measurement when sample conditions are within the ranges noted above.
Carbon dioxide may be calculated from cation conductivity and degassed cation conductivity using tables from ASTM Standard D4519. The 770MAX has these tables stored in memory which it uses when selected in the Measurements
menu by choosing units of “pbCO2” or “pmCO2” for parts per billion or parts per million. The display will call for a secondary channel, which must be measuring degassed cation conductivity on the same sample. Set both measurements to the “Cation” temperature compensation mode.
Total anions as chlorides or sulfates may be readout on a degassed cation conductivity sample using tables from ASTM Standard D4519. The 770MAX has these tables stored in memory which it uses when selected in the Measurements menu by choosing units of “ppbCl”, “ppmCl”, “pbSO4”, or pmSO4” for parts per billion or parts per million chlorides or sulfates. Conductivity is non-specific and cannot determine the actual anions present—it merely converts the conductivity value as if they were all chlorides or all sulfates. Set the temperature compensation mode to “Cation”.
sample conditioning for specific, cation and degassed cation conductivity measurements used to calculate pH, CO2 and anion concentration on power plant cycle chemistry samples
Chapter 6 Calibrating and Verifying 29
CHAPTER 6: CALIBRATING AND VERIFYING
The Calibrate Menu is used to calibrate the sensors, analog outputs, or the meter measuring circuits.
The 770MAX meter measuring and analog output circuits are factory calibrated within specifications; therefore, it is not normally necessary to re-calibrate them. Best sensor performance is normally obtained by using the factory-documented calibration constants programmed into Smart Sensors. However, pH sensors will require periodic re-calibration; see the pH sensor instruction manual for recommendations. Level sensors may require calibration after installation to accommodate the sensor location.
As a safeguard, a “hold time” may be entered to freeze the current relay states and analog outputs so that alarms are not triggered during calibration procedures.
CAUTION: “Hold time” will freeze all relays and analog outputs on all measurements, not just the measurement being calibrated.
ACCESS To access the Calibrate Menu:
1. Press Menus.
2. Press the up arrow key until the Calibrate Menu is displayed, then press Enter.
See the appropriate section below for calibration procedures.
After completing the desired calibration, press Menus twice to exit the menu system and return to display mode.
SENSOR CALIBRATION The 770MAX uses two calibration constants to calculate measured values from the sensor’s linear output signal. These constants, referred to as the adder and multiplier, are pre-programmed into all Smart Sensors and are automatically read by the 770MAX. They can be viewed in the Measurements Menu.
The adder (also known as zero or offset) is an indicator of how far the sensor is offset from the nominal zero point. The multiplier (also known as cell constant, slope or span) is an indication of the sensitivity of the sensor.
Sensors can be calibrated at either one or two points. A one-point calibration will calculate either a new adder or multiplier factor depending on the type of sensor (see chart below). A two-point calibration will recalculate both the multiplier and adder factors.
sensor type factor calculated by one-point calibration
resistivity/conductivity multiplier TOC user-selectable dissolved oxygen user-selectable dissolved ozone user selectable pH or ORP adder flow multiplier temperature adder pressure, tank level adder
Sensor calibration requires accurate standards in the range of expected measurements. For a one-point calibration only a single standard is needed. For a two-point calibration, two standards of known value are required.
The new calibration data is held in the 770MAX memory for use by any measurement using the sensor. The data is also saved in the Smart Sensor’s memory. The sensor can then be disconnected or moved to another channel or 770MAX without requiring re-calibration. If necessary, the user calibration data can be cleared, restoring factory calibration data, using the Smart Sensors Menu under the Other Menus (see Chapter 4: Using Menus).
The basic calibration procedure and sequence of screen messages are the same for all sensor types. Following is an overview of each sensor type, followed by the 770MAX sensor calibration procedure. pH is the only routinely calibrated measurement and is emphasized here.
NOTE: The accuracy of a calibration is limited by the accuracy and traceability of the standards and their vulnerability to contamination. Also, it is important to ensure that the meter is properly calibrated before performing a sensor calibration.
Calibration Overviews for Each Parameter pH
Due to aging in the process, pH sensors require periodic re-calibration. The stability of the sensor depends on the nature of the sample solution, pressure and temperature variations, etc. For this reason, calibration intervals should be based on experience with the particular application. For new applications it is advisable to re-calibrate frequently. If no significant variation is found, the calibration interval may be increased.
For example, begin with a daily calibration, then extend to weekly, then to monthly as experience and process accuracy dictate. Such a sequence is also appropriate for new sensors, because they will show some initial drift as they acclimate to the process.
Two methods are used for pH sensor calibration: buffer and grab sample.
Buffer calibration requires removal of the sensor from the process, rinsing it with deionized water and immersing it in
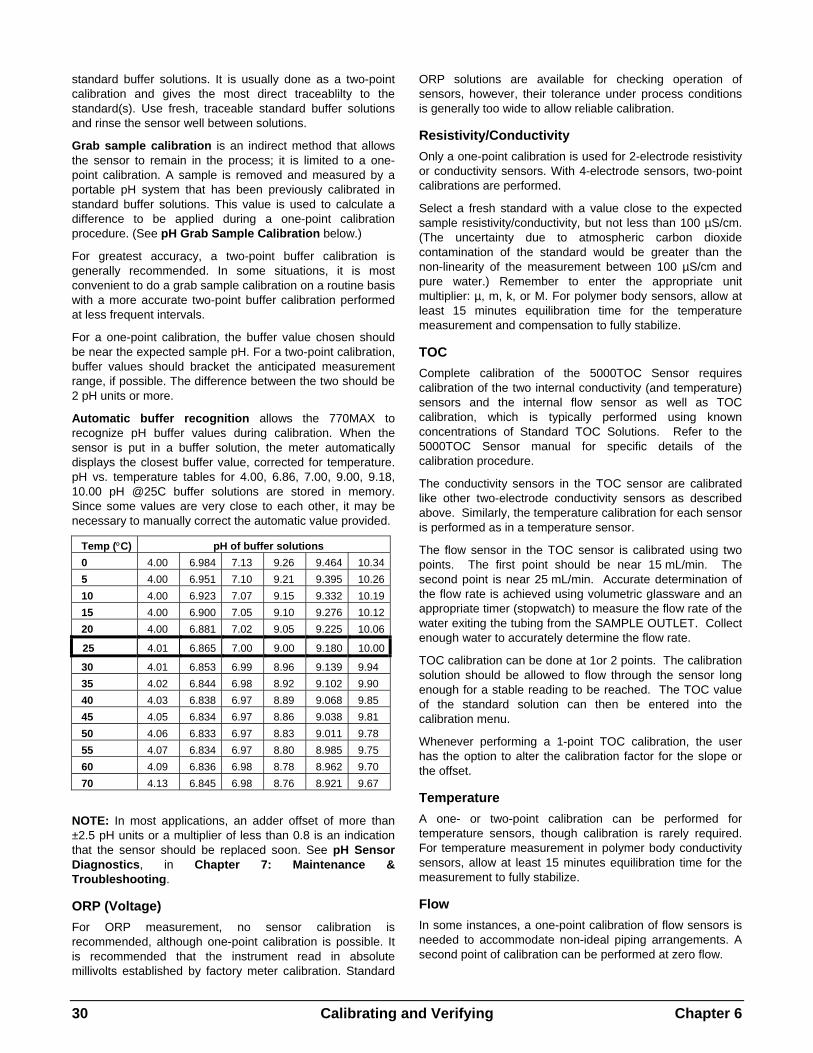
30 Calibrating and Verifying Chapter 6
standard buffer solutions. It is usually done as a two-point calibration and gives the most direct traceablilty to the standard(s). Use fresh, traceable standard buffer solutions and rinse the sensor well between solutions.
Grab sample calibration is an indirect method that allows the sensor to remain in the process; it is limited to a one-point calibration. A sample is removed and measured by a portable pH system that has been previously calibrated in standard buffer solutions. This value is used to calculate a difference to be applied during a one-point calibration procedure. (See pH Grab Sample Calibration below.)
For greatest accuracy, a two-point buffer calibration is generally recommended. In some situations, it is most convenient to do a grab sample calibration on a routine basis with a more accurate two-point buffer calibration performed at less frequent intervals.
For a one-point calibration, the buffer value chosen should be near the expected sample pH. For a two-point calibration, buffer values should bracket the anticipated measurement range, if possible. The difference between the two should be 2 pH units or more.
Automatic buffer recognition allows the 770MAX to recognize pH buffer values during calibration. When the sensor is put in a buffer solution, the meter automatically displays the closest buffer value, corrected for temperature. pH vs. temperature tables for 4.00, 6.86, 7.00, 9.00, 9.18, 10.00 pH @25C buffer solutions are stored in memory. Since some values are very close to each other, it may be necessary to manually correct the automatic value provided.
Temp (°C) pH of buffer solutions 0 4.00 6.984 7.13 9.26 9.464 10.345 4.00 6.951 7.10 9.21 9.395 10.2610 4.00 6.923 7.07 9.15 9.332 10.1915 4.00 6.900 7.05 9.10 9.276 10.1220 4.00 6.881 7.02 9.05 9.225 10.06
25 4.01 6.865 7.00 9.00 9.180 10.00
30 4.01 6.853 6.99 8.96 9.139 9.94 35 4.02 6.844 6.98 8.92 9.102 9.90 40 4.03 6.838 6.97 8.89 9.068 9.85 45 4.05 6.834 6.97 8.86 9.038 9.81 50 4.06 6.833 6.97 8.83 9.011 9.78 55 4.07 6.834 6.97 8.80 8.985 9.75 60 4.09 6.836 6.98 8.78 8.962 9.70 70 4.13 6.845 6.98 8.76 8.921 9.67
NOTE: In most applications, an adder offset of more than ±2.5 pH units or a multiplier of less than 0.8 is an indication that the sensor should be replaced soon. See pH Sensor Diagnostics, in Chapter 7: Maintenance & Troubleshooting.
ORP (Voltage) For ORP measurement, no sensor calibration is recommended, although one-point calibration is possible. It is recommended that the instrument read in absolute millivolts established by factory meter calibration. Standard
ORP solutions are available for checking operation of sensors, however, their tolerance under process conditions is generally too wide to allow reliable calibration.
Resistivity/Conductivity Only a one-point calibration is used for 2-electrode resistivity or conductivity sensors. With 4-electrode sensors, two-point calibrations are performed.
Select a fresh standard with a value close to the expected sample resistivity/conductivity, but not less than 100 µS/cm. (The uncertainty due to atmospheric carbon dioxide contamination of the standard would be greater than the non-linearity of the measurement between 100 µS/cm and pure water.) Remember to enter the appropriate unit multiplier: µ, m, k, or M. For polymer body sensors, allow at least 15 minutes equilibration time for the temperature measurement and compensation to fully stabilize.
TOC Complete calibration of the 5000TOC Sensor requires calibration of the two internal conductivity (and temperature) sensors and the internal flow sensor as well as TOC calibration, which is typically performed using known concentrations of Standard TOC Solutions. Refer to the 5000TOC Sensor manual for specific details of the calibration procedure.
The conductivity sensors in the TOC sensor are calibrated like other two-electrode conductivity sensors as described above. Similarly, the temperature calibration for each sensor is performed as in a temperature sensor.
The flow sensor in the TOC sensor is calibrated using two points. The first point should be near 15 mL/min. The second point is near 25 mL/min. Accurate determination of the flow rate is achieved using volumetric glassware and an appropriate timer (stopwatch) to measure the flow rate of the water exiting the tubing from the SAMPLE OUTLET. Collect enough water to accurately determine the flow rate.
TOC calibration can be done at 1or 2 points. The calibration solution should be allowed to flow through the sensor long enough for a stable reading to be reached. The TOC value of the standard solution can then be entered into the calibration menu.
Whenever performing a 1-point TOC calibration, the user has the option to alter the calibration factor for the slope or the offset.
Temperature A one- or two-point calibration can be performed for temperature sensors, though calibration is rarely required. For temperature measurement in polymer body conductivity sensors, allow at least 15 minutes equilibration time for the measurement to fully stabilize.
Flow In some instances, a one-point calibration of flow sensors is needed to accommodate non-ideal piping arrangements. A second point of calibration can be performed at zero flow.

Chapter 6 Calibrating and Verifying 31
If an accurate flowmeter is not available for comparison, determine a standard flow rate by measuring the amount of time for a known tank level change and computing the volume change per unit time.
Pressure Although calibration is seldom required, a simple 1-point zero calibration is easily performed. If a second point of calibration is needed, use an accurate traceable pressure instrument as the standard.
Tank Level A two-point calibration after installation is generally recommended to accommodate the unique sensor location. Calibrate at zero and some measurable high level. Level measurements are linear, for straight-sided tanks only.
Dissolved Oxygen Only a one-point air calibration is normally performed, at startup and periodically thereafter. Automatic correction for temperature and barometric pressure is provided. Although not normally required, a one-point calibration of the barometric pressure measurement may be performed if pressure is set up as a measurement. A one-point zero dissolved oxygen calibration is available but not normally recommended since zero DO is very hard to achieve and sensor electrical zero is very close to theoretical.
Dissolved Oxygen Electrical Zero Calibration For model 357-210 High Performance DO Sensor only it is possible to recalibrate for the electrical zero offset of the preamplifier. This is recommended when operation is near zero and it is suspected the calibration has shifted. It can give a more reliable and faster zero calibration than using a zero solution.
In the Measurements menu, page down and set Temperature Source to Fixed at 25°C or 77°F. Disconnect the probe from the preamp.
Note: the preamp must be connected to the 770MAX.
Perform a sensor zero calibration. Restore the Temperature Source to “This Ch”. Reconnect the probe and allow time for it to repolarize before using measurements.
Dissolved Ozone Perform zero and comparison/span calibrations after connecting the ozone sensor and allowing it to become fully polarized. Perform a zero calibration by leaving the probe in air or ozone-free water and step through the “AirZero” calibration procedure in the Calibrate Sensor menu. The zero calibration is generally quite stable and is performed at startup and at infrequent intervals thereafter.
Perform a span calibration by comparison while measuring a stable ozonated sample. Select “Compare” calibration in the Calibrate Sensor menu and enter the value of another calibrated ozone instrument or the value of a colorimeter reading on the same sample. A colorimeter sample must be taken from the same point and read very quickly to limit errors due to the natural decay of ozone. The span
calibration is performed periodically to accommodate gradual membrane aging and other effects.
Calibration Procedure This procedure is generic for all parameters. Refer above to specifics about the type of sensor to be calibrated. The accuracy of any calibration is limited by the accuracy of the standards and technique.
To perform a sensor calibration:
1. Access the Calibration Menu.
2. Select sensor calibration.
3. Enter the hold time in minutes. If holding the outputs is not necessary, leave at zero. Press Page Down.
4. Select the measurement letter corresponding to the sensor to be calibrated.
5. Select appropriate calibration type. (One-point air or zero calibration for dissolved oxygen; one-point compare/span or zero calibration for ozone.)
6. Place the sensor in the first calibration solution or establish conditions for the first calibration point.
Press Page Down. The current reading will be displayed.
7. Enter the value of the first calibration standard/point (including units multiplier, if necessary) as Cal point 1.
NOTE: For pH, the 770MAX automatically recognizes the nearest buffer value corrected for temperature. Press Enter if the value is correct, or change it if incorrect. For dissolved oxygen, the 770MAX automatically computes the oxygen concentration for air-saturated water, corrected for barometric pressure and temperature.
8. Wait for a stable reading, then press Page Down to begin calibration. (The displayed value is before calibration and will be slow to update.)
9a. If performing a one-point calibration go to Step 12.
9b. If performing a two-point calibration, place the sensor in the second calibration solution or establish conditions for the second calibration point. The current reading will be displayed. Press Page Down. The current reading will be displayed.
10. Enter the value of the second calibration standard/point (including units multiplier, if necessary).
11. Press Page Down to begin calibration.
12. After calibration is complete, the measurement values before and after calibration are displayed.
13. Enter the date as month/day/year (mm/dd/yy), then press Page Down to save.
14. Select Yes to save the calibration data in the Smart Sensor memory.
NOTE: Steps 13 and 14 must be completed, answering “yes” to save calibration data permanently; otherwise
32 Calibrating and Verifying Chapter 6
the calibration data will be lost on power down or on disconnecting the patch cord.
15. If the hold function was used, reset it to zero to resume normal operation of analog outputs and relays.
After calibration, the 770MAX will return to the display mode and the new calibration constants will be used for all measurements using that sensor.
pH Grab Sample or Comparison Calibration Procedure This method should only be used when the pH is stable. To perform a grab sample calibration:
NOTE: For pure water samples (<20 µS/cm conductivity), the “grab sample” should be a flowing side stream not exposed to air before the measurement to minimize contamination.
1. Take a grab sample from the process stream.
2. Record the pH displayed on the 770MAX at the time the grab sample is taken.
3. Measure the grab sample pH as soon as possible.
4. Subtract the recorded 770MAX pH from the grab sample pH. Record the difference, retaining the sign (positive or negative).
5. Access the 770MAX Calibration Menu.
6. Select sensor calibration.
7. Select the measurement letter corresponding to the sensor to be calibrated.
8. Select one-point calibration.
9. Press Page Down. The current reading will be displayed.
10. Add the difference value calculated in step 4 to the currently displayed pH and immediately enter the result as the calibration standard value.
11. After calibration is complete, the measurement values before and after calibration are displayed. These values are for display only.
12. Enter the date as month/day/year (mm/dd/yy), then press Page Down to save.
13. Select Yes to save the calibration data in the Smart Sensor memory; otherwise, select No.
ANALOG OUTPUT CALIBRATION This section is not for startup scaling of analog outputs; for that see Chapter 4: Using Menus. This section fine-tunes the 4 and 20 mA signal levels.
The analog output signals have been factory calibrated to specifications. They may be re-calibrated in a two step process where 0/4 mA and 20 mA levels are adjusted. A
precision milliammeter must be connected in series with the output to perform the calibration.
To perform an analog output calibration:
1. Connect the milliammeter to the analog output being calibrated.
2. Access the Calibration Menu.
3. Select analog output calibration.
4. Select the analog output channel to be calibrated.
6. Adjust the “4 mA adjust” percentage display to obtain the desired reading on the milliammeter (or other output reading device). A higher percentage display produces a lower output signal. When done, press Page Down.
7. Adjust the “20 mA adjust” percentage display to obtain the desired reading on the milliammeter and press Page Down.
8. Enter the calibration date as month/day/year (mm/dd/yy), and press Page Down to store it.
9. To perform another calibration, press Page Up to return to the initial calibration screen. To go to display mode, press Menus twice.
METER CALIBRATION The 770MAX is factory calibrated within specifications. It is not normally necessary to perform meter re-calibration unless required to meet Q.A. protocols or extreme conditions cause out of specification operation.
Meter measuring circuits are calibrated by input channel and circuit type. Each channel contains resistance, temperature, voltage and frequency measurement circuits. The resistance circuits can be calibrated over four ranges: 500K, 20K, 2K and 200 ohms.
In addition to calibration, the most recent calibration can be verified to ensure best performance.
To calibrate or verify the meter measuring circuits, precision electronics are required. It is strongly recommended to use the Automatic Smart Calibrator Kit, Part No. 1875. For details regarding meter calibration see the Calibrator Kit instruction manual.
If it is desired to use local standards lab equipment, provide a decade box, voltage source and frequency source with traceable accuracy exceeding meter specifications. Obtain the appropriate adapter cable(s) listed in Chapter 8: Accessories and Spare Parts and refer to Service Manual, Part No. 84373, for procedures
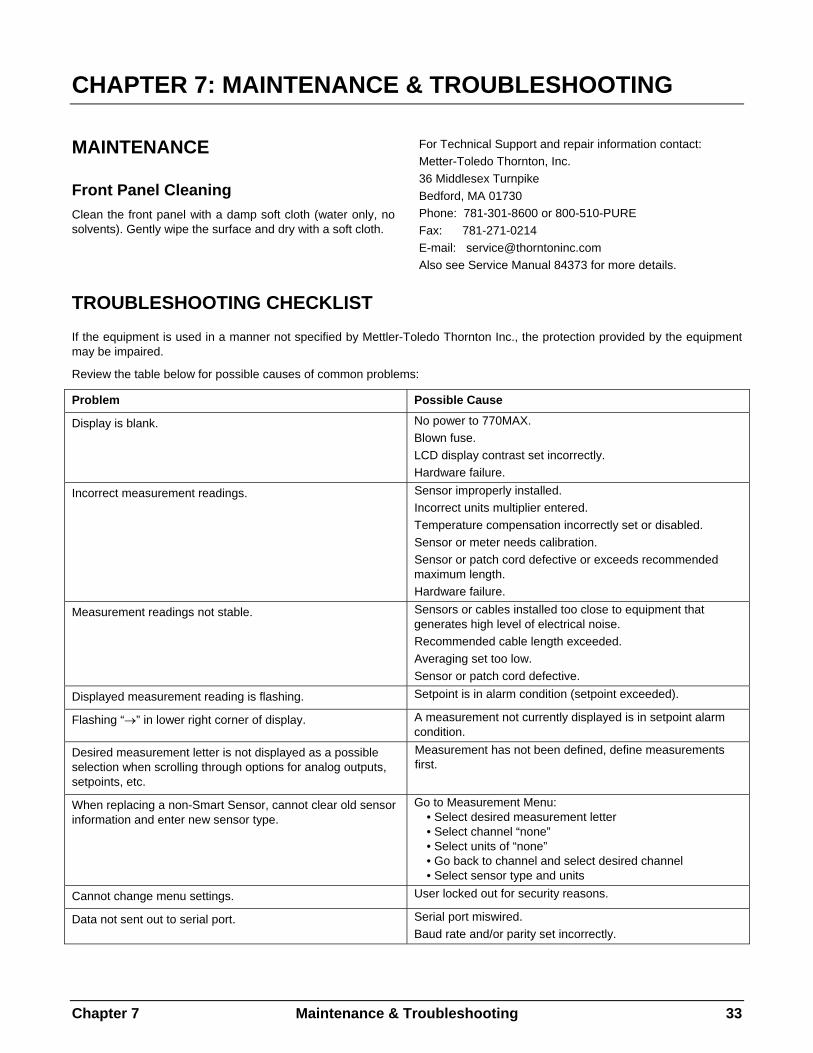
Chapter 7 Maintenance & Troubleshooting 33
CHAPTER 7: MAINTENANCE & TROUBLESHOOTING
MAINTENANCE
Front Panel Cleaning Clean the front panel with a damp soft cloth (water only, no solvents). Gently wipe the surface and dry with a soft cloth.
For Technical Support and repair information contact: Metter-Toledo Thornton, Inc. 36 Middlesex Turnpike Bedford, MA 01730 Phone: 781-301-8600 or 800-510-PURE Fax: 781-271-0214 E-mail: [email protected] Also see Service Manual 84373 for more details.
TROUBLESHOOTING CHECKLIST If the equipment is used in a manner not specified by Mettler-Toledo Thornton Inc., the protection provided by the equipment may be impaired. Review the table below for possible causes of common problems:
Problem Possible Cause
Display is blank. No power to 770MAX. Blown fuse. LCD display contrast set incorrectly. Hardware failure.
Incorrect measurement readings. Sensor improperly installed. Incorrect units multiplier entered. Temperature compensation incorrectly set or disabled. Sensor or meter needs calibration. Sensor or patch cord defective or exceeds recommended maximum length. Hardware failure.
Measurement readings not stable. Sensors or cables installed too close to equipment that generates high level of electrical noise. Recommended cable length exceeded. Averaging set too low. Sensor or patch cord defective.
Displayed measurement reading is flashing. Setpoint is in alarm condition (setpoint exceeded).
Flashing “→” in lower right corner of display. A measurement not currently displayed is in setpoint alarm condition.
Desired measurement letter is not displayed as a possible selection when scrolling through options for analog outputs, setpoints, etc.
Measurement has not been defined, define measurements first.
When replacing a non-Smart Sensor, cannot clear old sensor information and enter new sensor type.
Go to Measurement Menu: • Select desired measurement letter • Select channel “none” • Select units of “none” • Go back to channel and select desired channel • Select sensor type and units
Cannot change menu settings. User locked out for security reasons.
Data not sent out to serial port. Serial port miswired. Baud rate and/or parity set incorrectly.
34 Maintenance & Troubleshooting Chapter 7
pH SENSOR DIAGNOSTICS The adder and multiplier constants, viewed in the Measurements Menu, can provide valuable preventive maintenance information about pH sensors. However, the values must not be changed in this menu or the sensor will have to be recalibrated.
The adder factor (zero, asymmetry or standardize offset) is an indication of how far the sensor has drifted from the nominal zero starting point, in pH units. It is recalculated after every calibration. Drift in this value is usually due to aging or contamination of the reference electrode portion of the sensor.
An offset of more than ±2.5 pH units or a more rapid change in this value is an indication that the sensor should be replaced soon.
Because 770MAX display is auto-ranging, when the adder factor is very small, it may be displayed in milli-pH units with an “m” prefix following the numeric value. In this case the value is very near the nominal zero offset.
The multiplier (slope or span) is an indication of the sensitivity of the sensor to changes in pH. It has a nominal value near 1 and is recalculated after every 2-point calibration. Reduction in this value is usually due to aging, coating or hot caustic attack of the glass measuring membrane of the sensor.
A sensor with a multiplier value less than 0.80 should be replaced soon.
DIAGNOSTIC MENU The Diagnostic Menu is used to run a series of automated diagnostic testing routines to verify the operation of system components, including: meter, sensors, analog output, serial port, network, display, keypad, flow channels, inputs and outputs.
To access the Diagnostic Menu:
1. Press Menus.
2. Press the up arrow key until the Diagnostic Menu is displayed, then press Enter.
3. Use the up/down arrow keys to select a component to test, then press Enter. The indicated test will be performed and the results displayed.
4. To test another component, press Page Up to return to the Diagnostic Menu and select the next component.
5. After completing the desired diagnostics, press Menus twice to exit the menu system and return to display mode.
CAUTION: Some diagnostic tests may interrupt normal operation of analog outputs and relays and could upset related processes. Activate the HOLD function before using these diagnostics.
See the appropriate section below for information regarding the specific diagnostic tests.
Meter Tests Use to test the timers, ROM checksum, and RAM. Tests are performed sequentially, press Enter to perform next test.
Smart Sensors Select a channel to view the raw sensor data (actual voltage, ohms, etc.).
Serial Port On back of meter, use a jumper wire to connect TB2 terminals 9 and 10 then press Enter to begin test.
Network Not currently available.
Display An automated sequence will test the display of all characters (alpha, numeric and symbol). Press Enter to stop the test.
Keypad Press any key to test its response, the correct name of the key should be displayed. Press Menus twice to exit this test.
Flow Channels Diagnostic not currently available.
Inputs The level of the discrete input lines (high or low) will be displayed and updated.
Outputs Set the discrete outputs low or high for testing. Press 1 to set low or 2 to set high.
Self Tests An automated series of tests will check the operation of the following components:
• Smart sensors • Analog outputs • Discrete outputs • Discrete Inputs • Network • Display circuit board • Measurement circuit board • Options circuit board • Other components (ROM, RAM, etc.)
Chapter 7 Maintenance & Troubleshooting 35
The display shows how many times the tests have run, the elapsed time and the number of errors found. Press Menus to stop the test sequence.
Analog Output Select an output to test, then enter a current value (milliamps) to send out the analog output then press Page Down to set. Repeat test with a second current value to verify range response.
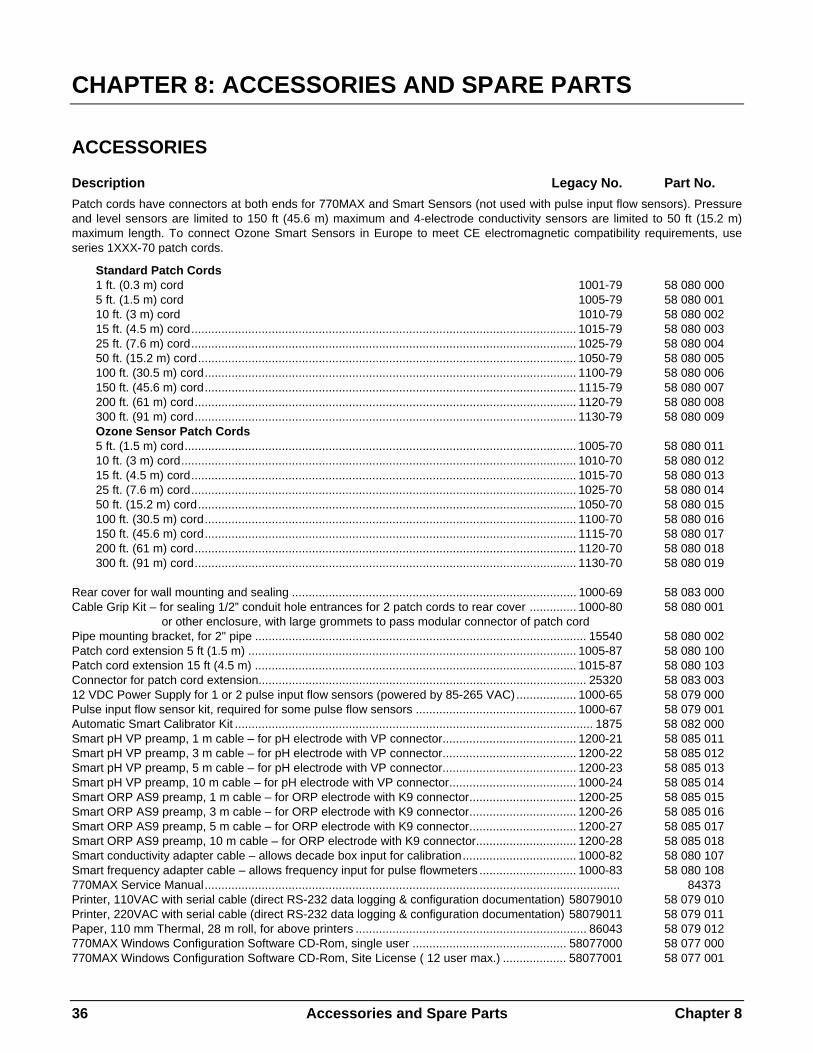
36 Accessories and Spare Parts Chapter 8
CHAPTER 8: ACCESSORIES AND SPARE PARTS
ACCESSORIES
Description Legacy No. Part No. Patch cords have connectors at both ends for 770MAX and Smart Sensors (not used with pulse input flow sensors). Pressure and level sensors are limited to 150 ft (45.6 m) maximum and 4-electrode conductivity sensors are limited to 50 ft (15.2 m) maximum length. To connect Ozone Smart Sensors in Europe to meet CE electromagnetic compatibility requirements, use series 1XXX-70 patch cords.
Standard Patch Cords 1 ft. (0.3 m) cord 1001-79 58 080 000 5 ft. (1.5 m) cord 1005-79 58 080 001 10 ft. (3 m) cord 1010-79 58 080 002 15 ft. (4.5 m) cord................................................................................................................... 1015-79 58 080 003 25 ft. (7.6 m) cord................................................................................................................... 1025-79 58 080 004 50 ft. (15.2 m) cord................................................................................................................. 1050-79 58 080 005 100 ft. (30.5 m) cord............................................................................................................... 1100-79 58 080 006 150 ft. (45.6 m) cord............................................................................................................... 1115-79 58 080 007 200 ft. (61 m) cord.................................................................................................................. 1120-79 58 080 008 300 ft. (91 m) cord.................................................................................................................. 1130-79 58 080 009 Ozone Sensor Patch Cords 5 ft. (1.5 m) cord..................................................................................................................... 1005-70 58 080 011 10 ft. (3 m) cord...................................................................................................................... 1010-70 58 080 012 15 ft. (4.5 m) cord................................................................................................................... 1015-70 58 080 013 25 ft. (7.6 m) cord................................................................................................................... 1025-70 58 080 014 50 ft. (15.2 m) cord................................................................................................................. 1050-70 58 080 015 100 ft. (30.5 m) cord............................................................................................................... 1100-70 58 080 016 150 ft. (45.6 m) cord............................................................................................................... 1115-70 58 080 017 200 ft. (61 m) cord.................................................................................................................. 1120-70 58 080 018 300 ft. (91 m) cord.................................................................................................................. 1130-70 58 080 019
Rear cover for wall mounting and sealing ..................................................................................... 1000-69 58 083 000 Cable Grip Kit – for sealing 1/2” conduit hole entrances for 2 patch cords to rear cover .............. 1000-80 58 080 001 or other enclosure, with large grommets to pass modular connector of patch cord Pipe mounting bracket, for 2" pipe ................................................................................................... 15540 58 080 002 Patch cord extension 5 ft (1.5 m) .................................................................................................. 1005-87 58 080 100 Patch cord extension 15 ft (4.5 m) ................................................................................................ 1015-87 58 080 103 Connector for patch cord extension.................................................................................................. 25320 58 083 003 12 VDC Power Supply for 1 or 2 pulse input flow sensors (powered by 85-265 VAC).................. 1000-65 58 079 000 Pulse input flow sensor kit, required for some pulse flow sensors ................................................ 1000-67 58 079 001 Automatic Smart Calibrator Kit ........................................................................................................... 1875 58 082 000 Smart pH VP preamp, 1 m cable – for pH electrode with VP connector........................................ 1200-21 58 085 011 Smart pH VP preamp, 3 m cable – for pH electrode with VP connector........................................ 1200-22 58 085 012 Smart pH VP preamp, 5 m cable – for pH electrode with VP connector........................................ 1200-23 58 085 013 Smart pH VP preamp, 10 m cable – for pH electrode with VP connector...................................... 1000-24 58 085 014 Smart ORP AS9 preamp, 1 m cable – for ORP electrode with K9 connector................................ 1200-25 58 085 015 Smart ORP AS9 preamp, 3 m cable – for ORP electrode with K9 connector................................ 1200-26 58 085 016 Smart ORP AS9 preamp, 5 m cable – for ORP electrode with K9 connector................................ 1200-27 58 085 017 Smart ORP AS9 preamp, 10 m cable – for ORP electrode with K9 connector.............................. 1200-28 58 085 018 Smart conductivity adapter cable – allows decade box input for calibration.................................. 1000-82 58 080 107 Smart frequency adapter cable – allows frequency input for pulse flowmeters ............................. 1000-83 58 080 108 770MAX Service Manual............................................................................................................................ 84373 Printer, 110VAC with serial cable (direct RS-232 data logging & configuration documentation) 58079010 58 079 010 Printer, 220VAC with serial cable (direct RS-232 data logging & configuration documentation) 58079011 58 079 011 Paper, 110 mm Thermal, 28 m roll, for above printers ..................................................................... 86043 58 079 012 770MAX Windows Configuration Software CD-Rom, single user .............................................. 58077000 58 077 000 770MAX Windows Configuration Software CD-Rom, Site License ( 12 user max.) ................... 58077001 58 077 001
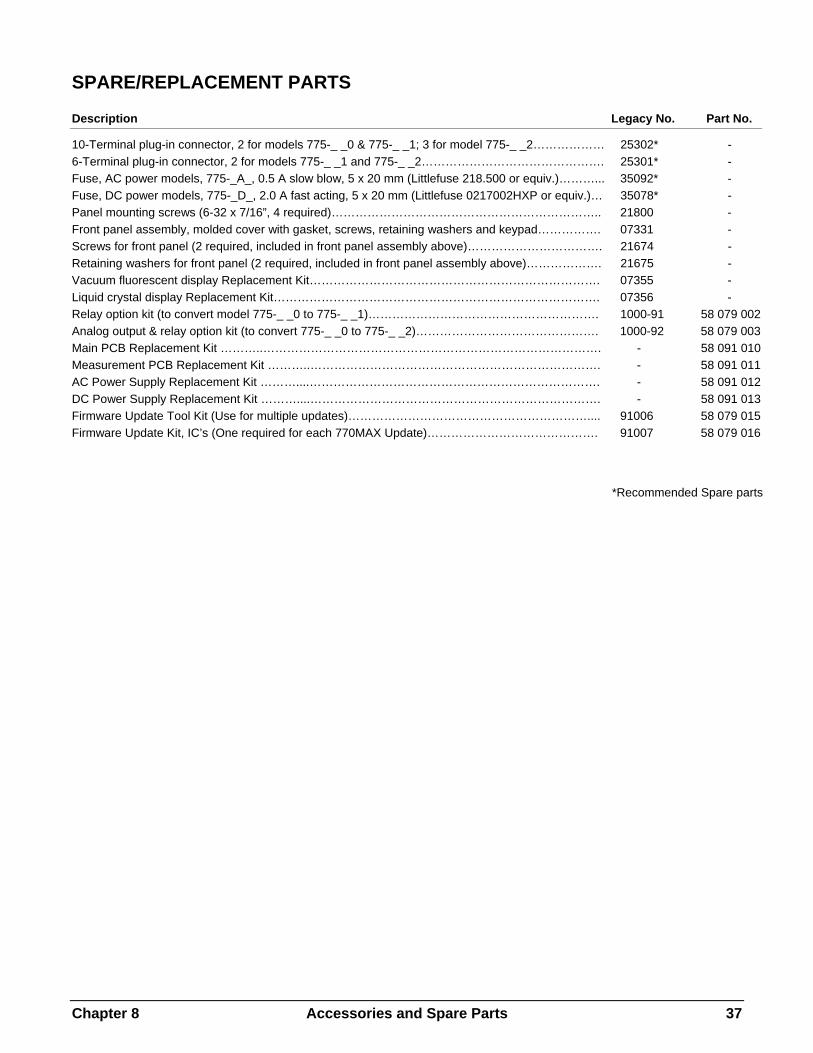
Chapter 8 Accessories and Spare Parts 37
SPARE/REPLACEMENT PARTS
Description Legacy No. Part No.
10-Terminal plug-in connector, 2 for models 775-_ _0 & 775-_ _1; 3 for model 775-_ _2……………… 25302* - 6-Terminal plug-in connector, 2 for models 775-_ _1 and 775-_ _2………………………………………. 25301* - Fuse, AC power models, 775-_A_, 0.5 A slow blow, 5 x 20 mm (Littlefuse 218.500 or equiv.)………... 35092* - Fuse, DC power models, 775-_D_, 2.0 A fast acting, 5 x 20 mm (Littlefuse 0217002HXP or equiv.)… 35078* - Panel mounting screws (6-32 x 7/16”, 4 required)………………………………………………………….. 21800 - Front panel assembly, molded cover with gasket, screws, retaining washers and keypad……………. 07331 - Screws for front panel (2 required, included in front panel assembly above)……………………………. 21674 - Retaining washers for front panel (2 required, included in front panel assembly above)………………. 21675 - Vacuum fluorescent display Replacement Kit………………………………………………………………. 07355 - Liquid crystal display Replacement Kit………………………………………………………………………. 07356 - Relay option kit (to convert model 775-_ _0 to 775-_ _1)…………………………………………………. 1000-91 58 079 002 Analog output & relay option kit (to convert 775-_ _0 to 775-_ _2)………………………………………. 1000-92 58 079 003 Main PCB Replacement Kit ………..…………………………………………………………………………. - 58 091 010 Measurement PCB Replacement Kit ………..………………………………………………………………. - 58 091 011 AC Power Supply Replacement Kit ………....………………………………………………………………. - 58 091 012 DC Power Supply Replacement Kit ………....………………………………………………………………. - 58 091 013 Firmware Update Tool Kit (Use for multiple updates)…………………………………………………….... 91006 58 079 015 Firmware Update Kit, IC’s (One required for each 770MAX Update)……………………………………. 91007 58 079 016
*Recommended Spare parts

38 Setup Parameters Appendix A
APPENDIX A: SETUP PARAMETERS
MEASUREMENT PARAMETERS RECORD Photocopy this form for each measurement programmed into the 770MAX.
Unit Name:
Date:
Sensors Installed:
Chan 1: S/N= Cal Date=
Chan 2: S/N= Cal Date=
Chan 3: S/N= Cal Date=
Chan 4: S/N= Cal Date=
Chan 5: S/N= Cal Date=
Chan 6: S/N= Cal Date=
Measurement (A–P):
Sensor Input Channel:
Sensor Type:
Units:
Name:
Multiplier:
Adder:
Averaging:
Temperature Compensation:
STC (pH only):
IP (pH only):
Temperature Source:
Resolution:
Max PSI (pressure only):
Pipe ID (flow only):
TDS Factor (conductivity /resistivity & DI Capacity only):
Tank Height (tank level only):
Area (tank level only):
Analog Output (1–4 or 8):
Output Type: On Failure Set Output:
Setpoint (1–16):
Setpoint Value:
Setpoint Type:
Setpoint Activates:
If Sensor Error:
Relay (1–4):
Time Delay:
Hysteresis Value:
Relay State:
External Clear?:
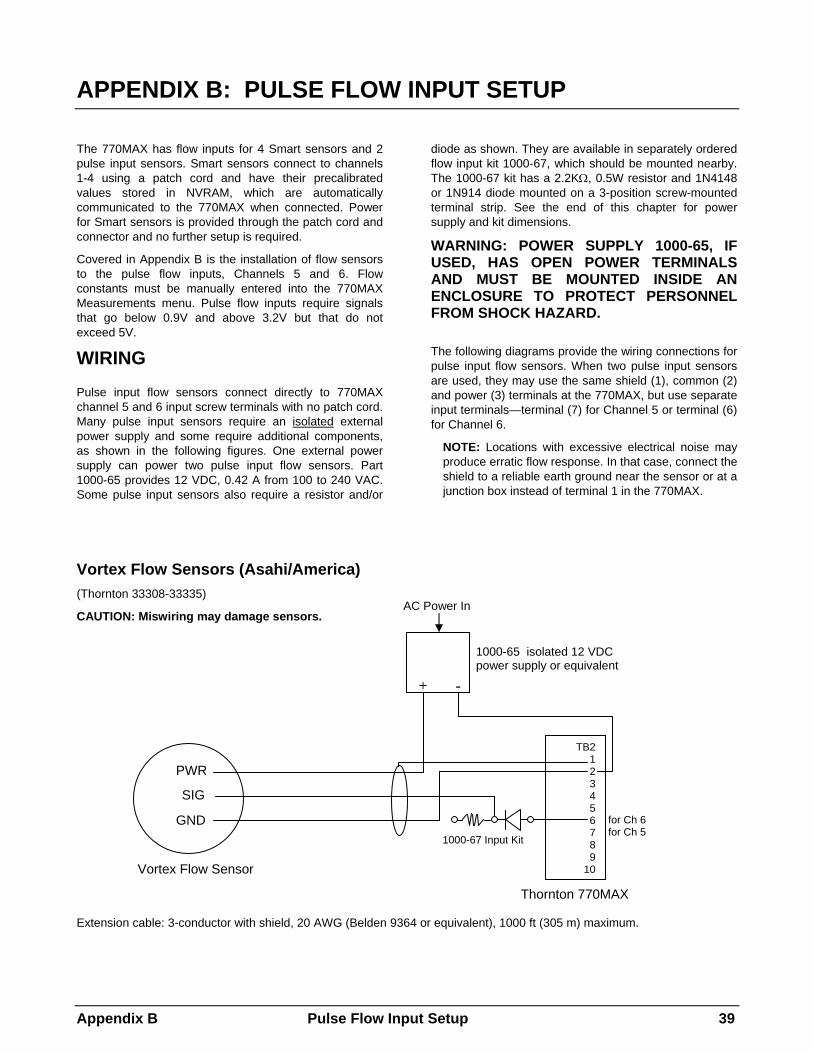
Appendix B Pulse Flow Input Setup 39
APPENDIX B: PULSE FLOW INPUT SETUP
The 770MAX has flow inputs for 4 Smart sensors and 2 pulse input sensors. Smart sensors connect to channels 1-4 using a patch cord and have their precalibrated values stored in NVRAM, which are automatically communicated to the 770MAX when connected. Power for Smart sensors is provided through the patch cord and connector and no further setup is required.
Covered in Appendix B is the installation of flow sensors to the pulse flow inputs, Channels 5 and 6. Flow constants must be manually entered into the 770MAX Measurements menu. Pulse flow inputs require signals that go below 0.9V and above 3.2V but that do not exceed 5V.
WIRING Pulse input flow sensors connect directly to 770MAX channel 5 and 6 input screw terminals with no patch cord. Many pulse input sensors require an isolated external power supply and some require additional components, as shown in the following figures. One external power supply can power two pulse input flow sensors. Part 1000-65 provides 12 VDC, 0.42 A from 100 to 240 VAC. Some pulse input sensors also require a resistor and/or
diode as shown. They are available in separately ordered flow input kit 1000-67, which should be mounted nearby. The 1000-67 kit has a 2.2KΩ, 0.5W resistor and 1N4148 or 1N914 diode mounted on a 3-position screw-mounted terminal strip. See the end of this chapter for power supply and kit dimensions.
WARNING: POWER SUPPLY 1000-65, IF USED, HAS OPEN POWER TERMINALS AND MUST BE MOUNTED INSIDE AN ENCLOSURE TO PROTECT PERSONNEL FROM SHOCK HAZARD.
The following diagrams provide the wiring connections for pulse input flow sensors. When two pulse input sensors are used, they may use the same shield (1), common (2) and power (3) terminals at the 770MAX, but use separate input terminals—terminal (7) for Channel 5 or terminal (6) for Channel 6.
NOTE: Locations with excessive electrical noise may produce erratic flow response. In that case, connect the shield to a reliable earth ground near the sensor or at a junction box instead of terminal 1 in the 770MAX.
Vortex Flow Sensors (Asahi/America) (Thornton 33308-33335)
CAUTION: Miswiring may damage sensors.
Extension cable: 3-conductor with shield, 20 AWG (Belden 9364 or equivalent), 1000 ft (305 m) maximum.
Vortex Flow Sensor
PWR
+ -
1000-65 isolated 12 VDC power supply or equivalent
AC Power In
SIG
GND
Thornton 770MAX
for Ch 6 for Ch 5
TB2 1 2 3 4 5 6 7 8 9
10
1000-67 Input Kit
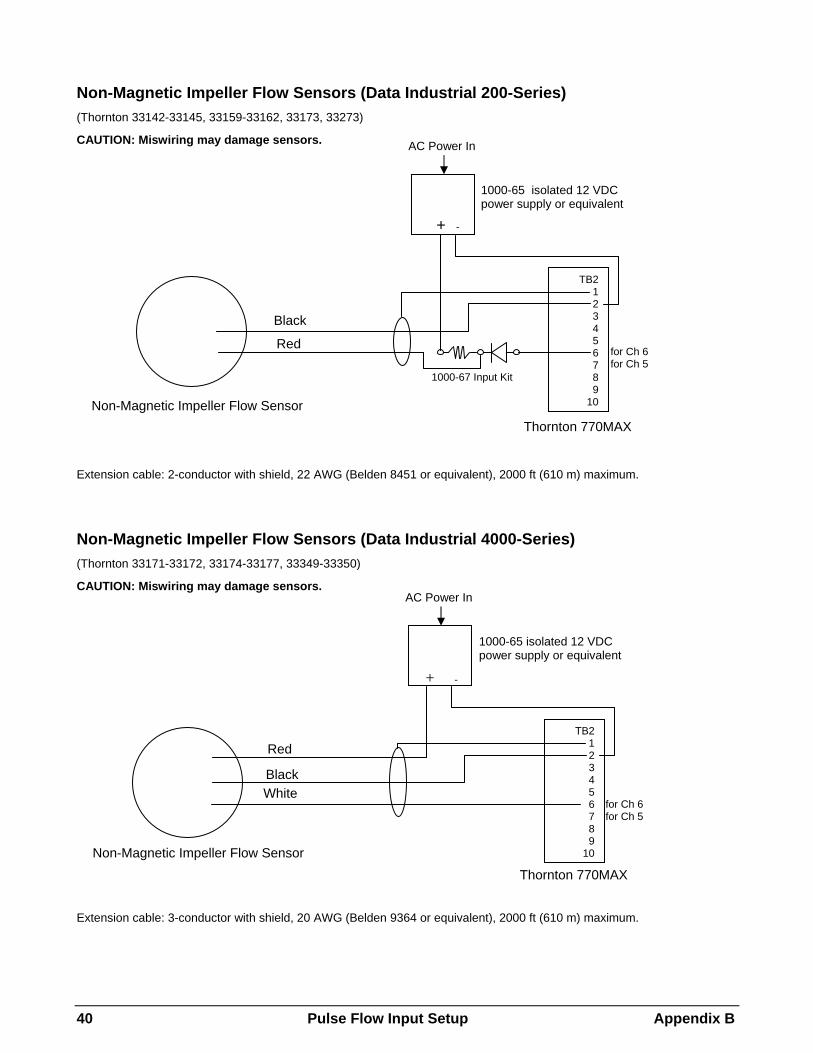
40 Pulse Flow Input Setup Appendix B
Non-Magnetic Impeller Flow Sensors (Data Industrial 200-Series) (Thornton 33142-33145, 33159-33162, 33173, 33273)
CAUTION: Miswiring may damage sensors.
Extension cable: 2-conductor with shield, 22 AWG (Belden 8451 or equivalent), 2000 ft (610 m) maximum.
Non-Magnetic Impeller Flow Sensors (Data Industrial 4000-Series) (Thornton 33171-33172, 33174-33177, 33349-33350)
CAUTION: Miswiring may damage sensors.
Extension cable: 3-conductor with shield, 20 AWG (Belden 9364 or equivalent), 2000 ft (610 m) maximum.
Non-Magnetic Impeller Flow Sensor
+ -
1000-65 isolated 12 VDC power supply or equivalent
AC Power In
Thornton 770MAX
for Ch 6 for Ch 5
TB2 1 2 3 4 5 6 7 8 9
10
1000-67 Input Kit
Black
Red
Non-Magnetic Impeller Flow Sensor
+ -
1000-65 isolated 12 VDC power supply or equivalent
AC Power In
Thornton 770MAX
for Ch 6 for Ch 5
TB2 1 2 3 4 5 6 7 8 9
10
Black
Red
White

Appendix B Pulse Flow Input Setup 41
Insertion Vortex Flow Sensors (Fluidyne 2300-A Pulse Output Type) (Thornton 33358-33375)
CAUTION: Miswiring may damage sensors.
Extension cable: 2-conductor with shield, 22 AWG (Belden 8451 or equivalent), 2000 ft (610 m) maximum.
Sanitary Turbine Flow Sensors (Hoffer HO-Series) (Thornton 33336-33348, 33376-33377)
CAUTION: Miswiring may damage sensors.
Extension cable: 3-conductor with shield, 20 AWG (Belden 9364 or equivalent), 3000 ft (915 m) maximum.
Note: Locations with excessive electrical noise may produce erratic flow response and may require the following steps to resolve it. Connect the shield of the flow sensor cable to a reliable earth ground, instead of terminal 1 on TB2. Ground the flow sensor body to a reliable earth ground.
Sanitary Turbine Flow Sensor
+ -
1000-65 isolated 12 VDC power supply or equivalent
AC Power In
Thornton 770MAX
for Ch 6 for Ch 5
TB2 1 2 3 4 5 6 7 8 9
10
Black
Red
White
Insertion Vortex Flow Sensor
Thornton 770MAX
for Ch 6 for Ch 5
TB2 1 2 3 4 5 6 7 8 9
10
1000-67 Input Kit
GND
- +
+ -
1000-65 isolated 12 VDC power supply or equivalent
AC Power In

42 Pulse Flow Input Setup Appendix B
Internal paddlewheel Flow Sensors (Proteus PS600 series) (Thornton 33286)
CAUTION: MISWIRING MAY DAMAGE SENSORS. Extension cable: 3-conductor with shield, 20 AWG (Belden 9364 or equivalent)
Flat Paddlewheel Hall-Effect Flow Sensors (Signet 2507, 2536, 2540-Series) (Thornton 33282, 33285, 33287, 33298-33305) first colors listed
and Flow Technology Sensors with PS-910-QD-0 Hall-Effect Pickup (colors in parentheses)
CAUTION: MISWIRING MAY DAMAGE SENSORS. Extension cable: 2-conductor with shield, 22 AWG (Belden 8451 or equivalent), 1000 ft (305 m) maximum.
Internal Paddlewheel Flow Sensor
+ -
1000-65 isolated 12 VDC power supply or equivalent
AC Power In
Thornton 770MAX
for Ch 6 for Ch 5
TB2 1 2 3 4 5 6 7 8 9
10
Black
Red
White
Green
Flat Paddlewheel Hall-Effect Flow Sensor
Thornton 770MAX
for Ch 6 for Ch 5
TB2 1 2 3 4 5 6 7 8 9
10
Black (Black/Red)
Red (White/Red)
(Green)
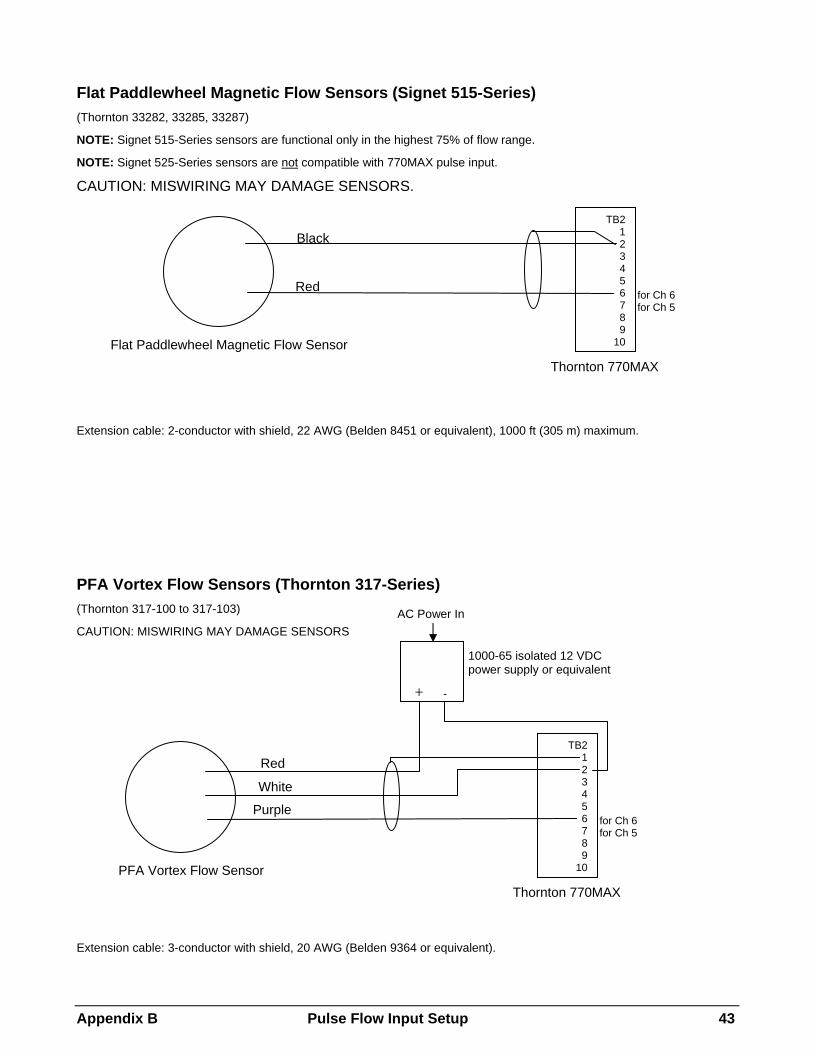
Appendix B Pulse Flow Input Setup 43
Flat Paddlewheel Magnetic Flow Sensors (Signet 515-Series) (Thornton 33282, 33285, 33287)
NOTE: Signet 515-Series sensors are functional only in the highest 75% of flow range.
NOTE: Signet 525-Series sensors are not compatible with 770MAX pulse input.
CAUTION: MISWIRING MAY DAMAGE SENSORS.
Extension cable: 2-conductor with shield, 22 AWG (Belden 8451 or equivalent), 1000 ft (305 m) maximum.
PFA Vortex Flow Sensors (Thornton 317-Series) (Thornton 317-100 to 317-103)
CAUTION: MISWIRING MAY DAMAGE SENSORS Extension cable: 3-conductor with shield, 20 AWG (Belden 9364 or equivalent).
Flat Paddlewheel Magnetic Flow Sensor
Thornton 770MAX
for Ch 6 for Ch 5
TB2 1 2 3 4 5 6 7 8 9
10
Black
Red
PFA Vortex Flow Sensor
Thornton 770MAX
for Ch 6 for Ch 5
TB2 1 2 3 4 5 6 7 8 9
10
Red
White
Purple
AC Power In
1000-65 isolated 12 VDC power supply or equivalent
+ -
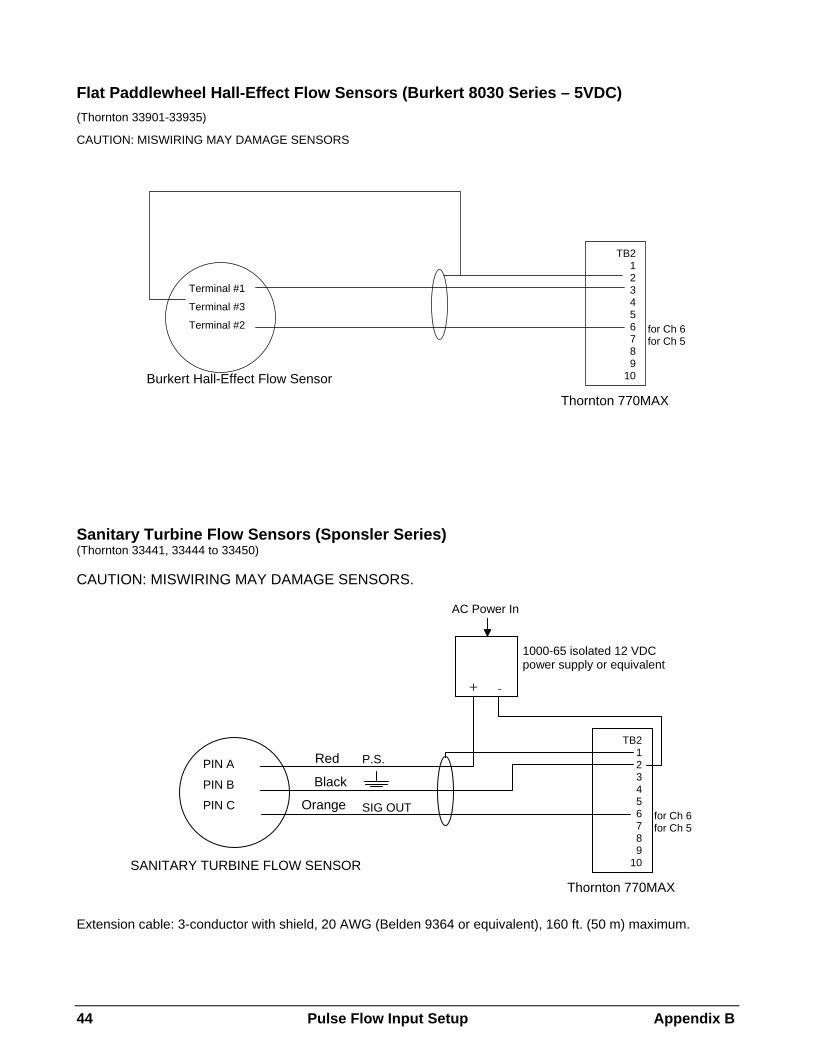
44 Pulse Flow Input Setup Appendix B
Flat Paddlewheel Hall-Effect Flow Sensors (Burkert 8030 Series – 5VDC) (Thornton 33901-33935)
CAUTION: MISWIRING MAY DAMAGE SENSORS Sanitary Turbine Flow Sensors (Sponsler Series) (Thornton 33441, 33444 to 33450) CAUTION: MISWIRING MAY DAMAGE SENSORS.
Extension cable: 3-conductor with shield, 20 AWG (Belden 9364 or equivalent), 160 ft. (50 m) maximum.
Burkert Hall-Effect Flow Sensor
Terminal #1
Terminal #3
Terminal #2
Thornton 770MAX
for Ch 6 for Ch 5
TB2 1 2 3 4 5 6 7 8 9
10
SANITARY TURBINE FLOW SENSOR
PIN A
PIN B
PIN C
Thornton 770MAX
for Ch 6 for Ch 5
TB2 1 2 3 4 5 6 7 8 9
10
Red
Black
Orange
AC Power In
1000-65 isolated 12 VDC power supply or equivalent
+ -
P.S.
SIG OUT
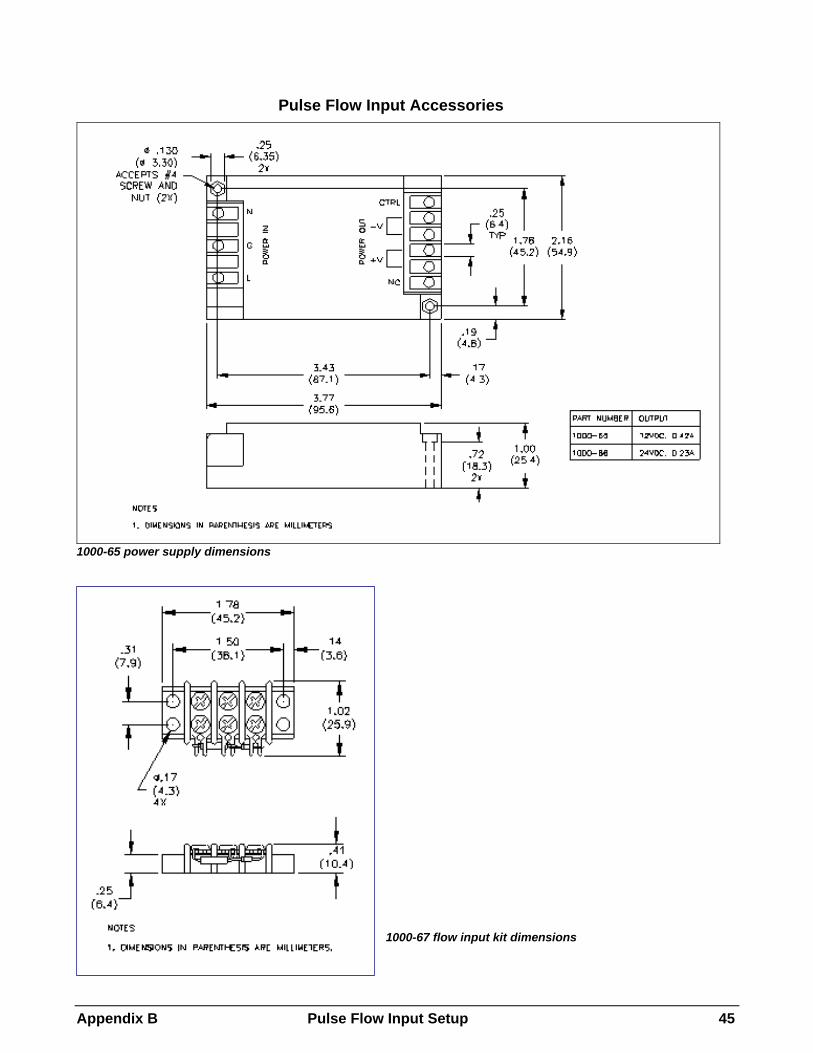
Appendix B Pulse Flow Input Setup 45
1000-65 power supply dimensions
1000-67 flow input kit dimensions
Pulse Flow Input Accessories
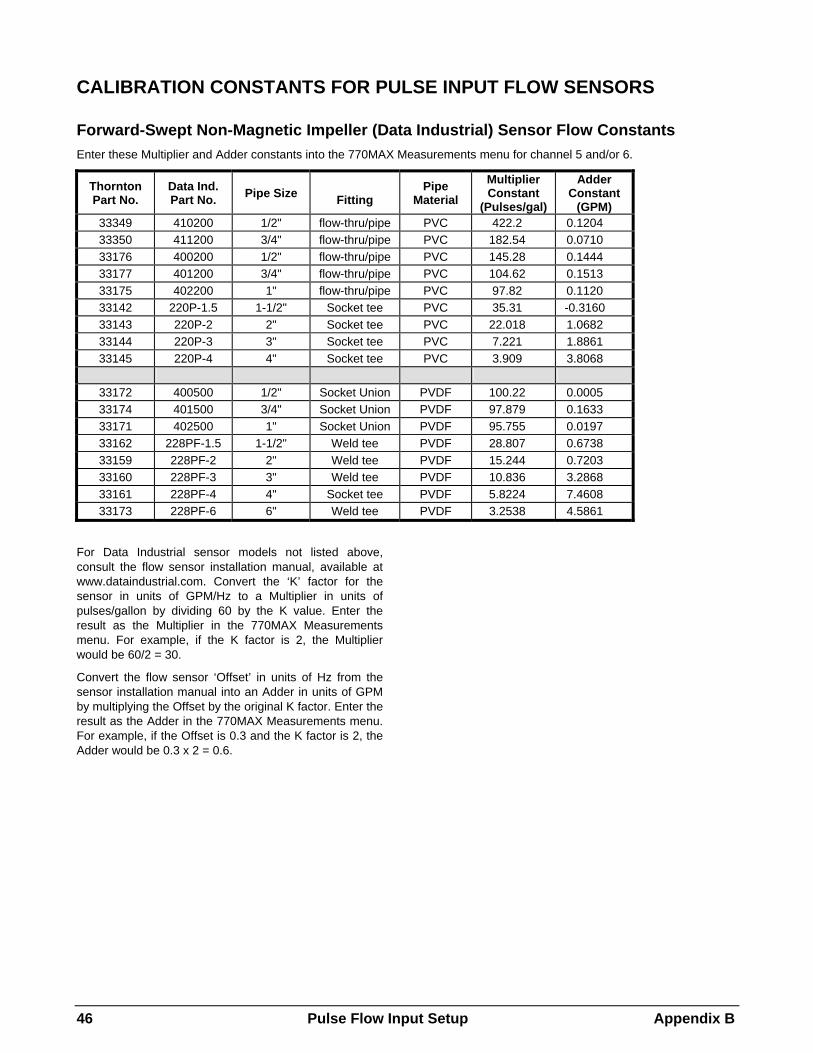
46 Pulse Flow Input Setup Appendix B
CALIBRATION CONSTANTS FOR PULSE INPUT FLOW SENSORS
Forward-Swept Non-Magnetic Impeller (Data Industrial) Sensor Flow Constants Enter these Multiplier and Adder constants into the 770MAX Measurements menu for channel 5 and/or 6.
Thornton Part No.
Data Ind. Part No. Pipe Size
Fitting Pipe
Material Multiplier Constant
(Pulses/gal)
Adder Constant
(GPM) 33349 410200 1/2" flow-thru/pipe PVC 422.2 0.1204 33350 411200 3/4" flow-thru/pipe PVC 182.54 0.0710 33176 400200 1/2" flow-thru/pipe PVC 145.28 0.1444 33177 401200 3/4" flow-thru/pipe PVC 104.62 0.1513 33175 402200 1" flow-thru/pipe PVC 97.82 0.1120 33142 220P-1.5 1-1/2" Socket tee PVC 35.31 -0.3160 33143 220P-2 2" Socket tee PVC 22.018 1.0682 33144 220P-3 3" Socket tee PVC 7.221 1.8861 33145 220P-4 4" Socket tee PVC 3.909 3.8068
33172 400500 1/2" Socket Union PVDF 100.22 0.0005 33174 401500 3/4" Socket Union PVDF 97.879 0.1633 33171 402500 1" Socket Union PVDF 95.755 0.0197 33162 228PF-1.5 1-1/2" Weld tee PVDF 28.807 0.6738 33159 228PF-2 2" Weld tee PVDF 15.244 0.7203 33160 228PF-3 3" Weld tee PVDF 10.836 3.2868 33161 228PF-4 4" Socket tee PVDF 5.8224 7.4608 33173 228PF-6 6" Weld tee PVDF 3.2538 4.5861
For Data Industrial sensor models not listed above, consult the flow sensor installation manual, available at www.dataindustrial.com. Convert the ‘K’ factor for the sensor in units of GPM/Hz to a Multiplier in units of pulses/gallon by dividing 60 by the K value. Enter the result as the Multiplier in the 770MAX Measurements menu. For example, if the K factor is 2, the Multiplier would be 60/2 = 30.
Convert the flow sensor ‘Offset’ in units of Hz from the sensor installation manual into an Adder in units of GPM by multiplying the Offset by the original K factor. Enter the result as the Adder in the 770MAX Measurements menu. For example, if the Offset is 0.3 and the K factor is 2, the Adder would be 0.3 x 2 = 0.6.
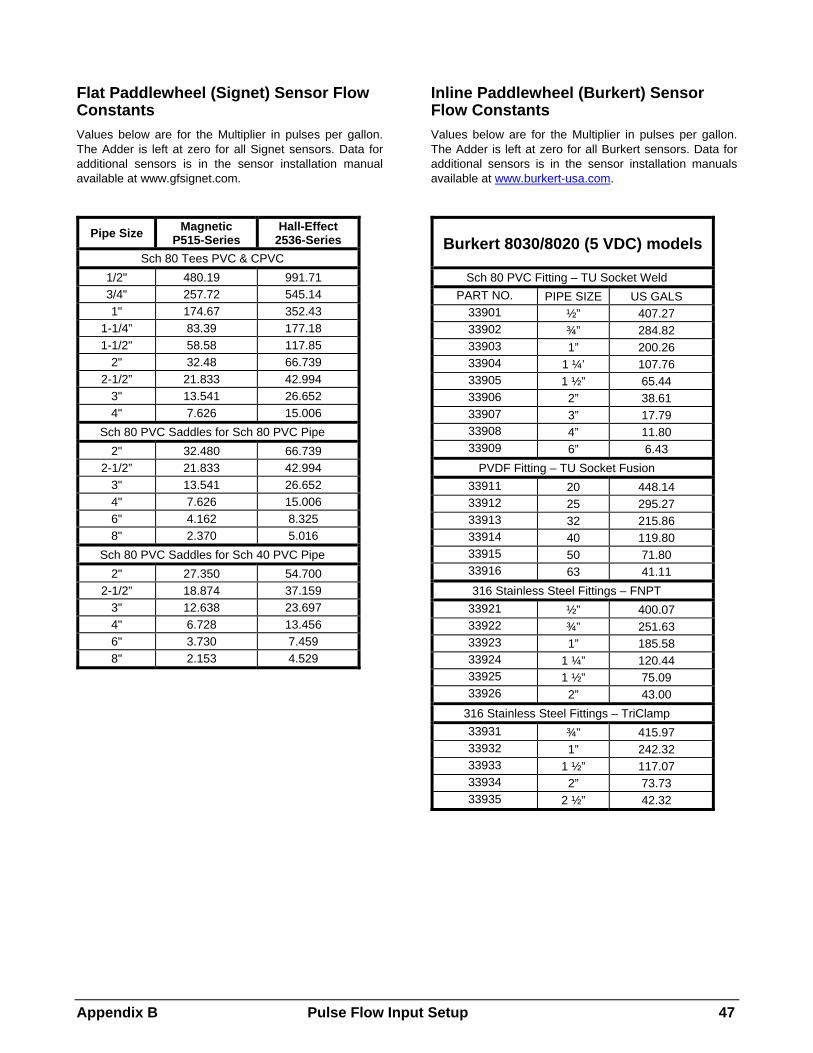
Appendix B Pulse Flow Input Setup 47
Flat Paddlewheel (Signet) Sensor Flow Constants Values below are for the Multiplier in pulses per gallon. The Adder is left at zero for all Signet sensors. Data for additional sensors is in the sensor installation manual available at www.gfsignet.com.
Pipe Size Magnetic P515-Series
Hall-Effect 2536-Series
Sch 80 Tees PVC & CPVC 1/2" 480.19 991.71 3/4" 257.72 545.14 1" 174.67 352.43
1-1/4” 83.39 177.18 1-1/2" 58.58 117.85
2" 32.48 66.739 2-1/2” 21.833 42.994
3" 13.541 26.652 4" 7.626 15.006
Sch 80 PVC Saddles for Sch 80 PVC Pipe 2" 32.480 66.739
2-1/2” 21.833 42.994 3" 13.541 26.652 4" 7.626 15.006 6" 4.162 8.325 8" 2.370 5.016
Sch 80 PVC Saddles for Sch 40 PVC Pipe 2" 27.350 54.700
2-1/2” 18.874 37.159 3" 12.638 23.697 4" 6.728 13.456 6" 3.730 7.459 8" 2.153 4.529
Inline Paddlewheel (Burkert) Sensor Flow Constants Values below are for the Multiplier in pulses per gallon. The Adder is left at zero for all Burkert sensors. Data for additional sensors is in the sensor installation manuals available at www.burkert-usa.com.
Burkert 8030/8020 (5 VDC) models
Sch 80 PVC Fitting – TU Socket Weld
PART NO. PIPE SIZE US GALS 33901 ½” 407.27 33902 ¾” 284.82 33903 1” 200.26 33904 1 ¼’ 107.76 33905 1 ½” 65.44 33906 2” 38.61 33907 3” 17.79 33908 4” 11.80 33909 6” 6.43
PVDF Fitting – TU Socket Fusion 33911 20 448.14 33912 25 295.27 33913 32 215.86 33914 40 119.80 33915 50 71.80 33916 63 41.11 316 Stainless Steel Fittings – FNPT
33921 ½” 400.07 33922 ¾” 251.63 33923 1” 185.58 33924 1 ¼” 120.44 33925 1 ½” 75.09 33926 2” 43.00
316 Stainless Steel Fittings – TriClamp 33931 ¾” 415.97 33932 1” 242.32 33933 1 ½” 117.07 33934 2” 73.73 33935 2 ½” 42.32
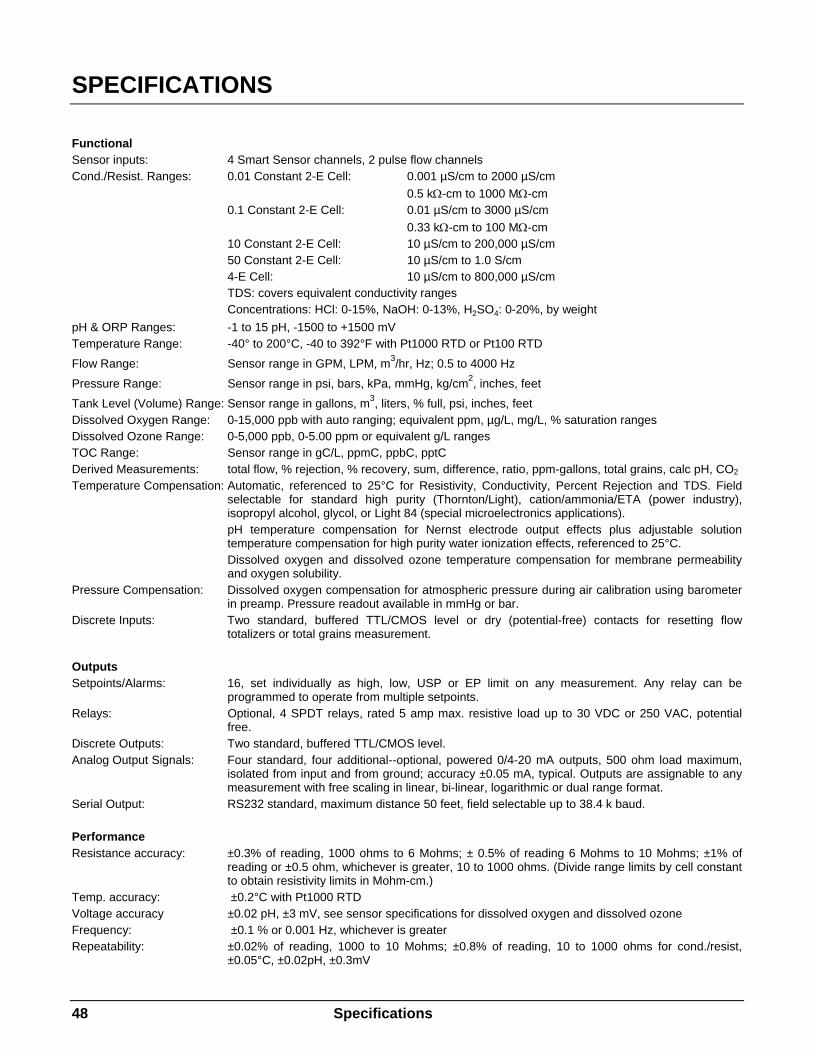
48 Specifications
SPECIFICATIONS
Functional Sensor inputs: 4 Smart Sensor channels, 2 pulse flow channels Cond./Resist. Ranges: 0.01 Constant 2-E Cell: 0.001 µS/cm to 2000 µS/cm 0.5 kΩ-cm to 1000 MΩ-cm 0.1 Constant 2-E Cell: 0.01 µS/cm to 3000 µS/cm 0.33 kΩ-cm to 100 MΩ-cm 10 Constant 2-E Cell: 10 µS/cm to 200,000 µS/cm 50 Constant 2-E Cell: 10 µS/cm to 1.0 S/cm 4-E Cell: 10 µS/cm to 800,000 µS/cm TDS: covers equivalent conductivity ranges Concentrations: HCl: 0-15%, NaOH: 0-13%, H2SO4: 0-20%, by weight pH & ORP Ranges: -1 to 15 pH, -1500 to +1500 mV Temperature Range: -40° to 200°C, -40 to 392°F with Pt1000 RTD or Pt100 RTD
Flow Range: Sensor range in GPM, LPM, m3/hr, Hz; 0.5 to 4000 Hz
Pressure Range: Sensor range in psi, bars, kPa, mmHg, kg/cm2, inches, feet
Tank Level (Volume) Range: Sensor range in gallons, m3, liters, % full, psi, inches, feet Dissolved Oxygen Range: 0-15,000 ppb with auto ranging; equivalent ppm, µg/L, mg/L, % saturation ranges Dissolved Ozone Range: 0-5,000 ppb, 0-5.00 ppm or equivalent g/L ranges TOC Range: Sensor range in gC/L, ppmC, ppbC, pptC Derived Measurements: total flow, % rejection, % recovery, sum, difference, ratio, ppm-gallons, total grains, calc pH, CO2 Temperature Compensation: Automatic, referenced to 25°C for Resistivity, Conductivity, Percent Rejection and TDS. Field
selectable for standard high purity (Thornton/Light), cation/ammonia/ETA (power industry), isopropyl alcohol, glycol, or Light 84 (special microelectronics applications).
pH temperature compensation for Nernst electrode output effects plus adjustable solution temperature compensation for high purity water ionization effects, referenced to 25°C.
Dissolved oxygen and dissolved ozone temperature compensation for membrane permeability and oxygen solubility.
Pressure Compensation: Dissolved oxygen compensation for atmospheric pressure during air calibration using barometer in preamp. Pressure readout available in mmHg or bar.
Discrete Inputs: Two standard, buffered TTL/CMOS level or dry (potential-free) contacts for resetting flow totalizers or total grains measurement.
Outputs Setpoints/Alarms: 16, set individually as high, low, USP or EP limit on any measurement. Any relay can be
programmed to operate from multiple setpoints. Relays: Optional, 4 SPDT relays, rated 5 amp max. resistive load up to 30 VDC or 250 VAC, potential
free. Discrete Outputs: Two standard, buffered TTL/CMOS level. Analog Output Signals: Four standard, four additional--optional, powered 0/4-20 mA outputs, 500 ohm load maximum,
isolated from input and from ground; accuracy ±0.05 mA, typical. Outputs are assignable to any measurement with free scaling in linear, bi-linear, logarithmic or dual range format.
Serial Output: RS232 standard, maximum distance 50 feet, field selectable up to 38.4 k baud. Performance Resistance accuracy: ±0.3% of reading, 1000 ohms to 6 Mohms; ± 0.5% of reading 6 Mohms to 10 Mohms; ±1% of
reading or ±0.5 ohm, whichever is greater, 10 to 1000 ohms. (Divide range limits by cell constant to obtain resistivity limits in Mohm-cm.)
Temp. accuracy: ±0.2°C with Pt1000 RTD Voltage accuracy ±0.02 pH, ±3 mV, see sensor specifications for dissolved oxygen and dissolved ozone Frequency: ±0.1 % or 0.001 Hz, whichever is greater Repeatability: ±0.02% of reading, 1000 to 10 Mohms; ±0.8% of reading, 10 to 1000 ohms for cond./resist,
±0.05°C, ±0.02pH, ±0.3mV
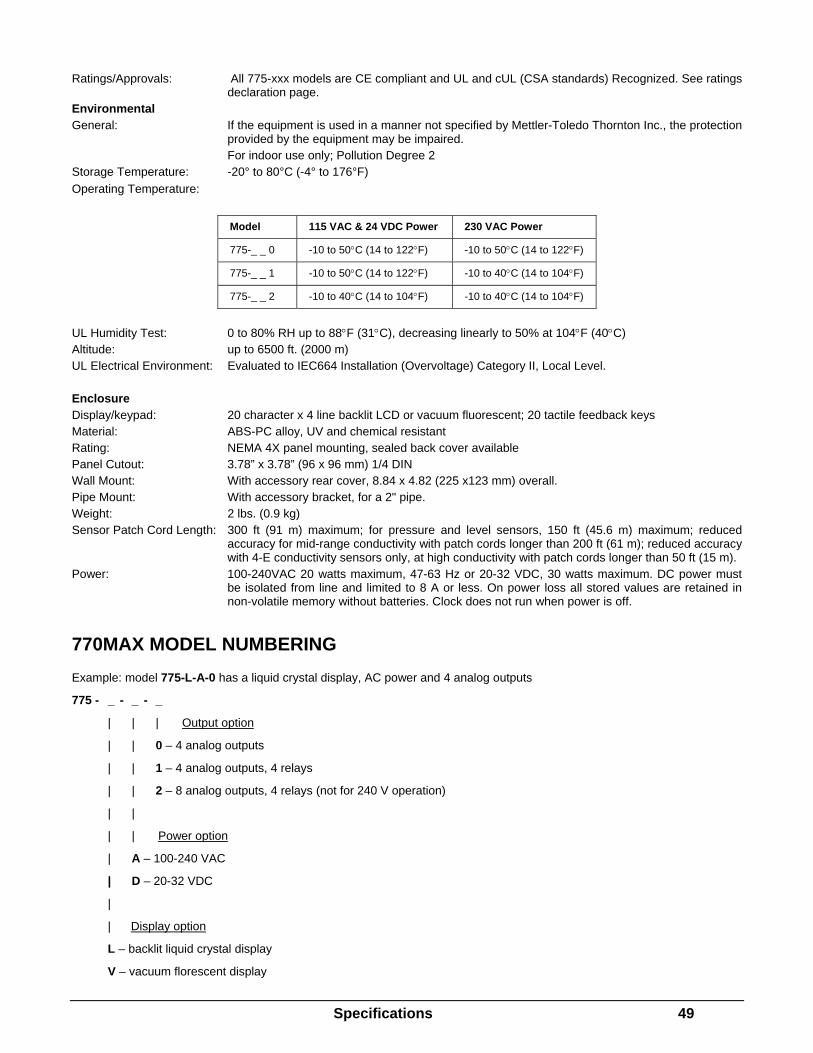
Specifications 49
Ratings/Approvals: All 775-xxx models are CE compliant and UL and cUL (CSA standards) Recognized. See ratings declaration page.
Environmental General: If the equipment is used in a manner not specified by Mettler-Toledo Thornton Inc., the protection
provided by the equipment may be impaired. For indoor use only; Pollution Degree 2 Storage Temperature: -20° to 80°C (-4° to 176°F) Operating Temperature:
UL Humidity Test: 0 to 80% RH up to 88°F (31°C), decreasing linearly to 50% at 104°F (40°C) Altitude: up to 6500 ft. (2000 m) UL Electrical Environment: Evaluated to IEC664 Installation (Overvoltage) Category II, Local Level. Enclosure Display/keypad: 20 character x 4 line backlit LCD or vacuum fluorescent; 20 tactile feedback keys Material: ABS-PC alloy, UV and chemical resistant Rating: NEMA 4X panel mounting, sealed back cover available Panel Cutout: 3.78” x 3.78” (96 x 96 mm) 1/4 DIN Wall Mount: With accessory rear cover, 8.84 x 4.82 (225 x123 mm) overall. Pipe Mount: With accessory bracket, for a 2" pipe. Weight: 2 lbs. (0.9 kg) Sensor Patch Cord Length: 300 ft (91 m) maximum; for pressure and level sensors, 150 ft (45.6 m) maximum; reduced
accuracy for mid-range conductivity with patch cords longer than 200 ft (61 m); reduced accuracy with 4-E conductivity sensors only, at high conductivity with patch cords longer than 50 ft (15 m).
Power: 100-240VAC 20 watts maximum, 47-63 Hz or 20-32 VDC, 30 watts maximum. DC power must be isolated from line and limited to 8 A or less. On power loss all stored values are retained in non-volatile memory without batteries. Clock does not run when power is off.
770MAX MODEL NUMBERING Example: model 775-L-A-0 has a liquid crystal display, AC power and 4 analog outputs
775 - _ - _ - _
| | | Output option
| | 0 – 4 analog outputs
| | 1 – 4 analog outputs, 4 relays
| | 2 – 8 analog outputs, 4 relays (not for 240 V operation)
| |
| | Power option
| A – 100-240 VAC
| D – 20-32 VDC
|
| Display option
L – backlit liquid crystal display
V – vacuum florescent display
Model 115 VAC & 24 VDC Power 230 VAC Power
775-_ _ 0 -10 to 50°C (14 to 122°F) -10 to 50°C (14 to 122°F)
775-_ _ 1 -10 to 50°C (14 to 122°F) -10 to 40°C (14 to 104°F)
775-_ _ 2 -10 to 40°C (14 to 104°F) -10 to 40°C (14 to 104°F)
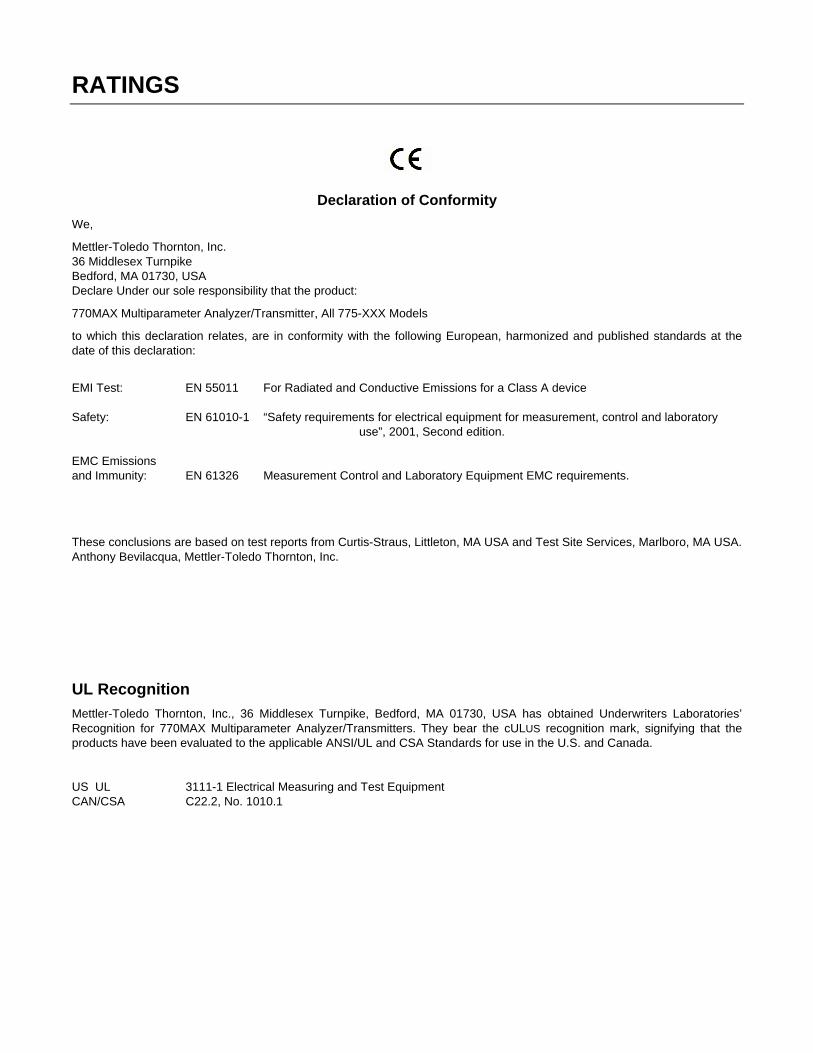
RATINGS
Declaration of Conformity We,
Mettler-Toledo Thornton, Inc. 36 Middlesex Turnpike Bedford, MA 01730, USA Declare Under our sole responsibility that the product:
770MAX Multiparameter Analyzer/Transmitter, All 775-XXX Models
to which this declaration relates, are in conformity with the following European, harmonized and published standards at the date of this declaration:
EMI Test: EN 55011 For Radiated and Conductive Emissions for a Class A device
Safety: EN 61010-1 “Safety requirements for electrical equipment for measurement, control and laboratory
use”, 2001, Second edition. EMC Emissions and Immunity: EN 61326 Measurement Control and Laboratory Equipment EMC requirements.
These conclusions are based on test reports from Curtis-Straus, Littleton, MA USA and Test Site Services, Marlboro, MA USA. Anthony Bevilacqua, Mettler-Toledo Thornton, Inc.
UL Recognition Mettler-Toledo Thornton, Inc., 36 Middlesex Turnpike, Bedford, MA 01730, USA has obtained Underwriters Laboratories’ Recognition for 770MAX Multiparameter Analyzer/Transmitters. They bear the cULUS recognition mark, signifying that the products have been evaluated to the applicable ANSI/UL and CSA Standards for use in the U.S. and Canada. US UL 3111-1 Electrical Measuring and Test Equipment CAN/CSA C22.2, No. 1010.1
WARRANTY
This Warranty is given expressly and in lieu of all other warranties, express or implied. The Buyer agrees that there is no warranty of merchantability and that there are no other warranties, express or implied, which extend beyond the description on the face of this agreement. Mettler-Toledo Thornton, Inc. (hereinafter referred to as The Company) warrants to the original Buyer each electrode, component, or instrument manufactured and/or sold by The Company to be free from defects in material and workmanship in normal use and service for a period of one (1) year from shipment, unless expressly stated otherwise by the product packaging or expressly agreed to in advance by the Company. The obligation of The Company under this warranty is limited to repair or replacement of the defective product at The Company’s discretion. All warranty claims shall be returned to The Company pursuant to The Company’s Returned Goods Authorization program. Shipping costs (including return shipping) are the responsibility of The Buyer. The Company assumes no responsibility for any direct or indirect costs associated with removal of defective products, or re-installation of replacement products. The Company shall not be responsible for damage to any electrode, component, or instrument resulting from misuse, negligence, accident or resulting from repairs, alterations, or installations made by any person or firm not duly authorized by The Company. No agent is authorized to assume for The Company any liability except as above set forth. The Company warrants that services will be performed in a workmanlike manner in conformity with standard industry practice. Should any nonconformity be detected within 30 days after the work is completed and prompt notification is made by Buyer in writing to the Company, Company will supply the necessary service, direction, or consultation to correct the nonconformity. Returned Goods Policy: A Returned Material Authorization (RMA) number must accompany all returned goods. This authorization is obtained by calling our Technical Service (800) 510-7873 or (781) 301-8600. All transportation costs on authorized returns must be prepaid. Authorized replacement parts sent prior to receipt and evaluation of merchandise being returned will be invoiced in full. Credit will be issued only after the returned part is received and evaluated by factory personnel. The Company is not responsible for products returned without proper authorization. Factory Restocking Charge: Items returned to The Company more than 30 days after shipment will be subject to a 25 % restocking charge, plus any additional charges for refurbishment to salable condition. The Company will not accept returns more than 90 days after shipment, unless returned under warranty or for non-warranty repair. Special Products: Cancellation or return of special products will not be accepted. Disclaimer of Damages: In no event shall The Company be liable for any type of special consequential, incidental or penal damages, whether such damages arise out of or are a result of breach of contract, warranty, tort (including negligence), strict liability or otherwise. Such damages shall include, but not be limited to loss of profits or revenues, loss of use of the equipment or associated equipment, cost of substitute equipment, facilities, down time costs, increased construction costs or claims of The Buyer’s customers or contractors for such damages. The Buyer agrees that in the event of a transfer, assignment, or lease of the equipment sold hereunder The Buyer shall secure for The Company the protection afforded to it in this paragraph.


Mettler-Toledo Thornton, Inc. www.mt.com/thornton 36 Middlesex Turnpike Bedford, MA 01730 Tel. +1-781-301-8600 Fax +1-781-301-8701 Toll Free +1-800-510-PURE (US and Canada only) [email protected] Part 84372 Rev.J 11/08
Top Related