


Languages
Pages
Legal

64-Bit Machine Instructions
TABLE OF CONTENTS
TABLE OF CONTENTS ..................................................................................................................................... 1
BEFORE YOU START ....................................................................................................................................... 1
CONFIGURE ODBC (64-BIT) ........................................................................................................................... 2
CONFIGURE ODBC (32-BIT) ........................................................................................................................... 5
INSTALL BDE ADMINISTRATOR ..................................................................................................................... 8
CONFIGURE BDE .......................................................................................................................................... 10
INSTALL AND CONFIGURE GOLDBOX 9 ....................................................................................................... 13
BEFORE YOU START
Log into Windows as a user with Administrator rights. Ticomix does not recommend installing
using Run As.
SQL Server client is already installed.
GoldMine is already installed.
Create a SQL Server user with sa rights to the GoldMine database.
Create a GoldMine user with master rights.
Download the BDEInfoSetup.zip file from the goldboxsoftware.com website. Unzip the file.
Download the FIX-GoldBox-Install.zip from the goldboxsoftware.com website. Unzip the file.
The BDE will need to be installed to a local hard drive. GoldBox itself can be installed to a
shared drive.
Note: You may need to download the NTWDBLIB.DLL file and place it in the
Windows\System32 directory.
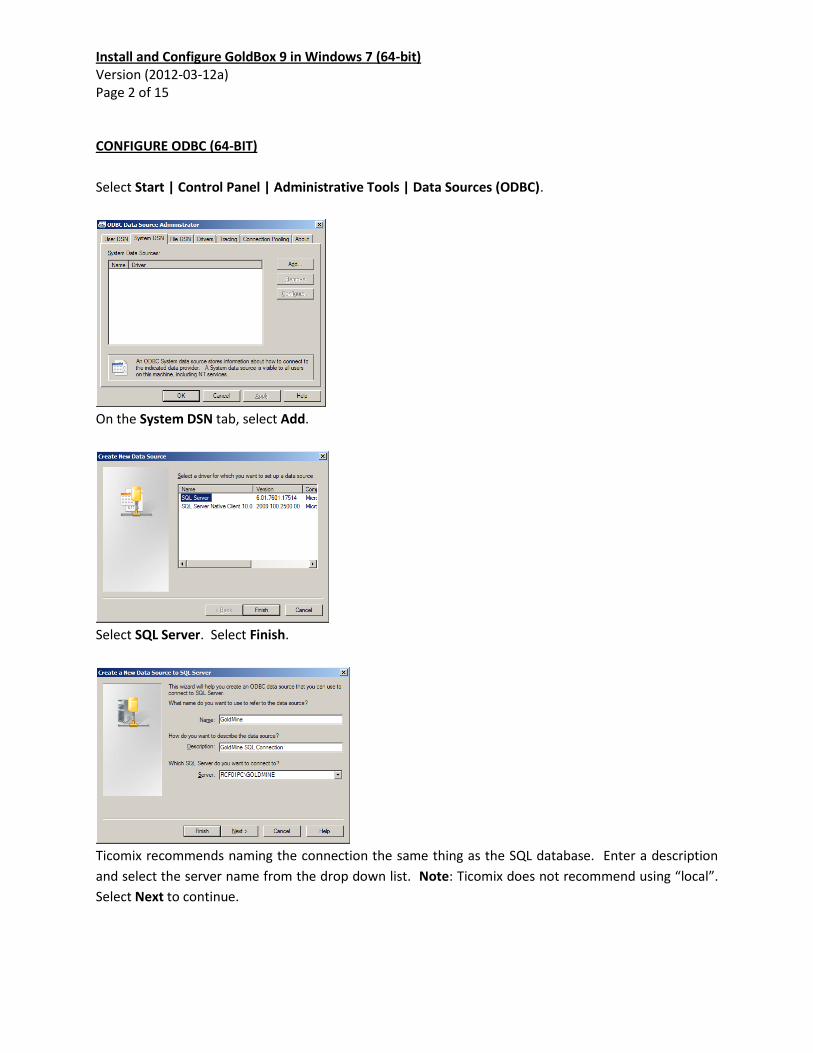
Install and Configure GoldBox 9 in Windows 7 (64-bit) Version (2012-03-12a) Page 2 of 15 CONFIGURE ODBC (64-BIT)
Select Start | Control Panel | Administrative Tools | Data Sources (ODBC).
On the System DSN tab, select Add.
Select SQL Server. Select Finish.
Ticomix recommends naming the connection the same thing as the SQL database. Enter a description
and select the server name from the drop down list. Note: Ticomix does not recommend using “local”.
Select Next to continue.

Install and Configure GoldBox 9 in Windows 7 (64-bit) Version (2012-03-12a) Page 3 of 15
Select With SQL Server authentication using a login ID and password entered by the user radio button.
Check the Connect to SQL Server to obtain default settings for the additional configuration options
check box. Enter the SQL Server “sa” level Login ID and Password. Select Next to continue.
Check the Change the default database to check box and select the GoldMine SQL database from the
drop down list. Check Use ANSI quoted identifiers and Use ANSI nulls, paddings and warnings check
boxes. Select Next to continue.
Check the Change the language of SQL Server system messages to check box and select English from
the drop down list. Check the Perform translation for character data check box. Select Finish.

Install and Configure GoldBox 9 in Windows 7 (64-bit) Version (2012-03-12a) Page 4 of 15
Select Test Data Source.
Confirm the tests complete successfully. Select OK. Select OK to return to ODBC Data Source
Administrator. Select OK.
Install and Configure GoldBox 9 in Windows 7 (64-bit) Version (2012-03-12a) Page 5 of 15 CONFIGURE ODBC (32-BIT)
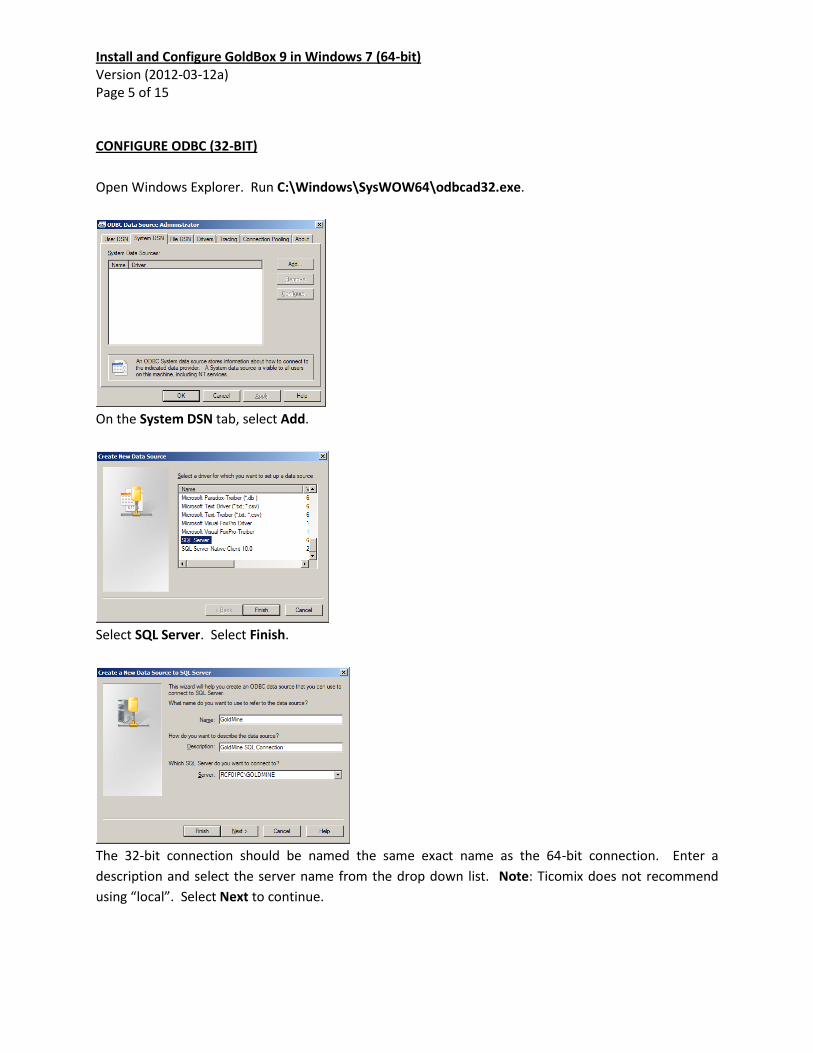
Open Windows Explorer. Run C:\Windows\SysWOW64\odbcad32.exe.
On the System DSN tab, select Add.
Select SQL Server. Select Finish.
The 32-bit connection should be named the same exact name as the 64-bit connection. Enter a
description and select the server name from the drop down list. Note: Ticomix does not recommend
using “local”. Select Next to continue.
Install and Configure GoldBox 9 in Windows 7 (64-bit) Version (2012-03-12a) Page 6 of 15
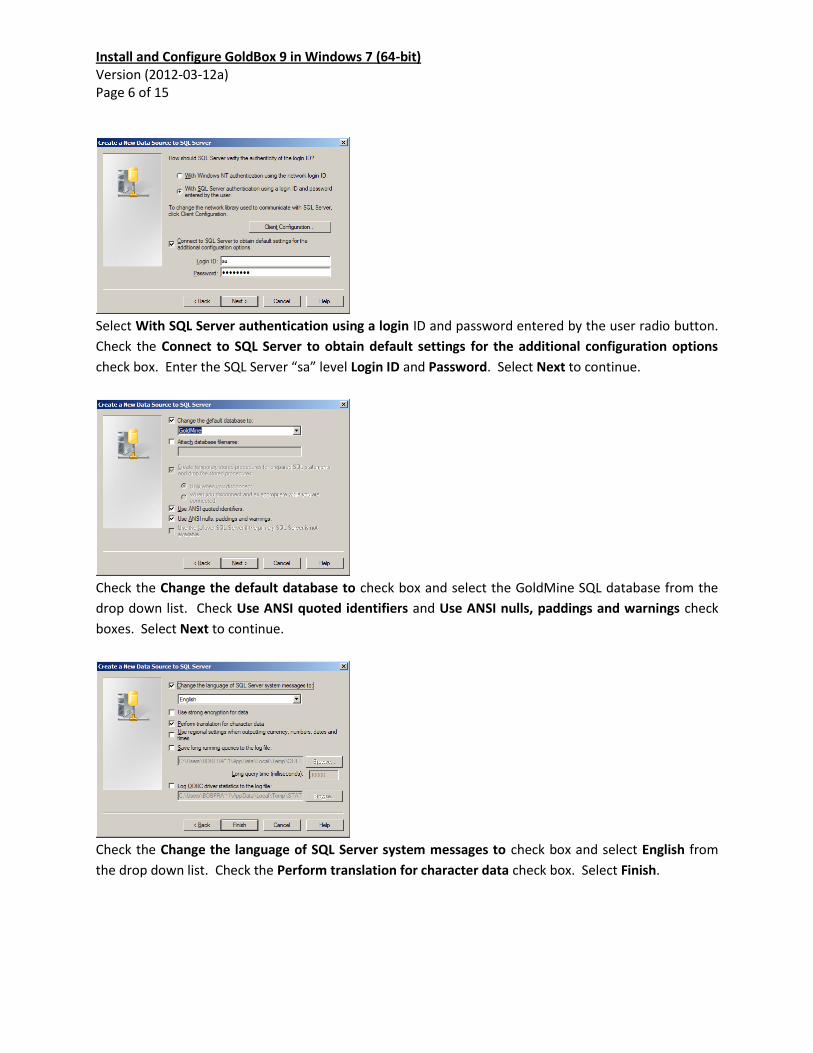
Select With SQL Server authentication using a login ID and password entered by the user radio button.
Check the Connect to SQL Server to obtain default settings for the additional configuration options
check box. Enter the SQL Server “sa” level Login ID and Password. Select Next to continue.
Check the Change the default database to check box and select the GoldMine SQL database from the
drop down list. Check Use ANSI quoted identifiers and Use ANSI nulls, paddings and warnings check
boxes. Select Next to continue.
Check the Change the language of SQL Server system messages to check box and select English from
the drop down list. Check the Perform translation for character data check box. Select Finish.
Install and Configure GoldBox 9 in Windows 7 (64-bit) Version (2012-03-12a) Page 7 of 15
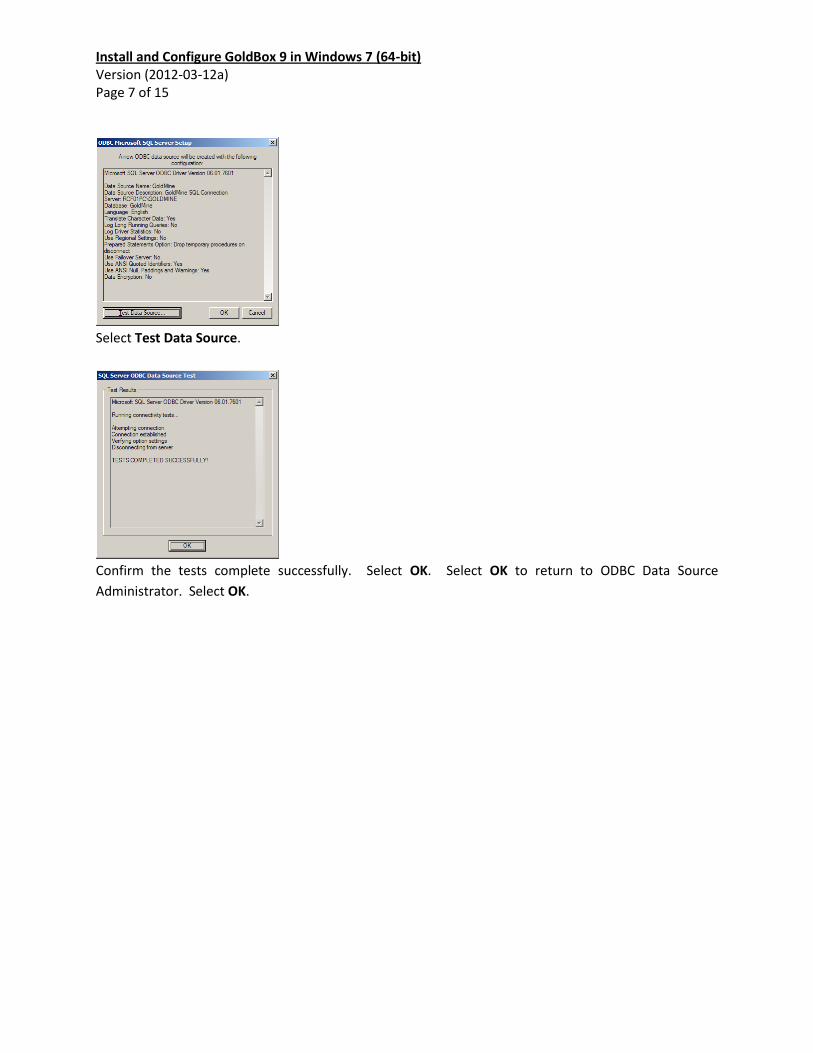
Select Test Data Source.
Confirm the tests complete successfully. Select OK. Select OK to return to ODBC Data Source
Administrator. Select OK.
Install and Configure GoldBox 9 in Windows 7 (64-bit) Version (2012-03-12a) Page 8 of 15 INSTALL BDE ADMINISTRATOR
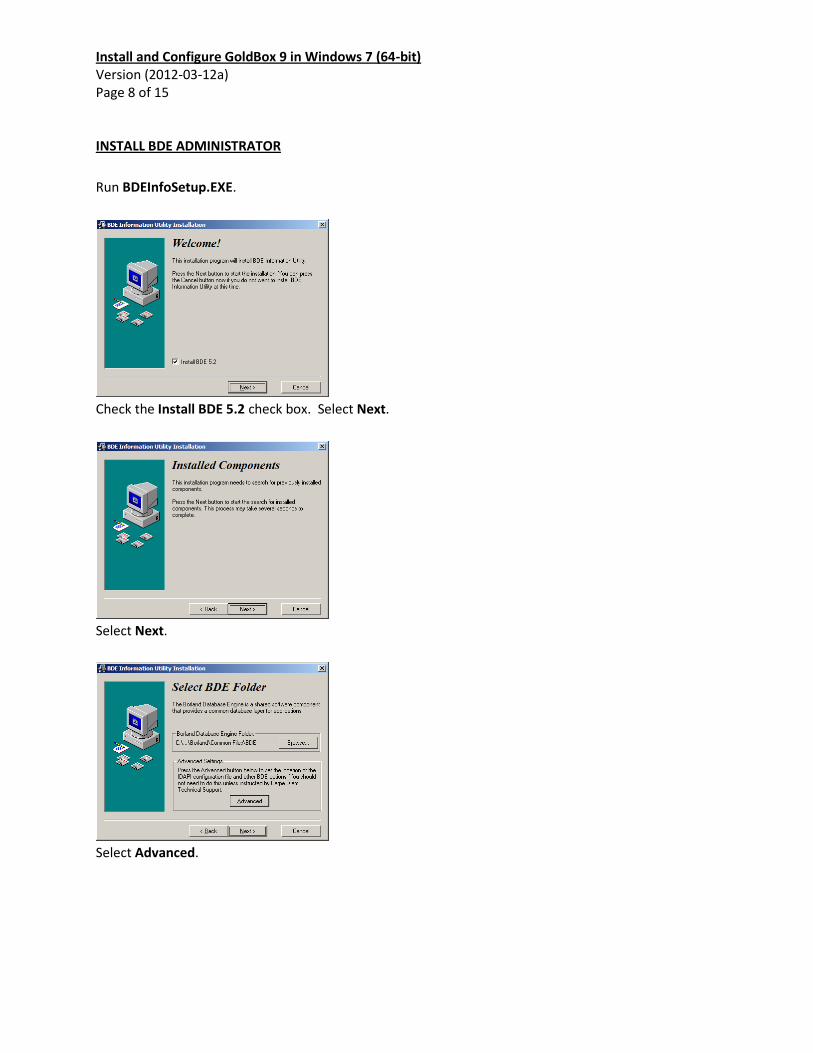
Run BDEInfoSetup.EXE.
Check the Install BDE 5.2 check box. Select Next.
Select Next.
Select Advanced.
Install and Configure GoldBox 9 in Windows 7 (64-bit) Version (2012-03-12a) Page 9 of 15
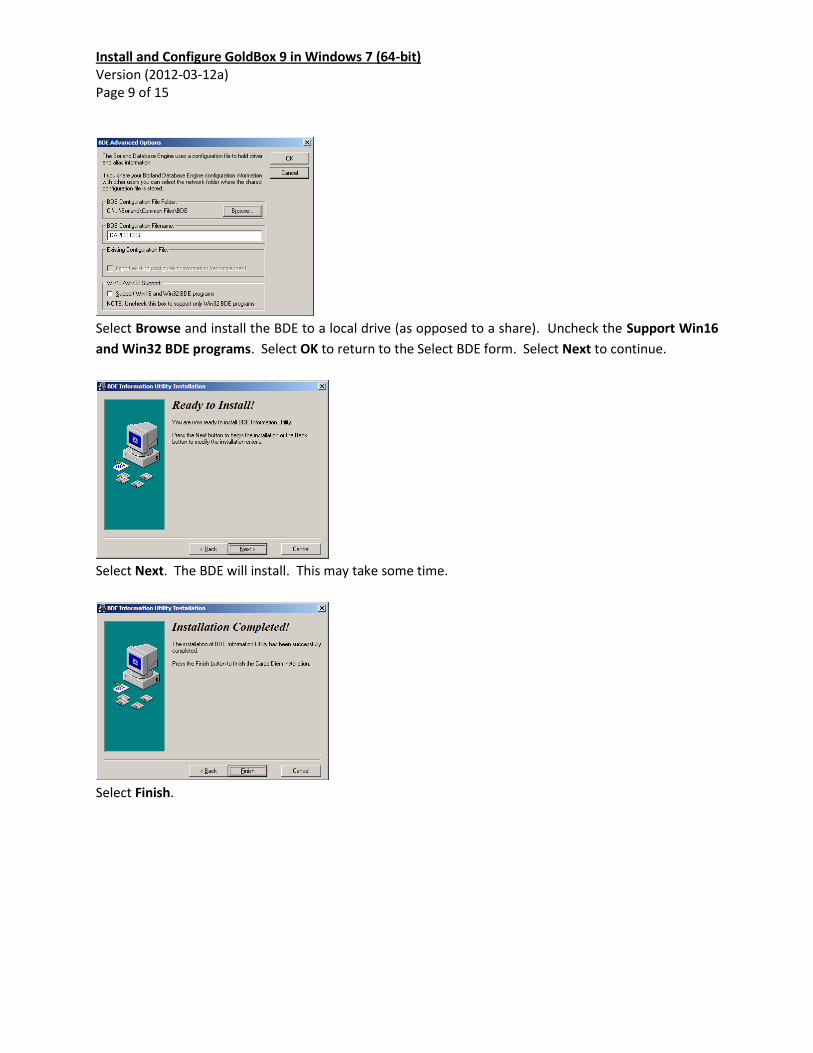
Select Browse and install the BDE to a local drive (as opposed to a share). Uncheck the Support Win16
and Win32 BDE programs. Select OK to return to the Select BDE form. Select Next to continue.
Select Next. The BDE will install. This may take some time.
Select Finish.
Install and Configure GoldBox 9 in Windows 7 (64-bit) Version (2012-03-12a) Page 10 of 15 CONFIGURE BDE
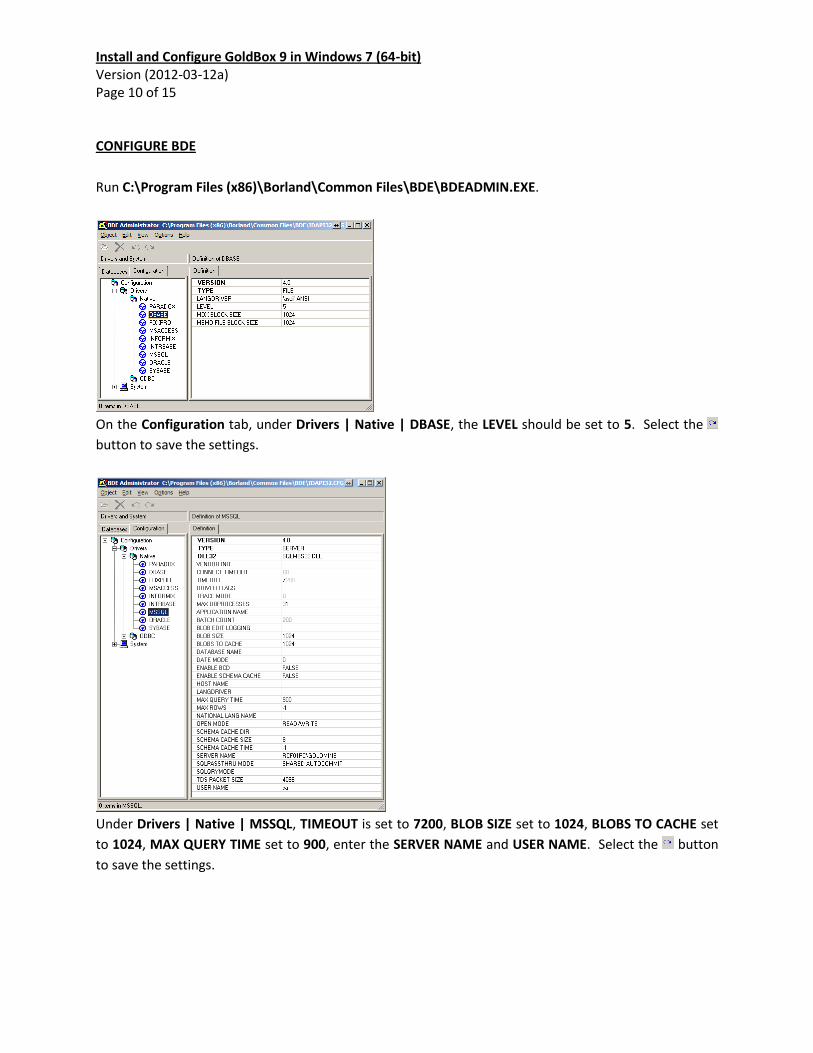
Run C:\Program Files (x86)\Borland\Common Files\BDE\BDEADMIN.EXE.
On the Configuration tab, under Drivers | Native | DBASE, the LEVEL should be set to 5. Select the
button to save the settings.
Under Drivers | Native | MSSQL, TIMEOUT is set to 7200, BLOB SIZE set to 1024, BLOBS TO CACHE set
to 1024, MAX QUERY TIME set to 900, enter the SERVER NAME and USER NAME. Select the button
to save the settings.

Install and Configure GoldBox 9 in Windows 7 (64-bit) Version (2012-03-12a) Page 11 of 15
Under System | INIT, DEFAULT DRIVE should be set to DBASE, set MAXFILEHANDLES to 64, set
MEMSIZE to 24, and set SHAREDMEMSIZE to 6BDE. Select the button to save the settings.
On the Databases tab, under Databases, locate the ODBC connection listed. Enter the DATABASE
NAME, enter the USER NAME. Select the button to save the settings. Double click on the name of
the connection.
Enter the SQL User Name and Password. Select OK.

Install and Configure GoldBox 9 in Windows 7 (64-bit) Version (2012-03-12a) Page 12 of 15
A green square will appear in front of the database name. Right mouse click on the database name and
select Close. Right mouse click and select Rename.
Ticomix recommends using a common prefix (i.e. “GX”) in the front of the ODBC database name.
Select OK. Select the button to save the settings. Select Object | Exit.
Select Yes. The BDE will exit.

Install and Configure GoldBox 9 in Windows 7 (64-bit) Version (2012-03-12a) Page 13 of 15 INSTALL AND CONFIGURE GOLDBOX 9
Note: GoldBox can be run from a shared directory. Open Windows Explorer. Create a folder called
GoldBox9. Unzip the contents of the zfreegx9.zip into the GoldBox9 directory. Note: This will set up the
free version of GoldBox 9. Place the LICENSE.GX9 file in the GoldBox9 folder to set up the licensed
version.
On the Desktop, right mouse click on the Computer icon and select Properties.
Select Advanced system settings.

Install and Configure GoldBox 9 in Windows 7 (64-bit) Version (2012-03-12a) Page 14 of 15
On the Advanced tab, select Performance | Settings.
On the Data Execution Prevention tab, if DEP is on for all programs and services, all the EXE files in the
GoldBox9 directory have to be added as exceptions. Select OK to return to the System Properties,
select OK to close.
Log into GoldMine as a user with master rights. Minimize GoldMine. Open GX9.EXE. This will take you
to the GoldBox 9 configuration tab. Select DDE to GoldMine. The current GoldMine settings should
appear.
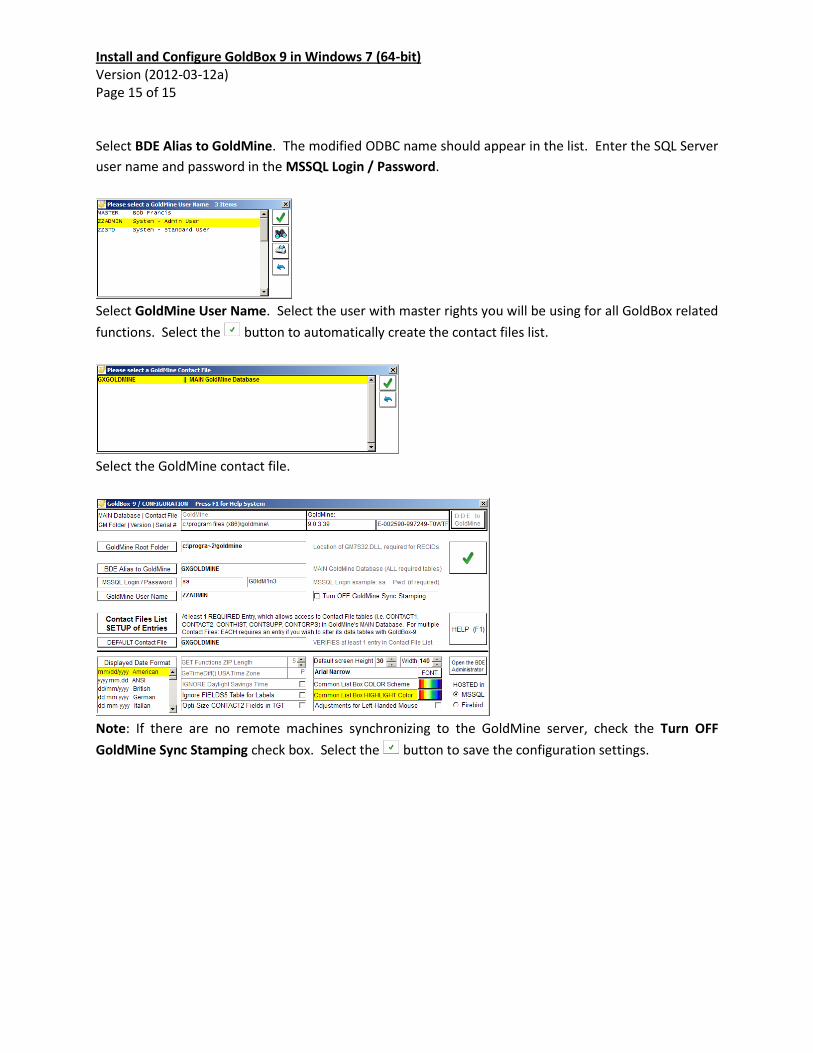
Install and Configure GoldBox 9 in Windows 7 (64-bit) Version (2012-03-12a) Page 15 of 15 Select BDE Alias to GoldMine. The modified ODBC name should appear in the list. Enter the SQL Server
user name and password in the MSSQL Login / Password.
Select GoldMine User Name. Select the user with master rights you will be using for all GoldBox related
functions. Select the button to automatically create the contact files list.
Select the GoldMine contact file.
Note: If there are no remote machines synchronizing to the GoldMine server, check the Turn OFF
GoldMine Sync Stamping check box. Select the button to save the configuration settings.
Top Related