Zuma II - Yamaha · The engine exhaust from this product contains chemicals know to the State of...
82
5LU-F8199-11 CW50N OWNER’S MANUAL LIT-11626-14-16
Transcript of Zuma II - Yamaha · The engine exhaust from this product contains chemicals know to the State of...

5LU-F8199-11
CW50N
OWNER’S MANUAL
LIT-11626-14-16

The engine exhaust from this product
contains chemicals know to the State
of California to cause cancer, birth
defects or other reproductive harm.
WARNING
YAMAHA LIT-CALIF-65-01

INTRODUCTION
EAA20301
Congratulations on your purchase of the Yamaha CW50.
This model is the result of Yamaha’s vast experience in the production of fine sporting, touring, and
pacesetting racing machines. It represents the high degree of craftsmanship and reliability that have
made Yamaha a leader in these fields.
This manual will give you an understanding of the operation, inspection, and basic maintenance of this
scooter.
If you have any questions about the operation or maintenance of your scooter, please consult a Yamaha
dealer.

IMPORTANT INFORMATIONS
EAA10500
Particularly important information is distinguished in this manual by the following notations:
The Safety Alert Symbol means ATTENTION! BECOME ALERT! YOUR SAFETY IS INVOLVED!
Failure to follow WARNING instructions could result in severe injury or death to the scooter operator,
a bystander or a person inspecting or repairing the scooter.
A CAUTION indicates special precautions that must be taken to avoid damage to the scooter.
NOTE: A NOTE provides key information to make procedures easier or clearer.
WARNING
CAUTION:

IMPORTANT INFORMATIONS
EUU00001
NOTE:
• This manual should be considered a permanent part of this scooter and should remain with it even if the scooter is
subsequently sold.
• Yamaha continually seeks advancements in product design and quality. Therefore, while this manual contains the most
current product information available at the time of printing, there may be minor discrepancies between your scooter
and this manual. If there is any question concerning this manual, please consult your Yamaha dealer.
EUU60001
PLEASE READ THIS MANUAL AND THE "YOU AND YOUR MOTORCYCLE: RIDING TIPS" BOOKLET CAREFULLY
AND COMPLETELY BEFORE OPERATING THIS SCOOTER. DO NOT ATTEMPT TO OPERATE THIS SCOOTER UNTIL
YOU HAVE ATTAINED A SATISFACTORY KNOWLEDGE OF ITS CONTROLS AND OPERATING FEATURES AND
UNTIL YOU HAVE BEEN TRAINED IN SAFE AND PROPER RIDING TECHNIQUES. REGULAR INSPECTIONS AND
CAREFUL MAINTENANCE, ALONG WITH GOOD RIDING SKILLS, WILL ENSURE THAT YOU SAFELY ENJOY THE
CAPABILITIES AND THE RELIABILITY OF THIS SCOOTER.
WARNING

EAA00100
CW50N
OWNER’S MANUAL
© 2000 by MBK INDUSTRIE
2nd Edition, April 2000
All rights reserved. Any reproduction or
representation without the written
permission of
MBK INDUSTRIE
is expressly prohibited.
Printed in France
P/N LIT-11626-14-16
AFFIX DEALER
LABEL HERE

1
2
3
4
5
6
7
8
9
1 GIVE SAFETY THE RIGHT OF WAY
3 DESCRIPTION
4 INSTRUMENT AND CONTROL FUNCTIONS
5 PRE-OPERATION CHECKS
6 OPERATION AND IMPORTANT RIDING POINTS
7 PERIODIC MAINTENANCE AND MINOR REPAIR
8 SCOOTER CARE AND STORAGE
9 SPECIFICATIONS
10 CONSUMER INFORMATION
INDEX
10
2 LOCATION OF THE IMPORTANT LABELS
TABLE OF CONTENTS

1THINK OF YOUR SAFETY .............................................................. 1-1
SAFETY INFORMATION ................................................................. 1-2
Safe riding ........................................................................................ 1-3
Protective apparel ............................................................................ 1-4
Modification ...................................................................................... 1-4
Loading and accessories ................................................................. 1-5
Loading ............................................................................................ 1-5
Accessories ...................................................................................... 1-6
Gasoline and exhaust gas................................................................ 1-7
Recommandations in case of accidents........................................... 1-8
GIVE SAFETY THE RIGHT OF WAY

1
1-1
GIVE SAFETY THE RIGHT OF WAY
EUU75900
THINK OF YOUR SAFETYBoth scooters and mopeds are fascinating vehicles which give a tremendous feeling of freedom to their riders. They
must be correctly maintained at all times in order to ensure optimum performance. However, as a rider you must also
ensure that your physical condition is good, and that you are not tired, in order that you too can optimize your vehicle
control. Medicines, drugs and alcohol should not be combined with riding, especially alcohol, which increases the
individual’s likelihood of taking risks. Alcohol is dangerous, even in small quantities.
Correct protective riding gear is just as much a part of motorcycling safety as the safety belt is in the car; a good leather
suit and gloves, sturdy boots and a good quality, properly fitting crash helmet are ideal. But beware: good protective
clothing can result in the individual being lulled into a false sense of security. When this happens more risks are taken
and speeds increase... this particularly applies in wet weather. The good motorcyclist therefore rides defensively and
protectively in order to minimize risks.
1
1-2
GIVE SAFETY THE RIGHT OF WAY
EUU77201
SAFETY INFORMATIONTWO-WHEELED SCOOTERS ARE SINGLE TRACK VEHICLES. THEIR SAFE USE AND OPERATION ARE DEPEN-
DENT UPON THE USE OF PROPER RIDING TECHNIQUES AS WELL AS THE EXPERTISE OF THE OPERATOR.
EVERY OPERATOR SHOULD KNOW THE FOLLOWING REQUIREMENTS BEFORE RIDING.
HE OR SHE SHOULD:
1. OBTAIN THOROUGH INSTRUCTIONS FROM A COMPETENT SOURCE ON ALL ASPECTS OF SCOOTER OPE-
RATION.
2. OBSERVE THE WARNINGS AND MAINTENANCE REQUIREMENTS IN THE OWNER’S MANUAL.
3. OBTAIN QUALIFIED TRAINING IN SAFE AND PROPER RIDING TECHNIQUES.
4. OBTAIN PROFESSIONAL TECHNICAL SERVICE AS INDICATED BY THE OWNER’S MANUAL AND/OR WHEN
MADE NECESSARY BY MECHANICAL CONDITIONS.
5. ALWAYS RESPECT THE RELEVANT LAWS AND REGULATIONS OF EACH COUNTRY.

1
1-3
GIVE SAFETY THE RIGHT OF WAY
SAFE RIDING
1. Always make pre-operation checks. Careful checks may help prevent an accident.
2. This scooter is designed to carry the operator and passenger in certain conditions (check the relevant regulation of
each country).
3. Most traffic accidents involving scooters and cars are due to the fact that car drivers do not see scooters. By making
yourself clearly visible, you can reduce the risks of accidents.
From now on:
a. Wear a brightly colored jacket.
b. Be very cautious when approaching crossroad, because this is where most accidents are caused.
c. Ride where other drivers can see you. Avoid remaining in car drivers' “blind spot”.
4. Numerous accidents are equally due to the rider’s lack of experience. In fact, it is those scooter riders who do not
hold a full driving licence who are involved in most accidents.
a. Make sure that you are properly taught. Do not lend your scooter to anyone who is not an experienced rider.
b. Know your limitations and do not over-estimate them.
c. Practice wherever there is no traffic until you are familiar with the scooter and its controls.
5. Many scooter accidents are due to riding faults. A typical riding fault is where the rider takes a corner too wide
because of EXCESSIVE SPEED or takes it too sharply (too tight a corner for the speed).
a. Always observe the speed limits and never go faster than the state of the road and the traffic conditions allow.
b. Always signal when turning or changing lanes. Make sure you can be seen by other road users.
6. The operator’s and passenger’s posture are important for proper control.
a. The operator should keep both hands on the handlebars and both feet on the footboard during operation to
maintain control of the scooter.
b. The passenger should always hold on the operator, or the seat strap or grab bar if the scooter is so equipped with
both hands and keep both feet on the passenger footrests.
c. Never carry a passenger unless he or she can firmly place both feet on the passenger footrests.
7. Never ride under the influence of alcohol or drugs.

1
1-4
GIVE SAFETY THE RIGHT OF WAY
8. Never carry any object which can cause danger if they fall off (pointed or sharp objects, for example).
9. This scooter is designed for on-road use only. It is not suitable for off-road use.
10. Always be particularly attentive when riding the scooter, and take care not to allow yourself to be distracted or
influenced by objects or people.
PROTECTIVE APPAREL
The majority of fatalities from scooter accidents are the result of head injuries. The use of a safety helmet is the single
most critical factor in the prevention or reduction of head injuries.
1. Always wear an approved helmet.
2. Wear a face shield or goggles. Wind on your unprotected eyes could contribute to an impairment of vision which
could delay seeing a hazard.
3. The use of substantial shoes, jacket, trousers, gloves, etc. is effective in preventing or reducing abrasions or
lacerations.
4. Never wear loose fitting clothing. It could catch on the control levers or wheels and cause injury or accident.
5. Never touch the engine or exhaust system during or after operation. They become very hot and can cause burns.
Always wear protective clothing that covers your legs, ankles, and feet.
6. A passenger should also observe the above precautions.
MODIFICATION
Modifications made to the scooter not approved by Yamaha, or the removal of original equipment, may render your
scooter unsafe for use and may cause severe personal injury. Modifications may also make your scooter illegal to use.

1
1-5
GIVE SAFETY THE RIGHT OF WAY
LOADING AND ACCESSORIES
Adding accessories or cargo to your scooter can adversely affect stability and handling if the weight distribution of the
scooter is changed. To avoid the possibility of an accident, extreme caution should be used if adding cargo or accessories
to your scooter. Use extra care if riding a scooter which has added cargo or accessories. Here are some general guidelines
to follow if loading cargo or adding accessories to your scooter:
LOADING
The total weight of the operator, passenger, accessories and cargo must not exceed the maximum load limit of 152 kg
(335 lb).
When loading within these weight limits, keep the following in mind:
1. Cargo and accessory weight should be kept as low and close to the scooter as possible. Be sure to distribute the
weight as evenly as possible on both sides of the machine to minimize imbalance or instability.
2. Shifting weights can create a sudden imbalance. Make sure that accessories and cargo are securely attached to the
scooter before riding. Recheck accessory mounts and cargo restraints frequently.
3. Never attach any large or heavy items to the handlebars, front forks, or front fender. These items can create unstable
handling or slow steering response.

1
1-6
GIVE SAFETY THE RIGHT OF WAY
ACCESSORIES
Yamaha original accessories have been specially designed for use on this scooter. Because Yamaha can not test every
accessory which is available on the market, the owner is personally responsible for the selection, fitting and use of
accessories of other makes.
The directives dealing with loading apply equally to accessories.
1. Never install accessories or carry cargo that would impair the performance of your scooter. Carefully inspect the
accessory before using it to make sure it does not in any way reduce ground clearance or cornering clearance, limit
suspension travel, steering travel or control operation, or obscure lights or reflectors.
a. Accessories fitted to the handlebar or the front fork area can create instability due to improper weight distribution
or aerodynamic changes. If accessories are added to the handlebar or front fork area, they must be as lightweight
as possible and should be kept to a minimum.
b. Bulky or large accessories may seriously affect the stability of the scooter due to aerodynamic effects. Wind may
attempt to lift the scooter, or the scooter may become unstable in cross winds. These accessories may also
cause instability when being passed by or passing large vehicles.
c. Certain accessories can displace the operator from his or her normal riding position. This improper position limits
the freedom of movement of the operator and may limit control ability. Therefore such accessories are not
recommended.
2. Caution must be used if adding electrical accessories. If these accessories exceed the capacity of the scooter’s
electrical system, an electric failure could result, which could cause a dangerous loss of lights or engine power.

1
1-7
GIVE SAFETY THE RIGHT OF WAY
GASOLINE AND EXHAUST GAS
1. GASOLINE IS HIGHLY FLAMMABLE:
a. Always turn off the engine when refueling.
b. Take care not to spill any gasoline on the engine or exhaust pipe(s)/muffler(s) when refueling.
c. Never refuel while smoking or in the vicinity of an open flame.
2. Never start the engine or let it run for any length of time in a closed area. The exhaust fumes are poisonous and may
cause loss of consciousness and death within a short time. Always operate your scooter in an area that has adequate
ventilation.
3. Always turn off the engine before leaving the scooter unattended and remove the ignition key. When parking the
scooter, note the following:
a. The engine and exhaust pipe(s)/muffler(s) may be hot. Park the scooter in a place where pedestrians or children
are not likely to touch these hot areas.
b. Do not park the scooter on a slope or soft ground: the scooter may fall over.
c. Do not park the scooter near a flammable source, e.g. a kerosene heater, or near an open flame. The scooter
could catch fire.
4. If you should swallow any gasoline, inhale a lot of gasoline vapor, or allow gasoline to get in your eye(s), see your
doctor immediately. If any gasoline spills on your skin or clothing, immediately wash with soap and water and
change your clothes.

1
1-8
GIVE SAFETY THE RIGHT OF WAY
RECOMMENDATIONS IN CASE OF ACCIDENT
If the scooter has been in an accident, it is imperative that the following points are checked:
1. The good condition of the entire braking system, including the levers, cables and lines, etc ...
2. The good condition of the active or passive indicators (lights, reflectors ...)
3. The good condition of all vital components such as the frame, wheels, suspension systems, oil reservoirs, petrol
tanks, etc ...
4. Do not ride the scooter if there is any doubt about its condition or operation, and have it taken to a Yamaha dealer for
a check-up and any repairs required, pointing out all its operating faults.

2
LOCATION OF THE IMPORTANT LABELS
Location of the important labels ....................................................... 2-1

2
2-1
EAA40000
Location of the important labelsPlease read following labels carefully before operating the scooter.
LOCATION OF THE IMPORTANT LABELS
1
3 / 4
2
5
6

2
2-2
LOCATION OF THE IMPORTANT LABELS
WARNINGI m p r o p e r l o a d i n g c a n c a u s e l o s s o f c o n t r o l .R e a d o w n e r ' s m a n u a l f o r p r o p e r l o a d i n g .
3JJ-28446-A0
WARNING• B E F O R E Y O U O P E R A T E T H I S V E H I C L E , R E A D
T H E O W N E R ' S M A N U A L A N D A L L L A B E L S .
• A L W A Y S W E A R A N A P P R O V E D M O T O R C Y C L EH E L M E T , e y e p r o t e c t i o n , a n d p r o t e c t i v e c l o t h i n g .
3MX-2118K-00
WARNING
N E V E R P L A C E A N Y T H I N G H E R E .F i r e c o u l d r e s u l t f r o m e n g i n e h e a t .
3MX-21568-00
3MX-21668-00
TIRE INFORMATIONCold tire pressure should be set as follows.•Up to 90kg (198 lbs) loadFRONT : 100kPa, (1.00kgf/cm2), 15psiREAR : 125kPa, (1.25kgf/cm2), 18psi•90 kg (198 lbs) ~ maximum loadFRONT : 100kPa, (1.00kgf/cm2), 15psiREAR : 150kPa, (1.50kgf/cm2), 21psi
1 2
6
3
WARNING
NEVER sit here.
3MX-24875-A0
3TB-24877-00
3 kg (7lbs)
LOAD LIMIT4
5

3
DESCRIPTION
Left view ........................................................................................... 3-1
Right view......................................................................................... 3-2
Controls /Instruments ....................................................................... 3-3

3
FAU00026
DESCRIPTION
Left view
1. Rear brake lever (page 4-6)
2. Left handlebar switches (page 4-4)
3. Fuel tank (page 4-6)
4. Seat lock (page 4-10)
5. Oil tank (page 4-6)
6. Rear carrier (page 4-10)
3-1
7. Rear light (page 7-18)
8. Rear brake wear indicator (page 7-11)
9. Kick starter (page 4-9)
10. Air filter (page 7-6)
11. Rear footrest
12. Front brake caliper (page 7-11)
101112
541
2 3
8
9
6
7

3
Right view
DESCRIPTION
3-2
1. Main switch (page 4-1)
2. Throttle grip (page 7-7)
3. Right handlebar switches (page 4-5)
4. Front brake lever (page 4-5)
5. Headlight (page 7-18)
6. Rear footrest
7. Centerstand (page 7-14)
8. Rear flasher light (page 7-19)
9. Passenger handle
1 2 34
5
67
8
9

3
Controls/Instruments
DESCRIPTION
3-3
1. Speedometer (page 4-4)
2. “HIGH BEAM” indicator light “ ” (page 4-1)
3. “TURN” indicator light “ ” (page 4-1)
4. “OIL” warning indicator light “ ”(page 4-2)
5. Fuel gauge (page 4-4)
6. “HORN” switch “ ”(page 4-4)
7. “TURN” signal switch “ ”(page 4-4)
8. Starter lever (CHOKE) (page 4-8)
9. Lights switch “ , ”(page 4-4)
10. “ENGINE STOP” switch (page 4-5)
11. Start switch “ ” (page 4-5)
12. Throttle grip (page 7-7)
6 7 8 9 11 1210
1020
30
0 40mph
mile
Highbeam Turn oil
F
E
FUEL
0
10
2030 40
5060
1
1 2 3 4
5

4
INSTRUMENT AND CONTROL FUNCTIONS
Main switch ...................................................................................... 4-1
Indicator lights .................................................................................. 4-1
Oil warning light circuit check ........................................................... 4-3
Speedometer.................................................................................... 4-4
Fuel gauge ....................................................................................... 4-4
Handlebar switches .......................................................................... 4-4
Front brake lever .............................................................................. 4-5
Rear brake lever ............................................................................... 4-6
Fuel and oil tank ............................................................................... 4-6
Fuel .................................................................................................. 4-6
Catalitic converter (depends on model) ........................................... 4-7
Engine oil ......................................................................................... 4-8
Starter lever (CHOKE) ..................................................................... 4-8
Kick starter ....................................................................................... 4-9
Steering lock .................................................................................... 4-9
Seat ................................................................................................ 4-10
Helmet holder ................................................................................. 4-10
Rear carrier .................................................................................... 4-10

4
FAU00027
INSTRUMENT AND CONTROL FUNCTIONS
4-1
PUSH
LOCK
OFFON
1. “HIGH BEAM” indicator light “ ”2. “TURN” indicator light “ ”3. “OIL” level indicator light “ ”
EAB10000
Indicator lights
EAB12403
“TURN” indicator light “ ” :
This indicator flashes when the turn
switch is moved to the left or right.
EAB00100
Main switchThe main switch controls the ignition
and lighting systems. Its operation is
described below.
EAB02300
ON:
Electrical circuits are switched on and
the taillight comes on. The engine can
be started. The key cannot be removed
in this position.
EUU10100
NOTE:
When the engine is started, the
headlight and meter lights come on
automatically.
EAB02100
*:
The oil warning light will come on. For
details of the oil warning light, refer to
“Oil warning light” on page 4-2.
EAB00600
OFF:
All electrical circuits are switched off.
The key can be removed in this posi-
tion.
EAB00701
LOCK:
The steering is locked in this position,
and all electrical circuits are switched
off. The key can be removed in this
position. Refer to “Steering lock” (page
4-9) for operation instructions.
EUU00700
NOTE:
Always turn the main switch to “OFF”
or “LOCK” and remove the key when
the scooter is unattended.
1020
30
0 40mph
mile
Highbeam Turn oil
F
E
FUEL
0
10
2030 40
5060
1
1 2 3
EAB10300
“HIGH BEAM” indicator light “ ”:
This indicator comes on when the
headlight high beam is used.

4
4-2
INSTRUMENT AND CONTROL FUNCTIONS
EAB11503*
Oil level indicator light “ ” :
The light comes on when the main
switch is at “*” or when there is little oil
in the oil tank during operation. If the
oil warning light comes on during
operation, refill the tank immediately
with Yamalube 2-cycle engine oil or air
cooled 2-stroke engine oil (in
accordance with the JASO FC or
ISO EG-C, EG-D standard). When the
tank is refilled, the indicator light will go
off.
CAUTION:
EUU10301
NOTE:
If the oil level indicator light does not
come on while the key is at “*”, have a
Yamaha dealer inspect it.
EUU30000
Do not run the scooter until you
know it has sufficient engine oil.

4
INSTRUMENT AND CONTROL FUNCTIONS
4-3
EAB31200
Oil warning light circuit check
*
Turn the main switchto "OFF".
Turn the main switchto " ".
Disconnected circuit,short circuit, faultylight bulb, etc.
Ask a Yamaha dealerto inspect.
Supply engine oil
Ask a Yamaha dealerto inspect
Turn the main switchto "ON".
Start the engine andgo ahead with riding.
: Oil level indicator light does not come on.
: Oil level indicator light comes on.

4
INSTRUMENT AND CONTROL FUNCTIONS
4-4
1. Speedometer2. Odometer3. Fuel gauge
1. “HORN” switch “ ”2. “TURN” switch “ ”3. “LIGHTS” (dimmer) switch “ , ”
EAB60000
Handlebar switches
1020
30
0 40mph
mile
Highbeam Turn oil
F
E
FUEL
0
10
2030 40
5060
1
1
2 3
EAB50701
Fuel gaugeThe fuel gauge indicates the quantity
of the remaining gasoline in the tank.
The gauge needle moves from “F”(Full)
to “E”(Empty) as the fuel level
decreases. When the needle moves to
the “E” position, add fuel as soon as
possible.
EAB40701
SpeedometerThe speedometer shows riding speed.
This speedometer is equipped with an
odometer.
1 2
3
EAB60200
“HORN” switch “ ”
Press the switch to sound the horn.
EAB62101
“TURN” signal switch “ ”
To signal a right-hand turn, push the
switch to the right. To signal a left-hand
turn, push the switch to the left. Once
the switch is released it will return to
the center position. To cancel the signal,
push the switch in after it has returned
to the center position.
EAB60100
“LIGHTS” (Dimmer) switch “ , ”
Turn the switch to “ ” for the high
beam and to “ ” for the low beam.

4
INSTRUMENT AND CONTROL FUNCTIONS
4-5
1. Start switch “ ”2. “ENGINE STOP” switch
1. Front brake lever
12
EAB61901
Start switch “ ”
The starter motor cranks the engine
when pushing the starter switch while
applying the front or rear brake.
EUU30700
See starting instructions prior to
starting the engine.
CAUTION:
EAB60901
“ENGINE STOP” switch
The engine stop switch is a safety
device for use in an emergency such
as when the motorcycle overturns or if
trouble occurs in the throttle system.
Turn the switch to “ ” to start the
engine.
In case of emergency, turn the switch
to “ ” to stop the engine.
EAB90001
Front brake leverThe front brake lever is located on the
right handlebar. Pull it toward the
handlebar to apply the front brake.
1

4
INSTRUMENT AND CONTROL FUNCTIONS
4-6
1. Fuel tank cap2. Oil tank cap
1. Rear brake lever������
CLOSE
OPEN
21
1. Filler tube2. Fuel level
1 2
EAB90201
Rear brake leverThe rear brake lever is located on the
left handlebar. Pull it toward the
handlebar to apply the rear brake.
1
WARNING
EAC00651
Fuel and oil tankTo add fuel and/or engine oil, open the
seat.
Then remove the fuel tank filler cap by
turning it counterclockwise.
Pull up the oil tank cap to open it.
EUU78900
Be sure the caps are properly
installed before riding the scooter.
EAE80000
FuelMake sure there is sufficient fuel in the
tank.
WARNINGEUU61000
Do not overfill the fuel tank. Avoid
spilling fuel on the hot engine. Do
not fill the fuel tank above the bottom
of the filler tube as shown in the il-
lustration or it may overflow when
the fuel heats up later and expands.

4
INSTRUMENT AND CONTROL FUNCTIONS
4-7
CAUTION:EUU39302
Always wipe off spilled fuel
immediately with a dry and clean
soft cloth. Fuel may deteriorate
painted surfaces or plastic parts.
EAE81701
Recommended fuel:
UNLEADED FUEL
Fuel tank capacity:
Total:
4.6 L (1.01 Imp gal, 1.21 US gal)
Your Yamaha engine has been
designed to use regular unleaded
gasoline with a pump octane number
([R + M]/2) of 86 or higher, or research
octane number of 91 or higher. If
knocking or pinging occurs, use a dif-
ferent brand of gasoline or premium
unleaded fuel. Unleaded fuel will give
you longer spark plug life and reduced
maintenance cost. If unleaded gasoline
is not available, then leaded regular
gasoline can be used.
Gasohol
There are two types of gasohol;
gasohol containing ethanol and that
containing methanol. Gasohol
containing ethanol can be used if etha-
nol content does not exceed 10%.
Gasohol containing methanol is not rec-
ommended by Yamaha because it can
cause fuel system damage or vehicle
performance problems.
WARNINGEUU61050
Gas and oil are flammable:
• When refuelling immediately after
operation, take special care not to
spill gasoline over the engine or
muffler.
• Should you spill gasoline or oil on
the engine or muffler, quicky wipe
it off before starting the engine.
• When refuelling, be sure to stop
the engine.
• Never attempt to refuel the scoo-
ter while smoking or near an open
flame.
WARNING
EAU01084
Catalytic converter (Depends
on model)This scooter is equipped with a catalytic
converter in the exhaust chamber.
EW000128
The exhaust system is hot during
and directly after engine operation.
Make sure the exhaust system has
cooled down before making any
adjustment to or lubricating the
scooter.

4
INSTRUMENT AND CONTROL FUNCTIONS
4-8
1. Starter lever (CHOKE)
CAUTION:FC000114
The following must be observed to
prevent a fire hazard or other
damages.
Use only unleaded gasoline.Use of
leaded gasoline will cause
unrepairable damage to the catalytic
converter.
Never park this scooter in an area
that would cause a fire hazard such
as grass or other materials that may
easily burn.
Do not allow the engine to idle for
very long.
EAE41302
Engine oilMake sure the engine oil is at the
specified level. Add oil as necessary.
Recommended oil :
Yamalube 2-cycle oil or
air-cooled 2-stroke engine oil
(according to JASO FC or ISO
EG-C, EG-D standard)
Oil quantity :
Total amount
1.3 L (1.14 Imp qt , 1.37 US qt)
EUU04201
NOTE:
Be sure the cap is properly seated
when replacing.
1
EAC20100
Starter lever (CHOKE)The starter lever is located on the left
handlebar.
Starting a cold engine requires a richer
fuel mixture. In such a case, turn the
starter lever to the left. After the engine
is warm, turn the lever to its original
position.EUU01600
NOTE:
Refer to “Starting and warming up a
cold engine” for proper operation.

4
INSTRUMENT AND CONTROL FUNCTIONS
4-9
1. Kick starter
1
PUSH
LOCK
OFF
In case of doubt and imperatively,
when the handlebar presents a
misalignment defect (after attempt of
robbery, fall, important hit). Bring the
scooter to the nearest Yamaha
dealer.DO NOT RIDE THE SCOO-
TER.
DO NOT TRY TO STRAIGHTEN A
BENT HANDLEBAR.
1 2 3
LOCKLOCK
OFF O
FF
LOCK
OFF
1. Push2. Release3. Turn
EAC60700
Kick starterRotate the kick starter away from the
engine. Push the starter down lightly
with your foot until the gears engage,
then kick smoothly and forcefully to start
the engine.
WARNING
EAC30401
Steering lockThe steering is locked when the main
switch is turned to "LOCK". To lock the
steering, turn the handlebars all the way
to the left. With the key at "OFF", push
it into the main switch and release it,
turn it counterclockwise to "LOCK", and
remove it. To release the lock, turn the
key to "OFF".
EUU61400
Never turn the key to "LOCK" when
the scooter is moving.
WARNING

4
INSTRUMENT AND CONTROL FUNCTIONS
4-10
1. Open2. Helmet holder
1. Fuel tank2. Oil tank
1 22
1
EAC72000
Rear carrier
1
1. Rear carrier
EAC42301
SeatTo open the seat:
1. Insert the key in the lock and turn it
as shown.
2. Lift the end of the seat up to open.
To lock the seat:
1. Replace the seat in the original po-
sition.
2. Slightly push the end of the seat
down to lock.
EUU14000
NOTE:
Lift the end of the seat up to make sure
the seat is securely locked.
WARNING
EAC50501
Helmet holderThe helmet holder is located under the
seat. Open the seat and hook the
helmet on the helmet holder. Then lock
the seat.EUU72900
Never ride with a helmet in the
helmet holder. The helmet may hit
objects, causing loss of control and
possibly an accident.
WARNINGEUU76001
Do not exceed the load limit of 3 kg
(7 lbs).

5
PRE-OPERATION CHECKS
PRE-OPERATION CHECKS............................................................ 5-1

5
PRE-OPERATION CHECKS
5-1
EAE00000
Owners are personally responsible for their vehicle’s condition. Your scooter’s vital function can start to deteriorate quickly
and unexpectedly, even if it remains unused (for instance, if it exposed to the elements). Any damage, fluid leak or loss of
tire pressure could have serious consequences. Therefore, it is very important that, in addition to a thorough visual inspec-
tion, you check the following points before each ride.
ITEM CHECKS PAGE
PRE-OPERATION CHECKS
Front brake (disc) • Check operation, free play, fluid level and vehicle for fluid leakage. 4-5/7-10 ~ 7-12• Top up with DOT #3 or DOT #4 brake fluid if necessary.
Rear brake (drum) • Check operation, damage and free play. 4-6/7-10/7-11• Adjust if necessary.
Throttle grip and housing • Check for smooth operation. 7-7/7-13• Adjust / Lubricate if necessary.
Engine oil • Check engine oil level and oil leakage. 4-6/4-8• Add oil if necessary.
Final gear oil • Check vehicle for leakage. 7-5• Add oil if necessary.
Wheels/Tires • Check tires pressure, wear and damage. 7-8
Fittings/Fasteners • Check all chassis fittings and fasteners. -• Tighten / Adjust if necessary.
Lights, signals • Check for proper operation. Correct if necessary. 4-1 ~ 4-5
and switches
Fuel tank • Check fuel level. Top up as required. 4-6
Controls/Meter cables • Check for smooth operation. 7-13• Lubricate if necessary.
Brake lever pivots • Check for smooth operation. 7-14• Lubricate if necessary.
Centerstand pivot • Check for smooth operation. 7-14• Lubricate if necessary.

5
PRE-OPERATION CHECKS
5-2
NOTE:
Pre-operation checks should be made each time the scooter is used. Such an inspection can be accomplished in a very
short time; and the added safety it assures is more than worth the time involved.
WARNING
The engine compartment and all the fan inlets need to stay clean and free of foreign materials.
Do not leave any rag inside or under the plastic covers of your scooter, whatever the location.
1. The engine, exhaust pipe(s), and muffler(s) will be very hot after the engine has been run. Be careful not to
touch them or to allow any clothing item to contact them during inspection or repair.
2. If any item in the PRE-OPERATION CHECK is not working properly, have it inspected and repaired before
operating the scooter. If necessary ask a Yamaha dealer.
WARNING

6
OPERATION AND IMPORTANT RIDING POINTS
Starting and warming up a cold engine ............................................ 6-1
Starting a warm engine .................................................................... 6-2
Starting the scooter .......................................................................... 6-3
Acceleration ..................................................................................... 6-3
Braking ............................................................................................. 6-3
Engine break-in ................................................................................ 6-4
Parking ............................................................................................. 6-5

6
FAU00372
OPERATION AND IMPORTANT RIDING POINTS
6-1
PUSH
LOCK
OFFON
1. Starter lever (CHOKE)
WARNINGEUU81800
• Before riding this scooter, become
thoroughly familiar with all operating
controls and their functions. Consult
a Yamaha dealer regarding any
control or function that you do not
thoroughly understand.
• Never start your engine or let it run
for any length of time in a closed area.
The exhaust fumes are poisonous
and can cause loss of consciousness
and death within a short time. Always
operate your scooter in an area with
adequate ventilation.
• Before starting out, be sure to use
the centerstand for safety.
EUU31100
1. Be careful where you store personal
items on the scooter. Avoid blocking
the air cleaner intake or performance
will suffer.
2. Be careful not to put anything near
the battery and its terminals.
Electrical failure and acid corrosion
may result.
CAUTION:
EAF14302
Starting and warming up a
cold engine1. Turn the engine stop switch to “RUN”
( ).
2. Turn the main switch to “*” . If the oil
warning light comes on, turn the
main switch to the “ON”.
3. Fully open the starter (CHOKE), and
completely close the throttle grip.
CAUTION:EUU40902
If the oil level indicator light does not
come on, ask a Yamaha dealer to
inspect it.
1

6
OPERATION AND IMPORTANT RIDING POINTS
6-2
21
1. Start switch “ ”2. Kick starter
4. Start the engine by pushing the star-
ter switch while holding the front or
rear brake lever, or by using the kick
starter.
5. After starting the engine, turn back
the starter (CHOKE) to warming up
position (about halfway).
EUU10001
NOTE:
If the engine fails to start, release the
start switch, wait a few seconds, then
try again. Each attempt should be as
short as possible to preserve the
battery. Do not crank the engine more
than 5 seconds on any one attempt. If
the engine does not start with the star-
ter motor, kick the kick starter to start
the engine.
CAUTION:
6. After warming up the engine, turn off
the starter completely.
EUU17000
NOTE:
For maximum engine life, always warm
up the engine about 1 ~ 3 minutes
before riding your scooter. Never
accelerate hard with a cold engine.
EUU02700
NOTE:
The engine is warm when it responds
normally to the throttle with the starter
turned off.
EUU31401
See the "Engine break-in" section
prior to operating the scooter for the
first time.
CAUTION:
EAF10800
Starting a warm engineThe starter (CHOKE) is not required
when the engine is warm.
EUU31400
See the “Break-in section” prior to
operating the scooter for the first
time.

6
OPERATION AND IMPORTANT RIDING POINTS
6-3
B A
A B
EAF21000
Starting the scooterAfter warming up the engine:
1. Hold the brake lever with your left
hand, and push the scooter off the
centerstand while holding the rear
passenger handle with your right
hand. Then push the scooter
forwards to fold the centerstand.
2. Sit astride the seat and check the
mirror for its angle.
3. Check the oncoming traffic, and use
a turn signal before entering traffic.
4. Turn out the throttle grip on the right
handlebar slowly, and you can now
start off. After starting off, turn off the
flasher.
EAF20900
AccelerationThe speed can be adjusted by opening
and closing the throttle grip. Turning it
toward you increases the speed, and
turning it in the opposite direction
decreases the speed.
EAF21102
Braking1. Close the throttle grip.
2. Apply both front and rear brakes
simultaneously with light pressure
and increase the pressure slowly.

6
OPERATION AND IMPORTANT RIDING POINTS
6-4
WARNINGEUU73802
1. Avoid hard or sudden braking. It
may cause the scooter to skid or
overturn.
2. Be sure to apply the brake
carefully if leaning over to one
side. Improper braking could lead
to a skid.
3. Street car rails, metal plates on
road construction sites, and man-
hole covers become particularly
slippery when they get wet. Cross
them slowly and cautiously.
4. Braking on a wet road will be very
difficult.
5. Braking on a hill can be difficult.
Proceed slowly when riding
downhill.
EAF30000
Engine break-inThere is never a more important period
in the life of your scooter than the period
between zero and 1,000 km (600 mi).
For this reason we ask that you
carefully read the following material.
Because the engine is brand new, you
must not put an excessive load on it for
the first 1,000 km (600 mi). The various
parts in the engine wear and polish
themselves to the correct operating
clearances. During this period,
prolonged full throttle operation, or any
condition which might result in exces-
sive heating of the engine, must be
avoided.
EAF32000
1. 0 ~ 150 km (0 ~ 90 mi):
Avoid operation above 1/3 throttle.
Stop the engine and let it cool for 5
to 10 minutes after every hour of
operation. Vary the speed of the
scooter from time to time. Do not
operate it at one set throttle position.
2. 150 ~ 500 km (90 ~ 300 mi):
Avoid prolonged operation above
1/2 throttle.
CAUTION:
EUU35300
After 1,000 km (600 mi) of operation,
be sure to replace the transmission
oil.
EUU32200
If any engine trouble should occur
during the break-in period, consult
a Yamaha dealer immediately.
CAUTION:
3. 500 ~ 1,000 km (300 ~ 600 mi):
Avoid cruising speeds in excess of
3/4 throttle.
4. 1,000 km (600 mi) and beyond:
Avoid prolonged full throttle
operation. Vary speeds occasionally.

6
OPERATION AND IMPORTANT RIDING POINTS
6-5
Correct
Incorrect Incorrect
EAF40000
ParkingWhen parking the scooter, stop the engine and remove the
ignition key.
WARNINGEUU63000
The muffler and exhaust pipe are hot. Park the scooter
in a place where pedestrians or children are not likely to
touch the scooter. Do not park the scooter on a slope or
soft ground; the scooter may overturn.

7
PERIODIC MAINTENANCE AND MINOR REPAIR
Recharging the battery .......................................... 7-16
Replenishing the battery fluid ................................ 7-17
Fuse replacement ................................................. 7-17
Headlight ............................................................... 7-18
Replacing the rear lamp bulb ............................... 7-18
Flasher light bulb replacement .............................. 7-19
Troubleshooting .................................................... 7-19
Troubleshooting chart ........................................... 7-20
PERIODIC MAINTENANCE/
LUBRICATION INTERVALS.................................... 7-2
Spark plug inspection .............................................. 7-4
Replacing the transmission oil ................................ 7-5
Air filter cleaning...................................................... 7-6
Carburetor adjustment ............................................ 7-7
Autolube pump adjustment ..................................... 7-7
Throttle grip ............................................................. 7-7
Throttle cable adjustment ........................................ 7-8
Tires ........................................................................ 7-8
Front brake adjustment ......................................... 7-10
Rear brake adjustment .......................................... 7-10
Checking the front brake pads
and the rear brake shoes ...................................... 7-11
Inspecting the brake fluid level .............................. 7-12
Brake fluid replacement ........................................ 7-13
Cable inspection and lubrication ........................... 7-13
Throttle cable and grip lubrication ......................... 7-13
Brake lever ............................................................ 7-14
Centerstand........................................................... 7-14
Front fork inspection .............................................. 7-14
Steering inspection ................................................ 7-15
Wheel bearings ..................................................... 7-15
Battery ................................................................... 7-16

7
FAU00462
PERIODIC MAINTENANCE AND MINOR REPAIR
7-1
EAH00400
Periodic inspection, adjustment and
lubrication will keep your scooter in the
safest and most efficient condition pos-
sible. Safety is an obligation of the
scooter owner. The maintenance and
lubrication schedule chart should be
considered strictly as a guide to general
maintenance and lubrication intervals.
YOU MUST TAKE INTO CONSIDERA-
TION THAT WEATHER, TERRAIN,
GEOGRAPHICAL LOCATIONS, AND
A VARIETY OF INDIVIDUAL USES ALL
TEND TO DEMAND THAT EACH
OWNER ALTER THIS TIME
SCHEDULE TO SHORTER
INTERVALS TO MATCH THE
ENVIRONMENT. The most important
points of scooter inspection,
adjustment, and lubrication are
explained in the following pages.
EUU63200
If you are not familiar with scooter
service, this work should be done by
a Yamaha dealer.
EUU67100
Modifications to this scooter not
approved by Yamaha may cause
loss of performance, and render it
unsafe for use. Consult a Yamaha
dealer before attempting any chan-
ges.
EUU76500
This scooter is designed for use on
paved road surface only. If this scoo-
ter is operated in abnormally dusty,
muddy or wet conditions, the air
filter should be cleaned or replaced
more frequently. Otherwise, rapid
engine wear may result. Consult a
Yamaha dealer for proper mainte-
nance intervals.
WARNINGWARNING
CAUTION:

7
EVERY
INITIAL1,000(600)
N° ITEM
1 * Fuel line
2 Spark plug
3 Air filter
4 * Battery
5 * Front brake (disc)
6 * Rear brake (drum)
7 * Wheels
8 * Tires
9 * Wheel bearings
10 * Steering bearings
CHECKS AND MAINTENANCE JOBS
• Check fuel hoses and vacuum hose for cracks or damage• Replace if necessary.
• Check condition.• Clean regap or replace if necessary.
• Clean or replace if necessary.
• Check electrolyte level and specific gravity.• Correct or recharge if necessary.• Make sure that the breather hose is properly routed.
• Check operation, fluid level and vehicle for fluid leakage.(See NOTE page 7-3)
• Correct accordingly.• Replace brake pads if necessary.
• Check operation.• Adjust brake lever free play and replace brake shoes if necessary.
• Check balance, runout and for damage.• Rebalance or replace if necessary.
• Check tread depth and for damage.• Replace if necessary.• Check air pressure.• Correct if necessary.
• Check bearing for looseness or damage.• Replace if necessary.
• Check bearing play and steering for roughness• Correct accordingly.• Lubricate with lithium soap base grease every 24,000 (16,000)
or 24 months (whichever occurs first)
3,000(2,000) or6 months(whichever
occurs first)
6,000(4,000) or12 months
(whichever
occurs first)
PERIODIC MAINTENANCE AND MINOR REPAIR
7-2
PERIODIC MAINTENANCE/LUBRICATION INTERVALS Units: Km (miles)

7
PERIODIC MAINTENANCE AND MINOR REPAIR
7-3
Units: Km (miles)
N° ITEM
11 * Chassis fasteners
12 Centerstand
13 * Front fork
14 * Rear shock absorber
15 * Carburetor
16 * Autolube pump
17 Final transmission oil
18 * V-belt
CHECKS AND MAINTENANCE JOBS
• Make sure that all nuts, bolts and screws are properly tightened.• Tighten if necessary.
• Check operation.• Lubricate and repair if necessary.
• Check operation and for oil leakage.• Correct accordingly.
• Check operation and shock absorber for oil leakage.• Replace shock absorber if necessary.
• Check engine idling speed and starter operation.• Adjust if necessary.
• Check operation.• Correct if necessary.• Bleed if necessary.
• Check oil level and vehicle for oil leakage.• Change oil at initial 1,000 (600) and thereafter every
24,000 (16,000) or 24 months (whichever occurs first).
• Check damage and wear.• Replace if necessary.
EVERYINITIAL1,000(600)
3,000(2,000) or6 months(whichever
occurs first)
6,000(4,000) or12 months
(whichever
occurs first)
REPLACE
Items maked with an asterisk (*) require special tools, data and technical skills for servicing. Take the scooter to a Yamaha dealer when servicing theseitems.
NOTE:
• The air filter needs more frequent service if you are riding in unusually wet or dusty areas.
• Hydraulic brake system
• When disassembling the master cylinder or caliper cylinder, always replace the brake fluid. Check the brake fluid
level regularly and fill as required.
• Replace the brake hoses every four years or if cracked or damaged.

7
PERIODIC MAINTENANCE AND MINOR REPAIR
7-4
1. Spark plug gap
1
EAH20202
Spark plug inspectionThe spark plug is an important engine
component and is easy to inspect. The
condition of the spark plug can indicate
the condition of the engine. The ideal
color on the white porcelain insulator
around the center electrode is a me-
dium-to-light tan color for a scooter that
is being ridden normally. Do not attempt
to diagnose any problems yourself.
Instead, take the scooter to a Yamaha
dealer. You should periodically remove
and inspect the spark plug because
heat and deposits will cause the spark
plug to slowly break down and erode.
If electrode erosion becomes exces-
sive, or if carbon and other deposits are
excessive, you should replace the
spark plugs with the specified plug.
Standard spark plug:
BR8HS (NGK)
Before installing the spark plug,
measure the electrode gap with a wire
thickness gauge and adjust the gap to
specification as necessary.
Spark plug gap:
0.5 ~ 0.7 mm (0.020 ~ 0.031 in)
When installing the plug, always clean
the gasket surface and use a new
gasket. Wipe off any grime from the
threads and tighten the spark plug to
the specified torque.
Tightening torque:
Spark plug:
20 Nm (2.0 m·kg, 14 ft·lb)
EUU03801
NOTE:
If a torque wrench is not available when
you are installing a spark plug, a good
estimate of the correct torque is 1/4 to
1/2 turn past finger tight. Have the spark
plug torqued to the correct value as
soon as possible with a torque wrench.

7
PERIODIC MAINTENANCE AND MINOR REPAIR
7-5
1. Drain plug2. Oil filler plug
1
2
EAH40603
Replacing the transmission oila. Place the scooter on a level surface
and put it on the centerstand. The
engine must be warm.
b. Place a receptacle under the drain
plug. Remove the oil filler cap and
the drain plug.
c. Completely drain the transmission
case.
f. Replace the filler cap.
g. After replacing the final transmission
oil, check for oil leakage.
d. Replace the transmission case drain
plug and tighten it, always use a new
gasket.
Tightening torque of drain plug:
18 Nm (1.8 m.kg, 13.0 ft.lb)
e. Fill the transmission case with the
specified quantity of oil.
Transmission oil recommended:
Yamalube 4 (10W30) or
SAE 10W30 type SE motor oil.
Quantity of oil (periodic drai-
nage):
0.11 L (0.10 Imp qt, 0.12 US qt)
Total quantity (when transmis-
sion case is removed):
0.13 L (0.11 Imp qt, 0.14 US qt)
EW000066
Do not let foreign material enter into
the transmission case. Be sure oil
does not get on tire or wheel.
WARNING

7
PERIODIC MAINTENANCE AND MINOR REPAIR
7-6
1
43
2
Recommanded oil :
Yamalube 2-cycle oil or
air-cooled, 2-stroke engine oil
1. Air filter case cover 1. Foam element
1 1
WARNING
EAH66700
Air filter cleaningThis air filter element should becleaned at the specified intervals. Itshould be cleaned more frequently youare riding in unusually wet or dustyareas.1. Remove the air filter case cover by
removing the screws.2. Remove the foam element from its
case. Wash the element gently, butthoroughly, in solvent.
3. Squeeze the excess solvent out ofthe foam element and let it dry.
4. Apply oil to the entire surface of theelement and squeeze out the excessoil. The element should be damp, but
not dripping with oil.
5. Install the element in its case. Besure the sealing edge of the elementperfectly matches with the sealingsurface of its case so there is no airleakage.
6. Install the air filter case cover. Besure that the seal is in place and thatthe bolts are tightened securely toavoid the possibility of unfiltered air
entering the engine.
EUU77000
Use parts cleaning solvent only.
Never use gasoline or low flash point
solvents which may lead to a fire or
explosion.
EUU42300
Do not twist or wring out the foam
element. This could damage the
foam material.
EUU42400
The engine should never be run
without the air filter element
installed; excessive piston and/or
cylinder wear may result.
CAUTION:
WARNING

7
PERIODIC MAINTENANCE AND MINOR REPAIR
7-7
EAH92300
Carburetor adjustmentThe carburetor is a vital part of the
engine and requires very sophisticated
adjustment. Most adjustments should
be left to a Yamaha dealer who has the
professional knowledge and
experience to do so.
EAI10801
Autolube pump adjustmentThe autolube pump is a vital part of the
engine and requires very sophisticated
adjustment. Adjusting should be left to
a Yamaha dealer who has the
professional knowledge and
experience to do so.
EAE30100
Throttle gripTurn the throttle grip to see if it operates
properly, and check the free play. Make
sure the grip returns by spring force
when released. Ask a Yamaha dealer
to make any necessary adjustments.

7
PERIODIC MAINTENANCE AND MINOR REPAIR
7-8
@
EAH90301
Throttle cable adjustment
Adjust the throttle cable by turning the
adjuster so that proper free play at the
throttle grip is obtained.
@ Free play: 1.5 ~ 3.0 mm
(0.06 ~ 0.12 in)
1. Loosen the lock nut.
2. Turn the adjuster in or out until
specified free play is obtained.
3. Tighten the lock nut.
EUU06400
NOTE:
Before adjusting the throttle cable free
play, the engine idling speed should be
adjusted.
EAE96501
TiresCheck both front and rear tire pressu-
res. Also check for nails, fractions of
glass, or stones embedded in the tire
treads. Check the run-out of each tire
rim, and recondition, as ne-cessary. Ask
a Yamaha dealer, if required.EUU73702
1. Proper loading is important for
several characteristics of your
scooter; such as handling,
braking, performance and safety.
NEVER OVERLOAD YOUR SCOO-
TER. Make sure the total weight
of the cargo, rider, and accesso-
ries (fairing, saddlebags, etc. if
approved for this model) does not
exceed the maximum load of the
scooter. Operation of an over-
loaded scooter could cause tire
damage, an accident, or even
injury.
2. Improper tire pressure greatly af-
fects tire life and handling. Check
the pressure of both tires prior to
each trip and adjust properly if
necessary. If tire pressure is too
high, shocks from the road will
not be damped and will be carried
to the frame and handlebars, thus
adversely affecting riding
comfort. In addition, scooter
stability will be poor when ma-
king a turn. If tire pressure is too
low, tires will be deformed greatly,
thus shortening tire life. When
braking, the tires could slip over
the wheel rims and the tubes
could be damaged. Also, when
turning a corner or going around
a curve, the scooter could easily
turn over.
WARNING

7
PERIODIC MAINTENANCE AND MINOR REPAIR
7-9
Minimum tire treaddepth (front and rear):
0.8 mm(0.031 in)
Too high
Too low
CE-05US
Basic weight: With oil
and full fuel tank
Maximum load*:
Cold tire pressure: RearFront
Up to 90 kg(198 lb) *:
90 kg (198 lb) load~ maximum load*
78 kg(172 lb)
152 kg (335 lb)
125 kPa1.25 kg/cm
2
100 kPa1.00 kg/cm
2150 kPa
1.50 kg/cm2
100 kPa1.00 kg/cm
2
15 psi 18 psi
15 psi 21 psi
* : Load is the total weight of cargo, rider,passenger and accessories.
WARNING
If tire treads are excessively worn, the
scooter tends to slip or skid on wet
roads or even on paved roads covered
with dirt. If center tread depth shows
crosswise lines, it means that the tire
is worn to its limit. Replace the tire.
EUU68000
It is dangerous to ride with a worn-out
tire. When a tire tread begins to show
lines, have a Yamaha dealer replace the
tire immediately. Brakes, tires, and
related wheel parts replacement should
be left to a Yamaha Service Technician.
3
1
2
1. Tread depth 2. Side wall 3. Wear indicator

7
PERIODIC MAINTENANCE AND MINOR REPAIR
7-10
1. Free play 1. Free play 1. Adjuster2. To reduce free play3. To increase free play
12
3
11
EAH89600
Rear brake adjustmentThe rear brake lever free play should
be adjusted to 10 ~ 20 mm
(0.4 ~ 0.8 in) at the brake lever end.
Adjustment is accomplished at the
brake hub. To adjust, turn the adjuster
clockwise to reduce play or
counterclockwise to increase play.
EAH86600
Front brake adjustmentThe front brake lever should have a free
play of 10 ~ 20 mm (0.4 ~ 0.8 in) at the
lever end. If not, ask a Yamaha dealer
to adjust it.
WARNINGEUU68800
An incorrect free play indicates a
hazardous condition in the brake
system. Do not operate the scooter
until the failure in the brake system
is corrected. Ask a Yamaha dealer
for immediate repairs.
WARNINGEUU73200
When it is impossible to make the
proper adjustment, ask a Yamaha
dealer.
7
1
PERIODIC MAINTENANCE AND MINOR REPAIR
7-11
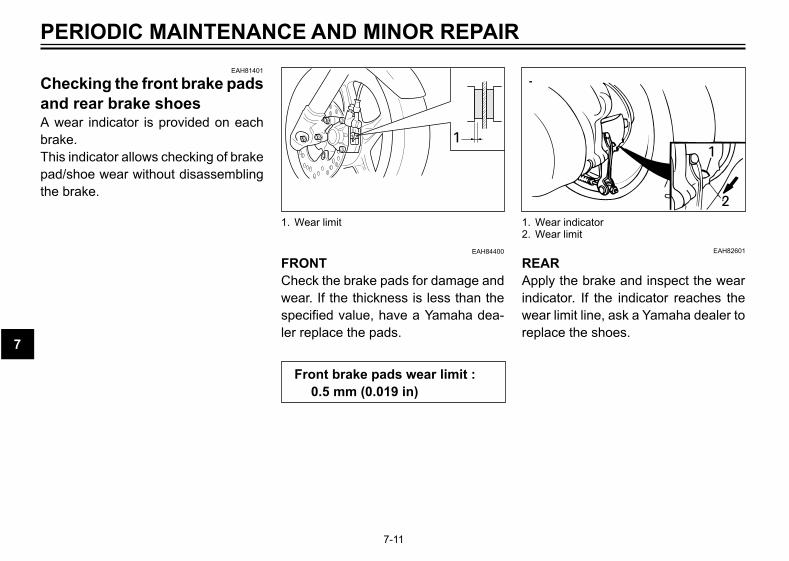
Front brake pads wear limit :
0.5 mm (0.019 in)
1. Wear limit 1. Wear indicator2. Wear limit
EAH81401
Checking the front brake pads
and rear brake shoesA wear indicator is provided on each
brake.
This indicator allows checking of brake
pad/shoe wear without disassembling
the brake.
EAH84400
FRONT
Check the brake pads for damage and
wear. If the thickness is less than the
specified value, have a Yamaha dea-
ler replace the pads.
EAH82601
REAR
Apply the brake and inspect the wear
indicator. If the indicator reaches the
wear limit line, ask a Yamaha dealer to
replace the shoes.
1
2

7
PERIODIC MAINTENANCE AND MINOR REPAIR
7-12
1. Lower brake fluid levelEAH88202
Inspecting the brake fluid levelInsufficient brake fluid may let air enter
the brake system, possibly causing the
brakes to become ineffective. Before
riding, check that the brake fluid is
above the lower level and replenish
when necessary.
Observe these precautions:
1. When checking the fluid level, make
sure the top of the master cylinder is
level by turning the handlebars.
2. Use only the designated quality
brake fluid. Otherwise, the rubber
seals may deteriorate, causing
leakage and poor brake perfor-
mance.
Recommended brake fluid:
DOT #3 or DOT #4
3. Refill with the same type of brake
fluid. Mixing fluids may result in a
harmful chemical reaction and lead
to poor brake performance.
4. Be careful that water does not enter
the master cylinder when refilling.
Water will significantly lower the
boiling point of the fluid and may
result in “VAPOR LOCK”.
5. Brake fluid may deteriorate painted
surfaces or plastic parts. Always
clean up spilled fluid immediately.
6. Have a Yamaha dealer check the
cause if the brake fluid level goes
down.
LOWER
1

7
PERIODIC MAINTENANCE AND MINOR REPAIR
7-13
EAH83501
Brake fluid replacement1. Complete fluid replacement should
be done only by trained Yamaha ser-
vice personnel.
2. Have a Yamaha dealer replace the
following components during
periodic maintenance or when they
are damaged or leaking.
a. Replace all hoses every four
years.
EAI10701*
Cable inspection and
lubrication
Lubricate the inner cable and the cable
end. If it does not operate smoothly, ask
a Yamaha dealer to replace them.
Recommended lubricant:
Yamalube 4 (10W30) or
SAE 10W30 motor oil
EAI10201
Throttle cable and grip
lubricationThe throttle twist grip assembly should
be greased at the time that the cable is
lubricated, since the grip must be
removed to get at the end of the throttle
cable. After removing the screws, hold
the end of the cable up in the air and
put in several drops of lubricant. With
the throttle grip disassembled, coat the
metal surface of the grip assembly with
a suitable all-purpose grease.
EUU64601
Damage to the outer housing of
cables may allow internal rusting
and cause interference with cable
movement. Replace damaged
cables as soon as possible to
prevent unsafe conditions.
WARNING

7
PERIODIC MAINTENANCE AND MINOR REPAIR
7-14
EAI32100
Brake leverLubricate the pivoting parts.
Recommended lubricant:
Yamalube 4 (10W30) or
SAE 10W30 motor oil
EAI30801*
CenterstandLubricate the pivoting parts. Check to
see that the centerstand moves up and
down smoothly.
Recommended lubricant:
Yamalube 4 (10W30) or
SAE 10W30 motor oil
EUU69301*
If the centerstand does not move
smoothly, consult a Yamaha dealer.
EAI20501
Front fork inspection
1. Visual check
Check for scratches/damage on the
inner tube and excessive oil leakage
from the front fork.
WARNING EUU65700
Securely support the scooter so
there is no danger of it falling over.
WARNING

7
PERIODIC MAINTENANCE AND MINOR REPAIR
7-15
2. Operation check
Place the scooter on a level place.
a. Hold the scooter in an upright po-
sition and apply the front brake.
b. Stroke the front fork up and down
several times.
EAI60301
Steering inspectionPeriodically inspect the condition of the
steering. Worn out or loose steering
bearings may be dangerous. Place a
stand under the engine to raise the front
wheel off the ground. Hold the lower
end of the front fork and try to move
them forward and backward. If any free
play can be felt, ask a Yamaha dealer
to inspect and adjust the steering. Ins-
pection is easier if the front wheel is
removed.
EAI60201
Wheel bearingsIf there is play in the front or rear wheel
hub or if the wheel does not turn
smoothly, have a Yamaha dealer
inspect the wheel bearings. The wheel
bearings should be inspected
according to the Maintenance
Schedule.EUU42500
If any damage or unsmooth
movement is found with the front
fork, consult a Yamaha dealer.
CAUTION:
WARNINGEUU65700
Securely support the scooter so
there is no danger of it falling over.

7
PERIODIC MAINTENANCE AND MINOR REPAIR
7-16
1. Battery2. Battery breather hose
A
A
2
1
EAI70801
BatteryCheck the level of the battery electrolyte
and make sure that the terminals are
tight. Add distilled water if the electrolyte
level is low.
EAI70002
Recharging the battery.Disconnect the battery and remove it
from its compartment. Remove the
element plugs. The value of the battery
charge is one tenth of its capacity (for
example, a battery having a capacity
of 4 amps must be recharged with an
amperage value of 0.4 amps). When
the recharging is complete, check the
electrolyte level and top it up if required.
EUU33601
When inspecting the battery, be sure
the breather pipe is routed correctly.
If the breather pipe is positioned in
such a way as to cause battery
electrolyte or gas to exit onto the
frame, structural and cosmetic
damage to the scooter can occur.
CAUTION:
WARNINGEUU65800
Battery electrolyte is poisonous and
dangerous, causing severe burns,
etc. It contains sulfuric acid. Avoid
contact with skin, eyes or clothing.
Antidote:
EXTERNAL: Flush with water.
INTERNAL: Drink large quantities of
water or milk. Follow with milk of
magnesia, beaten egg, or vegetable
oil. Call a physician immediately.
EYES: Flush with water for 15 minu-
tes and get prompt medical atten-
tion. Batteries produce explosive
gases. Keep sparks, flame, cigaret-
tes etc., away. Ventilate when
charging or using in an enclosed
space. Always shield your eyes
when working near batteries.
KEEP OUT OF REACH OF
CHILDREN.

7
PERIODIC MAINTENANCE AND MINOR REPAIR
7-17
+UPPERLOWER
1
2
1. Upper level2. Lower level
1. Battery2. Fuse
1
2
EAI91802
Fuse replacement1. The fuse case is located under the
seat.
2. If a fuse is blown, turn off the igni-
tion switch and the switch of the cir-
cuit in question. Install a new fuse of
proper amperage. Turn on the
switches and see if the electrical
device operates. If the fuse
immediately blows again, consult a
Yamaha dealer.
Specified fuse : 7A
CAUTION:EUU33800
Normal tap water contains minerals
which are harmful to a battery;
therefore, refill only with distilled
water.
EAI70301
Replenishing the battery fluidA poorly maintained battery will corrode
and discharge quickly. The battery fluid
should be checked at least once a
month.
1. The level should be between the
upper and lower level marks. Use
only distilled water if refilling is
necessary.
2. When the scooter will not be used
for a month or longer, remove the
battery and store it in a cool, dark
place. Completely recharge the
battery before reusing.
3. If the battery will be stored for a lon-
ger period than the above, check the
specific gravity of the fluid at least
once a month and recharge the
battery when it is too low.
4. Always make sure the connections
are correct when putting the battery
back in the scooter. Make sure the
breather pipe is properly connected
and is not damaged or obstructed.

7
PERIODIC MAINTENANCE AND MINOR REPAIR
7-18
1. Bulb2. Taillight lens
1 2
EAI85800
HeadlightIf the headlight beam adjustment or
headlight bulb replacement is
necessary, consult a Yamaha dealer.
EAJ10702*
Replacing the rear lamp bulb1. Remove the taillight lens by
removing the screws.
2. Push in the bulb and rotate it
counterclockwise to remove the
defective bulb.
3. Replace the gasket if necessary.
4. To reassemble, reverse the above
procedure.
EUU34400
Do not use fuses of higher amperage
rating than those recommended.
Substitution of a fuse of improper
rating can cause extensive electrical
system damage and possibly a fire.
CAUTION:

7
PERIODIC MAINTENANCE AND MINOR REPAIR
7-19
EAJ50002
TroubleshootingAlthough Yamaha scooters receive a
rigid inspection before shipment from
the factory, trouble may occur during
operation. Any problem in the fuel, com-
pression, or ignition systems can cause
poor starting and loss of power. The
troubleshooting chart describes a quick,
easy procedure for making checks. If
your scooter requires any repair, bring
it to a Yamaha dealer. The skilled
technicians at a Yamaha dealership
have the tools, experience, and know-
how to properly service your scooter.
Use only genuine Yamaha parts on
your scooter. Imitation parts may look
like Yamaha parts, but they are often
inferior. Consequently, they have a
shorter service life and can lead to
expensive repair bills.
EAJ40400*
Flasher light bulb replacement1. Take off the lense by removing the
screws.
2. Push in the defective bulb and turn
it counterclockwise to remove it.
3. For installation, reverse the above
procedure.

7
PERIODIC MAINTENANCE AND MINOR REPAIR
7-20
EAJ50700
Troubleshooting chart
WARNINGEUU66300
Never check the fuel system while
smoking or in the vicinity of an open
flame.
Fuel check No startOpen tank capto check internalpressure
Negative
Normal
Have tank capbreather inspected
Add fuel(fuel OK)
Start OK
No start Go to compressioncheck
Compressioncheck
No start(fuel OK)
Turn overengine
Normal resistance
Unusually light orheavy resistance
Start engine
No start
OK
Go to ignition check
Have engine inspected
Ignition check Fuel OKCompression OK
No start Replace spark plug
Start
No start
OK
Go to battery check
Battery checkFuel OKCompression OKIgnition OK
No start Use electric starter(if applicable)
Engine turns fast(battery is good)
Engine turns slowly(electrical problem)
Start
No start
OK
Have engineinspected
Have battery chargedand system inspected
1. Fuel
2. Compression
3. Ignition
4. Battery

8
SCOOTER CARE AND STORAGE
Cleaning ........................................................................................... 8-1
Storage............................................................................................. 8-2

8
SCOOTER CARE AND STORAGE
8-1
7. Automotive-type wax may be applied
to all painted and chrome-plated sur-
faces. Avoid combination cleaner-
waxes. Many contain abrasives
which may mar the paint or
protective finish. When finished, start
the engine and let it idle for several
minutes.
4. Once the majority of the dirt has
been hosed off, wash all surfaces
with warm water and mild, detergent-
type soap. An old toothbrush or bottle
brush is handy for hard-to-get-at pla-
ces.
5. Rinse the scooter off immediately
with clean water and dry all surfa-
ces with a chamois, clean towel, or
soft absorbent cloth.
6. Clean the seat with a vinyl upholstery
cleaner to keep the cover pliable and
glossy.
CAUTION:EUU34602
Excessive hose pressure may cause
water seepage and deterioration of
wheel bearings, front fork, brakes,
transmission seals and electrical
devices. Many expensive repair bills
have resulted from improper high
pressure detergent applications
such as those available in coin-
operated car washers.
EAK01102
A. CLEANINGFrequent, thorough cleaning of your
scooter will not only enhance its
appearance but will improve its general
performance and extend the useful life
of many components.
1. Before cleaning the scooter:
a. Block off the end of the exhaust
pipe to prevent water entry; a
plastic bag and strong rubber
band may be used.
b. Make sure the spark plug(s) and
all fil ler caps are properly
installed.
2. If the engine case is excessively
greasy, apply degreaser with a paint
brush. Do not apply degreaser to
wheel axles.
3. Rinse the dirt and degreaser off with
a garden hose. Use only enough
pressure to do the job.
CAUTION:All of the fan inlets need to be clean
and free from foreign materials.

8
SCOOTER CARE AND STORAGE
8-2
EAK01500
B. STORAGELong term storage (60 days or more)
of your scooter will require some
preventive procedures to guard against
deterioration. After thoroughly cleaning
the scooter, prepare for storage as
follows:
1. Drain the fuel tank, fuel lines, and
carburetor float bowl(s).
2. Remove the spark plug, pour about
one tablespoon of SAE 10W30 or
20W40 motor oil in the spark plug
hole and reinstall the spark plug. Kick
the engine over several times (with
the ignition off) to coat the cylinder
walls with oil.
3. Lubricate all control cables.
4. Block up the frame to raise both
wheels off the ground.
5. Tie a plastic bag over the exhaust
pipe outlet to prevent moisture from
entering.
6. If storing in a humid or salt-air
atmosphere, coat all exposed metal
surfaces with a light film of oil. Do
not apply oil to any rubber parts or
the seat cover.
7. Remove the battery and charge it.
Store it in a dry place and recharge
it once a month. Do not store the
battery in an excessively warm or
cold place (less than 0°C (30°F) or
more than 30°C (90°F)).
EUU66400
When using the starter motor to
crank the engine, remove the spark
plug wires, and ground them to
prevent sparking.
EUU05800
NOTE:
Make any necessary repairs before
storing the scooter.
WARNING

9
SPECIFICATIONS
Specifications ................................................................................... 9-1

9
FAU01038
SPECIFICATIONS
9-1
SpecificationsModel CW50
Dimensions:Overall lenght 1740 mm (68.5 in)Overall width 665 mm (26.2 in)
Overall Height 1050 mm (41.3 in)Seat height 745 mm (29.3 in)Wheel base 1170 mm (46.1 in)Minimum ground clearance 125 mm (4.9 in)Minimum turning radius 1800 mm (70.9 in)
Basic weight
(with oil and full fuel tank): 78 kg (172 lb)Engine:
Type Air cooled, 2 strokes
Cylinder arrangement Single cyclinder, verticalDisplacement 49.2 ccBore x Stroke 40.0 x 39.2 mm (1.57 x 1.54 in)Compression ratio 7.01 :1Starting system Electric and kick starter
Lubrication system Separate lubrication (Autolube)
Engine oil:
Type Yamalube 2-cycle oil orair cooled 2-stroke engine oil
Classification JASO FC or ISO EG-C, EG-DCapacity 1.3 L (1.14 Imp qt, 1.37 US qt)
Transmission oil:
Type Yamalube 4 (10W30) orSAE 10W30 type SE motor oil
Capacity 0.13 L (0.114 Imp qt, 0.137 US qt)
Air filter: Wet type element
Fuel:
Type Unleaded fuelTank capacity 4.6 L (1.01 Imp gal, 1.21 US gal)
Carburateur:
Type / quantity PHBN 12HS / 1
Manufacturer DELL’ORTO
Spark plug:
Type / Manufacturer BR8HS / NGKGap 0.5 ~ 0.7 mm
Cluth type: Dry, centrifugal automatic
Transmission:
Primary reduction system Helical gear
Primary reduction ratio 52/13 (4.000)Secondary reduction system Spur gearSecondary reduction ratio 43/13 (3.307)Transmission type Single-speed automatic
(V-belt)
Chassis:
Frame type Steel Tube UnderboneCaster angle 27 °Trail 90 mm (3.54 in)

9
SPECIFICATIONS
9-2
Tires:
Type TubelessSize
Front 120/90-10
Rear 130/90-10Manufacturer / model:
Front and Rear MICHELIN / DUNLOPREGGAE TL / TRAIL MAX
Maximum load* 152 kg (335 lb)
Cold tire pressure:Up to 90 kg
Front 100 kPa (1.00 kg/cm2, 15 psi)Rear 125 kPa (1.25 kg/cm2, 18 psi)
90 kg load ~ Maximum load*
Front 100 kPa (1.00 kg/cm2, 15 psi)Rear 150 kPa (1.50 kg/cm2, 21 psi)
* Load is the total weight of cargo, rider, passenger and accessories.
Wheels:
Type:Front / Rear Cast / aluminium
Size:
Front / Rear MT 3.50 x 10
Brakes:
Front:Type Disc brake
Operation Right hand operationBrake fluid type DOT #3 or DOT #4Rear:Type Drum brakeOperation Left hand operation
Suspension:
Front Telescopic forkRear Unit swing
Shock absorber:
Front Coil spring / Oil damperRear Coil spring / Oil damper
Wheel travel:
Front 62 mm (2.44 in)Rear 60 mm (2.36 in)
Electrical:
Ignition system C.D.I
Generator system Flywheel magnetoBattery:Type GM4-3B, YB4L-B, FB4L-BCapacity 12V 4AHHeadlight Sealed beam
Bulb voltage, wattage x quantity:
Headlight 12V,25W/25W x 2Taillight/stop 12V,5W/21W x 1Front flasher 12V,10W x 2
Rear flasher 12V,10W x 2Meter light 12V,3.4W x 1High beam indicator light 12V,1.7W x 1Oil warning light 12V,3.4W x 1Turn indicator light 12V,1.7W x 1
Fuse:
Main fuse 7 A

10
CONSUMER INFORMATION
SCOOTER IDENTIFICATION ........................................................ 10-1
Identification numbers record ......................................................... 10-1
Key identification number ............................................................... 10-1
Vehicule identification number ....................................................... 10-1
Engine serial number ..................................................................... 10-2
Reporting safety defects ................................................................ 10-3
Scooter noise regulation ................................................................ 10-4
Riva limited warranty ...................................................................... 10-5
Yamaha extended service .............................................................. 10-7

10
CONSUMER INFORMATION
10-1
EAA60000
SCOOTER IDENTIFICATION ZADI
1
1. Key identification number 1. Vehicule identification number
1EAA60402
Identification numbers recordRecord the key identification number,
vehicle identification number and
engine serial number in the spaces
provided for assistance when ordering
spare parts from your Yamaha dealer
or for reference in case the vehicle is
stolen.
1. KEY IDENTIFICATION NUMBER :
2. VEHICLE IDENTIFICATION
NUMBER :
3. ENGINE SERIAL NUMBER :
EAA61400
Key identification numberThe key identification number is
stamped on the key. Record this
number in the space provided for
reference when obtaining a new key.
EAA80200
Vehicle identification numberThe vehicle identification number is
stamped into the frame.
EUU00400
NOTE:
The vehicle identification number is
used to identify your scooter and may
be used to register your scooter with
the licensing authority in your state.

10
CONSUMER INFORMATION
10-2
1. Engine serial number
1
EAA70201
Engine serial numberThe engine serial number is stamped
into the transmission case.
EUU00300
NOTE:
The first three digits of these numbers
are for model identification; the
remaining digits are the unit production
number. Keep a record of these
numbers for reference when ordering
parts from a Yamaha dealer.

10
CONSUMER INFORMATION
EAL00900
REPORTING SAFETY DEFECTS
If you believe that your vehicle has a defect which could cause a crash or could cause injury or death, you should immediately
inform the National Highway Traffic Safety Administration (NHTSA) in addition to notifying YAMAHA MOTOR CORP.
U.S.A.. If NHTSA receives similar complaints, it may open an investigation, and if it finds that a safety defect exists in group
of vehicles, it may order a recall and remedy campaign. However, NHTSA cannot become involved in individual problems
between you, your dealer, or YAMAHA MOTOR CORP. U.S.A..
To contact NHTSA, you may either call the Auto Safety Hotline tollfree at 1-800-424-9393 (or 366-0123 in Washington,
D.C. area) or write to : NHTSA, U.S. Department of Transportation, Washington, D.C. 20590. You can also obtain other
information about motor vehicle safety from the Hotline.
10-3

10
CONSUMER INFORMATION
EAL00300
SCOOTER NOISE REGULATION
TAMPERING WITH NOISE CONTROL SYSTEM PROHIBITED :
Federal law prohibits the following acts or the causing thereof : (1) The removal or rendering inoperative by any person
other than for purposes of maintenance, repair, or replacement of any device or element of design incorporated into any
new vehicle for the purpose of noise control prior to its sale or delivery to the ultimate purchaser or while it is in use or (2)
the use of the vehicle after such device or element of design has been removed or rendered inoperative by any person.
"AMONG THOSE ACTS PRESUMED TO CONSTITUTE TAMPERING ARE THE ACTS LISTED BELOW".
These acts include tampering with the following systems; i.e, modification, removal, etc.
Exhaust system
Intake system
Muffler
Exhaust pipe
Silencer
Air cleaner case
Air cleaner element
Intake duct
10-4

10
10-5
CONSUMER INFORMATION
YAMAHA MOTOR CORPORATION, U.S.A.
RIVA LIMITED WARRANTY
Yamaha Motor Corporation, U.S.A. hereby warrants thateach new Yamaha Riva purchased from an authorisedYamaha Riva dealer in the continental United Stateswill be free from defects in material and workmanshipfor the period of time stated herein, subject to certainstated limitations.
THE PERIOD OF WARRANTY for Yamaha Riva shallbe one (1) year from the date of purchase, with no mile-age limitations.
MODELS EXCLUDED FROM WARRANTY includethose used for non-Yamaha-authorised renting, leas-ing, or other commercial purposes.
DURING THE PERIOD OF WARRANTY any author-ised Yamaha motorcycle dealer will, free of charge, re-pair or replace, at Yamaha’s option, any part adjudgeddefective by Yamaha due to faulty workmanship ormaterial from the factory. Parts used in warranty repairswill be warranted for the balance of the product’swarranty period. All parts replaced under warranty be-come property of Yamaha Motor Corporation U.S.A.
GENERAL EXCLUSIONS from this warranty shall in-clude any failures caused by :a. Competition or racing use.b. Installation of parts or accessories that are not quali-
tatively equivalent to genuine Yamaha parts.c. Abnormal strain, neglect, or abuse.d. Lack of proper maintenance.e. Accident or collision damage.f. Damage due to improper transportation.
SPECIFIC EXCLUSIONS from this warranty shall in-clude parts replaced due to normal wear or routine main-tenance.
THE CUSTOMER’S RESPONSIBILITY under this war-ranty shall be to :1. Operate and maintain the Riva as specified in the
appropriate Owner’s Manual, and2. Give notice to an authorised Yamaha Riva dealer of
any all apparent defects within ten (10) days afterdiscovery, and make the machine available at thattime for inspection and repairs at such dealer’s placeof business.
WARRANTY TRANSFER : To transfer the warranty fromthe original purchaser to any subsequent purchaser, itis imperative that the machine be inspected and regis-tered for warranty by an authorised Yamaha Riva dealer.In order for this warranty to remain in effect, this inspec-tion and registration must take place within ten (10) daysafter transfer. An inspection and registration fee will becharged for this service.
EMISSIONS CONTROL SYSTEM WARRANTY
Yamaha Motor Corporation, U.S.A. also warrants to theultimate purchaser and each subsequent purchaser ofeach Yamaha Riva covered by this warranty with a dis-placement of 50cc or greater, that the vehicle is de-signed, built, and equipped so as to conform at the timeof sale with all U.S. emissions standards applicable atthe time of manufacture and that it is free from defectsin materials and workmanship which would cause it notto meet these standards within the periods listed imme-diately below. Failure other than those resulting fromdefects in materials or workmanship which arise solelyas a result of owner abuse and/or lack of proper main-tenance are not covered by this warranty.
ENGINEDISPLACEMENT PERIOD
50cc to 169cc 12,000 km (7,465 miles)or five years, whichever occurs first
170cc to 279cc 18,000 km (11,185 miles)or five years, whichever occurs first
280cc or over 30,000 km (18,641 miles)or five years, whichever occurs first
YAMAHA MOTOR CORPORATION, U.S.A. MAKESNO OTHER WARRANTY OF ANY KIND, EXPRESSED
OR IMPLIED. ALL IMPLIED WARRANTIES OF
MERCHANTABILITY AND FITNESS FOR A PARTICU-
LAR PURPOSE WHICH EXCEED THE OBLIGATIONS
AND TIME LIMITS STATED IN THIS WARRANTY ARE
HEREBY DISCLAIMED BY YAMAHA MOTOR COR-PORATION, U.S.A. AND EXCLUDED FROM THIS
WARRANTY.
SOME STATES DO NOT ALLOW LIMITATIONS ON
HOW LONG AN IMPLED WARRANTY LASTS, SOTHE ABOVE LIMITATION MAY NOT APPLY TO YOU.
ALSO EXCLUDED FROM THIS WARRANTY ARE
ANY INCIDENTAL OR CONSEQUENTIAL DAMAGES
INCLUDING LOSS OF USE. SOME STATES DO NOT
ALLOW THE EXCLUSION OR LIMITATION OF INCI-DENTAL OR CONSEQUENTIAL DAMAGES, SO THE
ABOVE EXCLUSION MAY NOT APPLY TO YOU.
THIS WARRANTY GIVES YOU SPECIFIC LEGAL
RIGHTS, AND YOU MAY ALSO HAVE OTHERRIGHTS WHICH MAY VARY FROM STATE TO STATE.
YAMAHA MOTOR CORPORATION, U.S.AP.O Box 6555
Cypress, California 90630

10
10-6
CONSUMER INFORMATION
WARRANTY QUESTIONS AND ANSWERS
Q. What costs are my responsibility during the warranty period ?A. The customer’s responsibility includes all costs of normal maintenance services,
non-warranty repairs, accident and collision damage, and oil, oil filters, air filters,spark plugs, and brakes shoes or pads.
Q. What are some examples of “abnormal” strain, neglect, or abuse ?A. These terms are general and overlap each other in areas. Specific examples include
: Running the machine out of oil; sustained high-rpm, full-throttle use; operating themachine with a broken or damaged part which cause another part to fail; damageor failure due to improper or careless transportation and or tie down; and so on. Ifyou have any specific questions on operation or maintenance, please contact yourdealer for advice.
Q. Does the warranty cover incidental costs such as towing or transportation due to afailure ?
A. No. The warranty is limited to repair of the machine itself.
Q. May I perform any or all the recommended maintenance shown in the Owner’sManual instead of having the dealer do them ?
A. Yes, if you are a qualified mechanic and follow the procedures specified in theOwner’s and Service Manuals. We do recommend, however, that items requiringspecials tools or equipment be done by a Yamaha Riva dealer.
Q. Will the warranty be void or cancelled if I do not operate or maintain my new Rivaexactly as specified in the Owner’s Manual ?
A. No. The warranty on a new Riva cannot be “ voided ” or “ cancelled ”. However, ifa particular failure is caused by operation or maintenance other than as shownin the Owner’s Manual, that failure may not be covered under warranty.
Q. What responsibility does my dealer have under this warranty ?A. Each Yamaha Riva dealer is expected to :
1. Completely set up every new machine before sale.2. Explain the operation, maintenance, and warranty requirements to your satis-
faction at the time of sale, and upon your request at any later date.3. In addition, each Yamaha Riva dealer is held responsible for his setup, service
and warranty repair work.
Q. Is the warranty transferable to second owners ?A. Yes. The remainder of the existing warranty can be transferred upon request. The
unit has to be inspected and re-registered by an authorized Yamaha Riva dealer forthe warranty coverage to remain effective.
CUSTOMER SERVICE
If your machine requires warranty service, you must take it to any authorized YamahaRiva dealer within the continental United States. Be sure to bring your warrantyregistration identification or other valid proof of the original date of purchase. If a ques-tion or problem arises regarding warranty, first contact the owner of the dealership.Since all warranty matters are handled at the dealer level, this person is in best posi-tion to help you. If you are not satisfied and require additional assistance, please write:
YAMAHA MOTOR CORPORATION U.S.ACUSTOMER RELATIONS DEPARTMENT
P.O Box 6555Cypress, California 90630
When contacting Yamaha Motor Corporation, U.S.A. don’t forget to include any impor-tant information such as names, addresses, model, engine serial number, dates, andreceipts.
CHANGE OF ADDRESS
The federal government requires each manufacturer of a motor vehicle to maintain acomplete, up-to-date list of all first purchasers against the possibility of a safety-relateddefect and recall. This list is compiled from the purchase registrations sent to YamahaMotor Corporation, U.S.A. by the selling dealer at the time of your purchase.
If you should move after you have purchased your new Riva, please advise us of yournew address by sending a postcard listing your Riva model name, V.I.N. (frame number),dealer number (or dealer’s name) as it is shown on your warranty identification, yourname and new mailing address. Mail to :
YAMAHA MOTOR CORPORATION, U.S.A.WARRANTY DEPARTMENT
P.O Box 6555Cypress, California 90630
This will ensure that Yamaha Motor Corporation, U.S.A. has an up-to-date registrationrecord in accordance with federal law.

10
10-7
CONSUMER INFORMATION
YAMAHA EXTENDED SERVICE (Y.E.S.)
Keep your Yamaha protected even after your warranty ex-pires with genuine Yamaha Extended Service (Y.E.S.).
• Y.E.S. is designed and administered by Yamaha MotorCorporation to provide maximum owner satisfaction. Youget uninterrupted factory-backed coverage for extrapeace of mind.
• Y.E.S. is flexible. You choose the plan that’s right foryou: 12 months, 24 months, or 36 months beyond yourwarranty period.
• Y.E.S. is designed and administered by the sameYamaha people who handle your warranty - and it showsin the comprehensive coverage benefits. There are nomileage limitations. Coverage isn’t limited to “movingparts” or the “drive train” like many other plans. And Y.E.S.covers manufacturing defects just like the warranty. Seethe sample contract at your Yamaha dealer to see howcomforting uninterrupted factory-backed protection canbe.
• You don’t have to pay anything for covered repairs.There’s no deductible to pay, and repairs aren’t “pro-rated”. You don’t have any “out-of-pocket” expenses forcovered repairs.
• In addition, Travel and Recreation Interruption Protec-tion (TRIP) is included at no extra cost. TRIP gives youup to $150 reimbursement per occurrence for anyreasonable expenses you incur because your Yamahaneeds covered service : replacement vehicle rental,emergency towing, phone calls, even food and lodgingwhen you are away from home. This superb coveragegoes into effect when you purchase Y.E.S., so it appliesto any warranty repairs as well as covered repairs duringyour entire Y.E.S. plan period.
• Y.E.S. coverage is honored at any authorized Yamahadealer nationwide.
• Y.E.S. coverage is transferrable to a new owner if yousell or trade-in. That can make your Yamaha much morevaluable !
This excellent Y.E.S. plan coverage is only available toYamaha owners like you, and only while your Yamaha isstill within the Yamaha Limited Warranty period. So visityour authorized Yamaha dealer to get all the facts. Hecan show you how easy it is to protect your investmentwith Yamaha Extended Service.

10
Y E SYAMAHA EXTENDED SERVICE
10-8
CONSUMER INFORMATION
We urge you to act now. You’ll get the excellent benefitsof TRIP coverage right away, and you’ll rest easy knowingyou’ll have strong factory-backed protection even afteryour Yamaha Limited Warranty expires. You can also savemoney : Y.E.S. costs less within the first 90 days after youbuy your Yamaha. See your dealer today !
A special note :If visiting your dealer isn’t convenient, contact Yamahawith your Primary ID number (your frame number). We’llbe happy to help you get the Y.E.S. coverage you need.
Yamaha Service MarketingP.O. Box 6555Cypress, CA 90630

INDEX
A
Acceleration ........................................... 6-3Air filter cleaning .................................... 7-6Autolube pump adjustment .................... 7-7
B
Battery ................................................. 7-16Brake fluid replacement ....................... 7-13Brake levers ......................................... 7-14
Braking .................................................. 6-3
C
Cable inspection and lubrication ......... 7-13Carburetor adjustment ........................... 7-7
Catalitic converter(depends on model) .............................. 4-7Centerstand ......................................... 7-14Checking the front brake pads
and the rear brake shoes .................... 7-11FRONT .............................................. 7-11REAR ................................................. 7-11
Cleaning ................................................ 8-1
D
Description ............................................. 3-1Controls /Instruments .......................... 3-3Left view .............................................. 3-1Right view ............................................ 3-2
E
Engine break-in ..................................... 6-4Engine oil ............................................... 4-8Engine serial number .......................... 10-2
F
Flasher light bulb replacement ............ 7-19Front brake adjustment........................ 7-10Front brake lever ................................... 4-5
Front fork inspection ............................ 7-14Fuel ........................................................ 4-6Fuel and oil tank .................................... 4-6Fuel gauge ............................................ 4-4Fuse replacement ................................ 7-17
H
Handlebar switches ............................... 4-4“ENGINE STOP” switch ....................... 4-5“HORN” switch “ ” ........................... 4-4
“LIGHTS” (Dimmer) switch “ , ” ..... 4-4Start switch “ ” ................................... 4-5“TURN” signal switch “ ” .................. 4-4
Headlight ............................................. 7-18
Helmet holder ...................................... 4-10
I
Identification numbers record .............. 10-1Indicator lights ....................................... 4-1
“HIGH BEAM” indicator light “ ” ......... 4-1Oil level indicator light “ ” ................ 4-2“TURN” indicator light “ ” ................. 4-1
Inspecting the brake fluid level ............ 7-12
K
Key identification number .................... 10-1Kick starter ............................................. 4-9
L
Location of the important labels ............ 2-1
M
Main switch ............................................ 4-1
*........................................................... 4-1LOCK ................................................... 4-1OFF ..................................................... 4-1ON ....................................................... 4-1
Oil warning light circuit check ................ 4-3
P
Parking .................................................. 6-5PERIODIC MAINTENANCE /
LUBRICATION INTERVALS .................. 7-2PRE-OPERATION CHECKS ................. 5-1
R
Rear brake adjustment ........................ 7-10Rear brake lever .................................... 4-6Rear carrier ......................................... 4-10Recharging the battery ........................ 7-16Replacing the rear lamp bulb ................ 3-8
Replacing the transmission oil ............... 7-5Replenishing the battery fluid .............. 7-17Reporting safety defects ...................... 10-3Riva limited warranty ........................... 10-5

INDEX
S
SAFETY INFORMATION ....................... 1-2Accessories ......................................... 1-6Gasoline and exhaust gas ................... 1-7
Loading ................................................ 1-5Loading and accessories ..................... 1-5Modification ......................................... 1-4Protective apparel ................................ 1-4Safe riding ........................................... 1-3
SCOOTER IDENTIFICATION ............. 10-1Scooter noise regulation ...................... 10-4Seat ..................................................... 4-10Spark plug inspection ............................ 7-4Specifications ........................................ 9-1
Speedometer ......................................... 4-4Starter lever (CHOKE) ........................... 4-8Starting a warm engine.......................... 6-2Starting and warming up
a cold engine ......................................... 6-1Starting the scooter ............................... 6-3Steering inspection .............................. 7-15Steering lock .......................................... 4-9Storage .................................................. 8-2
T
THINK OF YOUR SAFETY ................... 1-1Throttle cable adjustment ...................... 7-8Throttle cable and grip lubrication ....... 7-13
Throttle grip ........................................... 7-7Tires ....................................................... 7-8Troubleshooting ................................... 7-19Troubleshooting chart .......................... 7-20
V
Vehicule identification number ............. 10-1
W
Wheel bearings ................................... 7-15
Y
Yamaha extended service ................... 10-7

PRINTED IN FRANCE
00.04 (E)
PROTECT YOUR INVESTMENTUse Genuine YAMAHA Parts And Accessories
See your Authorized YAMAHA Dealer for a Genuine YAMAHA
Service Manual
YAMAHA MOTOR CO., LTD.