ZENworks 11 SP2 Linux Management Migration Guide ZENworks 11 SP2 Linux Management Migration Guide...
30
www.novell.com/documentation ZENworks Linux Management Migration Guide ZENworks® 11 Support Pack 2 March 20, 2012
Transcript of ZENworks 11 SP2 Linux Management Migration Guide ZENworks 11 SP2 Linux Management Migration Guide...
www.novell.com/documentation
ZENworks Linux Management Migration GuideZENworks® 11 Support Pack 2
March 20, 2012

Legal Notices
Novell, Inc., makes no representations or warranties with respect to the contents or use of this documentation, and specifically disclaims any express or implied warranties of merchantability or fitness for any particular purpose. Further, Novell, Inc., reserves the right to revise this publication and to make changes to its content, at any time, without obligation to notify any person or entity of such revisions or changes.
Further, Novell, Inc., makes no representations or warranties with respect to any software, and specifically disclaims any express or implied warranties of merchantability or fitness for any particular purpose. Further, Novell, Inc., reserves the right to make changes to any and all parts of Novell software, at any time, without any obligation to notify any person or entity of such changes.
Any products or technical information provided under this Agreement may be subject to U.S. export controls and the trade laws of other countries. You agree to comply with all export control regulations and to obtain any required licenses or classification to export, re-export or import deliverables. You agree not to export or re-export to entities on the current U.S. export exclusion lists or to any embargoed or terrorist countries as specified in the U.S. export laws. You agree to not use deliverables for prohibited nuclear, missile, or chemical biological weaponry end uses. See the Novell International Trade Services Web page (http://www.novell.com/info/exports/) for more information on exporting Novell software. Novell assumes no responsibility for your failure to obtain any necessary export approvals.
Copyright © 2007-2012 Novell, Inc. All rights reserved. No part of this publication may be reproduced, photocopied, stored on a retrieval system, or transmitted without the express written consent of the publisher.
Novell, Inc.1800 South Novell PlaceProvo, UT 84606U.S.A.www.novell.com
Online Documentation: To access the latest online documentation for this and other Novell products, see the Novell Documentation Web page (http://www.novell.com/documentation/zenworks11/).
Novell Trademarks
For Novell trademarks, see the Novell Trademark and Service Mark list (http://www.novell.com/company/legal/trademarks/tmlist.html).
Third-Party Materials
All third-party trademarks are the property of their respective owners.

Contents
About This Guide 5
1 Installing the Migration Utility 7
1.1 Software Requirements . . . . . . . . . . . . . . . . . . . . . . . . . . . . . . . . . . . . . . . . . . . . . . . . . . . . . . . . . . . . 71.2 The Migration Process . . . . . . . . . . . . . . . . . . . . . . . . . . . . . . . . . . . . . . . . . . . . . . . . . . . . . . . . . . . . . 71.3 Downloading the Migration Utility . . . . . . . . . . . . . . . . . . . . . . . . . . . . . . . . . . . . . . . . . . . . . . . . . . . . . 8
2 Migrating Data 9
2.1 Preparing to Migrate Bundles Other Than Preboot Bundles . . . . . . . . . . . . . . . . . . . . . . . . . . . . . . . . 92.1.1 Prerequisites for Migrating Bundles on Linux . . . . . . . . . . . . . . . . . . . . . . . . . . . . . . . . . . . . 92.1.2 Prerequisites for Migrating Bundles on Windows . . . . . . . . . . . . . . . . . . . . . . . . . . . . . . . . 10
2.2 Preparing to Migrate Preboot Bundles . . . . . . . . . . . . . . . . . . . . . . . . . . . . . . . . . . . . . . . . . . . . . . . . 102.2.1 Prerequisites for Migrating Preboot Bundles on Linux. . . . . . . . . . . . . . . . . . . . . . . . . . . . . 112.2.2 Prerequisites for Migrating Preboot Bundles on Windows. . . . . . . . . . . . . . . . . . . . . . . . . . 12
2.3 Starting the Migration Utility . . . . . . . . . . . . . . . . . . . . . . . . . . . . . . . . . . . . . . . . . . . . . . . . . . . . . . . . 142.3.1 Starting the Utility on Windows . . . . . . . . . . . . . . . . . . . . . . . . . . . . . . . . . . . . . . . . . . . . . . 142.3.2 Starting the Utility on Linux . . . . . . . . . . . . . . . . . . . . . . . . . . . . . . . . . . . . . . . . . . . . . . . . . 14
2.4 Understanding the Migration Console . . . . . . . . . . . . . . . . . . . . . . . . . . . . . . . . . . . . . . . . . . . . . . . . 152.4.1 Migration Tasks . . . . . . . . . . . . . . . . . . . . . . . . . . . . . . . . . . . . . . . . . . . . . . . . . . . . . . . . . . 152.4.2 Migration Items . . . . . . . . . . . . . . . . . . . . . . . . . . . . . . . . . . . . . . . . . . . . . . . . . . . . . . . . . . 162.4.3 Migration Preferences . . . . . . . . . . . . . . . . . . . . . . . . . . . . . . . . . . . . . . . . . . . . . . . . . . . . . 172.4.4 Migration Log / Migration History . . . . . . . . . . . . . . . . . . . . . . . . . . . . . . . . . . . . . . . . . . . . . 172.4.5 Migration Queue . . . . . . . . . . . . . . . . . . . . . . . . . . . . . . . . . . . . . . . . . . . . . . . . . . . . . . . . . 17
2.5 Migrating Data . . . . . . . . . . . . . . . . . . . . . . . . . . . . . . . . . . . . . . . . . . . . . . . . . . . . . . . . . . . . . . . . . . 172.5.1 Selecting the Migration Source . . . . . . . . . . . . . . . . . . . . . . . . . . . . . . . . . . . . . . . . . . . . . . 172.5.2 Selecting the Migration Destination . . . . . . . . . . . . . . . . . . . . . . . . . . . . . . . . . . . . . . . . . . . 182.5.3 Migrating Objects. . . . . . . . . . . . . . . . . . . . . . . . . . . . . . . . . . . . . . . . . . . . . . . . . . . . . . . . . 19
2.6 Monitoring the Progress of the Migration . . . . . . . . . . . . . . . . . . . . . . . . . . . . . . . . . . . . . . . . . . . . . . 222.6.1 Migration Log Tab . . . . . . . . . . . . . . . . . . . . . . . . . . . . . . . . . . . . . . . . . . . . . . . . . . . . . . . . 232.6.2 Migration History Tab. . . . . . . . . . . . . . . . . . . . . . . . . . . . . . . . . . . . . . . . . . . . . . . . . . . . . . 23
2.7 Canceling a Migration . . . . . . . . . . . . . . . . . . . . . . . . . . . . . . . . . . . . . . . . . . . . . . . . . . . . . . . . . . . . 23
3 Migration Preferences 25
3.1 General . . . . . . . . . . . . . . . . . . . . . . . . . . . . . . . . . . . . . . . . . . . . . . . . . . . . . . . . . . . . . . . . . . . . . . . 253.2 Bundles . . . . . . . . . . . . . . . . . . . . . . . . . . . . . . . . . . . . . . . . . . . . . . . . . . . . . . . . . . . . . . . . . . . . . . . 253.3 Devices . . . . . . . . . . . . . . . . . . . . . . . . . . . . . . . . . . . . . . . . . . . . . . . . . . . . . . . . . . . . . . . . . . . . . . . 263.4 Preboot. . . . . . . . . . . . . . . . . . . . . . . . . . . . . . . . . . . . . . . . . . . . . . . . . . . . . . . . . . . . . . . . . . . . . . . . 263.5 Policies. . . . . . . . . . . . . . . . . . . . . . . . . . . . . . . . . . . . . . . . . . . . . . . . . . . . . . . . . . . . . . . . . . . . . . . . 28
A Troubleshooting the Linux Management Migration Utility 29
Contents 3

4 ZENworks 11 SP2 Linux Management Migration Guide
About This Guide
The Novell ZENworks 11 SP2 Linux Management Migration Utility lets you migrate data from ZENworks Linux Management to ZENworks 11 SP2.
This guide provides information to help you understand the migration process and steps to help you perform the process.
The information in this guide is organized as follows:
Chapter 1, “Installing the Migration Utility,” on page 7 Chapter 2, “Migrating Data,” on page 9 Chapter 3, “Migration Preferences,” on page 25
Audience
This guide is intended for ZENworks administrators.
Feedback
We want to hear your comments and suggestions about this manual and the other documentation included with this product. Please use the User Comments feature at the bottom of each page of the online documentation.
Additional Documentation
The ZENworks Linux Management Migration Utility is supported by other documentation (in both PDF and HTML formats) that you can use to learn about and implement the product. For additional documentation, see the ZENworks 11 SP2 documentation Web site (http://www.novell.com/documentation/zenworks11/).
About This Guide 5

6 ZENworks 11 SP2 Linux Management Migration Guide
1 1Installing the Migration Utility
The ZENworks Linux Management Migration Utility is used to migrate the data from ZENworks 7.2 Linux Management with IR2 or later to ZENworks 11 SP2. You can pattern your migration project before you actually perform the migration. This avoids interruption in the migration process and lets you correct any errors.
The migration utility is used to migrate the following data, which is defined by the ZENworks 7.2 Linux Management with IR2 or later server:
Bundles Policies Devices Assignments Settings
The migration process is independent of the databases used by the ZENworks Linux Management and ZENworks 11 SP2 servers.
The following sections provide instructions on how to use the ZENworks Linux Management Migration Utility to migrate data from ZENworks Linux Management:
Section 1.1, “Software Requirements,” on page 7 Section 1.2, “The Migration Process,” on page 7 Section 1.3, “Downloading the Migration Utility,” on page 8
1.1 Software RequirementsYou can run the ZENworks Linux Management Migration Utility on any Windows device that has the Java Runtime Environment 1.6 or later and Strawberry Perl 5.10.1.0 installed, and on any Linux device that has the Java Runtime Environment 1.6 or later installed.
1.2 The Migration ProcessThe migration process consists of the following steps:
1. Installing the migration utility. For more information, see Section 1.3, “Downloading the Migration Utility,” on page 8.
2. Backing up both the source and destination databases before starting migration.3. Selecting the migration source. For more information, see Section 2.5.1, “Selecting the Migration
Source,” on page 17.4. Selecting the migration destination. For more information, see Section 2.5.2, “Selecting the
Migration Destination,” on page 18.
Installing the Migration Utility 7

5. Selecting the objects to migrate. For more information, see Section 2.5.3, “Migrating Objects,” on page 19.
6. Initiating the migration.Migration can take several hours to complete, depending on the size of the data being migrated. For more information, see Section 2.5.3, “Migrating Objects,” on page 19.
1.3 Downloading the Migration Utility1 Use your Web browser to download the ZENworks Linux Management Migration utility to a
temporary location from one of the following locations:ZENworks download page: Go to http://zenworks_primary_server_id/zenworks-setup/?pageId=tools, then click zlmmigration.zip.You are automatically redirected to a page on Novell Download Site where you can download the utility.Novell Download Site: Go to http://download.novell.com/ and search for the ZENworks Linux Management Migration Utility to download it.
2 Unzip the content to a temporary folder.The run-migration.bat and run-migration.sh files are available in this folder.
3 Continue with Chapter 2, “Migrating Data,” on page 9.
8 ZENworks 11 SP2 Linux Management Migration Guide
2 2Migrating Data
This chapter details the steps to be performed for migrating data.
Section 2.1, “Preparing to Migrate Bundles Other Than Preboot Bundles,” on page 9 Section 2.2, “Preparing to Migrate Preboot Bundles,” on page 10 Section 2.3, “Starting the Migration Utility,” on page 14 Section 2.4, “Understanding the Migration Console,” on page 15 Section 2.5, “Migrating Data,” on page 17 Section 2.6, “Monitoring the Progress of the Migration,” on page 22 Section 2.7, “Canceling a Migration,” on page 23
2.1 Preparing to Migrate Bundles Other Than Preboot BundlesReview the following sections only if you want to migrate any bundle objects except for the Preboot bundles. If you want to migrate Preboot bundles, see Section 2.2, “Preparing to Migrate Preboot Bundles,” on page 10. If you do not want to migrate bundle objects, skip to Section 2.3, “Starting the Migration Utility,” on page 14.
Section 2.1.1, “Prerequisites for Migrating Bundles on Linux,” on page 9 Section 2.1.2, “Prerequisites for Migrating Bundles on Windows,” on page 10
2.1.1 Prerequisites for Migrating Bundles on Linux
If you choose to migrate any ZENworks Linux Management bundles except for the Preboot bundles to ZENworks 11 SP2 by using the ZENworks Linux Management Migration utility that is installed on a Linux device, you must perform the following tasks before migrating the bundles:
1 Back up both the source and destination databases.2 Access the package repo directory that is on the ZENworks Linux Management server:
2a Perform an NFS share on the package repo directory that is on the ZENworks Linux Management server by editing the /etc/exports file by appending the following line:
/var/opt/novell/zenworks/pkg-repo *(ro,sync)
2b Save the /etc/exports file.2c Start the NFS server by using the /etc/init.d/nfsserver start command.2d Verify if the package repo directory has been shared by using the showmount -e
zlm_server_id command.3 On the device where the utility is installed, create a pkg-repo directory by using the mkdir -p
command.The default location to mount the package repo directory is /mnt/zlm.
Migrating Data 9

However, you can also specify a different location to mount the package repo directory. Ensure that you archive this location because you need to specify it as the value of the Mounted ZLM Package Repository Path bundle preference on the Migration Preferences page.For example, to create the package repo directory under the default location /mnt/zlm, use the following command: mkdir -p /mnt/zlm/pkg-repo
4 Mount the shared pkg-repo directory to the directory that you created on the device by using the following command:
mount zlm_server_ip_address:/var/opt/novell/zenworks/pkg-repo /mnt/zlm/pkg-repo/
2.1.2 Prerequisites for Migrating Bundles on Windows
If you choose to migrate any ZENworks Linux Management bundles except for the Preboot bundles to ZENworks 11 SP2 by using the ZENworks Linux Management Migration utility that is installed on a Windows device, you must perform the following tasks before migrating the bundles:
1 Access the package repository directory on the ZENworks Linux Management server.2 Perform a Samba share on the package repository directory that is on the ZENworks Linux
Management server:2a Edit the /etc/samba/smb.conf file and append the following information:
[pkg-repo]
comment = All users
path = /var/opt/novell/zenworks/pkg-repo/
read only = No
create mask = 0775
directory mask = 0775
2b Run the smbpasswd -a test command, then provide the password.2c Start the Samba service by using the /etc/init.d/smb start command.
3 On the device where the utility is installed, click My Computer > Tools > Map Network Drive.4 Provide detailed information about the ZENworks Linux Management server and the path for
the package repository.For example: \\ZLM_Server_IP_address\pkg-repo.
2.2 Preparing to Migrate Preboot BundlesReview the following sections only if you want to migrate Preboot bundle objects:
Section 2.2.1, “Prerequisites for Migrating Preboot Bundles on Linux,” on page 11 Section 2.2.2, “Prerequisites for Migrating Preboot Bundles on Windows,” on page 12
If you do not want to migrate the bundle objects, skip to Section 2.3, “Starting the Migration Utility,” on page 14.
10 ZENworks 11 SP2 Linux Management Migration Guide
2.2.1 Prerequisites for Migrating Preboot Bundles on Linux
If you choose to migrate the ZENworks Linux Management Preboot bundles to ZENworks 11 SP2 by using the ZENworks Linux Management Migration utility that is installed on a Linux device, you must perform the following tasks before migrating the bundles:
1 Back up both the source and destination databases.You can migrate objects only once.
2 (Conditional) If you want to migrate ZENworks Image, Multicast Image Set, or DellDTK Configuration bundle, perform the following tasks:2a Mount the ZENworks Linux Management image repository on the device that has
ZENworks Linux Management Migration utility installed and running:2a1 Access the image repository directory that is on the ZENworks Linux Management
server.2a2 Perform an NFS share on the image repository directory by editing the /etc/exports
file by appending the following line:
/zlm_image_repo_path *(ro,sync)
2a3 Save the /etc/exports file.2a4 Start the NFS server by using the /etc/init.d/nfsserver start command.2a5 Verify if the image repository directory has been shared by using the showmount -e
zlm_server_id command.2a6 On the device where the utility is installed, create a zlm_image_repo directory by
using the following command:
mkdir -p /complete_path_of_the_new_directory_to_be_created/new_directory_name_to_be_created
The default location to mount the image repository directory is /mnt/zlm_images. However, you can also specify a different location to mount the package repo directory. Ensure that you archive this location because you need to specify it as the value for the Mounted ZLM Image Repository Path bundle preference on the Preboot page in the ZENworks Linux Management Migration utility. To create the zlm_image_repo directory within the default location /mnt/zlm_images, use the following command: mkdir -p /mnt/zlm_images/zlm_image_repo
2a7 Mount the shared zlm_image_repo directory to the directory that you created on the device by using the following command:
mount zlm_server_ip_address:/zlm_image_repo_path/ /mnt/zlm_images/zlm_image_repo
2b Mount the ZENworks Configuration Management image repository on the device that has ZENworks Linux Management Migration utility installed and running:2b1 Access the image repository directory that is on the ZENworks Configuration
Management server.2b2 Share the content-repo directory of ZENworks Configuration Management by
performing an NFS share by adding following line to /etc/exports:
/var/opt/novell/zenworks/content-repo/ *(ro.sync)
Ensure that you archive this location because you need to specify it as the value for the Mounted ZCM Image Repository Path bundle preference on the Preboot page in the ZENworks Linux Management Migration utility.
Migrating Data 11

3 (Conditional) If you want to migrate AutoYaST, Kickstart, or DellDTK Configuration bundle, perform the following tasks:3a Mount the ZENworks Linux Management TFTP directory on the device that has ZENworks
Linux Management Migration utility installed and running:3a1 Access the ZENworks Linux Management TFTP directory that is on the ZENworks
Linux Management server.3a2 Perform an NFS share on the TFTP directory by editing the /etc/exports file by
appending the following line:
/srv/tftp *(ro,sync)
3a3 Save the /etc/exports file.3a4 Start the NFS server by using the /etc/init.d/nfsserver start command.3a5 Verify if the TFTP directory has been shared by using the showmount -e
zlm_server_ip command.3a6 On the device where the utility is installed, create a zlm_tftp_repo directory by using
the following command:
mkdir -p /complete_path_of_the_new_directory_to_be_created/new_directory_name_to_be_created
The default location to mount the TFTP directory is /mnt/zlm_tftp. However, you can also specify a different location to mount the TFTP directory. Ensure that you archive this location because you need to specify it as the value for the Mounted ZLM TFTP Folder bundle preference on the Preboot page in the ZENworks Linux Management Migration utility.To create the zlm_tftp_repo directory within the default location /mnt/zlm_tftp, use the following command: mkdir -p /mnt/zlm_tftp/zlm_tftp_repo
3a7 Mount the shared zlm_tftp_repo directory to the directory that you created on the device by using the following command:
mount zlm_server_ip_address:/srv/tftp/ /mnt/zlm_tftp
3b Mount the ZENworks Configuration Management TFTP directory on the device that has ZENworks Linux Management Migration utility installed and running:3b1 Access the TFTP directory is on the ZENworks Configuration Management server.3b2 Share the TFTP directory of ZENworks Configuration Management by performing an
NFS share by adding following line to /etc/exports:
/srv/tftp/ *(ro.sync)
Ensure that you archive this location because you need to specify it as the value for the Mounted ZCM TFTP Folder bundle preference on the Preboot page in the ZENworks Linux Management Migration utility.
2.2.2 Prerequisites for Migrating Preboot Bundles on Windows
If you choose to migrate the ZENworks Linux Management Preboot bundles to ZENworks 11 SP2 by using the ZENworks Linux Management Migration utility that is installed on a Windows device, you must perform the following tasks before migrating the bundles:
1 Back up both the source and destination databases.You can migrate objects only once.
12 ZENworks 11 SP2 Linux Management Migration Guide
2 (Conditional) If you want to migrate ZENworks Image, Multicast Image Set, or DellDTK Configuration bundle, perform the following tasks:2a Mount the ZENworks Linux Management image repository on the device that has
ZENworks Linux Management Migration utility installed and running:2a1 Access the image repository directory that is on the ZENworks Linux Management
server.2a2 Perform a Samba share on the package repository directory that is on the ZENworks
Linux Management server:2a2a Edit the /etc/samba/smb.conf file and append the following information:
[zlm-images]comment = All userspath = /zlm_image_repo_pathread only = Nocreate mask = 0775directory mask = 0775
2a2b Run the smbpasswd -a test command, then provide the password.2a2c Start the Samba service by using the /etc/init.d/smb start command.
2a3 On the device where the utility is installed, click My Computer > Tools > Map Network Drive.
2a4 Provide detailed information about the ZENworks Linux Management server and the path for the package repository.For example: \\ZLM_Server_IP_address\zlm-imagesEnsure that you archive this location because you need to specify it as the value for the Mounted ZLM Image Repository Path bundle preference on the Preboot page in the ZENworks Linux Management Migration utility.
2b Mount the ZENworks Configuration Management image repository on the device that has ZENworks Linux Management Migration utility installed and running:2b1 Access the image repository directory that is on the ZENworks Configuration
Management server.2b2 Share the %ZENWORKS_HOME%zenworks\work\content-repo\ directory of ZENworks
Configuration Management.Ensure that you archive this location because you need to specify it as the value for the Mounted ZCM Image Repository Path bundle preference on the Preboot page in the ZENworks Linux Management Migration utility
3 (Conditional) If you want to migrate AutoYaST, Kickstart, or DellDTK Configuration bundle, perform the following tasks:3a Mount the ZENworks Linux Management TFTP directory on the device that has ZENworks
Linux Management Migration utility installed and running:3a1 Access the ZENworks Linux Management TFTP directory that is on the ZENworks
Linux Management server.3a2 Perform a Samba share on the TFTP directory that is on the ZENworks Linux
Management server:3a2a Edit the /etc/samba/smb.conf file and append the following information:
[zlm-tftp]comment = All userspath = /srv/tftpread only = Nocreate mask = 0775directory mask = 0775
Migrating Data 13

3a2b Run the smbpasswd -a test command, then provide the password.3a2c Start the Samba service by using the /etc/init.d/smb start command.
3a3 On the device where the utility is installed, click My Computer > Tools > Map Network Drive.
3a4 Provide detailed information about the ZENworks Linux Management server and the path for the package repository.For example: \\ZLM_Server_IP_address\zlm-tftpEnsure that you archive this location because you need to specify it as the value for the Mounted ZLM TFTP Folder bundle preference on the Preboot page in the ZENworks Linux Management Migration utility.
3b Mount the ZENworks Configuration Management TFTP directory on the device that has ZENworks Linux Management Migration utility installed and running:3b1 Access the TFTP directory is on the ZENworks Configuration Management server.3b2 Share the the %ZENWORKS_HOME%\zenworks\share\tftp\ directory of ZENworks
Configuration Management.Ensure that you archive this location because you need to specify it as the value for the Mounted ZCM TFTP Folder bundle preference on the Preboot page in the ZENworks Linux Management Migration utility.
2.3 Starting the Migration UtilityIf you want to start the migration utility in Chinese or Japanese locales, you must copy the /opt/novell/zenworks/share/zmd/java/lib/fonts/fallback directory from any ZENworks 11 SP2 managed device to the lib/fonts directory located under the Java path on your device before launching the utility.
Review the following sections to start the migration utility:
Section 2.3.1, “Starting the Utility on Windows,” on page 14 Section 2.3.2, “Starting the Utility on Linux,” on page 14
2.3.1 Starting the Utility on Windows
1 Double-click the run-migration.bat file. This file is located in the folder where you have downloaded the utility.For more information, see the Section 1.3, “Downloading the Migration Utility,” on page 8.
NOTE: If the utility fails to run, remove the .migration.pid file from the folder where you have downloaded the utility, then launch the utility.
2.3.2 Starting the Utility on Linux
1 Change to the directory where you have installed the migration utility.2 Run the chmod +x run-migration.sh command to provide the executable permission to the
migration utility.
14 ZENworks 11 SP2 Linux Management Migration Guide
3 Run the sh ./run-migration.sh command. This file is located in the folder where you have downloaded the utility.For more information, see the Section 1.3, “Downloading the Migration Utility,” on page 8.
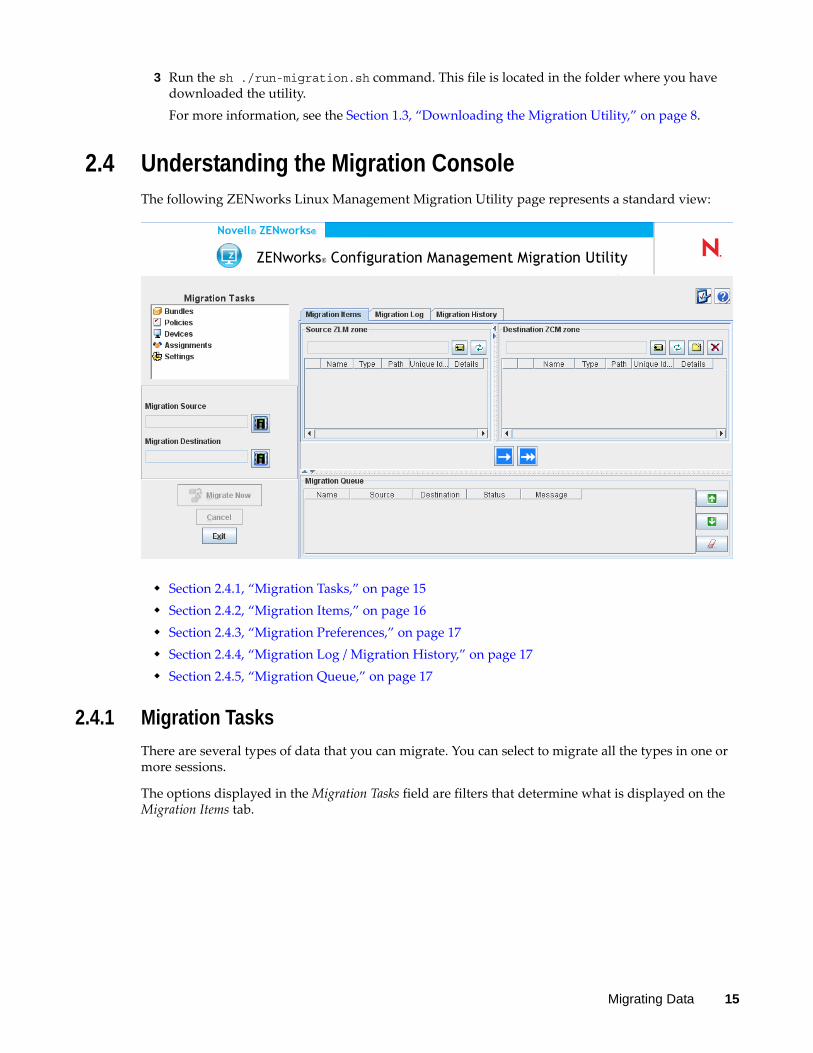
2.4 Understanding the Migration ConsoleThe following ZENworks Linux Management Migration Utility page represents a standard view:
Section 2.4.1, “Migration Tasks,” on page 15 Section 2.4.2, “Migration Items,” on page 16 Section 2.4.3, “Migration Preferences,” on page 17 Section 2.4.4, “Migration Log / Migration History,” on page 17 Section 2.4.5, “Migration Queue,” on page 17
2.4.1 Migration Tasks
There are several types of data that you can migrate. You can select to migrate all the types in one or more sessions.
The options displayed in the Migration Tasks field are filters that determine what is displayed on the Migration Items tab.
Migrating Data 15

2.4.2 Migration Items
The Migration Items tab in the migration console displays the Source ZLM Zone and Destination ZLM Zone panels.
When you select a migration task, the fields (and their data) change appropriately in the two panels (Source ZLM Zone and Destination ZCM Zone) on the Migration Items tab. For example, when you select Bundles, only the paths, fields, and data applicable to bundles are displayed in both panels. The Source ZLM Zone panel displays the objects existing in the Bundles tree. The Destination ZCM Zone panel displays the objects that currently exist in the ZENworks database, and this zone is viewable in ZENworks Control Center.
“Understanding the Source ZLM Zone” on page 16 “Understanding the Destination ZCM Zone” on page 16
Understanding the Source ZLM Zone
The Source ZLM Zone panel displays all the objects of the selected task. For example, if you select Bundles as the migration task, only bundle objects are displayed.
The Source ZLM Zone field displays the full path of the selected object.
The Source ZLM Zone panel also contains the following icons to help you view data about the migration:
Understanding the Destination ZCM Zone
The Destination ZCM Zone panel uses italics to display items to be migrated, and items that were either originally created in ZENworks Control Center are displayed with a lock next to the object. These objects can be deleted only from ZENworks Control Center and not by using the migration utility. You can also delete a migrated item from the Destination ZCM Zone panel, which deletes it from the ZENworks database so that it is no longer viewable in ZENworks Control Center.
The Destination ZCM Zone field displays the full path of the selected destination of the migrated object in the Management Zone. A default location is displayed.
The Destination ZCM Zone panel also contains the following icons to help you modify the migration and view the data:
Move one level up: Moves the focus up one level from the current context.
Refresh: Refreshes the view. For example, when you first click Bundles, you see the current state of the migration task. If changes are made to Bundles after that, you can click Refresh to capture them in the migration utility.
Move one level up: Moves the focus up one level from the current folder.
Refresh: Refreshes the view. For example, when you first click Bundles, you see the current state of the zone. If changes are made to the zone after that, you can click Refresh to update them in the migration utility.
Create New Folder: You can change the Configuration Management folder structure displayed in ZENworks Control Center by adding new folders to suit your management needs. For example, if you add a folder (such as Files) under /~bundles~, the Files folder is displayed under Bundles in ZENworks Control Center. The Files folder contains all bundles created for the objects that you copied there.
16 ZENworks 11 SP2 Linux Management Migration Guide
2.4.3 Migration Preferences
The icon accesses the Migration Preferences dialog box, where you can specify the settings for the migration. For information about the specific settings that are available, see Chapter 3, “Migration Preferences,” on page 25.
2.4.4 Migration Log / Migration History
The Migration Log and Migration History tabs monitor the progress of the migration. For more information on these tabs, see Section 2.6, “Monitoring the Progress of the Migration,” on page 22.
2.4.5 Migration Queue
Located at the bottom of the console window, this panel displays the objects that are selected for migration.
The Migration Queue panel also contains the following icons to help you modify the migration:
2.5 Migrating DataPerform the following tasks in the order listed to migrate data:
Section 2.5.1, “Selecting the Migration Source,” on page 17 Section 2.5.2, “Selecting the Migration Destination,” on page 18 Section 2.5.3, “Migrating Objects,” on page 19
2.5.1 Selecting the Migration Source
The migration source is your ZENworks Linux Management server. To log in to your server:
1 Start the migration utility. For more information on how to start the utility, see Section 2.3, “Starting the Migration Utility,” on page 14.
2 In the Migration Console, click the button next to the Migration Source field.3 Fill in the following fields:
Delete selected items: Deletes the selected object from the list and from the ZENworks Configuration Management server. If an object has a lock next to it, it was originally created in ZENworks Control Center, and cannot be deleted by using the migration utility. If you select a migrated object, click the Delete Selected items icon to delete the item from the ZENworks database. The deleted item is no longer viewable in ZENworks Control Center.
Moves the selected object one line up in the queue.
Moves the selected object one line down in the queue.
Removes the selected object from the queue. If the object is not migrated, the object is also removed from the Destination ZCM zone panel.
Migrating Data 17

Zone: Specify your Management Zone. If this is the first time you have logged in to this zone by using the Migration Console, nothing is displayed. Thereafter, any zone that you previously logged in to by using this dialog box is available from the drop-down list.Server (DNS Name or IP Address): Specify either the DNS name or IP address. This field is automatically populated when you select a Management Zone in the Zone field.Username: Specify the username for the zone. If this is the first time you have logged in to this zone by using the Migration Console, nothing is displayed; otherwise, the last username you used is displayed. If you select a Management Zone in the Zone field, this field is automatically populated with the username you last used for that zone.Password: Specify the password. You must enter the password every time to authenticate to the server.Web Service Port: Specify your Web service port. The default port 443 is automatically displayed.
4 To connect, click OK.5 Continue with Section 2.5.2, “Selecting the Migration Destination,” on page 18.
2.5.2 Selecting the Migration Destination
The migration destination is your ZENworks 11 SP2 server. To log in to the destination server:
1 Make sure you have selected the migration source. For more information, see Section 2.5.1, “Selecting the Migration Source,” on page 17.
2 In the Migration Console, click the button next to the Migration Destination field.3 Fill in the following fields:
Zone: Specify your Management Zone. If this is the first time you have logged in to this zone by using the Migration Console, nothing is displayed. Thereafter, any zone that you previously logged in to by using this dialog box is available from the drop-down list.Server (DNS Name or IP Address): Specify either the DNS name or IP address. This field is automatically populated when you select a Management Zone in the Zone field.Username: Specify the username for the zone. If this is the first time you have logged in to this zone by using the Migration Console, nothing is displayed; otherwise, the last username you used is displayed. If you select a Management Zone in the Zone field, this field is automatically populated with the username you last used for that zone.Password: Specify the password. You must enter the password every time to authenticate to the server.Web Service Port: Specify your Web service port. The default port 443 is automatically displayed.File Upload Http Port: Specify your HTTP port. The default port 80 is automatically displayed. This field is automatically populated when you select a Management Zone in the Zone field.
4 Click OK.The Migration items tab displays the object groups that can be migrated.
5 Continue with Section 2.5.3, “Migrating Objects,” on page 19.
18 ZENworks 11 SP2 Linux Management Migration Guide

2.5.3 Migrating Objects
The following topics provide information on migrating objects in each group. Although the steps to migrate different types of objects are presented separately, it is not necessary to migrate one type of object at a time.
“Migrating Bundles” on page 19 “Migrating Policies” on page 20 “Migrating Devices” on page 20 “Migrating Assignments” on page 21 “Migrating Settings” on page 22
Migrating Bundles
You can migrate only the deployed version of the bundles to the ZENworks 11 SP2 Server.
If you select to migrate a catalog as a Linux Dependency bundle, each bundle in the catalog is migrated as a new Linux Dependency bundle. A bundle group with the same name as the catalog is created and this bundle group must be used instead of the catalog in ZENworks 11 SP2.
1 Ensure that you have completed the prerequisites described in Section 2.1, “Preparing to Migrate Bundles Other Than Preboot Bundles,” on page 9 to successfully migrate the bundles.
2 Click to access the Migration Preferences dialog box, modify any settings that you want to change, then click OK to return to the Migration Console. For more information about the specific settings, see Chapter 3, “Migration Preferences,” on page 25.
3 In the Migration Tasks group, click Bundles. A list of objects is displayed in the Source ZLM Zone panel.
4 In the Source ZLM Zone panel, navigate the folders to locate the bundle objects to be migrated.5 Select the bundle objects to add to the migration queue:
To move all the objects to the migration queue, click .
To move a single object to the migration queue, select the object, then click .You can also use the Ctrl or Shift keys to select multiple objects.The Migration Queue panel displays the objects that are selected for migration. When you move the objects to the destination, all the subfolders within the objects are also moved to the destination folder.The Destination ZCM Zone panel uses italics to display the objects that are yet to be migrated. After migration, these objects are displayed in the normal font.
6 (Optional) To remove an object from the migration queue, select the object, then click .7 Click Migrate Now to migrate the selected bundles. The migration time depends on the size of the
bundle.The Step column in the Migration Queue panel displays the migration status of the object.
8 (Optional) Click Cancel to stop the process.If the migration of a bundle is in progress when you click Cancel, the migration for that object is not canceled. However, the migration of subsequent objects is canceled. Canceling a migration that is in progress might leave the destination server unstable, with dangling data and objects.
Migrating Data 19
If you choose to migrate a ZENworks 7.x Linux Management Preboot bundle that has Image Bundle Flag settings configured, the settings are also migrated to ZENworks 11 SP2.
NOTE: If the migration of a Preboot bundle fails but a bundle object is created in the destination location, you must manually delete the object before remigrating the bundle.
Migrating Policies
You can migrate only Remote Execute policies and Text File policies. The Remote Execute policies are migrated as Linux bundles with the Run Script Action, and the Text File policies are migrated as Linux bundles with the Edit Text File Action.
1 Click to access the Migration Preferences dialog box, modify any settings that you want to change, then click OK to return to the Migration Console. For more information about the specific settings, see Chapter 3, “Migration Preferences,” on page 25.
2 In the Migration Tasks group, click Policies. A list of objects is displayed in the Source ZLM Zone panel.
3 In the Source ZLM Zone panel, navigate the folders to locate the Policy objects to be migrated.4 Select the policy objects to add to the migration queue:
To move all the objects to the migration queue, click .
To move a single object to the migration queue, select the object, then click You can also use the Ctrl or Shift keys to select multiple objects.The Migration Queue panel displays the objects that are selected for migration. When you move the objects to the destination, all the subfolders within the objects are also moved to the destination folder.The Destination ZCM Zone panel uses italics to display the objects that are yet to be migrated. After migration, these objects are displayed in the normal font.
5 (Optional) To remove an object from the migration queue, select the object, then click .6 Click Migrate Now to migrate the selected policies.
The Step column in the Migration Queue panel displays the migration status of the object.7 (Optional) Click Cancel to stop the process.
If the migration of a policy is in progress when you click Cancel, the migration for that object is not canceled. However, the migration of subsequent objects is canceled. Canceling a migration that is in progress might leave the destination server unstable, with dangling data and objects.
Migrating Devices
You can migrate objects such as servers and workstations.
You can migrate devices with the following Linux distributions with either x86 or x86_64 architecture because only these distributions are supported in ZENworks 11 SP2:
SUSE Linux Enterprise Server (SLES) 10 SP2, SP3 SUSE Linux Enterprise Desktop (SLED) 10 SP2, SP3 SLES 11, SLES 11 SP1 SLED 11, SLES 11 SP1
20 ZENworks 11 SP2 Linux Management Migration Guide

Open Enterprise Server (OES) 2 SP2, SP3 Red Hat Enterprise Linux (RHEL) (AS / ES/ WS) 4.7, 4.8 RHEL 4.6, 5.3, 5.4, 5.5
NOTE: You can migrate the devices with the following distributions even though you cannot deploy the ZENworks Agent to these platforms in ZENworks 11 SP2: SLES 10, SLES 10 SP1 SLED 10, SLES 10 SP1 OES 2, OES 2 SP1 RHEL (AS / ES / WS) 4.0, 4.1, 4.2, 4.3, 4.4, 4.5 RHEL 5.1, 5.2
1 Click to access the Migration Preferences dialog box, modify any settings that you want to change, then click OK to return to the Migration Console. For more information about the specific settings, see Chapter 3, “Migration Preferences,” on page 25.
2 In the Migration Tasks group, click Devices. A list of objects is displayed in the Source ZLM Zone panel.
3 In the Source ZLM Zone panel, navigate the folders to locate the device objects to be migrated.4 Select the device objects to add to the migration queue:
To move all the objects to the migration queue, click .
To move a single object to the migration queue, select the object, then click You can also use the Ctrl or Shift keys to select multiple objects.The Migration Queue panel displays the objects that are selected for migration. When you move the objects to the destination, all the subfolders within the objects are also moved to the destination folder.The Destination ZCM Zone panel uses italics to display the objects that are yet to be migrated. After migration, the objects are displayed in the normal font.
5 (Optional) To remove an object from the migration queue, select the object, then click .6 Click Migrate Now.
The Step column in the Migration Queue panel displays the migration status of the object.7 (Optional) Click Cancel to stop the process.
If the migration of a device is in progress when you click Cancel, the migration for that object is not canceled. However, the migration of subsequent objects is canceled. Canceling a migration that is in progress might leave the destination server unstable, with dangling data and objects.
Migrating Assignments
You can migrate assignments for bundles, policies, and devices. Only those bundles, policies, and devices that are migrated are listed in this panel. If you want to migrate the assignments for bundles and policies, you need to retain the GUIDs of these objects.
For more information on how to retain the GUID of bundles and policies, see Chapter 3, “Migration Preferences,” on page 25.
Migrating Data 21

You can see the assignments for a device while navigating the Devices folder. You can migrate either a particular assignment or all the assignments of the object. However, before you migrate the assignment, the object of the assignment should be migrated.
NOTE: While migrating assignments for devices, the RHEL devices logo is displayed as SUSE logo.
1 Click to access the Migration Preferences dialog box, modify any settings that you want to change, then click OK to return to the Migration Console. For more information about the specific settings, see Chapter 3, “Migration Preferences,” on page 25.
2 In the Migration Tasks group, click Assignments. A list of objects is displayed in the Source ZLM Zone panel.
3 In the Source ZLM Zone panel, navigate the folders to locate the assignment objects to be migrated.
4 Select the assignment objects to move to the migration queue:
To move all the objects to the migration queue, click .
To move a single object to the migration queue, select the object, then click .You can also use the Ctrl or Shift keys to select multiple objects.The Migration Queue panel displays the objects that are selected for migration. When you move objects to the destination, all the subfolders within the objects are also moved to the destination folder.The Destination ZCM Zone panel uses italics to display the objects that are yet to be migrated. After migration, the objects are displayed in the normal font.
5 (Optional) To remove an object from the migration queue, select the object, then click .6 Click Migrate Now.
The Step column in the Migration Queue panel displays the migration status of the object. 7 (Optional) Click Cancel to stop the process.
If the migration of an assignment is in progress when you click Cancel, the migration for that object is not canceled. However, the migration of subsequent objects is canceled. Canceling a migration that is in progress might leave the destination server unstable, with dangling data and objects.
Migrating Settings
You can migrate only system variables as part of Management Zone Settings migration. The system variables that are part of the device level are migrated while migrating the devices.
2.6 Monitoring the Progress of the Migration Section 2.6.1, “Migration Log Tab,” on page 23 Section 2.6.2, “Migration History Tab,” on page 23
22 ZENworks 11 SP2 Linux Management Migration Guide

2.6.1 Migration Log Tab
The Migration Log tab displays details about all migration events. The log file can also be accessed from the log directory, which is created at the same location as the migration utility executable file.
Click Clear to clear the displayed details. Click Reload to refresh the migration log.
2.6.2 Migration History Tab
The Migration History tab displays the following details about the migration:
The device name and the complete path from which the object was migrated The device name and the complete path to which the object was migrated The date on which the object was migrated The user who migrated the object The object type The unique identifier of the object
Click Clear to clear the displayed details.
2.7 Canceling a MigrationWhen you click the Cancel button, the migration process stops. Objects that have already migrated when the Cancel button is clicked are not rolled back.
If the migration of an object is in progress when you cancel the migration process, the migration that is in progress is not canceled. However, the migration of subsequent objects is canceled. Canceling the migration process when the migration of an object is in progress might leave the destination server unstable with dangling data.
Migrating Data 23

24 ZENworks 11 SP2 Linux Management Migration Guide

3 3Migration Preferences
Migration preferences allow you to indicate your choices and so you can customize the migration process.
The icon in the ZENworks Linux Management Migration Utility accesses the Migration Preferences dialog box, where you can specify the settings for the migration. Some categories might not have preferences.
You can set preferences for the following categories:
3.1 GeneralYou can set the following general preferences:
Overwrite objects that already exist: Select this check box to overwrite an object that already exists in the destination zone. For bundles and policies, this option is applicable only if their GUIDs are retained after migration.
For more information on how to retain GUIDs in bundles and policies, see Section 3.2, “Bundles,” on page 25 and Section 3.5, “Policies,” on page 28.
Save history: Select this check box to save the migration history details of an object for later use.
Log Level: Select an option to define the level of errors that should be tracked. The level you indicate here determines which messages are available to the logs. By default, the log level is set to track informative (info) messages.
3.2 BundlesYou can set the following preferences for bundles:
Migration Preferences 25

Retain the GUID of migrated objects: Select this check box to retain the bundle GUID after migration.
Display object details: By default, this preference is deselected. Select this check box to display additional information about the bundles in the Details column of the source and destination panels. The migration utility might take some time to list the bundles because it needs to retrieve the details for each object.
IMPORTANT
If you choose to select this check box, the Preboot bundles are no longer displayed. To view the Preboot bundles, this check box must be deselected.
Migrate the bundle as Linux Dependency Bundle: Select this check box to migrate the bundle as a Linux Dependency bundle. Linux Dependency bundles store the dependency packages and thereby resolve package dependencies.
Mounted ZLM Package Repository Path: Specify the path where the ZLM package repository is mounted. This is the path that you specified while performing the preinstallation tasks for Linux (see Step 3 in “Prerequisites for Migrating Bundles on Linux” on page 9). On Linux, the default path is /mnt/zlm/pkg-repo/. On Windows, the default path is \\ZLM_Server_IP_address\pkg-repo_details_of_the_mapped_drive.
3.3 DevicesYou can set the following preferences for devices:
Display object details (Filter by target): By default, this preference is selected to filter devices with targets that are not supported in ZENworks 11 SP2. ZENworks Linux Management supports some targets such as SUSE Linux Enterprise Server (SLES) 9, Open Enterprise Server (OES) 1, and Red Hat Enterprise Linux (RHEL) 3, that are not supported by ZENworks 11 SP2. If you deselect this preference, the migration tool does not filter the devices with targets that are not supported in ZENworks 11 SP2, causing the migration of the associated objects to fail.
Leave this preference selected to display additional information about the devices in the Details column of the source and destination panels. The migration utility might take some time to list the devices because it needs to retrieve the details of each object. However, if you are sure that you do not want to migrate the devices with unsupported targets, you can deselect the preference.
3.4 PrebootYou can set the following preferences for preboot:
Overwrite preboot files: Select this check box to overwrite a preboot file that already exists in the destination zone.
Mounted ZLM Image Repository Path: Specify the location where the ZENworks Linux Management image repository is mounted on the local device that has the ZENworks Linux Management Migration Utility installed and running. For more information on how to mount the image repository on a Linux local device, see Step 2a on page 11, and on a Windows local device, see Step 2a on page 13.
This setting is applicable only for the ZENworks Image and Multicast Image Set bundles. It is also applicable for the DellDTK Configuration bundle if it has images associated with it.
26 ZENworks 11 SP2 Linux Management Migration Guide

Mounted ZCM Image Repository Path: Specify the location where the ZENworks Configuration Management content repository is mounted on the local device that has ZENworks Linux Management Migration utility installed and running. For more information on how to mount the image repository on a Linux local device, see Step 2b on page 11, and on a Windows local device, see Step 2a on page 13.
This setting is applicable only for the ZENworks Image and Multicast Image Set bundles. It is also applicable for the DellDTK Configuration bundle if it has images associated with it. Ensure that the specified location has the Write permission for all users.
Mounted ZLM TFTP Folder: Specify the location where the ZENworks Linux Management TFTP directory is mounted on the local device that has ZENworks Linux Management Migration Utility installed and running. For more information on how to mount the TFTP directory on a Linux local device, see Step 3a on page 12, and on a Windows local device, see Step 3a on page 13.
This setting is applicable only for the AutoYaST, Kickstart, and DellDTK Configuration bundles. Ensure that the specified location has the Execute permission for all users.
Mounted ZCM TFTP Folder: Specify the location where the ZENworks Configuration Management TFTP directory is mounted on the local device that has ZENworks Linux Management Migration Utility installed and running. For more information on how to mount the TFTP directory on a Linux local device, see Step 3b on page 12, and on a Windows local device, see Step 3b on page 14.
This setting is applicable only for the AutoYaST, Kickstart, and DellDTK Configuration bundles. Ensure that the specified location has the Write and Execute permissions for all users.
Root of image repository on ZLM server: Specify the location of the image repository that you want to migrate on the ZENworks Linux Management server (migration source). If the migration utility is running on Linux device, provide the samba shared path of ZLM Image repository. If the migration utility is running on a Windows device, provide the mounted drive of ZLM Image repository.
This setting is applicable only for the ZENworks Image and Multicast Image Set bundles. It is also applicable for the DellDTK Configuration bundle if it has images associated with it.
ZCM content repository: Specify the location of the content repository on the ZENworks Configuration Management server (migration destination). If the migration utility is running on Linux device, provide the samba shared path of /var/opt/novell/zenworks/content-repo/. If the migration utility is running on a Windows device, provide the mounted drive of %ZENWORKS_HOME%\zenworks\work\content-repo.
This setting is applicable only for ZENworks Image and Multicast Image Set bundles. It is also applicable for the DellDTK Configuration bundle if it has images associated with it.
Do not copy images as part of bundle migration: Select this check box if you do not want to copy images while migrating bundles. You can manually copy the images at a later time. This setting is applicable only for the ZENworks Image and Multicast Image Set bundles. It is also applicable for the DellDTK Configuration bundle if it has images associated with it.
When you migrate Preboot bundles, the associated images (the base image or add-on images) and the files (configuration or script) are also migrated. If the ZENworks Linux Management Preboot bundle that you want to migrate to ZENworks Configuration Management contains images or bundles, the migrated ZENworks Configuration Management bundle contains each image or bundle in a separate action.
For example, if the ZENworks Linux Management ZENworks Image bundle that you want to migrate has a base image and an add-on image, the migrated ZENworks Configuration Management ZENworks Image bundle contains two new actions for each type of image (base and add-on).
Migration Preferences 27

3.5 PoliciesYou can set the following preferences for policies:
Retain the GUID of migrated objects: Select this check box to retain the GUID of the object after migration.
Display destination bundle details: Select this check box to have the destination device display bundle details such as the bundle version and bundle name.
28 ZENworks 11 SP2 Linux Management Migration Guide

A ATroubleshooting the Linux Management Migration Utility
The following sections provide solutions to the problems you might encounter while working with the Linux Management Migration Utility:
“The bundle folder is not displayed in the destination ZCM Zone panel” on page 29
The bundle folder is not displayed in the destination ZCM Zone panel
Source: ZENworks Configuration Management; Linux Management Migration Utility.
Possible Cause: This issue might occur if the bundle folder name contains @Sandbox or @Version.
Action: None.
Troubleshooting the Linux Management Migration Utility 29

30 ZENworks 11 SP2 Linux Management Migration Guide