Zentry Trusted Access 1.1.5 Deployment Guide
58
Zentry Trusted Access 1.1.5 Deployment Guide
Transcript of Zentry Trusted Access 1.1.5 Deployment Guide

Zentry Trusted Access 1.1.5
Deployment Guide
Copyright Statement
©2021 Zentry Security, Inc All Rights Reserved.
i
Copyright Statement
Copyright©2021 Zentry Security, Inc., 1371 McCarthy Blvd, Milpitas, California 95035, USA. All rights reserved.
This document is protected by copyright and distributed under licenses restricting its use, copying, distribution, and compilation. No part of this document may be reproduced in any form by any means without prior written authorization of Zentry Security. Documentation is provided “as is” without warranty of any kind, either express or implied, including any kind of implied or express warranty of non-infringement or the implied warranties of merchantability or fitness for a particular purpose.
Zentry Security reserves the right to change any products described herein at any time, and without notice. Zentry Security assumes no responsibility or liability arising from the use of products described herein, except as expressly agreed to in writing by Zentry Security. The use and purchase of this product does not convey a license to any patent copyright, or trademark rights, or any other intellectual property rights of Zentry Security.

©2021 Zentry Security, Inc All Rights Reserved. i
About Zentry Security
Zentry provides next-generation Secure Access solutions that improve security, productivity, visibility, and usability. Zentry empowers enterprises to enable their workforce with zero trust secure access to any applications and resources across on-premises and cloud on any devices.
Contacting Zentry Security
https://zentrysecurity.com/
Phone: (408)240-8700
Toll Free: 1-866-692-7729
Support: 1-877-992-7729
Fax: (408)240-8754
Telephone access to Zentry Security is available Monday through Friday, 9 A.M. to 5 P.M. PST.
E-mail:
Address:
1371 McCarthy Boulevard
Milpitas, California 95035, USA
©2021 Zentry Security, Inc All Rights Reserved. ii
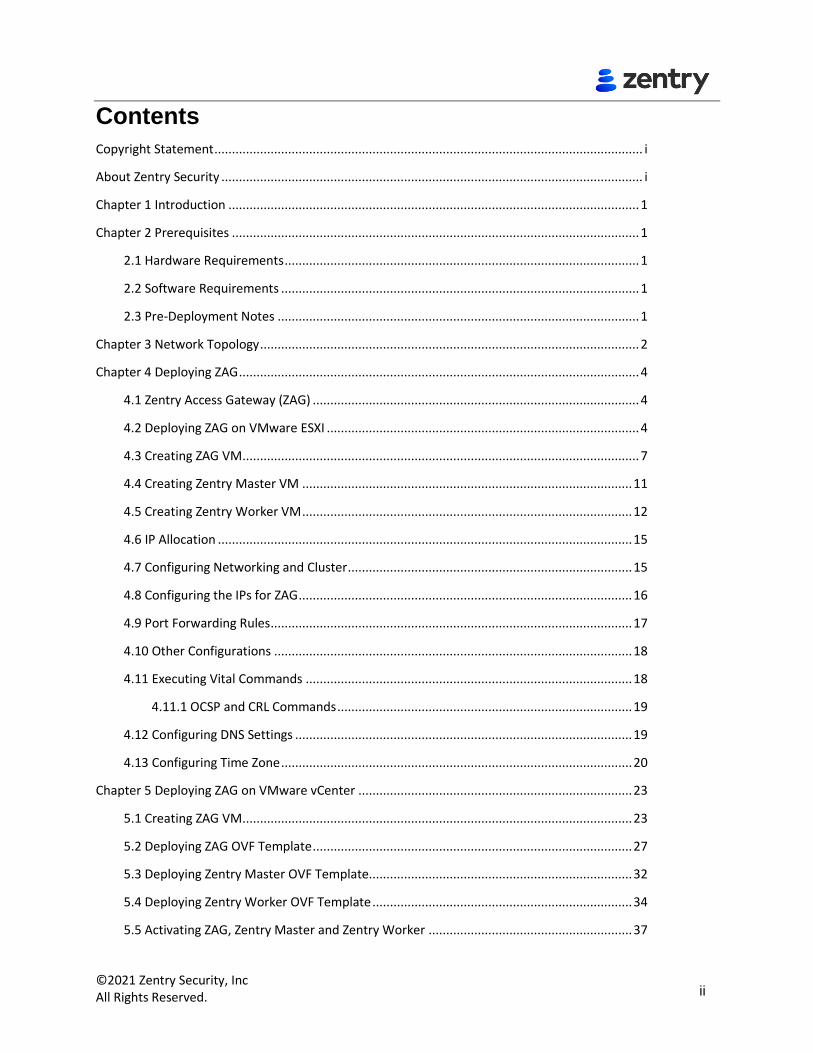
Contents
Copyright Statement .......................................................................................................................... i
About Zentry Security ........................................................................................................................ i
Chapter 1 Introduction ..................................................................................................................... 1
Chapter 2 Prerequisites .................................................................................................................... 1
2.1 Hardware Requirements ..................................................................................................... 1
2.2 Software Requirements ...................................................................................................... 1
2.3 Pre-Deployment Notes ....................................................................................................... 1
Chapter 3 Network Topology ............................................................................................................ 2
Chapter 4 Deploying ZAG .................................................................................................................. 4
4.1 Zentry Access Gateway (ZAG) ............................................................................................. 4
4.2 Deploying ZAG on VMware ESXI ......................................................................................... 4
4.3 Creating ZAG VM ................................................................................................................. 7
4.4 Creating Zentry Master VM .............................................................................................. 11
4.5 Creating Zentry Worker VM .............................................................................................. 12
4.6 IP Allocation ...................................................................................................................... 15
4.7 Configuring Networking and Cluster ................................................................................. 15
4.8 Configuring the IPs for ZAG ............................................................................................... 16
4.9 Port Forwarding Rules ....................................................................................................... 17
4.10 Other Configurations ...................................................................................................... 18
4.11 Executing Vital Commands ............................................................................................. 18
4.11.1 OCSP and CRL Commands .................................................................................... 19
4.12 Configuring DNS Settings ................................................................................................ 19
4.13 Configuring Time Zone .................................................................................................... 20
Chapter 5 Deploying ZAG on VMware vCenter .............................................................................. 23
5.1 Creating ZAG VM ............................................................................................................... 23
5.2 Deploying ZAG OVF Template ........................................................................................... 27
5.3 Deploying Zentry Master OVF Template........................................................................... 32
5.4 Deploying Zentry Worker OVF Template .......................................................................... 34
5.5 Activating ZAG, Zentry Master and Zentry Worker .......................................................... 37

©2021 Zentry Security, Inc All Rights Reserved. iii
Appendix I ....................................................................................................................................... 53
Creating REST Interface User .......................................................................................... 53

©2021 Zentry Security, Inc All Rights Reserved. 1
Chapter 1 Introduction
Zentry is a next-gen secure access solution based on zero-trust principles of ‘never trust, always verify’. It allows IT to provide the workforce with secure access to any application or resource, whether on-premises or in the cloud, from anywhere on any device. Zentry eliminates the need for client software and replaces legacy network-level VPN connectivity with application-level connectivity that shrinks attack surfaces and prevents data leakage and lateral movement.
provides information about how to deploy Zentry Trusted Access on ESXi.
This Zentry deployment guide is based on Two Node Kubernetes Clusters (Master and Worker), and a Zentry Access Gateway (ZAG).
Chapter 2 Prerequisites
This deployment requires the following hardware and software products.
2.1 Hardware Requirements
• Zentry Access Gateway requires 2 CPU / 4 GB RAM / 40 GB HDD.
• Zentry Trusted Access Master requires 2 CPU / 4 GB RAM / 50 GB HDD.
• Zentry Trusted Access Worker requires 6 CPU / 16 GB RAM / 500 GB HDD.
2.2 Software Requirements
• The ESXi hypervisor 6.5 and above.
2.3 Pre-Deployment Notes
Deployment is based on two node Kubernetes cluster (One of them is a Master and other one is a Worker). Make sure you have the following images for deployment:
• ZAG.vmdk - ZAG will run on ESXi 6.5 and above.
• Kubernetes Master.vmdk and Worker.vmdk - Both Kubernetes Master and Worker image will contain all the necessary software components that is required for Zentry to be running. Zentry Trusted Access to be running.
Software such as Kubernetes and Docker Engine are pre-installed. Image will have the Kubernetes cluster structure pre-programmed and Zentry Trusted Access containers pre-packaged. Once Kubernetes Master and Worker Virtual Appliances (VA’s) are instantiated, it will be ready to serve with a help of ZAG.
For more information on accessing Control Center, refer to the Zentry Control Center Admin Guide.

©2021 Zentry Security, Inc All Rights Reserved. 2
Chapter 3 Network Topology
The Zentry Security is composed of the following platform components:
• Zentry Access Gateway (ZAG)
• Zentry Master
• Zentry Worker
These components are deployed on separate VMs on ESXi. This is used to facilitate communication between the three platform components forming a private internal network.
The ZAG is configured with a default internal IP address of 10.0.0.1. The Zentry Master is configured with a default internal IP address of 10.0.0.10. The Zentry Worker is configured with a default internal IP address of 10.0.0.20. The virtual switch allows the three components to communicate with each other over an internal private network.
In this document the subnet 10.0.0.0/24 is used as an example. You can also choose 172.16.0.0/24 or 192.168.0.0/24 as your subnet. The IP address for ZAG, Master and Worker will change accordingly.

©2021 Zentry Security, Inc All Rights Reserved. 3
To be addressable/routable from outside the ESXi instance these components will be given client/customer specific NATed IP Addresses. ZAG will be given client/customer specific Management IP address. ZWS port 443: ZWS is the service that is used by the users to access private resources of the organization. They are exposed over a Public IP specific to the client. ZTA ports (RADIUS, LDAP etc.) will be exposed using a Port Mapping mechanism through the ZAG.

©2021 Zentry Security, Inc All Rights Reserved. 4
Chapter 4 Deploying ZAG
This chapter provides information about configuring the ZAG, Zentry Master and Worker Node.
4.1 Zentry Access Gateway (ZAG)
A high-performance access proxy that communicates with all Zentry Trusted Access components, and ensures that secure access is fully authenticated, authorized, user authentication with Multi-Factor Authentication (MFA), Single Sign-On, and policy enforcement. It delivers the following capabilities:
• User authentication with MFA and SSO/federation
• Access proxy, load balancing and application health checks
• End-to-end encryption
4.2 Deploying ZAG on VMware ESXI
To deploy the ZAG on the VMware ESXI:
1. Login to the VMware ESXI vSphere Client using your credentials.
2. Obtain the ZAG, Zentry Master, and the Zentry Worker OVF and VMDK files. Contact Zentry
Support to obtain these files.
3. Navigate to Networking and Virtual switches.

©2021 Zentry Security, Inc All Rights Reserved. 5
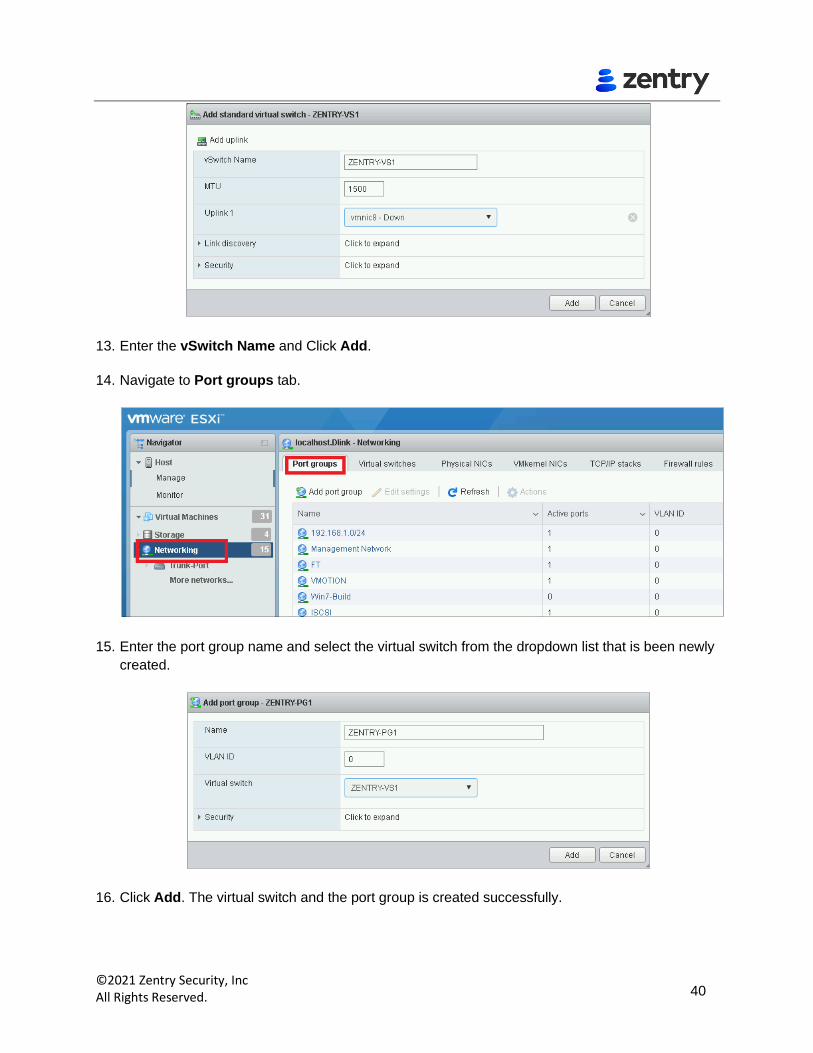
4. Click Add standard virtual switch.
5. Enter the vSwitch Name and Click Add.
6. Navigate to Port groups tab.
7. Enter the port group name and select the virtual switch from the dropdown list that is been newly
created.

©2021 Zentry Security, Inc All Rights Reserved. 6
8. Click Add. The virtual switch and the port group is created successfully.

©2021 Zentry Security, Inc All Rights Reserved. 7
4.3 Creating ZAG VM
1. Navigate to Virtual Machines and Create/Register VM.
2. In the New virtual machine window select creation type as Deploy a virtual machine from an
OVF or VMDK file.
3. Click Next.
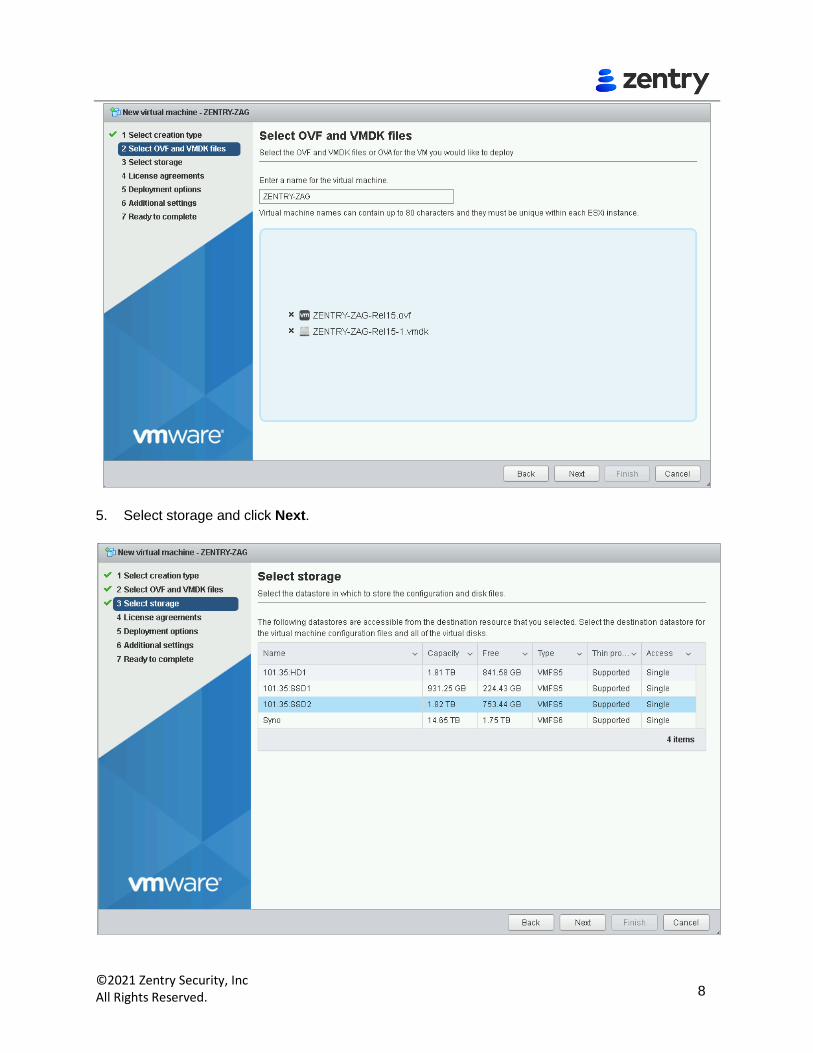
4. Select the ZAG OVF and the VMDK files and click Next.
©2021 Zentry Security, Inc All Rights Reserved. 8
5. Select storage and click Next.

©2021 Zentry Security, Inc All Rights Reserved. 9
6. Select the Deployment options and map the network to the newly created port group. Click Next.
7. Review the settings selection and click Finish.

©2021 Zentry Security, Inc All Rights Reserved. 10
©2021 Zentry Security, Inc All Rights Reserved. 11
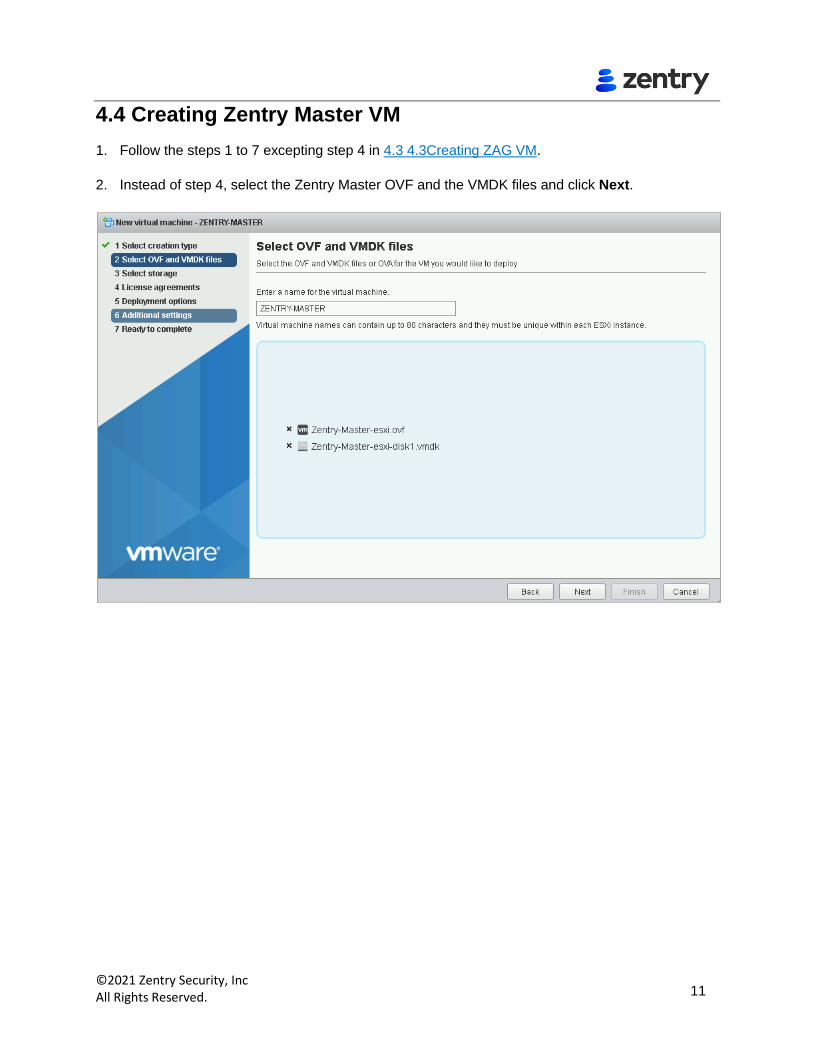
4.4 Creating Zentry Master VM
1. Follow the steps 1 to 7 excepting step 4 in 4.3 4.3Creating ZAG VM.
2. Instead of step 4, select the Zentry Master OVF and the VMDK files and click Next.
©2021 Zentry Security, Inc All Rights Reserved. 12
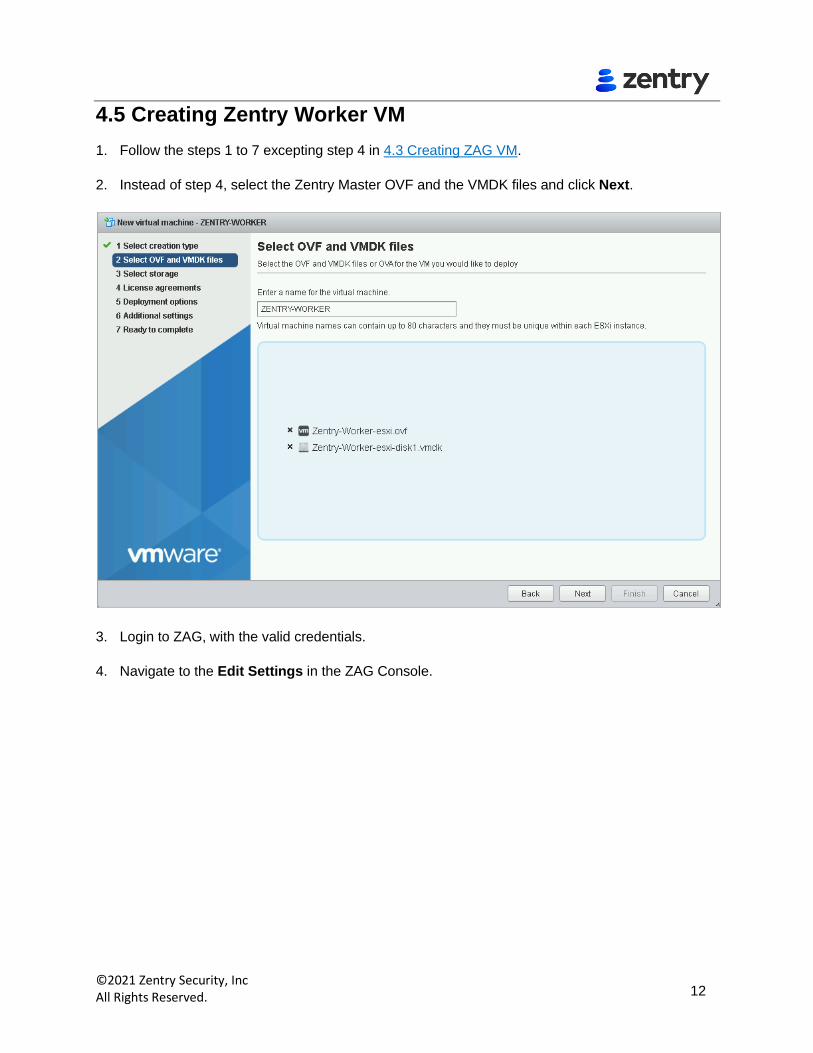
4.5 Creating Zentry Worker VM
1. Follow the steps 1 to 7 excepting step 4 in 4.3 Creating ZAG VM.
2. Instead of step 4, select the Zentry Master OVF and the VMDK files and click Next.
3. Login to ZAG, with the valid credentials.
4. Navigate to the Edit Settings in the ZAG Console.

©2021 Zentry Security, Inc All Rights Reserved. 13
5. Change the Network Adapter to one of the active interfaces and click Save.
• Network Adapter 1 – Select the VM network on which ZAG management IP can be accessed.
• Network Adapter 2 – Select the internal subnet chosen for communicating between ZAG, Master, and Worker nodes.

©2021 Zentry Security, Inc All Rights Reserved. 14
One arm of the ZAG should be associated with the virtual switch where the 10.0.0.0/24
(this subnet will change as per the choice made) subnet is assigned. The other arm of the
ZAG should be associated with any active network, and you can enter your IP.
6. Assign valid IPs to the interfaces of ZAG. Refer to 4.8 Error! Not a valid bookmark self-
reference..
7. Login to Zentry Worker or Master with the valid credentials and change the DNS and options if
required. Refer to 4.12 Configuring DNS Settings for more details on DNS Settings.

©2021 Zentry Security, Inc All Rights Reserved. 15
4.6 IP Allocation
The IPs for ZAG, Master, Worker varies based on the subnet chosen. The following table lists various subnet options and their respective IPs.
Subnet ZAG IP Master IP Worker IP
10.0.0.0/24 10.0.0.1 10.0.0.10 10.0.0.20
172.16.0.0/24 172.16.0.1 172.16.0.10 172.16.0.20
192.168.0.0/24 192.168.0.1 192.168.0.10 192.168.0.20
4.7 Configuring Networking and Cluster
After the ZAG, Zentry Master and Worker node are deployed configure the networking and cluster.
To configure the networking and cluster:
1. SSH into Zentry Master using IP configured in ZAG TCP forwarding rules.
2. Login using default credentials.
Login: admin
Password: zentry
3. You will be prompted with the following options:
-t Set Time
-T Set Timezone
-d Set Date
-dt Show Date/Time/Timezone
-n Set DNS Servers
-N Show DNS Servers
-sc Setup Networking and Cluster
-r Setup Docker registry
-e Exit

©2021 Zentry Security, Inc All Rights Reserved. 16
In this document the subnet 10.0.0.0/24 is used as an example. You can also choose 172.16.0.0/24 or 192.168.0.0/24 as your subnet.
4. Enter -sc from the options listed.
5. Select the required subnet from the following options listed.
10.0.0.0
172.16.0.0
192.168.0.0
Make sure the subnets are not changed once it is configured.
4.8 Configuring the IPs for ZAG
1. Open ZAG Console.
2. Login to ZAG using default credentials.
Login: admin
Password: zentry
3. Enter show interface and check if the status of the port is active.
4. Enter your ip address port1 and ip address port2 along with the netmask. For
example:
ip address port1 192.168.1.5 255.255.255.0 (use your own IP)
ip address port2 10.0.0.1 255.255.255.0 (use this IP only)
• In ESXI the first port, i.e., port1 is always management port.

©2021 Zentry Security, Inc All Rights Reserved. 17
• While adding Port 2, it should be added to active vSwitch and IP should be ’10.0.0.1’ or
‘172.16.0.1’ or ‘192.168.0.1’ based on the subnet chosen.
5. Enter write memory to save the IPs.
4.9 Port Forwarding Rules
1. Open ZAG Console.
2. Login to ZAG using default credentials.
Login: admin
Password: zentry
3. Enter fwd tcp and enter the IPs to access Control Center, Kubernetes Dashboard and
ZTA Proxy as follows:
i. Enter the ZAG IP to access Control Center.
fwd tcp 192.168.1.5 443 10.0.0.20 32678 630

©2021 Zentry Security, Inc All Rights Reserved. 18
4.10 Other Configurations
1. Open ZAG Console.
2. Login to ZAG using default credentials.
Login: admin
Password: zentry
3. Enter the zws service policy and zws service otp.
zws service policy 10.0.0.20 32679
zws service otp 10.0.0.20 30093
4. Enter the NAT and log host.
log host 10.0.0.20 32712 UDP 0
nat port "ZAG IP" 10.0.0.20 255.255.255.0 86400 0.0.0.0 "Zentry"
The following log host command should be used respectively based on the choice of subnet.
log host 172.16.0.20 32712 UDP 0
OR
log host 192.168.0.20 32712 UDP 0
5. Enter the default route and DNS server.
ip route default <use your own gateway IP>
ip nameserver <use the default DNS Server>
6. Enter write memory to save ZWS configurations.
4.11 Executing Vital Commands
After you have created virtual service in Control Center to access Service Broker, execute the following commands by SSH into Zentry Master using IP configured in ZAG TCP forwarding rules. These commands prevent possibility of spoofing the headers.
http rewrite request removeheader "vs_name" "X-ZConn"
http rewrite request removeheader "vs_name" "X-ZWeb"
http rewrite request removeheader "vs_name" "X-ZPass"

©2021 Zentry Security, Inc All Rights Reserved. 19
http rewrite request removeheader "vs_name" "X-ZGrp"
http rewrite request removeheader "vs_name" "X-ZCid"
Execute the following command for ZAG to forward Client IP to ZWS.
http xforwarded on "vs_name"
4.11.1 OCSP and CRL Commands
These commands check whether the certificate is revoked or to check the status of the certificate.
OCSP
ssl settings ocsp <virtual_host_name> <ocsp_server_url>
CRL
ssl settings crl online <virtual_host_name>
no ssl settings crl online <virtual_host_name>
ssl import crlca [virtual_host_name] [domain_name] [tftp_ip] [file_name]
This command is used to disable the OCSP certificate revocation check function for the specified SSL virtual host.
no ssl settings ocsp <virtual_host_name>
OCSP Stappling
ssl settings ocspstapling <virtual_host_name>
4.12 Configuring DNS Settings
After the ZAG, Zentry Master and Worker node are deployed configure the DNS servers.
To configure the DNS Servers:
1. SSH into Zentry Master using IP configured in ZAG TCP forwarding rules.
2. Login to Zentry Master and Worker using default credentials.
Login: admin
Password: zentry
3. You will be prompted with the following options:
-t Set Time
-T Set Timezone
-d Set Date

©2021 Zentry Security, Inc All Rights Reserved. 20
-dt Show Date/Time/Timezone
-n Set DNS Servers
-N Show DNS Servers
-sc Setup Networking and Cluster
-r Setup Docker registry
-e Exit
4. Enter -n from the options listed.
5. Enter the DNS Server IP (1) and DNS Server IP (2). For example:
DNS Server IP (1) 192.168.1.100 (use the default DNS server)
DNS Server IP (2).192.168.1.5 (use the secondary default DNS server)
• Make sure to configure DNS Servers correctly as there are chances of Policy Engine
restarting repeatedly. Be sure that the customer is referring to internal host names or domain
names in the AD or resource configurations.
• DNS on master and worker node should be set up only after the Kubernetes cluster is set up
and the pods are up.
4.13 Configuring Time Zone
Ensure to have the same time zone for ZAG, Master and Worker for the Investigation page to load.
To set the time for ZAG:
1. Open ZAG Console.
2. Login to ZAG using default credentials.

©2021 Zentry Security, Inc All Rights Reserved. 21
3. Enter system timezone.
4. Select the continent, country and timezone.
To set the timezone for Master and Worker:
5. SSH into Zentry Master using IP configured in ZAG TCP forwarding rules.
6. Login to Zentry Master and Worker using default credentials.
Login: admin
Password: zentry
7. You will be prompted with the following options:
-t Set Time
-T Set Timezone
-d Set Date
-dt Show Date/Time/Timezone
-n Set DNS Servers
-N Show DNS Servers
-sc Setup Networking and Cluster

©2021 Zentry Security, Inc All Rights Reserved. 22
-r Setup Docker registry
-e Exit
8. Enter -T and enter the Timezone.
©2021 Zentry Security, Inc All Rights Reserved. 23
Chapter 5 Deploying ZAG on VMware vCenter
To configure ZAG:
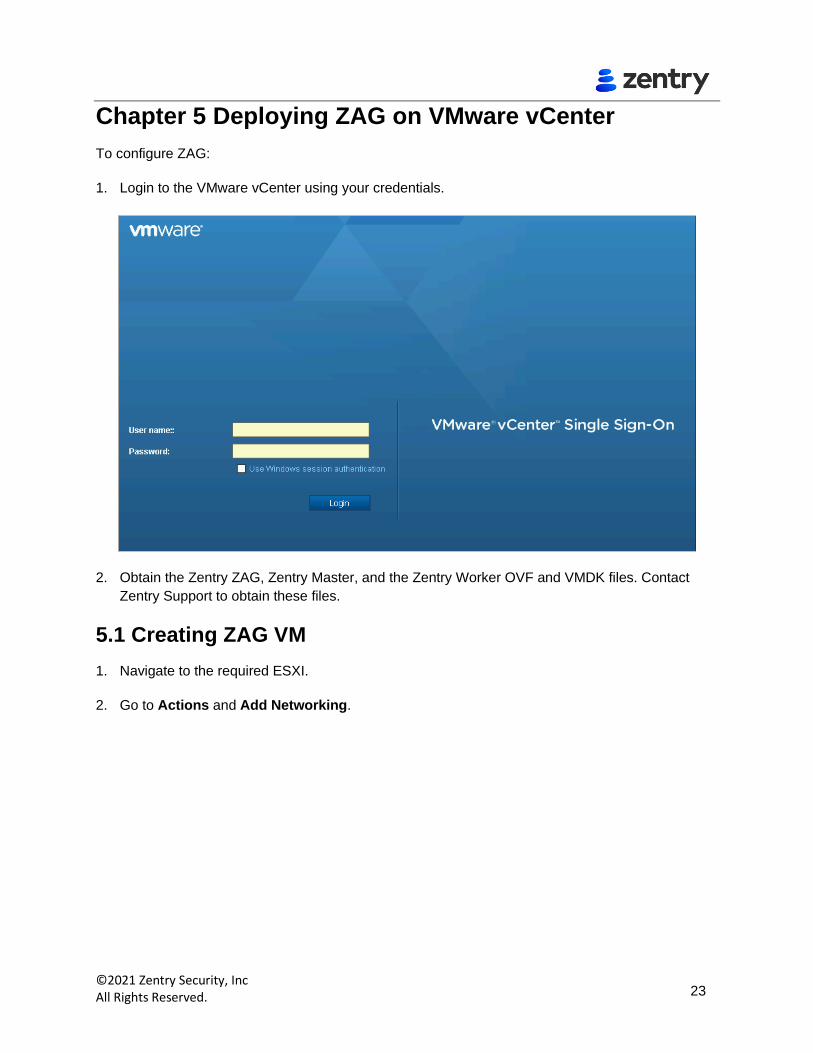
1. Login to the VMware vCenter using your credentials.
2. Obtain the Zentry ZAG, Zentry Master, and the Zentry Worker OVF and VMDK files. Contact
Zentry Support to obtain these files.
5.1 Creating ZAG VM
1. Navigate to the required ESXI.
2. Go to Actions and Add Networking.

©2021 Zentry Security, Inc All Rights Reserved. 24
3. Select the connection type as Virtual Machine Port Group for a Standard Switch from the
Add Networking window.

©2021 Zentry Security, Inc All Rights Reserved. 25
4. Select the target device. Click next.

©2021 Zentry Security, Inc All Rights Reserved. 26
5. Select the Standard Switch. Click next.
6. Enter the Network label for ZAG and click next.

©2021 Zentry Security, Inc All Rights Reserved. 27
7. Review the settings and click finish.
5.2 Deploying ZAG OVF Template
1. Right click on the required ESXI and navigate to Deploy OVF Template.

©2021 Zentry Security, Inc All Rights Reserved. 28
2. Select the OVF template and upload the ZAG OVF and VMDK files.

©2021 Zentry Security, Inc All Rights Reserved. 29
3. Select the name and the location for ZAG. Click next.
4. Select a compute resource and click next.
©2021 Zentry Security, Inc All Rights Reserved. 30
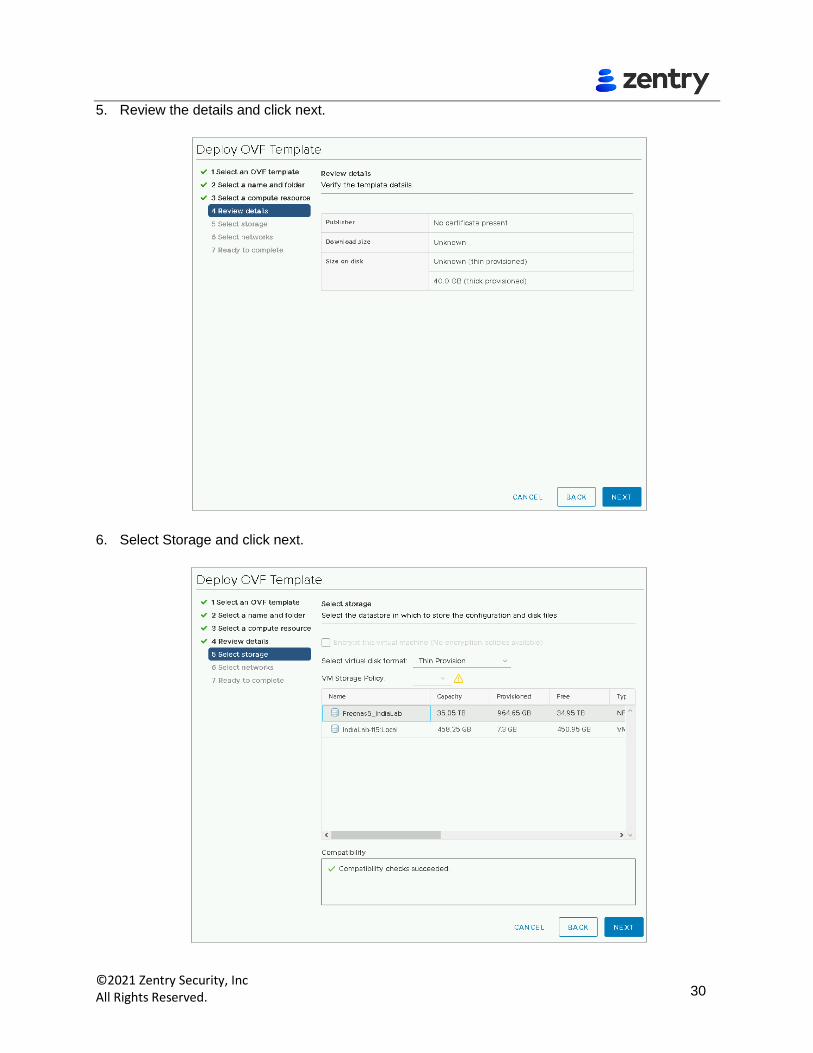
5. Review the details and click next.
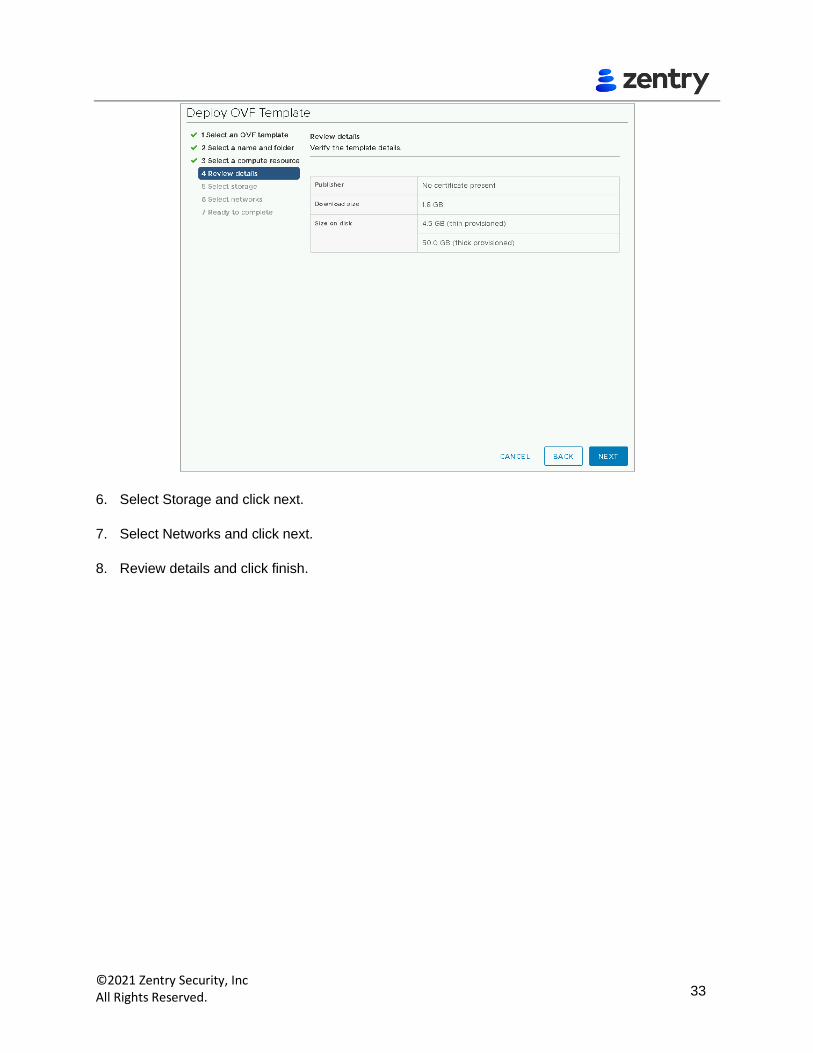
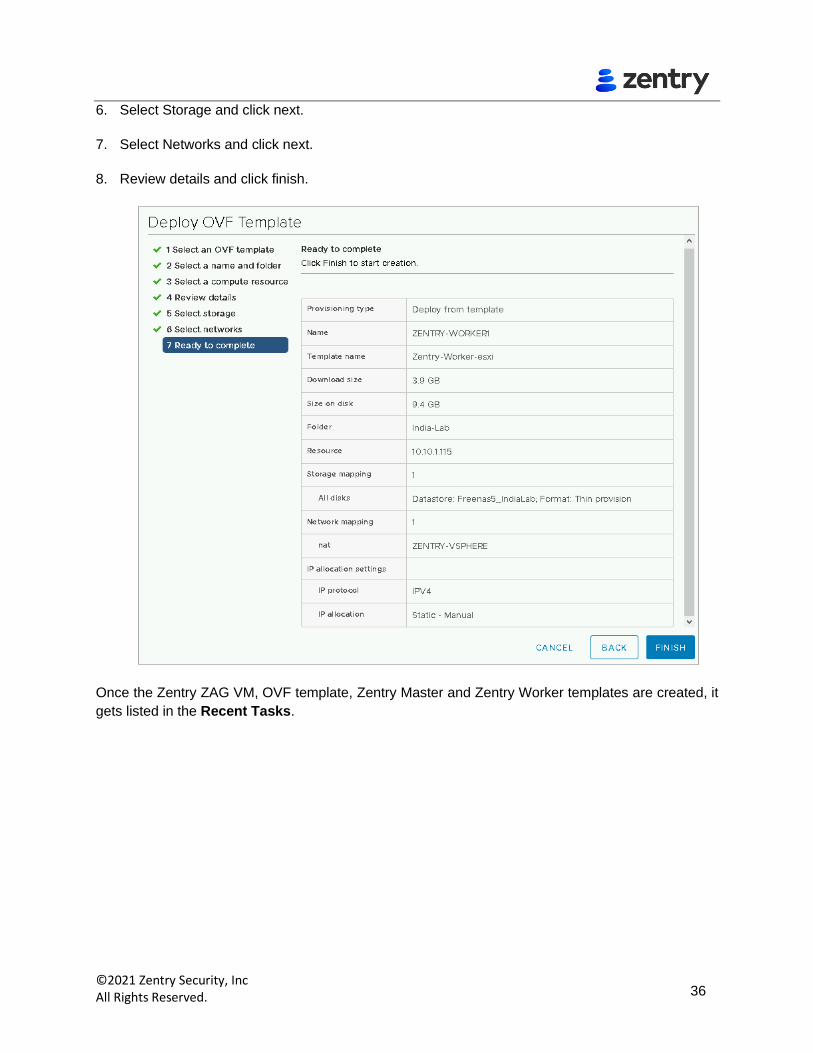
6. Select Storage and click next.
©2021 Zentry Security, Inc All Rights Reserved. 31
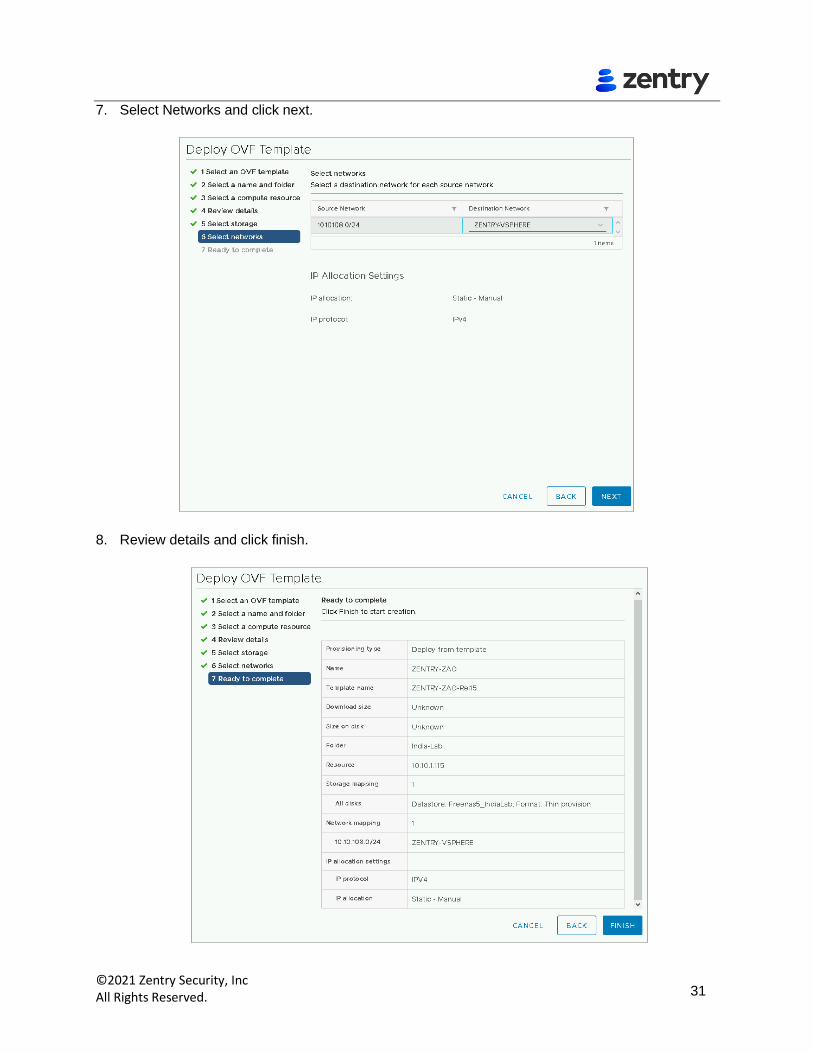
7. Select Networks and click next.
8. Review details and click finish.

©2021 Zentry Security, Inc All Rights Reserved. 32
5.3 Deploying Zentry Master OVF Template
1. Right click on the required ESXI and navigate to Deploy OVF Template.
2. Select the OVF template and upload the Master OVF and VMDK files.
3. Select the name and the location for Zentry Master. Click next.
4. Select a compute resource and click next.
5. Review the details and click next.
©2021 Zentry Security, Inc All Rights Reserved. 33
6. Select Storage and click next.
7. Select Networks and click next.
8. Review details and click finish.

©2021 Zentry Security, Inc All Rights Reserved. 34
5.4 Deploying Zentry Worker OVF Template
1. Right click on the required ESXI and navigate to Deploy OVF Template.
2. Select the OVF template and upload the Worker OVF and VMDK files.
3. Select the name and the location for Zentry Worker. Click next.

©2021 Zentry Security, Inc All Rights Reserved. 35
4. Select a compute resource and click next.
5. Review the details and click next.
©2021 Zentry Security, Inc All Rights Reserved. 36
6. Select Storage and click next.
7. Select Networks and click next.
8. Review details and click finish.
Once the Zentry ZAG VM, OVF template, Zentry Master and Zentry Worker templates are created, it
gets listed in the Recent Tasks.

©2021 Zentry Security, Inc All Rights Reserved. 37
5.5 Activating ZAG, Zentry Master and Zentry Worker
1. Navigate to the Edit Settings from Actions in the ZAG Console.
2. Change the Network Adapter to one of the active interfaces and click Ok.

©2021 Zentry Security, Inc All Rights Reserved. 38
One arm of the ZAG should be associated with ZAG Accessible Management Network.
The other arm of the ZAG should be associated with customer chosen subnet where the
10.0.0.0/24 is assigned.
5.6 Assign valid IPs to the interfaces of ZAG. Refer to 4.8 4.2Deploying ZAG on VMware ESXI
To deploy the ZAG on the VMware ESXI:
9. Login to the VMware ESXI vSphere Client using your credentials.
©2021 Zentry Security, Inc All Rights Reserved. 39
10. Obtain the ZAG, Zentry Master, and the Zentry Worker OVF and VMDK files. Contact Zentry
Support to obtain these files.
11. Navigate to Networking and Virtual switches.
12. Click Add standard virtual switch.
©2021 Zentry Security, Inc All Rights Reserved. 40
13. Enter the vSwitch Name and Click Add.
14. Navigate to Port groups tab.
15. Enter the port group name and select the virtual switch from the dropdown list that is been newly
created.
16. Click Add. The virtual switch and the port group is created successfully.
©2021 Zentry Security, Inc All Rights Reserved. 41
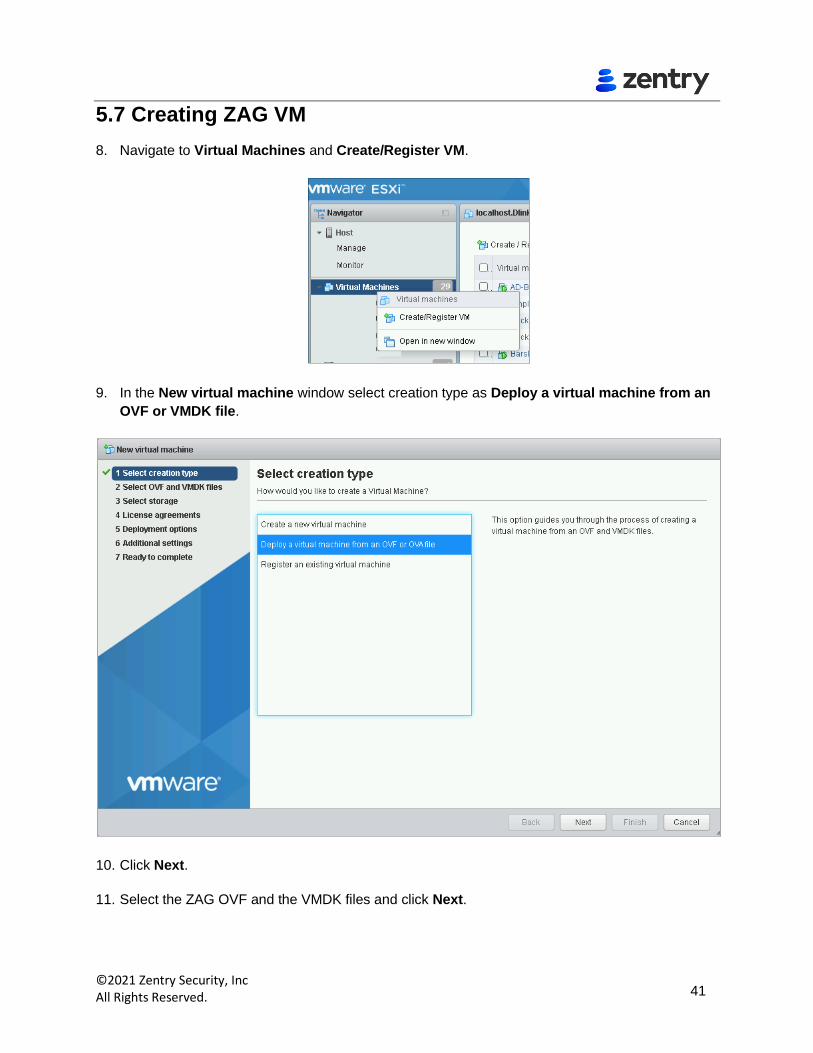
5.7 Creating ZAG VM
8. Navigate to Virtual Machines and Create/Register VM.
9. In the New virtual machine window select creation type as Deploy a virtual machine from an
OVF or VMDK file.
10. Click Next.
11. Select the ZAG OVF and the VMDK files and click Next.

©2021 Zentry Security, Inc All Rights Reserved. 42
12. Select storage and click Next.

©2021 Zentry Security, Inc All Rights Reserved. 43
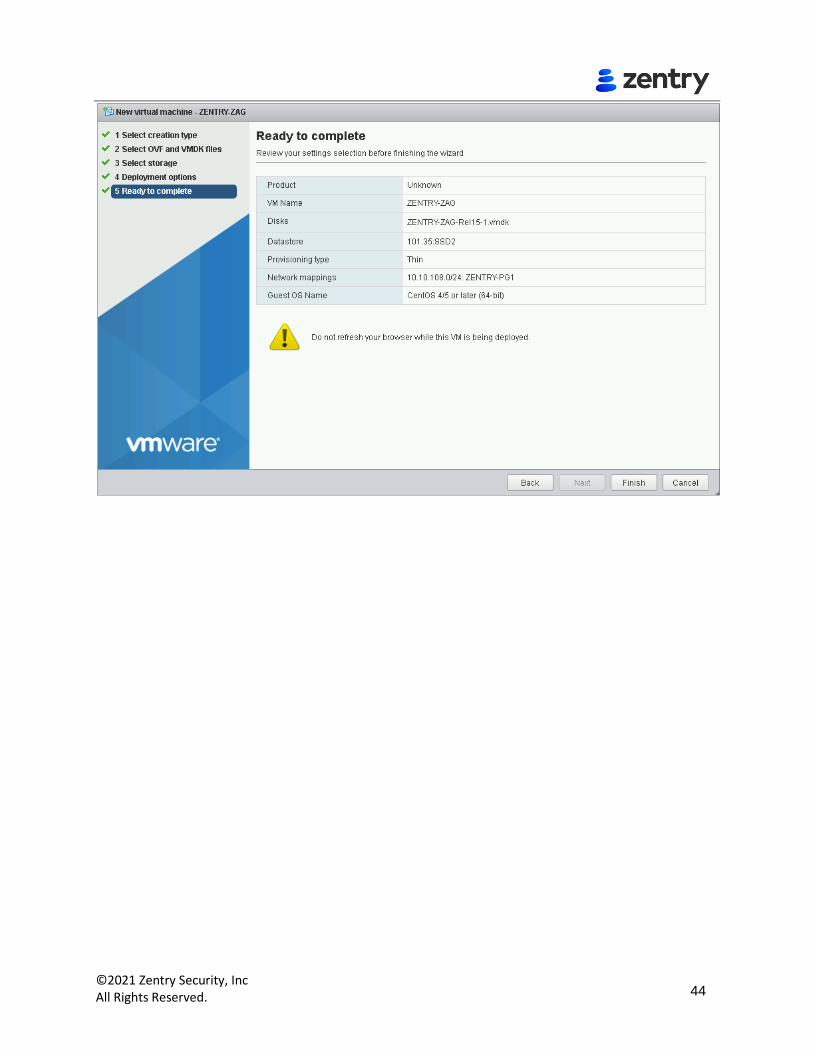
13. Select the Deployment options and map the network to the newly created port group. Click Next.
14. Review the settings selection and click Finish.
©2021 Zentry Security, Inc All Rights Reserved. 44

©2021 Zentry Security, Inc All Rights Reserved. 45
5.8 Creating Zentry Master VM
3. Follow the steps 1 to 7 excepting step 4 in 4.3 4.3Creating ZAG VM.
4. Instead of step 4, select the Zentry Master OVF and the VMDK files and click Next.

©2021 Zentry Security, Inc All Rights Reserved. 46
5.9 Creating Zentry Worker VM
8. Follow the steps 1 to 7 excepting step 4 in 4.3 Creating ZAG VM.
9. Instead of step 4, select the Zentry Master OVF and the VMDK files and click Next.
10. Login to ZAG, with the valid credentials.
11. Navigate to the Edit Settings in the ZAG Console.

©2021 Zentry Security, Inc All Rights Reserved. 47
12. Change the Network Adapter to one of the active interfaces and click Save.
• Network Adapter 1 – Select the VM network on which ZAG management IP can be accessed.
• Network Adapter 2 – Select the internal subnet chosen for communicating between ZAG, Master, and Worker nodes.

©2021 Zentry Security, Inc All Rights Reserved. 48
One arm of the ZAG should be associated with the virtual switch where the 10.0.0.0/24 (this
subnet will change as per the choice made) subnet is assigned. The other arm of the ZAG
should be associated with any active network, and you can enter your IP.
13. Assign valid IPs to the interfaces of ZAG. Refer to 4.8 Error! Not a valid bookmark self-
reference..
14. Login to Zentry Worker or Master with the valid credentials and change the DNS and options if
required. Refer to 4.12 Configuring DNS Settings for more details on DNS Settings.

©2021 Zentry Security, Inc All Rights Reserved. 49
5.10 IP Allocation
The IPs for ZAG, Master, Worker varies based on the subnet chosen. The following table lists various subnet options and their respective IPs.
Subnet ZAG IP Master IP Worker IP
10.0.0.0/24 10.0.0.1 10.0.0.10 10.0.0.20
172.16.0.0/24 172.16.0.1 172.16.0.10 172.16.0.20
192.168.0.0/24 192.168.0.1 192.168.0.10 192.168.0.20
5.11 Configuring Networking and Cluster
After the ZAG, Zentry Master and Worker node are deployed configure the networking and cluster.
To configure the networking and cluster:
6. SSH into Zentry Master using IP configured in ZAG TCP forwarding rules.
7. Login using default credentials.
Login: admin
Password: zentry
8. You will be prompted with the following options:
-t Set Time
-T Set Timezone
-d Set Date
-dt Show Date/Time/Timezone
-n Set DNS Servers
-N Show DNS Servers
-sc Setup Networking and Cluster
-r Setup Docker registry
-e Exit

©2021 Zentry Security, Inc All Rights Reserved. 50
In this document the subnet 10.0.0.0/24 is used as an example. You can also choose 172.16.0.0/24 or 192.168.0.0/24 as your subnet.
9. Enter -sc from the options listed.
10. Select the required subnet from the following options listed.
10.0.0.0
172.16.0.0
192.168.0.0
Make sure the subnets are not changed once it is configured.
3. Configuring the IPs for ZAG.
4. Activate the Zentry Master and Zentry Worker.

©2021 Zentry Security, Inc All Rights Reserved. 51
5. Login to Zentry Master or Zentry Worker with the valid credentials and change the DNS and
options if required. Refer to 4.12 Configuring DNS Settings for more details on DNS Settings.
©2021 Zentry Security, Inc All Rights Reserved. 52
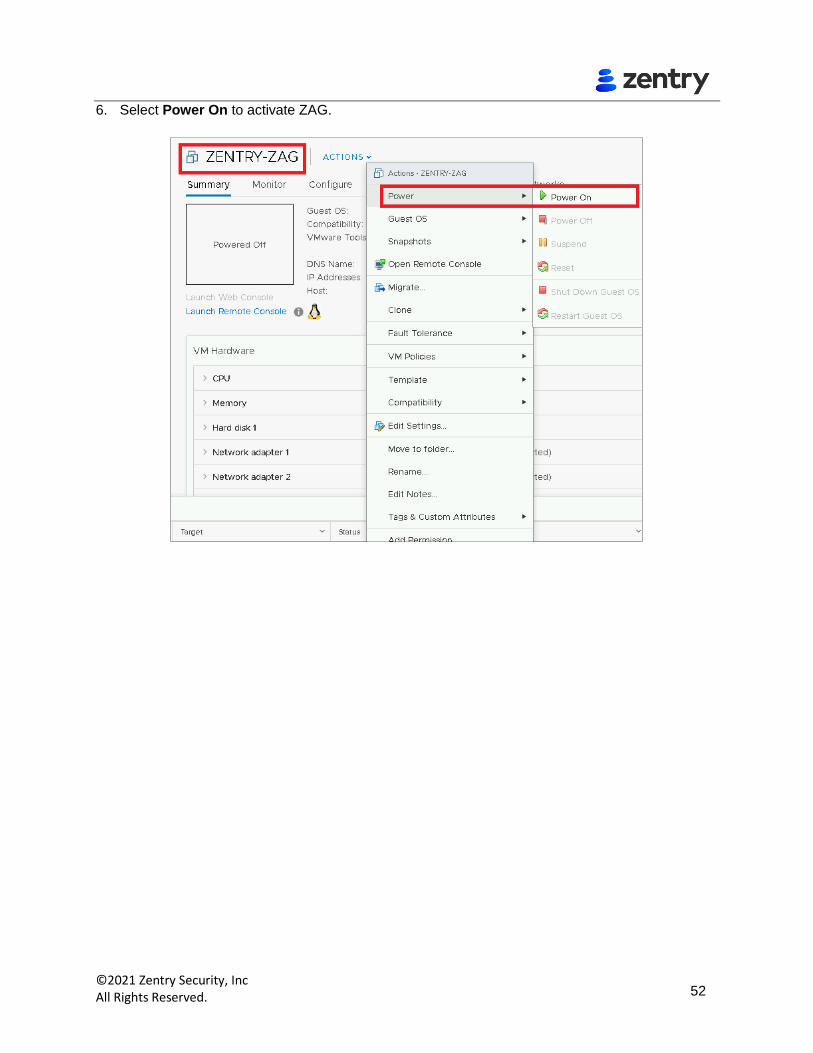
6. Select Power On to activate ZAG.
©2021 Zentry Security, Inc All Rights Reserved. 53
Appendix I
Creating REST Interface User
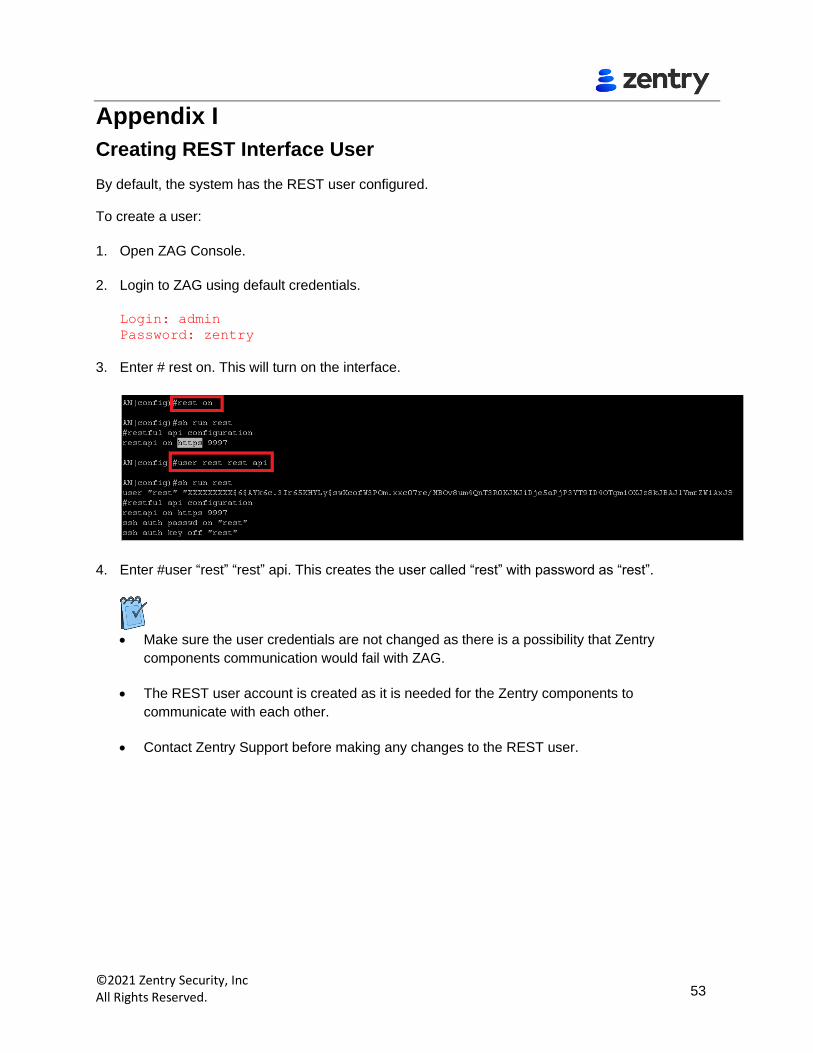
By default, the system has the REST user configured.
To create a user:
1. Open ZAG Console.
2. Login to ZAG using default credentials.
Login: admin
Password: zentry
3. Enter # rest on. This will turn on the interface.
4. Enter #user “rest” “rest” api. This creates the user called “rest” with password as “rest”.
• Make sure the user credentials are not changed as there is a possibility that Zentry
components communication would fail with ZAG.
• The REST user account is created as it is needed for the Zentry components to
communicate with each other.
• Contact Zentry Support before making any changes to the REST user.