Zeefax Limited - TRS
26
Guide to by Zeefax Limited Zeefax Limited Zeefax House, 320 King Street, LONDON, W6 0RR Tel : +44 (0) 20 8748 7808 Fax: +44 (0) 20 8748 7188 Web site: http://www.zeefax.com Copyright © 2007 Zeefax Limited. All rights reserved.
Transcript of Zeefax Limited - TRS

Guide to
by
Zeefax Limited
Zeefax Limited
Zeefax House, 320 King Street, LONDON, W6 0RR Tel : +44 (0) 20 8748 7808 Fax: +44 (0) 20 8748 7188
Web site: http://www.zeefax.com
Copyright © 2007 Zeefax Limited. All rights reserved.
Zeefax Limited Guide to Using TRS
Page 2 of 26
CONTENTS
1. What is TRS ? .................................................................................................................. 3
2. Quick Start ....................................................................................................................... 4
3. Logging In ........................................................................................................................ 6
4. General Navigation .......................................................................................................... 7
5. Accounts ........................................................................................................................ 10
5. Drilling Rigs .................................................................................................................... 12
7. Equipment Inventory ...................................................................................................... 15
8. Service Tickets ............................................................................................................... 19
Zeefax Limited Guide to Using TRS
Page 3 of 26
1. What is TRS ?
TRS is an on-line service and repair tracking and logging system for Oil Rig electrical and SCR systems which is unique to Zeefax Limited.
With TRS you can:
Create and maintain a list of rigs and system configuration
Create and maintain a rig documentation, drawings and manuals
Create and maintain a complete inventory of the system equipment and spares for each rig
Maintain a log of all repairs
Request technical support from Zeefax
Track progress of your service requests and equipment repairs
View equipment repair reports
Grant access rights to other users
Although TRS has special extensions aimed at rigs with Ross Hill, Hill Graham or Zeefax type SCR systems, it can be used to record maintenance records for any piece of rig equipment, and because it is an on-line system, it can be accessed and updated from almost anywhere in the world where there is internet access

Zeefax Limited Guide to Using TRS
Page 4 of 26
2. Quick Start
To get started with Zeefax TRS, go to http://www.totalrigsupport.com
If you don’t already have a TRS account, you can request one by completing your name, company, telephone and email address details on this screen and clicking Request.
If you would like to try TRS, we have set up a demo account for you with the following user name and password:
User Name: [email protected]
Password: demo
If you already have an account, enter your details and click Log In
The first screen you see displays the account details. If you have Account Holder access rights you will be able to amend these details, otherwise you can not.
Navigation through the system is via the tabs at the top of the screen.
Step 1 – Enter Drilling Rigs
The first task is to set up at least one Drilling Rig. Click the Drilling Rigs tab, and a list of any previously entered rigs will be displayed. Click the Add Rig button add a new rig, and enter the details on the on-screen form. When complete, click Update Rig Details. To add another rig, click Back To Rig List and repeat the process. It’s a good idea to set up a ‘General’ rig for general enquiries.
Step 2- Enter Equipment Inventory
Click the Equipment Inventory tab. This will display a list of all the equipment you are tracking in TRS. To add equipment, click the Add Equipment button.
Equipment is added by completing the on-screen form then clicking the Update Equipment Details button. The form contents depends on the Equipment Type you select (for example, special information is required about AC and DC control modules).
Once your equipment inventory is complete, you are ready to start recording information and raising service tickets against items on it.
Step 3 – Raising a Service Ticket
All records in TRS are in the form of a service ticket. A service ticket can be anything from a request to send a service engineer, to a suggestion for improving the TRS system. Correspondence related to a ticket is stored in the form of Messages. It’s a personal judgment call as to what constitutes a continuation of an existing ticket or a when a new ticket is required.
To raise a ticket, click the Service Tickets tab and select the rig to which the ticket applies. After the screen refreshes select the piece of equipment it relates to or the ‘Not Applicable’ option. Complete the rest of the form and enter your message in the box provided. You can attach a document (photo, report, PDF) to your message by clicking Browse… and selecting the file to attach. When finished, click Raise Ticket.

Zeefax Limited Guide to Using TRS
Page 5 of 26
An email with details of your ticket will be sent to the appropriate person nominated within the Account Details section to receive messages of a particular type, who will respond through the TRS system, or by telephone if applicable. A copy of the email is sent to your email address for your records.
That’s it! Read on for more detailed information about TRS.

Zeefax Limited Guide to Using TRS
Page 6 of 26
3. Logging In
Before logging in to TRS, you must have first been given an account on the system. To log in go to http://www.totalrigsupport.com and enter your user name (email address) and password in the boxes provided and click Log In.
Lost Password
If you have lost your password you can ask TRS to send you a reminder by entering your email address in the box provided in the Lost Password section and clicking Send. Your password will be sent to the email address provided. If, for any reason, your email address is not the same as that on the TRS system you will have to contact Zeefax directly to have your account re-set.
Requesting an Account
If you don’t have a TRS account you can request details about how to obtain one from Zeefax by completing the Request an Account section and clicking Request.
Access Rights
All users have access rights which restrict some of the available functions. For example, only ‘Account Holders’ have the rights to amend the Account Details, add Drilling Rigs or add and amend other users’ User Accounts.
Selecting Accounts
After logging in, a list of the accounts which you have access to is displayed:
This list displays all the accounts which are available to you. If you have more than one account, you might want to work on one account at a time or a selection of accounts. The working accounts are selected in the panel at the top of the screen. To select you working accounts click on the account name in the panel (it will automatically expand). To select more than one account, or de-select an account, use Control-Click. Use Shift-Click to select a block of accounts.
Zeefax Limited Guide to Using TRS
Page 7 of 26
4. General Navigation
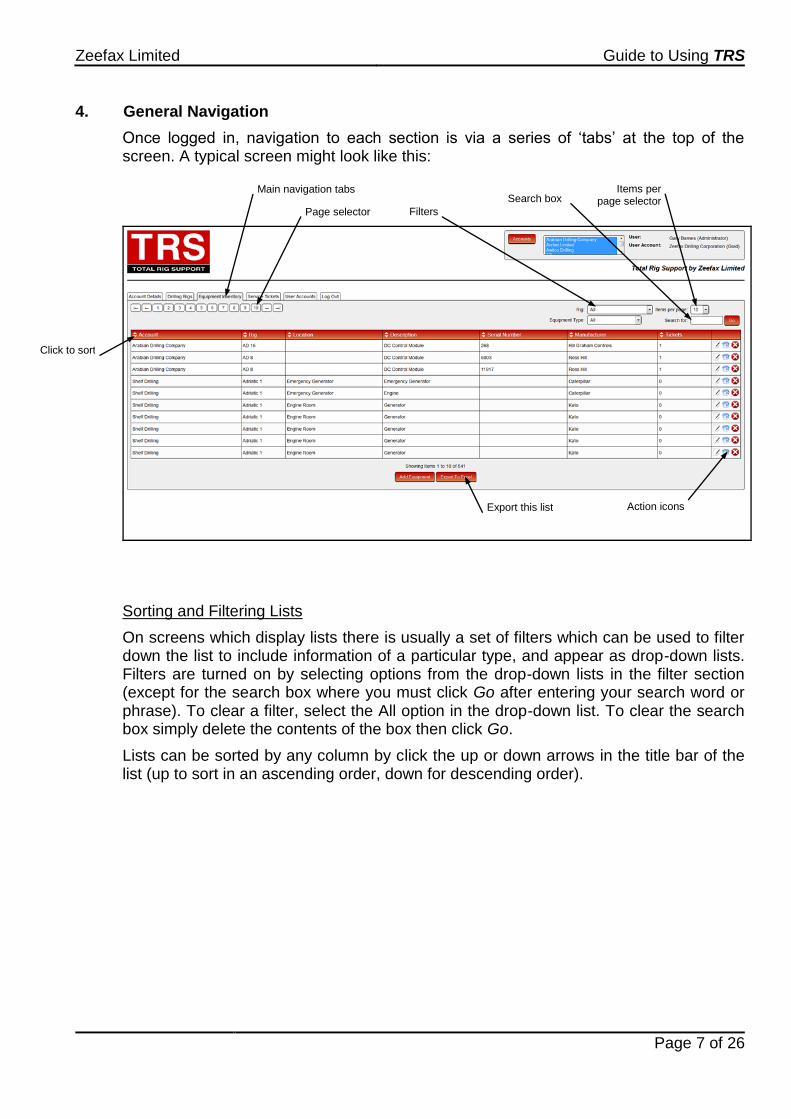
Once logged in, navigation to each section is via a series of ‘tabs’ at the top of the screen. A typical screen might look like this:
Sorting and Filtering Lists
On screens which display lists there is usually a set of filters which can be used to filter down the list to include information of a particular type, and appear as drop-down lists. Filters are turned on by selecting options from the drop-down lists in the filter section (except for the search box where you must click Go after entering your search word or phrase). To clear a filter, select the All option in the drop-down list. To clear the search box simply delete the contents of the box then click Go.
Lists can be sorted by any column by click the up or down arrows in the title bar of the list (up to sort in an ascending order, down for descending order).
Main navigation tabs
Page selector Filters
Items per page selector Search box
Action icons
Click to sort
Export this list

Zeefax Limited Guide to Using TRS
Page 8 of 26
Action Icons
In the right hand column of most lists are some icons which are used to edit or delete information, or provide other functions. Hover your mouse over each icon to see what it does. The following is an explanation of each icon used in TRS:
edit an item or information
delete an item
send an email
download attachment

Zeefax Limited Guide to Using TRS
Page 9 of 26
Page Selector
Some lists are split over a number of pages. At the top left f the screen is a series of icons to navigate through the pages, which appear as: |← ← 1 → →|. Clicking each does the following:
|← go to first page
← go to previous page
1 2 3 etc go to the selected page number
→ go to the previous page
→| go to the last page
The actual number of pages will depend on the number of items in the list and whatever is selected in the Items per page selector. This can be set to show as few as 10 items per page, or all items if required.
Export To Excel
This button opens a pop-up window which containing your list in excel format. All the filters which you have set on the list page are obeyed, so to when you want to download a complete list make sure the items per page is set to ‘All’ and any other filters are removed.

Zeefax Limited Guide to Using TRS
Page 10 of 26
5. Accounts
Only users with Account Holder status have the rights to amend the account details. You can check your access rights level after logging in by looking at the top tight-hand side of the page where you will see your name, followed by your access level in brackets.
To amend your account details, log in and click the icon of the account you want to edit from the Accounts list:
This opens up the Accounts detail page:

Zeefax Limited Guide to Using TRS
Page 11 of 26
On this screen you can amend name and address details and also select the email addresses of persons who received notifications when certain types of ticket are raised. To select more than one recipient, or de-select a recipient, use Control-Click. Use Shift-Click to select a block of recipients.
Once the on-screen form is complete click Update Account Details. This will be confirmed with the following dialogue box:
Click OK to return to the detail screen.
You can not change the Service Level from this screen: to upgrade please contact Zeefax Limited.
Zeefax Limited Guide to Using TRS
Page 12 of 26
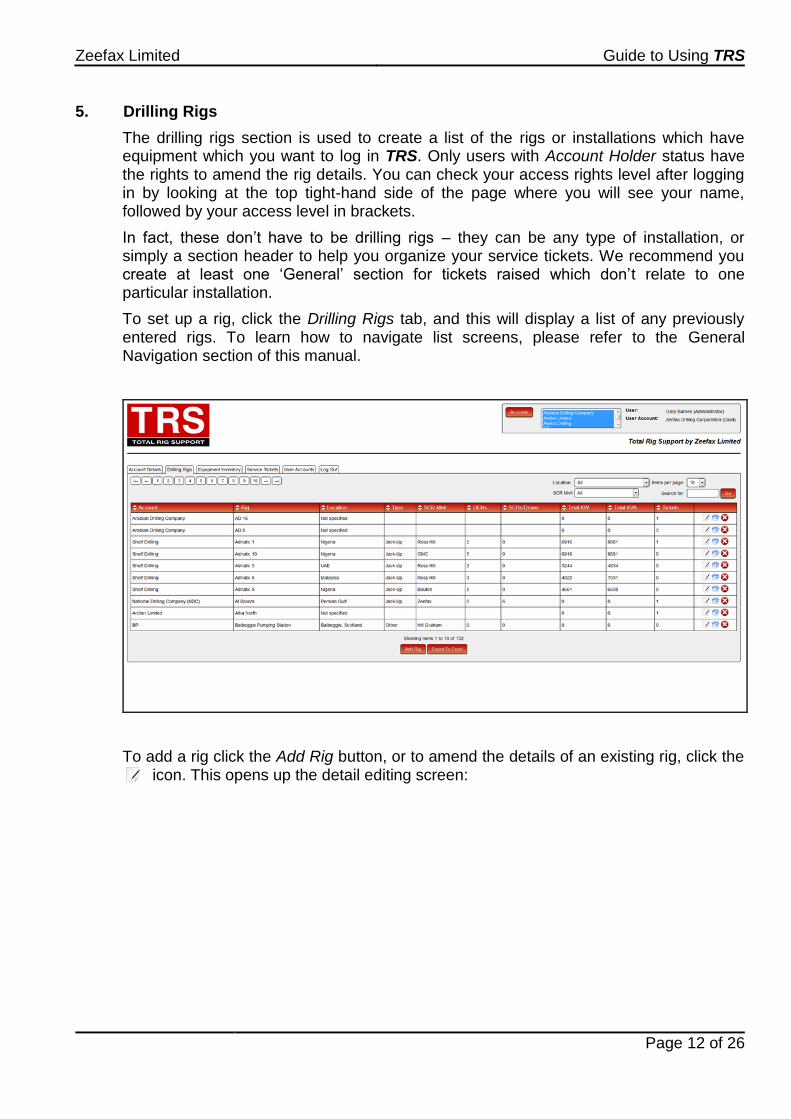
5. Drilling Rigs
The drilling rigs section is used to create a list of the rigs or installations which have equipment which you want to log in TRS. Only users with Account Holder status have the rights to amend the rig details. You can check your access rights level after logging in by looking at the top tight-hand side of the page where you will see your name, followed by your access level in brackets.
In fact, these don’t have to be drilling rigs – they can be any type of installation, or simply a section header to help you organize your service tickets. We recommend you create at least one ‘General’ section for tickets raised which don’t relate to one particular installation.
To set up a rig, click the Drilling Rigs tab, and this will display a list of any previously entered rigs. To learn how to navigate list screens, please refer to the General Navigation section of this manual.
To add a rig click the Add Rig button, or to amend the details of an existing rig, click the icon. This opens up the detail editing screen:

Zeefax Limited Guide to Using TRS
Page 13 of 26
Each field is described as follows:
Rig Name The name or reference number of the rig. This doesn’t have to be
an actual drilling rig – it can be an installation or simply a section name to help you organize your service tickets.
Rig Type Select the rig type, or select ‘Other’ if it’s not a rig.
Year of Manufacture Year in which the rig was built, or year of last major upgrade if more relevant and preferred.
Location Entering the location will help Zeefax organize the support services to fulfill your service requests.
Shipping Instructions Entering any instructions for shipping spares or returning items for repair and return.
SCR System Manufacturer
Select the manufacturer of the SCR system on the rig, or select ‘Other’ if it’s not a rig.
No. of SCRs Enter the number of SCRs sections in the SCR system, or zero if not applicable.
No. of Generators Enter the number of Generator sections in the SCR system, or zero if not applicable.
Total KW Enter the total amount of generated engine KW available on the rig
Total KVA Enter the total amount of generator KVA available on the rig

Zeefax Limited Guide to Using TRS
Page 14 of 26
Enter the details as appropriate then click the Update Rig Details button. You should see a confirmation message:
Click OK to return to the rig detail screen, followed by Back To Rig List to return to the list of rigs.
Deleting Rigs
To delete a rig, go to the list screen and click the corresponding icon. Deleting rigs which have equipment and service tickets against them is not recommended. After clicking the delete icon, you will be asked to confirm this action:
Click OK if you want to proceed with deleting, or click Cancel to return to the rig list.
WARNING Deleting a rig will delete all the associated equipment and service tickets, and is most strongly NOT RECOMMENDED.

Zeefax Limited Guide to Using TRS
Page 15 of 26
7. Equipment Inventory
The equipment inventory section is used to manage and maintain a list of equipment which might be serviced or repaired, and to be able to identify individual items and maintain a log of its service record. All users have the rights to add or amend equipment.
To add equipment, click the Equipment Inventory tab, and this will display a list of any previously entered equipment. To learn how to navigate list screens, please refer to the General Navigation section of this manual.

Zeefax Limited Guide to Using TRS
Page 16 of 26
To add a rig click the Add Equipment button, or to amend the details of existing equipment, click the icon. This opens up the detail editing screen, which will depend on the equipment type selected. The piece of equipment shown below is an AC Control Module, and has extra data fields:
Each field is described as follows. Many are optional, so complete what you can and the system will tell you if any important information is missing. Once the on-screen form is complete, click Update Equipment Details to save the changes.
Equipment Type Select from the drop-down list. The screen layout may change
depending on your selection. Each type is described later in this section.
Rig Select the rig where this equipment is located.
Location on Rig Typically this will be a section of the and SCR system (SCR1, SCR2, GEN3, etc, or may be ‘Drill Floor’ for equipment like a Foot Throttle.
Description Name of the equipment. This field is automatically filled for some equipment types.
Serial Number This is the manufacturer’s serial number, or any other unique identifier.
Tag Number Some rigs use tag numbers to help identify a piece of equipment in a particular location. This is not the same as the serial number which is unique and allocated to a particular item.
Mnfr project/Job Enter the system or project number assigned by the original

Zeefax Limited Guide to Using TRS
Page 17 of 26
Number equipment manufacturer.
Manufacturer This is the original manufacturer of the equipment. We have provided a handy drop-down list of some manufacturers which you can select from.
Mnfr Part Number Enter the original manufacturer’s part number. This can help Zeefax identify equivalent replacement parts, which is especially useful when parts become obsolete.
Zeefax Part Number This is the equivalent Zeefax part number for easy ordering of replacements and spares.
Notes Enter any notes associated with this equipment, including details of any special modifications.
AC Control Module
When this equipment type is selected, additional information is requested which can be obtained from the equipment label:
Engine Type Enter the engine manufacturer and type number
Power Enter the power rating of the engine. You can enter this as Kilowatts (KW) or Horsepower (HP) in the appropriate box and the corresponding KW or HP value will be calculated for you.
Speed Enter the RPM of the engine at normal running speed
Flywheel Enter the number of teeth on the flywheel where the magnetic pulse pick-up sensor is located.
Pulse Pick-Up Frequency
This is automatically calculated from the values you enter for speed and flywheel teeth.
Generator Type Enter the generator manufacturer and type number
Rating Enter the generator rating in KVA.
Voltage Enter the system volyage, e.g. 600 (V) 3 (phase) 60 (Hz).
DC Control Module
When this equipment type is selected, additional information is requested which can be obtained from the equipment label.
Enter the current limit for each assignment and select either Shunt or Series motor type. If all the motors are of the same type, click the Shunt or Series column headers to select the same for all assignments.
Two extra lines are provided for other, non-standard assignments. There is also provision to enter the DC Module terminal number which selects these assignments,

Zeefax Limited Guide to Using TRS
Page 18 of 26
Copying Equipment Details
When creating your inventory it is often convenient to copy details from a similar, existing piece of equipment and make minor changes such as the serial number and location. To do this, create the first item and save it, or select the item you want to copy from in the equipment list by clicking its icon to open the detail editing screen.
To copy this item, click the Make A Copy button at the foot of the screen.
This creates an exact copy of the equipment so that you can then make any minor changes and save it by clicking the Update Equipment Details button. To help identify the copy, the text ‘(Copy)’ is added to the serial number, which you can subsequently delete when you enter the actual serial number.
Deleting Equipment
To delete a piece of equipment, go to the list screen and click the corresponding icon. Deleting equipment which has service tickets against it is not recommended. After clicking the delete icon, you will be asked to confirm this action:
Click OK if you want to proceed with deleting, or click Cancel to return to the rig list.

Zeefax Limited Guide to Using TRS
Page 19 of 26
8. Service Tickets
Introduction
Service tickets are the engine room of the TRS system. A service ticket is any kind of record you want to raise on the system, and will typically be:
manual or drawing upload
a technical question
a request for a service engineer to visit a rig
comments and suggestions about the TRS system
a report about a service visit or repair.
maintenance report
This way, a comprehensive information system can be built up for each rig and piece of equipment to form a complete service record.
When you raise a ticket you will be asked for the type of ticket it is. This ensures that the ticket is directed to, and handled by, the correct department at Zeefax Limited. You can monitor the status and progress of your tickets, and you will be automatically notified of any change in status by email.
Each ticket maintains a record of messages, and each message can have a document uploaded and attached to it. This means that when you receive a report from Zeefax or any other supplier about a piece of equipment you can store it on the system. You might even want to store electronic versions of manuals and schematics against a piece of equipment.
A typical series of messages following a request for a Service Engineer might look like this:
ticket raised for service engineer visit containing details of the problem to be resolved
Zeefax confirm receipt and details of dates and times of the visit
service engineer returns and files the trip report.

Zeefax Limited Guide to Using TRS
Page 20 of 26
Raising A Ticket
To raise a ticket, click the Service Tickets tab. This displays a list of all the tickets on the account. Use the filters to narrow down your list. If you don’t know how to do this please refer to the General Navigation section of this manual.
To raise a new ticket, click the Raise New Ticket button:
Ensure the Ticket selector is set to ‘ New Ticket ’, and select the rig for which this ticket applies. If you want to raise a ticket which does not relate to any particular rig, you should first create a rig called ‘General’ (or similar) as described in the Setting Up Drilling Rigs section.

Zeefax Limited Guide to Using TRS
Page 21 of 26
Once the rig has been selected the screen refreshes:
Select the equipment which the ticket applies to, or select ‘Not Applicable’, and the screen will refresh again.

Zeefax Limited Guide to Using TRS
Page 22 of 26
Complete the rest of the form as applicable:
Each field is described as follows:.
Ticket Select ‘ New Ticket’ to raise a new ticket, or jump to another ticket by selecting it from the drop-down list. Be sure to save any changes before you do.
Rig Select the rig which this ticket applies to
Equipment Select the equipment which this ticket relates to, or select ‘Not Applicable’
Type Select the ticket type from the drop-down list. Selecting the correct type is important, because it determines which department in Zeefax will handle the ticket.
Status Set a new ticket to ‘Open’. As the ticket progresses the status will change.
Priority Set the priority for this ticket against all other tickets you may have raised. The temptation is to set all tickets to the highest priority, but this simply means that all tickets will be treated the same, so keep your powder dry and only make those tickets which are truly urgent to the highest priority.
Raised By (non-editable)
The name of the person who raised the ticket.
Raised On Date (non-editable)
The date the ticket was raised
Notify me by email about changes to this ticket
Leave this box checked to ensure you receive automatic notification by email about any changes to this ticket.
Zeefax Limited Guide to Using TRS
Page 23 of 26
New Message Enter your comments or message here. Click the Edit Window button to open up a larger-format window for easier editing.
Attach Document To attach any document to the message click Browse… and locate the file on your computer. If you have more than one document to upload, use the WinZip program to combine them before uploading.
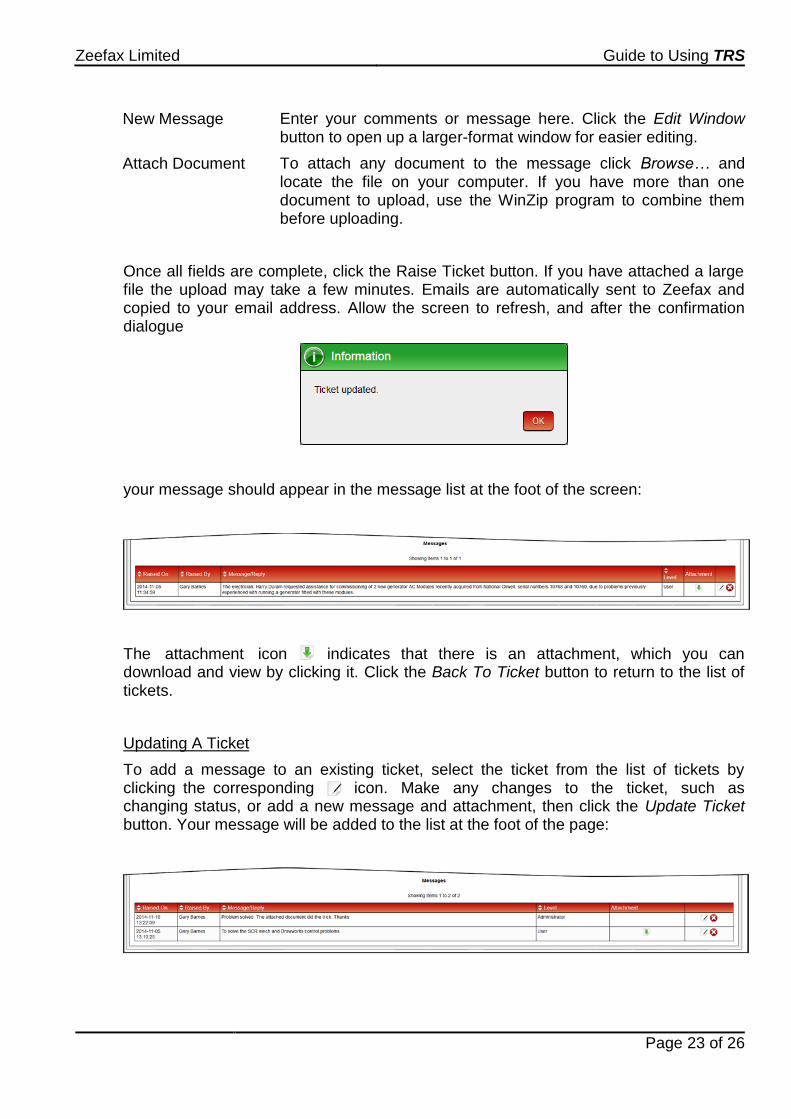
Once all fields are complete, click the Raise Ticket button. If you have attached a large file the upload may take a few minutes. Emails are automatically sent to Zeefax and copied to your email address. Allow the screen to refresh, and after the confirmation dialogue
your message should appear in the message list at the foot of the screen:
The attachment icon indicates that there is an attachment, which you can download and view by clicking it. Click the Back To Ticket button to return to the list of tickets.
Updating A Ticket
To add a message to an existing ticket, select the ticket from the list of tickets by clicking the corresponding icon. Make any changes to the ticket, such as changing status, or add a new message and attachment, then click the Update Ticket button. Your message will be added to the list at the foot of the page:

Zeefax Limited Guide to Using TRS
Page 24 of 26
Amending A Message
You can correct or amend a message by clicking the corresponding icon. This loads the message into the message are for editing:
Once there, you can amend the text or upload a new document, which will replace the old one. Click Update Ticket when finished.
Deleting A Message or Ticket
To delete a message or ticket, click the corresponding icon. Deleting is to be avoided if at all possible. Once a ticket has been raised or amended emails are sent to the designated recipients, so deleting it may cause confusion.

Zeefax Limited Guide to Using TRS
Page 25 of 26
9. User Accounts
The User Accounts tab is used to manage the users on the account. Only the Account Holder can add or amend other people’s accounts, but you are allowed to amend your own account if you are not an Account Holder. You can check your access rights level after logging in by looking at the top tight-hand side of the page where you will see your name, followed by your access level in brackets.
To see the list of users click the User Accounts tab, and this will display a list of all users. To learn how to navigate list screens, please refer to the General Navigation section of this manual.
To add a user click the Add User button, or to amend the details of an existing user, click the icon. If the Add User button is not visible, or the icon is greyed-out you do not have sufficient access rights for this operation. If you do have sufficient rights the detail editing screen will open up:

Zeefax Limited Guide to Using TRS
Page 26 of 26
Each field is described as follows:
First Name Enter the first (given) name of the user.
Surname Enter the surname (family name) of the user.
Job Title Specify the position or the job title of the user.
Telephone It’s often more convenient to respond to a user by telephone. Enter a number here, if possible.
Fax Enter a contact fax number if possible.
Email Address The email address must be entered. This is also the user name for logging in.
Password Enter an appropriate password. Passwords should be at least 6 characters in length and contain letters and numbers.
Access Level Select an access level for this user.
Enter the details as appropriate then click the Update User Details button. You should see a confirmation message:
Click OK to return to the user detail screen, followed by Back To User List to return to the list of users.
Send Password To User
You can send the log-in details to any user by clicking the icon corresponding to their name on the user list screen. If this icon is greyed-out then you don’t have sufficient access rights.