ZBrush - download.e-bookshelf.de€¦ · of Visual Effects. He was the first product manager for...
30
Transcript of ZBrush - download.e-bookshelf.de€¦ · of Visual Effects. He was the first product manager for...


ZBrush® Studio ProjectsR e a l i s t i c G a m e c h a R ac t e R s


ZBrush® Studio ProjectsR e a l i s t i c G a m e c h a R ac t e R s
R ya n K i n g s l i e n

A c q u i s i t i o n s E d i t o r : Mariann Barsolo
D e v e l o p m e n t E d i t o r : Stephanie Barton
Te c h n i c a l E d i t o r s : Paul Gaboury
P r o d u c t i o n E d i t o r : Christine O’Connor
C o p y E d i t o r s : Judy Flynn and Elizabeth Welch
E d i t o r i a l M a n a g e r : Pete Gaughan
P r o d u c t i o n M a n a g e r : Tim Tate
V i c e P r e s i d e n t a n d E x e c u t i v e G r o u p P u b l i s h e r : Richard Swadley
V i c e P r e s i d e n t a n d P u b l i s h e r : Neil Edde
A s s i s t a n t P r o j e c t M a n a g e r : Jenny Swisher
A s s o c i a t e P r o d u c e r : Josh Frank
Q u a l i t y A s s u r a n c e : Doug Kuhn
B o o k D e s i g n e r : Caryl Gorska
C o m p o s i t o r : Kate Kaminski, Happenstance Type-O-Rama
P r o o f r e a d e r : Publication Services, Inc.
I n d e x e r : Robert Swanson
P r o j e c t C o o r d i n a t o r, C o v e r : Katherine Crocker
C o v e r D e s i g n e r : Ryan Sneed
Copyright © 2011 by Wiley Publishing, Inc., Indianapolis, Indiana
Published simultaneously in Canada
ISBN: 978-0-470-87256-7
No part of this publication may be reproduced, stored in a retrieval system or transmitted in any form or by any means, elec-
tronic, mechanical, photocopying, recording, scanning or otherwise, except as permitted under Sections 107 or 108 of the 1976
United States Copyright Act, without either the prior written permission of the Publisher, or authorization through payment
of the appropriate per-copy fee to the Copyright Clearance Center, 222 Rosewood Drive, Danvers, MA 01923, (978) 750-8400,
fax (978) 646-8600. Requests to the Publisher for permission should be addressed to the Permissions Department, John Wiley
& Sons, Inc., 111 River Street, Hoboken, NJ 07030, (201) 748-6011, fax (201) 748-6008, or online at http://www.wiley.com/go/
permissions.
Limit of Liability/Disclaimer of Warranty: The publisher and the author make no representations or warranties with respect to
the accuracy or completeness of the contents of this work and specifically disclaim all warranties, including without limitation
warranties of fitness for a particular purpose. No warranty may be created or extended by sales or promotional materials. The
advice and strategies contained herein may not be suitable for every situation. This work is sold with the understanding that the
publisher is not engaged in rendering legal, accounting, or other professional services. If professional assistance is required, the
services of a competent professional person should be sought. Neither the publisher nor the author shall be liable for damages
arising herefrom. The fact that an organization or Web site is referred to in this work as a citation and/or a potential source of
further information does not mean that the author or the publisher endorses the information the organization or Web site may
provide or recommendations it may make. Further, readers should be aware that Internet Web sites listed in this work may have
changed or disappeared between when this work was written and when it is read.
For general information on our other products and services or to obtain technical support, please contact our Customer Care
Department within the U.S. at (877) 762-2974, outside the U.S. at (317) 572-3993 or fax (317) 572-4002.
Wiley also publishes its books in a variety of electronic formats. Some content that appears in print may not be available in elec-
tronic books.
Library of Congress Cataloging-in-Publication Data
Kingslien, Ryan, 1973-
ZBrush studio projects : realistic game characters / Ryan Kingslien.
p. cm.
ISBN 978-0-470-87256-7 (pbk.)
978-1-118-06762-8 (ebk.)
978-1-118-06772-7 (ebk.)
978-1-118-06763-5 (ebk.)
1. Computer games—Design. 2. Video game characters. 3. ZBrush. I. Title.
QA76.76.C672K56 2011
794.8’1536—dc22
2010054034
TRADEMARKS: Wiley, the Wiley logo, and the Sybex logo are trademarks or registered trademarks of John Wiley & Sons, Inc.
and/or its affiliates, in the United States and other countries, and may not be used without written permission. ZBrush is a regis-
tered trademark of Pixologic, Inc. All other trademarks are the property of their respective owners. Wiley Publishing, Inc., is not
associated with any product or vendor mentioned in this book.
10 9 8 7 6 5 4 3 2 1

Dear Reader,
Thank you for choosing ZBrush Studio Projects: Realistic Game Characters. This book is
part of a family of premium-quality Sybex books, all of which are written by outstanding
authors who combine practical experience with a gift for teaching.
Sybex was founded in 1976. More than 30 years later, we’re still committed to produc-
ing consistently exceptional books. With each of our titles, we’re working hard to set a
new standard for the industry. From the paper we print on, to the authors we work with,
our goal is to bring you the best books available.
I hope you see all that reflected in these pages. I’d be very interested to hear your com-
ments and get your feedback on how we’re doing. Feel free to let me know what you think
about this or any other Sybex book by sending me an email at [email protected]. If you
think you’ve found a technical error in this book, please visit http://sybex.custhelp.com.
Customer feedback is critical to our efforts at Sybex.
Best regards,
Neil Edde
Vice President and Publisher
Sybex, an Imprint of Wiley

To the craft of figurative sculpting and those who keep it alive.

The single most important person in shaping the ideas
and approach of this book is Al Gury, chair of the Painting Department at the
Pennsylvania Academy of the Fine Arts (PAFA), who gave me the tools I needed
when I was a student at PAFA. ■ The single most important person in making
this book possible is Ofer Alon, founder of Pixologic. Ofer brought me into Pixo-
logic based on a review I wrote many years ago. Since then Ofer has taught me
how to understand the technology of an artist in a way I never thought possible,
and his trust and kindness have been a guiding light for me. ■ Jaime Labelle,
COO of Pixologic, is the glue that binds all things ZBrush together and is the best
boss I ever had. Today, he is ZBrushWorkshops’ most tireless supporter and a
great friend. ■ I would also like to thank Marianne Barsolo, Stephanie Barton,
Christine O’Connor and all the great people at Wiley Publishing for their work
on this book. Paul Gaboury, my tech editor, offered suggestions and kept me
honest. ■ Tomas Babinec, at 3D.sk, has helped create one of the most important
resources for 3D artists and is always supportive. Travis Bourbeau, at the Gnomon
Workshop, has been a tireless supporter and always has encouraging words.
Andrew Cawrse and Grace Fua at Anatomy Tools provided models, kindness and
reference. ■ Finally, I would like to thank my wife for her support and encourage-
ment during the long hours it took to create a book like this.
Acknowledgments


Ryan Kingslien is the founder of www.zbrushworkshops.com.
He attended the Pennsylvania Academy of Fine Art and the Gnomon School
of Visual Effects. He was the first product manager for ZBrush at Pixologic,
where he combined the efforts of programmers and artists to help create some
of the revolutionary tools in ZBrush. He also created the first industry-
standard curriculum and documentation that helped bring ZBrush to com-
panies such as Industrial Light & Magic (ILM), Sony Pictures Imageworks,
and Electronic Arts (EA).
About the Author

A T A G L A N C ECO NTE NT S
Introduction ■ xv
Chapter 1 ■ Sculpting Tools and Workflow 1
Chapter 2 ■ Sculpting the Body 21
Chapter 3 ■ The Head and the Face 65
Chapter 4 ■ Texturing the Head 95
Chapter 5 ■ Suiting Up with Clothes 129
Chapter 6 ■ Building Weapons 175
Chapter 7 ■ Getting It Into the Game 215
Chapter 8 ■ Posing and Rendering in ZBrush 247
Appendix ■ About the Companion DVD 279
Index ■ 283

Introduction xv
Chapter 1 ■ sculpting Tools and Workflow 1
The Problem of Sculpting 1
Our Sculpting Toolkit 3
Unpacking Our Toolkit 9
The Road Ahead 18
Chapter 2 ■ sculpting the Body 21
Proportions 21
Project 1: Modeling Base Mesh in Maya 22
Project 2: Bony Landmarks 34
Project 3: Volume and Massing 38
Project 4: Painting in the Anatomy 45
Project 5: Filling in the Anatomy 52
Chapter 3 ■ The Head and the Face 65
Proportions 66
Project: Establishing the Foundation 66
Project: Establishing the Eye 73
Project: Establishing the Nose 79
Project: Establishing the Mouth 82
Project: Creating New Topology 87
Summary 93
Chapter 4 ■ Texturing the Head 95
Project: Texture Painting by Hand 96
Project: Texture Painting Approach #2 ZAppLink 113
Summary 127
Contents

Chapter 5 ■ suiting Up with Clothes 129
Creating a Jacket 130
Summary 172
Chapter 6 ■ Building Weapons 175
The Anatomy of the Weapon 175
Anatomy of the Holster 195
Texturing 210
Summary 213
Chapter 7 ■ getting it into the game 215
The Topology Spectrum 215
Project: Topology - Removing Interior Polygons 216
Project: Topology - Combining Parts 218
Project: Adding the Holster 221
Project: Topology - Decimation Master & Polypainting 223
Project: In-Game Hair 224
Project: Create UVs using UV Master 227
Project: UVs, Topology, and the Platform 228
Project: Creating Maps 230
Project: Setting Up Model in Maya 232
Assessing Your Topology 233
Project: Importing Jacket’s Reflowed Topology 237
Project: Getting Model into Marmoset 238
Summary 245
Chapter 8 ■ Posing and Rendering in ZBrush 247
Project: Finding the Pose with Mannequins 247
Project: Establishing the Pose for the Body 250
Project: Posing Multiple Objects 254
Project: Creating the Base 260
Project: Damaging the Base 265
Project: Shadows and Ambient Occlusion 267
Project: Using Render Passes 269
Project: Plastic Maquette Material 270
Project: Adding Some SSS 273
Project: Timeline Turntable 274
Project: XPose 275
Project: Exporting a Movie 276
Summary 278
appendix ■ about the Companion DVD 279
What You’ll Find on the DVD 279
System Requirements 280
Using the DVD 281
Troubleshooting 282
Customer Care 282
index 283


IntroductionSculpting is hard work. It’s not like painting or drawing or mak-
ing pretty pictures. It’s just plain old hard work. You don’t need to know how to draw to
do it. I’ve known several incredible sculptors who can’t draw. You don’t need to under-
stand color theory. You just need to be able to apply a certain amount of willpower to
overcome obstacles and accomplish the task, and trust me, there will be obstacles.
I want to tell you about a place where I’ve spent a lot of my professional life. It’s called
“the Valley of the Suck.” It’s not a nice place to be. In fact, it absolutely sucks to be there,
but it’s a necessary place to be. It’s an essential place to be. You simply cannot get to be a
better sculptor unless you walk through the Valley of the Suck and walk through it often.
It is the one place where your weaknesses are absolutely and completely obvious for
anyone to see. It’s that place you go to when you sculpt the wrists and you just don’t
quite understand them. It’s that place you go to when you muddle through the anatomy
of the back.
There is one good thing about the Valley of the Suck: it’s just a valley and it’s not the
entire planet, so you can eventually find your way out of it. Of all the skills that help you
find your way out of the valley the most, I find a stubborn, willful disregard for failure to
be the most important.
Who Should Buy This BookSculpting is one of those unique actions, like dancing, that fuse our senses with a way of
seeing the world. When you’re a sculptor, you just see things differently. You see the
zygomatic process under the skin. You look for the lacrimal bone in the corner of some-
one’s eyes.
This book is for sculptors—traditional or digital. For me, it’s all the same. I sculpt in
Roma Plastilena and in ZBrush. ZBrush is simply one medium in which I work. It has its
technical difficulties, just like clay, and it has its specific working properties, just like clay.
This book is suitable for everyone from beginners to advanced artists. In some sections
you will need to have a certain comfort level with ZBrush. These sections are pushed to
the end, though, to give beginners a chance to catch up. If you’re very new to this world

xvi ■ Introduction
of digital sculpting, I recommend reviewing the “Introduction to Sculpting” workshop
included with this book on the accompanying DVD.
If your goal is to work in the game industry or simply master digital sculpting, this
book is one of the essential steps along the way. My goal with this book is to fuse tradi-
tional learning with the digital nature of ZBrush while preparing you for the real world
of production sculpting. When you sculpt a character for production you will not paint its
anatomy. However, once you have painted the anatomy onto your model, you are much
better prepared to sculpt the figure without it.
What You NeedTo follow the techniques this book, you will need a Wacom tablet, a copy of ZBrush 4, a
computer, and willpower strong enough to eat through titanium.
Sculpting in ZBrush with a mouse is like painting with a brick. It’s just not going to
work. Sculpting with a Wacom tablet is the only way to go. If you can at all afford it,
though, I highly recommend the 21˝ Cintiq from Wacom. There is no other way to get
more closely connected to your sculpt than by using a Cintiq monitor.
You’ll also need Maya or a similar 3D application. “Why include Maya?” you might ask.
Maya is what they call a hub application. It’s the main application that everyone in a pro-
duction pipeline plugs into.
Digital sculptors, in the game industry, will work in ZBrush, but they still need to get
the model along with the normal map in Maya or another 3D application for export to the
game engine.
Anatomy ResourcesThe first resource you should have on your desk is Anatomy Tools’ Male and Female
Anatomy figure. You might balk at the price and wonder if it’s worth it, but I urge you to
look at that money as a down payment on the skills that will land you a job and take your
sculpting to the next level. For me, it is more important to get this anatomy figure than it
is to get any other book. As sculptors we need the thing in 3D, not as 2D on a page.
Regarding books, I highly recommend Gottfried Bammes’ Die Gestalt des Menschen
(Urania Verlag, 2002) and Eliot Goldfinger’s Human Anatomy for Artists (Oxford
University Press, 1991).

Introduction ■ xvii
What’s InsideHere’s a peek at what each chapter covers:
Chapter 1: Sculpting Tools and Workflow This chapter focuses on the stuff under the hood
of ZBrush. Although this is a highly technical chapter, it holds the key to understanding
how ZBrush’s brush system works.
Chapter 2: Sculpting the Body This chapter takes you through the process of sculpting the
body. It is not possible to discuss everything we need to cover in one chapter, though, and
this chapter is best viewed as a crash course.
Chapter 3: The Head and the Face Sculpting realistic game characters is more about sculpt-
ing realistic faces than anything else. This chapter focuses on the anatomy that you need
to know that no one else is teaching. Learn it well and you’ll be creating realistic faces in
no time.
Chapter 4: Texturing the Head Texturing means two things. It means texture painting and
it also means sculpting details like pores and wrinkles. In this chapter we look at both
concepts.
Chapter 5: Suiting Up with Clothes Clothing is an essential part of sculpting the character.
This chapter is a crash course on creating the base mesh and sculpting the wrinkles that
will make your character believable.
Chapter 6: Building Weapons Sculpting hard surfaces in ZBrush is a real treat if you know
how to use the tools. This chapter helps you understand them and create a pistol entirely in
ZBrush using the new Clip brushes.
Chapter 7: Getting It Into the Game Once you are done with the model, it’s time to put it
in a game. This chapter teaches you to work with your topology and the new Multi Map
Exporter to get everything ready in Maya.
Chapter 8: Posing and Rendering in ZBrush Posing the character adds that next bit of life
that is essential for a great presentation. This chapter teaches you how to use Transpose
to pose your models and how to get the most out of ZBrush’s Best Preview Rendering
system.

xviii ■ Introduction
Companion DVD The companion DVD includes a few of the resources you’ll use in the book. It also
includes some extra tutorials from ZBrushWorkshops to help you get the most out of
your reading time.
For those just starting with ZBrush, I’ve included one of our first workshops,
“Introduction to Sculpting.” This workshop is over 90 minutes of training that takes
you through learning to use the interface to learning how to get control over your
sculpting.
The DVD also includes resource files for each chapter and may include the final
sculpts done to demonstrate each project.
How to Contact the AuthorIf you are looking for more training, the best way to reach me is at my training site,
www.ZBrushWorkshops.com. At ZBrushWorkshops we train artists to sculpt in ZBrush. We
focus on specific problem areas like sculpting skin and scales or hard surfaces, and provide
the tools you need to master ZBrush.
We also provide custom training for companies and count Electronic Arts (EA),
Industrial Light & Magic (ILM), and many others in our list of clients.
You can also visit my personal site at www.ryankingslien.com where I keep you up-to-date
on my sculpting activities.
Please also check the book’s website at www.sybex.com/go/zsprealisticgame, where we’ll
post updates to this book as needed.

ZBrush® Studio ProjectsR e a l i s t i c G a m e c h a R ac t e R s

Sculpting Tools and Workflow
You face two core issues when you create realistic game characters: tech-
nology and artistic ability. Five years ago the biggest problem was technology. We simply
couldn’t put enough polygons on the screen to get true realism. Today, artistic ability is
the biggest factor limiting a 3D modeler’s growth in the game industry.
The demand for realism increases with technological advances. Today, it is your abil-
ity to sculpt a face, but in two years’ time realism may depend on understanding what
happens to the palpebral ligament when your character is frightened.
Your artistic ability is the one constant in the equation of creating realistic characters,
whether you are painting in Photoshop or sculpting in ZBrush.
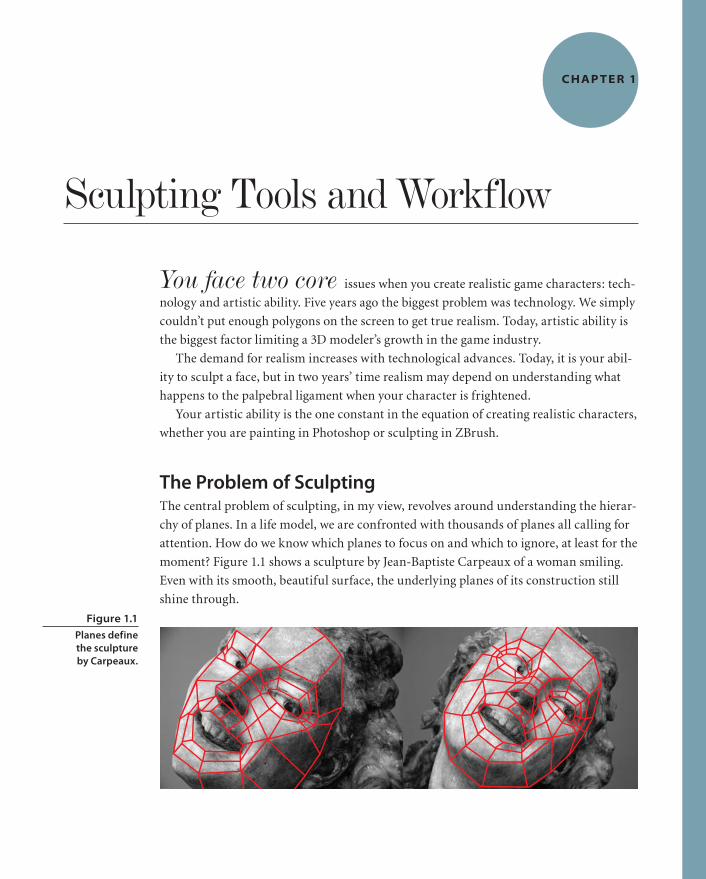
The Problem of SculptingThe central problem of sculpting, in my view, revolves around understanding the hierar-
chy of planes. In a life model, we are confronted with thousands of planes all calling for
attention. How do we know which planes to focus on and which to ignore, at least for the
moment? Figure 1.1 shows a sculpture by Jean-Baptiste Carpeaux of a woman smiling.
Even with its smooth, beautiful surface, the underlying planes of its construction still
shine through.
Figure 1.1
Planes define the sculpture by Carpeaux.
C hap TE r 1
2 ■ Chapter 1 : Sculpting Tools and Workflow
The key to working with planes is to move from the largest to the smallest. You, the
artist, must create inside of your own brain a 3D model that has multiple levels of resolu-
tion. On level 1, it should have the most basic and simplistic planes. On level 5, it might
have planes small enough to describe the caruncula of the eye.
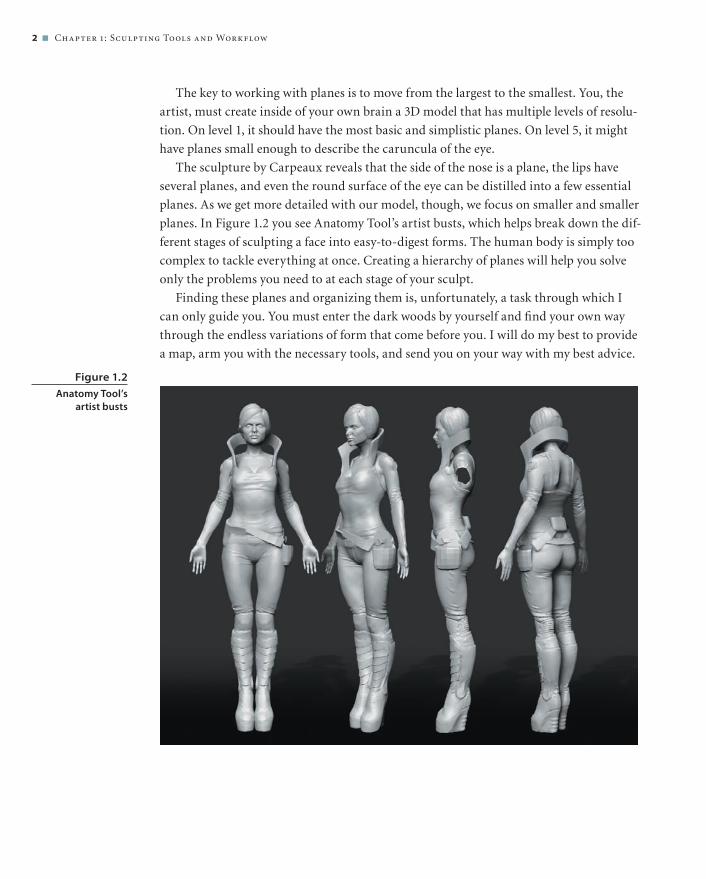
The sculpture by Carpeaux reveals that the side of the nose is a plane, the lips have
several planes, and even the round surface of the eye can be distilled into a few essential
planes. As we get more detailed with our model, though, we focus on smaller and smaller
planes. In Figure 1.2 you see Anatomy Tool’s artist busts, which helps break down the dif-
ferent stages of sculpting a face into easy-to-digest forms. The human body is simply too
complex to tackle everything at once. Creating a hierarchy of planes will help you solve
only the problems you need to at each stage of your sculpt.
Finding these planes and organizing them is, unfortunately, a task through which I
can only guide you. You must enter the dark woods by yourself and find your own way
through the endless variations of form that come before you. I will do my best to provide
a map, arm you with the necessary tools, and send you on your way with my best advice.
Figure 1.2
Anatomy Tool’s artist busts

Our Sculpting Toolkit ■ 3
Our Sculpting ToolkitThere are many features in ZBrush and many ways to work with the application. The goal
of this book is to guide you in creating realistic game characters, and so in this section, I
will present what I consider to be a sculptor’s workflow. This workflow should help you
organize complexity, create your own hierarchy of planes, and sculpt realistic characters
faster than ever before.
Project: Sculpting a Human FaceTo really get a sense of how tools work together, we will look at them in the context of a
project. In this case, we will sculpt a human face and look at each tool in its turn:
1. Our first goal is to establish the overall shape of a head with the Move brush so that
we can use other brushes to create the internal forms. Start with a PolySphere on the
canvas (see Figure 1.3). Make sure Symmetry is on.
2. Set Draw Size to 200 to increase the size of your brush. Click on the bottom half of
the PolySphere and drag downward to form the jaw and lower face.
Lower your Draw Size to somewhere around 50 and pull the nose outward and to the
left. Then push the eye socket inward toward the right. Note the S-shaped curve in
Figure 1.4.
Figure 1.3
A PolySphere on the canvas

4 ■ Chapter 1 : Sculpting Tools and Workflow
Rotate the model to a front view. Set your Draw Size to 256 and pull the sides inward
to flatten them. Continue working over the surface of your model. At a certain point
you will suffer diminishing returns and form will be harder to create. When that
happens to you, it’s time to switch brushes.
3. Once you have your “digital clay” roughly in the shape of the head, it is time to
sculpt some of the internal forms, such as the cheeks, forehead, eye area, and mouth
area. We’ll start this process with the Clay brush. Click the Brush icon in the far left
tray and select the Clay brush.
Press Alt and dig into the eye area to create the eye cavities. Continue sculpting into
the side of the nose, top of the nose, and down into the mouth. Release Alt when you
want to build the form back up.
Add a little bit of clay in the mouth area, but stay away from defining the lips. At this
point, you should be more focused on sculpting the barrel shape of the teeth. When
done, your model should look like Figure 1.5. Don’t try to take it much further than
that, as we will use other tools to refine the surface. The Clay brush is used mostly to
add volume and roughly sketch in form.
Figure 1.4
Side view with the S curve of
the side of face

Our Sculpting Toolkit ■ 5
The Clay brush is an important part of our sculpting workflow because of its unique algo-
rithm. ZBrush 4 has added newer brushes that build upon this and give us greater control,
but the Clay brush remains an important part of the process in the early stages.
4. Make sure to add geometry to your model as needed by choosing Tool ➔ Geometry ➔
Divide. In fact, with the newer topology-independent brushes such as Clay, we can
begin to increase our polygon count earlier in the sculpting process without worry-
ing about muddy form.
5. Eventually, your sculpt will have a lot of the form you want, but it will be a little
messy. This is where Trim Dynamic comes in. Select Trim Dynamic from the Brush
palette and use it the same way you use the Clay brush. Notice how the form it cre-
ates is very clean and planar.
Continue developing the form, switching between the Clay brush and Trim Dynamic.
When you need to add more form, use the Clay brush. Then immediately switch to
Trim Dynamic and create the necessary planes. Figure 1.6 shows you how far you
should take your work with Trim Dynamic. Again, don’t take your model too far. We
will keep looking at new tools for each stage.
Figure 1.5
Results after using the Clay brush

6 ■ Chapter 1 : Sculpting Tools and Workflow
Trim Dynamic is an extension of the Clay brush. Its algorithm goes further than the Clay
brush, however, and allows you to build up planes with a loose freehand stroke that cannot
be achieved any other way. It is an essential tool in your toolkit.
6. To create precise forms, we will need a sculpting knife. We can use the Standard
brush for this. Set Draw Size to somewhere around 10 and press Alt while you carve
into the model.
When you do this, it’s important to proceed with caution and maybe even to use
multiple strokes to carve in the surface. As always, it’s very important to smooth
out any irregularities as soon as you see them. When you are finished, your model
should resemble Figure 1.7.
The Standard brush is one of the oldest brushes in ZBrush and still considered by many art-
ists to be the workhorse of all the brushes. You can also try a variation of the Standard brush
called the Dam_Standard brush, named after the artist who created it, Damien Canderle. You
can access the Dam_Standard brush from Lightbox.
Figure 1.6
Results after using the Trim Dynamic
brush

Our Sculpting Toolkit ■ 7
7. Now we should have a fairly good approximation of the face. We should have clear
planes, but the separation of planes may not be very precise. All in all, our model
should look like a blurry but planar version of what we want.
To create more precise breaks in the form, we use Trim Adaptive. Click on the side
plane of the nose and use Trim Adaptive to create a consistent plane. With Trim
Adaptive you have to be careful where you start your brush stroke. The brush will
take the orientation of the first place you click and extend that orientation through
your model.
To get the most out of Trim Adaptive, repeat the stroke while pressing Alt, and the
brush will lift areas of the surface as well. Using Trim Adaptive and Trim Dynamic
and experimenting with Trim Front should get your sculpt to the level of Figure 1.8.
8. Masks allow us to isolate one part of the model and keep it safe from our brush.
Press and hold Ctrl and brush on the general shape of the ear. Then choose Tool ➔
Masking ➔ Inverse to invert this mask. Using the Move brush, pull out the backs of
the ear and set up the simple planes as shown in Figure 1.9.
Figure 1.7
Results after using the Standard brush

8 ■ Chapter 1 : Sculpting Tools and Workflow
Figure 1.8
Results after using various Trim
brushes
Figure 1.9
Using masks to establish the ear