ZAPATA COUNTY - Zapata County ISD - 2002 Texas School Survey of Drug and Alcohol Use


1
ZAPATA FLYRIDE™ – USER GUIDE SUMMARY
Description .......................................................................................................................................... 2
Security ............................................................................................................................................... 2
Maintenance ....................................................................................................................................... 4
Warranty ............................................................................................................................................. 4
Anatomy of Zapata Flyride™ ................................................................................................................... 5
Step 1 : PWC installation ......................................................................................................................... 1
Step 2 : Battery and charger .................................................................................................................... 2
Step 3 : EMK installation (optional) ......................................................................................................... 3
Step 4 : Pairing Zapata Flyride™ to EMK (optional) ................................................................................. 4
Step 5 : Handlebar to trigger calibration ................................................................................................. 5
Step 6 : Calibration of gyroscopes ........................................................................................................... 6
Step 7 : Difficulty levels ........................................................................................................................... 7
Step 8 : Start and take-off ....................................................................................................................... 8
Step 9 : Flight ........................................................................................................................................... 9
Step 10 : Tricks....................................................................................................................................... 12
Step 11 : Joystick (optional) ................................................................................................................... 14
2
DESCRIPTION
Zapata Flyride™ is a new generation hydro-flyer and the first to feature IFA – Intelligent Flight assistance.
Zapata Flyride™ is designed to make hydro-flight accessible to all, whilst offering new sensations to experienced riders. Handling is similar to that of a PWC with automatic self-stabilization above the water.
It can be used alone or with a passenger.
Zapata Flyride™ connects to the PWC’s pump and must be connected to a PWC in order to operate.
The supply hose (which is connected to the pump of the PWC) is attached to a Y shaped pipe which roots the water through the three nozzles (two at the front on each side of the machine and one at the back). This way, Zapata Flyride™ is propelled out of the water and can be driven with the handlebars.
Zapata Flyride™ is free to use for all recreational activities and flight initiations. Lucrative shows and demonstrations are the exclusivity of ZAPATA®.
Zapata Flyride™ is protected by international patents.
All rights reserved. Any reproduction, even partial of the product by any means whatsoever is prohibited.
Zapata Flyride™ is assembled in France and 95% of its parts are made in France.
SECURITY
Zapata Flyride™ is designed to offer maximum security to its user. IFA (Intelligent Flight Assistance) prevents falls, even if the user deliberately tries to loose balance.
Very easy to use, it nevertheless requires the observation of some basic security rules.
The Infinity mode must not be used when two people are riding the machine. The effort required is a little more intensive for a simple barrel roll; ensure to hold the handlebars firmly to perform this trick.
The user must do his best to never fall or jump from the machine, to avoid any collision with the PWC or the hose.
Each difficulty level must be practiced for 1 hour before moving on to the next level.Zapata Flyride™ can be used from the age of 5, in child mode and controlled with the joystick by the adult. Ensure the

3
child is tall enough to reach the handlebars. There is no minimum weight. Children can drive the machine with handlebars from the age of 8.
It is forbidden and dangerous to use Zapata Flyride™ when wind speed is over 60 km/h and when waves exceed 1 meter in height.
The minimum water depth must be 2 meters when the Flyride flies over a meter high. Avoid using Zapata Flyride™ in the sand, and rinse the bearings after each use to prevent them from being blocked while flying. WARNING: blocked bearings will cause the auto-stabilization to fail.
Ensure the watercraft has enough fuel.
It is strictly forbidden to use Zapata Flyride™ under the influence of alcohol, narcotics or drugs that reduce alertness. Ensure that the area where Zapata Flyride™ is used, is clear of any other watercraft such as boats, other PWCs or other hydro-flight users as well as swimmers, divers and other sea users.
Do not use Zapata Flyride™ near any source of risk such as rocks, wharves, beaches, boats, banks etc. There is a high risk of getting hurt by hitting these surfaces.
Do not exceed your limits and avoid any aggressive maneuvers, keep the machine in control (choose the appropriate difficulty level).
The user of Zapata Flyride™ must also constantly check the presence of any objects, reefs, buoys, etc .
If the user falls off the machine, he must immediately check the distance between himself and the watercraft as inertia may push the watercraft in his direction.
In case of a fall; if the throttle is managed through the watercraft, it is essential that the driver cuts the power as quickly as possible. A minimum level in swimming is compulsory. Zapata Flyride™ shouldn’t be used by anyone who suffers a phobia to water.
MANDATORY EQUIPMENT
- Life jacket with CE certification
- Wakeboard type helmet when using the barrel-roll mode WHERE TO PRACTICE ZAPATA FLYRIDE™
Zapata Flyride™ can be used in both lakes, open seas or rivers as long as the minimum water depth of 2 meters is respected when Zapata Flyride™ is used above 1 meter in height.
It is strictly forbidden to use Zapata Flyride™ in small places like pools.

4
IMPORTANT
Please follow the current navigation laws in the country where Zapata Flyride™ will be used.
MAINTENANCE
WARNING: NEVER use hydrocarbons (like acetone or petrol) on polycarbonate parts (all see-through parts) as these products can seriously damage the material.
To ensure adequate security, we recommend to:
- Change ball bearings every year. For assembly, please use silicone grease or Vaseline (no marine grease or other product containing hydrocarbons that may damage the Flyboard® material).
- Change all o-rings and wear rings every year
- Rince Zapata Flyride™ with clear water after every use
- Change the servo/brainbox every two years
- Respect the number of cycles of battery charges recommended by the manufacturer
WARRANTY
Zapata Flyride™ is covered by warranty against all manufacturing faults for 1 year following the date of purchase. You will be required to provide your purchasing invoice.
ZAPATA® will provide warranty cover on Zapata Flyride™ only if used as described in this manual.
Warranty is limited to the operation and not the visual condition of the parts.
Warranty does not cover any part subject to wear and tear (ball bearings, o-rings, wear wings, hose, guard, etc.)
Zapata Flyride™ must be used in its original configuration. It is strictly forbidden and dangerous to modify, remove or add parts other than those provided by ZAPATA®.
Breakage of equipment caused by falls or violent/extreme use will not be covered by warranty. ZAPATA® cannot be held responsible for such usage of the product.

5
ANATOMY OF ZAPATA FLYRIDE™
Up-Down Trigger Throttle trigger

6

1
STEP 1 : PWC INSTALLATION
PWC TYPE
Any type of watercraft as long as is approved and certified by the authorities in the country where it is used.
- Power requirement:
Minimum: 180 HP (possible to use with 155HP but the user must not weigh more than 90kg and the performance will be very limited).
In order to use Zapata Flyride™ with a passenger, minimum power required is 300HP.
Adaptors for Sea Doo, Yamaha, Kawasaki and Honda PWCs are available within the distribution network. The adaptor is compulsory in order to install Zapata Flyride™ on the PWC. Please let your reseller know which watercraft you are using
PWC ADAPTATION
In order to install Zapata Flyride™ on your PWC, you must remove the PWC pump and install the pump interface provided in your kit. It will be necessary to install it using the correct adapter according to the make and model of your PWC (see installation guide).
We advise that you use a dual impeller to optimize the performance of the PWC and avoid cavitation.

2
STEP 2 : BATTERY AND CHARGER
Zapata Flyride™ battery is not provided
It can be purchased through any specialized retailer, and possibly through your reseller.
Compatible batteries: 8000mA 6S LiPo Lithium Voltage 22.2
Internal dimension of the sealed compartment:
160x70x50mm
Recommended battery charger :
LiPo E6 50W AC charger + cable XT90 male type
Please comply with the load cycles recommended by the manufacturer.
BATTERY INSTALLATION:
Install the battery in the sealed compartment, making sure to close it properly to protect the battery from water. In order to do this, please tighten the lid until the logo is straight.

3
STEP 3 : EMK INSTALLATION (OPTIONAL)
This step is only necessary if you wish to use Zapata Flyride™ with throttle control at the handlebar. It is still possible to use Zapata Flyride™ without the EMK if a person is using the throttle on the PWC to power the machine.
If you wish to use Zapata Flyride™ with throttle control at the handlebar, you will need to purchase an EMK brain box (ref : ZR01A11 + ZR01A10 or ZR02A11 available through the distribution network).
To install, please follow the EMK manual available on our website www.zapata.com following Water > Support > How-to videos and Articles or by following this link: https://zapata.com/pub/media/notices/emk/emk_manuel_v3v2.pdf
Note regarding the « Plug N’ Play » EMK: changing power mode will be done though the Zapata Flyride™ handlebar. You will need to make a long press on the blue and yellow buttons simultaneously.
4
STEP 4 : PAIRING ZAPATA FLYRIDE™ TO EMK (OPTIONAL)
This step is only necessary if you wish to use Zapata Flyride™ with throttle control at the handlebar. It is still possible to use Zapata Flyride™ without the EMK if a person is using the throttle on the PWC to power the machine.
If you wish to use Zapata Flyride™ with throttle control at the handlebar, you will need to purchase an EMK brain box (ref : ZR01A11 + ZR01A10 or ZR02A11 available through the distribution network).
Pairing procedure :
1. Start Zapata Flyride™ : press the red button 2. Start the PWC 3. Put the EMK brain box in pairing mode (see relevant manual) 4. Put Zapata Flyride™ in pairing mode: press the green button for 10 seconds. Zapata Flyride™
will respond with a continuous vibration in the handlebar. o With a regular wireless EMK:
Long press on “mode” until all LEDs start flashing. When the vibrations start, turn the handlebar fully to the left, then to the
right, several times and simultaneously fully press the two triggers, then release, several times until vibrations stop and the LEDs stop flashing.
o With a « Plug n’Play » EMK: Remove the kill switch Long press on the PWC START button 4 LED start flashing turn the handlebar fully to the left, then to the right, several times and
simultaneously fully press the two triggers, then release, several times until vibrations stop and the outside LEDs stop flashing.
The two outside LEDs will switch off but the middle ones should continue flashing.
Pull the PWC trigger fully, then release several times until the two middle LEDs are off. Only the first LED will switch on again.
In order to change the EMK power mode: press and hold the yellow and blue handlebar buttons.
Note : The brain box can be paired with several systems (ex : a regular EMK remote control and a Zapata Flyride™)
5
STEP 5 : HANDLEBAR TO TRIGGER CALIBRATION
Zapata Flyride™ is calibrated before delivery.
If a new calibration is necessary (ie. 10 seconds hold on the green button), you can follow the calibration procedure.
1. Start the Zapata Flyride™: press the red button. 2. Start the PWC 3. Press and hold for 10 seconds the green button on the Zapata Flyride™ handlebar until
feeling vibrations. 4. Once the vibrations start: turn the handlebar fully to the left, then to the right, several
times and simultaneously fully press the two triggers, then release, several times until vibrations stop

6
STEP 6 : GYROSCOPES RESET
Zapata Flyride™ gyros are reset each time the system is started (red button).
When starting (red button) please wait 10 seconds: one vibration is sent to the handlebar. This means that the gyroscopes are reset.
We advise to perform a gyroscopes reset when the machine is stationary, for example on a dock. It is possible do so on a yacht if stationary. Whenever possible use a solid flat base free of motion to calibrate
In the event that the machine has been accidentally stopped at sea, it is possible to proceed in the water, while trying to keep it as stable as possible (it is not necessary to keep the machine flat). We advise to reset the gyroscopes once on a still surface.
Note: To avoid resetting the gyroscopes again, it is possible to leave the machine in standby. In this case, do not turn off the system (red button). The machine will automatically be in sleep mode when not in use. Sleep mode can last for several days.
7
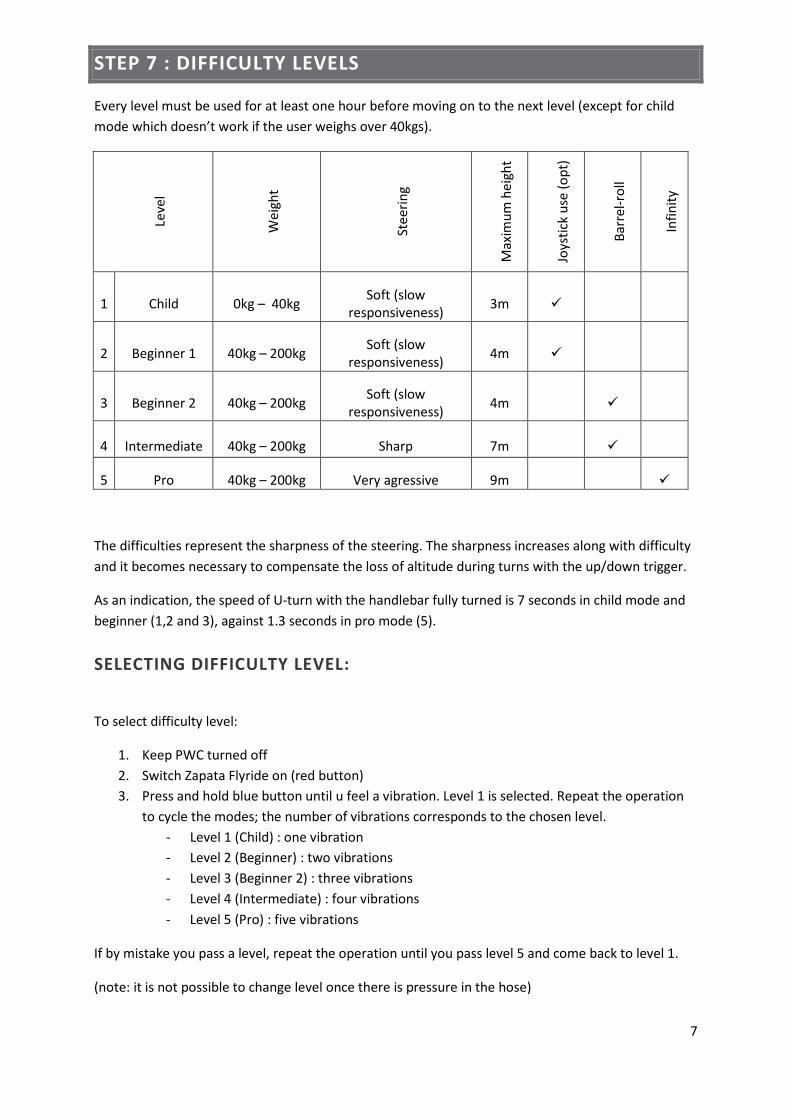
STEP 7 : DIFFICULTY LEVELS
Every level must be used for at least one hour before moving on to the next level (except for child mode which doesn’t work if the user weighs over 40kgs).
Leve
l
Wei
ght
Stee
ring
Max
imum
hei
ght
Joys
tick
use
(opt
)
Barr
el-r
oll
Infin
ity
1 Child 0kg – 40kg Soft (slow responsiveness) 3m
2 Beginner 1 40kg – 200kg Soft (slow responsiveness) 4m
3 Beginner 2 40kg – 200kg Soft (slow responsiveness) 4m
4 Intermediate 40kg – 200kg Sharp 7m
5 Pro 40kg – 200kg Very agressive 9m
The difficulties represent the sharpness of the steering. The sharpness increases along with difficulty and it becomes necessary to compensate the loss of altitude during turns with the up/down trigger.
As an indication, the speed of U-turn with the handlebar fully turned is 7 seconds in child mode and beginner (1,2 and 3), against 1.3 seconds in pro mode (5).
SELECTING DIFFICULTY LEVEL:
To select difficulty level:
1. Keep PWC turned off 2. Switch Zapata Flyride on (red button) 3. Press and hold blue button until u feel a vibration. Level 1 is selected. Repeat the operation
to cycle the modes; the number of vibrations corresponds to the chosen level. - Level 1 (Child) : one vibration - Level 2 (Beginner) : two vibrations - Level 3 (Beginner 2) : three vibrations - Level 4 (Intermediate) : four vibrations - Level 5 (Pro) : five vibrations
If by mistake you pass a level, repeat the operation until you pass level 5 and come back to level 1.
(note: it is not possible to change level once there is pressure in the hose)

8
STEP 8 : START AND TAKE-OFF
Once the assembly of the machine is finished, and that the pairing process has been followed (when necessary), you’re ready to start.
Go to the water with the Zapata Flyride and proceed to the following:
Gyroscopes reset (section 7):
- Place Zapata Flyride on a stationary surface (ex: dock) - Press and release the red button - Wait 10 seconds, the handlebar will vibrate once : the gyroscopes are reset.
Select difficulty level (section8), then turn the PWC on. Zapata Flyride is ready to fly.
Once in the water, mount the Zapata Flyride™ and press the green button (start).
Press the throttle (right trigger) or (depending on the case) let the watercraft driver accelerate.
Zapata Flyride™ has an assisted take-off technology: power will build and reach its maximum over 25 seconds to avoid a sudden start.
During the take-off phase, avoid moving the handlebar as much as possible. If necessary, balance the machine with the weight of your body. Set a point on the horizon to help with balance.
9
STEP 9 : FLIGHT
GENERAL INFORMATION
The machine can be used several ways:
1. The throttle is managed through the PWC, and steering/height through the joystick (mode 1 and 2).
2. The throttle is managed through the PWC and steering/height through Zapata Flyride handlebars.
3. The throttle, steering and height are managed through Zapata Flyride handlebars (use with EMK, see section 4).
The machine is fully stabilized, it cannot loose balance and will compensate the users’ movements and shifts in weight throughout.
The left trigger (up/down) is also assisted. Once the trigger is fully pulled, the maximum height will depend on the difficulty level that was chosen. The machine can’t tip or flip.
GOING UP AND DOWN
To manage the machine’s height, use the left trigger.
If the trigger isn’t used, the machine will stabilize around 1.5m above the surface.
During turns, the machine will go down, especially from Intermediate mode and up. The user must compensate using the up/down trigger.
The trigger is assisted. Once fully pulled, the maximum height will depend on the difficulty level that was chosen. The machine can’t tip or flip. The user must simply hold tightly to the handlebars to make sure he doesn’t slide back.
Warning: Don’t let the left trigger go all at once. Whilst the landing is slowed down, it still remains fast.
TURNS
The speed of turns will depend on the difficulty level that was chosen. If the machine isn’t turning fast enough to your liking, you can move forward one level once the machine is stopped.
Attention: do not force the handlebars when fully turned to avoid damage.
During turns, the machine will go down, especially from intermediate mode and up. The user must compensate using the up/down trigger.
10
GOING BACK TO THE BEACH
To come back, slowly release the up/down trigger to come back down and back towards the beach whilst slowing down.
It is possible to beach directly on the sand or concrete launching areas without damaging the mechanical parts of the machine. However, the guard will suffer from premature use and it will be necessary to replace it quicker.
It is strongly recommended to take the machine out of the water quickly, to avoid sand entering the bearings.
AUTONOMY AND BATTERY LEVEL MONITORING
There is around 7h hours of autonomy when using Zapata Flyride™.
When the battery reaches 30%, there will be a double vibration every minute.
When the battery reaches 25%, there will be a double vibration every 30 seconds.
When the battery reaches 20%, there will be a double vibration every 20 seconds.
When the battery reaches 15%, there will be double vibrations continuously.
When the battery is discharged, the machine will progressively lower its power. The user will be able to return at low speed (max 3000rpm) just above water. This configuration can be used for one hour.
If the user tries to accelerate when the battery is discharged, the machine will get closer to the water until immersion. This is to ensure the stabilization of the machine doesn’t stop during a flight.
STANDBY
When the triggers aren’t used for 30 seconds, and if there is no pressure in the hose, Zapata Flyride™ goes into Standby mode. The Nozzles stop moving in order to save battery.
Standby mode can last several days.
USING ZAPATA FLYRIDE™ WITH A PASSENGER
Zapata Flyride™ can be used with two people on the machine. If the machine is used by an adult and a child, the adult must go in front so they can drive.
A barrel-roll can be performed when two people are using Zapata Flyride™.

11
WARNING Never perform an Infinity when two people are using the machine.

12
STEP 10 : TRICKS
GENERAL INFORMATION AND SECURITY RULES
« Barrel-roll » and « Infinity » modes are completely automated. When triggered, the machine will rise to the required height, execute the trick and go down. The power will rest constant all along.
Ensure that Zapata Flyride™ and the VNM are properly aligned before the trick. Hold the handlebars firmly and bring your chest close to the Zapata Flyride™ during the trick.
Once triggered, the trick cannot be cancelled. When managing Zapata Flyride™ through the handlebars, the power will be constant during the barrel-roll/Infinity, even if the trigger is released. If the trigger is released, Zapata Flyride™ will go down gradually in 10 seconds. WARNING when managing Zapata Flyride™ through the watercraft, it is ESSENTIAL to keep a constant power during the spin. If the VNM driver releases the throttle, the Zapata Flyride™ user may fall and be injured.
DANGER: Make absolutely sure that will be no obstacles up to 150m ahead and around you.
If Zapata Flyride™ is used at too low a power to perform the requested trick, it will not be performed. In this case the handlebar will not vibrate.
WARNING Infinity mode should only be used if the user is alone on the machine (no passenger). The effort required is a little more intense than for a barrel-roll, it is advised to hold the handlebars firmly to perform this figure.
BARREL-ROLL
Barrel-rolls can be performed at level 3 (beginner2) and 4 (intermediate).
To trigger a barrel-roll:
1. Press and hold the yellow button for 3 seconds 2. The handlebars will vibrate 3. Release the yellow button to start the barrel-roll.
Once the yellow button is released, you cannot cancel the barrel-roll.
But if you change your mind, release the throttle before releasing the yellow button. If the power is not sufficient, it cancels the trick.

13
INFINITY
Infinity is a barrel-roll to the left and a barrel-roll to the right just after.
WARNING This mode should only be used if the user is alone on the machine (no passenger). The effort required is a little more intense than for a barrel-roll, it is advised to hold the handlebars firmly to perform this figure.
This mode is only available on level 5 (Pro).
To trigger a barrel-roll:
1. Press and hold the yellow button for 3 seconds 2. The handlebars will vibrate 3. Release the yellow button to start the Infinity
Once the yellow button is released, you cannot cancel the trick.
But if you change your mind, release the throttle before releasing the yellow button. If the power is not sufficient, it cancels the trick.
14
STEP 11 : JOYSTICK (OPTIONAL)
The joystick allows you to control Zapata Flyride™ (height and direction) from the watercraft. It is especially recommended for use with children.
The person on the watercraft will accelerate directly from the watercraft. Never use the EMK trigger with the joystick because, in addition to being dangerous, this may not meet the same laws governing Hydro-flying in force in your country.
The joystick only works at level 1 (child).
Availability : 2018.