Z20t-B, WT20-B User's Manual -...
154
User's Manual PORTÉGÉ Z20t-B PORTÉGÉ WT20-B Series
Transcript of Z20t-B, WT20-B User's Manual -...

User's Manual
PORTÉGÉ Z20t-BPORTÉGÉ WT20-B
Series

Table of ContentsChapter 1 TOSHIBA Legal, Regulatory, and Safety
Copyright, Disclaimer and Trademarks .............................................. 1-1Regulatory Information ......................................................................... 1-2Video Standard Notice .......................................................................... 1-9OpenSSL Toolkit License Issues ......................................................... 1-9FreeType License Issues .................................................................... 1-11ENERGY STAR® Program .................................................................. 1-15Disposing of the computer and the computer's battery .................. 1-15General Precautions ........................................................................... 1-15Safety Icons ......................................................................................... 1-18
Chapter 2 Getting StartedEquipment checklist ............................................................................. 2-1TOSHIBA Keyboard Dock ..................................................................... 2-1Operating mode ..................................................................................... 2-2Short model name ................................................................................. 2-3Conventions ........................................................................................... 2-3Using your computer for the first time ................................................ 2-5Getting to know Windows ................................................................... 2-14Turning off the power .......................................................................... 2-16
Chapter 3 The Grand TourTablet computer ..................................................................................... 3-1TOSHIBA Keyboard Dock ..................................................................... 3-7Internal Hardware Components ......................................................... 3-11Power Condition Descriptions ........................................................... 3-14
Chapter 4 Operating BasicsOperating in tablet mode (also for WT20-B) ....................................... 4-1Using the Touch Screen ....................................................................... 4-3Using the Touch Pad ............................................................................. 4-5TOSHIBA Pointing Device .................................................................... 4-5The Keyboard ....................................................................................... 4-11Battery .................................................................................................. 4-15Wireless WAN device .......................................................................... 4-19GPS Function ....................................................................................... 4-21LAN ....................................................................................................... 4-21Memory media ..................................................................................... 4-23
User's Manual ii

External Display .................................................................................. 4-25Security lock ........................................................................................ 4-30Optional TOSHIBA Accessories ........................................................ 4-31Sound System and Video mode ......................................................... 4-31
Chapter 5 Utilities and Advanced UsageUtilities and Applications ...................................................................... 5-1Special features ..................................................................................... 5-6TOSHIBA Password Utility ................................................................... 5-7TOSHIBA System Settings ................................................................. 5-10TOSHIBA Tablet Access Code Logon Utility .................................... 5-11TOSHIBA Face Recognition ............................................................... 5-11TruCapture ........................................................................................... 5-12ArcNote for Toshiba ............................................................................ 5-13Camera 365 for Toshiba ...................................................................... 5-16TOSHIBA Media Player by sMedio TrueLink+ .................................. 5-18TOSHIBA PC Health Monitor .............................................................. 5-20TOSHIBA Setup Utility ........................................................................ 5-21System Recovery ................................................................................ 5-22
Chapter 6 TroubleshootingProblem-solving process ..................................................................... 6-1Hardware and system checklist ........................................................... 6-4TOSHIBA support ................................................................................ 6-14
Chapter 7 AppendixSpecifications ........................................................................................ 7-1AC Power Cord and Connectors .......................................................... 7-2Information for Wireless Devices ........................................................ 7-4Information about Intel AMT ............................................................... 7-14Legal Footnotes ................................................................................... 7-17Glossary ............................................................................................... 7-19
Index
User's Manual iii

Chapter 1
TOSHIBA Legal, Regulatory, andSafety
This chapter states the legal, regulatory, and safety information applicableto TOSHIBA computers.
Copyright, Disclaimer and TrademarksCopyright
© 2014 TOSHIBA Corporation. All rights reserved. Under the copyrightlaws, this manual cannot be reproduced in any form without the priorwritten permission of TOSHIBA. No patent liability is assumed, with respectto the use of the information contained herein.First edition November 2014Copyright authority for music, movies, computer programs, databases andother intellectual property covered by copyright laws belongs to the authoror to the copyright owner. Copyrighted material can be reproduced only forpersonal use or use within the home. Any other use beyond that stipulatedabove (including conversion to digital format, alteration, transfer of copiedmaterial and distribution on a network) without the permission of thecopyright owner is a violation of copyright or author's rights and is subjectto civil damages or criminal action. Comply with copyright laws in makingany reproduction from this manual.
DisclaimerThis manual has been validated and reviewed for accuracy. Theinstructions and descriptions it contains are accurate for your computer atthe time of this manual’s production. However, succeeding computers andmanuals are subject to change without notice. TOSHIBA assumes noliability for damages incurred directly or indirectly from errors, omissions ordiscrepancies between the computer and the manual.
TrademarksIntel is a trademark or registered trademark of Intel Corporation.Windows, Microsoft, and Windows logo are registered trademarks ofMicrosoft Corporation.
User's Manual 1-1

The Bluetooth® word mark and logos are registered trademarks owned byBluetooth SIG, Inc. and any use of such marks by Toshiba Corporation andits affiliates is under license.The terms HDMI and HDMI High-Definition Multimedia Interface, and theHDMI Logo are trademarks or registered trademarks of HDMI LicensingLLC in the United States and other countries.sMedio and sMedio TrueLink+ are trademarks or registered trademarks ofsMedio, Inc.Secure Digital and SD are trademarks of SD Card Association.MultiMediaCard, MMC, and eMMC are trademarks of MultiMediaCardAssociation.QUALCOMM is a trademark of Qualcomm Incorporated, registered in theUnited States and other countries. ATHEROS is a trademark of QualcommAtheros, Inc., registered in the United States and other countries.DTS, the Symbol, & DTS and the Symbol together are registeredtrademarks and DTS Studio Sound is a trademark of DTS, Inc. © DTS, Inc.All Rights Reserved.Realtek is a registered trademark of Realtek Semiconductor Corporation.All other product names and service names in this manual might betrademarks or registered trademarks of their respective companies.
Regulatory InformationThe regulatory information herein might vary. Pease check the IDinformation on the back of the device for specific information applicable tothe model you purchased.
FCC informationFCC notice "Declaration of Conformity Information"
This equipment has been tested and found to comply with the limits for aClass B digital device, pursuant to part 15 of the FCC rules. These limitsare designed to provide reasonable protection against harmful interferencein a residential installation. This equipment generates, uses and canradiate radio frequency energy and, if not installed and used in accordancewith the instructions, may cause harmful interference to radiocommunications. However, there is no guarantee that interference will notoccur in a particular installation. If this equipment does cause harmfulinterference to radio or television reception, which can be determined byturning the equipment off and on, the user is encouraged to try to correctthe interference by one or more of the following measures:
Reorient or relocate the receiving antenna.Increase the separation between the equipment and receiver.
User's Manual 1-2

Connect the equipment into an outlet on a circuit different from that towhich the receiver is connected.Consult the dealer or an experienced radio/TV technician for help.
Only peripherals complying with the FCC class B limits might be attachedto this equipment. Operation with non-compliant peripherals or peripheralsnot recommended by TOSHIBA is likely to result in interference to radioand TV reception. Shielded cables must be used between the externaldevices and the computer’s Micro-USB (USB 2.0) port, HDMI Micro port,as well as the external RGB monitor port, Universal Serial Bus (USB 3.0)ports and HDMI port on the TOSHIBA Keyboard Dock. Changes ormodifications made to this equipment, not expressly approved byTOSHIBA or parties authorized by TOSHIBA could void the user’s authorityto operate the equipment.
FCC conditions
This device complies with part 15 of the FCC Rules. Operation is subject tothe following two conditions:1. This device may not cause harmful interference.2. This device must accept any interference received, including
interference that may cause undesired operation.
Contact
Address: TOSHIBA America Information Systems, Inc.
9740 Irvine Boulevard
Irvine, California 92618-1697
Telephone: (949) 583-3000
This information is only applicable for the countries/regions where it isrequired.
EU Declaration of Conformity
This product is carrying the CE-Mark inaccordance with the related European Directives.Responsible for CE-Marking is TOSHIBA EUROPEGMBH, Hammfelddamm 8, 41460 Neuss,Germany. The complete and official EUDeclaration of Conformity can be found onTOSHIBA’s web sitehttp://epps.toshiba-teg.com on the Internet.
User's Manual 1-3

CE compliance
This product is labeled with the CE Mark in accordance with the relatedEuropean Directives, notably RoHS Directive 2011/65/EU andElectromagnetic Compatibility Directive 2004/108/EC for the notebook andthe electronic accessories including the supplied power adapter, the RadioEquipment and Telecommunications Terminal Equipment Directive 1999/5/EC in case of implemented telecommunication accessories and the LowVoltage Directive 2006/95/EC for the supplied power adapter. Furthermorethe product complies with the Ecodesign Directive 2009/125/EC (ErP) andits related implementing measures.This product and the original options are designed to observe the relatedEMC (Electromagnetic Compatibility) and safety standards. However,TOSHIBA cannot guarantee that this product still observes these EMCstandards if options or cables not produced by TOSHIBA are connected orimplemented. In this case the persons who have connected/implementedthose options/cables have to provide assurance that the system (PC plusoptions/cables) still fulfils the required standards. To avoid general EMCproblems, the following guidance should be noted:
Only CE marked options should be connected/implementedOnly best shielded cables should be connected
Working environment
This product was designed to fulfil the EMC (Electromagnetic Compatibility)requirements to be observed for so-called “Residential, commercial andlight industry environments”. TOSHIBA do not approve the use of thisproduct in working environments other than the above mentioned“Residential, commercial and light industry environments”.For example, the following environments are not approved:
Industrial Environments (e.g. environments where a mains voltage of380 V three-phase is used)Medical EnvironmentsAutomotive EnvironmentsAircraft Environments
Any consequences resulting from the use of this product in workingenvironments that are not approved are not the responsibility of TOSHIBA.The consequences of the use of this product in non-approved workingenvironments may be:
Interference with other devices or machines in the near surroundingarea.Malfunction of, or data loss from, this product caused by disturbancesgenerated by other devices or machines in the near surrounding area.
Therefore TOSHIBA strongly recommend that the electromagneticcompatibility of this product should be suitably tested in all non-approvedworking environments before use. In the case of automobiles or aircraft,
User's Manual 1-4

the manufacturer or airline respectively should be asked for permissionbefore use of this product.Furthermore, for general safety reasons, the use of this product inenvironments with explosive atmospheres is not permitted.
VCCI Class B Information (Japan Only)
この装置は、クラスB情報技術装置です。この装置は、家庭環境で使用することを目的としていますが、この装置がラジオやテレビジョン受信機に近接して使用されると、受信障害を引き起こすことがあります。取扱説明書に従って正しい取り扱いをしてください。
VCCI-B
Canadian regulatory information (Canada only)This digital apparatus does not exceed the Class B limits for radio noiseemissions from digital apparatus as set out in the Radio InterferenceRegulation of the Canadian Department of Communications.Note that Canadian Department of Communications (DOC) regulationsprovide, that changes or modifications not expressly approved byTOSHIBA Corporation could void your authority to operate this equipment.This Class B digital apparatus meets all requirements of the CanadianInterference-Causing Equipment Regulations.Cet appareil numérique de la classe B respecte toutes les exigences duRèglement sur le matériel brouilleur du Canada.
User's Manual 1-5

Following information is only valid for EU-memberStates:
Disposal of products
The crossed out wheeled dust bin symbol indicates thatproducts must be collected and disposed of separatelyfrom household waste. Integrated batteries andaccumulators can be disposed of with the product. Theywill be separated at the recycling centres.The black bar indicates that the product was placed on themarket after August 13, 2005.By participating in the separate collection of products andbatteries, you will help to assure the proper disposal ofproducts and batteries and thus help to prevent potentialnegative consequences for the environment and humanhealth.For more detailed information about the collection andrecycling programmes available in your country, pleasevisit our website( www.toshiba.eu/recycling ) or contact your local counciloffice or the retail outlet where you purchased the product.
User's Manual 1-6

Disposal of batteries and/or accumulators
The crossed out wheeled dust bin symbol indicates thatbatteries and/or accumulators must be collected anddisposed of separately from household waste.If the battery or accumulator contains more than thespecified values of lead (Pb), mercury (Hg), and/orcadmium (Cd) defined in the European Battery Directive,then the chemical symbols for lead (Pb), mercury (Hg)and/or cadmium (Cd) will appear below the crossed outwheeled dust bin symbol.By participating in the separate collection of batteries, youwill help to assure the proper disposal of products andbatteries and thus help to prevent potential negativeconsequences for the environment and human health. Toachieve this you should take any battery and/oraccumulator to your local recycling site, or to a retail outletor facility that offers to collect these devices forenvironmentally friendly disposal, ensuring that theterminal contacts are covered by non-conductive tape.For more detailed information about the collection andrecycling programmes available in your country, pleasevisit our website( www.toshiba.eu/recycling ) or contact your local counciloffice or the retail outlet where you purchased the product.
These symbols might not stick depending on the country and region whereyou purchased.
REACH - Compliance StatementThe European Union (EU) chemical regulation, REACH (Registration,Evaluation, Authorization and Restriction of Chemicals), entered into forceon 1 June 2007, with phased deadlines to 2018.Toshiba will meet all REACH requirements and is committed to provide ourcustomers with information about the presence in our articles ofsubstances included on the candidate list according to REACH regulation.Please consult the following websitewww.toshiba.eu/reach for information about the presence in our articles ofsubstances included on the candidate list according to REACH in aconcentration above 0.1 % weight by weight.
User's Manual 1-7

Following information is only for Turkey:Disposal of products:
The crossed wheelie bin symbol means that thisproduct should not be collected and disposed withother household wastes. When product become wasteat the end-of-life, to protect environment and humanhealth, it should be given to nearest collectionrecycling or disposal center. For more informationabout collection and recycling programs in yourcountry please contact your local authority or theretailer where the product was purchased.
Toshiba meets all requirements of Turkish regulation 28300“Restriction of the use of certain hazardous substances in electricaland electronic equipment”.AEEE Yönetmeliğine UygundurToshiba 28300 sayılı Türkiye ''Elektrikle çalişan ve elektronikekipmanda belirli tehlikeli maddelerin kullanimiyla ilgili kisitlama”yönetmeliği gereklerini tamamen yerine getirmektedir.The number of possible pixel failures of your display is definedaccording to ISO 9241-307 standards. If the number of pixel failures isless than this standard, they will not be counted as defect or failure.Battery is a consumption product, since the battery time depends onthe usage of your computer. If the battery can not be charged at all,then it is a defect or failure. The changes in battery time is not a defector failure.
Following information is only for India:
The use of this symbol indicates that this product may notbe treated as household waste.By ensuring this product is disposed of correctly, you willhelp prevent potential negative consequences for theenvironment and human health, which could otherwise becaused by inappropriate waste handling of this product.For more detailed information about recycling of thisproduct, please visit our website( http://www.toshiba-india.com ) or contact call center(1800-200-8674).
These symbols might not stick depending on the country and region whereyou purchased.
User's Manual 1-8

Video Standard NoticeTHIS PRODUCT IS LICENSED UNDER THE AVC, THE VC-1 ANDMPEG-4 VISUAL PATENT PORTFOLIO LICENSE FOR THE PERSONALAND NON-COMMERCIAL USE OF A CONSUMER FOR (I) ENCODINGVIDEO IN COMPLIANCE WITH THE ABOVE STANDARDS ("VIDEO")AND/OR (II) DECODING AVC, VC-1 AND MPEG-4 VIDEO THAT WASENCODED BY A CONSUMER ENGAGED IN A PERSONAL ANDNONCOMMERCIAL ACTIVITY AND/OR WAS OBTAINED FROM AVIDEO PROVIDER LICENSED BY MPEG LA TO PROVIDE SUCHVIDEO. NO LICENSE IS GRANTED OR SHALL BE IMPLIED FOR ANYOTHER USE. ADDITIONAL INFORMATION INCLUDING THATRELATING TO PROMOTIONAL, INTERNAL AND COMMERCIAL USESAND LICENSING MAY BE OBTAINED FROM MPEG LA, L.L.C. SEEHTTP://WWW.MPEGLA.COM
OpenSSL Toolkit License IssuesLICENSE ISSUES==============The OpenSSL toolkit stays under a dual license, i.e. both the conditions ofthe OpenSSL License and the original SSLeay license apply to the toolkit.See below for the actual license texts. Actually both licenses are BSD-styleOpen Source licenses. In case of any license issues related to OpenSSLplease contact [email protected] License------------------------/*=====================================================Copyright (c) 1998-2011 The OpenSSL Project. All rights reserved.Redistribution and use in source and binary forms, with or withoutmodification, are permitted provided that the following conditions are met:1. Redistributions of source code must retain the above copyright notice,
this list of conditions and the following disclaimer.2. Redistributions in binary form must reproduce the above copyright
notice, this list of conditions and the following disclaimer in thedocumentation and/or other materials provided with the distribution.
3. All advertising materials mentioning features or use of this softwaremust display the following acknowledgment:"This product includes software developed by the OpenSSL Project foruse in the OpenSSL Toolkit."( http://www.openssl.org/ )
4. The names "OpenSSL Toolkit" and "OpenSSL Project" must not beused to endorse or promote products derived from this softwarewithout prior written permission. For written permission, please [email protected].
User's Manual 1-9

5. Products derived from this software may not be called "OpenSSL" normay "OpenSSL" appear in their names without prior written permissionof the OpenSSL Project.
6. Redistributions of any form whatsoever must retain the followingacknowledgment:"This product includes software developed by the OpenSSL Project foruse in the OpenSSL Toolkit"( http://www.openssl.org/ )
THIS SOFTWARE IS PROVIDED BY THE OpenSSL PROJECT ``AS IS''AND ANY EXPRESSED OR IMPLIED WARRANTIES, INCLUDING, BUTNOT LIMITED TO, THE IMPLIED WARRANTIES OF MERCHANTABILITYAND FITNESS FOR A PARTICULAR PURPOSE ARE DISCLAIMED. INNO EVENT SHALL THE OpenSSL PROJECT OR ITS CONTRIBUTORSBE LIABLE FOR ANY DIRECT, INDIRECT, INCIDENTAL, SPECIAL,EXEMPLARY, OR CONSEQUENTIAL DAMAGES (INCLUDING, BUT NOTLIMITED TO, PROCUREMENT OF SUBSTITUTE GOODS ORSERVICES; LOSS OF USE, DATA, OR PROFITS; OR BUSINESSINTERRUPTION) HOWEVER CAUSED AND ON ANY THEORY OFLIABILITY, WHETHER IN CONTRACT, STRICT LIABILITY, OR TORT(INCLUDING NEGLIGENCE OR OTHERWISE) ARISING IN ANY WAYOUT OF THE USE OF THIS SOFTWARE, EVEN IF ADVISED OF THEPOSSIBILITY OF SUCH DAMAGE.=====================================================This product includes cryptographic software written by Eric Young([email protected]). This product includes software written by TimHudson ([email protected]).*/Original SSLeay License----------------------------------/* Copyright (C) 1995-1998 Eric Young ([email protected])All rights reserved.This package is an SSL implementation written by Eric Young([email protected]).The implementation was written so as to conform with Netscapes SSL.This library is free for commercial and non-commercial use as long as thefollowing conditions are aheared to. The following conditions apply to allcode found in this distribution, be it the RC4, RSA, lhash, DES, etc., code;not just the SSL code. The SSL documentation included with thisdistribution is covered by the same copyright terms except that the holderis Tim Hudson ([email protected]).Copyright remains Eric Young's, and as such any Copyright notices in thecode are not to be removed.If this package is used in a product, Eric Young should be given attributionas the author of the parts of the library used.
User's Manual 1-10

This can be in the form of a textual message at program startup or indocumentation (online or textual) provided with the package.Redistribution and use in source and binary forms, with or withoutmodification, are permitted provided that the following conditions are met:1. Redistributions of source code must retain the copyright notice, this list
of conditions and the following disclaimer.2. Redistributions in binary form must reproduce the above copyright
notice, this list of conditions and the following disclaimer in thedocumentation and/or other materials provided with the distribution.
3. All advertising materials mentioning features or use of this softwaremust display the following acknowledgement:"This product includes cryptographic software written by Eric Young([email protected])"The word 'cryptographic' can be left out if the rouines from the librarybeing used are not cryptographic related :-).
4. If you include any Windows specific code (or a derivative thereof) fromthe apps directory (application code) you must include anacknowledgement:"This product includes software written by Tim Hudson([email protected])"
THIS SOFTWARE IS PROVIDED BY ERIC YOUNG ``AS IS'' AND ANYEXPRESS OR IMPLIED WARRANTIES, INCLUDING, BUT NOT LIMITEDTO, THE IMPLIED WARRANTIES OF MERCHANTABILITY ANDFITNESS FOR A PARTICULAR PURPOSE ARE DISCLAIMED. IN NOEVENT SHALL THE AUTHOR OR CONTRIBUTORS BE LIABLE FORANY DIRECT, INDIRECT, INCIDENTAL, SPECIAL, EXEMPLARY, ORCONSEQUENTIAL DAMAGES (INCLUDING, BUT NOT LIMITED TO,PROCUREMENT OF SUBSTITUTE GOODS OR SERVICES; LOSS OFUSE, DATA, OR PROFITS; OR BUSINESS INTERRUPTION) HOWEVERCAUSED AND ON ANY THEORY OF LIABILITY, WHETHER INCONTRACT, STRICT LIABILITY, OR TORT (INCLUDING NEGLIGENCEOR OTHERWISE) ARISING IN ANY WAY OUT OF THE USE OF THISSOFTWARE, EVEN IF ADVISED OF THE POSSIBILITY OF SUCHDAMAGE.The licence and distribution terms for any publically available version orderivative of this code cannot be changed. i.e. this code cannot simply becopied and put under another distribution licence [including the GNU PublicLicence.]*/
FreeType License IssuesThe FreeType Project LICENSE----------------------------2006-Jan-27
User's Manual 1-11
Copyright 1996-2002, 2006 byDavid Turner, Robert Wilhelm, and Werner LembergIntroduction============The FreeType Project is distributed in several archive packages; some ofthem may contain, in addition to the FreeType font engine, various toolsand contributions which rely on, or relate to, the FreeType Project.This license applies to all files found in such packages, and which do notfall under their own explicit license. The license affects thus the FreeTypefont engine, the test programs, documentation and makefiles, at the veryleast.This license was inspired by the BSD, Artistic, and IJG (Independent JPEGGroup) licenses, which all encourage inclusion and use of free software incommercial and freeware products alike. As a consequence, its mainpoints are that:
We don't promise that this software works. However, we will beinterested in any kind of bug reports. (`as is' distribution)You can use this software for whatever you want, in parts or full form,without having to pay us. (`royalty-free' usage)You may not pretend that you wrote this software. If you use it, or onlyparts of it, in a program, you must acknowledge somewhere in yourdocumentation that you have used the FreeType code. (`credits')
We specifically permit and encourage the inclusion of this software, with orwithout modifications, in commercial products.We disclaim all warranties covering The FreeType Project and assume noliability related to The FreeType Project.Finally, many people asked us for a preferred form for a credit/disclaimer touse in compliance with this license. We thus encourage you to use thefollowing text:"""Portions of this software are copyright (C) <year> The FreeType Projectwww.freetype.orgAll rights reserved."""Please replace <year> with the value from the FreeType version youactually use.Legal Terms============0. Definitions--------------Throughout this license, the terms `package', `FreeType Project', and`FreeType archive' refer to the set of files originally distributed by the
User's Manual 1-12

authors (David Turner, Robert Wilhelm, and Werner Lemberg) as the`FreeType Project', be they named as alpha, beta or final release.`You' refers to the licensee, or person using the project, where `using' is ageneric term including compiling the project's source code as well aslinking it to form a `program' or `executable'. This program is referred to as`a program using the FreeType engine'.This license applies to all files distributed in the original FreeType Project,including all source code, binaries and documentation, unless otherwisestated in the file in its original, unmodified form as distributed in the originalarchive. If you are unsure whether or not a particular file is covered by thislicense, you must contact us to verify this.The FreeType Project is copyright (C) 1996-2000 by David Turner, RobertWilhelm, and Werner Lemberg. All rights reserved except as specifiedbelow.1. No Warranty--------------THE FREETYPE PROJECT IS PROVIDED `AS IS' WITHOUTWARRANTY OF ANY KIND, EITHER EXPRESS OR IMPLIED,INCLUDING, BUT NOT LIMITED TO, WARRANTIES OFMERCHANTABILITY AND FITNESS FOR A PARTICULAR PURPOSE. INNO EVENT WILL ANY OF THE AUTHORS OR COPYRIGHT HOLDERSBE LIABLE FOR ANY DAMAGES CAUSED BY THE USE OR THEINABILITY TO USE, OF THE FREETYPE PROJECT.2. Redistribution--------------This license grants a worldwide, royalty-free, perpetual and irrevocableright and license to use, execute, perform, compile, display, copy, createderivative works of, distribute and sublicense the FreeType Project (in bothsource and object code forms) and derivative works thereof for anypurpose; and to authorize others to exercise some or all of the rightsgranted herein, subject to the following conditions:
Redistribution of source code must retain this license file (`FTL.TXT')unaltered; any additions, deletions or changes to the original files mustbe clearly indicated in accompanying documentation. The copyrightnotices of the unaltered, original files must be preserved in all copiesof source files.Redistribution in binary form must provide a disclaimer that states thatthe software is based in part of the work of the FreeType Team, in thedistribution documentation. We also encourage you to put an URL tothe FreeType web page in your documentation, though this isn'tmandatory.
These conditions apply to any software derived from or based on theFreeType Project, not just the unmodified files. If you use our work, youmust acknowledge us. However, no fee need be paid to us.3. Advertising
User's Manual 1-13
--------------Neither the FreeType authors and contributors nor you shall use the nameof the other for commercial, advertising, or promotional purposes withoutspecific prior written permission.We suggest, but do not require, that you use one or more of the followingphrases to refer to this software in your documentation or advertisingmaterials: `FreeType Project', `FreeType Engine', `FreeType library', or`FreeType Distribution'.As you have not signed this license, you are not required to accept it.However, as the FreeType Project is copyrighted material, only this license,or another one contracted with the authors, grants you the right to use,distribute, and modify it. Therefore, by using, distributing, or modifying theFreeType Project, you indicate that you understand and accept all theterms of this license.4. Contacts--------------There are two mailing lists related to FreeType:
[email protected] general use and applications of FreeType, as well as futureand wanted additions to the library and distribution. If you are lookingfor support, start in this list if you haven't found anything to help you inthe [email protected] bugs, as well as engine internals, design issues, specificlicenses, porting, etc.
Our home page can be found athttp://www.freetype.org
User's Manual 1-14

ENERGY STAR® ProgramYour Computer model may be ENERGY STAR®
compliant. If the model you purchased is compliant, it usesthe Energy Star logo and the following information applies.TOSHIBA is a partner in the ENERGY STAR Program andhas designed this computer to meet the latest ENERGYSTAR guidelines for energy efficiency. Your computerships with the power management options preset to aconfiguration that will provide the most stable operatingenvironment and optimum system performance for bothAC power and battery modes.To conserve energy, your computer is set to enter the low-power Sleep Mode which shuts down the system anddisplay within 15 minutes of inactivity in AC power mode.TOSHIBA recommends that you leave this and otherenergy saving features active, so that your computer willoperate at its maximum energy efficiency. You can wakethe computer from Sleep Mode by pressing the powerbutton.Your ENERGY STAR certified computer should be set bydefault to enter a low-power "sleep mode" after a period ofinactivity. Simply touching the mouse or keyboard "wakes"the computer in seconds. These sleep features can saveyou up to $23 per year (200 kWh per year in electricity)and prevent up to 300 pounds of greenhouse gasemissions annually. To learn how to adjust or activatethese sleep settings on your computer, please go to:www.energystar.gov/sleepinstructionsTo activate sleep settings organization-wide quickly andeasily through network tools, please go towww.energystar.gov/powermanagement
Disposing of the computer and the computer'sbattery
The computer's battery pack is not user-accessible. Contact an authorizedTOSHIBA service provider for details regarding how to dispose of thecomputer and the battery pack.
General PrecautionsTOSHIBA computers are designed to optimize safety, minimize strain, andwithstand the rigors of portability. However, certain precautions should be
User's Manual 1-15

observed to further reduce the risk of personal injury or damage to thecomputer.Be certain to read the following general precautions and to note thecautions included in the text of the manual.
Provide adequate ventilationAlways make sure that your computer and AC adaptor have adequateventilation and are protected from overheating when the power is turned onor when an AC adaptor is connected to a power outlet (even if yourcomputer is in Sleep Mode). In this condition, observe the following:
Never cover your computer or AC adaptor with any object.Never place your computer or AC adaptor near a heat source, such asan electric blanket or heater.Never cover or block the air vents including those at the base of thecomputer.Always operate your computer on a hard flat surface. Using yourcomputer on a carpet or other soft material can block the vents.Always provide sufficient space around the computer.
Overheating your computer or AC adaptor could cause system failure,computer or AC adaptor damage or a fire, possibly resulting in seriousinjury.
Creating a computer-friendly environmentPlace the computer on a flat surface that is large enough for the computerand any other items you are using, such as a printer.Leave enough space around the computer and other equipment to provideadequate ventilation. Otherwise, they might overheat.To keep your computer in prime operating condition, protect your work areafrom:
Dust, moisture, and direct sunlight.Equipment that generates a strong electromagnetic field, such asstereo speakers (other than speakers that are connected to thecomputer) or speakerphones.Rapid changes in temperature or humidity and sources of temperaturechange such as air conditioner vents or heaters.Extreme heat, cold, or humidity.Liquids and corrosive chemicals.
Stress injuryCarefully read the Instruction Manual for Safety and Comfort. It containsinformation on the prevention of stress injuries to your hands and wriststhat can be caused by extensive keyboard use. It also includes informationon work space design, posture, and lighting that can help reduce physicalstress.
User's Manual 1-16

Heat injuryAvoid prolonged physical contact with the computer. If the computer isused for long periods, its surface can become very warm. While thetemperature will not feel hot to the touch, if you maintain physicalcontact with the computer for a long time, for example if you rest thecomputer on your lap or if you keep your hands on the palm rest, yourskin might suffer a low-heat injury.If the computer has been used for a long time, avoid direct contactwith the metal plate supporting the various interface ports as this canbecome hot.The surface of the AC adaptor can become hot when in use but thiscondition does not indicate a malfunction. If you need to transport theAC adaptor, disconnect it and let it cool before moving it.Do not lay the AC adaptor on a material that is sensitive to heat as thematerial could become damaged.
Pressure or impact damageDo not apply heavy pressure to the computer or subject it to any form ofstrong impact as this can damage the computer's components or otherwisecause it to malfunction.
Cleaning the computerTo help ensure long, trouble-free operation, keep the computer free of dustand dirt, and use care with all liquids around it.
Be careful not to spill liquids into the computer. If the computer doesget wet, turn the power off immediately and let the computer drycompletely. In these circumstances, you should get the computerinspected by an authorized service provider in order to assess thescope of any damage.Clean the plastics of the computer using a cloth slightly dampenedwith water.You can clean the display screen by spraying a small amount of glasscleaner onto a soft, clean cloth and then wiping the screen gently withthe cloth.
Never spray cleaner directly onto the computer or let liquid run into any partof it. Never use harsh or caustic chemical products to clean the computer.
Moving the computerWhile the computer is designed for flexible day-to-day usage, you shouldexercise a few simple precautions when moving it in order to help ensuretrouble-free operation.
User's Manual 1-17

Make sure all disk/disc activity has ended before moving thecomputer.Turn off (shut down) the computer.Disconnect the AC adaptor and all peripherals before moving thecomputer (TOSHIBA Keyboard Dock, however, can remainconnected).Close the computer when the tablet computer is docked.Do not pick up the computer by its display panel when using in laptopor presentation mode.Before carrying your computer, shut it down, disconnect the ACadaptor and allow it to cool down. A failure to follow this instructionmight result in minor heat injury.Do not expose the computer to rapid temperature changes (forexample, in a situation where you carry the computer from a coldenvironment to a warm room). Do not turn on the power untilcondensation disappears.Be careful not to subject the computer to impact or shock. A failure tofollow this instruction could result in damage to computer, computerfailure, or loss of data.Never transport your computer with any cards installed. This mightdamage either the computer and/or the card resulting in computerfailure.Always use a suitable carry case when transporting the computer.When carrying your computer, be sure to hold it securely so that itdoes not fall or hit anything.Do not carry your computer by holding any of its protruding elements.
Mobile phonesBe aware that the use of mobile phones can interfere with the audiosystem. The operation of the computer will not be impaired in any way, butit is recommended that a minimum distance of 30 cm is maintainedbetween the computer and a mobile phone that is in use.
Instruction Manual for Safety and ComfortAll important information on the safe and proper use of this computer isdescribed in the enclosed Instruction Manual for Safety and Comfort. Besure to read it before using the computer.
Safety IconsSafety icons are used in this manual to bring important information to yourattention. Each type of message is identified as follows.
Indicates a potentially hazardous situation, which could result in death orserious injury, if you do not follow instructions.
User's Manual 1-18

A caution informs you that improper use of equipment or failure to followinstructions might cause data loss, equipment damage, or might result inminor or moderate injury.
Please read. A note is a hint or advice that helps you make best use ofyour equipment.
User's Manual 1-19

Chapter 2
Getting StartedThis chapter provides an equipment checklist, and basic information tostart using your computer.
If you use an operating system that was not pre-installed by TOSHIBA,some of the features described in this manual might not function properly.
Equipment checklistCarefully unpack your computer, taking care to save the box andpackaging materials for future use.
HardwareCheck to make sure that you have all the following items:
TOSHIBA Portable Personal ComputerTOSHIBA Keyboard Dock (provided with some models)Stylus Pen (provided with some models)Reserve Pen (in the pen slot and provided with some models)AC adaptor and power cord (2-pin plug or 3-pin plug)Cleaning cloth (provided with some models)
Stylus Pen is included together with spare pen tips and a tip removal tool inthe small case coming with the product.
DocumentationUser Information GuideInstruction Manual for Safety and Comfort
If any of the items are missing or damaged, contact your dealerimmediately.
TOSHIBA Keyboard DockDepending on the model you purchased, your device might be providedwith a TOSHIBA Keyboard Dock (hereafter referred to as “keyboard dock”).Your device contains a main unit and an accessory unit. The tabletcomputer, as the main unit, allows you to handle tasks that frequentlyrequire touch interactions while providing the portability; the keyboard dock,
User's Manual 2-1
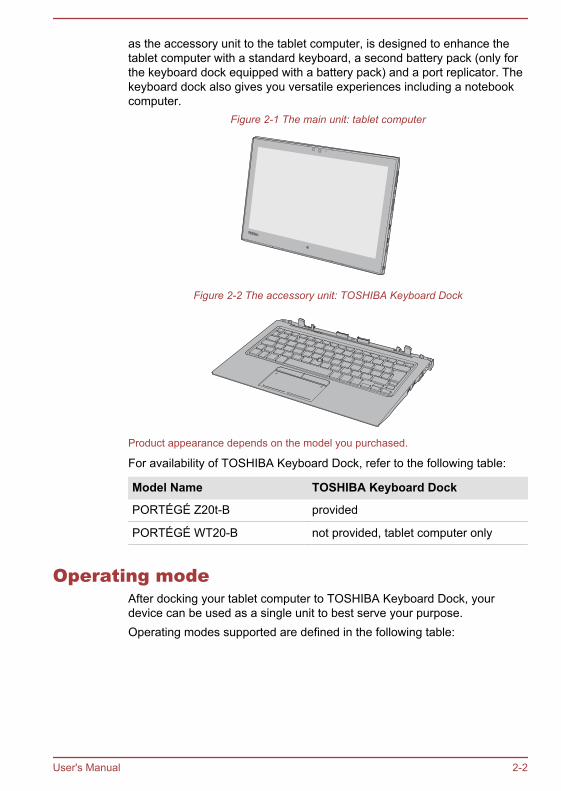
as the accessory unit to the tablet computer, is designed to enhance thetablet computer with a standard keyboard, a second battery pack (only forthe keyboard dock equipped with a battery pack) and a port replicator. Thekeyboard dock also gives you versatile experiences including a notebookcomputer.
Figure 2-1 The main unit: tablet computer
Figure 2-2 The accessory unit: TOSHIBA Keyboard Dock
Product appearance depends on the model you purchased.
For availability of TOSHIBA Keyboard Dock, refer to the following table:
Model Name TOSHIBA Keyboard Dock
PORTÉGÉ Z20t-B provided
PORTÉGÉ WT20-B not provided, tablet computer only
Operating modeAfter docking your tablet computer to TOSHIBA Keyboard Dock, yourdevice can be used as a single unit to best serve your purpose.Operating modes supported are defined in the following table:
User's Manual 2-2

Mode Name Illustration Definition
Laptop mode Suitable for tasks thatfrequently require thekeyboard, such astyping.
Presentationmode
Suitable for tasks thatrarely require touchinteractions, such as apresentation and a slideshow.
Tablet mode Suitable for tasks thatrequire both touchinteractions and mobility,such as reading.
For how to dock your tablet computer and start using, refer to Docking thetablet computer section for more information.
Your device is called “computer” when referred to as a single unit, or wheredescriptions are not specifically for one of the operating modes in thismanual.
Short model nameModel name of your computer is shortened and referred to as the followingin this manual.
Full Model Name Short Model Name
PORTÉGÉ Z20t-B Z20t-B
PORTÉGÉ WT20-B WT20-B
ConventionsThis manual uses the following formats to describe, identify, and highlightterms and operating procedures.
Internal storage Your computer is equipped with an SSD (SolidState Drive).In this manual, the word "internal storage" refersto SSD unless otherwise stated.
User's Manual 2-3

Click Tap the Touch Pad or click the left TouchPad control button once (for Z20t-B).Left-click the mouse once.Tap the touch screen once.
Right-click Tap the Touch Pad with two fingers togetheror click the right Touch Pad control buttononce (for Z20t-B).Right-click the mouse once.Press and hold on the touch screen.
Double-click Tap the Touch Pad or click the left TouchPad control button twice (for Z20t-B).Left-click the mouse twice.Tap the touch screen twice.
Charm You can find a list of charms: Search, Share,Start, Devices, and Settings by the followingways:
Point the mouse pointer to the lower-right (orupper-right) corner of your screen.Swipe in from the right edge of the TouchPad.Swipe in from the right edge of the touchscreen (only for touch screen models).
Desktop Click the Desktop tile from the Start screen toaccess the desktop.
Start screen You can go back to the Start screen from an appor the desktop by the following ways:
Click the Start charm.Move the mouse pointer all the way into thelower-left corner of the screen and then clickthe Start button ( ).
Use the Windows® logo key ( ) on thekeyboard (for Z20t-B).Tap the Windows® button ( ) on yourtablet computer.
For detailed information, refer to the WindowsHelp and Support.
Apps view You can find all of your apps including desktopprograms in the Apps view.To get to the Apps view:
Move the mouse pointer and then click the icon in the lower-left corner of the screen.
Slide up from the Start screen.
User's Manual 2-4

Using your computer for the first timeBe sure to read the enclosed Instruction Manual for Safety and Comfort forinformation on the safe and proper use of this computer. It is intended tohelp you be more comfortable and productive while using the computer. Byfollowing the recommendations in it, you can reduce your chance ofdeveloping a painful or disabling injury to your hand, arms, shoulders, orneck.
This section provides basic information to start using your computer. Itcovers the following topics:
Docking the tablet computer (only for Z20t-B)Undocking the tablet computer (only for Z20t-B)Connecting the AC adaptorTurning on the powerInitial setup
Use a virus-check program and make sure that it is updated regularly.Never format storage media without checking its content - formattingdestroys all stored data.It is a good idea to back up the internal storage or other main storagedevice to external media periodically. General storage media is notdurable or stable over long periods of time and under certainconditions might result in data loss.Before you install a device or application, save any data in memory tothe internal storage or other storage media. Failure to do so mightresult in data loss.
Docking the tablet computer (only for Z20t-B)Refer to the following recommended steps to dock your tablet computer.
Do not undock the tablet computer immediately after docking operation.Wait at least 5 seconds.
Converting to laptop mode
To use the computer in laptop mode, do the following:1. Check the security lock switch on the left side of the keyboard dock,
and slide it to the unlocked position.
User's Manual 2-5
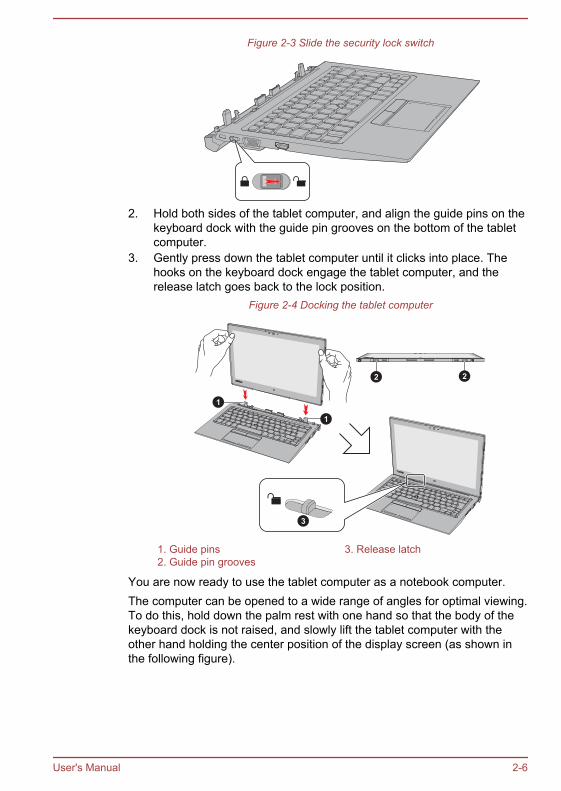
Figure 2-3 Slide the security lock switch
2. Hold both sides of the tablet computer, and align the guide pins on thekeyboard dock with the guide pin grooves on the bottom of the tabletcomputer.
3. Gently press down the tablet computer until it clicks into place. Thehooks on the keyboard dock engage the tablet computer, and therelease latch goes back to the lock position.
Figure 2-4 Docking the tablet computer
1
3
1
2 22
1. Guide pins 3. Release latch2. Guide pin grooves
You are now ready to use the tablet computer as a notebook computer.The computer can be opened to a wide range of angles for optimal viewing.To do this, hold down the palm rest with one hand so that the body of thekeyboard dock is not raised, and slowly lift the tablet computer with theother hand holding the center position of the display screen (as shown inthe following figure).
User's Manual 2-6
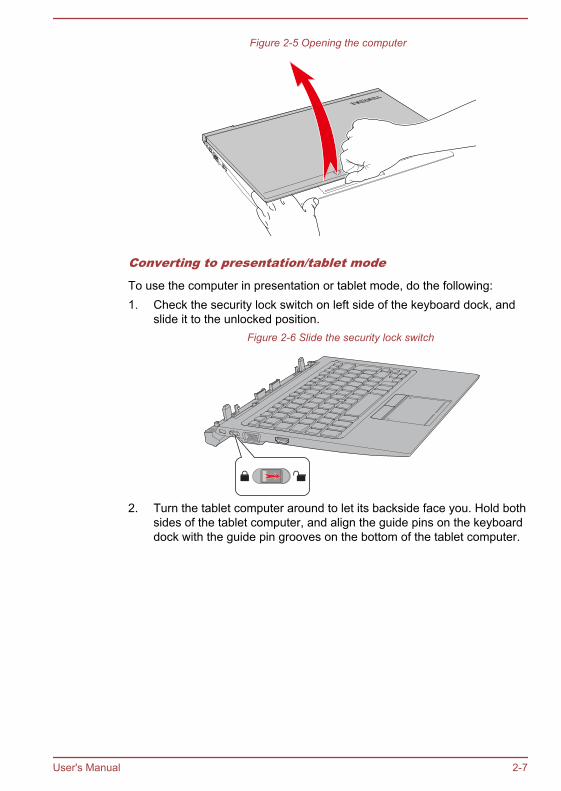
Figure 2-5 Opening the computer
Converting to presentation/tablet mode
To use the computer in presentation or tablet mode, do the following:1. Check the security lock switch on left side of the keyboard dock, and
slide it to the unlocked position.Figure 2-6 Slide the security lock switch
2. Turn the tablet computer around to let its backside face you. Hold bothsides of the tablet computer, and align the guide pins on the keyboarddock with the guide pin grooves on the bottom of the tablet computer.
User's Manual 2-7
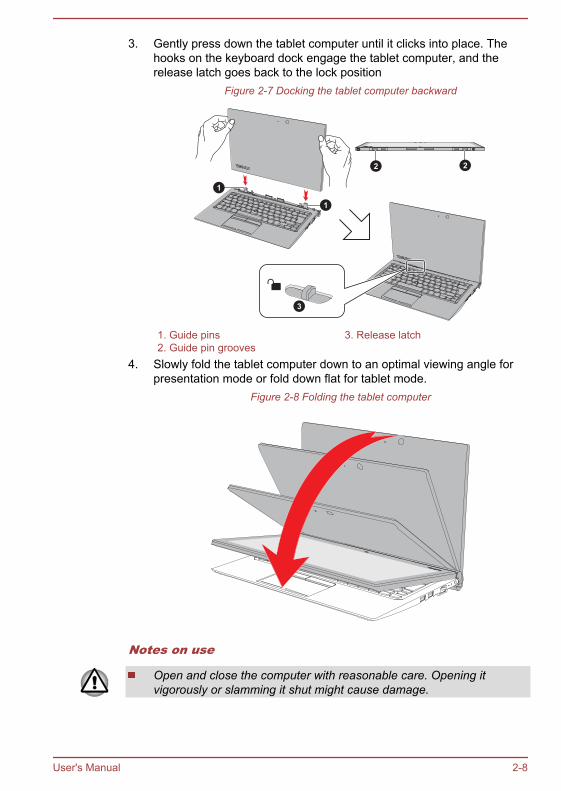
3. Gently press down the tablet computer until it clicks into place. Thehooks on the keyboard dock engage the tablet computer, and therelease latch goes back to the lock position
Figure 2-7 Docking the tablet computer backward
1
1
2 22
3
1. Guide pins 3. Release latch2. Guide pin grooves
4. Slowly fold the tablet computer down to an optimal viewing angle forpresentation mode or fold down flat for tablet mode.
Figure 2-8 Folding the tablet computer
Notes on use
Open and close the computer with reasonable care. Opening itvigorously or slamming it shut might cause damage.
User's Manual 2-8

Be careful not to open the computer too wide as it might put stress onthe hinges and cause damage.Make sure that the security lock switch is in locked position when youmove or carry the computer.Never remove the tablet computer without unlocking by the releaselatch, otherwise it might cause damage.Do not slide the release latch without the tablet computer docked.Be careful not to hurt your fingers when docking the tablet computer tothe keyboard dock.The rear of the keyboard dock is designed as a fulcrum, and movesslightly upwards when the computer is opened. Do not use thecomputer on soft surfaces or on rough surfaces where the base isvulnerable to scratches.
Do not lift the computer by the palm rest on the keyboard dock. Failureto do so might cause damage to the computer or result in minor injury.Do not pick up the computer by its display panel when using in laptopor presentation mode.Do not close the computer with pens or any other objects left inbetween the tablet computer and the keyboard dock.Never turn the hinges without the tablet computer docked, otherwise itmight cause damage or possibly result in mechanical malfunction.Do not press or push with excess force on the display screen,otherwise the computer might become unsteady and possibly fall over.
Undocking the tablet computer (only for Z20t-B)
Do not undock the tablet computer if the remaining power of Battery #1(refers to the battery pack inside the tablet computer) is 10% or less.
User's Manual 2-9

To check the remaining battery power, click the battery icon on theWindows Taskbar.
Do not dock the tablet computer immediately after undocking operation.Wait at least 5 seconds.
To undock the tablet computer from the keyboard dock, do the following:1. Disconnect and remove all peripheral devices and cables.
If the computer power is on, to ensure a safe removal, press FN + E tocut off all data communications with the keyboard dock. The dockingindicator ( ) on the right side of the keyboard dock goes off.
2. Check the security lock switch on the left side of the keyboard dock,and slide it to the unlocked position.
Figure 2-9 Slide the security lock switch
3. Turn the tablet computer to an upright position.
User's Manual 2-10

4. Slide the release latch to the unlocked position (a), and slowly lift thetablet computer to remove it while holding down the keyboard dock(b).
Figure 2-10 Undocking the tablet computer
a
b
Connecting the AC adaptorAttach the AC adaptor when you want to charge the battery or operate fromAC power. The battery pack must be charged before you can operate frombattery power.The AC adaptor can automatically adjust to any voltage ranging from 100volts to 240 volts and to a frequency of either 50 hertz or 60 hertz, enablingyou to use this computer in almost any country/region. The adaptorconverts AC power to DC power and reduces the voltage supplied to thiscomputer.
Always use the TOSHIBA AC adaptor that was included with yourcomputer, or use AC adaptors specified by TOSHIBA to avoid any riskof fire or other damage to the computer. Use of an incompatible ACadaptor might cause fire or damage to the computer possibly resultingin serious injury. TOSHIBA assumes no liability for any damagecaused by use of an incompatible adaptor.Never plug the AC adaptor into a power source that does notcorrespond to both the voltage and the frequency specified on theregulatory label of the unit. Failure to do so might result in a fire orelectric shock, possibly resulting in serious injury.Always use or purchase power cables that comply with the legalvoltage and frequency specifications and requirements in the countryof use. Failure to do so might result in a fire or electric shock, possiblyresulting in serious injury.
User's Manual 2-11

The supplied power cord conforms to safety rules and regulations inthe region the computer is bought and should not be used outside thisregion. For use in other regions, buy power cords that conform tosafety rules and regulations in the particular region.Do not use a 3-pin to 2-pin conversion plug.When you connect the AC adaptor to the computer, always follow thesteps in the exact order as described in this User’s Manual.Connecting the power cable to a live electrical outlet should be the laststep otherwise the adaptor DC output plug might hold an electricalcharge and cause an electrical shock or minor bodily injury whentouched. As a general safety precaution, avoid touching any metalparts.Never place your computer or AC adaptor on a wooden surface,furniture, or any other surface that might be marred by exposure toheat since the computer base and the surface of the AC adaptorincrease in temperature during normal use.Always place your computer or AC adaptor on a flat and hard surfacethat is resistant to heat damage.
Refer to the enclosed Instruction Manual for Safety and Comfort fordetailed precautions and handling instructions.
1. Connect the power cord to the AC adaptor.Figure 2-11 Connecting the power cord to the AC adaptor (2-pin plug)
Figure 2-12 Connecting the power cord to the AC adaptor (3-pin plug)
Either a 2-pin or 3-pin adaptor/cord is included with the computerdepending on the model.
User's Manual 2-12

2. Connect the DC output plug of the AC adaptor to the DC IN 19V jack.Figure 2-13 Connecting the DC output plug to the tablet computer
2
1
Figure 2-14 Connecting the DC output plug to the keyboard dock
1 2
1. DC IN 19V jack 2. DC output plug3. Plug the power cord into a live wall outlet. The Battery/Second
Battery indicator glows.When you connect the AC adaptor to the DC IN 19V jack on the keyboarddock, the second battery pack inside the keyboard dock also beginscharging. It might take longer to fully charge the second battery packdepending on the remaining system power.You can charge only the second battery pack without docking the tabletcomputer.
Turning on the powerPress the Power button to turn on the power, and the Power indicatorindicates the status. Refer to the Power Condition Descriptions section formore information.
User's Manual 2-13

Figure 2-15 Turning on the power
1
1. Power button
After you turn on the power for the first time, do not turn it off until youhave set up the operating system.Volume cannot be adjusted during Windows Setup.Do not touch the display screen while turning on the computer.
Initial setupThe Windows Startup Screen is the first screen displayed when you turn onthe power. To install the operating system properly, follow the on-screeninstructions on each screen.
When it is displayed, be sure to read the License Terms carefully.
Getting to know WindowsFor detailed information on what is new and how to operate Windows, referto the Windows Help and Support.
Start screenThe Start screen is the launching pad for everything you can do in theWindows operating system, providing new and easy ways to accesseverything from your favorite apps and websites to your contacts and otherimportant information.From the Start screen, you can start typing to search for what you want.From there, you can easily switch between results for apps, files, andmore.
User's Manual 2-14

Windows TaskbarPoint to the bottom edge to show the Windows Taskbar on the Startscreen. (If you’ve moved the Windows Taskbar to another edge, pointthere.)You can see all of your recently used apps on the Windows Taskbar.
Power Options iconThe Start screen provides you a convenient way to enter the Shut Down/Sleep/Hibernation Mode. You can just click the power icon ( ) on theupper right of the Start screen and then select the mode you want.
CharmsUse the Windows charms to start apps, find documents, set up systemcomponents, and perform most other computing tasks.By pointing the mouse pointer to the upper or lower right corner of yourscreen, you can find a list of charms: Search, Share, Start, Devices, andSettings.
Search This charm allows you to search your computer(apps, settings, and files), the web, or within anapp. You can also find the Search icon on theupper right of the Start screen.
Share This charm allows you to share items (links,photos, and more).
Start This charm takes you to the Start screen or, ifalready on the Start screen, returns you to yourlast app.
Devices This charm allows you to manage your hardware.
Settings This charm allows you to access your computersettings (volume, brightness, connecting to theInternet, and more).
TilesTiles can be accessed and launched from the Start screen.Typical Start screen tiles are the Desktop tile and Mail tile, as well as tilesrepresenting all other applications downloaded to your system.
User's Manual 2-15

Windows StoreAlthough many applications are pre-installed or built-in to your computer,you can also download many other applications at the click of your mouse.In the Windows Store, you can search for and browse thousands of apps,all grouped into easy to find categories.
Sign-in options
Windows offers a number of sign-in options including Password ( ),
PIN ( ) and Picture password ( ) authentication to prevent fromunauthorized access. If you have multiple sign-in methods set for a useraccount, you can select an option on the Windows login screen by clickingsign-in options. Password authentication is the default sign-in option.TOSHIBA also provides advanced sign-in options, such as Face Recognition and Access Code verification. For more information,refer to Chapter 5, Utilities.
Turning off the powerThe power can be turned off in one of the following modes, either ShutDown Mode, Sleep Mode or Hibernation Mode.
Shut Down ModeWhen you turn off the power in Shut Down Mode, no data will be savedand the computer will boot to the main screen of the operating system thenext time it is turned on.1. If you have entered data, either save it to the internal storage or to
other storage media.2. Make sure all disk/disc activity has stopped before removing the disk/
disc.
If you turn off the power while a disk (disc) is being accessed, youmight lose data or damage the disk.Never turn off the power while an application is running. Failure to doso can cause data loss.Never turn off the power, disconnect an external storage device, orremove storage media during data read/write. Failure to do so cancause data loss.
3. Click the power icon ( ) on the Start screen and then select Shut down.
4. Turn off any peripheral devices connected to your computer.
User's Manual 2-16
Do not turn the computer or peripheral devices back on immediately. Waita short period to avoid any potential damage.
Restarting the computerCertain conditions require that you reset the computer, for example if:
You change certain computer settings.To restart the computer, there are several ways this can be achieved:
Click the power icon ( ) on the Start screen and then select Restart.In the Settings charm, click Power and then select Restart.Press CTRL, ALT, and DEL simultaneously (once) to display themenu window, and then select Restart by clicking the power icon ( )in the lower-right corner.
Sleep ModeIf you have to interrupt your work, you are able to turn off the power withoutexiting from your software by placing the computer into Sleep Mode. In thismode, data is maintained in the main memory of the computer. When youturn on the power again, you can continue working right where you left off.
When you have to turn off your computer aboard an aircraft or in placeswhere electronic devices are regulated or controlled, always shut down thecomputer. This includes turning off any wireless communicationfunctionalities, and canceling settings that reactivate the computerautomatically, such as a timer recording function. Failure to shut down thecomputer in this way might allow the operating system to reactivate and runpre-programmed tasks or preserve unsaved data, which might interferewith aviation or other systems, possibly causing serious injury.
Before entering Sleep Mode, be sure to save your data.To prevent data loss, do not switch to Sleep Mode while transferringdata to external media, such as USB devices, memory media, or otherexternal memory devices.
When the AC adaptor is connected, the computer will go into SleepMode according to the settings in the Power Options (to access it,click Control Panel -> System and Security -> Power Optionsunder Windows System in the Apps view).To restore the operation of the computer from Sleep Mode, press andhold the power button or any key on the keyboard for a short amountof time. Note that keyboard keys can only be used if the Wake-up onKeyboard option is enabled within the TOSHIBA System Settings.
User's Manual 2-17

If the computer enters Sleep Mode while a network application isactive, the application might not be restored when the computer isnext turned on and the system returns from Sleep Mode.To prevent the computer from automatically entering Sleep Mode,disable Sleep Mode within the Power Options.To use the Hybrid Sleep function, configure it in the Power Options.
Benefits of Sleep Mode
The Sleep Mode feature provides the following benefits:Restores the previous working environment more rapidly than theHibernation Mode feature.Saves power by shutting down the system when the computerreceives no input or hardware access for the time period set by theSystem Sleep Mode feature.Allows the use of the panel power off feature.
Executing Sleep Mode
You can enter Sleep Mode in one of following ways:
Click the power icon ( ) on the Start screen and then select Sleep.In the Settings charm, click Power and then select Sleep.Close the display panel. Note that this feature must be enabled withinthe Power Options.Press the power button. Note that this feature must be enabled withinthe Power Options.
When you turn the power back on, you can continue where you left offwhen you shut down the computer.
When the computer is in Sleep Mode, the Power indicator blinks white.If you are operating the computer on battery power, you can lengthenthe overall operating time by turning it off into Hibernation Mode. SleepMode consumes more power while the computer is off.
Sleep Mode limitations
Sleep Mode will not function under the following conditions:Power is turned back on immediately after shutting down.Memory circuits are exposed to static electricity or electrical noise.
Hibernation ModeThe Hibernation Mode feature saves the contents of memory to the internalstorage when the computer is turned off so that, the next time it is turnedon, the previous state is restored. Note that the Hibernation Mode feature
User's Manual 2-18

does not save the status of any peripheral devices connected to thecomputer.
Save your data. While entering Hibernation Mode, the computer savesthe contents of memory to the internal storage. However, for safetysake, it is best to save your data manually.Data will be lost if you disconnect the AC adaptor before the save iscompleted.To prevent data loss, do not switch to Hibernation Mode whiletransferring data to external media, such as USB devices, memorymedia, or other external memory devices.
Benefits of Hibernation Mode
The Hibernation Mode feature provides the following benefits:Saves data to the internal storage when the computer automaticallyshuts down because of a low battery condition.You can return to your previous working environment immediatelywhen you turn on the computer.Saves power by shutting down the system when the computerreceives no input or hardware access for the time period set by theSystem Hibernate feature.Allows the use of the panel power off feature.
Starting Hibernation Mode
To enter Hibernation Mode, click the power icon ( ) on the Start screenand then select Hibernate.
To show Hibernate in Power menu, set up according to the followingsteps:1. Click Control Panel -> System and Security -> Power Options underWindows System in the Apps view.2. Click Choose what the power button does or Choose what closing the lid does.3. Click Change settings that are currently unavailable.4. Select the Hibernate check box from Shutdown settings.5. Click the Save changes button.
Automatic Hibernation Mode
The computer can be configured to enter Hibernation Mode automaticallywhen you press the power button or close the lid. To define these settings,do the following:
User's Manual 2-19

1. Click Power Options and then click Choose what the power button does or Choose what closing the lid does.
2. Enable the desired Hibernation Mode settings for When I press the power button and When I close the lid.
3. Click the Save changes button.
Data save in Hibernation Mode
When you turn off the power in Hibernation Mode, the computer takes amoment to save the current data in memory to the internal storage.After you turn off the computer, and the content of memory has been savedto the internal storage, turn off the power to any peripheral devices.
Do not turn the computer or devices back on immediately. Wait a momentto let all capacitors fully discharge.
User's Manual 2-20

Chapter 3
The Grand TourThis chapter identifies the various components of the computer. It isrecommended that you become familiar with each before you operate thecomputer.
Legal Footnote (Non-applicable Icons)For more information regarding Non-applicable Icons, refer to the LegalFootnotes section.
Handle your computer carefully to avoid scratching or damaging thesurface.
Tablet computerThe following figure shows essential components of the tablet computer.
User's Manual 3-1

Figure 3-1 Tablet computer
2426
4
6
19 20 21 21 2023
22
7 6 5
3 14
2
8
27
910
12
11
13
14
1516
17
18
25 26
1. Web Camera (front) 15. HDMI Micro port2. Web Camera LED (front) 16. Memory media slot3. Ambient light sensor 17. Headphone/Microphone combo jack4. Microphones 18. Reserve Pen slot*5. Display screen 19. Reserve Pen*6. Stereo speakers 20. Guide pin grooves7. Windows button 21. Hook grooves8. SIM card slot* 22. Docking interface9. Power button 23. DC IN 19V jack10. Force shutdown hole 24. Web Camera LED (back)11. Volume up/down button 25. Web Camera (back)12. Power indicator 26. Wireless communication antennas
(not shown)13. Battery indicator 27. ID information14. Micro-USB port
* Provided with some models.Product appearance depends on the model you purchased.
Web Camera (front) Web Camera is a device that allows you torecord video or take photographs with yourcomputer. You can use it for video chatting orvideo conferences using a communication tool.
User's Manual 3-2
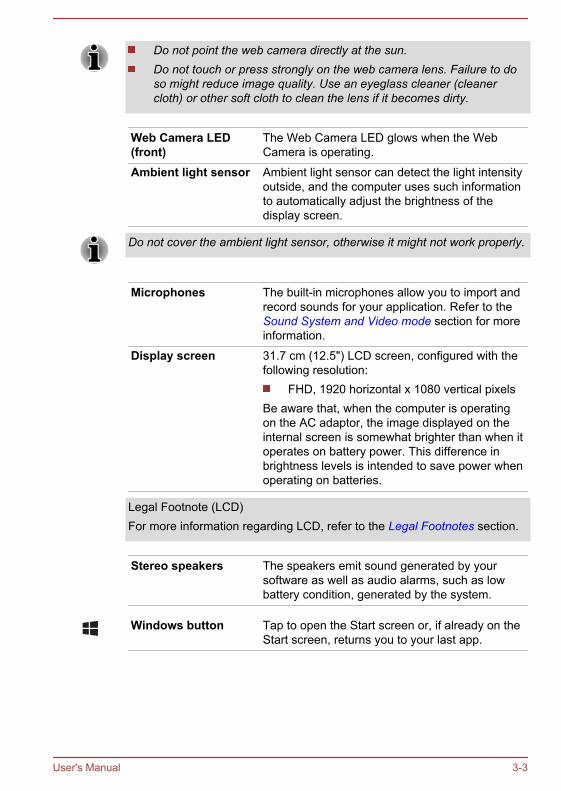
Do not point the web camera directly at the sun.Do not touch or press strongly on the web camera lens. Failure to doso might reduce image quality. Use an eyeglass cleaner (cleanercloth) or other soft cloth to clean the lens if it becomes dirty.
Web Camera LED(front)
The Web Camera LED glows when the WebCamera is operating.
Ambient light sensor Ambient light sensor can detect the light intensityoutside, and the computer uses such informationto automatically adjust the brightness of thedisplay screen.
Do not cover the ambient light sensor, otherwise it might not work properly.
Microphones The built-in microphones allow you to import andrecord sounds for your application. Refer to theSound System and Video mode section for moreinformation.
Display screen 31.7 cm (12.5") LCD screen, configured with thefollowing resolution:
FHD, 1920 horizontal x 1080 vertical pixelsBe aware that, when the computer is operatingon the AC adaptor, the image displayed on theinternal screen is somewhat brighter than when itoperates on battery power. This difference inbrightness levels is intended to save power whenoperating on batteries.
Legal Footnote (LCD)For more information regarding LCD, refer to the Legal Footnotes section.
Stereo speakers The speakers emit sound generated by yoursoftware as well as audio alarms, such as lowbattery condition, generated by the system.
Windows button Tap to open the Start screen or, if already on theStart screen, returns you to your last app.
User's Manual 3-3

SIM Card slot This slot allows you insert a SIM card whichenables a high-speed access to the Internet,corporate Intranet and your email while you areaway from office.Refer to the Wireless WAN device section formore information.
Power button Press this button to turn the computer's power onor off.
Force Shut down hole Insert a slender object, such as a needle into thishole to force a shutdown when the computerhangs.
Volume up/downbuttons
Press the button to increase or decrease thevolume.
Power indicator The Power indicator glows white when thecomputer is turned on. However, if you turn thecomputer off into Sleep Mode, this indicatorblinks white.
Battery indicator The Battery indicator shows the chargingcondition of the battery pack inside the tabletcomputer. White indicates the battery pack isfully charged while the power is being correctlysupplied from the AC power adaptor.Refer to the Power Condition Descriptionssection for more information on this feature.
Micro-USB port One Micro-USB port, which complies to the USB2.0 standard, is provided on the right side of thetablet computer.To connect a USB device, you must purchase aMicro B plug - Standard A receptacle cable.
Note that it is not possible to confirm the operation of all functions ofall USB devices that are available. Some functions associated with aspecific device might not operate properly.Before removing a USB device from the Micro-USB port, click theSafely Remove Hardware and Eject Media icon on the WindowsTaskbar, and then select the USB device that you want to remove.
User's Manual 3-4

Be careful when you connect and use chunky USB devices, the tabletcomputer might be lifted. Any possible stress put on the body of thetablet computer might cause damage.Keep foreign metal objects, such as screws, staples, and paper clips,out of the Micro-USB port. Foreign metal objects can create a shortcircuit, which can cause damage and fire, possibly resulting in seriousinjury.
HDMI Micro port HDMI Micro port can connect to HDMI cable withType D connector.An HDMI cable sends video and audio signals. Inaddition to this, it can send and receive controlsignals.Refer to the HDMI port section for moreinformation.
Be careful when you connect an HDMI cable, the tablet computer might belifted. Any possible stress put on the body of the tablet computer mightcause damage.
Memory media slot This slot lets you insert a micro SD™/SDHC™/SDXC™ memory card. Refer to the Memorymedia section for more information.
Keep foreign metal objects, such as screws, staples, and paper clips, out ofthe Memory media slot. Foreign metal objects can create a short circuit,which can cause damage and fire, possibly resulting in serious injury.
Headphone/Microphone combojack
A 3.5 mm mini headphone/microphone combojack enables connection of a monauralmicrophone or a stereo headphone.
Be careful when you connect an external microphone or headphone, thetablet computer might be lifted. Any possible stress put on the body of thetablet computer might cause damage.
Reserve Pen slot The Reserve Pen slot provides storage for theReserve Pen.
User's Manual 3-5

Reserve Pen A Reserve Pen is stored in the tablet computerand enables direct data entry through the displayscreen.Some models are provided with a Reserve Pen.Refer to the Stylus Pen and Reserve Pen sectionfor more information.
Make sure that the Reserve Pen is fully inserted into the Reserve Pen slotbefore docking the tablet computer.
Guide pin grooves Designed to engage the guide pins on thekeyboard dock.
Hook grooves Designed to engage the hooks on the keyboarddock.
Docking interface Designed to engage the docking connector onthe keyboard dock.
DC IN 19V jack The AC adaptor connects to this jack in order topower the computer and charge its internalbattery pack. Note that you must only use themodel of AC adaptor supplied with the computerat the time of purchase. Using the wrong ACadaptor can damage the computer.The tablet computer cannot be docked when theAC adaptor is connected.
Web Camera LED(back)
The Web Camera LED glows when the WebCamera is operating.
Web Camera (back) Your computer is also equipped with a back WebCamera used for recording video or takingphotographs.
Do not point the web camera directly at the sun.Do not touch or press strongly on the web camera lens. Failure to doso might reduce image quality. Use an eyeglass cleaner (cleanercloth) or other soft cloth to clean the lens if it becomes dirty.
Wirelesscommunicationantennas
Depending on the configuration of yourcomputer, one of the following antennas are built-in:
Wireless LAN/BluetoothWireless WAN/Wireless LAN/Bluetooth
User's Manual 3-6

Legal Footnote (Wireless LAN)For more information regarding Wireless LAN, refer to the Legal Footnotessection.
ID information The regulatory information applicable to yourcomputer can be identified here.
TOSHIBA Keyboard DockFront view
The following figure shows the front of the keyboard dock.Figure 3-2 Front view of the keyboard dock
1110
98
6
2
43
4
51
7
1. Touch Pad 7. AccuPoint2. Touch Pad ON/OFF icon 8. Release latch3. TOSHIBA eco icon 9. Docking connectors4. Touch Pad control buttons 10. Hooks5. AccuPoint control buttons 11. Guide pins6. Keyboard
Product appearance depends on the model you purchased.
Touch Pad The Touch Pad located in the palm rest is usedto control the movement of the on-screen pointer.To use the Touch Pad, simply touch and moveyour fingertip across it in the direction you wantthe on-screen pointer to go.
Touch Pad ON/OFFicon
Double tap to enable/disable the Touch Pad.
TOSHIBA eco icon Double tap to enable/disable TOSHIBA ecoUtility.
User's Manual 3-7

Touch Pad controlbuttons
Touch Pad control buttons are used like thebuttons on a standard mouse. Click the leftbutton to select a menu item or to manipulate textor graphics designated by the pointer, and clickthe right button to display a menu or otherfunction depending on the software you areusing.
AccuPoint controlbuttons
AccuPoint control buttons allow you to selectmenu items or manipulate texts and graphics asdesignated by the on-screen pointer.Refer to the AccuPoint section for moreinformation.
Keyboard Keyboard contains character keys, control keys,function keys, and special Windows keys.Refer to The Keyboard section for moreinformation.
AccuPoint A pointer control device in the center of thekeyboard is used to control the on-screenpointer.Refer to the AccuPoint section for moreinformation.
Hooks Hooks secure the physical connection betweenthe tablet computer and the keyboard dock.
Guide pins Guide pins make it easy for you to align the tabletcomputer with the keyboard dock. They alsosecure the physical connection between them.
Docking connectors Docking connectors establish the datacommunications with the tablet computer.
Left sideThe following figure shows the left side of the keyboard dock.
Figure 3-3 The left side of the keyboard dock
4321
1. Security lock slot 3. External RGB monitor port2. Security lock switch 4. HDMI out port
Product appearance depends on the model you purchased.
User's Manual 3-8

Security lock slot A security cable can be attached to this slot andthen connected to a desk or other large object inorder to deter theft of the computer.
Security lock switch When this switch is in the locked position ( ),the release latch cannot be slided.
External RGB monitorport
This port provides 15-pin, analog RGB port.Refer to the External RGB monitor port pinassignment section for more information onexternal RGB monitor port pin assignment.This port allows you to connect an external RGBmonitor to the computer.
HDMI out port HDMI out port can connect with Type Aconnector HDMI cable.
Right sideThe following figure shows the right side of the keyboard dock.
Figure 3-4 The right side of the keyboard dock
5431 1 2
1. Universal Serial Bus (USB 3.0) ports 4. Second Battery indicator2. LAN jack 5. DC IN 19V jack3. Docking indicator
Product appearance depends on the model you purchased.
Universal Serial Bus(USB 3.0) port
Two Universal Serial Bus ports, which comply tothe USB 3.0 standard, are provided on the rightside of the keyboard dock.The USB 3.0 port is compliant with USB 3.0standard and backward compatible with USB 2.0devices.
USB 3.0 port(s) might work as USB 2.0 port(s) when operating in USBLegacy Emulation mode.
User's Manual 3-9

Note that it is not possible to confirm the operation of all functions ofall USB devices that are available. Some functions associated with aspecific device might not operate properly.Before removing a USB device from the USB port of your computer,click the Safely Remove Hardware and Eject Media icon on theWindows Taskbar, and then select the USB device that you want toremove.
Keep foreign metal objects, such as screws, staples, and paper clips, out ofthe USB port. Foreign metal objects can create a short circuit, which cancause damage and fire, possibly resulting in serious injury.
LAN jack This jack allows you to connect to a LAN. Theadaptor has built-in support for Ethernet LAN (10megabits per second, 10BASE-T), or FastEthernet LAN (100 megabits per second,100BASE-TX) and Gigabit Ethernet LAN (1000megabits per second, 1000BASE-T). Refer toLAN section for more information.
Do not connect any cable other than a LAN cable to the LAN jack. It mightcause damage or malfunction.
Docking indicator The Docking indicator glows white when datacommunications between the keyboard dock andthe tablet computer are successfully establishedand in good condition.
Second Batteryindicator
The Second Battery indicator shows thecharging condition of the battery pack inside thekeyboard dock. White indicates the battery packis fully charged while the power is being correctlysupplied from the AC power adaptor.Some models are equipped with a secondbattery pack.Refer to the Power Condition Descriptionssection for more information on this feature.
DC IN 19V jack The AC adaptor connects to this jack in order topower the computer and charge its internalbattery. Note that you must only use the model ofAC adaptor supplied with the computer at thetime of purchase. Using the wrong AC adaptorcan damage the computer.
User's Manual 3-10

UndersideThe following figures show the underside of the keyboard dock.
Figure 3-5 The underside of the keyboard dock
1
1. Reset button
Product appearance depends on the model you purchased.
Reset button If your keyboard dock is equipped with a batterypack, and is not working correctly, such as whenthe keyboard or the Touch Pad does not respondto your command, do the following:1. Turn off the power, and undock the tablet
computer.2. Insert a slender object, such as a needle
into this hole to force reset the keyboarddock.
3. Dock the tablet computer, and turn on thepower.
Internal Hardware ComponentsThis section describes the internal hardware components of your computer.The actual specifications might vary depending on the model youpurchased.
User's Manual 3-11

Battery pack The tablet computer includes a battery packinside. The keyboard dock might include asecond battery pack inside depending on themodel you purchased.Do not attempt to dismount or replace the batterypack by yourself. Contact an authorizedTOSHIBA service provider, if necessary.The rechargeable lithium polymer battery packprovides power to the computer when the ACadaptor is not connected.For more detailed information on the use andoperation of the battery pack, refer to the Batterysection.
Legal Footnote (Battery Life)For more information regarding Battery Life, refer to the Legal Footnotessection.
CPU The processor type varies depending on model.To check which type of processor is included inyour model, open the TOSHIBA PC HealthMonitor utility by clicking PC Health Monitorunder TOSHIBA group in the Apps view, andthen click PC Information.
Legal Footnote (CPU)For more information regarding CPU, refer to the Legal Footnotes section.
Internal storage The capacity of the internal storage variesdepending on the model.To check which type of internal storage isincluded in your model, open the TOSHIBA PCHealth Monitor utility by clicking PC Health Monitor under TOSHIBA group in the Appsview, and then click PC Information.Note that part of the internal storage overallcapacity is reserved as administration space.
In this manual, the word "internal storage" refers to SSD unless otherwisestated.
Under certain unusual conditions of prolonged non-use and/or exposure tohigh temperatures, the SSD might be vulnerable to data retention errors.
User's Manual 3-12

Legal Footnote (Internal Storage Capacity)For more information regarding Internal Storage Capacity, refer to theLegal Footnotes section.
Video RAM The memory in the graphics adaptor of thecomputer, used to store the image displayed on abitmap display.The amount of Video RAM available depends onthe system memory of the computer.Click Control Panel -> Appearance and Personalization -> Display -> Adjust resolution under Windows System in the Appsview.The amount of Video RAM can be verified byclicking the Advanced settings button in theScreen Resolution window.
Graphics ProcessingUnit
Graphics Processing Unit (GPU) performancemight vary depending on product model, designconfiguration, applications, power managementsettings and features utilized. GPU performanceis only optimized when operating in AC powermode and might decrease considerably whenoperating in battery power mode.
Legal Footnote (Graphics Processing Unit (GPU))For more information regarding Graphics Processing Unit (GPU), refer tothe Legal Footnotes section.
Intel® Display Power Saving TechnologyIntel GPU models might include the Display Power Saving Technologyfeature that can save the power consumption of the computer by optimizingpicture contrast on the internal LCD.This feature can be used if the computer is:
running under battery modeusing the internal LCD display only
The Display Power Saving Technology feature is enabled as the factorydefault. If you want to turn off this feature, change it in the settingsaccordingly in the Intel® HD Graphics Control Panel.You can access this control panel in the following way:
Right-click on the desktop and click Graphics Properties...In Intel® HD Graphics Control Panel:
User's Manual 3-13

1. Click Power and then select On Battery from the drop-down menuunder Power in the upper-left corner.
2. Click Disable under Display Power Saving Technology.3. Click Apply.If you want to enable this feature, click Enable under Display Power Saving Technology.
Power Condition DescriptionsThe computer operating capability and battery charge status are affectedby different power conditions, including whether an AC adaptor isconnected and what the battery charge level is.
Battery indicatorCheck the Battery indicator to determine the status of the battery packinside the tablet computer and the power status with the AC adaptorconnected. The following indicator conditions should be noted:
Flashing amber The battery charge is low. The AC adaptor mustbe connected to recharge the battery pack.
Amber Indicates that the AC adaptor is connected, andbattery pack inside the tablet computer ischarging.
White Indicates that the AC adaptor is connected, andthe battery pack inside the tablet computer is fullycharged.
Flashing White Indicates a problem with the computer.Disconnect the AC adaptor for several seconds,and then reconnect the AC adaptor. If it still doesnot operate properly, you should contact yourreseller or dealer.
No light Under any other conditions, the indicator doesnot light.
Second Battery indicatorCheck the Second Battery indicator to determine the status of the batterypack inside the keyboard dock and the power status with the AC adaptorconnected. The following indicator conditions should be noted:
The Second Battery indicator does not function and remains off for thekeyboard dock not equipped with a battery pack.
Amber Indicates that the AC adaptor is connected, andthe battery pack inside the keyboard dock ischarging.
User's Manual 3-14

White Indicates that the AC adaptor is connected, andthe battery pack inside the keyboard dock is fullycharged.
No light Under any other conditions, the indicator doesnot light.
If the battery pack becomes too hot while it is being charged, the chargestops and the indicator goes out. When the temperature of the battery packfalls to a normal range, charging will resume. This process occursregardless of whether the computer's power is on or off.
Power indicatorCheck the Power indicator to determine the power status of the computer.The following indicator conditions should be noted:
White Indicates that power is being supplied to thecomputer, and the computer is turned on.
Flashing white Indicates that the computer is in Sleep Mode andthat there is sufficient power available (ACadaptor or battery) to maintain this condition.
No light Under any other conditions, the indicator doesnot light.
User's Manual 3-15

Chapter 4
Operating BasicsThis chapter describes the basic operations of your computer, andhighlights the precautions that must be taken when using it.
Operating in tablet mode (also for WT20-B)Observe the following instructions when you operate the computer in tabletmode.
Figure 4-1 Operating the computer in tablet mode
Remove all external peripheral devices and their connection cablesfrom the computer before carrying.Hold the computer firmly on your forearm.Be careful not to accidentally touch the Windows button.Remove the AC adaptor from the computer when using it held in yourforearm.Do not use the computer while walking or driving a car.Do not drop the computer or apply excessive impact to it. Do not leavethe computer in a car or similar environment where it is exposed todirect sunlight.
User's Manual 4-1
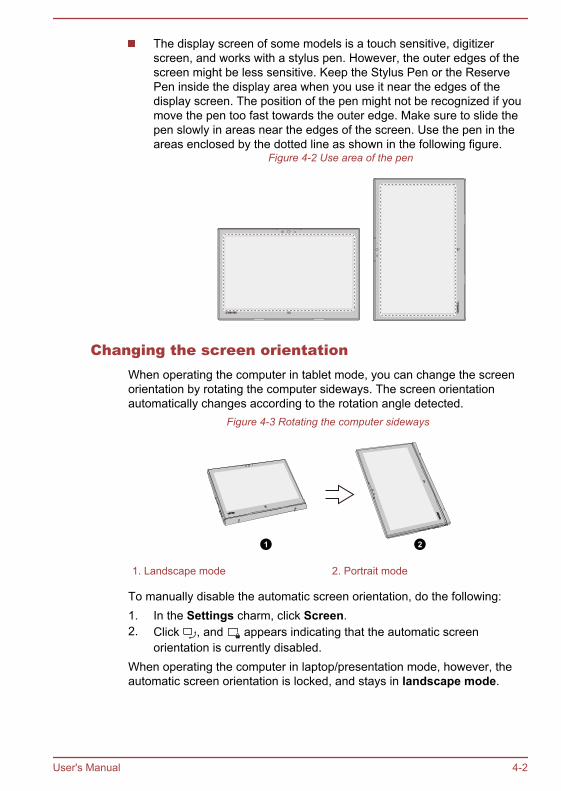
The display screen of some models is a touch sensitive, digitizerscreen, and works with a stylus pen. However, the outer edges of thescreen might be less sensitive. Keep the Stylus Pen or the ReservePen inside the display area when you use it near the edges of thedisplay screen. The position of the pen might not be recognized if youmove the pen too fast towards the outer edge. Make sure to slide thepen slowly in areas near the edges of the screen. Use the pen in theareas enclosed by the dotted line as shown in the following figure.
Figure 4-2 Use area of the pen
Changing the screen orientationWhen operating the computer in tablet mode, you can change the screenorientation by rotating the computer sideways. The screen orientationautomatically changes according to the rotation angle detected.
Figure 4-3 Rotating the computer sideways
1 2
1. Landscape mode 2. Portrait mode
To manually disable the automatic screen orientation, do the following:1. In the Settings charm, click Screen.2. Click , and appears indicating that the automatic screen
orientation is currently disabled.When operating the computer in laptop/presentation mode, however, theautomatic screen orientation is locked, and stays in landscape mode.
User's Manual 4-2

Avoid having direct contact with the other edges of the hand helddevice while the wireless device is turned on and transmitting. Onlyfactories installed wireless transmitter can be used with this hand helddevice to satisfy RF exposure compliance.Some drivers/utilities might not perform install and uninstall operationwhen the screen orientation is changed to portrait mode. If it occurs,switch to landscape mode to proceed.
Calibrating digital compassIf you have downloaded a compass application to use this feature, notethat the performance of any compass feature varies depending onenvironmental conditions. For example, any source using electromagneticor radio waves.Before using any compass feature the compass needs to be calibrated foraccuracy. To calibrate, disconnect the AC adaptor and remove allperipherals/cables, and then horizontally/vertically rotate the computer withthe power on several times as shown in the illustration below. Please notethis is the most effective method of calibrating this computer.
Figure 4-4 Calibrating digital compass
The digital compass sensor is magnetic, and might interfere withpacemakers, defibrillators or other medical devices.Do not place any products utilizing magnetic materials in close proximity tothe area marked in the following figure.
Using the Touch ScreenYou can use your finger to manipulate icons, buttons, menu items, theonscreen keyboard, and other items on the touch screen.
User's Manual 4-3

Tap Simply tap your finger once on the touch screento activate an item, such as an app.
Press and hold Press your finger down and leave it there for afew seconds. This shows information to help youlearn more about an item or opens a menuspecific to what you are doing.
Pinch or stretch Touch the screen or an item with two or morefingers, and then move the fingers toward eachother (pinch) or away from each other (stretch).This shows different levels of information orvisually zooms in or out.
Rotate Put two or more fingers on an item and then turnyour hand to rotate things in the direction youturn your hand. Only some items can be rotated.
Slide Drag your finger on the touch screen to movethrough what is on the screen.
Swipe Quickly move your finger in from the edge of thescreen, without pausing when you first touch it.Swipe from the left edge: shows your recentlyopened apps, and so on.Swipe from the right edge: opens or closes thecharms (Search, Share, Start, Devices, Settings).Swipe from the top edge: opens or closes theapp command bar.
For details and more advanced touch screen gestures to interact withWindows operating system, refer to Help and Support.
Do not press or push with excess force on the touch screen.Do not apply excess force when cleaning the touch screen.Never touch the screen with a sharp object such as a ball-point penwhich might scratch or damage the surface.Do not use a protecting sheet for the touch screen as it mightdecrease its sensitivity to gestures.Do not touch the screen with gloves, wet hands, or the tip of yourfingernails as it might decrease the sensitivity.
User's Manual 4-4

The touch screen might not work correctly if part of the surface isslightly wet, or covered with an object.
Using the Touch PadThe Touch Pad on the palm rest might support the following gestures:
Tap Tap once on the Touch Pad to activate an item,such as an app.
Two-Finger Tap Tap once on the Touch Pad with two fingerstogether to display a menu or other functiondepending on the software you are using.(Similar to right-click)
Pinch or stretch Place two or more fingers down on the TouchPad and move them toward each other (pinch) oraway from each other (stretch). This showsdifferent levels of information or visually zooms inor out.
Two-Finger Scroll Place two fingers down and slide them verticallyor horizontally from anywhere on the Touch Pad.This allows you to operate the scroll bars of awindow.
Swipe Quickly move your finger in from the edge of theTouch Pad, without pausing when you first touchit.Swipe from the left edge: shows your recentlyopened apps.Swipe from the right edge: opens or closes thecharms (Search, Share, Start, Devices, Settings).
Some of the Touch Pad operations described in this section are onlysupported in certain applications.
TOSHIBA Pointing DeviceAccuPoint
To use the AccuPoint, simply push it with your finger tip in the direction youwant to move the on-screen pointer.
User's Manual 4-5

The control buttons below the AccuPoint are used like the buttons on astandard mouse. Press the left button to select a menu item or tomanipulate text or graphics designated by the pointer, and press the rightbutton to display a menu or other function depending on the software youare using.
Figure 4-5 AccuPoint
2
1
3
1. AccuPoint 3. AccuPoint right control button2. AccuPoint left control button
AccuPoint precautions
Certain conditions can affect the on-screen pointer when using AccuPoint.For example, the pointer might travel contrary to AccuPoint operation or anerror message might appear, if
You touch the AccuPoint during power-up.You apply constant, soft pressure during power-up.There is a sudden temperature change.Strong stress is applied to the AccuPoint.
If an error message appears, reboot the computer. If an error messagedoes not appear, wait a moment for the pointer to stop, then continueoperation.
Replacing the cap
The AccuPoint cap is an expendable item that should be replaced afterprolonged use.1. To remove the AccuPoint cap, gently dig the cap out (with finger).
User's Manual 4-6

Figure 4-6 Removing the AccuPoint cap
2. Position a new cap on the peg and press it into place.
The peg is square, so be careful to align the cap’s square hole withthe peg.You can buy replacement AccuPoint caps from your TOSHIBAauthorized dealer.
Stylus Pen and Reserve PenYou can use the pen to execute actions and enter data. Hold the pen in anatural position and tap, press or trace on the screen lightly.
Figure 4-7 Stylus Pen
1
2
3
Figure 4-8 Reserve Pen
2
1
1. Pen point 3. Eraser2. Pen button
Pen point Provides the same function as left clicking themouse once.
User's Manual 4-7

Pen button Press and hold this button and touch the tip ofthe pen on an object. Immediately lift it to displaya pop-up menu or execute a specific action. Itfunctions as right clicking the mouse once.
Eraser The virtual eraser allows you to delete notes orsketches in applications that support eraserfunction.
To change the pen settings, click Control Panel -> Hardware and Sound-> Wacom Pen under Windows System in the Apps view.
Observe the following precautions on the handling of the Stylus Pen andthe Reserve Pen.
Do not apply excess force when cleaning the touch screen.To avoid damages to the display screen, refrain from doing anythingother than the specified operation methods. Failure to do so mightcause a malfunction or characteristic deterioration.Do not tap or press the pen forcefully against the display as this mightdamage the pen and the screen itself.Avoid using or keeping the pen in areas where the temperaturechanges rapidly or in places, such as a car, where the pen is exposedto direct sunlight. Store the pen without any pressure being applied tothe buttons. Failure to do so might cause a malfunction orcharacteristic deterioration.The pen is composed of precision parts. Do not drop the pen. Strongimpact causes a malfunction or characteristic deterioration. Do notapply excessive force to the pen point and the side buttons. Excessiveforce applied to these parts causes short life or characteristicdeterioration.Avoid water entering the pen or condensation forming within it aseither condition will cause a malfunction.Do not disassemble the pen. It causes maladjustment or short life.Do not stain the pen with cosmetics or chemicals as this will cause adeterioration in appearance. Use a glass wiping cloth or dry cloth toclean the pen. Do not use volatile liquids such as alcohol, thinner orpetroleum benzine to clean the pen.Do not apply excessive force to the pen point as a bent or deformedpen point causes a malfunction.Keep the small parts of the pen, such as the pen point or the knob ofthe side buttons, away from infants and small children to prevent theaccidental ingestion by them.Do not use a ball point pen instead of the pen included with theproduct.
User's Manual 4-8

The pen tip of the Reserve Pen cannot be replaced if it is worn. Youcan purchase a new one from a TOSHIBA authorized dealer.
Wipe the display screen with the provided cloth before you use thestylus pen.Clean the fingerprints or smudges with the provided cloth if thesensitivity to pen writing decreases.Do not use a protecting sheet for the touch screen as it might impactthe pen writing optimized for the touch screen.It is recommended that you keep another pen set as a spare. You canbuy replacement pen sets from your TOSHIBA authorized dealer.TOSHIBA is not liable for any problems arising on the products due tothe use of the pen in an environment where the above conditions arenot satisfied or because of its use by unspecified number of users.
Removing the Reserve Pen
To remove the Reserve Pen, slowly pull the Reserve Pen to remove it fromthe Reserve Pen slot.
Figure 4-9 Removing the Reserve Pen
1
2
1. Reserve Pen slot 2. Reserve Pen
Inserting the Reserve Pen
To insert the Reserve Pen, slowly push the Reserve Pen into the ReservePen slot until it clicks into place.
User's Manual 4-9

Figure 4-10 Inserting the Reserve Pen
1
2
1. Reserve Pen slot 2. Reserve Pen
Make sure that the Reserve Pen is fully inserted into the Reserve Pen slotbefore docking the tablet computer.
Pen actions
You can use the Stylus Pen or the Reserve Pen to enter data, startprograms, move objects and execute other actions.
Single tap
Lightly tap the tip of the pen on an object and lift it immediately to executean action. A single tap is similar to left clicking the mouse once.
Double tap
Lightly tap the tip of the pen twice on an object and lift it immediately toexecute an action. A double-tap is similar to left clicking the mouse twice.
Press and hold
Tap the tip of the pen on the screen and hold until a white circle appears.Lift the pen to open a pop-up menu or execute a specific action. Press andhold is similar to right clicking the mouse.
Drag
Touch the pen on the screen. Without lifting the pen, drag it across thescreen to select text or objects.
Drag and drop
Touch the pen on the screen to select an object. Without lifting the pen,drag it across the screen. Lift the pen to drop the object to a new location.
User's Manual 4-10

Replacing the pen tip
The pen tip of the Stylus Pen can be replaced with a new one which isprovided when it is worn. To replace the pen tip, do the following:1. Pinch the tip with a draw-out tool and pull it out.2. Insert a new pen tip into the Stylus Pen carefully, and press it
securely.Figure 4-11 Replacing the pen tip
1 2
1. Pen tip 2. Draw-out tool
Do not continue to use a broken pen tip as this might result in scratching ofthe display panel. When the pen tip breaks replace it with one of the refillsdelivered with the Stylus Pen. When these refills have run out, you canpurchase a new pen set from a TOSHIBA authorized dealer.
A short and worn pen point is difficult to pull out. Replace the pen pointwith a refill before it becomes too short to remove.It is recommended that you keep another pen set as a spare. You canbuy replacement pen sets from your TOSHIBA authorized dealer.
The KeyboardThe number of keys available on the keyboard dock depends on whichcountry/region your computer is configured for, with keyboards beingavailable for numerous languages.There are different types of keys, specifically typewriter keys, function keys,soft keys, Windows special keys, and the keypad overlay.
Never remove the key caps on your keyboard. Failure to do so mightdamage the parts under the key caps.
Keyboard indicatorThe following figure shows the position of the CAPS LOCK indicator whichshows the following condition:
User's Manual 4-11

When the CAPS LOCK indicator glows, the keyboard produces capitalswhen any letter is typed.
Figure 4-12 CAPS LOCK indicator
1
1. CAPS LOCK indicator
Product appearance depends on the model you purchased.
CAPS LOCK This indicator glows green when letter keys arelocked into their uppercase format.
Function KeyThe function keys (F1 ~ F12) are the 12 keys at the top of your keyboard.
The following specific functions are executed when the function keys arepressed in combination with the FN key.
Key Combination Function
FN + F1 Enters ''Lock computer mode''.To restore your desktop, you need to log on again.
FN + F2 Switches between the power plans.
FN + F3 Switches the system to Sleep Mode.
FN + F4 Switches the system to Hibernation Mode.
FN + F5 Changes the active display device.To use a simultaneous mode, you must set theresolution of the internal display panel to match theresolution of the external display device.
FN + F6 Decreases the brightness of the display panel inindividual steps.
FN + F7 Increases the brightness of the display panel inindividual steps.
User's Manual 4-12

Key Combination Function
FN + F8 Turns the Airplane mode on or off.
FN + F9 Enables or disables the Touch Pad.
FN + F10 Turns on Arrow Mode.
FN + F11 Turns on Numeric Mode.
FN + F12 Locks the cursor on a specific line.
FN + ESC Turns the sound on or off.
FN + 1 Reduces the icon size on the desktop or the fontsizes within one of the supported applicationwindows.
FN + 2 Enlarges the icon size on the desktop or the fontsizes within one of the supported applicationwindows.
FN + 3 Decreases the volume of the computer.
FN + 4 Increases the volume of the computer.
FN + Space Changes the display resolution.
FN + E ( ) Cuts off all data communications with the keyboarddock.
FN + Z ( ) Toggles the mode of the keyboard backlightbetween Timer, On, and Off.To set up the brightness, click System Settingsunder TOSHIBA group in the Apps view. ClickKeyboard tab, and select a level under Keyboard Backlight Brightness Control.To set up the timer, launch the BIOS setup utility,select Power Management -> Keyboard Backlight Control Mode, and select TIMER.Adjust the timer under Backlight Lighting Time.
Some functions show the toast notification at the edges of the screen.Those toast notifications are disabled by default. You can enable them inthe TOSHIBA Function Key application.To access it, click Function Key under TOSHIBA group in the Apps view.
User's Manual 4-13

Windows special keysThe keyboard provides two keys that have special functions in Windows,the Windows® logo key activates the Start screen while the application keyhas the same function as the secondary (right) mouse button.
This key activates the Windows Start screen.
This key has the same function as the secondary (right) mouse button.
Keypad overlayThe keyboard dock does not have a separate numeric keypad but includesa numeric keypad overlay which functions similarly. This is located in thecenter of the keyboard with the relevant keys having grey letters at theirfront edge. The overlay provides the same functions as the numeric keypadon a standard 104/105-key enhanced keyboard.
Turning on the overlays
The numeric keypad overlay can be used for numeric data input or cursorand page control.
Arrow Mode
Press FN + F10 to turn on Arrow Mode. You are able to access cursor andpage control functions by using the keys. Press FN + F10 again to turn offthis overlay function.
Numeric Mode
Press FN + F11 to turn on Numeric Mode. You are able to access numericcharacters by using the keys. Press FN + F11 again to turn off this overlayfunction.
Temporarily using normal keyboard (overlay on)
While using the overlay, you can temporarily access the normal keyboardfunctions without having to turn the overlay off:1. Hold down FN key and press any other key. This key will operate as if
the overlay were off.2. Type upper-case characters by holding down FN + SHIFT and
pressing a character key.3. Release FN key to continue using the selected overlay function.
Temporarily using overlay (overlay off)
While using the normal keyboard function, you can temporarily use thekeypad overlay without having to turn it on:
User's Manual 4-14
1. Hold down FN key and the keyboard will turn on the most recentlyused overlay function.
2. Release FN key to return to normal keyboard operation.
Temporarily changing modes
If the computer is in Numeric Mode, you can switch temporarily to Arrow Mode by pressing a SHIFT key, while if it is in Arrow Mode, you canswitch temporarily to Numeric Mode by also pressing a SHIFT key.
Generating ASCII charactersNot all ASCII characters can be generated using normal keyboardoperation, but you are able to generate these characters using theirspecific ASCII codes.1. Hold down ALT with the overlay on or ALT + FN with overlay off.2. Using the overlay keys, type the ASCII code of the character you
require.3. Release ALT or ALT + FN. The ASCII character appears on the
display screen.
Touch keyboardTouch keyboard is an on-screen virtual keyboard allowing you to type onthe touch screen.To use the touch keyboard, tap in an area where you can type. Thekeyboard opens automatically.To manually open the touch keyboard, do either of the following:
In the Settings charm, click Keyboard -> Touch keyboard and handwriting panel.Click the keyboard icon ( ) in the taskbar of your Windowsdesktop.
BatteryThis section explains battery use, recharging methods and handling.
Battery packThe tablet computer contains a battery pack inside. Also, depending on themodel you purchased, the keyboard dock might contain a second batterypack to extend the battery operating time.When the AC adaptor is not connected, the main power source of thecomputer is the lithium polymer battery pack.
Real-Time Clock (RTC) function
The Real-Time Clock (RTC) function is supported. The battery packprovides power for the internal real-time clock and calendar function and
User's Manual 4-15

also maintains the system configuration while the computer is turned off. Ifthe RTC lasting time completely runs out, the system will lose thisinformation and the real-time clock and calendar will stop working.You can change the Real-Time Clock settings in the BIOS setup utility.Refer to Troubleshooting for further information.
Care and use of the battery packThis section provides the important safety precautions in order to handleyour battery pack properly.Refer to the enclosed Instruction Manual for Safety and Comfort fordetailed precautions and handling instructions.
Charge the battery pack only in an ambient temperature from 5 through 35degrees Celsius. Otherwise, the electrolyte solution might leak, batterypack performance might deteriorate, and the battery life might beshortened.
Charging the battery packWhen the power in the battery pack becomes low, the Battery indicatorflashes amber to indicate that only a few minutes of battery power remain.If you continue to use the computer while the Battery indicator flashes, thecomputer enters Hibernation Mode so that you do not lose any data, andautomatically turn itself off.You must recharge the battery pack when it becomes discharged.
Procedures
To recharge the battery pack, connect the AC adaptor to the DC IN 19Vjack and plug the other end into a working outlet. The Battery and/orSecond Battery indicator glows amber while the battery pack is beingcharged.When you connect the AC adaptor to the DC IN 19V jack on the keyboarddock, the second battery pack inside the keyboard dock also beginscharging. It might take longer to fully charge the second battery packdepending on the remaining system power.You can charge only the second battery pack without docking the tabletcomputer.
Charging Time
The following table shows the approximate time required to fully charge anexhausted battery pack.
User's Manual 4-16

Battery pack type Power off Power on
Battery pack (36 Wh, 3cell)
about 3 hours about 3 - 10 hours
With the secondbattery pack (36 Wh, 3cell)
about 3.5 hours about 3.5 - 10 hours
Be aware that the charging time when the computer is on is affected byambient temperature, the temperature of the computer and how you areusing the computer. If you make heavy use of external devices forexample, the battery might scarcely charge at all during operation.
Charging notice
The battery pack might not begin charging immediately under the followingconditions:
The battery pack is extremely hot or cold (if the battery pack isextremely hot, it might not charge at all). To ensure the battery packcharges to its full capacity, charge it at room temperature of between5°C to 35°C (41–95°F).The battery pack is nearly completely discharged. In this instance,leave the AC adaptor connected for a few minutes and the batterypack should begin charging.
The Battery and/or Second Battery indicator might show a rapid decreasein battery operating time when you try to charge a battery pack under thefollowing conditions:
The battery pack has not been used for a long time.The battery pack has completely discharged and been left in thecomputer for a long time.
In such cases, do the following:1. Fully discharge the battery pack with power on until the system
automatically turns itself off.2. Connect the AC adaptor to the DC IN 19V jack, and to a wall outlet
that is supplying power.3. Charge the battery pack until the Battery and/or Second Battery
indicator glows white.Repeat these steps two or three times until the battery pack recoversnormal capacity.
Monitoring battery pack capacityRemaining battery power can be monitored using the following methods.
User's Manual 4-17

Clicking the battery icon on the Windows TaskbarBattery #1 refers to the battery pack inside the tablet computer.Battery #2 refers to the second battery pack inside the keyboarddock.Via the Battery Status (average remaining battery power of Battery #1 and Battery #2) in the Windows Mobility Center window
When you use the tablet computer with the keyboard dock, the secondbattery pack is the first source to provide power.
Wait several seconds to monitor the remaining operating time becausethe computer needs time to check the remaining capacity of thebattery pack and then calculate the remaining operating time, basedon this together with the current power consumption.Be aware that the actual remaining operating time might differ slightlyfrom the calculated time.With repeated discharges and recharges, the battery pack capacitywill gradually decrease. In view of this, it is noted that an often used,older battery pack will not operate for as long as a new battery packeven when both are fully charged.
Maximizing battery operating timeThe usefulness of a battery pack depends on how long it can supply poweron a single charge, while how long the charge lasts in a battery packdepends on:
Processor speedScreen brightnessSystem Sleep ModeSystem Hibernation ModeDisplay power off periodHow often and for how long you use the internal storage and externaldisk drives, for example, optical discHow much charge the battery pack contained to begin withHow you use optional devices, such as a USB device, to which thebattery pack supplies powerWhether you enable Sleep Mode, which can conserve battery power ifyou are frequently turning the computer off and onWhere you store your programs and dataWhether you close the display screen when you are not using thekeyboard - closing the display screen saves power.The environmental temperature - operating time decreases at lowtemperatures.
User's Manual 4-18

Battery pack exhausted timeWhen you turn off the power of your computer with the battery pack fullycharged, the battery pack exhaust within the following approximate period.
Battery pack type Sleep Mode Shut Down Mode
Battery pack (36 Wh, 3cell)
about 8 days about 45 days
With the secondbattery pack (36 Wh, 3cell)
about 17 days about 95 days
Extending battery lifeTo maximize the life of your battery pack, do the following at least once amonth.
1. Turn off the computer's power.
2. Disconnect the AC adaptor and turn on the computer's power. If itdoes not turn on then go to Step 4.
3. Operate the computer on battery power for five minutes. If you findthat the battery pack has at least five minutes of operating time,continue operating until the battery pack is fully discharged. However,if the Battery indicator flashes or there is some other warning toindicate a low battery condition, go to Step 4.
4. Connect the AC adaptor to the DC IN 19V jack and to a wall outletthat is supplying power. The Battery and/or Second Battery indicatorglows amber to indicate that the battery pack is being charged.However, if Battery and/or Second Battery indicator does not glow,this indicates that power is not being supplied. Check the connectionsfor the AC adaptor and the power cord.
5. Charge the battery pack until the Battery and/or Second Batteryindicator glows white.
Wireless WAN deviceSome models are equipped with the Wireless WAN device. This deviceenables a high-speed connection to the Internet, corporate intranet, andyour email while you are away from the office.
Installing a SIM cardTo install a SIM card, do the following:1. Click Power in the Settings charm, and then click Shut down and
ensure that the Power indicator is off
User's Manual 4-19

2. Remove the AC adaptor and all cables and peripherals connected tothe computer.
3. Locate the SIM card slot.4. To pop the SIM card tray partially open, insert a slender object (about
10mm), such as a straightened paper clip, into the eject hole. Gentlypull to open the SIM card tray.
Never pull the SIM card tray completely out of the slot.
Figure 4-14 Open the SIM card tray
1
2
1. Slender object (Diameter 0.8mm) 2. SIM card tray5. Place the SIM card into the SIM card tray with the metal connectors
facing up.6. Insert the SIM card tray into the SIM card slot, and push the center of
the tray to close it. Press gently until it locks into place.Figure 4-15 Inserting the SIM card
1
2
1. SIM card tray 2. SIM card
Never allow metal objects, such as screws, staples and paper clips, toenter the computer. Foreign metal objects can create a short circuit,which can cause damage and fire, possibly resulting in serious injury.Do not touch the connectors on the SIM card or on the computer.Debris on the connectors might cause access problems.
Removing a SIM CardTo remove the SIM card, do the following:
User's Manual 4-20

1. Shut down the computer. Make sure the Power indicator is off.2. To pop the SIM card tray partially open, insert a slender object (about
10mm), such as a straightened paper clip, into the eject hole. Gentlypull to open the SIM card tray.
3. Remove the SIM card from the SIM card tray.4. Insert the SIM card tray back into the SIM card slot.
GPS FunctionYour computer might include a built-in GPS (Global Positioning System).The performance of GPS varies depending on the environment. Failure topinpoint a location might happen.Your current location might not be shown depending on the status of GPSor the location. If you are obtaining your current location information fromthe computer, your current location might not be detected due to theinformation accuracy. Specifically, your current location might not bedetected in the following places or situations:
Inside or directly under a buildingInside a bag or boxAmong dense treesWhen there is an obstacle (person or object) in the front of theantennaUnderground tunnel, underground, or underwaterBuildings, streets or residential areasNear to high voltage cablesBad weather, such as heavy rain or snow
LANTOSHIBA Keyboard Dock has built-in support for Ethernet LAN (10megabits per second, 10BASE-T), Fast Ethernet LAN (100 megabits persecond, 100BASE-TX) or Gigabit Ethernet LAN (1000 megabits persecond,1000BASE-T).This section describes how to connect/disconnect to a LAN.
The Wake-up on LAN function consumes power even when thesystem is off. Leave the AC adaptor connected while using thisfeature.The Link speed (10/100/1000 megabits per second) changesautomatically depending on the network conditions (connected device,cable or noise and so on).
User's Manual 4-21

LAN cable types
The computer must be configured properly before connecting to a LAN.Logging onto a LAN using the computer’s default settings might cause amalfunction in LAN operation. Check with your LAN administrator regardingset-up procedures.
If you are using Gigabit Ethernet LAN (1000 megabits per second,1000BASE-T), be sure to connect with a CAT5e cable or higher. Youcannot use a CAT3 or CAT5 cable.If you are using Fast Ethernet LAN (100 megabits per second, 100BASE-TX), be sure to connect with a CAT5 cable or higher. You cannot use aCAT3 cable.If you are using Ethernet LAN (10 megabits per second, 10BASE-T), youcan connect with a CAT3 or higher cable.
Connecting the LAN cableTo connect the LAN cable, do the following:
Connect the AC adaptor before connecting the LAN cable. The ACadaptor must remain connected during LAN use. If you disconnect theAC Adaptor while the computer is accessing a LAN, the system mighthang up.Do not connect any other cable to the LAN jack except the LAN cable.Otherwise, malfunctions or damage might occur.Do not connect any power supplying device to the LAN cable that isconnected to the LAN jack. Otherwise, malfunctions or damage mightoccur.
1. Turn off the power to all external devices connected to the computer.2. Plug one end of the cable into the LAN jack. Press gently until you
hear the latch click into place.Figure 4-16 Connecting the LAN cable
2
1
1. LAN jack 2. LAN cable
User's Manual 4-22

3. Plug the other end of the cable into a LAN hub connector or router.Check with your LAN administrator and hardware or software vendorbefore using or configuring a network connection.
Memory mediaThe computer is equipped with a memory media slot that canaccommodate some kinds of memory media with various memorycapacities so that you can easily transfer data from devices, such as digitalcameras and Personal Digital Assistants.
Keep foreign objects out of the memory media slot. Never allow metalobjects, such as screws, staples and paper clips, to enter the computer orKeyboard. Foreign metal objects can create a short circuit, which cancause computer damage and fire, possibly resulting in serious injury.
This Memory media slot supports the following memory media:microSD/SDHC/SDXC Card.Not all memory media have been tested and verified to work correctly.Therefore, it is not possible to guarantee that all memory media canoperate properly.
Figure 4-17 Examples of memory media (microSD card)
Points to note about the memory media cardmicroSD/SDHC/SDXC memory cards comply with SDMI (Secure DigitalMusic Initiative), which is a technology adopted to prevent unlawful copy orplayback of digital music. For this reason, you cannot copy or play backprotected material on another computer or other device, and you cannotreproduce any copyrighted material except for your personal enjoyment.The supported maximum capacity of memory card is 128GB.
Memory media formatNew media cards are formatted according to specific standards. If you wishto reformat a media card, be sure to do so with a device that uses mediacards.
Formatting a memory media card
Memory media cards are sold already formatted in conformity to specificstandards. If you reformat a memory card, be sure to reformat it with adevice such as digital camera or digital audio player that uses the memorycards, not with the format command provided within Windows.
User's Manual 4-23

To format all areas of the memory card, including the protected area, youmust obtain an appropriate application that applies the copy protectionsystem.
Media careObserve the following precautions when handling the card.
Do not twist or bend cards.Do not expose cards to liquids or store in humid areas or lay mediaclose to containers of liquid.Do not touch the metal part of a card or expose it to liquids or let it getdirty.After using card, return it to its case.The card is designed so that it can be inserted only one way. Do nottry to force the card into the slot.Memory cards have a limited lifespan, so it is important to back upimportant data.Do not write to a card if the battery power is low. Low power mightaffect writing accuracy.Do not remove a card while read/write is in progress.
For more details on using memory cards, see manuals accompanying thecards.
Inserting memory mediaThe following instructions apply to all types of supported media devices. Toinsert memory media, do the following:1. Turn the memory media so that the contacts (metal areas) face down.2. Insert the memory media into the memory media slot on the tablet
computer.
User's Manual 4-24
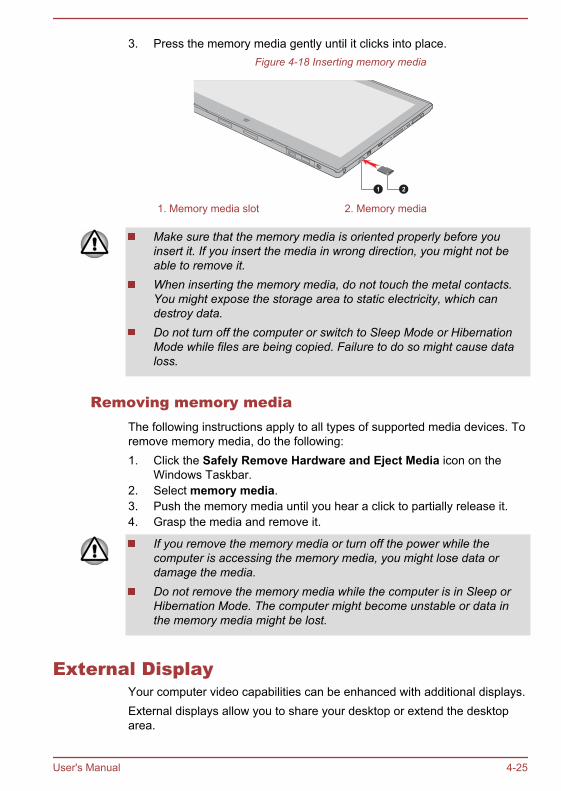
3. Press the memory media gently until it clicks into place.Figure 4-18 Inserting memory media
1 2
1. Memory media slot 2. Memory media
Make sure that the memory media is oriented properly before youinsert it. If you insert the media in wrong direction, you might not beable to remove it.When inserting the memory media, do not touch the metal contacts.You might expose the storage area to static electricity, which candestroy data.Do not turn off the computer or switch to Sleep Mode or HibernationMode while files are being copied. Failure to do so might cause dataloss.
Removing memory mediaThe following instructions apply to all types of supported media devices. Toremove memory media, do the following:1. Click the Safely Remove Hardware and Eject Media icon on the
Windows Taskbar.2. Select memory media.3. Push the memory media until you hear a click to partially release it.4. Grasp the media and remove it.
If you remove the memory media or turn off the power while thecomputer is accessing the memory media, you might lose data ordamage the media.Do not remove the memory media while the computer is in Sleep orHibernation Mode. The computer might become unstable or data inthe memory media might be lost.
External DisplayYour computer video capabilities can be enhanced with additional displays.External displays allow you to share your desktop or extend the desktoparea.
User's Manual 4-25

Connecting an external displayYour computer comes with a built-in display, but you can also connectother external displays via available ports on the computer.
As the port operation of all external display devices have not beenconfirmed, some devices might not function properly.HDMI port and External RGB monitor port on the keyboard dock cannot be connected for use at the same time. If both ports areconnected, only HDMI port is activated.
External RGB monitor port
An external analog monitor can be connected to the External RGB monitorport on the keyboard dock. To connect an external analog monitor, do thefollowing:1. Connect the RGB cable to the External RGB monitor port.
Figure 4-19 Connecting the RGB cable to the External RGB monitor port
12
1. External RGB monitor port 2. RGB cable
There are no fastening screws for an external monitor cable on theExternal RGB monitor port. However, external monitor cables which haveconnectors with fastening screws can still be used.
2. Turn the external monitor's power on.When you turn on the power, the computer automatically recognizes themonitor and determines whether it is a color or monochrome device.When displaying desktop on an external RGB monitor, desktop issometimes displayed on the center of the monitor with black bars arounddesktop (with small size).At that time, please read the manual of the monitor and set the displaymode which is supporting at the monitor. Then it will be displayed withsuitable size with correct aspect ratio.
User's Manual 4-26

HDMI port
HDMI (High-Definition Multimedia Interface) port digitally transfers bothvideo and audio data without reducing the quality. HDMI-compatibleexternal display devices including televisions can be connected via theHDMI port.To connect an HDMI-compatible display device, do the following:
As the port operation of all HDMI display devices have not beenconfirmed, some HDMI display devices might not function properly.To connect a device to the HDMI out port, you must purchase asuitable HDMI cable.
1. Plug one end of the HDMI cable into the HDMI in port of the HDMIdisplay device.
2. Plug the other end of the HDMI cable into the HDMI port on your tabletcomputer or on the keyboard dock.
3. Turn the HDMI display device's power on.Figure 4-20 Connecting the HDMI port
12
1. HDMI port 2. HDMI cable (Type A connector)
Figure 4-21 Connecting the HDMI Micro port
1 2
1. HDMI Micro port 2. HDMI cable (Type D connector)
Do not plug/unplug an HDMI device under the following conditions:The system is starting up.
User's Manual 4-27

The system is shutting down.When you connect a television or external monitor to the HDMI port, thedisplay output device is set to HDMI.When you unplug the HDMI cable and replug it, wait at least 5 secondsbefore you replug the HDMI cable again.When you change the display output device, the playback device might notswitch automatically. In this case, To set the playback device to the samedevice as the display output device, adjust the playback device manuallyby the following steps:1. Click Control Panel -> Hardware and Sound -> Sound underWindows System in the Apps view.2. In the Playback tab, select the playback device which you want toswitch to.3. To use the internal speakers on your computer, select Speakers. To usethe television or the external monitor that you have connected to thecomputer, select a different playback device.4. Click the Set Default button.5. Click OK to close the Sound dialog.
Settings for display video on HDMI
To view video on the HDMI display device, be sure to configure thefollowing settings otherwise you might find that nothing is displayed.
Be sure to use the function key to select the display device before startingto play video. Do not change the display device or audio device whileplaying media files.Do not change the display device under the following conditions.
While data is being read or writtenWhile communication is being carried out
Selecting HD Format
To select the display mode, do the following:1. Click Control Panel -> Appearance and Personalization -> Display
-> Change display settings -> Advanced settings -> List All Modes under Windows System in the Apps view.
2. Select one of the modes at List All Modes.
Multi Monitor (only for Z20t-B)Your computer supports the Multi Monitor function that can display imageon Multi Monitor independently.The following combinations are supported:
User's Manual 4-28

TOSHIBA Keyboard Dock 1 2
RGB Yes -
HDMI - Yes
Yes: Support
Wireless displayYour computer might support Wireless display, a wireless technology whichutilizes Wi-Fi to allow the computer to be wirelessly connected to externaldisplays including TVs as extended screens. With Wireless display,documents, streamed/local media contents or other online contents can beshared wirelessly with others.To use Wireless display, either one of the following devices is required:
A compatible external display with built-in support for Wireless display.An external display with HDMI port and a Wireless display adaptor.The Wireless display adaptor is a device that connects to the externaldisplay via HDMI port and can receive Wi-Fi signals from yourcomputer.
To wirelessly connect to an external display, you can follow the steps asdescribed below:1. In the Settings charm, click Change PC settings -> PC and devices
-> Devices.2. Click Add a device. Your computer will start searching for the
Wireless display device.3. After the Wireless display device is searched, follow the on-screen
instructions to finish connection.After the connection is established, the name of the Wireless displaydevice appears under Projectors.To disconnect the Wireless display device, click the Wireless displaydevice name and then click Remove device.
Changing the display settingsAfter one or more external displays are connected, the operating systemcan automatically detect, identify, and set up the display settings.You can also manually manage how the external displays work and changethe display settings by pressing P while holding down the Windows ( )key. If you disconnect the external display before you turn off thecomputer's power, be sure to switch to the internal display.
User's Manual 4-29

Security lockA security lock enables you to anchor your computer to a desk or otherheavy object in order to help prevent unauthorized removal or theft. Thecomputer has a security lock slot on the keyboard dock into which you canattach one end of the security cable, while the other end attaches to a deskor similar object. The methods used for attaching security cables differ fromproduct to product. Refer to the instructions for the product you are usingfor more information.
Connecting the security lockTo connect a security cable to the computer, do the following:1. Turn the computer so its left side faces you.2. Slide the security lock switch to the locked position.
Figure 4-22 Slide the security lock switch
3. Align the security cable with the lock slot and secure it in place.Figure 4-23 Security lock
1
2
1. Security lock slot 2. Security lock
User's Manual 4-30

Optional TOSHIBA AccessoriesTo make your computer even more powerful and convenient to use, youcan add a number of options and accessories. For reference, the followinglist details some of the items that are available from your reseller orTOSHIBA dealer:
Universal AC Adaptor If you frequently use your computer at more thanone site, it might be convenient to purchase anadditional AC adaptor to be kept at each site inorder to remove the need to carry the adaptorwith you always.
Stylus Pen Stylus Pen can be purchased from yourTOSHIBA dealer for use as spare items (sparepen tips and a tip draw-out tool are included).
Not all the accessories are available in your region. Contact your reseller orTOSHIBA dealer for more information.
Sound System and Video modeThis section describes some of the audio control functions.
Volume MixerThe Volume Mixer utility lets you control the audio volume for playback ofdevices and applications under Windows.
To launch the Volume Mixer utility, right-click on the speaker icon onthe Windows Taskbar, and then select Open Volume Mixer from thesub menu.To adjust the volume level of speakers or headphones, move theSpeakers slider.To adjust the volume level of an application that you are using, movethe slider for the corresponding application.
Microphone LevelTo change the microphone recording level, do the following:1. Right-click on the speaker icon on the Windows Taskbar, and select
Recording devices from the sub menu.2. Select Microphone, and click Properties.3. On the Levels tab, move the Microphone slider to increase or
decrease the microphone volume level.If you feel the microphone volume level is inadequate, move theMicrophone Boost slider to a higher level.
User's Manual 4-31
Audio EnhancementsTo apply the sound effects for your current speaker, do the following.1. Right-click on the Speakers icon on the Windows Taskbar, and then
select Playback devices from the sub menu.2. Select Speakers, and click Properties.3. On the Enhancements tab, select the sound effects you would like,
and click Apply.
SmartAudioYour computer contains SmartAudio, a powerful program that allows you toconfigure your audio software to enhance and personalize your listeningexperience.
Starting SmartAudio Application
To launch the SmartAudio, click Control Panel -> Hardware and Sound -> SmartAudio under Windows System in the Apps view.
Headphone/Microphone selection
To change the type of headphone or microphone, do the following:1. Plug a headphone or microphone into the headphone/microphone
combo jack.2. Click the Jack Configuration icon in the SmartAudio main screen.3. Select one from the device list for the device you plugged into.
Opening SmartAudio Help
Clicking "?" in the top right corner of the SmartAudio window will open theHelp file in your selected language, or in English if your selected languageis not supported.
DTS Studio SoundDTS Studio Sound™ is a premium audio enhancement suite that utilizesrevolutionary audio technology to provide the most immersive and realisticlistening experience ever offered for a two speaker playback environment.DTS Studio Sound provides the following features:
Advanced audio rendering to match 2D and 3D video content forenveloping surround soundAccurate placement of audio cues for immersive surround sound fromany PC speaker configuration laptop/desktop speakers or headphonesBroad sweet spot with elevated sound imageMaximum volume output delivering maximum volume without creatingclipping or distortionDialog enhancement for clear and intelligible vocalsBass enhancement for rich, low frequency production
User's Manual 4-32

High frequency definition for crisp detailsConsistent volume level across content
To access the utility, click DTS Studio Sound in the Apps view.U.S. patents apply to this product. See http://patents.dts.com.Manufactured under license from DTS Licensing Limited.
Video modeVideo mode settings are configured via the Screen Resolution dialog.To open the Screen Resolution dialog, click Control Panel ->Appearance and Personalization -> Display -> Change display settings under Windows System in the Apps view.
If you are running some applications (for example a 3D application or videoplayback), you might see some disturbance, flickering, or frame droppingon your screen.If that occurs, adjust the resolution of display, lowering it until the screen isdisplayed properly.
User's Manual 4-33

Chapter 5
Utilities and Advanced UsageThis chapter describes the utilities and special features of this computer,and the advanced usage of some utilities.
Utilities and ApplicationsThis section describes the pre-installed utilities that come with thecomputer and details how to start them. For further information on theiroperation, refer to online manual, help files, or README.TXT file (ifapplicable) of each utility.
TOSHIBA DesktopAssist
TOSHIBA Desktop Assist is a graphical userinterface that provides access to specific toolsand TOSHIBA utilities and applications that makethe use and configuration of the computer easier.To access this utility, click Desktop Assist onthe desktop.
User's Manual 5-1

TOSHIBA DisplayUtility
TOSHIBA Display Utility includes Desktop TextSize utility, Split Screen utility, and MultipleDisplays utility.Desktop Text Size allows you to make the textsize bigger or smaller on the desktop accordingto your usage and favorite. You can change thetext size on the display and on the title bar ofwindows by changing the scaling of the text size.When the scaling is smaller, more information willappear on the display simultaneously but the textsize becomes smaller. When the scaling islarger, less information will appear on the displaysimultaneously but the text size becomes larger.You can install Split Screen utility by yourself.Split Screen utility enables you to create multipledisplay zones on a screen and to fit the activewindows to within those zones.Multiple Displays utility allows you to configurethe Display Mode, select monitors, and configureyour desktop, etc.To access this utility, click Display Utility underTOSHIBA group in the Apps view.For details on this utility, see the help file.
TOSHIBA PasswordUtility
This utility allows you to set a password to restrictaccess to the computer.To access this utility, click Password Utilityunder TOSHIBA group in the Apps view.
TOSHIBA SystemSettings
This utility allows you to customize yourhardware settings according to the way you workwith the computer and the peripherals you use.To access this utility, click System Settingsunder TOSHIBA group in the Apps view.
TOSHIBA SetupUtility
TOSHIBA Setup Utility is a BIOS setup utility thatprovides you a menu-based user interface sothat you can easily view and change BIOSsettings.For more information, refer to the TOSHIBASetup Utility section.
User's Manual 5-2

TOSHIBA eco Utility This computer is equipped with "eco mode". Thismode slightly lowers performance of somedevices to reduce electric power consumption.You can realize measurable power savings byusing it continuously.TOSHIBA eco Utility helps control the powerconsumption of your computer. Variousinformation can help you understand your degreeof contribution to the environment.Furthermore, this utility contains Peak shiftfunction that can help reduce power usage duringperiods of peak demand by shifting some powerconsumption to periods when demand is lower.The utility also supports "eco charge mode". Thebattery pack will not be fully charged in thismode, thus extending the life cycle of the battery.It is recommended using the computer with ACadaptor connected as the battery operating timeis comparatively short in this mode.Depending on the usage situation, the life cycleof battery pack might not be extended properly.To access this utility, click eco Utility underTOSHIBA group in the Apps view.For details on TOSHIBA eco utility, see the helpfile.
TOSHIBA MediaPlayer by sMedioTrueLink+
This software is a multimedia player which canbe used to play back video, music, and photo.TOSHIBA Media Player can play back contentson a local library/home network/OneDrive.Toaccess it, click the Media Player icon on theStart screen. For details, refer to the Online help.
TOSHIBA FunctionKey
This utility allows you to perform some featuresby pressing a specified key or combined with theFN key.To set up this utility, click Function Key underTOSHIBA group in the Apps view.For details, refer to the Function Key section.
User's Manual 5-3
TOSHIBA ServiceStation
This application allows your computer toautomatically search for TOSHIBA softwareupdates or other alerts from TOSHIBA that arespecific to your computer system and itsprograms. When enabled, this applicationperiodically transmits to our servers a limitedamount of system information, which will betreated in strict accordance with the rules andregulations as well as applicable data protectionlaw.To access this utility, click Service Station underTOSHIBA group in the Apps view.
TOSHIBA PC HealthMonitor
The TOSHIBA PC Health Monitor applicationproactively monitors a number of systemfunctions such as power consumption, batteryhealth, and system cooling, informing you ofsignificant system conditions. This applicationrecognizes the system and individual componentserial numbers and tracks specific activitiesrelated to their usage.To access this utility, click PC Health Monitorunder TOSHIBA group in the Apps view.For details on TOSHIBA PC Health Monitor, seethe help file.
TOSHIBA FaceRecognition
TOSHIBA Face Recognition uses a faceverification library to verify the face data of userswhen they log in to Windows. If the verification issuccessful, the user will be logged into Windowsautomatically. The user can thus avoid having toenter a password or the like, which makes thelogin process easier.To access this utility, click Face Recognitionunder TOSHIBA group in the Apps view.
TOSHIBA TabletAccess Code LogonUtility
You can use the utility to perform user loginauthentication using a hand-written access code.To access this utility, click Tablet Access Code Logon Utility under TOSHIBA group in the Appsview.
User's Manual 5-4

TruCapture This software is a camera application with specialfeatures to take improved photographs ofwhiteboards, books, printed material, notebooks,and so on.To access it, tap TruCapture in the Apps view.For more information, refer to the TruCapturesection.
ArcNote for Toshiba ArcNote for Toshiba makes it easy to manageyour daily information, such as reminders,important minutes and to-do lists, etc. It allowscreating and presenting your own contents in allformats and saved them as pieces of note thatcan be shared with others.For more information, refer to the ArcNote forToshiba section.
Camera 365 forToshiba
Camera 365 for Toshiba combines photocapturing and video recording in one with theenhanced features allowing you to capture thefleeting moments.For more information, refer to the Camera 365 forToshiba section.
Dragon Assistant Dragon Assistant leverages the power of speechrecognition technology, offering you the freedomand flexibility to control your desktop applicationsusing your voice. With Dragon Assistant, simplyspeak commands to do lots of things on yourdesktop – search the web, post updates to yoursocial networks, check email and more.To access it, click Dragon Assistant in the Appsview.For details on Dragon Assistant, see the QuickStart Guide by right-clicking the utility icon on theWindows Taskbar.
Trusted PlatformModule (TPM)
The TPM (Trusted Platform Module) is a securityencryption device for the HDD/SSD.Trusted Platform Module is provided with somemodels. To operate the TPM function, use anapplicable utility.
You might not have all the software listed in this section depending on themodel you purchased.To access the setup files of the drivers/utilities, click Applications andDrivers in the Apps view.
User's Manual 5-5

Windows Store applications are not included in the setup files above butcan be downloaded from Windows Store.
Special featuresThe following features are either unique to TOSHIBA computers or areadvanced features which make the computer more convenient to use.Access each function using the following procedures.*1 To access the Power Options, click Control Panel -> System and Security -> Power Options under Windows System in the Apps view.
Display automaticpower off *1
This feature automatically cuts off power to thecomputer's display panel when there is nokeyboard input for a specified time, with powerbeing restored the next time a key is pressed.This can be specified in the Power Options.
SSD automatic poweroff *1
This feature automatically cuts off power to theSolid State Drive when it is not accessed for aspecified time, with power being restored whenthe hard disk drive is next accessed. This can bespecified in the Power Options.
System automaticSleep/HibernationMode *1
This feature automatically shuts down the systeminto either Sleep Mode or Hibernation Modewhen there is no input or hardware access for aspecified time. This can be specified in the PowerOptions.
Power on password Two levels of password security, supervisor anduser, are available to prevent unauthorizedaccess to your computer.
Intelligent powersupply *1
A microprocessor in the computer's intelligentpower supply detects the battery charge,automatically calculates the remaining batterycapacity, and protects electronic componentsfrom abnormal conditions such as a voltageoverload from the AC adaptor. This can bespecified in the Power Options.
Battery save mode *1 This feature lets you configure the computer inorder to save battery power. This can bespecified in the Power Options.
Panel power on/off *1 This feature automatically turns power to thecomputer off when the display panel is closed,and turns it back on when the display panel isopened. This can be specified in the PowerOptions.
User's Manual 5-6

Low batteryautomatic HibernationMode *1
When battery power is exhausted to the pointthat computer operation cannot be continued, thesystem automatically enters Hibernation Modeand shuts itself down. This can be specified inthe Power Options.
Sleep Mode If you have to interrupt your work, you can usethis feature to allow you to turn off power to thecomputer without exiting from your software.Data is maintained in the computer's mainmemory so that when you next turn on thepower, you can continue working right where youleft off.
Hibernation Mode This feature lets you turn off the power to thecomputer without exiting from your software. Thecontents of main memory are automaticallysaved to the internal storage so that when younext turn on the power again, you can continueworking right where you left off. You must enablethe Hibernation Mode before using this feature.Refer to the Starting Hibernation Mode sectionfor more details.
USB Wakeup function This function restores the computer from SleepMode depending on the external devicesconnected to the USB ports.For example, if a mouse or USB keyboard isconnected to a USB port, clicking the mousebutton or pressing the keyboard will wake up thecomputer.
Heat dispersal *1 To protect against overheating, the processor isequipped with an internal temperature sensorwhich lowers the processing speed if thecomputer's internal temperature rises to a certainlevel.When the processor's temperature falls withinnormal range, the processor operation returns toits standard speed.If the processor's temperature reaches anunacceptably high level with either setting, thecomputer automatically shuts down to preventany damage. In this instance, all unsaved data inmemory will be lost.
TOSHIBA Password UtilityThe TOSHIBA Password Utility provides two levels of password security:User and Supervisor.
User's Manual 5-7

Passwords set by the TOSHIBA Password Utility function are different fromthe Windows password.
User PasswordTo start the utility, click Password Utility under TOSHIBA group in theApps view, and click User Password.User authentication might be required to validate user rights when usingTOSHIBA Password Utility to delete or change passwords, and so on.
Set (button)Click this button to register a password. After a password is set, youare prompted to enter it when you start the computer.
After you set the password, a dialog box appears asking whether youwant to save it to other media. If you forget the password, you canopen the password file on another computer. Be sure to keep themedia in a safe place.When entering the character string to register the password, enterfrom the keyboard character by character and do not enter as ASCIIcode or copy-and-paste the character string. In addition, ensure thatthe registered password is correct by outputting the character string tothe password file.When entering a password, do not enter any characters (for example"!" or "#") produced by pressing the SHIFT or ALT keys.
Delete (button)Click this button to delete a registered password. Before you candelete a password, you must first enter the current password correctly.Change (button)Click this button to change a registered password. Before you canchange a password, you must first enter the current passwordcorrectly.Owner String (text box)You can use this box to associate text with the password. After youenter text, click Apply or OK. When the computer is started, this textis displayed together with the prompt asking you to enter a password.
You can launch the BIOS setup utility to set, change or delete the HDDPassword or HDD Master Password.Refer to the TOSHIBA Setup Utility section for further information.
User's Manual 5-8

If you forget your HDD User Password, TOSHIBA will NOT be able toassist you, and your HDD will be rendered COMPLETELY andPERMANENTLY INOPERABLE. TOSHIBA will NOT be heldresponsible for any loss of any data, any loss of use or access to yourHDD, or for any other losses to you or any other person ororganization that result from the loss of access to your HDD. If youcannot accept this risk, do not register the HDD User Password.When saving the HDD User Password shut down or restart thecomputer. If the computer is not shut down or restarted, the saveddata might not be correctly reflected. For more information on shuttingdown or restarting the computer, refer to Turning on the power.
Supervisor PasswordIf you set a Supervisor Password, some functions might be restricted whena user logs on with the User Password. To set a Supervisor Password:Click Password Utility under TOSHIBA group in the Apps view, and clickSupervisor Password.This utility lets you do the following:
Register or delete the Supervisor Password.Specify restrictions for general users.
Starting the computer using a passwordIf you have already registered a user password, there is one way to startthe computer:
Enter the password manually.
The password is necessary only if the computer was shut down inHibernation mode or boot mode. It is not needed in Sleep mode andRestart.
To enter a password manually, do the following:1. Turn on the power as described in the Getting Started section. The
following message appears in the screen:Password =
At this point, the function keys do not work. They will function after youenter the password.
2. Enter the Password.
User's Manual 5-9

3. Press ENTER.
If you enter the password incorrectly three times in a row, or if you do notenter the password within 1 minute, the computer shuts off. In this case,some features that can power on the computer automatically (Wake-up onLAN, Task Scheduler, etc) might not work. You must turn the computerback on to retry password entry.
TOSHIBA System SettingsTOSHIBA System Settings is the TOSHIBA configuration management toolavailable through the Windows operating system.To run TOSHIBA System Settings, click System Settings under TOSHIBAgroup in the Apps view.The TOSHIBA System Settings window contains a number of tabs to allowspecific functions of the computer to be configured.In addition there are also three buttons: OK, Cancel and Apply.
OK Accepts your changes and closes the TOSHIBASystem Settings window.
Cancel Closes the window without accepting yourchanges.
Apply Accepts all your changes without closing theTOSHIBA System Settings window.
Some options shown in gray are possible to confirm their status.
TOSHIBA System Settings screen might have the following tabs:General—Allows you to view the current BIOS version or changecertain settings back to their default valuesDisplay—Allows you to select the internal LCD and/or external monitorwhen the computer boots upBoot Options—Allows you to change the sequence in which yourcomputer searches the drives for the operating systemKeyboard—Allows you to access the wake-on keyboard function, or toconfigure the function keysUSB—Allows you to set conditions for USBSATA—Allows you to set conditions for SATALAN—Allows you to set conditions for LANUndock and Sleep—Allows you to set sleep conditions whileundockingAdvanced Options—Allows you to set conditions for a specific deviceor function
User's Manual 5-10

The settings or options explained here might vary depending on the modelyou purchased.After you changed the settings, a dialog box might appear to prompt youthat the changes will take effect after the computer is restarted. Make sureto restart your computer immediately to apply these changes.
TOSHIBA Tablet Access Code Logon UtilityYou can use the Tablet Access Code Logon Utility to perform user loginauthentication using a hand-written access code.Your access code is registered by using characters, symbols, speed ofyour signature, pen pressure, or directions in which you move the penbetween characters or symbols.Always register your access code in accordance with the procedure thatappears on the screen. You need to re-enter the same code several timesto register your access code properly.
Use multiple characters or symbols to create an access code that is noteasily identified by a third party, to prevent illegal access to your device.
DisclaimerTOSHIBA does not guarantee that the Tablet Access Code Logon Utility iscompletely secure or error-free at all times. TOSHIBA is not liable for anyfailure or damage that might arise out of your use of the Tablet AccessCode Logon Utility, even if advised of the possibility thereof.TOSHIBA, ITS AFFILIATES AND SUPPLIERS SHALL HAVE NORESPONSIBILITY FOR DAMAGE TO OR LOSS OF ANY BUSINESS,PROFITS, PROGRAMS, DATA, NETWORK SYSTEMS OR REMOVABLESTORAGE MEDIA ARISING OUT OF OR RESULTING FROM THE USEOF THE TABLET ACCESS CODE LOGON UTILITY , EVEN IF ADVISEDOF THE POSSIBILITY THEREOF.
TOSHIBA Face RecognitionTOSHIBA Face Recognition uses a face verification library to verify theface data of users when they log in to Windows. The user can thus avoidhaving to enter a password or the like, which makes the login processeasier.To access this utility, click Face Recognition under TOSHIBA group in theApps view.
User's Manual 5-11

TOSHIBA Face Recognition does not guarantee the correctidentification of a user. Changes to the likeness of a registrant, suchas hair style changes, wearing a cap, or wearing glasses might effectthe recognition rates when such changes occur after the registrant hadregistered.TOSHIBA Face Recognition might incorrectly recognize faces that aresimilar to a registrant.For high security purposes, TOSHIBA Face Recognition is not asuitable substitute for Windows passwords. When security is a highpriority, use your established Windows passwords to log in.Bright background light and/or shadows might prevent a registrantfrom being recognized correctly. In that case, log in using yourWindows password. If recognition of a registrant fails repeatedly, referto your computer documentation to learn ways to improve recognitionperformance.TOSHIBA Face Recognition records face data in a log when facerecognition fails. When transferring ownership or disposing of yourcomputer, uninstall the application or delete all the logs created by theapplication. For details on how to do this, see help file.
DisclaimerTOSHIBA does not guarantee that the face recognition utility technologywill be completely secure or error-free. TOSHIBA does not guarantee thatthe face recognition utility will accurately screen out unauthorized users atall times. TOSHIBA is not liable for any failure or damage that might ariseout of the use of the face recognition software or utility.TOSHIBA, ITS AFFILIATES AND SUPPLIERS SHALL HAVE NORESPONSIBILITY FOR DAMAGE TO OR LOSS OF ANY BUSINESS,PROFITS, PROGRAMS, DATA, NETWORK SYSTEMS OR REMOVABLESTORAGE MEDIA ARISING OUT OF OR RESULTING FROM THE USEOF THE PRODUCT, EVEN IF ADVISED OF THE POSSIBILITYTHEREOF.
How to launch the help fileFor further information on this utility, refer to help file.To launch the help file, click on the Help button in the Management screen.
TruCaptureTruCapture is a camera application with special features to improve thereadability of whiteboards, books, and so on in photographs taken byTruCapture. Those features include reflection reduction, colorenhancement, and cropping.
User's Manual 5-12

A Tutorial will appear on the screen which provides the basic informationabout how to use this feature.Tap Next if you want to continue viewing the Tutorial.For more detailed information on the use of this feature, tap More information. You can also find it by swiping from the right edge of thescreen, and then tap Settings -> Help.
ArcNote for ToshibaArcNote for Toshiba makes it easy to manage your daily information, suchas reminders, important minutes and to-do lists. The application allows youto create and present your own contents in all formats including text,sketches, audio, and images with annotations. All of these contents aresaved as pieces of note and can be shared with others.
Using ArcNote for ToshibaTo launch the application, tap ArcNote for Toshiba in the Apps view.
Organizing your notes
ArcNote for Toshiba offers a visual, convenient way to organize your notes.Notes are saved or placed in a container called notebook which separatesnotes of different ideas or subjects. Moreover, notebooks can becategorized so as to be quickly found. For example, you can create acategory for travel purpose and the other one for work purpose.
Home screen
Home screen is the start page where you can create, view and edit notesas well as manage notebooks. You’ll find the category pane in the left andthe notebook pane in the right.By default, a few common categories have been created on first launch. Ifyou want to create new categories, rename or delete saved categories,press and hold one category for a few seconds and then release. A pop-upmenu will appear.To browse your notes, tap one of the categories, and then tap a notebook.
Creating a note
The application supports to create a note in rich format including text,sketches, audio and images. To create a new note, do the following:1. Tap a category from the home screen, and then tap . An empty
notebook is automatically created.2. Tap Properties( ) from the command bar, and a dialog box
appears. The properties of the notebook (Name, Category and Tag)can be defined.
User's Manual 5-13

3. Start composing your note by attaching one of the following items:
Camera( )
Tap to activate your computer’s built-in camera. Capture anythingyou like and create as a note.
Pictures( )
Tap to import an image from your computer.
Sketch( )
Tap to draw on the canvas, and save the painting as a note.
Text( )
Tap to type texts using the physical/on-screen keyboard.4. (Optional)Tap Set as cover( ) to set the created note as the
notebook cover. Notebook cover is the thumbnail you see in thenotebook pane. By default, the first created note is the notebookcover.
5. (Optional)You can also attach an audio recording to the notebook. Tap to start recording, and tap again to stop. Tap to play the audio
recording.You can create an audio recording up to 180 minutes long.
Editing a note
To edit a note, do the following:1. Tap a note in the notebook to enter the preview mode.2. Swiping from the top or bottom edge of the screen to bring up the
command bar, and then tap Edit( ) to enter the edit mode.
Available editing options are detailed below. Depending on the note format(text, sketches, audio or images), the options might vary.
Crop( )
Drag the handles to select an area to keep in the image.
Tap Uncrop( ) will reset the handles.
Auto Crop is provided specifically for improving snapshots ofwhiteboards, printed materials, and so on. You can enable it byswiping from the right edge of the screen, tap Settings -> Options ->Image Optimization, and select Auto Crop.
Rotate( / )
Tap Rotate left or Rotate right to rotate the image.ContrastSelect a pre-set effect to adjust image contrast.
User's Manual 5-14

When finishing editing, tap Done( ) to confirm, or Cancel( ) to abort.
Annotating a note
You can annotate the notes so as to have important markups. Dependingon the note format, the available annotation type (text, sketch or audio)might vary.To annotating a note, do the following:1. Tap a note in the notebook to enter the preview mode2. Swiping from the top or bottom edge of the screen to bring up the
command bar, and then tap Annotate( ).
3. Tap Text, Sketch, or Audio.4. Tap to save the annotation, or tap to cancel.You can create an audio annotation up to 2 minutes long.To delete an annotation, do the following:1. Tap a note in the notebook to enter the preview mode2. Tap the annotation you want to delete.3. Tap , and select YES to delete an audio annotation or clear all the
text and tap to delete a text annotation.To delete a sketch annotation, enter the edit mode and a dialog willappear, then tap Yes to clear the sketch.
Moving a note/notebook
To move a note and change its order, simply drag the note to the place youwant and drop it.You can also re-categorize the notebook by moving it to another category.To do this:1. Swipe to select a notebook from the home screen, and tap Move
to( ).
2. In the pop-up drop-down list, select a new category and tap OK.
Deleting a note/notebook
To delete a note, follow the steps below:1. Tap a notebook from the home screen, swipe to select a note, and tap
Delete( ).
2. Tap Delete to confirm the operation which CANNOT be undone.To delete a notebook, do the following:1. Swipe to select a notebook from the home screen, and tap
Delete( ).
User's Manual 5-15
2. The notebook together with all the notes inside are moved to theRecycle Bin( ) where you can restore them by moving to othercategory if needed.
Advanced options
The advanced options can be accessed from the command bar. To do it:Swipe to select one or more notebooks and the command bar appears.Tap a note in the notebook to enter the preview mode, and swipe from thetop or bottom edge of the screen to bring up the command bar.
Lock( )
Tap to lock the selected notebook and once locked, the notes in thenotebook cannot be edited. The option is only applicable to notebooks.
PDF Preview( )
You can preview one note or the entire notebook in PDF. Tap toautomatically generate a PDF preview.By default, page size is A4. Swipe from the right edge of the screen,and tap Settings -> Options -> PDF size to change the page size.
Share as PDF( )
Share your notes with others in PDF format through apps availablefrom the Share charm.
Notes on useDo not power off your computer while editing the notes, as it mightcause saving failure possibly resulting in data loss.ArcNote for Toshiba does not support Portrait mode.
Camera 365 for ToshibaCamera 365 for Toshiba combines photo capturing and video recording inone with the enhanced features allowing you to capture the fleetingmoments.
Using Camera 365 for ToshibaTo launch the application, tap Camera 365 for Toshiba in the Apps view.
Start capturing
By default, photo mode is activated and the back Web Camera is set. Youcan see the real-time preview screen.To zoom in or zoom out, simply swipe up or down on the preview screen.Options on the main screen are the following:
User's Manual 5-16

Capture mode ( / )
Slide to switch between photo and video mode.Capture ( / )
Tap to take a photo or start recording a video.
In video mode, tap again to stop recording.
Change camera ( )
Tap to switch between back and front Web Camera.Photo modeTap to switch between the pre-set camera modes to improve effectsand enhance your photo-taking experiences.The option is not available in video mode.
Normal mode( )
Normal mode is set by default.Timer mode( )
Count down before capturing a photo. 5 seconds is set by defaultand you can change the countdown time in the app settings.Burst mode( )
Capture a set number of photos continuously in a short amount oftime. This often works best for fast moving objects or scenes. 5sequential images is set by default and you can change thenumber in the settings.Beauty mode( )
The camera detects the face and automatically retouches thefacial skin in real-time.Smile mode( )
The camera detects smile on the face and automatically capturethe joyous moment for you.
The lighting condition and the distance between camera and your facemight have an impact on the detection performance.
Gallery
Gallery is a media library which allows users to view and manage allcaptured photos and videos. To access Gallery, tap Gallery( ) on themain screen.To view an item, simply tap the thumbnail.To delete items, swipe to select one or more thumbnails, and tap Delete.
User's Manual 5-17

SettingsThe application settings are described below. Depending on the models,not all options are available.
Brightness( )
Adjust image brightness for capturing.Contrast( )
Adjust image contrast for capturing.White Balance( )
Adjust the lighting conditions manually. By default, the applicationautomatically fine-tunes the white balance.Burst( )
Select the number of photos for Burst mode.Timer( )
Select the countdown time for Timer mode.Resolution( )
Select the camera resolution, the higher of the resolution, the betterquality the captured media will be.Flicker( )
Select the frequency of the lighting conditions.Geo info( )
Turn on/off the automatic geographical tag to the photos. This optionis only available on models equipped with a GPS module.Focus( )
Select auto or manual focus to set for the camera.Reset( )
Tap and select Yes to reset all camera settings to the factory default.
Notes on useDo not power off your computer while capturing photos or videos, as itmight cause saving failure possibly resulting in data loss.
TOSHIBA Media Player by sMedio TrueLink+Be aware of the following limitations when you use the TOSHIBA MediaPlayer by sMedio TrueLink+:
User's Manual 5-18

Notes on useTOSHIBA Media Player by sMedio TrueLink+ is a multimedia player whichcan be used to play back video, music, and photo.This software is only provided with some models.
It is recommended that the AC adaptor is connected while TOSHIBAMedia Player is running. Power saving features might interfere withsmooth playback. When TOSHIBA Media Player is used with a batterypower, set the Power Options to "Balance".The screen saver is disabled while TOSHIBA Media Player is playinga video file or slideshows of photos.The computer will not enter Sleep and Hibernation modeautomatically, while TOSHIBA Media Player is running.The display automatic power off function is disabled while TOSHIBAMedia Player is playing a video file or slideshows of photos.The Resolution+ function was specially adjusted for the internalmonitor. Hence, turn OFF Resolution+ when viewing on externalmonitor.The Resolution+ feature for video playback is supported only on somemodels. Resolution+ can only be enabled for video/photo playback ifEnhance Video/Photo Quality is displayed. Resolution+ can beenabled only for photo playback if Enhance Photo Quality isdisplayed.The “Save with Resolution+ On” feature saves pictures withResolution+ On regardless of the current Resolution+ setting (On/Off/Demo). Since the picture is saved in a size appropriate for posting toSNS (largest edge of width/height is 2048 pixels), the saved picturemight look different than when browsing the original picture withResolution+ On.Playback of video/music/slideshow can be controlled using the mediabuttons on the preview window which is invoked when the mousecursor is moved over the TOSHIBA Media Player icon on the WindowsTaskbar.Video/Slideshow playback can only be controlled when the applicationis in the foreground.Music playback can be controlled even when the application is in thebackground.Playback of high bit rate content might cause frame dropping, audioskipping or decrease in computer performance.The above problems might be remedied by turning Resolution+ off.Tap/click the Refresh button on app commands to refresh the contentdisplayed on Library Screen. It will not be refreshed automatically.If sleep, hibernation, shutdown, or reboot operation is in processduring uploading the files to OneDrive, the operation will not beproperly completed.
User's Manual 5-19

This app does not support to play back content protected by DRM. Ifyou try to play DRM protected content with Resolution+ On state, thisapp might be closed.Photos uploaded to OneDrive are limited to a maximum resolution of2048 x 2048 pixels. Any photo over that resolution will be scaledproportionally to a maximum size of 2048 x 2048 pixels.This app does not support DMS.The playback of some media files might not be normal by this player.This might also happen when using Windows Media Player and Videoapp.User Interface and operational procedures might differ depending onthe application version. Refer to the Help of TOSHIBA Media Player by sMedio TrueLink+ for details.
Opening TOSHIBA Media Player by sMedio TrueLink+Manual
The features and operations about TOSHIBA Media Player are explainedin the TOSHIBA Media Player Manual.Use the following procedure to open TOSHIBA Media Player Online help:When TOSHIBA Media Player is running, click Help of the Settings charm.
TOSHIBA PC Health MonitorThe TOSHIBA PC Health Monitor application proactively monitors anumber of system functions such as power consumption, battery health (formodels with battery), and the system cooling, informing you of significantsystem conditions. This application recognizes the system and individualcomponent serial numbers, and tracks specific activities related to thecomputer and their usage.The collected information includes device operation time and number ofactuations or status changes (that is: number of power button and FN keycombination uses, AC adaptor, battery (for models with battery), LCD, fan(for models with fan), HDD/SSD, sound volume, wireless communicationfunctionalities and USB information), date of initial system use, and alsocomputer and device usage (that is: power settings, battery temperatureand recharging (for models with battery), CPU, memory, backlightillumination time, and temperatures for various devices). The collectedinformation is not limited to the examples specified here. The stored datauses a very small portion of the total internal storage capacity,approximately 10 MB or less per year.This information is used to identify and provide a notification of systemconditions which might affect the performance of your TOSHIBA computer.It might also be used to help diagnose problems should the computerrequire service by TOSHIBA or TOSHIBA authorized service providers.Additionally, TOSHIBA might also use this information for quality assuranceanalysis.
User's Manual 5-20

Subject to the use restrictions above, the data on the internal storage drivelogged might be transferred to entities located outside of your country orregion of residence (for example, European Union). Those countries mightor might not have the same data protection laws or data protection levelsas required by your home country or region.You can disable the TOSHIBA PC Health Monitor at any time byuninstalling the software via Uninstall a program in the Control Panel.Doing so will automatically delete all collected information from the internalstorage drive.The TOSHIBA PC Health Monitor software does not extend or modifyTOSHIBA obligations under its standard limited warranty in any way.TOSHIBA standard limited warranty terms and limitations apply.
Starting the TOSHIBA PC Health MonitorThe TOSHIBA PC Health Monitor can be opened by clicking PC Health Monitor under TOSHIBA group in the Apps view.The TOSHIBA PC Health Monitor main screen is displayed.This utility might be disabled by default on your computer. You can enableit by clicking Please click here to enable TOSHIBA PC Health Monitor.The "PC Health Monitor Software Notice & Acceptance" screen isdisplayed. Carefully read the information displayed. Selecting ACCEPTand clicking OK enables the program. By enabling the TOSHIBA PCHealth Monitor software, you agree with these terms and conditions and tothe use and sharing of the collected information. Once the program isenabled, the TOSHIBA PC Health Monitor screen is displayed, and theprogram begins monitoring system functions and collecting information.
A message is displayed if any changes which might interfere with theoperation of the program are detected. Follow the instructions displayedon-screen in the message.
TOSHIBA Setup UtilityTOSHIBA Setup Utility is a BIOS setup utility that provides you a menu-based user interface so that you can easily view and change BIOSsettings.To enter the BIOS setup utility, do the following:1. Save your work.2. Click the power icon ( ) on the Start screen and then select
Restart.3. Hold down the F2 key and then release this key one second after the
computer is power on.The BIOS setup utility can also be launched by button combination.1. Save your work.
User's Manual 5-21

2. Click the power icon ( ) on the Start screen and then select Shut down.
3. While holding down the Volume down button, press the Power buttonto turn on the power. Release the Volume down button afterTOSHIBA Setup Utility is loaded.
Make sure that fast startup is disabled in the Power Options by thefollowing steps:1. Click Control Panel -> System and Security -> Power Options underWindows System in the Apps view.2. Click Choose what the power button does or Choose what closing the lid does.3. Click Change settings that are currently unavailable.4. Deselect the Turn on fast startup check box from Shutdown settings.5. Click the Save changes button.
To save the changes and exit the utility, press the F10 key and proceed byselecting Yes or select Exit -> Exit Saving Changes -> Yes. Thecomputer restarts immediately.
Navigating the utilityTOSHIBA Setup Utility can be navigated through the touch screen or theprovided Stylus Pen.Some buttons on the tablet computer are also designated to execute thecorresponding key function on the keyboard. Details are described asfollows:
Button Key Function
Windows Enter key Proceed or confirmoperation
Volume up Up arrow key Select the previous item
Volume down Down arrow key Select the next item
System RecoveryThere is a hidden partition allocated on the internal storage for the SystemRecovery Options in the event of a problem.You can also create recovery media and restore the system.The following items are described in this section:
Creating Recovery MediaRestoring the pre-installed software from your created RecoveryMedia
User's Manual 5-22

Restoring the pre-installed software from the Recovery Partition
Creating Recovery MediaThis section describes how to create Recovery Media.
Be sure to connect the AC adaptor when you create Recovery Media.Be sure to close all other software programs.Do not run software such as screen savers which can put a heavyload on the CPU.Operate the computer at full power.Do not use power-saving features.Do not write to the media when the virus check software is running.Wait for it to finish, then disable virus detection programs including anysoftware that checks files automatically in the background.Do not use utilities, including those intended to enhance internalstorage access speed. They might cause unstable operation anddamage data.Do not shut down/log off or Sleep/Hibernate while writing or rewritingthe media.Set the computer on a level surface and avoid places subjected tovibrations such as airplanes, trains, or cars.Do not use on an unstable surface such as a stand.
A recovery image of the software on your computer is stored on the internalstorage, and can be copied to either disc media or USB Flash Memory byusing the following steps:1. Select either blank disc or USB Flash Memory.
The application allows you to choose from a variety of different mediaonto which the recovery image can be copied including disc mediaand USB Flash Memory.
Note that some of the disc media might not be compatible with theoptical disc drive connected to your computer. You should thereforeverify that the optical disc drive supports the blank media you havechosen before proceeding.USB Flash Memory will be formatted and all the data in the USB FlashMemory will be lost when proceeding.
2. Turn on your computer and allow it to load the Windows operatingsystem as normal.
3. Insert the first blank disc into the external optical disc drive tray, orinsert the USB Flash Memory into one available USB port.
User's Manual 5-23

4. For models with Recovery Media Creator pre-installed:Click Recovery Media Creator under TOSHIBA group in the Appsview.For models without Recovery Media Creator pre-installed:Click Control Panel -> System and Security -> Action Center ->Recovery -> Create a recovery drive under Windows System in theApps view.
5. Follow the on-screen instructions to finish creating the RecoveryMedia.
Restoring the pre-installed software from your createdRecovery Media
If the pre-installed files are damaged, you are able to use the RecoveryMedia you have created to restore the computer to the state it was in whenyou originally received it. To perform this restoration, do the following:
Make sure that the AC adaptor is connected during the restoringprocess.Make sure to dock the tablet computer to TOSHIBA Keyboard Dockbefore restoring the operating system (only for Z20t-B).
When you reinstall the Windows operating system, the internal storagewill be reformatted and all data will be lost.Make sure to use the default Boot Mode option in the BIOS setuputility before restoring.1.Launch the BIOS setup utility.Refer to the TOSHIBA Setup Utility section for further information.2. In the BIOS setup screen, select Advanced -> System Configuration -> Boot Mode.Note: Skip the following contents if you cannot find the Boot Modeoption in your system.3. Select UEFI Boot (Default).If you set the Boot Mode as CSM Boot, the recovery media created byRecovery Media Creator will NOT be able to restore.If you create a recovery image using advanced recovery tools fromControl Panel, also make sure to use the default Boot Mode option(UEFI Boot) in the BIOS setup utility before restoring.
1. Load the Recovery Media into the external optical disc drive or insertthe recovery USB Flash Memory into one available USB port.
2. Click the power icon ( ) on the Start screen, and select Restart.
User's Manual 5-24

3. Hold down the F12 key, and release this key one second after thecomputer is power on.Without the keyboard dock, you can hold down the Volume up buttonuntil the Boot menu is loaded.
4. Use the up and down cursor key to select the appropriate option fromthe menu according to your actual recovery media.Without the keyboard dock, you can use the Volume up and theVolume down button to select the appropriate option from the menu,and tap the Windows button to confirm the selection.
5. A menu is displayed from which you should follow the on-screeninstructions.
If you have previously chosen to remove the recovery partition withoutcreating "Recovery Media", the "Recovery Media" cannot be created.However, if you have already created a "Recovery Media", you can use itto restore the recovery partition.If you have not created "Recovery Media", contact TOSHIBA support forassistance.
Restoring the pre-installed software from theRecovery Partition
A portion of the internal storage space is configured as a hidden recoverypartition. This partition stores files which can be used to restore pre-installed software in the event of a problem.If you set up your internal storage again later, do not change, delete, or addpartitions in a manner other than specified in the manual, otherwise youmight find that space for the required software is not available.In addition, if you use a third-party partitioning program to reconfigure thepartitions on your internal storage, you might find that it becomesimpossible to set up your computer.
Make sure that the AC adaptor is connected during the restoringprocess.Make sure to dock the tablet computer to TOSHIBA Keyboard Dockbefore restoring the operating system (only for Z20t-B).
When you reinstall the Windows operating system, the internal storage willbe reformatted and all data will be lost.
1. Click the power icon ( ) on the Start screen, and select Restart.
User's Manual 5-25

2. Hold down 0 (zero) key, and release this key one second after thecomputer is power on.Without the keyboard dock, you can hold down the Volume up buttonuntil the Boot menu is loaded, and then select HDD Recovery.Choose Yes if you want to continue.
3. Select Troubleshoot.4. Select Reset your PC.5. Follow the on-screen instructions to finish the recovery.You can also perform the restoration through PC settings in the operatingsystem:1. Click the Settings charm, and click Change PC settings.2. Click Update and recovery under PC settings, and then click
Recovery.3. Click Get started under Remove everything and reinstall Windows.4. Follow the on-screen instructions to finish the recovery.
User's Manual 5-26
Chapter 6
TroubleshootingTOSHIBA has designed this computer for durability, however, shouldproblems occur you are able to use the procedures detailed in this chapterto help determine the cause.You should become familiar with this chapter as knowing what might gowrong can help prevent problems from occurring in the first place.
Problem-solving processIf you observe the following guidelines, resolving problems will be mucheasier.
Stop immediately when you recognize a problem exists as takingfurther action might result in data loss or damage, or you mightdestroy valuable problem-related information that can help solve theproblem.Observe what is happening. Write down what the system is doing andwhat actions you performed immediately before the problem occurred.Make a screenshot of the current display.
Also be aware that the questions and procedures described in this chapterare meant only as a guide, they are not definitive problem-solvingtechniques. In reality many problems can be solved simply, but a few mightrequire help from TOSHIBA Support. If you find you need to consult others,be prepared to describe the problem in as much detail as possible.
Preliminary checklistYou should always consider the simplest solution first. The items detailedin this checklist are easy to fix and yet can cause what appears to be aserious problem:
Make sure that you turn on all peripheral devices before you turn onthe computer. This includes your printer and any other external deviceyou are using.Before you attach an external device you should first turn off thecomputer, then when you turn the computer back on it recognizes thenew device.Make sure that all optional accessories are configured properly in thecomputer's setup program and that all required driver software hasbeen loaded (refer to the documentation included with the optionalaccessories for further information on its installation andconfiguration).
User's Manual 6-1

Check all cables to ensure that they are correctly and firmly attachedto the computer - loose cables can cause signal errors.Inspect all connecting cables for loose wires and all connectors forloose pins.Check that your disc media is correctly loaded
Always try to make detailed notes of your observations and keep them in apermanent error log - this helps you to describe your problems to TOSHIBASupport. In addition, if a problem recurs, the log you have made helps toidentify the problem faster.
Analyzing the problemSometimes the computer gives you clues that can help you identify why itis malfunctioning. In view of this, keep the following questions in mind:
Which part of the computer is not operating properly - keyboard,internal storage, display panel, Touch Pad, Touch Pad control buttons- as each device produces different symptoms.Check the options within the operating system to ensure that itsconfiguration is set properly.What appears on the display? Does it display any messages orrandom characters? Make a screenshot of the current display and, ifpossible, look up the messages in the documentation included with thecomputer, software, or operating system.Check that all connecting cables are correctly and firmly attached asloose cables can cause erroneous or intermittent signals.Do any indicators light, if so, which ones, what color are they and dothey stay on or blink? Write down what you see.Do you hear any beeps, if so how many, are they long or short and arethey high pitched or low pitched? In addition, is the computer makingany unusual noises? Write down what you hear.
Record your observations so you can describe them in detail to TOSHIBASupport.
Software The problems might be caused by your softwareor disk. If you cannot load a software package,the media might be damaged or the programmight be corrupted. In these instances, tryloading another copy of the software if possible.If an error message appears while you are usinga software package, you should refer to thedocumentation supplied with it as this usuallyincludes a problem-solving section or a summaryof error messages.Next, check any error messages against theoperating system documentation.
User's Manual 6-2

Hardware If you cannot find a software problem, you shouldthen check the setup and configuration of yourhardware. First run through the items in thepreliminary checklist as described previouslythen, if you still cannot correct the problem, try toidentify the source. The next section provideschecklists for individual components andperipherals.
Before using a peripheral device or application software that is not anauthorized TOSHIBA part or product, make sure that the device or softwarecan be used with your computer. Use of incompatible devices might causeinjury or might damage your computer.
If something goes wrongYour computer does not respond to the keyboard commands
If an error occurs and the computer does not respond to your keyboardcommands, do the following:
Press the power button and hold it down for five seconds. Once thecomputer has turned itself off, wait 10–15 seconds before turning onthe power again by pressing the power button.Insert a slender object, such as a needle into the force shut down holeon the tablet computer.
Your program stops responding
If you are working with a program that suddenly freezes all operations,chances are the program has stopped responding. You can exit the failedprogram without shutting down the operating system or closing otherprograms.To close a program that has stopped responding:1. Press CTRL, ALT, and DEL simultaneously (once), then click Task
Manager. The Windows Task Manager window appears.2. Select the program you want to close, then click End Task. Closing
the failed program should allow you to continue working. If it does not,continue with the next step.
3. Close the remaining programs one by one by selecting the programname, then End Task. Closing all programs should allow you tocontinue working. If it does not, power off your computer and thenrestart it.
The computer does not start
Make sure that you attached the AC adaptor and power cord/cableproperly.
User's Manual 6-3

If you are using the AC adaptor, check that the wall outlet is working byplugging in another device, such as a lamp.Verify that the computer is on by looking at the Power indicator.If the indicator is glowing, the computer is on. Also, try turning the computeroff and then on.If you are using an AC adaptor, verify that the computer is receiving powerfrom the external power source by looking at the Battery indicator. If theindicator is glowing, the computer is connected to a live external powersource.
The computer does not load advanced options duringstartup
By holding down one of the following keys or buttons during startup, yourcomputer can load the following advanced options.
Advanced option Key Button
BIOS utility F2 Volume down
Boot menu F12 Volume up
Recovery options 0 (zero) -
If your computer starts to load the Operating System instead of desiredadvanced options, do the following:
Make sure that fast startup is disabled in the Power Options by thefollowing steps:1. Click Control Panel -> System and Security -> Power Options underWindows System in the Apps view.2. Click Choose what the power button does or Choose what closing the lid does.3. Click Change settings that are currently unavailable.4. Deselect the Turn on fast startup check box from Shutdown settings.5. Click the Save changes button.
1. Click the power icon ( ) on the Start screen and then select Shut down.
2. While holding down the corresponding key or button, press the Powerbutton to turn on the power.
3. Follow the on-screen instructions to proceed.
Hardware and system checklistThis section discusses problems caused by your computer’s hardware orattached peripherals. Basic problems might occur in the following areas:
User's Manual 6-4

PowerKeyboardInternal display panelInternal StorageMemory Media CardPointing Device
USB deviceSound systemExternal monitorLANWireless LANBluetooth
PowerWhen the computer is not plugged into an AC power outlet, the batterypack is the primary power source. Your computer also has Real-TimeClock (RTC) function. All of the power resources are interrelated withanyone having the ability to produce apparent power problems.
Overheating power down
If the processor's temperature reaches an unacceptably high level witheither setting, the computer automatically shuts down to prevent anydamage. In this instance, all unsaved data in memory is lost.
Problem Procedure
Computer shutsdown automatically.
Leave the computer off until it reaches roomtemperature. If the computer has reached roomtemperature and it still does not start, or if it startsbut shuts down quickly, contact TOSHIBA Support.
AC power
If you have trouble turning on the computer with the AC adaptor connected,check the status of the DC IN/Battery indicator. Refer to the PowerCondition Descriptions section for further information.
Problem Procedure
AC adaptor does notpower the computer
Check the connections to make sure that thepower cord/adaptor is firmly connected to thecomputer and a working power outlet.Check the condition of the cord and terminals. Ifthe cord is frayed or damaged it should bereplaced, while if the terminals are soiled, theyshould be cleaned with a clean cotton cloth.If the AC adaptor still does not power thecomputer, you should contact TOSHIBA Support.
User's Manual 6-5

Battery
If you suspect a problem with the battery, check the status of the Batteryindicator or the Second Battery indicator.
Problem Procedure
Battery does notpower the computer
The battery might be discharged. Connect the ACadaptor to recharge the battery.
Battery does notcharge when the ACadaptor is attached.
If the battery is completely discharged, it will notbegin charging immediately. In these instances,wait a few minutes before trying again. If thebattery still does not charge, check that the poweroutlet the AC adaptor is connected to is supplyingpower. This can be tested by plugging anotherappliance into it.
Battery does notpower the computeras long as expected
If you frequently recharge a partially chargedbattery, the battery might not charge to its fullpotential. In these instances, you should fullydischarge the battery and then attempt to charge itagain.
Check the Power saver option under Choose or customize a power plan in the Power Options.
Real-Time Clock
Problem Procedure
The BIOS settingand system date/time are lost.
The lasting time of the Real-Time Clock (RTC) hasrun out. You must set the date and time in theTOSHIBA Setup Utility by using the followingsteps:1. Launch the BIOS setup utility.
Refer to the TOSHIBA Setup Utility section forfurther information.
2. Set the date in the System Date field.3. Set the time in the System Time field.4. Press F10 - a confirmation message is
displayed.5. Select Yes - the BIOS setup utility will end
and the computer will restart.
KeyboardKeyboard problems can be caused by the setup and configuration of thecomputer. Refer to the The Keyboard section for further information.
User's Manual 6-6

Problem Procedure
Output to screen isgarbled
Refer to your software documentation to ensurethat it is not remapping the keyboard in any way(remapping involves changing or reassigning thefunction of each key).If you are still unable to use the keyboard, youshould contact TOSHIBA Support.
Internal display panelApparent problems of the computer's display panel might be related tosetup and configuration of the computer.
Problem Procedure
No display Press the function keys to adjust the displaypriority, and to make sure that it is not set foroutput to an external monitor.
Markings appear onthe computer'sdisplay panel.
These marks might have come from contact withthe keyboard and Touch Pad while the displaypanel has been closed. Try to remove the marksby gently wiping the display panel with a clean drycloth or, if this fails, with a good quality LCD screencleaner. In this latter instance, you should alwaysfollow the instructions with the screen cleaner andalways ensure that you let the display panel dryproperly before closing it.
Internal Storage
Problem Procedure
Computer does notboot from theinternal storage
Check to see whether there is a disc in the externaloptical disc drive - if so remove it and try to startthe computer again.If this has no effect, check the Boot PriorityOptions setting within the TOSHIBA SystemSettings.
Memory Media CardFor further information, refer to Operating Basics.
User's Manual 6-7

Problem Procedure
Memory media carderror occurs
Remove the memory media card from thecomputer and then reinsert it to ensure that it isfirmly connected.If the problem persists, then you should refer to thedocumentation supplied with your memory mediacard for further information.
You cannot read afile
Check to ensure that the required file is actually onthe memory media card that is inserted into thecomputer.If you are still unable to resolve the problem,contact TOSHIBA Support.
Pointing deviceIf you are using a USB mouse, you should also refer to both the USBmouse section and the documentation supplied with your mouse.
Touch Pad
Problem Procedure
The Touch Pad doesnot work.
Check the Device Select settings by the followingsteps:1. Click Control Panel -> Hardware and Sound
-> Mouse under Windows System in theApps view.
2. In the Advanced tab, click Advanced feature settings... -> Device Select.
On-screen pointerdoes not respond topointing deviceoperation
In this instance, the system might be busy. Trymoving the mouse again after waiting a shortwhile.
Double-tapping(Touch Pad) doesnot work
In this instance, you should initially try changingthe double-click speed setting within the MouseControl utility.1. To access this utility, click Control Panel ->
Hardware and Sound -> Mouse underWindows System in the Apps view.
2. Within the Mouse Properties window, click theButtons tab.
3. Set the double-click speed as required andclick OK.
User's Manual 6-8

Problem Procedure
The on-screenpointer moves toofast or too slow
In this instance, you should initially try changingthe speed setting within the Mouse Control utility.1. To access this utility, click Control Panel ->
Hardware and Sound -> Mouse underWindows System in the Apps view.
2. Within the Mouse Properties window, click thePointer Options tab.
3. Set the pointer speed as required and clickOK.
The reaction ofTouch Pad is eithertoo sensitive or notsensitive enough.
Adjust the touch Sensitivity.To access it, click Control Panel -> Hardware and Sound -> Mouse under Windows System inthe Apps view.If you are still unable to resolve the problem,contact TOSHIBA Support.
USB mouse
Problem Procedure
On-screen pointerdoes not respond tomouse operation
In this instance, the system might be busy. Trymoving the mouse again after waiting a shortwhile.
Remove the mouse from the computer and thenreconnect it to a free USB port to ensure that it isfirmly attached.
Double-clicking doesnot work
In this instance, you should initially try changingthe double-click speed setting within the MouseControl utility.1. To access this utility, click Control Panel ->
Hardware and Sound -> Mouse underWindows System in the Apps view.
2. Within the Mouse Properties window, click theButtons tab.
3. Set the double-click speed as required andclick OK.
User's Manual 6-9

Problem Procedure
The on-screenpointer moves toofast or too slow
In this instance, you should initially try changingthe speed setting within the Mouse Control utility.1. To access this utility, click Control Panel ->
Hardware and Sound -> Mouse underWindows System in the Apps view.
2. Within the Mouse Properties window, click thePointer Options tab.
3. Set the pointer speed as required and clickOK.
The on-screenpointer moveserratically
The elements of the mouse responsible fordetecting movement might be dirty. Refer to thedocumentation supplied with the mouse forinstructions on how to clean it.If you are still unable to resolve the problem,contact TOSHIBA Support.
USB deviceIn addition to the information in this section, also refer to the documentationsupplied with your USB device.
Problem Procedure
USB device does notwork
Remove the USB device from the computer andthen reconnect it to a free port to ensure that it isfirmly attached.Ensure that any required USB device drivers areproperly installed. To achieve this, you should referto both the device documentation and theoperating system documentation.
Sound systemIn addition to the information in this section, also refer to the documentationsupplied with your audio device.
User's Manual 6-10

Problem Procedure
No sound is heard Press the function keys to increase or decreasevolume.Check the software volume settings.Check to see if Mute is turned to OffCheck to make sure that the headphoneconnection is secure.Check within the Windows Device Managerapplication to ensure that the sound device isenabled and that the device is properly working.
Annoying sound isheard
In this instance, you might be experiencingfeedback from either the internal microphone or anexternal microphone connected to the computer.Refer to Sound System and Video mode for furtherinformation.Volume cannot be adjusted during Windows startup or shut down.If you are still unable to resolve the problem,contact TOSHIBA Support.
External monitorAlso refer to Operating Basics, and to the documentation supplied withyour monitor for further information.
Problem Procedure
Monitor does notturn on
After confirming that the monitor's power switch ison, check the connections to make sure that thepower cord/adaptor is firmly connected to themonitor and to a working power outlet.
User's Manual 6-11

Problem Procedure
No display Try adjusting the contrast and brightness controlson the external monitor.Press the function key to change the displaypriority and ensure that it is not set for the internaldisplay only.Check to see if the external monitor is connected.When the external monitor is set as the primarydisplay device in extended desktop mode, it doesnot display when the computer wakes up fromSleep Mode if the external monitor has beendisconnected while in Sleep Mode.To keep this from happening, do not disconnectthe external monitor while the computer is in Sleepor Hibernation Mode.Remember to turn off the computer beforedisconnecting the external monitor.When the display panel and an external monitorare set to clone mode and they are turned off bythe timer, the display panel or the external monitormight not display when turned on again.If this occurs, press the function key to reset thedisplay panel and external monitor to clone mode.
Display error occurs Check that the cable connecting the externalmonitor to the computer is firmly attached.If you are still unable to resolve the problem,contact TOSHIBA Support.
LAN
Problem Procedure
Cannot access LAN Check for a firm cable connection between theLAN jack and the LAN hub.
User's Manual 6-12

Problem Procedure
Wake-up on LANdoes not work
Make sure the AC adaptor is connected. TheWake-up on LAN function consumes power evenwhen the system is off.Check to make sure that fast startup is disabled:1. Click Control Panel -> System and Security
-> Power Options under Windows Systemin the Apps view.
2. Click Choose what the power button doesor Choose what closing the lid does.
3. Click Change settings that are currently unavailable.
4. Clear the Turn on fast startup check box.5. Click the Save changes button.If problems persist, consult your LAN administrator.
Wireless LAN
Problem Procedure
Cannot accessWireless LAN
Make sure that the wireless communicationfunction of the computer is on.If problems persist, contact your LANadministrator.
Bluetooth
Problem Procedure
Cannot accessBluetooth device
Check to ensure that the wireless communicationfunction of the computer is on.Check to ensure that the Bluetooth Managerapplication is running on the computer and thatpower to the external Bluetooth device is turnedon.Check to ensure that no optional Bluetooth Adaptoris installed in the computer. The built-in Bluetoothhardware cannot operate simultaneously withanother Bluetooth controller.If you are still unable to resolve the problem,contact TOSHIBA Support.
User's Manual 6-13

TOSHIBA supportIf you require any additional help using your computer or if you are havingproblems operating the computer, you might need to contact TOSHIBA foradditional technical assistance.
Before you callSome problems you experience might be related to software or theoperating system so it is important that you investigate other sources ofassistance first. Before contacting TOSHIBA, try the following:
Review troubleshooting sections in the documentation supplied withyour software and/or peripheral devices.If a problem occurs when you are running software applications,consult the software documentation for troubleshooting suggestionsand consider calling the software company's technical supportdepartment for assistance.Consult the reseller or dealer from where you purchased yourcomputer and/or software - they are your best resource for currentinformation and support.
TOSHIBA technical supportIf you are still unable to solve the problem and suspect that it is hardware-related, visit TOSHIBA technical support websitehttp://www.toshiba.co.jp/worldwide/
User's Manual 6-14

Chapter 7
AppendixSpecifications
This section summarizes the technical specifications of the computer.
Physical DimensionsThe following physical dimensions do not include parts that extend beyondthe main body. The physical dimensions might vary depending on themodel you purchased.
Size Approximately 309.0 (w) x 215.2 (d) x 18.5/21.0 (h)millimeters (Z20t-B)Approximately 309.0 (w) x 199.9 (d) x 8.8 (h)millimeters (WT20-B)
(not including parts that extend beyond the main body).
Environmental Requirements
Conditions Ambient temperature Relative humidity
Operating 5°C (41°F) to 35°C(95°F)
20% to 80%(noncondensing)
Non-operating -20°C (-4°F) to 60°C(140°F)
10% to 90%(noncondensing)
Wet-bulb temperature 29°C maximum
Conditions Altitude (from sealevel)
Operating -60 to 3,000 meters
Non-operating -60 to 10,000 metersmaximum
Power Requirements
AC adaptor 100-240V AC50 Hz or 60 Hz (cycles per second)
User's Manual 7-1
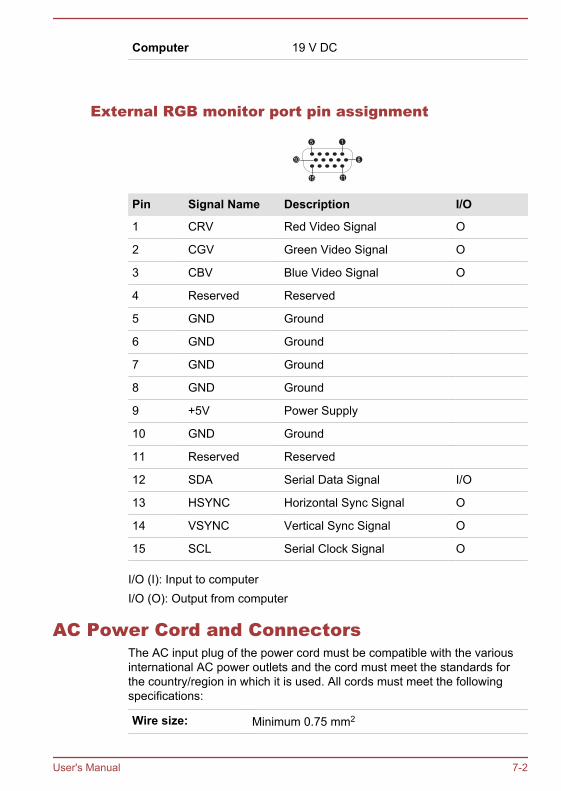
Computer 19 V DC
External RGB monitor port pin assignment
610
15
15 11
Pin Signal Name Description I/O
1 CRV Red Video Signal O
2 CGV Green Video Signal O
3 CBV Blue Video Signal O
4 Reserved Reserved
5 GND Ground
6 GND Ground
7 GND Ground
8 GND Ground
9 +5V Power Supply
10 GND Ground
11 Reserved Reserved
12 SDA Serial Data Signal I/O
13 HSYNC Horizontal Sync Signal O
14 VSYNC Vertical Sync Signal O
15 SCL Serial Clock Signal O
I/O (I): Input to computerI/O (O): Output from computer
AC Power Cord and ConnectorsThe AC input plug of the power cord must be compatible with the variousinternational AC power outlets and the cord must meet the standards forthe country/region in which it is used. All cords must meet the followingspecifications:
Wire size: Minimum 0.75 mm2
User's Manual 7-2

Current rating: Minimum 2.5 amperes
Certification agencies
China: CQC
U.S. and Canada: UL listed and CSA certifiedNo. 18 AWG, Type SVT or SPT-2
Australia: AS
Japan: DENANHO
Europe:
Austria: OVE Italy: IMQ
Belgium: CEBEC The Netherlands: KEMA
Denmark: DEMKO Norway: NEMKO
Finland: FIMKO Sweden: SEMKO
France: LCIE Switzerland: SEV
Germany: VDE United Kingdom: BSI
In Europe, two conductors power cord must be VDE type, H05VVH2-F orH03VVH2-F and for three conductors power cord must be VDE type,H05VV-F.For the United States and Canada, two-pin plug configuration must be a2-15P (250 V) or 1-15P (125 V) and three-pin plug configuration must be6-15P (250 V) or 5-15P (125 V) as designated in the U.S. NationalElectrical code handbook and the Canadian Electrical Code Part II.The following illustrations show the plug shapes for the U.S.A. andCanada, the United Kingdom, Australia, Europe, and China.
USA
UL approved
United Kingdom
BS approved
User's Manual 7-3

Australia
AS approved
Europe
Approved by the appropriateagency
Canada
CSA approved
China
CCC approved
Information for Wireless DevicesWireless Technology Interoperability
The Wireless LAN is compatible with other LAN systems Direct SequenceSpread Spectrum (DSSS) /Orthogonal Frequency Division Multiplexing(OFDM) radio technology, and is compliant to:
The IEEE 802.11 Standard on Wireless LANs (Revision a/b/g/n, b/g/nor Revision a/b/g/n/ac), as defined and approved by the Institute ofElectrical and Electronics Engineers.
Bluetooth® Modules are designed to be interoperable with any product withBluetooth wireless technology that is based on Frequency Hopping SpreadSpectrum (FHSS) radio technology, and is compliant to:
Bluetooth Specification (depending on the model you purchased), asdefined and approved by the Bluetooth Special Interest Group.Logo certification with Bluetooth wireless technology as defined by theBluetooth Special interest Group.
This Bluetooth product is not compatible with devices using BluetoothVersion 1.0B specifications.
The wireless devices have not completed verification of connection andoperation with all devices which are using the Wireless LAN or Bluetoothradio technology.Bluetooth and Wireless LAN devices operate within the same radiofrequency range and might interfere with one another. If you use Bluetoothand Wireless LAN devices simultaneously, you might occasionallyexperience a less than optimal network performance or even lose yournetwork connection.If you experience any such problem, immediately turn off either one of yourBluetooth or Wireless LAN.
User's Manual 7-4
If you have any questions about using Wireless LAN or Bluetooth Module,visithttp://www.pc.support.global.toshiba.comIn Europe, visithttp://www.toshiba-europe.com/computers/tnt/bluetooth.htm
Wireless Devices and your healthWireless products, like other radio devices, emit radio frequencyelectromagnetic energy. The level of energy emitted by Wireless productshowever is far much less than the electromagnetic energy emitted bywireless devices like for example mobile phones.Because Wireless products operate within the guidelines found in radiofrequency safety standards and recommendations, TOSHIBA believesWireless products are safe for use by consumers. These standards andrecommendations reflect the consensus of the scientific community andresult from deliberations of panels and committees of scientists whocontinually review and interpret the extensive research literature.In some situations or environments, the use of Wireless products may berestricted by the proprietor of the building or responsible representatives ofthe organization. These situations may for example include:
Using the Wireless products equipment on board of airplanes, orIn any other environment where the risk of interference to otherdevices or services is perceived or identified as harmful.
If you are uncertain of the policy that applies on the use of wireless devicesin a specific organization or environment (e.g. airports), you areencouraged to ask for authorization to use the Wireless device prior toturning on the equipment.
Wireless LAN TechnologyThe wireless communication function of the computer supports somewireless communication devices.Only some models are equipped with both Wireless LAN and Bluetoothfunctions.
Do not use the Wireless LAN (Wi-Fi) or Bluetooth functionalities near amicrowave oven or in areas subject to radio interference or magneticfields. Interference from a microwave oven or other source can disruptWi-Fi or Bluetooth operation.
User's Manual 7-5

Turn off all wireless functionalities when near a person who mighthave a cardiac pacemaker implant or other medical electric device.Radio waves might affect pacemaker or medical device operation,possibly resulting in serious injury. Follow the instruction for yourmedical device when using any wireless functionality.Always turn off wireless functionality if the computer is near automaticcontrol equipment or appliances such as automatic doors or firedetectors. Radio waves can cause malfunction of such equipment,possibly resulting in serious injury.It might not be possible to make a network connection to a specifiednetwork name using the ad hoc network function. If this occurs, thenew network (*) has to be configured for all computers connected tothe same network in order to re-enable network connections.* Make sure to use new network name.
Security
TOSHIBA strongly recommends that you enable encryptionfunctionality, otherwise your computer is open to illegal access by anoutsider using a wireless connection. If this occurs, the outsider mightillegally access your system, eavesdrop, or cause the loss ordestruction of stored data.TOSHIBA is not liable for the loss of data due to eavesdropping orillegal access through the wireless LAN and the damage thereof.
Card Specifications
Compatibility IEEE 802.11 Standard for Wireless LANs
Network OperatingSystem
Microsoft Windows Networking
Media AccessProtocol
CSMA/CA (Collision Avoidance) withAcknowledgment (ACK)
Radio Characteristics
Radio Characteristics of Wireless LAN module might vary according to:Country/region where the product was purchasedType of product
Wireless communication is often subject to local radio regulations.Although Wireless LAN wireless networking products have been designedfor operation in the license-free 2.4 GHz and 5 GHz band, local radioregulations might impose a number of limitations to the use of wirelesscommunication equipment.
User's Manual 7-6

Radio Frequency Band 5 GHz (5150-5850 MHz) (Revision aand n)Band 2.4 GHz (2400-2483.5 MHz) (Revisionb/g and n)
The range of the wireless signal is related to the transmit rate of thewireless communication. Communications at lower transmit range mighttravel larger distances.
The range of your wireless devices can be affected when theantennas are placed near metal surfaces and solid high-densitymaterials.Range is also impacted due to "obstacles" in the signal path of theradio that might either absorb or reflect the radio signal.
Radio Frequency Interference Requirements
This device is restricted to indoor use due to its operation in the 5.15 to5.25GHz frequency range.High-power radars are allocated as primary users (i.e. priority users) of thebands 5.25 to 5.35GHz and 5.65 to 5.85GHz and that these radars couldcause interference and/or damage to LE-LAN devices.
Bluetooth wireless technologySome computers in this series have Bluetooth wireless communicationfunction which eliminates the need for cables between electronic devicessuch as computers, printers, and mobile phones. When it is enabled,Bluetooth provides the wireless personal area network environment whichis safe and trustworthy, that is quick and easy.You cannot use the built-in Bluetooth functions of the computer and anexternal Bluetooth adaptor simultaneously. For reference, Bluetoothwireless technology has the following features:
Security
Two advanced security mechanisms ensure a high level of security:Authentication prevents access to critical data and makes it impossibleto falsify the origin of a message.Encryption prevents eavesdropping and maintains link privacy.
Worldwide operation
The Bluetooth radio transmitter and receiver operate in the 2.4 GHz band,which is license-free and compatible with radio systems in most countriesin the world.
User's Manual 7-7

Radio links
You can easily establish links between two or more devices, with theselinks being maintained even if the devices are not within a line-of-sight ofeach other.
Radio Regulatory InformationThe wireless device must be installed and used in strict accordance withthe manufacturer’s instructions as described in the user documentation thatcomes with the product. This product complies with the following radiofrequency and safety standards.
EuropeRestrictions for Use of 2400.0-2483.5MHz Frequencies in Europe
France: Outdoor uselimited to 10mWe.i.r.p. within theband2454-2483.5MHz
Military Radiolocation use.Refarming of the 2.4GHz band hasbeen ongoing in recent years toallow current relaxed regulation Fullimplementation planned 2012.
Italy: - For private use, a generalauthorization is required if WAS/RLAN’s are used outside ownpremises. For public use, a generalauthorization is required.
Luxembourg: Implemented General authorization required fornetwork and service supply.
Norway: Implemented This subsection does not apply forthe geographical area within aradius of 20 km from the centre ofNy-Alesund.
RussianFederation:
- Only for indoor applications.
Restrictions for Use of 5150-5350MHz Frequencies in Europe
Italy: - For private use, a generalauthorization is required if WAS/RLAN’s are used outside ownpremises.
Luxembourg: Implemented General authorization required fornetwork and service supply.
User's Manual 7-8

RussianFederation:
Limited e.i.r.p 100mW. Permitted to useonly for indoor applications, closedindustrial and warehouse areas,and on board aircraft.1. Permitted to use for local
networks of aircraft crewservice communications onboard aircraft in area of theairport and at all stages offlight.
2. Permitted to use for publicwireless access local networkson board aircraft during a flightat the altitude not less than3000m.
Restrictions for Use of 5470-5725MHz Frequencies in Europe
Italy: - For private use, a generalauthorization is required if WAS/RLAN’s are used outside ownpremises.
Luxembourg: Implemented General authorization required fornetwork and service supply
RussianFederation:
Limited e.i.r.p 100mW. Permitted to useonly for indoor applications, closedindustrial and warehouse areas,and on board aircraft.1. Permitted to use for local
networks of aircraft crewservice communications onboard aircraft in area of theairport and at all stages offlight.
2. Permitted to use for publicwireless access local networkson board aircraft during a flightat the altitude not less than3000m.
To remain in conformance with European spectrum usage laws forWireless LAN operation, the above 2.4GHz and 5GHz channel limitationsapply for outdoor usage. The user should use the Wireless LAN utility to
User's Manual 7-9

check the current channel of operation. If operation is occurring outside ofthe allowable frequencies for outdoor use, as listed above, the user mustcontact the applicable national spectrum regulator to request a license foroutdoor operation.
Canada - Industry Canada (IC)
This device complies with RSS-210 of the Industry Canada Rules.Operation is subject to the following two conditions: (1) This device may notcause harmful interference, and (2) this device must accept anyinterference received, including interference that may cause undesiredoperation.Ce dispositif est conforme à la norme CNR-210 d'Industrie Canadaapplicable aux appareils radio exempts de licence. Son fonctionnement estsujet aux deux conditions suivantes: (1) le dispositif ne doit pas produire debrouillage préjudiciable, et (2) ce dispositif doit accepter tout brouillagereçu, y compris un brouillage susceptible de provoquer un fonctionnementindésirable.Les dispositifs fonctionnant dans la bande 5.15-5.25GHz sont réservésuniquement pour une utilisation à l'intérieur afin de réduire les risques debrouillage préjudiciable aux systèmes de satellites mobiles utilisant lesmêmes canaux.Les utilisateurs devraient aussi être avisés que les utilisateurs de radars dehaute puissance sont désignés utilisateurs principaux (c.-à-d., qu'ils ont lapriorité) pour les bandes 5.25-5.35GHz et 5.65-5.85GHz et que ces radarspourraient causer du brouillage et/ou des dommages aux dispositifs LAN-EL.The term “IC” before the equipment certification number only signifies thatthe Industry Canada technical specifications were met.
USA-Federal Communications Commission (FCC)
This equipment has been tested and found to comply with the limits for aClass B digital device, pursuant to Part 15 of FCC Rules. These limits aredesigned to provide reasonable protection against harmful interference in aresidential installation.Refer to the FCC information section for the detailed information.This device and its antenna(s) must not be co-located or operating inconjunction with any other antenna or transmitter.
The radiated output power of the Wireless device is far below the FCCradio frequency exposure limits. Nevertheless, the Wireless device shall beused in such a manner that the potential for human contact during normaloperation is minimized.The installer of this radio equipment must ensure that the antenna islocated or pointed such that it does not emit RF field in excess of Health
User's Manual 7-10
Canada limits for the general population; consult Safety Code 6, obtainablefrom Health Canada’s website www.hc-sc.gc.ca
Taiwan
Article 12 Without permission granted by the NCC, anycompany, enterprise, or user is not allowed tochange frequency, enhance transmitting power oralter original characteristic as well as performanceto an approved low power radio frequency devices.
Article 14 The low power radio-frequency devices shall notinfluence aircraft security and interfere legalcommunications;If found, the user shall cease operatingimmediately until no interference is achieved.The said legal communications means radiocommunications is operated in compliance with theTelecommunications Act.The low power radio-frequency devices must besusceptible with the interference from legalcommunications or ISM radio wave radiateddevices.
Australia and New Zealand regulatory compliance
This equipment incorporates a radio transmitting device, in normal use aseparation distance of 20cm will ensure radio frequency exposure levelscomplies with the Australian and New Zealand Standards.
Using this equipment in Japan
In Japan, the frequency bandwidth of 2,400MHz to 2,483.5MHz for secondgeneration low-power data communication systems such as this equipmentoverlaps that of mobile object identification systems (premises radio stationand specified low-power radio station).
1. Important notice
The frequency bandwidth of this equipment may operate within the samerange as industrial devices, scientific devices, medical devices, microwaveovens, licensed radio stations and non-licensed specified low-power radiostations for mobile object identification systems (RFID) used in factoryproduction lines (Other Radio Stations).1. Before using this equipment, ensure that it does not interfere with any
of the equipment listed above.
User's Manual 7-11

2. If this equipment causes RF interference to other radio stations,promptly change the frequency being used, change the location ofuse, or turn off the source of emissions.
3. Contact an authorized TOSHIBA service provider if you haveproblems with interference caused by this product to Other RadioStations.
2. Indication for Wireless LAN
The indication shown below appears on this equipment.
(1)(2) (3)(4)
(5)
1. 2.4: This equipment uses a frequency of 2.4GHz.2. DS: This equipment uses DS-SS modulation.3. OF: This equipment uses OFDM modulation.4. 4: The interference range of this equipment is less than 40m.5. : This equipment uses a frequency bandwidth from 2,400MHz
to 2,483.5MHz. It is possible to avoid the band of mobile objectidentification systems.
3. Indication for Bluetooth
The indication shown below appears on this equipment.
(4)
(1) (2) (3)
1
1. 2.4: This equipment uses a frequency of 2.4 GHz.2. FH: This equipment uses FH-SS modulation.3. 1: The interference range of this equipment is less than 10m.4. : This equipment uses a frequency bandwidth from 2,400 MHz
to 2,483.5 MHz. It is impossible to avoid the band of mobile objectidentification systems.
4. About the JEITA
5GHz Wireless LAN supports W52/W53/W56 Channel.
User's Manual 7-12

Device AuthorizationThis device obtains the Technical Regulation Conformity Certification and itbelongs to the device class of radio equipment of low-power datacommunication system radio station stipulated in the TelecommunicationsBusiness Law of Japan.
Intel® Dual band Wireless-AC 7265
Intel® Dual band Wireless-N 7265
Intel® Wireless-N 7265The Name of the radio equipment: 7265NGWDSP Research, Inc.Approval Number: D140017003
Intel® Dual band Wireless-AC 3160The Name of the radio equipment: 3160NGWDSP Research, Inc.Approval Number: D130092003
The following restrictions apply:Do not disassemble or modify the device.Do not install the embedded wireless module into other device.
Radio approvals for wireless devicesThis equipment is approved to the radio standard by the countries/regionsin the following table.
If you use this equipment in the countries/regions which are not listed in thefollowing table, contact TOSHIBA Support.
As of November 2014
Austria Belgium Bulgaria Canada
Cyprus Czech Rep Denmark Estonia
Finland France Germany Greece
Hong Kong Hungary Iceland India
Ireland Italy Japan Korea
Latvia Liechtenstein Lithuania Luxemburg
Malta Monaco Netherlands Norway
Philippines Poland Portugal Romania
Slovak Republic Slovenia Spain Sweden
User's Manual 7-13

Switzerland UK USA
Information about Intel AMTYour computer might support Intel® Active Management Technology (AMT)depending on the model you purchased.Using built-in platform capabilities and popular third-party management andsecurity applications, Intel AMT allows IT to better discover, heal, andprotect their networked computing assets.Consult with your system administrator about configurations of the AMTfunction before connecting to a network.
Disable the AMT functionIntel AMT function is enabled by default, and in a situation where nosystem administrator presents, it is strongly recommended that you turn offthe AMT function before connecting to a network.If the AMT function is NOT turned off, there is a danger that themanagement of AMT function will be abused by other parties whichpossibly lead to the leak of sensitive and/or proprietary information,data loss, HDD erasure, or file overwritten.First, you must do the following in the BIOS setup utility:1. Turn on the computer while pressing the F2 key.2. On the BIOS setup utility screen, change AMT Setup Prompt to
Enabled.3. Press the F10 key, and press Y key to save the settings.When the computer restarts, the message “Press < Ctrl - P > to enterIntel(R) ME Setup” appears. Press CTRL + P to enter the MEBx Setup.To disable the AMT function, do the following:1. Select MEBx Login, and enter the default password “admin” in the
password field.
User's Manual 7-14
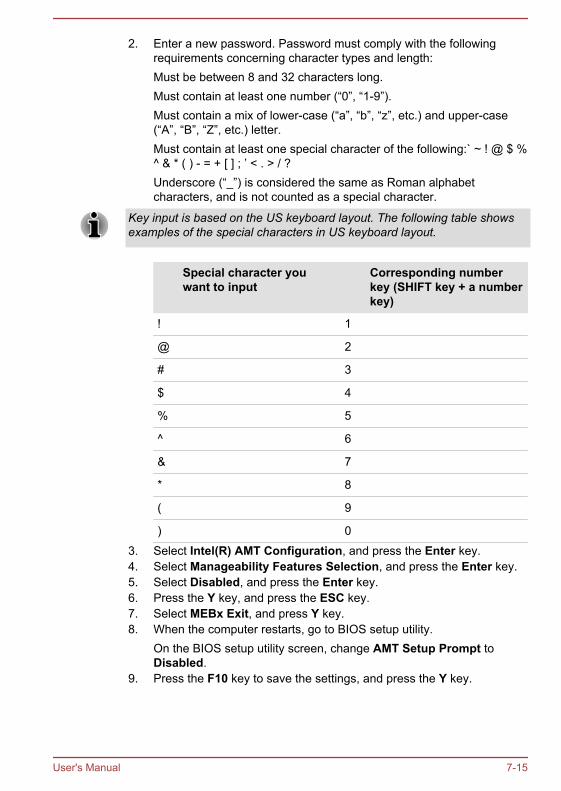
2. Enter a new password. Password must comply with the followingrequirements concerning character types and length:Must be between 8 and 32 characters long.Must contain at least one number (“0”, “1-9”).Must contain a mix of lower-case (“a”, “b”, “z”, etc.) and upper-case(“A”, “B”, “Z”, etc.) letter.Must contain at least one special character of the following:` ~ ! @ $ %^ & * ( ) - = + [ ] ; ’ < . > / ?Underscore (“_”) is considered the same as Roman alphabetcharacters, and is not counted as a special character.
Key input is based on the US keyboard layout. The following table showsexamples of the special characters in US keyboard layout.
Special character youwant to input
Corresponding numberkey (SHIFT key + a numberkey)
! 1
@ 2
# 3
$ 4
% 5
^ 6
& 7
* 8
( 9
) 0
3. Select Intel(R) AMT Configuration, and press the Enter key.4. Select Manageability Features Selection, and press the Enter key.5. Select Disabled, and press the Enter key.6. Press the Y key, and press the ESC key.7. Select MEBx Exit, and press Y key.8. When the computer restarts, go to BIOS setup utility.
On the BIOS setup utility screen, change AMT Setup Prompt toDisabled.
9. Press the F10 key to save the settings, and press the Y key.
User's Manual 7-15

When using the computer with the AC adaptor connected and theAMT function set to enabled, power might still be supplied to thesystem memory even when the computer power is turned off, or thecomputer is in Sleep Mode or Hibernation Mode.When connecting the AC adaptor, the computer is powered and canbe turned on. If the power is automatically turned off afterapproximately 5 to 7 seconds, it is because the RTC lasting time runsout, and the settings of AMT function have been cleared. This isnormal and not an error. If it occurs, the settings of AMT function mustbe reconfigured.If there is a problem when you start the computer, or initialize theManagement Engine (ME) firmware after the RTC lasting time runsout, the system will automatically reset itself during setup. This is thefunction of AMT configurations and is not an error.Enabling the AMT function might cause the network LAN Enable/Disable items to be no longer changeable in BIOS setup utility.Consult with your system administrator about details.When using the AMT function, TOSHIBA Keyboard Dock is required.When using MEBx, TOSHIBA Keyboard Dock or an external USBkeyboard is required.AMT function cannot be operated using a USB-LAN adaptor.
The useable system memory for models equipped with the AMT function is16 - 64 MB, less than that of models not equipped with the AMT function.The amount of the difference depends on the amount of memory installed.
Notes for system administratorsIntel AMT is enabled by default in the Management Engine (ME)firmware.Both the security of management console and the networkmanagement must be thoroughly implemented through managementof AMT function. Otherwise administrator privileges might be abusedby other parties which possibly lead to the leak of sensitive and/orproprietary information, data loss, HDD erasure, or file overwritten.The following functions are not supported:RPAT (Remote PC Assist Technology)Remote BIOS update
User's Manual 7-16
Legal FootnotesNon-applicable Icons
Certain computer chassis are designed to accommodate all possibleconfigurations for an entire product series. Therefore, be aware that yourselected model might not have all the features and specificationscorresponding to all of the icons or switches shown on the computerchassis.
CPUCentral Processing Unit (CPU) Performance Legal Footnotes.CPU performance in your computer product might vary from specificationsunder the following conditions:
use of certain external peripheral productsuse of battery power instead of AC poweruse of certain multimedia, computer generated graphics or videoapplicationsuse of standard telephone lines or low speed network connectionsuse of complex modeling software, such as high end computer aideddesign applicationsuse of several applications or functionalities simultaneouslyuse of computer in areas with low air pressure (high altitude >1,000meters or >3,280 feet above sea level)use of computer at temperatures outside the range of 5°C to 30°C(41–86°F) or >25°C (77°F) at high altitude (all temperature referencesare approximate and might vary depending on the specific computermodel - contact TOSHIBA support for details).
CPU performance might also vary from specifications due to designconfiguration.Under some conditions, your computer product might automaticallyshutdown. This is a normal protective feature designed to reduce the risk oflost data or damage to the product when used outside recommendedconditions. To avoid risk of lost data, always make back-up copies of databy periodically storing it on an external storage medium. For optimumperformance, use your computer product only under recommendedconditions. Read additional restrictions in your product documentation.Contact TOSHIBA technical service and support, refer to TOSHIBA supportsection for more information.
64-Bit Computing
Certain 32-bit device drivers and/or applications might not be compatiblewith a 64-bit CPU/operating system and therefore might not functionproperly.
User's Manual 7-17

Memory (Main System)Part of the main system memory might be used by the graphics system forgraphics performance and therefore reduce the amount of main systemmemory available for other computing activities. The amount of mainsystem memory allocated to support graphics might vary depending on thegraphics system, applications utilized, system memory size, and otherfactors.If your computer is configured with more than 3 GB memory, the memorymight be displayed as approximately 3 GB only (depending on thehardware specifications of the computer).This is correct because the operating system usually displays the availablememory instead of the physical memory (RAM) built into the computer.Various system components (like the video adapter’s GPU and PCIdevices like Wireless LAN, and so on) require their own memory space.Since a 32-bit operating system cannot address more than 4 GB ofmemory, these system resources overlap the physical memory. It is atechnical limitation that the overlapped memory is not available to theoperating system. Even though some tools might display the actualphysical memory built into your computer, the memory available to theoperating system is still approximately 3 GB only.Computers configured with a 64-bit operating system can address 4 GB ormore of system memory.
Battery LifeBattery life might vary considerably depending on product model,configuration, applications, power management settings, and featuresutilized, as well as the natural performance variations produced by thedesign of individual components. Published battery life numbers areachieved on select models and configurations tested by TOSHIBA at thetime of publication. Recharge time varies depending on usage. Batterymight not charge while computer is consuming full power.After going through many charge and discharge cycles, the battery loses itsability to perform at maximum capacity and needs to be replaced. This is anormal phenomenon for all batteries. To purchase a new battery pack, seethe accessories information that is shipped with your computer.
Internal Storage Capacity1 Gigabyte (GB) means 109 = 1,000,000,000 bytes using powers of 10.The computer operating system, however, reports storage capacity usingpowers of 2 for the definition of 1 GB = 230 = 1,073,741,824 bytes, andtherefore shows less storage capacity. Available storage capacity will alsobe less if the product includes one or more pre-installed operating systems,such as Microsoft Operating System and/or pre-installed softwareapplications, or media content. Actual formatted capacity might vary.
User's Manual 7-18
LCDOver a period of time, and depending on the usage of the computer, thebrightness of the LCD screen will deteriorate. This is an intrinsiccharacteristic of LCD technology.Maximum brightness is only available when operating in AC power mode.Screen dims when the computer is operated on battery power and youmight not be able to increase the brightness of the screen.
Graphics Processing Unit (GPU)Graphics processing unit (GPU) performance might vary depending onproduct model, design configuration, applications, power managementsettings and features utilized. GPU performance is only optimized whenoperating in AC power mode and might decrease considerably whenoperating in battery power mode.Total Available Graphics Memory is the total of, as applicable, DedicatedVideo Memory, System Video Memory and Shared System Memory.Shared System Memory varies depending on system memory size andother factors.
Wireless LANThe transmission speed over the wireless LAN and the distance over whichwireless LAN can reach might vary depending on surroundingelectromagnetic environment, obstacles, access point design andconfiguration, and client design and software/hardware configurations.The actual transmission speed is lower than the theoretical maximumspeed.
Copy ProtectionApplicable copy protection standards included in certain media mightprevent or limit recording or viewing of the media.
GlossaryThe terms in this glossary cover topics related to this manual. Alternatenaming is included for reference.Abbreviations
AC: Alternating Current
AMT: Intel Active Management Technology
ASCII: American Standard Code for InformationInterchange
BIOS: Basic Input/output System
BD-ROM: Blu-ray Disc Read-only Memory
User's Manual 7-19

bps: bits per second
CD: Compact Disc
CD-ROM: Compact Disc Read-only Memory
CD-RW: Compact Disc-rewritable
CMOS: Complementary Metal-oxide Semiconductor
CPU: Central Processing Unit
DC: Direct Current
DDR: Double Data Rate
DIMM: Dual Inline Memory Module
DVD: Digital Versatile Disc
DVD-R: Digital Versatile Disc-recordable
DVD-RAM: Digital Versatile Disc-random Access Memory
DVD-R DL: Digital Versatile Disc Recordable Dual Layer
DVD-ROM: Digital Versatile Disc-read Only Memory
DVD-RW: Digital Versatile Disc-rewritable
DVD+R DL: Digital Versatile Disc Recordable Double Layer
FAT: File Allocation Table
FCC: Federal Communications Commission
FHD: Full High Definition
GB: gigabyte
GBps: gigabytes per second
HD: High Definition
HD+: High Definition Plus
HDD: Hard Disk Drive
HDMI: High-definition Multimedia Interface
HDMI CEC: High-definition Multimedia Interface ConsumerElectronics Control
HTML: Hypertext Markup Language
IEEE: Institute of Electrical and Electronics Engineers
I/O: Input/Output
IRQ: interrupt request
ISP: Internet Service Provider
KB: kilobyte
LAN: Local Area Network
LCD: Liquid Crystal Display
User's Manual 7-20

LED: Light Emitting Diode
MB: megabyte
MBps: megabytes per second
MMC: MultiMediaCard
OCR: Optical Character Recognition (Reader)
PC: Personal Computer
PCI: Peripheral Component Interconnect
PCMCIA: Personal Computer Memory Card InternationalAssociation
RAM: Random Access Memory
RGB: Red, Green, and Blue
RFI: Radio Frequency Interference
ROM: Read-Only Memory
RTC: Real-Time Clock
S/P DIF: Sony/philips Digital Interface Format
SD: Secure Digital
SDHC: Secure Digital High Capacity
SDXC: Secure Digital Extended Capacity
SDRAM: Synchronous Dynamic Random Access Memory
SSD: Solid-State Drive
TFT: Thin-film Transistor
URL: Uniform Resource Locator
USB: Universal Serial Bus
WAN: Wide Area Network
WQHD: Wide Quad High Definition
www: World Wide Web
User's Manual 7-21

Index
AAC adaptor
additional 4-31connecting 2-11DC IN 19V jack 3-6, 3-10
ASCII characters 4-15
BBattery
extending life 4-19monitoring capacity 4-17save mode 5-6
Battery indicator 3-4, 3-14
Bluetooth 7-7
CCleaning the computer 1-17
Cooling vents 3-12
DDisplay
automatic power off 5-6screen 3-3
Documentation list 2-1
Dual Pointing DeviceTouch Pad 6-8
EEquipment checklist 2-1
External monitorproblems 6-11
GGraphics Processing Unit 3-13
HHDMI Micro port 3-5
HDMI out port 3-9
KKeyboard
function keys 4-12Function keys F1...F12 4-12problems 6-6Windows special keys 4-14
Keypad overlayArrow mode 4-14Numeric mode 4-14temporarily using normalkeyboard (overlay on) 4-14temporarily using overlay(overlay off) 4-14turning on the overlays 4-14
LLAN
User's Manual Index-1

cable types 4-22connecting 4-22
MMedia care
Card care 4-24
memory media cardinserting 4-24removing 4-25
Memory media slot 4-23
Moving the computer 1-17
PPassword
power on 5-6Starting the computer bypassword 5-9Supervisor 5-9user 5-8
Pointing DeviceAccuPoint 3-8, 4-5AccuPoint controlbuttons 4-6Touch Pad 3-7Pen 4-7
Powerconditions 3-14Hibernation Mode 2-18panel on/off 5-6Shut Down mode 2-16Sleep Mode 2-17turning off 2-16turning on 2-13
ProblemsAC power 6-5
Analyzing the problem 6-2Battery 6-6Dual Pointing device 6-8External monitor 6-11Hardware and systemchecklist 6-4Internal display panel 6-7Internal Storage 6-7Keyboard 6-6Memory Media Card 6-7Overheating powerdown 6-5Power 6-5Real-Time Clock 6-6Sound system 6-10TOSHIBA support 6-14Touch Pad 6-8USB device 6-10USB mouse 6-9
RRecovery Media 5-24
Recovery Partition 5-25
Restarting the computer 2-17
SSD/SDHC/SDXC Card
formatting 4-23note 4-23
Second Battery indicator 3-10,3-14
Security lock 4-30
SIM Cardinstalling 4-19removing 4-20
Sleep Modesetting 2-17System automatic 5-6
User's Manual Index-2

Sound systemproblems 6-10
SSDautomatic power off 5-6
TTOSHIBA Desktop Assist 5-1
TOSHIBA Display Utility 5-2
Touch Screen 4-3
UUSB device
problems 6-10
VVideo mode 4-33
Video RAM 3-13
WWeb Camera (back) 3-6
Web Camera (front) 3-2
Wireless communication 7-5
User's Manual Index-3