Your Gateway Remote Control User's...
40
Setting up Troubleshooting Your Gateway Remote Control user's guide
Transcript of Your Gateway Remote Control User's...

Setting up Troubleshooting
Your Gateway Remote Control
user'sguide


ContentsRemote Control User’s Guide . . . . . . . . . . . . . . . . . . . . . . . . . . . . . . . . . . . . . . . 1
Remote control buttons . . . . . . . . . . . . . . . . . . . . . . . . . . . . . . . . . . . . . . . . . . . . . . . 2Inserting batteries . . . . . . . . . . . . . . . . . . . . . . . . . . . . . . . . . . . . . . . . . . . . . . . . . . . 6Programming the remote control . . . . . . . . . . . . . . . . . . . . . . . . . . . . . . . . . . . . . . . . 7
Component program codes . . . . . . . . . . . . . . . . . . . . . . . . . . . . . . . . . . . . . . . . 8Searching for component codes . . . . . . . . . . . . . . . . . . . . . . . . . . . . . . . . . . . . 19Reassigning component buttons . . . . . . . . . . . . . . . . . . . . . . . . . . . . . . . . . . . 20Changing volume lock . . . . . . . . . . . . . . . . . . . . . . . . . . . . . . . . . . . . . . . . . . . 20Teaching the remote control new functions . . . . . . . . . . . . . . . . . . . . . . . . . . . 21
Changing OSD options . . . . . . . . . . . . . . . . . . . . . . . . . . . . . . . . . . . . . . . . . . . . . . 22Setting the sleep timer . . . . . . . . . . . . . . . . . . . . . . . . . . . . . . . . . . . . . . . . . . . 23Using parental controls . . . . . . . . . . . . . . . . . . . . . . . . . . . . . . . . . . . . . . . . . . . 24Setting a password . . . . . . . . . . . . . . . . . . . . . . . . . . . . . . . . . . . . . . . . . . . . . . 30
Troubleshooting . . . . . . . . . . . . . . . . . . . . . . . . . . . . . . . . . . . . . . . . . . . . . . . . . . . . 33
i

ii

1
Remote ControlUser’s GuideRead this guide to learn how to:
■ Identify the remote control buttons
■ Insert the batteries
■ Program the remote control
■ Use the remote control
■ Troubleshoot typical problems
© 2003 Gateway, Inc. All rights reserved. Gateway, Gateway Country, the Gateway stylized logo, and the black-and-white spot design are trademarks or registered trademarks of Gateway, Inc. in the United States and other countries. All other brands and product names are trademarks or registered trademarks of their respective companies.
1

Remote Control User’s Guide
Remote control buttonsButton Function
SETUP. Starts all programming sequences.
Remote LED. Blinks when the remote is being programmed or is sending a signal to your LCD TV.
POWER. Turns the selected component on and off.
Programs the remote control to recognize a component. For programming instructions, see “Programming the remote control” on page 7.
TV. Selects a programmed TV. Pre-programmed for your 23-inch or 26-inch LCD TV.
DVD. Selects a programmed DVD player. Pre-programmed for Gateway’s DVD player.
VCR. Selects a programmed VCR.
TV2. Selects a second programmed TV. Pre-programmed for Gateway’s 42-inch or 50-inch plasma TV.
CBL/SAT. Selects a programmed cable TV set-top box or selects a programmed satellite TV set-top box.
AMP. Selects a programmed amplifier.
CD. Selects a programmed CD player.
AUX. Selects a programmed component. Pre-programmed for Gateway’s Media Center PC.
2 www.gateway.com

Remote control buttons
Number button pad. Selects a channel or enters a password.
MUTE. Turns the sound on and off.
100. Scans four channels at a time in TV mode. Works as an Enter button in other video modes.
VOL. Turns volume up or down.
LAST. Recalls the previously viewed channel.
SLEEP. Turns on the sleep timer.
INPUT. Changes the input source.
CH. Changes the channel.
Button Function
3www.gateway.com

Remote Control User’s Guide
WIDE/GUIDE. Cycles through standard and widescreen viewing modes or accesses programming guides, such as the one that comes with a satellite dish. GUIDE does not work in TV mode.
INFO. Shows the current status of your LCD TV, such as the video input source, audio status, and channel number.
, , , . Navigates the on-screen display (OSD) menus.
OK. Works as the Enter button.
EXIT. Closes the component, guide, or OSD menus.
MENU. Enters the OSD menus.
Reverse. Rewinds the CD, DVD, or VCR when the component is activated with the remote control.
Play. Plays the CD, DVD, or VCR when the component is activated with the remote control.
Forward. Forwards the CD, DVD, or VCR when the component is activated with the remote control.
Record. Records the CD, DVD, or VCR when the component is activated with the remote control.
Stop. Stops the CD, DVD, or VCR when the component is activated with the remote control.
Pause. Pauses the CD, DVD, or VCR when the component is activated with the remote control.
Button Function
Universal Remote OFR-102.03
4 www.gateway.com

Remote control buttons
FREEZE. Freezes the display image.
ZOOM. Turns ZOOM mode on and off.
AUDIO. Selects STEREO, SAP, or MONO when in TV mode.
PIP. Turns picture-in-picture (PiP) mode on and off.
PIP mode does not work when parental controls are set.
YPbPr. Selects the component connected to component video connector as the input source.
CC. Turns CLOSED CAPTION mode on and off.
RGB. Selects the component connected to the RGB connector as the input source.
DVI. Selects the component connected to the DVI connector as the input source.
TV. Selects TV as the input source.
AV1. Selects the component connected to the AV1 connector as the input source.
AV2/S2. Selects the component connected to AV2 connector as the input source.
AV3. Selects the component connected to the AV3 connection as the input or output source.
Button Function
5www.gateway.com
Remote Control User’s Guide
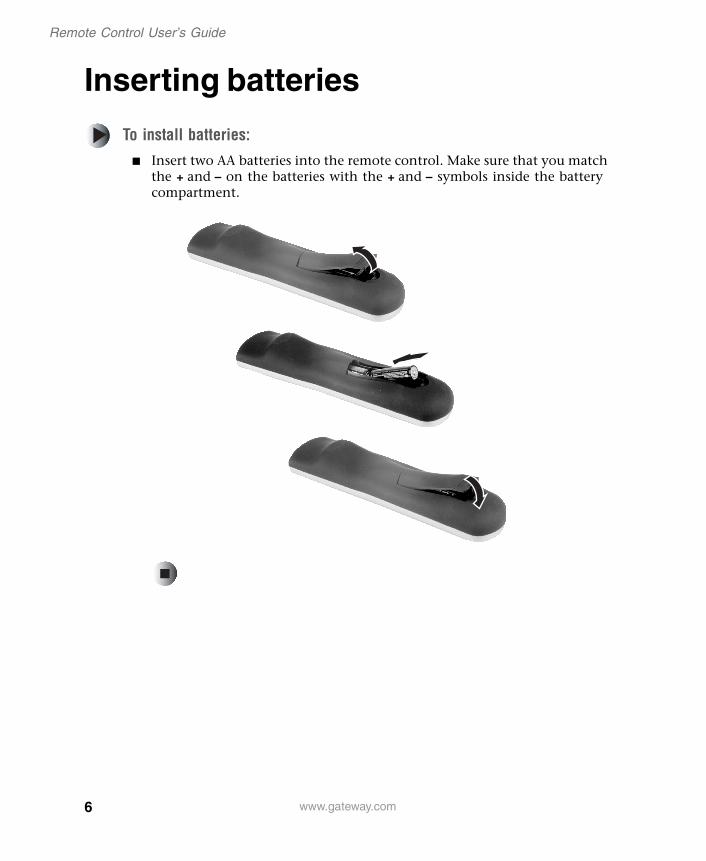
Inserting batteries
To install batteries:■ Insert two AA batteries into the remote control. Make sure that you match
the + and – on the batteries with the + and – symbols inside the battery compartment.
6 www.gateway.com

Programming the remote control
Programming the remote controlThe TV component button has been preset to work with your Gateway LCD TV (program code 0080). You can program the remote control to work with as may as seven other components.
To program the remote to control other components:1 Turn on the component.
2 Press the matching component button on the remote control.
3 Press and hold the SETUP button until the LED flashes twice.
4 Enter the programming code for the component and manufacturer. For a list of component programming codes, see “Component program codes” on page 8. If the code is accepted, the LED flashes twice after the last digit is entered.
If the LED does not flash twice, repeat Steps 2 through 4 with the next code listed for the component and manufacturer.
5 Point the remote control at the component and press the POWER button. The component should turn off.
Important Make sure that you try all the codes listed until you find the one that works for the component.
Tips & Tricks If you cannot find your manufacturer in the component list or the program code does not work, you can use the remote control to search for the correct component code. See “Searching for component codes” on page 19.
7www.gateway.com

Remote Control User’s Guide
Component program codesUse the codes in the following tables to program the remote control to work with your audio and video components.
Amplifier and tuner codes
Cable set-top box codes
Manufacturer Program Code Manufacturer Program Code
Bose 0674 Polk Audio 0892
GE 0078 Realistic 0395
Harman/Kardon 0892 Sony 0689
JVC 0331 Soundesign 0078
Marantz 0892 Victor 0331
Optimus 0395 Wards 0078
Philips 0892 Yamaha 0354
Manufacturer Program Code(s) Manufacturer Program Code(s)
ABC 0003, 0017 Philips 0305, 0317
Americast 0899 Pioneer 0144, 0533, 0877
Bell South 0899 Pulsar 0000
General Instrument 0276, 0476, 0810 Quasar 0000
Goldstar 0144 Regal 0273, 0279
Hamlin 0009, 0273 Runco 0000
Jerrold 0003, 0276, 0476, 0810 Samsung 0144
Memorex 0000 Scientific Atlanta 0017, 0477, 0877
Motorola 1106 Starcom 0003
Pace 0237 Toshiba 0000
Panasonic 0107, 0000 Zenith 0000, 0525, 0899
Paragon 0000
8 www.gateway.com

Programming the remote control
CD player codes
Manufacturer Program Code(s) Manufacturer Program Code(s)
Aiwa 0157 Parasound 0420
Burmester 0420 Philips 0157, 0626
California Audio Labs 0029 Pioneer 0032, 0468, 0305, 1062, 1063
Carver 0157, 0179 Polk Audio 0157
DKK 0000 Proton 0157
Denon 0003, 0873 QED 0157
Emerson 0305 Quasar 0029
Fisher 0179 RCA 0053, 0032, 1062, 0468, 0305, 0179
Garrard 0420 Realistic 0179, 0420
Genexxa 0032, 0305 Rotel 0157, 0420
Harman/Kardon 0157, 0173 SAE 0157
Hitachi 0032 Sansui 0157, 0305
JVC 0072 Sanyo 0179
Kenwood 0028, 0190, 0826, 0037, 0626, 0681
Scott 0305
Krell 0157 Sears 0305
LXI 0305 Sharp 0037, 0861
Linn 0157 Sherwood 1067
MCS 0029 Sonic Frontiers 0157
MTC 0420 Sony 0000, 0490
Magnavox 0157, 0305 Soundesign 0145
Marantz 0157, 0626, 0029 Tascam 0420
Mission 0157 Teac 0420
NSM 0157 Technics 0029
9www.gateway.com
Remote Control User’s Guide
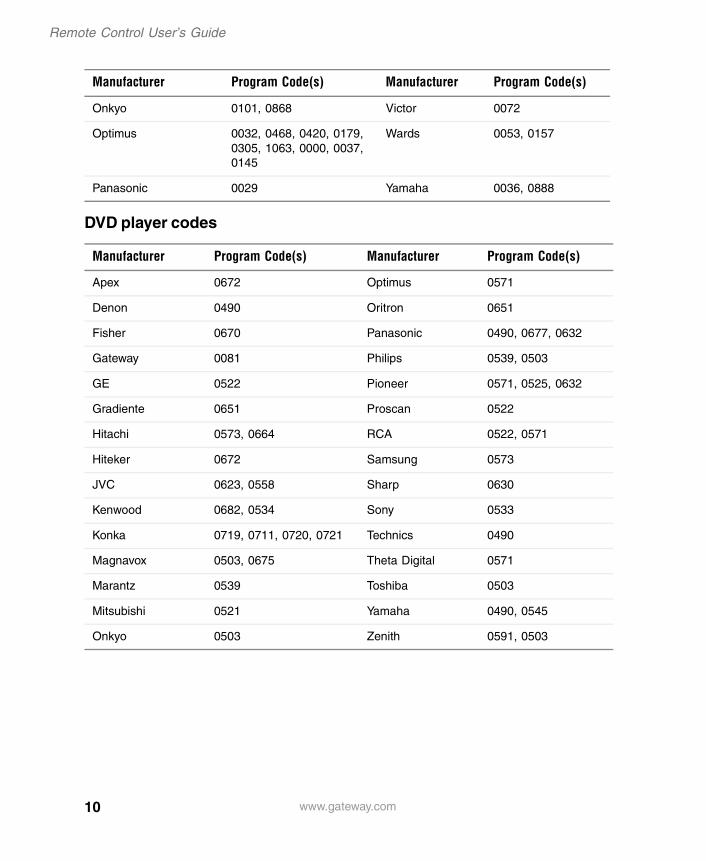
DVD player codes
Onkyo 0101, 0868 Victor 0072
Optimus 0032, 0468, 0420, 0179, 0305, 1063, 0000, 0037, 0145
Wards 0053, 0157
Panasonic 0029 Yamaha 0036, 0888
Manufacturer Program Code(s) Manufacturer Program Code(s)
Apex 0672 Optimus 0571
Denon 0490 Oritron 0651
Fisher 0670 Panasonic 0490, 0677, 0632
Gateway 0081 Philips 0539, 0503
GE 0522 Pioneer 0571, 0525, 0632
Gradiente 0651 Proscan 0522
Hitachi 0573, 0664 RCA 0522, 0571
Hiteker 0672 Samsung 0573
JVC 0623, 0558 Sharp 0630
Kenwood 0682, 0534 Sony 0533
Konka 0719, 0711, 0720, 0721 Technics 0490
Magnavox 0503, 0675 Theta Digital 0571
Marantz 0539 Toshiba 0503
Mitsubishi 0521 Yamaha 0490, 0545
Onkyo 0503 Zenith 0591, 0503
Manufacturer Program Code(s) Manufacturer Program Code(s)
10 www.gateway.com

Programming the remote control
Computer and Home automation codes
Receiver codes
Manufacturer Program Code Manufacturer Program Code
Gateway 1272 Security System 0167
GE 0240 Universal X10 0167
One For All 0167 X10 0167
Radio Shack 0240
Manufacturer Program Code(s) Manufacturer Program Code(s)
ADC 0531 Panasonic 0039, 1518
Aiwa 0121, 1405, 1089 Philips 1089, 1189, 1269
Bose 0238, 0639, 1229, 1253, 1355, 1356, 1357
Pioneer 0150, 0531, 0630, 1023
Capetronic 0531 Proscan 1254
Carver 1089, 1189 Quasar 0039
Denon 1160, 1104 RCA 1254, 0531, 1023
Harman/Kardon 0110 Sansui 1089
JBL 0110 Sharp 0186
JVC 0074 Sony 1158, 1058, 1258
Kenwood 1027, 0186, 1313, 1569, 1570
Soundesign 0670
MCS 0039 Sunfire 1313
Magnavox 1089, 0531, 1189 Technics 0039, 1308, 1518, 1309
Marantz 1189, 1089, 0039 Thorens 1189
Onkyo 0135 Victor 0074
Optimus 1023, 0186, 0531, 0670 Yamaha 0176, 0186, 1176
11www.gateway.com

Remote Control User’s Guide
Satellite set-top box codes
TV codes
Manufacturer Program Code(s) Manufacturer Program Code(s)
AlphaStar 0772 Next Level 0869
Chaparral 0216 Panasonic 0247, 0701
Echostar 0775, 1005 Philips 1076, 1142, 0722, 0724, 0749
Expressvu 0775 Proscan 0392
GE 0566 RCA 0566, 0392, 0143, 0855
General Instrument 0869 Radio Shack 0869
HTS 0775 Samsung 1109
Hitachi 0819 Sony 0639
Hughes Network Systems
0749, 1142, 1749 Star Choice 0869
JVC 0775 Toshiba 0749, 0790
Magnavox 0722, 0724 Uniden 0724, 0722
Memorex 0724 Zenith 0856
Mitsubishi 0749
Manufacturer Program Code(s) Manufacturer Program Code(s)
AOC 0019, 0030 Memorex 0179, 0463, 0178, 0016, 0056, 0150, 0154, 0250
Admiral 0093, 0463 Midland 0017, 0047, 0051
Aiko 0092 Mitsubishi 0150, 0178, 0019, 0093
Aiwa 0701 Motorola 0093
Akai 0030 Multitech 0180
Alaron 0179 NAD 0156, 0166, 0178
America Action 0180 NEC 0030, 0019, 0056
Anam 0180 NTC 0092
12 www.gateway.com
Programming the remote control
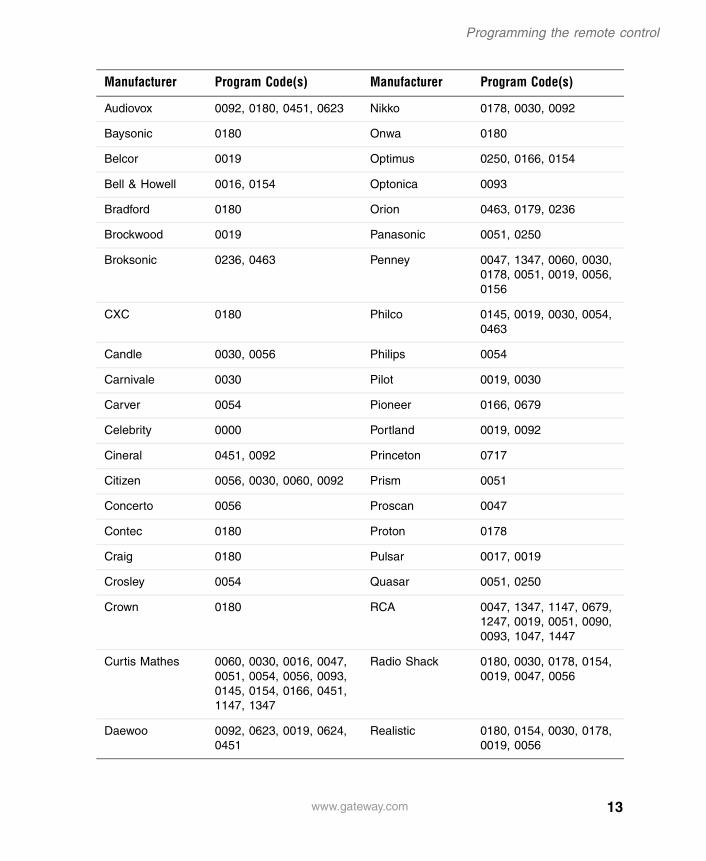
Audiovox 0092, 0180, 0451, 0623 Nikko 0178, 0030, 0092
Baysonic 0180 Onwa 0180
Belcor 0019 Optimus 0250, 0166, 0154
Bell & Howell 0016, 0154 Optonica 0093
Bradford 0180 Orion 0463, 0179, 0236
Brockwood 0019 Panasonic 0051, 0250
Broksonic 0236, 0463 Penney 0047, 1347, 0060, 0030, 0178, 0051, 0019, 0056, 0156
CXC 0180 Philco 0145, 0019, 0030, 0054, 0463
Candle 0030, 0056 Philips 0054
Carnivale 0030 Pilot 0019, 0030
Carver 0054 Pioneer 0166, 0679
Celebrity 0000 Portland 0019, 0092
Cineral 0451, 0092 Princeton 0717
Citizen 0056, 0030, 0060, 0092 Prism 0051
Concerto 0056 Proscan 0047
Contec 0180 Proton 0178
Craig 0180 Pulsar 0017, 0019
Crosley 0054 Quasar 0051, 0250
Crown 0180 RCA 0047, 1347, 1147, 0679, 1247, 0019, 0051, 0090, 0093, 1047, 1447
Curtis Mathes 0060, 0030, 0016, 0047, 0051, 0054, 0056, 0093, 0145, 0154, 0166, 0451, 1147, 1347
Radio Shack 0180, 0030, 0178, 0154, 0019, 0047, 0056
Daewoo 0092, 0623, 0019, 0624, 0451
Realistic 0180, 0154, 0030, 0178, 0019, 0056
Manufacturer Program Code(s) Manufacturer Program Code(s)
13www.gateway.com

Remote Control User’s Guide
Daytron 0019 Runco 0017, 0030
Denon 0145 SSS 0019, 0180
Dumont 0017, 0019 Sampo 0030
Electroband 0000 Samsung 0060, 0019, 0178, 0030, 0056
Emerson 0236, 0180, 0178, 0179, 0463, 0624, 0623, 0019, 0154
Sansei 0451
Envision 0030 Sansui 0463
Fisher 0154 Sanyo 0154
Fujitsu 0179, 0683 Scimitsu 0019
Funai 0180, 0171, 0179 Scotch 0178
Futuretech 0180 Scott 0236, 0019, 0178, 0179, 0180
Gateway 0072, 0080 Sears 0154, 0056, 0156, 0047, 0054, 0171, 0178, 0179
GE 0047, 1347, 0051, 0178, 0451, 1147, 0093
Semivox 0180
Gibralter 0017, 0019, 0030 Semp 0156
GoldStar 0178, 0019, 0030, 0056 Sharp 0093, 0688
Gradiente 0056, 0053 Shogun 0019
Grunpy 0179, 0180 Signature 0016
Hallmark 0178 Sony 0000
Harley Davidson 0179 Soundesign 0178, 0179, 0180
Harman/Kardon 0054 Squareview 0171
Harvard 0180 Starlite 0180
Hitachi 0145, 0056, 0016 Supreme 0000
Infinity 0054 Sylvania 0054, 0030
Manufacturer Program Code(s) Manufacturer Program Code(s)
14 www.gateway.com

Programming the remote control
Inteq 0017 Symphonic 0171, 0180
JBL 0054 TMK 0056, 0178
JCB 0000 TNCi 0017
JVC 0053 Tandy 0093
KEC 0180 Technics 0051, 0250
KTV 0180, 0030 Technol Ace 0179
Kenwood 0030, 0019 Techwood 0051, 0056
Konka 0707, 0632, 0628, 0638, 0703
Teknika 0016, 0054, 0179, 0180, 0019, 0092, 0056, 0060, 0150
LG 0056 Telefunken 0056
LXI 0154, 0047, 0054, 0156, 0178
Toshiba 0156, 0060, 0154, 1256
Logik 0016 Vector Research 0030
Luxman 0056 Victor 0053
MGA 0150, 0019, 0030, 0178 Vidikron 0054
MTC 0060, 0030, 0019, 0056 Vidtech 0019, 0178
Magnavox 0054, 0030, 0179, 1254 Wards 0054, 0178, 0016, 0019, 0030, 0056, 0179
Majestic 0016 White Westinghouse
0624, 0623, 0463
Marantz 0054, 0030 Yamaha 0019, 0030
Matsushita 0250 Zenith 0017, 0624, 0016, 0092, 0463
Megatron 0145, 0178
Manufacturer Program Code(s) Manufacturer Program Code(s)
15www.gateway.com
Remote Control User’s Guide
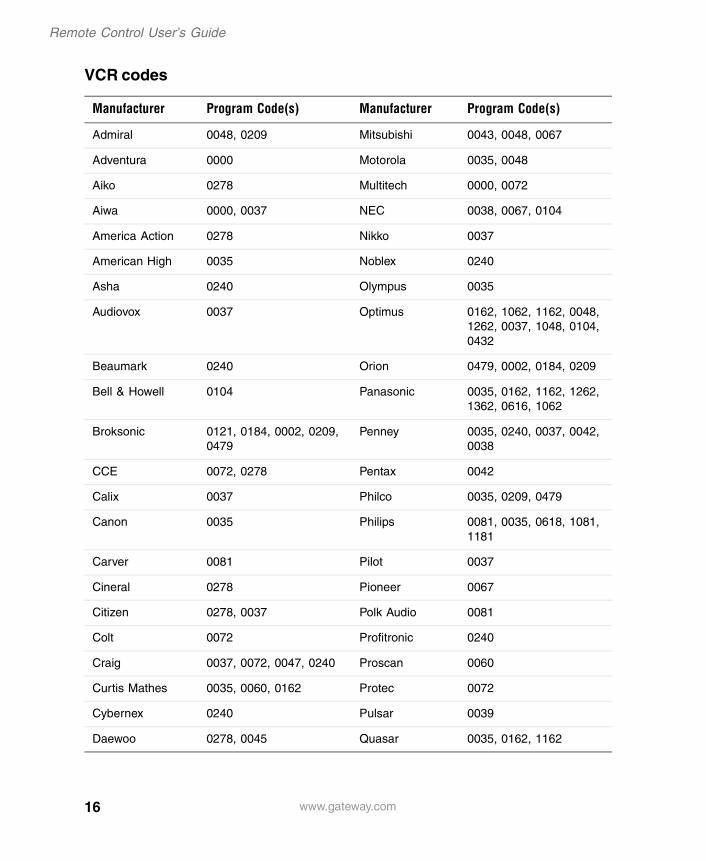
VCR codes
Manufacturer Program Code(s) Manufacturer Program Code(s)
Admiral 0048, 0209 Mitsubishi 0043, 0048, 0067
Adventura 0000 Motorola 0035, 0048
Aiko 0278 Multitech 0000, 0072
Aiwa 0000, 0037 NEC 0038, 0067, 0104
America Action 0278 Nikko 0037
American High 0035 Noblex 0240
Asha 0240 Olympus 0035
Audiovox 0037 Optimus 0162, 1062, 1162, 0048, 1262, 0037, 1048, 0104, 0432
Beaumark 0240 Orion 0479, 0002, 0184, 0209
Bell & Howell 0104 Panasonic 0035, 0162, 1162, 1262, 1362, 0616, 1062
Broksonic 0121, 0184, 0002, 0209, 0479
Penney 0035, 0240, 0037, 0042, 0038
CCE 0072, 0278 Pentax 0042
Calix 0037 Philco 0035, 0209, 0479
Canon 0035 Philips 0081, 0035, 0618, 1081, 1181
Carver 0081 Pilot 0037
Cineral 0278 Pioneer 0067
Citizen 0278, 0037 Polk Audio 0081
Colt 0072 Profitronic 0240
Craig 0037, 0072, 0047, 0240 Proscan 0060
Curtis Mathes 0035, 0060, 0162 Protec 0072
Cybernex 0240 Pulsar 0039
Daewoo 0278, 0045 Quasar 0035, 0162, 1162
16 www.gateway.com

Programming the remote control
Denon 0042 RCA 0060, 0149, 0042, 0035, 0048, 0240
Dynatech 0000 Radio Shack 0000, 1037
Electrohome 0037 Radix 0037
Electrophonic 0037 Randex 0037
Emerex 0032 Realistic 0000, 0104, 0047, 0048, 0037, 0035
Emerson 0184, 0002, 0209, 0278, 0121, 0479, 0000, 0037, 0043
ReplayTV 0614, 0616
Fisher 0047, 0104 Runco 0039
Fuji 0033, 0035 STS 0042
Funai 0000 Samsung 0045, 0240
GE 0035, 0060, 0048, 0240 Sanky 0039, 0048
Garrard 0000 Sansui 0479, 0000, 0067, 0209
Go Video 0432 Sanyo 0047, 0104, 0240
GoldStar 0037, 0038 Scott 0184, 0121, 0043, 0045
Gradiente 0000 Sears 0037, 0042, 0000, 0035, 0047, 0104
HI-Q 0047 Semp 0045
Harley Davidson 0000 Sharp 0048
Harman/Kardon 0038, 0081 Shintom 0072
Harwood 0072 Shogun 0240
Hitachi 0042, 0000 Singer 0072
Hughes Network Systems
0042 Sony 0033, 0032, 0000, 0035, 0636, 1032
JVC 0067 Sylvania 0035, 0081, 0000, 0043
KEC 0037, 0278 Symphonic 0000
Manufacturer Program Code(s) Manufacturer Program Code(s)
17www.gateway.com

Remote Control User’s Guide
KLH 0072 TMK 0240
Kenwood 0067, 0038 Teac 0000
Kodak 0035, 0037 Technics 0035, 0162
LXI 0037 Teknika 0000, 0035, 0037
Lloyd's 0000 Thomas 0000
Logik 0072 Tivo 0618, 0636
MEI 0035 Toshiba 0045, 0043
MGA 0043, 0240 Totevision 0037, 0240
MGN Technology 0240 Unitech 0240
MTC 0000, 0240 Vector 0045
Magnasonic 0278 Vector Research 0038
Magnavox 0035, 0081, 0563, 0000, 0039, 0149
Video Concepts 0045
Magnin 0240 Videosonic 0240
Marantz 0081, 0035 Wards 0035, 0060, 0000, 0047, 0240, 0042, 0048, 0072, 0081, 0149
Marta 0037 White Westinghouse
0072, 0278, 0209
Matsushita 0035, 0162 XR-1000 0072, 0000, 0035
Memorex 0104, 0047, 0479, 0000, 0037, 0048, 0035, 0240, 1037, 0039, 0162, 0209, 1162, 1262
Yamaha 0038
Minolta 0042 Zenith 0039, 0000, 0033, 0209, 0479
Manufacturer Program Code(s) Manufacturer Program Code(s)
18 www.gateway.com

Programming the remote control
Searching for component codesIf you cannot find your manufacturer in the component list or the program code does not work, you can use the remote control to search for the correct component code.
To search for a component code:
1 Turn on the component.
2 Press the matching component button on the remote control.
3 Press and hold the SETUP button until the LED flashes twice.
4 Press 9 9 1. The LED flashes twice.
5 Point the remote control at the component and alternate between pressing the POWER button and the component button on the remote control until the component turns off.
If the component still does not respond, clear the component button, then repeat the search procedure.
To clear the component button:
1 Make sure that the component is turned on.
2 Press and hold the SETUP button on the remote control until the LED flashes twice.
3 Press 9 9 2, then press the component button on the remote control twice.
19www.gateway.com

Remote Control User’s Guide
Reassigning component buttonsYou can reassign the component buttons on the remote control if you have more than one of the same type of component.
Example:If you are using the remote to control the cable (CBL), DVD, TV, and two VCRs, you can reassign the CD button as a second VCR button.
To reassign component buttons:
1 Press and hold the SETUP button until the LED flashes twice.
2 Press 9 9 2. The LED flashes twice.
3 Press the component button that you want (VCR) once, then press the component button that you are reassigning (CD) once. The CD button is now reassigned and can be programmed as a VCR component button. See “Programming the remote control” on page 7.
Changing volume lockThe remote control can be set to control volume through your TV while in cable (CBL), DVD, CD, and VCR component modes. Use the volume lock if you want to control the volume for all components through a specific component.
Example:You want to control volume for all components through the receiver (AUX).
To change the volume lock:1 Press and hold the SETUP button until the LED flashes twice.
2 Press 9 9 3. The LED flashes twice.
3 Press the component button that you want (AUX) once. The LED flashes twice. Volume will now be controlled through the receiver for all components.
20 www.gateway.com

Programming the remote control
Teaching the remote control new functionsThe remote control can learn up to 25 additional functions from the component’s original remote control.
Example:Your DVD player remote control has a scan function that you may use frequently. There is not a scan button on the remote control. You can assign a button and use the DVD remote to teach the remote control the scan function.
To teach the remote control a new function:
1 Press and hold the SETUP button on the remote control until the LED flashes twice.
2 Press 9 7 5. The LED flashes twice.
3 Press the component button that you want (DVD) once.
4 Press the button on the LCD TV remote control that you are assigning the new function to. The LED flashes quickly while it is waiting to receive the signal from the teaching remote control.
5 Hold the teaching remote control approximately 1-inch (2.54 cm) from the LCD TV remote control making sure that the infrared ports are lined up, then press the button on the teaching remote control that you want the remote control to learn. The LED flashes twice.
6 Press the SETUP button to exit learning mode.
Important Make sure that you have already programmed the remote control for the component. See “Programming the remote control” on page 7.
Make sure that area lighting is not too bright or it will interfere with the learning process.
21www.gateway.com
Remote Control User’s Guide
Changing OSD optionsYour LCD TV features an on-screen display (OSD) that lets you adjust and save contrast, brightness, and other settings. Your LCD TV saves changes you make to the settings, even if you turn off your TV. See the documentation that came with your LCD TV for more information about the OSD.
To access the OSD with the remote control:1 Press the TV component button.
2 Press the MENU button on the remote control to open the OSD.
3 Press the and buttons to select the menu you want.
4 Press the OK button to open the menu.
5 Press the and buttons to select the menu you want to change.
6 Press the and buttons to change settings.
7 Press the OK button to return to the previous menu option.
- OR -
Press the EXIT button to close the OSD.
22 www.gateway.com

Changing OSD options
Setting the sleep timerSet the sleep timer using the remote control. The sleep timer lets you set a time delay to turn off your LCD TV automatically.
You can set the sleep timer using the remote control or the OSD.
To set the sleep timer:
1 Press the TV component button.
2 Press the SLEEP button on the remote control. The sleep timer appears at the top of your screen.
3 Press the SLEEP button one or more times to select the time you want.
4 Press the EXIT button to hide the sleep timer display. Your sleep timer is now running in the background.
To turn off the sleep timer:
■ Press the SLEEP button repeatedly until Sleep OFF appears.
23www.gateway.com

Remote Control User’s Guide
Using parental controlsThe parental controls feature prevents viewers from watching programs that are not age-appropriate, such as programs containing violence or adult language.
The Status option in the OSD must be ON for parental controls to be in effect.
You can set parental control locks using:
■ MPAA
■ TV Guidelines
■ Can. English TV
■ Can. French TV
To set the parental controls using MPAA:
1 Press the MENU button on the remote control to open the OSD.
2 Press the and buttons to select the Setup menu, then press the OK button to open the menu.
Important PiP modes will not work when parental controls are turned on.
Setup Menu
Closed Caption [OFF]
Parental Controls
TV System [Air]
Auto Search
Manual Search
Move Setting Return EXIT
24 www.gateway.com

Changing OSD options
3 Press the and buttons to select the Parental Controls sub-menu, then press the OK button to open the sub-menu.
4 Use the number pad to enter your password if prompted.
If you have not set a password, enter 0000. For more information about setting a password, see “Setting a password” on page 30.
Parental Controls
Status [OFF]
MPAA
TV Guidelines
Can. English TV
Can. French TV
Change Password
Move Setting Return EXIT
Password
Please Input Password
_ _ _ _
25www.gateway.com

Remote Control User’s Guide
5 Press the and buttons to select the MPAA option, then press OK to open the option menu.
6 Press the and buttons to select each option, then press the button to select Block or Unblock.
This option lets you block the following MPAA movie ratings:
■ G (general audience)
■ PG (parental guidance suggested)
■ PG-13 (recommended for children 13 years of age and older)
■ R (mature audience)
■ NC-17 (no one under 17 years of age)
■ X (no one under 17 years of age)
7 Press the EXIT button when you are finished making changes to this option.
MPAA
G [Unblock]
PG [Unblock]
PG-13 [Unblock]
R [Unblock]
NC-17 [Unblock]
X [Unblock]
Move Setting Return EXIT
26 www.gateway.com

Changing OSD options
To set the parental controls using TV Guidelines:1 Press the MENU button on the remote control to open the OSD.
2 Press the and buttons to select the Setup menu, then press the OK button to open the menu.
3 Press the and buttons to select the Parental Controls sub-menu, then press the OK button to open the sub-menu.
Setup Menu
Closed Caption [OFF]
Parental Controls
TV System [Air]
Auto Search
Manual Search
Move Setting Return EXIT
Parental Controls
Status [OFF]
MPAA
TV Guidelines
Can. English TV
Can. French TV
Change Password
Move Setting Return EXIT
27www.gateway.com

Remote Control User’s Guide
4 Use the number pad to enter your password if prompted.
If you have not set a password, enter 0000. For more information about setting a password, see “Setting a password” on page 30.
5 Press the and buttons to select the TV Guidelines option menu, then pressthe OK button to open the option menu.
6 Press the and buttons to select each option, then press the button to change the settings.
This option menu lets you block TV program ratings. You can also block programs using the Block Content option.
Password
Please Input Password
_ _ _ _
TV Guidelines
TV-Y [Unblock]
TV-Y7 [Unblock]
TV-G [Unblock]
TV-PG [Unblock]
TV-14 [Unblock]
TV-MA [Unblock]
Block Content
Move Setting Return EXIT
28 www.gateway.com

Changing OSD options
7 Press the and buttons to select the Block Content option menu, then press the OK button to open the option menu.
8 Press the and buttons to select each option, then press the button to select Block or Unblock.
This option menu lets you block programs by content:
■ FV (fantasy violence)
■ V (general violence)
■ S (sexual situations)
■ L (adult language)
■ D (sexual dialog)
9 Press the EXIT button when you are finished making changes to this option.
TV Parental Guidelines
FV [Unblock]
V [Unblock]
S [Unblock]
L [Unblock]
D [Unblock]
Move Setting Return EXIT
29www.gateway.com

Remote Control User’s Guide
Setting a passwordYou control access to the parental controls with a password. The default password is 0000. You can change the password to any four-digit number.
To set or change a password:
1 Press the MENU button on the remote control to open the OSD.
2 Press the and buttons to select the Setup menu, then press the OK button to open the menu.
3 Press the and buttons to select the Parental Controls sub-menu, then press the OK button to open the sub-menu.
Setup Menu
Closed Caption [OFF]
Parental Controls
TV System [Air]
Auto Search
Manual Search
Move Setting Return EXIT
Parental Controls
Status [OFF]
MPAA
TV Guidelines
Can. English TV
Can. French TV
Change Password
Move Setting Return EXIT
30 www.gateway.com
Changing OSD options
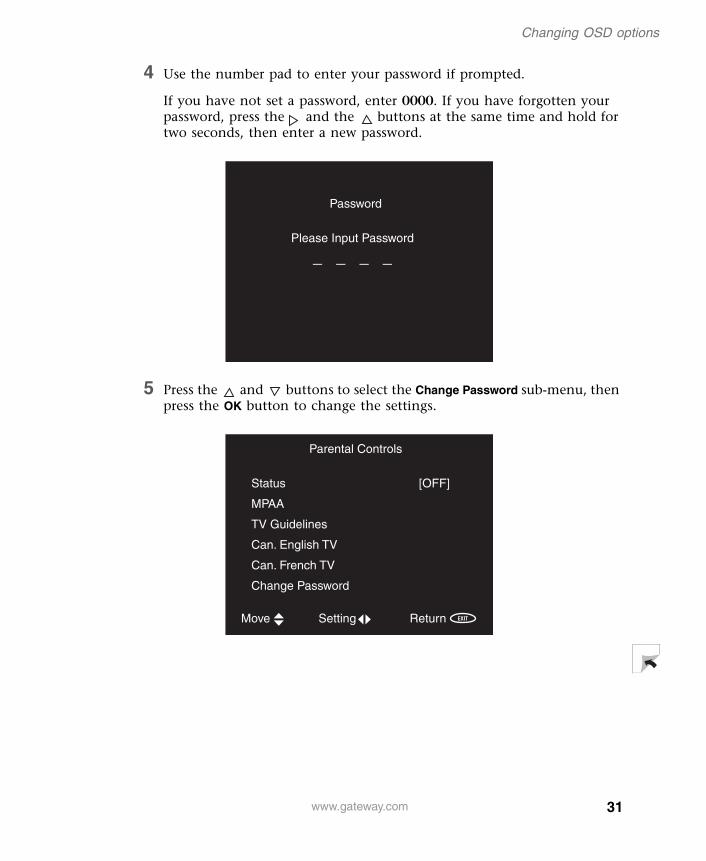
4 Use the number pad to enter your password if prompted.
If you have not set a password, enter 0000. If you have forgotten your password, press the and the buttons at the same time and hold for two seconds, then enter a new password.
5 Press the and buttons to select the Change Password sub-menu, then press the OK button to change the settings.
Password
Please Input Password
_ _ _ _
Parental Controls
Status [OFF]
MPAA
TV Guidelines
Can. English TV
Can. French TV
Change Password
Move Setting Return EXIT
31www.gateway.com

Remote Control User’s Guide
6 Use the number button pad to enter a new four-digit password when prompted.
7 Re-enter the new four-digit password.
8 Press the EXIT button to close the OSD.
Password
Enter New Password
_ _ _ _
Reconfirm New Password
_ _ _ _
32 www.gateway.com

Troubleshooting
TroubleshootingUse the following information to solve common problems.
The LED does not blink when a button is pressed.■ Replace the batteries. See “Inserting batteries” on page 6.
The LED blinks when a component mode is pressed, but the component does not respond.
■ Make sure that you are less than 15 feet (4.57 meters) from the infrared remote sensors on the component.
■ Make sure that nothing is blocking the infrared remote sensors on the remote control or the component.
■ Make sure that the remote is programmed for that component. See “Programming the remote control” on page 7.
The remote control will not accept the component program code.■ Make sure that you followed all the steps in the programming procedure.
See “Programming the remote control” on page 7.
■ Make sure that you tried all the program codes listed for the component manufacturer. See “Component program codes” on page 8.
■ Search for the component code. See “Searching for component codes” on page 19.
33www.gateway.com
Remote Control User’s Guide
34 www.gateway.com


MAN 23/36" LCD REMOTE GDE R0 10/03


![KÍCH THƯ˚C [Unit: : mm (inches)]samsunvina.com/public/uploads/files/PaX-i3D Smart/PaX-i3D...PaX-i3D Smart _ S cˆi ti n xanh PaX-i3D Smart _ S cˆi ti n xanh PaX-i3D Smart _ S cˆi](https://static.fdocuments.in/doc/165x107/61055b3f1cbfef4b416128d2/kch-thc-unit-mm-inches-smartpax-i3d-pax-i3d-smart-s-ci-ti-n.jpg)