Yokogawa Y-Flow™Y-Flow+Accessori… · AGA-3, AGA-5, AGA-7, AGA-8, AGA-9 (using AGA-7), AGA-11...
60
Instruction Manual Yokogawa Corporation of America 2 Dart Road, Newnan, Georgia U.S.A. 30265 Tel: 1-800-888-6400 Fax: 1-770-254-0928 IM 04Q01A02-01E-A ©Copyright 2016 1st Edition IM 04Q01A02-01E-A Yokogawa Y-Flow™ and Accessories Yokogawa Y-Flow™ Y-Flow™ and Accessories
-
Upload
vuongtuong -
Category
Documents
-
view
274 -
download
7
Transcript of Yokogawa Y-Flow™Y-Flow+Accessori… · AGA-3, AGA-5, AGA-7, AGA-8, AGA-9 (using AGA-7), AGA-11...

InstructionManual
Yokogawa Corporation of America2 Dart Road, Newnan, Georgia U.S.A. 30265Tel: 1-800-888-6400 Fax: 1-770-254-0928
IM 04Q01A02-01E-A©Copyright 2016
1st Edition
IM 04Q01A02-01E-A
Yokogawa Y-Flow™ and Accessories
Yokogawa Y-Flow™Y-Flow™ and Accessories

2
All Rights Reserved. Copyright © 2016, Yokogawa Electric Corporation. Subject to change without notice. August 2016IM 04Q01A02-01E-A
Introduction ................................................................4
Overview ................................................................5
Reliability ................................................................5
Hazardous Location Classifications ......................5
Four-Year Warranty ................................................5
Returns ...................................................................5
Enclosure ...............................................................5
Specifications .............................................................7
Power Options............................................................8
Internal Battery Power ...........................................8
External Power Supply ..........................................8
Hardware ....................................................................9
Onboard Backup Battery .......................................9
Input Power ..........................................................11
Output Power .......................................................11
Communications - USB .......................................11
Communications - Ethernet .................................11
Communications – Serial Ports ...........................12
RS-232 .............................................................13
RS-485 .............................................................14
Communications – I2C ........................................16
Digitals .................................................................16
Digital – Digital Outputs .......................................16
Digital – Solid-State Relays .................................17
Dual Form A / Form B .....................................18
Form C .............................................................18
Digital – Pulse Inputs ...........................................19
Digital – Digital Inputs ..........................................20
Analog ..................................................................21
Analog – RTD Input ..............................................21
Analog – Analog Inputs ........................................22
Analog Addressing ...............................................23
MVT ......................................................................33
Y-Flow™-Extender ...................................................24
Y-Flow™-Extender Communications ..................24
RS-232 .............................................................25
RS-485 .............................................................25
Y-Flow™-Extender Digitals ..................................26
OPTOS .............................................................26
Digital Inputs ....................................................27
Pulse Inputs .....................................................28
Digital Outputs .................................................29
Y-Flow™-Extender Analogs .................................29
RTD Input ........................................................29
Analog Input ....................................................30
Analog Addressing ..........................................31
Analog Output .................................................32
Accessories ..............................................................33
Displays ................................................................33
Y-Flow™ ESP Expansion (E-ESP) .......................36
Y-Flow™ Analog Output Expansion (E-AO) .........37
Y-Flow™ Digital Expansion (E-Digital) .................38
Y-Flow™ System Protection Modules (E-SPM) ..39
Software ...................................................................40
Y-Flow™ and Y-Flow™-Extender I/O Mapping ...40
I2C Addressing ....................................................42
System Settings .......................................................43
Introduction ..........................................................43
Accessing System Settings .................................43
Using the System Settings ..................................43
Operating Modes .....................................................51
Sleep/Wake-Up Mode .........................................51
Display Mode .......................................................51
Using the Scroll Switch ........................................52
Alarm Mode .........................................................52
Viewing and Clearing Alarms from the Keypad ...52
First Time Power Alarm ...................................52
Low Supply Volts Alarm ..................................53
Table of Contents

3
All Rights Reserved. Copyright © 2016, Yokogawa Electric Corporation. Subject to change without notice. August 2016IM 04Q01A02-01E-A
High Flow Rate Alarm ......................................53
Low Flow Rate Alarm ......................................53
High Pressure Alarm ........................................53
Low Pressure Alarm ........................................53
High Differential Pressure Alarm......................53
Low Differential Pressure Alarm ......................53
High Temperature Alarm ..................................53
Low Temperature Alarm ..................................54
Current Day Flow Alarm
(Transportation Limit) .......................................54
Low Voltage Shutdown Alarm .........................54
Configuration Mode .............................................68
Viewing Parameters .........................................54
Editing Parameters ..........................................54
Assigning Function Keys .................................55
Audit Trail .............................................................55
Memory (History Logging) ...................................55
Calibration Mode .................................................56
Installation ................................................................56
Unpacking ............................................................56
Mounting the RTU ................................................56
Grounding ............................................................57
Maintenance .............................................................57
Enclosure Maintenance .......................................58
Disposable Battery Packs ....................................58
Rechargeable Battery Packs
(charged by local solar array) ..............................58
Software Packages ..................................................58
Field Manager™ ...................................................59
Field Manager Plus™...........................................59
Field Monitor ........................................................59
Talon™ Monitor ....................................................59
Talon SCE™ .........................................................59
Talon Enterprise™ ................................................59
Talon Lite™ ..........................................................60
Applications ..............................................................60
Field Flow Computer (FFC) ..................................60
Remote Terminal Unit (RTU) ................................60
Appendix A – Y-Flow™ Processor GIS ....................61
Appendix B – Y-Flow™-Extender GIS .....................62
Appendix C – Y-Flow™ ESP Expansion GIS ...........63
Appendix D – Y-Flow™ AO Expansion GIS .............64
Appendix E – Y-Flow™ Digital Expansion GIS ........65
Appendix F – Y-Flow™ SPM’s .................................66
Appendix G – Software ............................................69

4
All Rights Reserved. Copyright © 2016, Yokogawa Electric Corporation. Subject to change without notice. August 2016IM 04Q01A02-01E-A
IntroductionOverview
The Yokogawa Y-Flow™ is Yokogawa’s latest flow computer and RTU product offering. With faster communication speeds and more memory the Y-Flow™ is the perfect choice for many applications. It is an intelligent, compact, rugged, and reli-able industrial microprocessor controlled computer designed for real time remote data acquisition and control applications. It can execute multiple processes including tasks such as complex math functions, control algorithms, etc., without host intervention.
The Y-Flow™ is the first processor released in the Yokogawa Y-Flow™ product line. This board is the next generation, premium version for the XARTU/1™. Typical applications will include complete automation for all industry segments; up-stream, downstream and midstream; gate stations, large multi-run metering stations, custody transfer points, compressor stations, tank batteries, well pad automation and more. The Y-Flow™ can calculate natural gas corrected volumes using AGA-3, AGA-5, AGA-7, AGA-8, AGA-9 (using AGA-7), AGA-11 (using AGA-7) and NX-19 reports. Yokogawa Research is committed to providing a complete solution for all gas flow, stream, and control applications. Flexibility, expandability, and reliability are the major factors in the Y-Flow™ design. Some of its features include flexible memory, IO, power, and communications schemes including support for HEXASCII, MODBUS, and various other custom protocols upon request. With onboard USB and Ethernet ports the Y-Flow™ can communicate at extremely high speed. A harsh environment tolerances is also one of the Y-Flow™ strengths. The operating temperature can range from -40C to 70C (-40F to 160F), and the Y-Flow™ is housed in a polycarbonate enclosure. This allows the Y-Flow™ to exist where the work must be done, eliminating costly signal conditioning or expensive long sensor runs.
The Y-Flow™ is normally fed with a 7-30VDC supply. An optional 120/240 VAC unit includes an uninterruptible power sup-ply. Should it lose power, the RTU will sense the failure, automatically switch to battery power, and continue to operate at full capacity. Other supply options include solar arrays and thermoelectric generators for sites without conventional power.
The standard Y-Flow™ configuration includes two I2C connections for easy expansion, optional Ethernet, optional USB, two configurable serial communication ports, digital outputs, optional solid state relays, pulse inputs, digital inputs, RTD, and analog inputs. With the optional Y-Flow™-Extender two more serial communication ports are added along with more digital inputs, pulse inputs, digital outputs, OPTO’s, Analog Inputs, Analog outputs and RTD. Along with the Y-Flow™-Ex-tender other auxiliary devices are available for Analog outputs, OPTO modules and serial expansions.
The optional operator interface is a one-line or four-line liquid crystal display, and 26-key keypad with ten user-definable function keys. This allows users to examine and/or change process data items and diagnose problems at the remote site without a local host or terminal. A 3-key keypad will also be available when a full 26-key keypad is not needed.

5
All Rights Reserved. Copyright © 2016, Yokogawa Electric Corporation. Subject to change without notice. August 2016IM 04Q01A02-01E-A
ReliabilityThe Yokogawa Y-Flow™ is ruggedly built to perform in a variety of industrial environments. Care is taken to maximize reli-ability by applying a urethane conformal coating to all circuit boards, utilizing a hermetically sealed keypad and display, and providing polycarbonate packaging.
Hazardous Location ClassificationsYokogawa is currently in the process of obtaining certification for mounting the Y-Flow™ in Class I, Division 2 hazardous lo-cations. Refer to the NFPA Electrical Code Book for more information.
Four-Year WarrantyYokogawa warrants the products it manufactures to be totally free from any defects in materials and workmanship under normal operation and use. Yokogawa agrees to repair or replace any instrument that is defective due to faulty workmanship or material, if returned to our factory with shipping charges prepaid, within four years of original purchase.
ReturnsWhen a faulty product cannot be repaired in the field, contact Yokogawa for an RMA number and for return information. Packaging and shipping criteria will be established at that time.
*IMPORTANT* REMOVE ANY REPLACEABLE BATTERY OR BATTERY PACK FROM ANY UNIT PRIOR TO ITS RETURN SHIPPING. DAMAGE CAUSED BY LOOSE BATTERIES WITHIN UNITS WILL NOT BE COVERED BY THE MANUFACTURER, AND MAY VOID ANY WARRANTY THE UNIT IS STILL UNDER.
EnclosureThe Y-Flow™ uses a polycarbonate enclosure that is more rigid which allows the RTU to withstand harsh environments. This new enclosure also allows more mounting options within the unit so that the space inside can be maximized. Along with be-ing more rigid the enclosure also has metal door hasp that can be padlocked for added security.

6
All Rights Reserved. Copyright © 2016, Yokogawa Electric Corporation. Subject to change without notice. August 2016IM 04Q01A02-01E-A
Figure 1: Example Enclosure 1 Figure 2: Example Enclosure 2
Figure 3: Example Enclosure 3

7
All Rights Reserved. Copyright © 2016, Yokogawa Electric Corporation. Subject to change without notice. August 2016IM 04Q01A02-01E-A
SpecificationsProcessor ................................................................................................................................ARM Dual Core 32 bit @ 48 MhzSRAM Memory ................................................................................................................................................................... 4 MBSPI Flash Memory .............................................................................................................................................................. 4 MBA/D ..............................................................................................16-Bit Analog to Digital Conv. With Software HART Filtering
Operating Temperature ......................................................................................................................-40 to 70C (-40F to 160F)
Battery Input Voltage (VBAT ......................................................................................................................................... 7-30VDCBattery Input Current (VBAT) ..........................................................................................................................To Be Determined
Solar Input Voltage (Vsolar ...............................................................................................................................................22VDCSolar Input Current MAX ..................................................................................................................................................2AmpsSolar Panel Size MAX .................................................................................................................................................... 20 Watt
Operating Current (mA) ..................................................................................................................................... 50mA @ 12VDCSleep Current (uA) .............................................................................................................................................. 80uA @ 12VDC
Output Voltage (Vout) ............................................................................................................................... Equals Vin (7-30VDC)Output Current MAX (Vout) ..............................................................................................................................................3Amps
Analog Input Voltage ...................................................................................................................................................... 0-5VDC
Digital Output Voltage ..............................................................................................................................................30VDC MaxDigital Output Current ......................................................................................................................................................2Amps
Digital Input Voltage ...........................................................................................................................................................5VDC
Pulse Input Voltage (Supply PWR) ..................................................................................................................................3.3VDCPulse Input Form A High Speed MAX Frequency ......................................................................................................... 150 KHzPulse Input Form A Low Speed MAX Frequency ............................................................................................................160 Hz

8
All Rights Reserved. Copyright © 2016, Yokogawa Electric Corporation. Subject to change without notice. August 2016IM 04Q01A02-01E-A
Power OptionsThe Yokogawa Y-Flow™ offers a variety of power options to allow for ease and flexibility from site to site. The Yokogawa Y-Flow™ offers: Internal Battery Power; External Uninterruptible Power Supply; External Solar Power Array or Supply; or some combination of these. In addition to the primary operating power for the Y-Flow™, there is an onboard backup battery to maintain unit memory and clock.
Internal Battery PowerSeveral internal battery packs are available for supplying primary power to the Y-Flow™. The two basic kinds are Alkaline (non-rechargeable) and Lead-Acid (rechargeable).
Alkaline packs are typically used alone, without external power, and provide a one-time supply until drained of energy. Alkaline battery life is determined by a number of factors, such as frequency of calculations and communication, cabinet temperature, etc. Connections on the Y-Flow™ processor board are arranged such that, as one battery pack begins to lose power, a second pack may be connected before the first is removed, thus providing uninterrupted power.
Lead-Acid batteries are rechargeable, and are typically used with an external power supply – such as a solar array. With normal operating conditions, lead-acid batteries and their associated external supplies should provide long periods, up to 5 years, of unattended power to the unit. This would be more suitable for remote locations.
External Power SupplyThere are two basic kinds of external power supplies, Uninterruptible Power Supplies (UPS) and Solar Power Supplies (SPS). In either case these supplies are designed to be uninterruptible; but the UPS is typically powered by an AC line volt-age, where SPS power comes from a solar array. Both types usually have an internal, rechargeable battery that provides power during outages (in the case of UPS), and darkness (in the case of SPS).
Uninterruptible Power Supplies (UPS) are typically fed by a 120 or 240 Volt AC supply, providing 12 Volts DC out, and backed by a 2.2 Amp-hour (or higher) rechargeable lead acid battery. Other forms of energy are available to power a UPS.
Solar Power Supplies (SPS) are fed by a solar array (panel) providing 1 to 64 watts of power to a rechargeable battery. While selected system size depends on geographical location, degree of sun exposure, equipment power consumption, site obstructions, and customer preferences, most Y-Flow™ applications require only a 20-watt system. Solar systems may be self-contained units mounted independently of the Y-Flow™, or simply a local solar array that charges a battery within the Y-Flow™ enclosure.

9
All Rights Reserved. Copyright © 2016, Yokogawa Electric Corporation. Subject to change without notice. August 2016IM 04Q01A02-01E-A
HardwareOnboard Backup BatteryThe onboard lithium backup battery on the Y-Flow™ maintains power for approximately ten years to the memory section and the real time clock of the processor board when primary operating power is not present. Note that when power is ap-plied the backup battery is not being used. Operation and interactivity with the processor is not available when the backup battery alone is in use.
Input Power If the unit is internally battery powered only, check the type of battery pack being used (it should be a non-rechargeable alkaline) and connected as follows: Plug it into either J3 or J4, white MTA connector close to terminal 10, to power up the Y-Flow™. When it is time to replace the pack, a second pack may be plugged into the other connector before removing the first so power is not interrupted. Due to diode isolation between J3 and J4, the batteries cannot supply power to each other (shown below).
Figure 4: Power Input Schematic
If the unit is solar powered with a local solar array feeding directly into the Y-Flow™, follow this procedure. First - connect the internal lead-acid (rechargeable) battery pack to J3 or terminals 9 and 10. Next - connect the (+) lead of the solar array to terminal 4 (VSOLAR) and the (-) lead to terminal 3 (GND). Use the reverse procedure to power the unit down, disconnect-ing the solar array wires first.
NOTE: THE MAXIMUM WATTAGE FOR THE ONBOARD SOLAR CHARGER IS 20 WATTS. DO NOT USE A PANEL LARGER THAN 20 WATTS. IF A PANEL LARGER THAN 20 WATTS IS NEEDED THEN A SEPARATE CHARGER SHOULD BE USED.
Do not connect the internal lead-acid battery to J4, as charging will not occur. IF, FOR ANY REASON, AN ALKALINE BAT-TERY PACK IS USED IN THIS APPLICATION, DO NOT PLUG IT INTO J3 AS DAMAGE MAY OCCUR.
If the unit is externally powered by either an UPS or a SPS, remove power from its source, connect its (+) and (-) output wires into terminals 10 (VBAT1) and 9 (GND) of terminal block TB3 respectively, and reconnect its source.

10
All Rights Reserved. Copyright © 2016, Yokogawa Electric Corporation. Subject to change without notice. August 2016IM 04Q01A02-01E-A
Table 1: Input Power Terminals
Power Input Description Y-Flow™ Terminal Description
GND 3 (TB4) Ground
Vsolar 4 (TB4) Connection for Solar Panel – 20 Watt Max (1 Amp) – Protected by fuse F3 (3 Amp)
GND 5 (TB4) Ground
GND 6 (TB4) Ground
GND 7 (TB4) Ground
GND 8 (TB4) Ground
GND 9 (TB3) Ground
Vbat1 10 (TB3) Processor Power Input – 7 to 30 VDC – Protected by fuse F4 (1 Amp)
VBAT1 J3 Primary Battery Pack Connection – 7-30VDC – Protected by fuse F4 (1 Amp)
VBAT2 J4 Secondary Battery Pack Connection – 7-30VDC – Protected by fuse F4 (1 Amp)
TIP: The Y-Flow™ is not Powering UpIf the Y-Flow™ is not powering up first check to see if there is adequate voltage, between 7-30VDC, coming into the pro-cessor board, terminals 9 and 10, switch on. Next, check the voltage on both sides of the fuse F4 with respect to ground. Ground can be taken from any of the ground terminals on TB4 (terminals 5-8). The voltage on both sides of the fuse should be very close to the input power. If the voltage is not present, remove power from the Y-Flow™, remove fuse and check for continuity. If the fuse is blown, discard the bad fuse and replace it with a new 1 Amp fuse.
TIP: The Battery is not being ChargedIf the battery is not being properly charged first check to make sure the solar panel is outputting adequate voltage and cur-rent. To check, remove the solar panel wires from terminals 3 and 4 and measure the voltage. This is the open circuit voltage which should be labeled on the back side of the panel. If this voltage is close to the voltage specified on the back of the panel then connect the solar panel wires back to terminals 3 and 4. Next check the fuse F3 (3 Amp). Measure the voltage on both sides of the fuse with respect to ground. The voltage on both sides of the fuse should be close to the voltage on termi-nals 3 and 4. If the voltage is not present, remove power from the Y-Flow™, remove fuse and check for continuity. If the fuse is blown, discard the bad fuse and replace with a 3 Amp fuse.

11
All Rights Reserved. Copyright © 2016, Yokogawa Electric Corporation. Subject to change without notice. August 2016IM 04Q01A02-01E-A
Output Power Two terminals are provided on the Y-Flow™ to provide power to external devices such as radios, cell modems or oth-er field equipment. The output voltage is dependent upon the input voltage; for example, if 12VDC is powering up the Y-Flow™ then the output voltage would be very close to 12VDC. Vout is protected by a 3 Amp Fuse (F5). Any device being powered up by Vout should not exceed 3 Amps. If more than one device is being powered up by Vout then the to-tal current draw between those devices should not exceed 3 Amps. Do not use these terminals for the application of power to the Y-Flow™.
Table 2: Output Power Terminals
Power Output Description Y-Flow™ Terminal Description
Vout 1 (TB4) Voltage Output – Protected by Fuse F5 (3Amp)
Vout 2 (TB4) Voltage Output – Protected by Fuse F5 (3Amp)
GND 5-8 (TB4) Ground
TIP: No Voltage on VoutIf a devices is connected to Vout but is not powering up, first check the fuse, F5. Check the fuse by placing the negative lead of a volt meter on a ground, terminals 5-8. Measure the voltage on both sides of the fuse with respect to ground. The voltage on both sides of the fuse should be close to the voltage on terminals 3 and 4. If the voltage is not present, remove power from the Y-Flow™, remove fuse and check for continuity. If the fuse is blown, discard the bad fuse and replace with a 3 Amp fuse.
Communications – USBThe Y-Flow™ is equipped with two USB 2.0 compliant connections; High Speed Device Type B and Full Speed Host Type A. The High Speed Type B (U4) is used for connecting a laptop for configuring and communicating with the Y-Flow™. The Full Speed Host Type A (6) connection is for future development.
NOTE: BEFORE CONNECTING TO AN E3 WITH USB A USB DRIVER MUST BE INSTALLED ON THE COMPUTER BEING USED. PLEASE CONTACT YOUR LOCAL YOKOGAWA SUPPORT FOR THE USB DRIVER.
TIP: USB Port Not CommunicatingVerify that the proper Com Port is selected for the USB device being used. This can be found under Device Manager on your computer.
NOTE: THAT THE DEVICE USB DRIVER WILL NEED TO BE LOADED. CONTACT YOKOGAWA FOR ASSISTANCE.
Communications - EthernetThe available on board Ethernet TCP-IP port supports up to 8 simultaneous connections using communication speeds of 10/100 Mbps. To use the Ethernet port connect an Ethernet cable into the RJ45 connector, U5. The Ethernet port can be configured for Static or DHCP communications. Ethernet configurations such as Static or DHCP, fixing the IP address, setting the Gateway Router and Masking can be found in section 402 in the System Settings. Refer to the System Set-tings section or System Settings manual for more information.
To easily locate the IP address of the unit use Virtual Keypad or Keypad with Display. Click on the conf button then the Yokogawa Logo to bring up the Special Functions menu. Use the arrow keys to navigate to Diagnostics then press enter. Once in Diagnostics mode press 9 to view the MAC Address, press 9 again to view the IP address. Continue pressing 9 to scroll through the different items.

12
All Rights Reserved. Copyright © 2016, Yokogawa Electric Corporation. Subject to change without notice. August 2016IM 04Q01A02-01E-A
Communications – Serial PortsThe Y-Flow™ Processor is equipped with two serial ports that can independently be configured for RS-232 or RS-485, 2-wire or 4-wire, communications. These serial ports are set to a default baud of 115,200Bd. Higher speeds can be set in the Hard-ware configuration settings but care must be taken when using higher speeds. Cable length and the field device can limit the use of higher baud rates. The recommended maximum communication speed for the serial ports is 115,200 baud due to cable lengths and field devices. By configuring the serial ports in the hardware settings the user can optimize and customize their communications by using Talon™, Field Manager™ or a keypad. Serial Port 1 and Serial Port 2 can directly interface to cell modems, radios and other field equipment allowing an operator to configure and collect data with an industry- standard portable computer. Port 1 and Port 2 are located on Terminal Block 2, starting at terminals 14 and 41 respectively, and are configured using switch 2 and switch 3 respectively. The table below shows how to configure the ports using the dipswitches.
Table 3: Serial Ports
Dipswitch Number
Dipswitch Position
Function Notes
1 ON RS-232 Enabled
OFF RS-485 Enabled
2 ON Ties RX+ to TX+ Use for RS-485 2-wire mode
OFF Disconnects RX+ & TX+ Use for RS-485 4-wire modeLeave in the OFF position for use with RS-232
3 ON Ties RX- to TX- Use for RS-485 2-wire mode
OFF Disconnects RX- & TX- Use for RS-485 4-wire modeLeave in the OFF position for use with RS-232
4 ON Connects a 14.7K resistor between TX+ and TX-
See NOTE 1 about terminating resistors
OFF Disconnects Terminating Resistor
See NOTE 1 about terminating resistorsLeave in the OFF position for use with RS-232
5 ON Connects a 120 OHM resis-tor between RX+ and RX-
See NOTE 1 about terminating resistors
OFF Disconnects Terminating Resistor
See NOTE 1 about terminating resistorsLeave in the OFF position for use with RS-232
NOTE: THE TERMINATION RESISTORS, ASSOCIATED WITH DIP SWITCH 4 AND 5, ARE A REQUIREMENT OF RS-485. HOWEVER, THEY ARE NOT TYPICALLY NEEDED AT THE BAUD RATES AVAILABLE. THE RESISTORS ADD A SIGNIFICANT AMOUNT OF CURRENT CONSUMPTION, AND SHOULD THEREFORE ONLY BE USED WHEN REQUIRED. INSTANCES THAT MAY BENEFIT FROM THE USE OF THESE RESISTORS INCLUDE NOISY ENVIRONMENTS AND THOSE INSTAL-LATIONS WITH VERY LONG WIRE RUNS BETWEEN RECEIVERS. THESE RESISTORS, WHEN USED, SHOULD BE IN-STALLED ONLY IN THOSE UNITS AT EXTREME ENDS OF THE INSTALLATION.

13
All Rights Reserved. Copyright © 2016, Yokogawa Electric Corporation. Subject to change without notice. August 2016IM 04Q01A02-01E-A
RS-232
Typically RS-232 communications are used for short distances, up to 100ft. In most applications, RS-232 is used for internal communications within the unit, such as cell modems, or between two devices that are next to each other.
The RS-232 ports are also equipped with Power Control. Power Control can be configured to turn an external device on and off if the device has a power control line. This allows the Y-Flow™ to conserve power. Power Control is set up in the System Configuration Settings and in the database.
Table 4: RS232 Serial Port Terminals
Terminal De-scription
RS-232 PORT1 Ter-minals
RS-232 PORT2 Terminals
GND 14 40
TX → 15 41
RX → 16 42
CMSW 17 (Address: 7.1) 43 (Address: 7.2)
RTS → 18 44
CTS → 19 45
PWR CTRL 20 (Address: 6.1) 46 (Address: 6.2)
TIP: RS-232 Device not CommunicatingSeveral settings can cause the RS232 communications to not work properly. If an RS232 device is unable to communicate with the Y-Flow™ follow the steps listed below:
STEP 1: CHECK THE DIP SWITCH SETTINGSVerify that the dip switch settings are set for RS232. They should be set as follows:
On Off
1 X
2 X
3 X
4 X
5 X
STEP 2: CHECK THE BAUD RATEMake sure that the baud rate between the Y-Flow™ and the external device matches. For example if a cell modem has a baud rate of 115,200Bd then the baud rate for the Y-Flow™ port that it is connected to should be set to 115,200Bd. The baud rate is set by going into the System Settings. Refer to the System Settings section for more information.

14
All Rights Reserved. Copyright © 2016, Yokogawa Electric Corporation. Subject to change without notice. August 2016IM 04Q01A02-01E-A
STEP 3: CHECK THE WIRINGVerify that the external device is wired properly to the Y-Flow™ port. With the device wires disconnected from the Y-Flow™, measure the voltage on the TX and RX wires with respect to ground. The wire that has -5VDC to -15VDC should be wired to RX terminal on the Y-Flow™.
Port 1 Port 2 Description
14 40 Ground
15 41 Tx (Transmit) →
16 42 Rx (Receive) ←
17 43 CMSW
18 44 RTS →
19 45 CTS ←
20 46 Power Control
STEP 4: CHECK VOLTAGESWith the external device wired to the Y-Flow™ use a volt meter to check the voltages on the RX and TX terminals with respect to ground. There should be -5VDC to -15VDC on both the RX and TX terminals.
RS-485
Typically RS-485 is used for communications outside of the box for distances up to 4,000 feet. RS-485 is great for noisy environ-ments and can also be used for Multi-Drop communications.
Ports 1 and 2 can be set up for RS-485 2-wire and RS-485 4-wire by using SW2 and SW3. See NOTE1 above about using the terminating resistors.
Table 5: RS485 Serial Port Terminals
Terminal Description RS-485 PORT1 Terminals RS-485 PORT2 Terminals
GND 14 40
TX+ → 15 41
TX- → 16 42
CMSW 17 – Not Used with RS-485 43 – Not Used with RS-485
RX+ ← 18 44
RX- ← 19 45
PWR CTRL 20 – Not Used with RS-485 46 – Not Used with RS-485

15
All Rights Reserved. Copyright © 2016, Yokogawa Electric Corporation. Subject to change without notice. August 2016IM 04Q01A02-01E-A
TIP: RS-485 Device not CommunicatingSTEP 1: CHECK THE DIP SWITCH SETTINGSVerify that the dip switch settings are set for RS-485. They should be set as follows (Note that the following dip switch settings are not using the terminating resistors)
RS-485, 2-Wire RS-485, 4-Wire
STEP 2: CHECK THE BAUD RATEMake sure that the baud rate between the Y-Flow™ and the external device matches. For example if an odorizer has a baud rate of 115,200Bd then the baud rate for the Y-Flow™ port that it is connected to should be set to 115,200Bd. The baud rate is set by going into the System Settings. Refer to the System Settings section for more information.
STEP 3: CHECK THE WIRINGVerify that the polarity is correct on the signal lines and that the wires are making contact to the terminals.
Port 1 Port 2 Description
14 40 Ground
15 41 TX+
16 42 TX-
17 43 N/A
18 44 RX+
19 45 RX-
20 46 N/A
STEP 4: TERMINATION RESISTORSFor noisy environments or long wire runs between receivers, termination resistors may need to be enabled. The resistors add a significant amount of current consumption, and should therefore only be used when required. These resistors, when used, should be installed only in those units at extreme ends of the installation.
STEP 5: DATABASE Check the database and verify that the proper port is enabled. Verify that other processes are not using the same port for other functions.
On Off
1 X
2 X
3 X
4 X
5 X
On Off
1 X
2 X
3 X
4 X
5 X
16
All Rights Reserved. Copyright © 2016, Yokogawa Electric Corporation. Subject to change without notice. August 2016IM 04Q01A02-01E-A
Communications – I2CThe I2C communication bus allows for expansion of auxiliary devices within the unit. Two 10-position I2C connectors are avail-able, easily allowing auxiliary devices to be added such as a display, Expansion Serial Port or Analog Out card. Up to 16 devices can be connected on the I2C bus; 4 Expansion Serial Ports, 1 Display Board, and up to 11 other devices. Although multiple de-vices can be daisy changed along the I2C bus, the I2C ribbon cable should not exceed 3 feet. Refer to the Accessories section for more information on the I2C expansion products.
TIP: I2C Device not Working ProperlyIf the I2C devices are not working properly then one of the devices on the I2C bus might be bad. To determine if one of the I2C devices is corrupting the I2C bus; remove all items on the bus then slowly add each device back until the devices begin to fail again. This will help eliminate the bad module.
Digitals The Digital section of the Y-Flow™ Processor is located along the lower right hand side of the board. This section contains two Form A / Form C Pulse Input high and low speed, two dual Form A and Form B or a single Form C Solid State Relays, two Digi-tal Outputs and two Digital Inputs.
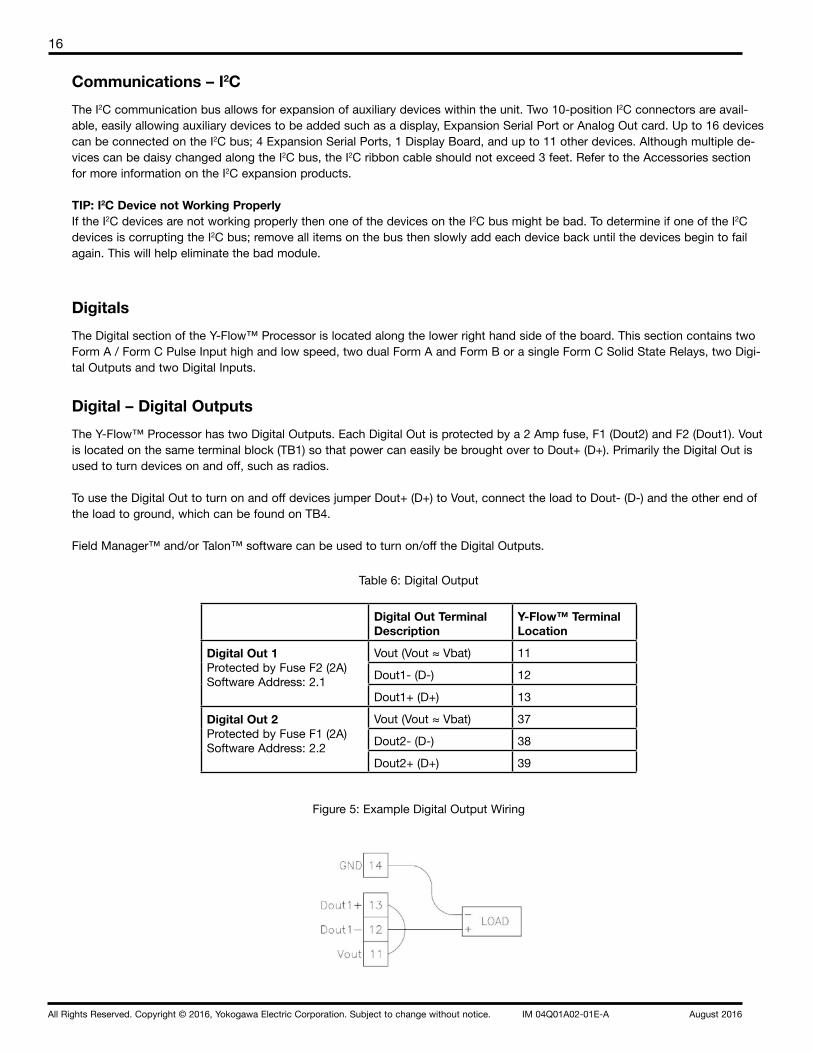
Digital – Digital OutputsThe Y-Flow™ Processor has two Digital Outputs. Each Digital Out is protected by a 2 Amp fuse, F1 (Dout2) and F2 (Dout1). Vout is located on the same terminal block (TB1) so that power can easily be brought over to Dout+ (D+). Primarily the Digital Out is used to turn devices on and off, such as radios.
To use the Digital Out to turn on and off devices jumper Dout+ (D+) to Vout, connect the load to Dout- (D-) and the other end of the load to ground, which can be found on TB4.
Field Manager™ and/or Talon™ software can be used to turn on/off the Digital Outputs.
Table 6: Digital Output
Digital Out Terminal Description
Y-Flow™ Terminal Location
Digital Out 1Protected by Fuse F2 (2A)Software Address: 2.1
Vout (Vout ≈ Vbat) 11
Dout1- (D-) 12
Dout1+ (D+) 13
Digital Out 2Protected by Fuse F1 (2A)Software Address: 2.2
Vout (Vout ≈ Vbat) 37
Dout2- (D-) 38
Dout2+ (D+) 39
Figure 5: Example Digital Output Wiring

17
All Rights Reserved. Copyright © 2016, Yokogawa Electric Corporation. Subject to change without notice. August 2016IM 04Q01A02-01E-A
TIP: Digital Out
If the Digital Out is not turning on and off the desired device follow the steps below:
STEP 1: CHECK WIRINGVerify that the device is properly wired, refer to Table 6.
STEP 2: CHECK SOFTWAREVerify that the software is set up properly to turn on the device. For trouble shooting purposes turn Dout to always on. Re-member to change the Dout settings when finished trouble shooting so the battery does not get drained. The pulse on and/or off times may also be set to a too small of an interval. Try adjusting on and off times to larger values.
STEP 3: CHECK VOLTAGEMeasure voltages on terminal 11, 12 and 13 with respect to ground, terminal 14. Terminals 11, 12 and 13 voltages should read close to Vin.
STEP 4: CHECK FUSESBoth digitals are protected by a 2 Amp fuse. If the digital out is turned on, measure the voltage on both sides of the fuse, F2 (Dout1) and F1 (Dout2). The voltage should be close to Vin. If voltage is only on one side of the fuse, then the fuse is blown and needs replaced. If voltages is not found on either side of the fuse then check to make sure the digital is turned on.
Digital – Solid-State RelaysThe Y-Flow™ Processor has the option of using two pluggable Solid State Relays (SSR) that can be used mainly for pulse outputs. Each Solid State Relay has independent Form A and Form B outputs OR a single Form C output.
Table 7: Solid-State Relays
SSR1 (K1)Terminals
SSR2 (K2)Terminals
NC (Normally Closed) 21 47
COM_NC 22 48
COM_NO 23 49
NO (Normally Open) 24 50
Field Manager™ and/or Talon™ software can be used to turn on/off the Solid State Relays.
Table 8: Solid State Relay Addressing
Output Type Software Address
Solid State Relay 1 SSR1_A (Form A) 3.1
SSR1_B (Form B) 3.2
SSR1_AB (Form C) 3.3
Solid State Relay 2 SSR2_A (Form A) 3.4
SSR2_B (Form B) 3.5
SSR2_AB (Form C) 3.6

18
All Rights Reserved. Copyright © 2016, Yokogawa Electric Corporation. Subject to change without notice. August 2016IM 04Q01A02-01E-A
Dual Form A / Form B
The Y-Flow™ Processor has the option of using the Solid State Relays as a dual Form A and Form B pulse outputs. Form A pulse outputs are Normally-Open (NO), when in their natural state. When activated the switch closes, sending the signal to the field device. Form B pulse outputs are Normally-Closed (NC), when in their natural state. When activated the switch opens, dis-connecting signal from the field device.
Figure 6: Example Solid-State Relay Wiring
TIP: Form A and Form B
To test From A, activate the output and measure the resistance across common (COM_NO) and NO. The resistance should be less than 50ohms.
To test Form B, activate the output and mreaure the ressistance across common (COM_NC) and NC. The resistance should show as open.
Form C
The Solid State Relay can easily be converted from a dual Form A and Form B relay to a single Form C relay simply by connect-ing COM_NO (Terminal 23 or 49) to COM_NC (Terminal 22 or 48) as shown in the diagram below. Form C combines Form A and Form B so that it has two primary sides and one common.
Figure 7: Example Form C Wiring
TIP: Form CTo test From C, activate the output and measure the resistance across common (COM_NO) and NO. The resistance should be less than 50ohms. Measure the resistance across common (COM_NO) and NC. The resistance should show as open.

19
All Rights Reserved. Copyright © 2016, Yokogawa Electric Corporation. Subject to change without notice. August 2016IM 04Q01A02-01E-A
Digital – Pulse InputsThe Y-Flow™ Processor comes standard with two Pulse Inputs. Each pulse input is software programmable for From A or Form C, High and low speed. These Pulse Inputs can be used as simple counters for index or turbine inputs. The ta-ble below shows the signal input limits for Form A and Form C, High Speed and Low Speed, with High Speed and Low Speed resistors enabled.
Form A High Speed
Low Speed Resistor Signal Input Limit ~20 KHz
High Speed Resistor Signal Input Limit ~20 KHz
Form A Low Speed
Low Speed Resistor Signal Input Limit ~100 KHz
High Speed Resistor Signal Input Limit ~250 KHz
Form C High Speed
Low Speed Resistor Signal Input Limit ~20 KHz
High Speed Resistor Signal Input Limit ~20 KHz
Form C Low Speed
Low Speed Resistor Signal Input Limit ~300 KHz
High Speed Resistor Signal Input Limit ~300 KHz
For Advanced programming enable the Pulse Input by using the corresponding software address.
Table 9: Pulse Inputs
Terminal Description Y-Flow™ Ter-minal
Pulse Input 1Software Ad-dress: 5.1
PUL1- (Low – Set) 25
PUL1 (Common) 26
PUL1+ (High – Reset) 27
Pulse Input 2Software Ad-dress: 5.2
PUL2- (Low – Set) 51
PUL2 (Common) 52
PUL2+ (High – Reset) 53
Figure 8: Pulse Input Schematic

20
All Rights Reserved. Copyright © 2016, Yokogawa Electric Corporation. Subject to change without notice. August 2016IM 04Q01A02-01E-A
Figure 9: Example Pulse Input Form A Wiring
Figure 10: Example Pulse Input Form C Wiring
TIP: Pulse InputsVerify that the application is set up properly according to the configuration of the pulse coming in. If testing the pulse for Form A then short PUL- and PUL (common) momentairly. The counts should increase. If testing for form C then momentairly short PUL- to PUL (common) then PUL+ to PUL (common). The counts should increase.
Digital – Digital Inputs
The Y-Flow™ Processor has two Digital Inputs. These inputs are used to present a field status to the processor, such as an alarm or status input. Vlimit is available next to the digital inputs to provide low current wetting voltage to prevent oxidation on switch contacts. Vlimit is equal to Vin through a 1K Ohm resistor (Vlimit = Vin through 1K resistor).
For Advanced programming enable the Digital Input by using the corresponding software address.
Table 10: Digital Inputs
Terminal De-scription
SBC91 Terminal
Digital Input 1Software Ad-dress: 1.1
GND 28
Din1 29
Vlimit1 30
Digital Input 2Software Ad-dress: 1.2
GND 54
Din2 55
Vlimit2 56

21
All Rights Reserved. Copyright © 2016, Yokogawa Electric Corporation. Subject to change without notice. August 2016IM 04Q01A02-01E-A
Figure 11: Example Digital Input Wiring 1 Figure 12: Example Digital Input Wiring 2
TIP: Digital InputsShort Din and GND, the logic level should appear as 1. When Din and GND are disconnected then the logic level should appear as a 0. Field Manager™ and/or Talon™ software can be used to configure and verify the Digital Input.
AnalogThe Analog section of the Y-Flow™ Processor is located in the upper right hand corner of the board. This section contains four configurable Analog Inputs along with one RTD temperature probe input. In addition to the Analog Input, there is a built in box temperature and supply voltage input that can be read.
Analog – RTD InputThe Y-Flow™ Processor includes one 100 ohm platinum RTD (Resistance Temperature Detector) coefficient 0.00385, input with 3-wire lead compensation and ground shield connection. The RTD is a 16-bit resolution input with analog sampling capability and can be software calibrated. The RTD input can measure temperatures from -40 to 160°F. Connect the RTD to terminals 31, 32, 57 and 58 as shown below.
Table 11: RTD Input
RTD Input Description
SBC91 Termi-nal Location
GND (Ground) 31PWR (Power) 32SIG (Signal) 57SIG (Signal) 58
Figure 13: Example RTD Input Wiring

22
All Rights Reserved. Copyright © 2016, Yokogawa Electric Corporation. Subject to change without notice. August 2016IM 04Q01A02-01E-A
TIP: RTD InputThe best way to test an RTD Input is by using an RTD Simulator for 100 ohm and coefficient 0.00385. Connect the RTD Simulator according to the diagram above. Change the temperature on the RTD Simulator and verify that the application reads the proper values. Connect the temperature probe back to the RTD Input and verify the reading.
Analog – Analog InputsThe Y-Flow™ includes four general-purpose, 4-20 mA or 0-5 VDC analog inputs. These are 16-bit resolution inputs with analog sampling capability. All analog inputs can be software calibrated. Jumpers JP13 & JP15 determine the voltage input to power the transmitters or transducers. They provide supply voltage (7-30 VDC) when positioned to the left (Vbat), and 5 VDC reference voltage when positioned to the right (5V). JP13 governs ADC1 & ADC2 and JP15 governs ADC3 and ADC4. An external supply can also be connected to channels used when the jumper is removed.
For transmitters that output a 4-20mA signal the brown 250 OHM dropping resistor must be installed. Wire the power wire of the transmitter to ADC+ and the signal wire to ADC Signal. ADC- should not be connected.
For transducers that output a 0-5V signal then the brown 250 OHM dropping resistor must be pulled. Wire the power wire of the transducer to ADC+, the signal wire to ADC Signal and the ground wire to ADC-.
The table below shows the terminal wiring for the analog inputs.
Table 12: Analog Input
Analog Input Description SBC91 Terminal Location
Analog 1Dropping Resistor R6
ADC1+ (Power) 63
ADC1 (Signal) 59
ADC1- (Ground) – No connection for 4-20mA input
33 – No connection for 4-20mA input
Analog 2Dropping Resistor R7
ADC2+ (Power) 64
ADC2 (Signal) 60
ADC2- (Ground) – No connection for 4-20mA input
34 – No connection for 4-20mA input
Analog 3Dropping Resistor R9
ADC3+ (Power) 65
ADC3 (Signal) 61
ADC3- (Ground) – No connection for 4-20mA input
35 – No connection for 4-20mA input
Analog 4 Dropping Resistor R10
ADC4+ (Power) 66
ADC4 (Signal) 62
ADC4- (Ground) – No connection for 4-20mA input
36 – No connection for 4-20mA input

23
All Rights Reserved. Copyright © 2016, Yokogawa Electric Corporation. Subject to change without notice. August 2016IM 04Q01A02-01E-A
Analog AddressingFor Advanced programming set the corresponding Analog address in the Analog Process to set up the device to read the Analog values correctly.
Table 13: Analog Addressing
Address Description
1 ADC1
2 ADC2
3 ADC3
4 ADC4
5 ADC5 (Y-Flow™-Extender Board)
6 ADC6 (E Y-Flow™-Extender Board)
7 ADC7 (Y-Flow™-Extender Board)
8 ADC8 (Y-Flow™-Extender Board)
9 Temperature 1
10 Temperature 2 (Y-Flow™-Extender Board)
11 Ambient Temperature
12 Supply Volts
TIP: Analog InputCheck voltages. There should be voltage on ADC+ and ADC Signal.Check the dropping resistor. The brown resistor should be installed for a 4-20mA transducer and removed for a voltage trans-ducer.
MVTThe Y-Flow™ Processor comes with an onboard MVT (Multi-Variable Transmitter) connector. This allows for an MVT to be plugged directly into the Y-Flow™ Processor without the need for an interface board. For advanced programming set Mode to 0 and Address to a 1 in the Transmitter Process to set up the MVT.

24
All Rights Reserved. Copyright © 2016, Yokogawa Electric Corporation. Subject to change without notice. August 2016IM 04Q01A02-01E-A
Y-Flow™-Extender
The Y-Flow™-Extender board adds more functionality to the Y-Flow™ processor simply by plugging directly into the ex-pansion header, J10. This board provides two additional communication ports, three additional Digital Outs, two additional Pulse Inputs, three additional Digital Inputs, two OPTO ports, four additional Analog Inputs, one Analog Output and one ad-ditional RTD Temperature Probe Input.
Y-Flow™-Extender CommunicationsThe Y-Flow™-Extender adds two additional communication serial ports that can independently be configured for RS-232 or RS-485, 2-wire or 4-wire, communications. These serial ports are set to 115,200 baud depending on the limit of the field de-vice and cable length. The recommended maximum communication speed for the serial ports is 115,200 baud. The baud rate can be adjusted using the System Configuration editor (EEPROM Configuration Editor) in the Y-Flow™ using Talon™, Field Manager™ or a keypad. Serial Port 3 and Serial Port 4 can directly interface to cell modems, radios and other field equipment allowing an operator to configure and collect data with an industry- standard portable computer. Port 3 and Port 4 are located on Terminal Block 4 (TB4) of the Y-Flow™-Extender and are configured using switch 1 and switch 2 respectively. The table below shows how to configure the ports using the dipswitches.
Table 14: Y-Flow™-Extender Serial Ports
Dipswitch Number
Dipswitch Position
Function Notes
1 ON RS-232 Enabled
OFF RS-485 Enabled
2 ON Ties RX+ to TX+ Use for RS-485 2-wire mode
OFF Disconnects RX+ & TX+ Use for RS-485 4-wire modeLeave in the OFF position for use with RS-232
3 ON Ties RX- to TX- Use for RS-485 2-wire mode
OFF Disconnects RX- & TX- Use for RS-485 4-wire modeLeave in the OFF position for use with RS-232
4 ON Connects a 14.7K resistor between TX+ and TX-
See NOTE 1 about terminating resistors
OFF Disconnects Terminating Resistor
See NOTE 1 about terminating resistorsLeave in the OFF position for use with RS-232
5 ON Connects a 120 OHM resis-tor between RX+ and RX-
See NOTE 1 about terminating resistors
OFF Disconnects Terminating Resistor
See NOTE 1 about terminating resistorsLeave in the OFF position for use with RS-232
NOTE1: THE TERMINATION RESISTORS, ASSOCIATED WITH SWITCHES 4 AND 5, ARE A REQUIREMENT OF RS-485. HOWEVER, THEY ARE NOT TYPICALLY NEEDED AT THE BAUD RATES AVAILABLE. THE RESISTORS ADD A SIGNIFICANT AMOUNT OF CURRENT CONSUMPTION, AND SHOULD THEREFORE ONLY BE USED WHEN REQUIRED. INSTANCES THAT MAY BENEFIT FROM THE USE OF THESE RESISTORS INCLUDE NOISY ENVIRONMENTS AND THOSE INSTAL-LATIONS WITH VERY LONG WIRE RUNS BETWEEN RECEIVERS. THESE RESISTORS, WHEN USED, SHOULD BE IN-STALLED ONLY IN THOSE UNITS AT EXTREME ENDS OF THE INSTALLATION.

25
All Rights Reserved. Copyright © 2016, Yokogawa Electric Corporation. Subject to change without notice. August 2016IM 04Q01A02-01E-A
RS-232
Typically RS-232 communications are used for short distances, up to 100ft. In most applications RS-232 is used for internal communications within the unit, such as cell modems, or between two devices that are next to each other.
The RS-232 ports are also equipped with Power Control. Power Control can be configured to turn an external device on and off if the device has a power control line. This allows the Y-Flow™-Extender and Y-Flow™ to conserve power. Power Control is set up in the System Settings and in the database.
Table 15: Y-Flow™-Extender RS232
Terminal Description
RS-232 PORT3 Terminals
RS-232 PORT4 Terminals
GND 97 115
TX → 98 116
RX ← 99 117
CMSW 100 (Address: 7.3) 118 (Address: 7.4)
RTS → 101 119
CTS ← 102 120
PWR CTRL 103 (Address: 6.3) 121 (Address: 6.4)
For troubleshooting tip refer to the TIP: RS-232 Device Not Communicating section.
RS-485
Typically RS-485 is used for communications outside of the box for distances up to 4,000 feet. RS-485 is great for noisy environ-ments and can also be used for Multi-Drop communications.
Ports 3 and 4 can be set up for RS-485 2-wire and RS-485 4-wire by using SW1 and SW2 on the Y-Flow™-Extender. See NOTE1 above about using the terminating resistors.
Table 16: Y-Flow™-Extender RS485
Terminal De-scription
RS-485 PORT1 Terminals
RS-485 PORT2 Terminals
GND 97 115
TX+ → 98 116
TX- → 99 117
CMSW 100 – Not Used with RS-485
118 – Not Used with RS-485
RX+ ← 101 119
RX- ← 102 120
PWR CTRL 103 – Not Used with RS-485
121 – Not Used with RS-485
For troubleshooting tip refer to the TIP: RS-485 Device Not Communicating section.

26
All Rights Reserved. Copyright © 2016, Yokogawa Electric Corporation. Subject to change without notice. August 2016IM 04Q01A02-01E-A
Y-Flow™-Extender DigitalsOPTOS
The Y-Flow™-Extender provides the Y-Flow™ with two OPTO slots to use for controls. These OPTO slots can provide any combination of DC Out, Relay, DC Input, AC Out, and AC Input. Each OPTO module comes with a built in status LED. Out-put OPTO modules come with a replaceable integral fuse.
Table 17: Y-Flow™-Extender OPTOs
Terminal De-scription
Terminal Number
OPTO 1OPTO 1 Address: 4.1
Ground 122
OPTO 1 + 123
OPTO 1 - 124
OPTO 2OPTO 2 Address: 4.2
Ground 104
OPTO 2 + 105
OPTO 2 - 106
Figure 14: Typical OPTO Input Wiring
Figure 15: Typical OPTO Output Wiring

27
All Rights Reserved. Copyright © 2016, Yokogawa Electric Corporation. Subject to change without notice. August 2016IM 04Q01A02-01E-A
Listed below are the available OPTO Module options.
Table 18: Y-Flow™-Extender Available OPTO Modules
Type Yokogawa Part Number
Color Current (mA)
Integral Fuse
Built in Status LED
Use
No OPTO -- -- -- -- -- --
DC Out (60VDC, 2A)
2030164 Red Yes Yes Control or switch DC loads
Relay (500mA) 2030165 Red Yes Yes Form A mechanical Relay
DC Input (32VDC)
2030166 White No Yes Detect on/off DC voltage levels
AC Input (90-140VAC)
2030167 Yellow No Yes Detect on/off AC voltage levels
AC Out (120VAC, 2A)
2030168 Black Yes Yes Control or switch AC loads
TIP: OPTOUsing a Volt Meter measure the voltage on the OPTO sockets. Socket 5 should have 0VDC and Socket 3 should have 5VDC.
Digital Inputs
The Y-Flow™-Extender has three additional Digital Inputs. These inputs are used to present a field status to the processor, such as an alarm or status input.
Table 19: Y-Flow™-Extender Digital Inputs
Terminal De-scription
SBC91 Terminal
Digital Input 3Address: 2.3
GND 107
Din3 108
Digital Input 4Address: 2.4
GND 89
Din4 90
Digital Input 5Address: 2.5
GND 58
Din5 86
Figure 16: Y-Flow™-Extender Example Digital Input Wiring
For troubleshooting information refer to the TIP: Digital Input section.
3.2V

28
All Rights Reserved. Copyright © 2016, Yokogawa Electric Corporation. Subject to change without notice. August 2016IM 04Q01A02-01E-A
Pulse Inputs
The Y-Flow™-Extender adds two additional Pulse Inputs to the Y-Flow™ processor. Each pulse input is software program-mable for From A and Form B or Form C, High and low speed. These Pulse Inputs can be used as simple counters for index or turbine inputs.
Table 20: Y-Flow™-Extender Pulse Inputs
Terminal Description SBC91 Terminal
Pulse Input 3Pulse Input 3 Ad-dress: 5.3
PUL3- (Low – Set) 110
PUL3 (Common) 111
PUL3+ (High – Reset) 112
Pulse Input 4Pulse Input 4 Ad-dress: 5.4
PUL4- (Low – Set) 92
PUL4 (Common) 93
PUL4+ (High – Reset) 94
Figure 17: Y-Flow™-Extender Exampl Pulse Input Form A Wiring
Figure 18: Y-Flow™-Extender Exampl Pulse Input Form A Wiring
Figure 19: Y-Flow™-Extender Exampl Pulse Input Form A Wiring
Figure 20: Y-Flow™-Extender Example Pulse Input Open Collector Wiring
For troubleshooting information refer to the TIP: Pulse Inputs section.

29
All Rights Reserved. Copyright © 2016, Yokogawa Electric Corporation. Subject to change without notice. August 2016IM 04Q01A02-01E-A
Digital Outputs
The Y-Flow™-Extender adds three addition Digital Outs to the Y-Flow™ processor. Each Digital Out is protected by a 2 Amp fuse, F1 (Dout3), F2 (Dout4) and F3 (Dout5). Primarily the Digital Out is used to turn devices on and off, such as radios.
To use the Digital Out to turn on and off devices jumper Dout+ (D+) to Vout, connect the load to Dout- (D-) and the other end of the load to ground, which can be found on TB4.
For Advanced Programming enter the Digital Out address into the correct process to enable Dgital Output.
Table 21: Y-Flow™-Extender Digital Outputs
Digital Out Terminal Description
SBC91 Terminal Location
Digital Out 3Protected by Fuse F1 (2A)Digital Out Address: 2.3
Dout3- (D-) 113
Dout3+ (D+) 114
Digital Out 4Protected by Fuse F2 (2A)Digital Out Address: 2.4
Dout4- (D-) 95
Dout4+ (D+) 96
Digital Out 5Protected by Fuse F3 (2A)Digital Out Address: 2.5
Dout5- (D-) 87
Dout5+ (D+) 88
Figure 21: Y-Flow™-Extender Example Digital Output Wiring
For troubleshooting information refer to the TIP: Digital Out section.
Y-Flow™-Extender Analogs
RTD Input
The Y-Flow™-Extender includes one 100 ohm platinum RTD (Resistance Temperature Detector) coefficient 0.00385, input with 3-wire lead compensation and ground shield connection. The RTD is a 16-bit resolution input with analog sampling capability and can be software calibrated. The RTD input can measure temperatures from -40 to 160°F. Connect the RTD to terminals 71, 72, 77 and 78 as shown below.

30
All Rights Reserved. Copyright © 2016, Yokogawa Electric Corporation. Subject to change without notice. August 2016IM 04Q01A02-01E-A
Table 22: Y-Flow™-Extender RTD Input
RTD Input Description SBC91 Terminal LocationGND (Ground) 71PWR (Power) 72SIG (Signal) 77SIG (Signal) 78
Figure 22: Y-Flow™-Extender Example RTD Input Wiring
For troubleshooting information refer to the TIP: RTD Input section.
Analog Input
The Y-Flow™-Extender provides four additional general-purpose, 4-20 mA or 0-5 VDC analog inputs. These are 16-bit res-olution inputs with analog sampling capability. All analog inputs can be software calibrated. Jumpers JP1 & JP2 determine the power input to the transmitters. They provide supply voltage (7-30 VDC) when positioned to the left, Vbat, and reference voltage (5 VDC) when positioned to the right, 5V. JP1 governs ADC5 & ADC6 and JP2 governs ADC7 and ADC8. An external supply can also be connected to channels used when the jumper is removed.
For transmitters that output a 4-20mA signal the brown 250 OHM dropping resistor must be installed. Wire the power wire of the transmitter to ADC+ and the signal wire to ADC Signal. ADC- should not be connected.
For transducers that output a 0-5V signal, the brown 250 OHM dropping resistor must be pulled. Wire the power wire of the transducer to ADC+, the signal wire to ADC Signal and the ground wire to ADC-.

31
All Rights Reserved. Copyright © 2016, Yokogawa Electric Corporation. Subject to change without notice. August 2016IM 04Q01A02-01E-A
The table below shows the terminal wiring for the analog inputs.
Table 23: Y-Flow™-Extender Analog Input
Analog Input Description SBC91 Terminal Location
Analog 5Dropping Resistor R8
ADC5+ (Power) 79
ADC5 (Signal) 73
ADC5- (Ground) – No connection for 4-20mA input
67 – No connection for 4-20mA input
Analog 6Dropping Resistor R11
ADC6+ (Power) 80
ADC6 (Signal) 74
ADC6- (Ground) – No connection for 4-20mA input
68 – No connection for 4-20mA input
Analog 7Dropping Resistor R13
ADC7+ (Power) 81
ADC7 (Signal) 75
ADC7- (Ground) – No connection for 4-20mA input
69 – No connection for 4-20mA input
Analog 8 Dropping Resistor R16
ADC8+ (Power) 82
ADC8 (Signal) 76
ADC8- (Ground) – No connection for 4-20mA input
70 – No connection for 4-20mA input
Analog Addressing
For Advanced Programming enter the Analog address into the Analog process to set up the analog device to read the Analog values correctly.
Table 24: Y-Flow™-Extender Analog Addressing
Addressing Description
1 AI1
2 AI2
3 AI3
4 AI4
5 AI5 (Expansion Board)
6 AI6 (Expansion Board)
7 AI7 (Expansion Board)
8 AI8 (Expansion Board)
9 Temperature 1
10 Temperature 2 (Expansion Board)
11 Ambient Temperature
12 Supply Volts
13 - 99 Spares
For troubleshooting information refer to the TIP: Analog Input section.

32
All Rights Reserved. Copyright © 2016, Yokogawa Electric Corporation. Subject to change without notice. August 2016IM 04Q01A02-01E-A
Analog Output
The Y-Flow™-Extender board contains one Analog output, 24VDC Loop Power, optically isolated, precision 4-20mA output. This allows an onboard solution to provide 4-20mA outputs for flow rate, pressure, or numerous other control and monitor-ing applications.
Figure 23: Y-Flow™-Extender Example Analog Output Wiring
33
All Rights Reserved. Copyright © 2016, Yokogawa Electric Corporation. Subject to change without notice. August 2016IM 04Q01A02-01E-A
AccessoriesDisplays
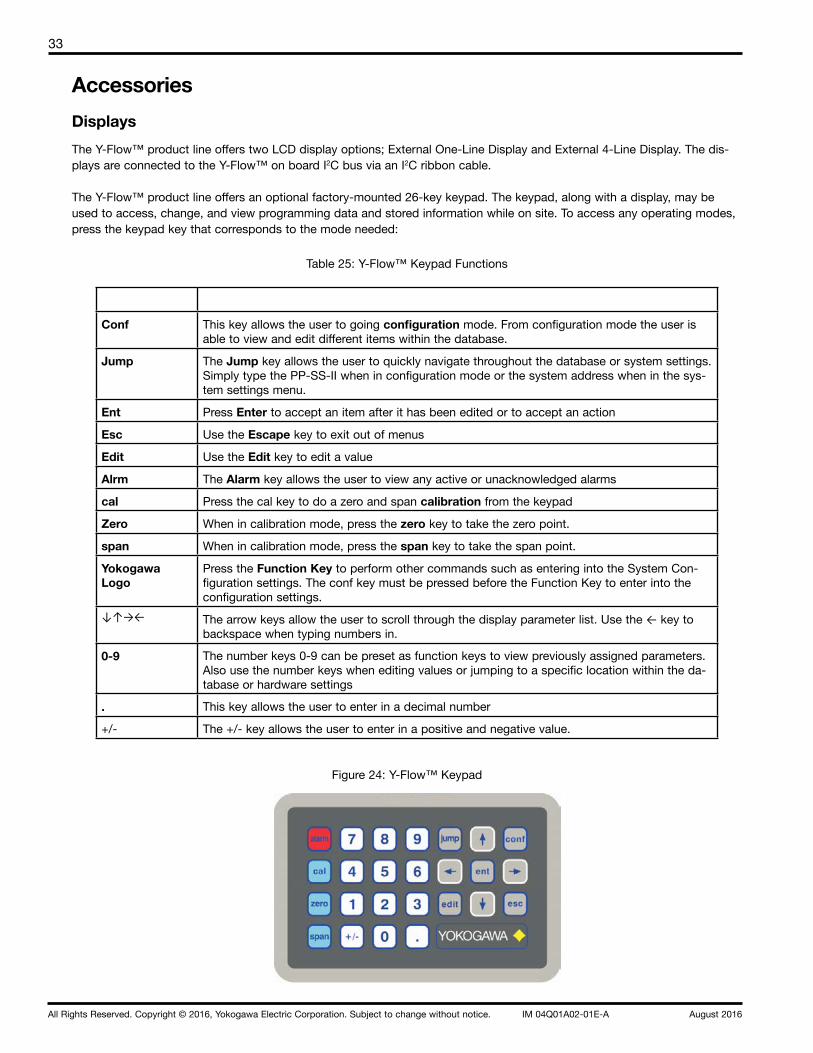
The Y-Flow™ product line offers two LCD display options; External One-Line Display and External 4-Line Display. The dis-plays are connected to the Y-Flow™ on board I2C bus via an I2C ribbon cable.
The Y-Flow™ product line offers an optional factory-mounted 26-key keypad. The keypad, along with a display, may be used to access, change, and view programming data and stored information while on site. To access any operating modes, press the keypad key that corresponds to the mode needed:
Table 25: Y-Flow™ Keypad Functions
Conf This key allows the user to going configuration mode. From configuration mode the user is able to view and edit different items within the database.
Jump The Jump key allows the user to quickly navigate throughout the database or system settings. Simply type the PP-SS-II when in configuration mode or the system address when in the sys-tem settings menu.
Ent Press Enter to accept an item after it has been edited or to accept an action
Esc Use the Escape key to exit out of menus
Edit Use the Edit key to edit a value
Alrm The Alarm key allows the user to view any active or unacknowledged alarms
cal Press the cal key to do a zero and span calibration from the keypad
Zero When in calibration mode, press the zero key to take the zero point.
span When in calibration mode, press the span key to take the span point.
Yokogawa Logo
Press the Function Key to perform other commands such as entering into the System Con-figuration settings. The conf key must be pressed before the Function Key to enter into the configuration settings.
↓↑→← The arrow keys allow the user to scroll through the display parameter list. Use the ← key to backspace when typing numbers in.
0-9 The number keys 0-9 can be preset as function keys to view previously assigned parameters. Also use the number keys when editing values or jumping to a specific location within the da-tabase or hardware settings
. This key allows the user to enter in a decimal number
+/- The +/- key allows the user to enter in a positive and negative value.
Figure 24: Y-Flow™ Keypad

34
All Rights Reserved. Copyright © 2016, Yokogawa Electric Corporation. Subject to change without notice. August 2016IM 04Q01A02-01E-A
By pressing config then the Yokogawa Logo the user can bring up a menu for special function options. The user can use the arrow keys to scroll through the functions then press enter to select the desired function. The following table shows the different functions.
Table 26: Y-Flow™ Keypad Special Function List
Function Description
System Set-tings
System Settings allows the user to configure certain hardware functions such as communication ports baud rates. For more information on the System Set-tings and navigating through them, see the System Settings section.
Diagnostics Diagnostics is used to access Diagnostics Mode. The display shows the pro-cesses executing. While in Diagnostics mode press the conf key to view each communication port. Press the conf key again to scroll through the different ports. This allows the user to view the baud rate for each port and communi-cation protocol. Press number 9 for IP Address information. Press zero or Esc to exit Diagnostics mode.
System Info System Info is used to view Firmware version, Unit Serial Number, Runtime, Number Processes and Free Data Bytes within the unit
User Extras User Extras is used to toggle the keypad beeps, setting up the four line dis-play and Yokogawa contact information
Unit Reset Unit Reset brings up the menu to Reboot the unit, Initialize the settings and clear the database. Note that passwords are required to perform these opera-tions.
Factory Test-ing
Factory Testing is used to test the Display and keypad.
Y-Flow™ ESP Expansion (E-ESP)This board is Yokogawa’s Y-Flow™ ESP Expansion (Expansion Serial Port) board. It provides an additional serial port with a jumper-selectable RS-232 or RS-485 interface. The E-ESP has minimal operating currents and supports sleep modes. In addition to the two onboard serial ports and the two serial ports on the Y-Flow™-Extender board, up to four E-ESP’s can be added to a system for a total of 8 serial ports.
The default address for all auxiliary boards is 0. When set to a 0 and connected to a device the board cannot be read. To operate properly, the E-ESP must be set to an address value between 1 and 4 that is unique to the rest of the system. Ad-dresses 1-4 are reserved for the E-ESP and addresses 5-15 are used for all other auxiliary devices.
To set the address on the E-ESP use the SW1 dipswitches, located in the middle of the PCB board, according to the chart below.
SW1 – Board AddressingTable 27: Y-Flow™ ESP Board Addressing
Address Switch 1 Switch 2 Switch 3 Switch 4 Switch 5 Switch 6
0 ↑ ↑ ↑ ↑ X X
1 ↓ ↑ ↑ ↑ X X
2 ↑ ↓ ↑ ↑ X X
3 ↓ ↓ ↑ ↑ X X
4 ↑ ↑ ↓ ↑ X X

35
All Rights Reserved. Copyright © 2016, Yokogawa Electric Corporation. Subject to change without notice. August 2016IM 04Q01A02-01E-A
The E-ESP board has three LED indicators; Enable (EN), Transmit (TX) and Receive (RX). The Enable LED will blink the number of the address, then pauses, then blinks the number of the address again. Example: If the address is set to 3 then the LED will blink 3 times, skips a blink, and then repeats. This allows the user to easily determine the health and address of the E-ESP without having to pull the board out of the enclosure.
The Transmit (TX) and Receive (RX) LED’s indicate that the E-ESP is transmitting and receiving data. These LED’s are use-ful when troubleshooting. If only one LED is blinking then that can indicate where the problem might be. Example: if the transmit LED is blinking but the receive LED is not then that indicates that the E-ESP is sending out a message but the device connected to the E-ESP is not transmitting the message back or it is wired wrong and the E-ESP is not receiving the message.
The E-ESP can be configured for RS-232, RS-485 2-wire or RS-485 4-wire by using the dipswitch bank SW2 located along the right edge of the PCB board. To set the dipswitch SW2 for the desired serial communication method use the chart below.
Table 28: Y-Flow™ ESP Dipswitch Settings
Master Intermediate Slave Final Slave
Function 1 2 3 4 5 6 1 2 3 4 5 6 1 2 3 4 5 6
RS485 4-Wire (Full Duplex)1 Point-to-Point
↑ ↑ ↑ ↑ ↓2 ↓2 Not Applicable ↑ ↑ ↑ ↑ ↓2 ↓2
RS485 4-Wire (Full Duplex)1 Point-to-Multipoint
↑ ↑ ↑ ↑ ↓2 ↓2 ↑ ↑ ↑ ↑ ↑ ↑ ↑ ↑ ↑ ↑ ↓2 ↓2
RS485 4-Wire (Half-Duplex)1 Point-to-Point
↑ ↓ ↑ ↑ ↓2 ↓2 Not Applicable ↑ ↓ ↑ ↑ ↓2 ↓2
RS485 4-Wire (Half-Duplex)1 Point-to-Multipoint
↑ ↓ ↑ ↑ ↓2 ↓2 ↑ ↓ ↑ ↑ ↑ ↑ ↑ ↓ ↑ ↑ ↓2 ↓2
RS485 2-Wire Point-to-Point
↑ ↓ ↓ ↓ ↓2 ↓2 Not Applicable ↑ ↓ ↓ ↓ ↓2 ↓2
RS485 2-Wire Point-to-Point
↑ ↓ ↓ ↓ ↓2 ↓2 ↑ ↓ ↓ ↓ ↑ ↑ ↑ ↓ ↓ ↓ ↓2 ↓2
All RS-232 Applications
↓ ↑ ↑ ↑ ↑ ↑
NOTE1: HALF DUPLEX IS THE MOST COMMON SETTING FOR 4-WIRE RS485 SINCE ALL CURRENTLY IMPLEMENTED COMMUNICATION PROTOCOLS ARE HALF DUPLEX. CONFIGURING FOR HALF DUPLEX WOULD HELP REDUCE THE CHANCE OF ANY NOISE CHARACTERS BEING RECEIVED DUE TO CROSS TALK WITH TRANSMITTING.
NOTE2: THE TERMINATION RESISTORS, ASSOCIATED WITH SWITCHES 4 AND 5, ARE A REQUIREMENT OF RS-485. HOWEVER, THEY ARE NOT TYPICALLY NEEDED AT THE BAUD RATES AVAILABLE. THE RESISTORS ADD A SIGNIF-ICANT AMOUNT OF CURRENT CONSUMPTION, AND SHOULD THEREFORE ONLY BE USED WHEN REQUIRED. IN-STANCES THAT MAY BENEFIT FROM THE USE OF THESE RESISTORS INCLUDE NOISY ENVIRONMENTS AND THOSE INSTALLATIONS WITH VERY LONG WIRE RUNS BETWEEN RECEIVERS. THESE RESISTORS, WHEN USED, SHOULD BE INSTALLED ONLY IN THOSE UNITS AT EXTREME ENDS OF THE INSTALLATION.

36
All Rights Reserved. Copyright © 2016, Yokogawa Electric Corporation. Subject to change without notice. August 2016IM 04Q01A02-01E-A
Y-Flow™ Analog Output Expansion (E-AO) The Y-Flow™ Analog Output Board (E-AO) provides a three-channel, two-wire, optically isolated, precision 4-20mA output signals with a resolution of 2 part in 65536 (26 bit), or 0.00024mA. This module interfaces with the Y-Flow™ to provide 4-20mA outputs for flow rate, pressure, or numerous other control and monitoring applications. The E-AO board interfaces to the Y-Flow™ via the standard I2C serial interface bus. Using the I2C bus the Y-Flow™ requests the desired mA output from the E-AO board. An I2C digital I/O chip is used to send the information to the analog output section of the Y-Flow™ board. Each E-AO has its own custom enclosure for easy din rail mounting.
The E-AO will function properly in temperatures from –40°F to +160°F, and in conditions of high humidity (including con-densing environments). Software calibration of the 4-20 mA output is provided for easy calibration.
The E-AO is simple to install and wire. Simply snap the E-AO into the din rail then connect the E-AO with the other I2C de-vices located on the same din rail. Commands are sent to the board via the I2C bus by the Y-Flow™. The 4-20mA current loops are simple two-wire connections; +24VDC is connected to the “+” terminal, and the “-“, or return terminal, is connect-ed to the field instrument to which the 4-20mA signal is being sent. Ground must come back to the Y-Flow™ Processor.
Figure 25: E-AO Example Wiring
The default address for all auxiliary boards is 0. When set to a 0 and connected to a device the board cannot be read. To operate properly, the E-AO must be set to an address value between 5 and 15 that is unique to the rest of the system. Ad-dresses 1-4 are reserved for the E-ESP and addresses 5-15 are used for all other auxiliary devices.

37
All Rights Reserved. Copyright © 2016, Yokogawa Electric Corporation. Subject to change without notice. August 2016IM 04Q01A02-01E-A
To set the address on the E-AO use the SW1 dipswitches, located in the middle of the PCB board, according to the chart below.
SW1 – Board AddressingTable 29: Y-Flow™ AO Board Addressing
Address Switch 1 Switch 2 Switch 3 Switch 4 Switch 5 Switch 6
0 ↑ ↑ ↑ ↑ X X
1
Reserved for E-ESP Expansion2
3
4
5 ↓ ↑ ↓ ↑ X X
6 ↑ ↓ ↓ ↑ X X
7 ↓ ↓ ↓ ↑ X X
8 ↑ ↑ ↑ ↓ X X
9 ↓ ↑ ↑ ↓ X X
10 ↑ ↓ ↑ ↓ X X
11 ↓ ↓ ↑ ↓ X X
12 ↑ ↑ ↓ ↓ X X
13 ↓ ↑ ↓ ↓ X X
14 ↑ ↓ ↓ ↓ X X
15 ↓ ↓ ↓ ↓ X X
Y-Flow™ Digital Expansion (E-Digital)The E-Digital Expansion board provides the Y-Flow™ with eight OPTO slots to use for controls. These OPTO slots can provide any combination of DC Out, Relay, DC Input, AC Out, and AC Input. Each OPTO module comes with a built in status LED. Output OPTO module comes with a replaceable integral fuse. The E-Digital Expansion board connects to the Y-Flow™ via an I2C cable. Because of the required voltage to operate the OPTO, the E-Digital Expansion board requires its own voltage source. Connect 8-30VDC to terminal 18 or 20 (Vin) and ground to terminals 17 or 19 (GND). Vin is protected to a 1-Amp fuse.
The default address for all auxiliary boards is 0. When set to a 0 and connected to a device the board cannot be read. To operate properly, the E-Digital Expansion board must be set to an address value between 5 and 15 that is unique to the rest of the system. Addresses 1-4 are reserved for the E-ESP and addresses 5-15 are used for all other auxiliary devices.

38
All Rights Reserved. Copyright © 2016, Yokogawa Electric Corporation. Subject to change without notice. August 2016IM 04Q01A02-01E-A
To set the address on the E-Digital Expansion use the SW1 dipswitches, located in the middle of the PCB board, accord-ing to the chart below.
SW1 – Board AddressingTable 26: Y-Flow™ Digital Expansion Board Addressing
Address Switch 1 Switch 2 Switch 3 Switch 4 Switch 5 Switch 6
0 ↑ ↑ ↑ ↑ X X
1
Reserved for E-ESP Expansion2
3
4
5 ↓ ↑ ↓ ↑ X X
6 ↑ ↓ ↓ ↑ X X
7 ↓ ↓ ↓ ↑ X X
8 ↑ ↑ ↑ ↓ X X
9 ↓ ↑ ↑ ↓ X X
10 ↑ ↓ ↑ ↓ X X
11 ↓ ↓ ↑ ↓ X X
12 ↑ ↑ ↓ ↓ X X
13 ↓ ↑ ↓ ↓ X X
14 ↑ ↓ ↓ ↓ X X
15 ↓ ↓ ↓ ↓ X X
Listed below are the available OPTO Module options.
Table 31: Y-Flow™ OPTO Modules
Type Yokogawa Part Num-
ber
Color Current (mA)
Integral Fuse
Built in Sta-tus LED
Use
No OPTO -- -- -- -- -- --
DC Out (60VDC, 2A)
2030164 Red Yes Yes Control or switch DC loads
Relay (500mA) 2030165 Red Yes Yes Form A mechanical Relay
DC Input (32VDC)
2030166 White No Yes Detect on/off DC volt-age levels
AC Input (90-140VAC)
2030167 Yellow No Yes Detect on/off AC voltage levels
AC Out (120VAC, 2A)
2030168 Black Yes Yes Control or switch AC loads

39
All Rights Reserved. Copyright © 2016, Yokogawa Electric Corporation. Subject to change without notice. August 2016IM 04Q01A02-01E-A
Y-Flow™ System Protection Modules (E-SPM)
The Y-Flow™ System Protection Module (E-SPM) is designed for easy mounting and changing out when needed. Each channel has a max operating current of 550mA. This can reduce the need to double up channels for higher current applica-tions such as using radios.
Along with higher operating currents on each channel the Y-Flow™ SPM has passed the IEC-61000-4-5 Level 4 Standard, meaning that the SPM protected and survived voltages over 4,000 Volts.
The E-SPM was designed to easily mount on din rail. Simply snap the assembly onto the din rail then wire the equipment to the pluggable terminal blocks on the equipment side and wire field wiring to the field side of the E-SPM. To swap out an E-SPM the only tool needed is a small screw driver to help pop out the pluggable terminal blocks and to pop plastic hous-ing apart.
Three versions of the E-SPM are available; 4 Channel – 8V which is used to protect communication lines, 4 Channel – 35V which is primarily used for incoming power and 4 Channel – 200V which is used to protect phone lines.
Table 32: Y-Flow™ SPM Terminals
Equipment Side Field Side Description
E1 L1 Channel 1
E2 L2 Channel 2
Y-Flow™ L3 Channel 3
E4 L4 Channel 4
PG PG Power Ground*
*All PG terminals are bonded to the protec-tive ground through a ground clip within the assembly. Note that the ground clip is not a substitute for the PG wire at the connector.
The table below gives the part numbers for the PCB board, assembly and the description of each item.
Table 33: Y-Flow™ SPM Part Numbers
SPM PCB Part Number SPM Enclosure Part Number Description
90105442 9010555 4 Channels; 8VDC Each
9010543 9010556 4 Channels; 35VDC Each
9010544 9010557 4 Channels; 200VDC Each

40
All Rights Reserved. Copyright © 2016, Yokogawa Electric Corporation. Subject to change without notice. August 2016IM 04Q01A02-01E-A
SoftwareY-Flow™ and Y-Flow™-Extender I/O MappingThe Y-Flow™ and Y-Flow™-Extender can easily be configured to maximize the function of the RTU. Below is a list of the I/O Mapping. By mapping these functions in the database the user can conserve power by using only the functions needed and when they are needed. This allows for more control and customization.
Table 34: Y-Flow™ and Y-Flow™-Extender Digital Hardware Addressing
Hardware Function Description Location Port Bit
DIN 1 Digital Input 1 Y-Flow™ 1.1
DIN 2 Digital Input 2 Y-Flow™ 1.2
DIN 3 Digital Input 3 Y-Flow™-Extender 1.3
DIN 4 Digital Input 4 Y-Flow™-Extender 1.4
DIN 5 Digital Input 5 Y-Flow™-Extender 1.5
DOUT 1 Digital Output 1 Y-Flow™ 2.1
DOUT 2 Digital Output 2 Y-Flow™ 2.2
DOUT 3 Digital Output 3 Y-Flow™-Extender 2.3
DOUT 4 Digital Output 4 Y-Flow™-Extender 2.4
DOUT 5 Digital Output 5 Y-Flow™-Extender 2.5
SSR1_A Solid State Relay 1 Form A Y-Flow™ 3.1
SSR1_B Solid State Relay 1 Form B Y-Flow™ 3.2
SSR1_AB Solid State Relay 1 Form C Y-Flow™ 3.3
SSR2_A Solid State Relay 1 Form A Y-Flow™ 3.4
SSR2_B Solid State Relay 1 Form B Y-Flow™ 3.5
SSR2_AB Solid State Relay 1 Form C Y-Flow™ 3.6
OPTO 1 OPTO Module 1 Y-Flow™-Extender 4.1
OPTO 2 OPTO Module 2 Y-Flow™-Extender 4.2
PUL 1 Pulse Input 1 (Configured as a Digital Input) Y-Flow™ 5.1
PUL 2 Pulse Input 2 (Configured as a Digital Input) Y-Flow™ 5.2
PUL 3 Pulse Input 3 (Configured as a Digital Input) Y-Flow™-Extender 5.3
PUL 4 Pulse Input 4 (Configured as a Digital Input) Y-Flow™-Extender 5.4
PWRCTRL 1 RS232 Power Control 1 Y-Flow™ 6.1
PWRCTRL 2 RS232 Power Control 2 Y-Flow™ 6.2
PWRCTRL 3 RS232 Power Control 3 Y-Flow™-Extender 6.3
PWRCTRL 4 RS232 Power Control 4 Y-Flow™-Extender 6.4
CMSW 1 RS232 Com Switch 1 Y-Flow™ 7.1
CMSW 2 RS232 Com Switch 2 Y-Flow™ 7.2
CMSW 3 RS232 Com Switch 3 Y-Flow™-Extender 7.3
CMSW 3 RS232 Com Switch 4 Y-Flow™-Extender 7.4

41
All Rights Reserved. Copyright © 2016, Yokogawa Electric Corporation. Subject to change without notice. August 2016IM 04Q01A02-01E-A
Table 35: Y-Flow™ and Y-Flow™-Extender Pulse Hardware Addressing
Hardware Function Description Location Port Bit
PUL 1 Pulse Input 1 Y-Flow™ 1.1
PUL 2 Pulse Input 2 Y-Flow™ 1.2
PUL 3 Pulse Input 3 Y-Flow™-Extender 1.3
PUL 4 Pulse Input 4 Y-Flow™-Extender 1.4
Table 36: Y-Flow™ and Y-Flow™-Extender Analog Hardware Addressing
Address Description Location
1 Analog Input 1 (ADC1) Y-Flow™
2 Analog Input 2 (ADC2) Y-Flow™
3 Analog Input 3 (ADC3) Y-Flow™
4 Analog Input 4 (ADC4) Y-Flow™
5 Analog Input 5 (ADC5) Y-Flow™-Extender
6 Analog Input 6 (ADC6) Y-Flow™-Extender
7 Analog Input 7 (ADC7) Y-Flow™-Extender
8 Analog Input 8 (ADC8) Y-Flow™-Extender
9 Temperature 1 (RTD) Y-Flow™
10 Temperature 2 (RTD) Y-Flow™-Extender
11 Ambient Temperature Y-Flow™
12 Supply Volts Y-Flow™

42
All Rights Reserved. Copyright © 2016, Yokogawa Electric Corporation. Subject to change without notice. August 2016IM 04Q01A02-01E-A
I2C AddressingThe I2C addressing is for any auxiliary device connected to the Y-Flow™ via an I2C cable. The first four I2C address are re-served for E-ESP. I2C addresses 105-115 are reserved for all other auxiliary devices. To set the address on Auxiliary Devices use the proper dip switch bank, this information is located on the GIS for that device or under the Auxiliary Device section. The auxiliary devices addresses range from 1 to 15. If the device is set to 0 them the Y-Flow™ will not recognize it. The device must be set to a valid address then power to the unit must be cycled before the Y-Flow™ will recognize the auxiliary device. Refer to the process manuals for proper placement of the I2C addresses.
Table 37: I2C Addressing
I2C Address Auxiliary Device Address
Description
101 1 The first four I2C address-es are reserved for ESP’s102 2
103 3
104 4
105 5 I2C addresses 105-115 are for all other devices on the I2C bus.106 6
107 7
108 8
109 9
110 10
111 11
112 12
113 13
114 14
115 15
43
All Rights Reserved. Copyright © 2016, Yokogawa Electric Corporation. Subject to change without notice. August 2016IM 04Q01A02-01E-A
System SettingsIntroductionThe System Settings are primarily used to configure communications. On-board communications such as serial, Ethernet and USB as well as the Y-Flow™ ESP Expansion cards can all be configure through the System Settings. Other items can also be stored in the System Settings such as board/unit serial numbers, temperature slope and offset, various passwords along with other functions. To access the System Settings use either Virtual Keypad or the built-in Keypad and Display.
Accessing System SettingsThe System Settings can be accessed by using the 26-key Keypad or by using Virtual Keypad in Field Manager™.
1 – Press the configuration ‘conf’ button then the function key (Yokogawa Logo)
2 – Use the arrow keys to scroll through the list to get to System Settings
3 – Press enter ‘ent’ to select System Settings.
4 – Enter in the password 3348 and press enter “ent”.
5 – To navigate the System Settings use the arrow keys and/or the jump keys as shown in the chart below. If the address of the System Setting is known then the user can press the Jump button and enter in the address in the format of FPP.II, where F is the Family, PP is the Port and II is the Item.
Table 38: System Setting Arrow Functions
Key Presses Description ExampleJump ↑ Jumps to previous whole number 102 → 101Jump ↓ Jumps to next whole number 101 → 102↑ Goes to previous item 101.2 → 101.1↓ Goes to next item 101.1 → 101.2Jump JUMP To FPP.II Enter Address
Using the System SettingsThe System Settings are arranged in the format of FPP.II, where F represents Family, PP represents Port and II represents the Item number. There are five families in the System Settings; On Board (0), ESP (1), USB (2), Ethernet (3) and System (4). The PP represents the Port within each family except for the System Family, which will be explained later in this document. For example, if the user is setting up port 2 on the Y-Flow™ then the FPP.II would be 002.II. If the user is setting up an ESP for port 3 then the FPP.II would be 103.II. The II represents the Items within each family. All items under the families On Board, ESP, USB and Ethernet are the same. The System Settings have different items and are explained later in this docu-

44
All Rights Reserved. Copyright © 2016, Yokogawa Electric Corporation. Subject to change without notice. August 2016IM 04Q01A02-01E-A
ment.
FPP.II | | | \\----------II: Items – These are the configuration items within each Family | \ \--------------PP: Port – Port is referred to the communication port being used. The | System Family does not use ports, but is still represented by | numerical values. This will be explained later in this document. \------------------F: Family 0: on Board
1: ESP 2: USB 3: Ethernet 4: System
The On-Board section consists of the System Settings for serial ports 1 and 2 located on the Y-Flow™ and serial ports 3 and 4 located on the Y-Flow™-Extender. This section uses addresses 1 through 4. The second section consist of the hard-ware configuration for four E-ESP’s which are connected to the Y-Flow™ via I2C connection. This section uses addresses 101-104. The third section is the hardware configuration for the Y-Flow™ USB port. This section is addressed as 201. Sec-tion four consist of the hardware configuration for Ethernet, addresses 301-308. The final section is the system level config-uration with the address of 401.
The chart below shows Family and Port addresses.
Table 39: System Settings Family and Ports
Family Port Family (F) and Port (PP)
On Board(0PP)
Com 1 (Port 1) 001
Com 2 (Port 2) 002
Com 3 (Port 3) 003
Com 4 (Port 4) 004
ESP’s(1PP)
ESP 101 101
ESP 102 102
ESP 103 103
ESP 104 104
USB(2PP)
USB 201
Ethernet(3PP)
IP 1 301
IP 2 302
IP 3 303
IP 4 304
IP 5 305
IP 6 306
IP 7 307
IP 8 308
System(4PP)
System - General 401
System - Ethernet 402
The chart below shows the Items located in the On Board, ESP, USB and Ethernet Families. Each Item will be in the same location under each Family and Port (FPP). Some Items are not used in some Families but they are left in the Item list so that it is uniform throughout the System Settings.

45
All Rights Reserved. Copyright © 2016, Yokogawa Electric Corporation. Subject to change without notice. August 2016IM 04Q01A02-01E-A
Table 40: System Settings for On-board, ESP, USB and Ethernet
Item # Default Value Item Name Item Description
FPP.01 0 Config Number
FPP.02 0 Comm X Config Bits 1
0 - RTS Disabled 0: Disables RTS1: Enables RTS 1 - RTS Enabled
0 - CTS Disabled 0: Disable CTS1: Enables CTS 2 - CTS Enabled
0 - Packet Radio Off 0: Disables Radio Protocol1: Enables Radio Protocol 4 - Packet Radio On
0 - HexASCII V2 Off 0: Disables “HOST” RTU Handshaking1: Enables “HOST” RTU Handshaking 8 - HexASCII V2 On
0 - Metricom Off 0: Disables Metricom Handshaking1: Enables Metricom Handshaking 16 - Metricom On
0 - Hayes Modem Off 0: Disables Hayes Modem1: Enables Hayes Modem 32 - Hayes Modem On
0 - Standard Hayes 0: DTR Hangup 1: +++ Hangup, multidrop enable 64 - Multidrop Hayes
0 - Multidrop Slave Enable/Disable sending hayes init commands to multidrop master 128 - Multidrop Master
0 - Yokogawa Read/Write 0: Yokogawa protocol allows read/write1: Yokogawa protocol allows read only access 256 - Yokogawa Read Only
0 - COMSW > Yokogawa On Enables/Disables automatic Yokogawa protocol when RS232 is grounded 512 - COMSW > Yokogawa Off
0 - Auto Baud On 0: Enable autobaud with Hayes / CDPD modems1: Disable autobaud with Hayes / CDPD modems 1024 - Auto Baud Off
0 - MV 90 I Com Off 0: Disable I command for MV-901: Enable I command for MV-90 2048 - MV90 I Com On
0 - NAK Enabled Set to 1 for 202 or radio where all units listen0: Enable sending NAK after bad message1: Disable sending NAK after bad message 4096 - NAK Disabled
0 - Text Reports Off 0: Disable Text Reports1: Allow Sending Text Reports 8192 - Text Reports On
0 - RS232 Power Save 0: Only powers up RS232 when CMSW is active 1: Keeps RS232 powered up 16384 - RS232 Always On
0 - WINI CMSW Off 0: Normal Mode Hayes Modem1: Sierra Wireless CDPD Modem Detect 32768 - WINI CMSW On

46
All Rights Reserved. Copyright © 2016, Yokogawa Electric Corporation. Subject to change without notice. August 2016IM 04Q01A02-01E-A
FPP.03
0 Comm X Config Bits 2
0 - Valmet Disabled 0: Valmet Disabled on this port1: Valmet Enabled on this port 1 - Valmet Enabled
0 - MultiOn Dur Com 0: Enable Multitasking during STX…Etx1: Disable Multitasking during STX..Etx 2 - MultiOff Dur Com
0 - Unique SiteIDs 0: Normal, HexAscii uses SiteID’s1: Unit will respond to any SiteID 4 - Ignore SiteIDs
0 - Hayes Norm Init 0: Normal Hayes Modem Handling1: Only initialize Hayes Modem with ATZ 8 - Hayes ATZ Init
0 - Use CMSW Normal 0: Normal handling of CMSW1: Ignore CMSW 16 - Ignore CMSW
0 - Normal Hangup 0: Sned normal Hangup Commands1: If in Multidrop use AT+++ Commands 32 - CDPD Mult Hangup
0 - No Echo Trig Req 0: No Trigger character required for echo1: Trigger Character required for echo 64 - Echo Trig Req
0 - No Echo Trig RTS 0: Don’t assert RTS on Echo Trig1: Assert RTS on Echo Trigger 128 - Echo Trig RTS
0 - GPRS Modem Off 0: Use Standard AT type modem1: Use Special AT Commands GPRS modem 256 - GPRS Modem On
0 - Modem Detect Off 0: Do not use AirLink/Modem Auto Detection 1: Use Automatic Airlink Modem Detection 512 - Modem Detect On
0 - MODBUS Disabled 0: Modbus Disabled on this port 1: Modbus Enabled on this port 1024 - MODBUS Enabled
0 - MODBUS RTU 0: Modbus RTU Mode1: Modbus Ascii Mode 2048 - MODBUS ASCII
0 - Normal RTS Mode 0: Normal RTU Operation1: Force RTS on during port init. 4096 - Force RTS On
0 - TTS Modem Off 0: Normal Hayes Modem1: Yokogawa Text to Speech Modem 8192 - TTS Modem On
0 - Cermetek Normal 0: Normal Cermetek Handling1: Init with AT+MS=B212, 0, 1200, 1200, 1200, 1200 to force 1200 baud connect, usually used with cell phone. Requires CH1786A
16384 - Cermetek Fix Baud
0 - No Init Hangup 0: Don’t reinitialize modem on each Hangup 1: Reinitialize modem on each hangup 32768 - Init on Hangup

47
All Rights Reserved. Copyright © 2016, Yokogawa Electric Corporation. Subject to change without notice. August 2016IM 04Q01A02-01E-A
FPP.04
0 Comm X Config Bits 3
0 - CTS Normal Act 0: Use standard CTS active level: CTS=True for RS232 High, CMOS low1: Use inverse CTS active level: CTS=true for RS232 Low, CMOS high
1 - CTS Inverse Act
0 - Zero String Auto 0: Default to no Zero String Commpression. Must be turned on in protocol1: Force Zero String Compression ON always 2 - Zero String On
0 - CMSW Wakeup On 0: CMSW is latched during wakeup like with external Hayes modem1: Disable CMSW latching during wakeup, use with MDS when CMSW is used to control the DTR/Sleep pin on the MDS Radio
4 - CMSW Wakeup Off
0 - Gen HFT-001 Off 0: Disable Genscape Japan HFT-001 Modem Sup-port1: Enable Genscape Japan HFT-001 Modem Sup-port
8 - Gen HFT-001 On
0 - 8-Bit XOR Check 0: HexAscii Protocol uses 8-bit XOR, auto mode may hange to 16-bit CRC1: Force 16-bit CRC checks for HexAscii Protocol 16 - 16-Bit CRC Check
0 - Modbus Read Write 0: Port has „read/write“ Modbus slave access1: Port has „read only“ Modbus slave access 32 - Modbus Read Only
0 - Modbus Def Ser 0: Uses 8,N,1 if port is set for Modbus RTU and 7,E,1 if port is set for Modbus ASCII1: Modbus slave protocol on this port will be forced to use 8 data bits, no parity and one stop bit
64 - Modbus Force 8N1
0 - Log Adt Tr Reset 0: Log Audit Trail Reset1: Do not Log Audit Trail Reset 128 - No Log Adt Tr Rst
FPP.05 115200 Main Baud Main Communications Baud Rate for PortSelect Desired Baud Rate300, 600, 1200, 2400, 4800, 9600, 19200, 38400, 57600, 115200
FPP.06 115200 CMSW Baud CMSW Baud Rate for PortSelect Desired Baud Rate300, 600, 1200, 2400, 4800, 9600, 19200, 38400, 57600, 115200

48
All Rights Reserved. Copyright © 2016, Yokogawa Electric Corporation. Subject to change without notice. August 2016IM 04Q01A02-01E-A
FPP.07 10000 HexAscii Timeout The amount of time, in seconds, allowed for HexAs-cii to try to communicate
FPP.08 2000 Aux Port Timeout
FPP.09 5 RTS On Time (ms) How long RTS will stay on for (in ms)
FPP.10 2 RTS Off Time (ms) How long RTS will turn off for (in ms)
FPP.11 300 Modem Timeout (s) The amout of time, in seconds, allowed for the mo-dem to try to connect
FPP.12 0 Dial Tone Wait (s)
FPP.13 1 Rings to Answer Number of rings befor the modem will pick up
FPP.14 0 Power Delay Delay in seconds after power is turned on and be-fore communications will begin
FPP.15 0 Power Address 1
FPP.16 0 Power Address 2
FPP.17 -1 Echo Port Passes Information from Port to Desired PortEnter Desired Port Number
FPP.18 0 Echo Trig Char
FPP.19 -1 SIM Card Pin
FPP.20 0 TCP Listen Port TCP/IP Listens on Por
FPP.21 0 Random Dial Delay
FPP.22 60 Clear Chan TO (s)
FPP.23 10 Clear Required (s)
FPP.24 0 Modbus Offset
FPP.25 2 Modbus Msg Delay
The System Family is broken down into two sections (these sections are represented as PP in FPP), System General and System Ethernet. System General is represented as 401 for FPP and System Ethernet is represented as 402 for FPP. The Items under these sections are different from the On Board, ESP, USB and Ethernet Families.
Table 41: System Settings for System General
System General - 401
FPP.II Default Value Item Name Item Description
401.01 0 Board Serial Number Serial Number of the Board
401.02 0 Unit Serial Number Serial Number of the Unit
401.03 0.00703125 Amb Temp Slope Ambient Temp Slope (calibrated during burn-in)
401.04 32 Amb Temp Offset Ambient Temp Offset (calibrated during burn-in)
401.05 947332 Clr DB Password Password for Clearing the Database
401.06 3348 EE Edit Password Password for Editing System Settings
401.07 4648 Clr All Password Password for clearing all

49
All Rights Reserved. Copyright © 2016, Yokogawa Electric Corporation. Subject to change without notice. August 2016IM 04Q01A02-01E-A
401.08 0 Sys_config1
0 - Alarm Clear On Alarm clearing with magnet 1 - Alarm Clear Off
0 - Dis Mode Ed Off Display mode edit enabled 2 - Dis Mode Ed On
0 - Password Log Off Allow logging passwords in audit trail 4 - Password Log On
0 - Normal Time Mode Debug mode to advance the time quickly, 1 hour at a time 8 - First Time Advanc
0 - Auto DLSTIME OFF True enables auto time changing for Daylight Savings/Standard Time 16 - Auto DLSTIME On
0 - VXD on for wake True keeps VXD off during wake
This option only used for Dominion units that were shipped about 10/28/04 built with ECN 35. A future ECN will change the 1N5817 diode to a 1N914 to avoid VXD coming on while in sleep mode at high temperatures. This Item must not be set true in post ECN 35 boards -- If it is, VXD will come on while the unit is asleep.
32 - VXD Off for wake
0 - 2007 DLS Time
0: This selects the new 2007 DST standard where DST starts at 2am on the second Sunday in March and ends on the first Sunday in November1: Will probably not be used, it selects the old daylight savings time mode established in 1966 when DST started at 2am on the first Sunday of April and ran until 2am on the last Sunday of October.
64 - 1966 DLS Time
0 - Ext Security Off
Returns true if Ext Security is enabled; False if not. Ex-tended Security is a new feature that supports 16 user names and passwords as well as access rights 128 - Ext Security On
0 - Enable Forth 256 - Disable Forth
0 - G Unique SiteIDs 512 - G Ignore SiteIDs
Sys_config2
401.09 0 0 - OPTOS Off Sleep
1 - OPTOS Off Sleep

50
All Rights Reserved. Copyright © 2016, Yokogawa Electric Corporation. Subject to change without notice. August 2016IM 04Q01A02-01E-A
401.10 0 Sys_config3
401.11 4 EBM800 Addr Port
401.12 3 EBM800 Data Port
401.13 1 EBM800ai del (ms)
401.14 17 Supply Volts Address
401.15 0.0471 Supply Volts Slope
401.16 -6.71 Supply Volts Offset
401.17 0 Solar Charger Addr
401.18 0 Eaves Drop Config
401.19 0 Eaves Drop Show Pt
401.20 1 Eaves Drop On Port
401.21 0 Hr Pulse Out Adr
401.22 0 Host ID
401.23 0 I2CRTC Sec/Day A
The System Ethernet section is used for viewing the MAC Address and configuring Ethernet settings
Table 42: System Settings for System Ethernet
System Ethernet - 402
FPP.II Default Value Item Name Item Description
402.01 0x00 MAC Addr 3 These are read only items. The MAC Address is set in the XA32/5™ at the factory.402.02 0x00 MAC Addr 4
402.03 0x00 MAC Addr 5
402.04 1 Ethernet CFG 1
0 - DHCP Disabled 0: Static (Fixed) IP1: DHCP Enabled1 - DHCP Enabled
402.05 0 Ethernet CFG 2
402.06 0 Ethernet CFG 3
402.07 0 IP Addr Part 1 IP address of the Y-Flow™
402.08 0 IP Addr Part 2
402.09 0 IP Addr Part 3
402.10 0 IP Addr Part 4
402.11 0 Gateway Part 1 Gateway IP address for a router
402.12 0 Gateway Part 2
402.13 0 Gateway Part 3
402.14 0 Gateway Part 4
402.15 255 IP Mask Part 1 IP Address Mask
402.16 255 IP Mask Part 2
402.17 255 IP Mask Part 3
402.18 0 IP Mask Part 4

51
All Rights Reserved. Copyright © 2016, Yokogawa Electric Corporation. Subject to change without notice. August 2016IM 04Q01A02-01E-A
Operating ModesThe Y-Flow™ operates in any of the following five standard modes; Sleep/Wake-Up, Display, Alarm, Configuration and Cali-bration. To access these operating modes press the corresponding key on the keypad.
Table 43: Keypad Operating Modes
Keypad Key Operating Mode
Conf Configuration Mode
Alrm Alarm Mode
Cal Calibration Mode
Esc Return to previous mode
Sleep/Wake-Up ModeNOTE: SLEEP MODE HAS NOT BEEN IMPLEMENTED IN THE Y-FLOW™ YET. BELOW IS A DESCRIPTION OF HOW THE SLEEP MODE WILL WORK ONCE IT HAS BEEN IMPLEMENTED.
In normal operation the Y-Flow™ maintains a powered down state (sleep mode) to conserve battery life. In this state the out-side display shows the first label, CV XXXXXXXX for example, where is the most recent reading prior to the next wake-up in-terval. The unit executes processes depending upon the user’s programmed wake-up interval. Shorter intervals result in more frequent data while longer intervals provide for longer battery life. The scheduled wake-ups result in immediate power-down after performing calculations.
In addition to the scheduled wake-ups for volumetric calculations, the Y-Flow™ can be brought up from its sleep mode by any of the following actions:
• Connecting a portable computer to the unit’s serial communication port (MS connector)
• Pressing any key on the keypad
• Scrolling the external display with a magnet (see the section on DISPLAY MODE)
• Calling the unit via modem
Once the unit is awake, it will automatically power down one minute after the operator stops interacting with it. The Y-Flow™ can also be forced to enter the sleep mode by pressing the function key (Yokogawa Logo) then the number 5.
NOTE: THE Y-FLOW™ WILL NOT GO TO SLEEP IF A LAPTOP IS CONNECTED TO THE UNIT.
Typically, the Y-Flow™ remains fully awake and does not enter sleep mode if it is powered with an external power supply. In this case, the Wake-Up Interval parameter is set to a 0 in the database.
Display ModeIn display mode, only limited parameters with assigned labels and function keys can be viewed. With the optional keypad and display, the ↑ and ↓ arrow keys will allow the user to scroll through the display parameter list. The user may use the jump key to directly view any of the assigned labels; press jump then enter the label number, followed by pressing ent. To view previously assigned parameters use the number keys 0-9. Talon™ or Field Manager™ and/or Talon™ software can be used to assign number keys and labels to any parameter. Also, the local keypad may be used to assign function keys.

52
All Rights Reserved. Copyright © 2016, Yokogawa Electric Corporation. Subject to change without notice. August 2016IM 04Q01A02-01E-A
Using the Scroll SwitchOn units that feature the external display, a magnet may be used to easily access information connecting to the unit. Just below the display, on the right, is a small printed dot on the display window. When the key chain magnet, supplied with these units, is held in the proximity of this dot, the display will vary its information. Each subsequent pass of the magnet over this dot will produce a new parameter display.
When in an alarm condition, the display will be flashing. To clear alarms, hold the magnet against the dot until flashing stops.
Alarm ModeThe Y-Flow™ can be configured to activate an alarm when certain conditions are met or when user-defined limits are ex-ceeded. Active alarm messages can be configured to show on the Y-Flow™’s display. The unit can also automatically call a host computer running Field Manager™ and the Talon™ Software Suite to report the alarm (see the section on SOFTWARE PACKAGES).
A history log is kept in the Y-Flow™ on each alarm condition, consisting of the following: • Current value • Type of alarm (high, low, etc.) • Set point value (alarm limit) • Time of alarm • Date of alarm • Time out of alarm • Date out of alarm • Extreme value alarm
The Y-Flow™ can be configured to monitor and alarm on any condition including, but not limited to, the following: • First Time Power • AC Power Failure • Low Supply Volts • High and Low Flow Rate • High and Low Pressure • High and Low Differential Pressure • High and Low Temperature • Current Day Flow (Transportation Limit) • Low Voltage Shutdown • Box intrusion
NOTE: ADDITIONAL HARDWARE EQUIPMENT AND CONFIGURATION MAY BE REQUIRED FOR SOME ALARM MONITOR-ING APPLICATIONS
Viewing and Clearing Alarms from the KeypadTo enter alarm mode, press the alrm key on the optional keypad. In alarm mode the user can view and acknowledge any alarm. If alarms are active, the unit will display the first alarm message. If there are more alarms, they can be viewed by pressing the alrm key. Repeatedly pressing the alrm key cycles through the active alarm list.
Alarms can be locally acknowledged at the Y-Flow™ by pressing the ent key while a particular alarm message is displayed, or by polling with Talon™ or Field Manager™ software.
When in an alarm condition, the optional external display will be flashing. To clear alarms, hold the magnet against the dot until flashing stops.
Unless the parameter’s limits are violated again, the unit will not include acknowledged alarms in its list the next time the user enters alarm mode. To exit alarm mode without acknowledging the alarm, simply press the esc key.

53
All Rights Reserved. Copyright © 2016, Yokogawa Electric Corporation. Subject to change without notice. August 2016IM 04Q01A02-01E-A
First Time Power Alarm
First Time Power alarm is defined as the re-application of power after interruption of the power source. For example, whenever the battery is disconnected and then subsequently reconnected, the unit records the First Time Power event.
Low Supply Volts Alarm
If the supply voltage to the unit falls below the Low Supply Volts Alarm Set-point value, a Low Supply Volts alarm will be initiated. The alarm will remain active until the supply voltage is greater than the Low Supply Volts Alarm Reset parameter. The set-points are user configurable with default values of 8.5 and 8.8 volts respectively for battery powered units.
High Flow Rate Alarm
If the flow rate should exceed the High Flow Rate Alarm Set-point, a High Flow Rate alarm will be initiated. The alarm will remain active until the flow rate falls below the High Flow Rate Reset parameter value. The set-points are user configurable with default values of 100000 and 99990 respectively.
Low Flow Rate Alarm
If the flow rate should fall below the Low Flow Rate Alarm Set-point, a Low Flow Rate alarm will be initiated. The alarm will remain active until the flow rate rises above the Low Flow Rate Reset parameter value. The set-points are user configurable with default values of -100 and -80 respectively.
High Pressure Alarm
If the gas pressure should exceed the High Pressure Alarm Set-point, a High Pressure alarm will be initiated. The alarm will remain active until the pressure falls below the High Pressure Reset parameter value. The set-points are user configu-rable with default values of 1500 and 1480 respectively.
Low Pressure Alarm
If the gas pressure should fall below the Low Pressure Alarm Set-point, a Low Pressure alarm will be initiated. The alarm will remain active until the pressure rises above the Low Pressure Reset parameter value. The set-points are user configu-rable with default values of -100 and -80 respectively.
High Differential Pressure Alarm
If the differential pressure should exceed the High Differential Pressure Alarm Set-point, a High Differential Pressure alarm will be initiated. The alarm will remain active until the differential pressure falls below the High Differential Pressure Reset parameter value. The set-points are user configurable with default values of 1500 and 1480 respectively.
Low Differential Pressure Alarm
If the differential pressure should fall below the Low Differential Pressure Alarm Set-point, a Low Differential Pressure alarm will be initiated. The alarm will remain active until the differential pressure rises above the Low Differential Pressure Reset parameter value. The set-points are user configurable with default values of -100 and -80 respectively.
High Temperature Alarm
If the gas flow temperature should exceed the High Temperature Alarm Set-point, a High Temperature alarm will be initi-ated. The alarm will remain active until the temperature falls below the High Temperature Reset parameter value. The set-points are user configurable with default values of 200 and 180 respectively.
Low Temperature Alarm
If the gas flow temperature should fall below the Low Temperature Alarm Set-point, a Low Temperature alarm will be initi-ated. The alarm will remain active until the temperature rises above the Low Temperature Reset parameter value. The set-points are user configurable with default values of -100 and -80 respectively.

54
All Rights Reserved. Copyright © 2016, Yokogawa Electric Corporation. Subject to change without notice. August 2016IM 04Q01A02-01E-A
Current Day Flow Alarm (Transportation Limit)
If the current day’s total volume should exceed the Current Day High Volume Alarm Set-point, a Current Day Flow alarm will be initiated. The alarm will remain active until the value for the current day volume is reset the next day at roll time. The set-points are user configurable with default values of 100000 and 99990 respectively. For transport or interruptible cus-tomers, this parameter can be used to alarm when an account has exceeded a predetermined daily volume allocation.
Low Voltage Shutdown Alarm
If the supply voltage should fall to approximately 6.0 volts, an interrupt will be triggered and the unit will enter Low Voltage (Critical) Shutdown mode. Low Batt will be displayed on the display. This is an indication that the supply voltage is abso-lutely too low to operate the unit properly. The battery must be changed at this point or adequate supply voltage applied. In this mode, all operation ceased, and the unit operates in a protective mode. The on-board battery will continue to protect the unit’s memory; therefore data prior to entering this mode will be maintained. The supply voltage is monitored constantly and the unit will reset itself should the supply voltage becomes greater than 6.0 volts. If the unit is left alone without apply-ing adequate supply voltage, the battery will continue to drain and the outside display will eventually go blank.
When sufficient supply voltage is applied and the unit is powered up, a Low Voltage Shutdown alarm will be recorded.
Configuration ModeConfiguration mode allows the user to set up the Y-Flow™’s initial configuration, change any of the operating parameter values, and set alarm conditions and limits. Talon™ software, Field Manager™ software, or the optional keypad and display is required to perform configuration. Field Manager™ software package is supplied with the unit consisting of Virtual Key-pad and other utilities.
CAUTION: CARE MUST BE TAKEN WHEN EDITING PARAMETERS. IMPROPER PARAMETER EDITING MAY RESULT IN CORRUPTION OF THE DATABASE.
To enter configuration mode, press the conf key on the optional keypad. If the configuration mode is password protected, the Y-Flow™ will display ENTER PASSWORD? Only a valid password entry would then be given access to this mode. Configuration mode allows the user to set up the Y-Flow™’s initial configuration, change any of the operating parameter values, set alarm conditions and limits, and assign function keys to various parameters. While in the configuration mode, the Y-Flow™ continues to operate normally. It continues to sample live pressure and temperature values, calculate correct-ed volume, and collect historical data.
Viewing Parameters
In configuration mode, any parameter value may be viewed. One method is to use the Jump key to directly view database items. Press Jump and then enter the address of the parameter (PPSSII) followed by pressing the ent key. The top line on the display is the address XX-XX-XX and the bottom line is the value. Function key assignments are still valid, so of-ten-viewed parameters may be accessed in this manner. The right and left arrow keys allow horizontal movement between processes, and the up and down arrow keys allow moving vertically within a process. Pressing Jump followed by the Right Arrow key will display the same item number in the next section. Likewise, pressing Jump followed by the Up Arrow key will display the same item number in the previous section. Jumping to assigned labels is also supported as described in Display mode.
Editing Parameters
1. Enter configuration mode by pressing the conf key (use the password if required). 2. Display the desired parameter. Press the jump key, followed by the address of the parameter. The function keys can also be used to view assigned parameters. 3. With the desired parameter displayed, press the edit key. (The unit will display the current parameter value and prompt for a new value.) Use the keypad to enter the correct value and then press the ent key to execute the change. Pressing the esc key when the RTU prompts for the new value will abort the change. Pressing the ent key if nothing has been typed, also leaves the parameter unchanged.

55
All Rights Reserved. Copyright © 2016, Yokogawa Electric Corporation. Subject to change without notice. August 2016IM 04Q01A02-01E-A
Assigning Function Keys
In configuration mode, any item can be assigned to a function key as follows: 1. Enter configuration mode by pressing the conf key (use the password, if required). 2. Display the desired parameter. Press & release the jump key, followed by the address of the parameter. 3. Assign a function key to the parameter. Press & release the jump key, then the edit key, and then the desired number key to be assigned to the current item [0 - 9].
Audit TrailThe Y-Flow™ maintains an electronic audit trail file that records all parameter changes and calibrations performed on the unit. Each entry is identified with the date and time the event occurred. The contents of this file cannot be changed, provid-ing a secure, non-editable audit trail.
In the standard Y-Flow™ configuration, the audit trail is disabled. Audit Trail logging can be enabled by editing address 010313 to 300 at the keypad or by using Talon™ or Field Manager™ software. The maximum memory allowed for audit trail is (300 records * 24 = 7,200).
NOTE: ONCE THE AUDIT TRAIL IS ENABLED (A VALUE GREATER THAN “0”), THE USER CANNOT DISABLE IT WITHOUT A FULL UNIT INITIALIZATION. RELOADING THE DATABASE WILL NOT DISABLE THE AUDIT TRAIL.
Once enabled, the Y-Flow™ maintains the audit trail file with a maximum of 300 records. The information from the unit can be uploaded to a portable or host computer using Talon™ or Field Manager™ software. When the audit trail is full, Audit Trail Full will appear if editing is attempted and the Y-Flow™ will not allow any changes. The audit trail must first be upload-ed and reset by Talon™ or Field Manager™ software.
Memory (History Logging)With a large memory capacity, historical inputs with time and date stamp can be stored. The non-editable history file pro-vides the user with time related data logged in any variation of selectable intervals; minute, daily, weekly, and monthly. An event-driven history mode allows the logging of data when an event occurs (e.g. alarms). An experienced user with Talon™ software can define the type of data and collection period. Since the history data elements are stored in a block of memory, the size has to be assigned at the time the history process is created in the Y-Flow™; typically when the database is down-loaded at the factory.
NOTE: THE SIZE OF THE HISTORY BLOCK CANNOT BE CHANGED ONCE THE HISTORY PROCESS HAS BEEN CRE-ATED IN THE UNIT. A COMPLETE DOWNLOAD WOULD BE REQUIRED TO RESET THE DATABASE AND CHANGE THE Y-FLOW™’S MEMORY ASSIGNMENT.
The memory required to store an entire history process data block is [Max pointers * (Max Record +1) *4]. Data may be collected over cell modems, Ethernet, or on-site through the USB connection or RS-232 serial connection. Tal-on™ or Field Manager™ software is required for collection. The collected data can then be used for:
• Billing information • Measurement reports for utility and customer management • System analysis using flow rate and pressure • Support for estimating gas volume consumption in cases of meter or instrument malfunction

56
All Rights Reserved. Copyright © 2016, Yokogawa Electric Corporation. Subject to change without notice. August 2016IM 04Q01A02-01E-A
Calibration ModeCalibration mode allows the user to calibrate the analog inputs such as differential pressure, static pressure, and temperature. While operating in calibration mode the Y-Flow™ continues to periodically update volume. The analog input value used for cal-culations is the value measured when calibration mode was initially entered. Once in calibration mode, the user can perform the following operations:
• Calibrate zero only • Calibrate both zero and span • Calibrate zero shift for the DP transmitter
Of course, the option to change the calibration reference points is available at all times. Several other features make the software calibration routine attractive and more intuitive. In the Y-Flow™, unit calibration is software based; there is no need for laborious operator adjustments. Software calibration does away with the need for repetitive potentiometer adjustments, thereby simplifying field calibration procedures.
InstallationUnpacking1. Thoroughly examine the box to verify it was not damaged in shipping. If you find damage, immediately file a claim with the shipper, as the manufacturer cannot be held responsible for items damaged in transportation and accepted by the customer.
2. Carefully unpack the Yokogawa Y-Flow™ device from the shipping container. Verify that the box contains every item listed on the shipping order.
!!! CAUTION !!! THIS UNIT CONTAINS CERTAIN ELECTRONIC COMPONENTS THAT ARE SENSITIVE TO ELECTROSTATIC DISCHARGE (ESD); THEREFORE, PROPER PRECAUTIONS SHOULD BE TAKEN DURING MAINTENANCE OPERATIONS TO AVOID ESD. IT IS REC-OMMENDED THAT THE OPERATOR FIRST TOUCH THE MS CONNECTOR (RS-232C PORT) ON THE SIDE OF THE UNIT TO DISSIPATE ANY ACCUMULATED STATIC CHARGE. ADDITIONAL PRECAUTIONS MAY BE TAKEN IN ORDER TO MINIMIZE THE POSSIBILITY OF ESD, INCLUDING THE USE OF A GROUNDING WRIST OR ANKLE STRAP. IF THESE PRECAUTIONS ARE NOT TAKEN AND THE UNIT IS SUBJECTED TO SEVERE ESD, IT MAY REVERT TO ITS DEFAULT STATE. HOWEVER, THE UNIT WILL NOT EXHIBIT ANY LOSS OF DATA OR DEGRADATION OF PERFORMANCE.
Mounting the RTUNOTE: FOR POSITIVE DISPLACEMENT (INDEX-MOUNTED) APPLICATIONS, SEE APPENDIX C.
The Yokogawa Y-Flow™ mounts directly on a wall or, optionally, on a pipe (see Fig. 3). Mounting feet are provided for wall mounting, and plates with U-bolts are provided for pole mounting. Two-inch rigid iron pipe or conduit is required for pipe mount-ing. It is recommended that the pipe be placed 18 to 24 inches into the ground in a 6-inch wide sackrete/concrete-filled hole. The length of the 2-inch mounting pipe or conduit will vary according to the site, but typical installations place the RTU at about eye level for ease of operation.

57
All Rights Reserved. Copyright © 2016, Yokogawa Electric Corporation. Subject to change without notice. August 2016IM 04Q01A02-01E-A
GroundingBecause of the potential for equipment damage and injury to personnel, certain practices should, and often must, be observed when installing Y-Flow™ systems. Of these practices, proper grounding is possibly the single most important. This section was included to point out general rules and practices, and NOT to supersede those defined in the National Electrical Code (NEC) published by the National Fire Protection Association (NFPA), nor the Classification of Gas Utility Areas for Electrical Instal-lations booklet published by the American Gas Association (AGA). A sound understanding of Federal, State, and Local laws is fundamental to proper and legal installation work. Yokogawa® makes no warranties or guarantees on the effectiveness or safety of any technique or suggestion here described.
All RTU, electronic utility interface, and gas meter equipment should be kept at the same ground potential so that unexpected voltages anywhere on the system are quickly shunted away to earth. This calls for a common ground rod (or “bed” of grounding materials) to which is securely tied to all equipment chassis, metal cabinets, and intrinsic safety ground brackets. For equipment chassis and metal cabinets, a solid copper ground wire or ground strapping of an approved size and type is recommended to tie this equipment to the rod(s). For Intrinsic Safety systems it is recommended that two #12 AWG wires be run in parallel from indi-vidual ground terminals on each I.S. ground frame. Where more than one rod is used, as when some distance separates equip-ment, all rods should be bonded together with copper in an approved manner.
References
• National Electrical Code
- Article 250 - Grounding
- Articles 500 & 501 - Hazardous (Classified) Locations
- Article 504 - Intrinsically Safe Systems
• The IAEI Soares’ Book on Grounding • PolyPhaser Corp.’98 catalog of Lightning/EMP & Grounding Solution
MaintenanceAs with any device based on solid-state electronics, maintenance of the Yokogawa Y-Flow™ should be minimal. However, there are certain guidelines that, if followed, will minimize device failure and increase the product’s service life.
Enclosure Maintenance
Enclosure maintenance is a program of routine inspections to ensure the integrity of the door’s seal and the various ports in the box’s exterior. Excess moisture can ruin an Y-Flow™ if allowed to accumulate within the enclosure. Although the circuit boards themselves are conformal coated to protect against humidity, the wiring interconnections and various exposed metal surfaces are susceptible to corrosion in extreme cases of interior humidity. Here are some checks you should periodically make of the enclo-sure:
1. Ensure that the mounting arrangement for the unit is secure and provides a stable platform for termination of the pressure tubing, conduits, etc.
2. Verify the integrity of the enclosure lid seal. Check the lid gasket for deterioration, chemical damage, tears, or compression.
3. Check for damaged cord grips and a missing or damaged MS connector (RS-232 port) cap.
4. Examine the RS-232C port itself. Ensure that the port’s mounting screws are secure and provide firm support when attaching a serial cable.

58
All Rights Reserved. Copyright © 2016, Yokogawa Electric Corporation. Subject to change without notice. August 2016IM 04Q01A02-01E-A
Disposable Battery PacksThe disposable (alkaline) battery pack, under normal operating conditions, will eventually drop below the voltage level needed to maintain unit power. Its lifespan is determined by dozens of variables specific to each unit, and therefore difficult to predict.
To replace the disposable battery pack in the unit:
1. Open the front door by releasing the upper and lower quick-release latches on the device enclosure and swinging the door out.
2. Attach the new battery to the unused connector J3 ‘VBAT1’ or J4 ‘VBAT2’.
3. Disconnect the old battery from the other connector in the unit. Power, in this case, is never removed from the unit, and no current data is lost due to temporary power down.
4. Remove the old battery from its mounting in the door, and press the new pack firmly into place. 5. Press any key to wake-up the unit and verify that it is fully operational.
6. Properly dispose of the spent battery pack.
Rechargeable Battery Packs (charged by local solar array)The rechargeable battery pack, under normal operating conditions, should provide as many as 10 years of productive service before needing to be replaced. When it becomes apparent that the rechargeable pack cannot maintain its charge during the hours without sunlight, replacement is in order.
To replace the rechargeable battery pack in the unit:
1. Open the front door by releasing the upper and lower quick-release latches on the device enclosure and swinging the door out.
2. Disconnect the old battery from the J3 ‘VBAT1’ connector in the unit. This will result in a momentary power-down of the Y-Flow™ that will interrupt any measurements being recorded at the time. No historical records or configuration settings will be lost, though.
3. Remove the old battery from its mounting in the door, and press the new pack firmly into place.
4. Connect the new, fully charged battery to the J3 ‘VBAT1’ connector in the unit. DO NOT CONNECT TO J4 (VBAT2) AS CHARGING WILL NOT OCCURE.
5. Press any key to wake-up the unit and verify that it is fully operational. A ‘first time power’ alarm will have been initiated.
See the section on ALARM MODE.
Software PackagesField Manager™Field Manager™ is a Windows based configuration utility for Yokogawa Y-Flow™ products. The software provides straight-forward support for all hardware in the field, and an easy to use group of functions to assist the user in setting up and configuring the field device, gathering data, viewing alarms, and calibrating transducers. It also features a variety of other useful tools.

59
All Rights Reserved. Copyright © 2016, Yokogawa Electric Corporation. Subject to change without notice. August 2016IM 04Q01A02-01E-A
Field Manager Plus™Field Manager Plus adds circular charting to all of Field Manager™’s features. Communication to the Yokogawa Y-Flow™ hardware is through an RS232 laptop cable or USB cable. A library of configuration databases simplifies the identification of standard device types in the field. The software matches the field Y-Flow™ to a device type automatically and displays the appropriate set up forms for the user.
Field MonitorField Monitor is a Windows based utility for Yokogawa® products. The software is Read Only and provides straight-for-ward support for all hardware in the field, and easy-to-use functions to assist the user in gathering data, and viewing alarms. It also features a variety of other useful tools.
Talon™ MonitorAs part of the Talon™ Software Suite, Talon™ Monitor permits remote device polling using cellular or a wide variety of other communication media. It is a great application for natural gas marketers to provide third party read-only access without editing capability.
Talon SCE™The Talon™ family specifically to meet the user’s needs, providing software modules for both central office and field op-erations. Talon™ Software Suite provides application solutions for Natural Gas, Water/Wastewater, Environmental Protec-tion, Stream, and Electrical applications. Industrial/Commercial Measurement, Pressure/Temperature Monitoring, Supervi-sory Control, and Odorization are but a few of the systems that can benefit from the use of this software.
Talon SCE™ (Single Computer Edition) provides a single computer based software platform to perform the functions often segregated into separate SCADA and Electronic Measurement Systems. The Talon™ family of software gives you the abil-ity to create a powerful host platform that can be tailored and scaled to meet specific and diverse user needs. Flexibility in the software design offers the option to purchase only the software component modules that the customer needs. Talon SCE™ has the ability to expand the system with additional features by adding new modules in the future when additional customer needs require. The users and groups function offers password access/control for viewing, editing, and other administrative functions. User shift schedules can be entered for alarming and reporting through e-mail, SMS, and voice calls using the optional Alert Server software module. This software is uniquely suited to meet the needs of the small to intermediate size companies. Talon SCE™ is suitable for a reduced scale SCADA system supporting four Serial and one TCP port, but can be expanded for larger applications, polling multiple devices over several communication ports simulta-neously.
Talon Enterprise™Talon Enterprise™ provides a company-wide software network platform to perform the functions that are often segregated into separate SCADA and Electronic Measurement Systems. The Talon™ family of software gives the user the ability to create a powerful host platform that meets specific distributed data collection requirements.
The modular and flexible design offers the option to purchase only the specific modules needed, and the ability to expand the system with additional features by adding new modules as system requirements change. Software modules can be configured for both central office and/or field operations, and then deployed across either a wide area or local area net-work. The users and groups function offers password access/control for viewing, editing, and other administrative func-tions. User shift schedules are managed in the software for alarming and reporting through e-mail, SMS, and voice calls using the optional Alert Server module.
In the current energy environment, many companies are scattered across state and international boundaries. Having the ability to distribute Talon Enterprise™ Modules across the network infrastructure puts data collection and management closer to the source of the data, resulting in improved overall system performance.

60
All Rights Reserved. Copyright © 2016, Yokogawa Electric Corporation. Subject to change without notice. August 2016IM 04Q01A02-01E-A
Talon Lite™In response to numerous customer request for a reduced cost version of Talon SCE™ that included on screen graphics, Tal-on Lite™ was launched. Talon Lite™ is packaged with a single TCP/IP Comm Port to permit polling across the Internet with a mobile laptop that included access to a cellular or other mobile data plan or from a single desktop machine with network Internet access. A serial communication pot is included as direct communications. Process programming and Edit Forms may be created as well allowing users to create new applications or modify existing field RTU loads. Parameter changes and other set-points can be edited using the Talon Lite™ software Edit Forms.
ApplicationsThe Y-Flow™ offers a variety of flexible and configurable options for many different applications. Some of the applications include Field Flow Computer (FFC) and Remote Terminal Unit (RTU).
Field Flow Computer (FFC) Orifice flow measurement requires the integration of Differential Pressure, Static Pressure and Temperature with adjustments for Specific Gravity and Composition. The FFC contains a full complement of standard Yokogawa processes including API Chapter 21 Compliancy, AGA3 and AGA5 capability and AGA8, Detailed and Gross Methods 1 and 2. The FFC comes com-plete with an integrated multivariable transmitter for Differential Pressure and Static Pressure along with an RTD (resistance temperature detector). Single and bidirectional measurements are available along with multiple run capability. Data can be read locally on the LCD display or collected with Field Manager™.
Remote Terminal Unit (RTU)For more customizable units Yokogawa offers the Y-Flow™ RTU. The RTU is fully customizable with the ability to add ex-pansions such as E-AO, E-ESP and E-Digital. A variety of controls and communications can also be configured into the RTU product line.


![STEP 7 AGA Gas Library User Guide[1]](https://static.fdocuments.in/doc/165x107/55cf945c550346f57ba181c7/step-7-aga-gas-library-user-guide1.jpg)