Fan Yang, Qian Zhang, Member, IEEE, Wenwu Zhu, Senior Member, IEEE, and Ya-Qin Zhang, Fellow, IEEE

Yang Fan
MOBILE FOOD ORDERING
APPLICATION
Technology and Communication
2014
1(1)
Keywords Struts 2, Spring, JPA, MySql, Servlet/JSP, Android, Mobile
Food Ordering Application
VAASAN AMMATTIKORKEAKOULU UNIVERSITY OF APPLIED SCIENCES Information Technology ABSTRACT
Author Fan Yang Title Mobile Food Ordering Application Year 2014 Language English Pages 82 Name of Supervisor Dr. Ghodrat Moghadampour
The purpose of this thesis was to build a food ordering client server application for Tom Yum Thai Oy, which is a Thai restaurant in Vaasa.
For the customer, this application provides a view of current food information (category, name, image,price, description etc.) on the website and Android application. The customer can order food from these two platforms. For the administrator in restaurant, this application offers a series of operations to add, update, delete and query the information of food, food order and employees. The application includes three parts: Background Management Platform, Website Foreground Public Page and Android Application. The Background Management Platform was implemented with S2SJ, a combination of Struts 2 framework, Spring framework and JPA framework. Servlet and JSP were used in the Website Foreground Public Page. The Android Application is obviously based on Android framework. So far, all core functions were developed successfully and the progress of the project was most rewarding and generated an excellent experience in programming.

1(82)
ACKNOWLEDGEMENTS
Firstly I would like to give a big appreciation to my supervisor Dr. Ghodrat
Moghadampour, for his patient guidance and support during conducting the whole
thesis.
Moreover, I would like to give my gratitude to other teachers, especially Gao
Chao, Antti Virtanen and Santiago Chavez Vega for the quality education. Finally
I also need thank all the people whose names are not mentioned here for their help
on study and life.
Vaasa, Finland, 2013/4/12
Fan Yang
2(82)
CONTENTS
1 INTRODUCTION ............................................................................................. 6
2 Technology overview ........................................................................................ 7
2.1 Struts 2 Framework ................................................................................ 7
2.2 Spring Framework ................................................................................ 10
2.3 JPA Framework .................................................................................... 12
2.4 Android Framework ............................................................................. 12
3 Application Description .................................................................................. 15
3.1 Functional Description ......................................................................... 16
3.1.1 Background .................................................................................. 16
3.1.2 Website Foreground Public Page ................................................. 22
3.1.3 Android Application ..................................................................... 24
3.2 Class Hierarchy .................................................................................... 26
3.2.1 Background Management Platform ............................................. 26
3.2.2 Website Foreground Public Page and Android Application ........ 32
3.3 Sequence Diagram ............................................................................... 37
3.3.1 Background Management Platform .......................................... 37
3.3.2 Website Foreground Public Page and Android Application ..... 42
4 DATABASE AND GUI DESIGN .................................................................. 44
4.1 Database Design ................................................................................... 44

3(82)
4.2 GUI Design .......................................................................................... 51
4.2.1 Background Management Platform ............................................. 51
4.2.2 Website Foreground Public Page ................................................. 57
4.2.3 Android Application ..................................................................... 59
5 IMPLEMENTATION ..................................................................................... 64
5.1 Adding Food in Background Management Platform ........................... 64
5.2 Display Food Information in Website Public Page .............................. 65
5.3 Order Food in Website Public Page ..................................................... 66
5.4 Display Food Information in Android Application .............................. 68
5.5 Order Food In Android Application ..................................................... 71
6 TESTING ........................................................................................................ 75
7 CONCLUSIONS ............................................................................................. 79
REFERENCES .............................................................................................. 82
APPENDICES

4(82)
LIST OF FIGURES AND TABLES
Figure 1. Struts 2 request processing/2/ p.7 Figure 2. Struts 2 Architecture/2/ p.8 Figure 3. Spring Framework Architecture /3/ p.10 Figure 4. Android Architecture p.13 Figure 5. Use Case diagram for administrator p.16 Figure 6. Order state changing flow p.21 Figure 7. Use case diagram for customer p.22 Figure 8. Use case diagram for customer in Android Application p.24 Figure 9. Order Module Controller Structure p.26 Figure 10. Employee Module Controller Structure p.28 Figure 11. Product Module Controller Structure p.29 Figure 12. Module Structure p.31 Figure 13. Controller structure in Website Foreground Public Page
p.32
Figure 14. Controller structure in Android Application p.35 Figure 15. Module structure p.36 Figure 16. Background Management Platform Login p.38 Figure 17. Product Category Management p.39 Figure 18. Product Information Management p.40 Figure 19. Order Management p.42 Figure 20. Customer Purchase sequence diagram p.43 Figure 21. Entity Relationship Diagram p.50 Figure 22. Login page p.51 Figure 23. Management main page p.52 Figure 24. Category List View Page p.53 Figure 25. Category Adding page p.53 Figure 26. Product List View page p.54 Figure 27. Add Product page p.54 Figure 28. Product Style page p.55 Figure 29. Order List View page p.55 Figure 30. Order Detail Display View page p.56 Figure 31. Dishes Display page p.57 Figure 32. Customer Login page p.57 Figure 33. Shopping Cart page p.58 Figure 34. Launch Window p.59 Figure 35. Register Window p.60 Figure 36. Dishes Display Main Window p.60 Figure 37. Dish Detail Information Window p.61 Figure 38. Shopping Cart Window p.62 Figure 39. Dish Modify Window p.62 Figure 40. Order Confirmation Window p.63 Table 1. Users Class Entity p.44 Table 2. OrderFoods Class Entity p.45

5(82)
Table 3. Order Class Entity p.45
Table 4. Employee Class Entity
p.46
Table 5. IDCard Class Entity p.47 Table 6. ProductInfo Class Entity p.48 Table 7. ProductType Class Entity p.49 Table 8. ProductStyle Class Entity p.49 Table 9. The application-testing table part 1 p.75 Table 10. The application-testing table part 2 p.77 Table 11. The application-testing table part 3 p.78

6(82)
1 INTRODUCTION
With the rapid development of information technology, web application and
Android application have been increasing in recent years. Compared with the
desktop application, the advantages of web application for users are:
- No need to install and update
- Easily visit through browsers
The advantage of the Android application:
- Mobile application is convenient to carry
- Global partnerships and large install base
- Powerful development framework
- Open marketplace for distributing apps
Based on the advantages of both applications, I motivated myself to develop a
combination project between web and Android application.
Tom Yum Thai Restaurant in Vaasa sells Chinese and Thai food. Due to the
cheaper prices and delicious food, more and more people select to eat in this
restaurant. Meanwhile, with the number of customers increasing, the new problem
occurs. Because the space of the restaurant is limited, the restaurant can only seat
a certain number of customers at the time, therefore, the full customer resource
cannot be utilized.
Mobile Food Ordering Application is the key to solve this problem. Using this
application, the customers need not go to the restaurant by themselves, but they
can order the dishes through computers and Android mobiles anywhere.
The Background Management platform in this application was designed for the
administrator. The Administrator will be able to manage food dishes, dish orders
and company employees here.

7(82)
2 TECHNOLOGY OVERVIEW
The administrator part was developed with struts2 framework, spring framework
and JPA framework, while the display part of website for customers is
implemented with servlet/JSP. MySql was chosen as a database for the project.
The Android part was developed with the Android framework. Following the core
frameworks will be generally introduced in this application.
2.1 Struts 2 Framework
“Apache Struts 2 is an elegant, extensible framework for creating enterprise-ready
Java web applications.” /1/
Struts 2, the next generation product of Struts, is the new framework merged
based on Struts 1 framework technology and WebWork framework technology.
The core of Struts 2 is WebWork. /1/
Figure 1. Struts 2 request processing/2/

8(82)
As shown in Figure 1, it illustrates the Request Lifecycle in Struts2 applications.
When the FilterDispatcher in the server receives the request sent from the user, it
will determine the appropriate Action. As the same time, interceptors configured
for applying the common functions, such as validation and file upload are applied
to the Request. Then the action method executes the related operations and the
Result renders the output. Then the request returns through the interceptor in the
reverse order. Finally the control returned in the servlet container will send the
output to the user browser. /2/
The Struts 2 allows us to define exception handlers and inceptors. Using the
exception handler, we can define the exception-handling procedure on global and
local basis. When the framework catches the exception, it will display the
exception details information on the page. The inceptors configured to apply the
functionalities, such as workflow, validation etc. are used to specify the
“request-processing lifecycle” for an action. /2/
Figure 2. Struts 2 Architecture/2/

9(82)
Figure 2 depicts the architecture of Structs 2 Framework. It also shows the initial
request going to the servlet container, such as tomcat, which is then passed
through the standard filter chain. The filter chain includes: Action
ContextCleanUp filter, FilerDispatcher and ActionProxy. /2/
! Action ContextCleanUp filter:
This filter is optional and useful when integration has to be done with other
technologies. /2/
! FilterDispatcher:
The FilterDispatcher uses the ActionMapper to determine whether to invoke an
Action or not when it is called. If the action needs to be invoked, the
FilterDispatcher delegates the control to the ActionProxy. /2/
! ActionProxy:
The ActionProxy takes help from the Configuration Files manager initialized from
the struts.xml. Then the ActionProxy creates an ActionInvocation. The
ActionInvocation process invokes the Interceptors (if configured) and the action.
The ActionInvocation looks for a proper result. Then the result that involves the
rendering of JSP or templates is executed. /2/
The Interceptors are executed again in the reverse order. Finally the response
returns through the filters configured in the web.xml file. The ThreadLocal
ActionContext will not be cleaned if the ActionContectCleanUp filter is
configured, otherwise. /2/
10(82)
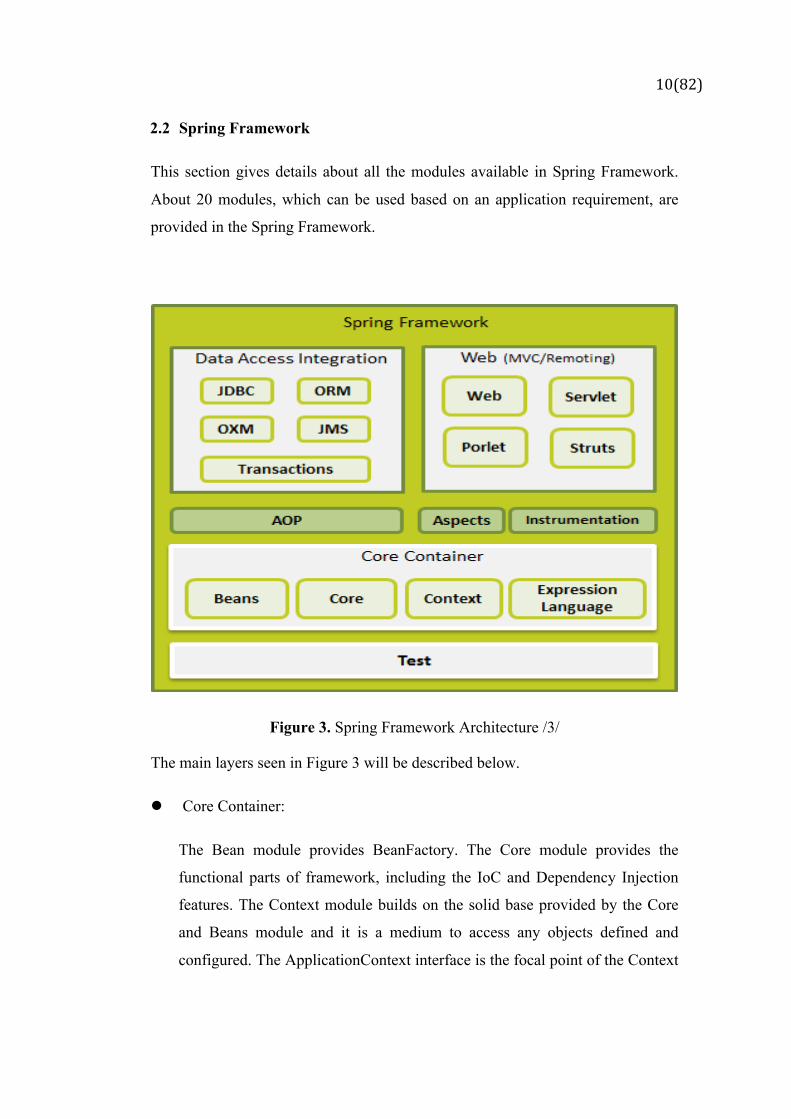
2.2 Spring Framework
This section gives details about all the modules available in Spring Framework.
About 20 modules, which can be used based on an application requirement, are
provided in the Spring Framework.
Figure 3. Spring Framework Architecture /3/
The main layers seen in Figure 3 will be described below.
! Core Container:
The Bean module provides BeanFactory. The Core module provides the
functional parts of framework, including the IoC and Dependency Injection
features. The Context module builds on the solid base provided by the Core
and Beans module and it is a medium to access any objects defined and
configured. The ApplicationContext interface is the focal point of the Context

11(82)
module. The Express Language module provides a powerful expression
language for querying and manipulating an object graph at runtime. /3/
! Data Access/Integration:
The JDBC module provides a JDBC-abstraction layer that removes the need
to do tedious JDBC related coding. The ORM module provides integration
layers for popular object-relational mapping APIs, including JPA, JDO,
Hibernate, and iBatis. The OXM module provides an abstraction layer that
supports Object/XML mapping implementations for JAXB, Castor,
XMLBeans, JiBX and XStream. The JMS module contains features for
producing and consuming messages. The Transaction module supports
programmatic and declarative transaction management for classes that
implement special interfaces and for all your POJOs. /3/
! Web:
The Web module provides basic web-oriented integration features such as
multipart file-upload functionality and the initialization of the IoC container
using servlet listeners and a web-oriented application context. The
Web-Servlet module contains Spring’s module-view-controller (MVC)
implementation for web applications. The Web-Struts module contains the
support classes for integrating a classic Struts web tier within a Spring
application. The Web-Portlet module provides the MVC implementation to
be used in a portlet environment and mirrors the functionality of Web-Servlet
module. /3/
! Miscellaneous:
The AOP module provides an aspect-oriented programming implementation
allowing the definition of method-interceptors and pointcuts to cleanly
decouple a code that implements functionality that should be separated. The
Aspects module provides integration with AspectJ that is again a powerful
and mature aspect oriented programming (AOP) framework. The
Instrumentation module provides class instrumentation support and class

12(82)
loader implementation to be used in certain application servers. The Test
module supports the testing of Spring components with JUnit or TestNG
frameworks. /3/
2.3 JPA Framework
“The Java Persistence API, sometimes referred to as JPA, is a Java programming
language application programming interface specification which describes the
management of relational data in application using Java Platform, Standard
edition and Java Platform, Enterprise Edition.” /4/
Persistence in this context covers three areas: /4/
1. the API itself, defines in the javax.persistence package
2. the Java Persistence Query Language (JPQL)
3. object/relational metadata
2.4 Android Framework
Android is known as a mobile operating system based on the Linux Kernel. It is
mainly designed for touchscreen mobile devices such as smartphone and table
computers. Meanwhile, the Android operating system is widely used in televisions,
games consoles, digital cameras and other electronics because of its open and
customizable features. Android was developed initially by Android, Inc. and
bought by Google in 2005. /5/
The source code for Android is available under free and open-source software
licenses. It means that the device manufactures, wireless carriers and enthusiast
developers can freely modify and distribute the software. Most Android devices
ship with a combination of open source and proprietary. /5/
Today, Android has become the most popular mobile OS, and is the leader in
smartphone market in the world. More and more customers select mobile phones
13(82)
with the Android operating system as their first choice. Meanwhile, mounts of
programmers throw themselves into the Android application development camp.
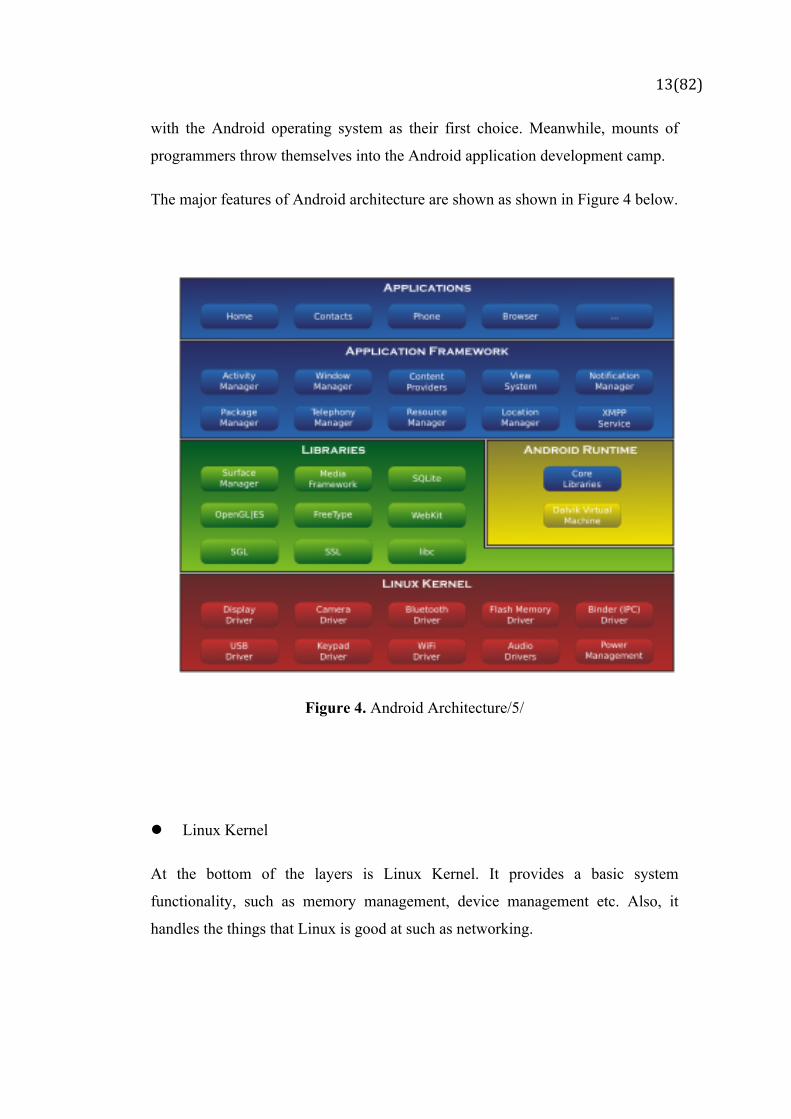
The major features of Android architecture are shown as shown in Figure 4 below.
Figure 4. Android Architecture/5/
! Linux Kernel
At the bottom of the layers is Linux Kernel. It provides a basic system
functionality, such as memory management, device management etc. Also, it
handles the things that Linux is good at such as networking.

14(82)
! Libraries
On top of Linux Kernel is a set of libraries including open-source Web browser
engine WebKit, SQLite database, libraries to play and record audio and video,
SSL libraries and so on.
! Android Runtime
This section provides a key component called Dalvik Virtual Machine that is a
kind of Java Virtual Machine designed for Android. The Android runtime also
offers a set of core libraries: it enables developers to develop Android applications
using the standard Java programming language.
! Application Framework
The Application Framework layer provides many higher-level services to
applications in the form of Java classes. Application developers are allowed to
make use of these services in their applications.
! Applications
All the Android applications will be found at the top layer. The application written
by the developer will be installed on this layer only.

15(82)
3 APPLICATION DESCRIPTION
There are certain requirements the proposed application must fulfil to meet the
objectives of the project.
The requirements to be achieved:
In Background Management Platform:
! Administrator can add and modify food categories.
! Administrator can add, modify and query food information.
! Administrator can add, modify and query employee information.
! Administrator can manage orders produced from the web application and
Android application.
In the Website Public Page and Android Application:
! Customer can view food information, such as category, name, price, image,
description and so on.
! Customer can order food.
! Customer can modify food item, food amount in Shopping Cart.
! Produce food order.
The requirements that should be achieved:
! The project supports internationalization, customer can select different
language environments according to their real requirements.
The requirements nice to be achieved:
! Permission Management in Background Management Platform
! Query Dish Function in Website Public Page
16(82)
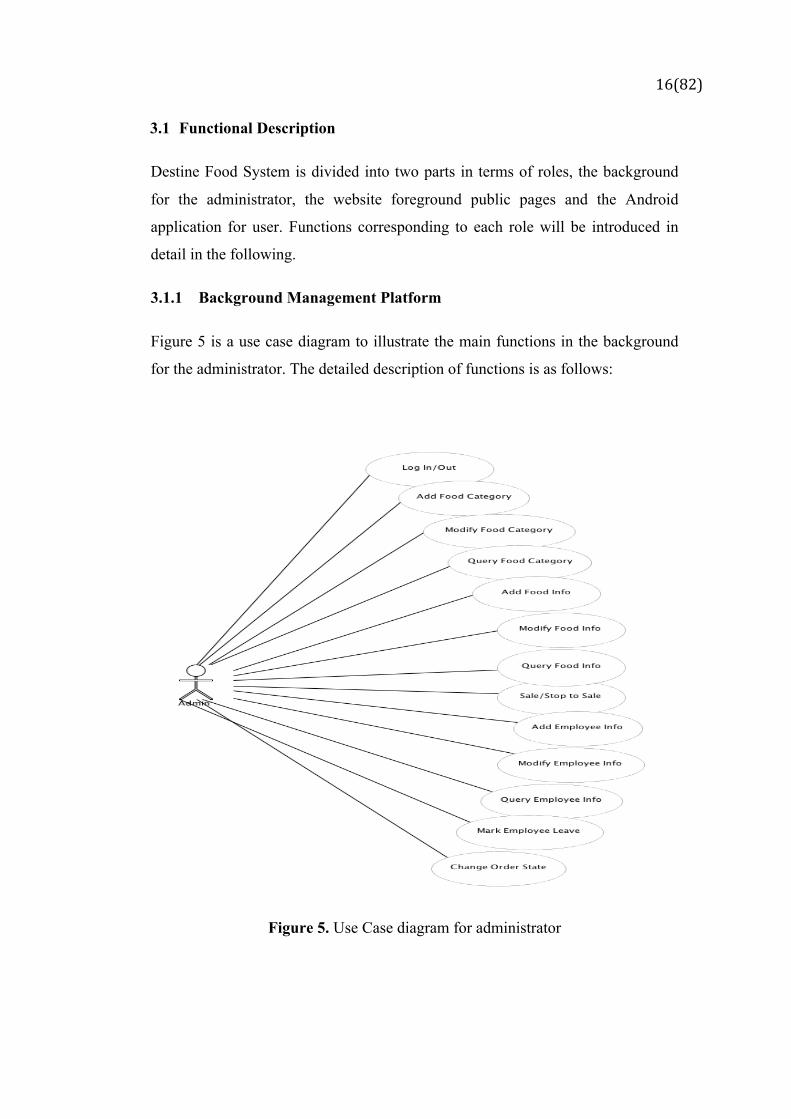
3.1 Functional Description
Destine Food System is divided into two parts in terms of roles, the background
for the administrator, the website foreground public pages and the Android
application for user. Functions corresponding to each role will be introduced in
detail in the following.
3.1.1 Background Management Platform
Figure 5 is a use case diagram to illustrate the main functions in the background
for the administrator. The detailed description of functions is as follows:
Figure 5. Use Case diagram for administrator

17(82)
Log In/Out
Properties:
" Username
" Password
When the administrator connects the background management platform url, a log
in interface will be displayed. The administrator needs to input correct username
and password to log into the main page of the background management page. One
admin username and password is pre-set when the application is initialized.
Add Food Category
Properties:
" Category Name
" Note
When the administrator clicks “Category Manage”, a list view of dish category
will be displayed. On the bottom of the list view page, there are two buttons:
“Add Category” and “Query”. While clicking the “Add Category” button, the
page will be linked to a dish-adding interface, the administrator can add a new
dish category here.
Query Food Category
Properties:
" Category Name
Also, clicking the “Query” Button, a dish category query interface will be
displayed, here the administrator can query current existing dish category
according to the category name.
Modify Food Category

18(82)
Properties:
" Category Name
" Note
In addition, in the category list view page, the administrator can modify the
existing dish category by clicking “Modify” button.
Add Food Info
Properties:
" Product Name
" Product Category
" Market Price
" Sell Price
" Product Code
" Product Style Image
" Product Description
When the administrator wants to add dishes, “Product Manage” just needs to be
clicked; the right frame page will jump to a list view page of dishes. On the page,
the detailed information of existing dishes will be shown, such as Product Code,
Product Name, Category Belong, Sell Price, the state of sale, etc.
Modify Food Info
Properties:
" Product Name
" Product Category

19(82)
" Market Price
" Sell Price
" Product Code
" Product Style Image
" Product Description
The administrator can modify food information by clicking “Modify“ button.
Query Food Info
Properties:
" Product Name
" Product Category
" Sell Price
" Product Code
The administrator can query food information according to different conditions
above.
Sale/Stop to sale
In addition, this project provides “On Sale” and “Stop Sale” functions. Using
these functions, the administrator can manage the state of dish sale.
Add Employee Info
Properties:
" Login Account
" Login Password

20(82)
" Repeat Password
" Employee Name
" Employee Photo
" Id Number
" Birthday
" Address
" Telephone
" Email (optional)
" Degree (optional)
" School (optional)
In the Employee Management module, the administrator can view the information
of existing employees in the company by clicking “Employee Manage”. The
functions of “Add“ and “Modify employee“ are also provided in the project. The
employee accounts added can be used to log in this background management
platform. In addition, according to the real request, when an employee leaves the
company, the administrator can mark leave for this employee using “Mark Leave”
function, it means that the employee account will be invalid to log in the
background management platform.
Query Employee Info
Properties:
" User Name
" Real Name
21(82)
By clicking the “Employee Query” link, the administrator can query company
employees by the user name (log in account) or the employee’s real name.
Change Order States
Figure 6 is a use case diagram for the order flow to illustrate the flow of order
state. When the customer purchases the dishes no matter what platform they are in
(website or Android application). The order of dishes will be produced and
showed in the background management platform.
Figure 6. Order state changing flow
The dish order is divided into five states: Unexamined, Wait Deliver, Delivered,
Received and Cancelled. The default state of produced order is Unexamined, the
administrator can load the order to check the detailed information, for example,
dish items, amount, price and customer information. After checking the
Unexamined order, the administrator can decide to change the state of order, if the
order is examined, the order state is changed to Wait Deliver, otherwise, the state
is changed to Cancelled. As the simpler flow, the order state goes through
Delivered, till Received. When order in Unexamined, Wait Deliver, Delivered,

22(82)
Received state, it can be cancelled, once the dish is delivered, the order cannot be
cancelled. In the Order Manage module, this project provides five order state links,
“Order Unexamined”, “Order Wait Deliver”, “Order Delivered”, “Order
Received”, “Order Cancelled”. In each link, there are the orders of related state. In
addition, the “Order Query” link is used to query the order according to Order
Code Or Buyer Name.
3.1.2 Website Foreground Public Page
Figure 7 shows the core functions provided for customers in this application.
Figure 7. Use case diagram for customer
Register
When the customer wants to purchase dishes on the website, first, he needs to
register an account by clicking “Register” button to enter the register page, and
then just filling in User Name, Password and Repeat Password. If the customer

23(82)
register is successful, a page will display to inform the customer, also if there is a
register fault, such as the User Name already exists, a friendly warning message
will be given on the register page. Note that in the register form, there is a
validation function written by JavaScript to validate whether the information filled
by the customer is valid or not. Only if all information is valid, the operation of
register will be successful.
Log In
After registering, the customer can log in with the correct User Name and
Password to the website to purchase the dishes.
View Dishes
To click “Online Order” tab, the customer can view the current dishes according
to different categories. Every dish item has two buttons: Order and Detail. The
customer can click the “Detail” Button to view the detailed information (big
image, material of dish, price, etc.) of dishes. By clicking “Order” Button, the dish
item you select will be added to the shopping cart.
Shopping Cart
The dish items purchased by the customer will be added to the shopping cart. The
customer can view the dish items he/she purchases, unit price, dish amount and
total price. The default amount for each dish item is one, the customer can update
the amount according to his own requirement. After modifying the amount,
customer needs to click “Update” button to update the dish amount. Also, if the
customer needs to delete some dish item, it is easily implemented by clicking
“Delete” Button following each dish item. On this Shopping Cart page, three
buttons (“Clear Cart”, “Continue to Buy”, “Produce Order”) are shown. “Clear
Cart” button means that the customer can delete all dish items in the shopping cart.
To click “Continue to Buy” button, the page will be linked to dishes display page,
the customer can continue shopping. By Clicking “Produce Order” Button, the
application will produce an order for dish items purchased by the customer, the
order produced will shown in background management platform. At the same

24(82)
time, the remainder of the page will display to inform the customer. This is the
entire purchasing process for the customer to order dish on the website platform.
3.1.3 Android Application
The Android application also provides the similar functions to those on website
foreground public page.
Figure 8. Use case diagram for customer in Android Application
Register
Compared with the website foreground public pages, the customer must register
an account first to view the information of dishes. When the customer launches
the Destine Food Client application on an Android mobile, a pop-up window will
display. The customer needs click the “Register” Button for the first time to use
this application. After clicking, the customer will see the Register window, then
he needs to fill in a valid username and password to finish the registering task.

25(82)
When the customer’s registering is successful, the window will jump back to the
log in window automatically.
Log In
When the customer has a valid account, just fill the username and password in
related fields, then “Enter” Button is clicked, and the dishes display window will
be shown. At the same time, if the customer wants to enjoy the music while
ordering dishes, the music play button is given.
View Dishes
In the dishes display window, there are three tab views for three different dish
categories. Each tab view contains the corresponding dishes. The customer can
view the dish information via clicking the tab views. To click some dish item, the
optional menu will come out, and the customer can view the details of dish or add
the dish to the shopping cart.
Shopping Cart
Once the customer clicks the “Add to Cart” button, the pop-up window of dish
amount will appear, in this window, the customer needs to fill in the integer
number and click “Order” button to confirm. Now the customer should go to the
shopping cart window. The dish items the customer ordered will be shown as a
list view here. The application will calculate the sub price and total price
automatically. If the customer wants to delete some dish item or modify the dish
amount, clicking anywhere of the dish item row will produce a pop-up window to
display to let the customer do related operations. In addition, the customer also
can clear the shopping cart, continue to purchase dishes and confirm the order
similarly to the operations on the website. Also, the produced order will be shown
in the background management platform.
26(82)
3.2 Class Hierarchy
3.2.1 Background Management Platform
The Background Management Platform part is architected with Struts2 framework,
Spring framework and JPA framework, and it makes use of classical concept
known as MVC, short for model, view and controller. This inside structure will be
analysed in detail in the following.
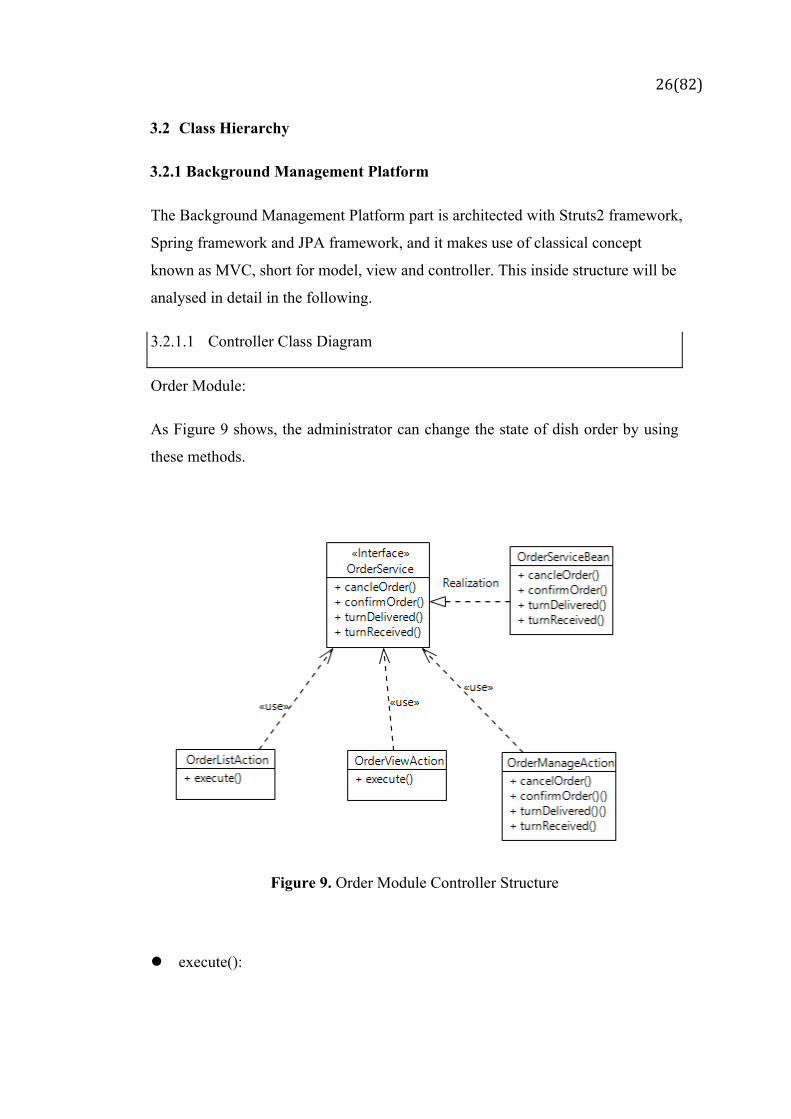
3.2.1.1 Controller Class Diagram
Order Module:
As Figure 9 shows, the administrator can change the state of dish order by using
these methods.
Figure 9. Order Module Controller Structure
! execute():

27(82)
Implement this method to jump to a JSP page.
! cancleOrder():
Cancel the dish order.
! confirmOrder():
Change order state from “Unexamined” to “Wait Deliver”
! turnDelivered();
Change order state from “Wait Deliver” to “Delivered”
! turnReceived():
Change order state from “Delivered” to “Received”
Employee Module:
The administrator can make a series of operations shown in Figure 10 regarding
employees. Also, employees can use their own function given in the system, such
as log in, log out and so on.

28(82)
Figure 10. Employee Module Controller Structure
! execute():
Implement this method to jump to a JSP page.
! editEmployee():
Modify the current existing employee information.
! editEmployeeUI():
Jump to modify employee information page.
! exist():
Measure whether the employee account exists or not when registering.
! leave():

29(82)
Mark an employee in leave situation when an employee leaves company.
! query():
Query an employee according to the account name or employee’s real name.
! regEmployee():
Employee registers.
! regEmployeeUI():
Jump to employee register page.
Product Module:
In the product module, the administrator can control the related operations for
dishes.
Figure 11. Product Module Controller Structure

30(82)
! execute():
Implement this method to jump to a JSP page.
! disable():
Stop to sale some dish.
! add():
Add dishes.
! edit():
Edit current existing dish.
! editUI():
Jump to edit dish page.
! queryUI():
Jump to query dish UI
! selectUI():
Select dish category for dish when adding a dish.
! visible():
Start to sell a dish corresponding to stop to sale some dishes
3.2.1.2 View Class Diagram
The view layer mainly takes in charge of JSP display pages in the foreground.

31(82)
3.2.1.3 Model Class Diagram
These POJO classes in the diagram in Figure 12 define their own entities in this
project meanwhile building a mapping with relative tables in the database.
Figure 12. Module Structure
As a consequence, each row of POJO attribute is relative to corresponding
attribute in tables (Object/Relatinal Mapping).

32(82)
3.2.2 Website Foreground Public Page and Android Application
The Website Foreground Public Page part and the Android Application still make
use of MVC structure. Compared with the Background Management platform, the
technology used for the controller layer is a servlet.
3.2.2.1 Controller Class Diagram
Controller layer in Website Foreground Public page is servlet. The main methods
called by servlet are described below.
Figure 13. Controller structure in Website Foreground Public Page
33(82)
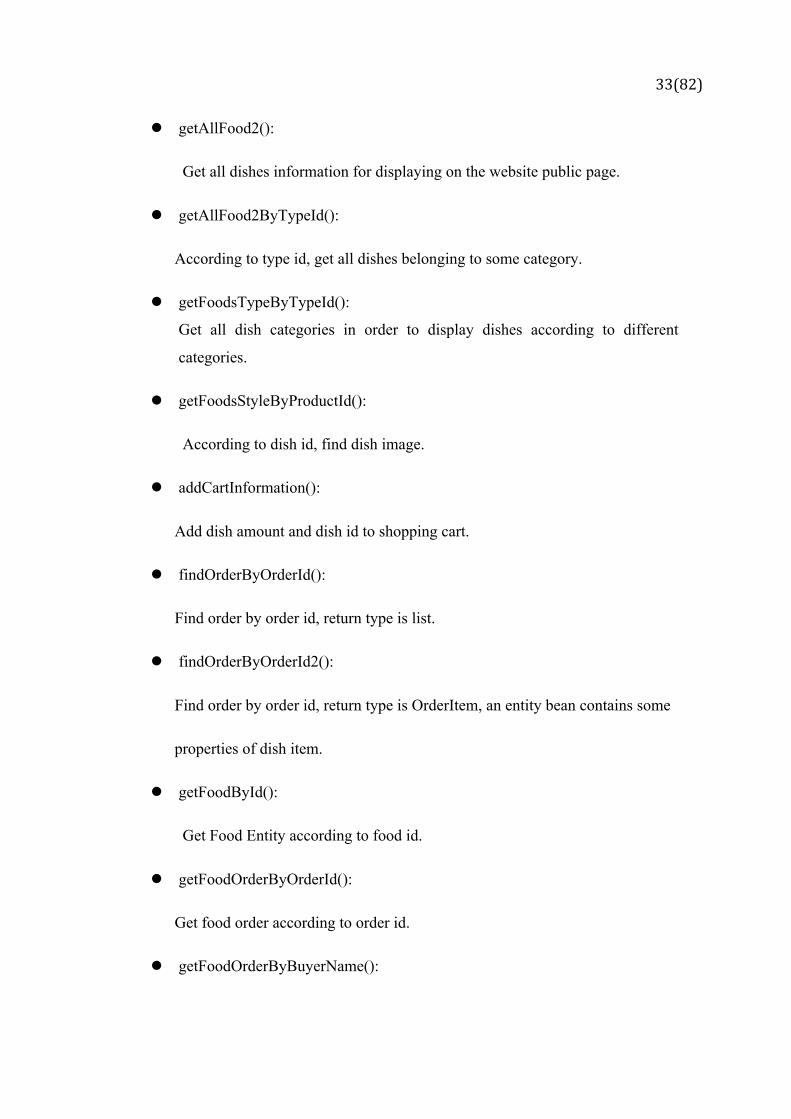
! getAllFood2():
Get all dishes information for displaying on the website public page.
! getAllFood2ByTypeId():
According to type id, get all dishes belonging to some category.
! getFoodsTypeByTypeId():
Get all dish categories in order to display dishes according to different
categories.
! getFoodsStyleByProductId():
According to dish id, find dish image.
! addCartInformation():
Add dish amount and dish id to shopping cart.
! findOrderByOrderId():
Find order by order id, return type is list.
! findOrderByOrderId2():
Find order by order id, return type is OrderItem, an entity bean contains some
properties of dish item.
! getFoodById():
Get Food Entity according to food id.
! getFoodOrderByOrderId():
Get food order according to order id.
! getFoodOrderByBuyerName():

34(82)
Find food order according to buyer’s name.
! getFoodsStyleImageNameByProductId():
Fetch some dish image name according to dish id.
! Login():
Customer logs in the website when purchasing dishes.
! addUser():
Customer registers in to the website.
! getUserByName():
Query the user by name in order to validate whether the user name exists or
not.
Customers do operations in Android Application, application sends request with
data to server, and then servlet in server will handle data and response data to
android application. Therefore, in Android Application, the controller layer is still
servlet. Also, the main methods in servlet will be given as follow.

35(82)
Figure 14. Controller structure in Android Application
! login():
Customer logs in the Android application platform to purchase dishes.
! addUser():
Customer registers in the Android application before purchasing dishes.
! addOrder():
Insert customers deliver information to the database.
! getAllFood2():
Return all dishes information from website.
! findOrderByOrderId():
Get some order according to order id.

36(82)
! addCartInformation():
Insert customers’ order detailed dishes information to database.
3.2.2.2 View Class Diagram
The view layer on the Website Foreground Public Page still includes some JSP
page to display on the foreground public pages. In the Android Application, the
view layer mainly takes in charge of the layout xml files.
3.2.2.3 Model Class Diagram
Below is the module structure in Android Application. The entities in theses
POJO classes also build a mapping with relative table in the MySql database.
Figure 15. Module structure

37(82)
Also, every POJO class is an entity bean containing some attributes, building a
mapping with relative tables in the database.
3.2 Sequence Diagram
The sequence diagram of main modules in Background Management Platform
shows here. Since Website Foreground Public Page and Android Application have
the same purchase sequence logic, so the purchase sequence in these both
platforms will be analysed in this chapter as well.
3.2.2 Background Management Platform
There are five main modules, such as Log In Module, Category Management
Module, Product Info Management Module, Employee Management Module and
Order Management Module. The sequence diagram will be given separately
below.
3.2.2.1 Log In
The administrator needs to login first before using the Background Management
Platform. An account username and password for the owner of company will be
pre-setted when the project is initialized.

38(82)
Figure 16. Background Management Platform Login
The administrator fills in the username and password in the related fields and
presses the login button. If the login is successful, the url will direct to the
Background Management Platform main UI, otherwise, the user will be notified
with an error message.
3.2.2.2 Category Management
Application provides function to allow customers to view dishes according to
different categories. Therefore, administrator needs to add to categories first.

39(82)
Figure 17. Product Category Management
To add dish to display on the website or Android, the administrator should add
dish categories first, in order that display dishes according to different categories.
1. Add Category:
In the Product Management, by clicking “Category Manage”, a list view page of
current existing dishes will be shown. By clicking “Add Category” button, the
right frame will jump to the category adding UI. Required data is filled in, then it
is confirmed, and a dish will be added successfully. At the same time, the right
frame will jump back to the category list view page, the new added dish will be
displayed on this page.

40(82)
2. Modify Category:
On the category list view page, every category item provides a “Modify” button,
by using this button, the administrator can modify the existing dish information.
3. Query Category:
In addition, there is a “Query” button. This button can help the administrator to
query some dish category among lots of categories.
3.2.2.3 Product Info Management
After adding categories, administrator can add dishes belong to different
categories in Product Management module.
Figure 18. Product Information Management
41(82)
In the Product Management, there is a similar logic to that in Product Category
Management, such as adding, modifying and querying. Therefore, no detailed
description is given here.
Stop or start selling
On the product list view page, there are two buttons: On Sale and Stop Sale. By
using these two button, the administrator can control the sale state of food dish in
order to display or remove a food dish on the website foreground public page or
the Android application.
3.2.2.4 Employee Management
The Employee Management also has a similar logic to that referred above. The
Mark Leave logic is also the same with the change sale state of food dishes. The
employee accounts added by the administrator are used to log in and make use of
the background management platform. Once the administrator marks an
employee's leave, the employee account will not log in and use this platform any
more.
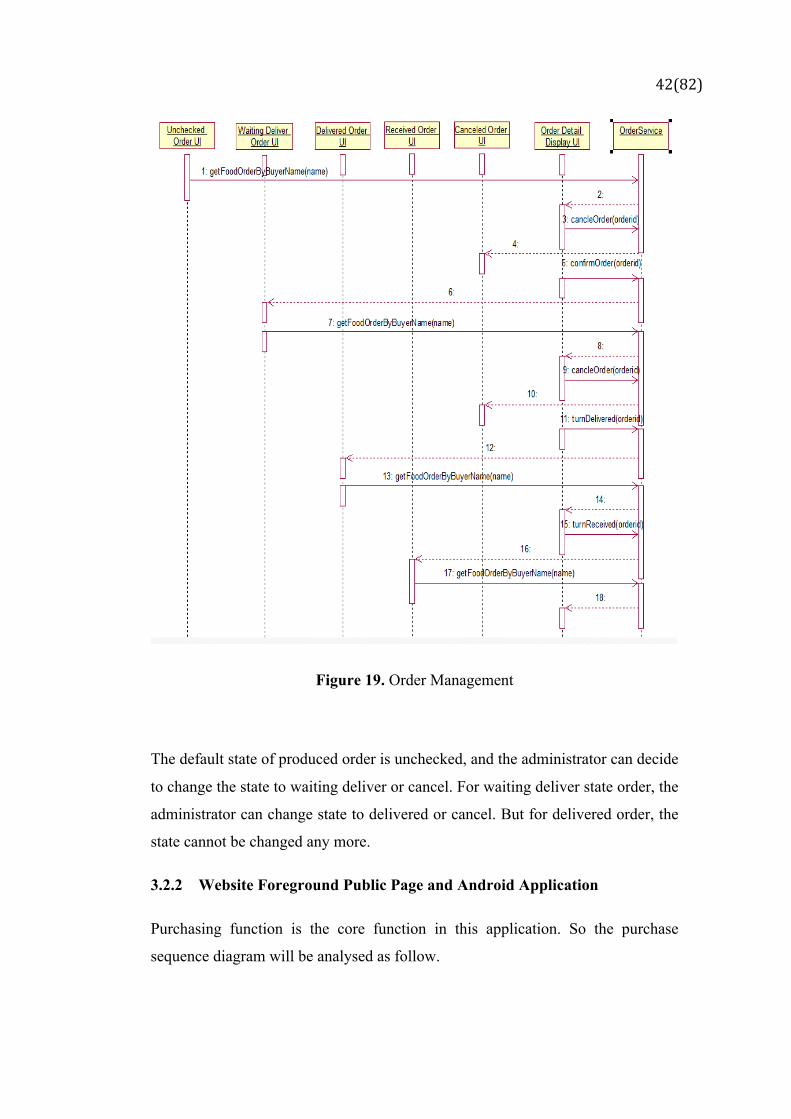
3.2.2.5 Order Management
As mentioned in use case diagram for order flow, figure 19 demonstrates the
entire ordering progress.
42(82)
Figure 19. Order Management
The default state of produced order is unchecked, and the administrator can decide
to change the state to waiting deliver or cancel. For waiting deliver state order, the
administrator can change state to delivered or cancel. But for delivered order, the
state cannot be changed any more.
3.2.2 Website Foreground Public Page and Android Application
Purchasing function is the core function in this application. So the purchase
sequence diagram will be analysed as follow.

43(82)
Figure 20. Customer Purchase sequence diagram
In the Website platform, the customer can view the information of food dishes
without logging in. Before purchasing dishes, the customer needs to log in. The
dish items purchased by the customer will be added to the shopping cart
temporarily. In the shopping cart, the customer can modify the number of dishes
and delete the dish items purchased. Moreover, the customer can select to
continue to buy or confirm the order.
In the Android Application, the purchase flow is almost the same as that in the
Website platform. The biggest difference is that in the Android Application, the
customer must register a valid account to launch the application to do the further
operations.
44(82)
4 DATABASE AND GUI DESIGN
This chapter will describe database design and main graphical user interface
design in this application.
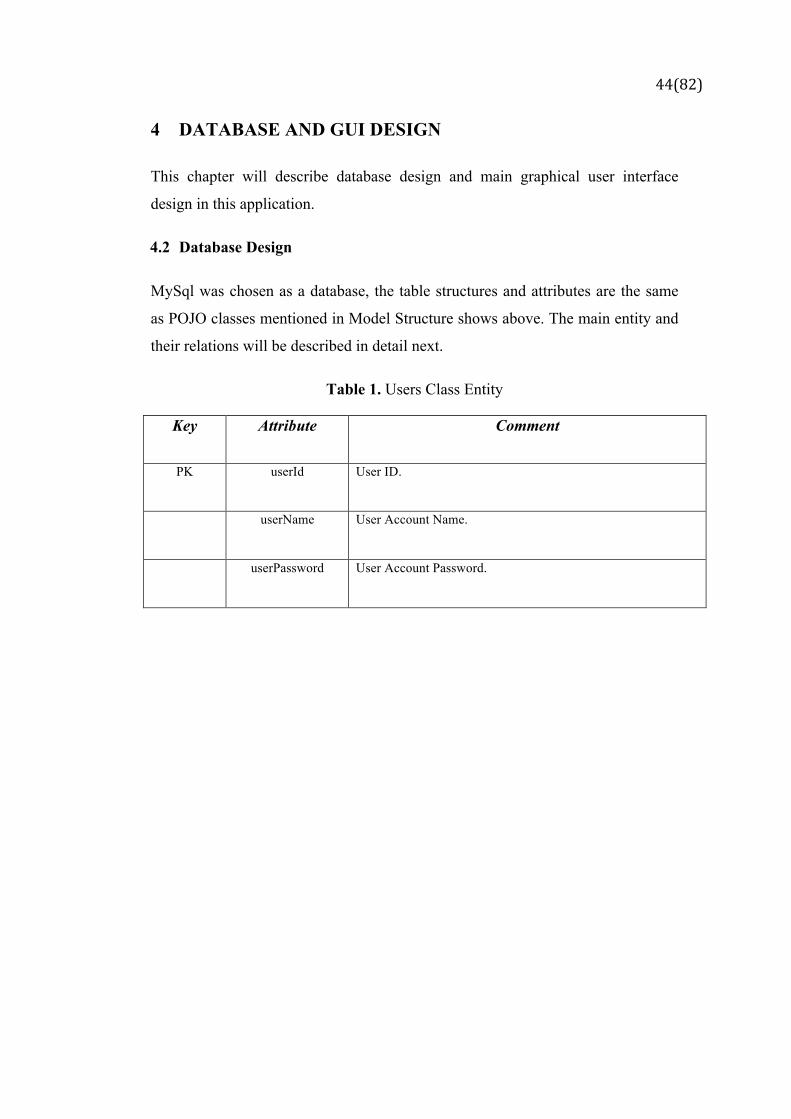
4.2 Database Design
MySql was chosen as a database, the table structures and attributes are the same
as POJO classes mentioned in Model Structure shows above. The main entity and
their relations will be described in detail next.
Table 1. Users Class Entity
Key Attribute Comment
PK userId User ID.
userName User Account Name.
userPassword User Account Password.

45(82)
The Users entity contains information about the customer registered.
Table 2. OrderFoods Class Entity
Key Attribute Comment
PK orderId Order ID:
FK(Users) userId Customer ID.
userName Customer Real Name.
address Deliver Address.
telephone Customer contact number.
email Customer contact email.
orderSuggest Customer’s requirement for dishes ordered.
state The state of order.
createDate Order created date.
postal Postal code of deliver address.
The OrderFoods entity is related to the customers who order dishes.
Table 3. Order Class Entity
Key Attribute Comment
PK foodId Dish ID.
PK/FK(Ord
erFoods)
orderId Order ID.
quantity The amount of dishes.
The entity in Table 3 responses for storing the relationship among order, dish
items and dish amount.

46(82)
Table 4. Employee Class Entity
Key Attribute Comment
PK username Employee login name.
degree Employee degree.
email Employee contact email.
imageName Employee photo name
password Employee login password.
phone Employee contact phone.
realname Employee real name.
school Employee graduate school.
visible The visible state of employee.
FK(IDCard) card_id The id of employee identity card.
The employee entity is used to store the information of employees in company.
Employee can use their account saved here to log in the Background Management
Platform.

47(82)
Table 5. IDCard Class Entity
Key Attribute Comment
PK id The id of employee identify card.
address The address in ID card.
birthday The birthday in ID card.
cardno ID card number
The Employee and IDCard entity contains the detailed information of an
employee. Because every employee has one unique IDCard, so the relationship
between the Employee entity and the IDCard entity is one to one.

48(82)
Table 6. ProductInfo Class Entity
Key Attribute Comment
PK id Dish ID.
buyexplaine The explainition of dish when customers buy.
code Dish code for administrator searching.
createdate The date for administrator add dish to system.
description Dish description.
imagename Dish image name.
marketprice Dish market price.
model Dish model.
name Dish name.
sellprice Dish sale price.
visible The state of dish sale, on sale or sale stop.
FK(Product
Type)
typeid Category id the dishes belong to.
The entity in ProductInfo Class is used to save dish information which is
displayed in Website Foreground Public Page and Android Application.

49(82)
Table 7. ProductType Class Entity
Key Attribute Comment
PK typeid Category id the dishes belong to.
name Category name.
note Category note.
Website Public Page and Android Application provide function to display dishes
according to different categories. The entity in Table 7 is used to store the dish
categories.
Table 8. ProductStyle Class Entity
Key Attribute Comment
PK id Dish style id.
imagename Dish style image name.
name Dish style name.
FK(ProductI
nfo)
productid The id of dish which style belongs to.
The entity in ProductInfo, ProductType and ProductStyle contains all information
of the dishes. One category can has many dishes, so the relationship between
ProductType and ProductInfo entity is one to many. One dish has only one style is
designed in this project, so the relationship between ProductStyle and ProductInfo
is one to one.

50(82)
Figure 21. Entity Relationship Diagram
Figure 21 shows the relationship between different entities. One employee has
only one IDCard, so the relationship between them is one to one. One product has
only one image style, so the relationship between ProductInfo and ProductStyle is
one to one. One product category can have several products, so the relationship
between ProductType and ProductInfo is one to many. One customer has unique
deliver and contact information, so their relationship is one to one.

51(82)
4.3 GUI Design
The user interface design was one of the core tasks in this project. The aim of UI
design is to make the application to be accepted and used easily by users. The
main UI will be shown next.
4.3.2 Background Management Platform
This section will describe the main GUI design in Background Management
Platform
# Administrator Login page
Figure 22. Login page
The administrator need fill in a valid username and password to log in to the
Background Management Platform. Here a validation function will check whether
the username and password provided by the administrator are valid or invalid, if
the username and password are valid, the administrator will log in successfully
and enter the Background Management Main page, and otherwise a warning
message will show.

52(82)
# Background Management Main page
Figure 23. Management main page
After the administrator has logged in successfully, he will be allowed to enter the
Background Management Main page. On this Main page, there are three main
modules: Order Management, Product Management and Employee Management.
The administrator can also log out of the system by clicking “Logout System“ link
and ”red cross” button.

53(82)
# Product Category List View page
Figure 24. Category List View Page
When Clicking “Category Manage“ link, the existing categories will display on
the left side.
# Category Adding page
Figure 25. Category Adding page
The administrator can add a new category on the Category adding page. All data
needed here are Type Name and Note.

54(82)
# Product Information List View page
Figure 26. Product List View page
To click “Product Manage“ link, the existing food information will be shown on
the left side.
# Product Adding page
Figure 27. Add Product page

55(82)
By clicking “add“ button on the Product Information List View page, the
administrator can go into Product Adding page and add new product information
here.
# Product Style page
Figure 28. Product Style page
On the Product Style page, the administrator can view and change food image.
# Order List View page
Figure 29. Order List View page

56(82)
In the Order Management module, there are orders with different states. For
example, when the administrator clicks “Order Unchecked“, the orders with
“unchecked“ state will be shown on the left side.
# Order Detail Display page
Figure 30. Order Detail Display View page
By clicking “Load Order“ link in Order List View page, the selected order will
show its detailed information.

57(82)
4.2.2 Website Foreground Public Page
# Dishes Display page
Figure 31. Dishes Display page
The food information, such as image, name and price and so on is shown on the
Dishes Display page.
# Customer Login page
Figure 32. Customer Login page
58(82)
On the Customer Login page, the customer needs customer to fill in a valid
username and password to log into the application.
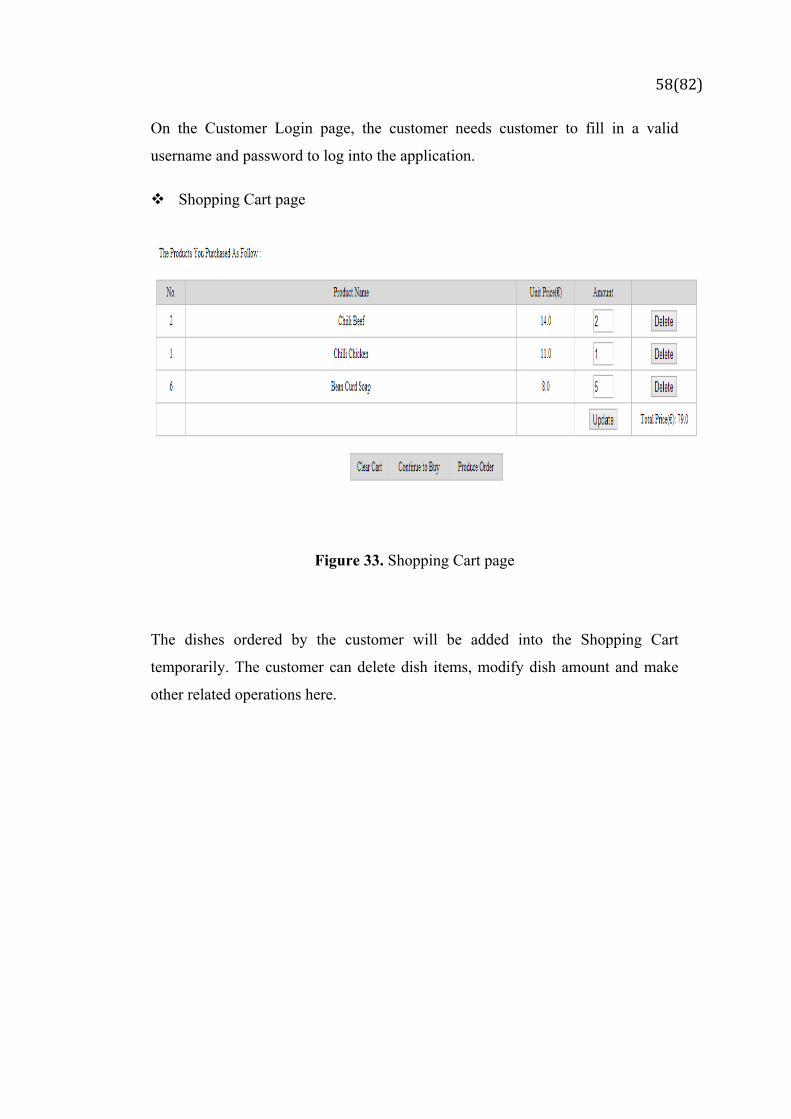
# Shopping Cart page
Figure 33. Shopping Cart page
The dishes ordered by the customer will be added into the Shopping Cart
temporarily. The customer can delete dish items, modify dish amount and make
other related operations here.

59(82)
4.2.3 Android Application
# Launch Window
Figure 34. Launch Window
The customer needs a valid username and password to use the Android food
ordering application.
60(82)
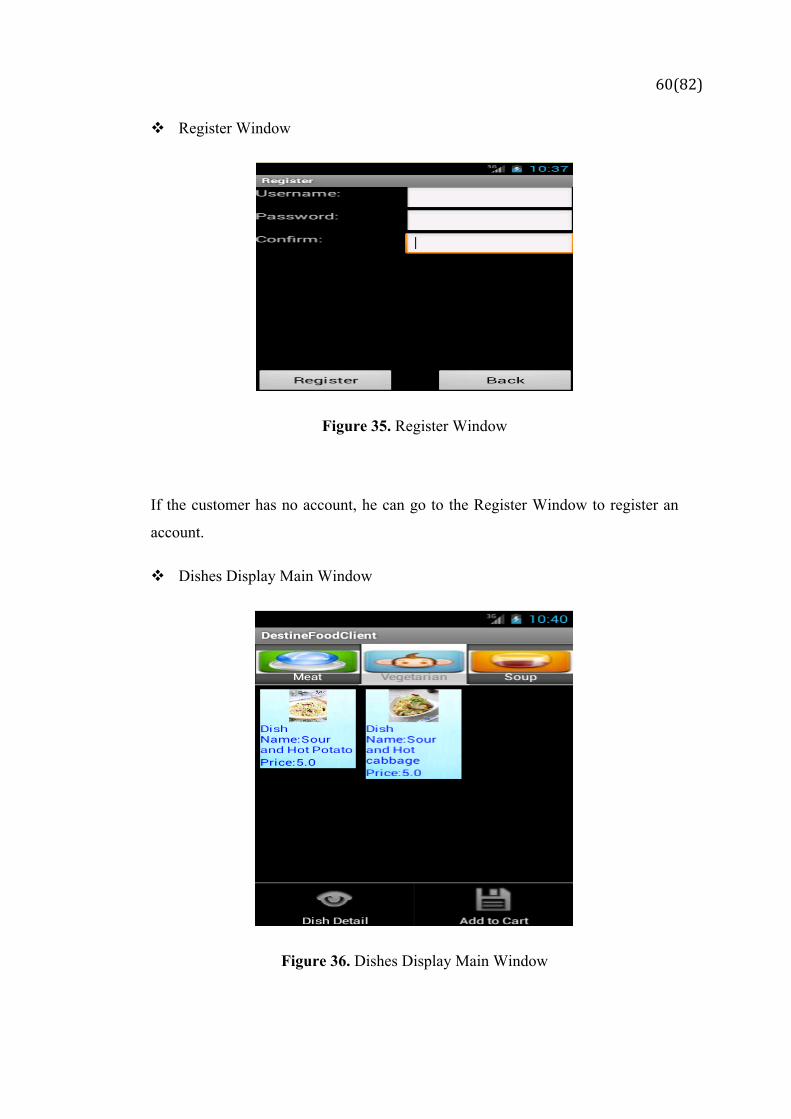
# Register Window
Figure 35. Register Window
If the customer has no account, he can go to the Register Window to register an
account.
# Dishes Display Main Window
Figure 36. Dishes Display Main Window

61(82)
The customer can view dishes information according to different food categories.
# Dish Detail Information Window
Figure 37. Dish Detail Information Window
The customer can view dish detailed information by touching “Dish
Detail“ button in the Dishes Display Main Window.

62(82)
# Shopping Cart Window
Figure 38. Shopping Cart Window
The dishes ordered by the customer will be stored in the Shopping Cart in Figure
38.
# Dish Modify Window
Figure 39. Dish Modify Window

63(82)
To touch some dish item, a pop-up window will show. In this window, the
customer can modify the number of dishes or delete this dish item.
# Order Confirmation Window
Figure 40. Order Confirmation Window
Finally, the customer needs to provide correct delivery and contact information.

64(82)
5 IMPLEMENTATION
The implementation of core functions is described in this chapter.
5.2 Adding Food in Background Management Platform
Adding Food is a core function in the Background Management Platform. The
food information added here will be displayed on the Website Public Page and
Android Application to the customer. The brief implementation code of this
method is shown below.
<action name="add_product" class="productform" method="add"> <interceptor-ref name="fileUpload"> // image formate allowed to be uploaded
<param name="allowedTypes">image/bmp,image/png,image/gif,image/jpeg,image/jpg</param> //image maximum size <param name="maximumSize">1025956</param>
</interceptor-ref> <interceptor-ref name="defaultStack"/>
<result name="message">/WEB-INF/page/share/message.jsp</result> <result name="input">/WEB-INF/page/share/img_error.jsp</result> </action>
Snippet 1. Action configuration in struts.xml
When ”add_product” action is executed, it will call “add“ method in productform
class. Meanwhile, the size and image format are restricted. Once, this
“add“ method runs successfully, this action will return to message.jsp page,
otherwise, action will return to img_error.jsp page.
public String add(){ ProductInfo product = new ProductInfo(); product.setName(name); product.setSellprice(sellprice); product.setMarketprice(marketprice); product.setBuyexplain(buyexplain); product.setCode(code); product.setDescription(description); product.setModel(model); product.setProducttype(new ProductType(typeid)); product.setImagename(imagefileFileName); //construct image name String ext = imagefileFileName.substring(imagefileFileName.lastIndexOf(".")); String imagename = UUID.randomUUID().toString() + ext; product.setImagename(imagename); product.addProductStyle(new ProductStyle(stylename, imagename));

65(82)
productInfoService.save(product); String pathdir ="/images/product";//create file store path // file store real path String realpathdir = ServletActionContext.getServletContext().getRealPath(pathdir); if(imagefile!=null){ File savedir = new File(realpathdir); if(!savedir.getParentFile().exists()) savedir.mkdirs(); String path = pathdir + "/" + imagename; File savefile = new File(savedir,imagename); try { FileUtils.copyFile(imagefile, savefile); } catch (IOException e) { e.printStackTrace(); } System.out.println(path); System.out.println(realpathdir+"/"+imagename); } ActionContext actionContext = ActionContext.getContext(); Map<String,Object> request = (Map) actionContext.get("request"); request.put("message", "Add product successfully!"); request.put("urladdress", SiteUrl.readUrl("control.product.list")); return "message"; }
Snippet 2. The adding food method
Using this method, the food information will be inserted into MySql database.
Meanwhile, the image will be stored into the Tomcat server.
5.3 Display Food Information in Website Public Page
The food information added in the Background Management Platform needs to be
displayed on the Website Public Page. This implementation code is described
here.
<servlet> <servlet-name>DisplayFoodServlet</servlet-name>
<servlet-class>com.yangfan.servlet.web.DisplayFoodServlet</servlet-class> </servlet> <servlet-mapping> <servlet-name>DisplayFoodServlet</servlet-name> <url-pattern>/DisplayFoodServlet</url-pattern> </servlet-mapping> <servlet/>
Snippet 3. Servlet configuration in web.xml

66(82)
When the customer visits the url address like …/DisplayFoodServlet through
browser, the methods in DisplayFoodServlet will be executed as follows.
public class DisplayFoodServlet extends HttpServlet{ @Override protected void doGet(HttpServletRequest request, HttpServletResponse response) throws ServletException, IOException { doPost(request, response); } @Override protected void doPost(HttpServletRequest request, HttpServletResponse response) throws ServletException, IOException { FoodDao dao = new FoodDaoImpl(); List<Foods> foods = new ArrayList<Foods>(); String typeid = request.getParameter("typeid"); //Display dishes according to different categories if(typeid != null){ if("all".equals(typeid)){ foods = dao.getAllFood2(); }else{ foods = dao.getAllFood2ByTypeId(Integer.parseInt(typeid)); } }else{ foods = dao.getAllFood2(); } List<FoodsType> types = dao.getAllFoodsType(); request.setAttribute("foodsTypes", types); //System.out.println(foods); request.setAttribute("foods", foods); request.getRequestDispatcher("show.jsp").forward(request, response); } }
Snippet 4. Display Food Servlet View
When doPost method is called, it will check what parameter is taken by the
request. If the parameter is “all“, all the food information will be displayed on the
Website Public Page, if the parameter is other, the food information belongs to
this category will be shown.
5.4 Order Food in Website Public Page
The food ordered by customers will be stored into the shopping cart temporarily.
The shopping cart is achieved with session and cookie.
protected void doPost(HttpServletRequest request, HttpServletResponse response) throws ServletException, IOException { String foodId = request.getParameter("foodId");

67(82)
ShopCart buyCart = (ShopCart) request.getSession().getAttribute("buycart"); //Create shopping cart, cookie id is not null. Shopping cart shared within different browsers
if(buyCart == null){ String sid = WebUtil.getCookieByName(request, "buyCartID"); //session id is not null if(sid != null){ HttpSession session = SiteSessionListener.getSession(sid); if(session != null) buyCart = (ShopCart) session.getAttribute("buycart"); if(buyCart == null){ SiteSessionListener.removeSession(sid); request.getSession().setAttribute("buycart", buyCart);
WebUtil.addCookie(response, "buyCartID", request.getSession().getId(),
request.getSession().getMaxInactiveInterval()); } } } //Create shopping cart if(buyCart == null){ buyCart = new ShopCart(); request.getSession().setAttribute("buycart", buyCart); WebUtil.addCookie(response, "buyCartID", request.getSession().getId(), request.getSession().getMaxInactiveInterval()); }
//put food into shopping cart if(foodId != null){ FoodDao dao = new FoodDaoImpl(); Foods food = dao.getFoodById(Integer.parseInt(foodId)); ShopCart cart = new ShopCart(); cart.setFoodId(food.getFoodId()); cart.setFoodName(food.getFoodName()); cart.setFoodPrice(food.getFoodPrice()); //cart.setFoodNum(Integer.parseInt(amount.trim())); buyCart.addItem(cart); } request.setAttribute("buyCart", buyCart); request.getRequestDispatcher("shopCart.jsp").forward(request, response); }
Snippet 5. Shopping Cart View
The food purchased by customers will be added to the shopping cart. If there is no
shopping cart in the session, a new shopping cart with name ”buycart” will be
created in the session. Meanwhile the “buyCardID“ of this shopping cart will be
added into the cookie to response to the customer’s browser and the customer’s
browser will store the cookie with “buyCartID“. When the customer opens a new
browser, the server will receive the request with the cookie. The cookie is used
here to solve the problem that the shopping cart is shared within several browsers,

68(82)
it will make sure that the previous shopping cart will not be lost when the
customer opens a new browser.
5.5 Display Food Information in Android Application
Step 1. Create connection between Android and website
public final static StringBuffer getConnectionPost(String url, HashMap<String, String> params) { StringBuffer sb = new StringBuffer(); HttpPost request = null; HttpResponse response = null; try { if (url != null) { request = new HttpPost(url); List<NameValuePair> list = new ArrayList<NameValuePair>(); for (Map.Entry<String, String> entry : params.entrySet()) { String name = entry.getKey(); String value = entry.getKey(); list.add(new BasicNameValuePair(name, value)); } //packaging request data request.setEntity(new UrlEncodedFormEntity(list, HTTP.UTF_8)); response = new DefaultHttpClient().execute(request); //make connection successfully if (response.getStatusLine().getStatusCode() == 200) { String temp = EntityUtils.toString(response.getEntity()); if (temp.trim().length() > 0) { sb.append(temp); } else { sb.append("error response data length"); } } else { sb.append("error response code:").append( response.getStatusLine().getStatusCode()); } } else { return null; } } catch (Exception e) { e.printStackTrace(); } return sb; }
Snippet 6. Connection Method View
Because the information shown in the Android application comes from the
website, the first step is to make the connection between the Android application
69(82)
and the website. The method in Snippet 6 illustrates how to make connection and
how to format the request data and response data.
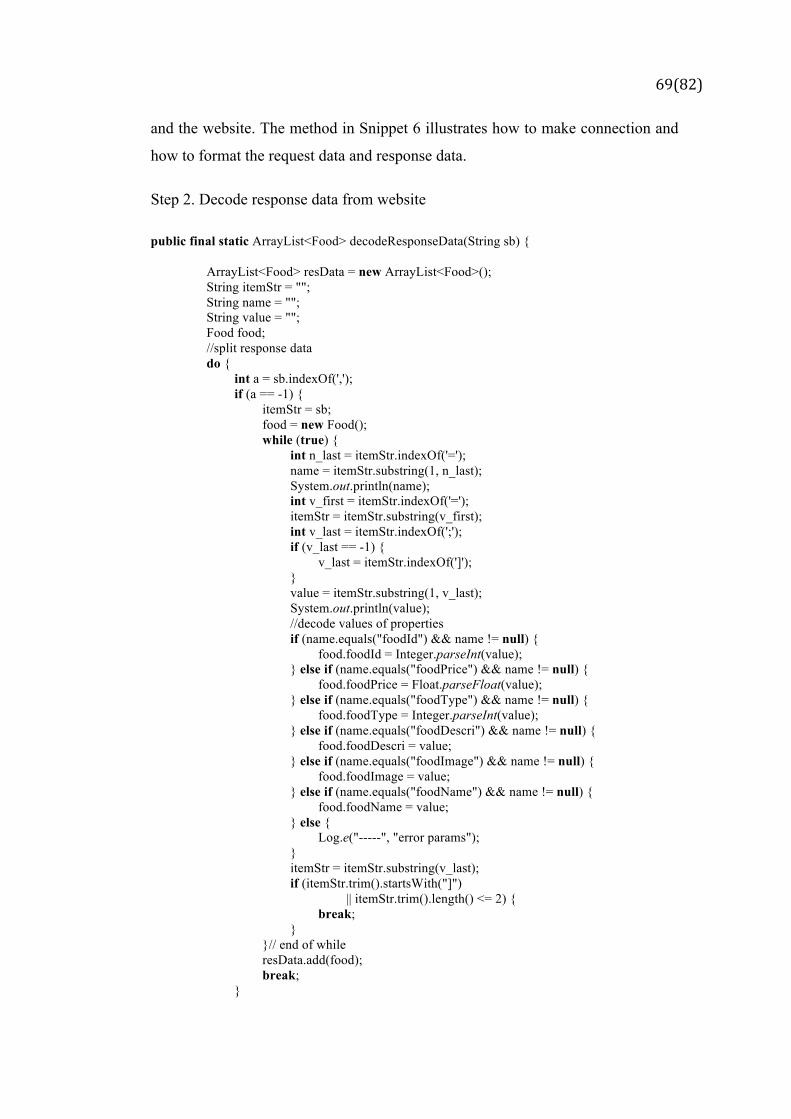
Step 2. Decode response data from website
public final static ArrayList<Food> decodeResponseData(String sb) { ArrayList<Food> resData = new ArrayList<Food>(); String itemStr = ""; String name = ""; String value = ""; Food food; //split response data do { int a = sb.indexOf(','); if (a == -1) { itemStr = sb; food = new Food(); while (true) { int n_last = itemStr.indexOf('='); name = itemStr.substring(1, n_last); System.out.println(name); int v_first = itemStr.indexOf('='); itemStr = itemStr.substring(v_first); int v_last = itemStr.indexOf(';'); if (v_last == -1) { v_last = itemStr.indexOf(']'); } value = itemStr.substring(1, v_last); System.out.println(value); //decode values of properties if (name.equals("foodId") && name != null) { food.foodId = Integer.parseInt(value); } else if (name.equals("foodPrice") && name != null) { food.foodPrice = Float.parseFloat(value); } else if (name.equals("foodType") && name != null) { food.foodType = Integer.parseInt(value); } else if (name.equals("foodDescri") && name != null) { food.foodDescri = value; } else if (name.equals("foodImage") && name != null) { food.foodImage = value; } else if (name.equals("foodName") && name != null) { food.foodName = value; } else { Log.e("-----", "error params"); } itemStr = itemStr.substring(v_last); if (itemStr.trim().startsWith("]") || itemStr.trim().length() <= 2) { break; } }// end of while resData.add(food); break; }

70(82)
itemStr = sb.substring(0, a ); food = new Food(); while (true) { int n_last = itemStr.indexOf('='); name = itemStr.substring(1, n_last); System.out.println(name); int v_first = itemStr.indexOf('='); itemStr = itemStr.substring(v_first); int v_last = itemStr.indexOf(';'); if (v_last == -1) { v_last = itemStr.indexOf(']'); } value = itemStr.substring(1, v_last); System.out.println(value); Log.e("name" + name, "value" + value); if (name.equals("foodId") && name != null) { food.foodId = Integer.parseInt(value); } else if (name.trim().equals("foodPrice") && name != null) { Log.e("GetNet test", "---" + name); food.foodPrice = Float.parseFloat(value); } else if (name.equals("foodType") && name != null) { Log.e("GetNet test", "---" + value); food.foodType = Integer.parseInt(value); } else if (name.equals("foodDescri") && name != null) { food.foodDescri = value; } else if (name.equals("foodImage") && name != null) { food.foodImage = value; } else if (name.equals("foodName") && name != null) { Log.e("GetNet test", "---" + value); food.foodName = value; } else { Log.e("-----", "error params"); } itemStr = itemStr.substring(v_last); if (itemStr.trim().startsWith("]") || itemStr.trim().length() <= 2) { break; } }// end of while resData.add(food); sb = sb.substring(a + 1); } while (true); return resData; }
Snippet 7. Decode response data from website
The Android application sends the request to the website, the website will
response food information to the Android application. Because the format of
response data is a List, the method in Snippet 7 descripts how to decode the
response data.
Step 3. Display Food Information Data in Android
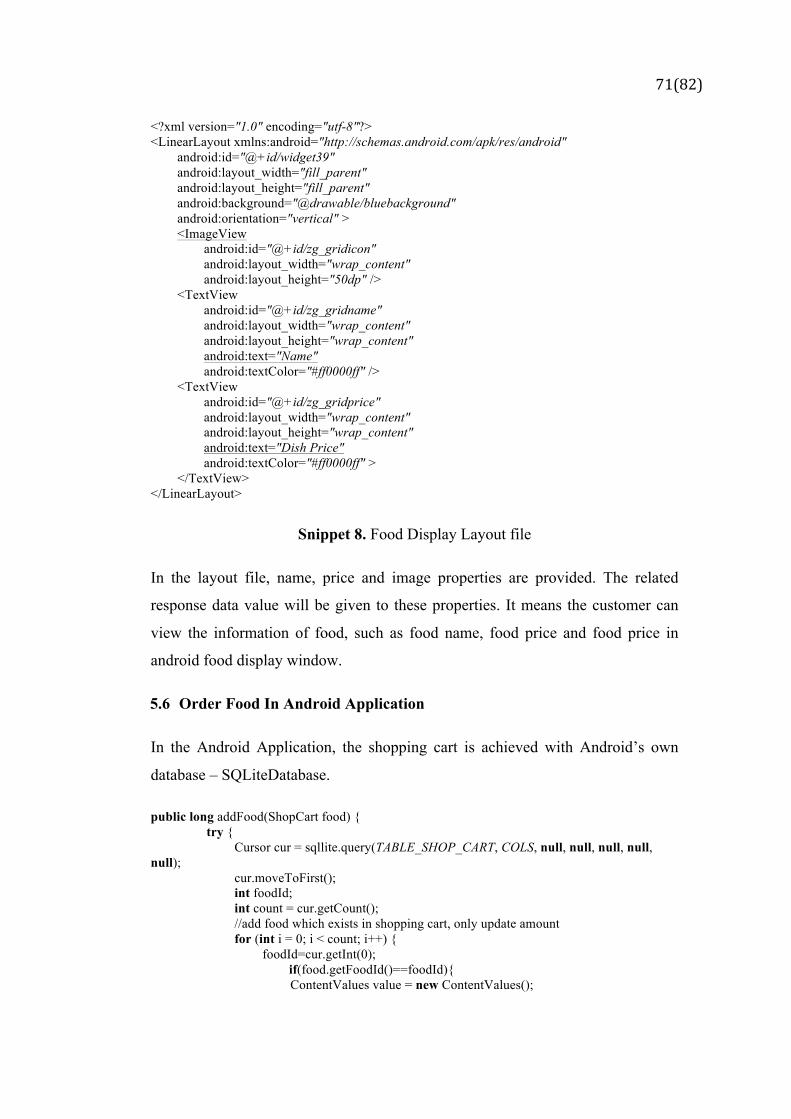
71(82)
<?xml version="1.0" encoding="utf-8"?> <LinearLayout xmlns:android="http://schemas.android.com/apk/res/android" android:id="@+id/widget39" android:layout_width="fill_parent" android:layout_height="fill_parent" android:background="@drawable/bluebackground" android:orientation="vertical" > <ImageView android:id="@+id/zg_gridicon" android:layout_width="wrap_content" android:layout_height="50dp" /> <TextView android:id="@+id/zg_gridname" android:layout_width="wrap_content" android:layout_height="wrap_content" android:text="Name" android:textColor="#ff0000ff" /> <TextView android:id="@+id/zg_gridprice" android:layout_width="wrap_content" android:layout_height="wrap_content" android:text="Dish Price" android:textColor="#ff0000ff" > </TextView> </LinearLayout>
Snippet 8. Food Display Layout file
In the layout file, name, price and image properties are provided. The related
response data value will be given to these properties. It means the customer can
view the information of food, such as food name, food price and food price in
android food display window.
5.6 Order Food In Android Application
In the Android Application, the shopping cart is achieved with Android’s own
database – SQLiteDatabase.
public long addFood(ShopCart food) { try { Cursor cur = sqllite.query(TABLE_SHOP_CART, COLS, null, null, null, null, null); cur.moveToFirst(); int foodId; int count = cur.getCount(); //add food which exists in shopping cart, only update amount for (int i = 0; i < count; i++) { foodId=cur.getInt(0); if(food.getFoodId()==foodId){ ContentValues value = new ContentValues();

72(82)
value.put("foodnum", food.getFoodNum()+cur.getInt(3)); value.put("foodsumprices", food.getSumPrices()+cur.getFloat(4));
return sqllite.update(TABLE_SHOP_CART, value, "foodid="+foodId, null);
} cur.moveToNext(); } } catch (Exception e) { e.printStackTrace(); } //add new food ContentValues value = new ContentValues(); value.put("foodid", food.getFoodId()); value.put("foodname", food.getFoodName()); value.put("foodprice", food.getFoodPrice()); value.put("foodnum", food.getFoodNum()); value.put("foodsumprices", food.getSumPrices()); value.put("foodimage", food.getImageName()); return sqllite.insert(TABLE_SHOP_CART, null, value); }
Snippet 9. Add Food Information into SQLiteDatabase
When the customer purchases a food item, the information of the food item will
be stored into SQLiteDatabase.
private void callPost(Object[][] foods, String address, String email, String telephone, String suggest, String userId, String userName) { //request address HttpPost req = new HttpPost( com.yangfan.util.URL.url+"AddOrderServlet"); List<NameValuePair> param = new ArrayList<NameValuePair>(); //packaging customer deliver information param.add(new BasicNameValuePair("userName", userName)); param.add(new BasicNameValuePair("userId", userId)); param.add(new BasicNameValuePair("address", address)); param.add(new BasicNameValuePair("email", email)); param.add(new BasicNameValuePair("telephone", telephone)); param.add(new BasicNameValuePair("suggest", suggest)); param.add(new BasicNameValuePair("foodsNum", orderFoods.size() + "")); //packaging dish ordering information for (int i = 0; i < orderFoods.size(); i++) { param.add(new BasicNameValuePair("foodId" + i, orderFoods .get(i).getFoodId() + "")); param.add(new BasicNameValuePair("foodName" + i, orderFoods .get(i).getFoodName())); param.add(new BasicNameValuePair("foodNum" + i, orderFoods .get(i).getFoodNum() + "")); param.add(new BasicNameValuePair("foodPrice" + i, orderFoods.get(i).getFoodPrice() + "")); param.add(new BasicNameValuePair("sumPrices" + i, orderFoods.get(i).getSumPrices() + ""));

73(82)
} try { //send request req.setEntity(new UrlEncodedFormEntity(param, HTTP.UTF_8)); try { HttpResponse res = new DefaultHttpClient().execute(req); if (res.getStatusLine().getStatusCode() == 200) { showDialog(1); } } catch (ClientProtocolException e) { e.printStackTrace(); } catch (IOException e) { e.printStackTrace(); } } catch (UnsupportedEncodingException e) { e.printStackTrace(); } } });
Snippet 10. Add shopping cart and deliver information to request parameter
Using this method, the information of purchased food and customer delivery
information will be added into the request parameter. Android sends a request to
the website servlet shown below.
public class AddOrderServlet extends HttpServlet { public void doGet(HttpServletRequest request, HttpServletResponse response) throws ServletException, IOException { response.setContentType("text/html"); PrintWriter out = response.getWriter(); int userId = Integer.parseInt(request.getParameter("userId")); String userName = request.getParameter("userName"); String address = request.getParameter("address"); String email = request.getParameter("email"); String telephone = request.getParameter("telephone"); String suggest = request.getParameter("suggest"); OrderFoods orderfoods = new OrderFoods(); orderfoods.setUserId(userId); orderfoods.setUserName(userName); orderfoods.setAddress(address); orderfoods.setEmail(email); orderfoods.setTelephone(telephone); orderfoods.setOrderSuggest(suggest); orderfoods.setCreateDate(new Date()); orderfoods.setState(OrderState.WAITCONFIRM); FoodDao dao = new FoodDaoImpl(); int orderId = dao.addOrder(orderfoods); int foodsNum =Integer.parseInt( request.getParameter("foodsNum")); ArrayList<ShopCart> list = new ArrayList<ShopCart>(); //Add food to shopping cart for(int i=0;i<foodsNum;i++){ ShopCart cart = new ShopCart();

74(82)
int foodId = Integer.parseInt(request.getParameter("foodId"+i)); int foodNum= Integer.parseInt(request.getParameter("foodNum"+i)); cart.setFoodId(foodId); cart.setFoodName(request.getParameter("foodName"+i)); cart.setFoodNum(foodNum); cart.setFoodPrice(Float.parseFloat(request.getParameter("foodPrice"+i))); cart.setSumPrices(Float.parseFloat(request.getParameter("sumPrices"+i))); list.add(cart); boolean success = dao.addCartInformation(orderId, foodId, foodNum);/ } ArrayList dingdan = new ArrayList(); dingdan = dao.findOrderByOrderId(orderId); StringBuffer sb = new StringBuffer(); int j=1; for(int i=0;i<dingdan.size();i+=3){
System.out.println(dingdan.get(i)+" "+dingdan.get(i+1)+" "+dingdan.get(i+2));
} out.flush(); out.close(); } public void doPost(HttpServletRequest request, HttpServletResponse response) throws ServletException, IOException { doGet(request, response); } }
Snippet 11. AddOrderServlet View
Android sends a request to AddOrderServlet on the website, the doGet method in
this servlet will be called. Through this method, the ordered food information and
customer information in the request parameter will be inserted into MySql
database.
These are the core functions of Mobile Food Ordering Application.

75(82)
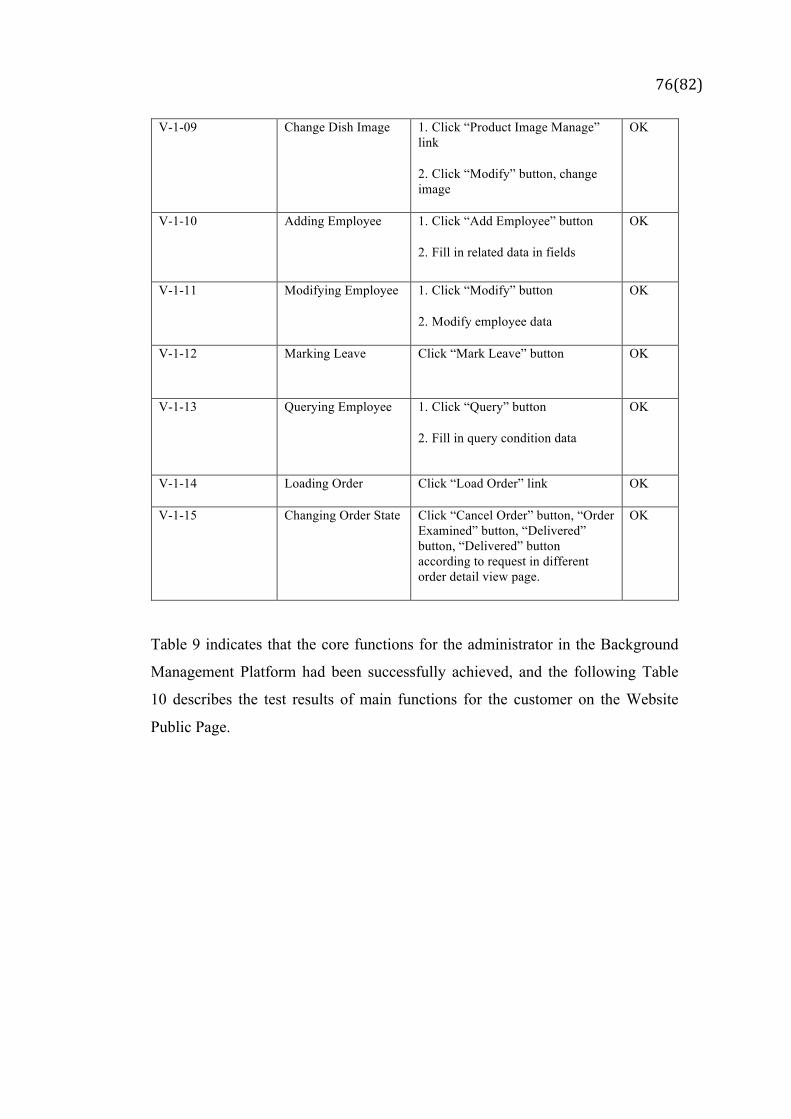
6 TESTING
The project has been deployed on the Tomcat server. All objectives of the
application were tested. The testing of the main features are described as the
following testing table:
Table 9. The application-testing table part 1
Test Case Description Predictions Result
V-1-01 Admin Login 1. Fill in username and password
2. The system validates whether user account is valid.
OK
V-1-02 Adding Dish Category
1. Click “Add Category” button
2. Fill in required data
OK
V-1-03 Modifying Dish Category
1. Click “Modify” button
2. Modify category data
OK
V-1-04 Querying Dish Category
1. Click “Query” button
2. Fill in category name
OK
V-1-05 Adding Dish 1. Click “Add” button
2. Fill in all data needed
OK
V-1-06 Modifying Dish 1. Click “Modify” button
2. Modify Dish data
OK
V-1-07 Querying Dish 1. Click “Query” button
2. Fill in query condition data.
OK
V-1-08 Stop Sale or Star Sale dish
1. Select some dish item or all dish items using checkbox.
2. Click “Stop Sale” button or “On Sale” button.
OK
76(82)
V-1-09 Change Dish Image 1. Click “Product Image Manage” link
2. Click “Modify” button, change image
OK
V-1-10 Adding Employee 1. Click “Add Employee” button
2. Fill in related data in fields
OK
V-1-11 Modifying Employee 1. Click “Modify” button
2. Modify employee data
OK
V-1-12 Marking Leave Click “Mark Leave” button OK
V-1-13 Querying Employee 1. Click “Query” button
2. Fill in query condition data
OK
V-1-14 Loading Order Click “Load Order” link OK
V-1-15 Changing Order State Click “Cancel Order” button, “Order Examined” button, “Delivered” button, “Delivered” button according to request in different order detail view page.
OK
Table 9 indicates that the core functions for the administrator in the Background
Management Platform had been successfully achieved, and the following Table
10 describes the test results of main functions for the customer on the Website
Public Page.

77(82)
Table 10. The application-testing table part 2
V-2-01 View different
categories dishes
Click different categories links OK
V-2-02 View Dish Detail Click “Detail” button OK
V-2-03 Order Dish Click “Purchase” button OK
V-2-04 Register 1. Click “Register” button
2. Fill in required data
OK
V-2-05 Login 1. Click “Login” button
2. Fill in data needed
OK
V-2-06 Updating Dish
Amount
1. Modify dish amount
2. Click “Update” button
OK
V-2-07 Delete some dish item Click “Delete” button OK
V-2-08 Clear Shopping Cart Click “Clear Cart” button OK
V-2-09 Continue to Buy 1.Click “Continue” button, jump to
dishes displaying page
2. Continue shopping
OK
V-2-10 Produce Order Click “Produce Order” button to
finish shopping.
OK
Table 11 describes the test results of main functions for the customer in the Android Application.

78(82)
Table 11. The application-testing table part 3
V-3-01 Register 1. Click “Register” button in
launcher window
2. Fill in data needed
OK
V-3-02 Login Fill in data in related field OK
V-3-03 View Dishes
according to dish
categories
Click Tab View button responding
to category
OK
V-4-04 View Detail
Information of dish
1. Click some dish item
2.Click “View” optional button
OK
V-4-05 Purchase Dish 1. Click some dish item
2. Click “Purchase” optional button
3. Fill in dish amount
OK
V-4-06 Modify or Delete
some dish item
1. Click some dish item in shopping
cart
2. Click “Delete” button
3. Modify dish amount, click
“Update” button
OK
V-4-07 Clear Shopping Cart Click “Clear” button OK
V-4-08 Continue to Buy Click “Continue” button, jump to
dishes display window
OK
V-4-09 Produce Order 1. Click “Confirm” button in
shopping cart
2. Fill in customer deliver
information and Click “confirm“.
OK

79(82)
7 CONCLUSIONS
This project contains three parts, Background Management Platform, Website
Public Page and Android Application. The Background Management Platform
was implemented with Struts2, Spring and JPA framework. Website Public Page
was achieved with Servlet/JSP and JavaBean. The Android framework was used
in the Android Application.
This project was a typical combination between a website and an Android
application. The aim of the project was to help the restaurant owner to improve
the efficiency of managing, meanwhile, help the customer to purchase dishes in
different platforms easily.
By now, the core function of this project has been implemented. The owner and
employees in the company can manage dishes and handle dish orders and so on.
On the public page, customers can view dish information and purchase dishes.
Also, the customer can order dishes from the Android platform.
Developing the application made it possible to learn and practice the whole
processes of agile development with S2SJ frameworks as well as Android
framework.
Main Challenges in Developing:
! Struts2, Spring, JPA frameworks Integration
The Background Management Platform was achieved with Struts2 framework,
Spring framework and JPA framework, the first challenge was how to integrate
these three frameworks. For this task, the framework version, jar packages and
configuration files needed to be considered and selected. Via checking related
books and videos, the challenge was overcome.
! Android Network Programming
Because the project was a combination between a website and an Android
application, the second challenge was how to transfer data between the website

80(82)
and the Android application. In order to overcome this challenge, the knowledge
about the Android Network Programming was learned alone by means of different
ways.
! Debugging
HTTP 404 and 500 errors appeared frequently during the project testing. Some
errors often needed to be solved for a long time. Although the errors were a
nuisance, it helped the programmers to improve their debugging ability and
accumulate development experience.
Future Work:
! Internationalization
In the future, the system will support internationalization. At least, Finnish,
Chinese and English language environment will be provided, customers that
come from different countries can order dishes in their own language.
! Permission Management in Background Management Platform
The Permission Management will need to be developed in the future.
Although the owner and the employees can log in to the Background
Management Platform and make related operations, the owner should have a
higher permission than the employees. It means that some operation only can
be done by the owner, the employees have no privilege to do, for instance,
adding an employee account, modifying employee information and marking
employee leave.
! Query Dish Function in Website Foreground Public Page
On the Website Foreground Public Page, a Query Dish Function should to be
provided. With the number of dishes increasing, customers can search some
dish and view related information quickly by using this function.
! System Extension

81(82)
Thanks to my friend’s idea, the system can be extended to a huge
food-ordering platform. This platform is used to display the dishes of several
restaurants, not only one. The restaurants can manage their own dish
information in the Background Management Platform. And customers can
view the dish information of different restaurants and select the restaurant
they like.
82(82)
REFERENCES
/1/Strut2 Framework Overview-Struts 2 Framework Overview (2014). Accessed
26.3.2014. http://struts.apache.org/development/2.x/
/2/Strut2 Framework Architecture Overview-Struts 2 Framework Architecture
(2014). Accessed 26.3.2014.
http://www.roseindia.net/struts/struts2/struts-2-architecture.shtml
/3/ Spring Framework Architecture Overview-Spring Framework
Archiecture(2013). Accessed 26.3.2014.
http://www.tutorialspoint.com/spring/spring_architecture.htm
/4/ JPA Framework Overview-JPA Framework Overview (2013). Accessed
26.3.2014. http://en.wikipedia.org/wiki/Java_Persistence_API
/5/ Wikipedia Foundation. Android (operating system). Accessed 26.3.2014.
http://en.wikipedia.org/wiki/Android_%28operating_system%29#cite_note-googl
e_code-6