XP Practical OpenOffice.org Chapter 8 1 Creating a Presentation.
28
Practical OpenOffice.org Chapter 8 1 XP Creating a Presentation
-
Upload
ethel-jenkins -
Category
Documents
-
view
216 -
download
0
Transcript of XP Practical OpenOffice.org Chapter 8 1 Creating a Presentation.

Practical OpenOffice.orgChapter 8
1
XP
Creating a Presentation

Practical OpenOffice.orgChapter 8
2
XPWhat’s Inside and on the CD?
Essentials of creating presentations with OpenOffice.org Impress
• Provides set of tools to script, organize, and display a presentation
• Consists of slides, each of which contains objects such as titles, items in a bulleted list, graphics, and charts
Good graphic design makes slides visually compelling and presentations easy to understand
• Avoid clutter and unnecessary graphical elements

Practical OpenOffice.orgChapter 8
3
XPWhat’s Inside and on the CD? (continued)
Slides can be:
• Presented with a computer and projection device
• Printed on transparent sheets for use with an overhead projector
• Printed on paper for handouts
• Converted to Web pages for display on the Internet

Practical OpenOffice.orgChapter 8
4
XPHow do I create a presentation?
Select a presentation background
• Collection of professionally selected slide color schemes, fonts, graphic accents, and background colors
Use a template to select presentation type, style, and title for each slide
Save frequently

Practical OpenOffice.orgChapter 8
5
XPHow do I create a presentation? (continued)
Practical OpenOffice.orgChapter 8
6
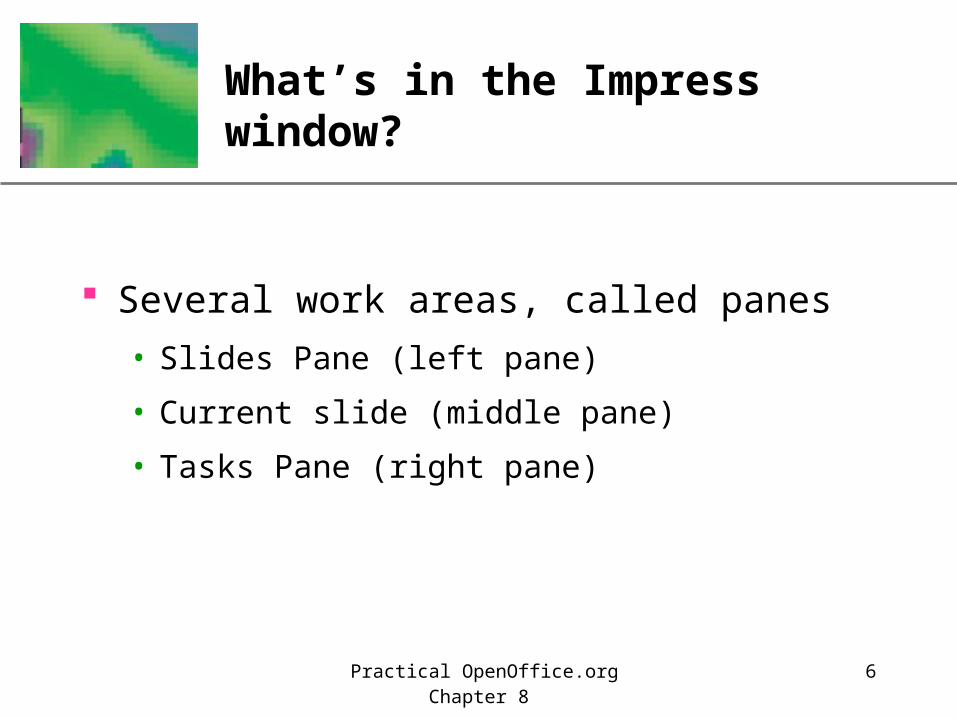
XPWhat’s in the Impress window?
Several work areas, called panes
• Slides Pane (left pane)
• Current slide (middle pane)
• Tasks Pane (right pane)

Practical OpenOffice.orgChapter 8
7
XPWhat’s in the Impress window? (continued)

Practical OpenOffice.orgChapter 8
8
XPHow do I create a presentation? (continued)
To select other layouts Use Layouts Task Pane
To change the template Click Slide Design button on Presentation toolbar
Click Load to view available templates and backgrounds
To change the background color
Click Format, Page Choose color from Fill area on
Background tab, then click OK Click Yes to apply change to all slides Click No to apply only to current slide

Practical OpenOffice.orgChapter 8
9
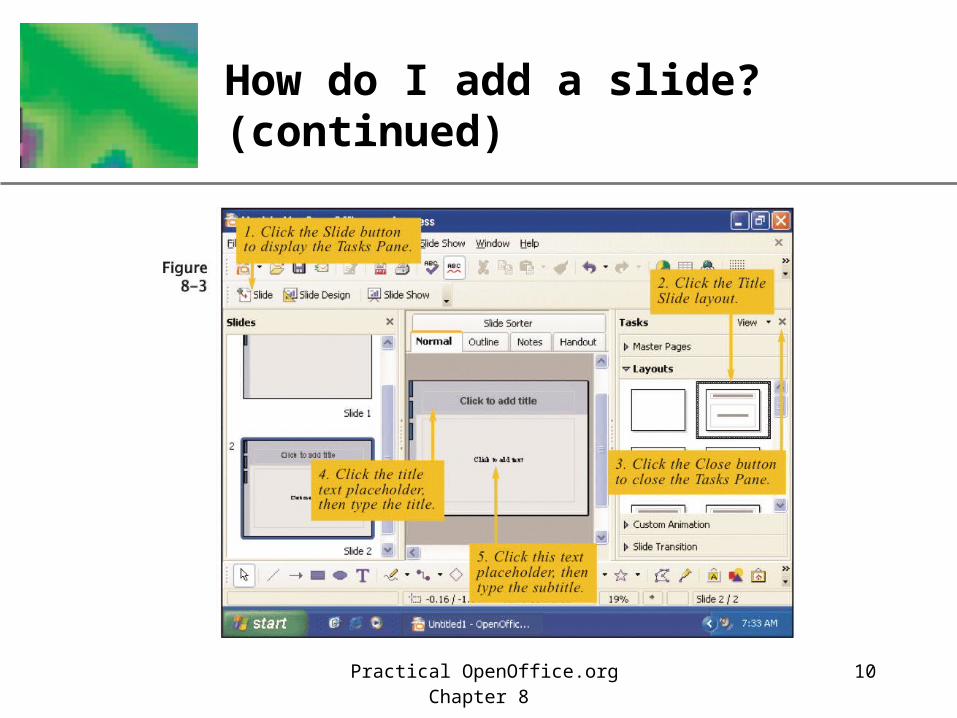
XPHow do I add a slide?
Click Slide button to display Tasks Pane
• Gives you a choice of slide layouts
• Includes thumbnail sketches of each slide type
Each design template has its own Title Slide layout (or use Title Only layout or Blank Slide for first slide)
Resize placeholders by using object’s sizing handles
Practical OpenOffice.orgChapter 8
10
XPHow do I add a slide? (continued)

Practical OpenOffice.orgChapter 8
11
XPHow do I add a bulleted list?
Use one of the title and text layouts
• Title, Text
• Title, Text, Object

Practical OpenOffice.orgChapter 8
12
XPHow do I add a bulleted list? (continued)

Practical OpenOffice.orgChapter 8
13
XPHow do I add a bulleted list? (continued)
To remove bullets
Use Bullets On/Off button, or Press Backspace key
To create a numbered list
Select list, click Format on menu bar Click Bullets and Numbering Select a style from Numbering tab,
then click OK
To createsub-bullets
Use Demote button on Text Formatting toolbar

Practical OpenOffice.orgChapter 8
14
XPHow do I add a graphic?
Select a slide layout from Layouts Task Pane that includes a placeholder for a graphic
Replace graphic placeholder with desired graphic
• Double-click placeholder
• Navigate to desired graphic in Insert picture dialog box
• Click Open button

Practical OpenOffice.orgChapter 8
15
XPHow do I add a graphic? (continued)
Practical OpenOffice.orgChapter 8
16
XPHow do I add a graphic? (continued)
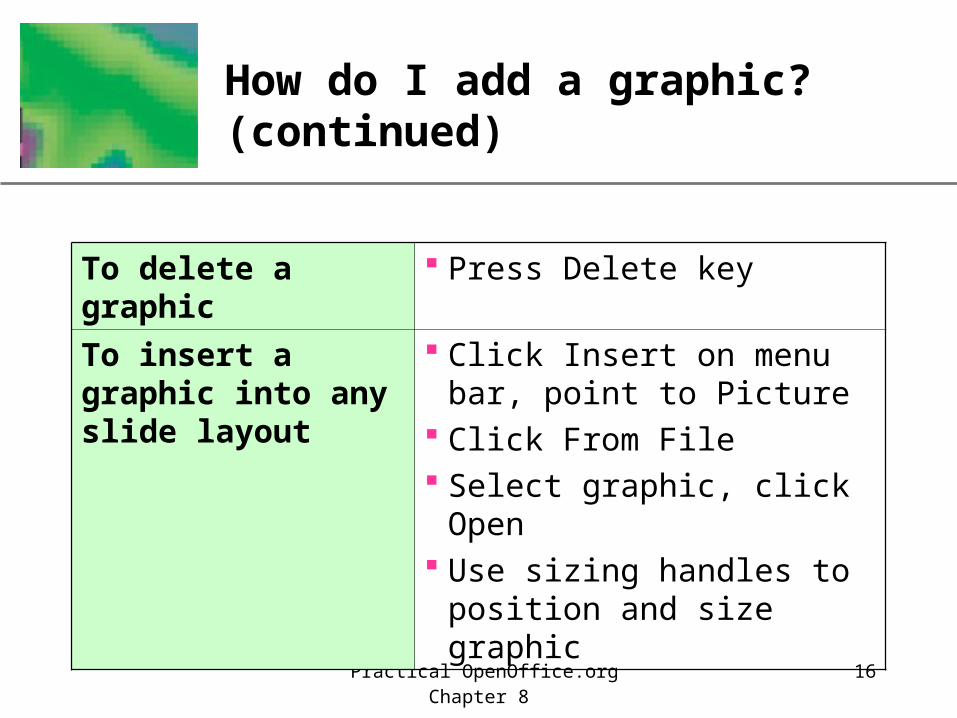
To delete a graphic Press Delete key
To insert a graphic into any slide layout
Click Insert on menu bar, point to Picture
Click From File Select graphic, click Open Use sizing handles to position
and size graphic

Practical OpenOffice.orgChapter 8
17
XPHow do I add a chart?
Several slide layouts contain chart placeholders
• Bar chart
• Line chart
• Pie chart
Chart placeholder includes sample data, which you change to reflect your data

Practical OpenOffice.orgChapter 8
18
XPHow do I add a chart? (continued)

Practical OpenOffice.orgChapter 8
19
XPHow do I add a chart? (continued)
To change sample data
Click each cell containing sample data and replace it with your own labels or numbers
To delete sample data
Select cells, press Delete key

Practical OpenOffice.orgChapter 8
20
XPHow do I add a chart? (continued)
To move data Select cells, right-click to display shortcut menu
Click Cut, then right-click cell where you want to move data
Click Paste from shortcut menu
To insert a row or column
Click cell where you want to insert
Click Insert Row button/Insert Column button on toolbar

Practical OpenOffice.orgChapter 8
21
XPHow do I add a table?
Select a slide layout from Layouts Task Pane that includes a placeholder for a table
Enter your own data into rows and columns of the table

Practical OpenOffice.orgChapter 8
22
XPHow do I add a table? (continued)

Practical OpenOffice.orgChapter 8
23
XPHow do I add a table? (continued)
To format borders, add color shading, and adjust text alignment
Use buttons on toolbars, or
Use options in Format Cells dialog box
To add text to a cell Click inside cell, type text
Practical OpenOffice.orgChapter 8
24
XPHow do I add a table? (continued)
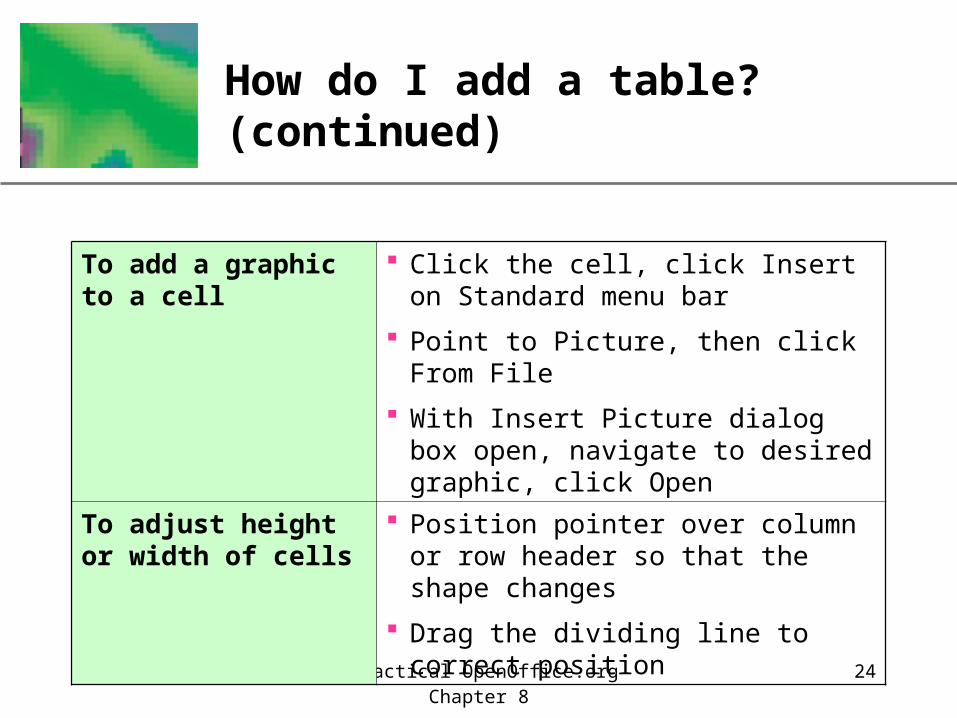
To add a graphic to a cell
Click the cell, click Insert on Standard menu bar
Point to Picture, then click From File
With Insert Picture dialog box open, navigate to desired graphic, click Open
To adjust height or width of cells
Position pointer over column or row header so that the shape changes
Drag the dividing line to correct position
Practical OpenOffice.orgChapter 8
25
XPHow do I view a slide show?
Move to first slide, then switch to Slide Show view

Practical OpenOffice.orgChapter 8
26
XPHow do I view a slide show? (continued)

Practical OpenOffice.orgChapter 8
27
XPHow do I view a slide show? (continued)
To display next slide or next bullet
Press left mouse button Press N key Press right-arrow key
To display previous slide or previous bullet
Press right mouse button Press P key Press left-arrow key
To cancel slide show Press Esc key

Practical OpenOffice.orgChapter 8
28
XPSummary
Creating a presentation
Adding a slide
Adding bulleted lists, graphics, charts, and tables
Viewing a slide show