Xerox Smart Card Installation Guide - Product Support and...
52
Version 3.0 09/11 Xerox ® Smart Card Installation Guide Xerox ® WorkCentre and WorkCentre Pro232/238/245/255/265/275
Transcript of Xerox Smart Card Installation Guide - Product Support and...

Version 3.009/11
Xerox® Smart CardInstallation GuideXerox® WorkCentre andWorkCentre Pro232/238/245/255/265/275

©2011 Xerox Corporation. All Rights Reserved. Unpublished rights reserved under the copyright laws of the United States. Contents of this publication may not be reproduced in any form without permission of Xerox Corporation.
XEROX® and XEROX and Design® are trademarks of Xerox Corporation in the United States and/or other countries.
Changes are periodically made to this document. Changes, technical inaccuracies, and typographic errors will be corrected in subsequent editions.
Document version 3.0: September 2011

Table of Contents
1 Introduction
Compatibility . . . . . . . . . . . . . . . . . . . . . . . . . . . . . . . . . . . . . . . . . . . . . . . . . . . . . . . . . . . . . . . . . . . . . . . . . . . . .6Supported Card Types . . . . . . . . . . . . . . . . . . . . . . . . . . . . . . . . . . . . . . . . . . . . . . . . . . . . . . . . . . . . . . . . . . . . .7Supported Card Readers . . . . . . . . . . . . . . . . . . . . . . . . . . . . . . . . . . . . . . . . . . . . . . . . . . . . . . . . . . . . . . . . . . .7Documentation and Support . . . . . . . . . . . . . . . . . . . . . . . . . . . . . . . . . . . . . . . . . . . . . . . . . . . . . . . . . . . . . . .8
2 Preparation
Server Specifications . . . . . . . . . . . . . . . . . . . . . . . . . . . . . . . . . . . . . . . . . . . . . . . . . . . . . . . . . . . . . . . . . . . . 10Electrical Requirements . . . . . . . . . . . . . . . . . . . . . . . . . . . . . . . . . . . . . . . . . . . . . . . . . . . . . . . . . . . . . . . . . . 10
3 Installation
Software Installation . . . . . . . . . . . . . . . . . . . . . . . . . . . . . . . . . . . . . . . . . . . . . . . . . . . . . . . . . . . . . . . . . . . . 12Configuring the Smart Card . . . . . . . . . . . . . . . . . . . . . . . . . . . . . . . . . . . . . . . . . . . . . . . . . . . . . . . . . . . . . . 16Hardware Installation . . . . . . . . . . . . . . . . . . . . . . . . . . . . . . . . . . . . . . . . . . . . . . . . . . . . . . . . . . . . . . . . . . . 25Using Smart Card . . . . . . . . . . . . . . . . . . . . . . . . . . . . . . . . . . . . . . . . . . . . . . . . . . . . . . . . . . . . . . . . . . . . . . . 33
4 Troubleshooting
Fault Clearance . . . . . . . . . . . . . . . . . . . . . . . . . . . . . . . . . . . . . . . . . . . . . . . . . . . . . . . . . . . . . . . . . . . . . . . . . 36Locating the Serial Number . . . . . . . . . . . . . . . . . . . . . . . . . . . . . . . . . . . . . . . . . . . . . . . . . . . . . . . . . . 36Troubleshooting Tips . . . . . . . . . . . . . . . . . . . . . . . . . . . . . . . . . . . . . . . . . . . . . . . . . . . . . . . . . . . . . . . . 37
A Retrieving the Certificate from a Domain Controller or OCSP Server
B Determining the Domain in which your Card is Registered
C Downloading the Xerox WorkCentre Software
Xerox® Smart CardInstallation Guide
3

Xerox® Smart CardInstallation Guide
4

1Introduction
The Xerox Smart Card solution brings an advanced level of security to sensitive information. Organizations can restrict access to the walk-up features of a Xerox device. This ensures only authorized users are able to copy, scan, email and fax information.
The key benefit of this solution is its two-factor identification requirement. Users must insert their access card and enter a unique Personal Identification Number (PIN) at the device. This provides added security in the event that a card is lost or stolen.
Once validated, a user is logged into the Xerox device for all walk-up features. The system allows for functions to be tracked for an added layer of security.
The Xerox Smart Card enablement kit integrates with Xerox multifunction printers and existing smart and personal identity verification cards and readers.
This guide explains how to install and configure the Smart Card solution. It identifies the resources and equipment required to complete a successful installation.
Should you require any further information, please contact your Local Xerox Representative.
Xerox® Smart CardInstallation Guide
5

Introduction
Compatibility
This solution is compatible with the following Xerox WorkCentre and WorkCentre Pro 232/238/245/255/265/275 configurations:
To identify the software level on your machine, perform the following steps:
1. Press the button on the control panel.
2. Select Machine Details.
The System Software Version number displays.
Configuration Software Level
WorkCentre Basic Multifunction 12.xx.xxx.xxx
WorkCentre Pro Advanced Multifunction 13.xx.xxx.xxx
WorkCentre Basic Multifunction with PostScript 14.xx.xxx.xxx
Xerox® Smart CardInstallation Guide
6

Introduction
Supported Card Types
The customer is responsible for purchasing and configuring the access cards. The following card types are recommended:• Gemalto TOP DL GX4 144K V2.6.2b Applets• Oberthur ID-One Cosmo v5.2 128K V2.6.2 Applets• Oberthur ID-One Cosmo v5.2 72K V2.6.1 Applets• Oberthur ID-One Cosmo v5.2D 72K V2.6.1 Applets• Oberthur ID-One Cosmo v5.2 72K V2.6.2 Applets• Gemalto GemCombiXpresso R4 dual interface 72K V2.6.2 Applets• Axalto Access 64KV1• Axalto Access 64KV1• Gemplus GXP3 64V2N V2.6.1 Applets• Gemalto Cyberflex Access V2C 64K V2.6.1 Applets• Oberthur ID-One Cosmo V5.2D 64K• Oberthur OCS Galactic V1 32K V1 Applets• Oberthur Cosmo V4 32K V1 Applets• Schlumberger / Axalto Cyberflex V2 32K V1 Applets
Other card types may function with the solution, but have not been validated.
Supported Card Readers
The customer is responsible for providing a card reader for each Xerox WorkCentre device. The following card readers are compatible with the solution:• Gemplus GemPC USB SL• Gemplus GEMPC Twin• SCM Micro SCR3310• SCM Micro SCR3311• OmniKey Cardman 3021 USB• OmniKey Cardman 3121 USB• ActivCard USB Reader V2 with SCR-331 firmware
Other CCID compliant readers may function with the solution, but have not been validated.
Additional information from your System Administrator may be required to validate which card reader works best in your environment.
Xerox® Smart CardInstallation Guide
7

Introduction
Documentation and Support
The following information resources are also available:• System Administration CD (CD1)
Contained in the CD Pack delivered with your machine, the System Administration CD (CD1) offers detailed information on configuring your machine for network printing and instructions on installing any of the optional features. The System Administration CD (CD1) is intended for System/Machine Administrators.
• Training and Information CD (CD2)For detailed information on any of the features or functions available on your machine, please refer to the Training and Information CD (CD2), contained in the CD Pack delivered with your machine.
• Utilities CD (CD3)Contained in the CD Pack, the Utilities CD (CD3) contains a utility for upgrading to new versions of software on the machine.
• Xerox Welcome CenterFor further information or advice, contact the Xerox Welcome Center.
Xerox® Smart CardInstallation Guide
8

2Preparation
This section explains the preparation and resources required to install the Smart Card.
The installation will take approximately one hour for each device. The following items are required in order to complete the installation:
To set up the Domain Controller (DC) validation, you will need to determine if your site validates the DC against the OCSP server. Many sites use OCSP to validate individuals, but do not register the DC with it. If you set up the Xerox WorkCentre device to validate the DC and it isn't registered, the procedure will fail.
Item Supplier
Compatible Card Reader (refer to Supported Card Types on page 7)
Customer
Compatible Access Card (refer to Supported Card Readers on page 7)
Customer
Smart Card Enablement Kit 498K17541 Xerox
WorkCentre Software Upgrade Files(refer to Downloading the Xerox WorkCentre Software on page 47 for download instructions)
Xerox / Customer
TCP/IP enabled on the WorkCentre Customer
DNS Host name or static IP address assigned Customer
Network Settings to be checked to ensure network is fully functional
Customer
Domain Controller (DC) information:• Domain Controller authentication environment• lP address or Host Name• Domain information• Domain Controller Root and Intermediate certificates• Check that all certificates are in 64 bit X.509 format• Determine if the DC is registered with the OCSP at this site
Customer
OCSP Server Information:• OCSP Server URL• OCSP - Root and Intermediate Certificates• Check that all certificates are in 64 bit X.509 format
Customer
Proxy Server configuration details Customer
Xerox® Smart CardInstallation Guide
9

Preparation
If your site does register the DC with OCSP, you will need to decide whether:• to validate the DC against OCSP before validation of the user, or• to validate the DC after validation of the user
The first method requires installation of the DC certificate as part of this procedure and is the more accepted method for validation. The second method retrieves the DC certificate automatically for each authentication and doesn't require installation of the DC certificate onto the Xerox WorkCentre device.
An additional option is to combine the first and second options and compare the retrieved DC certificate to the one stored at installation. This provides the most security as it prevents rogue DCs masquerading as the real DC.
Note: Certificates are often obtained from the Information Technology professionals that support your organization. If you are unable to obtain the required certificates, refer to the process outlined in Appendix A. You can determine the domain that you are registered in using the process outlined in Appendix B.
Server Specifications
Prior to installation, ensure your network infrastructure supports Smart Card or Personal Identification Verification (PIV).
Names or IP addresses of all servers and domains are required during setup.
Electrical Requirements
The USB port on the back of the Xerox WorkCentre network controller provides the power required for any of the supported card readers.
Xerox® Smart CardInstallation Guide
10

3Installation
This section provides instructions for installing and configuring the Smart Card solution.
There are 4 main installation procedures to follow in sequence.• Software Installation:
Upgrading the Xerox WorkCentre software to enable the Smart Card to be configured.• Configuring Smart Card:
Enabling the Smart Card function and customizing the settings.• Hardware Installation:
Unpacking the Smart Card enablement kit and installing the card reader device.• Using the Smart Card:
Instructions on how to use the card reader device to access the Xerox WorkCentre functions.
Xerox® Smart CardInstallation Guide
11

Installation
Software Installation
Ensure you have downloaded the Xerox WorkCentre software required prior to performing these instructions. For further information, refer to Downloading the Xerox WorkCentre Software on page 47.
If your policy is to use a Proxy Server to reach external addresses, ensure the proxy is turned off at your browser before beginning the software install process. You also have the option of sending the Xerox WorkCentre to the list of exceptions that do not use the Proxy Server.
Follow the instructions below to install the Xerox WorkCentre software.
Note: Some of the steps shown may require the System Administration password for the Xerox WorkCentre to be entered.
1. Access CentreWare Internet Servicesa. At the workstation open your web browser.b. In the URL field, enter http:// followed by the IP Address of the device. For example: If the IP
Address is 192.168.100.100, enter the following into the URL field: http://192.168.100.100.c. Press the Enter key on your workstation keyboard.The default Status window displays.
Xerox® Smart CardInstallation Guide
12

Installation
2. Enable software upgradesa. To ensure software Upgrades is enabled, select Properties. A pop-up window prompts for
administrator log on.b. Enter User name and Password and select OK.c. Once authenticated, select Services.d. Select Machine Software then Upgrades.e. Ensure the Enabled box is checked, then select Apply.
Xerox® Smart CardInstallation Guide
13

Installation
3. Locate the softwarea. To locate the software file for uploading, select Properties then Services.b. Select Machine Software then Manual Upgrade.c. Browse to the location of the software which was downloaded from the Xerox website and
select the file.The path to the software file displays in the browse window.
Xerox® Smart CardInstallation Guide
14

Installation
4. Install the software on the Xerox WorkCentrea. Select Install Software.The software file is uploaded and takes approximately 10 minutes.Once the software file has been uploaded a pop-up window displays File has been Submitted.The status of the upgrade is shown at the Xerox WorkCentre and the CentreWare Internet Services interface is no longer accessible.b. Close the browser.
5. Check the upgrade statusa. At the Xerox WorkCentre local user interface,
the xxx.dlm job appears and starts processing. The software upgrade begins.
b. Once the software has been upgraded, the Xerox WorkCentre reboots automatically.
Note: The system may reboot more than once, depending on the software level of the machine before the upgrade.
c. Once the installation is complete, the Xerox WorkCentre prints a Software Upgrade Report to indicate a successful upgrade.
d. A Configuration Report is also printed which shows the new software level.
Note: These reports only print if the Printing Configuration Reports setting has been enabled.
The Smart Card settings are now ready for configuring using the CentreWare Internet Services interface.
Xerox® Smart CardInstallation Guide
15

Installation
Configuring the Smart Card
Once the Xerox WorkCentre has received the software upgrade, the Smart Card can be configured and enabled using CentreWare Internet Services.
Follow the instructions below to enable and configure the Smart Card:
1. Access CentreWare Internet Servicesa. At the workstation open your web browser.b. In the URL field, enter http:// followed by the IP Address of the device. For example: If the IP
Address is 192.168.100.100, enter the following into the URL field: http://192.168.100.100.c. Press the Enter key on your workstation keyboard.The default Status window displays.
Xerox® Smart CardInstallation Guide
16

Installation
2. Configure the date and time to update automaticallya. Prior to configuring the date and time to update automatically, the Network Time Protocol
(NTP) must be enabled on a hidden web page.b. Go to http://device IP Address/diagnostics/ntpaccess.dhtml.c. Select the Enabled checkbox and then
select Apply.d. At the CentreWare Internet Services screen,
select Properties then General Setup.e. Select Date and Time.
Note: A pop-up window may appear requiring you to login.
f. Ensure the NTP Enabled box is checked for the Network Time Protocol option, then enter the IP Address or the NTP Host Server Name.
In most cases this will be your DHCP server, and it will provide the time in Greenwich which must be corrected for your time zone by the GMT offset.g. Select Apply.h. At the Offset of Local Time Zone option select the GMT offset that is correct for your region.
Note: The sign in front of the number is important. Most of Europe is plus of Greenwich Mean Time, while North America is minus.
Note: If Network Time Protocol is not available, check that the time set on the device matches the network time on the Domain Controller Authentication Server.
i. Exit General Setup.
Xerox® Smart CardInstallation Guide
17

Installation
j. To determine the network time, view the time as displayed on your computer. To observe or set the time on the machine use the following instructions:• At the Xerox WorkCentre, press the
Access button on the control panel.• Input your User Name and/or
Password.• Select Go to Tools.• Select System Settings.• Select Time and Date.• Select Set Date and Time.• Select Set Time.• Observe the time and if it is not correct,
validate that the GMT offset is correct for your region.
Xerox® Smart CardInstallation Guide
18

Installation
3. Configure the CAC settingsa. Select Security and then General.b. Select Authentication Server and then CAC/PIV.c. Select the Feature Coverage required:
• All Features restricts access to all features, including Scanning.• Scanning Features Only restricts access to all features managed by the network
controller e.g. Scan to File, E-mail, Server Fax and Internet Fax. Copy and Embedded Fax are not restricted. This option is the default setting.
d. Enter the Smart Card Timeout required between 1 and 120 minutes. The default setting is 5 minutes.
If the machine is inactive for the period of time specified, it will end the session automatically.
Xerox® Smart CardInstallation Guide
19

Installation
4. Domain Controller validationIf your site does not register the DC with OCSP:a. Uncheck all three Domain Controller Validation boxes and add the required Domain
Controller(s).If you wish to validate the DC against OCSP before validation of the user:b. Check the box for Validate the Domain Controller Before CAC/PIV Authentication.c. Enter the OCSP Server Service URL details.
Note: Depending on your environment, these details may be case sensitive.
If you wish to validate the DC against OCSP after validation of the user:d. Check the box for Validate Domain Controller Certificate via OCSP after CAC/PIV User
Authentication.e. Enter the OCSP Server Service URL details.f. If you wish to validate the DC certificate retrieved as part of the user authentication process
against the one stored during installation, check the box for Domain Controller Signature must match uploaded Domain Controller Certificate.
Xerox® Smart CardInstallation Guide
20

Installation
5. Upload certificatesa. Load the DC root and intermediate certificates and the OCSP root and intermediate
certificates:b. Select the Link to Security > Trusted Certificate Authorities Page option or select Trusted
Certificate Authorities from the menu.c. At the Trusted Certificates Authorities screen, select Add.
d. Browse to the previously retrieved certificates and add them one at a time.e. Select the certificate then select the
Upload Certificate Authority button to add each one.
f. Repeat the process until all certificates are installed.
g. Select Close.
Xerox® Smart CardInstallation Guide
21

Installation
6. Enter the Domain Controller details for the authentication server.a. Determine how many Domain Controllers used in your environment need to be accessed
from the particular device.b. Identify the order the Domain Controllers should be interrogated when users present their
card for authentication. The Domain Controller which services most of your users should be first followed by less popular Domain Controllers.
c. Enter the controllers in the preferred search order.
Note: The search order can be modified at a later date.
d. Select Add.e. Ensure the Domain Controller Type is
configured correctly for your authentication environment.
f. Enter the IP Address or enter the Domain Controller Host Name.
g. Ensure Port 88 is selected unless your Kerberos Port is different.
h. Enter the Domain Controller Name. This must be the fully qualified Domain Controller name.i. At the Domain Controller Certificate option select Add and browse to the Domain Controller
Certificate.
Note: If you are unable to obtain the required certificates, refer to Retrieving the Certificate from a Domain Controller or OCSP Server on page 41.
Xerox® Smart CardInstallation Guide
22

Installation
j. Select the Certificate then select Upload Domain Controller Certificate. If the Domain Controller certificate is not available, the certificate that was used to issue the Domain Controller certificate can be uploaded instead.The Domain Controller certificate, or its issuing certificate is needed by the device to validate the interactions between the device and the domain controller.
k. Select Save.l. Repeat the process to enter the details for all Domain Controllers. If an error is made, select
the Domain Controller from the list, and make any corrections.m. Select Edit.n. Make any changes, then Select Save.
Note: To change the Domain Controller search order, select the controller and use the up and down arrows on the right side of the screen to promote or demote the controller order.
7. Check the Proxy Server details are configureda. If required by your network environment, ensure the Proxy Server details have been
configured.b. Select the Properties tab, then Connectivity, Protocols and Proxy Server and enter the
details.c. Select Apply.
Xerox® Smart CardInstallation Guide
23

Installation
8. Reboot the Xerox WorkCentrea. If switching authentication modes another reboot may be required.b. Select Status, then General and Reboot Machine.
Xerox® Smart CardInstallation Guide
24

Installation
Hardware Installation
Install the card reader device using the following instructions.
1. Unpack the Smart Card Enablement Kit• The kit contains the following items:
• Xerox Smart Card Enablement Guide• Four Dual Lock Fastener pads (Velcro)• Three Cable Ties• One Ferrite Bead
• Ensure you have read the licence agreement and agree to the terms and conditions specified prior to installation.
Xerox® Smart CardInstallation Guide
25

Installation
2. Locate the card reader device being installed• There are four types of card reader available, one upright model or three slimline models.• Locate the device being installed and ensure it has been configured.
Note: The System Administrator should configure the cards prior to the card reader being installed on the machine.
4
Xerox® Smart CardInstallation Guide
26

Installation
3. Attach the ferrite bead to the reader cable
Note: The ferrite bead should be clipped onto the cable directly behind the connector.
Xerox® Smart CardInstallation Guide
27

Installation
4. Attach the fasteners to the card reader device• Fasteners have been provided to secure the card reader to the Xerox WorkCentre.• Peel back the fastener backing strip.• Position the fastener on the under-side of the card reader, as shown.• Repeat for each of the fasteners supplied.
Xerox® Smart CardInstallation Guide
28

Installation
5. Remove the fastener backing strips• When all the fasteners have been attached to the card reader, remove the backing strips on
each of the fasteners.
Xerox® Smart CardInstallation Guide
29

Installation
6. Place the card reader on the Xerox WorkCentre• Gently place the card reader on the Xerox WorkCentre shelf (do not fix in place at this point).• Position the card reader in a suitable location, ensure it does not obstruct the opening of the
document handler side cover.• Check the cable has sufficient length to connect to the rear of the network controller.• Once it is in a suitable location, press firmly on the card reader to fix it in place.
Xerox® Smart CardInstallation Guide
30

Installation
7. Connect the card reader to the Xerox WorkCentre• Insert the USB connection into the slot provided on the rear of the network controller.• Use the cable ties provided to ensure the cabling is neat and tidy.
The hardware installation is now complete.
Xerox® Smart CardInstallation Guide
31

Installation
8. Confirm the installation• When the card reader and the software has
been installed and configured, the Card Reader Detected screen displays on the Xerox WorkCentre local user interface.
• Select OK.Smart Card is now ready for use.
Note: If the card reader is not detected, refer to Troubleshooting Tips on page 37 for information.
Xerox® Smart CardInstallation Guide
32

Installation
Using Smart Card
Once the Smart Card has been enabled, each user must insert a valid card and enter their Personal Identification Number (PIN) on the touch screen. When a user has finished using the Xerox WorkCentre, they are then required to remove their card from the card reader to end the session. For instances where a user forgets to remove their card, the machine will end the session automatically after a specified period of inactivity.
Follow the instructions below to use the Smart Card:
1. The Authentication Required window may display on the touch screen, depending on your machine configuration.
2. Insert your card into the card reader.
3. Use the touch screen and numeric keypad to enter your PIN and then select Enter.If the card and PIN are authenticated, access is granted.
Note: If the access attempt fails, refer to Troubleshooting Tips on page 37.
4. Complete the job.5. To end the session, remove your card from the card reader.
The current session is terminated and the Authentication Required window displays.
Xerox® Smart CardInstallation Guide
33

Installation
Xerox® Smart CardInstallation Guide
34

4Troubleshooting
For optimal performance from your card reader, ensure the following guidelines are followed: • The Card Reader is only compatible with network connected products.• Ensure the Card Reader is plugged into the Network Controller. Refer to Connect the card reader to
the Xerox WorkCentre on page 31.• Do not position the Card Reader in direct sunlight or near a heat source such as a radiator.• Ensure the Card Reader does not get contaminated with dust and debris.
Xerox® Smart CardInstallation Guide
35
Troubleshooting
Fault Clearance
When a fault occurs, a message displays on the User Interface which provides information relating to the fault. If a fault cannot be resolved by following the instructions provided, refer to Troubleshooting Tips on page 37.
If the problem persists, identify whether it is related to the card reader device or the Xerox WorkCentre.• For problems with the card reader device, contact the manufacturer for further assistance.• For problems relating to the Xerox WorkCentre, contact the Xerox Welcome and Support Center.
The Welcome and Support Center will want to know the nature of the problem, the Machine Serial number, the fault code (if any) plus the name and location of your company.
• Contact Xerox using the numbers 1-800-ASK-XEROX or 1-800-275-9376.
Locating the Serial Number
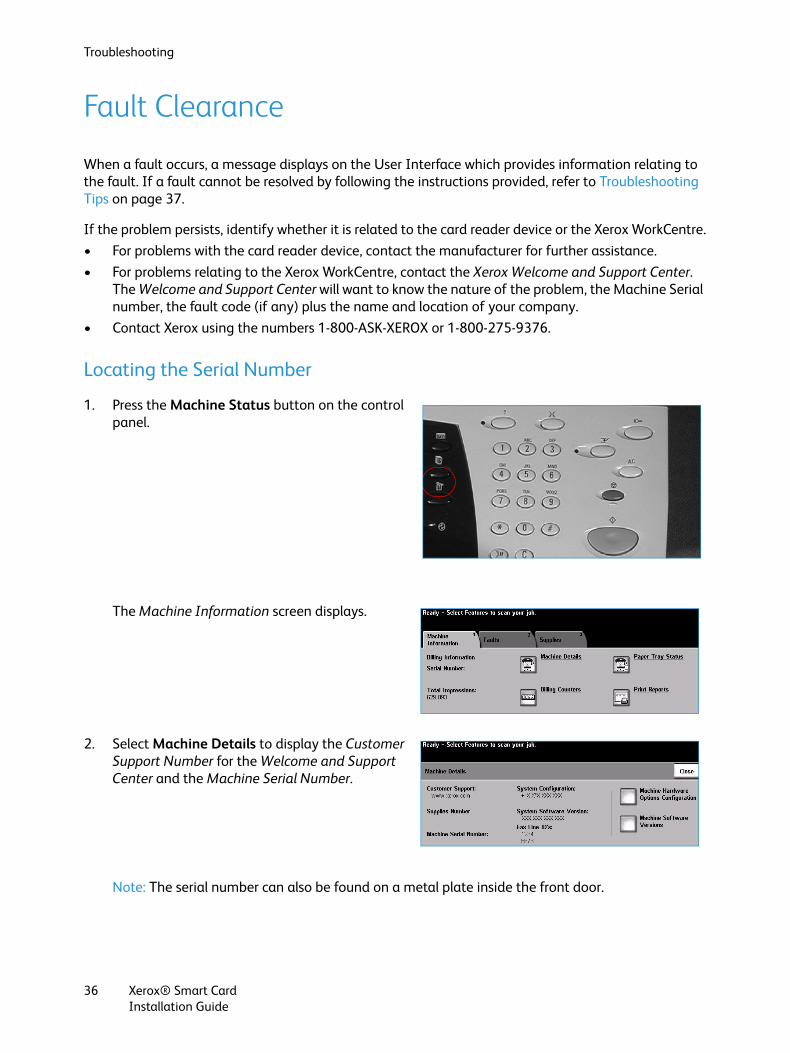
1. Press the Machine Status button on the control panel.
The Machine Information screen displays.
2. Select Machine Details to display the Customer Support Number for the Welcome and Support Center and the Machine Serial Number.
Note: The serial number can also be found on a metal plate inside the front door.
Xerox® Smart CardInstallation Guide
36

Troubleshooting
Troubleshooting Tips
The table below provides a list of problems and the possible cause and a recommended solution.
If you experience a problem during the installation process please refer to the During Installation problem solving table below.
If you have successfully installed the Smart Card solution but are now experiencing problems, refer to the After Installation troubleshooting tips on page 38.
During Installation:
Problem Possible Cause Solution
Card reader is installed but no message displays on the User Interface
• Card reader is faulty. • Try a different card reader.• Contact the System
Administrator.
• Card reader connection is faulty.
• Check the cable is plugged in correctly. Refer to Connect the card reader to the Xerox WorkCentre on page 31 for instructions.
• Unplug the card reader cable then plug back in.
• Plug the card reader into a different USB port.
• Card reader is not compatible. • Check that the card reader is on the list of compatible devices, refer to Supported Card Readers on page 7.
• Smart Card access is not enabled on the machine.
• Enable CAC through the Properties set up screens using CentreWare Internet Services, refer to Configure the CAC settings on page 19.
Xerox® Smart CardInstallation Guide
37

Troubleshooting
After Installation:
Problem Possible Cause Solution
Authentication failures • Incorrect PIN has been entered.
• Retry entering the correct PIN. If problem persists, contact the System Administrator for advice.
• Card is locked due to too many failed PIN attempts.
• Contact Registration Authority to reload or to get a new card.
• Unable to find identity certificate.
• Identity certificate has been revoked.
• Authentication with Domain Controller Failed.
• Check network cable is firmly connected.
• Contact the System Administrator.• Unable to validate server
certificate.
• Smart Card Authentication System Failed.
• Authentication Failed.
• System Administrator has not selected All Features or Scanning Service Only.
• Contact the System Administrator.
Time for date mismatch error • There is a mismatch between the time and date setting on the Xerox WorkCentre and the authentication server time or date setting.
• Verify that Network Time Protocol is properly set up.
• Verify that GMT offset is correct for your region, refer to Configure the date and time to update automatically on page 17.
• Verify that GMT offset is correct for Daylight Savings Time.
• Contact your System Administrator.
Xerox® Smart CardInstallation Guide
38

Troubleshooting
Cannot see the CentreWare Internet Services web page after software upgrade
• IP Address incorrect or has been reset.
• Check the IP Address printed on the configuration report. Ensure the DHCP settings match your site settings.
• To print a configuration report at the Xerox WorkCentre, select Machine Status, then Print Reports and Print System Config Report.
Problem Possible Cause Solution
Xerox® Smart CardInstallation Guide
39

Troubleshooting
Xerox® Smart CardInstallation Guide
40

ARetrieving the Certificate from a Domain Controller or OCSP Server
1. Access the Domain Controller using a web browser using the following syntax:https://IP Address of the Domain Controller:636For example: https://111.222.33.44:636 where 111.222.33.44 is the IP address of the appropriate server.A Security Alert warning window is displayed, similar to the one shown.
2. Click on View Certificate to proceed.If the window does not display, double click on the padlock icon in the lower right hand corner of your browser window.
The Certification Information window is displayed.
Xerox® Smart CardInstallation Guide
41

Retrieving the Certificate from a Domain Controller or OCSP Server
3. Select the Details tab.Record the name of the Certificate Authority (CA) that issued this certificate, the "Issuer".A certificate from this CA will be required during Smart Card setup.
4. Select the Copy to File button.
The Certification Export Wizard is displayed.5. Select Next.
6. Select Base-64 encoded X.509 (.CER).7. Select Next.
Xerox® Smart CardInstallation Guide
42

Retrieving the Certificate from a Domain Controller or OCSP Server
8. Select Browse.Browse to a directory to save the Certificate.
9. Enter a filename for the Certificate and select Save.10. Select Next.
11. Select Finish.The Certificate is retrieved from the server and saved in the selected directory.A pop-up message will confirm that the Certificate has been successfully saved.Once saved the Certificate can be loaded onto the device.
This process can be repeated to retrieve the Certificates from each of the required servers.
Xerox® Smart CardInstallation Guide
43

Retrieving the Certificate from a Domain Controller or OCSP Server
Xerox® Smart CardInstallation Guide
44

BDetermining the Domain in which your Card is Registered
1. From your PC, click the Start menu and right click on My Computer.2. From the drop down list, select Properties.
When the System Properties window opens, click on the Computer Name tab.Beneath the Full Computer name is the Domain Name.
3. Copy and paste the Domain Name directly into the CAC setup page on the Internet Services user interface.Refer to for instructions.
4. Select Cancel to close the System Properties window.
Xerox® Smart CardInstallation Guide
45

Determining the Domain in which your Card is Registered
Xerox® Smart CardInstallation Guide
46

CDownloading the Xerox WorkCentre Software
Additional software is required in order for the Xerox WorkCentre to function with the Smart Card. The software must be downloaded from the website specified prior to installation.
Use the following instructions to download the Xerox WorkCentre software:
1. Identify the Xerox WorkCentre software level
a. Press the button on the control panel.b. Select Machine Details. The System
Software Version number displays.c. Make a note of the software version in the
space provided below. This will be required when selecting which file to download from the Xerox website.
Software Version:____________________________________________________________________
2. Locate the software on the Xerox websitea. At the workstation open your web browser, then enter http:// and the following address:www.xrxgsn.com/admin/user/spar_release.ihtmlb. Press the Enter key on your workstation keyboard. The default Support window displays.
Xerox® Smart CardInstallation Guide
47

Downloading the Xerox WorkCentre Software
3. Enter the SPAR release codea. Enter the following release code to gain access to the software download window:WCP232CAC
Note: The code is case sensitive.
b. Select SPAR Release Code to accept the code. The software download window displays.
Xerox® Smart CardInstallation Guide
48

Downloading the Xerox WorkCentre Software
4. Select the software option requireda. Identify the option required using the model name and software version information
recorded earlier.b. Select the option required.
Note: It is important to select the correct file for your device. If you do not know the model and configuration of your WorkCentre, refer to Identify the Xerox WorkCentre software level on page 47 for instructions.
The File Download and End-User License Agreement page displays.
Xerox® Smart CardInstallation Guide
49

Downloading the Xerox WorkCentre Software
5. Read and accept the End User License Agreementa. To download the software file, read the End User License Agreement (EULA) and select
Accept.
The file download window displays.
Xerox® Smart CardInstallation Guide
50

Downloading the Xerox WorkCentre Software
6. Download the software to the required locationa. Select Save to save the zip file to a specified location.b. Browse to the required save location and select Save
A zip file containing all the files required is downloaded and saved to the location specified.
Note: The zip file contains the Installation Guide and device software and could take some time to download.
c. Open the zip file and extract the files to the location required. The following files are provided:• Smart Card Installation Guide• Software File (as required)
Xerox® Smart CardInstallation Guide
51

Downloading the Xerox WorkCentre Software
Xerox® Smart CardInstallation Guide
52