Xerox Nuvera User Guide and Training...
400
Xerox Nuvera User Guide and Training Aid (UGTA) for Software Version 9.3/10.3
Transcript of Xerox Nuvera User Guide and Training...

Xerox Nuvera User Guide and TrainingAid (UGTA) for Software Version9.3/10.3

Table of Contents1 Xerox Nuvera® User Guide and Training Aid (UGTA) Start
Page for Software Version 9.3/10.3..................................................1-1
2 What’s new?................................................................................................2-1
3 Flex Speed Option.....................................................................................3-1
4 When to unload Stackers.......................................................................4-1
5 About..............................................................................................................5-1Section 508 Compliance / Keyboard Accessibility..................................................5-1Copyright and Trademark Declarations......................................................................5-1Symbol Usage........................................................................................................................5-1Flash content.........................................................................................................................5-2Third Party Licenses............................................................................................................5-2About Pitch.............................................................................................................................5-2Paper Size/Pitch Relationships........................................................................................5-2
6 Xerox Nuvera EA/MX Production System.........................................6-1Basic Configuration.............................................................................................................6-1Sheet Feed Modules............................................................................................................6-2Post Process Module............................................................................................................6-3FreeFlow Print Server and Print Engine.......................................................................6-3Additional Configurations................................................................................................6-3Finisher Modules..................................................................................................................6-4Licensed Features.................................................................................................................6-5Loading Paper........................................................................................................................6-5Paper Tray Programming..................................................................................................6-6Solving Image Quality Problems...................................................................................6-6Clearing Paper Jams...........................................................................................................6-6Contacting Xerox..................................................................................................................6-7Sheet Feed Modules (SFM)..............................................................................................6-8Print Engine Module............................................................................................................6-9Control Console..................................................................................................................6-10Multifunction Finisher (MFF) Interface....................................................................6-10
The MFF Pro Plus..................................................................................................6-11MFF Professional..................................................................................................6-11
Multifunction Finisher (MFF)........................................................................................6-11MFF Pro Plus: Insertion Module.....................................................................6-13
Automatic Document Feeder.......................................................................................6-13
iXerox Nuvera User Guide and Training Aid (UGTA) for Software Version 9.3/10.3
Sheet Enhancement Module(SEM)............................................................................6-14
7 Xerox Nuvera 200/288 EA/MX Perfecting ProductionSystem..........................................................................................................7-1
Modules...................................................................................................................................7-1Special features....................................................................................................................7-2
Module Options.......................................................................................................7-2Licensed Features.................................................................................................................7-4FreeFlow Print Server and Print Engine.......................................................................7-4
8 Managing System Resources................................................................8-1Managing the Printer.........................................................................................................8-1
Printer Menu Selections.......................................................................................8-1Managing Paper Trays..........................................................................................8-2Managing Finishers...............................................................................................8-2
What Are Internal and External Finishers?.....................................8-2Managing Stackers................................................................................................8-3Managing Image Quality....................................................................................8-3User Interface Logging.........................................................................................8-3
Getting Billing Information..............................................................................................8-3Why would I need to access billing information?......................................8-4To access billing information.............................................................................8-4
Reading the Billing Meters.....................................................................8-4Billing Regions...............................................................................8-4Descriptions of Billing Meters.................................................8-4
9 Managing System Software and Hardware...................................9-1To access the Xerox System Install Service Utility..................................................9-1To perform Disk Overwrite................................................................................................9-1
10 Managing the Stock Library............................................................10-1Stock Management..........................................................................................................10-1
The Stock List.........................................................................................................10-2To set up/manage paper stock....................................................................................10-2
11 Advanced Publishing Features........................................................11-1Using Build Job...................................................................................................................11-1
Build Job is used to..............................................................................................11-1To use Build Job....................................................................................................11-2
Understanding Job and Segment Level Programming......................................11-2Job-Level Programming.....................................................................................11-2Segment-Level Programming..........................................................................11-3
Working with Job Tickets................................................................................................11-3
Xerox Nuvera User Guide and Training Aid (UGTA) for Software Version 9.3/10.3ii
Table of Contents

Open a job ticket..................................................................................................11-4Related Hints and Tips.......................................................................................11-4
Using Front-Back Registration......................................................................................11-5The Front-Back Registration window...........................................................11-6To use Front-Back Registration.......................................................................11-6
Copying Document Sets with Mixed-Size Sheets.................................................11-6If Mixed Size Originals has NOT been selected:......................................11-7When the Mixed Size Originals (MSO) feature IS selected:................11-7To copy documents with mixed-size originals..........................................11-7
Saving and Storing Jobs.................................................................................................11-7Copy Jobs................................................................................................................11-8Scan to File Jobs...................................................................................................11-8Print from File Jobs..............................................................................................11-8Related Hints and Tips.......................................................................................11-9
Finding a Saved Job to Print.......................................................................................11-13To find a saved job in Job Manager...........................................................11-13To find a saved job using Print From File.................................................11-13
Customizing System Default Options.....................................................................11-14To view current printer default options for systems with one
queue...............................................................................................................11-14To view current printer default options for systems with multiple
queues.............................................................................................................11-14To customize general system settings......................................................11-15
Using Xerox Freeflow® Remote Print Server Software......................................11-15Adding Annotations to your Jobs.............................................................................11-16
To Annotate Print or Copy Jobs...................................................................11-16Configuring Annotations................................................................................11-16
Generating a Sample Print..........................................................................................11-17To produce a sample print of a page while the job is
printing............................................................................................................11-17Sample Print From a Client Computer......................................................11-17
About Pitch........................................................................................................................11-18Paper Size/Pitch Relationships.....................................................................11-18
Using the Xerox Nuvera with Freeflow® Makeready.........................................11-19To print to the Xerox Nuvera from FreeFlow Makeready..................11-19
12 Cleaning Procedures...........................................................................12-1Cleaning the Document Glass......................................................................................12-1
To clean the document glass...........................................................................12-1Cleaning the Document Feeder...................................................................................12-2
To clean the document feeder........................................................................12-2
iiiXerox Nuvera User Guide and Training Aid (UGTA) for Software Version 9.3/10.3
Table of Contents

Cleaning Dry Ink (Toner) Spills.....................................................................................12-3Cleaning the Display........................................................................................................12-3
To clean the display............................................................................................12-3Cleaning the 'Optical' Mouse......................................................................................12-3
To clean the 'optical' mouse...........................................................................12-4Cleaning the Keyboard...................................................................................................12-4
To clean the keyboard........................................................................................12-4
13 Setting Up Complex Jobs..................................................................13-1Printing/Copying on Tabbed and Ordered Stock..................................................13-1
For systems with a Multifunction Finisher (MFF)....................................13-1For systems with a DS3500/DS5000 or BFM type finishers...............13-2For the Xerox Nuvera 200/288 Perfecting Production System -
Using Media Optimization mode for tabs...........................................13-2To set up and use ordered stock.....................................................................13-3
Load tray with ordered stock.............................................................13-3Submit job and choose ordered stock............................................13-4Use Media Optimization Mode to optimize job recovery
on jobs with Serialized Stocks.....................................................13-4More on loading tabbed stock and other special
papers...................................................................................................13-5Programming Tabs with 2-sided Original for Tab Images...................13-5Supported Tab Media.........................................................................................13-5
Using the Feed Module Tab Guides...........................................................................13-7Installing the Feed Module Tab Guides......................................................13-7Removing the Feed Module Tab Guides...................................................13-15More on printing with tabbed stock and other special
papers..............................................................................................................13-18
14 Using Media Optimization Mode on the Xerox Nuvera200/288 EA/MX Perfecting Production System.........................14-1
Optimizing productivity for jobs containing Pre-cut Tabs.................................14-1Optimizing productivity for jobs containing predominantly large stock
mixed with small stock..............................................................................................14-2Optimizing productivity for jobs containing wide stocks measuring 9 -
9.5 process direction..................................................................................................14-3Optimizing job recovery for jobs containing Serialized Stocks........................14-4
15 About Impositions...............................................................................15-1Impositions and Saddle Stitched Books..................................................................15-1Impositions and Perfect Bound Books......................................................................15-2Figures...................................................................................................................................15-3Setting Imposition Options...........................................................................................15-4
To set imposition options..................................................................................15-4
Xerox Nuvera User Guide and Training Aid (UGTA) for Software Version 9.3/10.3iv
Table of Contents

Related Hints and Tips.......................................................................................15-5
16 Reducing or Enlarging Images........................................................16-1To reduce or enlarge the image...................................................................................16-1Entering a custom reduction/enlargement value................................................16-1
17 Adding Pages to a Document.........................................................17-1Paper trays must be loaded and programmed with the appropriate
stocks...............................................................................................................................17-1Basic workflow to insert pages into a document.................................................17-1System Level (Administrative) Added Pages..........................................................17-2Adding System Level Pages...........................................................................................17-3
Enabling System Level Pages..........................................................................17-3Banner Pages.........................................................................................................17-3Error Pages..............................................................................................................17-4Job Attributes Report..........................................................................................17-4
18 Printing an Image That Extends to the Edge of thePage............................................................................................................18-1
Edge-to-edge printing workflow starts at client desktop / driver, andends at the Xerox Nuvera........................................................................................18-2
Workflow to enable a "full-bleed" print job:..............................................18-2
19 Programming Multiple Stocks in a Single Job..........................19-1To program a job to use multiple stocks..................................................................19-1
20 Adding Pages to your Document with the SFM InsertionModule.......................................................................................................20-1
To Add Sheets with the SFM Insertion Module.....................................................20-1
21 Using Background Forms..................................................................21-1When to use a background form.................................................................................21-1How to create a background form..............................................................................21-1Creating your variable data document....................................................................21-2Printing your variable data document with the background form................21-2
Using your client application and workstation........................................21-2Using Copy to create the final output document...................................21-3Using a background form from the FreeFlow Print Server...................21-3
Managing/Deleting background forms....................................................................21-4Related Hints and Tips....................................................................................................21-4
22 Replacing Consumables.....................................................................22-1Replacing the Developer Waste Container..............................................................22-1
To replace the Developer Waste container................................................22-1
vXerox Nuvera User Guide and Training Aid (UGTA) for Software Version 9.3/10.3
Table of Contents

Dry Ink (Toner)...................................................................................................................22-2Replacing the Dry Ink Container....................................................................22-2To replace a Dry Ink Container.......................................................................22-2
Replacing the Dry Ink Waste Container...................................................................22-3To replace the Dry Ink Waste Container.....................................................22-3
Replacing the Hole Punch Waste Container...........................................................22-4To replace the Hole Punch Waste Container.............................................22-4
Replacing the Hole Paper Punch.................................................................................22-4To Replace the Hole Paper Punch..................................................................22-5Hole Punch Module.............................................................................................22-5
Replacing Staples in the Finishers..............................................................................22-5Systems with Basic Finishing Modules (BFM)...........................................22-6Systems with Multifunction Finisher (MFF)...............................................22-6To replace staples.................................................................................................22-6Main Tray Stapler.................................................................................................22-6Booklet Tray Stapler............................................................................................22-7
Replacing Staples in the BFM.......................................................................................22-8To Replace BFM Stapler Cartridges............................................................................22-8
23 How Do I..................................................................................................23-1Contacting Xerox...............................................................................................................23-1
Service Code / Serial Number Locations.....................................................23-1Xerox prInteract™ Remote Service Offerings............................................23-2To submit system data.......................................................................................23-2Telephone numbers and World Wide Web address...............................23-2CRU/Maintenance/Consumables part names and numbers..............23-2
Copying your Document.................................................................................................23-3Setting up a Copy Job........................................................................................23-4
To set up a copy job...............................................................................23-4To Proof 1 Copy and Hold...................................................................23-5
Copying 2-Sided Pages......................................................................................23-5To copy 2-sided pages from the Document Feeder..................23-5Basic copy workflow using "sides imaged"
programming.....................................................................................23-5To copy 2-sided pages from the Document Glass
(platen).................................................................................................23-6Basic copy workflow using "sides imaged"
programming........................................................................23-6Adjusting Output Page Size.............................................................................23-6Managing Copy Jobs: Editing Held Jobs.....................................................23-7
Sample workflow to edit a held Copy job.....................................23-7
Xerox Nuvera User Guide and Training Aid (UGTA) for Software Version 9.3/10.3vi
Table of Contents
Making a Stapled Copy Job.............................................................................23-7To generate a stapled copy job.........................................................23-8
Using the Document Feeder............................................................................23-8To load the Document Feeder...........................................................23-8
Using the Multifunction Finisher (MFF)...................................................................23-9How to select the MFF finishing type as the output device...............23-9
Related Hints and Tips..........................................................................23-9Using the Multifunction Finisher (MFF) Pro Plus..................................23-10
To Insert Preprinted Sheets on the MFF Pro Plus....................23-10To Hole Punch Jobs on the MFF Pro Plus....................................23-10
Delivering Document Sets to the Stacker................................................23-11Multifunction Finisher (MFF)...........................................................23-11Basic Finishing Module (BFM)........................................................23-12To send document sets to the stacker.........................................23-12To unload the BFM stacker...............................................................23-12What the LED means.........................................................................23-13In case of a jam in the paper path or stapler:..........................23-13
Making a Booklet..............................................................................................23-14To make a booklet...............................................................................23-14
Sample Copy workflow.........................................................23-14Sample workflow from client driver.................................23-14
Related Hints and Tips.......................................................................23-15Printing Pads.......................................................................................................23-16
To print a pad........................................................................................23-16Booklet Size Limitations.................................................................................23-16
Maximum Booklet Sizes (in sheets)..............................................23-17Why is there this limitation?............................................................23-17
Using Offset to Separate Documents in a Stack..................................23-17Offset Choice Terminology..............................................................23-17To use offset to separate documents..........................................23-17
Creating Folded Documents.........................................................................23-18To make a C-Folded document while copying..........................23-18To make a Z-Folded document while copying..........................23-18To make a Folded document while printing..............................23-19
Using the Basic Finishing Module (BFM)..............................................................23-19Select the BFM or BFM Plus finisher as the output device...............23-19Define stacker settings and other adjustments affecting the
BFM..................................................................................................................23-19Enable/Disable Automatic Image Permanence for All
Stock Weights.................................................................................23-19Set BFM Stacker Limits......................................................................23-20
viiXerox Nuvera User Guide and Training Aid (UGTA) for Software Version 9.3/10.3
Table of Contents

Set BFM Registration Values...........................................................23-21Using the Variable Shaped Tray....................................................23-21
To install the Variable Shaped Tray.................................23-22To remove the Variable Shaped Tray..............................23-22Unloading stock from the Variable Shaped
Tray........................................................................................23-22Related Hints and Tips.......................................................................23-22
Using DFA Compliant Finishers through the DS3500......................................23-24External Finishers Available on the Xerox Nuvera System................23-24What is DFA?.......................................................................................................23-24DFA Configurations and Profiles.................................................................23-24
Managing DFA Configurations and Profiles..............................23-24Select the 3rd Party External Finisher as the output device............23-25Changing DFA Configurations for 3rd Party Finishers........................23-25
To enable a different profile than the one currentlyenabled for a finishing configuration:...................................23-25
To change from using currently installed finishers andenable a new configuration:.....................................................23-26
Related Hints and Tips.......................................................................23-26Related Hints and Tips....................................................................................23-27
Adjusting Image Quality.............................................................................................23-28To adjust image quality on copy and scanned jobs............................23-28To adjust image quality on print jobs.......................................................23-29
Stroke Thickening (increasing the weight or width of acharacter)..........................................................................................23-29
About Toner Saver...............................................................................23-29About Image Quality for Copy and Scan to file...................................23-30Choosing the Best Original Type (when scanning or
copying)..........................................................................................................23-31To select an Original Type.................................................................23-31Original Types........................................................................................23-31Rendering Options...............................................................................23-31
Mixed Original types.............................................................23-32Text...............................................................................................23-32Photo...........................................................................................23-32
About Contrast...................................................................................................23-32Limits of Contrast controls...............................................................23-32Adjusting Contrast (when scanning or copying).....................23-33
To adjust contrast...................................................................23-33About Lightness/Darkness.............................................................................23-34
Lightness/Darkness controls............................................................23-34Adjusting Lightness/Darkness.........................................................23-35
Xerox Nuvera User Guide and Training Aid (UGTA) for Software Version 9.3/10.3viii
Table of Contents

Adjust Lightness/Darkness for Copying.........................23-35Adjust Lightness/Darkness for Printing..........................23-35
About Sharpness................................................................................................23-36Sharpness control................................................................................23-36Adjusting Sharpness (when scanning or copying)..................23-37
To adjust sharpness...............................................................23-37Choosing the Best Halftone Setting..........................................................23-37
To select a Halftone............................................................................23-37Systems with the Enhanced Line Screen License....................23-38
Editing Images................................................................................................................23-38To edit copy or scanned images..................................................................23-38To edit print images.........................................................................................23-39Erasing Unwanted Marks On Originals.....................................................23-39
Erase Options.........................................................................................23-40To erase an edge..................................................................................23-40Other ways to work with edge-to-edge imaging.....................23-40
Shifting the Image...........................................................................................23-40To shift the image for a copy job...................................................23-40To shift the image for a print job...................................................23-41
Rotating the Image..........................................................................................23-41To manually rotate the image........................................................23-41Automatic Image Rotation..............................................................23-41
Printing your Document...............................................................................................23-41Supported File Types........................................................................................23-42Related Hints and Tips....................................................................................23-42Printing from the Media Drive......................................................................23-44
To print from the media drive.........................................................23-44Related Hints and Tips.......................................................................23-44
Setting up a Print Job......................................................................................23-44To set up a basic print job.................................................................23-45Batch Printing........................................................................................23-47Using Preview to proof a print job................................................23-47Related Hints and Tips.......................................................................23-48See also....................................................................................................23-49
Printing 2-Sided Pages....................................................................................23-49Basic workflow to change "Sides Imaged" programming at
the user interface...........................................................................23-49Printing a Job from your Networked PC...................................................23-50
To submit a print job from your PC using a webbrowser..............................................................................................23-50
ixXerox Nuvera User Guide and Training Aid (UGTA) for Software Version 9.3/10.3
Table of Contents
To submit a print job directly from a networked PCapplication.......................................................................................23-50
To manage print jobs submitted from a networkedPC............................................................................................23-51
Using Hot Folders from the Queue Manager..............23-51More information about printing from the
desktop.................................................................................23-51Print Drivers and Client Support..................................................................23-51
Print Driver Support.............................................................................23-51Xerox Custom Drivers............................................................23-51Generic PPDs............................................................................23-51
Print Client Support.............................................................................23-52Job Submission........................................................................23-52
Related Hints and Tips.......................................................................23-52Managing Print Jobs........................................................................................23-55
To manage multiple jobs submitted from a client.................23-55Basic job management controls....................................................23-56
Printing with the Parallel RIP feature........................................................23-58How the Parallel RIP process works..............................................23-58Which Jobs work best.........................................................................23-58How to create a queue with Parallel RIP enabled...................23-59
Reprinting a Saved Job....................................................................................23-59To reprint a saved job.........................................................................23-60
Printing Directly From a Mainframe Computer with LCDS...............23-60Enabling LCDS Printing: Overview.................................................23-61Verifying the presence of the LCDS and the Productivity
Pack Licenses...................................................................................23-62Viewing LCDS Resources......................................................23-62
Related Hints and Tips.......................................................................23-62Related Information...........................................................................23-62
Using VIPP...........................................................................................................23-63What is VIPP?........................................................................................23-63
How it Works.............................................................................23-63Programming options.........................................................................23-64Configuring the system to run a VIPP job.................................23-64
Working With IPDS...........................................................................................23-64Verifying the presence of the IPDS and the Productivity
Pack Licenses...................................................................................23-64Printing IPDS jobs................................................................................23-64Related Hints and Tips.......................................................................23-65
Working with Queues....................................................................................................23-67
Xerox Nuvera User Guide and Training Aid (UGTA) for Software Version 9.3/10.3x
Table of Contents

To add a new queue on systems with the Productivity Packlicense enabled............................................................................................23-68
To view or modify queue properties with the Productivity Packlicense enabled............................................................................................23-69
To view or modify queue properties of a single queue(Productivity Pack license not enabled).............................................23-69
To copy a queue with the Productivity Pack license enabled..........23-69Using Parallel RIP (on the Xerox Nuvera 200/288 EA/MX
Perfecting Production System)..............................................................23-70Locking/Unlocking a queue...........................................................................23-70When and how to use Hot Folders.............................................................23-70
To activate and create Hot Folders for a givenqueue:.................................................................................................23-70
To set or change the Hot Folder polling time:..........................23-71Job Definition Format Print Submission via Hot
Folders................................................................................................23-71Scanning your Document............................................................................................23-71
Setting up a Scan Job......................................................................................23-72To setup a scan job..............................................................................23-72Scan to File to a USB thumb drive................................................23-72
Choosing a Scan File Format........................................................................23-73Reasons for saving your scanned document as TIFF:...........23-73Reasons for saving your scanned document as PDF:............23-73
Setting Scan to File Image Resolution.....................................................23-73To set image resolution.....................................................................23-74Scan to File Resolution.......................................................................23-74
Scanning a 2-sided Document.....................................................................23-75To scan a 2-sided document............................................................23-75
Advanced Publishing Features...................................................................................23-75Using Build Job...................................................................................................23-75
Build Job is used to..............................................................................23-76To use Build Job....................................................................................23-76
Understanding Job and Segment Level Programming......................23-76Job-Level Programming.....................................................................23-77Segment-Level Programming..........................................................23-77
Working with Job Tickets................................................................................23-77Open a job ticket..................................................................................23-78Related Hints and Tips.......................................................................23-78
Copying Document Sets with Mixed-Size Sheets.................................23-79If Mixed Size Originals has NOT been selected:......................23-80When the Mixed Size Originals (MSO) feature IS
selected:.............................................................................................23-80
xiXerox Nuvera User Guide and Training Aid (UGTA) for Software Version 9.3/10.3
Table of Contents

To copy documents with mixed-size originals..........................23-80Saving and Storing Jobs.................................................................................23-80
Copy Jobs................................................................................................23-81Scan to File Jobs...................................................................................23-81Print from File Jobs..............................................................................23-81Related Hints and Tips.......................................................................23-82
Finding a Saved Job to Print.........................................................................23-86To find a saved job in Job Manager.............................................23-86To find a saved job using Print From File....................................23-86
Customizing System Default Options.......................................................23-87To view current printer default options for systems with
one queue.........................................................................................23-87To view current printer default options for systems with
multiple queues..............................................................................23-87To customize general system settings.........................................23-88
Using Xerox Freeflow® Remote Print Server Software........................23-88Adding Annotations to your Jobs...............................................................23-88
To Annotate Print or Copy Jobs......................................................23-89Configuring Annotations.....................................................23-89
Generating a Sample Print............................................................................23-90To produce a sample print of a page while the job is
printing..............................................................................................23-90Sample Print From a Client Computer.........................................23-90
About Pitch..........................................................................................................23-90Paper Size/Pitch Relationships........................................................23-91
Using the Xerox Nuvera with Freeflow® Makeready...........................23-92To print to the Xerox Nuvera from FreeFlow
Makeready.......................................................................................23-92Setting Up Complex Jobs............................................................................................23-93
About Impositions............................................................................................23-93Impositions and Saddle Stitched Books.....................................23-93Setting Imposition Options.............................................................23-94
To set imposition options....................................................23-95Related Hints and Tips.........................................................23-96
Printing an Image That Extends to the Edge of the Page................23-96Edge-to-edge printing workflow starts at client desktop /
driver, and ends at the Xerox Nuvera....................................23-97Workflow to enable a "full-bleed" print job:..............................23-97
Reducing or Enlarging Images.....................................................................23-97To reduce or enlarge the image.....................................................23-98Entering a custom reduction/enlargement value...................23-98
Xerox Nuvera User Guide and Training Aid (UGTA) for Software Version 9.3/10.3xii
Table of Contents

Programming Multiple Stocks in a Single Job........................................23-98To program a job to use multiple stocks.....................................23-98
Printing/Copying on Tabbed and Ordered Stock..................................23-98For systems with a Multifunction Finisher (MFF)....................23-99For systems with a DS3500/DS5000 or BFM type
finishers.............................................................................................23-99For the Xerox Nuvera 200/288 Perfecting Production
System - Using Media Optimization mode fortabs...................................................................................................23-100
To set up and use ordered stock..................................................23-100Load tray with ordered stock...........................................23-100Submit job and choose ordered stock.........................23-101Use Media Optimization Mode to optimize job
recovery on jobs with Serialized Stocks................23-101More on loading tabbed stock and other special
papers................................................................................23-102Programming Tabs with 2-sided Original for Tab
Images............................................................................................23-102Supported Tab Media......................................................................23-102
Adding Pages to a Document.................................................................................23-104Paper trays must be loaded and programmed with the
appropriate stocks...................................................................................23-104Basic workflow to insert pages into a document...............................23-104System Level (Administrative) Added Pages.......................................23-105Adding System Level Pages........................................................................23-105
Enabling System Level Pages........................................................23-106Banner Pages......................................................................................23-106Error Pages...........................................................................................23-106Job Attributes Report.......................................................................23-107
Adding Pages to your Document with the SFM Insertion Module..........23-107To Add Sheets with the SFM Insertion Module..................................23-107
24 Editing Images......................................................................................24-1To edit copy or scanned images..................................................................................24-1To edit print images.........................................................................................................24-2Erasing Unwanted Marks On Originals.....................................................................24-2
Erase Options.........................................................................................................24-2To erase an edge..................................................................................................24-2Other ways to work with edge-to-edge imaging.....................................24-3
Shifting the Image...........................................................................................................24-3To shift the image for a copy job...................................................................24-3To shift the image for a print job...................................................................24-3
Rotating the Image..........................................................................................................24-4
xiiiXerox Nuvera User Guide and Training Aid (UGTA) for Software Version 9.3/10.3
Table of Contents

To manually rotate the image........................................................................24-4Automatic Image Rotation..............................................................................24-4
25 Adjusting Image Quality...................................................................25-1To adjust image quality on copy and scanned jobs............................................25-1To adjust image quality on print jobs.......................................................................25-2
Stroke Thickening (increasing the weight or width of acharacter)..........................................................................................................25-2
About Toner Saver...............................................................................................25-3About Contrast...................................................................................................................25-3
Limits of Contrast controls...............................................................................25-3About Lightness/Darkness.............................................................................................25-4
Lightness/Darkness controls............................................................................25-4About Sharpness................................................................................................................25-5
Sharpness control.................................................................................................25-5
26 Clearing Paper Jams...........................................................................26-1Paper jam notification....................................................................................................26-2Clearing jams in the Xerox Nuvera 200/288 EA/MX Perfecting
Production System Print Engines..........................................................................26-2Clearing jams in the BFM Plus Area 2.......................................................................26-2Paper Purge..........................................................................................................................26-2
27 Maintaining Your Xerox Nuvera.....................................................27-1Power Procedures...............................................................................................................27-1
Powering On the Xerox Nuvera.......................................................................27-1To power on the Xerox Nuvera..........................................................27-1
Powering Off the System..................................................................................27-2To power off the system......................................................................27-2
Preferred power off method.................................................27-2If the preferred power off method is not
successful...............................................................................27-2Energy Star.............................................................................................................27-2Power Saver Mode...............................................................................................27-2
Power Saver modes and paper loading.........................................27-3Ways to exit Low Power Mode...........................................................27-3Ways to exit Sleep Mode.....................................................................27-3
Restarting the System........................................................................................27-3To restart the system.............................................................................27-3
Method A: Restart the system..............................................27-4Method B: Shut down the system......................................27-4
Using the Pass Through Mode Feature....................................................................27-4
Xerox Nuvera User Guide and Training Aid (UGTA) for Software Version 9.3/10.3xiv
Table of Contents

When to enable Pass Through Mode...........................................................27-5To enable and use the Pass Through Mode..............................................27-5To disable the Pass Through Mode...............................................................27-5
Running User Diagnostics..............................................................................................27-6To access User Diagnostics..............................................................................27-6
Document Scanner................................................................................27-6Print Engine...............................................................................................27-6Print Engine A1........................................................................................27-7Print Engine A2........................................................................................27-7System.........................................................................................................27-7System: System Optimization Customer Setup..........................27-8System: Advanced User Diagnostics...............................................27-9MFF B (not applicable to the Xerox Nuvera 200/288
EA/MX Perfecting Production System)..................................27-10Adjustments......................................................................................................................27-10
Managing Paper Curl.......................................................................................27-10What Would Cause Paper to Curl?................................................27-11How to Manage Paper Curl on Systems without a
SEM.....................................................................................................27-11How to Manage Paper Curl for Simplex Jobs...........................27-11How to Manage Paper Curl for Duplex Jobs.............................27-11How to Manage Paper Curl using the Sheet Enhancement
Module...............................................................................................27-12Use Automatic or Manual Mode...................................................27-12How to Set the Auto Decurl Mode for Simplex or Duplex
Jobs.....................................................................................................27-12How to Set the Manual Decurl Mode for Simplex or
Duplex Jobs......................................................................................27-14Product Recycling and Equipment End of Life Disposal: USA &
Canada.........................................................................................................................27-15
28 Setup Paper Trays................................................................................28-1Paper Tray Programming................................................................................................28-1
Tray Confirmation Options..............................................................................28-2To set a confirmation option.............................................................28-2
To program paper trays.....................................................................................28-2Program and Load Method................................................................28-2Load and Program Method................................................................28-3Rear Guide Stop for Tray 2 on the 4-Tray Feed
Module..................................................................................................28-4To enable a tray....................................................................................................28-4To disable a tray...................................................................................................28-4About Auto Tray Switching and setting tray priorities..........................28-4
xvXerox Nuvera User Guide and Training Aid (UGTA) for Software Version 9.3/10.3
Table of Contents

Feed Until Empty....................................................................................28-5To select Feed Until Empty....................................................28-5To set tray priority.....................................................................28-5
Avoiding Multi-Sheet Feeds When Using Special Stocks...................................28-6Loading Paper.....................................................................................................................28-6
Fan the paper first...............................................................................................28-7To load paper.........................................................................................................28-7
Loading Special Paper Types..............................................................28-8Definition of Leading Edge.................................................................28-8Definition of Trailing Edge..................................................................28-8
Loading Special Stock for Proper Finishing Output................................28-8Systems with SFM and/or Insertion Module and BFM............28-8Systems with MFF ONLY......................................................................28-9
Special Case: Jobs with drilled paper AND drilledtabs when using the MFF................................................28-9
Systems with SFM Insertion Module and MFFProfessional......................................................................................28-10
Systems with MFF Pro Plus ONLY...................................................28-10More information about tabbed stocks......................................28-11
Handling and Storing Paper.......................................................................................28-11To store and handle paper.............................................................................28-11Before you load paper.....................................................................................28-11
Using Special Paper Stocks.........................................................................................28-12Paper Usage and Expected Paper Performance...................................28-12
29 Problem Solving....................................................................................29-1Mode Indicator Icons......................................................................................................29-1Fault Messages...................................................................................................................29-2Attention Light...................................................................................................................29-2Paper Curling.......................................................................................................................29-2Poor or Slow System Performance..............................................................................29-3
Related Hints and Tips.......................................................................................29-3Restart procedures...............................................................................................29-4Improving print speed and productivity.....................................................29-4
Improving Print Speed Performance.........................................................................29-4Use the Parallel RIP feature for complex documents............................29-4Enable the Wide Stock feature when printing 9.25 inches or 9.5
inches wide stock...........................................................................................29-4How page/image size affects Pitch...............................................................29-4PDF to PS conversion..........................................................................................29-5Variable Data image caching..........................................................................29-5
Xerox Nuvera User Guide and Training Aid (UGTA) for Software Version 9.3/10.3xvi
Table of Contents
Solving Image Quality Problems.................................................................................29-5Image quality and system maintenance...................................................29-5Solving dark or light image problems..........................................................29-5Removing Moiré Patterns from Images (when scanning or
copying).............................................................................................................29-6Suggestions for removing moiré patterns:...................................29-6
About Halftones and Gray Levels..................................................................29-7Removing Lines, Streaks or Shadows (when copying or
scanning)..........................................................................................................29-8To remove lines, streaks or shadows...............................................29-8
Correcting Posterization (when scanning or copying)...........................29-9To correct posterization........................................................................29-9About Posterization and Gray Levels..............................................29-9
Correcting Halo (when scanning or copying).........................................29-10To decrease sharpening.....................................................................29-11
Removing Background Artifacts (when scanning orcopying)..........................................................................................................29-11
To remove background artifacts....................................................29-11Removing Image Show Through (when scanning or
copying)..........................................................................................................29-11To correct image show through.....................................................29-12
Removing Spots & Specks (when scanning or copying)....................29-12Clean the Document Glass...............................................................29-12Clean the Document Feeder............................................................29-13
Recovering Missing Parts of the Image....................................................29-13To recover missing parts of the image........................................29-13
Removing Drill Holes From Output (when scanning orcopying)..........................................................................................................29-13
To remove drill holes from output.................................................29-14
30 Machine Specifications......................................................................30-1Supported Paper................................................................................................................30-1
Compatible Stock Types....................................................................................30-1Paper size tables...................................................................................................30-1
Supported Paper Sizes: Trays 1 and 2.............................................30-2Supported Paper Sizes: Trays 3 and 4.............................................30-2
Recommendations for Paper Usage.............................................................30-4Related Information..............................................................................30-6
Document Feeder & Scanner Specifications.............................................30-6Document Feeder Paper Capacities and Capabilities..............30-7
Print Engine Specifications............................................................................................30-7Fuser Temperature...............................................................................................30-7
xviiXerox Nuvera User Guide and Training Aid (UGTA) for Software Version 9.3/10.3
Table of Contents
Registration............................................................................................................30-8Printer Resolution.................................................................................................30-8RIP (Raster Image Processor) Resolutions.................................................30-8Print Quality (halftone screens).....................................................................30-8Print Engine Type.................................................................................................30-8Printer Speed..........................................................................................................30-8
Variable Pitch Xerographics for maximumthroughput..........................................................................................30-9
Dry Ink (Toner)......................................................................................................30-9Paper Sizes Supported........................................................................................30-9Machine Warm-up Times..................................................................................30-9FreeFlow Print Server Capabilities..............................................................30-10
Xerox Nuvera EA Production System............................................30-10Xerox Nuvera 200/288 EA/MX Perfecting Production
System................................................................................................30-10Multifunction Finisher (MFF) Specifications........................................................30-10
Using the MFF....................................................................................................30-11Specifications......................................................................................................30-11The MFF Professional Model.........................................................................30-13
MFF Stapling..........................................................................................30-13MFF Capacities.....................................................................................30-13Top Tray...................................................................................................30-13Main Tray................................................................................................30-13Bottom (Booklet) Tray........................................................................30-14Booklet Making.....................................................................................30-14Folding Options (single sheets only)............................................30-15Finisher Pause Button........................................................................30-15To activate the Finisher Pause feature........................................30-15
The MFF Pro Plus Model.................................................................................30-15Post Process Insertion Tray..............................................................30-15Hole Punching.......................................................................................30-15Insertion Tray Capacities..................................................................30-16
Configurations....................................................................................................30-16Basic Finishing Module (BFM/BFM Plus) Specifications.................................30-17
Using the BFM....................................................................................................30-17Capacities.............................................................................................................30-17
Stacker......................................................................................................30-17Top Tray...................................................................................................30-18Stapler......................................................................................................30-18
Specifications......................................................................................................30-19Configurations....................................................................................................30-20
Xerox Nuvera User Guide and Training Aid (UGTA) for Software Version 9.3/10.3xviii
Table of Contents

DS3500 Specifications.................................................................................................30-23DS3500 Capacities and Capabilities.........................................................30-24
Stapler Specifications...................................................................................................30-25Basic Finishing Module Stapler....................................................................30-25Multifunction Finisher.....................................................................................30-25
Document Size Requirements.........................................................30-25Stapling Limit........................................................................................30-26Staple Cartridge Limitation.............................................................30-26Stock Weight / Maximum Sheets..................................................30-26
Stapler Maintenance.......................................................................................30-26Keyboard, Mouse & Display Specifications..........................................................30-26
Keyboard Specifications.................................................................................30-27Navigating the user interface using only the
keyboard...........................................................................................30-27Common Keyboard Shortcuts.........................................................30-27
User Interface Components Key......................................30-27Special Navigation/Activation Keyboard Shortcuts...............30-28Keyboard Shortcuts and Mnemonics...........................................30-34
List of Mnemonics..................................................................30-34Mouse Specifications.......................................................................................30-36Display (Monitor) Specifications.................................................................30-36
Media Drive Specifications.........................................................................................30-36File Submission...................................................................................................30-37File Saving/Archiving.......................................................................................30-37
Electrical and Environmental Specifications........................................................30-37Frequency.............................................................................................................30-37Voltage..................................................................................................................30-37Amps.......................................................................................................................30-37Receptacle NEMA Part Number...................................................................30-38Temperature and Humidity...........................................................................30-38Altitude..................................................................................................................30-38Heat Emission.....................................................................................................30-38Power Consumption.........................................................................................30-38
Sheet Feed Modules (SFM).........................................................................................30-384-Tray SFM Capabilities and Capacities...................................................30-392-Tray SFM (18.5 inches) Capabilities and Capacities.......................30-392-Tray SFM (19.33 inches) Capabilities and Capacities - Available
for Xerox Nuvera 200/288 EA/MX Perfecting ProductionSystem only...................................................................................................30-39
3-Tray SFM Capabilities and Capacities...................................................30-40
xixXerox Nuvera User Guide and Training Aid (UGTA) for Software Version 9.3/10.3
Table of Contents

31 Adding Pages to a Document.........................................................31-1Paper trays must be loaded and programmed with the appropriate
stocks...............................................................................................................................31-1Basic workflow to insert pages into a document.................................................31-1System Level (Administrative) Added Pages..........................................................31-2Adding System Level Pages...........................................................................................31-3
Enabling System Level Pages..........................................................................31-3Banner Pages.........................................................................................................31-3Error Pages..............................................................................................................31-4Job Attributes Report..........................................................................................31-4
32 Expected Paper Handling.................................................................32-1Expected Performance Tables......................................................................................32-1
Paper and Tray Performance Matrix -- 20 lb standard paper.............32-1Paper and Tray Performance Matrix -- 80 gsm standard
paper...................................................................................................................32-2Stock Types Performance Matrix...................................................................32-3Plain Paper Performance Matrix....................................................................32-5Paper and Tray Performance Matrix -- Loading Special
Stock...................................................................................................................32-6Paper Through Document Feeder Performance Matrix........................32-9
Paper Weight Conversion Chart................................................................................32-11Paper Weight Conversion Chart..................................................................32-11
33 Clearing Stapler Jams.........................................................................33-1Stapler jam notification..................................................................................................33-1To clear stapler jams........................................................................................................33-1
Access the Main Stapler Mechanism in the MFF....................................33-1Access the Main Stapler Mechanism in the BFM or BFM
Plus......................................................................................................................33-2
34 Index.........................................................................................................34-1Index Start Page................................................................................................................34-11................................................................................................................................................34-12................................................................................................................................................34-13................................................................................................................................................34-18................................................................................................................................................34-1A...............................................................................................................................................34-2B...............................................................................................................................................34-3C...............................................................................................................................................34-4D...............................................................................................................................................34-6E................................................................................................................................................34-7
Xerox Nuvera User Guide and Training Aid (UGTA) for Software Version 9.3/10.3xx
Table of Contents
F................................................................................................................................................34-8G...............................................................................................................................................34-9H...............................................................................................................................................34-9I..............................................................................................................................................34-10J..............................................................................................................................................34-12K.............................................................................................................................................34-13L.............................................................................................................................................34-13M...........................................................................................................................................34-14N............................................................................................................................................34-16O............................................................................................................................................34-16P.............................................................................................................................................34-17Q............................................................................................................................................34-20R.............................................................................................................................................34-20S.............................................................................................................................................34-21T.............................................................................................................................................34-24U............................................................................................................................................34-25V.............................................................................................................................................34-25W...........................................................................................................................................34-25X.............................................................................................................................................34-26Z.............................................................................................................................................34-26
xxiXerox Nuvera User Guide and Training Aid (UGTA) for Software Version 9.3/10.3
Table of Contents

Xerox Nuvera User Guide and Training Aid (UGTA) for Software Version 9.3/10.3xxii
Table of Contents
1Xerox Nuvera® User Guideand Training Aid (UGTA)Start Page for SoftwareVersion 9.3/10.3
Please select one of the sections below or from the sidebar.
What’s new?
Xerox Nuvera 100/120/144 System Tour
Xerox Nuvera 200/288 System Tour
How Do I...
Problem Solving
Maintaining Your Xerox Nuvera
About
Index
1-1Xerox Nuvera User Guide and Training Aid (UGTA) for Software Version 9.3/10.3

Xerox Nuvera User Guide and Training Aid (UGTA) for Software Version 9.3/10.31-2
Xerox Nuvera® User Guide and Training Aid (UGTA) Start Page for Software Version 9.3/10.3
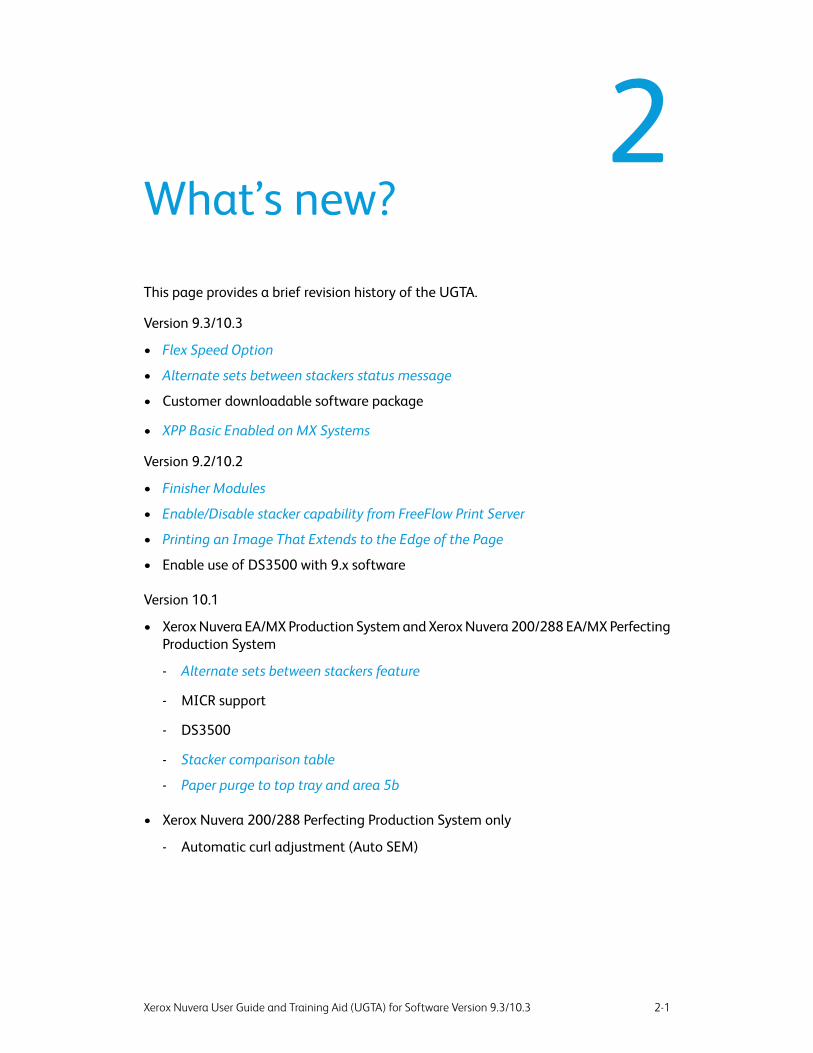
2What’s new?
This page provides a brief revision history of the UGTA.
Version 9.3/10.3
• Flex Speed Option
• Alternate sets between stackers status message
• Customer downloadable software package
• XPP Basic Enabled on MX Systems
Version 9.2/10.2
• Finisher Modules
• Enable/Disable stacker capability from FreeFlow Print Server
• Printing an Image That Extends to the Edge of the Page
• Enable use of DS3500 with 9.x software
Version 10.1
• Xerox Nuvera EA/MX Production System and Xerox Nuvera 200/288 EA/MX PerfectingProduction System
- Alternate sets between stackers feature
- MICR support
- DS3500
- Stacker comparison table
- Paper purge to top tray and area 5b
• Xerox Nuvera 200/288 Perfecting Production System only
- Automatic curl adjustment (Auto SEM)
2-1Xerox Nuvera User Guide and Training Aid (UGTA) for Software Version 9.3/10.3

Xerox Nuvera User Guide and Training Aid (UGTA) for Software Version 9.3/10.32-2
What’s new?

3Flex Speed Option
NOTEThe Flex Speed option is only available for 10.x version software and above. Systemsthat contain a Multifunction Pro or ProPlus finisher are not eligible for the Flex Speedoption.
The Flex Speed option allows you to upgrade the license of certain Xerox Nuvera systemsfor a period of 30, 60 or 90 days.
Available Flex Speed OptionsOriginal Xerox Nuvera Speed
Xerox Nuvera 120 EA/MX Production System orXerox Nuvera 144 EA/MX Production System
Xerox Nuvera 100 EA/MX Production System
Xerox Nuvera 144 EA/MX Production SystemXerox Nuvera 120 EA/MX Production System
Xerox Nuvera 288 EA/MX Perfecting ProductionSystem
Xerox Nuvera 200 EA/MX PerfectingProduction System
For more information on enabling Flex Speed, contact your Xerox representative.
3-1Xerox Nuvera User Guide and Training Aid (UGTA) for Software Version 9.3/10.3

Xerox Nuvera User Guide and Training Aid (UGTA) for Software Version 9.3/10.33-2
Flex Speed Option
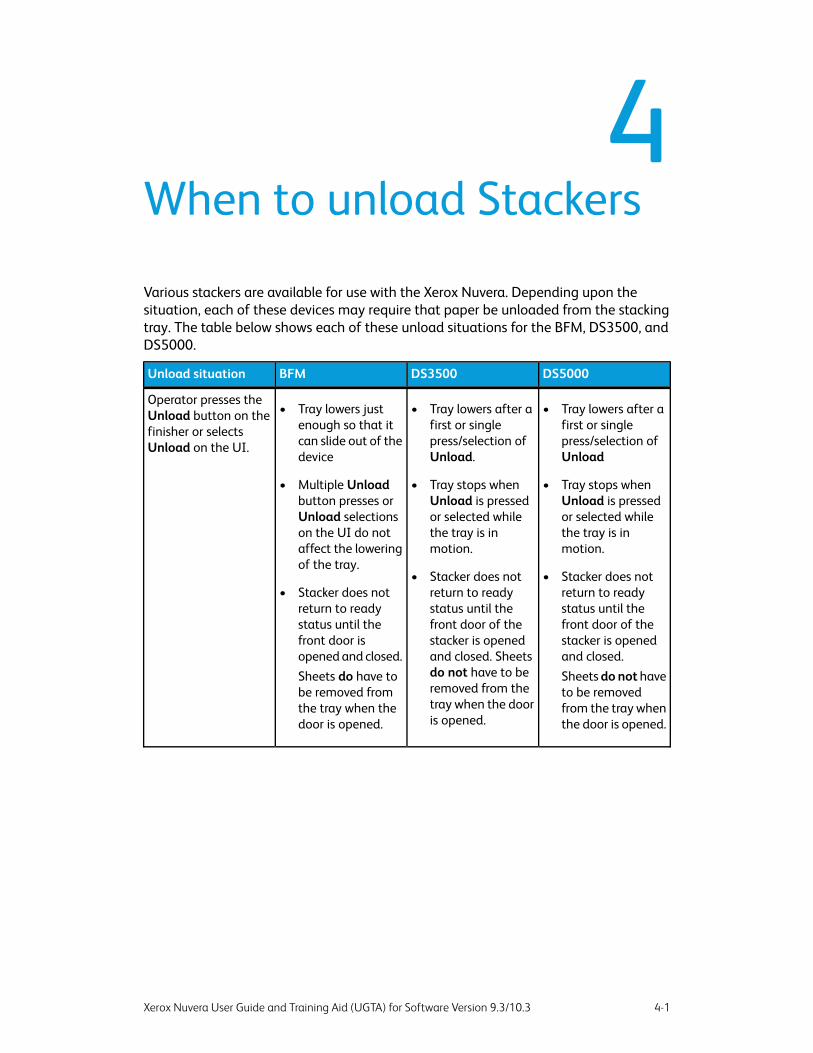
4When to unload Stackers
Various stackers are available for use with the Xerox Nuvera. Depending upon thesituation, each of these devices may require that paper be unloaded from the stackingtray. The table below shows each of these unload situations for the BFM, DS3500, andDS5000.
DS5000DS3500BFMUnload situation
Operator presses theUnload button on thefinisher or selectsUnload on the UI.
••• Tray lowers after afirst or singlepress/selection ofUnload
Tray lowers after afirst or singlepress/selection ofUnload.
Tray lowers justenough so that itcan slide out of thedevice
• ••Multiple Unloadbutton presses orUnload selectionson the UI do notaffect the loweringof the tray.
Tray stops whenUnload is pressedor selected whilethe tray is inmotion.
Tray stops whenUnload is pressedor selected whilethe tray is inmotion.
• •Stacker does notreturn to readystatus until thefront door of thestacker is openedand closed. Sheetsdo not have to beremoved from thetray when the dooris opened.
Stacker does notreturn to readystatus until thefront door of thestacker is openedand closed.Sheets do not haveto be removedfrom the tray whenthe door is opened.
• Stacker does notreturn to readystatus until thefront door isopened and closed.Sheets do have tobe removed fromthe tray when thedoor is opened.
4-1Xerox Nuvera User Guide and Training Aid (UGTA) for Software Version 9.3/10.3
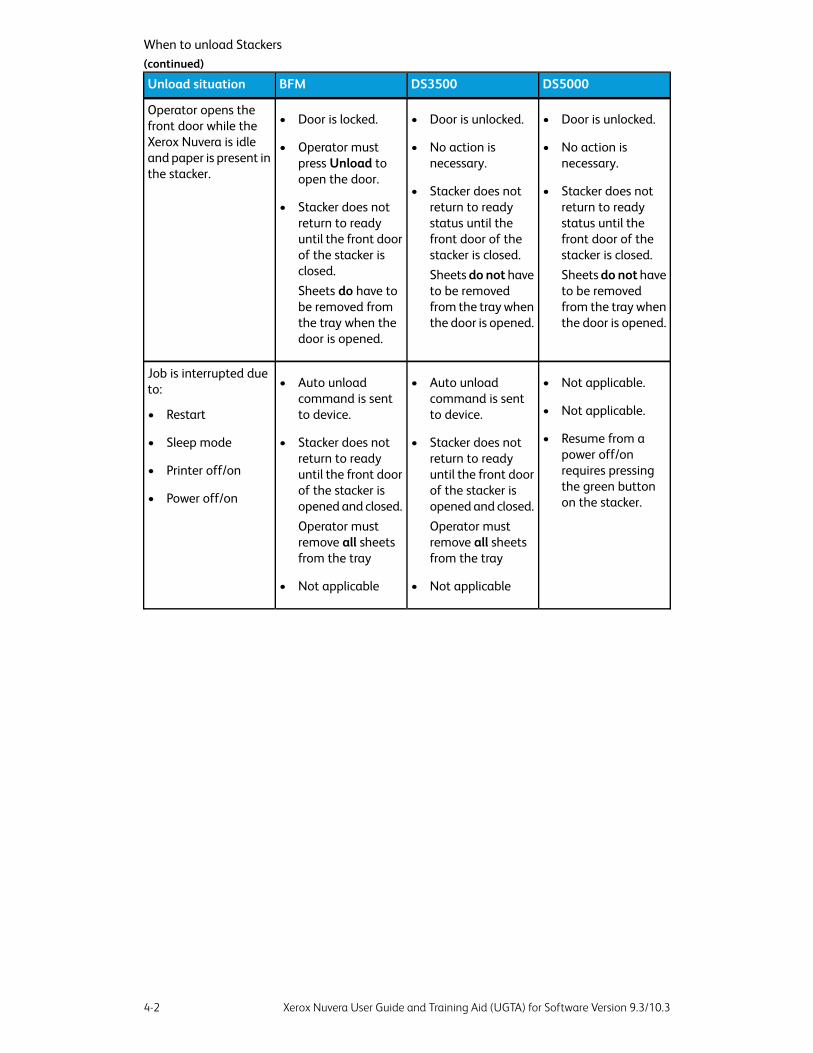
DS5000DS3500BFMUnload situation
Operator opens thefront door while theXerox Nuvera is idleand paper is present inthe stacker.
••• Door is unlocked.Door is unlocked.Door is locked.
• ••Operator mustpress Unload toopen the door.
No action isnecessary.
No action isnecessary.
• •Stacker does notreturn to readystatus until thefront door of thestacker is closed.Sheets do not haveto be removedfrom the tray whenthe door is opened.
Stacker does notreturn to readystatus until thefront door of thestacker is closed.Sheets do not haveto be removedfrom the tray whenthe door is opened.
• Stacker does notreturn to readyuntil the front doorof the stacker isclosed.Sheets do have tobe removed fromthe tray when thedoor is opened.
Job is interrupted dueto: ••• Not applicable.Auto unload
command is sentto device.
Auto unloadcommand is sentto device. • Not applicable.• Restart
• Resume from apower off/onrequires pressingthe green buttonon the stacker.
••• Stacker does notreturn to readyuntil the front doorof the stacker isopened and closed.Operator mustremove all sheetsfrom the tray
Stacker does notreturn to readyuntil the front doorof the stacker isopened and closed.Operator mustremove all sheetsfrom the tray
Sleep mode
• Printer off/on
• Power off/on
•• Not applicableNot applicable
Xerox Nuvera User Guide and Training Aid (UGTA) for Software Version 9.3/10.34-2
When to unload Stackers(continued)

DS5000DS3500BFMUnload situation
A paper jam occursinside of the stacker. ••• Sheets do not have
to be removedfrom the tray aftera jam is cleared.This includes jamsthat occur in areaF.
Sheets do not haveto be removedfrom the tray aftera jam is cleared.This includes jamsthat occur in areaF.
Sheets do not haveto be removedfrom the tray aftermost jams arecleared.
• 12-2505 Set DropFaultAuto unloadcommand is sentto the device.Operator mustremove all sheetsfrom the tray.
•• Not applicable.Not applicable.
• •Not applicable. Not applicable.
•• Not applicable.Not applicable.
• 12-10xx TransportJamRemove sheetsfrom the compilertray through thetop cover.Sheets do not haveto be removedfrom the tray aftera jam is cleared.
• 12-11xx BypassJamRemove sheetsfrom the bypasstransport throughthe top cover.Sheets do not haveto be removedfrom the tray aftera jam is cleared.
No action required.No action required.No action required.A paper jam occurselsewhere in the XeroxNuvera configuration.
No action required.Auto unload commandis sent to the device.Stacker does notreturn to ready untilthe front door of thestacker is opened andclosed.Sheets do not have tobe removed from thetray.No action required.
Auto unload commandis sent to the device.Stacker does notreturn to ready untilthe front door of thestacker is opened andclosed.Operator must removeall sheets from thetray.
Operator cancels,holds, or deletes a job.
4-3Xerox Nuvera User Guide and Training Aid (UGTA) for Software Version 9.3/10.3
When to unload Stackers(continued)

DS5000DS3500BFMUnload situation
Auto unload commandis sent to the device.Stacker does not returnto ready until the frontdoor of the stacker isopened and closed.Operator must removeall sheets from thetray.
Auto unload commandis sent to the device.Stacker does notreturn to ready untilthe front door of thestacker is opened andclosed.Operator must removesome sheets from thetray.
Auto unload commandis sent to the device.Stacker does notreturn to ready untilthe front door of thestacker is opened andclosed.Operator must removeall sheets from thetray.
Xerox Nuvera exits lowpower mode.
Auto unload commandis sent to deviceStacker does not returnto ready until the frontdoor of the stacker isopened and closed.Operator must removeall sheets from thetray.
Auto unload commandis sent to deviceStacker does notreturn to ready untilthe front door of thestacker is opened andclosed.Operator must removesome sheets from thetray.
Auto unload commandis sent to deviceStacker does notreturn to ready untilthe front door of thestacker is opened andclosed.Operator must removeall sheets from thetray.
The stacker fills tocapacity or setparameters are met.
No action required.No action required.No action required.The job is paused, theXerox Nuvera is out ofpaper or a xerographicadjustment is required.
Not applicable.Auto unload commandis sent to the devicewhen one of thefollowing criteria ismet:
Auto unload commandis sent to the devicewhen one of thefollowing criteria ismet:
Job is complete.
•• Page limitPage limit
• •Job Job
•• Set or stackSet or stack
• •Partition (datastream)
Partition (datastream)
Stacker does notreturn to ready untilthe front door of thestacker is opened andclosed.Operator must removeall sheets from thetray.
Stacker does notreturn to ready untilthe front door of thestacker is opened andclosed.Operator must removeall sheets from thetray.
Xerox Nuvera User Guide and Training Aid (UGTA) for Software Version 9.3/10.34-4
When to unload Stackers(continued)

DS5000DS3500BFMUnload situation
No action required.No action required.Auto unload commandis sent to the devicewhen one of thefollowing criteria ismet:Stacker does notreturn to ready untilthe front door of thestacker is opened andclosed.Operator must removeall sheets from thetray.
When entering orexiting diagnosticsmode.
4-5Xerox Nuvera User Guide and Training Aid (UGTA) for Software Version 9.3/10.3
When to unload Stackers(continued)

Xerox Nuvera User Guide and Training Aid (UGTA) for Software Version 9.3/10.34-6
When to unload Stackers

5About
Section 508 Compliance / KeyboardAccessibilityThe Xerox Nuvera User Interface is fully compliant with Section 508 of the RehabilitationAct Amendments of 1998. All controls on the user interface can be accessed using eitherkeyboard or mouse.
Copyright and Trademark Declarations©1998-2011 Xerox Corporation. All rights reserved. Xerox®, XEROX and Design®, XeroxNuvera®, and Freeflow® are registered trademarks of Xerox Corporation in the US and/orother countries. Microsoft is a registered trademark of Microsoft Corporation. Windows®
and Windows Vista® are registered trademarks of Microsoft Corporation. Internet Exploreris a copyright protected program of Microsoft Corporation. Novell® and NetWare® areregistered trademarks of Novell, Inc. Adobe® and PostScript® are registered trademarksof Adobe Systems Incorporated. TIFF is a copyright of Adobe Systems Incorporated.AppleTalk, LaserWriter, and Macintosh are trademarks of Apple Computer, Inc. PCL®
and HP-GL® are registered trademarks of Hewlett-Packard Corporation. WinZip® is aregistered trademark of Nico Mak Computing, Incorporated. Digi is a trademark of DigiInternational. VTAM® is a registered trademark of IBM Corporation. IPDS is a trademarkof IBM Corporation. Solaris and Java are trademarks of Oracle and/or its affiliates.
1Apr2011
Symbol UsageSymbols are used on the Xerox Nuvera to draw your attention to important safety noticesand useful information. Observe all cautions, hazards and warnings closely.
When performing maintenance or clearing jams on the machine, be sure to pay attentionto these symbols wherever they appear. The fuser, for example, will be marked with awarning icon wherever there is a hot surface that could burn your hand if touched.
5-1Xerox Nuvera User Guide and Training Aid (UGTA) for Software Version 9.3/10.3
Flash contentMacromedia Flash version 6 plugin is required to view interactive content and videos.
Third Party LicensesThis product includes the following Third Party software:
• JDOM Project ( http://www.jdom.org )
• Apache Software Foundation ( http://www.apache.org )
• Free Software Foundation ( http://www.gnu.org )
• Java 2 Runtime Environment (J2RE) (http://www.redhat.com/licenses/thirdparty/sun_j2re.html)
GNU source and object code is subject to the terms of the GNU GPL. Please review theGNU GPL terms and conditions to understand the restrictions under this license. Formore information on GNU, please go to http://www.gnu.org/licenses/gpl.txt.
As a requirement of the GNU GPL terms and conditions, a list of the source code for theabove programs can be found in the www.xerox.com web site for the product or can beordered from Xerox.
About PitchThe Xerox Nuvera is equipped with a variable pitch Xerographic belt. Pitch refers to thenumber of page images that can be placed on the belt, which are then transferred tothe paper. During printing, the system senses paper sizes requested, and optimizes theuse of the belt and the paper path to ensure maximum productivity.
Paper Size/Pitch RelationshipsThe charts below illustrate the expected system throughput, given a certain page/ imagesize.
NOTEIf you have the Xerox Nuvera 200/288 EA/MX Perfecting Production System andenable the Wide Stock feature from the User Diagnostics screen, the system will runstocks greater than 9.0 inches up to 9.5 inches wide in 5 pitch mode instead of 4pitch mode. This increases the print speed for this size paper to 240 ipm. For moreinformation about the Wide Stock feature, see Running User Diagnostics.
Xerox Nuvera User Guide and Training Aid (UGTA) for Software Version 9.3/10.35-2
About

Table 1. Xerox Nuvera 100 EA Production System
Maximum Throughput (PagesPer Minute/PPM)
Pitch (Images per PR beltrevolution)
Paper/Image Size (FeedDirection) Min-Max
10055.5 in (140mm) - 9.0 in(229mm)
8049.0 in (229mm) - 11 in(297mm)
60311 in (297mm) - 17 in(432mm)
40217 in (432mm) - 18.5 in(470mm)
Table 2. Xerox Nuvera 120 EA Production System
Maximum Throughput (PagesPer Minute/PPM)
Pitch (Images per PR beltrevolution)
Paper/Image Size (FeedDirection) Min-Max
12055.5 in (140mm) - 9.0 in(229mm)
9649.0 in (229mm) - 11 in(297mm)
72311 in (297mm) - 17 in(432mm)
48217 in (432mm) - 18.5 in(470mm)
Table 3. Xerox Nuvera 144 EA Production System
Maximum Throughput (PagesPer Minute/PPM)
Pitch (Images per PR beltrevolution)
Paper/Image Size (FeedDirection) Min-Max
14465.5 in (140mm) - 8.5 in(216mm)
12058.5 in ( 216mm)- 9.0 in(229mm)
9649.0 in (229mm) - 11 in(297mm)
72311 in (297mm) - 17 in(432mm)
48217 in (432mm) - 18.5 in(470mm)
Table 4. Xerox Nuvera 200/288 EA/MX Perfecting Production System
Maximum Throughput(Impressions Per Minute/IPM)Duplex
Pitch (Images per PR beltrevolution)
Paper/Image Size (FeedDirection) Min-Max
28865.5 in (140mm) - 8.5 in(216mm)
5-3Xerox Nuvera User Guide and Training Aid (UGTA) for Software Version 9.3/10.3
About

24058.5 in (216mm) - 9.0 in(229mm)
19249.0 in (229mm) - 11 in(297mm)
144311 in (297mm) - 17 in(432mm)
96217 in (432mm) - 19.33 in(491mm)
Xerox Nuvera User Guide and Training Aid (UGTA) for Software Version 9.3/10.35-4
AboutTable 4. (continued)
6Xerox Nuvera EA/MXProduction System
The Xerox Nuvera EA/MX Production System includes a wide range of configurationoptions based on your printing and publishing needs. You can select certain types ofSheet Feed Modules and Finishing modules to install with your system, as well as choosecertain feature software licenses.
Basic ConfigurationThe basic configuration of a Xerox Nuvera EA/MX Production System includes thefollowing:
• 4-Tray or 2-Tray Sheet Feeder Module (SFM)
• Control Console
• Print Engine
• Sheet Enhancement Module (not available if an MFF module is attached)
• Multifunction Finisher (either the Professional MFF or the Pro Plus MFF) or BasicFinishing Module (BFM)
• The base FreeFlow Print Server licensing includes 100 or 120 print speed, EA dry ink(toner), single print queue, no Stock Library, 125 lpi halftone screen for use withPS/PDL, TIFF, ACSII and PCL
6-1Xerox Nuvera User Guide and Training Aid (UGTA) for Software Version 9.3/10.3
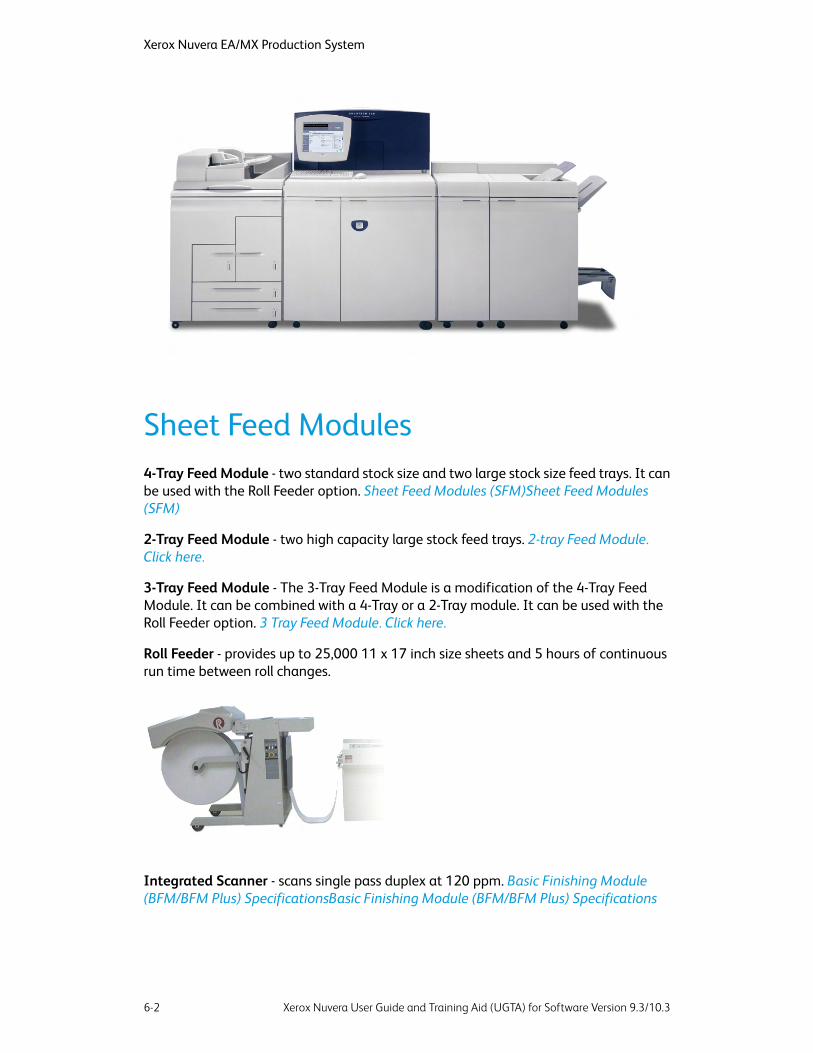
Sheet Feed Modules4-Tray Feed Module - two standard stock size and two large stock size feed trays. It canbe used with the Roll Feeder option. Sheet Feed Modules (SFM)Sheet Feed Modules(SFM)
2-Tray Feed Module - two high capacity large stock feed trays. 2-tray Feed Module.Click here.
3-Tray Feed Module - The 3-Tray Feed Module is a modification of the 4-Tray FeedModule. It can be combined with a 4-Tray or a 2-Tray module. It can be used with theRoll Feeder option. 3 Tray Feed Module. Click here.
Roll Feeder - provides up to 25,000 11 x 17 inch size sheets and 5 hours of continuousrun time between roll changes.
Integrated Scanner - scans single pass duplex at 120 ppm. Basic Finishing Module(BFM/BFM Plus) SpecificationsBasic Finishing Module (BFM/BFM Plus) Specifications
Xerox Nuvera User Guide and Training Aid (UGTA) for Software Version 9.3/10.36-2
Xerox Nuvera EA/MX Production System

Post Process ModuleSheet Enhancement Module - located directly to the right of the print engine, thismodule is used to remove upcurl or downcurl in paper as it passes through the modulefrom the print engine.
Sheet Enhancement Module(SEM)Sheet Enhancement Module(SEM)
FreeFlow Print Server and Print EngineControl Console - houses the computer components that drive your Xerox Nuvera system.The mouse driven UI provides access to the tools to manage jobs and the system. ControlConsoleControl Console
Print Engine - xerographics module Print Engine ModulePrint Engine Module
Additional ConfigurationsYou can customize the system by identifying whether to include an integrated scanner,a second Sheet Feeder Module, an insertion module and the complexity of your finishingdevices. The type of finisher you select can determine what other modules and licenseconfiguration options can be included.
The following modules are available for your system:
• An optional second 2-Tray or 4-Tray Sheet Feeder Module for a total of two SFMs
• An optional 3-Tray Sheet Feeder Module (either the 3-Tray or 4-Tray SFM can beused with the Roll Feeder if attached)
• The optional integrated Document Scanner Module (available only with the 4-TraySheet Feeder Module)
• An optional Insertion Module (a 2-Tray or 4-Tray SFM)
• Multifunction Finisher (Professional or Pro Plus)
• One or two Basic Finishing Module (BFM or BFM Plus)
• DS3500
• Third party finishing devices
6-3Xerox Nuvera User Guide and Training Aid (UGTA) for Software Version 9.3/10.3
Xerox Nuvera EA/MX Production System

Finisher ModulesMultifunction Finisher Professional - Professional model offers stacking/stapling, bookletmaking and c/z-folding.Multifunction Finisher (MFF)Multifunction Finisher (MFF)
Multifunction Finisher Pro Plus - The Pro Plus model adds to the Professional capabilitiesby also offering hole punching and an insertion module. Multifunction Finisher(MFF)Multifunction Finisher (MFF)
Basic Finisher Module - stacker/stapler with top tray. Basic Finishing Module (BFM/BFMPlus) SpecificationsBasic Finishing Module (BFM/BFM Plus) Specifications
Basic Finisher Module Plus - stacker/stapler with bypass paper path unit Basic FinishingModule (BFM/BFM Plus) SpecificationsBasic Finishing Module (BFM/BFM Plus)Specifications
Basic Finisher Module Plus Top Tray with Direct Connect - stacker/stapler with bypasspaper path unit with a selectable Top Tray. Directly connects to 3rd party devices viastandard DFA interface and locking pins. Basic Finishing Module (BFM/BFM Plus)SpecificationsBasic Finishing Module (BFM/BFM Plus) Specifications
Insertion Module - As an option, both the 4-Tray and the 2-Tray Feed Modules can beused as Insertion Modules.
DS3500 - enables inline finishing by providing document transport capability and fullDFA support to DFA-compliant finishing devices. DS3500 SpecificationsDS3500Specifications
Optional Inline Finishers - There are a number of DFA compliant external finishers thatare DFA compliant and can be installed with the system. You must have a DS3500installed to add an inline finisher.
• Xerox DS5000 High Capacity Stacker
• C.P Bourg BDFx Booklet Maker
• Xerox SQUAREFOLD Booklet Maker(SQFBM)
• GBC Fusion Punch 11 with Offset Stacker
• Xerox DB120-D Document Binder
• Xerox Manual and Book Factory
• Xerox Tape Binder
• Dual Xerox Tape Binder - This configuration allows for increased productivity; especiallyfor booklets 10 to 50 pages in length.
Xerox Nuvera User Guide and Training Aid (UGTA) for Software Version 9.3/10.36-4
Xerox Nuvera EA/MX Production System
Licensed FeaturesThe software options available to you depend on the licenses that were installed andenabled on your system at installation. The following lists some of the major licensesavailable for the system. Check with your System Administrator for more informationon what licenses are enabled.
• Productivity Pack - when enabled, this license provides multiple print queues insteadof one queue, Stock Library management, shows all media attributes, and is requiredfor LCDS and IPDS printing. Also includes the ability to enter exactly the paper weight,between 56 gsm and 250 gsm (upper weight depends on finisher type) for the stockthat is being loaded.
• Enhanced Line Screen - when enabled, this license allows all valid halftones to print(85 lpi, 106 lpi, 125 lpi, 134 lpi and 156 lpi) and offers additional halftone imagequality settings.
• PCL License
• Ethernet License - Bus & Tag are optional
• PS License
• DFA License
• Imposition License
• LCDS License
• IPDS License
• VIPP License (FreeFlow VI Interpreter)
• Disk Overwrite License
• Full, Basic, CPW (XPP) or ISO Diagnostics License
• Speed License - 100, 120 or 144 ppm are available on systems with a BFM/BFM Plusand/or DS3500. The 100/120 license is on systems with MFF.
Loading PaperThe videos above show you how to load paper into the trays. Take a moment to viewthem before attempting to load a paper tray.
Load paper as indicated by the labels on each paper tray. If you are using the 2-TrayFeed Module, load paper as indicated for trays 3 and 4 of the 4-Tray Feed Module.
NOTEIf printing on coated stock but only one side is coated, load the coated side up.
Systems with the Multifunction Finisher DO NOT support coated stock.
6-5Xerox Nuvera User Guide and Training Aid (UGTA) for Software Version 9.3/10.3
Xerox Nuvera EA/MX Production System

NOTEStocks greater than 250 gsm are not recommended for use with the Xerox Nuvera. For details on using the correct stocks, see Supported Paper.
NOTELoading papers of varying types and weights may warrant adjustment of the SheetEnhancement Module. For details, see Managing Paper Curl.
NOTEIt may be possible to configure your Xerox Nuvera with two or more SFMs, effectivelydoubling the feed capacity of the system. See your Xerox sales representative if youwish to configure your system in this way.
Paper Tray ProgrammingWhen you load paper in a paper tray, you must program the tray for the paper it contains.
To avoid loading a paper stock unsupported by the machine, see Recommendations forPaper Usage.
For details on paper handling and storage, see Handling and Storing Paper.
For details on loading special papers, see Loading Special Stock for Proper FinishingOutput.
CAUTIONPaper trays do not lock and can be opened while paper is being fed from the tray,resulting in misfeeds and/or paper jams. Wait for the LED light on the tray to turnOFF before opening the tray.
Solving Image Quality ProblemsThe Xerox Nuvera is capable of reproducing and generating high-quality images.
However, image defects may occur. These image quality problems are usually attributedto a defective original, or the user applying too much, too little, or the wrong type ofimage quality control.
Clearing Paper JamsIn the event of a paper jam, the paper path has been designed to allow the user to easilyclear the jam and continue the job. Take the time to familiarize yourself with the followingprocedures on clearing paper jams.
Clear jams from left to right and in the order shown in the message displayed on theUser Interface. Try to avoid tearing any jammed sheets.
Xerox Nuvera User Guide and Training Aid (UGTA) for Software Version 9.3/10.36-6
Xerox Nuvera EA/MX Production System

It is more desirable to prevent paper jams from occurring. Proper handling and storageof paper stocks will minimize jams. For details, see Handling and Storing Paper.
WARNINGMetallic surfaces in the fuser area are hot. Please use caution when removing paperjams from fuser areas, and avoid touching any metallic surfaces.
TIPIf the system declares a jam in the feeder at area 2, check area 2 and area 1 sincethe sheet may be stuck in between.
TIPIf you experience multi-sheet feed jams at any of the paper trays, make sure thatthe paper actually loaded in the tray matches what has been programmed in theuser interface.
TIPIf you load any type of drilled paper, to aid in sheet separation and to prevent jams,fan the reams before loading into the tray.
NOTEThe recovery procedure for the 12-2505 fault is improved. The jam clearanceprocedure instructs you to unload the main stacker. These sheets are now allconsidered good. After closing the front door, the system instructs you to open thetop main cover and remove and discard the sheets from area 3. After the sheetshave been removed, close the top main cover. The system will purge any other sheetsin the system before resuming the job. If any sheets on the stack are damaged orpoorly stapled, the operator may have to remake those sheets/set when the job isdone.
There are a few rare cases in which sheets can fall from the Compiler Arms onto thestacker. Check your output for any duplicates. The status message informs the user tomark the stack and check output for duplicates.
Contacting XeroxBefore contacting Xerox for a service problem, perform the following steps:
• For image quality problems, first attempt to resolve the problem using the imagequality troubleshooter.
• For worn out customer replaceable units, first attempt to replace the componentyourself.
6-7Xerox Nuvera User Guide and Training Aid (UGTA) for Software Version 9.3/10.3
Xerox Nuvera EA/MX Production System
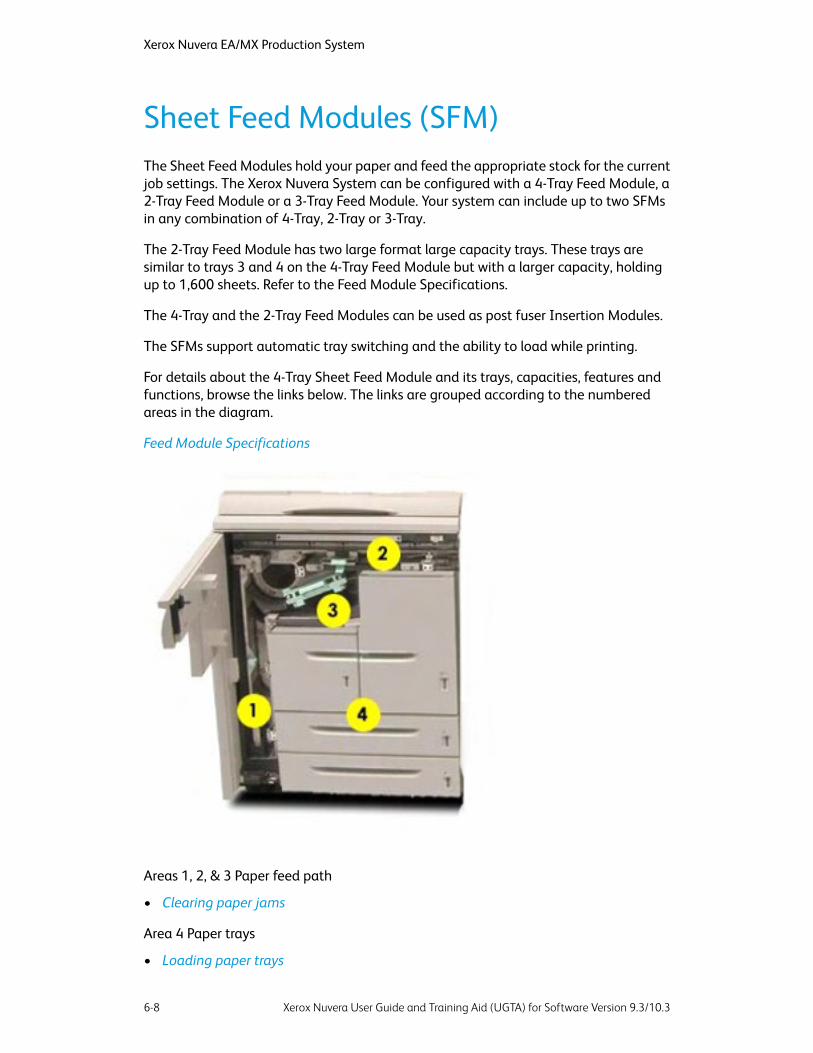
Sheet Feed Modules (SFM)The Sheet Feed Modules hold your paper and feed the appropriate stock for the currentjob settings. The Xerox Nuvera System can be configured with a 4-Tray Feed Module, a2-Tray Feed Module or a 3-Tray Feed Module. Your system can include up to two SFMsin any combination of 4-Tray, 2-Tray or 3-Tray.
The 2-Tray Feed Module has two large format large capacity trays. These trays aresimilar to trays 3 and 4 on the 4-Tray Feed Module but with a larger capacity, holdingup to 1,600 sheets. Refer to the Feed Module Specifications.
The 4-Tray and the 2-Tray Feed Modules can be used as post fuser Insertion Modules.
The SFMs support automatic tray switching and the ability to load while printing.
For details about the 4-Tray Sheet Feed Module and its trays, capacities, features andfunctions, browse the links below. The links are grouped according to the numberedareas in the diagram.
Feed Module Specifications
Areas 1, 2, & 3 Paper feed path
• Clearing paper jams
Area 4 Paper trays
• Loading paper trays
Xerox Nuvera User Guide and Training Aid (UGTA) for Software Version 9.3/10.36-8
Xerox Nuvera EA/MX Production System

• Configuring paper stocks and tray settings
• Handling and storing paper
• Using special paper stocks
• Clearing paper jams
• Supported paper types
• Recommendations for paper usage
• Expected paper handling and copy performance
Print Engine ModuleThe Print Engine houses the xerographic components that transfer the digital image tothe paper at the photoreceptor. The toner from the dry ink container is then fused tothe paper in the Fuser. The Xerox Nuvera EA Production System and Xerox Nuvera200/288 EA/MX Perfecting Production System print engines do not support MICR printingand uses EA dry ink only. For details, features and functions of the various components,browse the links below.
For print engine specifications, refer to Printer capabilities.
• 1. Developer Waste Container: Replacing the Developer Waste Container when full
• 2. Dry Ink (toner) Container: Replacing the Dry Ink Container
• 3. Paper Path: Clearing paper jams
• 4. Fuser and Decurler: Clearing paper jams and Adjusting the Decurler
• 5. Dry Ink (toner) Waste Container: Replacing the Dry Ink Waste Container when full
6-9Xerox Nuvera User Guide and Training Aid (UGTA) for Software Version 9.3/10.3
Xerox Nuvera EA/MX Production System

Control ConsoleJobs are programmed using the keyboard or mouse to click the buttons on the controlscreen. The Xerox Nuvera can also print jobs stored on CD. Browse the links below formore details about features and functions.
• 1. Keyboard and mouse: Keyboard, mouse and display specifications, Cleaning themouse, and Cleaning the keyboard
• 2. Control Screen: Keyboard, mouse and display specifications and Cleaning thedisplay
• 3. Media Drive Bay: Media Drive specifications and Printing from the Media Drive
• 4. Power Switch: Power procedures
Multifunction Finisher (MFF) InterfaceThe Interface Module on the Multifunction Finisher Professional is part of the paperpath that allows the Xerox Nuvera to connect to the Multifunction Finisher. For theMultifunction Finisher Pro Plus, it is also an Insertion Module that includes an InsertionTray on top and a Hole Punch unit and waste bin inside.
Xerox Nuvera User Guide and Training Aid (UGTA) for Software Version 9.3/10.36-10
Xerox Nuvera EA/MX Production System

The MFF Pro Plus
To learn about clearing jams in this area, refer to Clearing paper jams.
MFF Professional
Multifunction Finisher (MFF)The Multifunction Finisher adds a publishing capability to the Xerox Nuvera system. TheMFF Professional can fold documents, make booklets, staple bindings, collate and stackoutput. If your system has the MFF Pro Plus model, Pro Plus provides the samefunctionality but adds post process insertion capability (covers, preprinted sheets, tabs)and hole punch finishing.
6-11Xerox Nuvera User Guide and Training Aid (UGTA) for Software Version 9.3/10.3
Xerox Nuvera EA/MX Production System

The Interface Module on the Multifunction Finisher Professional is part of the paperpath that allows the Xerox Nuvera to connect to the Multifunction Finisher. For theMultifunction Finisher Pro Plus, it is also an Insertion Module that includes an InsertionTray on top and a Hole Punch unit and waste bin inside.
To learn more about its features and functions, browse the links below.
• 1, 2. Paper Path: Clearing paper jams
• 3. Top Tray: Finisher specifications
• 4. Main Tray / Stacker: Finisher specifications, Using Offset to separate documentsin a stack, and Using the stacker
• 5. Main Stapler: Stapler specifications
• 6. Lower Tray: Finisher specifications
• 7. Booklet Maker: Making a booklet and About impositions
Xerox Nuvera User Guide and Training Aid (UGTA) for Software Version 9.3/10.36-12
Xerox Nuvera EA/MX Production System

MFF Pro Plus: Insertion Module
To learn about the MFF models and their features, refer to Finisher specifications.
To learn about clearing jams in this area, refer to Clearing paper jams.
Automatic Document FeederUse the Automatic Document Feeder for rapid scanning of stacks of documents. Browsethe links below for more information.
• 1. Document Glass (not shown): Scanning from the Document Glass and Cleaningthe Document Glass
• 2. Document Input Tray: Scanning from the Document Feeder, Clearing paper jams,Document Feeder and Scanner specifications, and Cleaning the Document Feeder
• 3. Document Exit Tray
6-13Xerox Nuvera User Guide and Training Aid (UGTA) for Software Version 9.3/10.3
Xerox Nuvera EA/MX Production System

Sheet Enhancement Module(SEM)The Sheet Enhancement Module on the Xerox Nuvera EA Production System and theXerox Nuvera 200/288 EA/MX Perfecting Production System is a standard componenton all configurations except for those with a Multifunction Finisher.
Located to the right of the print engine, it is used to remove upcurl or downcurl in paperas it passes through the module from the print engine. This feature is performedautomatically by the system when the Decurl Automatic Mode is selected. You can alsomanually adjust the amount of decurl to apply for the job if more decurl is needed.Select the Manual or Automatic mode settings at the FreeFlow Print Server from thePrinter menu. For more information, see Managing Paper Curl.
Xerox Nuvera User Guide and Training Aid (UGTA) for Software Version 9.3/10.36-14
Xerox Nuvera EA/MX Production System
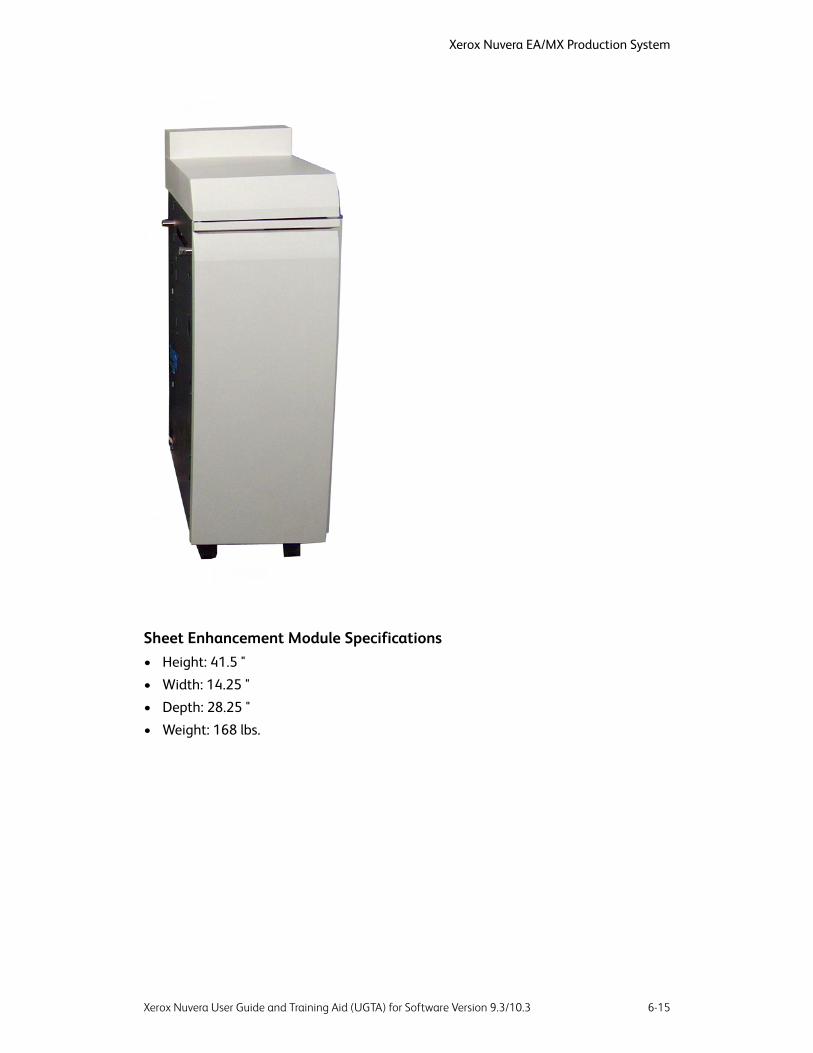
Sheet Enhancement Module Specifications• Height: 41.5 "
• Width: 14.25 "
• Depth: 28.25 "
• Weight: 168 lbs.
6-15Xerox Nuvera User Guide and Training Aid (UGTA) for Software Version 9.3/10.3
Xerox Nuvera EA/MX Production System

Xerox Nuvera User Guide and Training Aid (UGTA) for Software Version 9.3/10.36-16
Xerox Nuvera EA/MX Production System
7Xerox Nuvera 200/288EA/MX PerfectingProduction System
The basic configuration of a Xerox Nuvera 200/288 EA/MX Perfecting Production Systemincludes:
• Two 4-Tray Feed Modules, 2-Tray Feed Modules or 3-Tray Feed Modules
• Control Console
• Dual Print Engines (two Xerox Nuvera 100 ppm or 144 ppm Production Systemengines)
• Sheet Enhancement Module
• Insertion Module (4-Tray or 2-Tray)
• DS3500
• Two DS5000 Stacker Modules
ModulesYour Xerox Nuvera 200/288 EA/MX Perfecting Production System can be configuredwith a variey of modules. Select the link below for information on the modules that canbe installed.
4-Tray Feed Module - two standard stock size and two large stock size feed trays. Eitherthe 4-Tray or 3-Tray SFM must be used with the Roll Feeder option.
Sheet Feed Modules (SFM)Sheet Feed Modules (SFM)
2-Tray Feed Module - two high capacity large stock feed trays.
Sheet Feed Modules (SFM)Sheet Feed Modules (SFM)
Sheet Enhancement Module - located directly to the right of the A2 print engine, thismodule is used to remove upcurl or downcurl in paper as it passes through the modulefrom the print engine.
7-1Xerox Nuvera User Guide and Training Aid (UGTA) for Software Version 9.3/10.3
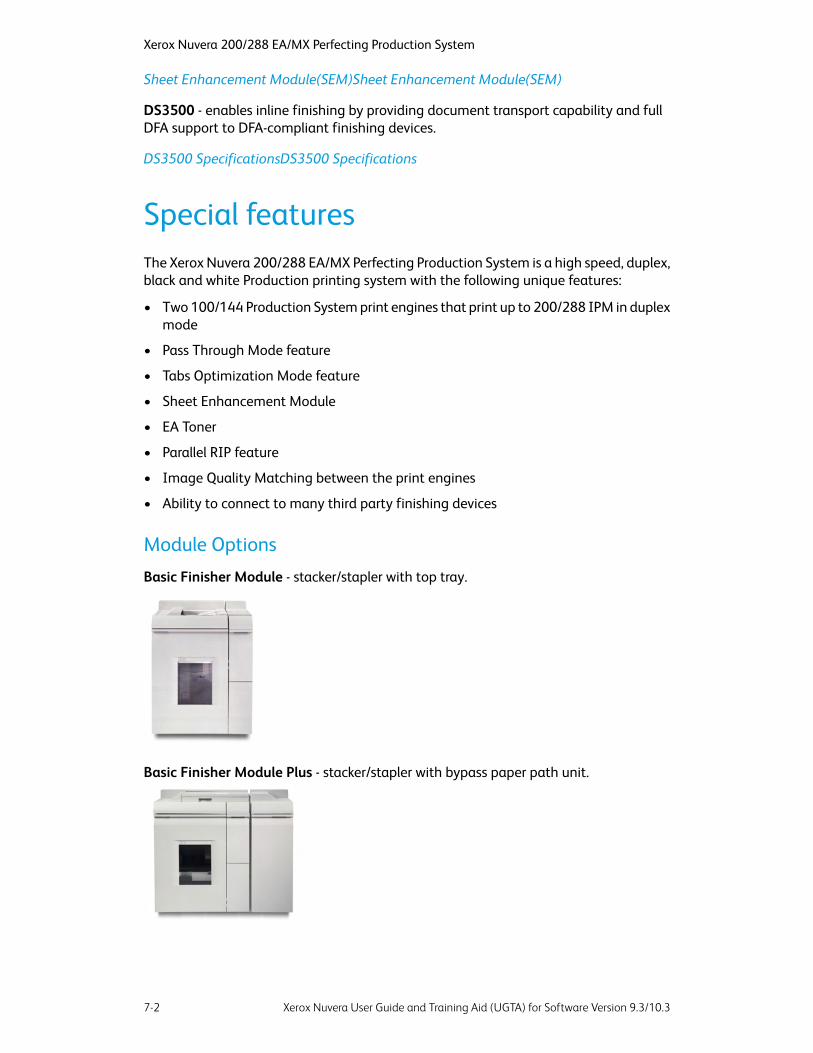
Sheet Enhancement Module(SEM)Sheet Enhancement Module(SEM)
DS3500 - enables inline finishing by providing document transport capability and fullDFA support to DFA-compliant finishing devices.
DS3500 SpecificationsDS3500 Specifications
Special featuresThe Xerox Nuvera 200/288 EA/MX Perfecting Production System is a high speed, duplex,black and white Production printing system with the following unique features:
• Two 100/144 Production System print engines that print up to 200/288 IPM in duplexmode
• Pass Through Mode feature
• Tabs Optimization Mode feature
• Sheet Enhancement Module
• EA Toner
• Parallel RIP feature
• Image Quality Matching between the print engines
• Ability to connect to many third party finishing devices
Module Options
Basic Finisher Module - stacker/stapler with top tray.
Basic Finisher Module Plus - stacker/stapler with bypass paper path unit.
Xerox Nuvera User Guide and Training Aid (UGTA) for Software Version 9.3/10.37-2
Xerox Nuvera 200/288 EA/MX Perfecting Production System

Basic Finisher Module Plus Top Tray with Direct Connect - s tacker/stapler with bypasspaper path unit with a selectable Top Tray. Directly connects to 3rd party devices viastandard DFA interface and locking pins.
Insertion Module - As an option, both the 4-Tray and the 2-Tray Feed Modules can beused as Insertion Modules.
3-Tray Feed Module - The 3-Tray Feed Module is a modification of the 4-Tray FeedModule. It can be combined with a 4-Tray or a 2-Tray module. Either the 4-Tray or 3-TraySFM must be used with the Roll Feeder option.
Roll Feeder - provides up to 25,000 11 x 17 inch size sheets and 5 hours of continuousrun time between roll changes.
Optional Inline Finishers - There are a number of DFA compliant external finishers thatcan be installed on a Production System. You must have a DS3500 installed to add aninline finisher.
• Xerox DS5000 High Capacity Stacker
• C.P Bourg BDFx Booklet Maker
• Xerox SQUAREFOLD Booklet Maker(SQFBM)
• GBC Fusion Punch 11 with Offset Stacker
• Xerox DB120-D Document Binder
• Xerox Manual and Book Factory
7-3Xerox Nuvera User Guide and Training Aid (UGTA) for Software Version 9.3/10.3
Xerox Nuvera 200/288 EA/MX Perfecting Production System

• Xerox Tape Binder
• Xerox Dual Tape Binder - This configuration allows for increased productivity; especiallyfor booklets 10 to 50 pages in length.
Licensed FeaturesThe software options available to you depend on the licenses that were installed andenabled on your system at installation. The following lists some of the major licensesavailable for the system. Check with your System Administrator for more informationon what licenses are enabled.
• Productivity Pack - when enabled, this license provides multiple print queues insteadof one queue, Stock Library management, shows all media attributes, and is requiredfor LCDS and IPDS printing. Also includes the ability to enter exactly the paper weight,between 56 gsm and 250 gsm (upper weight depends on finisher type) for the stockthat is being loaded.
• Enhanced Line Screen - when enabled, this license allows all valid halftones to print(85 lpi, 106 lpi, 125 lpi, 134 lpi and 156 lpi) and offers additional halftone imagequality settings.
• PCL License
• Ethernet License - Bus & Tag are optional
• PS License
• DFA License
• Imposition License
• LCDS License
• IPDS License
• VIPP License (FreeFlow VI Interpreter)
• Disk Overwrite License
• Full, Basic, CPW (XPP) or ISO Diagnostics License
• Speed License
FreeFlow Print Server and Print EngineControl Console - houses the computer components that drive your Xerox Nuvera system.The mouse driven UI provides access to the tools to manage jobs and the system.
Control ConsoleControl Console
Print Engine - xerographics module
Xerox Nuvera User Guide and Training Aid (UGTA) for Software Version 9.3/10.37-4
Xerox Nuvera 200/288 EA/MX Perfecting Production System
8Managing SystemResources
This section provides an overview of system management and some of the keyconfiguration tools, such as Queue Manager, that operators may need to use. For detailedinformation, see the System Administrator's Guide.
• Managing the Printer
• Getting Billing Information
• Reading the Billing Meters
• Managing System Software and Hardware
• Managing the Stocks Library
• Working with Queues
• Changing DFA Configurations for 3rd Party Finishers
Managing the PrinterYou can use the Printer menu to globally manage all aspects of the printer, includingprint quality, what types of papers are loaded, and tray enabling/disabling. Review thesections below to familiarize yourself with this part of the Xerox Nuvera user interface.
Printer Menu SelectionsPaper Trays
Shows the status of all the paper trays, as well as the types of stocks assigned to them.The columns show the properties of the stocks and the specifications that have beenmade for the trays.
Stock Library
If the Productivity Pack license is enabled on your system, the Stock Library databaseis available. The Stock Library allows you to see the complete list of stocks present, aswell as all stocks compatible with the system. Also, new stock types can be addedthrough this tab. For details, see the online Help.
8-1Xerox Nuvera User Guide and Training Aid (UGTA) for Software Version 9.3/10.3

Finishing
Used to set up or enable the available finishing options. Right-clicking on a finisherallows you to enable or disable a finisher or display its properties.
Stacking
Allows you to enable and disable the stacker (if stackers are present with your system).It also allows you to view and control settings for all stackers on your system.
Image Quality
Used to modify the printer darkness/IQ parameters for PostScript/PDF jobs, PCL jobs,and TIFF jobs.
Managing Paper Trays
The Paper Trays selection allows you to manage the following operations:
• Access paper tray properties
• Set stock properties
• Enable/Disable a paper tray
• Refill a tray
• Enable/Disable cleanup
• Enable/Disable stock size checking
• Load and program a stock
For more information, see Setup Paper Trays.
Managing Finishers
The Finishing selection allows you to view the status of Internal and External Finishers.
TIPBefore running any jobs, click Printer Menu > Finishing to quickly determine whattypes of Finishing devices are currently available and configured.
NOTESee your System Administrator to change any settings on the Finishing window.
What Are Internal and External Finishers?• Internal Finisher: i.e., the Stapler and Bottom Tray/Booklet Maker.
- Name: Shows the name of the device.
- Status: Indicates whether the finisher is enabled or disabled.
• External Finisher: External finishing options include any DFA compliant 3rd-partyfinishers that can be attached to the printer. If the printer is not configured with anexternal finisher, this field is not available.
Xerox Nuvera User Guide and Training Aid (UGTA) for Software Version 9.3/10.38-2
Managing System Resources

Managing Stackers
The Stacking selection allows you to view the status of Stackers which may be configuredon the system.
TIPBefore running any jobs, click Printer Menu > Stacking to quickly determine whattypes of Finishing devices are currently available and configured.
NOTESee your System Administrator to change any settings on the Stacking window.
Managing Image Quality
The Image Quality selection allows you to globally set the darkness and resolution levelsfor system supported file types.
If you are having Image Quality problems on a consistent basis (for example, your entirejob is either too light or too dark), check image quality settings using the Image Qualityselection on the Printer menu. For more information, see Solving Image Quality Problems.
TIPBefore running any jobs, select Image Quality on the Printer menu to quicklydetermine what global machine darkness and resolution settings are currentlyconfigured.
NOTESee your System Administrator to change the darkness and/or resolution settingson the Image Quality window.
User Interface Logging
This feature logs operator actions. It allows the customer to view the log and determineactions taken by the operator such as changing job parameters, queue settings, systemsettings or printer properties.
To enable and view the Log Console:1. Select System > Log console.2. Click Enable Logging.
Getting Billing InformationThe Billing capability enables the user to view and print Xerox billing data.
8-3Xerox Nuvera User Guide and Training Aid (UGTA) for Software Version 9.3/10.3
Managing System Resources

Why would I need to access billing information?
A few examples of why you need to access billing data:
• You can gain system usage information to more accurately plan your suppliesre-ordering.
• During a service call, you may be asked to retrieve billing information to aid a servicerepresentative in identifying any problems with your system.
• Depending on the terms of your purchase agreement, you may need to access andprint the billing data in order to be billed by Xerox.
• If the machine is used by personnel in shifts, billing data can be printed to tracksystem usage for each shift.
To access billing information1. In the user interface, click Administration > Billing.
The Billing dialog box appears.2. With the Billing dialog box open, you can then print the information, or relate it to
the service representative if contacting by phone.For more information about what each Billing Meter is recording, see Reading theBilling Meters.
3. Click Close.
Depending on your system's security setting, you may or not be able to access billingdata. Contact your System Administrator for adjusting your system's security setting.
Reading the Billing Meters
Following are descriptions of what each Billing Meter is tracking. Make sure you havecorrectly identified your region.
Billing Regions
Region 4Region 3Region 2Region 1
FXNASG-CANESGNASG-US
FXAPDMO-E
DMO-W
China
APO
Descriptions of Billing Meters
Billing Region 1
Meter A -Represents total impressions to output destination.
Meter B -Represents total impressions for each image of job up to and including thelast sheet of the 10th set.
Xerox Nuvera User Guide and Training Aid (UGTA) for Software Version 9.3/10.38-4
Managing System Resources

Meter C -Total impressions for all jobs that reach a breakpoint value.
Meter D -Total impressions for all images of a job above a breakpoint value.
Meter E - Total impressions printed on sheets wider than 16 " (Nuvera Xerox Nuvera200/288 EA/MX Perfecting Production System only)
Billing Region 2
Meter 1 -Total impressions to output destination.
Meter 2 -Total impressions printed on sheets wider than 16 ".
Meter 3 -Total impressions for sets 11-18.
Meter 4 -Total impressions for set 19.
Meter 5 -Total impressions for all jobs that reach a breakpoint value.
Meter 6 - Total impressions for all images of a job above a breakpoint value.
Billing Region 3
Meter A -Represents total impressions to output destination.
Meter B -Total impressions for all jobs that reach a breakpoint value.
Meter C -Total impressions for all images of a job above a breakpoint value.
Meter D - Total impressions printed on sheets wider than 16" (Xerox Nuvera 200/288EA/MX Perfecting Production System only)
Billing Region 4
Meter 1 -Represents total impressions to output destination.
Meter 2 -Total impressions for each image of a job up to and including the last sheetof the 10th set.
Meter 3 -Total impressions printed on sheets wider than 16 " (Xerox Nuvera 200/288EA/MX Perfecting Production System only).
8-5Xerox Nuvera User Guide and Training Aid (UGTA) for Software Version 9.3/10.3
Managing System Resources

Xerox Nuvera User Guide and Training Aid (UGTA) for Software Version 9.3/10.38-6
Managing System Resources

9Managing SystemSoftware and Hardware
In the event you need to install a software patch or upgrade, or attach new hardware,this can be done with the Xerox System Install Service Utility.
To access the Xerox System InstallService Utility1. In the Xerox Nuvera user interface, click System > Software Install.2. Choose from one of the utilities.3. Follow on-screen instructions.
See the Xerox Nuvera online Help--accessed directly from the user interface--fordetails about this utility.
4. Click Close.
To perform Disk OverwriteThis procedure enables the System Administrator to erase sensitive data from all harddisks (for example, the system disk and image disks). The Disk Overwrite feature is basedon the current FreeFlow Print Server data overwrite feature. The erase algorithm andpatterns conform to U.S. Department of Defense overwrite requirements.
NOTEThis feature requires the presence of the Disk Overwrite software and license in orderto function. The Disk Overwrite software is on a CD included as part of the DiskOverwrite kit. The software must be installed before enabling the license. Contactyour System Administrator to perform any activity related to Disk Overwrite.
9-1Xerox Nuvera User Guide and Training Aid (UGTA) for Software Version 9.3/10.3

Xerox Nuvera User Guide and Training Aid (UGTA) for Software Version 9.3/10.39-2
Managing System Software and Hardware

10Managing the Stock Library
NOTEThe Stock Library selection, located on the Printer menu, is only available on systemsthat have the Productivity Pack license installed and enabled.
The Stock Library selection enables you to add to the group of stocks that are eligibleto print. You can define attributes for a stock (such as size, color, type, and weight) andassign a name to identify the stock and its associated attributes. The standard stocknames Main, Aux, and Auto are also available.
Stock ManagementOnce a stock type has been defined, named, and saved as a new stock, it can be easilyreferenced from the Stock List, which is accessible from many different locations in theFreeFlow Print Server software.
You can perform the following tasks from the Stock Library tab:
• Set up a new paper stock in the stock list
• Modify a stock entry
• Copy a stock entry
• Delete a stock
• Assign stock to a paper tray
• Remove stock from an assigned tray
• Add stock to a preferred tray
• Enable/disable cleanup
• Hide/Show stock entries
• Import/Export stock settings
NOTEIf a user submits a job that specifies a user-defined stock not available in the StockLibrary, the job is still submitted to the FreeFlow Print Server. However, the job isfaulted until the requested, or user-defined, stock is programmed into the StockLibrary.
10-1Xerox Nuvera User Guide and Training Aid (UGTA) for Software Version 9.3/10.3

The Stock List
The Stock List is a GUI screen that is accessible from many different locations in theFreeFlow Print Server software. A named stock can be easily selected from this list andused in a variety of situations. Examples of activities during which the Stock List isaccessed include (but are not limited to):
• Assigning a named stock to a job
• Assigning a named stock as default for a queue
• Assigning a named stock as default for slip sheets
• Assigning a named stock as one or more cover pages
• Assigning a named stock to be used as an exception page
To set up/manage paper stock1. On the Printer Menu, select Stock Library.2. Select the New Stock to display the New Stock dialog.3. Enter a new stock name in the Name field.4. Select the tray for this stock by using the Add to Trays button, click OK.5. Select stock properties from the Size/Color, Type/Weight, and Coating controls.6. Enter any desired stock comments by selecting the Options button.7. Click Close.
NOTEWhen loading stock, it is recommended that you either enter a specified namefor all stocks, or use "unspecified" as a name value for all stocks. You should nevermix named stocks with "unspecified" stocks since Required Stock Not Loadedissues may arise.
For more information about the Stock Library, see the online Help on the system userinterface.
Xerox Nuvera User Guide and Training Aid (UGTA) for Software Version 9.3/10.310-2
Managing the Stock Library

11Advanced PublishingFeatures
You can print with the Xerox Nuvera in several ways:
• With a networked-configured system, you can submit a job to the Xerox Nuveraprinter directly from your desktop through the internet browser.
• You can download drivers and print directly from your desktop applications.
• You can also print from a data cd using the media drive on the Xerox Nuvera .
The Xerox Nuvera gives you many publishing options for enhancing your document. Tolearn more about these capabilities, explore the links at the left.
Using Build JobNOTEThis feature is only available if your system includes the integrated DocumentScanner module for copying and scanning jobs.
Build Job is used to combine multiple scans, each with different job programming, intoa single, compiled output. Specifically, Build Job allows you to scan many different typesof documents (either from the Document Feeder or the Document Glass) in separatejobs, then combine those separate scan jobs into one cohesive output.
Build Job is used to• Scan originals of different sizes that cannot be fed and scanned together
• Scan a collection of originals that require a mix of Document Feeder and DocumentGlass scanning
• Scan more originals than the Document Feeder can hold at one time (see DocumentFeeder & Scanner Specifications)
• Apply different image quality or image modification features to different scansegments
NOTEBuild job applies to any type of scan job and does NOT apply to print jobs.
11-1Xerox Nuvera User Guide and Training Aid (UGTA) for Software Version 9.3/10.3
Before using Build Job, there are two concepts to understand. See Understanding Joband Segment Level Programming.
To use Build Job1. In the Xerox Nuvera user interface, click Copy, then click the Build Job button at the
bottom left corner of the user interface.The system is now in Build Job mode.
2. Place the first part of the document set (Job Segment 1) to be scanned in theDocument Feeder or on the Document Glass (see Using the Document Feeder.
NOTEAt this point, perform any Job Level programming, since Job Level programmingchoices will be unavailable when scanning the remaining Job Segments.
3. Once Job Level programming is complete for Job Segment 1, press Continue. Theremainder of the tabs become enabled. Perform any Segment Level programming.
4. When satisfied with your settings, click Start.Job Segment 1 begins scanning.
5. When Job Segment 1 finishes, load the second part of the document set (Job Segment2) to be scanned in the Document Feeder or Document Glass.
6. Make any Segment Level programming.Remember, Job Level programming is already set, so all Job Level controls will bedisabled.
7. When satisfied with your settings, click Start.Job Segment 2 begins scanning.
8. Load the next Job Segment, and perform steps 6, 7, and 8 for the remaining segments.9. To exit Build Job mode, click End Build Job.
The job prints according to all of the Segment and Job Level programming.
Understanding Job and Segment LevelProgramming
NOTEThis feature is only available if your system includes the integrated DocumentScanner module for copying and scanning jobs.
Job and Segment Level programming are used in conjunction with Build Job. This allowsyou to control settings across an entire multi-segment scan job, as well as settings withinsmall segments of a multi-segment scan job.
Job-Level Programming
Job level programming applies to the entire job. Job level settings are programmedduring the first segment to be scanned or copied, and are not available for programmingduring the rest of the build job process. Examples of Job level settings are:
• Page Numbering
Xerox Nuvera User Guide and Training Aid (UGTA) for Software Version 9.3/10.311-2
Advanced Publishing Features

• Front Covers
• Annotation
• Stapling/Finishing
• Quantity
• Collation
• Back Covers
NOTEQuantity is a job-level setting that can be changed during any subsequentsegment-level scans.
Segment-Level Programming
Segment level features apply to the specific original or segment of originals about tobe scanned. Examples of Segment level settings are:
• Paper Attributes
• Sides Imaged
• Image Quality
• Image Source, either Document Glass or Document Feeder
• Negative Image
• Mirror Image
• Image Shift
Now that you are familiar with Job Segment programming, you can continue to UsingBuild Job.
Working with Job TicketsJob tickets are groups of saved job settings. Saving job settings from previous jobs allowsthe same user or a different user to quickly set up the machine to perform the sameactions. This is a tremendous time-saver when you have many original documentsrequiring the same settings. Rather than trying to re-create your programming, or haveanother user attempt to, rely on Job Tickets.
These settings could include:
• Number of pages
• Special Pages, such as covers, tabs, etc.
• Image Quality settings
• Image Adjustments (re-sizing, centering, reduction/enlargement, etc.)
• Finishing options
11-3Xerox Nuvera User Guide and Training Aid (UGTA) for Software Version 9.3/10.3
Advanced Publishing Features

Job Tickets can be submitted to the system from a remote client computer using theFreeFlow Print Manager application. See the applicable documentation for generatingjob tickets with FreeFlow.
Open a job ticket
Once a job has been submitted to the Xerox Nuvera and saved, it can be retrieved andopened at a later time.1. Select the Job Manager button, then choose Saved tab.
See Finding a Saved Job To Print.
2. Use the file type filter to find the job ticket.3. Double-click or right-click the job ticket file you want to open and make any additional
programming choices.4. When satisfied with your settings, click the Print button at the bottom of the window.
Related Hints and TipsHint/Tip DescriptionSubtopic
Selecting Cancel from FreeFlow Print Manager,while a job is being submitted to the system,does not completely cancel the job. Theworkaround is Delete the canceled job at theprinter, which appears in the Completed Jobslist as completed with errors.
FreeFlow Print Manager and canceling jobsubmission
Hint to avoid confusion when using theFreeFlow Print Manager application to specifyjob ticket attributes for custom stock. Theworkaround is from FreeFlow Print Manager,when you are adding a custom stock, youshould connect to the target printer and in JobSetup, use the Stock pull down menu (ratherthan the "Stocks..." button) and select "New."The window will limit the selection of the stockattributes to those that are settable for theconnected printer. You should be cautious whenusing the "Stocks..." button to add new stock.When using the "Stocks..." button, changesmade to non-applicable attributes will beignored. This printer only allows the followingmedia attributes to be specified: Size, Type,Color, Weight.
FreeFlow Print Manager and job ticketattributes for custom stock
Xerox Nuvera User Guide and Training Aid (UGTA) for Software Version 9.3/10.311-4
Advanced Publishing Features

Hint/Tip DescriptionSubtopic
When using FreeFlow Print Manager to programa job with a media size for either of the sizenames: Spanish (XE) or Foolscap (XE), thepull-down menu for "Main Paper Stock" in JobSetup will not contain these size names.Workaround: When specifying Paper Type inJob Setup of FreeFlow Print Manager orInternet Services, the following media sizes donot appear unless the paper is currently loadedin one of the trays at the printer:
FreeFlow Print Manager and media size names
• Spanish (XE)
• Foolscap (XE)
To program one of these sizes, perform thefollowing:
1. Load the paper in one of the trays.2. From the Main Paper Stock pull-down
menu, choose the Tray with the desiredpaper stock, or from the Main PaperStock pull-down menu, select New.
3. If you select New, select a size of Custom(.in) from the New Stock menu.
4. Enter the appropriate dimensions forwidth and height:
• Spanish (XE) - 8.46 x 12.4 in.
• Foolscap (XE) - 8.5 x 13.0 inches.
When programming custom stock size, if thestock size programmed is out of range, thewarning message does not indicate the validstock size range. Workaround if possible,program custom stock size at the Nuveraprinter.
Programming custom stock size
Using Front-Back RegistrationThis feature enables customized, independent, Side-1 and Side-2 registration fine-tuningfor a specific stock saved and stored within the stock library.
Due to the high levels of differences among stock characteristics that affect image tosubstrate performance, the system allows custom registration settings to be stored ascustom media properties. These settings are applied on a per sheet basis as an offsetto the baseline System Registration Setup values from the DC0604 Registration SetupRoutine.
11-5Xerox Nuvera User Guide and Training Aid (UGTA) for Software Version 9.3/10.3
Advanced Publishing Features(continued)
The custom registration settings include process registration, cross-process registration,and skew. These registration settings are saved with the stock name in the media library.This feature allows the customer to fine-tune the front-back registration for a particularstock without affecting the registration for all other stocks.
The Front-Back Registration window
The Front-Back Registration window displays a list of all media in the stock library. Anymedia currently loaded on the printer is at the top of the Media Name list with acheckmark in the adjacent Loaded column. When the Front-Back Registration valueschange from the media default settings, an icon appears in the Modified column to aidas a quick reference.
The following attributes can be changed:
• Process Direction registration - Side 1 and/or Side 2: +/- 5.0 mm
• Cross Process Direction registration - Side 1 and/or Side 2: +/- 5.0 mm
• Skew - Side 1 and/or Side 2: +/- 25mRadians Selecting Rotate both sides applies thesame skew factor to Side 1 and Side 2.
To use Front-Back Registration1. On the Printer menu, select Front-Back Registration.2. Select the media you want to modify.3. Change the media attributes.4. Select Apply to accept the changes.5. If you make selections but you don't want to apply them, click Default to return the
media settings to 0, or click Cancel to return the media settings to thepreviously-applied values.
NOTEThe Enable Front-Back Registration checkbox is selected by default.When it isnot selected, the software does not use the information stored in the databaseassociated with any Front-Back registration changes. The values remain at theirlatest applied values, but they are not used by the registration system if thefeature is disabled. This allows the customer to disable the feature withouthaving to reset the information back to 0.
Copying Document Sets with Mixed-SizeSheets
NOTEThis feature is only available if your system includes the integrated DocumentScanner module for copying and scanning jobs.
There may be instances where the document set you want to copy is made up of severaldocument sizes. The Document Feeder on the Xerox Nuvera can be programmed toprocess document sets comprised of mixed-size originals.
Xerox Nuvera User Guide and Training Aid (UGTA) for Software Version 9.3/10.311-6
Advanced Publishing Features

For example, a user wants to compile different documents into one cohesive collection.The set has 8.5 x 11 inch and 11 x 17 inch originals. The user can load those originalsinto the Document Feeder with the 11 inch edge going into the Document Feeder first.With Mixed Size Originals (MSO) selected, the system will process the document set.
There are certain constraints when using this feature. See the sections below for details.
NOTEThe default setting for MSO is off. The MSO default can not be changed.
If Mixed Size Originals has NOT been selected:• Some jobs and features may not work without selecting the Mixed Size Originals
feature.
• All output will be printed on the media the size of the largest original document.
• Images from the smaller originals will be placed in the upper left corner of the outputpaper.
NOTEIf MSO is enabled, and you load a set of same size documents, the job will still processwith no errors or warnings.
When the Mixed Size Originals (MSO) feature IS selected:• MSO and 1 to 2 Sides Imaged cannot be selected together.
• Reduce/Enlarge (R/E) must be set to 100%.
• Special Pages (Covers, Exception Programming, Inserts) can not be used.
• Signatures/Booklets can not be used.
• N-up can not be used.
To copy documents with mixed-size originals1. Place the document set in the Document Feeder. The set must be arranged so that
the leading edges of all sheets are the same width.2. In the Xerox Nuvera User Interface, click Copy, then click the Image Edit tab.3. On the Image Edit tab, click the Original Size button.4. Choose the Mixed Size Originals radio button.
Take note of the constraint on this control, regarding the original paper sizes it willaccept.
5. Click Close.
Saving and Storing JobsJobs (copy, scan, and print) can be submitted and programmed to be placed in a SavedJobs directory on the Xerox Nuvera user interface (FreeFlow Print Server). Once saved,they can be reprinted at any time.
11-7Xerox Nuvera User Guide and Training Aid (UGTA) for Software Version 9.3/10.3
Advanced Publishing Features

NOTEIf you are copying / moving a job ticket file and its associated file (.pdf, .tif, .ps) fromSaved Jobs to a UNIX File System directory, you may receive a message "Cannotmove saved job." However, if you click OK, you will see that the files are successfullymoved. To prevent this message from appearing, select only the job ticket file. Theassociated file will automatically be copied / moved with it.
NOTEThe scanning and copying of jobs is only available if your system includes theintegrated Document Scanner module.
Copy Jobs1. In the Xerox Nuvera user interface, click the Copy button.2. Select the Advanced tab.3. Enter a job name by typing it into the Job Name text box.4. Select the destination (Print, Print and Save, Save, Save as Background Form) for
your job. If saving the job, click the Save Location button to specify the location.5. If saving, choose the format to be saved.6. Set the job properties.7. When you are satisfied with your settings, click Copy.
For more information, see Setting up a Copy Job.
Scan to File Jobs1. In the Xerox Nuvera user interface, click the Scan To File button.2. Select the Basic tab (selected by default).3. Enter a job name by typing it into the Job Name text box.4. Use the Save Location button to specify the location.5. Choose the format to be saved as.
For more information, see Choosing a Scan File Format.
6. Set the job properties.7. When you are satisfied with your settings, click Scan.
For more information, see Setting up a Copy Job.
Print from File Jobs1. In the Xerox Nuvera user interface, click the Print From File button.2. Select the Files tab (selected by default).3. Click Browse to locate and select a job.4. Select the directory location of the job from the Look In pull-down menu.5. Select the destination (Print, Print and Save, Save, Save as Background Form) for
your job. If saving the job, use the Save Location button to specify the location.6. If saving, choose the format to be saved as.
For more information, see Choosing a Scan File Format.
7. Set the job properties.
Xerox Nuvera User Guide and Training Aid (UGTA) for Software Version 9.3/10.311-8
Advanced Publishing Features

8. When you are satisfied with your settings, click Print.
NOTEThe system is case sensitive when using file type filters in Print from File. Forexample, the PostScript filter will only display files with a .ps extension and notthose with a .PS extension.
NOTEThe Job Manager Saved tab displays a list of all jobs in the user-defined Savelocation as specified in System Preferences.
Related Hints and TipsHint/Tip DescriptionSubtopic
With Productivity Pack only: While copy jobscan be sent to any queue, sending a copy jobto a queue that does not have Auto Proofselected will produce unexpected results. ScanTo File jobs can only be directed to the defaultqueue. Do not select Auto Proof on the defaultqueue or your output will not be as expected.
Auto Proof Productivity Pack only
To change the default save directory inFreeFlow Print Server: 1. Open SystemPreferences. 2. Select the Save tab. 3. Enter aparent directory (either the actual directory youwant, or one that you can browse from). Note:While it is possible to save jobs to the rootdirectory and/opt directory, you will not be ableto reprint from there with operator privileges.It is strongly recommended that a new directorybe created that can be accessed by the operatorin which jobs can be saved for reprint.4. Select the save directory from the tree view(needs to be highlighted and this will changethe unlabeled path at the bottom of thewindow which happens to be the saveddirectory). 5. Click OK. Even though the top textbox is labeled Parent Directory, people may notread that correctly, and just enter the valuethey want for the saved directory and pressEnter. This will just change the root of the treeview below it. The user still has to click on thedirectory that they want.
Change the default Save directory
To scan a job to USB: 1. One-time setup: Go toSystem Preferences, Save tab and set thedefault Save Location to the root directory ). 2.Insert the thumb drive into an available USBport. 3. Under Scan to File, select theSave Location button. 4. SelectUnix File System from the drop down list. 5.Navigate to the directory then to thesubdirectory named for the USB device. 6. ClickOK and then scan the job.
Scan to File to a USB thumb drive
11-9Xerox Nuvera User Guide and Training Aid (UGTA) for Software Version 9.3/10.3
Advanced Publishing Features

Hint/Tip DescriptionSubtopic
When performing a Copy Save the text will beoverwritten by the text. So if you are saving acopy job and need the please put it in the Field.
Copy Save / Account ID Overwritten
Currently, when using Copy Save, if a user savesa job that has Auto Center on, the job will notbe centered when reprinted. The currentworkaround is to setSystem Preferences > Job Processing > TIFF Image Position from 'Normal' to'Centered on Page'.
Copy Save and Auto Center
System faults when processing a Booklet jobwith Covers. System Error occurred whileattempting to process this job. After this error,some jobs may fault to the same error. ARestart is required. Workaround: For a CopySave job with Booklet Imposition do notprogram with Covers. If this is done, the systemmay have generated a processing error and willneed to be restarted.
Booklet job with covers
Browsing for files to a Solaris FTP server doesn'tlist the directory links and you don't see /binor /lib because they are links to /usr/binand /usr/lib.
Browsing to a Solaris FTP server
When using Copy Save with the Landscape Leftstaple option, the saved ticket has the finishingas Portrait Right. If you scanned your originalsin Long Edge Feed (LEF) and are printing LEF,change the finishing to the Landscape Leftstaple option. If you scanned your originals inLEF and are printing SEF, program a 180-imagerotation from the Image Edit tab. If youscanned in SEF, you can reprint with the ticketas it is.
Copy Save and Landscape Left staple option
If using Copy Save with any Landscape Stapleoption, when reprinting the saved job ticket theimages may be upside down. To be sure it is OKproof the job. If it is upside down, program with180-image rotation from the Image Edit tab.
Copy Save and Landscape staple options
Files saved as Multi-page TIFF are limited to2GB in size. This limit may be reached after afew hundred images if the scanned originalscontain a lot of halftone content and arescanned at 1200x1200 resolution. When a jobreaches this size, a message may be displayedindicating that the disk is full. To save largejobs, use the save format of Single Page TIFF.
Multi-page TIFF file size limit
Xerox Nuvera User Guide and Training Aid (UGTA) for Software Version 9.3/10.311-10
Advanced Publishing Features(continued)
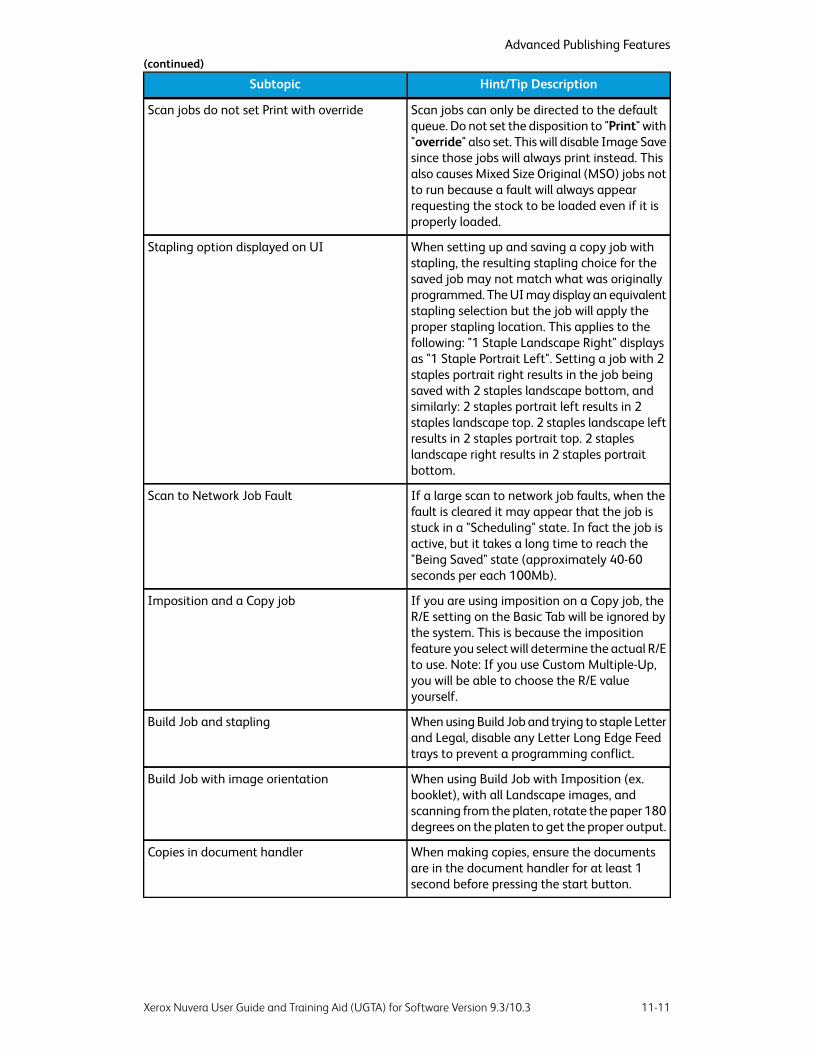
Hint/Tip DescriptionSubtopic
Scan jobs can only be directed to the defaultqueue. Do not set the disposition to "Print" with"override" also set. This will disable Image Savesince those jobs will always print instead. Thisalso causes Mixed Size Original (MSO) jobs notto run because a fault will always appearrequesting the stock to be loaded even if it isproperly loaded.
Scan jobs do not set Print with override
When setting up and saving a copy job withstapling, the resulting stapling choice for thesaved job may not match what was originallyprogrammed. The UI may display an equivalentstapling selection but the job will apply theproper stapling location. This applies to thefollowing: "1 Staple Landscape Right" displaysas "1 Staple Portrait Left". Setting a job with 2staples portrait right results in the job beingsaved with 2 staples landscape bottom, andsimilarly: 2 staples portrait left results in 2staples landscape top. 2 staples landscape leftresults in 2 staples portrait top. 2 stapleslandscape right results in 2 staples portraitbottom.
Stapling option displayed on UI
If a large scan to network job faults, when thefault is cleared it may appear that the job isstuck in a "Scheduling" state. In fact the job isactive, but it takes a long time to reach the"Being Saved" state (approximately 40-60seconds per each 100Mb).
Scan to Network Job Fault
If you are using imposition on a Copy job, theR/E setting on the Basic Tab will be ignored bythe system. This is because the impositionfeature you select will determine the actual R/Eto use. Note: If you use Custom Multiple-Up,you will be able to choose the R/E valueyourself.
Imposition and a Copy job
When using Build Job and trying to staple Letterand Legal, disable any Letter Long Edge Feedtrays to prevent a programming conflict.
Build Job and stapling
When using Build Job with Imposition (ex.booklet), with all Landscape images, andscanning from the platen, rotate the paper 180degrees on the platen to get the proper output.
Build Job with image orientation
When making copies, ensure the documentsare in the document handler for at least 1second before pressing the start button.
Copies in document handler
11-11Xerox Nuvera User Guide and Training Aid (UGTA) for Software Version 9.3/10.3
Advanced Publishing Features(continued)
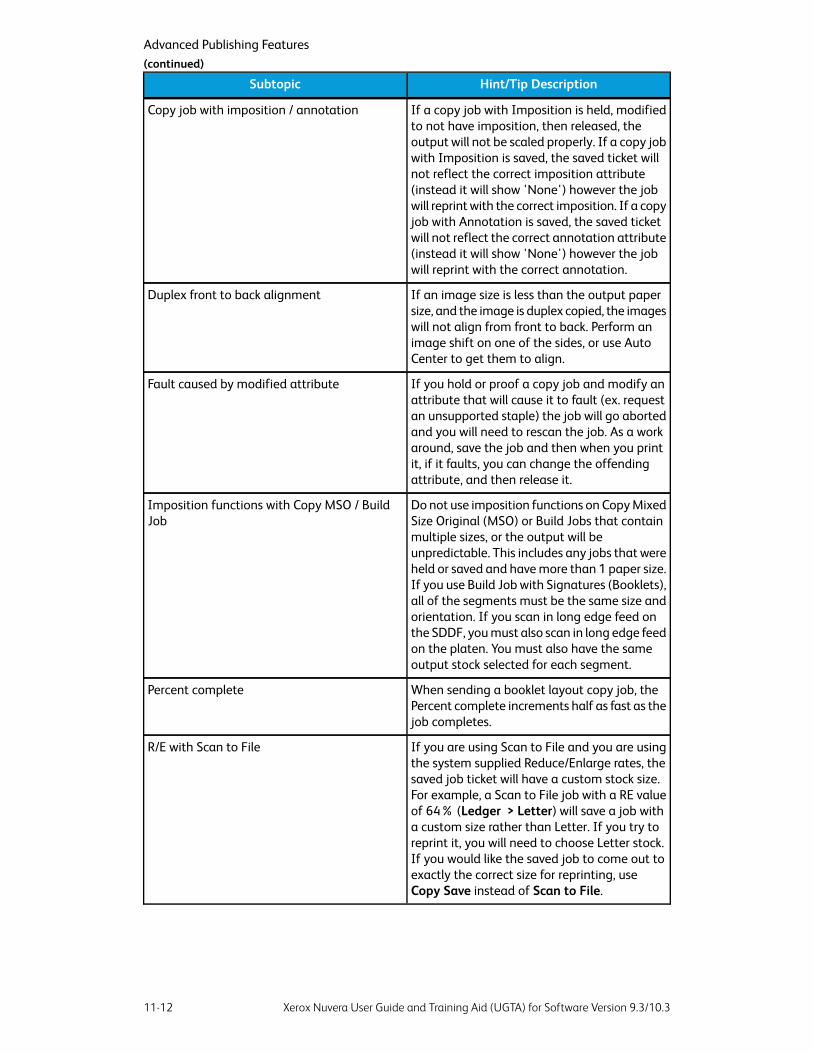
Hint/Tip DescriptionSubtopic
If a copy job with Imposition is held, modifiedto not have imposition, then released, theoutput will not be scaled properly. If a copy jobwith Imposition is saved, the saved ticket willnot reflect the correct imposition attribute(instead it will show 'None') however the jobwill reprint with the correct imposition. If a copyjob with Annotation is saved, the saved ticketwill not reflect the correct annotation attribute(instead it will show 'None') however the jobwill reprint with the correct annotation.
Copy job with imposition / annotation
If an image size is less than the output papersize, and the image is duplex copied, the imageswill not align from front to back. Perform animage shift on one of the sides, or use AutoCenter to get them to align.
Duplex front to back alignment
If you hold or proof a copy job and modify anattribute that will cause it to fault (ex. requestan unsupported staple) the job will go abortedand you will need to rescan the job. As a workaround, save the job and then when you printit, if it faults, you can change the offendingattribute, and then release it.
Fault caused by modified attribute
Do not use imposition functions on Copy MixedSize Original (MSO) or Build Jobs that containmultiple sizes, or the output will beunpredictable. This includes any jobs that wereheld or saved and have more than 1 paper size.If you use Build Job with Signatures (Booklets),all of the segments must be the same size andorientation. If you scan in long edge feed onthe SDDF, you must also scan in long edge feedon the platen. You must also have the sameoutput stock selected for each segment.
Imposition functions with Copy MSO / BuildJob
When sending a booklet layout copy job, thePercent complete increments half as fast as thejob completes.
Percent complete
If you are using Scan to File and you are usingthe system supplied Reduce/Enlarge rates, thesaved job ticket will have a custom stock size.For example, a Scan to File job with a RE valueof 64% (Ledger > Letter) will save a job witha custom size rather than Letter. If you try toreprint it, you will need to choose Letter stock.If you would like the saved job to come out toexactly the correct size for reprinting, useCopy Save instead of Scan to File.
R/E with Scan to File
Xerox Nuvera User Guide and Training Aid (UGTA) for Software Version 9.3/10.311-12
Advanced Publishing Features(continued)

Hint/Tip DescriptionSubtopic
Saved PDF files contain thumbnail images thatcan be displayed by Acrobat Reader. Whenviewing a PDF file saved from Scan to File, thoseimages are rotated 90 degrees clockwise fromthe orientation of the full-size page images.
PDF with Rotated Thumbnails
For more information, see Setting up a Copy Job.
Finding a Saved Job to PrintFinding jobs (copy, print, or scanned) saved on the Xerox Nuvera user interface can bedone in two ways:
• Through the user interface under the Job Manager Services
• Through the user interface under the Print From File Services
To find a saved job in Job Manager
The Job Manager button allows you to perform a number of tasks at the job level, suchas:
• Preview
• Hold
• Promote
• Move
• Copy
• Forward
Additionally, you can retrieve and print jobs that have been saved to the system.1. From the Xerox Nuvera user interface, select the Job Manager button.2. Select the Saved tab to display the list of saved jobs.3. From the list that displays, double-click on the saved job you want to print.
The print properties window displays.
NOTEThe Job Ticket format is chosen by default because this is the file type that isused to print the entire job. Selecting other file types will not give you the entirejob. For example, if you select TIFF, the system only prints the TIFF image. Thejob is printed without the original job programming choices.
4. Select or change any programming settings.5. When satisfied with your settings, click Print.
To find a saved job using Print From File1. From the Xerox Nuvera user interface, select the Print From File button.
11-13Xerox Nuvera User Guide and Training Aid (UGTA) for Software Version 9.3/10.3
Advanced Publishing Features(continued)

2. Select the Files tab.3. Select Browse to locate the file you want to print.4. From the files listed in the Browse window, double-click the job.
The print properties window displays.5. Select or change any programming settings.6. When satisfied with your settings, click Print.
NOTEBrowsing for files to a Solaris FTP server doesn't list the directory links. Forexample, you don't see /bin or /lib because they are links to /usr/bin and/usr/lib.
Customizing System Default OptionsIf your workflow requires you to use machine settings that differ from the system defaults,or you consistently print to a paper stock that is not the default, navigating all of theuser interface screens to program your jobs can be time consuming.
The default settings of the Xerox Nuvera are fully customizable by a SystemAdministrator, making job programming much quicker and easier. Some of the systemdefaults that can be customized for your particular workflow include:
• Sides imaged
• Finishing options
• Image editing
• PDL (Page Description Language. TIFF, PostScript, etc.) resolution settings
To view current printer default options for systems with onequeue
If your system does not have the Productivity Pack license enabled:1. In the Xerox Nuvera user interface, click Printer > Defaults.
The Printer Defaults window displays.2. In the tabbed interface, select each tab, viewing current settings.3. To customize settings, contact your System Administrator.
To view current printer default options for systems with multiplequeues
If your system has the Productivity Pack license enabled:1. In the Xerox Nuvera user interface, click the Queue Manager button.
The Queue window displays.2. Right-click on the queue and select [Properties].
The Properties window displays.3. In the tabbed interface, select each tab, viewing current settings.4. To customize settings, contact your System Administrator.
Xerox Nuvera User Guide and Training Aid (UGTA) for Software Version 9.3/10.311-14
Advanced Publishing Features

To customize general system settings
The following system default settings can be changed at any time by a SystemAdministrator using the Setup > System Preferences menu.
• Jobs Policy: For example, System action when out of paper
• Default font sets used/Substitute fonts: Enabled/Disabled
• Allow stock substitutions
• Save job locations
• Default launch screen (Copy, Print, Job Manager, Print From File)
• Tray Confirmation
• Job Processing defaults
• International settings
• Scheduling Mode
NOTEContact your System Administrator to configure custom System Preferences.
NOTERefer to the Xerox Nuvera online help for details about System Preferences settings.
Using Xerox Freeflow® Remote PrintServer SoftwareFreeFlow Remote Print Server software allows access to the Xerox Nuvera user interfacefrom a remote client (i.e., the computer at your own desk). Remote print server softwareprovides the functionality of the Xerox Nuvera at a remote desktop, enabling the user,from anywhere on the network, to use the full range of Xerox Nuvera functions.
NOTENew major releases of FreeFlow Print Server require updated versions of FreeFlowRemote Print Server software. Verify that you have the correct Remote Print Serverversion to match your version of FreeFlow Print Server software. Contact your SystemAdministrator to have FreeFlow Remote Print Server software installed and configuredon your computer.
NOTEFreeFlow Remote Print Server software does not support the IPS Manager.
11-15Xerox Nuvera User Guide and Training Aid (UGTA) for Software Version 9.3/10.3
Advanced Publishing Features

Adding Annotations to your JobsNOTEThis feature is only available if your system includes the integrated DocumentScanner module for copying and scanning jobs.
The following information applies to both Print and Copy jobs.
There may be times when you need to add extra content to your job. The Annotationfeature allows you to add these special marks:
• Page Numbers--can be configured to appear anywhere on each page
• Watermarks--Indicates to the reader that the document they have is Confidential,Draft, etc. The watermark appears as shaded text behind the actual page content
• Date Stamps
Annotation can be a queue setting. Any job being sent to that queue will be annotated.
The Xerox Nuvera systems that have the Productivity Pack license allowing for multiplequeues have a Queue manager to create new queues.
The Xerox Nuvera systems without the Productivity Pack license set up the systempreferences. By default, all annotations are set to off.
Print jobs refer to jobs being reprinted on the device. Any jobs being submitted througha driver use the watermark available on the driver. If a queue is set up for annotationsand a print job comes into that queue, then it will be annotated on the queue properties.
NOTEIf you forward a job from one machine to another, the forwarded job will lose itsannotation attributes as well as Printer Darkness settings and imposition attributes.
To Annotate Print or Copy Jobs1. From either the Print or Copy service, click on the Output tab.2. Click the Annotations button.
NOTETake notice of the text on the Annotations button. It will show which annotationtypes (if any) are currently enabled.
3. The Annotations window appears. Place a checkmark in any or all of theAnnotation-type checkboxes. Clear any Annotation-type checkboxes you do not wishto use.
4. When satisfied with your settings, click Copy or Print.
Configuring Annotations1. To configure how each Annotation type appears, click the Copy Service button.
Xerox Nuvera User Guide and Training Aid (UGTA) for Software Version 9.3/10.311-16
Advanced Publishing Features
2. Click the Output tab.3. Click Annotations.4. Click Setup.5. Click on one of the Annotation-type tabs.
The Annotation window appears.6. Make your selections. When satisfied with your settings, click OK, then click Copy.
For details about working with the Annotation controls, refer to the system online Help.
Generating a Sample PrintUse the Sample Current Job feature when releasing a job to print or while the job isprinting to see if the job will print as expected. A single, sample page of the job printsso you can verify the job settings.
This feature enables you to periodically check image quality and job programmingselections used on the job as it is printing. Since jobs sent to certain finishers (such as,the Xerox Basic Finisher Module) cannot be accessed while the main stacker tray is inuse, the Sample Current Job feature allows sample prints to be sent to the stacker toptray.
The Sample Current Job feature is different from proofing a job. When proofing a job,the entire job prints and it only allows you to make adjustments to the job beforesubmitting it for printing. The Sample Current Job option prints only a single page forsampling and allows you to make adjustments while the job is printing.
NOTEThis feature is not available for remote clients and is not available when the systemis in Secure Mode. You can, however, print sample variable data jobs
To produce a sample print of a page while the job is printing1. Submit a job to the Hold queue of the printer.2. Right-click on the job and select Release Job.3. While the job is printing, select Printer > Sample Current Job.
A single copy of the next image prints to the top tray (as a sample print) while theentire job continues to print to the stacker. Job integrity is not disrupted as the jobcontinues to print.
4. If you want to change job properties, right-click on the job and select Hold.The job is placed in the Inactive Jobs list.
5. Right-click the job, select Properties and make changes.6. Select Release to place the job back in the Active Jobs list.
Sample Print From a Client Computer
A sample print can not be programmed at the Client's workstation during job submission.However, the Client sample print workflow could be sent and the job can be held in ahold queue. Then you can program the sample printing attributes for that job at thesystem user interface. For details, see Working with Queues.
11-17Xerox Nuvera User Guide and Training Aid (UGTA) for Software Version 9.3/10.3
Advanced Publishing Features

About PitchThe Xerox Nuvera is equipped with a variable pitch Xerographic belt. Pitch refers to thenumber of page images that can be placed on the belt, which are then transferred tothe paper. During printing, the system senses paper sizes requested, and optimizes theuse of the belt and the paper path to ensure maximum productivity.
Paper Size/Pitch Relationships
The charts below illustrate the expected system throughput, given a certain page/ imagesize.
NOTEIf you have the Xerox Nuvera 200/288 EA/MX Perfecting Production System andenable the Wide Stock feature from the User Diagnostics screen, the system will runstocks greater than 9.0 inches up to 9.5 inches wide in 5 pitch mode instead of 4pitch mode. This increases the print speed for this size paper to 240 ipm. For moreinformation about the Wide Stock feature, see Running User Diagnostics.
Table 5. Xerox Nuvera 100 EA Production System
Maximum Throughput (PagesPer Minute/PPM)
Pitch (Images per PR beltrevolution)
Paper/Image Size (FeedDirection) Min-Max
10055.5 in (140mm) - 9.0 in(229mm)
8049.0 in (229mm) - 11 in(297mm)
60311 in (297mm) - 17 in(432mm)
40217 in (432mm) - 18.5 in(470mm)
Table 6. Xerox Nuvera 120 EA Production System
Maximum Throughput (PagesPer Minute/PPM)
Pitch (Images per PR beltrevolution)
Paper/Image Size (FeedDirection) Min-Max
12055.5 in (140mm) - 9.0 in(229mm)
9649.0 in (229mm) - 11 in(297mm)
72311 in (297mm) - 17 in(432mm)
48217 in (432mm) - 18.5 in(470mm)
Xerox Nuvera User Guide and Training Aid (UGTA) for Software Version 9.3/10.311-18
Advanced Publishing Features

Table 7. Xerox Nuvera 144 EA Production System
Maximum Throughput (PagesPer Minute/PPM)
Pitch (Images per PR beltrevolution)
Paper/Image Size (FeedDirection) Min-Max
14465.5 in (140mm) - 8.5 in(216mm)
12058.5 in ( 216mm)- 9.0 in(229mm)
9649.0 in (229mm) - 11 in(297mm)
72311 in (297mm) - 17 in(432mm)
48217 in (432mm) - 18.5 in(470mm)
Table 8. Xerox Nuvera 200/288 EA/MX Perfecting Production System
Maximum Throughput(Impressions Per Minute/IPM)Duplex
Pitch (Images per PR beltrevolution)
Paper/Image Size (FeedDirection) Min-Max
28865.5 in (140mm) - 8.5 in(216mm)
24058.5 in (216mm) - 9.0 in(229mm)
19249.0 in (229mm) - 11 in(297mm)
144311 in (297mm) - 17 in(432mm)
96217 in (432mm) - 19.33 in(491mm)
Using the Xerox Nuvera with Freeflow®
MakereadyNOTEThe following information is subject to change as new versions of the Makereadyapplication are developed.
If you have a Xerox FreeFlow solution, you can incorporate the FreeFlow Makereadyapplication with the Xerox Nuvera . For best results, follow these guidelines:
To print to the Xerox Nuvera from FreeFlow Makeready1. Make sure the target print driver is loaded on your PC.2. From the FreeFlow application, select the file you want to print.
11-19Xerox Nuvera User Guide and Training Aid (UGTA) for Software Version 9.3/10.3
Advanced Publishing Features

3. From the Print dialog, select the appropriate target printer type:
• Xerox Nuvera 100/120/144 EA Production System
• Xerox Nuvera 200/288 EA/MX Perfecting Production System
TIPJobs sent from FreeFlow Makeready should be programmed to hold at the XeroxNuvera then re-programmed through the printer's user interface to ensure correctjob attributes.
Xerox Nuvera User Guide and Training Aid (UGTA) for Software Version 9.3/10.311-20
Advanced Publishing Features

12Cleaning Procedures
In order to keep the Xerox Nuvera in good working condition, it is important to carefullyclean it at regular intervals. Depending on your work environment, your cleaning schedulemay be frequent or occasional.
Click the links at the left to learn how to clean the system.
Cleaning the Document GlassIn order to produce high-quality images, free from defects, it's important to keep theXerox Nuvera clean.
Depending on your work environment, you may need to perform these steps frequently.
There are two areas that comprise the Document Glass:
• Document Feeder Scan Area
• Main Document Glass
Spots and specks in the Document Feeder Scan Area can show up as streaks on copiesmade when using the Document Feeder.
Additionally, dirt on the Document Glass can show up as spots on copies made from theDocument Glass.
Specks and dirt can cause image detection problems. The scanner may interpretcontamination as part of the image, and produce faulty copies.
To clean the document glass
CAUTIONTo avoid damage to the machine, do not pour or spray water or cleaner directlyon the document glass of the Xerox Nuvera . Do not use any abrasive cleanersto clean the document glass of the Xerox Nuvera .
Recommended cleaning materials:
• Soft, lint-free cleaning towels (part # 600S4372).
12-1Xerox Nuvera User Guide and Training Aid (UGTA) for Software Version 9.3/10.3
• Xerox Glass Lens and Mirror Cleaner (part # 8R3669) (SeeCRU/Maintenance/Consumables part names and numbers).
For information on ordering supplies, see Contacting Xerox.1. Apply cleaner to the cleaning towel.2. Wipe the entire Document Glass with the dampened towel, until the glass is free of
dirt and smudges.3. Wipe the Document Feeder Scan area on the far left side of the glass. Wipe in one
direction along the divider strip.4. Using a clean, dry cleaning towel, wipe away any cleaner residue.5. See Cleaning the Document Feeder.
Cleaning the Document FeederCleaning the Document Feeder at regular intervals will help to prevent misfeeds.
Depending on your work environment, you may need to perform these steps frequently.
To clean the document feeder
CAUTIONTo avoid damage to the machine, do not pour or spray water or cleaner directlyinto the Xerox Nuvera . Do not use any abrasive cleaners to clean the XeroxNuvera .
Recommended cleaning materials:
• Soft, lint-free cleaning towels (part # 600S4372).
• Xerox Glass Lens and Mirror Cleaner (part # 8R3669) (SeeCRU/Maintenance/Consumables part names and numbers).
For information on ordering supplies, see Contacting Xerox.1. Dampen one end of a towel with Xerox Lens and Mirror Cleaner (part # 8R3669).2. Open the Document Scanner Top Cover. Clean the Nudger Rollers and all visible,
black-colored surfaces.3. Close the Document Scanner Top Cover and raise the Document Feeder. Clean the
rolls and all visible, black-colored surfaces.4. Clean both parts of the Document Glass. See Cleaning the Document Feeder.5. Lower the Document Feeder.
NOTEIt is important to clean the white Nudger Rollers to prevent poor paper feeding,misfeeds, and multi-feeds.
Xerox Nuvera User Guide and Training Aid (UGTA) for Software Version 9.3/10.312-2
Cleaning Procedures

Cleaning Dry Ink (Toner) SpillsThere may be a time when Dry Ink gets spilled while changing containers, or may leakduring usage.
If Dry Ink is spilled or inadvertently gets into the paper path or anywhere else in themachine, the best course of action is to contact a Xerox Service Representative. Theyhave equipment specifically suited for dealing with Dry Ink spills.
For details, see Contacting Xerox.
WARNINGDo not attempt to use a standard shop vacuum or home vacuum to clean Dry Ink.These types of vacuums are not equipped with correct filtration.
Cleaning the DisplayIf the control panel display gets dirty or smudged, use this procedure to clean it.
Depending on your work environment, you may need to perform these steps frequently.
To clean the display
CAUTIONTo avoid damage to the machine, do not pour or spray water or cleaner directlyinto the Xerox Nuvera . Do not use any abrasive cleaners to clean the XeroxNuvera .
Recommended cleaning materials:
• Soft, lint-free cleaning towels.
• Xerox Glass Lens and Mirror Cleaner (part # 8R3669) (SeeCRU/Maintenance/Consumables part names and numbers).
1. Dampen a cleaning towel with Xerox Glass Lens and Mirror Cleaner.2. Gently wipe the display until it is free of dust and smudges.3. Wipe away any cleaner reside with a clean, dry towel.
Cleaning the 'Optical' MouseDirt and dust settling on the Xerox Nuvera machine can work its way into the mouse,causing the user difficulty in efficiently navigating the controls on the machine display.
Depending on your work environment, you may need to perform these steps frequently.
12-3Xerox Nuvera User Guide and Training Aid (UGTA) for Software Version 9.3/10.3
Cleaning Procedures

To clean the 'optical' mouse
CAUTIONTo avoid damage to the machine, do not pour or spray water or cleaner directlyinto the Xerox Nuvera . Do not use any abrasive cleaners to clean the XeroxNuvera .
1. With a damp lint-free cloth, clean the exterior of the entire mouse. Be sure to cleanthe four pads on the bottom of the mouse that come in contact with the surface yourmouse travels on.
2. With a damp lint-free cloth, clean the center scrolling wheel. Roll the wheel with yourfinger to clean all exposed surfaces.
3. Pick up the mouse and turn it over. Using a damp cotton swab, clean the plastic areain front of where the red optical light is emitted.
4. Use a dry cotton swab to remove any remaining moisture from step 3.5. With a damp lint-free cloth, wipe off the surface (mouse pad or directly on the Xerox
Nuvera) your mouse travels on.
Cleaning the KeyboardDepending on the environment where your system is placed, keeping the keyboard freeof dirt and other contaminants will assure quick and accurate job programming.
To clean the keyboard
CAUTIONTo avoid damage to the machine, do not pour or spray water or cleaner directlyinto the Xerox Nuvera . Do not use any abrasive cleaners to clean the XeroxNuvera .
Cleaning the keyboard can be performed fairly quickly. It is recommended that youperform the following actions before the machine is started, or after the machine iscompletely shut down for the day.1. Over a waste container, turn the keyboard upside down and gently shake to allow
any large contaminant particles to fall out.2. Using canned air (commonly found at office supply stores), direct the air stream
directly at the keys, blowing away any remaining dust and other contaminants.3. Using a lightly moistened cloth, gently wipe down the keyboard; including the keys
and any surface where contact occurs.
Xerox Nuvera User Guide and Training Aid (UGTA) for Software Version 9.3/10.312-4
Cleaning Procedures

13Setting Up Complex Jobs
In addition to running basic jobs, you can also process more complex jobs such as:
• Converting single-sided (simplex) documents into 2-sided (duplex) documents
• Creating booklets
• Creating folded documents
• Printing on tabbed stock
• Running jobs with several types of paper stock
• Collate sets
• Adding pages to a document
• Using Background Forms
To learn about book printing productivity when setting up your job to print stock greaterthan 9.0 inches wide up to 9.5 inches wide, refer to Running User Diagnostics.
To learn more about the more complex tasks the Xerox Nuvera is capable of processing,explore the links at the left.
Printing/Copying on Tabbed and OrderedStockBecause of the special procedures required to use tabs, take time to review this sectionbefore attempting to use tabs with the Xerox Nuvera .
NOTEFor information on loading tabbed stock in the Sheet Feed Module, see Using theFeed Module Tab Guides. You must have the Tabs Guide installed in the feed traythat contains the tabbed stock.
NOTEPre-cut tabs can only print 1-sided. Full-cut tabs can print on both sides, either simplexor duplex.
For systems with a Multifunction Finisher (MFF)• Use only reverse collated tabs.
13-1Xerox Nuvera User Guide and Training Aid (UGTA) for Software Version 9.3/10.3

• Load paper according to the labels on the feed trays (5, 4, 3, 2, 1 with 5 being on top)with tabs on the trail edge.
• Program feed trays.
• Run job N-1, face-up.
• If printing on 8.5x11" tabs, set the properties for the tabs as single-sided ExceptionPages and set image shift to 1/2".
• If using preprinted tabs, add as Inserts.
• If the job uses hole-punched tabs and hole-punched body stock, make sure the bothstocks are loaded in the tray with the hole-punched edge leading.
• The system assumes tabs are right-edge portrait or bottom-edge landscape. If thejob is different you may need to select rotate 180 for the entire job.
• If using Build Job to program the tabs job, selectBuild Job Type > Contains Tab Stock or Envelopes.
• Tabs cannot be loaded in the Insertion Module.
For systems with a DS3500/DS5000 or BFM type finishers• Use only forward collated tabs.
• Load paper according to the labels on the feed trays ( 1, 2, 3, 4, 5 with 1 being ontop) with tabs on the trail edge.
• Program media for feed trays.
• Run job 1-N, face-down.
• If printing on 8.5x11" tabs, set the properties for the tabs as single-sided ExceptionPages and set image shift to 1/2".
• If using preprinted tabs, add as Inserts.
• If the job uses hole-punched tabs and hole-punched body stock, make sure the bothstocks are loaded in the tray with the hole-punched edge leading.
• The system assumes tabs are right-edge portrait or bottom-edge landscape. If thejob is different you may need to select rotate 180 for the entire job.
• If using Build Job to program the tabs job, selectBuild Job Type > Contains Tab Stock or Envelopes.
• Tabs can be loaded in the Insertion Module.
For the Xerox Nuvera 200/288 Perfecting Production System -Using Media Optimization mode for tabs
You can print jobs that contain a mix of sizes and media, including full-cut and pre-cuttabbed stock. If you need to print a job containing 8.5 x 11 inch paper, for example,containing 9 x 11 inch or A4 pre-cut tabs to be imaged, you must first enable thePre-Cut Tabs selection from the Media Optimization mode in the user interface. Thisprovides you with the best throughput and productivity rate when printing with tabbedstock.
Xerox Nuvera User Guide and Training Aid (UGTA) for Software Version 9.3/10.313-2
Setting Up Complex Jobs
Use Media Optimization mode to increase your job's productivity rate otherwise affectedby printing the tab portion of a duplex job, especially pre-cut tabs.
• If you are running a job that does not contain tabs, select Normal Mode from theMedia Optimization Switches for the best throughput rate.
• If you are printing on any size pre-cut tabbed stock, or printing on full-cut tabbedstock greater than 8.5 inches (215.9 mm) in the process direction, select Pre-Cut Tabsfrom the Media Optimization Switches window.
CAUTIONThe maximum throughput rate when the Media Optimization Switch is set toPre-Cut Tabs is 240 ipm, regardless of whether the job contains tabbed stock.Therefore, make sure the Media Optimization Switch is set to Normal Modewhen printing jobs without cut tabs or if the tabbed stock is smaller than 8.5inches (215.9mm).
To enable Media Optimization mode when printing with tabs to be imaged:1. Load paper according to the labels on the feed Trays (1, 2, 3, 4, 5 with 1 being on
top) with the tabs on the trail edge. If the job uses hole-punched tabs andhole-punched body stock, make sure both stocks are loaded in the tray with thehole-punched edge leading. Use only forward collated tabs.
2. Program media for the feed trays and run job 1-N, face-down.3. The system assumes tabs are right-edge portrait or bottom-edge landscape. If the
job is different, you may need to select rotate 180 for the entire job.4. From the FreeFlow Print Server user interface, select Printer > Media Optimization.
The window containing Media Optimization Switches displays.5. Select Pre-Cut Tabs and OK. You are now running in Pre-Cut Tab mode and the job
will print up to 240 ipm, regardless of whether or not the job contains tabs.6. When you finish running jobs that include cut tabs, make sure you disable Pre-Cut
Tab mode by first selecting Printer > Media Optimization and then Normal fromthe Media Optimization Switches dialog.
To set up and use ordered stock
Ordered stock is paper with multiple pieces, such as a carbonless form, multi-part coloredstocks, etc., which need to be kept in a certain sequence.
Load tray with ordered stock1. On the Home Screen, click the Paper Trays button.2. Double-click or right-click a fully adjustable tray row.
A Tray Properties window appears.3. Enter all choices pertaining to the stock you wish to load into the tray.4. In the Type pull-down menu, choose Ordered Stock from the list of stock types.5. Enter any descriptive name for the ordered stock (ex., "Carbonless" or "5-part Color")
in the Type text box (the cursor should have automatically placed itself there.). Thisinformation will appear in the Type column of the Trays tab.
13-3Xerox Nuvera User Guide and Training Aid (UGTA) for Software Version 9.3/10.3
Setting Up Complex Jobs

6. In the Sequence section, enter a number. This coincides with the number of parts inyour ordered stock.For example, if want to load a 3 part carbonless paper stock, enter 3 in the Sequencetext box.
7. Open the fully adjustable tray you just configured, as identified in the Tray Typecolumn of the Paper Trays window.
8. Load ordered stock that matches the settings you made in the Tray Properties window.For information on proper loading, see Recommendations for Paper Usage.
9. Click OK or Apply.
Submit job and choose ordered stock
With a tray properly loaded and configured with loaded stock, you are ready to submita job which uses ordered stock.1. Initiate a print or copy job. For example, on a copy job, select Loaded Stock from
the Paper Stock menu on the Basic tab.2. A list of loaded stock types appears. Choose the ordered stock you previously
configured and loaded.3. Make any other programming choices.4. When satisfied with your settings, click Copy or Print.
NOTEWhen using tabbed or ordered stocks the system may instruct you to reorderthe stock in the tray to the first position if events such as a multifeed occur. Anytime a tray containing ordered stock is cycled, the system assumes that the stockin the tray has been reset to the first position.
Use Media Optimization Mode to optimize job recovery on jobs withSerialized Stocks
You can print jobs using serialized stocks, such as checks or statements, and disable autosystem job recovery. The system will require more active operator intervention tomanually insure proper job recovery following system shutdowns. A message will indicatewhen this media optimization mode is enabled.
If a system fault condition occurs and requires a dynamic purge of sheets, the machinewill shut down after the purge is completed. Similarly, if the system shuts down hardwith a fault condition, after clearing the jam the system will cycle up, purge the paperpath contents, and shut down again. After both of these two types of conditions, a statusmessage will display to instruct the operator about job recovery. Be sure to disableSerialized Stock Mode when finished to restore full auto job recovery.
To enable Serialized Stocks mode:1. From the FreeFlow Print Server user interface, select Printer > Media Optimization.
The window containing all selections displays. Serialized Stock is above the areacontaining Media Optimization Switches.
2. Select Serialized Stock Mode and OK.You are now running in Serialized Stock mode which will print your job as programmedand will only prompt you for job recovery assistance following a system fault condition.
Xerox Nuvera User Guide and Training Aid (UGTA) for Software Version 9.3/10.313-4
Setting Up Complex Jobs

3. When you have completed running jobs that include serialized stock, make sure youexit the Serialized Stock mode by selecting Printer > Media Optimization and clearingSerialized Stock Mode from inside the window containing the selections.
For more information, see Using Media Optimization Mode on the Xerox Nuvera 200/288EA/MX Perfecting Production System.
More on loading tabbed stock and other special papers
Load stock in the orientation indicated on the feed tray labels.
Programming Tabs with 2-sided Original for Tab Images
To program a tab job using 2-sided originals with images for the tabs, program as specialpage exceptions on tab stock. Special page exception programming applies to the printedoutput; exception pages do not affect scanned input. Programming a 1-sided exceptionpage for the tab image tells the system to print the page as 1-sided output, whichautomatically forces the next image to be on the next side 1 in the output. To successfullyprogram the job:1. Create a set of 1-sided originals to use in the SDDF using 2-sided to 1-sided output.
Remove the excess side 2 blanks from the stack, load them in the SDDF, and programthe job using 1-sided to 2-sided output. (This is how the job would be run on a 5090.)
2. Scan the 2-sided input with all of the Copy job and exception page programming.However, instead of printing the job, save it.
3. Use the Editor feature to remove the excess blank pages prior to printing the job.
Supported Tab Media
The Xerox Nuvera 200/288 EA/MX Perfecting Production System supports the Xerox tabmedia (9 x 11 inches) listed in the following tables. If you use tabs other than thoselisted below, you may experience questionable results.
NOTEIf you are printing a job with preprinted tabs, program the job using ExceptionPages/inserts. For more information on printing with preprinted tabs, refer to AddingPages to your Document with the SFM Insertion Module. For information on printingwith preprinted tabs on a Multifunction Finisher Pro Plus, refer to MultifunctionFinisher (MFF) Specifications.
13-5Xerox Nuvera User Guide and Training Aid (UGTA) for Software Version 9.3/10.3
Setting Up Complex Jobs
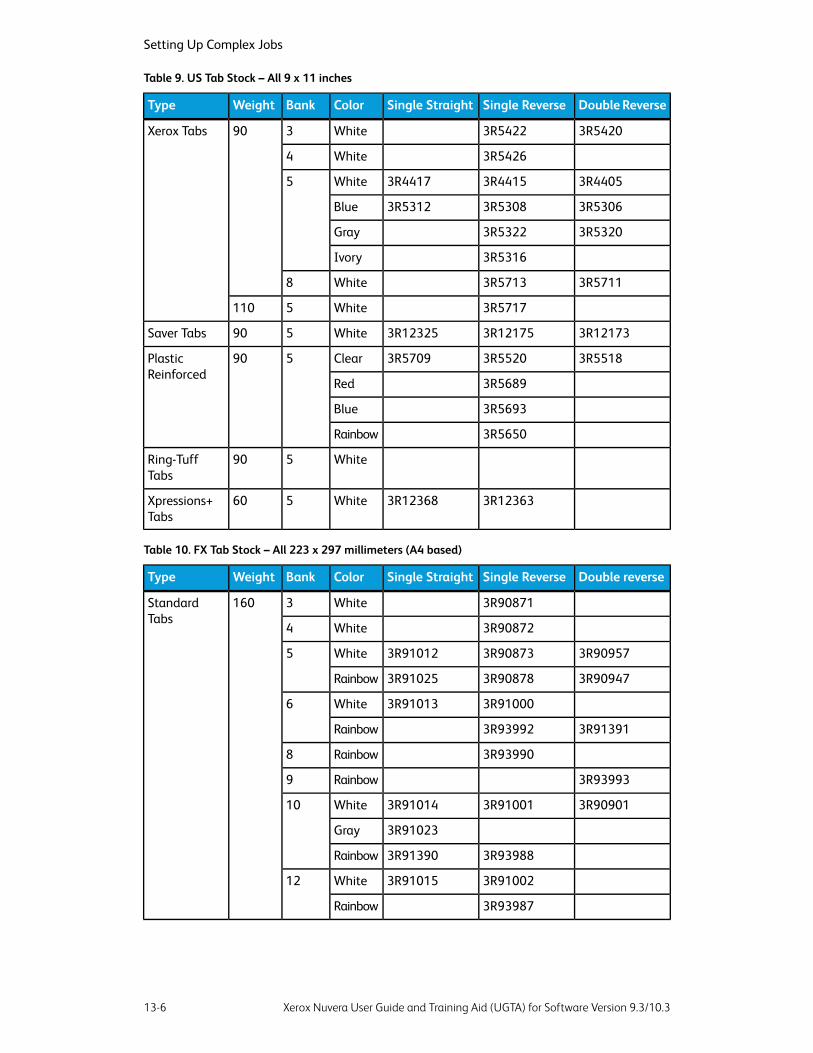
Table 9. US Tab Stock – All 9 x 11 inches
Double ReverseSingle ReverseSingle StraightColorBankWeightType
3R54203R5422White390Xerox Tabs
3R5426White4
3R44053R44153R4417White5
3R53063R53083R5312Blue
3R53203R5322Gray
3R5316Ivory
3R57113R5713White8
3R5717White5110
3R121733R121753R12325White590Saver Tabs
3R55183R55203R5709Clear590PlasticReinforced
3R5689Red
3R5693Blue
3R5650Rainbow
White590Ring-TuffTabs
3R123633R12368White560Xpressions+Tabs
Table 10. FX Tab Stock – All 223 x 297 millimeters (A4 based)
Double reverseSingle ReverseSingle StraightColorBankWeightType
3R90871White3160StandardTabs
3R90872White4
3R909573R908733R91012White5
3R909473R908783R91025Rainbow
3R910003R91013White6
3R913913R93992Rainbow
3R93990Rainbow8
3R93993Rainbow9
3R909013R910013R91014White10
3R91023Gray
3R939883R91390Rainbow
3R910023R91015White12
3R93987Rainbow
Xerox Nuvera User Guide and Training Aid (UGTA) for Software Version 9.3/10.313-6
Setting Up Complex Jobs

Double reverseSingle ReverseSingle StraightColorBankWeightType
3R97229White5160LaminatedTabs
3R972333R97234Rainbow
3R97230White10
3R972310White5200Colotech Tabs
3R97232White10
NOTEOn Tab stock, intermittent marks from photoreceptor seams may be seen on thetabbed area of the media.
For more information, see Loading Special Stock for Proper Finishing Output
Using the Feed Module Tab GuidesUse the Feed Module Tab Guides to improve the feeding of tab stock from any tray inthe Feed Module.
NOTEDo not use tab stock unless you install the appropriate Tab Guide in the paper traywhere the tab stock is loaded.
There are two Tab Guides:
• The A4/11" Tab Guide
• The A5/5.5" Tab Guide
Both of the Tab Guides are mounted on brackets or in a molded pocket located insidethe Feed Module Front Door.
Installing the Feed Module Tab Guides1. Program your job as you normally would, including programming of Tabs stock as
either the main body of the job or as special pages or inserts.
13-7Xerox Nuvera User Guide and Training Aid (UGTA) for Software Version 9.3/10.3
Setting Up Complex JobsTable 10. (continued)
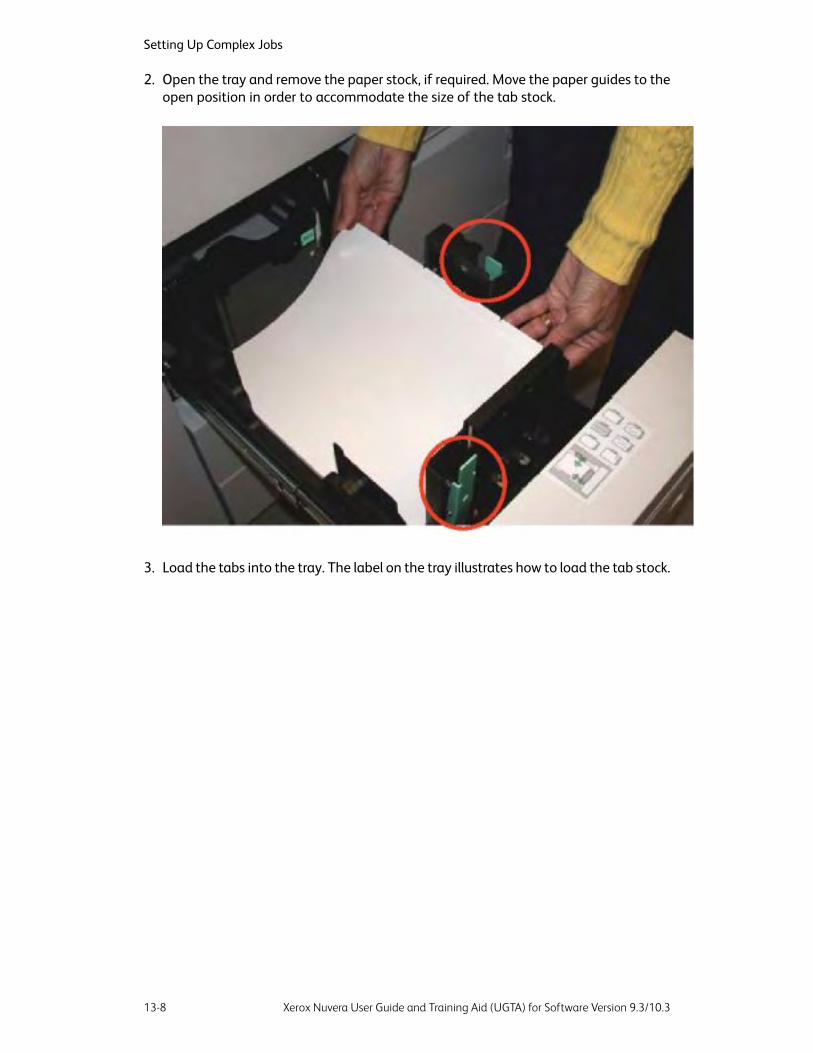
2. Open the tray and remove the paper stock, if required. Move the paper guides to theopen position in order to accommodate the size of the tab stock.
3. Load the tabs into the tray. The label on the tray illustrates how to load the tab stock.
Xerox Nuvera User Guide and Training Aid (UGTA) for Software Version 9.3/10.313-8
Setting Up Complex Jobs
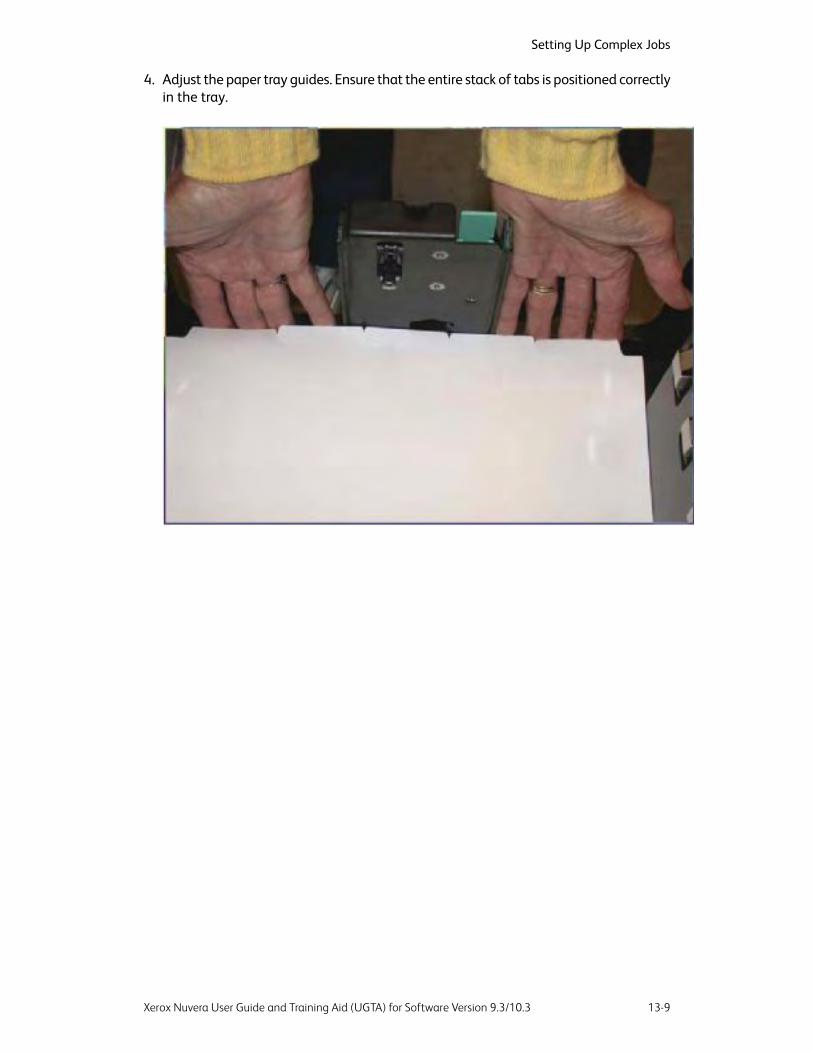
4. Adjust the paper tray guides. Ensure that the entire stack of tabs is positioned correctlyin the tray.
13-9Xerox Nuvera User Guide and Training Aid (UGTA) for Software Version 9.3/10.3
Setting Up Complex Jobs

5. Adjust any tabs that are misaligned.
Xerox Nuvera User Guide and Training Aid (UGTA) for Software Version 9.3/10.313-10
Setting Up Complex Jobs

6. Ensure that standard, uncoated tab stock is loaded a minimum inch (12.7 mm) belowthe MAX line.
Approximately 100 laminated or coated tabs may be loaded at one time; this amountis significantly less than standard, non-coated tabs. If a misfeed occurs while usinglaminated or coated tabs, remove some of the tabs from the tray.
13-11Xerox Nuvera User Guide and Training Aid (UGTA) for Software Version 9.3/10.3
Setting Up Complex Jobs

7. Open the Feed Module Front Door. Remove the appropriate Tab Guide (A4/11 orA5/5.5) from the Feed Module bracket or the molded pocket on the front door.
Xerox Nuvera User Guide and Training Aid (UGTA) for Software Version 9.3/10.313-12
Setting Up Complex Jobs

8. Install the appropriate Tab Guide (A4/11 or A5/5.5). Align the Tab Guide with thePaper Tray Guide.
13-13Xerox Nuvera User Guide and Training Aid (UGTA) for Software Version 9.3/10.3
Setting Up Complex Jobs

9. Ensure that the Tab Guide is positioned underneath the actuator arm of the PaperTray Guide.
Xerox Nuvera User Guide and Training Aid (UGTA) for Software Version 9.3/10.313-14
Setting Up Complex Jobs

Removing the Feed Module Tab Guides1. Lift the Tab Guide until it touches the bottom side of the actuator arm.
13-15Xerox Nuvera User Guide and Training Aid (UGTA) for Software Version 9.3/10.3
Setting Up Complex Jobs

2. Rotate the Tab Guide toward the tab stock to disengage the guide from the actuatorarm.
Xerox Nuvera User Guide and Training Aid (UGTA) for Software Version 9.3/10.313-16
Setting Up Complex Jobs

3. Push the Tab Guide forward until the actuator arm is clear of the Tab Guide.
4. Remove the Tab Guide.
13-17Xerox Nuvera User Guide and Training Aid (UGTA) for Software Version 9.3/10.3
Setting Up Complex Jobs
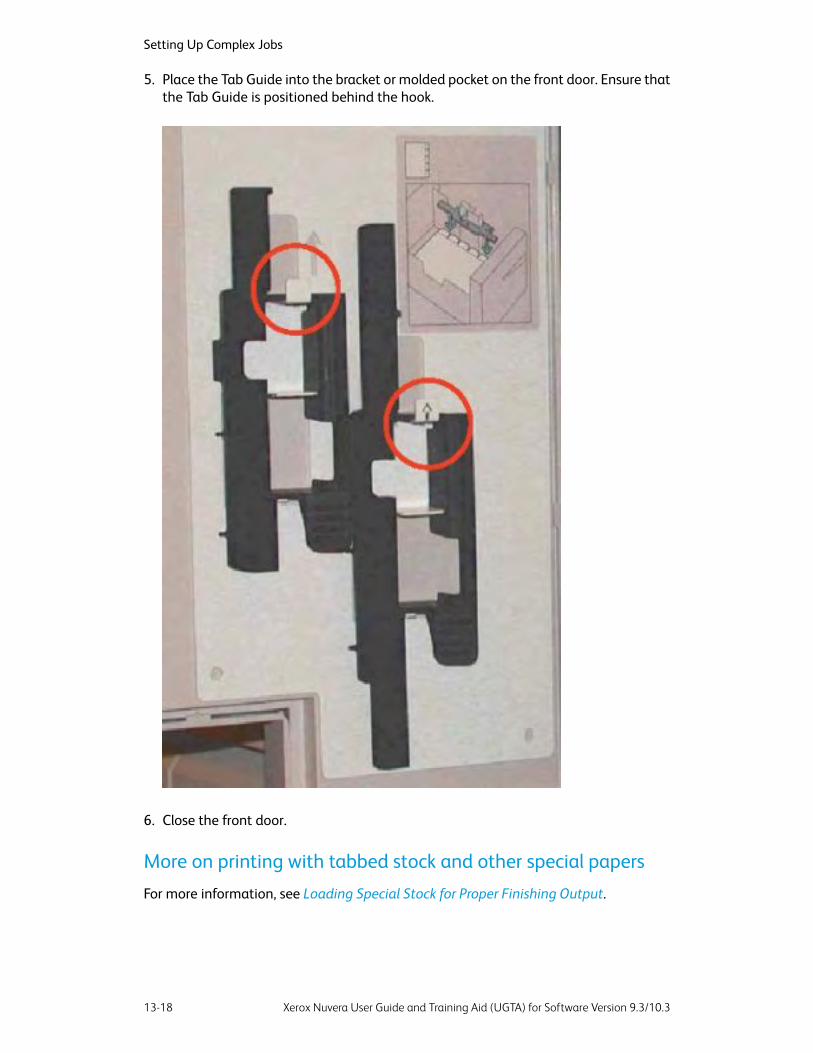
5. Place the Tab Guide into the bracket or molded pocket on the front door. Ensure thatthe Tab Guide is positioned behind the hook.
6. Close the front door.
More on printing with tabbed stock and other special papers
For more information, see Loading Special Stock for Proper Finishing Output.
Xerox Nuvera User Guide and Training Aid (UGTA) for Software Version 9.3/10.313-18
Setting Up Complex Jobs

14Using Media OptimizationMode on the Xerox Nuvera200/288 EA/MX PerfectingProduction System
You can use the Media Optimization Mode for maximizing productivity in the followingjob situations:
• Pre-cut tabs
• Small stock mixed with mostly large stock
• Wide Stocks measuring 9 - 9.5 process direction
• Optimization of job recovery for jobs containing Serialized Stocks
Optimizing productivity for jobscontaining Pre-cut TabsYou can print jobs that contain a mix of sizes and media, including full-cut and pre-cuttabbed stock. If you need to print a job containing 8.5 x 11 inch paper, for example,containing 9 x 11 inch or A4 pre-cut tabs to be imaged, you must first enable thePre-Cut Tabs selection from the Media Optimization mode in the user interface. Thisprovides you with the best throughput and productivity rate when printing with tabbedstock.
Use Media Optimization mode to increase your job's productivity rate otherwise affectedby printing the tab portion of a duplex job, especially pre-cut tabs.
• If you are running a job that does not contain tabs, select Normal Mode from theMedia Optimization Switches for the best throughput rate.
14-1Xerox Nuvera User Guide and Training Aid (UGTA) for Software Version 9.3/10.3

• If you are printing on any size pre-cut tabbed stock or printing on full-cut tabbedstock greater than 8.5 inches (215.9 mm) in the process direction, select Pre-Cut Tabsfrom the Media Optimization Switches window.
CAUTIONThe maximum throughput rate when Media Optimization Switch is set toPre-Cut Tabs is 240 ipm, regardless of whether the job contains tabbed stock.Therefore, make sure the Media Optimization Switch is set to Normal Modewhen printing jobs without cut tabs or if the tabbed stock is smaller than 8.5inches (215.9mm).
To enable Media Optimization mode when printing with tabs to be imaged:1. Load paper according to the labels on the feed Trays (1, 2, 3, 4, 5 with 1 being on
top) with the tabs on the trail edge. If the job uses hole-punched tabs andhole-punched body stock, make sure both stocks are loaded in the tray with thehole-punched edge leading. Use only forward-collated tabs.
2. Program the media for the feed trays and run job N-1, face-down.3. The system assumes tabs are right-edge portrait or bottom-edge landscape. If the
job is different, you may need to select rotate 180 for the entire job.4. From the FreeFlow Print Server user interface, select Printer > Media Optimization.
The window containing Media Optimization Switches displays.5. Select Pre-Cut Tabs and OK.
You are now running in Pre-Cut Tab mode and the job will print up to 240 ipm,regardless of whether or not the job contains tabs.
6. When you finish running jobs that include cut tabs, make sure you disable Pre-CutTab mode by first selecting Printer > Media Optimization and then Normal fromthe Media Optimization Switches dialog.
Optimizing productivity for jobscontaining predominantly large stockmixed with small stockYou can print jobs that contain a mix of sizes and media, such as ledger size with lettersize. When jobs contain mostly larger stock (> 50%) along with a smaller percentage ofsmaller stock, you should select Large Stock. In general, progressively larger stocks resultin a slower overall print rate. However, when smaller stocks are re-encountered duringa job, the time it takes the printer to re-adjust to the higher print speed of the smallerstocks can be a detriment to the overall print speed of the job containing mostly largerstocks.
Xerox Nuvera User Guide and Training Aid (UGTA) for Software Version 9.3/10.314-2
Using Media Optimization Mode on the Xerox Nuvera 200/288 EA/MX Perfecting ProductionSystem

When running Media Optimization for Large Stock, the printer will not re-adjust the printrate when encountering the smaller stock but will instead maintain the print rate of thelargest stock encountered even when printing on smaller stocks. However, the printerwill re-adjust the print rate for even larger stocks as they are encountered during a joband then maintain that print rate for all stocks. The effect will be to achieve an overallprint rate for the job that is consistent with the maximum print rate for the largest stock.The effect of Large Stock mode will continue until the jobs are complete and the printergoes into standby. Unless Large Stock mode is cleared on the FreeFlow Print Server userinterface, all subsequent jobs will run in this manner.
NOTEThe throughput rate when Media Optimization Switches is set to Large Stockwill be consistent with the rate of the largest stocks encountered. Therefore, forjobs containing a low percentage of larger stocks make sure Media OptimizationSwitches is set to Normal. This allows the printer to re-adjust to the higher printspeed of smaller stock.
To enable Large Stock mode:1. From the FreeFlow Print Server user interface, select Printer > Media Optimization.
The window containing Media Optimization Switches displays.2. Select Large Stock and OK.
You are now running in Large Stock mode and the job will adjust print speed whenencountering larger stocks but not re-adjust for smaller stocks.
3. When you finish running jobs that include predominantly large stocks, make sure youclear Large Stock mode by selecting Printer > Media Optimization and then selectingNormal from the Media Optimization Switches dialog.
Optimizing productivity for jobscontaining wide stocks measuring 9 - 9.5process directionFor printing systems that do not use the Basic Finishing Module (BFM), selectingWide Stocks Optimize Print Speed will result in these stock sizes running at a rate of240 ipm as opposed to 192 ipm when not selected. When trying to select this mode formachines with the BFM, a fault status is raised which prevents the printer from running.The Wide Stocks selection must be cleared to lower this fault. With the BFM, themaximum rate is 192 ipm for these stock sizes.
To enable Wide Stocks mode:1. From the FreeFlow Print Server user interface, select Printer > Media Optimization.
The window containing all selections displays. Wide Stocks is above the areacontaining Media Optimization Switches.
2. Select Wide Stocks (9.0 - 9.5 process direction) Optimize Print Speed and OK.You are now running in Wide Stocks mode which allows the printer to run these stocksizes at a print rate of 240 ipm.
There is no need to clear the Wide Stocks selection unless problems are encounteredrunning these stock sizes. The Wide Stocks mode can be left on permanently.
14-3Xerox Nuvera User Guide and Training Aid (UGTA) for Software Version 9.3/10.3
Using Media Optimization Mode on the Xerox Nuvera 200/288 EA/MX Perfecting ProductionSystem

Optimizing job recovery for jobscontaining Serialized StocksYou can print jobs using serialized stocks, such as checks or statements, and disable autosystem job recovery. The system will require more active operator intervention tomanually insure proper job recovery following system shutdowns. A message will indicatewhen this media optimization mode is enabled.
If a system fault condition occurs and requires a dynamic purge of sheets, the machinewill shut down after the purge is completed. Similarly, if the system shuts down hardwith a fault condition, after clearing the jam the system will cycle up, purge the paperpath contents, and shut down again. After both of these two types of conditions, a statusmessage will display to instruct the operator about job recovery. Be sure to disableSerialized Stock Mode when finished to restore full auto job recovery.
To enable Serialized Stocks mode:1. From the FreeFlow Print Server user interface, select Printer > Media Optimization.
The window containing all selections displays. Serialized Stock is above the areacontaining Media Optimization Switches.
2. Select Serialized Stock Mode and OK.You are now running in Serialized Stock mode which will print your job as programmedand will only prompt you for job recovery assistance following a system fault condition.
3. When you have completed running jobs that include serialized stock, make sure youexit the Serialized Stock mode by selecting Printer > Media Optimization and clearingSerialized Stock Mode from inside the window containing the selections.
Xerox Nuvera User Guide and Training Aid (UGTA) for Software Version 9.3/10.314-4
Using Media Optimization Mode on the Xerox Nuvera 200/288 EA/MX Perfecting ProductionSystem
15About Impositions
Imposition is the process of positioning multiple page images on a single output sheetto be printed at one time. Imposition has no effect on the content of any individualpage image; it only affects the size of the page image and where the pages are placedon an output sheet.
Imposition options include the ability to create 2-up to multiple-ups documents includingcustom multiple-up For a custom multiple-up, the Xerox Nuvera automatically calculateshow many images will fit on the sheet size selected for the job. Imposition settings areprovided for setting gutter margins and Repeated, Sequential, and Alternating imageon sheet outputs.
A Signature is the name given to a single sheet of paper or other substrate after it hasbeen folded. Many books are made up of signatures. The manner in which signaturesare bound influences the way that they must be printed.
For more information about setting up impositions, see Setting Imposition Options.
Impositions and Saddle Stitched BooksSaddle stitched books and calendars consist of all the signatures nested in one groupwith staples inserted at the fold. When signatures are nested, the fold, or gutter, getswider the further a sheet is from the centerfold (see Figure 1).
NOTEPage frame shifting is done automatically.
Therefore, page frames must be shifted slightly to compensate for the thickness of thegutter. The page frames are moved slightly away from the fold and toward the outsideedge. This results in the outside margin becoming narrower. When finished, the sheetscloser to the centerfold (with the narrower fold) will have more trimmed from the outsidemargin. When done properly, the images will appear in the same position on each pageas the pages are flipped.
15-1Xerox Nuvera User Guide and Training Aid (UGTA) for Software Version 9.3/10.3

Figure 1. (left) Nested signatures forming a saddle stitched book. (right) Stacked signatures forminga perfect-bound book.
Figure 2. Page order for a simple 4-page book.
Input pages are on the left. Output signature sheet is on the right. Numbers inparentheses represent page numbers on back side of the signature sheet.
Figure 3. Page order for a calendar signature.
Input pages are on the left. Output signature sheet is on the right. Numbers inparentheses represent page numbers on back side of the signature sheet.
Figure 4. (Top) Example of a signature layout for a perfect bound book. (Bottom) Example of a signaturelayout for a saddle stitched book.
TIPTo become familiar with both print and copy impositions, refer to the Xerox Nuveraonline help.
Impositions and Perfect Bound BooksA perfect bound book consists of signatures gathered next to each other, not nested, sothat they can be attached together at the bind edge with glue. The groups are in multiplesof 4 pages (1 printed output sheet with 2 images on the front and 2 on the back).
Xerox Nuvera User Guide and Training Aid (UGTA) for Software Version 9.3/10.315-2
About Impositions

The page images are automatically centered within the page frame. The user mayrequest an Image Shift. This will shift the entire page frame on the output sheet. Marginsmay also be specified; these will reduce the size of a page frame. The system must thenreduce the image to fit within the smaller page frame. If Image Shifts are combinedwith Margins, the image cannot move outside the margin. Therefore, any part of theimage that goes outside of the margin will be cropped.
FiguresFigure 5. (left) Nested signatures forming a saddle stitched book. (right) Stacked signatures forminga perfect-bound book.
Figure 6. Page order for a simple 4-page book.
Input pages are on the left. Output signature sheet is on the right. Numbers inparentheses represent page numbers on back side of the signature sheet.
Figure 7. Page order for a calendar signature.
Input pages are on the left. Output signature sheet is on the right. Numbers inparentheses represent page numbers on back side of the signature sheet.
Figure 8. (Top) Example of a signature layout for a perfect bound book. (Bottom) Example of a signaturelayout for a saddle stitched book.
TIPTo become familiar with both print and copy impositions, refer to the Xerox Nuveraonline help.
15-3Xerox Nuvera User Guide and Training Aid (UGTA) for Software Version 9.3/10.3
About Impositions

Setting Imposition OptionsImpositions, or Printer Spreads are a way to arrange page data out of order, so thatwhen printed, it will be in the correct order when folded, bound or otherwise finished.
For more information, see About Impositions.
To set imposition options1. Select the Job Manager button, then select your imposition print job and right-click
to select Properties. (Or, for systems with a scanner, place originals in the documenthandler.)
2. In the Properties window, click the Output tab, then the Layout button.3. Click the Layout Style pull-down menu. A list of imposition types appears.
• 1, 2, 4, 6, 8, 9, 16 up
• Custom multiple-up - automatically determines the number of images per sheetbased upon image size and sheet size
• Booklet
• Perfect Booklet
Other imposition settings include:
• Gutter margins
• Repeated, Sequential or Alternating image placement
NOTEDepending on the type of job you are working on -- print or copy -- you may seedifferent imposition type choices.
4. When satisfied with your settings, click OK.5. Make any other job programming choices and, depending on your system, click
Copy, Scan or Print.
NOTEIf you forward a job from one machine to another, the forwarded job will loseits imposition attributes as well as Printer Darkness settings and annotationattributes.
Xerox Nuvera User Guide and Training Aid (UGTA) for Software Version 9.3/10.315-4
About Impositions
Related Hints and TipsHint/Tip DescriptionSubtopic
FreeFlow Print Server supports automaticcreation of Signature Booklets and othermulti-up imposition formats. This can be donefrom any Print job in the active or inactive joblist or from the Print from File pathway. This issupported for jobs submitted from print driversand from print ready print submission tools suchas FreeFlow Print Manager and the WebUI.Suggested workflow for creating such jobs is todo one of the following:
Queue for imposition
1. Hold the job and reprogram it to performthe desired imposition.
2. Setup a queue with the default Layoutset to the desired imposition.
3. Submit the job directly to that queueand the imposition will be applied to thejob.
The Imposition features in the print driversoffer slightly different options and producedifferent output than the Imposition featuresavailable in the Print from File pathway on themachine.
Imposition in print driver
TIPTo become familiar with both print and copy impositions, refer to the Xerox Nuveraonline help.
15-5Xerox Nuvera User Guide and Training Aid (UGTA) for Software Version 9.3/10.3
About Impositions

Xerox Nuvera User Guide and Training Aid (UGTA) for Software Version 9.3/10.315-6
About Impositions
16Reducing or EnlargingImages
When in Copy mode, use the Reduce/Enlarge controls located on the Basic tab. Usingthese controls, you could for example, copy an original image on an 11 by 17 inch sheet,and shrink it to fit on a standard 8.5 by 11 inch sheet. Controlling output size is usefulif you need to archive hardcopy in a certain stock size, but original documents vary insize.
To reduce or enlarge the image1. Determine what size your output image will be copied to. Make the appropriate choice
in the Reduce/Enlarge pull-down menu, located on the Copy Basic tab.2. Press Copy.
NOTEIt is also possible to enter custom size values in the Reduce/Enlarge dialog. Clickon the User Specified or Independent X-Y menu choices.
Entering a customreduction/enlargement valueIf none of the preset reduction/enlargement values are acceptable, enter your own value.1. Select User Specified or Independent X-Y from the Reduce/Enlarge pull-down menu.2. Enter the value of reduction or enlargement. Entering 100% will yield no change to
the image size. Entering a value over 100% will enlarge the image. Entering a valueunder 100% will reduce the image.
16-1Xerox Nuvera User Guide and Training Aid (UGTA) for Software Version 9.3/10.3

Xerox Nuvera User Guide and Training Aid (UGTA) for Software Version 9.3/10.316-2
Reducing or Enlarging Images

17Adding Pages to aDocument
You can add pages of several types to any original document. This allows you to createprofessional quality document sets from otherwise disorganized and/or incompleteoriginals.
Types of added pages can include:
• Covers: may be a heavier paper stock, put on the front and back of a multi-pagedocument. Covers can be blank, printed on side 1 or both sides.
• Exception pages: allows you to program special characteristics for specific pages ora range of pages within a job (up to 1000 exception pages). For example, page 4 ofthe document can be programmed to print on pink paper and on side 1 only. Youcan also specify tabbed stock with the Exception Pages control. When printing onpre-cut tabs, you can only print on side 1. When printing on full cut tabs, you canprint on both sides.
• Inserts: An insert is a blank or pre-printed sheet of paper or other stock (such as atab) that is placed between the pages of the job. You can program up to 1000 insertsfor a job.
Paper trays must be loaded andprogrammed with the appropriate stocksThe key to successful page insertion is having the paper trays correctly programmedwith machine-compatible stocks. See Paper Tray Programming for details.
Basic workflow to insert pages into adocument(The following example procedure applies to both copy and print jobs)
17-1Xerox Nuvera User Guide and Training Aid (UGTA) for Software Version 9.3/10.3
Here's an example of how to program a copy job that includes inserts, exception pages,and covers. The steps to program a print job are very similar. The output will be a multi-page, 8.5 x 11 inch document, with Exception Pages (one-sided output) on the 2nd and3rd pages. In addition, there will be a one-page insert after the 3rd and 6th pages.Finishing includes front and back covers with a staple in the top left corner.1. If a copy job, place the original 2-sided (over 10 pages) document in the Document
Feeder.2. Verify that the paper supply trays are properly loaded and programmed with the
appropriate paper stocks.If they are not, and you need more information, see Paper Tray Programming.
3. From the Job Manager, set base job properties, such as 2-sided, paper stock, stapling,etc.
4. Select the Special Pages tab.5. Select the Exception Pages icon. Program From 2 to 3. Select stock size. Program
these pages for one-sided output. Select Add Exceptions.6. Close Job Exception window.7. Select the Inserts icon.8. Program the first insert for After page 3, Insert 1 Pages. Program the paper type,
size, etc. Select Add Inserts.9. Program the second insert for After page 6, Insert 1 Pages. Program the paper type,
size, etc. Select Add Insert.10. Close Inserts window.11. Select Front Cover icon.12. Program the cover to be printed on the outside only. Select the cover stock from the
tray you loaded with cover stock. Select Add Cover.13. Select Back Cover icon.14. Select None from the pull-down menu. Select the cover stock from the tray you loaded.
Select Add Cover.15. When satisfied with your settings, click Copy, Scan or Print.
System Level (Administrative) AddedPagesThe Xerox Nuvera can be configured to include Administrative information in each Joboutput.
• Banner pages
• Error pages
• Job attribute report
For more information about these types of pages, see Adding System Level Pages.
Xerox Nuvera User Guide and Training Aid (UGTA) for Software Version 9.3/10.317-2
Adding Pages to a Document

Adding System Level PagesThe Xerox Nuvera can be configured to add "system level" or "administrative" pages:
• Banner pages
• Error pages
• Job Attributes report
These administrative pages not only provide a useful way to separate jobs in a Finishertray, but also provide information about each job processed by the system.
Enabling System Level Pages
You need to logon as a System Administrator to enable or disable the system level pages.
To enable or disable the system level pages:1. Open a job or queue properties window.2. Perform one of the following:
• Under the Settings tab select Administrative Pages. Then enable or disable eachof the pages.
• For Production System queues, right-click on a queue and selectAdministrative Pages Control. Then enable or disable each of the pages.
Banner Pages
When enabled by your System Administrator, Banner Pages include the followinginformation:
• Job name
• Job sender
• Job recipient
• Banner Page message
• Date and Time of printing
• Number of copies
• Product name and software level/version
• Account number
• Job ID
• Server/Queue name
17-3Xerox Nuvera User Guide and Training Aid (UGTA) for Software Version 9.3/10.3
Adding Pages to a Document

Error Pages
When enabled by your System Administrator, Error Pages include the followinginformation:
• Job name
• Job sender
• Errors, Warnings
• Product name and software level/version
• Job ID
Job Attributes Report
The Job Attributes report is a summary of the job settings.
Xerox Nuvera User Guide and Training Aid (UGTA) for Software Version 9.3/10.317-4
Adding Pages to a Document

18Printing an Image ThatExtends to the Edge of thePage
Occasionally, you may need to print a document whose image extends beyond the edgeof the page. A document with a shaded background covering the entire page is a goodexample. Printing this type of image is called a "bleed". The ability to print full bleed(edge-to-edge) used to be only available through the use of offset printers. The XeroxNuvera platform is not a print to edge system due to potential image quality defectson the edge of the page. The system default is set for a 3 mm border erase. Border erasecan be customized from 0 to 6 mm for each side; Inboard, Outboard, Trail and Leadedge.
1. Select Printer and Switches.
2. On the right-side of the window, select the radio button next to Custom.
3. Change the measurements for each edge as desired.
4. Select Apply.
5. Select OK.
NOTEIf you are using Edge-to-edge printing and your originals have dark or solid edges,you may want to disable Electronic Hole Removal. If Electronic Hole Removal isenabled while Edge-to-edge printing and your originals have dark or solid edges,there is a possibility that your output will have unwanted markings along the darkor solid edge. For more information on using Electronic Hole Removal, see RemovingDrill Holes From Output.
18-1Xerox Nuvera User Guide and Training Aid (UGTA) for Software Version 9.3/10.3

Edge-to-edge printing workflow starts atclient desktop / driver, and ends at theXerox NuveraThere are three elements that work together to enable edge to edge printing:
• Correct system Edge Improvement settings at the Xerox Nuvera .
• A document created with edge-to-edge marking.
• Correct Margins settings in the Client driver.
NOTESee Printing a Job from your Networked PC for more details on client drivers.
Workflow to enable a "full-bleed" print job:1. At the Xerox Nuvera , click Printer > Switches. Place a checkmark in the
Edge Treatment Off box.The Edge Treatment must be off before sending the print job. Ask your SystemAdministrator to verify the system is configured in this way.
2. Create a document in a desktop application (Word, PhotoShop, Illustrator, etc.) thatincludes marking/data all the way to the edge of the page area.
3. In the client desktop application, select File > Print.The client driver window appears.
4. Click the Image Options tab. Click the Margins button.Refer to the client driver's online help for details about setting selections.
5. When done with the settings, click OK to send the document to the Xerox Nuvera .6. At the Xerox Nuvera , go to Job Manager.7. Find the job you just submitted. Double-click it.
The Job Properties window appears.8. When satisfied with your settings, click OK.
The document will be printed, and the marking extending to the edge of the outputpage will be visible.
Xerox Nuvera User Guide and Training Aid (UGTA) for Software Version 9.3/10.318-2
Printing an Image That Extends to the Edge of the Page

19Programming MultipleStocks in a Single Job
You can create new documents composed of different stocks, such as covers, tabs, normalstock, etc.
To program a job to use multiple stocksNOTEMake sure the paper trays are configured with the correct stocks. If you attemptto program a multi-stock job without the required stocks loaded, the system willgenerate a series of system alerts prompting you to load required stocks, slowingyour productivity. See Paper Tray Programming.
1. Set the properties for a job on the Xerox Nuvera user interface. See Copying yourDocument or Printing your Document for details.
2. Program papers trays with all stocks (cover stock, tabs, 8.5 x 11 white, 8.5 x 11 blue)necessary to process the job.
3. Follow the procedure for Adding Pages to a Document.4. In the user interface, click Print.
19-1Xerox Nuvera User Guide and Training Aid (UGTA) for Software Version 9.3/10.3

Xerox Nuvera User Guide and Training Aid (UGTA) for Software Version 9.3/10.319-2
Programming Multiple Stocks in a Single Job

20Adding Pages to yourDocument with the SFMInsertion Module
The SFM Insertion Module is either a 2-Tray or 4-Tray Sheet Feed Module used as apost-process inserter (pages do not go through the print engine). Use the SFM InsertionModule to add covers, inserts, or slip sheets to your documents. The SFM Insertion Modulefits between the print engine (or, if applicable to your configuration, the SheetEnhancement Module) and the finishing device.
NOTE: To learn how to insert covers, preprinted tabs or colored paper into your job usingthe Insertion Module on the Multifunction Finisher (MFF) Pro Plus, refer to Usingthe Multifunction Finisher (MFF) Pro Plus.
The addition of the SFM Insertion Module does not affect production speeds since coversand inserts are merged into the paper path after marking takes place, without requiringa gap in the pitch. For more information, see a description of About Pitch.
To Add Sheets with the SFM InsertionModulePick a stock that is loaded in the SFM Insertion Module, and program that on a blankinsert sheet or cover (through the Special Pages dialog).
The system should feed blank sheets from the SFM Insertion Module whenever possible.
NOTEPage insertion with the SFM Insertion Module may not occur when there is a blankpage in the actual document. The system software does not detect blank pagesembedded in documents, and will not trigger page insertion.
Alternatively, both of the SFM Insertion Module feed bins can be loaded with the samestock, allowing continuous uninterrupted production insertion of pre-printed stocks andthe addition of photographs and other sensitive documents that normally could bedamaged by heat from the fuser section of the printer.
20-1Xerox Nuvera User Guide and Training Aid (UGTA) for Software Version 9.3/10.3

Xerox Nuvera User Guide and Training Aid (UGTA) for Software Version 9.3/10.320-2
Adding Pages to your Document with the SFM Insertion Module

21Using Background Forms
A background form is a preprinted single page or multipage form or image you submitto the FreeFlow Print Server from your client workstation on which the Nuvera print orcopy job is overlaid and can be used repeatedly in a regular sequence.
When to use a background formIf you are printing a database report, a mailing, or personalized copies and variable dataof single or multipage forms where a background image is required, this feature savesprocessing time. The image or series of images are stored and RIPped at the printer.When you submit the personalized information, you don't have to reprocess the imagesfor each copy of your document. You merge the specified background form with theforeground job's variable data using job submission settings at the FreeFlow Print Server.
NOTEException pages and cover pages that contain job data are merged and printed withbackground forms. System generated pages including, banner pages, blank coverpages/page inserts/exceptions pages and error pages, do not contain job data andare not, therefore merged and printed with the background form.
How to create a background formYou will create the background form in the following steps. Once created and saved ona directory, CD or USB drive, you will create the variable data job that will be used andmerged with the background form. If the form file is not saved to a specified directory,it will automatically be RIPped and saved to the system's default folder(/opt/XRXnps/resources/bf).1. Create or open the image or form in the appropriate software application on your
client workstation.2. From the application's menu bar, select File to open a menu list.3. From the menu list that displays, select Print.
The Print window displays.4. Select the target printer to which the form job will be submitted.5. Select the Properties button.
The Document Properties window displays.
21-1Xerox Nuvera User Guide and Training Aid (UGTA) for Software Version 9.3/10.3

6. From the Paper/Output tab, select Normal Print from the Job Type field and selectCreate Background Form.
7. Select the Job Notes tab and type the name (up to 255 Roman characters) you wantfor the background form file in the Job Name field.This connects your variable data document to your background form without havingto go to your printer for the name assigned by the application and driver.
8. In the Document Properties window, click OK. You are returned to the Print window.Click OK.
9. Select Saved Background Form to create a form on the Xerox system that will bethe preprinted form.
10. Make sure to also save the original background form document you created to anarchive outside of the printer system for future jobs should the printer system losethe data.
Creating your variable data document1. To create the variable data document, open the document's word processing or
database application to create and process the variable data (such as your mailinglist, serial numbers, etc.).
2. Place the pages of the background form as a background image to help you line upthe variable data fields you'll be printing.
3. Place your variable data fields where you want them and then delete the backgroundimage.
Printing your variable data documentwith the background formWhen you print a variable data job with the background form, the document and formare merged and the resulting document appears as if it has been printed on top of apreprinted form.
Using your client application and workstation
To use your client application and workstation to program the final output documentsettings and submit the job to the FreeFlow Print Server:1. From the application toolbar, select the Merge to Printer icon.
The Merge Range window displays.2. Select the range of records you want to print and click OK.
The Print Window displays.3. Select your target printer and select the Properties button.
The Document Properties window displays.4. Select the Layout/Watermark tab and under the Background Form heading select
the Setup button.The Background Form Setup window displays.
Xerox Nuvera User Guide and Training Aid (UGTA) for Software Version 9.3/10.321-2
Using Background Forms

5. Select the Use Background Form button.6. In the Form Name field, type the name of the background form exactly as you entered
it when it was created.7. Click OK to accept your background form link and close the setup window.8. Click OK to accept the Xerox Job Ticket and close the properties window.9. Click OK to submit your variable data job to the printer where it will be merged with
the background form and the resulting output document printed.
Using Copy to create the final output document
If you are using Copy to create the final output document, (the copying feature is notavailable on the Xerox Nuvera 200/288 EA/MX Perfecting Production System):1. Select Copy Manager.2. Select the Advanced tab.3. Enter a Job Name.4. Under Destination select Save as Background Form.5. Select a save location. The default directory for background forms is:
/opt/XRXnps/Resources/bf.
Using a background form from the FreeFlow Print Server
To print a job using a background form from the FreeFlow Print Server.1. Select Job Manager and select a job in the Active or Inactive jobs list.2. Double-click on the job to open the Job Properties window.3. Select the Image Edit tab and select the Background Form button.4. Select Use Background Form checkbox.5. Select the background form you want to use from the Browse button.6. To identify how the merged form will be applied to the job output, select from one
of the following Apply Form Pages:
• Throughout Job: the background form will be applied to the foreground formuntil the foreground job printing is completed (cycles through job pagesrepeatedly).
• Once: the number of pages in the background form will be applied only once(cycles through job pages once) to the foreground job. Any remaining pages inthe foreground job will be printed without the merged form.
• Once, Then Repeat: the specified number of pages in the background form willbe applied and then repeated until the foreground job printing is completed (cyclesthrough the job once and then cycles repeatedly only from the entered From Pagelocation onward).
7. Enter horizontal and vertical Displacement values.Entered values shift the background form prior to merging with the document. Specifythe amount of shift (inches or mm) in the X or Y axis. A negative value shifts thebackground form to the right or downward. A positive value shifts the form to theleft or upward. The alignment values are determined from the lower left hand cornerof the page, independent of the orientation of the page.
21-3Xerox Nuvera User Guide and Training Aid (UGTA) for Software Version 9.3/10.3
Using Background Forms

8. Click OK.
NOTEAn example is an image or form (single or multipage document) that will bemerged in the FreeFlow Print Server with such information as a name/address,specific personal data, or serial number.
NOTEIf the background form image is larger than the output media, the system printsas much of the image as can fit on the media.
NOTEIf the background form image resolution differs from the resolution of the job,the printer scales the background form image data to match the resolution ofthe job prior to merging.
Managing/Deleting background formsIt is recommended that you store background forms on networked storage devices andnot at the Nuvera printer. This allows for optimal processing time.1. From the FreeFlow Print Server user interface, log on as System Administrator.2. From the menu bar, select Administration > Background Forms.
The Background Forms Manager displays.3. Select the background form you want to delete, right-click, and select Delete. Click
OK to confirm.
Related Hints and TipsHint/Tip DescriptionSubtopic
When using the Image Shift option with a jobthat also uses a Background Form, both thedata portion and the background form will beshifted by the Image Shift values.
Image Shift
Background Forms can be saved to CD but aBackground Form cannot be used directly froma CD. The background must be imported fromthe CD into the Background Form Repositoryusing the Background Form Manager and thenit will be available for use.
Saving to and importing from CD
The only job programming settings that can beapplied to a background form are Imposition,Annotation, and form programming. If you savethe form with other programming (such asimage shift and special pages), the SampleBackground Form option will not produceoutput that matches what you will see if youuse the form in an actual job.
Supported job programming
Xerox Nuvera User Guide and Training Aid (UGTA) for Software Version 9.3/10.321-4
Using Background Forms

Hint/Tip DescriptionSubtopic
Do not mix copy background forms with printvariable data if the background form containsimposition. Every other page will have the formand the data 180 degrees off from each other.
Variable data
To learn more about the advanced tasks the Xerox Nuvera is capable of processing,explore the links at the left.
21-5Xerox Nuvera User Guide and Training Aid (UGTA) for Software Version 9.3/10.3
Using Background Forms(continued)

Xerox Nuvera User Guide and Training Aid (UGTA) for Software Version 9.3/10.321-6
Using Background Forms

22Replacing Consumables
This section covers procedures for maintaining your Xerox Nuvera.
Consumables can be defined as any parts or supplies that need replacing periodicallyin order for the machine to perform all of its functions.
Click the links at the left to learn how to change or replace consumables.
For Customer Support telephone numbers and the reorder part numbers of supplies, goto Telephone numbers and World Wide Web address.
Replacing the Developer WasteContainerThe Developer Waste Container gets replaced after every 800,000 images. When themachine has reached the limit set for the Developer Waste Container, an alert will appearin the system messages portion of the user interface.
To replace the Developer Waste container
Double-click the system alert to see details about the action needed, instructions on howand where to return the used container, as well as the location of the container.
See Contacting Xerox to get the correct part number for this container.
Make sure there are no jobs running.1. Open the front access covers and identify the correct container.2. Prepare the new container for installation.3. Remove the used container.4. Insert the new container, making sure it is completely seated.5. Package the used container for return. Use the box and prepaid return label to return
the old unit to Xerox.
22-1Xerox Nuvera User Guide and Training Aid (UGTA) for Software Version 9.3/10.3
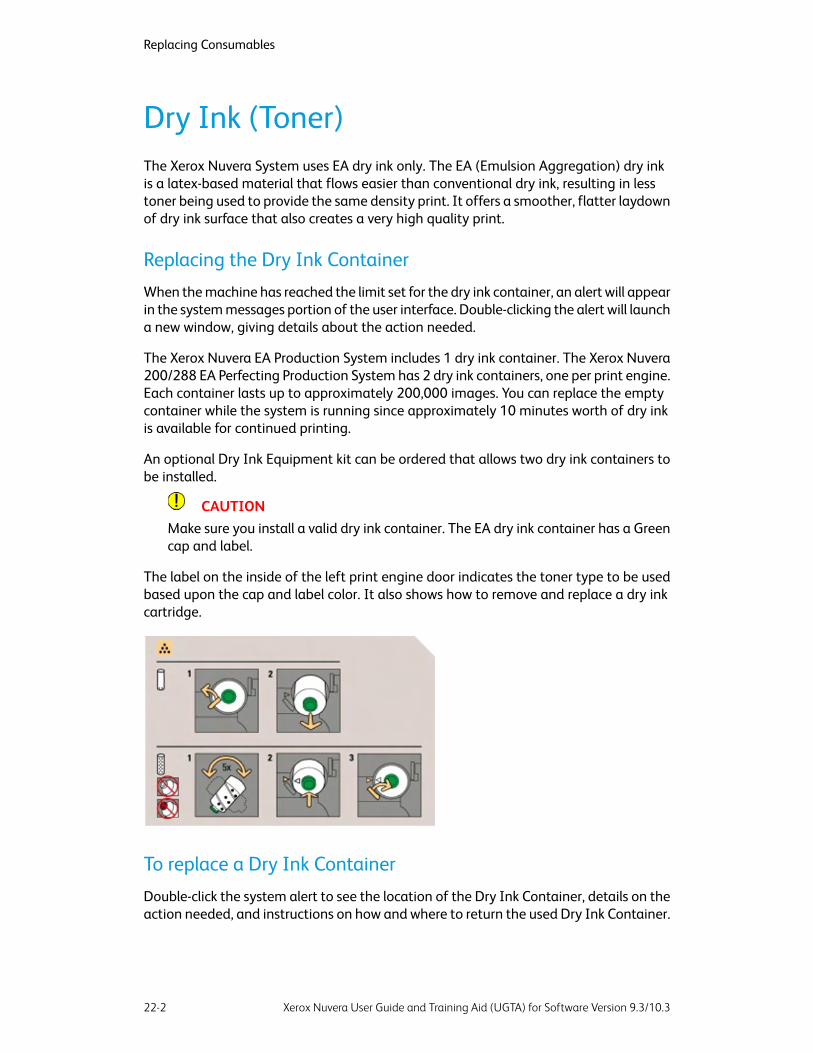
Dry Ink (Toner)The Xerox Nuvera System uses EA dry ink only. The EA (Emulsion Aggregation) dry inkis a latex-based material that flows easier than conventional dry ink, resulting in lesstoner being used to provide the same density print. It offers a smoother, flatter laydownof dry ink surface that also creates a very high quality print.
Replacing the Dry Ink Container
When the machine has reached the limit set for the dry ink container, an alert will appearin the system messages portion of the user interface. Double-clicking the alert will launcha new window, giving details about the action needed.
The Xerox Nuvera EA Production System includes 1 dry ink container. The Xerox Nuvera200/288 EA Perfecting Production System has 2 dry ink containers, one per print engine.Each container lasts up to approximately 200,000 images. You can replace the emptycontainer while the system is running since approximately 10 minutes worth of dry inkis available for continued printing.
An optional Dry Ink Equipment kit can be ordered that allows two dry ink containers tobe installed.
CAUTIONMake sure you install a valid dry ink container. The EA dry ink container has a Greencap and label.
The label on the inside of the left print engine door indicates the toner type to be usedbased upon the cap and label color. It also shows how to remove and replace a dry inkcartridge.
To replace a Dry Ink Container
Double-click the system alert to see the location of the Dry Ink Container, details on theaction needed, and instructions on how and where to return the used Dry Ink Container.
Xerox Nuvera User Guide and Training Aid (UGTA) for Software Version 9.3/10.322-2
Replacing Consumables

See Contacting Xerox to get the correct part number for this Dry Ink Container.
NOTEIf you install an invalid dry ink cartridge, a fault code will ask you to "remove theinvalid toner container".
1. Open the front access covers and identify the correct container.2. Move the Dry Ink Container latch to the left.3. Remove the used container by pulling the container outward. Keep the output hole
of the old container pointing up to avoid spilling any residual dry ink.4. Prepare the new container for installation. Before removing the orange seal, shake
the container end to end five times. This mixes up any dry ink that may have settled.5. Remove the orange seal.6. Insert the new container. Make sure:
• the intake core punctures the container's inner seal
• the container is completely seated
• the arrow on the container lines up with the arrow on the printer housing
7. Package the used container for return. Use the box and prepaid return label to returnthe old unit to Xerox.
Replacing the Dry Ink Waste ContainerThe Dry Ink Waste container gets replaced every 750,000 (750K) images. When thelimit is reached, an alert will appear in the system messages portion of the control screen.
NOTEThe alert appears before the waste container is completely full. This gives you theopportunity to finish any jobs in progress. As soon as the job is printed, replace thewaste container.
To replace the Dry Ink Waste Container
See Contacting Xerox to get the correct part number for this container.
Make sure there are no jobs running.1. Open the front access covers and locate the correct container.2. Prepare the new container for installation.3. Remove the used container.4. Insert the new container, making sure it is completely seated.5. Package the used container for return. Use the box and prepaid return label to return
the used unit to Xerox.
22-3Xerox Nuvera User Guide and Training Aid (UGTA) for Software Version 9.3/10.3
Replacing Consumables

Replacing the Hole Punch WasteContainerWhen the Hole Punch Waste container in the Interface Module of the MultifunctionFinisher Pro Plus reaches its limit, an alert will appear in the system messages portionof the user interface screen.
NOTEA 90% full warning appears before the waste container is completely full. This givesyou the opportunity to finish any jobs in progress. As soon as the job is printed,replace the waste container. If a full warning appears, the system will no longerpunch jobs in progress until the waste container is emptied and replaced.
To replace the Hole Punch Waste Container
Make sure there are no jobs running.1. Open the front access cover of the MFF Insertion Module and locate the black waste
container.2. Remove the waste container by grasping the black handle and sliding it straight out.3. Empty the waste container.4. Insert the empty waste container. Align the small black knobs on either side of the
container on top of the metal brackets.5. Push the container in all the way until it stops, making sure it is completely seated.6. Close the access cover of the MFF.
Replacing the Hole Paper PunchThere are two types of Hole Punch modules that can be used with the MultifunctionFinisher Pro Plus:
• 2 and 3 Hole Paper Punch, or
• 2 and 4 Hole Paper Punch
If the 2/3 Hole Paper Punch is installed, you can indicate that you want to finish andpunch your printed documents with 2 or 3 holes at the lead edge. If the 2/4 Hole PaperPunch is installed, you can identify your documents to be finished and punched with 2or 4 holes. The various punch finishing options, such as hole punching Portrait Top orLandscape Right, are selectable from the Output tab, the Stapling/Finishing area on theFreeFlow Print Server interface. Use this hole punching feature if you want to easilyplace your finished document in a 2, 3 or 4 ring binder.
Xerox Nuvera User Guide and Training Aid (UGTA) for Software Version 9.3/10.322-4
Replacing Consumables
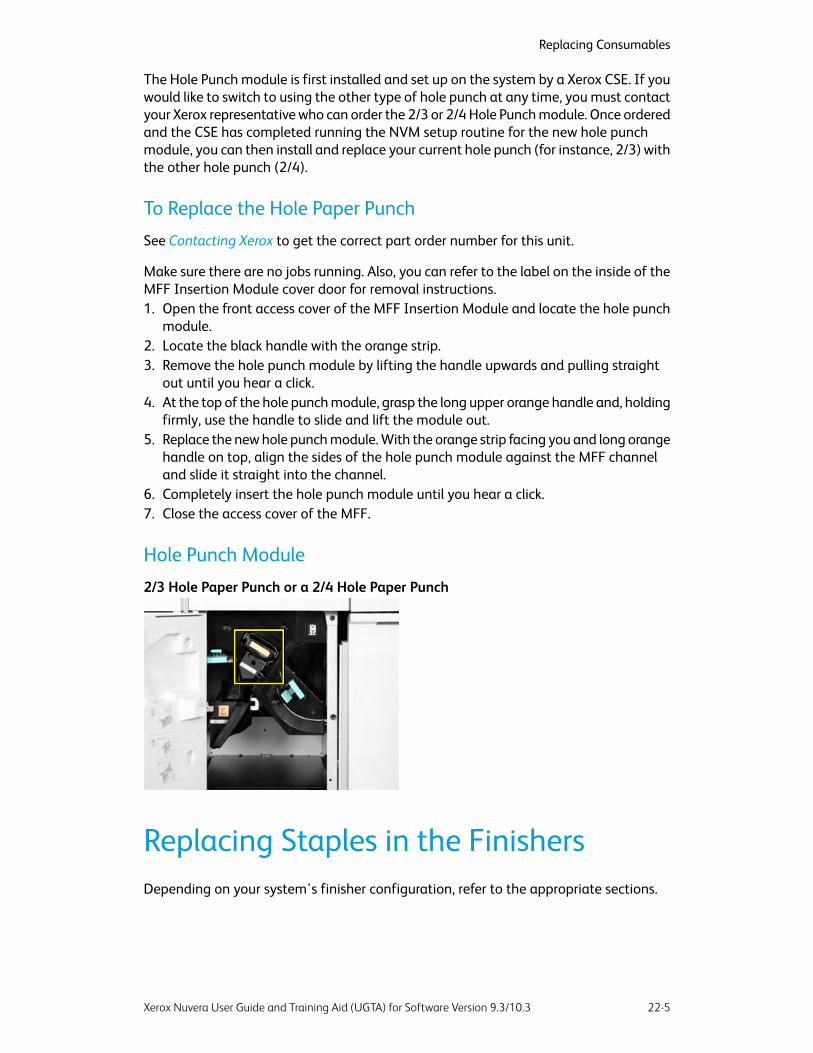
The Hole Punch module is first installed and set up on the system by a Xerox CSE. If youwould like to switch to using the other type of hole punch at any time, you must contactyour Xerox representative who can order the 2/3 or 2/4 Hole Punch module. Once orderedand the CSE has completed running the NVM setup routine for the new hole punchmodule, you can then install and replace your current hole punch (for instance, 2/3) withthe other hole punch (2/4).
To Replace the Hole Paper Punch
See Contacting Xerox to get the correct part order number for this unit.
Make sure there are no jobs running. Also, you can refer to the label on the inside of theMFF Insertion Module cover door for removal instructions.1. Open the front access cover of the MFF Insertion Module and locate the hole punch
module.2. Locate the black handle with the orange strip.3. Remove the hole punch module by lifting the handle upwards and pulling straight
out until you hear a click.4. At the top of the hole punch module, grasp the long upper orange handle and, holding
firmly, use the handle to slide and lift the module out.5. Replace the new hole punch module. With the orange strip facing you and long orange
handle on top, align the sides of the hole punch module against the MFF channeland slide it straight into the channel.
6. Completely insert the hole punch module until you hear a click.7. Close the access cover of the MFF.
Hole Punch Module
2/3 Hole Paper Punch or a 2/4 Hole Paper Punch
Replacing Staples in the FinishersDepending on your system's finisher configuration, refer to the appropriate sections.
22-5Xerox Nuvera User Guide and Training Aid (UGTA) for Software Version 9.3/10.3
Replacing Consumables

Systems with Basic Finishing Modules (BFM)
See Replacing Staples in the BFM for information on staple replacement.
Systems with Multifunction Finisher (MFF)
There are two stapler mechanisms in the Multifunction Finisher (MFF):
• Main Tray Stapler
• Booklet Tray Stapler
When the Xerox Nuvera has used all of the staples in either of the staplers, an alert willappear in the system messages portion of the UI.
NOTEThe Main Stapler cartridge must be completely empty before you can remove theold container.
To replace staples
Double-click the system alert to see details on the action needed, as well as the locationof the stapler needing attention.
See Contacting Xerox to get the correct part number for this CRU.
Main Tray Stapler1. Once you have identified the location of the stapler, open the access panel and locate
the stapler housing. It is identified with a pictorial representation of a staple.2. Grasp the stapler housing drawer handle and pull out towards you.3. Grasp the stapler cartridge handle. To remove, move it upwards, then pull out the
entire cartridge.4. Turn over the completely empty stapler cartridge. With a slight pinching motion,
release the cartridge cover. It will swing away, exposing the empty staple stackcontainer.
5. Take note of the way the container is housed in the cartridge. Grasp the white handleof the container, and pull it out of the housing. Discard this cardboard container.
6. Slide the new staple stack into the cartridge. Remove the white retainer strip.7. Swing the cartridge cover back up into place.8. Slide the stapler cartridge back into the drawer.
Xerox Nuvera User Guide and Training Aid (UGTA) for Software Version 9.3/10.322-6
Replacing Consumables
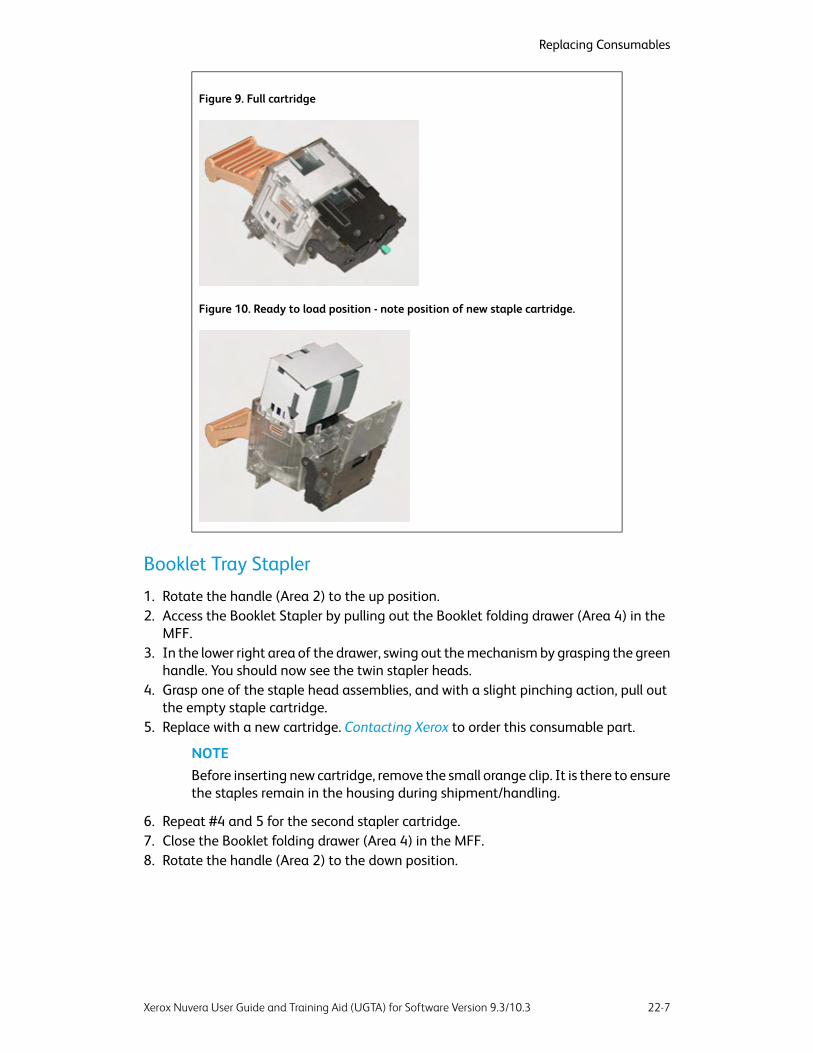
Figure 9. Full cartridge
Figure 10. Ready to load position - note position of new staple cartridge.
Booklet Tray Stapler
1. Rotate the handle (Area 2) to the up position.2. Access the Booklet Stapler by pulling out the Booklet folding drawer (Area 4) in the
MFF.3. In the lower right area of the drawer, swing out the mechanism by grasping the green
handle. You should now see the twin stapler heads.4. Grasp one of the staple head assemblies, and with a slight pinching action, pull out
the empty staple cartridge.5. Replace with a new cartridge. Contacting Xerox to order this consumable part.
NOTEBefore inserting new cartridge, remove the small orange clip. It is there to ensurethe staples remain in the housing during shipment/handling.
6. Repeat #4 and 5 for the second stapler cartridge.7. Close the Booklet folding drawer (Area 4) in the MFF.8. Rotate the handle (Area 2) to the down position.
22-7Xerox Nuvera User Guide and Training Aid (UGTA) for Software Version 9.3/10.3
Replacing Consumables
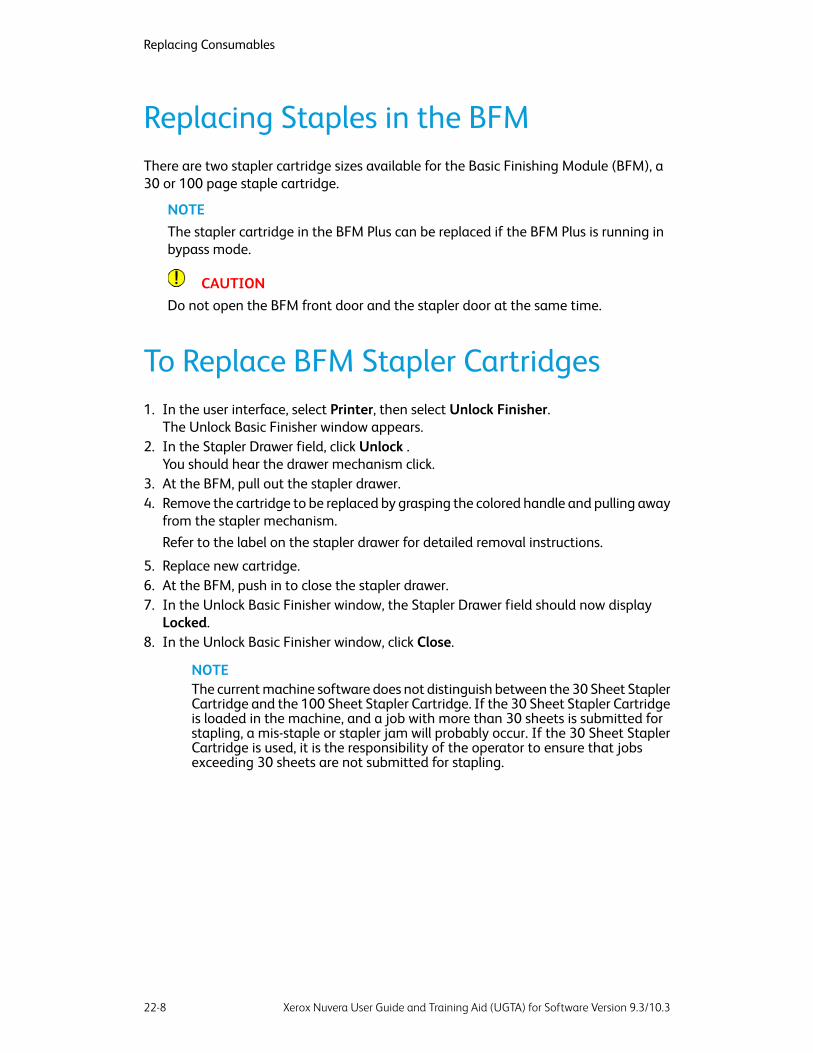
Replacing Staples in the BFMThere are two stapler cartridge sizes available for the Basic Finishing Module (BFM), a30 or 100 page staple cartridge.
NOTEThe stapler cartridge in the BFM Plus can be replaced if the BFM Plus is running inbypass mode.
CAUTIONDo not open the BFM front door and the stapler door at the same time.
To Replace BFM Stapler Cartridges1. In the user interface, select Printer, then select Unlock Finisher.
The Unlock Basic Finisher window appears.2. In the Stapler Drawer field, click Unlock .
You should hear the drawer mechanism click.3. At the BFM, pull out the stapler drawer.4. Remove the cartridge to be replaced by grasping the colored handle and pulling away
from the stapler mechanism.Refer to the label on the stapler drawer for detailed removal instructions.
5. Replace new cartridge.6. At the BFM, push in to close the stapler drawer.7. In the Unlock Basic Finisher window, the Stapler Drawer field should now display
Locked.8. In the Unlock Basic Finisher window, click Close.
NOTEThe current machine software does not distinguish between the 30 Sheet StaplerCartridge and the 100 Sheet Stapler Cartridge. If the 30 Sheet Stapler Cartridgeis loaded in the machine, and a job with more than 30 sheets is submitted forstapling, a mis-staple or stapler jam will probably occur. If the 30 Sheet StaplerCartridge is used, it is the responsibility of the operator to ensure that jobsexceeding 30 sheets are not submitted for stapling.
Xerox Nuvera User Guide and Training Aid (UGTA) for Software Version 9.3/10.322-8
Replacing Consumables
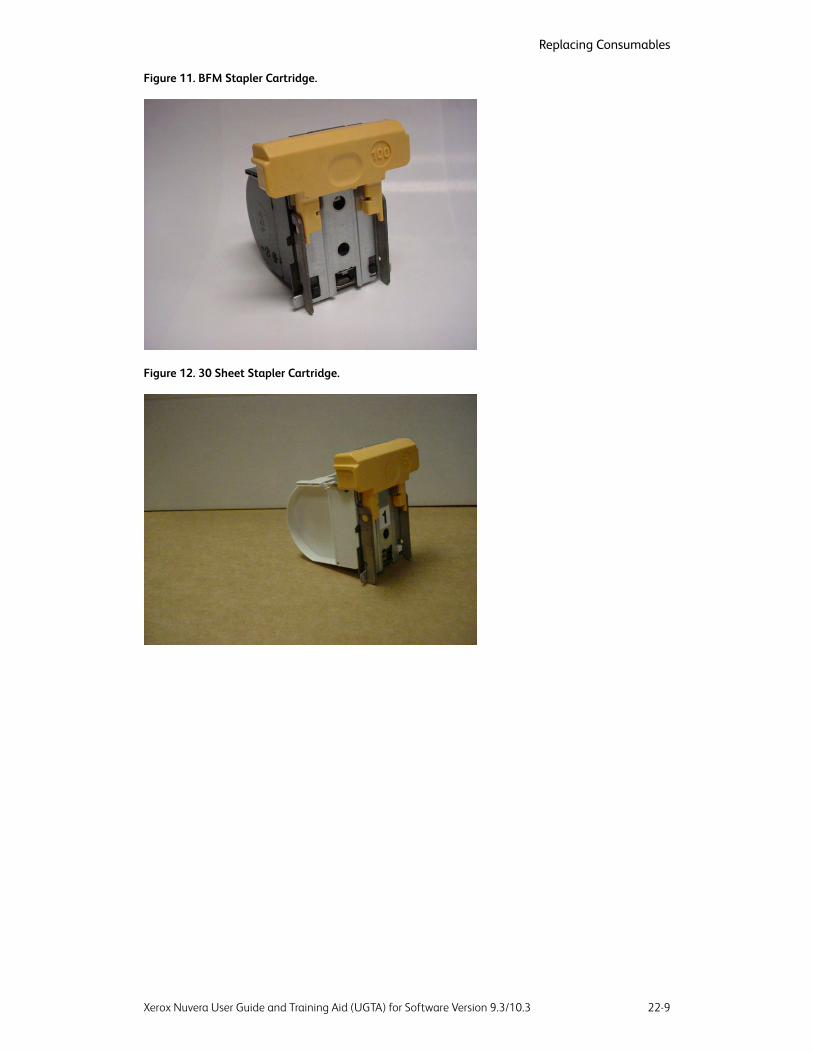
Figure 11. BFM Stapler Cartridge.
Figure 12. 30 Sheet Stapler Cartridge.
22-9Xerox Nuvera User Guide and Training Aid (UGTA) for Software Version 9.3/10.3
Replacing Consumables

Xerox Nuvera User Guide and Training Aid (UGTA) for Software Version 9.3/10.322-10
Replacing Consumables

23How Do I...
Your Xerox Nuvera is a fast, high-volume, networked Production publishing and printingsystem. It is comprised of multiple modules and configurations, and can accommodatevarious finishing devices.
Depending on the Nuvera configuration available to you, you can become a one-personpublishing shop, creating booklets, scanning images and documents for Optical CharacterRecognition (OCR), and storing documents on the system to be printed as needed.
Please take a few moments to learn what capabilities the Xerox Nuvera has to offer.
Contacting XeroxBefore contacting Xerox for a service problem, perform the following steps:
• For image quality problems, first attempt to resolve the problem using the imagequality troubleshooter.
• For worn out customer replaceable units, first attempt to replace the componentyourself.
Service Code / Serial Number Locations
If you have received a message directing you to call for service:
1. Write down the service code that appears in the user interface.2. Write down the machine serial number. There are several serial numbers. Record the
one that corresponds with the area that needs service. Serial number locations are:
• Paper Feeder Problems: The Serial Number is located behind the front access doorin the upper left corner, just below the Document Feeder. For details about this areaof the machine, see Feed Module.
• General System Problems: The Serial Number is located behind the Image OutputTerminal (IOT) right front access door in the lower right corner. For details about thisarea of the machine, see Print Engine Module.
• Finisher Problems: The Serial Number is located behind the Multifunction Finisher(MFF) front access door in the lower right corner. For details about this area of themachine, seeMultifunction Finisher (MFF) Module.
23-1Xerox Nuvera User Guide and Training Aid (UGTA) for Software Version 9.3/10.3

• The Serial Number is located behind the Basic Finishing Module front access door inthe center of the frame.
Xerox prInteract™ Remote Service Offerings
Xerox prInteract Remote Service Offerings provides an integrated approach to supportingyour machine. Through a secure, on-line connection with your machine we can betterunderstand your production needs and environment, which enables us to:
• Identify potential problems through on going data analysis
• Provide real-time recommendations to help optimize overall performance
• Use MeterAssistant to automatically generate accurate meter reads and submit themto Xerox
To read more about Xerox prInteract Remote Service Offerings , go to the RemoteServices link on the Home Page.
To submit system data1. At the Xerox Nuvera user interface, click System > Call for Assistance.
The Call for Assistance dialog window appears.2. In the Call for Assistance dialog, click Options > Submit data. If your machine is not
network enabled, choose Save Data. This will prompt the system to direct the datato the on-board CD drive, click Close.
Telephone numbers and World Wide Web address
Customer Technical Support Center: 1-800-821-2797
Supplies Hotline (United States): Xerox Parts: 1-800-828-5881
Xerox Supplies: 1-800-822-2200
Xerox CRUs: 1-800-822-2979
Supplies Hotline (Xerox Canada):
Xerox Canada Support Hotline : 1-800-939-3769
Xerox Canada Supplies: 1-800-668-0199
Internet: Xerox Parts Ordering
Contact your Xerox representative for Support and Supplies in all other countries.
CRU/Maintenance/Consumables part names and numbersPart NumberPart Name
6R1261 - North America6R90357 - Europe
EA (Emulsion Aggregation) Dry Ink
93K14840Dry Ink Waste Bottle
Xerox Nuvera User Guide and Training Aid (UGTA) for Software Version 9.3/10.323-2
How Do I...

Part NumberPart Name
93K08651Developer Waste Bottle
180K00171MFF 2/3 Hole Punch
180K00181MFF 2/4 Hole Punch
8R12912MFF Main Stapler Cartridge (100 sheet capacity)
8R12898MFF Main Stapler Cartridge Refill (100 sheet capacity)
8R12920MFF Main Stapler Cartridge (50 sheet capacity)
8R12919MFF Main Stapler Cartridge Refill (50 sheet capacity)
8R12897MFF Booklet Stapler Cartridge
8R13033BFM & BFM+ Stapler Cartridges (3 - 100 sheet staples)
8R13034BFM & BFM + Stapler Cartridges (3 - 30 sheet staples)
8R3669Xerox Glass, Lens and Mirror Cleaner
8R3669Xerox Lint-free Cleaning Cloths
Copying your DocumentNOTEThis feature is only available if your system includes the integrated DocumentScanner module for copying and scanning jobs.
1. Place your document face up in the Document Feeder or face down on the DocumentGlass.
2. Click the Copy Services button. Adjust the job settings under each tab.3. Select the Start button.
The Xerox Nuvera also offers many powerful features for reproducing documents:
• Copying Document Sets with Mixed-Size Sheets• Making a Booklet• Adding Pages to a Document• Using the Basic Finishing Module (BFM)• Using the Multifunction Finisher (MFF)• Using DFA Compliant Finishers through the DS3500• Reducing or Enlarging Images• Adjusting Image Quality for various original types (photos, halftones, text)
• Build and Store jobs online for printing on demand (see Using Build Job and Savingand Storing Jobs
• Printing an Image That Extends to the Edge of the Page (images that use the fullpage)
Your Xerox Nuvera also functions as a network workgroup printer and a workgroupscanner (see Printing a Job from your Networked PC and Scanning your Document.
23-3Xerox Nuvera User Guide and Training Aid (UGTA) for Software Version 9.3/10.3
How Do I...(continued)

Setting up a Copy Job
This topic explains how to copy documents. For more detailed information and specializedprocedures, explore the links in this topic and the column at the left.
NOTEThis feature is only available if your system includes the integrated DocumentScanner module for copying and scanning jobs.
To set up a copy job1. Place a document face up in the Document Feeder (place fragile or bound documents
face down on the Document Glass).2. Click the Copy Services button.3. Enter the desired quantity of copies.4. Adjust the settings on the other tabs as necessary. For descriptions of the buttons
and their functions, refer to the online help at the machine.
• Edit the images
• Rotate the images
• Adjust image quality
• Setup slip sheets and special pages
• Create booklets
• Set finishing options
5. On the Basic tab, Choose paper to copy on. You have four options for paper selection:
• Auto Paper Select - the Nuvera system senses the size of the stock and make aselection.
• Loaded Stock - you make a selection from the loaded stock list.
• Stock List - you make a selection from the stock list.
• Custom - you program a custom stock.
NOTEChoosing paper is not done on a "by tray" basis. For trays 1 and 2, if the samepaper is loaded in both trays and tray 1 has a higher priority (a lower number),then it will feed from the highest priority tray.
NOTEAdditionally, if you loaded 8.5 x 11 inch paper in 2 trays (1 LEF and 1 SEF), youwill see one choice for this paper, and 2 orientations to choose from in the LoadedPaper list.
6. Loading Paper with appropriate stock(s) and adjust tray programming (see PaperTray Programming) if necessary.
7. Click Start.
Xerox Nuvera User Guide and Training Aid (UGTA) for Software Version 9.3/10.323-4
How Do I...

To Proof 1 Copy and Hold1. Click the Copy Services button.2. Select Job Type.3. Select Proof 1 Copy and Hold. Once the proof copy is completed. A window displays
with three choices.
• Release to print job.
• Hold Job moves the job to the Job Manager inactive pane listed as successfullyProofed.
• Cancel
For an overview of more sophisticated jobs and workflows, see Setting Up Complex Jobs.
For details about advanced features, see Advanced Publishing Features.
Copying 2-Sided PagesNOTEThis feature is only available if your system includes the integrated DocumentScanner module for copying and scanning jobs.
The Xerox Nuvera makes it easy to copy 2-sided (duplex) originals, either from thedocument glass or from the high-speed Document Feeder.
To copy 2-sided pages from the Document Feeder
The Xerox Nuvera is equipped with a high-speed Document Feeder. For details aboutwhat kind of papers can be fed through the document feeder, see Document Feeder &Scanner Specifications.
TIPTo save paper and job running time, whenever possible/practical, convert anymulti-page one-sided original documents into 2-sided output.
Basic copy workflow using "sides imaged" programming1. Load originals face up into the Document Feeder.2. Decide what programming to apply to the original document(s).
For example: "I want to convert this 10 page single-sided document into a 2-sideddocument set."
3. Click the Copy Services button.4. On the Basic tab, select 1 to 2 Sided in the Sides Imaged field.5. Make any other adjustments on the other tabbed fields.6. Click Copy.
23-5Xerox Nuvera User Guide and Training Aid (UGTA) for Software Version 9.3/10.3
How Do I...

To copy 2-sided pages from the Document Glass (platen)
Some original document types will not feed properly through the Xerox Nuvera DocumentFeeder. Examples of these document types are:
• Fragile, old, or torn documents
• Documents printed on heavy card stock
• Photographs
For these and any other document you feel should not be processed through thedocument feeder, use the document glass.
Basic copy workflow using "sides imaged" programming1. Place the 2-sided original document onto the Document Glass; aligning it in the upper
left-hand corner of the glass.2. Click the Copy Services button.3. On the Basic tab, select 2 to 2 Sided in the Sides Imaged field.4. Make any other adjustments on the other tabbed fields. This could include stapling,
image quality adjustments, rotation, etc.5. Click Copy.
The first side of the document will be copied and stored in the system's memory. Inthe black system status area, the system prompts you Ready to Scan Side 2....
6. Raise the Document Glass cover and turn the document over for 2nd-side scanning.Turn the document over and click Copy.
The system will begin processing and printing your copy job.
Adjusting Output Page Size
You can print your copy to a different sized paper stock. There are two ways to accomplishthis:
• Auto Paper Selection (APS)
• Manual stock size selection
1. With APS, you can program the job, load documents in the Document Feeder or onthe Document Glass, and the machine automatically selects the appropriatepaper/tray for the job. The system determines the original document size and usesthis in combination with other features such as Reduce / Enlarge and Rotation todetermine the output paper size and select the best matching paper tray to feedfrom. The system does all this without losing any part of the page image. It will alwayschoose a paper/tray that is white, buff or ivory in color; has a weight of normal ormedium (56 - 105 gsm); and has a type of either plain or recycled. If theReduce/Enlarge is equal to 100%, and the correct size paper or tray is not available(either the paper tray is empty, raising, disabled or left open) a programming conflictwill appear stating that APS is selected and no tray is ready with the correct paperstock. If the Reduce/Enlarge is not equal to 100%, it will choose a larger size paper/trayif the correct size paper/tray is not available.
Xerox Nuvera User Guide and Training Aid (UGTA) for Software Version 9.3/10.323-6
How Do I...
2. You can override the default APS feature by manually selecting an output stock size.On the Home Screen, click the Paper Trays button, select a tray, and right-click toenable one of the tray selections.
NOTEThe APS feature is active by default. APS applies to copy jobs only.
NOTESee Supported Paper for details on paper sizes and types you can use with the XeroxNuvera.
Managing Copy Jobs: Editing Held JobsNOTEThis feature is only available if your system includes the integrated DocumentScanner module for copying and scanning jobs.
This feature provides the capability for the users to modify job programming from thelocal UI after the job has been received by the system. This feature applies to copy, scanand print jobs already in the queue (and in the case of copy jobs, programmed to beheld by the system. Not all job programming choices can be modified.
Sample workflow to edit a held Copy job1. In the Xerox Nuvera user interface, click the Copy button.2. Make sure Proof 1 Copy and Hold is selected for Job Type.3. Make any job programming choices that are available. Click Start.
The job is processed and placed in the Current Jobs list.4. Make note of the Job number in the dialog window that appears.5. Click the Job Manager button.6. Select the Current Jobs tab.7. Scroll down through the Inactive Jobs list (if needed). Double-click the job, which is
identified by a job number (noted in step 3).8. With the job window now launched, make any job programming changes.9. When you are satisfied with your settings, click OK.
For more information on managing system jobs, see Managing Print Jobs.
NOTEIf Retain PDL File is active, a completed copy job will be listed under theJob Manager > Completed tab. This allows you to resubmit the job for printing,changing job properties if needed.
Making a Stapled Copy JobNOTEThis feature is only available if your system includes the integrated DocumentScanner module for copying and scanning jobs.
Follow the guidelines below to generate a stapled copy using the Document Feeder.
For more information on the Document Feeder, see Using the Document Feeder.
23-7Xerox Nuvera User Guide and Training Aid (UGTA) for Software Version 9.3/10.3
How Do I...
To generate a stapled copy job1. Orient your original documents according to the instructions shown on the Document
Feeder.2. In the Xerox Nuvera user interface, select the appropriate paper/staple orientation
icon.3. When satisfied with your settings, click Copy.
Related Topics
• Stapler Specifications• Replacing Staples in the Finishers• Clearing Stapler Jams
Using the Document FeederNOTEThis feature is only available if your system includes the integrated DocumentScanner module for copying and scanning jobs.
The Xerox Nuvera is equipped with a Document Feeder, allowing you to quickly scanlarge document sets into the system for processing.
For more information on the capabilities of the Document Feeder, see Document Feeder& Scanner Specifications.
To load the Document Feeder
NOTETo ensure all image information from a 12 x 18 inch original is captured, usethe Document Glass.
NOTEFollow the steps below to avoid misfeeds and/or skewed output. The documentfeeder side guides must be positioned correctly to avoid misaligned copies orscans.
1. Remove any staples, paper clips, etc. that may be binding the paper set.2. Move the side guides outward as far as they will go.3. Place the document set to be scanned or copied face up in the center of the document
feeder input tray. Make sure the document set is neatly stacked to avoid skewing.For more information on paper loading (type and feed direction), see DocumentFeeder & Scanner Specifications.
4. Move the side guides inward. Make sure the paper guides are touching both sides ofthe paper stack. Failure to do so may result in sheets skewing and skewed images oncopies or scans.
5. Make any programming choices in the user interface.6. Click Start.
Xerox Nuvera User Guide and Training Aid (UGTA) for Software Version 9.3/10.323-8
How Do I...
If a jam occurs in the Document Feeder, see Clearing Paper Jams.
Using the Multifunction Finisher (MFF)The Xerox Nuvera can include a Multifunction Finisher (MFF). There are two MFF models:the Professional and the Pro Plus. Explore the links at the left to learn all of the ways toutilize the MFF.
Using the MFF Professional allows you to finish your jobs with features such as:
• Staple
• Collate
• Letter Tri-Fold
• Booklet Fold
Using the MFF Pro Plus allows you to finish your jobs using the same features availableon the MFF Professional but also includes an insertion module that offers these additionalfinishing features:
• An Insertion Tray for inserting preprinted tabs, covers and colored sheets into yourjob
• A 2/3 or 2/4 Hole Punch capability
How to select the MFF finishing type as the output device
Perform the following steps to use the MFF and select the finishing output at the userinterface.1. From the Copy Service, Print From File Service or Job Properties window of an inactive
job, select the Output tab.2. Select the Stapling/Finishing FAB.3. From the Output Location, Output Order, and Output Delivery pull-down menus, make
sure System Specified is selected.The system will automatically select the correct output destination tray and pageorder for the job. System Specified is selected by default.
4. From the Stapling/Finishing pull-down menu, select the stapling option, folding option,hole punching or multiple finishing option.
5. Select all other finishing attributes.6. Click Apply or OK.
Related Hints and Tips
On systems with an MFF, tab jobs are delivered to the finisher face up in N to 1 order.All sheets in tab jobs are inverted in the paper path prior to entering the finisher. Assuch, the following must be noted:
• Tabs need to be loaded in the feeder tray in N to 1 order (commonly referred to asreverse ordered tabs)
23-9Xerox Nuvera User Guide and Training Aid (UGTA) for Software Version 9.3/10.3
How Do I...

• If the job requires drilled paper, the drilled paper for the main body of the job mustbe rotated in the tray so that the holes are on the leading edge of the paper (to theleft). This is the opposite of what the tray labels indicate.
• If pre-printed stock is included in a tab job, the pre-printed stock must be rotated180 degrees in the feeder tray. This is the opposite of what the tray labels indicate.
Explore the links at the left to learn all of the ways to utilize the MFF.
For more information on the capabilities of the staplers, see Stapler Specifications.
For more information on the capabilities of the MFF Pro Plus Insertion Module, seeMultifunction Finisher (MFF) Specifications.
Using the Multifunction Finisher (MFF) Pro Plus
Using the MFF Pro Plus allows you to finish your jobs using the same features availableon the MFF Professional but also includes an insertion module that offers these additionalfinishing features:
• An Insertion Tray for inserting preprinted tabs, covers and colored sheets into yourjob
• A 2/3 or 2/4 Hole Punch capability
To Insert Preprinted Sheets on the MFF Pro Plus
To insert covers, preprinted tabs or colored paper into your job, follow these steps:1. On the Home Screen, select Paper Trays.2. Select the paper tray (for example, Tray 5 Insertion Tray or Finisher A, Tray 1) and
right-click on the tray.3. Select Properties. To use a particular stock type for the tray or change other properties,
select those attributes to match what will be loaded in the Insertion Tray.4. Click OK.5. At the MFF Insertion Tray, adjust the guides for the paper size and load paper in the
Insertion Tray with text face up and according to the label. Load tabbed stock withtabs leading.
6. On the Home Screen, open your job.7. Select Special Pages.8. Select Inserts and define the insertion page range for the job.9. Print the job.
To Hole Punch Jobs on the MFF Pro Plus
If the 2/3 Hole Paper Punch is installed on the Pro Plus, you can indicate that you wantto finish and punch your printed documents with 2 or 3 holes at the lead edge. If the2/4 Hole Paper Punch is installed, you can identify your documents to be finished andpunched with 2 or 4 holes. The various punch finishing options, such as hole punchingPortrait Top or Landscape Right, are selectable from the Output tab, the Stapling/Finishingarea on the FreeFlow Print Server interface. Use this hole punching feature if you wantto easily place your finished document in a 2, 3 or 4 ring binder.
Xerox Nuvera User Guide and Training Aid (UGTA) for Software Version 9.3/10.323-10
How Do I...

Do not use this feature on labels, transparencies, envelopes, or synthetic paper.
Paper Specifications for the Hole Punch Module
WeightSizeType
56-200 gsm171-321mm (6.74-12.63 in)width148-457mm (5.83-17.99 in)length
2-punch
56-200 gsm232-321mm (9.14-12.63 in)width148-457mm (5.83-17.99 in)length
3-punch
56-200 gsm255-321mm (10.04-12.63 in)width148-457mm (5.83-17.99 in)length
4-punch
1. Select Job Manager or Copy and open the job.2. Select the Output tab and the Stapling/ Finishing FAB.3. From the Stapling/Finishing pull-down menu, select the type of hole punch finishing,
staple finishing, or both (multiple finishing) to apply.4. Click OK5. Print the job..
Hole punch finishing output is sent to the Top Tray or the Main Tray
NOTEIf you have a MFF with hole punch and both the 2/3 and 2/4 hole punch dies,any job programmed for 2 hole punch will punch with either die loaded. Be surethe appropriate hole punch die is loaded before submitting the job. On a 2/4hole punch, the two center holes are 80 mm apart. On a 2/3 hole punch, the twocenter holes are 70 mm apart.
For more information on the capabilities of the staplers, see Stapler Specifications.
For more information on the capabilities of the MFF Pro Plus Insertion Module, seeMultifunction Finisher (MFF) Specifications
Delivering Document Sets to the Stacker
Printing out large volumes of documents is not a problem for the Xerox Nuvera . On theother hand, sorting and delivering those documents to people is difficult and timeconsuming if the output is not organized.
For more information about document set sorting at the Xerox Nuvera , see Using Offsetto Separate Documents in a Stack.
Multifunction Finisher (MFF)
The other use for the Bottom Tray on the MFF is for Making a Booklet, dual-stitched,saddle-stitched, and folded documents.
23-11Xerox Nuvera User Guide and Training Aid (UGTA) for Software Version 9.3/10.3
How Do I...

NOTEThe MFF is the basic or standard finisher on Xerox Nuvera . It is not available withany other finishers and the Sheet Enhancement Module is not part of theconfiguration.
Basic Finishing Module (BFM)
The BFM includes a top tray, which serves as a purge tray and as a destination for stocksineligible for delivery to the stacker (refer to the CED for stock compatible with thesystem). It also includes a high-capacity stacker. The BFM Plus has a bypass paper pathin place of the top tray.
For details, see Basic Finishing Module (BFM/BFM Plus) Specifications. For informationon using the Variable Shaped Tray on the BFM, refer to Using the Basic Finishing Module(BFM).
NOTEFor the BFM paper backed transparencies can go to the stacker. All othertransparencies types must go to the top tray.
To send document sets to the stacker
Documents submitted from a client application can be programmed to use the stacker.See Printing a Job from your Networked PC.1. At the Xerox Nuvera user interface, initiate a job and make job programming choices.2. On the Output tab, choose the Stapling/Finishing button.3. Click on the Output Location pull-down menu, and choose Finisher.
NOTEThis set of steps applies to systems with either an MFF or BFM.
4. To aid in the sorting and distribution of your output, you may want to program offsetinto the documents going to the stacker.For details, see Using Offset to Separate Documents in a Stack.
NOTEJobs with different sized papers can be stacked in the main tray. Small papersshould be stacked on top of large papers to prevent the stack from falling over.
To unload the BFM stacker
When the job assigned to the BFM stacker prints, the BFM collects the sheets in thestacker bin. Once the bin limit is reached, the BFM drops the sets onto the stack below.
Xerox Nuvera User Guide and Training Aid (UGTA) for Software Version 9.3/10.323-12
How Do I...

After the print job finishes, the system will unload the stacker based on the stacker limitsetting. For information on how to select the stacker limit, refer to Using the BasicFinishing Module (BFM).
CAUTIONDo NOT open the BFM front door and the stapler door at the same time.
1. Select the Unload button on the UI or press the Unload button on the front of theBFM.
2. When the LED is blinking, open the tray access door.3. Grasp the black handle and slide tray outward.4. Remove stack from stacker tray.5. Push tray back into the BFM.6. Close the access door.
What the LED means• LED is On = BFM is in use
• LED is Off = BFM is not in use or is initializing after an unload (Do not open BFM frontdoor)
• LED is Steady = Stacker tray is lowering (Do not open BFM front door)
• LED is Blinking Slow = Stacker tray is lowering for an unload and the request to openthe BFM front door is recognized
• LED is Blinking Fast = OK to open the BFM front door
NOTEThe Unload button will not cause an unload if the Feed Module runs out of paperin the middle of a job. Fill the Feed Module tray and allow the set to finish. Canceling,holding, or deleting a job will also allow unloading to occur.
In case of a jam in the paper path or stapler:
If paper should become jammed in the paper path section or stapler, and a system eventdoes not appear, you can access these areas by unlocking the drawer/cover through thesystem software.1. In the system user interface, click Printer > Unlock Finisher.
The Unlock Basic Finisher window appears.2. The Top Cover and Stapler Drawer unlock buttons are shown. Click the button of
the area you wish to unlock.3. You should hear a series of clicks coming from the BFM.
The cover or drawer can now be accessed.
CAUTIONDo NOT attempt to unlock any BFM covers or drawers while there is still an"Adjusting Finisher" status visible in the status area of the system user interface.Wait for this message to clear before attempting to use the Unlock Basic Finishercontrols.
For details on clearing papers jams in the BFM, see Clearing Paper Jams.
23-13Xerox Nuvera User Guide and Training Aid (UGTA) for Software Version 9.3/10.3
How Do I...
Making a Booklet
Those Xerox Nuvera systems with a Multifunction Finisher (MFF) offer booklet makingcapabilities.
For details about the Multifunction Finisher, see Multifunction Finisher (MFF)Specifications.
To make a booklet
Multiple-page documents can be arranged in a folded and bound output, most commonlycalled a booklet. The Xerox Nuvera allows you to set up a booklet output job in a fewdifferent ways.
Two conditions must be in place in order to process a booklet job:
1. A multi-page document: either a hard-copy original or an electronic file.2. A properly configured Xerox Nuvera system. See Setup Paper Trays for details.
Sample Copy workflow1. Place multi-page original in the Document Feeder.2. On the Copy section (chosen by default), begin setting the Job Properties.3. On the Basic tab of the Copy section, select Booklet Folded and Stapled from the
Stapling/Finishing pull-down menu.4. Choose 2 to 2 sided from the Sides Imaged pull-down menu.5. Choose Size / US ledger 17x11 (A3) from the Loaded Stock list.
Make sure a tray has been loaded with this stock type. See Configuring Paper Traysfor details.
6. Click on the Output tab. Click the Layout button. Choose Booklet from the LayoutStyle pull-down menu.
7. Choose Portrait for the Original Orientation.8. Click Copy.
Sample workflow from client driver
TIPOpen the Xerox Nuvera Client Driver beside this window as you follow thesesteps.
1. Select [File > Print] in your desktop application.2. Select the Xerox Nuvera print driver.3. Select Properties.4. On the Paper/Output tab, select the paper size of the original job: Letter (8.5" x 11").5. On the Paper/Output tab, select Finishing > Folding > Bi-Fold and Staple.6. On the Image Options tab, select Margins > None.7. On the Layout/Watermark tab, select Page Layout > Booklet Layout.8. Select Page Layout Options > Fit to New Paper Size > Tabloid (11" x 17").9. Select OK.
Xerox Nuvera User Guide and Training Aid (UGTA) for Software Version 9.3/10.323-14
How Do I...
Related Hints and Tips
Hint/Tip DescriptionSubtopic
You will not be able to use Booklet Layout withan Encrypted or Password Protected PDF usingthe print driver. To workaround this, send thePDF directly to the FreeFlow Print Server usingone of the web print submission tools or LPRand hold it. At the FreeFlow Print Server,program the Booklet Layout option and releasethe job. The job will print in booklet form.
Booklet Layout
Follow the steps below to properly programbooklets created using Adobe Acrobat PDF files.To create an 11x17 folded booklet out of8.5x11 size originals from PDF files, programthe job for 8.5x11 paper, use Fit to new PaperSize, and choose 11x17 as follows:
PDF Booklets
1. In the Nuvera Print Driver, select thePaper/Output tab.
2. Set Paper Size to size of the job (8.5x11).3. Select booklet fold if it applies to your
job.4. Select the Image Options tab.5. Set the Margins to None.6. Select the Layout/Watermark tab.7. Set Page Layout to Booklet Layout.8. Select Fit to New Paper Size and set the
output paper size to 11x17.
When printing a landscape document using thePCL driver, select the opposite duplexing optionfrom the one you want. 2 Sided Print and 2Sided Print, Flip on Short Edge are reversed.This also breaks Booklet Layout for landscapejobs. So to print a booklet using a landscapejob, send the job to the FreeFlow Print Serverand hold it. Program the Booklet Layout in thejob properties and release it.
Landscape duplex options reversed
For more information on printing from a client application, see Printing a Job from yourNetworked PC.
For detailed information about the controls used in these workflows, see the XeroxNuvera online Help system.
23-15Xerox Nuvera User Guide and Training Aid (UGTA) for Software Version 9.3/10.3
How Do I...
Printing Pads
You have the ability to produce printed pads on all Xerox Nuvera systems. Pads aretypically single sheet forms, often with a card stock back cover and a glued binding onthe top edge. Each sheet can be torn off the pad as needed.
Keep the following points in mind when considering pad printing:
• A pad printing job can only have one page image if printed one-sided, or two pageimages if printed duplex.
• If the finisher supports the required options, a pad printing job can be offset andfinished after each pad subset.
• Pad printing jobs can be saved, reprinted, and forwarded.
• NOTECombining pad printing with Special Pages or Slip Sheets is not recommendedsince it may produce unexpected results.
To print a pad
You can program pads in various ways including Copy, Print from File, Job Properties,and Queue defaults. The following instructions pertain only to the local user interface.1. Double-click the pad job.2. Select the Output tab.3. Select the Stapling/Finishing FAB.
NOTETo apply finishing to the pads job, first select the finishing, then select Finishingunder Subset Output Options, and finally select Pads Printing. If you decide tochange the finishing after you have programmed the pads, simply selectFinishing and Pad Printing again. The Sheets Per Pad and Number of Padsvalues will return to the values you selected prior to changing the finishing.
4. Select the Pad Printing checkbox.5. Select the number of Sheets Per Pad and the Number of Pads to print.
NOTEIf you remove the mark from the Pad Printing checkbox during the programmingof the job, the Quantity and Collation values return to their default values andan information message displays.
6. Optionally, select the Add Back Cover checkbox, and select the Paper Stock to usefor the back cover.
7. Click Print.
Booklet Size Limitations
To avoid sheet misfeeds or jams, you should understand how booklet sizes, stapled andunstapled, are expected to be handled by the Xerox Nuvera .
Xerox Nuvera User Guide and Training Aid (UGTA) for Software Version 9.3/10.323-16
How Do I...

Maximum Booklet Sizes (in sheets)
For stapled sets:
For best results, the maximum booklet size (number of sheets that make up the booklet)is 15 sheets of 80gsm paper (or 14 sheets of 80gsm, and 1 sheet of 200gsm cover stock).
For unstapled sets:
For best results, the maximum booklet size (number of sheets that make up the booklet)is 5 sheets of 80gsm paper.
Why is there this limitation?
When a stack of paper gets folded in the MFF, there is some shifting of the individualsheets of paper. Stapling occurs before folding in the MFF. By stapling the sheet stack,this shifting is controlled, allowing you to run more sheets.
In contrast, if the sheet stack is not stapled, this shifting is not controlled, creating thepossibility of sheets becoming jammed in the MFF mechanism.
Using Offset to Separate Documents in a Stack
Printing large volumes of documents is not a problem for the Xerox Nuvera . However,sorting and delivering those documents to people is difficult and time consuming if theoutput is all in one stack. You can program your jobs to include offset for finishers thathave stacking capabilities. This is useful for organizing multiple document sets for easydistribution. Settings may vary based upon the finisher installed.
Offset Choice Terminology
It is important to understand what Sets and Stacks are in the Offset pull-down menu.
• Set: all pages of a multi-page document. In other words, one complete copy of amulti-page document. This can be stapled or unstapled.
• Stack: several copies of a set.
To use offset to separate documents1. Submit the job to the Xerox Nuvera .2. From the FreeFlow Print Server user interface, select the Job Manager and open the
job's properties window.3. Select the Output tab and the Stapling/Finishing button.4. From the Output Location pull-down menu, choose the Finisher.5. From the Offset pull-down menu, select:
• None: Offset is not performed. This is the default selection.
• Each Collated Set: The offset occurs between each set printed.
• Each Uncollated Stack: The offset occurs between each stack printed.
23-17Xerox Nuvera User Guide and Training Aid (UGTA) for Software Version 9.3/10.3
How Do I...
• Each Set and Stack: The offset occurs between each set or stack printed, whichevercomes first.
6. If desired, mark the Subset Offset checkbox.Subset Offset inserts an offset within a stack (uncollated set) after each specifiedpage number. You can type the page count or use the arrow control to set the pagesper subset value.
7. When satisfied with your settings, click Print.
NOTEChoose Offset when stapling for the best stacking performance.
NOTESubset offset and finishing can be programmed in the Job manager or on aQueue. This works fine for simplex jobs. It will also work for duplex jobs, as longas the request is for an even number of images. However, if the request is for asubset that requires a duplex page to be split, the request will fail.
Creating Folded Documents
For those Xerox Nuvera systems that include a Multifunction Finisher (MFF), you willhave C and Z-Folding capabilities for 8.5 X11 inch and A4 stock. All that is required iseither an original document or print-ready file that is formatted for this type of output.
For details about the Multifunction Finisher, see Multifunction Finisher (MFF)Specifications.
The Xerox Nuvera Production System and Xerox Nuvera 200/288 EA/MX PerfectingProduction System may offer in-line finishers with fold capabilities. Refer the in-linefinisher documentation.
To make a C-Folded document while copying1. Place the original document in the Document Feeder, short edge feed, side one face
up with the top of sheet toward the back of the scanner.2. Select Copy Services.3. Select Clear All.4. If needed, add 8.5x11 white stock to tray 3 or 4. Place stock to short edge feed. Verify
tray programming.5. Program Job properties. For example:
a) In the user interface on the Basic tab, select Trifold C from the Finishing menu.b) Make any other job programming choices.
6. When satisfied with your settings, click Copy.
To make a Z-Folded document while copying1. Place the original document in the Document Feeder, short edge feed, side one face
up with the top of sheet toward the back of the scanner.2. Select Copy Services.3. Select Clear All.
Xerox Nuvera User Guide and Training Aid (UGTA) for Software Version 9.3/10.323-18
How Do I...

4. If needed, add 8.5x11 white stock to tray 3 or 4. Place stock to short edge feed. Verifytray programming.
5. Program Job properties. For example:a) In the user interface on the Basic tab, select Trifold Z from the Finishing menu.b) Make any other job programming choices.
6. When satisfied with your settings, click Copy.
To make a Folded document while printing
The steps for printing a Folded document are essentially the same as they are for copying.The only difference is that you will browse to find the print-ready file at the Xerox Nuvera.
For details on printing from the CD ROM drive, see Printing from the Media Drive.
For details on printing from your PC, see Printing a Job from your Networked PC.
Using the Basic Finishing Module (BFM)The Basic Finishing Module (BFM) is a high-capacity stacker designed to collate andstack up to 3000 sheets (20 lb paper or equivalent) and staple up to 100 sheets of 20lb (75 gsm).
Select the BFM or BFM Plus finisher as the output device1. Select the Output tab from a Job or Queue Properties window.2. Select the Stapling/Finishing FAB.3. From the Output Location pull-down menu, select the output device as:
-System Specified -Auto Switch -Finisher A or B: Main Stacker -Top Tray4. Select the single or dual stapling from the Stapling/Finishing pull-down menu.5. Select OK.
Define stacker settings and other adjustments affecting the BFM
There are several factors that may impact stacking quality and overall productivity ofthe BFM such as minimizing paper curl, setting stacking limits, improving jam rate, andthe use of the variable shaped tray for better registration. The following describes howto ensure the quality of your output and improve overall productivity.
Enable/Disable Automatic Image Permanence for All Stock Weights
The Xerox Nuvera is designed to optimize fusing performance across the supportedrange of paper types and weights. The BFM uses the paper weight programmed whenloading paper to optimize registration and compiling. Enable the AIP selection fromSystem > User Diagnostics to achieve the best fuse temperature and minimize curl inthe stacked output.
23-19Xerox Nuvera User Guide and Training Aid (UGTA) for Software Version 9.3/10.3
How Do I...

Set BFM Stacker Limits
While the BFM can stack up to 3,000 sheets, it is best to set a stacking limit that is amore comfortable stack size and not so large and heavy to lift or transport. Setting amanageable limit also helps to avoid paper curl that can occur in a large stack, whichthen eliminates the need for operator intervention.
The BFM detects when the stacker is about to reach its limit and automatically schedulesan unload when the next set is completed. If you have two BFMs in the system and onebecomes full, the system automatically switches to the second BFM.
Follow the steps below to set unique stacker limits for each stacker on the system.1. Select Print Manager > Stacking tab.2. Right-click on one of the finishing devices and select Stacker Limits.
The Stacker Limits window displays.3. Set Stacking Limits for each stacker that is available on your system:
• Main Stacker: This field identifies the number of sheets not to exceed indetermining when to unload the BFM main stacker. Select from 200 - 3000 sheets.
• Bindexer Capacity: This field identifies the number of sheets that can be compiledin the BFM main compiler for unfinished sets only. This feature allows you tocontrol the number of sheets to be compiled before they are placed onto the stack.Select from 15 - 100 sheets (20 lb paper). If you leave this field blank, theAutomated Bindexer is in effect. The system automatically calculates the thicknessof the unfinished set in the compiler before the sets are placed onto the stack.The system uses the lower of the manual or automatic setting. Bindexer is set to100 at install.
4. Adjust the Bindexer setting to:
• Help reduce excessive curl on sheets (lower the setting)
• Manage special stocks such as coated stock - Improve stacking of some papers(lower the setting)
• Improve jam rate of heavy papers
• Reduce the occurrence of BFM faults and the number of wasted sheets in thecompiler (lower the setting)
• Improve problem jobs by reducing to 35 (if setting is 35 and job is 37 sheets,increase to 37 or more).
NOTEWhen running smaller stapled sets (15 sheets or less), limit the quantity to 100maximum. Unload the stacker after each quantity is completed.
Xerox Nuvera User Guide and Training Aid (UGTA) for Software Version 9.3/10.323-20
How Do I...
Set BFM Registration Values
Paper registration at the BFM is impacted by curl. Follow the steps below to improvepaper registration quality at the BFM for each BFM on the system. However, it isrecommended that you first resolve curl issues with the IOT decurler or, if available, theSheet Enhancement Module setting (see Managing Paper Curl) before enabling thisfeature.1. Select Print Manager > Stacking tab.2. Right-click on one of the finishing devices and select Stacker Limits.
The Stacker Limits window displays.3. If this is a dual BFM system, select the stacker you need (for example, Stacker B).4. Select one of the following checkboxes in the Set Registration Quality area of the
window:
• Improve Set Registration: If sheets exiting the print engine have an excessiveamount of upcurl preventing the BFM from pushing sheets from the lead edgeinto registration position, select this checkbox. This selection enables and lowersthe scuffer in the BFM, which applies pressure to the center of a dual staple jobset, minimizing the amount of pucker or buckle between the staples. It also helpspush the sheets to the registration gate. In addition to improving set registration,this feature helps to reduce jams.
• Improve Initial Pages Registration Within Set:Select this checkbox if you areexperiencing jams and paper curl within sets. The system disables bufferingbetween sets. While registration of stock is improved, productivity will be impacted.The system skips a number of pitches until the compiler is ready to accept newsheets.
NOTERegistration is not optimized for tabs and oversized covers . This includes stapledand unstapled sets. The first 200 - 500 sheets from a cold start may exhibit thisproblem. Machines left in standby recover much more quickly.
Using the Variable Shaped Tray
If you are still experiencing curl in the stacked output and want to further improvestacking quality, you can install the Variable Shaped Tray on the stacker tray. The VariableShaped Tray is available through a customer kit for all BFMs and can be installed andremoved by the customer. It is designed to enhance the stacking of stock in the tray byimproving sheet flatness. If you are experiencing early unloads, jams, curling or poorstacking, use this feature for paper <140 gsm, only after trying the standard decurladjustments. Keep in mind that some papers will run best without the tray installed,especially if no curl exists. Do not use this feature for stock >140 gsm.
23-21Xerox Nuvera User Guide and Training Aid (UGTA) for Software Version 9.3/10.3
How Do I...

To install the Variable Shaped Tray1. Slowly pull out the Elevator Tray on the BFM.2. Place the Variable Shaped Tray on the BFM Elevator Tray.
It drops directly into the Elevator Tray when it is in the unload position.
3. Carefully push the Elevator Tray back into the BFM being careful not to damage theactuator on the right side of the tray.
To remove the Variable Shaped Tray1. Slowly pull out the Elevator Tray on the BFM.2. Unload the stacker, if necessary.3. Lift the Variable Shaped Tray off the Elevator Tray.4. Push the Elevator Tray back into the BFM.
Unloading stock from the Variable Shaped Tray1. Slowly pull out the Elevator Tray on the BFM being careful not to disturb the stack.2. Only unload up to two (2) reams of stock at a time, being careful to maintain stack
integrity3. For the the last two reams slide your fingers under the staple cutouts on the right of
the tray.4. Slide your hands back to mid-stack, lift and remove the stock.5. Close the Elevator Tray.
Related Hints and Tips
Tab behaviors for non-MFF systems only
On non-MFF systems, tab jobs are delivered to the finisher face down in 1 to N order.As such, the following must be noted:
• Tabs must be loaded in the feeder tray in 1 to N order (commonly referred to asforward-ordered tabs)
Xerox Nuvera User Guide and Training Aid (UGTA) for Software Version 9.3/10.323-22
How Do I...
• There are no special loading instructions required for drilled or pre-printed stock. Loadthose stocks according to the labels on the feeder trays.
NOTEIf the labels indicate that drilled paper is to be loaded with the holes along thetrailing edge (to the right), then the incorrect labels are installed on the feedermodule. Contact service for a replacement.
Alternate Sets Between Stackers Feature
The Alternate Sets Between Stackers feature allows each set of a job to be output toalternating stackers.
NOTEThis is a system setting that is applied to all jobs set to the System Specifiedoutput location. A status message appears when this feature is active.
This feature is most useful when:
• Small sets of two or three pages are printed
• Order does not matter
• Productivity is important
Toggle the Alternate Sets Between Stackers feature by doing the following:
1. Logon to the FreeFlow Print Server as a System Administrator.
NOTEAccessing the User Diagnostics mode pauses the printer.
2. Select System and User Diagnostics.
3. From the left navigation bar, select System Optimization Customer Setup.
4. Select the checkbox next to Alternate Sets Between Stackers.
5. Select OK to apply the setting.
6. Select File and Close.
7. Resume the printer.
Explore the links below to learn all of the ways to utilize the BFM
Delivering Document Sets to the Stacker
Using Offset to Separate Documents in a Stack
Replacing Staples in the BFM
Clearing Stapler Jams
Clearing Paper Jams
23-23Xerox Nuvera User Guide and Training Aid (UGTA) for Software Version 9.3/10.3
How Do I...

Using DFA Compliant Finishers throughthe DS3500If you have a 3rd party finisher attached to your system, you will also have a DS3500.The DS3500 is an interface between the main printing area of the Xerox Nuvera EAProduction System or Xerox Nuvera 200/288 EA/MX Perfecting Production System anda DFA-compliant finishing device of some type, such as a stapler, binder, booklet makeror folder.
External Finishers Available on the Xerox Nuvera System
There are a number of DFA-compliant inline finishers that can be installed on the system.You must have a DS3500 installed to add a 3rd party finisher. Here is a list of some ofthe finishers available.
• Xerox DS5000 High Capacity Stacker
• C.P. Bourg BDFx Booklet Maker
• Xerox SQUAREFOLD Booklet Maker(SQFBM)
• GBC Fusion Punch 11 with Offset Stacker
• Xerox DB120-D Document Binder
• Xerox Manual and Book Factory
• Xerox Tape Binder
What is DFA?
Document Finishing Architecture (DFA) is a set of published specifications that allowfinisher vendors to develop in-line devices that are compatible with Xerox printingequipment. The DS3500 is a DFA-compliant device.
DFA Configurations and Profiles
A set of default DFA profiles are preinstalled on the system for each DFA-compliantfinisher attached to the Xerox Nuvera System. Generally, the DFA profile is supplied bythe finisher vendor and installed at the time of the finisher installation.
Managing DFA Configurations and Profiles
To switch to a different DFA configuration on your system, refer to Changing DFAConfigurations for 3rd Party Finishers.
Refer to your System Administrator on how to create, edit, enable/disable, and deleteDFA Profiles and Configurations.
Xerox Nuvera User Guide and Training Aid (UGTA) for Software Version 9.3/10.323-24
How Do I...
Select the 3rd Party External Finisher as the output device
After you have set up the basic print sections of your job and the System Administratorhas defined and enabled the finisher configuration and profile for your system, performthe following steps to use the DS3500 and select the finishing output at the user interface.1. From the Copy Service, Print From File Service or Job Properties window of an inactive
job, select the Output tab.2. Select the Stapling/Finishing FAB.3. When printing to a 3rd party finisher, make sure the Output Location pull-down menu
is set to System Specified.4. From the Stapling/Finishing pull-down menu, select External. All available finishing
profiles display.5. From the profile list that displays, place the cursor over the icons to identify the
finishing device (such as DS5000). Select the profile. The profile name displays in theStapling/Finishing pull-down list. To enable or disable profiles, contact your systemadministrator.
6. Select all other finishing attributes.7. Click Apply or OK.8. If you are using the DS5000 stacker, make sure to press the green button on the
finishing unit so the device accepts the sheets entering it.Refer to your Finishing device's documentation for complete information on how toprint to that particular finisher.
Changing DFA Configurations for 3rd Party Finishers
When your system is installed, a Xerox CSE uses the FreeFlow Print Server to create aconfiguration and profile of the finishing devices on your system. A configurationrepresents the finishing module or combination of finishing modules installed. Withina configuration are profiles that represent specific destinations, device settings andattributes for that configuration.
If you need to switch from using one set of finishers to another set of finishers (forexample, a DS5000 to a Booklet Maker) or access a different finishing configuration,use the following instructions.
To enable a different profile than the one currently enabled for afinishing configuration:1. On the Printer menu, select Finishing.2. From the Finishers drop-down menu, select External Finishers.
The External Finisher window displays. One or more configurations will be listeddepending on the 3rd party finishers installed.
3. If the job you are running requires a different finishing location than what is currentlyenabled for that configuration, select the configuration identified as online.
4. Select a different destination profile listed under the configuration, right-click, andselect Enable to enable a different profile.
23-25Xerox Nuvera User Guide and Training Aid (UGTA) for Software Version 9.3/10.3
How Do I...

To change from using currently installed finishers and enable a newconfiguration:
This procedure is for instances when you need to physically change finishing devicesand replace existing finishers on the system with a different set of finishers. Refer to thevendor's 3rd party finishing documentation to learn which finisher profiles will be changedautomatically or which ones will need to be manually updated.1. On the Printer menu, select Finishing.2. From the Finishers drop-down menu, select External Finishers.
The External Finishers window displays.3. From the configuration list, select the configuration currently online.4. To disable the profiles you do not want, right-click the profile(s), and select Disable.
Disable all profiles being used.5. Remove existing finishing equipment and install the new equipment on the system
as needed. Refer to your 3rd party finishing documentation on how to manuallyadjust settings on the module itself.
6. On the External Finishers window, select a profile within the new configuration thatyou want to enable and right-click. Or, you can also select the Catalog button andselect predefined, Xerox supplied configurations.
7. Select Enable for all profiles.Previously enabled profiles will be disabled and placed offline. The new configurationis now online and the selected profiles enabled.
8. Select Close.
Related Hints and Tips
Pause behavior/ Banner sheet delivery
The Device Profile contains a Device Type field. The possible selections are Stacker andFinisher. The following two problems only occur with DFA finishers:
• You may notice that the banner sheets are delivered to the Top Tray rather than tothe stacker with the job output. If you prefer that the banner sheets be delivered tothe main stacker, configure the DFA device to be a 'stacker' as noted below.
• You may notice long delays before the printer stops when Pause is selected, especiallywhen running a job that is one long stream as opposed to multiple sets. This is becausethe system is attempting to get to a set boundary before stopping. If you prefer itto stop sooner, configure the DFA device to be a 'stacker' as noted below.
NOTEThe DFE is going to do a set terminate when the pause occurs. This may not behandled correctly by finishing type DFA devices such as booklet makers.
The Device Type options are Stacker and Finisher with Finisher as the default value.Each option configures different Pause behavior and Banner Sheet delivery.
If Device Type is set to Stacker, the resultant behavior is:
• Pause - immediate
• Banner sheet delivery - to the same destination as the job body
Xerox Nuvera User Guide and Training Aid (UGTA) for Software Version 9.3/10.323-26
How Do I...

If Device Type is set to Finisher, the resultant behavior is:
• Pause - next set boundary
• Banner sheet delivery - to the DS3500 top tray
DFA sheet rotation and letter-size banner sheets
If a Queue specifies DFA sheet rotation and letter size banner sheets, jobs sent to theDFA Rotate Queue will fault with the FreeFlow Print Server Required Media Not Loadedmessage when both Long Edge Fee (LEF) and Short Edge Feed (SEF) letter source mediaare available for paper feeding.
When the DS5000 is set to be a stacker, banner sheets are delivered to the main stacker.With sheet rotation, letter media must be fed SEF to satisfy the DS5000 minimum inputcross-process dimension of 10 inches. When tested, the system attempted to select LEFletter media for the banner sheet; when rotated, the cross-process dimension is 8.5inches.
NOTEDisabling the LEF letter paper tray allows the job to print, or disabling BannerPages allows the job to finish even if both trays are enabled. When the DS5000is set to be a finisher, banner sheets are delivered to the top tray and LEF letterfor the banner sheet top tray delivery does not cause a fault.
Enable/Disable stacker capability from FreeFlow Print Server
This feature is for the BFM, MFF and DS3500 finishers. This allows for a specific stackerto be disabled if working poorly and in need of service.
Perform the following steps to enable/disable stacker capability from FreeFlow PrintServer:
1. Logon to the FreeFlow Print Server as a System Administrator.
2. Select Printer and Stacking.
3. Right-click on the desired finisher and select Enable or Disable.
4. Select Close.
Related Hints and Tips
Tab behaviors for non-MFF systems only
On non-MFF systems, tab jobs are delivered to the finisher face down in 1 to N order.As such, the following must be noted:
• Tabs must be loaded in the feeder tray in 1 to N order (commonly referred to asforward-ordered tabs)
• There are no special loading instructions required for drilled or pre-printed stock. Loadthose stocks according to the labels on the feeder trays.
NOTEIf the labels indicate that drilled paper is to be loaded with the holes along thetrailing edge (to the right), then the incorrect labels are installed on the feedermodule. Contact service for a replacement.
23-27Xerox Nuvera User Guide and Training Aid (UGTA) for Software Version 9.3/10.3
How Do I...

For more information• For information about printing to the BFM, see Using the Basic Finishing Module
(BFM).• For information and video demonstrations on clearing paper jams in the DS3500,
see Clearing Paper Jams.
• For information about DS3500 specifications, see DS3500 Specifications.
• For details on the specifications of the DFA-compliant 3rd Party Finishers, contactyour Xerox representative for the Solutions Planning Guide for that finisher.
Adjusting Image QualityThe Xerox Nuvera user interface contains a set of Image Quality adjustment tools forCopy, Scan to File and Print jobs. Using these controls, you can make adjustments toimages containing text, photographic images, halftoned images, as well as documentswith mixed image types. This is useful if the original document is less than perfect; i.e.,text/images are too light or too dark.
To learn more about these capabilities, explore the links at the left.
NOTEThe Copy and Scan functionality is only available if your system includes theintegrated Document Scanner module. If the Enhanced Line Screen license is enabled,the system supports jobs with 85, 106, 125, 134 and 156 lpi halftone screens. If thislicense is not enabled, only 125 lpi is supported.
To adjust image quality on copy and scanned jobs1. At the Xerox Nuvera user interface, click on Copy (or Scan to File), then click on the
Image Quality tab.2. Choose the Original Type of the image to be copied. Click on the Original Type button,
then click on the Rendering Options Setup button. Choose any options accordingto the condition and type of the original document.
3. Click on the Basic tab, then use the Darken/Lighten control to make small correctiveadjustments.
4. Click on the Image Quality tab, then click on the Image Adjustments button. Usethe Contrast, Sharpness and Background Suppression controls to make smallcorrective adjustments.
5. Set Print Quality.The Toner Saver selection uses less toner and is more economical than the full qualitysetting of Normal. It is useful for scatter removal without causing a light solid imageon the page. You may want to use the Normal setting when printing proof documents.
TIPIf you copy /scan a great number of the same type of original documents, youcan set custom image quality defaults. For example, if the majority of yourcopying /scanning is of dark photographic content, the system defaults can beset to accommodate this, saving you job programming time. To set up yoursystem defaults to match your original input, contact your System Administrator.
Xerox Nuvera User Guide and Training Aid (UGTA) for Software Version 9.3/10.323-28
How Do I...

To adjust image quality on print jobs1. Select Print From File on the Service menu and use the Files tab to locate and select
the job.2. Select the Image Quality tab.3. From the Mode pull-down menu, select the printer emulation setting.
The DocuTech 135 setting prints output that is similar in appearance to that of theDT135 printer.
4. Use the Print Darkness control to make small corrective adjustments in increasingor decreasing darkness.All pixels in the image are moved either towards black or white. The values closestto 0 are intended for small adjustments to the darkness of text and pictures. Thedarkness +/-3 settings will make a noticeable difference on text but not recommendedfor most pictorials.
5. Select a Resolution.Since resolutions vary from printer to printer, use this option to achieve betterperformance for jobs that were saved at 300 dpi.
6. Set Print Quality. The Toner Saver selection uses less toner and is more economicalthan the full quality setting of Normal. It is useful for scatter removal without causinga light solid image on the page. You may want to use the Normal setting whenprinting proof documents.
7. To select a halftone, open the job. From either the Print Properties window or the JobProperties window, select a Halftone.This allows you to adjust the pattern of dots or lines of varying sizes applied to animage of varying tones, or same sized dots applied to a tint of color.
NOTEIf the Enhanced Line Screen license is not enabled, the Halftone selection is notavailable since there is only one halftone (125 lpi) offered.
Stroke Thickening (increasing the weight or width of a character)1. Open the Job Manager and select and open the job.2. Select the Image Quality tab.3. From the Job Properties window and the Stroke Thickening field, adjust this setting
to control the thickness of fine lines created by the PostScript stroke command.
About Toner Saver
The Toner Saver Print Quality selection is intended to save toner costs, similar to draftmode.
NOTEToner Saver is designed to save toner, and can produce poor image quality andundesirable, light, or washed-out prints.
23-29Xerox Nuvera User Guide and Training Aid (UGTA) for Software Version 9.3/10.3
How Do I...

About Image Quality for Copy and Scan to fileNOTEThis feature is only available if your system includes the integrated DocumentScanner module for copying and scanning jobs. Also, the halftones available to youdepends on whether the Enhanced Line Screen license is enabled or not.
The Xerox Nuvera is a digital imaging system. The scanner converts full color optical(analog) images to a gray digital image (0-255 gray scales). The image processingfunctions adjust the image according to the image quality features selected. The resultingimage is a binary image which records the 'appearance of gray' as a collection of dotsvarying in spacing and diameter. These dots are made up of several pixels (pictureelements). In a binary image, each pixel element is either 1 or 0.
Image quality involves adjusting the tones(darkness and contrast), sharpness andrendering textures of the scanned image to get a pleasing output image.
To get a optimal quality scan of an original requires the following types of imageprocessing:
• Detection and suppression of colored and shaded backgrounds
• Removal of halftone screens
• Sharpening of edges in the image
• Lightening or darkening of highlights, midtones and shadows to get good contrastand detail
• Application of new halftone screens to photos and halftones
The higher the quality of the original, the higher quality of the final copy. Imageprocessing adjustments can only enhance the information which is in the original orsuppress undesirable defects. It can not 'create information'.
The key to getting satisfactory scans or copies from your Xerox Nuvera is understandinghow to adjust the image quality processing controls and which controls to adjust. Digitalimage quality processing can often create a copy with 'better' image quality than theoriginal. Light text can be enhanced, past-up lines suppressed and even 'coffee stains'removed. For some applications, such as legal documents, it is desirable that allinformation on the original be preserved to create a 'faithful' copy.
Follow the links at the left to learn more about image quality adjustments.
Begin by selecting Choosing the Best Original Type (when scanning or copying)
For help with solving specific image quality problems, see Solving Image Quality Problems.
NOTEIf you copy /scan a great number of the same type of original documents, you canset custom image quality defaults. For example, if the majority of your copying/scanning is of dark photographic content, the system defaults can be set toaccommodate this, saving you job programming time. To set up your system defaultsto match your original input, contact your System Administrator.
Xerox Nuvera User Guide and Training Aid (UGTA) for Software Version 9.3/10.323-30
How Do I...

TIPIt is best to proof a job when you make image quality adjustments.
Choosing the Best Original Type (when scanning or copying)
Original Type is the most important image quality setting for copying images. Whenselecting an original type use a default setting for sharpness, contrast, darkness andbackground suppression.
To get the best results, it is important that you be able to assess your original document,and make a determination as to what types of images comprise the document.
To select an Original Type1. Select Copy (or Scan to File).2. Select the Image Quality tab.3. Select an Original Type.4. Select a Rendering Option, if needed.
Original Types
Mixed Text and Graphics: use for most jobs, business graphics, charts, logos and maps.This setting preserves gray text and is recommended for text critical applications.
Text: use for enhancing text only. Using the text setting turns dark gray text to black.For black and white transactional applications of text and numbers, or book copyingwithout pictures or graphics, use text mode.
Mixed Text and Halftones: use for printed photos and halftones. Recommended forpictorial critical applications.
Photo: use for photographs and continuous tone images
For example, if the original is a paste-up, or has multiple areas of different types ofinformation, Mixed Text and Graphics mode is the best compromise.
A good approach to making the best Original Type selection is to identify the area inthe document of greatest importance. Perhaps, in a document composed of text andimages, making the text legible is more important than a high quality reproduction ofthe pictures. If this is the case, use Text mode.
Photo mode is the only mode that applies a halftone; all of the others apply a form oferror diffusion to minimize moir. For jobs which contain various types of documents (e.g.some pages of text, some pages of halftoned context), the mixed mode is the bestcompromise. Alternatively, you're encouraged to use job programming to selectivelydefine a different original type for each page.
Rendering Options
The halftones available to you depends on whether the Enhanced Line Screen licenseis enabled or not.
23-31Xerox Nuvera User Guide and Training Aid (UGTA) for Software Version 9.3/10.3
How Do I...
Mixed Original types
Diffusion Dither simulates gray values using collections of black and white pixels withoutdisturbing sharp edges.
Hybrid combines halftones and diffusion in a manner determined by the local pixelclassification.
Text
Diffusion Dither simulates gray values using collections of black and white pixels withoutdisturbing sharp edges.
Threshold/High Contrast produces a very high contrast reproduction of black and whiteinputs.
Photo
125 lpi for high image quality results - recommended setting
106 lpi for medium image quality results
85 for low image quality results
Background suppression should be ON if the photo does not extent to the lead edge ofthe paper as it enters the scanner.
TIPOne of the advantages of build job is the ability to set Original Type for each sectionor page of the build job.
For information on Build Job see Using Build Job.
TIPIt is best practices to proof a job when you make image quality adjustments.
About Contrast
The Contrast control enhances the tonal separation, especially in the midtones. Increasingcontrast moves midtones (gray) toward black or white. Decreasing contrast makes blacksand whites appear gray.
Limits of Contrast controls
The Contrast control on the Xerox Nuvera applies to all of the pixels in an image at once.In other words, changing the contrast in the midtones of your image will also affecthighlights and shadows.
If contrast is increased too much, midtone detail may be enhanced, but at the expenseof highlight and shadow content. Differences between adjacent pixels become greater,causing shadow areas to turn completely black, while highlight areas turn completelywhite (see Figure 1).
Xerox Nuvera User Guide and Training Aid (UGTA) for Software Version 9.3/10.323-32
How Do I...

Figure 13. A high-contrast image. Gray levels are being spread out across the entire histogram.
On the other hand, decreasing contrast too much causes a loss of highlights and shadows.Instead of highlight content turning completely white and shadow content turningcompletely black, highlights and shadows get "compressed" into the midtone region ofthe histogram (see Figure 2).
Figure 14. A low-contrast image. Gray levels are compressed into midtones, and there is a loss ofhighlight and shadow, as evidenced in the histogram.
For details on working with the contrast control, see Adjusting Contrast (when scanningor copying).
NOTEOften, increased contrast will tend to make pictorials appear sharper. It isrecommended that the sharpness control be used to adjust sharpness because itincreases the sharpness of edges without having the macro tonal changes of thecontrast control.
Adjusting Contrast (when scanning or copying)
There are seven contrast levels which control the appearance of fine detail in the finaloutput image.
The solution to getting the image to look good, without creating image quality problems,is to increase or decrease contrast in small increments. See About Contrast.
To adjust contrast1. In the Xerox Nuvera user interface, click the Copy button.2. Click the Image Quality tab.3. Click the Image Adjustments button.
23-33Xerox Nuvera User Guide and Training Aid (UGTA) for Software Version 9.3/10.3
How Do I...
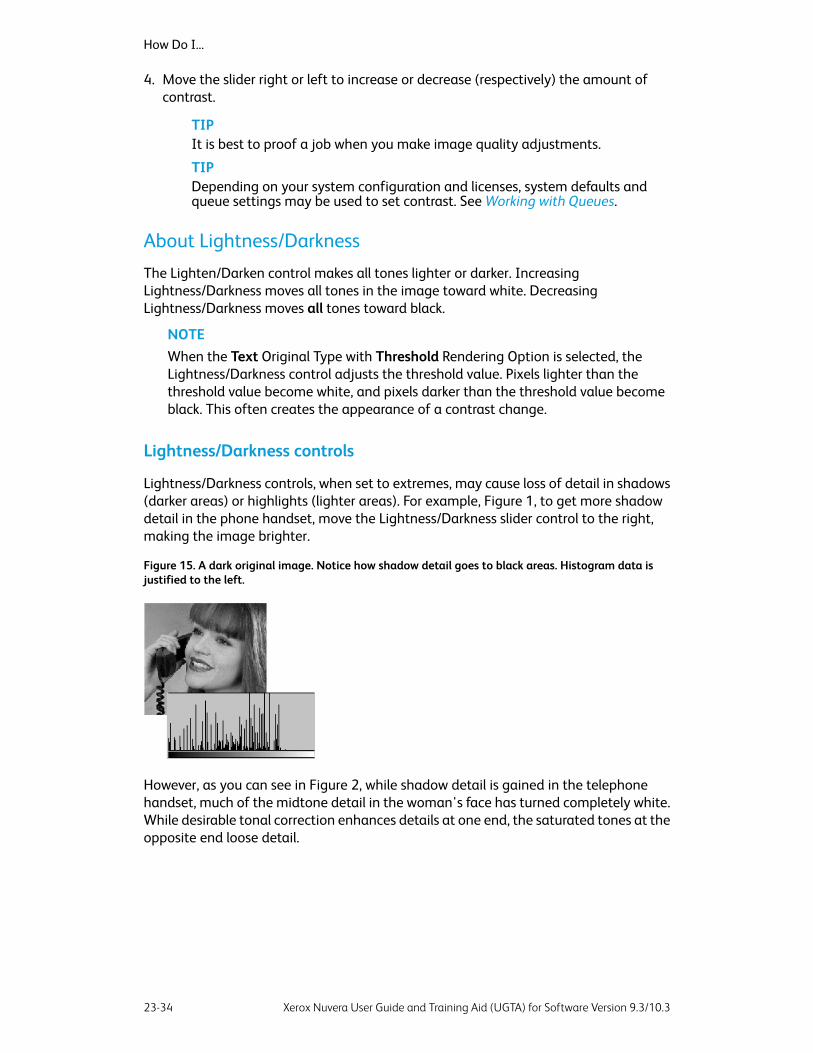
4. Move the slider right or left to increase or decrease (respectively) the amount ofcontrast.
TIPIt is best to proof a job when you make image quality adjustments.
TIPDepending on your system configuration and licenses, system defaults andqueue settings may be used to set contrast. See Working with Queues.
About Lightness/Darkness
The Lighten/Darken control makes all tones lighter or darker. IncreasingLightness/Darkness moves all tones in the image toward white. DecreasingLightness/Darkness moves all tones toward black.
NOTEWhen the Text Original Type with Threshold Rendering Option is selected, theLightness/Darkness control adjusts the threshold value. Pixels lighter than thethreshold value become white, and pixels darker than the threshold value becomeblack. This often creates the appearance of a contrast change.
Lightness/Darkness controls
Lightness/Darkness controls, when set to extremes, may cause loss of detail in shadows(darker areas) or highlights (lighter areas). For example, Figure 1, to get more shadowdetail in the phone handset, move the Lightness/Darkness slider control to the right,making the image brighter.
Figure 15. A dark original image. Notice how shadow detail goes to black areas. Histogram data isjustified to the left.
However, as you can see in Figure 2, while shadow detail is gained in the telephonehandset, much of the midtone detail in the woman's face has turned completely white.While desirable tonal correction enhances details at one end, the saturated tones at theopposite end loose detail.
Xerox Nuvera User Guide and Training Aid (UGTA) for Software Version 9.3/10.323-34
How Do I...

Figure 16. Too much Lightness applied. Notice how some of the highlight detail has gone to completelywhite. Histogram data is justified to the right.
For details on working with the lightness/darkness control, see AdjustingLightness/Darkness.
Adjusting Lightness/Darkness
Making adjustments to any of the image quality controls should be done in smallincrements. Making large adjustments can create image quality problems.
Adjust Lightness/Darkness for Copying1. In the Xerox Nuvera user interface, click the Copy button.2. Select the Basic tab.3. Move the slider right or left to increase or decrease (respectively) the amount of
lightness/darkness.
TIPIt is best to proof a job when you make image quality adjustments.
Adjust Lightness/Darkness for Printing1. In the Xerox Nuvera user interface, select Image Quality on the Printer menu.2. To select a printer darkness value, select the Setup button and choose one of the
following Print Quality modes:
• Best mode -the default and recommended for most jobs, especially those onuncoated stocks. It adds or subtracts sub pixels on the edge of the image element,text, lines, dots, solids, etc. It introduces no artifacts to lines. However, at extremeends of the range, contours may occur in halftones.
• Normal mode - the line width adjustment is identical to the Best mode and thedefects are similar. In addition, it applies a slight correction to reduce line edgescatter. The correction can be helpful for coated stocks or very smooth stocks.Typically the adjustment is so slight it is not helpful for any black dots scatteredon Mylar tabs. The amount of anti-scatter adjustment is fixed for all darknesslevels.
NOTEIf you notice black dots scattered at the edges of lines or text, use theToner Saver selection with a -3 or -2 setting to remove the dot scattering effect.
3. From the Darkness slider, increase or decrease the amount of black or white appliedto all pixels in the image.
23-35Xerox Nuvera User Guide and Training Aid (UGTA) for Software Version 9.3/10.3
How Do I...
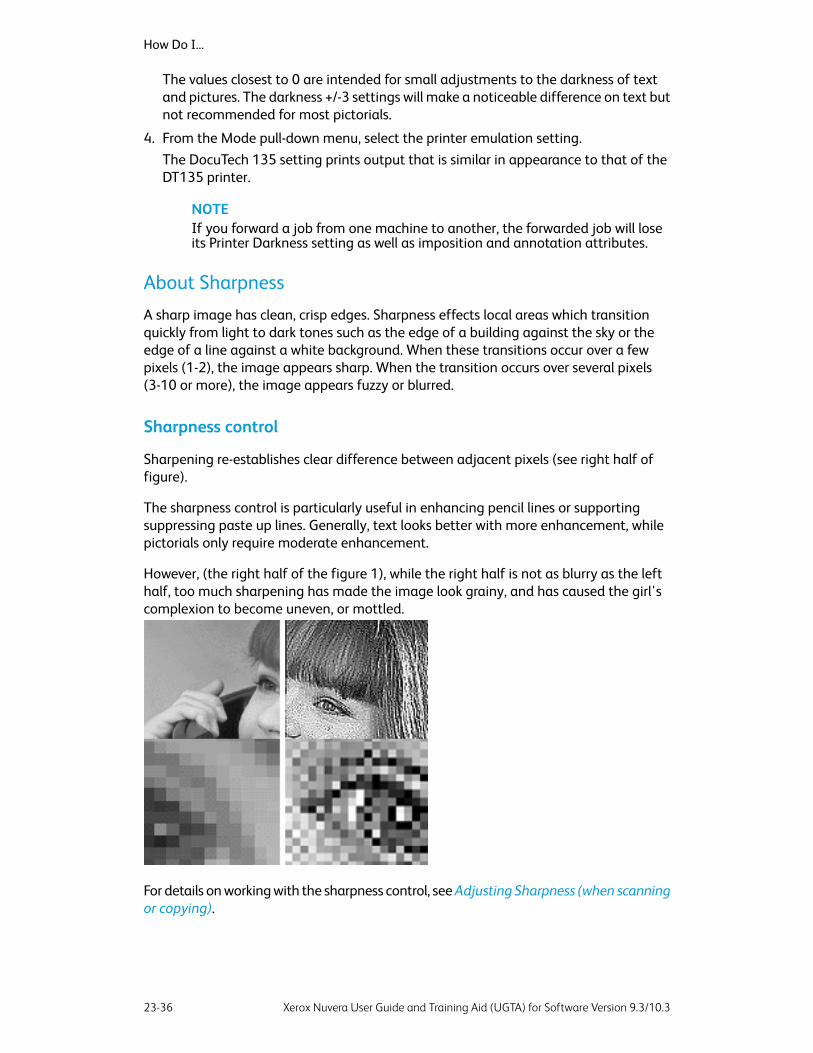
The values closest to 0 are intended for small adjustments to the darkness of textand pictures. The darkness +/-3 settings will make a noticeable difference on text butnot recommended for most pictorials.
4. From the Mode pull-down menu, select the printer emulation setting.The DocuTech 135 setting prints output that is similar in appearance to that of theDT135 printer.
NOTEIf you forward a job from one machine to another, the forwarded job will loseits Printer Darkness setting as well as imposition and annotation attributes.
About Sharpness
A sharp image has clean, crisp edges. Sharpness effects local areas which transitionquickly from light to dark tones such as the edge of a building against the sky or theedge of a line against a white background. When these transitions occur over a fewpixels (1-2), the image appears sharp. When the transition occurs over several pixels(3-10 or more), the image appears fuzzy or blurred.
Sharpness control
Sharpening re-establishes clear difference between adjacent pixels (see right half offigure).
The sharpness control is particularly useful in enhancing pencil lines or supportingsuppressing paste up lines. Generally, text looks better with more enhancement, whilepictorials only require moderate enhancement.
However, (the right half of the figure 1), while the right half is not as blurry as the lefthalf, too much sharpening has made the image look grainy, and has caused the girl'scomplexion to become uneven, or mottled.
For details on working with the sharpness control, see Adjusting Sharpness (when scanningor copying).
Xerox Nuvera User Guide and Training Aid (UGTA) for Software Version 9.3/10.323-36
How Do I...
TIPExtremely high levels of sharpness tend to cause 'ringing' on edges which gives theimage an artificial appearance. Depending on the application, some designers usethis method to create a 'better than original, very sharp focal point in the document.
TIPExtremely high levels of sharpness may amplify moire. see Suggestions for removingmoiré patterns:.
Adjusting Sharpness (when scanning or copying)
There are seven sharpness levels which control the appearance of fine detail in scannedimages and copy jobs.
The solution to getting the image to look good, without creating image quality problems,is to increase or decrease sharpness in small increments.
To adjust sharpness1. In the Xerox Nuvera user interface, click the Copy button.2. Click the Image Quality tab.3. Click the Image Adjustments button.4. Move the Sharpness slider right or left to increase or decrease (respectively) the
amount of sharpness.
TIPTo see the impact of the Sharpness control, try scanning a photo from yourwallet and/or copying a light pencil line drawing in photo mode. Scan and proofthem with different sharpness settings.
TIPIt is best practices to proof a job when you make image quality adjustments.
Choosing the Best Halftone Setting
If the Enhanced Line Screen license is enabled on your system, the Xerox Nuvera supportsa variety of halftones when printing. If this license is not installed and enabled, thesystem offers a 125 lpi line screen. Also, the available selections depend on the PageDescription Language (PDL) being submitted.
To select a Halftone1. Open a job properties window.2. Select the Image Quality tab.
23-37Xerox Nuvera User Guide and Training Aid (UGTA) for Software Version 9.3/10.3
How Do I...
3. Select the Halftone button and the screen value from the Halftone pull-down menu.
NOTESystems without the Enhanced Line Screen license offer only the 125 lpi 53degree halftone screen.
NOTEFor systems with the Enhanced Line Screen license enabled, the system offers85, 106, 125, 134 and 156 lpi halftone screens. The default 125 lpi 53 degreehalftone screen represents 256 levels of gray.
The default halftone screen can be selected for each print queue. The default will beused if a PostScript, PDF, or TIFF job does not contain a halftone command. This will bethe common case because the print drivers and job submission tool do not send a halftonecommand by default.
NOTEWhen reprinting a saved job, the system does NOT permit the Halftone Screenvalue to be changed, since saved jobs will already have had a halftone applied.
Often the selection of a different frequency will change the resulting Moir texture toone which is more acceptable, but can not totally eliminate Moir. For more information,see Suggestions for removing moiré patterns:.
Systems with the Enhanced Line Screen License
The rich variety of screen frequencies for these systems include 85, 106, 125, 134 and156 lpi and provide the flexibility required for a wide variety of applications.
The demo files are located in the Sample Jobs directory on the system. As systemadministrator, open and print the .tiff or .xpf file in the appropriate stock size. The jobticket contains all the necessary job settings. The job prints on letter stock.
The file names are:
• screenfreqdemo_ltr.tif
• screenfreqdemo_ltr.xpf
Editing ImagesThere may be instances where you may want to alter placement of the image on youroutput. The Copy Service, Scan to File Service and Print from File Service Image Edit tabon the Xerox Nuvera user interface offers controls to change image placement,orientation, etc.
NOTEThe Copy Service and Scan to File Service are only available if your system includesthe integrated Document Scanner module for copying and scanning jobs.
To edit copy or scanned images1. Place the original on the Document Glass or Document Feeder.
Xerox Nuvera User Guide and Training Aid (UGTA) for Software Version 9.3/10.323-38
How Do I...

2. Click the Image Edit tab.3. Click the Original Size button. Select Manual Document Glass or Mixed Size Originals
to input the size of the original document(s).4. If your output paper size is bigger than the original image, you may want to use the
Edge Erase controls. Utilizing these, you can eliminate the border caused by the copierdetecting and imaging the edge of the original document. Or, you can eliminateinformation around the edges of your original document, by placing a mask usingthe Edge Erase function.
5. Click the Image Shift button.Using this control, the image being copied can be placed anywhere on the outputpage.
6. Click the Image Rotation button.Using this control, the output image can be rotated 180 degrees. See Rotating theImage.
7. Click the Negative/Mirror Image button.Using this control, the output can be printed as a negative, where the black pixelsprint white and the white pixels print black and/or the output can be printed as amirror image on the lead edge.
8. When satisfied with the adjustments, click Copy or Scan.
To edit print images1. Open the Print Properties window of a print job.2. Click the Image Edit tab.3. Click the Image Shift button.
Using this control, the image being printed can be placed anywhere on the outputpage.
4. Click the Rotation button.Using this control, the image being printed can be rotated 180 degrees.
5. Click the Background Form button.Using this control, a Background Form can be added to the printed job.
6. When satisfied with the adjustments, click Print.
NOTEJobs can be saved as Background Forms. A listing of the available BackgroundForms is located in the FreeFlow Print Server menu bar under Administration > Background Forms. For more information, refer to the FreeFlow Print Serveronline Help.
Erasing Unwanted Marks On Originals
Sometimes the original document you are copying or scanning contains markings nearthe edges that you wish to remove. Examples of unwanted edge markings could be:
• Wrinkled, torn, or other damage near the original document's edges
• Hole punches
• Handwriting or other errant marks near the document's edges
23-39Xerox Nuvera User Guide and Training Aid (UGTA) for Software Version 9.3/10.3
How Do I...
• The edge of the paper causing a shadow
Erase Options
There are two methods for deleting unwanted edge markings:
• Edge Erase: This method allows you to set different deletion widths to every edgeof the page in the original document. This method is useful for damaged documentsor documents that have errant markings on some but not all edges.
• Border Erase: Using this setting, one deletion width is set and applied to all edgesof the document. This method is useful for originals on colored paper, or documentsthat have the same unwanted edge content on every page.
To erase an edge1. On the Home Screen, initiate a copy or print job.2. On the Image Edit tab, click the Edge Erase button.3. On the Edge Erase drop-down menu, select either Border Erase or
Standard Edge Erase.4. Use the spinner boxes to set the area (or areas if you selected Edge Erase) you want
Edge Erase to cover.
Other ways to work with edge-to-edge imaging
See Printing an Image That Extends to the Edge of the Page for information on moreways to utilize edge-to-edge imaging.
Shifting the Image
Sometimes the information on the output page needs to be moved to accommodatedifferent types of binding. This prevents information falling into areas that mayeventually be hole-punched, stapled, or perfect-bound.
NOTEThis feature is only available if your system includes the integrated DocumentScanner module for copying and scanning jobs.
To shift the image for a copy job1. Determine the amount of space needed to shift the content away from the binding
edge.2. Place the original document on the Document Glass.3. In the Xerox Nuvera user interface, click the Copy button.4. Click the Image Edit tab.5. Click the Image Shift button.
Image Shift controls appear. In the Shift Options drop-down menu, Manual is thedefault.
6. Enter the amount of margin shift determined in step 1.7. Make any other adjustments to the copy job.
Xerox Nuvera User Guide and Training Aid (UGTA) for Software Version 9.3/10.323-40
How Do I...

8. Click <Copy>.
To shift the image for a print job1. From the user interface, select Job Manager and open the job properties window of
the job.2. Select the Image Edit tab.3. Select the Image Shift button.4. Set the horizontal and vertical shift values.5. Make any other adjustments to the print job.6. Click Print.
Rotating the Image
You may be faced with situations where you need to rotate the original image beforeit is printed on the output page.
To manually rotate the image
You can rotate an image from the Image Edit tab of the Job Manager. Select theRotation button and the rotation value.
You might want to manually rotate the image when:
• copying a document that has damaged lead edges that experiences difficulty feedingproperly through the document feeder
• using some 3rd party finishing so that the finishing is applied correctly to the job
• using special stocks that can be loaded only in a certain way in the paper trays (forexample, tab stock can only be loaded with tabs trailing)
Automatic Image Rotation
The Xerox Nuvera automatically rotates the full page image, if necessary, to match theorientation of the paper loaded in the paper trays. Thus, you do not have to manuallyrotate originals or paper stock to get the correct orientation.
Printing your DocumentYou can print with the Xerox Nuvera in several ways:
• If you have a network you can submit a job to the Xerox Nuvera printer directly fromyour desktop through your Internet browser.
• You can download drivers and print directly from your desktop applications.
• You can also print from a data CD using the media drive on the Xerox Nuvera .
23-41Xerox Nuvera User Guide and Training Aid (UGTA) for Software Version 9.3/10.3
How Do I...

Depending on your system configuration, the Xerox Nuvera can offer many powerfulfeatures for reproducing documents:
• Making a Booklet
• Adding Pages to a Document
• Using the Basic Finishing Module (BFM)
• Using the Multifunction Finisher (MFF)
• Using DFA Compliant Finishers through the DS3500
• Adjusting Image Quality for various original types (photos, halftones, text)
• Build and store online for printing on demand
• Printing an Image That Extends to the Edge of the Page
Your Xerox Nuvera functions as a network workgroup printer and, depending on thesystem you have, a workgroup scanner.
Supported File Types
The following file types can be submitted to the printer from your PC or printed fromthe media drive:
• TIFF
• ASCII
• PostScript
• PCL
Related Hints and TipsHint/Tip DescriptionSubtopic
If a job faults after moving it from one queueto another, and the fault indicates somethingto the effect that queue attributes arecorrupted, and that a restart is required, yet arestart does not solve the problem, the causeis likely that the job's paper size is in conflictwith the programming attributes of the queue.For example, the job may contain paper sizesthat are not supported by the outputdestination programmed in the queue.
Job fault after switching queuest
FreeFlow Print Server will display the "queuedefault paper size" for the paper size of jobssent from the PCL driver. The same will happenfor PS jobs sent using a custom paper size. Thejob will print on the correct size paper in bothcases. This is just a display issue.
PCL driver and paper size
Xerox Nuvera User Guide and Training Aid (UGTA) for Software Version 9.3/10.323-42
How Do I...
Hint/Tip DescriptionSubtopic
For very long jobs, the percent completeindicator may not be correct. Use the PagesPrinted indicator to monitor job progressagainst the known size of the job.
Percent complete indicator
If you want to Print To File a PS or PDF job withDocuTech Emulation enabled, select a save typeof PDF. You will then be able to reprint the jobwith DocuTech Emulation enabled and the jobwill print as expected.
Print to File with DocuTech emulation
If you want to staple print a job that requirestwo sizes of SEF stocks, and one of them is alsoloaded LEF, program both the stocks that youwant to use with the same custom Type. Whensending the job, select the custom Type andthe job will use the correct paper and staple. Ifyou do not do this, the job will fault because itwill attempt to use LEF paper and won't be ableto staple.
Staple print with two stock sizes
When submitting a landscape job that containstabs running across the top, enable the 180rotate option to get the proper orientation ofthe image on the tabs.
Tab job landscape with tabs at top
For MFF configurations only: When running atab job with pre-drilled paper for the main bodypages, the pre-drilled paper must be loadedwith the holes leading, which is opposite ofwhat the label on the tray indicates.
Tab job with drilled paper (MFF configs. only)
When printing a job, if it runs out of paper, donot restart/shutdown the machine. If you do,the job may resume on the wrong orientationpaper. Example: If your job was printing onLetter LEF and ran out, the system wasrestarted, the job may resume printing on LetterSEF. As a work around, disable any trays of thewrong orientation before the restart/shutdownor fill the correct tray before the restart/powerup completes.
When paper runs out, do not restart or shutdown
If you want to print a job from the Print FromFile Service and use the Sample Print feature,submit the job to the Hold queue, open the job,and select Sample Print from the Job Propertieswindow. You could also add Sample Print to aqueue as an override. Sample Print is notavailable for selection from the Print From Filescreens.
Sample Print
23-43Xerox Nuvera User Guide and Training Aid (UGTA) for Software Version 9.3/10.3
How Do I...(continued)

Printing from the Media Drive
One way to submit a print job is to load the file into the system from a data CD or DVD.Once the file to be printed is loaded in the Xerox Nuvera , it can be programmed foroutput and printed immediately, or it can be saved for printing at a later time.
Use only high quality CD/DVD-R media to store jobs and make configuration back-ups."Bargain" CD/DVD-R media can be problematic and adversely affect the ability to storeand retrieve information. This also applies to CD/DVD-RW media.
To print from the media drive1. Open the media drive door, located in the bottom center of the main tower.
For details about the media drive, see Media Drive Specifications.
2. Insert the data CD or DVD into the media drive on the Xerox Nuvera .3. At the Xerox Nuvera user interface, click the Print From File button.4. Select the Files tab and click Browse.
This launches the Browse window.5. Choose [CD-RW0] from the Look In drop-down menu.6. Double-click the file you want to print from the Name list and click [OK].7. The print file is now available for programming throughout the user interface.
Extra pages can be inserted, and/or finishing options can be programmed. See AddingPages to a Document.
8. Select System > Eject CD.
NOTEDo not eject the CD before printing is complete.
Related Hints and Tips
Hint/Tip DescriptionSubtopic
Use of CD-RW media can cause read problemswhen written on one drive and read fromanother.
CD-RW media
Description: The DVD/CD RW drive is fullyfunctional. However, FreeFlow Print Server onlywrites to the CD for CFA logs andbackup/restore.Workaround: FreeFlow Print Server allows usersto back up and restore in a DVD format.
DVD/CD media selection
Setting up a Print Job
The Xerox Nuvera offers a wide array of features to support your workflow needs. Youcan make a print using the default settings in either a client-based printer driver, or onthe tabbed user interface. Or, you can use either of those methods to make changes toyour document.
Xerox Nuvera User Guide and Training Aid (UGTA) for Software Version 9.3/10.323-44
How Do I...

Explore the links at the left to learn more about ways to submit print jobs.
To set up a basic print job1. Submit a print job to the system using one of the methods (see the "Print My
Document" links at left).
• To input hard copy originals, use Copy Services.
• To print jobs located on media or a local or network drive, selectPrint from File Service and select the job from the Files tab.
• To print jobs from the Job Manager queue, select Job Manager.
2. Adjust the job properties under each tab.
• Editing Images
• Resize the images
• Adjust image quality
• Setup slip sheets and special pages
• Create booklets
• Print Pads
• Set MFF finishing options
• Set BFM finishing options
• Set 3rd Party finishing options
3. From the Paper Stock pull-down menu on the Basic tab, choose paper to print on.
• Auto Paper Select- system selects the paper stock to use
• Loaded Stock - you make a selection from the loaded stock list
• Stock List - you make a selection from the stock list
• Custom - you program a custom stock
NOTEIf your job is in Job Manager, select the stock from Loaded Stock or Stock Listunder the Stock tab in the Job Properties window.
NOTEChoosing paper is not done on a "by tray" basis. For trays 1 and 2, if the samepaper is loaded in both trays and tray 1 has a higher priority (a lower number),then it will feed from the highest priority tray.
Additionally, if you loaded 8.5 x 11 inch paper in 2 trays (1 LEF and 1 SEF), youwill see one choice for this paper, and 2 orientations to choose from in the LoadedStock user interface.
4. From the Basic tab you can also reduce or enlarge the size of the image to print,lighten or darken the copy or print, specify the output quantity, collate the pages,and specify finishing options.
23-45Xerox Nuvera User Guide and Training Aid (UGTA) for Software Version 9.3/10.3
How Do I...

Refer to the FreeFlow Print Server online Help for a detailed description of theseselections.
5. To save a copy job, use the Advanced tab and identify the save location and fileformat of the copy job for printing later.
6. Select the Output tab to identify the finishing options, output location and outputorder of the job. Use the Stapling/Finishing pull-down menu to select the finisheravailable on the system. The finishing options available depend on the configurationof your system.
NOTEConflicts for envelope jobs with finishing selected are not defined orimplemented. Applying finishing options such as stapling and folding to envelopesis not recommended. The system, however, does not prevent programmingfinishing to envelopes.
• If no finishing devices are installed, the default setting is none.
• If your system is installed with a BFM, you can select single or dual stapling.
• If your system is installed with a MFF, you can select stapling, hole punching,folding or multiple finishing.
• If your system is installed with a 3rd party finisher, first make sureSystem Specified is selected from the Output Location pull-down menu. SelectExternal from the Stapling/Finishing pull-down menu. A list of DFA-compliantprofiles display that represent the production finishers available. Move the cursoron top of the icon to select the profile enabled with your system.
NOTEAll DFA finishing profiles available on the system will display. If you send thejob to a finisher that is not enabled, the job faults to the inactive job queue inJob Manager. Contact your System Administrator to enable or disable DFAfinishing profiles.
NOTEWhen printing to a DFA-compliant 3rd party finisher, do not select BypassTransport as the output location.
7. To improve the image quality of a document, select the Image Quality tab.Refer to Adjusting Image Quality for more information.
8. To rotate, edge erase, resize the output image, select the Image Edit tab.Refer to Editing Images for more information.
9. To insert covers and other pages, select the Special Pages tab.Refer to special pages for more information.
10. Load paper trays with appropriate stock(s) and adjust tray programming if necessary.11. If in Copy Services, click Copy. If in Print from File Services, click Print.
Xerox Nuvera User Guide and Training Aid (UGTA) for Software Version 9.3/10.323-46
How Do I...
Batch Printing
You can print files in batches by choosing a folder on the hard drive, on a CD/DVD, orfrom the network (by selecting Windows Network (SMB)), and print all the documentsin the folder and subfolders. All the documents can be printed in one batch. The foldermay contain FreeFlow Print Server saved jobs or other documents in print-ready formats(single-page TIFF, multi-page TIFF, and PDF).
To print multiple files or all the files in a subdirectory, all the jobs must have the samestock programming. All the jobs will also print through the same queue, so all the jobparameters will be the same. To facilitate batch printing, organize jobs with the samejob programming within folders.1. In the Print from File window, select Browse.2. In the Browse window, select one of the following icons to open the Batch Print
window:
• Batch Files
• Batch Files including Subdirectories
3. In the Batch Print window, print all the files contained in the file or in the file includingits subfolders. You can order or delete files, and select single or multiple files to print.The files will print in the order listed.
Using Preview to proof a print job
Preview provides a low resolution (75 dpi) preview so that you can review the job priorto printing. An entire job or a select range of pages can be previewed. Preview allowsyou to view the job, including composition and layout, and make changes before thejob is submitted for final print. The following job types can be viewed:
• PostScript
• VIPP
• PCL
• ASCII
• TIFF
NOTEThe Preview feature is accessed through the Job Manager. For more information onusing Preview, see the online Help.
23-47Xerox Nuvera User Guide and Training Aid (UGTA) for Software Version 9.3/10.3
How Do I...

Related Hints and Tips
Hint/Tip DescriptionSubtopic
The default decals for the Sheet Feeder Module(SFM) are for machines with the MFF installed.New feeders come with extra decals that areto be used on machines with a BFM and/orDS3500 installed. These decals describe theproper orientation on how to load the differenttypes of media. Make sure the correct decalsare attached to the feeders. Referring to thesedecals will also help you to correctly load thelead edge of the stock in the SFM so it printscorrectly to the BFM. The decals for the MFFconfiguration are different so make sure to usethe correct decals for your system.
Feeder decals
The LED behavior on the Front door: The intentis to provide to the customer feedback as towhich stacker is being used when 2 BFMs areattached. The states are: Steady On: Stacker isIn Use Blink: Ready to Unload Steady Off: Notin use LED State Change: By selecting theUnload button, the LED will change state. If itis off, it will turn on for the duration that thebutton is depressed. If it is on, it will turn off forthe duration that the button is depressed. Thisrequest can occur when an unload is neededprior to the BFM finishing a set or the machineis cycled down due to being out of paper andneeds to finish the set before the unloadrequest is honored.
Front door LED behavior
To print and finish a job that contains the PCLjob separator command (&l1T), send the job toa queue that does not have an override set forfinishing. A default value is okay - just makesure there is no override. Setting an override forFinishing results in all job level finishing optionsbeing ignored and the default finishing optionbeing applied to the full job. The PCL jobseparation command falls into finishingcategory.
DS5000PCL job with job separator command
Xerox Nuvera User Guide and Training Aid (UGTA) for Software Version 9.3/10.323-48
How Do I...

Hint/Tip DescriptionSubtopic
You do not need to press the Finisher UnloadButton to remove output from the finisher.When you press the Finisher Unload Button,the finisher cycles down. Press the FinisherUnload Button again to re-enable marking.If landscape C-fold or Z-fold jobs printed fromprint clients, or the SDDF LEF scan, are rotated180 degrees, select 180 degree rotation fromthe Advanced tab in Print Drivers at the PCapplication or from the Image Edit tab, ImageRotation, at the Copier/Printer user interface.The PostScript Jog command, when used withina job, does not perform as described in theAdobe PostScript specifications. Changes to theJog value create subsets to which the job orqueue level finishing selections are applied. Forexample, if a job specifies<</Jog 3>>setpagedevice on page 1 and <</Jog0>>setpagedevice on page 5, then pages 1through 4 will be finished as a unit and pages5 through the end of the job will be finished asa separate unit. This is the same behavior asother Xerox production printers, such as theDocuTech 6180.On a MFF system, if you are Dual staplingmixed sizes (that are a mix of LEF and SEF)from the Copy pathway, they will print andstaple correctly. However, if you also save thejob and reprint it later, the job will Fault. ThePrint pathway currently can not handle Dualstapling with mixed sizes.
MFF Pro and Pro PlusFinisher Unload ButtonC or Z fold jobs rotated 180 degreesPostScript Jog commandDual Stapling with Mixed Sizes
See also
For an overview of more sophisticated jobs and workflows, see Setting Up Complex Jobs.
For details about advanced features, see Advanced Publishing Features.
Printing 2-Sided Pages
When submitting a print job from a client driver or the web-based interface, single ortwo-sided printing can be specified at that time. However, there may be instances whenyou'll need to override that programming from the actual Xerox Nuvera user interface.
For more information about submitting jobs from the desktop, see Printing a Job fromyour Networked PC.
Basic workflow to change "Sides Imaged" programming at the userinterface1. Submit a job to the Xerox Nuvera that includes "Sides Imaged" programming.
23-49Xerox Nuvera User Guide and Training Aid (UGTA) for Software Version 9.3/10.3
How Do I...(continued)

2. At the Xerox Nuvera user interface, locate the job by using the Job Manager service.3. In the Job Manager, double-click a job to launch the Job Properties window.4. Click the Output tab, then click on the Basic Settings button. Change Sides Imaged
programming, then make any other job programming changes, if any.5. Click Print.
Printing a Job from your Networked PC
You can submit the following file types directly from your network-enabled desktopcomputer, with either your /Content/about_60_xi191639_1_3.dita#concept2006, ornearly any desktop application:
• TIFF
• ASCII
• PostScript
• PCL
To submit a print job from your PC using a web browser1. Determine the IP address of the Xerox Nuvera .
Consult your System Administrator.
2. Launch your web browser. Type the IP address in the browser's address bar.3. After a few moments, the web-based user interface appears. Select Job Submission
to submit a print ready job from the browser.
To submit a print job directly from a networked PC application
This requires that you download and install the appropriate print drivers on your desktopsystem. Ask your System Administrator to install the drivers from the CD that came withthe Xerox Nuvera . For more details on available drivers, see Print Drivers and ClientSupport.
Or
Download the appropriate driver from the Xerox website. Once you have downloadedthe driver, follow the screen instructions to install it, adding the Xerox Nuvera to yourlist of available printers.
With the driver installed and the printer added to your list of available printers, you canprint directly from any desktop application.1. Make any selections to configure your document for output.
The Print window appears2. When you are satisfied with your settings, click <OK>.
Your document is sent to the Xerox Nuvera and printed.
Xerox Nuvera User Guide and Training Aid (UGTA) for Software Version 9.3/10.323-50
How Do I...
To manage print jobs submitted from a networked PC
With the Xerox Nuvera in Pause mode, you can submit print jobs from a client workstation,then retrieve them at the Xerox Nuvera , apply further job programming, and releasefor final printing. Also, you can send jobs with the Hold option and the job will be heldin Job Manager, with no need to pause the printer. For details, see Managing Print Jobs.
Using Hot Folders from the Queue Manager
The Hot Folders feature on the FreeFlow Print Server user interface allows you to dragand drop your print-ready jobs from your networked PC into a Hot Folder. The Hot Folderplaces the job in a queue on the Xerox Nuvera System. Once the job is submitted to thequeue, it will automatically print at a specified time and then be deleted from the HotFolder.
Hot Folders are activated in Queue Manager. For more information on Queue Managerand how to use the Hot Folders feature, see Working with Queues.
More information about printing from the desktop
Refer to the CentreWare Printer Driver Guide on the CentreWare Printer Driver CD in theCustomer Materials kit.
Print Drivers and Client Support
The Xerox Nuvera can accept jobs from a variety of print drivers and print clients overa network.
Print Driver Support
The print drivers are available on the CentreWare Print Drivers CD located in the UserGuide and Documentation Kit shipped with each Xerox Nuvera System. The print driverscan also be found on Xerox.com under the Support and Drivers section.
Xerox Custom Drivers
Xerox Custom Drivers provide full Xerox job programming including Special Pages.
There are PostScript drivers available for both Windows and Mac OS x.
Additionally, there are PCL5e and PCL6 drivers available for the Windows platform only(Not Mac).
Generic PPDs
The generic PPDs are supplied for use with third party print drivers and applications. Theprogramming ability via the PPDs is limited. They do not support job programming viaa Xerox job ticket like the custom drivers.
23-51Xerox Nuvera User Guide and Training Aid (UGTA) for Software Version 9.3/10.3
How Do I...

Print Client Support
The Xerox Nuvera is accessible over the network by entering the IP address of the XeroxNuvera System in the address line on a web browser. On the Xerox Nuvera's homepage,there are two selections available. There is the lightweight Job Submission selection andthe fully featured Job Submissions Applet selection.
Job Submission
Selecting Job Submission displays the Xerox Web User Interface.
This light-weight job submission tool is used to submit print-ready files directly from aweb browser to the Xerox Nuvera system. It supports most of the job programming withthe exception of Special Pages.
Related Hints and Tips
Hint/Tip DescriptionSubtopic
Booklet Layout• To use Booklet Layout successfully, set the
body Paper Size to the size of the image.Then turn Margins off in the Image LayoutTab to prevent 98% scaling. Now go to theLayout/Watermark tab and select BookletLayout. This will automatically select the2-sided printing for the job. Finally selectthe paper size you would like the outputprinted on in the Fit to New Paper Size listand then print the job.
• You will not be able to use Booklet Layoutwith an Encrypted or Password ProtectedPDF using the print driver. To workaroundthis, send the PDF directly to the FreeFlowPrint Server using one of the web printsubmission tools or LPR and hold it. At theFreeFlow Print Server, program the BookletLayout option and release the job. The jobwill print in booklet form.
Xerox Nuvera User Guide and Training Aid (UGTA) for Software Version 9.3/10.323-52
How Do I...
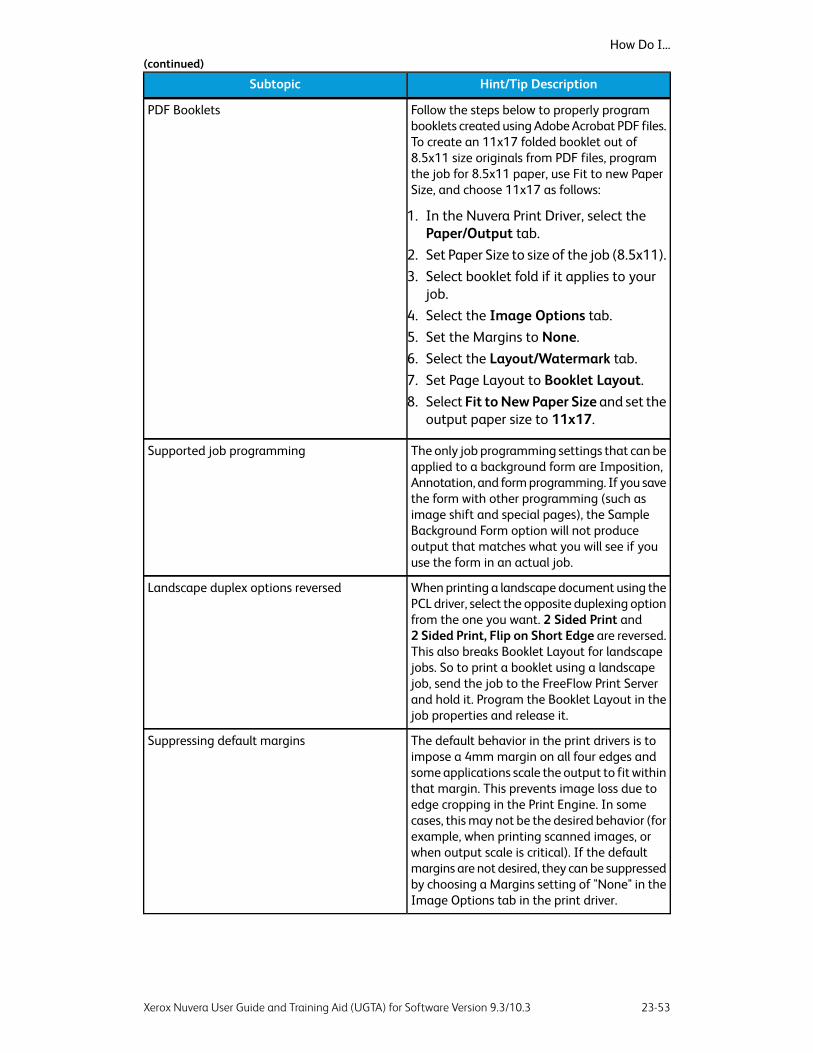
Hint/Tip DescriptionSubtopic
Follow the steps below to properly programbooklets created using Adobe Acrobat PDF files.To create an 11x17 folded booklet out of8.5x11 size originals from PDF files, programthe job for 8.5x11 paper, use Fit to new PaperSize, and choose 11x17 as follows:
PDF Booklets
1. In the Nuvera Print Driver, select thePaper/Output tab.
2. Set Paper Size to size of the job (8.5x11).3. Select booklet fold if it applies to your
job.4. Select the Image Options tab.5. Set the Margins to None.6. Select the Layout/Watermark tab.7. Set Page Layout to Booklet Layout.8. Select Fit to New Paper Size and set the
output paper size to 11x17.
The only job programming settings that can beapplied to a background form are Imposition,Annotation, and form programming. If you savethe form with other programming (such asimage shift and special pages), the SampleBackground Form option will not produceoutput that matches what you will see if youuse the form in an actual job.
Supported job programming
When printing a landscape document using thePCL driver, select the opposite duplexing optionfrom the one you want. 2 Sided Print and2 Sided Print, Flip on Short Edge are reversed.This also breaks Booklet Layout for landscapejobs. So to print a booklet using a landscapejob, send the job to the FreeFlow Print Serverand hold it. Program the Booklet Layout in thejob properties and release it.
Landscape duplex options reversed
The default behavior in the print drivers is toimpose a 4mm margin on all four edges andsome applications scale the output to fit withinthat margin. This prevents image loss due toedge cropping in the Print Engine. In somecases, this may not be the desired behavior (forexample, when printing scanned images, orwhen output scale is critical). If the defaultmargins are not desired, they can be suppressedby choosing a Margins setting of "None" in theImage Options tab in the print driver.
Suppressing default margins
23-53Xerox Nuvera User Guide and Training Aid (UGTA) for Software Version 9.3/10.3
How Do I...(continued)
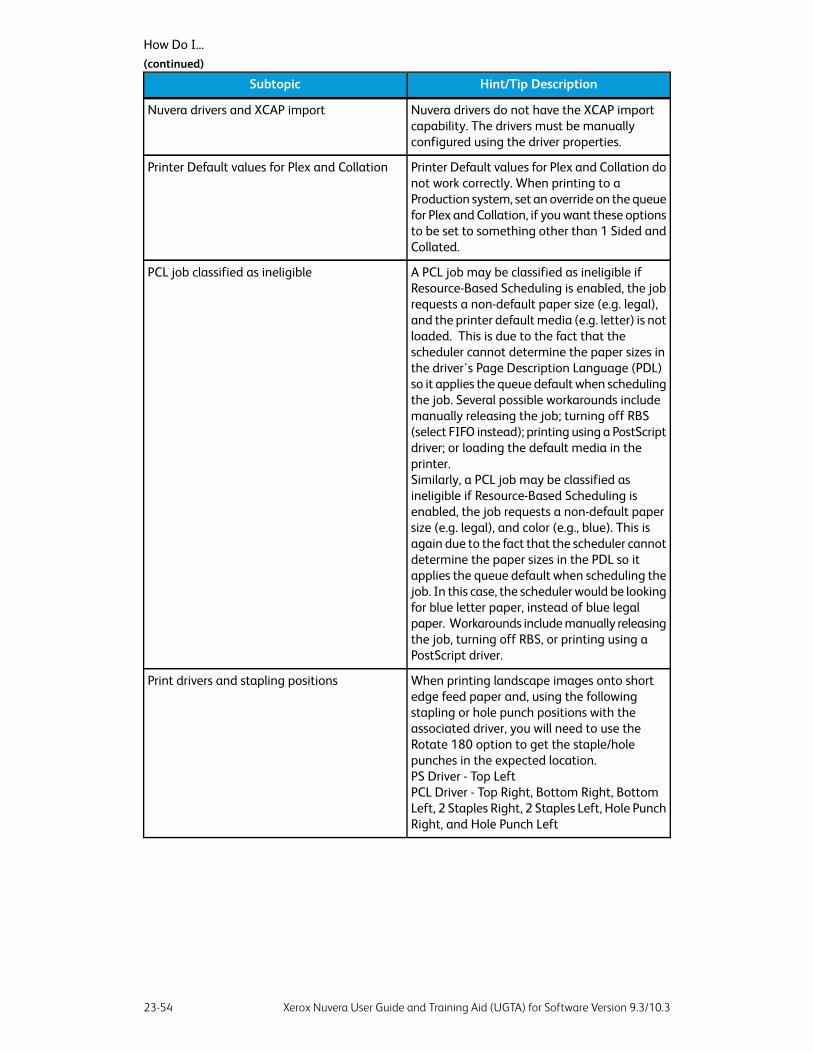
Hint/Tip DescriptionSubtopic
Nuvera drivers do not have the XCAP importcapability. The drivers must be manuallyconfigured using the driver properties.
Nuvera drivers and XCAP import
Printer Default values for Plex and Collation donot work correctly. When printing to aProduction system, set an override on the queuefor Plex and Collation, if you want these optionsto be set to something other than 1 Sided andCollated.
Printer Default values for Plex and Collation
A PCL job may be classified as ineligible ifResource-Based Scheduling is enabled, the jobrequests a non-default paper size (e.g. legal),and the printer default media (e.g. letter) is notloaded. This is due to the fact that thescheduler cannot determine the paper sizes inthe driver's Page Description Language (PDL)so it applies the queue default when schedulingthe job. Several possible workarounds includemanually releasing the job; turning off RBS(select FIFO instead); printing using a PostScriptdriver; or loading the default media in theprinter.Similarly, a PCL job may be classified asineligible if Resource-Based Scheduling isenabled, the job requests a non-default papersize (e.g. legal), and color (e.g., blue). This isagain due to the fact that the scheduler cannotdetermine the paper sizes in the PDL so itapplies the queue default when scheduling thejob. In this case, the scheduler would be lookingfor blue letter paper, instead of blue legalpaper. Workarounds include manually releasingthe job, turning off RBS, or printing using aPostScript driver.
PCL job classified as ineligible
When printing landscape images onto shortedge feed paper and, using the followingstapling or hole punch positions with theassociated driver, you will need to use theRotate 180 option to get the staple/holepunches in the expected location.PS Driver - Top LeftPCL Driver - Top Right, Bottom Right, BottomLeft, 2 Staples Right, 2 Staples Left, Hole PunchRight, and Hole Punch Left
Print drivers and stapling positions
Xerox Nuvera User Guide and Training Aid (UGTA) for Software Version 9.3/10.323-54
How Do I...(continued)

Hint/Tip DescriptionSubtopic
When printing a 2-sided, odd number of pagesjob from CorelDRAW using the PCL driver, theremay be an extra blank image (page) added tothe end. This blank image will "print" on thebackside of the last page unless there is specialpages programming. If the job requires specialpages programming, use the Pages to Printoption and select 1 - Number of Pages for therange to print the job without the extra blankpage at the end.
Printing from CorelDRAW with PCL driver
Printing a PDF from Adobe Reader using theWindows 2000 PS drivers may take a while tosend. If the time it takes to submit the job istoo long, submit the PDF directly using theWebUI or FreeFlow Print Manager.
Time to print a PDF
Managing Print Jobs
The Xerox Nuvera can be operated so that incoming jobs are held until an operatorretrieves them at the system and applies job programming before actually being sentto print.
In a Xerox Nuvera system this workflow is usually handled by a queue, or a location onthe machine where jobs line up and wait for further processing by an operator. Systemswith the Productivity Pack license enabled, have more than one queue to set for differentjob statuses. For those Xerox Nuvera systems that do not have the Productivity Packlicense enabled, there is only one queue and all jobs coming in simply pass through andare processed and completed. However, you can manage print jobs in a mannerresembling a traditional hold queue by using the Do Not Release feature. Right-click onthe queue and select Do Not Release Jobs to prevent jobs from processing or to holdjobs until each one is released to print.
This is a useful workflow to follow, as the browser and client driver offer only a subsetof the capabilities available at the actual system. Additionally, there may be occasionswhen you'll want to hold jobs until a certain point in the workday; such as large jobsthat require more processing time and paper resources.
NOTEJobs that were sent to a Do Not Release queue and are pending job processing aredisplayed in the Job Manager's Inactive job list with a Held By Queue job status.The Inactive job list identifies jobs as either Ineligible, Held By User, Held By Operator,Held By Queue and Faulted. Jobs in the Inactive job list can be sorted by Status foreasier identification and access of the Held jobs.
To manage multiple jobs submitted from a client1. Place the Xerox Nuvera in Do Not Release Job status or create a Hold queue.2. Any print jobs submitted to it will go into the Active Jobs list.3. From a client application, submit jobs to the Xerox Nuvera or submit jobs to a Hold
queue.
23-55Xerox Nuvera User Guide and Training Aid (UGTA) for Software Version 9.3/10.3
How Do I...(continued)
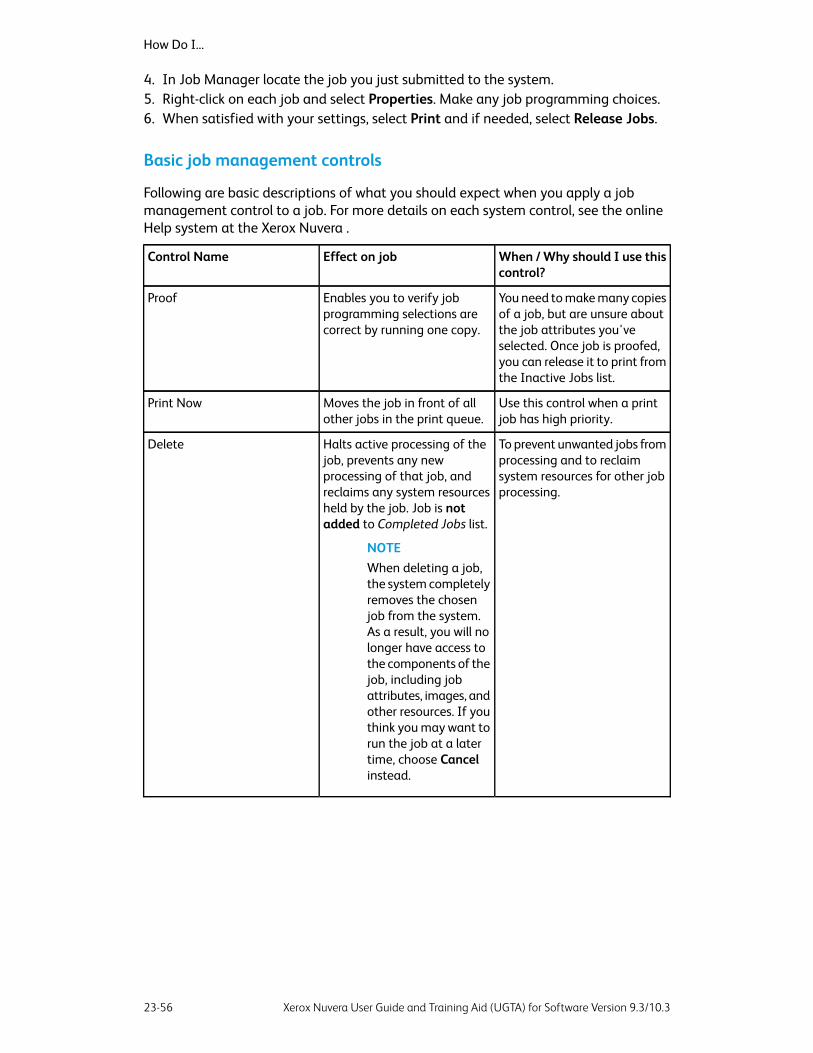
4. In Job Manager locate the job you just submitted to the system.5. Right-click on each job and select Properties. Make any job programming choices.6. When satisfied with your settings, select Print and if needed, select Release Jobs.
Basic job management controls
Following are basic descriptions of what you should expect when you apply a jobmanagement control to a job. For more details on each system control, see the onlineHelp system at the Xerox Nuvera .
When / Why should I use thiscontrol?
Effect on jobControl Name
You need to make many copiesof a job, but are unsure aboutthe job attributes you'veselected. Once job is proofed,you can release it to print fromthe Inactive Jobs list.
Enables you to verify jobprogramming selections arecorrect by running one copy.
Proof
Use this control when a printjob has high priority.
Moves the job in front of allother jobs in the print queue.
Print Now
To prevent unwanted jobs fromprocessing and to reclaimsystem resources for other jobprocessing.
Halts active processing of thejob, prevents any newprocessing of that job, andreclaims any system resourcesheld by the job. Job is notadded to Completed Jobs list.
NOTEWhen deleting a job,the system completelyremoves the chosenjob from the system.As a result, you will nolonger have access tothe components of thejob, including jobattributes, images, andother resources. If youthink you may want torun the job at a latertime, choose Cancelinstead.
Delete
Xerox Nuvera User Guide and Training Aid (UGTA) for Software Version 9.3/10.323-56
How Do I...

To reclaim system resourcesthat had been processing thejob, allowing the nextscheduled job to proceed.
Prevents any further processingof that job until it is releasedfrom a held state.
NOTEWhen a job is releasedfrom Hold, it willcontinue processing,but do so starting atthe beginning of thejob.
Hold
All jobs that you needed to runafter holding the job havefinished processing.
Reactivates held jobs, faultedjobs, and pending jobs.
NOTEWhen a job is releasedfrom Hold, it willcontinue processing,but do so starting atthe beginning of thejob.
Release
To prevent unwanted jobs fromprocessing and to reclaimsystem resources for other jobprocessing.
Halts active processing of thejob, prevents any newprocessing of that job, andreclaims any system resourcesheld by the job.
Cancel
There is more than onepending job in the active jobslist, and you need to beginprocessing a job immediately.
Enables you to elevate theposition of a pending job or setof jobs in the active jobs list.
Promote
When you need the flexibilityto move jobs between queues.
Enables you to move the job toanother queue.
Move
When you need to copy a jobwhile retaining the original joband programming.
Enables you to copy a Savedjob to a CD or to copy Savedjobs (set to retain PDL) listedin the Completed tab to aqueue.
Copy
When you have sent jobs to thesystem, not knowing it is down,or the job queue is too long, orany time you wish to divertyour job to another system.
Allows you to send jobs to adifferent printer.
Forward
23-57Xerox Nuvera User Guide and Training Aid (UGTA) for Software Version 9.3/10.3
How Do I...(continued)

When you have sent jobs to thesystem, and wish to verifyvisually that a given job hasbeen correctly configured, iscentered on the page, hascorrect image qualityadjustments applied, etc. Referto the online Help system fordetails about this user interfacecontrol.
Allows you to see a previewimage of the print job beforeactual printing.
Preview and Preview Range
Printing with the Parallel RIP feature
The Xerox Nuvera 200/288 EA/MX Perfecting Production System includes pageindependent Parallel RIP (PPR) as a standard feature used to improve image processingperformance and print speed, especially for complex documents.
How the Parallel RIP process works
Parallel RIP works with page independent jobs that are compliant with Adobe DocumentStructuring Conventions (DSC) 3.0, such as compliant PS, VIPP, and PDF.
When Parallel RIP is enabled from the Queue Manager, FreeFlow Print Server firstdetermines if the current job is eligible for Parallel RIP. If it is not eligible, the job isprocessed on a single RIP, which may leave one or more of the remaining RIPs availableto process the next waiting job. If it is, FreeFlow Print Server splits jobs, or pages of asingle job, and distributes them to the separate RIP processes running on the two separateCPUs. The maximum number of RIPs available depends on the number of processorsand the amount of memory on the FreeFlow Print Server. For instance, approximately2 to 3 RIPs will run on one dual core CPU. If an optional upgrade performance kit isinstalled with an additional dual core CPU, the system would then have four CPUs RIPpingdata (5 RIPs will run on two dual core CPUs), increasing processing time and producingfaster RIP speeds.
TIPTo see the number of parallel RIPs configured on the system, select Setup > System Preferences > Job Processing tab.
Which Jobs work best
Parallel RIP is ideal for long jobs with many nonrepeating scanned images or digitalphotographs such as text books, magazines, yearbooks and product manuals.
Parallel RIP supports data streams PS, PDF, and VIPP Database Mode. To take fulladvantage of Parallel RIP performance for PostScript or PDF jobs, always enable ParallelRIP at the printer queue and use DCS/Page Independence settings withOptimize for Portability. For these types of PS and PDF jobs, you will see a 50% or moreincrease in performance when compared to a printer queue without PPR set.
Xerox Nuvera User Guide and Training Aid (UGTA) for Software Version 9.3/10.323-58
How Do I...(continued)

NOTEYou can use the PostScript print driver to create page independent PS jobs. In thePostScript printer, select driver option Page Independence orOptimize for Portability to produce page independent output. Do not set the driveroption to Optimize for Speed, which generally produces output that is not pageindependent and not suitable for Parallel RIPping.
Jobs that are PCL, TIFF, ASCII, LCDS and IPDS will not benefit from Parallel RIP sincethey are not page independent or DSC compliant data streams. Disable the PPR optionfor this type of job. It is best that a suite of this type go to a standard queue.
How to create a queue with Parallel RIP enabled
NOTEIt is recommended that you enable Parallel RIP at all times unless printing a VIjob or a job with multiple repeated objects. Before enabling Parallel RIP, turnoff the Administrative Pages option (banner, error and property pages) as thisselection requires special processing.
1. From Queue Manager, select New from the Queue pull-down menu.2. Enter "Parallel" in the Queue Name text box.3. On the Settings tab, select Raster Image Processor.4. Select Enable as the Parallel RIP setting.5. Select Add Queue and Close.6. Select Setup > System Preferences and the Job Processing tab.
The Allocated spin box shows the number of RIPs that will be used for queues withParallel RIP enabled. You can set the number of active RIPs, however, FreeFlow PrintServer software automatically determines the optimal use of available processorsdepending upon the platform resources and the job flow. The best overall productivityis gained when the Allocated RIPs number is left at the recommended default setting.
7. Using the Parallel queue, print the job.
NOTE: The number of Allocated RIPs should match the Recommended number ofRIPs, unless directed otherwise by a Xerox Support representative.
For an overview of more sophisticated jobs and work flows, see Setup Complex Jobs.
Reprinting a Saved Job
A job submitted to a save queue is transformed to a PDF, Single-Page TIFF or a Multi-PageTiff.
23-59Xerox Nuvera User Guide and Training Aid (UGTA) for Software Version 9.3/10.3
How Do I...

To reprint a saved job
NOTEIf Retain PDL File is active, a completed copy job will be listed under the JobManager: Completed tab. This allows you to resubmit the job for printing,changing job properties if needed.
1. Select Job manager and the Saved tab or select [Print from File].2. Select Browse to locate the job on the Save directory on your system, a CD or
networked server save directory.3. Select the folder that contains the saved job.
NOTEVerify the correct Save Location by checking with the System Administrator orby viewing the Save Location in the Save Preferences. In some cases, additionalSave directories are created to save specific jobs by user, by department, or byanother categorization.
4. In the Browse window, or under the Saved Jobs tab, is a listing of saved jobs. You canfilter the list of jobs by selecting a specific file type in the File Filter pull-down menu.The available choices may include:
• Job Ticket
• PostScript
• PCL
• TIFF
• ASCII
• IPDS
• PPML
• All
NOTEThe default viewing is by Job Ticket because this is the file that retains all previousjob selections. Selecting other file types does not give you the entire job. Forexample, if you select a TIFF file type, the system prints out only the TIFF image.
5. To change the job properties double-click on a job to open the job properties window.6. Set job properties.7. Select Print.
Printing Directly From a Mainframe Computer with LCDS
Line Conditioned Data Stream (LCDS) is a mainframe to printer, Page DescriptionLanguage (PDL) which uses referenced (stored on the system) and datastream-embeddedcommands to control the processing of print jobs submitted from mainframe computers.
Xerox Nuvera User Guide and Training Aid (UGTA) for Software Version 9.3/10.323-60
How Do I...

The Xerox LCDS approach to printing dramatically reduces bandwidth requirements bylocating the final assembly of document elements on the printer where resources arestored. This eliminates the need for repeatedly sending complex elements like formsfrom the host as part of a fully formed data stream. It reduces the need for sendingthese high bandwidth items for each job by permanently placing them on the printerso they do not need to be sent for each job.
The system only needs to send the truly variable data to the printer. Even values thatcan be derived like the sum of a column of numbers can be computed on the printer sothat data transfer is minimized. This capability is unique in the industry and shows onereason why the LCDS data stream is selected by customers that need to minimize databandwidth requirements in complex distributed systems.
LCDS printers offer the ability to control the format of the final product, the printedpage, from outside the application generating the variable data. This separation offunction between the data generating application and the printer has always been acommon practice in the high performance range of computer printers. The data maybe in its proper position but post processing steps between the application and theprinter produces the final page appearance. The simplest way to visualize this type ofprinting is to think of preprinted forms where the printer prints variable information intoblank areas of the form.
LCDS resources can be loaded via tape, CD, USB, or over the network. A floppy drive isnot avaiable.
NOTEWhen using the LCDS application, the Xerox Nuvera System will not retrieve paperfrom the Insertion Module.
NOTEEdge marking is not supported.
Enabling LCDS Printing: Overview
To use LCDS printing, the Operator or System Administrator needs to make sure thatthe following conditions are met:
• the Productivity Pack license must be installed and enabled.
• the LCDS license must be installed and enabled.
• files containing the appropriate processing commands (see the "forms" analogyabove) have been loaded on the system
• supporting resources (such as forms and fonts) are installed on the system
• the correct license is installed on the system
• one specific queue has been created and dedicated on the system to process LCDS(streaming) jobs
The selection and setting of additional queue parameters, available under the varioustabs of the Queue Properties... dialog, in association with the resources installed on thesystem under LCDS Resources, determines how LCDS jobs are processed at the printer.
23-61Xerox Nuvera User Guide and Training Aid (UGTA) for Software Version 9.3/10.3
How Do I...

For more information about queues, see Working with Queues.
Verifying the presence of the LCDS and the Productivity Pack Licenses
To print LCDS jobs, you must verify that the LCDS license is installed and enabled onthe system. You must also have the Productivity Pack license enabled for the stock libraryto be available as well as all valid halftone screens.
Viewing LCDS Resources
To support LCDS, files containing the appropriate processing commands and supportingresources (such as forms and fonts) must be installed on the system under LCDSResources. To view the currently-installed LCDS resources, perform the following steps:1. Log on to the system by selecting Logon from the Logon menu.2. Select Operator (or System Administrator) as the user from the User pull-down
menu.3. Enter the Operator (or System Administrator) password and click <OK>.4. Select Administration > LCDS Resources.5. When the LCDS Resources window opens, if not already selected, select System from
the Source pull-down menu.6. A list of installed LCDS Resources will be displayed. Note the resource types displayed
under the Type category. FNT, for example, represents Font. FRM represents Form.JDL represents Job Descriptor Library (a source file of compiled PDL commands).
7. To select the specific types of resources displayed in the LCDS Resources window,click the Types... button which opens the System Resource Types dialog. After selectingthe desired resource types (by marking the checkboxes), click OK.
Related Hints and Tips
Hint/Tip DescriptionSubtopic
Offset Recovery is not supported when a DFAdevice is attached. There will be no offset onthe output to indicate where the fault hadoccurred. It will only work when there is a BFMor MFF attached.
Offset recovery
Only offset by job boundary or set boundary issupported with the third party inline DFAfinishing devices. DFA devices do not supportsingle page offsetting specified within the LCDSjob or report. A single page job or report will beoffset.
Offset with DFA
Related Information
For further information about LCDS printing with the system, and for queue setupinformation, refer to the LCDS Print documentation that is provided along with the LCDSlicense software CD. See your System Administrator or Xerox Customer Representativeto obtain this documentation.
Xerox Nuvera User Guide and Training Aid (UGTA) for Software Version 9.3/10.323-62
How Do I...
Using VIPP
The FreeFlow VI Interpreter (FF VII) is an optional software license installed on theFreeFlow Print Server that you can enable to interpret the VIPP language (Variable-dataIntelligent PostScript Printware).
Many Service Bureaus and Data Centers continue to print files written in Xerox's LCDS(Line Conditioned Data Stream) language; a legacy from the days of mainframes andpin-fed impact printers.
Many people are conducting their businesses and document production operations innetworked, PostScript-based environments. Given these divergent realities, this may bethe right time to convert LCDS-based documents to PostScript.
What is VIPP?
Xerox Variable Data Intelligent PostScript Printware (VIPP) is a powerful system of fullycompliant PostScript technologies for the production of personalized documents. TheFreeFlow VI Interpreter refers to the software used to interpret the VIPP commands.VIPP is used to discuss anything related to the VIPP commands or VIPP basedapplications.VIPP consists of a set of macros that reside on the PostScript interpreter,eliminating many of the time-consuming steps associated with traditional variableinformation workflows by enabling Dynamic Document Construction (DDC) at the printer.By dynamically creating the document at the printer, VIPP dramatically decreases theamount of time that it takes to compose and print documents.
Xerox VIPP is an open programming language that exploits the flexibility of PostScriptin constructing dynamic documents. Because VIPP has a powerful merge engine forcreating personalized business documents, it allows variable documents to be composedat the printer in real time. It also facilitates the migration of LCDS-based files to anetworked, PostScript environment, resulting in documents that are easy to manipulateand modernize, and that can be printed to a networked Xerox PostScript print device.
How it Works
VIPP uses the same "Dynamic Document Construction" concepts as the Xerox LCDSprinters. Fonts, forms, and images reside on the printer, and formatting is controlled bya template (JDT) called by the job. The bit-heavy resources stored at the printer aremerged with the variable data at run-time. The result is an efficient printing model thatsaves valuable network bandwidth. With VIPP-based documents, only the variable datais sent over the network.
The VIPP Thin Printer (VTP) allows the generation of Adobe PDF documents from VIPPbased variable data applications. Capabilities include the ability to split PDF files intoindividual PDF sets and add interactive features such as PDF Bookmarks, PDF Notes orURLs. The VTP supports personalized printing and 1-to-1 marketing by extending outputprinting capabilities to support production PDF creation that enables viewing, archivingand Web presentations of variable-information documents.
23-63Xerox Nuvera User Guide and Training Aid (UGTA) for Software Version 9.3/10.3
How Do I...

Programming options
A VIPP programmer can take advantage of control features that enable the creation ofVIPP jobs that emulate or enhance the original LCDS application without requiringchanges to the original data set. There are many features that can be added to modernizethe document without changing the source program or data file. These features include:
• rounded corners
• data-driven graphics
• reusable data elements
• multiple form layouts
Configuring the system to run a VIPP job
To support running VIPP jobs, refer to your System Administrator and the SystemAdministrator Guide. Also, for complete information about the FreeFlow VI Interpreterand the VIPP language, consult the FreeFlow VIPP Language Reference Manual on theFreeFlow VI Suite Documentation CD delivered in the VIPP ship kit.
Working With IPDS
IPDS is a printer device data stream (specific to IBM) that contains the informationnecessary to identify, monitor, and control the functions of the printer. This informationincludes the characteristics of the printer, its resolution, what resources it has, whetherit has sufficient memory, and whether it receives and prints a job.
IPDS enables a two-way dialog between the printer and the printer driver to create acooperative print management system. IPDS is device dependent and is unique for eachprinter.
Verifying the presence of the IPDS and the Productivity Pack Licenses
To print IPDS jobs, you must verify that the IPDS license is installed and enabled on thesystem. You must also have the Productivity Pack license enabled for the stock libraryto be available as well as all valid halfone screens.
Printing IPDS jobs
This is the general procedure for setting up the printer for printing an IPDS job. Theprocedure assumes that the correct IPDS options have been entered using Set Option,and that a virtual printer with appropriate attributes for the job, including a media list,has been created. It also assumes that printing and queuing are started.1. Enter Show IPDS Status so that you know the current system state and virtual printer
state.2. Enter Set Channel Online, if needed.3. Enter Set IPDS Virtual Printer, if needed.4. Load the required paper stock in the printer.
Xerox Nuvera User Guide and Training Aid (UGTA) for Software Version 9.3/10.323-64
How Do I...
5. Set up the paper trays using Set Tray or Set Tray fromVirtual Printer Media.6. Enter Start IPDS Printing, if needed.
Related Hints and Tips
Hint/Tip DescriptionSubtopic
The following FreeFlow Print Server featuresshould not be applied to IPDS jobs: JobForwarding, Save Jobs, Proof, Promote, Preview,Exception Pages, Covers, and Inserts.
FreeFlow Print Server features not supported
The Currently supported environments are Z/OS(MVS) with PSF, OS400 with PSF, AIX withInfoPrint Manager and Windows with InfoPrintManager. In addition, the Emtex VIP Front EndProcessor (FEP) is supported, but only formonochrome or highlight color data, at thistime. Some other environments or FEPs maywork successfully, but interoperability cannotbe guaranteed.
Environments supported
Image shift affects banners as well asapplication. IPDS host banners are notdistinguished from other application pages.Avoidance: Although they do not affectFreeFlow Print Server banners, queue and jobbased Image Shift and Alignment values applyto host banners, just as they do to otherapplication pages. If host banners are shiftedto an inappropriate position, but otherapplication data is printing correctly, revise thehost application so that both application dataand banners can be positioned correctly onFreeFlow Print Server without an added imageshift or alignment value.
Image shift affects banners
DocuPrint IPS 7.x Input Groups and 8.x VirtualPrinter Media Lists cannot be imported intoFreeFlow Print Server IPDS. FreeFlow PrintServer IPDS Job Setups must be recreated.
Importing
IOCA Tile objects which don’t contain an IOCAimage do not work reliably.User Action: Avoid using above feature.
IOCA Tile objects
Printer Tray values IPS Manager Printer Trayvalues are not intended for editing.Avoidance: Do not attempt to edit values in the'Printer Trays' column of the IPS Manager,'Tray/Bin Mappings' tab. Characters input intothis column, though allowed by the GUI, haveno effect on system operation, and will NOT beregistered by the IPS Manager. This field isintended for read-only use.
IPS Manager
23-65Xerox Nuvera User Guide and Training Aid (UGTA) for Software Version 9.3/10.3
How Do I...

Hint/Tip DescriptionSubtopic
N-1 job hangs if greater than IPDS throttling160-page limit.User Action: Restart IPDS Gateway from theIPS Manager GUI.Avoidance: Select Print Job Unfinished (vs. FaultJob) for Overlimit Finishing or print 1-N whenfeasible. If N-1 printing and faulting over limitjobs is required, set the maximum set size forthe finishing device to at least the size of thelargest jobs or sets that will be handled. Doingso forces the throttling limit to twice themaximum set size and ensures that throttlingwill not cause a deadlock.
N-1 job hangs
Only Offset at job or set boundary is supportedwith the third party inline DFA finishing devices.DFA devices do not support single pageoffsetting specified within the IPDS job or set.Single page job or set will be offset.
Offset and DFA
IPDS jobs cannot be processed 1-N with N-1finishing in Nuvera.User Action: Resubmit the job after setting thefinishing equipment for 1-N, if possible.Avoidance: Set both queue and finishing forthe same output order. If it is necessary to useN-1 for the finisher, send individual sets asseparate jobs, to ensure that the source job willnot exceed the length of the IPDS throttlinglimit.
Output order
Output Reposition is not supported for IPDSjobs. As with Sample current job, this featurewould also cause incorrect page counts to bereported to the host. However, host operatorcommands can be used for forward andbackward space within a job.In the IPDS environment, the host operator isexpected to effect repositioning commandsfrom the host platform (for example, JES2 $fand $b commands for forward and backwardspacing respectively). The FreeFlow Print ServerIPDS implementation manages thisrepositioning on the basis of the current set ofIPDS counters returned by the printer. Do notuse the FreeFlow Print Server Reposition Outputdialog with IPDS jobs.
Output Reposition not supported
The pause feature should not be used with IPDSas a way to continue RIPping while deferringprinting. It is not feasible to RIP a large printrun ahead of printing for IPDS, since throttlingwill limit the number of committed sheets inexcess of the number of stacked sheets.
Pause feature
Xerox Nuvera User Guide and Training Aid (UGTA) for Software Version 9.3/10.323-66
How Do I...(continued)

Hint/Tip DescriptionSubtopic
Specific printer status problems are notdescribed with Intervention Required messages.Only a generic message is sent.User Action: Operator should ensure that theirmanagement process for this system does notdepend on the printer providing a specificdescription of what is wrong (e.g. Check theprinter for the specific problem vs. relying onthe host message.)
Printer status messages
The IPS Manager is not automatically informedwhen physical tray contents are changed at theFreeFlow Print Server. Instead, you must usethe Refresh mechanism provided by the IPDSTray/Bin Mappings dialog to display the latestmapping information.
Refresh to update mappings
FreeFlow Print Server Remote Workflow (DRW)does not support the IPS Manager.
Remote Workflow
Sample current job is not supported for IPDSjobs. The IPDS host presumes full control overthe jobs output, and this feature would causeincorrect page counts to be reported to thehost. The FreeFlow Print Server GUI currentlyonly supports this capability at the PrinterManager level, and is not able to set thiscapability for individual jobs or queues.Therefore, the FreeFlow Print Server GUI doesnot prevent selecting Sample Current Job.However, the request will not be honored foran IPDS job, and no warning message will beprovided.
Sample Current Job not supported
Performance may be slow for jobs requiringlarge amounts of image data, especially whenprinting at 600 dpi.User Action: Schedule extra print time for jobsthat require many large images, or reduce thesize and number of images required for anapplication.
Slow performance
Spooling mode is not supported for IPDS jobs.Ensure IPDS queues are set up for Streaminginput.
Spooling mode not supported
Working with QueuesA printer queue is a list of print jobs that await an available printer, need furtherprogramming, or are being held by an operator for some reason.
23-67Xerox Nuvera User Guide and Training Aid (UGTA) for Software Version 9.3/10.3
How Do I...(continued)
NOTEXerox Nuvera systems that do not have the Productivity Pack license enabled haveone queue only. Once you set the properties for this queue using the Printer Defaultsselection from the System menu, all jobs coming in simply pass through and areprocessed and completed. If your system has the Productivity Pack license installedand enabled, the system offers multiple queues.
Three queues are pre-installed on Xerox Nuvera systems with the Productivity Packlicense enabled:
• HostName_Print - Jobs submitted to this queue are automatically printed
• HostName_Save - Jobs submitted to this queue are saved in the Save directory
• HostName_Hold - default setting release=No. Jobs submitted to this queue are helduntil manually set to release.
In the Xerox Nuvera user interface, Queue Manager is used to create numerous internalprinter queues that can be used to control the flow or handling of documents in differentways.
For example, you can configure one queue as a hold queue, where incoming jobs aresaved to a locally designated directory. This is useful when submitting jobs remotely,where the client submission tool may not include all programming options, or thesubmitter may not know exactly which types of paper stocks are available at the system.Jobs submitted to the Hold queue can be programmed directly at the Xerox Nuvera userinterface for final output. Queues can also be set up to allow print jobs to printimmediately.
For example, your work environment has 3 types of print jobs:
• Jobs submitted remotely. Set up a print queue to save received jobs to a specificlocation, to be retrieved and programmed further at a later time
• Jobs with little or no job programming required. Set up another print queue to printjobs immediately
• Jobs that need a large amount of special programming, including insertion of specialpages, covers, etc. You could send them to the same queue used for jobs submittedremotely, or you could set up a discrete queue for jobs that require special stockprogramming. This way, you can do all jobs that require paper tray loading all atonce
To add a new queue on systems with the Productivity Pack licenseenabled1. In the Xerox Nuvera user interface, select the Queue Manager button.2. Select the Queue pull-down list.3. Select New. The New Queue dialog displays,4. In the Queue Name field, enter a name of up to 25 characters. The name can consist
of letters, numbers, and underscores.5. Select a quantity between 1 and 65,500 to indicate the default number of job sets
to be printed for all jobs sent to this queue, unless otherwise specified in the job itself.6. Set a priority between 1 (highest priority) and 100 (lowest priority) for the queue.
Xerox Nuvera User Guide and Training Aid (UGTA) for Software Version 9.3/10.323-68
How Do I...
7. Select the input format to indicate the manner in which jobs will be submitted to thequeue.
8. Select a destination of either Print, Save, or Print and Save.Print releases the document immediately for printing. Save saves the document tothe location designated in Save Location.
9. If desired, add a banner page message or job comments.10. Make extended option selections from the Stock, Output, Image Quality, Image Edit,
and PDL Settings tabs.11. Select decomposer (RIP) options on either the PostScript/PDF, Advanced PostScript,
TIFF, PCL, ASCII, or LCDS buttons.12. Select Add Queue to complete the new queue.13. Select Close to exit the New Queue dialog.14. In the Queue list, right-click the new queue and choose Accept Jobs to enable the
queue.
To view or modify queue properties with the Productivity Packlicense enabled1. In the Xerox Nuvera user interface, click the Queue Manager button.2. Select a queue and double-click to open Queue Properties.3. Modify queue settings as desired, then click OK to have your changes enabled by the
system.
To view or modify queue properties of a single queue (ProductivityPack license not enabled)1. In the Xerox Nuvera user interface, select the System menu.2. Select Printer > Defaults to open Queue Properties.3. Modify queue settings as desired, then click OK to have your changes enabled by the
system.
To copy a queue with the Productivity Pack license enabled1. In the Xerox Nuvera user interface, click the Queue Manager button.2. Right-click on a queue.3. Select Copy. Rename the queue and set new queue properties.4. Select Copy Queue.5. Select Close.
The new queue is created.
NOTEOverride Feature. Many options in the Queue Manager dialogs contain anoverride setting. Select Override only if you want the queue settings to takeprecedence over any attributes programmed with individual jobs. This settingmay be useful for jobs being submitted by remote users who may not be familiarwith the system configuration.
23-69Xerox Nuvera User Guide and Training Aid (UGTA) for Software Version 9.3/10.3
How Do I...

Using Parallel RIP (on the Xerox Nuvera 200/288 EA/MXPerfecting Production System)
The FreeFlow Print Server Parallel RIP feature, previously available only on color products,is provided on the Xerox Nuvera 200/288 EA/MX Perfecting Production System. Accessthis feature from the Queue Manager to improve print speeds especially on complexjobs. For more information on Parallel RIP, refer to Printing with the Parallel RIP feature
Locking/Unlocking a queue
A System Administrator can lock queues so that the queue properties can not be changeduntil the queue is unlocked by a System Administrator. Right-click on a queue and selectLock or Unlock.
When and how to use Hot Folders
Hot Folders is a job flow productivity option that is mounted, enabled and disabled onyour networked PC by the System Administrator. Use this feature to help organize yourprint jobs and better manage the flow of these jobs from your PC to the printer. Youcan create a Hot Folder for specific types of jobs or for selected users.
When the Hot Folders feature is enabled, the Xerox Nuvera automatically performs allnetwork configurations and exports the Hot Folder to the network so it is visible to allusers. You can then quickly and easily submit print-ready jobs by dragging and droppingthem from your networked PC into the Hot Folder on the network server. The jobs aresubmitted to a specific queue in FreeFlow Print Server.
Once the job is submitted to the queue, it is printed at a specified polling time and thenautomatically deleted from the Hot Folder.
To activate and create Hot Folders for a given queue:1. Log on as a System Administrator.2. If your system has the Productivity Pack license enabled, select Queue Manager and
create a specific queue if needed.3. Right-click on the queue in which you want to activate a Hot Folder and select
Hot Folder > Enable Hot Folder.4. If your system does not have the Productivity Pack license enabled, select the System
menu and Enable Hot Folder.The Hot Folder associated with this queue is created on the network. A Hot Foldericon appears next to the queue name.
5. In the client's browser, enter \\ IP Address of the FreeFlow PrintServer.A window opens showing all available Hot Folders on the FreeFlow Print Server.
6. Drag and drop the print ready files from your desktop into the Hot Folder.The files print automatically in FIFO order.
7. To disable the Hot Folders feature, right-click on the queue and select Hot Folder > Disable Hot Folder. Or select Disable Hot Folder from the System menu.FreeFlow Print Server removes the Hot Folder from the network.
Xerox Nuvera User Guide and Training Aid (UGTA) for Software Version 9.3/10.323-70
How Do I...

To set or change the Hot Folder polling time:
The Hot Folder feature is set to look for jobs on the network and submit them to theFreeFlow Print Server at a specified time. This time interval can be changed or set froma minimum of 5 seconds up to a maximum of 10,000 seconds. If you are submittinglarge jobs, or if the network is slow, set the time to check for new jobs at a longer timeinterval.1. Select Setup > System Preferences.2. Select the Job Processing tab.3. In the Hot Folders area, in the Polling Time box, enter, in seconds, the time interval
desired before checking for new jobs.4. Restart the FreeFlow Print Server to have this change to the Hot Folder take effect.
Job Definition Format Print Submission via Hot Folders
Job Definition Format (JDF) is a job ticket and workflow specification language used byproduction printers. JDF tickets with PDF data files add flexibility for job submissionswhen you need specific settings for jobs instead of default queue settings. When a jobis added to a Hot Folder, the FreeFlow Print Server determines if the file has a JDF jobticket. If it does have a JDF job ticket, the job is processed according to the ticket. Itthen reports the job status information and the process times, which can be used by anMIS system for job costing and system utilization tracking.
Scanning your DocumentNOTEThis feature is only available if your system includes the integrated DocumentScanner module for copying and scanning jobs.
Scan To File allows you to turn your original documents into:
• Single Page TIFFs
• Multi-Page Tiffs
to be stored on removable media, the local drive, or network destination. Scan To Fileallows users to create digital images with input programming for distribution, archivalor modification (image save). This differs from the copy save service, which allows usersto create digital copies of jobs with output settings for reprint at a later time.
Once your original paper document has been converted to an electronic document youcan change, manage, share and distribute the document using a wide variety of softwareapplications.
To learn more about these capabilities, explore the links at left.
23-71Xerox Nuvera User Guide and Training Aid (UGTA) for Software Version 9.3/10.3
How Do I...

Setting up a Scan JobNOTEThis feature is only available if your system includes the integrated DocumentScanner module for copying and scanning jobs.
Setting up a Scan job is essentially the same as Copying your Document. The differencebeing that you can save a Scan job as a digital file, rather than just getting a hardcopyoutput.
To setup a scan job1. Place the original document on theDocuemtn Glass or Document Feeder (see Using
the Document Feeder).2. In the Xerox Nuvera user interface, select the Scan To File button.3. In the Job Name entry box, type in a name for the scan job.4. In the Save Location entry box, type in the location (if known) in which to save the
scanned file, or click the Save Location... button and use the directory window tobrowse to a desired destination.
NOTEIf your system is connected to a network, and a directory has been created onthe network, that network directory will be available for use in the Save Locationmenu. See your System Administrator to set up a network directory for scannedimages.
5. Make programming selections on any or all of the tabs:
• Basic
• Image Quality
• Image Edit
6. Choose how you want your scanned image to be handled by the system--either as aPDF, TIFF, or proprietary format which retains all of your job settings.For details on file formats, see Choosing a Scan File Format.
7. When satisfied with your settings, click Scan.
NOTEIf your original document is part of a larger set of documents, you can use theBuild Job functionality to scan the entire set. For more information, see UsingBuild Job.
Scan to File to a USB thumb drive1. One-time setup: Go to System Preferences, Save tab and set the default Save Location
to the root directory.2. Insert the thumb drive into an available USB port.3. Under Scan to File, select the Save Location button.4. Select Unix File System from the drop down list.5. Navigate to the directory then to the subdirectory named for the USB device.
Xerox Nuvera User Guide and Training Aid (UGTA) for Software Version 9.3/10.323-72
How Do I...

6. Click OK and then scan the job.
Choosing a Scan File FormatNOTEThis feature is only available if your system includes the integrated DocumentScanner module for copying and scanning jobs.
The file formats (Printer Description Languages, or PDLs) available to save in--PDF(Portable Document Format) and TIFF (Tagged Image File Format) -- give you the abilityto optimize your files for print or for online viewing.
Reasons for saving your scanned document as TIFF:
Save your document as TIFF if it is to become part of a print document. Additionally, ifsaved as a TIFF, it is immediately available for printing through the Xerox Nuvera .
• Ability to convert to a different format (in an external application, i.e., PhotoShop)later
• Ability to further manipulate the image in virtually any bitmap editor (i.e., PhotoShop),such as scale, resize, etc... without any detriment to image quality
Reasons for saving your scanned document as PDF:
Save your document as PDF if it will be distributed through the internet; either by emailor through a web server. Choose PDF if you are certain there will be no further need toadjust the image. If saved as a PDF, it is immediately available for printing through theXerox Nuvera .
• PDF--a bitmapped format--is essentially a "snapshot" of your document. Size of thedocument, formatting, etc... are all certain to be retained in this format
• PDF can be launched with the free Reader application from Adobe, the ability toshare your documents across the Internet, on disparate platforms, is possible
NOTEIf your original document is part of a larger set of documents, you can use the BuildJob functionality to scan the entire set. For more information, see Using Build Job.
Setting Scan to File Image ResolutionNOTEThis feature is only available if your system includes the integrated DocumentScanner module for copying and scanning jobs.
Image resolution deals with the amount of data, or pixels used when scanning an image.The higher the image resolution, the better the image looks. However, depending onwhere the image will ultimately be used, you may not need a high resolution image. Forexample, if an image will only be viewed on the web, you won't need an image that's1200 x 1200 pixels. The following will provide guidelines on image resolutions appropriatefor various delivery styles.
23-73Xerox Nuvera User Guide and Training Aid (UGTA) for Software Version 9.3/10.3
How Do I...

To set image resolution1. In the Xerox Nuvera user interface, click Scan To File.2. Select the Basic tab (default tab chosen after clicking Scan To File).3. Click the Resolution pull-down menu.4. Determine final output of image. See example guidelines below:
• Choose 1200 dpi, if image is composed mostly of text and/or line art, and finaloutput is print.
• Choose 600 dpi, if image is composed mostly of photographic or halftonedpictures, and final output is print.
• Choose 400 dpi, if image is composed mostly of text and/or line art, and finaloutput is the web or internet.
• Choose 300 dpi, if image is composed mostly of photographic or halftonedpictures, and final output is the web or internet.
NOTEThese are only suggested settings.
5. Make any other programming choices.6. When you are satisfied with your settings, click Scan.
Scan to File Resolution
Remote copy is the use of Scan to File for the purpose of reprinting on another XeroxNuvera system.
A local copy is created using the Copy function on the Xerox Nuvera. The local copy isequivalent to 1200 x 600 dpi scan (chosen for very high productivity with competitiveimage quality). Because 1200 x 600 dpi is an asymmetric image which is not conduciveto integration into make ready applications, the 1200 x 600 option is not provided forScan to File. For particularly stressful documents, local copy will generally be better thanthe remote copy.
The Scan to File selection between 600 x 600 dpi and 1200 x1200 dpi is a documentdependent one. It is dependent on productivity, archival file size and image qualityrequirements. Because the coarseness of the error diffusion (diffusion dither) variesbetween the two resolutions, the user is encouraged to try both and evaluate pictorialand business graphic areas for digital grain and text for sharpness. Chose the resolutionbest suited for your application. Generally 600 x 600 dpi image quality is preferred forpictorials and 1200 x 1200 dpi for text. The preference will also vary depending uponwhich mode (text, mixed text and graphics, mixed text and photos) is used.
Remember, documents scanned with higher contrast and lighter (more backgroundwashout), will compress better, improving productivity and storage.
For information on saving your scan jobs, see Saving and Storing Jobs.
Xerox Nuvera User Guide and Training Aid (UGTA) for Software Version 9.3/10.323-74
How Do I...

Scanning a 2-sided DocumentNOTEThis feature is only available if your system includes the integrated DocumentScanner module for copying and scanning jobs.
Some Xerox Nuvera systems include a document scanner with a full-featured documenthandling system. This allows the user to rapidly scan large documents and two-sideddocuments without requiring the user to re-load the original document tray.
To scan a 2-sided document1. Place original document face-up in the Document Feeder.2. In the Xerox Nuvera user interface, click the Scan to File button.3. On the Basic tab, click the Sides Imaged drop-down menu.4. Choose the two-sided icon.
5. Click Scan.
The scanner Document Feeder runs both sides of the original document over theDocument Glass, then returns the original document to the output tray.
Advanced Publishing FeaturesYou can print with the Xerox Nuvera in several ways:
• With a networked-configured system, you can submit a job to the Xerox Nuveraprinter directly from your desktop through the internet browser.
• You can download drivers and print directly from your desktop applications.
• You can also print from a data cd using the media drive on the Xerox Nuvera .
The Xerox Nuvera gives you many publishing options for enhancing your document. Tolearn more about these capabilities, explore the links at the left.
Using Build JobNOTEThis feature is only available if your system includes the integrated DocumentScanner module for copying and scanning jobs.
Build Job is used to combine multiple scans, each with different job programming, intoa single, compiled output. Specifically, Build Job allows you to scan many different typesof documents (either from the Document Feeder or the Document Glass) in separatejobs, then combine those separate scan jobs into one cohesive output.
23-75Xerox Nuvera User Guide and Training Aid (UGTA) for Software Version 9.3/10.3
How Do I...
Build Job is used to• Scan originals of different sizes that cannot be fed and scanned together
• Scan a collection of originals that require a mix of Document Feeder and DocumentGlass scanning
• Scan more originals than the Document Feeder can hold at one time (see DocumentFeeder & Scanner Specifications)
• Apply different image quality or image modification features to different scansegments
NOTEBuild job applies to any type of scan job and does NOT apply to print jobs.
Before using Build Job, there are two concepts to understand. See Understanding Joband Segment Level Programming.
To use Build Job1. In the Xerox Nuvera user interface, click Copy, then click the Build Job button at the
bottom left corner of the user interface.The system is now in Build Job mode.
2. Place the first part of the document set (Job Segment 1) to be scanned in theDocument Feeder or on the Document Glass (see Using the Document Feeder.
NOTEAt this point, perform any Job Level programming, since Job Level programmingchoices will be unavailable when scanning the remaining Job Segments.
3. Once Job Level programming is complete for Job Segment 1, press Continue. Theremainder of the tabs become enabled. Perform any Segment Level programming.
4. When satisfied with your settings, click Start.Job Segment 1 begins scanning.
5. When Job Segment 1 finishes, load the second part of the document set (Job Segment2) to be scanned in the Document Feeder or Document Glass.
6. Make any Segment Level programming.Remember, Job Level programming is already set, so all Job Level controls will bedisabled.
7. When satisfied with your settings, click Start.Job Segment 2 begins scanning.
8. Load the next Job Segment, and perform steps 6, 7, and 8 for the remaining segments.9. To exit Build Job mode, click End Build Job.
The job prints according to all of the Segment and Job Level programming.
Understanding Job and Segment Level ProgrammingNOTEThis feature is only available if your system includes the integrated DocumentScanner module for copying and scanning jobs.
Xerox Nuvera User Guide and Training Aid (UGTA) for Software Version 9.3/10.323-76
How Do I...
Job and Segment Level programming are used in conjunction with Build Job. This allowsyou to control settings across an entire multi-segment scan job, as well as settings withinsmall segments of a multi-segment scan job.
Job-Level Programming
Job level programming applies to the entire job. Job level settings are programmedduring the first segment to be scanned or copied, and are not available for programmingduring the rest of the build job process. Examples of Job level settings are:
• Page Numbering
• Front Covers
• Annotation
• Stapling/Finishing
• Quantity
• Collation
• Back Covers
NOTEQuantity is a job-level setting that can be changed during any subsequentsegment-level scans.
Segment-Level Programming
Segment level features apply to the specific original or segment of originals about tobe scanned. Examples of Segment level settings are:
• Paper Attributes
• Sides Imaged
• Image Quality
• Image Source, either Document Glass or Document Feeder
• Negative Image
• Mirror Image
• Image Shift
Now that you are familiar with Job Segment programming, you can continue to UsingBuild Job.
Working with Job Tickets
Job tickets are groups of saved job settings. Saving job settings from previous jobs allowsthe same user or a different user to quickly set up the machine to perform the sameactions. This is a tremendous time-saver when you have many original documentsrequiring the same settings. Rather than trying to re-create your programming, or haveanother user attempt to, rely on Job Tickets.
23-77Xerox Nuvera User Guide and Training Aid (UGTA) for Software Version 9.3/10.3
How Do I...
These settings could include:
• Number of pages
• Special Pages, such as covers, tabs, etc.
• Image Quality settings
• Image Adjustments (re-sizing, centering, reduction/enlargement, etc.)
• Finishing options
Job Tickets can be submitted to the system from a remote client computer using theFreeFlow Print Manager application. See the applicable documentation for generatingjob tickets with FreeFlow.
Open a job ticket
Once a job has been submitted to the Xerox Nuvera and saved, it can be retrieved andopened at a later time.1. Select the Job Manager button, then choose Saved tab.
See Finding a Saved Job To Print.
2. Use the file type filter to find the job ticket.3. Double-click or right-click the job ticket file you want to open and make any additional
programming choices.4. When satisfied with your settings, click the Print button at the bottom of the window.
Related Hints and Tips
Hint/Tip DescriptionSubtopic
Selecting Cancel from FreeFlow Print Manager,while a job is being submitted to the system,does not completely cancel the job. Theworkaround is Delete the canceled job at theprinter, which appears in the Completed Jobslist as completed with errors.
FreeFlow Print Manager and canceling jobsubmission
Hint to avoid confusion when using theFreeFlow Print Manager application to specifyjob ticket attributes for custom stock. Theworkaround is from FreeFlow Print Manager,when you are adding a custom stock, youshould connect to the target printer and in JobSetup, use the Stock pull down menu (ratherthan the "Stocks..." button) and select "New."The window will limit the selection of the stockattributes to those that are settable for theconnected printer. You should be cautious whenusing the "Stocks..." button to add new stock.When using the "Stocks..." button, changesmade to non-applicable attributes will beignored. This printer only allows the followingmedia attributes to be specified: Size, Type,Color, Weight.
FreeFlow Print Manager and job ticketattributes for custom stock
Xerox Nuvera User Guide and Training Aid (UGTA) for Software Version 9.3/10.323-78
How Do I...

Hint/Tip DescriptionSubtopic
When using FreeFlow Print Manager to programa job with a media size for either of the sizenames: Spanish (XE) or Foolscap (XE), thepull-down menu for "Main Paper Stock" in JobSetup will not contain these size names.Workaround: When specifying Paper Type inJob Setup of FreeFlow Print Manager orInternet Services, the following media sizes donot appear unless the paper is currently loadedin one of the trays at the printer:
FreeFlow Print Manager and media size names
• Spanish (XE)
• Foolscap (XE)
To program one of these sizes, perform thefollowing:
1. Load the paper in one of the trays.2. From the Main Paper Stock pull-down
menu, choose the Tray with the desiredpaper stock, or from the Main PaperStock pull-down menu, select New.
3. If you select New, select a size of Custom(.in) from the New Stock menu.
4. Enter the appropriate dimensions forwidth and height:
• Spanish (XE) - 8.46 x 12.4 in.
• Foolscap (XE) - 8.5 x 13.0 inches.
When programming custom stock size, if thestock size programmed is out of range, thewarning message does not indicate the validstock size range. Workaround if possible,program custom stock size at the Nuveraprinter.
Programming custom stock size
Copying Document Sets with Mixed-Size SheetsNOTEThis feature is only available if your system includes the integrated DocumentScanner module for copying and scanning jobs.
There may be instances where the document set you want to copy is made up of severaldocument sizes. The Document Feeder on the Xerox Nuvera can be programmed toprocess document sets comprised of mixed-size originals.
For example, a user wants to compile different documents into one cohesive collection.The set has 8.5 x 11 inch and 11 x 17 inch originals. The user can load those originalsinto the Document Feeder with the 11 inch edge going into the Document Feeder first.With Mixed Size Originals (MSO) selected, the system will process the document set.
23-79Xerox Nuvera User Guide and Training Aid (UGTA) for Software Version 9.3/10.3
How Do I...(continued)
There are certain constraints when using this feature. See the sections below for details.
NOTEThe default setting for MSO is off. The MSO default can not be changed.
If Mixed Size Originals has NOT been selected:• Some jobs and features may not work without selecting the Mixed Size Originals
feature.
• All output will be printed on the media the size of the largest original document.
• Images from the smaller originals will be placed in the upper left corner of the outputpaper.
NOTEIf MSO is enabled, and you load a set of same size documents, the job will still processwith no errors or warnings.
When the Mixed Size Originals (MSO) feature IS selected:• MSO and 1 to 2 Sides Imaged cannot be selected together.
• Reduce/Enlarge (R/E) must be set to 100%.
• Special Pages (Covers, Exception Programming, Inserts) can not be used.
• Signatures/Booklets can not be used.
• N-up can not be used.
To copy documents with mixed-size originals1. Place the document set in the Document Feeder. The set must be arranged so that
the leading edges of all sheets are the same width.2. In the Xerox Nuvera User Interface, click Copy, then click the Image Edit tab.3. On the Image Edit tab, click the Original Size button.4. Choose the Mixed Size Originals radio button.
Take note of the constraint on this control, regarding the original paper sizes it willaccept.
5. Click Close.
Saving and Storing Jobs
Jobs (copy, scan, and print) can be submitted and programmed to be placed in a SavedJobs directory on the Xerox Nuvera user interface (FreeFlow Print Server). Once saved,they can be reprinted at any time.
NOTEIf you are copying / moving a job ticket file and its associated file (.pdf, .tif, .ps) fromSaved Jobs to a UNIX File System directory, you may receive a message "Cannotmove saved job." However, if you click OK, you will see that the files are successfullymoved. To prevent this message from appearing, select only the job ticket file. Theassociated file will automatically be copied / moved with it.
Xerox Nuvera User Guide and Training Aid (UGTA) for Software Version 9.3/10.323-80
How Do I...

NOTEThe scanning and copying of jobs is only available if your system includes theintegrated Document Scanner module.
Copy Jobs1. In the Xerox Nuvera user interface, click the Copy button.2. Select the Advanced tab.3. Enter a job name by typing it into the Job Name text box.4. Select the destination (Print, Print and Save, Save, Save as Background Form) for
your job. If saving the job, click the Save Location button to specify the location.5. If saving, choose the format to be saved.6. Set the job properties.7. When you are satisfied with your settings, click Copy.
For more information, see Setting up a Copy Job.
Scan to File Jobs1. In the Xerox Nuvera user interface, click the Scan To File button.2. Select the Basic tab (selected by default).3. Enter a job name by typing it into the Job Name text box.4. Use the Save Location button to specify the location.5. Choose the format to be saved as.
For more information, see Choosing a Scan File Format.
6. Set the job properties.7. When you are satisfied with your settings, click Scan.
For more information, see Setting up a Copy Job.
Print from File Jobs1. In the Xerox Nuvera user interface, click the Print From File button.2. Select the Files tab (selected by default).3. Click Browse to locate and select a job.4. Select the directory location of the job from the Look In pull-down menu.5. Select the destination (Print, Print and Save, Save, Save as Background Form) for
your job. If saving the job, use the Save Location button to specify the location.6. If saving, choose the format to be saved as.
For more information, see Choosing a Scan File Format.
7. Set the job properties.
23-81Xerox Nuvera User Guide and Training Aid (UGTA) for Software Version 9.3/10.3
How Do I...

8. When you are satisfied with your settings, click Print.
NOTEThe system is case sensitive when using file type filters in Print from File. Forexample, the PostScript filter will only display files with a .ps extension and notthose with a .PS extension.
NOTEThe Job Manager Saved tab displays a list of all jobs in the user-defined Savelocation as specified in System Preferences.
Related Hints and Tips
Hint/Tip DescriptionSubtopic
With Productivity Pack only: While copy jobscan be sent to any queue, sending a copy jobto a queue that does not have Auto Proofselected will produce unexpected results. ScanTo File jobs can only be directed to the defaultqueue. Do not select Auto Proof on the defaultqueue or your output will not be as expected.
Auto Proof Productivity Pack only
To change the default save directory inFreeFlow Print Server: 1. Open SystemPreferences. 2. Select the Save tab. 3. Enter aparent directory (either the actual directory youwant, or one that you can browse from). Note:While it is possible to save jobs to the rootdirectory and/opt directory, you will not be ableto reprint from there with operator privileges.It is strongly recommended that a new directorybe created that can be accessed by the operatorin which jobs can be saved for reprint.4. Select the save directory from the tree view(needs to be highlighted and this will changethe unlabeled path at the bottom of thewindow which happens to be the saveddirectory). 5. Click OK. Even though the top textbox is labeled Parent Directory, people may notread that correctly, and just enter the valuethey want for the saved directory and pressEnter. This will just change the root of the treeview below it. The user still has to click on thedirectory that they want.
Change the default Save directory
To scan a job to USB: 1. One-time setup: Go toSystem Preferences, Save tab and set thedefault Save Location to the root directory ). 2.Insert the thumb drive into an available USBport. 3. Under Scan to File, select theSave Location button. 4. SelectUnix File System from the drop down list. 5.Navigate to the directory then to thesubdirectory named for the USB device. 6. ClickOK and then scan the job.
Scan to File to a USB thumb drive
Xerox Nuvera User Guide and Training Aid (UGTA) for Software Version 9.3/10.323-82
How Do I...

Hint/Tip DescriptionSubtopic
When performing a Copy Save the text will beoverwritten by the text. So if you are saving acopy job and need the please put it in the Field.
Copy Save / Account ID Overwritten
Currently, when using Copy Save, if a user savesa job that has Auto Center on, the job will notbe centered when reprinted. The currentworkaround is to setSystem Preferences > Job Processing > TIFF Image Position from 'Normal' to'Centered on Page'.
Copy Save and Auto Center
System faults when processing a Booklet jobwith Covers. System Error occurred whileattempting to process this job. After this error,some jobs may fault to the same error. ARestart is required. Workaround: For a CopySave job with Booklet Imposition do notprogram with Covers. If this is done, the systemmay have generated a processing error and willneed to be restarted.
Booklet job with covers
Browsing for files to a Solaris FTP server doesn'tlist the directory links and you don't see /binor /lib because they are links to /usr/binand /usr/lib.
Browsing to a Solaris FTP server
When using Copy Save with the Landscape Leftstaple option, the saved ticket has the finishingas Portrait Right. If you scanned your originalsin Long Edge Feed (LEF) and are printing LEF,change the finishing to the Landscape Leftstaple option. If you scanned your originals inLEF and are printing SEF, program a 180-imagerotation from the Image Edit tab. If youscanned in SEF, you can reprint with the ticketas it is.
Copy Save and Landscape Left staple option
If using Copy Save with any Landscape Stapleoption, when reprinting the saved job ticket theimages may be upside down. To be sure it is OKproof the job. If it is upside down, program with180-image rotation from the Image Edit tab.
Copy Save and Landscape staple options
Files saved as Multi-page TIFF are limited to2GB in size. This limit may be reached after afew hundred images if the scanned originalscontain a lot of halftone content and arescanned at 1200x1200 resolution. When a jobreaches this size, a message may be displayedindicating that the disk is full. To save largejobs, use the save format of Single Page TIFF.
Multi-page TIFF file size limit
23-83Xerox Nuvera User Guide and Training Aid (UGTA) for Software Version 9.3/10.3
How Do I...(continued)

Hint/Tip DescriptionSubtopic
Scan jobs can only be directed to the defaultqueue. Do not set the disposition to "Print" with"override" also set. This will disable Image Savesince those jobs will always print instead. Thisalso causes Mixed Size Original (MSO) jobs notto run because a fault will always appearrequesting the stock to be loaded even if it isproperly loaded.
Scan jobs do not set Print with override
When setting up and saving a copy job withstapling, the resulting stapling choice for thesaved job may not match what was originallyprogrammed. The UI may display an equivalentstapling selection but the job will apply theproper stapling location. This applies to thefollowing: "1 Staple Landscape Right" displaysas "1 Staple Portrait Left". Setting a job with 2staples portrait right results in the job beingsaved with 2 staples landscape bottom, andsimilarly: 2 staples portrait left results in 2staples landscape top. 2 staples landscape leftresults in 2 staples portrait top. 2 stapleslandscape right results in 2 staples portraitbottom.
Stapling option displayed on UI
If a large scan to network job faults, when thefault is cleared it may appear that the job isstuck in a "Scheduling" state. In fact the job isactive, but it takes a long time to reach the"Being Saved" state (approximately 40-60seconds per each 100Mb).
Scan to Network Job Fault
If you are using imposition on a Copy job, theR/E setting on the Basic Tab will be ignored bythe system. This is because the impositionfeature you select will determine the actual R/Eto use. Note: If you use Custom Multiple-Up,you will be able to choose the R/E valueyourself.
Imposition and a Copy job
When using Build Job and trying to staple Letterand Legal, disable any Letter Long Edge Feedtrays to prevent a programming conflict.
Build Job and stapling
When using Build Job with Imposition (ex.booklet), with all Landscape images, andscanning from the platen, rotate the paper 180degrees on the platen to get the proper output.
Build Job with image orientation
When making copies, ensure the documentsare in the document handler for at least 1second before pressing the start button.
Copies in document handler
Xerox Nuvera User Guide and Training Aid (UGTA) for Software Version 9.3/10.323-84
How Do I...(continued)

Hint/Tip DescriptionSubtopic
If a copy job with Imposition is held, modifiedto not have imposition, then released, theoutput will not be scaled properly. If a copy jobwith Imposition is saved, the saved ticket willnot reflect the correct imposition attribute(instead it will show 'None') however the jobwill reprint with the correct imposition. If a copyjob with Annotation is saved, the saved ticketwill not reflect the correct annotation attribute(instead it will show 'None') however the jobwill reprint with the correct annotation.
Copy job with imposition / annotation
If an image size is less than the output papersize, and the image is duplex copied, the imageswill not align from front to back. Perform animage shift on one of the sides, or use AutoCenter to get them to align.
Duplex front to back alignment
If you hold or proof a copy job and modify anattribute that will cause it to fault (ex. requestan unsupported staple) the job will go abortedand you will need to rescan the job. As a workaround, save the job and then when you printit, if it faults, you can change the offendingattribute, and then release it.
Fault caused by modified attribute
Do not use imposition functions on Copy MixedSize Original (MSO) or Build Jobs that containmultiple sizes, or the output will beunpredictable. This includes any jobs that wereheld or saved and have more than 1 paper size.If you use Build Job with Signatures (Booklets),all of the segments must be the same size andorientation. If you scan in long edge feed onthe SDDF, you must also scan in long edge feedon the platen. You must also have the sameoutput stock selected for each segment.
Imposition functions with Copy MSO / BuildJob
When sending a booklet layout copy job, thePercent complete increments half as fast as thejob completes.
Percent complete
If you are using Scan to File and you are usingthe system supplied Reduce/Enlarge rates, thesaved job ticket will have a custom stock size.For example, a Scan to File job with a RE valueof 64% (Ledger > Letter) will save a job witha custom size rather than Letter. If you try toreprint it, you will need to choose Letter stock.If you would like the saved job to come out toexactly the correct size for reprinting, useCopy Save instead of Scan to File.
R/E with Scan to File
23-85Xerox Nuvera User Guide and Training Aid (UGTA) for Software Version 9.3/10.3
How Do I...(continued)

Hint/Tip DescriptionSubtopic
Saved PDF files contain thumbnail images thatcan be displayed by Acrobat Reader. Whenviewing a PDF file saved from Scan to File, thoseimages are rotated 90 degrees clockwise fromthe orientation of the full-size page images.
PDF with Rotated Thumbnails
For more information, see Setting up a Copy Job.
Finding a Saved Job to Print
Finding jobs (copy, print, or scanned) saved on the Xerox Nuvera user interface can bedone in two ways:
• Through the user interface under the Job Manager Services
• Through the user interface under the Print From File Services
To find a saved job in Job Manager
The Job Manager button allows you to perform a number of tasks at the job level, suchas:
• Preview
• Hold
• Promote
• Move
• Copy
• Forward
Additionally, you can retrieve and print jobs that have been saved to the system.1. From the Xerox Nuvera user interface, select the Job Manager button.2. Select the Saved tab to display the list of saved jobs.3. From the list that displays, double-click on the saved job you want to print.
The print properties window displays.
NOTEThe Job Ticket format is chosen by default because this is the file type that isused to print the entire job. Selecting other file types will not give you the entirejob. For example, if you select TIFF, the system only prints the TIFF image. Thejob is printed without the original job programming choices.
4. Select or change any programming settings.5. When satisfied with your settings, click Print.
To find a saved job using Print From File1. From the Xerox Nuvera user interface, select the Print From File button.2. Select the Files tab.
Xerox Nuvera User Guide and Training Aid (UGTA) for Software Version 9.3/10.323-86
How Do I...(continued)

3. Select Browse to locate the file you want to print.4. From the files listed in the Browse window, double-click the job.
The print properties window displays.5. Select or change any programming settings.6. When satisfied with your settings, click Print.
NOTEBrowsing for files to a Solaris FTP server doesn't list the directory links. Forexample, you don't see /bin or /lib because they are links to /usr/bin and/usr/lib.
Customizing System Default Options
If your workflow requires you to use machine settings that differ from the system defaults,or you consistently print to a paper stock that is not the default, navigating all of theuser interface screens to program your jobs can be time consuming.
The default settings of the Xerox Nuvera are fully customizable by a SystemAdministrator, making job programming much quicker and easier. Some of the systemdefaults that can be customized for your particular workflow include:
• Sides imaged
• Finishing options
• Image editing
• PDL (Page Description Language. TIFF, PostScript, etc.) resolution settings
To view current printer default options for systems with one queue
If your system does not have the Productivity Pack license enabled:1. In the Xerox Nuvera user interface, click Printer > Defaults.
The Printer Defaults window displays.2. In the tabbed interface, select each tab, viewing current settings.3. To customize settings, contact your System Administrator.
To view current printer default options for systems with multiple queues
If your system has the Productivity Pack license enabled:1. In the Xerox Nuvera user interface, click the Queue Manager button.
The Queue window displays.2. Right-click on the queue and select [Properties].
The Properties window displays.3. In the tabbed interface, select each tab, viewing current settings.4. To customize settings, contact your System Administrator.
23-87Xerox Nuvera User Guide and Training Aid (UGTA) for Software Version 9.3/10.3
How Do I...
To customize general system settings
The following system default settings can be changed at any time by a SystemAdministrator using the Setup > System Preferences menu.
• Jobs Policy: For example, System action when out of paper
• Default font sets used/Substitute fonts: Enabled/Disabled
• Allow stock substitutions
• Save job locations
• Default launch screen (Copy, Print, Job Manager, Print From File)
• Tray Confirmation
• Job Processing defaults
• International settings
• Scheduling Mode
NOTEContact your System Administrator to configure custom System Preferences.
NOTERefer to the Xerox Nuvera online help for details about System Preferences settings.
Using Xerox Freeflow® Remote Print Server Software
FreeFlow Remote Print Server software allows access to the Xerox Nuvera user interfacefrom a remote client (i.e., the computer at your own desk). Remote print server softwareprovides the functionality of the Xerox Nuvera at a remote desktop, enabling the user,from anywhere on the network, to use the full range of Xerox Nuvera functions.
NOTENew major releases of FreeFlow Print Server require updated versions of FreeFlowRemote Print Server software. Verify that you have the correct Remote Print Serverversion to match your version of FreeFlow Print Server software. Contact your SystemAdministrator to have FreeFlow Remote Print Server software installed and configuredon your computer.
NOTEFreeFlow Remote Print Server software does not support the IPS Manager.
Adding Annotations to your JobsNOTEThis feature is only available if your system includes the integrated DocumentScanner module for copying and scanning jobs.
The following information applies to both Print and Copy jobs.
Xerox Nuvera User Guide and Training Aid (UGTA) for Software Version 9.3/10.323-88
How Do I...
There may be times when you need to add extra content to your job. The Annotationfeature allows you to add these special marks:
• Page Numbers--can be configured to appear anywhere on each page
• Watermarks--Indicates to the reader that the document they have is Confidential,Draft, etc. The watermark appears as shaded text behind the actual page content
• Date Stamps
Annotation can be a queue setting. Any job being sent to that queue will be annotated.
The Xerox Nuvera systems that have the Productivity Pack license allowing for multiplequeues have a Queue manager to create new queues.
The Xerox Nuvera systems without the Productivity Pack license set up the systempreferences. By default, all annotations are set to off.
Print jobs refer to jobs being reprinted on the device. Any jobs being submitted througha driver use the watermark available on the driver. If a queue is set up for annotationsand a print job comes into that queue, then it will be annotated on the queue properties.
NOTEIf you forward a job from one machine to another, the forwarded job will lose itsannotation attributes as well as Printer Darkness settings and imposition attributes.
To Annotate Print or Copy Jobs1. From either the Print or Copy service, click on the Output tab.2. Click the Annotations button.
NOTETake notice of the text on the Annotations button. It will show which annotationtypes (if any) are currently enabled.
3. The Annotations window appears. Place a checkmark in any or all of theAnnotation-type checkboxes. Clear any Annotation-type checkboxes you do not wishto use.
4. When satisfied with your settings, click Copy or Print.
Configuring Annotations1. To configure how each Annotation type appears, click the Copy Service button.2. Click the Output tab.3. Click Annotations.4. Click Setup.5. Click on one of the Annotation-type tabs.
The Annotation window appears.6. Make your selections. When satisfied with your settings, click OK, then click Copy.
For details about working with the Annotation controls, refer to the system online Help.
23-89Xerox Nuvera User Guide and Training Aid (UGTA) for Software Version 9.3/10.3
How Do I...

Generating a Sample Print
Use the Sample Current Job feature when releasing a job to print or while the job isprinting to see if the job will print as expected. A single, sample page of the job printsso you can verify the job settings.
This feature enables you to periodically check image quality and job programmingselections used on the job as it is printing. Since jobs sent to certain finishers (such as,the Xerox Basic Finisher Module) cannot be accessed while the main stacker tray is inuse, the Sample Current Job feature allows sample prints to be sent to the stacker toptray.
The Sample Current Job feature is different from proofing a job. When proofing a job,the entire job prints and it only allows you to make adjustments to the job beforesubmitting it for printing. The Sample Current Job option prints only a single page forsampling and allows you to make adjustments while the job is printing.
NOTEThis feature is not available for remote clients and is not available when the systemis in Secure Mode. You can, however, print sample variable data jobs
To produce a sample print of a page while the job is printing1. Submit a job to the Hold queue of the printer.2. Right-click on the job and select Release Job.3. While the job is printing, select Printer > Sample Current Job.
A single copy of the next image prints to the top tray (as a sample print) while theentire job continues to print to the stacker. Job integrity is not disrupted as the jobcontinues to print.
4. If you want to change job properties, right-click on the job and select Hold.The job is placed in the Inactive Jobs list.
5. Right-click the job, select Properties and make changes.6. Select Release to place the job back in the Active Jobs list.
Sample Print From a Client Computer
A sample print can not be programmed at the Client's workstation during job submission.However, the Client sample print workflow could be sent and the job can be held in ahold queue. Then you can program the sample printing attributes for that job at thesystem user interface. For details, see Working with Queues.
About Pitch
The Xerox Nuvera is equipped with a variable pitch Xerographic belt. Pitch refers to thenumber of page images that can be placed on the belt, which are then transferred tothe paper. During printing, the system senses paper sizes requested, and optimizes theuse of the belt and the paper path to ensure maximum productivity.
Xerox Nuvera User Guide and Training Aid (UGTA) for Software Version 9.3/10.323-90
How Do I...

Paper Size/Pitch Relationships
The charts below illustrate the expected system throughput, given a certain page/ imagesize.
NOTEIf you have the Xerox Nuvera 200/288 EA/MX Perfecting Production System andenable the Wide Stock feature from the User Diagnostics screen, the system will runstocks greater than 9.0 inches up to 9.5 inches wide in 5 pitch mode instead of 4pitch mode. This increases the print speed for this size paper to 240 ipm. For moreinformation about the Wide Stock feature, see Running User Diagnostics.
Table 11. Xerox Nuvera 100 EA Production System
Maximum Throughput (PagesPer Minute/PPM)
Pitch (Images per PR beltrevolution)
Paper/Image Size (FeedDirection) Min-Max
10055.5 in (140mm) - 9.0 in(229mm)
8049.0 in (229mm) - 11 in(297mm)
60311 in (297mm) - 17 in(432mm)
40217 in (432mm) - 18.5 in(470mm)
Table 12. Xerox Nuvera 120 EA Production System
Maximum Throughput (PagesPer Minute/PPM)
Pitch (Images per PR beltrevolution)
Paper/Image Size (FeedDirection) Min-Max
12055.5 in (140mm) - 9.0 in(229mm)
9649.0 in (229mm) - 11 in(297mm)
72311 in (297mm) - 17 in(432mm)
48217 in (432mm) - 18.5 in(470mm)
Table 13. Xerox Nuvera 144 EA Production System
Maximum Throughput (PagesPer Minute/PPM)
Pitch (Images per PR beltrevolution)
Paper/Image Size (FeedDirection) Min-Max
14465.5 in (140mm) - 8.5 in(216mm)
12058.5 in ( 216mm)- 9.0 in(229mm)
9649.0 in (229mm) - 11 in(297mm)
23-91Xerox Nuvera User Guide and Training Aid (UGTA) for Software Version 9.3/10.3
How Do I...

72311 in (297mm) - 17 in(432mm)
48217 in (432mm) - 18.5 in(470mm)
Table 14. Xerox Nuvera 200/288 EA/MX Perfecting Production System
Maximum Throughput(Impressions Per Minute/IPM)Duplex
Pitch (Images per PR beltrevolution)
Paper/Image Size (FeedDirection) Min-Max
28865.5 in (140mm) - 8.5 in(216mm)
24058.5 in (216mm) - 9.0 in(229mm)
19249.0 in (229mm) - 11 in(297mm)
144311 in (297mm) - 17 in(432mm)
96217 in (432mm) - 19.33 in(491mm)
Using the Xerox Nuvera with Freeflow® MakereadyNOTEThe following information is subject to change as new versions of the Makereadyapplication are developed.
If you have a Xerox FreeFlow solution, you can incorporate the FreeFlow Makereadyapplication with the Xerox Nuvera . For best results, follow these guidelines:
To print to the Xerox Nuvera from FreeFlow Makeready1. Make sure the target print driver is loaded on your PC.2. From the FreeFlow application, select the file you want to print.3. From the Print dialog, select the appropriate target printer type:
• Xerox Nuvera 100/120/144 EA Production System
• Xerox Nuvera 200/288 EA/MX Perfecting Production System
TIPJobs sent from FreeFlow Makeready should be programmed to hold at the XeroxNuvera then re-programmed through the printer's user interface to ensure correctjob attributes.
Xerox Nuvera User Guide and Training Aid (UGTA) for Software Version 9.3/10.323-92
How Do I...Table 13. (continued)

Setting Up Complex JobsIn addition to running basic jobs, you can also process more complex jobs such as:
• Converting single-sided (simplex) documents into 2-sided (duplex) documents
• Creating booklets
• Creating folded documents
• Printing on tabbed stock
• Running jobs with several types of paper stock
• Collate sets
• Adding pages to a document
• Using Background Forms
To learn about book printing productivity when setting up your job to print stock greaterthan 9.0 inches wide up to 9.5 inches wide, refer to Running User Diagnostics.
To learn more about the more complex tasks the Xerox Nuvera is capable of processing,explore the links at the left.
About Impositions
Imposition is the process of positioning multiple page images on a single output sheetto be printed at one time. Imposition has no effect on the content of any individualpage image; it only affects the size of the page image and where the pages are placedon an output sheet.
Imposition options include the ability to create 2-up to multiple-ups documents includingcustom multiple-up For a custom multiple-up, the Xerox Nuvera automatically calculateshow many images will fit on the sheet size selected for the job. Imposition settings areprovided for setting gutter margins and Repeated, Sequential, and Alternating imageon sheet outputs.
A Signature is the name given to a single sheet of paper or other substrate after it hasbeen folded. Many books are made up of signatures. The manner in which signaturesare bound influences the way that they must be printed.
For more information about setting up impositions, see Setting Imposition Options.
Impositions and Saddle Stitched Books
Saddle stitched books and calendars consist of all the signatures nested in one groupwith staples inserted at the fold. When signatures are nested, the fold, or gutter, getswider the further a sheet is from the centerfold (see Figure 1).
NOTEPage frame shifting is done automatically.
23-93Xerox Nuvera User Guide and Training Aid (UGTA) for Software Version 9.3/10.3
How Do I...

Therefore, page frames must be shifted slightly to compensate for the thickness of thegutter. The page frames are moved slightly away from the fold and toward the outsideedge. This results in the outside margin becoming narrower. When finished, the sheetscloser to the centerfold (with the narrower fold) will have more trimmed from the outsidemargin. When done properly, the images will appear in the same position on each pageas the pages are flipped.
Figure 17. (left) Nested signatures forming a saddle stitched book. (right) Stacked signatures forminga perfect-bound book.
Figure 18. Page order for a simple 4-page book.
Input pages are on the left. Output signature sheet is on the right. Numbers inparentheses represent page numbers on back side of the signature sheet.
Figure 19. Page order for a calendar signature.
Input pages are on the left. Output signature sheet is on the right. Numbers inparentheses represent page numbers on back side of the signature sheet.
Figure 20. (Top) Example of a signature layout for a perfect bound book. (Bottom) Example of asignature layout for a saddle stitched book.
TIPTo become familiar with both print and copy impositions, refer to the Xerox Nuveraonline help.
Setting Imposition Options
Impositions, or Printer Spreads are a way to arrange page data out of order, so thatwhen printed, it will be in the correct order when folded, bound or otherwise finished.
Xerox Nuvera User Guide and Training Aid (UGTA) for Software Version 9.3/10.323-94
How Do I...

For more information, see About Impositions.
To set imposition options1. Select the Job Manager button, then select your imposition print job and right-click
to select Properties. (Or, for systems with a scanner, place originals in the documenthandler.)
2. In the Properties window, click the Output tab, then the Layout button.3. Click the Layout Style pull-down menu. A list of imposition types appears.
• 1, 2, 4, 6, 8, 9, 16 up
• Custom multiple-up - automatically determines the number of images per sheetbased upon image size and sheet size
• Booklet
• Perfect Booklet
Other imposition settings include:
• Gutter margins
• Repeated, Sequential or Alternating image placement
NOTEDepending on the type of job you are working on -- print or copy -- you may seedifferent imposition type choices.
4. When satisfied with your settings, click OK.5. Make any other job programming choices and, depending on your system, click
Copy, Scan or Print.
NOTEIf you forward a job from one machine to another, the forwarded job will loseits imposition attributes as well as Printer Darkness settings and annotationattributes.
23-95Xerox Nuvera User Guide and Training Aid (UGTA) for Software Version 9.3/10.3
How Do I...
Related Hints and Tips
Hint/Tip DescriptionSubtopic
FreeFlow Print Server supports automaticcreation of Signature Booklets and othermulti-up imposition formats. This can be donefrom any Print job in the active or inactive joblist or from the Print from File pathway. This issupported for jobs submitted from print driversand from print ready print submission tools suchas FreeFlow Print Manager and the WebUI.Suggested workflow for creating such jobs is todo one of the following:
Queue for imposition
1. Hold the job and reprogram it to performthe desired imposition.
2. Setup a queue with the default Layoutset to the desired imposition.
3. Submit the job directly to that queueand the imposition will be applied to thejob.
The Imposition features in the print driversoffer slightly different options and producedifferent output than the Imposition featuresavailable in the Print from File pathway on themachine.
Imposition in print driver
TIPTo become familiar with both print and copy impositions, refer to the Xerox Nuveraonline help.
Printing an Image That Extends to the Edge of the Page
Occasionally, you may need to print a document whose image extends beyond the edgeof the page. A document with a shaded background covering the entire page is a goodexample. Printing this type of image is called a "bleed". The ability to print full bleed(edge-to-edge) used to be only available through the use of offset printers. The XeroxNuvera platform is not a print to edge system due to potential image quality defectson the edge of the page. The system default is set for a 3 mm border erase. Border erasecan be customized from 0 to 6 mm for each side; Inboard, Outboard, Trail and Leadedge.
1. Select Printer and Switches.
2. On the right-side of the window, select the radio button next to Custom.
3. Change the measurements for each edge as desired.
4. Select Apply.
5. Select OK.
Xerox Nuvera User Guide and Training Aid (UGTA) for Software Version 9.3/10.323-96
How Do I...

NOTEIf you are using Edge-to-edge printing and your originals have dark or solid edges,you may want to disable Electronic Hole Removal. If Electronic Hole Removal isenabled while Edge-to-edge printing and your originals have dark or solid edges,there is a possibility that your output will have unwanted markings along the darkor solid edge. For more information on using Electronic Hole Removal, see RemovingDrill Holes From Output.
Edge-to-edge printing workflow starts at client desktop / driver, andends at the Xerox Nuvera
There are three elements that work together to enable edge to edge printing:
• Correct system Edge Improvement settings at the Xerox Nuvera .
• A document created with edge-to-edge marking.
• Correct Margins settings in the Client driver.
NOTESee Printing a Job from your Networked PC for more details on client drivers.
Workflow to enable a "full-bleed" print job:1. At the Xerox Nuvera , click Printer > Switches. Place a checkmark in the
Edge Treatment Off box.The Edge Treatment must be off before sending the print job. Ask your SystemAdministrator to verify the system is configured in this way.
2. Create a document in a desktop application (Word, PhotoShop, Illustrator, etc.) thatincludes marking/data all the way to the edge of the page area.
3. In the client desktop application, select File > Print.The client driver window appears.
4. Click the Image Options tab. Click the Margins button.Refer to the client driver's online help for details about setting selections.
5. When done with the settings, click OK to send the document to the Xerox Nuvera .6. At the Xerox Nuvera , go to Job Manager.7. Find the job you just submitted. Double-click it.
The Job Properties window appears.8. When satisfied with your settings, click OK.
The document will be printed, and the marking extending to the edge of the outputpage will be visible.
Reducing or Enlarging Images
When in Copy mode, use the Reduce/Enlarge controls located on the Basic tab. Usingthese controls, you could for example, copy an original image on an 11 by 17 inch sheet,and shrink it to fit on a standard 8.5 by 11 inch sheet. Controlling output size is usefulif you need to archive hardcopy in a certain stock size, but original documents vary insize.
23-97Xerox Nuvera User Guide and Training Aid (UGTA) for Software Version 9.3/10.3
How Do I...
To reduce or enlarge the image1. Determine what size your output image will be copied to. Make the appropriate choice
in the Reduce/Enlarge pull-down menu, located on the Copy Basic tab.2. Press Copy.
NOTEIt is also possible to enter custom size values in the Reduce/Enlarge dialog. Clickon the User Specified or Independent X-Y menu choices.
Entering a custom reduction/enlargement value
If none of the preset reduction/enlargement values are acceptable, enter your own value.1. Select User Specified or Independent X-Y from the Reduce/Enlarge pull-down menu.2. Enter the value of reduction or enlargement. Entering 100% will yield no change to
the image size. Entering a value over 100% will enlarge the image. Entering a valueunder 100% will reduce the image.
Programming Multiple Stocks in a Single Job
You can create new documents composed of different stocks, such as covers, tabs, normalstock, etc.
To program a job to use multiple stocks
NOTEMake sure the paper trays are configured with the correct stocks. If you attemptto program a multi-stock job without the required stocks loaded, the system willgenerate a series of system alerts prompting you to load required stocks, slowingyour productivity. See Paper Tray Programming.
1. Set the properties for a job on the Xerox Nuvera user interface. See Copying yourDocument or Printing your Document for details.
2. Program papers trays with all stocks (cover stock, tabs, 8.5 x 11 white, 8.5 x 11 blue)necessary to process the job.
3. Follow the procedure for Adding Pages to a Document.4. In the user interface, click Print.
Printing/Copying on Tabbed and Ordered Stock
Because of the special procedures required to use tabs, take time to review this sectionbefore attempting to use tabs with the Xerox Nuvera .
NOTEFor information on loading tabbed stock in the Sheet Feed Module, see Using theFeed Module Tab Guides. You must have the Tabs Guide installed in the feed traythat contains the tabbed stock.
Xerox Nuvera User Guide and Training Aid (UGTA) for Software Version 9.3/10.323-98
How Do I...

NOTEPre-cut tabs can only print 1-sided. Full-cut tabs can print on both sides, either simplexor duplex.
For systems with a Multifunction Finisher (MFF)• Use only reverse collated tabs.
• Load paper according to the labels on the feed trays (5, 4, 3, 2, 1 with 5 being on top)with tabs on the trail edge.
• Program feed trays.
• Run job N-1, face-up.
• If printing on 8.5x11" tabs, set the properties for the tabs as single-sided ExceptionPages and set image shift to 1/2".
• If using preprinted tabs, add as Inserts.
• If the job uses hole-punched tabs and hole-punched body stock, make sure the bothstocks are loaded in the tray with the hole-punched edge leading.
• The system assumes tabs are right-edge portrait or bottom-edge landscape. If thejob is different you may need to select rotate 180 for the entire job.
• If using Build Job to program the tabs job, selectBuild Job Type > Contains Tab Stock or Envelopes.
• Tabs cannot be loaded in the Insertion Module.
For systems with a DS3500/DS5000 or BFM type finishers• Use only forward collated tabs.
• Load paper according to the labels on the feed trays ( 1, 2, 3, 4, 5 with 1 being ontop) with tabs on the trail edge.
• Program media for feed trays.
• Run job 1-N, face-down.
• If printing on 8.5x11" tabs, set the properties for the tabs as single-sided ExceptionPages and set image shift to 1/2".
• If using preprinted tabs, add as Inserts.
• If the job uses hole-punched tabs and hole-punched body stock, make sure the bothstocks are loaded in the tray with the hole-punched edge leading.
• The system assumes tabs are right-edge portrait or bottom-edge landscape. If thejob is different you may need to select rotate 180 for the entire job.
• If using Build Job to program the tabs job, selectBuild Job Type > Contains Tab Stock or Envelopes.
• Tabs can be loaded in the Insertion Module.
23-99Xerox Nuvera User Guide and Training Aid (UGTA) for Software Version 9.3/10.3
How Do I...

For the Xerox Nuvera 200/288 Perfecting Production System - UsingMedia Optimization mode for tabs
You can print jobs that contain a mix of sizes and media, including full-cut and pre-cuttabbed stock. If you need to print a job containing 8.5 x 11 inch paper, for example,containing 9 x 11 inch or A4 pre-cut tabs to be imaged, you must first enable thePre-Cut Tabs selection from the Media Optimization mode in the user interface. Thisprovides you with the best throughput and productivity rate when printing with tabbedstock.
Use Media Optimization mode to increase your job's productivity rate otherwise affectedby printing the tab portion of a duplex job, especially pre-cut tabs.
• If you are running a job that does not contain tabs, select Normal Mode from theMedia Optimization Switches for the best throughput rate.
• If you are printing on any size pre-cut tabbed stock, or printing on full-cut tabbedstock greater than 8.5 inches (215.9 mm) in the process direction, select Pre-Cut Tabsfrom the Media Optimization Switches window.
CAUTIONThe maximum throughput rate when the Media Optimization Switch is set toPre-Cut Tabs is 240 ipm, regardless of whether the job contains tabbed stock.Therefore, make sure the Media Optimization Switch is set to Normal Modewhen printing jobs without cut tabs or if the tabbed stock is smaller than 8.5inches (215.9mm).
To enable Media Optimization mode when printing with tabs to be imaged:1. Load paper according to the labels on the feed Trays (1, 2, 3, 4, 5 with 1 being on
top) with the tabs on the trail edge. If the job uses hole-punched tabs andhole-punched body stock, make sure both stocks are loaded in the tray with thehole-punched edge leading. Use only forward collated tabs.
2. Program media for the feed trays and run job 1-N, face-down.3. The system assumes tabs are right-edge portrait or bottom-edge landscape. If the
job is different, you may need to select rotate 180 for the entire job.4. From the FreeFlow Print Server user interface, select Printer > Media Optimization.
The window containing Media Optimization Switches displays.5. Select Pre-Cut Tabs and OK. You are now running in Pre-Cut Tab mode and the job
will print up to 240 ipm, regardless of whether or not the job contains tabs.6. When you finish running jobs that include cut tabs, make sure you disable Pre-Cut
Tab mode by first selecting Printer > Media Optimization and then Normal fromthe Media Optimization Switches dialog.
To set up and use ordered stock
Ordered stock is paper with multiple pieces, such as a carbonless form, multi-part coloredstocks, etc., which need to be kept in a certain sequence.
Load tray with ordered stock1. On the Home Screen, click the Paper Trays button.
Xerox Nuvera User Guide and Training Aid (UGTA) for Software Version 9.3/10.323-100
How Do I...

2. Double-click or right-click a fully adjustable tray row.A Tray Properties window appears.
3. Enter all choices pertaining to the stock you wish to load into the tray.4. In the Type pull-down menu, choose Ordered Stock from the list of stock types.5. Enter any descriptive name for the ordered stock (ex., "Carbonless" or "5-part Color")
in the Type text box (the cursor should have automatically placed itself there.). Thisinformation will appear in the Type column of the Trays tab.
6. In the Sequence section, enter a number. This coincides with the number of parts inyour ordered stock.For example, if want to load a 3 part carbonless paper stock, enter 3 in the Sequencetext box.
7. Open the fully adjustable tray you just configured, as identified in the Tray Typecolumn of the Paper Trays window.
8. Load ordered stock that matches the settings you made in the Tray Properties window.For information on proper loading, see Recommendations for Paper Usage.
9. Click OK or Apply.
Submit job and choose ordered stock
With a tray properly loaded and configured with loaded stock, you are ready to submita job which uses ordered stock.1. Initiate a print or copy job. For example, on a copy job, select Loaded Stock from
the Paper Stock menu on the Basic tab.2. A list of loaded stock types appears. Choose the ordered stock you previously
configured and loaded.3. Make any other programming choices.4. When satisfied with your settings, click Copy or Print.
NOTEWhen using tabbed or ordered stocks the system may instruct you to reorderthe stock in the tray to the first position if events such as a multifeed occur. Anytime a tray containing ordered stock is cycled, the system assumes that the stockin the tray has been reset to the first position.
Use Media Optimization Mode to optimize job recovery on jobs with SerializedStocks
You can print jobs using serialized stocks, such as checks or statements, and disable autosystem job recovery. The system will require more active operator intervention tomanually insure proper job recovery following system shutdowns. A message will indicatewhen this media optimization mode is enabled.
If a system fault condition occurs and requires a dynamic purge of sheets, the machinewill shut down after the purge is completed. Similarly, if the system shuts down hardwith a fault condition, after clearing the jam the system will cycle up, purge the paperpath contents, and shut down again. After both of these two types of conditions, a statusmessage will display to instruct the operator about job recovery. Be sure to disableSerialized Stock Mode when finished to restore full auto job recovery.
To enable Serialized Stocks mode:1. From the FreeFlow Print Server user interface, select Printer > Media Optimization.
23-101Xerox Nuvera User Guide and Training Aid (UGTA) for Software Version 9.3/10.3
How Do I...
The window containing all selections displays. Serialized Stock is above the areacontaining Media Optimization Switches.
2. Select Serialized Stock Mode and OK.You are now running in Serialized Stock mode which will print your job as programmedand will only prompt you for job recovery assistance following a system fault condition.
3. When you have completed running jobs that include serialized stock, make sure youexit the Serialized Stock mode by selecting Printer > Media Optimization and clearingSerialized Stock Mode from inside the window containing the selections.
For more information, see Using Media Optimization Mode on the Xerox Nuvera 200/288EA/MX Perfecting Production System.
More on loading tabbed stock and other special papers
Load stock in the orientation indicated on the feed tray labels.
Programming Tabs with 2-sided Original for Tab Images
To program a tab job using 2-sided originals with images for the tabs, program as specialpage exceptions on tab stock. Special page exception programming applies to the printedoutput; exception pages do not affect scanned input. Programming a 1-sided exceptionpage for the tab image tells the system to print the page as 1-sided output, whichautomatically forces the next image to be on the next side 1 in the output. To successfullyprogram the job:1. Create a set of 1-sided originals to use in the SDDF using 2-sided to 1-sided output.
Remove the excess side 2 blanks from the stack, load them in the SDDF, and programthe job using 1-sided to 2-sided output. (This is how the job would be run on a 5090.)
2. Scan the 2-sided input with all of the Copy job and exception page programming.However, instead of printing the job, save it.
3. Use the Editor feature to remove the excess blank pages prior to printing the job.
Supported Tab Media
The Xerox Nuvera 200/288 EA/MX Perfecting Production System supports the Xerox tabmedia (9 x 11 inches) listed in the following tables. If you use tabs other than thoselisted below, you may experience questionable results.
NOTEIf you are printing a job with preprinted tabs, program the job using ExceptionPages/inserts. For more information on printing with preprinted tabs, refer to AddingPages to your Document with the SFM Insertion Module. For information on printingwith preprinted tabs on a Multifunction Finisher Pro Plus, refer to MultifunctionFinisher (MFF) Specifications.
Xerox Nuvera User Guide and Training Aid (UGTA) for Software Version 9.3/10.323-102
How Do I...

Table 15. US Tab Stock – All 9 x 11 inches
Double ReverseSingle ReverseSingle StraightColorBankWeightType
3R54203R5422White390Xerox Tabs
3R5426White4
3R44053R44153R4417White5
3R53063R53083R5312Blue
3R53203R5322Gray
3R5316Ivory
3R57113R5713White8
3R5717White5110
3R121733R121753R12325White590Saver Tabs
3R55183R55203R5709Clear590PlasticReinforced
3R5689Red
3R5693Blue
3R5650Rainbow
White590Ring-TuffTabs
3R123633R12368White560Xpressions+Tabs
Table 16. FX Tab Stock – All 223 x 297 millimeters (A4 based)
Double reverseSingle ReverseSingle StraightColorBankWeightType
3R90871White3160StandardTabs
3R90872White4
3R909573R908733R91012White5
3R909473R908783R91025Rainbow
3R910003R91013White6
3R913913R93992Rainbow
3R93990Rainbow8
3R93993Rainbow9
3R909013R910013R91014White10
3R91023Gray
3R939883R91390Rainbow
3R910023R91015White12
3R93987Rainbow
23-103Xerox Nuvera User Guide and Training Aid (UGTA) for Software Version 9.3/10.3
How Do I...
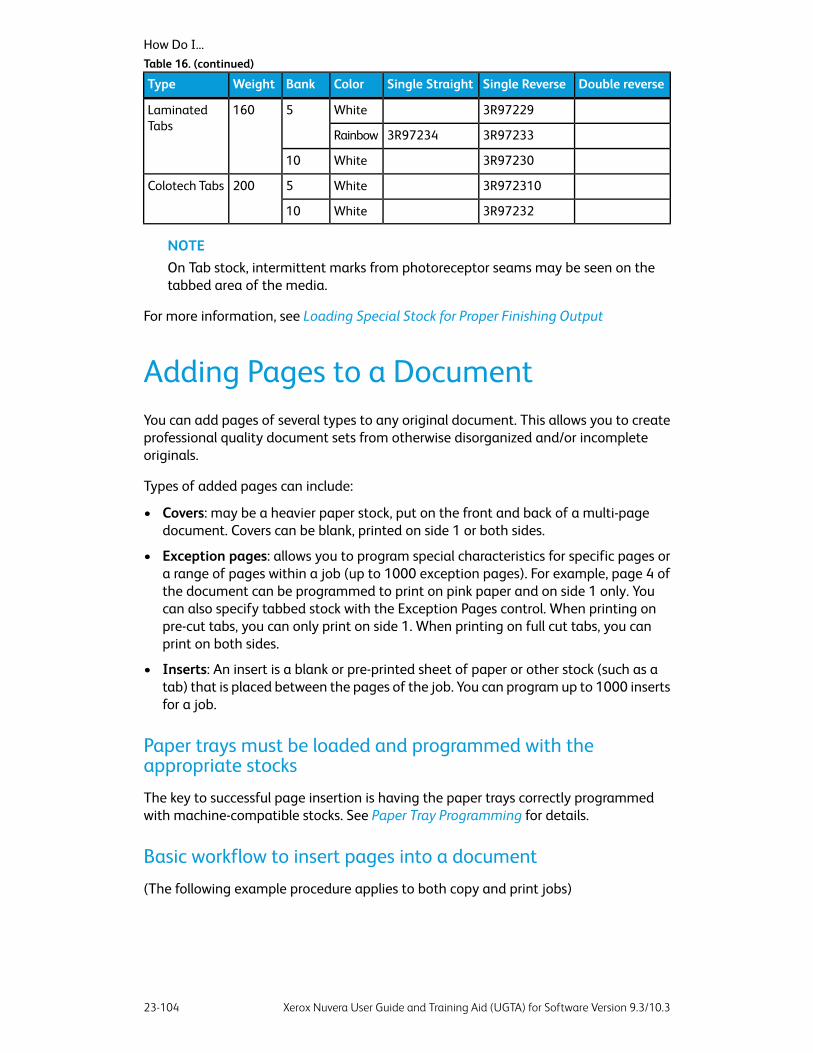
Double reverseSingle ReverseSingle StraightColorBankWeightType
3R97229White5160LaminatedTabs
3R972333R97234Rainbow
3R97230White10
3R972310White5200Colotech Tabs
3R97232White10
NOTEOn Tab stock, intermittent marks from photoreceptor seams may be seen on thetabbed area of the media.
For more information, see Loading Special Stock for Proper Finishing Output
Adding Pages to a DocumentYou can add pages of several types to any original document. This allows you to createprofessional quality document sets from otherwise disorganized and/or incompleteoriginals.
Types of added pages can include:
• Covers: may be a heavier paper stock, put on the front and back of a multi-pagedocument. Covers can be blank, printed on side 1 or both sides.
• Exception pages: allows you to program special characteristics for specific pages ora range of pages within a job (up to 1000 exception pages). For example, page 4 ofthe document can be programmed to print on pink paper and on side 1 only. Youcan also specify tabbed stock with the Exception Pages control. When printing onpre-cut tabs, you can only print on side 1. When printing on full cut tabs, you canprint on both sides.
• Inserts: An insert is a blank or pre-printed sheet of paper or other stock (such as atab) that is placed between the pages of the job. You can program up to 1000 insertsfor a job.
Paper trays must be loaded and programmed with theappropriate stocks
The key to successful page insertion is having the paper trays correctly programmedwith machine-compatible stocks. See Paper Tray Programming for details.
Basic workflow to insert pages into a document
(The following example procedure applies to both copy and print jobs)
Xerox Nuvera User Guide and Training Aid (UGTA) for Software Version 9.3/10.323-104
How Do I...Table 16. (continued)

Here's an example of how to program a copy job that includes inserts, exception pages,and covers. The steps to program a print job are very similar. The output will be a multi-page, 8.5 x 11 inch document, with Exception Pages (one-sided output) on the 2nd and3rd pages. In addition, there will be a one-page insert after the 3rd and 6th pages.Finishing includes front and back covers with a staple in the top left corner.1. If a copy job, place the original 2-sided (over 10 pages) document in the Document
Feeder.2. Verify that the paper supply trays are properly loaded and programmed with the
appropriate paper stocks.If they are not, and you need more information, see Paper Tray Programming.
3. From the Job Manager, set base job properties, such as 2-sided, paper stock, stapling,etc.
4. Select the Special Pages tab.5. Select the Exception Pages icon. Program From 2 to 3. Select stock size. Program
these pages for one-sided output. Select Add Exceptions.6. Close Job Exception window.7. Select the Inserts icon.8. Program the first insert for After page 3, Insert 1 Pages. Program the paper type,
size, etc. Select Add Inserts.9. Program the second insert for After page 6, Insert 1 Pages. Program the paper type,
size, etc. Select Add Insert.10. Close Inserts window.11. Select Front Cover icon.12. Program the cover to be printed on the outside only. Select the cover stock from the
tray you loaded with cover stock. Select Add Cover.13. Select Back Cover icon.14. Select None from the pull-down menu. Select the cover stock from the tray you loaded.
Select Add Cover.15. When satisfied with your settings, click Copy, Scan or Print.
System Level (Administrative) Added Pages
The Xerox Nuvera can be configured to include Administrative information in each Joboutput.
• Banner pages
• Error pages
• Job attribute report
For more information about these types of pages, see Adding System Level Pages.
Adding System Level Pages
The Xerox Nuvera can be configured to add "system level" or "administrative" pages:
• Banner pages
• Error pages
• Job Attributes report
23-105Xerox Nuvera User Guide and Training Aid (UGTA) for Software Version 9.3/10.3
How Do I...

These administrative pages not only provide a useful way to separate jobs in a Finishertray, but also provide information about each job processed by the system.
Enabling System Level Pages
You need to logon as a System Administrator to enable or disable the system level pages.
To enable or disable the system level pages:1. Open a job or queue properties window.2. Perform one of the following:
• Under the Settings tab select Administrative Pages. Then enable or disable eachof the pages.
• For Production System queues, right-click on a queue and selectAdministrative Pages Control. Then enable or disable each of the pages.
Banner Pages
When enabled by your System Administrator, Banner Pages include the followinginformation:
• Job name
• Job sender
• Job recipient
• Banner Page message
• Date and Time of printing
• Number of copies
• Product name and software level/version
• Account number
• Job ID
• Server/Queue name
Error Pages
When enabled by your System Administrator, Error Pages include the followinginformation:
• Job name
• Job sender
• Errors, Warnings
• Product name and software level/version
• Job ID
Xerox Nuvera User Guide and Training Aid (UGTA) for Software Version 9.3/10.323-106
How Do I...

Job Attributes Report
The Job Attributes report is a summary of the job settings.
Adding Pages to your Document withthe SFM Insertion ModuleThe SFM Insertion Module is either a 2-Tray or 4-Tray Sheet Feed Module used as apost-process inserter (pages do not go through the print engine). Use the SFM InsertionModule to add covers, inserts, or slip sheets to your documents. The SFM Insertion Modulefits between the print engine (or, if applicable to your configuration, the SheetEnhancement Module) and the finishing device.
NOTE: To learn how to insert covers, preprinted tabs or colored paper into your job usingthe Insertion Module on the Multifunction Finisher (MFF) Pro Plus, refer to Usingthe Multifunction Finisher (MFF) Pro Plus.
The addition of the SFM Insertion Module does not affect production speeds since coversand inserts are merged into the paper path after marking takes place, without requiringa gap in the pitch. For more information, see a description of About Pitch.
To Add Sheets with the SFM Insertion Module
Pick a stock that is loaded in the SFM Insertion Module, and program that on a blankinsert sheet or cover (through the Special Pages dialog).
The system should feed blank sheets from the SFM Insertion Module whenever possible.
NOTEPage insertion with the SFM Insertion Module may not occur when there is a blankpage in the actual document. The system software does not detect blank pagesembedded in documents, and will not trigger page insertion.
Alternatively, both of the SFM Insertion Module feed bins can be loaded with the samestock, allowing continuous uninterrupted production insertion of pre-printed stocks andthe addition of photographs and other sensitive documents that normally could bedamaged by heat from the fuser section of the printer.
23-107Xerox Nuvera User Guide and Training Aid (UGTA) for Software Version 9.3/10.3
How Do I...

Xerox Nuvera User Guide and Training Aid (UGTA) for Software Version 9.3/10.323-108
How Do I...

24Editing Images
There may be instances where you may want to alter placement of the image on youroutput. The Copy Service, Scan to File Service and Print from File Service Image Edit tabon the Xerox Nuvera user interface offers controls to change image placement,orientation, etc.
NOTEThe Copy Service and Scan to File Service are only available if your system includesthe integrated Document Scanner module for copying and scanning jobs.
To edit copy or scanned images1. Place the original on the Document Glass or Document Feeder.2. Click the Image Edit tab.3. Click the Original Size button. Select Manual Document Glass or Mixed Size Originals
to input the size of the original document(s).4. If your output paper size is bigger than the original image, you may want to use the
Edge Erase controls. Utilizing these, you can eliminate the border caused by the copierdetecting and imaging the edge of the original document. Or, you can eliminateinformation around the edges of your original document, by placing a mask usingthe Edge Erase function.
5. Click the Image Shift button.Using this control, the image being copied can be placed anywhere on the outputpage.
6. Click the Image Rotation button.Using this control, the output image can be rotated 180 degrees. See Rotating theImage.
7. Click the Negative/Mirror Image button.Using this control, the output can be printed as a negative, where the black pixelsprint white and the white pixels print black and/or the output can be printed as amirror image on the lead edge.
8. When satisfied with the adjustments, click Copy or Scan.
24-1Xerox Nuvera User Guide and Training Aid (UGTA) for Software Version 9.3/10.3
To edit print images1. Open the Print Properties window of a print job.2. Click the Image Edit tab.3. Click the Image Shift button.
Using this control, the image being printed can be placed anywhere on the outputpage.
4. Click the Rotation button.Using this control, the image being printed can be rotated 180 degrees.
5. Click the Background Form button.Using this control, a Background Form can be added to the printed job.
6. When satisfied with the adjustments, click Print.
NOTEJobs can be saved as Background Forms. A listing of the available BackgroundForms is located in the FreeFlow Print Server menu bar under Administration > Background Forms. For more information, refer to the FreeFlow Print Serveronline Help.
Erasing Unwanted Marks On OriginalsSometimes the original document you are copying or scanning contains markings nearthe edges that you wish to remove. Examples of unwanted edge markings could be:
• Wrinkled, torn, or other damage near the original document's edges
• Hole punches
• Handwriting or other errant marks near the document's edges
• The edge of the paper causing a shadow
Erase Options
There are two methods for deleting unwanted edge markings:
• Edge Erase: This method allows you to set different deletion widths to every edgeof the page in the original document. This method is useful for damaged documentsor documents that have errant markings on some but not all edges.
• Border Erase: Using this setting, one deletion width is set and applied to all edgesof the document. This method is useful for originals on colored paper, or documentsthat have the same unwanted edge content on every page.
To erase an edge1. On the Home Screen, initiate a copy or print job.2. On the Image Edit tab, click the Edge Erase button.
Xerox Nuvera User Guide and Training Aid (UGTA) for Software Version 9.3/10.324-2
Editing Images

3. On the Edge Erase drop-down menu, select either Border Erase orStandard Edge Erase.
4. Use the spinner boxes to set the area (or areas if you selected Edge Erase) you wantEdge Erase to cover.
Other ways to work with edge-to-edge imaging
See Printing an Image That Extends to the Edge of the Page for information on moreways to utilize edge-to-edge imaging.
Shifting the ImageSometimes the information on the output page needs to be moved to accommodatedifferent types of binding. This prevents information falling into areas that mayeventually be hole-punched, stapled, or perfect-bound.
NOTEThis feature is only available if your system includes the integrated DocumentScanner module for copying and scanning jobs.
To shift the image for a copy job1. Determine the amount of space needed to shift the content away from the binding
edge.2. Place the original document on the Document Glass.3. In the Xerox Nuvera user interface, click the Copy button.4. Click the Image Edit tab.5. Click the Image Shift button.
Image Shift controls appear. In the Shift Options drop-down menu, Manual is thedefault.
6. Enter the amount of margin shift determined in step 1.7. Make any other adjustments to the copy job.8. Click <Copy>.
To shift the image for a print job1. From the user interface, select Job Manager and open the job properties window of
the job.2. Select the Image Edit tab.3. Select the Image Shift button.4. Set the horizontal and vertical shift values.5. Make any other adjustments to the print job.6. Click Print.
24-3Xerox Nuvera User Guide and Training Aid (UGTA) for Software Version 9.3/10.3
Editing Images
Rotating the ImageYou may be faced with situations where you need to rotate the original image beforeit is printed on the output page.
To manually rotate the image
You can rotate an image from the Image Edit tab of the Job Manager. Select theRotation button and the rotation value.
You might want to manually rotate the image when:
• copying a document that has damaged lead edges that experiences difficulty feedingproperly through the document feeder
• using some 3rd party finishing so that the finishing is applied correctly to the job
• using special stocks that can be loaded only in a certain way in the paper trays (forexample, tab stock can only be loaded with tabs trailing)
Automatic Image Rotation
The Xerox Nuvera automatically rotates the full page image, if necessary, to match theorientation of the paper loaded in the paper trays. Thus, you do not have to manuallyrotate originals or paper stock to get the correct orientation.
Xerox Nuvera User Guide and Training Aid (UGTA) for Software Version 9.3/10.324-4
Editing Images

25Adjusting Image Quality
The Xerox Nuvera user interface contains a set of Image Quality adjustment tools forCopy, Scan to File and Print jobs. Using these controls, you can make adjustments toimages containing text, photographic images, halftoned images, as well as documentswith mixed image types. This is useful if the original document is less than perfect; i.e.,text/images are too light or too dark.
To learn more about these capabilities, explore the links at the left.
NOTEThe Copy and Scan functionality is only available if your system includes theintegrated Document Scanner module. If the Enhanced Line Screen license is enabled,the system supports jobs with 85, 106, 125, 134 and 156 lpi halftone screens. If thislicense is not enabled, only 125 lpi is supported.
To adjust image quality on copy andscanned jobs1. At the Xerox Nuvera user interface, click on Copy (or Scan to File), then click on the
Image Quality tab.2. Choose the Original Type of the image to be copied. Click on the Original Type button,
then click on the Rendering Options Setup button. Choose any options accordingto the condition and type of the original document.
3. Click on the Basic tab, then use the Darken/Lighten control to make small correctiveadjustments.
4. Click on the Image Quality tab, then click on the Image Adjustments button. Usethe Contrast, Sharpness and Background Suppression controls to make smallcorrective adjustments.
5. Set Print Quality.
25-1Xerox Nuvera User Guide and Training Aid (UGTA) for Software Version 9.3/10.3

The Toner Saver selection uses less toner and is more economical than the full qualitysetting of Normal. It is useful for scatter removal without causing a light solid imageon the page. You may want to use the Normal setting when printing proof documents.
TIPIf you copy /scan a great number of the same type of original documents, youcan set custom image quality defaults. For example, if the majority of yourcopying /scanning is of dark photographic content, the system defaults can beset to accommodate this, saving you job programming time. To set up yoursystem defaults to match your original input, contact your System Administrator.
To adjust image quality on print jobs1. Select Print From File on the Service menu and use the Files tab to locate and select
the job.2. Select the Image Quality tab.3. From the Mode pull-down menu, select the printer emulation setting.
The DocuTech 135 setting prints output that is similar in appearance to that of theDT135 printer.
4. Use the Print Darkness control to make small corrective adjustments in increasingor decreasing darkness.All pixels in the image are moved either towards black or white. The values closestto 0 are intended for small adjustments to the darkness of text and pictures. Thedarkness +/-3 settings will make a noticeable difference on text but not recommendedfor most pictorials.
5. Select a Resolution.Since resolutions vary from printer to printer, use this option to achieve betterperformance for jobs that were saved at 300 dpi.
6. Set Print Quality. The Toner Saver selection uses less toner and is more economicalthan the full quality setting of Normal. It is useful for scatter removal without causinga light solid image on the page. You may want to use the Normal setting whenprinting proof documents.
7. To select a halftone, open the job. From either the Print Properties window or the JobProperties window, select a Halftone.This allows you to adjust the pattern of dots or lines of varying sizes applied to animage of varying tones, or same sized dots applied to a tint of color.
NOTEIf the Enhanced Line Screen license is not enabled, the Halftone selection is notavailable since there is only one halftone (125 lpi) offered.
Stroke Thickening (increasing the weight or width of a character)1. Open the Job Manager and select and open the job.2. Select the Image Quality tab.3. From the Job Properties window and the Stroke Thickening field, adjust this setting
to control the thickness of fine lines created by the PostScript stroke command.
Xerox Nuvera User Guide and Training Aid (UGTA) for Software Version 9.3/10.325-2
Adjusting Image Quality

About Toner Saver
The Toner Saver Print Quality selection is intended to save toner costs, similar to draftmode.
NOTEToner Saver is designed to save toner, and can produce poor image quality andundesirable, light, or washed-out prints.
About ContrastThe Contrast control enhances the tonal separation, especially in the midtones. Increasingcontrast moves midtones (gray) toward black or white. Decreasing contrast makes blacksand whites appear gray.
Limits of Contrast controls
The Contrast control on the Xerox Nuvera applies to all of the pixels in an image at once.In other words, changing the contrast in the midtones of your image will also affecthighlights and shadows.
If contrast is increased too much, midtone detail may be enhanced, but at the expenseof highlight and shadow content. Differences between adjacent pixels become greater,causing shadow areas to turn completely black, while highlight areas turn completelywhite (see Figure 1).
Figure 21. A high-contrast image. Gray levels are being spread out across the entire histogram.
On the other hand, decreasing contrast too much causes a loss of highlights and shadows.Instead of highlight content turning completely white and shadow content turningcompletely black, highlights and shadows get "compressed" into the midtone region ofthe histogram (see Figure 2).
25-3Xerox Nuvera User Guide and Training Aid (UGTA) for Software Version 9.3/10.3
Adjusting Image Quality
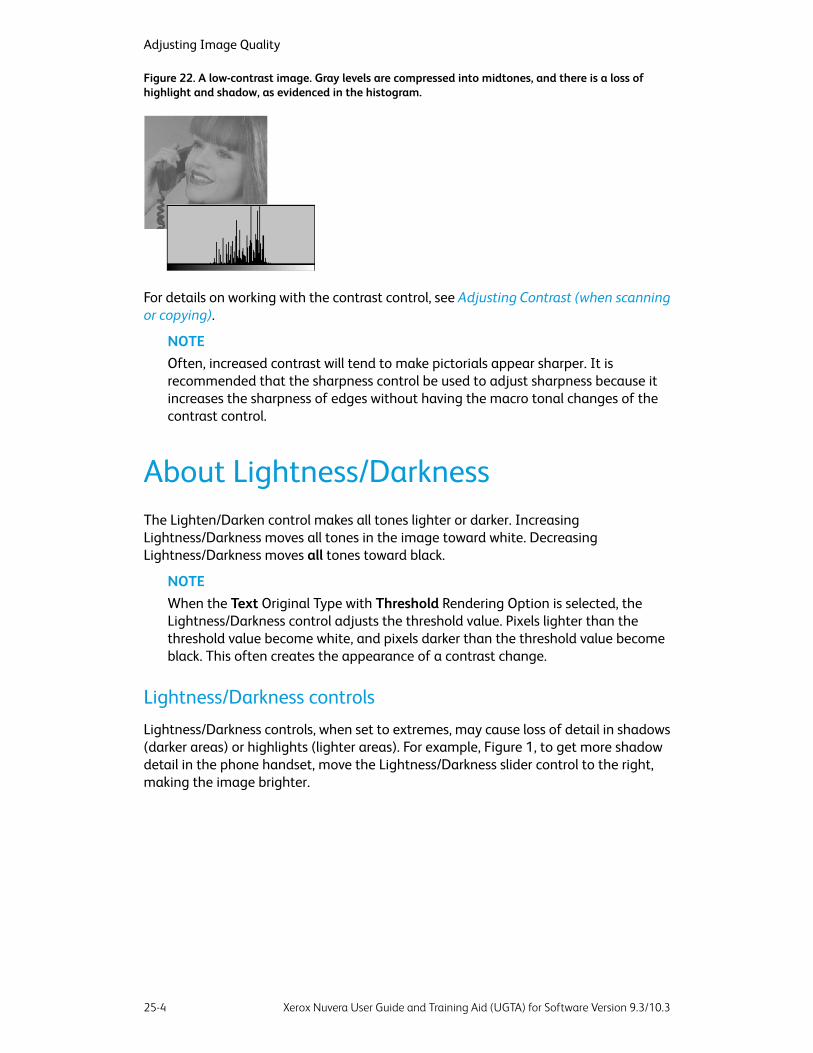
Figure 22. A low-contrast image. Gray levels are compressed into midtones, and there is a loss ofhighlight and shadow, as evidenced in the histogram.
For details on working with the contrast control, see Adjusting Contrast (when scanningor copying).
NOTEOften, increased contrast will tend to make pictorials appear sharper. It isrecommended that the sharpness control be used to adjust sharpness because itincreases the sharpness of edges without having the macro tonal changes of thecontrast control.
About Lightness/DarknessThe Lighten/Darken control makes all tones lighter or darker. IncreasingLightness/Darkness moves all tones in the image toward white. DecreasingLightness/Darkness moves all tones toward black.
NOTEWhen the Text Original Type with Threshold Rendering Option is selected, theLightness/Darkness control adjusts the threshold value. Pixels lighter than thethreshold value become white, and pixels darker than the threshold value becomeblack. This often creates the appearance of a contrast change.
Lightness/Darkness controls
Lightness/Darkness controls, when set to extremes, may cause loss of detail in shadows(darker areas) or highlights (lighter areas). For example, Figure 1, to get more shadowdetail in the phone handset, move the Lightness/Darkness slider control to the right,making the image brighter.
Xerox Nuvera User Guide and Training Aid (UGTA) for Software Version 9.3/10.325-4
Adjusting Image Quality
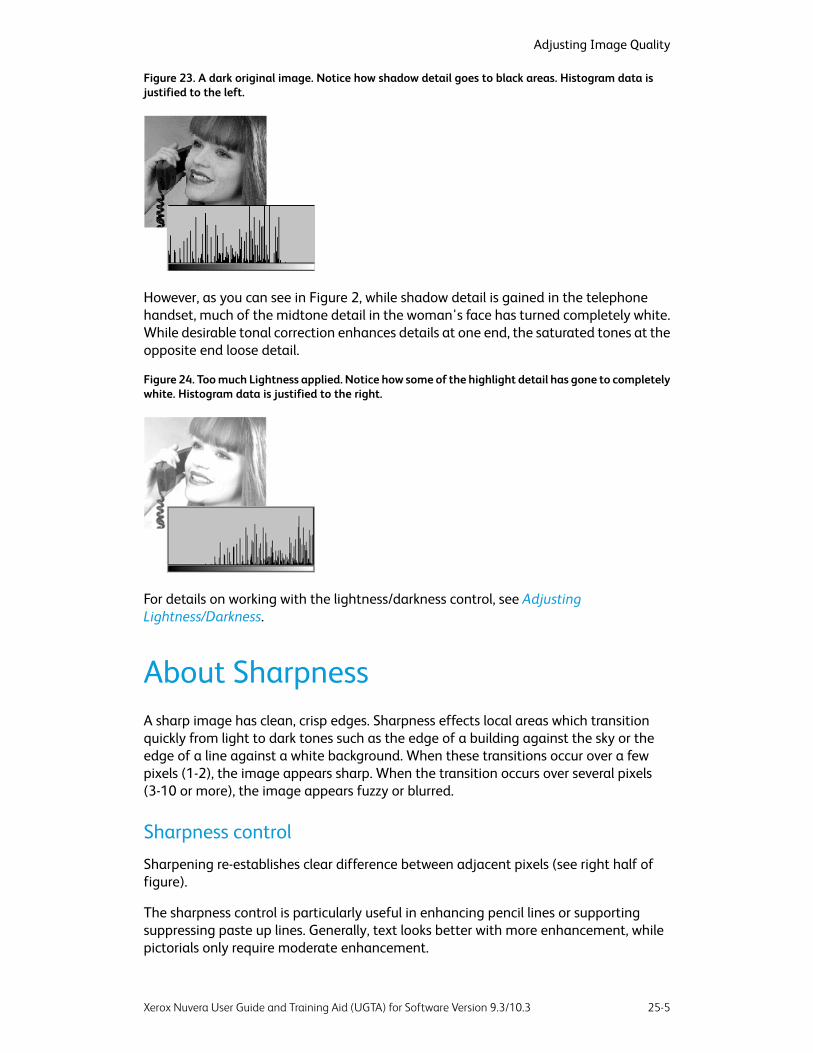
Figure 23. A dark original image. Notice how shadow detail goes to black areas. Histogram data isjustified to the left.
However, as you can see in Figure 2, while shadow detail is gained in the telephonehandset, much of the midtone detail in the woman's face has turned completely white.While desirable tonal correction enhances details at one end, the saturated tones at theopposite end loose detail.
Figure 24. Too much Lightness applied. Notice how some of the highlight detail has gone to completelywhite. Histogram data is justified to the right.
For details on working with the lightness/darkness control, see AdjustingLightness/Darkness.
About SharpnessA sharp image has clean, crisp edges. Sharpness effects local areas which transitionquickly from light to dark tones such as the edge of a building against the sky or theedge of a line against a white background. When these transitions occur over a fewpixels (1-2), the image appears sharp. When the transition occurs over several pixels(3-10 or more), the image appears fuzzy or blurred.
Sharpness control
Sharpening re-establishes clear difference between adjacent pixels (see right half offigure).
The sharpness control is particularly useful in enhancing pencil lines or supportingsuppressing paste up lines. Generally, text looks better with more enhancement, whilepictorials only require moderate enhancement.
25-5Xerox Nuvera User Guide and Training Aid (UGTA) for Software Version 9.3/10.3
Adjusting Image Quality
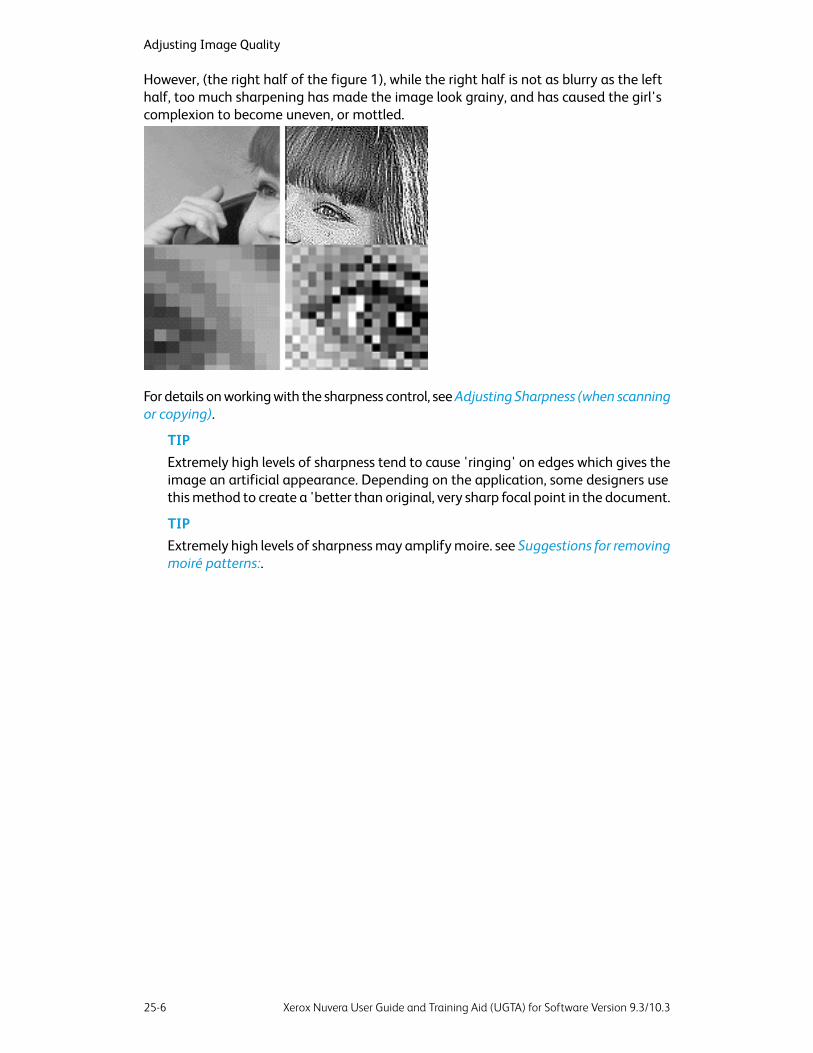
However, (the right half of the figure 1), while the right half is not as blurry as the lefthalf, too much sharpening has made the image look grainy, and has caused the girl'scomplexion to become uneven, or mottled.
For details on working with the sharpness control, see Adjusting Sharpness (when scanningor copying).
TIPExtremely high levels of sharpness tend to cause 'ringing' on edges which gives theimage an artificial appearance. Depending on the application, some designers usethis method to create a 'better than original, very sharp focal point in the document.
TIPExtremely high levels of sharpness may amplify moire. see Suggestions for removingmoiré patterns:.
Xerox Nuvera User Guide and Training Aid (UGTA) for Software Version 9.3/10.325-6
Adjusting Image Quality

26Clearing Paper Jams
In the event of a paper jam, the paper path has been designed to allow the user to easilyclear the jam and continue the job. Take the time to familiarize yourself with the followingprocedures on clearing paper jams.
Clear jams from left to right and in the order shown in the message displayed on theUser Interface. Try to avoid tearing any jammed sheets.
It is more desirable to prevent paper jams from occurring. Proper handling and storageof paper stocks will minimize jams. For details, see Handling and Storing Paper.
WARNINGMetallic surfaces in the fuser area are hot. Please use caution when removing paperjams from fuser areas, and avoid touching any metallic surfaces.
TIPIf the system declares a jam in the feeder at area 2, check area 2 and area 1 sincethe sheet may be stuck in between.
TIPIf you experience multi-sheet feed jams at any of the paper trays, make sure thatthe paper actually loaded in the tray matches what has been programmed in theuser interface.
TIPIf you load any type of drilled paper, to aid in sheet separation and to prevent jams,fan the reams before loading into the tray.
NOTEThe recovery procedure for the 12-2505 fault is improved. The jam clearanceprocedure instructs you to unload the main stacker. These sheets are now allconsidered good. After closing the front door, the system instructs you to open thetop main cover and remove and discard the sheets from area 3. After the sheetshave been removed, close the top main cover. The system will purge any other sheetsin the system before resuming the job. If any sheets on the stack are damaged orpoorly stapled, the operator may have to remake those sheets/set when the job isdone.
There are a few rare cases in which sheets can fall from the Compiler Arms onto thestacker. Check your output for any duplicates. The status message informs the user tomark the stack and check output for duplicates.
26-1Xerox Nuvera User Guide and Training Aid (UGTA) for Software Version 9.3/10.3

Paper jam notificationWhen paper becomes jammed anywhere in the paper path, the Xerox Nuvera notifiesyou by one or more of the following:
• a text notification in the status area of the User Interface, describing the location ofthe jam. Double-clicking the notification will launch a window providing moreinformation about the problem.
• a machine "mimic," or pictorial representation of the machine on the UI screen,depicting the location of the jam.
• a steady or blinking Attention Light.
Clearing jams in the Xerox Nuvera200/288 EA/MX Perfecting ProductionSystem Print EnginesDuring paper jam recovery, the two print engines coordinate automatically so that afterboth paper paths are cleared, the job can start printing at the correct position.
Clearing jams in the BFM Plus Area 2When accessing a jam clearance in area 2, gently open the Bypass Unit cover to the firststop.
WARNINGWhen you raise the Bypass Unit cover to clear a paper jam, do NOT raise the BypassUnit cover beyond the first stop.The Bypass Top Cover may open suddenly, causinga risk of injury to anyone standing behind the finisher.
TIPAn unclearable jam situation may occur that requires service intervention. Tominimize this occurrence, for any jam condition, clear the offending jam and thencheck and clear area 6 of the print engine before closing door for cycle up.
Paper PurgeWhen a paper jam occurs, paper is purged from the paper path. Paper purges to thefollowing areas:
• The first top tray after the print engine
Xerox Nuvera User Guide and Training Aid (UGTA) for Software Version 9.3/10.326-2
Clearing Paper Jams

• Area 5b of the print engine
Please see the topics below for more information.
NOTEFor the Xerox Nuvera 200/288 EA/MX, the paper is purged to area 5b of both printengines as required.
Top tray paper purge
This is the default purge location.
Area 5b paper purge
Area 5b can be accessed by a door located at the lower front right corner of the printengine.
TIPPlease see the video above titled "Clearing jams in areas 5a, 5b, 6 & 7 of theprinter / fuser module" for more information on accessing this area.
This paper purge location is enabled by default. If for any reason you want to disablethe area 5b purge, follow these steps:
1. Logon to the FreeFlow Print Server as a System Administrator.
NOTEAccessing the User Diagnostics mode pauses the printer.
2. Select System and User Diagnostics.
3. From the left navigation bar, select System Optimization Customer Setup.
4. Select/deselect the checkbox next to Enable Area 5B Purge.
5. Select OK to apply the setting.
6. Select File and Close.
7. Resume the printer.
26-3Xerox Nuvera User Guide and Training Aid (UGTA) for Software Version 9.3/10.3
Clearing Paper Jams

Xerox Nuvera User Guide and Training Aid (UGTA) for Software Version 9.3/10.326-4
Clearing Paper Jams

27Maintaining Your XeroxNuvera
The Xerox Nuvera is designed to maximize machine uptime. The machine is equippedwith a short paper path in order to minimize jams, and Replaceable Units in order toavoid extended periods of downtime.
Click any of the links on the left to learn about all aspects of maintaining your XeroxNuvera .
Power ProceduresIn order to ensure correct operation of the system, it is imperative that the system bepowered on and off in the way that it was designed to do so. Deviating from theprocedures can result in poor performance, loss of data and loss of productivity.
Click on the links to the left to learn about powering on, powering off, and restarting thesystem.
Powering On the Xerox Nuvera
Follow these procedures to correctly power up the entire Xerox Nuvera system and avoiddamage to the machine and/or loss of data.
Any finishing modules that have separate power on/off switches will be powered on atthe time of install.
To power on the Xerox Nuvera
The power switch is the white switch located on the right side of the machine. Press the(|) symbol embossed into the button toward the back of the machine to turn the poweron. (For the Xerox Nuvera 200/288 EA/MX Perfecting Production System PerfectingSystem, the Power On switch is located on Print Engine A1).
The Xerox Nuvera system begins its power-up/boot sequence and automatically launchesthe FreeFlow Print Server operating system.
27-1Xerox Nuvera User Guide and Training Aid (UGTA) for Software Version 9.3/10.3

NOTEDo not click anywhere in the user interface before the machine is through booting.
When the FreeFlow Print Server screen appears, you can begin printing jobs.
The entire power on process takes approximately 5 minutes.
Powering Off the System
Follow these procedures to correctly power down the machine. While turning the machineon and off may seem self-explanatory, there are a few conventions to adhere to, in orderto avoid damage to the machine and/or loss of data.
To power off the system
There are two non-emergency methods used to power off.
Preferred power off method1. In the user interface, click System > Shutdown.2. Click Yes to shut down the system in an orderly fashion, after all scheduled jobs are
processed.3. Click Interrupt to shut down the system without completing the processing of current
jobs.4. Click No to return to the user interface.
In a few moments, the system will begin an orderly shutdown.
If the preferred power off method is not successful1. Press the (O) symbol embossed into the button toward the back of the machine to
turn the power off. For the Xerox Nuvera 200/288 EA/MX Perfecting ProductionSystem, access the power switch on Print Engine A1.
2. Click Yes to shut down the system in an orderly fashion, after all scheduled jobs areprocessed.
3. Click Interrupt to shut down the system without completing the processing of currentjobs.
4. Click No to return to the user interface.
NOTEUsers should not use Printer Off, since Printer On is only available to SystemAdministrators. If a user does select it and needs to exit, select Restart and thesystem will come up to ready.
Energy Star
Please see the Xerox Nuvera Getting Started Guide for information on this topic.
Power Saver Mode
The capability to enter and exit Power Saver Modes is required to control powerconsumption during long periods of system inactivity and to comply with EPA's EnergyStar® regulations for energy savings.
Xerox Nuvera User Guide and Training Aid (UGTA) for Software Version 9.3/10.327-2
Maintaining Your Xerox Nuvera

The system has three Power Saver modes:
• Low Power Mode (LPM)
• Monitor Off Mode (MOM)
• Sleep Mode (SM)
The monitor will shut off (black screen) when the machine goes into any of the PowerSaver modes.
Power Saver modes and paper loading
When you are in Low Power Mode (LPM) or Sleep Mode (SM), the paper trays will notrespond when you open/close/load them with paper. LPM or SM must be exited first, inorder for the system to detect paper. However, you may load paper while you are in aPower Saver mode, and the paper will be detected after exiting Power Saver mode.
Ways to exit Low Power Mode• Place document(s) in the Document Feeder
• Send a job from a client
• Requesting an exit from the UI. Choose Printer > Exit Power Saver.
Ways to exit Sleep Mode• Send a job from a client
• Requesting an exit from the UI. Choose Printer > Exit Power Saver.
NOTEIt is NOT possible to exit LPM or SM by simply moving the mouse or with keyboardstrokes. However, moving the mouse will cause the system to exit MOM.
NOTEYou cannot set the total of LPM and SM timers to more than 240 minutes.
Restarting the System
If your machine performance becomes degraded, or it ceases to function correctly forany reason, executing a Restart will usually restore correct function. If the problemcontinues, contact your Xerox representative.
NOTEIf the system is restarted during the printing of a very long job, the system may takea long time to recover the job - approximately 1 minute for each 10,000 pages inthe job.
To restart the system
There are two ways to restart the Xerox Nuvera :
• Method A Restart: a shutdown and restart of the FreeFlow Print Server software.
27-3Xerox Nuvera User Guide and Training Aid (UGTA) for Software Version 9.3/10.3
Maintaining Your Xerox Nuvera

• Method B Shutdown : a machine shutdown.
TIPIf system performance becomes degraded, try Method A first. If this solvesperformance problems, don't perform Method B. If system performance is still poor,perform Method B.
For details on powering on the system, see Powering On the Xerox Nuvera
Method A: Restart the system1. In the user interface, click System > Restart.2. In a few moments, the system will begin an orderly shutdown of services.
The system will then begin an orderly startup. Wait several minutes for the system toload all services before clicking anywhere in the user interface.
Method B: Shut down the system1. In the user interface, click System > Shutdown.2. Click Yes to shut down the system in an orderly fashion, after all scheduled jobs are
processed.3. Click Interrupt to shut down the system without completing the processing of current
jobs.4. Click No to return to the user interface.5. In a few moments, the system will begin an orderly shutdown.6. Once the system has completely shutdown, wait 30 seconds and power on the system
by pressing (I) on the power switch located on the lower right corner of the controlconsole.
Using the Pass Through Mode FeatureThe Pass Through Mode (PTM) is only available on the Xerox Nuvera 200/288 EA/MXPerfecting Production System, which is uniquely configured with two print engines insteadof one.
The PTM feature is used to maximize print productivity in the event that only one of theprint engines is up and running. If a print engine is shut down due to a fault, imagequality mismatching, or pending maintenance, the PTM feature allows you to identifythe print engine to use for continued printing of simplex or duplex jobs. The other printengine will only be used to pass paper through the system.
NOTEWhen printing with one print engine, the productivity rate changes from 288 ipmto 144 ipm. To always make full use of the system's productivity, make sure to disablethis feature once the idle print engine is serviced and available for use.
Xerox Nuvera User Guide and Training Aid (UGTA) for Software Version 9.3/10.327-4
Maintaining Your Xerox Nuvera
When to enable Pass Through Mode
The following are the circumstances under which you would enable this feature andprint with only one print engine:
• One of the print engines is out of toner
• Required maintenance on one of the print engines is awaiting service (for example,the photo receptor belt needs to be replaced)
• Certain print engine faults or system faults
• The image quality between the two print engines does not match and you want touse the print engine that produces consistent image quality
If you encounter the following circumstances, contact Service. Do not use or enable thisfeature if the system is experiencing:
• Reoccurring jams
• Critical print engine problems
• Certain print engine faults
• Registration faults
NOTEIf PTM is enabled but a critical print engine problem or fault exists, the availableprint engine will not print. Since the same paper path is used whether PTM is enabledor disabled, the system is preventing any damage to the down print engine.
To enable and use the Pass Through Mode1. On the System menu, select
User Diagnostics > System Optimization Customer Setup.The System Customer Setup dialog displays.
2. From the Pass Through Mode drop-down menu, select Print with Engine A1 Only toselect only print engine A1 for printing or Print with Engine A2 Only to identify printengine A2 to use for printing.
3. Close the dialog.
The Pass Through Mode is in effect.
To disable the Pass Through Mode
Once the idle print engine is serviced, access and disable the PTM feature:1. On the System menu, select
User Diagnostics > System Optimization Customer Setup.The System Customer Setup dialog displays.
2. From the Pass Through Mode drop-down menu, select Off to instruct the system touse both print engines for printing.
3. Close the dialog.
The Pass Through Mode is disabled.
27-5Xerox Nuvera User Guide and Training Aid (UGTA) for Software Version 9.3/10.3
Maintaining Your Xerox Nuvera
Running User DiagnosticsYou may be prompted by the Xerox Nuvera , or by a Customer Support representativeto access and run diagnostic routines. The diagnostic routines are useful for getting thesystem back into proper calibration or adjustment, and/or as a part of general systemmaintenance.
CAUTIONSelecting and running any of the User Diagnostic routines modifies the systemsettings and may change the performance of your Nuvera. Use the User Diagnosticroutines and settings only with the direction of an authorized Xerox representative.
To access User Diagnostics1. In the Xerox Nuvera user interface, select System > User Diagnostics.
The User Diagnostics window appears. Depending on your system configuration,available diagnostic routines are listed.
2. After checking with your authorized Xerox representative, select one of the routinesto begin a diagnostic routine or to enable/disable a routine or algorithm.
3. Follow the on-screen instructions for information on how to run and perform thediagnostic routine. If you need further information on how to achieve certain results,contact Call for Assistance.
Document Scanner
Document Glass Scanner Setup - for systems with an integrated scanner, use to establishthe position of the Document Glass top and left registration edges, and set the scanspeed of the Document Scanner.
Print Engine
For the Xerox Nuvera EA Production System, perform the following routines as needed.
• dC0604 PE Registration Setup - use to align and register the image on side 1 withthe image on side 2.
• dC0943 Corotron Cleaning Routine - use weekly to remove dust and dirt that hasbuilt up on the corotron.
• Image Quality Setup - use if experiencing image quality problems after running theCorotron Cleaning routine.
Xerox Nuvera User Guide and Training Aid (UGTA) for Software Version 9.3/10.327-6
Maintaining Your Xerox Nuvera
Print Engine A1
For the Xerox Nuvera 200/288 EA/MX Perfecting Production System, select one of thefollowing routines when running Print Engine A1 only. Note that Print Engine A1 is theprint engine on the left, directly following the feeder modules.
• dC0604 PE Registration Setup - use to align and register the image on side 1 withthe image on side 2.
• dC0943 Corotron Cleaning Routine - use weekly to remove dust and dirt that hasbuilt up on the corotron.
• Image Quality Setup - use if experiencing image quality problems after running theCorotron Cleaning routine.
Print Engine A2
For the Xerox Nuvera 200/288 EA/MX Perfecting Production System, select one of thefollowing routines when running Print Engine A2 only. Note that Print Engine A2 is theprint engine on the right, between Print Engine A1 and the Sheet Enhancement Module.
• dC0604 PE Registration Setup - use to align and register the image on side 2 withthe image on side 1.
• dC0943 Corotron Cleaning Routine - use weekly to remove dust and dirt that hasbuilt up on the corotron.
• Image Quality Setup - use if experiencing image quality problems after running theCorotron Cleaning routine.
System
For the Xerox Nuvera 200/288 EA/MX Perfecting Production System, perform thefollowing routines as needed.
• dC0604 PE Registration Setup - use to align and register the image on side 1 withthe image on side 2.
• dC0965 System Image Quality Xerographic Balance - use to adjust the lightnessand darkness values between the two print engines. If you notice the images outputfrom one print engine appear lighter than the other print engine, run this imagequality matching diagnostic routine before contacting Service. The system performsan automatic check and prints 10 pages (side 1 printed from print engine A1 andside 2 printed from print engine A2). Visually inspect and compare the image qualityand select whether side 1 or side 2 is lighter, or no difference between the sides. Theroutine will increase the toner mass on the photoreceptor belt if the user indicatesthat one side is lighter than another.
27-7Xerox Nuvera User Guide and Training Aid (UGTA) for Software Version 9.3/10.3
Maintaining Your Xerox Nuvera

System: System Optimization Customer Setup
Enable or disable the following optimization switches as needed for the job.
• Wide Stocks (9.0-9.5 inches process direction) - Optimize Print Speed - for theXerox Nuvera 200/288 EA/MX Perfecting Production System only, enable this featureif you are printing stock greater than 9.0 inches and up to 9.5 inches wide. Thecommon book sizes for such a job is 9.25 inches and 9.5 inches wide. This featureallows this size paper to print at 240 ipm instead of 192 ipm thereby optimizing theprint speed for this workflow. This feature is not available on configurations with aBFM.
• Heavy-Weight Stock Jobs - Enhance Image Permanence (EIP) - select if printingmedia with challenging fix characteristics, such as heavy rough stock and some coatedstock. When EIP is enabled, an EIP icon displays in the status/mode indicator areaof the FreeFlow Print Server user interface indicating that this mode is in effect. Placethe mouse over the icon to display the tool tip for how and when to exit this mode.Selecting EIP runs the fuser at a constant, higher temperature and increases imagepermanence on heavyweight paper. Since this higher temperature may cause wavesand curl in lightweight stocks, and degrade output stack quality, deselect this featureand use AIP mode when not printing on heavyweight stock.
• Automatic Image Permanence for All Stock Weights (AIP) - AIP is the preferredmode. Use this routine to adjust the fuser temperature ac cordingly based on theprogrammed job information .
NOTEAutomatic Image Permanence (AIP) is dependent on how the user programsmedia characteristics into the stock library or into each feed tray. Spending afew moments to correctly program the media is important to getting the optimalperformance from your Xerox Nuvera system. The Xerox Nuvera runs in NominalMode if neither EIP or AIP is selected. Nominal Mode runs at a mid-level fusingtemperature that is satisfactory for most media.
• Light-WeightStock Jobs - Optimize Image Quality - use to improve image qualityproblems on lightweight stock resulting from deletions on large format media withlow area coverage. These deletions are typically only seen on side 2 of 2-sided jobs.Do not use with heavyweight stock and use only when directed to do so by a Xeroxrepresentative. Do not select this feature and EIP mode at the same time.
• Reduce Up-Curl for 2-Sided Jobs - for the EA Production System, enable when thereis excessive upcurl in the output stacks. The system prints side 2 first and then side1 to avoid the sheet being inverted after the second image. This causes the outputto have down curl instead of up curl. Note that this selection does not apply to jobsprogrammed with ordered stock and 3-hole punch stock. If used, the system ignoresthe Reduce Up-Curl feature and prints side 1first.
• Cycle Up Purge Enabled - not available to the user. This feature is used only by aXerox technical representative.
• Feed Until Empty Algorithm - when enabled, the system empties stock from thesecondary feed tray in use before switching back to the primary tray.
Xerox Nuvera User Guide and Training Aid (UGTA) for Software Version 9.3/10.327-8
Maintaining Your Xerox Nuvera

• Pass Through Mode - for the Xerox Nuvera 200/288 EA/MX Perfecting ProductionSystem only, from this drop-down menu, select the specific print engine (Print EngineA1 Only or Print Engine A2 Only) that you want the system to use to continue printing1-sided or 2-sided jobs when the other print engine is shut down. Pass Through Modeis in effect and paper will simply pass through the idle print engine. Select Off todisable Pass Through Mode and allow paper to print using both print engines.
• Crash Recovery: Last Sheet Delivered Not Known - If the system crashes whileprinting a large job and you need to restart FreeFlow Print Server and reboot thesystem, the system will attempt to perform a job recovery. If the system knows thelast sheet delivered to the finisher, the settings for this feature are not required andthe job is recovered automatically. However, in case the system crash affects thefinisher's ability to correctly detect the last sheet and automatically perform jobrecovery, use this feature to select either [Use Best Guess](default) or [Do Not RecoverJob] from this drop-down menu to indicate the type of job recovery to use. Select[Use Best Guess] if the last sheet delivered is not known and you want the system tostill attempt to recover the job. The system displays messages to check the outputfor duplicate pages or missing sheets. Select [Do Not Recover Job] if you want torecover the job, perform paper clearance and resubmit the job manually. The jobremains unrecoverable in the inactive queue. This feature is not used when the systemis only experiencing jam recovery or jam faults.
NOTEAfter a system reboot (due to power outage/tripped breaker, kernel panic, orpower cycle using the white button), if the job does not recover correctly, therecommended procedure is to open the Job Properties and set the Pages toPrint values to the range of pages remaining to be marked.
• Recovery Offset Enabled - If selected, on systems equipped with either an MFF orBFM only, the first recovered sheet delivered to the finisher following a jam will beoffset from the rest of the unfinished set (this applies to unfinished sets only and notstapled sets). It is intended to help the operator examine the set for completenessfollowing a jam. Only the first sheet after recovery is offset.
• Enable Tab Leading Sheets in IOT - not available to the user. This feature is accessibleby a trained customer operator or a Xerox technical representative only. It shouldalways be selected to ensure that jobs containing precut tabs are oriented correctlyin Tabs Optimization Mode and will run optimally with the print rate maximized. Thisfeature should only be deselected if Print Engine A2 is unable to process precut tabswithout damaging them.
System: Advanced User Diagnostics
If the Xerox Productivity Plus (XPP) or XPP Basic service options are enabled, thisdiagnostic mode is intended for and accessed by a trained customer operator only. Thetrained operator logs onto and accesses these advanced diagnostics to perform certainrepair and maintenance procedures without the need to contact Service. For moreinformation, refer to your XPP documentation or contact a Xerox sales representative.
27-9Xerox Nuvera User Guide and Training Aid (UGTA) for Software Version 9.3/10.3
Maintaining Your Xerox Nuvera

MFF B (not applicable to the Xerox Nuvera 200/288 EA/MX PerfectingProduction System)• dC1255 Booklet Staple Position Setup - used to align the staples on a folded booklet
• dC1254 Booklet Crease Position Setup - used to align the folded edge on a foldedbooklet
AdjustmentsThe Xerox Nuvera is designed to work in Production publishing environments and performa high volume of printing. Because of this, the machine may require slight adjustmentsto keep it working effectively. Click the links at the left for details about adjusting themachine.
Managing Paper Curl
To remove upcurl or downcurl (an upwards or downwards bend) in the paper in thestacked output, your Nuvera system provides the ability for you to make the necessaryadjustments.
If your configuration does not include a Multifunction Finisher (MFF), you will use theSheet Enhancement Module (SEM) and the FreeFlow Print Server Adjust Decurler featureto achieve sheet flatness in the stacker. If your configuration does include a MFF, youwill adjust only the Decurler Knob located in the print engine.
Xerox Nuvera User Guide and Training Aid (UGTA) for Software Version 9.3/10.327-10
Maintaining Your Xerox Nuvera
What Would Cause Paper to Curl?• Your paper supply is exposed to a humid environment, or otherwise stored improperly
• You have begun using lighter-than-normal paper stocks (lightweight paper), carbonlessstock, or poor quality recycled paper
• You are experiencing jams in your finishing device, poor set registration or stackingproblems.
• Paper left in the tray or left out unwrapped may require a change in the SEM decurlsetting.
• Some papers require a different decurl setting for one-sided vs. two-sided jobs.
NOTEStoring or using paper under humid conditions may increase paper curl. See Handlingand Storing Paper.
CAUTIONDo not use any paper that is not suitable for the system. For details on acceptedpapers, see Supported Paper.
How to Manage Paper Curl on Systems without a SEM
All Xerox Nuvera systems are equipped with a manual Decurler Adjustment Knob, ordial, located near the fuser in the print engine. Adjusting the Decurler Knob minimizesor eliminates curl in the stacked output.
However, only adjust the Decurler Knob to achieve paper flatness if your Nuvera systemincludes a MFF.
How to Manage Paper Curl for Simplex Jobs1. Open the right door of the Xerox Nuvera print engine module.2. Locate the Decurler Knob near Area 4 of the print engine paper path.3. Adjust the Decurler Knob to a higher setting to reduce upcurl and adjust to a lower
setting to reduce downcurl. The decurler introduces curl in the opposite direction ofthe curl created in the paper path.
Most simplex jobs work best with the Decurler Knob set at 4. If you continue to experienceupcurl with the Decurler Knob set at the maximum, consider running jobs N-1. This willcause a slight productivity loss. Printing N-1 is not to be used for stapled jobs ortransactional printing.
How to Manage Paper Curl for Duplex Jobs
For best performance, always set the Decurler Knob at the minimum for duplex jobs.
27-11Xerox Nuvera User Guide and Training Aid (UGTA) for Software Version 9.3/10.3
Maintaining Your Xerox Nuvera

If you notice excessive upcurl, set the Decurler Knob at 4 and select theReduce Upcurl for 2-sided Jobs option. The system prints side 2 before side 1 therebyreducing curl in the stacker. However, a slight productivity loss will occur. If you noticeexcessive downcurl, set the Decurler Knob from 4 to MIN. If this is not enough, disablethe Reduce Upcurl for 2-sided Jobs option.
To enable or disable Reduce Upcurl for 2-sided Jobs:
1. Select System > User Diagnostics to open the User Diagnostics window.2. Select System > System Optimization Customer Setting.3. Check or uncheck Reduce Upcurl for 2 sided Jobs.
How to Manage Paper Curl using the Sheet Enhancement Module
The Xerox Nuvera systems (except for systems with a MFF) are equipped with a SheetEnhancement Module located to the right of the print engine. This module is designedto automatically remove upcurl or downcurl in stacked paper as it passes from the printengine through the SEM.
If you notice excessive upcurl or downcurl in the paper in the stacked output, adjust theSheet Enhancement Module's setting at the FreeFlow Print Server interface to achievethe amount of sheet flatness you need. By ensuring sheet flatness, the SheetEnhancement Module can prevent problems, such as paper jams and skew, and improveprint performance.
NOTEFor all systems with a SEM, it is recommended that you only use the SheetEnhancement Module to remove curl and do not adjust the Print Engine DecurlerKnob. Make sure the Decurler Knob remains set at MIN.
Use Automatic or Manual Mode
The amount of decurl applied to paper passing through the Sheet Enhancement Moduleis set at the FreeFlow Print Server interface from the Printer menu.
The FreeFlow Print Server provides the option of operating the SEM in one of two modes:
• Auto Decurl Mode (default) - For optimal print productivity, use Auto Decurl Mode.When selected, the system automatically calculates the amount of decurl to applyusing the target values in the NVM and the paper tray programming to best positionthe decurler rolls. You must have set the correct paper properties in the Paper Traywindow for this mode to work accurately.
• Manual Decurl Mode - Adjusts the amount of decurling based strictly on the user'sdecurl setting. Select when you want to manually adjust the amount of decurl toapply.
How to Set the Auto Decurl Mode for Simplex or Duplex Jobs
Typically you will only need to select the Auto Decurl Mode. The system will automaticallycalculate the amount of decurl to apply to your job. In this mode you can still use a slidebar to make further setting adjustments.
Xerox Nuvera User Guide and Training Aid (UGTA) for Software Version 9.3/10.327-12
Maintaining Your Xerox Nuvera
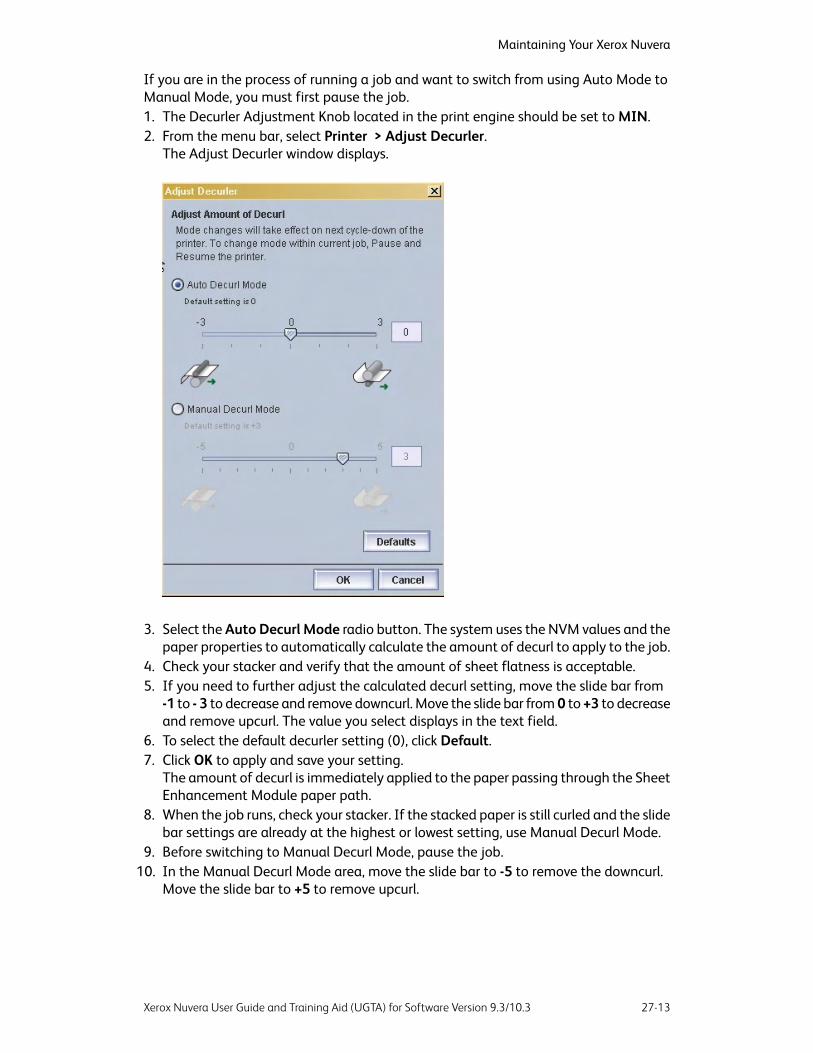
If you are in the process of running a job and want to switch from using Auto Mode toManual Mode, you must first pause the job.1. The Decurler Adjustment Knob located in the print engine should be set to MIN.2. From the menu bar, select Printer > Adjust Decurler.
The Adjust Decurler window displays.
3. Select the Auto Decurl Mode radio button. The system uses the NVM values and thepaper properties to automatically calculate the amount of decurl to apply to the job.
4. Check your stacker and verify that the amount of sheet flatness is acceptable.5. If you need to further adjust the calculated decurl setting, move the slide bar from
-1 to - 3 to decrease and remove downcurl. Move the slide bar from 0 to +3 to decreaseand remove upcurl. The value you select displays in the text field.
6. To select the default decurler setting (0), click Default.7. Click OK to apply and save your setting.
The amount of decurl is immediately applied to the paper passing through the SheetEnhancement Module paper path.
8. When the job runs, check your stacker. If the stacked paper is still curled and the slidebar settings are already at the highest or lowest setting, use Manual Decurl Mode.
9. Before switching to Manual Decurl Mode, pause the job.10. In the Manual Decurl Mode area, move the slide bar to -5 to remove the downcurl.
Move the slide bar to +5 to remove upcurl.
27-13Xerox Nuvera User Guide and Training Aid (UGTA) for Software Version 9.3/10.3
Maintaining Your Xerox Nuvera

How to Set the Manual Decurl Mode for Simplex or Duplex Jobs
If you are in the process of running a job and want to switch from using Auto Mode toManual Mode, you must first pause the job. To make further decurl adjustments inManual Decurl Mode, follow these steps. Make sure the Decurler Knob in the print engineis still set to MIN.1. From the menu bar, select Printer > Adjust Decurler.
The Adjust Decurler window displays.
2. Select the Manual Decurl Mode radio button.The system defaults to +3 to compensate for slight upcurl.
3. Move the slide bar from -1 to -5 to decrease and remove downcurl. Move the slidebar from 0 to +5 to decrease and remove upcurl.The value you select displays in the text field.
4. To select the default decurler setting (+3), click Default.5. Click OK to apply and save your setting.
The amount of decurl is immediately applied to the paper passing through the SheetEnhancement Module paper path.
6. When the job runs, check your stacker. Continue to adjust the settings as needed. Ifthis is a duplex job and the stacked paper is still experiencing upcurl with the slidebar settings for both Auto and Manual Mode already at the highest setting, use theReduce Upcurl feature in the User Diagnostics window on the FreeFlow Print Server.
7. For a duplex job only, access user diagnostics and select System > User Diagnostics.
Xerox Nuvera User Guide and Training Aid (UGTA) for Software Version 9.3/10.327-14
Maintaining Your Xerox Nuvera

8. Select System > System Optimization Customer Setting.9. Enable Reduce Upcurl for 2-sided Jobs.
10. Make sure the SEM Manual Mode is set to -5.
The system prints side 2 before side 1 thereby reducing curl in the stacker.
NOTEDo not use Reduce UpCurl if printing jobs with ordered stock or 3 hole punchstock. The system will ignore this setting and print side 1 first.
Product Recycling and Equipment Endof Life Disposal: USA & Canada• If you are managing the disposal of your Xerox product, please note that the product
contains lamp(s) with mercury and may contain lead, perchlorate, and other materialswhose disposal may be regulated due to environmental considerations. The presenceof these materials is fully consistent with global regulations applicable at the timethat the product was placed on the market.
• Xerox operates a worldwide equipment take back and reuse/recycle program. Contactyour Xerox sales representative (1-800-ASK-XEROX) to determine whether this Xeroxproduct is part of the program. For more information about Xerox environmentalprograms, visit . For recycling and disposal information, contact your local authorities.In the United States, you may also refer to the Electronic Industries Alliance web site.
• Perchlorate material - This product may contain one or more perchlorate-containingdevices, such as batteries. Special handling may apply. Please see
European Union
WEEE Directive 2002/96/EC
Some equipment may be used in both a domestic/household and a professional/businessapplication.
Equipment used in a domestic/household environment.
Application of this symbol on your equipment is confirmation that you should not disposeof the equipment in the normal household waste stream.
In accordance with European legislation end of life electrical and electronic equipmentsubject to disposal must be segregated from household waste
27-15Xerox Nuvera User Guide and Training Aid (UGTA) for Software Version 9.3/10.3
Maintaining Your Xerox Nuvera

Private households within EU Member States may return used electrical and electronicequipment to designated collection facilities free of charge. Please contact your localdisposal authority for information.In some Member States when you purchase newequipment your local retailer may be required to take back your old equipment free ofcharge. Please ask your retailer for information
Equipment used in a professional/business environment
Application of this symbol on your equipment is confirmation that you must dispose ofthis equipment in compliance with agreed national Procedures.
In accordance with European legislation, end of life electrical and electronic equipmentsubject to disposal must be managed within agreed procedures.
Prior to disposal please contact your local dealer or Xerox representative for end of lifetake back information.
Contact Information
For more information on Environment, Health and Safety in relation to this Xerox productand supplies, please contact the following customer help lines.
USA and Canada: 1-800-828-6571
Europe: +44 1707 353 434
Other Countries: Please contact your local waste authority and request disposal guidance.
Xerox Nuvera User Guide and Training Aid (UGTA) for Software Version 9.3/10.327-16
Maintaining Your Xerox Nuvera

28Setup Paper Trays
You can print and copy with many types of papers with the Xerox Nuvera :
• You can load many types of cover and tabbed stocks, giving you the ability to createprofessional-quality documents.
• You can load trays with special stocks, such as envelopes, transparencies, and labels.
• The Xerox Nuvera gives you many publishing options for enhancing your document.
Before you run your print or copy jobs, you must load and configure the paper trays withthe recommended stocks.
To learn more about these capabilities, explore the links at the left.
NOTEFor information about loading tabbed stock in the Feed Module, see Using the FeedModule Tab Guides.
Paper Tray ProgrammingWhen you load paper in a paper tray, you must program the tray for the paper it contains.
To avoid loading a paper stock unsupported by the machine, see Recommendations forPaper Usage.
For details on paper handling and storage, see Handling and Storing Paper.
For details on loading special papers, see Loading Special Stock for Proper FinishingOutput.
CAUTIONPaper trays do not lock and can be opened while paper is being fed from the tray,resulting in misfeeds and/or paper jams. Wait for the LED light on the tray to turnOFF before opening the tray.
28-1Xerox Nuvera User Guide and Training Aid (UGTA) for Software Version 9.3/10.3

Tray Confirmation Options
When you change or add paper to a feed tray, you need to program the tray for thestock you added. To avoid "Resource Not Available" faults, you can set a confirmationoption to match your workflow. The confirmation box displays asking you to confirm orchange the paper setting for a tray.
To set a confirmation option1. Select Setup from the Menu bar.2. Select System Preferences and the Stocks and Tray tab.3. Under Tray Confirmations, select the type of confirmation to display every time you
change or add paper:
• None - No Confirm box is displayed (Default).
• When Tray Settings Change - Confirm box displays only if you add a differentsized stock and do not change tray programming.
• After Every Tray Cycle - Confirm box displays every time a tray is opened andclosed.
• Auto Accept Settings Changes - If you have the Productivity Pack license enabled,this setting is available for selection. No Confirm box is displayed as the systemautomatically senses the new stock size. You may need to change other stockattributes based upon the stock you added to the tray.
TIPWhen programming a stock in a feed tray or the stock library, it is important toset the correct stock properties, especially the weight listed as gsm. Based onthe weight of the stock (gsm) setting, the feed tray 'fluffers' settings are modifiedto feed the programmed stock. Taking time to verify the gsm setting increasesruntime and productivity by decreasing feed module paper jams.
To program paper trays
You can either load the paper in the tray first and then program the paper tray settingsfor the job (Load and Program method) or program the paper settings and then loadthe paper in the tray (Program and Load method).
Tray programming procedures vary depending on how you configure confirmation alertsand on the particular system configuration.
NOTEIt is only possible to program and load fully adjustable trays. Only SystemAdministrators can change Dedicated tray programming.
Program and Load Method1. Use the previous steps to select the Tray Confirmation option to use.2. Click Paper Trays.
For more information, see Managing the Printer.
Xerox Nuvera User Guide and Training Aid (UGTA) for Software Version 9.3/10.328-2
Setup Paper Trays
3. Double-click or right-click a fully adjustable tray row.A Tray Properties window appears.
4. Enter all choices pertaining to the stock you wish to load into the tray. Systems withthe Productivity Pack license enabled have a stock library from which you can selecta stock to program the tray. Click OK or Apply.
5. When the Tray In Use light turns off, open the fully adjustable tray you just configured,as identified in the Tray Type column of the Paper Trays window.
6. Fan and load the paper stock that matches the settings you made in the TrayProperties window.
7. For Tray 2, refer to the section below on using the Rear Stop Guide.8. Push the tray closed. The system automatically confirms the size and attributes
programmed.
• For fully-adjustable trays, a "Confirm Tray Contents" alert window may appear.Either Confirm the tray contents, or click Change to enter the correct stocksize/type.
• For dedicated trays, a "Dedicated Tray Contents" alert will appear.
9. Either make appropriate changes in the Tray Properties window (Fully Adjustabletrays) or re-load the correct paper (Dedicated trays).
NOTEWhen entering the size of Catalog Envelopes, enter the dimension of the envelopewith the flap open. See Recommendations for Paper Usage for more information,as well as a listing of all paper types the system will work with.
NOTETrays are identified as "Fully Adjustable" and "Dedicated" in the Tray Type columnof the Paper Trays window.
Load and Program Method1. Open the fully adjustable tray.2. Fan and load the paper stock.3. For Tray 2, refer to the section below on using the Rear Stop Guide.4. Push the tray closed. The system automatically senses the size. Depending on the
Tray Confirmation option selected, an alert window may display.
• For fully-adjustable trays, a "Confirm Tray Contents" alert window may appear.Either Confirm the tray contents, or click Change to enter the correct stocksize/type.
• For dedicated trays, a "Dedicated Tray Contents" alert will appear.
• A Confirm Feeder Tray 1 message informs you of the last known paper loaded inthe tray.
5. The Tray Properties window displays.6. Either make appropriate changes in the Tray Properties window (Fully Adjustable
trays) or re-load the correct paper (Dedicated trays).7. Click OK. New stock will be available from the Stock Library.
28-3Xerox Nuvera User Guide and Training Aid (UGTA) for Software Version 9.3/10.3
Setup Paper Trays

Rear Guide Stop for Tray 2 on the 4-Tray Feed Module
The Tray 2 Rear Guide Stop is designed for systems that dedicate tray 2 on the 4-TrayFeed Module for 8.5 x 11" or A4 stock. It is designed to stabilize the rear guide in thetray improving registration. The stop is installed in the back of the tray to restrict therear guide from opening. The stop is set for 8.5 x 11" stock and is in the disabled positionwhen the machine is shipped. The user can Enable the stop by rotating the gray coloredlever to the right or Disable the stop by lifting and rotating the lever to the left.
DisabledEnabledLocated in back of tray
NOTEIf A4 stock is to be loaded in tray 2, service must be called to adjust the guide level.
To enable a tray1. Right-click one of the trays in the Paper Trays window.2. Click Enable Tray from the Tray pull-down menu.
To disable a tray
If a tray is broken, in need of service, or you do not want it used for some reason, youcan disable it.1. Right-click one of the trays in the Paper Trays window.2. Click Disable Tray from the Tray pull-down menu.
About Auto Tray Switching and setting tray priorities
The Xerox Nuvera is designed to allow a job to be submitted using only job attributes,and the system will then, based upon tray priorities, pull stock from the tray(s) containingthe programmed stock.
Xerox Nuvera User Guide and Training Aid (UGTA) for Software Version 9.3/10.328-4
Setup Paper Trays
You have the ability to control the order in which trays are used by the system, by settingeach tray's priorities. For example, if trays 1 and 2 contain the same type of paper, butyou are running a big job, you can set tray 2 to be chosen first, since it has a larger papercapacity. In this case, the job pulls stock from tray 2 first. When tray 2 is out of stock,the job switches to pull from tray 1. Once tray 2 is refilled, the job switches back to pullingstock from tray 2.
Feed Until Empty
A user selected workflow, Feed Until Empty, tells the system to empty the second traybefore switching back to the original tray. In the above example, once tray 2 is empty,the job switches to pulling stock from tray 1 and remains pulling stock from that trayuntil it is empty. Once tray 1 is empty, the job immediately switches back to tray 2, if ithas be refilled.
To select Feed Until Empty
• Select System > User Diagnostics > Feed System Optimization Customer Setup > Feed Until Empty Algorithmto enable Feed Until Empty.
NOTETo find out at a glance the priority setting of each paper tray,scroll to the rightside of the Paper Trays table. The Priority column shows the current setting foreach tray.
To set tray priority1. On the Home Screen, click Paper Trays and double-click the paper tray you want to
set.2. On the Tray Properties window, click the Options button.3. In the Tray Priority text box, type a lower number (the lower the number, the higher
the tray priority).4. Repeat Steps 2-4 to check that the other trays are assigned priority numbers which
will cause the system to use them in the order you want.5. When satisfied with the priority settings on each Tray Properties window, click OK.
NOTEIt is possible to configure your Xerox Nuvera with two or more Sheet FeedModules (SFM), effectively doubling the feed capacity of the system. Notify yourXerox sales representative if you wish to configure your system in this way. SeeSheet Feed Modules (SFM) for more details.
NOTEIf your Xerox Nuvera is configured with two or more Sheet Feed Modules, payspecial attention to how the trays are displayed in the user interface. For example,tray 2 in the first SFM will appear as "Feeder 1: Tray 2". Tray 1 in the second SFMwill appear as "Feeder 2: Tray 1."
28-5Xerox Nuvera User Guide and Training Aid (UGTA) for Software Version 9.3/10.3
Setup Paper Trays

Avoiding Multi-Sheet Feeds When UsingSpecial StocksThere may be times when the paper loaded in the paper trays do not feed correctly. TheXerox Nuvera will notify you of the problem with a message on the user interface screen.
Certain stock types such as:
• paper backed transparencies
• envelopes
• some label types
If not properly loaded and programmed in the system, will be detected as multi-sheetfeeds.
The solution to avoiding multi-sheet feeds and/or jams is to make sure the actual contentsof a given tray match the settings you program using the user interface.
For more information, see Clearing Paper Jams.
Loading PaperThe videos above show you how to load paper into the trays. Take a moment to viewthem before attempting to load a paper tray.
Load paper as indicated by the labels on each paper tray. If you are using the 2-TrayFeed Module, load paper as indicated for trays 3 and 4 of the 4-Tray Feed Module.
NOTEIf printing on coated stock but only one side is coated, load the coated side up.
Systems with the Multifunction Finisher DO NOT support coated stock.
NOTEStocks greater than 250 gsm are not recommended for use with the Xerox Nuvera. For details on using the correct stocks, see Supported Paper.
NOTELoading papers of varying types and weights may warrant adjustment of the SheetEnhancement Module. For details, see Managing Paper Curl.
NOTEIt may be possible to configure your Xerox Nuvera with two or more SFMs, effectivelydoubling the feed capacity of the system. See your Xerox sales representative if youwish to configure your system in this way.
Xerox Nuvera User Guide and Training Aid (UGTA) for Software Version 9.3/10.328-6
Setup Paper Trays

Fan the paper first
To aid in sheet separation and to prevent jams, always fan the reams of paper beforeloading into the trays. To do so:1. Place the new stack of paper on a flat surface.2. Place the palm of your hand on the center of the stack to hold it firmly.3. Place the other hand at one corner of the stack and fan through the paper.4. Repeat this procedure for each corner.5. Discard the top and bottom sheets of paper from the ream.
To load paper
For details on paper handling and storage, see Handling and Storing Paper.
CAUTIONDo not overload paper trays. Do not block or damage the stack height sensor.
1. Open the tray.2. Move the paper guides apart.3. If changing to a different sized stock, remove any unused stock from the tray.4. Fan the paper ream before loading it into the tray and make sure the paper is in good
condition.5. Place a ream of paper in the center of the tray between the guides, making sure the
feed direction is correct.6. Move the paper guides inward until they touch the paper stack. Make sure the side
and trail edge guides are snug against the stack after loading the first ream.7. Add more paper to the tray, up to the MAX line.8. Make sure the height sensor is not pinned down by the paper stack. The stack height
sensor is located on the inside of the right paper guide. Remove any excess paper.9. For Tray 2 of the 4-Tray SFM a Rear Guide Stop is installed and configured for either
8.5 x 11" or A4 stock. It is designed to stabilize the rear guide in the tray and improveregistration. When loading this tray with these stocks, enable the Rear Guide Stopby lifting and rotating the lever to the right. Disable this guide for all other papersizes used in this tray by lifting and rotating the lever to the left.
NOTEThe stop guide is set to either 8.5 x 11 " or A4 paper size. If you need to changefrom one of these sizes to the other, you must contact Service.
10. For tray 3 or 4, adjust the green baffle at the back of the tray to prevent the paperstack (11 x 17 inch and larger) from skewing when closing the tray. Properly adjusted,it should make light contact (or be within a few millimeters) with the loaded paperstack. The trays in the 2-Tray Feed Module do not have the green baffles.
11. Close the tray.12. Set the tray programming on the control screen to match the paper you just loaded
if you have not already done so.
28-7Xerox Nuvera User Guide and Training Aid (UGTA) for Software Version 9.3/10.3
Setup Paper Trays

Loading Special Paper Types
Certain paper types (such as tabs, drilled stock, transparencies, etc...) require that theybe loaded in a certain way in order to achieve the correct output.
Additionally, the types of finishing devices you may have installed impacts the way inwhich some stock types must be loaded to achieve correct output. For more information,see Loading Special Stock For Proper Finishing Output.
For general guidelines for proper paper usage, see Recommendations for Paper Usage.
Definition of Leading Edge
Leading edge is the left side of the paper as you look down on it in the tray. Leadingedge means that this is the edge of the paper that first enters the print engine.
Definition of Trailing Edge
Trailing edge is the edge opposite the leading edge. It is on the right side and is the lastedge of the paper to go into the print engine. When the leading edge is the short edgeof the paper, the paper is loaded SEF (short edge feed). When the leading edge is thelong edge of the paper, the paper is loaded LEF (long edge feed).
Loading Special Stock for Proper Finishing Output
Depending on the finishing devices that are present on your system, special paper stockmust be loaded in certain ways to achieve correct output. To ensure correct output andto avoid manual collation, load as indicated by the labels on each paper tray and followthe guidelines below.
If you are using a 2-Tray Sheet Feed Module, follow the guidelines for loading stocks intrays 3 and 4.
NOTEFor information about loading tabbed stock in the Sheet Feed Module, see Usingthe Feed Module Tab Guides. You need to have the Tabs Guide installed in the feedtray that contains the tabbed stock.
NOTEAs an aid to you, there are illustration decals on each paper tray which will help youto load stock correctly.
NOTEFor best results and most efficient operation, load special stocks LEF in the papertrays. Loading special stocks SEF may result in pages delivered with incorrect rotationand face-up or face-down delivery. Special programming may be required to correct.
Systems with SFM and/or Insertion Module and BFM
LoadingStock Type
Xerox Nuvera User Guide and Training Aid (UGTA) for Software Version 9.3/10.328-8
Setup Paper Trays

Holes leadingTrays 1 and 2Drilled paper
Holes leadingTrays 3 and 4
Label side upTrays 1 and 2Labels
Label side upTrays 3 and 4
Tabs trailing - face upTrays 1 and 2Tabs (forward collated tabsonly)
Tabs trailing - face upTrays 3 and 4
Face up, left edge leadingTrays 1 and 2Preprinted stock
Face up, left edge leadingTrays 3 and 4
Tape edge leadingTrays 1 and 2Transparencies
Tape edge leadingTrays 3 and 4
Face up, 1-N orderTrays 1 and 2Ordered stock
Face up, 1-N orderTrays 3 and 4
Systems with MFF ONLY
LoadingStock Type
Holes trailingTrays 1 and 2Drilled paper**
Holes trailingTrays 3 and 4
Label side upTrays 1 and 2Labels
Label side upTrays 3 and 4
Tabs trailing - face upTrays 1 and 2Tabs** (reverse collated tabsonly)
Tabs trailing - face upTrays 3 and 4
Face up, right edge leadingTrays 1 and 2Preprinted stock
Face up, right edge leadingTrays 3 and 4
Tape edge trailingTrays 1 and 2Transparencies
Tape edge trailingTrays 3 and 4
Face up, right edge leading,1-N order
Trays 1 and 2Ordered stock
Face up, right edge leading,1-N order
Trays 3 and 4
Special Case: Jobs with drilled paper AND drilled tabs when using the MFF
When processing jobs which use drilled paper and drilled tabs together, load the tabbedstock with tabs trailing as usual, but load the drilled paper stock with the holes leading.This is contrary to what the label on the tray depicts, but drilled stock must be loadedthis way in order to achieve correct output. If the job includes drilled tabs or drilled paper,but not within the same job, follow the diagram on the tray label and/or the informationin the table above.
28-9Xerox Nuvera User Guide and Training Aid (UGTA) for Software Version 9.3/10.3
Setup Paper Trays(continued)

Systems with SFM Insertion Module and MFF ProfessionalNOTENo tabs can be loaded into an SFM Insertion Module (if present) if using aMultifunction Finisher.
LoadingStock Type
Holes trailingTrays 1 and 2Drilled paper
Holes trailingTrays 3 and 4
Label side upTrays 1 and 2Labels
Label side upTrays 3 and 4
Tabs trailing (loaded intopre-fuser FM only)
Trays 1 and 2Tabs
Tabs trailing (loaded intopre-fuser FM only)
Trays 3 and 4
Face up, right edge leadingTrays 1 and 2Preprinted stock
Face up, right edge leadingTrays 3 and 4
Tape edge trailingTrays 1 and 2Transparencies
Tape edge trailingTrays 3 and 4
Face up, right edge leading,1-N order
Trays 1 and 2Ordered stock
Face up, right edge leading,1-N order
Trays 3 and 4
Systems with MFF Pro Plus ONLY
LoadingStock Type
Holes trailingTrays 1 and 2Drilled paper**
Holes trailingTrays 3 and 4
Holes trailingInsertion Tray
Label side upTrays 1 and 2Labels
Label side upTrays 3 and 4
Label side upInsertion Tray
Tabs trailing - face upTrays 1 and 2Trays 1,2,3,4: reverse collatedtabs only **Insertion Tray: forwardcollated tabs only
Tabs trailing - face upTrays 3 and 4
Tabs leading - face upInsertion Tray
Face up, right edge leadingTrays 1 and 2Preprinted stock
Face up, right edge leadingTrays 3 and 4
Face up, right edge leadingInsertion Tray
Xerox Nuvera User Guide and Training Aid (UGTA) for Software Version 9.3/10.328-10
Setup Paper Trays

Tape edge trailingTrays 1 and 2Transparencies
Tape edge trailingTrays 3 and 4
Face up, right edge leading,1-N order
Trays 1 and 2Ordered stock
Face up, right edge leading,1-N order
Trays 3 and 4
Face up, right edge leading,1-N order
Insertion Tray
More information about tabbed stocks
For more information, see Printing/Copying on Tabbed and Ordered Stock.
Handling and Storing PaperFollow these recommendations to get the best performance and reduce system downtime.
To store and handle paper
Damaged, curled, or damp paper can cause jams and image quality problems. Followthese guidelines to store paper:
• Store paper in dry conditions, away from extreme heat or cold, such as radiators oropen windows.
• Lay unused paper on a shelf or pallet above the floor level.
• If possible, leave the paper wrapped and boxed until you are ready to use it; otherwise,re-wrap partly used packages of paper.
NOTEPaper stored in extremely humid conditions (i.e., left in a machine over an extendedperiod of time) may have to be replaced with fresh stock in order to ensure optimalfeeding and image quality.
Before you load paper
Before loading paper, unwrap the paper from the moisture resistant wrapping, discardthe wrapper and insert the paper in the tray (see figure below for proper loadingorientation). Fanning the paper edges is not required, but may be beneficial when usingcertain stocks in dry environments.
TIPIf you are loading any type of drilled paper, to aid in sheet separation and to preventjams, it may be helpful to fan reams before loading them into the tray.
28-11Xerox Nuvera User Guide and Training Aid (UGTA) for Software Version 9.3/10.3
Setup Paper Trays(continued)

Load the paper in paper trays 1 - 4 "seam side" of the ream up. "Seam side" refers to theside of the unwrapped ream containing the seam.
For more information about proper handling of Xerox supplies, see Xerox Supplies Library.
Using Special Paper StocksThe Xerox Nuvera is capable of printing on much more than normal white paper.
The figures below provide a few examples of the special stocks you can use with thesystem.
Once you have these types of papers properly loaded and programmed in the papertrays, you can add them to your documents.
Paper Usage and Expected Paper Performance
For information on how each type of supported paper can be expected to perform withthe system, see Paper Performance Tables.
For information on proper usage of special papers, see Recommendations for PaperUsage.
Figure 25. Label stock.
Figure 26. DocuCard stock.
Figure 27. Tabbed stock.
Figure 28. Transparency stock.
Xerox Nuvera User Guide and Training Aid (UGTA) for Software Version 9.3/10.328-12
Setup Paper Trays

29Problem Solving
The Xerox Nuvera is designed to allow the user to easily correct any problem that mayarise. Click the links at the left for details on correcting system problems. Contact yourSystem Administrator if these topics do not help you solve the problem.
Mode Indicator IconsThe feature modes that are in effect on the system are displayed as icons in the statusindicator window in the upper right of the user interface above the printer graphic. Themode icons only display when that feature is in effect and active. For example, whenthe Logging mode icon displays, the logging feature is on and the system is recordingan event history for diagnostics.
Move the cursor on top of each icon to view information on where to find that featureand how to disable it when not needed.
The following mode icons that display on the user interface when in effect are:
Enhanced Image Permanence (EIP) mode
Diagnostics mode
Logging mode
Not Accepting mode
Not Releasing mode
29-1Xerox Nuvera User Guide and Training Aid (UGTA) for Software Version 9.3/10.3
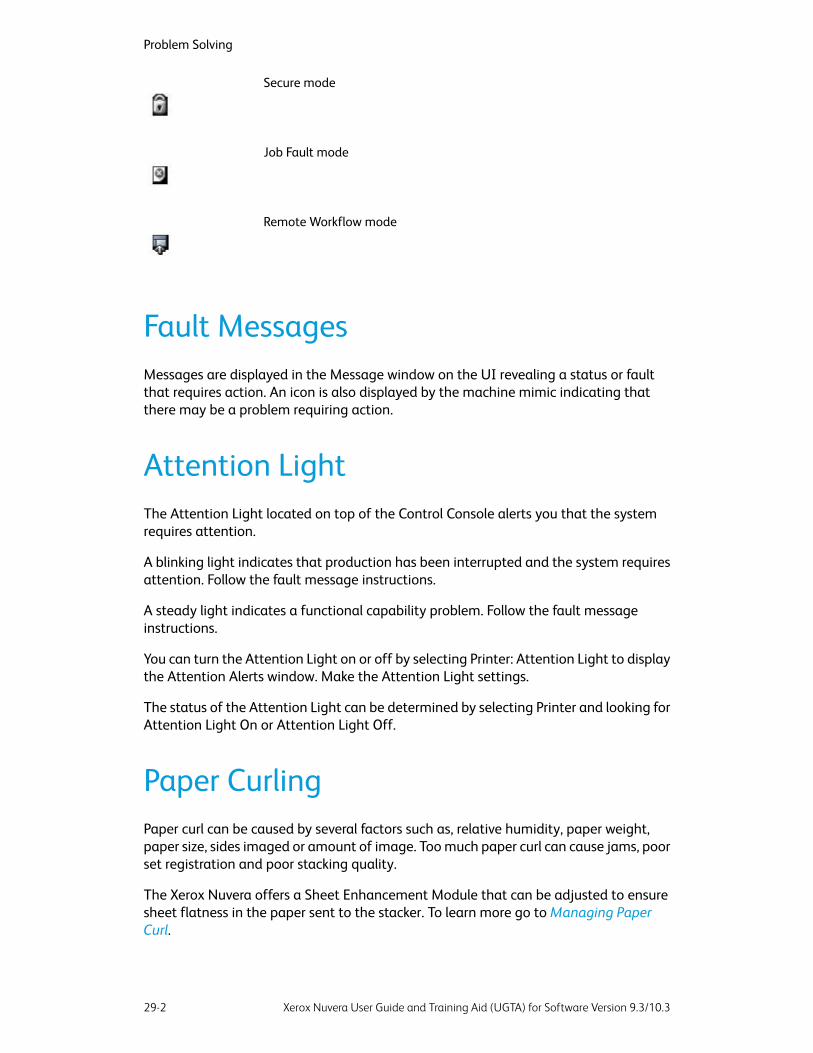
Secure mode
Job Fault mode
Remote Workflow mode
Fault MessagesMessages are displayed in the Message window on the UI revealing a status or faultthat requires action. An icon is also displayed by the machine mimic indicating thatthere may be a problem requiring action.
Attention LightThe Attention Light located on top of the Control Console alerts you that the systemrequires attention.
A blinking light indicates that production has been interrupted and the system requiresattention. Follow the fault message instructions.
A steady light indicates a functional capability problem. Follow the fault messageinstructions.
You can turn the Attention Light on or off by selecting Printer: Attention Light to displaythe Attention Alerts window. Make the Attention Light settings.
The status of the Attention Light can be determined by selecting Printer and looking forAttention Light On or Attention Light Off.
Paper CurlingPaper curl can be caused by several factors such as, relative humidity, paper weight,paper size, sides imaged or amount of image. Too much paper curl can cause jams, poorset registration and poor stacking quality.
The Xerox Nuvera offers a Sheet Enhancement Module that can be adjusted to ensuresheet flatness in the paper sent to the stacker. To learn more go to Managing PaperCurl.
Xerox Nuvera User Guide and Training Aid (UGTA) for Software Version 9.3/10.329-2
Problem Solving

Poor or Slow System PerformanceIf your machine performance becomes degraded, or it ceases to function correctly forany reason, executing a Restart will usually restore correct functionality. If the problemcontinues, contact your Xerox representative.
Related Hints and Tips
There are several things that affect the performance of the system and RIP speed whenprocessing print jobs. The following is a list of common situations that negatively canimpact throughput:
• The nature of printing is that the complexity of images is non-deterministic untilthose images are being processed so that rated speed of the engine is not guaranteedduring RIP. When printing multiple sets of a document, Nuvera retains all imagesafter RIP for all subsequent sets. Therefore, any performance penalty encounteredwill only be experienced during the first set.
NOTEThe default print resolution is 1200 dpi. 600 dpi printing may be adequate foryour job. Try setting your resolution to 600 dpi to improve the RIP performanceof complex 1200 dpi jobs. 1200 dpi results in four times the internal image dataof a comparable 600 dpi image that has to be transferred through the system.When the print resolution is changed from 1200 to 600 dpi, the stroke thickeningvalue may also need to be changed from 1 to 0 to avoid excessive line thickening.
• It is common to embed logos and watermarks in submitted print files. These aretypically bitmap images that, when embedded in a print stream (such as PostScript),can take a long time to process. Note also that resolution selections, such as 600 dpivs. 1200 dpi, can have a significant further impact on processing of these types ofembedded images. Consider the design of documents and impacts to printing speedin such cases. There are methods available, through PostScript for example, to cachethese embedded images, process them once, and retain them as a resource forapplication on each page without having to render and scale them for each page.Refer to your PostScript reference manuals and FreeFlow Print Server referencemanuals for information about caching.
• Submission of multiple TIFF images simultaneously is a common application. Thereare several batch printing tools available on the market. Most of them require theselection of a print driver for the target printer through which these images files aresubmitted. In these cases, the TIFF files are converted to a Printer DescriptionLanguage (PDL), such as PostScript, by the batch tool using the printer driver. Thenthey are submitted to the printer, which in turn RIPs that PDL and re-renders the TIFFbitmap images back into bitmaps. This is an inefficient process that can significantlyslow the machine down. Nuvera includes a native TIFF interpreter that can processTIFF files sent to it directly. Some of the batch tools on the market support a nativeTIFF submission capability. It may be referred to as a bypass mode or something
29-3Xerox Nuvera User Guide and Training Aid (UGTA) for Software Version 9.3/10.3
Problem Solving

similar. If such a capability is available, the Nuvera's performance can be significantlyimproved by taking advantage of that capability.
NOTEWhen printing to a DFA-compliant 3rd party finisher, do not select BypassTransport as the output location.
• The PDF Optimization feature should not be used when printing PDFs that were savedin FreeFlow Print Server using the RIP Save or Scan to File selections. These types ofdocuments will take much longer to RIP when PDF Optimization is enabled. Beforeenabling PDF Optimization, it is recommended that the user run performance testsusing representative customer jobs.
Restart procedures
Please see the Restarting the System topic for more information.
Improving print speed and productivity
Please see the Improving Print Speed Performance topic for more information.
Improving Print Speed PerformanceUse the Parallel RIP feature for complex documents
If you have the Xerox Nuvera 200/288 EA/MX Perfecting Production System, you canenable the Parallel RIP feature to improve image processing time and increase RIP printspeeds for long jobs with nonrepeating images.
For more information about using Parallel RIP with the Xerox Nuvera 200/288 EA/MXPerfecting Production System, see Printing with the Parallel RIP feature.
Enable the Wide Stock feature when printing 9.25 inches or 9.5inches wide stock
If you have the Xerox Nuvera 200/288 EA/MX Perfecting Production System and areprinting stock greater than 9.0 inches wide up to 9.5 inches wide, you can optimize theprint speed of the job by selecting the Wide Stock feature from the customer diagnosticsscreen.
For details on how to enable this feature with the Xerox Nuvera 200/288 EA/MXPerfecting Production System, refer to Running User Diagnostics.
How page/image size affects Pitch
The system senses paper sizes requested, and optimizes the use of the belt and the paperpath to ensure maximum productivity. For details on how page image size impacts beltpitch, which in turn impacts overall throughput, see About Pitch.
Xerox Nuvera User Guide and Training Aid (UGTA) for Software Version 9.3/10.329-4
Problem Solving

PDF to PS conversion
The PDF to PS conversion is a streaming workflow which allows the RIP to begin beforethe entire PDF to PS conversion is complete. Since the PDF to PS conversion is streaming,file size limitation is not an issue.
Variable Data image caching
Variable Data image caching retains repeated image data to achieve improved RIPperformance. Caching and reusing this data makes processing of variable data jobsmore efficient, and results in significant performance gains at the printer, especially injobs with many repeated images.
NOTEYou can enable or disable image caching in the IPDS Manager without restartingthe FreeFlow Print Server. In addition, you can program the image caching optionon a per job basis using the IPDS Job Profile user interface.
Solving Image Quality ProblemsThe Xerox Nuvera is capable of reproducing and generating high-quality images.
However, image defects may occur. These image quality problems are usually attributedto a defective original, or the user applying too much, too little, or the wrong type ofimage quality control.
Image quality and system maintenance
Image defects can also occur because the Xerox Nuvera is in need of maintenance. Thecondition of the photoreceptor belt, transfer blade and heat roller can affect the amountof dry ink (toner) transferred onto the paper.
Click on the links at the left to learn how to differentiate between machine and originalproblems, and how to avoid image quality problems.
Solving dark or light image problems
Using the Image Quality selection on the Printer menu, you can globally set the darknessand resolution levels for system supported file types. Check the Image Quality tab settingsif you are having image quality problems on a consistent basis (for example, your entirejob is either too light or too dark).
If you are using the Xerox Nuvera 200/288 EA/MX Perfecting Production System, themachine typically ensures that the print darkness between the print engines is equaland balanced. However, if you notice light or dark image quality differences betweenside 1 and side 2 of the print job, check the dC965 user diagnostic routine beforecontacting Service
29-5Xerox Nuvera User Guide and Training Aid (UGTA) for Software Version 9.3/10.3
Problem Solving

TIPBefore running any jobs, click Printer > Image Quality to quickly determine whatglobal machine darkness and resolution settings are currently configured.
NOTESee your System Administrator to change the darkness and/or resolution settingson the Image Quality window. If you are using the Xerox Nuvera 200/288 EA/MXPerfecting Production System and side 1 of your job is either lighter or darker thanside 2, refer to the image quality diagnostic routine, dC965, for more information.
TIPIf you have programmed and run a job, and received unexpected results, ensurethat the system-wide settings are all set back to their defaults by clicking Clear Allor Reset in the user interface. Then proceed to do the job programming pertinentto your job.
Removing Moiré Patterns from Images (when scanning orcopying)
The following excerpt is taken from Real World Scanning and Halftones by GlennFleishman, David Blatner, and Steve Roth:
"Moiré ("mwah-RAY") patterns are caused by our eyes' perception of straight lines andrepeating patterns. Anytime you overlay a bunch of straight lines or grids on top of eachother, you have the opportunity for moiré patterns. One grid, all by its lonesome, neverhas a problem with these patterns. It's when you have two or more overlaid on eachother that the wires in your perceptual system get crossed, and these little gremlins startto appear."
Moiré patterns occur when scanning copying an original that is comprised of a halftone.Moiré is a form of digital artifact that occurs when two regular patterns intersect to forma new pattern. Because the new pattern is always more coarse that the two originalpatterns, the appearance will change as a function of screen frequency and angle.Typically, the finer of the two originals patterns are the easier it is to see the Moiré.Lower frequency halftone screens are less prone to visible Moiré.
Moiré can occur while viewing scanned halftones on a monitor screen, because themonitor has a certain screen frequency, which may or may not be in alignment with thescreen frequency and angle of the original image.
Suggestions for removing moiré patterns:• From Copy or Scan Services, select the Image quality tab.
• If your image contains a halftone, make sure you are NOT using Text Mode. If legibilityof the the text is important, and good reproduction of any pictures is also needed,consider using Mixed Text & Halftones as the original type.
• Decrease the Sharpen control slightly. See Adjusting Sharpness (when scanning orcopying).
• Rotate the original slightly on the Document Glass.
• Scan/Copy at the highest possible resolution capable by the system.
Xerox Nuvera User Guide and Training Aid (UGTA) for Software Version 9.3/10.329-6
Problem Solving

• Wherever possible, scan/copy continuous tone images (for example, photographs)only. If there is no continuous tone original available, scan/copy the halftoned imageas a last resort.
• When submitting a print job, you may need to select a different halftone.
TIPIf you have programmed and run a job, and received unexpected results, ensurethat the system-wide settings are all set back to their defaults by clicking Clear Allor Reset in the user interface. Then proceed to do job programming pertinent toyour job.
Examples
Figure 29. Result of two distinct patterns superimposed
Figure 30. Patterns with distinct screen angle and LPI frequency superimposed to form Moiré pattern.
About Halftones and Gray Levels
A halftoned image is a series of dots arranged in a patterned grid of halftone cells, whichyields the appearance of a complete image.
Screen frequency refers to the number of rows of halftone cells. The higher the screenfrequency (in lines per inch) the sharper the halftone image appears (see 33 and 75 LPIexamples in the figure).
29-7Xerox Nuvera User Guide and Training Aid (UGTA) for Software Version 9.3/10.3
Problem Solving

Screen angle refers to the number of degrees from vertical at which the halftone grid isset. The halftone is set at an angle (usually 15, 45, or 75 degrees), to reduce moirépatterning. The idea behind halftone screens is to make the dots as fine as possible, sothat the image itself is more visible that the dots. The observer will tend to focus on the'big picture' while ignoring the microscopic halftone texture. When the dots are so finethat the eye can not resolve them, the image appears to be continuous.
TIPIf you have programmed and run a job, and received unexpected results, ensurethat the system-wide settings are all set back to their defaults by clicking Clear Allor Reset in the user interface. Then proceed to do job programming pertinent toyour job.
Go to Choosing the Best Halftone Setting for information on the Production SystemScreen Frequency Demo Job.
Removing Lines, Streaks or Shadows (when copying or scanning)
This problem can usually be attributed to a poor original, or a dirty scanner. Try one ora combination of the following to correct the problems.
To remove lines, streaks or shadows
• Clean the Document Glass, especially near the white plastic ramp on the left edgeof the glass, if using the Document Feeder
• Run the job from the Document Glass
• Check the quality of the original. Use Border Erase or Edge Erase to remove lines fromthe edges of the document
• Turn on Background Suppression
Xerox Nuvera User Guide and Training Aid (UGTA) for Software Version 9.3/10.329-8
Problem Solving
• Load fresh paper
TIPIf you have programmed and run a job, and received unexpected results, ensurethat the system-wide settings are all set back to their defaults by clicking Clear Allor Reset in the user interface. Then proceed to do job programming pertinentto your job.
If the problem continues, you may want to run the Corotron Cleaning Routine underUser Diagnostics. See your Xerox Representative for advice.
Correcting Posterization (when scanning or copying)
Obvious "stair-stepping," or sudden shifts in tones, rather than smooth transitions inareas of tonal gradation (see left half of figure), is called Posterization. It results becauseof a lack of available gray levels. The number of gray levels is determined by the numberof dots in a halftone cell.
To correct posterization
If you are copying or scanning a halftoned or photographic image, and getting posterizedoutput, try the following:1. On the Home Screen, click Copy.2. On the Image Quality tab, click the Original Type button and make sure
Mixed Text and Graphics is not selected.3. If satisfied with settings, click the Copy button.
Other options include:
• Scan at a higher resolution.
• Select a Original Mode with low contrast.
• Use the Contrast Control to lower the contrast.
For more details about posterization, see About Posterization and Gray Levels.
TIPIf you have programmed and run a job, and received unexpected results, ensurethat the system-wide settings are all set back to their defaults by clicking Clear Allor Reset in the user interface. Then proceed to do job programming pertinentto your job.
About Posterization and Gray Levels
The number of dots in a halftone spot determine the number of available gray levels.For example, a four by four dot halftone cell will yield 17 gray levels (multiply 4 x 4 =16, + 1 for either all dots on [black] or all dots off [white]). A 16 x 16 dot halftone cellwill yield 257 gray levels (multiply 16 x 16 = 256, + 1 for either all dots on or all dots off).
29-9Xerox Nuvera User Guide and Training Aid (UGTA) for Software Version 9.3/10.3
Problem Solving
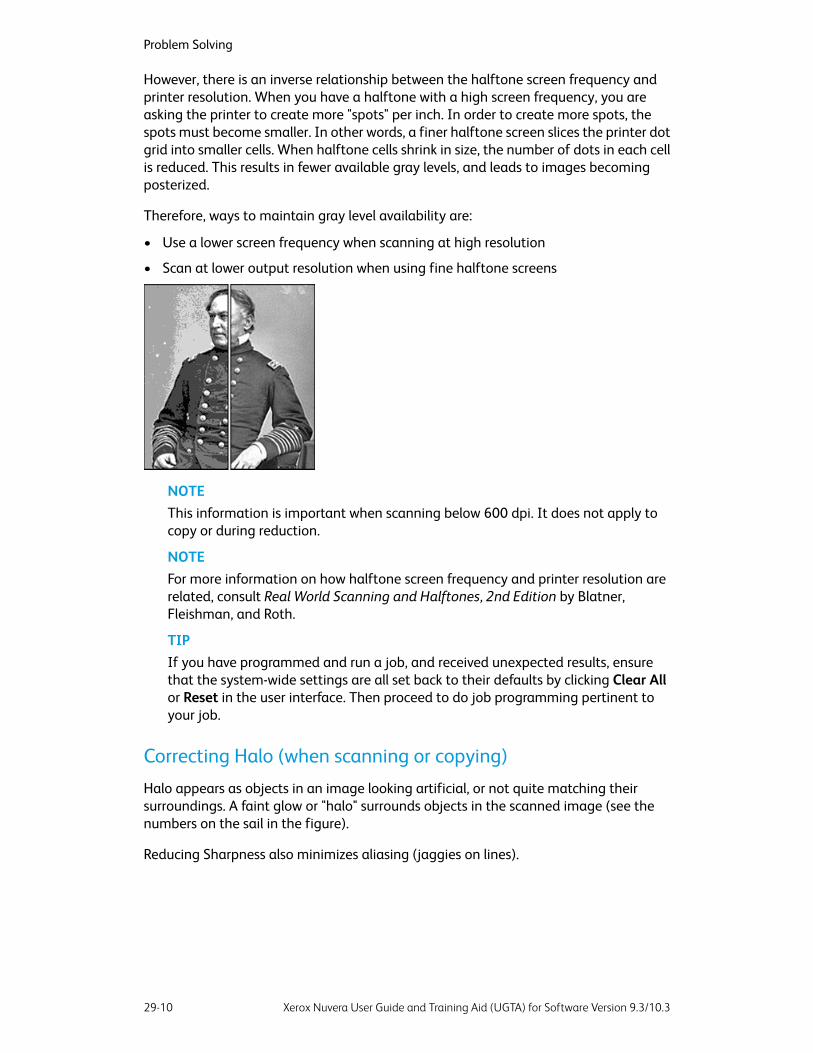
However, there is an inverse relationship between the halftone screen frequency andprinter resolution. When you have a halftone with a high screen frequency, you areasking the printer to create more "spots" per inch. In order to create more spots, thespots must become smaller. In other words, a finer halftone screen slices the printer dotgrid into smaller cells. When halftone cells shrink in size, the number of dots in each cellis reduced. This results in fewer available gray levels, and leads to images becomingposterized.
Therefore, ways to maintain gray level availability are:
• Use a lower screen frequency when scanning at high resolution
• Scan at lower output resolution when using fine halftone screens
NOTEThis information is important when scanning below 600 dpi. It does not apply tocopy or during reduction.
NOTEFor more information on how halftone screen frequency and printer resolution arerelated, consult Real World Scanning and Halftones, 2nd Edition by Blatner,Fleishman, and Roth.
TIPIf you have programmed and run a job, and received unexpected results, ensurethat the system-wide settings are all set back to their defaults by clicking Clear Allor Reset in the user interface. Then proceed to do job programming pertinent toyour job.
Correcting Halo (when scanning or copying)
Halo appears as objects in an image looking artificial, or not quite matching theirsurroundings. A faint glow or "halo" surrounds objects in the scanned image (see thenumbers on the sail in the figure).
Reducing Sharpness also minimizes aliasing (jaggies on lines).
Xerox Nuvera User Guide and Training Aid (UGTA) for Software Version 9.3/10.329-10
Problem Solving

To decrease sharpening1. Click the Copy Services button, then select the Image Quality tab.2. Select the Image Adjustments button.3. Decrease the amount of sharpness by moving the slider control to the left, or entering
a lower number in the text box to the right of the slider control.4. Click the Copy button when satisfied with your adjustments.
TIPIf you have programmed and run a job, and received unexpected results, ensurethat the system-wide settings are all set back to their defaults by clicking Clear Allor Reset in the user interface. Then proceed to do job programming pertinentto your job.
Removing Background Artifacts (when scanning or copying)
If your original document is on colored stock, the output copy may display backgroundartifacts.
Background is only detected on the first few mm of the lead edge. Ensure the lead edgeis not solid black and the document is registered against the registration edge indicatedon the platen.
To remove background artifacts1. In the Xerox Nuvera user interface, click the Copy Service button.2. Click the Image Quality tab.3. Click the Image Adjustments button.4. Make sure the Background Suppression Normal checkbox is enabled. It is on by
default.
TIPIf you have programmed and run a job, and received unexpected results, ensurethat the system-wide settings are all set back to their defaults by clicking Clear Allor Reset in the user interface. Then proceed to do job programming pertinentto your job.
Removing Image Show Through (when scanning or copying)
When scanning translucent originals, sometimes the image on the back side of the pageis detected, resulting in a scan of the image on the other side of the sheet (see figure).
29-11Xerox Nuvera User Guide and Training Aid (UGTA) for Software Version 9.3/10.3
Problem Solving

Figure 31. Example of Show Through
To correct image show through1. In the Xerox Nuvera user interface, click the Copy Services button.2. Click the Image Quality tab.3. Click the Image Adjustments button. Verify that the Background Suppression Strong
checkbox is enabled. If it is not, click in the checkbox.4. Click Copy to scan or copy your document.
TIPWhile this selection is not recommended for documents with pictures, select theImage Quality tab and click on Original Type, then click Text if you are scanningan image from a two-sided page. The scanner will not attempt to interpret andscan the image that shows through from the second side.
TIPWhen scanning a two-sided original, to reduce or eliminate image show through,place a piece of dark (preferably black) paper behind the original documentbefore scanning. You can also leave the platen glass cover open when scanning.
TIPIf you have programmed and run a job, and received unexpected results, ensurethat the system-wide settings are all set back to their defaults by clicking Clear Allor Reset in the user interface. Then proceed to do job programming pertinentto your job.
Removing Spots & Specks (when scanning or copying)
If you notice spots or specks on your image, try the following:
• Clean the Document Glass
• Clean the Document Feeder
Clean the Document Glass
Dirt and dust in the work environment, finger prints, and paste-up residue from documentswill gradually build up on the Document Glass. Sometimes this shows up on scans asspecks or spots.
Optimally, the Document Glass should be cleaned at the start of each work day.
Xerox Nuvera User Guide and Training Aid (UGTA) for Software Version 9.3/10.329-12
Problem Solving

Clean the Document Feeder
Though the Document Feeder is mainly enclosed, dirt and paper dust can get into thepaper path and rollers, causing spots, streaks and specks on the output image.
Optimally, the Document Feeder should be cleaned at the start of each work day.
TIPIf you have programmed and run a job, and received unexpected results, ensurethat the system-wide settings are all set back to their defaults by clicking Clear Allor Reset in the user interface. Then proceed to do job programming pertinent toyour job.
Recovering Missing Parts of the Image
If the image you are printing is comprised of very fine lines and/or you are printing athigh resolution (for example, 1200 x 1200 dpi), there may be instances when those partsof the image may not appear on the final output.
To recover missing parts of the image
To recover missing parts of an image, you must change the PostScript stroke thickeningcontrol from 0.0 to 1.0.1. On the Printer menu, select Image Quality.2. Double-click the PostScript processing resolution you wish to change (there may be
several). The PostScript/PDF Image Quality window appears.3. Select a True Type Spot Size to adjust the darkness of the scalable font.4. Select a Font Rendering to process the jobs containing Adobe Type 1 scalable fonts.5. Define, in pixels, the amount of thickening or darkening to apply to the font in the
Font Thickening box.6. Use Half Bitting to remove digital edge roughness.
TIPIf you have programmed and run a job, and received unexpected results, ensurethat the system-wide settings are all set back to their defaults by clicking<Clear All> or <Reset> in the user interface. Then proceed to do job programmingpertinent to your job.
Removing Drill Holes From Output (when scanning or copying)
If you are scanning or copying originals that have been drilled for insertion in a multi-ringbinder, or the paper is otherwise damaged at the edge, you may notice black holes orother unacceptable marks on one edge of your output image. Electronic Hole Removalcan be enabled to eliminate such defects.
TIPThe Electronic Hole Removal feature is also useful for removing output image defectscaused by folded-over corners (dog-ears) and/or torn edges located withinapproximately one inch from the edge of the original document.
29-13Xerox Nuvera User Guide and Training Aid (UGTA) for Software Version 9.3/10.3
Problem Solving

NOTEElectronic Hole Removal is only functional for originals placed in the DocumentFeeder. For details, see Using the Document Feeder.
NOTEElectronic Hole Removal is NOT available when Photo is the Original Type selected.
To remove drill holes from output1. Place original documents in the Document Feeder.2. Make sure Electronic Hole Removal is enabled.
a) Click the Copy button.b) Select the Image Edit tab.c) Click the Edge Erase button.d) Select Electronic Hole Removal. It should have a checkmark in it. If it does not,
select None from the Edge Erase list.This will enable the Electronic Hole Removal control.
3. When you are satisfied with your settings, click Copy.
Xerox Nuvera User Guide and Training Aid (UGTA) for Software Version 9.3/10.329-14
Problem Solving

30Machine Specifications
The Xerox Nuvera machine is available in several configurations. The configuration youhave may include an insertion module, a Sheet Enhancement Module and any numberof feeding modules and finishing options. Click the subtopics at the left to learn abouteach machine subsystem, as well as machine capabilities.
Supported PaperThe Xerox Nuvera will accept a wide variety of paper types and sizes. For best results,use only the papers mentioned in this topic. For more information, see Recommendationsfor Paper Usage.
For details on expected performance of papers through the system, see Expected PaperHandling.
For details on paper handling and storage, see Handling and Storing Paper.
Compatible Stock Types• Uncoated papers
• Coated papers (except for systems with an MFF)
• Transparencies
• Tabs
• Envelopes
• Label stock
• ID cards
WARNINGDo NOT use envelopes with latex-based glue closures. For example, self sealingenvelopes contain latex-based glues, and should NEVER be used.
Paper size tables
Supported Paper Sizes: Trays 1 and 2
Supported Paper Sizes: Trays 3 and 4
30-1Xerox Nuvera User Guide and Training Aid (UGTA) for Software Version 9.3/10.3

Supported Paper Sizes: Trays 1 and 2
SizePaper TypeFeedOrientation
LEF(long edgefeed)
SEF (short edgefeed)
mmInches
X228.6 x 279.49 x 11Letter Cover
X184.15 x 266.77.25 x 10.5Executive
X194 x 2677.64 x 10.5116 K (Taiwan)
X210 x 2708.27 x 10.63210 x 270
X215 x 2758.46 x 10.83215 x 275
X216 x 2738.5 x 10.75216 x 273
X215.9/216 x279.4
8.5 x 11Letter
X223 x 2978.78 x 11.69A4 Cover
X226 x 3108.89 x 12.2226 x 310
X320 x 22512.59 x 8.86SRA42 up-A5
X210 x 2978.27 x 11.69A4
X215 x 3158.46 x 12.4Spanish XE
X177.8 x 2547 x 107 x 10
X182 x 2577.17 x 10.12B5 -- JIS
X203.2 x 2548 x 108 x 10
X148 x 2105.83 x 8.27A5
X139.7 x 215.95.5 x 8.5Statement (Seenote below)
NOTEThe Xerox Nuvera 200/288 EA/MX Perfecting Production System no longer supportsStatement paper but continues to support A5 paper. In addition, the Xerox Nuvera200/288 EA/MX Perfecting Production System now supports up to 19.33 inches (491mm) in the process direction.
Supported Paper Sizes: Trays 3 and 4
SizePaper TypeFeedOrientation
LEF(long edgefeed)
SEF (short edgefeed)
mmInches
X184.15 x 266.77.25 x 10.5Executive
X194 x 2677.64 x 10.5116 K (Taiwan)
Xerox Nuvera User Guide and Training Aid (UGTA) for Software Version 9.3/10.330-2
Machine Specifications
X210 x 2708.27 x 10.63210 x 270
XX215 x 2758.46 x 10.83215 x 275
XX216 x 2738.5 x 10.75216 x 273
XX215.9/216 x279.4
8.5 x 11Letter
XX228.6 x 279.49 x 11Letter Cover
X241.3 x 279.49.5 x 119.5 x 11 tabs
X267 x 38811 x 17Ledger
X267 x 38810.51 x 15.288K (Taiwan)
XX210 x 2978.27 x 11.69A4
XX215 x 3158.46 x 12.4Spanish XE
XX223 x 2978.78 x 11.69A4 Cover
XX226 x 3108.89 x 12.2226 x 310
X320 x 22512.6 x 8.86SRA42-up-A5
X317.5 x 241.312.5 x 9.52up-6 x 9
X297 x 42011.69 16.54A3
X310 x 43212.2 x 17.01310 x 432
X320 x 45012.6 x 17.71SRA34up-A5
X304.8 x 457.212 x 1812 x 18
X304.8 x 469.912 x 18.512 x 18.5
X317.5 x 469.912.5 x 18.54 up-6 x 9
X182 x 2577.17 x 10.2B5 - JIS
XX203.2 x 2548 x 108 x 10
X252 x 3589.92 x 14.09SB4
X257 x 36410.12 x 14.33B4-JIS
X203.2 x 330.28 x 138 x 13
X210 x 3308.27 x 12.99210 x 330
X215 x 3308.46 x 12.99215 x 330
X215.9 x 330.28.5 x 13Foolscap - XE
X220 x 3308.66 x 12.99220 x 330
X210 x 2708.27 x 10.63210 x 270
X215.9 x 355.68.5 x 14Legal
30-3Xerox Nuvera User Guide and Training Aid (UGTA) for Software Version 9.3/10.3
Machine Specifications(continued)

Recommendations for Paper UsageUsage RecommendationPaper Type
Not supported on systems with a Multifunction Finisher.Coated stocks
Otherwise, stocks coated on both or only one side are supported.When printing on stocks that have only one side coated, loadthe coated side up.
For systems that do not have the Productivity Pack licenseenabled:
• Normal - 56 to 84 gsm (ex: standard copier paper, inkjetpaper)
• Medium - 85 to 105 gsm (ex:slightly heavier than Normal.Good for brochures, advertisements)
• Heavy - 106 to 220 gsm (index cards, cover stock, posters)
For systems with the Productivity Pack license enabled, you canenter exactly the paper weights for the stock that is beingloaded. The upper limit of the stock weight is determined bythe finisher on the system.When using the BFM, the system supports:
• 56 gsm - 250 gsm uncoated stock
• 90 gsm - 250 gsm coated stock
When using the DS5000, the system supports:
• 56 gsm - 250 gsm uncoated stock
• 120 gsm - 220 gsm coated stock
A system with a MFF supports:
• 56 gsm - 220 gsm uncoated stock; coated not supported
The weight range supported on a system with a DS3500depends on the 3rd party device, but most are 56 gsm - 250gsm for uncoated stock and 90 gsm - 250 gsm for coated stock.
Paper weight range
If you are loading any type of drilled paper, to aid in sheetseparation and to prevent jams, it may be helpful to fan reamsbefore loading into the tray.
Drilled stocks
Loading limit in Paper Feeder trays: 50 sheets.Transparency or Mylarreinforced sheets
Loading limit in Paper Feeder trays: 50 sheets.Load with stripe down on the lead edge.
NOTEFor dedicated transparency trays, first placeapproximately half an inch (12 mm) worth of plainpaper at the bottom of the tray. This will ensure thatall 50 of the transparencies get used.
Removable stripetransparencies
Xerox Nuvera User Guide and Training Aid (UGTA) for Software Version 9.3/10.330-4
Machine Specifications
• LEF
• Loading limit in Paper Feeder trays: 50 sheets.
Label Stock
• LEF
• For 1 to N printing order, load with top (white) sheet on top
• For N to 1 printing order, load with top (white) sheet at thebottom
Carbonless Forms
• 6"x9"
• 9"x12"
• 162x229
• 220x312
• Types: Closed flap, flap on long edge.
• Loading orientation: Address side up and flap-side leading
• Output to MFF top tray only
• Loading capacity limit - 60
• Output to top tray limit - 15** **More than 15 envelopes canbe output to the tray, as long as the tray is tended andemptied every 10-15 envelopes.
Booklet Envelope (closed flap)
• 6"x9"
• 7"x10"
• 162x229
• 178x254
• Type: Open flap.
• Loading orientation: Address side up and and flap orientedtowards operator.
• Output to MFF top tray only
• Loading capacity limit - 60
Catalog Envelope (open flap)
Do Not Use.Window stock
30-5Xerox Nuvera User Guide and Training Aid (UGTA) for Software Version 9.3/10.3
Machine Specifications(continued)

• Design the preprinted image so that no ink, varnish, oraqueous coating is placed in the area to be printed. Toneradhesion can not be assured when printing over inks orvarnish. If the image must be printed over pre-printed ink,results are more likely to be acceptable if the color isscreened back to less than 30% or the base stock is uncoatedpaper
• Select papers printed with laser-compatible, lithographicinks to minimize offsetting. UV-cured inks are recommended,especially on coated stocks, to insure complete drying beforeprinting on a Xerox Nuvera. Laser inks can be oxidative, orheat set types.
• Do not use papers preprinted with xerographic processes.
• Select preprinted sheets that are free of excessive curl.
• Select base paper stock approved for use on a Xerox Nuverasystem.
• Refer to the Xerox Nuvera Production Paper Guide for moreInformation.
Preprinted materials
• DocuCard sheet with a single card
• LEF for 8 x 11" and A4
• SEF for 11 x 17"
• Loading capacity 50 sheets
• If using a Tiltatron, capacity is 200 sheets in trays 1 and 2.
DocuCards
Loaded with side to be imaged facing up, and glued end to theleft.
Paper backed transparencies
Requires the same IB/OB dimension for all sheets.Mixed size sheet handling inDocument Feeder andMultifunction Finisher
Related Information• Supported Paper
• Expected Paper Performance Tables
• Configuring Paper Stocks and Trays
• Adding Pages To A Document
Document Feeder & Scanner SpecificationsNOTEThis feature is only available if your system includes the integrated DocumentScanner module for copying and scanning jobs.
The scanner includes the Simultaneous Duplex Document Feeder ("Document Feeder")and the Document Glass (or "Platen").
Xerox Nuvera User Guide and Training Aid (UGTA) for Software Version 9.3/10.330-6
Machine Specifications(continued)

The Document Feeder uses a Constant Velocity Transport (CVT) to scan each page asit passes the stationary scan module. The Document Feeder can scan both sides of apage at once (hence the name "Simultaneous Duplex"), using a second CVT to movethe document past the second scan module. This reduces the time required for copyingor scanning 2-sided originals.
The Document Glass provides a means for scanning documents that cannot be fedthrough the Document Feeder, such as fragile, bound, and extra large documents. Themaximum paper size that can be placed on the platen is 12.6 inches x 18.5 inches (imagesize 12.0 inches x 18.0 inches). The original is placed face down on the Document Glassand the scan module passes under the Document Glass.
For details on proper usage of the Document Feeder, see Using the Document Feeder.
Document Feeder Paper Capacities and Capabilities
SpecificationItem
11 x 17 inches (279.4 mm x 432 mm) (seeNOTE below)
Maximum paper dimensions
5.5 x 8.5 inches (140 mm x 216 mm)Minimum paper dimensions
300 sheets (20 lb. bond, 75 gsm weight)Weight 13 lb. bond to 113 lb. index (49 to 250gsm)
Paper capacity
8-bit Gray (256 shades) at 600 x 600 dpi 120images per minute one-sided 8.5 x 11"/A4 - 120sheets per minute120 images per minute two-sided 8.5 x 11"/A4- 60 sheets per minute
ResolutionThroughput
NOTEA5 and Statement stock should be fed SEF(Short Edge Feed). LEF (Long Edge Feed)of A5 and Statement stock is not supported by the Document Handler.
NOTEA 12x18 inch original will travel through the Document Feeder, but some informationon the output may be lost. To ensure all image information from a 12 x 18 inchoriginal is captured, use the Document Glass.
Print Engine SpecificationsBefore making prints with the Xerox Nuvera System, take the time to learn about itscapabilities and capacities.
Fuser Temperature
180 degrees Celsius (356 degrees Fahrenheit) when printing in Normal mode.
EIP Mode: 200 degrees Celsius (392 degrees Fahrenheit)
30-7Xerox Nuvera User Guide and Training Aid (UGTA) for Software Version 9.3/10.3
Machine Specifications

Registration
Benchmark registration system holds image to sheet alignment at +/- .65mm per sideand front-to-back on Letter/A4 size papers; +/- .75 mm per side and front-to-back onTabloid/A3 size papers.
Printer Resolution
4800 x 600 dpi
RIP (Raster Image Processor) Resolutions
The Parallel RIP feature is available on the Xerox Nuvera 200/288 EA/MX PerfectingProduction System, increasing processing time and RIP speed for complex jobs. For moreinformation about Parallel RIP, see Printing with the Parallel RIP feature.
The processor can process images for printing (RIP) at the following resolutions:
• 600x600 dpi - The 600 dpi option provides faster performance when processing andsaves files that are smaller in size
• 1200x600 dpi
• 1200x1200 dpi - 1200 dpi is the system default
Print Quality (halftone screens)
The base configuration (without the Enhanced Line Screen license enabled) supportsonly a 125 lines per inch (lpi) halftone screen. With the Enhanced Line Screen licenseenabled, the system supports 85, 106, 125, 134, and 156 lpi halftone screens.
Print Engine Type
Xerographic monochrome (black and white) only. The Xerox Nuvera 200/288 EA/MXPerfecting Production System is comprised of two 144 Production System print engines(A1 and A2).
Printer Speed
The Xerox Nuvera EA Production System can be licensed to support 100, 120 or 144ppm print speeds. For systems with a Multifunction Finisher, only 100 and 120 areavailable.
The Xerox Nuvera 200/288 EA/MX Perfecting Production System can be licensed tosupport either 200 or 288 impressions per minute at duplex mode with 2 - 3 Parallel RIPrunning on the dual core CPU.
Images Per Minute (ipm)Pages Per Minute (ppm)Xerox Nuvera System
100 ipm simplex100 ipm duplex
100 ppm simplex50 ppm duplex
Xerox Nuvera 100 EAProduction System
Xerox Nuvera User Guide and Training Aid (UGTA) for Software Version 9.3/10.330-8
Machine Specifications

Images Per Minute (ipm)Pages Per Minute (ppm)Xerox Nuvera System
120 ipm simplex120 ipm duplex
120 ppm simplex60 ppm duplex
Xerox Nuvera 120 EAProduction System
144 ipm simplex144 ipm duplex
144 ppm simplex72 ppm duplex
Xerox Nuvera 144 EAProduction System
144 ipm simplex288 ipm duplex
144 ppm simplex144 ppm duplex
Xerox Nuvera 200/288 EA/MXPerfecting Production System
Variable Pitch Xerographics for maximum throughput
The Xerox Nuvera is equipped with a variable pitch Xerographic belt. Pitch refers to thenumber of page images that can be placed on the belt, which are then transferred tothe paper. For details on how page image size impacts belt pitch, which in turn impactsoverall throughput, see About Pitch.
Dry Ink (Toner)
For the Xerox Nuvera EA/M Production System and Xerox Nuvera 200/288 EA/MXPerfecting Production System, EA dry ink or MICR ink.
Paper Sizes Supported
Nuvera EA
• Minimum size: A5 / 5.5 inches x 8.5 inches (140 mm x 216 mm)
• Maximum size: 12.2 inches x 18.5 inches (320 mm x 470 mm)
Xerox Nuvera 200/288 EA/MX Perfecting Production System
• Minimum size: A5 / 5.7 inches x 8.5 inches (144 mm x 216 mm)
• Maximum size: 12.2 inches x 19.33 inches (320 mm x 491 mm)
For details on papers supported, see:
• Supported Paper
• Recommendations for Paper Usage
• Expected Paper Handling and Copy Performance
Machine Warm-up Times
From cold start (ex: first thing in the morning): 4.5 to 7 minutes
From power saver mode: 3.5 minutes
From system restart: 4 to 5 minutes
30-9Xerox Nuvera User Guide and Training Aid (UGTA) for Software Version 9.3/10.3
Machine Specifications(continued)

FreeFlow Print Server Capabilities
All of the Xerox Nuvera systems are driven by one FreeFlow Print Server. For more detailon system information, select Setup from the FreeFlow Print Server menu bar.
• Removable storage device(s): DVD - R/W drive
• Ethernet connector type: 10/100/1000 BaseT
• PDL (Printer Description Language) support: PostScript Level 3, HP/PCL 5e & PCL 6,TIFF, Multi-page TIFF, Adobe PDF, ASCII, PPML, LCDS, IPDS
• Network protocols supported: TCP/IP, LPR, IPP, HTTP, AppleTalk, Novell (SPX-IPX),SNMP
Xerox Nuvera EA Production System• System Processor: single core 64 bit, 2.4 GHz, 160 GB system disk, 1 GB of RAM, X86
Tyan S2865 platform
• Monitor screen: 19-inch (size may vary depending on location) flat color LCD monitoroperated with USB keyboard and mouse
Xerox Nuvera 200/288 EA/MX Perfecting Production System• System Processor: dual core 64 bit, 2.6 GHz, two 160 GB hard drives, 4 GB of RAM,
X86 Tyan S2882 platform
• Monitor screen: 19-inch (size may vary depending on location) flat color LCD monitoroperated with USB keyboard and mouse
For details on printing from a client, see Printing a Job from your Networked PC.
Multifunction Finisher (MFF)SpecificationsThe Multifunction Finisher offers the basic publishing option on the Xerox Nuvera EAProduction System. It is the only finisher in the configuration and can not be followedby any other finishing devices. It provides stacking and stapling capabilities as well asthe ability to make booklets and trifold documents.
There are two MFF models available.
• The Professional is a finisher that provides high capacity collating, stacking andstapling. It also allows the ability to make booklets and trifold documents. This modelconsists of a Top Tray for collecting or purging sheets, a Main Tray and a Bottom(Booklet) Tray.
• The Pro Plus is the Professional model with added functionality provided in theInterface Module area. The Interface Module contains a sheet insertion module aswell as a hole punch module. The post process insertion capability of the MFF Pro
Xerox Nuvera User Guide and Training Aid (UGTA) for Software Version 9.3/10.330-10
Machine Specifications

Plus can insert covers, preprinted tabs and colored paper. The hole punch moduleoffers either a 2 and 3 Hole Paper Punch or a 2 and 4 Hole Paper Punch that allowsyou to punch 2, 3 or 4 holes in the printed document, depending on the paper punchinstalled and the finishing hole punch option selected.
Using the MFF
Go to Using the Multifunction Finisher (MFF)for information on how to use the MFF.
SpecificationsMFF Pro PlusMFF Professional
Same250 sheets of 20 lb bond (75gsm) or equivalentOutput to the Top Tray isdelivered with Side-1 down andsets are not offset. It can beset as a destination tray fornon-stapled jobs. Sheets lessthan 7 inches in the processdirection or 8 inches in thecross-process direction willautomatically go to the TopTray. The Top Tray alsoreceives sheets that are purgedfrom the system.
Top Tray
Does not accept hole punchedfinishing output
250 sheets of 20 lb bond (75gsm) or equivalentOutput to the Top Tray isdelivered with Side-1 down andsets are not offset. It can beset as a destination tray fornon-stapled jobs. Sheets lessthan 7 inches in the processdirection or 8 inches in thecross-process direction willautomatically go to the TopTray. The Top Tray alsoreceives sheets that are purgedfrom the system.
Bottom/Booklet Tray
200 sheets of 20 lb bond (75gsm) or equivalent56-220 gsmDelivers output to all 3 trays
Not availableInsertion Tray
30-11Xerox Nuvera User Guide and Training Aid (UGTA) for Software Version 9.3/10.3
Machine Specifications

MFF Pro PlusMFF Professional
Same3000 sheets of 20 lb bond (75gsm) or equivalentThe stack limit can be set fromthe UI for each BFMindependently.Stapled sets with <15 sheetsare limited to 100 sets.The Stacker is the output trayfor receiving compiled stapledand unstapled sets as well assingle sheets. Output isnormally delivered with side-1down and sets can be offset.
Main Tray/Stacker Capacity
SameUp to 100 sheets of 20 lb bond(75 gsm) (one or two staples)or equivalent substrates(reduced stapled sheetcapabilities can result based onsubstrate properties (i. e.thickness, density, material,coating, etc.)Includes two internalpass-through 100 sheet upsidedown staplers. The staplerdevices have the ability toportrait, landscape or dualstaple all supported papersizes. Finished sets can bestacked internally to the lowerstacker tray.If either of the Staplers runsout of staples see ReplacingStaples in the BFM or if it jamssee Clearing Stapler Jams.An alternate Staple Cartridgefor up to 30 sheets of 20lb isavailable. (75-80 gsm) papercapacity. Contacting Xerox forinformation on ordering refills.Each Stapler Cartridge holds5000 staples. Contacting Xeroxfor information on orderingrefills.
Stapler Capacity
Same8.26 in to 18.5 in (210 mm to457 mm)8.26 in to 12 in (210 mm to305 mm)
Paper Size Rangeprocess directioncross process direction
Same16 lb bond to 113 lb index (56to 220 gsm)No coated stock
Stock Weight Rangeuncoated:coated:
Xerox Nuvera User Guide and Training Aid (UGTA) for Software Version 9.3/10.330-12
Machine Specifications(continued)

The MFF Professional Model
MFF Stapling
Portrait, Landscape and Dual stapling is available for all media types, except Tabs andTransparencies. Stapling is offered for mixed sized sets if the length of the feed edge isthe same size for all sheets.
For details and specifications on the staplers, see Stapler Specifications.
MFF Capacities
The Xerox Nuvera Multifunction Finisher (MFF) adds the finishing touches to your jobby collating and stapling your output. The MFF Professional can be used to make foldedand stapled booklets and various folding options; Folded-Only Booklets, Tri-FoldC-Configuration and Z-Configuration folded documents.
• 2,250 sheet total capacity of 20 lb. (75-80 gsm) paper or equivalent
• 250 sheet Top Tray
• 2,000 sheet Main Tray
• 1 and 2 Position Stapling in Main Tray
• 100 sheet staple capacity, sizes 8.5 x 14 inch or B4 and smaller. Contacting Xerox toorder this consumable part.
• 50 sheet staple capacity paper sizes over 8.5 x 14 inch or B4. Contacting Xerox toorder this consumable part.
Top Tray
Output to the Top Tray is delivered with Side-1 down and sets are not offset. The TopTray can hold up to 250 sheets of 20 lb. (75-80 gsm) or equivalent paper. It can be setas a destination tray for non-stapled jobs. Copies that are less than 6.7 inches long infeed direction or 8 inches in the cross-feed direction will go to the Top Tray rather thanthe Main Tray. The Top Tray also receives sheets that are purged from the system whenusing the Main Tray or the Bottom Tray.
Main Tray
The Main Tray is the output tray for receiving compiled stapled and unstapled sets aswell as single sheets. Output is delivered with Side-1 down and sets are offset. It canstaple up to 100 sheets of 8.5 x 11 inch or A4 LEF, and 8.5 x 14 inch or B4 SEF of 20 lb.(75-80 gsm). It also can staple up to 50 sheets for paper sizes over 8.5 x 14 inch or B4SEF of 20 lb. (75-80 gsm). Portrait, landscape, and dual position stapling are available.
"Stack Limit" allows you to set the Main Tray to the size of the stack from 200 to 2500sheets. Once the set stack limit is achieved, the system will cycle down and display anEmpty Main Tray message. The default setting is 2500 sheets.
30-13Xerox Nuvera User Guide and Training Aid (UGTA) for Software Version 9.3/10.3
Machine Specifications

Bottom (Booklet) Tray
The Bottom Tray is the output tray for receiving compiled stapled and unstapled booklets.It can receive up to 20 booklets of 15 sheets maximum of 8.5 x 11 inch or A4, 8.5 x 14inch or Foolscap, and 11 x 17 inch or A3 20 lb. (75-80 gsm) or equivalent thickness withthe Bottom Tray Stop in the up position. It also can receive Folded-Only Booklet up to5 folded sheets per set of 8.5 x 11 inch or A4, 8.5 x 14 inch or Foolscap, and 11 x 17 inchor A3 or equivalent thickness with the Bottom Tray Stop in the up position. It can receiveTri-Fold C-Configuration and Tri-Fold Z-Configuration of single sheets only of 8.5 x 11inch or A4 SEF.
When using the MFF for folded output, the Banner Sheets that separate your print jobsfrom one another will come out folded on the long axis of 8.5 x 11 inch or A4 paper,allowing the customer to see separation easier.
Booklet Making• Folded Only Booklets 1-5 sheets
• Folded and Stapled Booklets 2-15 sheets
• Sizes from 8.5 x 11 inch or A4, 8.5 x 14 inch or Foolscap, and 8.5 x 17 inch or A3
The Booklet Maker on the Professional Finisher produces Booklets ( Folded Only andFolded and Stapled ) and Letter Tri-Fold (C- and Z-Configuration).
All Booklet and Tri-Fold jobs must use SEF oriented paper supply.
The Booklet Maker can fold 1-5* sheets or fold and staple 2-15* sheets of the followingpapers:
OrientationPaper Size
SEFmm (WxL)Inch (WxL)Name
X216x2798.5x11Letter
X210x2978.27x11.69A4
X215x3308.5x13Foolscap
X216x3568.5x14Legal
X297x42011.69x16.54A3
X279x43211x17Ledger
*Booklet Maker: 15 sheets or less of 80 gsm (20 lbs) or equivalent thickness, e.g., 12sheets of 80 gsm (20 lbs) with one cover of 200 gsm.
Fold: 5 sheets or less of 80 gsm (20 lbs) or equivalent thickness.
Tri-Folding enables bulk mailing applications and ease of fit into standard U.S. #10business size and DL (A4) size envelopes.
Special materials such as transparencies, drawing film, labels, and coated stocks are notcompatible with the Booklet Maker.
Xerox Nuvera User Guide and Training Aid (UGTA) for Software Version 9.3/10.330-14
Machine Specifications

Finished jobs are delivered to the Bottom Tray with side 1 down. If you use BannerSheets, they will be folded LEF orientation to separate jobs in the tray.
Folding Options (single sheets only)• C-Configuration and Z-Configuration folds
• Output 8.5 x 11 inch or A4 only
Finisher Pause Button
Removing output while the Finisher is running may produce sets that are incorrectlystapled. The Finisher Pause Button delays processing to allow you to remove finishedsets from the main tray without disturbing sets in progress.
The Finisher Pause Button is located near the right front corner of the top cover. Whenselected, it affects the operation of the Main Tray only.
To activate the Finisher Pause feature1. Press the Pause Button.2. Wait for the tray to lower.3. Unload the tray.4. Press the Pause Button again to continue subsequent processing.
NOTEThe finisher will pause after producing between 80 to 100 sets of thin sets (2-15sheets). This allows you to unload the finisher. It automatically resumes printingafter a lapse of 1 minute.
The MFF Pro Plus Model
Post Process Insertion Tray
Use this insertion tray on the MFF Pro Plus to add covers, preprinted sheets or tabs intoyour job, and program these sheets as Special Pages at the FreeFlow Print Server interface.
Hole Punching
This finishing option is selectable from the Output tab of the Job Properties window.Select Stapling/Finishing and the Stapling/Finishing pull-down menu. If the 2/3 HolePaper Punch is installed, you can select 2 or 3 hole punch and the various hole placementoptions such as portrait or landscape, and top or bottom. If the 2/4 Hole Paper Punchis installed, you can select either 2 or 4 hole punching along with the same placementoptions. Your output punched documents can then be placed in a 2, 3 or 4-ring binder.
Select the Multiple Finishing option from the same Finishing area on the FreeFlow PrintServer to simultaneously select stapling and hole punching for the job.
Paper Specifications for the Hole Punch Module
WeightSizeType
30-15Xerox Nuvera User Guide and Training Aid (UGTA) for Software Version 9.3/10.3
Machine Specifications

56-200 gsm171-321mm (6.74-12.63 in)width148-457mm (5.83-17.99 in)length
2-punch
56-200 gsm232-321mm (9.14-12.63 in)width148-457mm (5.83-17.99 in)length
3-punch
56-200 gsm255-321mm (10.04-12.63 in)width148-457mm (5.83-17.99 in)length
4-punch
Insertion Tray Capacities
The MFF Insertion Tray specifications are:
• Holds and feeds up to 200 sheets of 20 lb bond (75 gsm), all same stock size
• Accepts media weight of 56 - 220 gsm
• Accepts sizes of 176-470 mm (6.93 - 18.5 in) length and 176-298 mm (6.93 x 11.73in) width
For more information about loading special stock such as tabs, refer to Loading SpecialStock for Proper Finishing Output.
Configurations
The MFF is the basic configuration on the Xerox Nuvera EA Production System and isthe only configuration that does not include the Sheet Enhancement Module (SEM).The Sheet Enhancement Module is a standard component on systems with a BFM orDS3500.
The diagrams below show the MFF finishing configuration options.
Figure 32. Print Engine / MFF Professional (can include an SFM Insertion Module)
Xerox Nuvera User Guide and Training Aid (UGTA) for Software Version 9.3/10.330-16
Machine Specifications(continued)

Figure 33. Print Engine / MFF Pro Plus (can include an SFM Insertion Module)
Basic Finishing Module (BFM/BFM Plus)SpecificationsThe BFM is a finisher that provides high capacity collecting, stacking and stapling. Italso includes a top tray for collecting or purging sheets. The Xerox Nuvera System offerstwo BFM models:
• The BFM is a finisher that provides high capacity collating, stacking and stapling. Italso includes a top tray for collecting or purging sheets.
• The BFM Plus is comprised of the Bypass BFM and the Interface Module. The BFMPlus module provides the same capabilities as the BFM. However, it does not have atop tray and does include a bypass paper path that allows the BFM Plus to pass pagesthrough an Interface Module (IM) to another BFM or through an Interface Moduleand Finishing Transport Module to other DFA-compliant finishers.
• The BFM Plus Top Tray with Direct Connect is comprised of the Bypass BFM withan Interface Module that has Top Tray capabilities and is able to connect directly toa DFA-compliant finisher(s). The DFA-compliant finishers are limited to devices thathave an 860mm height, Center registration, and a velocity of 1130mm/s.
Using the BFM
Go to Using the Basic Finishing Module (BFM) for information on how to use the BFMand all of the adjustments that affect the BFM.
Capacities
Stacker• 3,000 sheets total capacity of 20 lb. (75-80 gsm) paper or equivalent.
• The stack limit can be set from the UI for each BFM independently.
• Stapled sets with <15 sheets are limited to 100 sets.
30-17Xerox Nuvera User Guide and Training Aid (UGTA) for Software Version 9.3/10.3
Machine Specifications
• It can staple up to 100 sheets of 8.5 x 11 inch or A4 LEF, and 8.5 x 14 inch or B4 SEFof 20 lb. (75-80 gsm). Portrait, landscape, and dual position stapling are available
• The Stacker is the output tray for receiving compiled stapled and unstapled sets aswell as single sheets. Output is normally delivered with side-1 down and sets can beoffset.
Top Tray• 250 sheets of 20 lb. (75-80 gsm) paper or equivalent.
• Output to the Top Tray is delivered with Side-1 down and sets are not offset.
• It can be set as a destination tray for non-stapled jobs.
• Sheets less than 7 inches in the process direction or 8 inches in the cross-processdirection will automatically go to the Top Tray. The Top Tray also receives sheetsthat are purged from the system.
• Paper size greater than 18.5 inches in the process length will run to the top tray only.
Stapler• The Basic Finishing Module has two internal pass-through 100 sheet up side down
staplers. The stapler devices have the ability to portrait, landscape or dual staple allpaper sizes between 5.5"x8.5"; / A5 and 12.6"x18.5 inches. Finished sets can be stackedinternally to the lower stacker tray.
• These staplers have the capability of stapling 100 sheets of 20lb. (75-80 gsm) orequivalent substrates (reduced stapled sheet capabilities can result based on substrateproperties (i. e. thickness, density, material, coating, etc.).
• If either of the Staplers runs out of staples see Replacing Staples in the BFM or if itjams see Clearing Stapler Jams.
• An alternate Staple Cartridge is available with 30 sheets of 20lb. (75-80 gsm) papercapacity. Contacting Xerox for information on ordering refills.
• Each Stapler Cartridge holds 5000 staples. Contacting Xerox for information onordering refills.
Xerox Nuvera User Guide and Training Aid (UGTA) for Software Version 9.3/10.330-18
Machine Specifications
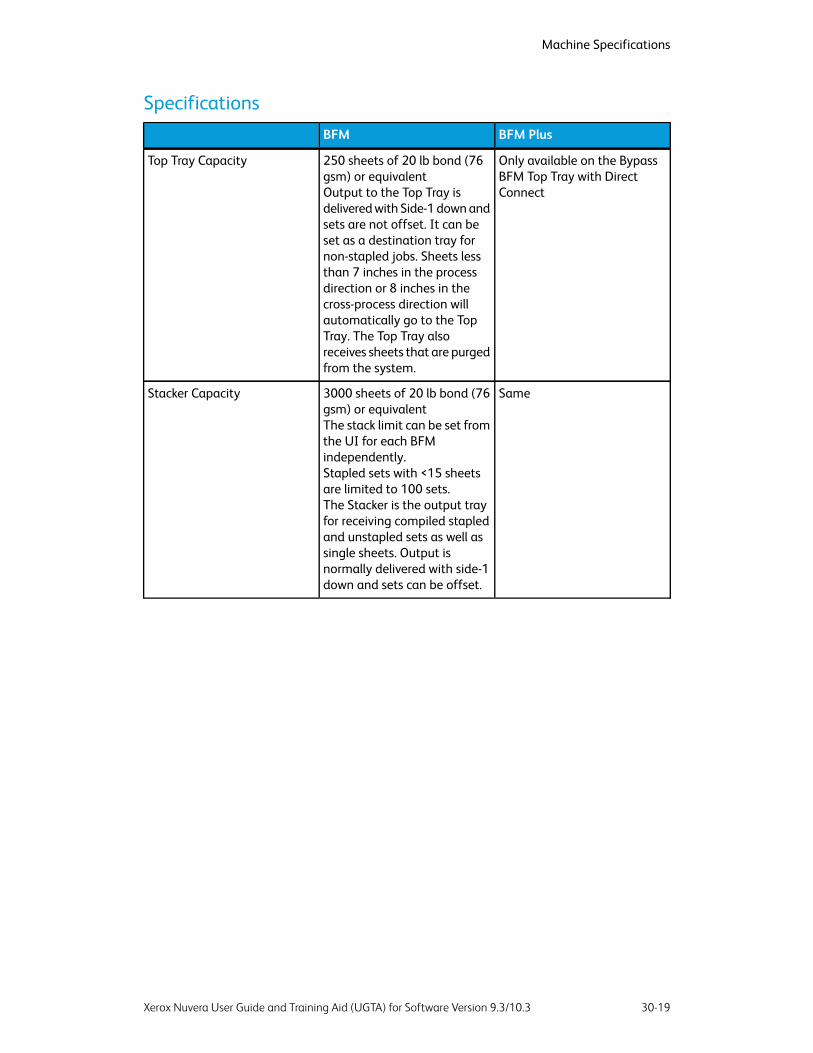
SpecificationsBFM PlusBFM
Only available on the BypassBFM Top Tray with DirectConnect
250 sheets of 20 lb bond (76gsm) or equivalentOutput to the Top Tray isdelivered with Side-1 down andsets are not offset. It can beset as a destination tray fornon-stapled jobs. Sheets lessthan 7 inches in the processdirection or 8 inches in thecross-process direction willautomatically go to the TopTray. The Top Tray alsoreceives sheets that are purgedfrom the system.
Top Tray Capacity
Same3000 sheets of 20 lb bond (76gsm) or equivalentThe stack limit can be set fromthe UI for each BFMindependently.Stapled sets with <15 sheetsare limited to 100 sets.The Stacker is the output trayfor receiving compiled stapledand unstapled sets as well assingle sheets. Output isnormally delivered with side-1down and sets can be offset.
Stacker Capacity
30-19Xerox Nuvera User Guide and Training Aid (UGTA) for Software Version 9.3/10.3
Machine Specifications

BFM PlusBFM
SameUp to 100 sheets of 20 lb bond(75 gsm) (one or two staples)or equivalent substrates(reduced stapled sheetcapabilities can result based onsubstrate properties (i. e.thickness, density, material,coating, etc.)Includes two internalpass-through 100 sheet upsidedown staplers. The staplerdevices have the ability toportrait, landscape or dualstaple all supported papersizes. Finished sets can bestacked internally to the lowerstacker tray.If either of the Staplers runsout of staples see ReplacingStaples or if it jams seeClearing Staple Jams.An alternate Staple Cartridgefor up to 30 sheets of 20lb isavailable. (75-80 gsm) papercapacity. Contact Xerox forinformation on ordering refills.Each Stapler Cartridge holds5000 staples. Contact Xerox forinformation on ordering refills.
Stapler Capacity
Same8.26 in to 18.5 in (210 mm to457 mm)8.26 in to 12 in (210 mm to305 mm)
Paper Size Rangeprocess directioncross process direction
Same16 lb bond to 113 lb index (56to 250 gsm)90 to 250 gsm
Stock Weight Rangeuncoated:coated:
NOTEFor information on how to use the BFM and BFM Plus and send documents to thestacker, see Using the Basic Finishing Module (BFM) andDelivering Document Setsto the Stacker.
Configurations
There are a number of possible 'Finishing' combinations for installing the BFM, InsertionModule, DS3500 and other external finishers on a Xerox Nuvera system. The BFM andBFM Plus or BFM Plus and BFM Plus can be installed together to double the stackercapacity.
Xerox Nuvera User Guide and Training Aid (UGTA) for Software Version 9.3/10.330-20
Machine Specifications(continued)

The diagrams below highlight some of the more common finishing configuration options.Notice that the Xerox Nuvera 200/288 EA/MX Perfecting Production System includestwo print engines in its configuration. Only the Nuvera EA Production System with a MFFdoes not include a Sheet Enhancement Module, which is always located directly afterthe print engine (or second print engine on the 200/288 system).
Figure 34. Print Engine / SEM/ BFM
Figure 35. Print Engine / SEM/ Insertion Module / BFM
Figure 36. Print Engine / SEM/ BFM Plus/ BFM
30-21Xerox Nuvera User Guide and Training Aid (UGTA) for Software Version 9.3/10.3
Machine Specifications

Figure 37. Print Engine / SEM/ Insertion Module / BFM Plus/ BFM
Figure 38. Print Engine / SEM / DS3500 -->connects to DFA compliant 3rd party Finisher
Figure 39. Print Engine / SEM/ Insertion Module/ DS3500 -->connects to DFA compliant 3rd partyFinisher
Xerox Nuvera User Guide and Training Aid (UGTA) for Software Version 9.3/10.330-22
Machine Specifications

Figure 40. Print Engine / SEM/ Insertion Module/ BFM Plus/ DS3500 -->connects to DFA compliant 3rdparty Finisher
Figure 41. Print Engine / SEM/ Insertion Module / BFM Plus / BFM Plus/ DS3500 -->connects to DFAcompliant 3rd party Finisher
DS3500 SpecificationsThe DS3500 is a DFA-compliant device that allows you to connect the printing systemto any DFA compliant 3rd-party finisher (for example, Bourg and Plockmatic bookletmakers, binders). The DS3500 serves as the link between the print engine of your systemand any 3rd-party finisher. Contact your Xerox representative for information on thisequipment.
30-23Xerox Nuvera User Guide and Training Aid (UGTA) for Software Version 9.3/10.3
Machine Specifications

DS3500 Capacities and Capabilities
Paper size capacity
Maximum 491 mm (19.33 in.)
Input speed
Up to 216 ppm
Eligible Paper Sizes/Orientation (as loaded into Paper Tray)
MillimetersInchesSEFLEF
105x241 to229x305
4.12x9.5 to9"x12"
XEnvelopes#102 to 9"x12"
148x2105.83x8.27XA5
140x2165.5x8.5XStatement
178x2547x10X7x10
182x2577.17x10.12XB5 - JIS
184x2677.25x10.5XExecutive
194x2677.64 x 10.51X16K (Taiwan)3
203x2548x10XX8x10
215/216x2798.5x11XXLetter
229x2799x11XXLtr Cover
229x2799x11XLtr Tab1
210x2708.27x10.63XX210x270
210x2978.27x11.69XXA4
210x3308.27x13X210x330
215x2758.46x10.83XX215x275
215x3568.46x14.02X215x356
216x2738.5x10.7XX216x273
223x2978.78x11.69XXA4 Cover
223x2978.78x11.69XA4 Tab1
215x3158.46x12.4XXSpanish - XE
203x3308x13X8x13
215x3308.46x13X215x330
216x3308.5x13XFoolscap - XE
220x3308.66x13X220x330
216x3568.5x14XLegal
229x3569x14X9x14
252x3589.9x14.1XSB4
Xerox Nuvera User Guide and Training Aid (UGTA) for Software Version 9.3/10.330-24
Machine Specifications

257x36410.12x14.33XB4 -JIS
267x38810.51x15.28X8K (Taiwan)3
297x42011.69x16.54XA3
279x43211x17XLedger
305x45712x18X12x18
305x47012x18.5X12x18.5
310x43212.2x17X12.2x17
317.5x47012.5x18.5X4 up-6x9
317.5x241.312.5x9.5X2 up-6x9
320x22512.6x8.9XSRA42 up-A5
320x45012.6x17.7XSRA34 up-A5
XXLabels
Stapler Specifications• Basic Finishing Module Stapler
• Multifunction Finisher
• Stapler Maintenance
Basic Finishing Module Stapler
For more information, see Basic Finishing Module Specification
Multifunction Finisher
If the Xerox Nuvera is equipped with a Multifunction Finisher, this finisher includes twostapling systems:
• Main Stapler
• Booklet Stapler
Before using any of the staplers on the Xerox Nuvera , take the time to learn about theircapabilities and capacities.
Document Size Requirements
Short Edge size range: 8 inches to 12 inches
Long Edge size range: 6.7 inches to 18 inches
30-25Xerox Nuvera User Guide and Training Aid (UGTA) for Software Version 9.3/10.3
Machine Specifications(continued)

Stapling Limit
The Main Stapler will accommodate either a 50 Sheet Stapler Cartridge or a 100 SheetStapler Cartridge. The maximum staple limit is either 50 sheetsof 80gsm (20lb.) paperor 100 sheets of 80gsm (20lb.) paper. Papers of heavier weights or larger sizes will reducethe maximum staple limits, accordingly.
Staple Cartridge Limitation
The machine software currently does not distinguish between the 50 Sheet StapleCartridge and the 100 Sheet Staple Cartridge. This means that if the 50 Sheet StapleCartridge is loaded in the machine, and a job with more than 50 sheets is sent to bestapled, a mis-staple or stapler jam will probably occur. If the 50 Sheet Staple Cartridgeis used, it is the responsibility of the operator to ensure that jobs exceeding 50 sheetsare not submitted for stapling.
Stock Weight / Maximum Sheets
100 Sheet CartridgeCapability
50 Sheet CartridgeCapability
Weight (UI Classification)
1005015 to 22 lb. (Normal)Small Paper Sizes (A4,Letter, Legal)
70 (105 gsm)35 (105 gsm)22+ to 28 lb. (Medium)
30 (216 gsm)15 (216 gsm)28+ lb. (Heavy)
505015 to 22 lb. (Normal)Large Paper Sizes (9 x14, B4, A3, & Ledger)
5035 (105 gsm)22+ to 28 lb. (Medium)
30 (216 gsm)15 (216 gsm)28+ lb. (Heavy)
Stapler Maintenance
If either of the staplers runs out of staples, or jams, see Clearing Stapler Jams or ReplacingStaples in the Finishers.
Keyboard, Mouse & DisplaySpecificationsThe User Interface (UI) provides the means for the user (operator) to interact with aprinter, copier, or Multifunctional device. Architecturally, the UI is a client of serviceswithin the printer, copier, or Multifunction device.
The user interface consists of the controls by which a user issues commands to a deviceor system, and the displays by which the device or system informs the user of the currentstate, its functions, and its processes.
Xerox Nuvera User Guide and Training Aid (UGTA) for Software Version 9.3/10.330-26
Machine Specifications
The UI will also provide a graphic display for messages, information, instructions, menusand machine diagram (mimic).
Keyboard Specifications
USB
Navigating the user interface using only the keyboard
The Xerox Nuvera user interface, in addition to being navigable with the USB mouse,can also be navigated through the keyboard.
Some examples of why the user interface is keyboard-accessible:
• Blind people cannot use a mouse because they cannot see where to click. They usetheir keyboard almost exclusively.
• Some individuals with neuromuscular impairments cannot use a mouse either.
For information on keyboard accessibility, see Special Navigation / Activation KeyboardShortcuts.
Common Keyboard Shortcuts
You can use the keyboard to navigate the UI and program jobs. For a complete set ofdocumentation on keyboard navigation, see Keyboard Operations on the Sun/Javawebsite.
User Interface Components Key
Focusable Component: Any button or control in the UI that can be clicked or have dataentered into it.
Character: A letter or number inside an editable text field.
Pane: One of 3 main areas of the user interface: the status area, service buttons (Copy,Print, etc...) on the left side, and the main content/tab area.
Keyboard Focus: The UI component that is enabled for some input from the user. Thisis visible in the UI as a blue border around the component.
ActionKeyboard Operation
Navigates to the next focusable component.Tab
Navigates to the previous focusablecomponent.
Shift+Tab
Navigates to the next focusable component.This works even if the component thatpreviously had focus accepts tabs; for examplethis is how to escape out of tables once a tableelement gets focus.
Control+Tab
30-27Xerox Nuvera User Guide and Training Aid (UGTA) for Software Version 9.3/10.3
Machine Specifications

Navigates to the previous focusablecomponent. This works even if the componentthat previously had focus accepts tabs; forexample this is how to escape out of tablesonce a table element gets focus.
Shift+Control+Tab
Moves focus left one character or component.Left arrow
Moves focus right one character or component.Right arrow
Moves focus up one line or component.Up arrow
Moves focus down one line or component.Down arrow
Moves up one pane of information.Page Up
Moves down one pane of information.Page Down
Moves to the beginning of the data; in a table,moves to the beginning of a row.
Home
Moves to the end of the data; in a table, movesto the last cell in a row.
End
Activates the default command button.Control Enter or Control-Return
Dismisses a menu or dialog box withoutchanges.
Escape
Activates the component that has keyboardfocus.
Spacebar
Special Navigation/Activation Keyboard Shortcuts
In addition to the common keyboard shortcuts, the Xerox Nuvera provides specialnavigation and activation keys. These keys allow the user to navigate around the userinterface and interact with the components and features of the system.
ActionKeyboard OperationComponent Type
Moves the focus between thepanes to first focusableelement in pane.
F6Split Pane
Gives focus to splitter bar.Arrow, Home and End keys canbe used to move the bar. Arrowkeys give fine control ofmovement. Home and End keyseffectively hide an entire panefrom view.
F8
Shortcut puts focus on firstmode indicator, from which theuser can post the tool tip. Modeindicators can include one ormore of the following modes:Secure, Job Fault, Diagnostic,Remote Workflow, andLogging.
Control-DMode Indicators
Xerox Nuvera User Guide and Training Aid (UGTA) for Software Version 9.3/10.330-28
Machine Specifications(continued)
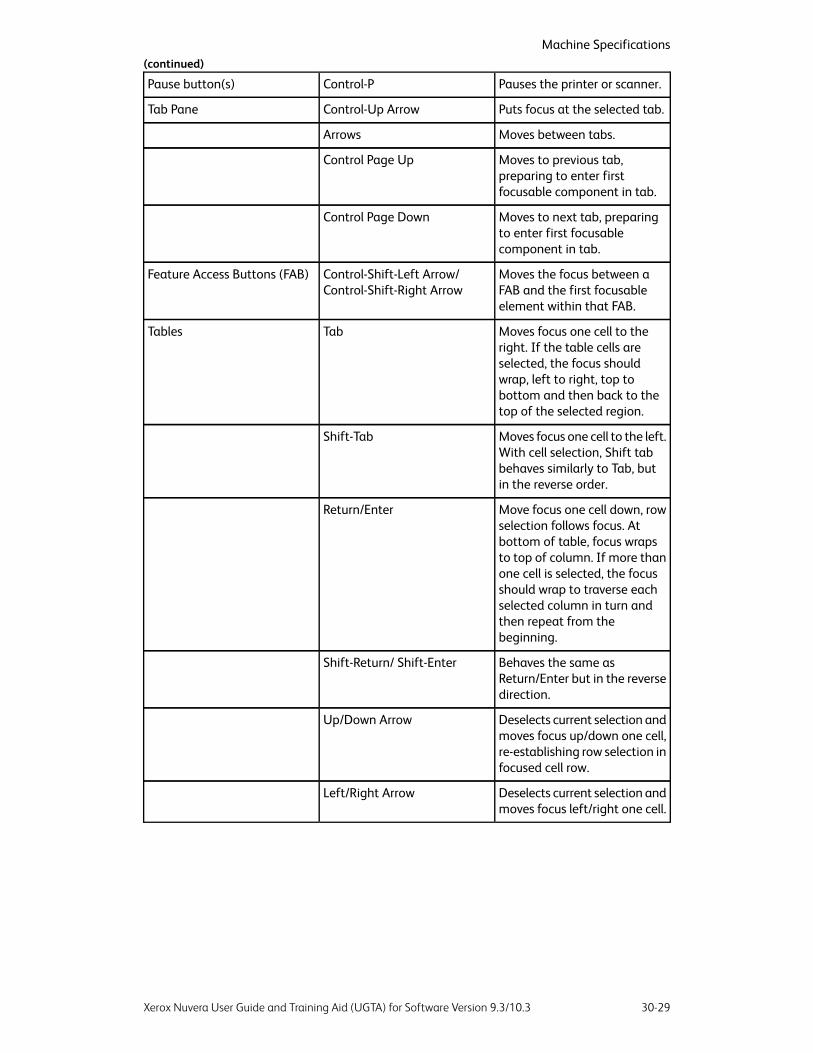
Pauses the printer or scanner.Control-PPause button(s)
Puts focus at the selected tab.Control-Up ArrowTab Pane
Moves between tabs.Arrows
Moves to previous tab,preparing to enter firstfocusable component in tab.
Control Page Up
Moves to next tab, preparingto enter first focusablecomponent in tab.
Control Page Down
Moves the focus between aFAB and the first focusableelement within that FAB.
Control-Shift-Left Arrow/Control-Shift-Right Arrow
Feature Access Buttons (FAB)
Moves focus one cell to theright. If the table cells areselected, the focus shouldwrap, left to right, top tobottom and then back to thetop of the selected region.
TabTables
Moves focus one cell to the left.With cell selection, Shift tabbehaves similarly to Tab, butin the reverse order.
Shift-Tab
Move focus one cell down, rowselection follows focus. Atbottom of table, focus wrapsto top of column. If more thanone cell is selected, the focusshould wrap to traverse eachselected column in turn andthen repeat from thebeginning.
Return/Enter
Behaves the same asReturn/Enter but in the reversedirection.
Shift-Return/ Shift-Enter
Deselects current selection andmoves focus up/down one cell,re-establishing row selection infocused cell row.
Up/Down Arrow
Deselects current selection andmoves focus left/right one cell.
Left/Right Arrow
30-29Xerox Nuvera User Guide and Training Aid (UGTA) for Software Version 9.3/10.3
Machine Specifications(continued)

Deselects current selection.When no vertical scrollbar isvisible, moves focus and rowselection to last/first row intable. The focused cell remainsin the same column in which itoriginated. When a verticalscrollbar is visible, scrolls thetable up/down one row andre-establishes the selected rowas the last/first visible row intable. The focus is moved,within its current column to thenewly selected row.
Page Up/Page Down
Deselects current selection.When no horizontal scrollbar isvisible, moves focus to first/lastcell in row and re-establishesrow selection where focusedcell resides. When a horizontalscrollbar is visible, scrolls thetable to left/right to make firstincompletely displayed columnvisible and places the focus inthat column. Row selection isre-established in focused cellrow.
Control-PageUp/Control-PageDown
Deselects current selection.Moves focus to first/last cell inrow and re-establishes rowselection in focused cell row.
Home/End
Deselects current selection.Moves focus to first/last row intable within the same columnwhere focus originated andre-establishes the row selection.
Control-Home/ Control-End
Select all rows in a table.Control-A
Selects whole row.Shift-End
Extend selection up/down onerow in table.
Shift-Up Arrow/ Shift-DownArrow
Xerox Nuvera User Guide and Training Aid (UGTA) for Software Version 9.3/10.330-30
Machine Specifications(continued)

Extend Selection up/down one"table page" at a time. Whenno vertical scrollbar is visible,moves focus and row selectionto last/first row in table. Thefocused cell remains in thesame column in which itoriginated. Row selection isestablished from original rowin which focus resided to therow in which the focus hasbeen moved. When a verticalscrollbar is visible, scrolls thetable up/down one row andmoves the focus within itscurrent column to the newlyvisible row. Row selection isestablished from original rowin which focus resided to therow in which the focus hasbeen moved.
Shift-PageUp/
Extend Selection from currentrow where focus resides tobeginning/end of table. Focusdoes not move.
Control-Shift Home/Control-Shift End
Presents popup menu, if oneexists.
Space
Move table column wherefocus resides right/left, onecolumn in the table.
Alt-Right Arrow/ Alt-Left Arrow
Extend selection up/down onerow in table.
Shift-Up Arrow/ Shift-DownArrow
30-31Xerox Nuvera User Guide and Training Aid (UGTA) for Software Version 9.3/10.3
Machine Specifications(continued)

Extend Selection up/down one"table page" at a time. Whenno vertical scrollbar is visible,moves focus and row selectionto last/first row in table. Thefocused cell remains in thesame column in which itoriginated. Row selection isestablished from original rowin which focus resided to therow in which the focus hasbeen moved.When a vertical scrollbar isvisible, scrolls the tableup/down one row and movesthe focus within its currentcolumn to the newly visiblerow. Row selection isestablished from original rowin which focus resided to therow in which the focus hasbeen moved.
Shift-PageUp/ Shift-PageDown
Extend Selection from currentrow where focus resides tobeginning/end of table. Focusdoes not move.
Control-Shift Home/Control-Shift End
Presents popup menu, if oneexists.
Space
Move table column wherefocus resides right/left, onecolumn in the table.
Control-Right Arrow/Control-Left Arrow
Sort column where focusresides inascending/descending order.(This assumes that the tablehas sorting activated.)
Control-Shift-Up Arrow/Control-Shift-Down Arrow
Deselects current selection andmoves focus up/down oneelement, > re-establishingselection on focused listelement.
Up/Down Arrow
Deselects current selection.When no vertical scrollbar isvisible, moves focus andelement selection to last/firstelement in list. When a verticalscrollbar is visible, scrolls the listup/down one row and movesfocus and element selection tothe last/first visible element inlist.
Page Up/Page Down
Xerox Nuvera User Guide and Training Aid (UGTA) for Software Version 9.3/10.330-32
Machine Specifications(continued)

Moves focus and selection tofirst/last element in list.
Home/End
Select all elements in list.Control-A
Extend selection up/down onelist element at a time. Focusmoves too.
Shift-Up Arrow/ Shift-DownArrow
Extend selection up/down one"page view" at a time. Focusmoves to bottom/top ofselection.
Shift-Page Up/ Shift-PageDown
Extend selection to top/bottomof list. Focus moves totop/bottom of list.
Shift-Home/ Shift-End
Scroll viewing window up/downone row at a time.
Up/Down ArrowScroll Bars
Scroll viewing window up/downone "page view" at a time.
Page Up/Page Down
Scroll viewing window to thetop/bottom of displayedcomponent (eg. tree, table, orlist).
Home/End
Select menu item with focus.Space/EnterPop Up Menu
Move focus to previous/nextmenu item.
Up/Down Arrow
Assuming focus is at acascading menu element, openup a cascading menu.
Right Arrow
Assuming focus is at acascading menu element, closethe cascading menu.
Left Arrow
Exit pop up menus.Esc
Post (activate) menu.Space/Down ArrowPull Down Box Menu
Move focus and selectprevious/next menu item.
Up/Down Arrow
Exit pull-down menus.Esc
Launch menu.F10Menu Bar
Move focus to previous/nextmenu item.
Up/Down Arrow
Select focused menu item.Space/Enter
Exit menu.Esc
Move focus and selectionup/down one row in directorytree.
Up/Down ArrowDirectory Tree
30-33Xerox Nuvera User Guide and Training Aid (UGTA) for Software Version 9.3/10.3
Machine Specifications(continued)

Move focus left/right onecolumn in directory tree. Ifclosed folder is selected, rightarrow opens folder when it isnot empty. If folder is openand selected, left arrow closesfolder.
Left/Right Arrow
Move up/down one "pageview", first focusablecomponent in view gets focusand selection.
Page Up/Down
Move to first/last element intree. This element gets thefocus and selection.
Home/End
Move focus up/down one rowin directory tree.
Control-Left Arrow/Control-Right Arrow
Move up/down one "pageview", first focusablecomponent in view gets focus.
Control-Page Up/ Control-PageDown
Move to first/last element intree. This element gets thefocus.
Control-Home/ Control-End
Select element in directory treewhere focus is located.
Space
Launch tool tip if one isattached to focusedcomponent.
Control-F1Tool Tip
Dismiss tool tip.Control-F1/Esc
Keyboard Shortcuts and Mnemonics
NotesResultKeyboard Shortcut
Pause dialog (pauses bothprinting and/or scanning)
Pause buttonCtrl-P
PS onlyPause ScanningCtrl-N
When available on the UI (asapplicable to theconfiguration)
Unload buttonCtrl-U
DC/ST onlyClear All buttonCtrl-A
Content Area
When pathway to the Startbutton is open.
Start button (Copy, Scan toFile, Print Service)
Ctrl-S
List of Mnemonics
CommentsItem(s)Letter
Xerox Nuvera User Guide and Training Aid (UGTA) for Software Version 9.3/10.330-34
Machine Specifications(continued)

Menus
Top level Logon menuAlt-L
Top level Logon menu needs tobe open. Once menu is open,user would use the "l" key toopen the logon dialog.
LogonL
Top level Logon menu needs tobe open. Once menu is open,user would use the "f" key toopen the logoff dialog.
LogoffF
Top level System menuAlt-M
Top level System menu needsto be open. Once menu is open,user would use the "p" key topause the RIP. The Ctrl-Shift-Pcombination is an accelerator,which does not require the userto open the System menu.
Pause Processing Ctrl-Shift-PP
Top level System menu needsto be open. Once menu is open,user would use the "r" key toresume the RIP. The Ctrl-Shift-Rcombination is an accelerator,which does not require the userto open the System menu.
Resume Processing Ctrl-Shift-RR
Top level System menu needsto be open. Once menu is open,user would use the "d" key toopen the service diagnosticsdialog.
Service DiagnosticsD
Top level System menu needsto be open. Once menu is open,user would use the "s" key toopen the Shutdown dialog. TheCtrl-Shift-S combination is anaccelerator, which does notrequire the user to open theSystem menu.
Shutdown Ctrl-Shift-SS
Top level Printer menuAlt-I
Top level Setup menuAlt-E
Top level Administration menuAlt-A
Top level Help menuAlt-H
Pathways
Copy Service PathwayAlt-C
Scan to Digital ServicePathway
Alt-S
30-35Xerox Nuvera User Guide and Training Aid (UGTA) for Software Version 9.3/10.3
Machine Specifications(continued)

Print Service PathwayAlt-P
Job Manager PathwayAlt-J
Queue Manager PathwayAlt-Q
Content Area
When pathway with button isopen.
Reset button (Copy, Scan toFile, Print Service)
Alt-R
When pathway with button isopen.
Build Job button (Copy, Scanto File)
Alt-B
When pathway with button isopen.
Continue Build Job button forBuild Job (Copy, Scan to FileService)
Alt-O
When pathway with button isopen.
End Build Job button (Copy,Scan to File Service)
Alt-N
When Build Job is on.Cancel Build Job (Copy, Scanto Service)
Esc
Child Window Controls
When child window is open andhas focus.
OKAlt-O
When child window is open andhas focus.
ResetAlt-R
When child window is open andhas focus.
Apply, Add Insert, AddException, or Add Cover
Alt-A
When child window is open andhas focus.
HelpAlt-H
Mouse Specifications
USB track ball or Optical mouse.
Display (Monitor) Specifications1024 x 768Screen Resolution
256,000Colors
15 inchesScreen Size
.27Dot Pitch
>50hzRefresh Rate
Media Drive SpecificationsAll Xerox Nuvera systems are equipped with a CD-RW/DVD drive, located just to theright of the monitor in the Control Console.
Xerox Nuvera User Guide and Training Aid (UGTA) for Software Version 9.3/10.330-36
Machine Specifications(continued)

File Submission
Systems equipped with the CD drive support reading from and writing to CD-R andCD-RW formats.
Systems equipped with the DVD drive support reading from and writing to CD-R, CD-RW,DVD-R, DVD-RW, DVD+R, and DVD+RW formats.
For details on submitting a job from the optical drive, see Printing from the Media Drive.
File Saving/Archiving
On Xerox Nuvera systems that support copying and scanning, you can save scannedjobs through the Scan-To-File application. Scanned and printed jobs can be saved tothe system disk, the CD-RW or to any NFS-mounted drive. Both the "ripped" image andthe job ticket are saved.
For best results use good quality optical media for saving and archiving.
Electrical and EnvironmentalSpecificationsThe print engine, which includes the FreeFlow Print Server, requires:
Frequency
50/60 hz
Voltage
US/Canada Line Voltage:
• Protection 115-127/200-220V 2 phase, 3 wire+ PE
• Line Current 24A or 40A, Frequency 60 and Branch Cir 30A or 50A
EU Line Voltage:
• Protection 200-240 V
• Line Current 24A, Frequency 50 and Branch Cir 30A
Amps
Dedicated 30 amps (Europe)
Dedicated 50 amps (US, Canada and Japan)
The outlets/circuits can not be shared with any other devices or equipment. Optional 50amp Adapter Box and 30A Extension Box with appropriate circuit breakers are available.
30-37Xerox Nuvera User Guide and Training Aid (UGTA) for Software Version 9.3/10.3
Machine Specifications
Receptacle NEMA Part Number
14-30 R (NASG)
Temperature and Humidity
Recommended 50 degrees F to 87 degrees F (10 C to 30.6 C)
15% relative humidity (minimum) to 85% relative humidity (maximum)
Altitude
Between 0 to 6000 ft (1828.8m) above sea level
Heat Emission
Approximately 2,018 BTU/hour (standby) and 11,600 BTU/hour (running)
Power Consumption
Approximately 0.658 kw maximum (standby) and 4.150 kw maximum (running). Forinformation on power consumption, see Power Saver Mode.
Sheet Feed Modules (SFM)The Xerox Nuvera can be configured with up to two Sheet Feed Modules. They includea 4-Tray Feed Module that can be installed with an optional Integrated Scanner, andan optional large format, high capacity 2-Tray Feed Module.
The Xerox Nuvera can have any combination of the 4-Tray or 2-Tray Feed Modulesinstalled up to a total of two modules. If the 4-Tray Feed Module has a scanner, it shouldbe installed closest to the Print Engine.
The 4-Tray Feed Module, without a scanner, or the 2-Tray Feed Module can also beinstalled as a post-fuser Insertion Module.
NOTEThe Xerox Nuvera 200/288 EA/MX Perfecting Production System 2-Try SFM is capableof feeding paper up to 19.33 inches (491 mm) in process length. This is not an optionon the Nuvera EA 2-Tray SFM.
NOTEYou can also configure your Xerox Nuvera with a 3-Tray Sheet Feed Module. If yoursystem includes a Roll Feeder, either a 3-Tray SFM or 4-Tray SFM must be installed.
Xerox Nuvera User Guide and Training Aid (UGTA) for Software Version 9.3/10.330-38
Machine Specifications
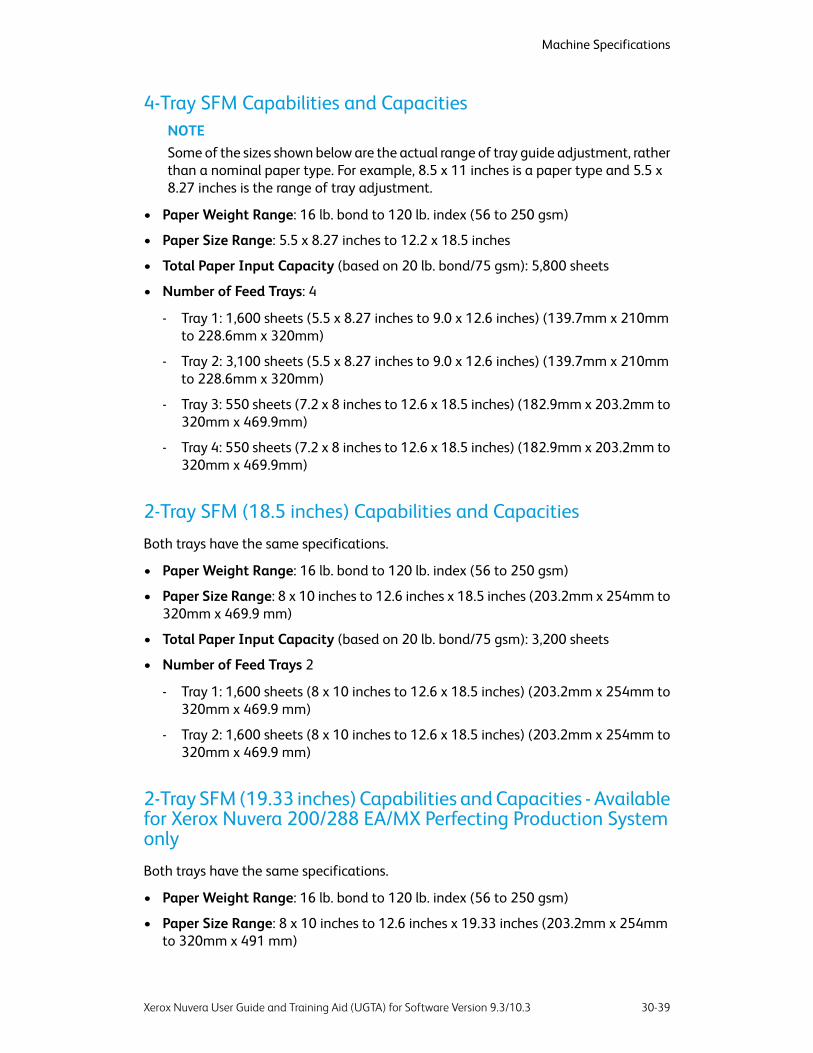
4-Tray SFM Capabilities and CapacitiesNOTESome of the sizes shown below are the actual range of tray guide adjustment, ratherthan a nominal paper type. For example, 8.5 x 11 inches is a paper type and 5.5 x8.27 inches is the range of tray adjustment.
• Paper Weight Range: 16 lb. bond to 120 lb. index (56 to 250 gsm)
• Paper Size Range: 5.5 x 8.27 inches to 12.2 x 18.5 inches
• Total Paper Input Capacity (based on 20 lb. bond/75 gsm): 5,800 sheets
• Number of Feed Trays: 4
- Tray 1: 1,600 sheets (5.5 x 8.27 inches to 9.0 x 12.6 inches) (139.7mm x 210mmto 228.6mm x 320mm)
- Tray 2: 3,100 sheets (5.5 x 8.27 inches to 9.0 x 12.6 inches) (139.7mm x 210mmto 228.6mm x 320mm)
- Tray 3: 550 sheets (7.2 x 8 inches to 12.6 x 18.5 inches) (182.9mm x 203.2mm to320mm x 469.9mm)
- Tray 4: 550 sheets (7.2 x 8 inches to 12.6 x 18.5 inches) (182.9mm x 203.2mm to320mm x 469.9mm)
2-Tray SFM (18.5 inches) Capabilities and Capacities
Both trays have the same specifications.
• Paper Weight Range: 16 lb. bond to 120 lb. index (56 to 250 gsm)
• Paper Size Range: 8 x 10 inches to 12.6 inches x 18.5 inches (203.2mm x 254mm to320mm x 469.9 mm)
• Total Paper Input Capacity (based on 20 lb. bond/75 gsm): 3,200 sheets
• Number of Feed Trays 2
- Tray 1: 1,600 sheets (8 x 10 inches to 12.6 x 18.5 inches) (203.2mm x 254mm to320mm x 469.9 mm)
- Tray 2: 1,600 sheets (8 x 10 inches to 12.6 x 18.5 inches) (203.2mm x 254mm to320mm x 469.9 mm)
2-Tray SFM (19.33 inches) Capabilities and Capacities - Availablefor Xerox Nuvera 200/288 EA/MX Perfecting Production Systemonly
Both trays have the same specifications.
• Paper Weight Range: 16 lb. bond to 120 lb. index (56 to 250 gsm)
• Paper Size Range: 8 x 10 inches to 12.6 inches x 19.33 inches (203.2mm x 254mmto 320mm x 491 mm)
30-39Xerox Nuvera User Guide and Training Aid (UGTA) for Software Version 9.3/10.3
Machine Specifications

• Total Paper Input Capacity (based on 20 lb. bond/75 gsm): 3,200 sheets
• Number of Feed Trays 2
- Tray 1: 1,600 sheets (8 x 10 inches to 12.6 x 19.33 inches) (203.2mm x 254mmto 320mm x 491 mm)
- Tray 2: 1,600 sheets (8 x 10 inches to 12.6 x 19.33 inches) (203.2mm x 254mmto 320mm x 491 mm)
3-Tray SFM Capabilities and Capacities
The 3-Tray Sheet Feed Module is an optional feeder that can be used with any otherFeed Module combination. The paper and tray specifications are the same as the 4-TrayFeed Module except that trays 3 and 4 are combined.
For more information on supported papers, see Recommendations for Paper Usage.
CAUTIONPaper trays do not lock and can be opened while paper is being fed from the tray,resulting in misfeeds and/or paper jams. Wait for the LED light on the tray to turnOFF before opening the tray.
Xerox Nuvera User Guide and Training Aid (UGTA) for Software Version 9.3/10.330-40
Machine Specifications

31Adding Pages to aDocument
You can add pages of several types to any original document. This allows you to createprofessional quality document sets from otherwise disorganized and/or incompleteoriginals.
Types of added pages can include:
• Covers: may be a heavier paper stock, put on the front and back of a multi-pagedocument. Covers can be blank, printed on side 1 or both sides.
• Exception pages: allows you to program special characteristics for specific pages ora range of pages within a job (up to 1000 exception pages). For example, page 4 ofthe document can be programmed to print on pink paper and on side 1 only. Youcan also specify tabbed stock with the Exception Pages control. When printing onpre-cut tabs, you can only print on side 1. When printing on full cut tabs, you canprint on both sides.
• Inserts: An insert is a blank or pre-printed sheet of paper or other stock (such as atab) that is placed between the pages of the job. You can program up to 1000 insertsfor a job.
Paper trays must be loaded andprogrammed with the appropriate stocksThe key to successful page insertion is having the paper trays correctly programmedwith machine-compatible stocks. See Paper Tray Programming for details.
Basic workflow to insert pages into adocument(The following example procedure applies to both copy and print jobs)
31-1Xerox Nuvera User Guide and Training Aid (UGTA) for Software Version 9.3/10.3

Here's an example of how to program a copy job that includes inserts, exception pages,and covers. The steps to program a print job are very similar. The output will be a multi-page, 8.5 x 11 inch document, with Exception Pages (one-sided output) on the 2nd and3rd pages. In addition, there will be a one-page insert after the 3rd and 6th pages.Finishing includes front and back covers with a staple in the top left corner.1. If a copy job, place the original 2-sided (over 10 pages) document in the Document
Feeder.2. Verify that the paper supply trays are properly loaded and programmed with the
appropriate paper stocks.If they are not, and you need more information, see Paper Tray Programming.
3. From the Job Manager, set base job properties, such as 2-sided, paper stock, stapling,etc.
4. Select the Special Pages tab.5. Select the Exception Pages icon. Program From 2 to 3. Select stock size. Program
these pages for one-sided output. Select Add Exceptions.6. Close Job Exception window.7. Select the Inserts icon.8. Program the first insert for After page 3, Insert 1 Pages. Program the paper type,
size, etc. Select Add Inserts.9. Program the second insert for After page 6, Insert 1 Pages. Program the paper type,
size, etc. Select Add Insert.10. Close Inserts window.11. Select Front Cover icon.12. Program the cover to be printed on the outside only. Select the cover stock from the
tray you loaded with cover stock. Select Add Cover.13. Select Back Cover icon.14. Select None from the pull-down menu. Select the cover stock from the tray you loaded.
Select Add Cover.15. When satisfied with your settings, click Copy, Scan or Print.
System Level (Administrative) AddedPagesThe Xerox Nuvera can be configured to include Administrative information in each Joboutput.
• Banner pages
• Error pages
• Job attribute report
For more information about these types of pages, see Adding System Level Pages.
Xerox Nuvera User Guide and Training Aid (UGTA) for Software Version 9.3/10.331-2
Adding Pages to a Document

Adding System Level PagesThe Xerox Nuvera can be configured to add "system level" or "administrative" pages:
• Banner pages
• Error pages
• Job Attributes report
These administrative pages not only provide a useful way to separate jobs in a Finishertray, but also provide information about each job processed by the system.
Enabling System Level Pages
You need to logon as a System Administrator to enable or disable the system level pages.
To enable or disable the system level pages:1. Open a job or queue properties window.2. Perform one of the following:
• Under the Settings tab select Administrative Pages. Then enable or disable eachof the pages.
• For Production System queues, right-click on a queue and selectAdministrative Pages Control. Then enable or disable each of the pages.
Banner Pages
When enabled by your System Administrator, Banner Pages include the followinginformation:
• Job name
• Job sender
• Job recipient
• Banner Page message
• Date and Time of printing
• Number of copies
• Product name and software level/version
• Account number
• Job ID
• Server/Queue name
31-3Xerox Nuvera User Guide and Training Aid (UGTA) for Software Version 9.3/10.3
Adding Pages to a Document
Error Pages
When enabled by your System Administrator, Error Pages include the followinginformation:
• Job name
• Job sender
• Errors, Warnings
• Product name and software level/version
• Job ID
Job Attributes Report
The Job Attributes report is a summary of the job settings.
Xerox Nuvera User Guide and Training Aid (UGTA) for Software Version 9.3/10.331-4
Adding Pages to a Document
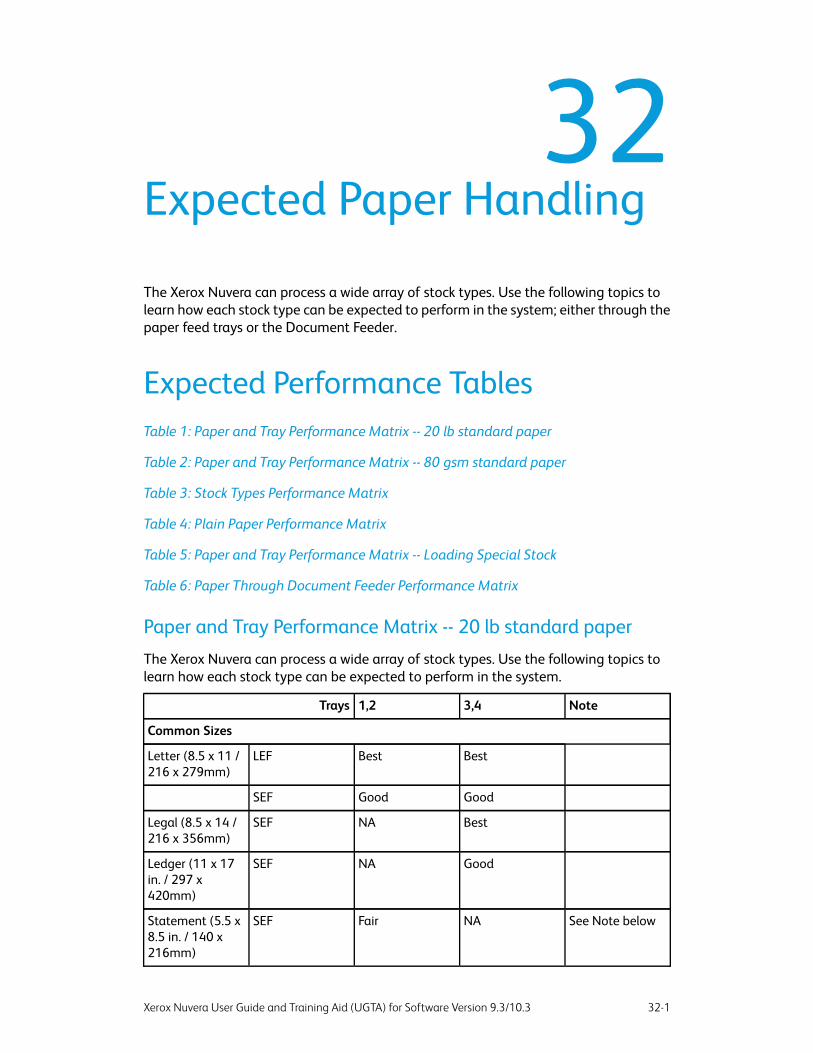
32Expected Paper Handling
The Xerox Nuvera can process a wide array of stock types. Use the following topics tolearn how each stock type can be expected to perform in the system; either through thepaper feed trays or the Document Feeder.
Expected Performance TablesTable 1: Paper and Tray Performance Matrix -- 20 lb standard paper
Table 2: Paper and Tray Performance Matrix -- 80 gsm standard paper
Table 3: Stock Types Performance Matrix
Table 4: Plain Paper Performance Matrix
Table 5: Paper and Tray Performance Matrix -- Loading Special Stock
Table 6: Paper Through Document Feeder Performance Matrix
Paper and Tray Performance Matrix -- 20 lb standard paper
The Xerox Nuvera can process a wide array of stock types. Use the following topics tolearn how each stock type can be expected to perform in the system.
Note3,41,2Trays
Common Sizes
BestBestLEFLetter (8.5 x 11 /216 x 279mm)
GoodGoodSEF
BestNASEFLegal (8.5 x 14 /216 x 356mm)
GoodNASEFLedger (11 x 17in. / 297 x420mm)
See Note belowNAFairSEFStatement (5.5 x8.5 in. / 140 x216mm)
32-1Xerox Nuvera User Guide and Training Aid (UGTA) for Software Version 9.3/10.3

GoodGoodLEFExecutive (7.25 x10.5 in. / 184 x267mm)
GoodGoodLEFExecutive (8 x 10in. / 203 x254mm)
GoodNRSEF
GoodNRSEF12 x 18 in. / 305 x457mm
Table Legend• SEF: Short Edge Feed
• LEF: Long Edge Feed
• Best: Best system performance
• Good: Good system performance
• Fair: Significant performance degradation is likely, particularly paper handling.
• NR: Not Recommended. Exceeds system design. Unacceptable performance likely.
• **: Same performance as shown in 20 lb. Standard Paper Table for the correspondingpaper sizes.
• NA: Not Applicable. Not possible to load.
NOTEThe output will go to the Top Tray in an MFF-equipped machine, and cannot bestapled.
Paper and Tray Performance Matrix -- 80 gsm standard paper
The Xerox Nuvera can process a wide array of stock types. Use the following topics tolearn how each stock type can be expected to perform in the system.
Note3,41,2Trays
Common Sizes
BestBestLEFA4 (210 x 297mm/ 8.27 x 11.69)
GoodNASEF
GoodNASEFA3 (297 x 420mm/ 11.69 x 16.54)
See Note belowNRGoodLEFA5 (148 x 210mm/ 5.83 x 8.27)
See Note belowNRNRSEF
GoodNASEFB4 (257 x 364mm/ 10.12 x 14.33)
GoodGoodLEFB5 (182 x 257mm/ 7.17 x 10.12)
Xerox Nuvera User Guide and Training Aid (UGTA) for Software Version 9.3/10.332-2
Expected Paper Handling(continued)
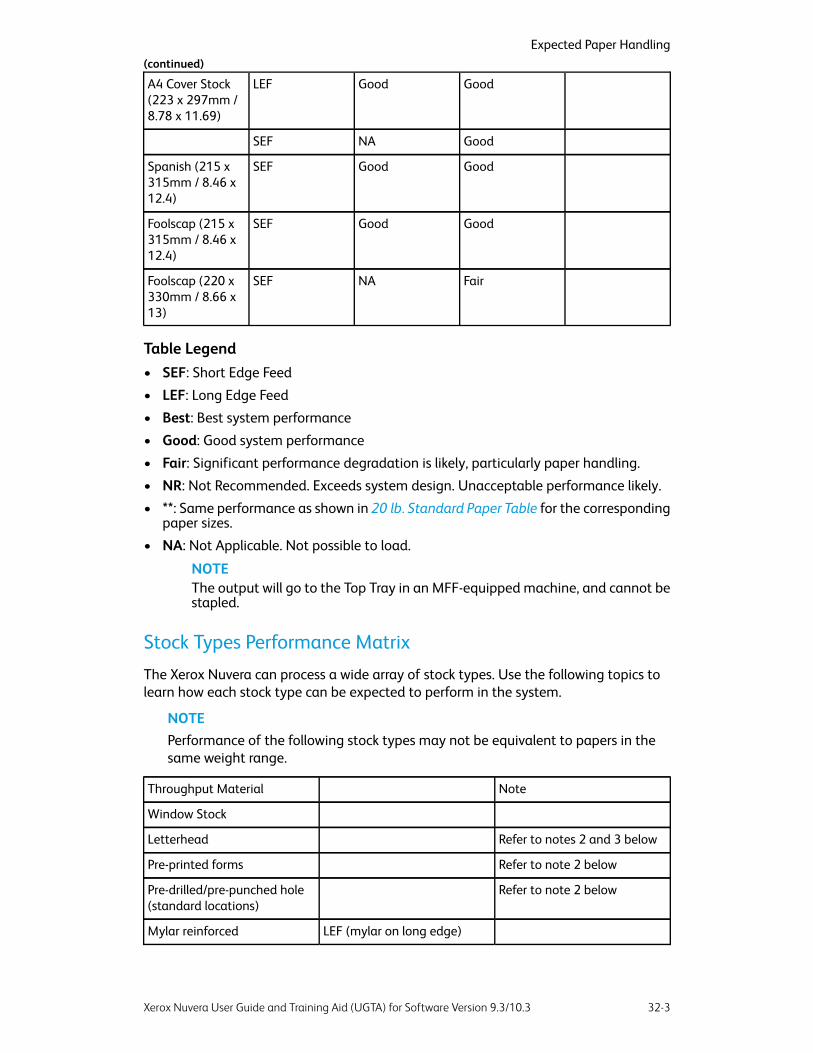
GoodGoodLEFA4 Cover Stock(223 x 297mm /8.78 x 11.69)
GoodNASEF
GoodGoodSEFSpanish (215 x315mm / 8.46 x12.4)
GoodGoodSEFFoolscap (215 x315mm / 8.46 x12.4)
FairNASEFFoolscap (220 x330mm / 8.66 x13)
Table Legend• SEF: Short Edge Feed
• LEF: Long Edge Feed
• Best: Best system performance
• Good: Good system performance
• Fair: Significant performance degradation is likely, particularly paper handling.
• NR: Not Recommended. Exceeds system design. Unacceptable performance likely.
• **: Same performance as shown in 20 lb. Standard Paper Table for the correspondingpaper sizes.
• NA: Not Applicable. Not possible to load.
NOTEThe output will go to the Top Tray in an MFF-equipped machine, and cannot bestapled.
Stock Types Performance Matrix
The Xerox Nuvera can process a wide array of stock types. Use the following topics tolearn how each stock type can be expected to perform in the system.
NOTEPerformance of the following stock types may not be equivalent to papers in thesame weight range.
NoteThroughput Material
Window Stock
Refer to notes 2 and 3 belowLetterhead
Refer to note 2 belowPre-printed forms
Refer to note 2 belowPre-drilled/pre-punched hole(standard locations)
LEF (mylar on long edge)Mylar reinforced
32-3Xerox Nuvera User Guide and Training Aid (UGTA) for Software Version 9.3/10.3
Expected Paper Handling(continued)

SEF
Transparencies
NOTEThe paperpath/sensors in theXerox Nuvera do notrequire that you feedtransparencies withremovable stripes. Ifyou have this type ofmedia, you can use it,but the stripe is notnecessary for properfunction.
NOTEFor dedicatedtransparency trays,first placeapproximately half aninch (12 mm) worth ofplain paper at thebottom of the tray.This will ensure that all50 of thetransparencies getused.
Refer to note 6 belowClear/plain
Refer to note 6 belowNon-removable white stripe
Refer to note 6 belowLEFRemovable Stripe
SEF
Refer to note 6 belowSEF DO NOT USEPaper backed
LEF
Refer to note 4 belowLEFLabels
Refer to note 2 belowSEF
LEFGBC brand or pre-punched withrectangular holes: (holes onlong edge). This type of paperonly works when holes are atthe rear of the paper tray.
Refer to note 4 below(Loadwith holes AWAY from user.)
SEF
Never Tear Type
Drafting Film
Perforated:
Xerox Nuvera User Guide and Training Aid (UGTA) for Software Version 9.3/10.332-4
Expected Paper Handling(continued)
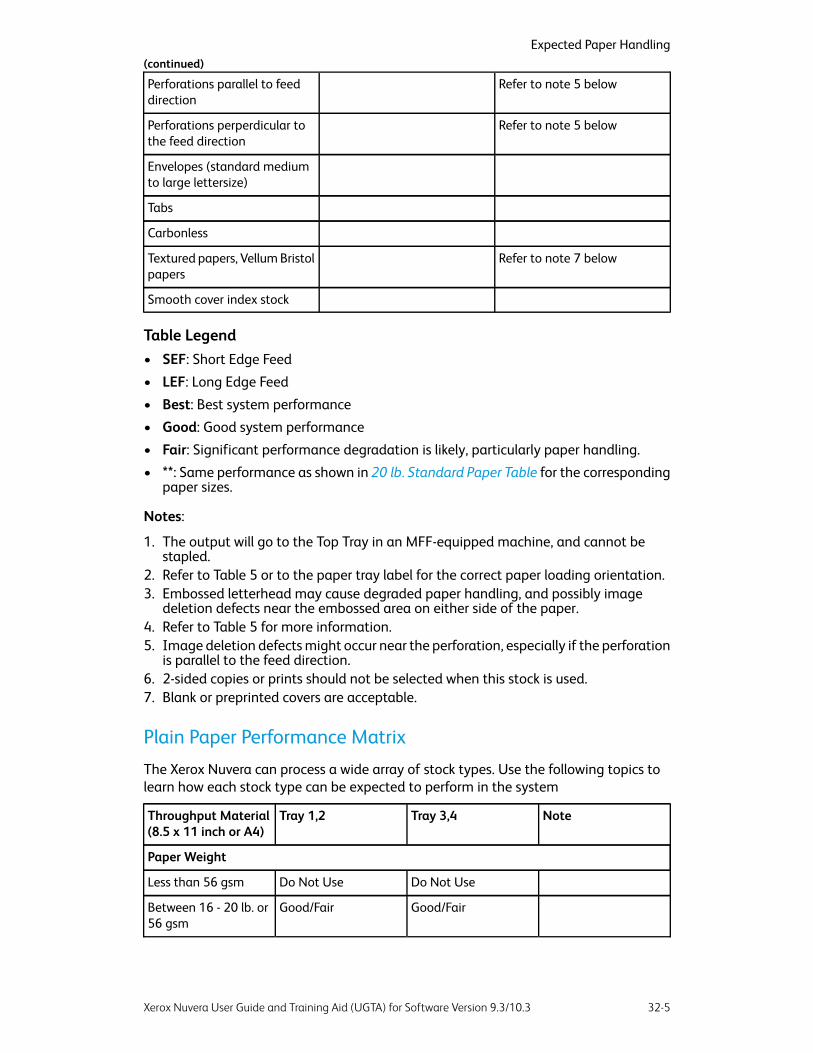
Refer to note 5 belowPerforations parallel to feeddirection
Refer to note 5 belowPerforations perperdicular tothe feed direction
Envelopes (standard mediumto large lettersize)
Tabs
Carbonless
Refer to note 7 belowTextured papers, Vellum Bristolpapers
Smooth cover index stock
Table Legend• SEF: Short Edge Feed
• LEF: Long Edge Feed
• Best: Best system performance
• Good: Good system performance
• Fair: Significant performance degradation is likely, particularly paper handling.
• **: Same performance as shown in 20 lb. Standard Paper Table for the correspondingpaper sizes.
Notes:
1. The output will go to the Top Tray in an MFF-equipped machine, and cannot bestapled.
2. Refer to Table 5 or to the paper tray label for the correct paper loading orientation.3. Embossed letterhead may cause degraded paper handling, and possibly image
deletion defects near the embossed area on either side of the paper.4. Refer to Table 5 for more information.5. Image deletion defects might occur near the perforation, especially if the perforation
is parallel to the feed direction.6. 2-sided copies or prints should not be selected when this stock is used.7. Blank or preprinted covers are acceptable.
Plain Paper Performance Matrix
The Xerox Nuvera can process a wide array of stock types. Use the following topics tolearn how each stock type can be expected to perform in the system
NoteTray 3,4Tray 1,2Throughput Material(8.5 x 11 inch or A4)
Paper Weight
Do Not UseDo Not UseLess than 56 gsm
Good/FairGood/FairBetween 16 - 20 lb. or56 gsm
32-5Xerox Nuvera User Guide and Training Aid (UGTA) for Software Version 9.3/10.3
Expected Paper Handling(continued)

BestBestBetween 20 - 32 lb. or75 - 120 gsm
GoodGoodBetween 32 - 110 lb.(index) or 120 - 216gsm
Do Not UseDo Not UseGreater than 110 lb.(index) or 250 gsm;Greater than 220 gsmfor systems with a MFF
Table Legend• SEF: Short Edge Feed
• LEF: Long Edge Feed
• Best: Best system performance
• Good: Good system performance
• Fair: Significant performance degradation is likely, particularly paper handling.
• NR: Not Recommended. Exceeds system design. Unacceptable performance likely.
• **: Same performance as shown in 20 lb. Standard Paper Table for the correspondingpaper sizes.
Paper and Tray Performance Matrix -- Loading Special Stock
The Xerox Nuvera can process a wide array of stock types. Use the following topics tolearn how each stock type can be expected to perform in the system
NoteRecommendationCommon UsesStock Type
Use long edge feed forbest copy speed (loadwith holes to the right).
Ringed bindersHole-Punched
When printing oncoated stock that hasonly one side coated,load the coated sideUP.
Presentations,collaterals
Coated (not supportedon MFF)
Where possible, loadwith perforationparallel to the feeddirection.
Pages for partialremoval, such as orderforms and receipts
Perforated
Commoncorrespondence,mailings andadvertising materials
Pre-printed andletterhead • Use ultra-violet
cured or oxidativeinks to extend thelife of the feed rollcartridges.
• Load face-up inTrays 1 - 4.
Xerox Nuvera User Guide and Training Aid (UGTA) for Software Version 9.3/10.332-6
Expected Paper Handling(continued)

Ring bindersReinforced Mylar edge• Load reinforced
edge on the rightin Trays 1 - 4.
• Use long-edge feedonly.
For best results, setHeavy Weightattribute whenprogramming Trays 1- 4.
Covers, signsCard stock
32-7Xerox Nuvera User Guide and Training Aid (UGTA) for Software Version 9.3/10.3
Expected Paper Handling(continued)
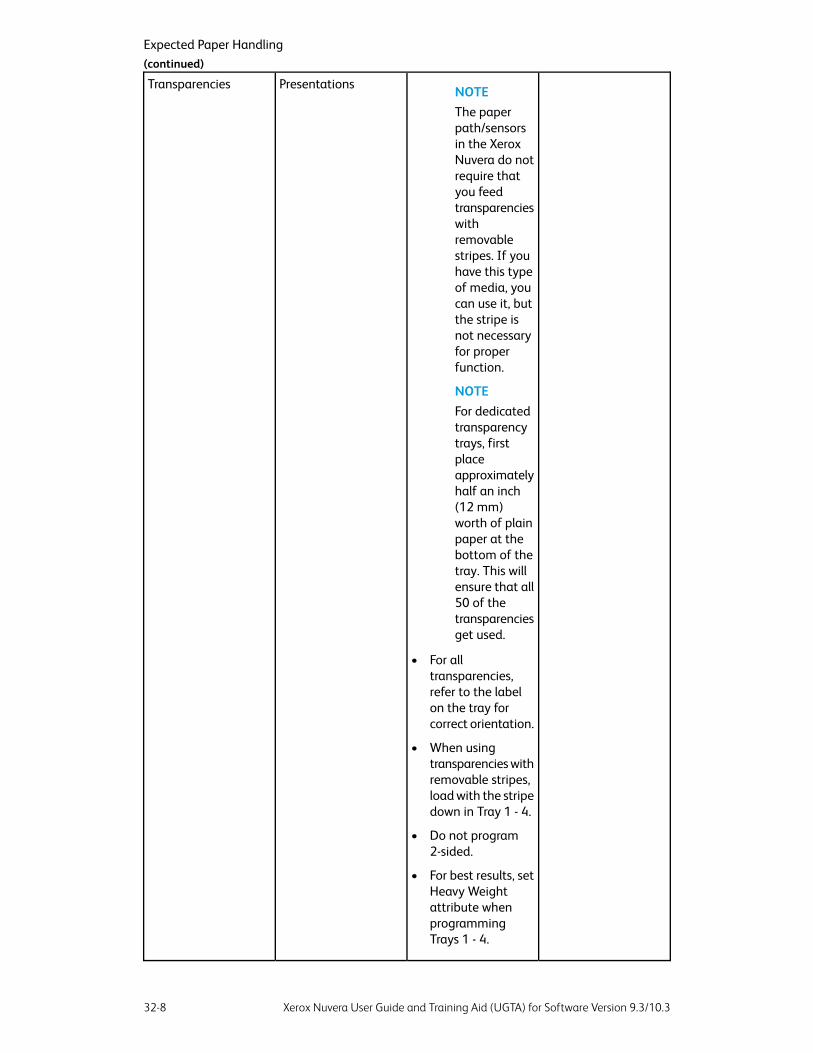
NOTEPresentationsTransparencies
The paperpath/sensorsin the XeroxNuvera do notrequire thatyou feedtransparencieswithremovablestripes. If youhave this typeof media, youcan use it, butthe stripe isnot necessaryfor properfunction.
NOTEFor dedicatedtransparencytrays, firstplaceapproximatelyhalf an inch(12 mm)worth of plainpaper at thebottom of thetray. This willensure that all50 of thetransparenciesget used.
• For alltransparencies,refer to the labelon the tray forcorrect orientation.
• When usingtransparencies withremovable stripes,load with the stripedown in Tray 1 - 4.
• Do not program2-sided.
• For best results, setHeavy Weightattribute whenprogrammingTrays 1 - 4.
Xerox Nuvera User Guide and Training Aid (UGTA) for Software Version 9.3/10.332-8
Expected Paper Handling(continued)

Nuvera supportsonly 8 1/2 x 11"
•
(A4)transparencies.
Self-adhesive labels forenvelopes andpackaging
Labels• Do not program
2-sided.
• For best results,feed labels into themachine LEF only.
• Load face-up inTrays 1 - 4.
• For best results, setHeavy Weightattribute whenprogrammingTrays 1 - 4.
Paper Through Document Feeder Performance Matrix
The Xerox Nuvera can process a wide array of stock types. Use the following topics tolearn how each stock type can be expected to perform in the system.
TIPIf you're having feeding problems through the Document Feeder, all problems canbe avoided by scanning directly from the Document Glass.
NotesRatingTypes andConditions ofOriginals
A 12x18 inch original actually will travel throughthe Document Feeder, but there is a good chancesome information on the output will be lost. Toensure all image information from a 12 x 18 inchoriginal is captured, use the Document Glass.
Do Not Feed12 x 18 inchoriginals
Feeding lightweight coated originals(approximately 16 lb. or 61 gsm) will normally workfine. You may experience problems with thealignment of the copy images if a color image iswithin 0.4 inches of the leading edge (the side ofthe document fed first) of the original.
FairCoated paper
Originals with a high talc content may contaminatethe Document Feeder Feed Rolls, resulting indegraded performance.
Good / FairHigh Talc paper
On copies with a high-area coverage (pictures andhalftones) tends to rub off on Feed Rolls, causingfeeding faults.
FairOriginals producedon a DocuTech100/120
32-9Xerox Nuvera User Guide and Training Aid (UGTA) for Software Version 9.3/10.3
Expected Paper Handling(continued)

NotesRatingTypes andConditions ofOriginals
Oils used to fuse the copies need to dry at least 2hours in order to prevent feeding problems.
Good / FairOriginals producedon a DocuTech100/120
Use Document Glass to avoid feeding problems.Do Not FeedXerographic colororiginals
Will transfer lead to the Feed Rolls, causing theoriginals to smear. Originals with occasional marks(i.e., a document with review markup) should feedsatisfactorily. To avoid problems, feed allpencil-marked originals from the Document Glass.
Do Not FeedOriginals consistingof mostly pencilmarks
Originals with dog-ears or folded corners on thelead edge may cause a jam. Ensure that the foldsare removed.
Do Not FeedDog-eared originals(folded corners)
Depending on the model, the Document Feedercan feed up to 300 sheets of 20 lb. paper. Thequantity that can be fed decreases as paper weightincreases. Use Build Job to feed more than theseamounts as a single copy job
Do Not FeedToo many sheets inthe stack
Folded originals do not trigger the automaticsensors in the Document Feeder. Ensure that thefolds are removed.
Do Not FeedFolded originals
May be fed after sticky notes removed.Do Not FeedOriginals withsticky-notesattached
Copy from the Document Glass.Do Not FeedEnvelopes
Copy from the Document Glass.Do Not FeedTab stock
Copy from the Document Glass.Do Not FeedLabels
Copy from the Document Glass.Do Not FeedGBC-brand papers
Copy from the Document Glass.Do Not FeedGlossy photographs
Copy from the Document Glass.Do Not FeedTransparencies
Table Legend• SEF: Short Edge Feed
• LEF: Long Edge Feed
• Best: Best system performance
• Good: Good system performance
• Fair: Significant performance degradation is likely, particularly paper handling.
• NR: Not Recommended. Exceeds system design. Unacceptable performance likely.
• **: Same performance as shown in 20 lb. Standard Paper Table for the correspondingpaper sizes.
Xerox Nuvera User Guide and Training Aid (UGTA) for Software Version 9.3/10.332-10
Expected Paper Handling(continued)

Paper Weight Conversion ChartIf the various g/m2 numbers describing paper weight confuse you, use this table to findthe equivalent weight (in pounds).
Paper Weight Conversion Chart
Paper Weight Conversion Chart
The following "Equivalent weights" chart shows you which weights of the different papertypes are equal to the same number of grams per square meter.
NOTEWeights are based on stacks of 500 sheets of the size indicated at the top of eachcolumn, under the paper type.
TIPPrint this topic and post near your system for quick reference to this paper data.
Table 17. Size of unfinished substrates before cutting to size.
Metric(g/m2)
Index25.5x30.5*
Bristol22.5x28.5*
Cover20x26*
Book25x38*
Bond17x22*
492722183313Bond
603327224116Xerographic
754234285120Ledger
905041336124Mimeo
1055848397128Duplicator
1206755458132Writing
442520163012
492722183313Book
593327224016Offset
673730254518Text
744134275020
814537305522
894940336024
1045747387028
1186554448031
14882675510039
17898816612047
1357562509136
32-11Xerox Nuvera User Guide and Training Aid (UGTA) for Software Version 9.3/10.3
Expected Paper Handling

14982685510040Cover
16290746011043
17697806511947
189105867012850
216120998014658
2431351119016465
27015012310018372
1256957468433
1478167549939Bristol
17697806511947
2191211008114858
32918215012222287
16390746011043
199110917413453Index
2531401159417167
Xerox Nuvera User Guide and Training Aid (UGTA) for Software Version 9.3/10.332-12
Expected Paper HandlingTable 17. (continued)

33Clearing Stapler Jams
In the event of a stapler jam, the system staplers have been designed to allow the userto easily correct the jam and continue with the job. Take the time to familiarize yourselfwith the following procedures on clearing staple jams. In addition, view the videosdepicting clearing jams.
Stapler jam notificationWhen any of the staplers become jammed, the Xerox Nuvera will provide notificationby:
• alpha-numeric messages
• a machine "mimic", or pictorial representation of the machine on the UI screen,depicting the location of the jam
• a steady or blinking Attention Light.
NOTEIf stapling is not possible due to out of staples and this condition is detected priorto running the job, the system shall hold the job until the staples can be replaced,but will allow other jobs to proceed.
NOTEIf stapling is not possible due to out of staples and this condition is detected whilethe job is running, the system shall hold the job and wait until the staples can bereplaced or the job to be cancelled before continuing to run other jobs.
To clear stapler jamsDouble-click the system alert to see details on the action needed, as well as the locationof the staple mechanism.
Access the Main Stapler Mechanism in the MFF1. Once you have identified the location of the stapler, open the access panel and locate
the stapler housing. It is identified with a pictorial representation of a staple.2. Grasp the stapler housing drawer handle and pull out towards you.
33-1Xerox Nuvera User Guide and Training Aid (UGTA) for Software Version 9.3/10.3

3. There are pictorial instructions affixed to the machine chassis near the stapler access.Follow these pictorial instructions in order to remove and replace the Main StaplerCartridge.
Access the Main Stapler Mechanism in the BFM or BFM Plus1. Once you have identified the location of the stapler, select ] in the User Interface.
The Unlock Base Finisher window appears.
NOTEStaple error messages will automatically unlock the finisher.
2. In the Stapler Drawer field, click Unlock.3. Pull out the Stapler Drawer.4. There are pictorial instructions affixed to the machine chassis near the stapler access.
Follow these pictorial instructions in order to remove and replace the staple cartridges.
Xerox Nuvera User Guide and Training Aid (UGTA) for Software Version 9.3/10.333-2
Clearing Stapler Jams

34Index
Index Start PageSelect links from the content pane on the left to navigate the index.
1• 1-N
2• Xerox Nuvera 200/288 EA/MX Perfecting Production System
• 2-Sided Documents
• scanning-
• 2-Sided
• copying-
- printing
3• 3rd-Party Finishers
• Connecting with the DS3500-
8• 800 Number
34-1Xerox Nuvera User Guide and Training Aid (UGTA) for Software Version 9.3/10.3

A• About
• accessibility-
- copyright
- interactive features
- navigation
- supported browsers
- symbols
- third party software
- typographic conventions
- videos
• Accessibility
• Accounting Pages
• Adding Pages
• banner pages-
- covers
- error pages
• Adding Pre-printed Pages To the Document
• With the Insertion Module-
• Adding
• queues-
• Adjustments
• decurl-
- overview
• Administration
• Administration Menu
• billing-
• Administrative Pages
• adding-
• Advanced Features
• build job-
Xerox Nuvera User Guide and Training Aid (UGTA) for Software Version 9.3/10.334-2
Index
- Using Build JobUsing Build Job-
- Understanding Job and Segment Level ProgrammingUnderstanding Job andSegment Level Programming
- customizing system defaults
- finding saved jobs with Job Manager
- Mixed-size Originals
- overview
- remote workflow software
- saving jobs
• Animation
• clearing stapler jams-
- loading paper trays
- paper jam clearance
- replacing developer waste bottle
- replacing dry ink (toner) container
- replacing dry ink waste bottle
- replacing staples
• Apache
• APS
• Auto Paper Selection
• Automatic Document Handler
• Automatic Image Rotation
B• Basic Finishing Module (BFM)
• Using-
• Basic Finishing Module
• availability-
• Basic Finishing Module Plus with Direct Connect
• Batch Printing
• BFM Stacker
• Unloading-
• Billing Data
34-3Xerox Nuvera User Guide and Training Aid (UGTA) for Software Version 9.3/10.3
Index

• accessing-
• Billing Meters
• Description of each-
• Black Holes
• removing-
• Booklet (bottom) tray
• Booklet Making
• Size (number of sheets) limitations-
• Booklet
• making-
• Books
• building-
• Brightness
• adjusting-
- overview
• Browsers
• Build Job
• overview-
- understanding segment programming
C• C-Fold
• How to program-
• Calendars
• building-
• Call For Assistance
• Save data to CD-ROM-
• Carbonless Forms
• Loading-
• Cautions
• Choose
Xerox Nuvera User Guide and Training Aid (UGTA) for Software Version 9.3/10.334-4
Index

• output page size-
• Cleaning
• display-
- document feeder
- document glass (platen)
- dry ink (toner) spills
- keyboard
- mouse
- overview
• Client print drivers
• availability-
• Client Print Drivers
• list-
• Coated Stock
• loading in Production System-
• Coated Stocks
• Proper loading in Production System-
• Colored Backgrounds, removing
• Common Tasks
• Complex jobs
• overview-
- - 13Setting Up Complex JobsSetting Up Complex JobsSetting Up Complex Jobs
- 21Using Background FormsUsing Background FormsUsing Background Forms
• Consumables
• replacing-
• Contacting Xerox
• Contours
• overview-
• Contrast
• adjusting-
- overview
• Controls
• Conventions
34-5Xerox Nuvera User Guide and Training Aid (UGTA) for Software Version 9.3/10.3
Index

• Copy Jobs
• Editing-
• Copy jobs
• saving-
• Copying
• 2-sided documents-
- mixed-size originals
- On tabbed stock
- overview
- set up a copy job
• Copyright
• Covers
• adding-
• CRU Parts Numbers
• Curled Paper
• Customizing
• System Defaults-
D• Darkness
• adjusting-
- overview
• Date Stamping
• Annotations-
• Decurl
• adjusting-
• Deleting jobs
• Diagnostics
• accessing-
• Disclaimer Information
• Energy Star-
• Disk Overwrite
Xerox Nuvera User Guide and Training Aid (UGTA) for Software Version 9.3/10.334-6
Index

• Erasing confidential job data-
• Display
• cleaning-
• Disposal
• DocuCards
• Document Feeder
• 2-sided copying-
- mixed-size originals
- Proper loading
- specifications
• Document Glass setup
• Document Glass
• 2-sided copying-
- cleaning
• Documents
• 2-sided-
- Copying 2-Sided Pages
- Printing 2-Sided Pages
• DPI
• Drill Holes
• removing-
• Dry Ink
• cleaning spills-
- replacing
• Duplex
E• EA Production System
• Edge Erase
• Editing Copy Jobs
• Editing Images
• Editing images
34-7Xerox Nuvera User Guide and Training Aid (UGTA) for Software Version 9.3/10.3
Index

• moving the output image-
- reducing or enlarging
• EIAE
• Electronic Hole Removal
• Enlarging
• mixed-size originals-
• Envelopes
• Environment
• product recycling-
• Erase edge
• using-
• Error Pages
• Exception Pages
• adding-
• Expected paper performance tables
F• Feed Module Tab Guides
• Feed Module(FM)
• specifications-
• File Format
• File Formats
• Finding what you are looking for
• Finisher
• overview-
• DS3500
• Specifications-
• DS3500
• Using-
• Finishing
• making a booklet-
- organizing document sets with the stacker
Xerox Nuvera User Guide and Training Aid (UGTA) for Software Version 9.3/10.334-8
Index

• Fixing Image Quality Problems
• hole punch shadows-
• Folded Documents
• Creating-
• Fonts and styles
• FreeFlow
• Using the system with-
• Front-Back registration
• DS3500
• Correct paper loading orientation-
- Using
• Full-bleed
• setting up-
G• Getting around
• GNU
• GPL
• Gray levels
• overview-
• GUI
• Guide to Buttons
H• Halftone Settings
• Choosing the best-
• Halftones
• overview-
- removing
• Hardware
• adding-
34-9Xerox Nuvera User Guide and Training Aid (UGTA) for Software Version 9.3/10.3
Index
• Help
• contacting Xerox-
• Hints and Tips
- Background forms
- Basic finishing module
- Booklets
- DFA finishers
- External finishers
- Imposition
- IPDS
- Job tickets
- LCDS
- Media, CD and DVD
- Multifunction finisher
- Print drivers
- Printing
- Saving and storing jobs
- Scan job
- Setting up a print job
- System performance
- Tabbed stock
• Holding print jobs
• Hole Punch Marks
• removing-
• Hot Folders
• How Do I
I• Icons
• Image Edit
• edge erase-
- electronic hole removal
• Image Processing
Xerox Nuvera User Guide and Training Aid (UGTA) for Software Version 9.3/10.334-10
Index

• overview-
• Image Quality Defects
• Halo-
• Image Quality Problems
• contours-
- lines on image
- missing parts of image
- overview
- posterization
- removing background artifacts
- removing image showthrough
- removing moiré patterns
- shadows on image
- spots and specks
- streaks on image
• Image Quality setup
• Image Quality
• adjusting-
- original types
- overview
• Image Resolution
• setting-
• Image Rotation
• Images
• editing-
• Impositions
• overview-
- setting options
• In high volume production environments
• Inserting Pages
• Insertion Module
• using-
• Inserts
34-11Xerox Nuvera User Guide and Training Aid (UGTA) for Software Version 9.3/10.3
Index
• adding-
• Integration Guidelines
• International Settings
• customizing-
• Interrupting Jobs
• Introduction
• system-
• IPDS
• printing jobs using IPDS data stream-
J• J2RE
• Jams
• paper-
- stapler
• Job Definition Format Print Submission
• JDOM
• Job Management
• Holding jobs-
• Job Manager
• working with saved files-
• Job Policies
• Job Processing Defaults
• customizing-
• Job Programming
• multiple stocks-
• Job tickets
• building-
• Job Tickets
• From XDDS Submission Tool-
• Job tickets
• opening-
Xerox Nuvera User Guide and Training Aid (UGTA) for Software Version 9.3/10.334-12
Index
- saving
• Job-Level Programming
• Jobs Policies
• customizing-
• Jobs
• finding saved-
- saving
- storing
K• Keyboard Shortcuts
• Using the keyboard to navigate the UI-
• Keyboard
• cleaning-
- common shortcuts
- mnemonics
- special navigation shortcuts
L• Labels
• Lead
• Licenses
• software-
• Lightness
• adjusting-
- overview
• Lightweight Originals
• Loading Paper
• Loading special paper
• For correct output to various finishers-
34-13Xerox Nuvera User Guide and Training Aid (UGTA) for Software Version 9.3/10.3
Index

M• Machine controls
• Machine maintenance
• overview-
• Machine power
• Power Saver Mode-
- Powering off
- Powering on
- procedures
- restarting the system
• Machine
• specifications-
• Mainframe Printing
• LCDS page description language-
• Managing print jobs
• Managing System Resources
• Managing the Printer
• Viewing and configuring printer/finisher properties-
• Manual Image Rotation
• Material Usage Guide
• Expected Paper Performance Tables-
- Expected performance of 20 lb standard paper
- Expected performance of 80 gsm standard paper
- Expected performance of non-standard paper
- Expected performance of paper through Document Feeder
- Expected performance of plain paper
- Expected performance of special stock
• Material Usage Information
• proper paper handling-
- supported paper types
- Supported Papers
Xerox Nuvera User Guide and Training Aid (UGTA) for Software Version 9.3/10.334-14
Index
- Recommendations for Paper Usage
• Maximum System Speed
• How pitch affects throughput-
• Media Optimization Mode (Xerox Nuvera 200/288 EA/MX Perfecting ProductionSystem only)
- Pre-cut tabs
- Large stock mixed with small stock
- Wide stocks
- Serialized stock
• Mercury
• Mixed
• Mixed Size Originals
• When using Electronic Hole Removal-
• Mixed-size Originals
• Modifying
• queues-
• Monitor
• cleaning-
• Mouse
• cleaning-
• Movie
• clearing stapler jams-
- loading paper trays
- paper jam clearance
- replacing developer waste bottle
• movie
• replacing dry ink (toner) container-
- replacing dry ink waste bottle
- replacing staples
• Multifunction finisher
• overview-
• Multi-sheet feeding
• avoiding-
34-15Xerox Nuvera User Guide and Training Aid (UGTA) for Software Version 9.3/10.3
Index
• Multi-sheet Feeds
• Preventing When Using Special Stocks-
• Multiple Stocks
N• N-1
• N-up
• using with mixed-size originals-
• Navigation
• keyboard-
• Notes
O• Offset
• On tabbed stock
• Open and Closed-Flap Envelopes
• Proper loading-
• Optional Equipment
• DS3500-
• Ordered Stock
• Setting up and using-
• Organization
• Orientation
• Original Types
• Originals
• 2-sided-
- Copying 2-Sided Pages
- Printing 2-Sided Pages
• Output order
• special loading requirements-
• Output page size
Xerox Nuvera User Guide and Training Aid (UGTA) for Software Version 9.3/10.334-16
Index
• adjust-
• Output trays
• overview-
• Overview
• Control Console-
- Document Feeder
- Image Output Terminal (Printer)
- Muli-Function Finisher
- Multifunction Finisher Interface (MFF Paper Path)
- Paper Feeder
- remote workflow software
P• Pads
• Page Numbering
• Annotations-
• Pages
• adding-
• Paper curl
• eliminating-
• Paper Curling
• remove-
• Paper Feeder
• specifications-
• Paper jams
• clearing-
• Paper Trays
• Paper trays
• configuring-
- loading
• Paper Trays
• specifications and capacities-
34-17Xerox Nuvera User Guide and Training Aid (UGTA) for Software Version 9.3/10.3
Index

• Paper Weight Conversion Chart
• g/m2 to pounds conversion-
- Expected Paper Handling and Copy Performance
- Paper Weight Conversion Chart
• Paper Weights
• As classified in the user interface-
• Paper
• loading-
- Printing or copying on tabbed stock
- proper handling and storing
- recommended uses
- saving
- Copying 2-Sided Pages-
- Printing 2-Sided Pages
- supported types
• Pass Through Mode
• Patterns, removing background
• Pause Mode
• Working with multiple jobs while system paused-
• Pausing jobs
• Perchlorate
• Photo
• Pitch
• about-
- Effect on print speeds
• Pixels
• Platen
• 2-sided copying-
- cleaning
• Poor image quality
• correcting-
• Poor Performance
Xerox Nuvera User Guide and Training Aid (UGTA) for Software Version 9.3/10.334-18
Index

• Position of the Image
• PostScript Printer Drivers
• availability-
• Preparing paper trays
• overview-
• Preview
• Print Jobs
• saving-
• Print to edge of page
• setting up-
• Printer Drivers
• MacIntosh-
• Printer spreads
• setting options-
• Printer
• specifications-
• Printing
• 2-sided-
- from a pc
- from client application
- From FreeFlow
- from the CD-ROM (media) drive
- overview
- Reprinting saved jobs
- setting up a print job
- submission methods
- submit job with web browser
• Problem solving
• overview-
• Problem Solving
• removing background artifacts-
- removing image show through
- removing spots and specks
34-19Xerox Nuvera User Guide and Training Aid (UGTA) for Software Version 9.3/10.3
Index

• Proofing jobs
Q• Queues
• Setting up-
R• Recommendations
• paper usage-
• Recycling
• Reduce / Enlarge
• using with mixed-size originals-
• Releasing jobs
• Remote Access
• controlling the user interface from a client computer-
• Remote Services
• initiating-
• Remote Workflow Software
• downloading-
• Replacing
• CRUs-
- Developer waste bottle
- Dry Ink Container
- Dry Ink Waste Bottle
- staples
- Toner Container
- Hole Punch Waste Container
- 2/3 or 2/4 Hole Punch Module
• Reuse
• Rotate Image
Xerox Nuvera User Guide and Training Aid (UGTA) for Software Version 9.3/10.334-20
Index

S• Sample Print
• Generating-
- Workflow from a client computer
• Save Scan
• as TIFF or PDF-
• Saving Paper
• Saving
• Copy Jobs-
• Scan File Formats
• Scan Jobs
• saving-
• Scanner
• specifications-
• Scanning
• 2-sided documents-
- file formats
- image resolution
- overview
• SDDF
• cleaning-
• Searching
• Section 508
• Segment-Level Programming
• Using Build JobUsing Build Job-
- Understanding Job and Segment Level ProgrammingUnderstanding Job andSegment Level Programming
• Sharpness
• adjusting-
- overview
• Shortcuts
34-21Xerox Nuvera User Guide and Training Aid (UGTA) for Software Version 9.3/10.3
Index
• keyboard-
- keyboard mnemonics
- special navigation
• Show Through, removing
• Signatures
• Slow performance
• Slow Performance
• Software licenses
• Software
• updating-
• Sorting
• Special characters
• Special Pages
• using with mixed-size originals-
• Special stock loading
• Special Stock Types
• Proper loading for different finisher configurations-
• Specifications
• Basic Finishing Module (BFM)-
- CD-ROM drive
- Display
- document feeder
- electrical
- keyboard
- Media drive
- MFF
- mouse
- Multifunction-finisher
- overview
- print engine
- stapler
• Specks, removing
• Spots, removing
• Stackers
Xerox Nuvera User Guide and Training Aid (UGTA) for Software Version 9.3/10.334-22
Index
• Unloading-
• Stacking
• Stapler Types
• Main tray-
• Stapler
• clearing jams-
- Making a stapled copy
- replacing staples
- specifications
• Staples
• Replacing in BFM-
• Stock Types
• Adding to the system-
• Stock
• loading-
- recommended uses
- supported types
• Stocks Library
• Managing stocks in the system-
• Stocks not to place in the Document Feeder
• Styles
• Submit a print job from a pc
• Support
• contacting Xerox-
• Supported Paper Sizes
• Trays 1 and 2-
- Supported Paper Sizes
• Supported Paper Sizes
• Trays 3 and 4-
- Supported Paper Sizes
• Symbols
• System Administration
• System Defaults
34-23Xerox Nuvera User Guide and Training Aid (UGTA) for Software Version 9.3/10.3
Index
• customizing-
• System lockup/degraded performance
• system restart-
• System Preferences
• customizing-
T• Tab Guides
• Tabbed Stock
• Using-
• Tabs
• 19Programming Multiple Stocks in a Single JobProgramming Multiple Stocks in aSingle JobProgramming Multiple Stocks in a Single Job
-
- Using Special Paper StocksUsing Special Paper Stocks
- Loading in BFM
- Loading in MFF
• Text
• Thin Originals
• Third-Party Finishers
• TIFF
• Tips
• Toll Free Number
• Toner
• cleaning spills-
- replacing
• Transparencies Presentation Mode
• using with mixed-size originals-
• Transparencies
• Loading recommendation-
• Trays
• loading paper-
• Typographic conventions
Xerox Nuvera User Guide and Training Aid (UGTA) for Software Version 9.3/10.334-24
Index

U• User Interface
• Using Special Papers
• transparencies-
• Using Paper Backed Transparencies
V• Video
• clearing stapler jams-
- loading paper trays
- paper jam clearance
- replacing developer waste bottle
- replacing dry ink (toner) container
- replacing dry ink waste bottle
- replacing staples
• VIPP
• About-
- Configuring system to run VIPP jobs
W• Warnings
• Waste Bottles
• replacing developer waste bottle-
• Watermarks
• Annotations-
• Web browsers
• weight range
• Weight Range
• Paper-
34-25Xerox Nuvera User Guide and Training Aid (UGTA) for Software Version 9.3/10.3
Index

• Welcome Center
• contacting-
X• Xerographics
• Variable pitch-
• Xerox Custom Client Print Drivers
• availability-
• Xerox
• contacting-
• Xerox Nuvera System Overview
Z• Z-Fold
• - How to program
Xerox Nuvera User Guide and Training Aid (UGTA) for Software Version 9.3/10.334-26
Index