xCAT 2 Extreme Cloud Administration Toolkit - SourceForge · PDF filexCAT 2 Extreme Cloud...
92
© 2011 IBM Corporation xCAT 2 Extreme Cloud Administration Toolkit http://xcat.sourceforge.net/ Jordi Caubet, IBM Spain – IT Specialist
-
Upload
vuongnguyet -
Category
Documents
-
view
240 -
download
2
Transcript of xCAT 2 Extreme Cloud Administration Toolkit - SourceForge · PDF filexCAT 2 Extreme Cloud...

© 2011 IBM Corporation
xCAT 2Extreme Cloud Administration Toolkithttp://xcat.sourceforge.net/
Jordi Caubet, IBM Spain – IT Specialist

© 2011 IBM Corporation2
xCAT – Extreme Cloud Administration Toolkit
xCAT Overview
xCAT Architecture & Basic Functionality
xCAT Commands
Setting Up an xCAT Cluster
Example
Energy Management
Monitoring

© 2011 IBM Corporation3
xCAT – Extreme Cloud Administration Toolkit
xCAT Overview
xCAT Architecture & Basic Functionality
xCAT Commands
Setting Up an xCAT Cluster
Example
Energy Management
Monitoring

© 2011 IBM Corporation4
xCAT – Extreme Cloud Administration Toolkit
What is xCAT ? Extreme Cluster (Cloud) Administration Toolkit
Open source (Eclipse Public License) cluster management solution
Configuration database – a relational DB with a simple shell
Distributed network services management and shell commands
Framework for alerts and alert management
Hardware management – control, monitoring, etc.
Software provisioning and maintenance
Design Goals Build on the work of others – encourage community participation Use Best Practices
– borrow concepts not code Scripts only (source included) portability – key to customization! Customer requirement driven Provide a flexible, extensible framework Ability to scale “beyond your budget”

© 2011 IBM Corporation5
xCAT – Extreme Cloud Administration Toolkit
What is xCAT ? Systems Need Management
Administrators have to manage increasing numbers of both physical and virtual servers
Workloads are becoming more specific to OS, libraries and software stacks
Increasing need for dynamic reprovisioning
Re-purposing of existing equipment
Single commands distributed to hundreds/thousands of servers/VMs simultaneously
File distribution
Firmware and OS updates
Cluster troubleshooting

© 2011 IBM Corporation6
xCAT – Extreme Cloud Administration Toolkit
xCAT 2 Main Features
Client/server architecture. Clients can run on any Perl compliant system. All communications are SSL encrypted.
Role-based administration. Different users can be assigned various administrative roles for different resources
New stateless and iSCSI support. Stateless can be RAM-root, compressed RAM-root, or stacked NFS-root. Linux software initiator iSCSI support for RH and SLES included. Systems without hardware-based initiators can still be iSCSI installed and booted
Virtualization support, including the rmigrate command to request live migration of a virtualized guest from one host to another. (KVM, XEN, VMWare)
Scalability. xCAT 2.x was designed to scale beyond your budget. 100,000 nodes? No problem with xCAT's Hierarchical Management Cloud (HMC).
Automagic discovery. Single power button press, physical location based, discovery and configuration capability

© 2011 IBM Corporation7
xCAT – Extreme Cloud Administration Toolkit
xCAT 2 Main Features
Choice of database backend: SQLite, PostgreSQL, MySQL, DB2
Plug-in architecture for compartmental development. Add your own xCAT functionally to do what ever you want. New plug-ins extend the xCAT vocabulary available to xCAT clients
Monitoring plug-in infrastructure to easily integrate 3rd party monitoring software into xCAT cluster. Plug-ins provided with xCAT: SNMP, RMC, Ganglia, Performance Copilot
Notification infrastructure to be able to watch for xCAT DB table changes
SNMP monitoring. Trap handler handles all SNMP traps
Node status update (nodelist.status is updated during the node deployment, node power on/off process)
Centralized console and systems logs
Automatic installation of any additional rpms: Requested by the user during node deployment phase and after the nodes are up and running
Supports a large number of operating systems

© 2011 IBM Corporation8
xCAT – Extreme Cloud Administration Toolkit
xCAT - Functionality
Remote Hardware Control– Power, reset, vitals, inventory, event logs, SNMP alert processing
Remote Console Management– Serial console, SOL, logging
Remote Destiny Control– Local boot, network boot, iSCSI boot
Parallel Cluster control– parallel shell, parallel rsync, parallel secure copy, parallel ping
Remote Automated Unattended Network Installation– Auto-discovery
• MAC address collection• Service processor programming
– Remote flashing– Kickstart, Autoyast, imaging, stateless/diskless
Easy to Use and it Scales! Think 100000 nodes– xCAT will make you lazy - no need to walk to datacenter again

© 2011 IBM Corporation9
xCAT – Extreme Cloud Administration Toolkit
xCAT – Past, Present October 1999
– xCAT Zero created for Web 1.0
January 2000 – Present– xCAT used WW for scale-out Linux and Windows clusters– xCAT Community: 273 members from at least 16 countries
May 2007– xCAT and CSM developers begin work together on xCAT 2
October 2007– xCAT 1.3.0 released– xCAT 2.0-alpha (Linux Only)
2008– xCAT 2.0 and 2.1 released
• xSeries and pSeries.• Linux and AIX, Windows and Xen• Open Source. CLI and GUI
2009 (10 years)– xCAT 2.2 and 2.3 released
• Statelite support
2010– xCAT 2.4 and 2.5 released
xCAT
PSSP
CSM
xCAT 2.0
pSeries
xSeries

© 2011 IBM Corporation10
xCAT – Extreme Cloud Administration Toolkit
Current state of xCATGood
Open Source
CSM/xCAT developers
Proven scalability – deployed at 100s of sites
Community involvement
Bad
Version 2 is a complete rewrite (current = 2.5.x)
Documentation (getting better)
Ugly
Need more developers
Web Interface

© 2011 IBM Corporation11
xCAT – Extreme Cloud Administration Toolkit
xCAT is a scaled-out DataCenter Control
Provision Operating Systems on physical or virtual machines: SLES10 SP2 & higher, SLES 11 (incl. SP1), RHEL4.x, RHEL5.x, RHEL 6, CentOS4.x, CentOS5.x, SL 5.5, Fedora 8-14, AIX 6.1, 7.1 (all available Technology Levels), Windows 2008, Windows 7, VMWare, KVM, PowerVM, zVM.
Scripted install, Stateless, Statelite, iSCSI, or Cloning
Remotely Manage Sytems: Integrated Lights-out management, remote console, and distributed shell support
Quickly set up and control Management node services: DNS, HTTP, DHCP, TFTP
Ideal management for HPC clusters, RenderFarms, Grids, WebFarms, Online Gaming Infrastructure, Clouds, Datacenters, ...

© 2011 IBM Corporation12
xCAT – Extreme Cloud Administration Toolkit
xCAT Overview
xCAT Architecture & Basic Functionality Architecture
Tables and Database (SQLite, PostGRES, MySQL, DB2)
Provisioning Methods (Stateful, Stateless, Satelite)
xCAT Commands
Setting Up an xCAT Cluster
Example
Energy Management
Monitoring
© 2011 IBM Corporation13
xCAT – Extreme Cloud Administration Toolkit
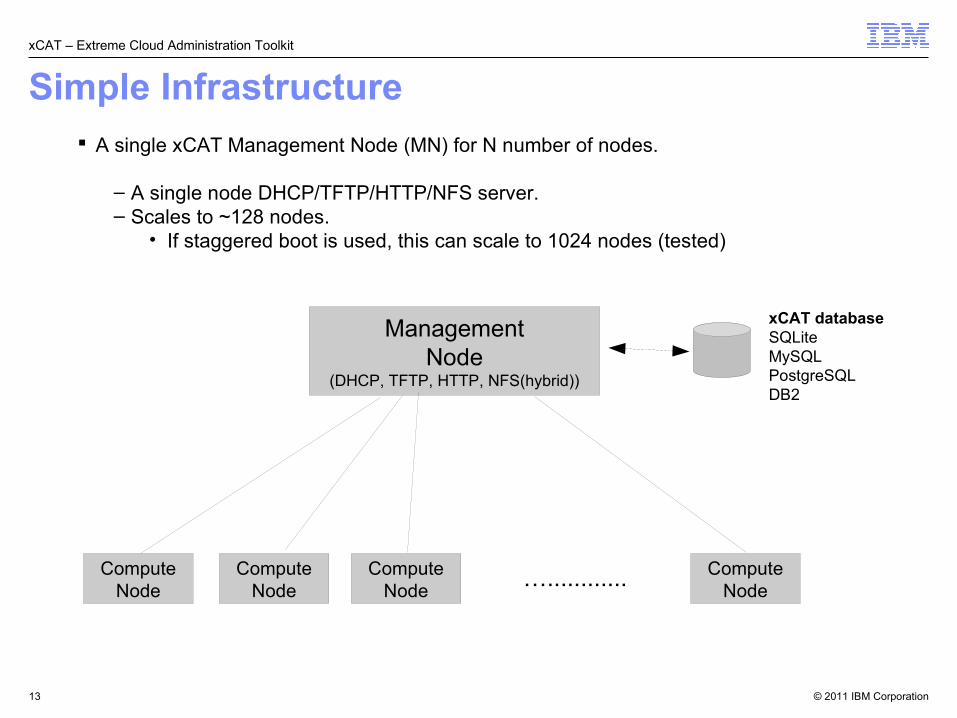
Simple Infrastructure A single xCAT Management Node (MN) for N number of nodes.
– A single node DHCP/TFTP/HTTP/NFS server.– Scales to ~128 nodes.
• If staggered boot is used, this can scale to 1024 nodes (tested)
ManagementNode
(DHCP, TFTP, HTTP, NFS(hybrid))
ComputeNode
ComputeNode
ComputeNode
ComputeNode
…............
xCAT databaseSQLiteMySQLPostgreSQLDB2

© 2011 IBM Corporation14
xCAT – Extreme Cloud Administration Toolkit
Hierarchical Infrastructure
Management Node (MN)(DHCP, TFTP, HTTP, NFS(hybrid))
ComputeNode
xCAT databaseSQLiteMySQLPostgreSQLDB2
ComputeNode
ComputeNode
Service Node (SN)(DHCP, TFTP, HTTP, NFS(hybrid))
….. ComputeNode
ComputeNode
ComputeNode
Service Node (SN)(DHCP, TFTP, HTTP, NFS(hybrid))
…..
…............
A single xCAT Management Node (MN) with multiple Service Nodes (SN) providing boot services to increasing scaling.
Can scale to 1000s and 100000s of nodes.
backup

© 2011 IBM Corporation15
xCAT – Extreme Cloud Administration Toolkit
xCAT Architecture
CLI Web GUI REST API
xcatd
ACL ACL
plugin plugin
XML/SSL
xcatd
ACL ACL
plugin plugin
Mgmt Node Service
Node
Client
XML/SSL
(optional)
Node Node Node Node Node Node
DeploymentServices
CLI
Logging/EventsDeployment
Services
Logging/Events
HWCtrl
HWCtrl
database
The heart of the xCAT architecture is the xCAT daemon (xcatd) on the management node.

© 2011 IBM Corporation16
xCAT – Extreme Cloud Administration Toolkit
Tables and Database
xCAT stores all information about the nodes and subsystems it manages in a database.
– XCAT default database is located in /etc/xcat in sqlite tables. XCAT can be instructed to store the tables in MySQL, PostgreSQL or DB2 as well.
For most installations you won't need to even fill up half of the tables!– And for the tables that you do need, in most cases you'll only need to put
one line in the table!
There are lot of tables but only some tables are for common to Linux and AIX, some are for only AIX, some just for monitoring, some for advanced functions (virtual machines, iSCSI settings), …
xCAT comes with a rich set of functions for manipulating tables.

© 2011 IBM Corporation17
xCAT – Extreme Cloud Administration Toolkit
Tables and DatabaseCommon tables
Table Description
site Controls settings that are primarily used for the management node in how xCAT will behave.
nodelist The list of all the nodes in the cluster, including each node's current status and what groups it is in.
nodehm Settings that control how each node's hardware is managed. Typically, an additional table that is specific to the hardware type of the node contains additional info. E.g. the ipmi, mp, and ppc tables.
ipmi Settings for nodes that are controlled by an on-board BMC via IPMI.
mp Contains the hardware control info specific to blades. This table also refers to the mpa table, which contains info about each Management Module.
mpa Contains info about each Management Module and how to access it.
networks Describes the networks in the cluster and info necessary to set up nodes on that network.
noderes Resources and settings to use when installing nodes.
passswd Contains default userids and passwords for xCAT to access cluster components. In most cases, xCAT will also actually set the userid/password in the relevant component when it is being configured or installed. Userids/passwords for specific cluster components can be overidden in other tables, e.g. mpa, ipmi, ppchcp, etc.
chain Controls what operations are done (and it what order) when a node is discovered and deployed.
switch Contains what switch port numbers each node is connected to.
nodetype A few hardware and software characteristics of the nodes.
mac The MAC address of the node's install adapter. Normally this table is populated by getmacs or node discovery, but you can also add entries to it manually.

© 2011 IBM Corporation18
xCAT – Extreme Cloud Administration Toolkit
xCAT Tables (1/3)
site table– Global settings for the whole cluster. – Defines overall cluster variables like Timezone, master node, install directory, name servers,
dhcp interfaces, etc.– A common place for user defined attributes– Site table is populated with a set of defaults at the time xCAT is installed – you may want to
add/modify entries, e.g. forwarders
key,value,comments,disable"xcatdport","3001",,"xcatiport","3002",,"tftpdir","/tftpboot",,"installdir","/install",,...
network table– All networks in the cluster must be defined in the networks table – makedns, makedhcp, etc. use
it– When xCAT was installed, it ran “makenetworks”, which created an entry in this table for each of
the networks the management node is on– network Attributes: dhcpserver, dynamicrange, gateway, mask, mgtifname, nameservers, net,
netname, tftpserver, usercomment– If needed, update the table using either the tabedit or chtab command - e.g.:
chtab net=172.20.0.0 networks.netname=compute networks.mask=255.255.0.0 networks.mgtifname=eth1 networks.dhcpserver=mgmt networks.tftpserver=mgmt networks.nameservers=mgmt networks.dynamicrange=172.20.0.2-172.20.250.250

© 2011 IBM Corporation19
xCAT – Extreme Cloud Administration Toolkit
xCAT Tables (2/3)
nodelist table– Maps nodes to node groups which are commonly used to define attributes that are pulled from
the tables– The nodeadd command adds entries to the table– The noderm command removes entries from the table– You can still tabedit, chtab, etc.– The concept of groups is used throughout xCAT commands, e.g. psh, rpower, rvitals, etc..
Groups allow simplified control and management over cluster nodes with a single command line– Not populated automatically – must be populated for just about anything to work
nodelist Attributes: node, groups, status, statustime, appstatus, appstatustime, primarysn, hidden, comments, disable
noderes table– Maps nodes or node groups to servers, services and network boot method – i.e. what resources
to use– Also defines NIC interfaces to use on the target nodes– Not populated automatically – must be populated for node discovery and installation to work– noderes Attributes: node, servicenode, netboot, tftpserver, nfsserver, monserver, nfsdir,
installnic, primarynic, discoverynics, cmdinterface, xcatmaster, current_osimage, next_osimage, nimserver, routenames, comments, disable

© 2011 IBM Corporation20
xCAT – Extreme Cloud Administration Toolkit
xCAT Tables (3/3)
nodehm table– Maps nodes or node groups to hardware management method, e.g. ipmi or blade – Also defines the console method to use and attributes of the serial console, e.g. rate and flow
control – used by makeconservercf and nodeset for console parameters– Not populated automatically – must be populated for node discovery and installation to work– nodehm Attributes: node, power, mgt, cons, termserver, termport, conserver, serialport,
serialspeed, serialflow, getmac, comments, disable
nodetype table– Maps nodes or node groups to OS version, architecture and “profile”– “Profile” is either a kickstart or autoyast template in the case of statefull installs or a
package/exclude list in the case of stateless installs– Used by nodeset – Not populated automatically – must be populated for node installation to work– nodetype Attributes: node, os, arch, profile, provmethod, supportedarchs, nodetype,
comments, disable

© 2011 IBM Corporation21
xCAT – Extreme Cloud Administration Toolkit
Nodes
“Nodes” are anything that require an IP address:– Servers, server IMM/BMCs– Switches, storage controllers, PDUs, etc.
(**) It's the groups that they belong to that matter – the groups are tags that are used to process their attributes through the tables
These “nodes” are added to the nodelist table
The nodeadd command takes a noderange and groups= parameters, example: nodeadd node1-node42 groups=compute,rack1,ipmi,x3550,servers
The nodels command can tell you the resulting attributes:
nodels rack1 |wc -l == 42 nodels node1 ipmi.bmc == node1-bmc nodels node1 switch.port == 1 nodels node1 switch.switch == switch1 nodels node2 nodehm.mgt == ipmi nodels node42 hosts.ip == 172.20.101.42

© 2011 IBM Corporation22
xCAT – Extreme Cloud Administration Toolkit
xCAT Provisioning Methods
XCAT provides a choice – conventional state-full installs to disk, state-less installs with no persistent media, and state-lite installs with persistent media NFS mounted.
Stateless nodes are an important concept in xCAT V2. A stateless node is defined as one that has no“state” (configuration changes, software updates, etc.) stored permanently on it. This is extremely useful in a cluster for the following reasons:
All nodes will have a much greater likelihood of staying consistent. And if the administrator does suspect that a node is out of sync with the rest of the cluster, they can simply reboot it and know that it is back in its original, pristine state.
If a node experiences a hardware problem, the hardware can be pulled from the rack and replaced with new hardware and the node booted again and it will come up with the same state as before.
In a provisioning environment, new nodes can be provisioned or migrated without the worry of them losing state.

© 2011 IBM Corporation23
xCAT – Extreme Cloud Administration Toolkit
Stateful
–It automatically installs the Operating System on the Compute Node.
– It uses KickStart or AutoYaST templates and related installation scripts to complete the installation and configuration of a compute node.
– The administrator can customize the installation. Default installation templates and scripts are provided.
– Installation can be performed on a local hard drive or a SAN/iSCSI attached storage.
xCAT
Stateful – Diskful
Local - HD - Flash
Stateful – Disk-Elsewhere
San - iSCSi
xCAT
OS
Inst
alle
r
HD Memory HD Memory
SAN/iSCSi
OS
Inst
alle
r
Node Node
OS
OS
• HD• Flash
• SAN• iSCSi

© 2011 IBM Corporation24
xCAT – Extreme Cloud Administration Toolkit
Stateless
Stateless provisioning method will create a stateless OS image for a Compute Node.
The list of rpms to added or exclude to thediskless images can be customized. Default lists are provided.
Three options:– Entire filesystem on memory (RAM). A
fairly stripped down image may still consume on the order of 200 MB of memory.
– Compressed squashfs form. The fairly stripped down images can consume on the order of 31-50 MB of memory.
– NFS-Hybrid. Lowest memory overhead. Single point-of-failure and requires that the distribution kernel source to be patched to include aufs filesystem.
HD Memory
Node
Stateless – Diskless Optional
Memory RAM - CRAM - NFS
xCAT
Image
Push
• RAM• CRAM• NFS Hybrid
OS
Too optimistic for most systems? (1GB)

© 2011 IBM Corporation25
xCAT – Extreme Cloud Administration Toolkit
Statelite or State-”lite”Statelite is one intermediate state between “statefull” and “stateless”
Statelite provides two kinds of efficient and flexible diskless solutions, most of the OS image can be NFS mounted read-only, or the OS image can be in the ramdisk with tmpfs type. Different with the state-less solution, statelite also provides a configurable list of directories and files that can be read-write. These read-write directories and files can either be persistent across reboots, or volatile (which means restoring to the original state after reboot)
State-lite is new to xCAT V2 and is in evolution
OS
tmpfs persistent readonly/var/log
/var/log
/var/mmfs/gen/mmsdrfs
/var/mmfs/gen/mmsdrfs
/etc/motd
/etc/motd
NFS roNFS rw
NFS ro
ServerNFS Server can be an external.

© 2011 IBM Corporation26
xCAT – Extreme Cloud Administration Toolkit
Statelite vs. Stateless (Linux)
Statelite semantics can now be used with either RAMdisk or NFSroot–Single image that all nodes boot from– Specific files and directories can be marked:
• Writeable, volatile• Writeable, persistent• Read-only, site specific
RAMdisk-based Stateless/Statelite:– Most of OS is in RAMdisk downloaded via tftp/http– Uses some memory on the node (around 1 GB – more or less
depending on what apps, and if you put them in GPFS or not)– Nodes are independent from server once they boot
NFSroot-based Stateless/Statelite:– NFS-based diskless with additional features– Uses less memory on the node– Dependent on the NFS server for continual operation

© 2011 IBM Corporation27
xCAT – Extreme Cloud Administration Toolkit
Statelite advantages over Stateless
Some files can be made persistent over reboot. However, you still get the advantage of only having to manage a single image
Changes to hundreds of machines can take place instantly, and automatically, by updating one main image. In most cases, machines do not need to reboot for these changes to take affect. (only for the NFSROOT-based solution)
Ease of administration by being able to lock down an image. Parts of the image can be read-only - so no modifications can be made without updating the central image
Files can be managed . You can set table values to allow machines to sync from different places based on their attributes – think overlays
Ideal for virtualization. Images can be smaller, use less disk and memory, and can be easier to manage tion

© 2011 IBM Corporation28
xCAT – Extreme Cloud Administration Toolkit
Statelite disadvantages compared to Stateless
Network traffic is not just at node boot time NFS and scaling While more flexible it does require more initial
configuration to work Some limitations on target environments. Mostly a testing
problem. Supported in xCAT 2.5, needs SVN update 8567 or later

© 2011 IBM Corporation29
xCAT – Extreme Cloud Administration Toolkit
postscripts table
Scripts executed after statefull node installation or stateless node boot – allows customization of nodes or continuation of provisioning
Two phases – post-install and on first boot – for stateless it's all done during boot
Postscripts reside in /install/postscripts – there are many that are supplied – you can write your own – debug it using updatenode
At install time the postscripts directory is ftp'd down and deleted after install
Populated automatically with:"xcatdefaults","syslog,remoteshell,syncfiles","otherpkgs",,

© 2011 IBM Corporation30
xCAT – Extreme Cloud Administration Toolkit
xCAT Overview
xCAT Architecture & Basic Functionality
xCAT Commands
Setting Up an xCAT Cluster
Example
Energy Management
Monitoring

© 2011 IBM Corporation31
xCAT – Extreme Cloud Administration Toolkit
xCAT Commands xCAT Commands used on the CLI interface can be divided in several groups.
There are commands for:
– Database support• chtab, chdef, nodels, mkrrbc, mkrrnodes, modech, tabdump, tabedit, ...
– Hardware control• getmacs, rcons, renergy, rnetboot, reventlog, ...
– Monitoring• monadd, monls, monstart, monstop, ...
– Inventory• rinv, rvitals, sinv
– Parallel commands• pscp, psh, prsync, pping, ...
– Deployment• copycds, genimage, liteimg, …
– CSM to xCAT migration Tools– Others
• makenetworks, makehost, makedhcp, ...

© 2011 IBM Corporation32
xCAT – Extreme Cloud Administration Toolkit
xCAT Commands
command Description
rpower Remote power control of nodesrpower noderange [--nodeps] [on|onstandby|off|suspend|stat|state|reset|boot]
rvitals Retrieves remote hardware vitals information.Blade specific: rvitals noderange {temp|wattage|fanspeed|leds|summary|all}
rspreset Resets the service processors associated with the specified nodes.rspreset noderange
rinv Remote hardware inventory.rinv noderange {pci|model|serial|asset|vpd|mprom|deviceid|guid|firm|diag|bios|mparom|mac|all}Blade specific: rinv noderange {mtm|serial|mac|bios|diag|mprom|mparom|firm|all}
getmancs Collects node MAC address.getmacs [-h| --help | -v| --version]Blade specific:getmacs noderange [-V| --verbose] [-d] [--arp]
rcons Remotely accesses the serial console of a nodercons singlenode [conserver-host] [-f] [-s]
nodestat Display the running status of each node in a noderangenodestat [noderange] [-m|--usemon] [-p|--powerstat] [-u|--updatedb]
rbeacon Turns beacon on/off/blink or gives status of a node or noderange.rbeacon noderange {on|blink|off|stat}
sinv Checks the software configuration of the nodes in the cluster.sinv [-o output] [-p template path] [-t template count] [-s seed node] [-i] [-e] [-r] [-V] [[-f command file] | [-c command]]
Some examples

© 2011 IBM Corporation33
xCAT – Extreme Cloud Administration Toolkit
xCAT Commands
command Description
updatenode Reruns postsctipts or runs additional scripts on the nodes. updatenode noderange [-V|--verbose] [-F|--sync] [-S|--sw] [-P|--scripts [script1,script2...]] [-s|--sn] [-A|--updateallsw] [-c|--cmdlineonly] [-d alt_source_dir] [attr=val [attr=val...]]
nodeset set the boot state for a noderangenodeset [noderange] [boot|install|stat|iscsiboot|netboot|statelite|runcmd=bmcsetup|osimage=<imagename>]
genimage Generates a stateless image to be used for a diskless install. genimage [-i nodebootif] [-n nodenetdrivers] -o OS -p profile [-l rootlimit] [-r additional_nics] [-k kernel_version] [--permission permission]
copycds Copies Linux distributions and service levels from CDs/DVDs to install directory.copycds [{-n|--name|--osver}=distroname] [{-a|--arch}=architecture] {iso|device-path} ...
nodels Lists the nodes, and their attributes, from the xCAT database. nodech noderange table.column=value [...]
nodeadd Adds nodes to the xCAT cluster database.nodeadd noderange groups=groupnames [table.column=value] [...]
rinstall Begin installation on a noderange.rinstall [-o|--osver] [-p|--profile] [-a|--arch] [-c|--console] [noderange]
More examples

© 2011 IBM Corporation34
xCAT – Extreme Cloud Administration Toolkit
xCAT noderange noderange is a syntax that can be used in most xCAT commands to conveniently specify
a list of nodes. The command will be applied to a range of nodes, often in parallel.
Comma-separated list where each token in the list can be a node or a group in any of the forms listed below:
node01-node10 (equivalent to: node01,node02,node03,...node10)node[01-10] (same as above)node01:node10 (same as above)node[01:10] (same as above)f[1-2]n[1-3] (equivalent to: f1n1,f1n2,f1n3,f2n1,f2n2,f2n3)group1-group3 (equivalent to: group1,group2,group3)node10-20 (equivalent to: node10,node11,node12,...node20)node10+3 (equivalent to: node10,node11,node12,node13)/node[345].* (will match any nodes that start with node3, node4, or node5)/group[12].* (will match any groups that start with group1 or group2)^/tmp/nodelist (file containing noderanges of nodes or groups)group1@group2 (list of nodes that group1 and group2 have in common)all,-node5-node10 (all nodes (assuming all is a group) listed in the nodelist table less node5 through node10)
Examples:– psh amm1-amm5 'info -T mm[1]' (run a command on some BladeCenter aMM)– psh rack01 'rm -f /tmp/*' (remove the tmp files on the nodes in the 1st frame)
Link: http://xcat.sourceforge.net/man3/noderange.3.html

© 2011 IBM Corporation35
xCAT – Extreme Cloud Administration Toolkit
xCAT User Management By default, only root on the management node can run xCAT Commands.
But xCAT can be configured to allow both non-root users and remote users to run xCAT commands.
Create SSL certificate so that user can be authenticated to xCAT– Run the following command on the Management node as root:
– It will create the following files in the $HOME/.xcat directory and causes xCAT to recognize this userid to be specified in the policy table.
Change the policy table to allow the user to run commands – To give a user all xCAT command privileges, run "tabedit policy", and add a line:
6,<username>,,,,,,allow,,– To only allow nodels: 6,<username>,,nodels,,,,allow– To allow all users to run nodels: 6.1,*,,nodels,,,,allow
To give a user the ability to run remote commands (xdsh,xdcp,psh,pcp), as the username run: xdsh <noderange> -K
Or you can enable a Login Node and allow users to launch commends from there.
/opt/xcat/share/xcat/scripts/setup-local-client.sh <username>
ca.pemclient-cert.pemclient-cred.pemclient-key.pemclient-req.pem

© 2011 IBM Corporation36
xCAT – Extreme Cloud Administration Toolkit
xCAT Overview
xCAT Architecture & Basic Functionality
xCAT Commands
Setting Up an xCAT Cluster
Example
Energy Management
Monitoring

© 2011 IBM Corporation37
xCAT – Extreme Cloud Administration Toolkit
Setting Up a xCAT cluster
Setting up a xCAT cluster involves several steps. Depending on the hardware, the Operating System and the provision method selected steps may differ.
Three main steps are required to set up a basic xCAT cluster:
(1) Install and setup the Management Node (MN).
(2) Install and setup the Service Nodes (SN).
(3) Install and Boot Compute Nodes (CN)
Stateful
Stateless
Statelite
Following slides will go through the different steps.

© 2011 IBM Corporation38
xCAT – Extreme Cloud Administration Toolkit
Setting Up a xCAT cluster
Prior to installing the Management Node, the administrator should already have an idea of how the overall cluster will look post-configured.
Internal Node naming scheme
Networks and IP addresses for every node on each net
Storage disk drive and filesystem layout
Linux version(s) to be used
Node or resource groups
Resource manager/scheduler
Cluster authentication method
License managers/services inside/outside the cluster

© 2011 IBM Corporation39
xCAT – Extreme Cloud Administration Toolkit
Setting Up a xCAT cluster
It's important to know what you want the names of the servers and their IP address before you start.
The names and IP addresses should reflect both what you have today and the need to grow for tomorrow
Try to avoid using non- AlphaNumeric symbols
Match names to rack location, IP addresses and network layout
Keep it as simple as possible and in sequence (i.e. node01-node42)

© 2011 IBM Corporation40
xCAT – Extreme Cloud Administration Toolkit
xCAT Overview
xCAT Architecture & Basic Functionality
xCAT Commands
Setting Up an xCAT Cluster Install and setup the Management Node (MN)
Install and setup the Service Nodes (SN)
Install and boot the Compute Nodes (CN) – Stateful
Install and boot the Compute Nodes (CN) – Stateless
Install and boot the Compute Nodes (CN) - Statelite
Example
Energy Management
Monitoring

© 2011 IBM Corporation41
xCAT – Extreme Cloud Administration Toolkit
xCAT Install and Setup the Management Node
(1) Install the Management Node (MN) by the traditional way → using DVD or CDs

© 2011 IBM Corporation42
xCAT – Extreme Cloud Administration Toolkit
xCAT Install and Setup the Management Node(2) Disable SELinux / AppArmor
(3) Disable the firewall if on a secure network. If not, enable at least: DHCP, TFTP, FTP, NTP, NFS, HTTP/HTTPS, FTP,
DNS services and ports 3001/3002 on the NIC that faces the cluster
(4) Setup the networks Configuring the networks before installing xCAT will aid in correct
configuration in the xCAT database (installation runs makenetworks command)
Prevent DHCP clients from overriding DNS configuration• Add PEERDNS=no in ifcfg-<interface> files
(5) Configure NTP, hostname and DNS or some hostname resolution method.
(6) Setup basic /etc/hosts file with the localhost and Management Node itself for each network.

© 2011 IBM Corporation43
xCAT – Extreme Cloud Administration Toolkit
xCAT Install and Setup the Management Node
(7) Configure Ethernet switches
Add the switches to /etc/hosts by vi or other - e.g.:
echo “172.10.0.254 switch1 switch1.cluster.ibm.com “>> /etc/hosts
xCAT can use the ethernet switches for discovery. This requires that the user setup an ip address and basic SNMP functionality on the switch in advance.
Allowing the SNMP version 1 community string “public” read access will allow xCAT to communicate without further customization
It is also recommended that spanning tree be set to “portfast”, “edge-port” or equivalent for node ports - Most Linux distros will fail during network install if this parameter is not set!
Please see your switch documentation as to how to configure these items

© 2011 IBM Corporation44
xCAT – Extreme Cloud Administration Toolkit
xCAT Install and Setup the Management Node(8) Create a separate file system for /install (optional).
Need at least 6GB/OS media.
(9) Remove tftp-server and OpenIPMIs-tools packages that conflict with xCAT provided packages
(10) Install xCAT using yum, zypper or manually (remember to install all the required packages)
On the MN xCAT-2* rpms must be installed. Do not install xCATsn-* rpms since these are for a Service Node
(11) Test xCAT installation source /etc/profile.d/xcat.sh
“tabdump site” to see the database is initialized
key,value,comments,disable
"xcatdport","3001",,
"xcatiport","3002",,
"tftpdir","/tftpboot",,
"installdir","/install",,
A second management node, or standby management node, can be set up to provide high availability management capability.

© 2011 IBM Corporation45
xCAT – Extreme Cloud Administration Toolkit
xCAT Overview
xCAT Architecture & Basic Functionality
xCAT Commands
Setting Up an xCAT Cluster Install and setup the Management Node (MN)
Install and setup the Service Nodes (SN)
Install and boot the Compute Nodes (CN) – Stateful
Install and boot the Compute Nodes (CN) – Stateless
Install and boot the Compute Nodes (CN) - Statelite
Example
Energy Management
Monitoring

© 2011 IBM Corporation46
xCAT – Extreme Cloud Administration Toolkit
xCAT Install and Setup the Service Nodes (SN)
Service Nodes (SN) are required when you want to set up a hierarchical management.
Service Nodes (SN) must be at same release/version that xCAT Management Node (nodels -v)
Requires the Management Node (MN) to run PostgreSQL, DB2 or MySQL for SN to access remotely the xCAT database in read/write mode.
Service Node (SN) installation packages are different from Management Node (MN)– XCATsn-* packages

© 2011 IBM Corporation47
xCAT – Extreme Cloud Administration Toolkit
xCAT Install and Setup the Service Nodes (SN)(1) Change default SQLite database on the Management Node (MN) to MySQL, PostgreSQL or DB2.
It requires database that provides the ability for remote access to the xCAT database on the MN which is required by Service Nodes.
To change SQLite to MySQL:
– Install MySQL on the MN.– As of xCAT 2.3.1, you can simply use mysqlsetup xCAT script to se it up: mysqlsetup -i– Give access to your SN when they are defined.
• Create a file with all the hostnames and/or ip addresses that you wish to access the database on the MN.mysqlsetup -u -f file
– Setup the ODBC on the Service Node (SN) after they are installed.• Install unixODBC and MySQL connector on them and modify the ODBC configuration
files.• Then sync the odbcinst.ini and odbc.ini files to the service nodes.
xdcp service -v /etc/odbcinst.ini /etc/odbcinst.inixdcp service -v /etc/odbc.ini /etc/odbc.inixdcp service -v /root/.odbc.ini /root/.odbc.ini
• As of xCAT 2.6, we have provided a post install script (odbcsetup), to automatically configure the ODBC after the Service node is installed.

© 2011 IBM Corporation48
xCAT – Extreme Cloud Administration Toolkit
xCAT Install and Setup the Service Nodes (SN)(2) Define the Service Nodes (SN) in the database
Same as defining the Compute Nodes (SN) but Services Nodes (SN) belong to the “service” group (service group can be changed but then some scripts must be modified)
chdef -t node -o sn1,sn2 groups=service,ipmi,all
(3) Add SN to the nodetype table as did by the compute nodes
(4) Add SN to the servicenode table An entry will be created for each service node or service group and contains the
services the node runs (DHCP, TFTP, NFS)
chdef -t group -o service setupnfs=1 setupnameserver=1 setuptftp=1
(5) Add SN postscripts to the postscripts table xCAT provides postscripts to automatically install and setup a SN. Own postscripts
can be added by adding them to the table and putting them in /install/postscripts.
(6) Setup the ODBC configuration postscripts on the Service Node (SN) (as of xCAT 2.6)

© 2011 IBM Corporation49
xCAT – Extreme Cloud Administration Toolkit
xCAT Install and Setup the Service Nodes (SN)(7) Assign nodes to their Service Node (SN)
The noderes table Noderes table defines:– where each node should boot from (xcatmaster). xcatmaster should be set to the
hostname of the SN that compute node knows it.– where commands should be sent that are meant for this node (servicenode).
servicenode attribute should be set to the hostname that MN knows it.– the type of network booting supported
Host name resolution must be setup in advance by /etc/hosts, DNS or DHCP.
Example: The Management Node (mn1) is the xcatmaster and the service node of a service node.– All nodes in node group compute1 served by service node sn1– All nodes in node group compute2 served by service node sn2– Management Node knows service nodes by sn1,sn2.– Compute Nodes (CN) knows service nodes by sn1-c,sn2-c
chdef -t node -o compute1 servicenode=sn1 xcatmaster=sn1-cchdef -t node -o compute2 servicenode=sn2 xcatmaster=sn2-cchdef -t node -o sn1,sn2 servicenode=mn1 xcatmaster=mn1

© 2011 IBM Corporation50
xCAT – Extreme Cloud Administration Toolkit
xCAT Install and Setup the Service Nodes (SN)Service Node Pools are lists of service nodes that support a set of compute nodes.
Having a list of service nodes allows backup service node(s) for a compute node when the primary service node is unavailable, or can be used for work-load balancing on the service nodes.
chdef -t node -o compute1 servicenode=sn1,sn2chdef -t node -o compute2 servicenode=sn2,sn1
tabdump noderes#node,servicenode,netboot,tftpserver,nfsserver,monserver,nfsdir,installnic,primarynic,cmdinterface,xcatmaster,current_osimage,next_osimage,nimserver,comments,disable"compute1","sn1,sn2","pxe",,,,,"eth0","eth0",,,,,,,"compute2","sn2,sn1","pxe",,,,,"eth0","eth0",,,,,,,"sn1","mn1","pxe",,,,,"eth0","eth1",,mn1,,,,,"sn2","mn1","pxe",,,,,"eth0","eth1",,mn1,,,,,

© 2011 IBM Corporation51
xCAT – Extreme Cloud Administration Toolkit
xCAT Install and Setup the Service Nodes (SN)(8) Setup site Table
If you are not using the NFS-hybrid method of stateless booting your compute nodes, set the installloc attribute to "/install". This instructs the service node to mount /install from the management node. (If you don't do this, you have to manually sync /install between the management node and the service nodes.)
If using service node pools:
The site table sharedtftp attribute must be set to 0 or no. The service nodes should not automount the tftpboot directory from the management node when using pools. The default is 1, the service node will automount the tftpboot directory when not using pools.
chtab key=installloc site.value=/install
chdef -t site -o clustersite sharedtftp=0
(9) Setup networks Table
You will need to update the entry for the network the management node uses to communicate to the service nodes, and create one for each network the service nodes use to communicate to the compute nodes.
(10) Setup nodehm/noderes Table for conserver/monserver
chdef -t node -o compute1 conserver=sn1 monserver=sn1chdef -t node -o compute2 conserver=sn2 monserver=sn2

© 2011 IBM Corporation52
xCAT – Extreme Cloud Administration Toolkit
xCAT Install and Setup the Service Nodes (SN)
(11) Install or Stateless boot the Service Nodes (SN)
xCAT uses KickStart/AutoYaST methodology to install a node and templates are provided to perform the installation:
/opt/xcat/share/xcat/install/<platform>/ (where platform is: sles, rh, fedora, …)
The same applies when creating a stateless image, default rpm list files to include or exclude packages are provided.
Service Node installation procedure is the same as the Compute Node
(CN) installation that will be showed in the following slides but since profile is service instead of compute, different templates are provided: /opt/xcat/share/xcat/install/<platform>/service.tmpl
/opt/xcat/share/xcat/install/<platform>/service.<os>.<architecure>.tmpl/opt/xcat/share/xcat/install/<platform>/service.<os>.<architecure>.pkglist/opt/xcat/share/xcat/install/<platform>/service.<os>.<architecure>.otherpkgs.pkglist/opt/xcat/share/xcat/install/<platform>/service.<architecure>.tmpl/opt/xcat/share/xcat/install/<platform>/service.<architecure>.pkglist/opt/xcat/share/xcat/install/<platform>/service.pkglist
profile: serviceos: rhels5.5, sles11.1,...architecture: ppc64, x86 – have to be already defined for the node.

© 2011 IBM Corporation53
xCAT – Extreme Cloud Administration Toolkit
xCAT Install and Setup the Service Nodes (SN)
To diskful install the Service Nodes (SN):
To stateless install the Service Nodes (SN):
nodeset service netbootrpower service boot
nodeset service installrpower service boot

© 2011 IBM Corporation54
xCAT – Extreme Cloud Administration Toolkit
xCAT Overview
xCAT Architecture & Basic Functionality
xCAT Commands
Setting Up an xCAT Cluster Install and setup the Management Node (MN)
Install and setup the Service Nodes (SN)
Install and boot the Compute Nodes (CN) – Stateful
Install and boot the Compute Nodes (CN) – Stateless
Install and boot the Compute Nodes (CN) - Statelite
Example
Energy Management
Monitoring

© 2011 IBM Corporation55
xCAT – Extreme Cloud Administration Toolkit
xCAT – Install a Compute Node (CN) - Stateful
Stateful provisioning method will automatically install the OS on the Compute Node.
xCAT uses KickStart/AutoYaST methodology.
KickStart template files and related installation scripts are located at:
/opt/xcat/share/xcat/install/<platform>/ (where platform is: sles, rh, fedora, …)
– Template files can be customized and to avoid overriding when updating xCAT, they must must be copied to:
/install/custom/install/<platform>(where platform is: sles, rh, fedora, …)
profile: compute,service,...os: rhels5.5, sles11.1,...architecture: ppc64, x86 – have to be already defined for the node.
xCAT
Stateful
Local - HD - Flash
OS
Inst
alle
r
HD Memory
Node
OS
• HD• Flash
© 2011 IBM Corporation56
xCAT – Extreme Cloud Administration Toolkit
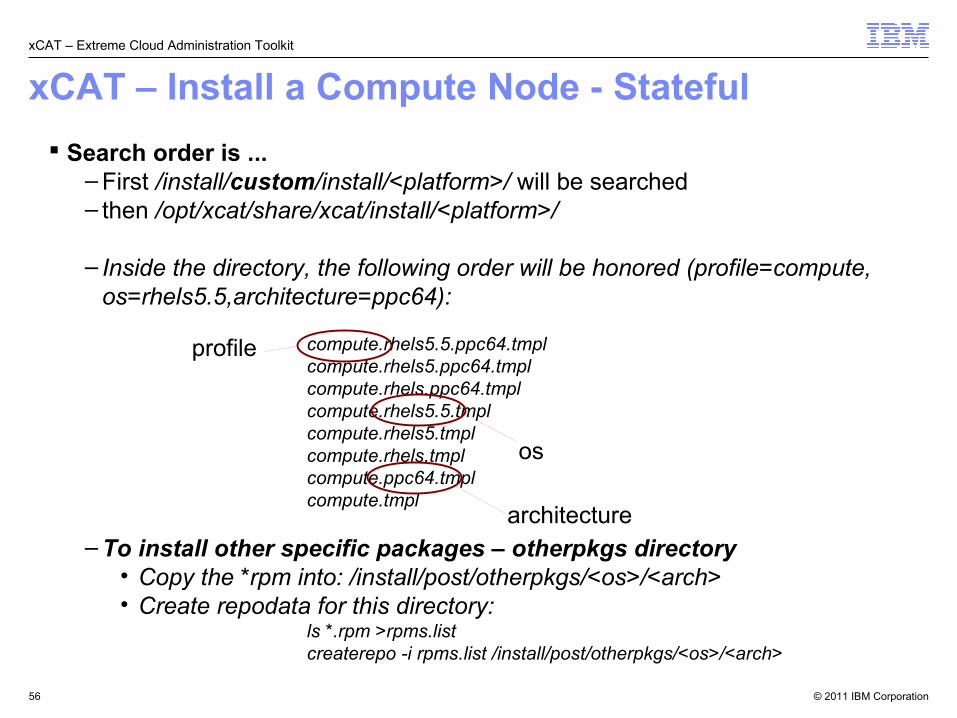
xCAT – Install a Compute Node - Stateful
Search order is ...– First /install/custom/install/<platform>/ will be searched– then /opt/xcat/share/xcat/install/<platform>/
– Inside the directory, the following order will be honored (profile=compute, os=rhels5.5,architecture=ppc64):
compute.rhels5.5.ppc64.tmpl compute.rhels5.ppc64.tmpl compute.rhels.ppc64.tmpl compute.rhels5.5.tmpl compute.rhels5.tmpl compute.rhels.tmpl compute.ppc64.tmpl compute.tmpl
– To install other specific packages – otherpkgs directory• Copy the *rpm into: /install/post/otherpkgs/<os>/<arch>• Create repodata for this directory:
ls *.rpm >rpms.list createrepo -i rpms.list /install/post/otherpkgs/<os>/<arch>
profile
architecture
os

© 2011 IBM Corporation57
xCAT – Extreme Cloud Administration Toolkit
xCAT – Install a Compute Node - Stateful
–Prepare the installation sourcecopycds /iso/RHEL5.2-Server-20080430.0-ppc-DVD.iso(Copies Linux distributions and service levels from CDs/DVDs to install directory)
–Customize KickStart template files–Add third-party software (otherpkgs)–Set the node status to ready for installation
nodeset <noderange> install
–Use network boot to start the installationrnetboot <noderange>
–Check the installation results• After the node is installed will be changed to booted• To check node status
lsdef pnode1 -i status

© 2011 IBM Corporation58
xCAT – Extreme Cloud Administration Toolkit
xCAT – Install a Compute Node - Stateful
To install a new Kernel on the nodes use a postinstall script or the updatenode method
–To use a postinstall script:mkdir /install/postscripts/datacp <kernel> /install/postscripts/data
–Create the postscript updatekernel:• vi /install/postscripts/updatekernel
#!/bin/bash rpm -Uivh data/kernel-*rpm chmod 755 /install/postscripts/updatekernel
–Add the script to the postscripts table and run the install:• chdef -p -t group -o compute postscripts=updatekernel• rinstall compute

© 2011 IBM Corporation59
xCAT – Extreme Cloud Administration Toolkit
xCAT Overview
xCAT Architecture & Basic Functionality
xCAT Commands
Setting Up an xCAT Cluster Install and setup the Management Node (MN)
Install and setup the Service Nodes (SN)
Install and boot the Compute Nodes (CN) – Stateful
Install and boot the Compute Nodes (CN) – Stateless
Install and boot the Compute Nodes (CN) - Statelite
Example
Energy Management
Monitoring
© 2011 IBM Corporation60
xCAT – Extreme Cloud Administration Toolkit
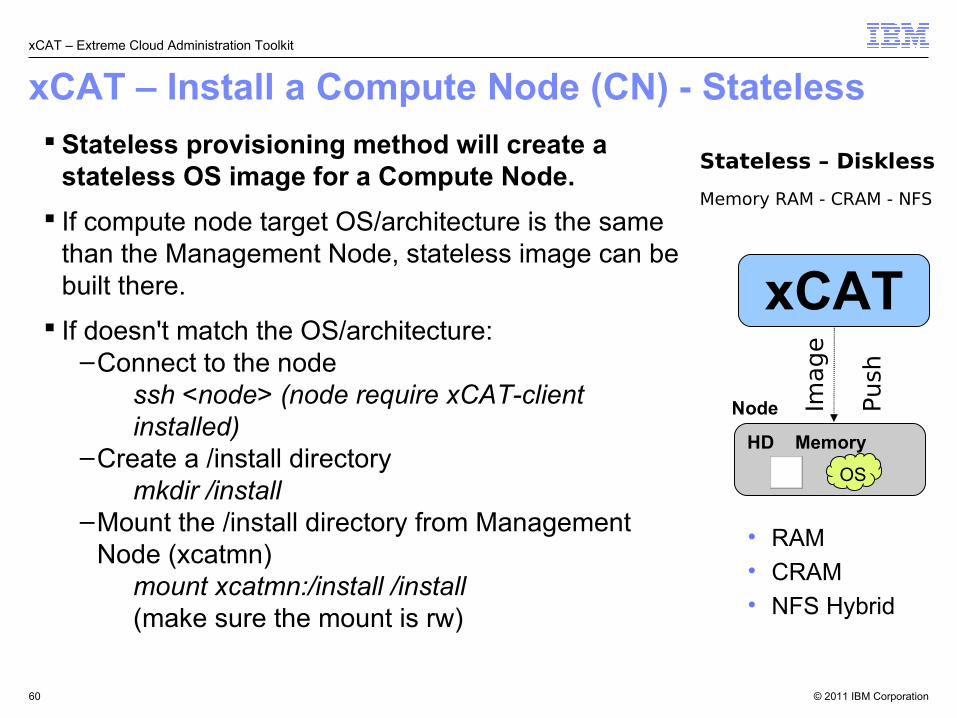
xCAT – Install a Compute Node (CN) - Stateless Stateless provisioning method will create a
stateless OS image for a Compute Node.
If compute node target OS/architecture is the same than the Management Node, stateless image can be built there.
If doesn't match the OS/architecture:–Connect to the node
ssh <node> (node require xCAT-client installed)
–Create a /install directorymkdir /install
–Mount the /install directory from Management Node (xcatmn)
mount xcatmn:/install /install(make sure the mount is rw)
HD Memory
Node
Stateless – Diskless
Memory RAM - CRAM - NFS
xCAT
Image
Push
• RAM• CRAM• NFS Hybrid
OS

© 2011 IBM Corporation61
xCAT – Extreme Cloud Administration Toolkit
xCAT – Install a Compute Node - Stateless
The default list of rpms to added or exclude to the diskless images is shipped in the following directory.
/opt/xcat/share/xcat/netboot/<platform>/(where platform is: sles, rh, fedora, …)
–Lists can be customized. Customized list must be copied to:/install/custom/netboot/<platform>(where platform is: sles, rh, fedora, …)
Setting up postinstall files:–If you are going to make modifications, copy the appropriate
/opt/xcat/share/xcat/netboot/<platform>/*postinstall files to the /install/custom/netboot/<platform> directory.

© 2011 IBM Corporation62
xCAT – Extreme Cloud Administration Toolkit
xCAT – Install a Compute Node - Stateless– To create the image
cd /opt/xcat/share/xcat/netboot/rh ./genimage -i eth0 -n ibmveth -o rhels5.2 -p compute
genimage command does: Will create an image in /install/netboot/<os>/<arch>/<profile>/rootimg Will create a ramdisk and kernel that can be used to boot the initial code (if you are using a different node than the MN, steps are different)
– Pack the image packimage -o rhels5.2 -p compute -a ppc64
– Set the node status to ready for installation• nodeset <noderange> netboot
– Use network boot to start the installation• rnetboot <noderange>
– Check the installation results• After the node is installed will be changed to booted• To check node status: lsdef pnode1 -i status

© 2011 IBM Corporation63
xCAT – Extreme Cloud Administration Toolkit
xCAT – Install a Compute Node - StatelessFor stateless compressed image
– Need to install squashfs tools– Need to build the aufs kernel module and copy it to /opt/xcat/share/xcat/neboot/<os>
cd /opt/xcat/share/xcat/netboot/fedora./geninitrd -i eth0 -n tg3,bnx2,squashfs,aufs,loop -o fedora8 -p service -l $(expr 100 \* 1024 \* 1024) 100MB./packimage -a $ARCH -o fedora8 -p compute -m squashfs
For stateless NFS-Hybrid:– Need to rebuild the kernel with the aufs kernel module embedded.– Append to fstab at /install/netboot/fedora8/x86_64/compute/rootimg/etc the following
line: “sunrpc /var/lib/nfs/rpc_pipefs rpc_pipefs rw 0 0”– Install nfs-utils on the image:
yum --installroot=/install/netboot/fedora8/x86_64/compute/rootimg install nfs-utils– Create initrd again and pack the image:
cd /opt/xcat/share/xcat/netboot/fedora ./geninitrd -i eth0 -n tg3,bnx2,aufs,loop,sunrpc,lockd,nfs_acl,nfs -o fedora8 -p compute -k 2.6.23.1-42.fc8-aufs packimage -a x86_64 -o fedora8 -p compute -m nfs

© 2011 IBM Corporation64
xCAT – Extreme Cloud Administration Toolkit
xCAT – Install a Compute Node - Sateless
To install a new kernel on the nodes:
– The kerneldir attribute in linuximage table is used to assign one directory to hold the new kernel to be installed into the stateless/statelite image. Its default value is /install/kernels, you need to create the directory named <kernelver> under the kerneldir, and genimage will pick them up from there.
– mkdir -p /install/kernels/2.6.32.10-0.5.ppc64– cd /install/kernels/2.6.32.10-0.5.ppc64– rpm2cpio /tmp/kernel-2.6.32.10-0.5.ppc64.rpm |cpio -idum
– Run genimage/packimage to update the image with the new kernel:• genimage -i eth0 -n ibmveth -o sles11.1 -p compute -k 2.6.32.10-0.5-ppc64• packimage -o sles11.1 -p compute -a ppc64
– Reboot the node with the new image:• nodeset pnode2 netboot• rnetboot pnode2

© 2011 IBM Corporation65
xCAT – Extreme Cloud Administration Toolkit
xCAT Overview
xCAT Architecture & Basic Functionality
xCAT Commands
Setting Up an xCAT Cluster Install and setup the Management Node (MN)
Install and setup the Service Nodes (SN)
Install and boot the Compute Nodes (CN) – Stateful
Install and boot the Compute Nodes (CN) – Stateless
Install and boot the Compute Nodes (CN) - Statelite
Example
Energy Management
Monitoring

© 2011 IBM Corporation66
xCAT – Extreme Cloud Administration Toolkit
xCAT – Install a Compute Node - Statelite Statelite provisioning method will create the statelite OS images
for a Compute Node.
Only one statelite image may be defined for a node or noderange.
Must configure the litefile table Specifies the directories and files on the statelite nodes that should be read/write, persistent, or read-only overlay. All other files in the statelite nodes come from the read-only statelite image

© 2011 IBM Corporation67
xCAT – Extreme Cloud Administration Toolkit
xCAT – Install a Compute Node - Statelite
Optionally configure the litetree tableControls where the initial content of the files in the litefile table come from, and the long term content of the "ro" files. Useful for per-node configuration options.
When a node boots up in statelite mode, it will by default copy all of its tmpfs files from the /.default directory of the root image, so there is not required to set up a litetree table.
If you decide that you want some of the files pulled from different locations that are different per node, you can use this table.
Must configure the policy tableEnsure policies are set up to allow litefile and litetree queries when a node boots

© 2011 IBM Corporation68
xCAT – Extreme Cloud Administration Toolkit
xCAT – Install a Compute Node - Statelite
– Once all the tables are set up, to create the base image cd /opt/xcat/share/xcat/netboot/rh ./genimage -i eth0 -n ibmveth -o rhels5.3 -p compute
genimage command does: Will create an image in /install/netboot/<os>/<arch>/<profile>/rootimg Will create a ramdisk and kernel aht can be used to boot the initial code (if you are using a different node than the MN, steps are different)
– Run liteimg command ./liteimg -o rhels5.3 -a x86_64 -p compute (if the RAMdisk-based solution is to be used, -t ramdisk must be specified)
© 2011 IBM Corporation69
xCAT – Extreme Cloud Administration Toolkit
xCAT – Install a Compute Node - Statelite
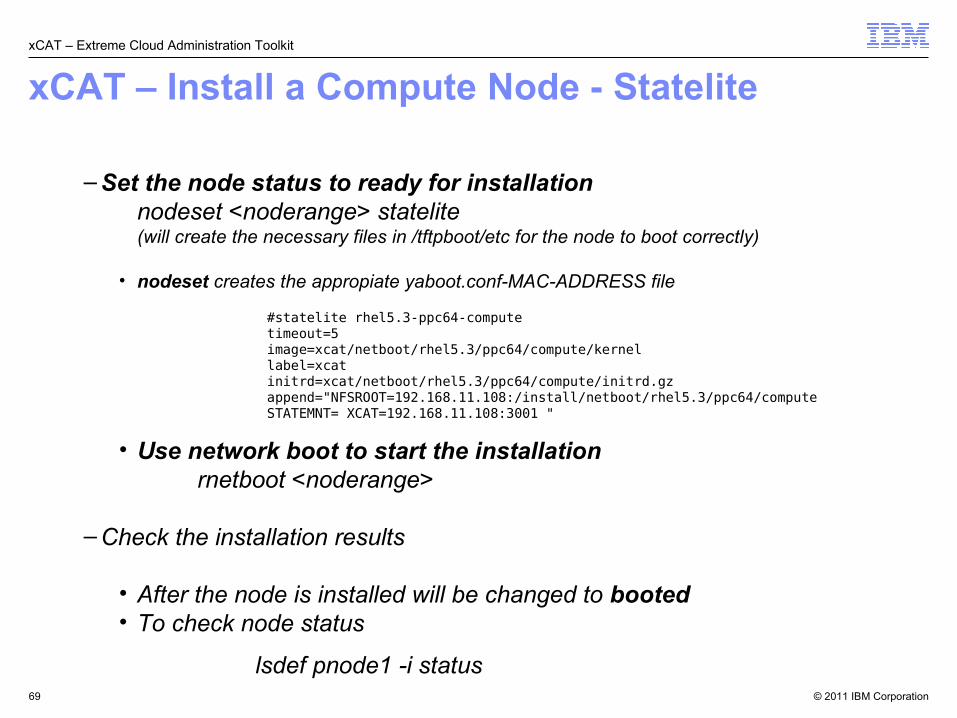
– Set the node status to ready for installationnodeset <noderange> statelite(will create the necessary files in /tftpboot/etc for the node to boot correctly)
• nodeset creates the appropiate yaboot.conf-MAC-ADDRESS file
• Use network boot to start the installation rnetboot <noderange>
– Check the installation results
• After the node is installed will be changed to booted• To check node status
lsdef pnode1 -i status
#statelite rhel5.3-ppc64-computetimeout=5image=xcat/netboot/rhel5.3/ppc64/compute/kernellabel=xcatinitrd=xcat/netboot/rhel5.3/ppc64/compute/initrd.gzappend="NFSROOT=192.168.11.108:/install/netboot/rhel5.3/ppc64/computeSTATEMNT= XCAT=192.168.11.108:3001 "

© 2011 IBM Corporation70
xCAT – Extreme Cloud Administration Toolkit
xCAT – Install a Compute Node - Statelite
Add/update software and files for the running nodes.
– Most of system files for the nodes are NFS mounted on the Management Node with read-only option, installing or updating software and files should be done to the image.
– Image location: /install/netboot/<os>/<arch>/<profile>/rootimg directory
– To install a package:
• rpm --root /install/netboot/<os>/<arch>/<profile>/rootimg -ivh rpm_name
• Reboot the node if required.

© 2011 IBM Corporation71
xCAT – Extreme Cloud Administration Toolkit
xCAT Overview
xCAT Architecture & Basic Functionality
xCAT Commands
Setting Up an xCAT Cluster
Example
Energy Management
Monitoring

© 2011 IBM Corporation72
xCAT – Extreme Cloud Administration Toolkit
xCAT IBM BladeCenter Cluster
XCAT ManagementServer
MM
switch
Setting up a small IBM BladeCenter xCAT cluster.

© 2011 IBM Corporation73
xCAT – Extreme Cloud Administration Toolkit
xCAT IBM BladeCenter Cluster
(1) Download Linux Distro ISOs and Create Repository on the Management Node (MN)
(2) Set Up Services on the Management Node (MN)–Set Up networks Table, DHCP, NTP, DNS
(3) Define AMMs and switches as Nodes.
chtab node=bca01 nodelist.groups=mmchtab node=swa01 nodelist.groups=nortel,switch
tabdump nodelistAs a result you will see the following:"bca01",mm,,,"swa01","nortel,switch",,,
(4) Define the hardware control attributes for the management modules:
chtab node=mm nodehm.mgt=bladechtab node=mm mp.mpa=bca01

© 2011 IBM Corporation74
xCAT – Extreme Cloud Administration Toolkit
xCAT IBM BladeCenter Cluster
(5) Setup the password table:chtab key=system passwd.username=root passwd.password=clusterchtab key=blade passwd.username=USERID passwd.password=PASSW0RD
(6) Setup the aMM network configuration:
rspconfig mm network=9.27.247.82,MM001125C33A86,9.27.247.254,255.255.248.0mm: OKmm: MM IP: 9.27.247.82mm: MM Hostname: MM001125C33A86mm: Gateway: 9.27.247.254mm: Subnet Mask: 255.255.248.0
(7) Setup the BladeCenter switch network configuration:
rspconfig mm swnet=9.27.247.84,9.27.247.254,255.255.248.0mm: OKmm: Switch IP: 9.27.247.84mm: Gateway: 9.27.247.254mm. Subnet Mask:255.255.248.0
(8) Enable SSH and SNMP
rspconfig mm snmpcfg=enable sshcfg=enablerspconfig mm pd1=redwoperf pd2=redwoperfrpower mm reset

© 2011 IBM Corporation75
xCAT – Extreme Cloud Administration Toolkit
xCAT IBM BladeCenter Cluster
(9) Define the Compute Nodes (CN) in the database• Set Up the nodelist Table:
nodeadd blade01-blade14 groups=all,ls21,bc01,blade,compute
• Set Up the nodehm Table:Specify that the BladeCenter management module should be used for hardware management.
chtab node=compute nodehm.cons=blade nodehm.mgt=blade nodehm.serialspeed=19200 nodehm.serialflow=hard nodehm.serialport=1
• Set Up the mp and mpa Table:Specify the slot(id) that each blade has in the mp table.
Define the username and password for the management module in the mpa table
chtab node=blade01 mp.id=1 mp.mpa=bca01chtab node=blade02 mp.id=2 mp.mpa=bca01chtab node=blade03 mp.id=3 mp.mpa=bca01...
chtab mpa=bca01 mpa.username=USERID mpa.password=newpasswd

© 2011 IBM Corporation76
xCAT – Extreme Cloud Administration Toolkit
xCAT IBM BladeCenter Cluster
• Set Up Conserver :Now that the nodehm and mp tables are set up, hardware management should work.
makeconservercfservice conserver stopservice conserver start
• Set Up the noderes Table:The noderes table defines where each node should boot from (xcatmaster), where commands should be sent that are meant for this node, and the type of network booting supported (among other things).
chtab node=compute noderes.netboot=pxe noderes.xcatmaster=xcatmn nodehm.serialport=1 noderes.installnic=eth0 noderes.primarynic=eth0 noderes.nfsserver=xcatmn
• Set Up the nodetype Table:Define the OS version and the specific set of packages (profile) that should be used for each node.The profile refers to a pkglist and exlist in /opt/xcat/share/xcat/netboot/<os> or /opt/xcat/share/xcat/install/<os>.
chtab node=compute nodetype.os=fedora8 nodetype.arch=x86_64 nodetype.profile=compute nodetype.nodetype=osi

© 2011 IBM Corporation77
xCAT – Extreme Cloud Administration Toolkit
xCAT IBM BladeCenter Cluster
(10) Set Up post-scripts to be run on the Nodes• Set Up the nodehm Table:
xCAT automatically adds several postscripts like syslog and remoteshell postscripts to the xcatdefaults row of the table.
• For example, add a ntp setup script or a custom script that must be copied to /install/postscripts:
chtab node=compute postscripts.postscripts=setupntp
(11) Get MAC addressesgetmacs compute
To verify the addresses: tabdump mac
(12) Add Compute nodes to DHCPmakedhcp -a (with dhcpd started)
(13) Setup blade for netbootrbootseq <nodename> net,hd

© 2011 IBM Corporation78
xCAT – Extreme Cloud Administration Toolkit
xCAT IBM BladeCenter Cluster
(14-a) Diskfull install the Blades nodeset <nodename> installrpower <nodename> boot
To monitor the install:rcons <nodename>tail -f /var/log/messages
(14-b) Stateless install the Blades –Create stateless image (fedora8)
nodeset <nodename> netbootrpower <nodename> boot
To monitor the install:rcons <nodename>tail -f /var/log/messages

© 2011 IBM Corporation79
xCAT – Extreme Cloud Administration Toolkit
xCAT Overview
xCAT Architecture & Basic Functionality
xCAT Commands
Setting Up an xCAT Cluster
Example
Energy Management
Monitoring

© 2011 IBM Corporation80
xCAT – Extreme Cloud Administration Toolkit
Energy Management This renergy command can be used to manage the energy consumption of IBM servers
which support IBM EnergyScale technology.
Through renergy command, user can query and set the power saving and power capping status, and also can query the average consumed energy, the ambient and exhaust temperature, the processor frequency for a server.
BladeCenter specific:For AMM as a target:
For Blade as a target:
renergy noderange [-V] { all | pd1all | pd2all | [pd1status] [pd2status] [pd1policy] [pd2policy] [pd1powermodule1] [pd1powermodule2] [pd2powermodule1] [pd2powermodule2] [pd1avaiablepower] [pd2avaiablepower] [pd1reservedpower] [pd2reservedpower] [pd1remainpower] [pd2remainpower] [pd1inusedpower] [pd2inusedpower] [availableDC] [averageAC] [thermaloutput] [ambienttemp] [mmtemp] }
renergy noderange [-V] { all | [averageDC] [capability] [cappingvalue] [CPUspeed] [maxCPUspeed] [savingstatus] [dsavingstatus] }renergy noderange [-V] { savingstatus={on | off} | dsavingstatus={on-norm | on-maxp | off}
For iDataPlex nodes, the renergy command depends on the Energy Management Plugin perl-IBM-EnergyManager to communicate with server. This plugin must be requested from IBM.
For the system p nodes, the renergy command depends on the Energy Management Plugin xCAT-energy to communicate with server. xCAT-energy can be downloaded from the IBM web site: http://www14.software.ibm.com/webapp/set2/sas/f/xcat/energy.html
The support for BladeCenter energy management is built into base xCAT, so no additional plugins are needed for BladeCenter.

© 2011 IBM Corporation81
xCAT – Extreme Cloud Administration Toolkit
Energy Management for POWER SystemsFeature Description P6 P7
Query power saving status (on/off) HV,IH HV,IH
Query dynamic power saving status (on-norm/on-maxp/off) HV,IH
Query power capping status (on/off) HV HV,IH
Query power capping min/max values HV HV,IH
Query power capping current value HV HV,IH
Query minimum soft capping value HV HV,IH
Query average consumed power (input) HV,IH HV,IH
Query average consumed power (output) HV HV,IH
Query current ambient temperature HV,IH HV,IH
Query current exhaust temperature HV,IH HV,IH
Query effective CPU speed HV,IH HV,IH
Query time used from FSP standby to OS standby HV,IH
Query system power consumed prior to power on HV,IH
Set power saving (on/off) HV,IH HV,IH
Set dynamic power saving (on-norm/on-maxp/off) HV,IH
Set power capping (on/off) HV HV,IH
Set power capping based on Watts HV HV,IH
Set power capping based on percentage of max - min HV HV,IH
Set CPU frequency 4Q2011
Separate (free) download from: http://www14.software.ibm.com/webapp/set2/sas/f/xcat/home.html

© 2011 IBM Corporation82
xCAT – Extreme Cloud Administration Toolkit
Energy Management for BladeCenter
Feature Description Chassis Blade
Query power saving status (on/off) Yes
Query dynamic power saving status (on-norm/on-maxp/off) Yes
Query power capping value Yes
Query power domain 1/2 status Yes
Query power domain 1/2 policy Yes
Query power domain 1/2 power module 1/2 capacity Yes
Query power domain 1/2 available power Yes
Query power domain 1/2 reserved power Yes
Query power domain 1/2 remaining power Yes
Query power domain 1/2 total power being used Yes
Query total DC power available Yes
Query average power AC (input) Yes
Query average power DC (output) Yes
Query current ambient temperature Yes
Query management module temperature Yes
Query current thermal output Yes
Query effective CPU speed Yes
Query maximum CPU speed Yes
Query energy management capability Yes
Set power saving (on/off) Yes
Set dynamic power saving (on-norm/on-maxp/off) Yes
BladeCenter energy management comes in base xCAT

© 2011 IBM Corporation83
xCAT – Extreme Cloud Administration Toolkit
Energy Management for iDataPlex
Feature Description iDataPlex
Query power capping status (enable/disable) Yes
Query power capping value (permitted max wattage per board) Yes
Query minimum guaranteed cap Yes
Query cumulative kWh meter per motherboard Yes
Query recent Average AC Wattage from PSU Yes
Query histogram data for wattage information Yes
Query current ambient temperature Yes
Query CPU exhaust temperature Yes
Set power capping (enable/disable) Yes
Set power capping value (permitted max wattage per board) Yes
iDataPlex energy management available upon request

© 2011 IBM Corporation84
xCAT – Extreme Cloud Administration Toolkit
xCAT Overview
xCAT Architecture & Basic Functionality
xCAT Commands
Setting Up an xCAT Cluster
Example
Energy Management
Monitoring

© 2011 IBM Corporation85
xCAT – Extreme Cloud Administration Toolkit
Monitoring Infrastructure There are two monitoring infrastructures introduced in xCAT 2.0:
– The xCAT Notification Infrastructure allows you to watch for the changes in xCAT database tables.
– The xCAT Monitoring Plug-in Infrastructure allows you to plug-in one or more third party monitoring software such as Ganglia, RMC, SNMP etc. to monitor the xCAT cluster.
xCAT Monitoring Plug-in Infrastructure – Uses monitoring plug-in modules that act as bridges to connect xCAT and the 3rd
party software. – You can write your own monitoring plug-in modules.
• xCAT (xcatmon.pm) (monitoring node statue using fping. Available)• SNMP (snmpmon.pm) (snmp monitoring. Available)• RMC (rmcmon.pm) (Available)• Ganglia (gangliamon.pm) (Available)• Nagios (nagiosmon.pm) (N/A)• Performance Co-pilot (pcpmon.pm) (N/A)

© 2011 IBM Corporation86
xCAT – Extreme Cloud Administration Toolkit
Monitoring Commands
command Description
monls list the current or all the monitoring plug-in names, their status and description.
monadd add a monitoring plug-in to the 'monitoring' table. This will also adds the configuration scripts for the monitoring plug-in, if any, to the 'postscripts' table.
monrm remove a monitoring plug-in from the 'monitoring' table. It also removes the configuration scripts for the monitoring plug-in from the 'postscripts' table.
moncfg configure the 3rd party monitoring software on the management server and the service node for the given nodes to include the nodes into the monitoring domain. It does all the necessary configuration changes to prepare the software for monitoring the nodes. The -r option will configure the nodes as well.
mondecfg deconfigure the 3rd party monitoring software on the management server and the service node for the given nodes to remove the nodes from the monitoring domain. The -r option will deconfigure the nodes as well.
monstart start 3rd party software on the management server and the service node for the given nodes to monitor the xCAT cluster. It includes starting the daemons. The -r option will start the daemons on the nodes as well.
monstop stop 3rd party software on the management server and the service node for the given nodes from monitoring the xCAT cluster. The -r will stop the daemons on the nodes as well.
monshow displays the events that happened on the given nodes or the monitoring data that is collected from the given nodes.

© 2011 IBM Corporation87
xCAT – Extreme Cloud Administration Toolkit
Monitoring Nodes Monitoring Nodes can be Management Nodes, Service Nodes or dedicated monitoring
nodes.
The monitoring servers are defined by the 'monserver' column of the noderes table. The data in 'monserver' column is a comma separated pairs of host names or ip
addresses. • The first host name or ip address represents the network adapter on that connects to the
mn. • The second host name or ip address represents the network adapter that connects to the
nodes.• If the no data is provided in the 'monserver' column, the values in the 'servicenode' and the
'xcatmaster' columns in the same table will be used. If none is defined, the mn will be used as the monitoring server.

© 2011 IBM Corporation88
xCAT – Extreme Cloud Administration Toolkit
SNMP Monitoring(1) Download the corresponding mib files for your system that you wish to receive SNMP traps from and copy
them to /usr/share/snmp/mibs/ on the monitoring server
(2) Add snmpmon to the monitoring table: monadd snmpmon
(3) Configure the Blade Center MM or BMC to set the trap destination to be the management server: moncfg snmpmon -r
(4) Activate: monstart snmpmon -r
(5) Verify monitoring was started: > monls output: snmpmon monitored
(6) Set email recipients. When traps are received, they will be logged into the syslog on the Management Node (mn).
(7) Set up the filters to avoid receiving not useful alerts.– The filtering can be done by adding a row in the monsetting table with name equals to snmpmon and
key equals to ignore. The value is a comma separated list that describes the contents in a trap.
(8) Make sure the blade names on Blade Center MM are identical to the node names defined in the xCAT nodelist table: rspconfig group1 textid (This command queries the blade name)
(9) Make sure snmptrapd is up and running on mn and all monitoring servers.
(10) Make sure snmp destination is set to the corresponding monitoring servers and SNMP alert is set to 'enabled'.
rspconfig mm snmpdest (mm is the group name for all the blade center mm) mm1: SP SNMP Destination 1: 192.152.101.1 mm2: SP SNMP Destination 1: 192.152.101.3
rspconfig mm alert mm1: SP Alerting: enabled mm2: SP Alerting: enabled

© 2011 IBM Corporation89
xCAT – Extreme Cloud Administration Toolkit
Ganglia Monitoring(1) Install Ganglia on the management node and prerequisites.
(2) Make sure all the nodes and service nodes that need to Ganglia installed have 'osi' in the nodetype column of the nodetype table: tabdump nodetyp
(3) Add gangliamon to the monitoring table. This command will also add the 'confGang' configuration scripts on the 'postscripts' table: monadd gangliamon
(4) Install Ganglia on the service node and the compute nodes.
(5) Configure management node and the service nodes: moncfg gangliamon -r
(6) To activate, use the monstart command. The -r flag will ensure that the Ganglia daemon (gmond) on the node is started.monstart: monstart gangliamon -r
(7) Verify monitoring was started:monlsgangliamon monitored

© 2011 IBM Corporation90
xCAT – Extreme Cloud Administration Toolkit
xCAT Documentation

© 2011 IBM Corporation91
xCAT – Extreme Cloud Administration Toolkit
xCAT Additional Information
Start at http://xcat.sf.net/ – Everything worth knowing is linked from there :)
xCAT DB: http://xcat.sf.net/man5/xcatdb.5.html
xCAT Man Pages: http://xcat.sf.net/man1/xcat.1.html
xCAT Wiki: http://xcat.wiki.sourceforge.net/
xCAT Bug List– https://sourceforge.net/tracker/?group_id=208749&atid=1006945
Mailing list– https://lists.sourceforge.net/lists/listinfo/xcat-user – Archive: http://sourceforge.net/mailarchive/forum.php?forum_name=xcat-user
xCAT Source– http://xcat.svn.sourceforge.net/svnroot/xcat/xcat-core/trunk/
xCAT Cookbooks (documentation)– http://xcat.svn.sourceforge.net/viewvc/xcat/xcat-core/trunk/xCAT-client/share/doc/index.html

© 2011 IBM Corporation92
xCAT – Extreme Cloud Administration Toolkit
TrademarksThe following are trademarks of the International Business Machines Corporation in the United States, other countries, or both.
The following are trademarks or registered trademarks of other companies.
* All other products may be trademarks or registered trademarks of their respective companies.
Notes: Performance is in Internal Throughput Rate (ITR) ratio based on measurements and projections using standard IBM benchmarks in a controlled environment. The actual throughput that any user will experience will vary depending upon considerations such as the amount of multiprogramming in the user's job stream, the I/O configuration, the storage configuration, and the workload processed. Therefore, no assurance can be given that an individual user will achieve throughput improvements equivalent to the performance ratios stated here. IBM hardware products are manufactured from new parts, or new and serviceable used parts. Regardless, our warranty terms apply.All customer examples cited or described in this presentation are presented as illustrations of the manner in which some customers have used IBM products and the results they may have achieved. Actual environmental costs and performance characteristics will vary depending on individual customer configurations and conditions.This publication was produced in the United States. IBM may not offer the products, services or features discussed in this document in other countries, and the information may be subject to change without notice. Consult your local IBM business contact for information on the product or services available in your area.All statements regarding IBM's future direction and intent are subject to change or withdrawal without notice, and represent goals and objectives only.Information about non-IBM products is obtained from the manufacturers of those products or their published announcements. IBM has not tested those products and cannot confirm the performance, compatibility, or any other claims related to non-IBM products. Questions on the capabilities of non-IBM products should be addressed to the suppliers of those products.Prices subject to change without notice. Contact your IBM representative or Business Partner for the most current pricing in your geography.
Adobe, the Adobe logo, PostScript, and the PostScript logo are either registered trademarks or trademarks of Adobe Systems Incorporated in the United States, and/or other countries.Cell Broadband Engine is a trademark of Sony Computer Entertainment, Inc. in the United States, other countries, or both and is used under license therefrom. Java and all Java-based trademarks are trademarks of Sun Microsystems, Inc. in the United States, other countries, or both. Microsoft, Windows, Windows NT, and the Windows logo are trademarks of Microsoft Corporation in the United States, other countries, or both.Intel, Intel logo, Intel Inside, Intel Inside logo, Intel Centrino, Intel Centrino logo, Celeron, Intel Xeon, Intel SpeedStep, Itanium, and Pentium are trademarks or registered trademarks of Intel Corporation or its subsidiaries in the United States and other countries.UNIX is a registered trademark of The Open Group in the United States and other countries. Linux is a registered trademark of Linus Torvalds in the United States, other countries, or both. ITIL is a registered trademark, and a registered community trademark of the Office of Government Commerce, and is registered in the U.S. Patent and Trademark Office.IT Infrastructure Library is a registered trademark of the Central Computer and Telecommunications Agency, which is now part of the Office of Government Commerce.
For a complete list of IBM Trademarks, see www.ibm.com/legal/copytrade.shtml:
*, AS/400®, e business(logo)®, DBE, ESCO, eServer, FICON, IBM®, IBM (logo)®, iSeries®, MVS, OS/390®, pSeries®, RS/6000®, S/30, VM/ESA®, VSE/ESA, WebSphere®, xSeries®, z/OS®, zSeries®, z/VM®, System i, System i5, System p, System p5, System x, System z, System z9®, BladeCenter®
Not all common law marks used by IBM are listed on this page. Failure of a mark to appear does not mean that IBM does not use the mark nor does it mean that the product is not actively marketed or is not significant within its relevant market.
Those trademarks followed by ® are registered trademarks of IBM in the United States; all others are trademarks or common law marks of IBM in the United States.


![EXTREME PROGRAMMINGfse.studenttheses.ub.rug.nl/8856/1/Infor_Ma_2001_TdeJong.CV.pdf · EXTREME PROGRAMMING 3.1. WHAT IS EXTREME PROGRAMMING? According to vd)sitc [3], Extreme Programming](https://static.fdocuments.in/doc/165x107/6008914c858cab1a066c00ad/extreme-extreme-programming-31-what-is-extreme-programming-according-to-vdsitc.jpg)


![TECA: A Parallel Toolkit for Extreme Climate Analysissbyna/research/papers/2012-dmess...PAGODA [8] are currently underway, advanced capabilities, such as machine learning and spatio-temporal](https://static.fdocuments.in/doc/165x107/60f7fdafb412631b83362f05/teca-a-parallel-toolkit-for-extreme-climate-analysis-sbynaresearchpapers2012-dmess.jpg)