X-Porte Service Manual - Frank's Hospital Workshop
92
i Service Manual Stand and Desktop Systems
Transcript of X-Porte Service Manual - Frank's Hospital Workshop
Service Manual
Stand and Desktop Systems
i

ii
Legal Notices
Manufacturer
FUJIFILM SonoSite, Inc.21919 30th Drive SEBothell, WA 98021-3904USA
T: (888) 482-9449 or (425) 951-1200F: (425) 951-1201
EC Authorized Representative
FujiFilm SonoSite B.V.Joop Geesinkweg 1401114 AB Amsterdam, The Netherlands
Australia Sponsor
FUJIFILM SonoSite Australasia Pty Ltd114 Old Pittwater RDBrookvale, New South Wales 2100, Australia
SonoMB, SonoSite, Steep Needle Profiling, X-Porte, and the SonoSite logo are registered (in some jurisdictions) and unregistered trademarks owned by FUJIFILM SonoSite, Inc. in various jurisdictions.
DICOM is the registered trademark of the National Electrical Manufacturers Association.
All other trademarks are the property of their respective owners.
Patents: US 8,216,146; US 8,213,467; US 8,147,408; US 8,137,278; US 8,088,071; US 8,066,642; US 8,052,606; US 7,819,807; US 7,804,970; US 7,740,586; US 7,686,766; US 7,604,596; US 7,591,786; US 7,588,541; US 7,534,211; US 7,449,640; US 7,169,108; US 6,962,566; US 6,648,826; US 6,575,908; US 6,569,101; US 6,471,651; US 6,416,475; US 6,383,139; US 6,364,839; US 6,203,498; US 6,135,961; US 5,893,363 ; US 5,817,024; US 5,782,769; US 5,722,412; AU: 730822; AU: 727381; CA: 2,372,152; CA: 2,371,711; CN 98108973.9; CN: 98106133.8; CN: 97113678.5; DE: 69831698.3; DE: 69830539.6; DE: 69730563.5; DE: 602004027882.3; DE: 602004023816.3; DE: 60034670.6; DE: 60029777.2; EP: 1589878; EP: 1552792; EP: 1180971; EP: 0875203; EP: 0815793; EP 1180970; EP 0881492; ES: 2229318; ES: 159878; ES: 1552792; ES: 0881492; FR: 158978; FR: 1552792; FR: 1180970; FR: 0881492; FR: 0875203; FR: 0815793; GB: 158978; GB: 1552792; GB: 1180971; GB: 1180970; GB: 0881492; GB: 0875203; GB: 0815793; IT: 1589878; IT: 1552792; IT: 0881492; IT: 0815793; JP: 4696150; KR: 532359; KR: 528102; NO: 326814; NO: 326202
Copyright © 2018 FUJIFILM SonoSite Inc, Inc. All rights reserved.
P16620-01
Caution: United States federal law restricts this device to sale by or on the order of a physician.
iii

iv

Table of Contents
Introduction ................................................................................. 1Audience.................................................................................................................. 1Contact Information ................................................................................................. 1Terms and symbols ................................................................................................. 2Labeling symbols ..................................................................................................... 2
Specifications .............................................................................. 3Specifications........................................................................................................... 3
System Specifications ............................................................................................. 3Electrical specifications ........................................................................................... 3Environmental limits ................................................................................................ 4Battery specifications............................................................................................... 4Accessories and peripherals ................................................................................... 4
Safety .......................................................................................... 5Electrical safety........................................................................................................ 5Electrical safety classification .................................................................................. 7Equipment safety ..................................................................................................... 7
DICOM standard...................................................................................................... 7HIPAA standard....................................................................................................... 7
Transporting X-Porte Stand Systems ...................................................................... 7
System Overview ........................................................................ 9About the System .................................................................................................... 9Theory of Operation................................................................................................. 9
Description of Operating Modes.............................................................................. 10Additional System Feature Performances............................................................... 12Front End Overview................................................................................................. 13X-Porte Front End Board......................................................................................... 14PW Doppler Processing .......................................................................................... 15CW Doppler Processing .......................................................................................... 16Back End Overview ................................................................................................. 17Control Subsystem .................................................................................................. 18Power Supply and Control....................................................................................... 19ECG Module............................................................................................................ 20DICOM..................................................................................................................... 21
Troubleshooting .......................................................................... 23X-Porte Desktop and Stand Versions Major Component Diagrams ........................ 23System and Subsystem Diagnosis .......................................................................... 23System Repair ......................................................................................................... 24Test Equipment........................................................................................................ 24Failure (Assert) Codes............................................................................................. 24
Verifying a System Assert Code.............................................................................. 24Clinical Monitor Display ........................................................................................... 25DICOM..................................................................................................................... 26SPMU ...................................................................................................................... 27Touch Control Panel................................................................................................ 29
X-Porte Power-0 & Power-1 Procedural Steps........................................................ 29
v

Replacement Procedures............................................................ 33Qualifying Service Personnel................................................................................... 34Clinical Monitor Display ........................................................................................... 34
Required Parts......................................................................................................... 34Required Tools ........................................................................................................ 34Clinical Monitor Display Removal ............................................................................ 34Clinical Monitor Display Replacement ..................................................................... 35
System (“Engine”).................................................................................................... 36Required Part .......................................................................................................... 36Required Tools ........................................................................................................ 36System (“Engine”) Removal .................................................................................... 36System (“Engine”) Replacement ............................................................................. 37
Clinical Monitor Stalk Cable..................................................................................... 37Required Parts......................................................................................................... 37Required Tools ........................................................................................................ 37Clinical Monitor Stalk Cable Removal ..................................................................... 37Clinical Monitor Stalk Cable Replacement .............................................................. 38
Touch Control Panel ................................................................................................ 38Required Parts......................................................................................................... 38Required Tools ........................................................................................................ 38Control Panel Removal............................................................................................ 38Control Panel Replacement..................................................................................... 40
Dock......................................................................................................................... 40Required Part .......................................................................................................... 40Required Tools ........................................................................................................ 40Dock Removal ......................................................................................................... 40Dock Replacement .................................................................................................. 41
Stand Power Management Unit (SPMU) ................................................................. 41Required Part .......................................................................................................... 41Required Tools ........................................................................................................ 41Stand Power Management Unit (SPMU) Removal.................................................. 42Stand Power Management Unit (SPMU) Replacement........................................... 45
Battery ..................................................................................................................... 46Required Part .......................................................................................................... 46Required Tools ........................................................................................................ 46Battery Removal ...................................................................................................... 46Battery Replacement ............................................................................................... 46
Triple Transducer Connect (TTC)............................................................................ 47Required Part .......................................................................................................... 47Required Tools ........................................................................................................ 47Triple Transducer Connect (TTC) Removal ............................................................ 47Triple Transducer Connect (TTC) Replacement ..................................................... 48
Optional Equipment - Stand System........................................................................ 49PowerPark ............................................................................................................... 49
Required Part .......................................................................................................... 50Required Tools ........................................................................................................ 50PowerPark Stand Module Removal......................................................................... 50PowerPark Stand Module Replacement.................................................................. 50PowerPark Stand Module Removal (Alternate Method-Upright System) ................ 50PowerPark Stand Module Replacement (Alternate Method-Upright System) ..... 50
Sony UP-D897MD Printer 50Required Part .......................................................................................................... 51Required Tools ........................................................................................................ 51
vi

Sony UP-D897MD Printer Removal ........................................................................ 51Sony UP-D897MD Printer Replacement ................................................................. 52
Maintenance................................................................................ 51Periodic Maintenance .............................................................................................. 51Cleaning and Disinfecting ........................................................................................ 51
Performance Testing................................................................... 53Overview.................................................................................................................. 53Recommend Test Equipment .................................................................................. 53Setting Up Performance Tests................................................................................. 53Basic Operational Tests........................................................................................... 542D Performance Tests............................................................................................. 54
2D Performance / Image Quality ............................................................................. 54Axial Measurement Accuracy .................................................................................. 55Lateral Measurement Accuracy............................................................................... 55Penetration .............................................................................................................. 56
Additional Performance Tests.................................................................................. 56Color Doppler (Color) .............................................................................................. 56Color Power Doppler (CPD) .................................................................................... 57M Mode Imaging...................................................................................................... 57Tissue Harmonic Imaging........................................................................................ 57Pulsed Wave (PW) Doppler Imaging....................................................................... 58Continuous Wave (CW) Doppler Imaging ............................................................... 58Image Quality Verification Test/Livescan ................................................................ 58Printer ...................................................................................................................... 59
Replacement Parts...................................................................... 61Clinical Monitor ........................................................................................................ 62Touch Control Panel ................................................................................................ 63Dock......................................................................................................................... 64“Ultrasound” Engine................................................................................................. 65Stand Power Management Unit (SPMU & Batteries) .............................................. 66Triple Transducer Connect (TTC)............................................................................ 67Clinical Monitor Hardware........................................................................................ 68Control Panel Hardware .......................................................................................... 68Dock Hardware ........................................................................................................ 69Stand Hardware Parts ............................................................................................. 69Optional Equipment ................................................................................................. 70PowerPark ............................................................................................................... 70Sony UP-D897MD B&W Printer .............................................................................. 71Desktop System Components ................................................................................. 72EPS for Desktop System (Engine)........................................................................... 72EPS for Desktop Clinical Monitor Display................................................................ 72Other Desktop Components .................................................................................... 73Ordering Replacement Parts ................................................................................... 73
Service Event Reporting ............................................................. 75Service Event Report Form ..................................................................................... 76Service Event Report Instructions ........................................................................... 77Returning Products to FUJIFILM SonoSite.............................................................. 78
vii

Shipping Instructions .............................................................................................. 78
viii

Chapter 1: Introduction
Before servicing the X-Porte Ultrasound System, please read this manual.
The ultrasound system has multiple configurations and feature sets. All are described in this service manual but not every option may apply to your system. System features depend on your system configuration, transducer, and exam type.
Refer to the X-Porte Product Information & Safety Guide (P14646) for additional information regarding safety, system controls, operation, capabilities, and specifications.
AudienceThe intended audience of this manual are properly trained field and in-house service personnel. The ultrasound system operators are expected to be able to replace all the components of the Desktop version and the System “Engine” attached to the Stand version. With technical support guidance, a basic knowledge of hand tools, and the ability to handle about 20 lb (9.1 kg), the system operators are expected to replace the touch Control Panel and Clinical Monitor display. The Stand Power Management Unit (SPMU) and batteries in the Stand version will be serviced by qualified field service personnel. The batteries used are sealed Lithium-ion type which requires no maintenance and are not serviceable. Expected life for these batteries are between 3-6 years depending on system usage and configuration of the Stand system.
Contact InformationQuestions and comments are encouraged. FUJIFILM SonoSite is interested in your feedback regarding the system and user documentation. Please call FUJIFILM SonoSite at 888-482-9449 in the U.S. Outside the U.S., call the nearest FUJIFILM SonoSite representative.
For technical support, please contact FUJIFILM SonoSite as follows:
FUJIFILM SonoSite Technical Support
Phone (U.S. or Canada):
877-657-8118
Phone (Outside U.S. and Canada):
425-951-1330Or call your local representative.
Fax: 425-951-6700
E-mail: [email protected]
Web site: www.sonosite.com
EuropeServiceCenter:
FUJIFILM SonoSite - AmsterdamJoop Geesinkweg 140 1114 AB AmsterdamThe NetherlandsTel (Main): +31 20 751 2020- English support: +44 14 6234 1151- French support: +33 1 8288 0702- German support: +49 69 8088 4030- Italian support: +39 02 9475 3655- Spanish support: +34 91 123 8451
Chapter 1: Introduction 1

FUJIFILM SonoSite Technical Support (Continued)
Terms and symbolsThe service manual follows these conventions:
• A WARNING describes precautions necessary to prevent injury or loss of life.
• A Caution describes precautions necessary to protect the products.
• Numbered steps in procedures must be performed in order.
• Items in bulleted lists do not require performance in sequence.
Labeling symbolsPlease refer to Chapter 4: Labeling Symbols found in the X-Porte Product Information & Safety Guide (P14646)
Asia ServiceCenter:
e-mail: [email protected]: +65 6380-5581
2 Chapter 1: Introduction

Chapter 2: Specifications
This chapter contains information regarding system specifications and accessory compatibility. The information applies to the ultrasound system, transducers, accessories, and peripherals.
Specifications
System Specifications
Stand Dimensions:
• Length: 26.4 in. (67.1 cm)
• Width: 21.2 in. (53.8 cm)
• Height (max): 64 in. (162.6 cm)
• Height (min): 42.2 in. (107.2 cm)
• Height Adjustment: 9 in. (22.9 cm) travel
Touch Panel
• Capacitive Display Type
• Diagonal: 12.1 in. (30.7 cm)
• Multi-touch Gestures for System Controls
• Tilt Adjustment: 7.3 in. (18.5 cm)
• Side to Side Turning: +/- 90 degrees from center
Display (HD Monitor)
• Diagonal: 19 in. (48.3 cm)
• Screen Size: 1280 x 800
• Image Size: 800 x 600
• Monitor Tilt: 5° tilting forward from vertical, 20° tilting back from vertical
Electrical specifications• Power Supply Input (Stand Version): 100-240V~ 6.0A Max, 50-60Hz
• Sony B/W Printer: 100-240V~ 1.5A-0.8A, 50-60Hz
• Power Supply Output 1 (Stand Version): 24 VDC, 11.5 A Max (Output not exceeding 275 watts)• Power Supply Output 2 (Stand Version): 100-240V~ 3.0A - 1.5A, 50-60Hz
• Power Supply Input (Desktop Version): 100-240V~ 3.4A - 1.4A, 50-60Hz
• Power Supply Output (Desktop Version): 24 VDC, 6.25 A Max (Combined Output not exceeding 150 watts)• Clinical Display Monitor Supply: 100-240V~ 2.7A, 50-60Hz• Sony B/W Printer: 100-240V~ 1.5A-0.8A, 50-60Hz
• Batteries (Stand Version): 3 Lithium-ion batteries (385Wh total)
• Battery Use Time: 1.0 hour, 3 days on idle
• Battery Charge Time: 2.5 hours
• Battery Life: 3-6 years
Chapter 2: Specifications 3
Environmental limitsNote: The temperature, pressure, and humidity limits apply only to the ultrasound system, transducers, and battery.
Operating
System and Transducer
10–40°C (50–104°F), 15–95% R.H.
700 to 1060hPa (0.7 to 1.05 ATM)
Shipping and Storage
System and Transducer
-35-65°C (-31-149°F), 15-95% R.H.
500 to 1060hPa (0.5 to 1.05 ATM)
Battery
-20–60°C (-4–140°F), 15–95% R.H. (For storage longer than 30 days, store at or below room temperature.)
500 to 1060hPa (0.5 to 1.05 ATM)
Battery specificationsThe X-Porte stand uses three lithium-ion batteries that are charged and controlled by the Stand Power Management Unit (SPMU) that can be switched off via three rocker type switches. These switches can be accessed by lifting up from the stand bottom a black plastic door located under the left rear caster leg.
Run time is up to one hour (up to 3days on idle) depending on imaging mode and display brightness. This chapter contains electrical, and clinical safety information required by regulatory agencies.
Accessories and peripherals
The system supports various accessories and peripherals. See the X-Porte Product Information & Safety Guide (P14646) for a list of compatible products.
4 Chapter 2: Specifications
Chapter 3: Safety
This chapter contains electrical and clinical safety information required by regulatory agencies. The information applies to the ultrasound system, transducers, accessories, and peripherals.
Electrical safetyThis system meets EN60601-1, Class I/internally-powered equipment requirements and Type BF (transducers) and Type CF (ECG leads) isolated patient-applied parts safety requirements.
This system complies with the applicable medical equipment requirements published in the Canadian Standards Association (CSA), European Norm Harmonized Standards, and Underwriters Laboratories (UL) safety standards.
For maximum safety observe the following warnings and cautions..
WARNING: To avoid the risk of injury, do not operate the system in the presence of flammable gasses or anesthetics. Explosion can result.
WARNING: To avoid the risk of electrical shock or injury, do not open the system enclosures. All internal adjustments and replacements, including battery replacement, must be made by a qualified technician.
WARNING: To avoid the risk of electrical shock:
• Use only properly grounded equipment. Shock hazards exist if the power supply is not properly grounded. Grounding reliability can be achieved only when equipment is connected to a receptacle marked “Hospital Only” or “Hospital Grade” or equivalent. The grounding wire must not be removed or defeated.
• This equipment must be connected only to supply mains with protective earth.
• Do not let any part of the system (including the bar code scanner, external mouse, power supply, or power supply connector), except for the transducer or ECG leads, touch the patient.
• Do not touch any of the following:
• The ungrounded signal input/output connectors on the back of the ultrasound system
• The system battery contacts (Stand System Only)
• The system transducer connector when the transducer or Triple Transducer Connect (TTC) is disconnected
• Any unused TTC transducer connector when the TTC is connected.
• Do not connect the system's power supply to an MPSO or extension cord.
• Before using the transducer, inspect the transducer face, housing, and cable. Do not use the transducer if the transducer or cable is damaged.
• Always disconnect the power supply from the system before cleaning the system.
• Do not use any transducer that has been immersed beyond the specified cleaning or disinfection level. See “Cleaning and Disinfecting X-Porte Products” P16529
• Use only accessories and peripherals recommended by FUJIFILM SonoSite, including the power supply. Connection of accessories and peripherals not recommended by FUJIFILM SonoSite could result in electrical shock. Contact FUJIFILM SonoSite or your local representative for a list of accessories and peripherals available from or recommended by FUJIFILM SonoSite.
Chapter 3: Safety 5

WARNING: To avoid the risk of electrical shock and fire hazard:
• Inspect the power supply, AC power cords, cables, and plugs on a regular basis. Ensure that they are not damaged.
• The power cord set that connects the power supply of the ultrasound system or to mains power must only be used with the power supply, and cannot be used to connect other devices to mains power.
WARNING: To avoid the risk of electrical shock, burn, or fire, use only AC power supplies specified by FUJIFILM SonoSite.
WARNING: To prevent injury to the operator/bystander, the transducer must be removed from patient contact before the application of a high-voltage defibrillation pulse.
WARNING: To avoid possible electrical shock or electromagnetic interference, verify proper operation and compliance with relevant safety standards for all equipment before clinical use. Connecting additional equipment to the ultrasound system constitutes configuring a medical system. FUJIFILM SonoSite recommends verifying that the system, all combinations of equipment, and accessories connected to the ultrasound system comply with JACHO installation requirements and/or safety standards such as AAMI-ES1, NFPA 99 OR IEC Standard 60601-1-1 and electromagnetic compatibility standard IEC 60601-1-2 (Electromagnetic compatibility), and are certified according to IEC Standard 60950 (Information Technology Equipment (ITE) or IEC 60601-1.).
WARNING: Due to the captive nature of the Stand version system batteries, any shipping transport, service activities, or extended periods of non-operation with the system unplugged from the AC wall source, will require that the battery ON-OFF switch be set to the “•O” (OFF) position. Please refer to Figure 3.1 on page 6.
Caution: Do not use the system if an error message appears on the display monitor: note the error code; call FUJIFILM SonoSite or your local representative; turn off the system by pressing and holding the power key until the system powers down.
Caution: To avoid increasing the system and transducer connector temperature, do not block the airflow to the rear fans and ventilation holes around the bottom and side perimeter of the Engine.
6 Chapter 3: Safety
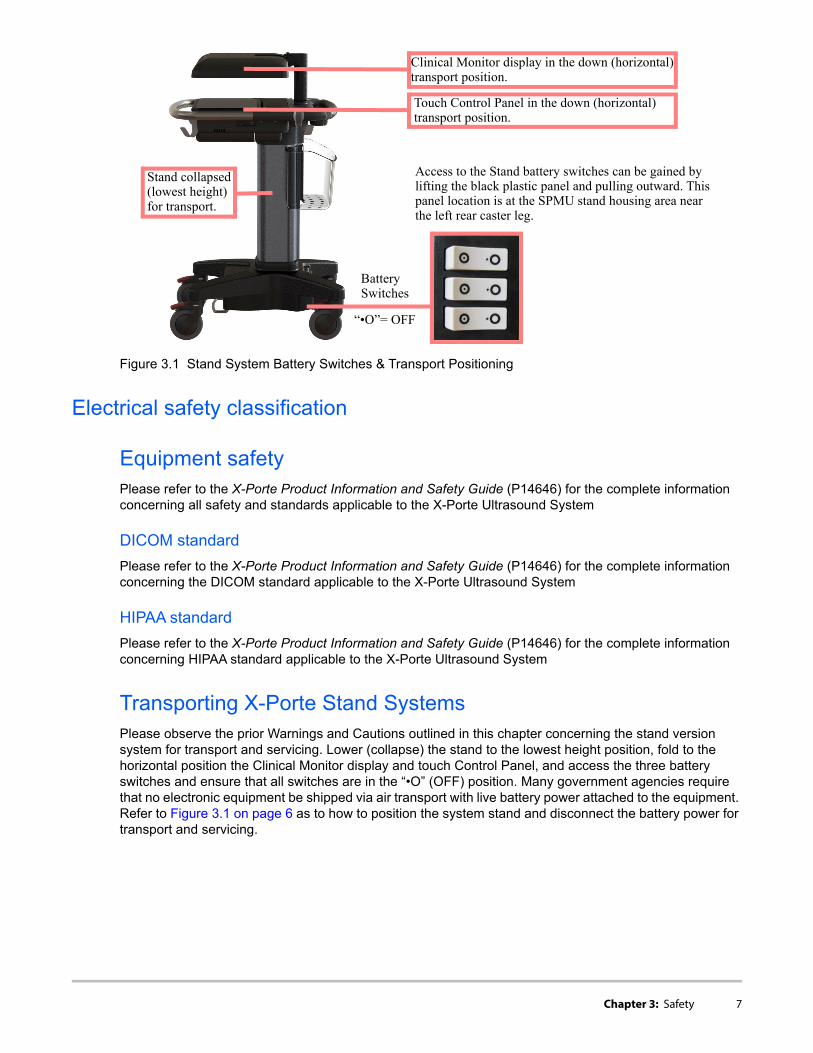
Figure 3.1 Stand System Battery Switches & Transport Positioning
Electrical safety classification
Equipment safetyPlease refer to the X-Porte Product Information and Safety Guide (P14646) for the complete information concerning all safety and standards applicable to the X-Porte Ultrasound System
DICOM standard
Please refer to the X-Porte Product Information and Safety Guide (P14646) for the complete information concerning the DICOM standard applicable to the X-Porte Ultrasound System
HIPAA standard
Please refer to the X-Porte Product Information and Safety Guide (P14646) for the complete information concerning HIPAA standard applicable to the X-Porte Ultrasound System
Transporting X-Porte Stand SystemsPlease observe the prior Warnings and Cautions outlined in this chapter concerning the stand version system for transport and servicing. Lower (collapse) the stand to the lowest height position, fold to the horizontal position the Clinical Monitor display and touch Control Panel, and access the three battery switches and ensure that all switches are in the “•O” (OFF) position. Many government agencies require that no electronic equipment be shipped via air transport with live battery power attached to the equipment. Refer to Figure 3.1 on page 6 as to how to position the system stand and disconnect the battery power for transport and servicing.
Access to the Stand battery switches can be gained bylifting the black plastic panel and pulling outward. Thispanel location is at the SPMU stand housing area near the left rear caster leg.
Clinical Monitor display in the down (horizontal) transport position.
Touch Control Panel in the down (horizontal)transport position.
BatterySwitches
Stand collapsed(lowest height)for transport.
“•O”= OFF
Chapter 3: Safety 7

8 Chapter 3: Safety

Chapter 4: System Overview
About the SystemThe FUJIFILM SonoSite X-Porte high-resolution ultrasound system is a portable, full featured, general purpose, software controlled, diagnostic ultrasound system using all digital architecture. The system is used to acquire and display high-resolution, real-time ultrasound data in 2D, M Mode, Pulsed Wave (PW) Doppler, Continuous Wave (CW) Doppler, Color Power Doppler (CPD), and color Doppler (Color) or in a combination of these modes.
The system has an electrocardiography (ECG) display feature and supports a 3-lead ECG cable assembly to collect data for M Mode and Doppler measurements. The system provides measurement capabilities for anatomical structures and fetal biometry that provide information used for clinical diagnostic purposes. The system has a PW and CW Doppler audio output feature, cine review, image zoom, labeling, biopsy, measurements and calculations, image storage and review, printing, and recording capabilities.
The system includes optional Digital Imaging and Communications (DICOM) capabilities as well as general computer communication capabilities to provide the acceptance, transfer, display, storage, and digital processing of ultrasound images and loops. Security support is also provided to facilitate HIPAA compliance.
The system displays the current output level in terms of one of two bioeffects indices (“Mechanical Index [MI]” and “Thermal Index [TI]”) in accordance with the AIUM/NEMA Standard for Real Time Display of Thermal and Mechanical Acoustic Output Indices on Diagnostic Ultrasound Equipment.
Theory of OperationThe X-Porte ultrasound system has seven (7) major functional groups:
• Transducer• Acquisition Subsystem• Processing Subsystem• Display Subsystem• Control Subsystem• User Interface Subsystem• Power Subsystem
The following block diagram shows the relationship of the functional groups.
Chapter 4: System Overview 9

Figure 4.1 Ultrasound System Functional Group
The Transducer elements convert the pulser voltage to acoustic energy during the transmit portion of the ultrasound acquisition cycle. The elements convert the acoustic echo to voltage in the receive portion of the acquisition. The voltage developed on the transducer elements is sensed by the acquisition subsystem. The system transducers have 64 to 256 elements.
The Acquisition Subsystem consists of the beamformer and interface to the transducer. The beamformer controls the timing of the transmit pulses to focus the acoustic beam. The beamformer amplifies the low-level received echos and controls the receive focusing. The system beamformer transmits on up to 128 elements and receives on 64 elements.
The Processing Subsystem includes capabilities for interfacing with the beamformer and performing high speed processing. The processing subsystem demodulates, filters, detects, and compresses the signal supplied by the beamformer into display information.
The Display Subsystem converts the detected ultrasound data into picture elements (pixels). The software user interface graphics are combined with the ultrasound information and converted to a video stream. The external video port supports NTSC and PAL format.
The Control Subsystem consists of the central processing unit, program and video memory, permanent image storage and retrieval memory, external communication interface ports, and connection to the user interface keys. The control software includes the acoustic power and intensity software subsystem, power group monitors, and a beamformer monitor. This software guarantees a level of patient safety by ensuring the system is operating within acoustic power and intensity limits.
The User Interface Subsystem represents the software interface and form factor. The software interface is the interaction between the user and the screen layout components. The form factor is the type of physical buttons, location, and grouping of the buttons and the device size, shape, and weight. Dedicated controls are for high usage activities and grouped according to the user workflow.
The Power Subsystem provides the system power and protects the hardware from destructive and/or unsafe conditions by detecting failures in the system through hardware and software monitors. Detection of a fault results in disabling of the pulser supply, and signaling of an error to the Control Group. The power subsystem includes the batteries (quantity of three lithium-ion) and battery charging electronics.
Description of Operating Modes
2D Mode 2D mode is a two dimensional image of the amplitude of the echo signal. It is used for location and measurement of anatomical structures and for spatial orientation during operation of other modes. In 2D, a two-dimensional cross-section of a 3-dimensional soft tissue structure such as the heart is displayed in real time. Ultrasound echoes of different intensities are mapped to different gray scale or color values in the display. The outline of the 2D cross-section may be a rectangle, parallelogram, trapezoid, sector, or a full circle, depending on the particular transducer used. 2D mode can be used in combination with any other modes.
M Mode M Mode is also known as “T-M mode” or “time-motion” mode. It is used primarily for cardiac measurements such as valve timing and septal wall thickness when accurate timing information is required.
Ultrasound echoes of different intensities are mapped to different gray scale values in a scrolling display. M Mode displays time motion information of the ultrasound data derived from a stationary beam. Depth is arranged along the vertical axis with time along the horizontal axis. M Mode can be used alone but is normally used in conjunction with a 2D image for spatial reference. The 2D image has a graphical line (M-line) superimposed on the 2D image indicating where the M Mode beam is located.
10 Chapter 4: System Overview
Color Doppler (Color)
In color Doppler, a real-time, two-dimensional cross-section of blood flow is displayed. The 2D cross-section may be presented as a rectangle, parallelogram, trapezoid, sector, or a full circle, depending on the particular transducer used.
The 2D cross-section is presented as a full color display, with various colors being used to represent the velocity, both positive and negative, of the blood flow echoes. Often, to provide spatial orientation, the full color blood flow cross-section is overlaid on top of the gray scale cross-section of soft tissue structure (2D echo). For each pixel in the overlay, the decision of whether to display VCD, gray scale (echo) information or a blended combination is based on the relative strength of echoes from the soft-tissue structures and from the red blood battery.
A high pass filter (wall filter) is used to remove the signals from stationary or slowly moving structures. Tissue motion is discriminated from blood flow by assuming that blood is moving faster than the surrounding tissue, although additional parameters may also be used to enhance the discrimination. The remaining signal after wall filtering may be averaged over time (persistence) to present a steady state image of blood flow distribution. Variance information may also be displayed to provide information when large variance is observed in the velocity information.
Color Power Doppler (CPD)
In CPD, a real-time two-dimensional cross-section of blood flow is displayed. The 2D cross-section may be presented as a rectangle, parallelogram, trapezoid, sector, or a full circle, depending on the particular transducer used.
The 2D cross-section is presented as a full color display, with various colors being used to represent the power in blood flow echoes. Often, to provide spatial orientation, the full color blood flow cross-section is overlaid on top of the gray scale cross-section of soft tissue structure (2D echo). For each pixel in the overlay, the decision of whether to display CPD, gray scale (echo) information or a blended combination is based on the relative strength of echoes from the soft-tissue structures and from the red blood battery.
A high pass filter (wall filter) is used to remove the signals from stationary or slowly moving structures. Tissue motion is discriminated from blood flow by assuming that blood is moving faster than the surrounding tissue, although additional parameters may also be used to enhance the discrimination. The power in the remaining signal after wall filtering may be averaged over time (persistence) to present a steady state image of blood flow distribution.
Continuous Wave (CW) Doppler
CW provides a real-time representation of blood flow and is displayed as a velocity-versus-time sweeping output. Velocity (or frequency) is presented as the vertical axis with time along the horizontal axis. The magnitude of the detected signal is represented as different gray scale values.
CW Doppler mode provides the clinician with the ability to obtain blood flow velocities focused about a user specified focal region. A continuous transmit waveform of ultrasound energy with a known frequency is transmitted and focused by the system; on the receive side, the transducer receive echoes are continuously amplified, focused about the focal region and converted to a base band quadrature signal. The signal is analyzed by a quadrature phase detector that establishes two receive channels to allow detection of flow direction. These two channels are then analyzed by a fast complex Fourier transform (FFT) circuit to establish the spectrum of frequencies present in the echoes. The data are displayed as spectrum frequencies with respect to time.
CW can be used alone but is normally used in conjunction with a 2D image for spatial reference. The 2D image has a graphical line (D-line) superimposed on the 2D image indicating where the M-mode beam is located.
Chapter 4: System Overview 11
Additional System Feature Performances
Pulsed Wave (PW) Doppler
PW provides a real-time representation of blood flow and is displayed as a velocity-versus-time sweeping output. Velocity (or frequency) is presented as the vertical axis with time along the horizontal axis. The magnitude of the detected signal is represented as different gray scale values. The ultrasound data is derived from a single area, the sample volume, on a stationary beam.
PW Doppler mode provides the clinician with the ability to obtain blood flow velocities about a spatial sample volume. A burst of ultrasound with a known spectrum is transmitted by the system; on the receive side, the transducer receive echoes are amplified and range gated at the appropriate depth. The signal is analyzed by a quadrature phase detector that establishes two receive channels to allow detection of flow direction. These two channels are then analyzed by a fast complex Fourier transform (FFT) circuit to establish the spectrum of frequencies present in the echoes. The data are displayed as spectrum frequencies with respect to time.
PW can be used alone but is normally used in conjunction with a 2D image for spatial reference. The 2D image has a graphical line (D-line) superimposed on the 2D image indicating where the M-mode beam is located. The sample volume position (depth) and size are also indicated on the D-Line.
Broadband Imaging This ultrasound acquisition system uses high resolution broadband technology in the transmit pulsers, transducer, and receivers. The receive path can capture and process signals over a wide spectrum, from below 2.0 MHz to beyond 10 MHz. For each application, the transmit pulse is designed to produce an appropriate bandwidth. For example, in 2D grayscale imaging, a wide band pulse is used to support good axial resolution. For Doppler modes, a narrower band pulse is used, which improves the spectral resolution of the detected Doppler signal.
In addition to transmit pulse control, programmable digital signal processing is used in the receive path to further refine the bandwidth used to produce the final image. Digital filters are applied to the digitized received signal to limit and shape the spectral bandwidth used to generate the displayed output.
Tissue Specific Imaging
In this feature, parameters for signal and image processing are optimized to maximize the image quality or to obtain the best compromise of resolution and penetration for different specific clinical applications. These parameters include: the order of received filters, the bandwidth, the dynamic range, the compression curve, the gain setting and parameters for compounding frequency band, etc. For example, different system parameter setups are used for abdominal or peritoneal scanning. This feature is for ease of use for the operator by automatically setting up system control parameters rather than manually adjusting settings for best performance.
Biopsy Guidance The system can display a pair of biopsy guidelines that represent the anticipated path of the biopsy needle. The image of an anatomical target, biopsy guidelines, a scan plane marker, and a biopsy needle are displayed to assist in guiding the biopsy needle to the target. The system also provides needle guidance for vascular access procedures. For additional information, see the biopsy user guides.
Measurement and Calculation Capabilities
The system offers a variety of measurements and calculations, specific to exam type and transducer. A list of them, and author references, are in the system user guide. Measurement accuracy is also discussed.
12 Chapter 4: System Overview

Front End Overview
The Front End is designed to support various imaging modalities such as 2D, M-Mode, Spectral Doppler and Color Doppler. From the Front End's perspective, all modes can be grouped into a few basic types: Single mode, simultaneous modes and triggered modes. All these modes are built from similar, basic transmit and receive sequences controlled within the Front End. A generic top level block diagram of a typical Front End is shown below in Figure 4.2 on page 13
Figure 4.2 Generic Front End Block Diagram
The transmit section consists of a waveform generator, delay block, and high power high voltage driver to excite the transducer element. Multiple elements are driven with delays determined by the time of flight in the medium from the elements to the point in space where the beam is to be focused. The longer the time of flight is to the focal point the smaller the delay is for a given transmit element to allow all to arrive at the
Continuous Wave Doppler Audio Output
The system provides for audio output of the CW velocity information. This can be presented as stereo information, with flow moving towards the transducer on one channel and flow away on the other, or as a mono output with the single audio output representing the summation of the flow directions.
Pulsed Wave Doppler Audio Output
The system provides for audio output of the PW velocity information. This can be presented as stereo information, with flow moving towards the transducer on one channel and flow away on the other, or as a mono output with the single audio output representing the summation of the flow directions.
Electrocardiograph (ECG) Display
ECG is provided to measure the electrical signal generated by the heart. A three lead interface: Right Arm (RA), Left Arm (LA) and Left Leg (LL), is provided on the system.
The ECG signal is displayed as an amplitude-versus-time sweeping output. Amplitude is presented on the vertical axis with time along the horizontal axis.
Receive Section
X
T/R Sw
TGC Amplifier
A/D Delay
Weight
Pulser
Waveform
Delay
X
T/R Sw
TGC Amplifier
A/D Delay
Weight
Pulser
Waveform
DelayBeamformed
Data
Transducer
Transmit Section
Control
Chapter 4: System Overview 13

focal point at the same time. The number of elements driven is determined by element sensitivity off axis and depth of field considerations. The waveform is selected to drive the transducer at a certain center frequency, bandwidth, and power and is optimized for the given mode.
The receive section consists of a transmit/receive switch to protect the receiver from the transmit voltage, a variable gain receiver to amplify and condition the return echoes, an A/D to digitize the data, a delay block to focus the return signals and a weight block to scale the return echoes for each channel. All the signals are then summed together to generate the beam-formed receive data. The analog gain varies with depth to compensate for signal attenuation through the medium. The delays and weights are independent for each channel. The delay and weight for the receive channel can typically be changed dynamically to keep the receive beam in continuous focus. The delay is simply set by the time of flight in the medium from the point of interest to the element, which starts at skin-line and proceeds to the deepest depth of interest.
The control section drives the data to the various data path elements on a line by line basis, controls the timing of the transmit and receive sections and controls the tagged information and timing of the data to the rest of the system.
X-Porte Front End Board
The X-Porte ultrasound system can be divide into two board section groups: Front End and Back End. Below is the block diagram linking the necessary functional groups of an ultrasound system as they apply to the X-Porte system. Please refer to Figure 4.3 on page 14
Figure 4.3 X-Porte Front End Board Block Diagram
14 Chapter 4: System Overview
PW Doppler Processing
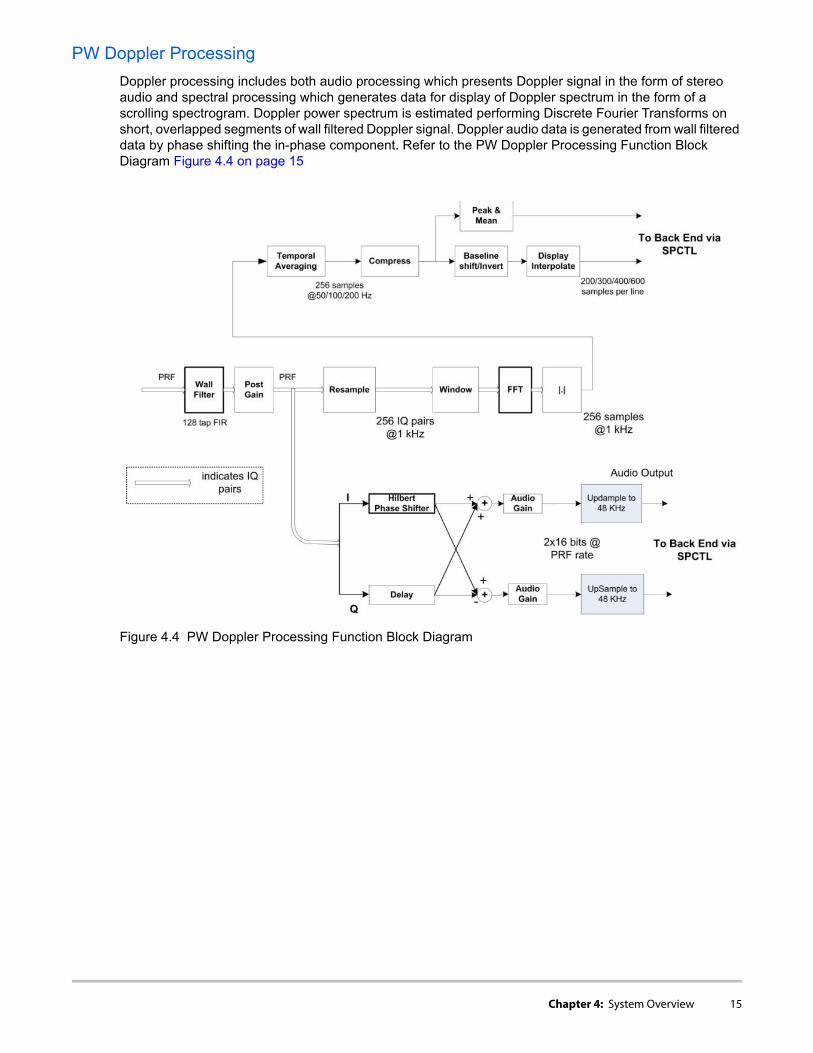
Doppler processing includes both audio processing which presents Doppler signal in the form of stereo audio and spectral processing which generates data for display of Doppler spectrum in the form of a scrolling spectrogram. Doppler power spectrum is estimated performing Discrete Fourier Transforms on short, overlapped segments of wall filtered Doppler signal. Doppler audio data is generated from wall filtered data by phase shifting the in-phase component. Refer to the PW Doppler Processing Function Block Diagram Figure 4.4 on page 15
Figure 4.4 PW Doppler Processing Function Block Diagram
Chapter 4: System Overview 15
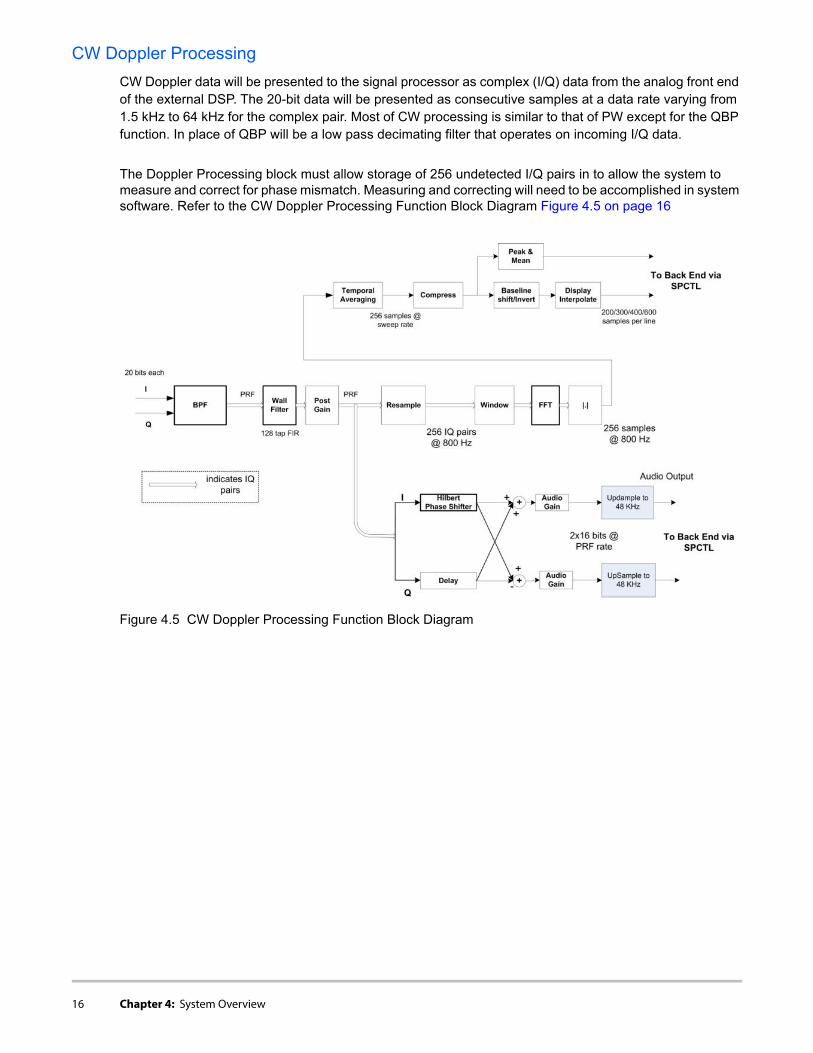
CW Doppler Processing
CW Doppler data will be presented to the signal processor as complex (I/Q) data from the analog front end of the external DSP. The 20-bit data will be presented as consecutive samples at a data rate varying from 1.5 kHz to 64 kHz for the complex pair. Most of CW processing is similar to that of PW except for the QBP function. In place of QBP will be a low pass decimating filter that operates on incoming I/Q data.
The Doppler Processing block must allow storage of 256 undetected I/Q pairs in to allow the system to measure and correct for phase mismatch. Measuring and correcting will need to be accomplished in system software. Refer to the CW Doppler Processing Function Block Diagram Figure 4.5 on page 16
Figure 4.5 CW Doppler Processing Function Block Diagram
16 Chapter 4: System Overview

Back End Overview
The Back End subsystem is responsible for the conversion of raw acquisition data into a raster image ready for display. The Back End subsystem also contains the video data path that supports generation of video comprising of the ultrasound image as well as graphics annotation. Video generation of both standard composite interlaced video and progressive scan video is supported. Most functionality is within the ASIC but the memory resources for acquisition memory, and display memory are found in external memory components. The conversion from PC type video to TV type video is also performed externally.
Control is received initially from the CPU to setup each functional block and afterward the hardware is completely data driven. This control takes the form of programming setup registers inside the blocks and setting up scan conversion tables. Each block provides temporary storage as required to buffer data and keep their respective processing pipeline full and operating. Also note that the block diagrams show only the data path, but each block is responsible for generating any necessary memory addresses for their respective input data stream.
The X-Porte Back End subsystem is shown in Figure 4.6 on page 17.
Figure 4.6 X-Porte System Back End Subsystem Block Diagram
The Back End Subsystem performs processing encompassing three main data domains, acquisition data, raster data, and video data. Support for acquisition data includes the input buffer, flash suppression, frame average, and external ACQ memory. Cine buffer management is performed by the acquisition controller. Conversion from acquisition data to raster data is performed by the graphics overlay, scan conversion sys-tem, sweeping system, and 3D system. Raster data is stored in an external DISPLAY memory. Also sup-porting raster operations is the graphics support block that provides acceleration hardware for pixel operations from the CPU and graphics overlay system. The progressive video path includes buffers, prior-ity logic, and LUTs.
Chapter 4: System Overview 17

Control Subsystem
The X-Porte Control Subsystem is shown in the figure below.
Figure 4.7 Control Subsystem Block Diagram
The core control subsystem contains the processor, the system bus, and the system memory resources of RAM and solid state hard drives. These two solid state hard drive devices are responsible for the system operating system software, ultrasound program software, scanhead operation files, on-board training videos, and storage for patient data (patient demographic information, images, and video clips)
LVDS (24 bit)
SDVO 720P
HDMI/DVItransmitterAD9889B orequivalent
Display Control I/FDisplay Control I/F
USB Host x3
Control FPGA
Interrupts from the FrontEnd,and FPGA.
Processor
Audio Codec/
Amp
Hard IP Block in FPGASoft IP Block in FPGA
Ethernet
WiFi
PCI Express
Video out (LVDS)
CH7308A LVDS (24 bit)
SATA 2
ConfigurationFLASH/CPLD
Prog
ram
Control/Processor Section
Main Clinical display forPOC. If M2/S2 to Dock forAux Monitor with Audio
If M2/S2: Main Clinical displayIf POC: Touch Screen
JTAG
GPIO
SATA 2
RJ45
Connector(Debug only)
FE I/F Connector
Hirose:(Debug only) JTAG
Mini PCIe(Debug Only)PCI Express for WiFi
Video Buffer RamDDR3 1 GByte
GPIOs to Dock (TBD)
PCI Express for Dock
Dock Connector
SATA Connector
CO
Me
Type
10
10/100/1G Ethernet
USB Host
Backlight enable and brightness
USB Host for Dock
Serial Port
SpeakersHDA
USB Type A(x3)
SATA BootDevice
Connector
Speakers
Switch
10/100/1GEthernet
10/100/1G Ethernet
Switch
HDMI/DVIreceiver
TP401A orequivalent
HDMI in
USB Module
USB
Line In Audio Line In
24 bit Video toVGA
ADV7123 orEquivalent
Some GPIOstied to bothFPGA and
CPLD
SATA2
Serial Lite (x4), WakeFromFE, FE_Detect
24 bit video
24 bit video
S/PDIF
S/PDIF
Note:HDMI with
Audio
Headphones Headphones
Serial Port
I2C
USB Host for Touch Screen
18 Chapter 4: System Overview
The main operational solid state storage drive is a mSATA form factor device totalling 16 GB of storage capacity. This device is responsible for handling the operational system software, the ultrasound program, and the on-board training videos.
A secondary solid state storage drive of 80 GB with an 1.8 inch form factor is used to handle the scanhead data files, other ultrasound system files, and 66 GB of storage capacity reserved for all patient data. It is with these new solid state devices, the X-Porte architecture is similar to our past products utilizing CF and SD storage cards, but with much improved data storage and throughput without the use of any mechanical hard drive devices.
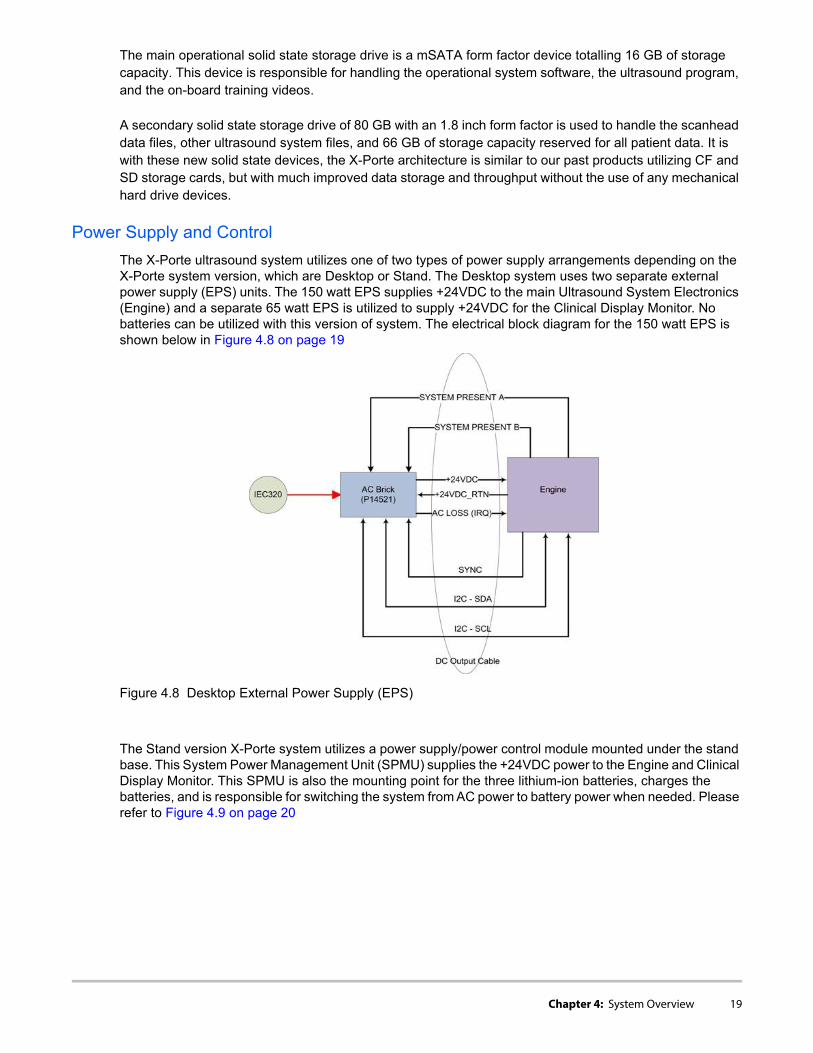
Power Supply and Control
The X-Porte ultrasound system utilizes one of two types of power supply arrangements depending on the X-Porte system version, which are Desktop or Stand. The Desktop system uses two separate external power supply (EPS) units. The 150 watt EPS supplies +24VDC to the main Ultrasound System Electronics (Engine) and a separate 65 watt EPS is utilized to supply +24VDC for the Clinical Display Monitor. No batteries can be utilized with this version of system. The electrical block diagram for the 150 watt EPS is shown below in Figure 4.8 on page 19
Figure 4.8 Desktop External Power Supply (EPS)
The Stand version X-Porte system utilizes a power supply/power control module mounted under the stand base. This System Power Management Unit (SPMU) supplies the +24VDC power to the Engine and Clinical Display Monitor. This SPMU is also the mounting point for the three lithium-ion batteries, charges the batteries, and is responsible for switching the system from AC power to battery power when needed. Please refer to Figure 4.9 on page 20
Chapter 4: System Overview 19
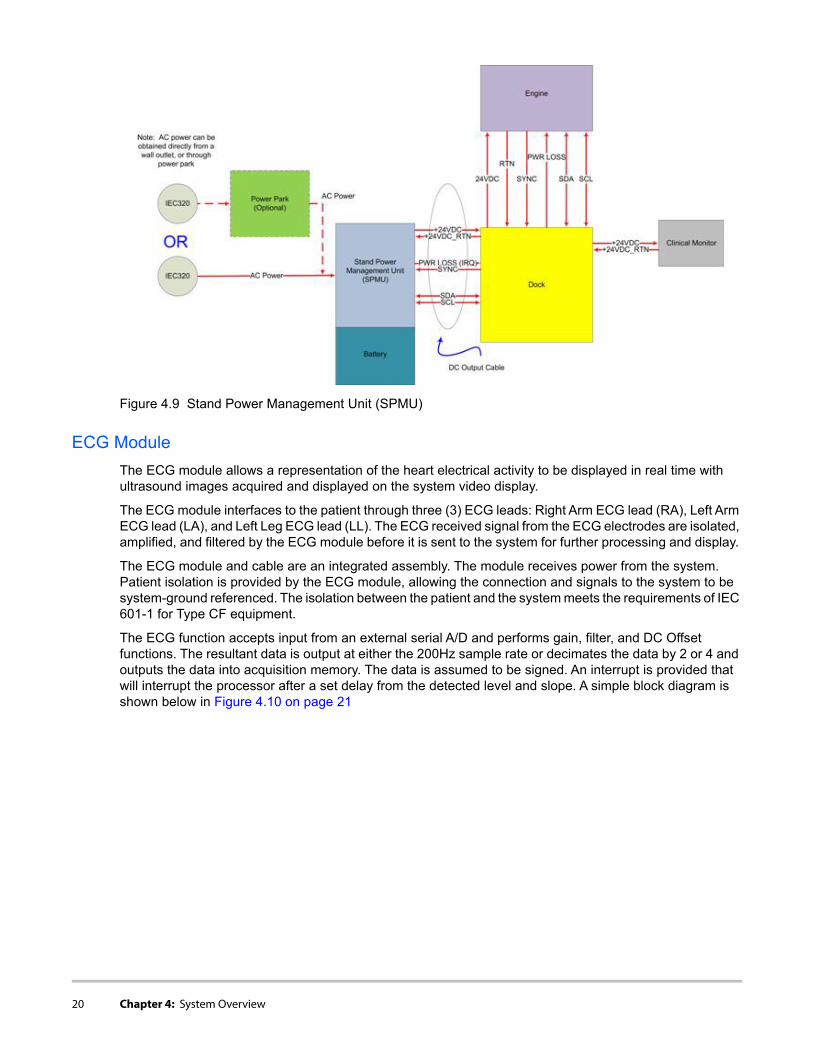
Figure 4.9 Stand Power Management Unit (SPMU)
ECG Module
The ECG module allows a representation of the heart electrical activity to be displayed in real time with ultrasound images acquired and displayed on the system video display.
The ECG module interfaces to the patient through three (3) ECG leads: Right Arm ECG lead (RA), Left Arm ECG lead (LA), and Left Leg ECG lead (LL). The ECG received signal from the ECG electrodes are isolated, amplified, and filtered by the ECG module before it is sent to the system for further processing and display.
The ECG module and cable are an integrated assembly. The module receives power from the system. Patient isolation is provided by the ECG module, allowing the connection and signals to the system to be system-ground referenced. The isolation between the patient and the system meets the requirements of IEC 601-1 for Type CF equipment.
The ECG function accepts input from an external serial A/D and performs gain, filter, and DC Offset functions. The resultant data is output at either the 200Hz sample rate or decimates the data by 2 or 4 and outputs the data into acquisition memory. The data is assumed to be signed. An interrupt is provided that will interrupt the processor after a set delay from the detected level and slope. A simple block diagram is shown below in Figure 4.10 on page 21
20 Chapter 4: System Overview
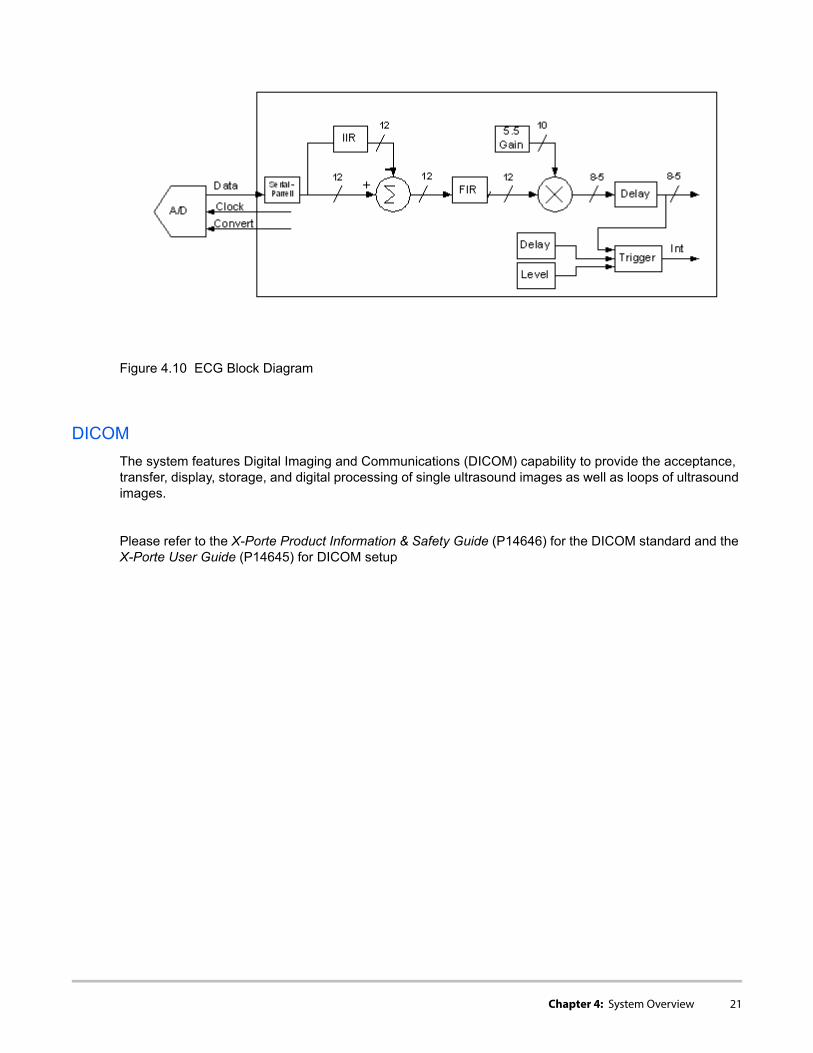
Figure 4.10 ECG Block Diagram
DICOM
The system features Digital Imaging and Communications (DICOM) capability to provide the acceptance, transfer, display, storage, and digital processing of single ultrasound images as well as loops of ultrasound images.
Please refer to the X-Porte Product Information & Safety Guide (P14646) for the DICOM standard and the X-Porte User Guide (P14645) for DICOM setup
Chapter 4: System Overview 21

22 Chapter 4: System Overview

Chapter 5: Troubleshooting
X-Porte Desktop and Stand Versions Major Component DiagramsPlease use Figure 5.1 on page 23below as a guide to help identify the major component sections of the two X-Porte system types, Desktop and Stand versions.
Figure 5.1 X-Porte Major Component Diagrams
System and Subsystem DiagnosisThis section covers basic diagnostic and troubleshooting procedures you may follow if the system does not operate properly. To diagnose system failures, consult the referenced diagnostic figures that follow or FUJIFILM SonoSite Technical Support.
Table 5.1: Troubleshooting Subassemblies and Diagnostic Figures
Subassemblies Diagnostic Figures or Table
Assert Codes Figure 5.2; Table 5.2
Battery - Stand System (Linked with SPMU) Figure 5.3; Table 5.6
Clinical Monitor Display - Stand Version System Figure 5.1; Figure 5.6; Table 5.3
Clinical Monitor Display - Desktop Version System
Figure 5.1; Table 5.4
DICOM Table 5.5
SPMU - Stand Version System Figure 5.3; Figure 5.4; Table 5.6
Touch Control Panel - Stand Version System Table 5.7
Chapter 5: Troubleshooting 23

System RepairThe system is repairable through subassembly replacement or through replacement of parts as recommended by FUJIFILM SonoSite. Component level repair of Printed Circuit Board Assemblies is performed only at the FUJIFILM SonoSite repair facility. Replacement of board level components by unauthorized service facilities voids the FUJIFILM SonoSite warranty.
Test EquipmentTest equipment is not required for this troubleshooting section.
Failure (Assert) CodesThe X-Porte system is capable in displaying an “assert screen-call for help” instructing the user to contact SonoSite Technical Support for hardware and software issues related to failures. PCB failures typically result in “assert codes” that are output to both the clinical display monitor and the touch panel display. If an assert screen appears, note the assert code information and contact FUJIFILM SonoSite Technical Support to clarify the fault or failure. Refer to Figure 5.2 for how this assert screen will be displayed and the information Technical Support will be asking from this screen.
Figure 5.2 Assert Screen-Call For Help
Verifying a System Assert Code
Ultrasound System - Stand Version System Figure 5.5
Table 5.1: Troubleshooting Subassemblies and Diagnostic Figures (Continued)
Subassemblies Diagnostic Figures or Table
P: xxxxx
C: xxxxx
D: x
Record the following informationand report these values to FUJIFILMSonoSite Technical Support.
24 Chapter 5: Troubleshooting

System asserts are caused by hardware and/or software faults. Hardware asserts typically require a PCB or hardware replacement. Software asserts can be reset and the system may recover. A simple method to identify the cause of the assert is identified here:
Note: Assert Code Table will be updated in future X-Porte Service Manual Revisions
Clinical Monitor Display
Assert Cause 1 Record the assert code.
2 Press and release the Power button to power the system down.
3 Press the Power button again to power on the system.
• If the system powers on normally, it has recovered from the fault (software assert) and you may use the system.
• If the assert condition remains, corrective action must be taken; usually replacement of a PCB or hardware is required. Contact FUJIFILM SonoSite Technical Support for assistance and to obtain repair parts.
If the Power button is not functional, all sources of power must be removed to allow the system to power down. I.e., disconnect AC power and switch the three battery switches to the “•O” (OFF) position. Refer to Figure 3.1 on page 6
Table 5.2: Assert Codes
Code Code Description Information Probable Cause Solution
16203 PS1 PCBA in Engine Replace Engine
17193 PS1 PCBA in Engine Replace Engine
18706 BE PCBA In Engine Replace Engine
19325 istouchinfopresent () Touch Control Panel cable connection to Dock Assembly
Reconnect cable connection
19361 BE PCBA in Engine Replace Engine
19466 Front-end not detected Internal cables/PCB connections
Replace Engine
Table 5.3: Clinical Monitor Display - Stand System
Symptom Possible Causes
No displayed video image, blank or black, no screen saver ICON.
Check +24V is present from Dock to Clinical Display Monitor. Replace Stalk Cable Assy. (P16773) or Dock (P15164) to restore +24V. If +24V is present, then replace Clinical Display Monitor (P14627).Note: The Desktop Power Supply (P16776) can be used to test the Clinical Monitor Display operation.
Chapter 5: Troubleshooting 25

No Ultrasound Image but screen-saver ICON is present.
Check Stalk Cable Assy. connections from the Dock to the Clinical Display Monitor. Replace Stalk Cable Assy. (P16773) and/or Dock (P15164). Try another video source plugged into the HDMI monitor port. Replace Clinical Display Monitor (P14627) if the monitor only displays the screen-saver ICON with another video source. Replace X-Porte Engine (P16055) if monitor functions with other video source.
Brighter background shading (blooming) at any of the image corners.
Replace Clinical Monitor Display (P14627).
Image background is purple, red, or green Re-seat HDMI cable connection. Replace Stalk Cable Assy. (P16773). Replace Clinical Monitor Display (P14627).
No Audio Access X-Porte audio controls via “More” on the Touch Control Panel. Check “Mute” is not enabled, adjust volume level higher. Re-seat HDMI cable from DOCK to Clinical Display Monitor. Test with another HDMI cable. Replace Stalk Cable Assy. (P16773), Clinical Display Monitor (P14627), Dock (P15164), then X-Porte Engine (P16055) in this order until audio is restored.
Table 5.3: Clinical Monitor Display - Stand System
Symptom Possible Causes
Table 5.4: Clinical Display Monitor - Desktop System
Symptom Possible Causes
No displayed video image, blank or black, no screen saver ICON.
Check +24V is present from external Power Supply to Clinical Display Monitor. Replace Power Supply, 65W, 24V (P16776). Replace Clinical Display Monitor (P14627).
No Ultrasound Image but screen-saver ICON is present.
Check the HDMI cable from the X-Porte Engine HDMI port to the Clinical Monitor Display. Check Monitor Display with another HDMI cable and video source. Replace Cable Assy, HDMI (P15334), replace X-Porte Engine (P16055) if monitor is good, or replace Clinical Display Monitor (P14627) if defective.
Brighter background shading (blooming) at any of the image corners.
Replace Clinical Monitor Display (P14627).
Image background is purple, red, or green Re-seat HDMI cable. Replace Cable Assy, HDMI (P15334). Replace Clinical Monitor Display (P14627).
No Audio Access X-Porte audio controls via “More” using the system mouse. Check “Mute” is not enabled, adjust volume level higher. Re-seat HDMI cable from Engine to Clinical Display Monitor. Test with another HDMI cable. Replace Cable Assy, HDMI (P15334), Clinical Display Monitor (P14627), then X-Porte Engine (P16055) in this order until audio is restored.
26 Chapter 5: Troubleshooting

DICOM
SPMU
The SPMU module has three LEDs that will help to isolate AC power versus X-Porte hardware failures. On the top-rear portion of the X-Porte stand base is a “Green” LED that is near the equipotential stud. A solid “Green” LED signifies that the X-Porte system is connected to a live AC source. If this LED is flashing at a 1Hz repetitive rate, then the system is charging the system batteries. When these batteries are fully charged, this LED will switch to a solid “Green” LED illumination. Refer to Figure 5.3
Table 5.5: DICOM Troubleshooting
Error Message Tiller Error Code Cause Troubleshooting
Socket communication failed
TSOCKET_CONNECT_FAILURE
Invalid network configuration.Wrong port number.Application is not running.Printer is offline.
Using Ping, verify that the Printer/Archiver is connected.• If Ping fails, check the
devices IP address, X-Porte IP address, Subnet mask, and Gateway IP address.
• If Ping is OK, use Verify to check if device is available. If Verify fails:a) Check the Printer/Archiver’s Port configuration on the X-Porte.b) Ensure that the Printer is online and the Archiver’s application is running.
Archiver transaction failed
TDICARCH_OPEN_FAILURE
Wrong Capture Type selected
Verify that the Archiver supports the selected Capture Type setting, e.g., US Image, SC Image or US-Ret Image.
Printer transaction failed
TDICPRNT_OPEN_FAILURE Wrong Image settings
Verify that the printer supports the selected Image settings. E.g,. Color (RGB) or Grayscale (Monochrome)
DICOM network communication failed
TDNETWORK_OPEN_FAILURE
Device does not recognize X-Porte, rejects association
Verify that X-Porte AE Title or IP address is correctly configured on the Printer/Archiver.
Note: Some devices require that the Imaging modality (X-Porte) be recognized in order to accept images. This requires configuration on the device.
Internal failure detected
TDNETWORK_READ_FAILURE
Invalid DICOM Attribute
Check X-Porte Printer DICOM settings for correctness (e.g., film size, format)
Chapter 5: Troubleshooting 27

Figure 5.3 Upper Stand Base Power LED
Two more LEDs are visible under the stand and can shine onto a piece of white paper placed under the stand base. The solid illuminated “Blue” LED indicates that the SPMU is producing the system’s +24 volts DC necessary to power the system electronics and Clinical Display monitor. The solid illumination faint “Green” LED is indicating that the system is connected to a live AC source. This LED is indicating the same AC as the topside “Green” LED except, this LED does not indicate the battery charge operation and will always be constantly lighted when connected to a live AC source. If the bottom “Green” LED is not visible due to the ambient light conditions, then check for the “Green” topside LED and the bottom “Blue” LED. These indicate that the SPMU is connected to a live AC source and that the SPMU is outputting +24 volts DC. Refer to Figure 5.4
Figure 5.4 Stand Baseplate LEDs
Refer to Table 5.6 below to verify the following normal conditions and configurations that the X-Porte system will operate properly. Any LED conditions other than those outlined in this table that exist could indicate a SPMU problem requiring replacement.
Note: If all three battery switches have been in the “•O” (OFF) position and all three are set to “ʘ” (ON), AC power has to be applied to the SPMU to allow the system SPMU to develop the +24VDC from battery operation. The lower Blue LED will remain off indicating no +24VDC until performing this procedure.
Table 5.6: SPMU LED Conditions - Stand SystemTable 5.7
Normal Operation Conditions Top Green LEDLower Green LED
Lower Blue LED
Connected to AC, no batteries ON ON ON (+24Vdc)
A solid Green LED indicates the system is connected to a live ACsource. When batteries are installed, this LED will flash at a 1 Hz rate when the batteries are charging and go to a solidillumination state upon battery charge completion.
System is connected to a live AC source. This LED does not
SPMU is outputting +24 volts DC.
If only the Blue LED is lighted, then the system is working fromthe batteries.
monitor the SPMU battery charge function.
28 Chapter 5: Troubleshooting
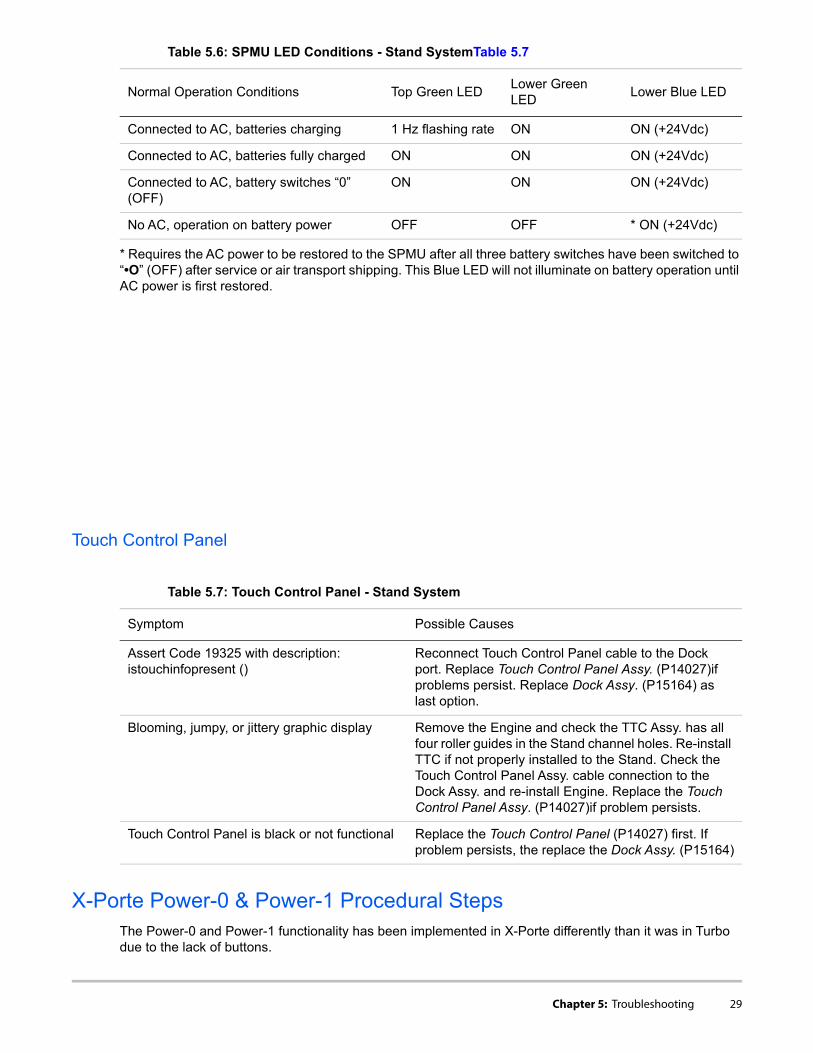
* Requires the AC power to be restored to the SPMU after all three battery switches have been switched to “•O” (OFF) after service or air transport shipping. This Blue LED will not illuminate on battery operation until AC power is first restored.
Touch Control Panel
X-Porte Power-0 & Power-1 Procedural StepsThe Power-0 and Power-1 functionality has been implemented in X-Porte differently than it was in Turbo due to the lack of buttons.
Connected to AC, batteries charging 1 Hz flashing rate ON ON (+24Vdc)
Connected to AC, batteries fully charged ON ON ON (+24Vdc)
Connected to AC, battery switches “0” (OFF)
ON ON ON (+24Vdc)
No AC, operation on battery power OFF OFF * ON (+24Vdc)
Table 5.6: SPMU LED Conditions - Stand SystemTable 5.7
Normal Operation Conditions Top Green LEDLower Green LED
Lower Blue LED
Table 5.7: Touch Control Panel - Stand System
Symptom Possible Causes
Assert Code 19325 with description: istouchinfopresent ()
Reconnect Touch Control Panel cable to the Dock port. Replace Touch Control Panel Assy. (P14027)if problems persist. Replace Dock Assy. (P15164) as last option.
Blooming, jumpy, or jittery graphic display Remove the Engine and check the TTC Assy. has all four roller guides in the Stand channel holes. Re-install TTC if not properly installed to the Stand. Check the Touch Control Panel Assy. cable connection to the Dock Assy. and re-install Engine. Replace the Touch Control Panel Assy. (P14027)if problem persists.
Touch Control Panel is black or not functional Replace the Touch Control Panel (P14027) first. If problem persists, the replace the Dock Assy. (P15164)
Chapter 5: Troubleshooting 29
The functionality is simple, but the format must be exact. Simply places a text file called reset.txt on a USB stick (P16967) then insert it into a USB slot of the system, remove all other USB sticks, and now power “ON” the system. The text file contains a phrase to tell the system which action to perform. Only one action can be performed at a time. The file will be deleted by the system after it is read to prevent inadvertent usage. Therefore, it is a good idea to save the reset.txt file to some other name before inserting into the system and powering up. The actual implementation of the action is performed during system initialization and is complete when the system disk becomes ready.
The Power-1 Reset function is specified by placing the phrase "restore-factory-settings" in the reset.txt file. The command causes the system to:
• "Remove Worklist files• "Rebuild the patient database• "Start a new patient• "Reset the DICOM location • "Reset the DICOM, user and system logs• "Reset user preferences• "Reset the system clock to January 1, 2003• "Reset the Control Panel brightness and backlight• "Records the action in the system log
The Power-0 Reset function is specified by placing the phrase "reformat-data-drive" in the reset.txt file. This command causes the system to:
• "Format the patient data drive and deletes all patient data• "Start a new patient• "Add a system log message recording the action
Figure 5.5 Troubleshooting Flow Chart - No System Operation
30 Chapter 5: Troubleshooting
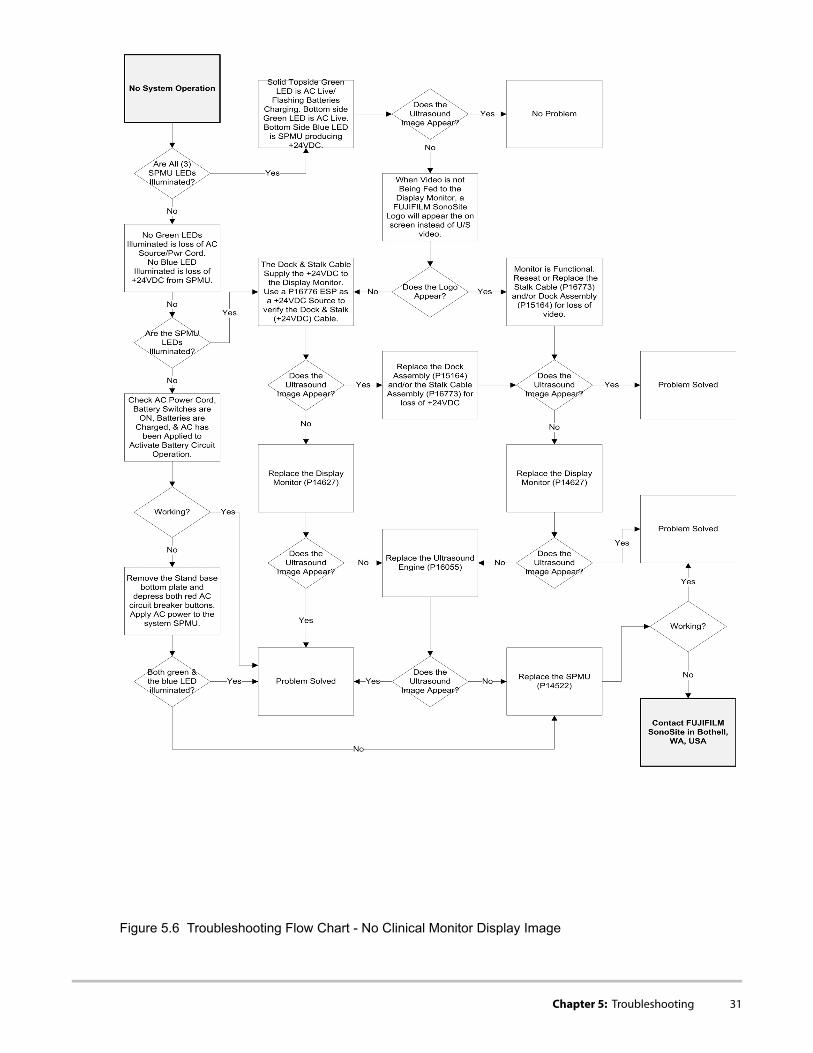
Figure 5.6 Troubleshooting Flow Chart - No Clinical Monitor Display Image
Chapter 5: Troubleshooting 31

32 Chapter 5: Troubleshooting
Chapter 6: Replacement Procedures
FUJIFILM SonoSite has determined several service activities that will be performed only by FUJIFILM SonoSite service personnel and/or their representative qualified to perform the service duties. These are the removal/replacement of the SPMU and the batteries that are in the X-Porte Stand system. Please contact FUJIFILM SonoSite or your appropriate FUJIFILM SonoSite representative when service is required. Refer to Table 6.1 on page 34 for a more complete list of subassemblies and the personnel that should attempt service on the X-Porte systems.
Prior to performing any service to the X-Porte system, remove the A.C. power cord from the wall outlet. This applies to both the X-Porte Stand and X-Porte Desktop system versions.
WARNING:The stand version is equipped with three lithium-ion batteries and require all three battery switches to be switched to their “•O” (OFF) position to cease the +24VDC developed by the SPMU. Access to these switches are by lifting the black plastic panel outward from the bottom of the X-Porte stand SPMU housing area near the left rear caster leg. Refer to Figure 3.1 on page 6 of Chapter 3 under “Safety”.
WARNING:The SPMU removal/replacement as well as the replacement of the batteries in the X-Porte Stand system requires the service personnel to be able to reposition an upright stand system onto its front caster legs (about 65 lb of the system weight) and lay the complete system horizontally on the floor. It is advisable to have a second person to help in repositioning the system if the 65 lb weight requirement is too great for one person. This service should only be performed by trained and qualified FUJIFILM SonoSite service personnel.
Caution:Follow all steps for stand height, Clinical Monitor, and touch Control Panel positioning in the forthcoming service procedures to ensure no damage to the system and/or possible injury to the servicing personnel.
Caution:Always use correct ESD procedures. ESD damage is cumulative and may not be noticeable at first. Initial ESD symptoms may be slightly degraded performance or image quality.
Caution:All fasteners should be torque to 5.5-inch pounds except where noted. Two ranges of torque screwdrivers will be required as torque requirements range from 3-inch pounds to 24-inch pounds. Generally the torque screwdrivers ranges are 1.0-10.0 inch pounds (0.23-1.1 Newton meter) and 10.0-25.0 inch pounds (1.1-2.8 Newton meter)
Note: If all three battery switches have been in the “•O” (OFF) position and all three are set to “ʘ” (ON), AC power has to be applied to the SPMU to allow the system SPMU to develop the +24VDC from battery operation. The lower Blue LED will remain off indicating no +24VDC until performing this procedure.
Chapter 6: Replacement Procedures 33

Qualifying Service PersonnelTable 6.1: Responsible Personnel for Subassemblies
Clinical Monitor DisplayThe weight of the Clinical Monitor is 16.8 lb (7.62kg) and will require the person removing this assembly to be able to support this weight with one hand while using a screw driver with the other hand.
Required Parts • P14627-N Service Assembly, Display Clinical Monitor, X-Porte• P14627-W Warranty Service Assembly, Display Clinical Monitor, X-Porte • V14627-N Vet Service Assembly, Display Clinical Monitor, X-Porte • V14627-W Vet Warranty Service Assembly, Clinical Monitor Display, X-Porte
Required Tools• #1 Phillips screwdriver• Torque screwdriver, 2.0-10.0 inch pounds (0.23-1.1 Newton meter)
Clinical Monitor Display Removal Clinical Monitor Display Removal1 Adjust the stand height to a comfortable level as to allow the best working height to access the mounting
screws and cables.
SubassemblyX-Porte Desktop SystemQualified Personnel
X-Porte Stand SystemQualified Personnel
Batteries N/A FUJIFILM SonoSite Representative
B/W Printer Customer Customer
Clinical Monitor Display Customer Customer
Touch Control Panel N/A Customer
Dock N/A Customer
System Customer Customer
External Power Supply (EPS) Customer N/A
Isolation Transformer Customer FUJIFILM SonoSite Representative
Mouse Customer Customer
Stand Power Management Unit (SPMU)
N/A FUJIFILM SonoSite Representative
Transducers Customer Customer
Triple Transducer Connect (TTC) N/A Customer
34 Chapter 6: Replacement Procedures
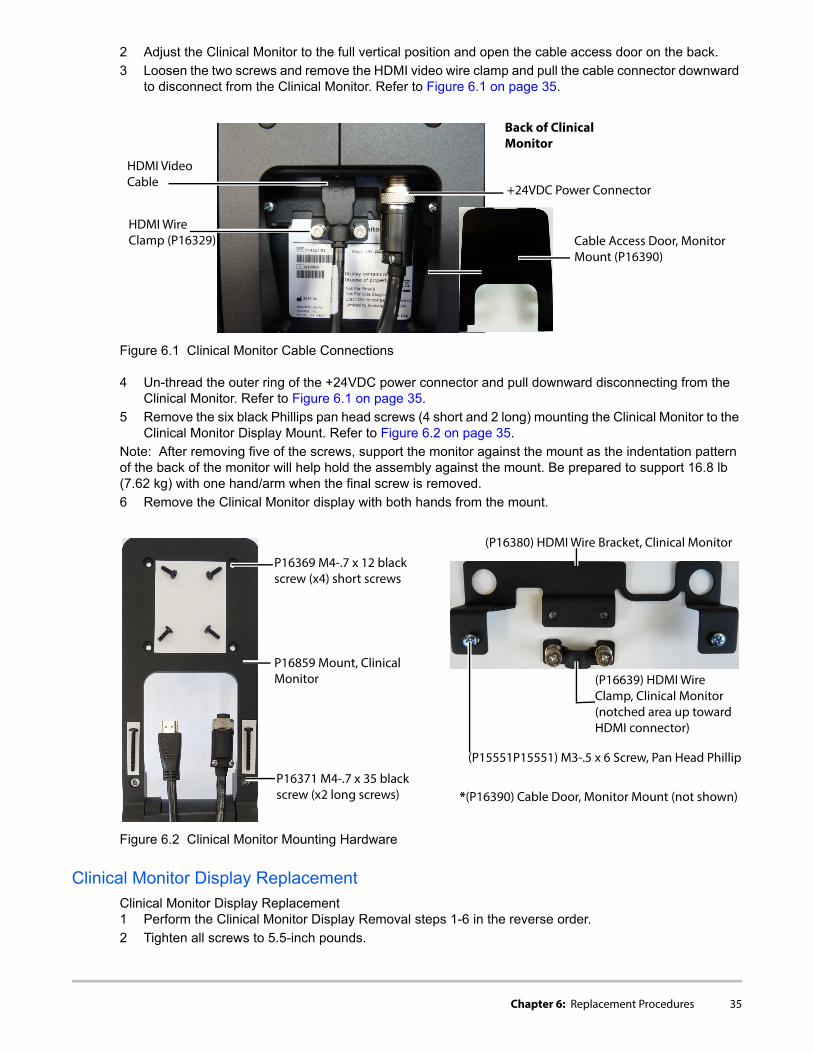
2 Adjust the Clinical Monitor to the full vertical position and open the cable access door on the back.
3 Loosen the two screws and remove the HDMI video wire clamp and pull the cable connector downward to disconnect from the Clinical Monitor. Refer to Figure 6.1 on page 35.
Figure 6.1 Clinical Monitor Cable Connections
4 Un-thread the outer ring of the +24VDC power connector and pull downward disconnecting from the Clinical Monitor. Refer to Figure 6.1 on page 35.
5 Remove the six black Phillips pan head screws (4 short and 2 long) mounting the Clinical Monitor to the Clinical Monitor Display Mount. Refer to Figure 6.2 on page 35.
Note: After removing five of the screws, support the monitor against the mount as the indentation pattern of the back of the monitor will help hold the assembly against the mount. Be prepared to support 16.8 lb (7.62 kg) with one hand/arm when the final screw is removed.
6 Remove the Clinical Monitor display with both hands from the mount.
Figure 6.2 Clinical Monitor Mounting Hardware
Clinical Monitor Display ReplacementClinical Monitor Display Replacement1 Perform the Clinical Monitor Display Removal steps 1-6 in the reverse order.
2 Tighten all screws to 5.5-inch pounds.
Back of ClinicalMonitor
+24VDC Power Connector
HDMI Video Cable
HHDMI WireClamp (P16329)
Cable Access Door, MonitorMount (P16390)
P16369 M4-.7 x 12 black
P16371 M4-.7 x 35 blackscrew (x2 long screws)
P16859 Mount, Clinical
screw (x4) short screws
Monitor (P16639) HDMI WireClamp, Clinical Monitor
(P16380) HDMI Wire Bracket, Clinical Monitor
(notched area up towardHDMI connector)
*(P16390) Cable Door, Monitor Mount (not shown)
(P15551P15551) M3-.5 x 6 Screw, Pan Head Phillips
Chapter 6: Replacement Procedures 35

System (“Engine”)Caution:Prior to unlatching the System from the stand, please check to ensure all USB connections on the right stand side and the ECG cable on the left stand side are removed. Failure to remove any devices plugged into the System ports will inhibit the System from unlatching from the stand as well as possible risk of damage to the connection ports of the System. Check to ensure that the TTC connection has been unlatched and the TTC main connector is pulled downward and away from the base of the System.
Required Part• P16055-N Service Assembly, X-Porte Engine, CW• P16055-W Warranty Service Assembly, X-Porte Engine, CW• V16055-N Vet Service Assembly, X-Porte Engine, CW• V16055-W Vet Warranty Service Assembly, X-Porte Engine, CW
Required Tools• None
System (“Engine”) RemovalSystem Removal1 Remove any USB devices connected into the right System/Stand side ports as well as the ECG cable
connected to the left System/Stand side ports. Refer to Figure 6.3 on page 36.
Note: Failure to remove connections into the System from either stand side will inhibit the release of the System from the stand as well as cause damage to the System’s connector ports.
2 Unlatch the Triple Transducer Connector (TTC), if installed, or any transducers connected directly to the System (Engine) and pull the TTC connector downward away from the base of the System. Refer to Figure Figure 6.18 on page 48
3 Locate the two gray latch levers under the right and left side stand top platform near where the black metal mates to the shiny metal handle. Refer to Figure 6.3 on page 36.
Figure 6.3 System Latch Release & Ports
4 Simultaneously push each latch outward away from the System toward the stand outer side edges. If all System connector ports are empty and the TTC main connector properly pulled away from the bottom of the System, the System will eject upward from the stand.
Left Stand Side Right Stand Side
System USB Ports Right System LatchLeft System Latch System ECG Port
36 Chapter 6: Replacement Procedures

5 Lift the System from the back edge and lift forward and up away from the top of the stand.
System (“Engine”) ReplacementSystem Replacement1 Place the replacement X-Porte System (“Engine”) into the stand System head by placing the front edge
into the head first just under the two metal retaining tabs at the front edge of the stand’s System head.
2 Push down at the top back edge of the System and the stand latches should engage and hold the System in place.
3 Reconnect the TTC, if equipped, by pushing upward on the TTC main connector and turning the latch into the locked position.
4 Reconnect any USB cables and/or the ECG cable to the right and left sides of the System/Stand area.
Clinical Monitor Stalk Cable
Required Parts• P16673--N Service Cable Assembly, Clinical Monitor Stalk Cable Set, X-Porte• P16673-W Warranty Service Cable Assembly, Clinical Monitor Stalk Cable Set, X-Porte
Required Tools• #1 Phillips screwdriver
Clinical Monitor Stalk Cable RemovalClinical Monitor Stalk Cable Removal
Note: Prior to performing this procedure, remove the Clinical Monitor and Engine as directed in procedures above. The HDMI cable and Clinical Monitor power cable should also be removed from the back of the Dock as directed in the Dock Removal Procedure below.
1 Remove two screws from the top plate of the stalk assembly. Refer to Figure 6.4
Chapter 6: Replacement Procedures 37
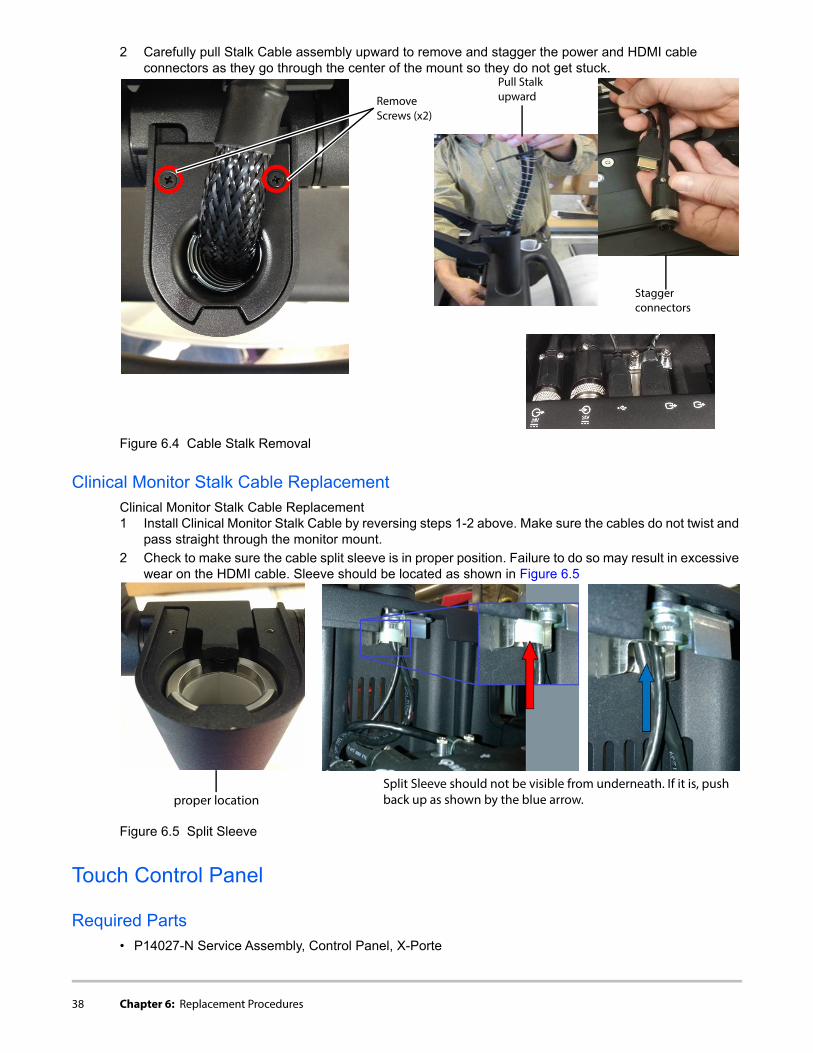
2 Carefully pull Stalk Cable assembly upward to remove and stagger the power and HDMI cable connectors as they go through the center of the mount so they do not get stuck.
Figure 6.4 Cable Stalk Removal
Clinical Monitor Stalk Cable ReplacementClinical Monitor Stalk Cable Replacement1 Install Clinical Monitor Stalk Cable by reversing steps 1-2 above. Make sure the cables do not twist and
pass straight through the monitor mount.
2 Check to make sure the cable split sleeve is in proper position. Failure to do so may result in excessive wear on the HDMI cable. Sleeve should be located as shown in Figure 6.5
Figure 6.5 Split Sleeve
Touch Control Panel
Required Parts• P14027-N Service Assembly, Control Panel, X-Porte
Remove Screws (x2)
Pull Stalk upward
Stagger connectors
proper locationSplit Sleeve should not be visible from underneath. If it is, push back up as shown by the blue arrow.
38 Chapter 6: Replacement Procedures
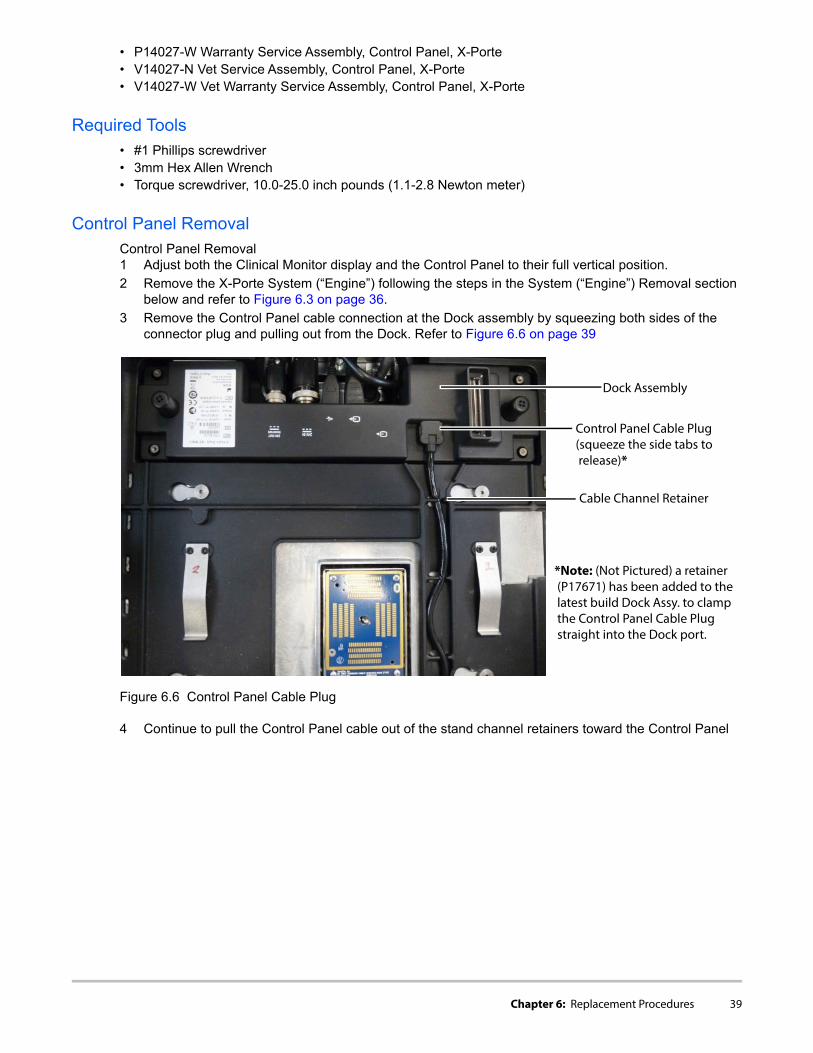
• P14027-W Warranty Service Assembly, Control Panel, X-Porte• V14027-N Vet Service Assembly, Control Panel, X-Porte• V14027-W Vet Warranty Service Assembly, Control Panel, X-Porte
Required Tools• #1 Phillips screwdriver• 3mm Hex Allen Wrench• Torque screwdriver, 10.0-25.0 inch pounds (1.1-2.8 Newton meter)
Control Panel RemovalControl Panel Removal 1 Adjust both the Clinical Monitor display and the Control Panel to their full vertical position.
2 Remove the X-Porte System (“Engine”) following the steps in the System (“Engine”) Removal section below and refer to Figure 6.3 on page 36.
3 Remove the Control Panel cable connection at the Dock assembly by squeezing both sides of the connector plug and pulling out from the Dock. Refer to Figure 6.6 on page 39
Figure 6.6 Control Panel Cable Plug
4 Continue to pull the Control Panel cable out of the stand channel retainers toward the Control Panel
Dock Assembly
Control Panel Cable Plug
Cable Channel Retainer
(squeeze the side tabs to release)*
*Note: (Not Pictured) a retainer (P17671) has been added to the latest build Dock Assy. to clamp the Control Panel Cable Plug straight into the Dock port.
Chapter 6: Replacement Procedures 39

.
Figure 6.7 Control Panel Mount
5 At the vertical cable retention, carefully pry out the rubber grommet and the cylindrical ferrite iron core. It may require some of the cable to be fed up from the bottom to loosen the cable. Refer to Figure 6.7 on page 40.
6 Using a 3mm Hex Allen Wrench, remove all four M4 x 12 socket cap (hex) screws in both Control Panel hinges.
Note: Use care and do not lose the four M4 external tooth washers on the M4 x 12 socket cap screws.
7 The Control Panel is now unmounted from the stand.
Control Panel ReplacementControl Panel Replacement 1 Perform steps 1-7 in the reverse order from the Control Panel Removal section of this chapter.
2 Refer to Figure 6.6 on page 39 and Figure 6.7 on page 40.
3 Torque the four black M4 x 12 socket cap screws with a M4 external tooth washer at each of the two hinges at 24-inch pounds.
Dock
Required Part• P15164-N Service Assembly, Dock with DVR, X-Porte• P15164-W Warranty Service Assembly, Dock with DVR, X-Porte• V15164-N Vet Service Assembly, Dock with DVR, X-Porte• V15164-W Vet Warranty Service Assembly, Dock with DVR, X-Porte
Note: The Latest version of the Dock Assy. will now incorporate additional hardware to secure the Touch Control Panel cable and the Clinical Display Monitor HDMI cable not shown in this chapter’s figures. Two pads will be located on the bottom of the Dock to help maintain the Dock level with the Engine connection port. The extra hardware are as follows: (P17671) Retainer; (P16639) HDMI Wire Clamp; (P16894) HDMI
Backside of Control Panel
(P16375) M4 x 12, Socket Cap Screw, Black (x4)(P16374) M4 ExternalTooth Washer, Silver (x4)
Rubber Grommet
Ferrite Iron Core
40 Chapter 6: Replacement Procedures
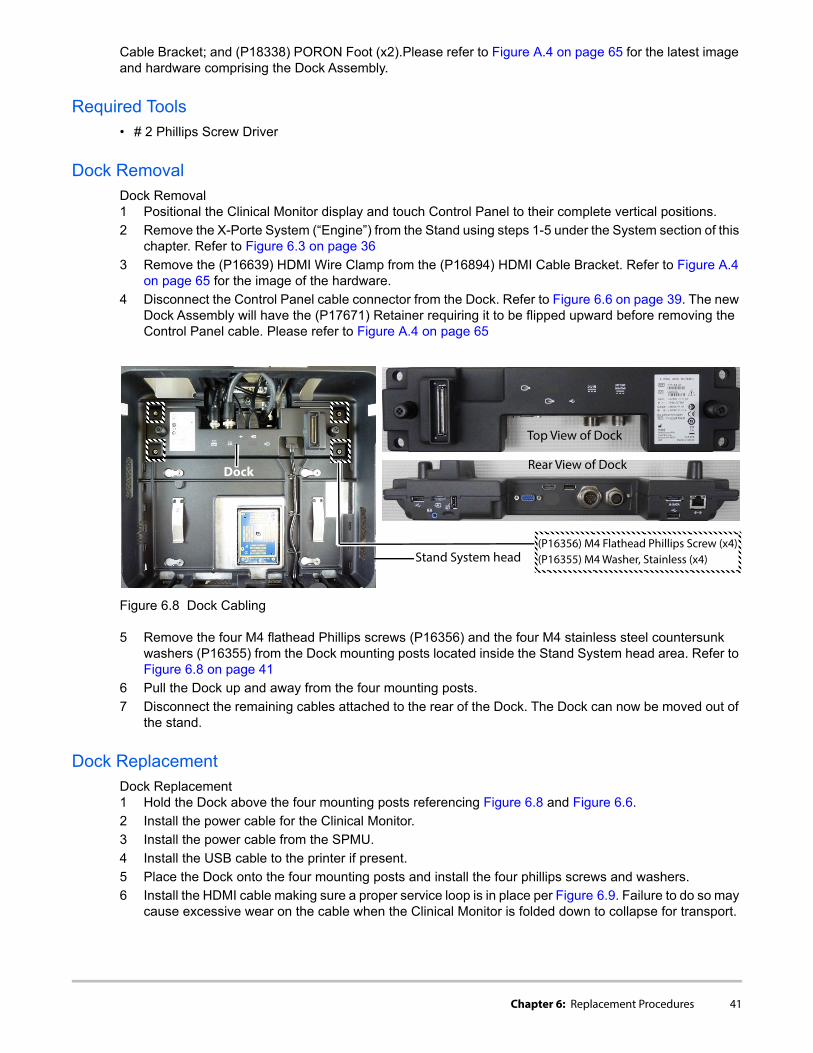
Cable Bracket; and (P18338) PORON Foot (x2).Please refer to Figure A.4 on page 65 for the latest image and hardware comprising the Dock Assembly.
Required Tools• # 2 Phillips Screw Driver
Dock RemovalDock Removal1 Positional the Clinical Monitor display and touch Control Panel to their complete vertical positions.
2 Remove the X-Porte System (“Engine”) from the Stand using steps 1-5 under the System section of this chapter. Refer to Figure 6.3 on page 36
3 Remove the (P16639) HDMI Wire Clamp from the (P16894) HDMI Cable Bracket. Refer to Figure A.4 on page 65 for the image of the hardware.
4 Disconnect the Control Panel cable connector from the Dock. Refer to Figure 6.6 on page 39. The new Dock Assembly will have the (P17671) Retainer requiring it to be flipped upward before removing the Control Panel cable. Please refer to Figure A.4 on page 65
Figure 6.8 Dock Cabling
5 Remove the four M4 flathead Phillips screws (P16356) and the four M4 stainless steel countersunk washers (P16355) from the Dock mounting posts located inside the Stand System head area. Refer to Figure 6.8 on page 41
6 Pull the Dock up and away from the four mounting posts.
7 Disconnect the remaining cables attached to the rear of the Dock. The Dock can now be moved out of the stand.
Dock ReplacementDock Replacement1 Hold the Dock above the four mounting posts referencing Figure 6.8 and Figure 6.6.
2 Install the power cable for the Clinical Monitor.
3 Install the power cable from the SPMU.
4 Install the USB cable to the printer if present.
5 Place the Dock onto the four mounting posts and install the four phillips screws and washers.
6 Install the HDMI cable making sure a proper service loop is in place per Figure 6.9. Failure to do so may cause excessive wear on the cable when the Clinical Monitor is folded down to collapse for transport.
Top View of Dock
Rear View of Dock
SStand System head
Dock
(P16356) M4 Flathead Phillips Screw (x4)(P16355) M4 Washer, Stainless (x4)
Chapter 6: Replacement Procedures 41

7 Install the (P16639) HDMI Wire Clamp tighten the two screws..
Figure 6.9 HDMI Cable Installation
Stand Power Management Unit (SPMU)Service for the SPMU and batteries should only be performed by qualified FUJIFILM SonoSite service personnel or their representative. Due to the lifting and positioning nature of performing the following steps, please refer to the Warnings and Cautions printed at the beginning of this chapter.
Required Part• P14522-N Service Assembly, Stand Power Management Unit, X-Porte• P14522-W Warranty Service Assembly, Stand Power Management Unit, X-Porte• V14522-N Vet Service Assembly, Stand Power Management Unit, X-Porte• V14522-W Warranty Vet Service Assembly, Stand Power Management Unit, X-Porte
Required Tools• #1 Phillips screwdriver• 5mm Hex Allen Wrench• Torque screwdriver, 10.0-25.0 inch pounds (1.1-2.8 Newton meter)
Stand Power Management Unit (SPMU) RemovalStand Power Management Unit (SPMU) Removal1 Removal all items from the stand rear storage basket.
2 Remove all cables, adapters, and any accessories plugged into either side of the System. Refer to Figure 6.3 on page 36.
3 Unlatch the System via the two small gray unlock levers. Refer to Figure 6.3 on page 36.
4 Pull up, forward, and away from the stand to remove the System from the stand System head.
5 Position the touch Control Panel to the horizontal (shipping position). Refer to Figure 6.10 on page 43.
6 Fold the Clinical Monitor display to the horizontal (shipping position). Refer to Figure 6.10 on page 43.
7 Adjust the stand to the minimum height (collapsed-shipping position).
8 Position the two front casters under the stand caster legs and lock all four casters. Refer to Figure 6.10 on page 43.
Pull cable straight, then push cable back while making one full clockwise turn
Proper orientation after installation
42 Chapter 6: Replacement Procedures

Figure 6.10 Stand Adjusted for Service or Transport
9 Access the three battery switches and set all switches to the “•O” (OFF) position. Refer to Figure 6.10 on page 43.
10 Tip the stand forward and continue towards the floor so that the stand rests with the front two caster legs and the brushed metal handle rest horizontal on the floor. This will expose the bottom plate of the stand base. Refer to Figure 6.11 on page 43.
Figure 6.11 Stand Tilted Forward-Bottom Plate
11 Remove the PowerPark Stand Module two mounting M5 x 20mm (P13629)Phillips screws. This is an optional feature and may not be present on your stand. Refer to Figure 6.12 on page 44
12 Remove the six M5 x 8 (P16382) Phillip screws securing the bottom plate and remove the plate. Refer to Figure 6.12 on page 44
Stand In The Service OrTransportMode
Front Casters Tucked & Locked Under TheStand Legs
View of the Battery Switch AccessPanel From The Cart Rear.
Chapter 6: Replacement Procedures 43

Figure 6.12 Stand Bottom Plate
13 Remove the three batteries mounted to the SPMU by loosing the four captive Phillips screws holding each battery and pull each battery off of the SPMU. Refer to Figure 6.13 on page 44.
Figure 6.13 Batteries
14 Loosen the seven captive 5mm hex head screws securing the SPMU to the bottom of the stand and pull away from the stand. Considerable effort is needed to break the adhesion caused by the gray thermal pad sandwiched between the heat sink of the SPMU and the bottom of the stand. Refer to Figure 6.14 on page 45.
(Optional) PowerPark
(P13629) M5 x 20mm Pan Head Steel Screw (x2)
Stand Module (P12822)
(P16382) M5 x 8 PanHead Steel Screw (x6)
Screws (4x) (Captive)
44 Chapter 6: Replacement Procedures
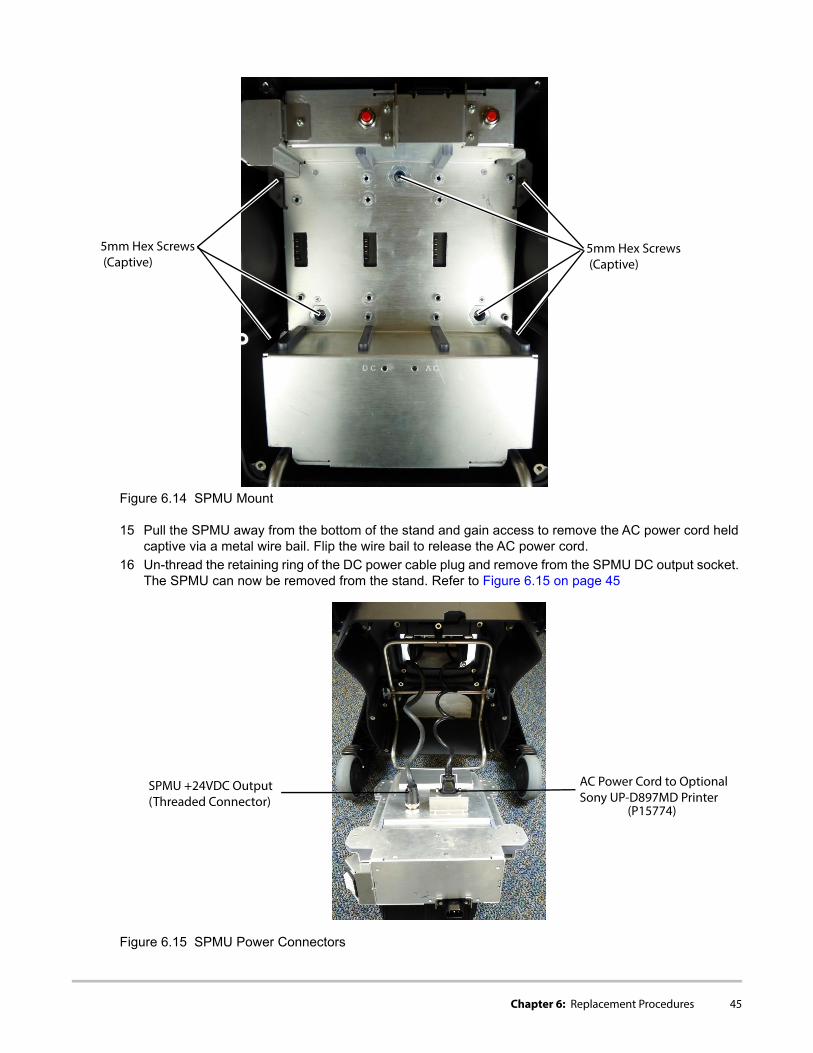
Figure 6.14 SPMU Mount
15 Pull the SPMU away from the bottom of the stand and gain access to remove the AC power cord held captive via a metal wire bail. Flip the wire bail to release the AC power cord.
16 Un-thread the retaining ring of the DC power cable plug and remove from the SPMU DC output socket. The SPMU can now be removed from the stand. Refer to Figure 6.15 on page 45
Figure 6.15 SPMU Power Connectors
5mm Hex Screws5mm Hex Screws (Captive) (Captive)
SPMU +24VDC Output AC Power Cord to Optional
(Threaded Connector) Sony UP-D897MD Printer (P15774)
Chapter 6: Replacement Procedures 45
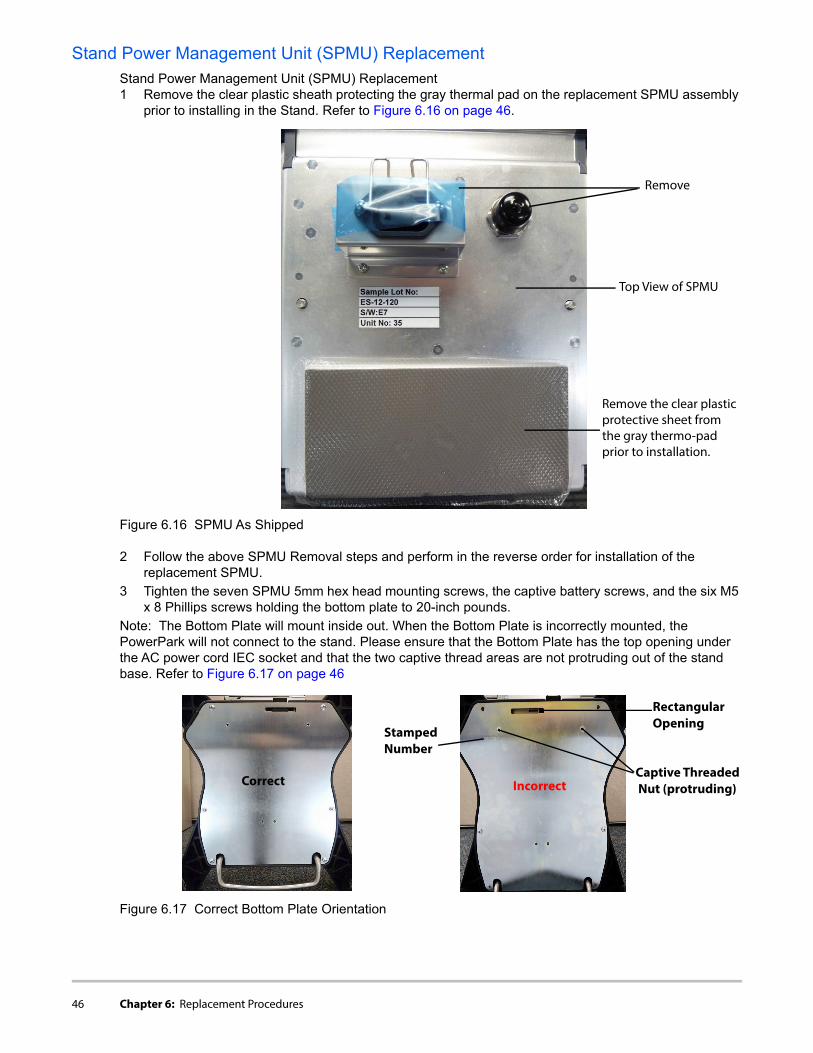
Stand Power Management Unit (SPMU) ReplacementStand Power Management Unit (SPMU) Replacement1 Remove the clear plastic sheath protecting the gray thermal pad on the replacement SPMU assembly
prior to installing in the Stand. Refer to Figure 6.16 on page 46.
Figure 6.16 SPMU As Shipped
2 Follow the above SPMU Removal steps and perform in the reverse order for installation of the replacement SPMU.
3 Tighten the seven SPMU 5mm hex head mounting screws, the captive battery screws, and the six M5 x 8 Phillips screws holding the bottom plate to 20-inch pounds.
Note: The Bottom Plate will mount inside out. When the Bottom Plate is incorrectly mounted, the PowerPark will not connect to the stand. Please ensure that the Bottom Plate has the top opening under the AC power cord IEC socket and that the two captive thread areas are not protruding out of the stand base. Refer to Figure 6.17 on page 46
Figure 6.17 Correct Bottom Plate Orientation
Remove the clear plasticprotective sheet from the gray thermo-padprior to installation.
Remove
Top View of SPMU
Correct
RectangularOpening
Captive Threaded Nut (protruding)Incorrect
StampedNumber
46 Chapter 6: Replacement Procedures
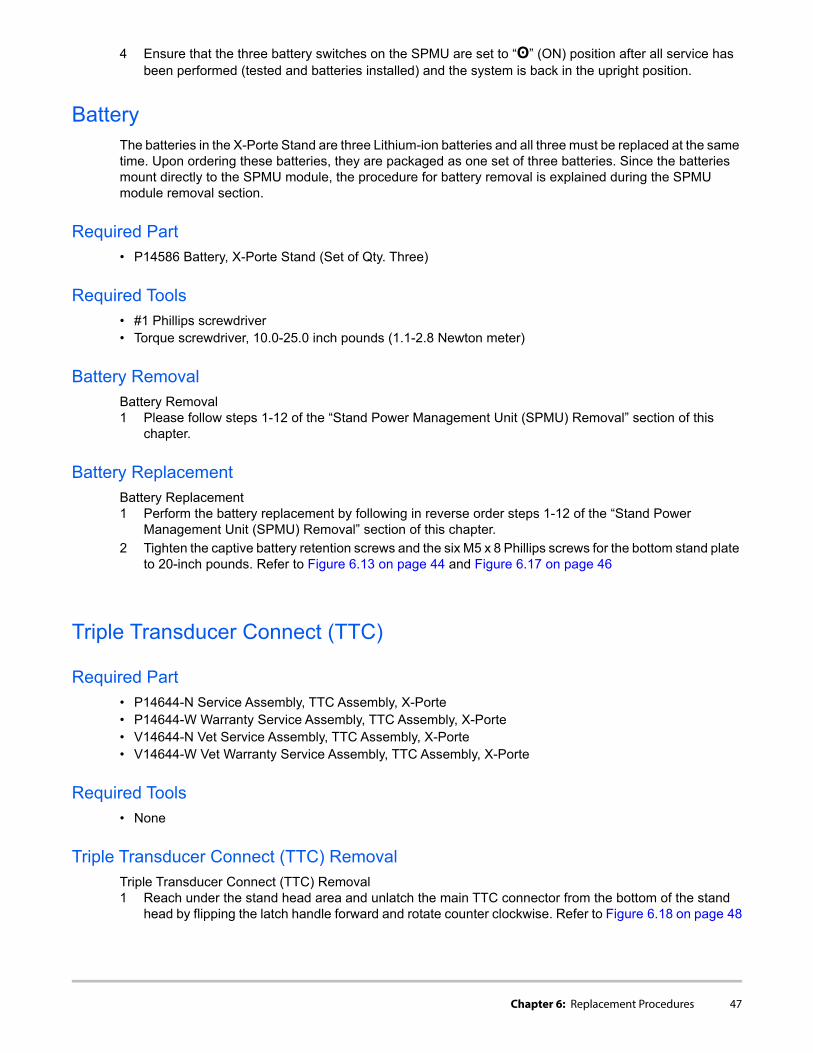
4 Ensure that the three battery switches on the SPMU are set to “ʘ” (ON) position after all service has been performed (tested and batteries installed) and the system is back in the upright position.
BatteryThe batteries in the X-Porte Stand are three Lithium-ion batteries and all three must be replaced at the same time. Upon ordering these batteries, they are packaged as one set of three batteries. Since the batteries mount directly to the SPMU module, the procedure for battery removal is explained during the SPMU module removal section.
Required Part • P14586 Battery, X-Porte Stand (Set of Qty. Three)
Required Tools• #1 Phillips screwdriver• Torque screwdriver, 10.0-25.0 inch pounds (1.1-2.8 Newton meter)
Battery RemovalBattery Removal1 Please follow steps 1-12 of the “Stand Power Management Unit (SPMU) Removal” section of this
chapter.
Battery ReplacementBattery Replacement1 Perform the battery replacement by following in reverse order steps 1-12 of the “Stand Power
Management Unit (SPMU) Removal” section of this chapter.
2 Tighten the captive battery retention screws and the six M5 x 8 Phillips screws for the bottom stand plate to 20-inch pounds. Refer to Figure 6.13 on page 44 and Figure 6.17 on page 46
Triple Transducer Connect (TTC)
Required Part• P14644-N Service Assembly, TTC Assembly, X-Porte• P14644-W Warranty Service Assembly, TTC Assembly, X-Porte• V14644-N Vet Service Assembly, TTC Assembly, X-Porte• V14644-W Vet Warranty Service Assembly, TTC Assembly, X-Porte
Required Tools• None
Triple Transducer Connect (TTC) RemovalTriple Transducer Connect (TTC) Removal1 Reach under the stand head area and unlatch the main TTC connector from the bottom of the stand
head by flipping the latch handle forward and rotate counter clockwise. Refer to Figure 6.18 on page 48
Chapter 6: Replacement Procedures 47
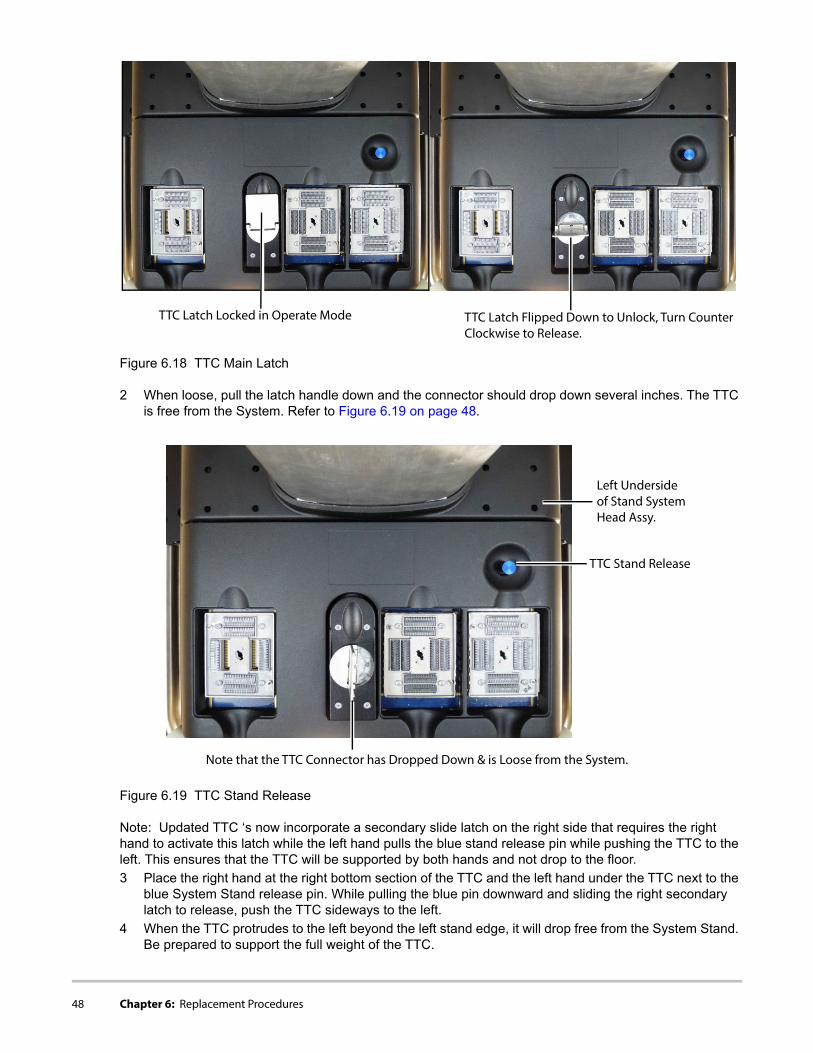
Figure 6.18 TTC Main Latch
2 When loose, pull the latch handle down and the connector should drop down several inches. The TTC is free from the System. Refer to Figure 6.19 on page 48.
Figure 6.19 TTC Stand Release
Note: Updated TTC ‘s now incorporate a secondary slide latch on the right side that requires the right hand to activate this latch while the left hand pulls the blue stand release pin while pushing the TTC to the left. This ensures that the TTC will be supported by both hands and not drop to the floor.
3 Place the right hand at the right bottom section of the TTC and the left hand under the TTC next to the blue System Stand release pin. While pulling the blue pin downward and sliding the right secondary latch to release, push the TTC sideways to the left.
4 When the TTC protrudes to the left beyond the left stand edge, it will drop free from the System Stand. Be prepared to support the full weight of the TTC.
TTC Latch Locked in Operate Mode TTC Latch Flipped Down to Unlock, Turn CounterClockwise to Release.
Left Underside
TTTC Stand Release
of Stand SystemHead Assy.
Note that the TTC Connector has Dropped Down & is Loose from the System.
48 Chapter 6: Replacement Procedures

Triple Transducer Connect (TTC) ReplacementTriple Transducer Connect (TTC) Replacement1 To mate the TTC to the stand, start by aligning the four stainless steel guide wheels on the top portion
of the TTC assembly which slide into the four TTC guide channels located at the bottom of the stand System head.
2 Position the TTC approximately 3/4” farther to the left than the left stand edge to allow the TTC stainless steel guide wheels to enter the stand TTC guide channels. Please refer to Figure 6.20 on page 49 for the location for these attachment points.
Figure 6.20 TTC Mounting Channels
3 Perform the TTC Removal steps 1-4 in the reverse order to complete the replacement operation.
Left Underside of Stand System head
TTC Guide Channels (x4)
TTC Guide Wheels (x4)
Right Topside of TTC Assembly
Main TTC Connector
TTC Blue Locking Pin(Part of TTC Stand Release)
Chapter 6: Replacement Procedures 49
Optional Equipment - Stand System
PowerPark The PowerPark accessory is a cordless charging station for most FUJIFILM SonoSite system stands. It is comprised of two portions with the PowerPark Stand Module (P12822) mounted to the underside of the stand which then connects to the PowerPark Dock Module (P12834) that is connected to the wall AC and sits on the floor. In the event that the stand module needs to be replaced on a X-Porte Stand System, please perform the following procedures.
Required Part• P12822 Assembly, PowerPark Stand Module
Required Tools• #1 Phillips screwdriver• #1 Phillips “stubby” screwdriver or ratchet type screwdriver (for repair without laying the stand on its side)
PowerPark Stand Module RemovalPowerPark Stand Module Removal
Note: The following will outline the replacement method by tipping the stand onto its side to gain full view and access to the underside of the stand. If tipping the stand is not possible, then proceed to the “alternate” methods.
1 Please refer to section in this chapter titled “Stand Power Management Unit (SPMU) Removal” and follow steps 1 through 11. Please refer to Figure 6.10 on page 43, Figure 6.11 on page 43, and Figure 6.12 on page 44
2 When the two M5 x 20mm Phillips (P13629) screws have been removed securing the PowerPark Stand Module, slide the module out from stand IEC power cord port.
PowerPark Stand Module ReplacementPowerPark Stand Module Replacement1 Perform the PowerPark Stand Module replacement following the prior removal steps 1 through 2 in the
reverse order.
2 Access the three battery switches and set all switches to the “ʘ” (ON) position. Refer to Figure 6.10 on page 43
PowerPark Stand Module Removal (Alternate Method-Upright System)PowerPark Stand Module Removal (Alternate Method)1 Pull the X-Porte Stand System away from the PowerPark Dock Module or remove the AC power cord
connected to the PowerPark Stand Module.
2 Access the three battery switches and set all switches to the “•O” (OFF) position. Refer to Figure 6.10 on page 43.
3 While lying on the floor to gain access to the underside of the X-Porte Stand, use a “stubby” or rachet type #1 Phillips screw driver to remove the two M5 x 20mm Phillips (P13629) screws.
4 Once the PowerPark Stand Module is loose, slide the module out away from the stand IEC power cord port.
50 Chapter 6: Replacement Procedures

PowerPark Stand Module Replacement (Alternate Method-Upright System)PowerPark Stand Module Replacement (Alternate Method)1 Perform the PowerPark Stand Module replacement following the “alternate” removal steps 1 through 4
in the reverse order.
2 Access the three battery switches and set all switches to the “ʘ” (ON) position. Refer to Figure 6.10 on page 43.
Sony UP-D897MD PrinterThe Sony UP-D897 digital thermal printer is a monochrome black and white printer which uses the USB 2.0 port to integrate to the X-Porte Stand and Desktop systems. This is an optional device and no special installation is necessary for the X-Porte Desktop system. The following instructions are for any replacement needs if the Sony UP-D897MD has to be replaced which is mounted to the X-Porte Stand (Kiosk) system.
Required Part• P16193-N Service Assembly, B&W Printer, X-Porte• P16193-W Warranty Service Assembly, B&W Printer, X-Porte• V16193-N Vet Service Assembly, B&W Printer, X-Porte• V16193-W Vet Warranty Service Assembly, B&W Printer, X-Porte
Required Tools• #1 Phillips screwdriver• 3mm hex long T-handle driver (optional)
Sony UP-D897MD Printer RemovalSony UP-D897 Printer Removal1 Raise or lower the Stand to a comfortable height to gain access to the printer shelf hardware.
2 From the rear of the Stand, loosen the captive screw that may be tightened to holding the printer cable shield closed. Loosen the screw and glide the screw through the channel to swing open the cover. Refer to Figure 6.21 on page 51
3 Remove the AC power cord and USB digital video cable from the printer.
Figure 6.21 Sony UP-D897MD Cable Cover
4 From the underside of the printer mounting shelf, remove the four M3-.5 x 8mm Pan Head Phillips screws (P15551) threaded into the Sony UP-D897MD printer. Refer to Figure 6.22 on page 52
(P15551) M3-.5 x 8mm Screws (x4)
Mounting Bracket 3mm Hex Screw
Chapter 6: Replacement Procedures 51

Note: Alternate method is to use a 3mm hex T-handle driver to loosen the hex screw in the clear mounting bracket and remove the printer shelf from the stand column. This method allows the four (P15551) M3-.5 x 8 mm screws to be removed and the printer replaced on a table and not from under the mounted shelf.
Figure 6.22 Stand Printer Shelve & Mounting Screws
5 Remove the Sony UP-D897MD printer from the shelf.
Sony UP-D897MD Printer ReplacementSony UP-D897 Printer Replacement1 Perform the Sony printer replacement by following the Sony UP-D897MD removal steps 1 through 5 in
the reverse order.
(P15551) M3-.5 x 8mm Pan Head Phillips Mounting Screws (x4)
Note: Viewed with the printer shelf removed from the Stand.
52 Chapter 6: Replacement Procedures

Chapter 7: Maintenance
This chapter contains information to direct you to where information about care for the system, transducers, and accessories can be obtained.
Periodic MaintenanceNo periodic or preventive maintenance is required for the system, transducers, or accessories other than cleaning and disinfecting the transducer after every use. (See the “Cleaning and Disinfecting X-Porte Products” guide (P16529). There are no internal adjustments or alignments required and there are no internal components that require periodic testing, calibration, adjustment, or alignment. Performance tests are described in Chapter 8, “Performance Testing” of this manual. Performing maintenance procedures not described in this manual may void the product warranty.
Local regulations may require electrical safety testing.
Contact FUJIFILM SonoSite Technical Support for any maintenance questions. (See “Contact Information” on page 1.)
Cleaning and DisinfectingPlease refer to Warnings, Cautions, and Step by Step procedures outlined in the FUJIFILM SonoSite “Cleaning and Disinfecting X-Porte Products” guide (P16529)
Chapter 7: Maintenance 53

54 Chapter 7: Maintenance
Chapter 8: Performance Testing
Overview
To obtain 2D images, FUJIFILM SonoSite recommends using the Gammex 403GS Soft Tissue Phantom or the Gammex 413A Multipurpose Phantom. A .7db/cm phantom is recommend but not required.
Some features and capabilities are optional and therefore may be unavailable to test.
Recommend Test Equipment• FUJIFILM SonoSite ultrasound system under test• C60xp/5-2 MHz transducer• P21xp/5-1 MHz transducer• Gammex 403 GS Multipurpose Phantom, 413A Soft Tissue Phantom, or equivalent.• Acoustic gel
Setting Up Performance Tests
WARNING: Critical Test Function — A failure of the system functions tested in this section could affect safety or effectiveness of the system adversely. While performing the steps in this section, verify that the images on the system display and on the external monitor are acceptable.
Set up Performance Tests
1 Attach the C60xp/5-2 MHz transducer to the system.
2 Select Gen for optimization and OB for exam type.
3 Couple the transducer to the phantom, adjusting gain settings and transducer for a proper phantom image (e.g., pins are high-level echoes positioned in straight lines; cysts are sonolucent, X-Portes are sharp, and graphite particles of the phantom are mid-grays).
Chapter 8: Performance Testing 55
Basic Operational Tests
2D Performance Tests
2D Performance / Image Quality
Basic System Operation Tests
1 Verify that the correct transducer name appears in the upper right corner of the system display.
2 Verify proper date and time.
3 Verify that the scan plane orientation mark in the image located near the skinline corresponds to element #1 on the transducer. To test, put your finger on the probe and run it across the transducer face. Your finger touching the transducer face should appear at the orientation mark on the display image format.
4 Verify that all of the keyboard keys are functional. Verify that all controls operate smoothly over their full range and that the system responds properly.
5 Verify that as the Gain controls are increased and decreased, there is a corresponding increase and decrease in echo intensity.
6 Capture a Cineloop buffer. Exercise the Cineloop controls and verify proper operation.
7 Verify the airflow from the fan vents on the rear of the Engine flow outward.
Test 2D Performance and Image Quality
1 Use a C60xp/5-2 MHz transducer in 2D mode.
2 Adjust the position of the C60xp/5-2 MHz transducer on the phantom.
3 With the array pointing down and the orientation mark to the operator’s left, element #1 corresponds with the left side of the array.
4 Use the 2D system controls to obtain a clear image that shows both the horizontal and vertical rows of pins.
5 Verify that the ultrasound image appears uniform in both the axial and lateral direction, with no dropouts or intensity variations.
6 Verify that the cystic structure at the focal zone is clearly differentiated from the surrounding tissue and is echo-free, while solid tissue with numerous echo sources, appears solid.
7 Press the Freeze key and then save the image. Slide the Freeze Unlock key to return to live imaging.
56 Chapter 8: Performance Testing

Axial Measurement AccuracyNote: Measurements must be performed while the image is frozen.
Lateral Measurement Accuracy
Set Up Axial Measurement Accuracy
1 Acquire the image.
2 Press the Freeze key.
3 Press the Caliper key. The caliper appears on the image display. (See the X-Porte Ultrasound System User Guide, if necessary, for caliper operation.)
4 Use the touchpad to position one of the calipers.
5 Press the Select key to fix the caliper and enable the other caliper.
6 Use the touchpad to move the other caliper. The results update as you move the caliper, and the measurement is complete when you finish moving the calipers. (Press the Select key to alternate the active caliper, and adjust the measurement with the touchpad.)
Test Axial Measurement Accuracy
1 Measure the distance, center to center, of any two pins that are 5-12 cm apart vertically.
2 Verify that the distance measured is within the tolerance listed in Table 8.1.
Set Up Lateral Measurement Accuracy
Perform “Set Up Axial Measurement Accuracy” on page 56.
Test Lateral Measurement Accuracy
1 Measure the distance, center to center, of any two pins that are 4-10 cm apart horizontally.
2 Verify that the distance measured is within the tolerance listed in Table 8.1.
3 Slide the Freeze Unlock to return the system to live 2D mode.
Table 8.1: System Measurement Accuracy
Measurements Tolerance
Axial Distance +/- 2%
Lateral Distance +/- 2%
Chapter 8: Performance Testing 57
Penetration
The penetration measurement is an integral part of the quality assurance program. Penetration is defined as the deepest depth at which an ultrasound system can provide adequate image quality of small anatomical structures.
Penetration measurements should be performed and the results retained for comparison to future measurements. Penetration measurements should remain fairly consistent over time assuming use of the same system settings and scanhead. Degradation of the penetration measurement in excess of 1cm may indicate a transducer or system electronics issue.
Loss of measured penetration may also be caused by degradation (dessication) of the ultrasound phantom. Ultrasound phantoms used for penetration measurements must also be part of a quality assurance program to maintain their integrity. Follow all of the phantom manufacturer recommendations for use, storage, and maintenance of the phantom.
Additional Performance Tests
Color Doppler (Color)
Test Penetration
1 Use the same scanhead and system settings as previous measurements if possible.
2 Adjust the system controls to obtain a clear image that shows the limits of echo penetration.
3 Press the Freeze key and then save the image.
4 Measure from the center of the skinline to the deepest vertical position—where the scatter echoes start to break up and tissue definition is lost.
5 Record and retain the results for future reference. Scanhead type and system settings (exam type, depth, resolution mode, etc.) should also be recorded to ensure proper comparison with future tests.
6 Slide the Freeze Unlock to return to live imaging.
Test Color 1 Connect any transducer.
2 Press the Color key. “Color” should be annotated in the top left corner of the display.
3 A Region of Interest (ROI) box is displayed on top of the grayscale image. Use the Touch Control Panel or Desktop System mouse to move the Color ROI. Verify that the ROI moves to the new position on the display.
4 Adjust the Depth control for minimum depth in the image.
5 Adjust the Gain control so that color speckles just appear inside the ROI box.
6 Gently tap the face of the transducer and observe that the ROI box fills with color information.
7 Press the Freeze key and then save the image. Slide the Freeze Unlock to return to live imaging.
58 Chapter 8: Performance Testing

Color Power Doppler (CPD)
M Mode Imaging
Tissue Harmonic Imaging
Test CPD 1 Connect any transducer.
2 Press the Color key. A Region of Interest (ROI) box is displayed on top of the grayscale image.
3 Press the Color softkey to switch to CPD. “CPD” should be annotated in the lower right corner of the display.
4 Adjust the Depth control for minimum depth in the image.
5 Adjust the Gain control so that color speckles just appear inside the ROI box.
6 Gently tap the face of the transducer and observe that the ROI box fills with color information.
Test M Mode Imaging
1 Attach a C60xp transducer and acquire an image.
2 Press the M Mode key for the M Mode sample line.
3 Position the M Mode sample line over the image using the Touch Control Panel or the Desktop System mouse.
4 Active the Start key to the right of the M Mode key to turn on M Mode.
5 Select the desired sweep speed from the on-screen menu (slow, med, or fast). The on-screen menu will show the selected sweep speed.
6 Press the Freeze key to freeze the image. Save the image. Slide the Freeze Unlock to return to live imaging.
7 Press the 2D key to return to 2D imaging.
Test THI Imaging
1 Attach the C60xp transducer and acquire an image.
2 Set the depth to maximum and note the depth at which echo information is lost.
3 Press the THI key on the control panel so it displays THI on the display. Tissue Harmonic Imaging in now active.
4 Observe a decrease in dot size and a significant loss in penetration due to the higher frequency. Image resolution increases.
5 Press the Freeze key and then save the image. Slide the Freeze Unlock to return to live imaging.
6 Press the THI key again to turn off Tissue Harmonic Imaging.
Chapter 8: Performance Testing 59

Pulsed Wave (PW) Doppler Imaging
Continuous Wave (CW) Doppler Imaging
Image Quality Verification Test/Livescan• Products with replaced subassemblies, or products that have been otherwise disassembled, must
undergo an Image Quality Verification Test/Livescan.• The Image Quality Verification Test/Livescan should be performed after successfully completing all
applicable performance tests listed prior in this chapter.• The test is completed before returning the system to service.• A certified sonographer must perform the test.• The Livescan test performed is at the discretion of the Sonographer and will represent their acceptance
of a successful service event.• Review all saved images and verify that the images are displayed properly.
Test PW Doppler Imaging
1 Attach the P21xp transducer.
2 Press the Doppler key for the Doppler sample gate.
3 Press the Doppler key again for the Doppler spectral trace.
4 Place a large drop of ultrasound gel on the transducer lens.
5 Adjust the Gain control as necessary and then gently tap the top of the gel and observe a reflection on the spectral trace and the sound from the speakers.
6 Press the Freeze key and then save the image. Slide the Freeze Unlock to return to live imaging.
7 Press the 2D key to return to 2D imaging.
Test CW Doppler Imaging
1 Attach the P21xp transducer.
2 Press the Patient key.
3 Select the Cardiac exam type.
4 Press the Done softkey.
5 Press the Doppler key for the Doppler sample gate.
6 Press the PW softkey to switch to CW Mode.
7 Press the Doppler key again for the Doppler spectral trace.
8 Place a large drop of ultrasound gel on the transducer lens.
9 Adjust the Gain control as necessary and then gently tap the top of the gel and observe a reflection on the spectral trace and the sound from the speakers.
10 Press the Freeze key and then save the image. Slide the Freeze Unlock to return to live imaging.
11 Press the 2D key to return to 2D imaging.
60 Chapter 8: Performance Testing

Printer
The printer test is an optional test that requires the Sony UP-D987MD USB Black & White Printer (P16193) to be connected to the system under test. Skip this test if a printer is not available.
Test Printer Operation
1 Press the print button and verify that the printer begins to print an image.
2 Verify the proper content of the printed image.
Chapter 8: Performance Testing 61

62 Chapter 8: Performance Testing

Appendix A: Replacement Parts
The following tables contain all the field-replaceable parts for the X-Porte ultrasound system. Quantities are one unless otherwise noted. Please refer to Figure A.1 on page 62 to identify the major components of the two X-Porte System variants which are the Desktop and Stand systems.
Figure A.1 X-Porte Major Components
1
2 3
4
5
Desktop System
Stand System
1. Clinical Monitor Display2. Monitor EPS (not shown)3. system EPS (power supply)4. system Assembly5. Mouse
Appendix A: Replacement Parts 63
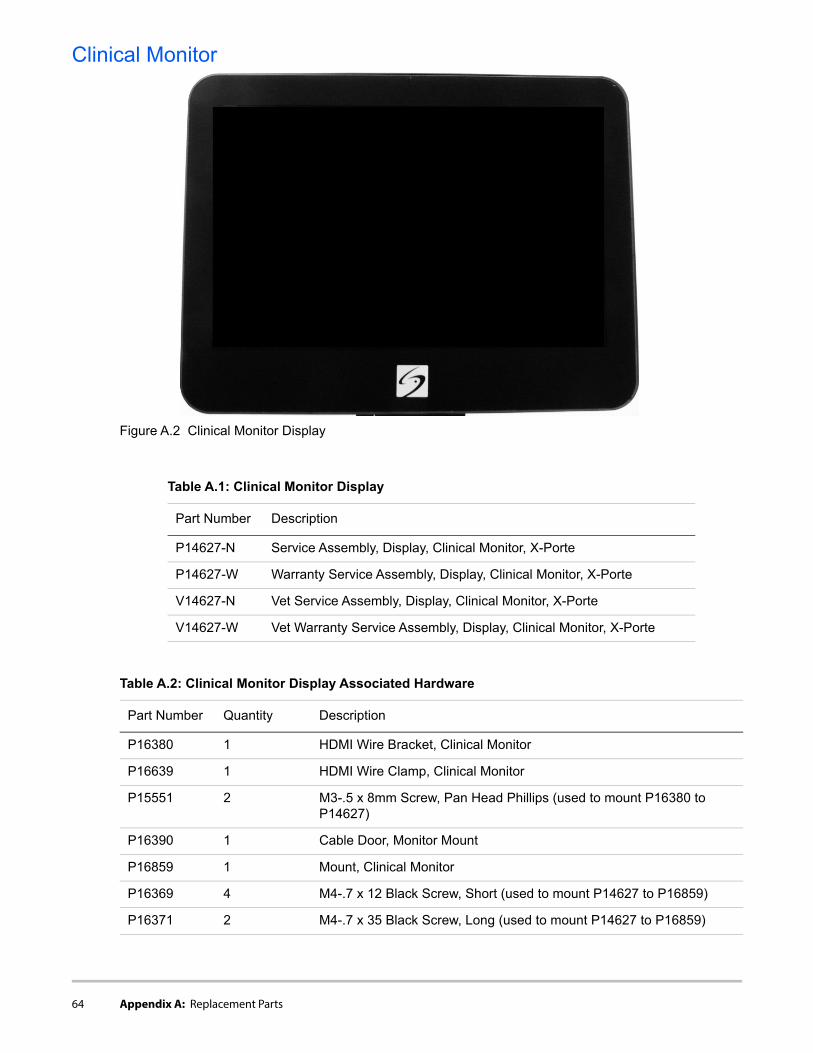
Clinical Monitor
Figure A.2 Clinical Monitor Display
Table A.1: Clinical Monitor Display
Part Number Description
P14627-N Service Assembly, Display, Clinical Monitor, X-Porte
P14627-W Warranty Service Assembly, Display, Clinical Monitor, X-Porte
V14627-N Vet Service Assembly, Display, Clinical Monitor, X-Porte
V14627-W Vet Warranty Service Assembly, Display, Clinical Monitor, X-Porte
Table A.2: Clinical Monitor Display Associated Hardware
Part Number Quantity Description
P16380 1 HDMI Wire Bracket, Clinical Monitor
P16639 1 HDMI Wire Clamp, Clinical Monitor
P15551 2 M3-.5 x 8mm Screw, Pan Head Phillips (used to mount P16380 to P14627)
P16390 1 Cable Door, Monitor Mount
P16859 1 Mount, Clinical Monitor
P16369 4 M4-.7 x 12 Black Screw, Short (used to mount P14627 to P16859)
P16371 2 M4-.7 x 35 Black Screw, Long (used to mount P14627 to P16859)
64 Appendix A: Replacement Parts

Touch Control Panel
Figure A.3 Touch Control Panel
P16773-N 1 Service Cable Assembly, Clinical Monitor Stalk Cable Set, M2
Table A.2: Clinical Monitor Display Associated Hardware
Part Number Quantity Description
Table A.3: Touch Control Panel
Part Number Description
P14027-N Service Assembly, Control Panel, X-Porte
P14027-W Warranty Service Assembly, Control Panel, X-Porte
V14027-N Vet Service Assembly, Control Panel, X-Porte
V14027-W Vet Warranty Service Assembly, Control Panel, X-Porte
Table A.4: Touch Control Panel Associated Hardware
Part Number Quantity Description
P16374 4 M4 External Tooth Washer, Silver (used with P16375 to mount P14027 to Stand)
P16375 4 M4 x 12, Socket Cap Screw, Black (used with P16374 to mount P14027 to Stand)
Appendix A: Replacement Parts 65
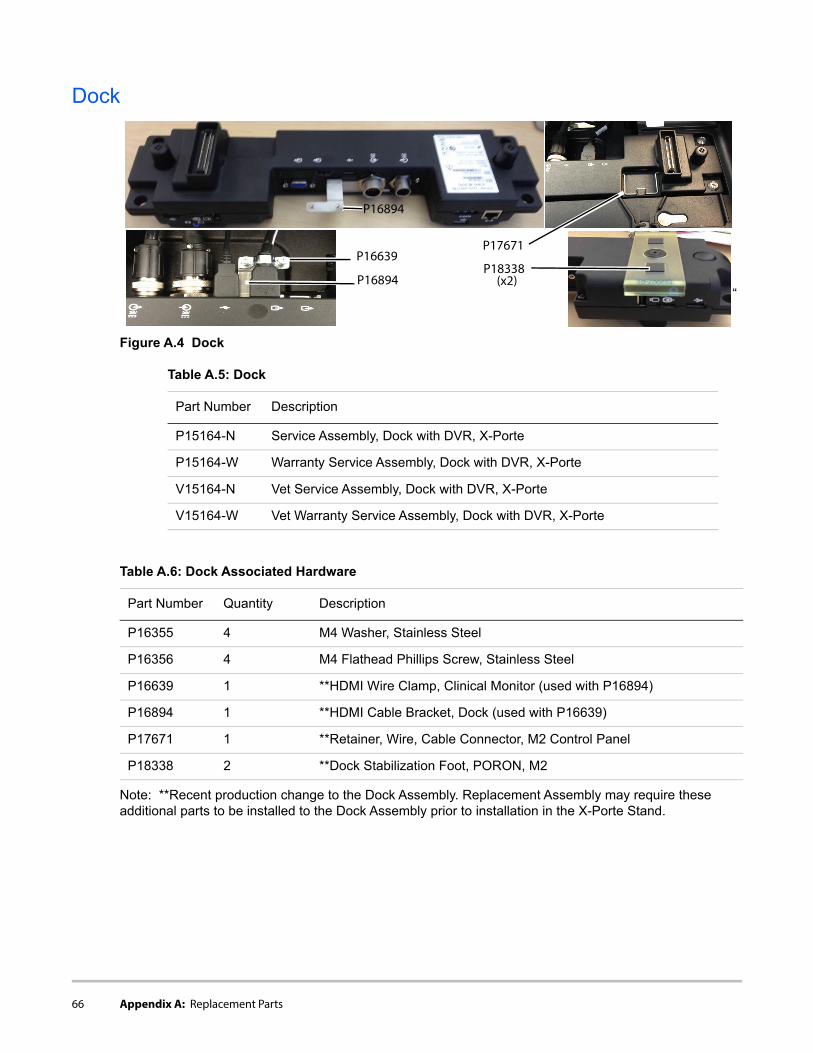
Dock
“
Note: **Recent production change to the Dock Assembly. Replacement Assembly may require these additional parts to be installed to the Dock Assembly prior to installation in the X-Porte Stand.
Figure A.4 Dock
Table A.5: Dock
Part Number Description
P15164-N Service Assembly, Dock with DVR, X-Porte
P15164-W Warranty Service Assembly, Dock with DVR, X-Porte
V15164-N Vet Service Assembly, Dock with DVR, X-Porte
V15164-W Vet Warranty Service Assembly, Dock with DVR, X-Porte
P16894
P16894
P16639P17671
P18338(x2)
Table A.6: Dock Associated Hardware
Part Number Quantity Description
P16355 4 M4 Washer, Stainless Steel
P16356 4 M4 Flathead Phillips Screw, Stainless Steel
P16639 1 **HDMI Wire Clamp, Clinical Monitor (used with P16894)
P16894 1 **HDMI Cable Bracket, Dock (used with P16639)
P17671 1 **Retainer, Wire, Cable Connector, M2 Control Panel
P18338 2 **Dock Stabilization Foot, PORON, M2
66 Appendix A: Replacement Parts

“Ultrasound” Engine
Figure A.5 Engine
Table A.7: “Ultrasound” Engine
Part Number Description
P16055-N Service Assembly, X-Porte Engine, CW
P16055-W Warranty Service Assembly, X-Porte Engine, CW
V16055-N Vet Service Assembly, X-Porte Engine, CW
V16055-W Vet Warranty Service Assembly, X-Porte Engine, CW
Appendix A: Replacement Parts 67

Stand Power Management Unit (SPMU & Batteries)
Figure A.6 SPMU & Batteries
*Batteries Only Ordered in Sets of 3 (All 3 Batteries Must Be Replaced as a Set)
Table A.8: Stand Power Module Unit (SPMU & Batteries)
Part Number Description
P14522-N Service Assembly, Stand Power Management Unit, X-Porte
P14522-W Warranty Service Assembly, Stand Power Management Unit, X-Porte
V14522-N Vet Service Assembly, Stand Power Management Unit, X-Porte
V14522-W Vet Warranty Service Assembly, Stand Power Management Unit, X-Porte
P14586 Battery, X-Porte Stand (Set of Qty. Three)
68 Appendix A: Replacement Parts
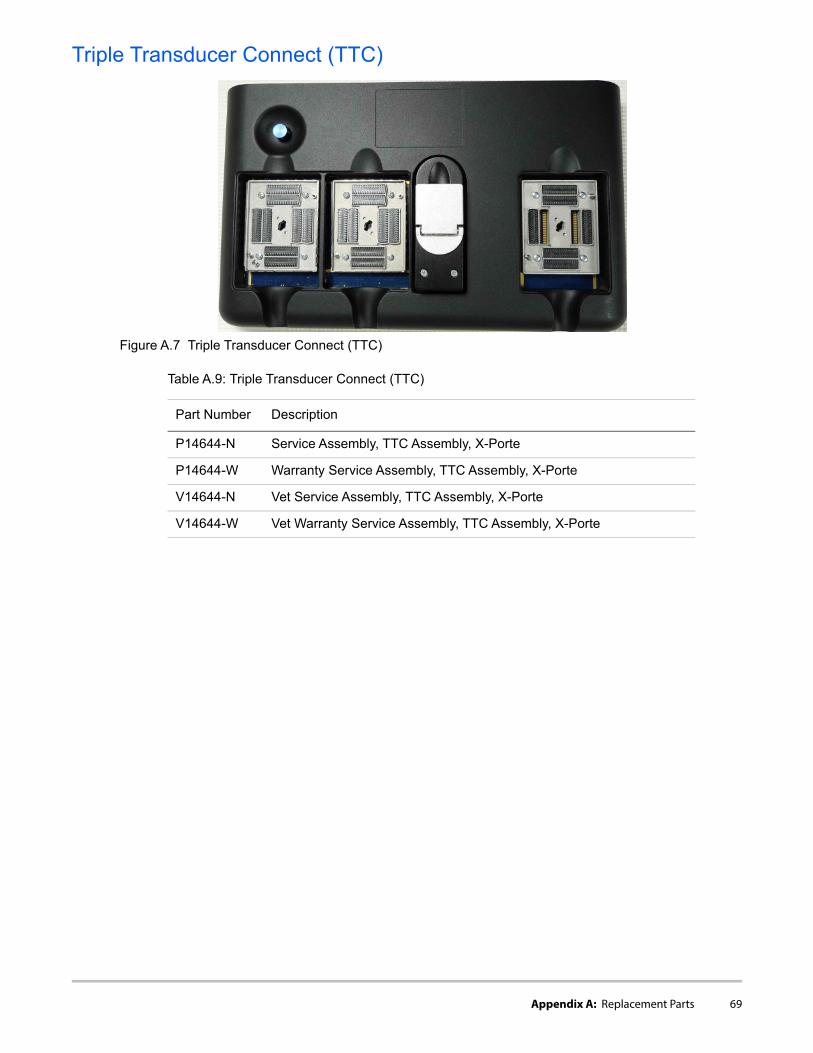
Triple Transducer Connect (TTC)
Figure A.7 Triple Transducer Connect (TTC)
Table A.9: Triple Transducer Connect (TTC)
Part Number Description
P14644-N Service Assembly, TTC Assembly, X-Porte
P14644-W Warranty Service Assembly, TTC Assembly, X-Porte
V14644-N Vet Service Assembly, TTC Assembly, X-Porte
V14644-W Vet Warranty Service Assembly, TTC Assembly, X-Porte
Appendix A: Replacement Parts 69

Clinical Monitor Hardware
Figure A.8 Clinical Monitor Hardware
Table A.10: Clinical Monitor Hardware
Control Panel Hardware
Figure A.9 Control Panel Hardware
Table A.11: Control Panel Hardware
Item 1
Item 2 Item 3
Item 4
Item 5
Item 6
Item Part Number Description
1 P16390 Cable Door, Monitor Mount
2 P16371 M4-.7 x 35 Black Screw (x2)
3 P16369 M4-.7 x 12 Black Screw (x4)
4 P16380 HDMI Wire Bracket, Clinical Monitor
5 P15551 M3-.5 x 8mm Screw, Pan Head Phillips (x2)
6 P16639 HDMI Wire Clamp, Clinical Monitor
Figure 6.2 P16859 Mount, Clinical Display
Item 1
Item 2
Item Part Number Description
1 P16375 M4 x 12, Socket Cap Screw, Black (x4)
2 P16374 M4 External Tooth Washer, Silver (x4)
70 Appendix A: Replacement Parts

Dock Hardware
Figure A.10 Dock Hardware
Table A.12: Dock Hardware
Stand Hardware Parts
Figure A.11 Stand Hardware Parts
Table A.13: Stand Part
Item 2
Item 1
Item Part Number Description
1 P16355 M4 Washer, Stainless (x4)
2 P16355 M4 Flathead Phillips Screw (x4)
Figure A.4 P16639 HDMI Wire Clamp, Clinical Monitor
Figure A.4 P16894 HDMI Cable Bracket, Dock
Figure A.4 P17671 Retainer, Wire, Cable Connector, M2 Control Panel
Figure A.4 P18338 Dock Stabilization Foot, PORON, M2
Item 1
Item 2
Item Part Number Description
1 P16733 X-Porte, Stand, Cable Baffle Plate
2 P16799 X-Porte, Stand, Screw, M4x5 (x3)
Figure 6.12 P16382 Screw, M5 X 8, Pan Head Phillips (x6) - (Bottom Stand Plate)
Figure 6.12 P13629 Screw, Pan Head, M5 X 20mm (x2) - (Power Park Stand Module)
Appendix A: Replacement Parts 71

Optional Equipment
PowerPark
Figure A.12 PowerPark
Table A.14: PowerPark
Part Number Description
P12822 Assembly, PowerPark Stand Module (Mounts to Stand)
P12834 Assembly, PowerPark Dock Module (Floor Portion Connected to AC Source)
P13629 Screw, Pan Head M5 x 20mm, Steel) (Mounts P12822 to Stand Bottom Plate)
(P12834) Assembly, PowerPark Dock Module
(P12822) Assembly, PowerPark Stand Module
*Note: Shown with the H-Universal Stand
72 Appendix A: Replacement Parts
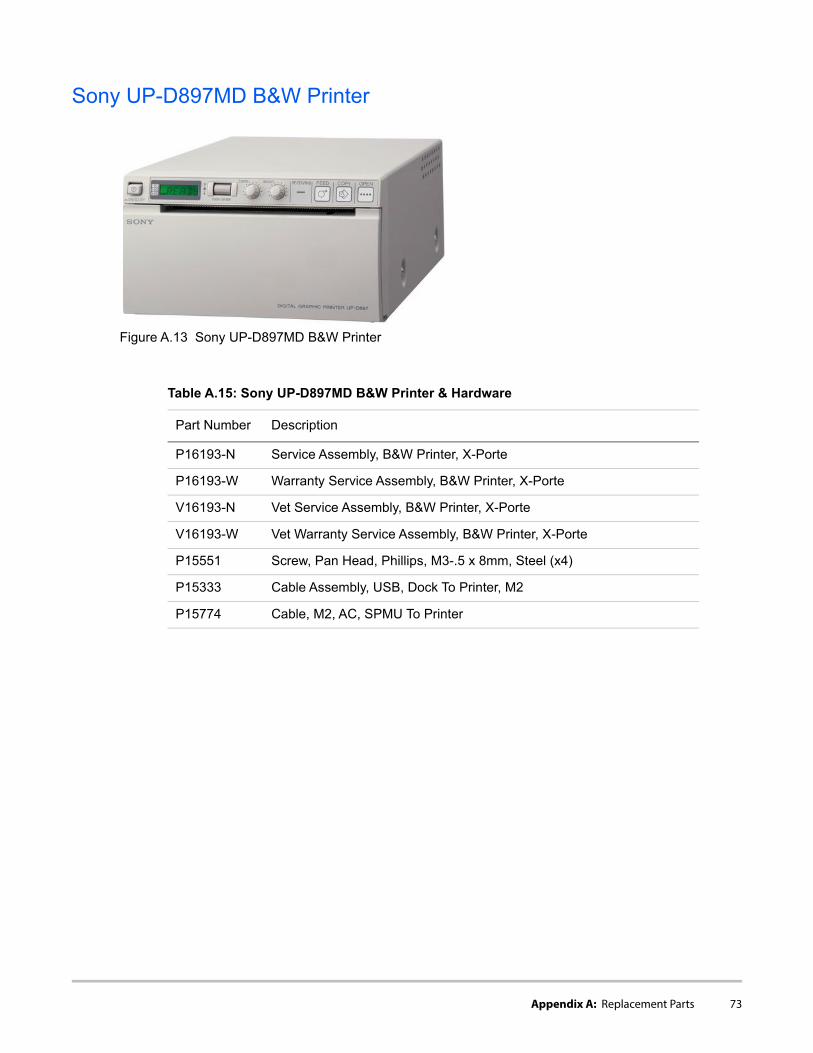
Sony UP-D897MD B&W Printer
Figure A.13 Sony UP-D897MD B&W Printer
Table A.15: Sony UP-D897MD B&W Printer & Hardware
Part Number Description
P16193-N Service Assembly, B&W Printer, X-Porte
P16193-W Warranty Service Assembly, B&W Printer, X-Porte
V16193-N Vet Service Assembly, B&W Printer, X-Porte
V16193-W Vet Warranty Service Assembly, B&W Printer, X-Porte
P15551 Screw, Pan Head, Phillips, M3-.5 x 8mm, Steel (x4)
P15333 Cable Assembly, USB, Dock To Printer, M2
P15774 Cable, M2, AC, SPMU To Printer
Appendix A: Replacement Parts 73

Desktop System Components
EPS for Desktop System (Engine)
Figure A.14 EPS for Desktop System (Engine)
EPS for Desktop Clinical Monitor Display
Figure A.15 EPS for Desktop Clinical Monitor Display
Table A.16: EPS for Desktop System (Engine)
Part Number Description
P14521 AC Power Supply, X-Porte, 150 W
Table A.17: EPS for Desktop Clinical Monitor Display
Part Number Description
P16776 Power Supply, 65W, 24V, X-Porte, Clinical Monitor
74 Appendix A: Replacement Parts

Other Desktop Components
Figure A.16 Other Components
Ordering Replacement PartsTo order parts, contact FUJIFILM SonoSite Technical Support as indicated in “Contact Information” on page 1.
Item 1
Item 2
Item 3
Table A.18: Other Components
Item Part Number Description
1 P02296 Transformer, Isolation
2 P16786 Pedestal Mount, X-Porte Monitor, 75 mm X 75 mm VESA
3 P14451 Mouse, Optical, 5 Button, Black, Washable, 6 ft. Cable
Not Shown P15334 Cable Assembly, HDMI, Dock To Clinical Monitor, M2
Not Shown P16967 USB Memory Stick, 16GB, X-Porte (Used for both Desktop & Stand Systems)
Appendix A: Replacement Parts 75

76 Appendix A: Replacement Parts

Appendix B: Service Event Reporting
The Service Event Report provides information about product failures to the manufacturer and to authorized service facilities, which provide approved warranty services for FUJIFILM SonoSite products. For all repairs completed, complete the form and email a copy of it to [email protected] or mail to the following address:
FUJIFILM SonoSite, Inc.Technical Support 21919 30th Drive SEBothell, Washington 98021USA
To contact FUJIFILM SonoSite Technical Support, see“Contact Information” on page 1.
Appendix B: Service Event Reporting 77

Service Event Report Form
Service Event Report Instructions on reverse
Service Type (check one) Parts Status (check one) For SonoSite Use O
Out of Box Failure No parts necessary for this repair. Service Event Report for your information. Service Request
Warranty Service I need parts for this repair (list the parts below and attach Purchase Order) Order Number
Out of Warranty Service I need parts to replenish my stock (list the parts used below and attach Purchase Order) RMA Number Will not replenish stock. Please give me a RMA for the return of the faulty parts. Work Order No parts necessary. Please issue a RMA for repair at SonoSite.
Service Provider Name: Provider Reference: Company: Date Reported: Address: Phone Number: Fax Number: E-mail address:
Device Description Ref Number: Serial Number: Name: Lot Number: ARM/SHDB Version: Configuration:
Problem Found
Service Performed
Performed By: Date:
Parts Removed Part Name Part Number Serial Number Lot Number Rev Replace
Parts Installed Part Name Part Number Serial Number Lot Number Rev Replace
Tests Performed (attach test data) Test: Test:
Enter complete
contact information
Enter product information for
the system being repaired
Put the system configuration here.
You can find this on the System
Information Page
Enter details for parts being
removed from the system.
Choose a Service Type Choose a Part Status
Enter DETAILED problem
description here.
Enter details for parts being
installed into the system.
78 Appendix B: Service Event Reporting

Service Event Report Instructions
Instructions for completing the Service Event Report
Sections highlighted in yellow must be completed for SonoSite to accept the Service Event Report. If additional information is
required for certain circumstances you will be advised.
Forward the completed form to:
Email: [email protected]
Fax: +1-425-951-6700
Service Type Out of Box Failure: the item has arrived from SonoSite with failures.
Warranty Service: the item has failed after arrival and is covered by either the included warranty or a valid extended
warranty.
Out of Warranty Service: the item has failed and it is no longer covered by a warranty.
Parts Status Check One.
Service Provider Name: the name of the technician performing the work.
Provider Reference: a unique number used by the Provider to track Service Event Reports. Any format is acceptable.
Company: the name of the Distributor or authorized repair facility.
Address: the address replacement parts will be shipped to.
Date Reported: the date the failure was reported to SonoSite.
Phone Number: the phone number to contact the service technician.
Fax Number: the fax number to contact the service technician.
Email Address: the email address to contact the service technician.
Device Description: Name: the description of the failed product.
Ref Number: the reference number from the part number label of the failed product.
Serial Number: the serial number from the part number label of the failed product.
Lot Number: if applicable, the Lot Number from the device identification label.
ARM/SHDB Version: the software level of the failed device. Typically found on the system information screen.
Configuration: for configurable devices, the optional features enabled.
Event Description A description of the problem in the words of the user. Typically what the user reports to the repair facility.
Diagnosis A description of what the repair technician found. Include a list of the suspect parts.
Service Performed A description of the work performed to repair the system. Typically only completed if it is repaired from stock repair parts.
Parts Removed Part Name: the name of the failed/suspect part to be replaced.
Part Number: the part number of the failed/suspect part.
Serial Number: the serial number from the failed/suspect part.
Lot Number: the lot number if applicable.
Rev: the revision of the failed/suspect part if available.
Replaced By: the person replacing the part.
Parts Installed The same information as the Parts Removed except from the parts installed if work has already been performed. If you are
waiting for parts to be ordered, leave this section blank.
Tests Performed The results of any testing performed, if testing has already been performed.
Appendix B: Service Event Reporting 79

Returning Products to FUJIFILM SonoSiteYou will be asked to provide the following information:
• Contact name and phone number
• Product name
• Serial number
• Description of the problem
Shipping InstructionsPlease contact FUJIFILM SonoSite to get a return material authorization number (RMA). Contact FUJIFILM SonoSite before returning any product.
The shipping address for all returned products is:
FUJIFILM SonoSite, Inc.Attn: Technical Support RMA ___________________21919 30th Drive SEBothell, Washington 98021USA
80 Appendix B: Service Event Reporting

INDEXNumerics2D performance tests
axial measurement accuracy 55image quality 55lateral measurement accuracy 55penetration 56
Aassert code 24assistance, customer 1Bbattery
safety 7specifications 4
Ccautions, definition 2Eelectrical
safety 5specifications 3
equipment safety 7error message 6FFailure Reporting 75Hhumidity limits 4Iimage
quality verification test 58review 59
Mmain PCBA
failures 24Pperformance tests
2D 54CPD 57CW 58M-Mode 57overview 53printer 59PW 58THI 57Velocity Color 56
periodic maintenance 51pressure limits 4printer
test 59Product Failures 75Rreplacement parts
81

list 61ordering 73
Return Material Authorization number (RMA) 78Returning Products 78Ssafety
battery 7electrical 5equipment 7
Service Event Report 75Shipping Instructions 78shipping specifications 4storage specifications
equipment 4subassembly replacement 23system
measurement accuracy 55overview 9
Ttemperature limits 4theory of operation 9Uuser guide, conventions used 2Wwarnings, definition 2
82

83

P16620-01
*P16620-01*
84