X-Lite for Windows User Guide - CounterPath for Windows User Guide 5 2.4 Troubleshooting X-Lite...
62
X-Lite for Windows User Guide
-
Upload
nguyencong -
Category
Documents
-
view
221 -
download
1
Transcript of X-Lite for Windows User Guide - CounterPath for Windows User Guide 5 2.4 Troubleshooting X-Lite...
X-Lite for Windows User Guide
CounterPath Corporation
CounterPath CorporationSuite 300, One Bentall Centre505 Burrard Street, Box 95Vancouver, BC V7X 1M3Tel: [email protected] www.counterpath.com
© March 2015 CounterPath Corporation. All rights reserved.This document contains information proprietary to CounterPath Corporation, and shall not be used for engineering, design, procurement, or manufacture, in whole or in part, without the consent of CounterPath Corporation. The content of this publication is intended to demonstrate typical uses and capabilities of the CounterPath X-Lite softphone application from CounterPath Corporation. Users of this material must determine for themselves whether the information contained herein applies to a particular IP-based networking system.CounterPath makes no warranty regarding the content of this document, including—but not limited to—implied warranties of fitness for any particular purpose. In no case will CounterPath or persons involved in the production of this documented material be liable for any incidental, indirect or otherwise consequential damage or loss that may result after the use of this publication.
CounterPath and the logo are trademarks of CounterPath Corporation.
The Bluetooth word mark, figure mark, and combination mark are all trademarks that are owned by the Bluetooth SIG. Windows, Windows Vista, Excel and Outlook are registered trademarks of Microsoft Corporation in the United States and other countries.
This manual corresponds to X-Lite version 4.8.0 and later.
Revision 6
2
ContentsIntroduction................................................................................................................................ 1Installation and Setup................................................................................................................. 3
Getting Ready ...................................................................................................................... 3Starting X-Lite ..................................................................................................................... 3Configuring X-Lite .............................................................................................................. 4Troubleshooting ................................................................................................................... 5
Making Phone Calls................................................................................................................... 7The Onscreen Softphone...................................................................................................... 7Placing a Call ....................................................................................................................... 9Handling Incoming Calls ..................................................................................................... 12Handling an Established Call............................................................................................... 13Handling Video Calls........................................................................................................... 14Conference Calls – Three-way Calls ................................................................................... 16Voicemail............................................................................................................................. 18
Other X-Lite Features ................................................................................................................ 19Instant Messaging ................................................................................................................ 19Viewing Messages ............................................................................................................... 20
The Contacts Tab ....................................................................................................................... 21Managing Contacts and Groups........................................................................................... 22Using Contacts ..................................................................................................................... 25Sharing Online Status .......................................................................................................... 26
Using Other Resources .............................................................................................................. 29History Tab .......................................................................................................................... 29Favorites Tab ....................................................................................................................... 30
Configuring X-Lite .................................................................................................................... 31Configuring Accounts.......................................................................................................... 31Configuring Preferences ...................................................................................................... 40
A Troubleshooting ..................................................................................................................... 47B Application Hot Keys............................................................................................................. 50C Dial Plan................................................................................................................................. 51D Exporting Contacts................................................................................................................. 55E Other Ways to Run X-Lite ..................................................................................................... 56F Glossary .................................................................................................................................. 57
1

CounterPath Corporation
2
1 Introduction
X-Lite is a softphone from CounterPath that enables you to make VoIP voice and video calls, send and receive instant messages, share online status (presence) information, and exchange files.
Standard Telephone FeaturesThe CounterPath X-Lite softphone has all standard telephone features, including:
• Call display and Message Waiting Indicator (MWI).• Speakerphone and Mute.• Redial, Hold, Do Not Disturb.• Call history – list of received, missed, and dialed calls.• Three-party audio conferencing.• Three-party video conferencing.
Enhanced Features and FunctionsX-Lite also supports the following features and functions:
• Video• IM and presence using the SIP SIMPLE protocol.• Contact list containing the individual user’s contacts.• Support for DTMF (RFC 2833 or inband DTMF). • Acoustic echo cancellation, automatic gain control, voice activity detection.• Support for the following audio codecs:
G.711aLaw, G.711uLaw, G.722, OPUS, Speex, Speex Wideband.
• Support for the following video codecs:H.263, H.263+ 1998.
• Compliance to 3261 SIP standard. For SIP and open standards to which X-Lite is compliant, visit http://www.counterpath.com/sip.html
• Support for these firewall traversal solutions: STUN, TURN, or ICE.
1

CounterPath Corporation
2
2 Installation and Setup
2.1 Getting Ready
SIP Account InformationAfter choosing a VoIP service provider, you will need the following information:
• User name and domain. For example, [email protected].• Password• Authorization Name (if applicable)• Firewall traversal and other network information; see page 35.
2.2 Starting X-LiteFirst-time StartupIf X-Lite is not already running, start it as you would any other program: Use the Windows Start menu or double-click the desktop icon. To quit X-Lite, choose Softphone > Exit or press Ctrl-Q.
3

CounterPath Corporation
2.3 Configuring X-Lite
Setting up AccountsAfter obtaining SIP account information from your VoIP service provider, you can set up X-Lite accounts.
Set up the SIP Account
1. When the softphone appears, click the Go to Account Settings link. The SIP Account window appears.
2. In the Account tab, complete the User Details area with the information obtained from your VoIP service provider.
3. Complete the remaining tabs as specified by your service provider or to suit your setup. Settings that you may need to change immediately include:
• Account tab, Domain Proxy area.• Topology tab, if your computer is on a network and/or behind a firewall.For more information, see page 57.
4. Click OK; the account is created and registered (enabled).
Populating your Contact ListTypically, you will want to create contacts in order to easily make phone calls and send IMs.. You can:
• Add addresses to the Contact list one by one. See page 22.• During a call that you place or receive, you can add the other party to your contact list. See “Handling an
Established Call” on page 13.
For general information on contacts, see page 21.
4
X-Lite for Windows User Guide
2.4 TroubleshootingX-Lite includes these tools for helping you troubleshoot problems:
• You can verify that your microphone, speakers and camera are working and can set the volume to a comfortable level without having to actually place a phone call.
• While you are on a phone call, you can test the quality of the audio • As a final option, you can create logs of your activity and send them to customer support.
See page 47.
5

CounterPath Corporation
6

3 Making Phone Calls
3.1 The Onscreen Softphone
The X-Lite MenuSoftphone.
• Accounts.
Show/hide resources such as contacts, favorites
Close to task bar. This icon does not shut down X-Lite.
X-Lite menu. See below.
Call entry field See page 9..
Minimize to system tray
Change layout of contact list
Toolbar. See page 13.
Opens the Message window. See page 20
Voicemail indicatorSee page 18
Detach the tab from the main window.
Missed calls indicator will appear on the History tab.
7
CounterPath Corporation
• Preferences. These settings control the way that you work with X-Lite and apply to all accounts. See “Configuring Preferences” on page 40.
• Exit. To shut down X-Lite. You can also exit by pressing Ctrl-Q.View. Changes how X-Lite looks.
Contacts. Lets you work with contacts.
Help. Provides access to various service-related features.
Receiving an Online Status RequestIf presence is enabled, then at any time you may get an Online Status Request dialog. For information on this request, see “Sharing Online Status” on page 26.
8
X-Lite for Windows User Guide
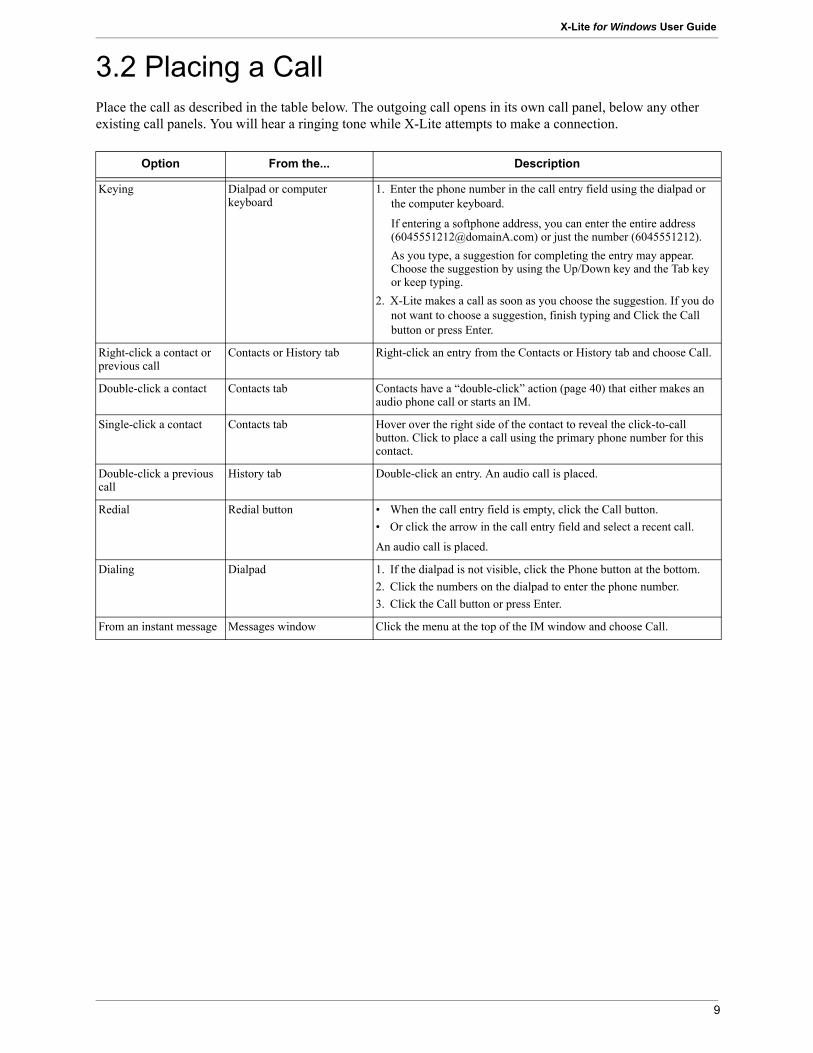
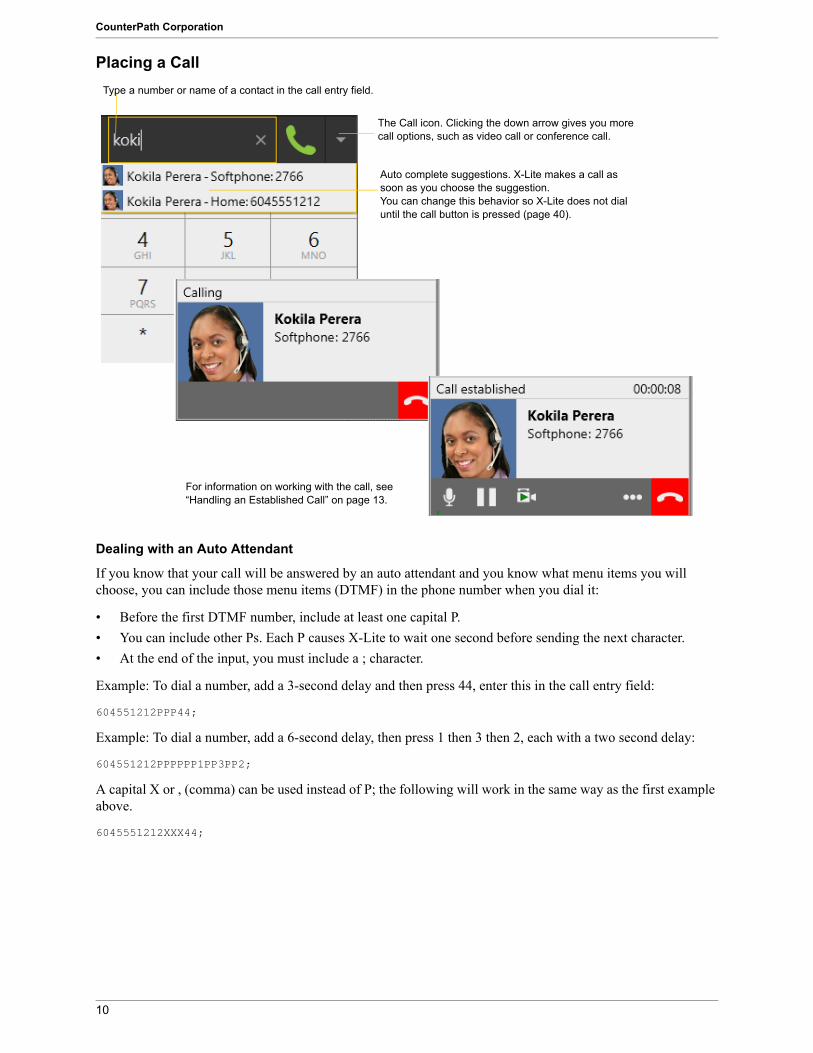
3.2 Placing a CallPlace the call as described in the table below. The outgoing call opens in its own call panel, below any other existing call panels. You will hear a ringing tone while X-Lite attempts to make a connection.
Option From the... Description
Keying Dialpad or computer keyboard
1. Enter the phone number in the call entry field using the dialpad or the computer keyboard.
If entering a softphone address, you can enter the entire address ([email protected]) or just the number (6045551212).As you type, a suggestion for completing the entry may appear. Choose the suggestion by using the Up/Down key and the Tab key or keep typing.
2. X-Lite makes a call as soon as you choose the suggestion. If you do not want to choose a suggestion, finish typing and Click the Call button or press Enter.
Right-click a contact or previous call
Contacts or History tab Right-click an entry from the Contacts or History tab and choose Call.
Double-click a contact Contacts tab Contacts have a “double-click” action (page 40) that either makes an audio phone call or starts an IM.
Single-click a contact Contacts tab Hover over the right side of the contact to reveal the click-to-call button. Click to place a call using the primary phone number for this contact.
Double-click a previous call
History tab Double-click an entry. An audio call is placed.
Redial Redial button • When the call entry field is empty, click the Call button.• Or click the arrow in the call entry field and select a recent call.
An audio call is placed.
Dialing Dialpad 1. If the dialpad is not visible, click the Phone button at the bottom.2. Click the numbers on the dialpad to enter the phone number.3. Click the Call button or press Enter.
From an instant message Messages window Click the menu at the top of the IM window and choose Call.
9
CounterPath Corporation
Placing a Call
Dealing with an Auto Attendant
If you know that your call will be answered by an auto attendant and you know what menu items you will choose, you can include those menu items (DTMF) in the phone number when you dial it:
• Before the first DTMF number, include at least one capital P.• You can include other Ps. Each P causes X-Lite to wait one second before sending the next character. • At the end of the input, you must include a ; character.
Example: To dial a number, add a 3-second delay and then press 44, enter this in the call entry field:
604551212PPP44;
Example: To dial a number, add a 6-second delay, then press 1 then 3 then 2, each with a two second delay:
604551212PPPPPP1PP3PP2;
A capital X or , (comma) can be used instead of P; the following will work in the same way as the first example above.
6045551212XXX44;
The Call icon. Clicking the down arrow gives you more call options, such as video call or conference call.
Auto complete suggestions. X-Lite makes a call as soon as you choose the suggestion. You can change this behavior so X-Lite does not dial until the call button is pressed (page 40).
For information on working with the call, see “Handling an Established Call” on page 13.
Type a number or name of a contact in the call entry field.
10
X-Lite for Windows User Guide
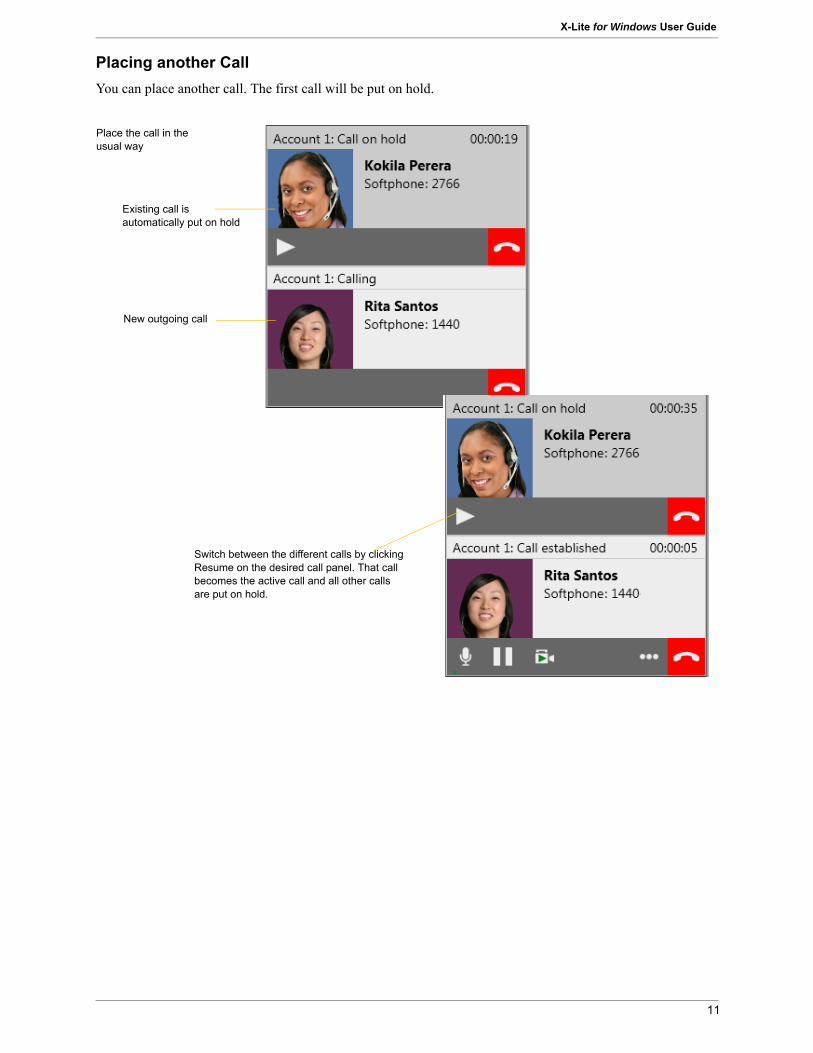
Placing another CallYou can place another call. The first call will be put on hold.
Place the call in the usual way
New outgoing call
Existing call is automatically put on hold
Switch between the different calls by clicking Resume on the desired call panel. That call becomes the active call and all other calls are put on hold.
11
CounterPath Corporation
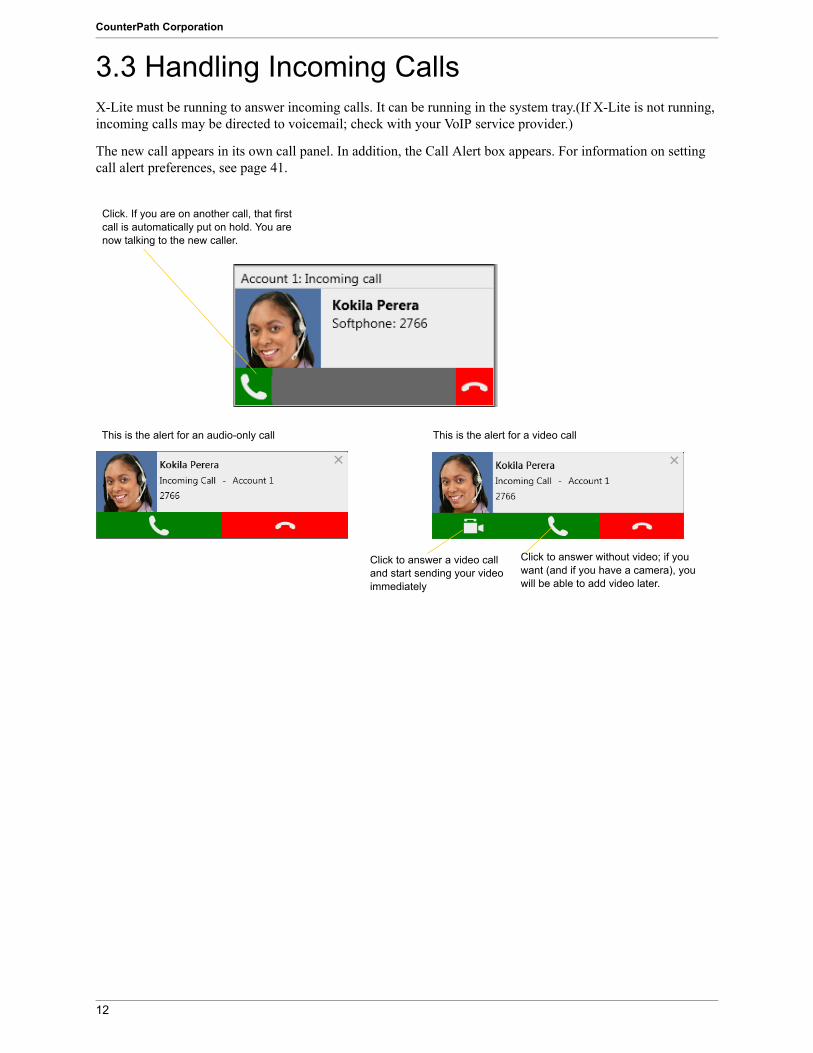
3.3 Handling Incoming CallsX-Lite must be running to answer incoming calls. It can be running in the system tray.(If X-Lite is not running, incoming calls may be directed to voicemail; check with your VoIP service provider.)
The new call appears in its own call panel. In addition, the Call Alert box appears. For information on setting call alert preferences, see page 41.
Click. If you are on another call, that first call is automatically put on hold. You are now talking to the new caller.
Click to answer a video call and start sending your video immediately
Click to answer without video; if you want (and if you have a camera), you will be able to add video later.
This is the alert for a video callThis is the alert for an audio-only call
12
X-Lite for Windows User Guide
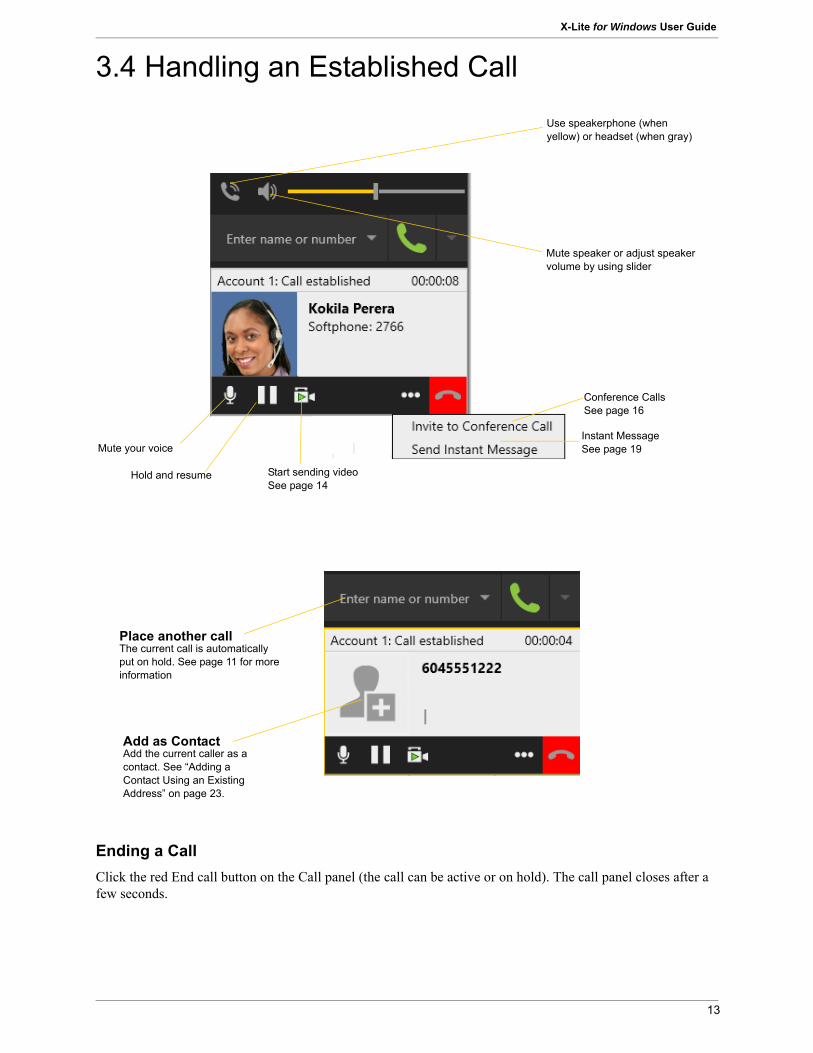
3.4 Handling an Established Call
Ending a CallClick the red End call button on the Call panel (the call can be active or on hold). The call panel closes after a few seconds.
Add as ContactAdd the current caller as a contact. See “Adding a Contact Using an Existing Address” on page 23.
Conference CallsSee page 16
Start sending videoSee page 14
Mute your voiceInstant MessageSee page 19
Place another callThe current call is automatically put on hold. See page 11 for more information
Mute speaker or adjust speaker volume by using slider
Use speakerphone (when yellow) or headset (when gray)
Hold and resume
13
CounterPath Corporation
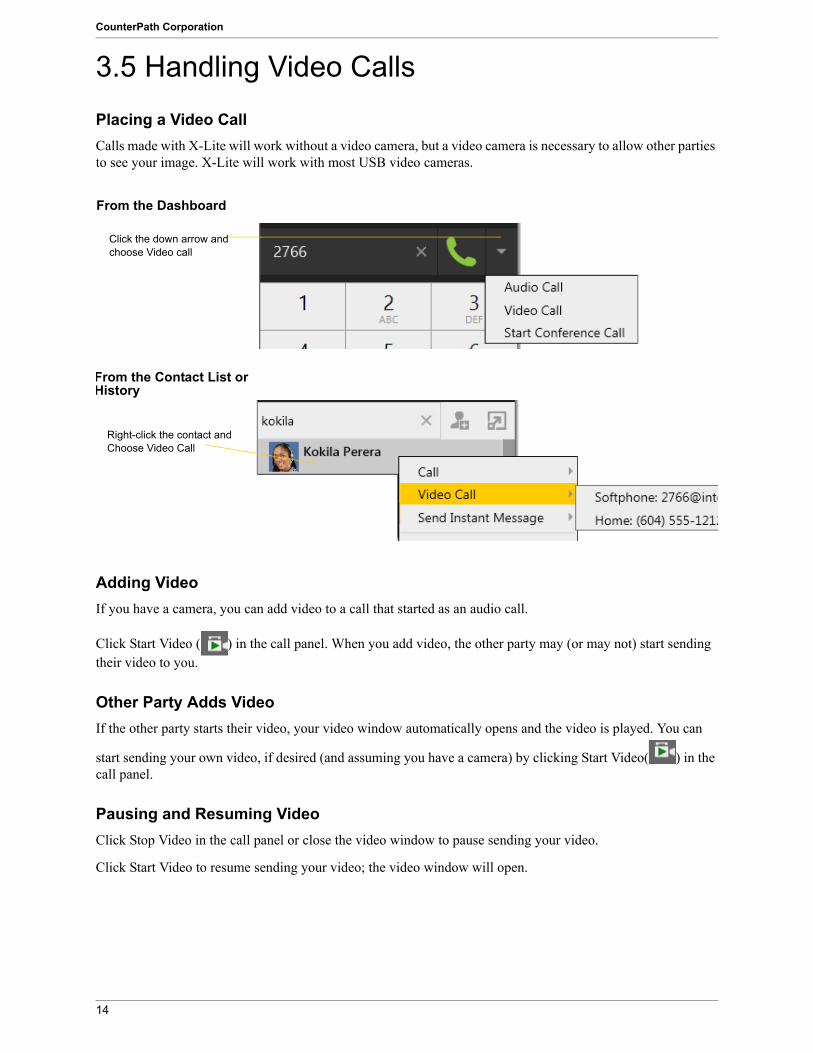
3.5 Handling Video CallsPlacing a Video CallCalls made with X-Lite will work without a video camera, but a video camera is necessary to allow other parties to see your image. X-Lite will work with most USB video cameras.
Adding VideoIf you have a camera, you can add video to a call that started as an audio call.
Click Start Video ( ) in the call panel. When you add video, the other party may (or may not) start sending their video to you.
Other Party Adds VideoIf the other party starts their video, your video window automatically opens and the video is played. You can
start sending your own video, if desired (and assuming you have a camera) by clicking Start Video( ) in the call panel.
Pausing and Resuming VideoClick Stop Video in the call panel or close the video window to pause sending your video.
Click Start Video to resume sending your video; the video window will open.
Click the down arrow and choose Video call
From the Dashboard
From the Contact List or History
Right-click the contact and Choose Video Call
14
X-Lite for Windows User Guide
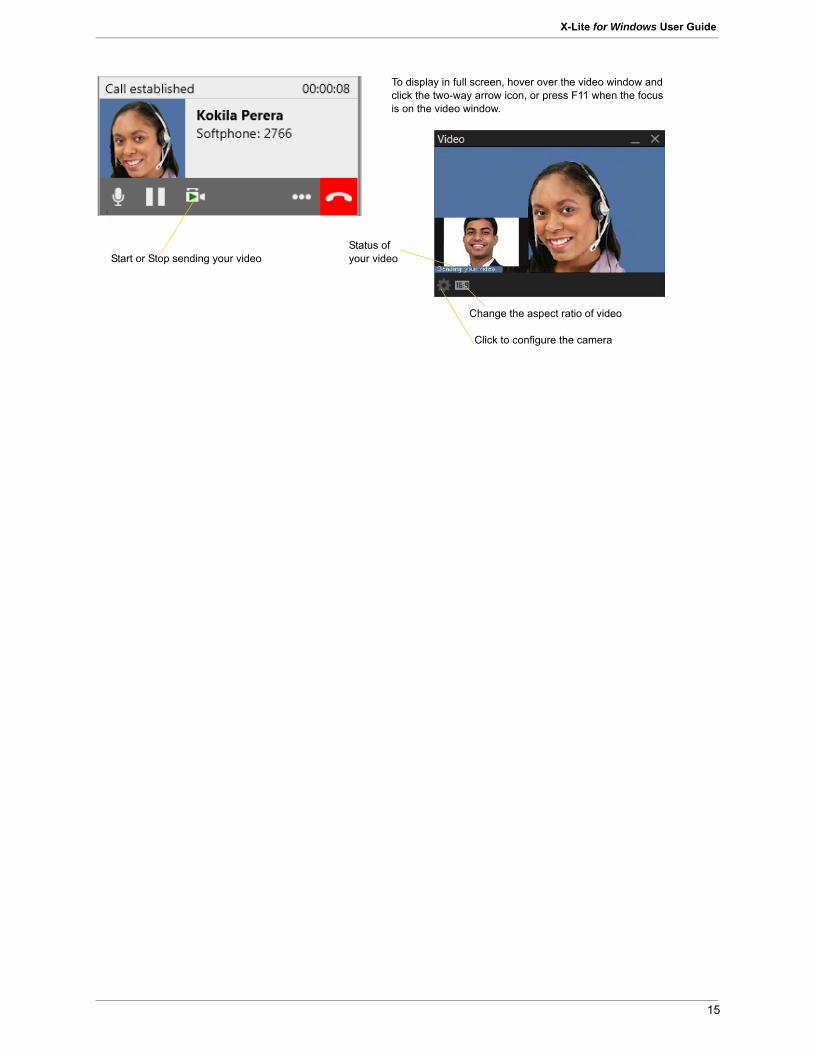
Start or Stop sending your videoStatus of your video
Click to configure the camera
Change the aspect ratio of video
To display in full screen, hover over the video window and click the two-way arrow icon, or press F11 when the focus is on the video window.
15
CounterPath Corporation
3.6 Conference Calls – Three-way Calls
Starting a Three-way Call
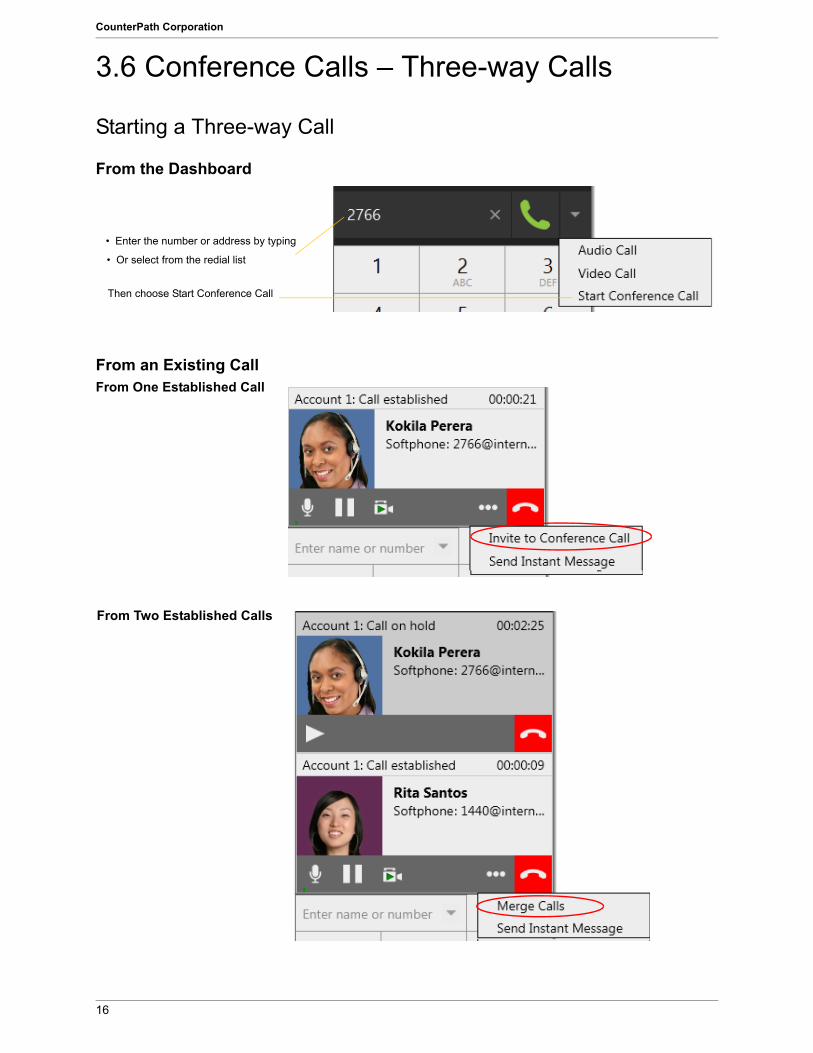
From the Dashboard
From an Existing Call
• Enter the number or address by typing
• Or select from the redial list
Then choose Start Conference Call
From One Established Call
From Two Established Calls
16
X-Lite for Windows User Guide
Managing the Three-way Call
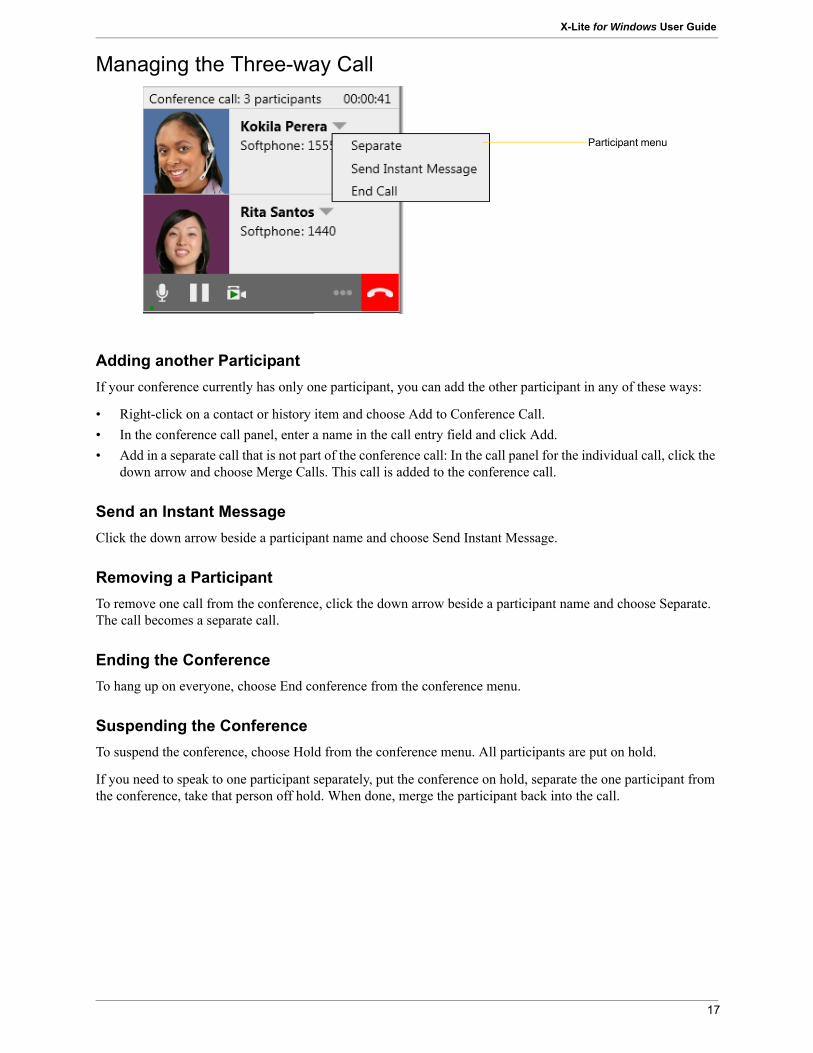
Adding another ParticipantIf your conference currently has only one participant, you can add the other participant in any of these ways:
• Right-click on a contact or history item and choose Add to Conference Call.• In the conference call panel, enter a name in the call entry field and click Add.• Add in a separate call that is not part of the conference call: In the call panel for the individual call, click the
down arrow and choose Merge Calls. This call is added to the conference call.
Send an Instant MessageClick the down arrow beside a participant name and choose Send Instant Message.
Removing a ParticipantTo remove one call from the conference, click the down arrow beside a participant name and choose Separate. The call becomes a separate call.
Ending the ConferenceTo hang up on everyone, choose End conference from the conference menu.
Suspending the ConferenceTo suspend the conference, choose Hold from the conference menu. All participants are put on hold.
If you need to speak to one participant separately, put the conference on hold, separate the one participant from the conference, take that person off hold. When done, merge the participant back into the call.
Participant menu
17
CounterPath Corporation
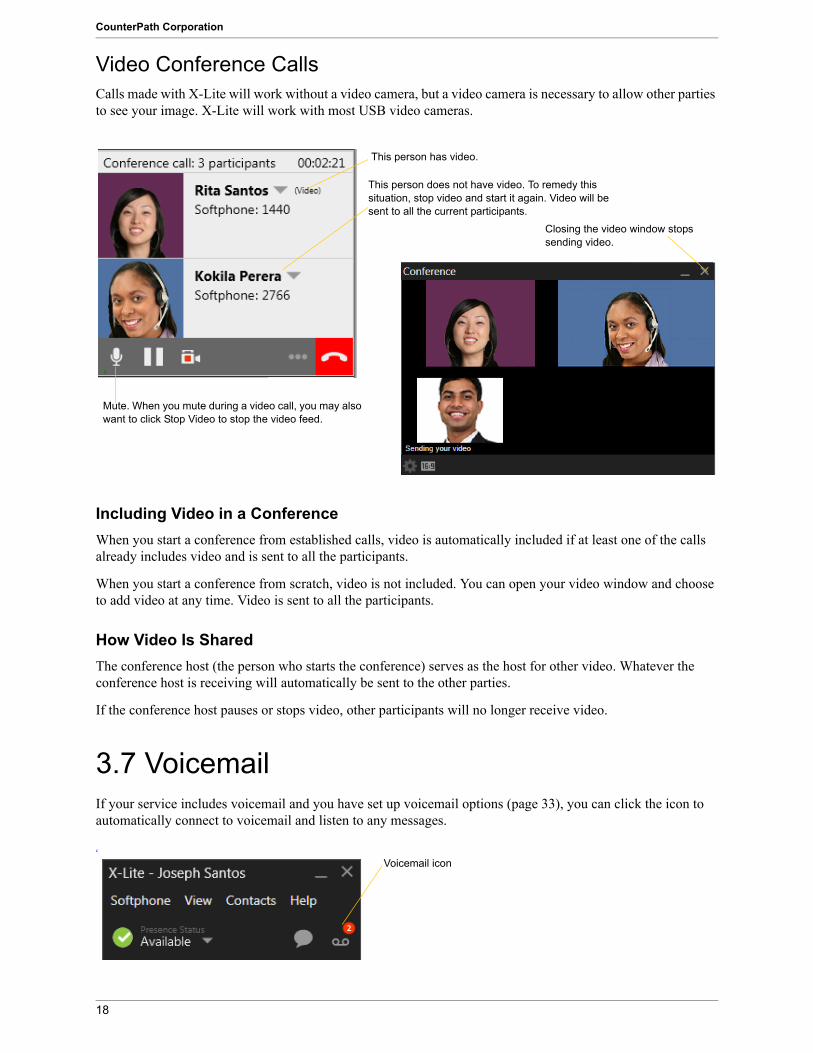
Video Conference CallsCalls made with X-Lite will work without a video camera, but a video camera is necessary to allow other parties to see your image. X-Lite will work with most USB video cameras.
Including Video in a ConferenceWhen you start a conference from established calls, video is automatically included if at least one of the calls already includes video and is sent to all the participants.
When you start a conference from scratch, video is not included. You can open your video window and choose to add video at any time. Video is sent to all the participants.
How Video Is SharedThe conference host (the person who starts the conference) serves as the host for other video. Whatever the conference host is receiving will automatically be sent to the other parties.
If the conference host pauses or stops video, other participants will no longer receive video.
3.7 VoicemailIf your service includes voicemail and you have set up voicemail options (page 33), you can click the icon to automatically connect to voicemail and listen to any messages.
c
This person has video.
This person does not have video. To remedy this situation, stop video and start it again. Video will be sent to all the current participants.
Closing the video window stops sending video.
Mute. When you mute during a video call, you may also want to click Stop Video to stop the video feed.
Voicemail icon
18
X-Lite for Windows User Guide
4 Other X-Lite Features
4.1 Instant Messaging
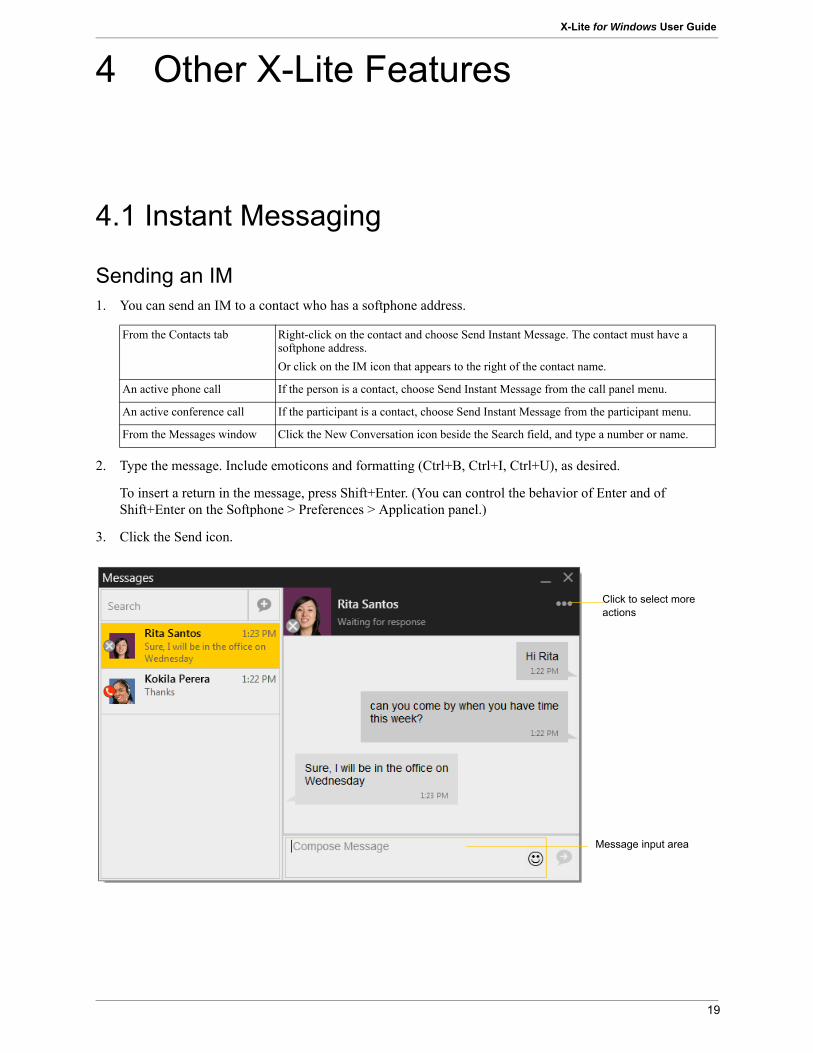
Sending an IM1. You can send an IM to a contact who has a softphone address.
2. Type the message. Include emoticons and formatting (Ctrl+B, Ctrl+I, Ctrl+U), as desired.
To insert a return in the message, press Shift+Enter. (You can control the behavior of Enter and of Shift+Enter on the Softphone > Preferences > Application panel.)
3. Click the Send icon.
From the Contacts tab Right-click on the contact and choose Send Instant Message. The contact must have a softphone address.Or click on the IM icon that appears to the right of the contact name.
An active phone call If the person is a contact, choose Send Instant Message from the call panel menu.
An active conference call If the participant is a contact, choose Send Instant Message from the participant menu.
From the Messages window Click the New Conversation icon beside the Search field, and type a number or name.
Click to select more actions
Message input area
19
CounterPath Corporation
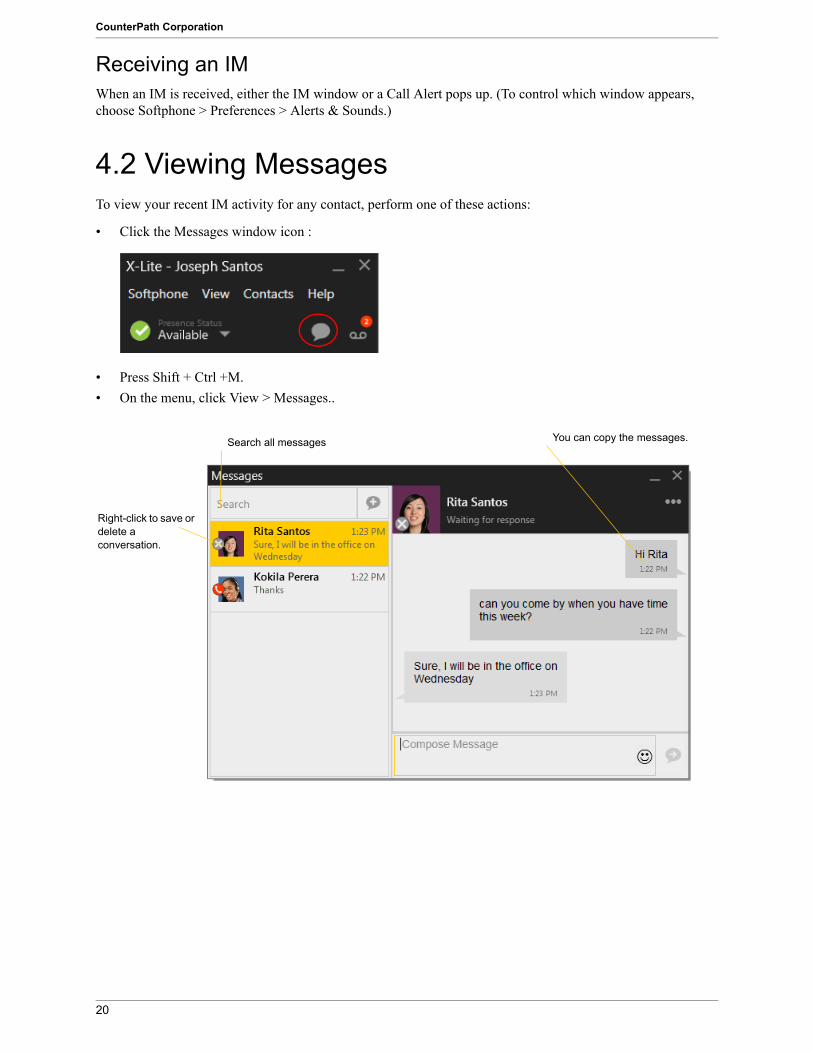
Receiving an IMWhen an IM is received, either the IM window or a Call Alert pops up. (To control which window appears, choose Softphone > Preferences > Alerts & Sounds.)
4.2 Viewing MessagesTo view your recent IM activity for any contact, perform one of these actions:
• Click the Messages window icon :
• Press Shift + Ctrl +M.• On the menu, click View > Messages..
Right-click to save or delete a conversation.
You can copy the messages.Search all messages
20
5 The Contacts Tab
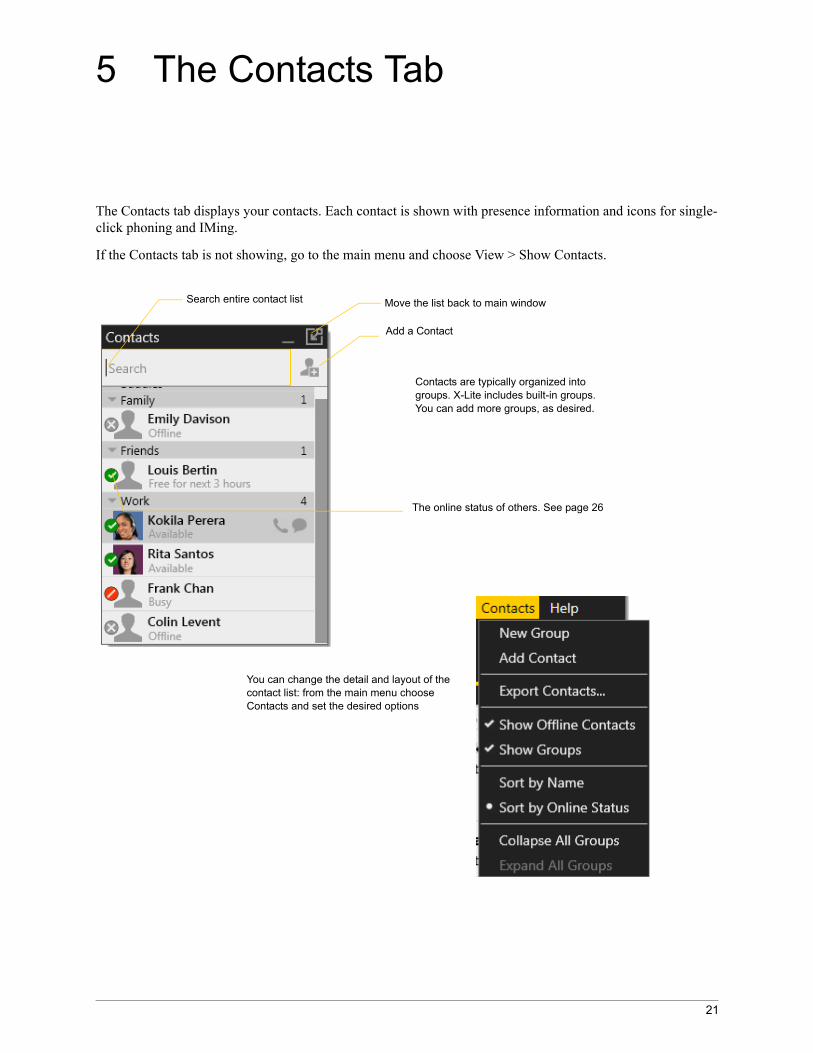
The Contacts tab displays your contacts. Each contact is shown with presence information and icons for single-click phoning and IMing.
If the Contacts tab is not showing, go to the main menu and choose View > Show Contacts.
Add a Contact
You can change the detail and layout of the contact list: from the main menu choose Contacts and set the desired options
Search entire contact list
Contacts are typically organized into groups. X-Lite includes built-in groups. You can add more groups, as desired.
The online status of others. See page 26
Move the list back to main window
21
CounterPath Corporation
5.1 Managing Contacts and Groups
Adding a Contact
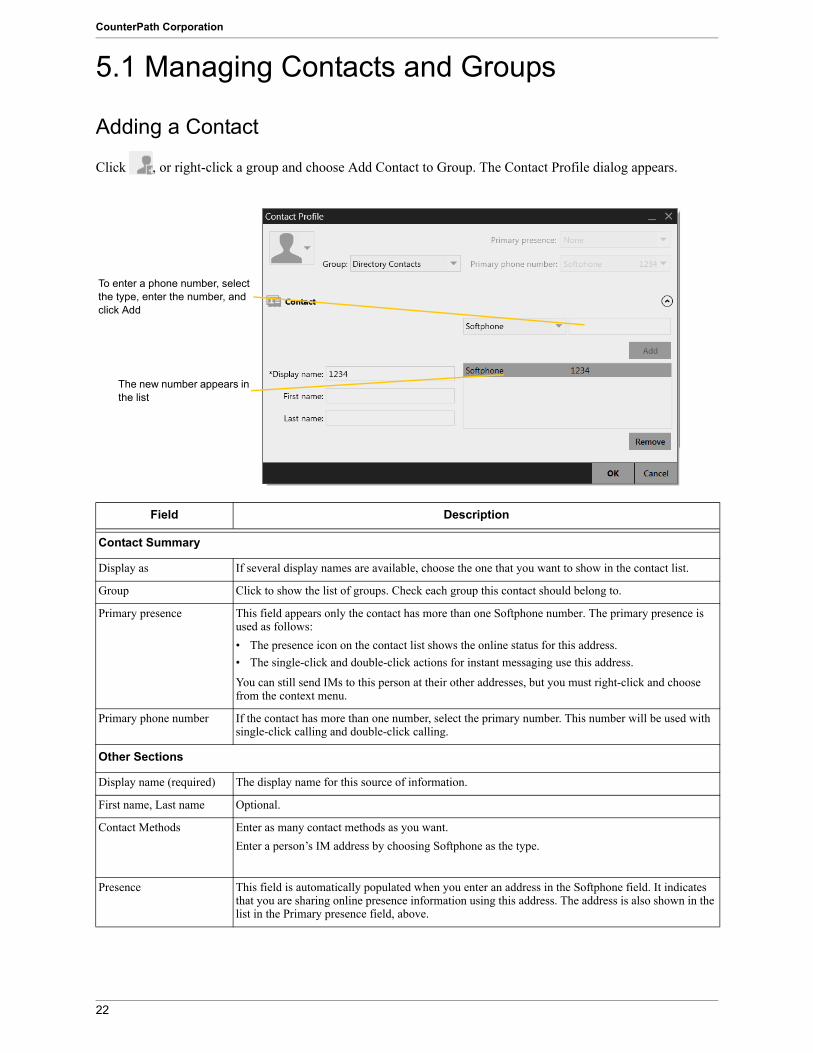
Click , or right-click a group and choose Add Contact to Group. The Contact Profile dialog appears.
Field Description
Contact Summary
Display as If several display names are available, choose the one that you want to show in the contact list.
Group Click to show the list of groups. Check each group this contact should belong to.
Primary presence This field appears only the contact has more than one Softphone number. The primary presence is used as follows:• The presence icon on the contact list shows the online status for this address.• The single-click and double-click actions for instant messaging use this address.
You can still send IMs to this person at their other addresses, but you must right-click and choose from the context menu.
Primary phone number If the contact has more than one number, select the primary number. This number will be used with single-click calling and double-click calling.
Other Sections
Display name (required) The display name for this source of information.
First name, Last name Optional.
Contact Methods Enter as many contact methods as you want. Enter a person’s IM address by choosing Softphone as the type.
Presence This field is automatically populated when you enter an address in the Softphone field. It indicates that you are sharing online presence information using this address. The address is also shown in the list in the Primary presence field, above.
To enter a phone number, select the type, enter the number, and click Add
The new number appears in the list
22
X-Lite for Windows User Guide
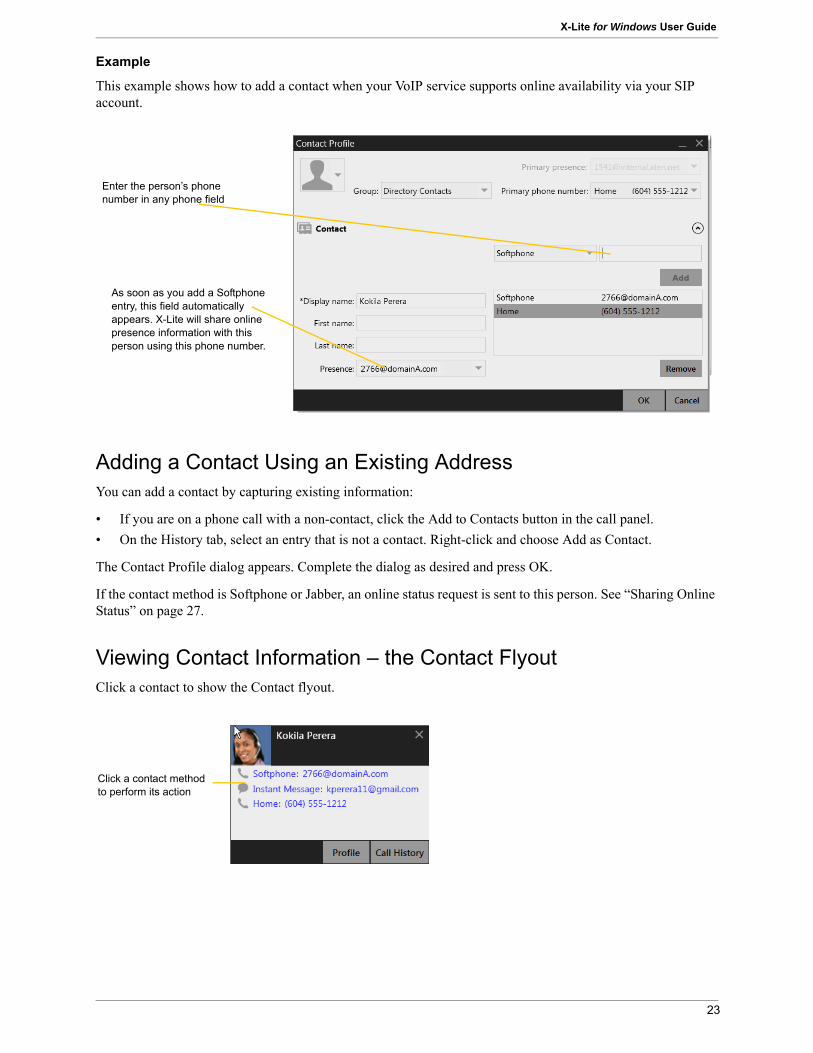
Example
This example shows how to add a contact when your VoIP service supports online availability via your SIP account.
Adding a Contact Using an Existing AddressYou can add a contact by capturing existing information:
• If you are on a phone call with a non-contact, click the Add to Contacts button in the call panel.• On the History tab, select an entry that is not a contact. Right-click and choose Add as Contact.
The Contact Profile dialog appears. Complete the dialog as desired and press OK.
If the contact method is Softphone or Jabber, an online status request is sent to this person. See “Sharing Online Status” on page 27.
Viewing Contact Information – the Contact Flyout Click a contact to show the Contact flyout.
Enter the person’s phone number in any phone field
As soon as you add a Softphone entry, this field automatically appears. X-Lite will share online presence information with this person using this phone number.
Click a contact method to perform its action
23
CounterPath Corporation
Modifying the Contact List
Changing Contact Information
To change the information for a contact, right-click the contact and choose Edit Profile. The Contact Profile dialog appears (page 22).
Moving or Deleting a Contact• To drag one or more contacts to a different group, select them and drag to the title bar of the new group.• To delete one or more contacts, select them, right-click, and choose Delete Contact or Delete Selected. The
contacts are removed from this group. If a contact belongs to several groups, it is removed from all groups.
Adding, Deleting or Renaming Groups
Select any group, right-click, and choose the appropriate menu item.
24
X-Lite for Windows User Guide
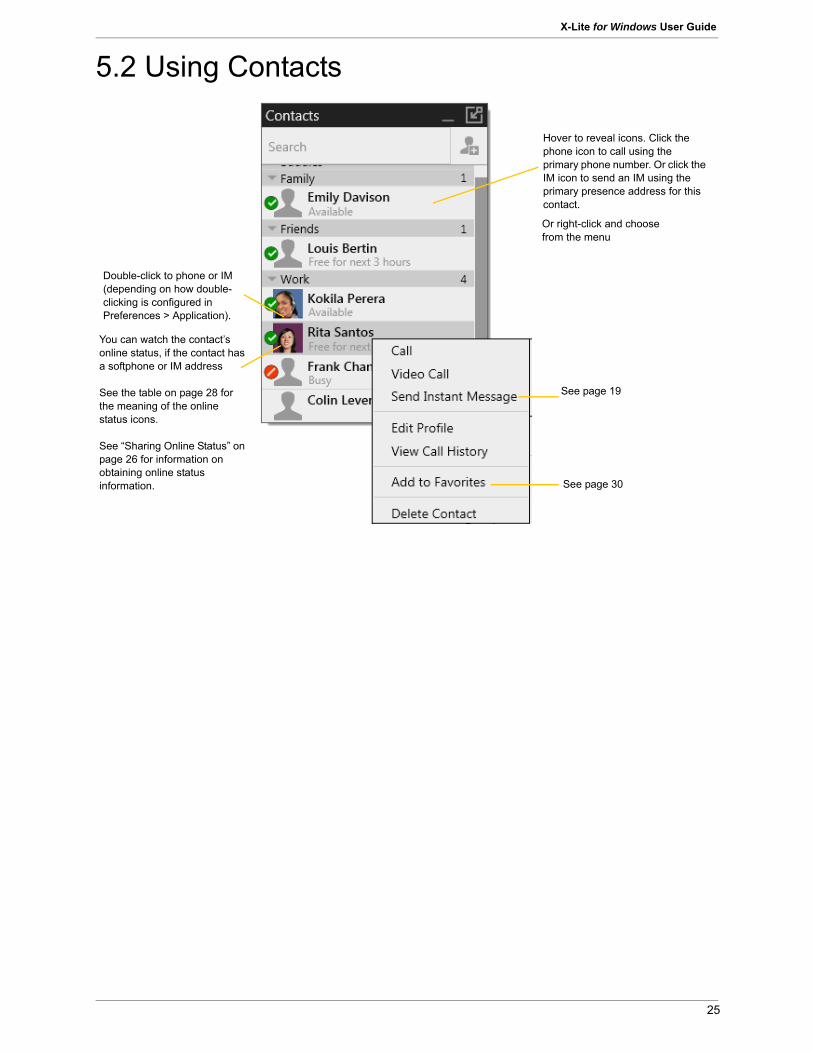
5.2 Using Contacts
Double-click to phone or IM (depending on how double-clicking is configured in Preferences > Application).
Hover to reveal icons. Click the phone icon to call using the primary phone number. Or click the IM icon to send an IM using the primary presence address for this contact.
Or right-click and choose from the menu
You can watch the contact’s online status, if the contact has a softphone or IM address
See the table on page 28 for the meaning of the online status icons.
See “Sharing Online Status” on page 26 for information on obtaining online status information.
See page 19
See page 30
25

CounterPath Corporation
5.3 Sharing Online StatusYou can publish your online status to contacts who have softphone address, and you can set up X-Lite to view the online status of other contacts. Typical online statuses are available, on the phone, busy, and so on.
Your online status.
Online status of other people
This person is either logged out or is not publishing their online status This person has no icon because
you are not subscribing to their online status
Custom note of your contact
26
X-Lite for Windows User Guide
Sharing Online Status
Watching Others’ StatusIf a contact has a SIP address in the Softphone field, X-Lite will automatically obtain status information for this address.
When you choose to share presence information, X-Lite sends the contact a notification request. The request asks that you be able to see that person’s status. If the person allows this request, then the icon beside their name (in your Contacts) becomes color coded to specify their status.
Allowing Other Parties to See your Status (Publishing your Status)Continuing from above, when the other person allows the notification request, your name is added to their contact list. As soon as you are added to their list, a request is sent back to you requesting that they be able to see your status. X-Lite accepts this request automatically, and the other person can now see your status.
Receiving an Online Status RequestSomeone who is not one of your contacts may add you as a contact on their end, and may include your softphone number. In this case, X-Lite receives an online status request.
27
CounterPath Corporation
Setting your Online Status
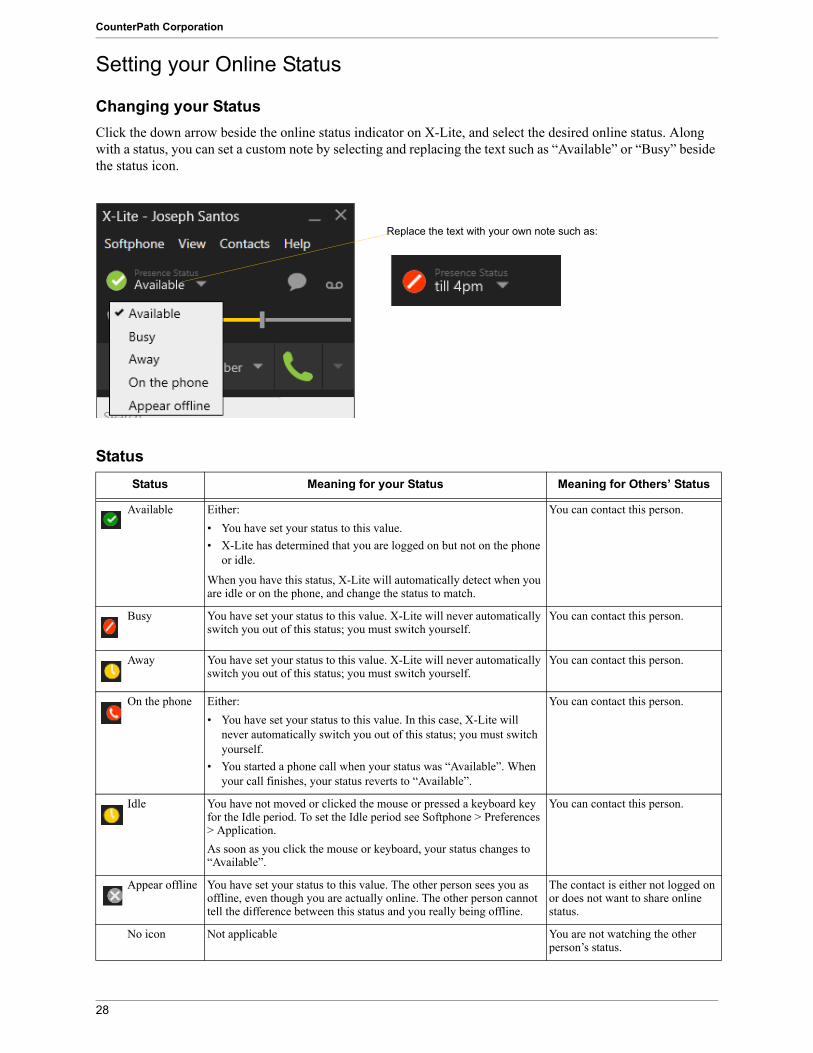
Changing your StatusClick the down arrow beside the online status indicator on X-Lite, and select the desired online status. Along with a status, you can set a custom note by selecting and replacing the text such as “Available” or “Busy” beside the status icon.
Status
Status Meaning for your Status Meaning for Others’ Status
Available Either:• You have set your status to this value. • X-Lite has determined that you are logged on but not on the phone
or idle.
When you have this status, X-Lite will automatically detect when you are idle or on the phone, and change the status to match.
You can contact this person.
Busy You have set your status to this value. X-Lite will never automatically switch you out of this status; you must switch yourself.
You can contact this person.
Away You have set your status to this value. X-Lite will never automatically switch you out of this status; you must switch yourself.
You can contact this person.
On the phone Either:• You have set your status to this value. In this case, X-Lite will
never automatically switch you out of this status; you must switch yourself.
• You started a phone call when your status was “Available”. When your call finishes, your status reverts to “Available”.
You can contact this person.
Idle You have not moved or clicked the mouse or pressed a keyboard key for the Idle period. To set the Idle period see Softphone > Preferences > Application.As soon as you click the mouse or keyboard, your status changes to “Available”.
You can contact this person.
Appear offline You have set your status to this value. The other person sees you as offline, even though you are actually online. The other person cannot tell the difference between this status and you really being offline.
The contact is either not logged on or does not want to share online status.
No icon Not applicable You are not watching the other person’s status.
Replace the text with your own note such as:
28
X-Lite for Windows User Guide
6 Using Other Resources
6.1 History Tab
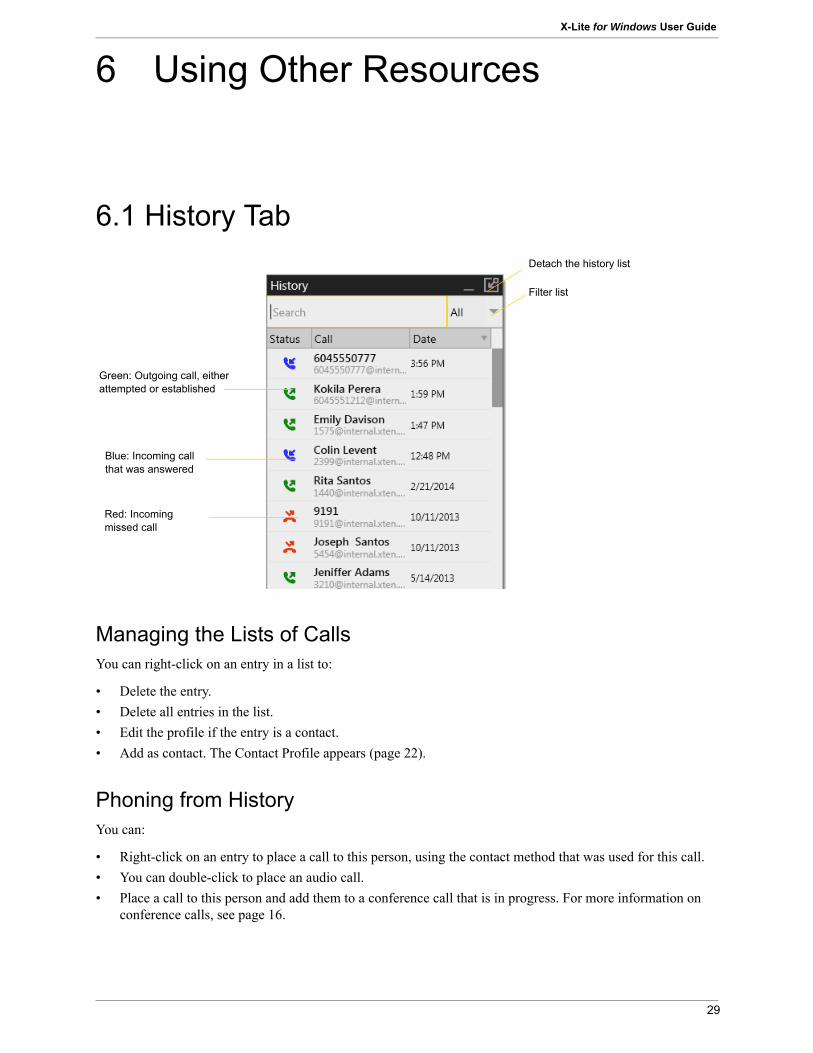
Managing the Lists of CallsYou can right-click on an entry in a list to:
• Delete the entry.• Delete all entries in the list.• Edit the profile if the entry is a contact.• Add as contact. The Contact Profile appears (page 22).
Phoning from HistoryYou can:
• Right-click on an entry to place a call to this person, using the contact method that was used for this call. • You can double-click to place an audio call.• Place a call to this person and add them to a conference call that is in progress. For more information on
conference calls, see page 16.
Filter list
Blue: Incoming call that was answered
Green: Outgoing call, either attempted or established
Detach the history list
Red: Incoming missed call
29
CounterPath Corporation
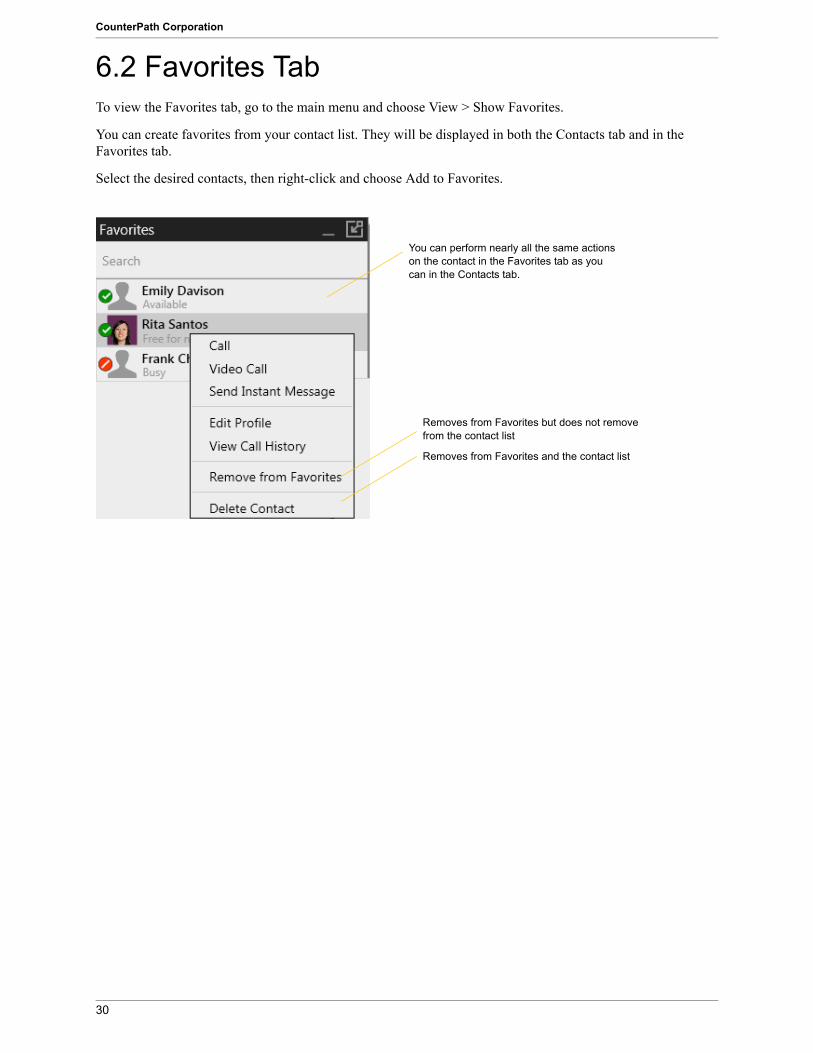
6.2 Favorites TabTo view the Favorites tab, go to the main menu and choose View > Show Favorites.
You can create favorites from your contact list. They will be displayed in both the Contacts tab and in the Favorites tab.
Select the desired contacts, then right-click and choose Add to Favorites.
You can perform nearly all the same actions on the contact in the Favorites tab as you can in the Contacts tab.
Removes from Favorites but does not remove from the contact list
Removes from Favorites and the contact list
30
7 Configuring X-Lite
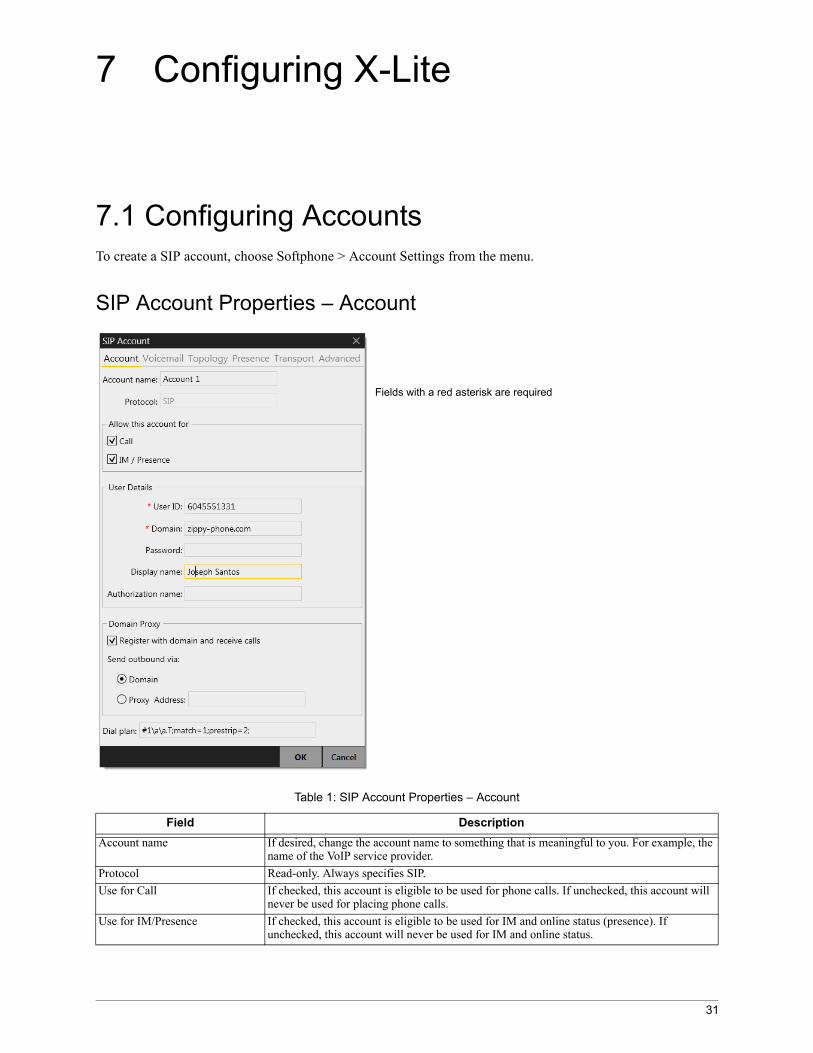
7.1 Configuring AccountsTo create a SIP account, choose Softphone > Account Settings from the menu.
SIP Account Properties – Account
Table 1: SIP Account Properties – Account
Field DescriptionAccount name If desired, change the account name to something that is meaningful to you. For example, the
name of the VoIP service provider.Protocol Read-only. Always specifies SIP.Use for Call If checked, this account is eligible to be used for phone calls. If unchecked, this account will
never be used for placing phone calls.Use for IM/Presence If checked, this account is eligible to be used for IM and online status (presence). If
unchecked, this account will never be used for IM and online status.
Fields with a red asterisk are required
31
CounterPath Corporation
User DetailsUser ID Typically the account number for the softphone account. For example, 6045551212 or 2766.
Provided by your VoIP service provider. Domain For example, domainA.com. Provided by your VoIP service provider.Password Provided by your VoIP service provider.Display name This name is displayed in the X-Lite title bar.
Other people will see you as this name.Authorization name May not be required. If it is required, it will be provided by your VoIP service provider.
Domain ProxyRegister with domain and receive calls
Check this box if you want to register with your VoIP service provider, so that you can receive incoming calls.Typically, this field is checked. This field must be left unchecked if, for example, your level of service does not include the ability to receive incoming calls. (In that case, turning this field on may cause the account to fail to be enabled).
Send outbound via Choose the setting specified by your VoIP service provider: • Domain: If your VoIP service provider requires that traffic be directed to proxies that are
discovered via the domain.• Proxy: If your VoIP service provider has an outbound proxy address and requires that you
provide the address to X-Lite. For the address, enter a domain name (for example, domain.com) or an IP address (for example, 123.456.789.012).
If you are using X-Lite in a test lab, it is possible that neither of these settings is suitable; see page 44 for a third way to direct traffic.
Dial Plan Information about the syntax of the numbers used by this VoIP service provider. Provided by the service provider. The default plan is:#1\a\a.T;match=1;prestrip=2;For information on determining whether you need to modify the default dial plan, see page 51.
Table 1: SIP Account Properties – Account
Field Description
32
X-Lite for Windows User Guide
33
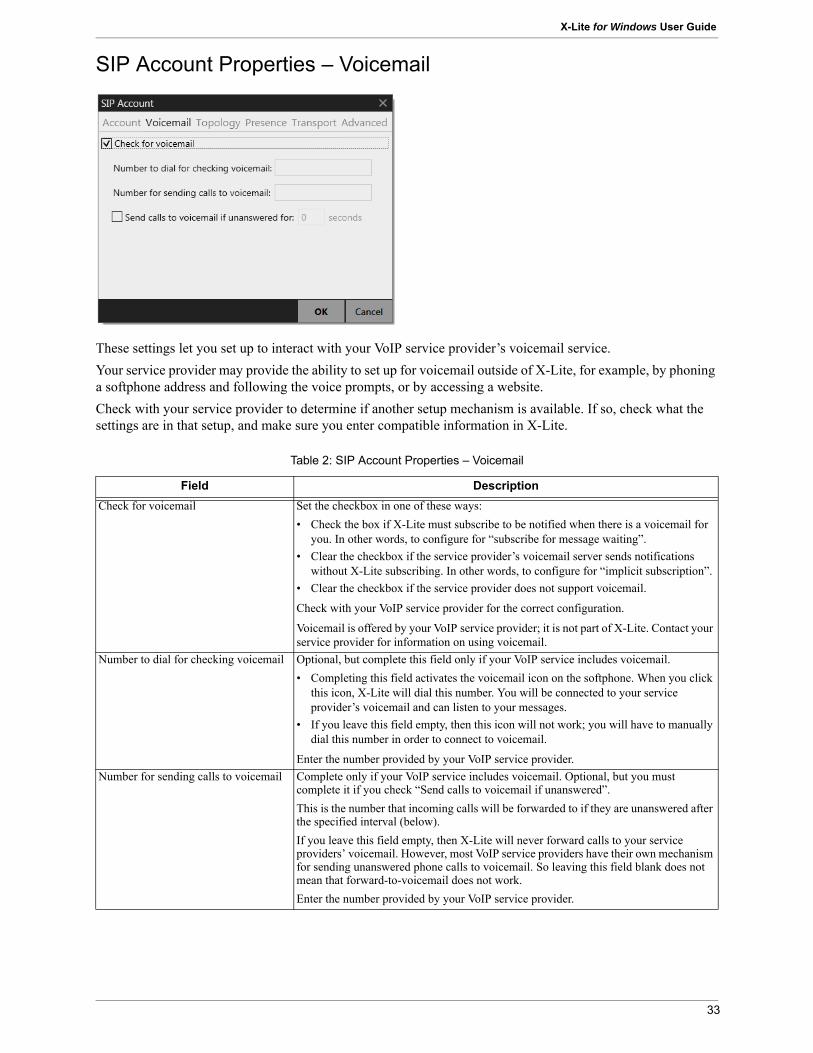
SIP Account Properties – Voicemail
These settings let you set up to interact with your VoIP service provider’s voicemail service. Your service provider may provide the ability to set up for voicemail outside of X-Lite, for example, by phoning a softphone address and following the voice prompts, or by accessing a website. Check with your service provider to determine if another setup mechanism is available. If so, check what the settings are in that setup, and make sure you enter compatible information in X-Lite.
Table 2: SIP Account Properties – Voicemail
Field DescriptionCheck for voicemail Set the checkbox in one of these ways:
• Check the box if X-Lite must subscribe to be notified when there is a voicemail for you. In other words, to configure for “subscribe for message waiting”.
• Clear the checkbox if the service provider’s voicemail server sends notifications without X-Lite subscribing. In other words, to configure for “implicit subscription”.
• Clear the checkbox if the service provider does not support voicemail.
Check with your VoIP service provider for the correct configuration.
Voicemail is offered by your VoIP service provider; it is not part of X-Lite. Contact your service provider for information on using voicemail.
Number to dial for checking voicemail Optional, but complete this field only if your VoIP service includes voicemail. • Completing this field activates the voicemail icon on the softphone. When you click
this icon, X-Lite will dial this number. You will be connected to your service provider’s voicemail and can listen to your messages.
• If you leave this field empty, then this icon will not work; you will have to manually dial this number in order to connect to voicemail.
Enter the number provided by your VoIP service provider.Number for sending calls to voicemail Complete only if your VoIP service includes voicemail. Optional, but you must
complete it if you check “Send calls to voicemail if unanswered”.This is the number that incoming calls will be forwarded to if they are unanswered after the specified interval (below).If you leave this field empty, then X-Lite will never forward calls to your service providers’ voicemail. However, most VoIP service providers have their own mechanism for sending unanswered phone calls to voicemail. So leaving this field blank does not mean that forward-to-voicemail does not work. Enter the number provided by your VoIP service provider.
CounterPath Corporation
Send calls to voicemail if unanswered Complete only if your VoIP service includes voicemail.To send to voicemail after the specified number of seconds. Your service provider may also provide a similar feature that is set up outside of X-Lite. If so, make sure you do not enter competing information in X-Lite and in the service provider’s user interface. For example, if you turn off this field, make sure the same feature at your service provider is also turned off. Otherwise, all your calls will continue to be forwarded.
Table 2: SIP Account Properties – Voicemail
Field Description
34
X-Lite for Windows User Guide
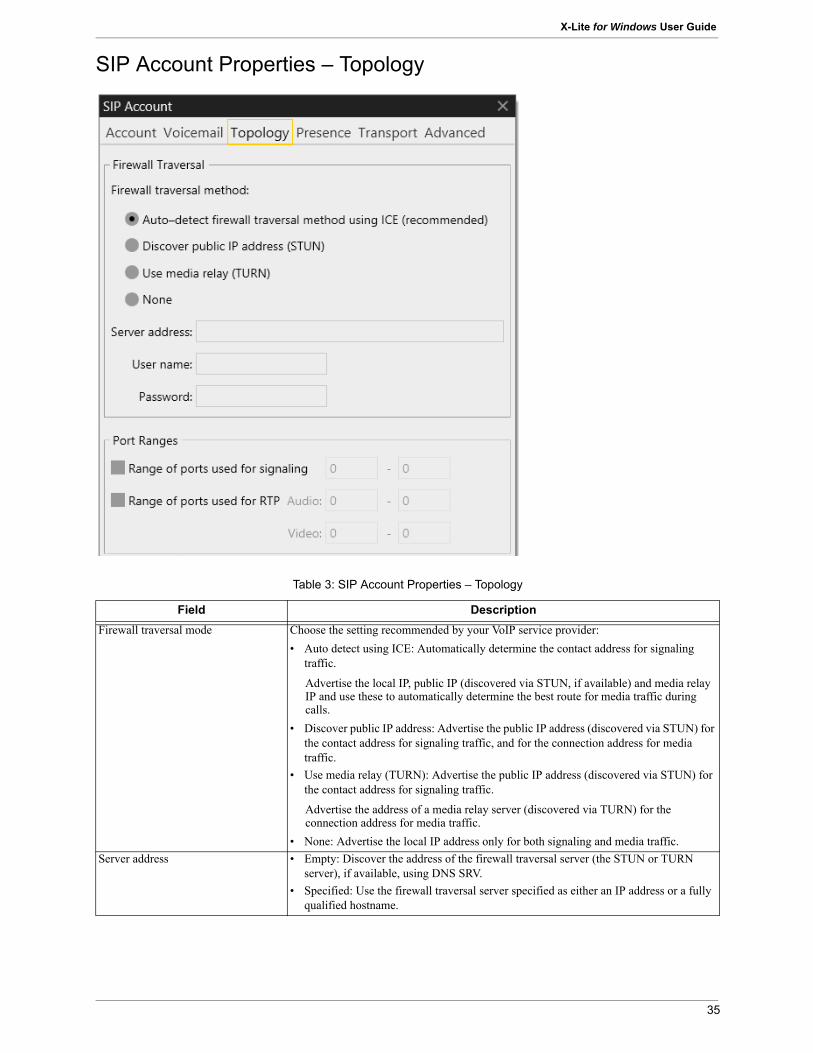
SIP Account Properties – Topology
Table 3: SIP Account Properties – Topology
Field DescriptionFirewall traversal mode Choose the setting recommended by your VoIP service provider:
• Auto detect using ICE: Automatically determine the contact address for signaling traffic.
Advertise the local IP, public IP (discovered via STUN, if available) and media relay IP and use these to automatically determine the best route for media traffic during calls.
• Discover public IP address: Advertise the public IP address (discovered via STUN) for the contact address for signaling traffic, and for the connection address for media traffic.
• Use media relay (TURN): Advertise the public IP address (discovered via STUN) for the contact address for signaling traffic.
Advertise the address of a media relay server (discovered via TURN) for the connection address for media traffic.
• None: Advertise the local IP address only for both signaling and media traffic.Server address • Empty: Discover the address of the firewall traversal server (the STUN or TURN
server), if available, using DNS SRV. • Specified: Use the firewall traversal server specified as either an IP address or a fully
qualified hostname.
35
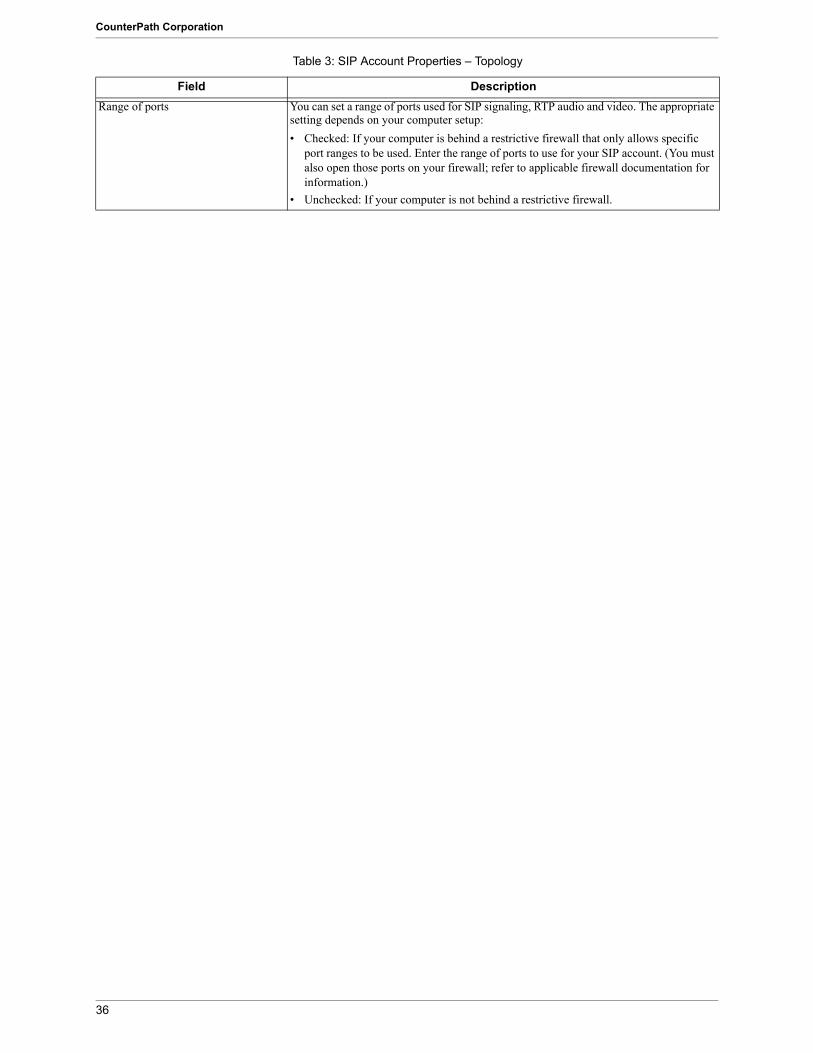
CounterPath Corporation
Range of ports You can set a range of ports used for SIP signaling, RTP audio and video. The appropriate setting depends on your computer setup:• Checked: If your computer is behind a restrictive firewall that only allows specific
port ranges to be used. Enter the range of ports to use for your SIP account. (You must also open those ports on your firewall; refer to applicable firewall documentation for information.)
• Unchecked: If your computer is not behind a restrictive firewall.
Table 3: SIP Account Properties – Topology
Field Description
36
X-Lite for Windows User Guide
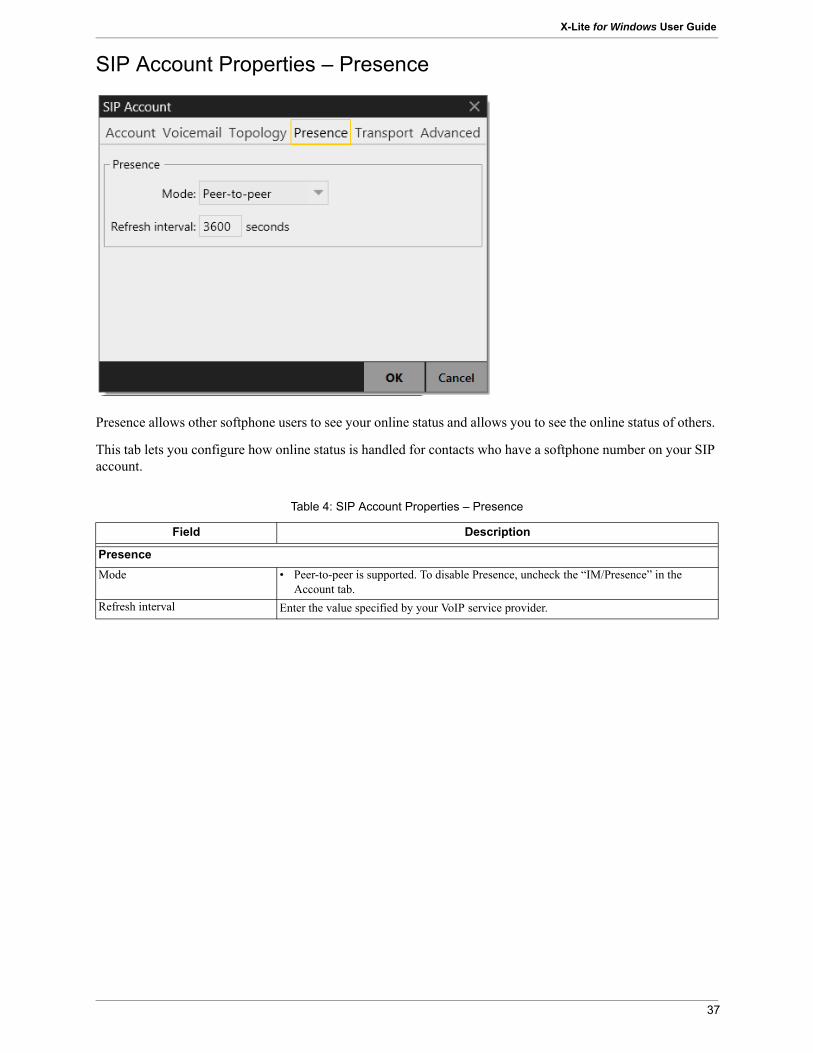
SIP Account Properties – Presence
Presence allows other softphone users to see your online status and allows you to see the online status of others.
This tab lets you configure how online status is handled for contacts who have a softphone number on your SIP account.
Table 4: SIP Account Properties – Presence
Field Description
PresenceMode • Peer-to-peer is supported. To disable Presence, uncheck the “IM/Presence” in the
Account tab.Refresh interval Enter the value specified by your VoIP service provider.
37
CounterPath Corporation
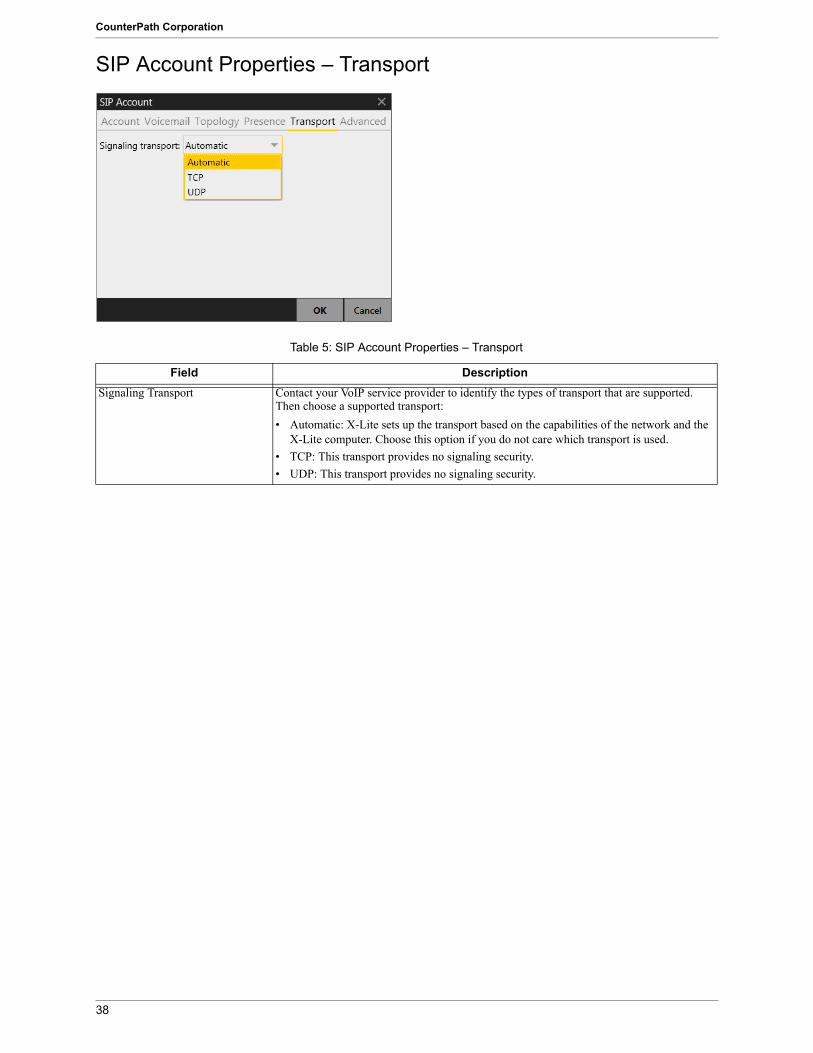
SIP Account Properties – Transport
Table 5: SIP Account Properties – Transport
Field DescriptionSignaling Transport Contact your VoIP service provider to identify the types of transport that are supported.
Then choose a supported transport:• Automatic: X-Lite sets up the transport based on the capabilities of the network and the
X-Lite computer. Choose this option if you do not care which transport is used.• TCP: This transport provides no signaling security. • UDP: This transport provides no signaling security.
38
X-Lite for Windows User Guide
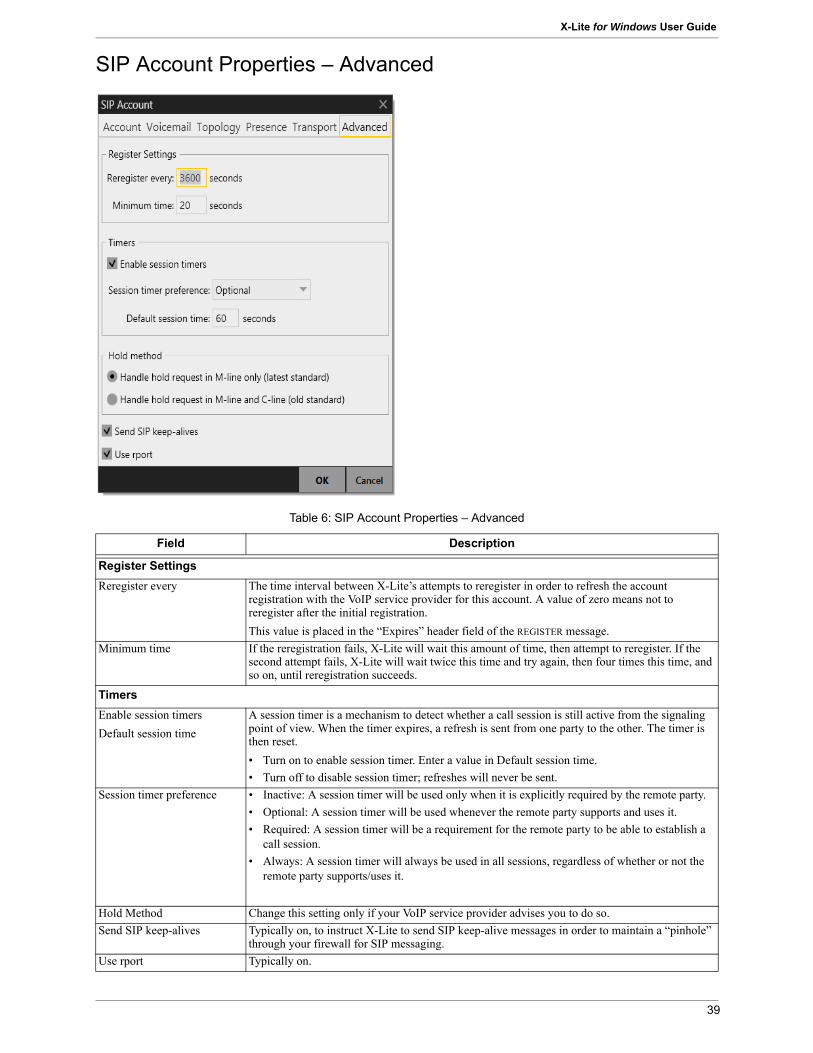
SIP Account Properties – Advanced
Table 6: SIP Account Properties – Advanced
Field Description
Register SettingsReregister every The time interval between X-Lite’s attempts to reregister in order to refresh the account
registration with the VoIP service provider for this account. A value of zero means not to reregister after the initial registration.This value is placed in the “Expires” header field of the REGISTER message.
Minimum time If the reregistration fails, X-Lite will wait this amount of time, then attempt to reregister. If the second attempt fails, X-Lite will wait twice this time and try again, then four times this time, and so on, until reregistration succeeds.
TimersEnable session timersDefault session time
A session timer is a mechanism to detect whether a call session is still active from the signaling point of view. When the timer expires, a refresh is sent from one party to the other. The timer is then reset.• Turn on to enable session timer. Enter a value in Default session time. • Turn off to disable session timer; refreshes will never be sent.
Session timer preference • Inactive: A session timer will be used only when it is explicitly required by the remote party.• Optional: A session timer will be used whenever the remote party supports and uses it.• Required: A session timer will be a requirement for the remote party to be able to establish a
call session.• Always: A session timer will always be used in all sessions, regardless of whether or not the
remote party supports/uses it.
Hold Method Change this setting only if your VoIP service provider advises you to do so.Send SIP keep-alives Typically on, to instruct X-Lite to send SIP keep-alive messages in order to maintain a “pinhole”
through your firewall for SIP messaging.Use rport Typically on.
39
CounterPath Corporation
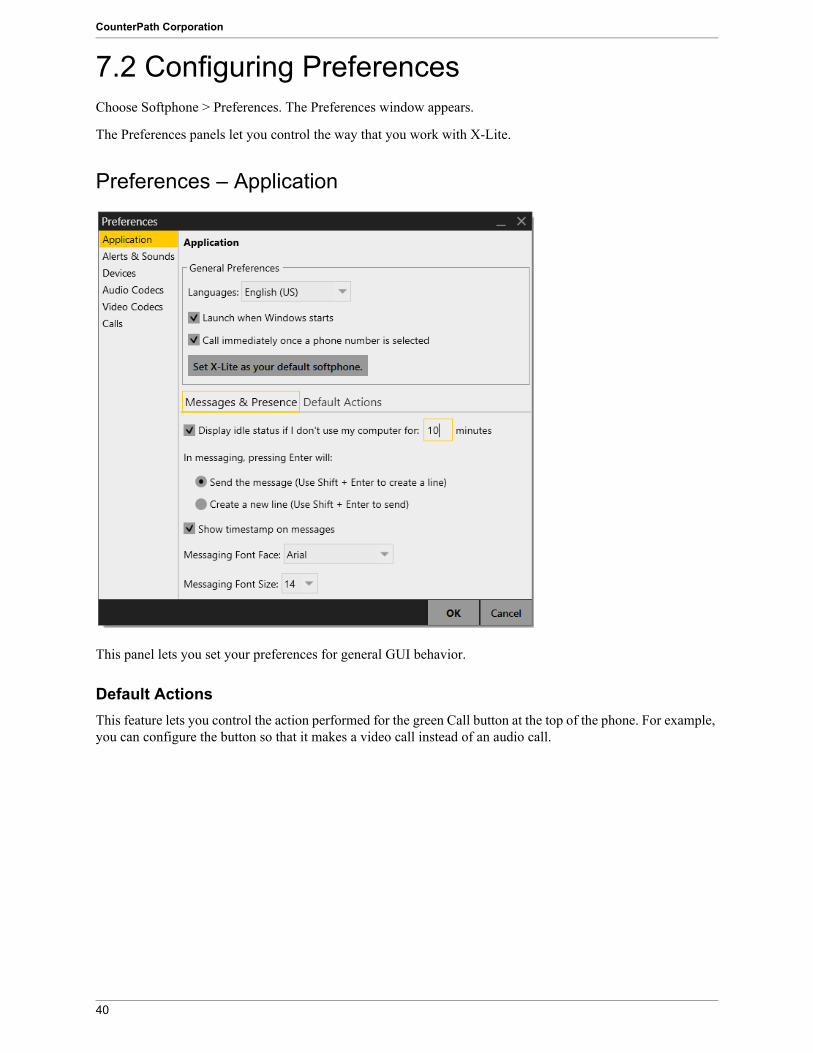
7.2 Configuring PreferencesChoose Softphone > Preferences. The Preferences window appears.
The Preferences panels let you control the way that you work with X-Lite.
Preferences – Application
This panel lets you set your preferences for general GUI behavior.
Default ActionsThis feature lets you control the action performed for the green Call button at the top of the phone. For example, you can configure the button so that it makes a video call instead of an audio call.
40
X-Lite for Windows User Guide
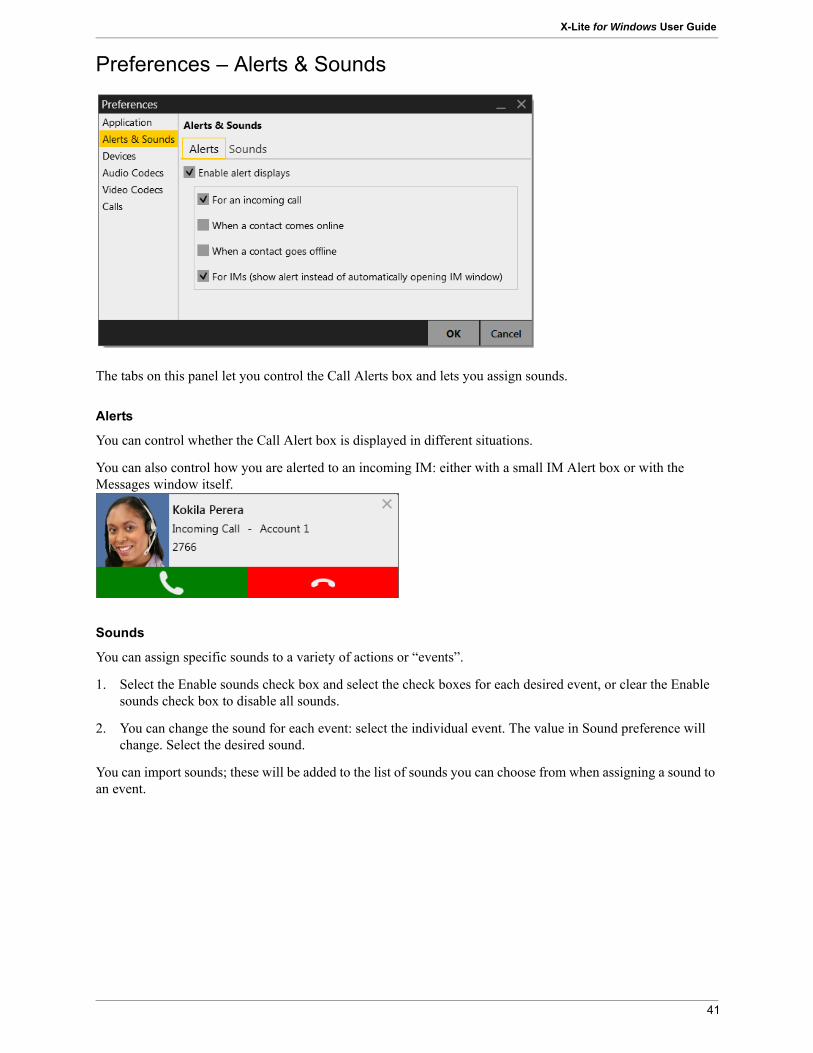
Preferences – Alerts & Sounds
The tabs on this panel let you control the Call Alerts box and lets you assign sounds.
Alerts
You can control whether the Call Alert box is displayed in different situations.
You can also control how you are alerted to an incoming IM: either with a small IM Alert box or with the Messages window itself.
Sounds
You can assign specific sounds to a variety of actions or “events”.
1. Select the Enable sounds check box and select the check boxes for each desired event, or clear the Enable sounds check box to disable all sounds.
2. You can change the sound for each event: select the individual event. The value in Sound preference will change. Select the desired sound.
You can import sounds; these will be added to the list of sounds you can choose from when assigning a sound to an event.
41
CounterPath Corporation
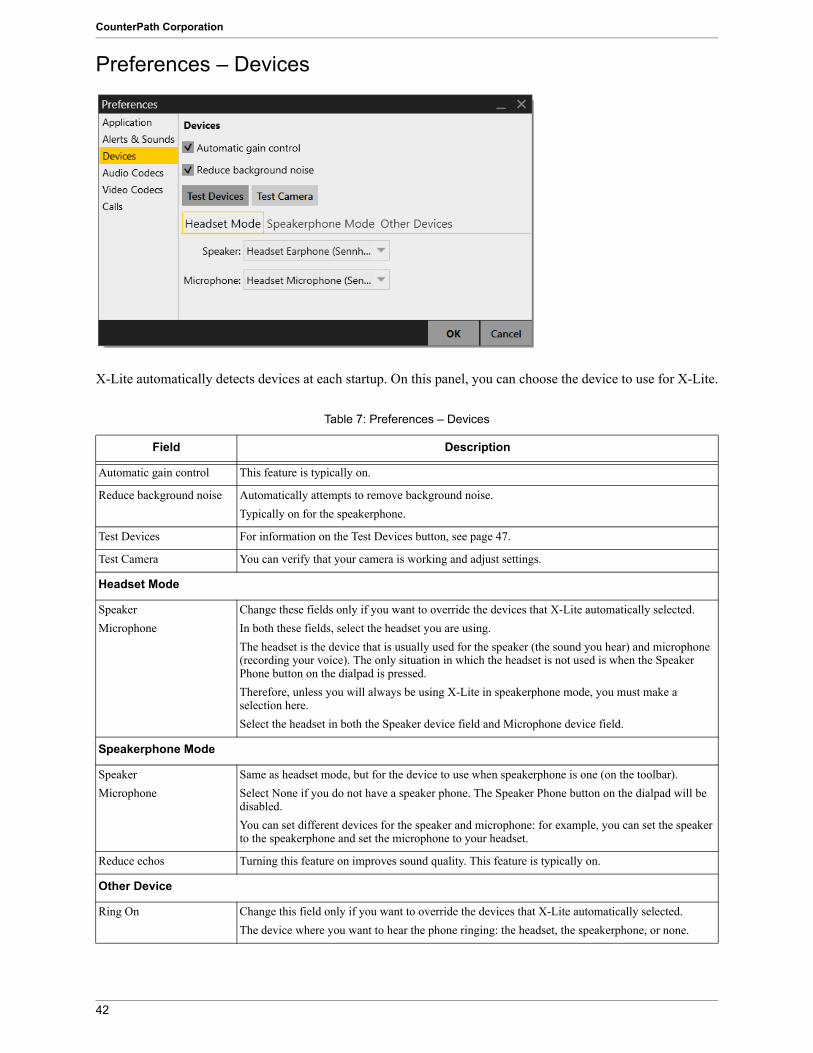
Preferences – Devices
X-Lite automatically detects devices at each startup. On this panel, you can choose the device to use for X-Lite.
Table 7: Preferences – Devices
Field Description
Automatic gain control This feature is typically on.
Reduce background noise Automatically attempts to remove background noise.Typically on for the speakerphone.
Test Devices For information on the Test Devices button, see page 47.
Test Camera You can verify that your camera is working and adjust settings.
Headset Mode
Speaker Microphone
Change these fields only if you want to override the devices that X-Lite automatically selected.In both these fields, select the headset you are using.The headset is the device that is usually used for the speaker (the sound you hear) and microphone (recording your voice). The only situation in which the headset is not used is when the Speaker Phone button on the dialpad is pressed. Therefore, unless you will always be using X-Lite in speakerphone mode, you must make a selection here.Select the headset in both the Speaker device field and Microphone device field.
Speakerphone Mode
Speaker Microphone
Same as headset mode, but for the device to use when speakerphone is one (on the toolbar). Select None if you do not have a speaker phone. The Speaker Phone button on the dialpad will be disabled.You can set different devices for the speaker and microphone: for example, you can set the speaker to the speakerphone and set the microphone to your headset.
Reduce echos Turning this feature on improves sound quality. This feature is typically on.
Other Device
Ring On Change this field only if you want to override the devices that X-Lite automatically selected.The device where you want to hear the phone ringing: the headset, the speakerphone, or none.
42
X-Lite for Windows User Guide
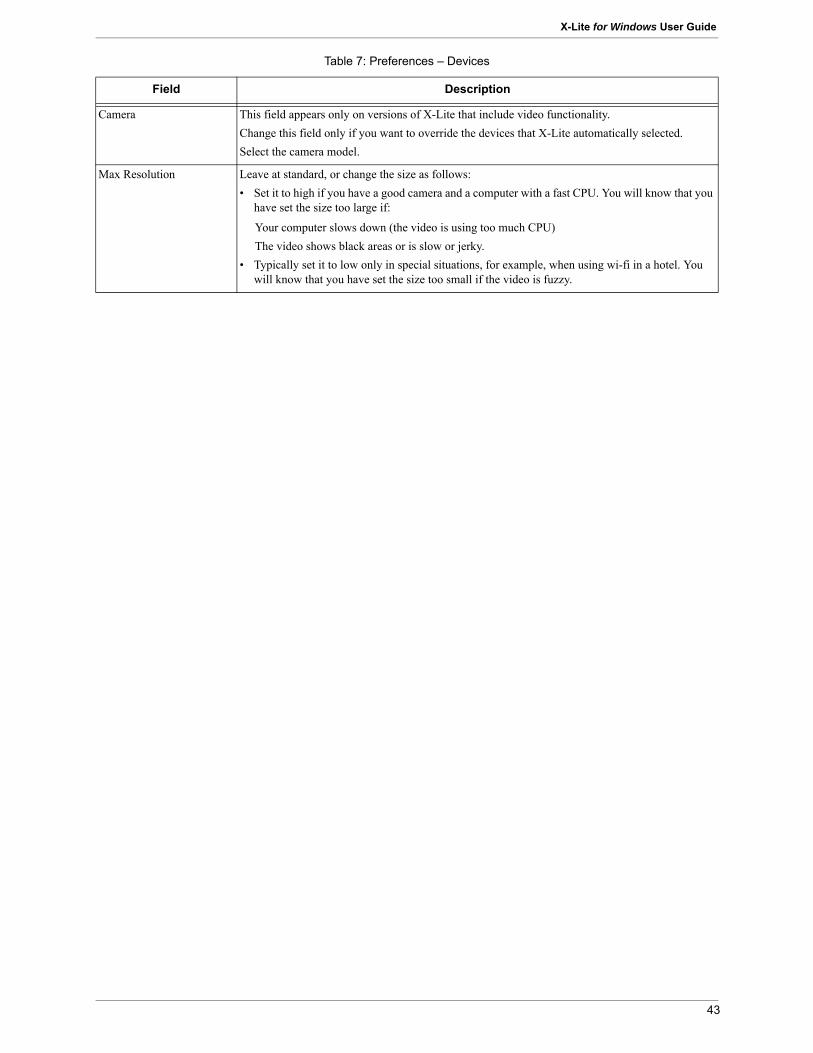
Camera This field appears only on versions of X-Lite that include video functionality.Change this field only if you want to override the devices that X-Lite automatically selected.Select the camera model.
Max Resolution Leave at standard, or change the size as follows:• Set it to high if you have a good camera and a computer with a fast CPU. You will know that you
have set the size too large if:
Your computer slows down (the video is using too much CPU)The video shows black areas or is slow or jerky.
• Typically set it to low only in special situations, for example, when using wi-fi in a hotel. You will know that you have set the size too small if the video is fuzzy.
Table 7: Preferences – Devices
Field Description
43
CounterPath Corporation
Preferences – Audio Codecs
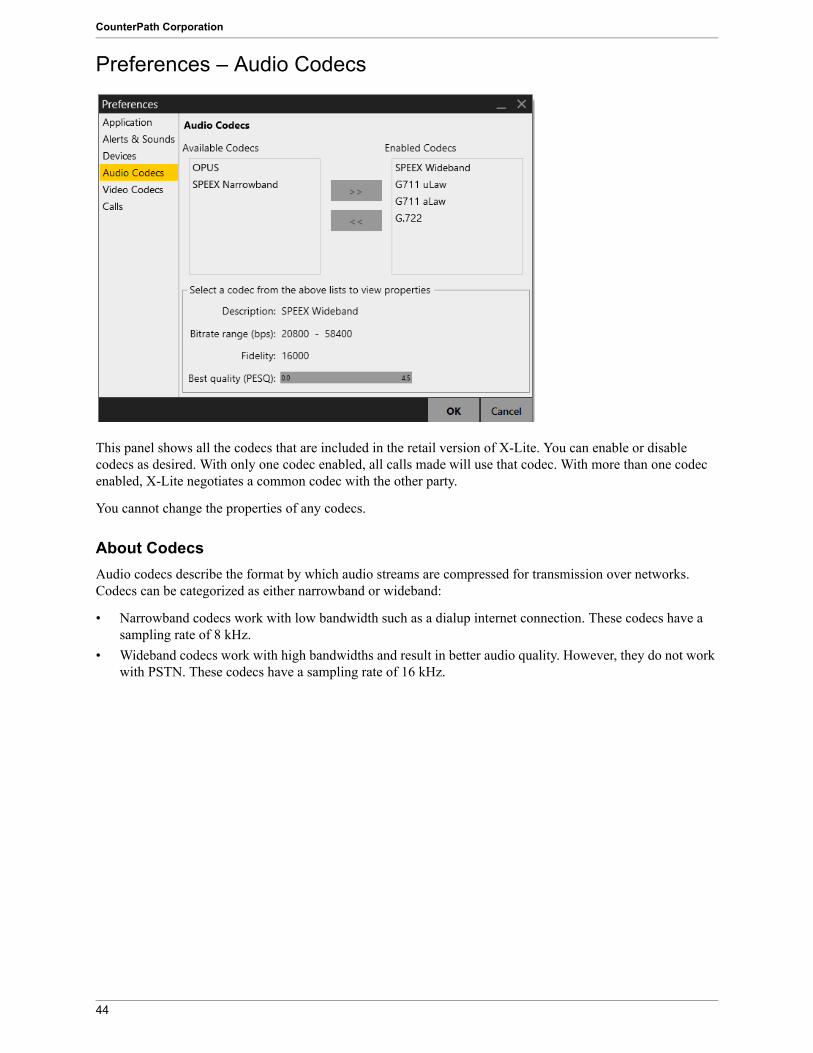
This panel shows all the codecs that are included in the retail version of X-Lite. You can enable or disable codecs as desired. With only one codec enabled, all calls made will use that codec. With more than one codec enabled, X-Lite negotiates a common codec with the other party.
You cannot change the properties of any codecs.
About CodecsAudio codecs describe the format by which audio streams are compressed for transmission over networks. Codecs can be categorized as either narrowband or wideband:
• Narrowband codecs work with low bandwidth such as a dialup internet connection. These codecs have a sampling rate of 8 kHz.
• Wideband codecs work with high bandwidths and result in better audio quality. However, they do not work with PSTN. These codecs have a sampling rate of 16 kHz.
44
X-Lite for Windows User Guide
Preferences – Video Codecs
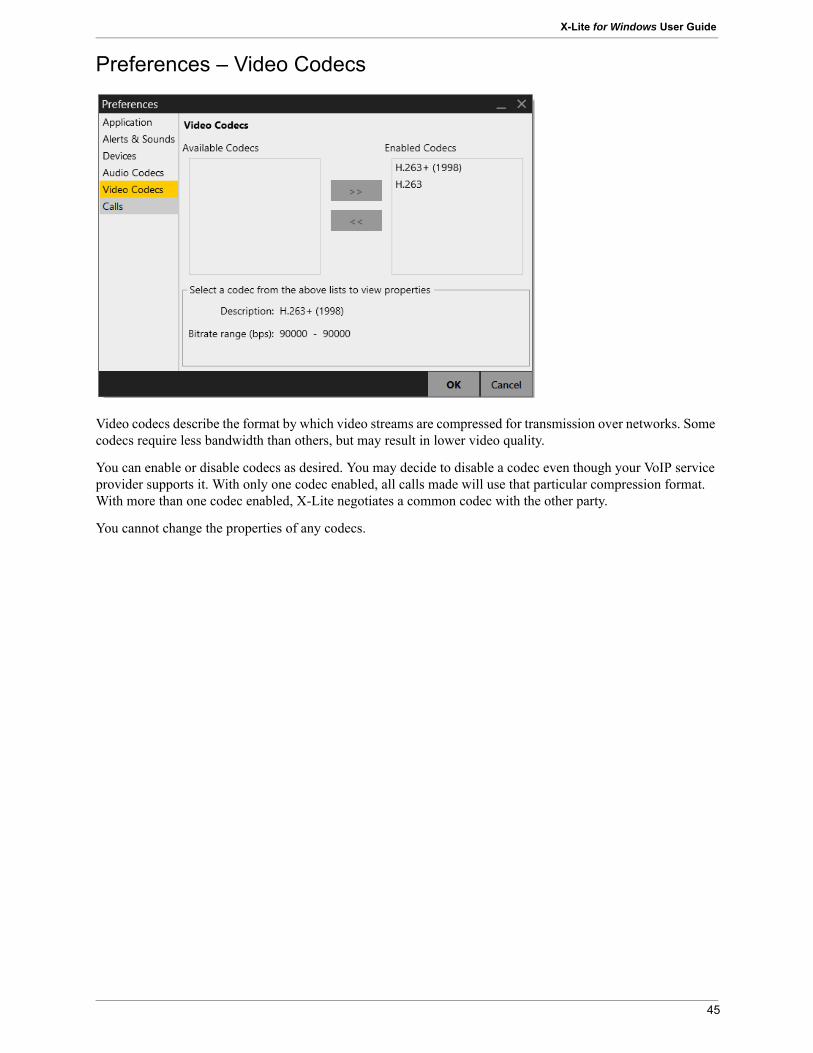
Video codecs describe the format by which video streams are compressed for transmission over networks. Some codecs require less bandwidth than others, but may result in lower video quality.
You can enable or disable codecs as desired. You may decide to disable a codec even though your VoIP service provider supports it. With only one codec enabled, all calls made will use that particular compression format. With more than one codec enabled, X-Lite negotiates a common codec with the other party.
You cannot change the properties of any codecs.
45
CounterPath Corporation
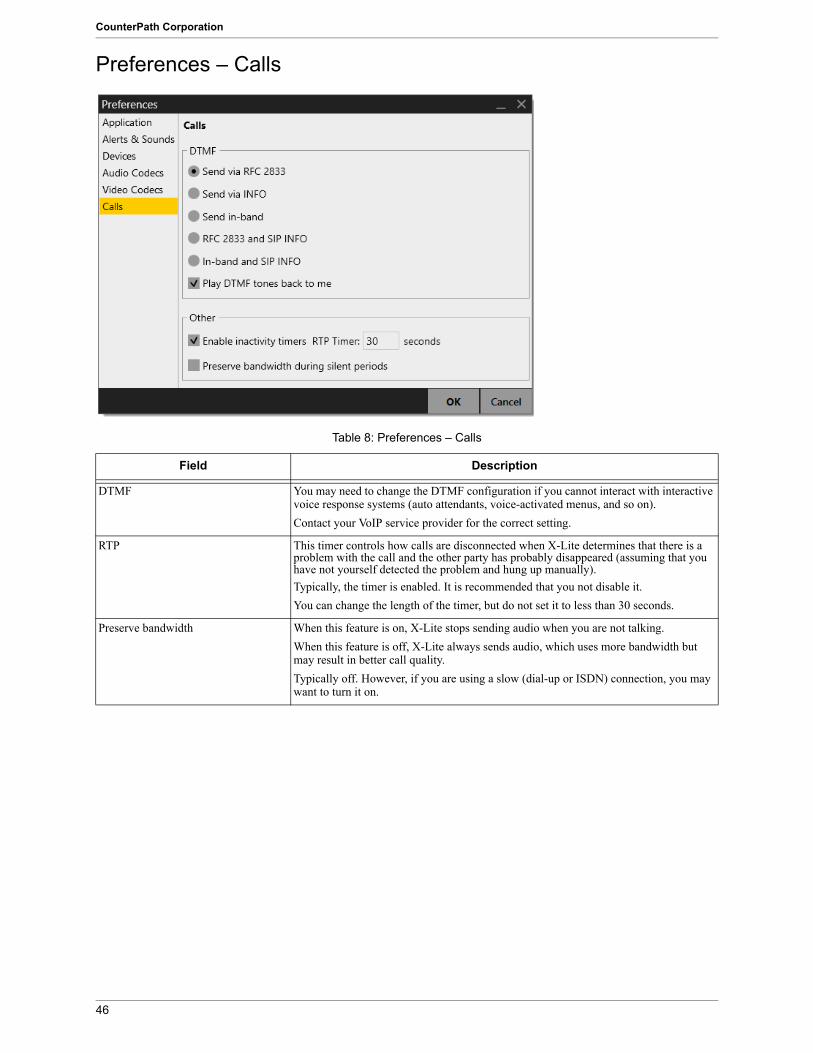
Preferences – Calls
Table 8: Preferences – Calls
Field Description
DTMF You may need to change the DTMF configuration if you cannot interact with interactive voice response systems (auto attendants, voice-activated menus, and so on).Contact your VoIP service provider for the correct setting.
RTP This timer controls how calls are disconnected when X-Lite determines that there is a problem with the call and the other party has probably disappeared (assuming that you have not yourself detected the problem and hung up manually).Typically, the timer is enabled. It is recommended that you not disable it.You can change the length of the timer, but do not set it to less than 30 seconds.
Preserve bandwidth When this feature is on, X-Lite stops sending audio when you are not talking.When this feature is off, X-Lite always sends audio, which uses more bandwidth but may result in better call quality.Typically off. However, if you are using a slow (dial-up or ISDN) connection, you may want to turn it on.
46
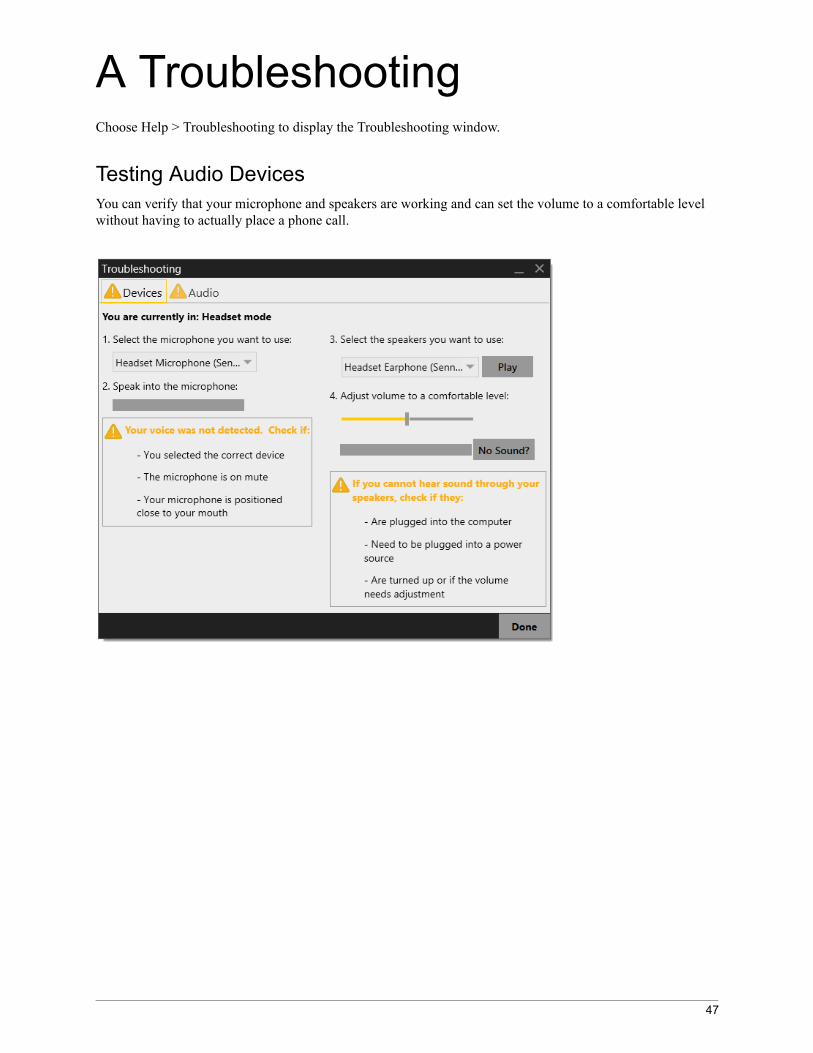
A TroubleshootingChoose Help > Troubleshooting to display the Troubleshooting window.
Testing Audio DevicesYou can verify that your microphone and speakers are working and can set the volume to a comfortable level without having to actually place a phone call.
47

CounterPath Corporation
Testing Audio QualityWhile you are on a phone call, you can test the quality of the audio. Note that to perform a valid test, you should be on an established call (not a call attempt).
48
X-Lite for Windows User Guide
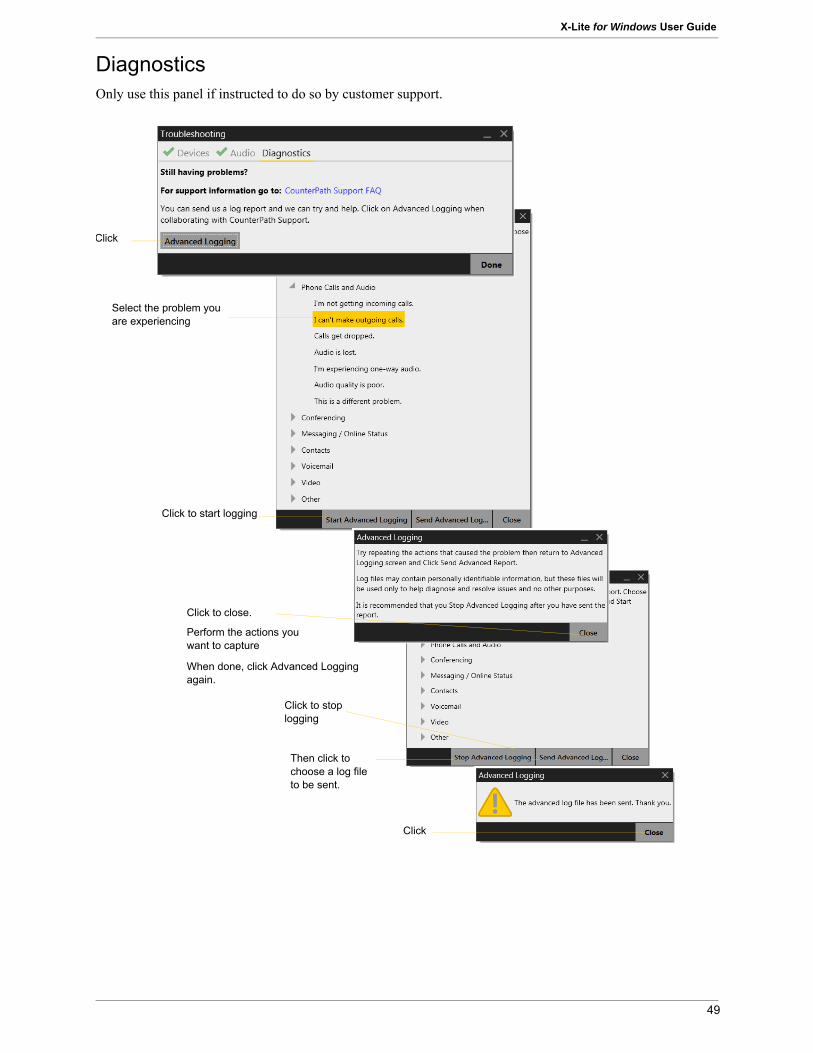
DiagnosticsOnly use this panel if instructed to do so by customer support.
Click
Select the problem you are experiencing
Click to start logging
Click to close.
Perform the actions you want to capture
When done, click Advanced Logging again.
Click
Click to stop logging
Then click to choose a log file to be sent.
49
CounterPath Corporation
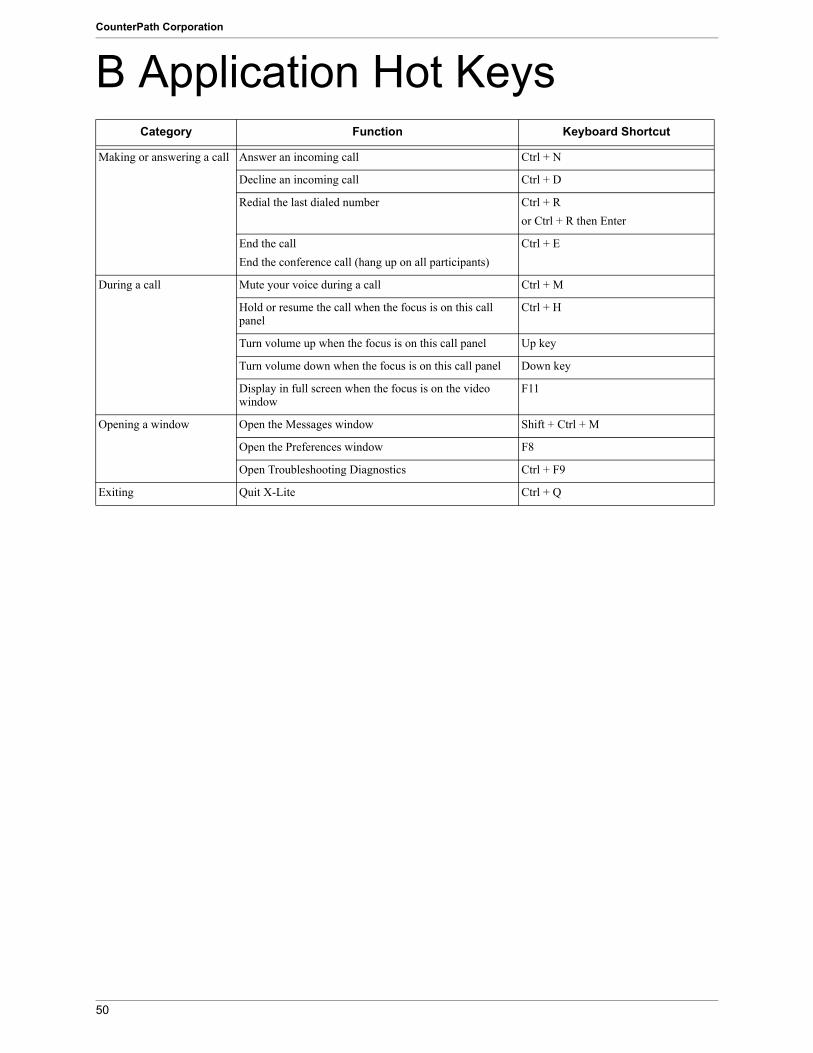
B Application Hot KeysCategory Function Keyboard Shortcut
Making or answering a call Answer an incoming call Ctrl + N
Decline an incoming call Ctrl + D
Redial the last dialed number Ctrl + Ror Ctrl + R then Enter
End the callEnd the conference call (hang up on all participants)
Ctrl + E
During a call Mute your voice during a call Ctrl + M
Hold or resume the call when the focus is on this call panel
Ctrl + H
Turn volume up when the focus is on this call panel Up key
Turn volume down when the focus is on this call panel Down key
Display in full screen when the focus is on the video window
F11
Opening a window Open the Messages window Shift + Ctrl + M
Open the Preferences window F8
Open Troubleshooting Diagnostics Ctrl + F9
Exiting Quit X-Lite Ctrl + Q
50
X-Lite for Windows User Guide
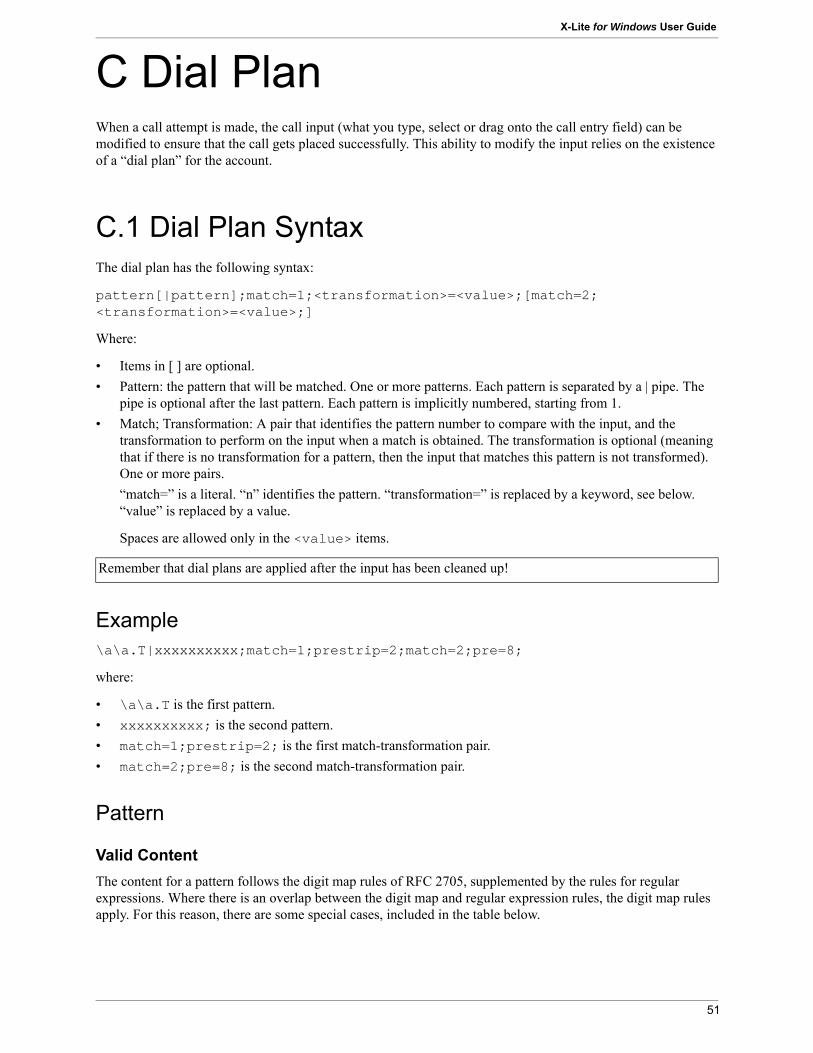
C Dial PlanWhen a call attempt is made, the call input (what you type, select or drag onto the call entry field) can be modified to ensure that the call gets placed successfully. This ability to modify the input relies on the existence of a “dial plan” for the account.
C.1 Dial Plan SyntaxThe dial plan has the following syntax:
pattern[|pattern];match=1;<transformation>=<value>;[match=2;<transformation>=<value>;]
Where:
• Items in [ ] are optional. • Pattern: the pattern that will be matched. One or more patterns. Each pattern is separated by a | pipe. The
pipe is optional after the last pattern. Each pattern is implicitly numbered, starting from 1.• Match; Transformation: A pair that identifies the pattern number to compare with the input, and the
transformation to perform on the input when a match is obtained. The transformation is optional (meaning that if there is no transformation for a pattern, then the input that matches this pattern is not transformed). One or more pairs.“match=” is a literal. “n” identifies the pattern. “transformation=” is replaced by a keyword, see below. “value” is replaced by a value.
Spaces are allowed only in the <value> items.
Example\a\a.T|xxxxxxxxxx;match=1;prestrip=2;match=2;pre=8;
where:
• \a\a.T is the first pattern.• xxxxxxxxxx; is the second pattern.• match=1;prestrip=2; is the first match-transformation pair.• match=2;pre=8; is the second match-transformation pair.
Pattern
Valid ContentThe content for a pattern follows the digit map rules of RFC 2705, supplemented by the rules for regular expressions. Where there is an overlap between the digit map and regular expression rules, the digit map rules apply. For this reason, there are some special cases, included in the table below.
Remember that dial plans are applied after the input has been cleaned up!
51
CounterPath Corporation
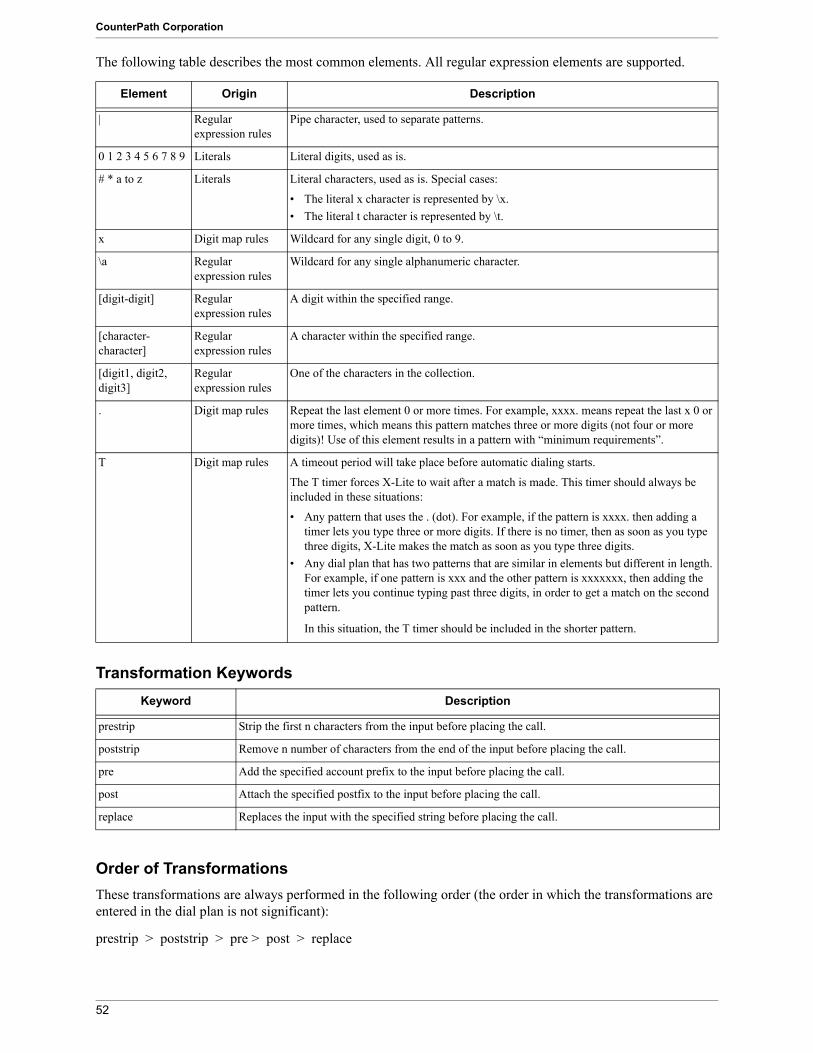
The following table describes the most common elements. All regular expression elements are supported.
Transformation Keywords
Order of TransformationsThese transformations are always performed in the following order (the order in which the transformations are entered in the dial plan is not significant):
prestrip > poststrip > pre > post > replace
Element Origin Description
| Regular expression rules
Pipe character, used to separate patterns.
0 1 2 3 4 5 6 7 8 9 Literals Literal digits, used as is.
# * a to z Literals Literal characters, used as is. Special cases:
• The literal x character is represented by \x.• The literal t character is represented by \t.
x Digit map rules Wildcard for any single digit, 0 to 9.
\a Regular expression rules
Wildcard for any single alphanumeric character.
[digit-digit] Regular expression rules
A digit within the specified range.
[character-character]
Regular expression rules
A character within the specified range.
[digit1, digit2, digit3]
Regular expression rules
One of the characters in the collection.
. Digit map rules Repeat the last element 0 or more times. For example, xxxx. means repeat the last x 0 or more times, which means this pattern matches three or more digits (not four or more digits)! Use of this element results in a pattern with “minimum requirements”.
T Digit map rules A timeout period will take place before automatic dialing starts.
The T timer forces X-Lite to wait after a match is made. This timer should always be included in these situations:
• Any pattern that uses the . (dot). For example, if the pattern is xxxx. then adding a timer lets you type three or more digits. If there is no timer, then as soon as you type three digits, X-Lite makes the match as soon as you type three digits.
• Any dial plan that has two patterns that are similar in elements but different in length. For example, if one pattern is xxx and the other pattern is xxxxxxx, then adding the timer lets you continue typing past three digits, in order to get a match on the second pattern.
In this situation, the T timer should be included in the shorter pattern.
Keyword Description
prestrip Strip the first n characters from the input before placing the call.
poststrip Remove n number of characters from the end of the input before placing the call.
pre Add the specified account prefix to the input before placing the call.
post Attach the specified postfix to the input before placing the call.
replace Replaces the input with the specified string before placing the call.
52
X-Lite for Windows User Guide
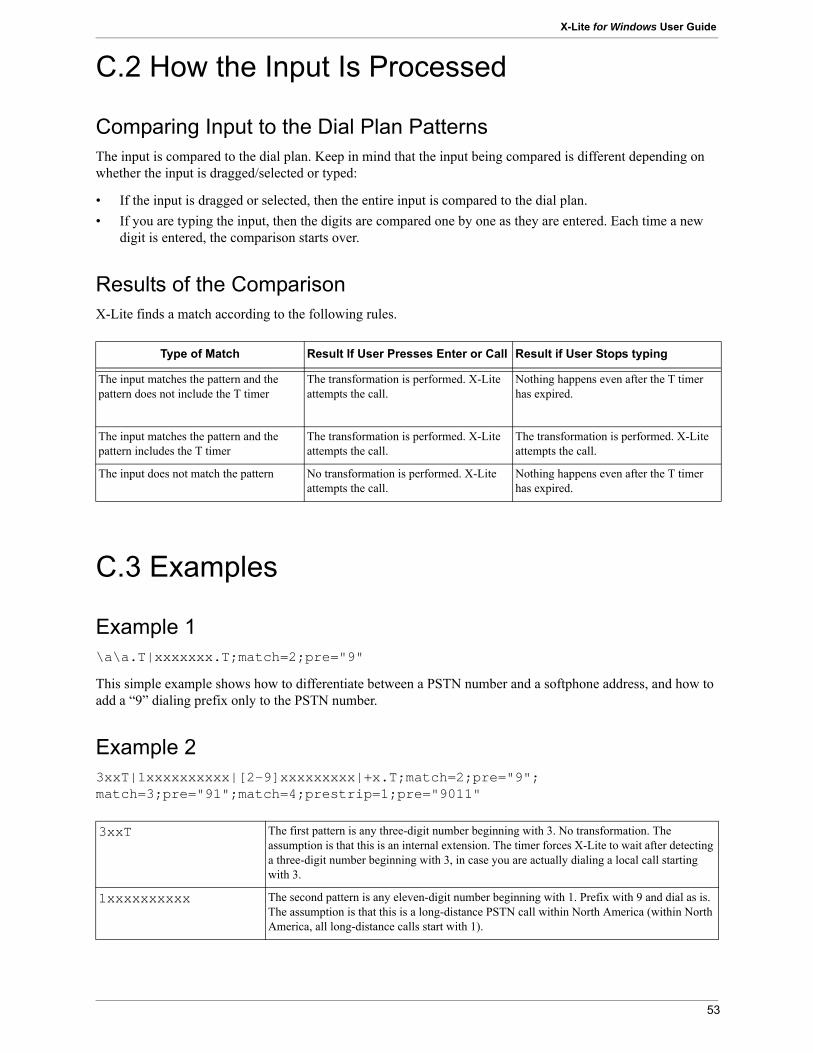
C.2 How the Input Is Processed
Comparing Input to the Dial Plan PatternsThe input is compared to the dial plan. Keep in mind that the input being compared is different depending on whether the input is dragged/selected or typed:
• If the input is dragged or selected, then the entire input is compared to the dial plan. • If you are typing the input, then the digits are compared one by one as they are entered. Each time a new
digit is entered, the comparison starts over.
Results of the ComparisonX-Lite finds a match according to the following rules.
C.3 Examples
Example 1\a\a.T|xxxxxxx.T;match=2;pre="9"
This simple example shows how to differentiate between a PSTN number and a softphone address, and how to add a “9” dialing prefix only to the PSTN number.
Example 23xxT|1xxxxxxxxxx|[2-9]xxxxxxxxx|+x.T;match=2;pre="9";match=3;pre="91";match=4;prestrip=1;pre="9011"
Type of Match Result If User Presses Enter or Call Result if User Stops typing
The input matches the pattern and the pattern does not include the T timer
The transformation is performed. X-Lite attempts the call.
Nothing happens even after the T timer has expired.
The input matches the pattern and the pattern includes the T timer
The transformation is performed. X-Lite attempts the call.
The transformation is performed. X-Lite attempts the call.
The input does not match the pattern No transformation is performed. X-Lite attempts the call.
Nothing happens even after the T timer has expired.
3xxT The first pattern is any three-digit number beginning with 3. No transformation. The assumption is that this is an internal extension. The timer forces X-Lite to wait after detecting a three-digit number beginning with 3, in case you are actually dialing a local call starting with 3.
1xxxxxxxxxx The second pattern is any eleven-digit number beginning with 1. Prefix with 9 and dial as is. The assumption is that this is a long-distance PSTN call within North America (within North America, all long-distance calls start with 1).
53

CounterPath Corporation
[2-9]xxxxxxxxx The third pattern is any ten-digit number beginning with a number other than 1. The assumption is that this is a local PSTN call within a ten-digit dialing zone.
+x.T; The fourth pattern is a number of any length that begins with +, to indicate an international PSTN call from North America. Delete the +, prefix with 9011 (011 is the number to access an international line from North America).
match=2;pre="9"; For the second pattern, prefix 9 to access an outside line.
match=3;pre="91"; For the third pattern, prefix 9 and 1 to access an outside line and enter the long-distance code.
match=4;prestrip=1;pre="9011"
For the fourth pattern, remove the + and prefix 9011 to access an outside line and enter the international code.
54
X-Lite for Windows User Guide
D Exporting ContactsYou can export your contacts to a CSV, vCard or PST file.
Exporting contacts to a file is particularly useful when you upgrade to X-Lite for Windows or X-Lite for Mac, because you can then import this file into your new softphone and instantly populate the new contact list.
1. From the main menu choose Contacts > Export Contacts. The Export Contacts wizard starts.
2. When you click Next, the export starts. The result is:
• For a PST export, the existing .pst file is updated to include the entries from the X-Lite contact list. If Outlook is open, the entries immediately appear in the Outlook contacts. All information in the X-Lite contact list is exported to Microsoft Outlook. Only information that can be displayed in Outlook actually appears in the Outlook Contacts window. Typically this means that all softphone addresses are exported (and stored in custom fields) but not displayed in Outlook.
• For other formats, a new file of the specified type is created.
55
CounterPath Corporation
E Other Ways to Run X-Lite
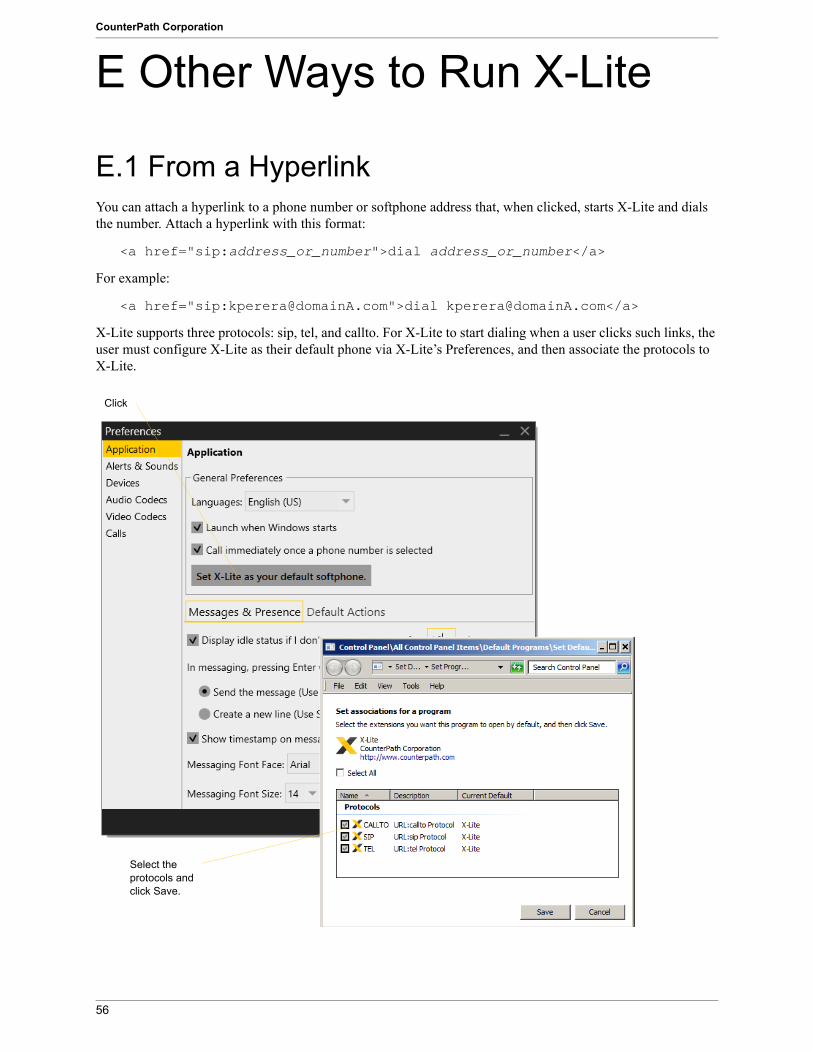
E.1 From a HyperlinkYou can attach a hyperlink to a phone number or softphone address that, when clicked, starts X-Lite and dials the number. Attach a hyperlink with this format:
<a href="sip:address_or_number">dial address_or_number</a>
For example:
<a href="sip:[email protected]">dial [email protected]</a>
X-Lite supports three protocols: sip, tel, and callto. For X-Lite to start dialing when a user clicks such links, the user must configure X-Lite as their default phone via X-Lite’s Preferences, and then associate the protocols to X-Lite.
Click
Select the protocols and click Save.
56

X-Lite for Windows User Guide
F GlossaryBroadband Broad or wide bandwidth. In data transmission, the wider the band, the more data it is
possible to transmit in a given time span. A cable, DSL and ADSL connection to the network provide broadband for data transmission. A dialup or ISDN connection typically provide a narrow bandwidth for data transmission.
Codec Codecs are programs in X-Lite involved in transmitting audio; each codec has different characteristics and therefore each works better in some situations than in others
Dial plan The rules that X-Lite follows in order to interpret the softphone address or phone number that the user has entered and to modify the number or address, as required, to ensure that the call will be placed successfully.
DTMF Dual-tone multi frequency. DTMF is the system that is used in interactive voice-response menu systems such as the menu system for accessing voicemail messages. The DTMF system allows the user to interact with the menu by pressing keys on a dialpad or keyboard.
Firewall A technology that prevents unauthorized people connecting to your computer and to the applications running on the computer.
IM Instant Messaging. A technology that lets users send text message and files for near instantaneous delivery and display on each others’ computers.
MWI Message Waiting Indicator. An indicator that there is a voicemail message for the owner of an account.
Narrowband In data transmission, the wider the band, the more data it is possible to transmit in a given time span. A cable, DSL and ADSL connection to the network provide broadband for data transmission. A dialup or ISDN connection typically provide a narrow bandwidth for data transmission.
Presence An instant messaging feature that allows users to share information about their online status.
PSTN Public Switch Telephone Network. The traditional land-line phone network.SIP account An account that provides the user the ability to make VoIP phone calls. The account
encapsulates the rules and functions the user can access.Softphone address The address used to connect to a SIP endpoint. In other words, the “phone number”
used in a VoIP phone call. For example, sip:[email protected] device Universal Serial Bus device. A device that follows a specific communications
standard. A headset may be a “USB type” of headset. VoIP Voice over Internet Protocol. A variation of IP used for sending voice data over the
Internet, in other words, used for making phone calls over the Internet.VoIP service provider A business that provides a VoIP service, allowing a user to connect to the Internet in
order to make VoIP phone calls using X-Lite. The VoIP service provider sets up a SIP account for the user.
57

CounterPath Corporation
58