;WYA R DEPA W.A. C. Field Manual PHYSICAL TRAINING
136
MHI I Copy 3 <- ' FM 35-20 ;WYA R DEPA R T M E N T W.A. C. Field Manual PHYSICAL TRAINING X-I I 15 VJULY,.1943
Transcript of ;WYA R DEPA W.A. C. Field Manual PHYSICAL TRAINING

MHI ICopy 3 <- ' FM 35-20
;WYA R DEPA R T M E N T
W.A. C. Field Manual
PHYSICALTRAINING
X-I I
15 VJULY,.1943
FM 35-20
WV AR D E P AI R T M E NV T
F A. C. Field Manual
PHYSICAL
TRAINING
United States Government Printing Office
Washington . 1943
WAR DEPARTMENT,WASHINGTON 25, D. C., 15 July 1943.
FM 35-20, WAC Field Manual, Physical Training,is published for the information and guidance of allconcerned.
(A. G. 300.7 (18 Mar 43).)
BY ORDER OF THE SECRETARY OF WAR:
G. C. MARSHALL,Chief of Staff.
OFFICIAL:
J. A. ULIO,Major General,
The Adjutant General.
DISTRIBUTION: X(For explanation of symbols see FM 21-6.)
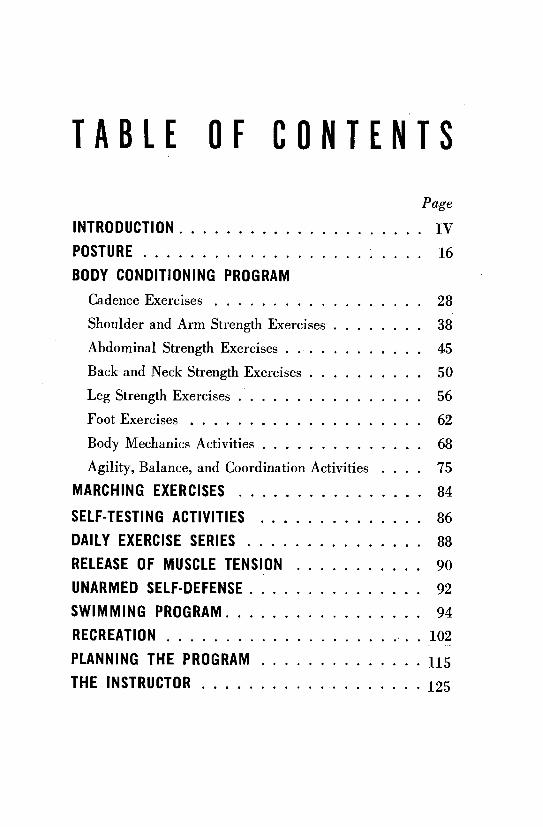
TABLE OF CONTENTSPage
INTRODUCTION ..................... IVPOSTURE ................... .... 16BODY CONDITIONING PROGRAM
Cadence Exercises .................. 28
Shoulder and Arm Strength Exercises ........ 38
Abdominal Strength Exercises ............ 45
Back and Neck Strength Exercises .......... 50
Leg Strength Exercises ................ 56
Foot Exercises ................... . 62
Body Mechanics Activities .............. 68
Agility, Balance, and Coordination Activities ... . 75
MARCHING EXERCISES ................ 84
SELF-TESTING ACTIVITIES .............. 86DAILY EXERCISE SERIES ............... 88RELEASE OF MUSCLE TENSION .......... . 90UNARMED SELF-DEFENSE ............... 92SWIMMING PROGRAM ................. 94RECREATION ...................... 102
PLANNING THE PROGRAM .............. 115THE INSTRUCTOR ..... ...... ... 125

YOU MUST BE FITYOU are a member of the first Women's Army 'in theY history of the United States. You are one of the smallpercentage of women qualified in mind and body to performa soldier's noncombat duties.
These duties are many. The demands of war are varied,endless, and merciless. To satisfy these demands, you mustbe fit.
You have successfully passed a rigid physical examina-tion. You are organically sound. Now you must build thestrength and stamina, the control and coordination, to do aman's work any hour of the day, every day of the month.
To condition your body so that it may meet every demandmade of it, a course of planned exercises has been developed.It has been planned by women, for women. It recognizesyour capacities. It is based upon a knowledge of the tasksyou may be called upon to perform.
These exercises are simple and progressive. By slow,methodical stages, they carry you to a new and better stateof physical condition, visibly expressed in a correct, attractivecarriage and an abundance of energy. They assist in supply-ing the mental, emotional, and physical stability you need tobecome an effective member of an effective organization.
The eyes of the Army-and of the Nation-are on you.It is of prime importance that you look well, feel well, andwork well throughout your military service.

YOUe-�F�BE �ITi
�i: :::: ;��: ::�
L
�
?:· -

WE ARE FIGHTING A TOTAL WART OTAL WAR calls every man,
woman, and child into service. This
type of war has been forced upon us.For over a decade the women of Ger-
many, Italy, and Japan have been train-ing for war. Their duties range from
front line combat to manual labor.
The women of the United Nations
I have'been swift to take up the chal-
lenge. Close to a half million British
women are in uniform today. The
Auxiliary Territorial Service (ATS) performs duties similar to
yours. ATS serves as motor mechanics, cooks, truck drivers, radio
locators, gunnery researchers, and in many other jobs formerly
held by men.
The women of Russia are fighting for their lives. Thousands
are with the Army in the field, serving as technicians, radio oper-ators, messengers, engineers, drivers, and medical personnel.Some serve as sharpshooters. As guerrillas, Russian women have
taken a heavy toll of the invaders. Women dig trenches and carry
munitions on their backs to the troops.
The women of Japan know the true, bitter meaning of war. For
years they have toiled 12 and 14 hours a day in the munitionsplants at Nagoya and Osaka. Thousands are serving with the Im-
perial Army as messengers, radio operators, orderlies, and drivers.
Reports from combat zones tell of women in uniform, serving withshock troops and piloting combat planes.
Women in uniform have long been a familiar sight in Germanyand Italy. The Nazi Labor Service drafts all girls between 17
and 25 who are not usefully employed in the factories or the ArmyAuxiliary services. Younger girls are enrolled in the Hitler Girls'Organization. German women are in the war, to the limit.
The war will not be won by women alone. But victory in totalwar will go to the side which utilizes the most women, and the fittest.
Page 2

TOTAL WAR IS A WOMAN'S WAR
'I 4
*~~~~~~~~~~~i~
'4',Ias
~~~~~~~~~~~~~~~~

YOUR JOB: TO REPLACE MENYOUR TASK is to do the things which, if you did not do them,
would have to be done by men taken from the fighting ranks;
men whose presence in the battle line may mean victory, whose
absence might mean defeat.
You must be able to do these things alone and unaided. You
must be ready 24 hours a day, 7 days a week, and every day of the
month. War makes no distinction between sexes. When the order
comes you must obey it-without question and without excuse.
None of your duties will be beyond the capacity of a woman in
fit condition. But nearly all military duties will be beyond the
ability of a woman who lacks strength, who tires easily, whose mind
and body do not work in swift accord, who is constantly prey to
illness and moods.
None of us knows what the future holds forth. None of us can
foretell what emergencies may arise, nor what tasks we may be
called upon to perform. Better to build up for the job-today-
than to fall down on the job-tomorrow.
Men are naturally endowed with greater physical strength than
women. But women at war, abroad and at home, are proving daily
that woman's strength, properly trained and developed, is ample to
perform hundreds of vital wartime tasks. And that women, in
achieving the muscular tone and control essential to their work,
realize greater poise, more grace, and better health than they ever
enjoyed before.
The Corps must sustain itself. Except for the hardest physical
labor, you must do every job that comes your way.
When a man moves out, be ready to take over. Be ready to give
the job all you have. Be ready with everything it takes to do it well.
Page 4

BE READY TO TAKE OVER;;;;::::i:::i- ; i:i:-~~a-7 77777-i:';ii:'
i:i :i ~::~~i::i:~::~~::- ; ·- ;·-:-i;;i:·_,-;~ ~F:~
:::: ": :":·:-: ::: '~~~~~:- ;-;'" :N
;~ ~ --;;i:::::
::i :::: ;: : :-:i: :::-i: rri:,:!i:::
':~':::~i,:t i ii ::;~i~:ii::;

BE READY FOR ANY JOBYOU MAY serve as a chauffeur, a telephone operator, a cook, a
stenographer, or a mechanic. You may be assigned to any ormany of the long and growing list of occupations in which women
serve. War may take you to a far-off corner of the world, to trying
climates, to primitive places where life is maintained with minimum
comfort, to areas where the enemy may even deny you food and
sleep for days at a stretch.
Whatever your job, this is sure: it will require a strong body and
steady nerves--the ability to "take it."
Moreover, your appearance must give assurance that you have
this ability: it must convince all who work with you that you are on
the job, a skilled, trained, and reliable member of a winning team.
Your carriage must be military. Your skin must be healthy and
clear. Your responses must be quick. Your manner must be alert.
You must have the bearing and the self-confidence of a trained
soldier.
These qualities must be developed before you report for your job.
Planned exercise must prepare your body and mind to take over and
to work hard with a minimum of "breaking in." Planned exercise
must become a habit which, supplemented by work and recreation,
will keep you fit throughout your service.
Page 6

- 1
/SS:0
>4<
-~~~~4Y - >

HAVE THESE FOUR QUALITIESSTRENGTHYOU must have strength. You must be able to perform with ease
the heaviest tasks which you may encounter. You must be able topersist for long periods of time. This means neither "new" musclesnor large muscles. It means giving the muscles you have sufficienttone and capacity to do their work. It means balanced muscle con-trol, with each set of muscles helping the others, to make workeasier.
STAMINAYou must have stamina. You must be able to stay with a job until
it is finished. It means a strong heart that pumps more blood perstroke, that does more work with less effort. It means lungs thatbreathe deeply and regularly-that take in plenty of fresh, oxygen-rich air and expel used air. A strong heart and good lungs keep' thecells of your body amply supplied with fuel, and rid them of thewaste products of fatigue.
COORDINATIONYou must have coordination of mind and body. When your brain
receives a command your body must respond instantly. The "com-munications system" between body and brain must be efficient. Themuscular and nervous systems must operate together smoothly. Youmust be alert-mind and body must be a well-drilled team.
STABILITYYou must have stability. You must be on the job all day, every
day, as long as you are needed. Your nervous system must standthe "gaff." Your digestive system must function properly. Elimi-nation must be regular. Menstruation must be normal and easy. Youmust be a completely reliable member of your unit. "In-and-outers"wreck an organization's efficiency.
Put yourself in the place of the women on the opposite page.Your duties may be as varied and as demanding. Get ready now.
Page 8

YOUR WORK DEPENDS UPON THEM
STRENGTH STAMINA
COORDINATION -STABILITY _
fir]
S M 1

FITNESS CAN'TBE FAKED
HYSICAL fitness can't be faked.You are fit, or you aren't. Strength,
stamina, coordination, and stability donot come in bottles, pills, nor powder,nor in foundation garments, nor indiets.
The test of true physical fitness ishard work. A girdle alone won't holdyou up throughout a tough day in thecab of a truck. Firmly toned ab-dominal muscles will.
There are no "rules" against syn-thetic beauty. But war exacts a crueltoll of the woman who prefers a foun-dation garment to a basic foundationof muscular tone.
It is important that your complexionbe clear because of functional regu-larity rather than laxatives; that yourcolor be healthy because of a clean,well-aired bloodstream rather than lip-stick and rouge; that excess fat bemelted off, not by a weakening diet,but through strengthening exercise.
A _,n;5r~Lu~r In civilian life women can get by onfashions, fads, and fancies. War, how-ever, demands the real thing. Physicalfitness is not something you put onand take off. It must be there-in you,with you-all the time, wherever youmay be.
Page 10

j iX~~~~
iI,~~~~~~~~~~_
. ii'p~~~~

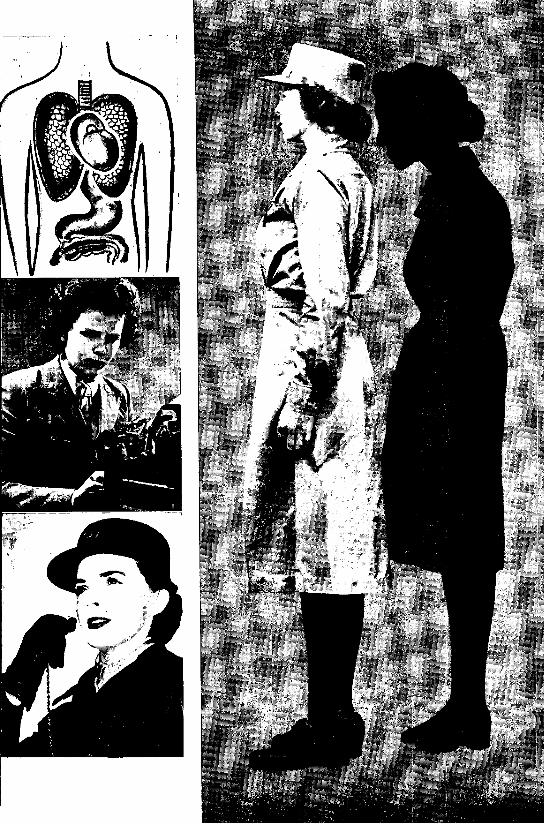
WHAT PLANNED EXERCISE DOESStudy the pictures on the opposite page. The full length picture
shows the trim, attractive military carriage as contrasted with the
fleshy silhouette behind it. How does planned exercise help to
achieve this?
MUSCULAR TONET improves muscular tone. It helps to shed excess fat, or, if under-
weight, it builds a substructure of flexible muscle and healthy,
compact flesh. Without increasing the size of the muscles, it im-
proves their endurance and tone. It does this in a balanced manner,
so that one part of the body is not overdeveloped at the expense of
another. It teaches muscles to work together, easing the strain of
work and conserving energy.
STABILITY
It makes for stability. It gives tone to the muscles and organs of
the pelvic region. It helps to relieve congestion and thereby men-
strual distress. Duties can be performed without lessened efficiency.
ELIMINATION
It aids elimination. It prods the sweat glands to action, removing
impurities through the skin. It forces the lungs to expel more com-
pletely the waste products generated by the human motor. It stimu-
lates and regulates intestines and kidneys. A clear complexion is
a natural result of regular, complete elimination.
RESISTANCEIt increases resistance. Better functioning of the heart, lungs, and
digestive and circulatory systems has a beneficial effect on the body
as a whole. You can stand heat and cold better. You are less likely
to be thrown off balance by illness and deprivation. That's im-
portant whether you're headed overseas--or holding down a man'sjob at home.
Page 1 2

I~~~~~~.
1 ~ ~ ~ ~ · ·~~

OTHER ADVANTAGES OF EXERCISEPOSTUREIT improves posture. Planned or systematic exercise aims at reach-
ing the whole muscular structure. This means that opposingmuscle groups balance and thus maintain the bony structure in abalanced position. The correct bone alignment provides for thecorrect positions of the internal organs. Correct position of the or-gans assists them in the performance of their various functions.Good posture makes for grace, poise, and unstilted military bearing.
STAMINAIt improves stamina. It forces muscles and organs to the limit of
their capacity. Thus, it stimulates their development. It systemati-cally steps up heart and lung action until these organs can workharder and longer with less effort and fatigue.
RELIEVES TENSIONIt relieves tensioni. Steady, prolonged concentration on the job
tends to tighten nerves and muscles and increases fatigue. Plannedexercise at suitable intervals relaxes the muscles and nerves andrestores a feeling of well-being.
COORDINATIONIt improves coordination. It accustoms body and mind to work in
perfect accord-the brain to receive and transmit orders rapidly,the body to obey orders correctly and speedily. Perfect coordina-tion builds self-confidence. It inspires the confidence of others. It de-velops self-control and poise. It is the essence of leadership.
WHAT IS THE OVER-ALL AIM?Planned exercise develops maximum body fitness in minimum
time. It helps you maintain this fitness throughout your militaryservice. All that follows in this program contributes to this end.Some of the exercises may seem too easy. Others may seem toohard. By first doing the easier ones faithfully, you'll be able to dothe hard ones later-with ease. The results of planned exercisedescribed above will then be fully achieved.
Page 14
-1 ~ ~aE~~iB$1111~~I
n~~~~
K;~~~~~~~~~~~;
I~~~~~~~C
4st ";:·- ". : :.:f~~~~~~~~~~~~~~. 4
~~~~~Cf~~~~~~~~~~( D
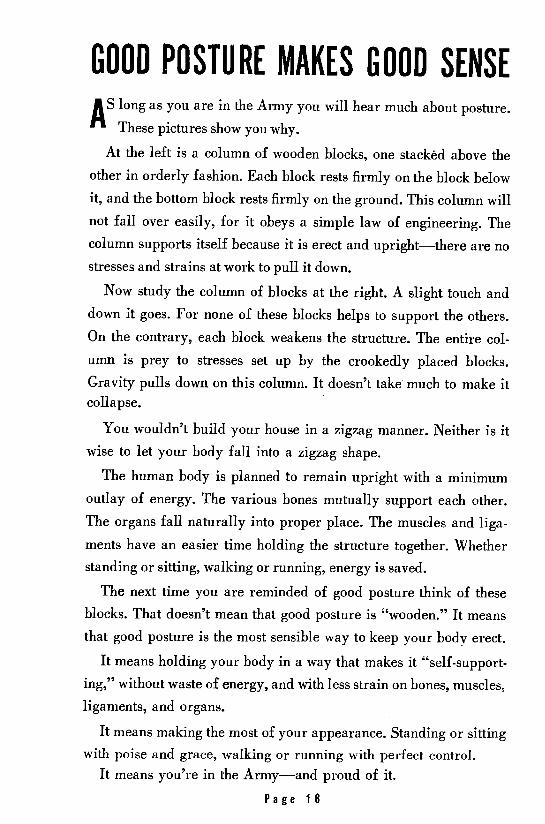
GOOD POSTURE MAKES GOOD SENSEAS long as you are in the Army you will hear much about posture.
These pictures show you why.
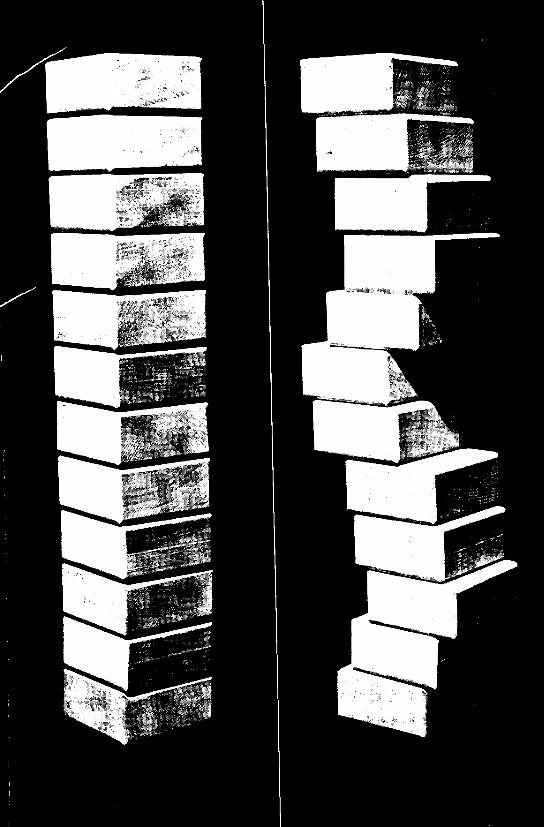
At the left is a column of wooden blocks, one stacked above theother in orderly fashion. Each block rests firmly on the block belowit, and the bottom block rests firmly on the ground. This column willnot fall over easily, for it obeys a simple law of engineering. Thecolumn supports itself because it is erect and upright-there are nostresses and strains at work to pull it down.
Now study the column of blocks at the right. A slight touch anddown it goes. For none of these blocks helps to support the others.On the contrary, each block weakens the structure. The entire col-umn is prey to stresses set up by the crookedly placed blocks.Gravity pulls down on this column. It doesn't take much to make itcollapse.
You wouldn't build your house in a zigzag manner. Neither is itwise to let your body fall into a zigzag shape.
The human body is planned to remain upright with a minimumoutlay of energy. The various bones mutually support each other.The organs fall naturally into proper place. The muscles and liga-ments have an easier time holding the structure together. Whetherstanding or sitting, walking or running, energy is saved.
The next time you are reminded of good posture think of theseblocks. That doesn't mean that good posture is "wooden." It meansthat good posture is the most sensible way to keep your body erect.
It means holding your body in a way that makes it "self-support-ing," without waste of energy, and with less strain on bones, muscles,ligaments, and organs.
It means making the most of your appearance. Standing or sittingwith poise and grace, walking or running with perfect control.
It means you're in the Army-and proud of it.
Page 1 6
-J·
:: ;yi;
r'- .-r
-·T*i-·: ;-i
�*·:-:
d:�"·;

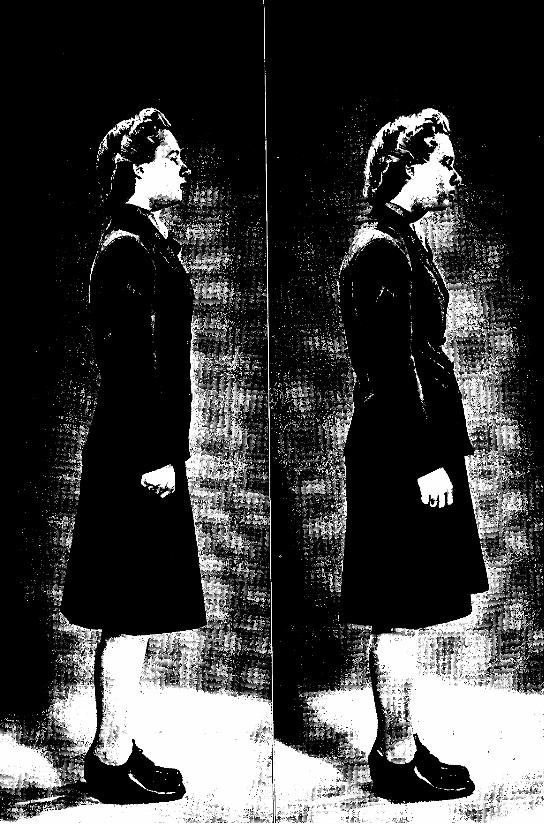
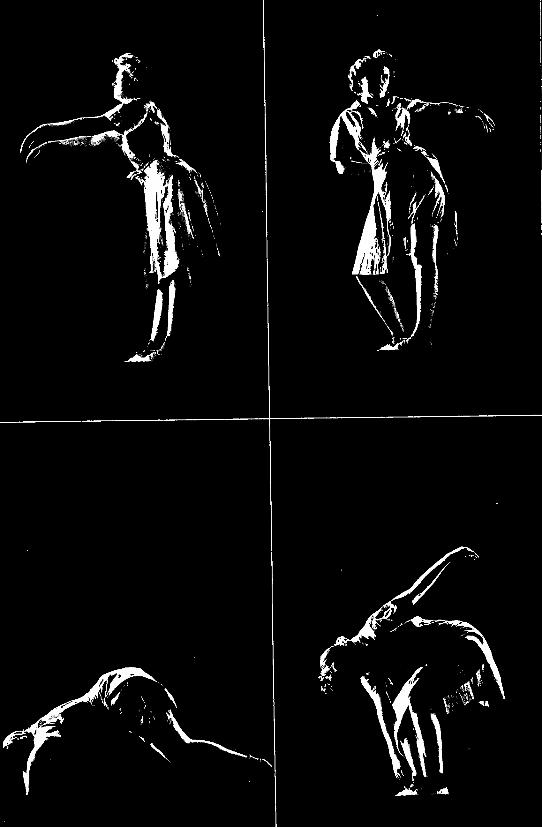
WHICH OF THESE WOMEN IS YOU?ERE is the same posture principle you saw expressed in wooden
blocks. But this time it is expressed by the human body.These pictures are interesting. Study them for a moment. In which
do the clothes drape more smartly? In which does the girl seemsmarter, more alert, more military? In which does the bone struc-
ture seem to be more firmly posed? In which do the organs seem tohave more room to function efficiently? Which of these girls would
you rather be?
Actually, the girl at the left is exactly the same as the girl at the
right. But in one instance her posture is good. Her head is balancedand erect. Her shoulders are relaxed and low. Her chest is held
high. Her lower back is only slightly curved. Her abdomen is flat.
Her hips are tucked under. Her knees are straight but not stiff. Herweight is toward the outer borders of the feet.
Now look at this girl droop into sloppy posture. Her head andneck fall forward. Shoulders are round. The back is hollow. Her
chest is sunken. Buttocks and abdomen protrude. Her knees arelocked, stiff. Her weight is on the inside borders of the feet, with
ankles protruding inward.
Your body can assume a variety of postures. Another commonfault, for example, is the overexaggerated military posture in whichshoulders are held too far back. The spine is overly arched. Kneesare locked and buttocks are thrown back. On page 24 are picturesof this posture at parade rest, and a salute.
Remember: In standing, only one posture is correct. It is the oneat the left. You can test good posture with the "plumb line" test:
THE "PLUMB LINE" TESTDrop a weighted string from a point opposite the middle of your
ear. It should fall opposite the middle of the shoulder, hip, andknee. The weight should come to rest slightly in front of the anklebone. One more point to watch: the toes should be pointed straightahead when not at the military position of "attention."
Page 1 8
41~~~~~~~~~~~~~~~~~~~~i~:%i·~~

THIS IS CORRECT SITTING POSTUREHIS woman sits well back on the seat of the chair. Her feet are
Tflat on the floor. She keeps the upper part of her body in a straightline. Note her straight back and flat abdomen. Note how gracefullyshe carries her head. She bends forward from the hips-not waist.
Before sitting, remember this hint: stand close to the chair with onefoot in front of the other. Don't "search" for the seat. Keep the bodyerect and the hips tucked under as you bend your knees to sit down.
Page 20Page 20

THIS SITTING POSTURE IS INCORRECTANY women sit this way, with head and neck forward, shouldersrounded, back curved, chest flat, abdomen protruding. They
look tired and, doubtless, they feel tired, for in this position thehead lacks support. The bones, instead of resting firmly on each
other, go off at angles. Muscles and ligaments are strained to keepmatters under control. The organs are cramped. After a time, fatigue
sets in and the weary body practically "lies down" while sitting.Page 21
~~~~~~ 4 4 4~ ~~~~·::~a·: w~
4*44 ::
4'
~~~~~~~~~~~~~~~~~~cl ~ ~ ~ ~ ~ ~ ~ ~ 4
THIS SITTING POSTURE IS INCORRECT~4
4j oe i hswawt edadnckfrad hudr
Page 21

WALIKInLi: Movement starts at hips, not knees. Hold tfe upper Dnouy ao neau alt llrlL a,..so LO
the ground. Swing arms freely. Keep eyes off the ground. Point toes straight ahead. Heels touchthe ground first. Transfer weight forward toward the outer borders of feet and push off withthe toes. Grasp with. toes for balance. Don't hold body and head at an awkward angle (below).Avoid swaying hips from side to side. Don't lock knees.
Page 22

A -A
RUNNING: Bend forward slightly from the waist. Bend elbows slightly and clench hands lightly.Legs reach out directly to the front. Push off with the toes and vigorously extend back leg toassist forward motion. Don't hold body too erect (below). Keep legs from moving up and down andcovering very little space. Avoid kicking feet up behind you. Note how woman below requires fourdistinct motions to move over the ground covered by the woman above in three.
Page 23

EVERYDAY POSTUREPOINTS
O YOU salute this way? If so, snapout of it. This is bad military form,
and it is bad posture. When you salute,bring you hand to your forehead-notyour forehead to your hand. Relax.Don't stiffen or arch your back. Don'tthrow out your hips.
Do you stand at PARADE REST thisway? If so, check up. This woman hassnapped her knees back and lockedthem. Her hips serve as a shelf to resther hands. This is bad posture and badmilitary form. PARADE REST is simplygood standing posture, with the feet instride position, and the hands heldeasily, comfortably behind the back.
How do you climb stairs? The rightway is shown above. This woman keepsher body erect. She places her foot onthe step and straightens the knee to lifther body. She swings the opposite leginto position on the next step. Armsswing naturally. She raises herself byleg action, assisting her upward move-ment by a vigorous thrust of the toes.
Below, a woman climbs stairs thehard way. Knees are continually bent.Her trunk leans forward. She comesdown flat-footedly on each step.
Watch these and other everydayposture points. The Army will judgeyou by your appearance. A smart,soldierly carriage usually meanssmart, soldierly performance.
Page 24

I-~~~~~~~~~~.
P~~~~
PI 1I-
e~~~" A
.i eA
ml

CHECK YOUR POSTURETHE PLUMB LINE test for posture hasTbeen mentioned before. Try your knowl-edge on this figure. Use your knowledge onthe woman next to you in ranks. Try it onyourself in front of a mirror. Stiff postureis not good posture. Good military postureis no different from good civilian posture.
HEAD BALANCED AND ERECT
CHEST HELD HIGH
BACK STRAIGHT
ABDOMEN IN
HIPS DO NOT PROTRUDE
KNEES STRAIGHT BUT NOT STIFF
WEIGHT TOWARD OUTER BORDERS OFFEET
Page 26

NAME
DATE
HIS CHART is a sample of a group chart for checking posture, but it can easilybe adapted as an individual record. The purpose of the chart is to keep a con-
sistent record of the woman's posture as an incentive to correction. As such, it shouldbe used as often as possible. The chart is better used when the person is not aware ofobservation. She should, however, know the results of the check so that she may useit as a guide to improvement. Good posture is the reward of day-in, day-out vigilance.
Page 27

BEGIN WITH CADENCE EXERCISESWARM-UP
EFORE you run your car it's a good idea to warm up the motor.Before you exercise it's wise to "warm up" your body.
The cadence exercises which follow are "warmer-uppers." Theyare especially planned to prime your heart, muscles, and circulatorysystem for a step-up in activity. Gradually, easily, they get yourbody set for the big job ahead. Pitchers warm up before going tothe box. Runners jog around the track before a race. Basketballplayers shoot baskets before the opening whistle. It's all for thesame reason-to "warm up the motor."
FLEXIBILITYCadence exercises also develop flexibility. They limber up the
joints-give them the full range of movement on which grace andsmoothness depend. To appear your best, and to work your best, youmust be supple. Without this quality, simple everyday tasks-likelifting, carrying, climbing, and jumping-become difficult. Lack offlexibility is fair warning of advancing age.
CONTROLCadence exercises develop control. They give you the knack of
controlling other sections of the body while one part is in action.This control is reflected in better posture, in work and play. Whenperformed by a group, cadence exercises develop coordinationbetween body and mind.
RELEASE OF MUSCLE TENSIONCadence exercises help to release muscle tension. The typist whose
upper back and neck ache because she has held one position toolong will find the cadence series helpful in relieving tension.
Later on you will learn more about the benefits of cadence exer-cises-in "Release of Tension Activities." For the present remem-ber that the cadence series put you into gear for an uphill pull.
Page 28
I

CADENCE SERIES 1 IS SIMPLEST
SWING FLINGArm swinging forward and sideward Single arm swinging forward and flinging back
HEAD SHOULDERSHead lowering forward and backward Shoulder hunching
Page 30

SERIES OF WARMER-UPPERS
TRUNK LEGS
Trunk springing forward and stretching upward Bouncing
COUNTS FOR CADENCE SERIES 1SWING Forward and sideand SHOULDERS Up and 2 and
2 and side and (and up to) 8 and
(and up to) (Repeat right)(Repeat lcet)7 and side and (Repeat alternately)Circle, circle
FLING Forward fling forward down TRUNK Relax 234 Up 234
(and up to) 2-234Up2344 fling forward change (and up to)
right fling forward down 7 -2 3 4 Up 2 3 4
(continue) 8--234 Up 23 Turn
HEAD Forward and back and LEGS Bounce 2 3 42 and back and Turn 2 3 4(and up to) (continue)7 and back and Turn 2 3 4
8 up Turn 2 and stop.
Pas 31a

DIRECTIONS FOR CADENCE SERIES 1Starting position: Stride standing.
Arm swinging forward and sideward. Swing arms forward to shoulderlevel. Swing arms down to starting position. Swing arms to side at shoulderlevel. Swing arms down to starting position. Directions: These four swingsare performed in a continuous movement for seven times. The hands brushthe skirts as they pass through the starting position. Transition: Circle armsforward, up, back, and down twice and place right arm behind back.
Single arm swinging forward and flinging back. Swing the left arm for-ward to shoulder level. Fling the left arm at shoulder level as far toward theback as possible. The upper body twists to the left as the head follows theaction of the left arm. Swing the left arm forward to shoulder level. Swingthe left arm down to starting position. Directions: These four movementsare performed as one continuous movement. The swinging arm should notdrop below shoulder level on the fling. The action is performed 4 times withthe left arm and repeated 4 times with the right arm, 4 with left, 4 withright. The change to use the right arm is accomplished on the last swing byplacing the left arm behind the back and beginning the movement with theright. Transition: Arms at sides.
Head lowering forward and backward. Drop head forward to chest. Lifthead to normal position. Drop head backward. Lift head to normal position.Directions: These four movements are performed as two movements; a for-ward drop followed by a backward drop of the head. They are repeated .8times. Transition: Head returns to normal position.
Shoulder hunching. Lift shoulders up as far as possible. Relax shoulders.Directions: These two movements are performed consecutively for 8 times.Repeat movement using only the left shoulder for 8 times. Repeat movementusing only the right shoulder for 8 times. Repeat movement alternating leftand right shoulders for 8 times. Transition: Shoulders in normal position.
Trunk springing forward and stretching upward. Bend the trunk down asfar as possible. Without rising to an upright position, pull the head andtrunk farther down with a bobbing motion 4 times. Roll the trunk up to anerect position in four counts. Directions: These movements are performedconsecutively for 8 times. Transition: As the body is raised to the startingposition the last time, make a quarter turn left and bring feet together.
Bouncing. Small bounces in place. (1) Bend knees slightly. (2) Push fromtoes. (3) Bounce a few inches off the floor. Directions: Four bounces in eachdirection making a quarter turn left after every fourth bounce until you arefacing the front. Repeat, turning to the right until you are again facingfront. Transition: The series ends in erect standing position facing originaldirection.
Page 32

ARM FLING HEAD TURNING TRUNK TWISTING
DIRECTIONS FOR CADENCE SERIES 2Starting position: Stride Standing, right hand behind back.
Single- and double-arm circling. Swing left arm in a circle, forward, up,back, and down six times. Swing arms forward to shoulder level. Swing armsdown to starting position and place left arm behind back. Swing right arm ina circle, forward, up, back, and down six times. Swing arms forward anddown. Swing both arms in a circle, forward, up, back, and down six times.Directions: The left arm is circled 6 times. Change with forward and downswing. The right arm is circled 6 times. Change with forward and downswing. Both arms are circled 6 times. Transition: Swing arms forward toshoulder level. Swing arms down to starting position.
Double-arm swinging forward and flinging sideward. Swing arms forwardto shoulder level. Fling arms to the side and back as far as possible, keepingarms at shoulder level. Swing arms forward to shoulder level. Swing armsdown to side. Directions: These four movements are performed consecu-tively for eight times. Transition: Stride standing, arms at side.
Head turning. Turn the head as far as possible to the left. Turn the headas far as possible to the right. Directions: Repeat consecutively eight times.Transition: Head returns to normal position.
Shoulders backward and forward. Pull shoulders back as far as possible.Pull shoulders forward as far as possible. Directions: Repeat consecutively8 times. Transition: Bend trunk forward, arms hanging toward ground.
Trunk twisting and arm flinging. Fling arms up to left; at same time,twist upper body to left. Fling arms up to right; at same time, twist upperbody to right. Directigns: Keep trunk bent forward. Repeat consecutively8 times. Transition: Return to erect standing making a quarter turn left.
Stride jumping. Jump to a stride position. Jump with feet together. Direc-tions: Repeat consecutively. On the fourth jump, make a quarter turn to theleft. Repeat this until you face your original direction. Repeat whole series,making quarter turns to the right until you face your original direction.Transition: The series-ends in erect standing, facing original direction.
Page 33
ARM FLING BENT OVER AIRPLANE JUMPING JACK
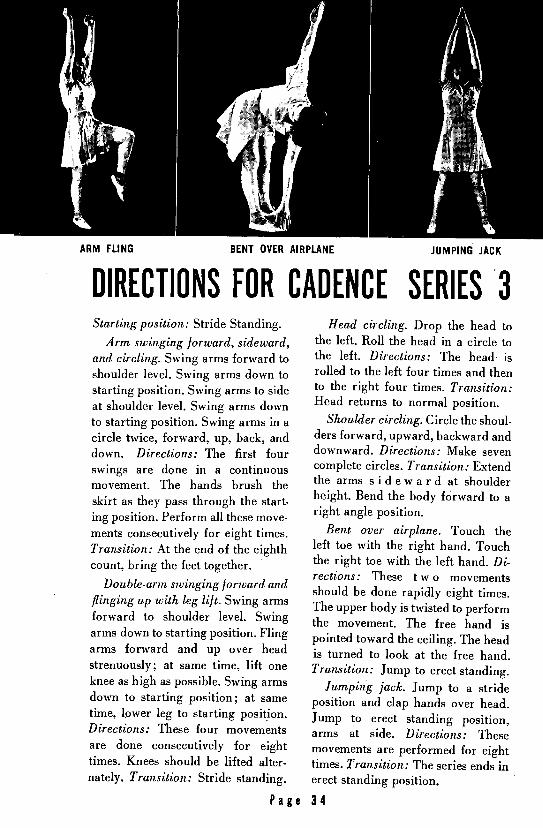
DIRECTIONS FOR CADENCE SERIES 3Starting position: Stride Standing. Head circling. Drop the head to
Arm swinging forward, sideward, the left. Roll the head in a circle toand circling. Swing arms forward to the left. Directions: The head isshoulder level. Swing arms down to rolled to the left four times and thenstarting position. Swing arms to side to the right four times. Transition:at shoulder level. Swing arms down Head returns to normal position.to starting position. Swing arms in a Shoulder circling. Circle the shoul-circle twice, forward, up, back, and ders forward, upward, backward anddown. Directions: The first four downward. Directions: Make sevenswings are done in a continuous complete circles. Transition: Extendmovement. The hands brush the the arms s i d ew a r d at shoulderskirt as they pass through the start- height. Bend the body forward to aing position. Perform all these move- right angle position.ments consecutively for eight times. Bent over airplane. Touch theTransition: At the end of the eighth left toe with the right hand. Touchcount, bring the feet together. the right toe with the left hand. Di-
rections: These t w o movementsDouble-arm swinging forward and should be done rapidly eight times.
flinging up with leg lilt. Swing arms The upper body is twisted to performforward to shoulder level. Swing the movement. The free hand isarms down to starting position. Fling pointed toward the ceiling. The headarms forward and up over head is turned to look at the free hand.strenuously; at same time, lift one Transition: Jump to erect standing.knee as high as possible. Swing arms Jumping jack. Jump to a stridedown to starting position; at same position and clap hands over head.time, lower leg to starting position. Jump to erect standing position,Directions: These four movements arms at side. Directions: Theseare done consecutively for eight movements are performed for eighttimes. Knees should be lifted alter- times. Transition: The series ends innately. Transition: Stride standing. erect standing position.
Page 34
ARM THRUST STRETCHING RUNNING
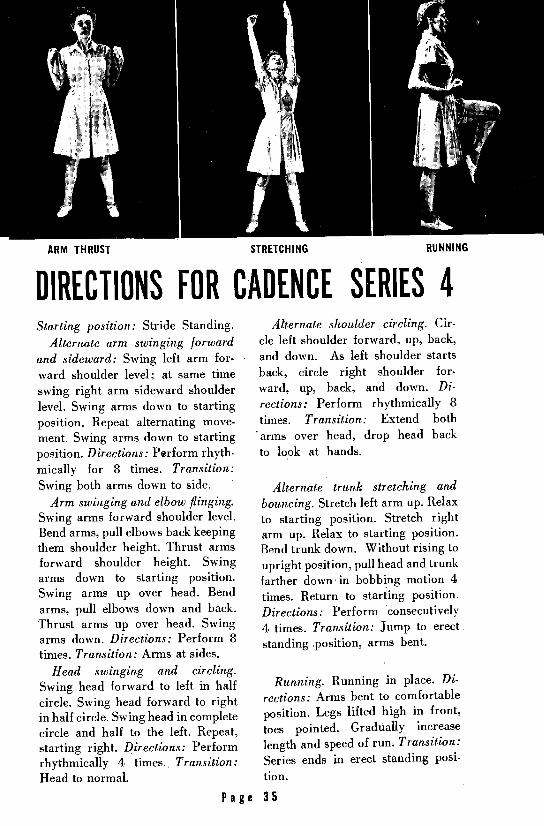
DIRECTIONS FOR CADENCE SERIES 4Starting position: Stride Standing. Alternate shoulder circling. Cir-
Alternate arm swinging forward cle left shoulder forward, up, back,
and sideward: Swing left arm for- and down. As left shoulder starts
ward shoulder level; at same time back, circle right shoulder for-
swing right arm sideward shoulder ward, up, back, and down. Di-
level. Swing arms down to starting rections: Perform rhythmically 8
position. Repeat alternating move- times. Transition: Extend bothment. Swing arms down to starting arms over head, drop head back
position. Directions: Perform rhyth- to look at hands.mically for 8 times. Transition:Swing both arms down to side. Alternate trunk stretching and
Arm swinging and elbow flinging. bouncing. Stretch left arm up. RelaxSwing arms forward shoulder level. to starting position. Stretch rightBend arms, pull elbows back keeping arm up. Relax to starting position.them shoulder height. Thrust arms Bend trunk down. Without rising toforward shoulder height. Swing upright position, pull head and trunkarms down to starting position. farther down in bobbing motion 4Swing arms up over head. Bend times. Return to starting position.arms, pull elbows down and back. Directions: Perform consecutivelyThrust arms up over head. Swing 4 times. Transition: Jump to erectarms down. Directions: Perform 8 standing position, arms bent.times. Transition: Arms at sides.
Head swinging and circling.Swing head forward to left in half Running. Running in place. Di-
circle. Swing head forward to right rections: Arms bent to comfortablein half circle. Swing head in complete position. Legs lifted high in front,
circle and half to the left. Repeat, toes pointed. Gradually increasestarting right. Directions: Perform length and speed of run. Transition:rhythmically 4 times. Transition: Series ends in erect standing posi-Head to normal. tion.
Page 35

COUNTS FOR CADENCE SERIESSERIES 2 SERIES 3
SWING Circle 23456 forward down SWING Forward side circle circleRight 23456 forward down 2 side circle circleBoth 23456 forward down (and up to)
7 side circle circle8 side circle circleFLING Forward fling forward down
2 fling forward down FLING Forward and left and(and up to) 2 and right and
8 fling forward down (and up to)7 and left and
HEAD Left right 8 and right apart2 and
(and up to) HEAD Round and Right and7 and 2 and 2 and8 front 3 and 3 and
4 change 4 upSHOULDERS Backward forward
2 and SHOULDERS Circle and(and up to) 2 and
7 and *(and up to)8 bend 7 and
Bend overTRUNK Left right TRUNK Left right
2 and 2 and(and up to) (and up to)
7 and 7 andturn down 8 jump
LEGS Apart together, apart turn LEGS Apart togetherApart together, apart turn 2 together(continuing) (and up to)
Apart together, apart turn 7 togetherApart together and stop and stop
SERIES 4SWING Swing and SHOULDERS Left right
2 and 2 and(and up to) (and up to)
7 and 7 and8 and 8 up
FLING Forward pull thrust down TRUNK Left and right andUp pull thrust down Relax 2 3 4
(and up to) (and up to)8 pull thrust down 4 and right andUp pull thrust down Relax 2 3 jump
HEAD Left and right and LEGS Left rightCircle around 3 4 5 6 7 8(continuing) 2-2 3 4 5 6 7 8
Right and left and 3-2 3 4 5 6 7 8Circle around 4-2 3 4 5 6 7 8
Page 36

* ~ · f -7
WOMEN WITHOUT UNIFORMSOT all women in war wear uniforms. Fighting uniforms do not make fight-
Some, like these Russians outside ing women. It is the heart and hardi-
Moscow, dig the trenches and tank hood beneath the khaki or olive drabbarricades that helped to turn back the that helps to win wars. In the toughGermans. Others labor in factories, in backs and flexible sinews of these sim-ships, in mines, and in the fields. War, ple peasants is the stuff of which victoryto these women, is neither glamorous is made. On the steel which you buildnor exciting. It is a fight for existence. into your body will your contribution toIt is a bitter fight without end. victory largely depend.
Page 37

HOW TO DEVELOP SHOULDER STRENGTHEVERYBODY has muscles. Some women's muscles are weak and
flabby-like rubber bands that have been around too long andlost their snap.
Other women have strong muscles--like fresh rubber bands, withplenty of stretch and pull.
Weak or strong, the length and thickness of rubber bands areabout the same. And it's the same way with muscles. To be strong,you needn't have muscles that bulge. You need muscles with elas-ticity and tone-lithe, energy-packed muscles that get the job done.
To understand the muscles of your chest and shoulders, study thelittle manikin. The muscle in front of the chest is called the pec-toralis. It joins up the breast bone, the collar bone, and the arms..Any work you perform in front of your body-jobs like lifting,,pushing, reaching, driving, typing, stirring-would use the pecto.ralis. It must therefore be strong and firm, and when it is you'llnotice a difference in your appearance. A firm pectoralis gives youa straighter line from collar bone to breast.
The muscle on the tip of the manikin's shoulder is the deltoid. Itjoins the arm to the shoulder. Every time you move your arms youcall on your deltoid muscle. Whatever your job, you'll be using itall the time.
The muscles in the arm are called the biceps and triceps. Whenyou bend your arm you use your biceps. To straighten it out youuse the triceps; For carrying heavy objects or handling light objectsover a period of time you rely on these muscles. No matter what youwill be doing, well-conditioned biceps and triceps are importantallies in doing your job.
How can you condition your pectoralis, deltoid, biceps, and tri-ceps muscles? By the brief, simple series of planned exercises ex-plained on the following pages.
What will these exercises do for you? First, they will systemati-cally add to your strength and endurance.
Second, they will improve coordination between these and otherparts of your body, and between these muscles and the brain. Youwill work more easily and efficiently.
Third, they will give chest, shoulders, and arms a firm contour.
Page 38

I
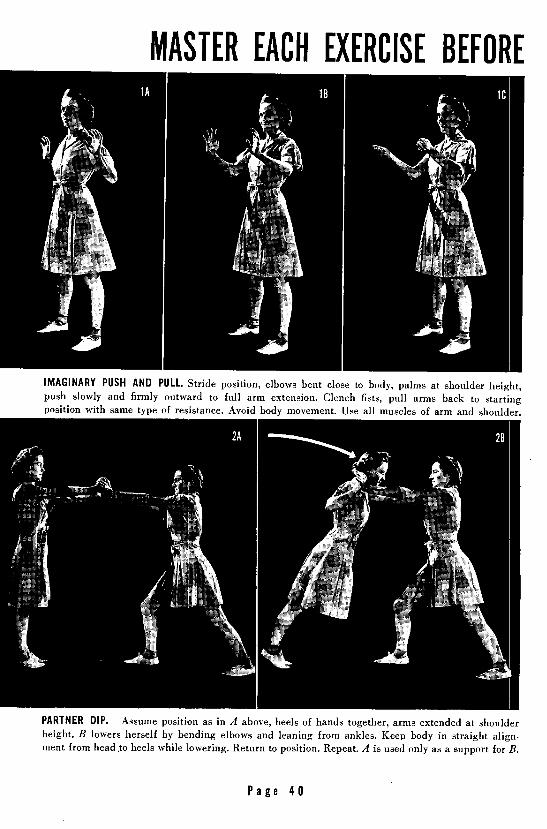
MASTER EACH EXERCISE BEFORE
IMAGINARY PUSH AND PULL. Stride position, elbows bent close to body, palms at shoulder height,push slowly and firmly outward to full arm extension. Clench fists, pull arms back to startingposition with same type of resistance. Avoid body movement. Use all muscles of arm and shoulder.
PARTNER DIP. Assume position as in A above, heels of hands together, arms extended at shoulderheight. B lowers herself by bending elbows and leaning from ankles. Keep body in straight align-ment from head to heels while lowering. Return to position. Repeat. A is used only as a support for B.
Page 40

PROGRESSING TO THE NEXT
ALL FOURS DIP. On hands and knees with hips directly above knees and shoulders directly above
hands. Slowly bend elbows to permit the chin to touch the ground between the hands. No other
part of the body should touch the ground. Keep the back fiat. Slowly straighten the elbows to
return to starting position. Repeat several times. To make the exercise more difficult, make the
distance between the hands and knees greater and repeat the same movement making sure that
the chin touches the ground between the hands. It is essential that you master this exercise.
Page 41

LEARN TO CONTROL YOUR BODY
LET DOWN. In prone fall position, lower the body slowly to the ground by bending the elbows.Relax. Assume starting position by shifting weight back to knees. Straighten knees and assumeprone fall position again, ready to repeat the exercise. Keep the body in a straight line whilelowering. Do not allow the hips to sag. Work for as slow and controlled a descent as possible.
I
KNEE DIP. Lie face down on the ground with knees bent and feet up toward ceiling. Hands shouldbe placed just outside the shoulders ready to push body up to supported position. Straighten elbowsand push body up to a supported position resting on hands and knees. Slowly bend the elbows toreturn to the starting position. Repeat this exercise several times. Do not allow the hips to sag.
Page 42

MAKE IT DO AS YOU BID AT ALL TIMESYOU are now reaching the point where it is important that you progress
only within your ability to perform correctly. Much can be gained by
thorough mastering of every exercise. Much will be lost by hastening the
progress unduly and jeopardizing the accomplishment of the end result.You should now be well aware of the muscles involved in the performanceof these exercises. It is not the ability to do these activities that is importantto our work and your future; it is the actual muscle tone which is developedthat will translate itself into your success in many other activities.
.K
HALF DIP. Prone fall position, with hands grasping edge of chair, foot locker or shoulders of aperson on all fours. Lower body slowly by bending elbows until chest touches support. Push backto starting position. Repeat. Begin by lowering only as far as possible, still being able to assumestarting position in the form described above. Do not allow hips to sag nor knees to bend.
Page 43

BE ABLE TO DO THIS EXERCISE
FULL DIP. Assume prone fall position. Hands starting position. It is important to keep theshould be at least shoulder distance apart and body in a straight line from head to heels andfingers may be pointed either forward or to keep the hips from sagging when doing thethe side. Lower the body very slowly only as exercise. Having once mastered the ability tofar as it is possible to go and still return with- perform a full dip correctly, work for an in-out relaxing, to the starting position. Repeat crease in the number of consecutive dips youthis exercise as many times as possible. In- can perform. This is the last exercise increase the distance of the dip more and more the shoulder strength progression and asuntil it is possible to touch the chin to the such appears in the daily exercise series onfloor and still return without relaxing to the page 88.
1~~~~~~~~~~~~~~~~~~~~~

THIS manikin displays a "girdle"-an abdominal girdle of muscle
which every woman wears under her skin. It is built through
planned, progressive exercise. Properly maintained, it lasts a life-time. It aids in keeping the internal organs in correct position. It
keeps the abdomen flat and firm. It is essential to correct militaryposture. Few women have it. Yet a few exercises, graduated ac-
cording to your ability, make it a simple matter to acquire sound
muscular tone in this vital area. Regular care keeps the tone alive.
Page 45

THESE EXERCISES TONE THE
STARTING POSITION FOR ALL ABDOMINAL EXERCISES. Lie on back with hands on top of upperleg. The hands are placed in this position in order to keep the elbows off the ground. The armsshould be relaxed so that the hands may slide toward the knees as the head and shoulders lift up.
ONE LEG PLEADING. Raise head and shoulders off the ground to look at left leg which is raisedabout eight inches from the ground. Hold position. Relax and repeat the exercise, using the rightleg. Do not attempt to sit up. The hands should slide toward the knees as the shoulders are lifted.
TWO LEG PLEADING. Raise head and shoulders off the ground to look at both legs which areraised about 8 inches from ground. Hold position. Relax. The hands should slide toward the kneesas the chest lifts. May be used as a test by counting number of performances done consecutively.
Page 46
IMPORTANT ABDOMINAL MUSCLES
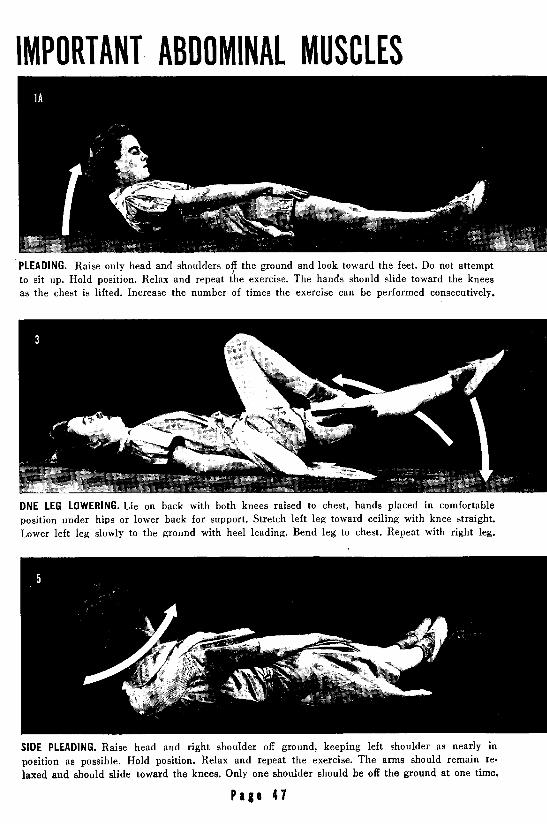
PLEADING. Raise only head and shoulders of the ground and look toward the feet. Do not attemptto sit up. Hold position. Relax and repeat the exercise. The hands should slide toward the kneesas the chest is lifted. Increase the number of times the exercise can be performed consecutively.
ONE LEG LOWERING. Lie on back with both knees raised to chest, hands placed in comfortableposition under hips or lower back for support. Stretch left leg toward ceiling with knee straight.Lower left leg slowly to the ground with heel leading. Bend leg to chest. Repeat with right leg.
SIDE PLEADING. Raise head and right shoulder off ground, keeping left shoulder as nearly in
position as possible. Hold position. Relax and repeat the exercise. The arms should remain re-laxed and should slide toward the knees. Only one shoulder should be off the ground at one time.
Page 47

MORE DIFFICULT EXERCISES FOR ABDOMINAL
SIDE PLEADING WITH ONE LEG LIFT. Lift head, right shoulder, and left leg from ground. At thesame time, touch the left knee with the right hand. Hold position. Relax. Repeat, using oppositearm and leg. Keep left shoulder down. The arms should remain relaxed throughout the exercise.
OPPOSITE KNEE TO ELBOW. Raise head and right shoulder off ground and bring left knee uptoward chest. Bend right elbow and move it across body to touch left knee. Hold position. Relax.Repeat, using opposite arm and knee. The emphasis should be placed on very vigorous body twist.
Page 48
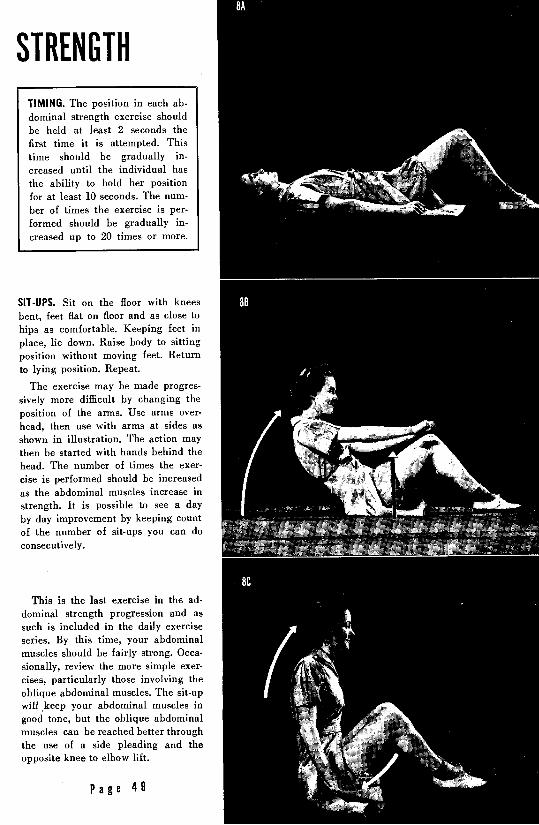
STRENGTHTIMING. The position in each ab-dominal strength exercise shouldbe held at least 2 seconds thefirst time it is attempted. Thistime should be gradually in-
creased until the individual hasthe ability to hold her positionfor at least 10 seconds. The num-ber of times the exercise is per-formed should be gradually in-creased up to 20 times or more.
SIT-UPS. Sit on the floor with kneesbent, feet flat on floor and as close tohips as comfortable. Keeping feet inplace, lie down. Raise body to sittingposition without moving feet. Returnto lying position. Repeat.
The exercise may be made progres-sively more difficult by changing theposition of the arms. Use arms over-head, then use with arms at sides asshown in illustration. The action maythen be started with hands behind thehead. The number of times the exer-
cise is performed should be increasedas the abdominal muscles increase instrength. It is possible to see a dayby day improvement by keeping count
of the number of sit-ups you can doconsecutively.
This is the last exercise in the ad-dominal strength progression and assuch is included in the daily exerciseseries. By this time, your abdominalmuscles should be fairly strong. Occa-sionally, review the more simple exer-cises, particularly those involving theoblique abdominal muscles. The sit-upwill keep your abdominal muscles ingood tone, but the oblique abdominalmuscles can be reached better throughthe use of a side pleading and theopposite knee to elbow lift.
Page 49

IMPORTANT POSTURE BUILDERSOUR body may or may not be in perfect balance. One of the pur-poses of planned exercise is to develop or preserve this balance.
When you exercise one set of muscles it is necessary to develop theopposing set of muscles to an equal degree. This results in perfectharmony and coordination among various parts of the body.
This-is particularly true of the back and neck muscles. This set ofmuscles acts in opposition to the chest muscles. To achieve correctposition you must balance the strength in these two sections.
KNOW YOUR BACK MUSCLESStudy the manikin for a moment. That large muscle attached on
either side of the spine from the neck, reaching halfway down theback, is the "trapezius." It is attached to the collar bone and the tipof the shoulder blades. When this muscle lacks tone the shoulderstend to fall forward. Result: round shoulders.
Beneath the trapezius muscle are other muscles which work tokeep the shoulder blades close to the spine and ribs. When these:muscles are flabby the result is an irregular back- caused by shoul-.der blades that stick out like wings.
BACK MUSCLES HELP YOU STAND ERECTOther muscles running up and down the spine keep the spine
erect. When they're strong, you stand erect. When they're weak, youslump. The muscles of the neck and upper back function to keep the:head in a balanced position. When the head is carried in a forwardposition these muscles are badly strained. This habit may, in its;worst form, cause neckaches and headaches. It is important to de-.velop a proud and erect carriage of the head. First, for reasons of'health; second, for an attractive appearance.
PLANNED EXERCISE DEVELOPS BACK MUSCLESThe back muscles are important in nearly everything you do.
They function whenever the shoulders are drawn back, wheneveryou draw up your trunk in an erect position, whenever you bend
over and straighten up. They are important posture builders..Develop these muscles.
Page 50
I~11 Y ~~I
ARMY TASKS DEMAND THAT YOU
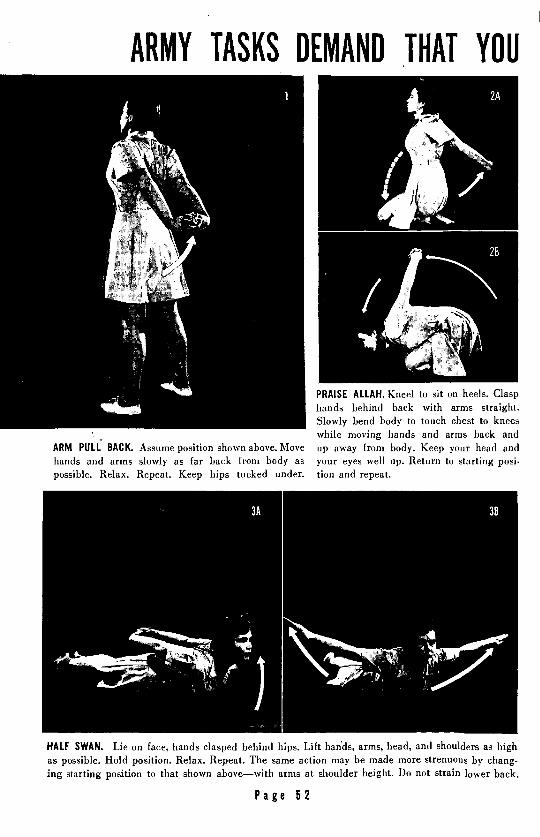
PRAISE ALLAH. Kneel to sit on heels. Claspbands behind back with arms straight.Slowly bend body to touch chest to kneeswhile moving hands and arms back and
ARM PULL BACK. Assume position shown above. Move lip away from body. Keep your head andhands and arms slowly as far back from body as your eyes well up. Return to starting posi.possible. Relax. Repeat. Keep hips tucked under. tion and repeat.
HALF SWAN. Lie on face, hands clasped behind hips. Lift hadds, arms, head, and shoulders as highas possible. Hold position. Relax. Repeat. The same action may be made more strenuous by chang-ing starting position to that shown above-with arms at shoulder height. Do not strain lower back.
Page 52
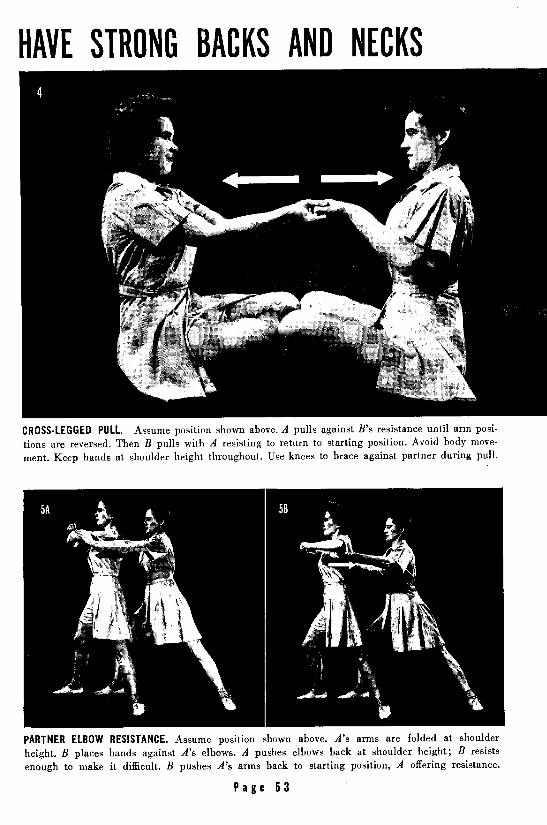
HAVE STRONG BACKS AND NECKS
CROSS-LEGGED PULL. Assume position shown above. A pulls against B's resistance until arm posi-
tions are reversed. Then B pulls with A resisting to return to starting position. Avoid body move-
ment. Keep hands at shoulder height throughout. Use knees to brace against partner during pull.
PARTNER ELBOW RESISTANCE. Assume position shown above. A's arms are folded at shoulderheight. B places hands against A's elbows. A pushes elbows back at shoulder height; B resistsenough to make it difficult. B pushes A's arms back to starting position, A offering resistance.
Page 53

TURN OVER. Sit on floor, knees and legs straight, hands opposite chest, elbows on floor supportingtrunk. Straighten the elbows, turn the fingers toward the head, and lift the hips so that the bodyis supported on heels and hands. Turn from a back-down supported position to a prone fall positionby turning to the left. Lift the right leg and right arm up into the air and bring them down acrossbody to the prone fall position. Continue turning in same direction by lifting left leg and armup into air and returning to starting position. Relax. Repeat movement going in other direction.
RESIST AND ASSISTRESISTANCE EXERCISES. In working with a partner, it is important to under-
stand the principle of resistance. The partner is there to offer just enough resist-ance to make you work a little harder than you would need to if she were not there.Care should be taken that the resistance is not so great that the exercise must be donepoorly. Resist only enough to make the exercise difficult; not enough to make it irn-possible. The amount of force applied necessarily varies with the exercise performedand the individual performing the exercise. Learn to recognize muscle groups, tomake them work against your resistance. Review the Imaginary Push and Pull in theShoulder and Arm Strength Progression keeping in mind the principle of resistance.Remember-apply resistance to make the exercise difficult, not to make it impossible.
Page 54
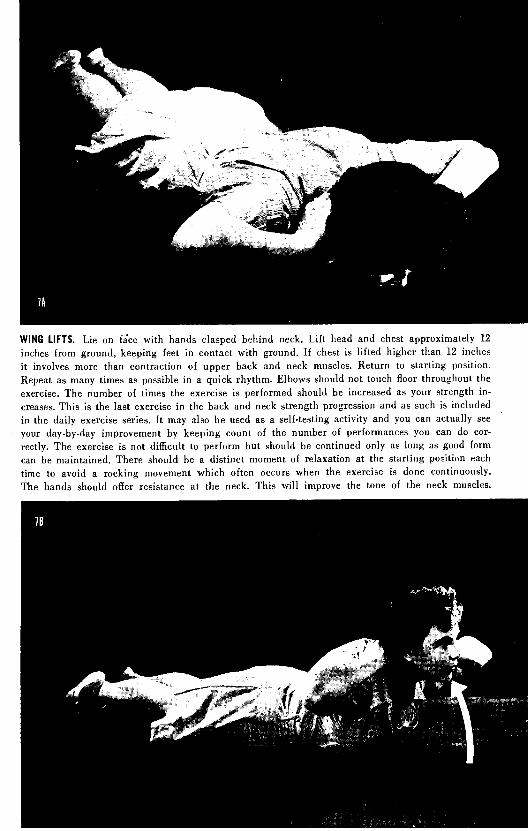
WING LIFTS. Lie on face with hands clasped behind neck. Lift head and chest approximately 12
inches from ground, keeping feet in contact with ground. If chest is lifted higher than 12 inches
it involves more than contraction of upper back and neck muscles. Return to starting position.
Repeat as many times as possible in a quick rhythm. Elbows should not touch floor throughout the
exercise. The number of times the exercise is performed should be increased as your strength in-
creases. This is the last exercise in the back and neck strength progression and as such is included
in the daily exercise series. It may also be used as a self-testing activity and you can actually seeyour day-by-day improvement by keeping count of the number of performances you can do cor-
rectly. The exercise is not difficult to perform but should be continued only as long as good form
can be maintained. There should be a distinct moment of relaxation at the starting position each
time to avoid a rocking movement which often occurs when the exercise is done continuously.
The hands should offer resistance at the neck. This will improve the tone of the neck muscles.

MARCHING DEMANDS LEG STRENGTHIN THE ARMY you'll march.
Each step you take will demand muscle. Not bulky muscle, butlithe, flexible muscle that enables you to take an easy, swingingstride and keep it up.
The anatomy of leg action is displayed by the manikin. Thatmuscle down the front of the leg is the quadriceps-"quad" forshort. It is composed of four muscles. The quad is the kickingmuscle of the leg. It lifts the thighs in front of the body andstraightens the knees.
The muscle pictured on the buttocks also has a scientific name-gluteus maximus. It is a naturally strong muscle, but if it is not usedit is prone to fatty development. Long periods of sitting tend toweaken it, so does artificial support. Vigorous exercise is necessaryto retain this muscle in a normal, vigorous state.
At the rear of the leg is the biceps femoris-part of a group ofmuscles called the "hamstrings." You feel the stretch in this musclewhen you try to touch the ground with your hands while keepingyour knees straight. The hamstring muscle pulls the thigh back andcauses the knees to bend.
That large muscle on the back-of the leg is the gastronemius orcalf muscle. Its tendon runs down to the heel and is commonly calledthe tendon of Achilles. Every time you lift your heel off the ground,with each step you take, you use this important muscle.
Walking, running, jumping, lifting, carrying, and many othereveryday activities demand that you have strong legs. Firmly tonedlegs and buttocks, devoid of excessive fat, are important to attractiveappearance.
Planned exercise helps you avoid or lose the excess weight thattends to deposit on the buttocks, thighs, and calves of the legs. Atthe same time it tones up the muscles so that they have the power tocarry you through a hard Army day.
One more word about marching. When you do it well, you giveyour feet a healthful work-out. But poor control of the legs placesan undue strain on the feet. Then pain and fatigue result.
Page 56

U
II"

WORK TOWARD EASE AND SMOOTHNESS
PARTNER PUSH-UP. A lies on ground, arms under hips, feet stretched up toward partner's shouldersat 450 angle, legs slightly apart. B places hands and shoulders on A's feet, relaxing so A is holding
HALF KNEE BOUNCES. Stand erect with hands Repeat rhythmically and with increasing speedplaced on hips. Bend knees, keeping body so that a bouncing movement is attained. Kneeserect. Return almost to a starting position. straighten only at the end of the exercise.
Pa I58

OF PERFORMANCE IN ALL EXERCISES
her entire weight. A slowly lowers legs by bending knees to chest, then stretches legs back tostarting position. B remains relaxed with weight on A's feet. Repeat exercise until legs become tired.
FULL KNEE BENDS, HANDS ON KNEES. Bend FULL KNEE BENDS, HANDS ON FLOOR. Bendknees to squat position with hands on knees. knees to squat position touching hands to floorUse hands on knees to push back to stand, between knees. Rise. Repeat it rhythmically.
Pi.r 59

JUMPING. Bend knees slightly as in 5A. Rise on toes. Repeat rhythmically and with increasing speeduntil a jump is attained. Work for smoothness of movement then for height in each jump. Usearms to lift body into air. Toes should be pointed when body is in air. Shock of landing should be
absorbed by landing on toes and shifting weight to heels and bending knees. See "Jumping," page 71.
SQUAT JUMPING. Stand with eitherleg slightly in front. Bend knees to
squat position. Extend legs forcibly to
cause body to rise a few inches off
ground in an erect position. Use arms to
help lift body into air. From this jump,
return to squat position and repeat
rhythmically. After the action is mas-
tered increase the height of the jump.
Now, with a fresh eye, study the pic-
tures on these pages once again. What
is their one outstanding quality? Right--
it is the posture and balance maintained
throughout each phase of the exercises.
Be sure you also watch your posture as
you do these different activities.
Page 60

- ii
/A
RUNNING. For this exercise arms should be bent to a comfortable position for running. Legs should
be lifted as high as hips in front with toes pointed down toward ground. Running time should be
gradually increased each day to build up endurance. In an outdoor program running for distance
should be substituted. To gain the most benefit, maintain the principles of good posture while running.
Page 61

ARMIES MOVE ON THEIR FEETARMIES move on their feet. That fact has hitherto ruled out female
Armies, for the average woman's foot is her "Achilles' heel"--the weakest spot in her armor. High heels, poorly fitted shoes, andneglect of proper foot hygiene have made women's feet a source oftrouble and unhappiness.
In the Army you receive well-fitted shoes with a moderate heel-_designed to help you use your feet correctly. Planned exercise is the:second factor in winning foot health.
Study your foot for a moment. Its bony structure consists of twoarches. One is called the longitudinal arch because it runs the lengthof the foot. The other is called the metatarsal arch because it runsunder the metatarsal bones-the bones of the sole of the foot. Whenone of these arches is strained it weakens the other, for the foot isan unusually sensitive and well-balanced structure.
This structure is assisted in maintaining its position by ligamentsand muscles. The muscle you see on the side of the manikin's leg isthe "tibialis anticus"-a big name for a muscle which runs alongthe front of the leg near the shinbone. This muscle runs across theankle and attaches itself to the underside of the foot near the bigtoe. It therefore helps to maintain the arch. When it contracts it pullsup on the arch.
There are many other sets of muscles on the bottom of the footthat play an important part in maintaining the arch. They come intoplay when the toes are used.
Whether or not you remember the bony or muscular structure ofthe foot isn't important. It is important to know that the best exer-cise for the foot is to walk correctly. To do this simply place the heeldown squarely. Shift the weight down the foot more toward the outerborder than the inner border. Grip and push off with the toes.
Planned exercises give your feet the build-up they need. Theymake walking and standing easier, more pleasurable, less fatiguing.Nothing in this entire series can mean more to a woman's Army thanthe exercises that follow.
See "Marching Exercises" for variations of walking that help foothealth.
Page 62

mmI
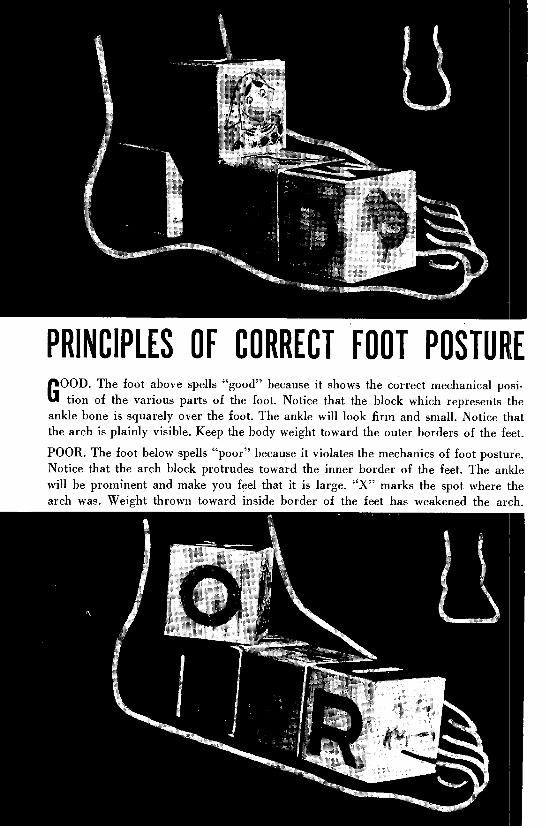
PRINCIPLES OF CORRECT FOOT POSTUREGOOD. The foot above spells "good" because it shows the correct mechanical posi-
tion of the various parts of the foot. Notice that the block which represents theankle bone is squarely over the foot. The ankle will look firm and small. Notice thatthe arch is plainly visible. Keep the body weight toward the outer borders of the feet.
POOR. The foot below spells "poor" because it violates the mechanics of foot posture.Notice that the arch block protrudes toward the inner border of the feet. The anklewill be prominent and make you feel that it is large. "X" marks the spot where thearch was. Weight thrown toward inside border of the feet has weakened the arch.
i:

SOME SIMPLE EXERCISES FOR YOUR FEET
HEEL AND TOE RAISING. Stand with feet par- FOOT CIRCLING. Sit on ground with legs out-
allel. Rise on toes. Return to starting position. ·stretched, hands under one knee to hold legShift weight to outer border of feet. Return off the ground. (1) Point the toe as far as pos-to starting position. Shift weight to heels, sible. Relax. Push the heel as far out as pos-
raising toes from ground. Return to starting sible. Relax. Combine the two. (2) Turn theposition. When these three movements can be foot in as far as possible. Relax. Turn the foot
done well, repeat them consecutively; up on out as far as possible. Relax. Combine the two.
toes, roll to outer edge of feet, and back (3) Circle the foot. Emphasize pulling up on
to heels without returning to starting position. the arch. Do not twist the leg from the knee.
Page 65

MORE EXERCISES
HEEL AND TOE PULL. Sit on ground with soles offeet together, hands grasping ankles. The backshould be kept straight throughout the exercise.
BALANCED HEEL LOWERING. Standing on footlocker with only balls of feet holding weight,heels extended back off trunk. Rise on toes.
Keeping heels together, pull balls of feet as farapart as possible. Keep heels and little toes incontact with the ground. Return to first position.
Keeping balls of feet together, pull heels as far Drop the heels down as far as possible belowapart as possible. Return to starting position. Re- the level of the trunk. This exercise can bepeat these two stretching movements alternately. done with a partner aiding for good balance.
Page 66

FOR FOOT FITNESS
TOE PICK UP. Pick up paper or pencil with toes.Change object from one side of body to otherby lifting and placing to outside of opposite foot.
TOE GATHERING. Curl toes over edge of towel.Pull towel toward you by gripping, releasing,lifting toes. Relax. Repeat. Stress curling toes.
SOLE TO SOLE. Sit on ground with legs out- TENDON STRETCHING. Stand erect and fall to-
stretched. Attempt to touch soles of feet together ward wall keeping feet flat on floor. Regulatewithout bending knees. Remember posture. your stretch by the distance from the wall.
Page 67

HOW TO SAVE ENERGYT'S OBVIOUS that five women are stronger than one woman.
It's equally obvious that five sets of muscles are stronger than
one set of muscles. Correct body mechanics is the art of distributing
the strain of a job over several sets of muscles instead of putting
the whole load on a few. It is the art of using the strongest muscles
of the body instead of straining the weaker members. As a result,
you do your job more efficiently. You use up less energy. You avoidl
injury. And you feel fresher and happier at the end of a hard day.
Turn for a moment to page 83. Note how Josephine Jerk wields
a broom and lifts a weight. Because she uses her body clumsily,,
she doesn't do her job very well. She is inefficient. She looks
inefficient.
We laugh at the idea of a person scratching her right ear with her
left hand. Why? Because it seems a foolish waste of energy-a hard
way to do an easy thing.
Yet many of us distort our bodies, employ wrong muscles and
approach simple tasks in complex ways that would also be laughable
were they not so costly in energy.
It is not hard to understand the simple principles underlying the
exercises that follow. They are based on practical common sense.
Neither is it hard to have them become fixed habits. At first youmay be conscious of them as you do your work. But after a while,
you will employ the principles of correct body mechanics without
realizing it-in everything you do, whether it is making a bed or
rising from a chair.
On the following pages you see correct ways of lifting, pushing,
pulling, falling, and crawling. Study these pictures and you dis-
cover that when the body does these things efficiently, it does them
gracefully as well. The two-efficiency and grace are inseparable.
Page 68

I11
BODY MECHANICS: LEARN THE RIGHIT
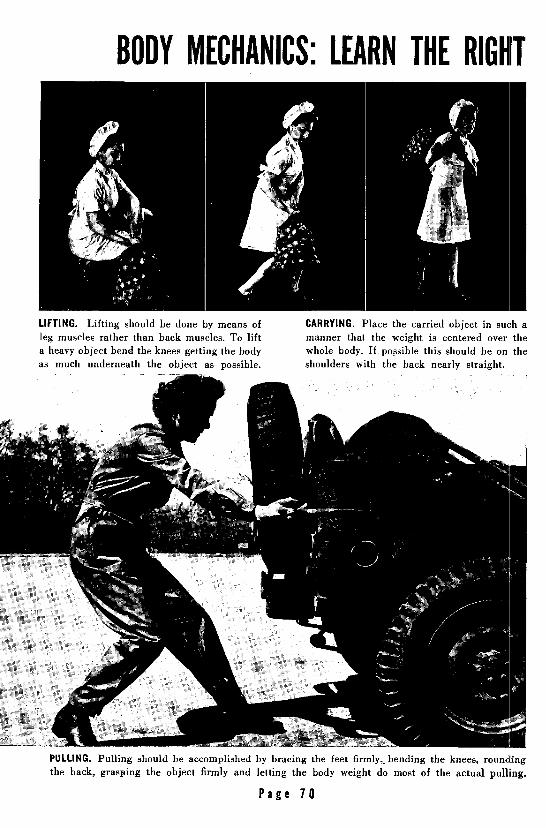
LIFTING. Lifting should be done by means of CARRYING. Place the carried object in such aleg muscles rather than back muscles. To lift manner that the weight is centered over thea heavy object bend the knees getting the body whole body. If possible this should -be on theas much underneath the object as possible. shoulders with the back nearly straight.
PULLING. Pulling should be accomplished by bracing the feet firmly,. bending the knees, roundingthe back, grasping the object firmly and letting the body weight do most of the actual pulling.
Page 70

WAY TO DO THESE EVERYDAY JOBS
PUSHING. In pushing any heavy object make use of the whole body weight. Lean the body fromthe ankles, brace the feet and push against the ground. This may be done by facing the obj'ectand pushing with the arms. Or with the right or left shoulder against the object and the bodyfacing sideways and pushing with shoulder. Or with back against object pushing with upper back.
JUMPING. When jumping from a height land on the toes bending the knees to absorb the shock. Theknees should be bent in proportion to the height from which the jump is made.'Study pictures.
Page 71
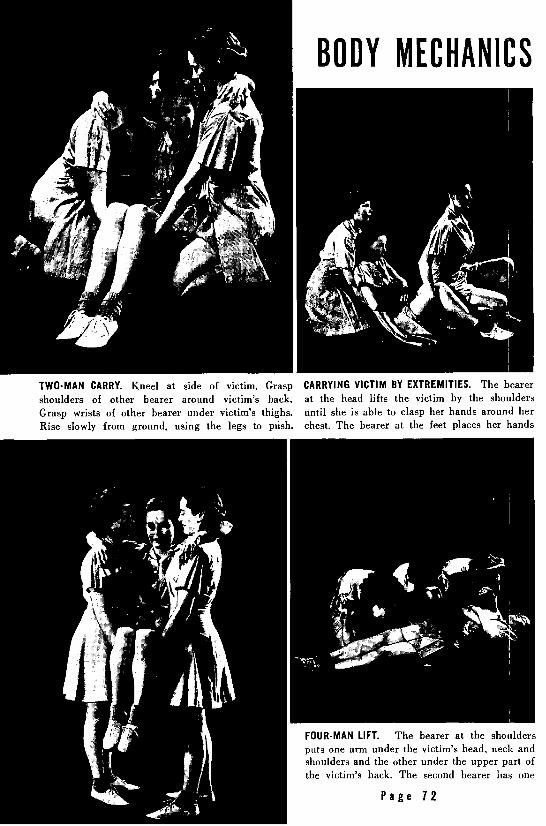
BODY MECHANICS
TWO-MAN CARRY. Kneel at side of victim, Grasp CARRYING VICTIM BY EXTREMITIES. The bearershoulders of other bearer around victim's back. at the head lifts the victim by the shouldersGrasp wrists of other bearer under victim's thighs. until she is able to clasp her hands around herRise slowly from ground, using the legs to push. chest. The bearer at the feet places her hands
FOUR-MAN LIFT. The bearer at the shouldersputs one arm under the victim's head, neck andshoulders and the other under the upper part of
the victim's back. The second bearer has one
Page 72

ARE IMPORTANT IN FIRST AID
around and under the victim's knees. At the FIREMAN'S DRAG. Victim's hands are tied orsignal, "Lift" from the head bearer, the victim is clasped around bearer's neck. Bearer raises vic-lifted and carried. In rising, the bearers must be tim's head and shoulders off ground and pro-sure and lift themselves by means of leg muscles. gresses by crawling, dragging victim on ground.
arm under the victim's back and the other under side of the victim at the hips and is not shownthe thighs. The third bearer places one arm here. All bearers lift together and place victimunder the knees and the other under the ankles. on their knees. All rise together and carry victimThe fourth bearer takes position on the opposite in horizontal position. Keep step in walking.
Page 73

FALLING AND CRAWLING
FALLING. With right foot placed forward and toes turned inward, fall forward, landing on the outsideof the right knee and thigh to break the fall. As body falls toward ground, break the rest o:[ thefall with hands. Keep body relaxed. Distribute impact of ground evenly along the entire body.
CRAWLING. To prepare to crawl, bend the left knee and raise it as high as possible with the insideborder of the left foot against the ground. The hands are placed opposite the ears. The body ispulled forward by the action of the arms and the bent legs. Keep body close to the ground always.
Page 74

THESE stunts, games, and relay races are in the nature of recrea-
tion. However, they should be emphasized as abilities and skillswhich are necessary aids to body conditioning. Balance cannot be
overemphasized. Every opportunity should be taken to improve
your control in balance work. Remember that good posture depends
on balance. The partner contests give you an opportunity to pit
your strength and agility against an opponent. Relay races involve
speed, agility and swift coordination between body and mind.
Page 75

GOOD WAYS
HAND WRESTLE. Take position shown above. Try to makepartner move either foot by pushing or pulling her offbalance. without body contact. Quick movements are best.
ROOSTER FIGHT. Take position shown.Attempt to make opponent release toegrip by pushing with right shoulder.
TWO ARM TUG. Take position shown. Attempt to pullpartner forward or push her backward. In this the armsshould be kept at shoulder height. Notice both 2A and 2B.
DUCK WADDLE. Walk forward pickingup each foot, lifting it with the handgrasping ankle. Do not release ankles.
Page 76

TO LEARN BALANCE AND AGILITY
CRAB WALK. Take position shown above. Move body to either side by walking on hands and feet.The body may also be moved frontward or backward. This movement can be used as a relay raceif the distance is not too great. Be sure that the hips are kept well off the ground, with arms straight.
Page 77
ifth dstnc i nt oograt B sret atte hisaekp eloftegrud iham tagt

HEEL CLICK. Erect standing.Jump into air and try to clickheels twice before landing.
SQUAT THRUST. Stand erect. Bend knees and place hands on floorbetween knees. Extend legs backward with a jump. Body should besupported on hands and toes so that a straight line could be drawnfrom head to heels. Return to bent knee position. Return to erectstanding. Repeat these four movements rhythmically. This exercisemay be used as a test of agility and endurance by counting thenumber of performances you are able to complete in 30 seconds.
BALANCE STAND. Position asin picture 10. Close eyes.Balance for ten seconds.
BALANCE WALK. Walk toe toheel in a straight line witheyes closed, arms extended.
Page '78

RELAY RACES ARE TESTS OF SPEED
all
INE RELAY. The group forms in files with about 5 feet between files. Each file ismade up of an equal number of participants. In the above illustration there are five.
The first person in each file should be behind a restraining line over which she doesnot step until the signal to begin. Opposite each file at a chosen distance should be apoint to which each participant should travel. On the signal to go, the first person ineach line proceeds to the given point and returns to the starting line, when the nextperson in each file starts the trip. Upon completion of the trip the first person goesto the end of the file. This continues until the last person in the file has taken her turn.The first file to finish wins. The activities used in relay races are limited only by theinstructor's ingenuity. Any of the common locomotor movements such as running,hopping, jumping, sliding, or skipping may be used. Many of the agility activitiesdescribed on previous pages can be used when the distance of the race is not too great.
Page 79

SHUTTLE RELAYS. The group forms in teams composed of two files facing each other,
with an equal number of participants in each file. The above illustration has 5 participantsin each file making a team total of 10 participants. Each file is behind a restraining
line. On the signal to go the first person in the left file proceeds to the first person in
the right file. The first person in the right file goes to the left file. This shuttle continues
until every person is in the file opposite to the one in which she started. The firstteam to be so formed wins. The women raise their hands to signal that they are finished.
OVER AND UNDER RELAY. An object is passed over the head of one player, between the
legs of the next player, etc., until the last player receives it. She runs to the front of thefile and starts the object over and under the file again. This continues until the file is in
original order. The first to finish wins. If object is lost, it must be restarted in same place.
SEE "RECREATION" FOR GAMES TO USE
Page 80

ARMS AND THE WOMANTHESE civilians build a machine of war. The path of each moving part is
fixed. Pistons, bearings, wheels, move directly and efficiently, without
wobble and waste. The human body is designed to function with equal
efficiency. But the range of movement is broader; the chances of wasteful
motion greater. Movement, to be efficient, must be controlled by muscles-
muscles trained to perform everyday actions with precision and control.
The science of your body's movement is called Kinesiology (Kin-eez-i-
ology). It governs the movements of these workers. It governs the perform-
ance of your military duties. The planned exercises you receive in the Army
are based on this science. They develop habits of movement which save
energy, improve efficiency, reduce fatigue.
Page 81
IfWE~~~
9'O

DON'T BE AJOSEPHINE JERK
OSEPHINE JERK is the limp number inevery outfit who dives into her daily
dozen with the crisp vitality of a dampmop. Her joints are all limber in the wrongplaces-her head, hands, and hips dangle,her full dips resemble Pike's Peak, and sheworships the body beautiful to such anextent that she always bends her knees.
Josephine isn't built like other women.Her body has a posture all its own. Andwhile she can snap to it when the sergeant'seye is on her, bones and muscles fold uplike an accordion when she's on her own.Her body lies down standing up.
Because Josephine's muscles and boneslet her down, she counts on her girdle tohold her up. But when the going gets tough,usually after 10 minutes of any activity, sheleans heavily on the nearest broom.
Josephine never does anything in halves.When she lifts a weight, she throws in herbody's weight for good measure, and won-ders why she just can't make it.
These pictures may seem funny. But toomany Josephine Jerks hinder, rather thanhelp, the war effort.
Don't be a Josephine Jerk.
When you exercise, do it vigorously andcorrectly.
Get the most out of each exercise.
Realize that planned exercise, properlydone, develops your entire body evenly,with balanced strength and graceful postureas the result.
When you work, make your task easierby using your body properly.
Planned exercise shows you how.
Page 83
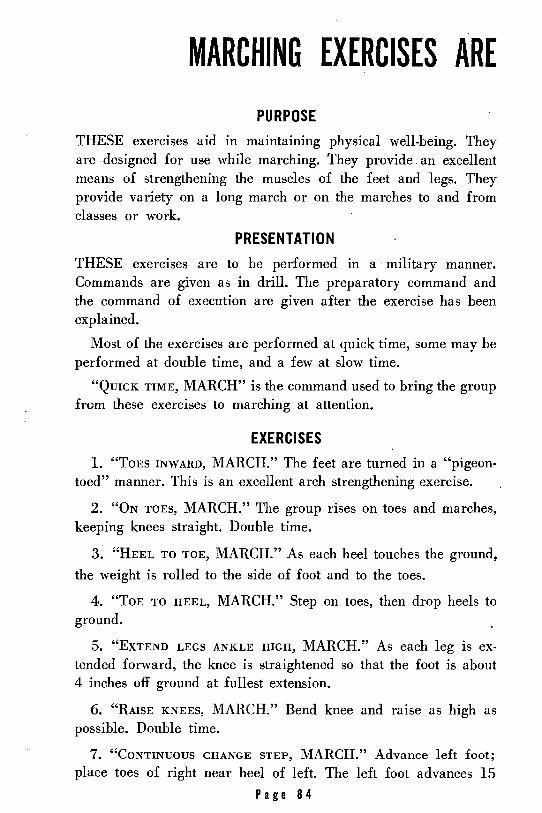
MARCHING EXERCISES AREPURPOSE
THESE exercises aid in maintaining physical well-being. Theyare designed for use while marching. They provide an excellentmeans of strengthening the muscles of the feet and legs. Theyprovide variety on a long march or on the marches to and fromclasses or work.
PRESENTATION
THESE exercises are to be performed in a military manner.Commands are given as in drill. The preparatory command andthe command of execution are given after the exercise has beenexplained.
Most of the exercises are performed at quick time, some may beperformed at double time, and a few at slow time.
"QUICK TIME, MARCH" is the command used to bring the groupfrom these exercises to marching at attention.
EXERCISES
1. "TOES INWARD, MARCH." The feet are turned in a "pigeon-toed" manner. This is an excellent arch strengthening exercise.
2. "ON TOES, MARCH." The group rises on toes and marches,keeping knees straight. Double time.
3. "HEEL TO TOE, MARCH." As each heel touches the ground,
the weight is rolled to the side of foot and to the toes.
4. "TOE TO HEEL, MARCH." Step on toes, then drop heels toground.
5. "EXTEND LEGS ANKLE HIGH, MARCH." As each leg is ex-tended forward, the knee is straightened so that the foot is about4 inches off ground at fullest extension.
6. "RAISE KNEES, MARCH." Bend knee and raise as high aspossible. Double time.
7. "CONTINUOUS CHANGE STEP, MARCH." Advance left foot;place toes of right near heel of left. The left foot advances 15
Page 84
A SUPPLEMENTARY PROGRAM AIDinches, and right foot advances a full step. The toes of the leftfoot are then brought up to heel of the right foot, which advancesa half step when left is advanced a full step, etc. (step, close, step).
8. "LUNGING STEP, MARCH." The length of step is 45 inches,
the knee in advance being well bent, the other leg remaining fullyextended, heel raised, trunk erect. Slow time.
9. "CROSS STEP, MARCH." As legs are extended forward in
turn, the right leg is crossed and placed to the front and outsideof the left. The left leg is then brought around the right leg andcrossed. Slow time. The body does not turn.
10. "HANDS ON SHOULDERS, MARCH." "WITH ELBOW PULLING,
MARCH." Place hands on shoulders with elbows bent shoulderlevel. On each left step pull elbows back. On each right step let
'elbows rebound to original position.
11. "SLIDE (LEFT OR RIGHT), MARCH." (Left) Step to leftwith left foot. Bring right foot to left. Step to left with left footand repeat.
12. "HANDS ON SHOULDERS, MARCH." "ARM STRETCHING UP-
WARD, SIDEWARD, FORWARD AND DOWN, MARCH." On each left
step, place arms in the position and in the order of the command.On each right step return the hands to the shoulders.
].3. "SHOULDER HUNCHING, MARCH." Arms hang loosely at
sides. On each left step, hunch shoulders up. On each right step re-
turn shoulders to normal. Shoulders may be hunched forward,
backward or circled.
14. "ARMS OVERHEAD, ON TOES, MARCH." Place arms high
overhead, palms facing each other. Hold body stiffly erect andwalk forward, high on toes with ankles and knees tense.
15. "WITH STIFF ARMS AND LEGS, MARCH." Arms swing stifflyforward to shoulder level and backward in opposition to legs.Hold body stiffly erect and walk forward with knees stiff.
Page 85

GAUGE YOUR PHYSICAL ABILITYPURPOSE
SELF-TESTING activities may be used by any woman to test her ownphysical ability. If you cannot perform these simple tests, it means that youmust spend more time and more effort on the improvement of your physicalcondition. Lack of success in these activities denotes lack of muscle tone andendurance. No standards of performance have been set at this time. Thereshould be constant improvement over a period of time to the limit of yourcapacity.
Self-testing activities may be used by the instructor to test the physical.quality of a group. Results may then be used as a guide to lesson planning.Results may be used to motivate the women to more strenuous effort bypointing out their weaknesses. Results will point out individuals needingspecial attention.
CONDUCT OF THE TESTALWAYS use light exercise (such as a Cadence Series) before proceedingwith the testing activities.
Instructors should prepare recording sheets in advance. A sample ofsuch a test blank is on the opposite page.
Instructors and individuals taking the test should be sure of the correctexecution of the test items.
SELF-TESTING ACTIVITIES1. FULL DIP. This exercise may be found on page 88. Score is determined
by the number of full dips executed correctly. Only the chin should touchthe floor on each full dip.
2. SIT-UPS. This exercise may be found on page 88. Score is determinedby the number of sit-ups that can be executed correctly. The hands shouldbe at the sides and the feet on the floor on each sit-up.
3. WING LIFTS. This exercise may be found on page 89. Score is deter-mined by the number of lifts that can be executed correctly. The feet shouldremain in contact with the floor and the head should be lifted not more than1 foot off the floor on each lift.
4. ENDURANCE may be tested by the following means:Squat Thrust: This exercise may be found on page 78. Score is determined
by the number of squat thrusts performed in 30 seconds.Running: Endurance may be determined by either running in place or
running for distance at an even dog trot pace. Consult page 61 for thecorrect execution of stationary running and page 23 for the correct methodof running.
5. BALANCE. Balance exercises may be found on page 78. Score isdetermined by the number of seconds position can be held.
Page 86

WITH THESE SELF-TESTING ACTIVITIES
PLATOONR
N _
HIS TORY:
Age: Years and months.Height: Nearest half inch.Weight: Nearest half pond.
CHART NOTES:
1. The items of age, height and weight are included toassist instructor or woman to evaluate performance.
2. A chart of the same type may be set up for the DailyExercise Series. It would serve as a check on the wom-an's improvement in the field.

THIS DAILY EXERCISE SERIES WILL HELPT D O E S N 'T ments to do a brief and simple seriestake much time of exercises. And they do these exer-
and energy to cises every day thereafter.keep yourself fit These "keep-fit-in-the-field" exer-in the field. What cises are described here. There areit takes are com- three important things about themmon sense and which should never be forgotten.will power. First, you may do them alone, un-
Some women observed. You may become careless.WARM-UP coast on the ener- Don't. Their value depends on your
gy and muscle tone built up by doing them as correctly and pre-planned, compulsory exercise in cisely as you would under the eyescamp. They're too tired or "busy" of an instructor.to exercise in the field. Their jobs Second, do them all. For each ofuse certain muscles and neglect them is planned to preserve the toneothers. Balanced control is lost. The of a certain set of important mus-smooth, elastic muscle structure cles. To do some and not do othersbuilt up in camp turns flabby. Fat is to fall short of the balanced con-builds up in the wrong places. Pos- trol essential to efficiency and goodture becomes sloppy. A gloomy pic- appearance.ture, but a true one. Third, do them the very first day
Other women form the exercise you're on your own. Don't wait to,habit. On the very first day they be checked and supervised. Make itleave camp, they find a few mo- your own very special responsibility.
FULL DIP SIT-UP
Page 88

TO KEEP YOU FIT IN THE FIELDDAILY PROGRAM
WARM-UP EXERCISE head. For further description of thisexercise, see page 49.
Choose any cadence series or combi-nation of cadence exercises that in-volves all sections of the body. Per-form vigorously so that the body Repeat as many times as possible,is ready for the more strenuous trying to better your former high.activity. Be careful not to lift the back too
high. The emphasis should be on the
FULL DIPS upper back and neck. Completedescription of this exercise is on
Perform as many full dips as pos- page 55.sible. Try to exceed the total num-ber you were last able to do. This RUNNINGexercise is shown at the bottom ofthe page. For a complete descrip- When running in place, strive totion, see page 44. increase the time of endurance.
N'ever desert good form for time.
SIT-UPS When running for distance, in-crease the distance as often as pos-
Perform as many times as possible. sible. For the correct execution ofIncrease the number daily. This stationary running, see page 61. Forexercise can be made more difficult the correct method of running forby placing the hands behind the distance, see page 23.
WING LIFT RUNNING
Page 89

RELEASE OFTENSION ACTIVITIESCCUPATIONS that require long periods
of desk work or other close work tendto keep your body tense. Efficiency is low-ered if this tenseness is not relieved. Theseactivities will help to relieve that tensenessand repair your efficiency. Many of themcan be performed at your desk. Othersmay be used to advantage in barracks.
EXERCISES
1. Progressive Relaxation. Lie back down-ward on the ground or the floor. Extendboth arms overhead and stretch completelythroughout the body. Relax the entire body,beginning with the fingers and letting thefeeling of freedom flow through the bodyto the toes. Repeat. This is a good exerciseto use if you have difficulty going to sleep.
2. Neck Release. See chart on page 121.Use any or all of the exercises under HEAD orSHOULDERS. Perform in a relaxed manner.
3. Arm Fatigue. See chart on page 121.Use any or all of the exercises under ARMSWINGING or ARM FLINGING. Perform ina relaxed manner.
4. Lower Back Fatigue. See chart onpage 121. Use any or all of the exercisesunder TRUNK. Perform in a relaxed manner.
5. Foot Relaxation. See Foot Exercises,pages 62 to 67.
6. Whole Body Release. See chart onpage 121. Use any cadence series, prefer-ably 1 or 2. If variety is desired, a seriesmay be made up by selecting any one exer-cise from each column. Thus, an individualmay choose those exercises she likes toperform and originate her own series.
Page 90

BRITAIN'S WAAFSRITAIN'S Women's Auxiliary Air Force was formed on June 28, 1939, by Royal
Warrant. It is part of the Crown forces, under direct command of the RAF. Its
members do not fly, but they serve as armorers, electricians, flight mechanics, wire-
less operators, motor transport mechanics, meteorologists, cooks, waitresses, and in
dozens of other occupations. Among other jobs, they serve as balloon barrage crews.
Hoisting a balloon into the air is a muscle-straining ordeal. It requires 10 or 12 men
to handle a barrage balloon. Today the job is being done by women. That takes
strength and stamina-won by planned exercise in camps throughout the Empire.
The WAAF is renowned for the superb posture of its members. And their reliability,
year after year, has won the applause and admiration of the senior Services.
Page 91

SOME PRACTICAL HINTS ONUNARMED self-defense activities help to prepare women to takeU care of themselves under all circumstances. The occasion maynever arise where such tactics are needed; but if it does, the womenare not defenseless, though unarmed. Unarmed self-defense trainingis essential for military police groups and overseas contingents, butshould be presented to as many women as possible.
INSTRUCTION MATERIALINSTRUCTION should take place on the basis of FM 21-150,"Unarmed Defense for the American Soldier." Consult this manualfor methods of teaching. The following techniques are recommendedfor inclusion in unarmed self-defense training. The instructor mustremember that the content of the course should be determined bythe time allotted for the whole course. A little knowledge is danger..ous. Plan the course so that all instruction is thoroughly mastered.
The following references are to FM 21-150:
1. Basic principles.-Section II.
2. Wrist escapes.-Section III.
Defense against two-hand overhand grip on both wrists-Paragraph 8.Defense against two-hand underhand grip on both wrists-Paragraph 10.
Page 92

UNARMED SELF-DEFENSE FOR WOMENDefense against left-hand grip on right wrist or right-hand grip on leftwrist-Paragraph 11.
Defense against two-hand grip on one wrist-Paragraph 13.
3. Escapes from body holds.-Section IV.
Two escapes from bear hug-Paragraph 17.Escape from first rear underarm body hold-Paragraph 20.Escape from fourth underarm rear body hold-Paragraph 23.Escape from first overarm rear body hold-Paragraph 25.
4. Defense against choke holds.-Section V.
Second defense against two-hand front choke hold-Paragraph 28.Second defense against two-hand front choke hold against wall-Par. 33.Third defense against two-hand front choke hold against wall-Par. 34.
5. Taking prisoners.-Section VII.
Handling a hand-squeezer-Paragraph 41.Ejecting a troublesome visitor-Paragraph 42.A simple come-along-Paragraph 43.Alternate for simple come-along when meeting resistance-Paragraph 44.Taking an approaching man prisoner-Paragraph 45.Fingers come-along-Paragraph 46.Lock come-along-Paragraph 47.
6. Incapacitating an opponent.-Section XV.
Page 93
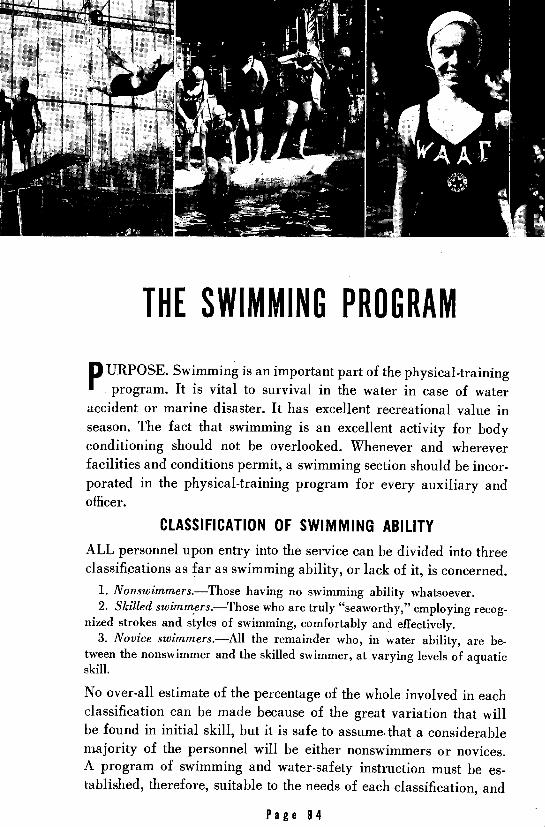
THE SWIMMING PROGRAMP URPOSE. Swimming is an important part of the physical-training
program. It is vital to survival in the water in case of wateraccident or marine disaster. It has excellent recreational value inseason. The fact that swimming is an excellent activity for bodyconditioning should not be overlooked. Whenever and whereverfacilities and conditions permit, a swimming section should be incor-porated in the physical-training program for every auxiliary andofficer.
CLASSIFICATION OF SWIMMING ABILITYALL personnel upon entry into the service can be divided into threeclassifications as far as swimming ability, or lack of it, is concerned.
1. Nonswimmers.-Those having no swimming ability whatsoever.2. Skilled swimmers.-Those who are truly "seaworthy," employing recog-
nized strokes and styles of swimming, comfortably and effectively.3. Novice swimmers.-All the remainder who, in water ability, are be-
tween the nonswimmer and the skilled swimmer, at varying levels of aquaticskill.
No over-all estimate of the percentage of the whole involved in eachclassification can be made because of the great variation that willbe found in initial skill, but it is safe to assume. that a considerablemajority of the personnel will be either nonswimmers or novices.A program of swimming and water-safety instruction must be es-tablished, therefore, suitable to the needs of each classification, and
Page 94

it should be so arranged that learners can progress from one classifi-
cation to another as they master the skills in each phase.
ORGANIZATION FOR INSTRUCTIONSWIMMING INSTRUCTORS. Swimming instructors should be
qualified American Red Cross Water Safety instructors, and should
be provided with Red Cross textbooks, instructor's manuals and
guides, and test and certification materials.NoTE.-These may be obtained without cost for use of watersafety instructors upon application to the American Red CrossField Director stationed at any post.
GROUP CLASSIFICATION. Each group should be classified accord-
ing to ability, and instruction groups should be formed in each
classification. A system of self-classification may be used in each
group which is not only effective but is the means of saving the
time which would ordinarily be used in classification tests. Briefly,
it is nothing more than an announcement by the instructor at the
beginning of the course that all nonswimmers in the group move
out of ranks to form a unit of their own; then, that all skilled swimmers
perform a similar detachment operation. The group remaining con-
stitutes the novice classification. Actual operation of this plan indi-
cates that many novices at the lower level of novice skill will classify
themselves as nonswimmers and that some semiskilled swimmers
will automatically place themselves in the novice class, a helpful
tendency in each instance.
For mutual aid and safety, the "Buddy" system should be used
in all class periods.
NOTE.-For description of system, see pp. 54-55, Red Cross Life
Saving and Water Safety Textbook.
Page 95

TIME ALLOTMENT FOR SWIMMING. Whenever possible, dailyswimming instruction periods should be scheduled, since continuityis a desirable factor in the learning process. Certainly, trainingshould be not less than three periods or sessions per week.
INSTRUCTION FOR NONSWIMMERS
OVER-ALL OBJECTIVE. The over-all objective of the non-swimmer instruction is to get the nonswimmer afloat and water-borne, and navigating under her own power as quickly as possibleand with a minimum of difficulty. The rate of progress, however,must be consistent with mastery of the fundamental principles ofswimming which are best begun at this level. These are: (1) Useof buoyancy; (2) breath control and breathing; (3) relaxation;(4) balance; (5) swimming and floating positions; (6) funda-mental propulsive strokes.
It is recommended that the American Red Cross Beginner's Coursebe used to attain these objectives.
NOTE.-For reference see pp. 30-46, Red Cross Instructor'sManual for Swimming and Diving Courses.
SKILLS TO BE ACHIEVED. This course contains the followingmajor elementary skills:
1. Breath holding. 9. Finning.2. Rhythmic breathing. 10. Combined stroke (front) hu-3. Prone float. man stroke.4. Prone glide. 11. Combined stroke (back).5. Back glide. 12. Change of direction.6. Kick glide (on front). 13. Turning over.7. Kick glide (on back). 14. Jumping into waist-deep water.8. Armstroke (beginner). 15. Jumping into deep water.
For complete description of listed skills see page 15, chapter II,Red Cross Swimming and Diving Textbook, "Learning How toSwim."
The course finishes with two combined tests in which are incor-porated many of the above-listed skills.
NOTE.-For description of this, see pp. 45-46, Red CrossInstructor's Manual for Swimming and Diving Courses.
Page 96

RESULT OF BEGINNER'S COURSE. The end result of the Be-ginner's Course is not only to get the nonswimmer afloat and navi-
gating with some degree of ease in deep water. If the fundamentalprinciples of support and propulsion are well-learned, the non-swimmer at the conclusion of the course, should be able to remainafloat for a half-hour or more and propel herself for a considerable
distance.
If formal instruction for the individual has to end at this point,and time permits, additional practice may be given in swimmingpartially and fully clothed, and in the use of auxiliary floatingsupports.
NOTE.-See Red Cross Instructor's Guide for Functional Swim-ming and Water Safety Training, "Shirt-tail life saving."
INSTRUCTION FOR NOVICE SWIMMERS
NOVICE SWIMMERS are novices for one of two reasons; eitherthey have had insufficient instruction and practical experience in
the water, or they are self-taught. In either case they are, and willremain, novices because they have not mastered the fundamentalprinciples upon which effective swimming is based. At the sametime, they have eliminated fear of the water, and do possess some
crude aquatic skill.
In order that the novice group may truly learn the fundamentalprinciples of use of buoyancy, breath-control and breathing, relax-ation, balance, and effective swimming and floating positions, it isrecommended that all novice swimmers be given the American Red
Cross Beginner's Course training.
COURSE CONTENT. The course content should not differ in de-tail from that given to nonswimmers. However, novices will accom-plish the skills listed in a much shorter time than nonswimmers.Therefore, as soon as the listed skills are mastered and the funda-mental objectives attained, the remaining class hours allotted toswimming instruction may be utilized for more advanced instruc-tion in preparation for Functional Swimming and Water Safetytraining which should follow.
Page 97
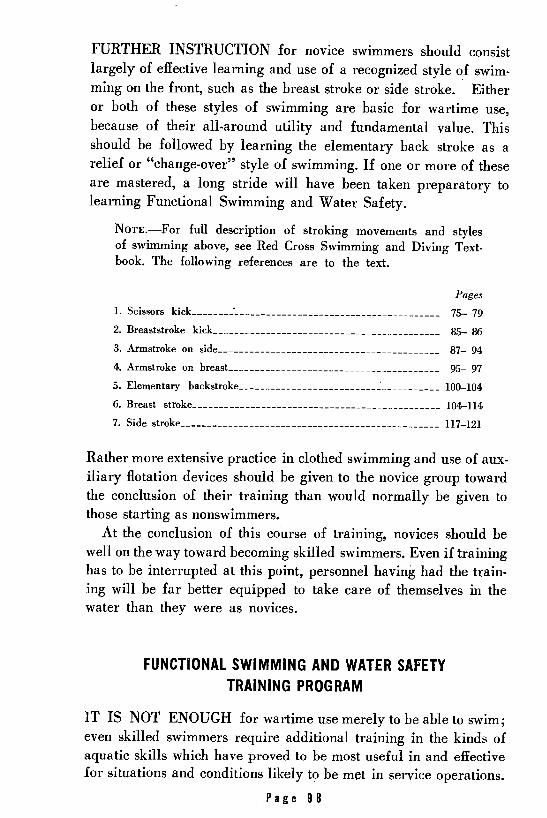
FURTHER INSTRUCTION for novice swimmers should consistlargely of effective learning and use of a recognized style of swim-ming on the front, such as the breast stroke or side stroke. Eitheror both of these styles of swimming are basic for wartime use,because of their all-around utility and fundamental value. Thisshould be followed by learning the elementary back stroke as arelief or "change-over" style of swimming. If one or more of theseare mastered, a long stride will have been taken preparatory tolearning Functional Swimming and Water Safety.
NOTE.-For full description of stroking movements and stylesof swimming above, see Red Cross Swimming and Diving Text-book. The following references are to the text.
Pages1. Scissors kick __:._.___ .. ......................_ 75- 792. Breaststroke kick-__ _--------- ------------------------------ 85- 86
3. Armstroke on side-__ ---- ---- --- ---- --- ---- --- ---- --_ 87- 944. Armstroke on breast---------_ --------------- -------------- _ 95- 975. Elementary backstroke ------------_- _.........._ 100-1046. Breast stroke -------___ _ _-----------------_ 104-114
7. Side stroke-----_--___ _ -___ -_-__ ___ _- - - - --_ 117-121
Rather more extensive practice in clothed swimming and use of aux-iliary flotation devices should be given to the novice group towardthe conclusion of their training than would normally be given tothose starting as nonswimmers.
At the conclusion of this course of training, novices should bewell on the way toward becoming skilled swimmers. Even if traininghas to be interrupted at this point, personnel having had the train-ing will be far better equipped to take care of themselves in thewater than they were as novices.
FUNCTIONAL SWIMMING AND WATER SAFETYTRAINING PROGRAM
IT IS NOT ENOUGH for wartime use merely to be able to swim;even skilled swimmers require additional training in the kinds ofaquatic skills which have proved to be most useful in and effectivefor situations and conditions likely to be met in service operations.
Page 98

It is recommended, therefore, that training sections in FunctionalSwimming and Water Safety be established for the skilled swimmergroup and for beginners and novices after they have become semi-skilled as a result of their training in the courses previouslyoutlined.
DIVISION OF SECTIONS. The course is divided into four sec-tions and is so progressively and cumulatively arranged that, at itsconclusion, the trainee has become not only versatile but extraor-dinarily competent in the water.
BASIC AQUATIC SKILLS. The first phase of training is made upof eight basic aquatic skills which serve as the foundation for sub-sequent variations and adaptations taught. They are all importantbecause of their utility. The basic skills are:
1. Floating. 6. Treading water.2. Breast stroke. 7. Jumping.3. Side stroke. 8. Diving.4. Elementary backstroke.5. Submersion and underwater
swimming.
The styles of swimming selected are all strong, energy-conservingand have a variety of uses.
USEFUL VARIATIONS. The second phase of training is com-posed of useful variations of swimming skills. These are:
1. Swimming and floating in a re- 5. Swimming with legs and onestricted area. arm.
2. Swimming with head high (use 6. Swimming with legs alone.in oil or debris). 7. Plunge diving.
3. Swimming silently. 8. Leaping from heights feet fore-4. Swimming with splash recovery most.
(useful and practical for swim-ming through ignited oils ofsome types).
APPLICATION OF SKILLS. The third phase of training embracesapplication of skills to possible service conditions and situations.
1. Swimming fully clothed. 4. Leaping from heights fully2. Swimming with equipment. clothed.3. Swimming under water fully
clothed.
Page 99

PERSONAL SAFETY IN WATER. The fourth phase of trainingis concerned wholly with elements which contribute to personalsafety in the water, and with means of rescue and resuscitation.
1. Release of leg cramps. 4. Tired swimmer carry.2. Taking off clothes in deep water. 5. Wrist tow.3. "Shirt-tail" life saving (use of 6. Collar carry.
articles of clothing and certain 7. Resuscitation by the prone pres-types of equipment as floating sure method.auxiliary supports).
ACHIEVEMENT TESTS. At the conclusion of the FunctionalCourse a series of tests are given to measure achievement of eachperson completing the course. Following are the test items:
1. 200-yard swim fully clothed. 4. 15-yard underwater swim, fully2. 10-minute swim, float, tread clothed.
water in a restricted area fully 5. Disrobing and 5-minute float.clothed. 6. 20-yard carry, with rescuer and
3. 50-yard swim on back, fully victim fully clothed.clothed.
The American Red Cross has prepared and printed an instructor'sGuide for a Functional Swimming and Water Safety TrainingCourse, A. R. C. 1059, which it will furnish to Water Safety In-structors giving this type of training. In it, the items listed above aredescribed fully, as well as uses to which the various skills are put.
LENGTH OF COURSE. It has been determined that the averageswimmer will need 20 hours of instruction, training, and practice
to cover the content of the course. Skilled swimmers in the upperbracket of performance will require less time, and the lower bracketof semiskilled swimmers may need a few hours more.
SWIMMING FOR RECREATION
NO FORMAL PROGRAM is suggested for recreational swimmingand bathing, because of diversity of interest among participants.Some organization is essential, however, to insure a maximum ofsafety to the bathers.
Page 100

SAFETY ELEMENTS
1. It should be ascertained first that the water meets safe hygienic re-
quirements with regard to harmful bacteria load.
2. Bathing areas should definitely be delimited either by marking or by
instruction of the bathers, as to where they may bathe and how far they
may venture.
3. Bathing areas should be selected with care and established where there
is an absolute minimum of hazard consistent with the natural features of the
body of water of which they are a part.
4. Improvised or other safety and rescue equipment should be placed in
each bathing area according to need.
5. All recreational bathing and swimming should be at specified hours
in the day.
6. Each bathing area while in use should be supervised by Red Cross
trained lifeguards.
7. It is strongly recommended that the "Buddy" system be used for all
bathers and swimmers when in the water, for mutual aid and protection.
NOTE.-For complete information of safe bathing areas and
their organization, equipment, and supervision, see Chapter II,
"Bathing Places," American Red Cross Life Saving and Water
Safety Textbook.
SWIMMING REFERENCES
1. Swimming and Diving, American Red Cross, Blakiston, 1937.
2. Life Saving and Water Safety, American Red Cross, Blakiston, 1937.
3. Life Saving and Water Safety Courses-Instructor's Manuals, Ameri-
can Red Cross, ARC 1030, March 1938.
4. Swimming and Diving Courses-Instructor's Manual, American Red
Cross, ARC 1042, February 1939.
5. Instructor's Guide in Functional Swimming, American Red Cross,
ARC 1059, February 1943.
Page 101

ATHLETIC RECREATIONATHLETIC RECREATION should play an important part in thephysical training program, since it provides the means for addi-tional body conditioning on a voluntary basis.
Since recreation is wholly voluntary, the instructor must leadrather than teach. A recreational leader must be friendly andenthusiastic. She should be familiar with the games and sportsincluded in the program. She should show initiative and ingenuityin providing or improvising equipment.
Full use should be made of all available recreational facilitiesboth on the post and in the community. Materials and equipmentmay often be secured through the cooperation of such agencies asthe following:
Physical Training Departments at WAC Training Centers, Serv-ice Command Headquarters, Special Service Office, The Red Cross,U. S. O., Y. W. C. A., Y. M. C. A., Community Clubs, Churches.
RULES FOR CONDUCTING GROUP RECREATION1. Give rules and directions for games clearly and simply.2. Stand where you can be seen and heard easily. Never stand in the
center of a circle or between two lines where your back would be to someof the participants.
3. Never use military commands to secure the attention of the group.4. Do not repeat directions unless the majority of the players fail to
understand.5. Ask one group to wear service hats if it is necessary to distinguish
between groups.6. Always make arrangements in advance for music if it is needed.7. Plan games so that each member of the group may be assured active
participation and personal enjoyment.
Page 102

8. Always begin a new activity before interest wanes.9. Encourage friendly rivalry.10. Plan programs to feature the games most enjoyed on previous occa-
sions, as well as to introduce new games.11. Always start a program with a familiar and popular game.12. Encourage participants to direct activities and develop leadership.
CONDUCTING TEAM SPORTS1. Inform all participants, officials, and spectators of the time, place, and
event in advance.2. Try to match teams according to ability so as to insure competition.3. Arrange all necessary equipment in advance and place it at the dis-
posal of the players.4. Designate one person on each team to be responsible for the equip-
ment.5. Encourage friendly rivalry by planning tournaments.
TYPES OF ACTIVITIESMANY types of activities can be included in a recreational program.Such a program should include a variety. References to such activi-ties may be found at the end of this chapter.
MIXERSA "MIXER" is an introduction game. It is an excellent game tostart any recreational program, particularly for a group whichis not well acquainted.1.Name: Circle introduction.Formation: Double circle.Action: A march is played as the inside circle moves in one direction andthe outside circle moves in the opposite direction. When the music stops,
Page 103

the circles face, and each person introduces herself to the person opposite.
When the music starts again, each circle continues marching in the original
direction and the game continues as above.
Music: Any marching music.
?.Name: Paul Jones.Formation: Partners join hands in a single circle.
Action: 8 slides right, 8 slides left, 4 skips or walks into the center of the
circle, 4 out, 4 in, and 4 out. Partners join hands (right) and continue
around the circle with the grand right and left until the music stops.
Everybody should end up with a new partner.
Music: Turkey in the Straw, Pop Goes the Weasel.
3.Name: Partner mixer.Formation: Double circle.
Action: Walk forward 4 steps holding partner's hands. Face partner. Boys'
backs to the center of the circle, girls facing the center of the circle. Walk
backward away from partner for 4 steps. Boys point both hands toward
girl ahead of his first partner; girls point both hands toward boy behind
her first partner. Walk 4 steps toward person to whom you are pointing.
Hold both hands of new partner. Walk 4 steps, turning around with new
partner. The action may be repeated as many times as desired, changing
partners each time. The mixer may be made more interesting by starting it;
slowly and increasing the tempo each time the action is repeated.
Music: Glow Worm.
Words:
(1) Walk two, three, four.(2) Back two, three, four.(3) Point. two, three, four.(4) Turn two, three, four.
SINGING GAMES AND FOLK DANCES
SINGING games and folk dances are always popular. They are an
excellent means of producing group spirit and are enjoyed by all.
1.Name: Oh Susanna.Formation: Partners join hands in a single circle.
Action: Numbers correspond with those on song lines.
1. Drop hands. All ladies walk 4 steps toward the center of the circle and
4 steps backward to place.2. Men do the same (4 steps forward, 4 steps backward).3. Repeat 1.4. Repeat 2.
Page 104

5. Grand Right and Left around the circle until the words, "Susanna, don'tyou cry," are sung the second time.
6. On the word "cry," each man takes the nearest lady for his newestpartner. They cross hands skating fashion and skip around the circlecounterclockwise (the direction of the men), the men on the inside,the ladies on the outside. Finish in a single circle just before the endof the chorus so that the lady is on the right of her new partner andrepeat the dance as often as desired. All those who find themselveswithout partners should step to the inside of the circle. There theywill find others without partners with whom they may join hands andreenter the circle.
Music: Oh Susanna.Words:1. I come from Alabama wid my banjo on my knee,2. I'm going to Louisiana, my Susanna for to see.3. It rained all day the night I left,
De weather was so dry,4. De sun so hot I froze myself,
Susanna, don't you cry.5. Oh Susanna, now don't you cry for me,
For I come from Alabama wid my banjo on my knee.
2.Name: Skip to My Lou.Formation: Partners join hands in a single circle.Action:1. Boys 4 steps to center and back. Repeat.2. Girls 4 steps to center and back. Repeat.3. Swing partners 2 times around with right hand.4. Swing neighbor 2 times around with left hand.5. Hold hands with partner, as in skating, and promenade counterclockwise,
boys on the inside of the circle.6. Girls continue, boys turn right and face and move in opposite direction.7. Get the nearest partner and promenade until music is finished.Music: Skip to My Lou.Words:1. Boys to the center, skip to My Lou (3 times); Skip to My Lou, my
darling.2. Girls to the center, skip to My Lou (3 times); Skip to my Lou, my
darling.3. Swing your partner, skip to My Lou (3 times); Skip to my Lou, my
darling.4. Swing your neighbor, skip to My Lou (3 times); Skip to My Lou, my
darling.5. Promenade all and skip to My Lou (3 times); Skip to My Lou, my
darling.
Page 105

6. I lost my partner, what shall I do? (3 times); Skip to My Lou, mydarling.
7. I'll get another one good and true (3 times); Skip to My Lou, my darling.3.Name: WAC'S from an Army Post.Formation: Double circle, men on inner circle, ladies on outer circle, part-ners facing with about 2 feet between couples.Action: Numbers correspond to those on song lines.1. At the word "WAC's", clap hands once and all move forward about 4
steps, partners passing right shoulders.2. All move backward 4 steps into place.3. All swing partners. (From waltz position, turn clockwise, lady a little
to her partner's right, pivoting on the right foot, which is shifted onlyslightly.)
4. Stand at attention.5. Swing your partner.6. Face partner, salute and turn to the right, moving toward new partner.7. Bow to new partner who has just stepped into place.8. Swing new partner, and finish up facing partner, ready to begin again
with (1).
Music: Captain Jinks from the Horse Marines.Words:1. Oh, we're the WAC's from an Army Post.2. We work the hardest and play the most.3. We know we're good, don't mean to boast,4. But that's the style in the Army.5. We teach the ladies how to march, how to march, how to march.
We teach the ladies how to march,For that's the style in the Army.
6. Salute your partner, turn to the right,7. And greet your neighbor with great delight;8. Then swing her around with all your might,
For that's the style in the Army.
4.Name: Virginia Reel.Formation: Arrange the players in groups of five or six couples in twoparallel lines, partners facing each other.Action: Everyone in both lines moves forward 3 steps and backward3 steps in each of the first 6 movements.1. Come to center and bow.2. Meet partner, swing around using right hands.3. Meet partner, swing around using left hands.4. Meet partner, swing partner around with both hands.5. Meet partner, do-si-do. Passing right shoulders, go around each other
back to back at center.
Page 106

6. Meet partner, do-si-do. Passing left shoulders, go around each otherback to back at center.
7. The partners opposite each other at the head of the lines are the leadcouple. They swing partner with right arms locked. Other couples re-main in place.
8. Swing first one of partner's line, left elbows locked.9. Swing partner, joining right elbows.
10. Swing second one of partner's line, left elbows locked.11. Swing partner.
This continues until each of leading couple has swung each one in herpartner's line. Leaders then slide down center, hands joined, to their placesat the head of their own lines. Each one heads her own line, turns awayfrom center and skips, followed by the rest of the line, back to the placeof the last couple in the group. There head couple joins hands, forming abridge, under which all pass with partners. First pair to go under takeoriginal position of the head couple who remain where they formed a bridge,thus taking the position of the last couple. The reel is started from the begin-ning now and is continued until all persons have been at the head of thelines. The players clap hands in time to the music when not moving.Music: Turkey in the Straw, Pop Goes the Weasel, or Whistling Rufus.
GAMES WHICH DO NOT REQUIRE EQUIPMENTTHERE are many opportunities to play games with large groupswhen there is absolutely no equipment available. The followinggames need nothing more than individual energy:1.Name: Chinese Tag.Formations: One player is "it." Other players are scattered.Action: "It" chases the other players, attempting to catch one of them.The person tagged, placing her hand on the place where she was tagged,proceeds as "it." Each "it" must hold such position until she tags anotherperson.
2.Name: Partner Tag.Formation: Hands joined with a partner.Action: One set of partners is "it." They must run and tag some other set,without letting go of hands. As soon as they successfully tag another set,the new set is "it." Any pair being chased must not break their hold.If they do, they automatically become "it," even though they aren't tagged.3.Name: Streets and Alleys.Formation: All but two of the players stand in parallel lines, one behindthe other, and clasp hands across in long lines.Action: The director will call either the words "streets" or "alleys" at dif-ferent intervals during the game. When the director calls "streets," the
Page 107

players will all face in the same direction and clasp hands forming lines.When the director calls "alleys," the players drop hands, make a quarter turnto the right and form lines in that direction by clasping hands. These twoformations are the only ones the players take during the game. The twoplayers not taking part in the formation are called the chaser and the runner.At the signal of the director, one of the players chases the other and at-tempts to catch her. The two players must run only in the lanes. The suddenchanges of directions makes the game very entertaining. This is continueduntil the chaser tags the runner. The runner and chaser then choose othersfrom the lines to take their places.
4.Name: Fox and Squirrels.Formation: Groups of threes (two trees facing each other and one squirrelinside the tree). There should be two extra players-one fox and onesquirrel.Action: The fox chases the free squirrel around the territory, attempting totag her. Squirrel may run into any tree for shelter, and the squirrel who isthere must then leave and become "free squirrel." Should the fox tag thefree squirrel, they change places, the fox becoming the free squirrel and thefree squirrel becoming the fox. Every few minutes, change people around.The trees become squirrels and the squirrels become trees.
5.Name: Catch the Caboose.Formation: Squads.Action: Each member of a squad takes hold of the waistline of the playerin front of her. Members represent a train, with the last member acting as acaboose. First member of the squad faces the group and acts as "bum,"whose object is to catch a ride on the caboose. This member runs around;and if successful in catching hold of the caboose, becomes the caboose andthe first in line becomes the "bum."
6.Name: Hook On.Formation: Groups of three (one girl behind the other with hands on hipsof girl in front).Action: On the signal to go, the sets of threes chase each other. The objectis to hook on to another set, and still prevent anyone from hooking on toone's own set. The game becomes exciting as the sets grow in length. Shouldthe line break at any time, it must stop and permit the broken end to backon. At the finish, the last three girls in the longest line are the winners.
7.Name: Gas Area.Formation: Circle.Action: Put hats in center of circle. Holding hands, try to pull others sothey touch hats-anyone who touches a hat is a casualty. Continue until onlyone survives.
Page 1 08

8.Name: Black and White.Formation: The players form two parallel lines about 2 feet apart facingforward. One line is called "black" and the other line "white," each havingas its goal the wall nearest it.
Action: When the director calls "black," all the players in that line runto their goal and the "white" try to tag them. Any players that the "whites"tag are taken to their side. In the same way when "white" is called, theymust run for their goal. The game is to see which side has more playersat the end of a certain time.
9.
Name: Three Deep.Formation: All the players except two form in a double circle, facinginward; that is, in two concentric circles, with one player directly behindanother. The two not in the circles, one of whom is runner and the otherthe chaser, start outside of the circle, one of them being on one side of thecircle and the other opposite.Action: The object of the game is for the chaser to tag the runner. Therunner may save herself by stopping in front of any couple standing inthe circle. Thereupon, that file having been made "Three Deep," the outerplayer or third woman becomes at once liable to tagging, and in turnbecomes runner and tries to evade the chaser. It is permissible for her to seekrefuge in front of the couple standing immediately on the right or the left.
GROUP GAMES WHICH REQUIRE EQUIPMENT
MANY simple games can be played with equipment which isavailable on most posts.
1.Name: Steal the Bacon.Equipment: Tenpin, bottle, or any object.Formation: Two lines or more face each other approximately 8 feet apart.Tenpin, bottle, or object used is centered between the lines.Action: Number off from opposite end of each line. Leader calls a numberand the player so called from each side runs to the center and tries to "stealthe bacon" and get home with it before the other one touches her. A point isgiven to the side whose player either gets home safely with the bacon ortouches her opponent who has taken the bacon.
2.
Name: Circle Dodge Ball.Formation: Single circle with several players inside the circle.Equipment: Volley ball or rubber ball.
Page 109

Action: In this game, the players on the outside of the circle try to hit, withthe ball, the players on the inside of the circle who are trying to dodge theball. When a player is hit, she takes her place outside the circle and helps tohit the others. The last one remaining inside the circle is the winner.
3.
Name: Field Dodge Ball.Equipment: Volley ball or rubber ball, a home plate, and a stationary objectin the middle of the field which must be suitable for the players to circlewhile running.
Formation: The fielding team is scattered over the field from about 10feet in front of home plate back to the stationary object which shouldbe placed about 30 or 40 feet from the home plate.
Action: The ball is thrown into the field by the runner, who immediatelyruns around the object in the middle of the field and back to home plate.If the thrown ball is caught before touching the ground, the runner is out.If the ball is not caught, the fielders try to hit the runner with the ball.Fielders may not run with the ball in their hands but may pass it fromone to another to get a closer throw at the runner. The object, is to seehow many runs a team can make by giving everyone a chance to be therunner.
RELAYS
RELAYS are an easy way to quickly organize a large group into
a game in which everyone plays an active part.
Name: Walk-Run-Skip-Hop Relay.Formations: Line relay formation.
Action: A line is drawn about 15 paces in front of the starting line. Onthe signal to go, the first person in each file walks to the given pointand walks back again, touching hand of number 2, Number 2 in eachfile runs up and back. Number 3 skips up and back. Number 4 hops upand back. The same routine is repeated until every person has been upand back. It must be remembered that each person does a differentactivity. Have squads number off from front to rear in sets of 4 so thateach is sure of her activity. First file to finish wins.
2.
Name: Animal Relay.Formation: Line Relay Formation.Action: No. 1 person waddles like a duck; No. 2 hops like a rabbit. No. 3runs on all fours-and repeat. Each runs back and touches next person infile. First file to finish wins.
Page 110

3.
Name: Heel-Toe Relay.
Formation: Line Relay Formation.Action: On the signal to go, the first person in each squad starts moving byplacing one foot directly in front of the other so that the heel of the ad-vancing foot touches the toe of the other foot. By this slow method shereturns to the file, touching hand of number 2, who proceeds with the heel-toe method. This procedure is continued until everyone in the file has takenher turn. First file to finish wins.
4.Name: Sore Toe Relay.Formation: Line Relay Formation.Action: On the signal to go, the first person in each file takes hold ofher toe with one hand and runs to the given line. As soon as she reachesit, she may let go of her toe and run back to tag the next person in file,who repeats the same procedure. The first file to finish wins.
5.Name: Pick-Up Relay.Formation: Line Relay Formation.Action: On the signal to go, the leader of each file runs to the designatedline and back. She takes hand of the second person in file and they bothrun up and back. This continues on down the file until they have picked upevery person in the file and all are at the designated line, in file formation.The first line to finish wins.
ADDITIONAL SPORTS
A NUMBER of active sports are considered desirable for women.These are not described in this manual since rule books may easilybe obtained. Field Manual 21-220 "Sports and Games" may alsobe consulted. These sports include basketball, softball, speedball,soccer, hockey, ice skating, tobogganning, tabl> tennis, badminton,volleyball, shuffleboard, horseshoes, etc.
TOURNAMENTS
TOURNAMENTS should be introduced in the program occasion-ally to encourage friendly competition and promote participationand interest in activities.
The elimination tournament is the most common and the mostused type of tournament. Any number of teams or individuals may
Page 111
enter such a tournament. It is an excellent way of caring for alarge number of people who are eager for competition.
Elimination Tournament: A bracket may be made up of 4, 8,
16, 32, or 64 teams. If there are more than 4 or less than 8 teamsentered in the tournament, an 8-bracket tournament should be used.Likewise, if more than 8 and less than 16 teams are entered, a16-bracket tournament should be used and "byes" used in thevacant lines. A team which has to play a "bye" automatically movesinto the next round of play. The two teams which draw placestogether will play. The winner will play the winner of the nexttwo games, etc., until the team reaching the last round is winnerof the tournament.
A Round Robin Tournament is used for a fairly small number
of teams. Each team is scheduled to play every other team enteredin the tournament. The winner will be the team winning the mostnumber of games.
A Ladder Tournament is a continuous tournament. It may becontinued as long as there is any interest. The names of individualsDr teams are placed one under the other. Any team may challengeeither of the two teams directly above but none below its positionon the ladder. If the team which is challenged wins, it remainsin the same place. If the challenging team wins, it moves up totake the place of the loser. The team or individual that is on topof the ladder at the end of the tournament is the winner.
EXPLANATION OF FORMATIONS
A SUCCESSFUL recreational leader has at her fingertips theknowledge of many group formations. The following descriptionsinclude only the simplest of formations:
1. Single Circle:
a. Facing the center of the circle, players stand side by side. Whenthere are couples, the lady is on the gentleman's right (this can be re-membered easily by the phrase, "The lady is always right").
b. Facing clockwise around the circle, players are standing one behindthe other facing in the same direction that the hands of the clock move.
c. Facing counterclockwise around the circle. Players are standing onebehind the other facing in the direction opposite to that in which thehands of a clock move.
d. Partners facing. Boys face counterclockwise-girls face clockwise.
Page 112

2. Double Circle:
a. Facing the center of the circle. This formation is similar to the singlecircle except that now there are two concentric circles-one circle inside theother. Both circles may be facing the center or circles may be facing eachother, or the circles may be going in the opposite direction.
b. Facing clockwise around the circle. Partners stand shoulder to shoulderfacing the direction in which the hands of a clock move. If there are couples,the lady is on the inside circle and the gentleman on the outside circle ("Thelady is always right").
c. Facing counterclockwise around the circle. Partners stand shoulder toshoulder facing in the direction opposite to that in which the hands of aclock move. If there are couples, the lady is on the outside circle and thegentleman is on the inside circle ("The lady is always right").
3. Line Formations. Two lines, partners side by side, may all be facingin the same direction.
4. Grand Right and Left. A single circle with partners facing and righthands joined. Boys proceed around the circle in a counterclockwise direc-tion; girls proceed around the circle in a clockwise direction. Partners passeach other dropping hands and joining left hands with the next person inthe circle. Each passes by the next person and joins right hands with thefollowing person. The players continue in this manner, joining alternatehands with each person they meet. A grand right and left may be continueduntil partners are together, until the music stops, or until the players returnto their original places.
SOURCES AND BIBLIOGRAPHYBibliography:1. Bancroft, Jesse H., Games for the Playground, Home or School and Gym-
nasium, the MacMillan Co., New York, 1935.2. Blair, Mary E., Games for All Occasions, Grosset and Dunlop, New York,
1930.
3. Bowers, Ethel, Parties-Musical Mixers, National Recreation Association.4. Bowers, Ethel, Parties-Plans and Programs, National Recreation Asso-
ciation.
5. Mason and Mitchell, Social Games for Recreation, A. S. Barnes & Co.,New York City.
6. Murray, Robert K., Leadership and Organization of School Recreation,National Recreation Association.
Sources:
1. National Recreation Association, 315 Fourth Avenue, New York City.2. Special Service Offices.3. Community Recreation Associations.
Page 113

RESPONSIBILITY FOR THE PROGRAMPHYSICAL TRAINING STAFF
THE physical training staff will be charged with the conduct
of teacher training -officers and cadre members.
The conduct of the physical training program for auxiliariesin training will be supervised by the physical training staff. They
will make suggestions to the proper echelon for the improvement
of the conduct of the program.
COMPANY COMMANDER
THE company commander is responsible for the conduct of the
physical training program in her company. All company officers
will be familiar with and be able to teach the physical training
program.In the training center they will be supervised by the physical
training staff in this work.In the field there will be general supervision to insure correct
and adequate conduct of the program.
CADRE MEMBERS
NONCOMMISSIONED personnel capable of teaching should be
encouraged and permitted to teach under the supervision of the
company officers. No cadre member should teach unless she has
been given thorough training and is supervised by an officer.
ENROLLED PERSONNEL
IN THE final analysis every woman is responsible for her own
physical fitness. Enrolled personnel should be stimulated at all
times to realize their responsibility and to act upon it. This does
not relieve the physical training staff, company commanders orcadre members of their responsibility. It will, however, prove to
be of great assistance to them in the fulfillment of the program.
Page 114
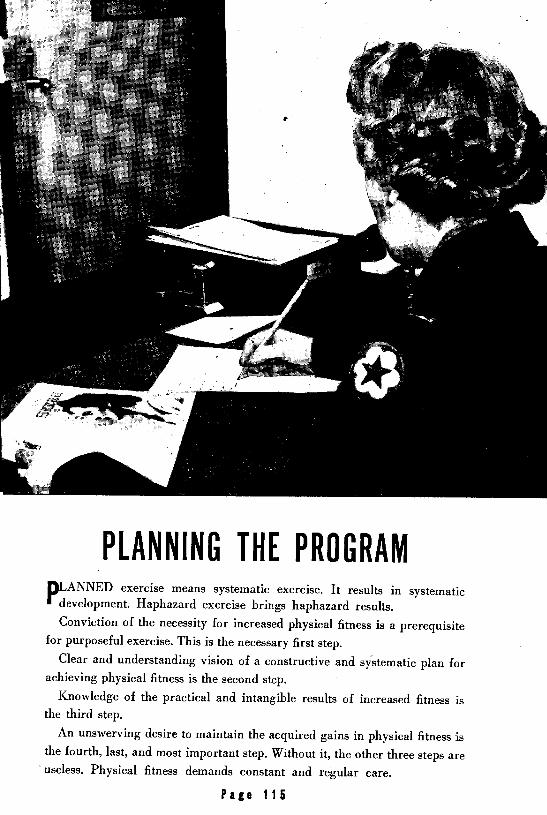
PLANNING THE PROGRAMPLANNED exercise means systematic exercise. It results in systematic
development. Haphazard exercise brings haphazard results.Conviction of the necessity for increased physical fitness is a prerequisite
for purposeful exercise. This is the necessary first step.Clear and understanding vision of a constructive and systematic plan for
achieving physical fitness is the second step.Knowledge of the practical and intangible results of increased fitness is
the third step.An unswerving desire to maintain the acquired gains in physical fitness is
the fourth, last, and most important step. Without it, the other three steps are'useless. Physical fitness demands constant and regular care.
Page 115

THESE ARE THEPHYSICAL TRAINING ACTIVITIES
POSTURE IMPROVEMENT
BODY CONDITIONING
CADENCE SERIES
STRENGTH EXERCISES
FOOT EXERCISES
BODY MECHANICS OF EVERYDAY ANDMILITARY ACTIVITIES
AGILITY, COORDINATION ANDBALANCE ACTIVITIES
MARCHING EXERCISES
SELF-TESTING ACTIVITIES
DAILY EXERCISE SERIES
RELEASE OF TENSION ACTIVITIES
FUNCTIONAL SWIMMING
UNARMED SELF-DEFENSE
RECREATIONPage 116

WHEN TO USE THEMBASIC TRAINING
THE emphasis in basic training will be placed on aiding the woman tochange from civilian to military life in the shortest time with the greatest
safety. Five hours weekly will be spent on the physical conditioning of thewomen. This time will be used for concentrated work on posture, body con-ditioning, and body mechanics. Recreation is very valuable during this time.It is not, however, of such a nature as to contribute to systematic develop-ment of the body and all effort should be made during this period of train-ing to throw the responsibility for maintaining physical fitness squarely upto each woman. This is the proper place for this responsibility if it is tocarry itself in months to come.
SPECIALIST TRAINING
THE emphasis is toward furthering her adjustment to military life and aid-ing her to retain the benefits gained in basic training. Five hours weekly willbe spent on the physical conditioning of the women. A. physical training pro-gram will consist of further work on posture and systematic development ofthe body plus as much recreation as successful completion of the abovedictates. Whenever facilities permit, functional swimming and unarmedself-defense will also be offered. Exercises for the release of occupationaltension will be offered for the women's use. These exercises will naturallyvary with the specialist training they are taking.
OFFICER TRAINING
EVERY officer candidate will be instructed in the methods and materials ofphysical training. She will become able to demonstrate and instruct in thebasic body conditioning course. She will become able to plan and conductrecreation of all types. She will become proficient in recognizing and cor-recting. poor posture.
OFFICERS
IT IS every officer's responsibility to keep herself fit. The standard she setswill establish the standard of her unit.
Page 117

HOW TO KEEP UNITS FIT IN THE FIELDFIELD TRAINING
FIFTEEN minutes a day will be spent on furthering and main-taining the physical condition of the women through body con-
ditioning exercises. Recreation will play an important part in theall around program, but these 1]5 minutes will be devoted to posture
correction, body conditioning, and special exercises for the releaseof occupational tension.
The daily exercise series is designed to be used in this 15-minute
period. There is no excuse for lack of physical condition due tohours of work or type of occupation. The daily exercise seriesmay be done by a woman singly or in small groups. The timerequirement may be met at any time during the day or evening.Progress should be reported to the officers in charge. The officersare responsible for the stimulation and carrying out of the program.This method should only be used where large groups may not beassembled. There is great psychological benefit and stimulation inmass participation.
It is essential that exercise takes place daily. A greater numberof periods of exercise of shorter duration are more effective thanfewer longer periods.
Recreation should include such things as organized sports ofall kinds, dancing, hiking and camping, swimming, unarmed self-defense, and all other available activities.
OVERSEAS UNITS
FUNCTIONAL swimming and unarmed self-defense will be offeredto every woman preparing to go overseas. The program otherwisewill be the same as that for field companies at home.
A high degree of physical fitness is even more essential for over-seas companies than for companies at home. The daily exerciseseries makes this simple for every woman.
Page 118

PROGRAMPLANNING
CHART EC M E EmmMM NREC~S~MrP~DADDITION
AD~lrON~Z~RECOMMEND~ZA OPosture .~~~~~~~~~~~~~~~~~~~~Postu~~~~~~~~~~e ~~ADDITIONALiGeneraCondtl
Marching Eecise
Self. Test.ng Ac i yjtj
DoIEercise Series
A s of TensionAtvtes
Functional Swi rn
Unarmed Self DefenseRecreation
· r 1x~~72f~k
.4
ii 3 i~~~~~~~~~~~~~~~~~~~~~

DIFFERENT ACTIVITIES CALL FORPOSTURE,
P OSTURE should be emphasized in every physical training period,
drill period, and during off-duty hours. Posture training can neverleave off.
With a new group, point out the benefits of good posture. Demon-strate and describe the correct position. Diagnose the defects of thegroup as a whole. Point out defects individually when necessary.Assume that correction of posture is no more personal than pointingout the wrong solution to a map reading problem.
CADENCE EXERCISES
TO GAIN benefit from a cadence series correct execution of theexercises must be stressed. Once a series is taught, the womenmay be led through the exercises rhythmically without hesitation.Thus the series is performed as one exercise. The best performersshould be allowed to lead the group with the instructor correctingthe women in the class.
When one series has been mastered, progress to the next. Whenthe four series have been mastered, use them alternately at thebeginning of the lesson.
Cadence series are done in normal 4/4 marching cadence, in-cluding the transitions. Do not overemphasize transitions but keepthe group together.
Mass commands may be used to keep the group in rhythmand to count the number of times an exercise has been per-formed. "Cadence-COUNT" is the command to begin counting."Cadence-STOP" is the command to cease counting.
If conditions are not favorable for exercising in the lying downor sitting position, cadence series may be used as alternate activity.All omitted exercises from strength progressions should be presentedfor barracks practice and mastery.
Page 120

DIFFERENT TEACHING APPROACHESCADENCE SERIES
SW INGING
SWNGING FL NSin G HEAD |SHOULDERS TRUNKArm Swinging Ai TR UN LEGSFSorward ng ead Lowering ardi Sing
and Sider'd ForWard and Shoulder rd
- Q nginf t Backward HUnching nd trtci Bouncin
Single ble Arm wrdand Double Sringg ShouldArm Circling and Flinging Head Turning Backward Tr ising
Sideward and FOrward nd Sride.l jns. TetsyArm Fali nging te PingArm Swinging Double Arm arm FlingingForward. Swinging
Sideward Farword and
ead Circling Flinging Up adCirclein Soulder Alernwith Leg Lift rce Touching
Alternate A.Swinging Arm Swinging
and Side wrd Elbrand. HeaOd Swinging Aelterar ATruna
dCdrlnCr ~ Stretching Rj n
Cadence series are warm-up series. Theyincrease range of movement and flexibility inall joints. They test your ability to coordinate tmind and body. They improve control andposture.
Reading across the page one finds a cadenceseries. Reading down the page one finds ex-ercises for one specific part of the body. Theymay be used to release muscle tension.

STRENGTH PROGRESSIONSTHE strength progressions are arranged so that every woman will
have a feeling of achievement as she masters each step. Thereare satisfying goals to achieve. The series are arranged so that noone individual need feel at a disadvantage because of age or stature.
ITEMS INCLUDED
1. Shoulder and arm strength. 3. Back and neck strength.2. Abdominal strength. 4. Leg strength.
TEACHING TECHNIQUES
TEACH at least one exercise from each of the four progressionsevery day. During the first lesson present the first exercise of eachprogression. When the group has mastered this exercise, progressto the second exercise. When presenting a new exercise, repeat theone just learned to show progression.
The group may master the exercises from one progression fasterthan those of another. It is important that mastery of these exercisesbe as complete as possible.
When a group has mastered all the exercises from a progressionreview the last exercise of the series each day. Upon the teacherrests the responsibility of adequate stimulation of the group. Em-phasis should be placed on the lasting qualities and enduring valueof each of the last exercises. Each of these exercises presents achallenging situation in t'n-at each of the exercises can be performeda greater number of times with practice and development. Thisallows for stimulating interest by self-competition-by competitionof groups, or individuals. Competition may take concrete form byuse of a chart.
Women should get to know and feel so familiar with the exercisesthat they will never forget them. If this is done no woman will everbe able to say that she does not have the means at her command forkeeping herself in good physical condition.
If strength progressions cannot be used outdoors it will benecessary to conduct this important part of the training on thebasis of out-of-class endeavor. This calls for high organization andstimulation.
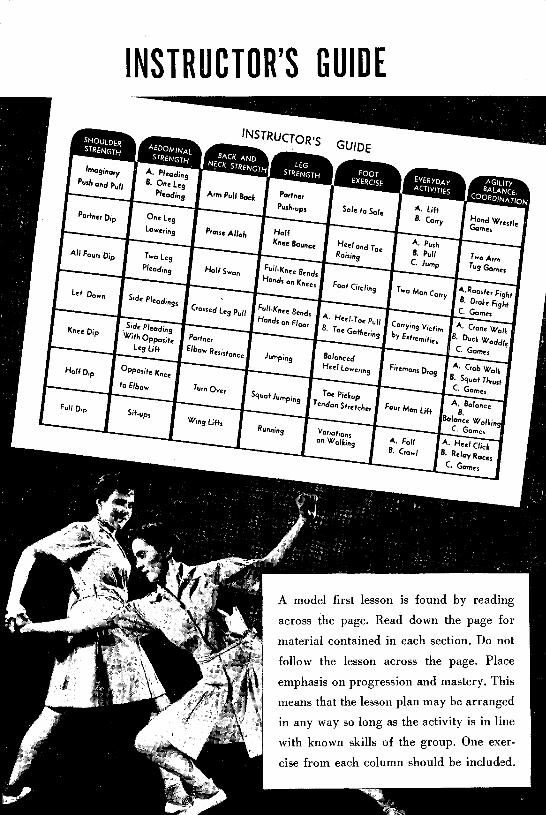
INSTRUCTOR'S GUIDE
INSTRUCTOR'S GUIE
Pushand Pull P.'Plading Arm Pull Back Partner
Push.ups Sole to Sole A. LiftPartner Dip | nt Le| B. Carry Hand Wrestle
Losering Praise Allah Half GamesKnee Bounce Heel and Toe A. ush
All Fours Dip Tro Leg Raising B. Pull Tao ArmPleadin Half Swn FullKne Jump g Game
Let Dow SidPioHnn iKnee, Foot Circlig Two Man Carry ARote htLet Do~n Side Pleadingr B. Drake Fight
gs Crossed LegPull Full.Knee Bends A H C. GamesSi 0 Ft H1A. e-Toepull CarryingVictim A- CraneW
Knee Dip P n B, Tone G/re mit
C. GamesLeg Lift Elbow. Resistonce Jumping Balan ced
Half D,p site Knee Heel Loerg Firemoan Drag A. Crab Walkto Elb TrerB. Squat Thrust
'o E'b·~ I Turn~vcr cPickup C. GamesSquat Jumping P ickup
Full Dp UPS Squat eumpg Tendon Stretcher Four Man Lift A. BalncSit-ups B.
Wins Lifts|Rj 6 Wkin
- -t~~ z-1~ B. Crawl B. Relayoces
C. Games
A model first lesson is found by reading
across the page. Read down the page for
material contained in each section. Do not
follow the lesson across the page. Place
emphasis on progression and mastery. This
means that the lesson plan may be arranged
in any way so long as the activity is in line
with known skills of the group. One exer-
cise from each column should be included.

ADDITIONAL TEACHING TECHNIQUESFOOT EXERCISES
AT LEAST one foot exercise should be included in every lesson:It is not essential that the foot exercises be presented in any
particular order. Stress should be placed on correct walking asthe best foot exercise. There may be a tendency for the standardof performance to fall off when doing foot exercises. This tendencymust be eliminated. Repetition of foot exercises out of class isnecessary for foot improvement.
BODY MECHANICS OF EVERYDAY ANDMILITARY ACTIVITIES
THE body mechanics of everyday activities should be presentedat the first opportunity after a woman arrives at a training center.This material should then be re-presented in the light of her in-creased muscular tone. One such activity should be presented eachlesson. Everyday activities should be presented first. Practice thecorrect execution of these activities until this execution becomeshabitual.
Material for military application-First Aid and Falling andCrawling--should be presented in the order in which it is organizedin the body mechanics section. Emphasis should be placed uponthe mastery of the activity.
AGILITY, BALANCE, AND COORDINATION
AT LEAST one activity from this category should be presented ineach lesson.
Although these exercises, games, and relay races are in the natureof recreation, they should be emphasized as abilities and skillswhich are necessary aids to body conditioning. The material foundin this section may be supplemented by activities presented in thechapter on "Recreation" and in other standard games books. Careshould be taken that activities fall within the range of skill of themajority of the women.
Page 124

IN:. -i
I$_ 5aB': X ~ n-·t
e~~~~~~t -I t/-

INSTRUCTOR'S RESPONSIBILITYKNOW the purpose and aims of the physical training programKand be convinced of its value.
Understand and be fully acquainted with the teaching contentof the program.
Acquire the ability to demonstrate all exercises properly.Make yourself an example in posture, poise, and appearance.
Do not belie your words.Be interested in the progress of every woman and be ready to
assist each woman to aid herself.Show enthusiasm for your work. Any group will react to the
standards of performance set by an instructor and the attitude sheshows. The amount of effort put forth by a class will correspondto that put forth by their instructor.
Give praise where praise is due.Use your voice to make a group respond as you desire., De-
termine the pitch in which your voice carries best. Generally, alow-pitched voice is more distinct and requires less effort. Practicegiving admonitions that are forceful, direct, precise, and distinct.The words of a command should be enunciated clearly and withsufficient volume. Learn to fit your voice to the number of peopleyou are attempting to reach. Practice this art indoors and outdoors.
Page 126

EVERYDAY PREPARATIONYOU SHOULD:
Check on the group's progress. Choose the exercises to be presented thatday. Think how you can best present the exercises so that learning will takeplace easily and quickly.
Practice the correct demonstration of the exercise prior to the period ofinstruction.
Check through the lesson to determine where posture hints, safety pre-cautions, and practical applications of body mechanics may be fitted in tothe best advantage.
Check on teaching aids, and equipment for games if there are any.Check to see that sport clothing is neat and tidy.
ORGANIZATION OF THE CLASSPHYSICAL training will be held outdoors whenever possible. During thewinter or in inclement weather, it will be necessary to conduct classes in-doors. Adequate ventilation must be provided.
Keep the group for physical training as small as possible. A platoon is therecommended size. It allows for some individual instruction. Occasionally, acompany or more may be brought together in order to vary the programand aid morale. A company is massed with six paces between each platoon.
The class should form in columns facing the instructor, who commands:1. "Extend to the left-MARCH." At this command, the women on the
right flank stand fast, with arms extended sideward; all others run to theirleft until there is sufficient interval for each person to stand with both armsextended.
2. "Arms-DOWN."3. "From front to rear-COUNT OFF." At this command, the leading
woman of each column turns her head to the right, calls out ONE and facesthe front. Each woman in the column calls out her number in the samemanner.
4. "Even numbers, to the left-UNCOVER." At the command UNCOVER,those having even numbers take one jump to the left, landing squarely inthe middle of the interval.
5. "Assemble to the right-MARCH." At the conclusion of the physicaltraining period when the command MARCH is given, all return on thedouble to their original positions.
6. "In column of threes by platoons-FALL IN." This command may beused if the company is in an informal formation at the end of the period.
7. For partner work the instructor commands: "Even numbers, one stepforward-MARCH." This should bring the even numbers on line with theodd numbers. "Even numbers, right-FACE." "Odd numbers, left-FACE."This will bring each woman face to face with her partner.
Page 127

PRESENTATION OF MATERIALGENERAL RULES FOR TEACHING
DEMONSTRATE the exercise or activity while the group is at ease. Thisshould give the group an idea of the timing of the exercise and eliminate
lengthy explanation. This presentation period will be shortened if you find itpossible to talk while demonstrating. When facing a group, always moveto the right when commanding the group to move to the left.
The class should be kept in unison. Establish the rhythm during the firstperformance of the exercise and keep the group together by counting1-2-3-4. It is preferable to use words which indicate the action being per-formed, as stretch, bend, up, down, etc. Straight counting on the part of aninstructor tends to become monotonous. A class performing together givesthe instructor a chance to observe those incorrectly doing an exercise.
During the cadence exercises, the class may be instructed to count outloud, if so desired. This practice is recommended as it involves more co-ordination of mind and body than would otherwise occur.
If a large number are performing the exercise incorrectly, stop the groupand make corrections. If only a few are making mistakes, it may be possibleto use admonitions while continuing to control the rhythm of the group. Oneexample might be, "Keep-the-knees-straight" instead of "1-2-3-4."
TERMINOLOGY
COMMANDS are the means whereby a group is stimulated to respond inunison. There are two parts to every command. The preparatory part indi-cates the movement that is to be executed. The command of execution causesthe movement to begin. A sufficient interval should be allowed between thesetwo parts to permit full comprehension by the class.
No specific terminology has been set up for the conduct of these exercises.The instructor may use any words she desires as long as she keeps the classin unison and her words fulfill the requirements of a good command.
The following are a few suggestions for commands:
1. "Feet apart _-_-_------ ---- JUMP" 6. "To dip position __.------_ DOWN"2. "Hands on hips ------_____. PLACE" 7. "Exercise_ __-_-__-. BEGIN"3. "Arms upward _----------_ BEND" 8. "Ready ----- _-_-_---__ -_. BEGIN"4. "Trunk forward ----------_ BEND" 9. "To a stand --------- _ UP"5. "Lying on ground_ __-_---_ DOWN" 10. "Cadence -____--______... BEGIN"
The group should be stopped in unison. They must be warned in advance ifexercise has a momentum factor. The normal place to end exercise is at thestart position. If command "Class-HALT!" is used, the "HALT" shouldbe followed by two counts before ending the exercise. If "And-STOP"is used, the "And" falls on count preceding the final movement.
Page 128

FACTORS TO BE CONSIDEREDFACTORS TO BE CONSIDERED BY THE INSTRUCTOR
HYSICAL training classes should not be held immediately fol-lowing a meal. In the summer they should not be held during the
heat of the day.A warm-up of light exercises should always be provided before
strenuous activity is presented.Strength is developed by exercising vigorously and to the point
of fatigue, but never to the point of utter exhaustion.Rest periods should be provided only when necessary.Women are required to dress for physical training classes and
participate in as much exercise as they feel able during theirmenstrual periods.
PERSONAL HEALTH FACTORS
DURING the menstrual period, women will participate in as muchof the physical training program as they are able. Light exercisedoes no harm during this time and it often proves beneficial.
Cold beverages should never be taken during or immediatelyfollowing the exercise period. However, cool water in small quan-tities will not prove harmful.
After the exercise period is over, additional clothing should beworn to keep the body from cooling off too rapidly.
A shower should be taken following exercise.Each individual is responsible for the development and main-
tenance of her posture, physical strength, and endurance. If theabove qualities cannot be sufficiently developed in the time allotted,it is her personal responsibility to spend additional time on herown improvement.
YOU MUST BE FIT

AND WHEN IT'S ALL OVEROME day life will go back to you in Peace. Good health is an en-
normal. Some day you will return during asset. The habits of planned
home-to the jobs and joys of exercise-the strength, the stamina,peace-perhaps to marriage and the coordination and stability won
families. Then you will discover that in the ranks-will make you a morethe physical fitness which helped you useful and happier member of to-
to weather the War will not forsake morrow's world.
529942 * u. . GOVERNMENT PRINTING OFFICE: 194

* I:
·- ~~~~~~~~~~~~~~~~~~~-
4


![Chemical equilibrium - [DePa] Departamento de Programas](https://static.fdocuments.in/doc/165x107/61fb7a992e268c58cd5ea6e0/chemical-equilibrium-depa-departamento-de-programas.jpg)