WX-021 Owner's Manual - Sam Ash Music...1 Start iTunes, or display the iPhone’s music playback...
33
WX-021 EN Owner’s Manual Before using this unit, be sure to read the “Safety Brochure.” Wireless Streaming Speaker
Transcript of WX-021 Owner's Manual - Sam Ash Music...1 Start iTunes, or display the iPhone’s music playback...
WX-021
EN
Owner’s Manual
Before using this unit, be sure to read the “Safety Brochure.”
Wireless Streaming Speaker
Table of contents
Introduction .......................................................................................... 3
About this document ................................................................................................................................ 3
Accessories ....................................................................................................................................................... 3
Using the unit ....................................................................................... 4
Parts of the unit .................................................................................... 5
Top panel .......................................................................................................................................................... 5
Rear panel ......................................................................................................................................................... 6
Use MusicCast CONTROLLER to connect to a network ................. 7
Play from an input source ................................................................... 8
Listening to music stored on the mobile device ...................................................................... 8
Listening to Internet radio ...................................................................................................................... 9
Listening to streaming services ........................................................................................................... 9
Listening to music stored on a media server ........................................................................... 10
Listening to music via AirPlay ............................................................................................................ 11
Listening to music via Bluetooth ..................................................................................................... 12
Pair the unit with MusicCast-enabled devices ............................. 13
Configuring a MusicCast network .................................................................................................. 13
Using two units as stereo speakers (MusicCast Stereo function) ................................ 14
Using two units as surround speakers (MusicCast Surround function) ................... 15
Useful features ................................................................................... 16
Favorites .......................................................................................................................................................... 16
Alarm ................................................................................................................................................................. 17
Child lock function .................................................................................................................................... 19
Option settings ........................................................................................................................................... 20
Firmware updates ..................................................................................................................................... 22
Using iPhone settings to connect to a network ..................................................................... 23
Mounting the speaker on a wall ....................................................................................................... 24
Troubleshooting ................................................................................ 26
General ............................................................................................................................................................. 26
Network ........................................................................................................................................................... 27
Bluetooth ........................................................................................................................................................ 29
File formats, and devices/media supported by the unit ............ 30
Specifications ..................................................................................... 31
Trademarks ......................................................................................... 32
2

Introduction
About this documentThis document explains all unit functions and operation in detail. The supplied Quick
Manual provides brief instructions on connecting the unit to a network through the
playing of music files stored on a mobile device. Keep the Quick Manual at hand for
future reference.
• In this document, smartphones and other mobile devices running the iOS or
Android operating systems are collectively referred to as “mobile devices”.
• The term “iPhone” as used in this document also refers to “iPod touch” and “iPad”
devices.
• Illustrations in this manual may differ slightly from the actual objects depicted.
• MusicCast CONTROLLER app screenshots in this document were captured on a
device running the English version of iOS. Actual screen displays may differ
depending upon the version of the app or iOS used.
• Symbols and conventions
Caution Indicates information that should be read before use to prevent failure
or physical damage.
Note Indicates precautions and supplementary information that should be
read before using the unit.
References another page or pages that provide additional information.
Accessories
Power cord Anti-vibration padsUse when mounting the unit on the wall ( p. 24)
Quick Manual Safety Brochure
WX-021
WX-021
3
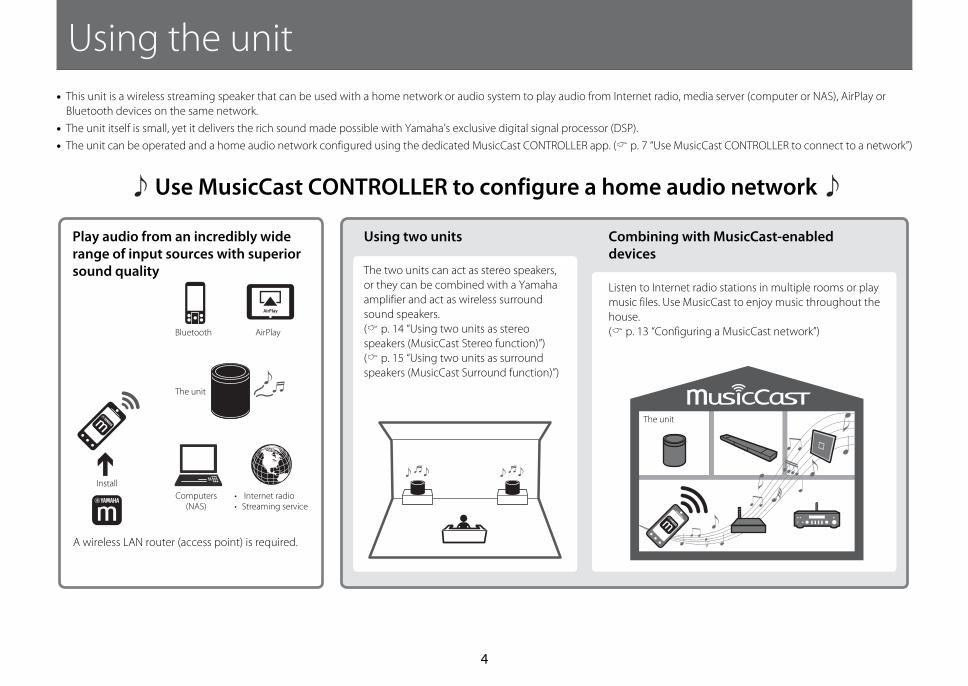
Using the unit
• This unit is a wireless streaming speaker that can be used with a home network or audio system to play audio from Internet radio, media server (computer or NAS), AirPlay or
Bluetooth devices on the same network.
• The unit itself is small, yet it delivers the rich sound made possible with Yamaha’s exclusive digital signal processor (DSP).
• The unit can be operated and a home audio network configured using the dedicated MusicCast CONTROLLER app. ( p. 7 “Use MusicCast CONTROLLER to connect to a network”)
Use MusicCast CONTROLLER to configure a home audio network
A wireless LAN router (access point) is required.
Play audio from an incredibly wide range of input sources with superior sound quality
Using two units
The two units can act as stereo speakers,
or they can be combined with a Yamaha
amplifier and act as wireless surround
sound speakers.
( p. 14 “Using two units as stereo
speakers (MusicCast Stereo function)”)
( p. 15 “Using two units as surround
speakers (MusicCast Surround function)”)
Combining with MusicCast-enabled devices
Listen to Internet radio stations in multiple rooms or play
music files. Use MusicCast to enjoy music throughout the
house.
( p. 13 “Configuring a MusicCast network”)
The unit
Bluetooth AirPlay
The unit
Computers (NAS)
• Internet radio• Streaming service
Install
4
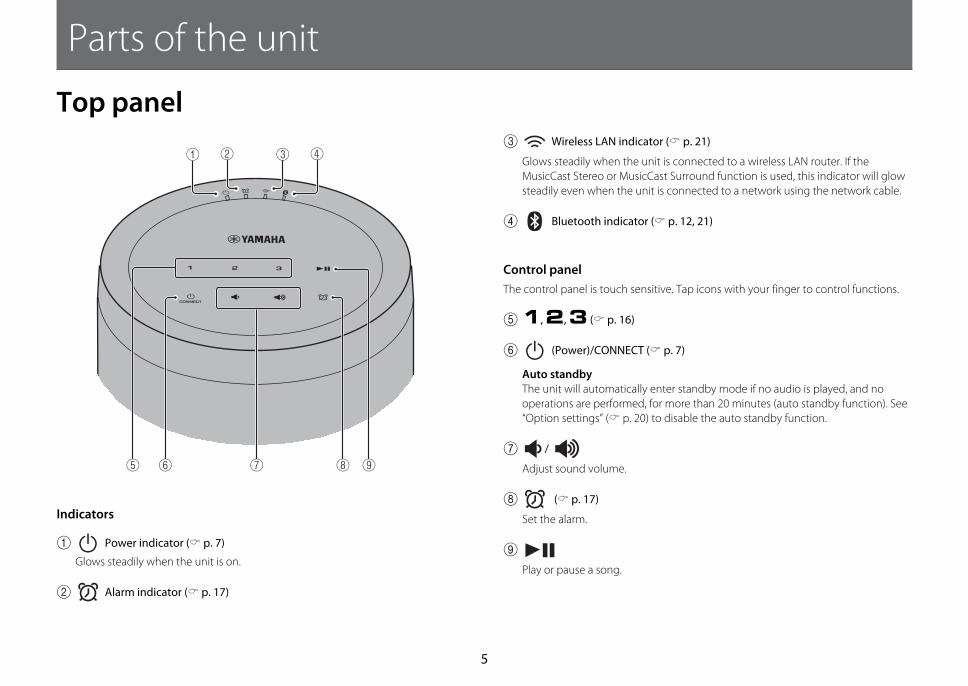
Parts of the unit
Top panel
Indicators
1 Power indicator ( p. 7)
Glows steadily when the unit is on.
2 Alarm indicator ( p. 17)
3 Wireless LAN indicator ( p. 21)
Glows steadily when the unit is connected to a wireless LAN router. If the
MusicCast Stereo or MusicCast Surround function is used, this indicator will glow
steadily even when the unit is connected to a network using the network cable.
4 Bluetooth indicator ( p. 12, 21)
Control panel
The control panel is touch sensitive. Tap icons with your finger to control functions.
5 1, 2, 3 ( p. 16)
6 (Power)/CONNECT ( p. 7)
Auto standby
The unit will automatically enter standby mode if no audio is played, and no
operations are performed, for more than 20 minutes (auto standby function). See
“Option settings” ( p. 20) to disable the auto standby function.
7 /
Adjust sound volume.
8 ( p. 17)
Set the alarm.
9
Play or pause a song.
CONNECT
1 2 3
5
Parts of the unit
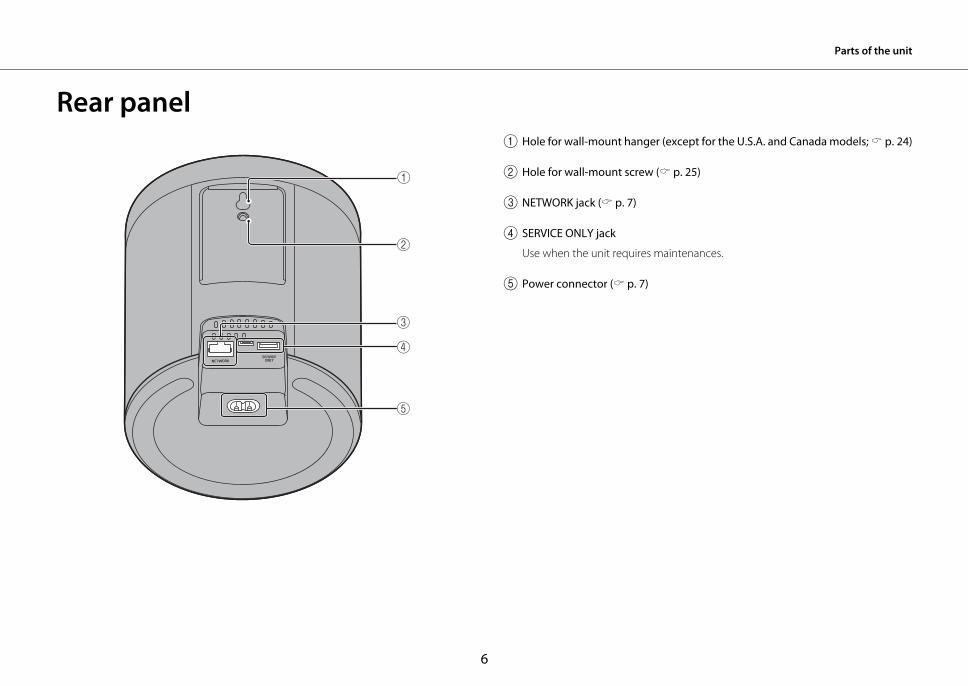
Rear panel1 Hole for wall-mount hanger (except for the U.S.A. and Canada models; p. 24)
2 Hole for wall-mount screw ( p. 25)
3 NETWORK jack ( p. 7)
4 SERVICE ONLY jack
Use when the unit requires maintenances.
5 Power connector ( p. 7)
6
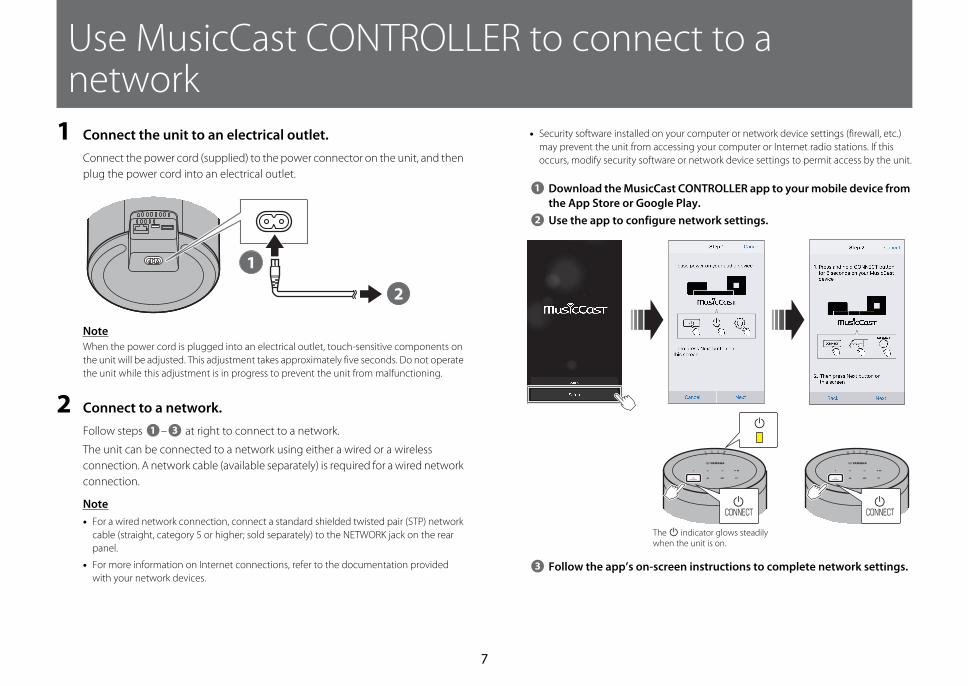
Use MusicCast CONTROLLER to connect to a network
1 Connect the unit to an electrical outlet.Connect the power cord (supplied) to the power connector on the unit, and then
plug the power cord into an electrical outlet.
Note
When the power cord is plugged into an electrical outlet, touch-sensitive components on
the unit will be adjusted. This adjustment takes approximately five seconds. Do not operate
the unit while this adjustment is in progress to prevent the unit from malfunctioning.
2 Connect to a network.
Follow steps – at right to connect to a network.
The unit can be connected to a network using either a wired or a wireless
connection. A network cable (available separately) is required for a wired network
connection.
Note
• For a wired network connection, connect a standard shielded twisted pair (STP) network
cable (straight, category 5 or higher; sold separately) to the NETWORK jack on the rear
panel.
• For more information on Internet connections, refer to the documentation provided
with your network devices.
• Security software installed on your computer or network device settings (firewall, etc.)
may prevent the unit from accessing your computer or Internet radio stations. If this
occurs, modify security software or network device settings to permit access by the unit.
Download the MusicCast CONTROLLER app to your mobile device from
the App Store or Google Play.
Use the app to configure network settings.
Follow the app’s on-screen instructions to complete network settings.
1
2
1 3
1
2
1 2 3
CONNECT
1 2 3
CONNECT
The z indicator glows steadily when the unit is on.
3
7
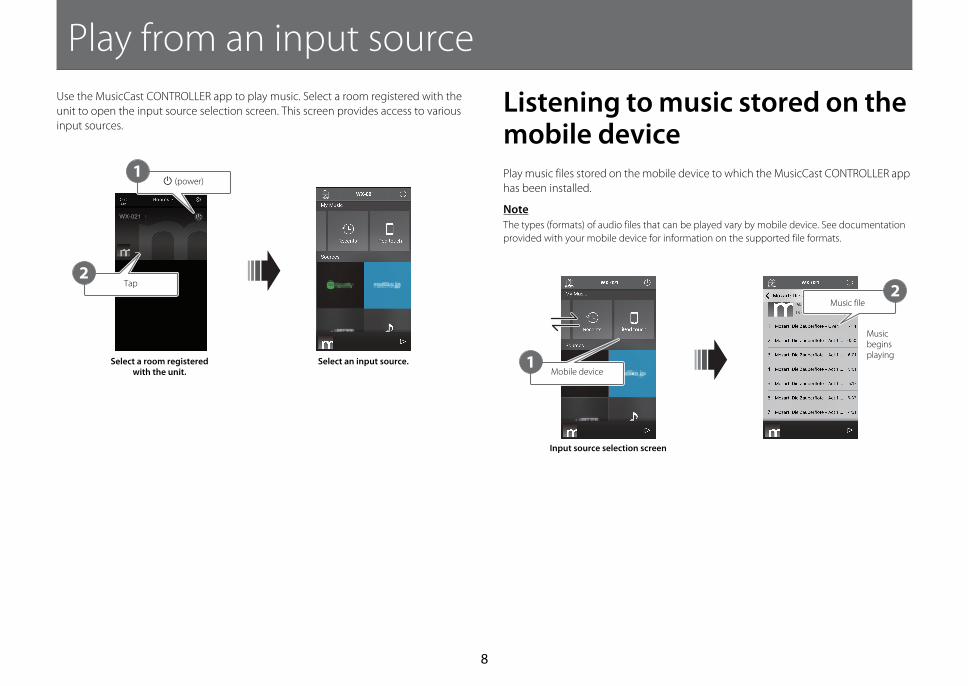
Play from an input source
Use the MusicCast CONTROLLER app to play music. Select a room registered with the
unit to open the input source selection screen. This screen provides access to various
input sources.
Listening to music stored on the mobile devicePlay music files stored on the mobile device to which the MusicCast CONTROLLER app
has been installed.
Note
The types (formats) of audio files that can be played vary by mobile device. See documentation
provided with your mobile device for information on the supported file formats.
WX-021
1
2
Select a room registered with the unit.
Select an input source.
z (power)
Tap 2
1Mobile device
Music file
Music begins playing
Input source selection screen
8

Play from an input source
Listening to Internet radioListen to radio broadcasts from around the world that are distributed via the Internet.
Note
• Some Internet radio stations may not be available, or may be available only during certain
hours.
• This service may be terminated without prior notice.
• This function uses airable.Radio’s extensive catalog. “airable” is a service of Tune In GmbH.
Listening to streaming servicesA streaming service can be heard using the MusicCast CONTROLLER app. On the
MusicCast CONTROLLER screen, select the room registered with the unit, and select
the streaming service to be tuned into by its station name. For details, see the
MusicCast CONTROLLER app.
Note
• Service is limited to certain areas.
• Services supported with the unit may not be available depending upon some regions where
the unit is purchased.
• Service may change or be discontinued without notice.
• After registering the unit in the MusicCast CONTROLLER app, the streaming service can be
used. For details, see “Use MusicCast CONTROLLER to connect to a network” ( p. 7).
• For details on music streaming services, see the supplements for streaming services. Access the
Yamaha Downloads site to download the supplement.
https://download.yamaha.com/
2
1Internet radio
Stations
Broadcast begins
Input source selection screen
9
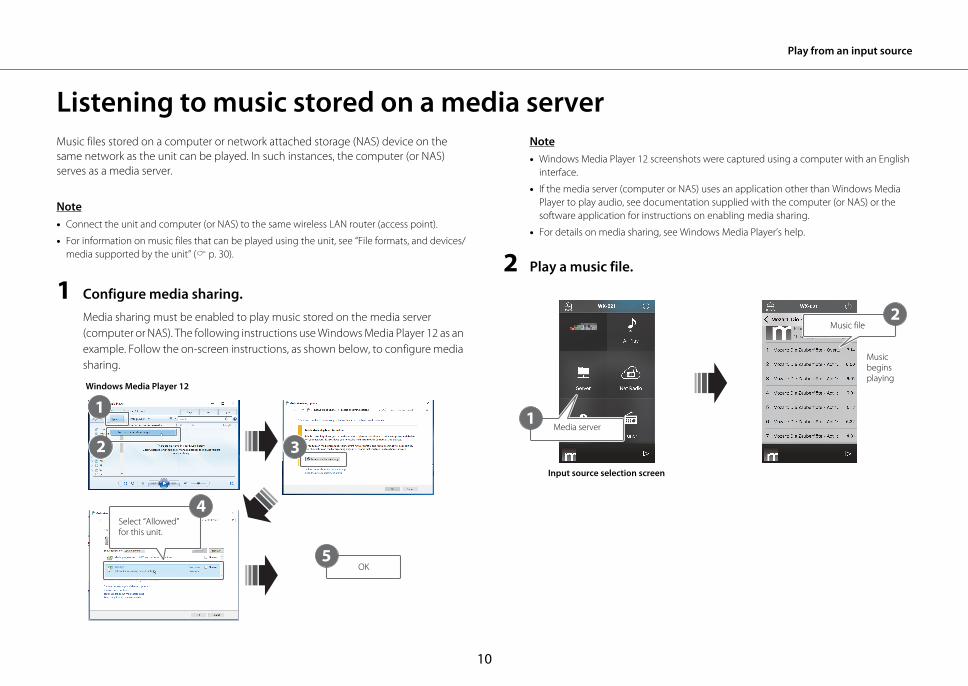
Play from an input source
Listening to music stored on a media serverMusic files stored on a computer or network attached storage (NAS) device on the
same network as the unit can be played. In such instances, the computer (or NAS)
serves as a media server.
Note
• Connect the unit and computer (or NAS) to the same wireless LAN router (access point).
• For information on music files that can be played using the unit, see “File formats, and devices/
media supported by the unit” ( p. 30).
1 Configure media sharing.
Media sharing must be enabled to play music stored on the media server
(computer or NAS). The following instructions use Windows Media Player 12 as an
example. Follow the on-screen instructions, as shown below, to configure media
sharing.
Note
• Windows Media Player 12 screenshots were captured using a computer with an English
interface.
• If the media server (computer or NAS) uses an application other than Windows Media
Player to play audio, see documentation supplied with the computer (or NAS) or the
software application for instructions on enabling media sharing.
• For details on media sharing, see Windows Media Player’s help.
2 Play a music file.
xxxxxx
WX-021
4
1
32
5
Windows Media Player 12
Select “Allowed” for this unit.
OK
1
2
Media server
Music file
Music begins playing
Input source selection screen
10
Play from an input source
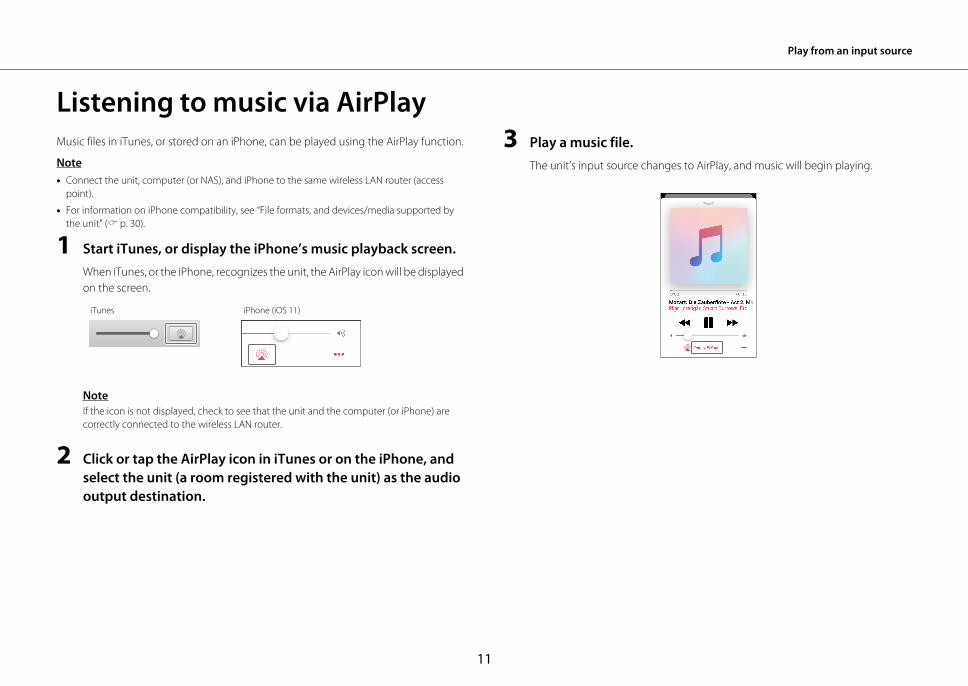
Listening to music via AirPlayMusic files in iTunes, or stored on an iPhone, can be played using the AirPlay function.
Note
• Connect the unit, computer (or NAS), and iPhone to the same wireless LAN router (access
point).
• For information on iPhone compatibility, see “File formats, and devices/media supported by
the unit” ( p. 30).
1 Start iTunes, or display the iPhone’s music playback screen.
When iTunes, or the iPhone, recognizes the unit, the AirPlay icon will be displayed
on the screen.
Note
If the icon is not displayed, check to see that the unit and the computer (or iPhone) are
correctly connected to the wireless LAN router.
2 Click or tap the AirPlay icon in iTunes or on the iPhone, and
select the unit (a room registered with the unit) as the audio
output destination.
3 Play a music file.
The unit’s input source changes to AirPlay, and music will begin playing.
iTunes iPhone (iOS 11)
11
Play from an input source
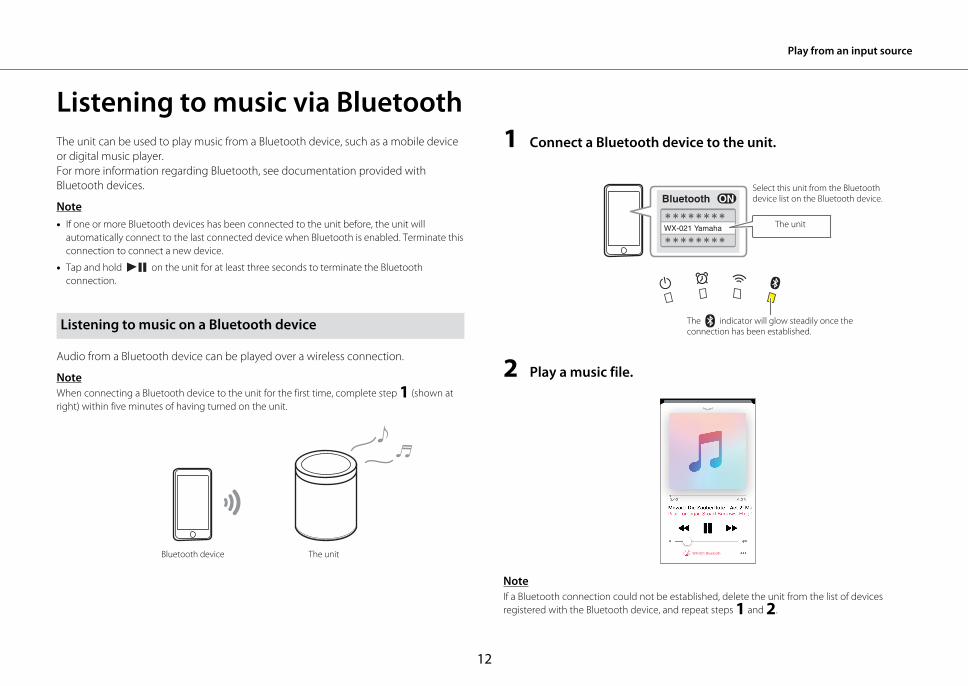
Listening to music via BluetoothThe unit can be used to play music from a Bluetooth device, such as a mobile device
or digital music player.
For more information regarding Bluetooth, see documentation provided with
Bluetooth devices.
Note
• If one or more Bluetooth devices has been connected to the unit before, the unit will
automatically connect to the last connected device when Bluetooth is enabled. Terminate this
connection to connect a new device.
• Tap and hold on the unit for at least three seconds to terminate the Bluetooth
connection.
Audio from a Bluetooth device can be played over a wireless connection.
Note
When connecting a Bluetooth device to the unit for the first time, complete step 1 (shown at
right) within five minutes of having turned on the unit.
1 Connect a Bluetooth device to the unit.
2 Play a music file.
Note
If a Bluetooth connection could not be established, delete the unit from the list of devices
registered with the Bluetooth device, and repeat steps 1 and 2.
Listening to music on a Bluetooth device
The unitBluetooth device
WX-021 Yamaha The unit
Select this unit from the Bluetooth device list on the Bluetooth device.
The indicator will glow steadily once the connection has been established.
WX-021 Bluetooth
12
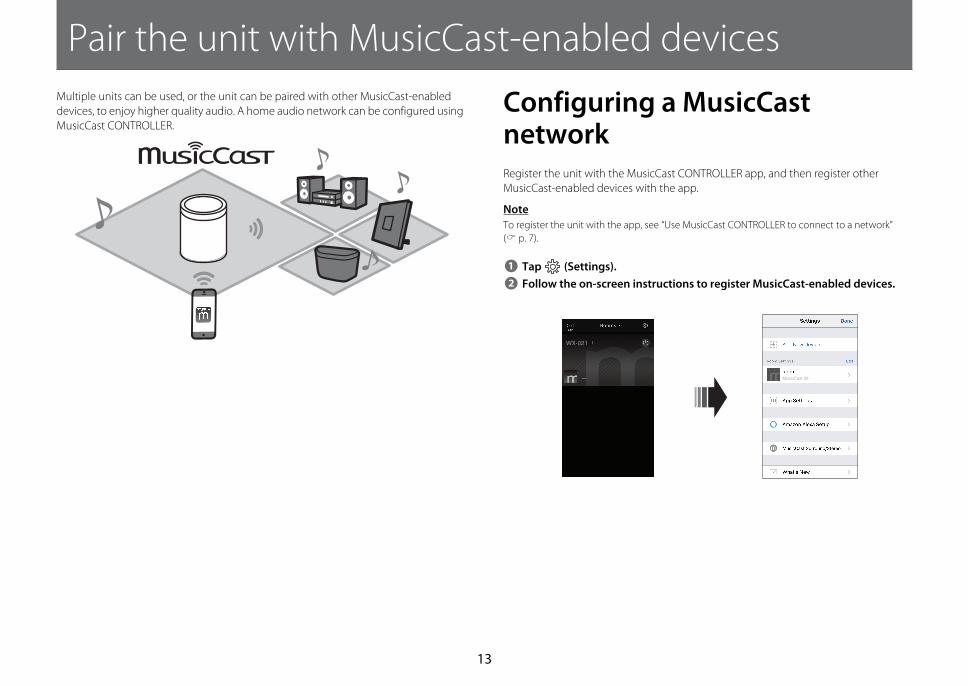
Pair the unit with MusicCast-enabled devices
Multiple units can be used, or the unit can be paired with other MusicCast-enabled
devices, to enjoy higher quality audio. A home audio network can be configured using
MusicCast CONTROLLER.
Configuring a MusicCast networkRegister the unit with the MusicCast CONTROLLER app, and then register other
MusicCast-enabled devices with the app.
Note
To register the unit with the app, see “Use MusicCast CONTROLLER to connect to a network”
( p. 7).
Tap (Settings).
Follow the on-screen instructions to register MusicCast-enabled devices.
1
2
WX-021
MusicCast 20
13
Pair the unit with MusicCast-enabled devices
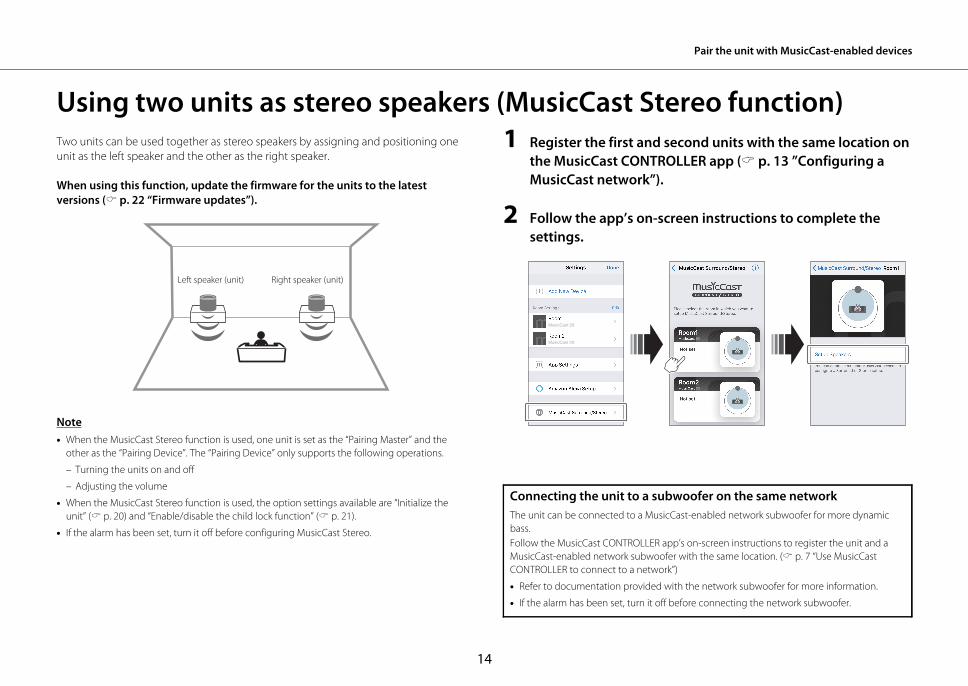
Using two units as stereo speakers (MusicCast Stereo function)Two units can be used together as stereo speakers by assigning and positioning one
unit as the left speaker and the other as the right speaker.
When using this function, update the firmware for the units to the latest
versions ( p. 22 “Firmware updates”).
Note
• When the MusicCast Stereo function is used, one unit is set as the “Pairing Master” and the
other as the “Pairing Device”. The “Pairing Device” only supports the following operations.
– Turning the units on and off
– Adjusting the volume
• When the MusicCast Stereo function is used, the option settings available are “Initialize the
unit” ( p. 20) and “Enable/disable the child lock function” ( p. 21).
• If the alarm has been set, turn it off before configuring MusicCast Stereo.
1 Register the first and second units with the same location on
the MusicCast CONTROLLER app ( p. 13 ”Configuring a
MusicCast network”).
2 Follow the app’s on-screen instructions to complete the
settings.
Left speaker (unit) Right speaker (unit)
Connecting the unit to a subwoofer on the same network
The unit can be connected to a MusicCast-enabled network subwoofer for more dynamic
bass.
Follow the MusicCast CONTROLLER app’s on-screen instructions to register the unit and a
MusicCast-enabled network subwoofer with the same location. ( p. 7 “Use MusicCast
CONTROLLER to connect to a network”)
• Refer to documentation provided with the network subwoofer for more information.
• If the alarm has been set, turn it off before connecting the network subwoofer.
MusicCast 20
MusicCast 2020
20
14

Pair the unit with MusicCast-enabled devices
Using two units as surround speakers (MusicCast Surround function)MusicCast Surround-enabled devices such as AV receivers or sound bars can be paired
with the units to enjoy multi-channel audio.
When using this function, update the firmware for the units and MusicCast
Surround-enabled devices to the latest versions ( p. 22 “Firmware updates”).
See documentation provided with external devices for information on firmware
updates.
1 Register the units and a MusicCast Surround-enabled AV
receiver or sound bar with the same location on the
MusicCast CONTROLLER app ( p. 13 “Configuring a
MusicCast network”).
2 Follow the app’s on-screen instructions to complete the
settings.
Note
• The following functions and operations are not available when the units are used as a surround
sound speakers.
– Favorites function
– Alarm function
– Volume adjustment
The volume is adjusted to match the volume level specified with the AV receiver or sound
bar.
– Option settings other than “Initialize the unit” ( p. 20) and “Enable/disable the child lock
function” ( p. 21).
• If the alarm has been set, turn it off before configuring MusicCast Surround.
Left surround speaker (unit)
Right surround speaker (unit)
MusicCast 20
MusicCast 20
20
Configure MusicCast Surround on the AV receiver or sound bar that will be paired with the unit.
15
Useful features
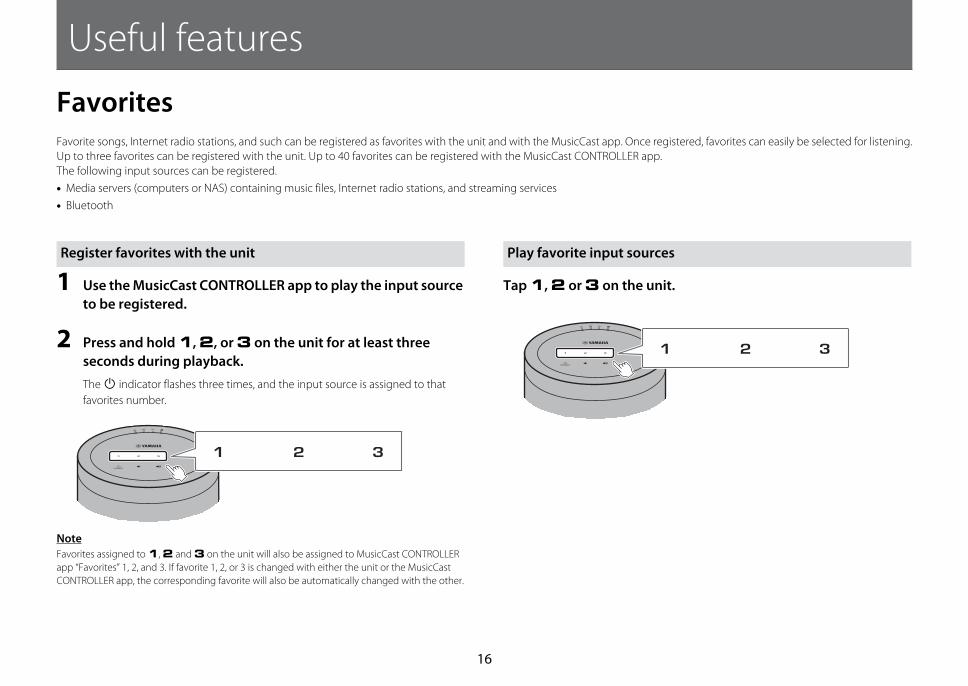
FavoritesFavorite songs, Internet radio stations, and such can be registered as favorites with the unit and with the MusicCast app. Once registered, favorites can easily be selected for listening.
Up to three favorites can be registered with the unit. Up to 40 favorites can be registered with the MusicCast CONTROLLER app.
The following input sources can be registered.
• Media servers (computers or NAS) containing music files, Internet radio stations, and streaming services
• Bluetooth
1 Use the MusicCast CONTROLLER app to play the input source
to be registered.
2 Press and hold 1, 2, or 3 on the unit for at least three
seconds during playback.
The z indicator flashes three times, and the input source is assigned to that
favorites number.
Note
Favorites assigned to 1, 2 and 3 on the unit will also be assigned to MusicCast CONTROLLER
app “Favorites” 1, 2, and 3. If favorite 1, 2, or 3 is changed with either the unit or the MusicCast
CONTROLLER app, the corresponding favorite will also be automatically changed with the other.
Tap 1, 2 or 3 on the unit.
Register favorites with the unit
CONNECT
1 2 3 1 2 3
Play favorite input sources
CONNECT
1 2 3 1 2 3
16
Useful features
AlarmThe MusicCast CONTROLLER app can be used to set the alarm. The alarm can sound as beeps, or as network content played from a media server (computer or NAS) or Internet radio
station, for example.
Three alarm types—music, beeps, combination of music and beeps—are available. 1 Use the MusicCast CONTROLLER app to set the alarm.
Note
No alarm will sound if “Music only” is selected for the alarm type and the specified network
content is unavailable for some reason. Therefore, selecting “Music + beeps” or “Beeps”
only is recommended for important alarms.
Alarm type
Music only Music begins playing at the specified time. The volume starts
low and gradually increases.
Music + beeps Music begins playing at low volume three minutes prior to the
specified time, increasing gradually. Beeps begin sounding over
the music at the specified time.
Beeps only Beeps begin sounding at the specified time.
Set the alarm
WX-021 3
2
1Tap , and then select a room registered with the unit.
Tap Clock Settings, and then confirm that Set Automatically is enabled.
Follow the app’s on screen instructions to set the alarm.
Tap
This setting is required only for the first time.
17
Useful features
2 Tap on the unit.
The indicator glows steadily and the alarm is turned on.
Alarm status alternates between on and off each time is tapped.
Note
Alarm settings are retained when the alarm is turned off. When is tapped to turn on the
alarm, the last alarm setting specified is applied.
Tap any of the icons on the unit’s control panel while the alarm is sounding to stop the
alarm.
Note
If the alarm is not stopped manually, it will stop automatically after one hour has passed.
Stop the alarm
CONNECT
1 2 3
Alarm on ( indicator glows)
Alarm off ( indicator off)
Snooze function
The MusicCast CONTROLLER app can be used to set the snooze function, which
stops the alarm and sets it to sound again five minutes later.
When this function is enabled, the alarm will stop and then go off again five
minutes later when any of the icons on the control panel is tapped. To stop the
alarm completely, press and hold any of the icons on the control panel for at least
five seconds.
Note
When “Music + beeps” is selected as the alarm type, tapping any of the icons on the control
panel while the alarm is sounding will stop only the beeps. Tap any of the icons again to stop
the music as well. Note that the alarm will sound again five minutes later. To stop both the
music and beeps completely, press and hold any of the icons on the control panel for at least
five seconds.
CONNECT
1 2 3Alarm stops temporarily
(snooze)Alarm stops (snooze function is canceled)
The indicator flashes while the snooze function is active.
Flashes Off
Indicator
18
Useful features
Child lock functionThis unit is equipped with a child lock function. When the child lock function is
enabled, some control panel operations are disabled to prevent unintended or
accidental operation.
This function is disabled by default. When the child lock function is enabled, only the
following functions can be operated via the control panel. Use the MusicCast
CONTROLLER app to operate other functions.
When the unit is in standby mode
• turn on the unit
• configure options ( p. 20)
When the unit is on
• set the unit to standby mode
• stop the alarm
1 Tap and hold and on the control panel simultaneously
for at least five seconds when the unit is in standby mode.
2 Tap and hold at least three seconds.
The and indicators will flash three times, and the child lock function will
be enabled.
To disable the child lock function, repeat steps 1 and 2.
The and indicators will flash twice, and the child lock function will be
disabled.
Note
If no operations are performed for ten seconds or more after performing step 1, the unit will
revert to standby mode without enabling/disabling the child lock function. Proceed from step 1
again to enable/disable the child lock function.
Enabling/disabling the child lock function
CONNECT
1 2 3
CONNECT
1 2 3
19
Useful features
Option settingsThe following options can be changed when the unit is in option setting mode. To set the unit to option setting mode, tap and hold and on the control panel
simultaneously for at least five seconds when the unit is in standby mode.
Note
• If no operations are performed for ten seconds or more, option setting mode will be cancelled.
• The option settings available when the MusicCast Stereo function or MusicCast Surround function is used, or when a MusicCast-enabled network subwoofer is connected to the unit are “Initialize the
unit” and “Enable/disable the child lock function”.
* This option enables or disables network operations when the unit is in standby mode. When network standby mode is disabled, network operations are terminated while the unit is in standby mode.
Further, a special “eco standby” mode that minimizes power consumption is enabled. The following operation and functions are not available in eco standby mode. To perform or use them, tap z/
CONNECT on the unit to turn on the unit.
• Using the MusicCast CONTROLLER app to turn on the unit
• AirPlay
• Bluetooth
• MusicCast Stereo/MusicCast Surround function
Setting menu Default Instructions
Initialize the unit —Tap and hold z/CONNECT on the control panel for at least three seconds.
The z indicator will flash twice, and the unit will be initialized.
Enable/disable Network
standby*Enabled
Tap and hold 1 on the control panel for at least three seconds.
The z and indicators will flash twice, and this function will be disabled. Repeating this operation alternately enables and disables this
function.
When this function is enabled, the z and indicators will flash three times.
Enable/disable Auto standby Enabled
Tap and hold 2 on the control panel for at least three seconds.
The indicator will flash twice, and this function will be disabled. Repeating this operation alternately enables and disables this function.
When this function is enabled, the indicator will flash three times.
With an advanced energy saving design, this product achieves a low
power consumption of not more than two watts when in Network
Standby mode
20
Useful features
Setting menu Default Instructions
Enable/disable Wireless LAN Enabled
Tap and hold 3 on the control panel for at least three seconds.
The indicator will flash twice, and wireless LAN function will be disabled. Repeating this operation alternately enables and disables this
function.
When this function is enabled, the indicator will flash three times. Be sure to configure network settings using the MusicCast
CONTROLLER app to connect the unit to a network ( p. 7).
Enable/disable Bluetooth Enabled
Tap and hold on the control panel for at least three seconds.
The indicator will flash twice, and Bluetooth will be disabled. Repeating this operation alternately enables and disables this function.
When this function is enabled, the indicator will flash three times.
Enable/disable the child lock
functionDisabled
Tap and hold for at least three seconds.
The and indicators will flash three times, and this function will be enabled. Repeating this operation alternately enables and
disables this function.
When this function is disabled, the and indicators will flash twice.
21
Useful features
Firmware updatesThe unit’s firmware can be updated if it is connected to the Internet. When new
firmware is released, a notice is displayed by the MusicCast CONTROLLER app. Follow
the app’s on-screen instructions to update the unit’s firmware.
Update progress can be confirmed using the indicators on the unit.
Note
• Do not attempt to operate the unit, or disconnect the power cord or network cable while
firmware is being updated.
• Insufficient Internet speed or other wireless network issues may cause a firmware update to fail.
Update progress indicators
Status Indicators
Update in
progressIndicators other than the z indicator will flash or glow as the
update progresses.
Update
completed
successfullyGlow steadily
When the update has been successfully completed, the unit
will automatically turn off and then on again.
Update failedIndicators will flash or glow depending upon the cause of the failure.
Unplug the power cord from the electrical outlet, plug it in
again, and try to update the unit’s firmware again.
22
Useful features
Using iPhone settings to connect to a networkWhen the unit is turned on for the first time after purchase or after initializing the unit,
the indicator on the unit flashes, and the unit will automatically begin searching
for an iOS device such as an iPhone. Network settings from your iOS device can be
applied to the unit for easy connection to an existing wireless network.
Note
• Be sure that the iOS device is connected to the wireless LAN router (access point).
• An iOS device running iOS 7.1 or later is required.
• iOS device network settings cannot be applied to the unit to establish a wireless connection if
the wireless LAN router uses WEP encryption.
1 While the indicator is flashing, open the iOS device’s Wi-
Fi settings, and then specify this unit as the AirPlay speaker.
2 Choose the wireless network (access point) to which the unit
will be connected.
Once network settings have been successfully shared, the unit will automatically
connect to the selected wireless network.
• Download and install the MusicCast CONTROLLER app to your iOS device to take
full advantage of all the features this unit offers ( p. 7).
• iOS device network settings cannot be automatically applied to the unit (this
feature) when a network cable is connected to the unit.
iOS 11 (English interface)
Name of the unit
Tap here to start setup
Selected network
23
Useful features
Mounting the speaker on a wallThe unit can be mounted on a wall. Be sure to attach the supplied anti-vibration pads
to the four corners of the rear panel to prevent the transmission of sound vibrations to
the wall.
Caution
Be sure to check the stability of the unit after mounting it on the wall. Yamaha is not responsible
for any accidents resulting from improper mounting or installation. Have a professional mount
the unit if you have any safety concerns.
1 Screw a self-tapping screw (3.5–4 mm (1/8") in diameter; not
supplied) into a wall or other vertical support of sufficient
strength.
2 Position the wall mount hanger hole on the rear panel over
the head of the screw.
Push the unit toward the wall until the head of the screw is fully inserted in the
wall mount hanger hole.
Using the wall mount hanger hole (does not apply to the U.S.A. and Canada models)
1 2Wall/wall support
20 mm (3/4") or more
6 mm (1/4")
Unit weight 2.2 kg (4.8 lbs)
24
Useful features
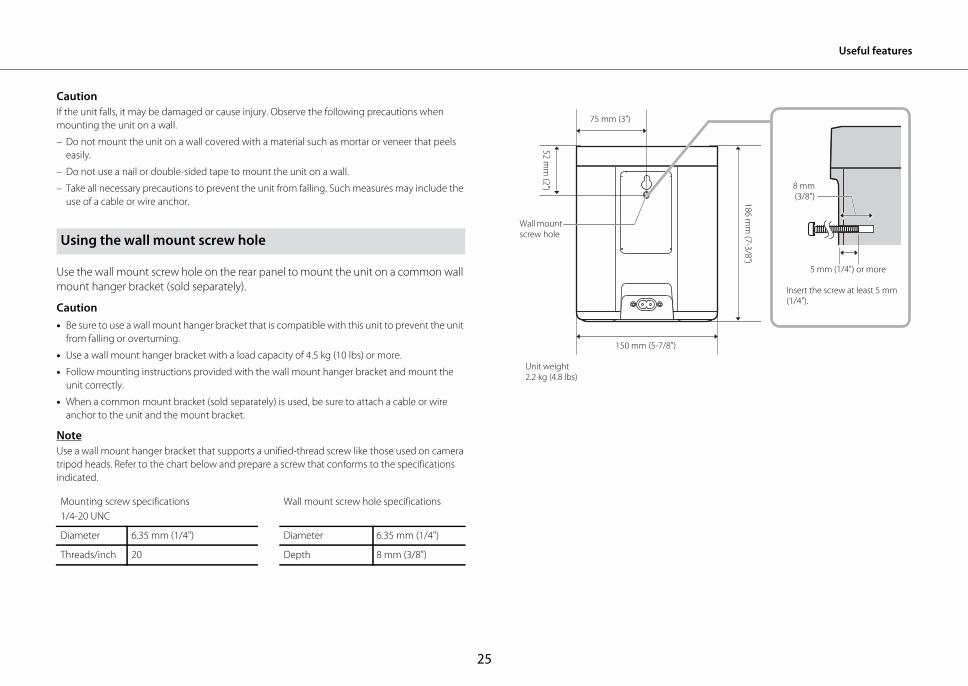
Caution
If the unit falls, it may be damaged or cause injury. Observe the following precautions when
mounting the unit on a wall.
– Do not mount the unit on a wall covered with a material such as mortar or veneer that peels
easily.
– Do not use a nail or double-sided tape to mount the unit on a wall.
– Take all necessary precautions to prevent the unit from falling. Such measures may include the
use of a cable or wire anchor.
Use the wall mount screw hole on the rear panel to mount the unit on a common wall
mount hanger bracket (sold separately).
Caution
• Be sure to use a wall mount hanger bracket that is compatible with this unit to prevent the unit
from falling or overturning.
• Use a wall mount hanger bracket with a load capacity of 4.5 kg (10 lbs) or more.
• Follow mounting instructions provided with the wall mount hanger bracket and mount the
unit correctly.
• When a common mount bracket (sold separately) is used, be sure to attach a cable or wire
anchor to the unit and the mount bracket.
Note
Use a wall mount hanger bracket that supports a unified-thread screw like those used on camera
tripod heads. Refer to the chart below and prepare a screw that conforms to the specifications
indicated.
Using the wall mount screw hole
Mounting screw specifications
1/4-20 UNC
Wall mount screw hole specifications
Diameter 6.35 mm (1/4") Diameter 6.35 mm (1/4")
Threads/inch 20 Depth 8 mm (3/8")
75 mm (3")
150 mm (5-7/8")
18
6 m
m (7
-3/8
")
52
mm
(2")
5 mm (1/4") or more
8 mm(3/8")
Unit weight2.2 kg (4.8 lbs)
Insert the screw at least 5 mm (1/4").
Wall mount screw hole
25
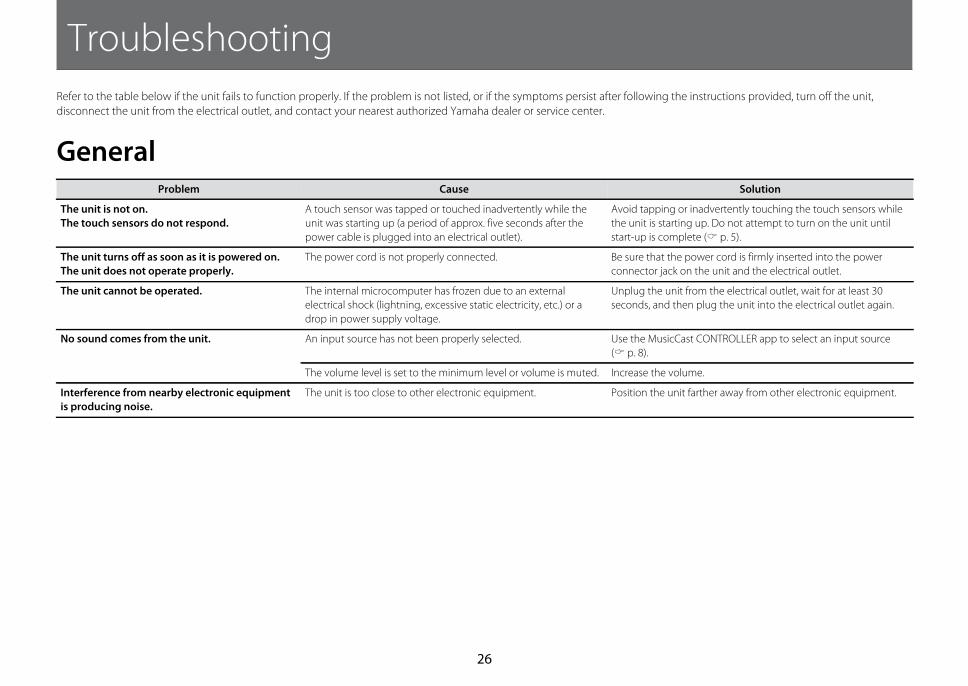
Troubleshooting
Refer to the table below if the unit fails to function properly. If the problem is not listed, or if the symptoms persist after following the instructions provided, turn off the unit,
disconnect the unit from the electrical outlet, and contact your nearest authorized Yamaha dealer or service center.
GeneralProblem Cause Solution
The unit is not on.
The touch sensors do not respond.
A touch sensor was tapped or touched inadvertently while the
unit was starting up (a period of approx. five seconds after the
power cable is plugged into an electrical outlet).
Avoid tapping or inadvertently touching the touch sensors while
the unit is starting up. Do not attempt to turn on the unit until
start-up is complete ( p. 5).
The unit turns off as soon as it is powered on.
The unit does not operate properly.
The power cord is not properly connected. Be sure that the power cord is firmly inserted into the power
connector jack on the unit and the electrical outlet.
The unit cannot be operated. The internal microcomputer has frozen due to an external
electrical shock (lightning, excessive static electricity, etc.) or a
drop in power supply voltage.
Unplug the unit from the electrical outlet, wait for at least 30
seconds, and then plug the unit into the electrical outlet again.
No sound comes from the unit. An input source has not been properly selected. Use the MusicCast CONTROLLER app to select an input source
( p. 8).
The volume level is set to the minimum level or volume is muted. Increase the volume.
Interference from nearby electronic equipment
is producing noise.
The unit is too close to other electronic equipment. Position the unit farther away from other electronic equipment.
26
Troubleshooting
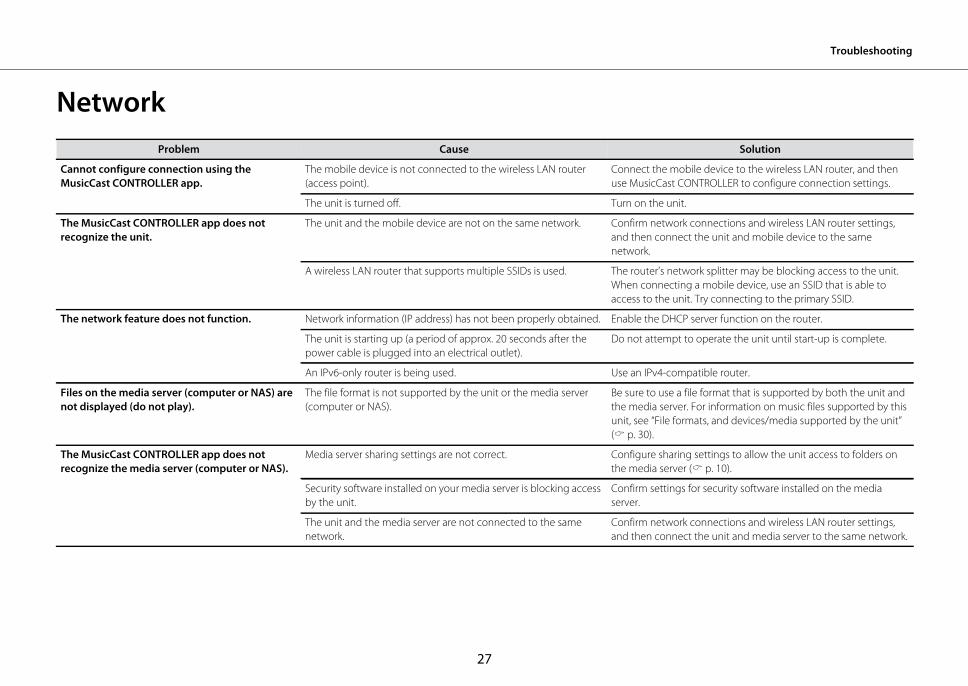
Network
Problem Cause Solution
Cannot configure connection using the
MusicCast CONTROLLER app.
The mobile device is not connected to the wireless LAN router
(access point).
Connect the mobile device to the wireless LAN router, and then
use MusicCast CONTROLLER to configure connection settings.
The unit is turned off. Turn on the unit.
The MusicCast CONTROLLER app does not
recognize the unit.
The unit and the mobile device are not on the same network. Confirm network connections and wireless LAN router settings,
and then connect the unit and mobile device to the same
network.
A wireless LAN router that supports multiple SSIDs is used. The router’s network splitter may be blocking access to the unit.
When connecting a mobile device, use an SSID that is able to
access to the unit. Try connecting to the primary SSID.
The network feature does not function. Network information (IP address) has not been properly obtained. Enable the DHCP server function on the router.
The unit is starting up (a period of approx. 20 seconds after the
power cable is plugged into an electrical outlet).
Do not attempt to operate the unit until start-up is complete.
An IPv6-only router is being used. Use an IPv4-compatible router.
Files on the media server (computer or NAS) are
not displayed (do not play).
The file format is not supported by the unit or the media server
(computer or NAS).
Be sure to use a file format that is supported by both the unit and
the media server. For information on music files supported by this
unit, see “File formats, and devices/media supported by the unit”
( p. 30).
The MusicCast CONTROLLER app does not
recognize the media server (computer or NAS).
Media server sharing settings are not correct. Configure sharing settings to allow the unit access to folders on
the media server ( p. 10).
Security software installed on your media server is blocking access
by the unit.
Confirm settings for security software installed on the media
server.
The unit and the media server are not connected to the same
network.
Confirm network connections and wireless LAN router settings,
and then connect the unit and media server to the same network.
27
Troubleshooting
Unable to play Internet radio. The selected Internet radio station is currently offline. The radio station may be experiencing problems with their
network, may not be broadcasting, or their services may have
been terminated. Try to play the station later or select another
station.
The selected Internet radio station is currently broadcasting
silence.
Some Internet radio stations broadcast silence at certain times of
the day. When this occurs, there are no problems with reception,
but no sound plays. Try the station later or select another station.
Access to the network is restricted by network device (wireless
LAN router, etc.) firewall settings.
Check device firewall settings. Internet radio can be played only
through the port specified by each radio station. The port number
varies depending on the radio station.
Firmware update failed. The network connection is unstable. Try again later.
The unit is unable to connect to the Internet via a
wireless LAN router (access point).
The wireless LAN router is turned off. Turn on the wireless LAN router.
The unit and the wireless LAN router are too far apart. Place the unit and the wireless LAN router closer to each other.
There is an obstacle between the unit and the wireless LAN router. Move the unit and the wireless LAN router to a location with a
direct line of sight (no obstacles) between the two.
The unit’s wireless LAN function is disabled. Enable the unit’s wireless LAN function ( p. 21).
The MusicCast CONTROLLER app does not
detect a wireless network.
A device that operates in the 2.4 GHz band (microwave oven,
wireless network device, etc.) is interfering with wireless
communication.
Turn off the offending device, or move it farther away from the
unit and the wireless LAN router.
Access to the network is restricted by the wireless LAN router’s
(access point’s) firewall settings.
Confirm wireless LAN router firewall settings.
My iPhone does not recognize the unit when
using AirPlay.
A wireless LAN router that supports multiple SSIDs is used. The router’s network splitter may be blocking access to the unit.
When connecting a mobile device, use an SSID that is able to
access to the unit. Try connecting to the primary SSID.
Problem Cause Solution
28
Troubleshooting
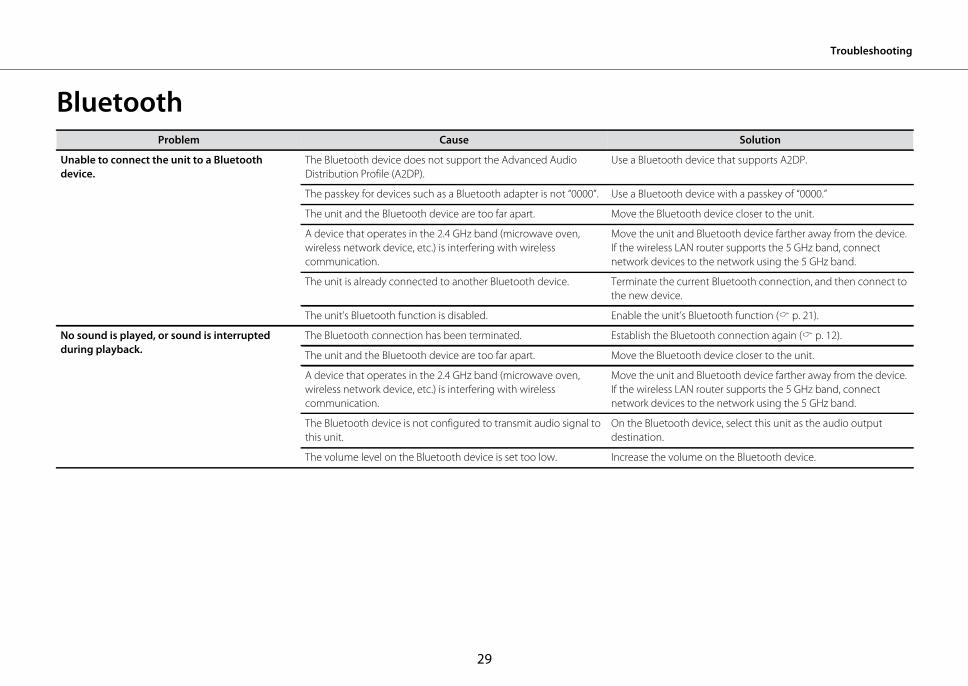
BluetoothProblem Cause Solution
Unable to connect the unit to a Bluetooth
device.
The Bluetooth device does not support the Advanced Audio
Distribution Profile (A2DP).
Use a Bluetooth device that supports A2DP.
The passkey for devices such as a Bluetooth adapter is not “0000”. Use a Bluetooth device with a passkey of “0000.”
The unit and the Bluetooth device are too far apart. Move the Bluetooth device closer to the unit.
A device that operates in the 2.4 GHz band (microwave oven,
wireless network device, etc.) is interfering with wireless
communication.
Move the unit and Bluetooth device farther away from the device.
If the wireless LAN router supports the 5 GHz band, connect
network devices to the network using the 5 GHz band.
The unit is already connected to another Bluetooth device. Terminate the current Bluetooth connection, and then connect to
the new device.
The unit’s Bluetooth function is disabled. Enable the unit’s Bluetooth function ( p. 21).
No sound is played, or sound is interrupted
during playback.
The Bluetooth connection has been terminated. Establish the Bluetooth connection again ( p. 12).
The unit and the Bluetooth device are too far apart. Move the Bluetooth device closer to the unit.
A device that operates in the 2.4 GHz band (microwave oven,
wireless network device, etc.) is interfering with wireless
communication.
Move the unit and Bluetooth device farther away from the device.
If the wireless LAN router supports the 5 GHz band, connect
network devices to the network using the 5 GHz band.
The Bluetooth device is not configured to transmit audio signal to
this unit.
On the Bluetooth device, select this unit as the audio output
destination.
The volume level on the Bluetooth device is set too low. Increase the volume on the Bluetooth device.
29
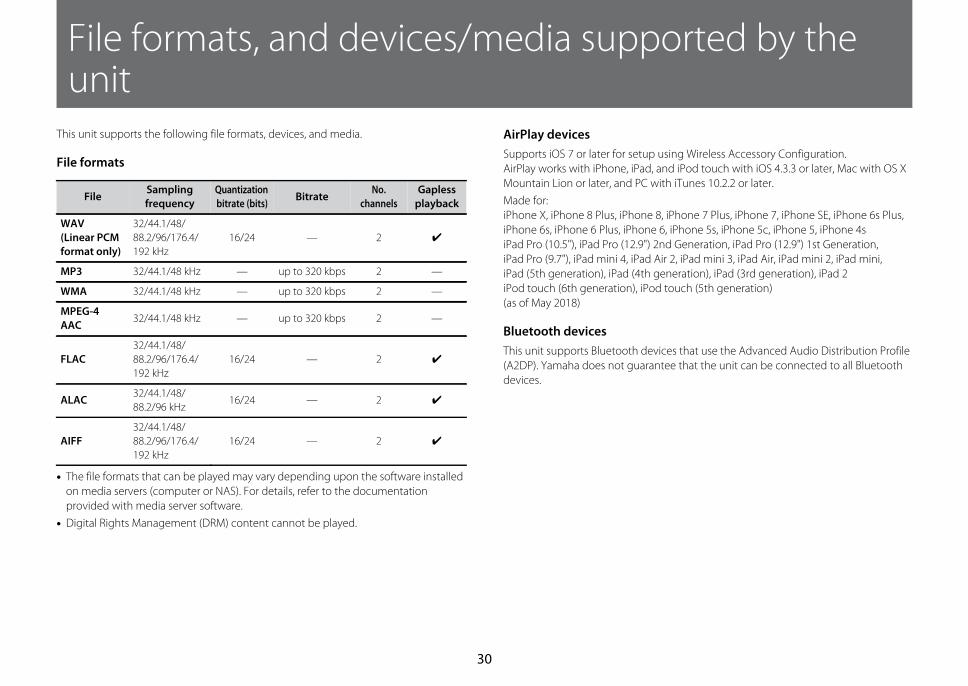
File formats, and devices/media supported by the unit
This unit supports the following file formats, devices, and media.
File formats
• The file formats that can be played may vary depending upon the software installed
on media servers (computer or NAS). For details, refer to the documentation
provided with media server software.
• Digital Rights Management (DRM) content cannot be played.
AirPlay devices
Supports iOS 7 or later for setup using Wireless Accessory Configuration.
AirPlay works with iPhone, iPad, and iPod touch with iOS 4.3.3 or later, Mac with OS X
Mountain Lion or later, and PC with iTunes 10.2.2 or later.
Made for:
iPhone X, iPhone 8 Plus, iPhone 8, iPhone 7 Plus, iPhone 7, iPhone SE, iPhone 6s Plus,
iPhone 6s, iPhone 6 Plus, iPhone 6, iPhone 5s, iPhone 5c, iPhone 5, iPhone 4s
iPad Pro (10.5"), iPad Pro (12.9") 2nd Generation, iPad Pro (12.9") 1st Generation,
iPad Pro (9.7"), iPad mini 4, iPad Air 2, iPad mini 3, iPad Air, iPad mini 2, iPad mini,
iPad (5th generation), iPad (4th generation), iPad (3rd generation), iPad 2
iPod touch (6th generation), iPod touch (5th generation)
(as of May 2018)
Bluetooth devices
This unit supports Bluetooth devices that use the Advanced Audio Distribution Profile
(A2DP). Yamaha does not guarantee that the unit can be connected to all Bluetooth
devices.
FileSampling
frequency
Quantization
bitrate (bits)Bitrate
No.
channels
Gapless
playback
WAV
(Linear PCM
format only)
32/44.1/48/
88.2/96/176.4/
192 kHz
16/24 — 2 ✔
MP3 32/44.1/48 kHz — up to 320 kbps 2 —
WMA 32/44.1/48 kHz — up to 320 kbps 2 —
MPEG-4
AAC32/44.1/48 kHz — up to 320 kbps 2 —
FLAC
32/44.1/48/
88.2/96/176.4/
192 kHz
16/24 — 2 ✔
ALAC32/44.1/48/
88.2/96 kHz16/24 — 2 ✔
AIFF
32/44.1/48/
88.2/96/176.4/
192 kHz
16/24 — 2 ✔
30
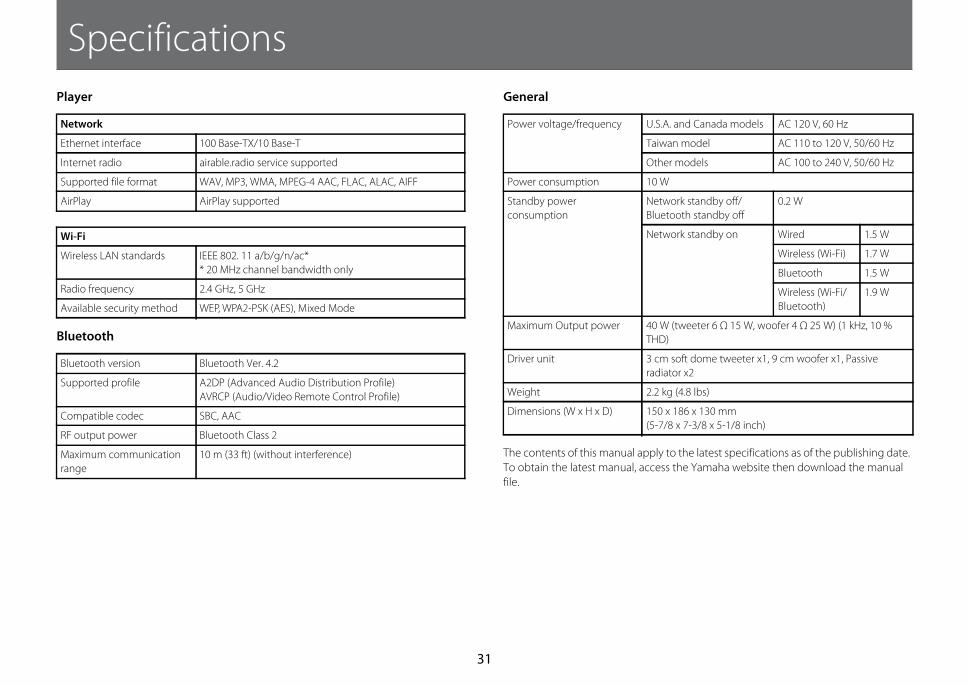
Specifications
Player
Bluetooth
General
The contents of this manual apply to the latest specifications as of the publishing date.
To obtain the latest manual, access the Yamaha website then download the manual
file.
Network
Ethernet interface 100 Base-TX/10 Base-T
Internet radio airable.radio service supported
Supported file format WAV, MP3, WMA, MPEG-4 AAC, FLAC, ALAC, AIFF
AirPlay AirPlay supported
Wi-Fi
Wireless LAN standards IEEE 802. 11 a/b/g/n/ac*
* 20 MHz channel bandwidth only
Radio frequency 2.4 GHz, 5 GHz
Available security method WEP, WPA2-PSK (AES), Mixed Mode
Bluetooth version Bluetooth Ver. 4.2
Supported profile A2DP (Advanced Audio Distribution Profile)
AVRCP (Audio/Video Remote Control Profile)
Compatible codec SBC, AAC
RF output power Bluetooth Class 2
Maximum communication
range
10 m (33 ft) (without interference)
Power voltage/frequency U.S.A. and Canada models AC 120 V, 60 Hz
Taiwan model AC 110 to 120 V, 50/60 Hz
Other models AC 100 to 240 V, 50/60 Hz
Power consumption 10 W
Standby power
consumption
Network standby off/
Bluetooth standby off
0.2 W
Network standby on Wired 1.5 W
Wireless (Wi-Fi) 1.7 W
Bluetooth 1.5 W
Wireless (Wi-Fi/
Bluetooth)
1.9 W
Maximum Output power 40 W (tweeter 6 Ω 15 W, woofer 4 Ω 25 W) (1 kHz, 10 %
THD)
Driver unit 3 cm soft dome tweeter x1, 9 cm woofer x1, Passive
radiator x2
Weight 2.2 kg (4.8 lbs)
Dimensions (W x H x D) 150 x 186 x 130 mm
(5-7/8 x 7-3/8 x 5-1/8 inch)
31
Trademarks
MusicCast is a trademark or registered trademark of Yamaha Corporation.
The Bluetooth® word mark and logos are registered trademarks owned by Bluetooth
SIG, Inc. and any use of such marks by Yamaha Corporation is under license.
Windows™
Windows is a registered trademark of Microsoft Corporation in the United States and
other countries.
Internet Explorer, Windows Media Audio and Windows Media Player are either
registered trademarks or trademarks of Microsoft Corporation in the United States
and/or other countries.
Android™ Google Play™
Android and Google Play are trademarks of Google LLC.
The Wi-Fi CERTIFIED™ Logo is a certification mark of Wi-Fi Alliance®.
Licenses
For information on the licenses of the third-party software in this product, refer to the
following.
http://(IP address of this product*)/licenses.html
* IP address of this product is checked with MusicCast CONTROLLER.
Yamaha Eco-Label is a mark that certifies products of high environmental
performance.
App Store is a service mark of Apple Inc.
Use of the Works with Apple badge means that an accessory has been designed to
work specifically with the technology identified in the badge and has been certified by
the developer to meet Apple performance standards.
Apple, iPad, iPad Air, iPad Pro and iPhone are trademarks of Apple Inc., registered in
the U.S. and other countries.
Explanations regarding GPL
This product utilizes GPL/LGPL open-source software in some sections. You have
the right to obtain, duplicate, modify, and redistribute this open-source code
only. For information on GPL/LGPL open source software, how to obtain it, and
the GPL/LGPL license, refer to the Yamaha Corporation website
(https://download.yamaha.com/sourcecodes/musiccast/).
32

Published 05/2018 KSOE-C0
Manual Development Group© 2018 Yamaha Corporation
WX-021OM/EN
Yamaha Global Sitehttps://www.yamaha.com/
Yamaha Downloadshttps://download.yamaha.com/
10-1 Nakazawa-cho, Naka-ku, Hamamatsu, 430-8650 Japan