
WS-311M WS-321M WS-331M Instructions EN...Getting Started P.8 When Using the Recorder as a Voice...
102
Thank you for purchasing an Olympus Digital Voice Recorder. Please read these instructions for information about using the product correctly and safely. Keep the instructions handy for future reference. To ensure successful recordings, we recommend that you test the record function and volume before use. EN DIGITAL VOICE RECORDER WS-331M WS-321M WS-311M INSTRUCTIONS INSTRUCTIONS
Transcript of WS-311M WS-321M WS-331M Instructions EN...Getting Started P.8 When Using the Recorder as a Voice...

Thank you for purchasing an OlympusDigital Voice Recorder.
Please read these instructions for informationabout using the product correctly and safely.
Keep the instructions handy for future reference.
To ensure successful recordings, werecommend that you test the record function
and volume before use.EN
DIGITAL VOICERECORDER
WS-331MWS-321MWS-311M
INSTRUCTIONSINSTRUCTIONS

2
Trademarks
IBM and PC/AT are the trademarks or registered trademarks of International BusinessMachines Corporation.
Microsoft, Windows and Windows Media are registered trademarks of Microsoft Corporation.
WOW XT, SRS and symbol are trademarks of SRS Labs, Inc.
WOW XT technology is incorporated under license from SRS Labs, Inc.
MPEG Layer-3 audio coding technology licensed from Fraunhofer IIS and Thomson.
The product was developed based on noise-canceling technology under license from NECCorporation.
Other product and brand names mentioned herein may be the trademarks or registeredtrademarks of their respective owners.
Introduction
The contents of this document may be changed in the future without advanced notice.Contact our Customer Support Center for the latest information relating to productnames and model numbers.
The utmost care has been taken to ensure the integrity of the contents of this document.In the unlikely event that a questionable item, error, or omission is found, please contactour Customer Support Center.
Any liability for passive damages or damage of any kind occurred due to data lossincurred by a defect of the product, repair performed by the third party other thanOlympus or an Olympus authorized service station, or any other reasons is excludedfrom the Olympus’s liability.

3
12
6
3
5
7
4
INDEX
Table of Contents P.4
Safe and Proper Usage P.6
Getting Started P.8
When Using the Recorder as a Voice Recorder P.19
Using the Recorder on Your PC P.44
Using the Recorder as a Music Player P.48
P.72
Other Practical Use Methods P.94
Other Information P.95
Feature Common to the Voice Recorderand Music Player

4
Introduction .............................................. 2
INDEX ...................................................... 3
Table of Contents .................................... 4
Safe and Proper Usage ........................... 6
General Precautions ................................ 6
1 Getting Started
Main Features .......................................... 8
Identification of Parts ............................. 10
Inserting Battery .................................... 12
Power Supply ........................................ 13
VOICE Mode and MUSIC Mode ........... 14
Setting Time/Date (Time & Date) .......... 17
2 When Using the Recorder as aVoice Recorder
Recording .............................................. 19
Using the Variable Control
Voice Actuator (VCVA) .................... 22
Recording Modes (Rec Mode) .............. 24
Microphone Sensitivity (Mic Sense) ...... 25
Set the Low Cut Filter (Low Cut Filter) .... 26
Recording from External Microphone
or Other Devices ............................. 28
Playing ................................................... 30
Noise Cancel Function (Noise Cancel) ... 34
Set the Voice Filter (Voice Filter) .......... 36
Continuous Playback (All Play) ............. 38
Locking Files (Lock) .............................. 40
Menu List (VOICE Mode) ...................... 42
3 Using the Recorder on Your PC
Saving Files in Your PC ......................... 44
Operating Environment ......................... 45
Connecting to Your PC .......................... 46
4 Using the Recorder as aMusic Player
Using the Recorder as a Music Player .... 48
Using Windows Media Player ............... 48
Importing Content for Listening on the
Recorder .......................................... 49
Window Names ..................................... 50
Copying Music from CD ........................ 51
Table of Contents

5
Transferring Music File to the Recorder ...... 52
Music Playback ...................................... 55
Select Play Mode (Play Mode) .............. 59
Random Playback (Random) ................ 61
Increasing the WOW Effect (WOW) ...... 63
Selecting Equalizer (EQ) ....................... 66
Moving the Tracks (Move) ..................... 68
Menu List (MUSIC Mode) ...................... 70
5 Feature Common to the VoiceRecorder and Music Player
Erasing ................................................... 72
Hold ........................................................ 75
Index Marks and Temp Marks ............... 76
How to Begin Segment Repeat Playback ... 78
Menu Setting Method ............................ 80
Auto Backspace Review (Back Space) ... 82
Changing the Playback Speed
(Play Speed) ................................... 84
System Sounds (Beep) ......................... 87
Backlight (Backlight) .............................. 88
LCD Contrast Adjustment (Contrast) .... 89
LED (LED) ............................................. 90
Formatting the Recorder (Format) ........ 91
Viewing System Information
(System Info.) .................................. 93
6 Other Practical Use Methods
Using as External Memory
of the Computer ............................. 94
7 Other Information
Alarm Message List ............................... 95
Troubleshooting ..................................... 96
Accessories (Optional) .......................... 97
Specifications ........................................ 98
Technical Assistance and Support ...... 100
Table of Contents

6
Safe and ProperUsageBefore using your new recorder, read thismanual carefully to ensure that you knowhow to operate it safely and correctly.Keep this manual in an easily accessiblelocation for future reference.
• The warning symbols indicate important safetyrelated information. To protect yourself and othersfrom personal injury or damage to property, it isessential that you always read the warnings andinformation provided.
General Precautions
Do not leave the recorder in hot,humid locations such as inside aclosed automobile under directsunlight or on the beach in thesummer.
Do not store the recorder in placesexposed to excessive moisture ordust.
Do not use organic solvents such asalcohol and lacquer thinner to cleanthe unit.
Do not place the recorder on top ofor near electric appliances such asTVs or refrigerators.
Avoid recording or playing back nearcellular phones or other wirelessequipment, as they may causeinterference and noise. If youexperience noise, move to anotherplace, or move the recorder furtheraway from such equipment.
Avoid sand or dirt. These can causeirreparable damage.
Avoid strong vibrations or shocks. Do not disassemble, repair or modify
the unit yourself.

7
General Precautions
Do not operate the unit whileoperating a vehicle (such as abicycle, motorcycle, or go-cart).
Keep the unit out of the reach ofchildren.
<Warning regarding data loss>
Recorded content in memory may bedestroyed or erased by operatingmistakes, unit malfunction, or duringrepair work.It is recommended to back up and saveimportant content to other media such asa computer hard disk.Any liability for passive damages ordamage of any kind occurred due to dataloss incurred by a defect of the product,repair performed by the third party otherthan Olympus or an Olympus authorizedservice station, or any other reasons isexcluded from the Olympus’s liability.
Batteries
Warning
• Batteries should never be exposed toflame, heated, short-circuited ordisassembled.
• Do not attempt to recharge alkaline,lithium or any other non-rechargeablebatteries.
• Never use any battery with a torn orcracked outer cover.
• Keep batteries out of the reach ofchildren.
• If you notice anything unusual whenusing this product such as abnormalnoise, heat, smoke, or a burning odor:
1 remove the batteries immediatelywhile being careful not to burnyourself, and;
2 call your dealer or local Olympusrepresentative for service.

8
1
Main
Featu
res
Getting Started
Main Features
This product can be used to record meetings or notes, for use in conferences and otherbusiness settings, and for language studies. It can also be used as a digital music player.This recorder features a two-part design. The battery compartment separates from the mainunit to expose a USB terminal, for direct connection to your PC.
Main Features of the DigitalVoice Recorder The recorder stores highly compressed
WMA (Windows Media Audio) format voicemessages in integrated flash memory. (P. 19)It can also play back WMA and MP3(MPEG-1/MPEG-2 Audio Layer-3) formatfiles. ( P. 30)
It has a built-in Variable Control VoiceActuator (VCVA) function. ( P. 22)
The Low Cut Filter minimizes air conditionernoise and other similar noises while recording.( P. 26)
A Noise Cancel function ( P. 34) and a Voice Filterfunction ( P. 36) cut noise and enable clear audio playback.
Stereomicrophone
Noise-Cancellationmonaural microphone
Telephonepickup
Tie clip microphone
External Microphone(optional) P. 97
Recording modes WS-331M (2GB) WS-321M (1GB) WS-311M (512MB)
ST XQ 35 hours 30 minutes 17 hours 40 minutes 8 hours 45 minutesST HQ 71 hours 00 minutes 35 hours 25 minutes 17 hours 40 minutesST SP 142 hours 05 minutes 70 hours 55 minutes 35 hours 25 minutesHQ 142 hours 05 minutes 70 hours 55 minutes 35 hours 25 minutesSP 279 hours 35 minutes 139 hours 40 minutes 69 hours 40 minutesLP 555 hours 45 minutes 277 hours 35 minutes 138 hours 30 minutes
Available recording time may be shorter if many short recordings are made. (The displayed available recording timeand recorded time are approximate indications.)
You can choose one of three stereo or three monaural recording modes. ( P. 24)
Recording time:

9
1
Main
Featu
res
It has a backlight full-dot display (LCDdisplay screen). ( P. 11)
It features various repeat functions.( P. 59, P. 78)
Index mark and temp mark featuresallow you to quickly find desiredlocations. ( P. 76)
The playback speed can be controlledas preferred. ( P. 84)
Connecting this recorder directly to the USB portlinks up with your PC. The data can be transferredor saved without USB cable or driver software. (P. 46)• This recorder is compatible with USB 2.0, enabling fast
data transfer to a computer.
This USB storage class support recorder can beutilized as external memory to read and save thedata. ( P. 94)• By connecting the computer with the USB, pictures, text
data, etc. can be saved, and utilized to carry data.
Main Features
Ni-MHrechargeablebattery and chargerset (optional)
P. 97
Main Features of the Digital Music Player You can play back music files in WMA and MP3 format. ( P. 55)
• The WS-331M can hold about 500 songs; the WS-321M about 250, andthe WS-311M about 125. (at 128 kbps, 4 minutes per song)
It has built-in WOW XT. ( P. 63)
You can change the playback equalizer settings. ( P. 66)

10
1
1 EAR (Earphone) jack2 MIC (Microphone) jack3 Built-in stereo microphone (R)4 REC (Record) button5 STOP button6 PLAY button7 Built-in speaker8 USB terminal9 VOL (+) button0 9 button! VOL (–) button@ FOLDER/INDEX button
# ERASE button$ OK/MENU button% 0 button^ Display (LCD panel)& Record/Play indicator light* Built-in stereo microphone (L)( USB access indicator light) Strap hole- HOLD switch= Mode (VOICE/MUSIC) switchq RELEASE (Release) buttonw Battery cover
Identification of Parts
4
3
9
0
!
@
#
^
w
&
*
$
%
5
6
7
8
12
(
=-
)
q
Main unit
Batterycompartment
Iden
tification
of P
arts

11
1
Identification of Parts
Display (LCD Panel)
VOICE mode display MUSIC mode display
1 Folder indicator2 VCVA (Variable Control Voice
Actuator) indicator3 Record mode indicator
4 Character information display5 Microphone sensitivity indicator6 Erase lock indicator
7 Low Cut Filter indicator8 Playback effect indicator
9 Battery indicator0 Current file number
! Total number of recorded filesin the folder
@ Memory remaining indicator (E/F bar)
# Title and artist name indicator$ Play position bar indicator
0Music 1 /36SONG A/Artist
SA
$
4
9
#
8
0 !1
120 120HQE F
S
@
9
!
0
1
2
3
4
8765
Iden
tification
of P
arts

12
1
A
B
1
2
3
Inserting Battery
1 Lightly press down on the arrow and slide thebattery cover open.
2 Insert size-AAA alkaline battery, observing thecorrect polarity.
3 Close the battery cover completely by pressing tothe direction A, then sliding to the direction B.
If the “hour” indicator flashes in the display, see “Setting Time/Date (Time & Date)” ( P. 17).
Replacing the BatteryThe battery indicator on the display changes as the batteryloses power.
When appears on the display, replace the battery as soonas possible.When the battery is too weak, “Battery Low” appears on thedisplay and the recorder shuts down. When changing battery, AAAalkaline battery or Olympus Ni-MH battery is recommended.
Optional Ni-MH rechargeable batteries from Olympus can beused for the recorder. Use them with the BU-400 Olympus Ni-MH Rechargeable Battery Charger (Europe only) ( P. 97).
Ni-MH Rechargeable Battery
..................................................................................................................................................Notes• Manganese battery may not be used in this recorder.• Be sure to stop the recorder before replacing the battery. Unloading the battery while the recorder
is in use may corrupt the file. If you are recording into a file and the battery runs out, you will lose yourcurrently recorded file because the file header will not be able to close. It is crucial to change the batteryonce you see only one hash mark in the battery indicator.
• If it takes longer than 15 minutes to replace the dead battery or if you take the battery in and outrepeatedly at short intervals, you may have to reset the time when you have loaded a fresh battery.
• Remove the battery if you are not going to use the recorder for an extended period of time.• When playing a voice/music file, the recorder may be reset due to the reduction of the voltage output of
the battery depending on the volume level even if is displayed in the battery indicator. In this case,lower the volume of the recorder.
Insertin
g B
attery

13
1
Turning On the Power
Slide the HOLD switch in the direction oppositethat indicated by the arrow.The display will turn on and the power will be turned on.The resume function will bring the recorder back to the stopposition in memory before power was turned off.
Turning Off the Power
Slide the HOLD switch in thedirection indicated by thearrow while the recorder is notin operation.The display shuts off and the powerwill be turned off.The resume function remembers thestop position before the power isturned off.
H o l d
Power Supply
If the recorder is stopped/not used for over 5 minutesafter it is turned on, it goes into standby (power-save)mode, and the display shuts off. To exit standby modeand turn on the display, press any button.
Standby Mode and Display Shut Off
When the recorder is not being used, turn the power off to reduce battery consumption to aminimum. Even if the power is turned off, existing data, mode settings, and clock settings willbe maintained.
Po
wer S
up
ply

14
1
VOICE Mode and MUSIC Mode
This device can be used as a voice recorder or as a music player. For recording and playingback voice recordings, set the mode switch to VOICE. For listening to music, set the modeswitch to MUSIC.
WS330001.WMA
VOICE ModeSlide the mode switch to the VOICE position.The recorder provides five folders, named A through E, forstoring audio data. The files like recorded audio or languagefiles transferred from a PC, are stored in these folders asindividual files. Up to 200 files can be saved in each folder.
File names will be automatically created for files recorded bythis recorder.
Extension
File number: A serial number automatically assigned bya Digital Voice Recorder.
User ID: The name that has been set on the Digital VoiceRecorder.
001 /1201.WMA/ 5M 24D AMWS330002.WMAWS330003.WMAWS330004.WMA
0 001 1
18MM
05
20
0 0HQ
SS
List displayCurrent folder and files recorded in this folder aredisplayed.
File displayInformation of the selected file isdisplayed.
Current folder
Scroll bar (appears whenthe whole contents cannotbe displayed.)
File being selected (The file name will be highlighted,and the file name, and date and time the file wasrecorded, will scroll across the screen once.)
Currentfolder
Filelength
VO
ICE
Mo
de an
d M
US
IC M
od
e

15
1
VOICE Mode and MUSIC Mode
MUSIC ModeSlide the mode switch to the MUSIC position.This recorder can save the music files (WMA, MP3 files)transferred from the PC in the 2 music folders, the original “Root”folder and its subsidiary “Music” folder.Also, this recorder can create the folders in up to 2 layers withinthe “Music” folder. It is convenient to manage the multiple albumswith the same artist name. Up to 200 files can be saved in eachfolder.
Root
Music
Artist AArtist A
Artist BArtist B
Artist CArtist C
Album 1Album 1
Album 2Album 2
001
002
200
A
Folder
File
Music File A
Music File B
Music File C Music File D
Music File E
Music File F
Music File G
First layer Second layer
Save up to 200files.
..................................................................................................................................................
Notes• Up to 128 folders including “Root” and “Music” folders can be operated on this recorder.• When using Windows Media Player 10, click [Start Sync] instead of setting the synchronization options. All
the files will be transferred to the part A above ( P. 52).
VO
ICE
Mo
de an
d M
US
IC M
od
e

16
1
MusicSONG A.wmaSONG B.wmaSONG C.wma
Root
MusicSONG A.wmaSONG B.wmaSONG C.wma
Root BestSONG K.wmaSONG L.wmaSONG M.wma
Art ist BSONG N.wmaSONG O.wmaSONG P.wmaSONG Q.wma
Best
Artist A Artist B Artist CSONG D.wma
Music Album1 Album2SONG E.wmaSONG F.wma
Art ist ASONG G.wmaSONG H.wmaSONG I .wmaSONG J.wma
Album1 Album1 01 /11SONG G / Artist A
05 3200 00
Artist A Artist B Artist CSONG D.wma
Music Best 01 /16SONG N / Artist B
04 3500 00
MusicSONG A.wmaSONG B.wmaSONG C.wma
Root Root 01 /06SONG B
03 4800 00
∗
∗
∗
Fld
Fld
Fld
∗Pressing the OK button will play theselected file.
Meaning of Icons in this Manual
Set the mode switch to VOICE before operating the recorder.
Set the mode switch to MUSIC before operating the recorder.
Convenient features that can be used with both the Voice Recorder andMusic Player.
VOICE Mode and MUSIC Mode
How to Select a File
Current folder Folder being selected File being selected
Title (name of the file)/Artist
Current file number/Total number of recorded files in the folder
9 or OK button: Opens the selected folder/file.
FOLDER button: Returns to the folder in the higherlevel and shows the list display.
+ or – button: Moves the cursor up and down.
VO
ICE
Mo
de an
d M
US
IC M
od
e

17
1
1 Press the 9 or 0 button toselect the item to set.Select the item from “hour”, “minute”,“year” “month” and “day” with a flashingpoint.
2 Press the + or – button to set.Follow the same steps by pressing the9 or 0 button to select the next item,and press the + or – button to set.
• You can choose between 12 and 24 hour display by pressingthe FOLDER button while setting the hour and minute.
Example: 10:38 P.M.10:38 PM ←→ 22:38
(Initial setting)
• You can choose the order of the year, month, day by pressingthe FOLDER button while setting them.
Example: January 7, 2007
1
2
1M 7D 2007Y4 : 3 8 PM
Time & Date
1M 7D 2007Y: 3 8 PM1 0
Time & Date
Setting Time/Date (Time & Date)
If you set the date and time beforehand, the information when the file is recorded isautomatically stored for each file. Setting the date and time beforehand enables easier filemanagement.
The hour indicator will flash automatically when you load a batterybefore using the recorder for the first time, or after the recorder hasn’tbeen used for a long time. Proceed from step 1.
e tT i m e & M
D a t e
S
Settin
g T
ime/D
ate (Tim
e & D
ate)
1M 7D 2007Y
(Initial setting)7D 1M 2007Y 2007Y 1M 7D

18
1
1 While the recorder is stopped, press the MENU buttonfor 1 second or longer.The “Menu” screen opens ( P. 42).
2 Press the + or – button to choose“Sub Menu”.
3 Press the OK or 9 button.
4 Press the + or – button to choose“Time & Date”.
5 Press the OK or 9 button.The hour indicator flashes, indicating thestart of the Time/Date setup process.
The following steps are the same as Step 1through Step 4 of “Setting Time/Date (Time& Date)” ( P. 17).
4
3
31
2
5
4
Rec MenuPlay MenuBeep & DisplaySub Menu
e n uM
u b M e n uSLockTime & DateFormatSystem
Setting Time/Date (Time & Date)
3 Press the OK button to complete the setup screen.The clock will start from the set date and time. Press the OK buttonaccording to the time signal.
4 Press the STOP button to close the menu.
.........................................................................................................Note• If you press the OK button during the setup operation, the recorder will save
the items that were set to that point.
Changing the Time/Date
Press and hold the STOP button while this recorder is in stop mode to display the “Time &Date”. If the “Time & Date” is not correct, set it using the procedure below.
Settin
g T
ime/D
ate (Tim
e & D
ate)
19
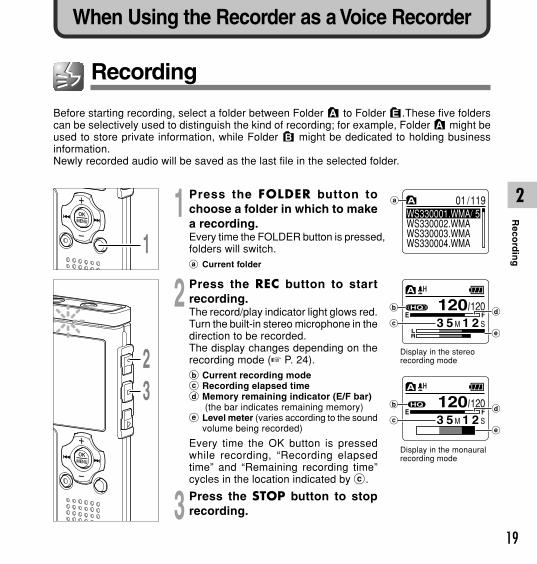
21 Press the FOLDER button tochoose a folder in which to makea recording.Every time the FOLDER button is pressed,folders will switch.a Current folder
2 Press the REC button to startrecording.The record/play indicator light glows red.Turn the built-in stereo microphone in thedirection to be recorded.The display changes depending on therecording mode ( P. 24).b Current recording modec Recording elapsed timed Memory remaining indicator (E/F bar)
(the bar indicates remaining memory)e Level meter (varies according to the sound
volume being recorded)
Every time the OK button is pressedwhile recording, “Recording elapsedtime” and “Remaining recording time”cycles in the location indicated by c.
3 Press the STOP button to stoprecording.
120 120
RL
E FHQ
3 5 M 1 2 S
b
ce
d
120 120E F
HQ
3 5 M 1 2 S
b
ce
d
1
32
901 /11WS330001.WMA/ 5WS330002.WMAWS330003.WMAWS330004.WMA
a
Recording
Before starting recording, select a folder between Folder A to Folder E.These five folderscan be selectively used to distinguish the kind of recording; for example, Folder A might beused to store private information, while Folder B might be dedicated to holding businessinformation.Newly recorded audio will be saved as the last file in the selected folder.
When Using the Recorder as a Voice Recorder
Display in the monauralrecording mode
Display in the stereorecording mode
Reco
rdin
g

20
2
Notes• To ensure recording from the beginning, start speaking after you see the red record/play indicator light on.• A beep will sound when remaining recording time reaches 60 seconds, 30 seconds, and 10 seconds
while recording.• When remaining recording time is less than 60 seconds, the record/play indicator light starts flashing in
red. When the recording time is decreasing to 30 or 10 seconds, the light flashes faster.• “Memory Full” or “Folder Full” will be displayed when the memory or folder capacity is full. Delete any
unnecessary files before recording any further ( P. 72).• If the REC button is pressed while the mode switch is set to MUSIC, “Music Mode” will flash on the
screen. Set the mode switch to VOICE before recording ( P. 14).
Pause
Press the REC button while recording. “Rec Pause” will flash on the display.
• The recorder will time out after 1 hour whenleft in “Rec Pause”.
Resume Recording
Press the REC button again. Recording will resume at the point of
interruption.
120 120E F
Rec Pause3 5 M 1 2 S
HQ
120 120
RL
E FHQ
3 5 M 1 3 S
Recording
Reco
rdin
g
21
2
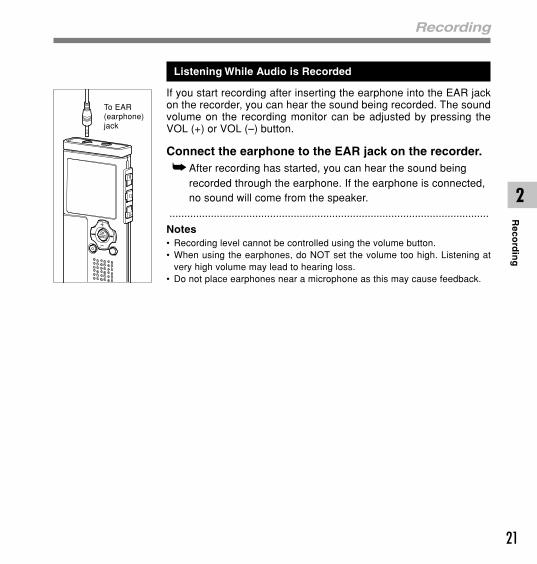
Listening While Audio is Recorded
If you start recording after inserting the earphone into the EAR jackon the recorder, you can hear the sound being recorded. The soundvolume on the recording monitor can be adjusted by pressing theVOL (+) or VOL (–) button.
Connect the earphone to the EAR jack on the recorder. After recording has started, you can hear the sound being
recorded through the earphone. If the earphone is connected,no sound will come from the speaker.
............................................................................................................
Notes• Recording level cannot be controlled using the volume button.• When using the earphones, do NOT set the volume too high. Listening at
very high volume may lead to hearing loss.• Do not place earphones near a microphone as this may cause feedback.
To EAR(earphone)jack
RecordingR
ecord
ing

22
2 1 While the recorder is stopped,press the MENU button for 1second or longer.The “Menu” screen opens ( P. 42).
2 Press the OK or 9 button.The “Rec Menu” screen opens.
3 Press the + or – button to choose“VCVA”.
4 Press the OK or 9 button.The VCVA setup process begins.
5 Press the + or – button to choosebetween “On” and “Off”.On: Will start recording in VCVA mode.Off: Will resume recording in normal mode.
6 Press the OK button to completethe setup screen.If the 0 button is pressed, the settingwill be canceled and it will return to the“Rec Menu” screen.
Using the Variable Control VoiceActuator (VCVA)
When the microphone senses that sounds have reached a preset threshold volume level, thebuilt-in Variable Control Voice Actuator (VCVA) starts recording automatically, and stops whenthe volume drops below the threshold level.The VCVA feature extends recording time and conserves memory by stopping recordingduring silent periods, which helps the playback to be more efficient.
21
4
3
6
5
Rec ModeMic SenseVCVALow Cut Filter
e c M e n uR
O nO f f
C V AV
Rec MenuPlay MenuBeep & DisplaySub Menu
e n uM
Usin
g th
e Variab
le Co
ntro
l Voice A
ctuato
r (VC
VA
)

23
2
7 Press the STOP button to close themenu.If it is set to “On”, will appear on thedisplay.a VCVA (Variable Control Voice Actuator)
indicator
8 Press the REC button to startrecording.When the sound volume is lower than thepreset threshold sound level, recordingautomatically stops after 1 sec approximately,and “Standby” flashes on the display. Therecord/play indicator light glows red whenrecording starts and flashes when recordingpauses.
9 Press the 9 or 0 button adjustthe pause sound level.The VCVA level can be set to any of 15different values. The higher the value, themore sensitive the recorder to sounds. Atthe highest value, even the faintest soundwill activate recording.The VCVA pause sound level can beadjusted according to the ambient(background) noise.b Level meter (varies according to the sound volume being recorded)c Start level (moves to the right/left according to the set level)
Using the Variable Control Voice Actuator (VCVA)
..................................................................................................................................................
Notes• The start/stop actuation level also varies depending on the selected microphone sensitivity mode ( P. 25).• If the starting level is not adjusted within 2 seconds, the display will return to the previous.• If the surrounding noise is loud, the starting sensitivity of the VCVA can be adjusted according to the
recording situation.• To ensure successful recordings, prior testing and adjustment of the start/stop actuation level is
recommended.
78
9
120 1
1H 27M53S
20HQ
0 0 M 0 0 S
a
121 121
RL
E FS t a n d b y
HQ
121 121
RL
E F0 2VCVA Level
HQ
c
b
Usin
g th
e Variab
le Co
ntro
l Voice A
ctuato
r (VC
VA
)

24
2
1 While the recorder is stopped,press the MENU button for 1second or longer.The “Menu” screen opens ( P. 42).
2 Press the OK or 9 button.The “Rec Menu” screen opens.
3 Press the OK or 9 button.The recording mode setup processbegins.
4 Press the + or – button to selectthe recording mode.
5 Press the OK button to completethe setup screen.If the 0 button is pressed, the settingwill be canceled and it will return to the“Rec Menu” screen.
6 Press the STOP button to close themenu.a Record mode indicator
Press and hold the STOP button while therecorder is stopped to check “RemainingMemory” and “Remaining Recording Time” inthe selected recording mode.
120 1
1H 27M53S
20HQ
0 0 M 0 0 S
a
21
3
4
6
5
Rec ModeMic SenseVCVALow Cut Filter
e c M e n uR
H Q
e c M o d eRS T X QS T H QS T S P
Recording Modes (Rec Mode)
The recording mode can be chosen from ST XQ (stereo extra high quality sound recording),ST HQ (stereo high quality sound recording), ST SP (stereo standard recording), HQ (highquality sound recording), SP (standard recording), and LP (long-term recording).
..................................................................................................................................................Notes• When a meeting and lecture is to be recorded clearly, set other than LP mode to record.• When an external monaural microphone is used while the recorder is set to ST XQ, ST HQ, or ST SP
mode, audio will be recorded to the L channel only.
Reco
rdin
g M
od
es (Rec M
od
e)

25
2
1 While the recorder is stopped,press the MENU button for 1second or longer.The “Menu” screen opens ( P. 42).
2 Press the OK or 9 button.The “Rec Menu” screen opens.
3 Press the + or – button to choose“Mic Sense”.
4 Press the OK or 9 button.The microphone sensitivity setup processbegins.
5 Press the + or – button to choosebetween “Conf” and “Dict”.Conf: High-sensitivity mode that recordssounds in all directions.Dict: Low-sensitivity mode suited fordictation.
6 Press the OK button to completethe setup screen.If the 0 button is pressed, the settingwill be canceled and it will return to the“Rec Menu” screen.
7 Press the STOP button to close themenu.a Microphone sensitivity indicator
21
3
5
4
7
6
D i c
Mic Sense
tC o n f
Rec ModeMic SenseVCVALow Cut Filter
e c M e n uR
120 1
1H 27M53S
20HQ
0 0 M 0 0 S
a
Microphone Sensitivity (Mic Sense)
Microphone sensitivity is adjustable to meet recording needs.
..................................................................................................................................................Note• When the speaker’s voice is to be recorded clearly, set to Dict (dictation) mode and move the built-in
stereo microphone close to the speaker’s mouth (5 to 10 cm / 2 to 4 inches) and record.
Micro
ph
on
e Sen
sitivity (Mic S
ense)

26
2
1 While the recorder is stopped,press the MENU button for 1second or longer.The “Menu” screen opens ( P. 42).
2 Press the OK or 9 button.The “Rec Menu” screen opens.
3 Press the + or – button to choose“Low Cut Filter”.
4 Press the OK or 9 button.The Low Cut Filter setup process begins.
5 Press the + or – button to choosebetween “On” and “Off”.On: Low Cut Filter will be turned on.Off: Low Cut Filter will be canceled.
6 Press the OK button to completethe setup screen.If the 0 button is pressed, the settingwill be canceled and it will return to the“Rec Menu” screen.
7 Press the STOP button to close themenu.If it is set to “On”, will appear on thedisplay.a Low Cut Filter indicator
The recorder has a Low Cut Filter function to minimize low-frequency sounds and recordvoices more clearly. This function can reduce noise from air conditioners, projectors andother similar noises.
Set the Low Cut Filter (Low Cut Filter)
21
3
5
4 O nO f f
Low Cut Filter
Rec ModeMic SenseVCVALow Cut Filter
e c M e n uR
120 1
1H 27M53S
20HQ
0 0 M 0 0 S
a
Set th
e Lo
w C
ut F
ilter (Lo
w C
ut F
ilter)
7
6

27
2
ST XQ
ST XQ, ST HQ, ST SP
ST XQ, ST HQ, HQ
ST XQ
Recommended Settings by Recording Condition
Recording condition
Conferences with large crowds andlectures in large rooms.
Meetings and business negotiations witha small number of people.
Dictation with a lot of background noise.
Music playing, wild birds singing, andrailway sounds.
Dictation in a quiet environment.
Recommended settings
Recording Mode Microphone Sensitivity
Low CutFilter
Dict
Conf
On
OffMicrophone Sensitivity∗
There is no particular recommendation. Choose a settingfor recording.
∗ Set the microphone sensitivity according to the volume being recorded.
Set the Low Cut Filter (Low Cut Filter)S
et the L
ow
Cu
t Filter (L
ow
Cu
t Filter)

28
2
Recording with External MicrophoneConnect the external microphone to the microphonejack of the recorder.When the external microphone is connected to the microphonejack of the recorder, the built-in microphone will not operate.
Applicable External Microphones (optional)
Stereo microphone: ME51SThe built-in large-diameter microphone enables sensitive stereorecording. Stereo recording is available only in ST XQ, ST HQ or ST SPmodes.
Highly sensitive noise-cancellation monaural microphone:
ME52This microphone is used to record sound at a distance while minimizingsurrounding noise.
Noise-Cancellation monaural microphone: ME12
(Dictation microphone)Used to get clear recordings of your own voice by reducing the effects ofambient noise.
Tie clip microphone: ME15 (Monaural)Small concealing microphone with a tie-clip.
Telephone pickup: TP7 (Monaural)Earphone type microphone can be plugged into your ear while phoning.The voice or conversation over the phone can be clearly recorded.
Recording from External Microphoneor Other Devices
To MIC(microphone) jack
Reco
rdin
g fro
m E
xternal M
icrop
ho
ne o
r Oth
er Devices

29
2VOLUME EAR
ME EAR
Recording the Sound of OtherDevices with this Recorder
The sound can be recorded when connecting tothe audio output terminal (earphone jack) of theother device, and the microphone jack of therecorder with the connecting cord (optionalKA333) ( P. 97) for dubbing.
Recording the Sound of thisRecorder with Other Devices
The sound of this recorder can be recorded toother devices when connected to the audio inputterminal (microphone jack) of other devices andthe earphone jack of this recorder, with theconnecting cord (optional KA333) for dubbing.
To MIC(microphone)jack
To audio outputterminal of otherdevices
To audio inputterminal ofother devices
To EAR(earphone) jack
..................................................................................................................................................
Notes• Use the connecting cord sold separately for dubbing (KA333) to connect the recorder with other devices.• The detailed input levels cannot be adjusted with this recorder. When you connect the recorder to an
external device, execute a test recording and adjust the output level of the external device.• A microphone with plug-in power, which receives the power supply from this recorder, can be used.• When the external stereo microphone is inserted while set in HQ, SP, and LP modes, it enables recording
only with the L channel microphone.• When an external monaural microphone is used while the recorder is set to ST XQ, ST HQ, or ST SP
mode, audio will be recorded to the L channel only.
Recording from External Microphone or Other DevicesR
ecord
ing
from
Extern
al Micro
ph
on
e or O
ther D
evices

30
2
1 Press the FOLDER button tochoose a folder.Every time the FOLDER button is pressed,folders will switch.
2 Press the + or – button to choosethe file that you want to play.In the list display, use the + and – buttonsto place the cursor on the desired file.Press the 9 button in the list display tochange the screen to the file display.In the file display, press the 9 or 0button to select a file.If you want to return from the file displayto the list display, press the FOLDERbutton.
3 Press the PLAY or OK button tostart playback.The record/play indicator light glowsgreen.a Play position bar indicatorb Current playback timec File length
You can change the playing speed bypressing the PLAY button while therecorder is playing back ( P. 84).
4 Press the + or – button to selectthe proper sound volume.The display shows the volume level. Youcan choose between 0 and 30.d Volume level meter
03 1
22M41S
20HQ
0 0 M 0 0 S
03 1
22M41S
20HQ
0 5 M 1 0 Sabc
1
2
3
4
03 1201 5
d
Volume Level
HQ
001 /12WS330001.WMA/ 5WS330002.WMAWS330003.WMAWS330004.WMA
003 /12WS330001.WMAWS330002.WMAWS330003.WMA/ 5WS330004.WMA
Playing
List display
File display
Playin
g

31
2
Forwarding
Press and hold the 9 button while therecorder is stopped in the file display. If you release the button, it will stop. Press
the PLAY or OK button to start playingback from where it was stopped.a File length
Press and hold the 9 button while playing a file. When you release the 9 button the recorder will resume normal
playback.
• If there is an index mark or temp mark ( P. 76) in the middle of the file, therecorder will stop at that location.
• The recorder stops when it reaches the end of the file. Continue pressing the9 button to proceed with the cue from the beginning of the next file.
5 Press the STOP or OK button atany point you want to stop theplayback.Stop a file play back at any point.Press the PLAY or OK button to startplaying back from where it was stopped.
Press and hold the STOP button while thisrecorder is in stop mode to display theremaining memory.
03 120
22M41Sa
HQ
0 2 M 0 5 S
51M 7D 07Y 10:38A
M
Time & Date
R e m a i n6 8H5 6M0 2S
1 . 9 G B
PlayingP
laying

32
2
Rewinding
Press and hold the 0 button while therecorder is stopped in the file display. If you release the button, it will stop. Press
the PLAY or OK button to start playingback from where it was stopped.a File length
Press and hold the 0 button while playing afile. When you release the 0 button the recorder will resume normal
playback.• If there is an index mark or temp mark in the middle of the file, the recorder
will stop at that location.
• The recorder stops when it reaches the beginning of the file. Continuepressing the 0 button to proceed with the review from the end of theprevious file.
• If the 0 button is kept pressed while the recorder is stopped at the start ofthe top file, the recorder will fast rewind starting from the end of the last file.
Locating the Beginning of the File
Press the 9 button during playback, slow playback, or fast playback. The next file is cued and playback starts at the previously set
speed.
Press the 0 button during playback, slow playback, or fast playback. The file being played is cued and playback starts at the previously
set speed.*
Press the 0 button 2 times during playback, slow playback or fastplayback. The previous file is cued and playback starts at the previously
set speed.*• If there is an index mark or temp mark in the middle of the file, the recorder
will stop at that location.
* If the previous playback is set ( P. 82), the recorder will playback in reverseskip for the set time.
03 120
22M41Sa
HQ
0 2 M 0 5 S
Playing
Playin
g

33
2
Playback Through Earphone
An earphone can be connected to the EAR jack of the recorder forlistening.
When the earphone is used, the recorder speaker will beswitched-off.
.......................................................................................................
Notes• To avoid irritation to the ear, insert the earphone after turning down the
volume level.• When you listen with the earphone during playback, do not raise the volume
too much. It may cause hearing impairment and decrease in hearing ability.
To EAR(earphone)jack
PlayingP
laying

34
2
1
While the recorder is stopped orduring playback, press the MENUbutton for 1 second or longer.The “Menu” screen opens ( P. 42).If the recorder is stopped, proceed to Step2. If the recorder is playing, proceed toStep 4.
2 Press the + or – button to choose“Play Menu”.
3 Press the OK or 9 button.The “Play Menu” screen opens.
4 Press the + or – button to choose“Noise Cancel”.
5 Press the OK or 9 button.The noise cancel setup process begins.
6 Press the + or – button to choosefrom “High”, “Low” and “Off”.If the recorder goes to the menu screenduring playback, move the cursor tochange playback sound accordingly.
2
1
4
3
6
5
Rec MenuPlay MenuBeep & DisplaySub Menu
e n uM
Back SpaceNoise CancelVoice FilterPlay Speed
Play Menu
H i g hL o wO f f
Noise Cancel
Noise Cancel Function (Noise Cancel)
If recorded audio is difficult to understand because of noisy surroundings, adjust the NoiseCancel setting level. Noise will be reduced in the file when it’s played back for better soundquality.
No
ise Can
cel Fu
nctio
n (N
oise C
ancel)

35
2
7 Press the OK button to completethe setup screen.If the 0 button is pressed, the settingwill be canceled and it will return to the“Play Menu” screen.
8 Press the STOP button to close themenu.If the recorder goes to the menu screenduring playback, press the 0 button toclose the menu screen.If it is set to anything other than “Off”, will appear on the display.a Noise Cancel indicator
03 1
22M41S
20HQ
0 5 M 1 0 S
a
8
7
Noise Cancel Function (Noise Cancel)
..................................................................................................................................................
Notes• If you set Noise Cancel to “Low” or “High”, the setting remains valid until it’s set to “Off”.• The Noise Cancel is not available when either the Voice Filter ( P. 36) or Playback Speed ( P. 84) is set.• If the Noise Cancel is enabled, the Voice Filter and Playback Speed are not available.
No
ise Can
cel Fu
nctio
n (N
oise C
ancel)

36
2
1
While the recorder is stopped orduring playback, press the MENUbutton for 1 second or longer.The “Menu” screen opens ( P. 42).If the recorder is stopped, proceed to Step2. If the recorder is playing, proceed toStep 4.
2 Press the + or – button to choose“Play Menu”.
3 Press the OK or 9 button.The “Play Menu” screen opens.
4 Press the + or – button to choose“Voice Filter”.
5 Press the OK or 9 button.The voice filter setup process begins.
6 Press the + or – button to choosebetween “On” and “Off”.On: Voice Filter will be turned on.Off: Voice Filter will be canceled.
If the recorder goes to the menu screenduring playback, move the cursor tochange playback sound accordingly.
2
1
4
3
6
5
Rec MenuPlay MenuBeep & DisplaySub Menu
e n uM
Back SpaceNoise CancelVoice FilterPlay Speed
Play Menu
O nO f f
Voice Filter
Set the Voice Filter (Voice Filter)
The recorder has a Voice Filter Function to cut low and high frequency tones during normal,fast, or slow playback, and enable clear audio playback.
Set th
e Voice F
ilter (Voice F
ilter)

37
2
7 Press the OK button to completethe setup screen.If the 0 button is pressed, the settingwill be canceled and it will return to the“Play Menu” screen.
8 Press the STOP button to close themenu.If the recorder goes to the menu screenduring playback, press the 0 button toclose the menu screen.If it is set to “On”, will appear on thedisplay.a Voice Filter indicator
..................................................................................................................................................
Notes• Once the Voice Filter is set to “On“, it will remain enabled until set to “Off“.• The Voice Filter and Noise Cancel ( P. 34) features cannot be used at the same time.
Set the Voice Filter (Voice Filter)
8
703 1
22M41S
20HQ
0 5 M 1 0 S
a
Set th
e Voice F
ilter (Voice F
ilter)

38
2
1
While the recorder is stopped orduring playback, press the MENUbutton for 1 second or longer.The “Menu” screen opens ( P. 42).If the recorder is stopped, proceed to Step2. If the recorder is playing, proceed toStep 4.
2 Press the + or – button to choose“Play Menu”.
3 Press the OK or 9 button.The “Play Menu” screen opens.
4 Press the + or – button to choose“All Play”.
5 Press the OK or 9 button.The continuous playback setup processbegins.
6 Press the + or – button to choosebetween “On” and “Off”.On: Continuous playback.Off: Returns to playback with stopbetween single files.
2
1
4
3
6
5
Noise CancelVoice FilterPlay SpeedAll Play
Play Menu
O nO f f
All Play
Rec MenuPlay MenuBeep & DisplaySub Menu
e n uM
Continuous Playback (All Play)
This function allows you to listen to all your recordings of one folder in one go without anystop between the files.
Co
ntin
uo
us P
layback (A
ll Play)

39
2
8
7
Continuous Playback (All Play)
7 Press the OK button to complete the setup screen.If the 0 button is pressed, the setting will be canceled and itwill return to the “Play Menu” screen.
8 Press the STOP button to close the menu.If the recorder goes to the menu screen during playback, pressthe 0 button to close the menu screen.
..................................................................................................................................................
Note• After playback of last file in the folder, “End” appears on the screen and playback stops automatically.
Co
ntin
uo
us P
layback (A
ll Play)

40
2
1 Choose the file that you want tolock.In the list display, use the + and – buttonsto place the cursor on the desired file.Press the 9 button in the list display tochange the screen to the file display.In the file display, press the 9 or 0button to select a file.
2 While the recorder is stopped,press the MENU button for 1second or longer.The “Menu” screen opens ( P. 42).
3 Press the + or – button to choose“Sub Menu”.
4 Press the OK or 9 button.The “Sub Menu” screen opens.
5 Press the OK or 9 button.The file locking setup process begins.
03 1
22M41S
20HQ
0 0 M 0 0 S
1
2
3
4,5
003 /12WS330001.WMAWS330002.WMAWS330003.WMA/ 5WS330004.WMA
Rec MenuPlay MenuBeep & DisplaySub Menu
e n uM
u b M e n uSLockTime & DateFormatSystem
Locking Files (Lock)
Locking a file keeps important data from being accidentally erased.Locked files are not erased when you choose to erase all files from a folder ( P. 73).
List display
File display
Lo
cking
Files (L
ock)

41
2
6 Press the + or – button to choosebetween “On” and “Off”.On: Locks the file and prevents it frombeing erased.Off: Unlocks the file and allows it to beerased.
7 Press the OK button to completethe setup screen.If the 0 button is pressed, the settingwill be canceled and it will return to the“Sub Menu” screen.
8 Press the STOP button to close themenu.a Erase lock indicator 03 1
22M41S
20HQ
0 0 M 0 0 S
a
6 8
7
03 120O nO f f
Locking Files (Lock)L
ockin
g F
iles (Lo
ck)

42
2 ST XQ, ST HQ, ST SP, HQ, SP, LP
RecMenu
PlayMenu
High, Low, Off
Conf, Dict
On, Off
On, Off
Off, 1Sec, 2Sec, 3Sec, 4Sec, 5Sec, 10Sec
On, Off
S. Play: x0.5, x0.625, x0.75, x0.875 PlayF. Play: x1.125, x1.25, x1.375, x1.5 Play
On, Off
Back Space
Play Speed
Rec Mode
Mic Sense
VCVA
Low Cut Filter
Noise Cancel
Voice Filter
All Play
Menu List (VOICE Mode)
Menu Setting Ref. Page
Below is a map of the menu structure seen when the menus are entered while the recorder isstopped. If the MENU button is pressed and held for more than one second during playback,“Back Space”, “Noise Cancel”, “Voice Filter”, “Play Speed”, and “All Play” settings can be set,without interrupting playback.Menus highlighted with are common to both “VOICE” and “MUSIC” modes, and canbe selected even when the mode switch is set to “MUSIC”.
Men
u L
ist (VO
ICE
Mo
de)
P. 24
P. 25
P. 22
P. 26
P. 82
P. 34
P. 36
P. 84
P. 38

43
2
Beep &Display
SubMenu
On, Off
On, Off
On, Off
On, Off
Start, Cancel
Capacity, Model Name, Version
01-12
Beep
Backlight
Contrast
Time & Date
Format
System Info.
LED
Lock
Menu List (VOICE Mode)
..................................................................................................................................................
Notes• The recorder will stop if you leave it idle for 3 minutes during a menu setup operation, when a selected
item is not applied.• If the menus are entered during playback but 8 seconds elapse with no buttons being pressed, the
screen will return to the playback display.
Menu Setting Ref. Page
In order of hour, minute, year, month,and day
Men
u L
ist (VO
ICE
Mo
de)
P. 87
P. 88
P. 89
P. 90
P. 40
P. 17
P. 91
P. 93

44
3
Using the Recorder on Your PC
Saving Files in Your PC
By being connected to a PC, the recorder enables you to do the following:
• You can save (back-up) the files stored in the recorder on your PC. Also, you cantransfer the files from your PC to the recorder.
• Using the Windows Media Player, the stored WMA or MP3 files on your PC can betransferred and played back on this recorder.
• Playback voice files on your PC. The voice file recorded by this recorder can be played on your PC using the WindowsMedia Player or the simplified playback software, DSS Player - Lite, which can bedownloaded for free from the website of the Olympus. Using the DSS Player - Liteenables you to search the index marks that are marked on the voice files. Free DSSPlayer-Lite can be downloaded from Olympus homepage.
http://www.olympusamerica.com/cpg_section/cpg_downloads.asphttp://olympus-europa.com/consumer/2590_software.cfm
Precautions on Using the Recorder Connected to a PC
When you are downloading a file from the recorder or uploading a file to the recorder, donot remove the USB connecter even if the screen is indicating you can. Data is stillbeing transferred while the record/play indicator light and USB access indicator light areblinking in red. When removing the USB connecter, be sure to follow the description in P. 47. If the USB connecter is removed before the drive is stopped, data may not besuccessfully transferred.
On a PC, do not format the drive of the recorder. Initialization is not successfullyachieved on a PC. For initialization, follow the instructions in the Sub Menu screen of therecorder ( P. 91).
Never make an operation such as deleting, moving or changing the name of thisrecorder’s 5 voice folders, music folders or management files in each folder using the filemanagement tool such as “Explorer”.The order of files may be changed or files may become unrecognizable.
Savin
g F
iles in Yo
ur P
C

45
3
Saving Files in Your PC
Data can be written or uploaded to therecorder even though the attribute ofthe recorder drive is shown as readonly by the operating system of the PC.
As the noise may cause adverse effectson electronics devices nearby therecorder, unplug the externalmicrophone and earphone when youconnect the recorder to a PC.
OperatingEnvironment
PC:IBM PC/AT compatible PC
Operating System:Microsoft Windows 2000/XP/Vista
USB port:One free port
Others:Internet environment when accessing tothe music information site.
...................................................................
Notes• The support service will not cover if your PC
has been updated from Windows 95/98/Me toWindows 2000/XP/Vista.
• Any failure on a self-modified PC will not becovered under the operational warranty.
Savin
g F
iles in Yo
ur P
C/O
peratin
g E
nviron
men
t

46
3
1 With the recorder stopped, slide the HOLDswitch to the HOLD position, and turn therecorder off.The display will turn off.
2 Detach the battery compartment pressing theRELEASE button of the rear side.
3 Connect the recorder’s USBterminal to a PC USB port orUSB hub.“Remote” is displayed on recorder ifthe USB is connected.Launch My Computer, in the window,the recorder will appear as aremovable disk.
4 Transfer the voice files to your computer.The 5 voice folders of this recorder are displayed as“DSS_FLDA”, “DSS_FLDB”, “DSS_FLDC”, “DSS_FLDD”and “DSS_FLDE”, and the recorded voice files are saved inWMA format in these folders.You can copy them to any folder on your computer.While transmitting data, “Busy” is displayed, and the record/play indicator light and USB access indicator light flashes red.If you double-click on the file, Windows Media Player willbe launched and playback will start.
1
2
3
R e m o t e
Connecting to Your PC
Connecting to Your PC
..................................................................................................................................................Notes• If you are using Windows 2000, Windows Media Player must be installed on the PC.• If you leave the battery compartment disconnected from the recorder for a longer period of time or if you
remove the battery compartment repeatedly at short intervals, you may have to reset the time ( P. 17).C
on
nectin
g to
You
r PC

47
3
1 Click the on the task bar locatedat the lower-right corner of thescreen. Click [Safely RemoveHardware].The drive letter will differ depending on thePC being used.
2 When the safe to remove hardware window appears, click [OK].
3 Make sure that the display is turned off, disconnect the USB.
4 Connect the battery compartment to the main unit.Leave the HOLD switch in its disabled position ( P. 75) when connecting the batterycompartment.
Connecting to Your PC
Disconnecting from Your PC
..................................................................................................................................................
Notes• NEVER disconnect the USB while the record/play indicator light and USB access indicator light are
flashing in red. If you do so, the data may be destroyed.• Refer to the user's manual for your PC regarding the USB port or USB hub on your PC.• Be sure to push the USB connector all the way in. Otherwise, the recorder may not operate properly.• Use the supplied USB extension cable depending on situations.• Do not use USB extension cables other than the supplied cable. Using cables from other manufacturers
could result in damage to the recorder. Do not use the supplied USB extension cable with devices fromother manufacturers.
1
Co
nn
ecting
to Yo
ur P
C

48
4
Using the Recorder as a Music PlayerThe recorder supports music files in WMA and MP3 formats, which can be transferred fromthe PC to the corresponding music folder of the recorder.
Using Windows Media PlayerBy using Windows Media Player, music filesfrom music CDs can be converted (ripped) (P. 51) and music files that you have boughtfrom any music distribution sites can be easilytransferred to the recorder ( P. 52).
Using the Recorder as a Music Player
Internet
Music CD
Copyright and Copyright Protection Feature (DRM)By the Copyright Act, any voice/music files and music CDs downloaded from the Internetwithout the copyright holder’s permission may not be reproduced, distributed, publicized/re-publicized on the Internet, or converted into WMA or MP3 files for the purpose of commercialbusiness or sale.A WMA file may be provided with DRM (Digital Right Management) for copyright protection.DRM limits the file to copy or distribute music files that are converted (ripped) from a musicCD or downloaded from music distribution services. To transfer a WMA file with DRM to therecorder, you need to use appropriate methods such as Windows Media Player. Copying themusic files with DRM purchased from online music distribution service to a portable devicesuch as this recorder may be restricted.
..................................................................................................................................................
Note• This recorder is compatible with Microsoft Corporation DRM9, but not with DRM10.
Usin
g th
e Reco
rder as a M
usic P
layer/U
sing
Win
do
ws M
edia P
layer

49
4
Importing Content for Listening on theRecorderYou can transfer language content and music files imported from language CDs and theInternet using Windows Media Player for playing on the recorder.The recorder is compatible with WMA and MP3 language content.
Import Files Using Windows Media Player
Copy music files and language content from CDs to a computer.
Please see “Copying Music from CD” ( P. 51) for details.
Transfer files from the PC to the recorder
Transfer copied music files and language content from the PC to the recorder.
Please see “Transferring Music File to the Recorder” ( P. 52) for details.
Directly Record Files to the Recorder
Connect the recorder to another device to record directly to the recorder.
Please see “Recording the Sound of Other Devices with this Recorder” ( P. 29) for
details.
Imp
ortin
g C
on
tent fo
r Listen
ing
on
the R
ecor d
er

50
4
Windows Media Player 11 Windows Media Player 10
Window Names
1 Features taskbar
2 Seek slider
3 Shuffle button
4 Repeat button
5 Stop button
6 Previous button
7 Play button
8 Next button
9 Mute button
0 Volume slider
1
Win
do
w N
ames
1 Features taskbar
2 Quick Access Panel button
3 Seek slider
4 Rewind button
5 Play button
6 Stop button
7 Previous button
8 Next button
9 Mute button
0 Volume slider
! Shuffle/Repeat button
@ Fast Forward button
1
4
56
78
90
!@
3
2
2 90864
753

51
4
1 Insert CD into the CD-ROM driveand start Windows Media Player.
2 From the Features taskbar, clickthe [Rip] menu.After clicking the [Rip] menu, click the[View Album Info] for Windows MediaPlayer 10 as necessary.If Internet connectivity is available, CDinformation is searched.
3 Put a check mark on the music filethat you want to copy.
5 Click the [Start Rip].For Windows Media Player 10Click the [Rip Music].Files copied to a PC are stored in WMAformat. Music fi les copied arecategorized by artist, album, genre, etc.and added to the play list.
Copying Music from CD
Windows Media Player 10
2 43
Co
pyin
g M
usic fro
m C
D
Windows Media Player 11
2 43

52
4
Transferring Music File to the Recorder
You can transfer the music files saved in your PC to this recorder. For how to copy themusic files from the CD to your PC, see “Copying Music from CD” ( P. 51).
Windows Media Player 11
1 Connect the recorder to a PC andstart Windows Media Player.
2 From the Features taskbar, click the[Sync].
3 Click the [Sync] menu again toselect [DVR] → [Advanced Options],[Set Up Sync], then set as follows.Click on the [Create folder hierarchy ondevice] to check.*1 *2
The folder with artist name or album nameis automatically created. This will make youfind the file you want to listen to moreeasily.
*1 If [Create folder hierarchy on device] ischecked by default, click to uncheck thebox once, and click it again to check.
*2 After the synchronous transfer to therecorder, a file named “WMPInfo.xml” iscreated. If you delete this file, the *1 mayneed to be set again.
Transferrin
g M
usic F
ile to th
e Reco
r der
2,3
3

53
4
Transferring Music File to the RecorderTran
sferring
Mu
sic File to
the R
ecord
er
1 Connect the recorder to a PC andstart Windows Media Player.
2 From the Features taskbar, click the[Sync].
3 From the pull down menu on the leftside window, select the play list tobe transferred to the recorder andput the check marks on the musicfile that you want to transfer.The order of music pieces can be changedby Drag & Drop of the music file in the playlist displayed.
4 From the pull down menu on theright side window, select the drivecorresponding to the recorder.The recorder is recognized as a RemovableDisk.
2 43Windows Media Player 10
4 Select the desired category from the[Library] on the left, then select musicfiles or albums to transfer to therecorder and drag and drop them inthe [Sync List] on the right.
5 Click the [Start Sync].The file is transferred to the recorder.
54

54
4
..................................................................................................................................................
Notes• Copying the music files with DRM purchased online music distribution service to a portable device such
as this recorder may be restricted.• Refer to the online help of Windows Media Player for details.• If the music files are transferred to the recorder until it reaches to the maximum memory, the message
“Cannot make the system file. Connect to PC and delete unnecessary file” may appear on this recorder’sdisplay. In such a case, erase the files to make free space (hundreds of KB to dozens of MB dependingon the music file sizes) for the management file. (The more capacity for the management file will benecessary as the number of the music files increases.)
Transferring Music File to the Recorder
Transferrin
g M
usic F
ile to th
e Reco
r der
5 Click on the upper right cornerand set the synchronization options.Click on the [Create folder hierarchy ondevice] to check.*1 *2
The folder with artist name or album nameis automatically created. This will make youfind the file you want to listen to moreeasily.
*1 If [Create folder hierarchy on device] ischecked by default, click to uncheck thebox once, and click it again to check.
*2 After the synchronous transfer to therecorder, a file named “WMPInfo.xml” iscreated. If you delete this file, the *1 mayneed to be set again.
6 Click the [Start Sync].The file is transferred to the recorder. Themusic file transferred to the recorder isdisplayed in Item on Device.
56
5

55
4
1 Set the mode switch to MUSIC (P. 15) .
2 Insert the stereo earphone into theEAR (earphone) jack of the recorder.
3 Select the music file that you wantto play ( P. 16) .In the file display, press the 9 or 0button to select a file.a Current folder (The first 6 characters will
be displayed)b File being selectedc Length of the file being selected
If you want to return from the file displayto the list display, or go back from the listdisplay to a higher-level list display, pressthe FOLDER button.
4 Press the PLAY or OK button tostart playback.The title/artist name that cannot bedisplayed in one line is displayed scrollingto the left.d Title and artist name of the file being
playede Play time of the file being played
You can change the playing speed bypressing the PLAY button while therecorder is playing back ( P. 84).
SONG A / Artist CRoot
04 2600 00
01 /06
Fld
b
c
a
SONG A / Artist CRoot
04 2602 13
01 /06
Fld
d
e
4
This recorder supports WMA and MP3 formats. To playback the music files using the musicplayer, you need to transfer (copy) the corresponding music files from the PC to this recorder’sfolders for music ( P. 52).
Music Playback
File display
Mu
sic Playb
ack
2
1
1

56
4
5
6
SONG A / Artist CRoot 01 /06
1 5Volume Levelf
1M 7D 07Y 10:38AM
Time & Date
R e m a i n
1 . 9 G B
5 Press the + or – button to selectthe proper sound volume.The display shows the volume level. You canchoose between 0 and 30.f Volume level meter
6 Press the STOP or OK button atany point you want to stop theplayback.Stop a file play back at any point.Press the PLAY or OK button to startplaying back from where it was stopped.
Press and hold the STOP button while thisrecorder is in stop mode to display theremaining memory.
The next track will automatically start oncethe track being played is finished.
............................................................................................................................................................
Notes• The proper bit rate for playback on the recorder is 5 kbps to 256 kbps for both the WMA and MP3 format.• It is possible to play back MP3 files with different bit rates (converting the bit rate within one file);
however, the displayed time may not be accurate.• When using the earphones, do NOT set the volume too high. Listening at very high volume may lead to
hearing loss.• It is possible to listen to music without the earphones, using the internal speakers; however, the sound
will be in mono, not stereo.• Up to 40 characters per track can be used to list title and artist name.
Music Playback
Mu
sic Playb
ack

57
4
Music Playback
Forwarding
Press and hold the 9 button while the recorder is stopped in thefile display. If you release the button, it will stop. Press the PLAY or OK button
to start playing back from where it was stopped.
Press and hold the 9 button while playing a file. When you release the 9 button the recorder will resume normal
playback.• If there is an index mark or temp mark ( P. 76) in the middle of the file, the
recorder will stop at that location.
• The recorder stops when it reaches the end of the file. If you press and holdthe 9 button, it continues fast forwarding within the playback range selectedin the “Play Mode”( P. 59). While “Random” ( P. 61) is set to “On”, itcontinues fast forwarding of files randomly.
Rewinding
Press and hold the 0 button while the recorder is stopped in thefile display. If you release the button, it will stop. Press the PLAY or OK button to
start playing back from where it was stopped.
Press and hold the 0 button while playing a file. When you release the 0 button the recorder will resume normal
playback.• If there is an index mark or temp mark in the middle of the file, the recorder
will stop at that location.
• Once it reaches back to the starting position of the file, it stops. If you pressand hold the 0 button, it continues rewinding within the playback rangeselected in the “Play Mode”. While “Random” is set to “On”, it continues therewinding of files randomly.
• If the 0 button is kept pressed while the recorder is stopped at the start ofthe top file, the recorder will fast rewind starting from the end of the last file.
Mu
sic Playb
ack

58
4
Skip a Music File While Playing It
Press the 9 button during playback, slow playback, or fast playback. The next file is cued and playback starts at the previously set
speed.• It cues within the playback range selected in “Play Mode”. If “Random” is
“On”, it cues the next file randomly.
Press the 0 button during playback, slow playback, or fast playback. The file being played is cued and playback starts at the previously
set speed.
Press the 0 button 2 times during playback, slow playback or fastplayback. The previous file is cued and playback starts at the previously
set speed.• If “Random” is “On”, the files will be cued randomly.
Music Playback
When the playback reaches to the end of the last file, it returns to the starting position ofthe head file and stops. If “Random” ( P. 61) is “On”, it returns to the starting position ofthe file that is randomly played and stops. If you select “All” in “Play Mode” ( P. 59), allthe files in this recorder can be played continuously.
When the Playback or Fast Forward Reaches to the End of the Last File
Mu
sic Playb
ack

59
4
1
While the recorder is stopped orduring playback, press the MENUbutton for 1 second or longer.The “Menu” screen opens ( P. 70).If the recorder is stopped, proceed to Step2. If the recorder is playing, proceed toStep 4.
2 Press the OK or 9 button.The “Play Menu” screen opens.
3 Press the OK or 9 button.Start setting a play mode.
4 Press the + or – button to select adesired play mode.File: Stop after playing back the current file.File Repeat ( 1 ): Play the current filerepeatedly.Folder ( Fld ): Play files continuously in thecurrent folder until the last file and stop.Folder Repeat ( F ): Play all files in thecurrent folder continuously.All ( All ): Play all files in the recordercontinuously and stop.All Repeat ( A): Play all files in therecorder continuously and repeatedly.
21
3
4
Play ModeRandomWOWEQ
Play Menu
FileFile RepeatFolderFolder Repeat
Play Mode
Play MenuBeep & DisplaySub Menu
e n uM
Select Play Mode (Play Mode)
There are six play modes. You can choose whether to play by file or folder, or all files storedin the recorder.
Select P
lay Mo
de (P
lay Mo
de)

60
4
5 Press the OK button to completethe setup screen.If the 0 button is pressed, the settingwill be canceled and it will return to the“Play Menu” screen.
6 Press the STOP button to close themenu.If the recorder goes to the menu screenduring playback, press the 0 button toclose the menu screen.An icon wil l appear on the displayaccording to the setting.a Selected play mode
SONG A / Artist CRoot
04 2602 13F
01 /06
a
6
5
..................................................................................................................................................
Notes• In “File” mode, when the recorder comes to the end of the last file in the folder, “End” flashes for 2
seconds on the display and the recorder stops at the start of the last file.• In “Folder” mode, when the recorder comes to the end of the last file in the folder, “End” flashes for 2
seconds on the display and the recorder stops at the start of the first file in the folder.• In “All” mode, after playing the last file in the folder, the recorder will start playing from the first file in the
next folder. When it comes to the end of the last file in the recorder, “End” flashes for 2 seconds on thedisplay and the recorder stops at the start of the first file in the recorder.
Select Play Mode (Play Mode)
Select P
lay Mo
de (P
lay Mo
de)

61
4
1
While the recorder is stopped orduring playback, press the MENUbutton for 1 second or longer.The “Menu” screen opens ( P. 70).If the recorder is stopped, proceed to Step2. If the recorder is playing, proceed toStep 3.
2 Press the OK or 9 button.The “Play Menu” screen opens.
3 Press the + or – button to choose“Random”.
4 Press the OK or 9 button.The random setup process begins.
5 Press the + or – button to choosebetween “On” and “Off”.On: Plays the music files within the rangeset in “Play Mode” randomly.Off: Cancels the setting.If the recorder goes to the menu screenduring playback, move the cursor tochange playback sound accordingly.
6 Press the OK button to completethe setup screen.If the 0 button is pressed, the settingwill be canceled and it will return to the“Play Menu” screen.
21
4
3
6
5
Play ModeRandomWOWEQ
Play Menu
O nO f f
a n dR o m
Random Playback (Random)
You can set the random playback of the music files within the range set in “Play Mode”( P. 59).
Ran
do
m P
layback (R
and
om
)

62
4
7 Press the STOP button to close themenu.If the recorder goes to the menu screenduring playback, press the 0 button toclose the menu screen.If it is set to “On”, will appear on thedisplay.a Random playback indicator
SONG A / Artist CRoot
04 2602 13Fld
01 /06
a7
Random Playback (Random)
............................................................................................................................................................
Notes• If “All” is selected in “Play Mode”, all files in a folder are randomly played, then another folder will be
randomly selected, and the files in the folder will be randomly played.• If both “Repeat” and “Random” are set to “On”, it repeats playback randomly.
Ran
do
m P
layback (R
and
om
)

63
4
1
While the recorder is stopped orduring playback, press the MENUbutton for 1 second or longer.The “Menu” screen opens ( P. 70).If the recorder is stopped, proceed to Step2. If the recorder is playing, proceed toStep 3.
2 Press the OK or 9 button.The “Play Menu” screen opens.
3 Press the + or – button to choose“WOW”.
4 Press the OK or 9 button.“SRS 3D” will be displayed on the screen.
5 Press the OK or 9 button again.The surround effect setup process begins(SRS 3D).
21
4
3
5
Play ModeRandomWOWEQ
Play Menu
S R S 3 DT r u B a s s
WOW
The recorder has WOW XT, an audio processing technology that increases sound clarity andbass quality. The level of the surround effect (SRS 3D) and the bass effect (TruBass) may beindividually adjusted through three levels of processing or turned off.
Surround effect (SRS 3D): Increases the sound-expansion effect and sound clarity.Bass effect (TruBass): Enriches the low sounds.
Increasing the WOW Effect (WOW)In
creasing
the W
OW
Effect (W
OW
)

64
4
6 Press the + or – button to selectthe surround level.If the recorder goes to the menu screenduring playback, move the cursor tochange playback sound accordingly.
7 Press the OK button to saveyour setting.Returns to the “SRS 3D” or “TruBass”selection display.If the 0 button is pressed, the settingwill be canceled.
8 Press the + or – button tochoose “TruBass”.
9 Press the OK or 9 button.The bass effect setup process begins(TruBass).
10 Press the + or – button to selectthe bass effect level.If the recorder goes to the menu screenduring playback, move the cursor tochange playback sound accordingly.
6
7
9
8,10
H i g hM i d d l eL o wO f f
S R S 3 D
S R S 3 DT r u B a s s
WOW
H i g hM i d d l eL o wO f f
T r u B a s s
H i g h
O f f
S R S 3 D
M i d d l eS e t
Increasing the WOW Effect (WOW)
Increasin
g th
e WO
W E
ffect (WO
W)

65
4
11 Press the OK button to save yoursetting.Returns to the “SRS 3D” or “TruBass”selection display.If the 0 button is pressed, the settingwill be canceled.
12 Press the STOP button to closethe menu.If the recorder goes to the menu screenduring playback, press the 0 buttonto close the menu screen.If it is set to anything other than “Off”, will appear on the display.a WOW indicator
SONG A / Artist CRoot
04 2602 13
01 /06
Flda
12
11
H i g h
O f f
T r u B a s s
L o wS e t
............................................................................................................................................................
Notes• If no operation is made for 3 minutes during the setting, it will return to the stop status.• Both the surround effect and bass effect are Off as the WOW default settings.• will be displayed on the screen if the surround effect or the bass effect is set.• The WOW effect will be weakened if the bit rate for any music file is less than 32 kbps.• Depending on the song, the WOW effect will be heightened, and may sound like noise. If this happens,
adjust the WOW effect.• The WOW Effect cannot be used when Playback Speed ( P. 84) is set.
Increasing the WOW Effect (WOW)In
creasing
the W
OW
Effect (W
OW
)

66
4
1
While the recorder is stopped orduring playback, press the MENUbutton for 1 second or longer.The “Menu” screen opens ( P. 70).If the recorder is stopped, proceed to Step2. If the recorder is playing, proceed toStep 3.
2 Press the OK or 9 button.The “Play Menu” screen opens.
3 Press the + or – button to choose“EQ”.
4 Press the OK or 9 button.The equalizer setup process begins.
5 Press the + or – button to selectthe desired equalizer characteristics.Select "User" to save your own customequalizer settings.If "User" is selected, proceed to Step 6.Otherwise, proceed to Step 9.If the recorder goes to the menu screenduring playback, move the cursor tochange playback sound accordingly.
6 Press the 9 button.Select the frequency band.
21
4
3
5
6
R o kP o pJ a zU s e
E Qc
zr
Play ModeRandomWOWEQ
Play Menu
Selecting Equalizer (EQ)
If you change the equalizer setting, you can enjoy the music with your favorite sound quality.
Selectin
g E
qu
alizer (EQ
)

67
4
7 Press the 9 or 0 button toselect the frequency band.You can set frequency band for the 60Hz, 250 Hz, 1 kHz, 4 kHz, and 12 kHzbands.
8 Press the + or – button to selectthe equalizer level.You can select the equalizer level from–10dB to 10dB in 1dB increments. Thehigher the decibel value, the louder thesound. The default setting is 0dB.To change the settings again, press the9 or 0 button and repeat theprocedure from step 7.
9 Press the OK button to completethe setup screen.If the 0 button is pressed, the settingwill be canceled and it will return to the“Play Menu” screen.
10 Press the STOP button to closethe menu.If the recorder goes to the menu screenduring playback, press the 0 buttonto close the menu screen.An icon will appear on the displayaccording to the setting.a Selected equalizer indicator
SONG A / Artist CRoot
04 2602 13
01 /06
UFlda
7
8
10
9
U S E R
60Hz
0dBE Q
250Hz
10dBU S E R E Q
Selecting Equalizer (EQ)
............................................................................................................................................................
Notes• The equalizer default setting is Flat.• Your equalizer settings will be retained in memory even when you change the battery.
Selectin
g E
qu
alizer (EQ
)

68
4
1 While the recorder is stopped,press the MENU button for 1second or longer.The “Menu” screen opens ( P. 70).
2 Press the + or – button to choose“Sub Menu”.
3 Press the OK or 9 button.The “Sub Menu” screen opens.
4 Press the OK or 9 button.Show files in the current folder in a list.
5 Press the + or – button to choosethe file you want to move it.
6 Press the OK or 9 button.The cursor will flash to confirm that thefile can be moved.
1
2
3,4
5
6
Play MenuBeep & DisplaySub Menu
e n uM
u b M e n uSMoveTime & DateFormatSystem
MusicSONG A.wmaSONG B.wmaSONG C.wma
o v eM
MusicSONG A.wmaSONG B.wmaSONG C.wma
o v eM
MusicSONG A.wmaSONG B.wmaSONG C.wma
o v eM
Moving the Tracks (Move)
You can move a file in a folder to change the order of playback. First select the file for which youwant to change the playback order.
Mo
ving
the Tracks (M
ove)

69
4
7 Press the + or – button to selectthe location to move it to.
8 Press the OK button to completethe file moving.If there are more files to move, repeatSteps 5 through 8.If the OK button is pressed for one secondor longer, file order rearrangement willclose and the recorder will return to the“Sub Menu” screen.
9 Press the STOP button to close themenu.
7 9
8
MusicSONG A.wmaSONG C.wmaSONG B.wma
o v eM
MusicSONG A.wmaSONG C.wmaSONG B.wma
o v eM
Moving the Tracks (Move)M
ovin
g th
e Tracks (Mo
ve)

70
4
Play Mode
Random
EQ
WOWPlayMenu
On, Off
Flat, Rock, Pop, Jazz, User
S. Play: x0.5, x0.625, x0.75, x0.875 PlayF. Play: x1.125, x1.25, x1.375, x1.5 Play
SRS 3D: High, Middle, Low, OffTruBass: High, Middle, Low, Off
File, File Repeat, Folder, Folder Repeat, All, All Repeat
Off, 1Sec, 2Sec, 3Sec, 4Sec, 5Sec, 10SecBack Space
Play Speed
Menu List (MUSIC Mode)
Menu Setting Ref. Page
Below is a map of the menu structure seen when the menus are entered while the recorder isstopped. If the MENU button is pressed and held for more than one second during playback,“Play Mode”, “Random”, “WOW”, “EQ”, “Back Space”, and “Play Speed” settings can be set,without interrupting playback.Menus highlighted with are common to both “VOICE” and “MUSIC” modes, and canbe selected even when the mode switch is set to “VOICE”.
Men
u L
ist (MU
SIC
Mo
de)
P. 59
P. 61
P. 63
P. 66
P. 82
P. 84
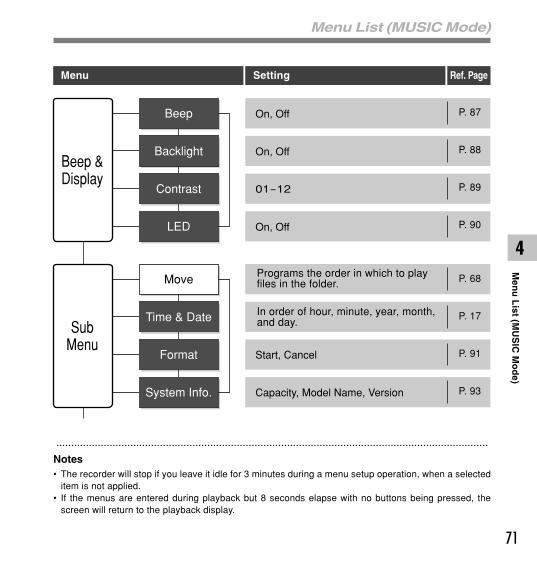
71
4
Beep &Display
SubMenu
On, Off
On, Off
On, Off
01-12
Start, Cancel
Capacity, Model Name, Version
Beep
Backlight
Contrast
Time & Date
Format
System Info.
LED
Move
Menu List (MUSIC Mode)
..................................................................................................................................................
Notes• The recorder will stop if you leave it idle for 3 minutes during a menu setup operation, when a selected
item is not applied.• If the menus are entered during playback but 8 seconds elapse with no buttons being pressed, the
screen will return to the playback display.
Menu Setting Ref. Page
In order of hour, minute, year, month,and day.
Programs the order in which to playfiles in the folder.
Men
u L
ist (MU
SIC
Mo
de)
P. 87
P. 88
P. 89
P. 90
P. 68
P. 17
P. 91
P. 93

72
5
1 Select the file you want to delete.In the stop status, display the file or placethe cursor on the file in the list display.
2 Press the ERASE button.The “Cancel” indicator flashes.
3 Press the + button to choose“Erase”.
4 Press the OK button.The display changes to “File Erase!” anderasing will start.
“Erase Done” is displayed when the file iserased. File numbers will be reassignedautomatically.
2
43
33 120XQ
E rC a n
s ec e l
a
33 120i l
E r a s eeF
!
33 119XQ
E r a s eD o n e
33 120E rC a n
s ec e l
a
Features Common to the Voice Recorder and Music Player
Erasing
Erasing One File at a TimeA selected file can be erased from a folder.
* This chapter will use VOICE mode display screens to explain the operations.
Erasin
g

73
5
1 Press the FOLDER button to selectthe folder in which you want toerase all files.
2 Press the ERASE button twice.The “Cancel” indicator flashes.
3 Press the + button to choose “AllErase”.
4 Press the OK button.The display changes to “All Erase!” anderasing will start.
“Erase Done” is displayed when the files areerased. The locked files and read-only filesare reassigned the file numbers in ascendingorder, starting from “1”.
12
43
120XQ
C a n c e llA E r s eal
120l l
E r a s eA
!
120
C a n c e llA E r s eal
00 00XQ
E r a s eD o n e
Erasing
Erase All Files from a FolderAll files in a folder can be erased simultaneously.The locked files ( P. 40) and the files set to read-only on the PC will not be erased.
Erasin
g

74
5
Notes• An erased file cannot be restored.• The locked files and the files that are set to read-only will not be erased ( P. 40).• If an action is not selected within eight seconds on the “Cancel”, “Erase”, or “All Erase” screens, the
recorder will return to stop status.• It may take over 10 seconds to complete erasing. Never turn the power off or remove batteries during
this time because data may be corrupted.
Erasing
Erasin
g

75
5
Set the Recorder to HOLD Mode
Slide the HOLD switch in thedirection indicated by thearrow while the recorder is notin operation.After “Hold” appears on the display,the recorder is set to HOLD mode.
Exit HOLD Mode
Slide the HOLD switch in the direction oppositethat indicated by the arrow.
H o l d
Hold
If you bring the HOLD switch to the HOLD position, thecurrent conditions will be preserved, and all buttons andswitches will be disabled.This feature is useful when therecorder has to be carried in a bag or pocket.
..................................................................................................................................................Notes• If you press any button in HOLD mode, the clock display flashes for 2 seconds, but it will not operate the
recorder.• If HOLD is applied during playback (recording), operation is disabled with the playback (recording) state
unchanged. (When playback ends, or recording ends due to insufficient memory, the recorder will stoponce, then will automatically enter in hold status.)
Ho
ld

76
5
1 Locate the index or temp mark youwant to clear.
2 Press the 9 or 0 button toselect an index or temp mark toerase.
1 Press the INDEX button duringrecording or playing.A number appears on the display and anindex mark or temp mark will be placed.Even after an index or temp mark isplaced, recording or playback will continueso you can place index or temp marks inother locations in a similar manner.
1
2
120 1200 8n d
S e teI x
HQ
Index Marks and Temp Marks
If index marks and temp marks are placed, you can quickly find a location you want to listento in fast forward and fast rewind and when cuing a file. Index marks cannot be placed onfiles created on machines other than Olympus IC recorders, but temp marks can be placedinstead to temporarily remember desired locations.
Setting an Index Mark or a Temp Mark
Clearing an Index Mark or a Temp MarkFollow the procedures below to erase index or temp marks.
120 120
0 8n d eI x1 6 M 4 1 S
HQ
Ind
ex Marks an
d Tem
p M
arks

77
5
120 1200 8n d eI x
l e aC r
HQ
Index Marks and Temp Marks
..................................................................................................................................................
Notes• Up to 16 index and temp marks can be set in a file. If you try to place more than 16 index or temp marks,
the “Index Full” message will appear for index marks, and “Temp Full” for temp marks.• Index or temp marks cannot be set or erased in a locked file ( P. 40).
3 Press the ERASE button while theindex or temp number appears forapproximately 2 seconds on thedisplay.The index or temp mark is erased.
Index or temp numbers after the erased index or temp number willautomatically move up.Temp marks are temporary markings, so if you move to anotherfile, switch to the list screen, or connect the recorder to a computer,they will be automatically erased.
3
Ind
ex Marks an
d Tem
p M
arks

78
5
1 Choose a file that contains asegment you want to play backrepeatedly, and press the PLAY orOK button.File playback begins.
2 Press the REC button at the pointyou want to start segment repeatplayback.“ End?” will flash on the display.
Even while “ End?” is flashing, changingthe playback speed ( P. 84), fast forwardand rewind ( P. 31, P. 32) can be executedthe same as during normal playback, and itcan be advanced quickly to the end position.When it reaches to the end of the file while“ End?” is flashing, the point will becomethe end position, and repeat playback willstart.
3 Press the REC button again at theposition where you want to endsegment repeat playback.The “ Play” message appears, andrepeat playback will start. The recorderrepeatedly plays back the segment untilthe segment repeat playback is canceled.
As in regular play mode, playback speed ( P. 84) can be changedduring segment repeat playback as well. If an index mark and tempmark ( P. 76) are inserted or eliminated during segment repeatplayback, segment repeat playback will be canceled and it will returnto regular play mode.
120 1
45M06S
20HQ
1 0 M 3 6 S
1
2
3
120 120
n d ?E
HQ
2 2 M 5 0 S
120 120
l a yP
HQ
1 6 M 4 1 S
How to Begin Segment Repeat Playback
This function enables repeated playback of part of the file being played.
Ho
w to
Beg
in S
egm
ent R
epeat P
layback

79
5
How to Begin Segment Repeat Playback
Cancel the Segment Repeat Playback Function
Press the REC button.
The segment repeat playback is released and playbackcontinues without repeating.
Press the STOP button.
The segment repeat playback is released and stop playback.
Press the 9 button.
Pressing the 9 button will release segment repeat playbackand fast forward and cue to the beginning of the next file.
Press the 0 button.
Pressing the 0 button will release segment repeat playbackand rewind and reverse to the beginning of the current file.
Ho
w to
Beg
in S
egm
ent R
epeat P
layback

80
5
1
While the recorder is stopped orduring playback, press the MENUbutton for 1 second or longer.The “Menu” screen opens.If the recorder is stopped, proceed to Step2. If the recorder is playing, proceed toStep 4.For information on the menu items whichcan be set during playback, see the menulist.
2 Press the + or – button to moveto the item to be set.
3 Press the OK or 9 button.Moves to the setting of the selected item.
4 Press the + or – button to moveto the item to be set.
5 Press the OK or 9 button.Moves to the setting of the selected item.
1
3
2
5
4
Menu Setting Method
Each item of the menu list ( P. 42, P. 70) can be set by the following method.
Rec MenuPlay MenuBeep & DisplaySub Menu
e n uM
Rec MenuPlay MenuBeep & DisplaySub Menu
e n uM
Back SpaceNoise CancelVoice FilterPlay Speed
Play Menu
Back SpaceNoise CancelVoice FilterPlay Speed
Play Menu
H i g hL o wO f f
Noise Cancel
Men
u S
etting
Meth
od

81
5
6 Press the + or – button to changethe setting.If the recorder goes to the menu screenduring playback, move the cursor tochange playback sound accordingly.
7 Press the OK button to completethe setup screen.The new setting will be displayed on thescreen.Pressing the 0 button rather than theOK button will cancel the new setting andreturn the display to the previous menuscreen.
8 Press the STOP button to close themenu.If the menus were entered duringplayback, pressing the 0 button willreturn the screen to the playback displaywithout interrupting playback.
H i g hNoise Cancel
H i g hS E T
6 8
7
Menu Setting Method
H i g hL o wO f f
Noise Cancel
Men
u S
etting
Meth
od

82
5
1 While the recorder is stopped orduring playback, press the MENUbutton for 1 second or longer.The “Menu” screen opens ( P. 42, P. 70).If the recorder is stopped, proceed to Step2. If the recorder is playing, proceed toStep 4.
2 Press the + or – button to choose“Play Menu”.
3 Press the OK or 9 button.The “Play Menu” screen opens.
4 Press the OK or 9 button.The auto backspace review setup processbegins.
5 Press the + or – button to selectspace.Off: Perform normal cueing.1Sec, 2Sec, 3Sec, 4Sec, 5Sec, 10Sec:The recorder rewinds a set space andstarts playing back.
2
1
3,4
5
Back SpaceNoise CancelVoice FilterPlay Speed
Play Menu
Rec MenuPlay MenuBeep & DisplaySub Menu
e n uM
Back SpaceO f1 S e2 S e3 S e
f
cc
c
Auto Backspace Review (Back Space)
To ease the reviewing of a voice file you can set an auto backspace for several seconds, soyou will listen to the last phrase repeatedly.
Au
to B
ackspace R
eview (B
ack Sp
ace)

83
5
7
68
Rec MenuPlay MenuBeep & DisplaySub Menu
e n uM
Auto Backspace Review (Back Space)
6 Press the OK button to completethe setup screen.If the 0 button is pressed, the settingwill be canceled and it will return to the“Play Menu” screen.
7 Press the STOP button to close themenu.If the recorder goes to the menu screenduring playback, press the 0 button toclose the menu screen.
8 Press the 0 button while the fileis being replayed.Playback starts at the set point ofseconds before.
..................................................................................................................................................Note• If the setting other than ”Off” is selected at the previous playback, and even though the 0 button is
pressed, it does not reverse skip to the cue or the index mark position. Reverse skip is executed foronly the set time (1 to 10 seconds).
Au
to B
ackspace R
eview (B
ack Sp
ace)

84
5
1 Press the PLAY button duringplayback.Every time the PLAY button is pressed,the playback speed will switch.Regular Play: Playback at normal speed.S. Play (slow playback): Playback speedslows down, and S will turn on (defaultat 0.75 times as fast).F. Play (fast playback): Playback speedbecomes faster, and F will turn on(default at 1.5 times as fast).a Selected play speed indicator
Even if playback is stopped, the changed playback speed will beretained. The next playback will be at that speed.
Changing the Playback Speed (Play Speed)
The playback speed of the file can be changed between 0.5 and 1.5 times speed in incrementsof 0.125. Change the speed according to need such as listening to meeting content at a fastspeed or reviewing spots that you couldn't catch in a language lesson at a slow speed. Thetone will be automatically adjusted digitally without changing the voice so it sounds natural.
Change Playback Speed
1 While the recorder is stopped orduring playback, press the MENUbutton for 1 second or longer.The “Menu” screen opens ( P. 42, P. 70).
Change Playback Speed SettingYou can change the playback speed setting for S. Play and F. Play.
Ch
ang
ing
the P
layback S
peed
(Play S
peed
)
120 1
45M06S
20HQ
S
1 0 M 3 6 S
a
1
1

85
5
2 Press the + or – button to choose“Play Menu”.
3 Press the OK or 9 button.The “Play Menu” screen opens.
4 Press the + or – button to choose“Play Speed”.
5 Press the OK or 9 button.The playback speed setup processbegins.
6 Press the + or – button to choosebetween “S. Play” and “F. Play”.
7 Press the OK or 9 button.Start setting each of “S. Play” and “F. Play”.
8 Press the + or – button to set theplayback speed.S. Play: x0.5, x0.625, x0.75, x0.875F. Play: x1.125, x1.25, x1.375, x1.5
If the recorder goes to the menu screenduring playback, move the cursor tochange playback sound accordingly.
3
2,4
5
6
Back SpaceNoise CancelVoice FilterPlay Speed
Play Menu
S .
Play Speed
P l a yF . P l a y
x0.875 Playx0.75 Playx0.625 Playx0.5 Play
S. Play Speed
7
8
Changing the Playback Speed (Play Speed)C
han
gin
g th
e Playb
ack Sp
eed (P
lay Sp
eed)

86
5
..................................................................................................................................................Notes• F. Play and S. Play are available even if either the Voice Filter ( P. 36) or Equalizer ( P. 66) is set.• F. Play and S. Play are not available if either the Noise Cancel ( P. 34) or WOW Effect ( P. 63) is set.• During fast playback/slow playback, it will be played back in monaural even though the file was recorded
in ST XQ, ST HQ, ST SP mode.• Playback speed will return to normal if the mode switch setting is changed.
10
9
Changing the Playback Speed (Play Speed)
9 Press the OK button to complete the setup screen.Returns to the “S.Play” or “F.Play” selection display.
10 Press the STOP button to close the menu.If the recorder goes to the menu screen during playback, pressthe 0 button to close the menu screen.
As in Regular Play mode, you can stop playback, cue a file, or insertan index mark ( P. 76) in F. Play and S. Play modes as well.
Ch
ang
ing
the P
layback S
peed
(Play S
peed
)

87
5
1 While the recorder is stopped,press the MENU button for 1second or longer.The “Menu” screen opens ( P. 42, P. 70).
2 Press the + or – button to choose“Beep & Display”.
3 Press the OK or 9 button.The “Beep & Display” screen opens.
4 Press the OK or 9 button.The system sound setup process begins.
5 Press the + or – button to choosebetween “On” and “Off”.On: System sounds are enabled.Off: System sounds are disabled.
6 Press the OK button to completethe setup screen.If the 0 button is pressed, the settingwill be canceled and it will return to the“Beep & Display” screen.
7 Press the STOP button to close themenu.
2
1
3,4
5 7
6
Rec MenuPlay MenuBeep & DisplaySub Menu
e n uM
BeepBacklightContrastLED
Beep & Display
O nO f f
e e pB
System Sounds (Beep)
The recorder beeps to alert you to button operations or warn you of errors. System soundsmay be turned off.
System
So
un
ds (B
eep)

88
5
1 While the recorder is stopped,press the MENU button for 1second or longer.The “Menu” screen opens ( P. 42, P.70).
2 Press the + or – button to choose“Beep & Display”.
3 Press the OK or 9 button.The “Beep & Display” screen opens.
4 Press the + or – button to choose“Backlight”.
5 Press the OK or 9 button.The backlight setup process begins.
6 Press the + or – button to choosebetween “On” and “Off”.On: Backlight is enabled.Off: Backlight is disabled.
7 Press the OK button to completethe setup screen.If the 0 button is pressed, the settingwill be canceled and it will return to the“Beep & Display” screen.
8 Press the STOP button to close themenu.
2
31
4
5
6 8
7
BeepBacklightContrastLED
Beep & Display
O nO f f
Backlight
Backlight (Backlight)
The recorder display backlight is On by default. The display will remain lit for about 10 secondswhen a button on the recorder is pressed.
Backlig
ht (B
ackligh
t)

89
5
1 While the recorder is stopped,press the MENU button for 1second or longer.The “Menu” screen opens ( P. 42, P. 70).
2 Press the + or – button to choose“Beep & Display”.
3 Press the OK or 9 button.The “Beep & Display” screen opens.
4 Press the + or – button to choose“Contrast”.
5 Press the OK or 9 button.The contrast setup process begins.
6 Press the + or – button to set thecontrast level.You can adjust the LCD display contrastlevel from 1 to 12.
7 Press the OK button to completethe setup screen.If the 0 button is pressed, the settingwill be canceled and it will return to the“Beep & Display” screen.
8 Press the STOP button to close themenu.
2
31
4
5
6 8
7
BeepBacklightContrastLED
Beep & Display
0 6
L H
o n tC a s tr
Level
LCD Contrast Adjustment (Contrast)
Display contrast can be adjusted in 12 levels.
LC
D C
on
trast Ad
justm
ent (C
on
trast)

90
5
1 While the recorder is stopped,press the MENU button for 1second or longer.The “Menu” screen opens ( P. 42, P. 70).
2 Press the + or – button to choose“Beep & Display”.
3 Press the OK or 9 button.The “Beep & Display” screen opens.
4 Press the + or – button to choose“LED”.
5 Press the OK or 9 button.The LED setup process begins.
6 Press the + or – button to choosebetween “On” and “Off”.On: LED light will be set.Off: LED light will be canceled.
7 Press the OK button to completethe setup screen.If the 0 button is pressed, the settingwill be canceled and it will return to the“Beep & Display” screen.
8 Press the STOP button to close themenu.
2
31
4
5
6 8
7
BeepBacklightContrastLED
Beep & Display
L E D
O nO f f
LED (LED)
You can set it so the Record/Play indicator light does not turn on.
LE
D (L
ED
)

91
5
1 While the recorder is stopped,press the MENU button for 1second or longer.The “Menu” screen opens ( P. 42, P. 70).
2 Press the + or – button to choose“Sub Menu”.
3 Press the OK or 9 button.The “Sub Menu” screen opens.
4 Press the + or – button to choose“Format”.
5 Press the OK or 9 button.The “Cancel” indicator flashes.
6 Press the + button to choose“Start”.
2
1
4
3
56
Rec MenuPlay MenuBeep & DisplaySub Menu
e n uM
u b M e n uSLockTime & DateFormatSystem
S tC a n
r tc e l
a
o r m aF t
S tC a n
r tc e l
a
o r m aF t
Formatting the Recorder (Format)
If you format the recorder, all files will be removed and all function settings will return todefaults except date and time settings. Transfer any important files to a computer beforeformatting the recorder.
Fo
rmattin
g th
e Reco
rder (F
orm
at)

92
5
7 Press the OK button.After the "Data Will Be Cleared" messageis on for 2 seconds, "Cancel" will turn on.
8 Press the + button again to choose“Start”.
9 Press the OK button.Formatting begins and an indicator flasheson the display.
“Format Done” displays when formattingends.
8
7,9
S tC a n
r tc e l
a
o r m aF tS u e ?r
S tC a n
r tc e l
a
o r m aF tS u e ?r
o r m aF t
F o m ar t !
o r m aF t
F o r m aD o n e
t
Formatting the Recorder (Format)
..................................................................................................................................................Notes• Never turn the power off or remove batteries during formatting because data may be corrupted. It may
take over 10 seconds to complete erasing.• Never format the recorder from a PC.• After formatting, recorded voice file names may start from 0001.• Once the recorder is formatted, the music files with DRM may not be transferred to the recorder again.• When the recorder is formatted, all the saved data, including locked files and read-only files, are erased.
Fo
rmattin
g th
e Reco
rder (F
orm
at)

93
5
1 While the recorder is stopped,press the MENU button for 1second or longer.The “Menu” screen opens ( P. 42, P. 70).
2 Press the + or – button to choose“Sub Menu”.
3 Press the OK or 9 button.The “Sub Menu” screen opens.
4 Press the + or – button to choose“System Info.”.
5 Press the OK or 9 button.“Capacity/Model/Version” will appear.
6 Press the STOP button to close themenu.
2
31
u b M e n uSLockTime & DateFormatSystem Info.
:2GB:WS331:1.00
CapacityModelVersion
System Info.
Viewing System Information (System Info.)
You can check the recorder's information on the menu screen.
4
5
6
View
ing
System
Info
rmatio
n (S
ystem In
fo.)

94
6
Other Practical Use Methods
Using as External Memory of the ComputerWith the recorder connected to your PC, you can download data from the memory to your PC andupload data stored on your PC to the memory.
Example: Copying Data from PC to Recorder using Explorer
1 Start Windows.
2 Connecting the recorder to your PC.For the connection procedure, refer to “Connecting to Your PC” ( P. 46).
3 Open the Explorer window.The product’s name is displayed.
4 Copy the data.While the data is being written or copied, the record/play indicator light and USB accessindicator light on the recorder will flash in red.
5 Unplug the recorder from a computer.For how to unplug the recorder, please see "Disconnecting from Your PC" ( P. 47).
..................................................................................................................................................
Note• NEVER disconnect the USB while the record/play indicator light and USB access indicator light are
flashing in red. Otherwise data may be damaged.
Usin
g as E
xternal M
emo
ry of th
e Co
mp
uter

95
7
Other Information
Alarm Message List
MeaningLow batterypower
Erase-locked
Index full
Tempmark full
Folder full
Error in theinternalmemory
Illegally copiedfile
Zero remainingmemory
No file
Formattingerror
Themanagementfile cannot becreated.
ActionReplace with new batteries ( P. 12).
Unlock the file ( P. 40).
Erase index marks that are no longerrequired ( P. 76).
Erase Tempmarks that are no longerrequired ( P. 76).
Erase unnecessary files ( P. 72).
This is a malfunction, so go to the storewhere you purchased the recorder or anOlympus service station for repair.
Delete the file ( P. 72).
Erase unnecessary files ( P. 72).
Select another folder.
Reformat the memory ( P. 91).
Connect the recorder to a computerand delete any unnecessary files.
ExplanationBattery power is getting low.
Tried to delete a locked file.
The file is full of index marks(maximum of 16 marks).
The file is full of Tempmarks(maximum of 16 marks).
The folder is full of files(maximum of 200 files).
Error in the internal memory.
The music files copiedillegally.
No remaining internal memory.
No files were found in thefolder.
There was an error whileformatting the recorder'smemory.
The file for managementcannot be created due to ashortage of capacity forremaining flash memory.
MessageBattery Low
File Protected
Index Full
Temp Full
Folder Full
Memory Error
LicenseMismatch
Memory Full
No File
Format Error
Can't Make TheSystem File.Connect To PCAnd DeleteUnnecessary File
Alarm
Messag
e List

7
96
Troubleshooting
Probable causeThe battery is not loaded properly.
The battery is dead.
The recorder is in HOLD mode.
The recorder is in HOLD mode.
The battery is dead.
Low remaining internal flash memory.
The maximum number of files has beenreached.
MUSIC mode is active.
The earphone is connected.
The VOL(+ or -) button is set to 0.
The file is locked.
The file is read-only.
The recorder was shaken during recording.
The recorder was placed near a cell phoneor fluorescent light while recording or duringplayback.
The microphone sensitivity is too low.
The maximum number of marks has beenreached.
The file is locked.
The file is read-only.
Wrong folder.
SymptomNothing appearson the display
Won’t start
Unable torecord
No playbacktone heard
Unable to erase
Noise heardduring playback
Recording leveltoo low
Unable to setindex marks,tempmarks
Cannot find therecorded voice
ActionVerify polarity is correct.
Replace with new battery ( P. 12).
Release the recorder from HOLD( P. 75).
Release the recorder from HOLD( P. 75).
Replace with new battery ( P. 12).
Erase unnecessary files ( P. 72).
Check another folder.
Switch to VOICE mode ( P. 14).
Unplug the earphones to use theinternal speaker.
Adjust the VOL(+ or –) button ( P. 30).
Unlock the file ( P. 40).
Cancel the read-only setting of the fileon the PC.
Move the recorder.
Set the microphone sensitivity to “Conf”mode and try again ( P. 25).
Erase unnecessary marks ( P. 76).
Unlock the file ( P. 40).
Cancel the read-only setting of the fileon the PC.
Switch to the right folder.
Trou
blesh
oo
ting

7
97
Accessories (Optional)
Stereo microphone: ME51SThe high fidelity of the recording, which onlystereo can perform. Furthermore, it gives clearsound quality with less noise.
Highly sensitive noise-cancellationmonaural microphone: ME52This microphone is used to record sound at adistance while minimizing surrounding noise.
Noise-Cancellation monauralmicrophone: ME12(Dictation microphone)Used to get crisp recordings of your own voice byreducing the effects of ambient noise.
Tie clip microphone: ME15(Monaural)Small concealing microphone with a tie-clip.
Telephone pickup: TP7(Monaural)Earphone type microphone can be plugged intoyour ear while phoning. The voice or conversationover the phone can be clearly recorded.
Ni-MH rechargeable battery and chargerset: BC400 (Europe only)BC400 comes with an Ni-MH rechargeablebattery charger(BU-400) and 4 Ni-MHrechargeable batteries (BR401) as a pack. Thischarger can quick charge Olympus AA or AAA Ni-MH rechargeable batteries.
Ni-MH rechargeable battery: BR401High-efficiency rechargeable long life batteries.
Connecting cord: KA333Connecting cord which has stereo mini-plugs(ø3.5) with resistance at both ends. Use toconnect from the earphone jack output of therecorder to the microphone input jack whenrecording.Converting plug adapters (PA331/PA231) whichconvert to the monaural mini plug (ø3.5) ormonaural mini plug (ø2.5) are also enclosed.
DSS Player softwareIf you transfer voice files recorded with therecorder to a PC, you can easily play back,organize, and edit the files.You can also manage Podcast contents(download from web site or transfer to therecorder). The DSS Player can be upgraded to aDSS Player Plus, which is equipped with aenhanced functionality (Option).(compatible with recognition software, joining andsplitting of the files and configuring the menusettings of this recorder)
Accesso
ries (Op
tion
al)

7
98
Specifications
For the Digital Voice RecorderRecording format:WMA (Windows Media Audio)
Input level:–70 dBv
Sampling frequency:ST XQ mode: 44.1 kHzST HQ mode: 44.1 kHzST SP mode: 44.1 kHzHQ mode: 44.1 kHzSP mode: 22 kHzLP mode: 8 kHz
Overall frequency response:ST XQ mode: 50 Hz to 19 kHzST HQ mode: 50 Hz to 15 kHzST SP mode: 50 Hz to 9 kHzHQ mode: 50 Hz to 13 kHzSP mode: 100 Hz to 7 kHzLP mode: 100 Hz to 3 kHz
Recording time:(WS-331M)ST XQ mode: 35 hours 30 minutesST HQ mode: 71 hours 00 minutesST SP mode: 142 hours 05 minutesHQ mode: 142 hours 05 minutesSP mode: 279 hours 35 minutesLP mode: 555 hours 45 minutes(WS-321M)ST XQ mode: 17 hours 40 minutesST HQ mode: 35 hours 25 minutesST SP mode: 70 hours 55 minutesHQ mode: 70 hours 55 minutesSP mode: 139 hours 40 minutesLP mode: 277 hours 35 minutes
Sp
ecification
s
(WS-311M)ST XQ mode: 8 hours 45 minutesST HQ mode: 17 hours 40 minutesST SP mode: 35 hours 25 minutesHQ mode: 35 hours 25 minutesSP mode: 69 hours 40 minutesLP mode: 138 hours 30 minutes
Alkaline battery life:(Recording)ST XQ mode: Approx. 11.5 hoursST HQ mode: Approx. 13.5 hoursST SP mode: Approx. 14.5 hoursHQ mode: Approx. 16 hoursSP mode: Approx. 16.5 hoursLP mode: Approx. 21 hours(Playback/ All Mode)Speaker playback: Approx. 7 hoursEarphone playback: Approx. 15 hours
Ni-MH rechargeable battery life:(Recording)ST XQ mode: Approx. 9.5 hoursST HQ mode: Approx. 11.5 hoursST SP mode: Approx. 12 hoursHQ mode: Approx. 12.5 hoursSP mode: Approx. 12.5 hoursLP mode: Approx. 15 hours(Playback/ All Mode)Speaker playback: Approx. 6 hoursEarphone playback: Approx. 11.5 hours

7
99
Specifications
Common SpecificationsRecording medium:Built-in NAND FLASH memory (WS-331M:2GB/ WS-321M: 1GB/ WS-311M: 512MB)
Speaker:Built-in ø18 mm round dynamic speaker
MIC jack:ø3.5 mm, impedance 2kΩEAR jack:ø3.5 mm, impedance 8Ω or more
Maximum working output (3 V DC):70 mW or more (8Ω speaker)
Input power requirement:Rated voltage: 1.5 VBatteries: AAA battery (LR03 or ZR03) orNi-MH rechargeable battery
External dimensions:94.8 x 38.6 x 11 mm (without protrusions)
Weight:47 g (including alkaline battery)
* Specifications and design are subject to changewithout notice.
* Battery life is measured by Olympus. It variesgreatly according to the type of batteries usedand the conditions of use.
Sp
ecification
s
For the Digital Music PlayerCompatible data format:WMA, MP3 (MPEG-1/MPEG-2 AudioLayer-3)
Sampling frequency:44.1 kHz
Frequency band:20 Hz to 20 kHz
Playback time:WS-331M: about 500 songsWS-321M: about 250 songsWS-311M: about 125 songs(128kbps/4 minutes per song)
Maximum headphone output:5mW + 5mW (at load of 22 Ω)
Alkaline battery life:WMA: Approx. 16 hoursMP3: Approx. 19 hours
Ni-MH rechargeable battery life:WMA: Approx. 12.5 hoursMP3: Approx. 14 hours

7
100
Technical Assistance and Support
The following are contact information for technical support for Olympus recorders and software only.
Technical Hotline Number in the U.S. and Canada1-888-553-4448
User Support E-mail address in the U.S. and [email protected]
Technical Hotline Number in EuropeToll free number00800 67 10 83 00
available for Austria, Belgium, Denmark, Finland, France, Germany, Italy, Luxemburg,Netherlands, Norway, Portugal, Spain, Sweden, Switzerland, United Kingdom
Charged numbers for the Rest of Europe+49 180 567 1083+49 40 23773 4899
User Support E-mail address in [email protected]
Techn
ical Assistan
ce and
Su
pp
or t

Declaration of ConformityModel Number: WS-331M/WS-321M/WS-311MTrade Name: DIGITAL VOICE RECORDERResponsible Party: OLYMPUS IMAGING AMERICA INC.Address: 3500 Corporate Parkway, P.O. Box 610, Center Valley, PA 18034-0610, U.S.A.Telephone Number: 1-888-553-4448
This device Complies with Part 15 of the FCC Rules. Operation is subject to the following two conditions: (1) This device maynot cause harmful interference, and (2) this device must accept any interference received, including interference that maycause undesired operation.
Tested To ComplyWith FCC Standards
FOR HOME OR OFFICE USECanadian RFIThis digital apparatus does not exceed the Class B limits for radio noise emissions from digital apparatus as set out in the RadioInterference Regulations of the Canadian Department of Communications.
Cet appareil numérique ne dépasse pas les limites de la Catégorie B pour les émissions de bruit radio émanant d’appareils numériques,tel que prévu dans les Règlements sur l’Interférence Radio du Département Canadien des Communications.
Das „CE“ Zeichen bestätigt die übereinstimmungmit den Europäischen Bestimmungen fürBetriebssicherheit und Umweltschutz.
Знак "CE" обозначает, что этот пpодуктсоответствует евpопейским тpебованиям побезопасности, охpане здоpовья, экологическойбезопасности и безопасности пользователя.
Dieses Symbol [durchgestrichene Mülltonne nach WEEEAnhang IV] weist auf die getrennte Rücknahmeelektrischer und elektronischer Geräte in EU-Ländernhin. Bitte werfen Sie das Gerät nicht in den Hausmüll.Informieren Sie sich über das in Ihrem Land gültigeRücknahmesystem und nutzen dieses zur Entsorgung.Anwendbare Produkte: WS-331M/WS-321M/WS-311M
Этот символ [пеpечеpкнутая мусоpная уpна WEEE наколесах, пpиложение IV] обозначает pаздельныйсбоp электpических и электpонных отходов в Pоссии.Пожалуйста, не выбpасывайте изделия в бытовоймусоpопpовод. Используйте системы возвpата исбоpа (если таковые имеются) для утилизацииотходов вышеуказанных типов.Пpименимое изделие: WS-331M/WS-321M/WS-311M
“CE” mark indicates that this product complies with theEuropean requirements for safety, health,environmentand customer protection.
For customers in Europe
La marca “CE” indica que este producto cumple conlos requisitos europeos en materia de seguridad,salud, medio ambiente y protección al consumidor.
This symbol [crossed-out wheeled bin WEEE AnnexIV] indicates separate collection of waste electricaland electronic equipment in the EU countries. Pleasedo not throw the equipment into the domestic refuse.Please use the return and collection systems availablein your country for the disposal of this product.Applicable Product: WS-331M/WS-321M/WS-311M
L’indication « CE » signifie que ce produit est conformeaux exigences concernant la sécurité, la santé,l’environnement et la protection du consommateur.
Le symbole [poubelle sur roue barrée d’une croixWEEE annexe IV] indique une collecte séparée desdéchets d’équipements électriques et électroniquesdans les pays de L’UE. Veuillez ne pas jeterl’équipement dans les ordures domestiques. A utiliserpour la mise en rebut de ces types d’équipementsconformément aux systèmes de traitement et decollecte disponibles dans votre pays.Produit applicable: WS-331M/WS-321M/WS-311M
Este símbolo [un contenedor de basura tachado conuna X en el Anexo IV de WEEE] indica que larecogida de basura de equipos eléctricos yelectrónicos deberá tratarse por separado en lospaíses de la Unión Europea. No tire este equipo a labasura doméstica. Para el desecho de este tipo deequipos utilice los sistemas de devolución al vendedory de recogida que se encuentren disponibles.Producto aplicable: WS-331M/WS-321M/WS-311M
Il marchio “CE” indica che questo prodotto èconforme alle norme della comunità europea perquanto riguarda la sicurezza, la salute, l’ambientee la protezione del consumatore.
Questo simbolo [contenitore di spazzatura barratocome illustrato nell’allegato IV della direttiva WEEE]indica una raccolta separata dei rifiuti diapparecchiature elettriche ed elettroniche nei paesidell’Unione Europea. Si prega di non gettare questodispositivo tra i rifiuti domestici. Si prega di utilizzarei sistemi di raccolta e di recupero disponibili per losmaltimento di questo tipo di dispositivi.Prodotto applicabile: WS-331M/WS-321M/WS-311M
U1-BZ8231-03AP0706


![DIGITAL VOICE 1 RECORDER Recording WS-853 · WS-853 model only NOTE • ore charging the battery, insert the Bef rechargeable battery provided and set [Battery] to [Ni-MH] (☞ P.8,](https://static.fdocuments.in/doc/165x107/6005066a552ca8520a14ecd6/digital-voice-1-recorder-recording-ws-853-ws-853-model-only-note-a-ore-charging.jpg)


