
Workshop 7: Microsoft Word To the Advanced User Workshop 7: Microsoft Word…€¦ · ·...
26
Faculty Computer Literacy Training Workshop 7: Microsoft Word… To the Advanced User Armand Poblete © 2014 1 Workshop 7: Microsoft Word… To the Advanced User Contents Lab: WRD2 – Formatting Appendices, Graphics, Charts, Tables, and Smart Art .......................................... 1 In-Lab ........................................................................................................................................................ 1 In-Lab Materials .................................................................................................................................... 1 In-Lab Instructions ................................................................................................................................ 1 Save the entire document and upload to iClassBook.com ......................................................................... 26 Lab: WRD2 – Formatting Appendices, Graphics, Charts, Tables, and Smart Art In this Lab you will learn how to apply and use graphical tools into your paper or report, formatting graphics, modify/edit charts, create/format tables, and the application of Microsoft’s SmartArt graphical tools. You will also learn about the basics of graphical layout elements and be able to select and apply a layout theme. You will also gain more experience in pagination tricks and updating the table of contents. Learn how to create an index using Word’s reference tool. In-Lab Scenario: You will need to write a report on the wettest place on earth – Cherrapunji. The document must include pictures, appetencies, an index, and graphics. In-Lab Materials 1. Microsoft Word 2. Access to the Internet 3. Files.zip In-Lab Instructions Step 1: Setting up your files 1. Download and extract Files.zip to your Desktop. 2. Open the file Cherrapunji.docx. Cherapunji.docx is a formatted report that we need to edit and complete. 3. Now Resave the document to your Desktop and rename it as Cherapunji_Firstname_Lastname. By doing this you are creating a working copy of the original with harming the original
-
Upload
nguyenthuan -
Category
Documents
-
view
217 -
download
0
Transcript of Workshop 7: Microsoft Word To the Advanced User Workshop 7: Microsoft Word…€¦ · ·...

Faculty Computer Literacy Training Workshop 7: Microsoft Word… To the Advanced User
Armand Poblete © 2014
1
Workshop 7: Microsoft Word… To the Advanced User Contents Lab: WRD2 – Formatting Appendices, Graphics, Charts, Tables, and Smart Art .......................................... 1
In-Lab ........................................................................................................................................................ 1
In-Lab Materials .................................................................................................................................... 1
In-Lab Instructions ................................................................................................................................ 1
Save the entire document and upload to iClassBook.com ......................................................................... 26
Lab: WRD2 – Formatting Appendices, Graphics, Charts, Tables, and
Smart Art In this Lab you will learn how to apply and use graphical tools into your paper or report, formatting
graphics, modify/edit charts, create/format tables, and the application of Microsoft’s SmartArt graphical
tools. You will also learn about the basics of graphical layout elements and be able to select and apply a
layout theme.
You will also gain more experience in pagination tricks and updating the table of contents. Learn how to
create an index using Word’s reference tool.
In-Lab Scenario: You will need to write a report on the wettest place on earth – Cherrapunji. The document must
include pictures, appetencies, an index, and graphics.
In-Lab Materials 1. Microsoft Word 2. Access to the Internet 3. Files.zip
In-Lab Instructions
Step 1: Setting up your files
1. Download and extract Files.zip to your Desktop.
2. Open the file Cherrapunji.docx. Cherapunji.docx is a formatted report that we need to edit and
complete.
3. Now Resave the document to your Desktop and rename it as Cherapunji_Firstname_Lastname.
By doing this you are creating a working copy of the original with harming the original
Faculty Computer Literacy Training Workshop 7: Microsoft Word… To the Advanced User
Armand Poblete © 2014
2
document. By using underscores (_) you are replacing spaces. This makes it easier if you need
to publish this to the web.
Step 2: Inserting and Formatting Images
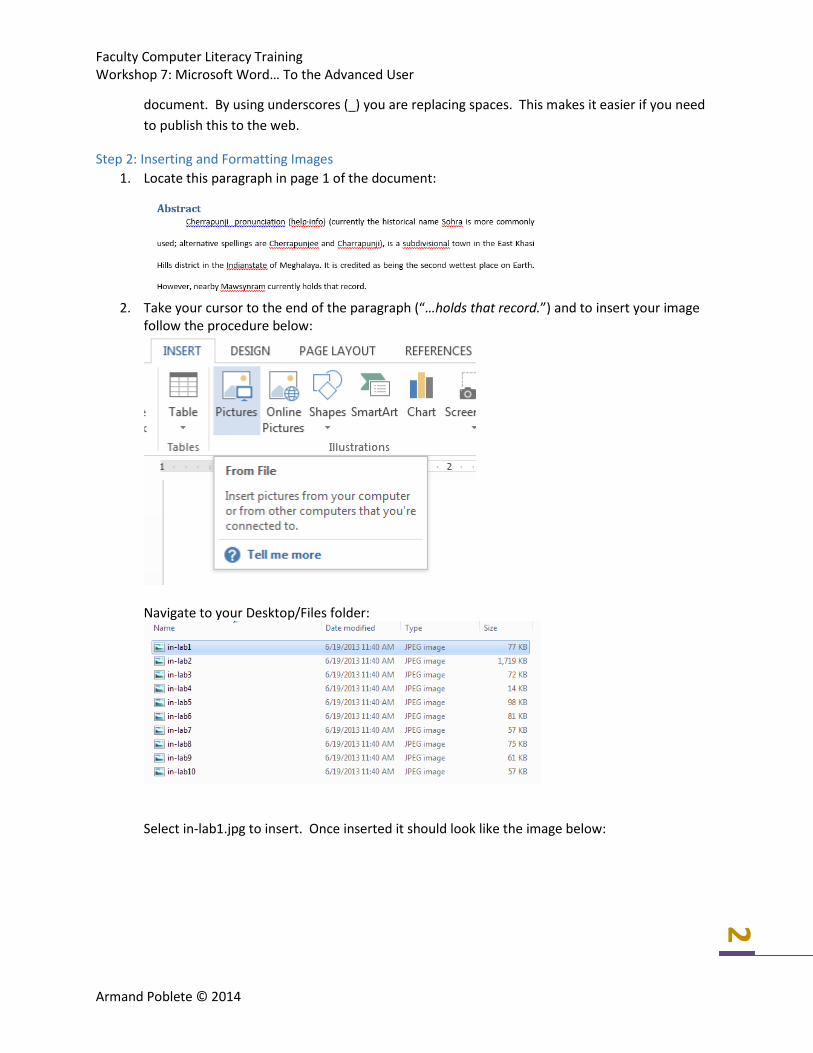
1. Locate this paragraph in page 1 of the document:
2. Take your cursor to the end of the paragraph (“…holds that record.”) and to insert your image
follow the procedure below:
Navigate to your Desktop/Files folder:
Select in-lab1.jpg to insert. Once inserted it should look like the image below:

Faculty Computer Literacy Training Workshop 7: Microsoft Word… To the Advanced User
Armand Poblete © 2014
3
Now make sure that you select the image by clicking on it. The Layout Options icon will pop out.
Select Square:
Faculty Computer Literacy Training Workshop 7: Microsoft Word… To the Advanced User
Armand Poblete © 2014
4
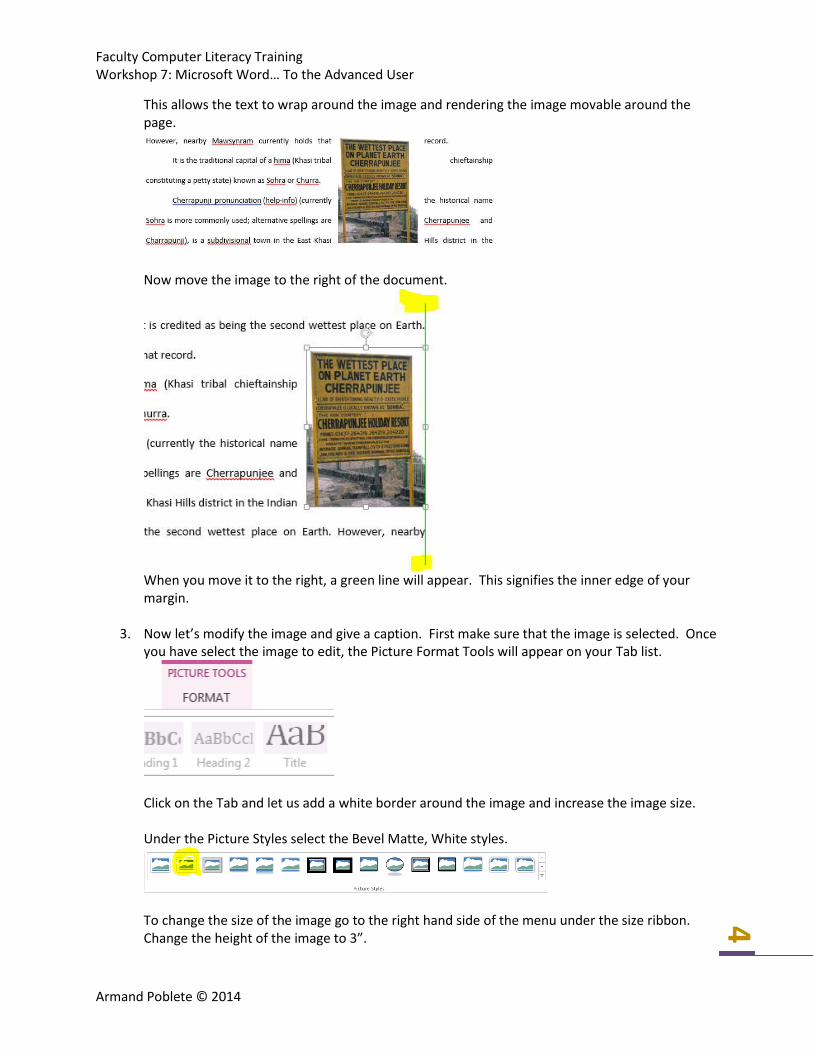
This allows the text to wrap around the image and rendering the image movable around the page.
Now move the image to the right of the document.
When you move it to the right, a green line will appear. This signifies the inner edge of your margin.
3. Now let’s modify the image and give a caption. First make sure that the image is selected. Once you have select the image to edit, the Picture Format Tools will appear on your Tab list.
Click on the Tab and let us add a white border around the image and increase the image size. Under the Picture Styles select the Bevel Matte, White styles.
To change the size of the image go to the right hand side of the menu under the size ribbon. Change the height of the image to 3”.
Faculty Computer Literacy Training Workshop 7: Microsoft Word… To the Advanced User
Armand Poblete © 2014
5
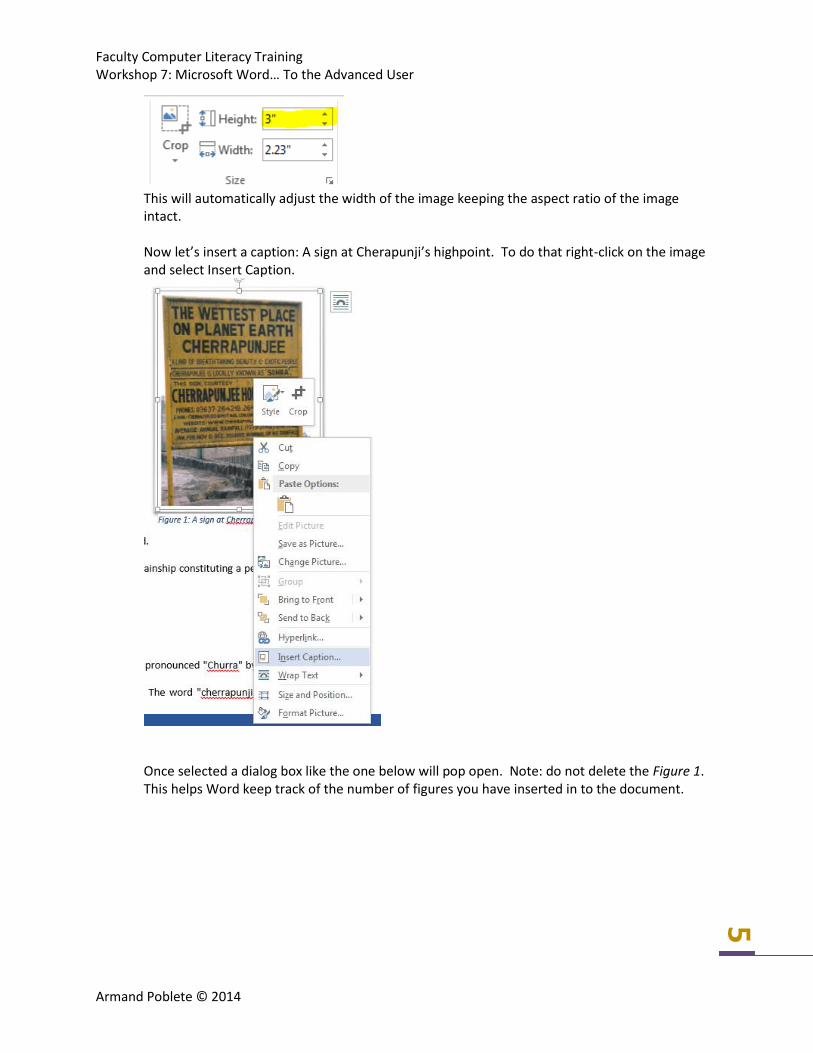
This will automatically adjust the width of the image keeping the aspect ratio of the image intact. Now let’s insert a caption: A sign at Cherapunji’s highpoint. To do that right-click on the image and select Insert Caption.
Once selected a dialog box like the one below will pop open. Note: do not delete the Figure 1. This helps Word keep track of the number of figures you have inserted in to the document.

Faculty Computer Literacy Training Workshop 7: Microsoft Word… To the Advanced User
Armand Poblete © 2014
6
The final product of the image insertion and manipulation below:
4. Now insert in-lab2.jpg, in-lab3.jpg, and in-lab4.jpg anywhere in the document. Follow the image
specifications for each image from Number 3. Insert the following captions for each image: in-lab2.jpg – Nohkalikai Falls in-lab3.jpg – Khasi Children in traditional dress in-lab4.jpg – Khasi woman in traditional dress
Faculty Computer Literacy Training Workshop 7: Microsoft Word… To the Advanced User
Armand Poblete © 2014
7
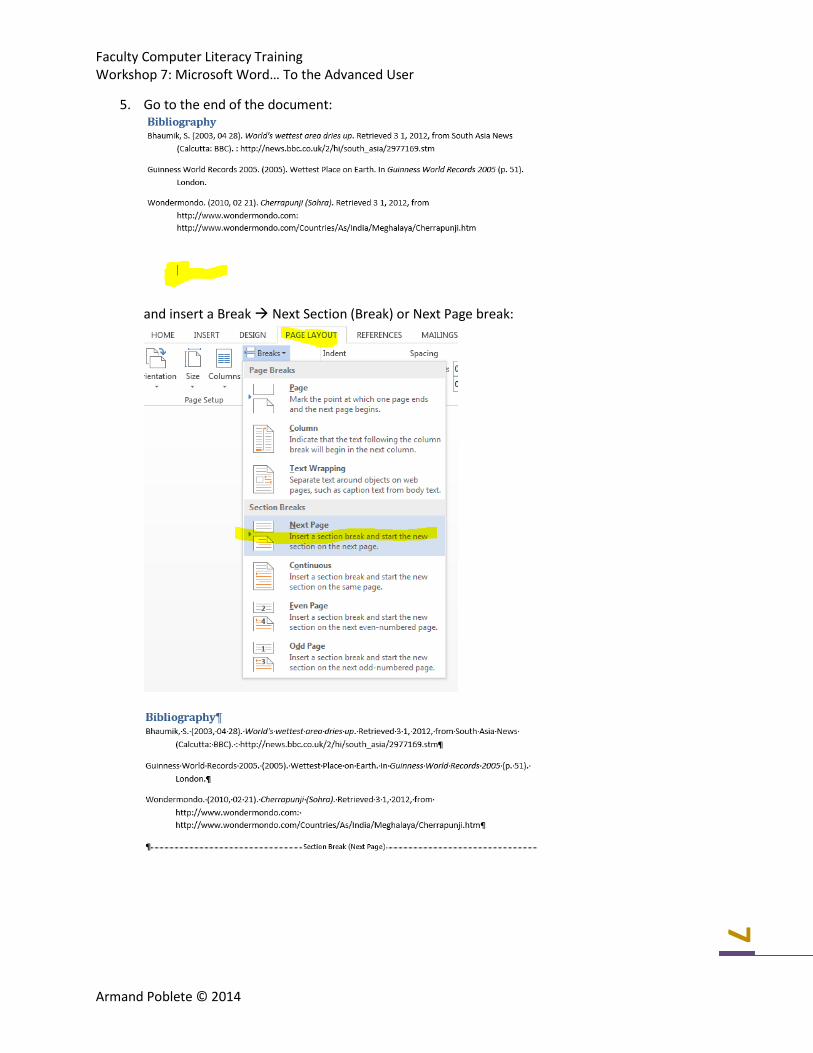
5. Go to the end of the document:
and insert a Break Next Section (Break) or Next Page break:

Faculty Computer Literacy Training Workshop 7: Microsoft Word… To the Advanced User
Armand Poblete © 2014
8
6. On the new blank page change the page layout orientation to landscape:
Set margins to Narrow:
Faculty Computer Literacy Training Workshop 7: Microsoft Word… To the Advanced User
Armand Poblete © 2014
9
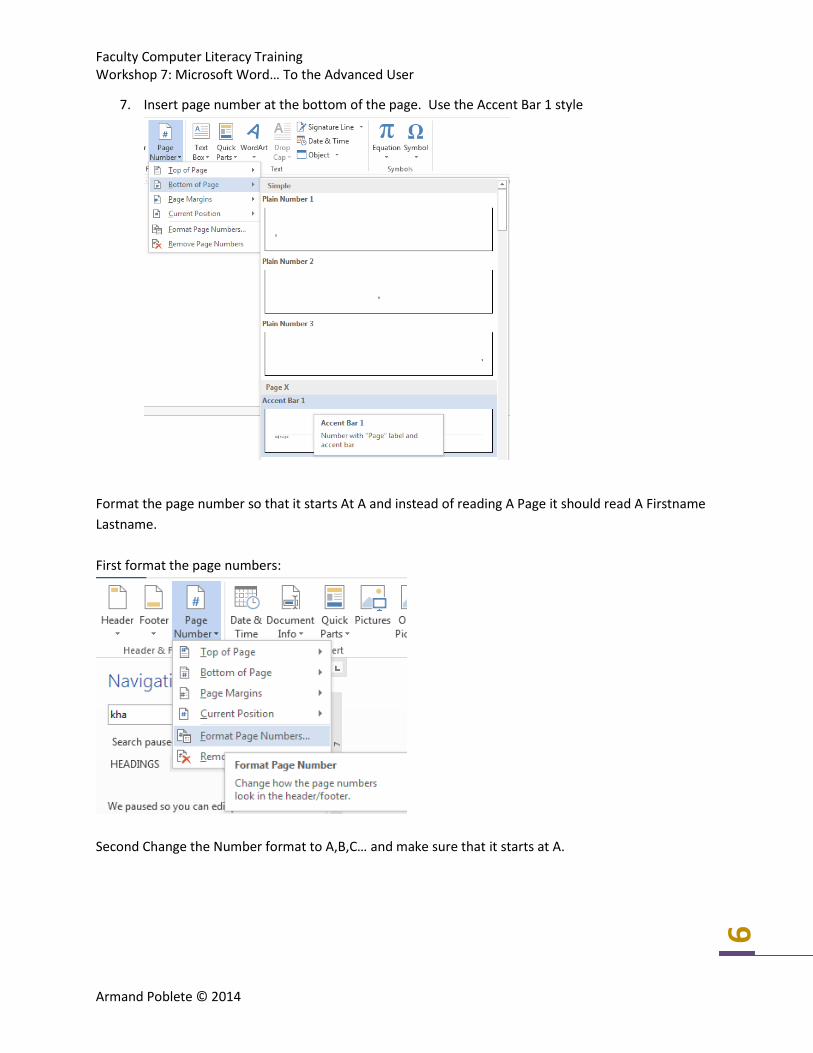
7. Insert page number at the bottom of the page. Use the Accent Bar 1 style
Format the page number so that it starts At A and instead of reading A Page it should read A Firstname
Lastname.
First format the page numbers:
Second Change the Number format to A,B,C… and make sure that it starts at A.

Faculty Computer Literacy Training Workshop 7: Microsoft Word… To the Advanced User
Armand Poblete © 2014
10
Third go to the footer and change Page to Appendix:
From this:
To this:
8. Go back into the document and take your cursor to the first line of page A. Type Appendix A and
change the text style to Heading 1. By changing the text to a heading we are letting Word know
that we want this as part of the Table of Contents.

Faculty Computer Literacy Training Workshop 7: Microsoft Word… To the Advanced User
Armand Poblete © 2014
11
Insert 2 new lines.
9. At the second new line insert any SmartArt Style listed under Picture
First click on the Insert Tab and click on the SmartArt Icon.
Second click on Picture and you can select any one of the listed picture list styles, but for the
purpose of this example we will use Picture Strips.

Faculty Computer Literacy Training Workshop 7: Microsoft Word… To the Advanced User
Armand Poblete © 2014
12
Once you have inserted the SmartArt it will look like the example below:
The panel on the left is the outline form and will not be displayed. You can toggle it using the
small arrow icon:
Now let us insert images in-lab5.jpg, in-lab6.jpg, and in-lab7.jpg. To do this click on either the
image icon either on the outline panel or the SmartArt image icon. Now navigate to your folder
and insert the images.
Faculty Computer Literacy Training Workshop 7: Microsoft Word… To the Advanced User
Armand Poblete © 2014
13
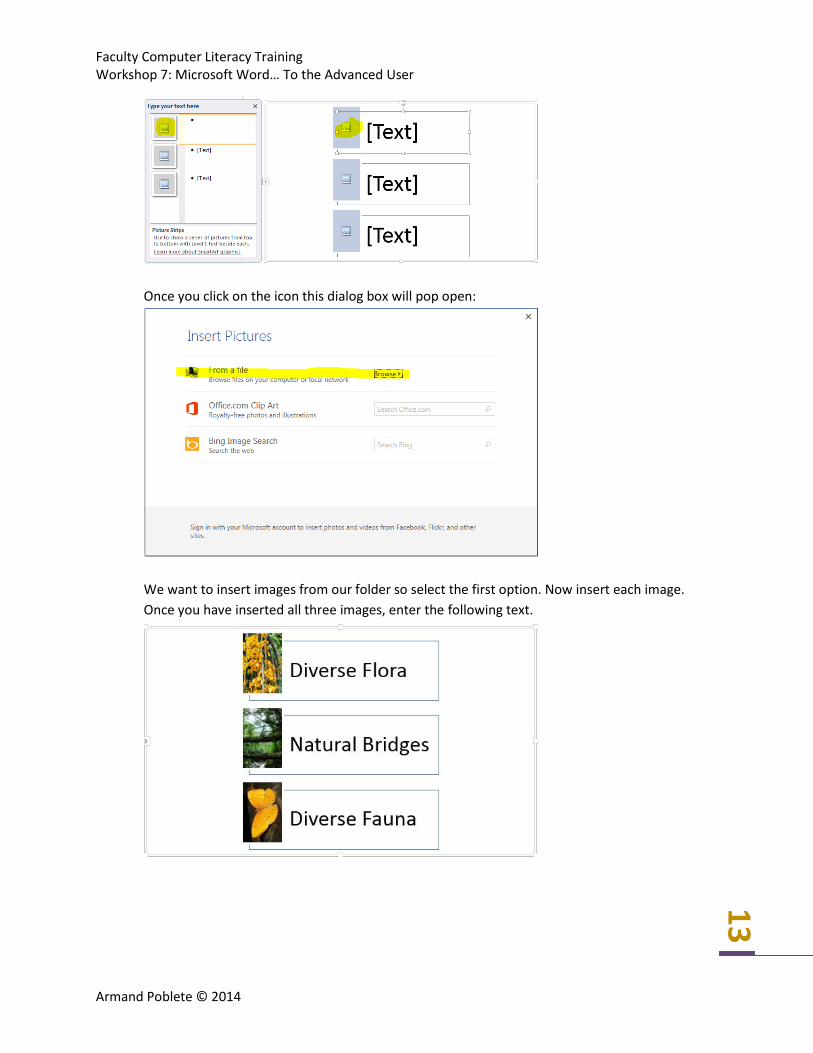
Once you click on the icon this dialog box will pop open:
We want to insert images from our folder so select the first option. Now insert each image.
Once you have inserted all three images, enter the following text.
Faculty Computer Literacy Training Workshop 7: Microsoft Word… To the Advanced User
Armand Poblete © 2014
14
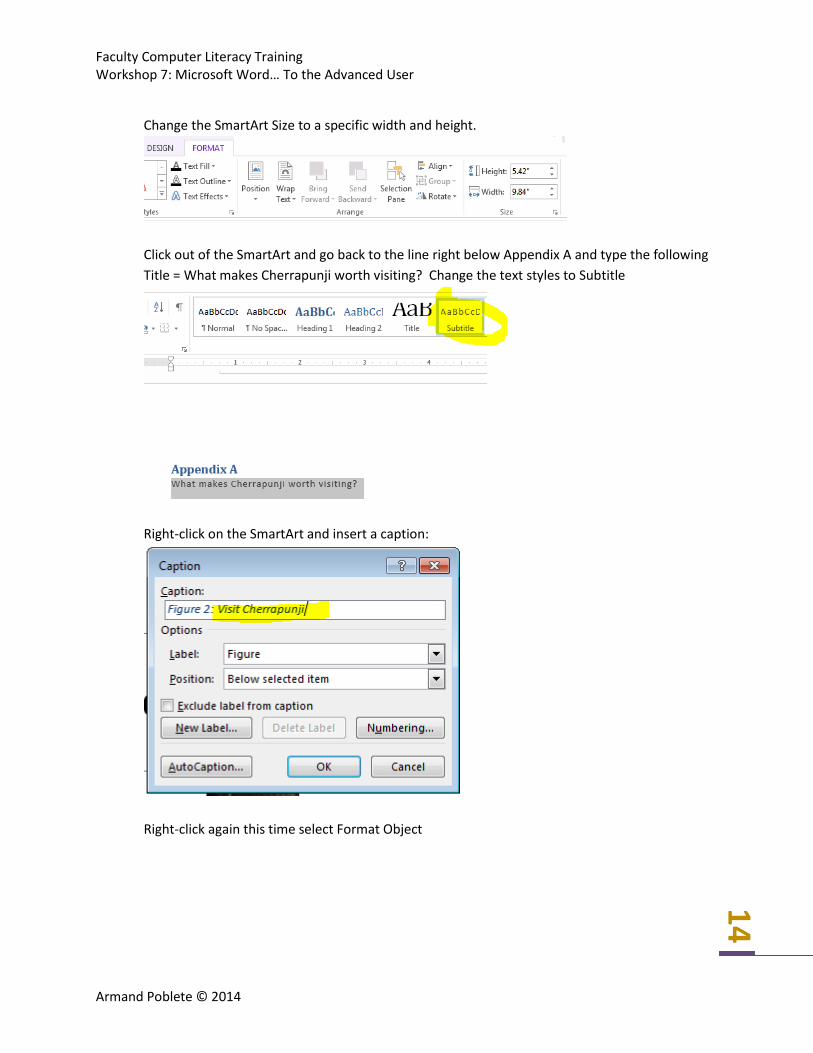
Change the SmartArt Size to a specific width and height.
Click out of the SmartArt and go back to the line right below Appendix A and type the following
Title = What makes Cherrapunji worth visiting? Change the text styles to Subtitle
Right-click on the SmartArt and insert a caption:
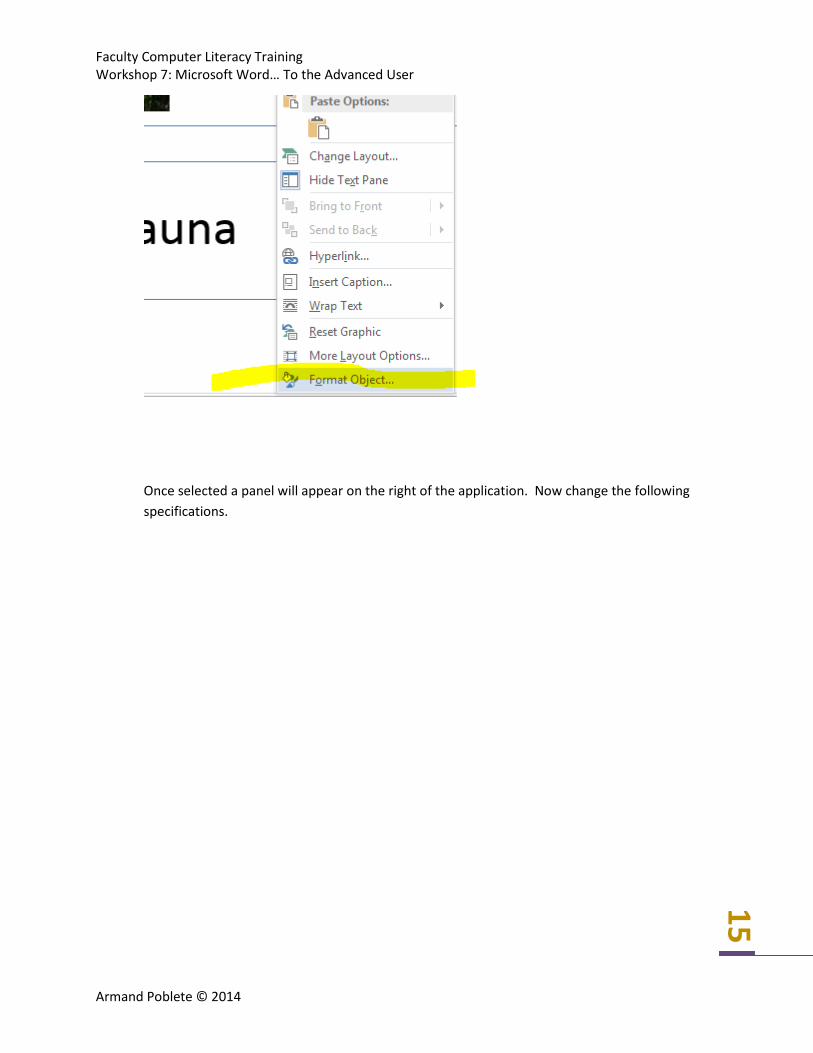
Right-click again this time select Format Object
Faculty Computer Literacy Training Workshop 7: Microsoft Word… To the Advanced User
Armand Poblete © 2014
15
Once selected a panel will appear on the right of the application. Now change the following
specifications.

Faculty Computer Literacy Training Workshop 7: Microsoft Word… To the Advanced User
Armand Poblete © 2014
16
Change to solid line.
Set the transparency to 83%
Change the width to 0.5pt
Compound type to Double
Dash type to Round Dot
and Join type Round
The final result is a SmartArt with a very Fine
dotted border

Faculty Computer Literacy Training Workshop 7: Microsoft Word… To the Advanced User
Armand Poblete © 2014
17
Go to the end of this page and insert a new line till you get to the next page
10. On first line of page B insert the following text = Appendix B and change the style to Heading 1
and enter a new line and type in the title = Rain fall at Cherrapunji as recorded by
Meteorological Observatory. Change the style of the title to Subtitle
Enter a new line and we will change the layout into a two column.
Once you have selected more columns a dialog box like the one below will appear. Enter the
specs below.

Faculty Computer Literacy Training Workshop 7: Microsoft Word… To the Advanced User
Armand Poblete © 2014
18
Now open table.docx in your Files folder. Copy the table (Ctrl+C) and paste it into the left of
page B. Copy the text below the table in your table.docx file and paste to the left. You might
need to use the return key until you reach the right column.
Now highlight the text inserted and change the alignment to justify:
Go back and highlight the table or simply click into one of the cells. You will see the table tools
tabs appear Click on the design tab and change the Table Styles
to any you want, but for the purpose of this example we are going with Grid Table 7, Colorful.
Once that is done then it should look like the example below:
Faculty Computer Literacy Training Workshop 7: Microsoft Word… To the Advanced User
Armand Poblete © 2014
19
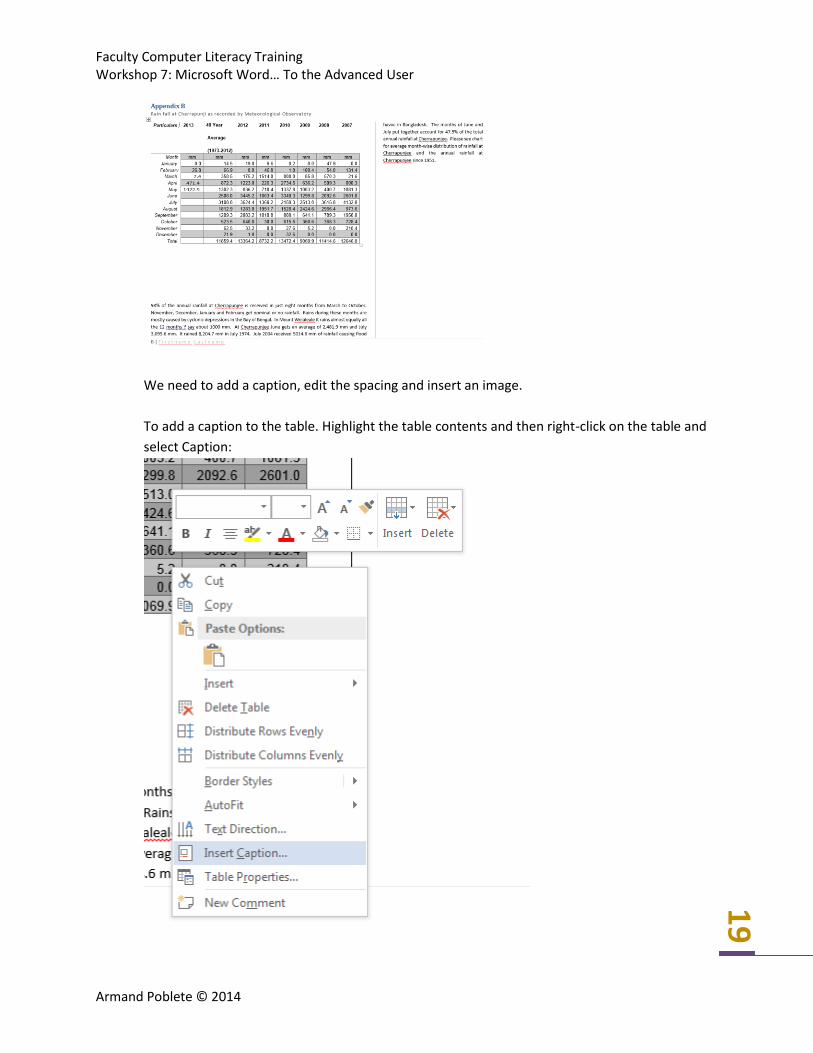
We need to add a caption, edit the spacing and insert an image.
To add a caption to the table. Highlight the table contents and then right-click on the table and
select Caption:
Faculty Computer Literacy Training Workshop 7: Microsoft Word… To the Advanced User
Armand Poblete © 2014
20
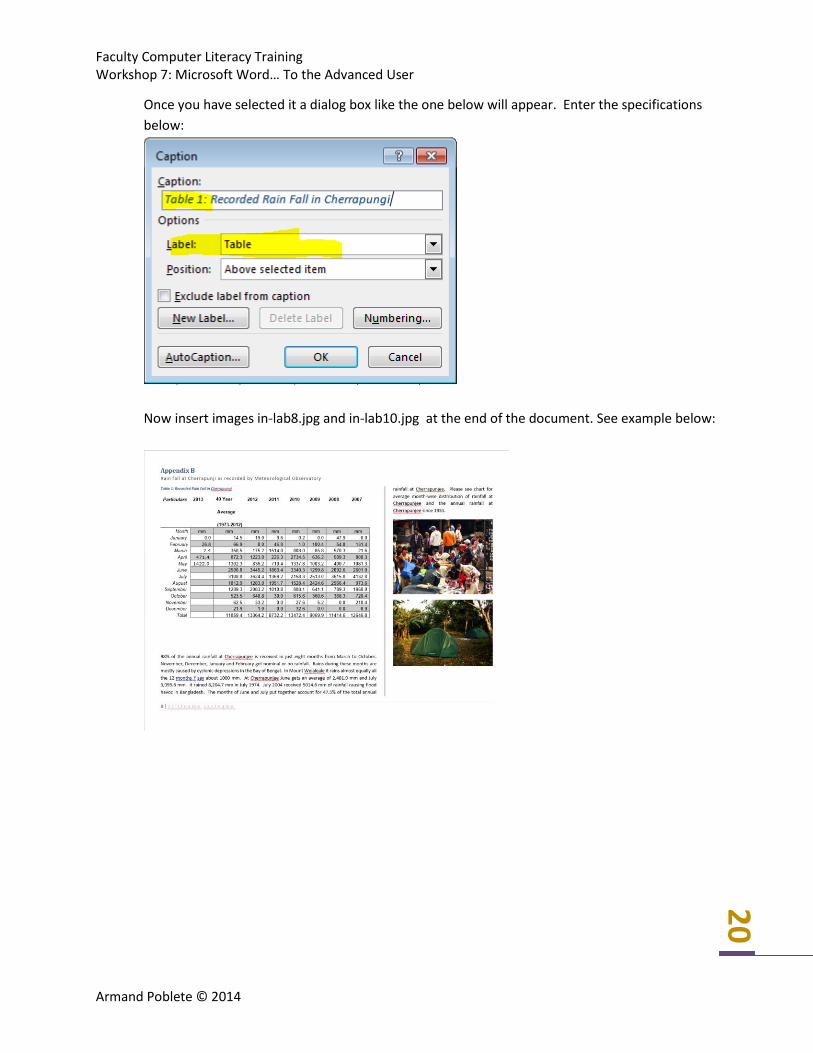
Once you have selected it a dialog box like the one below will appear. Enter the specifications
below:
Now insert images in-lab8.jpg and in-lab10.jpg at the end of the document. See example below:

Faculty Computer Literacy Training Workshop 7: Microsoft Word… To the Advanced User
Armand Poblete © 2014
21
11. Go to the last line of page B and insert a Next Page Break or a Section Break (Next Page).
12. Change the page layout back to Portrait and format the page numbers to capital I.
Make sure that you only have one column. Type the following starting at the first line of page I:
To create an index we will need to auto mark the document using a template. Microsoft Word
uses a 2 column formatting for its index creation:
Keyword Search Display term
The keyword search will be used as a search criteria for Word to scan the entire document and
recording the pages where the keyword(s) are found. The display term is what Word will use to
display or list on the index. It is not necessary that the keyword search and the display term
matches.
Now open index_table.docx which contains a list of keywords searches and display terms, but
they are not formatted into a table. So you will have to format it first into a table using the
Covert to text tool. Since each item listed falls under this pattern Keyword Search/ Display Term
and each criteria is divided by a specific character symbol (in this case the forward slash /). To
convert in a table so that Word can recognize it as a template, first highlight the entire content
(Crtl+A) and convert the text into a table. Since each

Faculty Computer Literacy Training Workshop 7: Microsoft Word… To the Advanced User
Armand Poblete © 2014
22
Once selected a dialog box will appear like the one below:
Do not change anything but the Other. This will now create a table based on the dividing
symbol or character and in this case the /. Once completed it should look like the image below:

Faculty Computer Literacy Training Workshop 7: Microsoft Word… To the Advanced User
Armand Poblete © 2014
23
Now SAVE the document (index_table.docx) and close the file.
13. To insert an index, go back to your report and take your cursor after the subtitle of your last
page
Click on the References Tab and under the Index Ribbon click on the Insert Index Icon.
This dialog box will pop open
Faculty Computer Literacy Training Workshop 7: Microsoft Word… To the Advanced User
Armand Poblete © 2014
24
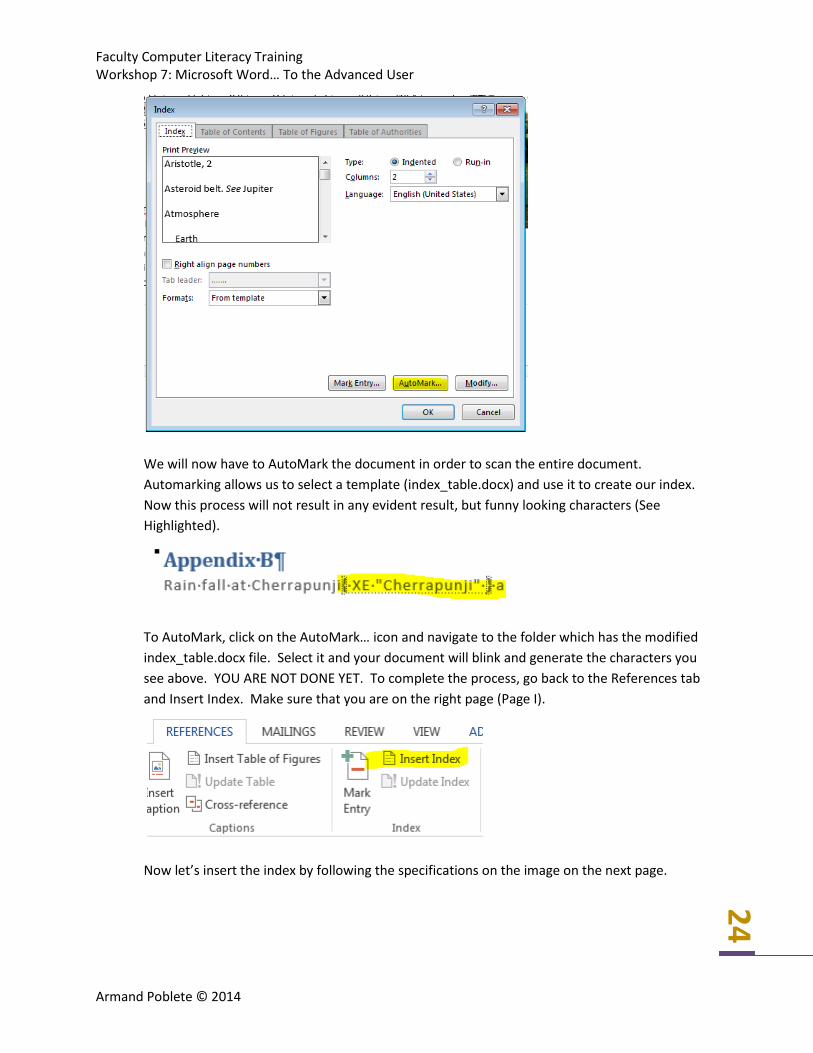
We will now have to AutoMark the document in order to scan the entire document.
Automarking allows us to select a template (index_table.docx) and use it to create our index.
Now this process will not result in any evident result, but funny looking characters (See
Highlighted).
To AutoMark, click on the AutoMark… icon and navigate to the folder which has the modified
index_table.docx file. Select it and your document will blink and generate the characters you
see above. YOU ARE NOT DONE YET. To complete the process, go back to the References tab
and Insert Index. Make sure that you are on the right page (Page I).
Now let’s insert the index by following the specifications on the image on the next page.

Faculty Computer Literacy Training Workshop 7: Microsoft Word… To the Advanced User
Armand Poblete © 2014
25
The result should look like the one below:
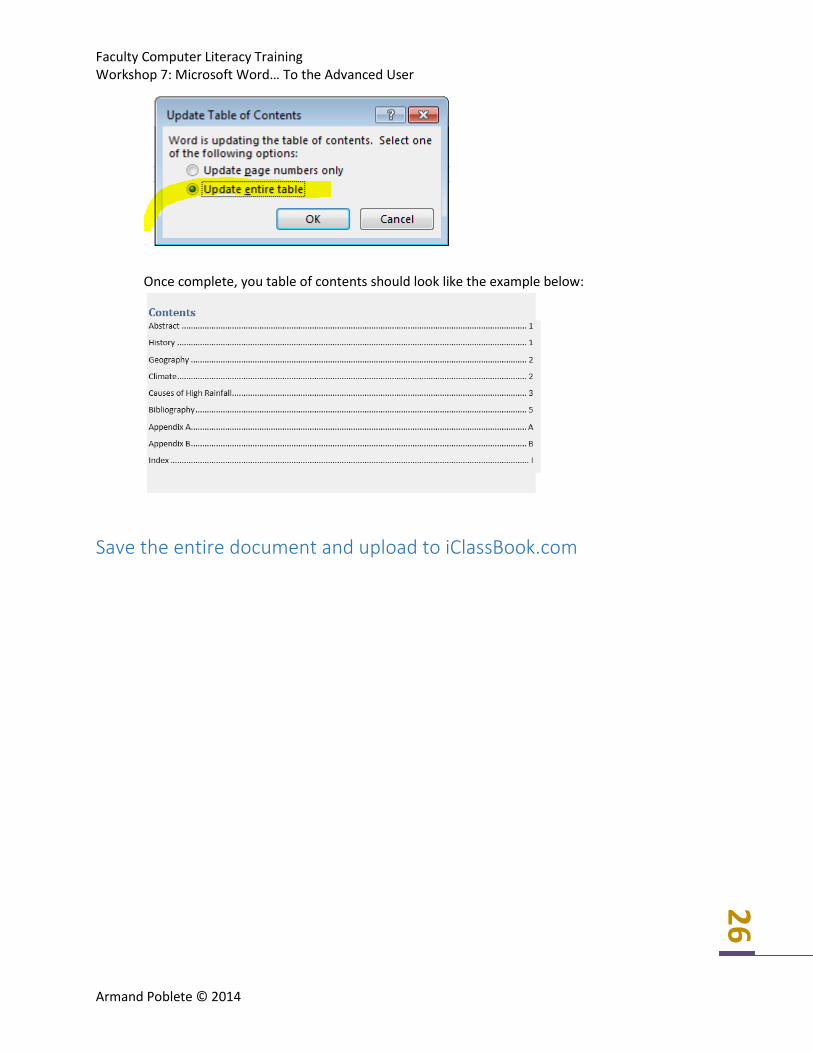
14. Now update your table of contents. Take your cursor to the table of contents and click on this
icon.
Make sure that you update the entire table:
Faculty Computer Literacy Training Workshop 7: Microsoft Word… To the Advanced User
Armand Poblete © 2014
26
Once complete, you table of contents should look like the example below:
Save the entire document and upload to iClassBook.com


![[MS-OFFDI]: Microsoft Office File Format Documentation … · 2017-09-19 · Microsoft Word 97 Microsoft Word 2000 Microsoft Word 2002 Microsoft Office Word 2003 Microsoft Office](https://static.fdocuments.in/doc/165x107/5edde022ad6a402d66691993/ms-offdi-microsoft-office-file-format-documentation-2017-09-19-microsoft-word.jpg)