HIKVISION PERU 995034574-MANUAL ESPAÑOL DVR HIKVISION NUEVA VERSION
DIY Security Cameras
Hikvision
Intercom Setup Guide
February 2018
Prepared by DIY Security Cameras
Version 2.0
12th February 2018

Hikvision Intercom Setup Guide (v2.0) November 2017
DIY Security Cameras (www.diysecuritycameras.com.au) Page 2
Document Changes:
Who Date Version Comments
Support 23/09/2017 1.0 Initial release version
Support 12/02/2018 2.0 Updated for Firmware Release 1.4.71Build170515

Hikvision Intercom Setup Guide (v2.0) November 2017
DIY Security Cameras (www.diysecuritycameras.com.au) Page 3
Contents
1 INTRODUCTION .......................................................................................................................................................... 4
2 EQUIPMENT .................................................................................................................................................................. 4
3 PRE-REQUISITES ......................................................................................................................................................... 4
3.1 NETWORK WORKSHEET ............................................................................................................................................ 4 3.2 FIRMWARE ................................................................................................................................................................ 4 3.3 IVMS4200 SOFTWARE ............................................................................................................................................. 4 3.4 PC/LAPTOP ............................................................................................................................................................ 4
4 CONFIGURE IVMS4200 SOFTWARE ....................................................................................................................... 5
5 ACTIVATE INTERCOM DEVICES ........................................................................................................................... 6
5.1 DOOR STATION ......................................................................................................................................................... 7 5.2 INDOOR STATION ...................................................................................................................................................... 8
6 ASSIGN IP ADDRESS TO INTERCOM DEVICES ................................................................................................ 11
6.1 DOOR STATION ....................................................................................................................................................... 11 6.2 INDOOR STATION .................................................................................................................................................... 13
7 CONFIGURATION AND SETUP OF INTERCOM DEVICES .............................................................................. 15
7.1 DOOR STATION ....................................................................................................................................................... 15 7.2 MASTER INDOOR STATION ...................................................................................................................................... 18 7.3 EXTENSION INDOOR STATION ................................................................................................................................. 20
8 VALIDATION .............................................................................................................................................................. 22

Hikvision Intercom Setup Guide (v2.0) November 2017
DIY Security Cameras (www.diysecuritycameras.com.au) Page 4
1 Introduction This guide will take you through the steps to setup a Hikvision Video Intercom system for a single dwelling with 2 x Indoor Room Stations and 1 x Villa Door Station. This assumes that the Intercom devices are at factory default settings and need to be activated.
2 Equipment 1 x KAD606 – Video/Audio Distributor 2 x DS-KH8301-WT – Indoor WiFi station 1 x DS-KV8102-IM – Villa Door Station 1 x PC/Laptop running iVMS4200 2.6.2.50 Build 170724
3 Pre-Requisites
3.1 Network Worksheet Before we begin we need to plan out our network IP addresses to be assigned to each of the intercom components to provide connectivity. Any IP subnet can be used, however note that there can only be a maximum of 9 villa door stations in one system, so leave enough address space to cater for this if required. In our example we are going to use 192.168.20.0/24 subnet as per the table below.
Device Type
Local IP Subnet Mask Gateway Door Station IP
SIP Server Main Door Type
Main Door V Series 192.168.20.100 255.255.255.0 192.168.20.254 N/A N/A V Series
Master Indoor Station
Indoor Station
192.168.20.110 255.255.255.0 192.168.20.254 192.168.20.100 192.168.20.100 N/A
Extension Indoor Station
Extension Station
192.168.20.111 255.255.255.0 192.168.20.254 N/A N/A 192.168.20.110
3.2 Firmware The minimum firmware release for the intercom system is v1.4.71 Build 170715. Please ensure this version of firmware is installed before proceeding with the remaining setup. To obtain the firmware please login to your account on our website or email us at [email protected]. Note we can only supply firmware to our customers.
3.3 iVMS4200 Software You will need to install the iVMS4200 software version 2.6.2.50 Build20170724 onto your laptop. This is the minimum version of iVMS4200 required for this version of the firmware.
3.4 PC/LAPTOP A Windows PC/Laptop is required to run the iVMS4200 software to programme and setup the Intercom system. The PC in our example should be connected directly to the KAD LAN2 port. Initially the default factory IP address for the Intercom devices are: 192.0.0.64/24 (255.255.255.0) and 192.0.0.65/24 (255.255.255.0)
To allow the PC to communicate with the Intercom devices, configured the PC with a primary IP address of 192.168.20.150 (in our example) and a secondary IP address of 192.0.0.250. If you are not sure how to setup a secondary IP address, Google is your friend.

Hikvision Intercom Setup Guide (v2.0) November 2017
DIY Security Cameras (www.diysecuritycameras.com.au) Page 5
4 Configure iVMS4200 Software This version of iVMS4200 software the device types have been combined and there is no need to add another device type.
1. Start the iVMS-4200 software. 2. Click on Help->About 3. Ensure your version is 2.6.2.50 Build 20170724 or later

Hikvision Intercom Setup Guide (v2.0) November 2017
DIY Security Cameras (www.diysecuritycameras.com.au) Page 6
5 Activate Intercom Devices All Intercom devices need to be activated (ie with a strong password) before being configured for use. Activation can be done via the iVMS4200 software tool. Notes around the activation password
a. Please make this a strong password. b. The activation password is the main admin configuration/setup password. c. This password is required to perform configuration of the Intercom devices via the iVMS4200 software. d. This password is different to the indoor station “admin” password, which can be set separately.
Plug in all the Intercom devices as per above diagram and they will booted up and power on. When powered on they will appear at the bottom in “Online Devices” section of the iVMS4200 software. Note in version v1.4.71 Build 170715 all devices appear together.
Now we activate the devices individually.

Hikvision Intercom Setup Guide (v2.0) November 2017
DIY Security Cameras (www.diysecuritycameras.com.au) Page 7
5.1 Door Station
1. Select Door Station at the bottom of the screen and click “Activate”
2. Enter a strong password for the door station and click “OK”
3. Device should now show as active.
Hikvision Intercom Setup Guide (v2.0) November 2017
DIY Security Cameras (www.diysecuritycameras.com.au) Page 8
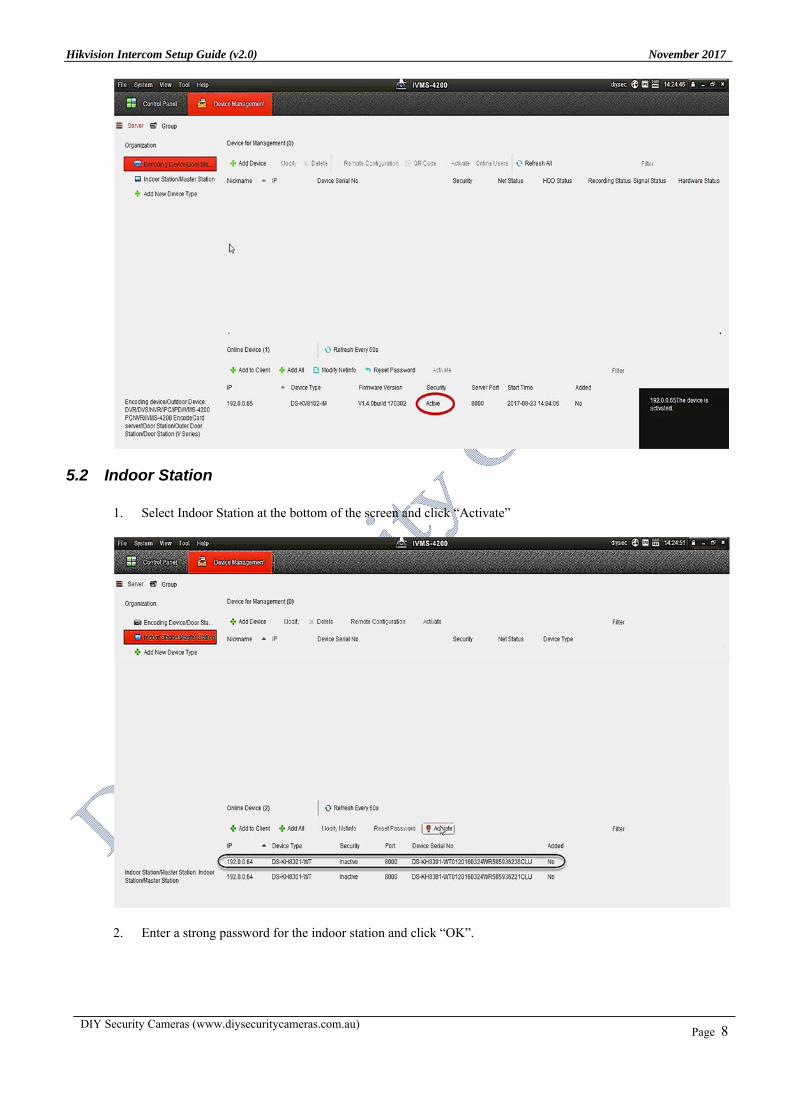
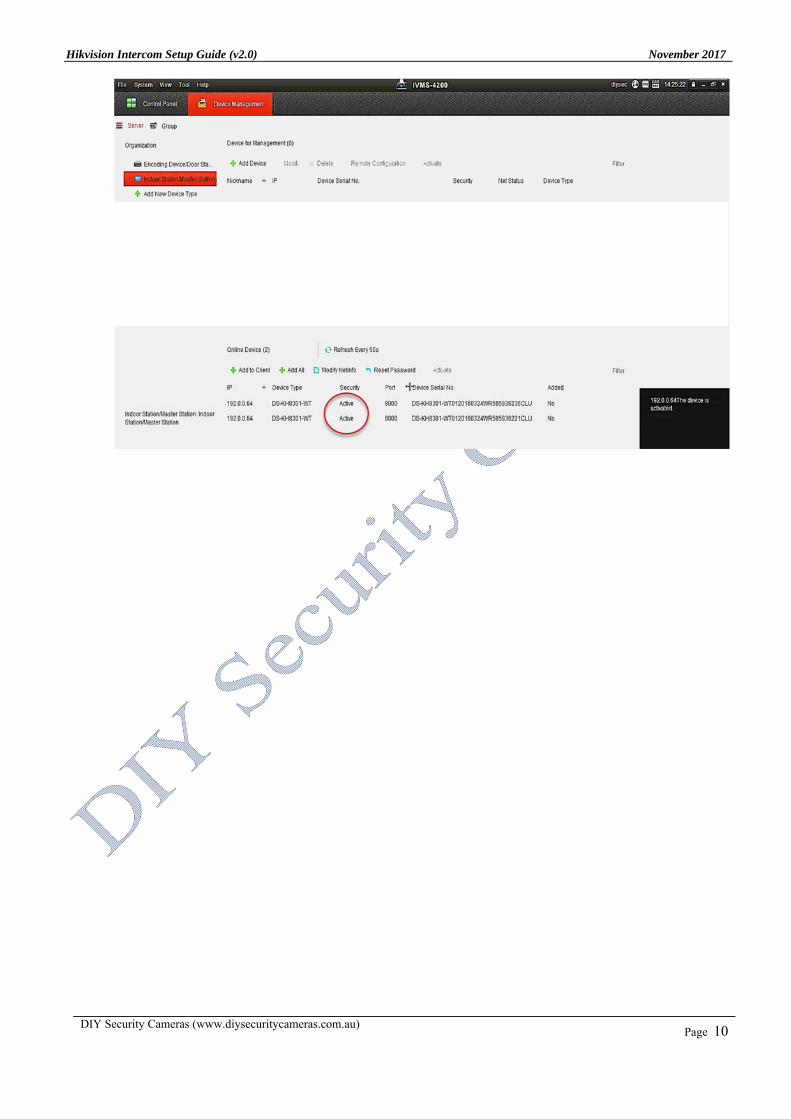
5.2 Indoor Station
1. Select Indoor Station at the bottom of the screen and click “Activate”
2. Enter a strong password for the indoor station and click “OK”.

Hikvision Intercom Setup Guide (v2.0) November 2017
DIY Security Cameras (www.diysecuritycameras.com.au) Page 9
3. Device should now show as active
4. Repeat steps 1 and 2 for the remaining Indoor Stations until all show as active.
Hikvision Intercom Setup Guide (v2.0) November 2017
DIY Security Cameras (www.diysecuritycameras.com.au) Page 10
Hikvision Intercom Setup Guide (v2.0) November 2017
DIY Security Cameras (www.diysecuritycameras.com.au) Page 11
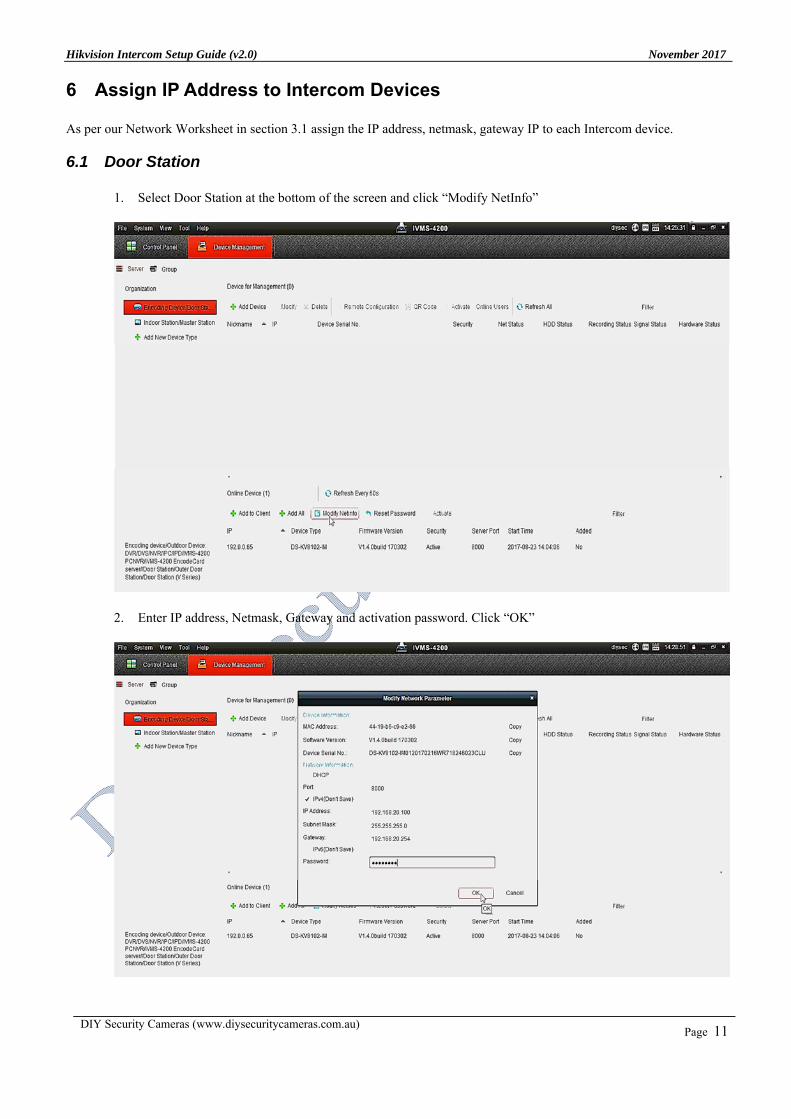
6 Assign IP Address to Intercom Devices As per our Network Worksheet in section 3.1 assign the IP address, netmask, gateway IP to each Intercom device.
6.1 Door Station
1. Select Door Station at the bottom of the screen and click “Modify NetInfo”
2. Enter IP address, Netmask, Gateway and activation password. Click “OK”

Hikvision Intercom Setup Guide (v2.0) November 2017
DIY Security Cameras (www.diysecuritycameras.com.au) Page 12
3. Device should now show with the new assigned IP address.

Hikvision Intercom Setup Guide (v2.0) November 2017
DIY Security Cameras (www.diysecuritycameras.com.au) Page 13
6.2 Indoor Station Note: All indoor stations will have the same default IP address of 192.0.0.64. If you require a particular Indoor Station to be the Master, then plug the Indoor Station in one at a time and assign the IP address to it.
1. Select one Indoor Station at the bottom of the screen and click “Modify NetInfo”.
2. Enter IP address, Netmask, Gateway and activation password.

Hikvision Intercom Setup Guide (v2.0) November 2017
DIY Security Cameras (www.diysecuritycameras.com.au) Page 14
3. Device should now show with the new assigned IP address
4. Now select the remaining Indoor Station and repeat steps 1 and 2 above. After completing all Indoor stations
should show their new IP addresses as per below.

Hikvision Intercom Setup Guide (v2.0) November 2017
DIY Security Cameras (www.diysecuritycameras.com.au) Page 15
7 Configuration and Setup of Intercom Devices We have successfully activated all our devices and assigned IP addresses. We are now ready to add the devices to the iVMS4200 software client and configure each individual component. The following section will configure each Intercom device as per our worksheet details in 3.1. Important things to note in our configuration:
a. The Door Station provides our SIP server. b. The Door Station provides our time synchronisation. c. The Door Station is linked to the Master Indoor Station. d. The Master Indoor Station then links to any Extension Indoor Stations within the system. e. The Master Indoor Station is used to contact the Hik-Connect app.
7.1 Door Station 1. Click “Add to Client” bottom section 2. In the popup box enter Nickname (ie MainDoor), admin as the user id and the admin password, and click add.
3. If successful the door station should now appear in the “Device for Management” section ready for
configuration.

Hikvision Intercom Setup Guide (v2.0) November 2017
DIY Security Cameras (www.diysecuritycameras.com.au) Page 16
4. Highlight the “MainDoor” device just added and click on “Remote Configuration”. 5. Navigate to System->Time. Setup the time using NTP. Note the Door Station is responsible to keep our time
synchronised. In our example we use the gateway address because it is an NTP server, however your setup may vary. Note the NTP server must be entered as an IP address and not a domain name. If unsure you can use public NTP servers like Google (time.google.com / 216.239.35.12).
6. Select “Enable DST” and set the appropriate start/end time and DST bias. 7. Click Save and the Synchronization.
Hikvision Intercom Setup Guide (v2.0) November 2017
DIY Security Cameras (www.diysecuritycameras.com.au) Page 17
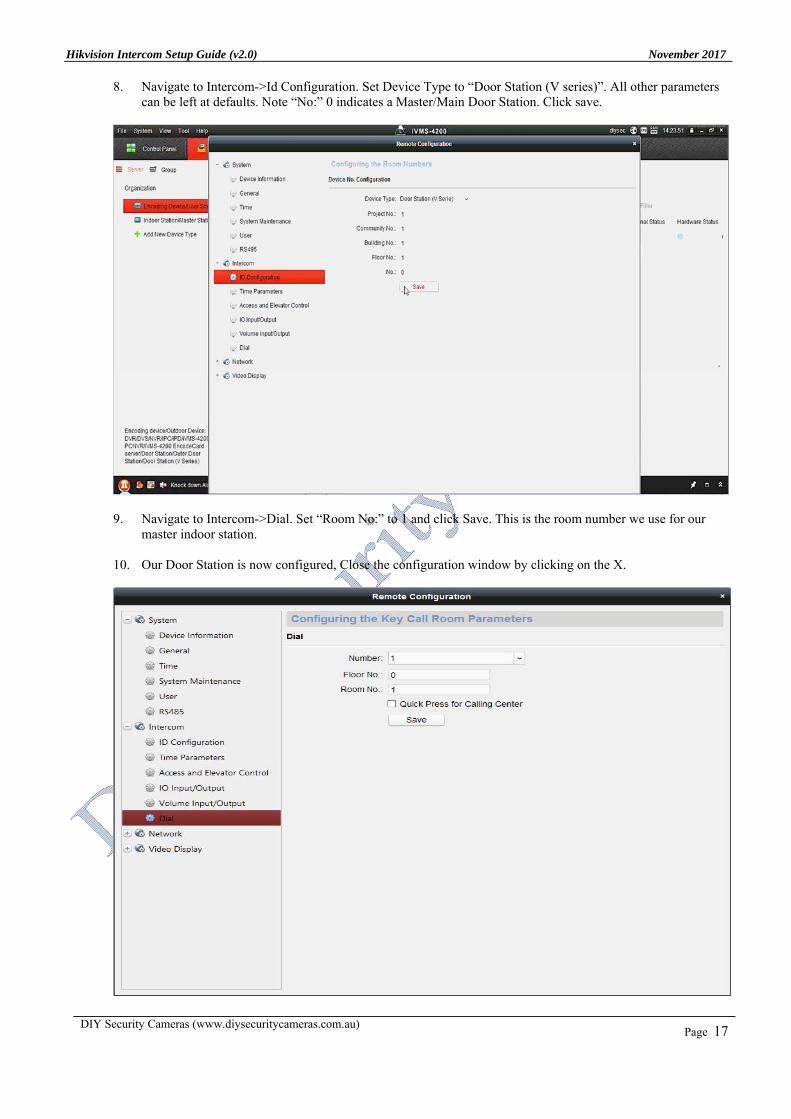
8. Navigate to Intercom->Id Configuration. Set Device Type to “Door Station (V series)”. All other parameters can be left at defaults. Note “No:” 0 indicates a Master/Main Door Station. Click save.
9. Navigate to Intercom->Dial. Set “Room No:” to 1 and click Save. This is the room number we use for our
master indoor station. 10. Our Door Station is now configured, Close the configuration window by clicking on the X.
Hikvision Intercom Setup Guide (v2.0) November 2017
DIY Security Cameras (www.diysecuritycameras.com.au) Page 18
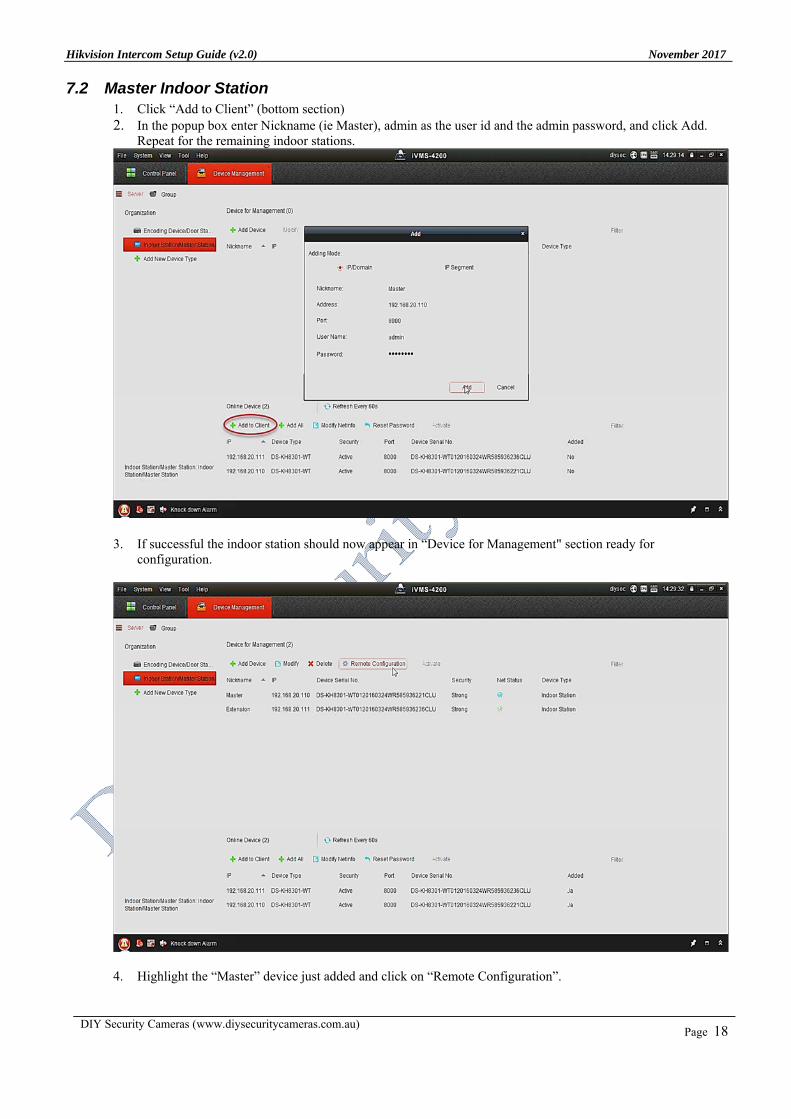
7.2 Master Indoor Station 1. Click “Add to Client” (bottom section) 2. In the popup box enter Nickname (ie Master), admin as the user id and the admin password, and click Add.
Repeat for the remaining indoor stations.
3. If successful the indoor station should now appear in “Device for Management" section ready for
configuration.
4. Highlight the “Master” device just added and click on “Remote Configuration”.

Hikvision Intercom Setup Guide (v2.0) November 2017
DIY Security Cameras (www.diysecuritycameras.com.au) Page 19
5. Navigate to Intercom->ID Configuration. a. Set “Device Type” to “Indoor Station”. b. Set “Room No:” as 1. c. Click “Save”.
6. Navigate to Network->Linked Network Configuration. This is where we link our Master Indoor station to our Main Door Station. Main point to note here is that our Main Door Station is also our SIP Server. Set the following parameters (as per our example):
a. Main Door Station IP: 192.168.20.100. b. SIP Server IP: 192.168.20.100. c. Main Door Station Type: Main Door Station (V Series) d. Connect Mode: Same Network. e. Click Save
7. Our Main Indoor Station is now configured, Close the configuration window by click on the X.

Hikvision Intercom Setup Guide (v2.0) November 2017
DIY Security Cameras (www.diysecuritycameras.com.au) Page 20
7.3 Extension Indoor Station
1. Highlight the “Extension” device and click on “Remote Configuration”.
2. Navigate to Intercom->ID Configuration. Set the following:
a. Device Type: Station Extension b. No: 1 (As the first extension. Multiple extension from 2 upwards for a maximum of 9) c. Click Save. d. Click “OK” (To change the device type and reboot. (The device will now reboot)
Hikvision Intercom Setup Guide (v2.0) November 2017
DIY Security Cameras (www.diysecuritycameras.com.au) Page 21
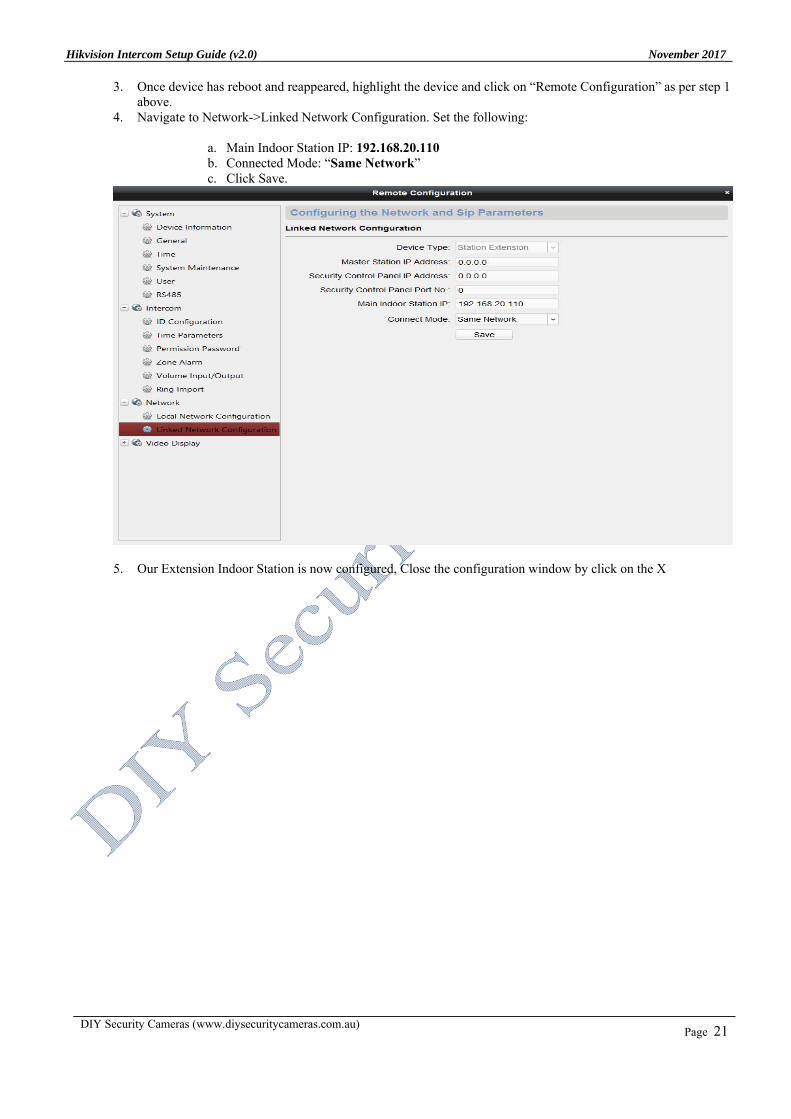
3. Once device has reboot and reappeared, highlight the device and click on “Remote Configuration” as per step 1 above.
4. Navigate to Network->Linked Network Configuration. Set the following:
a. Main Indoor Station IP: 192.168.20.110 b. Connected Mode: “Same Network” c. Click Save.
5. Our Extension Indoor Station is now configured, Close the configuration window by click on the X
Hikvision Intercom Setup Guide (v2.0) November 2017
DIY Security Cameras (www.diysecuritycameras.com.au) Page 22
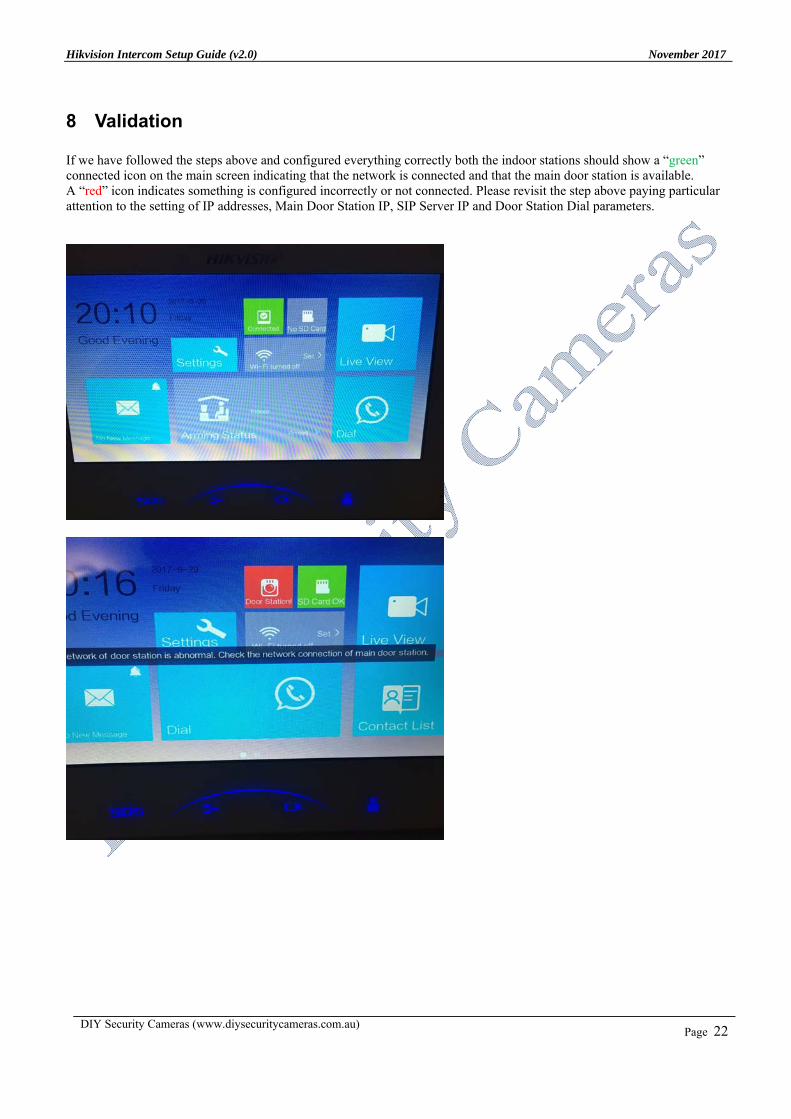
8 Validation If we have followed the steps above and configured everything correctly both the indoor stations should show a “green” connected icon on the main screen indicating that the network is connected and that the main door station is available. A “red” icon indicates something is configured incorrectly or not connected. Please revisit the step above paying particular attention to the setting of IP addresses, Main Door Station IP, SIP Server IP and Door Station Dial parameters.