Workbench user guide WPS Workbench user guide wps... · SAS language program development supplied...
113
Workbench user guide Version 4.0 WPS Workbench user guide To help guide you through using WPS Workbench to create, edit and run programs Version: 4.0.2 Copyright © 2002-2018 World Programming Limited www.worldprogramming.com
Transcript of Workbench user guide WPS Workbench user guide wps... · SAS language program development supplied...
Workbench user guideVersion 4.0
WPS Workbenchuser guide
To help guide you through using WPSWorkbench to create, edit and run
programs
Version: 4.0.2Copyright © 2002-2018 World Programming Limited
www.worldprogramming.com

Workbench user guideVersion 4.0
2
Contents
Introduction...............................................................................................6About WPS.....................................................................................................................................6WPS and SAS® software.............................................................................................................. 7WPS components...........................................................................................................................8
Getting started........................................................................................10Workspace Launcher....................................................................................................................10
Welcome pages.................................................................................................................11Migrating existing programs or projects.......................................................................................11
Migrating from previous versions of WPS.........................................................................11Migrating from SAS® software..........................................................................................11Code Analyser................................................................................................................... 12
Import a project............................................................................................................................ 16Workbench layout.........................................................................................................................16
Default WPS perspective.................................................................................................. 16Online help................................................................................................................................... 17Cheat sheets................................................................................................................................ 18
WPS server............................................................................................. 21Configure a local WPS installation.............................................................................................. 21Default WPS server..................................................................................................................... 23WPS server LOCALE and ENCODING settings.............................................................................23
General text file encoding................................................................................................. 24Licence key.................................................................................................................................. 25
Apply a licence key........................................................................................................... 25Database connectivity.................................................................................................................. 26
Connect to Oracle............................................................................................................. 26Connect to DB2.................................................................................................................28Connect to SQL Server.....................................................................................................29Connect to MySQL............................................................................................................30Connect to a database using ODBC................................................................................ 32
Restart the server........................................................................................................................ 33
Views and perspectives........................................................................ 34Project Explorer............................................................................................................................34
Projects.............................................................................................................................. 35Local history...................................................................................................................... 40Switching to a different workspace................................................................................... 43
File Explorer................................................................................................................................. 43
Workbench user guideVersion 4.0
3
Managing files in the File Explorer................................................................................... 44Link Explorer................................................................................................................................ 46
Local host connection properties...................................................................................... 47Connect to a remote WPS server.....................................................................................48
WPS Server Explorer...................................................................................................................52WPS server properties...................................................................................................... 53
Properties......................................................................................................................................54Editor............................................................................................................................................ 55Bookmarks....................................................................................................................................55
Bookmark anchors.............................................................................................................56Tasks............................................................................................................................................ 57
Task markers.....................................................................................................................57Outline.......................................................................................................................................... 58Output Explorer............................................................................................................................ 59Results Explorer........................................................................................................................... 59Console.........................................................................................................................................60Search.......................................................................................................................................... 60Working with views...................................................................................................................... 60
View stacks........................................................................................................................61Open a view...................................................................................................................... 62Detach and re-attach a view.............................................................................................63
Perspectives................................................................................................................................. 63Open a perspective........................................................................................................... 63Close a perspective...........................................................................................................64Resetting a perspective.....................................................................................................64Saving a perspective.........................................................................................................64Deleting a perspective.......................................................................................................65
Create a new program...........................................................................66Creating a new program file in a project..................................................................................... 67Entering WPS code via templates............................................................................................... 68WPS Code Injection.....................................................................................................................68Using Program Content Assist.....................................................................................................68WPS syntax colouring..................................................................................................................69
Run a program....................................................................................... 70Run a program in Workbench..................................................................................................... 70
Run part of a program...................................................................................................... 70Stop program execution.................................................................................................... 71WPS Preferences for running programs........................................................................... 71
Command line mode....................................................................................................................73
Libraries and datasets...........................................................................75Set WORK location...................................................................................................................... 75Catalogs........................................................................................................................................76
Workbench user guideVersion 4.0
4
Datasets........................................................................................................................................77Import datasets..................................................................................................................77Export datasets..................................................................................................................80Clear datasets................................................................................................................... 80Dataset Viewer.................................................................................................................. 80
Working with program output.............................................................. 88Dataset generation....................................................................................................................... 88Logs.............................................................................................................................................. 89
View the log.......................................................................................................................89Save the log to a file.........................................................................................................89Print the log....................................................................................................................... 89Log colouring preferences.................................................................................................90
Managing ODS output..................................................................................................................90Automatically manage ODS destinations..........................................................................90Listing output..................................................................................................................... 91HTML output......................................................................................................................92PDF output........................................................................................................................ 94Clearing the results output................................................................................................ 95
Text-based editing features.................................................................. 96Working with editors.....................................................................................................................97
SAS Editor......................................................................................................................... 97Text Editor......................................................................................................................... 98System Editor.................................................................................................................... 98In-Place Editor................................................................................................................... 98Text Editor Preferences.....................................................................................................99Closing files....................................................................................................................... 99
Jumping to a particular project location.......................................................................................99Navigation between multiple project files...................................................................................100Searching and replacing............................................................................................................ 100Undoing and redoing your edits.................................................................................................101
Preferences...........................................................................................102General preferences...................................................................................................................102Change shortcut key preferences..............................................................................................103Back up Workbench preferences...............................................................................................103Import Workbench preferences..................................................................................................104
Configuration files............................................................................... 105
AutoExec file........................................................................................ 108
WPS Tips and Tricks...........................................................................109
Workbench user guideVersion 4.0
5
Troubleshooting................................................................................... 111
Making technical support requests................................................... 112
Legal Notices........................................................................................113
Workbench user guideVersion 4.0
6
IntroductionThis guide is intended to help you gain familiarity with the SAS language programming environmentthrough WPS Workbench, the graphical user interface of WPS (the World Programming System). TheWorkbench SAS Language Environment enables you to create, edit and run SAS language programs,and view the resulting dataset, logs and other output.
WPS Workbench also contains the Data Science Module – a drag-and-drop workflow editor and dataprofiling tool ideal for data mining or predictive modelling tasks. For more information, see the WPSData Science User Guide.
The user guide does not aim to:
• Train you in the use of the SAS language. If you are not already familiar with this language, there isa wide range of educational and reference material available from many sources.
• Teach you every option within WPS. However, once you have worked through this guide you shouldbe sufficiently familiar with the system to run some basic programs and to begin processing andanalysing data.
For an overview of some commonly-used features, see Tips and tricks (page 109), and forinformation to help you resolve some previously-reported problems see troubleshooting (page111).
About WPSThe World Programming System (WPS) consists of the following components:
• An Integrated Development Environment (IDE) – WPS Workbench. This environment utilises theEclipse IDE as the basic framework to provide the graphical user interface. The IDE providesfacilities to manage, create and edit SAS language programs, and then to run these programs usingthe WPS server.
• A compiler/interpreter – WPS server. When using WPS Workbench, the compiler is run as a serverprocess and is used to process and execute programs. The compiler is also used when runningWPS from the command line (CLI), sometimes referred to as running WPS in batch mode.
WPS server processTo run SAS language programs, WPS Workbench requires a connection to a licensed WPS serverprocess (for more information, see WPS server (page 21)). This process may be running eitheron the local workstation (a local server), or on an installation of WPS on a remote machine (a remoteserver).
Workbench user guideVersion 4.0
7
Eclipse IDEEclipse is an open source tool that provides an environment for editing and managing files and tasks. Itis designed to accommodate plug-ins to perform specific tasks, for example the plug-ins designed to aidSAS language program development supplied as WPS Workbench.
WPS intentionally leaves the Eclipse environment open for advanced users to add in other third partytools and facilities. Consequently, WPS Workbench includes some unused features that allow otherEclipse-based plug-ins and extensions.
Some of the features mentioned in this guide are built-in features of Eclipse, but are referred to asfeatures of WPS for simplicity.
WPS and SAS® softwareIf you are accustomed to using other products related to the SAS language, you will find that thelanguage support in WPS is familiar. You can expect to find much of the same syntax in terms ofprocedures, formats, macros, DATA steps, and so on.
WPS provides other recognisable features and objects such as logs, datasets, or the Work library.Other features may be new to you, such as the Workbench environment itself and the way in which ithandles or displays objects. You will find that the Workbench has help and reference material to assistyou in migrating to WPS.
Compatibility with SAS® softwareBesides being able to run, modify, share and save programs written in the SAS language, WPS is alsoable to read from and write to data files used by SAS software. WPS also includes a wide selectionof library engines to allow you to access many leading third party databases, data warehouses andHadoop big data environments.
WPS also uses a proprietary dataset file format known as WPD. As the default dataset library engine,WPD datasets are used for the Work library. Because it is the dataset library engine that is native toWPS, it has the most complete feature support, including, for example, indices.
Supported language elementsWPS does not yet support every element in the SAS language. The Workbench provides a codeanalysis tool (see code analyser (page 12)) to help determine if any of your existing SASprograms contain unknown language elements. Details of the SAS language elements currently-supported in WPS can be found in the WPS Reference for Language Elements.
Existing SAS programsWPS uses SAS language program, or program to describe scripts, programs and applications written inthe SAS language.
Workbench user guideVersion 4.0
8
WPS componentsThis section gives brief descriptions of the objects managed by the Workbench.
ProjectsThe fundamental unit of organisation for SAS language programs and related objects. Forexample, you might have a project for applications under development, or another for monthlyreporting jobs. For more information, see Projects (page 35).
SAS language programsCreate or modify SAS language programs using the SAS language editor. Files containing SASlanguage programs use either .wps or .sas extensions. For more information see SAS languageeditor (page 97).
Log outputWhen you run a SAS language program, the information generated is stored in the log file.This file can be viewed, printed and saved from within the Workbench. The log generated iscumulative and contains the results of each program run since opening WPS Workbench,restarting the WPS Server, or clearing the log. For more information, see Logs (page 89).
Listing outputThis contains the printed output from any programs that you have run. For example, this couldbe a table of data generated by a PROC PRINT statement. Listing output can be viewed, printedand saved in the Workbench. The listing output generated is cumulative and contains the outputof each program run since opening WPS Workbench, restarting the WPS Server, or clearing thelisting output. For more information, see Listing output (page 91).
ODS outputAs described, the ODS (Output Delivery System) can be used to produce text listing and HTMLoutput. Each program can specify when and where its output is stored but it is also possibleto allow the Workbench to manage the process automatically. The default option is for theWorkbench to generate HTML output. For more information see Managing ODS output (page90).
DatasetsThe data generated from running a program is stored in datasets. You can either browse or edit adataset using the dataset viewer. For more information, see Datasets (page 77).
Host ConnectionA computer, local or remote that Workbench can access. The local host connection enables youto run SAS language programs on the WPS server installed on your local machine. Connectionscan also be made to remote WPS servers, see Connect to a remote WPS server (page 48)for more information.
Workbench user guideVersion 4.0
9
WPS serverExecutes SAS language programs and generates the resulting output, such as the log, listingoutput, results files, and datasets. The WPS server maintains an environment of assignedlibraries, macros and macro variables, and so on, with which all of the running programs interact.For more information, see WPS server (page 21).
Workbench user guideVersion 4.0
10
Getting started
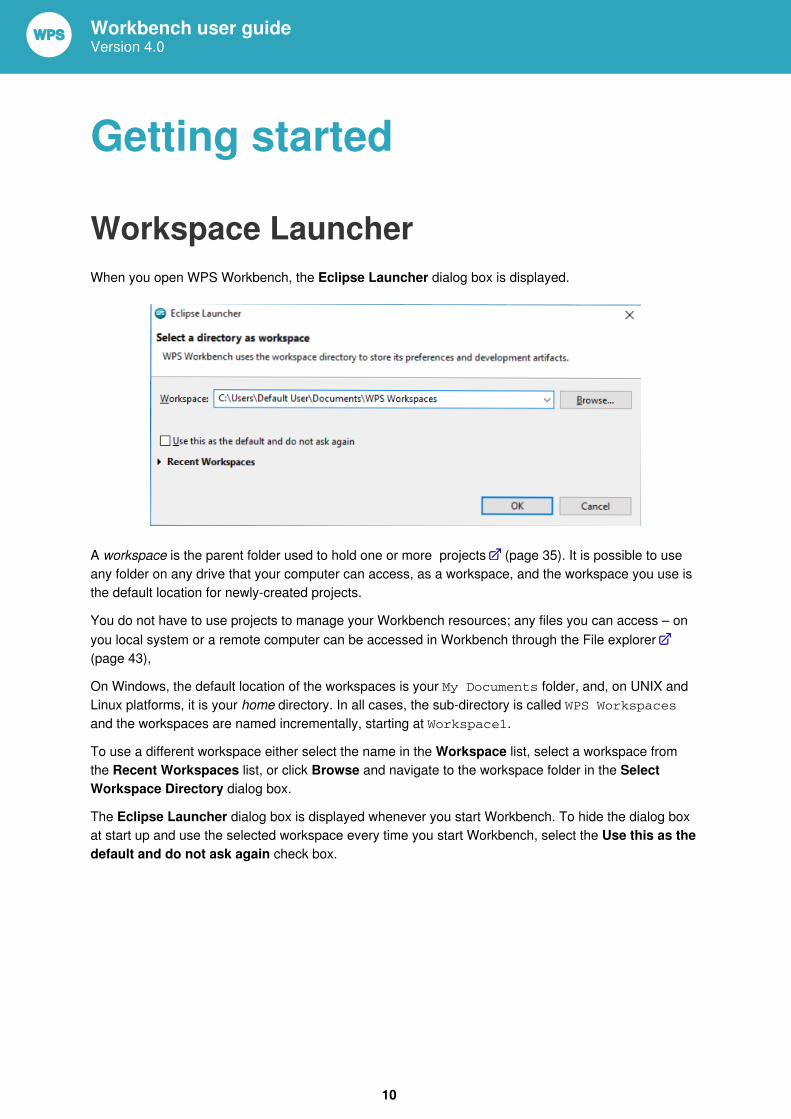
Workspace LauncherWhen you open WPS Workbench, the Eclipse Launcher dialog box is displayed.
A workspace is the parent folder used to hold one or more projects (page 35). It is possible to useany folder on any drive that your computer can access, as a workspace, and the workspace you use isthe default location for newly-created projects.
You do not have to use projects to manage your Workbench resources; any files you can access – onyou local system or a remote computer can be accessed in Workbench through the File explorer(page 43),
On Windows, the default location of the workspaces is your My Documents folder, and, on UNIX andLinux platforms, it is your home directory. In all cases, the sub-directory is called WPS Workspacesand the workspaces are named incrementally, starting at Workspace1.
To use a different workspace either select the name in the Workspace list, select a workspace fromthe Recent Workspaces list, or click Browse and navigate to the workspace folder in the SelectWorkspace Directory dialog box.
The Eclipse Launcher dialog box is displayed whenever you start Workbench. To hide the dialog boxat start up and use the selected workspace every time you start Workbench, select the Use this as thedefault and do not ask again check box.
Workbench user guideVersion 4.0
11
Welcome pagesThe Welcome pages display introductory information about WPS Workbench. The default Get Startedpage is designed to help you start using WPS Workbench as quickly as possible. This page alsodisplays a number of links to other welcome pages, including our website.
Closing and re-opening the welcome pagesTo close the welcome pages and start using the Workbench without further guidance, click Close onthe Welcome tab.
To reopen the welcome pages, click the Help menu and then click Welcome.
Migrating existing programs or projectsThis section describes how to use existing projects or SAS language programs with the latest version ofWPS.
Migrating from previous versions of WPSWorkspaces opened with previous versions of WPS can be opened with the current version, sothere are no migration steps to be performed to use a workspace from a previous version of WPSwith the latest version. However, the first time that you open a workspace that was created using anearlier version of WPS, an Eclipse dialog is displayed asking for your confirmation that it is OK for theworkspace to be upgraded automatically. Such automatic upgrades should not cause any problems.
Existing programs do not need to be modified to work with the latest version of WPS. In addition,projects that were created with earlier versions of WPS can be opened and used by later versions ofWPS without any additional action.
Migrating from SAS® softwareIf you already have programs written in the SAS language, there is no conversion process to undertakein order to use these programs with WPS. Any file with the .wps or .sas extension is assumed to be aprogram that the Workbench can open, edit and run.
Accessing your existing programsYou can access your existing programs from the File Explorer view.
Workbench user guideVersion 4.0
12
Alternatively, you can use Workbench projects, to manage your files enabling you to use other featuressuch as local history.
Checking program compatibilityOpening programs in the Workbench causes unknown or unsupported language elements tobe displayed in red. However, before trying to execute your existing programs in WPS, it is alsorecommended that you use the Workbench Code Analyser (page 12) for further verification.
Analysing programs, even hundreds of programs at a time, can take less than a few minutes tocomplete and can therefore be quicker than trying to execute long-running programs. Program analysisis available from both the File Explorer view or the Project Explorer view.
Code AnalyserUse the Workbench Code Analyser to scan the code of existing programs written in the SAS language.
The Code Analyser is a feature of the Workbench and can therefore only be used on platforms onwhich Workbench is supported. The Code Analyser generates reports that indicate which of yourexisting programs will run unchanged in WPS, which programs may require modification to run, andwhich programs contain language elements not yet supported by WPS.
The Code Analyser allows you to:
• Analyse Program Compatibility – whether your existing programs or projects contain anyunsupported language elements.
• Analyse Language Usage – lists language elements used in the selected programs or projects.The analysis indicates which elements are supported and which are not.
Running analysesThe Code Analyser can quickly analyse single programs, or all programs in one or more projects, or allprograms in one or more folders.
Programs that might normally be executed on multiple different platforms can be analysed together.Gather the programs from these other environments, copy them to your workstation and then run theanalysis tools from Workbench.
Analysing program compatibilityYou can analyse one or more programs to identify which contained language elements are supported inWPS.
To analyse SAS language programs:
Workbench user guideVersion 4.0
13
1. Select the files to be analysed:
• Select the required file or files to analyse in the Project Explorer or File Explorer. You canhighlight programs in different projects or folders within the particular view.
• Select one or more projects in the Project Explorer to analyse all contained programs.• Select one or more folders in the File Explorer to analyse all contained programs.
2. In the view corresponding to your selection, right-click on the selected items and from the short cutmenu click Analyse, and then click Program Compatibility.
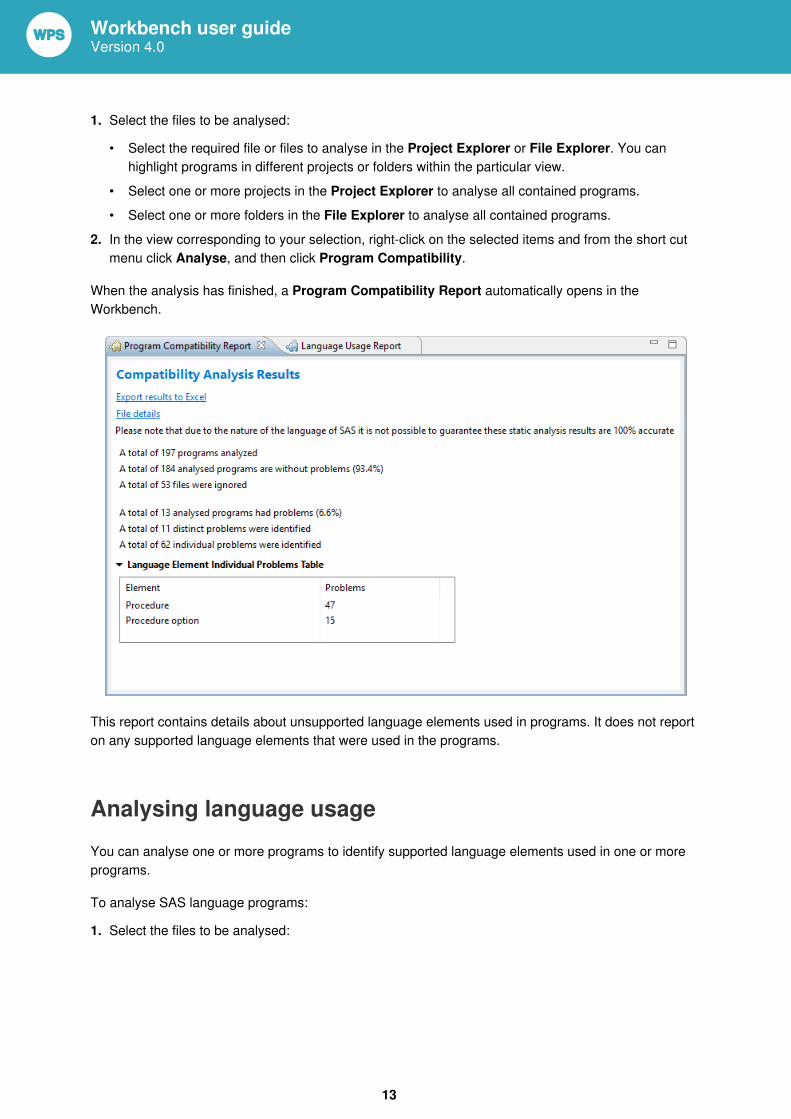
When the analysis has finished, a Program Compatibility Report automatically opens in theWorkbench.
This report contains details about unsupported language elements used in programs. It does not reporton any supported language elements that were used in the programs.
Analysing language usageYou can analyse one or more programs to identify supported language elements used in one or moreprograms.
To analyse SAS language programs:
1. Select the files to be analysed:

Workbench user guideVersion 4.0
14
• Select the required file or files to analyse in the Project Explorer or File Explorer. You canhighlight programs in different projects or folders within the particular view.
• Select one or more projects in the Project Explorer to analyse all contained programs.• Select one or more folders in the File Explorer to analyse all contained programs.
2. In the view corresponding to your selection, right-click on the selected items and from the short cutmenu click Analyse, and then click Language Usage.
When the analysis has finished, a Language Usage Report automatically opens in the Workbench.
This report details the SAS language elements used in the selected programs, and you can explore thedetail of this report in the Workbench, or export the content to Microsoft Excel
Analysing mainframe programsThe Code Analyser is a feature of the Workbench and can therefore only be used on platforms onwhich Workbench is supported. To analyse programs designed to run on a mainframe, copy therequired programs from the mainframe to a workstation running the Workbench. When these programsare analysed, the Code Analyser will identify SAS language elements specific to the z/OS platform.
Before analysing programs copied from a mainframe to a workstation:
• We recommended you remove sequence numbers from your jobs.• Ensure each program file has a file extension of .sas• Package up the jobs on the mainframe using XMIT.
Workbench user guideVersion 4.0
15
• Once transferred to the workstation, use XMIT Manager to un-XMIT the jobs for analysis.
Note:XMIT Manager can only handle PDSs (Partitioned Datasets) and not PDSEs (Extended PartitionedDatasets).
When downloading the XMIT files from mainframe to your workstation, you must specify FB (FixedBlock) with an LRECL (Logical Record Length) of 80 and with no ASCII/EBCIDIC conversion, truncationor CRLF translation.
Viewing or exporting an analysis reportYou can view the detail of a Code Analyser report in Workbench, or export the report detail to MicrosoftExcel.
When viewing a report in Workbench, you can navigate to more detail, and ultimately to the sourceprogram where an issue is located.
• The program compatibility report summary links to a list of programs analysed. From this list youcan access a list of problem elements, see where those elements are used within a program, andnavigate to the element location within the file.
• The language usage report summary displays the SAS language elements used in the analysedprograms. From this list you can find the frequency of SAS language element usage, whichprograms contain the elements, and navigate to the element location within the file.
Exporting analysis results to Microsoft ExcelThe results of a program compatibility report or language usage report can be exported to a MicrosoftExcel spreadsheet for either further analysis or to preserve the report information. To export a report:
1. In the report summary page, click Export results to Excel.2. In the Save as window, enter the required name for the spreadsheet, and browse to the required
location before saving it.
Analysis restrictionsBecause of the nature of the SAS language, the result of the analysis cannot be guaranteed, andreports should be treated as a guide for further analysis.
The Code Analyser has some limitations:
• The Code Analyser will not report incorrect syntax.• SAS language elements that are not currently supported in WPS are now shown in the Compatibility
Report as unknown.

Workbench user guideVersion 4.0
16
• The analysis reports do not currently contain information about the use of macro language elementsand library engine (data access) elements. Their use is however supported in WPS.
Import a projectTo import an existing project into the Workbench:
1. Click the File menu, click Import to open the Import wizard.2. On the Select page, expand the tree under the General node, select Existing Projects into
Workspace and click Next3. Select the import method:
• To import an existing project, click Select root directory and either select the project from the listor click Browse to navigate to the folder where the project is located.
• To import an archived project, for example stored as a Zip .zip or Tar .tar file, click Selectarchive file. Select the archive file from the list or click Browse to navigate to the folder wherethe archive file is located.
If the archive file or folder contains a valid project, the project name is added to the Projects list.4. Click Finish to import the selected project.
Use this method to import the samples project supplied with Workbench. Sample projects are availablein each supported language, and the project archive file samples.zip is located in the doc/<language> folder in your workbench installation.
Workbench layoutThe workbench layouts, or Perspectives, are designed to support creating, managing, editing andrunning particular language programs.
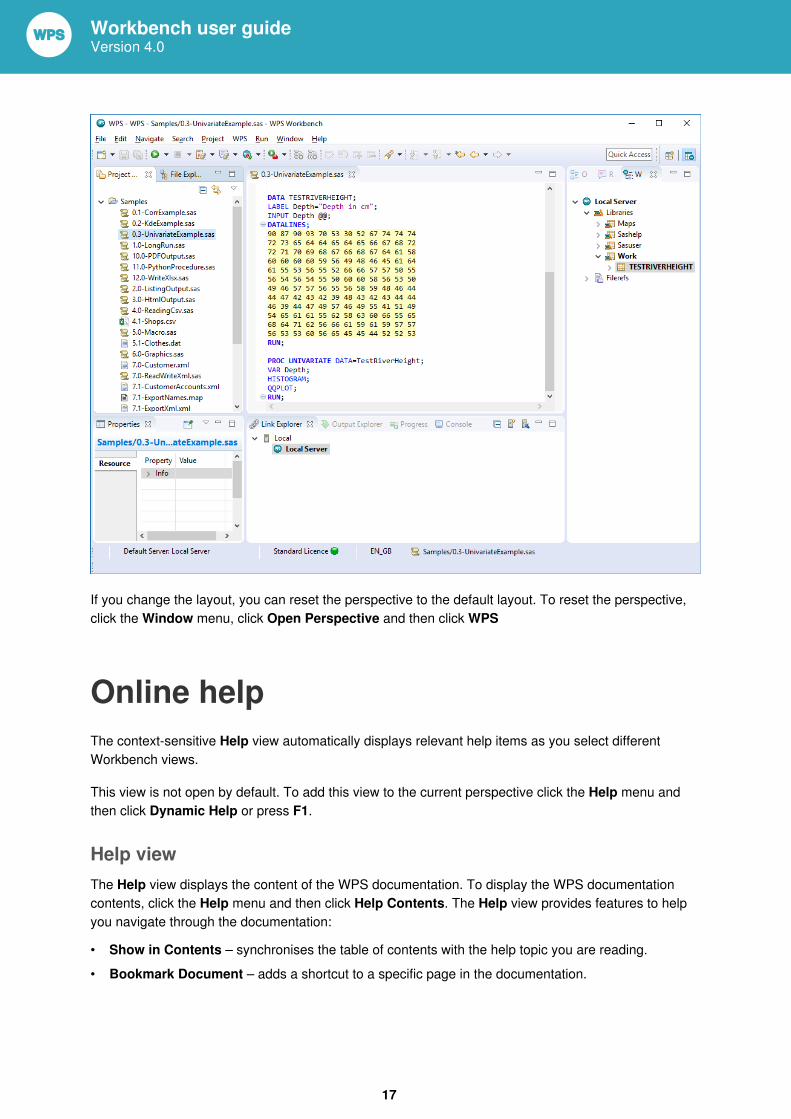
Default WPS perspectiveThe default WPS perspective shows Workbench views needed to create and run SAS languageprograms.
The following is an example of the default WPS perspective. For details on customising this layout, seeperspectives (page 63).
Workbench user guideVersion 4.0
17
If you change the layout, you can reset the perspective to the default layout. To reset the perspective,click the Window menu, click Open Perspective and then click WPS
Online helpThe context-sensitive Help view automatically displays relevant help items as you select differentWorkbench views.
This view is not open by default. To add this view to the current perspective click the Help menu andthen click Dynamic Help or press F1.
Help viewThe Help view displays the content of the WPS documentation. To display the WPS documentationcontents, click the Help menu and then click Help Contents. The Help view provides features to helpyou navigate through the documentation:
• Show in Contents – synchronises the table of contents with the help topic you are reading.• Bookmark Document – adds a shortcut to a specific page in the documentation.
Workbench user guideVersion 4.0
18
• Search – search the help for specific keywords and phrases.
Cheat sheetsThe Workbench contains tutorials known as cheat sheets designed to help you start using WPS byintroducing specific tasks and features.
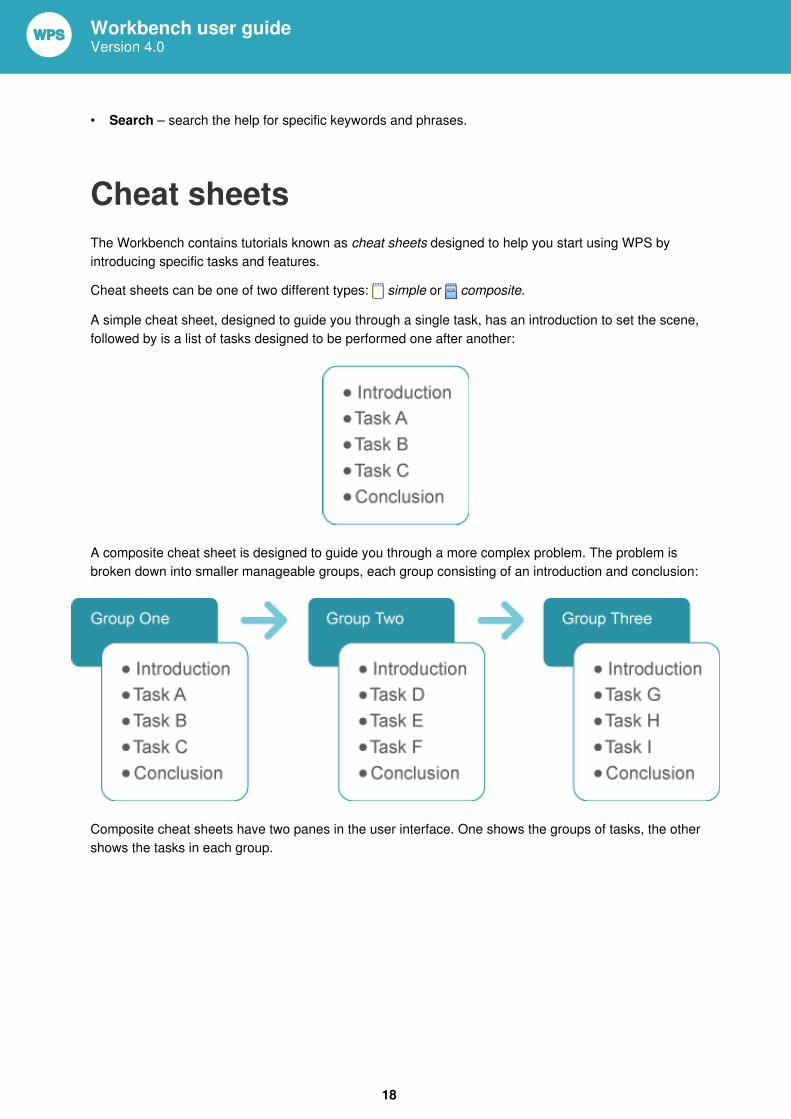
Cheat sheets can be one of two different types: simple or composite.
A simple cheat sheet, designed to guide you through a single task, has an introduction to set the scene,followed by is a list of tasks designed to be performed one after another:
A composite cheat sheet is designed to guide you through a more complex problem. The problem isbroken down into smaller manageable groups, each group consisting of an introduction and conclusion:
Composite cheat sheets have two panes in the user interface. One shows the groups of tasks, the othershows the tasks in each group.
Workbench user guideVersion 4.0
19
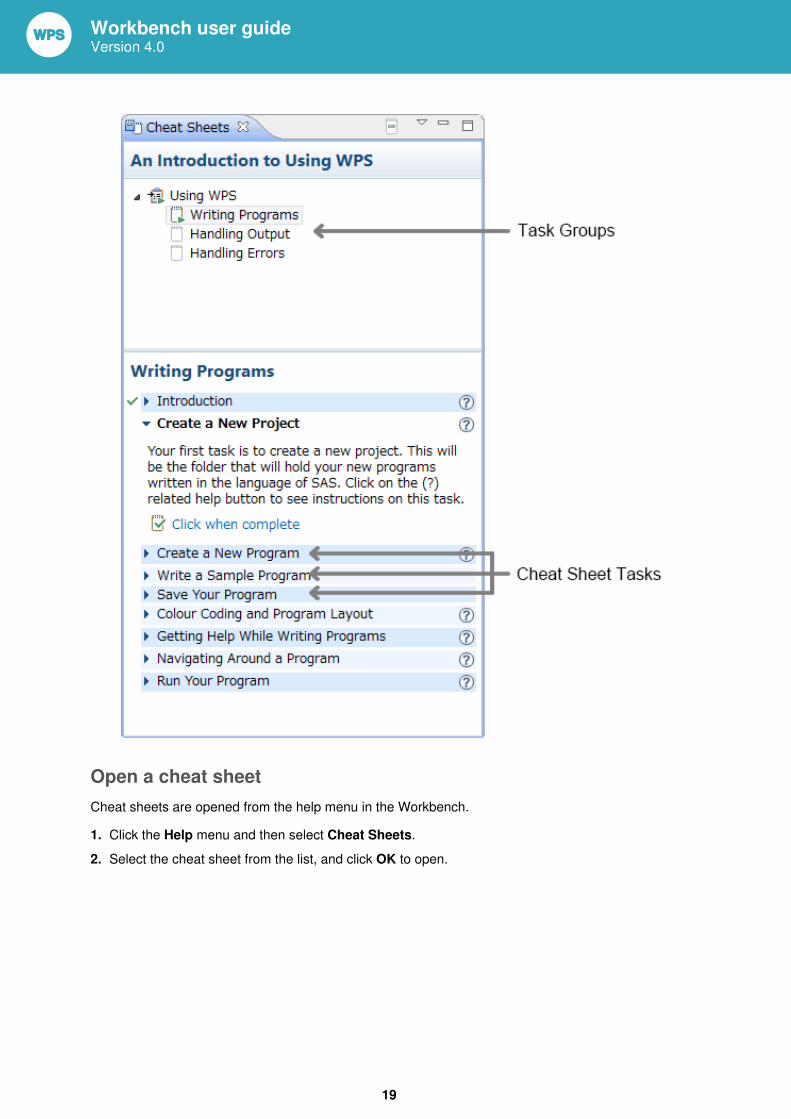
Open a cheat sheetCheat sheets are opened from the help menu in the Workbench.
1. Click the Help menu and then select Cheat Sheets.2. Select the cheat sheet from the list, and click OK to open.

Workbench user guideVersion 4.0
20
Close a cheat sheetYou can close the active cheat sheet by selecting the Close on the cheat sheet's tab. The active cheatsheet saves its completion status when it is closed so that you can continue where you left off when younext re-open it.
Working through a cheat sheetWhen you open a new cheat sheet, the introduction is expanded so that you can read a briefdescription about the selected cheat sheet.
In a simple cheat sheet, click Click to Begin at the bottom of the introductory step. The next step isthen expanded and highlighted. You should also see action buttons at the bottom of the next step, forexample Click to Complete.
In a composite cheat sheet, read the introduction and then click the Go to... link at the bottom of thefirst sheet. The introduction for the first group is displayed, click the Start working... link to begin. Youprogress through a group in the same manner as a simple cheat sheet.
In simple cheat sheets or a composite group, when you have finished a particular step, click Clickwhen complete to move to the next step. A check mark appears in the left margin of eachcompleted step.
Composite cheat sheets have a conclusion, and also the option to review the task, or to progress ontothe next group of tasks. Starting the next task will take you to the introduction for the next group.
You can open any step out in a cheat sheet by clicking the title of the section. If you are workingthrough each step in the sheet, click Collapse All Items but Current to collapse all opened stepsexcept the current active step waiting to be completed.
In composite cheat sheets, you can review any previously-completed group by clicking the group inthe task group pane. The displayed point in the group is where you left that group, for example if youcompleted the group tasks, the conclusion is displayed.
A simple cheat sheet is completed when you finish the last step. A composite cheat sheets is completewhen all task groups have been finished.
To restart from the first step, open the first step and click Click to Restart. A Composite cheat sheetallows you to reset task groups. Right-click on the task group in the groups pane and click Reset.
Workbench user guideVersion 4.0
21
WPS serverTo run SAS language programs, the Workbench requires a connection to a licensed WPS server.
The WPS server may be running on the local workstation or on an installation of WPS on a remotemachine.
• A WPS server on a local machine – a local server – can be accessed through a local hostconnection.
• A WPS server on a remote machine – a remote server – can be accessed through a remote hostconnection.
When WPS Workbench is first installed, a single local host connection called Local and a servercalled Local Server are created. This server is started by default when the Workbench is started, andterminates when the Workbench is closed.
Further local servers can be created if required or the local server can be deleted or uninstalled.Creating multiple local servers requires no further licensed WPS products and the only restriction on thenumber of local servers is the local machine resources.
Setting up remote servers gives you access to the processing power of remote server machines fromthe Workbench on your workstation. Multiple servers can run under a single remote host connection.For more information, see Connect to a remote WPS server (page 48).
The list of defined connections and servers is stored in a workspace, and is visible through the Linkexplorer. If you change workspace, you will have different connections and servers. To share serverdefinitions in a work group, or between workspaces, export (see Export a WPS server definition(page 51)), and import (see Import a WPS server definition (page 52)) server definitions to orfrom a file.
Configure a local WPS installationHow to configure WPS workbench to remove the WPS server from your workstation.
If you only run SAS language programs on a remote WPS server, you can modify your Workbenchinstallation to remove the local server. This option is only available for Workbench installations onMicrosoft Windows.
To remove the WPS server:
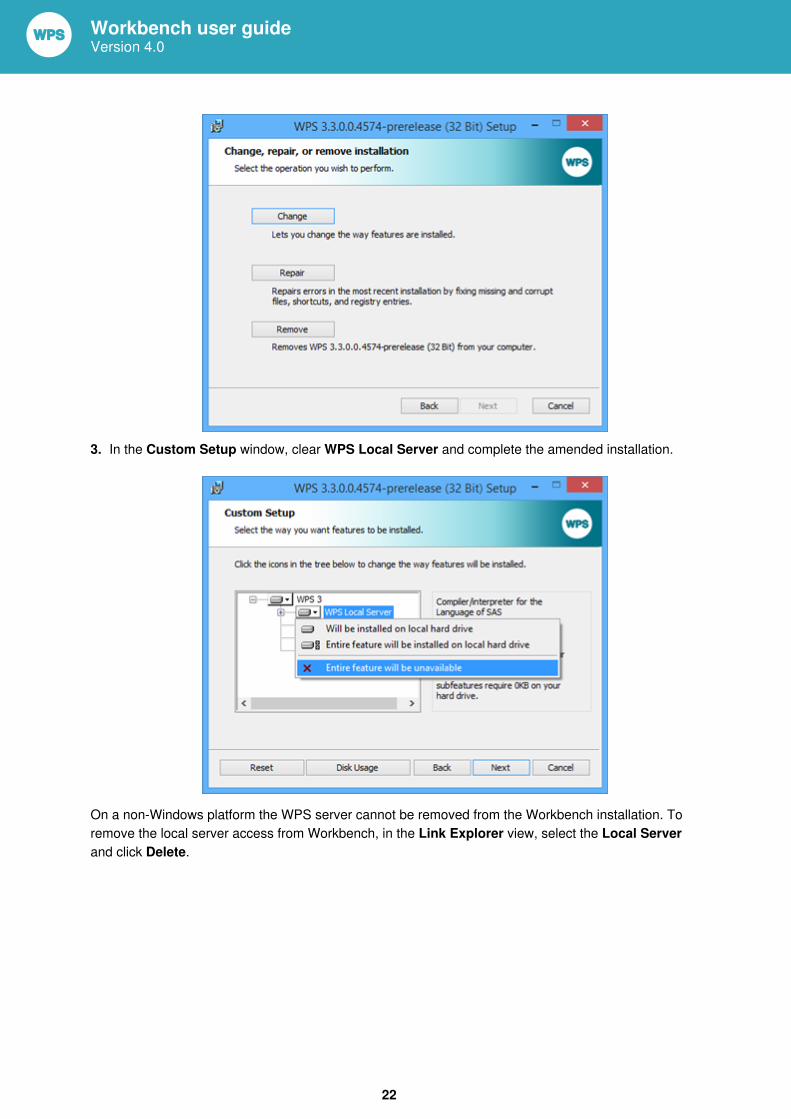
1. Open the Programs and Features control panel item and select WPS in list of installed programs.2. Click Change at the top of the Programs and Features window. In the Change, repair, or remove
installation click Change:
Workbench user guideVersion 4.0
22
3. In the Custom Setup window, clear WPS Local Server and complete the amended installation.
On a non-Windows platform the WPS server cannot be removed from the Workbench installation. Toremove the local server access from Workbench, in the Link Explorer view, select the Local Serverand click Delete.
Workbench user guideVersion 4.0
23
Default WPS serverSet or change the WPS server used by default when running SAS language programs in Workbench.
One of the available server connections defined in Workbench must be identified as the default WPSserver to be used when a SAS language program is executed using the Run command.
When Workbench is first installed, the Local Server is the default WPS server; you can select anyavailable server to be the default Workbench server.
To set the default server.
1. Open the Link Explorer view and expand the connection containing the required WPS server.2. Right-click on the required server and click Set as Default Server on the shortcut menu.
WPS server LOCALE and ENCODINGsettingsSpecifying locale and encoding options for a WPS server.
Any LOCALE option defined in a configuration file is ignored when running SAS language programsfrom Workbench; the LOCALE must be set as a Workbench start-up option to be effective.
In order to display and save programs and other files that contain characters for your selected LOCALE,you may need to set a General text file encoding (page 24) value for the Workbench.
Set LOCALE for a WPS serverThe locale used by WPS is set individually by the particular server. To set the language system optionfor the locale for a server:
1. In the Link Explorer view, ensure the required server is running.2. Right-click the server and click Properties on the shortcut menu to display the Properties dialog
box.3. In the properties list, click Startup and then click System Options.4. On the System Options panel, click Add to display the Startup Option dialog box.5. In the Name field, type LOCALE, and in the Value field enter the required locale value.
A list of valid LOCALE values can be found in the WPS Reference for Language Elements.6. Click OK to save the changes restart the server to apply your changes.
Workbench user guideVersion 4.0
24
Set ENCODING for a WPS serverYou may also need to set an appropriate ENCODING value on the server (for example to execute aWPS installation containing non-ASCII characters). As an example, proceed as follows to set UTF-8 onthe server:
1. In the Link Explorer view, ensure the required server is running.2. Right-click the server and click Properties on the shortcut menu to display the Properties dialog
box.3. In the properties list, click Startup and then click System Options.4. On the System Options panel, click Add to display the Startup Option dialog box.5. In the Name field, type ENCODING, in the Value field type UTF-8 and click OK.
A list of valid ENCODING values can be found in the WPS Reference for Language Elements.6. Restart the server when prompted.
General text file encodingTo display and save programs and files that contain international characters, you may need to set anappropriate text file encoding.
The text file encoding can be done at either a global – for all Workbench projects and associated files –or project level – for programs contained in the specific project – where a different encoding is requiredto the inherited global encoding option.
Set the encoding at a global levelTo set a global encoding value:
1. Click the Window menu and then click Preferences to display the Preferences dialog box.2. In the preferences list, expand General and then click Workspace.3. In the Workspace panel, under Text File Encoding, click Other and select the required value from
the list.
If the required encoding option is not in the drop-down list, enter the encoding name, for exampleShift_Jis in the Other field.
4. Click OK to apply your change.
Check the locale is set for your country so that data is handled correctly by the WPS server. The localeis displayed in the bottom right hand corner of Workbench (for example, to FR_FR if you are in Frenchterritories). If not set, specify the LOCALE and ENCODING settings. For more information, see WPSserver LOCALE and ENCODING settings (page 23).
Workbench user guideVersion 4.0
25
Setting encoding at a project levelTo set a project encoding value:
1. In the Project Explorer view, select the required project, right-click and on the shortcut menu clickProperties.
2. In the Properties for… dialog box, in the properties list, click Resource.3. On the left of the Properties window, ensure the Resource option is selected.4. In the Resource panel, under Text File Encoding, click Other and select the required value from
the list.
If the required encoding option is not in the drop-down list, enter the encoding name, for exampleUTF-8 in the Other field.
5. Click OK to apply your change.
Licence keyA valid licence key is required to run programs on a WPS server, and each server, whether local orremote, requires a separate licence key.
A licence key is provided in a file ending in .wpskey that is separate from the WPS installation file.
Apply a licence keyHow to apply a new licence key to your local WPS server.
If you are using a Microsoft Windows operating system, ensure that you have administrator privilegesbefore applying a licence key.
1. Click the Help menu and then click Apply Licence.2. In the Import licence for server Local Server dialog box, either:
• Copy and paste the entire contents of your licence file into the window.• Click Import from file. Find your licence key file and click Open.
3. Click Finish to apply the licence.
Following installation, you can view the details of the licence. To do so click the Help menu and clickView Licence.
Workbench user guideVersion 4.0
26
Database connectivityWPS can be used in conjunction with many different database management systems.
WPS can be used in conjunction with many different database management systems. This sectioncovers installation of ODBC (Open Database Connectivity) and some of the most commonly-usednative clients:
• Oracle, through the Oracle Instant Client.• DB2, through the IBM Data Server Runtime Client.• SQL Server, through the SQL Server Native Client.• MySQL through the MySQL Connector/C.• Sybase Adaptive Server Enterprise through the Sybase ASE Client
Wherever possible, you should use the native database client to obtain the best support for databaseoptions and the SAS language. If you are unable to use a native database client, WPS supporteddatabase connectivity using ODBC. For more information about creating an ODBC connection on bothMicrosoft Windows and Linux systems.
Supported client driversThe following client connector versions are supported:
Engine Client version
Oracle Instant Client 12
DB2 IBM Data Server Runtime Client 10.5
SQL Server Microsoft SQL Server 2012 Native Client
MySQL Connector/C 6.1
Sybase ASE Sybase ASE 15.7
If you use ODBC on Linux, WPS only supports unixODBC version 2.3.2 or later
Connect to OracleHow to install the Oracle Instant Client on Microsoft Windows.
Before installing the Oracle Instant Client software, ensure that:
• You have installed and licensed WPS.• You have the requisite administrator privileges to install both WPS and the Oracle Instant Client.• You download the version of the Oracle Instant Client that matches the version of the Oracle
database to which you are connecting.
Workbench user guideVersion 4.0
27
When installing the Oracle Instant Client, you must match the WPS Workbench installation type :
• The Windows (32-bit) client is required for the 32-bit version of WPS Workbench• The Windows (x64) client is required for the 64-bit version of WPS Workbench.
The Oracle Instant Client must be installed on the same PC or server as the WPS server on which yourSAS language programs will be run.
To install the Oracle Instant Client:
1. Download the basic Oracle Instant Client from the Instant Client download page of the Oraclewebsite.
2. Once the appropriate installation (.zip) file has been downloaded, create a folder for the instant clienton your PC, for example C:\oracle, and unzip the content of the file into that folder:
3. Add the Oracle Instant Client installation directory to the system Path variable, as follows:
a. In the Control Panel, select the System and Security group. Select System and clickAdvanced System Settings.
b. In the Advanced tab, click Environment Variables. Select the Path entry in the Systemvariables list and click Edit…
c. In the Edit environment variable dialog, click New and enter the installation directory path.d. Click OK in the Edit environment variable dialog to save the changes, and close the remaining
system and security dialogs.4. Start WPS Workbench to ensure that the Path environment changes to the path are available.
You can view the Path variable in WPS Workbench using the following SAS language program:
DATA _null_;
LENGTH pathname $ 32760;pathname = SYSGET('PATH');PUT pathname= ;RUN;
The log output should contain the Oracle Instant Client installation directory.
Once the client has been installed, test the connection using the following:
LIBNAME DATASRC ORACLE USER=<user_name> password=<password> PATH='<remote-id>/TNS';PROC DATASETS LIBRARY=DATASRC;RUN;
Replace <user_name> and <password> with your user name and password for the server. The PATHoption contains the server name (specified as <remote-id>) and, optionally, a TNS name.
The PROC DATASETS statement returns the names of all tables in the selected database; fordatabases with large numbers of tables, this program may take some time to run.
Workbench user guideVersion 4.0
28
Connect to DB2How to install the IBM Data Server Runtime Client, on Microsoft Windows.
Before installing the IBM Data Server Runtime Client, ensure that:
• You have installed and licensed WPS.• You have the requisite administrator privileges to install both WPS and the IBM Data Server
Runtime Client,.
When installing the IBM Data Server Runtime Client,, you must match the WPS Workbenchinstallation type :
• The Windows 32-bit AMD and Intel x86 client is required for the 32-bit version of WPS Workbench.• The Windows AMD64 and Intel EM64T client is required for the 64-bit version of WPS Workbench.
The IBM Data Server Runtime Client, must be installed on the same PC or server as the WPS serveron which your SAS language programs will be run.
To install the IBM Data Server Runtime Client,:
1. Download the IBM Data Server Runtime Client, from the Download Clients and Drivers page of the IBM website.
2. Once downloaded, locate and run the executable installation file. Follow the instructions in thewizard for the Typical installation type.
Note:For ease of future use, you are advised to ensure that the installation folder is on the system path.
3. Set the DB2CMDEXE environment variable to point to the db2cmd.exe file (typically C:\ProgramFiles\IBM\SQLLIB\BIN\db2cmd.exe), as follows:
a. In the Control Panel, select the System and Security group. Select System and clickAdvanced System Settings.
b. In the Advanced tab, click Environment Variables. In the System variables section, clickNew…
c. Create a system variable with a Variable name of DB2CMDEXE, and a Variable value of theIBM Data Server Runtime Client, installation directory, for example C:\Program Files\IBM\SQLLIB\BIN\db2cmd.exe
4. Configure the connection from the IBM Data Server Runtime Client, to the server you will access:
a. Open a command prompt and run DB2CMD.b. In the new window, type DB2 to access the command line processor for the DB2 client.c. Create a node to reference the remote database, using the following command:
catalog TCPIP node <node_name> REMOTE <server> SERVER <port_service>
Where:
Workbench user guideVersion 4.0
29
• <node_name> is the local connection name.• <server> is the IP address or name of the server hosting the database.• <port_service> is either the server port number or the database instance name on the server.
d. Create a database instance reference (that you will connect to through the <node_name>), usingthe following command:
catalog database <database_name> AS <alias_name> AT NODE <node_name>
Where:
• <database_name> is the instance of the database on the DB2 server.• <alias_name> is the name you will use in the DB2 client to connect to the database instance.• <node_name> is the previously-created connection name.
e. Connect to the local connection name (<node_name>) using the following command:
connect to <node_name> user <user_name> using <password>
Where:
• <node_name> is the previously-created connection name.• <user_name> and <password> are your user ID and password for the DB2 server.
If the connection is successful, the database information is displayed and you can close thecommand line processor for the DB2 client:
Database Connection Information Database server = DB2/LINUX SQL authorization ID = TEST Local database alias = TESTDB2
Once the client has been installed, test the connection using the following:
LIBNAME DATASRC DB2 user=<user_name> password=<password> DSN=TESTDB2;PROC DATASETS LIBRARY=DATASRC;RUN;
Replace <user_name> and <password> with your user name and password for the server.
The PROC DATASETS statement returns the names of all tables in the selected database; fordatabases with large numbers of tables, this program may take some time to run.
Connect to SQL ServerHow to install the Microsoft SQL Server Native Client on Microsoft Windows
Before installing the Microsoft SQL Server Native Client, ensure that:
• You have installed and licensed WPS.
Workbench user guideVersion 4.0
30
• You have the requisite administrator privileges to install both WPS and the Microsoft SQL ServerNative Client.
When installing the Microsoft SQL Server Native Client, you must match the WPS Workbenchinstallation type
• The X86 client is required for the 32-bit version of WPS Workbench.• The X64 client is required for the 64-bit version of WPS Workbench.
The Microsoft SQL Server Native Client must be installed on the same PC or server as the WPS serveron which your SAS language programs will be run.
To install the Microsoft SQL Server Native Client:
1. Download the Microsoft SQL Server Native Client installer from the SQL Server Native Clientpage of the Microsoft website.
2. Once the file has been downloaded, execute the file and follow the onscreen instructions to installthe Microsoft SQL Server Native Client.
Once the client has been installed, test the connection using the following:
LIBNAME DATASRC SQLServr user=<user_name> password=<password> server=<remote-id>;PROC DATASETS LIBRARY=DATASRC;RUN;
Replace <user_name> and <password> with your user name and password for the <remote-id>server.
The PROC DATASETS statement returns the names of all tables in the selected database; fordatabases with large numbers of tables, this program may take some time to run.
Connect to MySQLHow to install the MySQL Connector/C client on Microsoft Windows.
Before installing the MySQL Connector/C client software, ensure that:
• You have installed and licensed WPS.• You have the requisite administrator privileges to install both WPS and the MySQL Connector/C
client.
When installing the MySQL Connector/C client, you must match the WPS Workbench installation type:
• The Windows (x86 32-bit) client is required for the 32-bit version of WPS Workbench• The Windows (x86 64-bit) client is required for the 64-bit version of WPS Workbench.
Note:The library names for the different versions of the MySQL Connector/C client are identical, so you canonly have one version of the client (either 32-bit or 64-bit) registered on the Path system variable.
Workbench user guideVersion 4.0
31
The MySQL Connector/C client must be installed on the same PC or server as the WPS server onwhich your SAS language programs will be run.
To install the MySQL Connector/C client
1. Download the MySQL Connector/C client installer (.msi) from the Download Connector/C pageof the MySQL website.
2. Once the installation (.msi) file has been downloaded:
a. Double-click the downloaded file to begin installation (you will need to read and accept theMySQL licence agreement).
b. Select a Typical installation, and click Install.3. Add the MySQL Connector/C client installation directory containing libmysql.dll to the system
Path variable, as follows:
a. In the Control Panel, select the System and Security group. Select System and clickAdvanced System Settings.
b. In the Advanced tab, click Environment Variables. Select the Path entry in the Systemvariables list and click Edit…
c. In the Edit environment variable dialog, click New and enter the installation directory path.d. Click OK in the Edit environment variable dialog to save the changes, and close the remaining
system and security dialogs.4. Start WPS Workbench to ensure that the Path environment changes are available.
You can view the Path variable in WPS Workbench using the following SAS language program:
DATA _null_; LENGTH pathname $ 32760; pathname = SYSGET('PATH'); PUT pathname= ;RUN;
The log output should contain the MySQL Connector/C client installation directory.
Once the client has been installed, test the database connectivity by using the following in WPS Workbench:
LIBNAME DATASRC MYSQL USER=<user-name> PASSWORD=<password> SERVER=<remote-id> DATABASE=<dbase>;PROC DATASETS LIBRARY=DATASRC;RUN;
In the LIBNAME statement, replace <user-name> and <password> with your user name andpassword for the <remote-id> server, and replace <dbase> with the name of the MySQL database.
Note:You must supply a DATABASE name in for WPS to successfully connect to the MySQL server.
The PROC DATASETS statement returns the names of all tables in the selected database; fordatabases with large numbers of tables, this program may take some time to run.
Workbench user guideVersion 4.0
32
Connect to a database using ODBCODBC (Open Database Connectivity) is a database-independent connection option for WPS. Youshould use ODBC as the connection option where no native connection client exists.
ODBC provides the facility to create a SAS language program that stores data in one RDBMS, andthen to modify the database storing the data without the need to modify your program significantly.
The version of ODBC driver you select must match the WPS installation type:
• If you have the 32-bit version of WPS installed, select a 32-bit ODBC driver.• If you have the 64-bit version of WPS installed, select a 64-bit ODBC driver.
Using ODBC may limit the functionality that would otherwise be available through a native client, forexample when using Explicit passthrough commands in PROC SQL. (Explicit passthrough uses SQLas understood by the server to which you are connecting, and passes those statements to the RDBMSverbatim.)
Each ODBC driver requires the creation of a DSN (Data Source Name), and the information requiredwhen creating this will vary between databases.
The ODBC Client must be installed, and DSN created on the same PC or server as the WPS server onwhich your SAS language programs will be run.
The following example creates a DSN for the SQLite ODBC driver:
1. Download the ODBC driver for SQLite from the SQLite ODBC Driver website.2. Once downloaded, double-click the executable file and follow the on-screen instructions to install
the driver.3. Create an empty file on your PC to hold the database, for example E:\data\mydata.sqlite.4. Create a DSN for the ODBC driver, as follows.
a. In the Control Panel, select Administrative tools and then choose either ODBC Data Sources(32-bit) or ODBC Data Sources (64-bit) as appropriate.
b. On the User DSN tab, click Add... and select SQLite3 ODBC Driver in the Create New DataSource dialog.
c. In the SQLite3 ODBC DSN Configuration dialog, enter the following information:
• Data Source Name – the name to be referenced by the SAS language programs run inWPS, for example SQLITE.
• Database Name – the file name for the database, for example E:\data\mydata.sqlite.
Other information is optional, but may provide better data management within the database. Forexample, to enforce foreign key constraints, select Foreign Keys in the Configuration window.Further details on the options can be found in the SQLiteODBC documentation.
d. Once all required options have been selected, click OK to create the DSN, and close the ODBCData Sources dialog.
Workbench user guideVersion 4.0
33
Once the DSN has been created, test the database connectivity by using the following:
PROC SQL; CONNECT TO ODBC (DATASRC=<dsn-name>); EXECUTE (CREATE TABLE test (ID INTEGER, name TEXT)) BY ODBC; DISCONNECT FROM ODBC;QUIT;
Replace <dsn-name> with the Data Source Name entered in the DSN configuration dialog.
If successful, the WPS log should contain the following information:
CONNECT TO ODBC (DATASRC=SQLITE);NOTE: Successfully connected to database ODBC as alias ODBC.EXECUTE (CREATE TABLE test (ID INTEGER, name TEXT)) BY ODBC;The statement completed successfully.NOTE: Successfully passed statement to database ODBC.
Restart the serverEach time that the Workbench is closed, the temporary results associated with the session – the log, allthe output results, file references, library references, datasets, and so on – are cleared. If you want toclear the same temporary results prior to the end of the Workbench session, you can restart the WPSserver. Restarting the server means that programs will no longer be able to interact with temporaryobjects created in the previous server session.
Alternatively, you can clear the log or results and keep all the other temporary output.
To restart the server:
1. Click the File menu, click Restart server and click Local (or the name of your remote WPS server).If you are restarting the local server, you can use the Ctrl + Alt + S shortcut key.
2. A confirmation dialog box may be displayed. Click OK to restart the server. You will not see theconfirmation dialog if you have previously selected the Do not show this confirmation againoption in this dialog box
Restarting with Advanced Server ActionsIf you have selected Show advanced server actions in the WPS Preferences page of thePreferences window, the shortcut menu for the WPS server in the WPS Server Explorer, OutputExplorer and Results Explorer views displays alternative restart options:
• Restart, new WORK – restart and clear the contents of the WORK library.• Restart, keep WORK – restart and keep the contents of the WORK library.
Workbench user guideVersion 4.0
34
Views and perspectivesThe layout of the items in WPS Workbench is known as a perspective and comprises individualwindows that contain one or more views. These views display specific types of information and providespecific functions. Some views also have context-specific toolbars located in the top right of each view.
This section gives an overview of perspectives, and each of the available views and describes the mainactions that are carried out within each view.
Project ExplorerThe Project Explorer view is used to edit and manage SAS language programs and related files,programs or datasets organised in projects.
Projects can store any kind of local file, and support file system operations, such as running programs.Objects within projects can be managed with Local history (page 40), and they can also beexported to archives or to other folders in the local file system. The Project view cannot be used tomanage files stored on a remote file system or files on a local file system that are not part of the project.
The Project Explorer view only displays projects that are in your current workspace. You can createseveral Projects (page 35) in a workspace, and use each project for a specific task.
Selecting an item in the Project Explorer displays information about that item in the Properties view.
Displaying the viewTo display the Project Explorer view:
From the Window menu, click Show View and then click Project Explorer.
Operating system toolsAs well as the Workbench's tools, you can use those supplied by your operating system to delete,cut, copy and paste objects into a project. If you do use the operating system tools rather than theWorkbench tools, modifications are not preserved in the local history.
You may need to refresh the Project Explorer view to ensure that objects manipulated in this way aredisplayed correctly. To do this right-click the project and, click Refresh on the shortcut menu.
Workbench user guideVersion 4.0
35
ProjectsA project is a Workbench representation of a folder containing objects such as programs, datasets, filesand folders.
WPS uses a project to hold the files and folders that relate to each other. For example, you mighthave one project containing programs that are still under development and another project for monthlyreporting applications. There is no limit to the number of projects you can have open within WPSWorkbench.
Each project is defined by a project definition file named .project stored in the root directory of a project.This file can only be viewed in the system file browser and must not be deleted, edited, moved from theproject folder or copied into another project.
Only one workspace can be open at a time in Workbench, but you can switch between workspaces asrequired. The Project Explorer view is used to display and manage the current workspace and projectsin the active workspace.
Create a new projectTo create a new project:
1. Click the File menu, click New and then click Project to launch the New Project wizard.2. Expand the General folder, click Project and click Next.3. Enter the new Project name.4. To create the new project in a location other than the current workspace folder, clear Use default
location and specify a new directory in the Location field.5. Click Finish to create the new project.
The new project is displayed in the Project Explorer view. If the new project location is not in theworkspace folder, the path to the project folder is displayed in the Properties view.
You can also use the Workbench's copy and paste facility to create a new project based on an existingproject.
Create a new folder in a project
To create a new folder:
1. On the File menu, click New and then click Folder to launch the New Folder wizard.2. The parent for the folder defaults to either the current project or folder selected in the Project
Explorer view.3. Enter a Folder name for the new folder.
Workbench user guideVersion 4.0
36
4. To change the location of the folder on the file system click Advanced and select one of:
• Use default location. The folder is created as a file system folder, in the same location as theparent folder or workspace.
• Folder is not located in the file system (Virtual Folder). The folder only exists as a workspaceartifact, no folder is created on the file system. You can drag and drop your other projectresources into the virtual folder to create links to other files and folders in this new folder, andalso add other virtual folders. It is not possible to create physical files and folders within virtualfolders.
• Link to alternate location (Linked Folder). Creates the folder on the file system in a differentlocation to the parent folder or workspace. Click Browse to select the location on your file systemto which to link.
5. Click Finish to create the new folder.
Move or copy a project file
To move any folder, file, program, or any other object, between projects, or between folders within thesame project::
1. In the Project Explorer view, select the object you need to move.2. Click the File menu, and then click Move. In the Move Resources dialog box, select the new
destination project or folder and click OK to move the resource.
If you want to duplicate rather than move the object, click the Edit menu and then click Copy; selectthe target folder or project, click the Edit menu and then click Paste. If you duplicate the object inthe same project or folder as the original, you must provide a different name for the copied object.
To return the object to its original location, click the Edit menu and then click either Undo MoveResource if the object was moved, or Undo Copy Resource if the object was duplicated.
Linking the active file to the Project Explorer
If you have several files from different projects open in the Editor view, you can configure the ProjectExplorer view to highlight the program in the project or folder each time that you switch the focus tothat program in the Editor view.
To link the Project Explorer view and the Editor view, in the Project Explorer view click Link withEditor
Delete a file from a project
To delete an object from a project:
Workbench user guideVersion 4.0
37
1. In the Project Explorer view, select the required object to delete.2. Click the Edit menu, and then click Delete. In the Delete Resources dialog box, click OK.
To return the object to its original location, click the Edit menu and click either Undo Delete Resource.
Rename a project or project fileTo rename a project, or an object in a project:
1. In the Project Explorer view, select the required object or project.2. Click the File menu and then click Rename.3. Enter the New name in the Rename Resource dialog box and click OK.
Copy a projectYou can use the Workbench's Copy and Paste facility to create a new project based on anexisting project.
1. In the Project Explorer view, select the required project.2. Click the Edit menu, and then click Copy.3. Click the Edit menu, click Paste and in the Copy Project dialog box, enter a new Project name .
If you want to copy the project to a location other than the current workspace, clear Use defaultlocation and enter an alternate Location for the new project.
4. Click OK to create the project.
Import files or archivesYou can import files from either an archive file (such as a zip file) or from the file system into an existingproject.
To import files:
1. Click the File menu and then click Import to open the Import wizard.2. Expand the tree under the General node and select one of the following options:
• File System – to import files and folders not archived in a single file.• Archive File – to import files and folders that are archived in one file (for example, a zip, or
tar.gz).3. Click Next and click Browse to select either the archive file or directory.
Workbench user guideVersion 4.0
38
4. You will see a list of the files and folders that are available to import. Ensure that all the objects thatyou want to import are selected.
Do not select the parent folder of the files to import; if you do, your imported files are added to asubfolder in your project.
Note:Do not import a project definition file (.project ); if you do the imported file will overwrite the projectdefinition file in the existing project
5. Click Browse and specify the Into folder – the target folder for the imported files.6. Click Finish to import the selected files.
Close and reopen a projectYou can close or open a project to control the number of available projects in a workspace.
To close a project:
1. In the Project Explorer, right-click an open project and click Close Project on the shortcut menu.
Closing a project collapses the tree under project in the Project Explorer view and closes anyprograms or other files that were open in the Workbench Editor view.
If you want to open or reopen a closed project, in the Project Explorer, right-click a closed project( ) and click Open Project on the shortcut menu.
Export a projectTo make a copy or backup of a project and all the files and folders contained within it:
1. In the Project Explorer view, select the project to export.2. Click the File menu and then click Export to display the Export wizard.3. On the Select page, expand the General node and select
• Archive File to create zip file in the export location.• File System to makes a copy of your project folder and its contents.
4. Click Next and select the folders and files to export from the selected project5. If you are exporting to an archive, enter the path for file, including filename in To archive file. If you
are exporting to the file system, enter the folder path in To directory.6. Click Finish to export the selected folders and files.
Workbench user guideVersion 4.0
39
Delete a projectTo delete a project:
1. In the Project Explorer view, select the required project to delete.2. Click the Edit menu and click Delete.3. In the Delete Resources dialog box,choose whether to delete the reference to the project in the
current workspace, or delete the reference and the folder contents on disk:
a. to remove the workspace reference to the project without deleting the project folder and contents,clear Delete project contents on disk (cannot be undone).
b. To remove the workspace reference and folder contents from the disk, select Delete projectcontents on disk (cannot be undone).
4. Click OK.
Comparing and merging multiple filesYou can carry out either two-way or three-way comparisons between different versions of a file.
Three-way comparisons show the differences between three different versions of a file, for examplethe differences between the resource in the Workbench, the version of the resource that is committedin a branch, and the common ancestor on which the two conflicting versions are based. If a commonancestor cannot be determined, for example because a resource with the same name and path wascreated and committed by two different developers, the comparison becomes a two-way comparison.
1. In the Project Explorer, highlight the files that you want to compare. You can select up to threedifferent files.
2. Right-click, and on the shortcut menu, click Compare With and then click Each Other.
• In a two-way comparison, the Text Compare window displays the differences (marked in grey)between the two files.
• In a three-way comparison, select the common ancestor – the file against which comparisonswill be made. The Text Compare window displays the two file versions. To display the commonancestor at the same time, clickShow Ancestor Pane
3. Make the required changes to the files
You can navigate through the files using the text compare toolbar:
• Click Next Difference to show the first difference between the files after the cursor location orhighlighted text.
• Click Previous Difference to show the first difference between the files before the cursorlocation or highlighted text.
• Click Next Change to show the first change between file versions after the cursor location orhighlighted text.

Workbench user guideVersion 4.0
40
• Click Previous Change to show the first difference between file versions before the cursorlocation or highlighted text.
You can merge changes from one file to the other using the text compare toolbar:
• Click Copy Current Change from Right to Left to overwrite the highlighted text in the left filewith the highlighted text in the right file.
• Click Copy All from Right to Left to replace the content of the left file with the content of theright file.
• Click Copy Current Change from Left to Right to overwrite the highlighted text in the right filewith the highlighted text in the left file.
• Click Copy All from Left to Right to replace the content of the right file with the content of theleft file.
4. Once you have made your changes, click the File menu and then click Save.5. Click the File menu and then click Close to close the Text Compare window.
Local historyThe Workbench maintains a local history of modifications to programs or other project files changed inthe Project Explorer view.
Each time you save a project file in the Workbench, a snapshot of the current contents of the file isadded to the Workbench's local history. This history provides the ability to take any of your currentprograms and compare or replace them with local history.
History of DeletionsEach time you delete a program or file, the edit history of the item being deleted is added to the localhistory of the containing project or folder. This enables you to restore state from local history, or toselect which particular state from the item's history to restore. See Restore from local history (page42) and Replace from local history (page 41) for more information.
Local History PreferencesLocal history preferences allow you to control how long to keep the local history, how many entries tokeep in the history, and the maximum file size that can be recorded. See Local history preferences(page 42) for more information.
Compare with local historyTo compare a current saved project file with a previous version:
Workbench user guideVersion 4.0
41
1. In the Project Explorer view, select the required file, right-click, clickCompare With and then clickLocal History on the shortcut menu..
A History window opens listing program revisions with revision times.2. Double-click the revision with which you want to compare the current version of the file.
The Text Compare window opens showing the differences (marked in grey) between the twoversions. The current version is shown on the left, with the local history version on the right.
3. Make the required changes to the files
You can navigate through the files using the text compare toolbar:
• Click Next Difference to show the first difference between the files after the cursor location orhighlighted text.
• Click Previous Difference to show the first difference between the files before the cursorlocation or highlighted text.
• Click Next Change to show the first change between file versions after the cursor location orhighlighted text.
• Click Previous Change to show the first difference between file versions before the cursorlocation or highlighted text.
You can merge changes from one file to the other using the text compare toolbar:
• Click Copy Current Change from Right to Left to overwrite the highlighted text in the left filewith the highlighted text in the right file.
• Click Copy All from Right to Left to replace the content of the left file with the content of theright file.
4. Once you have made your changes, click the File menu and then click Save.5. Click the File menu and then click Close to close the Text Compare window.
Replace from local historyHow to revert a program in a project back to a previous saved version
You can either replace the current version with the previous version or select a version from the localhistory.
1. To replace the current version with the previous version, in the Project Explorer right-click therequired file and, on the shortcut menu, click Replace With and then click Previous from LocalHistory
2. To replace the current version with a version from the local history:
a. In the Project Explorer right-click the required file and, on the shortcut menu, click ReplaceWith and then click Local History
Workbench user guideVersion 4.0
42
b. In the Compare dialog, Double-click a revision to review and select the required version. ClickReplace to use the selected version.
Restore from local historyRecovering a project file that has been deleted in the Project Explorer view.
To restore a project file:
1. In the Project Explorer view, right-click either the project or a contained folder and on the shortcutmenu click Restore from Local History.
2. In the Restore from Local History, select the files to restore:
1. Click the check box next to the project file name To restore the last version of that file.2. If a selected file has a saved local history, select the file name and choose the required version of
the file in the Select an edition of a file panel.3. Click Restore to recover the selected files and close the Restore from Local History dialog box.
Local history preferencesBy default, the Workbench keeps seven days of local history for each individual project file, with amaximum of fifty versions for each file. There is also a default of 1 MB of storage allocated for eachprogram's local history.
The above settings can be changed as follows:
1. Select Window ➤ Preferences… ➤ General ➤ Workspace ➤ Local History.
The Local History dialog is displayed.2. Set any of the following as required:
• Days to Keep Files - The number of days that you want to keep records for any one project file.For example, if you type 20, then a history of saved versions from the last twenty days will bekept. The default value is 7 days.
• Maximum Entries per File - The number of versions to keep for any one project file. If thisnumber is exceeded, the oldest changes are discarded to make room for the new changes. Thedefault is 50 versions per file.
• Maximum File Size (MB) - The maximum file size (in MB) for a project file's local history. If thissize if exceeded, then no more local history is kept for the file. The default size is 1MB.
Note:The Days to Keep Files and Maximum Entries per File are only applied when the local history iscompacted on server shutdown.
Workbench user guideVersion 4.0
43
Switching to a different workspaceHow to switch to a different workspace, to use a different group of projects:
1. Click the File menu, click Switch Workspace and click Other.2. In the Workspace Launcher, select the required Workspace or expand the Recent Workspaces
list and select the required workspace if it appears in the list.3. Click OK to restart Workbench displaying the selected workspace.
File ExplorerThe File Explorer view is used to edit and manage SAS language programs and related files, programsor datasets on your file system
The File Explorer view can be used to manage SAS language programs and associated files onremote and local file systems. Because the File Explorer view does not manage content throughprojects, you cannot use the local history, not use Workbench functionality to import or export projectsor archives.
The File Explorer view enables access to all files that are available on your local file system, and onany connected remote hosts. The view also displays the following object types:
• Connections: The root node that represents a connection to a host machine. This can be either localor remote.
• Shortcuts: A directory on a file system selected for management via the File Explorer view.
• Symbolic linked file: A file that points to another file in the host file system via a symbolic link.• Symbolic linked directory: A file that points to another directory in the host file system via a symbolic
link.
Selecting an item (other than a connection) in the File Explorer displays information about that item inthe Properties view.
Displaying the viewTo display the File Explorer view:
From the Window menu, click Show View and then click File Explorer.
Connections and shortcutsIt is only possible to view files on remote systems when you have an open host connection. The hostconnection is opened from the Link Explorer view, or when starting WPS servers in the WPS ServerExplorer view.
Workbench user guideVersion 4.0
44
Each host connection can have several directory shortcuts, each providing access to the files andfolders on the associated file system.
To create a new directory shortcut, in the File Explorer view, right-click on the required folder, clickNew and click Directory Shortcut in the shortcut menu and enter a Directory Name in the DirectoryShortcut dialog box.
Working with files and foldersIt is possible to perform the following operations on files and folders within the File Explorer:
• Create a new directory shortcut, directory or file.• Selected files and directories to be moved, copied or deleted.• Run a program on a selected WPS server.• Rename a selected file or directory.• Analyse the contents of programs, and folders containing programs (see Code Analyser (page 12)
for more information).
File explorer preferencesTo display hidden files and folders in the File Explorer view, in the Preferences dialog box, expand theWPSgroup, select File Explorer and in the File Explorer panel select Show hidden files and folders.
Managing files in the File ExplorerThe File Explorer view can be used to manipulate the various objects in the available local and remotefile systems.
When you open files from the File Explorer view, the file is displayed in the most appropriate Editorview:
• Program files (those with .wps and .sas file extensions) are opened in the SAS editor.• Text files (.txt) are opened in the Text Editor.• XML files (.xml) are opened in the Text Editor.• HTML files (.html) are opened in Workbench where possible (this is platform-dependent).
On some operating systems, the Workbench attempts to open the application associated with the file,for example PDF files, even if the file cannot be opened in Workbench itself.
Create a new folder in a file systemFolders can be created wherever you have appropriate operating system privileges for the particularlocal or remote host.
Workbench user guideVersion 4.0
45
1. Click the Window menu, click Show View and then click File Explorer to display the File Explorerview.
2. In the File Explorer view, right-click the required parent directory shortcut or Folder, click New andclick Folder on the shortcut menu.
3. Enter a new Folder name and click Finish.
Create a new file or program in a file systemTo create a new file in an existing file system, proceed as follows:
1. In the File Explorer view, right-click the Directory Shortcut or Folder, click New and then click Fileon the shortcut menu.
If you are creating a new SAS language program, click New and then click Program on the shortcutmenu.
2. In the dialog box, enter a Filename, including file extension, and click Finish.
If you are creating a new SAS language program, the Filename has a default extension of .sas,you can change this to .wps if you prefer.
Moving a file in a file systemYou can move files to other folders in your local and remote connections. To move objects in the FileExplorer view:
1. Click the Window menu, click Show View and then click File Explorer to display the view.2. In the File Explorer view, right-click the required object to move and click Cut on the shortcut menu.3. Right-click the target Shortcut Directory or Folder to which you want to move the object and click
Paste on the shortcut menu.
Alternatively, you can select the object you want to move and drag the object to the requiredShortcut Directory or Folder.
Renaming an object in a file systemTo rename a file system object:
1. In the File Explorer view, right-click the required object to rename and click Rename on the shortcutmenu.
2. In the Rename File, enter a new name for the file and click OK.
You may need to refresh the connection in the Link Explorer view to see the change.
Workbench user guideVersion 4.0
46
Deleting an object from a file systemTo delete an object from a file system, proceed as follows:
1. In the File Explorer view, Right-click on the required object to delete and click Delete on theshortcut menu.
2. In the Confirm Delete dialog box, click OK to confirm deletion.
Once you confirm the deletion of the object from the file system, the operation cannot be undone.
Link ExplorerThe Link Explorer view allows you to manage host connections, and any WPS servers on thoseconnections.
The Link Explorer view is the key view if you are using WPS Link – the collective term for thetechnology used to provide a client/server architecture.
Using the Workbench on your local PC, you can connect to a remote machine on which the WPS serveris installed to run SAS language programs. The output from the remote server can be viewed andmanipulated in Workbench, in the same manner as a locally-executed program.
Displaying the viewTo display the Link Explorer view
From the Window menu, click Show View and then click Link Explorer.
Objects displayedThere are two node types visible in this view:
1. A Connection node – represents a connection to a host machine. The connection can either be alocal connection or a connection to a remote machine and contain one or more WPS server nodes.
2. A Server node – represents the WPS server installation where you may run your SAS languageprograms.
Managing the connections and serversFrom this view you can:
• Open or close a local or remote host connection.• Stop, start or restart a WPS server in the connection• Export a host connection (see Export a host connection definition (page 50)).• Define a new WPS server (see Define a new WPS server (page 51)).
Workbench user guideVersion 4.0
47
• Import or export a WPS server definition (see Import a WPS server definition (page 52) orExport a WPS server definition (page 51)).
A WPS server can be moved or copied to a different host connection. A drag and drop operation movesthe server from its current host connection to the target host connection. Press and hold the Ctrl key atthe same time to copy the WPS server to the new host connection.
Commands (top right corner of the view)The view contains the following commands
• Collapse All – collapse the view to show just the root nodes.• Create a new remote host connection – add a new remote connection.• Import a host connection definition –import a connection definition file.
Local host connection propertiesThe local host is created during workbench installation, and the only properties available for a local hostconnection are directory shortcuts.
To access local host connection properties, in the Link Explorer view, right-click on the Local hostconnection and click Properties in the shortcut menu.
A directory shortcut is a shortcut to a directory on the local file system. The local shortcuts that arecreated by default differ in accordance with the operating system on which you are running theWorkbench:
• On Microsoft Windows operating systems, there will be Home and Workspace shortcuts, and alsoa shortcut for each available local drive. For example, if you have drives C:\ and D:\ on yourcomputer, there will be four shortcuts by default.
• On all other operating systems, only the Home (~/) and Root (/) shortcuts are created by default.
Create a new shortcutTo create a new directory shortcut:
1. In the Link Explorer view, right-click on the Local host connection and click Properties in theshortcut menu.
2. Click Add to display the Directory Shortcut dialog box.3. In Directory Name enter the displayed shortcut name, and in Directory Path he full path of the
target directory. Click OK to save the changes.
Workbench user guideVersion 4.0
48
Connect to a remote WPS serverHow to create a link from Workbench to a WPS server on a remote machine.
The WPS server must exist before a connection can be made from Workbench. The remote serverrequires an SSH server and a licensed copy of the WPS server. For information about setting up aremote server for WPS, see the WPS Link user guide and reference.
Client/server installation summaryBefore connecting to a remote server, you require the hostname for the remote server, the user nameand password log on credentials, and the full WPS server installation path on the remote server.
To create a connection to a remote server:
1. Create a connection to the remote host. See Create a new remote host connection (page 48).2. Add a WPS server to this remote host. See Define a new WPS server (page 51).
Create a new remote host connectionBefore creating a new connection, you will need
• SSH access to the server machine that has a licensed WPS server installation.• The installation directory path for the WPS server installation.
You may need to contact the administrator to obtain this information, and to ensure that you haveaccess. For more details about SSH authentication, see the WPS Link user guide and reference.
To create a new remote host connection:
1. Click the WPS menu, click Link and then click New Remote Host Connection.2. In the New Server Connection dialog, choose one of:
• New SSH Connection (3.1 Compatibility) if you require backwards compatibility to a WPSserver version 3.1.
• New SSH Connection (3.2 and later -- UNIX, MacOS, Windows) for all other connections.
Note:If you select New SSH Connection (3.2 and later -- UNIX, MacOS, Windows), and subsequentlyrevert to WPS Version 3.1, you will lose any remote host connections set up in WPS Version 3.2.
3. Click Next and complete the New Remote Host Connection (3.2 and later) dialog box:
a. In Hostname, enter the name or IP address of the remote server machine.b. Unless modified by your system administrator, the default Port value (22) should be left
unchanged.c. In Connection name enter a unique name to be displayed in Workbench for this connection.
Workbench user guideVersion 4.0
49
d. In User name, enter your user ID on the remote host.
Click the required check box:
Option DescriptionEnable compression Controls whether or not data sent between
the Workbench and the remote connection iscompressed.
Verify Hostname Confirms whether the host you have specified inthe Hostname entry exists.
Open the connection now Whether the connection is automatically openedimmediately
Open the connection automatically onWorkbench startup
Controls whether the connection is automaticallyopened when the Workbench is started.
4. Click Next to define the connection directory shortcuts:
1. Click Add to display the Directory Shortcut dialog box.2. In Directory Name enter the displayed shortcut name, and in Directory Path he full path of the
target directory. Click OK to save the changes.
Enter the displayed shortcut name in Directory Name, and the full path in Directory Path and clickOK.
5. Click Finish to save the changes.
If you have not previously validated the authenticity of the remote host, an SSH2 Message dialogbox is displayed:
If the identity of the host is correct, click Yes.6. In the Password Required dialog enter your password for the remote machine and click OK.
Workbench user guideVersion 4.0
50
The Link Explorer view contains an entry for the new connection, with a server on which you can runSAS language programs.
Advanced connection options
Controlling the environment variables available to a remote WPS server.
By default the WPS server process inherits the interactive shell environment for the user under whoseID the server is being started. The default environment may not include everything required by the WPSserver, for example database client shared libraries may not be defined for the server.
On Unix/Linux systems, this might require that any special environment variables for the WPS serverare added to the LD_LIBRARY_PATH; or the /etc/profile or ~/.profile modified so thatdatabase client shared libraries can be loaded by the WPS Server.
An alternative on Unix/Linux is to place a wpsenv.sh file in the WPS installation directory, or in yourhome directory. This file is automatically run before the server is launched
On Windows, any special environment variables for the WPS server should be configured through theControl Panel, as either system or user environment variables.
Note:All processes running as the user will see the created variables, and there is no way to specify that theyshould only be visible to the WPS process.
Export a host connection definition
A host connection definition can be exported from Workbench to enable sharing in a workgroup or tocopy connection definitions between workspaces.
To export host connection definitions:
1. In the Link Explorer view, select the connection for which definitions will be exported.2. Right-click the connection and click Export Host Connection in the shortcut menu.3. In the Export to File dialog box, navigate to the save location, enter a File name and click Save.
The exported file .cdx contains the connection definition in XML format.
The host connection definition is saved to the selected file, which can be shared in the workgroup.
You can select multiple connections in the Link Explorer view and export them all to the samedefinition file to share more than one connection definition.
See Import a host connection definition (page 51) for how to import the connection definitions intoa workspace.
Workbench user guideVersion 4.0
51
Import a host connection definition
A host connection definition can be imported into Workbench to use consistent host definitions in aworkgroup or between workspaces.
This task assumes that you have previously exported some connection definitions to a file, or havebeen provided with an export file created by someone else in your work group.
1. Click the WPS menu, click Link, and then click Import Host Connection Definition.2. In the Import Remote Host Connection dialog box, select the required connection definition file
(.cdx) and click Open.
The host connection definition is imported from the selected file.
If there are any name clashes, the imported connection definition is automatically renamed so that ithas a unique name within your list of connections.
Define a new WPS serverWorkbench allows you to have multiple WPS servers defined on a local or remote host connection.
To define a new server:
1. In the WPS menu, click Link, click New WPS Server and then either click Local or the connectionname of the remote server.
2. In New WPS Server dialog box, enter a unique display name in Server name.
If you are defining a new remote WPS server, enter the path to the WPS executable on the remoteserver in Base WPS install directory.
3. Click Start the server now and Start the server automatically on connection startup to ensurethe WPS server can be used whenever Workbench is started.
4. Click Finish save the changes.
The Link Explorer view contains an entry for the new WPS server. If required, you can configure thestartup options for the new server, see WPS server properties (page 53).
Export a WPS server definition
A WPS server definition can be exported from Workbench to enable sharing in a workgroup or to copyconnection definitions between workspaces.
To export a WPS Server definition:
1. In the Link Explorer view, select the server for which the definition will be exported.
Workbench user guideVersion 4.0
52
2. Right-click the server and click Export WPS Server Definition in the shortcut menu.3. In the Export to File dialog box, navigate to the save location, enter a File name and click Save.
The exported file .sdx contains the connection definition in XML format.
The WPS server definitions will be saved to the selected file, which can be shared in the workgroup.
You can select multiple servers in the Link Explorer view and export them all to the same definition fileto share more than one connection definition.
See Import a WPS server definition (page 52) for how to import the server definitions into aworkspace .
Import a WPS server definition
A WPS server definition can be imported into Workbench to use consistent definitions in a workgroup orbetween workspaces.
A WPS server definition can only be imported into a host connection. If you need to create a hostdefinition, see Create a new remote host connection (page 48).
To import a WPS server definition
1. Click the WPS menu, click Link, and then click Import WPS Server Definition. Launch the Importfrom File dialog by doing one of the following:
2. In the Import from File dialog box, select the required server definition file (.sdx) and click Open.
The WPS server definitions are imported from the selected file.
If there are any name clashes, the imported server definition is automatically renamed so that it has aunique name within your list of WPS servers.
WPS Server ExplorerThe WPS Server Explorer view is used to display all Filerefs, libraries, catalogs and datasetsgenerated from running a SAS language program on a WPS server.
While the WPS server is running, the Filerefs and library contents generated from previous SASlanguage programs are preserved. To remove these items, you need to restart the server.
Displaying the viewTo display WPS Server Explorer view
From the Window menu, click Show View and then click WPS Server Explorer.
Workbench user guideVersion 4.0
53
Objects displayedThe view contains a WPS Server node that represents the WPS server where your SAS languageprogram has run. Under this node:
• Libraries – a parent node for individual library items.
The libraries node contains a library node called Work. This is the default temporary library used ifone is not specified in a program.
• Library – a collection of catalogs and datasets.
If you use a LIBNAME statement in a SAS language program to specify your own library name, thenyou will see a library node with the specified name also listed in the view.
• Catalog – a collection of user-defined items such as formats and informats.• Dataset – a data file containing numeric and/or character fields.• Dataset View – a dataset created by invoking a view in the source data.• Numeric Dataset Field – a dataset field that contains numeric values.• Character Dataset Field – a dataset field that contains character values.• Filerefs – The parent node for Fileref items.• Fileref – an individual reference to a file.
Filerefs are normally generated automatically, but you can create a Fileref using the FILENAMEstatement, for example:
filename shops 'c:\Users\fred\Desktop\4.1-Shops.xls';
The link between a Fileref and its associated external file lasts for the duration of the current WPSsession, or until you change it or discontinue it. To keep a Fileref from session to session, then savethe FILENAME statement in the relevant program(s).
If you select an item in the WPS Server Explorer view, information about that item displayed in theProperties view.
WPS server propertiesThe following properties and information are available for a WPS server:
Code SubmissionSets the server working directory to the directory from which the program is opened.
EnvironmentA read-only list describing the server's environment (working directory, process ID andenvironment variables). This information is only available when the server is running.
Workbench user guideVersion 4.0
54
Macro VariablesA list of the automatic and global macro variables used by the server, and the associated values.This information is only available when the server is running. Existing variables cannot bemodified, but new variables can be created.
StartupThe main page has an option called Start the server automatically on connection startup.Ensure that this is selected to automatically start the server whenever the associated connectionis launched. The Initial current directory for server process option specifies the workingdirectory for the server, determining where the output is generated. If you have %INCLUDEstatements in your program using relative paths, it is important that you start the server in thecorrect directory to allow those %INCLUDE statements to find the files.
The Startup page contains:
System OptionsEnables you to specify any WPS options to be processed by the server on startup. ClickAdd... to specify the name and value of the option. You can then use Edit... and Removeto modify and delete any previously-created options and values.
Environment Variables
For a local WPS server only
Used to specify any environment variables to be set before the server is started. ClickNew..., to specify the name and value of the variable. You can use Edit... and Remove tomodify and delete previously-created environment variables.
System OptionsWhen the WPS server is running, provides a read-only list of system options and their valuescurrently set on the server. This is the same information as would by provided via the OPTIONSprocedure.
WPS Licence InformationDisplays the licence information for the server. The information cannot be modified and is onlyavailable when the server is running.
WPS Software InformationDisplays details about the WPS software. The information cannot be modified and is onlyavailable when the server is running.
PropertiesThe Properties view displays the properties of a selected object.
Select an object in one of the following views to show the object details in the Properties view:
• File Explorer view
Workbench user guideVersion 4.0
55
• Link Explorer view• Project Explorer view• Search view• WPS Server Explorer view
Displaying the viewTo display the Properties view
From the Window menu, click Show View and then click Properties.
EditorWhen you open any type of file in the Workbench, the file is opened as a tab in the Editor view .
The Editor view is the main interactive view when creating or editing SAS language programs. Theview is also used to display output such as result datasets or log information.
Datasets opened from the WPS Server Explorer view, and files opened from the Project Explorerviewor File Explorerview can be edited. Logs and output files can be viewed bu not edited.
The Editor view can be split to view or modify two or more files together. To split the view, from theWindow menu, click Editor and then click Toggle Split Editor (Vertical). The editor can also be splithorizontally by using Toggle Split Editor (Horizontal), and you can open another copy of the currentfile by using the Clone option.
BookmarksThe Bookmarks view lists the bookmarks added to any program or file in a project.
You can add bookmarks on any line in any program or file you can open from the Project Explorerview, and edit with the Editor view.
The Bookmarks view lists bookmarks for all programs in all open projects. Bookmarks cannot becreated for programs not managed through the Project view.
To open a file at the bookmark, double-click the bookmark in the Bookmarks view. The file is openedin the Editor view, with the bookmarked line highlighted, or at the first line in the file if the entire file wasbookmarked
Displaying the viewTo display the Bookmarks view:
Workbench user guideVersion 4.0
56
From the Window menu, click Show View and then click Bookmarks.
Bookmark anchorsA bookmark is an anchor that you can specify to navigate back to that point at any time.
There is no limit to the number of bookmarks that you can create either against a particular line in theprogram, or a program file as a whole.
You can list, and navigate between, all your bookmarks using the Bookmarks view. If you export aproject containing bookmarks, the individual bookmarks are not exported with it.
Add a bookmarkTo add a new bookmark on a particular line in a program:
1. Open the program or file in the Editor view.2. Right-click in the grey border to the left of the required line and click Add Bookmark on the shortcut
menu:3. Enter a bookmark name in the Add Bookmark dialog box and click OK.
A bookmark tag ( ) is displayed in the border, and a corresponding entry made in the Bookmarksview.
You can also add a bookmark to a whole file: select the file in the Project Explorer view, click Editmenu and then click Add Bookmark.
Delete a bookmarkTo delete a bookmark:
1. Click the Window menu, click Show View and then click Bookmarks.2. In the Bookmarks view, right-click the bookmark's description and click Delete on the shortcut
menu.
Workbench user guideVersion 4.0
57
TasksThe Tasks view lists any tasks added to any program or file in a project.
You can add tasks on any line in any program or file you can open from the Project Explorer view, andedit with the Editor view.
The Tasks view lists tasks associated with all programs in all open projects. Tasks cannot be createdfor programs not managed through the Project view.
You can use the Tasks view to change the priority levels, modify descriptions, and mark them ascompleted or leave them uncompleted.
You can add Task markers (page 57) (reminders) against any line in a program that has beenopened from the Project Explorer (page 34), and associate each of them with notes and a prioritylevel. To list, update and navigate between any tasks you have added, you need to use the Tasksview.
To open a file associated with a task, double-click the task in the Tasks view. The file is opened in theEditor view, with the relevant line highlighted.
Displaying the viewTo display the Tasks view:
From the Window menu, click Show View and then click Tasks.
Task markersA task marker represents a reminder about a work item.
Task markers can only be added to programs in a project. You can add a task and associate a shortdescription and a priority level (one of High, Normal or Low) against any line in a program. You can listand navigate between all your tasks in the Tasks view.
There is no limit to the number of task markers that you can add to a program. However, if you export aproject, the individual tasks are not exported with it.
Add a taskTo add a new task marker on a particular line in a program:
1. Open the program or file in the Editor view.2. Right-click in the grey border to the left of the required line and click Add Task on the shortcut
menu.
Workbench user guideVersion 4.0
58
3. In the Properties dialog, enter a Description and select the Priority for the task.4. Click OK, to save the task
A task marker ( ) is displayed in the border, and a corresponding entry in the Tasks view.
Delete a taskTo delete a task:
1. Click the Window menu, click Show View and then click Tasks.2. Right-click on the task's description, and click Delete on the shortcut menu.
OutlineThe Outline view displays structural elements for a file that can be used to locate the line associatedwith the element.
Opening or giving focus to a program, log, listing or HTML result file, automatically refreshes theOutline view to display the structural elements that are relevant to the active item.
Displaying the viewTo display the Outline view:
From the Window menu, click Show View and then click Outline.
Displayed structural elementsViewing programs displays the following structural elements in the Outline view:
• Global statement
• DATA step
• Procedure
• Macro
Viewing the log file displays the following structural elements in the Outline view:
• An individual log entry.
• Error
• Warning
Viewing the output results from program execution displays the following structural elements in theOutline view:
Workbench user guideVersion 4.0
59
• Results parent node
• HTML tabular output
• Listing tabular output
You can control which structural elements are displayed in the Outline view using the toolbar at the topof the view panel.
Output ExplorerThe Output Explorer view displays the output files generated from running a SAS language program.
Output items are associated with the server on which they were generated, and may be one of thefollowing types:
• Listing output• HTML output• PDF output
Log output is always shown for each server.
Displaying the viewTo display the Output Explorer view:
From the Window menu, click Show View and then click Output Explorer.
View outputDouble-click on one of the output nodes to open the output type in its associated editor. For outputtypes other than log output the individual result elements are listed in the Results Explorer view whenthe output is opened.
Results ExplorerThe Results Explorer view displays the results from every SAS language program that has beenexecuted.
The view contains hierarchical links to the results, grouped by server, since the last time that the serverwas started.
Displaying the viewTo display the Results Explorer view:
Workbench user guideVersion 4.0
60
From the Window menu, click Show View and then click Results Explorer.
OutputOnce a program has been executed, an entry appears under the relevant server for every procedurethat created output. For example PROC PRINT will produce an entry named The PRINT Procedure.Expand this link to find each type of output that has been generated.
ConsoleThe Console view displays all system standard output and system standard error messages producedby a WPS server.
The Console view is automatically opened when a system error is reported.
Displaying the viewTo display the Console view:
From the Window menu, click Show View and then click Console.
SearchThe Search view displays the results of searches carried out using the Search dialog box.
When you click an item in the Results view, the file is opened in the Editor view, with the relevant linehighlighted.
To open the Search dialog box, click theSearch menu and then click Search. The Search view opensautomatically to display the results.
Working with viewsThis section describes how to manipulate the Workbench views both individually and as part of overallview stacks (page 61).
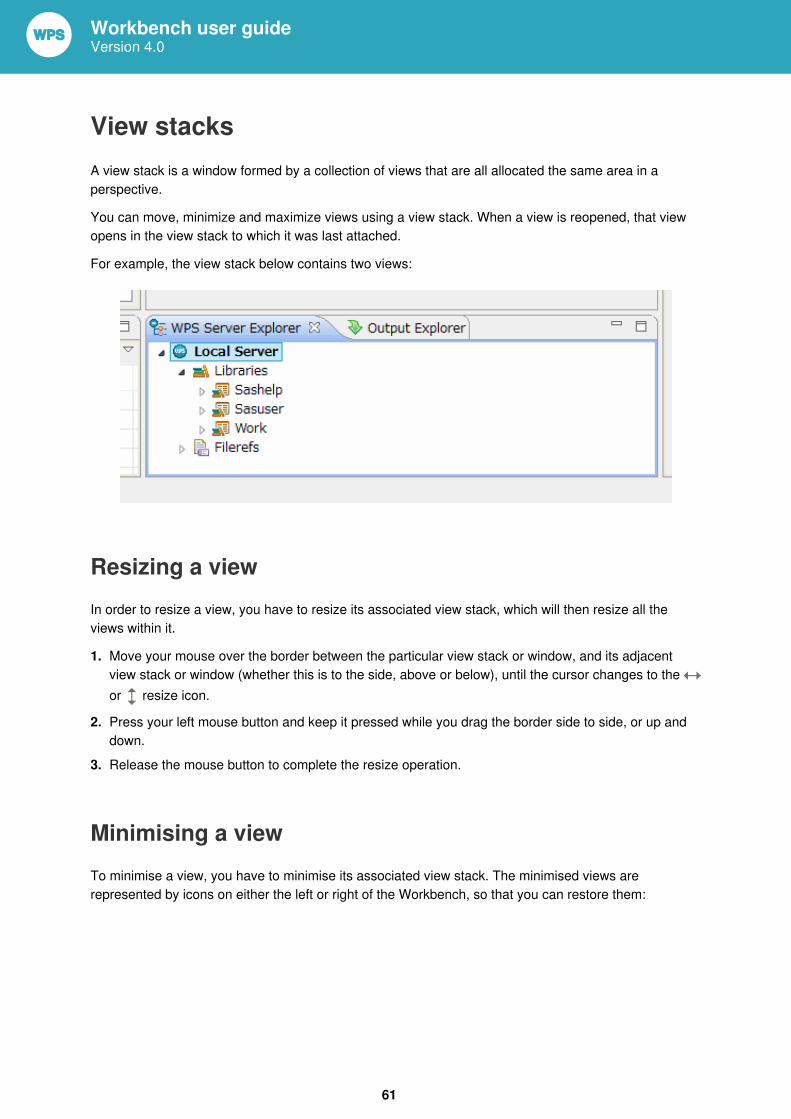
Workbench user guideVersion 4.0
61
View stacksA view stack is a window formed by a collection of views that are all allocated the same area in aperspective.
You can move, minimize and maximize views using a view stack. When a view is reopened, that viewopens in the view stack to which it was last attached.
For example, the view stack below contains two views:
Resizing a viewIn order to resize a view, you have to resize its associated view stack, which will then resize all theviews within it.
1. Move your mouse over the border between the particular view stack or window, and its adjacentview stack or window (whether this is to the side, above or below), until the cursor changes to the or resize icon.
2. Press your left mouse button and keep it pressed while you drag the border side to side, or up anddown.
3. Release the mouse button to complete the resize operation.
Minimising a viewTo minimise a view, you have to minimise its associated view stack. The minimised views arerepresented by icons on either the left or right of the Workbench, so that you can restore them:
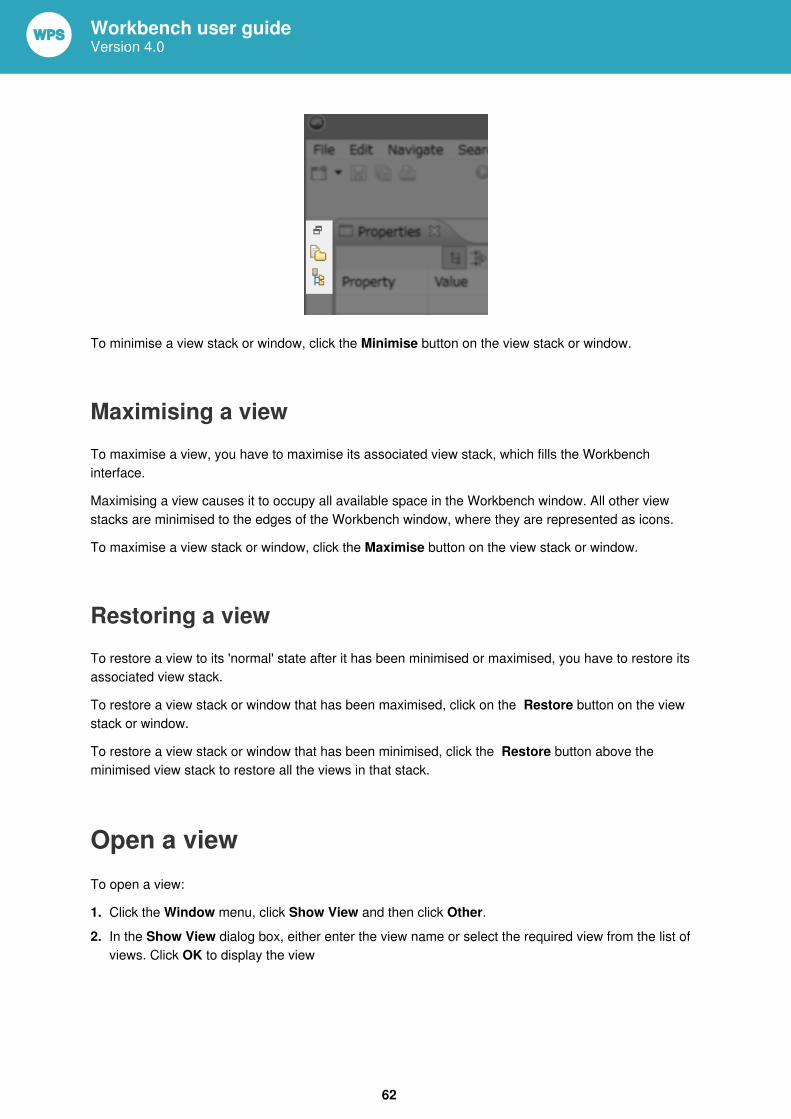
Workbench user guideVersion 4.0
62
To minimise a view stack or window, click the Minimise button on the view stack or window.
Maximising a viewTo maximise a view, you have to maximise its associated view stack, which fills the Workbenchinterface.
Maximising a view causes it to occupy all available space in the Workbench window. All other viewstacks are minimised to the edges of the Workbench window, where they are represented as icons.
To maximise a view stack or window, click the Maximise button on the view stack or window.
Restoring a viewTo restore a view to its 'normal' state after it has been minimised or maximised, you have to restore itsassociated view stack.
To restore a view stack or window that has been maximised, click on the Restore button on the viewstack or window.
To restore a view stack or window that has been minimised, click the Restore button above theminimised view stack to restore all the views in that stack.
Open a viewTo open a view:
1. Click the Window menu, click Show View and then click Other.2. In the Show View dialog box, either enter the view name or select the required view from the list of
views. Click OK to display the view
Workbench user guideVersion 4.0
63
The view is opened in the view stack to which it was last attached. If the required view is already open,it will become active in Workbench.
Detach and re-attach a viewYou can move a view between view stacks in Workbench or into a new detached window.
To detach a view:
Click on the view tab or title bar and drag the view to a different view stack. Alternatively, drag the viewaway from the Workbench window to create a new view stack. If you close a detached view stack, it willstill be detached when you next open it.
To attach a view to a view stack:
Click on the view tab or title bar and drag the view over the required view stack. Use the guides toposition the view in the view stack.
PerspectivesThe positions of available views, windows, view stacks, menu items, and toolbars, together with anyother items that make up the general layout of Workbench, together constitute a perspective.
The default WPS perspective (page 16) can be customised by moving, resizing, adding or removingdifferent views. You can save customised perspectives and to switch between different Workbenchperspectives.
When you open Workbench, the windows views, toolbars and the so on, are displayed in the samearrangement as when closed. This ensures that your preferred perspective is visible when you openWorkbench.
Open a perspectiveTo open a different perspective:
1. Click the Window menu click Open Perspective and then click Other.2. In the Open Perspective dialog box, select the required perspective from the list and click OK.
The selected perspective is displayed in Workbench. If you have other perspectives available, they arelisted in top right of the Workbench, so that you can click switch between them quickly.
Workbench user guideVersion 4.0
64
Close a perspectiveThe quickest way to close a perspective is to go to the area to the right of the Open Perspective icon, right-click on the perspective required, and then select Close. Alternatively:
1. If you have more than one perspective open, ensure that the Workbench is displaying the one thatyou want to close.
Note:To switch perspective, look in the area to the right of the Open Perspective icon, and then clickon the perspective required.
2. Select Window ➤ Close Perspective.
Note:To close all the perspectives, so that only the Default WPS perspective (page 16) remainsavailable for selection, select Window ➤ Close All Perspectives. Your interface will go blank. Torestore the default perspective, select Window ➤ Open Perspective ➤ Other ➤ ➤ WPS (default).
Resetting a perspectiveYou can reset the current perspective back to its default layout at any time, by proceeding as follows:
1. Select Window ➤ Reset Perspective.
2. You are prompted for confirmation that you wish to reset the perspective. Click Yes to confirm thatyou wish to do so.
Saving a perspectiveIf you have changed the layout of a perspective, you can save it under a user defined name for futureuse, as follows:
1. Select Window ➤ Save Perspective As….
2. Enter a name for the perspective at the top of the Save Perspective As... dialog.3. Click OK to continue.
The new perspective appears in the top right of the Workbench, to the right of the Open Perspective icon.
Note:A perspective derives its icon from the one that you had open when you saved it.
Workbench user guideVersion 4.0
65
Deleting a perspectiveTo delete a perspective:
1. Select Window ➤ Preferences.
2. From the left hand tree view of the Preferences window, select General ➤ Perspectives.
3. From the list of Available perspectives, click on the perspective that you want to delete.4. Click Delete to remove the perspective permanently. There is no confirmation prompt.
Note:You can only delete user-defined perspectives. In other words, you cannot delete a perspective thatwas supplied with WPS, including the default WPS perspective.
5. Click OK to close the Preferences window.
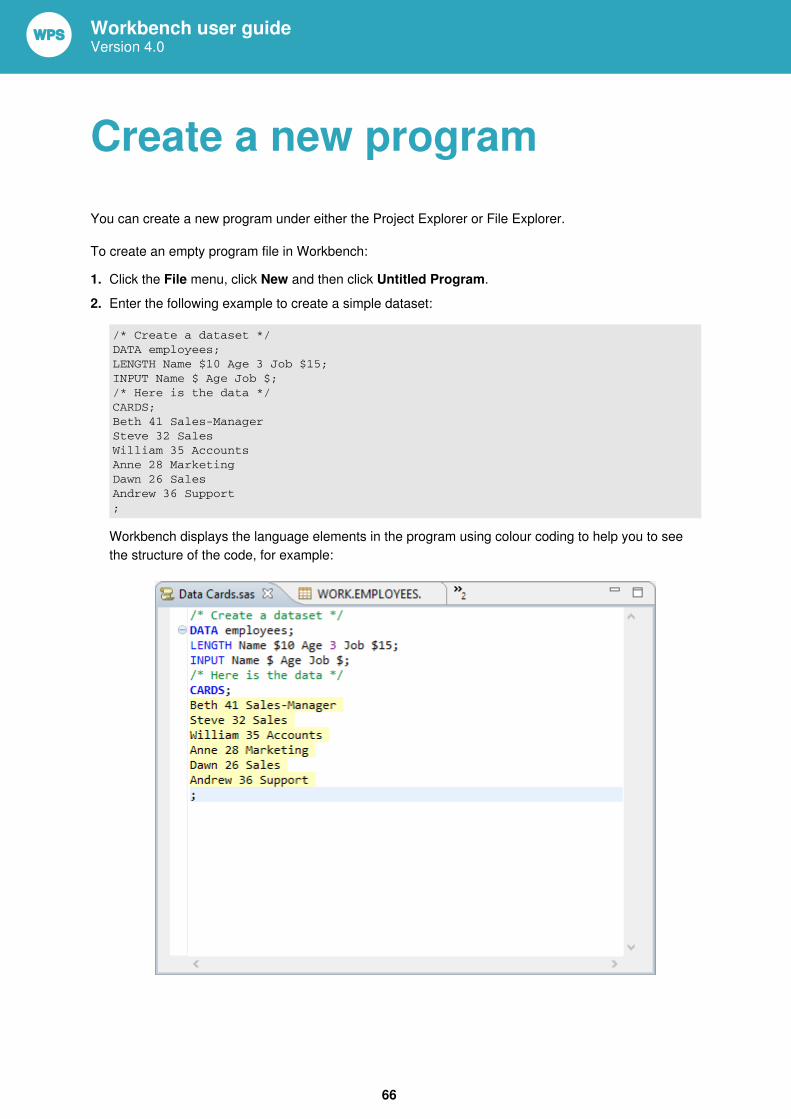
Workbench user guideVersion 4.0
66
Create a new programYou can create a new program under either the Project Explorer or File Explorer.
To create an empty program file in Workbench:
1. Click the File menu, click New and then click Untitled Program.2. Enter the following example to create a simple dataset:
/* Create a dataset */ DATA employees; LENGTH Name $10 Age 3 Job $15; INPUT Name $ Age Job $; /* Here is the data */ CARDS; Beth 41 Sales-Manager Steve 32 Sales William 35 Accounts Anne 28 Marketing Dawn 26 Sales Andrew 36 Support ;
Workbench displays the language elements in the program using colour coding to help you to seethe structure of the code, for example:
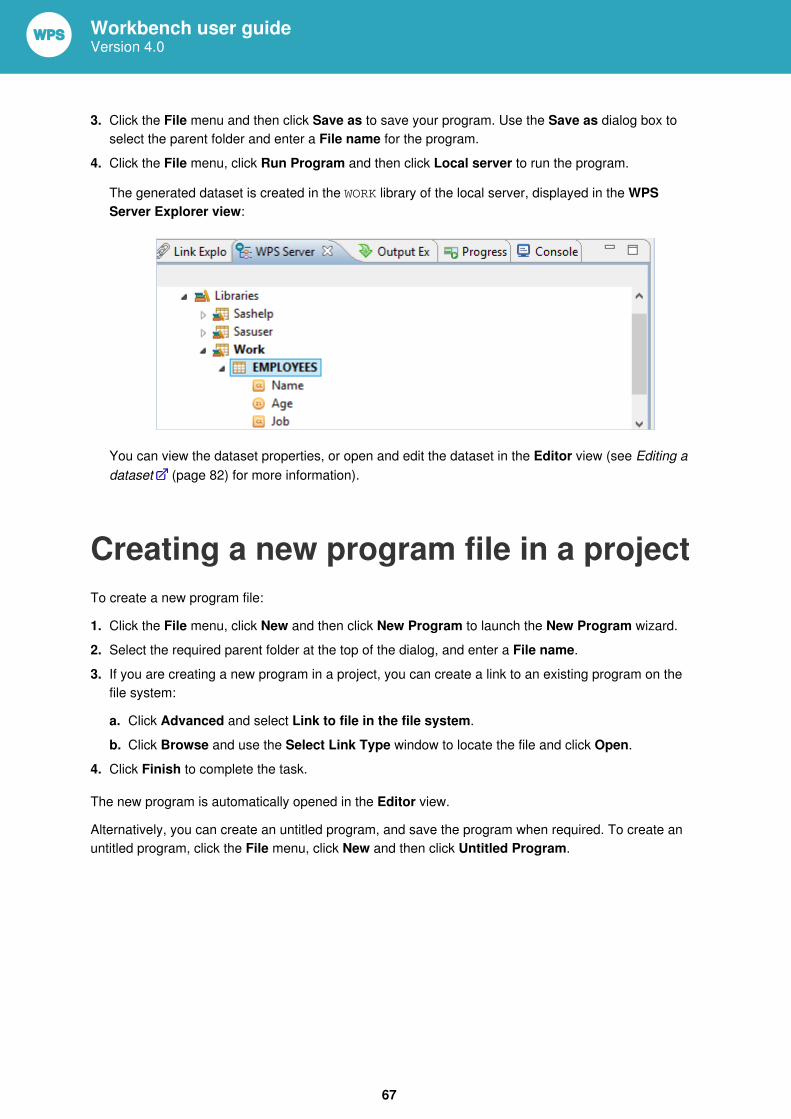
Workbench user guideVersion 4.0
67
3. Click the File menu and then click Save as to save your program. Use the Save as dialog box toselect the parent folder and enter a File name for the program.
4. Click the File menu, click Run Program and then click Local server to run the program.
The generated dataset is created in the WORK library of the local server, displayed in the WPSServer Explorer view:
You can view the dataset properties, or open and edit the dataset in the Editor view (see Editing adataset (page 82) for more information).
Creating a new program file in a projectTo create a new program file:
1. Click the File menu, click New and then click New Program to launch the New Program wizard.2. Select the required parent folder at the top of the dialog, and enter a File name.3. If you are creating a new program in a project, you can create a link to an existing program on the
file system:
a. Click Advanced and select Link to file in the file system.b. Click Browse and use the Select Link Type window to locate the file and click Open.
4. Click Finish to complete the task.
The new program is automatically opened in the Editor view.
Alternatively, you can create an untitled program, and save the program when required. To create anuntitled program, click the File menu, click New and then click Untitled Program.
Workbench user guideVersion 4.0
68
Entering WPS code via templatesYou can define templates that can be entered as code shortcuts into programs. These templates canbe accessed through the normal code completion key sequence (typically, CTRL+Space). For exampleif you define a code template with the name template1, you can type temp followed by CTRL+Spaceand the code completion feature will execute the following actions:
1. Match temp against the list of code templates.2. Find your template called template1.3. Enter the Pattern associated with the template into your program.
The Pattern containing the code to be entered into your program can be as simple or as complex asyou like. It could just be a single word. For example, you could define a code template to expand to thename of a frequently used dataset for which the name is difficult to type. A code template could alsodefine a large amount of text, for example, a boilerplate invocation of a particular procedure. If you areenter a variable into a Pattern, it needs to be enclosed within pairs of '$$' characters.
You can export code templates to an external file, or import them from a previously exported file. Thisallows you to share code templates, or to copy code templates between workspaces.
WPS Code InjectionYou can create SAS language code to be run before or after your program using the Workbench codeinjection feature. The code to run is entered in the Code Injection panel of the Preferences window.
Enable custom pre-code injectionWhen this option is selected, the code in the text box is executed immediately prior to therunning of a program. This option is similar to the INITSTMT system option, except that thiscode is automatically run before each submitted program. (The INITSTMT system option is onlyprocessed on server startup).
Enable custom post-code injectionWhen this option is enabled, the code in the text box is executed immediately following therunning of a program. This option is similar to the TERMSTMT system option except that thiscode is automatically run after each submitted program. (The TERMSTMT system option is onlyprocessed on server shutdown.)
Using Program Content AssistThe SAS Language editor provides a content assistance feature that suggests language elements.When you select these elements, they are automatically added to your program:
Workbench user guideVersion 4.0
69
1. Type a keyword into a program that may be associated with language elements.
For example, type the word PROC.2. After the word, type a single space character. and press CTRL+SPACEBAR.
If there are any expected language elements after the word you typed, a popup list is displayed ofthese elements.
3. You can filter the list by typing in the first few letters of the language element that you want to use.4. Double-click the language element you require and it will added to your program.
WPS syntax colouringWorkbench preferences SAS language Syntax can be modified to provide your preferred color schemein the SAS language editor. To modify the syntax colouring:
1. Click the Window menu and then click Preferences.2. In the Preferences window, expand the WPS group and select Syntax Colouring.3. For each different type of language item, specify attributes relating to Color, Background Color
and whether the item should be displayed in Bold orItalic.4. Click OK to save the changes and close the Preferences window.
Workbench user guideVersion 4.0
70
Run a programYou can run a program from either inside the Workbench or a command line outside of the Workbench.
All libraries, datasets and macro variables are persistent. This means that, once they are assignedduring the execution of a program, they are available to other programs that are run during the sameWorkbench session.
If required you can clear all previous libraries, datasets, variables and output on a WPS server for thecurrent session by restarting the server (see Restart the server (page 33)). Alternatively you canuse the Clear Log , Clear Results options on the WPS menu to reset the log and program outputrespectively.
For more information about controlling the output (datasets, logs, results, and so on) generated from theexecution of a program see Working with program output (page 88).
Run a program in WorkbenchWhen you run a program, the state from previous program executions run on the same WPS server, inthe same server session, is preserved, so the program can interact with the datasets, Filerefs, and soon, that have been previously created.
To run a program in Workbench:
1. Ensure that the program to be run is open and active in the Editor view.2. Click the WPS, click Run selected code from <pathname> and then click Local Server
(Substitute the name of your remote WPS server in place of Local Server). Alternatively use theCtrl + R shortcut key.
Alternatively, you can select and run an unopened SAS language program in either the ProjectExplorer or File Explorer and click Run on in the shortcut menu.
Run part of a programYou can execute part of a SAS language program as follows:
1. Ensure that the relevant program is open and active in the Editor view.2. Highlight the section of code in the program that you want to execute.3. Click the WPS, click Run selected code from <pathname> and then click Local Server
(Substitute the name of your remote WPS server in place of Local Server). Alternatively use theCtrl + R shortcut key.
Workbench user guideVersion 4.0
71
Stop program executionTo stop SAS language program before it has finished:
1. Click the WPS menu, click Cancel and then click Local Server (Substitute the name of your remoteWPS server in place of Local Server) to stop program execution.
2. Once the progress indicator in the lower right corner of the Workbench disappears, this indicatesthat the program has stopped running.
Depending on the particular step that the program is executing, the program may not stop immediately.
When the program stops, a message similar to ERROR: Execution was cancelled is displayed in thelog.
WPS Preferences for running programsPreferences used to control the behaviour of Workbench during program execution.
The WPS page of the Preferences contains options affecting how SAS language programs are run.Before running any programs, select your preferred settings from the page:
Save all modified files before running a program
Specifies whether modified programs open in the Editor view are saved before a program is run.The behaviour can be one of : Always, Never or Prompt. The default ,Prompt, displays theSave and Run dialog box listing modified files.
• If you select Always save resources before run, all modified files open in the Editor vieware saved before the program is run.
• If you select Never save resources before run, no changes to files open in the Editor vieware saved before the program is run. Errors may occur if your program relies on other filesopen in Workbench that have been modified but not saved.
Close all open datasets before running a program
Specifies whether open datasets are closed before running a program. The behaviour can be oneof: Always, Never or Prompt. The default, Prompt, displays the Datasets are open dialog boxlisting all opened datasets.
• If you select Always close datasets before run, all open datasets are closed before theprogram is run.
• If you select Never close datasets before run, all datasets are left open when the program isrun. This may cause errors if the program attempts to modify an open dataset
Workbench user guideVersion 4.0
72
Show log when an error is encountered running a program
Specifies whether the log file is displayed when an error is encountered in a program. Thebehaviour can be one of: Always, Never or Prompt. The default, Prompt, displays the ConfirmLog Display dialog box:
• If you select Remember my decision, the log file is always shown whenever an error isencountered.
• If you clear Remember my decision, the log file is never shown whenever an error isencountered.
Close all open datasets when deassigning a librarySpecifies whether open datasets are closed when the containing library is deassigned. Thebehaviour can be either Always or Prompt. The default, Prompt, displays a dialog listing opendatasets that must be closed to de-assign the library.
Confirm deletionsSpecifies whether confirmation is required when deleting an item in the WPS Server Explorerview.
Confirm server restartSpecifies whether confirmation is required when you restart a server in the WPS ServerExplorer view.
Autoscroll the logSpecifies whether the log output is automatically scrolled (see View the log (page 89)).
Autoscroll the listingSpecifies whether the listing output is automatically scrolled (see View the listing output (page91)).
Show advanced server actionsControls the context menu options available when restarting WPS servers (see Restarting withAdvanced Server Actions (page 33)).
Temporary file locationThis field points to the directory where the Workbench stores temporary files. The log filescreated during execution of a program are stored in this directory, as are any ODS HTML resultsgenerated by programs.
You should be aware that output files, particularly logs, can be sizeable, and so may find that youneed to modify this setting if the field points by default to a location with space restrictions.
Workbench user guideVersion 4.0
73
Command line modeRunning SAS language programs on a WPS server from the command line.
To use the WPS server from a command line, you need to execute the wps program. This executablefile is located in the bin directory of your WPS installation.
When running the WPS server from a command line, you cannot compile programs into run-time jobs.
OptionsRunning wps on its own will not do anything, and so you will need to pass some additional instructionsin the following form:
wps <options> <programFileName>
The <options> arguments can be a list of any of the following:
• -optionname [optionalValue] – specifies a WPS system option.• -config <configFileName> – specifies a configuration file containing WPS system options• -set <envVarName> <envVarValue> – specifies an environment variable that takes effect
when the WPS server is run.
You can define any number of <options> arguments, but the <programFileName> must always bethe last argument on the command line.
System optionsTo set a system option specify:
wps -optionname [optionalValue] <programFileName>
You can pass as many -optionname system options to the WPS server as required. However, youcan only pass single value options, so must specify -optionname [optionalValue] for eachsystem option.
Configuration filesSystem options can be defined in a configuration file, and this file referenced when running the WPSserver:
wps -config <configFileName> <programFileName>
For more information about configuration files and the order in which they are processed, seeConfiguration files (page 105).
Workbench user guideVersion 4.0
74
Environment variablesTo set an environment variable to use with the WPS server:
wps.exe -set <envVarName> <envVarValue> <programFileName>
You can set as many environment variables as you require. However, you can only pass single valueoptions, so must specify -set <envVarName> <envVarValue> for each environment variable.
Log outputWhen you run the WPS server from the command line, log information is sent to the standard output(stdout) for the operating system. Once the program has finished running this log information is lost. Topreserve the log output, redirect stdout to a file, for example:
wps program1.sas > program1.log
Results outputWhen you run the WPS server from the command line, any results generated by the program areautomatically captured into a file called <programFileName>.lst created in the same directory as theprogram. For example, a file called Program1.lst is output if you run a program called Program1.sas.
Workbench user guideVersion 4.0
75
Libraries and datasetsA library is used to store WPS data files (including datasets), folder locations and database connectionsvia the LIBNAME statement.
On the majority of operating systems, a library maps directly to an operating system folder. Theoperating system folder may contain non-WPS files, but only the files with extensions that WPSrecognises will be visible in Workbench.
The default Libraries that are visible under each server in the WPS Server Explorer view are:
• SASHELP – a read-only library containing a variety of system metadata.• SASUSER – used to store datasets and other information that you want to keep beyond the end of
your WPS session. To use this location, add SASUSER. in front of the name of the relevant datasetin your program.
• WORK – where your datasets, catalogs and Filerefs are stored by default. WORK is a 'temporaryworking space' that is automatically cleared of all data when your WPS server session ends.
To preserve output your program creates, you can redefine the work location to a non-temporarylocation (see Set WORK location (page 75)), or use the LIBNAME statement to write outputyou want to keep, to your own permanent location (such as a directory or database connection), forexample:
LIBNAME mylib '/directories/mydirectory/';
Any directory or database connection that you associate with the alias must already exist before youassign it. Once a dataset has been created and stored in this location, the associated alias (mylib)must be used to retrieve the dataset.
Set WORK locationChange the WORK location when SAS language programs are run in Workbench.
To set the pathname for the WORK location that is used every time you start up a particular server:
1. In the WPS Server Explorer view, right-click the required server and click Properties in the shortcutmenu.
2. In the properties list, expand the Startup group and select System Options.3. On the System Options panel, click Add to display the Startup Option dialog box.4. In Name enter WORK, and in Value enter the full pathname for the new WORK location.5. Click OK to save the system option, and click OK on the Properties dialog box to restart the server
and apply your changes.
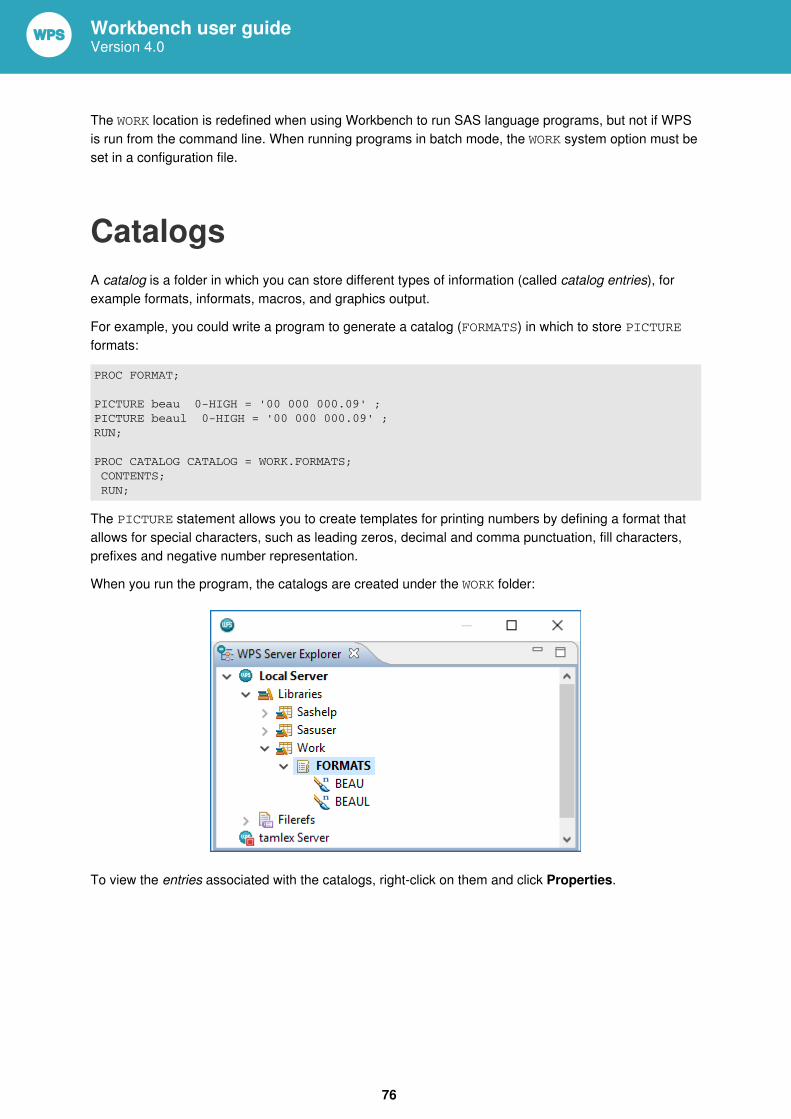
Workbench user guideVersion 4.0
76
The WORK location is redefined when using Workbench to run SAS language programs, but not if WPSis run from the command line. When running programs in batch mode, the WORK system option must beset in a configuration file.
CatalogsA catalog is a folder in which you can store different types of information (called catalog entries), forexample formats, informats, macros, and graphics output.
For example, you could write a program to generate a catalog (FORMATS) in which to store PICTUREformats:
PROC FORMAT;
PICTURE beau 0-HIGH = '00 000 000.09' ; PICTURE beaul 0-HIGH = '00 000 000.09' ; RUN; PROC CATALOG CATALOG = WORK.FORMATS; CONTENTS; RUN;
The PICTURE statement allows you to create templates for printing numbers by defining a format thatallows for special characters, such as leading zeros, decimal and comma punctuation, fill characters,prefixes and negative number representation.
When you run the program, the catalogs are created under the WORK folder:
To view the entries associated with the catalogs, right-click on them and click Properties.
Workbench user guideVersion 4.0
77
DatasetsA dataset is a file created or imported by a WPS server, and stored in a library (see Libraries anddatasets (page 75)). It contains rows and columns known as observations and variablesrespectively.
Observations (rows) usually relate to one specific entity (for example, an order or person).
Variables (columns) describe attributes of an entity (for example, an item ID in an order).
Example DatasetIn this example dataset, each observation is an item in the order. The variables are Order ID, Item ID,Quantity and Unit Price.
Order ID Item ID Quantity Unit Price
10001 47853 3 30.75
10001 23104 10 4.90
10002 62091 1 89.99
Open a datasetYou can open a dataset in the WPS Server Explorer view. Expand the required server node, expandLibraries and double-click the required dataset.
Import datasetsIn addition to the datasets created by running SAS language programs, datasets can be created byimporting data from external files. You can only create datasets in this way on a local WPS Server,currently supported formats are:
• Delimited• Fixed Width• Microsoft Excel Spreadsheet Files
The Dataset Import Wizard enables you to configure the dataset as it is imported. It is not alwaysnecessary to go through all of the steps in the wizard; you can import a dataset from a file and clickFinish on the first page to accept all the default options. If you import a dataset with the same name asan existing one, you will overwrite it.
When importing delimited files, Workbench determines the delimiter character from the data. If thisdelimiter is not correct, you can change it prior to importing the dataset.
When importing fixed width files, Workbench determines column start and end from the data. If thiswidths are not correct, you can change the widths prior to importing the dataset.

Workbench user guideVersion 4.0
78
Spreadsheet files may contain several worksheets. By default, the Workbench will select the first sheetwith data for importing. A sheet may also have names that refer to cell ranges, and it is possible toimport data from these names, and also from the clipboard.
Import of Excel spreadsheet files is also possible via either of the following methods:
• Programatically using the XLSX or Excel engines. For example:
LIBNAME xlsxlib XLSX ‘myfile.xlsx’ HEADER=YES; DATA WORK.IMPORTED;SET xlsxlib.Sheet1;RUN;
• Using the Dataset Import Wizard on Windows local servers. In this approach, WPS uses theEXCEL engine and you will therefore need to have the Microsoft ACE OLEDB engine installed inorder to be able to read and write Excel files in the XLS or XLSX format.
If you do not have Excel installed, you will need to install the Microsoft Access Database EngineRedistributable to import Excel data.
Import datasets from filesTo import files:
1. In the WPS Server Explorer view, right-click local server and click Import Dataset on the shortcutmenu.
Alternatively, you can select a file in from the file system and either drag the file to the local server orcopy and paste the file to the local server.
2. In the Dataset Import dialog box, enter a file name or click Change and open the required file.3. Select a Library Name for the dataset and, if required, change the Member Name to rename the
dataset4. The type of format is inferred from the type of file imported. If required, change the type of Data
Format that best describes the dataset content.5. Click Next and Configure the imported dataset depending on the type:
• If you select Fixed width, for each Column modify the Start value and Width value to alter thewidth of the exported variable.
• If you select Delimited
• Select the required delimiter. To define your own delimiter, select Other and enter thedelimiter character.
• Select Include field names on first row to include the names of the columns.• If you select Excel
• If required, select a different worksheet in Whole Worksheet. You can also select an existingNamed Range from the existing or new worksheet
• Select Include first row names as column headers to use the first row as variable names.
Workbench user guideVersion 4.0
79
6. Click Next and, if required, edit the dataset column properties.
• To change a column name, select a column header in the preview and edit the Column Name.• To change a column label, select a column header in the preview and edit the Column Label.• To change the column data type, select a column header in the preview edit the Column Data
Format.7. Click Finish to import the dataset
Import spreadsheet dataYou can use the Dataset Import Wizard to import range of cells directly from Excel spreadsheets. Dataimported will have the last-saved value. Cell formulae are not reevaluated when the spreadsheet isopened, and the last-saved value is used for these cells.
1. Select the contiguous range in your Excel spreadsheet that you want to import. and copy and pastethe content to the local server in the WPS Server Explorer view.
Alternatively, you can drag the selected range to the required library in the local server.2. In the Dataset Import dialog box, enter a file name or click Change and open the required file.3. Select a Library Name for the dataset and, if required, change the Member Name to rename the
dataset4. The type of format is inferred from the type of file imported. If required, change the type of Data
Format that best describes the dataset content.5. Click Next and Configure the imported dataset depending on the type:
• If you select Fixed width, for each Column modify the Start value and Width value to alter thewidth of the exported variable.
• If you select Delimited
• Select the required delimiter. To define your own delimiter, select Other and enter thedelimiter character.
• Select Include field names on first row to include the names of the columns.6. Click Next and, if required, edit the dataset column properties.
• To change a column name, select a column header in the preview and edit the Column Name.• To change a column label, select a column header in the preview and edit the Column Label.• To change the column data type, select a column header in the preview edit the Column Data
Format.7. Click Finish to import the dataset
Workbench user guideVersion 4.0
80
Export datasetsWPS datasets can be exported under Windows as delimited and fixed width text, and also as MicrosoftExcel spreadsheets. The Dataset Export Wizard allows you to fine tune the contents of export file asrequired.
To export a dataset:
1. In the WPS Server Explorer view, expand the required server, right-click the required dataset andclick Export Dataset on the shortcut menu.
2. In the Dataset Export Wizard, select the export type, one of: Delimited, Fixed Width or Excel. ForExcel, select the required file format and click Next.
3. Configure the exported dataset depending on the export type:
If you select fixed width, for each Column modify the Start value and Width value to alter the widthof the exported variable.
If you select Delimited:
• Select the required delimiter. To define your own delimiter, select Other and enter the delimitercharacter.
• Select Include field names on first row to include the names of the columns.4. In the Select Destination File panel, enter a file name for the exported dataset and click Finish
Clear datasetsYou cannot clear a dataset on its own. The process for clearing datasets (see Restart the server(page 33)) means that you also clear all the other output, such as the HTML output, listing output, logentries, libraries, file references, and so on.
Dataset ViewerYou can view, filter or sort a dataset within the viewer. You can also edit observation variables, removeobservations, and also add new observations.
The contents of a dataset are shown in a grid. The rows of the grid represent dataset observations, andthe columns represent dataset variables.
You can display labels in the column headers of a dataset, re-organise the view by moving columns,and if some of the datagrid columns are irrelevant for a task, you can hide them.
Workbench user guideVersion 4.0
81
ModeA dataset is opened in Browse mode, but can be converted to Edit mode if you want to make changesto the data. To edit the dataset content, click the Data menu and then click Toggle Edit Mode.
Organising the datasetYou can manipulate the view of the dataset so that you hide variables you do not need, and movecolumns so that they are in a different order. Any changes made in this view do not change theunderlying data.
Show labelsYou can specify whether to display labels for columns rather than column names. In the Preferenceswindow click WPS, click Dataset Viewer and then click Show labels for column names.
Hide variablesTo hide a datagrid column:
1. Right-click the column header for the variable you want to hide.2. Click Hide column(s).
The datagrid column disappears from the view. If you hide a column for which filtering is currentlyactive, you need to confirm that you want to remove the filter and hide the column.
Show hidden variablesTo show previously hidden dataset variables:
1. Right-click the dataset header row.2. Click Show / Hide Columns.3. In the Show / Hide Columns dialog, select the columns to show and click OK.
Move columnsYou can move columns in the dataset view:
1. Left-click and hold the mouse button on the column header.2. Drag the column to where you want it to be.
You will see a thick grey line appear between columns, indicating where the column will appear.3. Release the mouse button, and the column appears in the indicated location.
Workbench user guideVersion 4.0
82
Editing a datasetYou can edit observations, and also add and delete them, if the dataset is in Edit mode.
Controls for editing a dataset are available from the Data menu, from the toolbar, and also from thedataset context menu.
If the dataset is open in Browse mode, you can switch to Edit mode by clicking Edit:
You can make as many changes as required, changes are not automatically writen to the dataset, youmust choose to save changes. If saving your changes fails, then any changes that were not writtenremain visible and details of the failure are written to the Workbench log
Modify observations
You can edit observation variables (cells) as raw values. If your variables have any formatting applied,you will not see this during editing; once edit is complete the formatted observation is displayed.
1. Double click the cell that you want to edit:Variable Type DescriptionNumeric The raw, unformatted value is displayed in the cell where you can
enter a new value. If you want to see how the current cell appearswhen formatted , press Shift +F8 and it will be shown as a tooltip.
DATE, DATETIME or TIME DATE, DATETIME and TIME values are edited as their respectivetypes. You can click on any individual element of a date or time(such as a year or hour) in-place, and use the keyboard arrowkeys or mouse wheel to increase or decrease them in steps.Numeric elements can also be overtyped with replacementvalues.
Workbench user guideVersion 4.0
83
Variable Type DescriptionYou can use the alternative edit control associated with eachtype. DATE values have a calendar, times have a timepicker, and DATETIME values have a DATETIME pickercombination. Click on the button to the right of the in-place valueand the appropriate editor will appear.
String The raw, unformatted value is displayed in the cell where you canenter a new value. If you want to see how the current cell appearswhen formatted , press Shift +F8 and it will be shown as a tooltip.
2. When you have completed your edits, press Enter.
If the value you entered is different from the original saved value, then the observation value isdisplayed in bold type with an asterisk (*) next to the observation number in the left margin of thegrid.
3. Changes are not saved to the dataset immediately. To save the changes to the original dataset, clickthe File menu, and then click Save. If the changes have been made in error, you can undo all edits(see Cancel changes (page 84)).
Add observations
New observations can be added to a dataset. They are always added to the end of the dataset,regardless of your current position within it. To add a new observation:
1. Click the Data menu and then click Add Observation.2. The new row will appear in bold type, and a plus character (+) will appear next to the observation
number in the left margin of the grid. Double-click each cell in the observation and modify thecontent as required.
3. Changes are not saved to the dataset immediately. To save the changes to the original dataset, clickthe File menu, and then click Save. If the changes have been made in error, you can undo all edits(see Cancel changes (page 84)).
Delete observations
To delete an observation from a dataset:
1. Select the observation that you want to delete by clicking on its observation number in the left handcolumn. To delete multiple observations, hold down the CTRL key while selecting the observationsyou want to delete.
2. Click the Data menu, and then click Delete Observation.
Workbench user guideVersion 4.0
84
3. Changes are not saved to the dataset immediately. To save the changes to the original dataset, clickthe File menu, and then click Save. If the changes have been made in error, you can undo all edits(see Cancel changes (page 84)).
Cancel changes
You can cancel any changes that you have made but not yet saved. To cancel unsaved changes:
1. Click the Data menu and then click Cancel edits.2. In the Confirm Cancel Edits, click Yes to undo any changes.
Missing values
You can set an observation variable to missing using the Set Missing option.
Note:When numeric variables are formatted as DATE, DATETIME or TIME, this is the only way to set thesevariables as missing.
1. Select the observation variable (cell) you want to set as missing.
Only one variable at a time can be set to missing in a single operation.2. Right-click the selected cell, and click Set Missing in the shortcut menu.
1. If the cell is a character variable type, the cell is set to a single space (' ') character.2. If the cell is a numeric variable type, the Set Missing Value dialog is used to set the missing
value. If the observation variable is already set to a missing value, then the current raw valueis shown. If the observation variable is not set to missing, the default . (full stop) value is used.If required, you can change the missing value to the value to one of: . (full stop), ._ (full stop followed by an underscore), or .A to .Z.
3. Changes are not saved to the dataset immediately. To save the changes to the original dataset, clickthe File menu, and then click Save. If the changes have been made in error, you can undo all edits(see Cancel changes (page 84)).
Filter a datasetYou can filter the contents of the dataset by variable to show only the data that you need. Filters arecumulative, if you filter on more than one variable, all filters apply. You can cancel any of the filters atany time.
You can set filter criteria on multiple columns and, as you apply filters, the dataset contents areautomatically updated.
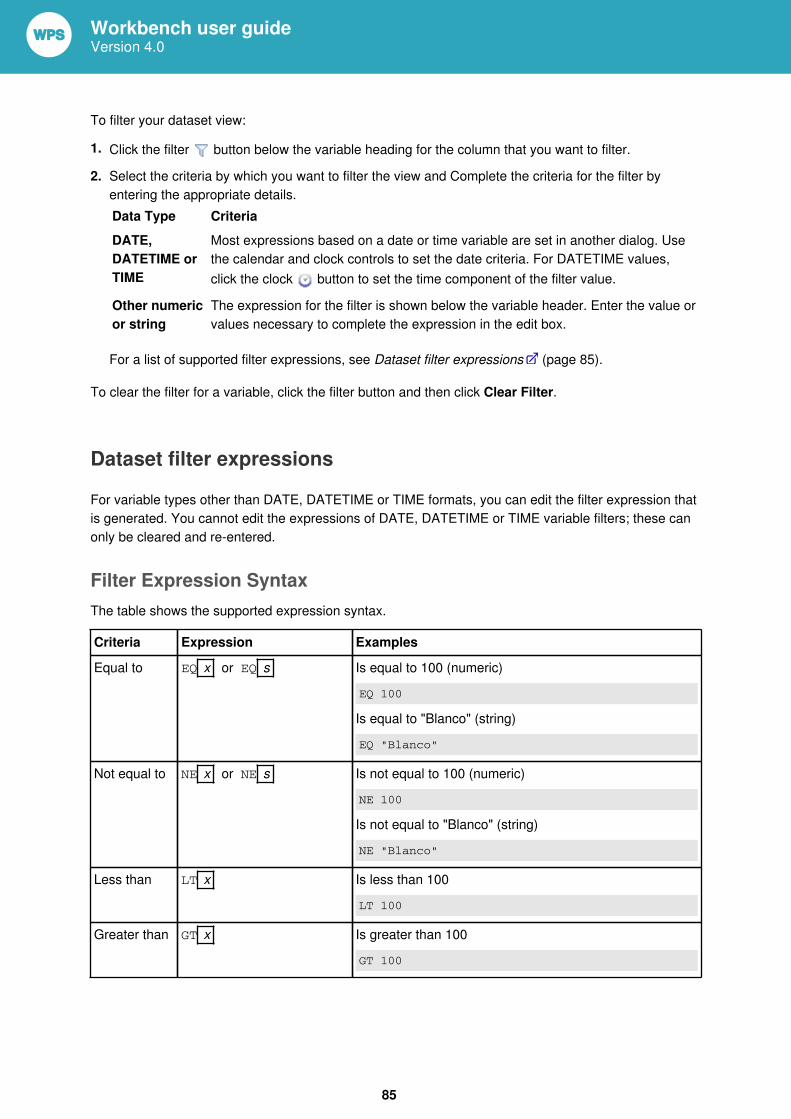
Workbench user guideVersion 4.0
85
To filter your dataset view:
1. Click the filter button below the variable heading for the column that you want to filter.
2. Select the criteria by which you want to filter the view and Complete the criteria for the filter byentering the appropriate details.Data Type CriteriaDATE,DATETIME orTIME
Most expressions based on a date or time variable are set in another dialog. Usethe calendar and clock controls to set the date criteria. For DATETIME values,click the clock button to set the time component of the filter value.
Other numericor string
The expression for the filter is shown below the variable header. Enter the value orvalues necessary to complete the expression in the edit box.
For a list of supported filter expressions, see Dataset filter expressions (page 85).
To clear the filter for a variable, click the filter button and then click Clear Filter.
Dataset filter expressions
For variable types other than DATE, DATETIME or TIME formats, you can edit the filter expression thatis generated. You cannot edit the expressions of DATE, DATETIME or TIME variable filters; these canonly be cleared and re-entered.
Filter Expression SyntaxThe table shows the supported expression syntax.
Criteria Expression Examples
Equal to EQ x or EQ s Is equal to 100 (numeric)
EQ 100
Is equal to "Blanco" (string)
EQ "Blanco"
Not equal to NE x or NE s Is not equal to 100 (numeric)
NE 100
Is not equal to "Blanco" (string)
NE "Blanco"
Less than LT x Is less than 100
LT 100
Greater than GT x Is greater than 100
GT 100
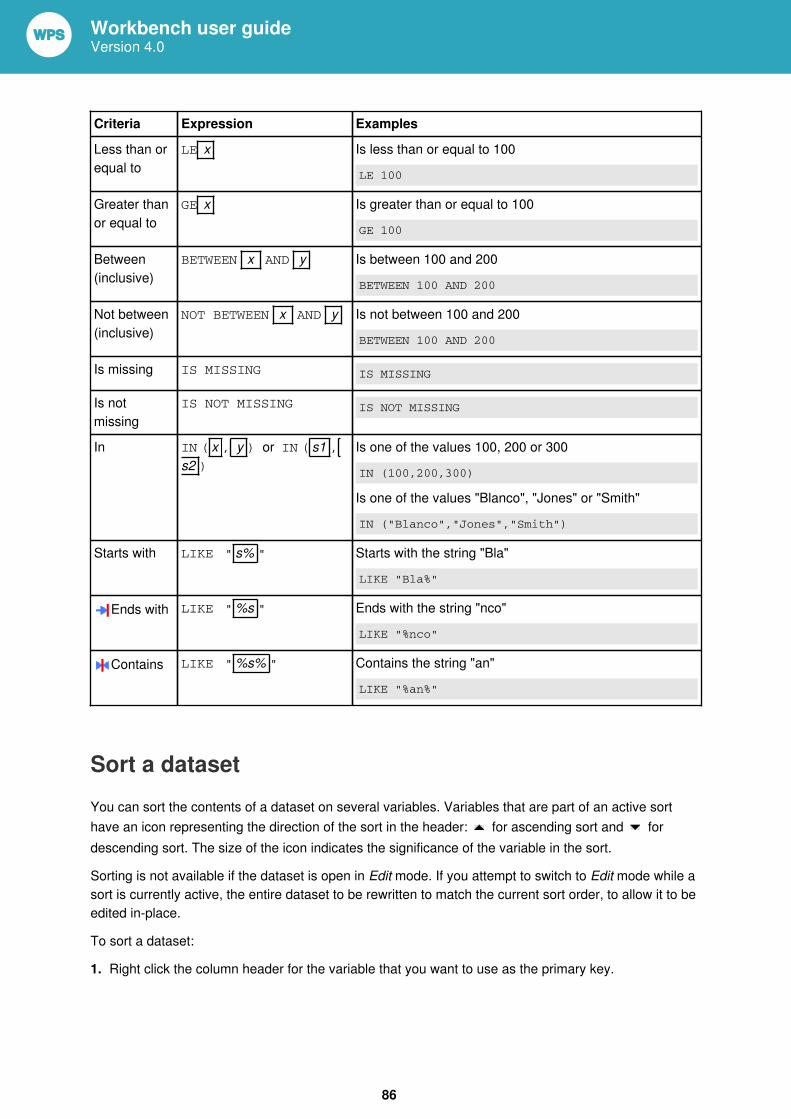
Workbench user guideVersion 4.0
86
Criteria Expression Examples
Less than orequal to
LE x Is less than or equal to 100
LE 100
Greater thanor equal to
GE x Is greater than or equal to 100
GE 100
Between(inclusive)
BETWEEN x AND y Is between 100 and 200
BETWEEN 100 AND 200
Not between(inclusive)
NOT BETWEEN x AND y Is not between 100 and 200
BETWEEN 100 AND 200
Is missing IS MISSING IS MISSING
Is notmissing
IS NOT MISSING IS NOT MISSING
In IN ( x , y ) or IN ( s1 ,
s2 )
Is one of the values 100, 200 or 300
IN (100,200,300)
Is one of the values "Blanco", "Jones" or "Smith"
IN ("Blanco","Jones","Smith")
Starts with LIKE " s% " Starts with the string "Bla"
LIKE "Bla%"
Ends with LIKE "%s " Ends with the string "nco"
LIKE "%nco"
Contains LIKE "%s% " Contains the string "an"
LIKE "%an%"
Sort a datasetYou can sort the contents of a dataset on several variables. Variables that are part of an active sorthave an icon representing the direction of the sort in the header: for ascending sort and fordescending sort. The size of the icon indicates the significance of the variable in the sort.
Sorting is not available if the dataset is open in Edit mode. If you attempt to switch to Edit mode while asort is currently active, the entire dataset to be rewritten to match the current sort order, to allow it to beedited in-place.
To sort a dataset:
1. Right click the column header for the variable that you want to use as the primary key.
Workbench user guideVersion 4.0
87
2. Click either Ascending Sort or Descending Sort on the shortcut menu to perform the sort.3. You can add further keys to the sort by selecting the required column and clicking either Ascending
Sort or Descending Sort.4. Optional:
You can clear any of the sorts by using the Clear Sort option on the shortcut menu.
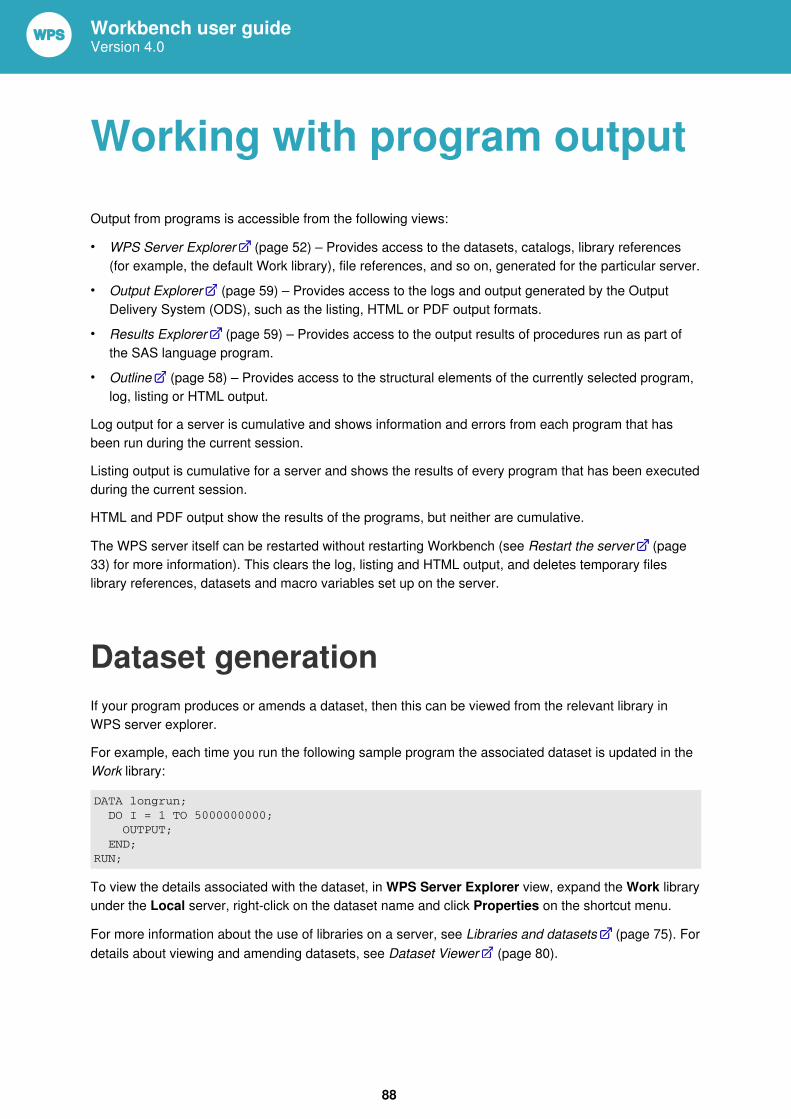
Workbench user guideVersion 4.0
88
Working with program outputOutput from programs is accessible from the following views:
• WPS Server Explorer (page 52) – Provides access to the datasets, catalogs, library references(for example, the default Work library), file references, and so on, generated for the particular server.
• Output Explorer (page 59) – Provides access to the logs and output generated by the OutputDelivery System (ODS), such as the listing, HTML or PDF output formats.
• Results Explorer (page 59) – Provides access to the output results of procedures run as part ofthe SAS language program.
• Outline (page 58) – Provides access to the structural elements of the currently selected program,log, listing or HTML output.
Log output for a server is cumulative and shows information and errors from each program that hasbeen run during the current session.
Listing output is cumulative for a server and shows the results of every program that has been executedduring the current session.
HTML and PDF output show the results of the programs, but neither are cumulative.
The WPS server itself can be restarted without restarting Workbench (see Restart the server (page33) for more information). This clears the log, listing and HTML output, and deletes temporary fileslibrary references, datasets and macro variables set up on the server.
Dataset generationIf your program produces or amends a dataset, then this can be viewed from the relevant library inWPS server explorer.
For example, each time you run the following sample program the associated dataset is updated in theWork library:
DATA longrun; DO I = 1 TO 5000000000; OUTPUT; END;RUN;
To view the details associated with the dataset, in WPS Server Explorer view, expand the Work libraryunder the Local server, right-click on the dataset name and click Properties on the shortcut menu.
For more information about the use of libraries on a server, see Libraries and datasets (page 75). Fordetails about viewing and amending datasets, see Dataset Viewer (page 80).
Workbench user guideVersion 4.0
89
LogsThe log output contains the a record of events occurring during the execution of a SAS languageprogram.
The log file contains a record of activity for the current WPS server session. If multiple programs areexecuted on the same server during a single server session, the output for all programs is appended tothe same log.
To reset the log, click the WPS menu, click Clear Log and then click Local Server (or the name of theserver you have run your programs on.
If you have more than one WPS server registered in the Workbench, each WPS server creates to itsown log file.
View the logTo display the information contained in the log:
1. In the Output Explorer view, click the arrow next to the required server to display output files forthat server.
2. Double-click the Log to open the log file in the Editor view.
If you have run several programs, log information for all programs is concatenated into a single log file.To help locate information, you can use the Outline view to navigate the log, see the Outline view(page 58) for more information.
Save the log to a fileTo save the log to a file:
1. In the Output Explorer view, click the arrow next to the required server to display output files forthat server.
2. Double-click the Log to open the log file in the Editor view.3. Click the File menu and then click Save As. Use the Save As dialog box to save the file to the
required location.
Print the logTo print the log for a particular server:
Workbench user guideVersion 4.0
90
1. In the Output Explorer view, click the arrow next to the required server to display output files forthat server.
2. Double-click the Log to open the log file in the Editor view.3. Click the File menu and then click Print. Use the Print dialog to send the log to your required
printer.
Log colouring preferencesYou can control the visual preferences for items (errors, notes, warnings, and so on) displayed in a logfile using the Log Syntax Coloring page of the Preferences window.
For each item type, you can specify attributes for Colour, Background Colour, and whether the itemshould be displayed in Bold.
Managing ODS outputOnce you have run a program that produces some output using the ODS (Output Delivery System), youcan view it in the Results Explorer view.
The ODS destinations and the location of the generated output, can either be automatically managedby Workbench, or controlled through statements in the SAS language program.
Automatically manage ODS destinationsPreferences to control the ODS destinations automatically created when a SAS language program isrun in Workbench. To output the ODS destinations in a program not running in Workbench, you willneed to add the required ODS creation statements to your program.
Automatically Manage Result TypesClick Yes to create ODS destinations for each of the result types selected. Click No to managethe output within the SAS language program.
Result TypesSelect the ODS destination to be automatically created. Workbench creates a temporary file foreach destination type for each SAS language program run. When a different program is run, orthe same program run again, new temporary files are created.
Show generated injected code in the logClick to show the automatically created code for each ODS destination in the log output.
Workbench user guideVersion 4.0
91
Listing outputThis section of the guide looks at the listing output of results.
Listing Colouring PreferencesThe preferences that you can set regarding the different items contained in listing results are foundunder Window ➤ Preferences… ➤ WPS ➤ Listing Syntax Coloring:
For each different type of item contained in a listing, you can specify attributes for Colour, BackgroundColour, and whether or not the item should be displayed in Bold.
View the listing outputTo view the listing output:
1. Ensure you have the Output Explorer open ( Window ➤ Show View ➤ Output Explorer).
2. If there is more than one server, open the required server node to display the associated output.3. Either double-click the Listing node, or right-click it and select Open from the context menu.
The listing output opens and is given focus.
If you have performed several runs, the previous listing output will be concatenated into the existingresults. If you want to clear the output, to ensure that when you next run a program the listing onlycontains results for that run, then you can proceed in accordance with either of the following:
• Clearing the results output (page 95) (which will also clear any HTML output (page92)).
• Restart the server (page 33) (which will clear the log and all results, datasets, library andFilerefs).
Navigating the listing outputIf you have executed several programs, or several instances of the same program, and have notcleared the results for the particular server by either Clearing the results output (page 95) or
Restart the server (page 33), then each instance of listing output will have been appended to theexisting listing file in order of execution.
To navigate the output contained in the listing file:
1. Open the results in accordance with View the listing output (page 91).
Workbench user guideVersion 4.0
92
2. Ensure that you have the Outline (page 58) view open ( Window ➤ Show View ➤ Outline).
3. In this view you will see nested output for the various programs, with nodes for the different outputelements. Click on any of these nodes and the corresponding section in the listing file will bedisplayed.
Saving the listing output to a fileTo save the listing output to a file:
1. Ensure that you have the Output Explorer open ( Window ➤ Show View ➤ OutputExplorer).
2. Do one of the following:
• Right-click on the Listing node, and, from the context menu, select Save As....
• Open the listing in the editor (see View the listing output (page 91)), and then right-click inthe editor window and select Save As….
• Open the listing in the editor and then select File ➤ Save As... from the main menu.
3. Use the Save As dialog to save the file to the required location.
Printing the listing outputTo print the listing output for a particular server:
1. Ensure that you have the Output Explorer open ( Window ➤ Show View ➤ OutputExplorer).
2. If there is more than one server, open the required server node to display the associated output.3. Do one of the following:
• Right-click on the Listing node, and, from the context menu, select Print Results....
• Open the listing in the editor (see View the listing output (page 91)), and then right-clickin the editor window and either select Print… or press Ctrl+P on Windows (Cmd-P onMacOS).
• Open the listing in the editor and then select File ➤ Print... from the main menu.
4. Use the Print dialog to send the results to your required printer.
HTML outputThis section of the guide looks at the HTML output of results.
Workbench user guideVersion 4.0
93
Viewing the HTML outputTo view the HTML output:
1. Ensure you have the Output Explorer open ( Window ➤ Show View ➤ Output Explorer).
2. If there is more than one server, open the required server node to display the associated output.3. Either double-click the HTML node, or right-click it and select Open from the context menu.
The HTML output file opens and is given focus.
Navigating the HTML outputIf you opted to have the HTML output automatically managed by the Workbench (see Automaticallymanage ODS destinations (page 90)), then each run will create a new HTML file. However, if youhave executed several programs, or several instances of the same program, and have not cleared theresults for the particular server by either Clearing the results output (page 95) or Restartthe server (page 33), then the previous HTML output will still be available in the Outline (page58) view.
To navigate the output contained in the HTML file:
1. Open the results in accordance with Viewing the HTML output (page 93).2. Ensure that you have the Outline (page 58) view open ( Window ➤ Show View ➤
Outline).3. In this view you will see nested output for the various programs, with nodes for the different output
elements. Click on any of these nodes and the corresponding section in the HTML output will bedisplayed.
Printing the HTML outputTo print the HTML output:
1. Ensure that you have the Output Explorer open ( Window ➤ Show View ➤ OutputExplorer).
2. If there is more than one server, open the required server node to display the associated output.3. Do one of the following:
• Right-click on the HTML node, and, from the context menu, select Print Results....
• Open the HTML file in the editor (seeViewing the HTML output (page 93)), and then right-click in the editor window and either select Print… or press Ctrl+P on Windows (Cmd-P onMacOS).
• Open the HTML file in the editor and then select File ➤ Print... from the main menu.
Workbench user guideVersion 4.0
94
4. Use the Print dialog to send the results to your required printer.
Note:A single HTML output file is created for each run within the Workbench. However, you can only print theHTML output of one run at a time.
PDF outputThis section of the guide looks at the PDF output of results.
To set up the automatic management of PDF output, refer to Automatically manage ODSdestinations (page 90).
The default settings for PDF output are as specified in the wps.cfg file (see Configuration files(page 105)), and are as follows:
• -BOTTOMMARGIN 1cm
• -LEFTMARGIN 1cm
• -RIGHTMARGIN 1cm
• -TOPMARGIN 1cm
• -ORIENTATION portrait
The PAPERSIZE is determined automatically by the locale of WPS Workbench (see WPS serverLOCALE and ENCODING settings (page 23)). It can be reset using unmanaged output (see below).
The startpage option, which determines whether or not the output from each PROC starts on a newpage, is not configurable inside WPS Workbench. It is initially set to STARTPAGE=yes in the ODSsoftware, which means that each PROC does start on a new page. The option can also be reset usingunmanaged output (see below).
You create unmanaged output by entering code directly into your programs, as per the example below:
options orientation=landscape;options papersize=A4;options topmargin=0.75in;options bottommargin=0.5in;options leftmargin=0.5in;options rightmargin=0.5in; ods pdf file="body.pdf" startpage=no; /* Startpage=no means that new pages are not generated between PROCs */ /* Insert PROCs to generate output */ ods_all_ close;
Note:Relevant parts of the code can also be used as WPS code injections (page 68).
Workbench user guideVersion 4.0
95
Clearing the results output1. To save your output before clearing it, save your PDF elsewhere if you have been using the PDF
destination, or proceed as in Saving the listing output to a file (page 92).2. Clear the output results for the required server by doing one of the following:
• From the main menu, select WPS ➤ ➤ Clear Results ➤ Local Server (or substitute the nameof your remote WPS server in place of Local Server).
• Use the keyboard shortcut Ctrl + Alt + O to remove the results from the default server.
Note:If you have more than one WPS server registered, then the above action will clear the results forthe Default WPS server (page 23). If in doubt as to which is the default server, use the tooltipfor the toolbar button to show which server's results will be cleared.
• From the toolbar, click to clear the results from the default server, or click the drop-down next to this button to select a non-default server.
• Ensure that you have the Output Explorer open ( Window ➤ Show View ➤ OutputExplorer), right-click on the listing output, HTML output or PDF output for the requiredserver, and from the context menu, select Clear All Results.
All output will now be blank.
Note:The effects of this option are different from Restart the server (page 33) in that you preserve thecontext of what you are currently doing, and do not lose your temporary work.
Workbench user guideVersion 4.0
96
Text-based editing featuresYou can use these features with the SAS Editor (page 97) to help you write and modify programsand other project files. The same features are available with the Text Editor (page 98), with theexception of Colour Coding of Language Elements. These features are not available when managingfiles through the File Explorer view.
Left hand bordersThe left hand borders are used to display different features:
• In the outer left grey border, you will see annotations.• In the inner left white border, you will see the expand and collapse controls for blocks of related
language items. The white border is also used to display quick difference indicators.
AnnotationsThese can consist of the following displayed in the outer left grey border of a file:
• Bookmark anchors (page 56)
• Task markers (page 57)
• Search results
Quick difference indicatorsA quick difference indicator in the inner left white border of a program shows that something haschanged in that line of code since it was last saved:
• Indicates that a change has been made to the line of code.
If you hover the mouse over this coloured block, a popup window will show you the code as it wasprior to the change.
• Indicates that there is a new, additional line of code.• Indicates the position where one or more lines of code have been deleted.
When you save a program, the quick difference indicators will be cleared from the margin.
Navigating between annotations and quick difference indicatorsYou can navigate between annotations within an individual program by using the Navigate menuoptions. The Next option moves to the next annotation, the Previous option moves to the previousannotation.
You can also use Next Annotation and Previous Annotation on the Workbench's main button bar tomove between annotations and quick difference indicators.
Workbench user guideVersion 4.0
97
Layout preferencesThe display controls for a program, including the current line, foreground and background colours, andwhether to display line numbers, are user defined. See Text Editor Preferences (page 99) formore details.
Colour Coding of Language ElementsThe colours used to display language elements in a program can be controlled via the Preferences.See WPS Syntax Colouring (page 69) for more information.
Working with editorsIn any Workbench perspective you use, the Editor window is always displayed so that you can continueto write and modify files. This section describes the various ways of opening files in the Editor windowwith the different editors.
Only one file can be active at any one time. This is the file that currently has focus within the Editorwindow.
You can open programs using either the Project Explorer view orFile Explorer view. The ProjectExplorer view offers more control than the File Explorer view, which determines the most suitableeditor automatically, based on the filename extension of the file being opened.
Editing files within projects allows you to use local history to help you manage changes. See Localhistory (page 40) for more information
SAS EditorThe SAS Editor view provides features suitable for editing SAS language programs, such as syntaxcolouring.
Programs can be opened either via a project or directly from one of the available file systems. Only fileswith an extension .wps or .sas can be opened in this editor.
To open a program in the SAS Editor view:
1. Click the Window menu, click Show View and then click Project Explorer.
If you are using the File Explorer view, Click the Window menu, click Show View and then clickFile Explorer.
2. Navigate to the program you want to open and double-click on the program name.
Workbench user guideVersion 4.0
98
Text EditorThe Workbench has a basic Text Editor view. You can open a program with this editor but the contentsare treated as regular text file..
To open a file in the Text Editor view :
1. Click the Window menu, click Show View and then click Project Explorer.
If you are using the File Explorer view, Click the Window menu, click Show View and then clickFile Explorer.
2. Navigate to the file you want to open. If the file is a text file, then double-click on it. Otherwise, right-click on the file, and, from the context menu, select Open With ➤ Text Editor.
System EditorIf a file has an extension associated with an application installed on your computer (for example, .docmay be associated with Microsoft Word), the System Editor will launch that application with the file in anew window outside the Workbench.
To open a file with the System Editor:
1. Click the Window menu, click Show View and then click Project Explorer.
If you are using the File Explorer view, Click the Window menu, click Show View and then clickFile Explorer.
2. Navigate to the program you want to open and double-click on the program name.
In-Place EditorThe Workbench supports OLE (Object Linking and Embedding) document editing. For example, if youhave a Microsoft Word document in your project and use the In-Place Editor, the Word documentwill open in the Workbench's Editor (page 55), with Microsoft Word's pull-down menu options beingintegrated into the menu bar of the view.
To open a file with the In-Place Editor:
1. Click the Window menu, click Show View and then click Project Explorer.2. Right-click on the required file, click Open With and then click In-Place Editor on the shortcut
menu.
If the file has an associated OLE editor, the file is opened in the In-Place Editor in the Editor view andthe menus and options associated with the linked application are available.
Workbench user guideVersion 4.0
99
Text Editor PreferencesYou can control the text editor preferences using the Text Editors page of the Preferences window:
1. Click the Window menu and then click Preferences.2. In the Preferences window, expand the General group, expand the Editors group and select the
Text Editors group.
You can use the preferences to determine how programs are displayed in the SAS language editor andthe text editor. For example, to set the background colour, in the Appearance colour options, selectBackground colour, clear System Default, and then select the required Colour.
These preferences only apply to files opened within the Project Explorer view.
Some of the Preferences that can be configured are:
• Undo history size – The number of operations able to be undone.• Displayed tab width – the width of the tab used in files• Show line numbers – whether line numbers are displayed in the margin• Colours – current line, foreground, background, and so on.
Closing filesAny file that is opened in the Editor view has a tab labelled with the file name. To stop displaying thefile in the Editor view click the File menu and then click Close. Alternatively click Close on the tab.
Jumping to a particular project locationYou can jump to a particular location in a project file:
To jump to a bookmarked location:
1. Open the Bookmarks view ( Window ➤ Show View ➤ Bookmarks).
2. Either double-click on the required bookmark description, or right-click on it, and, from the contextmenu, select Go To.
3. The relevant file will then be opened (if it was closed), and the bookmarked line will be highlighted(or else the first line in the file if the entire file was bookmarked).
To jump to a task:
1. Open the Tasks view (Window ➤ Show View ➤ Tasks).
2. Either double-click on the required task description, or right-click on it, and, from the context menu,select Go To.
Workbench user guideVersion 4.0
100
3. The relevant file will then be opened (if it was closed), and the line containing the task will behighlighted.
To jump to a particular line number:
1. Select Navigate ➤ Go to Line....
2. Enter the required number in the Go to Line dialog.3. Either press Enter on your keyboard, or click OK, to complete the operation and close the dialog.
To jump to the last edit:
1. Select Last Edit Location from either the toolbar or Navigate menu.
The relevant file will be opened (if it was closed), the last line you edited will be highlighted, and thecursor will be placed at the end of the last piece of text you edited.
Navigation between multiple projectfilesYou can have as many projects open in the Workbench as you like and each of these projects cancontain any number of programs.
You can open any number of programs and other files from the different projects in the Editor (page55). For each program that is open, a corresponding tab is displayed. An open program can begiven focus in the Editorwindow by clicking on its tab.
Moving backwards and forwards between programsThe main menu options Navigate ➤ Back and Navigate ➤ Forward (or and on thetoolbar) are analogous to the back and forward buttons on a web browser. However, unlike a webbrowser, when you close and re-open WPS Workbench, it still has the navigational information.
• Back navigates to the previous resource that was viewed in the Editorwindow.
• Forward displays the program that was active prior to selection of the previous Back command.
Searching and replacingYou can find any text string in an open program, as follows:
1. Ensure that the program to be searched is open in the File Explorer ( Window ➤ Show View ➤ File Explorer).
Workbench user guideVersion 4.0
101
2. Display the Find/Replace dialog by either selecting Edit ➤ Find/Replace... from the menu, orpressing CTRL + F on your keyboard.
The Find/Replace dialog is displayed, which allows you to specify the term to be found, and, ifrequired, the term with which it is to be replaced.
Note:The default Scope is All, which means that the whole file is searched (you can amend this toSelected lines if required). The other options are those that you would expect to find in any searchdialog and are self-explanatory.
3. Click Find to find the first instance of the word and then proceed as required, clicking Find to moveto each new instance of the text string.
Note:If you select Close to remove the dialog, then the string is remembered, and selecting Edit ➤ FindNext and Edit ➤ Find Previous will conduct the same search, forwards and then backwards, withoutre-opening the dialog.
Undoing and redoing your editsThere is a multiple undo facility for project file edits, as follows:
1. Either select Edit ➤ Undo from the menu, or press CTRL + Z on your keyboard.
The last change you made is undone.2. Repeat the above step for each previous edit that you want to undo.
Note:The number of undo actions that can be performed is determined by Undo history size in the TextEditor Preferences (page 99).
Note:You can also redo any undone edits on an incremental basis, by either selecting Edit ➤ Redofrom the menu, or pressing CTRL + Y on your keyboard, the requisite number of times.
Workbench user guideVersion 4.0
102
PreferencesThere are many user settings, controls and defaults that you can control using the Preferenceswindow. To open the window, click the Window menu and then click Preferences.
Any preferences that are not described in this guide can be looked up in the Eclipse-specificWorkbench User Guide.
The Preferences window has a filter function that can help you find preference pages quickly. Onceyou have opened the window, you will see the filter at the top of the preferences list.
General preferencesThe General page of the Preferences window contains controls that affect general aspects of WPSWorkbench.
Always Run in BackgroundSpecifies that long running tasks to be run without displaying the Executing window. This allowsyou to carry on using Workbench for other tasks.
Show Heap StatusWhen selected, an indicator is displayed in Workbench showing information about usage of thecurrent Java heap memory used by the Workbench interface This indicator appears in the bottomof the window to the left of the server status.To increase your Java heap storage, modify the workbench.ini in the eclipse folder of yourinstallation, to, for example, -vmargs -Xmx1024m. This sets the maximum Java heap value of1024 megabytes.
Workbench save interval (in minutes)Specifies how often the state of the Workbench, including perspective layouts, is automaticallysaved to disk. Set to 0 (zero) to disable automatic saving.
Open ModeSpecifies the method used to open objects in Workbench.
• Double click – open an object with a double-click, select by single click.
Workbench user guideVersion 4.0
103
• Single click (Select on hover) – Open an object with a single click, select by hovering themouse cursor over the resource.
• Single click (Open when using arrow keys) – Open an object with a single click, select byhovering the mouse cursor over the resource. When you use the arrow keys to open an objectwith a single click , Selecting a resource with the arrow keys will automatically open it in aneditor.
Change shortcut key preferencesWorkbench provides shortcut key mappings for the most commonly-used commands. You can modifythese mappings, or create new mappings.
To change a shortcut key mapping:
1. Click the Window menu and then click Preferences.2. In the Preferences window, expand the General group and select Keys.3. Either type the command name, for example Cancel edits in the filter, or select the required
command in the list.4. Select Binding and type the shortcut key, for example Ctrl= 5.5. If no conflicts are reported, click OK to save the new mapping.
To delete a binding, select the required command and click Unbind Command.
Back up Workbench preferencesSave your current preferences to file to preserve preferences or to import into a different Workbenchinstallation.
To save your preferences to file:
1. Click the File menu and then click Export.2. In the Export dialog, expand the General group and click Preferences.3. Click Next and in the Export Preferences page, select the required preferences and enter a
preference filename.
If you are updating an existing file, you can select Overwrite existing files without warning toavoid warning dialogs during export.
4. Click Finish to create the backup file.
Workbench user guideVersion 4.0
104
Import Workbench preferencesImport saved preferences from file to a Workbench installation.
To import preferences from file:
1. Click the File menu and then click Import.2. In the Import dialog, expand the General group and click Preferences.3. Click Next and in the Import Preferences page, select the required preferences file and choose the
preference group to import. and enter a preference filename.4. Click Finish to import the preferences.
Workbench user guideVersion 4.0
105
Configuration filesConfiguration files are files incorporating system options that control the initial WPS environment.Configuration files are used during WPS initialisation when WPS is run from the command line, andalso when the Workbench is being used.
You can open a configuration file as a basic text file in order to add, remove or change system optionsto suit your needs.
There is a base configuration file that is included with the WPS installation, called wps.cfg and it islocated in the directory where WPS is installed. It is recommended that this file be left untouched andone of the override mechanisms below be used if any modifications need to be made.
Note:A number of configuration files can be processed during WPS initialisation, each of which may setsome of the same options. If an option is set in more than one place, the last one processed will haveprecedence. Options set on the command line, or options set in the Startup Options configurationpanel for a server, will override any settings that are set in the configuration files.
WPS initialisation procedure for WindowsWhen WPS is invoked, the following initialisation procedure occurs:
1. The WPS_SYS_CONFIG operating system environment variable is evaluated and, if it exists, thespecified configuration file is processed . The processing of this file does not affect whether thedefault configuration files are loaded.
2. Any files specified via the -config option on the command line or in the startup options for a serverare processed.
If any configuration files are specified via the -config option, the default configuration files are notloaded, and the WPS_USER_CONFIG is processed instead.
Take care when overriding the default configuration file processing, specifically the loading of thewps.cfg file. There are many required options in the base wps.cfg file. If you use the -configoption, it is recommended that you either take a copy of the base wps.cfg file and modify it to suit,or that you make sure to include the base wps.cfg file in your custom configuration file and thenoverride any settings that you need, for example:
-set wpshome 'somewhere'-config !wpshome/wps.cfg/* And now set any options you want */
3. The default configuration files are processed in the following order:
a. wps.cfg in the WPS installation directoryb. My Documents/My WPS Files/.wps.cfgc. My Documents/My WPS Files/wps.cfg

Workbench user guideVersion 4.0
106
d. My Documents/My WPS Files/.wpsv3.cfge. My Documents/My WPS Files/wpsv3.cfg
f. wps.cfg in the current directoryg. wpsv3.cfg in the current directory
4. The WPS_USER_CONFIG environment variable is evaluated and, if it exists, the specifiedconfiguration file is processed.
5. The WPS_OPTIONS environment variable is evaluated and, if it exists, any options specified areprocessed. The syntax of this environment variable is the same as if the options are specified on thecommand line.
6. Any options specified on the command line are processed.
WPS initialisation procedure for UNIX platformsWhen WPS is invoked, the following initialisation procedure occurs:
1. Any files specified via the -config option on the command line or in the startup options for theserver are processed.
If any configuration files are loaded in this way, the default configuration files are not loaded.2. The WPS_OPTIONS and WPS_V3OPTIONS environment variables are evaluated and any contained -
config options are processed.
If any configuration files are loaded in this way, the default configuration files are not loaded.
Note:This step is skipped if the -NOCONFIG option is specified on the command line.
3. The WPS_CONFIG and WPS_V3CONFIG environment variables are evaluated and, if they exist, thespecified configuration files are processed.
If any configuration files are loaded in this way, the default configuration files are not loaded.
Note:This step is skipped if the -NOCONFIG option is specified on the command line.
4. If no configuration files have yet been loaded, the default configuration files are loaded in thefollowing order:
a. wps.cfg in the WPS installation directoryb. wps_local.cfg in the WPS installation directory. This file can be edited to provide site-specific
overrides of various options.c. .wps.cfg in your home directoryd. wps.cfg in your home directorye. .wpsv3.cfg in your home directoryf. wpsv3.cfg in your home directoryg. wps.cfg in the current directory

Workbench user guideVersion 4.0
107
h. wpsv3.cfg in the current directory5. The WPS_OPTIONS environment variable is evaluated and, if it exists, any options specified are
processed. The syntax of this environment variable is the same as if the options are specified on thecommand line.
6. The WPS_V3OPTIONS environment variable is evaluated and, if it exists, any options specified areprocessed. The syntax of this environment variable is the same as if the options are specified on thecommand line.
7. Any options specified on the command line are processed.
There are also "restricted" configuration files that will always be processed. Any options in these filescannot be changed by any other method. The files are based on the user's userid and groupid.For example, if the user is <user> and the group is <group>, the following configuration files will beprocessed:
1. misc/rstropts/rwps.cfg in the WPS installation directory2. misc/rstropts/groups/<group>_rwps.cfg in the WPS installation directory3. misc/rstropts/users/<user>_rwps.cfg in the WPS installation directory
Get information about the startup procedureIt is possible to check which configuration files have been processed by checking the CONFIG systemoption. You can do this by invoking a PROC OPTIONS statement as follows:
PROC OPTIONS OPTION=CONFIG;RUN;
You can also set the VERBOSE system option on the command line, or in the startup options for theserver, and WPS will then generate information in the normal log output indicating which configurationfiles were processed and which system options were set.
Workbench user guideVersion 4.0
108
AutoExec fileAn AutoExec file containing SAS language statements or a program that is automatically executedwhen the WPS server is started, or restarted from Workbench. The file can be used for a numberof purposes, such as setting up common LIBNAMES so that they do not need to be added to everyprogram that is run.
WindowsThe WPS server automatically runs a file called autoexec.sas. The WPS server searches for theautoexec.sas file in the following directories, in the order shown::
1. The current directory2. My Documents in your user profile3. Paths specified in the PATH environment variable4. The root directory of the drive, for example C:\5. The WPS installation directory.
Other operating systemsThe WPS server automatically runs a file called autoexec.sas.The WPS server searches for theautoexec.sas file in the following directories, in the order shown::
1. The current directory2. Your user home ($HOME) directory3. The WPS installation directory.
Specifying a different fileTo automatically run a different file, or a file not in the searched directory hierarchy, set the AUTOEXECsystem option to point to the file (see Configuration files (page 105)).
You can also set the AUTOEXEC system option through Workbench:
1. In the WPS Server Explorer view, right-click the server name and click Properties from theshortcut menu.
2. In the Properties list, double-click Startup, click System Options.3. On the System Options panel, click Add.4. In the Name field, enter AUTOEXEC, and in the Value field enter the path to the required
configuration file and click OK.5. Click OK on the Properties dialog and you will be prompted to restart the server.
Workbench user guideVersion 4.0
109
WPS Tips and Tricks
WPS Setup• Use WPS Link connect to a remote server solution and run SAS language programs (see Connect
to a remote WPS server (page 48)).• You can change the Workbench font, background appearance, or change the shortcut key bindings
(see Preferences (page 102)).• You can export and import preferences (including templates) between workspaces.• You can use configuration files to control the system options used in the WPS environment (see
Configuration files (page 105)).• You can use an AutoExec file to set up common LIBNAME statements and use them any program
running on the WPS server (see AutoExec file (page 108)).• You can define multiple servers the same machine and distribute programs between those servers
(see Define a new WPS server (page 51)).
File Management• To display or create a different group of projects, you can switch to a different workspace (see
Switching to a different workspace (page 43)).• You can restore a file deleted in the Project Explorer from the project's local history (see Restore
from local history (page 42)).• You can use the Project Explorer to compare and merge files (see Comparing and merging
multiple files (page 39)).• You can create directory shortcuts in the File Explorer to access files on the host file system (see
Create a new remote host connection (page 48)).
Running SAS language programs• You can specify code that is to be executed automatically before and after each program (see WPS
Code Injection (page 68)).• You can create templates containing code snippets that can be re-used (see Entering WPS code via
templates (page 68)).• You can run part of a program from the Workbench (see Run part of a program (page 70)).• You can control whether or not the ODS destinations are to be controlled automatically, and, if so,
which specific types of output are to be used (see Automatically manage ODS destinations (page90)).

Workbench user guideVersion 4.0
110
• You can set a permanent location for the WORK library to preserve datasets when Workbench isclosed (see Set WORK location (page 75)).
Datasets• You can edit datasets from within the Workbench, using in-place context-aware editing and column
re-ordering.• You can export datasets as delimited and fixed width text, and also as Microsoft Excel
spreadsheets.
Workbench user guideVersion 4.0
111
TroubleshootingThe following is a list of potential problems and how to resolve them:
Why are the icons greyed out so that I cannot run any programs?
The icons will be greyed out if:
• The server on which you are running programs is not licensed or has been uninstalled. SeeWPS server (page 21) for more information.
• The name of the program file open in the Editor view does not use the .sas or .wps filename extension.
• The focus of the mouse is in a view other than the Editor view.
Why do I see a dialog saying that there is no default server on which to submit the program?
Usually because the default WPS server has been removed. If you have other WPS serversdefined, select one of those as the new default (see Default WPS server (page 23)).Alternatively, you can restore the WPS server that was removed (see Define a new WPSserver (page 51)) and set it as the default.
Why are the characters in my files not being displayed correctly?
This is likely to be an encoding issue. You should follow all the steps in WPS server LOCALEand ENCODING settings (page 23) and General text file encoding (page 24), and restartWorkbench. If you have imported the files that are displayed incorrectly, then you many need tore-import them.
Why can't I start the Workbench?
If the Workbench usually starts, but then fails, you may have run out of disk space, causingone or more files in the workspace .metadata directory to become corrupted. Rename the.metadata folder in the corrupt workspace directory to something else, restart WPS, andselect to the workspace again. The Project Explorer contains no entries, but the project contentand location are unaffected. You can reimport any existing projects as required. See Import aproject (page 16) for more information.
How do I increase my Java heap storage in the event of Java Runtime errors?
You can set the -Xmx and -Xms Java options to change the amount of heap memory available tothe Java Runtime. See Show Heap Status (page 102) for more information.
Workbench user guideVersion 4.0
112
Making technical supportrequestsHow you access technical support for your WPS software depends on how you purchased yoursoftware. If you made a standard purchase of WPS software you have an annual subscription licencethat entitles you to unlimited free upgrades throughout the twelve months, and free email support [email protected] .
Larger customers may have additional support arrangements in place. In this case, the handling oftechnical support requests may be carried out via one or more super users in your organisation – youneed to be aware who the super users are to progress support issues.
Due to the complex nature of the SAS language, extended interaction between World Programmingand yourselves may be required to identify and resolve the issue. Resolutions to problems may includesuggested workarounds or may require you to update your WPS software installation.
WPS server log filesFor certain types of issue, you may be requested to provide the log file. If the log is open in Workbench,right-click on the view and slick Save as from the shortcut menu. If the log is not open, the .log file isstored in the .metadata directory in the active workspace.
Because .metadata and .log start with a period, they will normally be hidden and you will need toensure you can see these types of file.
Workbench user guideVersion 4.0
113
Legal NoticesCopyright © 2002–2018 World Programming Limited.
All rights reserved. This information is confidential and subject to copyright. No part of this publicationmay be reproduced or transmitted in any form or by any means, electronic or mechanical, includingphotocopying, recording, or by any information storage and retrieval system.
TrademarksWPS and World Programming are registered trademarks or trademarks of World Programming Limitedin the European Union and other countries. (r) or ® indicates a Community trademark.
SAS and all other SAS Institute Inc. product or service names are registered trademarks or trademarksof SAS Institute Inc. in the USA and other countries. ® indicates USA registration.
All other trademarks are the property of their respective owner.
General NoticesWorld Programming Limited is not associated in any way with the SAS Institute.
WPS is not the SAS System.
The phrases "SAS", "SAS language", and "language of SAS" used in this document are used to refer tothe computer programming language often referred to in any of these ways.
The phrases "program", "SAS program", and "SAS language program" used in this document are usedto refer to programs written in the SAS language. These may also be referred to as "scripts", "SASscripts", or "SAS language scripts".
The phrases "IML", "IML language", "IML syntax", "Interactive Matrix Language", and "language of IML"used in this document are used to refer to the computer programming language often referred to in anyof these ways.
WPS includes software developed by third parties. More information can be found in the THANKS oracknowledgments.txt file included in the WPS installation.