Work Instruction Producer - Complete Data Development ... · Producer - Complete Data . Development...
30
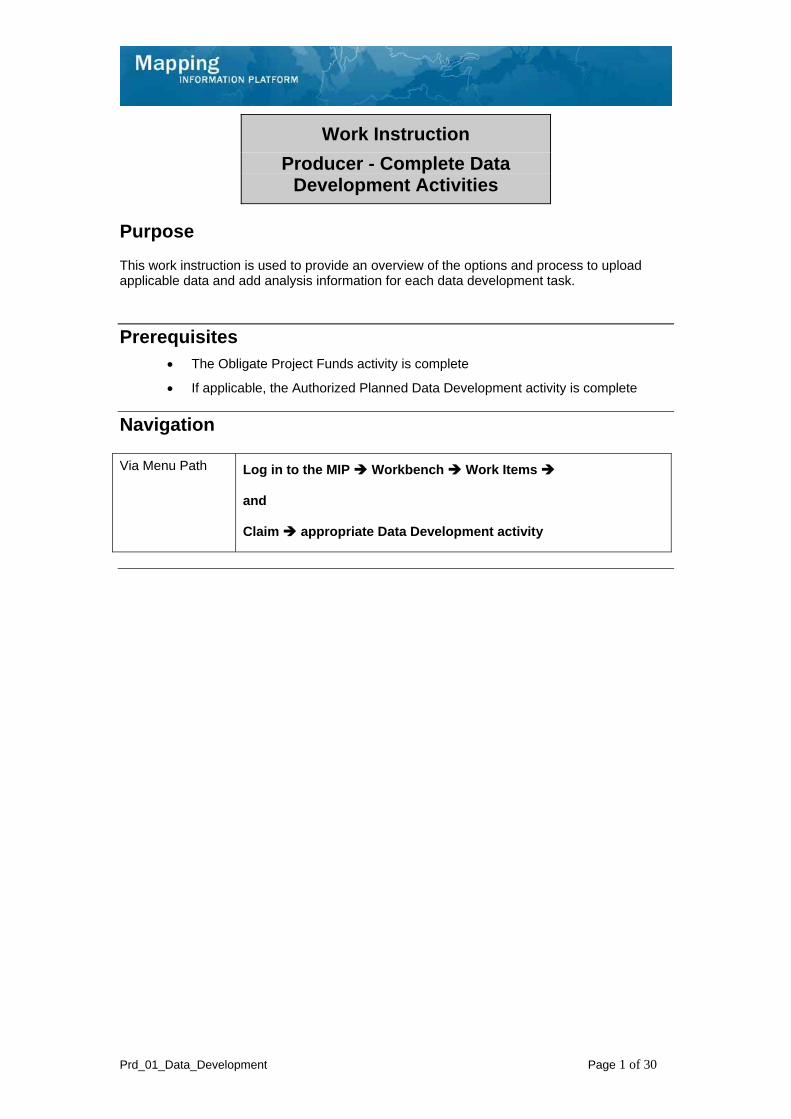
Prd_01_Data_Development Page 1 of 30 Work Instruction Producer - Complete Data Development Activities Purpose This work instruction is used to provide an overview of the options and process to upload applicable data and add analysis information for each data development task. Prerequisites The Obligate Project Funds activity is complete If applicable, the Authorized Planned Data Development activity is complete Navigation Via Menu Path Log in to the MIP Workbench Work Items and Claim appropriate Data Development activity
-
Upload
truongnguyet -
Category
Documents
-
view
226 -
download
0
Transcript of Work Instruction Producer - Complete Data Development ... · Producer - Complete Data . Development...
Prd_01_Data_Development Page 1 of 30
Work Instruction
Producer - Complete Data Development Activities
Purpose
This work instruction is used to provide an overview of the options and process to upload applicable data and add analysis information for each data development task.
Prerequisites The Obligate Project Funds activity is complete
If applicable, the Authorized Planned Data Development activity is complete
Navigation Via Menu Path Log in to the MIP Workbench Work Items
and
Claim appropriate Data Development activity
Prd_01_Data_Development Page 2 of 30
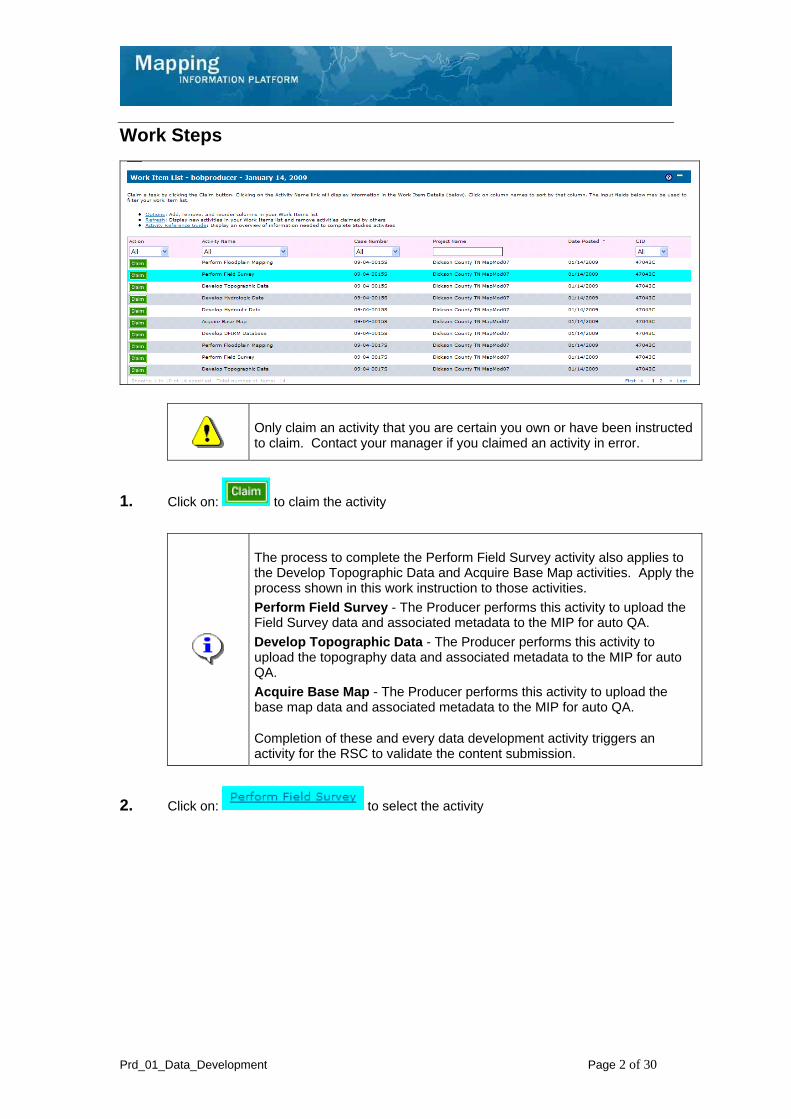
Work Steps
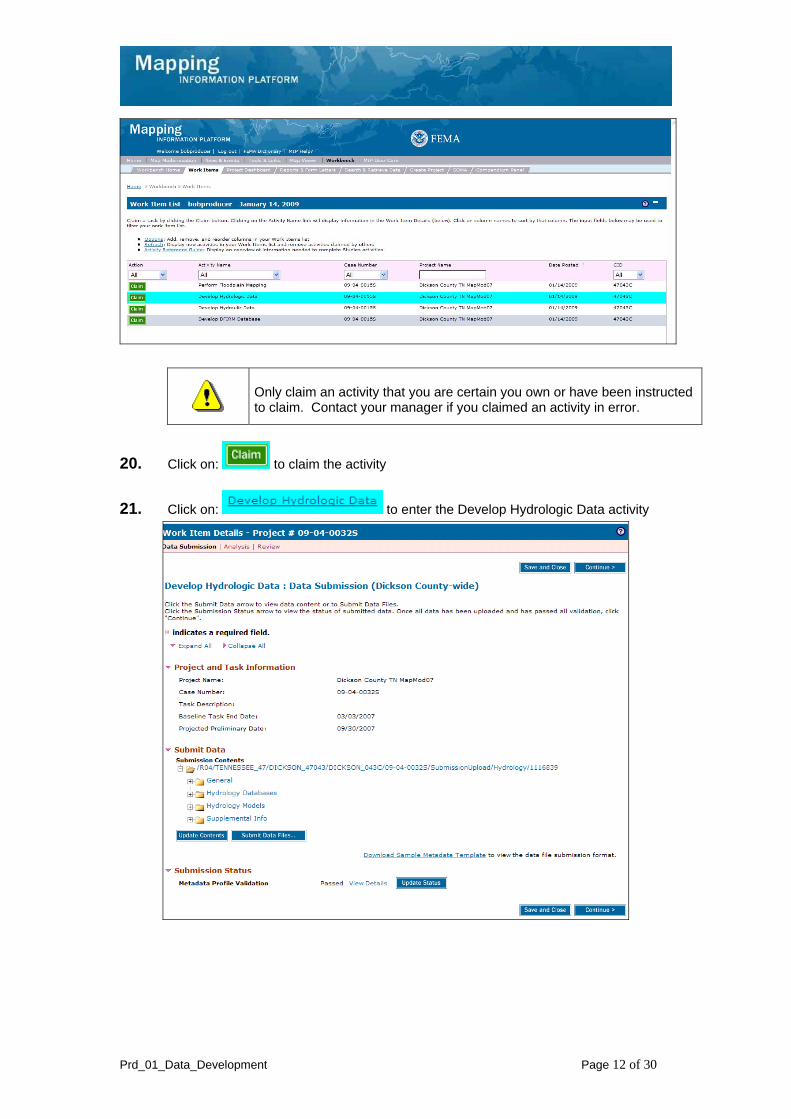
Only claim an activity that you are certain you own or have been instructed to claim. Contact your manager if you claimed an activity in error.
1. Click on: to claim the activity
The process to complete the Perform Field Survey activity also applies to the Develop Topographic Data and Acquire Base Map activities. Apply the process shown in this work instruction to those activities.
Perform Field Survey - The Producer performs this activity to upload the Field Survey data and associated metadata to the MIP for auto QA.
Develop Topographic Data - The Producer performs this activity to upload the topography data and associated metadata to the MIP for auto QA.
Acquire Base Map - The Producer performs this activity to upload the base map data and associated metadata to the MIP for auto QA.
Completion of these and every data development activity triggers an activity for the RSC to validate the content submission.
2. Click on: to select the activity
Prd_01_Data_Development Page 3 of 30
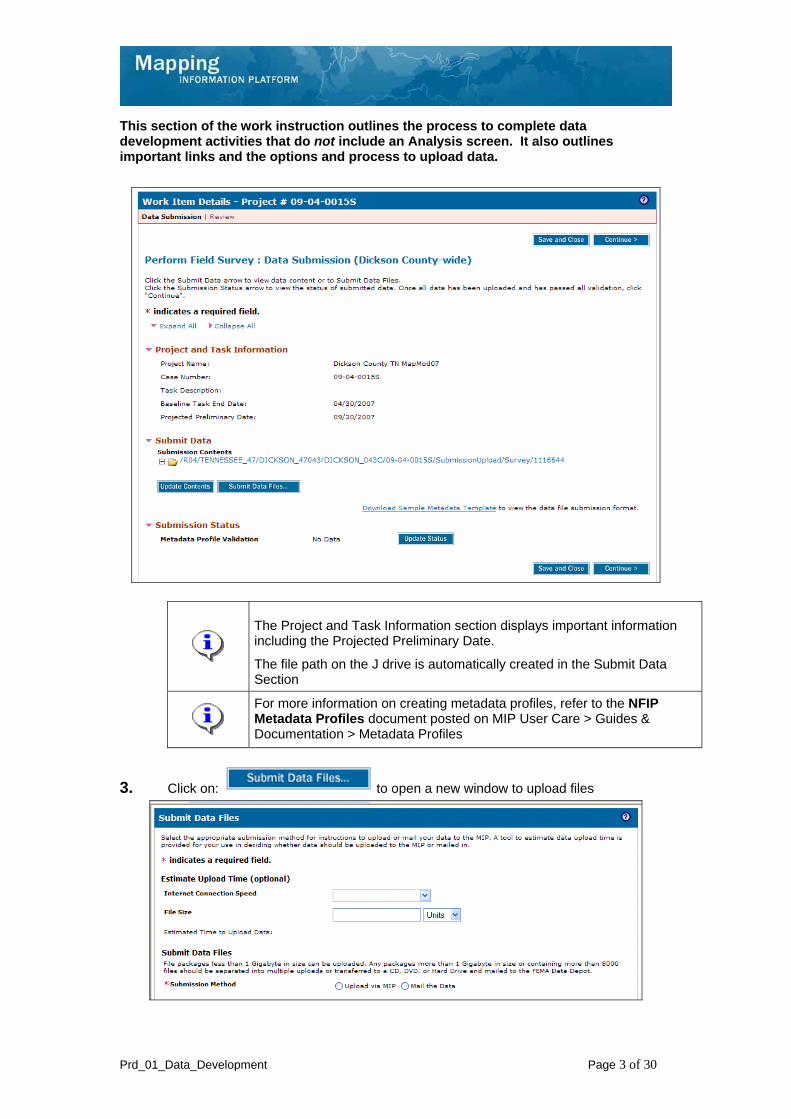
This section of the work instruction outlines the process to complete data development activities that do not include an Analysis screen. It also outlines important links and the options and process to upload data.
The Project and Task Information section displays important information including the Projected Preliminary Date.
The file path on the J drive is automatically created in the Submit Data Section
For more information on creating metadata profiles, refer to the NFIP Metadata Profiles document posted on MIP User Care > Guides & Documentation > Metadata Profiles
3. Click on: to open a new window to upload files
Prd_01_Data_Development Page 4 of 30
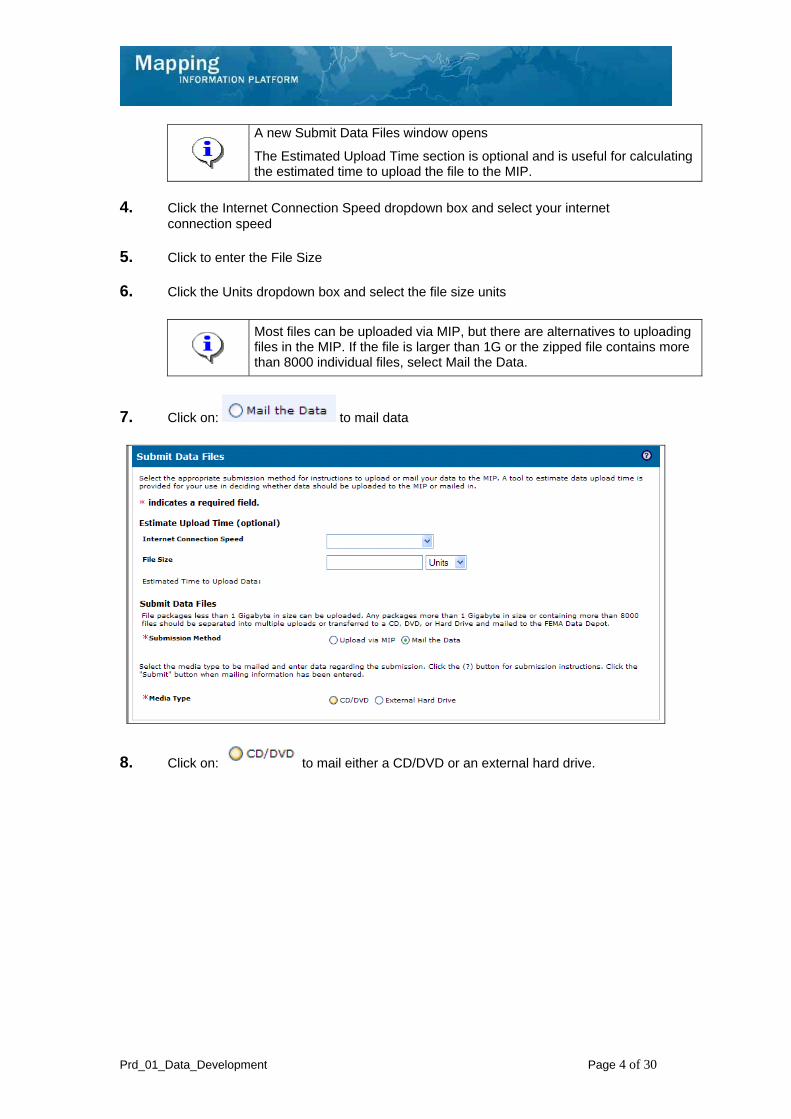
A new Submit Data Files window opens
The Estimated Upload Time section is optional and is useful for calculating the estimated time to upload the file to the MIP.
4. Click the Internet Connection Speed dropdown box and select your internet connection speed
5. Click to enter the File Size
6. Click the Units dropdown box and select the file size units
Most files can be uploaded via MIP, but there are alternatives to uploading files in the MIP. If the file is larger than 1G or the zipped file contains more than 8000 individual files, select Mail the Data.
7. Click on: to mail data
8. Click on: to mail either a CD/DVD or an external hard drive.
Prd_01_Data_Development Page 5 of 30
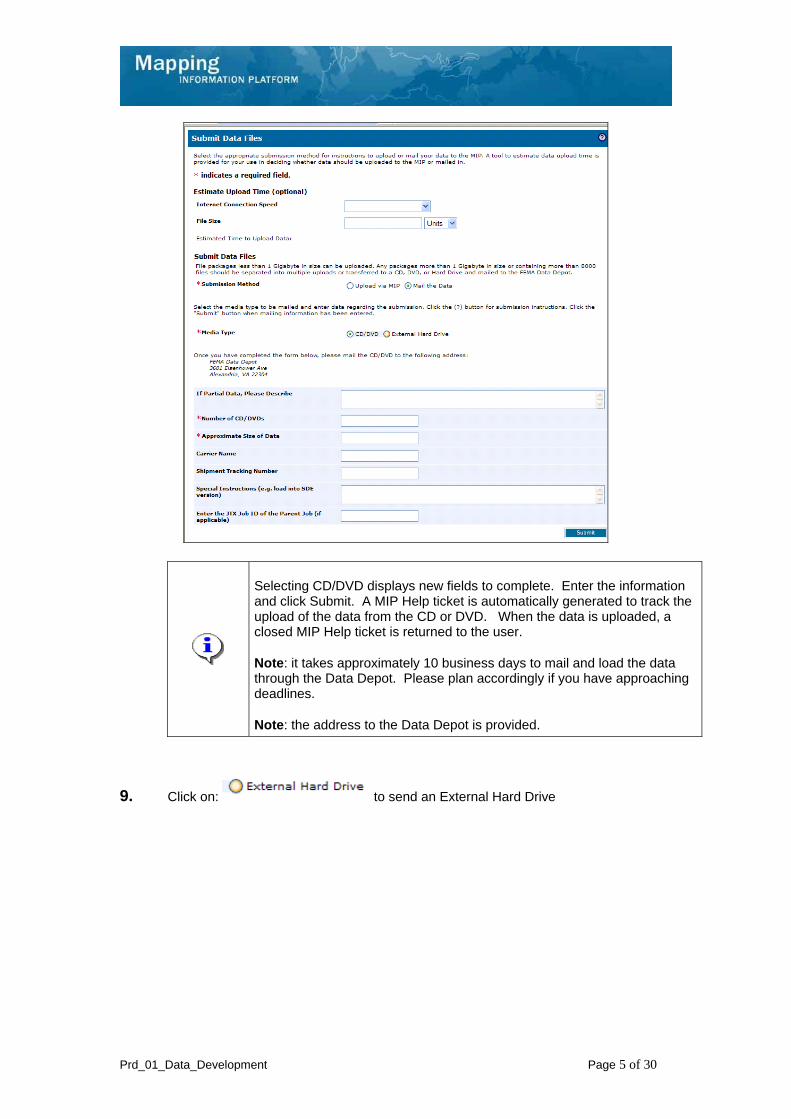
Selecting CD/DVD displays new fields to complete. Enter the information and click Submit. A MIP Help ticket is automatically generated to track the upload of the data from the CD or DVD. When the data is uploaded, a closed MIP Help ticket is returned to the user.
Note: it takes approximately 10 business days to mail and load the data through the Data Depot. Please plan accordingly if you have approaching deadlines.
Note: the address to the Data Depot is provided.
9. Click on: to send an External Hard Drive
Prd_01_Data_Development Page 6 of 30
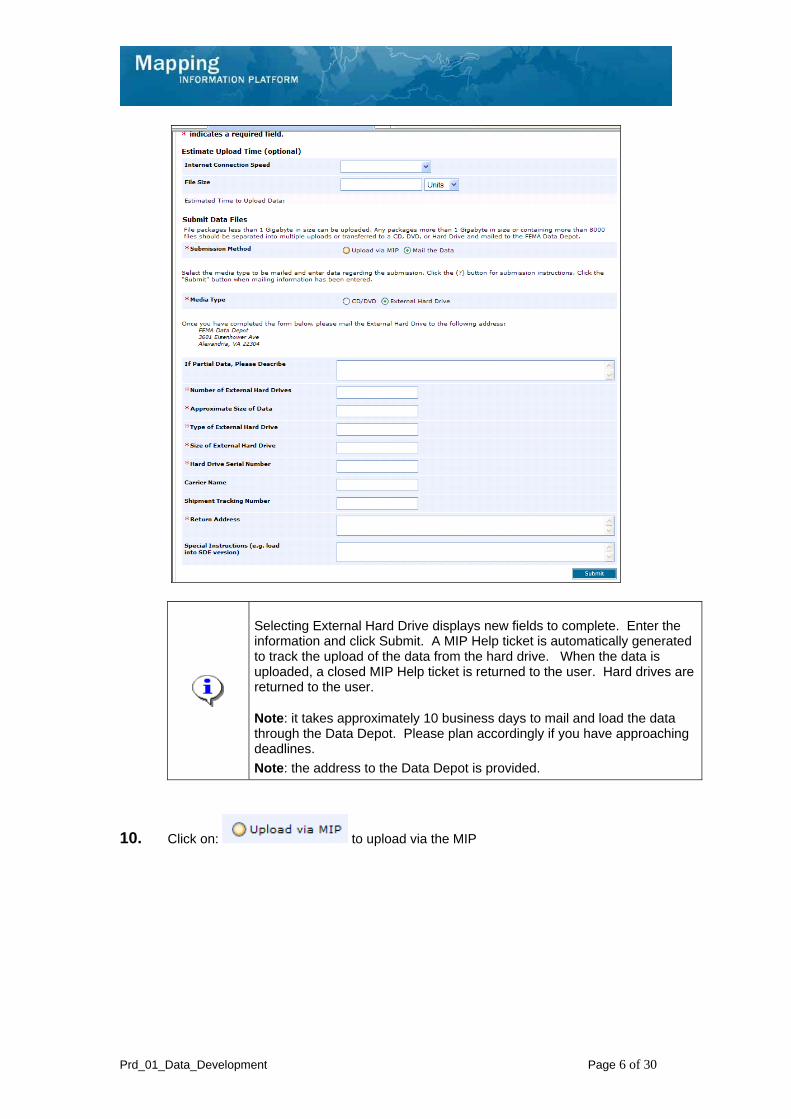
Selecting External Hard Drive displays new fields to complete. Enter the information and click Submit. A MIP Help ticket is automatically generated to track the upload of the data from the hard drive. When the data is uploaded, a closed MIP Help ticket is returned to the user. Hard drives are returned to the user.
Note: it takes approximately 10 business days to mail and load the data through the Data Depot. Please plan accordingly if you have approaching deadlines.
Note: the address to the Data Depot is provided.
10. Click on: to upload via the MIP
Prd_01_Data_Development Page 7 of 30
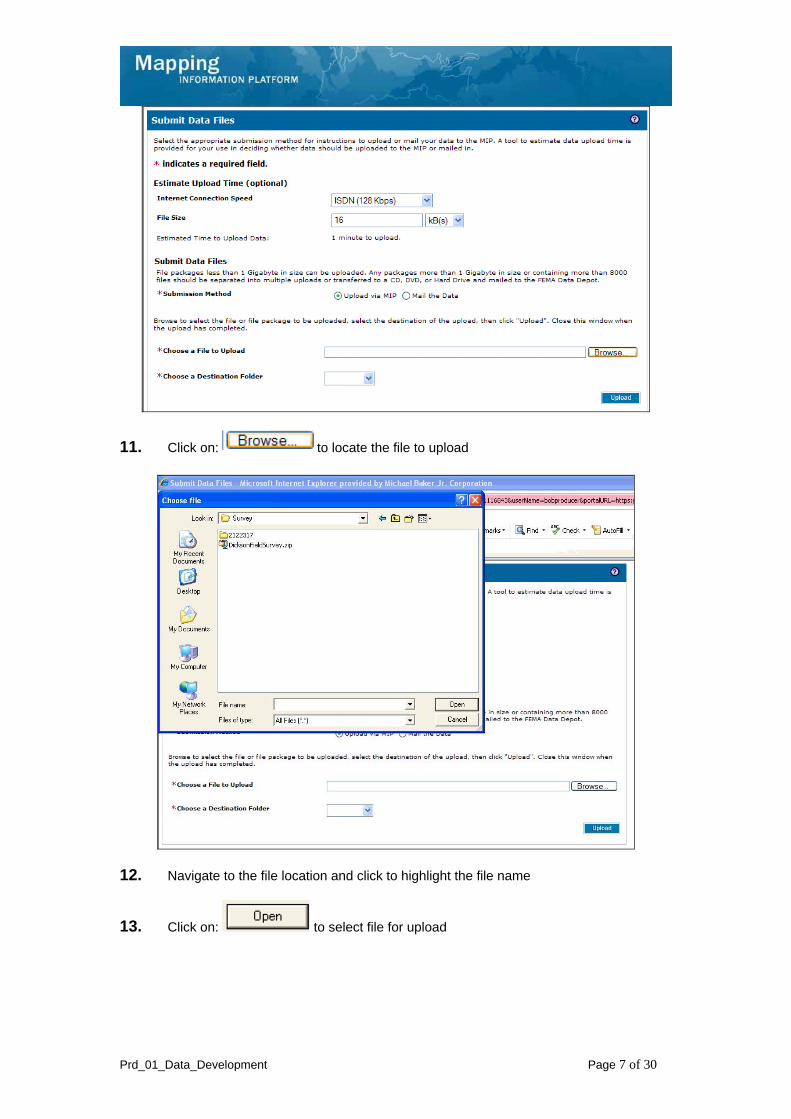
11. Click on: to locate the file to upload
12. Navigate to the file location and click to highlight the file name
13. Click on: to select file for upload
Prd_01_Data_Development Page 8 of 30
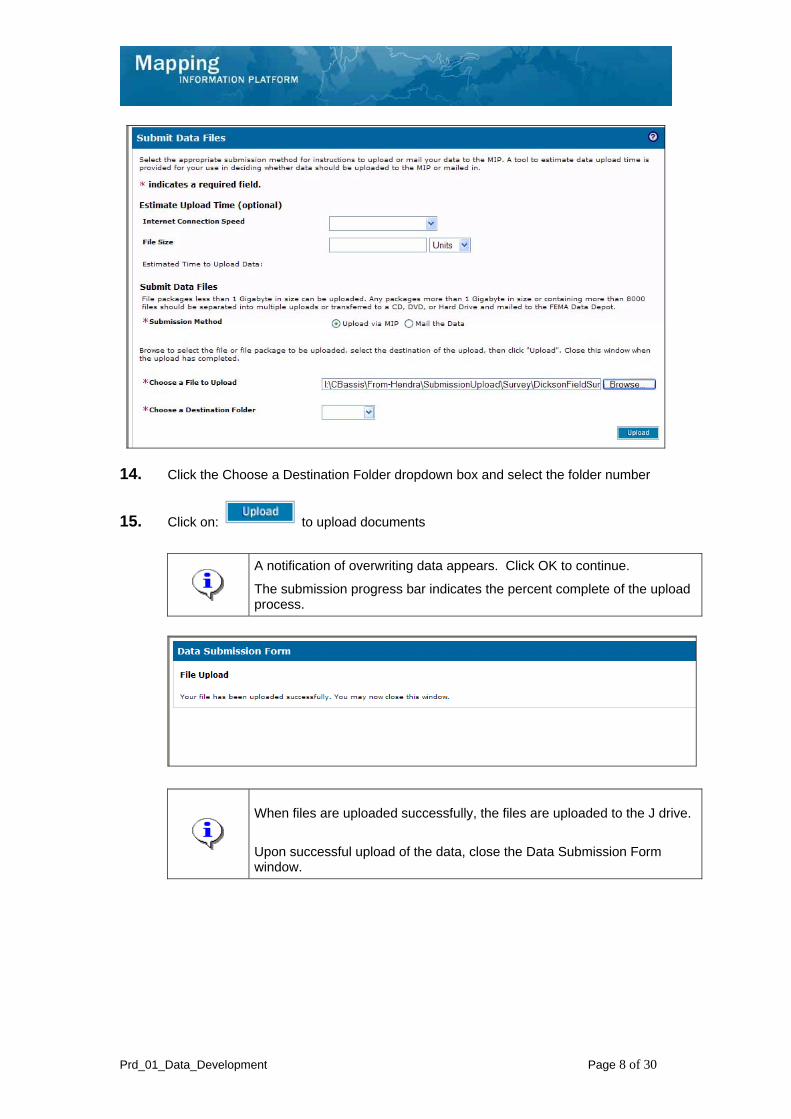
14. Click the Choose a Destination Folder dropdown box and select the folder number
15. Click on: to upload documents
A notification of overwriting data appears. Click OK to continue.
The submission progress bar indicates the percent complete of the upload process.
When files are uploaded successfully, the files are uploaded to the J drive.
Upon successful upload of the data, close the Data Submission Form window.
Prd_01_Data_Development Page 9 of 30
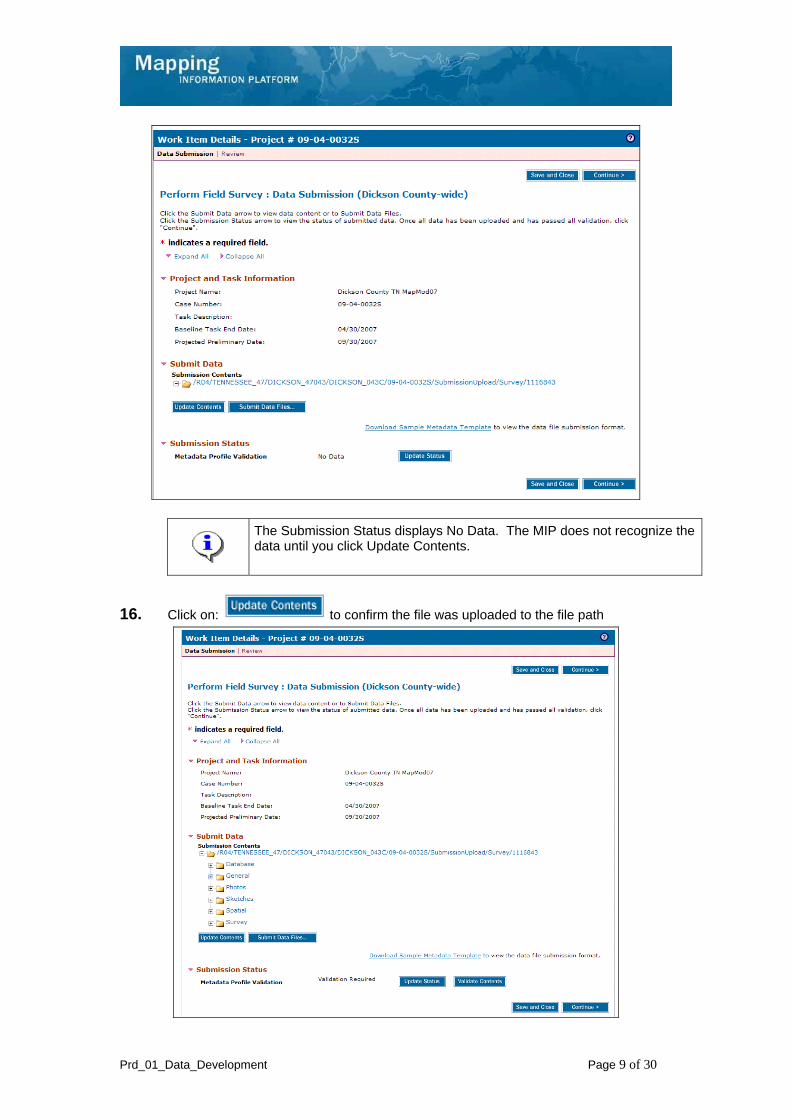
The Submission Status displays No Data. The MIP does not recognize the data until you click Update Contents.
16. Click on: to confirm the file was uploaded to the file path
Prd_01_Data_Development Page 10 of 30
The files now displays in the Submission Contents folder and the Submission Status changes to Validation Required. Use the + icons to open each folder.
17. Click on: to send the submission for auto review
If the Submission Status displays In-Progress, click Update Status to recheck the status
Click View Details for more information on the results of the auto review. If the status displays Failed, the View Details link provides specific information on what part of the metadata failed the review.
For more information on specific validation errors, refer to the DFIRM Verification Check Standard January 2009 posted on MIP User Care > Guides and Documentation > User Guidance.
You can only continue if the Submission Status reads Passed.
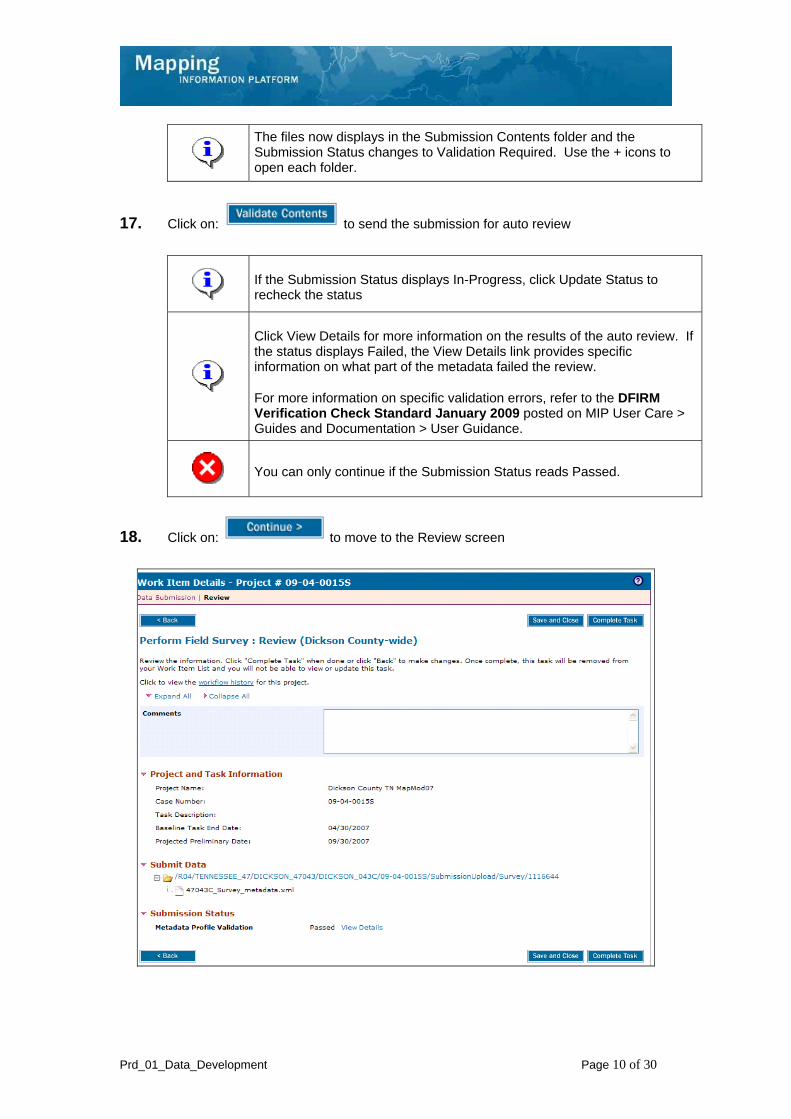
18. Click on: to move to the Review screen
Prd_01_Data_Development Page 11 of 30
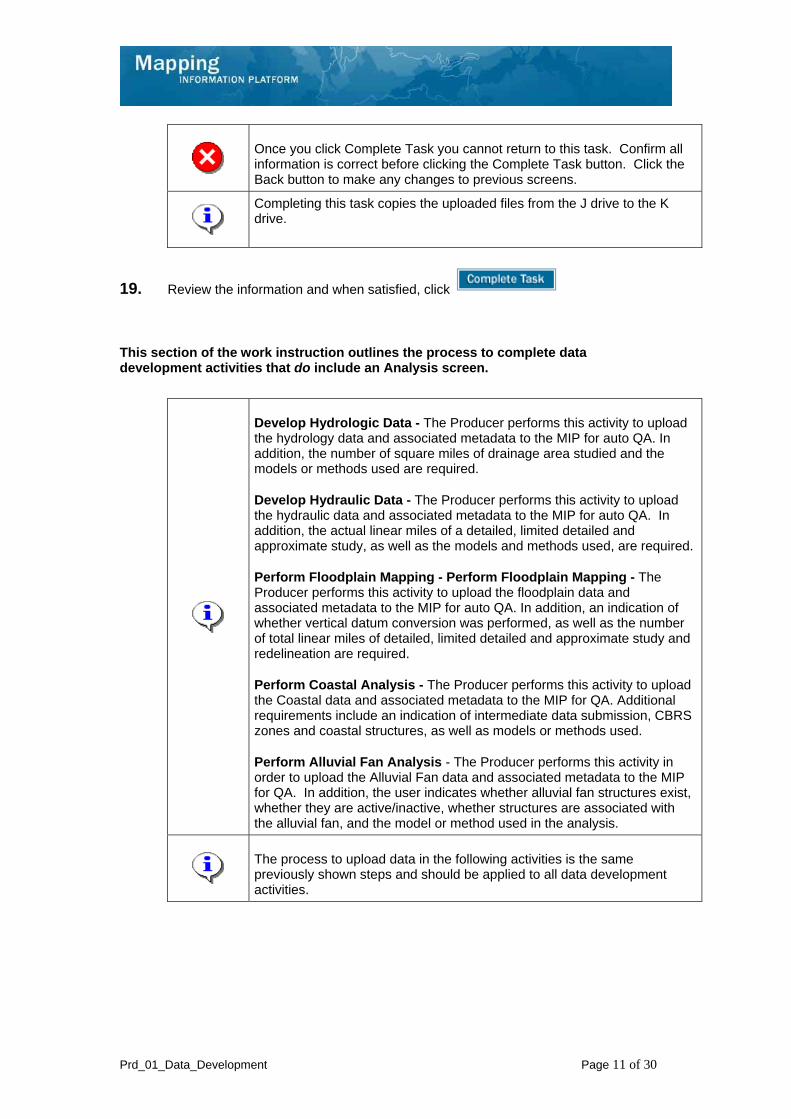
Once you click Complete Task you cannot return to this task. Confirm all information is correct before clicking the Complete Task button. Click the Back button to make any changes to previous screens.
Completing this task copies the uploaded files from the J drive to the K drive.
19. Review the information and when satisfied, click
This section of the work instruction outlines the process to complete data development activities that do include an Analysis screen.
Develop Hydrologic Data - The Producer performs this activity to upload the hydrology data and associated metadata to the MIP for auto QA. In addition, the number of square miles of drainage area studied and the models or methods used are required.
Develop Hydraulic Data - The Producer performs this activity to upload the hydraulic data and associated metadata to the MIP for auto QA. In addition, the actual linear miles of a detailed, limited detailed and approximate study, as well as the models and methods used, are required.
Perform Floodplain Mapping - Perform Floodplain Mapping - The Producer performs this activity to upload the floodplain data and associated metadata to the MIP for auto QA. In addition, an indication of whether vertical datum conversion was performed, as well as the number of total linear miles of detailed, limited detailed and approximate study and redelineation are required.
Perform Coastal Analysis - The Producer performs this activity to upload the Coastal data and associated metadata to the MIP for QA. Additional requirements include an indication of intermediate data submission, CBRS zones and coastal structures, as well as models or methods used.
Perform Alluvial Fan Analysis - The Producer performs this activity in order to upload the Alluvial Fan data and associated metadata to the MIP for QA. In addition, the user indicates whether alluvial fan structures exist, whether they are active/inactive, whether structures are associated with the alluvial fan, and the model or method used in the analysis.
The process to upload data in the following activities is the same previously shown steps and should be applied to all data development activities.
Prd_01_Data_Development Page 12 of 30
Only claim an activity that you are certain you own or have been instructed to claim. Contact your manager if you claimed an activity in error.
20. Click on: to claim the activity
21. Click on: to enter the Develop Hydrologic Data activity
Prd_01_Data_Development Page 13 of 30
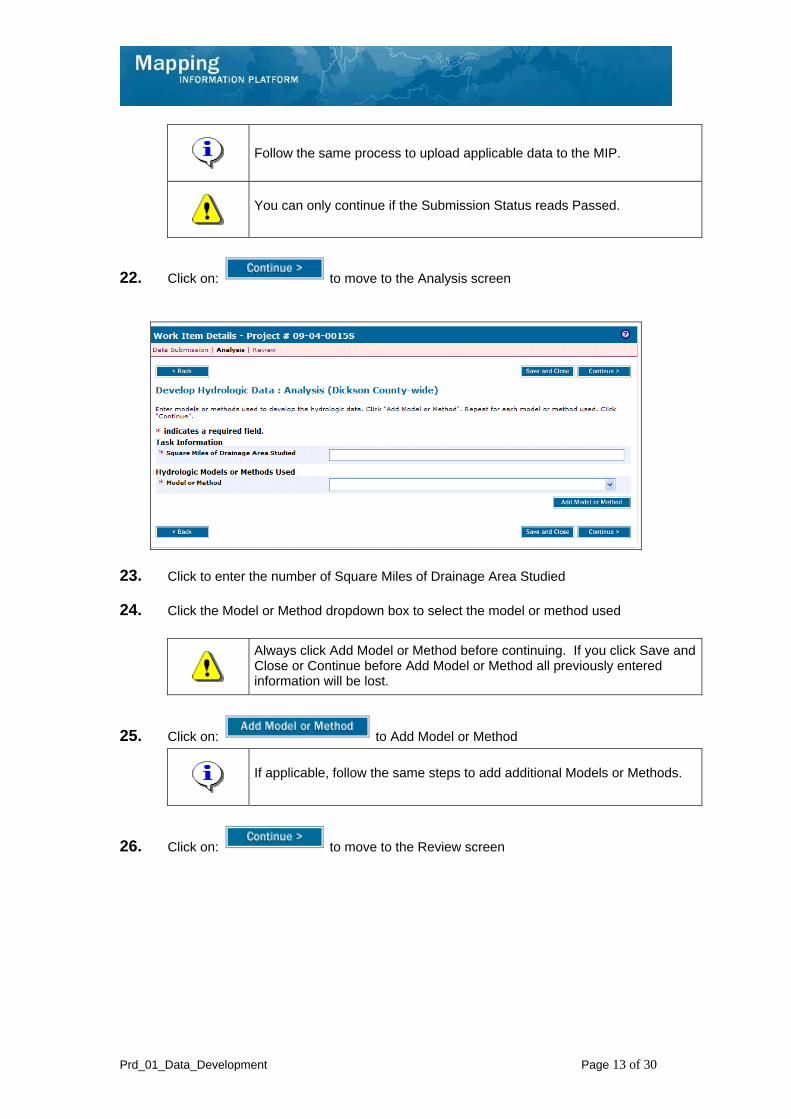
Follow the same process to upload applicable data to the MIP.
You can only continue if the Submission Status reads Passed.
22. Click on: to move to the Analysis screen
23. Click to enter the number of Square Miles of Drainage Area Studied
24. Click the Model or Method dropdown box to select the model or method used
Always click Add Model or Method before continuing. If you click Save and Close or Continue before Add Model or Method all previously entered information will be lost.
25. Click on: to Add Model or Method
If applicable, follow the same steps to add additional Models or Methods.
26. Click on: to move to the Review screen

Prd_01_Data_Development Page 14 of 30
Once you click Complete Task you cannot return to this task. Confirm all information is correct before clicking the Complete Task button. Click the Back button to make any changes to previous screens.
Completing this task copies the uploaded files from the J to the K drive.
27. Review the information and when satisfied, click
Prd_01_Data_Development Page 15 of 30
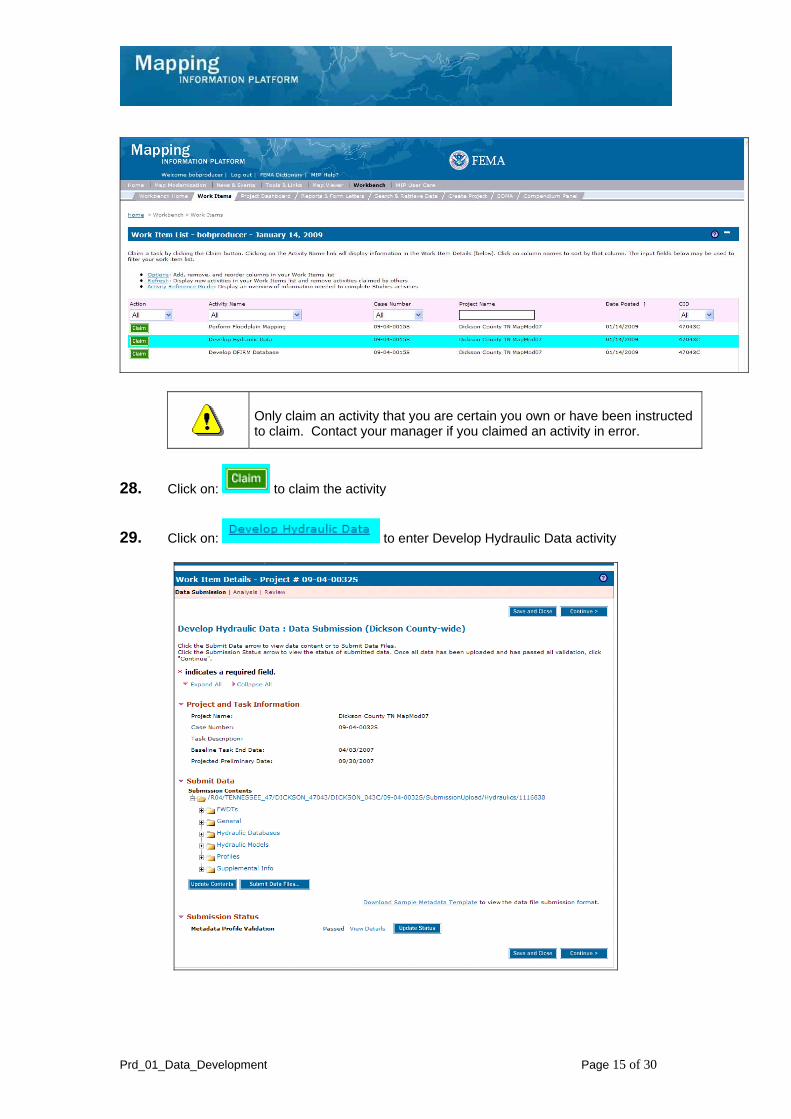
Only claim an activity that you are certain you own or have been instructed to claim. Contact your manager if you claimed an activity in error.
28. Click on: to claim the activity
29. Click on: to enter Develop Hydraulic Data activity

Prd_01_Data_Development Page 16 of 30
Follow the same process to upload applicable data to the MIP.
You can only continue if the Submission Status reads Passed.
30. Upon receipt of a passing report click on: to move to the Analysis screen
31. Click to enter the number of Actual Linear Miles of Detailed Study
32. Click to enter the number of Actual Linear Miles of Limited Detailed Study
33. Click to enter the number of Actual Linear Miles of Approximate Study
34. Click the Model or Method dropdown box to select the model or method used
Always click Add Model or Method before continuing. If you click Save and Close or Continue before Add Model or Method all previously entered information will be lost.
35. Click on: to Add Model or Method
If applicable, follow the same steps to add additional Models or Methods.
36. Click on: to move to the Review screen
Prd_01_Data_Development Page 17 of 30
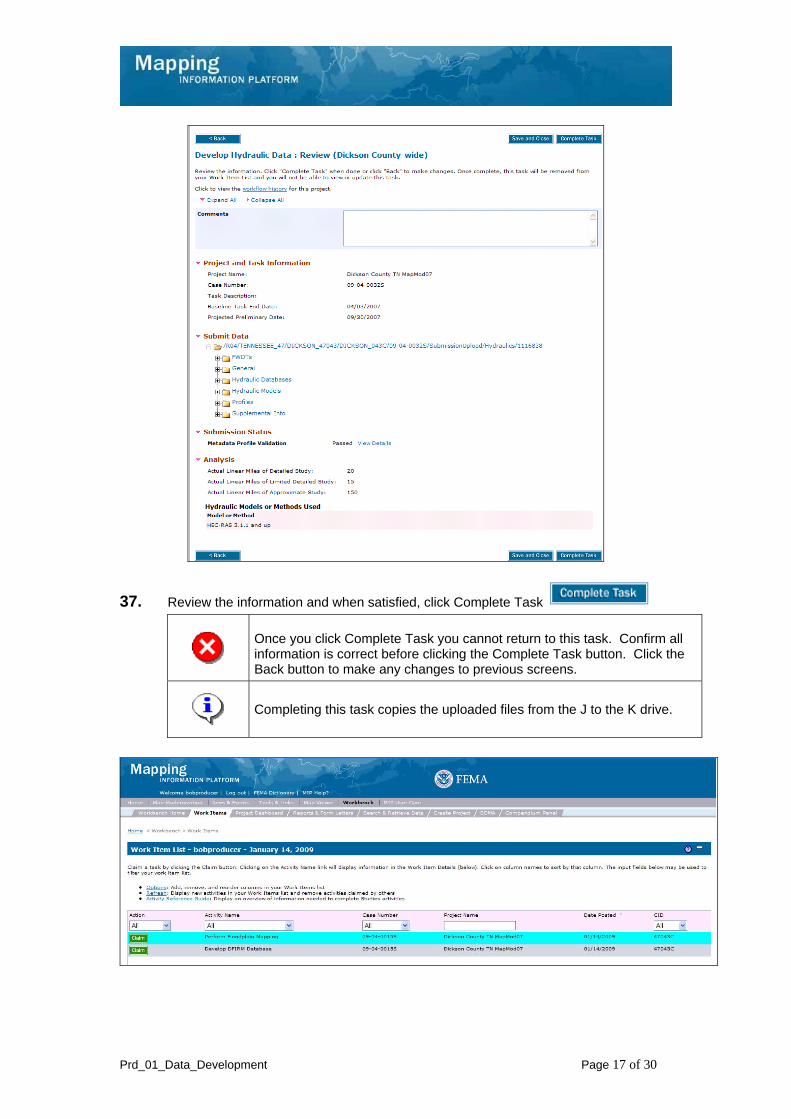
37. Review the information and when satisfied, click Complete Task
Once you click Complete Task you cannot return to this task. Confirm all information is correct before clicking the Complete Task button. Click the Back button to make any changes to previous screens.
Completing this task copies the uploaded files from the J to the K drive.
Prd_01_Data_Development Page 18 of 30
Only claim an activity that you are certain you own or have been instructed to claim. Contact your manager if you claimed an activity in error.
38. Click on: to claim the activity
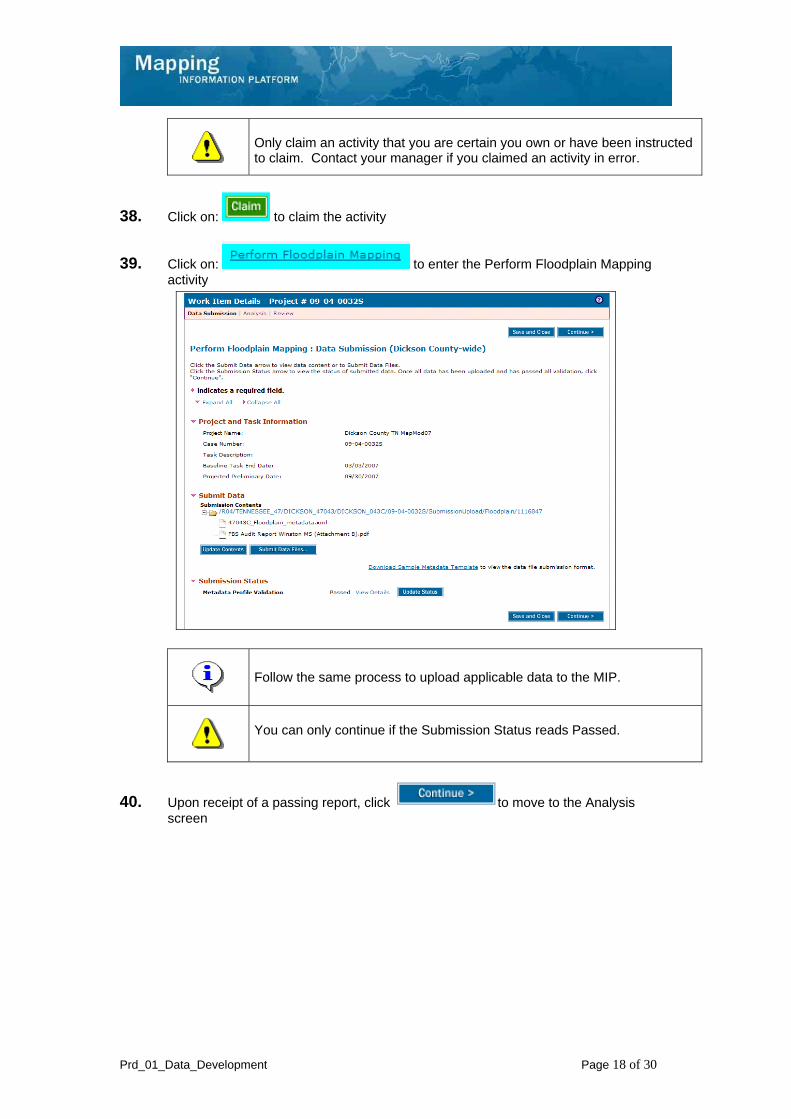
39. Click on: to enter the Perform Floodplain Mapping activity
Follow the same process to upload applicable data to the MIP.
You can only continue if the Submission Status reads Passed.
40. Upon receipt of a passing report, click to move to the Analysis screen
Prd_01_Data_Development Page 19 of 30
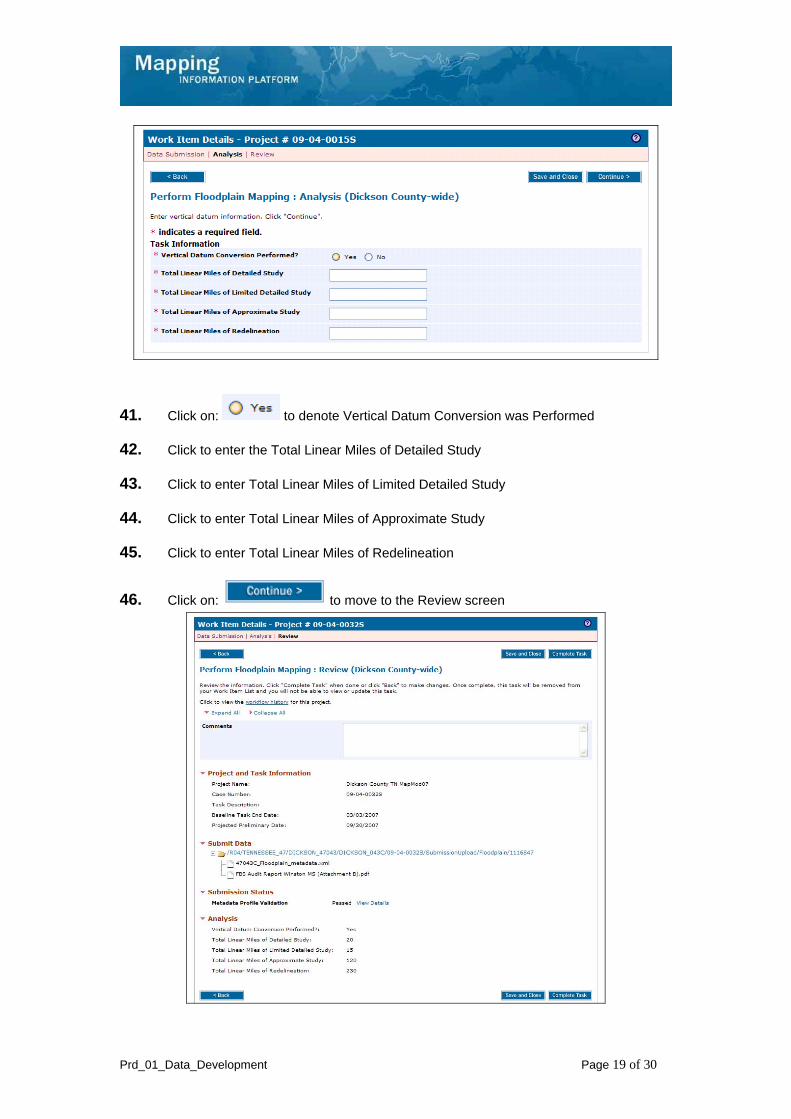
41. Click on: to denote Vertical Datum Conversion was Performed
42. Click to enter the Total Linear Miles of Detailed Study
43. Click to enter Total Linear Miles of Limited Detailed Study
44. Click to enter Total Linear Miles of Approximate Study
45. Click to enter Total Linear Miles of Redelineation
46. Click on: to move to the Review screen
Prd_01_Data_Development Page 20 of 30
Once you click Complete Task you cannot return to this task. Confirm all information is correct before clicking the Complete Task button. Click the Back button to make any changes to previous screens.
Completing this task copies the uploaded files from the J to the K drive.
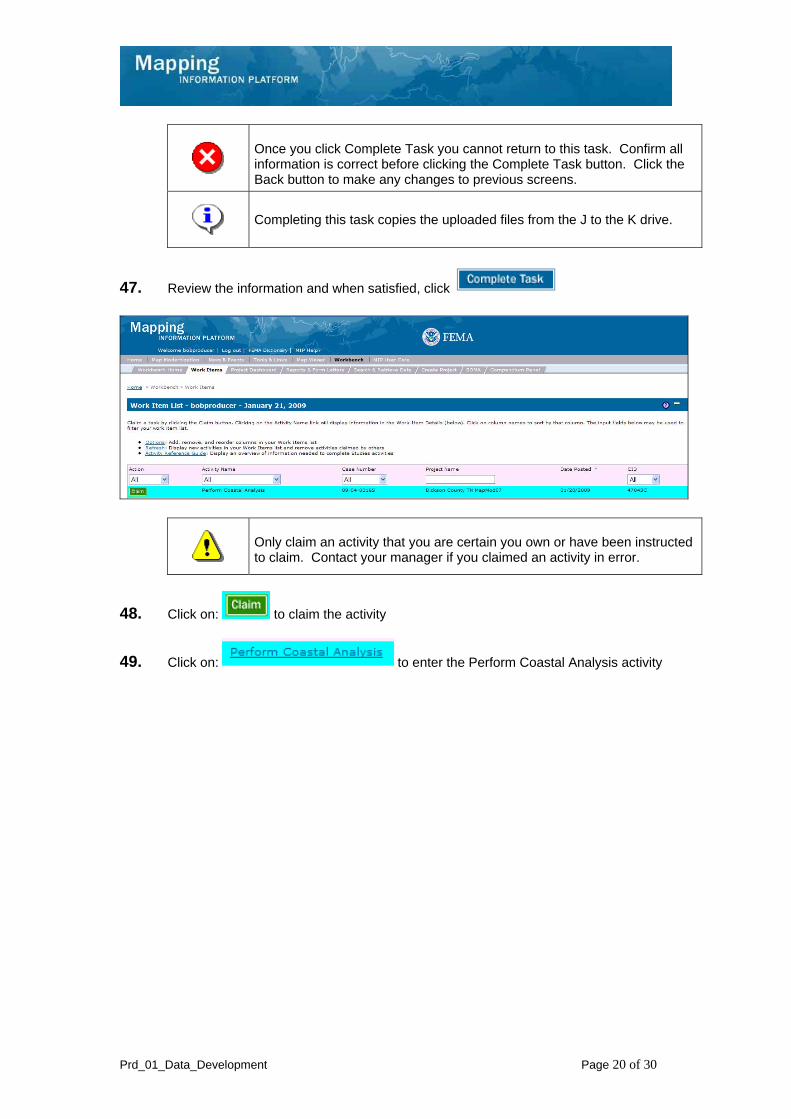
47. Review the information and when satisfied, click
Only claim an activity that you are certain you own or have been instructed to claim. Contact your manager if you claimed an activity in error.
48. Click on: to claim the activity
49. Click on: to enter the Perform Coastal Analysis activity
Prd_01_Data_Development Page 21 of 30
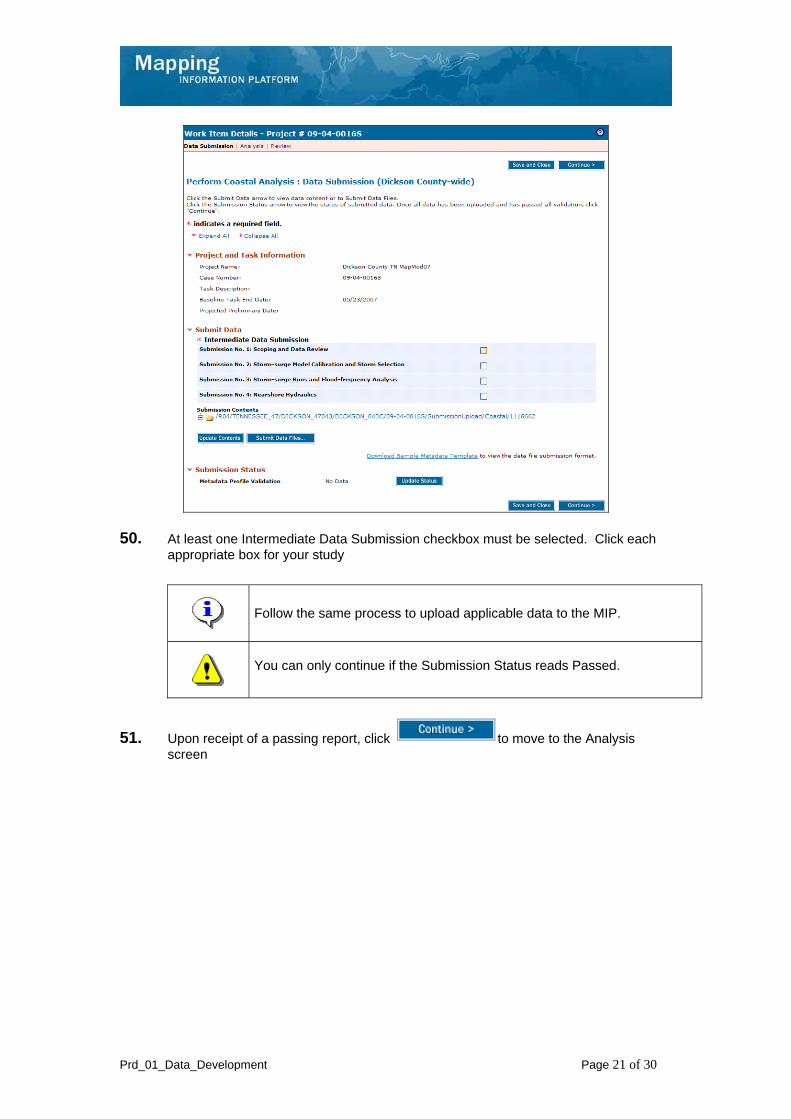
50. At least one Intermediate Data Submission checkbox must be selected. Click each appropriate box for your study
Follow the same process to upload applicable data to the MIP.
You can only continue if the Submission Status reads Passed.
51. Upon receipt of a passing report, click to move to the Analysis screen
Prd_01_Data_Development Page 22 of 30
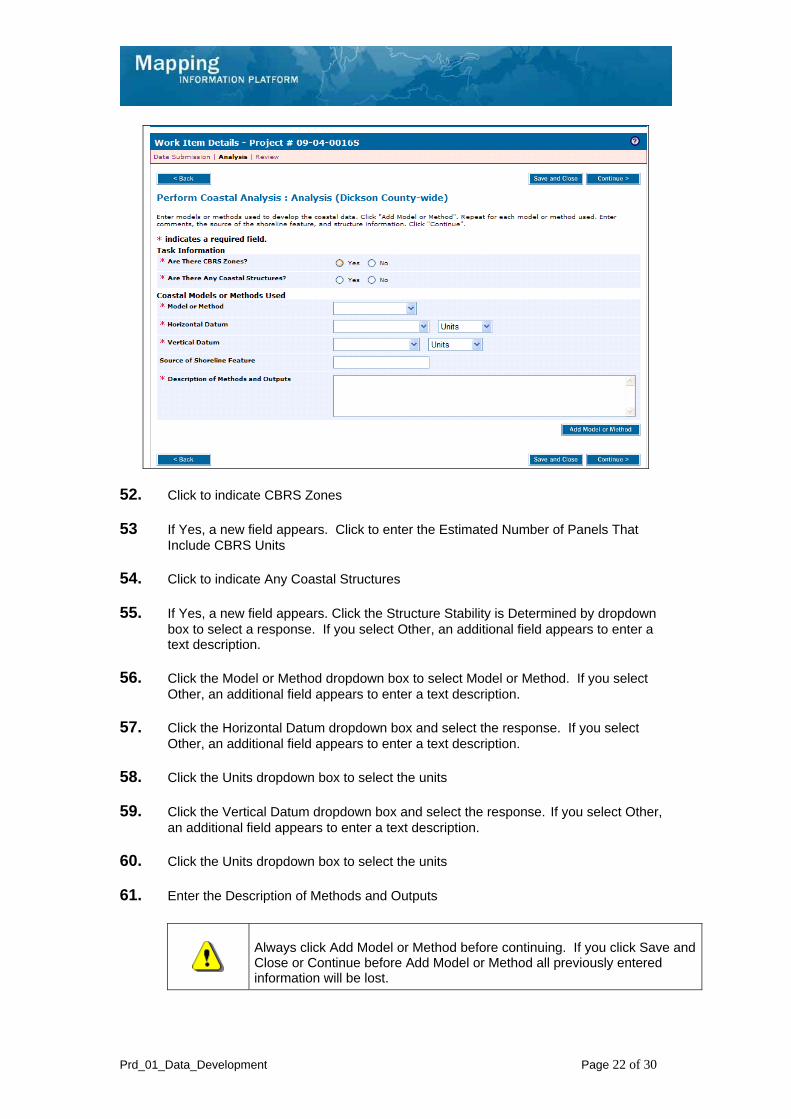
52. Click to indicate CBRS Zones
53 If Yes, a new field appears. Click to enter the Estimated Number of Panels That Include CBRS Units
54. Click to indicate Any Coastal Structures
55. If Yes, a new field appears. Click the Structure Stability is Determined by dropdown box to select a response. If you select Other, an additional field appears to enter a text description.
56. Click the Model or Method dropdown box to select Model or Method. If you select Other, an additional field appears to enter a text description.
57. Click the Horizontal Datum dropdown box and select the response. If you select Other, an additional field appears to enter a text description.
58. Click the Units dropdown box to select the units
59. Click the Vertical Datum dropdown box and select the response. If you select Other, an additional field appears to enter a text description.
60. Click the Units dropdown box to select the units
61. Enter the Description of Methods and Outputs
Always click Add Model or Method before continuing. If you click Save and Close or Continue before Add Model or Method all previously entered information will be lost.
Prd_01_Data_Development Page 23 of 30
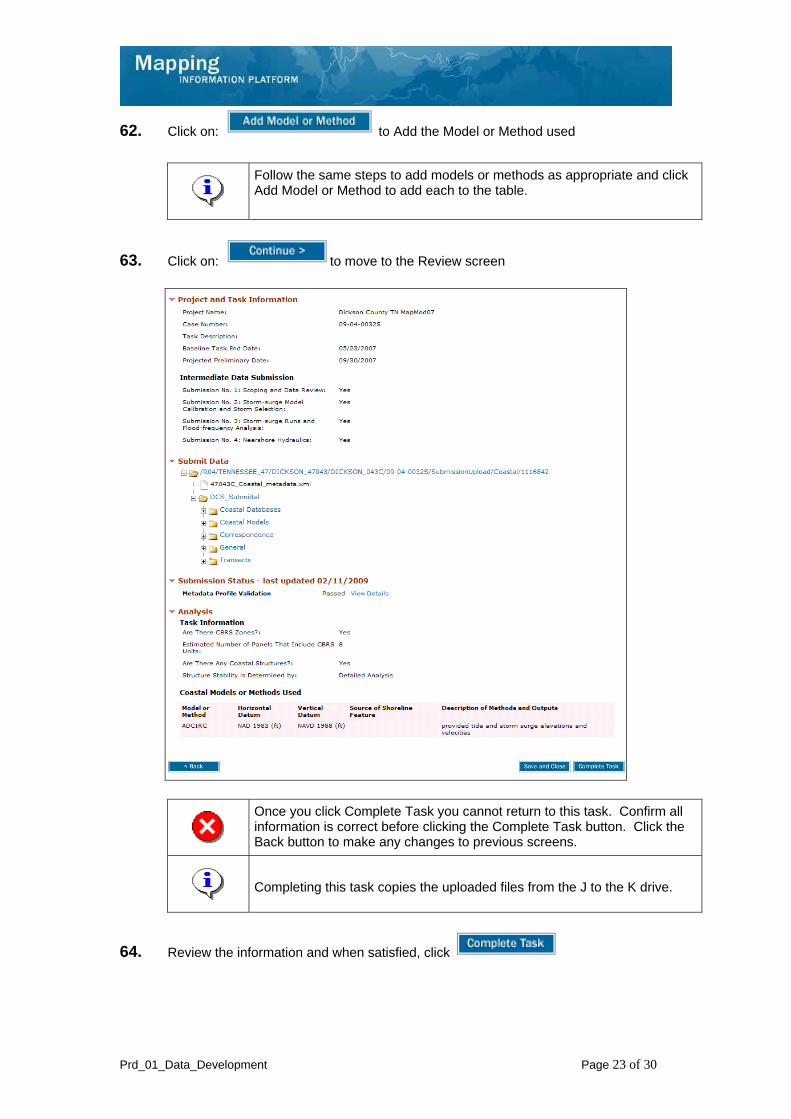
62. Click on: to Add the Model or Method used
Follow the same steps to add models or methods as appropriate and click Add Model or Method to add each to the table.
63. Click on: to move to the Review screen
Once you click Complete Task you cannot return to this task. Confirm all information is correct before clicking the Complete Task button. Click the Back button to make any changes to previous screens.
Completing this task copies the uploaded files from the J to the K drive.
64. Review the information and when satisfied, click
Prd_01_Data_Development Page 24 of 30
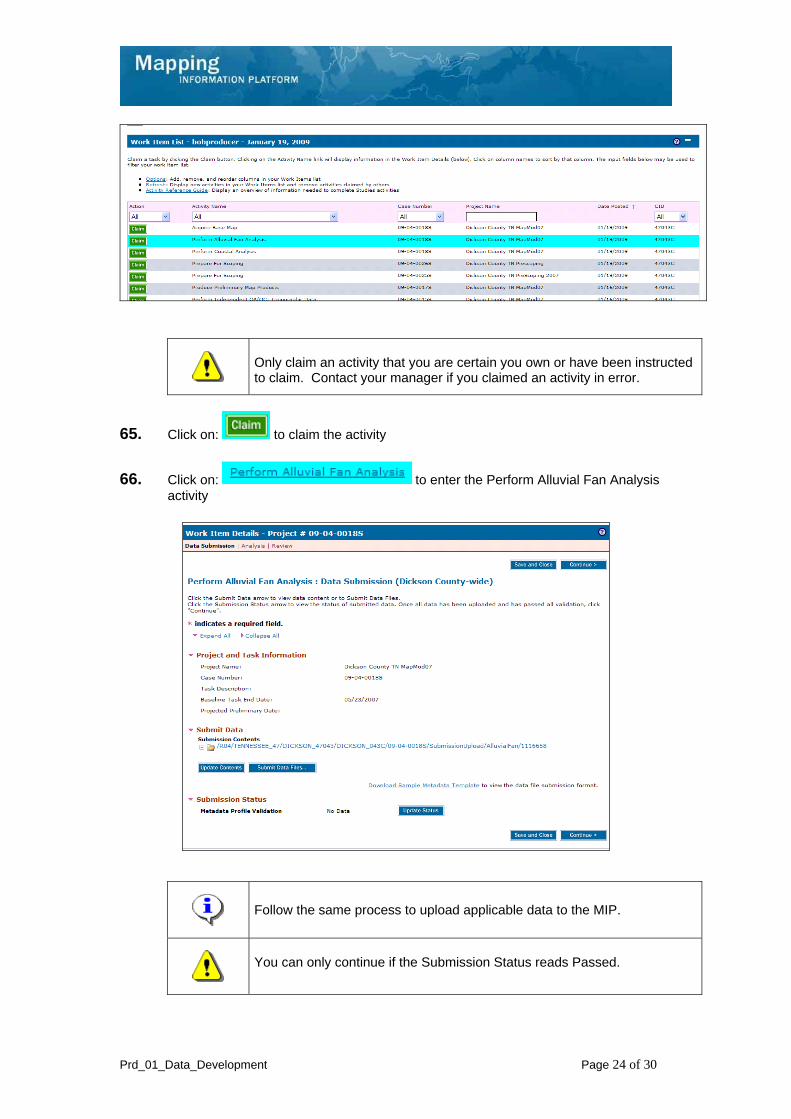
Only claim an activity that you are certain you own or have been instructed to claim. Contact your manager if you claimed an activity in error.
65. Click on: to claim the activity
66. Click on: to enter the Perform Alluvial Fan Analysis activity
Follow the same process to upload applicable data to the MIP.
You can only continue if the Submission Status reads Passed.
Prd_01_Data_Development Page 25 of 30
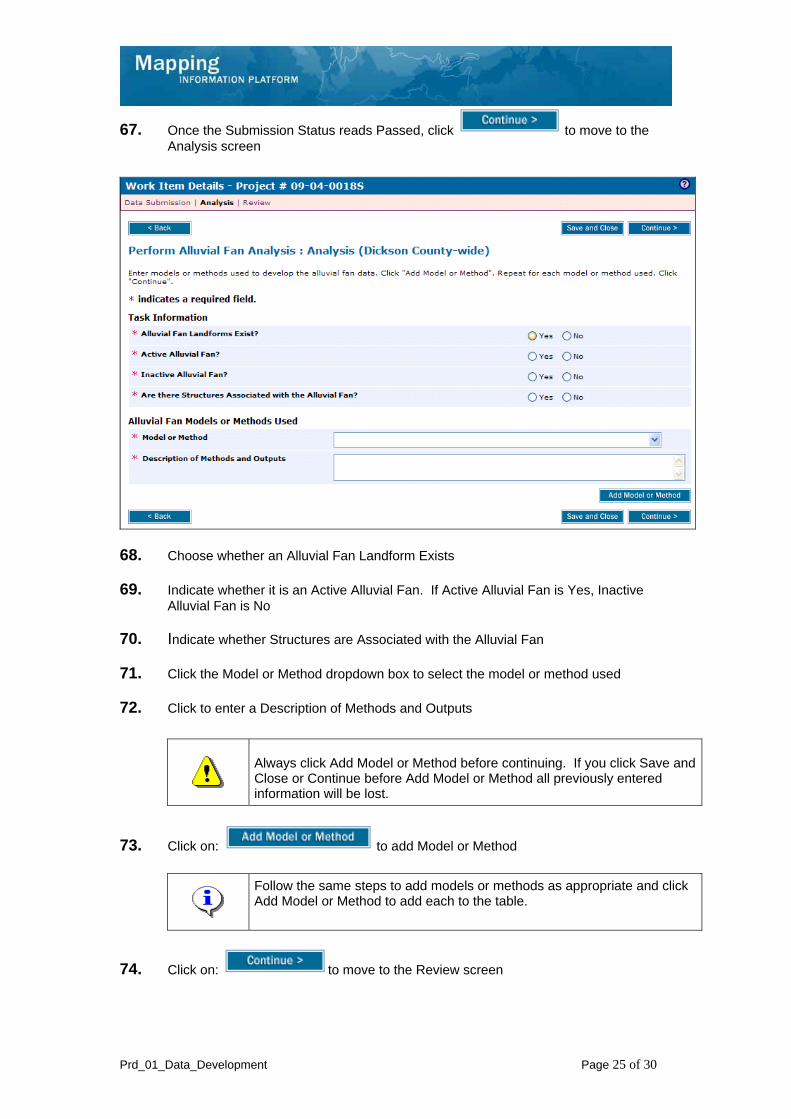
67. Once the Submission Status reads Passed, click to move to the Analysis screen
68. Choose whether an Alluvial Fan Landform Exists
69. Indicate whether it is an Active Alluvial Fan. If Active Alluvial Fan is Yes, Inactive Alluvial Fan is No
70. Indicate whether Structures are Associated with the Alluvial Fan
71. Click the Model or Method dropdown box to select the model or method used
72. Click to enter a Description of Methods and Outputs
Always click Add Model or Method before continuing. If you click Save and Close or Continue before Add Model or Method all previously entered information will be lost.
73. Click on: to add Model or Method
Follow the same steps to add models or methods as appropriate and click Add Model or Method to add each to the table.
74. Click on: to move to the Review screen
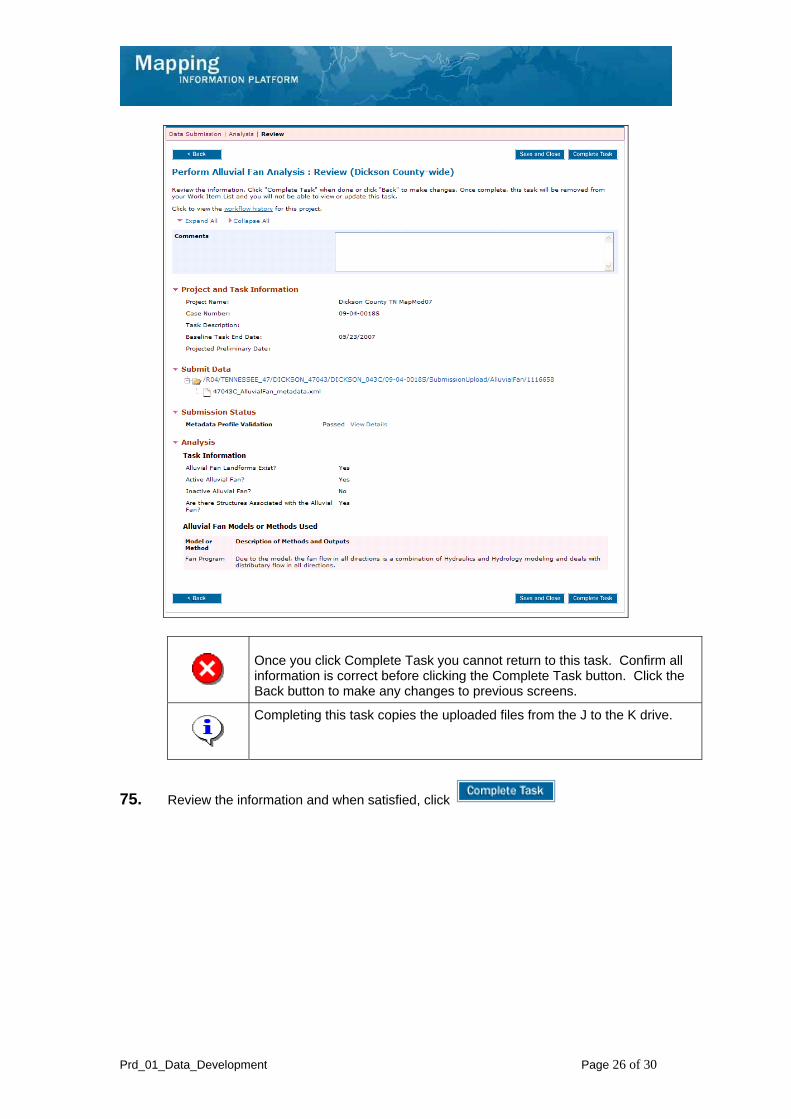
Prd_01_Data_Development Page 26 of 30
Once you click Complete Task you cannot return to this task. Confirm all information is correct before clicking the Complete Task button. Click the Back button to make any changes to previous screens.
Completing this task copies the uploaded files from the J to the K drive.
75. Review the information and when satisfied, click
Prd_01_Data_Development Page 27 of 30
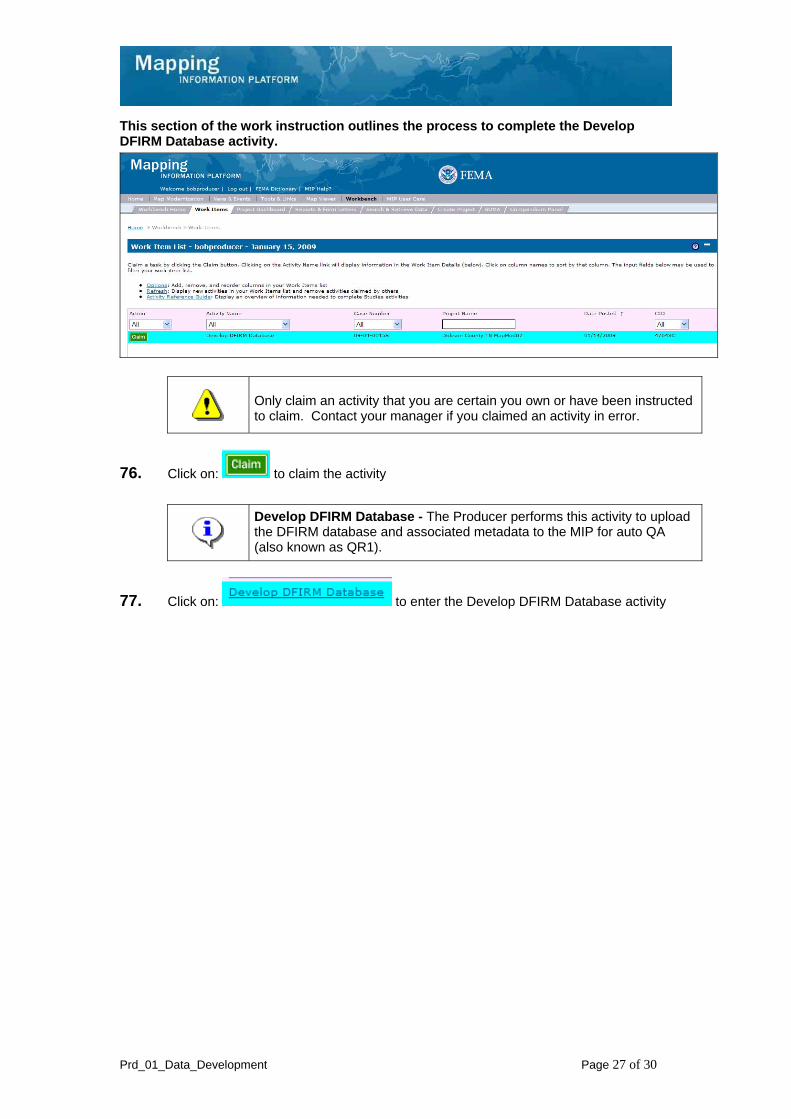
This section of the work instruction outlines the process to complete the Develop DFIRM Database activity.
Only claim an activity that you are certain you own or have been instructed to claim. Contact your manager if you claimed an activity in error.
76. Click on: to claim the activity
Develop DFIRM Database - The Producer performs this activity to upload the DFIRM database and associated metadata to the MIP for auto QA (also known as QR1).
77. Click on: to enter the Develop DFIRM Database activity
Prd_01_Data_Development Page 28 of 30
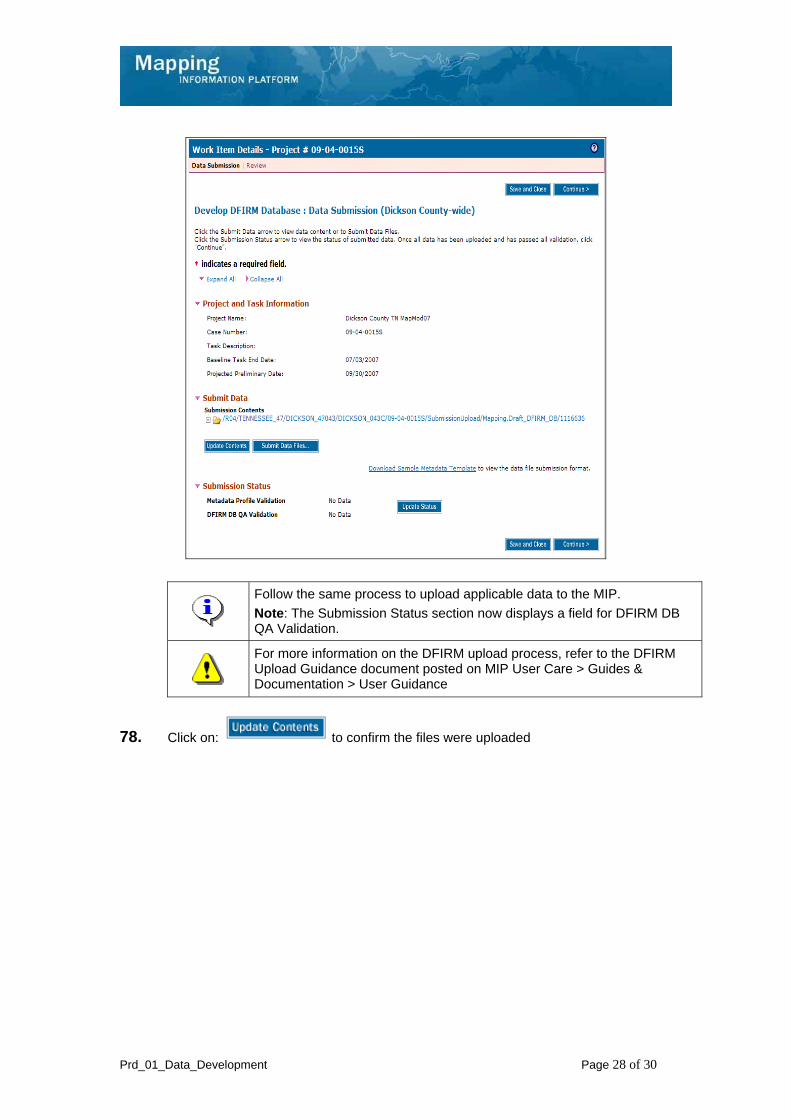
Follow the same process to upload applicable data to the MIP.
Note: The Submission Status section now displays a field for DFIRM DB QA Validation.
For more information on the DFIRM upload process, refer to the DFIRM Upload Guidance document posted on MIP User Care > Guides & Documentation > User Guidance
78. Click on: to confirm the files were uploaded
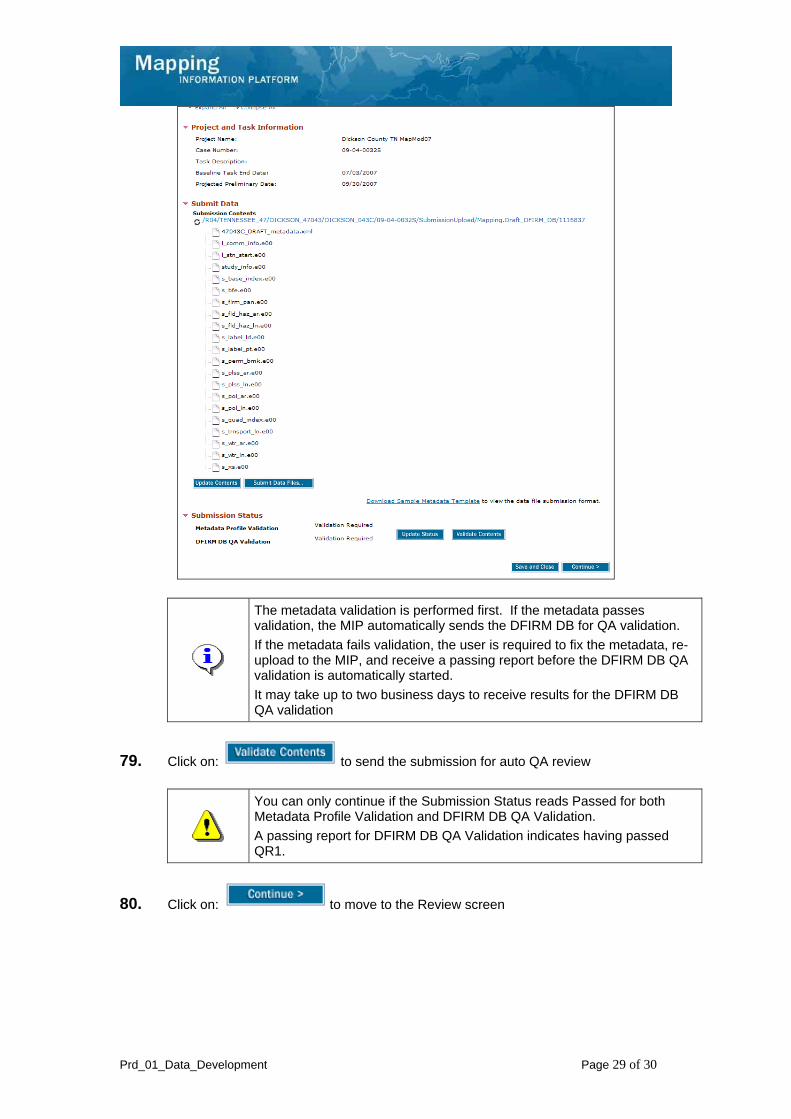
Prd_01_Data_Development Page 29 of 30
The metadata validation is performed first. If the metadata passes validation, the MIP automatically sends the DFIRM DB for QA validation.
If the metadata fails validation, the user is required to fix the metadata, re-upload to the MIP, and receive a passing report before the DFIRM DB QA validation is automatically started.
It may take up to two business days to receive results for the DFIRM DB QA validation
79. Click on: to send the submission for auto QA review
You can only continue if the Submission Status reads Passed for both Metadata Profile Validation and DFIRM DB QA Validation.
A passing report for DFIRM DB QA Validation indicates having passed QR1.
80. Click on: to move to the Review screen
Prd_01_Data_Development Page 30 of 30
Once you click Complete Task you cannot return to this task. Confirm all information is correct before clicking the Complete Task button. Click the Back button to make any changes to previous screens.
Completing this task copies the uploaded files from the J to the K drive.
81. Review the information and when satisfied, click
Results
All Data Development activities are now complete. The workflow now moves to the Validate Content Submission and applicable Independent QA activities. Upon completion of those activities and the Manager completing the Manage Data Development activity, the workflow moves to the Manage Preliminary Map process and the Producer will receive the Produce Preliminary Map Products activity of the Work Item List.
Last updated: March 2009