


Word press 3 cookbook
329
www.it-ebooks.info
-
Upload
fjollajokull -
Category
Automotive
-
view
128 -
download
16
description
a
Transcript of Word press 3 cookbook

WordPress 3 Cookbook
Over 100 recipes to help you enhance your WordPress site!
Ric Shreves
Jean-Baptiste Jung
BIRMINGHAM - MUMBAI
www.it-ebooks.info

WordPress 3 Cookbook
Copyright © 2011 Packt Publishing
All rights reserved. No part of this book may be reproduced, stored in a retrieval system, or transmitted in any form or by any means, without the prior written permission of the publisher, except in the case of brief quotations embedded in critical articles or reviews.
Every effort has been made in the preparation of this book to ensure the accuracy of the information presented. However, the information contained in this book is sold without warranty, either express or implied. Neither the author, nor Packt Publishing, and its dealers and distributors will be held liable for any damages caused or alleged to be caused directly or indirectly by this book.
Packt Publishing has endeavored to provide trademark information about all of the companies and products mentioned in this book by the appropriate use of capitals. However, Packt Publishing cannot guarantee the accuracy of this information.
First published: July 2009
Second published: December 2011
Production Reference: 1071211
Livery Place 35 Livery Street Birmingham B3 2PB, UK.
ISBN 978-1-84951-460-6
www.packtpub.com
Cover Image by J.Blaminsky ([email protected])
www.it-ebooks.info

Credits
AuthorRic Shreves
Jean-Baptiste Jung
ReviewersShameer C
John Eckman
Acquisition EditorUsha Iyer
Development EditorSusmita Panda
Technical EditorMerwine Machado
Project CoordinatorKushal Bhardwaj
ProofreaderAaron Nash
IndexerRekha Nair
Production Coordinator ArvindKumar Gupta
Cover WorkArvindKumar Gupta
www.it-ebooks.info

About the Author
Ric Shreves is one of the founding partners of water&stone, an interactive agency that specialises in open source web content management systems. He has been building CMS websites for over 10 years, and during that time, he has been involved in projects for a number of global brands, including BASF, BearingPoint, Colgate-Palmolive, Tesco Lotus, CBRichard Ellis, Mercy Corps, and many others. He has published a number of books on open source in general and on open source content management systems in particular. Past work includes books on Mambo, Drupal, Joomla!, and Ubuntu. This is his first book on the WordPress CMS.
Ric lives in Bali with his wife and business partner, Nalisa.
I would like to thank Packt Publishing for giving me the opportunity to work on this WordPress title. With the advent of WordPress 3, the system has come into its own as a CMS and I am proud to be able to do something to help users get the most out of the system. I would also like to thank my partner, Nalisa, for her patience and support during the writing of this text.
www.it-ebooks.info
About the Reviewer
Shameer C is a software engineer and database administrator from Kerala, India. He started his career as a web developer after completing B-tech in computer science. He has experience in various programming languages such as PHP, Javascript, HTML5, Ruby, and so on. On the database side he mainly uses MySQL. He has contributed to Aura PHP, which is an enterprise-level php 5.3 framework and customized Toto, a flat file blogging engine in ruby. Occasionally he writes articles on his blog at http://shameerc.com. You can reach him at twitter @shameerc.
Shameer is currently working for Qburst Technologies, a company with expertise in both mobile and web application development on various platforms.
I would like to thank Packt Publishing for giving me an opportunity to work on their project, and all my family members, friends, especially Hari K T, for inspiring and encouraging me throughout my career.
John Eckman has more than a decade of experience in designing and building web applications for organizations ranging from small non-profit organizations to Fortune 500 enterprises. Currently a Digital Strategist with ISITE Design, he often works with clients to develop and execute complex web applications, but not exclusively with open source platforms.
John received a Bachelor of Arts from Boston University, a Masters in Information Systems from Northeastern University, and a Ph.D. from the University of Washington, Seattle. He is an active contributor to a number of open source communities, a founding organizer of WordCamp Boston 2010 and 2011, and the lead developer of the WPBook plugin for WordPress. He blogs at www.openparenthesis.org and tweets as @jeckman.
I'd like to thank the broader WordPress community — users and developers — without whom none of this would be possible.
www.it-ebooks.info

www.PacktPub.com
Support files, eBooks, discount offers and moreYou might want to visit www.PacktPub.com for support files and downloads related to your book.
Did you know that Packt offers eBook versions of every book published, with PDF and ePub files available? You can upgrade to the eBook version at www.PacktPub.com and as a print book customer, you are entitled to a discount on the eBook copy. Get in touch with us at [email protected] for more details.
At www.PacktPub.com, you can also read a collection of free technical articles, sign up for a range of free newsletters and receive exclusive discounts and offers on Packt books and eBooks.
http://PacktLib.PacktPub.com
Do you need instant solutions to your IT questions? PacktLib is Packt's online digital book library. Here, you can access, read and search across Packt's entire library of books.
Why Subscribe? f Fully searchable across every book published by Packt
f Copy and paste, print and bookmark content
f On demand and accessible via web browser
Free Access for Packt account holdersIf you have an account with Packt at www.PacktPub.com, you can use this to access PacktLib today and view nine entirely free books. Simply use your login credentials for immediate access.
www.it-ebooks.info

Table of ContentsPreface 1Chapter 1: The WordPress Cook's Tools 5
Introduction 5Managing media files with the Media Library 6Modifying theme files with the built-in Theme Editor 10Modifying plugin files with the built-in Plugin Editor 13Managing users 14Gaining control over user roles and permissions 18Setting up editorial workflow 21Importing and exporting content 24Installing and using Jetpack 26Enabling the toolbar for users and administrators 29
Chapter 2: Installing and Customizing Themes 31Introduction 32Installing a theme 32Creating a child theme 36Modifying your theme colors 38Modifying your theme fonts 40Creating and integrating a favicon 43Adding a custom logo 45Customizing the login page 48Using conditional tags to control content display 52Using multiple page templates 56Using post formats 59Creating a custom 404 error page 63Using a static page as a homepage 64Adding custom styles to your theme 66Making your site mobile device friendly 67
www.it-ebooks.info

ii
Table of Contents
Chapter 3: Working with Plugins and Widgets 71Introduction 71Installing plugins 72Installing widgets 77Adding widget areas to your themes 79Creating your own widget 82Modifying core widgets 85Displaying tabs on your sidebar 92Using conditional tags to control widget display 94Displaying widgets inside of posts and pages 97
Chapter 4: Customizing Content Display 101Introduction 102Accessing posts within the WordPress loop 103Retrieving posts from a specific category 105Getting a specific number of posts 107Retrieving posts by date 108Displaying posts published today 110Displaying posts published exactly one year ago 111Using multiple loops 112Accessing post data outside of the WordPress loop 114Accessing permalinks outside the loop 118Displaying thumbnails on your homepage 119Alternating background colors on post lists 121Displaying posts in two columns 123Save time by using WordPress shortcodes 125Enabling the use of shortcodes in widgets 126Adding notes to your posts 128Adding tags to your pages 130
Chapter 5: Building Interactivity and Community 133Introduction 134Improving navigation with a paginator 134Highlighting searched text in search results 137Integrating a forum into your site 139Adding social bookmarking buttons to your theme 144Aggregating RSS content 146Integrating Feedburner into your site 150Displaying a retweet button on your posts 152Getting more comments with the Subscribe to Comments Reloaded plugin 155Remove the nofollow attribute to motivate users to leave comments 156Provide recognition to your top contributors 158
www.it-ebooks.info

iii
Table of Contents
Displaying author-related information on posts 160Displaying the author's avatar on posts 163Allowing multiple authors on posts 164Displaying a list of all of the authors 166Creating community with BuddyPress 169Adding a simple gallery to your site 174Bringing Facebook functionality into your site 178Integrating a Twitter stream into your site 180
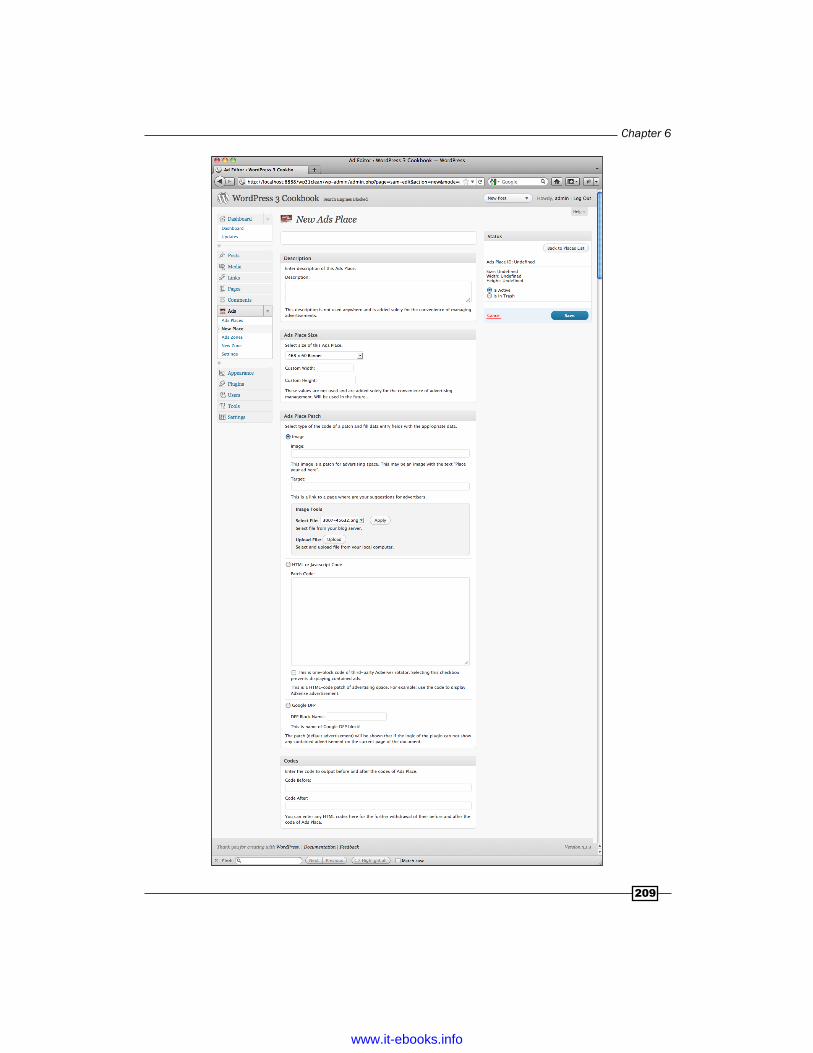
Chapter 6: Implementing Online Sales and Advertising 187Introduction 187Integrating Adsense 188Displaying ads anywhere in your posts by using WordPress shortcodes 192Managing ad visibility 194Inserting ads into your RSS feeds 198Showing your site stats to find advertisers 200Enhancing your Advertise page by adding Paypal subscriptions 206Managing your advertising space with an ad manager 207Adding a shopping cart to your site 213
Chapter 7: Making an SEO Friendly Site 217Introduction 217Making your site visible to search engines 218Optimizing your permalinks for SEO 220Migrating your permalinks safely 224Adding redirects for changed URLs 225Creating meta descriptions for your posts and pages 226Avoiding duplicate content with a robots.txt file 229Pinging third-party services 231Enhancing site indexing with XML sitemaps 233Using Google's and Bing's Webmaster Tools 237Improving SEO with the SEO Ultimate plugin 241
Chapter 8: Enhancing Usability and Accessibility 245Introduction 245Creating print-friendly pages 246Extending WordPress search 249Enhancing navigation with breadcrumbs 252Stopping SPAM 256Optimizing performance with cache management 258Displaying a login form 262Displaying related posts 265Creating a Featured Posts block 268
www.it-ebooks.info
iv
Table of Contents
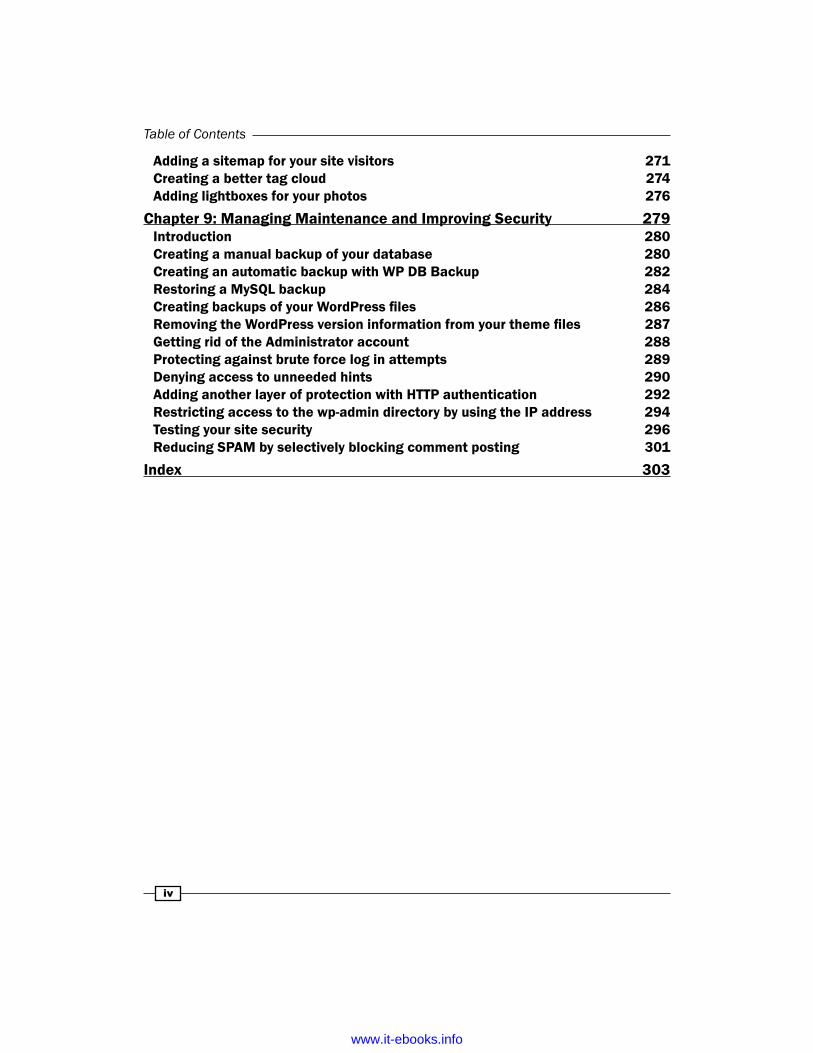
Adding a sitemap for your site visitors 271Creating a better tag cloud 274Adding lightboxes for your photos 276
Chapter 9: Managing Maintenance and Improving Security 279Introduction 280Creating a manual backup of your database 280Creating an automatic backup with WP DB Backup 282Restoring a MySQL backup 284Creating backups of your WordPress files 286Removing the WordPress version information from your theme files 287Getting rid of the Administrator account 288Protecting against brute force log in attempts 289Denying access to unneeded hints 290Adding another layer of protection with HTTP authentication 292Restricting access to the wp-admin directory by using the IP address 294Testing your site security 296Reducing SPAM by selectively blocking comment posting 301
Index 303
www.it-ebooks.info

PrefaceWordPress 3 Cookbook will help you get the most from version 3 of the popular WordPress CMS. The book is focused on showing how to achieve the most commonly desired system modifications and customizations, with an emphasis on enhancing themes and content presentation. Other chapters look at the practicalities of owning a WordPress site, including SEO, advertising, online sales, and site maintenance.
What this book coversChapter 1, The WordPress Cook's Tools, explains the basic tools and options that are built into the default WordPress CMS and discusses simple enhancements that can extend the base functionality.
Chapter 2, Installing and Customizing Themes, covers how to install and customize themes for your WordPress site. The chapter covers important concepts such as creating child themes and how to use conditional tags to control theme output.
Chapter 3, Working with Plugins and Widgets, dives into the WordPress CMS plugin system. The contents cover how to install new plugins, as well as how to customize plugins and widgets.
Chapter 4, Customizing Content Display, deals with issues related to WordPress themes. The chapter includes both the basics of how to modify your existing theme, and more advanced theming topics that give you the ability to customize any WordPress theme.
Chapter 5, Building Interactivity and Community, examines how you can use social media and social sharing tools to increase participation on your site and help bring your content to the attention of potential new visitors.
Chapter 6, Implementing Online Sales and Advertising, we look at how to implement advertising and online sales inside the WordPress CMS. Topics range from basics like adding Google AdSense, to more advanced topics like adding a shopping cart and PayPal payment.
www.it-ebooks.info

Preface
2
Chapter 7, Making an SEO Friendly Site, takes on the topic of search engine optimization. The recipes show how to enhance your site's SEO and how to improve your site's chances of ranking well on the search engines.
Chapter 8, Enhancing Usability and Accessibility, covers accessibility and usability issues, with recipes that show how to make your site more accessible and usable by a wider range of visitors.
Chapter 9, Managing Maintenance and Improving Security, discusses the issues related to owning a WordPress site, including how to manage updates and upgrades and improve WordPress CMS security.
What you need for this bookTechnically, all you need to have in order to benefit from this book is access to an installation of Version 3 of the WordPress open source CMS. That said, you will also find it useful to have the following:
f Your favorite code editor, whether it's a basic text editor or something such as Dreamweaver
f An FTP program, or other means of moving files to and from the server where you WordPress installation is located
Who this book is forThe WordPress 3 Cookbook was intended for a wide audience of potential WordPress users, from casual website owners who simply want to know how to do a bit more with their site to developers who are looking for tried and true solutions to common problems.
ConventionsIn this book, you will find a number of styles of text that distinguish between different kinds of information. Here are some examples of these styles, and an explanation of their meaning.
Code words in text are shown as follows: " The Breadcrumbs Plus plugin enables the breadcrumbs_plus () function."
A block of code is set as follows:
/**Time to register the widget*/
add_action( 'widgets_init', create_function('', 'return register_widget("Meta_Mod");') );
?>
www.it-ebooks.info

Preface
3
New terms and important words are shown in bold. Words that you see on the screen, in menus or dialog boxes for example, appear in the text like this:" Click on the Save button ".
Warnings or important notes appear in a box like this.
Tips and tricks appear like this.
Reader feedbackFeedback from our readers is always welcome. Let us know what you think about this book—what you liked or may have disliked. Reader feedback is important for us to develop titles that you really get the most out of.
To send us general feedback, simply send an e-mail to [email protected], and mention the book title via the subject of your message.
If there is a book that you need and would like to see us publish, please send us a note in the SUGGEST A TITLE form on www.packtpub.com or e-mail [email protected].
If there is a topic that you have expertise in and you are interested in either writing or contributing to a book, see our author guide on www.packtpub.com/authors.
Customer supportNow that you are the proud owner of a Packt book, we have a number of things to help you to get the most from your purchase.
Downloading the example codeYou can download the example code files for all Packt books you have purchased from your account at http://www.PacktPub.com. If you purchased this book elsewhere, you can visit http://www.PacktPub.com/support and register to have the files e-mailed directly to you.
www.it-ebooks.info

Preface
4
ErrataAlthough we have taken every care to ensure the accuracy of our content, mistakes do happen. If you find a mistake in one of our books—maybe a mistake in the text or the code—we would be grateful if you would report this to us. By doing so, you can save other readers from frustration and help us improve subsequent versions of this book. If you find any errata, please report them by visiting http://www.packtpub.com/support, selecting your book, clicking on the errata submission form link, and entering the details of your errata. Once your errata are verified, your submission will be accepted and the errata will be uploaded on our website, or added to any list of existing errata, under the Errata section of that title. Any existing errata can be viewed by selecting your title from http://www.packtpub.com/support.
PiracyPiracy of copyright material on the Internet is an ongoing problem across all media. At Packt, we take the protection of our copyright and licenses very seriously. If you come across any illegal copies of our works, in any form, on the Internet, please provide us with the location address or website name immediately so that we can pursue a remedy.
Please contact us at [email protected] with a link to the suspected pirated material.
We appreciate your help in protecting our authors, and our ability to bring you valuable content.
QuestionsYou can contact us at [email protected] if you are having a problem with any aspect of the book, and we will do our best to address it.
www.it-ebooks.info

1The WordPress
Cook's Tools
In this chapter you will learn about:
f Managing media files with the Media Library
f Modifying theme files with the built-in Theme Editor
f Modifying plugin files with the built-in Plugin Editor
f Managing users
f Gaining control over user roles and permissions
f Setting up editorial workflow
f Importing and exporting content
f Installing and using Jetpack
f Enabling the toolbar for users and administrators
IntroductionThis chapter serves as an introduction to the basic tools and features that are part of your WordPress administration system. All of the topics discussed in this chapter relate to fundamental functionality needed to use the WordPress CMS. Most of the chapter is focused on tools that are included in the default WordPress system.
www.it-ebooks.info
The WordPress Cook's Tools
6
Understanding the tools discussed in this chapter is essential to understand how to get the most out of your WordPress site. There's a lot you can do with WordPress, even without installing additional plugins and custom themes. In this chapter, we look at how the basic tools enable you to work with users, set permissions, and workflow, and how you can even modify plugins and themes – all from within the WordPress administration interface and without the need for specialized or external tools.
Managing media files with the Media LibraryWordPress includes a tool designed to help you deal with the media files for your website. The tool, called appropriately the Media Library, allows you to view and manage all your media files (images, videos, and so on) in one place.
Once you've added files to your Media Library, they are available to you as you work with the posts and pages of your site. The key advantage of using the Library is that you can work with images in bulk, uploading or deleting multiple images at one time.
In this recipe, we cover the basics of working with this useful tool, including adding, editing, and deleting files.
Getting readyEverything you need for this recipe is located inside the dashboard of your WordPress site.
How to do it...1. Log in to your WordPress Dashboard.
2. Click on the Media menu.
3. To view the files in the Library, click on the Library option and you'll see the existing files, if any. The following screenshot shows you a typical view:
www.it-ebooks.info

Chapter 1
7
4. To add a new media file to your Media Library, click on Add New.
5. On the screen that loads in your browser, click on the Select Files button and the system will show you a pop-up that lets you to select the media files from your hard drive.
6. Once you locate the file you want, select it, then click the Upload button and the system will add the file to the Media Library. As it uploads, you will see a status bar showing you the progress.
www.it-ebooks.info

The WordPress Cook's Tools
8
7. Once the upload is complete you can view the file in the library and edit the details, if you so desire. The following screenshot shows you the Upload New Media screen, where you can edit the image info. Once you finish with your edits, click on Save all changes.
www.it-ebooks.info

Chapter 1
9
There are two uploaders available: the Flash uploader and the Browser uploader. The Flash uploader allows you to select multiple files at once, while the Browser uploader allows you to upload only one file at a time. While the Flash uploader can be faster and more convenient, on some systems you may experience some difficulties using it. If you have any issues with the Flash uploader, simply choose the Browser uploader; it's slower, but it's very reliable.
To delete files from the Media Library, carry out the following steps:
1. When inside the Media Library, simply hover the mouse over an item and the Edit, Delete Permanently, and View buttons will be appear.
2. Click on Delete Permanently and the system will prompt you for confirmation.
3. If you wish to remove the file, click on OK in the pop-up and the system will delete the file.
For bulk media deletion, carry out the following steps:
1. Go to the Media Library.
2. Select the checkboxes immediately to the left of the files you wish to delete.
3. Select the option Delete Permanently from the Bulk Actions drop-down list (located above the list of files)
4. Click on the Apply button.
Be careful – when using bulk deletion, there is no confirmation dialogue! Once you click the Apply button the system will immediately delete all the files you have selected.
Editing files in the Media Library is limited to modifying the meta information associated with the file; you cannot actually edit the media file itself. To edit existing file's information, carry out the following steps:
1. Access the Media Library.
2. Hover the mouse over the item you'd like to edit and click on the Edit link that appears.
www.it-ebooks.info

The WordPress Cook's Tools
10
3. In the page that opens, you can define the file settings. The following screenshot shows the Edit Media page:
4. Click on the Update Media button when you're done and the system will save your changes.
Modifying theme files with the built-in Theme Editor
As you are probably aware, the appearance of your WordPress site is dictated by the theme you use. Themes themselves are comprised of a number of files, typically a mix of PHP and CSS files. Editing the files in your theme can be handled in one of two ways: either with a third party editor, or with WordPress' built-in Theme Editor. In this recipe, we introduce the basics of working with the Theme Editor.
www.it-ebooks.info

Chapter 1
11
Getting readyEverything you need to complete this recipe is located inside your WordPress dashboard.
How to do it...1. Log in to your WordPress Dashboard.
2. Click on the Appearance menu.
3. Click on the option Editor.
4. By default, the system will load one of the files from the active theme, as seen in the following screenshot. If you wish to change the view to edit a different file, simply click on the name of the file in the right hand column.
5. Make your changes.
6. When you're done, click on the Update File button to save your modifications.
www.it-ebooks.info

The WordPress Cook's Tools
12
How it works...The Theme Editor simply provides an editing interface for the files in the active theme. You can change to edit the files of a different theme by selecting the theme name from the combo box labeled Select theme to edit.
Be cautious! Remember that when you edit a theme file in WordPress Theme Editor, you are editing the real file on the server. Once you press the Update File button, the file is saved and the previous version is erased. This is an issue of particular importance where the theme you are editing is the active theme on a live site.
There's more...Although the Theme Editor is very convenient, you have to be careful with it.
Depending on your web hosting environment, you may experience problems using the Theme Editor. Accordingly, it is essential that you have a back up of your WordPress files before you begin working.
f Best practice is to create a backup of your theme before editing. If you have made a modification and later would like to undo the modification, you need to have a backup of the previous version of the file.
f Use the Theme Editor only if you're sure about what you're doing. If you're editing your current theme and make a programming error (for example, a PHP syntax error), it is possible that your site will stop functioning until you correct the error.
f Sometimes, a programming mistake can even result in you losing access to the Theme Editor. While this is quite a rare case (it mostly happens when you make a code mistake in the functions.php file), the problem is serious. You will most likely need to have a backup of your theme (as well as an FTP connection to your server) to sort out this problem.
See also f Chapter 2, Installing and Customizing Themes, covers WordPress themes in
more detail
www.it-ebooks.info

Chapter 1
13
Modifying plugin files with the built-in Plugin Editor
Plugins are a vital part of your WordPress site, adding much of the key functionality to your site. Just as we saw with the Theme Editor in the previous recipe, you can edit plugin files directly from within the WordPress dashboard, without the need of a third party editor. In this recipe, we introduce the basics of working with the Plugin Editor.
Getting readyEverything you need to complete this recipe is located inside your WordPress dashboard.
How to do it...1. Log in to your WordPress Dashboard.
2. Click on the Plugins menu.
3. Click on the option Editor.
4. By default, the system will display one of the files from the first available plugin, as seen in the next screenshot. If you wish to change the view to edit a different file for the plugin, simply click the name of the file in the right hand column. To change to a different plugin, select one from the combo box labeled Select plugin to edit.
5. Make your changes.
6. When you're done, click on the Update File button to save your modifications.
www.it-ebooks.info

The WordPress Cook's Tools
14
How it works...The built-in Plugin Editor works in exactly the same way as the Theme Editor. When a file is modified and saved, the modifications are written directly in the source file—there's no copy or backup.
The system provides a link to documentation for the plugin. If you look below the editing window in the previous screenshot, you can see a combo box labeled Documentation. Select the appropriate file from the list then click Lookup to view the documentation.
There's more...The Plugin Editor is a very useful tool; however, it can also create problems if used improperly.
f Unless you're very sure about what you're doing, always deactivate the plugin before editing
f Always have a backup of the plugin you're editing, as the Plugin Editor does not save any revisions
f If—after editing a plugin—your site does not function correctly, deactivate the plugin, and upload your plugin files backup to your wp-content/plugins/yourplugin directory
See also f Chapter 3, Working with Plugins and Widgets, covers WordPress plugins in
more detail
Managing usersAll WordPress sites include a combination of public and registered users. Registered users can be assigned to various roles that give access to different features of the site. WordPress includes a feature that enables you to manage the registered users of your website the Users Manager, as shown in the following screenshot:
www.it-ebooks.info

Chapter 1
15
In this recipe we introduce the Users Manager and the basics of creating, editing, and deleting registered users in WordPress.
Getting readyEverything you need for this recipe can be found in the WordPress dashboard.
How to do it...WordPress users manager allows you to add, edit, or delete user accounts. Let's learn how to do this in detail.
In order to add a new user, carry out the following steps:
1. Log in to the WordPress Dashboard.
2. Click on the menu labeled Users. The Users Manager, as shown in the previous screenshot, will load.
3. Click on Add New.
www.it-ebooks.info

The WordPress Cook's Tools
16
4. The Add New User screen in shown in the following screenshot. The only required fields are Username, E-mail, and Password (which must be entered twice). However, you should also check the Role control and make sure you are setting the right access privileges for the user.
5. Once done, click on the Add New User button.
In order to edit an existing user account, carry out the following steps:
1. Access the Users menu, as explained in the previous steps.
2. Find the name of the user you wish to edit and hover the mouse over the name; the Edit and Delete buttons will be displayed.
3. Click on the Edit button.
4. On the next page, as shown in the next screenshot, you can edit the following information about the user:
� Enable/Disable Visual Editor
� Admin color scheme
� Enable/Disable Keyboard Shortcuts
� User Role
www.it-ebooks.info

Chapter 1
17
� First Name, Last Name, and Nickname
� How the user name should be publicly displayed
� Contact info
� User bio
� Password
5. Make the changes you desire.
6. Click on the Update User button to save your modifications.
www.it-ebooks.info

The WordPress Cook's Tools
18
In order to delete a user's account, carry out the following steps:
1. Access the Users Manager, as discussed previously.
2. Find the user you'd like to delete (a mini search engine is included on the top right of the page) and place the mouse cursor over his or her name. The Edit and Delete button will appear.
3. Click on the Delete button.
4. The system will prompt you to choose between deleting the user and all the content which he has provided (posts, comments, and so on) or deleting the user, but transferring the content to another author. Make your selection.
5. Click on Confirm Deletion.
You can also delete multiple users simultaneously by selecting them on the main users manager page, then choosing Delete from the Bulk Actions combo box.
See also f Gaining control over user roles and permissions section in this chapter
f Setting up editorial workflow section in this chapter
Gaining control over user roles and permissions
User permissions in WordPress are dictated by the role the user is assigned to. By default, the WordPress system includes five roles:
f Admin
f Editor
f Author
f Contributor
f Subscriber
The permissions associated with each role are fixed and cannot be edited without the use of a plugin. While there are several plugins that provide this functionality, in this recipe we take you through using the User Role Editor and show you how to both modify existing roles and how to create new ones.
www.it-ebooks.info

Chapter 1
19
To learn more about the default user roles and their capabilities, visit the WordPress Codex page on the subject at http://codex.wordpress.org/Roles_and_Capabilities
Getting readyTo execute this recipe, you will need to install the User Role Editor plugin. You will need to install this plugin before you can get started. Search for User Role Editor inside the Add New Plugins screen of your WordPress site. After you find it, click on it to install, and then activate it.
You can learn more about the plugin by visiting the developer's website at http://www.shinephp.com/user-role-editor-wordpress-plugin/
How to do it...To edit an existing role, follow these steps:
1. Log in to your WordPress Dashboard.
2. Click on the Users menu.
3. Click on the options User Role Editor.
4. On the page that loads, first select the role you wish to edit from the Select Role combo box.
5. Make the changes you desire.
6. Click on the Update button to save your changes.
Your changes will now impact all users assigned to the role you have edited.
You cannot modify the Admin role.
To create a new role, follow these steps:
1. Log in to your WordPress dashboard.
2. Click on the Users menu.
3. Click on the options User Role Editor.
4. On the page that loads, enter a name for the new role in the Add New Role field.
5. Click on the Add button.
6. On the page that loads, select the privileges you want to role to enjoy.
www.it-ebooks.info

The WordPress Cook's Tools
20
7. Click on the Update button to save your changes.
The fields marked level_x are only applicable to older, version 2 installations of WordPress and should not be used for WordPress 3. Note also that you can make the role capabilities easier to read by clicking on the check box labeled Show capabilities in human readable form, at the top right of the page.
www.it-ebooks.info

Chapter 1
21
How it works...The plugin edits the default role settings and, by interfacing with the database, allows for creation of new roles. Those of you who wish to explore modifying roles without the use of a plugin will need to explore the WordPress Plugin API at http://codex.wordpress.org/Plugin_API
See also f Managing users section in this chapter
f Setting up editorial workflow section in this chapter
Setting up editorial workflowIf you allow multiple people to post articles and pages to your site, you will want to stay up to date on what your authors and contributors are doing, and you may want to set up a system that allows posts to be reviewed and edited prior to publication. While you can always manage this manually by sending e-mails back and forth, that approach is far from ideal and can be quite a time-consuming task. A better solution to this problem is found in a plugin called Edit Flow.
Edit Flow is a complex plugin. It not only adds content notifications and review process, but also gives the ability to create custom status posts and groups for your users. There are also features appropriate for an online publications, such as an editorial calendar and a story budget feature. If you do not need all the features, the plugin allows you to only enable those things you require.
In this recipe we look how the Edit Flow plugin can be used to create a manageable editorial workflow for content creation on your site.
Getting readyTo execute this recipe, you will need to install the Edit Flow plugin. You will need to install this plugin before you can get started. Search for Edit Flow inside the Add New Plugins screen of your WordPress site. After you find it, click on it to install, and then activate it.
You can learn more about the plugin by visiting the developer's website at http://editflow.org/
www.it-ebooks.info

The WordPress Cook's Tools
22
How to do it...Let's start out by configuring Edit Flow for basic article submissions and a review process:
1. Log in to the WordPress Dashboard.
2. Click on the new menu named Edit Flow.
3. On the configuration screen, de-select Enable Edit Flow Calendar and Enable Story Budget. Also select the option Always Notify Admin.
4. Click on Save Changes.
How it works...You now have a basic editorial review process in place, with notifications being sent to the site admin every time critical actions occur. The plugin has automatically added a set of custom statuses for your posts and pages. Click on the link Custom Status to see the list. The plugin has also created new usergroups. View the groups by clicking on the Usergroups option in the Edit Flow menu.
Taken together, the changes allow a site user (assuming they have permission to create content!) to submit an article for review. Notifications will be sent to higher-level users, who can then log in and comment privately on the content of the posts. When comments are made, the author is notified. This process can be repeated as many times as necessary. Once the post is ready for publication, the status of the post can be changed to published, thereby completing the editorial cycle.
When you log in to the dashboard, a new Edit Flow widget shows you a list of the posts in the editorial process, as shown in the following screenshot:
www.it-ebooks.info

Chapter 1
23
There's more...As the next screenshot shows, the editing page for each post now contains several extra field:
f The Editorial Comments field is where the editors can comment privately on the post for the author's benefit.
f The Notifications Subscriptions section allows you to specify who will receive notifications and can avoid your site editors and admins from being bombarded with unwanted e-mails.
f The Editorial Metadata fields give you a way to capture useful information about the post for your internal records. These fields can be customized from the Edit Flow menu.
See also f Managing users section in this chapter
f Gaining control over user roles and permissions section in this chapter
www.it-ebooks.info

The WordPress Cook's Tools
24
Importing and exporting contentWordPress features a very useful script to import your posts, comments, and links from another platform to WordPress. The system also allows you to export your current blog content.
Getting readyEverything you need to complete this recipe is included inside the WordPress dashboard. Note, however, that while the WordPress import function is included in the dashboard, you will be prompted to download individual importers.
How to do it...WordPress supports the importation of blog content from several other platforms, including Blogger, Blogroll, LiveJournal, MovableType, and TypePad. It also makes it easier to import posts saved from another WordPress site. The functionality also includes options to help import categories, tags, and RSS feeds.
By way of example, let's assume you wish to import content from a LiveJournal blog site. Follow these steps:
1. Connect to your old blog and export your content. Save the file on your hard drive.
2. Log in to your WordPress Dashboard.
3. Click on the Tools menu.
4. Click on the option Import.
5. On the page that loads, you can select the type of import. In this example, we're going to select the option LiveJournal.
6. The system will now prompt you to install the LiveJournal import plugin. Install the plugin and activate it.
7. Once done, input your LiveJournal Username and Password on the fields provided, as shown in the next screenshot.
8. You're done! Please note that depending on your exported file size, this procedure can take a while.
The system will now attempt to import the posts and add them to your WordPress site.
The process used for a LiveJournal import is typical of that used by all the import options. If you wish to import from a system not listed, check the WordPress plugins listings at www.WordPress.com.
www.it-ebooks.info

Chapter 1
25
Exporting content is also quite easy; simply carry out the following steps:
1. Log in to your WordPress Dashboard.
2. Click on the Tools menu.
3. Click on the Export option.
4. Select what you wish to export and click on the appropriate radio button, as shown in the next screenshot.
5. Click on the Download Export File button.
www.it-ebooks.info

The WordPress Cook's Tools
26
The system will then prompt you to save the export file.
Installing and using JetpackIn early 2011, Automattic released Jetpack, a cloud-based suite of extensions for the WordPress CMS. Jetpack's features are based in part on functionality users of www.WordPress.com have enjoyed for some time. The modules include:
f A site traffic statistics function
f A LaTeX plugin
f A spellchecker
f A Twitter widget
f A shortlinks functionality
f A social sharing mechanism
f Easy embeds from video and media sites
www.it-ebooks.info

Chapter 1
27
Additional functionality is in the pipeline.
While some of the features of Jetpack are also available in other plugins, Jetpack is a quick and easy solution from a known solutions provider.
In this recipe, we look at installing Jetpack and getting it up and running.
Getting readyTo execute this recipe, you will need to install the Jetpack plugin. You will need to install this plugin before you can get started. Search for Jetpack inside the Add New Plugins screen of your WordPress site. After you find it, click on it to install, and then activate it.
Installation requires a slightly different approach than for most other plugins. To use Jetpack, you must be a registered user on www.WordPress.com. As the next screenshot shows, you will need to use your www.WordPress.com credentials to activate the plugin:
How to do it...After you have installed Jetpack and authorized it with www.WordPress.com, you will see the Jetpack Dashboard, as shown in the next screenshot. Before you can start using the features, you will need to do a bit of configuration, as follows:
1. To begin using any of the features, first click on the Learn More button.
www.it-ebooks.info

The WordPress Cook's Tools
28
2. The module will now be activated; if you don't want to use it, click on the Deactivate button.
3. Some modules will present you with a Configure button, indicating there are customization options available. Click on the Configure button to learn what options are available.
4. Some items, such as the Twitter Widget, are actually controlled in a separate location.
Once Jetpack is installed, a link to the Jetpack settings page is always visible at the top left of your WordPress dashboard. A separate link will show you the site statistics, assuming you have activated the feature.
Site statistics and the WP.me shortlinks functionality are also available from the front-end, if you have installed the admin toolbar for the front-end of the site. See the next recipe for a discussion of the admin toolbar.
www.it-ebooks.info

Chapter 1
29
How it works...While some of the features in Jetpack are simple plugins, other features rely on a cloud-based approach to services. Both the stats and the shortlinks functionalities need a connection to the Internet and to www.WordPress.com.
There's more...WordPress Popular Posts is a separate plugin that uses the information gathered in the Jetpack stats module. The plugin provides a nice and configurable widget that shows a list of the most popular posts on your site.
Learn more about the plugin by visiting the developer's site at http://polpoinodroidi.com/wordpress-plugins/wordpresscom-popular-posts/
Enabling the toolbar for users and administrators
One of the new features included with version 3 of WordPress is the Admin Bar. The bar is a menu bar that sticks to the top of the page and is always visible. It can be activated for either the front-end, the back-end or both. The bar contains shortcuts to the Admin dashboard and to various administration functions, depending largely on the user role of the viewer.
This recipe shows you how to enable this useful feature for your site users.
Getting readyEverything you need to complete this recipe is included inside the WordPress dashboard. Note, however, that while the WordPress import function is included in the dashboard, you will be prompted to download individual importers.
www.it-ebooks.info

The WordPress Cook's Tools
30
How to do it...This feature is not enabled by default, so you need to set it up for your users. Here's how to do it:
1. Log in to the WordPress Dashboard.
2. Click on the Users menu.
3. Click on the name of the user for whom you wish to enable the Admin Bar.
4. On the user Profile page, look for the option labeled Show Admin Bar.
5. Select whether you want to user to see it on the front-end, the back-end, or both.
6. Click on Update Profile.
www.it-ebooks.info
2Installing and
Customizing Themes
In this chapter, we will cover:
f How to install a new theme
f Creating a new child theme
f How to modify the colors of a theme
f How to modify the fonts used by a theme
f Creating and integrating a favicon
f Adding a custom logo to a theme
f Customizing the login page
f Using conditional tags to control content display
f Using multiple page templates
f Using post formats
f Creating a custom 404 error page
f Using a static page for your home page
f Adding custom styles to your theme
f Making your site mobile device friendly
www.it-ebooks.info

Installing and Customizing Themes
32
Introductionthemes are the most visible portion of your website. The theme controls the appearance of the site, and is largely responsible for the first impression your site makes to visitors.
While the default WordPress installation includes a couple of simple themes, those themes are not right for everyone and are already widely used by others. If you want your site to stand out, you will want to create a distinctive appearance for your site.
Creating the right look for your site can be achieved by customizing an existing theme, adding new theme, or a mix of these approaches. In this chapter, we look at how to work with theme files with the goal of helping you to achieve a unique or distinctive look and feel for your WordPress site.
Installing a themeA theme is actually a set of files — templates, stylesheets and other helper files — that control the display of your site. There are quite a few themes available on the WordPress.org site and they are all free for your use. Alternatively, there are commercial theme providers and you can always hire something to design a theme for you, or you can even do it yourself. Regardless of how you source your theme, you will need to install it on your site. In this recipe, we look at how to install and activate a new theme.
To check out the free themes on the official WordPress site, visit http://wordpress.org/extend/themes/
Getting readyTo install theme automatically, you don't need anything special. The entire recipe can be completed from within the WordPress dashboard. If, however, you wish to install the theme manually, as explained later in this recipe, then you will need to have the theme files as well as access to the WordPress installation on your server.
How to do it...1. Log in to your WordPress Dashboard.
2. Click on the Appearance menu.
www.it-ebooks.info

Chapter 2
33
3. Click on the Themes option.
4. Click on the Install Themes tab.
5. In the empty text field at the top of the page, either enter the name of the theme you wish to install, or a search term.
6. Click on the Search button.
7. Any themes that match your query will appear, as shown in the following screenshot:
www.it-ebooks.info

Installing and Customizing Themes
34
8. Click on the Install link beneath the name of the theme you wish to install. The system will ask you to confirm the installation, as seen in the next screenshot:
9. Click on the Install Now button.
10. If you are successful, you will see a confirmation message.
11. If you want to use your new theme immediately, click the Activate link.
12. The system will then activate the theme and return to the Theme Manager where you will see a confirmation message, as shown in the following screenshot:
www.it-ebooks.info

Chapter 2
35
There's more...If you are like most users, you will wind up using the automatic installer for your themes. However, if you have built your own theme, or obtained the theme files directly, you may want to use manual installation.
Installing a theme manuallyOnce you have your theme files, follow these steps:
1. Access your WordPress installation on your server.
2. Navigate to the directory /wp-content/themes.
3. Move your theme files into the directory, but located inside their own directory, for example, /wp-content/themes/mynewtheme.
4. Log in to your WordPress Dashboard.
5. Click on the Appearance menu.
www.it-ebooks.info

Installing and Customizing Themes
36
6. Click on the Themes option.
7. You should see your theme listed on the Theme Manager page. Find it and click on the Activate link under the theme's name.
Creating a child themeIn WordPress terminology, a child theme is any theme that inherits the functionality of another theme. The theme that provides the original functionality is referred to as the "parent theme." Child themes are useful, as they allow you to customize the appearance of your site without having to modify the original files, and thereby run into problems when you install upgrades or patches.
Child themes are very easy to create while also giving you a great deal of freedom. Since the attributes of the original theme are inherited, all you really need to put into your child theme are the things you want to modify.
In this recipe, we go through the steps involved in creating a basic child theme and we also look at some of the things you can do with it.
You can learn more about child themes by visiting the WordPress Codex at http://codex.wordpress.org/Child_Themes
Getting readyFor our example, we're going to use the default WordPress Twenty Ten theme. All you need to execute this recipe is your favorite code editing program and access to the WordPress files on your server.
How to do it...1. Access the WordPress installation on your server.
2. Go the /wp-content/themes directory.
3. Create a new directory; name it twentytwenty.
4. Create a new blank file named style.css and save it to /wp-content/themes/twentytwenty.
5. Paste into your new style.css file the following code:/*Theme Name: Twenty Twenty URI: http://www.yoursite.com/ Description: Child theme based on the Twenty Ten theme
www.it-ebooks.info

Chapter 2
37
Author: Author's NameAuthor URI: http: //www.authorsurl.com/ Template: twentytenVersion: 1.0*/@import url('../twentyten/style.css');
6. Save the file.
7. Log in to your WordPress dashboard.
8. Click on the Appearance menu.
9. Click on the Themes option.
10. You will see on the Themes page a list of the themes installed on your site, including your new theme Twenty Twenty.
11. Activate the Twenty Twenty theme.
When you visit the front-end of your website, you will see no differences. That is because while you have created a new theme, at this point there are no unique styles or functions associated with Twenty Twenty, hence the output is straight from the original TwentyTen.
How it works...All you need to create a new child theme is the style.css file. That file, however, is required and must be named style.css. Moreover, you must make several of the declarations you see in the code example above. You must give your child theme a unique theme name and you must declare the parent theme in the template field. All other values in the code above are optional.
The theme system in WordPress works on a system of inheritance. When you declare the parent theme in the template field of your style.css file, WordPress will automatically treat the new theme as a child theme.
Note that the child theme's style.css file completely replaces the parent theme's stylesheet of the same name. Accordingly, we import the parent theme's stylesheet with the declaration @import url('../twentyten/style.css');
If you only import the parent theme's styles, your theme might be impacted if the parent theme's stylesheet is updated, say, as the result of a theme upgrade. To avoid this problem, you can simply copy all the parent theme's styles into the child theme's stylesheet.
www.it-ebooks.info

Installing and Customizing Themes
38
There's more...The child theme we created above looks identical to the original parent theme. Here's how to customize the output of your new Twenty Twenty to fit your needs.
Customizing the styling of your child themeTo customize the styling of your new child theme, simply place selectors in the new style.css file. You can add new selectors, or you can change the definition of any of the original selectors by placing new versions in your stylesheet.
You can also impact the styling through the use of unique templates in your child theme. WordPress will look first for templates in your child theme, then it will look in the parent theme. This means that not only can you add new templates to your child theme, you can override the original templates by creating new ones inside your child theme and giving them the same name as templates in your parent theme.
Customizing the functionality of your child themeTo add your own functions to your child theme, simply create a new file named functions.php and place it in the child theme directory. Note that, unlike templates and stylesheets, the functions.php file in your child theme will not override the functions.php file in the parent theme. This means that the functions of the parent theme will always be used unless you disable those functions. You can simply comment out the original function and add a new, properly named function to your child theme's functions.php file.
Remember, if the parent theme's files are updated and the original functions.php file is overwritten, you will have to go back and comment out the relevant functions again!
Modifying your theme colorsHave you ever come across a WordPress theme available online and thought, 'Wow, this is a great theme, but it would look even better if it had a green layout!'? Luckily, changing a theme's color scheme isn't as difficult as it might seem.
In this recipe we look at editing your theme's stylesheets to modify the theme color scheme.
Getting readyWe're going to be working on the files inside your theme. To complete this recipe, you will need an editor to work with the CSS files of your theme; a standard text editor will do the job. You will also need access to the files of your WordPress installation on your server.
www.it-ebooks.info
Chapter 2
39
Before you get started with making changes, it's a good idea to first sort out the color scheme you want to implement and grab the color codes. One of the best ways to do this is to use a graphics program to work up a mock up of what you want your page to look like. Once you have adjusted things and got them just the way you want them, copy the color codes you need and keep them handy for the steps below.
How to do it...1. The first thing we need to know is which hexadecimal color codes are currently used
in the theme you want to modify. Most WordPress themes use a color scheme of three to five different colors. In order to know which colors are used in the theme, access your theme files and open the CSS file style.css.
2. The CSS property used to define a background is called background-color (or simply as part of the background selector). For the foreground color, the property's name is color. For the border colors, it is border-color (or simply, as part of the border selector). For example, here's the color scheme that's used on the OpenBook theme:
� Background color: #151515
� Content background color: #fff
� Header blocks: #222
� Green (used for links): #49AB0D
� Blue (Titles, hover links): #109dd0
3. Search for the color codes used in the current theme and then replace them with the color codes you saved earlier.
4. Repeat the search and replace the command as necessary.
5. Save the file.
If you now view the front-end of your WordPress site, you should see your new colors in place.
If you're new to CSS a good starting point is the tutorial at W3C Schools: http://www.w3schools.com/css/css_intro.asp
How it works...CSS, or Cascading Style Sheets, contain the definitions of the various styles used in your theme. By changing the color codes in the stylesheet, we change the colors displayed by the browser when it interprets your theme files.
www.it-ebooks.info

Installing and Customizing Themes
40
There's more...The following are a few important points, for your information:
f All themes use a style.css file, but some themes also use additional stylesheets (for example, using a specific stylesheet for Internet Explorer is very common). Thus, make sure to replace colors in all stylesheets that are part of the theme.
f This trick can only replace CSS-based colors. To modify image colors, you'll need to use a design program such as Adobe Photoshop or The Gimp.
f If you changed your theme colors and some parts still display the old colors, make sure that the CSS colors are written in hexadecimal codes (for example: #151515). Some theme designers use color names instead of hexadecimal codes (for example: they may use background color: white instead of background color: #ffffff).
f Some color codes can be written by using shorthand, for example, #006699 can be written as #069—therefore, make sure that you've checked for that too.
Modifying your theme fontsNow that you have learned how to search and replace hexadecimal color codes, let's customize your theme a bit more.
In this recipe, we're going to see how we can easily modify the fonts used in a WordPress theme and also discuss best practices for typography in WordPress.
Getting readyFor this recipe, you'll need exactly the same things that were needed in the Modifying your theme colors recipe—a theme to customize, and a text editor. As we recommended in the previous recipe, it's a good idea to sort out the font scheme you want to implement before you get started. A good graphic design program will allow you to experiment with different combinations until you find the font scheme you prefer. Once you have it sorted out, note the names of all the fonts used, as you will need that information for the steps that follow.
www.it-ebooks.info

Chapter 2
41
Web safe fontsA common beginner's mistake is to try and use non web-safe fonts for a web site. For example, there are web sites using the Myriad Pro or Segoe UI fonts. While those fonts may look great, they are only available on about 10% percent of the browsers that are likely to be used by your readers.The following fonts are widely supported, even by most older browsers:
f Times New Roman
f Arial
f Verdana
f Courier
f Comic Sans
f Trebuchet MS
f Century Gothic
f Helvetica
You can find a full listing of web safe font combinations at http://www.w3schools.com/cssref/css_websafe_fonts.asp.The list of fonts above is pretty limiting; in the latter part of this recipe we look at a new alternative that has arisen with CSS3.
How to do it...1. In order to modify the fonts of a theme, the first step is to identify all the font
declarations in the theme and find out which fonts are being used presently. Open your theme's style.css file and search to find the font and font-family CSS properties.
2. Modify the font declarations you wish to change, adding or substituting the new fonts you wish to see used.
3. Save the style.css file.
4. Open the other style sheets in your theme and repeat the process.
Check the front-end of your site and you should see your new themes at work.
www.it-ebooks.info
Installing and Customizing Themes
42
There's more...Here are some useful tips about fonts in general and a way to sidestep the web safe fonts issue.
Tips and things to know about fontsA few things to keep in mind:
f The optimal font size for text readability is between 11 and 14 pixels; 12px is the most common choice of font size. For titles, (h1, h2, h3, and so on) a font size between 14 and 26 pixels tends to work well.
f While using a font with a two word name (for example, Trebuchet MS), always put it between quotes; that is, font-family: "Trebuchet MS";)
f While defining font families always list at least two fonts, and offer a generic family name as the last alternative. The client's browser will use the first font that it recognizes.
Using @font-faceCSS3 is the latest standard in stylesheets. It adds a number of interesting properties, including one that has been seen on and off in previous versions of the standard: @font-face. As the rule has appeared before, browser support for it is quite good, including with traditionally problematic Internet Explorer. @font-face lets you break away from worrying whether a particular font is installed on the user's machine and thereby gives you a wide range of options for your typography.
It works like this: Use of an @font-face declaration in your theme will allow you to place your font file in a web directory and then link to it from the theme's CSS. Since the fonts are already hosted on the web, you don't have to rely on the local browser to supply them.
Here's how you can use it:
1. Obtain the font files you need for your site.
2. Move them on to a server, into a directory that is publicly accessible. If this is only for the one site you are working on, you can even place them inside your theme directory.Open up the primary CSS file for your theme and add font declaration for your new font. The declaration will look something like this:@font-face { font-family: 'NameOfTheFont'; src: url('path-to-my-webfont.eot') format ('eot'), url('path-to-my-webfont.woff') format ('woff'), url('path-to-my-webfont.ttf') format ('truetype');}
www.it-ebooks.info

Chapter 2
43
3. Your are ready now to use the new font family in your selectors. Simply specify the 'NameOfTheFont' as part of a font-family definition, for example:
body { font-family: NameOfTheFont, times, serif;}
Not all fonts are free for use without restriction. Before you adopt a font for this usage, make sure you have the rights to use it on your site.
Creating and integrating a faviconA favicon is a small icon (16 x16 pixel) associated with a website. The favicon is displayed by modern web browsers in the address bar, tabs, and bookmarks.
Nowadays, almost all the websites and blogs have their own favicon. The following screenshot shows the BBC website's favicon, as displayed in the Mozilla Firefox browser:
In this recipe, we look at how you can add a favicon to your site.
Getting readyTo execute this recipe, you will need access to your WordPress installation on your server. You will also need a 16 x 16 pixels image to serve as a favicon. Due to the very small display size of the favicon, the image must be very simple.
Try using a background color that fits your website's color scheme, together with a simplified version of your logo.
www.it-ebooks.info

Installing and Customizing Themes
44
While you can use .jpg, .png, .gif, or even .mg and a .png file to display a favicon, unfortunately, Internet Explorer (6 and 7) only recognizes the Windows .ico file format. Therefore, if you want to have an IE-compatible favicon, you'll have to convert your image file from .png, .gif, or .jpg to Windows .ico.
Many imaging software applications can convert an image into a Windows icon file. There is even an online service called ConvertIcon at http://converticon.com/. The ConvertIcon application will also resize your image if needed. Therefore, there's no need to worry about your image width and height.
How to do it...1. Once you have your favicon ready, upload it to a directory inside the WordPress
installation on your server; your theme's directory is a good location, but it is up to you.
2. Open the header.php file from your theme.
3. Add the following line of code to the file. This line can be placed anywhere within the <head> and </head> tags:<link rel="shortcut icon" type="image/x-icon" href="/path/to/your/favicon.ico" />
4. Once you have saved your header.php file, your favicon will be displayed.
How it works...With the addition of the code above, the browser will automatically detect and display the favicon when someone visits the site.
There's more...If you uploaded your favicon into your wp-content/themes/yourtheme directory, we can also use the bloginfo() function in order to automatically retrieve the template path as follows:
<link rel="shortcut icon" type="image/x-icon" href="<?php bloginfo('template_url'); ?>/favicon.ico" />
If you chose to use a file format such as .gif, .png, or .jpg for your favicon, you can add your favicon with the following code; however, Internet Explorer may not recognize it:
<link rel="icon" type="image/png" href="favicon.png" />
www.it-ebooks.info

Chapter 2
45
Adding a custom logoBy default, most WordPress themes display a header text—usually the name of the blog and blog description. This is a nice option for personal blogs. However, I personally believe that displaying your own personal logo will make your blog look even more professional.
In this recipe, we shall learn how we can add a logo instead of the default blog name and slogan on a WordPress theme. The screenshot at the end of the recipe shows the logo integration on a default WordPress theme.
Getting readyFor this recipe, you'll need your own logo and a WordPress theme on which you'd like to integrate your logo. I shall be using the WordPress default theme for this recipe.
However, there are a few things to be kept in mind before getting on with this recipe:
f Some recent themes don't display the blog name and slogan anymore—instead, they display a default logo which can be changed by editing the code or even by defining a new logo in a custom WordPress control panel (which shall be covered in Chapter 3).
f Due to the fact that each theme is coded differently, the result of this recipe may vary from one theme to another.
How to do it...1. Access the directory containing the theme files for your WordPress installation.
2. Copy your logo into the /images directory of your active theme; note the name.
3. Open the active theme's header.php file.
4. Locate the part of code where the blog name and description are displayed. In the WordPress default theme, in the default Twenty Eleven theme, it looks like this:<hgroup> <h1 id="site-title"><span><a href="<?php echo esc_url( home_url( '/' ) ); ?>" title="<?php echo esc_attr( get_bloginfo( 'name', 'display' ) ); ?>" rel="home"><?php bloginfo( 'name' ); ?></a></span></h1> <h2 id="site-description"><?php bloginfo( 'description' ); ?></h2></hgroup>
5. While we could just put an html image tag between the <h1> and </h1> tags, there's a much better, SEO friendly, way to display our logo—by using CSS.
www.it-ebooks.info

Installing and Customizing Themes
46
6. Open the style.css file from your theme.
7. Find the definition for #site-title. In the default Twenty Eleven theme, it looks like this:#site-title { margin-right: 270px; padding: 3.65625em 0 0;}
8. Now, replace the preceding piece of code with the following:
#site-title { padding: 3em 0; background: url("images/logo.png") no-repeat scroll 0 1em transparent; margin-right: 270px;}
9. Find the definition for #site-title a. In the default Twenty Eleven theme, it looks like this:#site-title a { color: #111; font-size: 30px; font-weight: bold; line-height: 36px; text-decoration: none;}
10. Now, replace the preceding piece of code with the following:#site-title a { color: #111; font-size: 30px; font-weight: bold; line-height: 36px; text-decoration: none; margin-left: 120px;}
11. Find the definition for #site-description. In the default Twenty Eleven theme, it looks like this:#site-description { color: #7a7a7a; font-size: 14px; margin: 0 270px 3.65625em 0;}
www.it-ebooks.info

Chapter 2
47
12. Now, replace the preceding piece of code with the following:
#site-description { color: #7a7a7a; font-size: 14px; margin: -50px 270px 3.65625em 120px;}
If you visit the front-end of the site now and refresh the page, you should see your new logo on the header of your site. The original Twenty Ten theme does not display a logo; you can see in the screenshot below the revised theme with our logo to the left of the title and tagline:
www.it-ebooks.info

Installing and Customizing Themes
48
How it works...The CSS approach to displaying a logo works by using the logo image as a background for the <h1> tag. In the first selector, #site-title, you can see the background property being used to display the image file. The margin and padding have been adjusted to aid in proper display inside the header. In the #site-title a selector, the margin has been adjusted to place the text for the site name to the right side of the logo. Finally, the #site-description selector was adjusted to add a margin to place the site description underneath the site title and to the right of the logo image.
Customizing the login pageBy default the WordPress login page is outside the theme system and therefore, the login page does not change when the theme changes. By default, all WordPress login pages look the same, with the basic WordPress branding in place and no information that identifies the site.
For many clients, the default presentation is not the best choice. Some prefer to brand the login page, or at least to make it visually consistent with the active theme. In this recipe we look at a plugin that turns the default login page into a page that can be managed through the dashboard and themed via the theme system.
Getting readyTo execute this recipe, you will need to install the Theme My Login plugin. You will need to install this plugin before you can get started. Search for Theme My Login inside the Add New Plugins screen of your WordPress site. After you find it, click on it to install, and then activate it.
The developer maintains a basic set of online documentation for the plugin at http://www.jfarthing.com/docs/Theme_My_Login
How to do it...Once the plugin is installed and activated, carry out the following steps to configure the plugin:
1. Log in to the WordPress Dashboard.
2. Click on the Settings menu.
3. Click on the Theme My Login option.
4. On the Basic tab, the default settings are fine for most people. Simply click on the Save Changes button to finalize the configuration.
www.it-ebooks.info

Chapter 2
49
The new login page is now ready to go. It will be active on your site as soon as you finish the configuration steps, above. The default output is shown in the next screenshot:
www.it-ebooks.info

Installing and Customizing Themes
50
To customize the page, you have several options. You can add text to the page by editing the new login page under the Page Manager. To add text to the page, follow these steps:
1. Log in to the WordPress Dashboard.
2. Click on the Pages menu.
3. Select the Log In page from the list of pages and click on the Edit link to open it for editing.
4. Make your changes to the page.
5. Click on the Update button to make your changes live.
When editing the page, you will see the following: [theme-my-login]. This is the shortcode that is used to put the login output on the page. You can use that shortcode elsewhere if you prefer, and unpublish the default page created by the plugin.
Another option for customizing the page is to modify the CSS. The plugin adds a new stylesheet to your site just for this purpose, but to use it, you need to take some steps:
1. Access your WordPress installation on the server.
2. Go to the directory /plugins/theme-my-login.
3. Copy the file theme-my-login.css.
4. Paste the file inside your active theme's directory.
The new .css will now control the styling of the form. You can edit it like any other CSS, using either the system's built-in editor, or editing with the application of your choice.
Yet another option for customizing the page is to use a custom template. The plugin adds a number of new stylesheets to your site just for this purpose, but to use them, you need to take the following steps:
1. Access your WordPress installation on the server.
2. Go to the directory /plugins/theme-my-login
3. Copy any of the templates you wish to use.
4. Paste the files inside your active theme's directory.
www.it-ebooks.info

Chapter 2
51
How it works...The plugin enables a shortcode that allows for the login and related functionality to be displayed in a page or a post. The plugin also comes with a dedicated stylesheet and a set of templates that can be used to control not only the login page, but also all related pages, for example, the register form or the reset password form.
There's more...The plugin includes several options that extend the login functionality and allow for further customization.
Enabling the plugin's modulesThe plugin is bundled with a set of modules that allow you to do any of the following:
f Customize notification e-mails related to the login and registration process
f Enable custom passwords, allowing people to login with their username or e-mail address
f Redirect users to specific pages after submitting registration and login forms
f Add to or edit the links shown to logged in users
f Enhance security by limiting the number of login attempts
f Provide themes profiles for your users
f Enable moderation for particular actions, related primarily to registration
To enable and customize some or all of these functions, follow these steps:
1. Log in to the WordPress Dashboard.
2. Click on the Settings menu.
3. Click on the Theme My Login option.
4. Click on the Modules tab.
5. Select any of the options you desire.
6. Click on the Save Changes button.
www.it-ebooks.info

Installing and Customizing Themes
52
7. You will now see a new set of tabs, as shown in the screenshot below. The number of tabs will depend upon which options you have selected. Click on the tabs to configure the options.
8. Click on the Save Changes button when you are finished.
Using conditional tags to control content display
Sometimes, you may want to display some content only on specific pages or sections. For example, you may wish to display a welcome message on your blog homepage or show specific information on the Categories page. In this recipe, we'll learn how to control output with the use of WordPress conditional tags.
Getting readyTo achieve this recipe, you'll need a code editor and access to the files of your WordPress installation.
www.it-ebooks.info

Chapter 2
53
How to do it...1. Access your WordPress installation on the server.
2. Navigate to your active theme directory and find the template file you wish to modify.
3. Open the file for editing with your favorite editor.
4. WordPress conditional tags are Boolean variables so you have to use them as a condition of a php if statement, as shown in the following example: <?php if(is_page()) { echo "Page title:"; the_title; } ?>
5. The preceding if statement will return false if the current page template isn't a WordPress page template so nothing would happen. Otherwise, the if statement will return true and will print the page title on screen.
6. After you've added the logic to the template you desire, save the file.
How it works...The PHP conditional statement frames the tag and tells the system to check and see if the condition is true. Essentially, it works like this:
<?php if (conditional_tag()) " { //Do something only if the condition is met.} ?>
On the other hand, some conditional tags request a parameter to work. For example, to use the is_year() tag, you have to provide a year in the parameter.
<?php if (is_year("2007")) { //Do something only if the post or page was published during the year 2007.} ?>
Most conditional tags don't take any parameters, but there are exceptions. Visit the WordPress Codex to learn more.
www.it-ebooks.info

Installing and Customizing Themes
54
There's more...Conditional tags, as we have seen, are very useful. Moreover, some conditional tags accept optional arguments that allow you to create more complex logic. Some conditional tags can accept up to four different types of parameters:
1. ID: The ID parameter can be used in is_category, is_page(), is_tag(), is_single(), is_author(), and is_sticky(). <?php if (is_category(5)) { }?>
As a result, the preceding code returns true if the category ID is 5.
2. Name: The name parameter can be used in is_category, is_page(), is_single(), and is_author(). <?php if (is_category("Blogging Tips")) { }?>
As a result, the preceding code returns true if the category name is "Blogging Tips".
3. Slug: The slug parameter can be used in is_category, is_page(), is_tag(), is_single(), and is_author(). <?php if (is_category("blogging-tips")) { }?>
As a result, the preceding code returns true if the category slug is "blogging-tips".
4. Array: The array parameter can be used in is_category, is_page(), is_tag(), has_tag(), is_single(), and is_author().
<?php if(is_category(array(5,'blogging-tips','Blogging Tips'))) { } ?>
As a result, the preceding code returns true if the category of posts being displayed either has the ID of 5, slug as "blogging-tips", or the name "Blogging Tips".
www.it-ebooks.info

Chapter 2
55
WordPress features a large number of conditional tags that provide for a wide variety of conditions. All work as described above. Here is a list of some of the most useful conditional tags:
f is_home(): Returns true if the current page is the blog homepage f is_front_page() : Returns true if the current page is the blog front page f is_single() : Returns true if the current page is a single post template f is_page(): Returns true if the current page is a page template f is_page_template("about.php"): Returns true if a page template is currently
being used f is_category(): Returns true if the current page is a category template f in_category('4'): Returns true if the current posts belongs to the
specified category f is_tag():Returns true if the current page is a tag template f has_tag("wordpress"): Returns true if the post has the tag specified
in parameter f is_author():Returns true if the current page is an author archive f is_date():Returns true if the post or page is a date-based archive f is_year():Returns true if it's a yearly archive f is_month():Returns true if it's a monthly archive f is_day():Returns true if it's a daily archive f is_time():Returns true if an hourly, minutely, or secondly archive is
being displayed f is_archive():Returns true true if the current page display any type of archives
(time, author, tag, and so on) f is_search():Returns true if the current page displays search results f is_paged():Returns true if the current page is paged f is_404():Returns true if the current page is a 404 f is_sticky():Returns true if the Stick this post to the front page check box has
been checked for the current post f has_tag("WordPress"): Returns true if the current posted has been tagged
with WordPress
f is_admin():Returns true if the dashboard or an admin page is currently displayed
f comments_open():Returns true if commenting is allowed on the post f pings_open():Returns true if pinging is allowed on the post
f is_preview():Returns true if the post or page is displayed in preview mode
www.it-ebooks.info

Installing and Customizing Themes
56
A complete and current list of WordPress conditional tags is maintained at http://codex.wordpress.org/Conditional_Tags
Using multiple page templatesIn WordPress themes, templates are used to control the layout available to your pages. Even though most of WordPress themes use a single page template, WordPress allows you to create as many different page templates as you want. Running multiple templates opens up a significant degree of flexibility in design and page layouts. You could, for example, create a page template specifically suited for forms, or others tailored to the page content and functionality.
In this recipe, you'll learn to create and use page templates.
Getting readyTo achieve this recipe, all you need is your favorite text editor and access to the WordPress files on your server.
How to do it...We're going to start out with a bare minimum page template; once you've set up the basics, you can style it anyway you like. To create a basic page template, follow these steps:
1. Access your WordPress installation on your server.
2. Navigate to your active theme directory and find the file page.php.
3. Make a copy of the file and rename it mytemplate.php.
4. Open the mytemplate.php file in your favorite text editor and find the following code, located at the very top of the file:<?php/** * The template for displaying all pages.** This is the template that displays all pages by default.* Please note that this is the WordPress construct of pages* and that other 'pages' on your WordPress site will use a* different template.** @package WordPress* @subpackage Twenty_Eleven* @since Twenty Eleven 1.0*/
www.it-ebooks.info

Chapter 2
57
5. Replace the code above with this code:<?php/** * My first custom template * * Template Name: My Template *
*/
6. Save the file.
That's all there is to it; your new page template is ready to use. To apply it to a page on your site, follow these steps:
1. Login to your WordPress Dashboard. 2. Click on the Pages menu.
3. Open any of the pages for editing by clicking the Edit link, seen when you move your over the page listing.
4. Look to the right column where you can see a combo box labeled Template.
5. Click to open the Template drop-down menu and you will see listed there your new template, My Template.
6. Select My Template.
7. Click on the Update button to apply the change.
If you visit your page, you will now see your new template applied.
How it works...The WordPress page template allows you to define special template layouts that can be assigned to pages. As the administrator creates (or edits) a page, a template can be selected from the Page Template combo box in the sidebar.
Your custom page template files are also available for editing through the WordPress' built-in editor, under the Appearance menu.
There's more...In the steps above, we created the most basic of page templates. However, now that you know how to make a page template, you can do with it whatever you want. Add your own styling, hard code text, or images, even add your own functional elements.
www.it-ebooks.info

Installing and Customizing Themes
58
There's no upper limit on how many page templates you can create, so you can feel free to make any number of purpose-built templates that can be used by your content creators.
For some ideas of what you can do with this powerful WordPress feature, visit this page http://codex.wordpress.org/Pages#Page_Templates
Adding functionality with template tagsTemplate tags in WordPress work like snippets that provide you with discrete bits of functionality, but without the hassle of dealing with long segments of code. The tags are used to display information dynamically or to customize the output of the page.
There are a number of template tags available to you. You can see a complete list by visiting http://codex.wordpress.org/Template_Tags. Note that some tags include parameters that let you further extend the functionality.
Implementing a template tag is simply a matter of wrapping the tag in a php statement. Where parameters are available, you can also declare those, if you wish to use them. For example, let's say that in a particular page template you wish to automatically insert the date the page was posted. You could do this very easily by employing a template tag: the_date(). Your code might look like this: <p>Date created: <?php the_date(); ?></p>
In the example above, I wrapped the template tag in a <p> tag, but you could use the styling of your choice or even omit it completely.
There are other options as well, since the_date() also supports the following parameters: $format, $before, $after, $echo. Using the parameters, you could, for example, specify that the date will be in the format Year-Month-Day and also be wrapped with an <H3> tag: <?php the_date('Y-m-d', '<h3>', '</h3'); ?>
You can download a handy template tags cheatsheet by visiting http://docs.ekinertac.com/Wordpress-Cheat-Sheet.pdf
www.it-ebooks.info

Chapter 2
59
Using post formatsPost formats are a relatively new feature in WordPress, having first appeared in WordPress 3.1. The formats are a welcome development. In the past, many developers used categories as a way to group post content by nature or function and had to style based on category. With post formats, you have available a wide range of options that cover the most common categories of use, including audio, video, images, and galleries.
Support for post formats depends on the theme. As you can see in the next screenshot, there are even differences between TwentyTen and TwentyEleven. While TwentyEleven comes ready to use with a large number of post formats, in reality the theme uses only seven of the ten formats WordPress provides.
In this recipe we're going to look at how you can enable some or all of the additional post formats in your theme.
www.it-ebooks.info

Installing and Customizing Themes
60
Getting readyPost formats are a default feature of WordPress, however support for them varies from theme to theme. In this recipe we will look at the default Twenty Ten theme. We will modify the functions.php file to provide more post formats for the theme. To complete this recipe you will need a code editor and access to your WordPress installation on your server.
How to do it...1. Access your WordPress installation on your server.
2. Open the functions.php file of your active theme. In this example, we are using the functions.php file from the default TwentyTen theme.
3. Find the following lines in the file:function twentyten_setup() {
// This theme styles the visual editor with editor-style.css to match the theme style. add_editor_style();
// Post Format support. You can also use the legacy "gallery" or "asides" (note the plural) categories. add_theme_support( 'post-formats', array( 'aside', 'gallery' ) );
4. We want to add additional items to the array of post formats, so we need to modify the last line of that code as follows:add_theme_support( 'post-formats', array( 'aside', 'gallery','link','image','quote','status','video','audio','chat' ) );
5. Save the file.
If you now access your WordPress dashboard and create a new post, or edit an existing post, you will see a full list of options under the Format sidebar, as seen in the preceding image.
www.it-ebooks.info
Chapter 2
61
How it works...WordPress comes with a default set of post formats. While you cannot add your own, you can style the ones that are included in the system. The default post formats are:
f Aside: For holding a short piece of content, typically without a title
f Audio: To hold a single audio file
f Chat: Formatted to hold a chat transcript
f Gallery: Intended for use as a gallery of images
f Image: A single image file
f Link: A single link (URL) to an external site
f Quote: A quotation, often done without a title
f Status: A short status message, like you would see on Twitter or another micro-blogging service
f Video: Holds a single video file
Additionally there is the standard post format, which is simply the default format used by the system if no other format is specified.
The post format options are set in the theme by the init function. In the recipe, we simply accessed the functions.php file, found the relative line, and then added to the array of post format types. Now, when the theme is activated, all post formats will be available through the WordPress post creation and editing screens.
There's more...The recipe above shows you how to enable all the default post formats. The next question for most people will be "how do I style the post formats"?
www.it-ebooks.info

Installing and Customizing Themes
62
An easy option for styling post formatsStyling post formats can be rather clunky, involving diving into the WordPress loop. There is, however, another way. The WP Post Formats plugin makes enabling and customizing post formats easy. Once installed, the plugin exposes the entire range of post format options and also includes editing windows that let you manage template for each of the formats, as you can see in the following screenshot :
www.it-ebooks.info

Chapter 2
63
Creating a custom 404 error page404, or 'page not found' errors, are part of life on the web. They are impossible to avoid. What you can do, however, is control what kind of an impact they have on your site's users. Graceful management of 404 errors is one of the hallmarks of a professional website. When handled properly, the number of visitors you will lose due to 404 errors will drop off substantially.
It is important that you site has a proper 404 page. The key aspects here are making sure the 404 error page shown is consistent with your brand and identity and providing your site visitors with a way to reach the rest of your site. In this recipe we discuss how to modify the default 404 page, if your site's theme already has one, and if not, how to create one.
Getting readyFor this recipe, you'll need a code editor and access to the files of your WordPress installation.
How to do it...Many WordPress themes, including the default Twenty Eleven, come with a special template to handle 404 errors. The default Twenty Eleven 404 page template is displayed in the following screenshot:
www.it-ebooks.info

Installing and Customizing Themes
64
The 404 error template is named 404.php and resides in the active theme directory. If you wish to edit this file, follow these steps:
1. Access your WordPress installation.
2. Go to the directory that contains your active theme.
3. Open the 404.php file with your favorite editor.
4. Make any changes you wish to the file.
5. Save the file back to your server, overwriting the original.
If, for some reason, your theme doesn't include a 404.php, you should create one. To create simple 404 page, follow these steps:
1. Create a new file with your favorite editor.
2. Name it 404.php
3. Paste the following code in the file:<?php get_header(); ?> <div id="content" class="narrowcolumn"> <h2 class="center">Error 404 - Not Found</h2> </div><?php get_sidebar(); ?><?php get_footer(); ?>
4. Save the file to your active theme's directory, and you're done!
How it works...WordPress features an interesting template hierarchy mechanism. When a 404 error appears, WordPress automatically looks for a file named 404.php. If such a file exists, it is displayed.
Using a static page as a homepageQuite a few WordPress sites use the list of most recent posts as the site homepage. This is the default option and a common solution for blog sites. However, if you prefer to use a static page as a homepage, you can do so easily. In this recipe, we will learn how to set up a static page as a homepage for your site.
Getting readyNothing special is needed here. The possibility of using a static page as a homepage is built-in in the WordPress.
www.it-ebooks.info

Chapter 2
65
How to do it...1. Log in to your WordPress Dashboard.
2. Click on the Pages menu.
3. Click on the Add New option.
4. Create a new page for use as your site's homepage. Name it Welcome…
5. Publish your new Welcome… page.
6. Click on the Settings menu.
7. Click on the option Reading.
8. You'll see a title saying Front page displays. Select the radio button marked A static page.
9. Choose your new front page from the drop-down list marked Front page:. The following screenshot shows the settings:
10. Click the Save Changes button.
www.it-ebooks.info

Installing and Customizing Themes
66
How it works...WordPress allows you to choose your home page content. You can use either the list of posts, or a static page of your choice. This second option gives you quite a few possibilities, in particular if you'd like to create a non-blog site using WordPress.
Adding custom styles to your themeNow that you know how to create a child theme and are able to use post formats and custom page templates, you will need to be able to insert new styling into your themes. The basic principles are straight out of CSS 101. In this recipe we look at the simple steps needs to add a custom style to your theme.
Getting readyWe're going to do everything in this recipe using only the tools inside your WordPress dashboard. For the sake of simplicity, we're using the default TwentyEleven theme. The principles demonstrated will work for anything, though the code may vary.
How to do it...There are two parts to this recipe: First, you need to wrap the area you want to affect with the styling. Second, you need to define the CSS selector in the theme's stylesheet. For this example, let's modify the header of the page to add new div we can use to control the area around the top menu:
1. Log in to your WordPress Dashboard.
2. Click on the Appearance menu.
3. Click on the Editor option.
4. Find the Template named Header and click on it.
5. Find the tag <hgroup>
6. Let's add some styling to this area. Modify the tag to look like this: <hgroup id="headhgroup">
7. Click the Update File button.
That completes the first step. The new style has been added and whatever we define for #headhgroup will now impact the area wrapped by the <hgroup> tag. Let's now add a definition for the selector:
1. Click on Stylesheet.
www.it-ebooks.info

Chapter 2
67
2. Scroll to the bottom of the file and let's add a new selector:#headhgroup { background: #666666;}
3. Click on the Update File button.
If you visit the front end of your website now and refresh the page in your browser, you should see a light gray colored background in the head of your pages.
How it works...We're simply using the power of HTML and CSS. We've defined a selector in the theme's stylesheet, then applied it to a section of the code in the header.php file.
Making your site mobile device friendlyWith the ubiquity of handheld and portable devices and with ready access to WiFi and other connectivity, having a mobile-friendly website is now almost a necessity. While you can go to the effort of building a dedicated mobile site or creating a mobile theme, a new WordPress plugin makes it easy to have a simple and effective mobile-friendly website.
In this recipe, we look at using the WPtouch plugin.
In this example we use the free version of the plugin. There is also a commercial version. Though the free version is fully functional, you will want to look at all the options.
Getting readyTo execute this recipe, you will also need to install the WPtouch plugin. You will need to install this plugin before you can get started. Search for WPtouch inside the Add New Plugins screen of your WordPress site. After you find it, click to install, and then activate it.
You can learn more about this plugin by visiting the plugin's page on Wordpress.org at http://wordpress.org/extend/plugins/wptouch/.
www.it-ebooks.info

Installing and Customizing Themes
68
How to do it...1. Log in to your WordPress Dashboard.
2. Click on the Settings menu.
3. Click on the option WPtouch.
4. In the General Settings portion of the page, seen in the screenshot below, you can set the basic configuration options you need for the plugin to display your site. The numerous advanced options seen further down the WPtouch configuration page allow you to tailor things more closely to your needs.
www.it-ebooks.info

Chapter 2
69
5. When you've finished, click Save Options.
Now, when a visitor accesses your site from a mobile device, WPtouch will automatically display the contents in a mobile-friendly format.
The WPtouch plugin has been tested with iPhone, iPod Touch, Google Android, Blackberry Storm, Blackberry Torch, Palm Pre, and Samsung touch.
How it works...Though WPtouch seems a great deal like a theme, the detection of the mobile device and the formatting of the contents on the fly is the byproduct of a plugin. When a mobile device visits the site, the plugin automatically detects it and feeds that device a different set of theme files. As a result, the installation of this plugin will have no impact on the appearance of the site in a browser on a standard resolution monitor.
www.it-ebooks.info

3Working with Plugins
and Widgets
In this chapter, we will cover:
f Installing plugins
f Installing widgets
f Adding new widget areas to your theme
f Creating your own widgets
f Modifying core widgets
f Displaying tabs on your sidebar
f Using conditional tags to control widget display
f Displaying widgets inside of posts and pages
IntroductionPlugins are the key to extending the functionality of your WordPress site. Virtually all WordPress installations run one or more plugins; many run quite a few. Plugins vary in complexity, from adding very simple functionality to very complex plugins that require extensive configuration.
Widgets work hand-in-hand with plugins by allowing you to position discrete bits of simple functionality on your pages. Widgets are often a by-product of plugins; when you install a new plugin, you will often get new widgets that can be used to expose all or part of the plugin's functionality.
In this chapter, we look at how to extend your site through the strategic use of plugins and widgets.
www.it-ebooks.info

Working with Plugins and Widgets
72
Installing pluginsThe first step to adding new functionality to your site is to learn how to install new plugins for your WordPress site.
In this recipe we look at how to install plugins. Installation can be either automatic or manual; both are discussed in this recipe.
The key interface for plugin management, including installation, is the Plugins Manager, shown in the next screenshot. The Plugins Manager exists in all WordPress sites and can be accessed by clicking on the Plugins menu.
Getting readyAs noted above, installing a WordPress plugin can be done one or two ways: either manually or automatically. If you use the automatic installer, seen at the top of the Plugins Manager in the preceding screenshot, then you need no additional tools to complete the recipe. If on the other hand, you wish to install a plugin manually, you will need the ability to add files to your WordPress installation on your server.
www.it-ebooks.info

Chapter 3
73
You can find new plugins by either searching from inside the Plugins Installer in the WordPress dashboard (as explained below), or by visiting www.Wordpress.org at http://wordpress.org/extend/plugins/
Before you install any plugin, you must first check the compatibility of the plugin. If the plugin is not cleared to work with your version of WordPress, you should be very reluctant to install it. If the plugin is not approved for your version of WordPress, it may not function properly or it may introduce security risks.
To identify the compatibility of a plugin, you can either view the plugin's page on the WordPress.org site, or you can click and view details about the plugin from inside the plugin installer in the Plugins Manager. The following screenshot shows how the version data appears in both situations:
www.it-ebooks.info
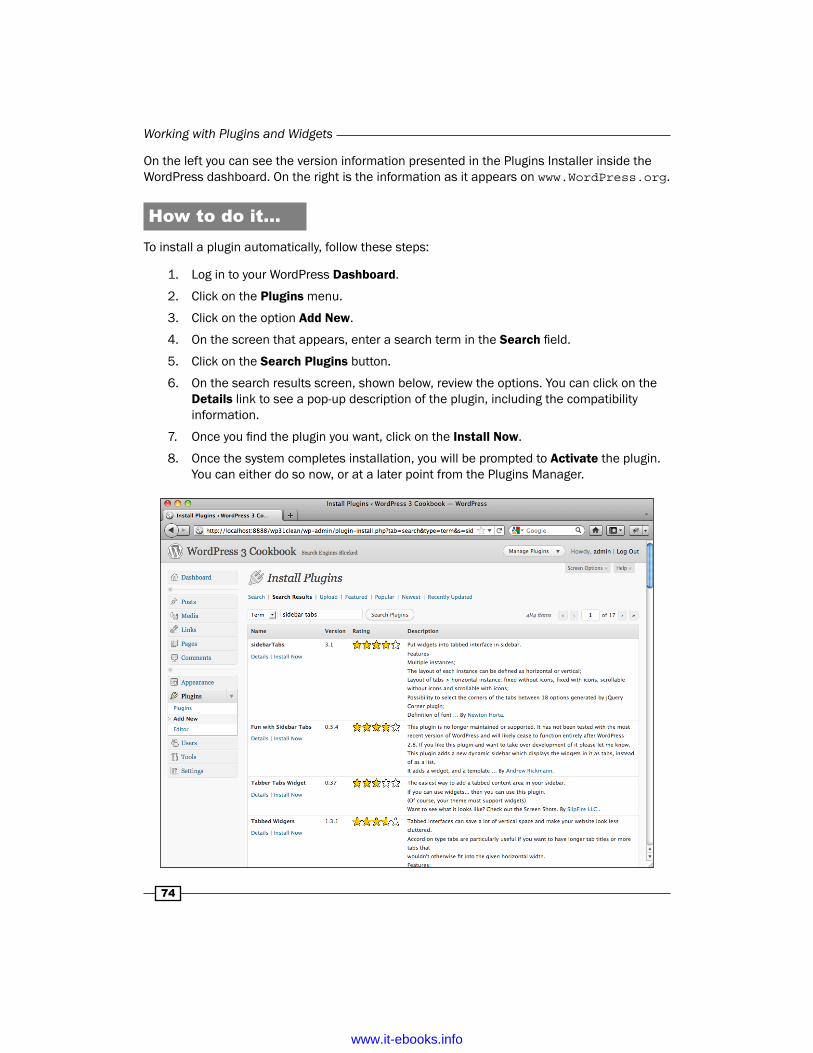
Working with Plugins and Widgets
74
On the left you can see the version information presented in the Plugins Installer inside the WordPress dashboard. On the right is the information as it appears on www.WordPress.org.
How to do it...To install a plugin automatically, follow these steps:
1. Log in to your WordPress Dashboard.
2. Click on the Plugins menu.
3. Click on the option Add New.
4. On the screen that appears, enter a search term in the Search field.
5. Click on the Search Plugins button.
6. On the search results screen, shown below, review the options. You can click on the Details link to see a pop-up description of the plugin, including the compatibility information.
7. Once you find the plugin you want, click on the Install Now.
8. Once the system completes installation, you will be prompted to Activate the plugin. You can either do so now, or at a later point from the Plugins Manager.
www.it-ebooks.info
Chapter 3
75
To install a plugin manually, follow these steps:
1. Obtain a copy of the archive file containing your plugin; typically this is done from the www.WordPress.org Plugins page.
2. Extract the plugin locally on your computer.
3. Access the filesystem of your WordPress installation.
4. Navigate to the directory /wp-content/plugins.
5. Copy the directory containing your plugin files to the directory on your server.
6. Log in to your WordPress Dashboard.
7. Click on the Plugins menu.
8. Scan the list of plugins to find the name of the plugin you have just installed.
9. Click on Activate to use the plugin.
At this point, your plugin should be ready to go. At any time, you can visit the Plugins Manager to disable or delete your plugin.
How it works...When a plugin is installed, its name is registered in the WordPress database, which means that the plugin is active and WordPress will let it execute the tasks it was developed for.
Plugins use hooks (we will discuss this later) and the Plugin API, which provide useful PHP functions to modify WordPress default functions.
There's more...If you decide to stop using a plugin you should de-activate it and delete it from your system. Leaving unused plugins on your site not only increases your maintenance burden, but also exposes your site to security risk. Moreover, in some situations, you may install a plugin only to find that it does not work properly, or even worse, causes a problem for your site. If that happens, you will need to remove the plugin.
In WordPress, deleting a plugin is very easy, and you can always re-install it again if you decide to use it in the future.
Deleting installed plugins automaticallyThe following steps can be used to delete a plugin automatically:
1. Log in to your WordPress Dashboard.
2. Click on the Plugins menu.
3. Scan the list of plugins to find the name of the plugin you want to remove.
www.it-ebooks.info

Working with Plugins and Widgets
76
4. Make sure the plugin is de-activated. If it is still active, then click on the Deactivate link.
5. Once deactivated, you can remove the plugin completely by clicking on the Delete link.
6. After you click the link, you will be prompted to confirm the decision, as seen in the following screenshot:
7. To confirm the delete, click on the Yes, Delete these files button. To cancel and return to the Plugins Manager, click on the No, Return me to the plugin list button.
www.it-ebooks.info

Chapter 3
77
Deleting installed plugins manuallyThe following steps can be used to delete a plugin from your system manually:
1. Access the filesystem of your WordPress installation.
2. Navigate to the directory /wp-content/plugins.
3. Find the directory containing the file of the plugin you need to disable.
4. Rename the directory, which will force the system to deactivate the plugin.
5. Check your site; if it is working properly, you may now delete the directory containing the plugin's files.
6. Log in to your WordPress Dashboard.
7. Click on the Plugins option on the menu.
8. Scan the list of plugins to see if the plugin has been removed.
Some plugins modify the WordPress database. If you wish to completely remove plugins that modify the database, you will need to also access your site's database, identify the information inserted by the plugin, and then remove it from the database. Check the plugin's documentation to determine whether this is necessary.
Installing widgetsNow that we have studied how to install WordPress plugins and what plugins can do for you, let's have a look at widgets. A widget does the same thing as a plugin, that is, it adds more functionality to your site. Widget installation, however, works differently than plugin installation. Typically, widgets are by-products of plugins. Widgets are not created independently and installed independently.
To use widgets on your site, you do have to take some steps. Assuming that your theme is widget-ready, you can visit the Widgets Manager screen, shown in the next screenshot, and simply drag a widget to a widget-ready zone.
www.it-ebooks.info

Working with Plugins and Widgets
78
Most all themes are widget-ready, meaning that the theme has defined zones into which you can manually place widgets from within the Widgets Manager. If your theme does not have pre-defined zones into which you can add widgets, you will need to modify the theme's files to add this functionality. Modifying your theme to add new widget areas is discussed below in the section Adding Widget Areas to your Theme.
Getting readyThere are no special requirements to complete this recipe. Everything you need is found inside the WordPress dashboard.
How to do it...1. Log in to your WordPress Dashboard.
2. Click on the Appearance menu.
www.it-ebooks.info

Chapter 3
79
3. Click on the Widgets option.
4. On the Widgets Manager page, find the widget you wish to use.
5. Click and drag the widget to any of the widget areas you see on the right hand column.
6. Click the arrow on the title bar of the widget to open the widget and view the configuration options.
7. Edit its parameters as desired.
8. Click on the Save button on the widget and you're done!
See also f Adding widget areas to your theme
f Using widget logic to control widget display
f Displaying widgets inside of posts and pages
Adding widget areas to your themesWidgets are useful and can help you to achieve a lot of tasks on your site. Having a choice of widget areas in your theme means you have options. Sometimes you find, however, that your theme needs a widget area where one does not exist. It's an easy problem to resolve; all you need to do is add a bit of code to your theme and you can add the additional widget areas you desire.
Many WordPress and third party documents refer to widget areas as 'dynamic sidebars.' These two names mean the same thing in this context.
Getting readyTo complete the following recipe, all that you need is a code editor and access to the theme files of your WordPress installation.
www.it-ebooks.info

Working with Plugins and Widgets
80
How to do it...Let's add a new widget area to the right sidebar of the default TwentyTen theme. To accomplish this you will need to accomplish two tasks: first, register the new widget area, and then place it in the theme files.
1. Open your theme's functions.php (or create a new one if your theme does not include one) and let's register a new widget area called tailormade. To do this, add the following lines of code to the file:if ( function_exists('register_sidebar') ){ register_sidebar(array( 'name' => 'tailormade', 'before_widget' => '<div id="my-mega-menu-widget">', 'after_widget' => '</div>', 'before_title' => '<h3 class="widget-title">', 'after_title' => '</h3>',));
}
2. Save the file.
3. Open your theme's sidebar.php file and add the following code where you want the new widget area to appear:<?php if ( !function_exists('dynamic_sidebar') dynamic_sidebar('tailormade') ) : ?> <?php endif; ?>
Though it is not absolutely necessary, WordPress coding standards prefer widgets to be placed inside of lists. Best practices would dictate that you make your new widget area a list item <li> of an unordered list <ul>. Also, try not to hard code unnecessary styling, as it may have undesired results when it interacts with the widget's styling.
4. Save the file.
The preceding example is basic, but the principles demonstrated are applicable to other scenarios. You can use the technique to add multiple widget areas anywhere in your theme's templates.
As a result of this code, you now have a new widget area available on the dashboard's widgets page, as shown in the next screenshot. You will also have widget output visible on the front-end of the site.
www.it-ebooks.info

Chapter 3
81
How it works...When we were adding a single widget-ready zone, we used the dynamic_sidebar() function. This is why I used dynamic_sidebar('tailormade') in the sidebar template. Then, in the functions.php file, I used the register_sidebar() function, which can only handle a single widget-ready zone.
To learn more about the register_sidebar() function and the parameters available, see the WordPress Codex at http://codex.wordpress.org/Function_Reference/register_sidebar
See also f Installing widgets
f Using widget logic to control widget display
f Displaying widgets inside of posts and pages
www.it-ebooks.info

Working with Plugins and Widgets
82
Creating your own widgetEven though there are a lot of quality WordPress widgets available, sometimes you will find that there isn't one that exactly fits the requirements. In such a case, you'll have to create your own widget. It may sound difficult at first, but if you have any programming experience it is very easy.
Creating a widget requires creating the plugin that powers the widget; this chapter is, therefore, not about simply creating a widget, but also about creating a plugin. We will create a plugin, which in turn provides us with a widget.
Getting readyTo create your very own widget, you need nothing but a text editor and access to the WordPress installation on your server.
How to do it...1. Find the directory /wp-content/plugins.
2. Create a new directory inside and name it simplewidget.
3. Create a blank file and name simplewidget.php.
4. Save it to the wp-content/plugins/simplewidget directory.
5. Open the simplewidget.php file for editing.
6. Paste into simplewidget.php the following code:<?php/*Plugin Name: A Simple Widget Example
Plugin URI: http://yoursite.com/
Version: 1.0
Description: Demonstrate how to create a simple widget.
Author: The Great Gazoo
Author URI: http://yoursite.com/*/
/**Creates new class to extend the system's WP_Widget class*/
class simple_widget extends WP_Widget {
www.it-ebooks.info

Chapter 3
83
function simple_widget() { $widget_ops = array('description' => 'Displays the Packt Publishing logo with a link to the site.'); $this->WP_Widget('simple_widget', 'A Simple Widget', $widget_ops); }
/**Implement the form() function, which creates the widget's editing options for admin.*/
function form($instance) { $instance = wp_parse_args((array) $instance, array( 'title' => '' )); $title = $instance['title'];?> <p> <label for="<?php echo $this->get_field_id('title'); ?>"><?php _e('Title:'); ?></label> <input class="widefat" id="<?php echo $this->get_field_id('title'); ?>" name="<?php echo $this->get_field_name('title'); ?>" type="text" value="<?php echo attribute_escape($title); ?>" /> </p> <?php }
/**Implements the update() function, which allows us to set options for the widget*/
function update($new_instance, $old_instance) { $instance = $old_instance; $instance['title'] = $new_instance['title']; return $instance; }
/**Implements the widget() function, where we build the widget output.*/
function widget($args, $instance) { extract($args, EXTR_SKIP);
echo $before_widget; $title = empty($instance['title']) ? '' : apply_filters('widget_title', $instance['title']);
www.it-ebooks.info

Working with Plugins and Widgets
84
if (!empty($title)) echo $before_title . $title . $after_title;; echo '<a href="http://www.packtpub.com"><img src="http://www.packtpub.com/sites/all/themes/pixture_reloaded/images/pp/packt-logo.jpg"></a>';
echo $after_widget; }}
/**Time to register the widget*/
add_action( 'widgets_init', create_function('', 'return register_widget("simple_widget");') );
?>
The plugin will now appear in your Plugins Manager. Activate and you will find a new widget in your list of widgets, seen as follows.
Once you place the widget into a visible widget area, you will be able to see your first custom widget on your site.
www.it-ebooks.info

Chapter 3
85
How it works...Now that we have created a working widget, let's take a function-by-function look at its code.
First, you have to tell WordPress that this file is a widget or a plugin by adding the PHP comments at the beginning of the file. The information will be used by your WordPress dashboard when you activate the widget. If WordPress can't find these comments, the file won't be recognized.
The first actual code begins with declaring our new class simple_widget and specifying that it is an extension of the WordPress system's WP_Widget. This first block of code also includes the function simple_widget, where we specify the description and name seen in the admin system.
The next function is form(). As the name implies, this function sets up any configuration options that will be available to the admin in the Widgets Manager. In this case, we have only given the administrator the option to specify a title for the widget.
The update() function is needed to enable the admin to make changes to the widget and then see those reflected in the widget output. In this case, the only option needed relates to the title.
Next comes the widget() function where we build the widget output for the front-end of the site. In this case, we tell the function to print the title, followed by an image file which has a link attached to it.
The last bIt of code will register our widget and add it to the admin interface; the user will be able to drag and drop it into one of his widget-ready zones.
Modifying core widgetsIn the previous recipes, we showed you how to create new widgets and how to add new widget areas to your theme. As you know, WordPress comes with a number of built-in widgets including the categories list, the search form, and so on. While many of the default widgets are useful, they are also often lacking in any meaningful configuration options. If you want one of the default widgets to look or function differently, you will need to either find another solution or modify the widget.
In this recipe, we'll show you how to modify WordPress core widgets – without editing the core files.
While it is possible to change your site's core widgets by directly editing the files that produce them, this is not recommended. The better choice is to create copies of them and make your modifications there. If you modify the core files, you run the risk of over-writing your changes when you update or upgrade your site.
www.it-ebooks.info
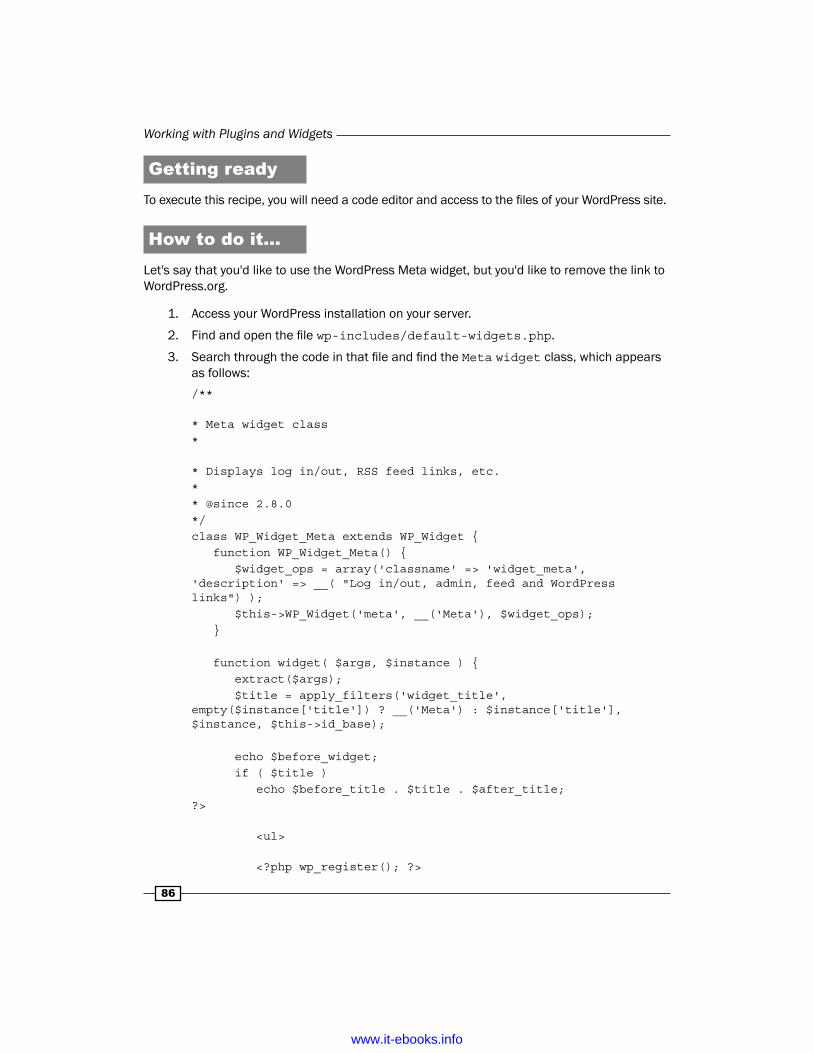
Working with Plugins and Widgets
86
Getting readyTo execute this recipe, you will need a code editor and access to the files of your WordPress site.
How to do it...Let's say that you'd like to use the WordPress Meta widget, but you'd like to remove the link to WordPress.org.
1. Access your WordPress installation on your server.
2. Find and open the file wp-includes/default-widgets.php.
3. Search through the code in that file and find the Meta widget class, which appears as follows:/**
* Meta widget class*
* Displays log in/out, RSS feed links, etc.** @since 2.8.0*/class WP_Widget_Meta extends WP_Widget { function WP_Widget_Meta() { $widget_ops = array('classname' => 'widget_meta', 'description' => __( "Log in/out, admin, feed and WordPress links") ); $this->WP_Widget('meta', __('Meta'), $widget_ops); }
function widget( $args, $instance ) { extract($args); $title = apply_filters('widget_title', empty($instance['title']) ? __('Meta') : $instance['title'], $instance, $this->id_base);
echo $before_widget; if ( $title ) echo $before_title . $title . $after_title;?> <ul> <?php wp_register(); ?>
www.it-ebooks.info

Chapter 3
87
<li><?php wp_loginout(); ?></li> <li><a href="<?php bloginfo('rss2_url'); ?>" title="<?php echo esc_attr(__('Syndicate this site using RSS 2.0')); ?>"><?php _e('Entries <abbr title="Really Simple Syndication">RSS</abbr>'); ?></a></li> <li><a href="<?php bloginfo('comments_rss2_url'); ?>" title="<?php echo esc_attr(__('The latest comments to all posts in RSS')); ?>"><?php _e('Comments <abbr title="Really Simple Syndication">RSS</abbr>'); ?></a></li> <li><a href="http://wordpress.org/" title="<?php echo esc_attr(__('Powered by WordPress, state-of-the-art semantic personal publishing platform.')); ?>">WordPress.org</a></li>
<?php wp_meta(); ?> </ul><?php echo $after_widget; }
function update( $new_instance, $old_instance ) { $instance = $old_instance; $instance['title'] = strip_tags($new_instance['title']);
return $instance; }
function form( $instance ) { $instance = wp_parse_args( (array) $instance, array( 'title' => '' ) ); $title = strip_tags($instance['title']);?> <p><label for="<?php echo $this->get_field_id('title'); ?>"><?php _e('Title:'); ?></label> <input class="widefat" id="<?php echo $this->get_field_id('title'); ?>" name="<?php echo $this->get_field_name('title'); ?>" type="text" value="<?php echo esc_attr($title); ?>" /></p>
<?php }}
4. Copy the Meta widget code.
5. Create a new directory inside wp-content/plugins. Name it metamod.
www.it-ebooks.info
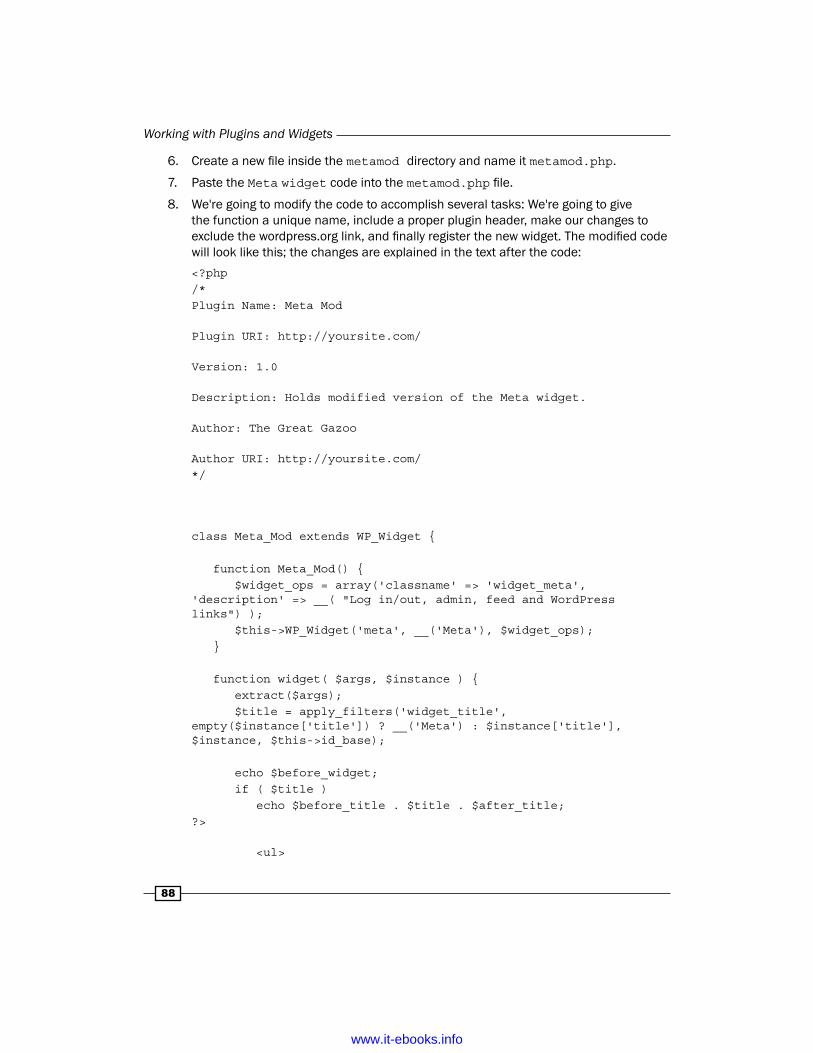
Working with Plugins and Widgets
88
6. Create a new file inside the metamod directory and name it metamod.php.
7. Paste the Meta widget code into the metamod.php file.
8. We're going to modify the code to accomplish several tasks: We're going to give the function a unique name, include a proper plugin header, make our changes to exclude the wordpress.org link, and finally register the new widget. The modified code will look like this; the changes are explained in the text after the code:<?php/*Plugin Name: Meta Mod
Plugin URI: http://yoursite.com/
Version: 1.0
Description: Holds modified version of the Meta widget.
Author: The Great Gazoo
Author URI: http://yoursite.com/*/
class Meta_Mod extends WP_Widget {
function Meta_Mod() { $widget_ops = array('classname' => 'widget_meta', 'description' => __( "Log in/out, admin, feed and WordPress links") ); $this->WP_Widget('meta', __('Meta'), $widget_ops); }
function widget( $args, $instance ) { extract($args); $title = apply_filters('widget_title', empty($instance['title']) ? __('Meta') : $instance['title'], $instance, $this->id_base);
echo $before_widget; if ( $title ) echo $before_title . $title . $after_title;?> <ul>
www.it-ebooks.info

Chapter 3
89
<?php wp_register(); ?> <li><?php wp_loginout(); ?></li> <li><a href="<?php bloginfo('rss2_url'); ?>" title="<?php echo esc_attr(__('Syndicate this site using RSS 2.0')); ?>"><?php _e('Entries <abbr title="Really Simple Syndication">RSS</abbr>'); ?></a></li> <li><a href="<?php bloginfo('comments_rss2_url'); ?>" title="<?php echo esc_attr(__('The latest comments to all posts in RSS')); ?>"><?php _e('Comments <abbr title="Really Simple Syndication">RSS</abbr>'); ?></a></li> </ul><?php echo $after_widget; }
function update( $new_instance, $old_instance ) { $instance = $old_instance; $instance['title'] = strip_tags($new_instance['title']);
return $instance; }
function form( $instance ) { $instance = wp_parse_args( (array) $instance, array( 'title' => '' ) ); $title = strip_tags($instance['title']);?> <p><label for="<?php echo $this->get_field_id('title'); ?>"><?php _e('Title:'); ?></label> <input class="widefat" id="<?php echo $this->get_field_id('title'); ?>" name="<?php echo $this->get_field_name('title'); ?>" type="text" value="<?php echo esc_attr($title); ?>" /></p>
<?php }}
/**Time to register the widget*/
add_action( 'widgets_init', create_function('', 'return register_widget("Meta_Mod");') );
?>
www.it-ebooks.info

Working with Plugins and Widgets
90
How it works...The idea behind this recipe is to take the code from a default widget, use it as the basis of a new plugin, which will then provide us with a widget we can modify as we wish. Once installed, we will use the new widget and remove the default widget from display on the site.
The process is very straightforward. The vast majority of the work is simply copying the existing widget code and pasting it into a new file. We have to change the name of the function so that it does not conflict with the original function. To make that change, we simply modify the beginning of the code to make this change:
class WP_Widget_Meta extends WP_Widget { function WP_Widget_Meta() {
It becomes the following:
class Meta_Mod extends WP_Widget { function Meta_Mod() {
As we saw in the previous recipe, creating a widget requires a proper header, so we add the following to the top of the file:
<?php/*Plugin Name: Meta Mod
Plugin URI: http://yoursite.com/
Version: 1.0
Description: Holds modified version of the Meta widget.
Author: The Great Gazoo
Author URI: http://yoursite.com/*/
www.it-ebooks.info

Chapter 3
91
Finally, to make the plugin work, we need to register our new function. To accomplish this, we added the following to the end of the file:
/**Time to register the widget*/
add_action( 'widgets_init', create_function('', 'return register_widget("Meta_Mod");') );
?>
That's all there is to make the plugin and widget work, but our original goal was to delete the link to WordPress.org, so we also need to edit a portion of the code, as follows:
<ul> <?php wp_register(); ?> <li><?php wp_loginout(); ?></li> <li><a href="<?php bloginfo('rss2_url'); ?>" title="<?php echo esc_attr(__('Syndicate this site using RSS 2.0')); ?>"><?php _e('Entries <abbr title="Really Simple Syndication">RSS</abbr>'); ?></a></li> <li><a href="<?php bloginfo('comments_rss2_url'); ?>" title="<?php echo esc_attr(__('The latest comments to all posts in RSS')); ?>"><?php _e('Comments <abbr title="Really Simple Syndication">RSS</abbr>'); ?></a></li> <li><a href="http://wordpress.org/" title="<?php echo esc_attr(__('Powered by WordPress, state-of-the-art semantic personal publishing platform.')); ?>">WordPress.org</a></li>
<?php wp_meta(); ?> </ul>
This becomes the following:
<ul> <?php wp_register(); ?> <li><?php wp_loginout(); ?></li> <li><a href="<?php bloginfo('rss2_url'); ?>" title="<?php echo esc_attr(__('Syndicate this site using RSS 2.0')); ?>"><?php _e('Entries <abbr title="Really Simple Syndication">RSS</abbr>'); ?></a></li>
www.it-ebooks.info

Working with Plugins and Widgets
92
<li><a href="<?php bloginfo('comments_rss2_url'); ?>" title="<?php echo esc_attr(__('The latest comments to all posts in RSS')); ?>"><?php _e('Comments <abbr title="Really Simple Syndication">RSS</abbr>'); ?></a></li> </ul>
Once these changes are done, you will find a new plugin on your site. Once you activate it, you will have a new widget named Meta Mod.
You will also still have the original Meta widget, which has not been changed.
Displaying tabs on your sidebarIf you are like many site owners, there are a number of items you would like to display in your widget areas. The problem is, if you try to put too many items into a single widget area, the area can become quite lengthy or crowded, which isn't visually appealing.
In this recipe we look at one possible solution for this problem: Implementing tabbed widgets.
Getting readyTo execute this recipe, you will need to install the Tabbed Widgets plugin. You will need to install this plugin before you can get started. Search for Tabbed Widget inside the Add New Plugins screen of your WordPress site. After you find it, click to install, and then activate it.
You can learn more about the plugin by visiting the developer's website at http://konstruktors.com/projects/wordpress-plugins/tabbed-accordion-widgets/
How to do it...Though Tabbed Widgets is a plugin, once you activate it, all other work occurs in the Widgets Manager. Widget placement and configuration works a bit differently than usual, expalined as follows:
1. Log in to your WordPress Dashboard.
2. Click on the Appearance menu.
3. Select the option Widgets.
4. Click and drag the Tabbed Widget widget to the widget area where you wish it to appear.
www.it-ebooks.info

Chapter 3
93
There is a new widget area named Invisible Widget Area. Drag into that widget area any widgets you want to appear in the new Tabbed Widget.
5. Next, open the Tabbed Widget. The following screenshot shows what it will look like:
6. Select what you want to appear in each tab.
7. Select the style of the appearance, either tabs or accordion style.
www.it-ebooks.info

Working with Plugins and Widgets
94
8. Select any other configuration options you want to use.
9. Click on the Save button.
How it works...The plugin enables you to stack multiple widgets into the space taken by one. The configuration options allow you to then either display the widgets in a set of horizontal tabs or in a set of vertical accordion menus. The plugin has very little styling, so you will most likely want to style this yourself with a bit of CSS.
Using conditional tags to control widget display
While WordPress widgets are a great way to create pages that are rich in functionality and content, there are times when you want to be able to control which widgets show on which pages. By default, a widget placed in a widget area will appear on all pages of your site. Some themes, like the default TwentyTen, provide the option to show one set of widgets on the home page and a different set on the interior pages, but sometimes you want more variety.
In this recipe, we explore implementing the Widget Logic plugin, which enables the use of WordPress conditional tags in widgets through the Widgets Manager.
Conditional tags are typically used in template files to control the display of items depending on what conditions that page matches. You can learn more about conditional tags on the WordPress Codex at http://codex.wordpress.org/Conditional_Tags
Getting readyTo execute this recipe, you will need to install the Widget Logic plugin. You will need to install this plugin before you can get started. Search for Widget logic inside the Add New Plugins screen of your WordPress site. After you find it, click on it to install, and then activate it.
You can learn more about the plugin by visiting the developer's website at http://freakytrigger.co.uk/wordpress-setup/
www.it-ebooks.info

Chapter 3
95
How to do it...There are no configuration options associated with this plugin. Once it is installed and activated, it is ready to use. The plugin works by adding a new field to all the widgets on your site. That field is labelled simply Widget logic and you will use this field to inset the conditional tags that control that particular widget. The screenshot below shows the appearance of the Search widget before and after the Widget Logic plugin is activated; note the Widget logic field in the second example.
By way of example, assume that you want to only display the Meta widget on the home page of your site. To implement this using the Widget Logic plugin, you would follow these steps:
1. Log in to your WordPress Dashboard.
2. Click on the Appearance menu.
3. Click the Widgets option.
4. Find the Meta widget (by default it is assigned to the Primary Widget Area).
5. Open the options for the Meta widget.
6. In the Widget logic field, type the following conditional tag: is_front_page()
7. Click on the Save button.
www.it-ebooks.info

Working with Plugins and Widgets
96
How it works...The Widget Logic plugin simply adds the power of the WordPress conditional tags functionality to your widgets. The entire functionality hinges on conditional tags, which are part of the WordPress API. To use this plugin effectively, you do need to understand the conditional tags options available to you and the proper syntax.
There's more...In the context of widget display, some of the most useful conditional tags are:
f is_author(): Only displays widget to visitors viewing an Author page. This tag includes variables that also allow you to name specific authors.
f in_category(): Only displays widget on posts within a specific Category.
f is_category(): Only displays widget on Category archive pages. There are variables available which allow you to restrict display to specific categories.
f is_front_page(): Only displays widget on the front page of the website.
f is_page(): Displays widget when any page is being viewed. Variables allow more specificity.
f is_page_template(): Display widget when a specific page template is being used.
f is_single(): Display when any single post, or custom Post Type, is shown.
f is_sticky(): Display widget when a post is marked as sticky.
f is_tag(): Display widget when any tag archive page is displayed. Variables allow you to tailor the display to specific pages.
f has_tag(): Display widget when the post has a specific tag. Variables allow more specificity.
To learn more about conditional tags, visit the WordPress Codex at http://codex.wordpress.org/Conditional_Tags
Using the widget content filterAn additional functionality of the plugin is hidden away down on the bottom of the Widgets page. Note the screenshot below, which shows the options in their default state.
The widget_content filter is a more advanced functionality. If you enable the widget_content filter you can modify the text displayed by any widget on your site by hooking into the filter in your theme's function.php file. A typical usage would be to add additional styling to your widgets, thereby giving you more control over their appearance or placement.
www.it-ebooks.info

Chapter 3
97
The widget_content filter is discussed more on the plugin's page on wordpress.org. Visit: http://wordpress.org/extend/plugins/widget-logic/other_notes/
The second checkbox you see in the screenshot below, Use 'wp_reset_query fix', should only be used if you are experiencing display problems with widgets employing widget logic:
See also f Installing widgets
f Adding widget areas to your theme
f Displaying widgets inside of posts and pages
Displaying widgets inside of posts and pages
As we saw earlier in this chapter, widget placement options on your WordPress site are a by-product of your theme. The options you have are a direct result of what the theme developer has provided for you. Wouldn't it be nice if you could put widgets wherever you like, without having to edit your theme files? This recipe addresses part of that need, by opening up your content area for widget placement.
In this recipe, we look at implementing a plugin that enables you to place widgets directly inside of your posts and pages.
www.it-ebooks.info

Working with Plugins and Widgets
98
Getting readyTo execute this recipe, you will need to install the Widgets on Pages plugin. You will need to install this plugin before you can get started. Search for Widgets on Pages inside the Add New Plugins screen of your WordPress site. After you find it, click to install, and then activate it.
You can learn more about the plugin by visiting the developer's website at http://gingerbreaddesign.co.uk/wordpress/widgets-on-pages/
How to do it...Before you can begin to insert widgets into your pages and posts, you need to first create the extra widget areas you want, then assign widgets to those areas. Follow these steps:
1. Log in to your WordPress Dashboard.
2. Click on the Settings menu.
3. Click on the option Widgets on Pages.
4. Select how many additional widget areas (what the plugin calls "sidebars") you need by entering a value in the field labeled Number of additional sidebars.
5. Click on Save Changes.
6. In the fields provided, give names to each of your new widget areas, as shown in the following screenshot:
www.it-ebooks.info

Chapter 3
99
7. Click on the Save Changes button.
Next, let's assign widgets to the new areas:
1. Click on the Appearance menu.
2. Click on the option Widgets.
3. You will see the new widget areas you just created on the bottom right. Click and drag the widgets you want to use into the new widget areas, as shown in the following screenshot:
You are now set to add widgets to your pages or posts. To do so, you will insert WordPress shortcodes into each page or post. Let's assume you want to add an RSS feed to the content area of a specific page. We put the RSS widget into the Inline 1 widget area, above. Now, to get that into the page, follow these steps:
1. Open the page for editing.
2. Switch to the HTML editor.
www.it-ebooks.info

Working with Plugins and Widgets
100
3. Enter the shortcode provided where you want the output to appear. As you can see in the preceding screenshot (view the text in the widget area), the shortcode you will need to use is [widgets_on_pages id="Inline 1"]. The following screenshot shows how this would work:
4. Click the Update button to save the page.
How it works...This plugin allows for the ad hoc creation of new widget areas, which the plugin refers to as sidebars. The plugin also creates a specific shortcut for each of the new widget areas. By placing the shortcode inside of pages or posts, you are able to place the custom widget area where you wish.
See also f Installing widgets
f Adding widget areas to your theme
f Using widget logic to control widget display
www.it-ebooks.info

4Customizing Content
Display
In this chapter, we will cover:
f How to work with the WordPress loop
f How you can retrieve posts from a specific category
f How to control how many posts you display
f Retrieving posts by date
f Showing only those posts published today
f How to show posts published exactly one year ago
f How to set up and use multiple loops
f How to access your post data from outside the WordPress loop
f How to access permalink information outside the loop
f How to display thumbnails on your posts, using custom fields
f How to implement alternating backgrounds for lists of posts
f How to display posts in a two column layout
f Creating WordPress shortcodes
f Enabling shortcode usage within widgets
f How to add notes to your posts
f How to enable tagging support for your site's page
www.it-ebooks.info

Customizing Content Display
102
IntroductionWhat is the WordPress loop? The loop is a group of PHP instructions that retrieve posts from the database of your WordPress site and then displays them on the page. You can find the WordPress loop inside your themes, for example, inside index.php, single.php, or page.php. Any HTML or PHP code placed between the beginning of the loop and the end will be used for each post.
At its most basic, a simple implementation of the loop could work like this:
<?php if (have_posts()) : while (have_posts()) : the_post(); ?><?php the_title(); ?><?php the_content(); ?><?php endwhile; else: ?> <p>Sorry, no posts matched your criteria.'</p> <?php endif; ?>
In the real world, however, the WordPress loop is rarely that simple. This is one of those concepts best explained by referring to a real world example, so open up the index.php file of your system's TwentyEleven theme. Look for the following lines of code:
<?php if ( have_posts() ) : ?>
<?php twentyeleven_content_nav( 'nav-above' ); ?>
<?php /* Start the Loop */ ?> <?php while ( have_posts() ) : the_post(); ?>
<?php get_template_part( 'content', get_post_format() ); ?>
<?php endwhile; ?>
<?php twentyeleven_content_nav( 'nav-below' ); ?>
<?php else : ?>
<article id="post-0" class="post no-results not-found"> <header class="entry-header"> <h1 class="entry-title"><?php _e( 'Nothing Found', 'twentyeleven' ); ?></h1> </header><!-- .entry-header -->
<div class="entry-content">
www.it-ebooks.info
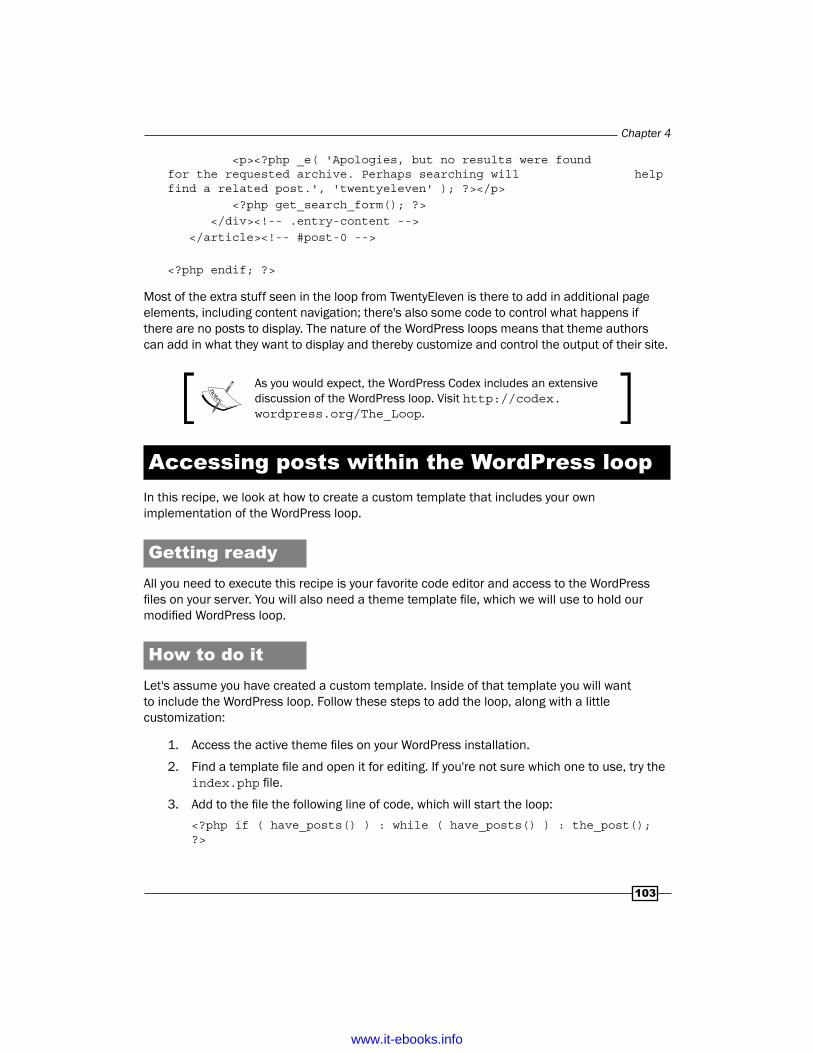
Chapter 4
103
<p><?php _e( 'Apologies, but no results were found for the requested archive. Perhaps searching will help find a related post.', 'twentyeleven' ); ?></p> <?php get_search_form(); ?> </div><!-- .entry-content --> </article><!-- #post-0 -->
<?php endif; ?>
Most of the extra stuff seen in the loop from TwentyEleven is there to add in additional page elements, including content navigation; there's also some code to control what happens if there are no posts to display. The nature of the WordPress loops means that theme authors can add in what they want to display and thereby customize and control the output of their site.
As you would expect, the WordPress Codex includes an extensive discussion of the WordPress loop. Visit http://codex.wordpress.org/The_Loop.
Accessing posts within the WordPress loopIn this recipe, we look at how to create a custom template that includes your own implementation of the WordPress loop.
Getting readyAll you need to execute this recipe is your favorite code editor and access to the WordPress files on your server. You will also need a theme template file, which we will use to hold our modified WordPress loop.
How to do itLet's assume you have created a custom template. Inside of that template you will want to include the WordPress loop. Follow these steps to add the loop, along with a little customization:
1. Access the active theme files on your WordPress installation.
2. Find a template file and open it for editing. If you're not sure which one to use, try the index.php file.
3. Add to the file the following line of code, which will start the loop:<?php if ( have_posts() ) : while ( have_posts() ) : the_post(); ?>
www.it-ebooks.info

Customizing Content Display
104
4. Next, let's display the post title, wrapped in an h2 tag:<h2><?php the_title() ?></h2>
5. Let's also add a link to all posts by this author. Add this code immediately below the previous line:<?php the_author_posts_link() ?>
6. For the post content, let's wrap it in a div for easy styling:<div class="thecontent"> <?php the_content(); ?></div>
7. Next, let's terminate the loop and add some code to display a message if there were no posts to display:<?php endwhile; else: ?><p>Oops! There are no posts to display.</p>
8. Finally, let's put a complete stop to the loop by ending the if statement that began the code in step number 3, above:<?php endif; ?>
9. Save the file.
That's all there is to it. Your code should look like this:
<?php if ( have_posts() ) : while ( have_posts() ) : the_post(); ?> <h2><?php the_title() ?></h2> <?php the_author_posts_link() ?> <div class="thecontent"> <?php the_content(); ?> </div> <?php endwhile; else: ?> <p>Oops! There are no posts to display.</p><?php endif; ?>
How it works...This basic piece of code first checks if there are posts in your site. If the answer is yes, the loop will repeat until every post title and their contents are displayed on the page. The post title is displayed using the_title(). The author's name and link are added with the_author_posts_link() function. The content is displayed with the_content() function and styled by the div named thecontent. Finally, if there are no posts to display, the code will display the message Oops! There are no posts to display.
www.it-ebooks.info

Chapter 4
105
There's more...In the preceding code you saw the use of two template tags: the_author_posts_link and the_content. These are just two examples of the many template tags available in WordPress. The tags make your life easier by reducing an entire function to just a short phrase. You can find a full list of the template tags at: http://codex.wordpress.org/Template_Tags.
The template tags can be broken down into a number of categories:
f General tags: The tags in this category cover general page elements common to most templates
f Author tags: Tags related to author information
f Bookmark tags: The tag to list bookmarks
f Category tags: Category, tag, and item description-related
f Comment tags: Tags covering the comment elements
f Link tags: Tags for links and permalinks
f Post tags: Tags for posts, excerpts, titles, and attachments
f Post Thumbnail tags: Tags that relate to the post thumbnails
f Navigation Menu tags: Tags for the nav menu and menu tree
Retrieving posts from a specific categoryThere are times when you might wish to display only those posts that belong to a specific category, for example, perhaps you want to show only the featured posts. With a small modification to the WordPress loop, it's easy to grab only those posts you want to display.
In this recipe we introduce query_posts(),which can be used to control which posts are displayed by the loop.
Getting readyTo execute this recipe, you will need a code editor and access to the WordPress files on your server. You will also need a theme template file, which we will use to hold our modified WordPress loop. To keep this recipe short and to the point, we use the loop we created in the preceding recipe.
www.it-ebooks.info

Customizing Content Display
106
How to do it...Let's create a situation where the loop shows only those posts assigned to the Featured category. To do this, you will need to work through two different processes.
First, you need to find the category ID number of the Featured category. To do this, follow these steps:
1. Log in to the Dashboard of your WordPress site.
2. Click on the Posts menu.
3. Click on the Categories option.
4. Click on the category named Featured.
5. Look at the address bar of your browser and you will notice that part of the string looks something like this: &tag_ID=9. On the site where we are working, the Featured category has the ID of 9.
Category IDs vary from site to site. The ID used in this recipe may not be the same as the ID for your site!
Next, we need to add a query to our loop that will extract only those posts that belong to the Featured category, that is, to those posts that belong to the category with the ID of 9. Follow these steps:
1. Open the file that contains the loop. We'll use the same file we created in the preceding recipe.
2. Find the loop: <?php if ( have_posts() ) : while ( have_posts() ) : the_post(); ?> <h2><?php the_title() ?></h2> <?php the_author_posts_link() ?> <div class="thecontent"> <?php the_content(); ?> </div> <?php endwhile; else: ?> <p>Oops! There are no posts to display.</p> <?php endif; ?>
3. Add the following line of code immediately above the loop:<?php query_posts($query_string.'&cat=9'); ?>
4. Save the file.
www.it-ebooks.info
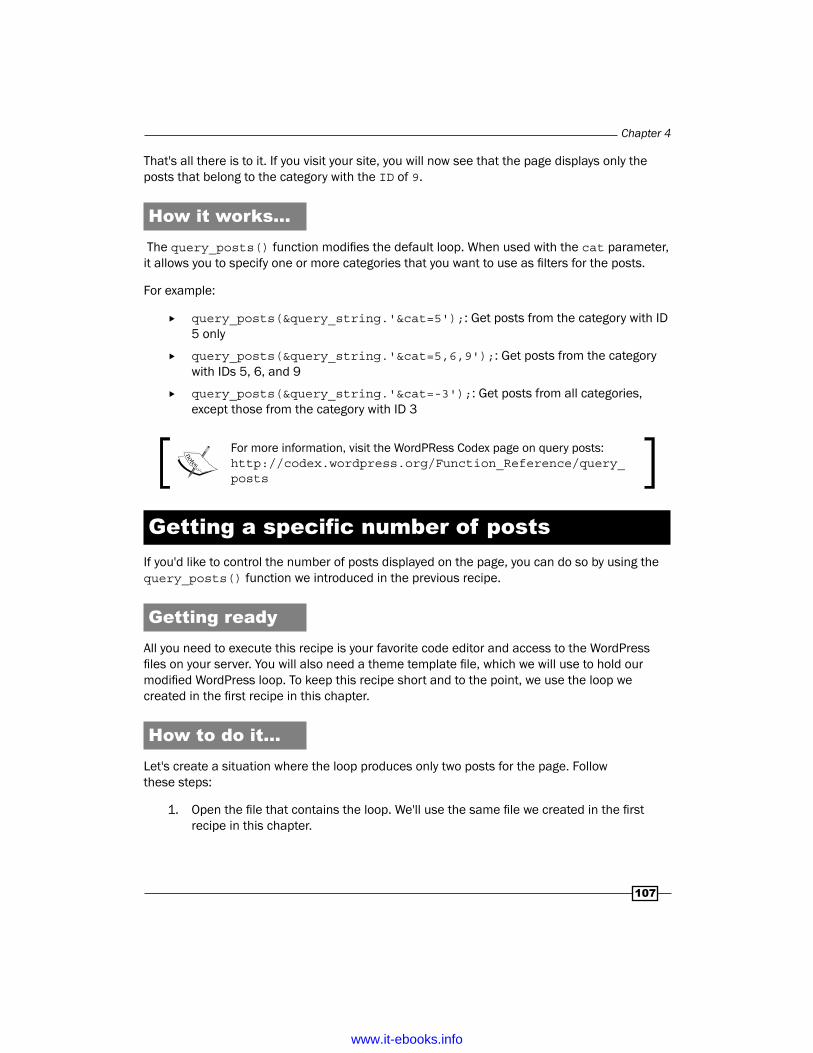
Chapter 4
107
That's all there is to it. If you visit your site, you will now see that the page displays only the posts that belong to the category with the ID of 9.
How it works... The query_posts() function modifies the default loop. When used with the cat parameter, it allows you to specify one or more categories that you want to use as filters for the posts.
For example:
f query_posts(&query_string.'&cat=5');: Get posts from the category with ID 5 only
f query_posts(&query_string.'&cat=5,6,9');: Get posts from the category with IDs 5, 6, and 9
f query_posts(&query_string.'&cat=-3');: Get posts from all categories, except those from the category with ID 3
For more information, visit the WordPRess Codex page on query posts: http://codex.wordpress.org/Function_Reference/query_posts
Getting a specific number of postsIf you'd like to control the number of posts displayed on the page, you can do so by using the query_posts() function we introduced in the previous recipe.
Getting readyAll you need to execute this recipe is your favorite code editor and access to the WordPress files on your server. You will also need a theme template file, which we will use to hold our modified WordPress loop. To keep this recipe short and to the point, we use the loop we created in the first recipe in this chapter.
How to do it...Let's create a situation where the loop produces only two posts for the page. Follow these steps:
1. Open the file that contains the loop. We'll use the same file we created in the first recipe in this chapter.
www.it-ebooks.info

Customizing Content Display
108
2. Find the loop: <?php if ( have_posts() ) : while ( have_posts() ) : the_post(); ?> <h2><?php the_title() ?></h2> <?php the_author_posts_link() ?> <div class="thecontent"> <?php the_content(); ?> </div> <?php endwhile; else: ?> <p>Oops! There are no posts to display.</p> <?php endif; ?>
3. Add the following line of code immediately above the loop:<?php query_posts($query_string.'showposts=2'); ?>
4. Save the file.
That's all there is to it. If you visit your site, you will now see that the page displays only two posts (by default, the two most recent posts).
How it works...Just like in the previous example, we're using the powerful query_posts() function. This time, we use the showposts parameter that allows you to specify how many posts must be displayed.
While this recipe shows you how to hard code the number of posts, you can also control the number of posts per page from within the WordPress dashboard. Accordingly, this recipe should be used only in special circumstances, where the default controls will not meet your needs.
Retrieving posts by dateAnother very handy use of the query_posts() function is to get posts according to specific date and time parameters. Retrieving posts by a specific date can be a bit more complex than, for example, getting an exact number of posts, because you sometimes need to use multiple parameters with the query_posts() function. The example in this recipe, however, is rather simple. We'll see more complex uses of query_posts() date and time parameters in the next recipes.
Let's see how to use query_posts() to retrieve and display the posts from a specific date.
www.it-ebooks.info

Chapter 4
109
Getting readyAll you need to execute this recipe is your favorite code editor and access to the WordPress files on your server. You will also need a theme template file, which we will use to hold our modified WordPress loop. To keep this recipe short and to the point, we use the loop we created in the first recipe in this chapter.
How to do it...Let's create a situation where the loop produces only the posts that were published in October. Follow these steps:
1. Open the template file that contains the loop. We'll use the same file we created in the first recipe in this chapter.
2. Find the loop: <?php if ( have_posts() ) : while ( have_posts() ) : the_post(); ?> <h2><?php the_title() ?></h2> <?php the_author_posts_link() ?> <div class="thecontent"> <?php the_content(); ?> </div> <?php endwhile; else: ?> <p>Oops! There are no posts to display.</p> <?php endif; ?>
3. Add the following line of code immediately above the loop:<?php query_posts($query_string.'monthnum=10'); ?>
4. Save the file.
That's all there is to it. If you visit your site, you will now see that the page displays only the posts published in any October of any year.
How it works...The monthnum parameter allows you to specify a month number, and retrieve only the posts published in the given period. You can also get posts by day, year, hour, and even minutes and seconds. In the following recipe, we will look at how to combine multiple parameters to narrow in on specific posts.
www.it-ebooks.info
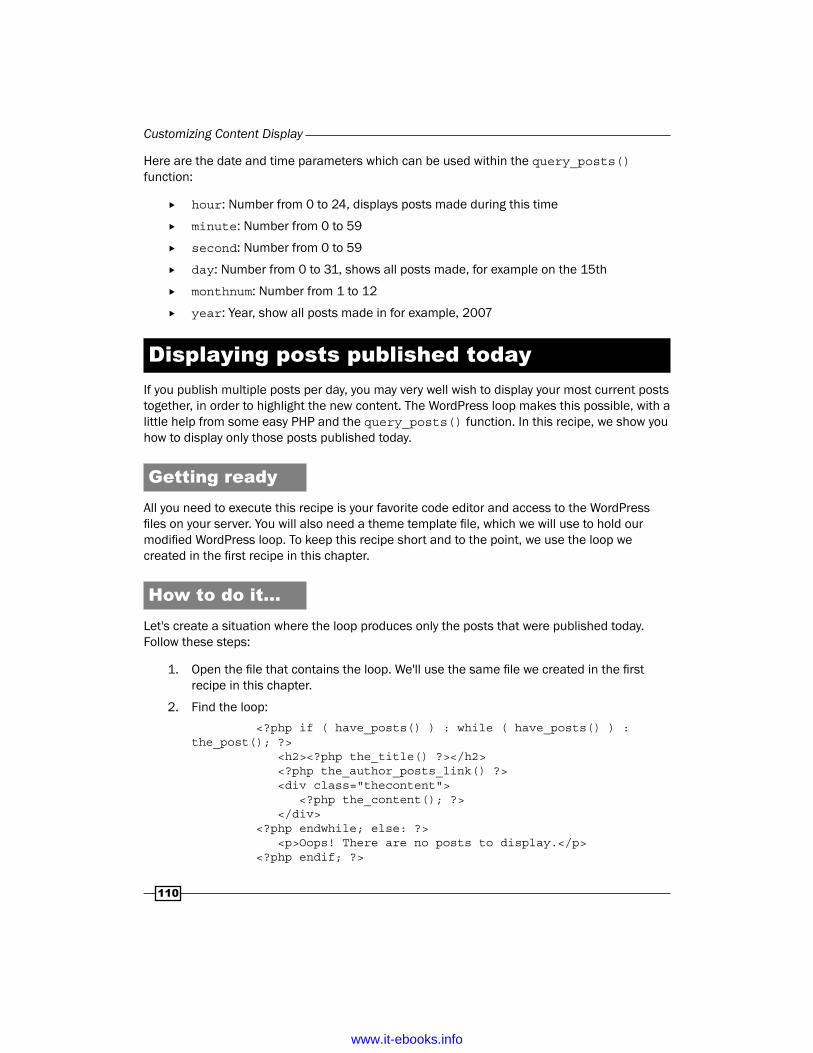
Customizing Content Display
110
Here are the date and time parameters which can be used within the query_posts() function:
f hour: Number from 0 to 24, displays posts made during this time
f minute: Number from 0 to 59
f second: Number from 0 to 59
f day: Number from 0 to 31, shows all posts made, for example on the 15th
f monthnum: Number from 1 to 12
f year: Year, show all posts made in for example, 2007
Displaying posts published todayIf you publish multiple posts per day, you may very well wish to display your most current posts together, in order to highlight the new content. The WordPress loop makes this possible, with a little help from some easy PHP and the query_posts() function. In this recipe, we show you how to display only those posts published today.
Getting readyAll you need to execute this recipe is your favorite code editor and access to the WordPress files on your server. You will also need a theme template file, which we will use to hold our modified WordPress loop. To keep this recipe short and to the point, we use the loop we created in the first recipe in this chapter.
How to do it...Let's create a situation where the loop produces only the posts that were published today. Follow these steps:
1. Open the file that contains the loop. We'll use the same file we created in the first recipe in this chapter.
2. Find the loop: <?php if ( have_posts() ) : while ( have_posts() ) : the_post(); ?> <h2><?php the_title() ?></h2> <?php the_author_posts_link() ?> <div class="thecontent"> <?php the_content(); ?> </div> <?php endwhile; else: ?> <p>Oops! There are no posts to display.</p> <?php endif; ?>
www.it-ebooks.info
Chapter 4
111
3. Add the following lines of code immediately above the loop:<?php $current_day = date('j');$current_month = date('m');$year = date('Y');query_posts($query_string . 'day='.$current_day.'&month='.$current_month.'&year='.$year); ?>
4. Save the file.
If you visit your site, you will now see that the page displays only those posts published on the current date.
How it works...In the preceding code, we started with creating PHP variables named $current_day $current_month and $year. We then used the query_posts() function to tell the system to only extract those posts that matched the date criteria.
Displaying posts published exactly one year ago
Here's a nice idea to give a second life to your older posts. This recipe automatically displays the posts you published exactly one year ago. The recipe uses some simple PHP, the WordPress loop, and the super-useful query_posts() function.
Getting readyAll you need to execute this recipe is your favorite code editor and access to the WordPress files on your server. You will also need a theme template file, which we will use to hold our modified WordPress loop. To keep this recipe short and to the point, we use the loop we created in the first recipe in this chapter.
How to do it...Let's create a situation where the loop produces only the posts that were published exactly one year ago. Follow these steps:
1. Open the file that contains the loop. We'll use the same file we created in the first recipe in this chapter.
www.it-ebooks.info

Customizing Content Display
112
2. Find the loop: <?php if ( have_posts() ) : while ( have_posts() ) : the_post(); ?> <h2><?php the_title() ?></h2> <?php the_author_posts_link() ?> <div class="thecontent"> <?php the_content(); ?> </div> <?php endwhile; else: ?> <p>Oops! There are no posts to display.</p> <?php endif; ?>
3. Add the following lines of code immediately above the loop:<?php $current_day = date('j');$current_month = date('m');$last_year = date('Y')-1;query_posts($query_string . 'day='.$current_day.'&month='.$current_month.'&year='.$last_year); ?>
4. Save the file.
If you visit your site, you will now see that the page displays only those posts published on the same day of the previous year.
How it works...The code in this recipe works exactly the same as that in the previous example. First, we have to use the PHP date() function to get the current day and month number, and then we subtract 1 from the current year. Once done, we simply use query_posts() and the WordPress loop to display the posts.
Using multiple loops While the default implementation of the WordPress loop uses just one instance of the loop in a template, there is no reason why you cannot use multiple loops in a single template. Using multiple loops allows you the ability to produce specific content items, or lists of contents items in multiple locations on the page – in a sidebar, in the header, in the footer, and so on.
In this recipe, we explore the WP_query() function, and learn how to use it to create multiple loops inside a single template.
www.it-ebooks.info

Chapter 4
113
Creating multiple loops does have an incremental impact on site performance, so while we say there is "no reason why you cannot use multiple loops," that statement comes with the caveat that you are not running an extreme number of loops on each page!
Getting readyTo execute this recipe you will need a code editor and access to the WordPress files on your server. You will also need a theme template file, which we will use to hold loops we create.
How to do it...We are going to put two loops in a single template, so there are two parts to this recipe. We're going to set up one loop to show all the posts with the category ID 3. Then we will set up another loop to display the two most recent posts.
In the first part, we create the first loop, using WP_query (). Follow these steps:
1. Open for editing the template file where you want the loops to appear.
2. Insert the following lines of code:<?php // Loop 1$first_query = new WP_Query('cat=9');while($first_query->have_posts()) : $first_query->the_post(); ?><h1><a href="<?php the_permalink(); ?>"><?php the_title(); ?></a></h1><?php the_content(); ?><?php endwhile; ?><?php wp_reset_postdata(); ?>
Next, let's set up the second loop. Follow these steps:
1. Add the following to the template file:<?php // Loop 2$second_query = new WP_Query('showposts=2');while($second_query->have_posts()) : $second_query->the_post(); ?> <h1><a href="<?php the_permalink(); ?>"><?php the_title(); ?></a></h1> <?php the_content(); ?><?php endwhile; ?><?php wp_reset_postdata(); ?>
2. Save the file.
If you view the page on your site now, you will see output from both of the loops.
www.it-ebooks.info

Customizing Content Display
114
How it works...WP_Query() provides an alternative method for grabbing posts for display by the loop. It can be used to create any number of loops and is the preferred method for putting multiple loops in a single template. It accepts the same parameters as query_posts(), making it easy to use.
In the preceding code, we created first a single loop that uses the cat variable to pull out the posts in a specific category. The while statement cycles through the posts, producing them for output until there are no more posts that meet the criteria.
The second loop uses the showposts variable to limit the number of posts displayed to the two most recent and then again we see the while statement being used to output the posts.
Both loops close in standard fashion.
Visit the WordPress Codex to learn more about WP_Query() at http://codex.wordpress.org/Class_Reference/WP_Query
Accessing post data outside of the WordPress loop
WordPress template tags, such as the_title() or the_content(), can't be used outside the loop. There will, however, be times that you want to be able to access post data from outside the loop, for example, to tap into author or post data outside of the primary content display of your page. To access post data outside the loop, you need to tap into the power of WordPress' global variables.
In this recipe, we'll show you how to access post data anywhere on your theme, without using the loop.
Getting readyAll you need to execute this recipe is your favorite code editor and access to the WordPress files on your server. You can use any template files from your active theme for this example.
www.it-ebooks.info

Chapter 4
115
How to do it...1. Open the template file for editing.
2. Add the following code to the template file: <?php setup_postdata($post); ?> <?php the_title(); ?> <?php the_content(); ?>
3. Save the file.
If you now visit the page on your site that uses the template, you should see the title and the body content of the first post in your system.
How it works...The $post() function allows us to access the post data. Once called, we can use template tags to display the post data on the page, as we would inside the loop.
There's more...WordPress is a very flexible system and there are alternative methods for accessing your post data outside the loop. While the $post() approach outlined in the recipe above is probably the simplest, there are other options.
Using get_post()You can also access post data directly from the database by using the function get_post(). get_post() works entirely outside the loop. Nonetheless, as it is capable of querying the database, you can use it to grab multiple posts by a variety of criteria.
To display post data, you have to specify the name of the data that you'd like to show.
Learn more about the function get_post() at http://codex.wordpress.org/Function_Reference/get_post and also here: http://codex.wordpress.org/Template_Tags/get_posts
The following post data is the available from the database:
f post_author: ID of the post author
f post_date: Publication date; according to your date settings
f post_date_gmt: Publication date; according to GMT time
f post_content: Post content
www.it-ebooks.info

Customizing Content Display
116
f post_title: Post title
f post_category: ID of the post category
f post_excerpt: Post excerpt
f post_status: Post status (published, draft, and so on)
f comment_status: If comments are open
f ping_status: If pingbacks are allowed
f post_password: Post password, if any
f post_name: Post permalink %postname%
f to_ping: Sites to ping
f pinged: Sites pinged
f post_modified: Last modified date; according to your time settings
f post_modified_gmt: Last modified date; according to GMT time
f post_content_filtered: Post content, filtered
f post_parent: ID of the post parent, if any
f guid: Standard URL (for example, http://blog.com/?p=10)
f menu_order: Order in the menu
f post_type: Post or page
f post_mime_type: Mime time of the post
f comment_count: Number of comments or trackbacks of the posts
The previous data should be used in the following way:
echo $data->post_title;echo $data->post_date_gmt; echo $data->post_content; echo $data->post_category; echo $data->post_excerpt; echo $data->post_status; echo $data->comment_status; echo $data->ping_status; echo $data->post_password; echo $data->post_name; echo $data->to_ping; echo $data->pinged; echo $data->post_modified;echo $data->post_modified_gmt; echo $data->post_content_filtered; echo $data->post_parent; echo $data->guid;
www.it-ebooks.info

Chapter 4
117
echo $data->menu_order; echo $data->post_type; echo $data->post_mime_type; echo $data->comment_count;
Using get_post_data()The function get_post_data() lets you access the data for a specific post. This approach differs, as you can see in the following steps:
1. Open your active theme's functions.php file for editing.
2. Add the following code to the file:function get_post_data($postId) { global $wpdb; return $wpdb->get_results("SELECT * FROM $wpdb->posts WHERE ID=$postId");}
3. Save the file.
The global variable $wpdb is used to communciate with the WordPress database.
The function is now ready to use. To use the function, add the following anywhere in your theme files:
<?php$data = get_post_data(5): // the ID number of the post you wish to display all or part ofecho $data[0]->post_title; // Print the titleecho $data[0]->post_content; // Print the content?>
Note that the function takes a single argument: the post ID. Use the ID of the post you wish to access to make all the elements of that post available to you. Once called, you can display all or part of the post data. While in the example above we only display the title and the content, you can display all the other elements of the post in a similar fashion.
Use this technique sparingly as it does increase load on your database!
www.it-ebooks.info
Customizing Content Display
118
Accessing permalinks outside the loopThe previous recipe gave you access to post data outside the loop, but what if you need the permalink? Permalink data is dealt with differently and so you need a different approach.
In this recipe we show you how to use the get_permalink() function to get the permalink information from outside the WordPress loop.
Getting readyAll you need to execute this recipe is your favorite code editor and access to the WordPress files on your server. You can use any template files from your active theme for this example.
How to do it...1. Get the post ID of the post for which you wish to display a permalink.
2. Open for editing the template file where you wish to display the permalink.
3. Add the following line of code:<a href="<?php echo get_permalink(10); ?>" >Link to the post</a>
4. Save the file.
That's all there is to it!
How it works...Just like get_post(), the get_permalink() function takes a single argument—the ID of the post.
There's more...When you're on a post or page, and within the loop, a $post global variable is initialized. This variable contains all of the data you can get with the get_post() function that we saw in the previous recipe. The get_permalink() function can be used along with the $post global variable, for example:
<a href="<?php echo get_permalink($post->ID); ?>" >Link to the post</a>
In order to minimize database requests, if you are inside the loop, you should always try to use the $post variable.
www.it-ebooks.info

Chapter 4
119
Displaying thumbnails on your homepageYou must have heard many times that 'A picture is worth a thousand words'. This old saying remains true on the web today. Many sites use thumbnails displayed next to post excerpts on their homepage to visually enhance their site and give it a more professional look.
In this recipe, we'll show you how you can easily add thumbnails to your homepage, independent of the theme you're using.
To add thumbnails to your homepage, we'll be using custom fields. Custom fields are one of the most powerful WordPress techniques. Using custom fields, you can define a key and give it a value. In your template, you simply have to get the key to display the custom value. Custom fields are individually defined on each post or page.
Getting readyAll you need to execute this recipe is your favorite code editor and access to the WordPress files on your server. You can use any template files from your active theme for this example.
How to do it...There are three parts to executing this recipe. First, we have to enable the custom fields option in the WordPress editor. Then we must create a key, and finally we have to get the key into the template files.
As of WordPress 3.1, some of the functionality in the editing window is hidden by default. One of the items that has been hidden is the custom fields functionality, which we need to complete this recipe. To enable the custom fields functionality, follow these steps:
1. Log in to your WordPress Dashboard.
2. Open a post for editing.
3. Click on the Screen Options tab at the top of the page.
www.it-ebooks.info

Customizing Content Display
120
4. Select the option Custom Fields option, as shown in the following screenshot:
5. Click on the Screen Options tab again to hide the panel from sight.
Now that the custom fields function is activated, we can move forward and set up the key that we need:
1. Open for editing the post where you wish to display the thumbnail.
2. Upload the thumbnail image for this post. Though it depends on your design, a good size is typically around 120 x 120 pixels.
3. Copy the image's URL.
4. Close the image upload dialogue.
5. Scroll down the page until you see Custom fields. In the name field enter thumbnail.
6. In the value field, paste the image URL that you previously copied.
7. Click on the Add Custom Field button.
8. Update the post.
If you visit your blog now, you won't see any changes. The custom field is defined and it has a value, but for now our theme doesn't know what to do with it. In the next steps, we tell the template to display the thumbnail:
1. Open your index.php file for editing.
2. Find the WordPress loop.
www.it-ebooks.info

Chapter 4
121
3. Add the following code into the loop, placing it where you want to see your thumbnails:<img src="<?php echo get_post_meta($post->ID, "thumbnail", true);?>" />
4. Save the file.
Visit your site and you should see the thumbnails displayed! Now, you can go back in and add styling around the code we inserted to control the formatting of the thumbnail, or even add other attributes to the <img> tag.
How it works...To be fully functional, a custom field has to be entered on any post where you'd like to use it, and your theme must have the preceding code to handle it. Some recent WordPress themes can natively handle custom fields, but a majority of themes still can't.
To get the value of the custom field, I have used the get_post_meta() function, which takes the key name of your custom field as an argument. The function simply produces on the screen the value you gave to the key field for this particular post, in this case, as part of the URL string for an image.
Alternating background colors on post listsA common technique used to improve the readability of long lists of posts is to employ what is commonly known as zebra striping, that is, to provide alternative background colors to the posts. The use of a subtle background color on every other post helps to visually separate the posts and makes it easier on the viewers' eyes.
In this recipe, we look at how to add alternating background colors to you post lists.
Getting readyThis recipe can be achieved with any WordPress theme. You don't need anything except a WordPress theme and a text editor.
How to do it...1. Access the active theme files for your WordPress installation.
2. Open index.php for editing.
3. Find the loop.
www.it-ebooks.info

Customizing Content Display
122
4. Replace your current loop with the following one:<?php $odd_or_even = 'odd'; ?><?php if (have_posts()) : while (have_posts()) : the_post(); ?><div class="post <?php echo $odd_or_even; ?>"><?php $odd_or_even = ('odd'==$odd_or_even) ? 'even' : 'odd'; ?> <h2><?php the_title(); ?></h2> <?php the_content(); ?></div><?php endwhile; else: ?> <p>Sorry, no posts matched your criteria.'</p> <?php endif; ?>
5. Save index.php.
6. Open your active theme's style.css file for editing.
7. Add the following classes to style.css: post.odd{ background: #ccc; } .post.even{ background: #fff; }
8. Save style.css
If you visit your site, you will now see your post backgrounds display alternating background colors. Feel free to replace the colors in the code with the colors of your choice.
How it works...The principle used here is fairly simple. We alternate two CSS classes. To achieve this, we use a PHP operator, which is a short way to write:
<?phpif ('odd' == $odd_or_even){ $odd_or_even = 'even';}else{ $odd_or_even = 'odd';}?>
www.it-ebooks.info

Chapter 4
123
Displaying posts in two columnsAn increasing number of themes support two column layouts. If yours does not, this recipe will give you a solution. In this recipe, we add a bit of PHP logic to the loop and some CSS styling to the style sheet to achieve a ready-to-use two-column display of your posts.
Getting readyAll you need to execute this recipe is your favorite code editor and access to the WordPress files on your server. You can use any template files from your active theme for this example.
How to do it...1. Access your WordPress installation.
2. Find the template file where you wish to use the two-column layout and open it for editing.
3. Find your current loop in the file.
4. Replace the loop with the following code:<?php $col = 1; ?> <?php if (have_posts()) : while (have_posts()) : the_post(); ?> <?php if ($col == 1) echo "<div class=\"row\">"; ?> <div class="post hol<?php echo $col;?>" id="post-<?php the_ID(); ?>"> <h2><?php the_title(); ?></h2> <?php the_excerpt(); ?> <?php if ($col == 1) echo "</div>";(($col==1) ? $col=2 : $col=1); ?> </div>
<?php endwhile; else: ?> <p>Sorry, no posts matched your criteria.'</p> <?php endif; ?>
5. Save the file.
6. Open the style.css file of your active theme for editing.
7. Add the following styles to the file:.row { clear: both; }
www.it-ebooks.info

Customizing Content Display
124
.hol1 { width: 200px; float: left; padding: 0 10px; }
.hol2 { width: 200px; float: right; padding: 0 10px; }
8. Save your style.css file.
If you visit your site, you will now see that your posts are displayed in two columns as seen in the following screenshot:
www.it-ebooks.info

Chapter 4
125
How it works...Before the loop starts, we initialized a PHP variable called $col. This variable will contain a value (1 or 2) that helps differentiate the posts and decide when to start a new row or continue with the existing one. We use divs to style the posts into a two-column layout.
After the loop displays the post data, the $col variable checks whether to close the div tag; the value of the variable determines which column the post goes into. Finally, we used a ternary operator to give $col manage the value of variable.
Save time by using WordPress shortcodesWhen you know that you'll have to insert the same code snippets on many posts, you should definitely create a shortcode. Introduced in WordPress 2.5, the shortcode API provides a simple set of functions for creating macro codes for use in post content. A classic shortcode looks like this:
[author_info]
Shortcodes can handle attributes. For example:
[download file="myfile.zip"]
Also, a shortcode can have embedded content:
[mycode]Some Content[/mycode]
In this recipe, we show you how you can create your own shortcodes and then use them in posts.
Getting readyThis recipe can be achieved with any WordPress theme. You don't need anything except your favorite WordPress theme and a text editor.
How to do it...Creating shortcodes is relatively simple. For your first shortcode, let's create a simple one that will display a disclaimer.
We begin by adding a simp9le PHP function to your theme's functions.php file. To do so, follow these steps:
1. Open for editing the functions.php file from your active theme.
www.it-ebooks.info

Customizing Content Display
126
2. Add the following code to the file:
function displayDisclaimer() { return 'This product is meant for educational purposes only. Use of the programs or procedures in such a manner, is at your own risk.';}add_shortcode('disclaimer', 'displayDisclaimer');
You're now able to use the disclaimer shortcode. To employ the shortcode, follow these steps:
1. Write a new post, or edit an existing one.
2. Click on the HTML tab to switch the editor to HTML mode.
3. Insert the shortcode you just created: [disclaimer]
4. Click on the Update button.
If you visit the page you just edited, instead of seeing [disclaimer], you will see the text you put into the function.
How it works...In this example, we created a very basic function and then used the add_shortcode() function to turn it into a shortcode. The add_shortcodes() function takes two arguments—the first is the shortcode name, and the second is the function to call when the shortcode will be used.
Every time WordPress displays a post, the system automatically looks for shortcodes and, when it finds one, executes the associated function.
Enabling the use of shortcodes in widgetsWhile WordPress shortcodes are incredibly useful, sadly, they are only available inside of posts and pages. In this recipe, we show you how to extend the power of shortcodes by enabling their use in widgets.
Getting readyThis recipe requires modifying the functions.php file of your theme. This will work with any theme, so all you need is access to your theme files and a code editor.
www.it-ebooks.info

Chapter 4
127
How to do it...1. Access your active WordPress theme.
2. Open the functions.php file for editing.
3. Add the following line of code to the file:add_filter('widget_text', 'do_shortcode');
4. Save the file.
That's all it takes. Now you can add shortcodes directly into a Text widget, as shown in the next screenshot, and the system will display the proper output:
How it works...The line of code added to the functions.php file simply allows the shortcodes to be properly interpreted by the system when they appear inside of widget content areas. Thereafter, normal shortcode usage applies and the system will display the proper output, rather than the shortcode text.
www.it-ebooks.info

Customizing Content Display
128
Adding notes to your postsIf you are working with others to create content for your site, there are times when it would be nice to be able to leave private notes concerning the revision of the content items. In this recipe, we look at using a shortcode to enable administrators to post private messages on content items. The messages can only be seen by other users who have the permission to publish posts, and even then, only when they are logged in. Public visitors to the site and registered users who do not have permissions to publish content will not see the messages. This gives you an easy way make comments to the author and provide suggestions and feedback directly on the content item.
Getting readyAll you need to execute this recipe is a code editor and access to your theme files. We will be working with the ��nctions.php file from your active theme.
How to do it...First, let's create the shortcode:
1. Access the active theme files on your WordPress installation.
2. Open for editing the functions.php file.
3. Add to the file the following lines of code:function admin_note( $atts, $content = null ) { if ( current_user_can( 'publish_posts' ) ) return '<div class="adminnote">'.$content.'</div>'; return '';}
4. Save the file.
The shortcode is now ready to use. Next, let's create a unique style for the note so that it is easily visible. Follow these steps:
Open for editing the style.css file of your active theme.
1. Add the following selector to the file:.adminnote { color:#990000; background:#ffff00;}
2. Save the style.css file.
www.it-ebooks.info

Chapter 4
129
To apply the new admin note shortcode to a post, follow these steps:
1. Log in to your WordPress Dashboard.
2. Open a content item for editing, or create a new item.
3. Click on the HTML tab to switch to the HTML editor.
4. Type your message into the editing window, using a format like this:
[adminnote] Your message goes in here [/adminnote]
5. Click on the Update button to save the content item.
If you stay logged in and visit the page on your site, you will now see the message, as shown in the following screenshot:
www.it-ebooks.info

Customizing Content Display
130
How it works…We started in the functions.php file, where we created a new function called admin_note(). In that function we tell the system to check whether the active user has the permission to publish posts and if so, we show that user any content inside the adminnote shortcode. Next, we edited the style.css file to provide a selector for the class we used to wrap the $content in the functions.php file.
Adding tags to your pagesThe tags system included in the WordPress core makes it easy for you to tag your posts and then produce a tag cloud, based on that data. Unfortunately, the default tagging system does not extend to the pages of your site – it only works on posts.
In this recipe we look at implementing a simple plugin to fill that gap and to bring full tagging to your site's pages.
Getting readyTo execute this recipe, you will need to install the Page Tagger plugin. You will need to install this plugin before you can get started. Search for page tagger inside the Add New Plugins screen of your WordPress site. After you find it, click to install, and then activate it.
You can learn more about the plugin by visiting the developer's site at http://www.hiddentao.com/code/wordpress-page-tagger-plugin/
How to do it...1. Log in to your WordPress Dashboard.
2. Click on the Pages menu.
3. Click on the page your wish to edit, or create a new page.
4. In the right hand column, typically below the Page Attributes widget, you will see the Tags widget. The next screenshot shows the Tags widget. Simply enter the tags you wish to associate with the page, separating multiple tags with commas.
5. Click on the Add button to save the tags.
www.it-ebooks.info

Chapter 4
131
6. Click on the Update button to save the page.
How it works…The plugin here does all the work; it merely extends the tagging functionality to the pages of your site.
www.it-ebooks.info

5Building Interactivity
and Community
In this chapter, we will cover:
f Improving navigation with a paginator
f Highlighting searched text in search results
f Integrating a forum into your site
f Adding social bookmarking buttons to your site
f Aggregating RSS content
f Integrating Feedburner into your site
f Displaying a retweet button on your posts
f Getting more comments with the Subscribe to Comments Reloaded plugin
f Removing the nofollow attribute to motivate users to leave comments
f Providing recognition for your top contributors
f Displaying author-related information on posts
f Displaying the author's avatar on posts
f Allowing multiple authors on posts
f Diaplying a list of all of the authors
f Creating community with BuddyPress
f Adding a simple gallery to your site
f Bringing Facebook functionality into your site
f Integrating a Twitter stream into your site
www.it-ebooks.info

Building Interactivity and Community
134
IntroductionWebsites today are expected to provide users with a degree of interactivity. Moreover, with the growth of social networks and the prevalence of mobile devices and location services, the ability for a site to generate community is becoming an increasingly important factor. In this chapter, we look at a variety of techniques and plugins that allow you to add important interactivity to your WordPress and enable you to build community.
Some of the recipes in this chapter are simple to execute, and others, such as the BuddyPress recipe, are quite complex. Before you consider the suggestions given in the following recipes, you should think carefully about what features your site visitors are likely to use.
If you are unsure about how to begin with building community on your site, start small and add features as you learn what your users like and find beneficial.
The recipes in this chapter also include plugins that let you tap into two of today's most popular third-party platforms: Facebook and Twitter. There is some overlap in a few of these recipes, at least where they concern social bookmarking. The recipes that provide multiple social bookmarking solutions tend to be more general in functionality, and the recipes focused on specific systems tend to offer a richer feature set – choose whichever you feel is most suitable for you.
Improving navigation with a paginatorWhen a website, or blog, publishes lots of articles on a single page, the list can quickly become very long and hard to read. To solve this problem, paginations were created. Simple paginations allow you to move forward and backwards through the list of articles by clicking on next and previous links. More advanced pagination options present you with a numbered list of pages corresponding to the total number of articles (divided by the number of articles per page). Numbered pagination not only provides the user with more information about the number of pages and where they are in the list, it also makes it possible to jump directly to specific pages.
The default WordPress system relies on simple pagination. In this recipe, we'll show you how to integrate a plugin that enables the richer, numbered pagination option.
Getting readyTo execute this recipe, you will need to install the WP-Paginate plugin. You will need to install this plugin before you can get started. Search for WP-Paginate inside the Add New Plugins screen of your WordPress site. After you find it, click on it to install, and then activate it.
www.it-ebooks.info

Chapter 5
135
You can learn more about the plugin by visiting the developer's site at http://www.ericmmartin.com/projects/wp-paginate/
How to do it...There are two parts to the recipe. In the first part, we need to configure the plugin. In the second part, we need to add a bit of code to our theme to place the output on the page.
To begin, let's look at the configuration options offered by the plugin:
1. Log in to your WordPress Dashboard.
2. Click on the Settings menu.
3. Click on the WP-Paginate option.
4. On the page that appears, select the options you want to use. The image following shows the standard configuration:
5. When you've finished, click on the Save Changes button.
www.it-ebooks.info

Building Interactivity and Community
136
The plugin is now ready to go; all that remains is for us to add the code to our theme files to display the pagination. Follow these steps:
1. Open the file containing the WordPress loop. For many this will be the index.php file. For some of the more recent themes, it may be the loop.php file.
2. Place the following code where you want the pagination controls to appear:
<?php if(function_exists('wp_paginate')) { wp_paginate(); } ?>
3. Save the file.
4. If you view your site, you should now see your new pagination controls, similar to what is shown in the following image:
If your theme relies on multiple template files, you may need to add the code to more than one file, for example, the templates that control the archive pages or the category pages.
www.it-ebooks.info

Chapter 5
137
How it works...The plugin does most of the work here, but you still need to add the code to your template files so that the controls are displayed. The key for you is the placement of the code inside the template files in order to display the pagination controls where you want. You will also likely want to wrap the WP-Paginate code with a div or some other styling in order to control the appearance and exact placement of the controls.
Highlighting searched text in search resultsThe default WordPress search is somewhat limited. While it does a fine job of searching your content, it does not provide automatic highlighting of search terms in the search results; a useful feature that improves usability and makes it easier for users to identify the right article for their needs.
In this recipe, we look at installing a plugin that not only adds highlighting of search terms for searches made on your site, but also highlights search terms when visitors arrive at your site from the big search engines.
Getting readyTo execute this recipe, you will need to install the Highlight Search Terms plugin. You will need to install this plugin before you can get started. Search for "highlight search terms" inside the Add New Plugins screen of your WordPress site. After you find it, click on it to install, and then activate it.
You can learn more about the plugin by visiting the developer's site at http://4visions.nl/wordpress-plugins/highlight-search-terms/
How to do it...After you have installed and activated the plugin, you still need to take a further step. While the plugin is operational as soon as it is installed, the highlights will not appear on your site until you add a highlights style to your style sheet. Here's how to do it:
1. Access the theme files of your WordPress installation.
2. Open the style.css file of your active theme for editing.
www.it-ebooks.info

Building Interactivity and Community
138
3. Add the following selector to the stylesheet:hilite { background:#D3E18A;}
4. Save the file.
You're done. Now, the searched text will be highlighted in your search results, as shown in the following screenshot:
How it works...The plugin uses jQuery to power the highlights function. Highlights will show for the search results generated by your WordPress search and they will also show when someone runs a search on Google, Bing, Baidu, and other major search engines, then clicks on a link to your site in the search results; when the user arrives at your site, the terms they searched for will be highlighted in the content item.
www.it-ebooks.info

Chapter 5
139
The CSS selector we created uses a light green color (indicated by the hex value #D3E18A) for the background of the search terms. You can set the color value for any color that suits your theme.
Integrating a forum into your siteAdding a forum to your site is a great way to provide a place for users to interact with you and with each other. Forums are an effective means of stimulating interaction and increasing page views but they can, however, also increase site management overhead as forum administration can be a huge time sink. Moreover, if your site lacks sufficient traffic, forums can wither and die from lack of activity.
Many forum solutions are available for WordPress: from stand-alone systems like PhpBB/Vbulletin and BBPress to plugins that give you a native WordPress solution. One of the best plugin options for WordPress 3 is the WP Forum Server. The plugin is complete, powerful, and easy to install, use, and manage.
In this recipe, you're going to learn how to integrate WP Forum Server on your WordPress site.
Getting readyTo execute this recipe, you will need to install the WP Forum Server plugin. You will need to install this plugin before you can get started. Search for WP Forum Server inside the Add New Plugins screen of your WordPress site. After you find it, click on it to install, and then activate it.
You can learn more about the plugin by visiting the developer's site at http://forumpress.org/
How to do it...There are several parts to this recipe. In addition to configuring the plugin, you will also want to change the page template associated with the forum page.
Let's get started by configuring the plugin.
1. Log in to your WordPress Dashboard.
2. Click the menu named Forum Server.
www.it-ebooks.info

Building Interactivity and Community
140
3. On the page that appears, as shown in the following screenshot, you can set your basic forum options. Select the choices you want here.
Next, let's set up some basic categories and forums to get things started.
1. On the Forum Server menu, click on the option Categories & Forums.
In WP Forum Server terminology, categories are created to contain forums. Forums contain threaded discussion topics. If you only have one forum on your site, you only need one category.
2. You may want to begin by changing the name of the default Category, which is uncategorized. For our example, we changed it to a generic Welcome to our Forum. To make this change, click the Modify link next to the name of the category.
www.it-ebooks.info

Chapter 5
141
3. Type the label you desire in the field marked Name.
4. Add a description if you want.
5. Click on the Save Group button.
6. Click on the Add forum link to create new top-level forums into which your users can add topics.
7. Give the new forum a Name and a Description.
8. Click on the Save forum button. At the end of this process you will see something similar to what is shown in the following screenshot:
Your forum is now ready to go. When you installed this plugin, the system automatically created and published a new page containing the forum. In the default theme, the template that is automatically used by the system is not ideal – it is a two-column layout that forces the forum into a narrow column. Accordingly, we're going to change the template to allow the forum to span the width of the page. To do so, follow these steps:
1. Click the menu option Pages.
2. Click on the Edit link for the page named ForumPress.
www.it-ebooks.info
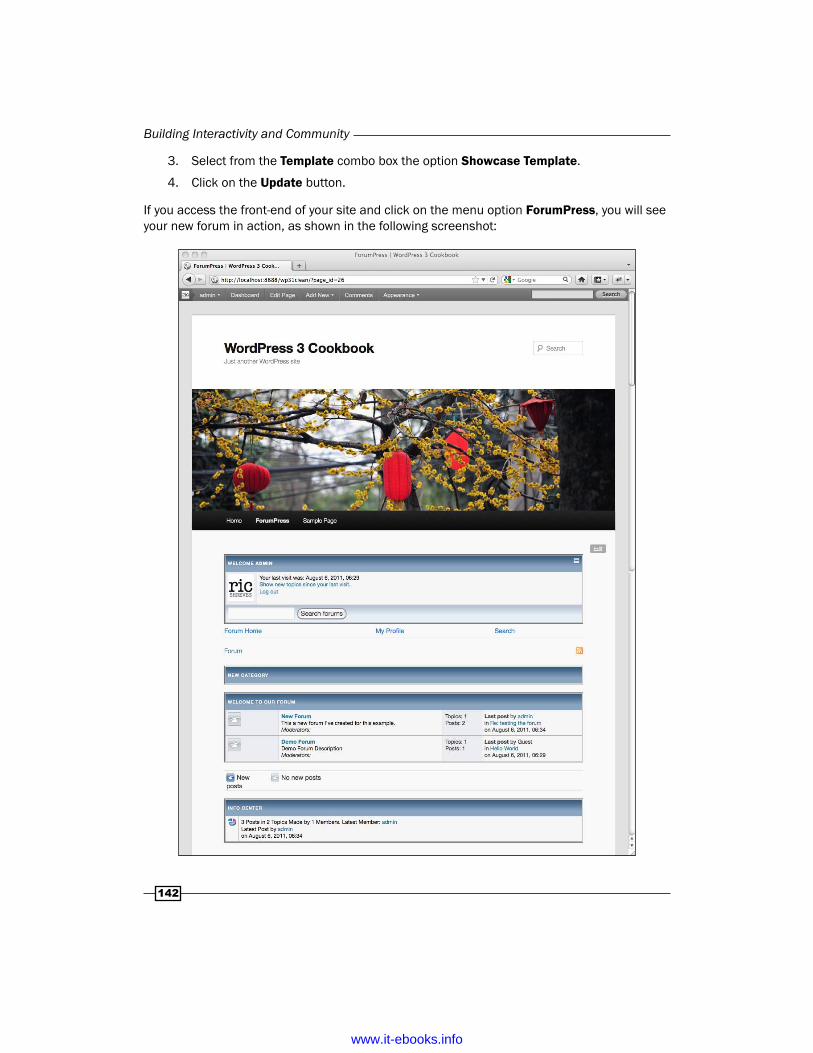
Building Interactivity and Community
142
3. Select from the Template combo box the option Showcase Template.
4. Click on the Update button.
If you access the front-end of your site and click on the menu option ForumPress, you will see your new forum in action, as shown in the following screenshot:
www.it-ebooks.info

Chapter 5
143
How it works...When installed, the plugin creates some new database tables in order to record threads and topics of your forum. For the rest, it is an advanced forum working the same way (but with less functionality) as popular solutions such as V-Bulletin or PhpBB.
There's more...As you have seen in the Forum Server menu item, there are additional options that you can use to further customize this plugin. In this section we take a quick look at each.
SkinsSkins are CSS files and images that can give a new look and feel to your forum. There are multiple options built into the system, but you can also create new skins. To create a new skin, follow these steps:
1. Access your WordPress installation on the server.
2. Go to the skin's directory for the plugin, at /wp-content/plugins/forum-server/skins.
3. Create a new directory; name it for your new skin.
4. Copy the style.css file from an existing forum skin.
5. Paste it into your new skin's directory.
6. Open the style.css file for editing.
7. Change the name, description, and author information at the top of the file to reflect the name of the new skin and your details.
8. Edit the styles as you see fit to tailor the appearance of the new skin.
9. Save the file.
If you visit the Skins link on the Forum Server menu, you will see your new skin listed and ready to use.
ModeratorsOn this page, you can select one of your registered users (who must have the right to edit posts) and allow him to moderate your forum. You can create a global moderator (who can moderate all forums) or a normal moderator (who moderates one forum). Once you have chosen the user to be the moderator, just click on the Add moderator button to give him or her the moderation rights.
www.it-ebooks.info

Building Interactivity and Community
144
User groupsUser groups allow you to group your users together for the purpose of giving the group specific permissions.You can create a group by naming it and giving it a description. Once done, you can add members to the group.
See also... f Creating community with BuddyPress
Adding social bookmarking buttons to your theme
Social bookmarking websites are common features on today's web. Digg, Del.icio.us, StumbleUpon, Reddit, and many more. Such websites can drive a huge amount of traffic to your site. Given their potential value to your site, you should add social bookmarking buttons to your theme and give your readers the opportunity to help promote your content items.
In this recipe, we look at how to implement a plugin that adds social bookmarking buttons for all the most popular sites.
Getting readyTo execute this recipe, you will need to install the Sexy Bookmarks plugin (also known as "Shareaholic"). You will need to install this plugin before you can get started. Search for Sexy Bookmarks inside the Add New Plugins screen of your WordPress site. After you find it, click to install, and then activate it.
You can learn more about the plugin by visiting the developer's site at http://sexybookmarks.shareaholic.com/
How to do it...1. Log in to your WordPress Dashboard.
2. If you've just installed the Sexy Bookmarks plugin, you are likely to see a notice at the top of the page, advising you to configure the plugin. Click on the Shareaholic menu item.
www.it-ebooks.info

Chapter 5
145
3. On the Shareaholic Settings page, as shown in the next screenshot, you have a large number of options for configuring the appearance and functionality of this plugin. Select the options you wish to use.
4. Click on the Save Changes button.
How it works...The plugin does all the work here. You need only configure it and you're ready to go!
There's more...In addition to social bookmarking functionality, the Sexy Bookmarks plugin also supports a mail to a friend functionality and a print function. You can select these options from the lengthy list labeled Enabled Networks, as partially shown in the previous screenshot.
www.it-ebooks.info

Building Interactivity and Community
146
See also... f Bringing Facebook functionality into your site
Aggregating RSS contentRSS feeds are common across the web and represent a great opportunity for you to enrich the content of your site and provide your visitors with related relevant content. If you are running a news site, RSS feeds are an invaluable way of providing more comprehensive coverage of your topic.
While the default WordPress system makes it easy to add individual feeds in widget positions, if you want to manage multiple feeds and produce the content in the main content areas of your pages, the default system is awkward to use. Fortunately there is a great plugin that enables you to aggregate and manage multiple RSS feeds. In this recipe, we introduce you to this handy plugin and show you how to complete a basic setup that will provide your site with RSS-sourced content items.
Getting readyTo execute this recipe, you will need to install the Feed WordPress plugin. You will need to install this plugin before you can get started. Search for Feed Wordpress inside the Add New Plugins screen of your WordPress site. After you find it, click on it to install, and then activate it.
You can learn more about the plugin by visiting the developer's site at http://feedwordpress.radgeek.com/
How to do it...1. Log in to your WordPress Dashboard.
2. Click on the Syndication option on the admin menu.
3. On the page that loads, enter the URL of the first RSS feed you wish to aggregate.
4. Click on the Add button.
5. On the page that loads, check the options you wish to apply to this feed.
6. Click on the Use this feed button.
7. Repeat the process as needed to gather all the RSS feeds you wish to display.
8. Next, you need to schedule the updates. On the Syndicated Sites Settings page, click on the Feed & Update Settings link.
www.it-ebooks.info

Chapter 5
147
9. The Feed and Update Settings page, as shown in the next screenshot, provides all the options you need to schedule the updating of your feeds:
www.it-ebooks.info

Building Interactivity and Community
148
10. Click on the Save Changes button.
The Updates option enables you to select how the feeds will be updated. The options include manual updates, update before or after pages load, and cron. If you wish to use cron, you will have to take additional steps to set up a cron job on your server, as explain in the text immediately underneath the Updates heading, seen in the previous screenshot.
The plugin is ready to go; however, until you update the feeds to bring in the content items, there will be no content to display. To update your feeds for the first time, follow these steps:
1. Click on the Syndication option on the Syndication menu.
2. In the Syndicated sources section of the page, as shown in the next screnshot, click on the checkbox next to the name of all the feeds you wish to update:
3. Click on the Update checked button.
www.it-ebooks.info

Chapter 5
149
The system will check the feeds for new items and, where it finds them, will add them as posts in your site.
You should always seek permission before you display content written by others as posts on your site.
How it works...This plugin allows you to query multiple RSS sources and to then bring the feed items into your site as posts. The multiple configuration options enable you to select how you want to display the posts and how to manage updating. There's no additional work required here on your part, unless you want to add the cron update option, as noted above.
There's more...If you don't need to aggregate multiple RSS feeds, there is a simpler solution. The default WordPress system gives you a ready-to-use RSS widget specifically for this purpose. To display the output of a single RSS feed in a widget on your site, follow these steps:
1. Log in to your WordPress Dashboard.
2. Click on the Appearance option on the main admin menu.
3. Click on the Widget option on the Appearance menu.
4. Click and drag the RSS widget on to the widget area where you want the output to appear.
5. Inside the new widget, enter the RSS URL, and set the other options you want, as shown in the following screenshot:
www.it-ebooks.info

Building Interactivity and Community
150
6. Click on the Save button.
If you visit the front-end of your site, you should see the output from the RSS feed. This process can be repeated as many times as you like; the system will support multiple instances of the RSS widget.
Integrating Feedburner into your siteFeedburner is a service that allows you to keep a count of the people who have subscribed for your RSS feed. The Feedburner service is a great way to keep up with the RSS subscribers to your site and gain insight into what's working and what needs improvement. The following screenshot shows the Feedburner analytics page for a site:
www.it-ebooks.info

Chapter 5
151
Once you have created your Feedburner feed, you have to integrate it to your theme. In this recipe, we look at a plugin that helps you integrate the Feedburner feeds with your theme.
Getting readyBefore we can begin this recipe, you need to have a Feedburner account. Feedburner is a free service owned by Google. To set up your Feedburner account, visit http://feedburner.google.com
You will need to install the FeedBurner FeedSmith Extend plugin. You will need to install this plugin before you can get started. Search for Feedburner Feedsmith Extend inside the Add New Plugins screen of your WordPress site. After you find it, click on it to install, and then activate it.
How to do it...Let's start with the manual way by carrying out the following steps:
1. Log in to your WordPress Dashboard.
2. Click on the Settings menu.
3. Click on the FeedburnerFeedSmith Extend option in the Settings menu.
4. Add your Feedburner URL to the field marked Main Feed, as you can see in the following screenshot:
www.it-ebooks.info

Building Interactivity and Community
152
5. Add any other feed URLs you want in the remaining fields.
6. Click on the Save button.
How it works...The FeedSmith plugin simply redirects all requests for the standard WordPress RSS to the Feedburner URLs you set up in the configuration process.
Displaying a retweet button on your postsRetweeting refers to the process of repeating a post on Twitter. Retweeting is also an effective method for publicizing your content items. By placing a retweet button on your content items, users can simply click the retweet button next to the content item and the system will automatically post it to Twitter, and log the retweet.
In this recipe we show you how to implement a plugin that makes it easy to add a retweet button to the content items on your site.
Getting readyTo execute this recipe, you will need to install the TopsyRetweet Button plugin. You will need to install this plugin before you can get started. Search for TopsyRetweet button inside the Add New Plugins screen of your WordPress site. After you find it, click on it to install, and then activate it.
You can learn more about the plugin by visiting the developer's site at http://corp.topsy.com/2009/10/13/wordpress-plugin-updated-version-0-9-1/
How to do it…1. Log in to your WordPress Dashboard.
2. Click on the Settings menu.
3. Click on the Topsy link in the Settings menu.
www.it-ebooks.info

Chapter 5
153
4. On the TopsyRetweet Button Setup page, as shown in the next screenshot, you can select from a wide variety of options to customize how the post will be broadcast, whether the URL will be shortened (always a good idea on Twitter!), which categories will include the button, and options to control the buttons appearance and placement. Make your choices here, or simply use the defaults.
5. Click on the Save Changes button.
www.it-ebooks.info

Building Interactivity and Community
154
The retweet button is now ready to go. Check the front-end of your site to verify the placement and styling; you should see something similar to the next screenshot. Give it a click and try it out.
How it works…When a user clicks on the retweet button, they are prompted to log in to their Twitter account. Once they log in, the short message with the link to your content item is posted to Twitter through their account and is then viewable by anyone who follows that user (and to those who find the post by searching on Twitter).
www.it-ebooks.info

Chapter 5
155
Getting more comments with the Subscribe to Comments Reloaded plugin
Comments are very important on the web, because they encourage discussion. When leaving a comment on a post, it's tiresome to come back to the page repeatedly to see if anyone has replied or adding their own comments to the post. There is a solution: Add a subscription function to the comments.
In this recipe we look at implementing a plugin that will add a comments subscription functionality to your site.
Getting readyTo execute this recipe, you will need to install the Subscribe to Comments Reloaded plugin. You will need to install this plugin before you can get started. Search for Subscribe to Comments Reloaded inside the Add New Plugins screen of your WordPress site. After you find it, click on it to install, and then activate it.
How to do it...1. Log in to your WordPress Dashboard.
2. Click on the Settings menu.
3. Click on the Subscribe to Comments option in the Settings menu.
4. Click on the Comment Form tab at the top of the screen. This tab contains the options related to the visual appearance of the form and the messages that will be shown to your site visitors.
5. Select the options you desire.
6. Click on the Save Changes button.
7. You can also configure the Management Page options on the tab of the same name; this tab controls the availability and appearance of a management page for the subscribers to see all the comments to which they have subscribed and modify their subscriptions. The Management Page is enabled by default.
8. The Notifications tab lets you control what is sent out to subscribers in the notifications e-mails. The Notifications can be configured, but it is not necessary to make changes to this tab; the default settings will be fine for most people.
9. Finally, you should also check the Options tab and see if the default settings are sufficient for your needs.
www.it-ebooks.info

Building Interactivity and Community
156
How it works...When someone leaves a comment on your blog, he or she can check the Subscribetocomments checkbox. If he or she checks it, the person will receive any other comment posted on the same article through his or her e-mail. This is particularly useful when debating with other readers, or when you have asked a question to the author.
There's more...If you want, you can check out the subscriber list, see how many people subscribed to your blog posts, and manage subscriptions. To do all of this, log in to your WordPress Dashboard and go to the Subscribe to Comments page under the Settings menu.
From here, you can perform the following tasks:
f Search if a particular email address is subscribing to one or more of your posts
f Get e-mail addresses of your subscribers
f Get a list of most subscribed posts
f Remove subscribers
f Change e-mail address
Remove the nofollow attribute to motivate users to leave comments
By default, the links left in the comments have a rel="nofollow" attribute automatically added by WordPress. According to Wikipedia, nofollow is an HTML attribute value used to instruct some search engines that a hyperlink should not influence the link's target ranking in the search engine's index. It is intended to reduce the effectiveness of certain types of search engine spam, thereby improving the quality of search engine results and preventing spamdexing from occurring.
In other words, any link pointing to a site provides a potential boost to the site's relevancy ranking. If a link has a rel="nofollow" attribute, it will not provide any boost to the linked site.
In order to reward commentators it is a good idea to get rid of this rel="nofollow" attribute on links. This way, your commentators will gain some benefit when they leave comments on your site.
In this recipe we implement a plugin to selectively remove the nofollow links and thereby provide an incentive to people to post comments on your site.
www.it-ebooks.info

Chapter 5
157
Getting readyTo execute this recipe, you will need to install the Remove Comment NoFollow plugin. You will need to install this plugin before you can get started. Search for Remove Comment nofollow inside the Add New Plugins screen of your WordPress site. After you find it, click to install, and then activate it.
You can learn more about the plugin by visiting the developer's site at http://myhub.gumz-ex-press.com/remove-comment-nofollow-plugin
How to do it...There is only one configuration option available for this plugin. To access that option, follow these steps:
1. Log in to your WordPress Dashboard.
2. Click on the Settings menu.
3. Click on the GMZ Comment Follow option in the Settings menu.
4. Enter the message you want to display on the comments form.
5. Click on the Save Changes button.
That's all there is to it. As you can see in the following screenshot, the message you enter appears on the comment to help motivate users to post comments on your site:
www.it-ebooks.info
Building Interactivity and Community
158
How it works...The plugin in this recipe provides an alternative to hacking the core files to remove the nofollow attribute. As we want to always avoid hacking the core files, the plugin provides us with an easy solution.
Once the nofollow instruction is removed, the search engines will credit the target website with an additional inbound link, thereby providing the site with an incremental boost in its relevancy rankings.
Provide recognition to your top contributorsAnother good way to reward commentators is to provide them with some recognition. The Top Contributors widget enables you to display a list of the people who provide the most comments or articles for your site. Placing the widget on your site is a good way to not only motivate people to be active on your site, but also a good way to provide direct links to the content generated by your most valuable users.
Getting readyTo execute this recipe, you will need to install the Top Contributors plugin. You will need to install this plugin before you can get started. Search for Top Contributors inside the Add New Plugins screen of your WordPress site. After you find it, click on it to install, and then activate it.
You can learn more about the plugin by visiting the developer's site at http://justmyecho.com/2010/07/top-contributors-plugin-wordpress/
How to do it...There are two parts to this recipe: First we must configure the plugin, then we must set up the widget.
Carry out the following steps to configure the Top Contributors plugin:
1. Log in to your WordPress Dashboard.
2. Click on the Settings menu.
3. Click the Top Contributors link in the Settings menu.
www.it-ebooks.info

Chapter 5
159
4. Select from the options displayed, as shown in the following screenshot:
5. Click on the relevant Save button.
www.it-ebooks.info

Building Interactivity and Community
160
Now that the plugin is configured, you still need to set up the widget to display the list of top contributors on your site. To set up the widget, follow these steps:
1. Click on the Appearance menu.
2. Click on the Widgets option.
3. Click and drag the Top Contributors widget to the sidebar where you wish it to appear.
4. In the widget options, shown in the following image, give the widget a name and select whether it will show top commentators or the top authors.
5. Click on the Save button.
The widget should now be visible on your site.
How it works...The plugin does all the work here; it looks into the database to obtain the information on all the users. Your configuration options simply tell it how to filter the users and which to display.
Displaying author-related information on posts
It's always good for the reader to know the author of the article that they're currently reading. It's even better if they can learn some extra information about the author, such as his website, a short bio, and so on. While many modern themes offer the option to display author info on posts, if your theme does not, you may want to consider adding this information to your posts, as it benefits both your site visitors and your authors.
www.it-ebooks.info

Chapter 5
161
In this recipe, you'll learn how to edit your single.php theme file to automatically retrieve the author-related information, and display it at the top of the page.
Note that many themes today offer the option to display author info, photos, or avatars. This recipe, therefore, is intended for themes that lack this capacity.
Getting readyAll you need to execute this recipe is your favorite text editor and access to the theme files of your WordPress installation.
How to do it...Once you have made sure that your authors have successfully filled in their information, you can start coding by carrying out the following steps:
1. Access your WordPress installation.
2. Find the directory containing your active theme's files.
3. Open the single.php file for editing.
4. Find the loop, and paste the following inside it:<div id="author-info"> <strong>The author:</strong><?phpthe_author();?><br /> <strong>About the author:</strong><?phpthe_author_meta('description'); ?><br /> <strong><?phpthe_author();?>'s website:</strong><a href="<?phpthe_author_meta('user_url'); ?>"><?phpthe_author_url(); ?></a><br /> <strong>Other posts by</strong><?phpthe_author_posts_link(); ?> </div><br /><hr /><br /><!--/author-info-->
5. Save the file.
www.it-ebooks.info

Building Interactivity and Community
162
If you access your site now you will see the following appended to the post pages:
How it works...WordPress provides a dozen author-related template tags, which are an easy way to retrieve information that is entered by authors in their profile. The tags rely upon the data entered into the user's profile. Users can either enter that themselves, or it can be added by an administrator with privileges sufficient to edit the users.
There's more...The code in this recipe relies on the use of template tags, primarily the_author_meta(), which includes a number of parameters that provide the output in this recipe. Here's a listing of the more useful parameters for this key template tag:
www.it-ebooks.info

Chapter 5
163
Parameter Output f description The author's description (Bio) f user_firstname The author's first name f user_lastname The author's last name f nickname The author's nickname f author_url The author's website URL f aim The author's AIM screen name f yim The author's Yahoo! Messenger email
Displaying the author's avatar on postsWordPress provides site administrators with multiple options for adding user images. By default, the system supports several choices, including the popular Gravatar service.
In this recipe, we'll show you how to display the author's avatar on posts. This recipe is a good complement to the previous recipe showing how to display author info on a post.
Note that many themes today offer the option to display author info, photos, or avatars. This recipe, therefore, is intended for themes that lack this capacity.
Getting readyAll you need to complete this recipe is a text editor and access to your WordPress theme files on your server.
How to do it...1. Access the WordPress installation on your server.
2. Open for editing the single.php file of your active theme.
3. Locate the loop.
4. Add the following line of code inside the loop, where you want the avatar to appear:<?php echo get_avatar( get_the_author_meta( 'user_email' ) ); ?>
5. Save the file.
www.it-ebooks.info

Building Interactivity and Community
164
How it works...This recipe uses the_author_meta() function we saw earlier in this chapter. In this case, we use the function to retrieve the avatar image associated with the author and display it on the page.
Allowing multiple authors on postsIn a multi-author blog, sometimes an author starts a post and another one finishes it. Or, perhaps, two or more contributors share their ideas and create a great article together.
Unfortunately, by default, WordPress allows only one author per post. Although this is good for most blogs, it can quickly become very frustrating for contributors on a multi-author blog. Just imagine that two authors have worked together to write a post, but only one can be rewarded; that's not a very comfortable situation for either of them.
Luckily, there is a WordPress plugin that allows your site to assign more than one author to a post. The plugin is named Co-Authors Plus and in this recipe we look at implementing it on your site.
How to do it...This plugin requires no additional configuration – simply install it and activate it and you are ready to go. To add additional authors to a post, follow these steps:
1. Log in to your WordPress Dashboard.
2. Open for editing a content item.
3. Scroll down to the area just below the editing window and you will see a new dialogue box on the page: Post Authors.
4. To add another author, start typing in the empty field you can see in the following image:
www.it-ebooks.info
Chapter 5
165
5. The system will attempt to autocomplete the author field for you as you type. As soon as you find the name you want, click on it and the system will automatically add it to the list of authors for the post.
6. Click the Update button to save your changes.
While the plugin requires no additional configuration, if you wish to display the additional authors on the front-end of the website, you do need to modify your template files. To add display co-authors on your site, follow these steps:
1. Access your WordPress installation on the server.
2. Open the directory for the active theme.
3. Open the file (or files) containing the loop.
4. Find the loop.
5. Insert inside the loop the following:<?php if(function_exists('coauthors_posts_links')) coauthors_posts_links();elsethe_author_posts_link(); ?>
6. Save the file.
If you visit the front end of your website, you should see co-authors listed on the relevant items.
Note that the example shows just one way of achieving the output of the co-authors' names, in this case with a link to a page containing all the posts of each author. In the next section we look at other options you can use. Note also that the placement of the code inside the loop will affect the appearance. Typically you will want to place this code immediately beneath the_title() to maintain standard placement.
How it works...The plugin simply associates registered users with posts. The additional template tags the plugin provides, discussed below, give you the flexibility to control the output.
There's more...The plugin provides you with a set of co-author template tags, which function in a similar fashion as the_author() tags discussed earlier in this chapter. The new template tags are:
f coauthors()
f coauthors_posts_links()
www.it-ebooks.info
Building Interactivity and Community
166
f coauthors_firstnames()
f coauthors_lastnames()
f coauthors_nicknames()
f coauthors_links()
f coauthors_IDs()
For more insight into the options presented by the plugin's template tags, see http://wordpress.org/extend/plugins/co-authors-plus/other_notes/
Displaying a list of all of the authorsIf your site features content from multiple contributors, then you might want to think about including a page listing all the authors, with links to their contributions. Not only is such a page potentially useful to your site visitors, but also your authors tend to appreciate it and additionally, it can increase your internal link density, thereby giving you a search engine advantage.
In this recipe, we look at creating a page listing all your site's authors, with links to their contributions.
Getting readyTo achieve this recipe you will want create a page template to hold the output of the author listing; though this is not mandatory, it makes things a bit simpler and enables you to style the page effectively and without complication.
Once you have your page template created, all you need to complete this recipe is a text editor and access to the WordPress installation on your server.
Creating custom page templates is covered in Chapter 2, Installing and Customizing Themes.
How to do it...There are two parts to this recipe. First, we must add a line of code to one of your page templates, and then we need to create and publish a page using the template:
1. Access your WordPress installation on your server.
2. Go to the directory containing the active theme.
www.it-ebooks.info

Chapter 5
167
3. Open the page template you created for this recipe (or any existing page template).
4. Add the following line of code where you want the list of authors to appear:
<?phpwp_list_authors(); ?>
5. Save the template file.
6. Log in to your WordPress Dashboard.
7. Click on the Pages menu.
8. Click on the Add New link in the Pages menu.
9. Give your new page a title.
10. Select form the Page Attributes section in the right column the Template that holds the code above.
11. Publish the page.
If you now visit your site, you can visit the page created, where you should see something similar to the following screenshot:
www.it-ebooks.info

Building Interactivity and Community
168
How it works...To display the list of your authors, you only need the wp_list_authors() function. This function can be inserted anywhere into your theme files. Once called, wp_list_authors() executes a database query to get the list of authors. The function can be controlled with parameters.
There's more...The wp_list_authors() function offers several parameters, as shown in the following table:
Parameter Descriptionecho Display the results.exclude_admin Exclude the admin account from the list.feed Display a link to the author's RSS feed.feed_image Display the graphic from the author's RSS feed.feed_type The type of feed.hide_empty Do not display authors with no posts.html Determines whether the list of items is in html or
plain text.orderby Sort the results.number The maximum number of users to display.optioncount Display the number of posts published by each user.order Order, ascending or descending.show_fullname Display the first and last name of the users.style Style in which to display the list.
To learn more about the wp_list_authors() function, visit http://codex.wordpress.org/Function_Reference/wp_list_authors
www.it-ebooks.info

Chapter 5
169
Creating community with BuddyPressIn this chapter we've looked at a number of recipes that add little bits of functionality designed to improve interactivity and encourage community. There is, however, one plugin that is built to help you create a full-featured community site. The BuddyPress plugin provides turnkey social networking functionality. Among the features included in this plugin:
f Forum
f Groups
f Member directory
f Activity stream
f Custom user profile creation
Of course, in addition to those features, you still have available the full range of standard WordPress functions and it's all extensible too, with a large number of plugins you can install to further customize BuddyPress to your needs.
It's a complex package, but very well done. BuddyPress is not your typical plugin; it literally transforms how your site handles users and the way that they interact with content and with each other. Be certain you need the richness of BuddyPress before you install it, as it represents a significant change in the nature of your site.
In this recipe we look at the basic setup needed to get you up and running quickly.
To get a better idea of what this plugin is capable of, visit the Showcase page on the BuddyPress site at http://buddypress.org/showcase/
Getting readyTo execute this recipe, you will need to install the BuddyPress plugin. You will need to install this plugin before you can get started. Search for BuddyPress inside the Add New Plugins screen of your WordPress site. After you find it, click on it to install, and then activate it.
You can learn more about the plugin by visiting the developer's site at http://buddypress.org
www.it-ebooks.info

Building Interactivity and Community
170
How to do it…BuddyPress is a complex plugin and requires a bit of configuration if you want to get the most out of it. Follow these steps to get up and running quickly:
1. Log in to your WordPress Dashboard.
2. If you've just installed and activated BuddyPress, you may see a warning message at the top of the Dashboard, advising you to adjust your permalinks settings. BuddyPress will not work with the default permalinks settings. If you see a warning message, follow the given link and change the permalinks settings to anything other than the default option.
3. Click the BuddyPress option on the admin menu.
4. On the page that loads, you will likely see a message prompting you to select a BuddyPress compatible theme. If you see that message, click on the link labeled activate a BuddyPress compatible theme. Clicking on that link will take you to the themes page where you need to activate the BuddyPress theme. Once you have done that, return to the BuddyPress Settings page by clicking on the BuddyPress link on the admin menu. The default BuddyPress theme can be seen in the following screenshot:
www.it-ebooks.info

Chapter 5
171
5. The General Settings options, seen in the following image, establish some basic behaviors for the system. The default values are likely to be OK for most sites, but if you need to make adjustments, do so, then click on the Save Settings button.
www.it-ebooks.info

Building Interactivity and Community
172
6. Click the Component Settings link on the BuddyPress menu. Select the components you wish to use from the list, seen in the screenshot below. By default, all components are active. Note that if you enable the bbPress Forums option, you will need to complete the Forums Setup, in the next step.
7. If you enabled the bbPress Forums option on the previous screen, click on the Forums Setup option on the BuddyPress menu.
8. The screen contains two buttons: If you have an existing bbPress installation, select the second. If you need to set up bbPress, click the button labeled Set up a new bbPress installation. The system will then automatically set up the forum and add a link to your main nav.
www.it-ebooks.info

Chapter 5
173
9. The final step in the initial configuration is add any custom profile fields you require, if any. If you wish to add fields to the user profiles, then click on the Profile Field Setup link under the BuddyPress menu.
10. Click on the Add New Field button, as shown in the following screenshot:
11. The Field Title is required, but the Description is optional. Also select whether the new field will be required for users and the Field Type.
12. Click on the Save button.
The BuddyPress plugin is now ready to go. Visit the front-end of the site to explore the options.
How it works…Though there is a lot going on, the BuddyPress plugin does all the work in this recipe.
www.it-ebooks.info

Building Interactivity and Community
174
See also... f Adding a forum into your site
Adding a simple gallery to your siteIf you've ever wanted to add a photo gallery to your WordPress site, you'll be glad to know that there is a gallery functionality built into the system. In this recipe we look at using the default gallery feature inside a post or a page; in the latter portions of this recipe, we dive into adding the gallery directly into a template file.
Getting readyYou don't need anything special to complete this recipe, only access to your server and your favorite code editor.
How to do it…Let's create a new page and use it to hold a photo gallery. Follow these steps:
1. Log in to your WordPress Dashboard.
2. Click on the Pages link on the admin nav.
3. Click on the option Add New.
4. Name the new page The Gallery.
5. Click on the Media icon, next to the Upload/Insert label.
6. Upload the images you want to appear in your gallery. As you upload each, select Save All Changes, but do not insert the photo into the page.
7. On the Gallery tab, shown in the next screenshot, select the Gallery Settings you wish to use.
www.it-ebooks.info

Chapter 5
175
8. Click on the Insert gallery button.
9. Publish the page.
www.it-ebooks.info
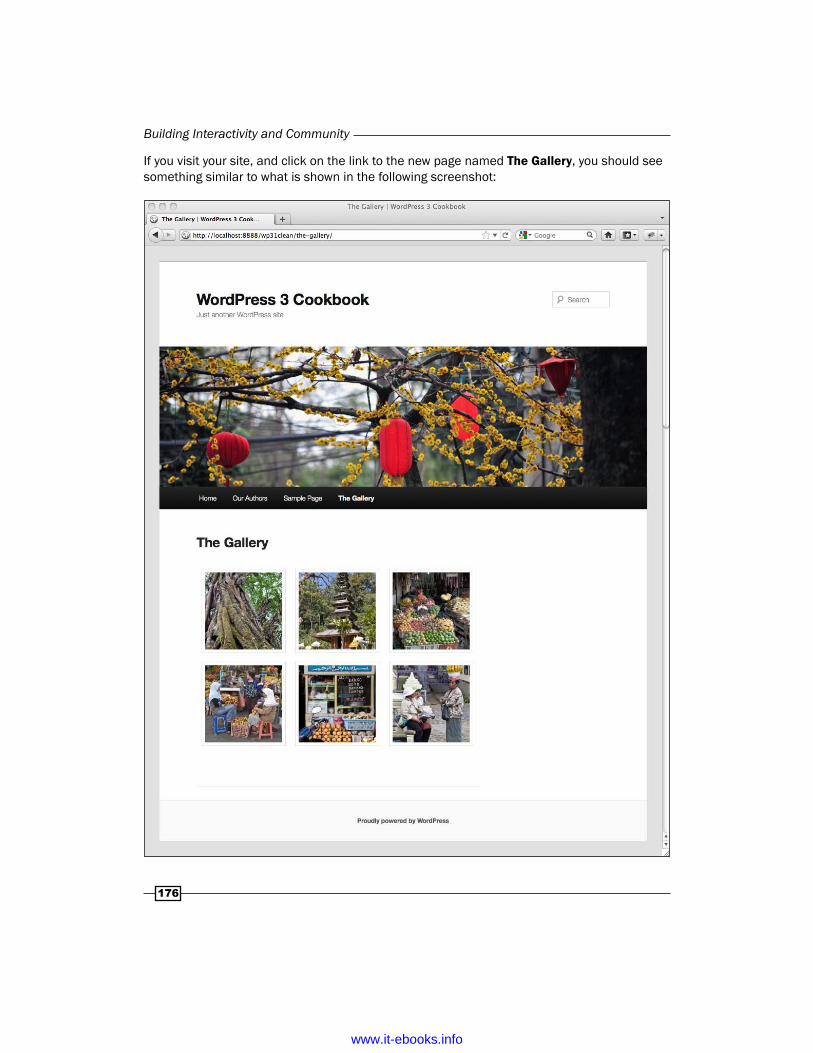
Building Interactivity and Community
176
If you visit your site, and click on the link to the new page named The Gallery, you should see something similar to what is shown in the following screenshot:
www.it-ebooks.info

Chapter 5
177
How it works…The gallery functionality is built into WordPress; you simply need to tell the system what images to use and which page or post you wish to use to hold the gallery. As you will see in the next section, you also have the option to use a shortcode.
There's more...The gallery feature can also be inserted into content items or templates using the [gallery] shortcode. To use the code in a content item, first create the gallery by uploading images, then switch to the HTML editor for the content item and type the shortcode where you want the thumbnails to appear.
The shortcode can also be used inside templates, but the syntax is slightly different. To place a gallery inside a template, put this line of code where you want the thumbnails to appear:
<?php echo do_shortcode('[gallery]'); ?>
The gallery shortcode also includes a number of optional parameters. The following table shows the options available:
Parameter DescriptionColumns Number of columns for the thumbnailsLink How each image will be linkedOrderby How to order the imagesSize The size of the images to displayId Instructs the gallery to display the images from a specific post IDInclude Include specific imagesExclude Exclude specific images
You can learn more about the WordPress gallery shortcode by visiting the WordPress Codex at http://codex.wordpress.org/Gallery_Shortcode
www.it-ebooks.info

Building Interactivity and Community
178
Bringing Facebook functionality into your site
The Facebook API offers website owners access to a variety of features. By connecting with the API, you can display widgets of Facebook content and user activity, allow users to log in using their Facebook I.D., or let them post your content to their Facebook account.
In this recipe we implement the Simple Facebook Connect plugin, which gives you access to a wide assortment of Facebook features that you can use to enhance your site. The following screenshot shows just some of the functions supported by the plugin (though obviously you'd never want to display them like this on your site!):
www.it-ebooks.info

Chapter 5
179
Getting readyTo execute this recipe, you will need to install the Simple Facebook Connect plugin. You will need to install this plugin before you can get started. Search for Simple Facebook Connect inside the Add New Plugins screen of your WordPress site. After you find it, click on it to install, and then activate it. Visit the installed plugins page to see the full list of items added by this plugin – it is extensive. Activate all those you wish to use.
You can learn more about the plugin by visiting the developer's site at http://ottopress.com/wordpress-plugins/simple-facebook-connect/
Additionally you will need to have access to the Facebook API. To get the access you need, go to https://developers.facebook.com/apps, click on the Create new App button, and follow the steps outlined there.
How to do it…1. Log in to your WordPress Dashboard.
2. Click on Settings on the main admin nav.
3. Click on the option Simple Facebook Connect in the Settings menu.
4. In the space provided, enter your Facebook API Key, as shown in the following screenshot:
www.it-ebooks.info

Building Interactivity and Community
180
5. Enter your Facebook Application Secret.
6. Enter your Facebook Application ID.
7. Click the Save Changes button.
Next, you need to get the widgets assigned to the pages.
1. Click on the Appearance menu.
2. Click on the Widgets option in the Appearance menu.
3. Click and drag all the widgets you wish to appear on the site.
4. Configure any widgets that require additional information.
How it works…The functionality supplied by this plugin is all derived directly from Facebook. The plugin uses your APIR credentials to access the Facebook system and display the output on your pages.
Expect that as Facebook makes changes to their offerings, that this plugin, and possibly the functionality, will change.
See also... f Adding social bookmarking buttons to your site
Integrating a Twitter stream into your siteTwitter is a free micro blogging service that allows you to post short messages (less than 140 characters). Given the popularity of Twitter, we thought to include a recipe that allows you to integrate Twitter streams into your WordPress site.
www.it-ebooks.info
Chapter 5
181
There are quite a few plugins out there that let you bring Twitter content into your site. The Twitter Goodies Widget profiled in this recipe was chosen due to its flexibility and the fact that it relies on functionality provided directly by Twitter. The plugin allows you to display all four of the widget styles provided by Twitter and you can show these either in your site's widgets, or in your content items through the use of a shortcode.
You can also grab the widget code directly from Twitter and integrate it into your site manually, if you prefer. Visit http://twitter.com/about/resources/widgets
Getting readyTo execute this recipe, you will need to install the Twitter Goodies Widget plugin. You will need to install this plugin before you can get started. Search for Twitter Goodies Widget inside the Add New Plugins screen of your WordPress site. After you find it, click on it to install, and then activate it.
You can learn more about the plugin by visiting the developer's site at http://netweblogic.com/wordpress/plugins/twitter-goodies-widgets/
How to do it...There are two parts to this recipe. First, you need to configure the plugin. Second, you need to set up the WordPress widget to display the output.
To configure the plugin, follow these steps:
1. Log in to your WordPress Dashboard.
2. Click on the Settings menu.
3. Click on the Twitter Goodies Widget link in the Settings menu.
4. Enter a name in the field marked Theme Name, as seen in the next screenshot. This name will appear in the widget options when you set up the widget later.
5. Select any other options you want on this page, including the color scheme.
www.it-ebooks.info

Building Interactivity and Community
182
6. Click the Save Changes button.
www.it-ebooks.info

Chapter 5
183
The plugin is now ready to go. Let's place the output on the screen through the use of the WordPress widget that comes with the plugin. Follow these steps:
1. Click on the Appearance menu option.
2. Click on the Widgets choice on the Appearance menu.
3. Click and drag the widget named Twitter Goodies Widget to the sidebar where you want it to appear on your site.
4. Inside the Twitter Goodies Widget, select from the combo box the Widget Theme you wish to use (this is the theme you set up in the previous part of this recipe).
5. Select the Widget Type you want to display.
6. Most other values are optional, with some exceptions: If you select List, you will need to also choose the list to display. If you choose Profile or Faves, you must enter a username. If you choose Search, you must enter a search query.
7. When you've finished, click on the Save button.
www.it-ebooks.info

Building Interactivity and Community
184
View the front end of your site to view the widget. In the next screenshot, you can see the Twitter search widget in action.
How it works...The Twitter Goodies Widget leverages the widget capabilities offered by Twitter. Your choices mirror those options available on the Twitter site:
f Faves: Show all those tweets starred as favorites by a specific Twitter user account
f List: Show the members of one of the lists on a Twitter user's account
f Profile: Show the tweets from one specific Twitter user account
f Search: Set up a search of all Twitter users' posts
The various configuration options likewise mirror the choices offered by Twitter.
www.it-ebooks.info
Chapter 5
185
There's more...As mentioned at the outset of this recipe, the plugin also supports inclusion of a Twitter stream inside of content items, through the use of a shortcode. To embed a Twitter stream, follow these steps:
1. Log in to your WordPress Dashboard.
2. Open for editing the content item in which you wish to display the Twitter stream.
3. Click on the HTML tab to switch to the HTML editor.
4. Type [tgw] where you want the Twitter Goodies Widget to appear.
5. Save the content item.
www.it-ebooks.info

6Implementing Online
Sales and Advertising
In this chapter, we will cover:
f Integrating Google Adsense
f Displaying ads in your posts by using WordPress shortcodes
f Managing ad visibility
f Inserting ads into your RSS feeds
f Showing your site stats to find advertisers
f Enhancing your advertise page by adding Paypal subscriptions
f Managing your advertising space with an ad manager
f Adding a shopping cart to your site
IntroductionThough not all site owners are concerned with generating revenue from their site, if you are concerned with making money with your site, then WordPress is a good choice. Not only is WordPress flexible enough to support a variety of business models, there exists a large number of plugins that are designed to help you turn your site into a source of income.
Monetizing a site is typically accomplished through one of two methods: either selling advertising, or selling a product or service. In this chapter, we look at tools and techniques that can help you with either business model. The chapter includes plugins that let you insert and manage ads on your site and we also look at how to add a shopping cart to your site to support checkout of products or services.
www.it-ebooks.info

Implementing Online Sales and Advertising
188
One of the most popular advertising programs, Google AdSense, is discussed in several recipes in this chapter. Additionally, if you wish to manage your own ad space and inventory, later recipes cover ad management.
While accepting payment online is an important topic, we focus only on PayPal in this chapter, due to the many variables users must overcome to establish a relationship with a payment gateway. Between regional variations, variations in site content, and other facts, it is not possible to set out steps and processes that will be applicable to everyone.
Integrating Adsense Google AdSense is one of the most popular platforms for integrating the display of paid advertising into your site. The service, provided free of charge by Google, allows you to display ads on the pages of your website through the insertion of a simple code. Google manages the ads and keeps them relevant to your content. When a visitor clicks on an ad, a portion of the revenues Google earns is credited to you. Google will then periodically pay out the earnings directly to you.
While there are other, and more lucrative advertising channels, there are few that have the ease of use of Google AdSense.
In this recipe we look at how to integrate AdSense ads into your site.
In the later recipes in this chapter we look at setting up and managing direct advertising on your site.
Getting readyThe first thing to do is to get the AdSense code to display ads on your blog. To get the code, connect to https://www.google.com/adsense. If you do not currently have an AdSense account, create one. If you already have a Google account for any service, you can add AdSense to that account. If you don't have a Google account, creating one is necessary to take part in the AdSense program.
Once you're connected to Google AdSense you have to create an advertisement. To do so, click on the My ads tab and click on the button labeled New ad unit.
You will be prompted to name and configure your new ad. One of the key steps is choosing an ad size. According to Google, the best performing ad sizes are 336 x 280, 300 x 250, and 160 x 600, but the decision ultimately depends on the space in your blog layout. Select the configuration options you prefer, and then click on the button labeled Save and get code.
www.it-ebooks.info
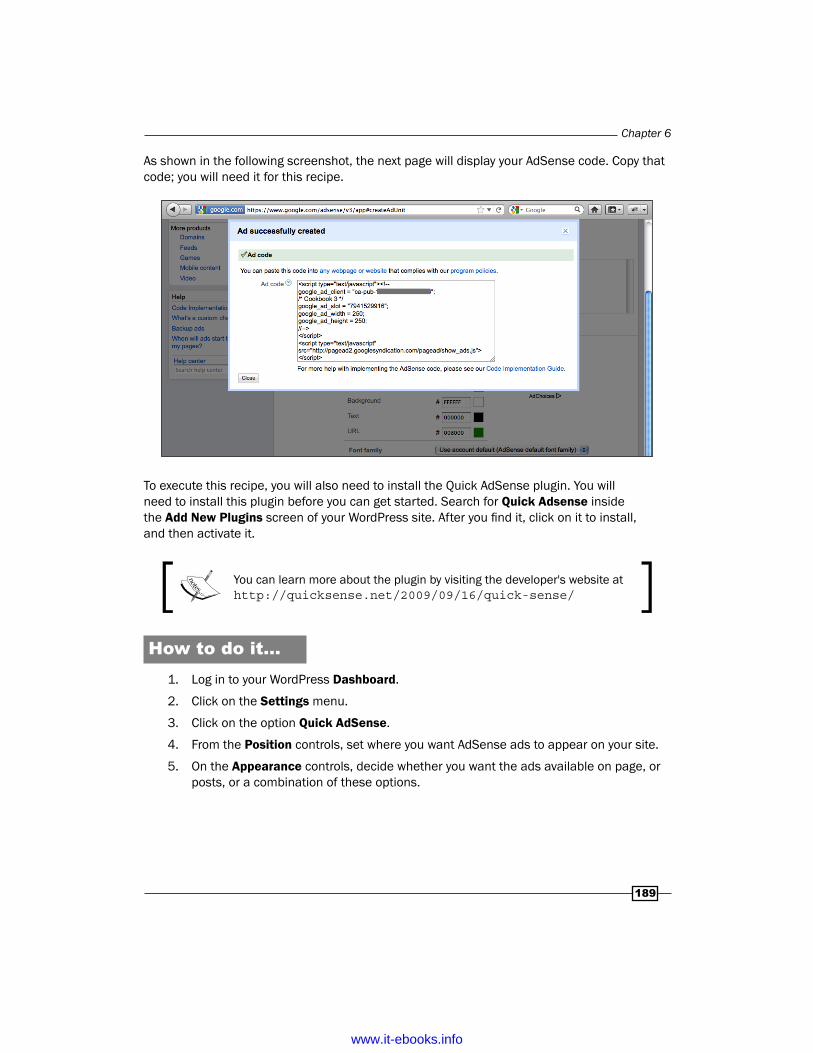
Chapter 6
189
As shown in the following screenshot, the next page will display your AdSense code. Copy that code; you will need it for this recipe.
To execute this recipe, you will also need to install the Quick AdSense plugin. You will need to install this plugin before you can get started. Search for Quick Adsense inside the Add New Plugins screen of your WordPress site. After you find it, click on it to install, and then activate it.
You can learn more about the plugin by visiting the developer's website at http://quicksense.net/2009/09/16/quick-sense/
How to do it...1. Log in to your WordPress Dashboard.
2. Click on the Settings menu.
3. Click on the option Quick AdSense.
4. From the Position controls, set where you want AdSense ads to appear on your site.
5. On the Appearance controls, decide whether you want the ads available on page, or posts, or a combination of these options.
www.it-ebooks.info

Implementing Online Sales and Advertising
190
6. Scroll down to the AdSense Codes section, as you can see in the following screenshot. Paste your AdSense code into the fields you need. For example, if you set Ads1 to appear in the Position controls, then add your code into the field marked Ads1.
www.it-ebooks.info
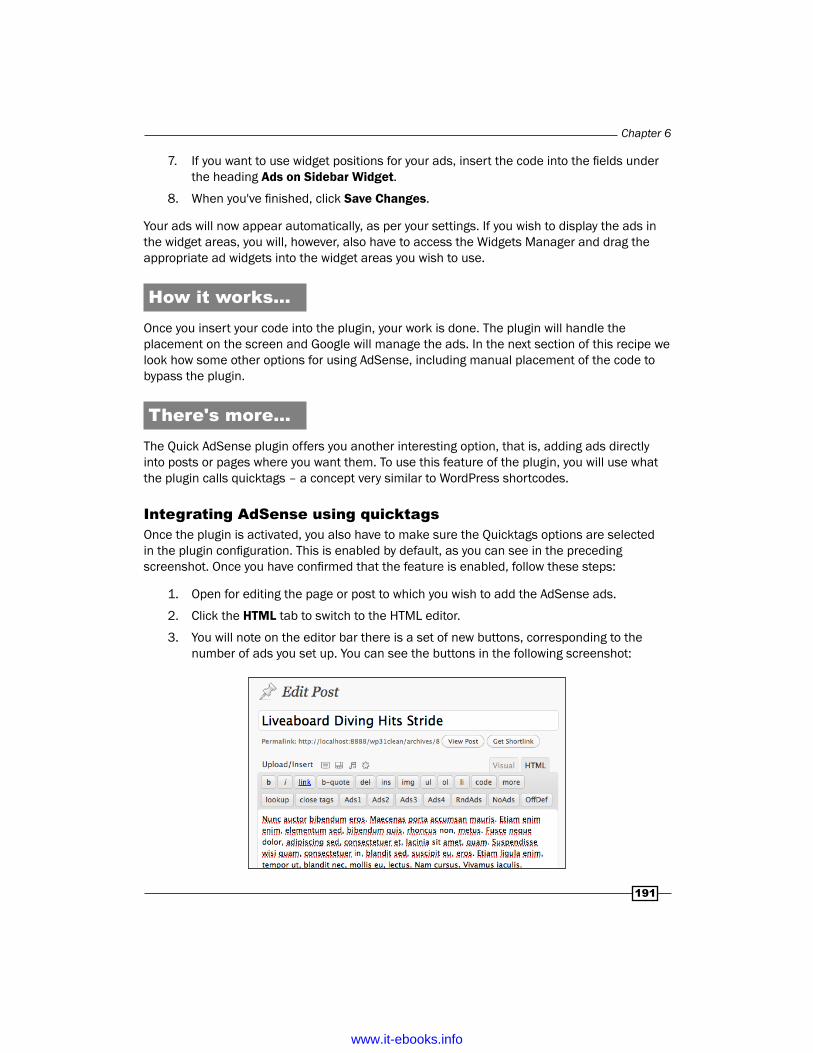
Chapter 6
191
7. If you want to use widget positions for your ads, insert the code into the fields under the heading Ads on Sidebar Widget.
8. When you've finished, click Save Changes.
Your ads will now appear automatically, as per your settings. If you wish to display the ads in the widget areas, you will, however, also have to access the Widgets Manager and drag the appropriate ad widgets into the widget areas you wish to use.
How it works...Once you insert your code into the plugin, your work is done. The plugin will handle the placement on the screen and Google will manage the ads. In the next section of this recipe we look how some other options for using AdSense, including manual placement of the code to bypass the plugin.
There's more...The Quick AdSense plugin offers you another interesting option, that is, adding ads directly into posts or pages where you want them. To use this feature of the plugin, you will use what the plugin calls quicktags – a concept very similar to WordPress shortcodes.
Integrating AdSense using quicktagsOnce the plugin is activated, you also have to make sure the Quicktags options are selected in the plugin configuration. This is enabled by default, as you can see in the preceding screenshot. Once you have confirmed that the feature is enabled, follow these steps:
1. Open for editing the page or post to which you wish to add the AdSense ads.
2. Click the HTML tab to switch to the HTML editor.
3. You will note on the editor bar there is a set of new buttons, corresponding to the number of ads you set up. You can see the buttons in the following screenshot:
www.it-ebooks.info

Implementing Online Sales and Advertising
192
4. Place the cursor where you want the ad to appear.
5. Click on the button for the ad number you want to appear.
6. Click on the Update button to finish and update the post.
Integrating AdSense manuallyThe first method is to insert the code directly into your theme files. To do so, follow these simple steps:
1. Open the file where you'd like the ads to be displayed, for example, index.php (your homepage), sidebar.php (your blog sidebar), or single.php (single posts pages).
2. Paste your AdSense code. Make sure that you're not inserting your Google AdSense code within PHP tags,(<?php and ?>) as you'll probably get a parsing error.
3. Save the file. Your AdSense ads are now displayed on your blog. Please note that sometimes it can take up to 15 minutes until the first ads are displayed.
The second method is to use a text widget to display your AdSense ads.
Text widgets can't display PHP code, but they can display the JavaScript code used by Google AdSense.
1. Log in to your WordPress Dashboard.
2. Click on the Appearance menu.
3. Click on the Widgets option.
4. Add a text widget to your sidebar.
5. Paste your AdSense code in the widget body.
6. You can also give a title to the widget, but this isn't recommended. Google AdSense terms and conditions don't allow text such as Please visit or Recommended above AdSense ads. You shouldn't give any title to the widget.
7. Click on the Save button of the widget to record your changes in this widget.
Displaying ads anywhere in your posts by using WordPress shortcodes
In the previous recipe, we looked at how to add Google AdSense ads to your site by using a plugin or by using a text widget. However, there is another option—enabling your site to display ads anywhere in your posts through the use of a WordPress shortcode.
Introduced in WordPress 2.5, shortcodes are powerful WordPress functions.
www.it-ebooks.info

Chapter 6
193
If you use forums such as phpBB or Vbulletin, you're probably familiar with the use of shortcodes; the concept in WordPress is similar.
One of the most powerful features of WordPress shortcodes is that you are able to create your own shortcodes. In this recipe, you'll learn to create a WordPress shortcode dedicated to inserting AdSense ads anywhere in your posts.
Getting readyTo execute this recipe, you'll need an AdSense code, as described in the previous recipe. You will also need a code editor and need access to your WordPress theme files on your server.
How to do it...Follow these simple steps to get started:
1. Open your functions.php file.
2. Enter the following code. Don't forget to replace the AdSense code provided here by yours!function cookbook_showads() { return '<script type="text/javascript"><!-- google_ad_client = "ca-pub-xxxxxxxxxxxx"; google_ad_slot = "7941529916"; google_ad_width = 250; google_ad_height = 250;//--></script><script type="text/javascript" src="http://pagead2.googlesyndication.com/pagead/show_ads.js"></script>';}add_shortcode('adsense', 'cookbook_showads');
3. Save your functions.php file.
Your system now has a new shortcode available: adsense. To insert it into a post, follow these additional steps:
1. Open any of your published posts for editing.
2. Switch to the HTML editor by clicking on the HTML tab.
www.it-ebooks.info

Implementing Online Sales and Advertising
194
3. Insert the following shortcode anywhere in the post code, where you'd like AdSense to be displayed:[adsense]
4. Save your post.
How it works...Shortcodes are handled by a set of functions called the shortcode API. When a post is displayed, post content is parsed and the shortcode API automatically transforms shortcodes into what they're supposed to be.
You can learn more by visiting the WordPress API at http://codex.wordpress.org/Shortcode_API
In this recipe, we started by creating a very simple PHP function, called cookbook_showads(), to return the AdSense code. Then, we used the add_shortcode() function to create a shortcode by using the cookbook_showads() function.
Managing ad visibilityAll web site owners who are interested in selling advertising on their site need to be concerned about click through rates (CTRs). For example, your CTR is one percent if your ads are displayed to 100 visitors and only one of them clicked on it.
A high CTR is usually a sign of good matching of ads to content and to visitors. The higher your CTR is, the more money Google earns from your ads. If they display some ads on your website, but no one clicks on them, they don't earn any money and that space is a waste for them.
Low CTR is also an issue for you as a site owner. Many AdSense users who have a CTR below one or two percent see their AdSense earnings dramatically decrease. Google calls this policy Smart Pricing, and as a site owner, it means that clicks on your ads will only get about 10 percent of what they are normally worth. As we can't do anything to fight the Smart Pricing policy, the best thing you can do is to try and avoid being Smart Priced.
Many search engine specialists agree that people coming from search engines tend to click more on the ads on a site. Your readership (such as RSS subscribers) don't often click on your ads.
In this recipe, we'll look at a plugin that helps you display your ads to the most likely visitors, while hiding them from those less likely to click. The net effect is that you will see an improvement in your CTR. The plugin is called Who Sees Ads.
www.it-ebooks.info

Chapter 6
195
Getting readyTo execute this recipe, you will need to install the Who Sees Ads plugin. You will need to install this plugin before you can get started. Search for Who Sees Ads inside the Add New Plugins screen of your WordPress site. After you find it, click on it to install, and then activate it.
You can learn more about the plugin by visiting the developer's website at http://planetozh.com/blog/my-projects/wordpress-plugin-who-sees-ads-control-adsense-display/
How to do it...1. Log in to your WordPress Dashboard.
2. Click on the Settings menu.
3. Click on the option Who Sees Ads.
4. On the Who Sees Ads configuration screen, shown in the following screenshot, the first thing you have to do is to create a context. A context is simply a condition, or a set of conditions, that control the display of an ad. By default, you can select one or more of the following:
� If visitor comes from a search engine, display / don't display
� If visitor is a regular reader, display / don't display
� If post is older than XX days, display / don't display
� If visitor is logged in, display / don't display
� If date is between specified date interval, display / don't display
� If ad has been showed fewer than XX times, display / don't display
� If this visitor has viewed this ad fewer than XX times, display / don't display
� If all previous conditions fail, try another context
� If any condition, display / don't display
5. Provide a name for the context in the Name of the Context field.
6. Select one or more of the possible rules.
7. In the Ad code text area, paste your AdSense (or other) code.
8. Click on the Save context to save your context. It is now ready for use.
www.it-ebooks.info

Implementing Online Sales and Advertising
196
9. To insert ads, use the following code in your posts (after turning WordPress editor to HTML mode):<!--wsa:context_name-->
www.it-ebooks.info

Chapter 6
197
How it works...The Who Sees Ads plugin is a complex plugin. When you create a context, it is recorded in the WordPress database. When a visitor comes to the site, a PHP conditional statement is created and appended to your theme files and posts. This code contains PHP conditional statements to make sure that the current visitor matches the conditions established in the context.
There's more...Like any other very advanced plugin, Who Sees Ads has a lot of options. Now that you have learned how to install and configure this powerful plugin, let's look at the available configuration options.
Global optionsThe Who Sees Ads plugin also allows you to set up global options such as what defines a regular reader, what is an old post, and so on.
Here are the possible options:
f Old post: The number of days after which a post is considered old
f Regular reader: How many pages a visitor must have seen in the last X days to be considered as a regular reader
f Click safety: If enabled, this option will not display any AdSense or Yahoo ads to the blog administrator
f Date format: You can choose to use two different date formats—the American mm/dd/yyyy or the European dd/mm/yyyy
Once you're done with the global options, simply click on the Update Options button to save it.
www.it-ebooks.info

Implementing Online Sales and Advertising
198
Inserting ads into your RSS feedsYour WordPress site comes with RSS feeds ready to go. Over time, users will subscribe to your feed to receive notifications of new content on your site. A portion of those RSS subscribers may rarely visit your site, preferring instead to simply use their feed reader to read your articles. If you want to reach those users with a promotional message, you need a way to embed that message into the RSS feed. If you're using Feedburner and Google AdSense, the solution is simple, as Feedburner allows you to insert AdSense ads into your feeds. However, if you want to insert other ads or promotional messages into your feed, you will need another solution.
In this recipe we look at a plugin that allows us to insert additional information into your site's feed.
Getting readyTo execute this recipe, you will need to install the RSS Footer plugin. You will need to install this plugin before you can get started. Search for Rss Footer inside the Add New Plugins screen of your WordPress site. After you find it, click on it to install, and then activate it.
You can learn more about the plugin by visiting the developer's website at http://yoast.com/wordpress/rss-footer/
How to do it...1. Log in to your WordPress Dashboard.
2. Click on the Settings menu.
3. Click on the option RSS Footer.
4. On the RSS Footer options page, seen in the following screenshot, you can input the content you want to add to the RSS feed, and position it on the screen. Type your message in the text box at the top of the page.
5. From the Settings combo box, select whether the message will appear above or below the feed items.
www.it-ebooks.info

Chapter 6
199
6. Click on the Update RSS Footer Settings button.
www.it-ebooks.info

Implementing Online Sales and Advertising
200
How it works...The plugin simply adds new information to the RSS feed output.
There's moreIf you are using Feedburner to manage the RSS feed for your site, you may have to take further steps to make sure the new footer message is distributed with your feed items.
First things first – after implementing the recipe, visit your Feedburner feed and see whether your RSS Footer message is appearing. If it is, then you are fine and no further steps are needed. If the content is not appearing, you will need to follow these additional steps:
1. Log in to your Feedburner account.
2. Click on the name of your site's feed.
3. Look for the Troubleshootize tab at the top of the page. Click on it.
4. On the page that loads, scroll down to find the button Resynch Now. Click on that button.
If you were successful, you should see a confirmation message in your browser. You can then check again your feed output to see if the RSS Footer message appears.
Showing your site stats to find advertisersIn this chapter, we have talked a lot about Google AdSense as a means of monetizing your website. However, another effective way to make money of your site is to directly sell the advertising space on your site.
Undertaking direct ad sales has implications for the site owner: You need to market the site, process payments, and provide an advertising management system. In this recipe, we look at the first issue and discuss how to help promote your site through the display of performance statistics.
Displaying select site performance statistics can help attract advertisers and also help shape advertiser expectations and justify pricing. The data you show should help convince the prospective advertisers that your site is an appropriate place for them to promote their products or services.
www.it-ebooks.info

Chapter 6
201
In terms of advancing the cause of advertising sales, you should display a mix of statistics that show how popular your site is, how well it ranks, and how much reach it has. As this sort of data changes over time, you don't want to hardcode it; rather you want these statistics to be current and to automatically update themselves.
This recipe covers implementing the WPStatsDashboard plugin as a means of enhancing site promotion. Display this widget on a page containing your advertising rates and information to create a page that will help prospective advertisers connect with your site.
Getting readyThe WP Stats Dashboard relies on the statistics plugin from WordPress.com. In Chapter 1, we looked at installing JetPack, a plugin from Automattic that incorporates the WordPress Stats functionality. Before you set up WP Stats Dashboard, you will need to have the Jetpack plugin installed and properly configured. You will also need to know your Wordpress.com username and password.
To execute this recipe, you will need to install the WP Stats Dashboard plugin. You will need to install this plugin before you can get started. Search for WP Stats Dashboard inside the Add New Plugins screen of your WordPress site. After you find it, click on it to install, and then activate it.
You can learn more about the plugin by visiting the developer's website at http://www.daveligthart.com/wp-stats-dashboard-10/
How to do it...There are two parts to this recipe. In the first part, we will configure the plugin to produce for us the stats we want to display. In the second part, we will set up and display a widget containing these statistics.
Let's start by configuring the plugin:
1. Log in to your WordPress Dashboard.
2. Click on the WPSD menu.
www.it-ebooks.info

Implementing Online Sales and Advertising
202
3. Click on the option Settings. The following screenshot shows part of this very long screen:
4. Make sure the Blog ID field, seen at the top of the page in the preceding image, is filled in. Normally this will happen automatically if you have properly installed and configured the WordPress Stats or Jetpack plugin.
5. Add your WordPress.com username, in the field marked Username.
6. Add your WordPress.com password, in the field marked Password.
7. Click on Save changes.
8. Scroll down the page to the Profile Settings section of the page. You can complete any of the options you want here, but for advertising sales purposes, you will probably want to make sure to complete the fields for any chapters where your site performance is particularly strong.
9. Click on the Save Changes button at the bottom of the Profile Settings section.
www.it-ebooks.info

Chapter 6
203
The plugin is now ready for your use. The next part of the recipe is to configure and position a widget to display select information for your advertising page. To do that, follow these steps:
1. Click on the Appearance menu.
2. Click on the option Widgets.
3. Find the Social Metrics widget and drag it to the widget area where you wish it to appear.
4. Click on it to open the widget for editing.
5. Give it a name, for example, Site Statistics.
6. Click on it to select from the list the statistics you feel show your site in the best light, as shown in the following image:
7. Click on the Save button.
www.it-ebooks.info

Implementing Online Sales and Advertising
204
Your site statistics are now visible on your site, as seen in the following screenshot:
For best effect, publish the widget to the page containing your pricing information and contact details.
How it works...This plugin gathers data from multiple sources. It interfaces with the WordPress.com statistics system to pull in site traffic stats, but then also looks to third party sites for additional information, from traffic and site rank, to social bookmarking activity, to intangibles such as Klout.
There's moreThis plugin also supplies are very thorough statistics dashboard for your site. You will want to explore the options for displaying admin dashboard widgets. On the WPSD configuration screen, shown on the first screenshot in this section, there are multiple options that relate to the display of the statistics inside your WordPress dashboard. To get the most out of the plugin, select the dashboard widgets you want from the list labeled Enable / Disable Dashboard Widgets. You will also want to select the option marked Disable widgets on main dashboard page in order to avoid performance problems on your main dashboard page.
www.it-ebooks.info

Chapter 6
205
Once you have made your selections, save your changes, then click on the option Dashboard Stats, under the Dashboard menu. When you click on that link, you will be taken to a dashboard similar to the one shown in the following screenshot:
www.it-ebooks.info

Implementing Online Sales and Advertising
206
Enhancing your Advertise page by adding Paypal subscriptions
If you have applied the previous recipe to your blog, you now have a stunning Advertise page with your site stats. That's great, but how can the advertisers pay you? You could use a contact form and ask advertisers to e-mail you and then send them your Paypal ID, but that process is slow and loaded with opportunities for the buyer to change their mind before completing the payment. A better solution would be to provide a payment option directly from your Advertise page. Even better would be setting up recurring payments so that the buyers can subscribe to your advertising service on an ongoing basis.
On this recipe we look at setting up Paypal to enable recurring or subscription payment for your site.
Getting readyTo allow Paypal subscriptions on your WordPress blog, you need a Paypal account. If you don't already have a Paypal account, just go to www.paypal.com and create one.
How to do it...Once you have your Paypal account ready, follow these steps to create a subscription for your ads.
1. First, log in to Paypal.
2. Click on Merchant Services.
3. In the Merchant Tools page, click on the Subscriptions & Recurring Payments button.
4. Complete the form and specify your subscription options.
5. You need to fill in the following details:
� Accept payments for: Leave the default, Subscriptions and recurring billing. � Item name: Give a name to the subscription, as shown in the preceding
example. � Subscription ID: You can leave this field blank. � Customize button: Only useful if you wish to allow the advertiser to define
the ads own price.
www.it-ebooks.info

Chapter 6
207
� Currency: The currency you'd like to display your prices in. You should choose USD, as US dollars are a de facto standard on the Internet, except if your blog is in any other language than English.
� Recurring amount to be billed: The sum you'd like to get each month. � Billing cycle: Choose the time period for the subscription. On most blogs, 1
month is the default. � After how many cycles should billing stop: You should leave the field
as is, however you can decide that the subscription should be canceled automatically after X cycles.
6. Once done, click on the Create button. The next page will provide your custom subscription code.
7. Copy the code.
8. Log in to your WordPress Dashboard.
9. Open for editing the page where you have your advertising information for site visitors.
10. Paste the code where you want the payment button to appear.
Your advertisers can now automatically pay for their ads on a monthly basis.
Managing your advertising space with an ad manager
If you wish to display multiple ads on your site, or you wish to use an ad network other than Google AdSense, you may want to explore the use of an ad manager for your website. Ad management systems typically include the range of options needed to maximize the use of the advertising space on your site. The ad manager is also the key in situations where you wish to run campaigns by time, impressions, or clicks.
There are a number of options for ad management, from relatively simple systems to complete software packages you have to install independently on your server. This recipe looks at the Simple Ads Manager plugin for WordPress. It is a relatively complex plugin, but offers a fair amount of power in exchange. If you wish to sell time-based, or click-based ads, or if you wish to divide your site's pages into different zones for displaying ads, then Simple Ads Manager is a good choice for you.
www.it-ebooks.info

Implementing Online Sales and Advertising
208
Getting readyTo execute this recipe, you will need to install the Simple Ads Manager plugin. You will need to install this plugin before you can get started. Search for "Simple ads manager" inside the Add New Plugins screen of your WordPress site. After you find it, click to install, and then activate it.
You can learn more about the plugin by visiting the developer's website at http://www.simplelib.com/?p=480
In addition to the plugin, you will need the ads you want to display, or if you plan to use AdSense, the code.
How to do it...There are several steps to this recipe. The Simple Ads Manager groups all ads inside of what the plugin calls Ad Places. The first task we need to complete is the creation of at least one Ad Place. To create your site's first Ad Place, follow these steps:
1. Log in to your WordPress Dashboard.
2. Click on the Ads menu.
3. Click on the option New Place, or click on the button marked Add New Place.
4. On the New Ads Place screen that appears (see the following screenshot) enter a logical name for the Ads Place in the first field. You can also give it a Description if you wish.
www.it-ebooks.info
Implementing Online Sales and Advertising
210
5. Next, in the section marked Ads Place Size, select a size for your ad, or enter a custom width and height in the fields provided.
6. In the Ads Place Patch, select whether this place will hold image ads, HTML / javascript ads or ads, from Google DoubleClick for Publishers (Google DFP).
7. Click on the Save button.
Next, you need to create at least one ad to run in your Ad Place. To create an ad, follow these steps:
1. Click on the Ads menu.
2. Click on the option Ads Place.
3. On the Managing Ad Places page, hover the mouse over the name of the Ad Place you wish to hold your new ad. On the options that appear, click New Ad.
4. The New Advertisement screen is where you set up the actual ad. In the first field on the page, give your ad a name. Add a Description if you wish.
5. In the Ad Code section of the page, select whether you wish to use Image Mode (an image ad) or Code Mode (an HTML or javascript ad).
6. If you selected Image Mode, upload the image you want to use. If you selected Code Mode, paste the code in the field given.
7. Next, set the display conditions for the ad in the section titled Restrictions of advertisements showing (see image below). Note that the section immediately below, labeled Extended restrictions, allows you to make even more specific conditions on the display.
8. Add Prices, if relevant.
9. Click on the Save button.
www.it-ebooks.info
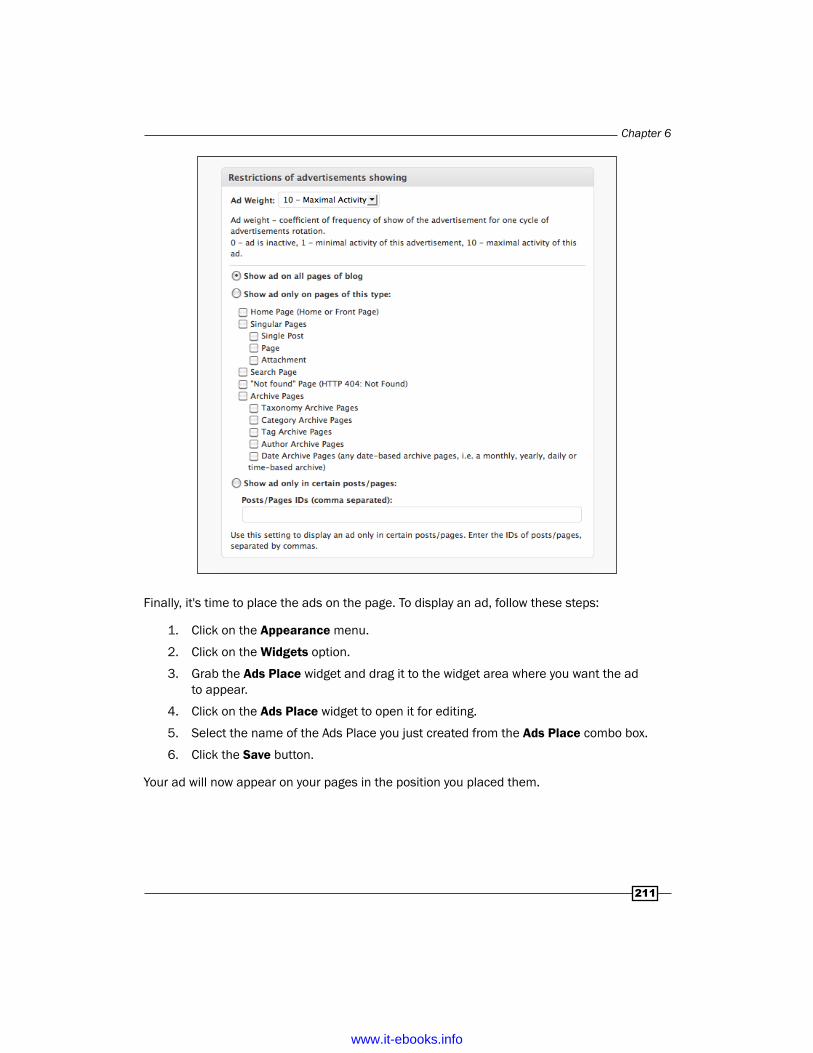
Chapter 6
211
Finally, it's time to place the ads on the page. To display an ad, follow these steps:
1. Click on the Appearance menu.
2. Click on the Widgets option.
3. Grab the Ads Place widget and drag it to the widget area where you want the ad to appear.
4. Click on the Ads Place widget to open it for editing.
5. Select the name of the Ads Place you just created from the Ads Place combo box.
6. Click the Save button.
Your ad will now appear on your pages in the position you placed them.
www.it-ebooks.info

Implementing Online Sales and Advertising
212
How it works...Ad Places are used to hold one or more individual ads. The Ad Places widget will allow you to then place the ads on the page. If you put more than one ad into an Ad Place, the ads can be set to rotate. If you need to create multiple ads in different positions, simply create multiple Ad Places.
There's more...The plugin also provides support for Ads Zones. Zones are containers that can hold one or more Ad Places. Zones are most useful for grouping together content pages for the purpose of controlling ad display.
Creating a new Ad Zone1. Log in to your WordPress Dashboard.
2. Click on the Ads menu.
3. Click on the New Zone option.
4. In the first field on the New Ads Zone page, shown in the next screenshot, give your new zone a name. Add a description if you wish.
5. In the Ads Zone Settings section, set up which Ad Places you wish to use. You can set a default Place to show where no specifics are provided, or you can vary the Places used by a variety of criteria.
6. Click on the Save button.
7. Click on the Appearance menu.
8. Click on the Widgets option.
9. Find the Ads Zone widget and drag it to the widget area where you want the ads to appear.
10. Click on the Ads Zone widget to open it for editing.
11. Select which Zone you want to use from the Ads Zone combo box.
12. Click on the Save button.
www.it-ebooks.info

Chapter 6
213
Adding a shopping cart to your siteIf you want to sell products on your site, at the very least you will need a way for people to add those products to a shopping cart and go through a checkout process to pay for the items. In this recipe, we look at a basic e-commerce solution. The plugin covered in this recipe enables you to create an Add to Cart button for your products and also provides a shopping cart widget. Once the user decides to checkout, the plugin will send the users to Paypal for payment.
Getting readyTo execute this recipe, you will need to install the WP Paypal Shopping Cart plugin. You will need to install this plugin before you can get started. Search for WP Paypal Shopping Cart inside the Add New Plugins screen of your WordPress site. After you find it, click on it to install, and then activate it.
You can learn more about the plugin by visiting the developer's website at http://www.tipsandtricks-hq.com/wordpress-simple-paypal-shopping-cart-plugin-768
How to do it...There are three parts to this recipe. First, we need to configure the plugin. Second, we need to enable the Shopping Cart widget. Finally, we need to add the shortcode to our products.
Let's start by configuring the plugin; here's how to do it:
1. Log in to your WordPress Dashboard.
2. Click on the Settings menu.
3. Click on the option WP Shopping Cart.
4. On the page that loads, you will see a large number of configuration options. The next screenshot shows the WP Paypal Shopping Cart Options page. You will need to go through this page and select the options necessary for your shop, including your Paypal e-mail address, your preferred currency, whether shipping costs are involved, and so on. You can also configure the text that will appear for your cart and the Buy now button.
5. Once you have selected the options you wish, click the Update Options button.
www.it-ebooks.info

Implementing Online Sales and Advertising
214
The system is now ready to go. Let's next place the shopping cart link on the page for your site visitors. Follow these steps:
1. Click on the Appearance menu.
2. Click on the Widgets option.
3. Find the WP Paypal Shopping Cart widget and drag it to the widget area where you want it to appear on your site.
The final step is to place the appropriate code on your product page to enable the purchase. Follow these steps:
1. Go to the page where you want the product with the checkout option to appear.
2. Click and open the page (or post) for editing.
3. Click on the HTML tab to switch to the HTML editor.
4. Where you want the Add to Cart button to appear, paste the following code into the text: [wp_cart:PRODUCT-NAME:price:PRODUCT-PRICE:end]. Replace PRODUCT-NAME with the name of your product and PRODUCT-PRICE with the price of the product, for example, [wp_cart:WordPress Book:price:29.95:end].
5. Click to update the page.
That's all there is to it. You can use the plugin to create Add to Cart buttons for as many unique products as you like. All products will add to the shopping cart. Users will be able to remove things from the cart or add new items before checking out.
www.it-ebooks.info

Implementing Online Sales and Advertising
216
How it works...This plugin does not create a product catalog, nor does it manage the display of products; it simply enables an "add to cart" button and provides the users with a shopping cart interface that enables payment via Paypal. If you want to style your product display, you will need to lay it out inside a content item and style it to suit your needs.
When a plugin is installed, it adds a new shortcode functionality to your site. The configuration options you set are used to provide the basic information that is used both in the shopping cart display and in the transaction data to Paypal.
The shopping cart contains most of the critical user interfaces and interfaces with the Paypal system for getting the payment information to that system.
There's more...The shopping cart is available both as a widget, and as a shortcode that can be added into a content item. If you prefer to use the shortcode to place the shopping cart, simply add the code [show_wp_shopping_cart] to your content item.
www.it-ebooks.info

7Making an SEO
Friendly Site
In this chapter you will learn:
f Making your site visible to search engines
f Optimizing your permalinks for SEO
f Migrating your permalinks safely
f Adding redirects for changed URLs
f Creating meta descriptions for your posts and pages
f Avoiding duplicate content with a robots.txt file
f Pinging third party services
f Enhancing site indexing with XML sitemaps
f Using Google's and Bing's Webmaster tools
f Improving SEO with the SEO Ultimate plugin
IntroductionBuilding a great site is one thing, getting people to visit it is another thing entirely. From a marketing perspective, making your site search engine friendly is essential to your success in driving traffic to the site.
Search engine optimization, or SEO, as it is commonly known, is more of an art than a science. Though the experts are unlikely to agree to one specific approach that is key to your SEO success, there are a number of techniques that are widely recognized as effective in helping you to achieve your goals.
www.it-ebooks.info

Making an SEO Friendly Site
218
In this chapter, we look at some of the most effective tools and techniques for making your WordPress site more search engine friendly. Topics covered include how to create search engine friendly URLS, how to enhance your metadata, how to avoid duplicate content penalties, and how to register with third-party services that can help boost your search engine visibility.
Effective search engine marketing requires planning, coordination, and a dedication to consistent effort over time. There are no fast fixes. You should consider the recipes in this chapter as a good starting point, not a definitive final solution.
Making your site visible to search enginesYou have to set your WordPress configuration to allow the search engines to index the site. If you do not allow the site to be visible to the search engines, then your site's pages will not be included in the search engine indexes and consequently, will not appear in the search results.
During the installation process, the WordPress installer prompts you to make a decision whether to make the site visible to the search engines. In the following screenshot you can see where this appears in the installer:
www.it-ebooks.info
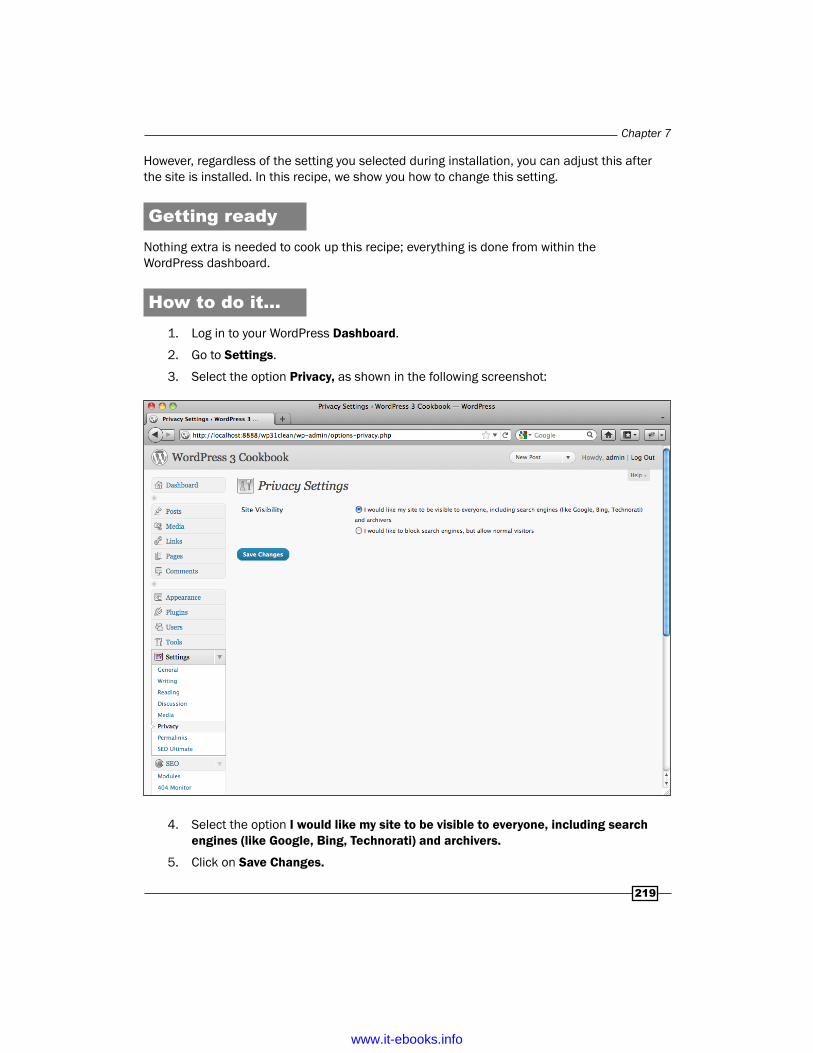
Chapter 7
219
However, regardless of the setting you selected during installation, you can adjust this after the site is installed. In this recipe, we show you how to change this setting.
Getting readyNothing extra is needed to cook up this recipe; everything is done from within the WordPress dashboard.
How to do it...1. Log in to your WordPress Dashboard.
2. Go to Settings.
3. Select the option Privacy, as shown in the following screenshot:
4. Select the option I would like my site to be visible to everyone, including search engines (like Google, Bing, Technorati) and archivers.
5. Click on Save Changes.
www.it-ebooks.info

Making an SEO Friendly Site
220
Optimizing your permalinks for SEOOne of the most influential factors in search engine optimization is the content of your site's URLs. If a URL contains real words relevant to your content and target keyphrases, you are more likely to find that page in the search results.
The process of getting search engine friendly (and human friendly!) URLs is known as URL re-writing. By default, WordPress URLs aren't rewritten so as to avoid compatibility problems with non-Apache servers. A raw, unprocessed URL might look like this:
http://www.mysite.com/index.php?page=start&access=1&category=25
The same URL, after rewriting to improve readability and search engine effectiveness, might look like this:
http://www.mysite.com/about-us/company-information
As you can see, the second URL is a lot more readable and contains appropriate keywords that might help someone find the page. With this rewritten URL, a reader, as well as a search engine crawler, has some idea of the page's content.
In this recipe, we show you how to implement search engine friendly URLs or, as WordPress calls them, permalinks.
Getting readyNothing extra is needed to cook up this recipe; everything is done from within the WordPress dashboard.
How to do it...1. Log in to your WordPress Dashboard.
2. Go to Settings.
3. Click on the option Permalinks.
4. Select the permalink structure you'd like to use, or enter a custom structure.
5. Click on Save Changes.
6. As you can see in the following image, WordPress offers the default structure and three others predefined options:
www.it-ebooks.info

Chapter 7
221
Which permalink structure is the best? There are many online discussions about which permalink structure is the best. There is no dispositive answer to this question. While putting your keyphrases into your URLs is desirable, you must exercise a bit of restraint. Too much crammed into your URLs looks unnatural, creates clumsy URLs that are hard for people to work with, and runs the risk of being labeled deceptive by the search engines.
How it works...The permalinks functionality relies upon the Apache mod_rewrite. The module works by transforming a URL with GET parameters to a human-readable URL. The exact structure used is dictated by the options you select on the Permalinks Settings screen.
www.it-ebooks.info

Making an SEO Friendly Site
222
There's more...Now that you know how to define permalinks in your WordPress blog, let's have a look at creating custom structures for your URLs. You can also define a custom URL structure and enter it in the Custom Structure text field. To define a custom structure, you must enter structure tags in the Custom Structure text field. Separate each structure tag with a separator character.
Two things to keep in mind: First, never put the site URL in the custom structure fields. Second, always end with either %post_id% or %postname% to make sure the URL points to a single unique page.
Structure tags referenceWordPress gives you 10 structure tags that can be used to personalize your permalink structure. They are:
f %author%: The post author
f %category%: The post category
f %day%: The day the post was published, for example 03 for the third day of the month
f %hour%: The hour the post was published
f %minute%: The minute the post was published
f %monthnum%: The month the post was published, for example 01 for January
f %post_id%: The post ID, for example, 735
f %postname%: The name of the post
f %second%: The second the post was published
f %tag%: The tag slug field
f %year%: The year the post was published, for example, 2011
Structure tags can be mixed up together to create a personalized structure. Don't forget to use a separator between structure tags.
The following are the recommended separators:
f the slash (/)
f the underscore (_)
f the hyphen (-)
www.it-ebooks.info

Chapter 7
223
Further optimizing your permalinksWhen you're writing a post or page, WordPress allows you to edit the permalink for the current article. You can use this tool to improve keyword density as well as for getting rid of unnecessary words in your permalinks.
For example, if you have written a post entitled "Introducing my first WordPress theme", the default permalink will be something like this:
/introducing-my-first-wordpress-theme
This permalink is bad because it contains unnecessary words, and not enough keywords. Think about the keywords people will search for on Google. A much better permalink would be:
/free-wordpress-theme-yourthemename
This way, you ensure that people will be able to find your post on search engines while searching for your theme. Adding the "free" keyword is also important because many people will look for a free WordPress theme.
To do this, open the post for editing, then click on the Edit link under the post title as shown in the following screenshot. After you click on the Edit link, the permalink will become editable.
Another use of the URL editing feature is to rid of words which aren't needed in your URL. For example, if you wrote a post entitled "Creating user-defined RSS feeds in your WordPress site", then the permalink created by WordPress would be something like this:
/creating-user-defined-rss-feeds-in-your-wordpress-site
In this permalink a few words such as "in" or "your" aren't necessary at all. Some others can be removed as well to keep your URL short and concise.
www.it-ebooks.info

Making an SEO Friendly Site
224
To continue with the previous example, you could edit the URL to create a tighter structure, such as:
creating-user-defined-rss-feeds-wordpress
Once done, click on the Update button and your changes will be recorded.
Migrating your permalinks safelyWordPress gives you the ability to modify your permalinks structure at any time. Generally, this is not a good idea as it can cause problems with inbound links from other sites and with your users' bookmarks. It is not, however, a complete disaster; if you decide that you must modify your permalinks, WordPress will help you avoid a site full of 404 errors.
Getting readyYou don't need anything special to whip up this recipe; WordPress does all the work!
How to do it...1. Log in to your WordPress Dashboard.
2. Click on the Settings menu.
3. Access the permalinks settings by clicking on the option Permalinks.
4. Make whatever changes you want to the permalinks settings.
5. Click on Save Changes.
That's it, you're done. Your permalinks have been modified, but should not suffer any loss of traffic due to broken links on other websites and search engines, results pages.
How it works...The WordPress core does the work in this recipe. The system is designed to help avoid problems when users change their permalinks structures. When you change the structure, WordPress will automatically direct traffic that comes from the old link to the proper page.
If you are used to working with older versions of WordPress, then you will be pleased to learn that changing permalinks is no longer a recipe for problems. While, in the past, changing permalinks required a third party plugin, or a lot of work with .htaccess, it can now all be done with just the WordPress core.
www.it-ebooks.info
Chapter 7
225
Adding redirects for changed URLsSometimes you need to edit the URL for a specific page or post. In that situation, you run a risk of breaking links to the original page. This recipe will show you how to avoid this problem, using the Permalink Finder plugin.
Getting readyTo execute this recipe, you will need to install the Permalinks Finder plugin. You will need to install this plugin before you can get started. Search for Permalinks Finder inside the Add New Plugins screen of your WordPress site. After you find it, click on it to install, and then activate it.
You can learn more about the plugin by visiting the developer's website at http://www.blogseye.com/i-make-plugins/permalink-finder/
How to do it...1. Click on the Settings menu.
2. On the Settings menu, click on the option Permalink Finder.
3. Select Don't use Common words.
4. Select Don't use short words.
5. Select Don't use numbers.
6. Click on Save Changes.
How it works...The Permalinks Finder plugin works by detecting a request for an invalid URL, then trying to match that to an existing page. Once it finds the proper page, it will send the user to the right page. Additionally, the plugin sends a 301 redirect to help inform search engines and spiders that the link has changed.
www.it-ebooks.info

Making an SEO Friendly Site
226
There's more...The Permalink Finder plugin is also very useful to you if you have migrated an existing website to WordPress. By installing and activating the plugin, you can prevent loss of traffic to both internal pages and the home page of your new WordPress site. The plugin also includes a specific option intended to help those that are migrating from Blogger to WordPress, as you can see in the following screenshot:
Creating meta descriptions for your posts and pages
By default, WordPress doesn't add the meta description tag to the posts you write. While meta descriptions aren't as important as they used to be in SEO, they are always a plus for both your visitors and search engine bots. You do want to include these.
www.it-ebooks.info

Chapter 7
227
In this recipe we look at several solutions for providing your site with a meta description field. In the first part of this recipe, we look at two options for creating static (unchanging) descriptions. In the latter part of the recipe we look at a more advanced solution that lets you edit the description for individual posts.
Getting readyTo complete this recipe, you will need access to your WordPress installation on your server and you will also need a text editor. To create the more advanced solution, discussed in the There's more section, you will need to install the SEO Ultimate plugin, discussed later in this chapter.
How to do it...Let's start by looking at two static solutions, that is, solutions that set a static description that will be applied across all pages. In the first option, you are simply adding a line of code to your theme that specifies the meta description tag's content throughout the site. In the second option, we simply use the text input for the Tagline in the General Settings in the administration system of your WordPress installation. Using the latter method, if you wish to change the meta description for the site, you can do so by simply editing the Tagline value inside the dashboard.
1. Access the files for your WordPress installation on your server.
2. Open header.php for editing – use the file inside your active theme.
3. If you wish to add a standardized meta description for use on all pages, you can do so by adding the following code somewhere inside the <head> of the file:<meta name="description" content="the description you wish to use will go here, inside the quotations" />
4. If you wish to use the site's description, which is editable from within the admin system, use this code instead:<meta name="description" content="<?php bloginfo('description'); ?>" />
5. Save the header.php file.
Meta descriptions are now displayed in the head of your WordPress posts and pages.
How it works...In the first example, the value for the meta description tag is simply hard coded. In the second example, the value input by the administrator for the site's tagline is automatically printed on the page as the value for the meta description field.
www.it-ebooks.info

Making an SEO Friendly Site
228
There's more...While the preceding code is good, it is very limited. It is not ideal to have the same meta description value for all your pages; it would be better if you could control the description on individual pages so that the description tag can be tailored to match the contents of the page.
To achieve a more flexible solution, install the SEO Ultimate plugin, discussed later in this chapter. Once the plugin is installed and activated, each of the posts on your site will now have a new SEO Settings section, as shown in thefollowing screenshot:
The fields include not only a meta description option, but also a title tag and other options.
www.it-ebooks.info
Chapter 7
229
See also f Improving SEO with the SEO Ultimate plugin
Avoiding duplicate content with a robots.txt file
To avoid being penalized for duplicate content on your site, you can use a simple file tailored to that task. This useful file is a basic text file, named robots.txt and it is located at the root of your WordPress blog. The file is used to tell the search engines crawlers that they don't have to follow or index some pages or directories.
Getting readyTo implement this recipe you will need a text editor and access to the server where your WordPress site is installed.
How to do it...1. Create a new blank file on your computer. Name it robots.txt.
2. Copy and paste the following code in the robots.txt file: User-agent: * Disallow: /wp- Disallow: /search Disallow: /feed Disallow: /comments/feed Disallow: /feed/$ Disallow: /*/feed/$ Disallow: /*/feed/rss/$ Disallow: /*/trackback/$ Disallow: /*/*/feed/$ Disallow: /*/*/feed/rss/$ Disallow: /*/*/trackback/$ Disallow: /*/*/*/feed/$ Disallow: /*/*/*/feed/rss/$ Disallow: /*/*/*/trackback/$
www.it-ebooks.info

Making an SEO Friendly Site
230
3. Save the file.
4. Upload it to your WordPress site root.
Obviously this recipe assumes you don't already have a robots.txt file on your site. If you do, edit that file, rather than overwriting it completely with a new one!
How it works...This robots.txt file prevents duplicate content by telling all search engines crawlers not to index search results, feeds, trackbacks URLs, as well as wp-* directories.
There's more...The robots.txt file is the most common technique used to avoid duplicate content on web sites. Though, as you can guess, this isn't the only way to protect your WordPress blog from search engine optimization problems caused by duplicate content.
A plugin to remove duplicate contentWhile the robots.txt recipe above is effective at preventing the double indexing of the content on your site, there are other ways that your site may find itself with duplicate content. If you have saved multiple copies of the same post or page during editing, or if you are using a scraper or RSS aggregator, it is possible that multiple copies of the same post may wind up in your site; if those circumstances arise, the robots.txt fix outlined above will not solve the problem.
The solution is either to diligently monitor your site, or install an automated tool to watch it for you. The Delete Duplicate Posts plugin is one solution. The plugin will monitor your site each cron run, search for duplicate content, then eliminate the duplicates. The settings for the plugin, as shown in the following screenshot, allow you to set automatic or manual cleaning, determine the deletion criteria, and even set up e-mail notifications when duplicate posts are found:
www.it-ebooks.info

Chapter 7
231
Pinging third-party servicesIf you're interested in SEO, then you are interested in getting more visitors. A good way to bring new readers is to ping third-party services.
In this recipe, we're looking at third-party services, such as Technorati or Google blog search. These services publish links to popular posts and allow visitors to search among blogs.
Pinging is simply the act of notifying these services that new content is available on your site. After you have successfully pinged for example, Technorati, a crawler from that site will visit your site and index your newest content, making it available to their visitors.
www.it-ebooks.info

Making an SEO Friendly Site
232
Getting readyTo ping a website, you have to get the trackback URL. For example, Technorati trackback URL is http://rpc.technorati.com/rpc/ping.
Finding trackback or ping URLs isn't always easy as most websites just display a link on their footer, or even worse, on a specific page. Often the quickest way to find the ping URL is to run a Google search. To perform this search quickly and accurately, use the following specific syntax:site:technorati.com ping url
How to do it...Once you have the ping URLs of the websites you'd like to notify about your new content, you have to configure WordPress so that it will automatically ping the selected website when you write new posts or pages.
To do so, follow this short procedure:
1. Log in to your WordPress Dashboard.
2. Go to Settings.
3. Click on Writing.
4. Scroll down to the bottom of the page. You'll see the Update Services paragraph, which includes a text area in which you can specify one or more URLs you'd like to ping.
5. Paste your ping URLs in the text area. Make sure to write each URL on a new line.
6. Save your URLs by clicking on the Save Changes button.
That's all it takes. The next time you publish a new post, your WordPress system will automatically ping the sites and notify them of the new content.
How it works...To notify other websites about the changes that you made in yours, WordPress uses the RPC (Remote Procedure Call) technology that consists of an inter-process communication technology to send a signal to another web site. When a web site (one that accepts pings) receives a ping, it automatically executes a bunch of functions. For example, it can tell a crawler to visit and index the site which has pinged it, or it can post a comment to the blog. This is exactly how trackbacks or pingbacks work.
www.it-ebooks.info

Chapter 7
233
The WordPress Codex includes a list of recommended Ping URLs and related services. Visit http://codex.wordpress.org/Update_Services
Enhancing site indexing with XML sitemapsWhile it is one thing to create a website and build pages of content, it is another thing entirely to make sure that all of those pages are indexed by the search engines. The simple act of creating a web page does not assure that it will be indexed. While the search engines today are much better at detecting and indexing new content, it is best to provide them with some guidance and to help assure that all the pages are indexed in a timely fashion. The best way to guarantee that the search engine crawlers can see and index all of your site pages is to use an XML sitemap.
According to sitemaps.org, "sitemaps are an easy way for webmasters to inform search engines about pages on their sites that are available for crawling. In its simplest form, a sitemap is an XML file that lists URLs for a site along with additional metadata about each URL (when it was last updated, how often it usually changes, and how important it is, relative to other URLs in the site) so that search engines can more intelligently crawl the site."
In other words, although using a sitemap doesn't guarantee that absolutely all your pages will be indexed by search engines, it does gives crawlers some information to do a better job. All three of the major search engines follow the XML sitemaps protocol and, as you will see in a later recipe, Google and Bing provide services to help you monitor the effectiveness of the sitemaps.
Google and Bing Webmaster services are discussed in the next recipe in this chapter.
Sitemaps can be created manually, but that approach requires you to update the sitemap file after each new post or page is published. The better course is to use a third-party plugin that's purpose-built for managing your XML sitemaps. In this recipe, we look at implementing the XML Sitemap Generator for WordPress. At the end of this recipe, you will have an XML sitemap that automatically updates to reflect your content changes and notifies the search engines that there are new pages to index.
www.it-ebooks.info

Making an SEO Friendly Site
234
Getting readyXML Sitemap Generator is a third-party plugin. Accordingly, you must first install and enable this plugin on your WordPress site. Search for XML Sitemap Generator inside the Add New Plugins screen of your WordPress site. After you find it, click on it to install, and then activate it.
You can learn more about this plugin by visiting the developer's site at http://www.arnebrachhold.de/projects/wordpress-plugins/google-xml-sitemaps-generator/
How to do it...1. Log in to your WordPress Dashboard.
2. Go to the Settings tab.
3. Click on the option XML-Sitemap.
4. On the XML Sitemap Generator Settings page you can select from multiple options, as shown in the next screenshot. The default settings will be fine for most sites.
Note: If you are using a dedicated robots.txt file, such as the one recommended earlier in this chapter, de-select the option Add sitemap URL to the virtual robots.txt file.
5. After you have made your selections, click on the Update options button.
If you want to check the result, simply open a browser and visit http://www.yoursite.com/sitemap.xml and you should be able to see your new sitemap. If the output is not what you expected, repeat the steps above to adjust the settings.
www.it-ebooks.info

Making an SEO Friendly Site
236
How it works...A sitemap is, as an RSS feed, a good old XML file, encoded in UTF-8. Here's an example of a sitemap:
<?xml version="1.0" encoding="UTF-8"?><urlset xmlns="http://www.sitemaps.org/schemas/sitemap/0.9"><url> <loc>http://www.example.com/</loc> <lastmod>2005-01-01</lastmod> <changefreq>monthly</changefreq> <priority>0.8</priority></url><url> <loc>http://www.example.com/catalog?item=73&desc= vacation_new_zealand</loc> <lastmod>2004-12-23</lastmod> <changefreq>weekly</changefreq></url><url><loc>http://www.example.com/catalog?item=74&desc= vacation_newfoundland</loc> <lastmod>2004-12-23T18:00:15+00:00</lastmod> <priority>0.3</priority></url><url> <loc>http://www.example.com/catalog?item=83&desc= vacation_usa</loc> <lastmod>2004-11-23</lastmod></url></urlset>
Let's have a look at the different attributes of this standard sitemap:
f urlset: Reference the sitemap protoc (required)
f urn: This is the parent tag for each URL of your site (required)
f loc: The URL of the page; must start with http:// (required)
f lastmod: The date of the last modification on the page; format must be YYYY-MM-DD (optional)
f changefreq: How frequently the content of the page is updated; values can be always, hourly, daily, weekly, monthly, yearly, or never (optional)
f priority: The importance of this URL relative to other URLs from your site; values range from 0.0 to 1.0 and the default priority is 0.5 (optional)
www.it-ebooks.info

Chapter 7
237
If you decide to create your own, you will need to follow a few important rules:
f Sitemaps must have an .xml extension.
f Sitemaps must be encoded using UTF-8.
f All data in a sitemap must be entity-escaped. For example, you can't include the less than character (<). You have to use the related escaped entity, which is <.
f A sitemap must always begin with the <urlset> tag, and close with the corresponding closing </urlset> tag.
f <url> and <loc> tags are mandatory.
See also f Using Google's and Bing's Webmaster Tools
Using Google's and Bing's Webmaster ToolsNow that you have created an XML sitemap, you should also consider taking advantage of two services maintained by Google and Bing. Both services have similar names and provide similar functionality: Google Webmaster Central and Bing Webmaster Tools.
These popular services provide a place for website owners to gain insight into how their websites are performing on the search engines. Both systems provide a set of tools and reports that allow you to see how your site is ranked and what you can do to enhance it.
Both systems require you to first verify your site. While you can verify manually, by adding a file to your server, or a tag to your page code, in this recipe we explore an easy-to-use plugin that can make verification easier. The plugin is called the All in One Webmaster and it handles Google, Bing, and a number of other services as well.
Getting readyAll in One Webmaster is a third-party plugin. Accordingly, you must first install and enable this plugin on your WordPress site. Search for All in One Webmaster inside the Add New Plugins screen of your WordPress site. After you find it, click on it to install, and then activate it.
You can learn more about this plugin by visiting the developer's site at http://arpitshah.com/post/10117563852/all-in-one-webmaster
Next, if you have not done so already, register with Google and with Bing to gain access to their webmaster tools. You will need to have access to these services to complete this recipe.
www.it-ebooks.info
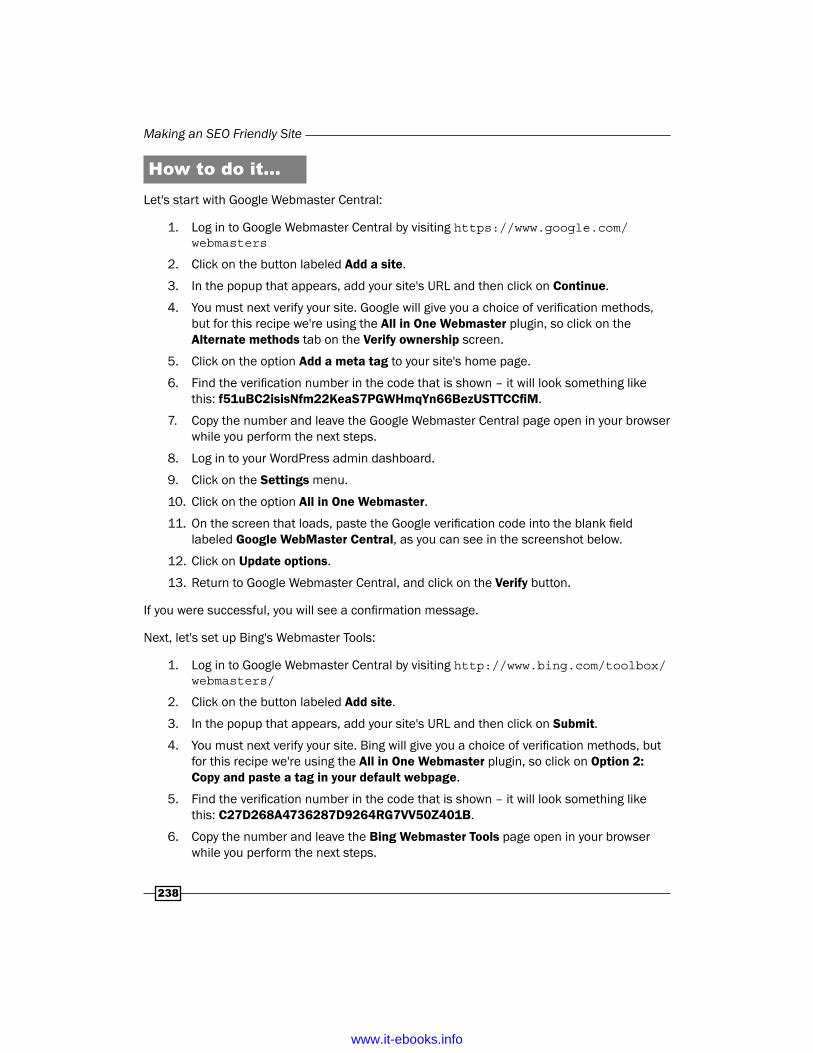
Making an SEO Friendly Site
238
How to do it...Let's start with Google Webmaster Central:
1. Log in to Google Webmaster Central by visiting https://www.google.com/webmasters
2. Click on the button labeled Add a site.
3. In the popup that appears, add your site's URL and then click on Continue.
4. You must next verify your site. Google will give you a choice of verification methods, but for this recipe we're using the All in One Webmaster plugin, so click on the Alternate methods tab on the Verify ownership screen.
5. Click on the option Add a meta tag to your site's home page.
6. Find the verification number in the code that is shown – it will look something like this: f51uBC2isisNfm22KeaS7PGWHmqYn66BezUSTTCCfiM.
7. Copy the number and leave the Google Webmaster Central page open in your browser while you perform the next steps.
8. Log in to your WordPress admin dashboard.
9. Click on the Settings menu.
10. Click on the option All in One Webmaster.
11. On the screen that loads, paste the Google verification code into the blank field labeled Google WebMaster Central, as you can see in the screenshot below.
12. Click on Update options.
13. Return to Google Webmaster Central, and click on the Verify button.
If you were successful, you will see a confirmation message.
Next, let's set up Bing's Webmaster Tools:
1. Log in to Google Webmaster Central by visiting http://www.bing.com/toolbox/webmasters/
2. Click on the button labeled Add site.
3. In the popup that appears, add your site's URL and then click on Submit.
4. You must next verify your site. Bing will give you a choice of verification methods, but for this recipe we're using the All in One Webmaster plugin, so click on Option 2: Copy and paste a tag in your default webpage.
5. Find the verification number in the code that is shown – it will look something like this: C27D268A4736287D9264RG7VV50Z401B.
6. Copy the number and leave the Bing Webmaster Tools page open in your browser while you perform the next steps.
www.it-ebooks.info

Chapter 7
239
7. Log in to your WordPress admin dashboard.
8. Click on the Settings menu.
9. Click on the option All in One Webmaster.
10. On the screen that loads, paste the Google verification code into the blank field labeled Bing WebMaster Central, as you can see in the following screenshot:
11. Click on Update options.
12. Return to Bing Webmaster Tools, and click on the Verify button.
13. If you were successful, you will see a confirmation message.
How it works...These two services work in a very similar fashion and provide very similar tools. Let's look at Google Webmaster Central for an example of what can be done.
www.it-ebooks.info
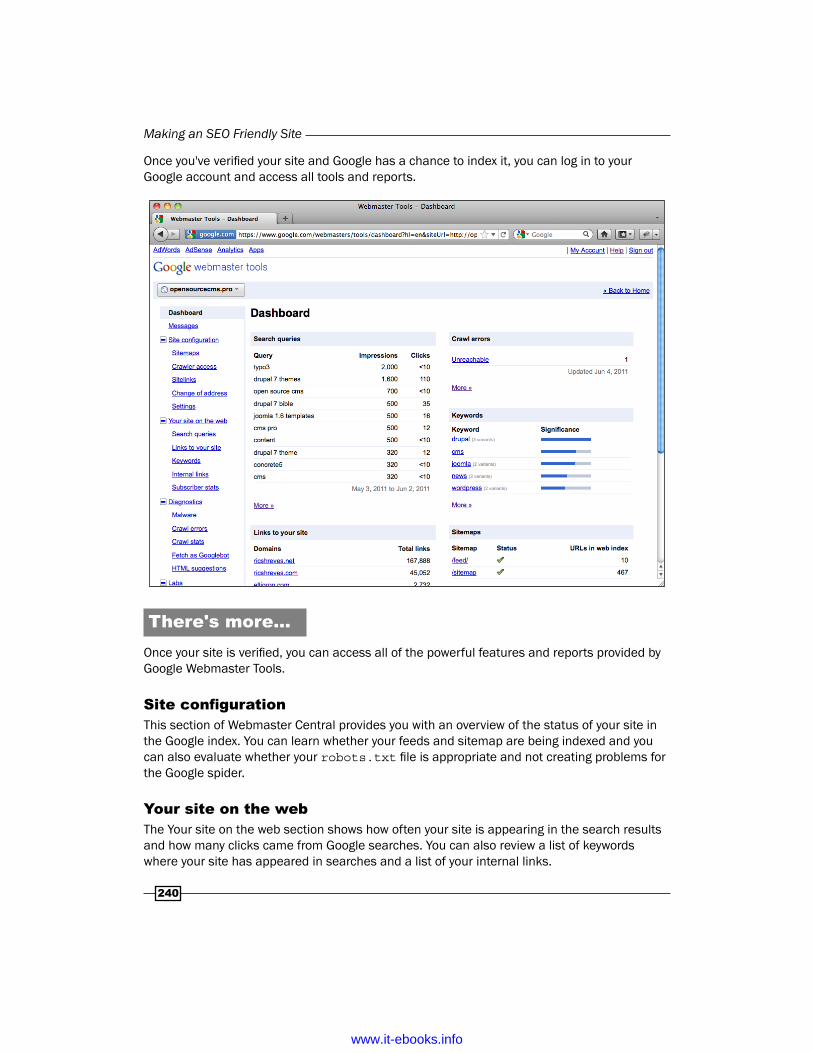
Making an SEO Friendly Site
240
Once you've verified your site and Google has a chance to index it, you can log in to your Google account and access all tools and reports.
There's more...Once your site is verified, you can access all of the powerful features and reports provided by Google Webmaster Tools.
Site configurationThis section of Webmaster Central provides you with an overview of the status of your site in the Google index. You can learn whether your feeds and sitemap are being indexed and you can also evaluate whether your robots.txt file is appropriate and not creating problems for the Google spider.
Your site on the webThe Your site on the web section shows how often your site is appearing in the search results and how many clicks came from Google searches. You can also review a list of keywords where your site has appeared in searches and a list of your internal links.
www.it-ebooks.info

Chapter 7
241
DiagnosticsAs the name implies, the Diagnostics section helps you identify whether there are any significant problems with your site – from Google's perspective. Reports indicate whether Google suspects there is malware on our site and more importantly, gives you insights into crawl errors and statistics. This section also gives you a tool that lets you view your site as Google sees it, which is useful in helping to identify whether you key meta data and contents are visible to the Google spider.
LabsLabs contains a varying set of new tools in development at Google Labs. Check this section regularly as the contents do change and sometimes you can find some very interesting tools that are still largely new to the Google world.
See also f Enhancing site indexing with XML sitemaps
Improving SEO with the SEO Ultimate pluginSEO is a popular topic and there are many WordPress plugins dedicated to enhancing your site's SEO. One of the best of the group is SEO Ultimate, a plugin that includes a large number of features to help optimize your site for the search engines. Among the functionality included with this plugin:
f Generate META tags automatically
f Edit META tags throughout the site
f Monitor for 404s
f Maintain canonical URLs
f Handle robot tags
f Insert code into the top or bottom of your pages
f Automatically create internal links
The plugin also includes some things you might not expect, including a competitor analysis tool and the ability to automatically insert a linkbox at the end of each content item.
www.it-ebooks.info

Making an SEO Friendly Site
242
Getting readySEO Ultimate is a third-party plugin. Accordingly, you must first install and enable this plugin on your WordPress site. Search for SEO Ultimate inside the Add New Plugins screen of your WordPress site. After you find it, click on it to install, and then activate it.
To learn more about this plugin, visit the developer's site at http://www.seodesignsolutions.com/wordpress-seo/
How to do it...After you have successfully installed the SEO Ultimate plugin, you will want to configure it a bit. To do so, follow these simple steps:
1. Log in to your WordPress Dashboard.
2. Click on the SEO menu.
3. On the page that appears, select the modules you wish to use; disable those you do not intend to use.
4. Among the key modules you will want to configure are the following:
� Meta Descriptions
� Meta Keywords
� Meta Robot Tags
� Slug Optimizer
� Title Tag Rewriter
5. As you configure each of these options, click on the Save Changes button after you finish each.
There's more...Earlier in this chapter we discussed creating custom page titles and meta descriptions. Those recipes give both a manual option for dealing with these areas and the option to use the SEO Ultimate plugin. For those who want the most control, the SEO Ultimate option is the better choice. If you wish to use the manual approach, then you should disable the relevant modules in the plugin.
Five more tips for a better SEOIn this chapter, we saw many tips and tools to enhance your site's SEO and get more traffic from the search engines. SEO is a big subject and there are many other things that you can do to improve your likelihood of success. Here are five quick tips to help you get better rankings.
www.it-ebooks.info

Chapter 7
243
Get backlinksIn terms of SEO, the number of links back to your site is a key factor. Basically, the more backlinks you have, the better you'll be ranked. Getting backlinks isn't always easy. If, however, you produce good content, other sites will link to you. If you want to be more aggressive about building links, seek out similar sites and contact them directly to propose exchanging links.
Use the proper h tags structureProper use of h tags is important both for SEO and for accessibility. The tags should be used consistently, and in a fashion that clearly indicates the hierarchical structure of the content item.
An example of a bad title would be this:
<strong><font color="#00FF00" size="24px">My blog post title</font></strong>
A better title would look like this:
<h2>My blog post title</h2>
With the following in your style.css file:
H2 {font-family: Arial; size: 24px; color: #00FF00; font-weight: bold;}
Both of these code examples visually appear the same, but the second is much better for SEO purposes. Do not hesitate to check your theme file and verify that they're using a proper h tag structure.
Make sure your blog is XHTML validSearch engines love valid XHTML websites. Having a valid XHTML codeset means that your pages are coded according to the W3C recommendations.
To check if your site is valid in terms of XHTML, go to http://validator.w3.org/ and type your site's URL. If you have any errors, the validator will tell you where they're located and why it is a problem.
Use keywords in your content itemsAn important point for search engine ranking is keyword density. This refers to the frequency that a term appears throughout the code for a specific page.
Let's say you wrote a post about SEO for WordPress blogs. You'll probably want your post to be featured in search engines results pages when someone searches for keywords as such as 'WordPress SEO', or 'blog SEO'.
www.it-ebooks.info
Making an SEO Friendly Site
244
To improve your odds for success, you should start by writing a keyword-rich title for the article. A good example would be SEO for WordPress blogs or Tips and tricks for better WordPress SEO. These are good titles because they are concise, descriptive, and contain appropriate keywords.
It is also important that your post content contains the same keywords. You don't need to repeat them on each paragraph of course, but make sure to use your keywords frequently. You should also make sure the meta tags for page reflect the same keywords. Taken together, when managed properly, these factors will give you appropriate keyword density and improve your odds of ranking well for that page.
See also f Creating meta descriptions for your posts and pages
www.it-ebooks.info
8Enhancing Usability
and Accessibility
In this chapter you will learn about:
f Creating print friendly pages
f Extending WordPress search
f Enhancing navigation with breadcrumbs
f Stopping SPAM
f Optimizing performance with cache management
f Displaying a login form
f Displaying related posts
f Creating a Feature Posts block
f Adding a sitemap for your site visitors
f Creating a better tag cloud
f Adding lightboxes for your images
IntroductionGood site design includes putting thought into how to make the site easy to use to the widest number of people. In this chapter, we look at a number of plugins and techniques that are intended to make your site friendlier for visitors.
The recipes in this chapter are concerned with improving navigation, and making it easier for people to discover popular and relevant content. Usability is, in other words, not only good for the users, but also good for the site owners, as a usable site typically translates into more page views and better user engagement.
www.it-ebooks.info

Enhancing Usability and Accessibility
246
In this chapter, we also look at some enhancement techniques that are popular in site design today, for example, implementing tag clouds and using lightboxes for image display. While none of the recipes in this chapter are absolutely essential for your site, it is definitely worth considering adding at least some of these to your site.
Creating print-friendly pagesYes, it may seem a little obsolete in a technically advanced world and it isn't green at all, but the fact is that many Internet users still print pages for offline consultation. While some social sharing plugins also offer print options and you can always use your browser's print function, you may want to have more control over what your pages look like when printed.
In this recipe we install a plugin that not only enables a print friendly option, but also gives you complete control over the output.
Getting readyTo execute this recipe, you will need to install the WP Print Friendly plugin. You will need to install this plugin before you can get started. Search for WP Print Friendly inside the Add New Plugins screen of your WordPress site. After you find it, click on it to install, and then activate it.
You can learn more about the plugin by visiting the developer's website at http://www.thinkoomph.com/plugins-modules/wp-print-friendly/
If you wish to apply any of the more advanced techniques discussed later in this recipe, you will also need a code editor and access to the files of the WordPress installation on your server.
This plugin has been known to cause conflicts with some SEO and permalinks plugins. Consult the plugin's FAQ page on WordPress.org to view an updated list.
How to do it...Let us start with getting the system ready and configuring the plugin:
1. Log in to the WordPress Dashboard.
2. You will see a notification at the top of the page, advising you to refresh your permalinks, as shown in the following screenshot:
www.it-ebooks.info

Chapter 8
247
3. Click on the Settings menu.
4. Click on the Permalinks option.
5. Click on the Save Changes button.
6. Click on the WP Print Friendly option in the Settings menu. You will see the WP Print Friendly page, as shown in the following screenshot:
www.it-ebooks.info

Enhancing Usability and Accessibility
248
7. Select the options you want.
8. Click the Save Changes button.
How it works...The WP Print Friendly plugin works by tapping into the templating system of WordPress 3. The plugin leverages features of the core, specifically the optional templates and the system CSS.
There's more...To get the most out of this plugin, you need to do a bit more. You can style both the print link and the resulting print page.
To style the print linkAs you can see in the screenshot above, the plugin specifies a class specifically for the purpose of handling the styling of the print link that appears on the pages and posts of your site. The default class is named print_link, but you can change it at any time from the WP Print Friendly settings page.
To take advantage of this feature, you will need to edit your theme's active stylesheet and add a definition for .print_link.
To style the print pageIf you look inside the WP Print Friendly plugin directory you will find a file named default-template.php. To gain control over the formatting of your print friendly pages, follow these steps:
1. Copy the default-template.php file.
2. Paste the copy into your active theme's directory.
3. Rename the file wpf.php.
4. Open the file for editing.
5. Make any customizations you desire.
6. Save the file.
Now, when someone clicks on the print link on one of your articles, they will be shown the new template you just created. This feature makes it possible for you to tailor the print friendly pages to fit the identity of your site and to carry relevant information you want people to have when they print the article.
www.it-ebooks.info

Chapter 8
249
Note that since the plugin uses the default templating functionality built into WordPress 3, you can also create template suggestions to be used in specific situations. If, for example, you want to have different print formats for various taxonomy terms, or for custom content types, you can do so. Follow the standard WordPress naming conventions to call the relevant template. To produce a template for use by a specific taxonomy term use, wpf-[taxonomy-term].php. To produce a template for use by a custom content type, use wpf-[custom-content-type-name].php.
Extending WordPress searchWordPress comes with a site search functionality. The default search is quite good, but if you want to obtain a more complete set of search results, you will need to look at installing a plugin that provides enhanced search capabilities.
In this recipe, we look at how you can index your site more completely and provide a more comprehensive set of search results for your site user.
Getting readyTo execute this recipe, you will need to install the Search Engine plugin. You will need to install this plugin before you can get started. Search for Search Engine inside the Add New Plugins screen of your WordPress site. After you find it, click on it to install, and then activate it.
You can learn more about the plugin by visiting the developer's website at http://scottkclark.com/wordpress/search-engine/
How to do it...There's a bit of configuration needed for the plugin to work properly:
1. Log in to your WordPress Dashboard.
2. Click on Search Engine menu.
www.it-ebooks.info

Enhancing Usability and Accessibility
250
3. Click on Wizard option. The following screenshot will appear:
Be patient. Site indexing can take a while!
www.it-ebooks.info

Chapter 8
251
4. Click Show Advanced Options to expose all the configuration options for the plugin.
5. Select your site's name from the Configure a New Index of an Existing Site. If your site name does not appear there, enter it in the field Index a New Site.
6. Select the configuration options you desire from the choices on the page.
7. Click on the Index my Site button.
How it works...The Search Engine plugin indexes pages in a comprehensive fashion. Unlike the default WordPress search, which is focused exclusively on your article content, the Search Engine plugin indexes the pages as the visitors see them; that means not only posts and pages, but also custom content types, plugin generated content, sidebars, and widgets.
You can control the indexing through the use of a robots.txt file. Files blocked in robots.txt will also not be indexed, unless you configure the plugin to ignore the robots.txt file. If you need more granular control, exclude content within a specific section of a page by added the class .noindex to the element tag.
There's moreYou can index your site manually if you wish, but it's much more convenient to have it indexed frequently and automatically. To set up automatic indexing, you will need to have a server that supports cron. If you have access to cron, then follow these steps:
1. Log in to the WordPress Dashboard.
2. Click on the Search Engine menu.
3. Click on the Settings option.
www.it-ebooks.info

Enhancing Usability and Accessibility
252
4. Copy the information in the field URL to Cronjob, as you can see in the following screenshot:
5. Access your web hosting control panel, or use SSH and work on the command line.
6. Access the cron functionality on the control panel.
7. Enter the data you copied from the URL to Cronjob.
8. Set the frequency you want the cron job to run.
9. Save the changes.
Your site will now be automatically indexed, at the frequency you have specified. To check to see when the last indexing was run, access the information in your Dashboard by clicking on the option Index Templates on the Search Engine menu.
Enhancing navigation with breadcrumbsIf you are looking for ways to improve your site's usability, adding a breadcrumb trail is definitely an option to consider.
www.it-ebooks.info

Chapter 8
253
What's a breadcrumb trial? According to Wikipedia:Breadcrumbs typically appear horizontally across the top of a webpage, usually below any title bars or headers. They provide links back to each previous page that the user navigated through in order to get to the current page, for hierarchical structures usually the parent pages of the current one. Breadcrumbs provide a trail for the user to follow back to the starting/entry point of a website. Generally, a greater than symbol (>) is used as hierarchy separator, although other glyphs can be used to represent this.
In this recipe we explore using a plugin to add breadcrumbs functionality to your site.
Getting readyTo execute this recipe, you will need to install the Breadcrumbs Plus plugin. You will need to install this plugin before you can get started. Search for Breadcrumbs Plus inside the Add New Plugins screen of your WordPress site. After you find it, click on it to install, and then activate it.
You can learn more about the plugin by visiting the developer's website at http://snippets-tricks.org/proyecto/breadcrumbs-plus-plugin/
In addition to installing the plugin, you will also need a code editor and access to the files of the WordPress installation on your server.
How to do it...Setting up a breadcrumb trail involves two separate processes. First you must install the plugin, then you must add a line of code to your theme.
Once you have installed and activated the plugin, follow these steps to get the code into your theme files:
1. Access your WordPress installation on your server.
2. Download the template files you are using on your site.
3. Open each template file for editing.
www.it-ebooks.info

Enhancing Usability and Accessibility
254
4. Add to each file the following line of code:<?php breadcrumbs_plus(); ?>
Make sure you don't place the line of code inside of an existing php block!
5. Save the files and return them to your server, overwriting the original files.
If you visit your site, you should now see a breadcrumb trail on all the pages whose templates you modified.
Which templates to modify?The answer depends on what theme you are using and which content types and site functions you have enabled. Looking at the default TwentyTen theme, most people would certainly want to add the breadcrumb function to the file single.php, which controls the display of single posts and page.php, which controls the display of the page content type. Additionally, if you are using categories, you will want to modify category.php. If you are using tags, also modify tags.php. If you are using the archive functionality, modify archive.php. Another option is to add breadcrumbs to the author pages, by modifying author.php. If you have created custom content types, or you are using a more complex theme, this list may well be longer.
How it works...The Breadcrumbs Plus plugin enables the breadcrumbs_plus () function. The function includes a number of variables you can use to customize your breadcrumb display, as discussed in the next section.
You control the placement of the breadcrumbs on the page by where you place the function inside the template files, and through the use of CSS styling.
There's more...The Breadcrumbs Plus plugin includes a set of arguments that can be added to the function to customize the display. The function syntax is as follows:
<?php breadcrumbs_plus( $args ); ?>
The possible arguments include:
f prefix: Used to add things, typically code for styling, before the breadcrumbs.
f suffix: Used to add things, typically the closing tags for styling, after the breadcrumbs.
www.it-ebooks.info

Chapter 8
255
f title: The text shown before the first link in the breadcrumb trail. f home: The name to be shown for the home page link. f sep: The character to be used in between each item in the breadcrumb trail. f front_page: Set to true to show the breadcrumb trail on the home page. f bold: Set to true to make the text in the breadcrumb trail bold. f show_blog: Set to true to display the name of the blog before individual posts. f echo: The echo parameter appears to have no functionality in the present version of
the plugin. f singular_post_taxonomy: Set to display the category to which a single
post belongs.
The default values are:
f 'prefix' => '<p>' f 'suffix' => '</p>'
f 'title' => _( 'You are here', 'breadcrumbs-plus' )
f 'home' => _( 'Home', 'breadcrumbs-plus' )
f 'sep' => '>>',
f 'front_page' => false
f 'bold' => true
f 'show_blog' => true
f 'echo' => true
f 'singular_post_taxonomy' => 'category'
Let's look at an example of how to use this information. The default formatting provides output like this:
You are here: Home >> [category] >> [post name]
We want to construct a custom breadcrumb trail that looks like this:
History : Top > [category] > [post title]
To achieve this change in the output, we need to modify the function to override the default values. The customized function would look like this:
<?php breadcrumbs_plus( array( 'title' => 'History : ', 'home' => 'Top', 'sep' => '>') ); ?>
You can also modify the styling of the breadcrumbs trail by adding the class .breadcrumbs-plus to your active theme's stylesheet.
www.it-ebooks.info

Enhancing Usability and Accessibility
256
Stopping SPAMAll website owners have to be alert for SPAM postings on their websites. Monitoring your site and policing comments to remove unwanted commercial solicitations is not only time consuming, but also prone to error. SPAM can clog up the comments on your site and create a bad impression of your professionalism. Moreover, it can also be a potential security issue, as SPAM can be used as a vector for malware.
In this recipe, we look at implementing the Akismet system to help automatically monitor your site for SPAM comments and keep them from appearing to your site visitors.
Getting readyTo execute this recipe, you will be using the Akismet plugin. This plugin is included in the WordPress core. You should not need to install it – unless you have previously deleted it from your system. Check the Plugins page to see if it is there and if so, activate it. If it is not present, you will need to install this plugin before you can get started. Search for Akismet inside the Add New Plugins screen of your WordPress site. After you find it, click on it to install, and then activate it.
You can learn more about the plugin by visiting the developer's website at http://akismet.com/
How to do it...To create featured posts, simply add it to the "featured" category. The five most recent posts will be shown on your blog homepage.
1. Log in to your WordPress Dashboard.
2. Click on the Plugins menu.
3. Click on the Plugins option.
4. If you have not done so already, click on the Activate link for the Akismet plugin.
5. The system will provide a notification that you need to enter an Akismet API key. Either click the link in the warning, or click the option Akismet Configuration on the Plugin menu.
www.it-ebooks.info

Chapter 8
257
6. On the Akismet Configuration page, shown in the next screenshot, you will need to enter your Akismet API key. If you do not have a key, you will need to visit http://akismet.com and obtain a key. Keys are free for personal sites.
7. Select any other options you desire.
8. Click on the Update options button.
www.it-ebooks.info

Enhancing Usability and Accessibility
258
How it works...Akismet was created by Automattic, the creators of WordPress. The plugin is designed to provide a system for reporting and then identifying SPAM and SPAMmers. When a comment is posted, Akismet will assess it on a variety of factors in an attempt to identify whether it is potential SPAM. If Akismet suspects it is SPAM, the comment will automatically be put into the SPAM queue and a notification will appear on your dashboard, as seen in the following screenshot :
You can then check the comment in the queue. If it is SPAM you can delete it permanently. If it is not SPAM, you can mark it as Not Spam and return it to the publication queue. Over time, the Akismet system will continue to refine its SPAM detection abilities and learn from what you tell it about the content of the comments on the site.
Optimizing performance with cache management
As both website users and website owners, we want sites to load quickly without long delay. With Google now looking at site performance as a factor in search rankings, it is even more important that a site performs well relative to competitors. Site performance is impacted by a number of factors; one of the key issues is the amount of time it takes the server to generate pages on the site. An easy way to improve your site's performance is to implement caching, which takes some of the load off the server by making copies of frequently used files and displaying them to site visitors, instead of relying on the server to construct/retrieve the files every single time they are requested.
In this recipe, we look at implementing the powerful WP Super Cache plugin. When properly configured, this plugin can achieve considerable improvements in site performance.
www.it-ebooks.info

Chapter 8
259
Getting readyTo execute this recipe, you will need to install the WP Super Cache plugin. You will need to install this plugin before you can get started. Search for WP Super Cache inside the Add New Plugins screen of your WordPress site. After you find it, click on it to install, and then activate it.
You can learn more about the plugin by visiting the developer's website at http://ocaoimh.ie/wp-super-cache/
How to do it...The WP Super Cache plugin is a complex piece of code with a number of configuration options. Let's look at basic setup first:
1. After you install and activate the plugin, you will see a notification that the plugin must be enabled, as shown in the following screenshot:
www.it-ebooks.info

Enhancing Usability and Accessibility
260
2. Click on the Settings menu.
3. Click on the option WP Super Cache.
4. On the WP Super Cache Settings page, seen in the next screenshot, select the choice Caching On.
5. Click on Update Status.
Caching is now enabled for your site; however, to get the most out of the plugin, you need to explore the options found on the various tabs seen at the top of the WP Super Cache Settings page, as shown in the following screenshot:
www.it-ebooks.info

Chapter 8
261
Follow these steps to configure the plugin:
1. On the WP Super Cache Settings page, select the tab Advanced.
2. Select the option Cache hits to this website for quick access.
3. Select the option Use mod_rewrite to serve cache files.
4. Select Compress pages so they're served more quickly to visitors.
5. Select 304 Not Modified browser caching. Indicate when a page has not been modified since last requested.
6. Select Don't cache pages for known users.
7. Select Cache rebuild. Serve a supercache file to anonymous users while a new file is being generated.
8. Select Extra homepage checks.
9. Click Update Status.
The system will display a notice that the Rewrite rules must be updated, as shown in the following screenshot:
Scroll down the page and click on the button labeled Update Mod_Rewrite Rules.
You probably also want to exclude certain types of pages from being cached, particularly search results and feeds. You can select those options, and others, on the Advanced tab.
How it works...WP Super Cache's purpose is static caching. The plugin generates HTML files that are served directly by Apache without processing comparatively heavy PHP scripts, resulting in a significant increase in speed for serving of your WordPress blog.
www.it-ebooks.info

Enhancing Usability and Accessibility
262
There's more...This plugin supports a number of options. You should explore all the tabs to learn what choices appear. As you grow more familiar with the plugin, you may wish to be more aggressive about your caching. Let's look at two techniques you can apply.
Using a content delivery networkWP Super Cache offers CDN support. CDN is a content delivery network, which is a system of computers that contain cached copies of data. As the network distributes the load between multiple computers, it tends to increase performance and reduce latency. By default, the system uses origin pull to populate the CDN. If you prefer to upload and synch the files yourself, you can use the CDN Sync Tool plugin.
You can set up CDN support by clicking on the CDN tab on the WP Super Cache Settings page.
Preloading contentAnother technique that can improve performance and can also help your Google ranking, is the selective use of preloading. Click on the Preload tab on the WP Super Cache Settings page to see the options available. Select the option Preload mode, then click on Preload Cache Now. The system will make static copies of the pages on your website and serve them to visitors.
If you have a very large site, you should limit the number of items preloaded, as the plugin will create a large number of files to support the caching. If you are on a shared webhost, excessive preloading may cause you problems, or may even be prohibited by the host.
Displaying a login formHaving a login form visible on the page will improve the usability of your site. Instead of having to click on a link and wait for a new page to load, users can directly enter their username and password and immediately log in.
In this recipe, we implement the Sidebar Login plugin to add not only a login form, but also password reminder and registration links. The following screenshot shows the plugin in action, with the login widget assigned to the right sidebar of the default theme:
www.it-ebooks.info

Chapter 8
263
Getting readyTo execute this recipe, you will need to install the Sidebar Login plugin. You will need to install this plugin before you can get started. Search for Sidebar Login inside the Add New Plugins screen of your WordPress site. After you find it, click on it to install, and then activate it.
You can learn more about the plugin by visiting the developer's website at http://wordpress.org/extend/plugins/sidebar-login/
How to do it…1. Log in to your WordPress Dashboard.
2. Click on the Appearance menu.
3. Click on the option Sidebar Login.
4. On the Sidebar Login configuration screen, shown in the next screenshot, you can customize the appearance of the login box and related links.
5. Click on the Save Changes button.
6. Click on the Widgets link on the Appearance menu.
7. Grab the Sidebar Login widget and drag it to the widget area where you want it to appear.
www.it-ebooks.info
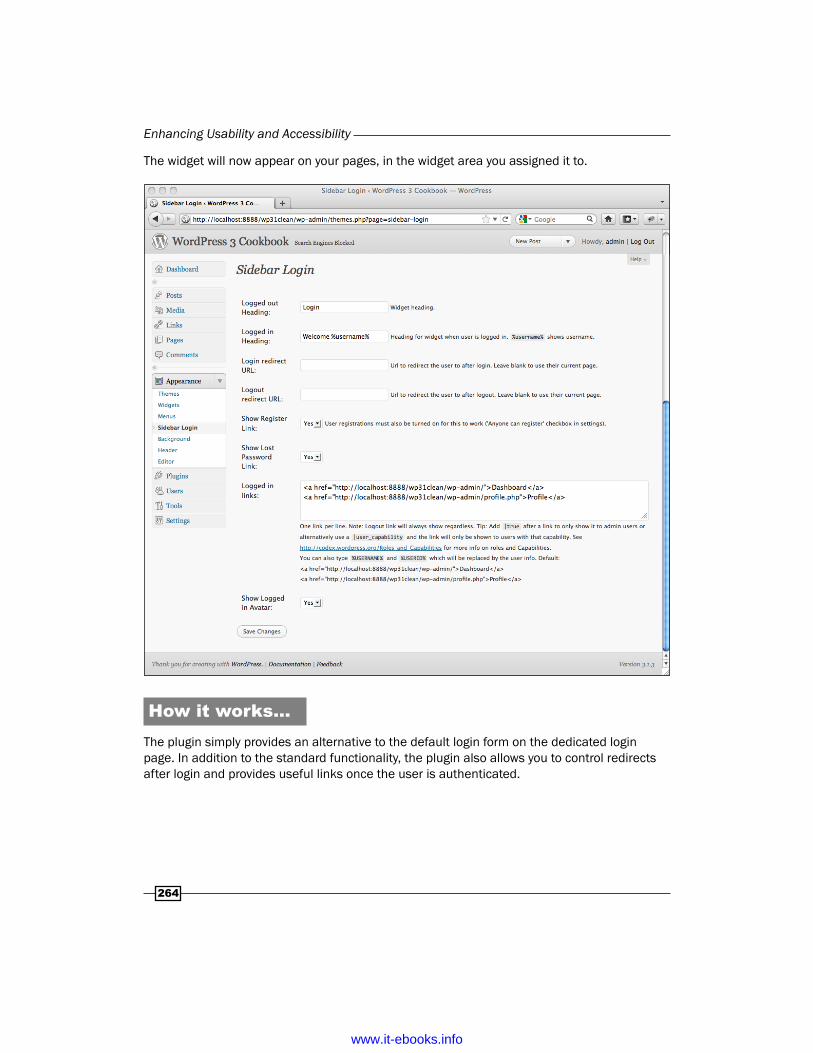
Enhancing Usability and Accessibility
264
The widget will now appear on your pages, in the widget area you assigned it to.
How it works...The plugin simply provides an alternative to the default login form on the dedicated login page. In addition to the standard functionality, the plugin also allows you to control redirects after login and provides useful links once the user is authenticated.
www.it-ebooks.info

Chapter 8
265
Displaying related postsAs a site owner, you want to give visitors reasons to stay on your site. One of the most effective methods for increasing page views is to display a list of related posts. Providing the visitors with a list of other content items that are similar to the one they are viewing is not only a good deal for site owners, but also for visitors, as it provides them with access to richer information about a topic.
In this recipe, we look at implementing a plugin to add related posts functionality to your site. In the first part of the recipe, we look at a basic plugin. In the second part of the recipe we look at an alternative plugin solution.
Getting readyTo execute this recipe, you will need to install the All Related Posts plugin. You will need to install this plugin before you can get started. Search for All Related Posts inside the Add New Plugins screen of your WordPress site. After you find it, click on it to install, and then activate it.
You can learn more about the plugin by visiting the developer's website at http://blog.bigcircle.nl/about/wordpress-plugins/
How to do it...To configure this plugin and enable it on the site, follow these simple steps:
1. Log in to your WordPress Dashboard.
2. Click on the Appearance menu.
3. Click on the Widgets option.
4. Find the All Related Posts widget and drag it to one of your site's Primary Widget Areas.
www.it-ebooks.info

Enhancing Usability and Accessibility
266
5. Click on the arrow on the widget's title bar to expand it and view the configuration options, as shown in the following screenshot:
6. Select the options you wish to use.
7. Click on the Save button.
If you now visit the front-end of your WordPress site, you should see the plugin in action. If it is not showing any links inside the related posts widget, click through a few pages; you should start to see output in the widget.
How it works...The All Related Posts plugin uses a variety of methods for selecting the posts that are displayed. You can see the choices available in the previous screenshot:
f the first post a visitor came to on his previous visit
f posts related to the shown post
f posts related to search engine terms (tags and categories)
f posts related to search engine terms (full post content)
www.it-ebooks.info

Chapter 8
267
Of the choices, the second is the most commonly used criteria for determining whether posts are related. The other options offered by the plugin, however, are interesting. The first option relates to repeat visitors; if the visitor has been to the site in the past, the plugin will show them things they looked at on the previous visit. The latter two choices both affect visitors who come to your site through a search engine; the posts shown in the widget will be based on the words that were entered in the search query.
You can use any, or all of the options. The best approach is to set one up and view the results.
There's more...While the All Related Posts plugin is a good solution, if you want more control, and more options, consider the nrelate Related Content plugin. The plugin works in a completely different fashion. With nrelate, your site will be indexed by nrelate's own spider. The indexing will create a listing of all the content on your site and thereafter, the plugin will draw up the index in order to find the most relevant onsite content.
Though nrelate offers only one matching methodology for identifying related content, it is extremely good at producing posts on the basis of relevance. You can configure both the degree of relevance and the depth of the indexing, giving you the option to provide highly relevant recommendations to your site visitors.
Another attractive feature of this plugin is the flexibility in layout. As you can see in the next screenshot, you have multiple choices for placing the related content list; you are not restricted to widget areas (though the plugin does also include a widget). If you prefer, you can also embed the output directly into your theme files. nrelate also comes with some styling options or, if you prefer, you can remove all styling and use the default theme styles.
www.it-ebooks.info
Enhancing Usability and Accessibility
268
Creating a Featured Posts blockIn the default WordPress installation, new posts on your site are displayed on the home page in chronological order. While you can control the output on the home page to a certain extent, what you cannot do is select specific articles to be featured at the top of the page, or in a widget area.
In this recipe we look at a solution that allows you to mark posts you want to be featured and then display those together as a group. This recipe relies on a plugin and modification to your theme files.
Getting readyTo execute this recipe, you will need to install the List Category Posts plugin. You will need to install this plugin before you can get started. Search for All Related Posts inside the Add New Plugins screen of your WordPress site. After you find it, click on it to install, and then activate it.
In addition, you will also need a code editor and access to your WordPress installation on your server.
You can learn more about the plugin by visiting the developer's website at http://foro.picandocodigo.net/categories/list-category-posts
How to do it...There are two parts to this recipe. In the first, we create a dedicated category to use for our featured posts; in the second, we modify the theme files to display the category. Let's start with the creation of a new category:
1. Log in to your WordPress Dashboard.2. Click on the Posts menu.3. Click on the option Categories.4. In the Name field, enter Featured.5. Click on the Add New Category button.6. The newly-created Featured category will now appear in the list of categories on
the right side of the page. Click on the edit button, immediately below the Featured category's name.
www.it-ebooks.info

Chapter 8
269
7. The edit category screen will load. Look at the URL in the browser's address bar and find the value for category&tag_ID. Note that value as you will need it in the next part of this recipe.
To make this feature work, you will need to have at least one post assigned to the new Featured category, so assign a couple for testing purposes and let's move on to the next part of the recipe. Next, let's open the theme files and add the shortcode enabled by the plugin:
1. Access your WordPress installation on the server.
2. We're going to add the Featured Posts list to the top of the home page only, so open the index.php file for editing.
3. Add the following code where you want the Featured Posts block to appear: <h2>Featured Posts</h2> <?php echo do_shortcode("[catlist id=9 excerpt=yes]"); ?> <hr />
4. Save the file.
Now, if you view the home page of your site, you should see at the top of the content area a list of all posts assigned to the Featured category.
You could also place this block of posts inside a content item, but the syntax for the use of the shortcode will be different. Instead of wrapping the shortcode in PHP tags, you would simply switch your editor into HTML mode and type the following into the body of the post: [catlist id=9 excerpt=yes]
How it works...The List Category Posts plugin enables for your use a new shortcode, catlist id=x, where x is the ID of the category you wish to display. Shortcodes can be used inside content items, or inside widgets, or inside your templates. In this recipe, we want to display Featured Posts at the top of our home page, so we edited the template being used for the home page in this theme.
This recipe uses the default TwentyTen theme. If your theme uses a different file for the home page, for example, home.php, then you will modify that file, not index.php. Note that this will impact where the output appears. If, for example, your theme uses the index.php file for multiple pages, your output will show on all.
www.it-ebooks.info

Enhancing Usability and Accessibility
270
There's more...This plugin enables a number of parameters that allow you to customize the output of the shortcode. In the example code above you see one of those parameters being used, excerpt.
The available parameters are shown in the following table:
Parameters Purpose Valid valuesid Specify the category to display,
by category ID. You can display multiple categories by separating them with a for example, id=1,3,5
Integer
name Specify the category to display, by category name.
Text
tags Display posts from a specific tag. Textorderby Customize the order. author, category, content,
date, ID, menu_order, mime_type, modified, name, parent, password, rand, status, title, type.
order Set alphabetical order. ASC, DESCnumberposts Number of posts to display. Default
is 5. Set to -1 to remove limitation.Integer
date Display the post date. The default is no.
yes, no
author Display the post author's name. The default is no.
yes, no
dateformat Format of the date output. See, http://codex.wordpress.org/Formatting_Date_and_Time for possible formats
template Used to specify a template for the output.
Template name, without the file extension.
excerpt Include an excerpt from the post. Default is no.
yes, no
excludeposts IDs of posts to exclude from the list.
Integer
offset Pass over one or more initial posts. Integer
www.it-ebooks.info
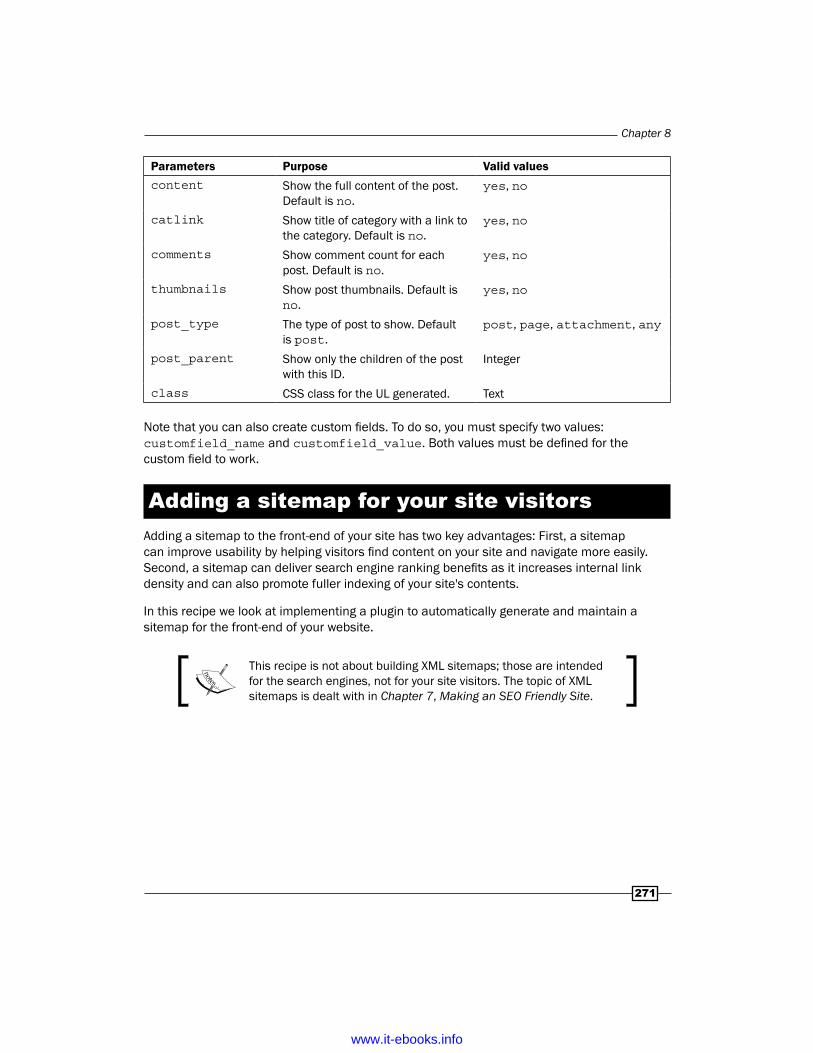
Chapter 8
271
Parameters Purpose Valid valuescontent Show the full content of the post.
Default is no.yes, no
catlink Show title of category with a link to the category. Default is no.
yes, no
comments Show comment count for each post. Default is no.
yes, no
thumbnails Show post thumbnails. Default is no.
yes, no
post_type The type of post to show. Default is post.
post, page, attachment, any
post_parent Show only the children of the post with this ID.
Integer
class CSS class for the UL generated. Text
Note that you can also create custom fields. To do so, you must specify two values: customfield_name and customfield_value. Both values must be defined for the custom field to work.
Adding a sitemap for your site visitorsAdding a sitemap to the front-end of your site has two key advantages: First, a sitemap can improve usability by helping visitors find content on your site and navigate more easily. Second, a sitemap can deliver search engine ranking benefits as it increases internal link density and can also promote fuller indexing of your site's contents.
In this recipe we look at implementing a plugin to automatically generate and maintain a sitemap for the front-end of your website.
This recipe is not about building XML sitemaps; those are intended for the search engines, not for your site visitors. The topic of XML sitemaps is dealt with in Chapter 7, Making an SEO Friendly Site.
www.it-ebooks.info

Enhancing Usability and Accessibility
272
Getting readyTo execute this recipe, you will need to install the HTML Sitemap Generator plugin. You will need to install this plugin before you can get started. Search for Html Sitemap Generator inside the Add New Plugins screen of your WordPress site. After you find it, click on it to install, and then activate it.
You can learn more about the plugin by visiting the developer's website at http://cranesandskyhooks.com/wordpress-plugins/html-sitemap-generator/
How to do it...There are two parts to this recipe. You must configure the sitemap settings and you must add the shortcode to a page on your site to display the sitemap:
1. Log in to your WordPress Dashboard.
2. Click on the Settings menu.
3. Click on the option HTML Sitemap.
4. View the options and select those you desire for your site. The options are shown in the next screenshot.
5. Click on the Save Settings button.
Next, let's set up a dedicated page to hold the sitemap:
1. Click the Pages menu.
2. Click on the option Add New.
3. In the Title field, enter Site Map.
4. In the editor box, switch to HTML.
5. Enter the sitemap shortcode as follows: [sitemap]
6. Click on the Publish button.
In the default installation with the TwentyTen theme installed, the steps above are all you need to do. With another theme, however, you may need to add the new page to one of your theme's menus to make it visible to site visitors.
www.it-ebooks.info

Enhancing Usability and Accessibility
274
How it works...This plugin works by tapping into the power of WordPress shortcodes. When this plugin is installed and activated, it allows you to use the shortcode wherever you see fit. In this example, we placed the shortcode in a dedicated page, but you could put it inside any content area, or even into a dedicated template.
Unlike some other plugins that rely on shortcodes, there are no parameters for you to configure manually. Instead, all configuration is done through the HTML Sitemap configuration settings, discussed above.
Creating a better tag cloudThe default installation of WordPress comes with a simple tag cloud widget. The standard widget has virtually no configuration options. If you wish to have a tag cloud with more functionality, or even simply more options for styling and presentation, then you will need to explore other options. Fortunately there are a couple of tag cloud plugins. Our favorite is Ultimate Tag Cloud, which is the subject of this recipe.
The following screenshots show you the default tag cloud (at top) contrasted with the output of the Ultimate Tag Cloud plugin (at bottom):
www.it-ebooks.info

Chapter 8
275
Getting readyTo execute this recipe, you will need to install the Ultimate Tag Cloud plugin. You will need to install this plugin before you can get started. Search for Ultimate Tag Cloud inside the Add New Plugins screen of your WordPress site. After you find it, click on it to install, and then activate it.
You can learn more about the plugin by visiting the developer's website at http://www.0x539.se/wordpress/ultimate-tag-cloud-widget/
How to do it...There's a bit of configuration needed for the plugin to work properly:
1. Log in to your WordPress Dashboard.
2. Click on the Appearance menu.
3. Click on the Widgets option.
4. Find the Ultimate Tag Cloud widget and drag it to the widget area where you want it to appear.
5. Click to open the options for the widget.
6. Set the Data options of the widget to determine where the tag info comes from. The following screenshot shows you part of the widget settings:
www.it-ebooks.info

Enhancing Usability and Accessibility
276
7. Set the Appearance options of the widget to suit your site.
8. Click on the Save button.
Adding lightboxes for your photosLightboxes are a common feature of many sites you visit these days. A lightbox works like a pop-up. It typically opens on top of the underlying page and occupies all or almost all of the screen space. When you close the pop-up, the original page is still available in the background. You can see a lightbox in action in the following screenshot:
There are several good reasons for the popularity of lightboxes. First, for site visitors, lightboxes tend to enhance visibility by decreasing page reloads and by providing a positive aesthetic experience. For site owners, lightboxes are an easy way to implement slideshows and even forms.
In this recipe we look at how you can add lightbox functionality to your WordPress site.
www.it-ebooks.info

Chapter 8
277
Getting readyTo execute this recipe, you will need to install the WP jQuery Lightbox plugin. You will need to install this plugin before you can get started. Search for "wp jquery lightbox" inside the Add New Plugins screen of your WordPress site. After you find it, click to install, and then activate it.
How to do it...First you need to configure your lightboxes:
1. Log in to your WordPress dashboard.
2. Click on the Settings menu.
3. Click on the option jQuery Lightbox.
4. Select the configuration options shown in the following screenshot:
5. Click the Save Changes button.
www.it-ebooks.info

Enhancing Usability and Accessibility
278
Next, we need to enable the lightbox functionality for our images. To do that, follow these steps:
1. Click the Posts menu.
2. Find a post that contains images; if you don't have one, create one. Then click to edit the post.
3. To add the lightbox functionality to an image, you need to edit the image settings.
4. Switch to HTML view.
5. Add to the image link the attribute rel="lightbox"
6. Update the post.
Now, if you visit the post on the front end of the website and click on the image you modified, it should pop up in a lightbox.
There's moreThe jQuery Lightbox plugin also supports several other useful features; one of the most useful is the creation of slideshows.
If you wish, you can group images together to create a slideshow that can be clicked through from within the lightbox. To group images for a slideshow, simply add to the link the rel attribute a common group name. For example, rel="lightbox[groupname]".
It does not matter what group name you use, so long as it is used consistently on all the images you want to include in the show.
www.it-ebooks.info

9Managing
Maintenance and Improving Security
In this chapter, we cover:
f Creating a manual backup of your database
f Creating an automatic backup with WP DB backup
f Restoring a MySQL backup
f Creating backups of your WordPress files
f Removing the WordPress version information from your theme files
f Getting rid of the administrator account
f Protecting against brute force login attempts
f Denying access to unneeded hints
f Adding another layer of protection with HTTP authentication
f Restricting access to the wp-admin directory by IP address
f Testing your site security
f Reducing SPAM by selectively blocking comment posting
www.it-ebooks.info

Managing Maintenance and Improving Security
280
IntroductionCreating and maintaining a secure website is an ongoing process. There is no one single thing you need to do, or even a definitive list of items, that will result in your site remaining secure from attack. Rather, site security is about being aware of your risk profile and taking steps to bring the risk down to acceptable levels. If your site contains user data or other sensitive, or valuable data, then you must do more than if your site is merely a single user blog.
In this chapter we go through a number of basic techniques that will harden your installation against the most common attacks and provide you with a fair degree of peace of mind. Some of the recipes are intended to block aggressors, others to simply deter them; still other recipes are aimed at decreasing SPAM on your site, as it is often used as a vector for attacks.
If you are serious about security, then the recipes in this chapter provide just a starting point. Making your WordPress installation secure is only part of the battle. If you want to increase your security significantly, then you must work with your server settings to make sure the server itself is less vulnerable. Server hardening is not covered in this chapter, as there are too many variables for us to anticipate.
Also not covered in this chapter, but worth mentioning, is the need to maintain a secure development environment and development process when you are building your site. Poor development practices often leave open avenues for later attacks. If you have inherited a site from another developer, you would do well to investigate whether you have inherited any potential problems as well.
Creating a manual backup of your databaseIf you remember only one recipe from this entire book, then this is the one! With WordPress, your site contents, comments, and parameters are all stored in a MySQL database. The database is the heart of your site and you don't want to run the risk that something might happen to it. Having backups of your database is not just important, it's essential.
While all your site files are kept on the server, all of your WordPress data (posts, pages, categories, comments, and so on) are saved in your site's MySQL database. Without the database, the only thing you'll get is an empty theme. In this recipe, we're going to manually create a backup of your MySQL database using phpMyAdmin.
Getting readyTo complete this recipe, you must have phpMyAdmin installed on your web server. Typically this is not a problem; most web hosts have phpMyAdmin installed by default. Nonetheless, don't simply assume it is installed. Consult your hosting provider's documentation to see whether it is installed (and enabled) on your server.
www.it-ebooks.info

Chapter 9
281
How to do it...1. Log in to your phpMyAdmin installation (the URL depends on how things are
configured on your server. For most people you will access this through your web hosting control panel. If you don't know how to find it, then contact your web host's support team). The following screenshot shows the entry screen in a typical phpMyAdmin installation:
2. Select the database that is being used by your WordPress site.
3. Click on the Export tab on the horizontal menu near the top of the screen.
4. Next, scroll to the bottom of the page and select the option Save as file. If you wish, you can choose to compress the backup. Gzipped is a good option and widely compatible.
5. Click on the Go button. Wait a few seconds and your browser will ask you to download the backup. Keep it in a secure place, like a USB drive.
www.it-ebooks.info

Managing Maintenance and Improving Security
282
The export option is one of the numerous things that phpMyAdmin can do for you. Creating manual backups using the command line is easy as well, but most people will find it a bit more difficult than creating backups from within phpMyAdmin.
There's more...If you're interested in having a plugin that can perform backups for you, and can even schedule automatic backups, then you should refer to the next recipe.
See also f Creating an automatic backup with WP DB Backup
f Creating backups of your WordPress files
Creating an automatic backup with WP DB Backup
While the recipe above explains how to create a backup manually, you can set up automatic backups using a third-party plugin. The WP DB Backup plugin is one of several that offer the required functionality. This particular backup provides not only automated backup, but also several additional useful options, including the ability to schedule regular backups.
Getting readyWP DB Backup is a third-party plugin. Accordingly, you must first install and enable this plugin on your WordPress site. Search for wp db backup inside the Add New Plugins screen of your WordPress site. After you find it, click on it to install, and then activate it.
You can visit the plugin's home page by going to http://austinmatzko.com/wordpress-plugins/wp-db-backup/
How to do it...1. Open the Tools menu from inside your WordPress Dashboard.
www.it-ebooks.info
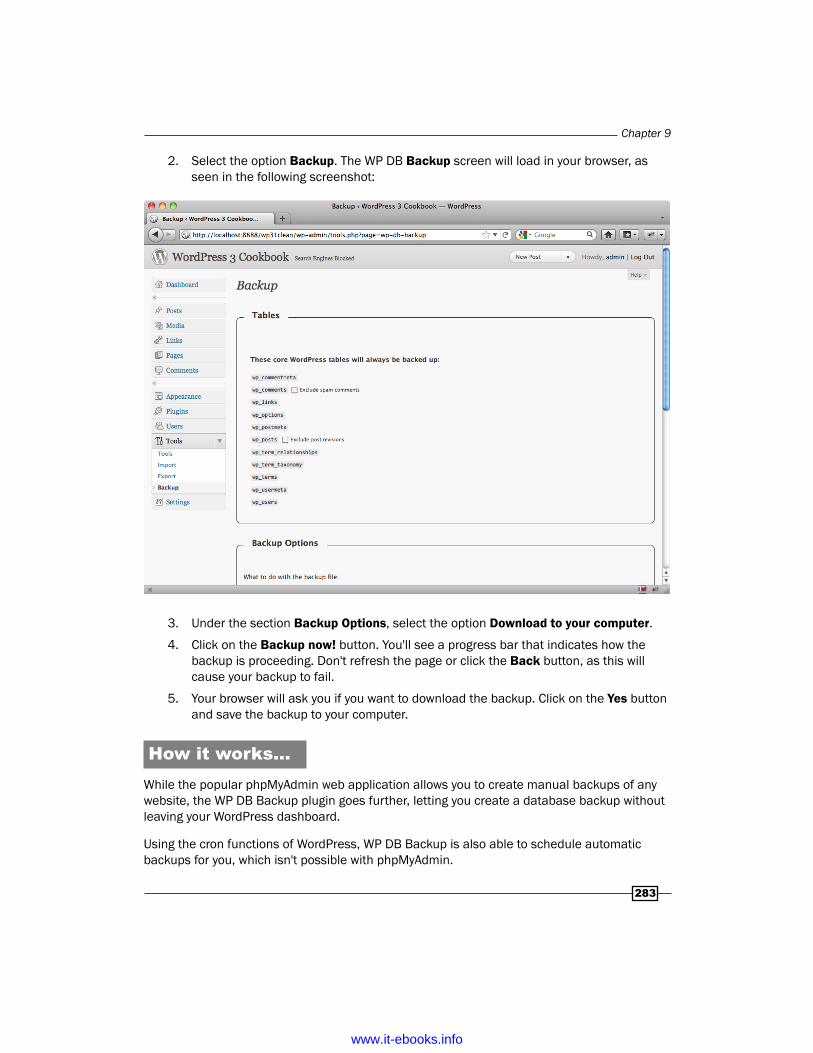
Chapter 9
283
2. Select the option Backup. The WP DB Backup screen will load in your browser, as seen in the following screenshot:
3. Under the section Backup Options, select the option Download to your computer.
4. Click on the Backup now! button. You'll see a progress bar that indicates how the backup is proceeding. Don't refresh the page or click the Back button, as this will cause your backup to fail.
5. Your browser will ask you if you want to download the backup. Click on the Yes button and save the backup to your computer.
How it works...While the popular phpMyAdmin web application allows you to create manual backups of any website, the WP DB Backup plugin goes further, letting you create a database backup without leaving your WordPress dashboard.
Using the cron functions of WordPress, WP DB Backup is also able to schedule automatic backups for you, which isn't possible with phpMyAdmin.
www.it-ebooks.info

Managing Maintenance and Improving Security
284
There's more...While creating backups on demand is a cool option, it is even more secure to schedule automatic backups. WP DB Backup can easily do this. Use the Scheduled Backup section to create periodic updates – you can even have them automatically e-mailed to the address of your choice.
See also f Creating manual backups of your database
f Creating backups of your WordPress files
Restoring a MySQL backupNow that you know how to create a backup of your site database, you should also know how to restore it when needed. A restore can be done in whole or in part, but for this discussion we will assume that you are restoring the whole database.
Getting readyFor this recipe, you need a backup of your site's database and access to the phpMyAdmin installation on your web server.
This is for emergencies only. If you want to test this process, then you should install WordPress locally and perform your tests on the local installation; don't test this out on a live production site!
How to do it...1. Log in to phpMyAdmin and select your WordPress database.
2. Click on the Import tab from the horizontal menu near the top of the page. The following screenshot shows the Import screen:
www.it-ebooks.info

Chapter 9
285
3. Click on the Browse button and select the backup file on your hard drive.
4. Once done, scroll down the page and click on the Execute button.
The database backup is imported into your database and the existing data in the database has been replaced.
How it works...When you import a MySQL backup with phpMyAdmin, your database is truncated (which means that the database becomes empty), and the previous data is replaced by the data contained in the backup. If changes have been made to the content of your site since your last backup, they will be lost. This is why you should create backups frequently. The more frequently you create backups, the less data you may lose.
www.it-ebooks.info

Managing Maintenance and Improving Security
286
Creating backups of your WordPress filesAs we have seen earlier, having backups of your WordPress database is really important, but what about your files? Core files aren't really a problem because you can download them when you want from www.wordpress.org. However, when you're writing posts, you often upload pictures, and maybe even modify your theme; those files are not kept in the database, but rather in the directories on your server. Accordingly, we need to be able to make copies of those files as well in order to create a complete backup of your site.
Getting readyThis recipe is very easy to achieve. You will need an FTP program, access to your server, and some space on your hard drive or USB device to store the backup files.
How to do it...1. Open your favorite FTP program, and connect to your site's web host.
2. Select all of your files, including the .htaccess file, and copy them into a directory on your local hard drive.
That's all there is to it! Now, if for some reason the WordPress files on your server are lost or corrupted, then you just have to open the directory, and copy anything from it to the root of your site's web host.
How it works...There is really nothing hard here. In this recipe, you created a directory on your computer and then copied the files from your server to this directory, using an FTP program. The result is a backup of your files on your computer that can be used to replace your WordPress files, if any kind of problem occurs.
See also f Creating a manual backup of your database
f Creating an automatic backup with WP DB Backup
www.it-ebooks.info

Chapter 9
287
Removing the WordPress version information from your theme files
By default, WordPress adds the Generator metatag to the header of your site's pages. The tag contains the WordPress version you're site is using. The problem is that, since this data is available to anyone who views the site's source, hackers who are looking for information about your site can learn what version of WordPress you're running. While that information alone is unlikely to present an opportunity for an attack on your site, it can make their job easier, and we want to block that.
Getting readyTo complete the recipe, you must access your WordPress installation, edit a file from your site, and then get it back on the server. To grab the file and replace it, you will need an FTP program or the file manager in your web hosting control panel. You can edit the file with either a web editing program or with a simple text editor.
How to do it...1. Access your server and go to the directory that holds your theme files.
2. Open the functions.php file from inside your theme. If that file doesn't exist, then create it and save it inside your theme's directory.
3. Add the following code to the bottom of the functions.php file: add_filter( 'the_generator', create_function('$a', "return null;"));
4. Save the file.
If you reload your site's home page and view the page source, you will find that the Generator metatag is no longer displayed.
How it works...This meta tag is added by WordPress to help them gather data about the installations on the web. While the information may be useful to the WordPress team, it is absolutely unnecessary for you or your site. We can get rid of it without losing any functionality.
The reason you need to add a filter on the_generator() function is to avoid displaying your WordPress version. This is done by creating a basic function that returns null instead of the WordPress version.
www.it-ebooks.info

Managing Maintenance and Improving Security
288
Getting rid of the Administrator accountBy default, all WordPress sites have an Administrator account. This account is automatically created when you install WordPress. If you have not changed the default value, the username is admin. The account has administrator rights, which means that someone logged in with the Administrator account can create other user accounts, change the WordPress password, and much more.
Hackers know that every WordPress site automatically creates an Administrator account, and if they want to try to break into a WordPress site, they will typically try to target the admin user account in an attempt to crack the password. A simple, but effective way to avoid being vulnerable to this sort of attack is to create a new administrator account to replace the default admin account and then delete the original account.
Getting readyAll of the steps necessary to complete this recipe can be completed from within the WordPress administration system.
How to do it...1. Log in to your WordPress Dashboard.
2. Go to the Users page.
3. Click on the Add new button.
4. Enter the details for your new account. Select the role to be Administrator.
5. After you have created your new account, log out.
6. Log in again, this time using the new account you just created.
7. Go to the Users page.
8. Find the original Admin account, and delete it.
How it works...This process is necessitated by the fact that usernames in WordPress cannot be changed. Therefore, we must use our existing Admin account to create another account, give it Administrator rights, and then delete the original account.
See also f Testing your site security
www.it-ebooks.info

Chapter 9
289
Protecting against brute force log in attempts
In the previous recipe, we covered deleting the default admin account. By deleting the admin account, you have taken one more potential avenue of attack away from hackers. However, hackers are typically smart (and persistent!) and are likely to also try other logins.
The method of attack generally involved isolating a potential username, then trying one password after another until they are successful. This type of attack is called a brute force attack. This recipe shows you how to install and configure a third-party plugin to help protect against this common attack vector.
Getting readyThe recipe relies on the Limit Login Attempts plugin. You will need to install and enable the plugin, as described in Chapter 3, Working with Plugins and Widgets.
How to do it...To configure Limit Login Attempts to protect your site, follow these steps:
1. Log in to the your WordPress Dashboard.
2. Under the Settings menu, click on the option Limit Login Attempts. The Limit Login Attempts configuration page is shown in the following screenshot:
www.it-ebooks.info

Managing Maintenance and Improving Security
290
3. Set the options you wish. Fewer allowed retries and longer values for the minutes lockout field are more secure.
4. Click on Change Options.
How it works...A brute force attack is a method for attempting to defeat a cryptographic scheme by systematically trying a large number of possibilities. When someone attempts this on your site, the plugin in this recipe will record the IP address and timestamp of every failed login attempt. If more than a certain number of attempts are detected within a short period of time from the same IP range, then the login function is disabled for all of the requests from that range. This helps in preventing brute force password discovery.
See also f Adding another layer of protection with HTTP authentication
f Restricting access to the wp-admin directory by IP address
Denying access to unneeded hintsSometimes WordPress can be a bit more helpful than you might want. One example is the system's error messages on failed logins. By default, if a login fails, the system will tell the user whether the problem lies with the username they entered or if it was the password. While this is helpful to your users, it is also very helpful to anyone trying to hack into your account by compromising a user account. With the default error messages in place, the hacker will learn whether they need to concentrate their efforts on cracking the username of the password.
In this recipe we show you how to block this unwanted hint and replace it with a generic error message.
Getting readyThis recipe works with the user.php file, so you will need access to your WordPress installation on your server and the ability to edit this file type.
How to do it...1. Access your WordPress installation on the server.
2. Find the user.php file.
www.it-ebooks.info
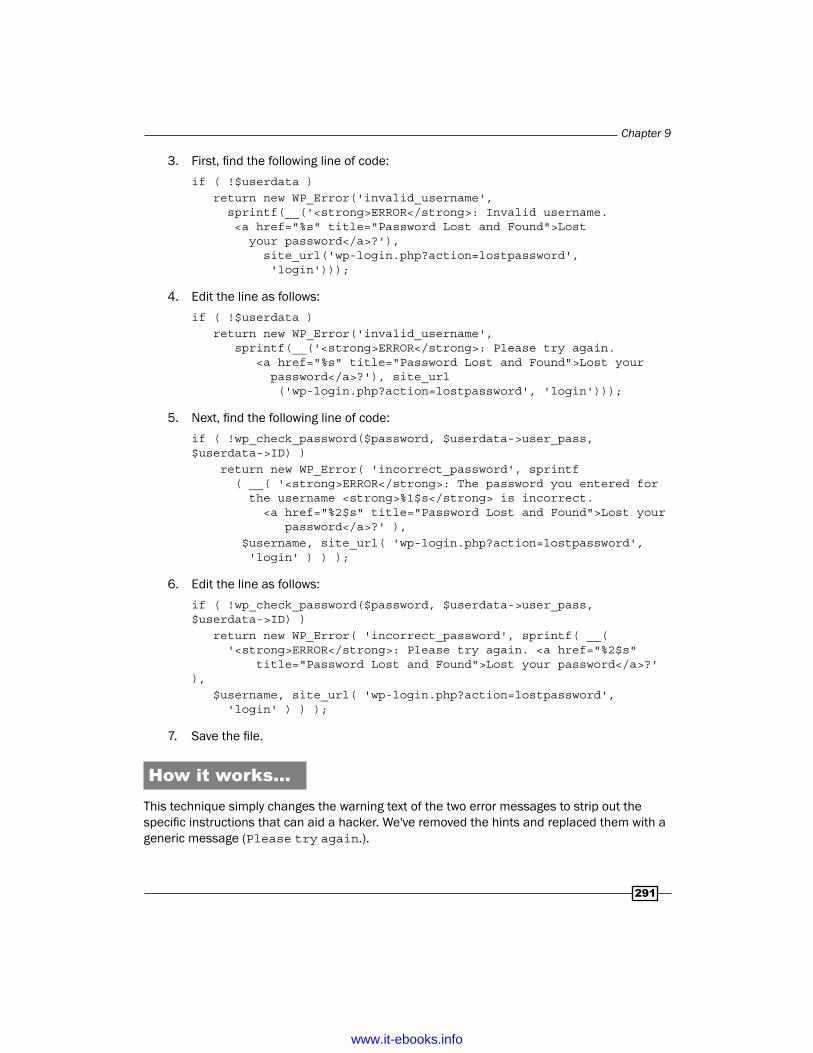
Chapter 9
291
3. First, find the following line of code:if ( !$userdata ) return new WP_Error('invalid_username', sprintf(__('<strong>ERROR</strong>: Invalid username. <a href="%s" title="Password Lost and Found">Lost your password</a>?'), site_url('wp-login.php?action=lostpassword', 'login')));
4. Edit the line as follows:if ( !$userdata ) return new WP_Error('invalid_username', sprintf(__('<strong>ERROR</strong>: Please try again. <a href="%s" title="Password Lost and Found">Lost your password</a>?'), site_url ('wp-login.php?action=lostpassword', 'login')));
5. Next, find the following line of code:if ( !wp_check_password($password, $userdata->user_pass, $userdata->ID) ) return new WP_Error( 'incorrect_password', sprintf ( __( '<strong>ERROR</strong>: The password you entered for the username <strong>%1$s</strong> is incorrect. <a href="%2$s" title="Password Lost and Found">Lost your password</a>?' ), $username, site_url( 'wp-login.php?action=lostpassword', 'login' ) ) );
6. Edit the line as follows:if ( !wp_check_password($password, $userdata->user_pass, $userdata->ID) ) return new WP_Error( 'incorrect_password', sprintf( __( '<strong>ERROR</strong>: Please try again. <a href="%2$s" title="Password Lost and Found">Lost your password</a>?' ), $username, site_url( 'wp-login.php?action=lostpassword', 'login' ) ) );
7. Save the file.
How it works...This technique simply changes the warning text of the two error messages to strip out the specific instructions that can aid a hacker. We've removed the hints and replaced them with a generic message (Please try again.).
www.it-ebooks.info

Managing Maintenance and Improving Security
292
Adding another layer of protection with HTTP authentication
When it comes to blocking brute force attacks, two layers of protection are better than one. In this recipe, we look at how to add another barrier to brute force attacks by using a third-party plugin named AskApache Password Protection.
The plugin makes it easy for you to set up HTTP authentication on your WordPress site. HTTP authentication is one of the most effective methods for protecting your site against brute force attacks, though it does add a bit of inconvenience for you as well; with HTTP authentication in place, you have to log in twice before you can access the WordPress Dashboard.
Getting readyThe recipe relies on the AskApache Password Protect plugin. You will need to install and enable the plugin, as described in Chapter 3, Working with Plugins and Widgets.
You can learn more by visiting the plugins homepage at http://www.askapache.com/wordpress/htaccess-password-protect.html
How to do it...1. Once the plugin is installed and enabled, log in to your WordPress Dashboard.
2. Go to Settings | AA PassPro.
3. If this is your first visit to this page, you will need to go through verification to make sure that the plugin will work with your server. The verification process is handled automatically by the plugin; you simply need to click on the button at the bottom of the page. Once you have completed verification, then you can move on to set up the plugin. The setup page for the plugin is shown in the following screenshot:
www.it-ebooks.info

Chapter 9
293
4. On the setup page, define your password settings. Pick a Username, a Password, and a message to be displayed on the authentication pop-up. The Username and Password have nothing to do with WordPress so they don't need to match your WordPress login ID and password.
5. Once done, click on the Save Settings button.
www.it-ebooks.info
Managing Maintenance and Improving Security
294
6. On the next screen, you can manage security modules. A security module is basically a piece of code dedicated to performing a particular action inserted in your .htaccess file. Use of the modules is optional, but can increase the security on your site. You may want to consider enabling at least the following modules: Password Protect wp-login.php; Password Protect wp-admin; BAD Content Type; Stop Hotlinking.
How it works...Once activated and configured, the AskApache plugin generates a server-side password verification using the WordPress .htaccess file. When someone tries to access the wp-login.php page, a pop-up window created by the server will be launched. The user must input the proper username and password to proceed. With no password, the person attempting to view the wp-login.php file will not be able to see it. Note that while this same protection can be implemented manually, the AskApache Password Protection plugin does simplify implementation plus give you additional options with the security modules, making it a good choice for most site owners.
See also f Protecting against brute force login attempts
f Restricting access to the wp-admin directory by IP address
Restricting access to the wp-admin directory by using the IP address
A very radical, but effective, solution to protect your wp-admin directory from brute force attacks, as well as any kind of intrusion, is to restrict access to this directory to a single IP address—yours.
Getting readyBefore applying this recipe, you need to make sure that you're using a static IP address. To do so, ask your Internet Service Provider (ISP). This recipe can't be achieved if you're using dynamic IP addresses.
How to do it...1. The first thing to do is to find out your IP address. There are many ways to obtain it,
but the simplest is to go to http://whatsmyip.org. When you visit the site, your IP address will be displayed on the page; make a note of it.
www.it-ebooks.info

Chapter 9
295
2. Next, create a file named .htaccess on your computer and enter the following lines in it. Do not edit the .htaccess file located at the root of your WordPress install. AuthUserFile /dev/null AuthGroupFile /dev/null AuthName "Example Access Control" AuthType Basic <LIMIT GET> order deny,allow deny from all allow from xx.xx.xx.xx </LIMIT>
On the next to last line of the preceding code, replace xx.xx.xx.xx. with the IP address that you wish to allow access to the wp-admin directory.
3. Save the .htaccess file on the wp-admin directory of your WordPress site.
How it works...In this recipe, we have used the authentication functionalities of the Apache web server to restrict access to the wp-admin directory to a specific IP address. Any IP address that isn't listed in the .htaccess file, will only see a 403 Forbidden error.
There's more...In the steps above, we have shown you how to restrict the wp-admin directory to a single IP address. However, in the case of a multiauthor site, or if you need to access the admin system from multiple locations, you may need to authorize more than just one IP address.
Allowing access to more than one IPUse the following syntax in the .htaccess file (one IP address per line) to authorize multiple IP addresses:
AuthUserFile /dev/nullAuthGroupFile /dev/nullAuthName "Example Access Control"AuthType Basic<LIMIT GET> order deny,allow deny from all allow from xx.xx.xx.xx allow from xx.xx.xxx.xx allow from xx.xx.xxx.xx allow from xx.xx.xx.xx</LIMIT>
www.it-ebooks.info

Managing Maintenance and Improving Security
296
See also f Protecting against brute force login attempts
f Adding another layer of protection with HTTP authentication
Testing your site securityOne of the more challenging aspects of site security is identifying potential security risks. Luckily, there are tools to help you in the quest for a secure site. In this recipe, we're going to show you how to use the WP Security Scan plugin to scan your site, get a listing of security problems, and fix them.
Getting readyThe recipe relies on the WP Security Scan plugin. You will need to install and enable the plugin, as described in Chapter 3, Working with Plugins and Widgets.
Before you begin making any modifications with the plugin, create a backup of both your database and files, as described earlier in this chapter.
How to do it...Once installed, the plugin will analyze the following:
f passwords
f file permissions
f database security
f version hiding
f WordPress admin protection and security
f WP Generator META tag
The plugin will provide recommendations for settings of each of the items above and, in some cases, allow you to implement the changes directly from within the plugin's dashboard.
www.it-ebooks.info

Chapter 9
297
After installation, the plugin adds a new option to your WordPress dashboard. To access the plugin's functionality, click on the tab labeled Security. This tab contains a submenu composed of the following five items:
1. Security: Click on this option to gain an overview of security-related information about your site and your server configuration, as you can see in the next screenshot. It also provides a particularly interesting tool, which is the database prefix switcher. If your tables' prefixes are the default wp_, then you'll see a prompt asking if you'd like to change your database prefix. (Having wp_ as a prefix is a potential security risk, because many people use it. Therefore, this will be the first thing a hacker will try in order to hijack your site.) The Security tab will also let you know whether the WordPress version is visible and if so, will allow you to hide it. The plugin will check for an .htaccess file in your wp-admin directory and will also verify whether an Admin account exists.
www.it-ebooks.info
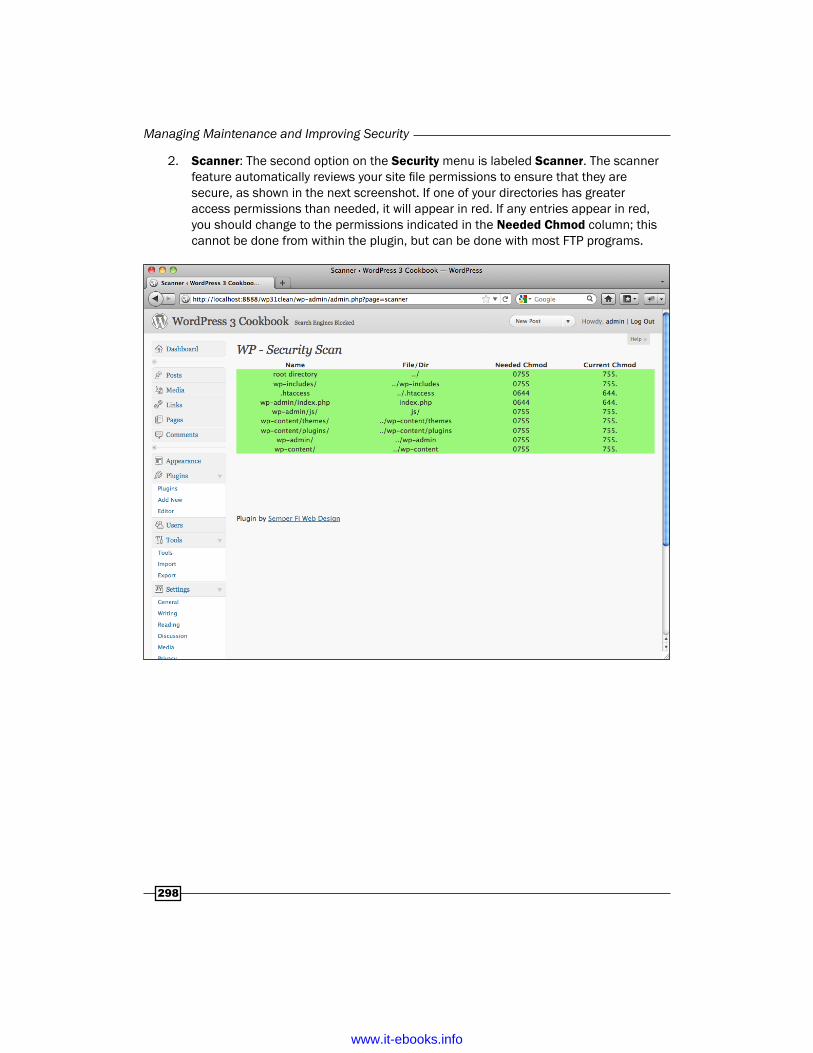
Managing Maintenance and Improving Security
298
2. Scanner: The second option on the Security menu is labeled Scanner. The scanner feature automatically reviews your site file permissions to ensure that they are secure, as shown in the next screenshot. If one of your directories has greater access permissions than needed, it will appear in red. If any entries appear in red, you should change to the permissions indicated in the Needed Chmod column; this cannot be done from within the plugin, but can be done with most FTP programs.
www.it-ebooks.info

Chapter 9
299
3. Password Tool: The Password Tool option provides both a utility to test the strength of your password and a password generator that can create a very strong password to help keep your user account secure. To test a password, just enter it in the Type password field and the utility will tell you if it's weak, average, or strong. It is best to use a strong password. To save you a bit of time, the utility also suggests a strong password for you, as you can see in the following screenshot:
www.it-ebooks.info

Managing Maintenance and Improving Security
300
4. Database: As noted earlier, having the default wp_ table prefix is a potential security risk. While you can remedy this by renaming your tables using phpMyAdmin, WP Security Scan can do the job faster and easier. Before you begin, however, back up your database and make sure your wp-config.php file is writable. Once you've completed your backup and made sure the file is writable, access the Database option under the Security menu. On the image that appears, designate a new prefix and then click the Start Renaming button. After a short bit of time, your tables will be renamed with the selected prefix. The following screenshot shows the Database option dashboard:
5. Support: As you can expect, the Support tab contains links to the plugin documentation and change log.
www.it-ebooks.info

Chapter 9
301
How it works...The WP Security Scan plugin offers an easy-to-use way to identify potential security vulnerabilities and then take steps to remedy them. While it addresses many common issues and is extremely helpful to novice users, more experienced users and those who are very security conscious will want to do more. The options given in this chapter provide further guidance to harden your WordPress installation.
See also f Getting rid of the administrator account
Reducing SPAM by selectively blocking comment posting
Comment spam is not only a nuisance for site owners, but also a potential vector for malware. While the Akismet plugin included in the WordPress core is very good at helping to identity spam, it does require some management time to process the potential spam comments in the Akismet queue. Ideally, it would be better to prevent the spam submissions in the first place.
One of the most common characteristics of spam comments is the posting of links in the comment that do not point back to the domain the request came from. Most spammers don't personally go to your site to post their spam comments; instead, they use a dedicated script or software to post the comments. As a result, the comment will come from a script instead of from your site's comment form. In this recipe, we'll show you how to block comment postings that lack a valid referrer request from your site.
Getting readyIn the next section, we show you two different methods for implementing this recipe. In the first approach, we modify the .htaccess file. In the second approach, we use a snippet of php code placed in the functions. Php file.
In both techniques, you will need access to the relevant files on your server and the ability to edit those files.
How to do it...There are two different ways to implement this recipe. The first method modifies the .htaccess file and rewrites rules, while the second uses php. Both methods work in a similar fashion and you can pick whichever you prefer.
www.it-ebooks.info

Managing Maintenance and Improving Security
302
To implement the .htaccess method, follow these steps:
1. Access your WordPress installation on the server.
2. Find the.htaccess file, which is located in the root of your WordPress install. Back up the file, just in case anything goes wrong.
3. Open the original file and insert the following code: RewriteEngine On RewriteCond %{REQUEST_METHOD} POST RewriteCond %{REQUEST_URI} .wp-comments-post\.php* RewriteCond %{HTTP_REFERER} !.*yoursite.com.* [OR] RewriteCond %{HTTP_USER_AGENT} ^$ RewriteRule (.*) ^http://%{REMOTE_ADDR}/$ [R=301,L]
4. Replace yoursite.com, on line 4 above, with your site's URL.
5. Save the file.
Another alternative is to use php. To use this approach, follow these steps:
1. Access the server where your WordPress installation is located and find the functions.php file.
2. Add the following piece of code to that file: function check_referrer() { if (!isset($_SERVER['HTTP_REFERER']) || $_SERVER['HTTP_REFERER'] == "") { wp_die( __('Please enable referrers in your browser, or, if you\'re a spammer, bugger off!') ); } } add_action('check_comment_flood', 'check_referrer');
3. Save the functions.php file.
How it works...The hack consists of looking up the comment's referrer (the page from where the comment posting request comes). If the referrer doesn't exist, then it means that the request didn't come directly from your site and is likely from a script. The user is then redirected and blocked from posting.
www.it-ebooks.info

IndexSymbols$post() function 115$post variable 118$wpdb object 115@font-face
using 42, 43_generator() function 287.gif file 44<h1> tag 48<hgroup> tag 66.htaccess file 286, 294, 295, 301.htaccess method
implementing 302.ico file format 44<img> tag 121.jpg file 44.png file 44</urlset> tag 237
Aaccess
allowing, for multiple IPs 295denying, to unneeded hints 290, 291restricting, to wp-admin directory by IP
address 294Activate link 34Add New Plugins screen 27, 67, 92, 130,
139, 277add_shortcode() function 126add_shortcodes() function 126Add to Cart buttons 214ad manager
new Ad Zone, creating 212used, for advertising space management
207-211
working 212Admin Bar 29Administrator account
removing 288administrators
toolbar, enabling 29, 30admin_note() function 130Adsense
about 188integrating 188-191integrating, manually 192integrating, quicktags used 191, 192working 191
Advertise pageenhancing, by adding Paypal subscriptions
206, 207enhancing, steps 206
advertising spacemanaging, ad manager used 207-211
Akismet API key 257Akismet plugin
about 256, 301working 258
All Related Posts plugin 267AskApache Password Protection plugin
about 292URL, for homepage 292
author listabout 166displaying 166, 167working 168wp_list_authors() function 168
author parameter 270author-related information
displaying, on posts 160, 162
www.it-ebooks.info

304
author's avatardisplaying, posts 163working 164
automatic backupcreating, with WP DB Backup plugin 282, 283
Bbackups
creating, for WordPress files 286Bing
Webmaster Tools, using 237Bing's webmaster tools
using 237-239bloginfo() function 44breadcrumbs
used, for navigation extension 252, 253breadcrumbs_plus () function 254Breadcrumbs Plus plugin
about 253arguments 254, 255values 255working 254
breadcrumb trial 253brute force attack 289BuddyPress
used, for creating community 169-173working 173
built-in Plugin Editorplugin files, modifying 13, 14
built-in Theme Editortheme files, modifying 10-12
Ccache management
used, for performance optimization 258-261catlink parameter 271child theme
about 36creating 36, 37functionality, customizing 38style, customizing 38working 37
class parameter 271click through rates (CTRs) 194commentators, rewarding
Top Commentators widget used 158-160
commentsposting, Subscribe to Comments Reloaded
plugin used 155, 156comments_open() function 55comment spam 301comments parameter 271community
about 134creating, BuddyPress used 169-173
conditional tagscomments_open() function 55has_tag() 96has_tag("wordpress") function 55has_tag("WordPress") function 55in_category() 96is_404() function 55is_admin() function 55is_archive() function 55is_author() 96is__author() function 55is_category() 96is_category(‘4') function 55is_category() functionis_category() function,
conditional tags 55is__date()f unction 55is_day() function 55is_front_page() 96is_front_page() function 55is_home() function 55is__month() function 55is_page() 96is_paged() function 55is_page() function 55is_page_template() 96is_page_template(about.php) 55is_search() function 55is_single() 96is_single() function 55is_sticky() 96is_sticky()function 55is_tag() 96is_tag() function 55is_time() function 55is__year() function 55pings_open() function 55special parameters 54special parameters, Array 54
www.it-ebooks.info

305
special parameters, ID 54special parameters, Name 54using, for content display control 52using, to control widget display 94, 95widget content filter, using 96, 97working 53, 54
configuration, Limit Login Attempts plugin 289
Configure button 28content
exporting 24-26importing 24-26
content parameter 271core widgets
modifying 85-89working 90, 91
cron functions 283custom 404 error page
about 63creating 63, 64working 64
custom logoabout 45adding 45, 47starting with 45working 48
custom stylesadding, to theme 66, 67
Ddatabase
manual backup, creating 280-282date and time parameters, within query_
posts()day 110hour 110minute 110monthnum 110second 110year 110
dateformat parameter 270date parameter 270Deactivate button 28Delete Duplicate Posts plugin 230Disable widgets on main dashboard page
204
div tag 125Download Export File button 25duplicate content
avoiding, with robots.txt file 229, 230removing, plugin used 230, 231
dynamic_sidebar() function 81
Eeditorial workflow
about 21Editorial Comments field 23Editorial Metadata fields 23Notifications Subscriptions section 23setting up 21working 22, 23
Enable / Disable Dashboard Widgets 204excerpt parameter 270excludeposts parameter 270
FFacebook functionality access
enabling, to site 178-180working 180
faviconabout 43creating 43integrating 43working 44
Featured Posts blockabout 268creating 268List Category Posts plugin, using 268
Feedburnerintegrating, into site 150, 151integrating, manual steps 151, 152working 152
form() function 85forum
integrating, into site 139-142moderators 143plugin, configuring 139skins 143usergroups 144working 143
FTP program 286
www.it-ebooks.info

306
functions.php file 60, 61
GGenerator metatag 287get_permalink() function 118get_post() function
using 115get_post_meta() function 121Google
Webmaster Tools, using 237Google's webmaster tools
Diagnostics 241Labs 241site configuration 240using 237, 238working 239, 240
Hhack 302hackers 288has_tag(), conditional tag 96has_tag () function 55homepage
static page, using 64, 65thumbnails, displaying 119-121
h tags structureusing 243
HTML editor 99HTML Sitemap Generator plugin
about 272working 274
HTTP authenticationabout 292setting up, on WordPress site 292-294
Iid parameter 270Import tool
content importing, steps 24in_category(), conditional tag 96in_category() function 55installing
Jetpack 27, 28plugins 72themes 32-35
themes manually 35widgets 78, 79
Install link 34interactivity 134Internet Service Provider (ISP) 294is_404() function 55is_admin() function 55is_archive() function 55is_author(), conditional tag 96is_author() function 55is_author() tag 54is_category(), conditional tag 96is_category() function 55is_category tag 54is_date() function 55is_day() function 55is_front_page(), conditional tag 96is_front_page() function 55is_home() function 55is_month() function 55is_page(), conditional tag 96is_paged() function 55is_page() function 55is_page() tag 54is_page_template(), conditional tag 96is_page_template function 55is_preview() function 55is_search() function 55is_single(), conditional tag 96is_single() function 55is_single() tag 54is_sticky(), conditional tag 96is_sticky() function 55is_sticky () tag 54is_sticky() tag 54is_tag(), conditional tag 96is_tag() function 55is_time() function 55is_year() function 55is_year() tag 53
JJetpack
about 26, 27installing 27, 28modules 26
www.it-ebooks.info

307
using 27, 28working 29
jQuery Lightbox plugin 278
Llightboxes
configuring 277, 278photos, adding 276WP jQuery Lightbox plugin, adding 277
Limit Login Attempts pluginconfiguring 289
List Category Posts pluginabout 268author parameter 270catlink parameter 271class parameter 271comments parameter 271content parameter 271date parameter 270deformed parameter 270excerpt parameter 270excludepost parameter 270id parameter 270name parameter 270number posts parameter 270offset parameter 270orderby parameter 270order parameter 270post_parent parameter 271post_type parameter 271tags parameter 270template parameter 270thumbnails parameter 271working 269
login formabout 262displaying 263, 264
login pageabout 48customizing 48-50functions, customizing 51, 52plugin's module, enabling 51working 51
Mmanual backup
creating, for database 280-282media files
managing, Media Library used 6-10Media Library
media files editing, steps 9media files, managing 6-10
meta descriptionsabout 226creating, for posts 227, 228working 227, 228
metamod directory 88meta tag 287moderators 143monthnum parameter 109multi-author WordPress blog
author-related information, displaying on posts 161
multiple authorsallowing, on posts 164, 165working 165
multiple IPsaccess, allowing for 295
multiple loopsabout 112using 113working 114
multiple page templatesabout 56creating 56functionality adding, template tags used 58using 56, 57working 57
MySQLbackup, restoring 284, 285
MySQL backuprestoring 284, 285
MySQL database 280
Nname parameter 270navigation
extending, breadcrumbs used 252, 253improving, paginator used 134, 136
www.it-ebooks.info

308
New Ads Place screen 208nofollow attribute
removing, for comments posting by users 156-158
numberposts parameter 270
Ooffset parameter 270orderby parameter 270order parameter 270own widget
creating 82-84working 85
Ppages
tags, adding to 130tags, working 131
paginatorusing, for navigation improvement 134, 136working 137
parameters, wp_list_authors() functionecho 168exclude_admin 168feed 168feed_image 168feed_type 168hide_empty 168html 168number 168optioncount 168order 168orderby 168show_fullname 168style 168
Password Tool option 299Paypal subscriptions
adding, for Advertise page enhancement 206, 207
performanceoptimizing, cache management used 258-
261Permalink Finder plugin
working 226permalinks
accessing 118
get_permalink() function, working 118migrating 224optimizing, steps 219, 220structure, selecting 221structure tags reference 222working 221, 224
photoslightboxes, adding 276
phpMyAdmin 280pings_open() function 55plugin files
modifying, built-in Plugin Editor used 13, 14plugins
about 71installing 72installing, steps 77
plugins installationabout 72automatically 74, 75installed plugins, deleting automatically 75,
76installed plugins, deleting manually 77starting with 72, 74working 75
post formatsabout 59aside 61audio 61chat 61gallery 61image 61link 61quote 61status 61styling, option 62using 60video 61working 61
post listbackground color, alternating 121, 122
post_parent parameter 271post published today
displaying 110, 111displaying, steps 111
postsaccessing, within WordPress loop 103, 104
www.it-ebooks.info

309
accessing within WordPress loop, working 104, 105
author-related information, displaying 160, 162
author's avatar, displaying 163background color, alternating on post list 122by date, retrieving 108-110data accessing, outside WordPress loop 114,
115displaying, in two columns 123-125displaying, on posts 152, 154get_post_data (), using 117get_post(), using 115-117multiple authors, allowing 164, 165notes, adding to 128-130published today, retrieving 110, 111published year ago, retrieving 111, 112retrieving, from specific category 105, 107retrieving, within WordPress loop 102, 103specific number, retrieving 107, 108thumbnails, displaying on blog homepage
121thumbnails, displaying on homepage 119-
121post_type 271print friendly pages
about 246creating 246-248print link, styling 248print page, styling 248WP Print Friendly plugin 246WP Print Friendly plugin, working 248
Qquery_posts() function 107, 108
Rredirects
adding, for changed URLs 225Permalink Finder plugin, using 225Permalink Finder plugin, working 225
register_sidebar() function 81related posts
about 265All Related Posts plugin, using 265displaying 265, 266
related posts pluginconfiguring 265feature 267working 266, 267
retweet buttondisplaying, on posts 152, 154
robots.txt fileused, for avoiding duplicate content 229,
230roles
controlling 18creating 19, 20editing 19working 21
RSS contentabout 146-149aggregating 146-149working 149, 150
RSS feedsads, inserting 198, 199working 200
RSS Footer plugin 198
SSave Changes button 99scanner feature 298Scheduled Backup section 284searched text
highlighting, in search results 137Search engine optimization. See SEOSearch Engine plugin
about 249working 251, 252
search resultsplugin, working 138searched text, highlightining 137
SEOabout 217backlinks, getting 243blog, checking for XHTML validity 243h tags structure, using 243improving, SEO Ultimate plugin used 241keywords, using 243, 244permalinks optimizing, steps 220permalinks optimizing, working 221tips 242
www.it-ebooks.info

310
SEO, enhancing tipspermalinks, optimizing 223
SEO Friendly Site, creatingpermalinks, safe migration 224
SEO Ultimate pluginSEO, improving 242
shopping cartadding, to site 213-215working 216
Show Admin Bar 30sidebar
tabs, displaying 92Sidebar Login plugin
about 262, 263working 264
simple galleryadding, to site 174-176parameters 177working 177
siteexposing, to search engines 218, 219Facebook functionality access, enabling 178-
180Feedburner, integrating into 150, 151forum, integrating 139-142monetizing 187shopping cart, adding 213-215simple gallery, adding 174-176Twitter stream, integrating into 180-185
site indexingabout 233enhancing, XML sitemaps used 233
site indexing enhancing, XML sitemaps usedabout 233sitemaps, creating 237standard sitemap, attributes 236steps 234working 236XML Sitemap Generator 234
sitemapdata, to exclude 18working 18
sitemap, of site visitorsadding 271-274
site mobile deviceworking 69WPtouch plugin, suing 67-69
site securityabout 280testing 296-301
site statsdisplaying, for advertisers search 200-204working 204, 205
skins 143social bookmarking buttons
about 144adding, to theme 144, 145working 145
spamabout 256Akismet plugin, using 256reducing, by blocking comment posting 301,
302stopping 256, 257
spammers 301static page
using, as homepage 64, 65working 66
Stop Hotlinking 294structure tags, permalink
%author% 222%category% 222%hour% 222hyphen (-) separator 222%minute% 222%monthnum% 222%post_id% 222%second% 222%year% 222
style.css file 41Subscribe to Comments Reloaded plugin
using, for comments 155, 156working 156
Ttabs, displaying on sidebar
starting with 92steps 92-94
tag cloudabout 274Ultimate Tag Cloud plugin, using 275, 276
tags parameter 270template parameter 270
www.it-ebooks.info

311
templatesmodifying 254
template tagsauthor tags 105bookmark tags 105category tags 105coauthors() 165coauthors_firstnames() 166coauthors_IDs() 166coauthors_lastnames() 166coauthors_links() 166coauthors_nicknames() 166coauthors_posts_links() 165comment tags 105general tags 105link tags 105navigation menu tags 105post tags 105post thumbnail tags 105
template tags, author relatedthe_author_aim 163the_author_description 163the_author_firstname 163the_author_lastname 163the_author_nickname 163the_author_url 163the_author_yim 163
the_author_aim 163the_author_description, template tags 163the_author_firstname, template tags 163the_author_lastname, template tag 163the_author_nickname, template tag 163the_author_url, template tag 163the_author_yim, template tag 163theme colors
Cascading Style Sheets, working 39important points 40modifying 38, 39
theme colors, modifyingsteps 39
Theme editorstarting 11
theme filesmodifying, built-in Theme Editor used 10, 11,
12version information, removing from 287
theme fonts@font-face, using 42modifying 40, 41web-safe fonts 41
theme installationstarting with 32steps 32-35Themes option 33
themesabout 32colors, modifying 38custom styles, adding 66fonts, modifying 40installing 32-35installing, manually 35, 36single widget-ready zone, working 81social bookmarking buttons, adding 144, 145widget areas, adding 79, 80
third party servicesabout 231pinging 232working 232
thumbnails parameter 271toolbar
enabling, for administrators 29, 30enabling, for users 29, 30
Top Commentators widgetabout 158, 160working 160
Twitter streamintegrating, into site 180-185working 184, 185
Twitter Tools plugintwitter integrating, steps 183
UUltimate Tag Cloud plugin 275Update button 100, 165Update File button 11, 67update() function 85Update Media button 10Update RSS Footer Settings button 199Update User button 17URL re-writing 220usergroups
forum 144
www.it-ebooks.info
312
user permissionscontrolling 18
usersmanaging 14-18toolbar, enabling 29, 30
Vversion information
removing, from theme files 287visibility
about 194, 195managing 195, 196Who Sees Ads plugin, working 197
Wweb-safe fonts 41Who Sees Ads plugin
global options 197global options, click safety 197global options, date format 197global options, old post 197global options, regular reader 197working 197
widget_content filter 97widget display
controlling, conditional tags used 94, 95working 96
widget() function 85widgets
about 71core widget, modifying 85installing 78, 79own widget, creating 82-84placing, inside of pages 97-100placing, inside of posts 97-100shortcode use, enabling 126, 127shortcode use, working 127using 77, 78working 100
Widgets option 211WordPress
about 5Admin Bar 29administration system 5child theme, creating 36content, exporting 24
content exporting, Export tool used 25content, importing 24content importing, Import tool used 24editorial workflow, setting up 21favicon, integrating 44homepage, thumbnails displaying 119-121Jetpack, installing 26Jetpack, using 26media files managing, Media Library used 6permissions, controlling 18plugin files modifying, built-in Plugin Editor
used 13roles 18theme files modifying, built-in Theme Editor
used 10themes 32toolbar for administrators, enabling 29toolbar for users, enabling 29user roles, controlling 18users, managing 14version information, removing from theme
files 287WordPress blog
core widgets, modifying 92homepage, thumbnails displaying 121
WordPress Codex 36WordPress files
backups, creating 286WordPress gallery shortcode 177WordPress loop
about 102, 103outsidedata posts, accessing 114, 115posts, accessing 103, 104posts accessing, working 104, 105posts, retrieving 102, 103template tags. category 105URL 103
Wordpress.org 67WordPress search
about 249extending 249, 251Search Engine plugin 249Search Engine plugin, working 251, 252
WordPress shortcodescreating 126starting 192using 125
www.it-ebooks.info

313
used, for ad display 192, 193working 194
WordPress siteaccess, denying to unneeded hints 290, 291access, restricting to wp-admin directory by IP
address 294Administrator account, removing 288automatic backup, creating with WP DB
Backup plugin 282, 283backups, creating for files 286HTTP authentication, setting up 292-294manual backup, creating for database 280-
282MySQL backup, restoring 284, 285protecting, against brute force login attempts
289, 290security, testing 296-301spam, reducing by blocking comment posting
301, 302version information, removing from theme
files 287WordPress theme
custom 404 error page, creating 63favicon, integrating 44
WordPress version informationremoving, from theme files 287
WP database backupdownloading 19
WP DB Backup pluginabout 282automatic backup, creating with 282, 283
WP jQuery Lightbox plugin 277wp_list_authors() function 168
parameters 168WP Print Friendly plugin
about 246working 248
WP_query() function 112, 113WP Security Scan plugin 296, 301WP Super Cache plugin
about 259configuring 261content delivery network 262content, preloading 262options 262working 261
WP Super Cache Settings page 260WPtouch plugin 67
www.it-ebooks.info

Thank you for buying
WordPress 3 Cookbook
About Packt PublishingPackt, pronounced 'packed', published its first book "Mastering phpMyAdmin for Effective MySQL Management" in April 2004 and subsequently continued to specialize in publishing highly focused books on specific technologies and solutions.
Our books and publications share the experiences of your fellow IT professionals in adapting and customizing today's systems, applications, and frameworks. Our solution based books give you the knowledge and power to customize the software and technologies you're using to get the job done. Packt books are more specific and less general than the IT books you have seen in the past. Our unique business model allows us to bring you more focused information, giving you more of what you need to know, and less of what you don't.
Packt is a modern, yet unique publishing company, which focuses on producing quality, cutting-edge books for communities of developers, administrators, and newbies alike. For more information, please visit our website: www.packtpub.com.
About Packt Open SourceIn 2010, Packt launched two new brands, Packt Open Source and Packt Enterprise, in order to continue its focus on specialization. This book is part of the Packt Open Source brand, home to books published on software built around Open Source licences, and offering information to anybody from advanced developers to budding web designers. The Open Source brand also runs Packt's Open Source Royalty Scheme, by which Packt gives a royalty to each Open Source project about whose software a book is sold.
Writing for PacktWe welcome all inquiries from people who are interested in authoring. Book proposals should be sent to [email protected]. If your book idea is still at an early stage and you would like to discuss it first before writing a formal book proposal, contact us; one of our commissioning editors will get in touch with you.
We're not just looking for published authors; if you have strong technical skills but no writing experience, our experienced editors can help you develop a writing career, or simply get some additional reward for your expertise.
www.it-ebooks.info

WordPress 3 Site BlueprintsISBN: 978-1-847199-36-2 Paperback: 300 pages
Ready-made plans for 9 different professional WordPress sites
1. Everything you need to build a varied collection of feature-rich customized WordPress websites for yourself
2. Transform a static website into a dynamic WordPress blog
3. In-depth coverage of several WordPress themes and plugins
4. Packed with screenshots and step-by-step instructions to help you complete each site
WordPress Theme DesignISBN: 978-1-847193-09-4 Paperback: 224 pages
A complete guide to creating professional WordPress themes
1. Take control of the look and feel of your WordPress site
2. Simple, clear tutorial to creating Unique and Beautiful themes
3. Expert guidance with practical step-by-step instructions for theme design
4. Design tips, tricks, and troubleshooting ideas
Please check www.PacktPub.com for information on our titles
www.it-ebooks.info

WordPress for Business BloggersISBN: 978-1-847195-32-6 Paperback: 356 pages
Promote and grow your WordPress blog with advanced plug-ins, analytics, advertising, and SEO
1. Gain a competitive advantage with a well polished WordPress business blog
2. Develop and transform your blog with strategic goals
3. Create your own custom design using the Sandbox theme
4. Apply SEO (search engine optimization) to your blog
5. Market and measure the success of your blog
WordPress 3 Ultimate SecurityISBN: 978-1-84951-210-7 Paperback: 408 pages
Protect your WordPress site and its network
1. Know the risks, think like a hacker, use their toolkit, find problems first – and kick attacks into touch
2. Lock down your entire network from the local PC and web connection to the server and WordPress itself
3. Find out how to back up and secure your content and, when it's scraped, know what to do to enforce your copyright
Please check www.PacktPub.com for information on our titles
www.it-ebooks.info