Woodland Christmas - Blank Quilting - Welcome to the...
5
A Free Project Sheet From Finished Quilt Size: 41” x 59” 49 West 37th Street, 14th floor, New York, NY 10018 Toll Free: 800-294-9495 fax: 212-679-4578 www.blankquilting.com Panel Woodland Christmas Woodland Christmas By Gina Linn
Transcript of Woodland Christmas - Blank Quilting - Welcome to the...

A Free Project Sheet FromFinished Quilt Size: 41” x 59”
49 West 37th Street, 14th floor, New York, NY 10018Toll Free: 800-294-9495
fax: 212-679-4578www.blankquilting.com
PanelWoodland ChristmasWoodland Christmas
By Gina Linn

Woodland Christmas
Fabrics in the Woodland Christmas Collection
Finished Quilt Size: 41” x 59”
Panel
Snowflakes - Red7250-88
Pinecones - Red7248-88
Texture - Cream7246-45
Texture - Blue7246-11
Holly - Cream7245-45
Holly - Blue7245-11
Snowmen - Red7244-88
Snowmen - Blue7244-11
Panel - Green7243P-66
Pinecones - Green7248-66
Novelty Stripe - Green7247-66
Snowflakes - Green7250-66
Snowflakes - Blue7250-11
Owls - Red7249-88
Owls - Blue7249-11

Woodland Christmas PanelCutting Instructions Please note: all strips are cut across the width of fabric (WOF) from selvage to selvage edge unless otherwise noted.
Page 1Materials 1 panel Panel – Green (A) 7243P-66¾ yard Snowflakes – Red (B) 7250-88*⅜ yard Holly – Cream (C) 7245-45⅓ yard Pinecones – Green (D) 7248-66⅓ yard Snowflakes – Green (E) 7250-66⅓ yard Pinecones – Red (F) 7248-881 ⅞ yards Novelty Stripe – Green (G) 7247-663 yards Snowmen – Blue (Backing) 7244-11
*Includes binding
From the Panel - Green (A):• Fussy cut (1) 22 ½” x 40 ½” panel, centered on the Santa.
From the Snowflakes - Red (B), cut:• (2) 2” x 40 ½” strips.• (2) 2” x 25 ½” strips.• (6) 2 ½” x WOF strips for the binding.
From the Holly - Cream (C), cut:• (3) 3 ⅞” x WOF strips. Sub-cut strips into (22) 3 ⅞” squares and (4) 3 ½” squares. From the Pinecones - Green (D), cut:• (2) 3 ⅞” x WOF strips. Sub-cut strips into (11) 3 ⅞” squares.
From the Snowflakes - Green (E), cut:• (2) 3 ⅞” x WOF strips. Sub-cut strips into (11) 3 ⅞” squares.
From the Pinecones - Red (F), cut:• (3) 1 ½” x WOF strips. Sew the strips together, end to end with diagonal seams, and cut (2) 1 ½” x 48 ½” strips.• (2) 1 ½” x 32 ½” strips. From the Novelty Stripe - Green (G), cut:• (2) 5” x 63” strips from the length of fabric (LOF).• (2) 5” x 45” LOF strips.
From the Snowmen - Blue (Backing), cut:• (2) 49” x WOF strips for the backing. Sew the strips together and trim to make the 49” x 67” back.

3. Sew (1) 2” x 40 ½” Fabric B strip to each side of the 22 ½” x 40 ½” Fabric A panel. Sew (1) 2” x 25 ½” Fabric B strip to the top and to the bottom of the Fabric A panel. Trim the block to measure 24 ½’ x 42 ½” to make the center block.
Woodland Christmas Panel
Fig. 1 Fig. 2
Fig. 4
Fig. 3
Fig. 5
Page 2
11. Layer and quilt as desired.
12. Sew the (6) 2 ½” x WOF Fabric B strips together, end to end with 45-degree seams, to make the binding. Fold this long strip in half lengthwise with wrong sides together and press.
13. Bind as desired.
Sewing Instructions1. Place (1) 3 ⅞” Fabric C square on top of (1) 3 ⅞” Fabric D square, right sides together. Draw a line across the diagonal of the top square (Fig. 1). Sew ¼” away from each side of the drawn diagonal line (Fig. 1). Cut the two squares apart on the drawn diagonal line (Fig. 2) to make two CD units (Fig. 3). Trim the CD units to measure 3 ½” square. Repeat to make (22) CD units total.
CD
make 22
2. Repeat Step 1 using (11) 3 ⅞” Fabric C squares and (11) 3 ⅞” Fabric E squares to make (22) 3 ½” CE units (Fig. 4).
CE
make 22
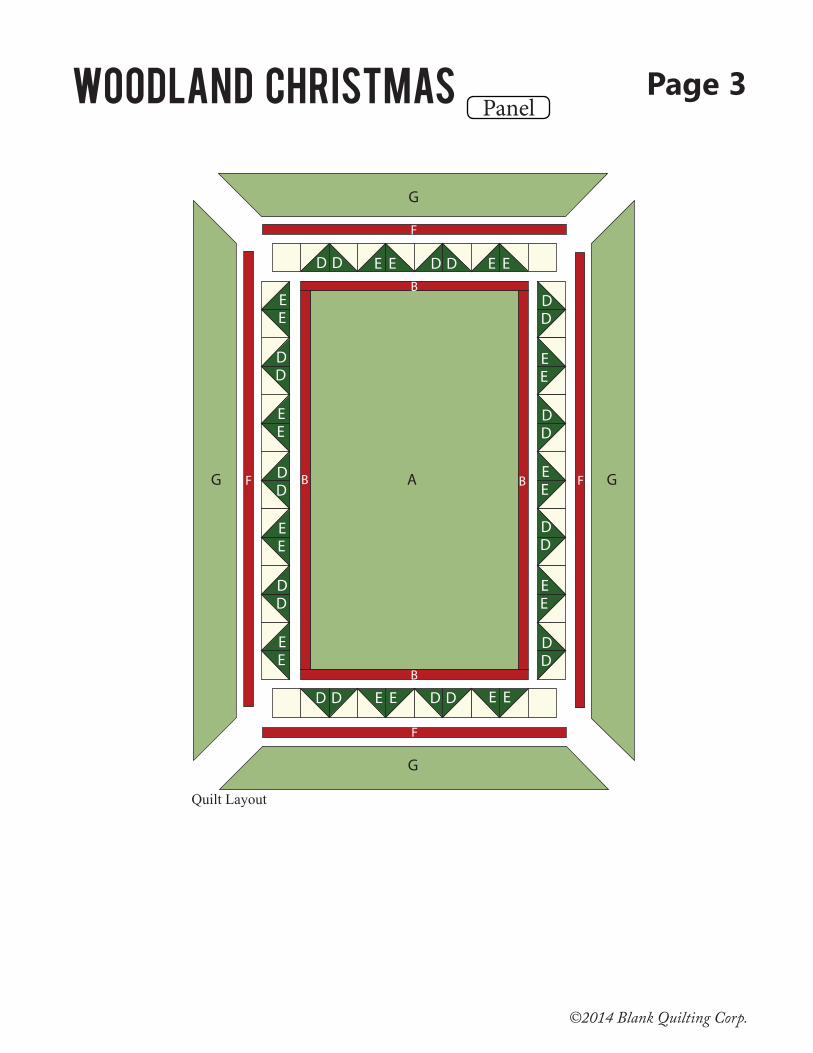
Quilt Top Assembly (Refer to the Quilt Layout while assembling.)4. Sew (8) CE units and (6) CD units together to make (1) strip. Sew this strip to the left side of the center block. (Pay attention to the orientation and position of the CD and CD units.)
5. Sew (8) CD units and (6) CE units together to make (1) strip. Sew this strip to the right side of the center block. (Pay attention to the orientation and position of the CD and CD units.)
6. Sew (2) 3 ½” Fabric C squares (4) CD units and (4) CE units together to make (1) strip. Repeat to make a second strip. Sew the strips to the top and to the bottom of the center block to make the quilt top. (Pay attention to the orientation and position of the CD and CD units.) 7. Sew (1) 1 ½” x 48 ½” Fabric F strip to each side of the quilt top. Sew (1) 1 ½” x 32 ½” Fabric F strip to the top and to the bottom of the quilt top.
8. Center (1) 5” x 63” Fabric G strip on one side of the quilt top pin in place. Start sewing the strip a ¼” from the top edge of the quilt top and stop a ¼” from the bottom edge. DO NOT TRIM THE EXCESS. Repeat with the opposite side.
9. Repeat Step 8 to sew (1) 5” x 45” Fabric G strip to the top and to the bottom of the quilt top, making sure to stop and start ¼” away from each end of the quilt top. To miter each corner, fold the quilt top on a diagonal, wrong side together. This should line up the strips from adjacent sides (Fig. 5).
Quilt To
p
Folded on
the Diag
onal
10. Starting at the sewn seam (represented by the arrow in Figure 5 ), draw a 45-degree line to the edge of the fabric. Sew on the drawn line. Trim the excess fabric leaving a ¼” seam. Repeat this step with the remaining corners.
©2014 Blank Quilting Corp.
Woodland Christmas PanelPage 3
D
DD
DD
DD
DD
DD
DD
DD
EE
EE
EE
EE
EE
EE
EE
D D D
AG G
G
G
D D D D
EB
F
F F
F
B
B B
E E E
E EE E
Quilt Layout