Wonderware HMI Workstation - General Millsengrfp.generalmills.com/RFPDocs/CIS_403_HMI Application...
26
Wonderware HMI Workstation Programming Guidelines Introduction CIS_403_HMI Application Standard_WHQ1.docx, Revision 3, April 2008 1 Wonderware HMI Workstation This guideline describes the content, creation, and domain installation of a standard Wonderware plant floor HMI workstation. Table of Contents 1. Introduction 2. Design 3. Installation 4. Documentation and Deliverables 5. References and Related Documents 6. Appendix A—Modifying the GMI Altiris Desktop 7. Appendix B—Creating a Standard GMI OS Image 8. Appendix C—Configuring a Standard Plant Floor Image 9. Revision Summaries 1. Introduction Consider all standards described in this document mandatory unless otherwise identified as optional or preferred. Any variance from GMI requirements or preferences requires prior GMI Engineering approval. Obtain approval from the engineer that issued this document or has been designated as responsible for project deliverables. GMI will provide and document specific project requirements and approvals. Any network computer with access to the Genmills Domain shall at a minimum have General Mills approved real time virus protection, Microsoft SMS client installed and maintain current with Microsoft OS patches that have been approved by General Mills.
Transcript of Wonderware HMI Workstation - General Millsengrfp.generalmills.com/RFPDocs/CIS_403_HMI Application...

Wonderware HMI Workstation Programming Guidelines
Introduction
CIS_403_HMI Application Standard_WHQ1.docx, Revision 3, April 2008 1
Wonderware HMI Workstation
This guideline describes the content, creation,
and domain installation of a standard
Wonderware plant floor HMI workstation.
Table of Contents
1. Introduction
2. Design
3. Installation
4. Documentation and Deliverables
5. References and Related Documents
6. Appendix A—Modifying the GMI Altiris Desktop
7. Appendix B—Creating a Standard GMI OS Image
8. Appendix C—Configuring a Standard Plant Floor Image
9. Revision Summaries
1. Introduction Consider all standards described in this document mandatory unless otherwise
identified as optional or preferred. Any variance from GMI requirements or preferences
requires prior GMI Engineering approval. Obtain approval from the engineer that issued
this document or has been designated as responsible for project deliverables. GMI will
provide and document specific project requirements and approvals.
Any network computer with access to the Genmills Domain shall at a minimum have
General Mills approved real time virus protection, Microsoft SMS client installed and
maintain current with Microsoft OS patches that have been approved by General Mills.
Wonderware HMI Workstation Programming Guidelines
Design
CIS_403_HMI Application Standard_WHQ1.docx, Revision 3, April 2008 2
2. Design The Wonderware HMI workstation is a General Mills standard PC with an installed plant
floor image. General Mills uses the following standard PCs:
Corporate IS standard HP Compaq desktop computer with a Hope Industrial
Systems industrial 15", 17", 19", or 21" flat panel monitor and resistive touch
screen
Beckhoff C6920 industrial computer with a Hope Industrial Systems industrial
15", 17", 19", or 21" flat panel monitor and resistive touch screen
CIS supports each computer standard with a plant floor image. The image provides an
efficient and rapid means of configuring a new computer with the software needed to
run a Wonderware InTouch application in the General Mills domain environment. The
plant floor image installs a standard GMI OS and CIS Wonderware software
environment that enables plant and CIS support engineers to quickly troubleshoot
problems.
2.1 Plant Floor Image
The plant floor image is derived from the General Mills Windows XP SP2 Granite image
prepared by IS Desktop Technology or its equivalent. This initial configuration is
modified by removing unnecessary applications, installing appropriate Wonderware and
support software, and configuring a standard folder structure and interface look and
feel. The plant floor image is unique to the PC model, Wonderware InTouch version and
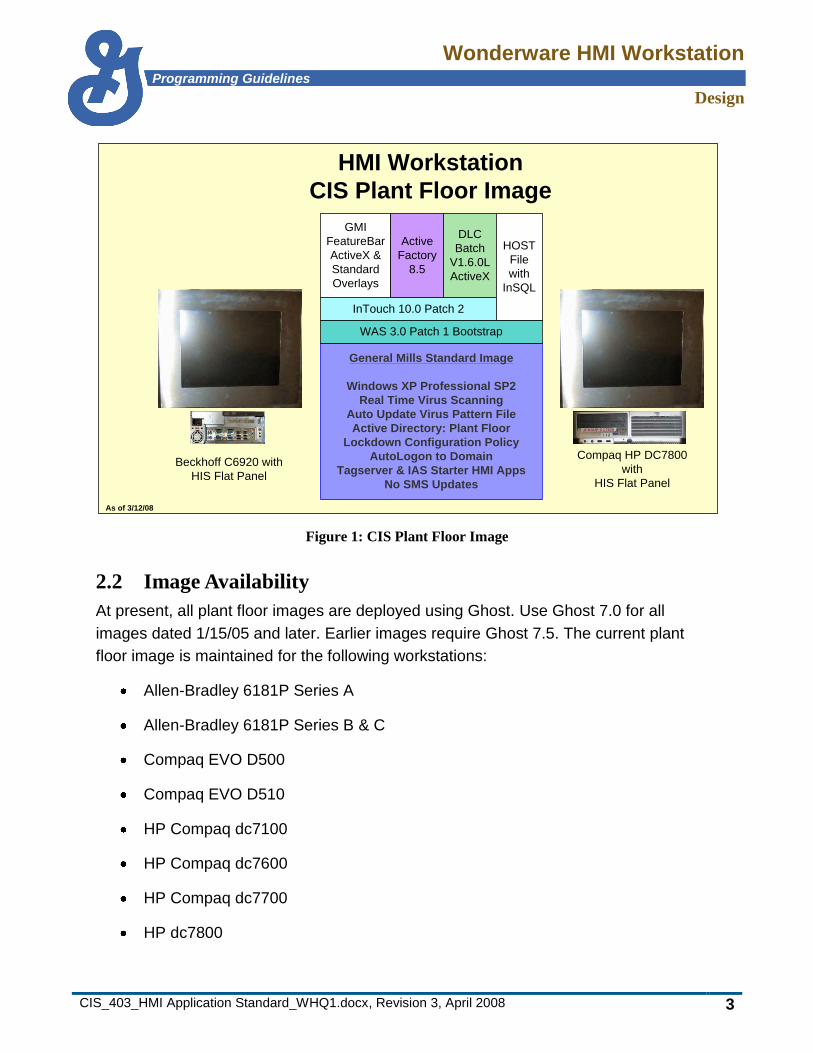
GMIFrameworks Shell versions. Figure 1 summarizes the current standard. See
Appendices A through C for details about its content and construction.
The current plant floor image uses Wonderware InTouch 10.0 Patch 2 and GMI IAS
Frameworks Shell Client Components.
Wonderware HMI Workstation Programming Guidelines
Design
CIS_403_HMI Application Standard_WHQ1.docx, Revision 3, April 2008 3
Figure 1: CIS Plant Floor Image
2.2 Image Availability
At present, all plant floor images are deployed using Ghost. Use Ghost 7.0 for all
images dated 1/15/05 and later. Earlier images require Ghost 7.5. The current plant
floor image is maintained for the following workstations:
Allen-Bradley 6181P Series A
Allen-Bradley 6181P Series B & C
Compaq EVO D500
Compaq EVO D510
HP Compaq dc7100
HP Compaq dc7600
HP Compaq dc7700
HP dc7800
As of 3/12/08
InTouch 10.0 Patch 2
DLC
Batch
V1.6.0L
ActiveX
HOST
File
with
InSQL
GMI
FeatureBar
ActiveX &
Standard
Overlays
HMI Workstation
CIS Plant Floor Image
General Mills Standard Image
Windows XP Professional SP2
Real Time Virus Scanning
Auto Update Virus Pattern File
Active Directory: Plant Floor
Lockdown Configuration Policy
AutoLogon to Domain
Tagserver & IAS Starter HMI Apps
No SMS Updates
Active
Factory
8.5
Beckhoff C6920 with
HIS Flat Panel
Compaq HP DC7800
with
HIS Flat Panel
WAS 3.0 Patch 1 Bootstrap
Wonderware HMI Workstation Programming Guidelines
Design
CIS_403_HMI Application Standard_WHQ1.docx, Revision 3, April 2008 4
Beckhoff C6920
All images are available on the CIS Support server in the Ghost share,
\\Genmills\CIS\Ghost. Folders identify the computer model, OS, image date, and series
if appropriate. Older images are located in the image archive folder. However the
current image is not always available for older computer models
The document \\Genmills\CIS\Ghost\Plant Floor Image Windows XP Contents.doc
summarizes the image content of the current and previous image releases.
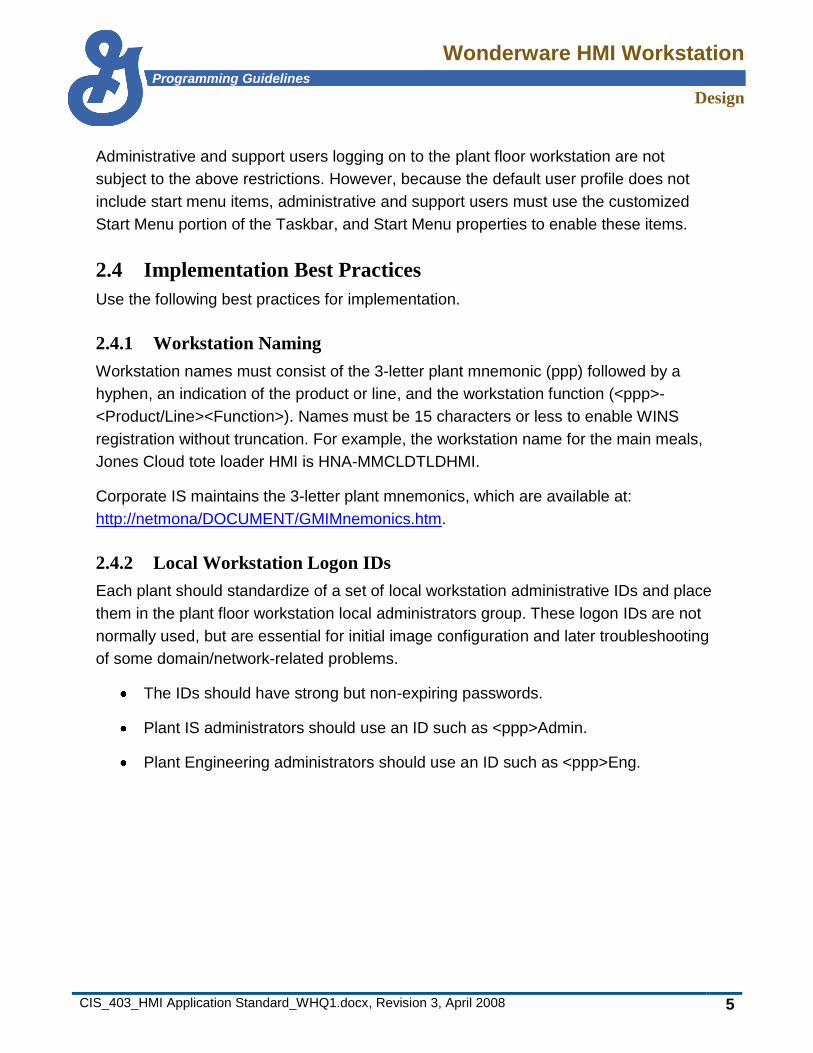
2.3 HMI Workstation Security Implementation
Plant floor HMI workstations implement normal Windows XP security. The Genmills
domain plant floor Lock Down Policy settings provide additional security. Plant floor
workstations are placed in the plant‘s plant floor\computer OU (organizational unit). The
autologon user (restricted) is placed in the plant floor\users OU. The plant floor lock
down policy implements the following major restrictions:
No desktop Icons
Restricted user access (the user has access only to programs in the restricted
user‘s start menu)
Inactive screen saver
Shutdown options are available.
Figure 2: Restricted Desktop User’s Start Menu
Wonderware HMI Workstation Programming Guidelines
Design
CIS_403_HMI Application Standard_WHQ1.docx, Revision 3, April 2008 5
Administrative and support users logging on to the plant floor workstation are not
subject to the above restrictions. However, because the default user profile does not
include start menu items, administrative and support users must use the customized
Start Menu portion of the Taskbar, and Start Menu properties to enable these items.
2.4 Implementation Best Practices
Use the following best practices for implementation.
2.4.1 Workstation Naming
Workstation names must consist of the 3-letter plant mnemonic (ppp) followed by a
hyphen, an indication of the product or line, and the workstation function (<ppp>-
<Product/Line><Function>). Names must be 15 characters or less to enable WINS
registration without truncation. For example, the workstation name for the main meals,
Jones Cloud tote loader HMI is HNA-MMCLDTLDHMI.
Corporate IS maintains the 3-letter plant mnemonics, which are available at:
http://netmona/DOCUMENT/GMIMnemonics.htm.
2.4.2 Local Workstation Logon IDs
Each plant should standardize of a set of local workstation administrative IDs and place
them in the plant floor workstation local administrators group. These logon IDs are not
normally used, but are essential for initial image configuration and later troubleshooting
of some domain/network-related problems.
The IDs should have strong but non-expiring passwords.
Plant IS administrators should use an ID such as <ppp>Admin.
Plant Engineering administrators should use an ID such as <ppp>Eng.
Wonderware HMI Workstation Programming Guidelines
Installation
CIS_403_HMI Application Standard_WHQ1.docx, Revision 3, April 2008 6
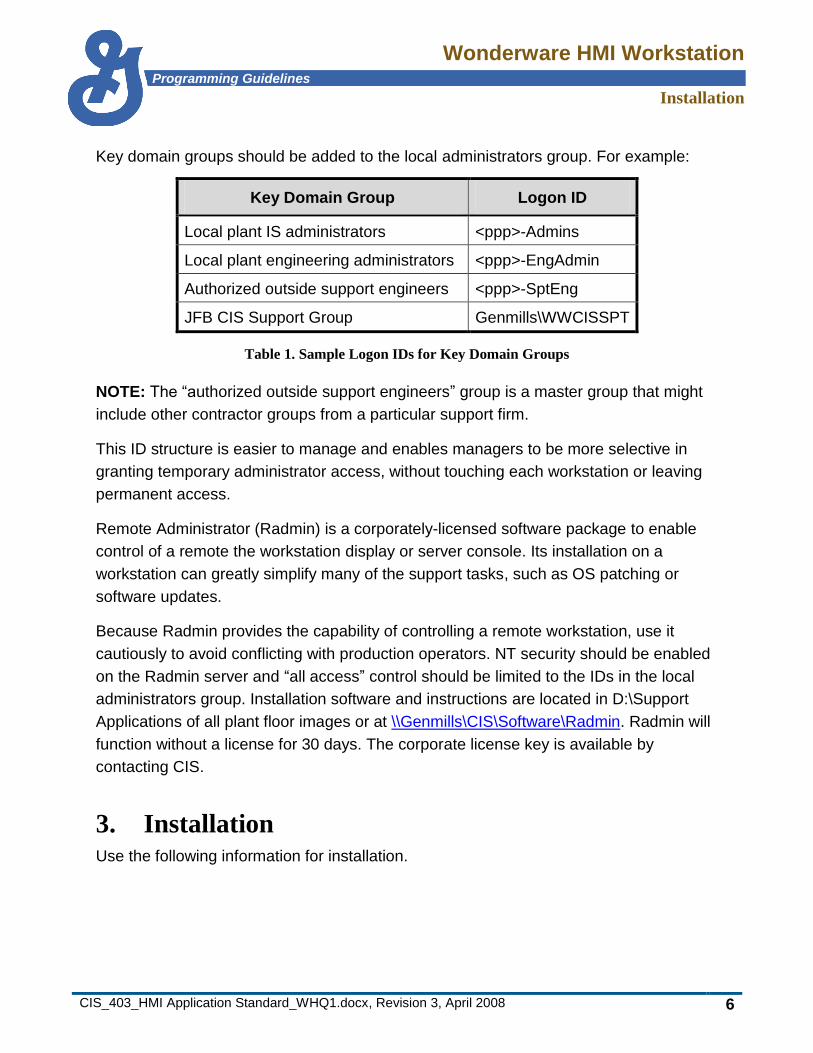
Key domain groups should be added to the local administrators group. For example:
Key Domain Group Logon ID
Local plant IS administrators <ppp>-Admins
Local plant engineering administrators <ppp>-EngAdmin
Authorized outside support engineers <ppp>-SptEng
JFB CIS Support Group Genmills\WWCISSPT
Table 1. Sample Logon IDs for Key Domain Groups
NOTE: The ―authorized outside support engineers‖ group is a master group that might
include other contractor groups from a particular support firm.
This ID structure is easier to manage and enables managers to be more selective in
granting temporary administrator access, without touching each workstation or leaving
permanent access.
Remote Administrator (Radmin) is a corporately-licensed software package to enable
control of a remote the workstation display or server console. Its installation on a
workstation can greatly simplify many of the support tasks, such as OS patching or
software updates.
Because Radmin provides the capability of controlling a remote workstation, use it
cautiously to avoid conflicting with production operators. NT security should be enabled
on the Radmin server and ―all access‖ control should be limited to the IDs in the local
administrators group. Installation software and instructions are located in D:\Support
Applications of all plant floor images or at \\Genmills\CIS\Software\Radmin. Radmin will
function without a license for 30 days. The corporate license key is available by
contacting CIS.
3. Installation Use the following information for installation.

Wonderware HMI Workstation Programming Guidelines
Installation
CIS_403_HMI Application Standard_WHQ1.docx, Revision 3, April 2008 7
3.1 Required Plant IS Coordination
The plant IS department‘s level of involvement with plant floor workstations varies from
plant to plant. Some plants prefer to configure the workstation before turning it over to
the project team; other plants prefer to let the project team configure the workstation. In
either case, a discuss configuration responsibilities early in the project. At a minimum,
the plant IS department shall:
Assign or provide a range of HMI LAN fixed IP workstation addresses.
Add the workstation‘s computer name or move it to the plant‘s plant
floor\computer OU.
Join the workstation to the Genmills domain.
Provide the names of required domain groups and the autologon AUID.
3.2 Plant Floor Image Installation
Detailed installation instructions are contained in a text document located on the first CD
in the plant floor image CD set or in the image folder located on the Ghost share. Ghost
7.0 is used to create all plant floor images dated 01/15/05 and later. Ghost 7.5 is used
to create earlier images. The correct version of Ghost is included on the CDs. For older
images, the instructions refer to ―Ghost‖. Newer creations of the CD sets and the Ghost
share use Ghost75 or Ghost70 as appropriate, rather than ―Ghost‖.
Key points:
Create a local administrative user before you reboot. The administrator ID is
used to boot the system only once before its password is changed. Rebooting
before a local administrative user is created requires the PC to be re-imaged.
Run Windows Update using the custom option. Apply all critical updates.
3.3 Enclosures
Install the computer and display in an enclosure that meets the NEMA requirements
specified in the plant‘s area classification drawings.
Wonderware HMI Workstation Programming Guidelines
Installation
CIS_403_HMI Application Standard_WHQ1.docx, Revision 3, April 2008 8
The enclosure design must ensure that the internal maximum temperature remains
below the maximum specified rating for the computer or display, under maximum
expected ambient temperature conditions.
Beckhoff C6920 is rated to 50°C or 122°F
HP Compaq dc7800 is rated to 35°C or 95°F
Hope Industrial 15", 17", and 21" industrial flat panels are rated to 50°C or 122°F
Hope Industrial 19" industrial flat panel is rated to 40°C or 104°F
A rough enclosure temperature rise calculator is available at:
\\Genmills\CIS\Software\Estimating.
CIS and Control Center, Inc. of Plymouth, MN developed a standard enclosure for the
HP Compaq SFF computer equipped with a Hope Industrial Systems touch screen flat
panel. See CIS_307_HMI/SCADA Workstation Standard_WHQ for details.
3.4 Workstation Setup
Use the following steps to set up a workstation.
1. Add the necessary domain groups and the autologon AUID to the workstation‘s
administrators group.
2. Place the WindowViewer shortcut in the autologon users startup folder. Do not
place it in the all users folder.
3. Add the following entries to the C:\WINDOWS\system32\drivers\etc\hosts file:
<HMI LAN IP address> <InSQL server computer name>
<HMI LAN IP address> <galaxy repository server computer name>
<HMI LAN IP address> <primary tagserver computer name> or <HMI
LAN IP address> <primary application object server computer name>
<HMI LAN IP address> <secondary tagserver computer name> or <HMI
LAN IP address> <secondary application object server computer name>
4. Configure the workstation to log on the autologon user automatically. To
simplify this task, modify the Autologon.txt file in
Wonderware HMI Workstation Programming Guidelines
Documentation and Deliverables
CIS_403_HMI Application Standard_WHQ1.docx, Revision 3, April 2008 9
\\Genmills\CIS\Software\Microsoft\AutoLogon For Control Workstations and
change the extension to .reg.
4. Documentation and Deliverables In addition to any project-specific deliverables, submit the following information on a
spreadsheet to the plant IS manager and the plant controls engineer.
Computer name
Computer manufacturer (if not Allen-Bradley or HP Compaq)
Computer model (for Allen-Bradley computers, add the series number)
Computer serial number
Assigned IP address
Wonderware license number
5. References and Related Documents CIS_307_HMI/SCADA Workstation Standard_WHQ
6. Appendix A—Modifying GMI’s Granite Image Use the following information to modify the GMI Windows XP SP2 Granite image install
to create a standard GMI OS only image.
1. After the Single Image has been installed and configured, uninstall the following
applications:
BindView Password Self Service Direct Login 8.00
Client for Microsoft Office SharePoint Portal Server 2003
Compatibility Pack for the 2007 Office System
Incident Icon
Meeting Manager for Internet Explorer
Wonderware HMI Workstation Programming Guidelines
Appendix B—Creating a Standard GMI OS Image
CIS_403_HMI Application Standard_WHQ1.docx, Revision 3, April 2008 10
Microsoft Office Professional Edition 2003
Microsoft Visio Viewer 2003 (English)
Microsoft Windows Journal Viewer
NewG-DEXIcon
2. Delete remaining unneeded folders.
3. Delete patch backup files.
4. Delete unneeded desktop icons and program shortcuts.
5. Configure Power Options
Turn off Hibernation
Set ‗Turn off Monitor‖ to Never
Set ―System Standby‖ to Never
6. Run Microsoft Hotfix KB887816 for Windows XP SP2 if creating an image that
will be syspreped to keep the sysprep mini-setup from copying the Administrator
profile to the Default User profile. Contact CIS for more information.
7. Appendix B—Creating a Standard GMI OS
Image Use the following information to create a standard GMI OS only image from an original
Windows XP, SP2 install.
1. Load Windows XP, SP2 on a hard drive that has had all partitions removed.
Make the C: partition NTFS.
2. Install the following additional software:
Symantec Client Security 10
Computer manufacturer‘s driver updates and support files
Microsoft‘s MSXML 4.0, SP-2 and MSXML 6.0 Parser
Wonderware HMI Workstation Programming Guidelines
Appendix B—Creating a Standard GMI OS Image
CIS_403_HMI Application Standard_WHQ1.docx, Revision 3, April 2008 11
Microsoft SMS Client
Acrobat Reader 7.0.5 or most recent version
Apple QuickTime Player 6.5 or most recent version, without auto update
Macromedia Flash Player 8 or most recent version
Macromedia Shockwave 10.1.0.001 or most recent version
Sun Java 1.4.2.04 or most recent version with the Internet Explorer browser
disabled.
WinZIP 9.0 or most recent version
3. Update the Kerberos parameters registry keys.
[HKEY_LOCAL_MACHINE\SYSTEM\CurrentControlSet\Control\Lsa\Kerberos\
Parameters]
"MaxTokenSize"=dword:000186a0
"MaxPacketSize"=dword:00000001
4. Allow IE intranet zone settings.
[HKEY_LOCAL_MACHINE\SOFTWARE\Policies\Microsoft\Windows\
CurrentVersion\Internet Settings]
"Security_Options_Edit"=dword:00000000
"Security_Zones_Map_Edit"=dword:00000000
Wonderware HMI Workstation Programming Guidelines
Appendix C—Configuring a Standard Plant Floor Image
CIS_403_HMI Application Standard_WHQ1.docx, Revision 3, April 2008 12
5. Configure Microsoft IE 6.0 Internet Properties Advanced tab settings.
a. Disable script debugging.
b. Show Go button in address bar.
8. Appendix C—Configuring a Standard Plant Floor
Image 1. Start with a Standard GMI OS ―only‖ image.
2. Create the following local users with a non-expiring password, and add them to
the local administrators group.
CISAdmin
MQISAdmin
<ppp>Admin where <ppp> is replaced with the three-letter mnemonic for the
plant location
<ppp>Eng where <ppp> is replaced with the three-letter mnemonic for the
plant location
Temp
3. If attached to the Genmills domain, add the following domain groups to the local
groups.
Genmills\WWCISSPT to Administrators
Genmills\WIN2000_PWEUSRS to Power Users
4. Create a master administrative profile.
a. Adjust the functionality, look, and feel of the administrator logon profile.
b. Log on and off of CISAdmin and MQISAdmin to create their user profiles.
c. Copy the administrator profile to CISAdmin and MQISAdmin.
5. Run Windows Update, and point to the GMI SUS update server.
Wonderware HMI Workstation Programming Guidelines
Appendix C—Configuring a Standard Plant Floor Image
CIS_403_HMI Application Standard_WHQ1.docx, Revision 3, April 2008 13
a. Run Windows Update from the normal Microsoft site. Download all critical
updates.
b. Configure Windows Update to point to the GMI SUS update server. Replace
the value ―http://mgoapsusp1‖ with whatever is appropriate for the specific
plant location. Check with the plant ISM for the proper server.
1) In HKLM\SOFTWARE\Policies\Microsoft\Windows\WindowsUpdate
create or add
a) Set or Add ―WUServer‖, String Value, to ―http://wsusweb.genmills.com‖
b) Set or Add ―WUStatusServer‖, String Value, to ―http://
wsusweb.genmills.com‖
2) In HKLM\Software\Policies\Microsoft\Windows \WindowsUpdate\AU
create or add
a) Set or Add ―NoAutoRebootWithLoggedOnUsers‖, DWORD value, to 1.
b) Set or Add ―NoAutoUpdate‖, DWORD value, to 0.
c) Set or Add ―AUOptions‖, DWORD value, to 3 which is download
updated but do not apply.
d) Set or Add ―ScheduledInstallDay‖, DWORD value, to 0.
e) Set or Add ―ScheduledInstallTime‖, DWORD value, to e hex or 14
decimal.
f) Set or Add ―UseWUServer‖, DWORD value, to 1.
g) Set or Add ―RescheduleWaitTime‖, DWORD value, to 2.
h) Set or Add ―AutoInstallMinorUpdates‖, DWORD value, to 0.
6. Enable the Microsoft date and time picker.
[HKEY_CLASSES_ROOT\Licenses\4F86BADF-9F77-11d1-B1B7-0000F8753F5D]
@="iplpwpnippopupiivjrioppisjsjlpiiokuj"
7. Install the Elo XP universal touch screen serial driver. The driver is available at
\\Genmills\CIS\Software\EloTouch or http://elotouch.com/support/dnld.asp.
Wonderware HMI Workstation Programming Guidelines
Appendix C—Configuring a Standard Plant Floor Image
CIS_403_HMI Application Standard_WHQ1.docx, Revision 3, April 2008 14
8. Partition the hard drive to create the D drive formatted for NTFS. The C drive
should be sized to about 15 GB for a 40 GB drive and about 25 GB for larger
drives, with the remaining space allocated to the D drive.
9. Create the following standard folders, and add the appropriate support files. If
you can connect to the Genmills domain, map the M drive to
\\Genmills\CIS\Software\Wonderware\Registry&Dir_patches and execute
Setup_WrkStn_dirs.bat.
D:\Support Applications\Autologon For Control Workstations. Add the
autologon.txt and the AutologonReadMe.txt files, located at
\\\Genmills\CIS\Software\Microsoft\AutoLogon For Control Workstations or
the CIS Support FTP site.
D:\Support Applications\WWClient. Add WWClientArchestrA.zip, located at
\\Genmills\CIS\Software\Wonderware\Utilities\WWClient.
D:\Support Applications\WWSysInfo. Add WWSysInfo.exe located at
\\Genmills\CIS\Software\Wonderware\Utilities\WWSysInfo
D:\WWApp.
D:\WWLogger.
D:\Temp.
10. Install Wonderware InTouch 10.0 with Patch 2.
a. Perform a standard install, and add the following components:
InTouch SPCPro
Recipe Manager
InTouch SQL Access
Symbol Factory
16 Pen Trend
b. Unless the plant already has a MppIAS ID where pp represents the first two
letters of the three-letter plant mnemonic, let the install process create the
user ―wwInstall‖ and user password ―Cissupport!‖.

Wonderware HMI Workstation Programming Guidelines
Appendix C—Configuring a Standard Plant Floor Image
CIS_403_HMI Application Standard_WHQ1.docx, Revision 3, April 2008 15
c. Eliminate the Wonderware$ Everybody share by copying License.INI to
C:\Program Files\FactorySuite\Common from
\\Genmills\CIS\Software\Wonderware\Remove Wonderware$ License Share.
11. Install Wonderware ActiveFactory 8.5 using a standard install.
12. Install Wonderware Application Server 3.0 Patch 2 Bootstrap.
13. Install the GMI IAS Frameworks Client components located at
\\Genmills\CIS\Software\Wonderware\ArchestrA\IAS Frameworks\GMI IAS Shell
Installs\GMI Client Components for IAS\DISK1 or on the CIS Support FTP site.
14. Configure the Wonderware SMC log files to be saved in D:\WWLogger and to
delete log messages older than 30 days by Opening Programs > Wonderware >
System Management Console.
a. Right click on Log\Viewer\Default Group\Local and select ―Configure‖.
b. If unable to open Logger the processor probably supports hardware Data
Execution Prevention (DEP). Wonderware Technote 437 details the fix
with the following steps.
i. Hardware DEP can be verified by going to Advanced tab on
System Performance and clicking on the Settings button under
Performance. If there is a Data Execution Prevention tab the
hardware supports DEP.
ii. Return to the Advanced tab and click Settings under Startup and
Recovery.
iii. Under System Startup click the Edit button which will open boot.ini.
c. Add the /noexecute=alwaysoff /NOPAE switch to the end of the boot.ini
file.
d. Right click on Log\Viewer\Default Group\Local and select ―Configure‖.
e. On the ―Storage‖ Tab set ―Store log messages in this path‖ to
D:\WWLogger.Set ―Delete log messages older than‖ to 30 days.
f. Delete the old log files by deleting the directory: C:\Documents and
Settings\All users\Application Data\Archestra\LogFiles
Wonderware HMI Workstation Programming Guidelines
Appendix C—Configuring a Standard Plant Floor Image
CIS_403_HMI Application Standard_WHQ1.docx, Revision 3, April 2008 16
15. Install DLCBatch 1.6.0L located at \\\Genmills\CIS\Software\DLCBatch\Version
1.6 or on the CIS Support FTP site. Use the custom install and do not install the
following:
Data Reporter
Recipe Editor
Datacollector
16. Install MQIS Forms.
a. Rename C:\SMSTAG\SKIPSFTWINST.SMS if present.
b. Execute MQISForms2_0.exe from
\\Genmills\Desktop\PRODUCTION\MQISForms2_0.
c. Using a non-restricted Domain user with proper MQIS access select DEVL
3 as the location when the Select Location dialog appears or if it does not
appear select the File menu and click Change Location.
d. Copy mqisforms.bat from
\\Genmills\CIS\Software\Wonderware\MQISForms to C:\Program
Files\General Mills\MQIS Forms.
e. If SKIPSFTWINST.SMS was renamed change it back to
C:\SMSTAG\SKIPSFTWINST.SMS.
17. Install Radmin with the local Administrators group and the local RAdmin group
having ―All Access‖.
18. Configure Symantec Antivirus and Microsoft SMS.
a. To disable the automatic weekly virus scan and set the applicable firewall
policies to allow access, the Norton Antivirus Parent Server must be set to
the PLANTFLOOR group with the following steps.
i. Rename C:\SMSTAG\SKIPSFTWINST.SMS.
Wonderware HMI Workstation Programming Guidelines
Appendix C—Configuring a Standard Plant Floor Image
CIS_403_HMI Application Standard_WHQ1.docx, Revision 3, April 2008 17
ii. Using a GID with local Administrator privileges, go to
\\Genmills\Desktop\Production\SCS_AVParent and run
SCScfg3.exe. When prompted change the Group to
PLANTFLOOR.
iii. Double click on the gold shield in the System Tray to open Norton
Antivirus. Check to see that the ―Parent Server‖ is MGONAV3 &
Group is PLANTFLOOR. This will also disable the Symantec
Firewall.
iv. Make sure that the Live Update is working by clicking the ―Live
Update‖ button.
i. Rename the renamed file back to
C:\SMSTAG\SKIPSFTWINST.SMS.
b. To advise SMS that the PC is a Wonderware plant floor workstation, add
the following files (located in SMS.zip on the engineering web on the CIS
– Support Wonderware site) to the C:\SMSTAG folder:
i. SIPSFTWINST.SMS. SIPSFTWINST.SMS prevents SMS from
automatically installing any package sent to it by mistake.
ii. WonderWare.SMS. WonderWare.SMS identifies the PC as a
protected PC on the plant floor.
19. Configure Wonderware.
a. Install an InTouch or FactorySuite developer‘s license.
b. Run InTouch Application Manager and find a InTouch application.
c. Open the InTouch application in WindowMaker, and install the following
ActiveX controls:
ActiveFactory
ActiveFactoryGraph.iTrendGraph Control
ActiveFactoryGraph.iTrendTagList Control
ActiveFactoryGraph.iTrendToolBar Control
Wonderware HMI Workstation Programming Guidelines
Appendix C—Configuring a Standard Plant Floor Image
CIS_403_HMI Application Standard_WHQ1.docx, Revision 3, April 2008 18
ActiveFactoryiQuery.iQuery
ActiveFactoryiQuery.IWFunction
ActiveFactoryTrend.iTrend Control
DLC Batch
DLCRecipeControlV1_6.BatchButtons
DLCRecipeControlV1_6.CampaignInfo
DLCRecipeControlV1_6.DLCConnect
DLCRecipeControlV1_6.ExecutionConfig
DLCRecipeControlV1_6.ExecutionSelect
DLCRecipeControlV1_6.Message
DLCRecipeControlV1_6.RecipeLines
DLCRecipeControlV1_6.DownloadTool
FeatureBar
GMIShellContinRecipe.ContinuousRecipe
GMIShellFeatureBar.FeatureBar
Microsoft
Microsoft Date and Time Picker Control 6.0
Microsoft Forms 2.o CommandButton
Microsoft Web Browser
Wonderware HMI Workstation Programming Guidelines
Appendix C—Configuring a Standard Plant Floor Image
CIS_403_HMI Application Standard_WHQ1.docx, Revision 3, April 2008 19
Wonderware
Wonderware Alarm Database View Control
Wonderware Alarm Praeto Control
Wonderware Alarm Tree View Control
Wonderware Alarm Viewer Control
20. Configure the following DCOM settings running DCOMCnfg.
a. When ―Component Services‖ opens navigate to Computers\My Computer.
b. Right click on ―My Computer‖ and select ―Properties‖.
c. Click on the ―COM Security‖ tab.
d. Under ―Access Permissions‖ click on ―Edit Default‖. Click on ―Add‖, select the
local machine and type ―All Domains_LG‖ and ―All Domains_Vendors_LG‖
with ―Local Access‖ and ―Remote Access‖. Delete Everyone. Click ―OK‖.
e. Under ―Launch Permissions‖ click on ―Edit Default‖. Click on ―Add‖, select the
local machine and type ―All Domains_LG‖ and ―All Domains_Vendors_LG‖
with ―Local Launch‖ and ―Remote Launch‖, ―Local Activation‖ and ―Remote
Activation‖. Delete Everyone. Click ―OK‖.
f. Click on the ―COM Security‖ tab.
g. Under ―Access Permissions‖ click on ―Edit Default‖. Click on ―Add‖, select the
local machine and type ―Authenticated Users‖ with ―Local Access‖ and
―Remote Access‖. Delete Everyone. Click ―OK‖.
h. Under ―Launch Permissions‖ click on ―Edit Default‖. Click on ―Add‖, select the
local machine and type ―Authenticated Users‖ with ―Local Launch‖ and
―Remote Launch‖, ―Local Activation‖ and ―Remote Activation‖. Delete
Everyone. Click ―OK‖.
21. While logged in as the Temp user, configure Windows look and feel by
confirming or setting the following. (The plant floor image is constructed to
operate in a locked-down environment, as described in paragraph 2.3 HMI
Workstation Security Implementation.)
Wonderware HMI Workstation Programming Guidelines
Appendix C—Configuring a Standard Plant Floor Image
CIS_403_HMI Application Standard_WHQ1.docx, Revision 3, April 2008 20
a. Confirm that the logon banner is deactivated by going to
[HKLM\Software\Microsoft\Windows\CurrentVersion\Policies\System] and
clearing the ―legalnoticecaption‖ and legalnoticetext‖ keys.
b. Remove the Ctrl-Alt-Del logon requirement.
1) Clear the ―Require users to press Ctrl-Alt-Delete‖ check box on the
advanced tab of the Control Panel‘s User Accounts.
2) Run gpedit.msc and enable ―Interactive logon: Do not require Ctrl-Alt-
Delete‖ in the Computer Configuration\Windows Settings\Security
Settings\Local Policies\Security Options‖.
c. Allow the screen saver to be set to ―None‖ by running gpedit.msc and
disabling the ―Screen Saver executable name‖ in User
Configuration\Administrative Templates\Control Panel\Display Key.
d. Allow security zone changes by setting or creating the as DWORD values the
―Security_Options_edit‖ and ―Security_Zones_Map_Edit‖ keys to 0 in
[HKLM\Software\Policies\Microsoft\Windows\CurrentVersion\Internet
Settings].
e. Confirm or set the following display properties:
1) Select ―My Documents‖, ―My Network Places‖, ―My Computer‖, and
―Internet Explorer‖ to be desktop icons by checking the appropriate boxes
on the ―Customize Desktop‖ Desktop tab. Unselect ―Run Desktop
Cleanup Wizard every 60 days‖.
2) Set the screen saver to ―[None]‖.
3) Arrange the My Documents, My Computer, My Network Places, Internet
Explorer, and Recycle Bin desktop icons from top to bottom.
4) Select ―Auto Arrange‖ icons.
5) Deselect ―Auto Arrange‖ icons, and place the Recycle Bin icon in the
lower, right-hand corner of the desktop.
f. Set the following task bar properties:
1) ―Lock the taskbar‖
Wonderware HMI Workstation Programming Guidelines
Appendix C—Configuring a Standard Plant Floor Image
CIS_403_HMI Application Standard_WHQ1.docx, Revision 3, April 2008 21
2) Unselect ―Keep the taskbar on top of other windows‖
3) ―Group Similar taskbar buttons‖
4) ―Show the clock‖
5) ―Hide inactive icons‖
6) No other items selected.
g. Set the following start menu properties:
1) Check the following items on the General tab of the Start Menu>
Customize dialog box:
i. Select ―Small Icons‖.
ii. Show “Internet Explorer” on the start menu.
iii. Deselect ―E-mail‖.
iv. No other items selected.
3) Check the following items on the Advanced tab of the Start Menu>
Customize dialog box:
a) Select ―Open submenus when I pause on them with my mouse‖.
b) Don‘t display ―Control Panel‖.
c) Select ―Enable dragging and dropping‖.
d) Deselect ―Favorites menu‖.
e) Deselect ―Help and Support‖.
f) Don‘t display ―My Computer‖.
g) Don‘t display ―My Documents‖.
h) Don‘t display ―My Music‖.
i) Deselect ―My Network Places‖.
j) Don‘t display ―My Pictures‖.
Wonderware HMI Workstation Programming Guidelines
Appendix C—Configuring a Standard Plant Floor Image
CIS_403_HMI Application Standard_WHQ1.docx, Revision 3, April 2008 22
k) Don‘t display ―Network Connections‖.
l) Deselect ―Printer and Faxes‖.
m) Deselect ―Run Command‖.
n) Deselect ―Search‖.
o) Select ―Display on the All Programs menu‖ for ―Systems Administrative
Tools‖.
p) Deselect ―List my most recently opened documents‖ and click ―Clear
List‖ if it is not grayed out.
q) No other items selected.
h. Turn off the quick launch toolbar.
i. Configure the General tab of Folder Options by selecting the following:
1) ―Use Windows classic folders‖.
4) ―Open each folder in the same window‖.
5) ―Double-click to open an item (point to select)‖.
j. Open Windows Explorer, click the C: drive and select viewing ―details‖
k. Configure the View tab of Folder Options by selecting the following:
1) ―Apply to All Folders‖ button and click ―Yes‖ at the ―Folder views‖ dialog.
6) ―Display the size information in folder tips‖.
7) ―Display simple folder view in Explorer‘s Folders list‖
8) ―Display the contents of system folders‖.
9) ―Display the full path in the address bar‖.
10) ―Display the full path in title bar‖.
11) ―Do not show hidden files and folders‖.
12) ―Hide protected operating system files‖.
Wonderware HMI Workstation Programming Guidelines
Appendix C—Configuring a Standard Plant Floor Image
CIS_403_HMI Application Standard_WHQ1.docx, Revision 3, April 2008 23
13) ―Remember each folder‘s view settings‖.
14) ―Show Control Panel in My Computer‖.
15) ―Show encrypted or compressed NTFS files in color‖.
16) ―Show pop-up descriptions for folders and desktop items‖.
17) None of the other properties should be checked of selected.
l. Place a shortcut to WinZip 9.0 and WindowViewer in C:\Document and
Settings\All Users\Start Menu\Programs.
m. Place a shortcut to WindowViewer and Internet Explorer in C:\Document and
Settings\Temp\Start Menu.
n. Delete all folders in the Temp Users‘ start menu, except the Programs and
Startup folders. Make sure that the Startup folder is empty.
o. Remove all programs listed in the Start Menu Recently Opened list, except
WindowViewer.
p. Sort ―All Programs‖ by name.
22. Copy the Temp Users profile to the Default User.
a. Log off as a temporary user, and log on as any other administrator. Make
sure that you can see ―Hidden files and folders‖.
b. Using the My Computer > Properties > Advanced > User Profiles ―Settings‖
button, highlight Temp and click ―Copy To‖.
c. Browse to C:\Documents and Settings, highlight Default User, and click on
OK.
d. Click on the ―Change‖ button under ―Permitted to Use‖.
e. Click on the ―Locations‖ button and ―Cancel‖ at the Enter Network password
screen.
f. Select the <WorkstationName> in the ―Locations‖ selection box on the
―Locations‖ dialog.
Wonderware HMI Workstation Programming Guidelines
Appendix C—Configuring a Standard Plant Floor Image
CIS_403_HMI Application Standard_WHQ1.docx, Revision 3, April 2008 24
g. Type ―Everyone‖ in the ―Enter the object name to select‖ text box, and click
OK twice.
h. At the ―Confirm Copy‖ dialog click ―Yes‖.
i. Delete ALL user profiles that can be deleted except Administrator, CISAdmin,
and MQISAdmin. Note: Do not use Windows Explorer to do this.
j. Remove Temp from the Local Users.
23. Perform final windows clean up.
a. Remove Temp from the Local Users.
b. Delete any items in the recycle bin.
Wonderware HMI Workstation Programming Guidelines
Revision Summaries
CIS_403_HMI Application Standard_WHQ1.docx, Revision 3, April 2008 25
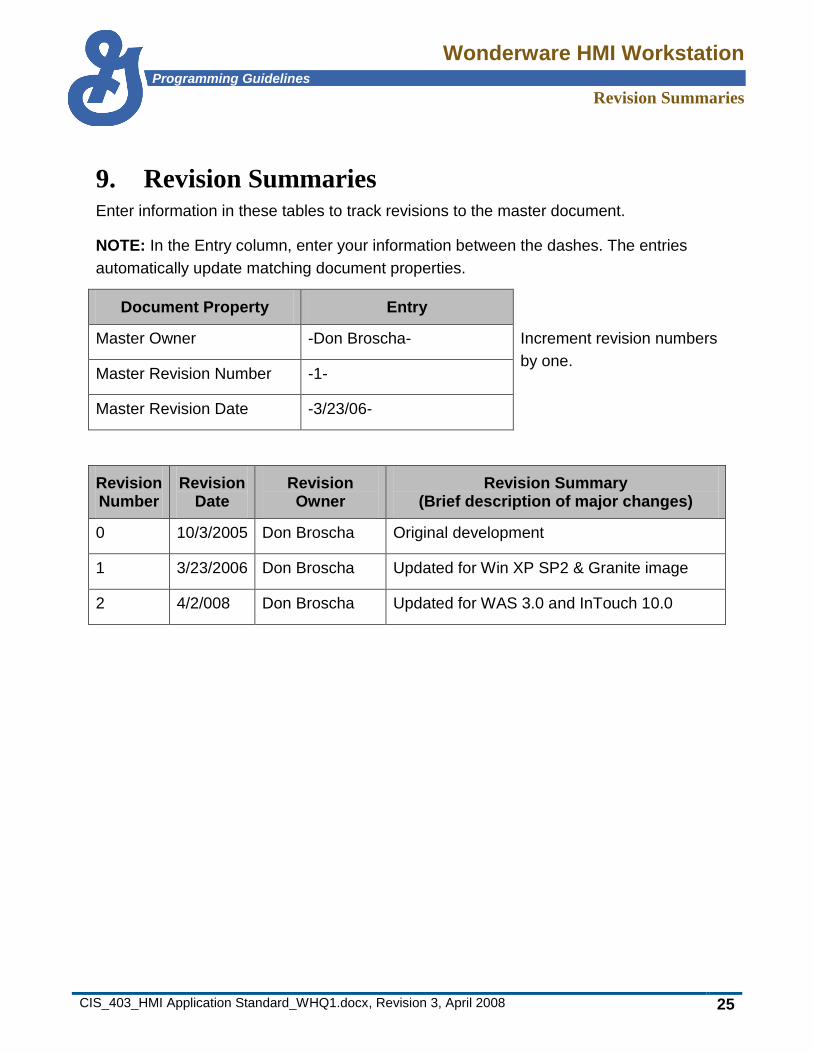
9. Revision Summaries Enter information in these tables to track revisions to the master document.
NOTE: In the Entry column, enter your information between the dashes. The entries
automatically update matching document properties.
Document Property Entry
Master Owner -Don Broscha- Increment revision numbers
by one. Master Revision Number -1-
Master Revision Date -3/23/06-
Revision Number
Revision Date
Revision Owner
Revision Summary (Brief description of major changes)
0 10/3/2005 Don Broscha Original development
1 3/23/2006 Don Broscha Updated for Win XP SP2 & Granite image
2 4/2/008 Don Broscha Updated for WAS 3.0 and InTouch 10.0
Wonderware HMI Workstation Programming Guidelines
Revision Summaries
CIS_403_HMI Application Standard_WHQ1.docx, Revision 3, April 2008 26
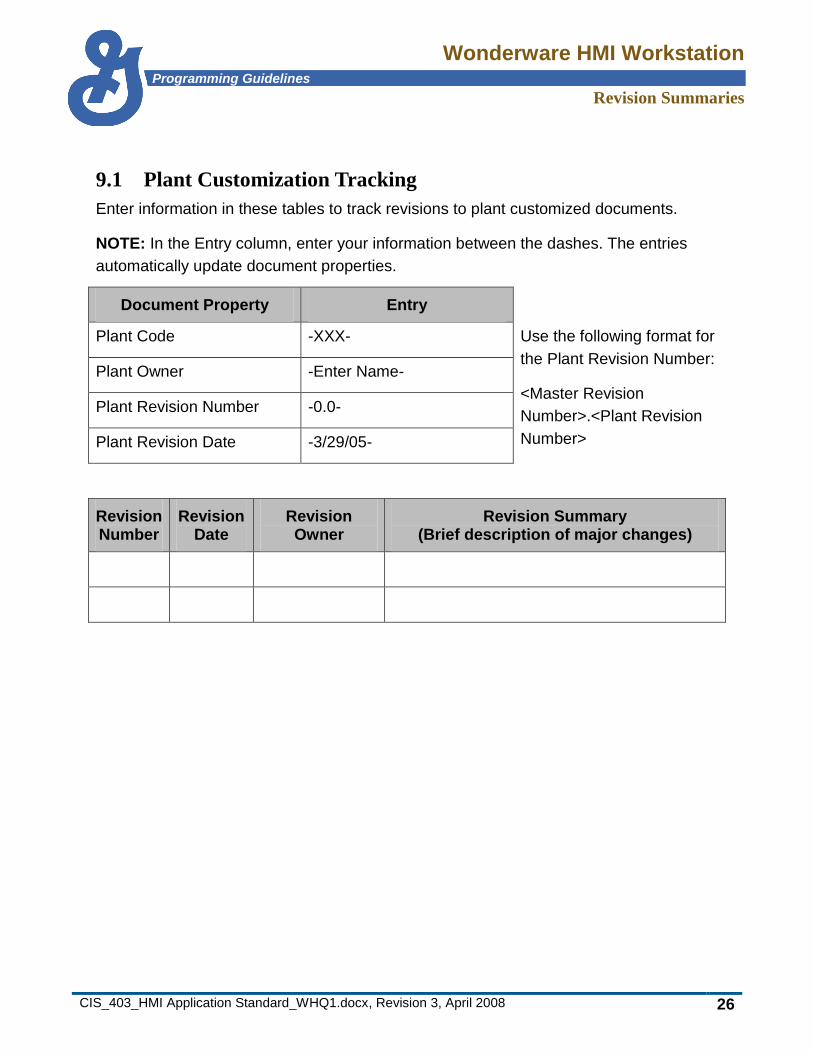
9.1 Plant Customization Tracking
Enter information in these tables to track revisions to plant customized documents.
NOTE: In the Entry column, enter your information between the dashes. The entries
automatically update document properties.
Document Property Entry
Plant Code -XXX- Use the following format for
the Plant Revision Number:
<Master Revision
Number>.<Plant Revision
Number>
Plant Owner -Enter Name-
Plant Revision Number -0.0-
Plant Revision Date -3/29/05-
Revision Number
Revision Date
Revision Owner
Revision Summary (Brief description of major changes)