Wizzy: A Needle Felted Cat - Adafruit Industries · you are satisfied, go over the seam until it...
58
Wizzy: A Needle Felted Cat Created by Rick Winscot Last updated on 2016-11-21 07:25:55 PM UTC
-
Upload
truongxuyen -
Category
Documents
-
view
219 -
download
4
Transcript of Wizzy: A Needle Felted Cat - Adafruit Industries · you are satisfied, go over the seam until it...

Wizzy: A Needle Felted CatCreated by Rick Winscot
Last updated on 2016-11-21 07:25:55 PM UTC

2357
132023283441465156
Guide Contents
Guide ContentsTools and Materials3D PrintingWarm Fuzzies!Wireframing the BodyFelting the BodyFelting the FeetServo InstallationWireframing the HeadFelting the HeadFelting the TailDetails... detailsElectronics
© Adafruit Industries https://learn.adafruit.com/wizzy-a-needle-felted-cat Page 2 of 58

Tools and Materials"In mythology, the Muses were nine goddesses who symbolized the arts and sciences.Today, a muse is a person who serves as an artist's inspiration."
Person?
What about all the Cats in Engineering (http://adafru.it/oAd)?
If you have mad pet allergies (like me) you might have to make a hypoallergenic (http://adafru.it/sBV)muse... er... cat.
Like Wizzy!
Supplies can be had on Amazon, eBay, Etsy, and Michaels.
© Adafruit Industries https://learn.adafruit.com/wizzy-a-needle-felted-cat Page 3 of 58

Black / White Wool (http://adafru.it/sBW)Black Felt Sheet Felting Needles (http://adafru.it/sBX)Craft Eyes and Nose (http://adafru.it/sBY)Beadalon Stringing Wire (http://adafru.it/sBZ)~24 inches X 1/2 inch Silicone Tubing (http://adafru.it/sC0) (tail)10 inch Wood Base (optional)3/16 inch Drill BitSmall Wood Screws21 mm Dowel (body)12 mm Dowel (neck)Pipe CleanersScissorsHot Glue Gun
Remaining tools and electronics can all be purchased in the Adafruit store.
Wizzy the Cat is a substantial / advanced project that spans animatronics, electronicsengineering, software engineering, and needle felting. This project may take three or moreweekends to complete!
© Adafruit Industries https://learn.adafruit.com/wizzy-a-needle-felted-cat Page 4 of 58

3D PrintingWizzy's 3D printed parts can be printed without support, minimal infill, and ~3 shells. Beforewe dig-in, I've broken the 3D Printed Animatronic Tail (http://adafru.it/sC1) out into aseparate guide.
Build that first...
Tinkercad: 3D Printed Animatronic Tail (http://adafru.it/ea8)
Our head mount is simple: head plate, flanges, and a frame for a standard-size servo.Again, no support, minimal infill, and ~3 shells should be plenty strong.
Tinkercad: Wizzy the Cat Head Mount (http://adafru.it/sC2)
© Adafruit Industries https://learn.adafruit.com/wizzy-a-needle-felted-cat Page 5 of 58

The bottom (body) flange is for the 21 mm dowel and the top (neck) is for the 12 mm dowel
© Adafruit Industries https://learn.adafruit.com/wizzy-a-needle-felted-cat Page 6 of 58

Warm Fuzzies!Needle Felting can be a little scary, especially at the point where your confidence andpokes-per-second exceed your attention span.
Here, a quick reminder to take your time...
Needles push or pull fibers, compacting the felt as you go. (They'll work just as wellcompacting right into your finger!)
Buying an assortment with at least one of each of the following is a good place to start.
Triangular - barbs on three sides that are good for general detailStar / Square - barbs on four sides that are good for coarse workSpiral - good for quick and firm feltingReverse - barbs are reversed to pull fibers out rather than in
© Adafruit Industries https://learn.adafruit.com/wizzy-a-needle-felted-cat Page 7 of 58

Generally, detail is determined by the size or gauge of the needle.
As you can see... I have not graduated (yet) to anything smaller than 36 gauge.
© Adafruit Industries https://learn.adafruit.com/wizzy-a-needle-felted-cat Page 8 of 58

Needle felting (http://adafru.it/sC3)starts with fiber... like wool, which is amazing stuff! Butfor some reason, it's difficult to find a source for smooth, consistent, and beautifully coloredfiber.
Etsy is my go-to for batts (http://adafru.it/sC4)and roving (http://adafru.it/sC5).
© Adafruit Industries https://learn.adafruit.com/wizzy-a-needle-felted-cat Page 9 of 58

Pull just a bit from the end... too far in and the fiber resists separating.
© Adafruit Industries https://learn.adafruit.com/wizzy-a-needle-felted-cat Page 10 of 58

Vary the angle of the needle as you felt to develop strength in all directions. Using sponges,brushes, and even felt craft-sheets as a backer / base can help get things started.
So... let's throw-down some tufts of wool and get poking!
© Adafruit Industries https://learn.adafruit.com/wizzy-a-needle-felted-cat Page 11 of 58

© Adafruit Industries https://learn.adafruit.com/wizzy-a-needle-felted-cat Page 12 of 58

Wireframing the BodyGrab your pliers and pipe cleaners... and hot-glue the animatronic tail to the 10 inch base.
Your frame needs to be solid / stiff, which may require doubling-up on pipe cleaners - twoor three should be sufficient.
Twist them together, staggering the overlap for maximum strength and rigidity.
© Adafruit Industries https://learn.adafruit.com/wizzy-a-needle-felted-cat Page 13 of 58

Start, by building a loose 'hoop' around the base.
© Adafruit Industries https://learn.adafruit.com/wizzy-a-needle-felted-cat Page 14 of 58

Next, add a sturdy loop on both sides... this is where the hind legs meet the body.
© Adafruit Industries https://learn.adafruit.com/wizzy-a-needle-felted-cat Page 15 of 58

Slap some feet on, and begin adding sculpted horizontal, vertical, and cross-cross pipecleaners - overlapping at least three or four times!
© Adafruit Industries https://learn.adafruit.com/wizzy-a-needle-felted-cat Page 16 of 58

Continue, until your reach the base of the tail and neck.
© Adafruit Industries https://learn.adafruit.com/wizzy-a-needle-felted-cat Page 17 of 58

Pretty is not the goal here... only strength and general shape!
© Adafruit Industries https://learn.adafruit.com/wizzy-a-needle-felted-cat Page 18 of 58

© Adafruit Industries https://learn.adafruit.com/wizzy-a-needle-felted-cat Page 19 of 58

Felting the BodyPlace small but long tufts of fiber over the outside of your frame and felt from all angles tomaximize strength and compactness. Work from the inside-out or use a reverse needle ifthe felt begins to sag.
Keep adding felt until the body is completely opaque. Coarse needles move a lot of fiberbut tend to leave the surface ragged; you can smooth everything out nicely with a smallergauge needle.
© Adafruit Industries https://learn.adafruit.com/wizzy-a-needle-felted-cat Page 20 of 58

Here is what we are aiming for... let's work on the feet next!
© Adafruit Industries https://learn.adafruit.com/wizzy-a-needle-felted-cat Page 21 of 58

© Adafruit Industries https://learn.adafruit.com/wizzy-a-needle-felted-cat Page 22 of 58

Felting the FeetGrab a sheet of black craft-felt and cut a rectangle about two-inches wide and long enoughto cover the leg - rolling it around the leg as shown.
Sheets of felt can be joined / tacked together with a few vigorous pokes.
© Adafruit Industries https://learn.adafruit.com/wizzy-a-needle-felted-cat Page 23 of 58

Thicker legs are easy, just increase the number of wraps around the pipe cleaner. Whenyou are satisfied, go over the seam until it disappears.
© Adafruit Industries https://learn.adafruit.com/wizzy-a-needle-felted-cat Page 24 of 58

Craft felt sheets are pretty rough... you can add a thin layer of roving / fiber on top to finishthe job.
© Adafruit Industries https://learn.adafruit.com/wizzy-a-needle-felted-cat Page 25 of 58

Fill gaps between the leg and the body for maximum strength and cuteness.
© Adafruit Industries https://learn.adafruit.com/wizzy-a-needle-felted-cat Page 26 of 58

© Adafruit Industries https://learn.adafruit.com/wizzy-a-needle-felted-cat Page 27 of 58

Servo InstallationUse a 3/16 inch drill bit to make mounting holes in the flange that match the hole pattern inthe servo. We could have 3D printed these... but hole patterns are a moving target.
Drill another hole about half-way up flange to secure the neck dowel in place.
© Adafruit Industries https://learn.adafruit.com/wizzy-a-needle-felted-cat Page 28 of 58

Repeat these steps with the base flange and install the servo.
© Adafruit Industries https://learn.adafruit.com/wizzy-a-needle-felted-cat Page 29 of 58

Extra screws left-over from micro-servos are great for holding the 12mm dowel in place.Hot-glue works nicely as well.
© Adafruit Industries https://learn.adafruit.com/wizzy-a-needle-felted-cat Page 30 of 58

Make sure to check the height of the dowels as you go... the neck flange needs to be justabove the hole at the base of the neck.
© Adafruit Industries https://learn.adafruit.com/wizzy-a-needle-felted-cat Page 31 of 58

Grab some milk and cookies as a reward for your work so-far... you are in the home-stretch!
© Adafruit Industries https://learn.adafruit.com/wizzy-a-needle-felted-cat Page 32 of 58

© Adafruit Industries https://learn.adafruit.com/wizzy-a-needle-felted-cat Page 33 of 58

Wireframing the HeadIn my zeal to make the body frame strong, I ran out of white pipe cleaners. Remember, weare going to cover all this with a layer of felt.
No big!
Use the same framing technique on the head as you used on the body.
Reference drawings can be helpful, but only if you measure (http://adafru.it/sC6)every now-and-again to make sure you are on target.
© Adafruit Industries https://learn.adafruit.com/wizzy-a-needle-felted-cat Page 34 of 58

Serviceability is a good thing to keep in mind... if something breaks, how hard will it be tofix?
© Adafruit Industries https://learn.adafruit.com/wizzy-a-needle-felted-cat Page 35 of 58

A good example, would be adding a speaker grill if you don't have one - making it muchmore difficult to puncture the delicate cone.
© Adafruit Industries https://learn.adafruit.com/wizzy-a-needle-felted-cat Page 36 of 58

Use enough hot-glue to mount components securely... somewhere between temporary andpermanent.
© Adafruit Industries https://learn.adafruit.com/wizzy-a-needle-felted-cat Page 37 of 58

And... a little more generous on components that vibrate!
© Adafruit Industries https://learn.adafruit.com/wizzy-a-needle-felted-cat Page 38 of 58

Use some more hot-glue to affix the upper neck flange to the head-plate. Glue the 12mmdowel into that flange keeping it perpendicular to the base and centered (roughly) within theneck.
This is my favorite stage of a project, where personality starts to emerge!
© Adafruit Industries https://learn.adafruit.com/wizzy-a-needle-felted-cat Page 39 of 58

© Adafruit Industries https://learn.adafruit.com/wizzy-a-needle-felted-cat Page 40 of 58

Felting the HeadWe are going to use the last of our felt sheet for the head... stitching pieces together asneeded to maximize natural contour.
Felt is such an amazing medium to work with... a simple needle becomes a sewingmachine!
© Adafruit Industries https://learn.adafruit.com/wizzy-a-needle-felted-cat Page 41 of 58

Cut, trim, and seam as needed until the head is covered. Mistakes are easily fixed - pull thefelt until it overlaps a bit and poke! poke! poke!
© Adafruit Industries https://learn.adafruit.com/wizzy-a-needle-felted-cat Page 42 of 58
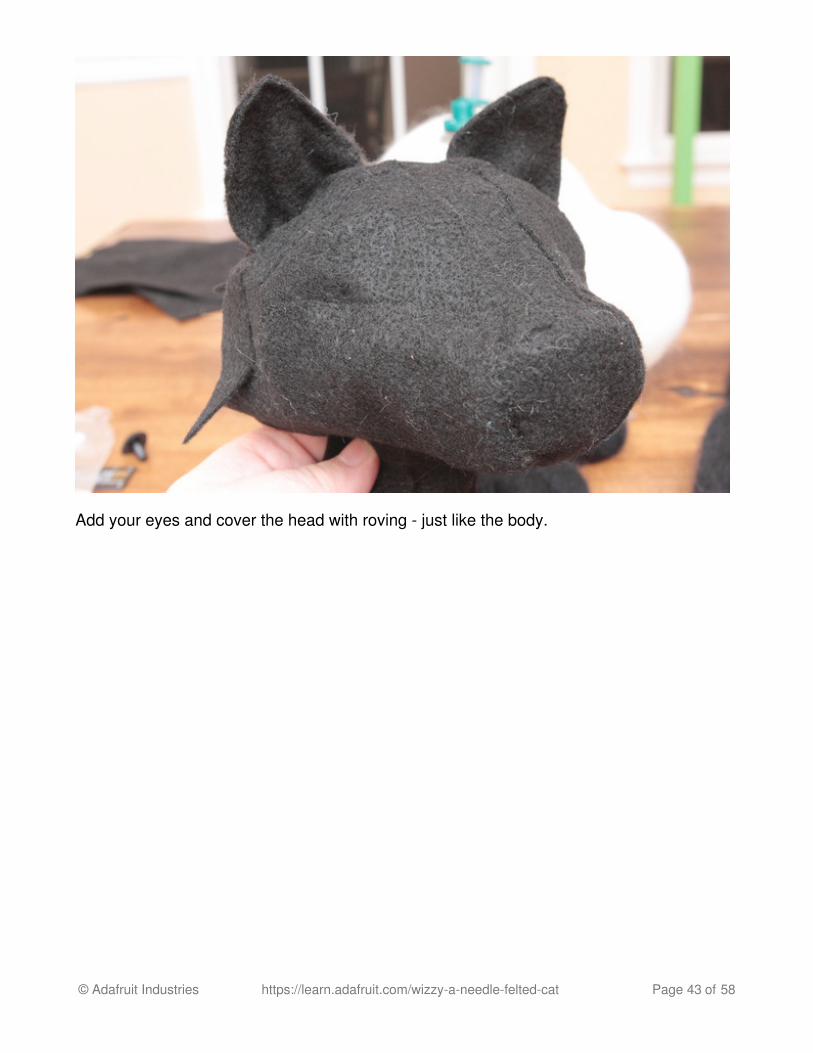
Add your eyes and cover the head with roving - just like the body.
© Adafruit Industries https://learn.adafruit.com/wizzy-a-needle-felted-cat Page 43 of 58

We are going to have to do something about those eyes... kinda creepy don't you think?
© Adafruit Industries https://learn.adafruit.com/wizzy-a-needle-felted-cat Page 44 of 58

© Adafruit Industries https://learn.adafruit.com/wizzy-a-needle-felted-cat Page 45 of 58

Felting the TailTwo things!
First, our tail is going to wag back-and-forth... a tight fit may have an undesirable result -felt loosely for free-flowing movement.
Second, watch the angle of your felting needles. We don't want to damage the tubeunderneath or break a needle on a hard plastic piece.
© Adafruit Industries https://learn.adafruit.com/wizzy-a-needle-felted-cat Page 46 of 58

Especially on the tip of the tail.
© Adafruit Industries https://learn.adafruit.com/wizzy-a-needle-felted-cat Page 47 of 58

You could attach the tail directly to the body... but for sake of serviceability I'm going tomake a 'port' for the tail to slip-through.
© Adafruit Industries https://learn.adafruit.com/wizzy-a-needle-felted-cat Page 48 of 58

If you need to service anything inside Wizzy, all you will have to do is loosen one screw(neck base / servo) and slip the body over the tail.
Seams can be hidden fairly well if you build-up the rim until it's snug around the tail.
© Adafruit Industries https://learn.adafruit.com/wizzy-a-needle-felted-cat Page 49 of 58

© Adafruit Industries https://learn.adafruit.com/wizzy-a-needle-felted-cat Page 50 of 58
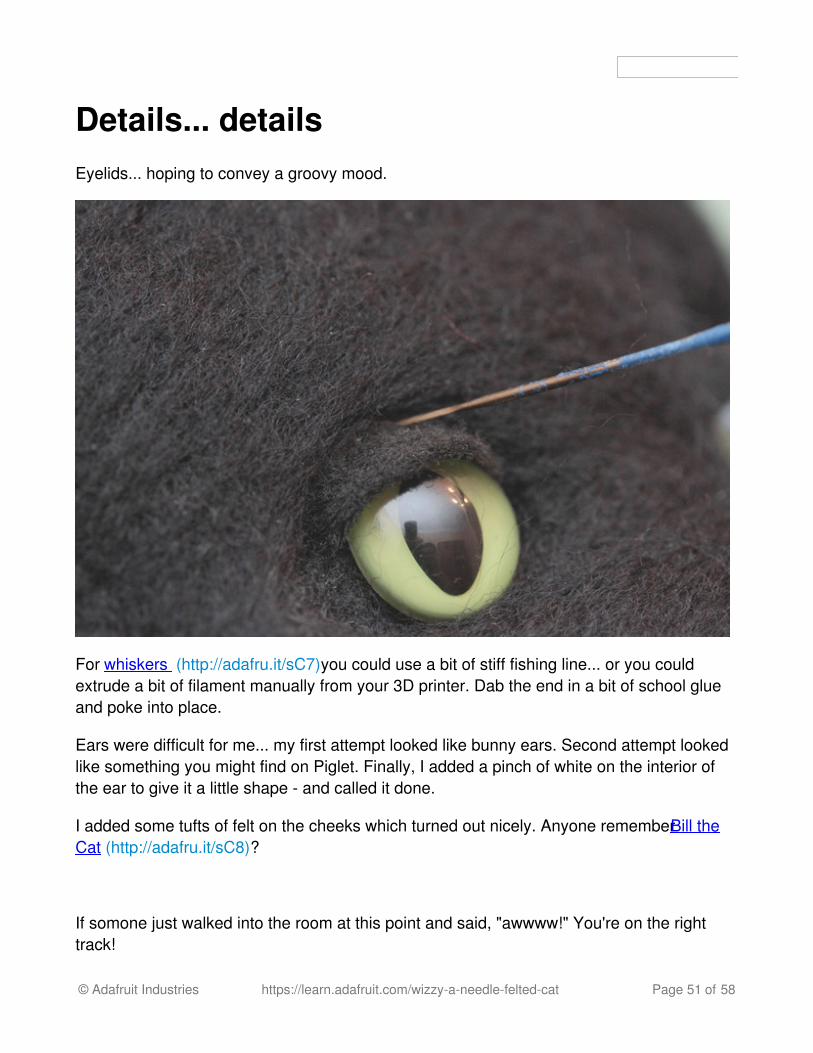
Details... detailsEyelids... hoping to convey a groovy mood.
For whiskers (http://adafru.it/sC7)you could use a bit of stiff fishing line... or you couldextrude a bit of filament manually from your 3D printer. Dab the end in a bit of school glueand poke into place.
Ears were difficult for me... my first attempt looked like bunny ears. Second attempt lookedlike something you might find on Piglet. Finally, I added a pinch of white on the interior ofthe ear to give it a little shape - and called it done.
I added some tufts of felt on the cheeks which turned out nicely. Anyone remember Bill theCat (http://adafru.it/sC8)?
If somone just walked into the room at this point and said, "awwww!" You're on the righttrack!
© Adafruit Industries https://learn.adafruit.com/wizzy-a-needle-felted-cat Page 51 of 58

Not part of my original plan, but I'm going to load-up the front feet with a few beefy washersto keep them from flopping around as the tail wags back-and-forth.
© Adafruit Industries https://learn.adafruit.com/wizzy-a-needle-felted-cat Page 52 of 58

If you're [ pick one or more: obsessive, compulsive, picky, detail oriented, excessivelycaffinated], you can cover the ugly with a bit of felt sheet.
© Adafruit Industries https://learn.adafruit.com/wizzy-a-needle-felted-cat Page 53 of 58

As well as the base, for ultra-fuzziness!
© Adafruit Industries https://learn.adafruit.com/wizzy-a-needle-felted-cat Page 54 of 58

© Adafruit Industries https://learn.adafruit.com/wizzy-a-needle-felted-cat Page 55 of 58

ElectronicsWhen Wizzy guards the Halloween candy bowl at our house, I use an RC transmitter /receiver - which allows me to interact 'personally' with trick-or-treaters.
Electronically, Wizzy is pretty simple... two servos and an audio trigger.
This setup will perform a tail-wag, head movement, and offer a snarky comment. Make sureto use a 5V power supply that can provide a constant 2 AMPs or better.
You can use just about any Arduino compatible!
#include <Servo.h>
// head and tail servo objectsServo head;Servo tail;
// variables used to track the position of the head and tail servosint hpos = 0;int tpos = 0;
void setup() {
© Adafruit Industries https://learn.adafruit.com/wizzy-a-needle-felted-cat Page 56 of 58

// attach head and tail servo to digital pins 9 and 10 respectively head.attach(9); tail.attach(10);}
void loop() {
delay(5000);
// wag the tail back and forth - adjust range as needed for (tpos = 0; tpos <= 180; tpos += 1) { tail.write(tpos); delay(15); } for (tpos = 180; tpos >= 0; tpos -= 1) { tail.write(tpos); delay(15); }
delay(5000);
// rotate head left and right - adjust range as needed for (hpos = 0; hpos <= 180; hpos += 1) { head.write(hpos); delay(15); } for (hpos = 180; hpos >= 0; hpos -= 1) { head.write(hpos); delay(15); }
delay(5000);
// trigger random audio playback analogWrite(0, -255); delay(15); analogWrite(0, 0);}
Use these audio files if you like... the Audio FX board will randomly play one of them whenTrigger 0 goes LOW.
OGG Samples - Wizzy!http://adafru.it/sC9
So many ways to drive Wizzy... Bluetooth, PIR sensors, laser triggers, flex-sensors,vibration switches, Infrared, and accelerometers.
© Adafruit Industries https://learn.adafruit.com/wizzy-a-needle-felted-cat Page 57 of 58

If you make your own animatronic pet, I would LOVE to hear about it!
© Adafruit Industries Last Updated: 2016-11-21 07:25:54 PM UTC Page 58 of 58