with Two Scanning Heads Centering - Heidenhain...Centering with two scanning heads is considered to...
10
ND 287 Centering with Two Scanning Heads English (en) 7/2018
Transcript of with Two Scanning Heads Centering - Heidenhain...Centering with two scanning heads is considered to...

ND 287Centering
with Two Scanning Heads
English (en)
7/2018

Centering of graduation carriers with two scanning heads | 1
2 HEIDENHAIN | ND 287 | User's Manual | 7/2018
1 Centering of graduation carriers with two scanning
heads
Centering with two scanning heads is considered to be the most accurate
centering method for the graduation carriers (circular scale or scale drum) of
modular angle encoders. With this centering method, the angle position is
directly used for centering; there is no need for any mechanical or optical auxiliary
geometry.
You can use this centering method with all HEIDENHAIN modular angle encoders
with 1 VPP or EnDat interface.
For more information, you can download an instructional video from the
download area at www.heidenhain.de.

Aids and requirements | 2
HEIDENHAIN | ND 287 | User's Manual | 7/2018 3
2 Aids and requirements
The following aids are needed for centering with two scanning heads:
Two scanning heads of the same design with the corresponding adapter cables
(one scanning head is needed only for the centering process)
ND 287 evaluation unit
Encoder module for the ND 287 evaluation unit for connection of an additional
HEIDENHAIN encoder to the X2 axis
Current product software
The current version of the product software
is available at www.heidenhain.de under
Software > Filebase > Evaluation Electronics > ND 287 > Software
The following additional requirements must be fulfilled:
Mounting option (threaded hole and installation space) for the second scanning
head directly opposite (180°)
Accessibility for removal of the second scanning head after centering

Preparing the graduation carrier of the angle encoder | 3
4 HEIDENHAIN | ND 287 | User's Manual | 7/2018
3 Preparing the graduation carrier of the angle encoder
To perform centering, you have to roughly align the graduation carrier (circular scale
or scale drum) and mount the second scanning head.
Mount the graduation carrier according to the mounting instructions
Pre-center the graduation carrier mechanically or optically to a radial runout of
less than approx. 50 µm
Mount the scanning heads approximately directly opposite (180° ± 5°) from
each other and align them as follows:
Rough alignment using a spacer shim or mounting aid
No fine adjustment necessary (signal amplitudes of approx. 0.7 VPP are
sufficient)
No adjustment of the reference mark signals required
Connect the scanning heads by means of the adapter cables to the encoder
inputs X1 and X2 of the ND 287 evaluation unit

Preparing the evaluation electronics (1 VPP interface) | 4
HEIDENHAIN | ND 287 | User's Manual | 7/2018 5
4 Preparing the evaluation electronics (1 VPP interface)
To perform centering, you have to configure the settings for the scanning heads
and the screen display on the ND 287 evaluation unit.
Product software V1.09 is required for centering via the 1 VPP interface.
Switch on the product
Press the C key
Press the SETUP ► INSTALLATION SETUP soft key
Enter the code number 95148, if required.
Make the following settings in the submenus:
In COUNTER SETTINGS, select the 2 AXES mode by pressing the 1 AXIS / 2AXES soft key
In ENCODER SETUP ► INPUT X1 ► ENCODER TYPE, select LINEAR by
pressing the TYPE soft key
The ENCODER SETUP (X1) form allows you to define the following settings:
In the SIGNAL PERIOD field, press the COARSER or FINER soft keys
to select the corresponding value for the encoder (see "Signal period
settings", Page 6)
In the REFERENCE MARK field, select NONE by pressing the REF MARKsoft key
In the COUNT DIRECTION field, select the POSITIVE mode by pressing
the POSITIVE/ NEGATIVE soft key
Repeat the encoder settings for INPUT X2In DISPLAY CONFIGURATION ► INPUT X1 ► DISPL. RESOLUTION, set the
display resolution to 0.0005 by pressing the COARSER or FINER soft keys
Repeat the display settings for INPUT X2In COUNTER SETTINGS, open the FORMULA FOR FUNCTION f(X1,X2) form
by pressing the FUNCTION f(X1,X2) soft key
Enter the formula f(X1,X2)=(X1-X2)/2 in the FORMULA FOR FUNCTIONf(X1,X2) form and confirm with the ENTER key
In ERROR COMPENSATION ► INPUT X1, select the OFF mode by pressing
the ERROR COMP. soft key
Repeat the error compensation settings for INPUT X2Press the SETUP ► JOB SETUP soft key
Make the following settings in the submenus:
In UNIT OF MEASURE, select mm by pressing the mm/inch soft key
In SCALING FACTOR, select OFF by pressing the ON/OFF soft key
Use the NAVIGATION key to switch to soft-key level 3
Press and hold the X1 soft key until the display value f(X1,X2) is shown
The evaluation unit's display shows the radial runout of the graduation carrier in
µm
The algebraic sign shows the direction of the radial runout

Preparing the evaluation electronics (1 VPP interface) |4
6 HEIDENHAIN | ND 287 | User's Manual | 7/2018
Settings for the 1 VPP interface
Press the SETUP ► INSTALLATION SETUP soft key
2 AXESCOUNTER
SETTINGSAPPLICATION FUNCTION
f(X1,X2)
f(X1,X2)=
(X1-X2)/2
SIGNAL PERIOD
see "Signal
period
settings",
Page 6
REFERENCE MARK NONE
ENCODER SETUPINPUT X1
INPUT X2ENCODER TYPE LINEAR
COUNTING
DIRECTIONPOSITIVE
DISPLAY
CONFIGURATION
INPUT X1
INPUT X2
DISPLAY
RESOLUTION0.0005
ERROR
COMPENSATION
INPUT X1
INPUT X2OFF
SETUP ► JOB SETUP soft key
UNIT OF
MEASURELINEAR mm
SCALING FACTORINPUT X1
INPUT X2OFF
Signal period settings
Encoder Signal period (µm)
ERP 4000/ERP 8000 1
ERP 1000 7.3
ERA 4200/ERO 2000 20
ERA 4400 40
ERA 4800 80
ERO 6000 25
ERO 6100 50
ERM 2200 200
ERM 200/ERM 2400 400
ERM 2900 1000

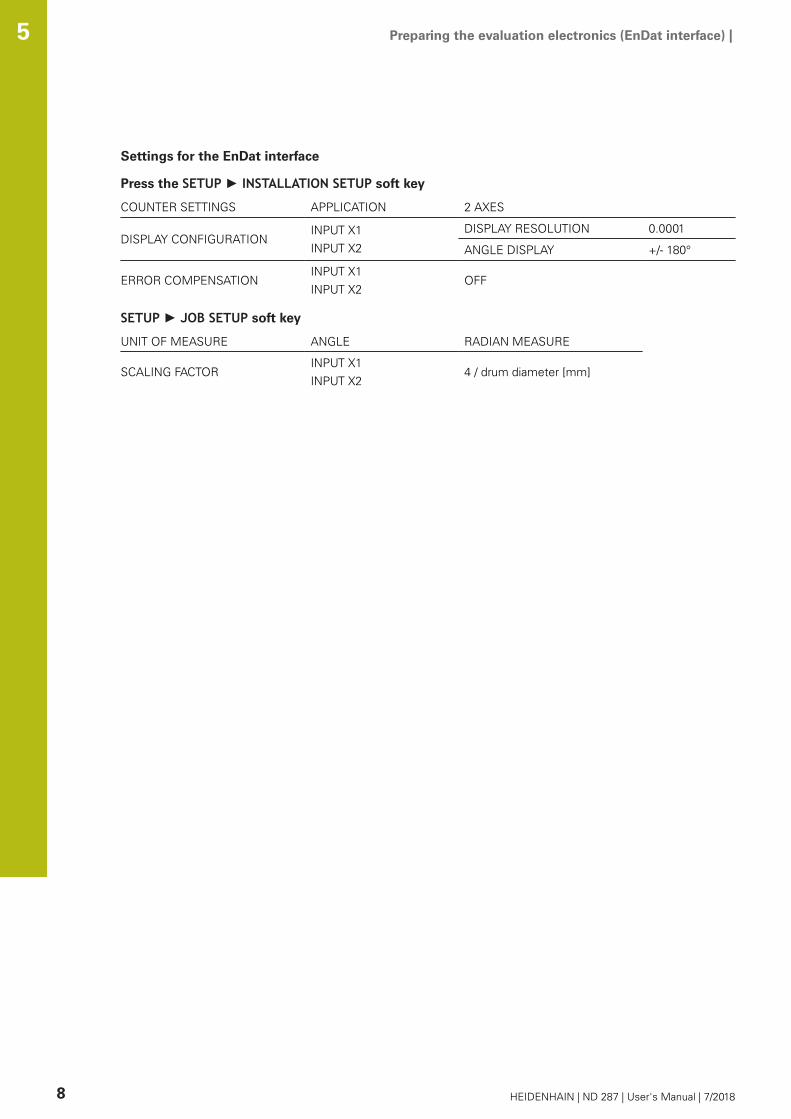
Preparing the evaluation electronics (EnDat interface) | 5
HEIDENHAIN | ND 287 | User's Manual | 7/2018 7
5 Preparing the evaluation electronics (EnDat interface)
To perform centering, you have to configure the settings for the scanning heads
and the screen display on the ND 287 evaluation unit.
Product software V0.36 (special version) is required for centering via the
EnDat interface.
Switch on the product
Press the C key
Press the SETUP ► INSTALLATION SETUP soft key
Enter the code number 95148, if required
Make the following settings in the submenus:
In COUNTER SETTINGS, select the 2 AXES mode by pressing the 1 AXIS /2 AXES soft key
In DISPLAY CONFIGURATION ► INPUT X1 ► DISPL. RESOLUTION, set the
display resolution to 0.0001 by pressing the COARSER or FINER soft keys
In DISPLAY CONFIGURATION ► INPUT X1 ► ANGLE DISPLAY, set the value
to +/-180°Repeat the display settings for INPUT X2In ERROR COMPENSATION ► INPUT X1, select the OFF mode by pressing
the ERROR COMP. soft key
Repeat the error compensation settings for INPUT X2Press the SETUP ► JOB SETUP soft key
Make the following settings in the submenus:
In UNIT OF MEASURE ► ANGLE, select the value RADIAN MEASURE by pressing the ANGLE soft key
In SCALING FACTOR ► INPUT X1, enter the value calculated by means of the formula SCALING FACTOR = 4 / drum diameter [mm] using the keyboard Example: Outside diameter of scale drum 127 mm →scaling factor = 4 / 127 = 0.031
Repeat the scaling factor settings for INPUT X2Use the NAVIGATION key to switch to soft-key level 3
Press and hold the X1 soft key until the display value X1 - X2 is shown
Use the NAVIGATION key to switch to soft-key level 2
Check whether the values are displayed in rad and change them, if necessary
The evaluation unit's display shows the radial runout of the graduation carrier in
mm
The algebraic sign shows the direction of the radial runout
Preparing the evaluation electronics (EnDat interface) | 5
8 HEIDENHAIN | ND 287 | User's Manual | 7/2018
Settings for the EnDat interface
Press the SETUP ► INSTALLATION SETUP soft key
COUNTER SETTINGS APPLICATION 2 AXES
DISPLAY RESOLUTION 0.0001DISPLAY CONFIGURATION
INPUT X1
INPUT X2 ANGLE DISPLAY +/- 180°
ERROR COMPENSATIONINPUT X1
INPUT X2OFF
SETUP ► JOB SETUP soft key
UNIT OF MEASURE ANGLE RADIAN MEASURE
SCALING FACTORINPUT X1
INPUT X24 / drum diameter [mm]

Performing centering | 6
HEIDENHAIN | ND 287 | User's Manual | 7/2018 9
6 Performing centering
Centering of the graduation carrier (circular scale or scale drum) is performed
iteratively in multiple runs and becomes more accurate with every repetition.
Check the torque of the mounting screws on the graduation carrier. All screws
must be tightened with the same torque
Press C to set the position display unit to zero
Performing centering:
Rotate the graduation carrier by at least one rotation and define the
minimum position value
Keep the graduation carrier in this position and press C to set the position
display to zero
Rotate the graduation carrier by at least one rotation and find the maximum
position value
Keep the graduation carrier in this position and remember the position value
By tapping lightly perpendicularly to the scanning heads, move the
graduation carrier halfway to the position value displayed before
Pay attention to the direction of movement, the position value
being displayed must become smaller
Always move the graduation carrier perpendicularly to the
scanning heads
Repeat the centering process until the desired centering accuracy has been
reached
Centering is completed
Finish mounting of the graduation carrier according to the mounting instructions
Verify the centering accuracy again after mounting
Remove the second scanning head again
Adjust and mount the other scanning head in its final position according to the
mounting instructions

DR. JOHANNES HEIDENHAIN GmbHDr.-Johannes-Heidenhain-Straße 583301 Traunreut, Germany +49 8669 31-0 +49 8669 32-5061E-mail: [email protected]
Technical support +49 8669 32-1000Measuring systems +49 8669 31-3104
E-mail: [email protected] support +49 8669 31-3101
E-mail: [email protected] programming +49 8669 31-3103
E-mail: [email protected] programming +49 8669 31-3102
E-mail: [email protected] programming +49 8669 31-3106
E-mail: [email protected]
www.heidenhain.de
Original document
1259987 · 00 · 02 · 07/2018 · PDF*I1259987*