with IBM Corp. fileIBM Maximo Enterprise Ada pter for SAP A pplica tions on AEX V ersion 7 Release 6...
44
IBM Maximo Enterprise Adapter for SAP Applications on AEX Version 7 Release 6 Configuration Guide IBM
Transcript of with IBM Corp. fileIBM Maximo Enterprise Ada pter for SAP A pplica tions on AEX V ersion 7 Release 6...

IBM Maximo Enterprise Adapter for SAP Applications onAEXVersion 7 Release 6
Configuration Guide
IBM

NoteBefore using this information and the product it supports, read the information in “Notices” on page 33.
This edition applies to version 7, release 6, modification 1 of IBM Maximo Enterprise Adapter and to all subsequentreleases and modifications until otherwise indicated in new editions.
© Copyright IBM Corporation 2008, 2018.US Government Users Restricted Rights – Use, duplication or disclosure restricted by GSA ADP Schedule Contractwith IBM Corp.

Contents
Configuring Maximo Enterprise Adapterfor SAP Applications on AEX . . . . . 1Configuring the adapter . . . . . . . . . . 1
Specifying the end point for the adapter . . . . 1Multitenancy: Creating and configuring JMSqueues . . . . . . . . . . . . . . 1
Enabling the SAP2005 external system . . . . . 2Activating cron tasks for sequential queues . . . 3
Multitenancy: Specifying the JMS queue namesfor cron tasks . . . . . . . . . . . . 3
Activating the SAPMASTERDATAUPDATE crontask . . . . . . . . . . . . . . . . 3
Configuring the SAP application server . . . . . 4Importation of ABAP transport programs. . . . 4IDoc configuration . . . . . . . . . . . 4
Accessing the Display IMG window . . . . 5Maintaining the IDoc distribution model . . . 5Generating partner profiles . . . . . . . 8Configuring partner profiles manually . . . . 8Activating change pointers . . . . . . . 9Defining variants for replication of modifiedmaster data . . . . . . . . . . . . 10
Configuring custom tables . . . . . . . . 11Configuring ZBC_BATCHES. . . . . . . 11Configuring ZBC_DESTINATION . . . . . 12Maintaining ZBC_FILTERS . . . . . . . 12Maintaining ZBC_INBPROGRAMS . . . . 13Configuring ZBC_RUNTIMES . . . . . . 15Configuring ZBC_SAPMXCONFIG . . . . 15
Creating integration users in SAP . . . . . . 16Creating number range objects for BAPI errorhandling . . . . . . . . . . . . . . 17
Configuring SAP NetWeaver Process Integration orSAP NetWeaver Process Orchestration . . . . . 18
Configuring the System Landscape Directory . . 19
Logging on to the System LandscapeDirectory . . . . . . . . . . . . . 19Adding Maximo to the System LandscapeDirectory software catalog . . . . . . . 19Defining technical systems . . . . . . . 20Creating business systems . . . . . . . 20
Importing integration objects . . . . . . . 21Copying the integration objects file from thexi-repository folder . . . . . . . . . . 21Importing objects into the Enterprise ServiceRepository. . . . . . . . . . . . . 22
Configuring integration objects . . . . . . . 22Logging on to the Integration Directory . . . 22Assigning services without party . . . . . 22Creating communication channels for Maximobusiness systems . . . . . . . . . . 23Creating communication channels for SAPbusiness systems . . . . . . . . . . 25
Configuring integration scenarios . . . . . . 28Applying integration scenarios . . . . . . 28Assigning services to scenario templates. . . 29Generating scenarios . . . . . . . . . 30Activating change lists. . . . . . . . . 30
Adjusting integrated configuration objectsmanually . . . . . . . . . . . . . . 30
Defining conditions for integratedconfiguration objects . . . . . . . . . 31
Notices . . . . . . . . . . . . . . 33Trademarks . . . . . . . . . . . . . . 35Terms and conditions for product documentation. . 35IBM Online Privacy Statement . . . . . . . . 36
Index . . . . . . . . . . . . . . . 37
© Copyright IBM Corp. 2008, 2018 iii

iv Configuration Guide

Configuring Maximo Enterprise Adapter for SAP Applicationson AEX
As part of installing Maximo® Enterprise Adapter for SAP Applications onAdvanced Adapter Engine Extended (AEX), you must complete configuration tasksin Maximo Asset Management. Maximo configuration tasks require systemadministrator rights and privileges.
Configuring the adapterBefore you can complete the configuration steps, you must have IBM® MaximoEnterprise Adapter for SAP Applications installed on your system. For informationabout installing Maximo Enterprise Adapter for SAP Applications, see theInstallation Guide for Maximo Enterprise Adapter for SAP Applications.
Specifying the end point for the adapterThe endpoint defines where and how you send outbound transactions to SAP.
About this task
Configure SAP NetWeaver Process Integration (PI) or SAP NetWeaver ProcessOrchestration (PO) as the end point for the adapter. The end point that youconfigure uses an HTTP Post handler. The handler that the end point usesdescribes how the adapter sends transactions to SAP.
Procedure1. Open the End Points application.2. On the List tab, select the SAPPAE end point.3. On the End Point tab, specify the following values for the properties of the
SAPPAE end point:
Table 1. SAPPAE end-point properties
Property Value
HTTPEXIT Use the default value.
PASSWORD The password of the SAP NetWeaver PI/PO user (in the EncryptedValue field)
USERNAME The SAP NetWeaver PI user name
URL The SAP NetWeaver PI host and, if necessary, port
4. Click Save.
Multitenancy: Creating and configuring JMS queuesAbout this task
In Maximo Asset Management Multitenancy, the multitenancy manager mustcreate and configure inbound and outbound JMS queues to exchange data with theSAP external system.
© Copyright IBM Corp. 2008, 2018 1

Procedure1. In the External Systems application, select the SAPPAE system.2. Select the Add/Modify Queues action.3. Click New Row.4. Add and configure the following inbound and outbound JMS queues:
Table 2. Inbound continuous JMS queue configuration
Field Value
Queue JNDI Name jms/maximo/int/queues/cqin_<tenantcode>
Queue Connection Factory jms/maximo/int/cf/intcf
Tenant <tenantcode>
Sequential check box Clear
Inbound check box Select
Maximum Try Count <count>
Table 3. Inbound sequential JMS queue configuration
Field Value
Queue JNDI Name jms/maximo/int/queues/sqin_<tenantcode>
Queue Connection Factory jms/maximo/int/cf/intcf
Tenant <tenantcode>
Sequential check box Select
Inbound check box Select
Maximum Try Count <count>
Table 4. Outbound sequential JMS queue configuration
Field Value
Queue JNDI Name jms/maximo/int/queues/sqout_<tenantcode>
Queue Connection Factory jms/maximo/int/cf/intcf
Tenant <tenantcode>
Sequential check box Select
Inbound check box Clear
Maximum Try Count <count>
5. On the System tab, enter the JMS queue names in the following fields:v Outbound Sequential Queuev Inbound Sequential Queuev Inbound Continuous Queue
6. Click Save.
Enabling the SAP2005 external system
About this task
After you install the adapter, you must enable the SAP2005 external system.
2 Configuration Guide

Procedure1. On the List tab of the External Systems application, select the SAP2005 external
system.2. On the System tab, select the Enabled check box.
Activating cron tasks for sequential queues
About this task
After you install the adapter, you must activate the JMS sequential queues inMaximo Asset Management.
Procedure1. In the Cron Task Setup application, select JMSQSEQCONSUMER from the list
of cron tasks.2. On the Cron Task tab, select the Active check box for the SEQQIN and
SEQQOUT cron task instances.3. Click Save.
Multitenancy: Specifying the JMS queue names for cron tasksAbout this task
In Maximo Asset Management Multitenancy, you must specify the JMS queuenames for the inbound and outbound cron task instances.
Procedure1. In the Cron Task Setup application, select JMSQSEQCONSUMER from the list
of cron tasks.2. On the Cron Task tab, select the SEQQIN cron task instance and update the
value field of the QUEUENAME cron task parameter to jms/maximo/int/queues/sqin_<tenantcode>.
3. On the Cron Task tab, select the SEQQOUT cron task instance and update thevalue field of the QUEUENAME cron task parameter to jms/maximo/int/queues/sqout_<tenantcode>.
4. Click Save.
Activating the SAPMASTERDATAUPDATE cron taskYou must configure the SAPMASTERDATAUPDATE cron task. This cron task setsany Maximo records that were archived or deleted in SAP to inactive.
About this task
The archived or deleted statuses of these records in SAP are included in thefollowing bulk loads:v Chart of Accountsv Vendorsv Craftv GL Componentsv Inventory Vendors
Configuring Maximo Enterprise Adapter for SAP Applications on AEX 3

Immediately after a bulk load is completed, run the SAPMASTERDATAUPDATEcron task. This cron task sets to inactive any Maximo records that correspond tobulk⌂loaded SAP records that were archived or deleted in SAP.
If you are running more than one bulk load program, you can run theSAPMASTERDATAUPDATE cron task after you run the last bulk load.
Procedure1. On the List tab of the Cron Task Setup application, select the
SAPMASTERDATAUPDATE cron task.2. On the Cron Task tab, select the Active? check box for the following required
instances of the SAPMASTERDATAUPDATE cron task:v CHARTOFACCOUNTSv COMPANIESv CRAFTv GLCOMPONENTSv INVVENDOR
3. Click Save.
What to do next
For more configuration information, including bulk loads and setting InterfaceControls, see the IBM Maximo Enterprise Adapter for SAP Applications 7.6.1 SystemAdministrator Guide.
Configuring the SAP application serverYou must adapt your SAP system to integrate it with Maximo Asset Management.You must perform installation tasks in the application server that SAP uses.
Installing and configuring the adapter requires system administrator rights andprivileges.
Importation of ABAP transport programsYou must import the external files of the integration to your SAP clientdevelopment system. These files contain all ABAP programs and dictionary objectsthat are needed for the integration.
To complete the installation of Maximo Enterprise Adapter for SAP Applications,use the K900254.D05 transport file. To upgrade your product from a previousversion, use the K900256.D05 transport file.
The base installation transport files are in the \Maximo\SAP⌂side\transports\cofiles folder and the \Maximo\SAP⌂side\transports\data folder in the Maximoapplication server directory. If you downloaded a fix pack during your installationof the adapter, the fix pack transport files are in the same folders. Import the fixpack transport files after you import the files from the base installation. Sequentialnumbers are used for the transport files, so transport files that are part of a fixpack have higher numbers than the base installation transport files.
IDoc configurationIntermediate Document (IDoc) customization activates the IDocs you need for yourbusiness transactions.
4 Configuration Guide
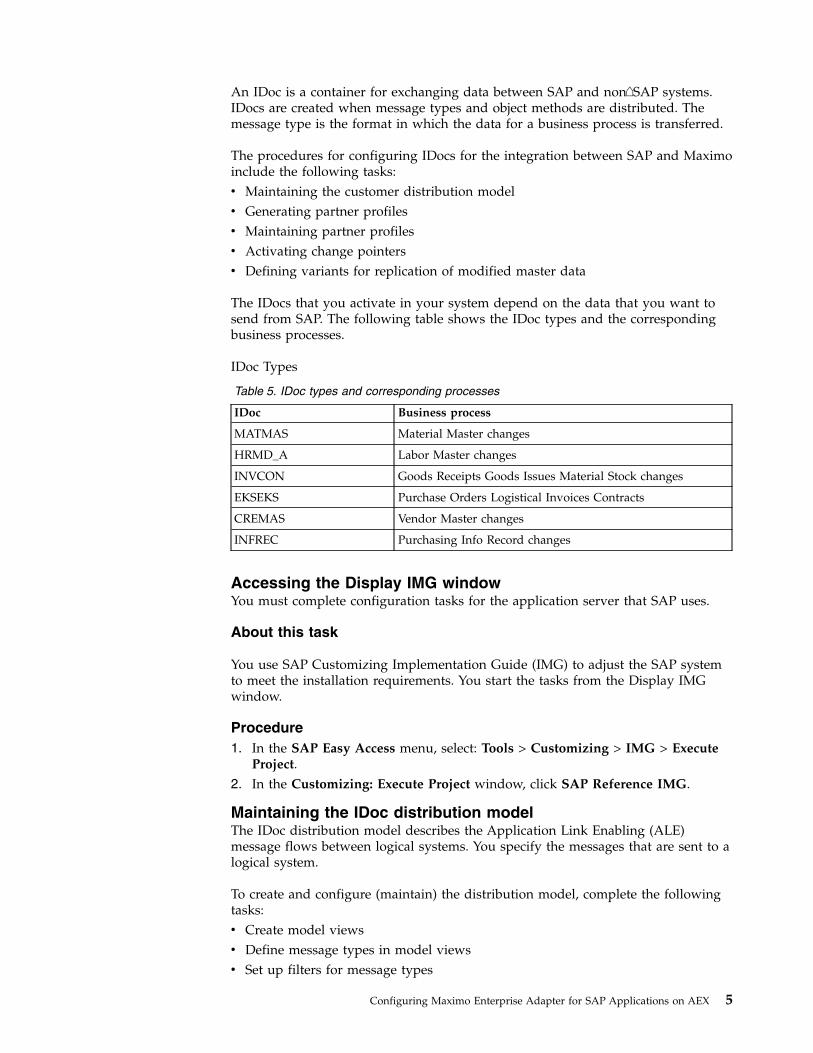
An IDoc is a container for exchanging data between SAP and non⌂SAP systems.IDocs are created when message types and object methods are distributed. Themessage type is the format in which the data for a business process is transferred.
The procedures for configuring IDocs for the integration between SAP and Maximoinclude the following tasks:v Maintaining the customer distribution modelv Generating partner profilesv Maintaining partner profilesv Activating change pointersv Defining variants for replication of modified master data
The IDocs that you activate in your system depend on the data that you want tosend from SAP. The following table shows the IDoc types and the correspondingbusiness processes.
IDoc Types
Table 5. IDoc types and corresponding processes
IDoc Business process
MATMAS Material Master changes
HRMD_A Labor Master changes
INVCON Goods Receipts Goods Issues Material Stock changes
EKSEKS Purchase Orders Logistical Invoices Contracts
CREMAS Vendor Master changes
INFREC Purchasing Info Record changes
Accessing the Display IMG windowYou must complete configuration tasks for the application server that SAP uses.
About this task
You use SAP Customizing Implementation Guide (IMG) to adjust the SAP systemto meet the installation requirements. You start the tasks from the Display IMGwindow.
Procedure1. In the SAP Easy Access menu, select: Tools > Customizing > IMG > Execute
Project.2. In the Customizing: Execute Project window, click SAP Reference IMG.
Maintaining the IDoc distribution modelThe IDoc distribution model describes the Application Link Enabling (ALE)message flows between logical systems. You specify the messages that are sent to alogical system.
To create and configure (maintain) the distribution model, complete the followingtasks:v Create model viewsv Define message types in model viewsv Set up filters for message types
Configuring Maximo Enterprise Adapter for SAP Applications on AEX 5

Creating a model view:
Procedure
1. Expand the IMG Structure to the following path: SAP Netweaver >Application Server > IDoc Interface / Application Link Enabling (ALE) >Modeling and Implementing Business Processes > Maintain DistributionModel and Distribute Views.
2. On the Maintain Distribution Model and Distribute Views row, click theclock icon or right-click and select Edit Activity.
3. In the Display Distribution Model window, switch to edit mode.4. In the Change Distribution Model window, click Create Model View.5. In the Create Model View window, specify values for the model view short text
and the technical name.6. Click Continue. The new model is added to the list of model views on the
Change Distribution Model window.
Defining message types in the model view:
You must define the message types that are used for transactions that go from SAPto Maximo.
About this task
The Sender value that you specify must match the Business System value that youuse when you configure SAP NetWeaver Process Integration (PI) or SAPNetWeaver Process Orchestration (PO).
Procedure
1. On the Change Distribution Model window, select the model view that youcreated, and click Add message type.
2. In the Add Message Type window, place your cursor in the Sender field, andselect a sender from the selection list. The sender is your application server forERP.
3. Place your cursor in the Receiver field and select a receiver from the selectionlist. The receiver is your integration server for PI/PO.
4. Place your cursor in the Message type field and select a message type, such asHRMD_A, from the selection list. This message type corresponds to labor datain Maximo.
5. Click Choose. The message type is added to the model view.6. If you use the following message types for the MXES Integration model view in
your integration, repeat steps 1 - 5 to add each message type:v HRMD_A (HR plan and master data)v MATMAS (Material Master)v INVCON (Inventory controlling IDoc)v EKSEKS (PO/Invoice)v CREMAS (Vendor)v INFREC (Purchasing Information RecordsUse the same sender and receiver for all message types that you create for theMXES Integration model view, as shown in the following table:
6 Configuration Guide

Table 6. Message type configuration
Messagetype Description Sender Receiver
HRMD_A HR plan andmaster data
Application server forSAP ERP
Integration server for SAPNetWeaver PI/PO
MATMAS Material Masterdata
Application server forSAP ERP
Integration server for SAPNetWeaver PI/PO
INVCON Inventorycontrolling IDOC
Application server forSAP ERP
Integration server for SAPNetWeaver PI/PO
EKSEKS Purchasingdocument forPurchasing andInvoice informationsystem
Application server forSAP ERP
Integration server for SAPNetWeaver PI/PO
CREMAS Vendor Master data Application server forSAP ERP
Integration server for SAPNetWeaver PI/PO
INFREC PurchasingInformationRecords
Application server forSAP ERP
Integration server for SAPNetWeaver PI/PO
The message types are added to model view in the Change Distribution Modelwindow.
Setting up filters for message types:
You can use filtering to improve performance speed. For example, by setting filters,you can reduce the number of IDocs that are created.
About this task
Depending on the definition in the Distribution Model, SAP creates IDocs forseveral business transactions. For example, for creating or changing a material, orfor posting the movement of goods. If filters are defined, SAP first checks whetherthe transaction matches these filters. If yes, SAP creates the IDoc, if not, SAP doesnot create the IDoc or the IDoc segment.
You can set filters on any of the message types that you create:v EKSEKSv HRMD_Av INVCONv MATMASv CREMASv INFREC
You can set filtering on a message type by using the MATMAS message typeexample as shown in the following steps. You can use the same procedures to setfiltering on the other message types.
Procedure
1. In the Change Distribution Model window, expand the tree structure under theMATMAS message type.
2. Double-click No filter set.
Configuring Maximo Enterprise Adapter for SAP Applications on AEX 7
3. In the Change Filter window, click Create filter group.4. Expand Data filtering to show the list of fields that you can use to filter
messages for this message type.5. Double-click a filter group, and then specify the values in the Edit List of
Values window.6. Enter filter values and save your changes. You can filter by criteria such as
material group or material type.
Generating partner profilesYou defined the parameters for exchanging data with a partner system by using anIDoc interface. The definitions of the distribution model are used to set up thepartner profile. Those settings become the default values of the partner profile.
About this task
You generate the partner profile to activate the distribution model view that youcreated.
Procedure1. Expand the IMG Structure to the following path: SAP Netweaver >
Application Server > IDoc Interface / Application Link Enabling (ALE) >Modeling and Implementing Business Processes > Partner Profiles >Generate Partner Profiles.
2. On the Generate Partner Profiles row, click the clock icon or right-click andselect Edit Activity.
3. In the Generating Partner Profile window, the User field shows the defaultentry for the recipient of email messages. Edit this value as appropriate foryour integration.
4. Select the transfer method that is best for your outbound integration. You canselect the default triggering method, because triggering does not play a role inour integration.
5. Specify the Model View, and click the clock icon. The partner, ports, andoutbound parameter are generated automatically. Next, a protocol for thepartner, ports, and outbound parameters is shown in the Generating PartnerProfile window.
What to do next
Ignore any errors in the Port message section of the Generating Partner Profilewindow. You can address these errors when you configure the partner profileparameters in the next task.
Configuring partner profiles manuallyAfter you create the partner profile, you must configure the connection parametersmanually for the communication between SAP and SAP NetWeaver ProcessIntegration or SAP NetWeaver Process Orchestration.
About this task
You configure the parameters for all of the message types that you created.
8 Configuration Guide

Procedure1. Expand the IMG Structure to the following path: Cross-Application
Components > Predefined ALE Business Processes > Logistics > Logistics <->External Systems > External Transportation Planning Systems > MaintainALE Partner Profiles.
2. On the Maintain ALE Partner Profiles row,click the clock icon or right-clickand select Edit Activity.
3. Expand Partner Type LS.4. Under Partner Type LS, select the Process Integration or Process Orchestration
Server IDoc Adapter. This adapter is the receiving system. Add outboundparameters for each message type of the model view.
5. Click the Create Outbound Parameter icon in the Outbound parameterssection.
6. Define outbound parameters for each message type of the model view.Configure the Partner profiles: Outbound parameters window with theparameters shown in the following tables:
Table 7. Outbound parameters for partner profiles
Outbound Options tab parameter Value
Receiver port Your receiver port number
Output Mode Transfer Idoc immed. option.
IDoc Type: Basic type Use Basic types from the following table.
Table 8. Message type parameters
For Message Type Select Basic type
EKSEKS EKSEKS01
HRMD_A HRMD_A01
INVCON INVCON02
MATMAS MATMAS02
CREMAS CREMAS04
INFREC INFREC01
7. Click Save.8. Repeat steps 6 and 7 for all message types. Save each message type
configuration before you create the next one.9. If it is necessary for your integration to change the default to specify different
receivers, you can do so on the Post Processing Permitted Agent tab.
Results
After you add the message types, they are shown in the Outbound parmtrs.section of the Partner profiles window.
Activating change pointersThe distribution of material and labor master data is based on change pointers.When you activate change pointers, SAP writes a change pointer to the databasefor every change in the master record data. A report checks for existing changepointers and creates the necessary IDocs.
Configuring Maximo Enterprise Adapter for SAP Applications on AEX 9

About this task
Procedure1. In the Display IMG tree structure, expand the Structure tree structure to
Activate Change Pointers Generally:SAP Netweaver > Application Server > IDoc Interface / Application LinkEnabling (ALE) > Modeling and Implementing Business Processes > MasterData Distribution > Replication of Modified Data > Activate Change Pointers- Generally
2. Select Activate Change Pointers - Generally.3. Select the Change pointers activated - generally check box.4. Click Save.5. In the previous Display IMG window, select Activate Change Pointers for
Message Types.6. In the Change View “Activate Change pointers for Message Type”: Overview
window, select the active check boxes for the HRMD_A and MATMAS messagetypes.a. If your integration includes vendor master data transactions, also select the
active check box for CREMAS.b. If your integration includes purchasing info records, also select the active
check box for INFREC.7. Click Save.
Defining variants for replication of modified master data
About this task
You must define variants to run the RBDMICOD program, the standard SAP reportthat creates IDocs from change pointers, to distribute the following message types:v HRMD_Av MATMASv CREMASv INFREC
Procedure1. In the Display IMG tree structure, expand the Structure tree structure to
Define Variants: SAP Netweaver > Application Server > IDoc Interface /Application Link Enabling (ALE) > Modeling and Implementing BusinessProcesses > Master Data Distribution > Replication of Modified Data >Create IDocs from Change Pointers > Define Variants.
2. Select Define Variants.3. In the Program field of the ABAP Editor: Initial Screen window, select
RBDMIDOC.4. In the Subobjects section, select Variants.5. Click Create.6. In the Message type field of the Maintain Variant: Report RBDMIDOC,
Variant MATMASIDOC window, type MATMAS and click Attributes.7. Add a variant description and click Save.8. In the ABAP: Variants - Initial window, type the variant name, HRMD_A.9. Click Create.
10 Configuration Guide

10. In the Message type field, type HRMD_A and click Attributes.11. Add a variant description and click Save.12. Repeat steps 8 to 11 for the CREMAS and INFREC variants.13. Click Save.
What to do next
Run the RBDMIDOC report every 5 minutes.
Configuring custom tablesYou must configure the new custom tables for the integration between Maximoand SAP. These tables are provided with the integration.
About this task
To access and configure the adapter custom tables, use the SAP transaction codeSM30. You can create special authorization groups for the adapter tables and assignonly certain users to these authorization groups. To display or query the adaptercustom tables, you can use the SAP transaction code SM16. However, to configurethe adapter custom tables, you must use the SAP transaction code SM30.
You must configure the following custom tables:v ZBC_BATCHESv ZBC_DESTINATIONv ZBC_FILTERSv ZBC_INBPROGRAMSv ZBC_RUNTIMESv ZBC_SAPMXCONFIG
Procedure1. Open the Edit Table Views: Initial window for working with tables. You can
use transaction code SM30.2. In the Table/View field, specify the table name, for example, ZBC_Filters and
click Enter. The transport file creates the table with default values. It shows allprocesses inbound into SAP.
3. In the Data Browser window of the table you specified, click Execute.4. To edit table fields in the Change View window, select the check box in the first
column of a row, and switch to edit mode. If you double click an entry row, thedisplay mode opens. To change values, use the edit mode.
5. Click Save.
Results
The changes are updated in the database.
Configuring ZBC_BATCHESThis table holds the Reports, Functions, and Structures for the integration. Theinformation in this table controls a remote function call integration.
Configuring Maximo Enterprise Adapter for SAP Applications on AEX 11

Activating and deactivating programs
A flag sets the programs in this table to active or inactive. This table is deliveredwith default values. You can set this flag by typing a Y (to activate) or N (todeactivate) in the Active field of the program.
Package size
The Package Size controls how many records are in one XML message. The defaultis 1. The SAP NetWeaver Process Integration (PI) server or SAP NetWeaver ProcessOrchestration (PO) server can have performance problems when processing a largeamount of small messages. For example, if you download 10,000 vendors fromSAP, the default package size of 1 generates 10,000 XML messages. If you increasethe package size to 20, you generate only 500 XML messages and performanceimproves.
However, setting the package size greater than 1 can cause the following issues inMaximo:v If one record in the XML message is not correct, the entire XML fails. For
information about error handling, see the IBM Maximo Enterprise Adapter for SAPApplications 7.6 System Administrator Guide.
v The database can run out of open cursors. In this case you increase the amountof open cursors that your database permits.
You must balance the improved performance in the PI/PO server against thepotential for errors in the adapter and in the database.
Configuring ZBC_DESTINATIONThis table controls where SAP data is sent to Maximo.
About this task
Procedure1. In the initial window of this table, click Create Entries.2. Specify the following parameters:
Table 9. ZBC_DESTINATION table parameters
ZBC_DESTINATION field Value
RFCDEST Your Maximo business system name in ProcessIntegration or Process Orchestration
DESCRIPTION Description of your Maximo business system
3. Click Save.4. Optional: If you use more than one instance of Maximo, repeat steps 1-3 for
each instance.
Maintaining ZBC_FILTERSThis table controls what data content you send to Maximo. You use this table to setthe rules for every receiver that defines the data sent to the Maximo ER structure.
The filtering rule is an OR relationship, so you can set up operators and fieldvalues.
12 Configuration Guide

The receiver must have the same name as the definition of the Maximo BusinessSystem in the System Landscape Directory of SAP NetWeaver Process Integrationor SAP NetWeaver Process Orchestration and the ZBC_Destination.
You can configure the ZBC_FILTERS table for the following possible objects:
Table 10. ZBC_Filters table object descriptions
ZBC_FILTERS object Description
MATMASTER Material Master
PURCHORDER Purchase Order
INVOICE Invoice
GOODSMOV Goods Movement
CONTRACT Contracts
CONTRACTAU Contract Authorization
LABMASTER Labor Master
CREMASTER Vendor Master data
INFORECORD Purchasing Info Record
The ZBC_FILTERS table has the following fields:
Table 11. Field values for the ZBC_Filters table
ZBC_FILTERS field Value
MANDT SAP Client value
RECEIVER Maximo destination name
OBJECT MATMASTER (Material Master IDOC Object name)
RULENUMBER Condition sequence number for the IDOC object
FIELDNAME Any field name from the Material Master Messagetable
OPERATOR Any SAP Relationship operator
FIELDVALUE Value to be checked against the operator
For more information about configuring the ZBC_FILTERS table, see the IBMMaximo Enterprise Adapter for SAP Applications 7.6.1 System Administrator Guide.
RULENUMBER
The ABAP program handles the RULENUMBER as follows:v If the same OBJECT uses the same RULENUMBER more than once, then ABAP
handles them all as AND conditions (all are true).v If the same OBJECT has more than one RULENUMBER, ABAP handles it as an
OR condition.
Maintaining ZBC_INBPROGRAMSThis table controls SAP inbound program processing methods and error handlingof inbound programs from Maximo to SAP.
For every process, specify the following modes:v processing mode
Configuring Maximo Enterprise Adapter for SAP Applications on AEX 13

v error handling mode
SAP has two inbound processing modes:v Business Application Programming Interface (BAPI)v Batch Data Communication (BDC)
Note: The inbound processing modes are dependent on your SAP system. Ensurethat your SAP system supports the inbound processing mode that you use.
Not all modes apply to each program. The adapter has two inbound errorhandling modes:v INT (Internal messaging system) - The Internal messaging system notifies the
Integration server that there are no errors. You must handle errors within theSAP system (this method is the default).With this option, you also can specify error notification to the email addresses ofup to four SAP users.To create email or SAP user notification, complete the following steps:1. Select recipient.2. Specify reception type:
a. B= SAP user for that clientb. U= internet address
3. Optional: To enable error messages to display on window, select Express.4. Optional: If you select INT error handling:
a. For BDC processing, you receive batch input maps to reprocess the error.b. For BAPI processing, you need a program, ZBC_BAPIADMIN, provided
with the integration, to reprocess errors.v EXT (External messaging system) - The External messaging system sends back a
return code to the message queue.
The following table shows the processing modes that each program uses in thisintegration.
Table 12. Integration processing modes
Ident Description Processing mode
MICFI CREATE FI INVOICE BDC/BAPI
MICMM CREATE MM INVOICE BAPI
MISU CREATE GOODS ISSUE BDC/BAPI
MPOI CREATE PURCHASE ORDER BDC/BAPI
MPOU UPDATE PURCHASE ORDER BDC/BAPI
MPRI CREATE PURCHASE REQUISITION BDC/BAPI
MRCV CREATE RECEIPT BDC/BAPI
MRSVD DELETE RESERVATION BDC
MRSVI CREATE RESERVATION BDC/BAPI
MSRVU UPDATE RESERVATION BDC
MWI CREATE WORKORDER BDC/BAPI
MWU UPDATE WORKORDER BDC
MLPYI CREATE LABOR HOURS BDC/BAPI
14 Configuration Guide
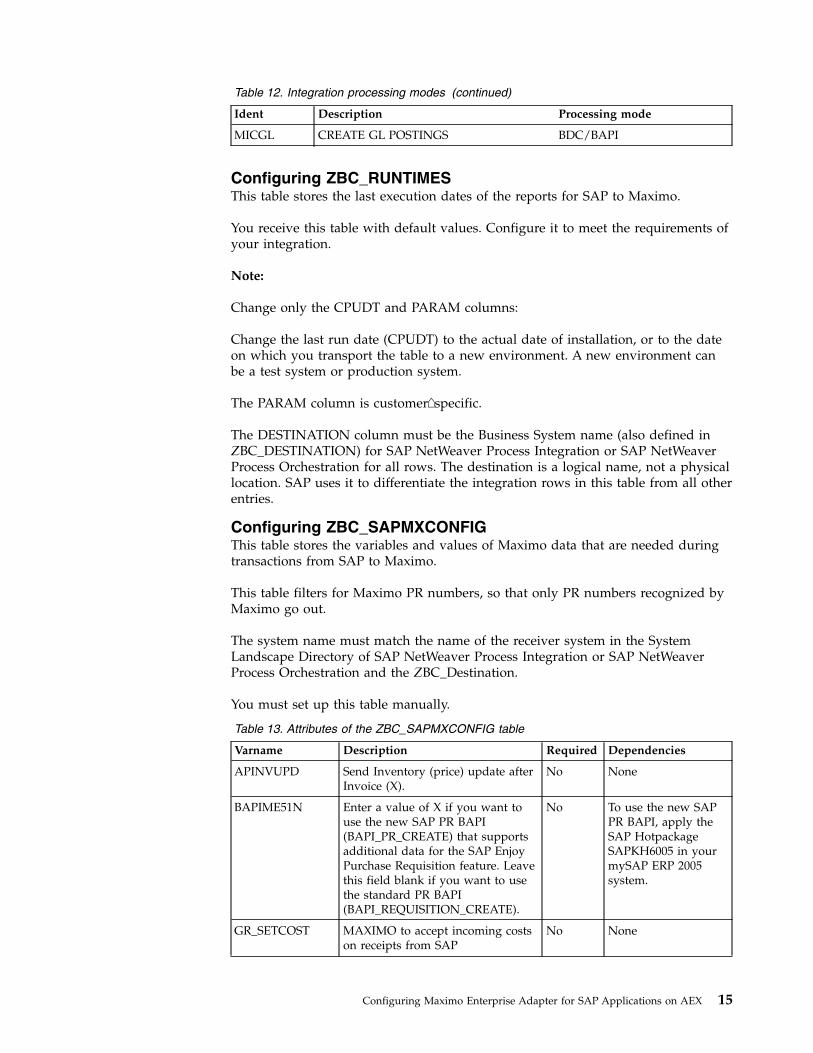
Table 12. Integration processing modes (continued)
Ident Description Processing mode
MICGL CREATE GL POSTINGS BDC/BAPI
Configuring ZBC_RUNTIMESThis table stores the last execution dates of the reports for SAP to Maximo.
You receive this table with default values. Configure it to meet the requirements ofyour integration.
Note:
Change only the CPUDT and PARAM columns:
Change the last run date (CPUDT) to the actual date of installation, or to the dateon which you transport the table to a new environment. A new environment canbe a test system or production system.
The PARAM column is customer⌂specific.
The DESTINATION column must be the Business System name (also defined inZBC_DESTINATION) for SAP NetWeaver Process Integration or SAP NetWeaverProcess Orchestration for all rows. The destination is a logical name, not a physicallocation. SAP uses it to differentiate the integration rows in this table from all otherentries.
Configuring ZBC_SAPMXCONFIGThis table stores the variables and values of Maximo data that are needed duringtransactions from SAP to Maximo.
This table filters for Maximo PR numbers, so that only PR numbers recognized byMaximo go out.
The system name must match the name of the receiver system in the SystemLandscape Directory of SAP NetWeaver Process Integration or SAP NetWeaverProcess Orchestration and the ZBC_Destination.
You must set up this table manually.
Table 13. Attributes of the ZBC_SAPMXCONFIG table
Varname Description Required Dependencies
APINVUPD Send Inventory (price) update afterInvoice (X).
No None
BAPIME51N Enter a value of X if you want touse the new SAP PR BAPI(BAPI_PR_CREATE) that supportsadditional data for the SAP EnjoyPurchase Requisition feature. Leavethis field blank if you want to usethe standard PR BAPI(BAPI_REQUISITION_CREATE).
No To use the new SAPPR BAPI, apply theSAP HotpackageSAPKH6005 in yourmySAP ERP 2005system.
GR_SETCOST MAXIMO to accept incoming costson receipts from SAP
No None
Configuring Maximo Enterprise Adapter for SAP Applications on AEX 15

Table 13. Attributes of the ZBC_SAPMXCONFIG table (continued)
Varname Description Required Dependencies
MXBASELANG Maximo base language Yes Receiving systemdependent
MXLANGUAGE Additional languages per receiver No Per receiver
MXPLANT SAP plant codes for each plantintegrated with Maximo. If an itemis used in Maximo, theZBC_FILTERS looks at this field tosee if the plant is one that is usedin Maximo.
No Receiving systemdependent
POPREFIX Prefix that uniquely identifies anoutbound PO as a Maximo POnumber
No None
PRPREFIX Prefix that uniquely identifies anoutbound PR as a Maximo PRnumber
No None
MX5UPGDATE Customers who upgraded fromRelease 5.x SAP adapter R/3 4.7must manually configure thiscolumn to store date of upgrade.
No None
SEQ_QUEUE Specify one queue name perreceiver. If a queue name isspecified here, all records for thereceiving system are written intothe specified queue. If no queuename is specified, ProcessIntegration or Process Orchestrationuses multiple random queues.When messages are split, ProcessIntegration or Process Orchestrationwrites the resulting records to thesame queue.
No Receiving systemdependent
WOPARSETTL Used for Work Order settling rules No Receiving systemdependant
Specify the base language of Maximo. Languages are per receiver system.
Creating integration users in SAPYou must create an integration user in SAP, for example, the MQM user, to permitusers to log on externally from the SAP Integration Server to the SAP system.
About this task
You need the user name and password that you define here when you create achannel on the SAP Business System during the configuration of ProcessIntegration or Process Orchestration.
Procedure1. In the SAP Easy Access menu, select Tools > Administration > User
Maintenance.2. Use the Create User Master Record window to create a user with the
parameters in the following table:
16 Configuration Guide
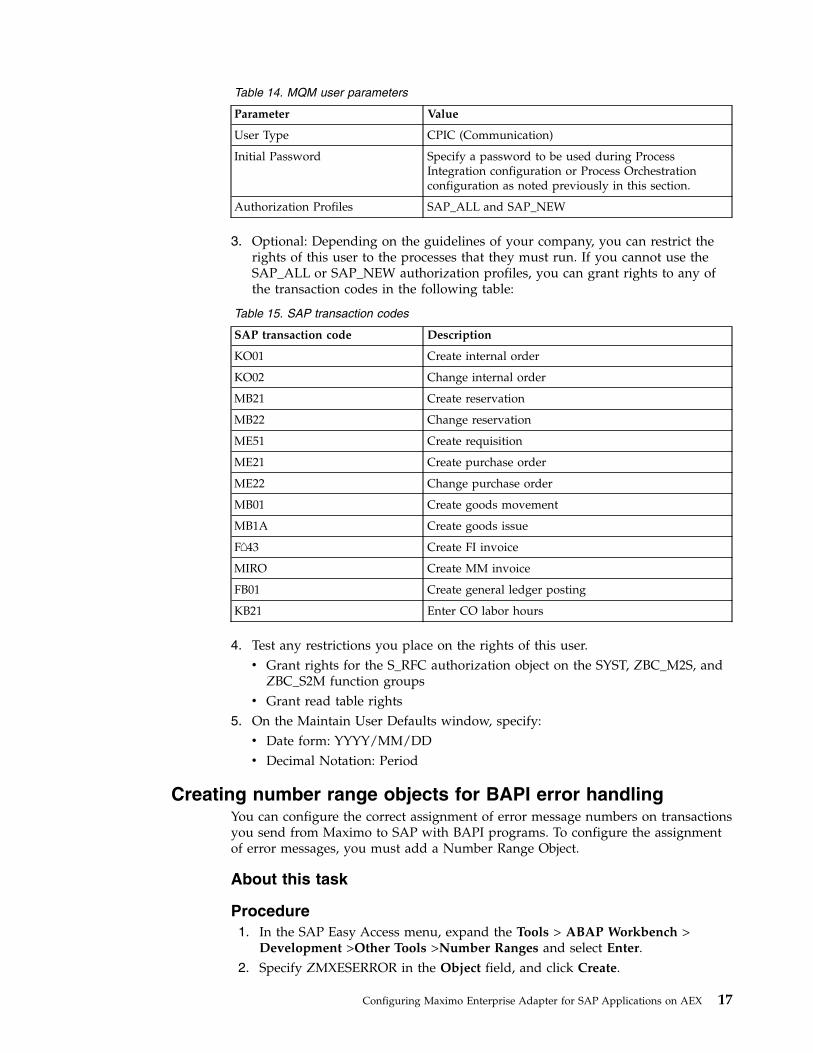
Table 14. MQM user parameters
Parameter Value
User Type CPIC (Communication)
Initial Password Specify a password to be used during ProcessIntegration configuration or Process Orchestrationconfiguration as noted previously in this section.
Authorization Profiles SAP_ALL and SAP_NEW
3. Optional: Depending on the guidelines of your company, you can restrict therights of this user to the processes that they must run. If you cannot use theSAP_ALL or SAP_NEW authorization profiles, you can grant rights to any ofthe transaction codes in the following table:
Table 15. SAP transaction codes
SAP transaction code Description
KO01 Create internal order
KO02 Change internal order
MB21 Create reservation
MB22 Change reservation
ME51 Create requisition
ME21 Create purchase order
ME22 Change purchase order
MB01 Create goods movement
MB1A Create goods issue
F⌂43 Create FI invoice
MIRO Create MM invoice
FB01 Create general ledger posting
KB21 Enter CO labor hours
4. Test any restrictions you place on the rights of this user.v Grant rights for the S_RFC authorization object on the SYST, ZBC_M2S, and
ZBC_S2M function groupsv Grant read table rights
5. On the Maintain User Defaults window, specify:v Date form: YYYY/MM/DDv Decimal Notation: Period
Creating number range objects for BAPI error handlingYou can configure the correct assignment of error message numbers on transactionsyou send from Maximo to SAP with BAPI programs. To configure the assignmentof error messages, you must add a Number Range Object.
About this task
Procedure1. In the SAP Easy Access menu, expand the Tools > ABAP Workbench >
Development >Other Tools >Number Ranges and select Enter.2. Specify ZMXESERROR in the Object field, and click Create.
Configuring Maximo Enterprise Adapter for SAP Applications on AEX 17
3. Specify the following values and save your entries:
Table 16. Field values for number range objects
Field Value
Short Text Transaction Number
Long Text Transaction Number for BAPI Errors
Number length domain NUM10
Warning % 2.0
4. Click Yes.5. Specify the name of the package and save.6. Click Continue.7. Click Number Ranges.8. In the Transaction Errors for BAPI Errors window, click Intervals. The
Maintain Number Range Intervals window appears.9. Click Interval and specify the following values:
Table 17. Interval field values
Field Value
Interval No 01
From Number 0000000001
To Number 9999999999
Current® Number value = maximum value of ZBC_BAPI_ADMIN.MINDEX +1
To find the value of the Current Number field, complete the following steps:a. Type SE16 in the field of the SAP Easy Access menu.b. Select the ZBC_BAPI_ADMIN table.c. Sort the output by MINDEX to determine the last number assigned.d. Increase this value by 1 and use the new value as the current number. If
there are no numbers in the ZBC_BAPI_ADMIN table yet, set the currentnumber to 1.
10. Click Insert and Save.
What to do next
For more information about SAP transaction codes used for this integration, see theIBM Maximo Enterprise Adapter for SAP Applications 7.6.1 System Administrator Guide.
Configuring SAP NetWeaver Process Integration or SAP NetWeaverProcess Orchestration
You must perform configuration tasks in the System Landscape Directory for SAPNetWeaver Process Integration or SAP NetWeaver Process Orchestration.
The System Landscape Directory contains all of the information about theinformation technology landscape of a system.
You must have system administrator rights and authorities to perform theconfiguration.
18 Configuration Guide

Configuring the System Landscape DirectorySAP NetWeaver Process Integration or SAP NetWeaver Process Orchestration is aset of applications that you use to configure the components of the integration inSAP. This configuration allows the SAP and Maximo systems to exchangeinformation.
The first tools application that you must configure for Process Integration orProcess Orchestration is the System Landscape Directory. The System LandscapeDirectory contains all of the information about the IT landscape of a system. Thesystem landscape is logically divided into the following parts:v Technical landscape: computers, hardware, systems, and serversv Business landscape: logical definitions and configurations
Logging on to the System Landscape DirectoryBefore you configure the System Landscape Directory, you must log on to theSystem Landscape Directory.
Procedure1. Use the SAPGUI to log on to the SAP NetWeaver Process Integration server or
the SAP NetWeaver Process Orchestration server.2. In a new internet browser window, open the Tools home page for Process
Integration or Process Orchestration by typing transaction code SXMB_IFR inthe command field, and then press Enter. Instead of taking steps 1 and 2, youcan access the Tools home page directly in a browser window by accessing thefollowing URL: http://server_name:http_port/rep/start/index.jsp.
3. Select the System Landscape Directory link.4. Type the System Landscape Directory user ID and password, and then click
Log on.
Adding Maximo to the System Landscape Directory softwarecatalogThe first task in the System Landscape Directory is to register your Maximointegration software with SAP. To do so, you add a new product to the softwarecatalog.
About this task
The software catalog contains the information for software products installed onthe SAP system. You must add the adapter to the catalog.
Procedure1. In the System Landscape Directory home window, select the Products link.2. Click New Product Version.3. Specify the Name, Vendor, and Version fields as shown in the following table:
Table 18. Product details
Field Value
Name IBM Maximo Enterprise Adapter for SAP Applications
Vendor ibm.com®
Version 7.6.1
4. Click Create.
Configuring Maximo Enterprise Adapter for SAP Applications on AEX 19

5. In the Name field, specify IBM Maximo Enterprise Adapter.6. Click Create.7. Specify the field values as shown in the following table. When you import the
Maximo software component version, it must match the values that you typehere.
Table 19. Field values for IBM Maximo Enterprise Adapter
Field Value
Name (must be in uppercase) IMEA⌂INTEGRATE
Version IMEA75⌂mySAPERP2005
8. Click Create.9. Return to the System Landscape Directory home window by clicking the Home
link.
Defining technical systemsYou must define a technical system for the Maximo application server.
About this task
The technical system is the computer that Maximo runs on.
Procedure1. In the System Landscape Directory home window, click the Technical Systems
link.2. Open the Technical System wizard by clicking New Technical System.3. Select Third-Party as the technical system type, and click Next.4. Specify details about the Maximo system with which you are integrating SAP,
as shown in the following table:
Table 20. Maximo system and host names
Technical System Wizard, System Detailsfield Value
System Name The name that you assigned to your MaximoAsset Management system
Host Name The name of the computer where MaximoAsset Management is installed
5. Click Next.6. In the list of available products, select the product that you created earlier, for
example, IBM Maximo Enterprise Adapter for SAP Applications.7. Select the check box for the IMEA-INTEGRATE, IMEA75-mySAPERP2005
component of ibm.com.8. Click Finish. In the Technical System Browser, the message area shows that the
third-party system was created.9. Return to System Landscape Directory home window by clicking the Home
link.
Creating business systemsThe business system is the Maximo server that integrates with SAP NetWeaverProcess Integration or SAP NetWeaver Process Orchestration.
20 Configuration Guide

About this task
The business system is the logical sender and receiver that exchanges messageswith SAP NetWeaver Process Integration or SAP NetWeaver Process Orchestration.
Procedure1. In the System Landscape Directory home window, select the Business
Systems link.2. Open the Business System wizard by clicking New Business System.3. Select Third-Party as the type of technical system that this business system is
associated with and click Next.4. Select the technical system that you created. Ensure that the Logical System
Name field is blank.5. Click Next.6. Specify the logical name of the business application, the Maximo system that
you want to integrate SAP with. The default value is Maximo. Use the namethat you defined for the Maximo receiver system in the ZBC_SAPMXCONFIGtable and click Next.
7. Ensure that your product, for example, IBM Maximo Enterprise Adapter forSAP Applications is visible, that the check box is selected, and click Next.
8. Select the Process Integration or Process Orchestration server name for theSAP integration that you defined as the integration server when you installedthe SAP NetWeaver Process Integration or SAP NetWeaver ProcessOrchestration system. Because it is a third-party product, the server ispredefined as an application system in the Business System Role field.
9. Click Finish.10. Click the Home link.
Importing integration objects
You must copy a file of integration objects, and then import the integration objectsin the Enterprise Service Repository.
Copying the integration objects file from the xi-repository folderYou can import the integration objects from your computer or from the server.
About this task
To import the integration objects from the server, you must copy a file from theadapter xi⌂repository folder to your SAP NetWeaver Process Integration (PI) orSAP NetWeaver Process Orchestration (PO) system.
Procedure1. Copy the following file from the \\MAXIMO\SAP-Side\xi-repository folder on
the Maximo application server (n = a sequential number): XI3_0_IMEA-INTEGRATE_IMEA75-mySAPERP2005_of_ibm.com_n.tpz to the following folder onthe PI or PO server (SID = the SAP system number): \\usr\SAP\SID\SYS\global\xi\repository_server\import. This file contains all of the PI or POobjects that the adapter integration needs.
2. Optional: If you downloaded a fix pack when you installed the adapter, the fixpack might add one or more additional files to the \\MAXIMO\SAP-Side\xi-repository folder on the Maximo application server. A file in the fix pack has aname such as the following example: XI3_0_IMEA-INTEGRATE_IMEA75-
Configuring Maximo Enterprise Adapter for SAP Applications on AEX 21

mySAPERP2005_of_ibm.com-objs_x.tpz. If the file is part of a fix pack, the filename contains the string objs. The file contains the objects that are fixed in thefix pack. Copy the files by using the same method and location describedpreviously in step 1.
What to do next
After you copy the file, you import the integration objects in the Enterprise ServiceRepository.
Importing objects into the Enterprise Service RepositoryAfter you copy the integration objects file to the SAP NetWeaver ProcessIntegration (PI) or SAP NetWeaver Process Orchestration (PO) Server, you mustimport the integration objects into the Enterprise Service Repository.
Procedure1. In the Process Integration or Process Orchestration Tools home window, click
Enterprise Service Repository.2. Log on to the Enterprise Services Builder and select Tools > Import Design
objects.3. Select the following installation file from the list: XI3_0_IMEA-
INTEGRATE_IMEA75-mySAPERP2005_of_ibm.com_x.tpz and click OK.4. Click Import. The import process uploads the interface and message mapping,
design objects, interfaces, and structures.5. Optional: If you downloaded a fix pack during your installation of the adapter,
repeat the import process for all fix pack files in the \\MAXIMO\SAP-Side\xi-repository folder on the Maximo application server. The fix pack files havenames like XI3_0_IMEA-INTEGRATE_IMEA75-mySAPERP2005_of_ibm.com-objs_x.tpz. The x immediately before the.tpz extension in the file name isreplaced in the actual file name with a number. If you have multiple fix packfiles, you must begin with the lowest sequential number.
6. After you import the design source objects, a confirmation window opens.Click Close. On the Objects tab of the repository, you can expandIMEA-INTEGRATE to view the imported objects.
Configuring integration objectsAfter you register the integration software in the System Landscape Directory andimport integration objects, you must configure the integration objects that youneed for exchanging data between SAP and Maximo.
Logging on to the Integration DirectoryYou configure integration objects in the Process Integration Directory or ProcessOrchestration Directory application.
Procedure1. In the Process Integration Tools or Process Orchestration Tools home window,
select the Integration Directory link in the Configuration: Enterprise ServicesBuilder module.
2. Log on as the Enterprise Services Builder user.
Assigning services without partyYou must assign the previously created Maximo business system as a servicewithout party.
22 Configuration Guide

About this task
A service without party is an application within the network of a company.
Procedure1. In the Configuration: Enterprise Services Builder window, select the Objects
tab.2. Expand Communication Component.3. Right-click Business System and select Assign Business System.4. Click Continue. Do not type anything in the Assign Party window.5. Click Continue.6. Select the Maximo business system. Ensure that the Create Communication
Channels Automatically check box is also selected and click Finish.7. Select the language that you want to use for your configuration documentation
and object descriptions. The default language setting in this window is the userlogon language. In the integration, the original language is English. Selecting alanguage other than English here does not affect the integration.You can write documentation for any object that you create when you configureProcess Integration (PI) or Process Orchestration (PO). PI and PO use thelanguage that you select here for the documentation and descriptions that youwrite for the objects that you create during configuration.The adapter integration maintains its descriptions in English.
8. Click Apply.9. Click Close. The new service name is visible under Business System in the tree
view.
Creating communication channels for Maximo business systemsYou must create and configure the sender and receiver channels for your Maximobusiness systems. Maximo Enterprise Adapter for SAP Applications on AdvancedAdapter Engine Extended (AEX) uses only HTTP channels to communicate withthe Maximo business system.
Creating the HTTP receiver channel for Maximo business systems:Procedure
1. On the Objects tab of the Configuration: Integration Builder window, expandthe Communication Component Without Party structure to display the list ofbusiness systems.
2. Expand the Maximo business system, and right-click Communication Channel.3. Select New.4. Specify a name for the receiver communication channel, and click Create.5. On the Parameters tab, specify the following attributes for the receiver
communication channel:
Table 21. Parameters of the HTTP receiver communication channel
Field Value
Adapter Type HTTP_AAE
Direction Receiver
Transport Protocol HTTP 1.1
Message Protocol POST
Adapter Engine Central Adapter Engine
Configuring Maximo Enterprise Adapter for SAP Applications on AEX 23

6. On the General tab, specify the following attributes for the receivercommunication channel:
Table 22. General attributes of the HTTP receiver communication channel
Field Value
Addressing Mode URL Address
Target Host
(This value comes from the technical system thatwas defined in the System Landscape Directory.)
<maximohost>
Target Port <maximoport>
Path /meaweb/esqueue/<Name of theexternal system that is specifiedin Maximo Asset Management>
User Authentication Anonymous logon
7. On the Advanced tab, select the following query parameter check boxes:v Sender Partyv Sender Servicev Receiver Interfacev Message IDv Quality of Servicev Queue ID
8. Click Save.
Multitenancy: Defining a header field:About this task
Users of Maximo authentication must define a header field for the Maximoreceiver communication channel.
Procedure
1. To define a header field, specify the following attributes in the Header fieldssection of the Advanced tab:
Table 23. Header field values
Field Value
Name maxauth
Value <User credentials encoded to base64 format>
To encode user credentials to base64 format, use an online base64 encoder, forexample, https://www.base64encode.org. Enter the user credentials in thefollowing format: <username>:<password>. For example, to generate a base64code for a username of MAXUSER and a password of MAXuser1, enter thecredentials into the base64 encoder as follows: MAXUSER:MAXuser1. Thesecredentials generate the following base64 code:TUFYVVNFUjpNQVh1c2VyMQ==.
2. Use the Security Groups application to grant users access to the followingsecurity groups:v TOOLMGRv ITEMMGRv EVERYONE
24 Configuration Guide

v ALLSITESv PURCHASINGv PERSONALCONFIGv CONTRACTMGRv STDSVCMGRv SDREP2
3. The tenant administrator must specify the following attributes for users ofMaximo authentication:
Table 24. Attributes for multitenancy environments that use Maximo authentication
Field Value
Status Active
Type Type 1
Default Insert Site <Default Insert Site>
Language <Language>
4. Click Save.
Creating the HTTP sender channel for Maximo business systems:Procedure
1. On the Objects tab of the Configuration: Integration Builder window, expandthe Communication Component Without Party structure to display the list ofbusiness systems.
2. Expand the Maximo business system, and right-click Communication Channel.3. Select New.4. Specify a name for the sender communication channel, and click Create.5. On the Parameters tab, specify the following attributes for the sender
communication channel:
Table 25. Parameters of the HTTP sender communication channel
Field Value
Adapter Type HTTP_AAE
Direction Sender
Transport Protocol HTTP 1.1
Message Protocol POST
Adapter Engine Central Adapter Engine
6. Save the HTTP sender communication channel.
Creating communication channels for SAP business systemsYou must create and configure the sender and receiver channels for your SAPbusiness systems. The Maximo Enterprise Adapter for SAP on AEX uses IDOC andSOAP channels to communicate with SAP business systems.
Creating the IDOC receiver channel for SAP business systems:Procedure
1. On the Objects tab of the Configuration: Integration Builder window, expandthe Communication Component Without Party structure to display the list ofbusiness systems.
2. Expand the SAP business system, and right-click Communication Channel.
Configuring Maximo Enterprise Adapter for SAP Applications on AEX 25

3. Select New.4. Specify a name for the IDOC receiver communication channel, and click Create.5. On the Parameters tab, specify the following attributes for the receiver
communication channel:
Table 26. Parameters of the IDOC receiver communication channel
Field Value
Adapter Type IDOC_AAE
Direction Receiver
Transport Protocol tRFC
Message Protocol Idoc XML
Adapter Engine Central Adapter Engine
6. On the RFC Parameters tab, specify the following attributes for the receivercommunication channel:
Table 27. RFC parameters of the IDOC receiver communication channel
Field Value
RFC Client Parameters Default
Destination <RFC destination that is used by the SAP ECCsystem>
7. Save the IDOC receiver communication channel.
Creating the IDOC sender channel for SAP business systems:Procedure
1. On the Objects tab of the Configuration: Integration Builder window, expandthe Communication Component Without Party structure to display the list ofbusiness systems.
2. Expand the SAP business system, and right-click on Communication Channel.3. Select New.4. Specify a name for the IDOC sender communication channel, and click Create.5. On the Parameters tab, specify the following attributes for the sender
communication channel:
Table 28. Parameters of the IDOC sender communication channel
Field Value
Adapter Type IDOC_AAE
Direction Sender
Transport Protocol tRFC
Message Protocol Idoc XML
Adapter Engine Central Adapter Engine
6. On the RFC Parameters tab, specify the following attribute for the sendercommunication channel:
Table 29. RFC Parameters of the IDOC sender communication channel
Field Value
Ack Destination <RFC destination that is used by the SAP ECC system>
26 Configuration Guide

7. Save the IDOC sender communication channel.
Creating the SOAP receiver channel for SAP business systems:Procedure
1. On the Objects tab of the Configuration: Integration Builder window, expandthe Communication Component Without Party structure to display the list ofbusiness systems.
2. Expand the SAP business system, and right-click on Communication Channel.3. Select New.4. Specify a name for the SOAP receiver communication channel, and click
Create.5. On the Parameters tab, specify the following attributes for the receiver
communication channel:
Table 30. Parameters of the SOAP receiver communication channel
Field Value
Adapter Type SOAP
Direction Receiver
Transport Protocol HTTP
Message Protocol XI 3.0
Adapter Engine Central Adapter Engine
6. On the General tab, specify the following attributes for the receivercommunication channel:
Table 31. General attributes of the SOAP receiver communication channel
Field Value
Addressing Type URL Address
Target URL http://<saphost>:<sapport>/sap/xi/engine?type=entry
Authentication Mode Use logon data for SAP system
User Name <Integration user for Maximo Asset Management>
7. Save the SOAP receiver communication channel.
Creating the SOAP sender channel for SAP business systems:Procedure
1. On the Objects tab of the Configuration: Integration Builder window, expandthe Communication Component Without Party structure to display the list ofbusiness systems.
2. Expand the SAP business system, and right-click on Communication Channel.3. Select New.4. Specify a name for the SOAP sender communication channel, and click Create.5. On the Parameters tab, specify the following attributes for the sender
communication channel:
Table 32. Parameters of the SOAP sender communication channel
Field Value
Adapter Type SOAP
Direction Sender
Configuring Maximo Enterprise Adapter for SAP Applications on AEX 27

Table 32. Parameters of the SOAP sender communication channel (continued)
Field Value
Transport Protocol HTTP
Message Protocol XI 3.0
Adapter Engine Central Adapter Engine
6. Save the SOAP sender communication channel.
Configuring integration scenariosIntegration scenarios are templates that are included with the integration. Youselect the integration scenarios that are specific to your integration requirements.You can use these scenarios as a basis for configuring the information and detailsof your integration between Maximo and SAP.
About this task
When you configure an integration scenario, you specify all parameters of amessage exchange in a single integration configuration object.
The following sequence describes the general flow of tasks to complete whenconfiguring each scenario:
Procedure1. Apply a scenario from the Enterprise Service Repository.2. Assign business system services to component actions based on template
scenarios.3. Configure the connections.4. Generate the scenario.
What to do next
You can create your own configurations by building transaction flows by using ,for example, every object and message type available. To save configuration time,you can review the scenario templates provided with the integration to decide ifyou can use them for your customization requirements.
Applying integration scenariosThe first task when configuring integration scenarios is to select and transfer ascenario from the Enterprise Service Repository.
Procedure1. In the Configuration: Integration Builder window, select Apply Model from ES
Repository from the Tools menu.2. Select the Process Integration Scenario or Process Orchestration Scenario
radio button and open the selection list of the Name field. The list shows allthe integration scenarios in the Enterprise Service Repository. Scenarios for theintegration between Maximo and SAP begin with the MXES_ prefix.
3. Select a scenario to configure from the list and click Apply.4. Click Continue. The default scenario name is entered in the Configuration
Scenario field. Use the default naming convention, which matches the scenarioname in the repository.
5. Click Finish and close the wizard.
28 Configuration Guide

Assigning services to scenario templatesYou assign services that you defined in the System Landscape Directory to eachscenario template that has one or more actions.
About this task
Each scenario can have up to three templates. The templates are displayed in theComponent View section of the Model Configurator. Two of them contain processboxes. These boxes are called actions.
Procedure1. In the Model Configurator window, select the first template.2. On the Business System Components for A2A tab, open the Communication
Component value list.3. Select the relevant business system communication component and click Apply.
Assign SAP business system services to SAP scenario templates, and assignMaximo business system services to Maximo scenario templates.
4. Repeat steps 1 to 3 until you have assigned a service to each of your templates.5. Click the connecting arrow between two scenario templates, and specify the
following communication channels:
Table 33. Communication channels: Maximo Asset Management to SAP
Field Value
Sender business component (Maximo AssetManagement):
HTTP Sender Channel
Receiver business component (SAP) SOAP receiver channel
Table 34. Communication channels: SAP to Maximo Asset Management - batch reports
Field Value
Sender business component (Maximo AssetManagement):
SOAP Sender Channel
Receiver business component (SAP) HTTP receiver channel
Table 35. Communication channels: SAP to Maximo Asset Management - IDOC (firstconnection)
Field Value
Sender business component (SAP): IDOC Sender Channel
Receiver business component (SAP) SOAP receiver channel
Table 36. Communication channels: SAP to Maximo Asset Management – IDOC (secondconnection)
Field Value
Sender business component (SAP): SOAP Sender Channel
Receiver business component (Maximo AssetManagement)
HTTP receiver channel
6. Repeat steps 1 to 5 for each connection between two templates. Ensure that theactivation check box is selected for the first connection between two templates.For each subsequent connection, clear the activation check box to avoidduplicate interfaces being created when you generate the integration scenario.
Configuring Maximo Enterprise Adapter for SAP Applications on AEX 29

Generating scenariosYou must generate the integration scenario in the Generate step of the componentview of the Model Configurator.
Procedure1. Click Create Configuration Objects.2. In the General section, select the Generation radio button.3. Click Start. The Generation Log, a summary of the configuration, shows your
configuration entries. You can use this view to check for errors.4. Expand the Notes for Using the Log section for help text.5. Save or close the log file to continue.6. Close the Model Configurator and click Apply. The Objects tab in the Display
Configuration Scenario window displays the objects that you created.
What to do next
To review configuration information for objects that you created, select theConfiguration Overview tab in the Display Configuration Scenario window. Youcan activate the scenario now, or continue configuring scenarios, and activate themas a group later.
Continue selecting and configuring the scenarios that apply to your integrationrequirements. Do so for transactions that go from SAP to Maximo, and fortransactions that go from Maximo to SAP.
Use the procedures already described in the previous sections to select andconfigure scenarios, assign services, and generate the scenarios.
Repeat this configuration process for each scenario that you use in yourintegration.
Activating change listsAfter you configure the scenarios that you need for your integration, the next stepis to activate the change lists to activate the objects.
Procedure1. Close edit windows.2. Click the Change Lists tab.3. Right-click Standard Change List, and then select Activate.4. Click Activate.
Adjusting integrated configuration objects manuallyYou must edit the expressions that define the conditions for how the interfaceshandle transactions between SAP and Maximo.
Integrated configuration objects can have one or more receiver interfaces. Thefollowing objects have more than one receiver interface. Replace SAP system andMaximo with the values that you use for both systems, and require conditions to bedefined:v SAP systemSAP_MATERIALS_TOMXMaximo
v MaximoMXINVOICE_TOSAP05SAP system
v MaximoMXWODETAIL_TOSAP05SAP system
30 Configuration Guide

v SAP systemSAP_GM_TOMXMaximo
The interface that is called depends on the data being sent, based on conditionsdefined in the integrated configuration object. For example, one condition forsending data might call the reservation interface only if a work order reservation isattached.
Defining conditions for integrated configuration objectsYou must define conditions for integrated configuration objects that have morethan one receiver interface.
About this task
The conditions specify which interface is used when handling transactions betweenSAP and Maximo.
Procedure1. On the Objects tab of the Configuration: Integration Builder window, expand
the Integrated Configuration structure to display the list of generatedconfiguration objects.
2. Open an integrated configuration object that contains more than one interface,and select the Receiver Interfaces tab.
3. Change to edit view.4. Select the condition field of the first receiver interface, and click on the value
list to open the Condition Editor. Ensure that you define the conditions in thesame order as specified in tables 1 to 4.
5. Use the value list in the Left Operand field to specify an XPATH, and type therelevant values from tables 1 to 4 in the Right Operand field. The followingtables show the values that you must configure for each integratedconfiguration object:
Table 37. Interface conditions for S2M_MaterialMaster / Material Master from SAP toMaximo
Interface Condition
Sender: SAP_MATERIALS_TOMX Not applicable
Receiver: MXITEM_FRSAP05 //IDENT=XII
Receiver: MXINVENTORY_FRSAP05 //WERKS~+*
Receiver: MXINVBAL_FRSAP05 //LGORT~+*
Table 38. Interface conditions for S2M_MaterialMovement / Material Movements from SAPto Maximo
Interface Condition
Sender: SAP_GM_TOMX Not applicable
Receiver: MXINVISSUE_FRSAP05 //IDENT=XISU
Receiver: MXRECEIPT_FRSAP05 //IDENT=XRCVI
Table 39. Interface conditions for M2S_Invoice / Invoice from Maximo to SAP
Interface Condition
Sender: MXINVOICE_TOSAP05 Not applicable
Receiver: SAP_INVOICEMM_TOSAP //p1:SAP_APTYPE=MM
Configuring Maximo Enterprise Adapter for SAP Applications on AEX 31

Table 39. Interface conditions for M2S_Invoice / Invoice from Maximo to SAP (continued)
Interface Condition
Receiver: SAP_INVOICEFI_TOSAP //p1:SAP_APTYPE=FI
v prefix = p1v namespace = http://www.ibm.com/maximo
Table 40. Interface conditions for M2S_Reservation / Reservation from Maximo to SAP
Interface Condition
Sender: MXWODETAIL_TOSAP05 Not applicable
Receiver: SAP_WO_TOSAP Not applicable
Receiver: SAP_RESERVATION_TOSAP //p1:INVRESERVE/@action=Add
v prefix = p1v namespace = http://www.ibm.com/maximo
If the condition requires a namespace prefix (p1), add the prefix and namespaceinformation to the list of namespaces in the Expression Editor.
6. Ensure that the Maintain Order at Runtime check box is cleared.7. Save the integrated configuration object and open the Change Lists tab.8. To activate your changes, right-click Standard Change List, and then select
Activate.9. Click Activate.
Results
You have completed the installation and basic configuration of the adapter.
32 Configuration Guide

Notices
This information was developed for products and services that are offered in theUSA.
IBM may not offer the products, services, or features discussed in this document inother countries. Consult your local IBM representative for information on theproducts and services currently available in your area. Any reference to an IBMproduct, program, or service is not intended to state or imply that only that IBMproduct, program, or service may be used. Any functionally equivalent product,program, or service that does not infringe any IBM intellectual property right maybe used instead. However, it is the user's responsibility to evaluate and verify theoperation of any non-IBM product, program, or service.
IBM may have patents or pending patent applications covering subject matterdescribed in this document. The furnishing of this document does not grant youany license to these patents. You can send license inquiries, in writing, to:
IBM Director of LicensingIBM CorporationNorth Castle Drive, MD-NC119Armonk, NY 10504-1785United States of America
For license inquiries regarding double-byte character set (DBCS) information,contact the IBM Intellectual Property Department in your country or sendinquiries, in writing, to:
Intellectual Property LicensingLegal and Intellectual Property LawIBM Japan Ltd.19-21, Nihonbashi-Hakozakicho, Chuo-kuTokyo 103-8510, Japan
The following paragraph does not apply to the United Kingdom or any othercountry where such provisions are inconsistent with local law:INTERNATIONAL BUSINESS MACHINES CORPORATION PROVIDES THISPUBLICATION "AS IS" WITHOUT WARRANTY OF ANY KIND, EITHEREXPRESS OR IMPLIED, INCLUDING, BUT NOT LIMITED TO, THE IMPLIEDWARRANTIES OF NON-INFRINGEMENT, MERCHANTABILITY OR FITNESSFOR A PARTICULAR PURPOSE. Some states do not allow disclaimer of express orimplied warranties in certain transactions, therefore, this statement may not applyto you.
This information could include technical inaccuracies or typographical errors.Changes are periodically made to the information herein; these changes will beincorporated in new editions of the publication. IBM may make improvementsand/or changes in the product(s) and/or the program(s) described in thispublication at any time without notice.
Any references in this information to non-IBM websites are provided forconvenience only and do not in any manner serve as an endorsement of those
© Copyright IBM Corp. 2008, 2018 33

websites. The materials at those websites are not part of the materials for this IBMproduct and use of those websites is at your own risk.
IBM may use or distribute any of the information you supply in any way itbelieves appropriate without incurring any obligation to you.
Licensees of this program who wish to have information about it for the purposeof enabling: (i) the exchange of information between independently createdprograms and other programs (including this one) and (ii) the mutual use of theinformation which has been exchanged, should contact:
IBM Corporation2Z4A/10111400 Burnet RoadAustin, TX 78758 U.S.A.
Such information may be available, subject to appropriate terms and conditions,including in some cases, payment of a fee.
The licensed program described in this document and all licensed materialavailable for it are provided by IBM under terms of the IBM Customer Agreement,IBM International Program License Agreement or any equivalent agreementbetween us.
Any performance data contained herein was determined in a controlledenvironment. Therefore, the results obtained in other operating environments mayvary significantly. Some measurements may have been made on development-levelsystems and there is no guarantee that these measurements will be the same ongenerally available systems. Furthermore, some measurements may have beenestimated through extrapolation. Actual results may vary. Users of this documentshould verify the applicable data for their specific environment.
Information concerning non-IBM products was obtained from the suppliers ofthose products, their published announcements or other publicly available sources.IBM has not tested those products and cannot confirm the accuracy ofperformance, compatibility or any other claims related to non-IBM products.Questions on the capabilities of non-IBM products should be addressed to thesuppliers of those products.
All statements regarding IBM's future direction or intent are subject to change orwithdrawal without notice, and represent goals and objectives only.
All IBM prices shown are IBM's suggested retail prices, are current and are subjectto change without notice. Dealer prices may vary.
This information is for planning purposes only. The information herein is subject tochange before the products described become available.
This information contains examples of data and reports used in daily businessoperations. To illustrate them as completely as possible, the examples include thenames of individuals, companies, brands, and products. All of these names arefictitious and any similarity to the names and addresses used by an actual businessenterprise is entirely coincidental.
COPYRIGHT LICENSE:
34 Configuration Guide

This information contains sample application programs in source language, whichillustrate programming techniques on various operating platforms. You may copy,modify, and distribute these sample programs in any form without payment toIBM, for the purposes of developing, using, marketing or distributing applicationprograms conforming to the application programming interface for the operatingplatform for which the sample programs are written. These examples have notbeen thoroughly tested under all conditions. IBM, therefore, cannot guarantee orimply reliability, serviceability, or function of these programs. The sampleprograms are provided "AS IS", without warranty of any kind. IBM shall not beliable for any damages arising out of your use of the sample programs.
Each copy or any portion of these sample programs or any derivative work, mustinclude a copyright notice as follows:
Portions of this code are derived from IBM Corp. Sample Programs.
© Copyright IBM Corp. 2015. All rights reserved.
TrademarksIBM, the IBM logo, and ibm.com are trademarks or registered trademarks ofInternational Business Machines Corp., registered in many jurisdictions worldwide.Other product and service names might be trademarks of IBM or other companies.A current list of IBM trademarks is available on the web at www.ibm.com/legal/copytrade.shtml.
Terms and conditions for product documentationPermissions for the use of these publications are granted subject to the followingterms and conditions.
Applicability
These terms and conditions are in addition to any terms of use for the IBMwebsite.
Personal use
You may reproduce these publications for your personal, noncommercial useprovided that all proprietary notices are preserved. You may not distribute, displayor make derivative work of these publications, or any portion thereof, without theexpress consent of IBM.
Commercial use
You may reproduce, distribute and display these publications solely within yourenterprise provided that all proprietary notices are preserved. You may not makederivative works of these publications, or reproduce, distribute or display thesepublications or any portion thereof outside your enterprise, without the expressconsent of IBM.
Rights
Except as expressly granted in this permission, no other permissions, licenses orrights are granted, either express or implied, to the publications or anyinformation, data, software or other intellectual property contained therein.
Notices 35

IBM reserves the right to withdraw the permissions granted herein whenever, in itsdiscretion, the use of the publications is detrimental to its interest or, asdetermined by IBM, the above instructions are not being properly followed.
You may not download, export or re-export this information except in fullcompliance with all applicable laws and regulations, including all United Statesexport laws and regulations.
IBM MAKES NO GUARANTEE ABOUT THE CONTENT OF THESEPUBLICATIONS. THE PUBLICATIONS ARE PROVIDED "AS-IS" AND WITHOUTWARRANTY OF ANY KIND, EITHER EXPRESSED OR IMPLIED, INCLUDINGBUT NOT LIMITED TO IMPLIED WARRANTIES OF MERCHANTABILITY,NON-INFRINGEMENT, AND FITNESS FOR A PARTICULAR PURPOSE.
IBM Online Privacy StatementIBM Software products, including software as service solutions, (“SoftwareOfferings”) may use cookies or other technologies to collect product usageinformation, to help improve the end user experience, to tailor interactions withthe end user or for other purposes. In many cases no personally identifiableinformation is collected by the Software Offerings. Some of our Software Offeringscan help enable you to collect personally identifiable information. If this SoftwareOffering uses cookies to collect personally identifiable information, specificinformation about this offering’s use of cookies is set forth below.
Depending of the configuration deployed in the application server, this SoftwareOffering may use session cookies for purposes of session management. Thesecookies can optionally be enabled or disabled, but disabling the cookies will alsodisables the functionality they enable. See the application server documentation foradditional information.
Optionally, you can also use functionality, such as typeahead, to store data locallyon the browser. The data that is stored locally could contain personally identifiableinformation: Data validation.
If the configurations deployed for this Software Offering provide you as customerthe ability to collect personally identifiable information from end users via cookiesand other technologies, you should seek your own legal advice about any lawsapplicable to such data collection, including any requirements for notice andconsent.
For more information about the use of various technologies, including cookies, forthese purposes, see IBM’s Privacy Policy at http://www.ibm.com/privacy andIBM's Online Privacy Statement at http://www.ibm.com/privacy/details in thesection entitled “Cookies, Web Beacons and Other Technologies” and the "IBMSoftware Products and Software-as-a-Service Privacy Statement" athttp://www.ibm.com/software/info/product-privacy.
36 Configuration Guide

Index
© Copyright IBM Corp. 2008, 2018 37

38 Configuration Guide


IBM®
Printed in USA