WISP Setup Guide for TP-Link TL-WR841N 300 Mbps Wireless N ... TC WISP Setup Guide for TP-Link...
17
1 September 7, 2018 WISP Setup Guide for TP-Link TL-WR841N 300 Mbps Wireless N Router AARP Foundation Tax-Aide Colorado Technology Specialist Summary This document explains how to configure the TP-Link WR841N router to provide a secure private network for Tax-Aide work. It is based on the document titled “WISP Setup Guide for TP-Link TL- WR810N, produced by the Tax-Aide National Technology Committee. Contents WISP Setup Guide for TP-Link TL-WR841N 300 Mbps Wireless N Router.................................................... 1 Summary ................................................................................................................................................... 1 Overview ................................................................................................................................................... 1 Collect Information, Set Up Your Computer and Connect the Router ..................................................... 1 Router Setup ............................................................................................................................................. 2 Accessing the Router after Configuration................................................................................................. 7 Recommended Configuration ....................................................................................................................... 8 Set Time Zone and Time ........................................................................................................................... 8 Check for New Firmware .......................................................................................................................... 9 Set the DHCP IP Pool Address Range ...................................................................................................... 15 Backup Configuration.............................................................................................................................. 16 Overview • This setup must be performed for first-time connection to the host site wireless network or AARP hotspot, or if the host site’s or hotspot’s network name or password changes. • This setup makes the router work at one site or for hotspot only. • If connecting to a host site internet connection, the setup must be done at that site. Collect Information, Set Up Your Computer and Connect the Router 1. Get the SSID (network name) and password for the network to which you are going to connect (host site or AARP hotspot.) 2. Use a recently reimaged AARP laptop for the setup. 3. Get the SSID and the wireless password for the TP-Link TL-WR841N router from the label on its bottom site. Note that the label is very small, smaller than pictured here.
Transcript of WISP Setup Guide for TP-Link TL-WR841N 300 Mbps Wireless N ... TC WISP Setup Guide for TP-Link...
1 September 7, 2018
WISP Setup Guide for TP-Link TL-WR841N 300 Mbps Wireless N Router AARP Foundation Tax-Aide Colorado Technology Specialist
Summary This document explains how to configure the TP-Link WR841N router to provide a secure private network for Tax-Aide work. It is based on the document titled “WISP Setup Guide for TP-Link TL-WR810N, produced by the Tax-Aide National Technology Committee.
Contents WISP Setup Guide for TP-Link TL-WR841N 300 Mbps Wireless N Router .................................................... 1
Summary ................................................................................................................................................... 1
Overview ................................................................................................................................................... 1
Collect Information, Set Up Your Computer and Connect the Router ..................................................... 1
Router Setup ............................................................................................................................................. 2
Accessing the Router after Configuration ................................................................................................. 7
Recommended Configuration ....................................................................................................................... 8
Set Time Zone and Time ........................................................................................................................... 8
Check for New Firmware .......................................................................................................................... 9
Set the DHCP IP Pool Address Range ...................................................................................................... 15
Backup Configuration .............................................................................................................................. 16
Overview • This setup must be performed for first-time connection to the host site wireless network or
AARP hotspot, or if the host site’s or hotspot’s network name or password changes. • This setup makes the router work at one site or for hotspot only. • If connecting to a host site internet connection, the setup must be done at that site.
Collect Information, Set Up Your Computer and Connect the Router 1. Get the SSID (network name) and password for the network to which you are going to connect
(host site or AARP hotspot.)
2. Use a recently reimaged AARP laptop for the setup.
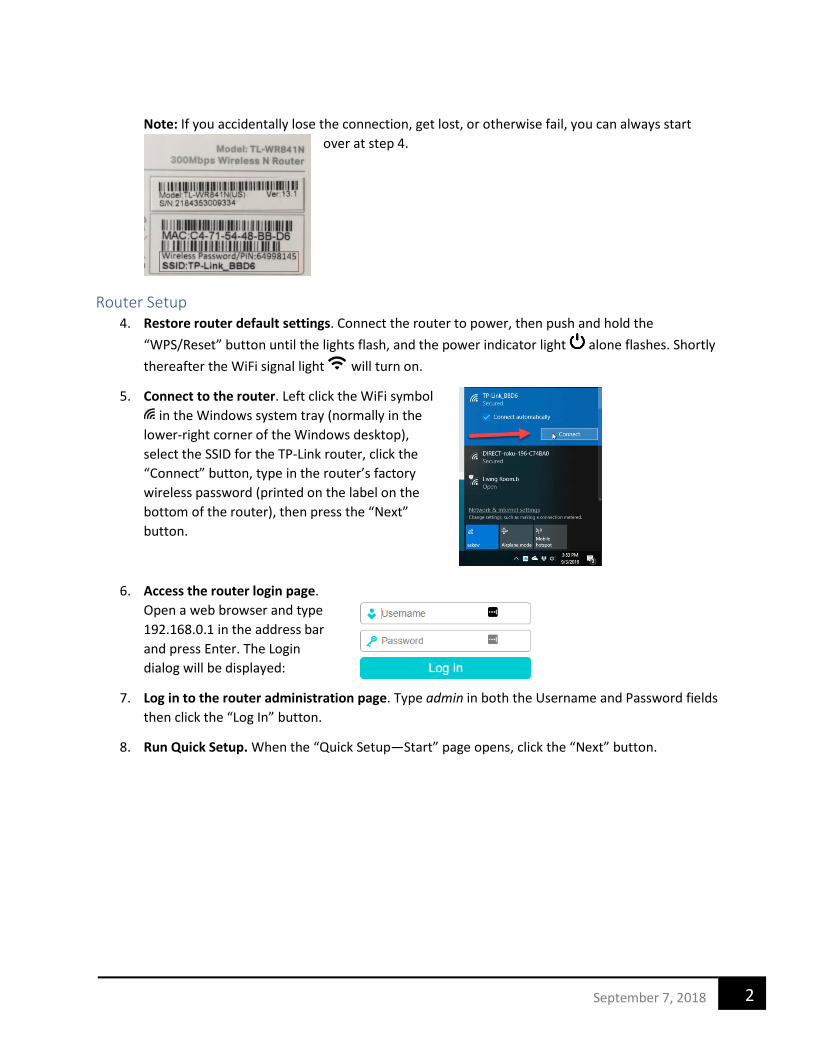
3. Get the SSID and the wireless password for the TP-Link TL-WR841N router from the label on its bottom site. Note that the label is very small, smaller than pictured here.
2 September 7, 2018
Note: If you accidentally lose the connection, get lost, or otherwise fail, you can always start
over at step 4.
Router Setup
4. Restore router default settings. Connect the router to power, then push and hold the “WPS/Reset” button until the lights flash, and the power indicator light alone flashes. Shortly thereafter the WiFi signal light will turn on.
5. Connect to the router. Left click the WiFi symbol in the Windows system tray (normally in the
lower-right corner of the Windows desktop), select the SSID for the TP-Link router, click the “Connect” button, type in the router’s factory wireless password (printed on the label on the bottom of the router), then press the “Next” button.
6. Access the router login page. Open a web browser and type 192.168.0.1 in the address bar and press Enter. The Login dialog will be displayed:
7. Log in to the router administration page. Type admin in both the Username and Password fields then click the “Log In” button.
8. Run Quick Setup. When the “Quick Setup—Start” page opens, click the “Next” button.
3 September 7, 2018
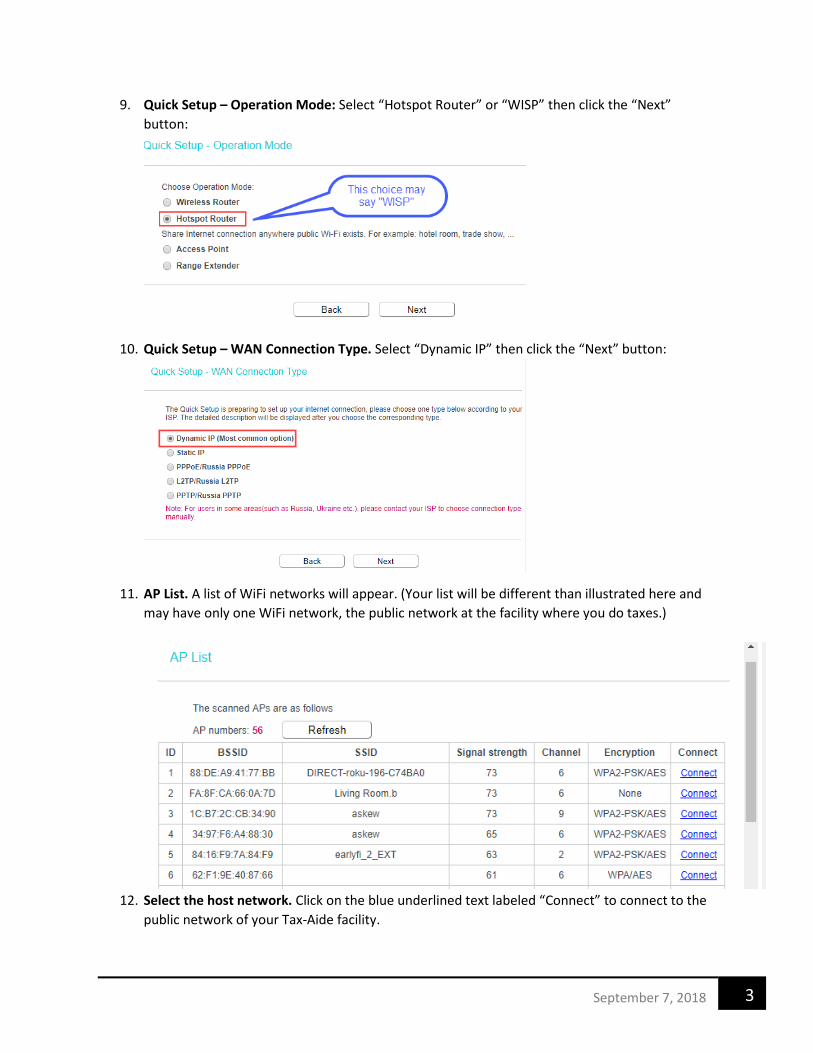
9. Quick Setup – Operation Mode: Select “Hotspot Router” or “WISP” then click the “Next” button:
10. Quick Setup – WAN Connection Type. Select “Dynamic IP” then click the “Next” button:
11. AP List. A list of WiFi networks will appear. (Your list will be different than illustrated here and may have only one WiFi network, the public network at the facility where you do taxes.)
12. Select the host network. Click on the blue underlined text labeled “Connect” to connect to the
public network of your Tax-Aide facility.
4 September 7, 2018
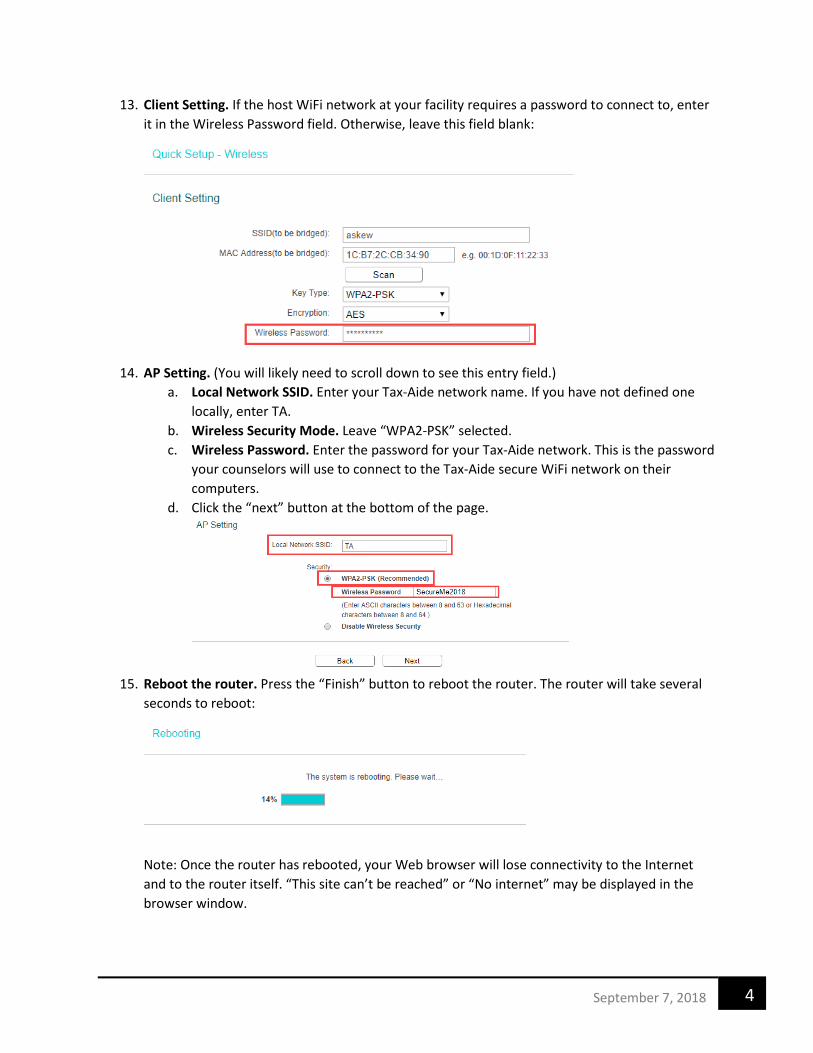
13. Client Setting. If the host WiFi network at your facility requires a password to connect to, enter it in the Wireless Password field. Otherwise, leave this field blank:
14. AP Setting. (You will likely need to scroll down to see this entry field.) a. Local Network SSID. Enter your Tax-Aide network name. If you have not defined one
locally, enter TA. b. Wireless Security Mode. Leave “WPA2-PSK” selected. c. Wireless Password. Enter the password for your Tax-Aide network. This is the password
your counselors will use to connect to the Tax-Aide secure WiFi network on their computers.
d. Click the “next” button at the bottom of the page.
15. Reboot the router. Press the “Finish” button to reboot the router. The router will take several
seconds to reboot:
Note: Once the router has rebooted, your Web browser will lose connectivity to the Internet and to the router itself. “This site can’t be reached” or “No internet” may be displayed in the browser window.
5 September 7, 2018
16. Reconnect to the router. Left click the WiFi symbol in the Windows system tray, select the name of the Tax-Aide network (TA, for example) from step 14, and click the “Connect” button. Next, enter the password created in step 14, then press the “Next” button.
17. If necessary, access the router login page. (Note: If you left the browser window open, this step will likely not be necessary.) Open a browser window and type 192.168.0.1 in the address bar and press Enter. The Login dialog will be displayed. Type admin in both the “Username” and “Password” fields then click the “Log In” button.
6 September 7, 2018
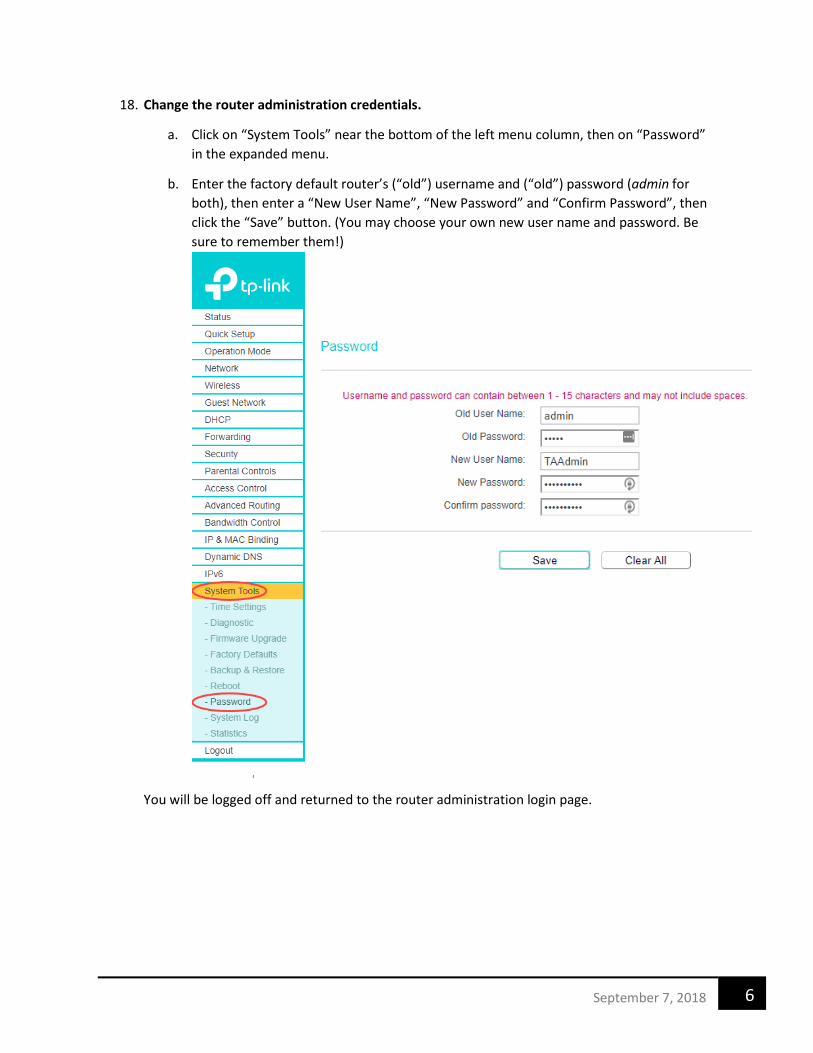
18. Change the router administration credentials.
a. Click on “System Tools” near the bottom of the left menu column, then on “Password” in the expanded menu.
b. Enter the factory default router’s (“old”) username and (“old”) password (admin for both), then enter a “New User Name”, “New Password” and “Confirm Password”, then click the “Save” button. (You may choose your own new user name and password. Be sure to remember them!)
You will be logged off and returned to the router administration login page.
7 September 7, 2018
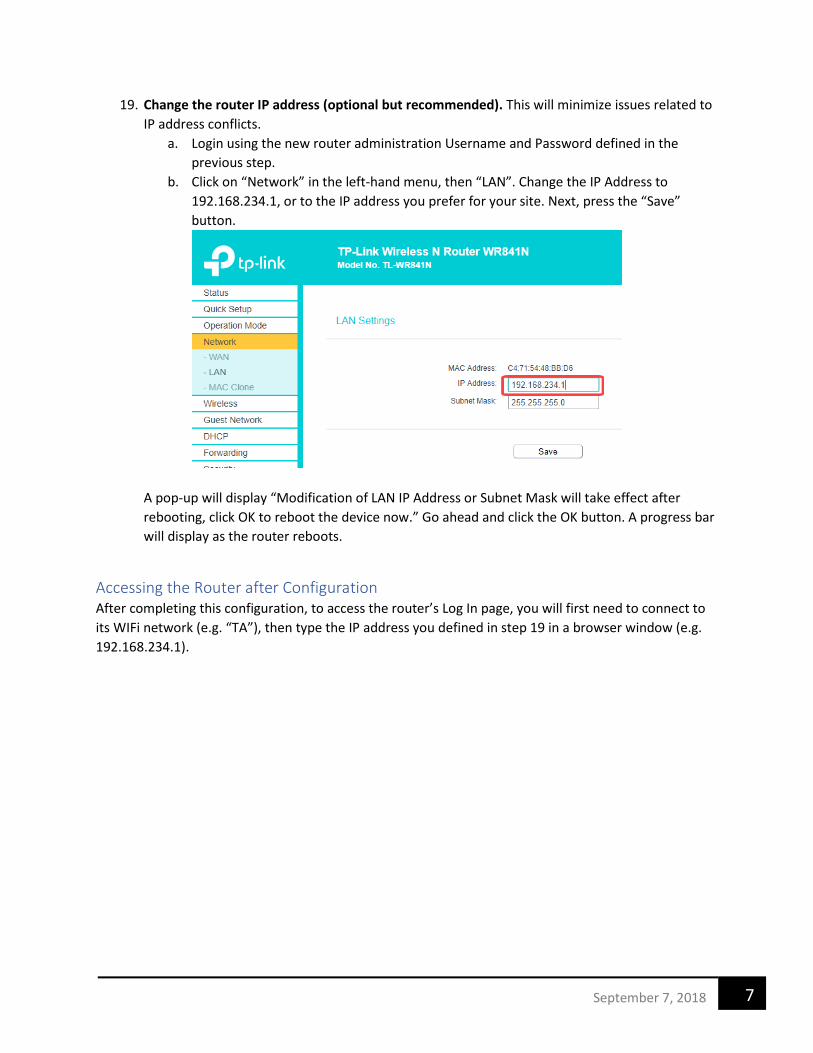
19. Change the router IP address (optional but recommended). This will minimize issues related to IP address conflicts.
a. Login using the new router administration Username and Password defined in the previous step.
b. Click on “Network” in the left-hand menu, then “LAN”. Change the IP Address to 192.168.234.1, or to the IP address you prefer for your site. Next, press the “Save” button.
A pop-up will display “Modification of LAN IP Address or Subnet Mask will take effect after rebooting, click OK to reboot the device now.” Go ahead and click the OK button. A progress bar will display as the router reboots.
Accessing the Router after Configuration After completing this configuration, to access the router’s Log In page, you will first need to connect to its WIFi network (e.g. “TA”), then type the IP address you defined in step 19 in a browser window (e.g. 192.168.234.1).
8 September 7, 2018
Recommended Configuration We recommend the following to further configure your router:
• Set the correct time zone and time. Enable daylight savings time. • Update firmware to the latest available version • Backup configuration settings • Set the DHCP IP Pool address range
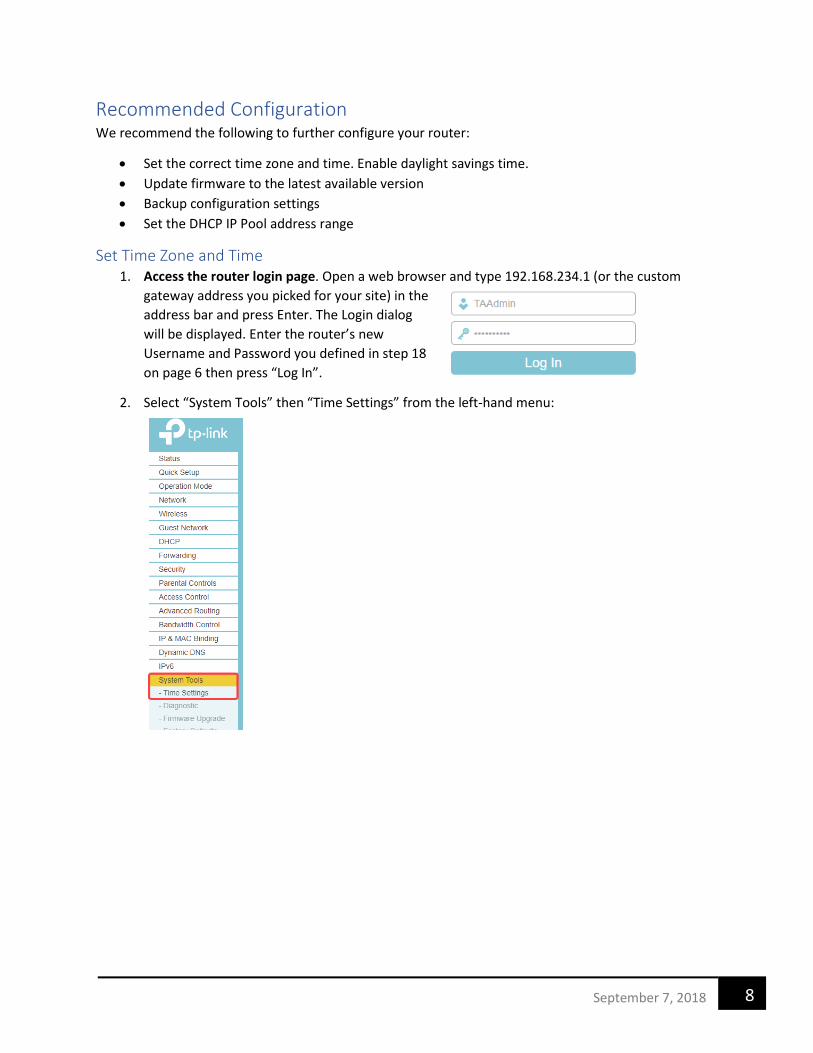
Set Time Zone and Time 1. Access the router login page. Open a web browser and type 192.168.234.1 (or the custom
gateway address you picked for your site) in the address bar and press Enter. The Login dialog will be displayed. Enter the router’s new Username and Password you defined in step 18 on page 6 then press “Log In”.
2. Select “System Tools” then “Time Settings” from the left-hand menu:
9 September 7, 2018
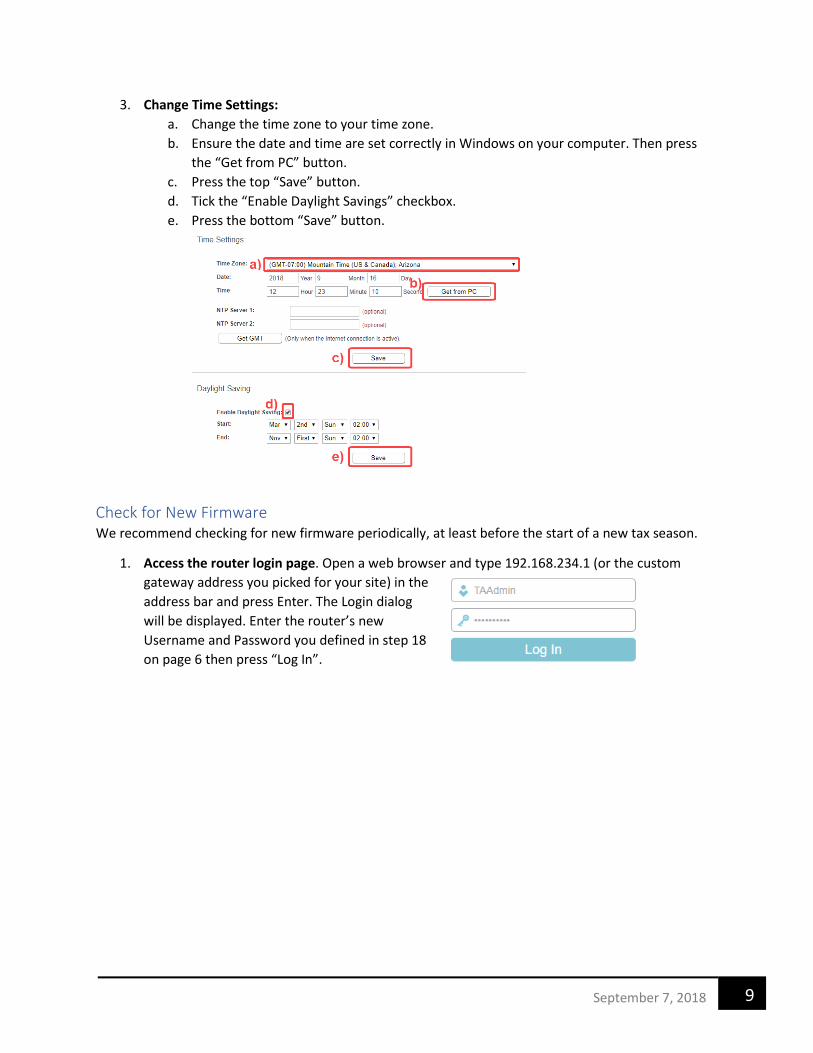
3. Change Time Settings: a. Change the time zone to your time zone. b. Ensure the date and time are set correctly in Windows on your computer. Then press
the “Get from PC” button. c. Press the top “Save” button. d. Tick the “Enable Daylight Savings” checkbox. e. Press the bottom “Save” button.
Check for New Firmware We recommend checking for new firmware periodically, at least before the start of a new tax season.
1. Access the router login page. Open a web browser and type 192.168.234.1 (or the custom gateway address you picked for your site) in the address bar and press Enter. The Login dialog will be displayed. Enter the router’s new Username and Password you defined in step 18 on page 6 then press “Log In”.
10 September 7, 2018
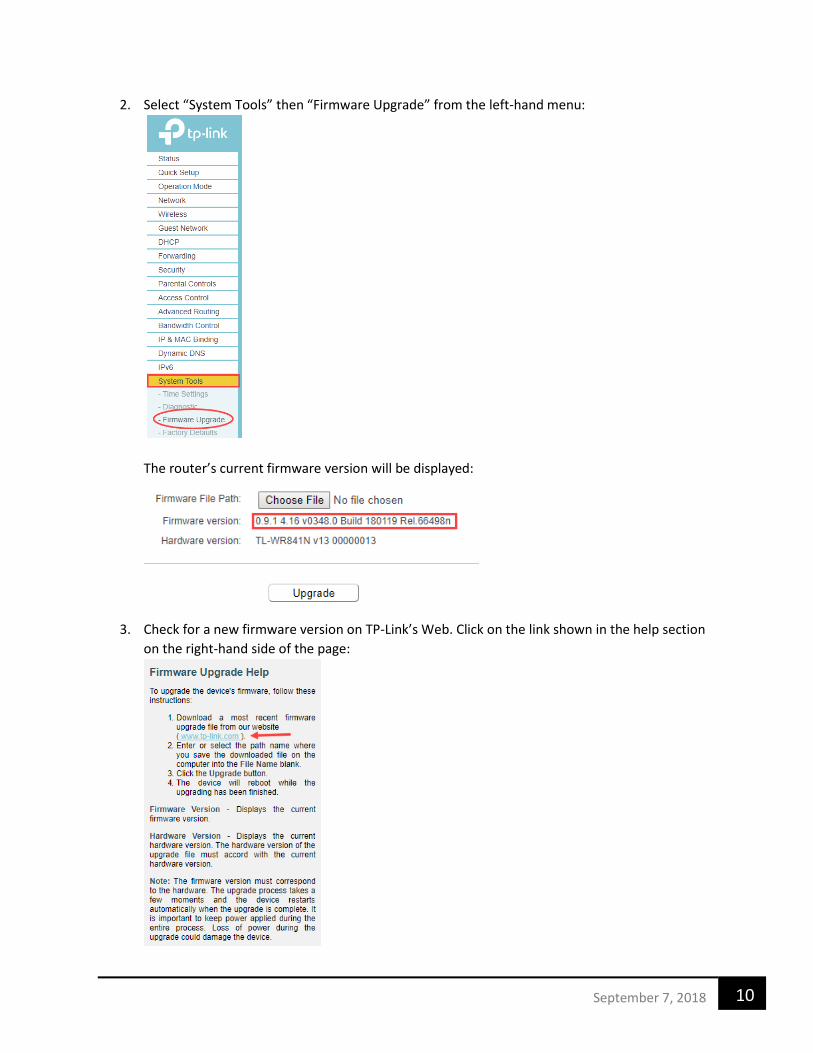
2. Select “System Tools” then “Firmware Upgrade” from the left-hand menu:
The router’s current firmware version will be displayed:
3. Check for a new firmware version on TP-Link’s Web. Click on the link shown in the help section on the right-hand side of the page:
11 September 7, 2018
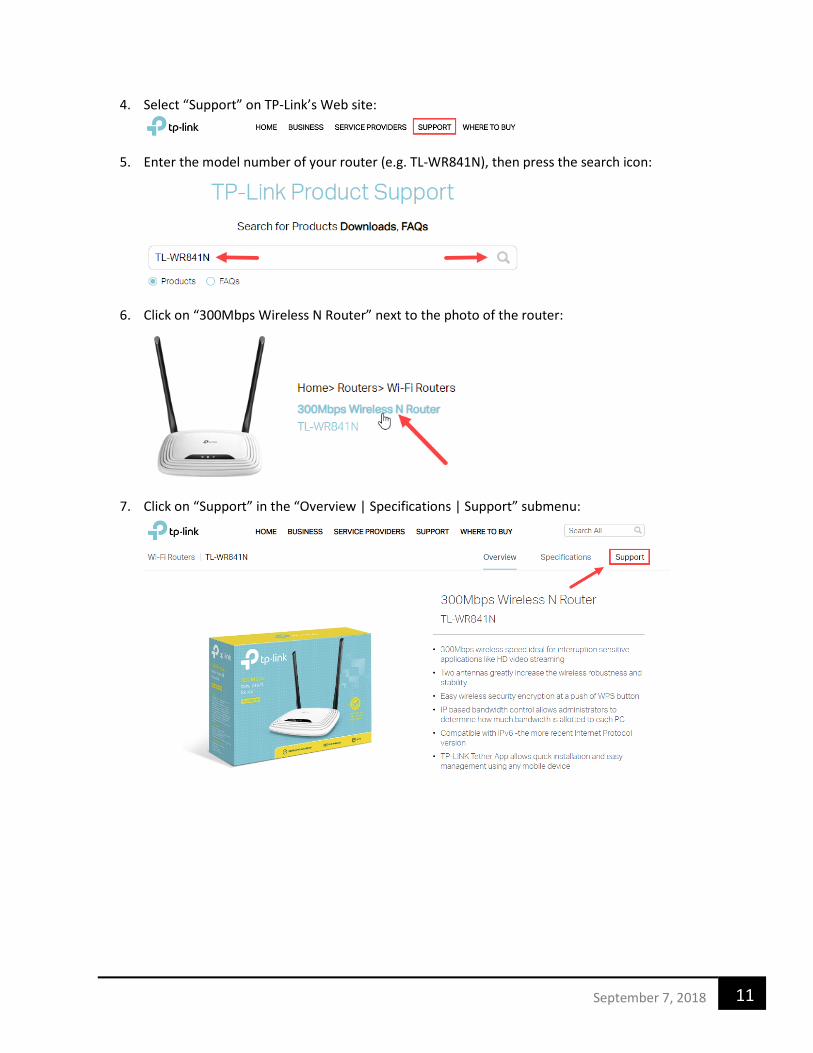
4. Select “Support” on TP-Link’s Web site:
5. Enter the model number of your router (e.g. TL-WR841N), then press the search icon:
6. Click on “300Mbps Wireless N Router” next to the photo of the router:
7. Click on “Support” in the “Overview | Specifications | Support” submenu:
12 September 7, 2018
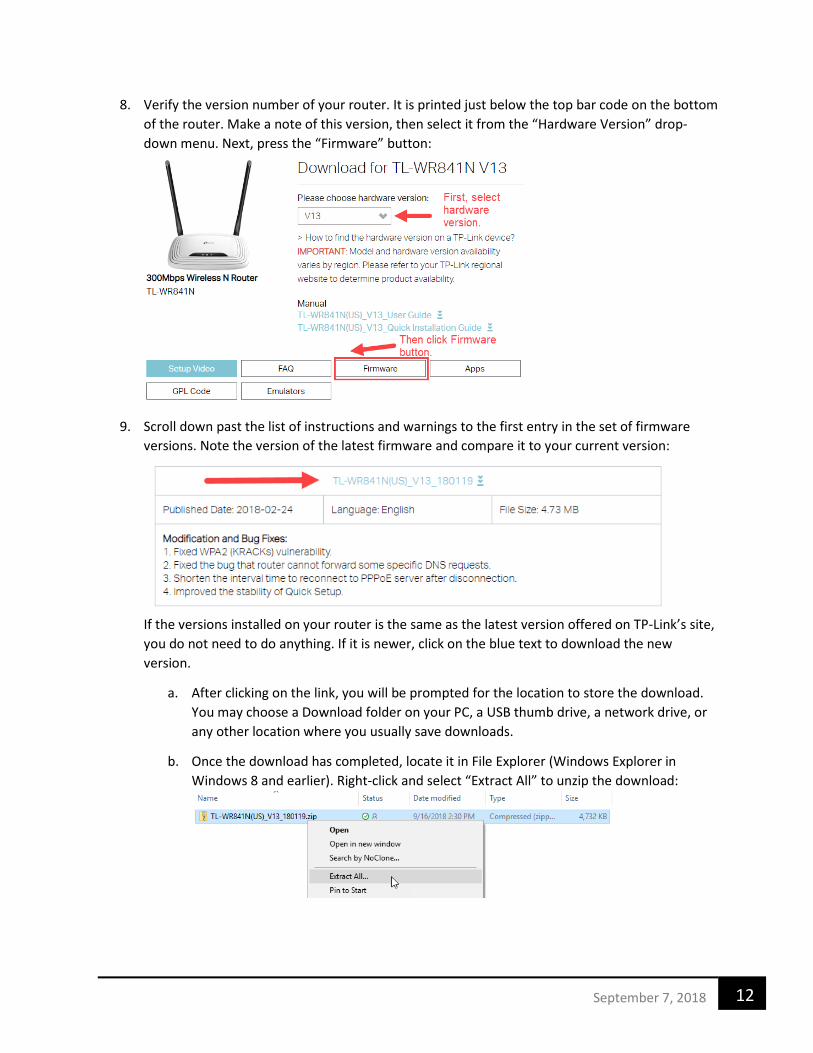
8. Verify the version number of your router. It is printed just below the top bar code on the bottom of the router. Make a note of this version, then select it from the “Hardware Version” drop-down menu. Next, press the “Firmware” button:
9. Scroll down past the list of instructions and warnings to the first entry in the set of firmware versions. Note the version of the latest firmware and compare it to your current version:
If the versions installed on your router is the same as the latest version offered on TP-Link’s site, you do not need to do anything. If it is newer, click on the blue text to download the new version.
a. After clicking on the link, you will be prompted for the location to store the download. You may choose a Download folder on your PC, a USB thumb drive, a network drive, or any other location where you usually save downloads.
b. Once the download has completed, locate it in File Explorer (Windows Explorer in Windows 8 and earlier). Right-click and select “Extract All” to unzip the download:

13 September 7, 2018
c. If desired, change the folder where you want the files to be extracted, or leave the default. Press the “Extract” button:
d. Make note of where these extracted files are on your PC.
10. Return to your router’s configuration page following steps 1 and 2 on page 9.
11. Select the “Choose File” button on the Firmware Upgrade page:
12. Locate the “bin” file in the location on your computer where you unzipped the download from TP-Link, click the filename to select it, then press the “Open” button:
14 September 7, 2018
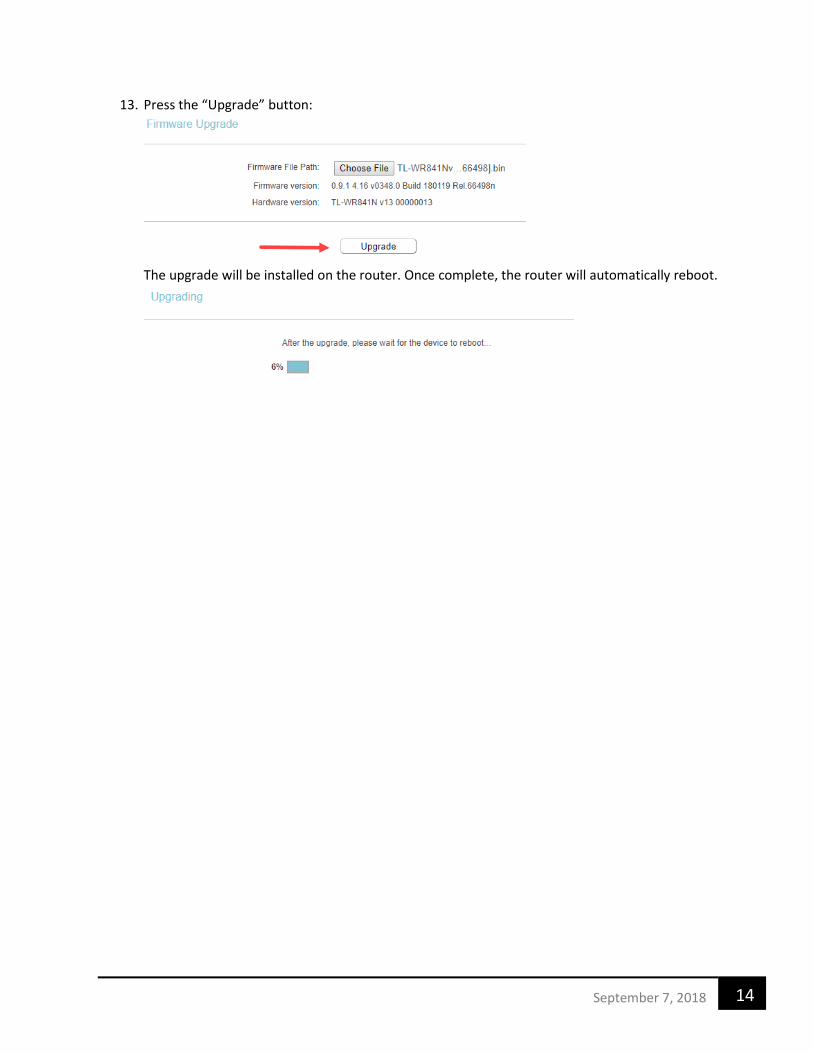
13. Press the “Upgrade” button:
The upgrade will be installed on the router. Once complete, the router will automatically reboot.

15 September 7, 2018
Set the DHCP IP Pool Address Range By default, the TP-Link WR841N router enables one-hundred computers at one time to connect. If you set the Default Gateway address to 192.168.234.1 as described in step 19 on page 7, the range of IP addresses that will be assigned to computers and other devices (cell phones, tablets, etc.) is from 192.168.234.100 to 192.168.234.200. You may want to reduce the size of this range to a smaller value. One reason for doing so is to allocate a few addresses outside of what DHCP assigned to use for devices you’ve assigned fixed IP addresses, printers, for example.
1. Access the router login page. Open a web browser and type 192.168.234.1 (or the custom gateway address you picked for your site) in the address bar and press Enter. The Login dialog will be displayed. Enter the router’s new Username and Password you defined in step 18 on page 6 then press “Log In”.
2. Select “DHCP” then “DHCP Settings” in the left-hand menu:
3. Select your desired “Start IP Address” and “End IP Address”. For example, a starting address of 192.168.123.20 with an ending address of 192.168.123.50 will support thirty connected computers or other devices:
Press the “Save” button once you’ve entered your desired start and end IP addresses.
Note: We recommend that network connected printers (connected either through a hard-wired Ethernet or WiFi connection) are set up to use a fixed IP address outside of the DHCP range. For example, given the settings shown above, you might set the IP address of the printer to
16 September 7, 2018
“192.168.234.10”, which is outside the range of 192.168.123.20 to 192.168.123.50. Using this technique, the IP address of the printer will remain the same, so that all laptops on your network will be able to assume that the printer has the same address as the last time the router was restarted. To set a fixed IP address for a printer, you use either the printer’s front panel controls, or the printer’s Web page.
Backup Configuration It can sometimes come in handy to backup the configuration of your router. Doing so saves all the changes you’ve made to your router in a file that you can keep on your PC or a USB thumb drive. This is especially handy if you manage more than one router in your district. You can set up the first router, then restore its configuration to the other (identical model) routers you use elsewhere.
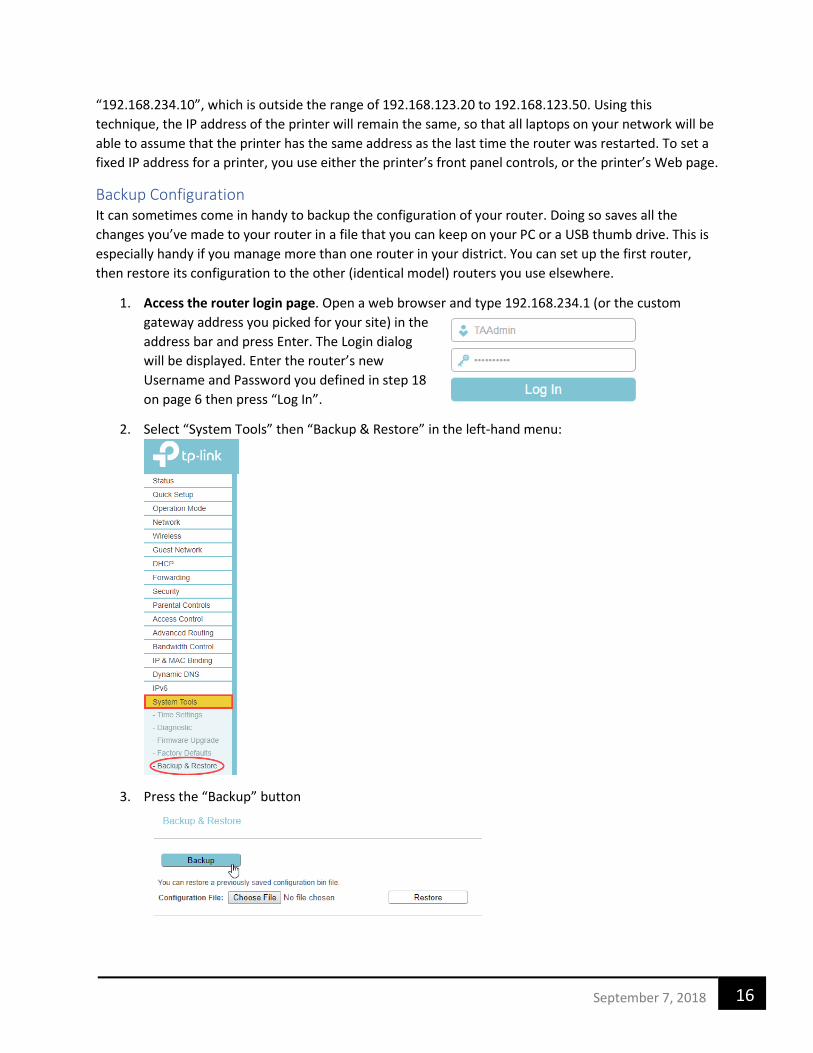
1. Access the router login page. Open a web browser and type 192.168.234.1 (or the custom gateway address you picked for your site) in the address bar and press Enter. The Login dialog will be displayed. Enter the router’s new Username and Password you defined in step 18 on page 6 then press “Log In”.
2. Select “System Tools” then “Backup & Restore” in the left-hand menu:
3. Press the “Backup” button
17 September 7, 2018
4. Select a name and location to save the configuration backup file. The default name is “conf.bin”. You may want to rename this to something more meaningful using the model of the router and today’s date, for example: “TP-Link TL-WR841N Router Backup 2018-09-18.bin”.
5. At a later time, or with a different router of the same model, you can use the Restore button on this screen to load the router with the defaults you just saved.