
WIS2000 Control Tablet for MDVR (IPS700A) User’s Guide · WIS2000 Control Tablet for MDVR...
20
WIS2000 Control Tablet for MDVR (IPS700A) User’s Guide Before connecting, operating or adjusting this product, please read this instruction booklet carefully and completely.
Transcript of WIS2000 Control Tablet for MDVR (IPS700A) User’s Guide · WIS2000 Control Tablet for MDVR...
WIS2000 Control Tablet for MDVR (IPS700A)
User’s GuideBefore connecting, operating or adjusting this product, please read this instruction booklet carefully and completely.
2 - English FSN1950 - 4/2014
Table of Contents
Parts . . . . . . . . . . . . . . . . . . . . . . . . . . . . . . . . . . . . . . 4 WIS2000 Sample Configuration . . . . . . . . . . . . . . . . . . . . . 5Tablet Dock Mounting . . . . . . . . . . . . . . . . . . . . . . . . . . . 6Docking and Removing the Tablet . . . . . . . . . . . . . . . . . . . 7Tablet Start-up . . . . . . . . . . . . . . . . . . . . . . . . . . . . . . . . 8Interface Start-up . . . . . . . . . . . . . . . . . . . . . . . . . . . . . . 9The Drop Down Menu . . . . . . . . . . . . . . . . . . . . . . . . . . 10Adjust Settings . . . . . . . . . . . . . . . . . . . . . . . . . . . . . . 11Patient Information. . . . . . . . . . . . . . . . . . . . . . . . . . . . 12Capture and Record . . . . . . . . . . . . . . . . . . . . . . . . . . . 13The Recording List . . . . . . . . . . . . . . . . . . . . . . . . . . . . 14Working with Recorded Files . . . . . . . . . . . . . . . . . . . . . . 15Wired Tablet Connection . . . . . . . . . . . . . . . . . . . . . . . . 16Wireless Tablet Connection . . . . . . . . . . . . . . . . . . . . . . 17Mechanical Drawing . . . . . . . . . . . . . . . . . . . . . . . . . . . 18Contacts . . . . . . . . . . . . . . . . . . . . . . . . . . . . . . . . . . . 20
The specifications and information in this document are subject to change without notice.

English - 3FSN1950 - 4/2014
Overview
The WIS2000 Control Tablet from FSN Medical Technologies is a single appliance that can operate FSN’s IPS700A Medical Digital Video Recorder with the touch of a finger.
The tablet hardware and software have been designed to easily capture and record medical images and video for later play back. The system can be controlled, wirelessly if desired.
FSN’s simple tablet user interface has been designed to meet the needs of today’s OR environment, where hospital personnel’s primary focus is patient care. It excels at meeting this requirement with intuitive simplicity and ease of use.
This User Guide will provide instructions for appropriate product configuration, based upon your hospital’s requirements.
4 - English FSN1950 - 4/2014
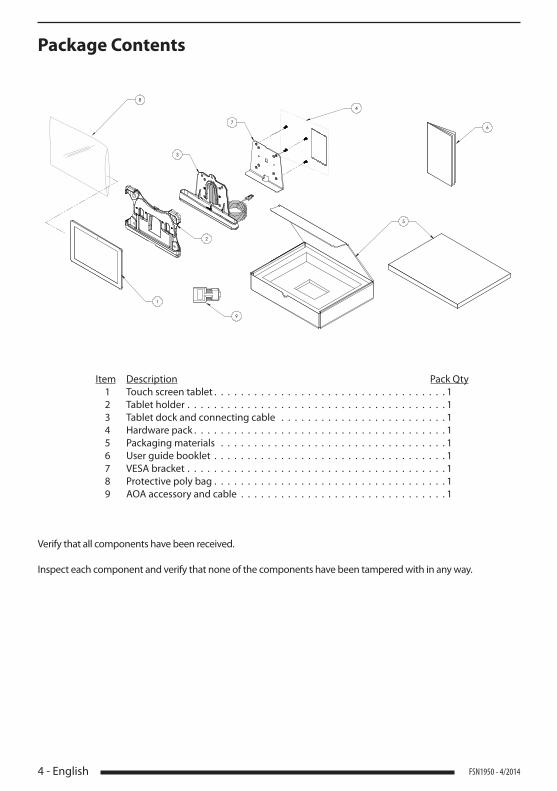
Package Contents
Verify that all components have been received.
Inspect each component and verify that none of the components have been tampered with in any way.
Item Description Pack Qty 1 Touch screen tablet . . . . . . . . . . . . . . . . . . . . . . . . . . . . . . . . . . . 1 2 Tablet holder . . . . . . . . . . . . . . . . . . . . . . . . . . . . . . . . . . . . . . . 1 3 Tablet dock and connecting cable . . . . . . . . . . . . . . . . . . . . . . . . . 1 4 Hardware pack . . . . . . . . . . . . . . . . . . . . . . . . . . . . . . . . . . . . . . 1 5 Packaging materials . . . . . . . . . . . . . . . . . . . . . . . . . . . . . . . . . . 1 6 User guide booklet . . . . . . . . . . . . . . . . . . . . . . . . . . . . . . . . . . . 1 7 VESA bracket . . . . . . . . . . . . . . . . . . . . . . . . . . . . . . . . . . . . . . . 1 8 Protective poly bag . . . . . . . . . . . . . . . . . . . . . . . . . . . . . . . . . . . 1 9 AOA accessory and cable . . . . . . . . . . . . . . . . . . . . . . . . . . . . . . . 1
1
2
3
5
6
8
7
4
9

English - 5FSN1950 - 4/2014
WIS2000 Control Tablet/MDVR Sample Configuration
Source Signals• VGA• DVI-D• CVBS• S-Video• Audio
Saved to Media:• CD• DVD• Blu-ray• USB • FTP Server
Display MonitorPlayback
Medical DigitalVideo Recorder
Start and stop with foot pedal or hand switch.
WIS2000Control Tablet
6 - English FSN1950 - 4/2014
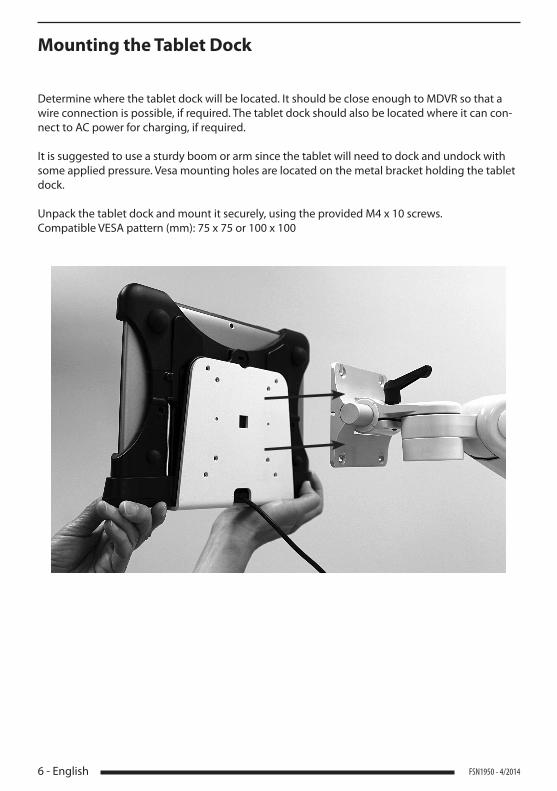
Mounting the Tablet Dock
Determine where the tablet dock will be located. It should be close enough to MDVR so that a wire connection is possible, if required. The tablet dock should also be located where it can con-nect to AC power for charging, if required.
It is suggested to use a sturdy boom or arm since the tablet will need to dock and undock with some applied pressure. Vesa mounting holes are located on the metal bracket holding the tablet dock.
Unpack the tablet dock and mount it securely, using the provided M4 x 10 screws.Compatible VESA pattern (mm): 75 x 75 or 100 x 100
English - 7FSN1950 - 4/2014
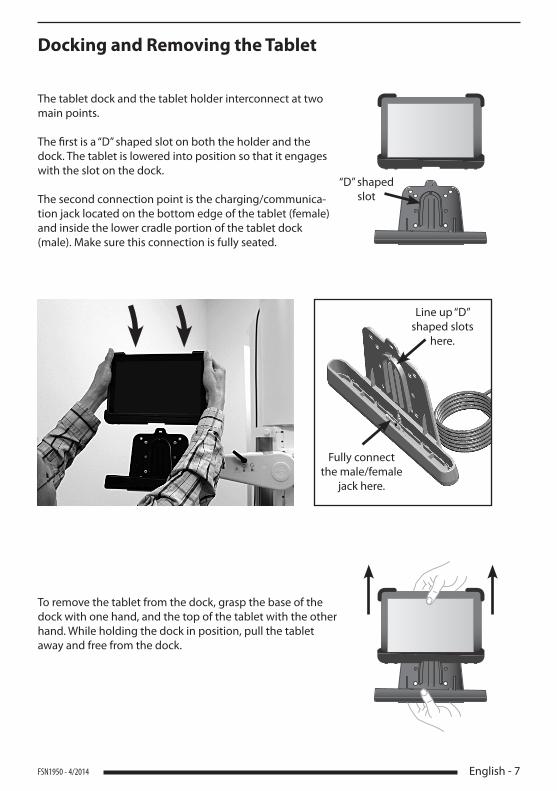
Docking and Removing the Tablet
The tablet dock and the tablet holder interconnect at two main points.
The first is a “D” shaped slot on both the holder and the dock. The tablet is lowered into position so that it engages with the slot on the dock.
The second connection point is the charging/communica-tion jack located on the bottom edge of the tablet (female) and inside the lower cradle portion of the tablet dock (male). Make sure this connection is fully seated.
To remove the tablet from the dock, grasp the base of the dock with one hand, and the top of the tablet with the other hand. While holding the dock in position, pull the tablet away and free from the dock.
“D” shaped slot
Line up “D” shaped slots
here.
Fully connect the male/female
jack here.

8 - English FSN1950 - 4/2014
Tablet Start-up
Turning Your Tablet On and Off
Press and hold the Power/Lock Key. If your device has fatal errors, hangs up, or freezes, you may need to reset the device to regain functionality. If your device is unresponsive, press and hold the Power/Lock Key for 8 to 10 seconds.
English - 9FSN1950 - 4/2014
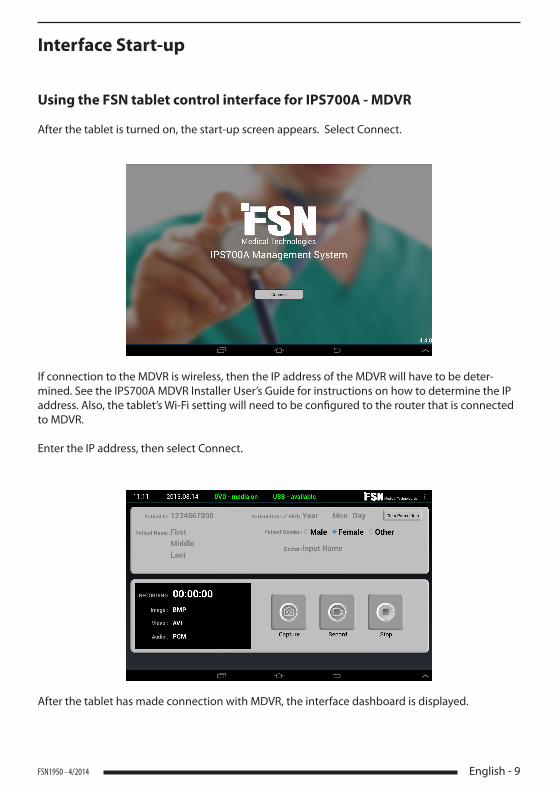
Interface Start-up
Using the FSN tablet control interface for IPS700A - MDVR
After the tablet is turned on, the start-up screen appears. Select Connect.
If connection to the MDVR is wireless, then the IP address of the MDVR will have to be deter-mined. See the IPS700A MDVR Installer User’s Guide for instructions on how to determine the IP address. Also, the tablet’s Wi-Fi setting will need to be configured to the router that is connected to MDVR.
Enter the IP address, then select Connect.
After the tablet has made connection with MDVR, the interface dashboard is displayed.
10 - English FSN1950 - 4/2014
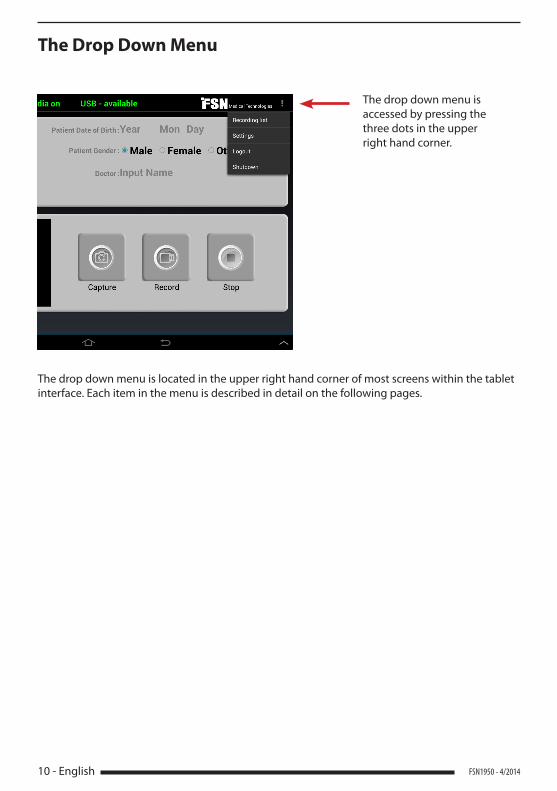
The Drop Down Menu
The drop down menu is located in the upper right hand corner of most screens within the tablet interface. Each item in the menu is described in detail on the following pages.
The drop down menu is accessed by pressing the three dots in the upper right hand corner.
English - 11FSN1950 - 4/2014
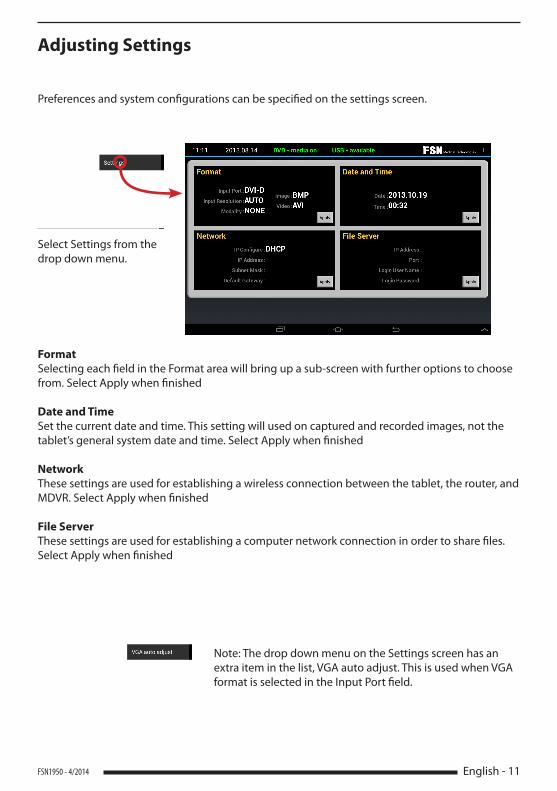
Preferences and system configurations can be specified on the settings screen.
Select Settings from the drop down menu.
Adjusting Settings
FormatSelecting each field in the Format area will bring up a sub-screen with further options to choose from. Select Apply when finished
Date and TimeSet the current date and time. This setting will used on captured and recorded images, not the tablet’s general system date and time. Select Apply when finished
NetworkThese settings are used for establishing a wireless connection between the tablet, the router, and MDVR. Select Apply when finished
File ServerThese settings are used for establishing a computer network connection in order to share files. Select Apply when finished
Note: The drop down menu on the Settings screen has an extra item in the list, VGA auto adjust. This is used when VGA format is selected in the Input Port field.
12 - English FSN1950 - 4/2014
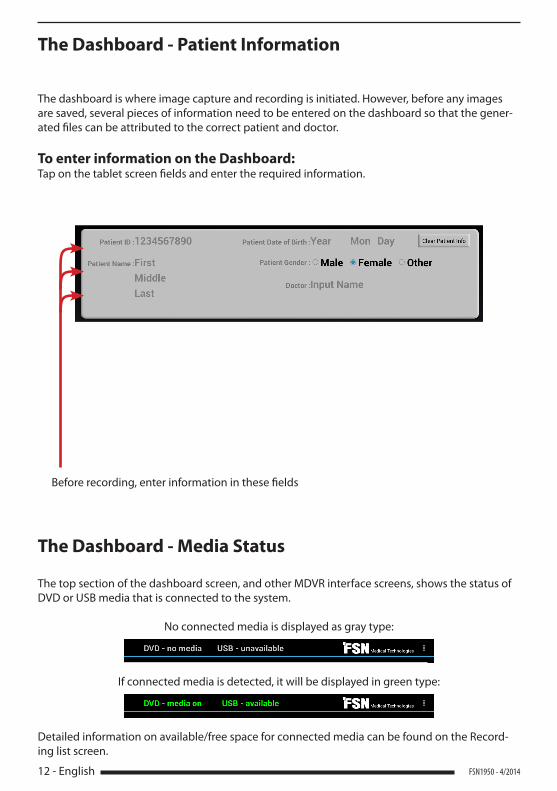
The Dashboard - Patient Information
The Dashboard - Media Status
The dashboard is where image capture and recording is initiated. However, before any images are saved, several pieces of information need to be entered on the dashboard so that the gener-ated files can be attributed to the correct patient and doctor.
To enter information on the Dashboard:Tap on the tablet screen fields and enter the required information.
The top section of the dashboard screen, and other MDVR interface screens, shows the status of DVD or USB media that is connected to the system.
No connected media is displayed as gray type:
If connected media is detected, it will be displayed in green type:
Detailed information on available/free space for connected media can be found on the Record-ing list screen.
Before recording, enter information in these fields
English - 13FSN1950 - 4/2014
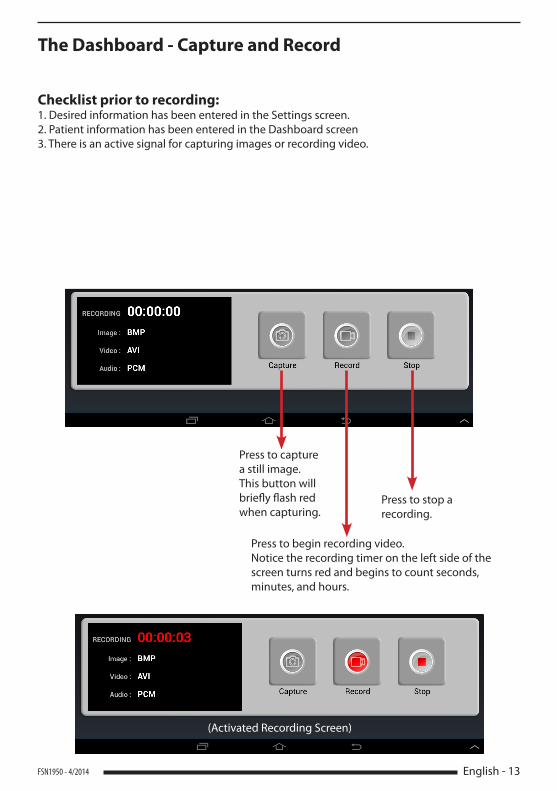
The Dashboard - Capture and Record
Checklist prior to recording:1. Desired information has been entered in the Settings screen.2. Patient information has been entered in the Dashboard screen3. There is an active signal for capturing images or recording video.
Press to capture a still image. This button will briefly flash red when capturing.
Press to stop a recording.
Press to begin recording video. Notice the recording timer on the left side of the screen turns red and begins to count seconds, minutes, and hours.
(Activated Recording Screen)
14 - English FSN1950 - 4/2014
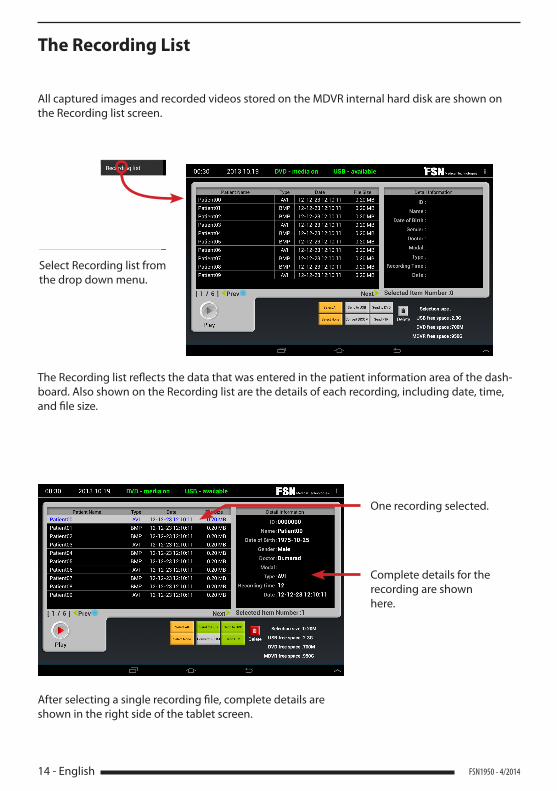
The Recording List
All captured images and recorded videos stored on the MDVR internal hard disk are shown on the Recording list screen.
The Recording list reflects the data that was entered in the patient information area of the dash-board. Also shown on the Recording list are the details of each recording, including date, time, and file size.
After selecting a single recording file, complete details are shown in the right side of the tablet screen.
Select Recording list from the drop down menu.
One recording selected.
Complete details for the recording are shown here.
English - 15FSN1950 - 4/2014
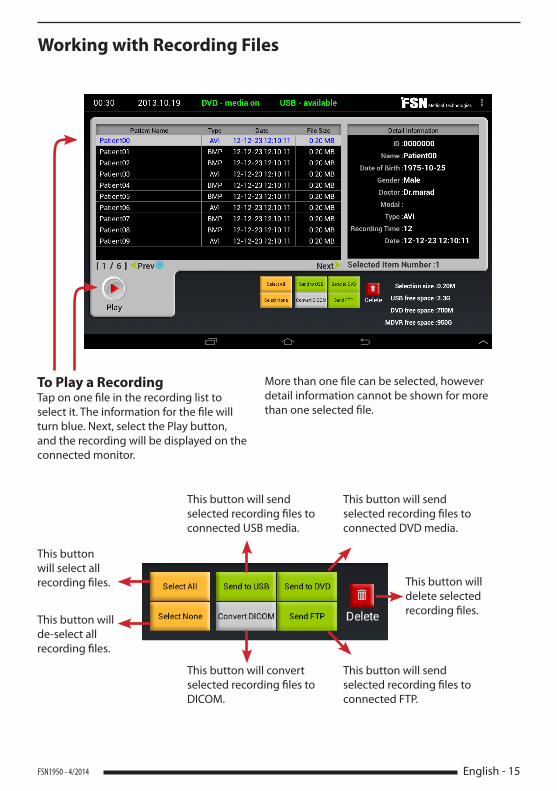
Working with Recording Files
To Play a RecordingTap on one file in the recording list to select it. The information for the file will turn blue. Next, select the Play button, and the recording will be displayed on the connected monitor.
More than one file can be selected, however detail information cannot be shown for more than one selected file.
This button will send selected recording files to connected USB media.
This button will convert selected recording files to DICOM.
This button will send selected recording files to connected DVD media.
This button will send selected recording files to connected FTP.
This button will delete selected recording files.
This button will select all recording files.
This button will de-select all recording files.
16 - English FSN1950 - 4/2014
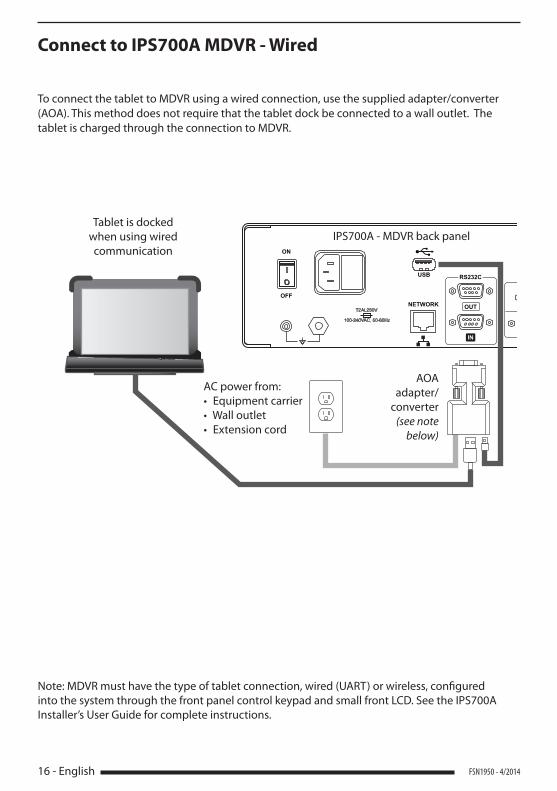
Connect to IPS700A MDVR - Wired
To connect the tablet to MDVR using a wired connection, use the supplied adapter/converter (AOA). This method does not require that the tablet dock be connected to a wall outlet. The tablet is charged through the connection to MDVR.
IPS700A - MDVR back panelTablet is docked
when using wired communication
AOA adapter/
converter (see note
below)
AC power from:• Equipment carrier• Wall outlet• Extension cord
Note: MDVR must have the type of tablet connection, wired (UART) or wireless, configured into the system through the front panel control keypad and small front LCD. See the IPS700A Installer’s User Guide for complete instructions.
English - 17FSN1950 - 4/2014
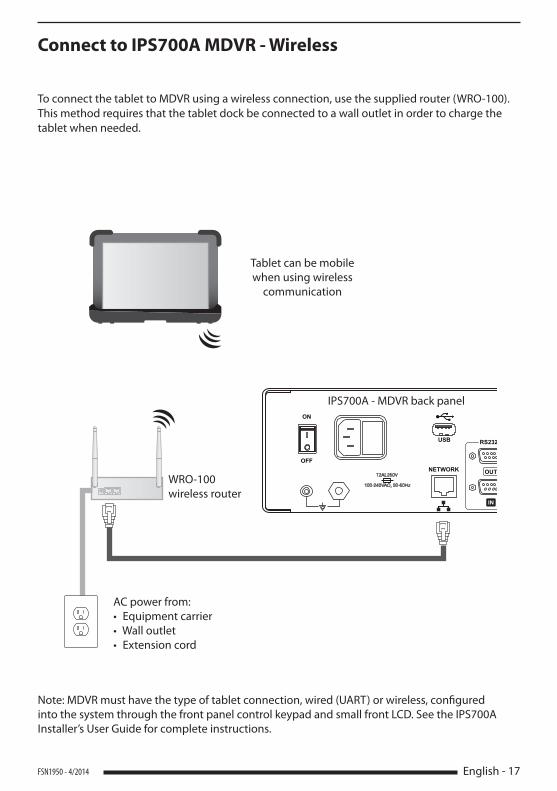
IPS700A - MDVR back panel
Note: MDVR must have the type of tablet connection, wired (UART) or wireless, configured into the system through the front panel control keypad and small front LCD. See the IPS700A Installer’s User Guide for complete instructions.
Connect to IPS700A MDVR - Wireless
To connect the tablet to MDVR using a wireless connection, use the supplied router (WRO-100). This method requires that the tablet dock be connected to a wall outlet in order to charge the tablet when needed.
Tablet can be mobile when using wireless
communication
WRO-100 wireless router
AC power from:• Equipment carrier• Wall outlet• Extension cord
18 - English FSN1950 - 4/2014
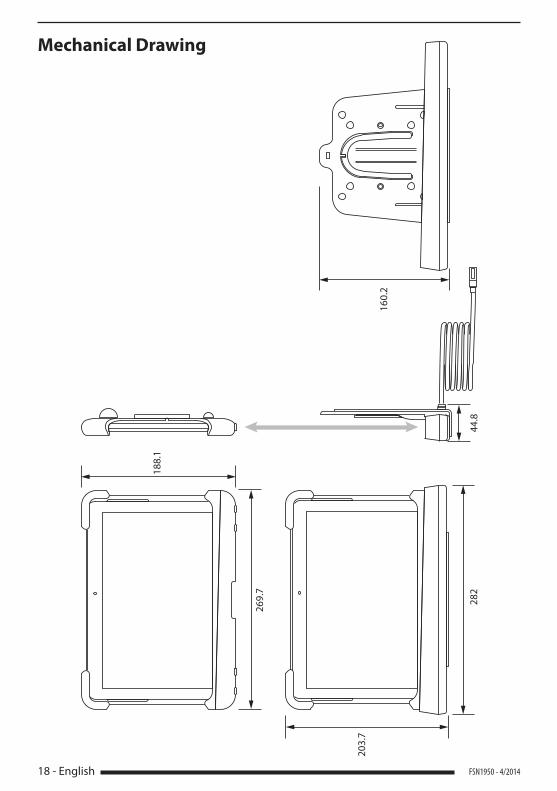
Mechanical Drawing
188.
1
203.
7
160.
2
282
269.
7
44.8

English - 19FSN1950 - 4/2014

20 - English FSN1950 - 4/2014
www.fsnmed.com
Foreseeson Custom Displays, Inc.2210 E. Winston RoadAnaheim, CA 92806 USATel: 714-300-0540Fax: 714-300-0546 Foreseeson Korea404B, Pangyoinnovalley B253 Pangyo-roBundang-gu Seongnam-si Gyeonggi-do, Korea 463-400Tel: +82-31-8018-0780Fax: +82-31-8018-0786
Foreseeson GmbHIndustriestrasse 38a63150 Heusenstamm, GermanyTel: +49 6104 64398 0 Fax: +49 6104 64398 11 Foreseeson UK Ltd. Unit 2 Kingsmill Business Park Chapel Mill RoadKingston upon Thames, Surrey KT1 3GZ Tel: +44 (0) 208 546 1047Fax: +44 (0) 208 546 3931


