Inside Telephone Wiring and Equipment - Phone, High Speed Internet

Copyright 2010 Terry Peterman, the ‘Internet Electrician ‘ www.electrical-online.com
Wiring Secrets
of the
Internet Electrician

Copyright 2010 Terry Peterman, the ‘Internet Electrician‘ www.electrical-online.com
- 2 -
Index
Topic Page
Introduction
3
Safety First! 3
Secret #1: Planning 4
Secret #2: Marking Device Locations 4
Secret #3: Drilling Holes 5
Secret #4: Mounting Wire Reels for Easy Unspooling 6
Secret #5: Pulling Cables 7
Secret #6: Stripping Cables 8
Secret #7: Cable Positions in the Box 10
Secret #8: Splicing Wires 11
Secret #9: Device Installation 14
Secret #10: Faceplate Installation 16
Conclusion 17

Copyright 2010 Terry Peterman, the ‘Internet Electrician‘ www.electrical-online.com
- 3 -
Introduction:
When helping people with their home wiring projects, I sometimes find myself getting
too far in front of the skill level of the person that I‟m trying to assist. For example, I‟ll
tell a client to pig-tail the hot conductors, forgetting that they may not even know what
“pig-tailing” means.
In “Wiring Secrets of the Internet Electrician”, my goal is to fill in some of the gaps that
may get left out while attempting to resolve a wiring problem, and to „demystify‟ the
techniques that an electrician with over 25 years of experience takes for granted!
Note that the “secrets” or “tricks of the trade” that I use may differ from those used by
other professional electricians. However, the principles of safety and code compliance
remain consistent, regardless of the differences in technique.
In this e-book, I share with you some of the wiring methods and “tricks of the trade” that
I personally use when taking on basic wiring projects. We‟ll discuss a broad range of
topics, from proper planning, the correct tools, to actual techniques that I use for
performing tasks correctly, like spicing wires, mounting devices, etc.
I hope you find the information useful. Don‟t forget that if you have suggestions for
other content that you would like to see, please send me an e-mail at: terry@electrical-
online.com
Safety First!!
Before undertaking any project, review our website article on safety prior to commencing. This article can be found on the Electrical-online.com website via the following link (copy and paste the link into your browser):
http://www.electrical-online.com/safety-fundamentals/
Having a solid understanding and respect for the electricity in your home is also very
important. Take the time to review the basics of home electrical (a GREAT reference is
„The Basics of Household Wiring‟ DVD and companion e-book, which are available on
our site).
Click HERE for more details on these valuable resources.

Copyright 2010 Terry Peterman, the ‘Internet Electrician‘ www.electrical-online.com
- 4 -
Secret #1: Planning
There is nothing worse than setting aside a day to complete a home improvement
project, only to be stopped partway through because you realize you‟re missing a
necessary tool or material(s) for the job, or haven‟t thought out the project completely
and are unsure of what to do next.
Proper planning is critical to the success of any project, home wiring or otherwise. I
always start planning the project inside my head for several days prior to beginning.
Capture your ideas on paper – „map out‟ the project. Make a list of all the materials,
equipment and tools you will require for the job. By the time you‟re ready to get started,
you will already have a good idea of everything you need and what needs to take place
when the time comes to begin the task.
Being prepared and taking care of the details up front saves time and energy in the long
run. Ask any contractor in the construction business. Making changes after the job has
already been completed or partially completed can be three times as costly as getting it
right the first time.
Secret #2: Marking Device Locations
When marking out device locations and heights, use a fine point felt pen, and instead of
marking out every device using a tape measure every time, take a thin piece of wood or
stiff plastic and mark out the most common device heights (receptacles, switches,
kitchen receptacles, wall lights, etc.) on the stick and then use the stick to mark out all
the outlets on the studs.
Copyright 2010 Terry Peterman, the ‘Internet Electrician‘ www.electrical-online.com
- 5 -
This saves a lot of time, and reduces the margin of error. It‟s very important to have
consistent outlet heights, especially where outlets are fairly close together, like on the
backsplash in the kitchen. Tiles will magnify just how bad it will look if the outlets aren‟t
all the same height!
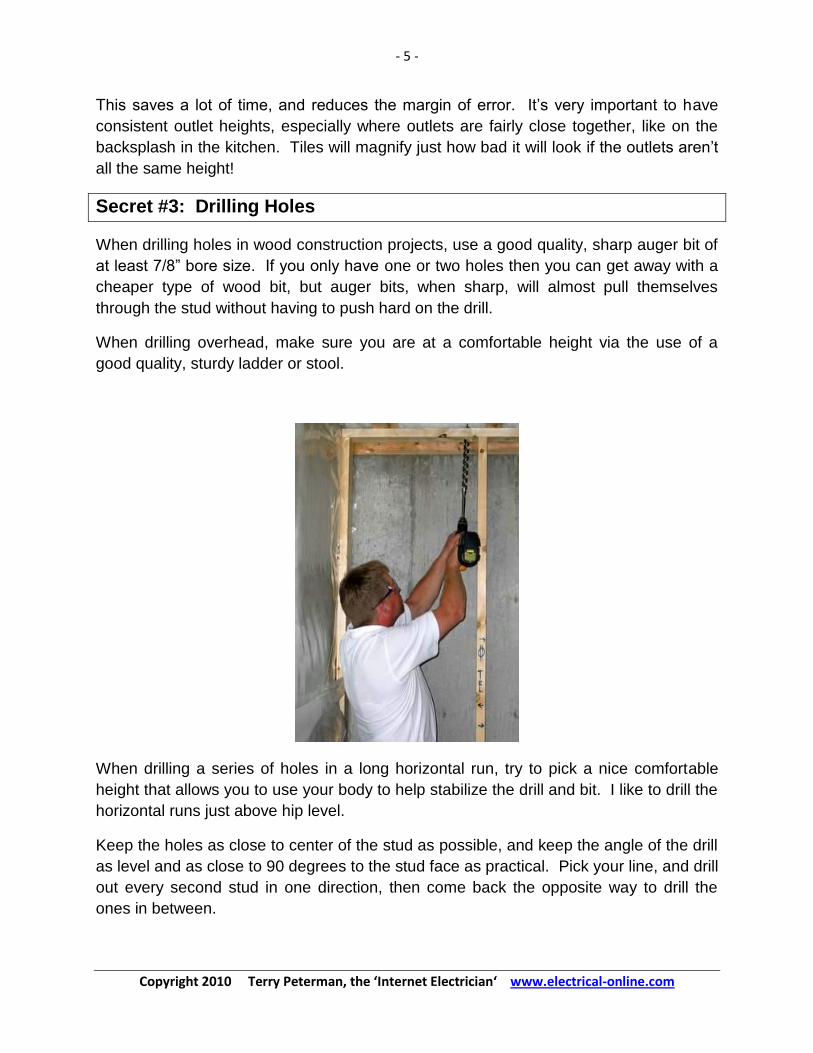
Secret #3: Drilling Holes
When drilling holes in wood construction projects, use a good quality, sharp auger bit of
at least 7/8” bore size. If you only have one or two holes then you can get away with a
cheaper type of wood bit, but auger bits, when sharp, will almost pull themselves
through the stud without having to push hard on the drill.
When drilling overhead, make sure you are at a comfortable height via the use of a
good quality, sturdy ladder or stool.
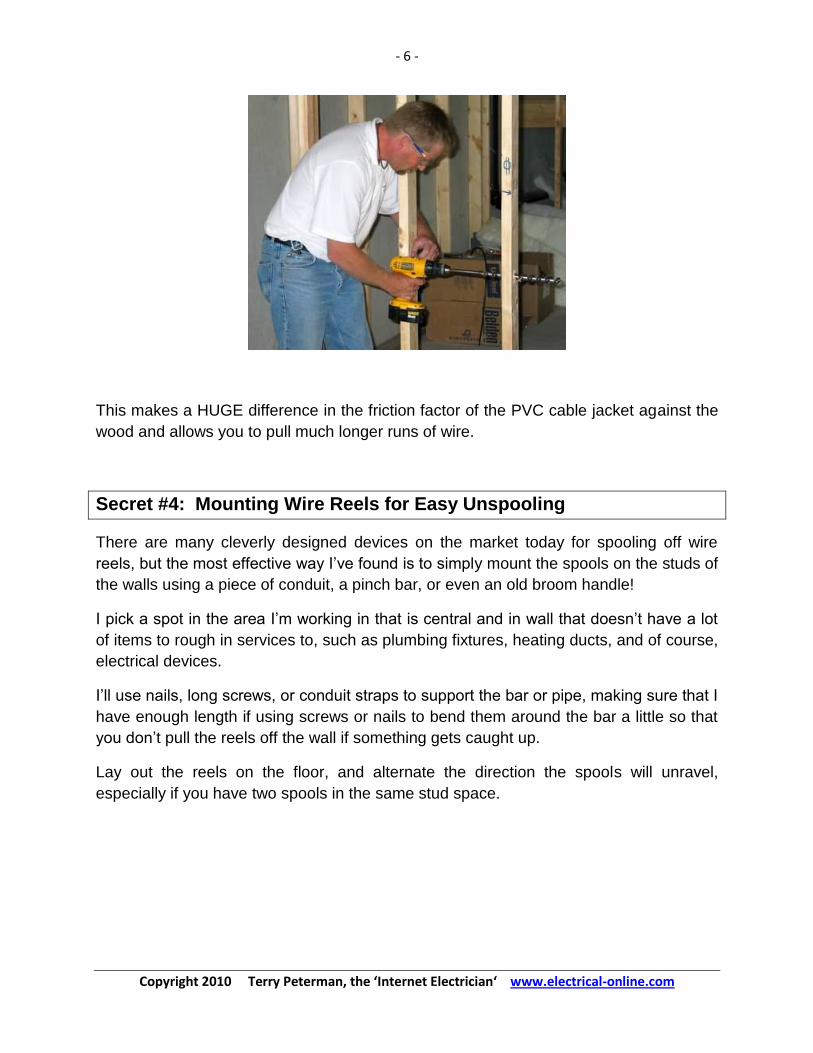
When drilling a series of holes in a long horizontal run, try to pick a nice comfortable
height that allows you to use your body to help stabilize the drill and bit. I like to drill the
horizontal runs just above hip level.
Keep the holes as close to center of the stud as possible, and keep the angle of the drill
as level and as close to 90 degrees to the stud face as practical. Pick your line, and drill
out every second stud in one direction, then come back the opposite way to drill the
ones in between.
Copyright 2010 Terry Peterman, the ‘Internet Electrician‘ www.electrical-online.com
- 6 -
This makes a HUGE difference in the friction factor of the PVC cable jacket against the
wood and allows you to pull much longer runs of wire.
Secret #4: Mounting Wire Reels for Easy Unspooling
There are many cleverly designed devices on the market today for spooling off wire
reels, but the most effective way I‟ve found is to simply mount the spools on the studs of
the walls using a piece of conduit, a pinch bar, or even an old broom handle!
I pick a spot in the area I‟m working in that is central and in wall that doesn‟t have a lot
of items to rough in services to, such as plumbing fixtures, heating ducts, and of course,
electrical devices.
I‟ll use nails, long screws, or conduit straps to support the bar or pipe, making sure that I
have enough length if using screws or nails to bend them around the bar a little so that
you don‟t pull the reels off the wall if something gets caught up.
Lay out the reels on the floor, and alternate the direction the spools will unravel,
especially if you have two spools in the same stud space.

Copyright 2010 Terry Peterman, the ‘Internet Electrician‘ www.electrical-online.com
- 7 -
This prevents one spool from unravelling the one next to it. If you are pulling wire in an
area that isn‟t lined up with your improvised wire rack, pull the wire out to a stud space
that is, and then pull the wire around toward your workspace.
Take care that there are no sharp objects, like protruding nails or screws that may
damage the outer jacket of the cable while pulling in your runs.
Secret #5: Pulling Cables
When pulling the cables in, start as close as possible to the location of your wire rack to
reduce friction and the risk of the cables getting caught up in something and damaged
in the process.
Pull enough wire that you are certain you have enough to make your splices, and to
leave the extra length outside of the box. You may have some waste, but error on the
side of too much cable at the box as opposed to not enough. You can always use the
scraps for making pig-tails for spicing (covered later).

Copyright 2010 Terry Peterman, the ‘Internet Electrician‘ www.electrical-online.com
- 8 -
The extra cable above or below the box before tightening the cable clamp is just in case
the cable gets damaged somehow before the job is done. All it would take is a careless
wall board installer getting a bit too aggressive while cutting out the box openings to
damage the conductors or cable jacket.
Without some slack, this would necessitate the replacement of the entire run instead of
just pulling down the extra cable. It‟s better to be looking at some extra slack, rather
than looking for it!
Secret #6: Stripping Cables
Some prefer to strip the jacket on the cables in the finishing stage. I personally think
this is a bad idea for so many reasons.
I strip the cables and place them in the box clamps on project rough-in. For stripping
cable jacket, you will find many methods and mine will open up debate amongst other
professionals, but it works for me, so I‟m going to share it with you.
I use a razor blade style utility knife. Make sure you are using a sharp blade! Most cuts
from knives are an indirect result of a dull blade. Besides, cuts from a nice sharp blade
are much easier for the Doctor to stitch up! Just kidding, but you must be very careful
using sharp tools, or any tool for that matter. Wear leather gloves while stripping cables
is a good way to help prevent injury.
For two-wire Romex or Loomex, I will carefully slide the blade of the knife between the
two conductors, and next to the bare ground wire.

Copyright 2010 Terry Peterman, the ‘Internet Electrician‘ www.electrical-online.com
- 9 -
Most arguments to this method revolve around the risk of cutting the insulation on the
current carrying conductors, but if you are careful, and gently slide the sharp blade in
perpendicular to the wires, you won‟t harm the insulation.
It takes a bit of practice, and if you do knick the insulation inside, replace the cable or
take advantage of the extra loop you left yourself.
For three-wire cable, I will slice the jacket one or two inches from the end and out to the
end of the cable. If I knick the insulation here, it can be easily cut off so I don‟t have to
be quite as careful in that regard.
Then I pull out the wires from the jacket and pull them apart to the required length for
the splice. If ripping the jacket from the cable gets too tough, I‟ll just score the jacket
with my knife to help things along. Then when I‟ve opened up enough of the jacket I
just pull it back out of the way and cut it off with the knife or a diagonal plier.
Copyright 2010 Terry Peterman, the ‘Internet Electrician‘ www.electrical-online.com
- 10 -
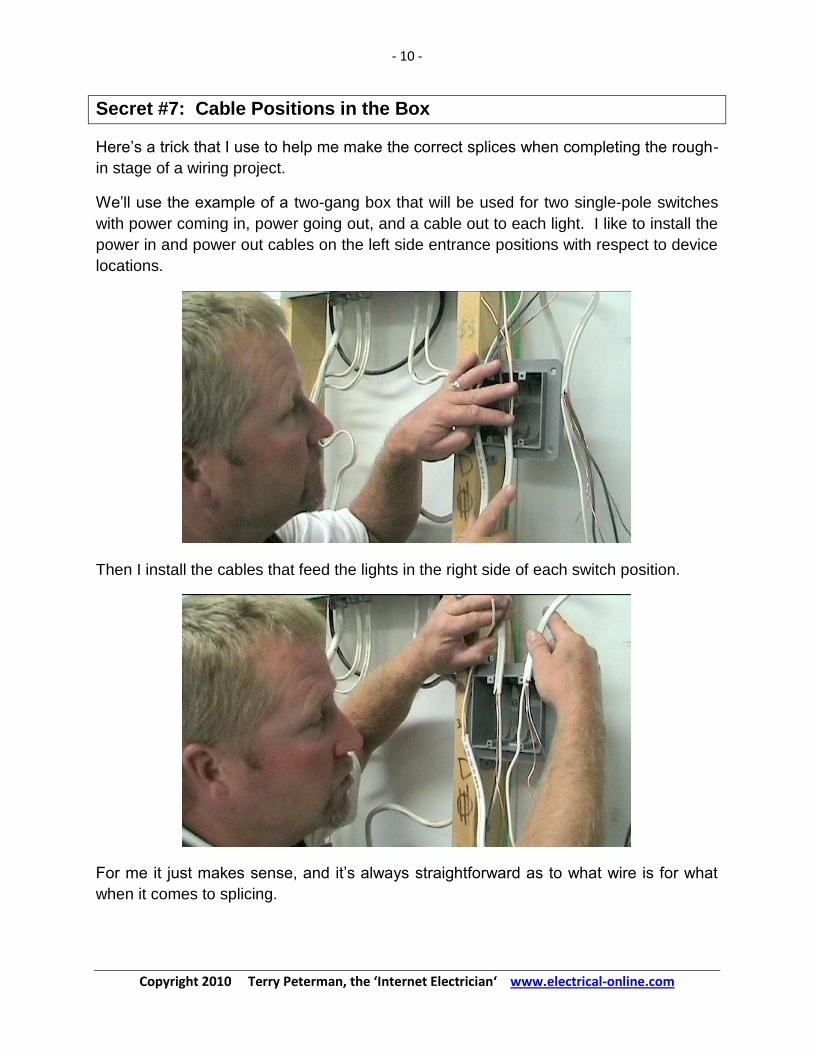
Secret #7: Cable Positions in the Box
Here‟s a trick that I use to help me make the correct splices when completing the rough-
in stage of a wiring project.
We‟ll use the example of a two-gang box that will be used for two single-pole switches
with power coming in, power going out, and a cable out to each light. I like to install the
power in and power out cables on the left side entrance positions with respect to device
locations.
Then I install the cables that feed the lights in the right side of each switch position.
For me it just makes sense, and it‟s always straightforward as to what wire is for what
when it comes to splicing.
Copyright 2010 Terry Peterman, the ‘Internet Electrician‘ www.electrical-online.com
- 11 -
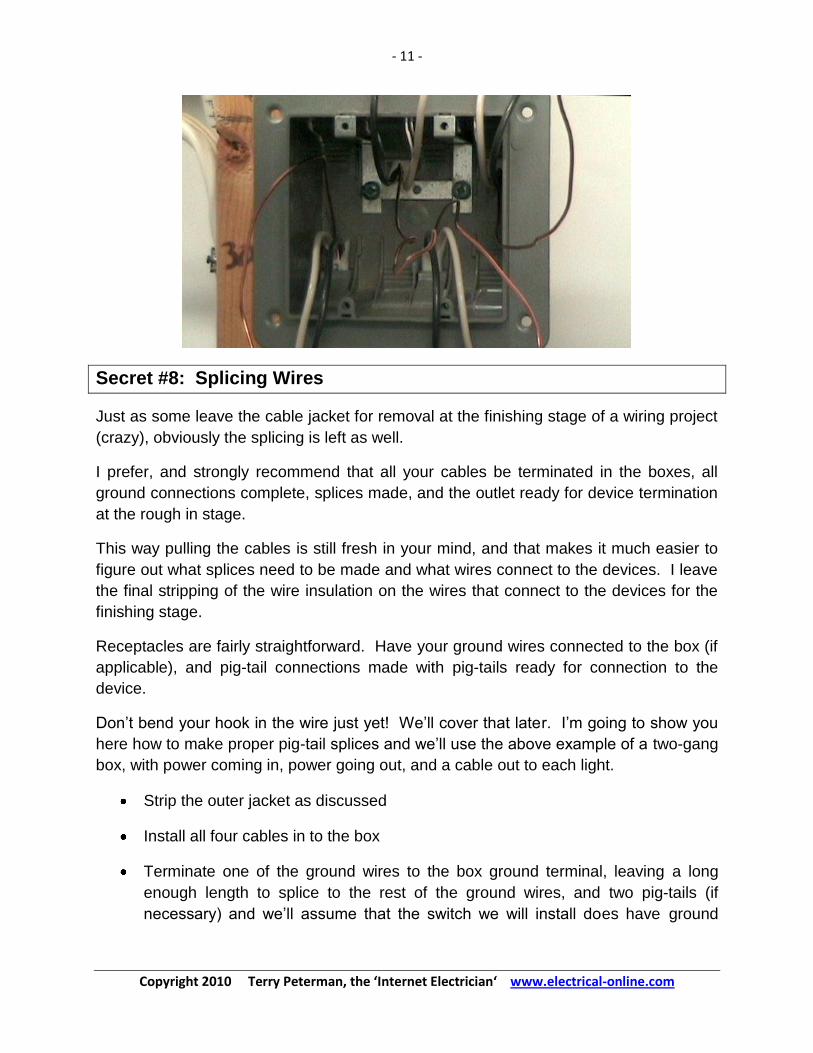
Secret #8: Splicing Wires
Just as some leave the cable jacket for removal at the finishing stage of a wiring project
(crazy), obviously the splicing is left as well.
I prefer, and strongly recommend that all your cables be terminated in the boxes, all
ground connections complete, splices made, and the outlet ready for device termination
at the rough in stage.
This way pulling the cables is still fresh in your mind, and that makes it much easier to
figure out what splices need to be made and what wires connect to the devices. I leave
the final stripping of the wire insulation on the wires that connect to the devices for the
finishing stage.
Receptacles are fairly straightforward. Have your ground wires connected to the box (if
applicable), and pig-tail connections made with pig-tails ready for connection to the
device.
Don‟t bend your hook in the wire just yet! We‟ll cover that later. I‟m going to show you
here how to make proper pig-tail splices and we‟ll use the above example of a two-gang
box, with power coming in, power going out, and a cable out to each light.
Strip the outer jacket as discussed
Install all four cables in to the box
Terminate one of the ground wires to the box ground terminal, leaving a long
enough length to splice to the rest of the ground wires, and two pig-tails (if
necessary) and we‟ll assume that the switch we will install does have ground
Copyright 2010 Terry Peterman, the ‘Internet Electrician‘ www.electrical-online.com
- 12 -
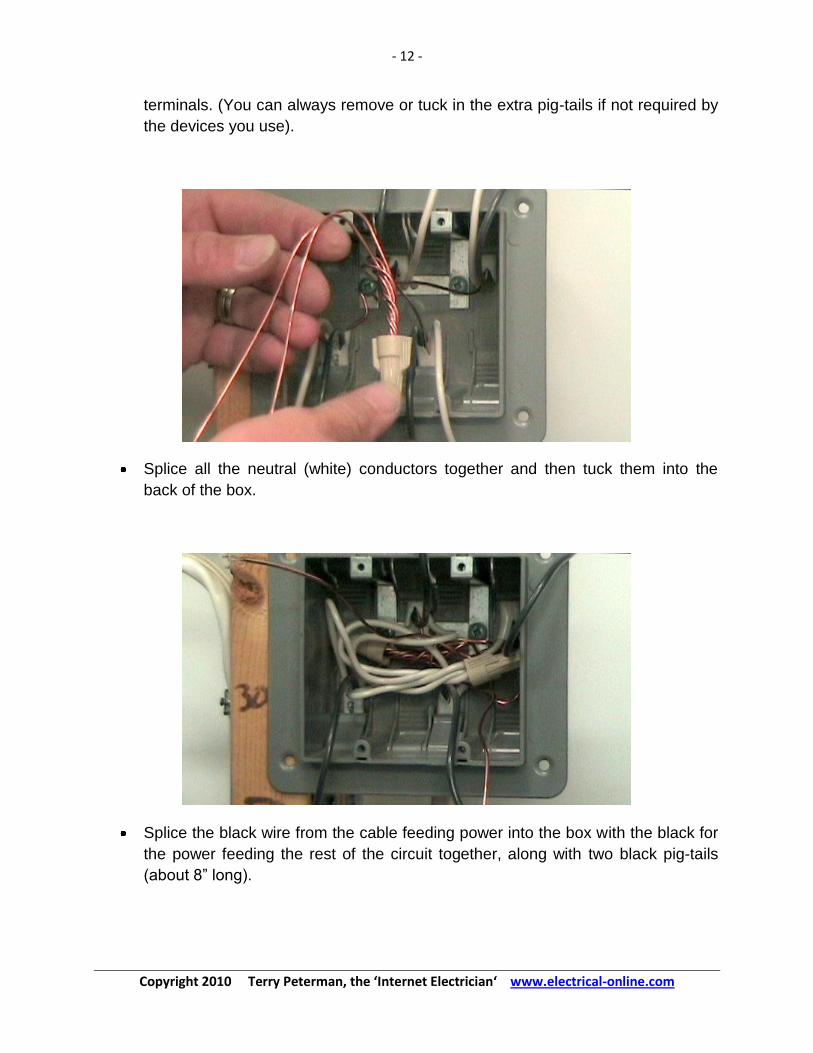
terminals. (You can always remove or tuck in the extra pig-tails if not required by
the devices you use).
Splice all the neutral (white) conductors together and then tuck them into the
back of the box.
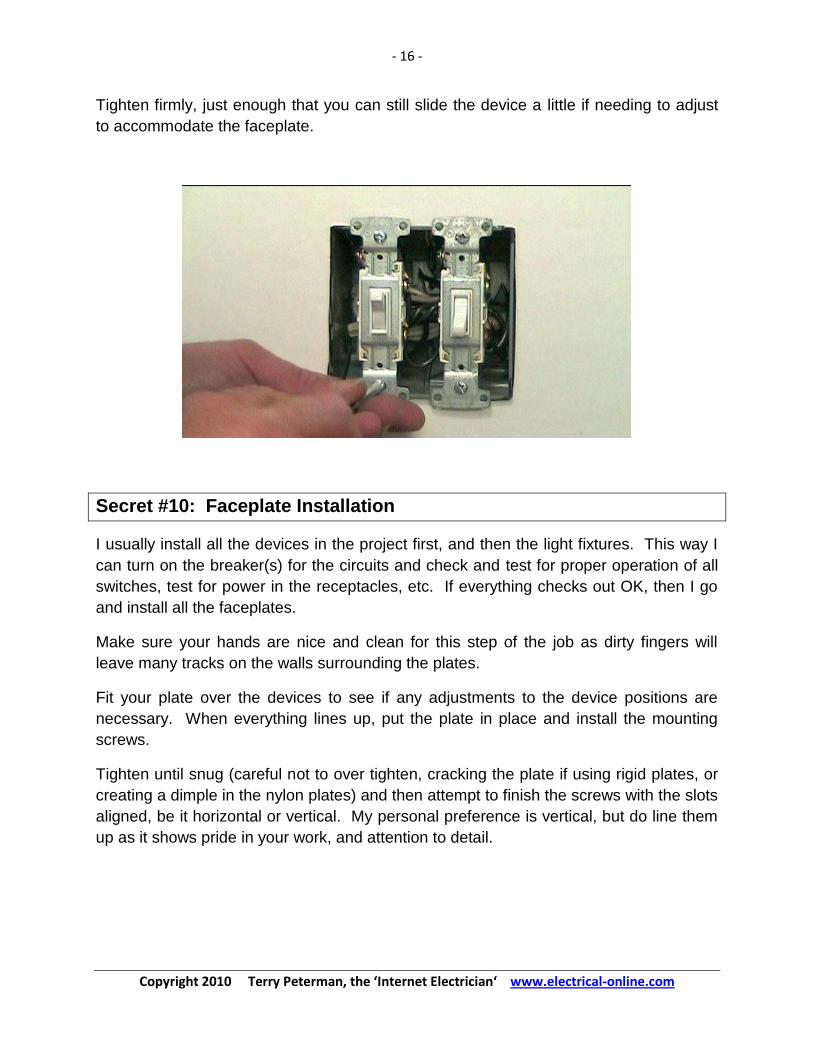
Splice the black wire from the cable feeding power into the box with the black for
the power feeding the rest of the circuit together, along with two black pig-tails
(about 8” long).

Copyright 2010 Terry Peterman, the ‘Internet Electrician‘ www.electrical-online.com
- 13 -
Tuck this spice in to the box, but pull out one pig-tail and pair it with the black
wire feeding the light for switch #1, and pair the second pig-tail with the black
wire for the light at switch position #2.
If the switches you are using are fitted with a ground terminal, include the bare
ground pig-tail in the loop as well. Now when it comes time to install the switches,
you have a very clear picture of what wires are to connect to what switch.

Copyright 2010 Terry Peterman, the ‘Internet Electrician‘ www.electrical-online.com
- 14 -
Call the Inspector!
Do not forget to call for a rough-in inspection at this stage! If the wallboard is installed
when the Electrical Inspector arrives, he has the authority to insist on the removal of the
wallboard to check your wiring. This would obviously be a very costly mistake.
Communicate the progress of the project to your inspector.
Secret #9: Device Installation
Now with the wallboard installed, finished, and painted, it‟s time to install the devices.
Again, we‟ll go back to the two-gang box from the previous example to show the
installation of the two switches. See how easy it is to see what wires to use to connect
to the devices. I just put my finger through the loop at the switch position and pull out
the wires that connect to the device.
The reason I don‟t strip the insulation and bend my hook in the wires is now apparent,
as I would likely cut my finger on the wires when I pull them out, and also the bare
conductors ready for termination might have drywall mud caked on them and that would
have to be cleaned off prior to connection to the switch.
The only exception to that rule for me is that when I prepare the splices for a 3-way
switch. I strip the insulation on the common wire, but I don‟t bend the hook on it.
Straighten out the wires and strip about ¾” of the insulation. Have you ever noticed,
and wondered what the two holes in the jaws of a wire stripping tool are for?

Copyright 2010 Terry Peterman, the ‘Internet Electrician‘ www.electrical-online.com
- 15 -
Using one of these holes (if equipped), bend a nice tight 180 degree hook in each wire.
If your stripping tool doesn‟t have this feature, I strongly recommend that you purchase
one that does. You‟d be surprised how many people don‟t know about the purpose of
these holes.
Holding the device in your left hand (if right-handed), with the terminals out, and put
your wire hooks around the screw terminals in a clockwise direction and then firmly
tighten the screws.
Do this for both switches first, and then install them into the box. Start with one device
screw, only starting it a few threads. Then start the other screw and finish installing the
device, taking care to center the screw in the elongated hole in the device strap.
Copyright 2010 Terry Peterman, the ‘Internet Electrician‘ www.electrical-online.com
- 16 -
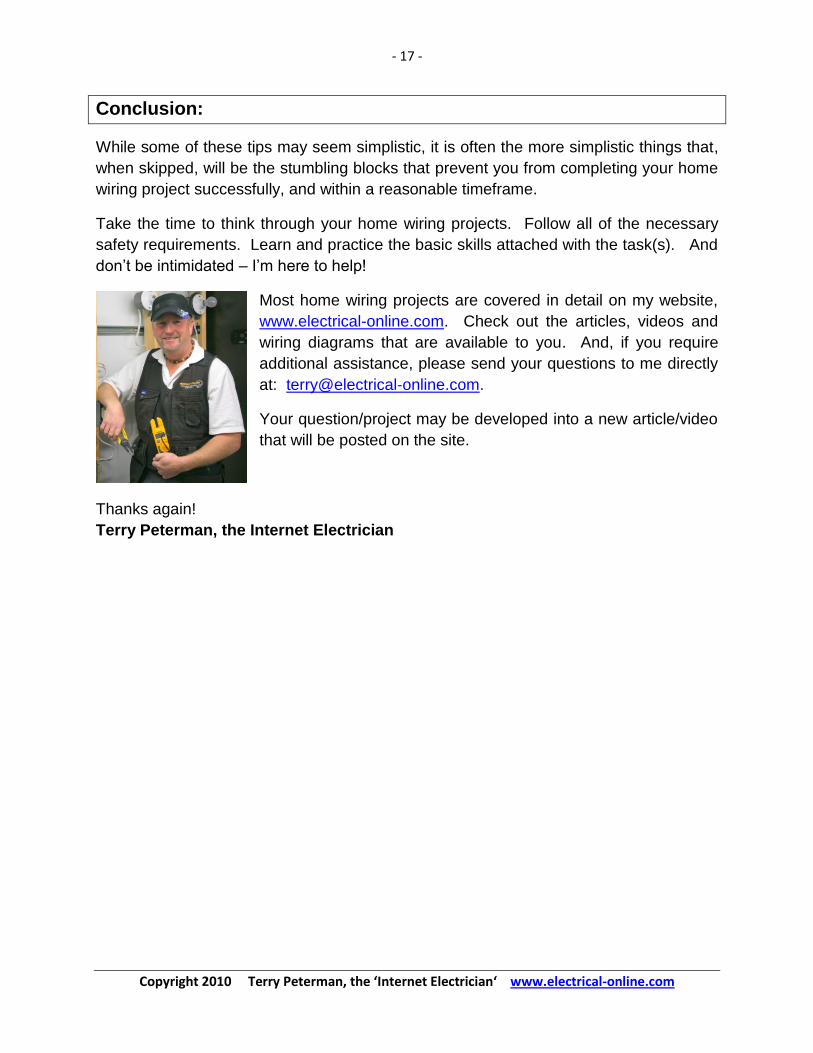
Tighten firmly, just enough that you can still slide the device a little if needing to adjust
to accommodate the faceplate.
Secret #10: Faceplate Installation
I usually install all the devices in the project first, and then the light fixtures. This way I
can turn on the breaker(s) for the circuits and check and test for proper operation of all
switches, test for power in the receptacles, etc. If everything checks out OK, then I go
and install all the faceplates.
Make sure your hands are nice and clean for this step of the job as dirty fingers will
leave many tracks on the walls surrounding the plates.
Fit your plate over the devices to see if any adjustments to the device positions are
necessary. When everything lines up, put the plate in place and install the mounting
screws.
Tighten until snug (careful not to over tighten, cracking the plate if using rigid plates, or
creating a dimple in the nylon plates) and then attempt to finish the screws with the slots
aligned, be it horizontal or vertical. My personal preference is vertical, but do line them
up as it shows pride in your work, and attention to detail.
Copyright 2010 Terry Peterman, the ‘Internet Electrician‘ www.electrical-online.com
- 17 -
Conclusion:
While some of these tips may seem simplistic, it is often the more simplistic things that,
when skipped, will be the stumbling blocks that prevent you from completing your home
wiring project successfully, and within a reasonable timeframe.
Take the time to think through your home wiring projects. Follow all of the necessary
safety requirements. Learn and practice the basic skills attached with the task(s). And
don‟t be intimidated – I‟m here to help!
Most home wiring projects are covered in detail on my website,
www.electrical-online.com. Check out the articles, videos and
wiring diagrams that are available to you. And, if you require
additional assistance, please send your questions to me directly
at: [email protected].
Your question/project may be developed into a new article/video
that will be posted on the site.
Thanks again!
Terry Peterman, the Internet Electrician