Wireless LCD Control Panel Installation Guide
2
Wireless LCD Control Panel Wireless LCD Control Panel 9290 014 70180 Wireless LCD Control Panel Wireless 9290 014 70180 1. Communication distance: 15-30M 1. Fix the base of product to the 86 base of wall with screws. 2. Put the power supply of accessories into 86 boxes and connect the 220V mains wire with the wire L and N of the accessories;(where input: brown L, blue N;Output: 2 pin jack, red L, black N;Note: please disconnect the 220V power supply when wiring. 3. Connect the output of the accessory power supply and the power input of the multi-function touch panel as shown below. 4. Lock the wall bracket as shown below on the transit box through the _tting screw (note that the arrow is up in the correct direction) 5. Insert the product power wire and output wire of the power supply through the terminal and tilt the product at a certain Angle. Fasten the upper button and then press the lower end of the product Installation guide For detailed information of APP , please refer to : www.beesmart.com.hk:88 12NC The information provided herein is subject to change, without notice. Signify does not give any representation or warranty as to the accuracy or completeness of the information included herein and shall not be liable for any action in reliance thereon. The information presented in this document is not intended as any commercial offer and does not form part of any quotation or contract, unless otherwise agreed by Signify.Philips and the Philips Shield Emblem are registered trademarks of Koninklijke Philips N.V. All other trademarks are owned by Signify Holding or their respective owners. www.philips.com/lighting 2018 Signify Holding, IBRS 10461, 5600VB, NL. All rights reserved.
Transcript of Wireless LCD Control Panel Installation Guide
Wireless LCD Control Panel
Wireless LCD Control Panel 9290 014 70180
Wireless LCD Control Panel
Wireless
9290 014 70180
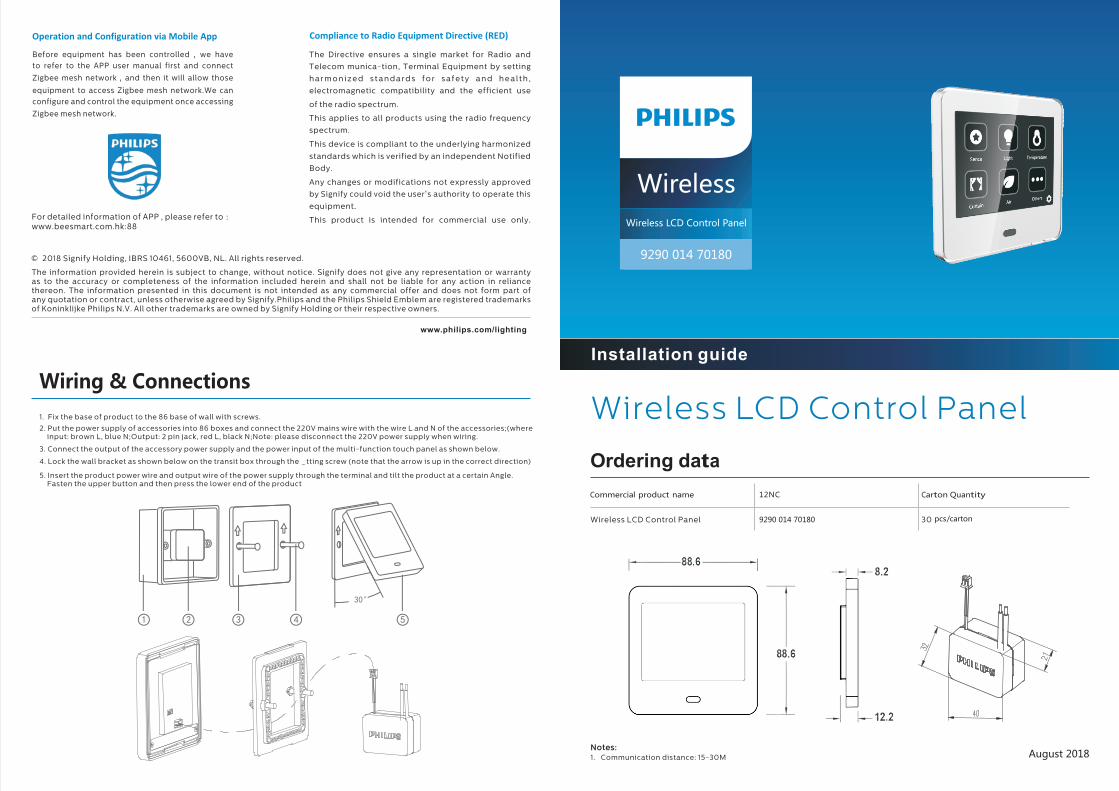
1. Communication distance: 15-30M
1. Fix the base of product to the 86 base of wall with screws.
2. Put the power supply of accessories into 86 boxes and connect the 220V mains wire with the wire L and N of the accessories;(where input: brown L, blue N;Output: 2 pin jack, red L, black N;Note: please disconnect the 220V power supply when wiring.
3. Connect the output of the accessory power supply and the power input of the multi-function touch panel as shown below.
4. Lock the wall bracket as shown below on the transit box through the _tting screw (note that the arrow is up in the correct direction)
5. Insert the product power wire and output wire of the power supply through the terminal and tilt the product at a certain Angle. Fasten the upper button and then press the lower end of the product
Installation guide
For detailed information of APP , please refer to :www.beesmart.com.hk:88
12NC
The information provided herein is subject to change, without notice. Signify does not give any representation or warrantyas to the accuracy or completeness of the information included herein and shall not be liable for any action in reliance thereon. The information presented in this document is not intended as any commercial offer and does not form part of any quotation or contract, unless otherwise agreed by Signify.Philips and the Philips Shield Emblem are registered trademarksof Koninklijke Philips N.V. All other trademarks are owned by Signify Holding or their respective owners.
www.philips.com/lighting
2018 Signify Holding, IBRS 10461, 5600VB, NL. All rights reserved.

02 Select One Option
05 Input MAC CODE
New product can be located after successful adding
Network overtime or searching failurewarning,please check again
03 scan
06 Select Zone
01 Add Product
04 Search
07 Successful Adding 08 Adding Failure
Product configuration
Check Gateway and compatibility
enviromnent 1
Check product power-on condition2
Retry after few seconds3
1 . Press "Setting" into setting page.
2. Press " Join" into next page.
3. Long press " Reset" for 8 second to restore original state.
1 . Press the button of "Setting" on the Wireless LCD Control Panel.
2. Adding and searching the equipment of Wireless LCD Control Panel.
3. Click the button “join” to access the network.
setting Join Reset