Mobile Devices & BYOD Security – Deployment & Best Practices

Wireless BYOD for FlexConnect Deployment Guide
Document ID: 113606
Contributed by Surendra BG and Ramamurthy Bakthavatchalam, CiscoTAC Engineers.
Sep 12, 2013
Contents
IntroductionPrerequisites Requirements Components Used TopologyDevice Registration and Supplicant ProvisioningAsset Registration PortalSelf−Registration PortalAuthentication and ProvisioningProvisioning for iOS (iPhone/iPad/iPod)Provisioning for AndroidDual SSID Wireless BYOD Self−RegistrationSingle SSID Wireless BYOD Self−RegistrationFeature Configuration WLAN Configuration FlexConnect AP Configuration ISE ConfigurationUser Experience − Provisioning iOS Dual SSID Single SSIDUser Experience − Provisioning Android Dual SSIDMy Devices PortalReference − CertificatesRelated Information
Introduction
Mobile devices are becoming more computationally powerful and popular among consumers. Millions ofthese devices are sold to consumers with high−speed Wi−Fi so users can communicate and collaborate.Consumers are now accustomed to the productivity enhancement these mobile devices bring into their livesand are seeking to bring their personal experience into the workspace. This creates the functionality needs of aBring Your Own Device (BYOD) solution in the workplace.
This document provides the branch deployment for the BYOD solution. An employee connects to a corporateservice set identifier (SSID) with his/her new iPad and gets redirected to a self−registration portal. The CiscoIdentity Services Engine (ISE) authenticates the user against the corporate Active Directory (AD) anddownloads a certificate with an embedded iPad MAC address and username to the iPad, along with asupplicant profile that enforces the use of the Extensible Authentication Protocol−Transport Layer Security(EAP−TLS) as a method for dot1x connectivity. Based on the authorization policy in ISE, the user can then

connect with the use of dot1x and gain access to appropriate resources.
ISE functionalities in Cisco Wireless LAN Controller software releases earlier than 7.2.110.0 did not supportlocal switching clients that associate through FlexConnect access points (APs). Release 7.2.110.0 supportsthese ISE functionalities for FlexConnect APs for local switching and centrally authenticated clients.Furthermore, Release 7.2.110.0 integrated with ISE 1.1.1 provides (but is not limited to) these BYOD solutionfeatures for wireless:
Device profiling and posture• Device registration and supplicant provisioning• Onboarding of personal devices (provision iOS or Android devices)•
Note: Although supported, other devices, such as PC or Mac wireless laptops and workstations, are notincluded in this guide.
Prerequisites
Requirements
There are no specific requirements for this document.
Components Used
The information in this document is based on these software and hardware versions:
Cisco Catalyst Switchs• Cisco Wireless LAN (WLAN) Controllers• Cisco WLAN Controller (WLC) Software Release 7.2.110.0 and later• 802.11n APs in FlexConnect mode• Cisco ISE Software Release 1.1.1 and later• Windows 2008 AD with Certificate Authority (CA)• DHCP server• Domain Name System (DNS) server• Network Time Protocol (NTP)• Wireless client laptop, smartphone, and tablets (Apple iOS, Android, Windows, and Mac)•
Note: Refer to Release Notes for Cisco Wireless LAN Controllers and Lightweight Access Points for Release7.2.110.0 for important information about this software release. Log in to the Cisco.com site for the latestrelease notes before you load and test software.
The information in this document was created from the devices in a specific lab environment. All of thedevices used in this document started with a cleared (default) configuration. If your network is live, make surethat you understand the potential impact of any command.
Topology
A minimal network setup, as shown in this diagram is required in order to properly implement and test thesefeatures:

For this simulation, you need a network with a FlexConnect AP, a local/remote site with local DHCP, DNS,the WLC, and the ISE. The FlexConnect AP is connected to a trunk in order to test local switching withmultiple VLANs.
Device Registration and Supplicant Provisioning
A device must be registered so that its native supplicant can provisioned for dot1x authentication. Based onthe right authentication policy, the user is redirected to the guest page and authenticated by employeecredentials. The user sees the device registration page, which asks for their device information. The deviceprovisioning process then begins. If the operating system (OS) is not supported for provisioning, the user isredirected to the Asset Registration Portal in order to mark that device for MAC Authentication Bypass(MAB) access. If the OS is supported, the enrollment process begins and configures the native supplicant ofthe device for dot1x authentication.
Asset Registration Portal
The Asset Registration Portal is the element of the ISE platform that allows employees to initiate theonboarding of endpoints through an authentication and registration process.
Administrators are able to delete assets from the endpoints identities page. Each employee is able to edit,delete, and blacklist the assets they have registered. Blacklisted endpoints are assigned to a blacklist identitygroup, and an authorization policy is created in order to prevent network access by blacklisted endpoints.
Self−Registration Portal
In the Central Web Authentication (CWA) flow, employees are redirected to a portal that allows them to entertheir credentials, authenticate, and enter the specifics of the particular asset they wish to register. This portal iscalled the Self Provisioning Portal and is similar to the Device Registration Portal. It allows the employees toenter the MAC address as well as a meaningful escription of the endpoint.
Authentication and Provisioning
Once employees select the Self−Registration Portal, they are challenged to provide a set of valid employee

credentials in order to proceed to the provisioning phase. After successful authentication, the endpoint can beprovisioned into the endpoints database, and a certificate is generated for the endpoint. A link on the pageallows the employee to download the Supplicant Pilot Wizard (SPW).
Note: Refer to the FlexConnect Feature Matrix Cisco article in order to view the latest FlexConnect featurematrix for BYOD.
Provisioning for iOS (iPhone/iPad/iPod)
For EAP−TLS configuration, ISE follows the Apple Over−the−Air (OTA) enrollment process:
After successful authentication, the evaluation engine evaluates client−provisioning policies, whichresults in a supplicant profile.
•
If the supplicant profile is for the EAP−TLS setting, the OTA process determines whether the ISE isusing self−signed or signed by an unknown CA. If one of the conditions is true, the user is asked todownload the certificate of either ISE or CA before the enrollment process can begin.
•
For other EAP methods, ISE pushes the final profile upon successful authentication.•
Provisioning for Android
Because of security considerations, the Android agent must be downloaded from the Android marketplace siteand cannot be provisioned from ISE. Cisco uploads a release candidate version of the wizard into the Androidmarketplace through the Cisco Android marketplace publisher account.
This is the Android provisioning process:
Cisco uses the Software Development Kit (SDK) in order to create the Android package with a .apkextension.
1.
Cisco uploads a package into the Android marketplace.2. The user configures the policy in client provisioning with the appropriate parameters.3. After registration of the device, the end user is redirected to the client provisioning service whendot1x authentication fails.
4.
The provisioning portal page provides a button that redirects user to the Android marketplace portalwhere they can download the SPW.
5.
The Cisco SPW is launched and performs provisioning of the supplicant:SPW discovers the ISE and downloads the profile from ISE.1. SPW creates a cert/key pair for EAP−TLS.2. SPW makes a Simple Certificate Enrollment Protocol (SCEP) proxy request call to ISE andgets the certificate.
3.
SPW applies the wireless profiles.4. SPW triggers re−authentication if the profiles are applied successfully.5. SPW exits.6.
6.
Dual SSID Wireless BYOD Self−Registration
This is the process for dual SSID wireless BYOD self−registration:
The user associates to the Guest SSID.1. The user opens a browser and is redirected to the ISE CWA Guest Portal.2. The user enters an employee username and password in the Guest Portal.3. ISE authenticates the user, and, based on the fact that they are an employee and not a guest, redirectsthe user to the Employee Device Registration guest page.
4.

The MAC address is pre−populated in the Device Registration guest page for the DeviceID. The userenters a description and accepts the Acceptable Use Policy (AUP) if required.
5.
The user selects Accept and begins to download and install the SPW.6. The supplicant for that user's device is provisioned along with any certificates.7. CoA occurs, and the device reassociates to the corporate SSID (CORP) and authenticates withEAP−TLS (or other authorization method in use for that supplicant).
8.
Single SSID Wireless BYOD Self−Registration
In this scenario, there is a single SSID for corporate access (CORP) that supports both Protected ExtensibleAuthentication Protocol (PEAP) and EAP−TLS. There is no Guest SSID.
This is the process for single SSID wireless BYOD self−registration:
The user associates to CORP.1. The user enters an employee username and password into the supplicant for the PEAP authentication.2. The ISE authenticates the user, and, based on the PEAP method, provides an authorization policy ofaccept with redirect to the Employee Device Registration guest page.
3.
The user opens a browser and is redirected to the Employee Device Registration guest page.4. The MAC address is pre−populated in the Device Registration guest page for the DeviceID. The userenters a description and accepts the AUP.
5.
The user selects Accept and begins to download and install the SPW.6. The supplicant for that user's device is provisioned along with any certificates.7. CoA occurs, and the device reassociates to the CORP SSID and authenticates with EAP−TLS.8.
Feature Configuration
Complete these steps in order to begin configuration:
For this guide, ensure that the WLC version is 7.2.110.0 or later.1.
Navigate to Security > RADIUS > Authentication, and add the RADIUS server to the WLC.2.

Add the ISE 1.1.1 to the WLC:
Enter a Shared Secret.♦ Set Support for RFC 3576 to Enabled.♦
3.
Add the same ISE server as a RADIUS accounting server.4.
Create a WLC Pre−Auth ACL to use in the ISE policy later. Navigate to WLC > Security > AccessControl Lists > FlexConnect ACLs, and create a new FlexConnect ACL named ACL−REDIRECT(in this example).
5.

In the ACL rules, permit all traffic to/from the ISE, and permit client traffic during supplicantprovisioning.
For the first rule (sequence 1):
Set Source to Any.◊ Set IP (ISE address)/ Netmask 255.255.255.255.◊ Set Action to Permit.◊
a.
For the second rule (sequence 2), set source IP (ISE address)/ mask 255.255.255.255 to Anyand Action to Permit.
b.
6.
Create a new FlexConnect Group named Flex1 (in this example):
Navigate to FlexConnect Group > WebPolicies tab.a. Under the WebPolicy ACL field, click Add, and select ACL−REDIRECT or the FlexConnectACL created previously.
b.
Confirm that it populates the WebPolicy Access Control Lists field.c.
7.

Click Apply and Save Configuration.8.
WLAN Configuration
Complete these steps in order to configure the WLAN:
Create an Open WLAN SSID for the dual SSID example:
Enter a WLAN name: DemoCWA (in this example).♦ Select the Enabled option for Status.♦
1.
Navigate to the Security tab > Layer 2 tab, and set these attributes:
Layer 2 Security: None♦ MAC Filtering: Enabled (box is checked)♦ Fast Transition: Disabled (box is not checked)♦
2.

Go to the AAA Servers tab, and set these attributes:
Authentication and Account Servers: Enabled♦ Server 1: <ISE IP address>♦
3.
Scroll down from the AAA Servers tab. Under Authentication priority order for web−auth user, makesure that RADIUS is used for authentication and the others are not used.
4.
Go to the Advanced tab, and set these attributes:
Allow AAA Override: Enabled♦ NAC State: Radius NAC♦
5.

Note: RADIUS Network Admission Control (NAC) is not supported when the FlexConnect AP is indisconnected mode. Thus, if the FlexConnect AP is in standalone mode and loses connection to theWLC, all clients are disconnected, and the SSID is no longer advertised.Scroll down in the Advanced tab, and set FlexConnect Local Switching to Enabled.6.
Click Apply and Save Configuration.7.
Create a 802.1X WLAN SSID named Demo1x (in this example) for single and dual SSID scenarios.8.

Navigate to the Security tab > Layer 2 tab, and set these attributes:
Layer 2 Security: WPA+WPA2♦ Fast Transition: Disabled (box is not checked)♦ Authentication Key Management: 802.lX: Enable♦
9.
Go to the Advanced tab, and set these attributes:
Allow AAA Override: Enabled♦ NAC State: Radius NAC♦
10.
Scroll down in the Advanced tab, and set FlexConnect Local Switching to Enabled.11.

Click Apply and Save Configuration.12.
Confirm that both of the new WLANs were created.13.
FlexConnect AP Configuration
Complete these steps in order to configure the FlexConnect AP:
Navigate to WLC > Wireless, and click the target FlexConnect AP.1.
Click the FlexConnect tab.2.
Enable VLAN Support (box is checked), set the Native VLAN ID, and click VLAN Mappings.3.

Set the VLAN ID to 21 (in this example) for the SSID for local switching.4.
Click Apply and Save Configuration.5.
ISE Configuration
Complete these steps in order to configure the ISE:
Log in to the ISE server: <https://ise>.1.
Navigate to Administration > Identity Management > External Identity Sources.2.

Click Active Directory.3.
In the Connection tab:
Add the Domain Name of corp.rf−demo.com (in this example), and change the Identity StoreName default to AD1.
a.
Click Save Configuration.b. Click Join, and provide the AD Administrator account username and password required tojoin.
c.
The Status must be green. Enable Connected to: (box is checked).d.
4.
Perform a basic connection test to the AD with a current domain user.5.
If the connection to the AD is successful, a dialog confirms that the password is correct.6.

Navigate to Administration > Identity Management > External Identity Sources:
Click Certificate Authentication Profile.a. Click Add for a new Certificate Authentication Profile (CAP).b.
7.
Enter a name of CertAuth (in this example) for the CAP; for the Principal Username X509 Attribute,select Common Name; then, click Submit.
8.
Confirm that the new CAP is added.9.
Navigate to Administration > Identity Management > Identity Source Sequences, and click Add .10.

Give the sequence a name of TestSequence (in this example).11.
Scroll down to Certificate Based Authentication:
Enable Select Certificate Authentication Profile (box is checked).a. Select CertAuth (or another CAP profile created earlier).b.
12.
Scroll down to Authentication Search List:
Move AD1 from Available to Selected.a. Click the up button in order to move AD1 to the top priority.b.
13.

Click Submit in order to save.14.
Confirm that the new Identity Source Sequence is added.15.
Use the AD in order to authenticate the My Devices Portal. Navigate to ISE > Administration >Identity Management > Identity Source Sequence, and edit MyDevices_Portal_Sequence.
16.
Add AD1 to the Selected list, and click the up button in order to move AD1 to the top priority.17.

Click Save.18.
Confirm that the Identity Store sequence for MyDevices_Portal_Sequence contains AD1.19.
Repeat steps 16−19 in order to add AD1 for Guest_Portal_Sequence, and click Save.20.
Confirm that Guest_Portal_Sequence contains AD1.21.
In order to add the WLC to Network Access Device (WLC), navigate to Administration > NetworkResources > Network Devices, and click Add.
22.
Add the WLC name, IP address, Subnet Mask, and so forth.23.

Scroll down to Authentication Settings, and enter the Shared Secret. This must match the sharedsecret of the WLC RADIUS.
24.
Click Submit.25.
Navigate to ISE > Policy > Policy Elements > Results.26.
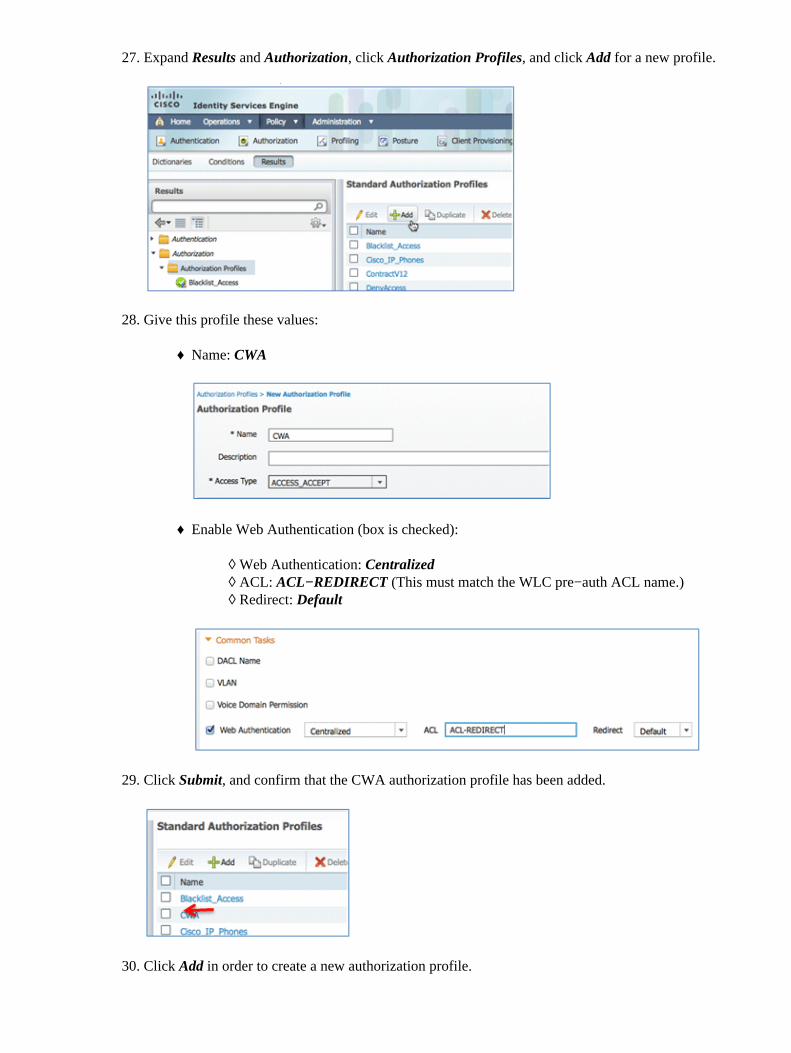
Expand Results and Authorization, click Authorization Profiles, and click Add for a new profile.27.
Give this profile these values:
Name: CWA♦
Enable Web Authentication (box is checked):
Web Authentication: Centralized◊ ACL: ACL−REDIRECT (This must match the WLC pre−auth ACL name.)◊ Redirect: Default◊
♦
28.
Click Submit, and confirm that the CWA authorization profile has been added.29.
Click Add in order to create a new authorization profile.30.
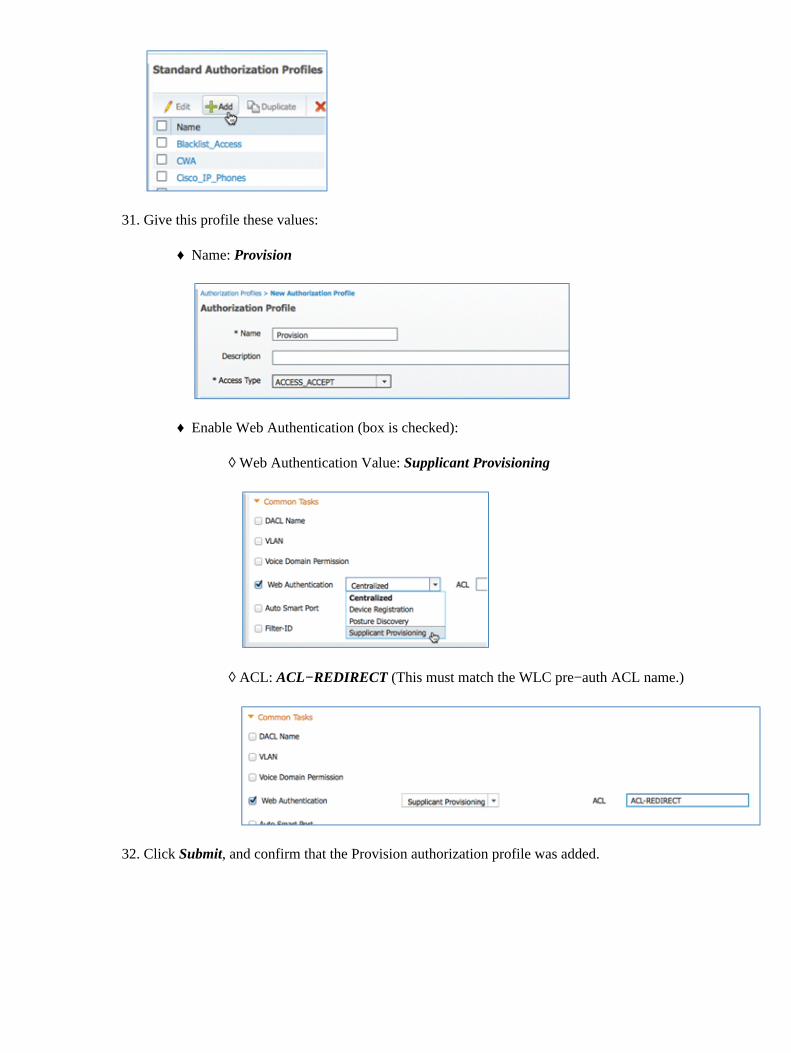
Give this profile these values:
Name: Provision♦
Enable Web Authentication (box is checked):
Web Authentication Value: Supplicant Provisioning◊
ACL: ACL−REDIRECT (This must match the WLC pre−auth ACL name.)◊
♦
31.
Click Submit, and confirm that the Provision authorization profile was added.32.

Scroll down in Results, expand Client Provisioning, and click Resources.33.
Select Native Supplicant Profile.34.
Give the Profile a name of WirelessSP (in this example).35.

Enter these values:
Connection Type: Wireless♦ SSID: Demo1x (this value is from the WLC 802.1x WLAN configuration)♦ Allowed Protocol: TLS♦ Key Size: 1024♦
36.
Click Submit.37.
Click Save.38.
Confirm that the new profile has been added.39.
Navigate to Policy > Client Provisioning.40.

Enter these values for the provisioning rule of iOS devices:
Rule Name: iOS♦ Identity Groups: Any♦
Operating Systems: Mac iOS All♦
Results: WirelessSP (this is the Native Supplicant Profile created earlier)
Navigate to Results > Wizard Profile (drop−down list) > WirelessSP.◊
♦
41.

Confirm that the iOS Provisioning Profile was added.42.
On the right side of the first rule, locate the Actions drop−down list, and select Duplicate below (orabove).
43.
Change the Name of the new rule to Android.44.
Change the Operating Systems to Android.45.
Leave other values unchanged.46.
Click Save (lower left screen).47.
Navigate to ISE > Policy > Authentication.48.

Modify the condition to include Wireless_MAB, and expand Wired_MAB.49.
Click the Condition Name drop−down list.50.
Select Dictionaries > Compound Condition.51.
Select Wireless_MAB.52.

To the right of the rule, select the arrow to expand.53.
Select these values from the drop−down list:
Identity Source: TestSequence (this is the value created earlier)♦ If authentication failed: Reject♦ If user not found: Continue♦ If process failed: Drop♦
54.
Go to the Dot1X rule, and change these values:
Condition: Wireless_802.1X♦
Identity Source: TestSequence♦
55.

Click Save.56.
Navigate to ISE > Policy > Authorization.57.
Default rules (such as Black List Default, Profiled, and Default) are already configured frominstallation; the first two can be ignored; the Default rule will be edited later.
58.
To the right of the second rule (Profiled Cisco IP Phones), click the down arrow next to Edit, andselect Insert New Rule Below.
59.

A new Standard Rule # is added.
Change the Rule Name from Standard Rule # to OpenCWA. This rule initiates the registration processon the open WLAN (dual SSID) for users that come to the guest network in order to have devicesprovisioned.
60.
Click the plus sign (+) for Condition(s), and click Select Existing Condition from Library.61.
Select Compound Conditions > Wireless_MAB.62.
In the AuthZ Profile, click the plus sign (+), and select Standard.63.

Select the standard CWA (this is the Authorization Profile created earlier).64.
Confirm that the rule is added with the correct Conditions and Authorization.65.
Click Done (on the right side of the rule).66.
To the right of the same rule, click the down arrow next to Edit, and select Insert New Rule Below.67.
Change the Rule Name from Standard Rule # to PEAPrule (in this example). This rule is for PEAP(also used for single SSID scenario) to check that authentication of 802.1X without Transport LayerSecurity (TLS) and that network supplicant provisioning is initiated with the Provision authorizationprofile created previously.
68.

Change the Condition to Wireless_802.1X.69.
Click the gear icon on the right side of the condition, and select Add Attribute/Value. This is an 'and'condition, not an 'or' condition.
70.
Locate and select Network Access.71.
Select AuthenticationMethod, and enter these values:72.

AuthenticationMethod: Equals♦
Select MSCHAPV2.♦
This is an example of the rule; be sure to confirm that the Condition is an AND.
In AuthZ Profile, select Standard > Provision (this is the Authorization Profile created earlier).73.
Click Done.74.
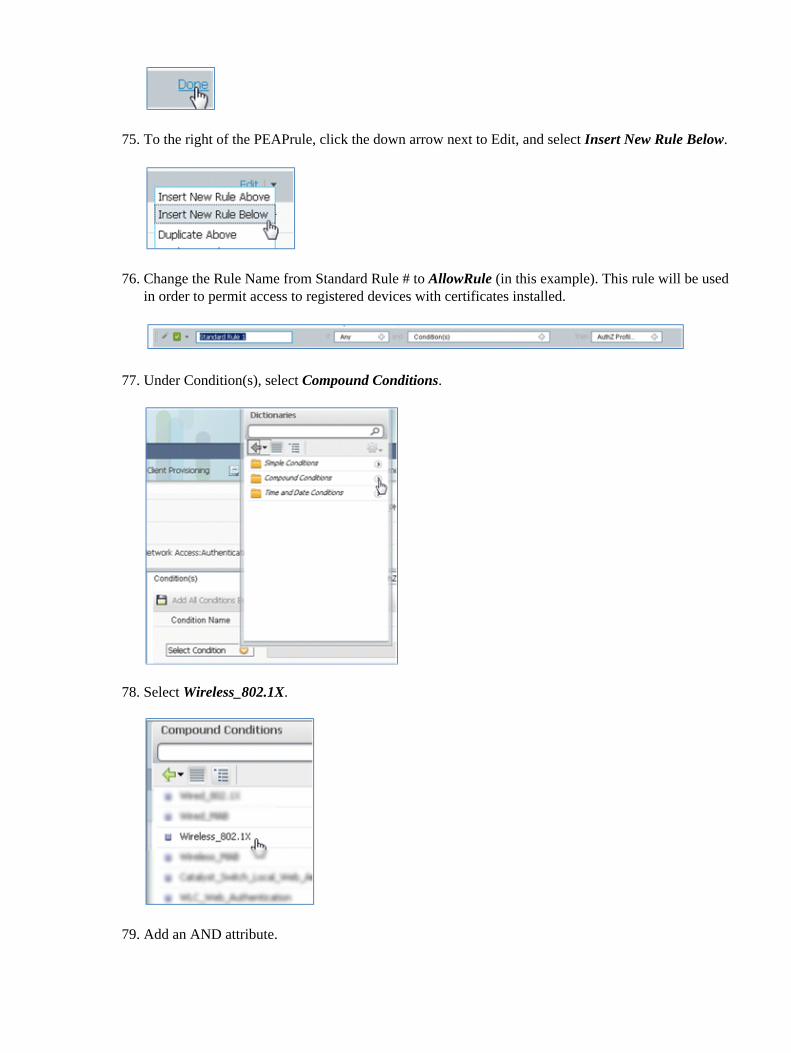
To the right of the PEAPrule, click the down arrow next to Edit, and select Insert New Rule Below.75.
Change the Rule Name from Standard Rule # to AllowRule (in this example). This rule will be usedin order to permit access to registered devices with certificates installed.
76.
Under Condition(s), select Compound Conditions.77.
Select Wireless_802.1X.78.
Add an AND attribute.79.

Click the gear icon on the right side of the condition, and select Add Attribute/Value.80.
Locate and select Radius.81.
Select Calling−Station−ID−−[31].82.
Select Equals.83.
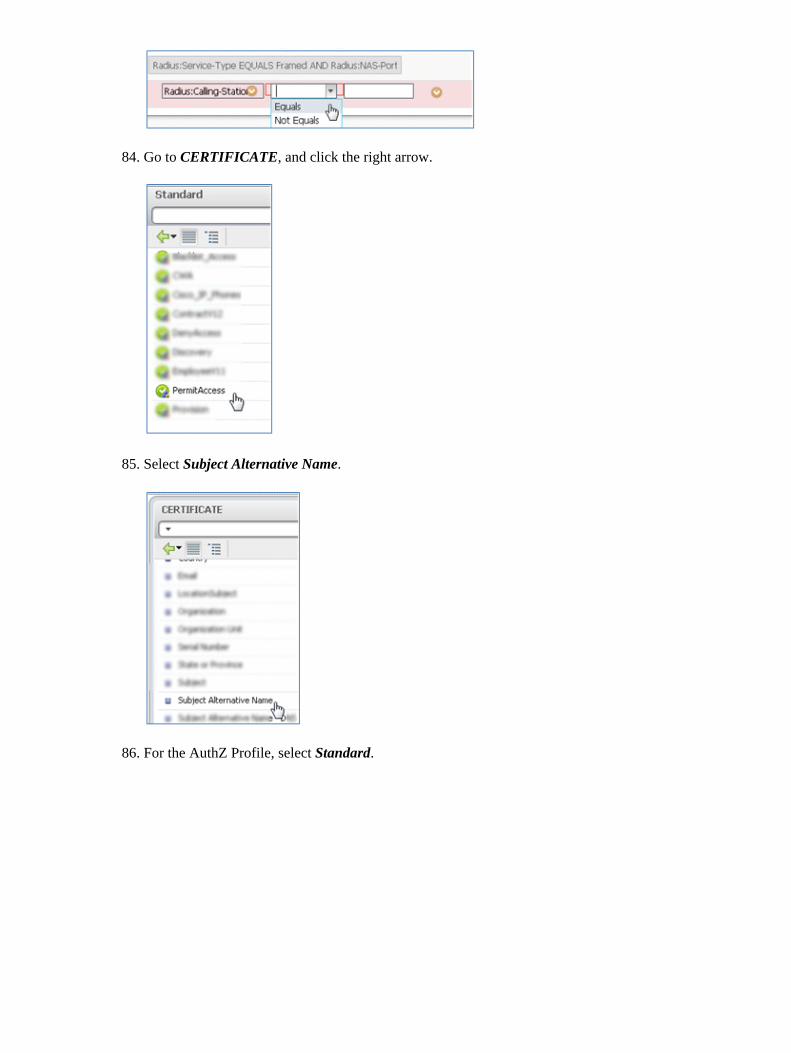
Go to CERTIFICATE, and click the right arrow.84.
Select Subject Alternative Name.85.
For the AuthZ Profile, select Standard.86.

Select Permit Access.87.
Click Done.
This is an example of the rule:
88.
Locate the Default rule in order to change PermitAccess to DenyAccess.89.
Click Edit in order to edit the Default rule.90.

Go to the existing AuthZ profile of PermitAccess.91.
Select Standard.92.
Select DenyAccess.93.
Confirm that the Default rule has DenyAccess if no matches are found.94.
Click Done.
This is an example of the main rules required for this test; they are applicable for either a single SSIDor dual SSID scenario.
95.

Click Save.96.
Navigate to ISE > Administration > System > Certificates in order to configure the ISE server with aSCEP profile.
97.
In Certificate Operations, click SCEP CA Profiles.98.
Click Add.99.
Enter these values for this profile:
Name: mySCEP (in this example)♦ URL: https://<ca−server>/CertSrv/mscep/ (Check your CA server configuration for thecorrect address.)
♦
100.

Click Test Connectivity in order to test connectivity of the SCEP connection.101.
This response shows that the server connectivity is successful.102.
Click Submit.103.
The server responds that the CA Profile was created successfully.104.
Confirm that the SCEP CA Profile is added.105.
User Experience − Provisioning iOS
Dual SSID
This section covers dual SSID and describes how to connect to the guest to be provisioned and how to connectto a 802.1x WLAN.
Complete these steps in order to provision iOS in the dual SSID scenario:
On the iOS device, go to Wi−Fi Networks, and select DemoCWA (configured open WLAN onWLC).
1.

Open the Safari browser on the iOS device, and visit a reachable URL (for example, internal/externalwebserver). The ISE redirects you to the portal. Click Continue.
2.
You are redirected to the Guest Portal for login.3.
Log in with an AD user account and password. Install the CA Profile when prompted.4.

Click Install trusted certificate of the CA server.5.
Click Done once the profile is completely installed.6.
Return to the browser, and click Register. Make a note of the Device ID that contains the MACaddress of the device.
7.

Click Install in order to install the verified profile.8.
Click Install Now.9.
After the process is completed, the WirelessSP profile confirms that the profile is installed. ClickDone.
10.
Go to Wi−Fi Networks, and change the network to Demo1x. Your device is now connected and usesTLS.
11.

On the ISE, navigate to Operations > Authentications. The events show the process in which thedevice is connected to the open guest network, goes through the registration process with supplicantprovisioning, and is allowed permit access after registration.
12.
Navigate to ISE > Administration > Identity Management > Groups > Endpoint Identity Groups >RegisteredDevices. The MAC address has been added to the database.
13.
Single SSID
This section covers single SSID and describes how to connect directly to an 802.1x WLAN, provide ADusername/password for PEAP authentication, provision through a guest account, and reconnect with TLS.
Complete these steps in order to provision iOS in the single SSID scenario:

If you are using the same iOS device, remove the endpoint from the Registered Devices.1.
On the iOS device, navigate to Settings > Generals > Profiles. Remove the profiles installed in thisexample.
2.
Click Remove in order to remove the previous profiles.3.

Connect directly to the 802.1x with the existing (cleared) device or with a new iOS device.4.
Connect to Dot1x, enter a Username and Password, and click Join.5.
Repeat Steps 90 and on from the ISE Configuration section until the appropriate profiles arecompletely installed.
6.
Navigate to ISE > Operations > Authentications in order to monitor the process. This example showsthe client that is connected directly to 802.1X WLAN as it is provisioned, disconnects, and reconnectsto the same WLAN with the use of TLS.
7.
Navigate to WLC > Monitor > [Client MAC]. In the client detail, note that the client is in the RUNstate, its Data Switching is set to local, and the Authentication is Central. This is true for clients thatconnect to FlexConnect AP.
8.

User Experience − Provisioning Android
Dual SSID
This section covers dual SSID and describes how to connect to the guest to be provisioned and how to connectto an 802.1x WLAN.
The connection process for the Android device is very similar to that for an iOS device (single or dual SSID).However, an important difference is that the Android device requires access to the Internet in order to accessGoogle Marketplace (now Google Play) and download the supplicant agent.
Complete these steps in order to provision an Android device (such as the Samsung Galaxy in this example)in the dual SSID scenario:
In the Android device, use Wi−Fi in order to connect to DemoCWA, and open the guest WLAN.1.
Accept any certificate in order to connect to the ISE.2.
Enter a Username and Password at the Guest Portal in order to log in.3.
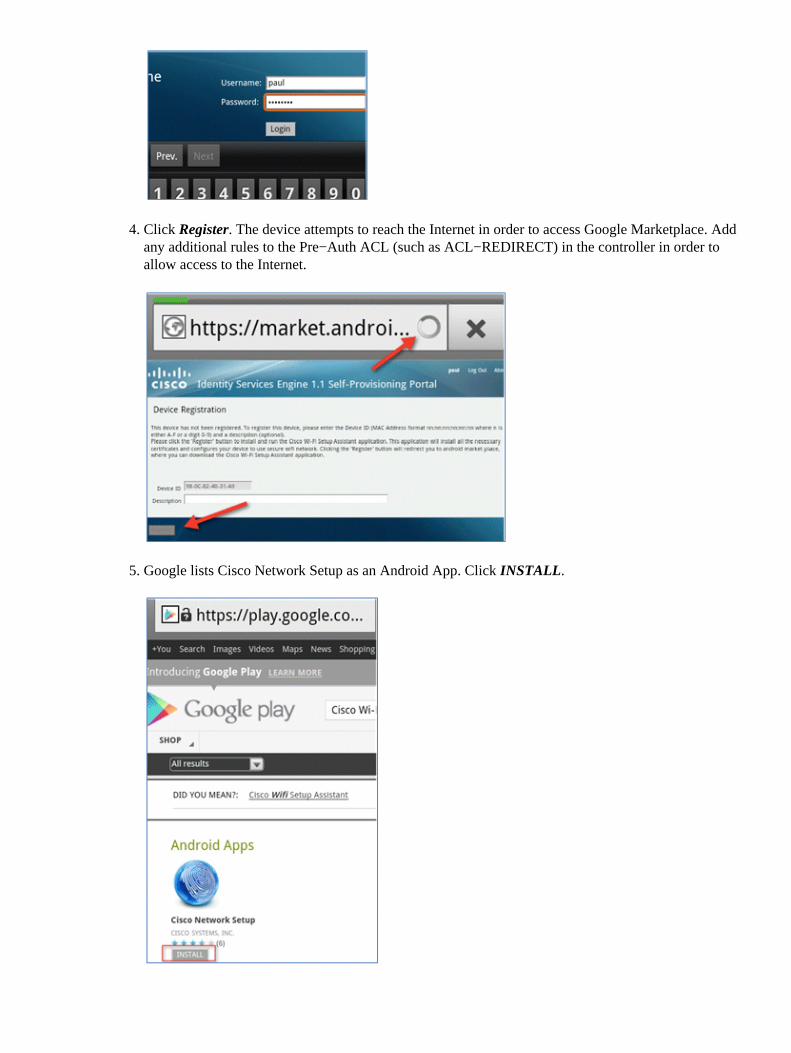
Click Register. The device attempts to reach the Internet in order to access Google Marketplace. Addany additional rules to the Pre−Auth ACL (such as ACL−REDIRECT) in the controller in order toallow access to the Internet.
4.
Google lists Cisco Network Setup as an Android App. Click INSTALL.5.

Sign in to Google, and click INSTALL.6.
Click OK.7.
On the Android device, find the installed Cisco SPW app, and open it.8.
Make sure that you are still logged in to the Guest Portal from your Android device.9.
Click Start in order to start the Wi−Fi Setup Assistant.10.

The Cisco SPW begins to install certificates.11.
When prompted, set a password for credential storage.12.
The Cisco SPW returns with a certificate name, which contains the user key and user certificate. ClickOK in order to confirm.
13.

Cisco SPW continues and prompts for another certificate name, which contains the CA certificate.Enter the name iseca (in this example), then click OK in order to continue.
14.
The Android device is now connected.15.

My Devices Portal
My Devices Portal allows users to blacklist previously registered devices in the event a device is lost orstolen. It also allows users to re−enlist if needed.
Complete these steps in order to blacklist a device:
In order to log in to My Devices Portal, open a browser, connect to https://ise−server:8443/mydevices(note the port number 8443), and log in with an AD account.
1.
Locate the device under Device ID, and click Lost? in order to initiate blacklisting of a device.2.
When the ISE prompts a warning, click Yes in order to proceed.3.
ISE confirms that the device is marked as lost.4.

Any attempt to connect to the network with the previously registered device is now blocked, even ifthere is a valid certificate installed. This is an example of a blacklisted device that fails authentication:
5.
An administrator can navigate to ISE > Administration > Identity Management > Groups, clickEndpoint Identity Groups > Blacklist, and see the device is blacklisted.
6.
Complete these steps in order to reinstate a blacklisted device:
From the My Devices Portal, click Reinstate for that device.1.
When ISE prompts a warning, click Yes in order to proceed.2.
ISE confirms that the device has been successfully reinstated. Connect the reinstated device to thenetwork in order to test that the device will now be permitted.
3.

Reference − Certificates
ISE not only requires a valid CA root certificate, but also needs a valid certificate signed by CA.
Complete these steps in order to add, bind, and import new trusted CA certificate:
Navigate to ISE > Administration > System > Certificates, click Local Certificates, and click Add.1.
Select Generate Certificate Signing Request (CSR).2.
Enter the Certificate Subject CN=<ISE−SERVER hostname.FQDN>. For the other fields, you canuse the default or the values required by your CA setup. Click Submit.
3.
ISE verifies that the CSR was generated.4.
In order to access the CSR, click the Certificate Signing Requests operations.5.

Select the CSR recently created, then click Export.6.
ISE exports the CSR to a .pem file. Click Save File, then click OK in order to save the file to the localmachine.
7.
Locate and open the ISE certificate file with a text editor.8.
Copy the entire content of the certificate.9.

Connect to the CA server, and log in with an administrator account. The server is a Microsoft 2008CA at https://10.10.10.10/certsrv (in this example).
10.
Click Request a certificate.11.
Click advanced certificate request.12.
Click the second option in order to Submit a certificate request by using a base−64−encoded CMCor ... .
13.

Paste the content from the ISE certificate file (.pem) into the Saved Request field, ensure theCertificate Template is Web Server, and click Submit.
14.
Click Download certificate.15.
Save the certnew.cer file; it will be used later in order to bind with the ISE.16.
From ISE Certificates, navigate to Local Certificates, and click Add > Bind CA Certificate.17.

Browse to the certificate that was saved to the local machine in the previous step, enable both theEAP and Management Interface protocols (boxes are checked), and click Submit. ISE may takeseveral minutes or more in order to restart services.
18.
Return to the landing page of the CA (https://CA/certsrv/), and click Download a CA certificate,certificate chain, or CRL.
19.
Click Download CA certificate.20.

Save the file to the local machine.21.
With the ISE server online, go to Certificates, and click Certificate Authority Certificates.22.
Click Import.23.
Browse for the CA certificate, enable Trust for client authentication (box is checked), and clickSubmit.
24.
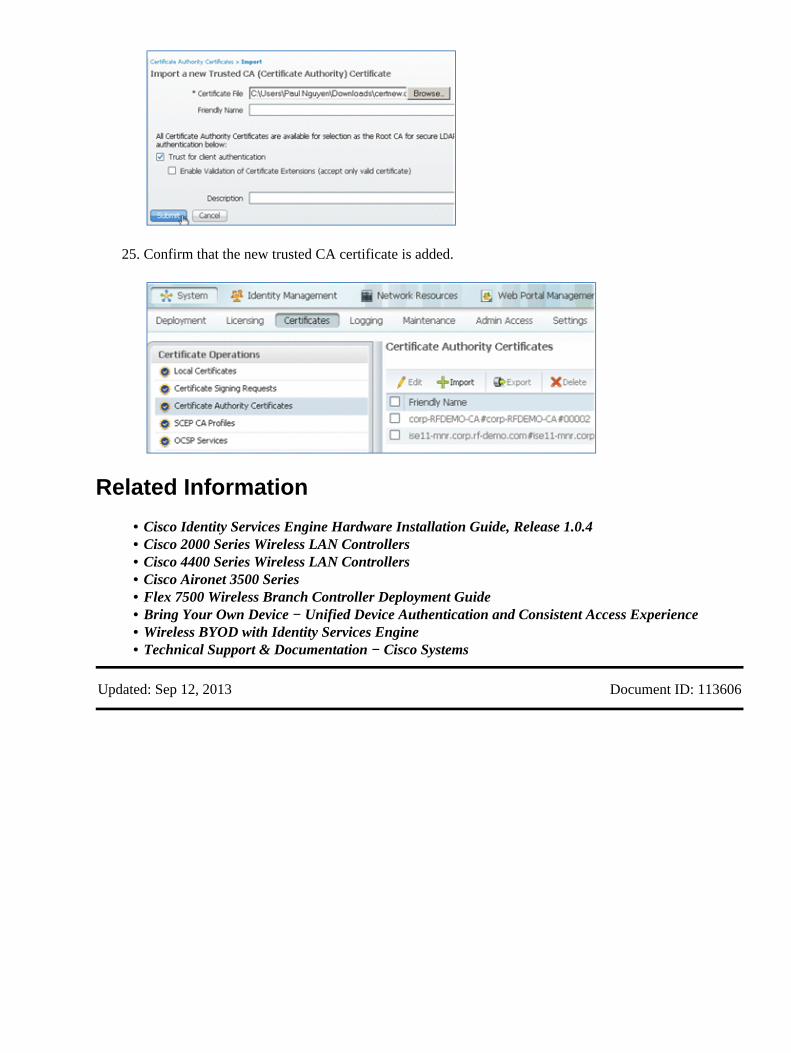
Confirm that the new trusted CA certificate is added.25.
Related Information
Cisco Identity Services Engine Hardware Installation Guide, Release 1.0.4• Cisco 2000 Series Wireless LAN Controllers• Cisco 4400 Series Wireless LAN Controllers• Cisco Aironet 3500 Series• Flex 7500 Wireless Branch Controller Deployment Guide• Bring Your Own Device − Unified Device Authentication and Consistent Access Experience• Wireless BYOD with Identity Services Engine• Technical Support & Documentation − Cisco Systems•
Updated: Sep 12, 2013 Document ID: 113606