Wireless Authentication Types on Fixed ISR Through … Authentication Types on Fixed ISR Through SDM...
49
Wireless Authentication Types on Fixed ISR Through SDM Configuration Example Document ID: 98584 Contents Introduction Prerequisites Requirements Components Used Conventions Background Information Configure Network Diagram Configure the Router for SDM Access Launch the SDM Wireless Application on the Router Configure Open Authentication with WEP Encryption Configure Internal DHCP Server for Wireless Clients of This VLAN Configure Open with MAC Authentication Configure 802.1x/EAP Authentication Configure Shared Authentication Configure WPA Authentication Configure WPA-PSK Authentication Wireless Client Configuration Configure Wireless Client for Open Authentication with WEP Encryption Configure Wireless Client for Open with MAC Authentication Configure Wireless Client for 802.1x/EAP Authentication Configure Wireless Client for Shared Authentication Configure Wireless Client for WPA Authentication Configure Wireless Client for WPA-PSK Authentication Troubleshoot Troubleshooting Commands Related Information Introduction This document provides configuration examples that explain how to configure various Layer 2 authentication types on a Cisco Wireless integrated fixed-configuration router for wireless connectivity with Security Device Manager (SDM). Prerequisites Requirements Ensure that you meet these requirements before you attempt this configuration: Knowledge of how to configure the basic parameters of the Cisco Integrated Services Router (ISR) with SDM • Knowledge of how to configure the 802.11a/b/g Wireless Client Adapter with the Aironet Desktop Utility (ADU) •
Transcript of Wireless Authentication Types on Fixed ISR Through … Authentication Types on Fixed ISR Through SDM...

Wireless Authentication Types on Fixed ISRThrough SDM Configuration Example
Document ID: 98584
Contents
Introduction Prerequisites Requirements Components Used Conventions Background Information Configure Network Diagram Configure the Router for SDM Access Launch the SDM Wireless Application on the Router Configure Open Authentication with WEP Encryption Configure Internal DHCP Server for Wireless Clients of This VLAN Configure Open with MAC Authentication Configure 802.1x/EAP Authentication Configure Shared Authentication Configure WPA Authentication Configure WPA−PSK Authentication Wireless Client Configuration Configure Wireless Client for Open Authentication with WEP Encryption Configure Wireless Client for Open with MAC Authentication Configure Wireless Client for 802.1x/EAP Authentication Configure Wireless Client for Shared Authentication Configure Wireless Client for WPA Authentication Configure Wireless Client for WPA−PSK Authentication Troubleshoot Troubleshooting Commands Related Information
Introduction
This document provides configuration examples that explain how to configure various Layer 2 authenticationtypes on a Cisco Wireless integrated fixed−configuration router for wireless connectivity with SecurityDevice Manager (SDM).
Prerequisites
Requirements
Ensure that you meet these requirements before you attempt this configuration:
Knowledge of how to configure the basic parameters of the Cisco Integrated Services Router (ISR)with SDM
•
Knowledge of how to configure the 802.11a/b/g Wireless Client Adapter with the Aironet DesktopUtility (ADU)
•
Components Used
The information in this document is based on these software and hardware versions:
Cisco 877W ISR that runs Cisco IOS® Software Release 12.3(8)YI1• Cisco SDM Version 2.4.1 installed on the ISR• Laptop with Aironet Desktop Utility Version 3.6• 802.11 a/b/g Client Adapter that runs Firmware Version 3.6•
The information in this document was created from the devices in a specific lab environment. All of thedevices used in this document started with a cleared (default) configuration. If your network is live, make surethat you understand the potential impact of any command.
Conventions
Refer to Cisco Technical Tips Conventions for more information on document conventions.
Background Information
Cisco SDM is an intuitive, web−based device−management tool for Cisco IOS Software−based routers. CiscoSDM simplifies router and security configuration through smart wizards, which help customers quickly andeasily deploy, configure, and monitor Cisco Systems® routers without requiring knowledge of the Cisco IOSSoftware command−line interface (CLI).
SDM can be downloaded free of charge from the Software Center on Cisco.com.
SDM can be installed independently as a separate copy on every individual routers, or it can also be installedon a PC. Cisco SDM installed on a PC allows you to use SDM to manage other routers that run proper IOSimages on the network. However, SDM on a PC does not support the reset of the router configuration toManufacture default.
This document uses the SDM installed on the wireless router to configure the router for wirelessauthentication.
Cisco SDM communicates with routers for two purposes:
Access the Cisco SDM application files for download to the PC• Read and write the router configuration and status•
Cisco SDM uses HTTP(s) to download the application files (sdm.tar, home.tar) to the PC. A combination ofHTTP(s) and Telnet/SSH is used to read and write the router configuration.
Refer to Cisco Router and Security Device Manager Q&A for the latest information on routers and IOSsoftware releases that support SDM.
Refer to Configure Your Router to Support SDM for more information on how to use Cisco SDM on a router.
Refer to Install the SDM Files for instructions to install and download SDM files on the router or on the PC.
Configure
The document explains how to configure these authentication types through SDM:
Open Authentication with WEP Encryption• Open with MAC Authentication• Shared Authentication• 802.1x/Extensible Authentication Protocol (EAP) Authentication• Wi−Fi Protected Access (WPA)−Pre Shared Key (PSK) Authentication• WPA Authentication•
In this section, you are presented with the information to configure the features described in this document.
Note: Use the Command Lookup Tool (registered customers only) to obtain more information on thecommands used in this section.
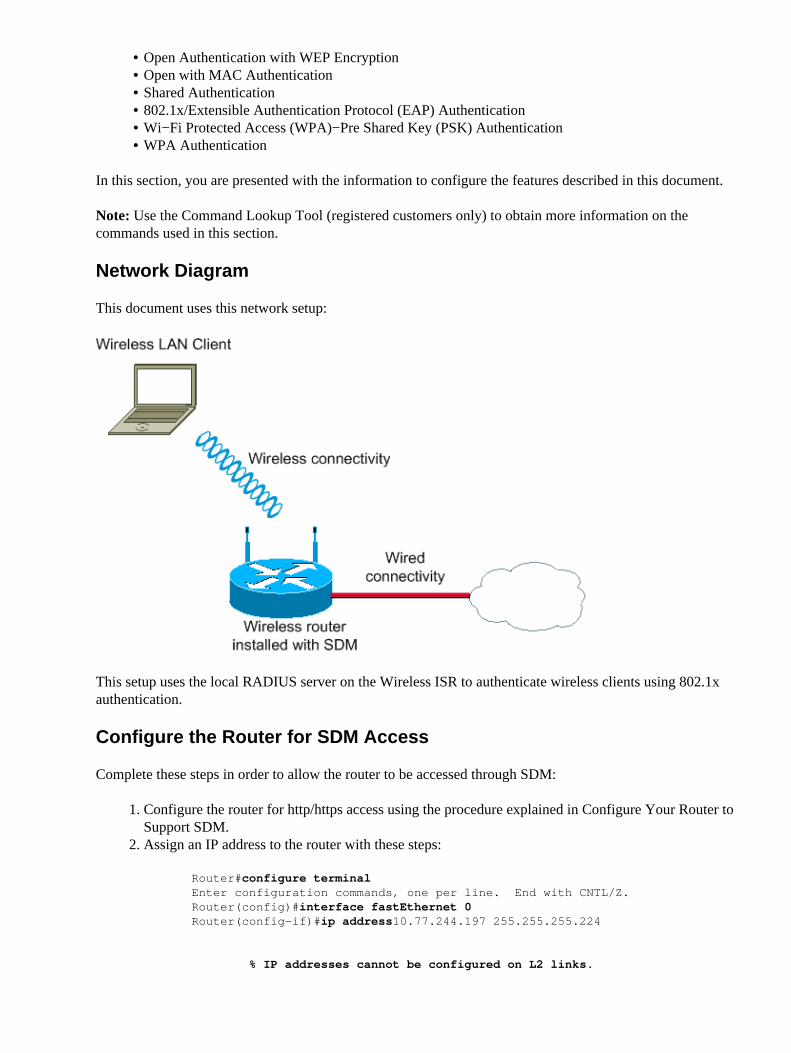
Network Diagram
This document uses this network setup:
This setup uses the local RADIUS server on the Wireless ISR to authenticate wireless clients using 802.1xauthentication.
Configure the Router for SDM Access
Complete these steps in order to allow the router to be accessed through SDM:
Configure the router for http/https access using the procedure explained in Configure Your Router toSupport SDM.
1.
Assign an IP address to the router with these steps:
Router#configure terminalEnter configuration commands, one per line. End with CNTL/Z.Router(config)#interface fastEthernet 0Router(config−if)#ip address10.77.244.197 255.255.255.224
% IP addresses cannot be configured on L2 links.
2.
In the 871W router, you might encounter such an error message. This error message shows that fastethernet 0 is a Layer 2 link on which you cannot configure any IP address.In order to overcome this issue, create a Layer−3 (VLAN) interface and assign an IP address on thesame with these steps:
Router(config)#interface Vlan1Router(config−if)#ip address 10.77.244.197 255.255.255.224
3.
Allow this VLAN on the Layer−2 fast ethernet 0 interface with these steps. This document configuresfast ethernet interface as a trunk interface to allow VLAN1. You can also configure it as an accessinterface and allow VLAN1 on the interface per your network setup.
Router(config)#interface fastEthernet 0
Router(config−if)#switchport trunk encapsulation dot1qRouter(config−if)#switchport trunk allowed vlan add vlan1
!−−− This command allows VLAN1 through the fast ethernet interface. !−−− In order to allow all VLANs through this interface, issue the !−−− switchport trunk allowed vlan add all command on this interface.
Note: This example assumes that basic router and wireless configurations are already performed onthe router. Therefore, the next step is to straight away launch the wireless application on the router toconfigure authentication parameters.
4.
Launch the SDM Wireless Application on the Router
Complete these steps in order to launch the wireless application:
Start SDM by opening a browser and entering the IP address of your router.
You are prompted to acccept or decline a Web Browser Security Alert window that looks like this:
1.

Click Yes to proceed.2. On the window that appears, enter the privilege level_15 username and password in order to accessthe router.
This example uses admin as the username and password:
3.
Click OK to continue. Enter the same information wherever it is required.4. Click Yes and OK as appropriate in the resultant pages in order to launch the SDM application.
As the SDM application opens, you are prompted by a security alert window to accept a signedsecurity certificate.
5.
Click Yes to accept the signed certificate.6.

The resultant Cisco Router and SDM main page look like this:
On this page, click Configure at the top in order to launch the router configure mode window.7.

In the configure mode window, select Interfaces and Connections from the Tasks column thatappears at the left side of this page.
8.
In the Interfaces and Connections window, click the Create Connection tab.
This lists all the interfaces available to be configured on the router.
9.
In order to launch the wireless application, choose Wireless from the list of interfaces. Then, clickLaunch Wireless Application.
This screenshot explains steps 8, 9 and 10:
This launches the SDM Wireless Application in a separate window where various authenticationtypes can be configured.
The SDM Wireless Application home page looks like this:
10.

Observe that the Software Status is Disabled and the Hardware Status of the radio (wireless) interfaceis Down because no SSID is configured on the interface. Next, you configure the SSIDs andauthentication types on this radio interface so that wireless clients can communicate through thisinterface.
Configure Open Authentication with WEP Encryption
Open authentication is a null authentication algorithm. The access point (AP) will grant any request forauthentication. Open authentication allows any device network access. If no encryption is enabled on thenetwork, any device that knows the SSID of the AP can gain access to the network. With WEP encryptionenabled on an AP, the WEP key itself becomes a means of access control. If a device does not have thecorrect WEP key, even though authentication is successful, the device will be unable to transmit data throughthe AP. Also, it cannot decrypt data sent from the AP.
Refer to Open Authentication to the Access Point for more information.
This example uses these configuration parameters for open authentication with WEP encryption:
SSID name: openwep• VLAN id: 1• VLAN IP address: 10.1.1.1/16• DHCP address range for the wireless clients of this VLAN/SSID: 10.1.1.5/16 − 10.1.1.10/16•
Complete these steps in order to configure open authentication with WEP:
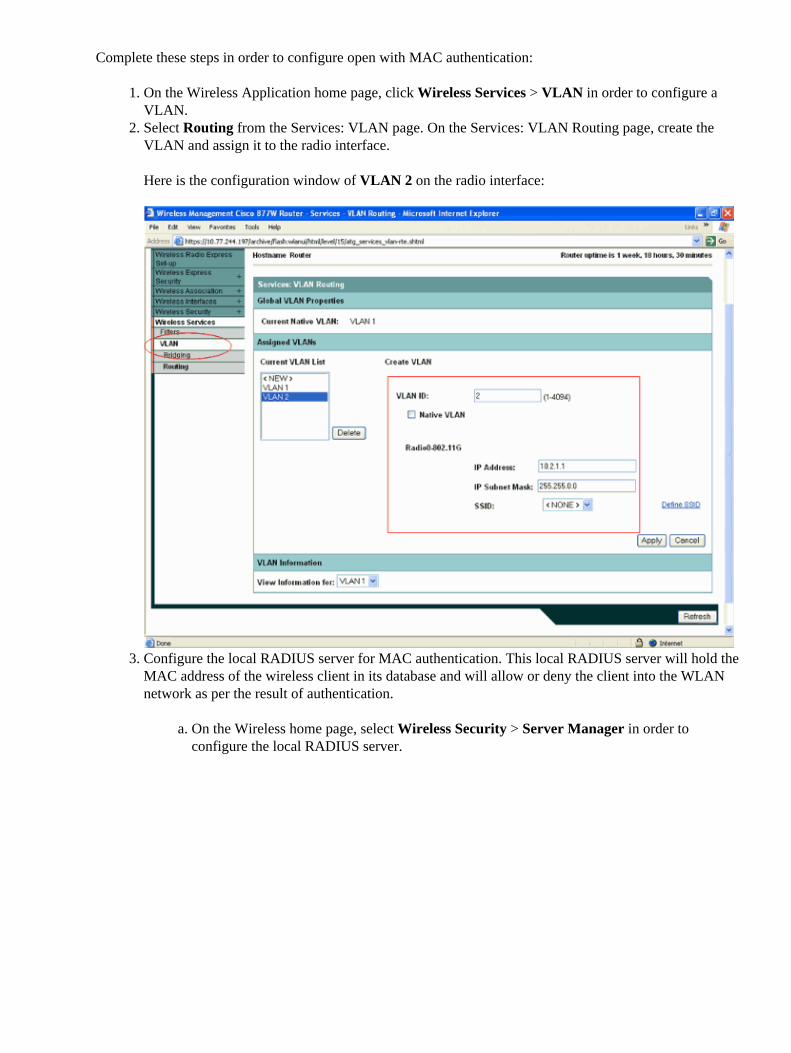
On the Wireless Application home page, click Wireless Services > VLAN in order to configure aVLAN.
1.

Select Routing from the Services: VLAN page.2.
On the Services: VLAN Routing page, create the VLAN and assign it to the radio interface.3.

This is the configuration window of VLAN1 on the radio interface. VLAN1 is the native VLAN here:
On the Wireless Application home page, select Wireless Security > SSID Manager in order toconfigure the SSID and the authentication type.
4.
On the Security: SSID Manager page, configure the SSID and assign the SSID to the VLAN createdin step1 in order to enable the SSID on the radio interface.
5.
Under the Authentication Settings section of this page, choose Open Authentication.
Here is the configuration window that explains these steps:
6.

Click Apply.
Note: The drop−down box that corresponds to the Open Authentication check box implies that openauthentication can be configured in addition with several additional authentication types, such as EAPor MAC authentication. This section discusses only open authentication with NO ADDITION(without additional authentication type).
7.
Configure WEP encryption for this SSID/VLAN. On the Wireless home page, select WirelessSecurity > Encryption Manager in order to configure the encryption settings.
On the Security: Encryption Manager page, set the Encryption Mode and Keys for VLAN1.a. Choose WEP Encryption: Mandatory as the Encryption Mode.b. Set the Encryption Key for this VLAN.
This section uses these encryption key settings:
Encryption key slot 1: used as the Transmit Key◊ Encryption key size: 40 bit◊ Encryption key in hexadecimal value: 1234567890◊
Note: The same encryption key slot (1, in this case) should be used as the transmit key at thewireless client. Also, the wireless client should be configured with the same key value(1234567890 in this case) in order for the wireless client to communicate with this WLANnetwork.
This configuration window explains these steps:
c.
8.

This Wireless Security page represents the entire configuration:
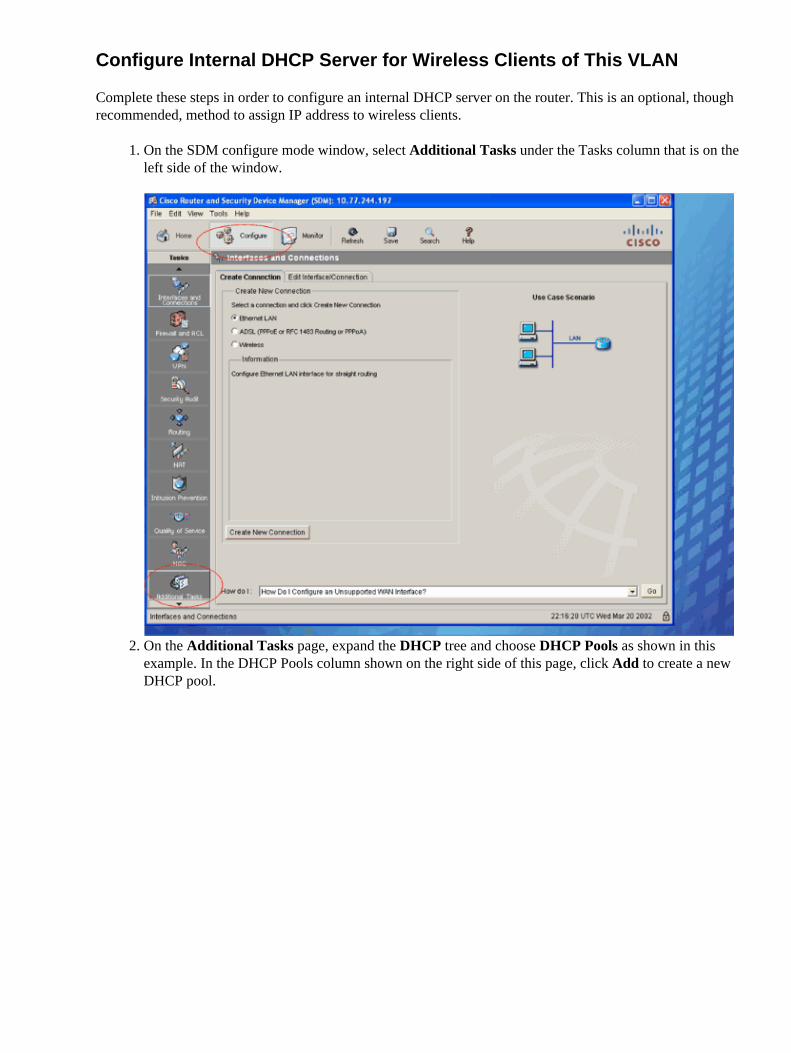
Configure Internal DHCP Server for Wireless Clients of This VLAN
Complete these steps in order to configure an internal DHCP server on the router. This is an optional, thoughrecommended, method to assign IP address to wireless clients.
On the SDM configure mode window, select Additional Tasks under the Tasks column that is on theleft side of the window.
1.
On the Additional Tasks page, expand the DHCP tree and choose DHCP Pools as shown in thisexample. In the DHCP Pools column shown on the right side of this page, click Add to create a newDHCP pool.
2.

On the Add DHCP Pool page, specify the DHCP Pool Name, DHCP Pool Network, Subnet mask,Starting IP address, Ending IP address and Default Router parameters as shown in this example:
3.

Click OK.
The internal DHCP server is configured on the router.
4.
Configure Open with MAC Authentication
In this type of authentication, the wireless client will be allowed to access the WLAN network only if theclient's MAC address is under the list of allowed MAC addresses in the authentication server. The AP relaysthe wireless client device's MAC address to a RADIUS authentication server on your network, and the serverchecks the address against a list of allowed MAC addresses. MAC−based authentication provides an alternateauthentication method for client devices that do not have EAP capability.
Refer to MAC Address Authentication to the Network for more information.
Note: The entire document uses local RADIUS server for MAC authentication, 802.1x/EAP, as well as WPAauthentication.
This example uses these configuration parameters for open with MAC authentication:
SSID name: openmac• VLAN id: 2• VLAN IP address: 10.2.1.1/16• DHCP address range for the wireless clients of this VLAN/SSID: 10.2.1.5/16 − 10.2.1.10/16•
Complete these steps in order to configure open with MAC authentication:
On the Wireless Application home page, click Wireless Services > VLAN in order to configure aVLAN.
1.
Select Routing from the Services: VLAN page. On the Services: VLAN Routing page, create theVLAN and assign it to the radio interface.
Here is the configuration window of VLAN 2 on the radio interface:
2.
Configure the local RADIUS server for MAC authentication. This local RADIUS server will hold theMAC address of the wireless client in its database and will allow or deny the client into the WLANnetwork as per the result of authentication.
On the Wireless home page, select Wireless Security > Server Manager in order toconfigure the local RADIUS server.
a.
3.

On the Server Manager page, configure the IP address, Shared Secret, and the Authenticationand Accounting Ports of the RADIUS server.
Because it is a local RADIUS server, the IP address specified is the address of this wirelessinterface. The shared secret key used should be the same on the AAA client configuration.
In this example, the shared secret is cisco.
b.
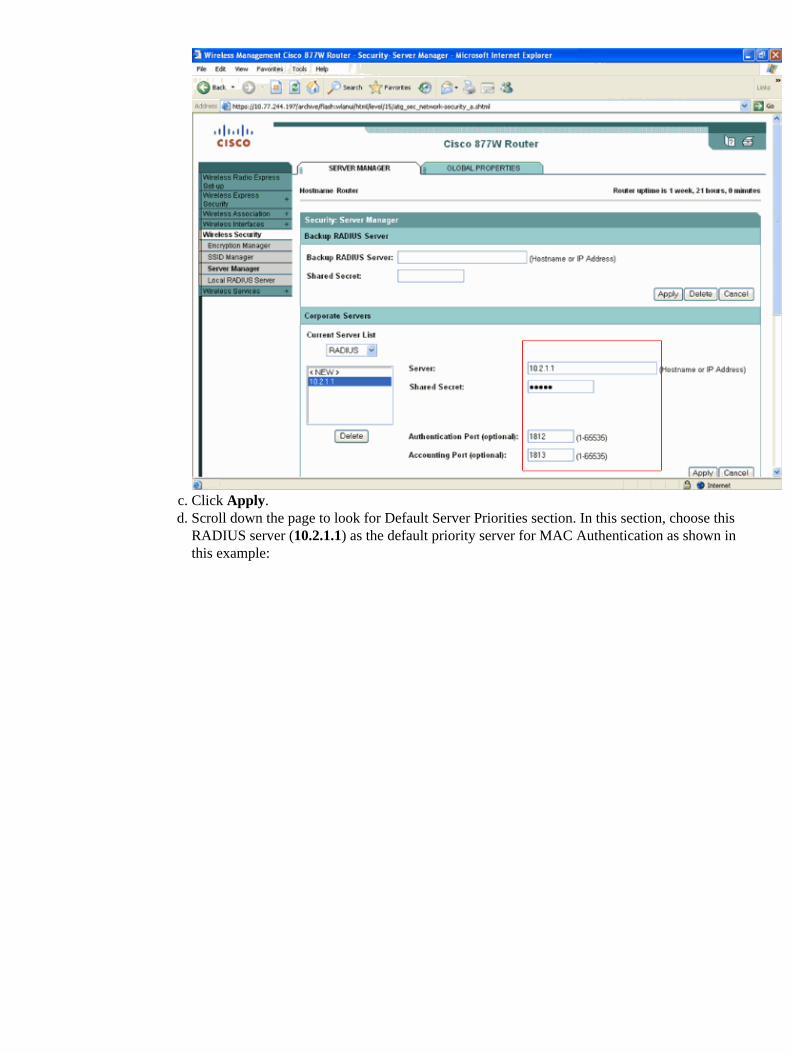
Click Apply.c. Scroll down the page to look for Default Server Priorities section. In this section, choose thisRADIUS server (10.2.1.1) as the default priority server for MAC Authentication as shown inthis example:
d.
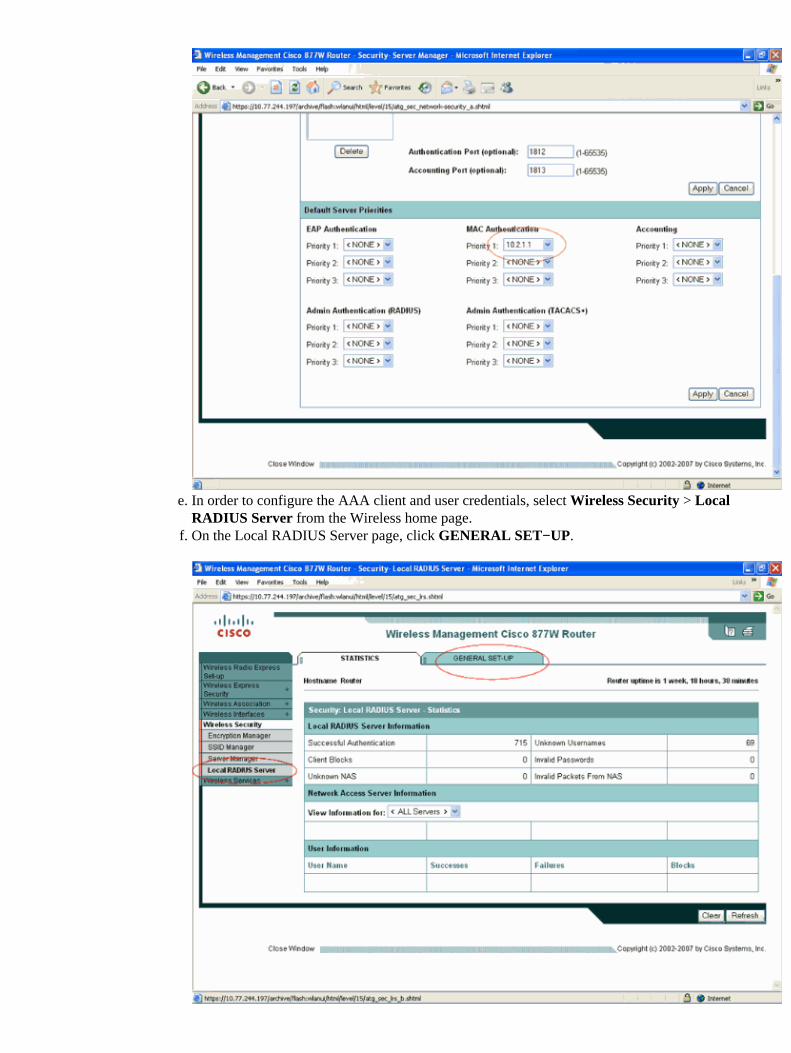
In order to configure the AAA client and user credentials, select Wireless Security > LocalRADIUS Server from the Wireless home page.
e.
On the Local RADIUS Server page, click GENERAL SET−UP.f.
On the GENERAL SET−UP page, configure the AAA client and the shared secret key asshown.
With a local RADIUS server configuration, the IP address of the server and the AAA clientwill be the same.
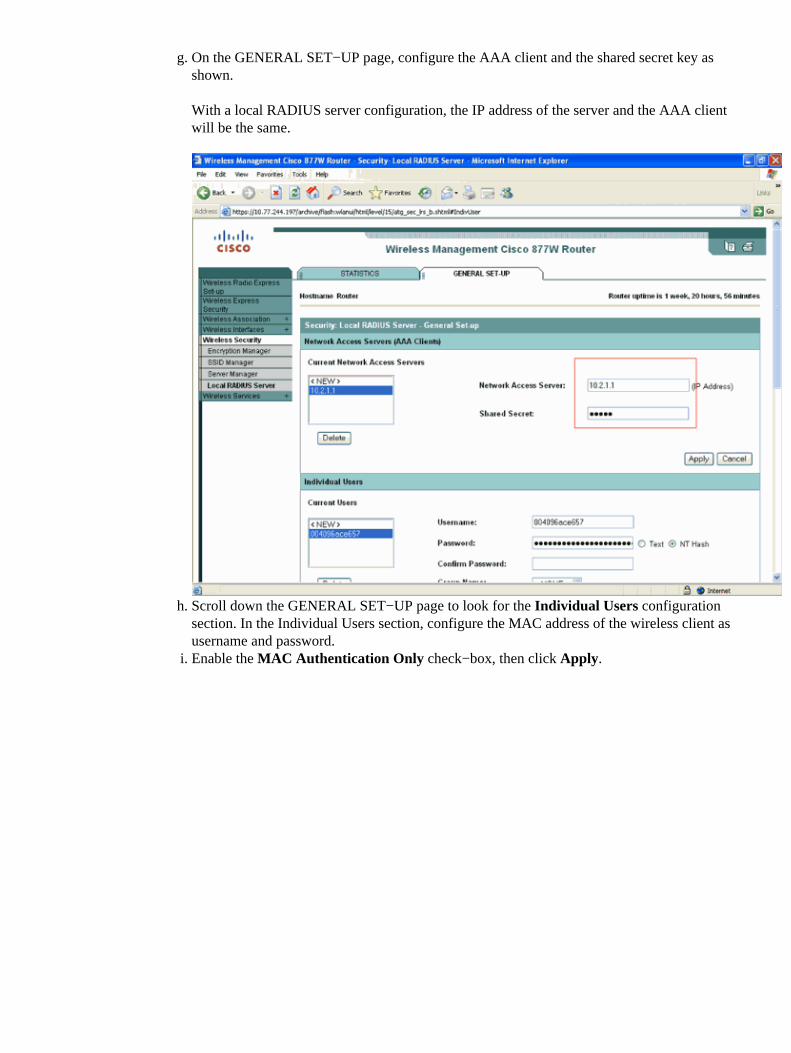
g.
Scroll down the GENERAL SET−UP page to look for the Individual Users configurationsection. In the Individual Users section, configure the MAC address of the wireless client asusername and password.
h.
Enable the MAC Authentication Only check−box, then click Apply.i.

In order to avoid the client from authentication failure at times, specify the MAC address ofthe client in a continuous format without any separation as shown in this example.
On the Wireless Application home page, select Wireless Security > SSID Manager in order toconfigure the SSID and the authentication type.
On the Security: SSID Manager page, configure the SSID and assign the SSID to the VLANcreated in step1 in order to enable the SSID on the radio interface.
a.
Under the Authentication Settings section of this page, choose Open Authentication andfrom the corresponding drop−down box, choose with MAC Authentication.
b.
In order to configure Server Priorities, choose Customize under MAC Authenticate Serversand choose the IP address of the local RADIUS server 10.2.1.1.
This is an example that explains this step:
c.
4.

In order to configure the internal DHCP server for wireless clients of this VLAN, complete the samesteps explained in the Configure Internal DHCP Server for Wireless Clients of This VLAN section ofthis document with these configuration parameters:
DHCP Pool Name: VLAN 2♦ DHCP Pool Network: 10.2.0.0♦ Subnet Mask: 255.255.0.0♦ Starting IP: 10.2.1.5♦ Ending IP: 10.2.1.10♦ Default Router: 10.2.1.1♦
5.
Configure 802.1x/EAP Authentication
This authentication type provides the highest level of security for your wireless network. By using the EAP tointeract with an EAP−compatible RADIUS server, the AP helps a wireless client device and the RADIUSserver to perform mutual authentication and derive a dynamic unicast WEP key. The RADIUS server sendsthe WEP key to the AP which uses it for all unicast data signals that it sends to, or receives, from the client.
Refer to EAP Authentication to the Network for more information.
Note: There are several methods of EAP authentication available. Throughout this document, it explains howto configure Lightweight Extensible Authentication Protocol (LEAP) as the EAP authentication. LEAP usesthe username and password as user credentials for authentication.
Note: In order to configure EAP−Flexible Authentication via Secure Tunneling (EAP−FAST) as the EAPauthentication type, refer to EAP−FAST Version 1.02 Configuration Guide for the procedure.
This example uses these configuration parameters for EAP authentication:

SSID name: leap• VLAN id: 3• VLAN IP address: 10.3.1.1/16• DHCP address range for the wireless clients of this VLAN/SSID: 10.3.1.5/16 − 10.3.1.10/16•
Complete these steps in order to configure EAP authentication:
Repeat steps 1 and 2 of Configure Open with MAC Authentication in order to create and configureVLAN with these configuration parameters:
VLAN id: 3♦ Radio interface IP address: 10.3.1.1♦ subnet mask: 255.255.0.0♦
1.
Then, configure the local RADIUS server for client authentication. In order to perform this, repeatsteps 3a to 3c of Configure Open with MAC Authentication with these configuration parameters:
IP address of RADIUS server: 10.3.1.1♦ Shared Secret: cisco♦
Here is the configuration screen that explains step 2 of EAP authentication:
2.
Scroll down the page to look for the Default Server Priorities section. In this section, choose thisRADIUS server (10.3.1.1) as the default priority server for EAP Authentication as shown in thisexample.
3.

Repeat steps 3e and 3f of Configure Open with MAC Authentication.4. Repeat steps 3g and 3h of Configure Open with MAC Authentication with these configurationparameters for EAP authentication:
AAA client IP address: 10.3.1.1♦ Shared secret: cisco♦ Under the Individual Users section, configure the username and password as user1.♦
5.
On the Wireless Application home page, select Wireless Security > SSID Manager in order toconfigure the SSID and the authentication type.
On the Security: SSID Manager page, configure the SSID and assign the SSID to the VLANcreated in step 1 in order to enable the SSID on the radio interface.
a.
Under the Authentication Settings section of this page, choose Open Authentication andfrom the corresponding drop−down box, choose EAP Authentication. Also, select theNetwork EAP authentication type.
b.
In order to configure the Server Priorities, choose Customize under EAP AuthenticateServers and choose the IP address of the local RADIUS server 10.3.1.1.
c.
Here is an example that explains these steps:
6.

In order to configure the internal DHCP server for wireless clients of this VLAN, complete the samesteps explained in the Configure Internal DHCP Server for Wireless Clients of This VLAN section ofthis document with these configuration parameters:
DHCP Pool name: VLAN 3♦ DHCP Pool Network: 10.3.0.0♦ Subnet Mask: 255.255.0.0♦ Starting IP: 10.3.1.5♦ Ending IP: 10.3.1.10♦ Default Router: 10.3.1.1♦
7.
Configure the Cipher to be used for dynamic key management upon successful authentication of thewireless client.
On the Wireless home page, select Wireless Security > Encryption Manager in order toconfigure the encryption settings.
a.
On the Wireless Security > Encryption Manager screen on the Security: Encryption Managerpage, enter 3 for Set Encryption Mode and Keys for VLAN.
b.
Choose Cipher as the Encryption Mode, and choose a Cipher encryption algorithm from thedrop−down box.
This example uses TKIP as the Cipher algorithm:
c.
8.
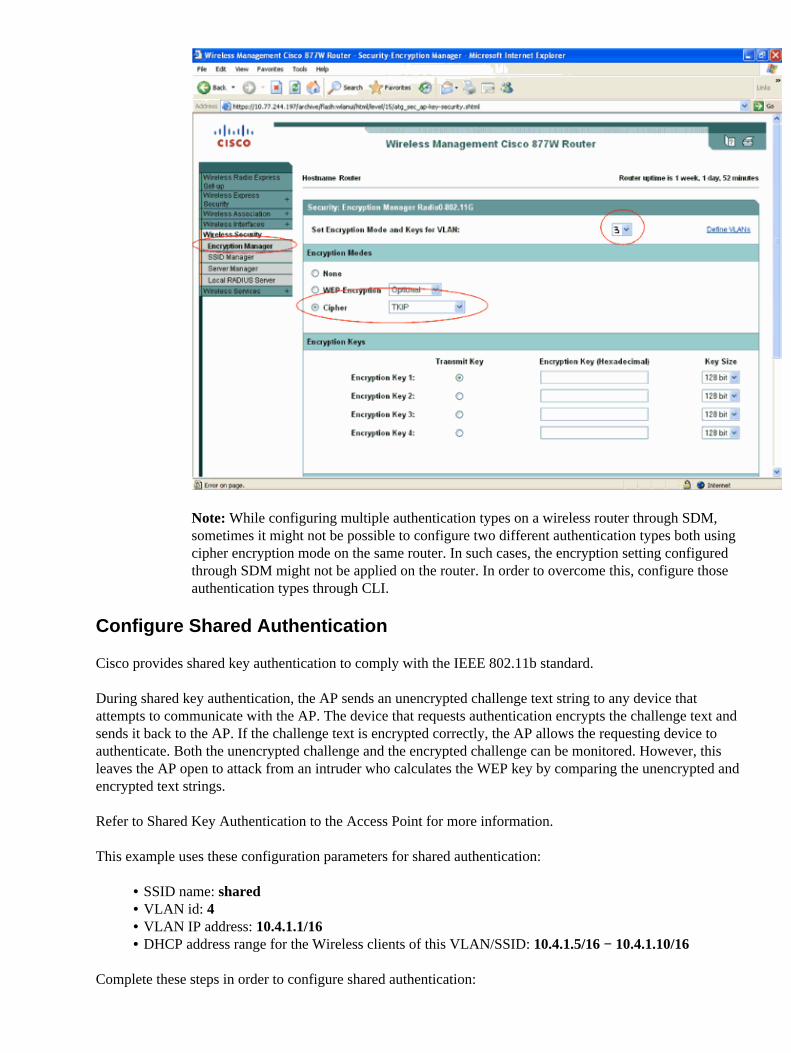
Note: While configuring multiple authentication types on a wireless router through SDM,sometimes it might not be possible to configure two different authentication types both usingcipher encryption mode on the same router. In such cases, the encryption setting configuredthrough SDM might not be applied on the router. In order to overcome this, configure thoseauthentication types through CLI.
Configure Shared Authentication
Cisco provides shared key authentication to comply with the IEEE 802.11b standard.
During shared key authentication, the AP sends an unencrypted challenge text string to any device thatattempts to communicate with the AP. The device that requests authentication encrypts the challenge text andsends it back to the AP. If the challenge text is encrypted correctly, the AP allows the requesting device toauthenticate. Both the unencrypted challenge and the encrypted challenge can be monitored. However, thisleaves the AP open to attack from an intruder who calculates the WEP key by comparing the unencrypted andencrypted text strings.
Refer to Shared Key Authentication to the Access Point for more information.
This example uses these configuration parameters for shared authentication:
SSID name: shared• VLAN id: 4• VLAN IP address: 10.4.1.1/16• DHCP address range for the Wireless clients of this VLAN/SSID: 10.4.1.5/16 − 10.4.1.10/16•
Complete these steps in order to configure shared authentication:
Repeat steps 1 and 2 of Configure Open with MAC Authentication in order to create and configureVLAN with these configuration parameters:
VLAN id: 4♦ Radio interface IP address: 10.4.1.1♦ subnet mask: 255.255.0.0♦
1.
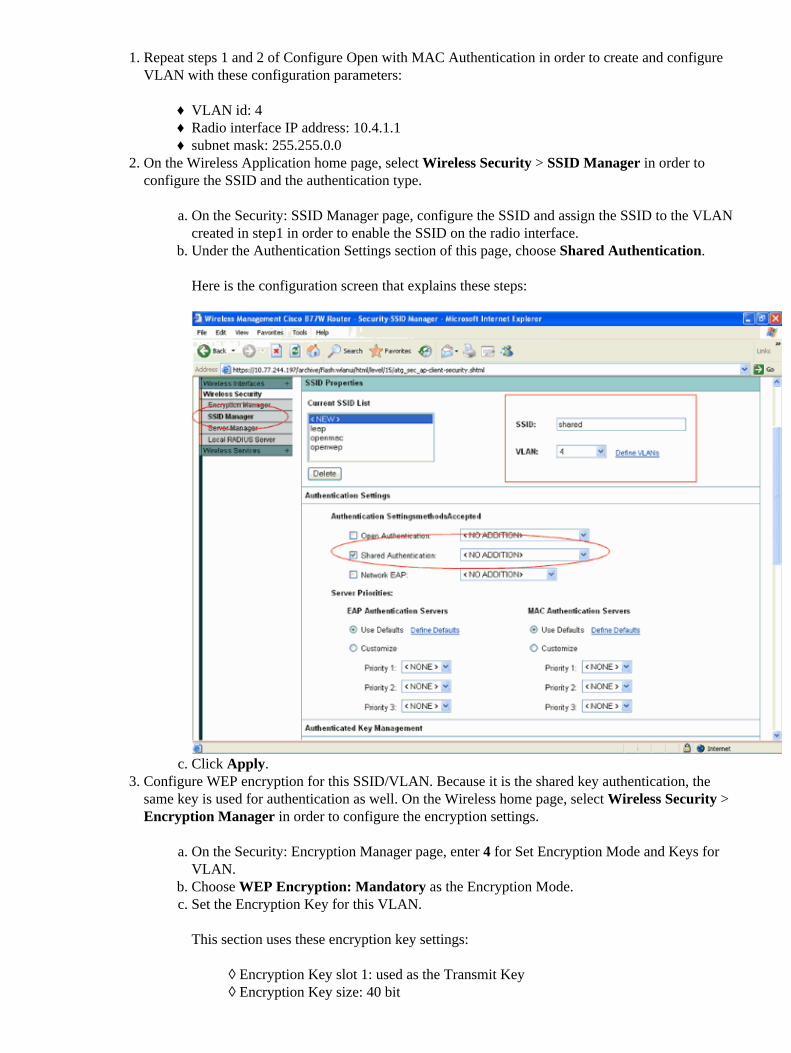
On the Wireless Application home page, select Wireless Security > SSID Manager in order toconfigure the SSID and the authentication type.
On the Security: SSID Manager page, configure the SSID and assign the SSID to the VLANcreated in step1 in order to enable the SSID on the radio interface.
a.
Under the Authentication Settings section of this page, choose Shared Authentication.
Here is the configuration screen that explains these steps:
b.
Click Apply.c.
2.
Configure WEP encryption for this SSID/VLAN. Because it is the shared key authentication, thesame key is used for authentication as well. On the Wireless home page, select Wireless Security >Encryption Manager in order to configure the encryption settings.
On the Security: Encryption Manager page, enter 4 for Set Encryption Mode and Keys forVLAN.
a.
Choose WEP Encryption: Mandatory as the Encryption Mode.b. Set the Encryption Key for this VLAN.
This section uses these encryption key settings:
Encryption Key slot 1: used as the Transmit Key◊ Encryption Key size: 40 bit◊
c.
3.

Encryption key in hexadecimal value: 1234567890◊ Note: The same encryption key slot (1, in this case) should be used as the transmit key at thewireless client. Also, the wireless client should be configured with the same key value(1234567890 in this case) in order for the wireless client to communicate with this WLANnetwork.
This configuration screen explains these steps:
In order to configure the internal DHCP server for wireless clients of this VLAN, complete the samesteps explained in Configure Internal DHCP Server for Wireless Clients of This VLAN section of thisdocument with these configuration parameters:
DHCP Pool name: VLAN 4♦ DHCP Pool Network: 10.4.0.0♦ Subnet Mask: 255.255.0.0♦ Starting IP: 10.4.1.5♦ Ending IP: 10.4.1.10♦ Default Router: 10.4.1.1♦
4.
Configure WPA Authentication
WPA is a standards−based, interoperable security enhancement that strongly increases the level of dataprotection and access control for existing and future wireless LAN systems. WPA key management supportstwo mutually exclusive management types: WPA and WPA−PSK.
Refer to Using WPA Key Management for more information.
Using WPA key management, clients and the authentication server authenticate to each other using an EAPauthentication method, and the client and server generate a pairwise master key (PMK). Using WPA, theserver generates the PMK dynamically and passes it to the AP.

This example uses these configuration parameters for WPA authentication:
SSID name: wpa• VLAN id: 5• VLAN IP address: 10.5.1.1/16• DHCP address range for the wireless clients of this VLAN/SSID: 10.5.1.5/16 − 10.5.1.10/16•
Complete these steps in order to configure WPA authentication:
Repeat steps 1 and 2 of Configure Open with MAC Authentication in order to create and configureVLAN with these configuration parameters:
VLAN id: 5♦ Radio interface IP address: 10.5.1.1♦ subnet mask: 255.255.0.0♦
1.
Because WPA is a key management standard, configure the cipher to be used for WPA keymanagement.
On the Wireless home page, select Wireless Security > Encryption Manager in order toconfigure the encryption settings.
a.
On the Wireless Security > Encryption Manager screen on the Security: Encryption Managerpage, enter 5 for Set Encryption Mode and Keys for VLAN.
b.
Choose Cipher as Encryption Mode, and choose a Cipher encryption algorithm from thedrop−down box.
This example uses TKIP as the Cipher algorithm:
c.
2.

Note: While configuring multiple authentication types on a wireless router through SDM,sometimes it might not be possible to configure two different authentication types both usingcipher encryption mode on the same router. In such cases, the encryption setting configuredthrough SDM might not be applied on the router. In order to overcome this, configure thoseauthentication types through CLI.
The next step is to configure local RADIUS server for client authentication. In order to perform this,repeat steps 3a to 3c of Configure Open with MAC Authentication with these configurationparameters:
IP address of RADIUS server: 10.5.1.1♦ Shared Secret: cisco♦ Scroll down the Server Manager page to look for the Default Server Priorities section. Inthis section, choose this RADIUS server (10.5.1.1) as the default priority server for EAPAuthentication as shown in this example:
a.
Repeat steps 3e and 3f of Configure Open with MAC Authentication.b. Repeat steps 3g and 3h of Configure Open with MAC Authentication with theseconfiguration parameters for EAP authentication:
AAA client IP address: 10.5.1.1◊ Shared Secret: cisco◊
c.
Under the Individual Users section, configure the username and password as user2.d.
3.
In order to enable WPA for an SSID, you need to enable Open with EAP or Network EAP on theSSID. In order to enable Network EAP, on the Wireless Application home page, select WirelessSecurity > SSID Manager to configure the SSID and the authentication type.
On the Security: SSID Manager page, configure the SSID and assign the SSID to the VLANcreated in step1 in order to enable the SSID on the radio interface.
a.
4.

Under the Authentication Settings section of this page, choose Open Authentication andfrom the corresponding drop−down box, choose EAP Authentication. Also, select theNetwork EAP authentication type.
b.
In order to configure Server Priorities, choose Customize under EAP Authenticate Serversand choose the IP address of the local RADIUS server 10.5.1.1.
c.
Here is an example that explains these steps:
Scroll down the SSID Manager page to look for the Authenticated Key Management section.5. In this section, choose Mandatory from the Key Management drop−down box, and enable the WPAcheck−box.
Here is the configuration window that explains these steps:
6.
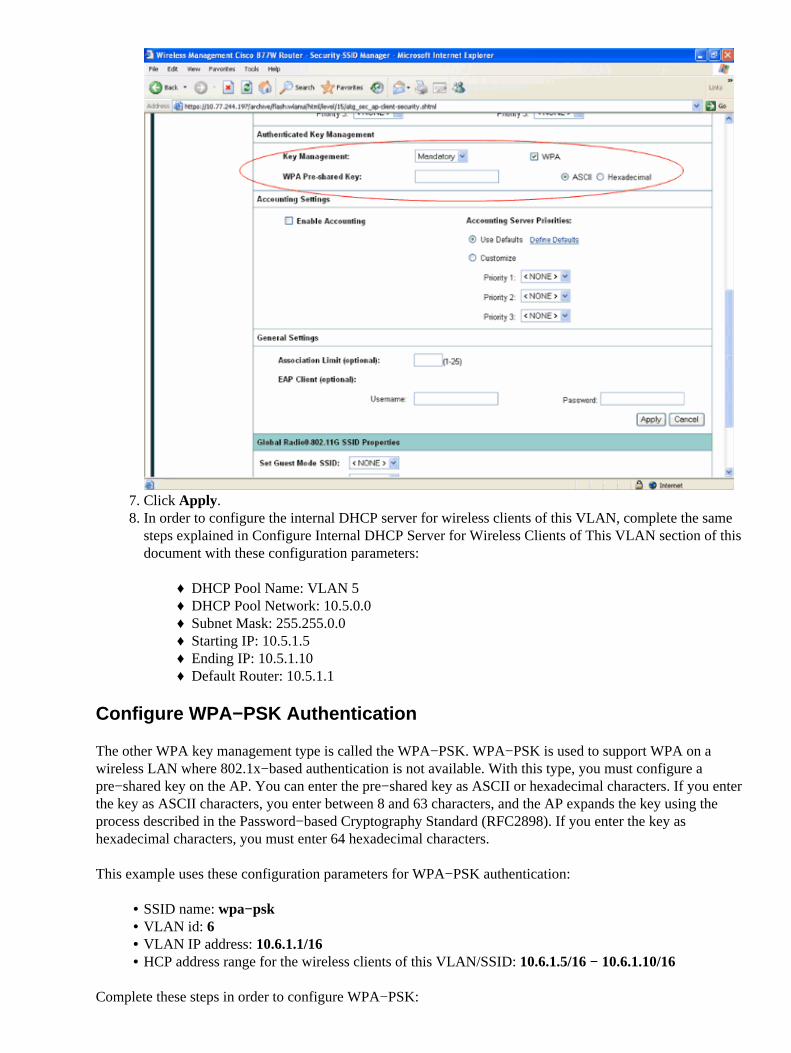
Click Apply.7. In order to configure the internal DHCP server for wireless clients of this VLAN, complete the samesteps explained in Configure Internal DHCP Server for Wireless Clients of This VLAN section of thisdocument with these configuration parameters:
DHCP Pool Name: VLAN 5♦ DHCP Pool Network: 10.5.0.0♦ Subnet Mask: 255.255.0.0♦ Starting IP: 10.5.1.5♦ Ending IP: 10.5.1.10♦ Default Router: 10.5.1.1♦
8.
Configure WPA−PSK Authentication
The other WPA key management type is called the WPA−PSK. WPA−PSK is used to support WPA on awireless LAN where 802.1x−based authentication is not available. With this type, you must configure apre−shared key on the AP. You can enter the pre−shared key as ASCII or hexadecimal characters. If you enterthe key as ASCII characters, you enter between 8 and 63 characters, and the AP expands the key using theprocess described in the Password−based Cryptography Standard (RFC2898). If you enter the key ashexadecimal characters, you must enter 64 hexadecimal characters.
This example uses these configuration parameters for WPA−PSK authentication:
SSID name: wpa−psk• VLAN id: 6• VLAN IP address: 10.6.1.1/16• HCP address range for the wireless clients of this VLAN/SSID: 10.6.1.5/16 − 10.6.1.10/16•
Complete these steps in order to configure WPA−PSK:

Repeat steps 1 and 2 of Configure Open with MAC Authentication in order to create and configureVLAN with these configuration parameters:
VLAN id: 6♦ Radio interface IP address: 10.6.1.1♦ subnet mask: 255.255.0.0♦
1.
Because WPA−PSK is a key management standard, configure the cipher to be used for WPA keymanagement.
On the Wireless home page, select Wireless Security > Encryption Manager in order toconfigure the encryption settings.
a.
On the Wireless Security > Encryption Manager window on the Security: EncryptionManager page, enter 6 for Set Encryption Mode and Keys for VLAN.
b.
Choose Cipher as Encryption Mode, and choose a Cipher encryption algorithm from thedrop−down box.
This example uses TKIP+WEP 128bit as the Cipher algorithm.
Note: While configuring multiple authentication types on a wireless router through SDM,sometimes it might not be possible to configure two different authentication types both usingcipher encryption mode on the same router. In such cases, the encryption setting configuredthrough SDM might not be applied on the router. In order to overcome this, configure thoseauthentication types through CLI.
c.
2.
In order to enable WPA−PSK for an SSID, you need to enable open authentication on the SSID. Inorder to enable open authentication, repeat step 6 of Configure Open Authentication with WEPEncryption.
Here is the configuration window of WPA−PSK:
3.
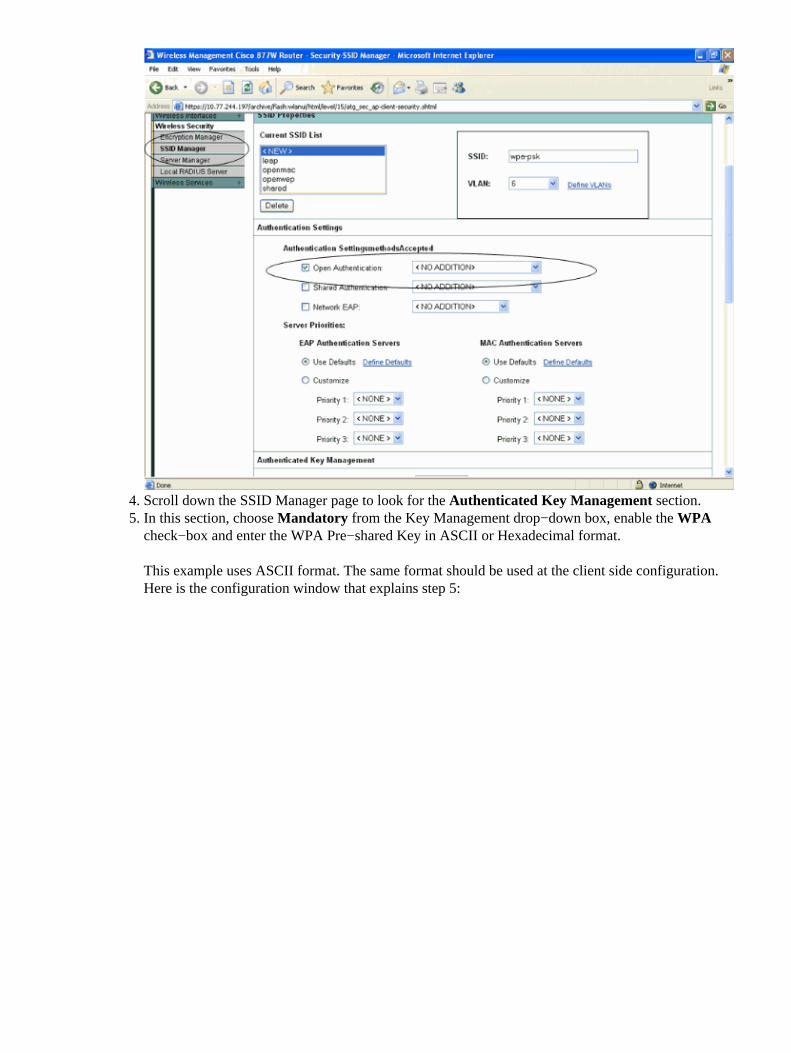
Scroll down the SSID Manager page to look for the Authenticated Key Management section.4. In this section, choose Mandatory from the Key Management drop−down box, enable the WPAcheck−box and enter the WPA Pre−shared Key in ASCII or Hexadecimal format.
This example uses ASCII format. The same format should be used at the client side configuration.Here is the configuration window that explains step 5:
5.

The WPA Pre−Shared Key used in this configuration is 1234567890.Click Apply.6. In order to configure the internal DHCP server for wireless clients of this VLAN, complete the samesteps explained in Configure Internal DHCP Server for Wireless Clients of This VLAN section of thisdocument with these configuration parameters:
DHCP Pool Name: VLAN 6♦ DHCP Pool Network: 10.6.0.0♦ Subnet Mask: 255.255.0.0♦ Starting IP: 10.6.1.5♦ Ending IP: 10.6.1.10♦ Default Router: 10.6.1.1♦
7.
Wireless Client Configuration
After you configure the ISR through SDM, you need to configure the wireless client for the differentauthentication types so that the router can authenticate these wireless clients and provide access to the WLANnetwork. This document uses ADU for client side configuration.
Configure Wireless Client for Open Authentication with WEP Encryption
Complete these steps:
In the Profile Management window on the ADU, click New in order to create a new profile.
A new window displays where you can set the configuration for open authentication.
1.
Under the General tab, enter the Profile Name and the SSID that the client adapter will use.2.
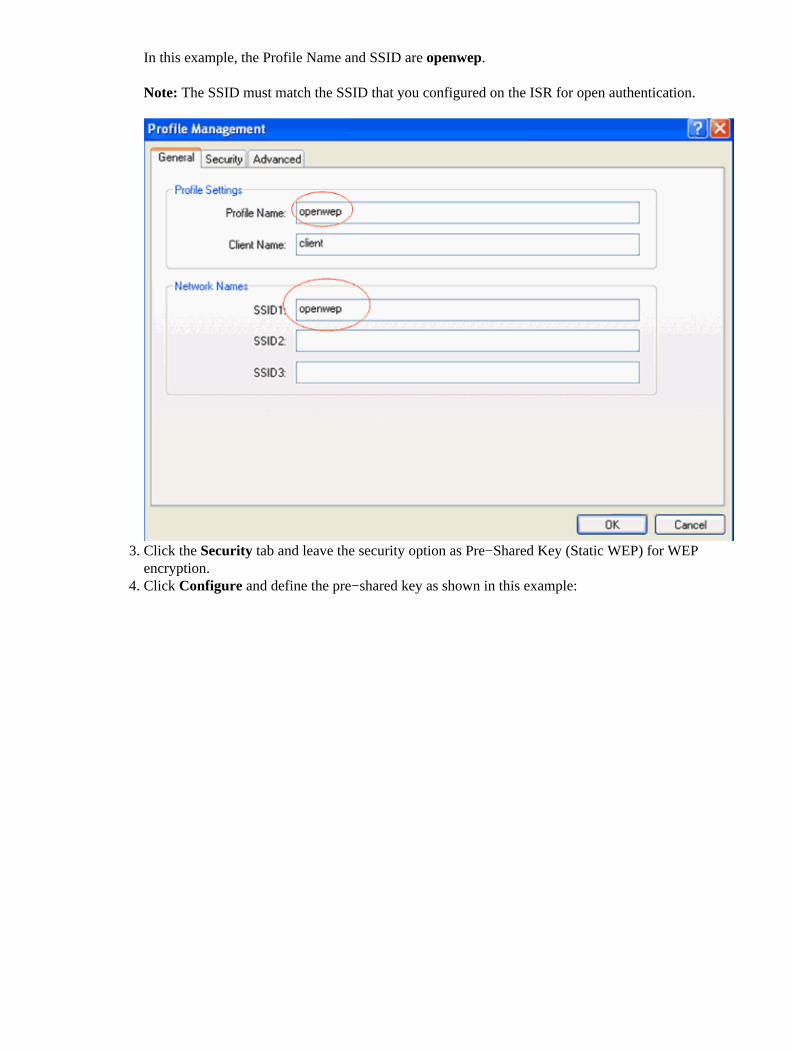
In this example, the Profile Name and SSID are openwep.
Note: The SSID must match the SSID that you configured on the ISR for open authentication.
Click the Security tab and leave the security option as Pre−Shared Key (Static WEP) for WEPencryption.
3.
Click Configure and define the pre−shared key as shown in this example:4.

Click the Advanced tab on the Profile Management page and set 802.11 Authentication Mode asOpen for open authentication.
5.

In order to verify open with WEP authentication, activate the openwep SSID configured.6.
Verify the wireless client is associated successfully with the router. This can be verified in detail fromthe wireless router using the show dot11 associations command.
Here is an example:
Router#show dot11 associations802.11 Client Stations on Dot11Radio0:
7.
SSID [openwep] :
MAC Address IP address Device Name Parent State 0040.96ac.e657 10.1.1.5 CB21AG/PI21AG client self Assoc
Others: (not related to any ssid)
Configure Wireless Client for Open with MAC Authentication
Complete these steps:
In the Profile Management window on the ADU, click New in order to create a new profile.
A new window displays where you can set the configuration for open authentication.
1.
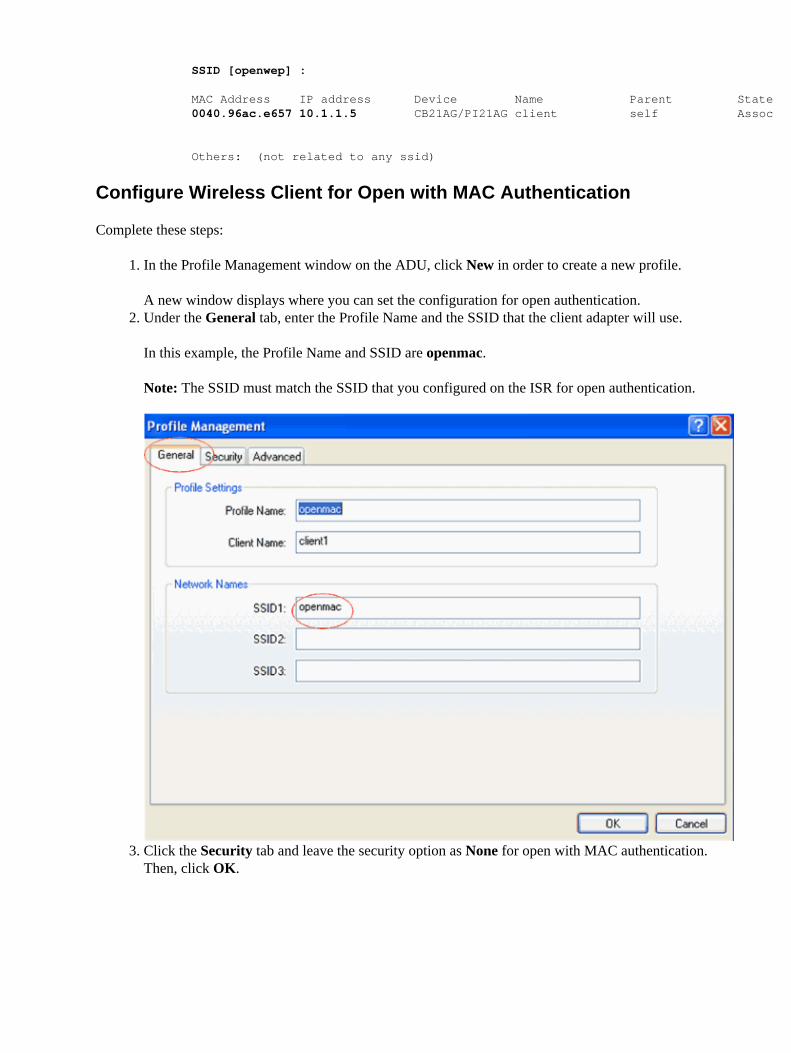
Under the General tab, enter the Profile Name and the SSID that the client adapter will use.
In this example, the Profile Name and SSID are openmac.
Note: The SSID must match the SSID that you configured on the ISR for open authentication.
2.
Click the Security tab and leave the security option as None for open with MAC authentication.Then, click OK.
3.

In order to verify open with MAC authentication, activate the openmac SSID configured.4.
Verify the wireless client is associated successfully with the router. This can be verified in detail fromthe wireless router using the show dot11 associations command.
Here is an example:
Router#show dot11 associations802.11 Client Stations on Dot11Radio0:
5.

SSID [openmac] :
MAC Address IP address Device Name Parent State 0040.96ac.e657 10.2.1.5 CB21AG/PI21AG client1 self MAC−Assoc
SSID [openwep] :
Others: (not related to any ssid)
Configure Wireless Client for 802.1x/EAP Authentication
Complete these steps:
In the Profile Management window on the ADU, click New in order to create a new profile.
A new window displays where you can set the configuration for open authentication.
1.
Under the General tab, enter the Profile Name and the SSID that the client adapter will use.
In this example, the Profile Name and SSID are leap.
Note: The SSID must match the SSID that you configured on the ISR for 802.1x/EAP authentication.
2.
Under Profile Management, click the Security tab, set the security option as 802.1x and choose theappropriate EAP type.
This document uses LEAP as the EAP type for authentication.
3.
Click Configure in order to configure the LEAP username and password settings.
Under the username and password settings, this example chooses to Manually Prompt for UserName and Password so that the client will be prompted to enter the correct username and password
4.

while trying to connect to the network.Click OK.5.
In order to verify EAP authentication, activate the leap SSID configured. You are prompted to enter aLEAP username and password. Enter both the credentials as user1 and click OK.
6.
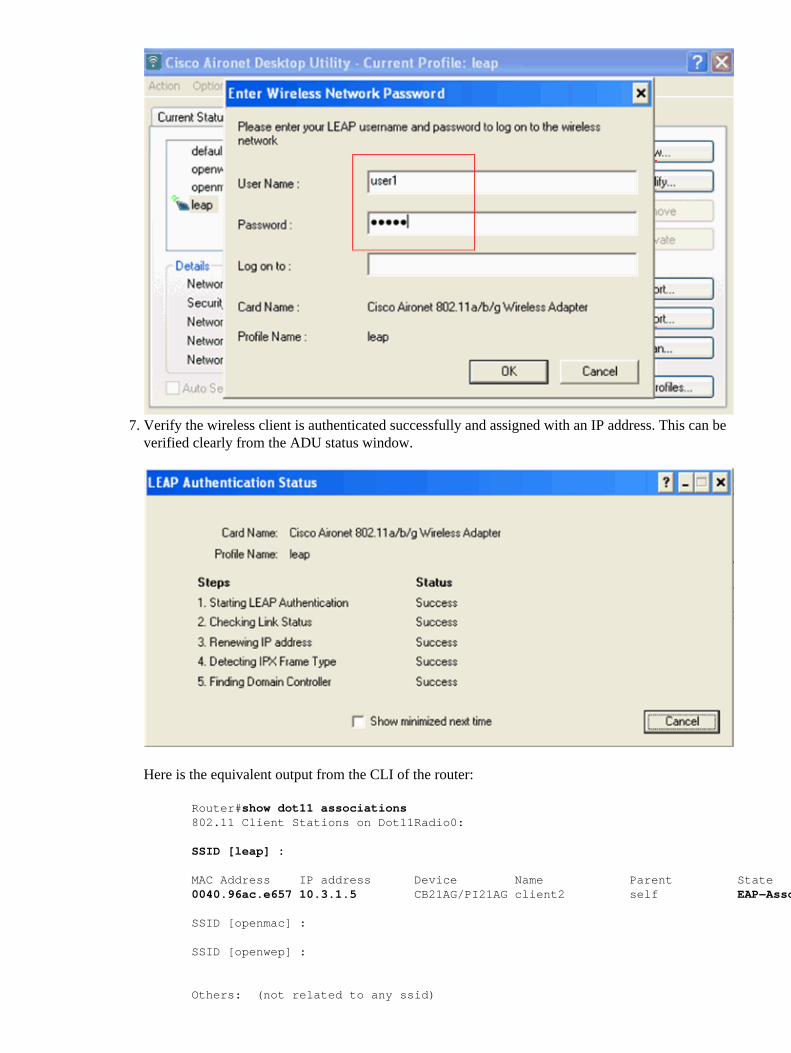
Verify the wireless client is authenticated successfully and assigned with an IP address. This can beverified clearly from the ADU status window.
Here is the equivalent output from the CLI of the router:
Router#show dot11 associations802.11 Client Stations on Dot11Radio0:
SSID [leap] :
MAC Address IP address Device Name Parent State 0040.96ac.e657 10.3.1.5 CB21AG/PI21AG client2 self EAP−Assoc
SSID [openmac] :
SSID [openwep] :
Others: (not related to any ssid)
7.

Configure Wireless Client for Shared Authentication
Complete these steps:
In the Profile Management window on the ADU, click New in order to create a new profile.
A new window displays where you can set the configuration for open authentication.
1.
Under the General tab, enter the Profile Name and the SSID that the client adapter will use.
In this example, the Profile Name and SSID are shared.
Note: The SSID must match the SSID that you configured on the ISR for open authentication.
2.
Click the Security tab and leave the security option as Pre−Shared Key (Static WEP) for WEPencryption. Then, click Configure.
3.
Define the pre−shared key as shown in this example:4.

Click OK.5. Under Profile Management, click the Advanced tab and set 802.11 Authentication Mode as Sharedfor shared authentication.
6.
In order to verify shared authentication, activate the shared SSID configured.7. Verify the wireless client is associated successfully with the router. This can be verified in detail fromthe wireless router using the show dot11 associations command.
Here is an example:
Router#show dot11 associations802.11 Client Stations on Dot11Radio0:
SSID [shared] :
MAC Address IP address Device Name Parent State 0040.96ac.e657 10.4.1.5 CB21AG/PI21AG WCS self Assoc
8.
Configure Wireless Client for WPA Authentication
Complete these steps:
In the Profile Management window on the ADU, click New in order to create a new profile.
A new window displays where you can set the configuration for open authentication.
1.
Under the General tab, enter the Profile Name and the SSID that the client adapter will use.
In this example, the Profile Name and SSID are wpa.
Note: The SSID must match the SSID that you configured on the ISR for WPA (with EAP)authentication.
2.
Under Profile Management, click the Security tab, set the security option as WPA/WPA2/CCKMand choose the appropriate WPA/WPA2/CCKM EAP type.
This document uses LEAP as the EAP type for authentication.
3.

Click Configure in order to configure the LEAP username and password settings.
Under the username and password settings, this example chooses to Manually prompt for UserName and Password so that the client will be prompted to enter the correct username and passwordwhile trying to connect to the network.
4.
Click OK.5. In order to verify EAP authentication, activate the leap SSID configured. You are prompted to enter aLEAP username and password. Enter both the credentials as user2, then click OK.
6.
Verify the wireless client is authenticated successfully and assigned with an IP address. This can beverified clearly from the ADU status window.
7.
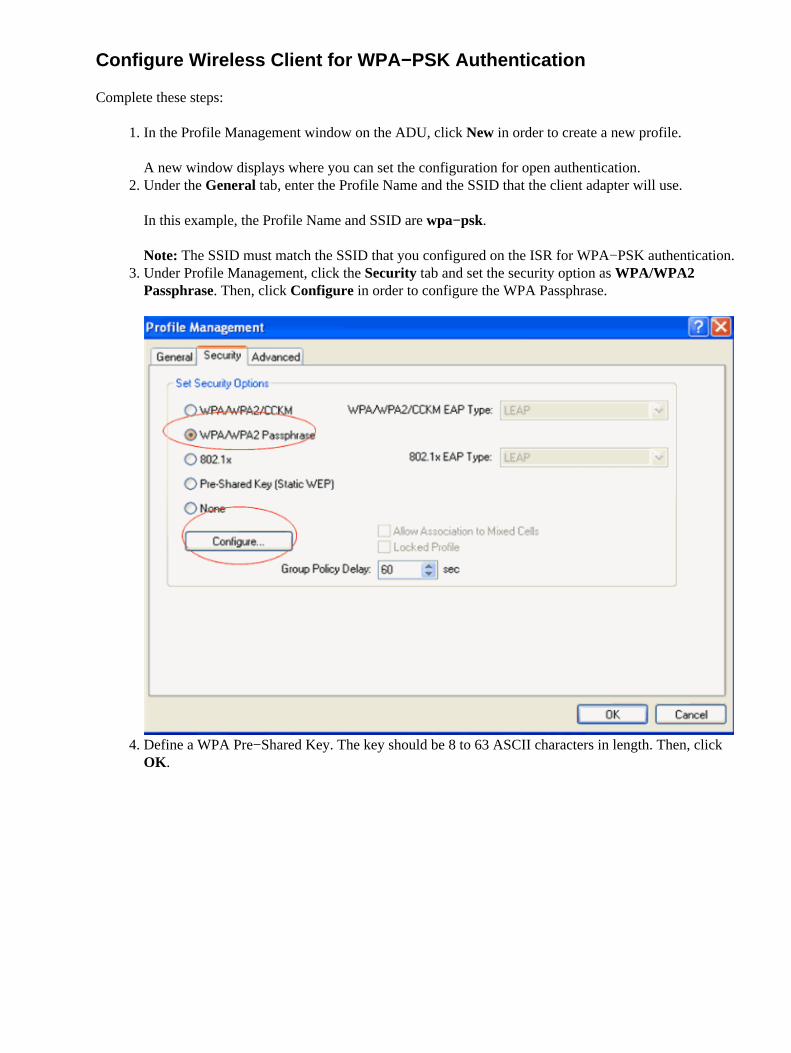
Configure Wireless Client for WPA−PSK Authentication
Complete these steps:
In the Profile Management window on the ADU, click New in order to create a new profile.
A new window displays where you can set the configuration for open authentication.
1.
Under the General tab, enter the Profile Name and the SSID that the client adapter will use.
In this example, the Profile Name and SSID are wpa−psk.
Note: The SSID must match the SSID that you configured on the ISR for WPA−PSK authentication.
2.
Under Profile Management, click the Security tab and set the security option as WPA/WPA2Passphrase. Then, click Configure in order to configure the WPA Passphrase.
3.
Define a WPA Pre−Shared Key. The key should be 8 to 63 ASCII characters in length. Then, clickOK.
4.

In order to verify WPA−PSK, activate the wpa−psk SSID configured.5. Verify the wireless client is associated successfully with the router. This can be verified in detail fromthe wireless router using the show dot11 associations command.
6.
Troubleshoot
There is currently no specific troubleshooting information available for this configuration.
Troubleshooting Commands
You can use these debug commands to troubleshoot your configuration.
debug dot11 aaa authenticator all�Activates the debugging of MAC and EAP authenticationpackets.
•
debug radius authentication�Displays the RADIUS negotiations between the server and client.• debug radius local−server packets�Displays the content of the RADIUS packets that are sent andreceived.
•
debug radius local−server client�Displays error messages about failed client authentications.•
Related Information
Authentication on Wireless LAN Controllers Configuration Examples• Configuring VLANs• 1800 ISR Wireless Router with Internal DHCP and Open Authentication ConfigurationExample
•
Cisco Wireless ISR and HWIC Access Point Configuration Guide• Wireless LAN Connectivity using an ISR with WEP Encryption and LEAP AuthenticationConfiguration Example
•
Configuring Authentication Types• Wireless LAN Connectivity using an ISR with WEP Encryption and LEAP AuthenticationConfiguration Example
•
Technical Support & Documentation − Cisco Systems•
Contacts & Feedback | Help | Site Map© 2013 − 2014 Cisco Systems, Inc. All rights reserved. Terms & Conditions | Privacy Statement | Cookie Policy | Trademarks ofCisco Systems, Inc.

Updated: Apr 07, 2008 Document ID: 98584