Wireless 802.11n PC Card user manual
48
WIRELESS 802.11n PC CARD USER MANUAL MODEL 524070 INT-524070-UM-0208-01
Transcript of Wireless 802.11n PC Card user manual

Wireless 802.11n PC Card user manual Model 524070
INT-524070-UM-0208-01

Thank you for purchasing the INTELLINET NETWORK SOLUTIONS™ Wireless 802.11n PC Card, Model 524070.Connecting your notebook PC to a wireless network, this handy card supports Wi-Fi Multimedia for increased data throughput and Software AP to turn your wireless client into a wireless access point. And with the easy-to-follow instructions in this manual, you’ll soon be able to enjoy the benefits of these additional features: • Up to 300 Mbps network link speed• Advanced 2T3R MIMO technology with 3 internal antennas for enhanced throughput and coverage• Compliance with 2.4 GHz Draft IEEE 802.11n standard; backward compatible with IEEE 802.11g/b standards• Lifetime Warranty
FCC CertiFiCations This equipment has been tested and found to comply with the limits for a Class B digital device, pursuant to Part 15 of the FCC Rules. These limits are designed to provide reasonable protection against harmful interference in a residential installation. This equipment generates, uses and can radiate radio frequency energy and, if not installed and used in accordance with the instructions, may cause harmful interference to radio communications. However, there is no guarantee that interference will not occur in a particular installation. If this equipment does cause harmful interference to radio or television reception, which can be determined by turning the equipment off and on, the user is encouraged to try to correct the interference by one or more of the following measures: • Reorient or relocate the receiving antenna. • Increase the separation between the equipment and the receiver. • Connect the equipment to an outlet on a circuit different from that to which the receiver is connected. • Consult the dealer or an experienced radio/TV technician for help.CAUTION: This device and its antennas must not be co-located or operated in conjunction with any other antenna or transmitter. Any changes or modifications not expressly approved by the party responsible for compliance could void the user’s authority to operate the equipment. This device
�

complies with Part 15 of the FCC Rules. Operation is subject to the following two conditions: (1) This device may not cause harmful interference; and (2) this device must accept any interference received, including interference that may cause undesired operation.
FCC rF radiation exposure statementThis equipment complies with FCC RF radiation exposure limits set forth for an uncontrolled environment, and should be installed and operated with a minimum distance of 20 cm (8 in.) between the radiator and your body during normal operation. The antenna(s) used for this transmitter must not be co-located or operated in conjunction with any other antenna or transmitter.
r&tte ComplianCe statementThis equipment complies with all the requirements of Directive 1999/5/EC of the European Parliament and the Council of March 9, 1999, on radio equipment and telecommunication terminal equipment (R&TTE) and the mutual recognition of their conformity. The R&TTE directive repeals and replaces Directive 98/13/EEC (Telecommunications Terminal Equipment and Satellite Earth Station Equipment) as of April 8, 2000.
eu Countries intended For useThe ETSI version of this device is intended for home/office use in Austria, Belgium, Denmark, Finland, France, Germany, Greece, Ireland, Italy, Luxembourg, the Netherlands, Portugal, Spain, Sweden and the U.K., and is also authorized for use in EFTA member states Iceland, Liechtenstein, Norway and Switzerland. (EU countries not intended for use: none.).
saFety• This card can become hot during extended periods of use. This is normal and is not a malfunction. Upon removal from your computer, do not place the card on paper, cloth or other flammable objects. • Keep this device out of the reach of children. • Do not expose this device to direct sunlight, moisture or conditions of excessive heat or humidity.
�

table of Contents
Installation ..........................................................................................6 Hardware .....................................................................................6 Software .......................................................................................7 Configuration ....................................................................................8 Connecting to a Wireless Access Point .......................................9 Connection Profile Management ...................................................17 View Network Statistics and Link Status ................................... 24 Advanced Settings .....................................................................26 QoS Settings ..............................................................................29 About..........................................................................................35 Soft AP .................................................................................................... 36 Switch to AP Mode and Basic Configuration .............................36 Security Settings ........................................................................38 Access Control ..........................................................................40 MAC (Connection) Table ............................................................ 41 Event Log ................................................................................... 42 Statistics ....................................................................................43 Troubleshooting ...............................................................................44 Specifications...................................................................................45
NOTE: Some screen-shot images have been modified to fit the format of this user manual.
CONTENTS
section page
�
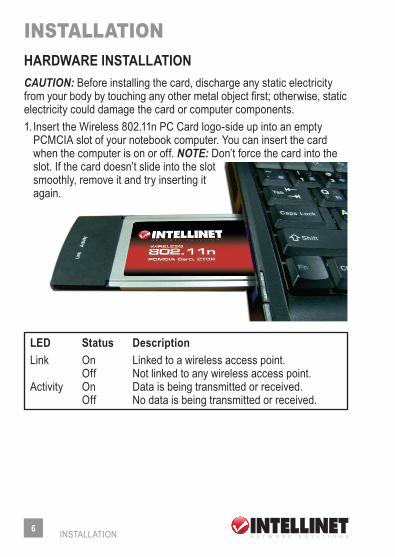
installationhArdwAre inSTAllATionCAUTION: Before installing the card, discharge any static electricity from your body by touching any other metal object first; otherwise, static electricity could damage the card or computer components.1. Insert the Wireless 802.11n PC Card logo-side up into an empty PCMCIA slot of your notebook computer. You can insert the card when the computer is on or off. NOTE: Don’t force the card into the slot. If the card doesn’t slide into the slot smoothly, remove it and try inserting it again.
� INSTALLATION
led Status descriptionLink On Linked to a wireless access point. Off Not linked to any wireless access point.Activity On Data is being transmitted or received. Off No data is being transmitted or received.

SofTwAre inSTAllATion1. With the Wireless 802.11n PC Card inserted and the computer on, the Found New Hardware Wizard displays a welcome screen. Click “Cancel” to proceed with the driver installation.
2. Insert the enclosed driver CD in the CD-ROM drive and run the “Setup. exe” program in the “Driver” folder. When the license agreement screen displays, select “I accept the terms of the license agreement,” then click “Next” to continue with the adapter’s software installation.3. When the first Setup Type screen displays, the Select Configuration Tool panel presents two options: “Ralink Configuration Tool” is recommended because it provides full access to all the functions available with this Wireless 802.11n PC Card; “Microsoft Zero Configuration Tool” can be selected if you prefer using the option provided by Windows XP or Vista. Once either of the Select Configuration Tool options has been chosen, click “Next” to continue with the software installation.
�INSTALLATION

4. The second Setup Type screen gives you two options. To enhance wireless performance (the data transfer rate, specifically), you can select “Optimize for performance mode.” Wireless compatibility is not guaranteed in this mode, however: You may not be able to communicate with older wireless devices or wireless access points (such as 802.11b devices). NOTE: Select this mode when you plan to communicate only with 802.11 Draft-N devices. To maintain compatibility and communicate with older devices, select “Optimize for WiFi mode.” Once either mode has been selected, click “Next.” NOTE: If the Found New Hardware screen displays again, ignore it while the installation procedure continues and wait for the next screen.5. When the InstallShield Wizard Complete screen displays, click “Finish.”
ConfigurationWith the driver installation complete, a new icon appears in the desktop menu tray, presenting the status of the card when moused over. To begin configuring the wireless connection, right-click on the icon and click “Launch Config Utilities” from the pop-up menu. (The full procedure is presented in the next subsection of this manual.)
CONFIGURATION �

To close the configuration utility, click “Exit.” NOTE: Clicking “Exit” to stop the configuration utility prevents you from maintaining the wireless link to the access point you wish to use. In this case, you can re-start the configuration utility by clicking the Wireless Utility icon as shown (Start ‡ All Programs ‡ Ralink Wireless).
ConneCTing To A wireleSS ACCeSS PoinT (wAP)Once the driver is correctly installed, it will try to connect to any unencrypted wireless access point automatically. If you want to connect to a specific wireless access point, or the access point you wish to connect to uses encryption, you need to configure the PC card and input the required parameters.There are two ways you can configure the Wireless 802.11n PC Card to connect to a wireless access point: using the configuration utility that comes with the wireless adapter driver and using the built-in Windows zero configuration utility.
Using the Configuration Utility1. Right-click the configuration utility icon in lower-right corner of the
CONFIGURATION �

desktop, then click “Launch Config Utilities” in the pop-up menu (as shown above).2. The configuration utility will automatically scan for wireless access points, and all those found will be displayed. If the wireless access point (WAP) you want to connect to doesn’t show here, click “Rescan” until it displays. NOTE: You may need to click “Rescan” repeatedly to display the WAP you want. If it doesn’t appear after clicking “Rescan” five times, move your computer closer to the wireless access point or refer to the Troubleshooting section at the back of this manual.
SSid: The service set identifier is the name of the wireless access point or other wireless device. BSSid: The basic service set identifier is the MAC address of a wireless access point or other network device. Unlike an SSID, the BSSID of every access point is unique; if multiple devices share an SSID, each can be identified by its BSSID. Signal: This shows the signal strength of an access point (AP) or wireless device. The larger the number, the better the radio strength, which often means you’re not too far from that AP or wireless device.
10 CONFIGURATION

Channel: This shows the channel number used by the corresponding AP or wireless device. encryption: This shows the encryption method the AP or other wireless device uses. If the WAP doesn’t enable encryption, “None” will be displayed here. Authentication: This shows the authentication mode used. If the WAP doesn’t require authentication,”Unknown” will be displayed here. network Type: This shows the type of wireless connection. If it’s a WAP, “Infrastructure” will be displayed here; if it’s a computer or network device, “Ad Hoc” will be displayed here. NOTE: WAP/Infrastructure acts as a bridge to let wired and wireless network devices communicate with each other. Ad Hoc establishes a direct wireless link between computers and/or network devices without the use of a WAP.3. Click to highlight the wireless access point or network device you want to connect; then click “Connect.”
If the selected AP doesn’t enable encryption (the Encryption field of the selected AP reads “None”), connection to this WAP will occur within a minute; proceed to Step 6. If the selected AP does enable encryption, proceed to the next step.
CONFIGURATION 11

4. If the selected WAP already has an SSID, proceed to the next step; otherwise, this prompt displays. Obtain the exact SSID of the wireless access point and enter it in the prompt field, then click “OK.” NOTE: If the SSID entered here is wrong, you won’t be able to connect to this access point. 5. If the wireless access point uses encryption, a WEP password or WPA preshared key needs to be entered; if not, skip this step. (Obtain whichever is needed from the owner of the WAP you want to connect to.) Once the correct entry is made, click “OK.” If the value entered here is wrong, you won’t be able to connect to the wireless access point.
NOTE: Authentication Type is automatically selected and should not be changed. 6. “Connected <–> SSID” (where “SSID” represents the actual SSID of the wireless access point or wireless device you connected to) displays at the lower-left corner of configuration utility, indicating a successful connection to the selected access point or wireless device.
CONFIGURATION12

Using the windows Zero ConfigurationWindows XP and Vista have a built-in wireless network configuration utility called Windows Zero Configuration (WZC), providing an alternative for configuring your wireless network parameters.1. Right-click the configuration utility icon in the lower-right corner of the desktop, then click “Use Zero Configuration as Configuration utility” in the pop-up menu.2. Click “Start” (it should be in the bottom-left corner of the Windows desktop); go to Control Panel”; then click “Network and Internet Connections.”
1�CONFIGURATION

3. Click “Network Connections” (below), then click “Connect to a network.”
CONFIGURATION1�

4. Right-click “Wireless Network Connection.” NOTE: This option may have a numerical suffix (as shown) if you have more than one wireless network card, so make sure you’re selecting this device; then click “View Available Wireless Networks.”
5. All wireless access points in proximity will be displayed. If the access point you want to use is not displayed, move your computer closer to the access point or click “Refresh network list” to re-scan for access points. Click the access point you want to use if it’s shown, then click “Connect.”
CONFIGURATION 1�

6. If the access point is protected by encryption, enter its security key or passphrase here. It must match the encryption setting on the access point. If the selected access point doesn’t use encryption, this prompt screen won’t display.7. When the Wireless Network Connectin screen shows “Connected,” the connection between your computer and the wireless access point has been successfully established.
1� CONFIGURATION

ConneCTion Profile mAnAgemenTIf you need to connect to different wireless access points at different times — at home, the office or a cybercafe, for example — you can store the connection parameters (encryption, passphrase, security and so forth) as a profile for every access point so you don’t have in enter them every time you want to connect to a specific wireless access point.
making a Profile for an Access Point or other wireless device1. Right-click the configuration utility icon in the lower-right corner of the desktop, then click “Launch Config Utilities” in the pop-up menu.2. Choose one of the two options available for adding a connection profile to your Profile List: create a new one or add an existing one. • To create and add a new profile, click the Profile tab to display the current Profile List, then click “Add.”
• To simply add a profile already established, click the Site Survey tab (shown below), highlight the connection(s) you want to add to the current Profile List, then click “Add to Profile.”
CONFIGURATION 1�

3. On the Add Profile screen, set or re-set the parameters for the newly created/added profile.
1� CONFIGURATION

Profile name: Enter up to 32 alphanumerical characters and/or symbols (but no spaces). SSid: If available, the SSID of the selected WAP or other wireless device will display here; otherwise, it needs to be entered manually. PSm (Power Saving mode): CAM (Constantly Awake Mode) keeps the wireless radio active even when not transferring data); PSM (Power Saving Mode) switches the radio off when not transferring data. NOTE: PSM is recommended to help the battery live longer if you’re using the adapter with a notebook computer. network Type: Select “Ad Hoc” or “Infrastructure.” If you’re adding a profile from an existing access point or other wireless device, it’s automatically selected and you don’t have to change it. Preamble: This option is only available when the network type is “Ad Hoc.” Select “Auto” or “Long Preamble.” (Select “Auto” if you’re unsure.) rTS Threshold: Check the box to manually set it here. NOTE: Do not modify the default setting unless you know what it is. fragment Threshold: Check the box to manually set it here. NOTE: Do not modify the default setting unless you know what it is.4. Click the Authentication and Security tab to display and enter the encryption and authentication settings.
CONFIGURATION 1�

Authentication Type: Select the authentication type of the WAP or other wireless device you wish to connect. If adding a profile from an existing access point or wireless device, this is automatically entered: Do not modify it. NOTE: If you select “LEAP” (Lightweight Extensible Authentication Protocol), an additional screen displays for entering/ selecting the LEAP identity, password, domain name and encryption type. Check the “Show Password” box to display the password entered instead of asterisks.
encryption: Select the encryption type of the WAP or other wireless device you wish to connect. If adding a profile from an existing access point or wireless device, this is automatically entered: Do not modify it. wPA Preshared Key: Enter your values here. If encryption is not enabled or if “WEP” is selected as the encryption type, this field will be disabled and grayed out. weP Key: Select the key type (Hex or ASCII) and input the WEP key here. If encryption is not enabled or if “WPA” is selected as the encryption type, this field will be disabled and grayed out. Show Password: If you check this box, all passphrases or security
20 CONFIGURATION

keys will be displayed as they’re entered, instead of asterisks. Use 802.1x: This enables 802.1x wireless authentication. Click “802.1x Setting” to set 802.1x parameters. (See next section.)5. After you finish with the settings, click “OK” to save the settings and exit. The profile you just created will be displayed.
6. To use the profile, click to highlight it, then click “Activate.” Only one profile can be activated at a time: A green check identifies the currently activated profile; a red check indicates the wireless access point is not reachable.7. To change the connection parameters of a specific profile, click to highlight it, then click “Edit” to display the prompts for entering the connection parameters, just like you’re creating a new profile.8. To remove a profile, click to highlight it, then click “Delete.”
Using 802.1x – CertificationClicking “802.1x Setting” (as mentioned in “Use 802.1x” in Step 4 above) displays the 802.1x Setting screen.1. Click the Certification tab to display the Certification settings. Authentication Type: This selection must be identical to the 802.1x authentication type you’re using.
CONFIGURATION 21

Session resumption: Enable/disable the function. NOTE: If unsure about this setting, ask your 802.1x authentication administrator. identity: Enter the 802.1x identity here. Password: Enter the password for the 802.1x identity here. domain name: Enter the domain name of the 802.1x authentication here. NOTE: This field will be grayed out when authentication type is not “EAP-FAST.” Use Client certificate: If the authentication type selected is “PEAP” or “TTLS,” you can use the certificate stored on your computer. If the selected authentication type is “TLS/Smart Card,” this box is always checked. more...: Click to select a certificate on your computer. Allow unauthenticated provision mode: This box is always checked
22 CONFIGURATION

and cannot be modified. Use protected authentication credential: If the authentication type selected is “EAP-FAST,” you can check this box to use a protected authentication credential. remove: Remove the credential you imported previously. import: Click to be prompted to select an authentication credential file from your computer. Protocol: Select the protocol of tunneled authentication here. This pull-down menu is only available when the selected authentication type is “PEAP” or “TTLS.” When “EAP-FAST” is selected, the protocol setting is always “Generic Token Card” and cannot be changed. identity: Enter the identity of tunneled authentication here. Password: Enter the password of tunneled authentication here. Password mode: Select the password mode of the “EAP-FAST” authentication mode. NOTE: This setting is hidden when the selected authentication type is other than “EAP-FAST.”2. After finishing with the settings, click “OK” to save the settings and exit.Using 802.1x – CA Server1. Click the CA Server tab to display the Certification Authority settings. Use certificate chain: Check this box to enable the use of a certificate chain. Certificate issuer: Select the issuer of the certificate from this drop- down menu. Allow intermediate certificates: Check this box to allow intermediate certificates. Server name: Enter the name of the CA server here. Server name must match exactly: Check this box and the wireless configuration utility will check if the server name of the CA server you’ve entered is matched exactly with the CA server being connected to. If they don’t match, the connection will be dropped. domain name must end in specified name: Check this box and the wireless configuration utility will check the end of the domain name. If there’s anything wrong, the connection will be dropped.2. After finishing with the settings, click “OK” to save the settings and exit.
CONFIGURATION 2�

view neTworK STATiSTiCS And linK STATUSThe configuration utility provides information about network statistics and link status. If you want to know how your wireless PC card works, you can use these functions to get detailed information about the wireless connection you’re using.
network Statistics1. Right-click the configuration utility icon in the lower-right corner of the desktop, then click “Launch Config Utilities” in the pop-up menu.2. Click the Statistics tab to display the wireless connection statistics.
2� CONFIGURATION
3. To reset the statistics of all the displayed items back to zero, click “Reset Counter.”4. Click “OK” to close the window.
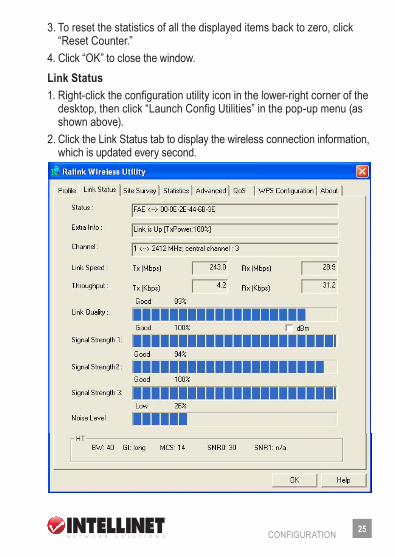
link Status1. Right-click the configuration utility icon in the lower-right corner of the desktop, then click “Launch Config Utilities” in the pop-up menu (as shown above).2. Click the Link Status tab to display the wireless connection information, which is updated every second.
CONFIGURATION 2�
Status: Displays the SSID and BSSID of the connected wireless access point or other wireless device (displayed as SSID <–> BSSID). If there’s no active connection, “Disconnected” displays here. extra info: Displays the link status (“Link is Up” or “Link is Down”) and the radio transmitting power of your PC card. Channel: Displays the radio channel in use. link Speed: Displays the link speed of data transmitting (Tx, in Mbps) and receiving (Rx, in Mbps). Link speed is the maximum available data transfer speed of the wireless connection, which depends on the radio signal quality of the wireless connection. Throughput: Displays the rate of data transmitting (Tx, in kbps) and receiving (Rx, in kbps). link Quality: Displays the link quality (radio signal quality) by percentage and a descriptive word (“Good,” “Normal,” “Weak” or “Low”). The better the link quality, the better the wireless link speed. Signal Strength 1-3: Displays the radio signal strength of the built-in antenna(s). Like Link Quality, each of the three antenna readings also presents a descriptive word above the bar (“Good,” “Normal,” “Weak” or “Low”). noise level: Displays the percentage or level of noise (unusable) of the signal. As this value rises, the data transfer rate drops. dBm: Check this box to display the signal strengths and noise level in dBm instead of as a percentage.
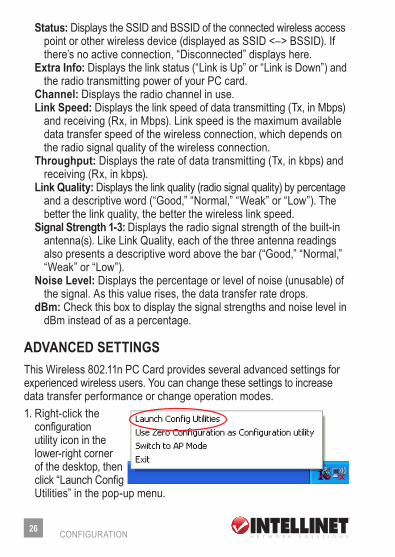
AdvAnCed SeTTingSThis Wireless 802.11n PC Card provides several advanced settings for experienced wireless users. You can change these settings to increase data transfer performance or change operation modes.1. Right-click the configuration utility icon in the lower-right corner of the desktop, then click “Launch Config Utilities” in the pop-up menu.
2� CONFIGURATION
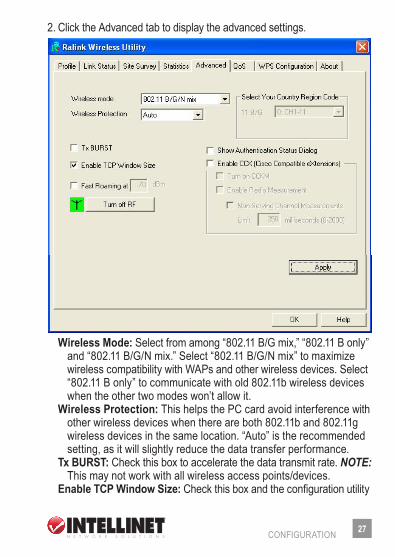
2. Click the Advanced tab to display the advanced settings.
wireless mode: Select from among “802.11 B/G mix,” “802.11 B only” and “802.11 B/G/N mix.” Select “802.11 B/G/N mix” to maximize wireless compatibility with WAPs and other wireless devices. Select “802.11 B only” to communicate with old 802.11b wireless devices when the other two modes won’t allow it. wireless Protection: This helps the PC card avoid interference with other wireless devices when there are both 802.11b and 802.11g wireless devices in the same location. “Auto” is the recommended setting, as it will slightly reduce the data transfer performance. Tx BUrST: Check this box to accelerate the data transmit rate. NOTE: This may not work with all wireless access points/devices. enable TCP window Size: Check this box and the configuration utility
CONFIGURATION 2�
will adjust the TCP window size automatically for better performance. NOTE: This should be safe for most wireless environments, but if data transfer problems occur, uncheck this box. fast roaming at: Check this box to adjust the threshold at which this card switches to another wireless access point with better signal quality. NOTE: Only adjust this value if you understand what it means. Turn off rf: Click to switch the wireless radio off; click again to switch it back on. Select Your Country region Code: Select the country/region code of your location. NOTE: Regulations for wireless devices vary from country to country, and local laws may prohibit the use of certain channels (radio frequencies). Show Authentication Status dialog: When your computer is being authenticated by a wireless authentication server, a dialog window with the process of authentication will appear. This function is helpful in determining the problem when you can’t be authenticated, and you can provide this information to the authentication server’s administrator for debugging purposes. enable CCX: Enable Cisco Compatible eXtensions is a wireless feature developed by Cisco to improve wireless performance with CCX- compatible wireless devices. Check this box if you need to connect to such wireless devices. Turn on CCKm: Check to enable Cisco Centralized Key Management, which enables wireless clients to roam between CCKM-enabled access points in a very short time. enable radio measurement: When connecting to a CCX-compatible AP, check this box to enable the radio measurement function and improve wireless connectivity. non-Serving Channel measurements: When connecting to a CCX- compatible AP, check this box to enable the measurement on unused radio channels and improve wireless connectivity. limit --- milliseconds: Limit the time used for above measurements to a certain time. The default value is 250.3. After finishing with the settings, click “Apply” to apply the settings; click “OK” to close the configuration utility.
2� CONFIGURATION

QoS SeTTingSThis Wireless 802.11n PC Card provides a QoS (Quality of Service) function to improve the performance of certain network applications: audio/video streaming, network telephony (VoIP) and others. When you enable the WMM (Wi-Fi MultiMedia) function of this card, you can define the priority of different kinds of data to give higher priority to applications that require instant response, therefore improving their performance.1. Right-click the configuration utility icon in the lower-right corner of the desktop, then click “Launch Config Utilities” in the pop-up menu.2. Click the QoS tab to display the QoS settings.
CONFIGURATION 2�

wmm enable: Check to enable the WMM function. Click “Apply” (the upper of three such buttons) each time the box is checked/unchecked in order to activate/de-activate the corresponding settings. wmm - Power Save enable: Enable the WMM power saving mode to save energy and increase battery life. Setting...: Click to select the WMM data type (suppressing the power- saving function). When this kind of data is transferring, the power- saving function is disabled. Select “AC_BK” (Background/Low Priority), “AC_BE” (Best Effort), “AC_VI” (Video First) or “AC_VO” (Voice First). direct link: Enable/disable the direct link setup (DLS) function. Setup enable: This function greatly improves the data transfer rate between WMM-enabled wireless devices. Click “Apply” (the middle of three such buttons) each time the box is checked/unchecked in order to activate/de-activate the corresponding settings. mAC Address: Input the MAC address of another WMM-enabled wireless device you want to directly link to. Click “Apply” (the lowest of the three) to add this MAC address to the DLS address table. Timeout value: If the wireless device doesn’t respond after the amount of time entered here, it will be removed from DLS table. Tear down: To remove a specific wireless device from the DLS table, select the device and click this button to remove it.3. After finishing with the settings, click “OK” to close the utility.
wPS ConfigUrATionThe latest wireless network technology, Wi-Fi Protected Setup (WPS) makes wireless network setup relatively simple. If you have a WPS-enabled wireless access point and you want to establish a secure connection to it, you don’t have to configure the WAP or set up data encryption. Just go to the WPS setup screen, click a button, then press a button on the wireless access point you want to establish a secure connection with. For an older wireless access point, a firmware upgrade can update it to WPS-enabled. Since the older device may not have a hardware button to press for WPS setup, an alternate method exists: entering the PIN code. Every WPS-compatible wireless network card/adapter comes with a unique
�0 CONFIGURATION

CONFIGURATION �1
WPS PIN code: Just input the code to the WAP, and the wireless access point and wireless card will do the rest. NOTE: This Wireless 802.11n PC Card is compatible with WPS. To use this function, however, the WAP you wish to connect to must also support WPS functionality.
wPS Setup — PBC (Push-Button Configuration)1. Right-click the configuration utility icon in the lower-right corner of the desktop, then click “Launch Config Utilities” in the pop-up menu.2. Click the WPS Configuration tab to display the WPS settings.
3. Set Config Mode to “Enrollee,” then push the “WPS” button on your wireless access point (the button used to activate WPS standby mode may have another name), or start WPS standby mode using whatever method is listed in the WAP user manual.

4. Before establishing the wireless connection using WPS, you can click “Rescan” to search for WPS-enabled access points near you to make sure the WPS function of your access point is activated. NOTE: All access points with the WPS function enabled will be displayed. Make sure the AP you want to connect to is displayed; if it isn’t, click “Rescan” a few more times. To see details about the selected access point click “Information.” 5. Start the PBC pairing procedure (refer to the access point’s manual), then click “PBC” to initiate the wireless connection by WPS. NOTE: This may take up to a minute to complete. When you see “WPS status is connected successfully,” the connection between the adapter and the access point is successful, and information about the selected AP is displayed. Should WPS fail to activate, click “PBC” a few more times.
�2 CONFIGURATION
6. To disconnect the wireless adapter from a connected access point, click “Disconnect.” 7. To select another WPS-enabled wireless access point, click “Disconnect,” then click “Connect” to establish a connection to another selected AP (if more than one WPS-enabled access point was found). You can also click “Rotate” to connect to the next access point on the list.8. To remove a found access point from the list, select it and click “Delete.”
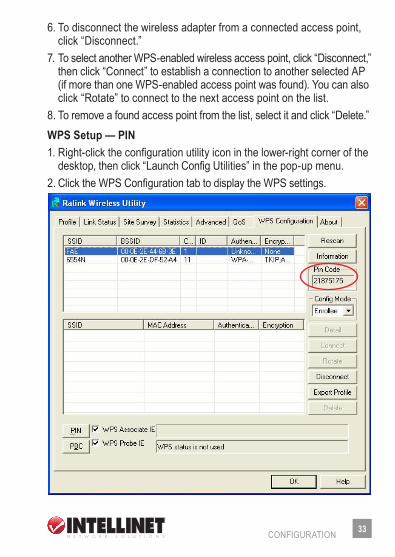
wPS Setup — Pin1. Right-click the configuration utility icon in the lower-right corner of the desktop, then click “Launch Config Utilities” in the pop-up menu.2. Click the WPS Configuration tab to display the WPS settings.
CONFIGURATION ��

The PIN code of the Wireless 802.11n PC Card is an eight-digit number located on the right side of configuration utility screen. Record it for reference, and enter it in your wireless access point as the WPS PIN code. (Refer to the access point’s manual for instructions.) NOTE: The PIN code of every wireless network card/adapter is different: Don’t use the sample code shown here.3. Click “PIN.” Within a few seconds (though it can take up to a full minute), the “WPS status is connected successfully” message will appear to indicate that a wireless access point with the correct PIN code has been found and connected to. NOTE: It may be necessary to click “PIN” several times to make a proper connection. Always double-check that the correct PIN code has been entered.
�� CONFIGURATION

ABoUTDetails of the Wireless 802.11n PC Card’s configuration utility and firmware versions and other important information can easily be accessed when assistance is required. For additional information about the PC card, you can go to www.intellinet-network.com.1. Right-click the configuration utility icon in the lower-right corner of the desktop, then click “Launch Config Utilities” in the pop-up menu.2. Click the About tab to display the details.
3. Click “OK” to close the configuration utility.
CONFIGURATION ��

soft aPIn addition to acting as a wireless client of other wireless access points, the Wireless 802.11n PC Card can function as a wireless service provider. You can switch this adapter’s operating mode to AP mode to simulate the function of a real wireless access point using software (“soft” AP) so that any other computer or wireless device can wirelessly connect to your computer, even sharing your Internet connection.
SwiTCh To AP mode And BASiC ConfigUrATionThe operating mode of this card is Station mode (becoming a client of other wireless access points) by default. 1. Right-click the configuration utility icon in the lower-right corner of the desktop, then click “Switch to AP Mode” in the pop-up menu. NOTE: A different utility icon now appears , indicating the adapter is operating in AP mode. The pop-up menu now lists “Switch to Station Mode” if you want to revert to that function. 2. On the configuration screen that displays when you switch to AP mode (or when you click “Launch Config Utilities” while operating in this mode), assign a network card with an Internet connection.
�� SOFT Ap

3. If your computer has another network card connected to the Internet, select it from the Name drop-down menu, then click “Enable ICS.” If your computer does not have another network card with an Internet connection, click “Not enable ICS.” Either option will display the basic configuration menu of the AP function.
SSid: Enter the SSID (the name used to identify this wireless access point) using up to 32 alphanumerical characters (but no spaces). Channel: Select a wireless channel from the drop-down menu. The number of channels available here depends on the setting of Country Region Code. wireless mode: With this selection, you can limit the type of wireless client to only 802.11b or 802.11g or either; or you can select “802.11 B/G/N mix” to allow all kinds of wireless clients to connect to your computer.
SOFT Ap ��

Use mac Address: Click to use the MAC address of the wireless PC card as the SSID. A prefix of “AP” will be added. Security Setting: Set the security options (wireless data encryption). (See Security Settings below for details.) Country region Code: Available options are 0-7, which will affect the available wireless channels you can use. 0: FCC (the U.S., Canada and some other countries use FCC radio communication standards); 1: ETSI (Europe); 2: Spain; 3: France; 4: MKK; 5: MKKI (TELEC); 6: Israel (Channel 3 to 9); 7: Israel (Channel 5 to 13). Beacon (ms): Define the time interval for sending beacon signals. The default value is 100. NOTE: Do not modify this value unless you know what will be affected. idle Time: Select the idle time of your wireless PC card. The default value is 300. NOTE: Do not modify this value unless you know what will be affected. no forwarding among wireless clients: When checked, wireless clients will not be able to share data with each other. hide SSid: When checked, the SSID will not be broadcast to the public: Your wireless clients will need to know the exact SSID to be able to connect to your computer. NOTE: This option is useful to enhance your security. Allow Bw 40 mhz: Check to allow 40 MHz bandwidth capability. default: Click to restore all settings on this screen to default values. Apply: Click to activate current settings.4. Click the “X” at the upper-right corner of the screen to exit.
SeCUriTY SeTTingSThe Wireless 802.11n PC Card supports wireless encryption in AP mode, which will encrypt the data being transferred over the air to enhance data security. Unless you want to open your computer (and its Internet connection) to the public, it’s recommended that data encryption be enabled.1. Click “Security Setting” on the Utility screen (see previous section), to display the security options.
�� SOFT Ap

Authentication Type: Available options are “Open,” “Shared,” “WPA- PSK,” “WPA2-PSK” and “WPA-PSK / WPA2-PSK.” To disable wireless data encryption, select “Open” or “Shared.” encryption Type: The available options depend on the authentication type selected. If you select “Not Use,” data will not be encrypted and anyone with networking knowledge would be able to read the data you transfer. NOTE: WPA encryption is safer than WEP; however, some older wireless clients don’t support WPA encryption. wPA Pre-shared Key: Only clients with the same pre-shared key entered here will be able to connect to your computer. This setting is only available when you select one of the WPA encryptions. group rekey interval: Specify the time interval to re-issue the key to your wireless clients, either by entering a value in the field (1,000 ... data packets times the number entered) or by clicking “10 seconds” to change to this time unit.
SOFT Ap ��
wep Key #1 – 4: If selecting “WEP” as the encryption type, enter the WEP encryption key: hex (numerals 0 – 9 and/or ASCII characters A – F) or ASCII (all alphanumerical characters/symbols). Select the type of WEP key first, then enter the WEP key(s) accordingly. • To use WEP 64-bit encryption, input 10 hex characters or five ASCII characters. • To use WEP 128-bit encryption, input 26 hex characters or 13 ASCII characters. NOTE: 128- bit encryption is safer than 64-bit, but the data transfer speed will be slightly reduced. Show Password: Check this box to show the WPA pre-shared key or WEP key entered instead of asterisks. oK: Click to save changes made on this screen. Cancel: Click to discard all changes made on this screen.
ACCeSS ConTrolIf you’re not going to open your computer and wireless resources to the public, you can use the MAC address filtering function to enforce your access control policy so that only wireless clients with the MAC address you defined through this function can be connected to your soft AP.1. Right-click the configuration utility icon in the lower-right corner of the desktop, then click “Launch Config Utilities” in the pop-up menu.2. Click the Access Control tab to display the access options. Access Policy: Select the policy type of your access rule: “Disable” allows any wireless client with proper authentication settings to connect to this AP; “Allow All” allows only wireless clients with the MAC address listed here to connect to this AP; “Reject All” prevents wireless clients with the MAC address listed here to be connected to this AP.
�0 SOFT Ap

mAC Address: Enter the MAC address of the wireless client you want to allow or reject here. NOTE: No colons (:) or hyphens (-) required. Add: Add the MAC address you entered in the MAC Address field to the list. delete: Select a MAC address on the list; click “Delete” to remove it. remove All: Click to delete all MAC addresses on the list. Apply: Click to save and apply changes made.
mAC (ConneCTion) TABleYou can view the list of all wireless clients connected to this access point. 1. Right-click the configuration utility icon in the lower-right corner of the desktop, then click “Launch Config Utilities” in the pop-up menu.2. Click on the MAC Table tab to display the list.
SOFT Ap �1

mAC Address: Displays the MAC address of this wireless client. Aid: The serial number of this wireless connection. Power Saving mode: Displays the client’s capability. Status: Displays current operating mode, data transfer rate and more.
evenT logSoft AP mode will list all wireless-related activities as a log for reference. 1. Right-click the configuration utility icon, then click “Launch Config Utilities.” 2. Click on the Event Log tab to display the list.
3. Click “Clear” to remove all entries in the log.
�2 SOFT Ap

STATiSTiCSYou can view operating details of the Soft AP mode on this screen. 1. Right-click the configuration utility icon, then click “Launch Config Utilities.”2. Click on the Statistics tab to display the information.
3. Click “RESET COUNTERS” to reset all counters to zero.
SOFT Ap ��

troubleshootingSome of the problems you may encounter during installation, configuration or operation are listed below with various possible solutions.
Can’t find any wireless access point or other wireless device in the Site Survey function. 1. Click “Rescan” a few more times. 2. Move closer to any known wireless access point. 3. Confirm that the Ad Hoc function is enabled for the wireless device you’re trying to link to. 4. Adjust the position of the computer and click “Rescan” a few more times. If you can find the wireless access point or wireless device you want to connect to by doing this, try to move closer to the place where the wireless access point or wireless device is located.Nothing happens when “Launch config utilities” is clicked. 1. Make sure the wireless PC card is properly inserted into the computer’s PCMCIA slot. If the configuration utility’s icon is black, the card is not being detected by your computer. 2. Reboot the computer and try again. 3. Remove the card and insert it into another slot, if available. 4. Remove the driver and re-install. 5. Contact your dealer for help.Can’t establish a connection with a particular wireless access point. 1. Click “Connect” a few more times. 2. If the SSID of the access point you wish to connect to is hidden (nothing is displayed in the “SSID” field in Site Survey function), re-enter the correct SSID of that access point. 3. Confirm that the correct passphrase/security key has been entered in order to connect an access point with encryption. 4. The access point you want to connect only allows network cards and adapters with a specific MAC address to establish a connection. Go to the About screen and note the value of Phy_Address, then present this value to the owner of that access point so they can add the MAC
�� TROUbLEShOOTING

address of your card to their access point’s list.The network is slow or having problems when transferring large files. 1. Move closer to the access point’s location. 2. Enable Wireless Protection on the Advanced screen. 3. Disable Tx Burst on the Advanced screen. 4. Enable WMM on the QoS screen if you need to use multimedia/ telephony-related applications. 5. Disable WMM – Power Save Enable on the QoS screen. 6. There could be too many people using the same radio channel. Ask the owner of the access point to change the channel number.
sPeCifiCationsStandards • IEEE 802.11b (11 Mbps Wireless LAN)• IEEE 802.11g (54 Mbps Wireless LAN)• IEEE 802.11n Draft 2.0 (300 Mbps Wireless LAN)
general• Bus type: 32-bit PC Card• Chipset: Ralink RT2860+RT2820• Frequency band: 2.4000 – 2.4835 GHz (Industrial Scientific Medical Band)• Modulation technologies: - 802.11b: Direct Sequence Spread Spectrum (DSSS): DBPSK, DQPSK, CCK - 802.11g: Orthogonal Frequency Division Multiplexing (OFDM): BPSK, QPSK, 16QAM, 64QAM - 802.11n: Orthogonal Frequency Division Multiplexing (OFDM): BPSK, QPSK, 16QAM, 64QAM• Security: - 64/128-bit WEP data encryption - WPA and WPA2 - Cisco CCX• Transmit power: - 300 Mbps 20 MHz, 15 dBm +/- 1 dBm
SpECIFICATIONS ��
- 300 Mbps 40 MHz, 13 dBm +/- 1 dBm - 54 Mbps OFDM, 15 dBm +/- 1 dBm - 11 Mbps CCK, 18 dBm +/- 1 dBm• Receive sensitivity: - 300 Mbps 20 MHz, -70 dBm - 300 Mbps 40 MHz, -67 dBm - 54 Mbps OFDM, -78 dBm - 11 Mbps CCK, -92 dBm• Max. coverage distance: 100 m / 328 ft. (indoor), 600 m / 1,968 ft. (outdoor)• Certification: FCC Class B, CE Mark
leds• Link• Activity
environmental• Weight: 0.18 kg (0.4 lbs.)• Operating temperature: 0 – 55°C (32 – 131°F)• Operating humidity: 10 – 95% RH, non-condensing• Storage temperature: 0 – 60°C (0 – 149°F)
System requirements• Notebook with Pentium 300 MHz-compatible processor or higher• Windows 2000/XP/2003/Vista• Available 32-bit PC card slot
Package Contents• Wireless 802.11n PC Card• Setup CD, user manual and quick install guide
�� SpECIFICATIONS


INTellINeT NeTWoRK SolUTIoNS™ offers a complete line of active and passive networking products.
Ask your local computer dealer for more information or visit
www.intellinet-network.com.
Copyright © INTELLINET NETWORK SOLUTIONSAll products mentioned are trademarks or registered trademarks of their respective owners.