Wire Shelving Pjt Planner -...
9
Transcript of Wire Shelving Pjt Planner -...


START HERE!CHOOSE THE RIGHT TYPE OF SHELF
2 WAYS TO INSTALL SHELVING
1ft. 2ft. 3ft. 4ft. 5ft. 6ft. 7ft. 8ft.
96”
85 1/2”
71 1/2”
57 1/2”
42”
28”
14”
0”
Upper shelf height
Long hang height
Double hang height
Sketch the layout of your closet on the gridbelow to assist you in determining needed
hardware. Refer to Closet Layout & InstallationTips for helpful information.
TRADITIONAL METHODMOST ECONOMICAL CHOICE FOR
A FIXED INSTALLATION
SHELFTRACK™
FASTER, EASIER INSTALLATION,ALLOWS SHELVES TO BE ADJUSTED
For Closets:Use SuperSlide® as a storageshelf or with traditional HangerBar so hangers slide freely.
For Kitchen Pantry:Use Close Mesh with tightlyspaced wires so small itemsdon’t tip over.
For Laundry & Utility:Use Shelf & Rod™ for an economical storage andclothes hanging shelf.

TRADITIONAL HARDWARE
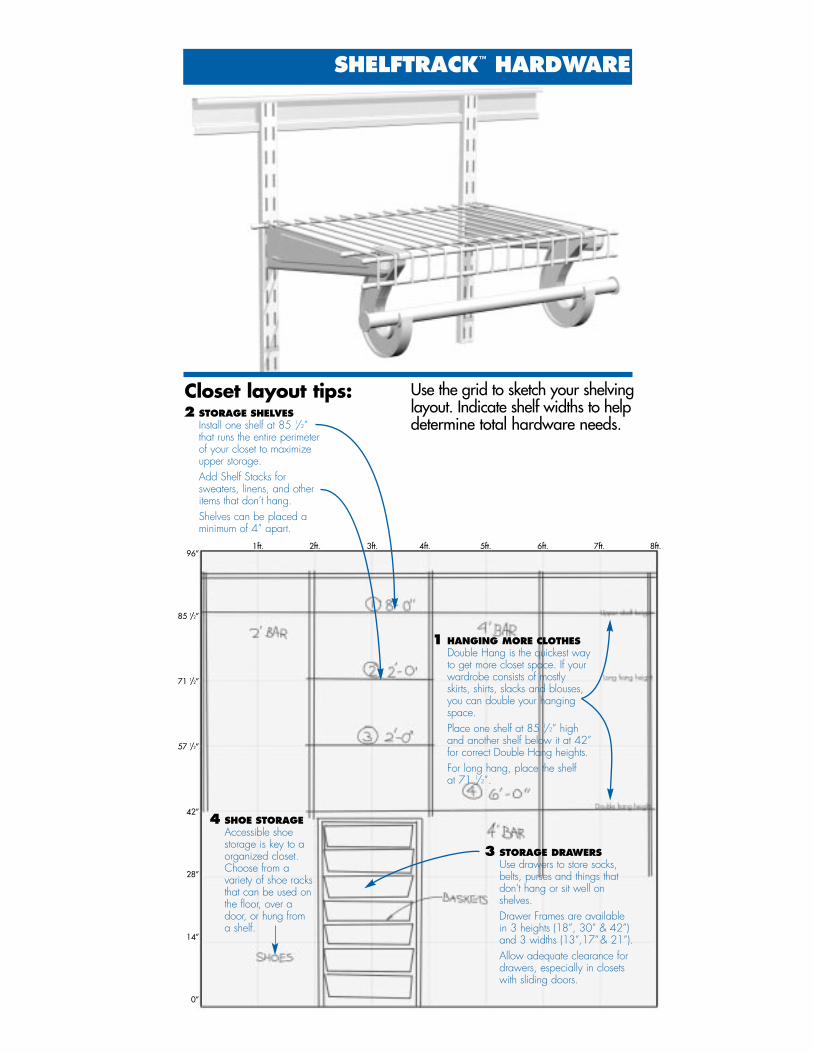
1 HANGING MORE CLOTHESDouble Hang is the quickestway to get more closet space.If your wardrobe consists ofmostly skirts, shirts, slacks andblouses, you can double yourhanging space. Place one SuperSlide shelf at85 1/2” high and another below it at 42” for correct DoubleHang heights. For long hang, place the shelf at 71 1/2”.
2 STORAGE SHELVESInstall one shelf at 85 1/2”that runs the entire perimeterof your closet to maximizeupper storage. Add Shelf Stacks forsweaters, linens, and otheritems that don’t hang.
3 STORAGE DRAWERSUse drawers to store socks,belts, purses and things thatdon’t hang or sit well onshelves. Drawer Frames are availablein 3 heights (18”, 30” & 42”)and 3 widths (13”,17” & 21”).Allow adequate clearance fordrawers, especially in closetswith sliding doors.
4 SHOE STORAGEAccessible shoe storage is key to anorganized closet.Choose from a variety of shoe racksthat can be used onthe floor, over adoor, or hung from a shelf. Or, create shoeshelves using invertedSuperSlide shelvingsupported by ShoeShelf Supports.
Closet layout tips: Use the grid to sketch your shelvinglayout. Indicate shelf widths to helpdetermine total hardware needs.
1ft. 2ft. 3ft. 4ft. 5ft. 6ft. 7ft. 8ft.96”
85 1/2”
71 1/2”
57 1/2”
42”
28”
14”
0”
When stacking 3 or more shelves overeach other, use Support Poles (poles are pre-drilled to space shelves 14” apart).
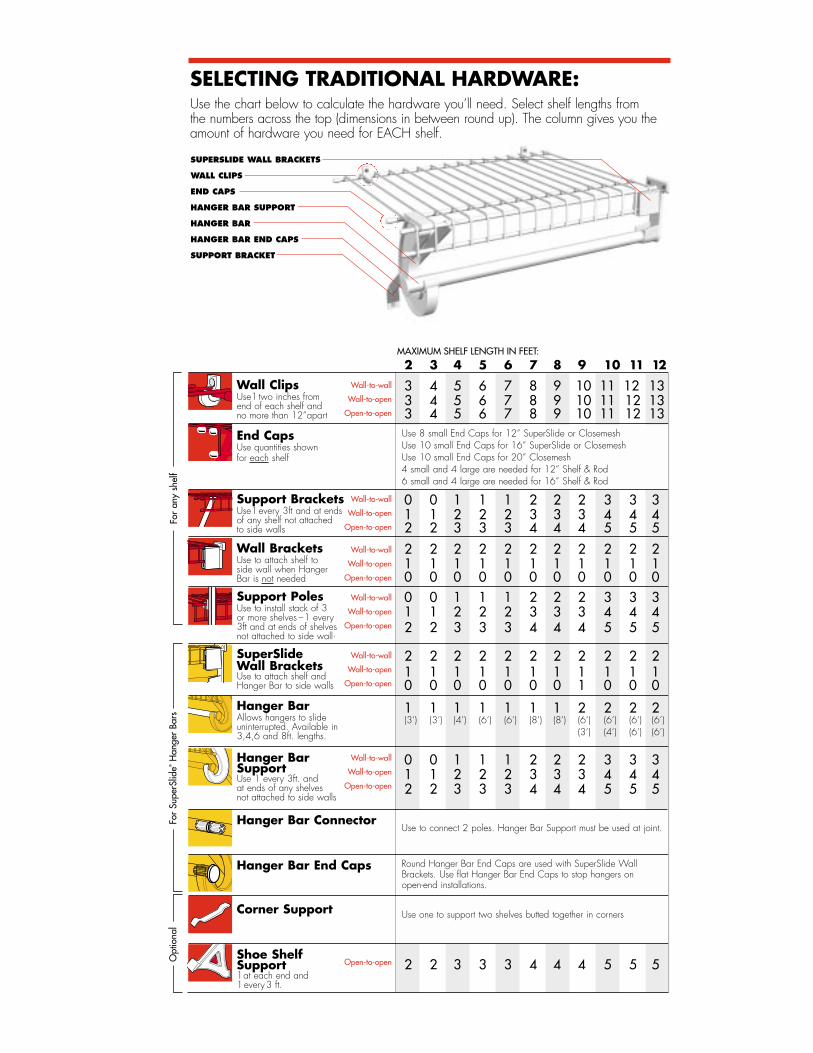
SELECTING TRADITIONAL HARDWARE:Use the chart below to calculate the hardware you’ll need. Select shelf lengths from the numbers across the top (dimensions in between round up). The column gives you theamount of hardware you need for EACH shelf.
SUPERSLIDE WALL BRACKETS
WALL CLIPS
END CAPS
HANGER BAR SUPPORT
HANGER BAR
HANGER BAR END CAPS
SUPPORT BRACKET
2 3 4 5 6 7 8 9 10 11 12
Wall Clips 3 4 5 6 7 8 9 10 11 12 13Use1 two inches from 3 4 5 6 7 8 9 10 11 12 13end of each shelf and
3 4 5 6 7 8 9 10 11 12 13no more than 12”apart
End CapsUse quantities shownfor each shelf
Support Brackets 0 0 1 1 1 2 2 2 3 3 3Use1every 3ft and at endsof any shelf not attached 1 1 2 2 2 3 3 3 4 4 4to side walls 2 2 3 3 3 4 4 4 5 5 5Wall Brackets 2 2 2 2 2 2 2 2 2 2 2Use to attach shelf toside wall when Hanger 1 1 1 1 1 1 1 1 1 1 1Bar is not needed 0 0 0 0 0 0 0 0 0 0 0Support Poles 0 0 1 1 1 2 2 2 3 3 3Use to install stack of 3or more shelves –1 every 1 1 2 2 2 3 3 3 4 4 43ft and at ends of shelves not attached to side wall.
2 2 3 3 3 4 4 4 5 5 5
SuperSlide 2 2 2 2 2 2 2 2 2 2 2Wall Brackets 1 1 1 1 1 1 1 1 1 1 1Use to attach shelf and
0 0 0 0 0 0 0 1 0 0 0Hanger Bar to side walls
Hanger Bar 1 1 1 1 1 1 1 2 2 2 2Allows hangers to slide (3’) (3’) (4’) (6’) (6’) (8’) (8’) (6’) (6’) (6’) (6’)uninterrupted. Available in (3’) (4’) (6’) (6’)3,4,6 and 8ft. lengths.
Hanger Bar 0 0 1 1 1 2 2 2 3 3 3Support 1 1 2 2 2 3 3 3 4 4 4Use 1 every 3ft. and
2 2 3 3 3 4 4 4 5 5 5at ends of any shelvesnot attached to side walls
Hanger Bar Connector
Hanger Bar End Caps
Corner Support
Shoe Shelf Support 2 2 3 3 3 4 4 4 5 5 51at each end and1every3 ft.
Use to connect 2 poles. Hanger Bar Support must be used at joint.
Round Hanger Bar End Caps are used with SuperSlide WallBrackets. Use flat Hanger Bar End Caps to stop hangers on open-end installations.
Use 8 small End Caps for 12” SuperSlide or ClosemeshUse 10 small End Caps for 16” SuperSlide or ClosemeshUse 10 small End Caps for 20” Closemesh4 small and 4 large are needed for 12” Shelf & Rod6 small and 4 large are needed for 16” Shelf & Rod
Use one to support two shelves butted together in corners
Wall-to-wall
Wall-to-open
Open-to-open
Wall-to-wall
Wall-to-open
Open-to-open
Wall-to-wall
Wall-to-open
Open-to-open
Wall-to-wall
Wall-to-open
Open-to-open
Wall-to-wall
Wall-to-open
Open-to-open
Wall-to-wall
Wall-to-open
Open-to-open
Open-to-open
For
any
shel
fFo
r Su
perS
lide®
Han
ger
Bars
Opt
iona
l
MAXIMUM SHELF LENGTH IN FEET:
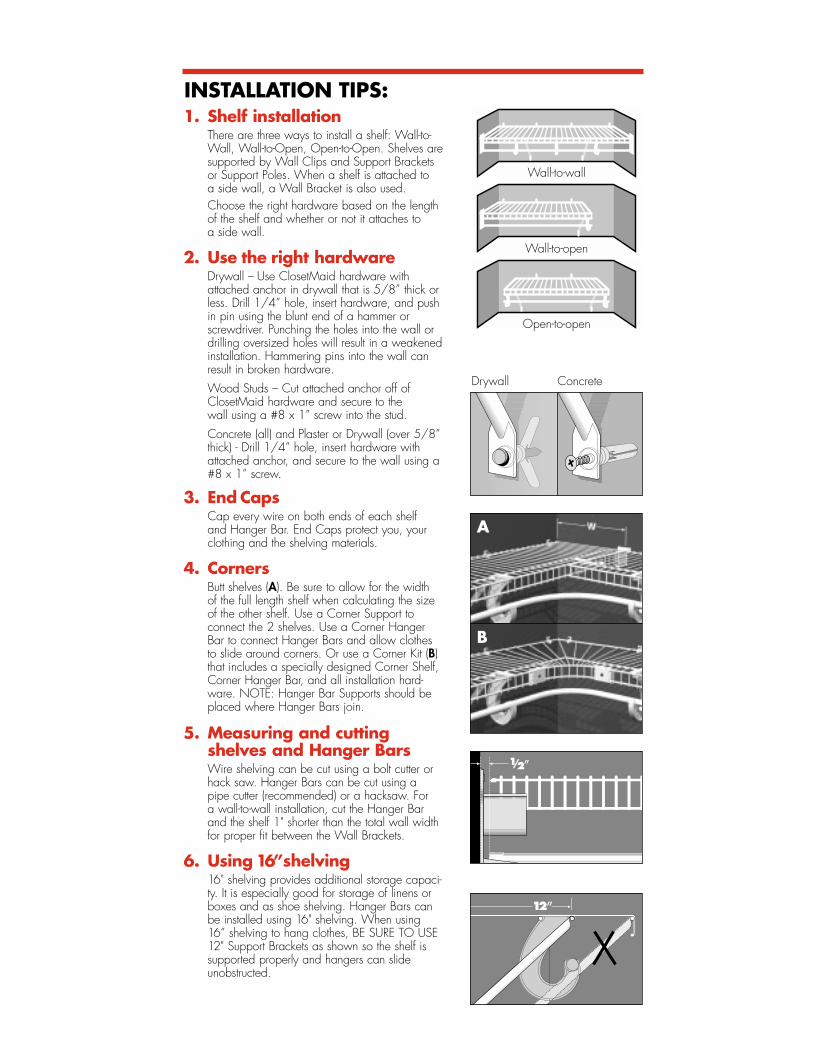
INSTALLATION TIPS:1. Shelf installation
There are three ways to install a shelf: Wall-to-Wall, Wall-to-Open, Open-to-Open. Shelves aresupported by Wall Clips and Support Brackets or Support Poles. When a shelf is attached to a side wall, a Wall Bracket is also used. Choose the right hardware based on the lengthof the shelf and whether or not it attaches to a side wall.
2. Use the right hardwareDrywall – Use ClosetMaid hardware withattached anchor in drywall that is 5/8” thick orless. Drill 1/4” hole, insert hardware, and pushin pin using the blunt end of a hammer or screwdriver. Punching the holes into the wall ordrilling oversized holes will result in a weakenedinstallation. Hammering pins into the wall canresult in broken hardware.Wood Studs – Cut attached anchor off ofClosetMaid hardware and secure to the wall using a #8 x 1” screw into the stud.Concrete (all) and Plaster or Drywall (over 5/8”thick) - Drill 1/4” hole, insert hardware withattached anchor, and secure to the wall using a#8 x 1” screw.
3. End CapsCap every wire on both ends of each shelf and Hanger Bar. End Caps protect you, yourclothing and the shelving materials.
4. CornersButt shelves (A). Be sure to allow for the width of the full length shelf when calculating the size of the other shelf. Use a Corner Support to connect the 2 shelves. Use a Corner Hanger Bar to connect Hanger Bars and allow clothes to slide around corners. Or use a Corner Kit (B) that includes a specially designed Corner Shelf,Corner Hanger Bar, and all installation hard-ware. NOTE: Hanger Bar Supports should beplaced where Hanger Bars join.
5. Measuring and cutting shelves and Hanger BarsWire shelving can be cut using a bolt cutter orhack saw. Hanger Bars can be cut using a pipe cutter (recommended) or a hacksaw. For a wall-to-wall installation, cut the Hanger Bar and the shelf 1" shorter than the total wall widthfor proper fit between the Wall Brackets.
6. Using 16”shelving16" shelving provides additional storage capaci-ty. It is especially good for storage of linens orboxes and as shoe shelving. Hanger Bars canbe installed using 16" shelving. When using 16” shelving to hang clothes, BE SURE TO USE12" Support Brackets as shown so the shelf issupported properly and hangers can slide unobstructed.
A
B
Wall-to-wall
Wall-to-open
Open-to-open
Drywall Concrete
1 HANGING MORE CLOTHESDouble Hang is the quickest wayto get more closet space. If yourwardrobe consists of mostlyskirts, shirts, slacks and blouses,you can double your hangingspace. Place one shelf at 85 1/2” highand another shelf below it at 42”for correct Double Hang heights. For long hang, place the shelf at 71 1/2”.
2 STORAGE SHELVESInstall one shelf at 85 1/2”that runs the entire perimeterof your closet to maximizeupper storage. Add Shelf Stacks forsweaters, linens, and otheritems that don’t hang. Shelves can be placed aminimum of 4” apart.
3 STORAGE DRAWERSUse drawers to store socks,belts, purses and things thatdon’t hang or sit well onshelves. Drawer Frames are availablein 3 heights (18”, 30” & 42”)and 3 widths (13”,17”& 21”). Allow adequate clearance fordrawers, especially in closetswith sliding doors.
4 SHOE STORAGEAccessible shoe storage is key to aorganized closet.Choose from a variety of shoe racksthat can be used onthe floor, over adoor, or hung from a shelf.
Closet layout tips: Use the grid to sketch your shelvinglayout. Indicate shelf widths to helpdetermine total hardware needs.
SHELFTRACK™ HARDWARE
1ft. 2ft. 3ft. 4ft. 5ft. 6ft. 7ft. 8ft.96”
85 1/2”
71 1/2”
57 1/2”
42”
28”
14”
0”

HARDWARE FOR EACH WALL: 2 3 4 5 6 7 8 9 10 11 12Hang Track 1 1 1 1 1 1 2 2 2 2 2Available in 40” (40”) (40”) (40”) (80”) (80”) (80”) (40”) (40”) (40”) (40”) (80”)and 80” lengths (80”) (80”) (80”) (80”)
Standards 2 2 3 3 4 4 5 5 6 6 7Available in 12”, 30”, 48”, 60”, 84”lengths
Wall Anchorsand screws
Toggles & screws
HARDWARE FOR EACH SHELF:
Shelf Brackets 2 2 3 3 4 4 5 5 6 6 7Available in 12”, 16” and 20” lengthsto match shelf width (Shelf & Rod,12" only).
End Caps
Hanger Bar 1 1 1 1 1 1 1 2 2 2 2Allows hangers to slideuninterrupted. Available in (3’) (3’) (4’) (6’) (6’) (8’) (8’) (6’) (6’) (6’) (6’)3,4,6 and 8ft. lengths. (3’) (4’) (6’) (6’)
Hanger Bar Support 2 2 3 3 3 4 4 4 5 5 5Use 1 every 3ft. and at ends of anyshelves not attached to side walls
Hanger Bar Connector
Hanger Bar End Caps
Corner Support
SELECTING SHELFTRACK™ HARDWARE:
Use to connect 2 poles. Hanger Bar Support must be used at joint.
Use flat Hanger Bar End Caps to stop hangers.
MAXIMUM SHELF LENGTH IN FEET:
Use screw to mount Hang Tracks or Wall Standards to studs. Use screw with anchor for installation in concrete.
Use to mount Hang Tracks or Wall Standards to drywall.
Use one to support shelves butted together in corners
Use 8 small End Caps for 12” SuperSlide or ClosemeshUse 10 small End Caps for 16” SuperSlide or ClosemeshUse 10 small End Caps for 20” Closemesh4 small and 4 large are needed for 12” Shelf & Rod6 small and 4 large are needed for 16” Shelf & Rod
For
any
shel
fFo
r Su
perS
lide®
Han
ger
Bars
Opt
iona
l
Use the chart below to calculate the hardware you’ll need. Select shelf lengths from the numbers across the top (dimensions in between round up). The column gives you theamount of hardware you need for EACH shelf.
HANG TRACK
STANDARDS
SHELF BRACKETS
END CAPS
HANGER BAR
HANGER BAR END CAPS
HANGER BAR SUPPORTS

INSTALLATION TIPS:1. Use the right hardware
Select hardware that is right for your wall type:Drywall: Drill 1/2" holes and secure to the wall with toggle bolts. Studs: Secure to the wall with #12x2" pan head screws at stud locations.Concrete: Drill 1/4" holes, insert #12 wallanchors and secure to the wall with #12x2" pan head screws.
2. Hang Track locationTrack can be installed at any height. However,for maximum adjustability and strongest installation, install track flush to ceiling and screwinto wood header behind wall board. Studinstallation is recommended whenever possible for the strongest installation.
3. Determine length andspacing of standardsStandards are available in several lengths,depending on the number of shelves you want and the spacing between the shelves.The closer the standards are placed together,the stronger the installation. Standards shouldbe spaced no more than 24" apart, and nomore than 4" from the end of the shelf.
4. Securing standardsEach standard must be secured to the wall with one screw at the closest hole to the centerof the standard for proper installation. Whenusing toggle bolts, remove toggle, put boltthrough standard and re-attach toggle to boltbefore placing standard on track.
5. Cutting shelves, Hanger Bars, and Hang TracksWire shelving can be cut using a bolt cutter or hack saw. Hanger Bars can be cut using a pipe cutter (recommended) or a hacksaw.Hang Tracks can be cut with a hacksaw.
6. CornersOne shelf is installed the full length of the walland the other shelf butts to the front of it. Be sure to allow for the width of the full length shelfwhen calculating the size of the other shelf. Use a Corner Support to connect the 2 shelves.Use a Corner Hanger Bar to connect HangerBars and allow clothes to slide around corners.NOTE: Hanger Bar Supports should be placedwhere Hanger Bars join.
7. End CapsCap every wire on both ends of each shelf and Hanger Bar. End Caps protect you, yourclothing, and the shelving materials.
8. Using 16" Shelving16" shelving provides additional storage capacityand is especially good for storage of linens orboxes. Hanger Bars can be installed using 16"shelving. Be sure to use 16" Brackets with 16"shelving (with the exception of Shelf & Rod).
Drywall
Studs
Concrete
24”Maximum
Materials List:
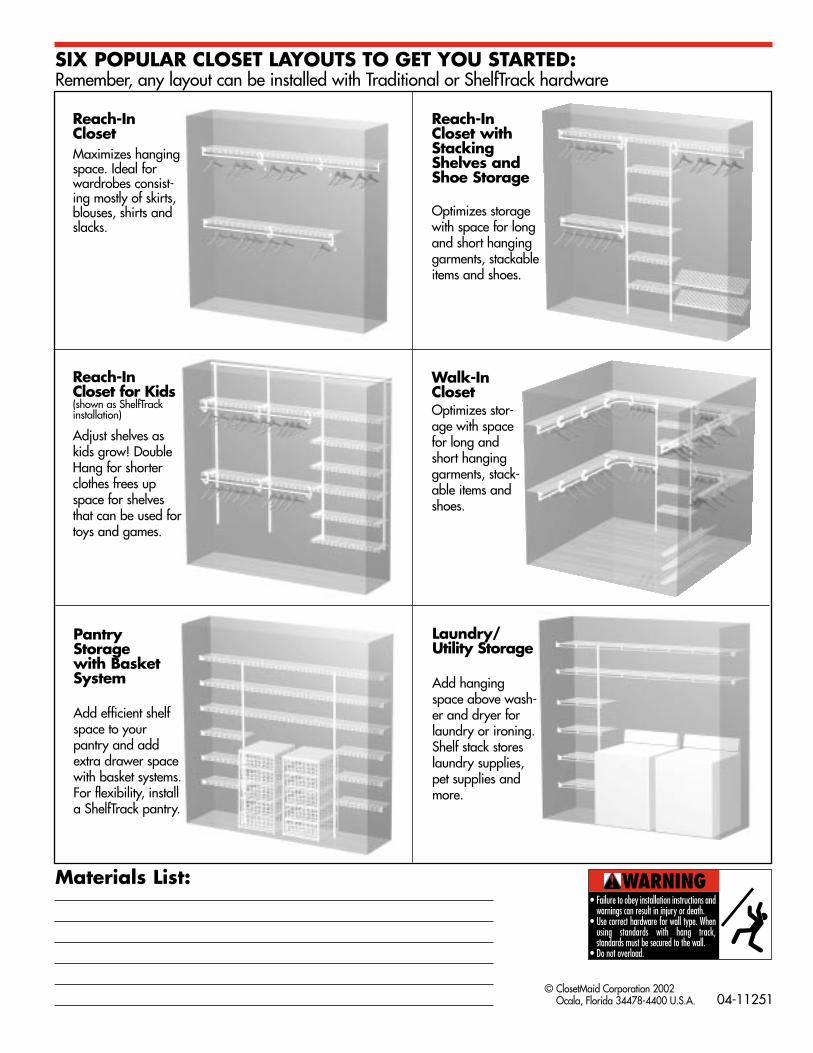
SIX POPULAR CLOSET LAYOUTS TO GET YOU STARTED:Remember, any layout can be installed with Traditional or ShelfTrack hardware
04-11251
Reach-In ClosetMaximizes hangingspace. Ideal forwardrobes consist-ing mostly of skirts,blouses, shirts andslacks.
Reach-In Closet withStackingShelves andShoe Storage
Optimizes storagewith space for longand short hanginggarments, stackableitems and shoes.
Reach-In Closet for Kids(shown as ShelfTrackinstallation)
Adjust shelves askids grow! DoubleHang for shorterclothes frees upspace for shelvesthat can be used fortoys and games.
Walk-In ClosetOptimizes stor-age with spacefor long andshort hanginggarments, stack-able items andshoes.
Pantry Storage with Basket System
Add efficient shelfspace to yourpantry and addextra drawer spacewith basket systems.For flexibility, installa ShelfTrack pantry.
Laundry/Utility Storage
Add hangingspace above wash-er and dryer forlaundry or ironing.Shelf stack storeslaundry supplies,pet supplies andmore.
© ClosetMaid Corporation 2002Ocala, Florida 34478-4400 U.S.A.
• Failure to obey installation instructions andwarnings can result in injury or death.
• Use correct hardware for wall type. Whenusing standards with hang track,standards must be secured to the wall.
• Do not overload.
WARNING