WinTV-HVR-900 Quick Installation Guide N - … 5 Page 6 Page 7 Page 8 ... WinTV-HVR-900 Quick...
2
Page 1 Page 2 Page 3 Page 4 Page 5 Page 6 Page 7 Page 8 Page 9 Page 10 Page 11 Page 12 WinTV-HVR-900 Quick Installation Guide ©Hauppauge Computer Works, Inc. 2008 · QI-WINTV-HVR900-V2.0-ENG · 2008/01/25 ● WinTV-HVR-900 Hybrid stick ● USB extension cable ● WinTV-Installation CD-ROM including the following: · WinTV application v6 with SoftPVR™ · WinTV-Scheduler · 7 Day EPG · VTPlus ● This installation guide Options available on certain models: ● Audio/Video input cable ● Portable TV antenna ● IR remote control transmitter and batteries Contents of this WinTV-HVR-900 package 1. Locate a free USB 2.0 port (normally located at the side or back on the computer). N ote: Due to power and bandwidth requirements, we do not recommend connecting the unit into a USB Hub. 2.Turn on your PC and wait until Windows has completely started. 3.Plug the WinTV-HVR-900 stick into the USB 2.0 port. You can use the USB extension cable (available on some models) to locate the WinTV-HVR-900 a short distance from the USB slot. N ote: If you plug the device into a different USB socket, you may need to reinstall the WinTV-HVR-900 driver, but you will not need to reload any WinTV applications. 2. Installing the WinTV-HVR-900 Connecting an antenna or set top box Plug your TV antenna or RF output from your cable/satellite box into the WinTV-HVR-900’s TV Connector. For digital TV reception, it is rec- ommended to connect to a roof top aerial as this may provide a bet- ter signal quality then the portable antenna provided on some models of WinTV-HVR-900. You will need to ensure that you are located in a area that has Digital Terrestrial coverage. Please visit in the U.K.: www.dtg.org.uk/retailer/coverage.html In Sweden: www.teracom.se In Finland: www.digitv.fi In Denmark: www.digi-tv.dk In Poland: www.emitel.pl 1. Connecting the Aerial and A/V input cable When you run WinTV for the first time, a message will appear ask- ing you to scan for tuner chan- nels now; please ensure that the TV antenna is connected, click YES. To start the WinTV application, double click on the WinTV icon. 4. WinTV ® application v6 Select your country location, for instance, select United Kingdom and then, select Scan. The scanning process will start by scanning the analogue frequencies for channels, if any are found they will be added to the channel list. The scanning process for DVB-T will then scan for channels. When a DVB-T channel is found, the Signal Status will show a quality level and the locked box will be checked. The DVB-T digital channels that are found will appear in the channel listing box. N ote: If you have attached an antenna and do not receive any digital TV channels, either use a stronger antenna (a roof top antenna is recommended for best reception) or try to add a TV channel manually (see trouble shooting section). Click Close when finished. If you are using a external source like a Hi-8 Camcorder, Video recorder etc, then you will need to connect via the S- Video/Composite for the Video picture and Line-Input for the sound. N ote: Unless stated, most VCR's and STB's only output in com- posite video via SCART'. A SCART to S-Video lead, in most cases, will not work correctly and will only yield a black and white picture. If you are using a Scart to composite (RCA Yellow phono) lead, please ensure that the signal is being sent in the correct direction from the Scart lead to the phono connection. Configuring a external source in WinTV In the WinTV application click on Menu then Suite Manager, then click on the Sources tab. To add the S-Video or Composite channel select the option on the left and then select the Video Format from the drop down list. N ote: PAL BGHIDK is the commonly used format in Europe. Type in a channel “Name” e.g. Video and a Description and then click on “Save” the channel will now be added and if you click on Close you will be returned back to the main TV viewing window. Keyboard shortcuts Sound up - Page Up Sound down - Page Down Plus (+) - Chanel Up Minus (-) - Channel Down Ctrl T - Frame TV Ctrl P - Frame print Ctrl+M - Mute on/off ALT+M - Re-size TV menu 0-9 - Channel number Space bar - Take a snapshot Ctrl F - Still image Using a external A/V source Snapshot Still capture Freeze picture CFG Configure Snapshot Mute Setup Menu Full screen Remove toolbars no title mode Minimise Close Channel surf Channel down Channel up Last channel Current TV channel Click your right mouse button here to see the channel selector Click your right mouse button in the TV window to remove toolbars. Click again to restore toolbars. Record Playback Volume Always on Top Snapshot viewer window: Double click on each thumbnail to see image full size.Click and hold your right mouse button to see image options. Pause TV-Mode Watch TV Changing channels You can change channels by using the Channel Up or Channel Down buttons on the WinTV. You can type a channel number (for example: 27) and WinTV will tune to that channel. If the entered chan- nel does not exist, you will see a black window. You can also right click in the Current TV channel box, where you will see a list of channels. Or type letters (for example: BBC) to access to the list of the channels including these letters. TV Mode When you click the Full screen TV button, TV will appear full screen on your PC monitor. When finished watching TV full screen, click your right mouse button in the TV window. If you see video with a black box around it, click the Pref button then click TV mode tab. Check the box which says “Allow resolution change”. "Always on top" Mode The WinTV application will remain in view over any other appli- cations even if it is not selected. To turn on, click the Always on top button. It will turn green. To turn off, click this button again. A convenient way to use Always-on-top is to make the TV window in the no-title mode small, and to make the TV window in the title mode larger. Then you can switch from a small window to a larger one by clicking the right mouse button. Pref button Click the Pref button to open the preferences menu: View: These are the settings for the On Screen Display of the TV channel and Audio Volume, where you can enable Close Captions (if supported in your system configuration), plus controls for the Toolbar mode (Title mode), NoToolbar mode (No Title) and Full Screen (TV mode). Movies: Here is where you configure some video and audio settings. You can set the movie record directory (DVCR Record File Path). Snapshot: Set the size of your captured images, plus single or two field captures for capturing motion or still image video. Audio: Your audio settings are configured here. Menu Button Click the Menu button to open the TV setup menu. Here is the main control bar for TV channels, and duplicate controls for other functions: Suite Manager: Configure the TV tuner (scanning, naming, channel pre set, etc..) and setting up favourite channel lists. Configuration: Duplicate configuration menus for colour, audio, etc. View: For settings an exact TV window size: 320x240, 640x480 etc. There are three buttons to control the watching, recording and paus- ing of TV. Clicking on the Pause button will cause the Pause menu to roll down from the WinTV application, while clicking on the Record button will cause the Record menu to roll down. Pause and Record TV Mode One Touch Pause One Touch Record The Pause button prepares the WinTV pausing live video. The Record button will start a record session. If you click Record button more than once, a record timer will be set and the recording will be done for 15 minutes for each time the Record button is clicked. For example, if you click the button 3 times, the WinTV will record for 30 minutes. Pause mode The pause mode allow you to pause the Live TV picture and allows you to use the TimeShift function to rewind and fast forward the TV. Clicking the Pause button on the WinTV application starts the Pause mode. The Pause Menu will drop down. Record and Playback Clicking the Record button will automatically generate a file name and start recording your audio/video program. Functions: ● When recording TV, the record button will depressed ● A time counter will be shown indicating the lenght of time of the recording If you click Stop the time counter will revert back to 00:00:00 The time is specified in a Hour:Minute:Second format. Rewind Record Pause Play Stop Display Counter Forward File Video-Position Play forward slow Record mode Stop Clicking the Stop button will stop the video you are recording or playing back. Play Clicking the Play button will playback from disk the last video file created. When playing a video, you can rewind, fast forward, replay 10 sec or skip forward 10 sec using the buttons on the control bar. Pause Clicking the Pause button while Playing will pause your audio/video. Rewind Clicking the Rewind button will play the video file in reverse. Clicking the Rewind button again will continue the playing of the video. Fast Forward Clicking the Fast Foward button one time will fast foward your video at 2X speed. Clicking the Fast Foward button two times will fast foward your video at 8X speed. Clicking the button again will continue playing back at normal speed. Slow Motion Clicking the Slow Motion button during playback will cause the video to play in slow motion (at 1/2 speed). Clicking the Slow Motion button again will return the video to normal playback speed. File button Clicking the File button opens the File menu. The last file record- ed is listed in the File name box. In the File menu you can: ● Rename your recorded video file: To rename a video file, find the file you would like to rename, highlight it with your mouse, and click and hold the right mouse button. Go down to Rename and then you can type in a new name. Remember: you must keep the MPG extension on the file. ● Play a video file previously recorded: Find the file you would like to play, highlight it with your mouse (one click of the mouse button) and click Open. Then click the Play button. ● Delete recorded video files which you no longer want: Click your right mouse button on the video file once, go down the menu and click Delete. Record Play Pause Time counter Pause Video-position Fast forward Fast forward Slow motion Fast rewind Skip forward 10 sec TV-Mode Pause Buffer The Pause buffer is space on your hard disk where video is stored during the Pause mode. The maximum amount of time which your TV program can be delayed is dependent upon how much storage space you have set for the Pause buffer. Clicking the Pause button will start recording into WinTV's Replay Buffer. It takes about 10 seconds for the Replay Buffer to be initialized and for Pause to become effective. Unclicking the Pause button will cause the audio/video program to start playing from the point where the button was originally pushed. Most WinTV functions are active while in the Pause or Pause Live mode. For example, you can change volume, resize the TV window, go into "no-title mode", etc. While in Pause mode, the Video Position bar shows the amount of the Replay Buffer which is filled with video. For example, if the Video Position indicator shows halfway, it means that half of the Replay Buffer is filled. If you find you cannot Pause as many minutes as you would like, increase the size of the Replay Buffer. While in Pause mode, the A/V stream is always saved in the Replay Buffer. To stop saving the A/V stream in the Replay Buffer, you must exit the Pause mode by clicking TV mode. Replay While in the Pause mode, hitting the Replay button acts like the Instant Replay you see on TV broadcast sporting events: the audio/video goes back in time and you repeat what you have previ- ously seen. Each click of the Replay button causes audio/video to go back 10 seconds. For example, if you want to repeat the audio/video you saw 10 seconds ago, you would click the Replay button once. If you want to see the video you saw one minute ago, you would need to click the Replay button six times. For extended replay times, you might find it more convenient to grab the Video Position indicator control bar and move it to the left. Once you let the control bar go, audio/video starts to play (it might take a few seconds for the WinTV application to start playing). You might have to move the Video Position indicator to the left and right to find the desired spot to start replaying audio/video. While Replaying, your audio/video program continues to be recorded in the Replay Buffer. Therefore, if you have clicked the Replay button 3 times (so that you are replaying the audio/video seen 30 seconds ago), the video you see in the WinTV window will be 30 seconds behind the live program. Skip Ahead Clicking the Skip button will skip the video ahead 10 seconds. Rewind Clicking the Rewind button while playing video will rewind the recorded video. Clicking the Rewind button again will continue the playing. Slow Motion Clicking the Slow Motion button while playing video will play in Slow Motion. Clicking the Slow Motion button again, will continue playing normally. Fast Forward Clicking the Fast Forward button one time will fast forward your video at 2X speed. Clicking the Fast Forward button two times will fast forward your video at 8X speed. Hauppauge Computer Works, Ltd. 10 Borough High Street Bank Chambers London, UK, SE1 9QQ www.hauppauge.co.uk Tech Support: (+44) 0207 378 0202 Telephone: (+44) 0207 378 1997 Fax: (+44) 0207 357 9171 [email protected] N ote: If you do not receive channels using the portable anten- na, try connecting a rooftop aerial to the device and scan again, if channels are now received there may be an issue with sig- nal strength/quality in your area you may not be able to use the small antenna. Connecting an external A/V source You can also connect sources via the A/V input cable (available on some mod- els of WinTV-HVR-900). Plug the A/V input cable into the small connector on the side of the WinTV- HVR-900 Connect your source using either the Composite or S-Video connection and the audio mini-jack connector. N ote: Unless stated, most video- recorders and Set Top Boxes use only a Composite output via the SCART output. Insert your WinTV Installation CD-ROM, the installation window will automatically appear. N ote: If the autorun does not start, browse to the files on the disc and double click on the file called 'Setup'. In the installation window click on Step 1: Install WinTV Drivers. A blue screen will open which will begin installing and updating the drivers for your product. Once complete, a message appears in the bar. If this message is Drivers have been updated Successfully, click on the bar to exit. If the message reports an error, check the connection of your WinTV, or contact our tech- nical support. N ote: If you have any anti-virus software enabled, please dis- able it during the installation of the software. When you attach the WinTV-HVR- 900, the Found New Hardware Wizard will appear. Click on Cancel. 3. Install the WinTV Drivers and Applications Next, click on Step 2: Install WinTV and select your language from the list. The setup window should appear and begin to auto- matically install the WinTV appli- cations. N ote: During the installati- on, other installation wizards may open, we recom- mend following the instructions in each of these and installing with the default options availa- ble. N ote: For advanced users you can select the 'Custom Installation' which will allow you to modify the list of appli- cations that are installed by default. Once the WinTV installation is complete, click OK then Exit in the win- dow "Hauppauge WinTV Installation CD". You should now be back at your Windows desktop.
Transcript of WinTV-HVR-900 Quick Installation Guide N - … 5 Page 6 Page 7 Page 8 ... WinTV-HVR-900 Quick...
Page 1 Page 2 Page 3 Page 4
Page 5 Page 6 Page 7 Page 8
Page 9 Page 10 Page 11 Page 12
WinTV-HVR-900Quick Installation Guide
©Hauppauge Computer Works, Inc. 2008 · QI-WINTV-HVR900-V2.0-ENG · 2008/01/25
● WinTV-HVR-900 Hybrid stick● USB extension cable● WinTV-Installation CD-ROM
including the following:· WinTV application v6 with SoftPVR™· WinTV-Scheduler· 7 Day EPG· VTPlus
● This installation guide
Options available on certain models:● Audio/Video input cable● Portable TV antenna● IR remote control transmitter and batteries
Contents of this WinTV-HVR-900 package
1.Locate a free USB 2.0 port (normally located at the side or back onthe computer).
N ote: Due to power and bandwidth requirements, we do notrecommend connecting the unit into a USB Hub.
2.Turn on your PC and wait until Windows has completely started.3.Plug the WinTV-HVR-900 stick into the USB 2.0 port. You can use
the USB extension cable (available on some models) to locate theWinTV-HVR-900 a short distance from the USB slot.
N ote: If you plug the device into a different USB socket, youmay need to reinstall the WinTV-HVR-900 driver, but you will
not need to reload any WinTV applications.
2. Installing the WinTV-HVR-900
Connecting an antenna or set top boxPlug your TV antenna or RF output from your cable/satellite box intothe WinTV-HVR-900’s TV Connector. For digital TV reception, it is rec-ommended to connect to a roof top aerial as this may provide a bet-ter signal quality then the portable antenna provided on some modelsof WinTV-HVR-900.You will need to ensure that you are located in a area that has DigitalTerrestrial coverage.Please visit in the U.K.: www.dtg.org.uk/retailer/coverage.htmlIn Sweden: www.teracom.se In Finland: www.digitv.fiIn Denmark: www.digi-tv.dk In Poland: www.emitel.pl
1. Connecting the Aerial and A/V input cable
When you run WinTV for the firsttime, a message will appear ask-ing you to scan for tuner chan-nels now; please ensure that theTV antenna is connected, clickYES.
To start the WinTV application, double click on the WinTV icon.
4. WinTV® application v6
Select your country location, for instance, select United Kingdom andthen, select Scan.The scanning process will start by scanning the analogue frequenciesfor channels, if any are found they will be added to the channel list.The scanning process for DVB-T will then scan for channels. When aDVB-T channel is found, the Signal Status will show a quality leveland the locked box will be checked. The DVB-T digital channels thatare found will appear in the channel listing box.
N ote: If you have attached an antenna and do not receive anydigital TV channels, either use a stronger antenna (a roof top
antenna is recommended for best reception) or try to add a TVchannel manually (see trouble shooting section).
Click Close when finished.
If you are using a external source like a Hi-8 Camcorder, Videorecorder etc, then you will need to connect via the S-Video/Composite for the Video picture and Line-Input for the sound.
N ote: Unless stated, most VCR's and STB's only output in com-posite video via SCART'. A SCART to S-Video lead, in most
cases, will not work correctly and will only yield a black and whitepicture.
If you are using a Scart to composite (RCA Yellow phono) lead, pleaseensure that the signal is being sent in the correct direction from theScart lead to the phono connection.
Configuring a external source in WinTVIn the WinTV application click on Menu then Suite Manager, then clickon the Sources tab. To add the S-Video or Composite channel selectthe option on the left and then select the Video Format from the dropdown list.
N ote: PAL BGHIDK is the commonly used format in Europe.
Type in a channel “Name” e.g. Video and a Description and then clickon “Save” the channel will now be added and if you click on Closeyou will be returned back to the main TV viewing window.
Keyboard shortcuts
Sound up - Page UpSound down- Page DownPlus (+) - Chanel UpMinus (-) - Channel DownCtrl T - Frame TVCtrl P - Frame print
Ctrl+M - Mute on/offALT+M - Re-size TV menu0-9 - Channel numberSpace bar - Take a snapshotCtrl F - Still image
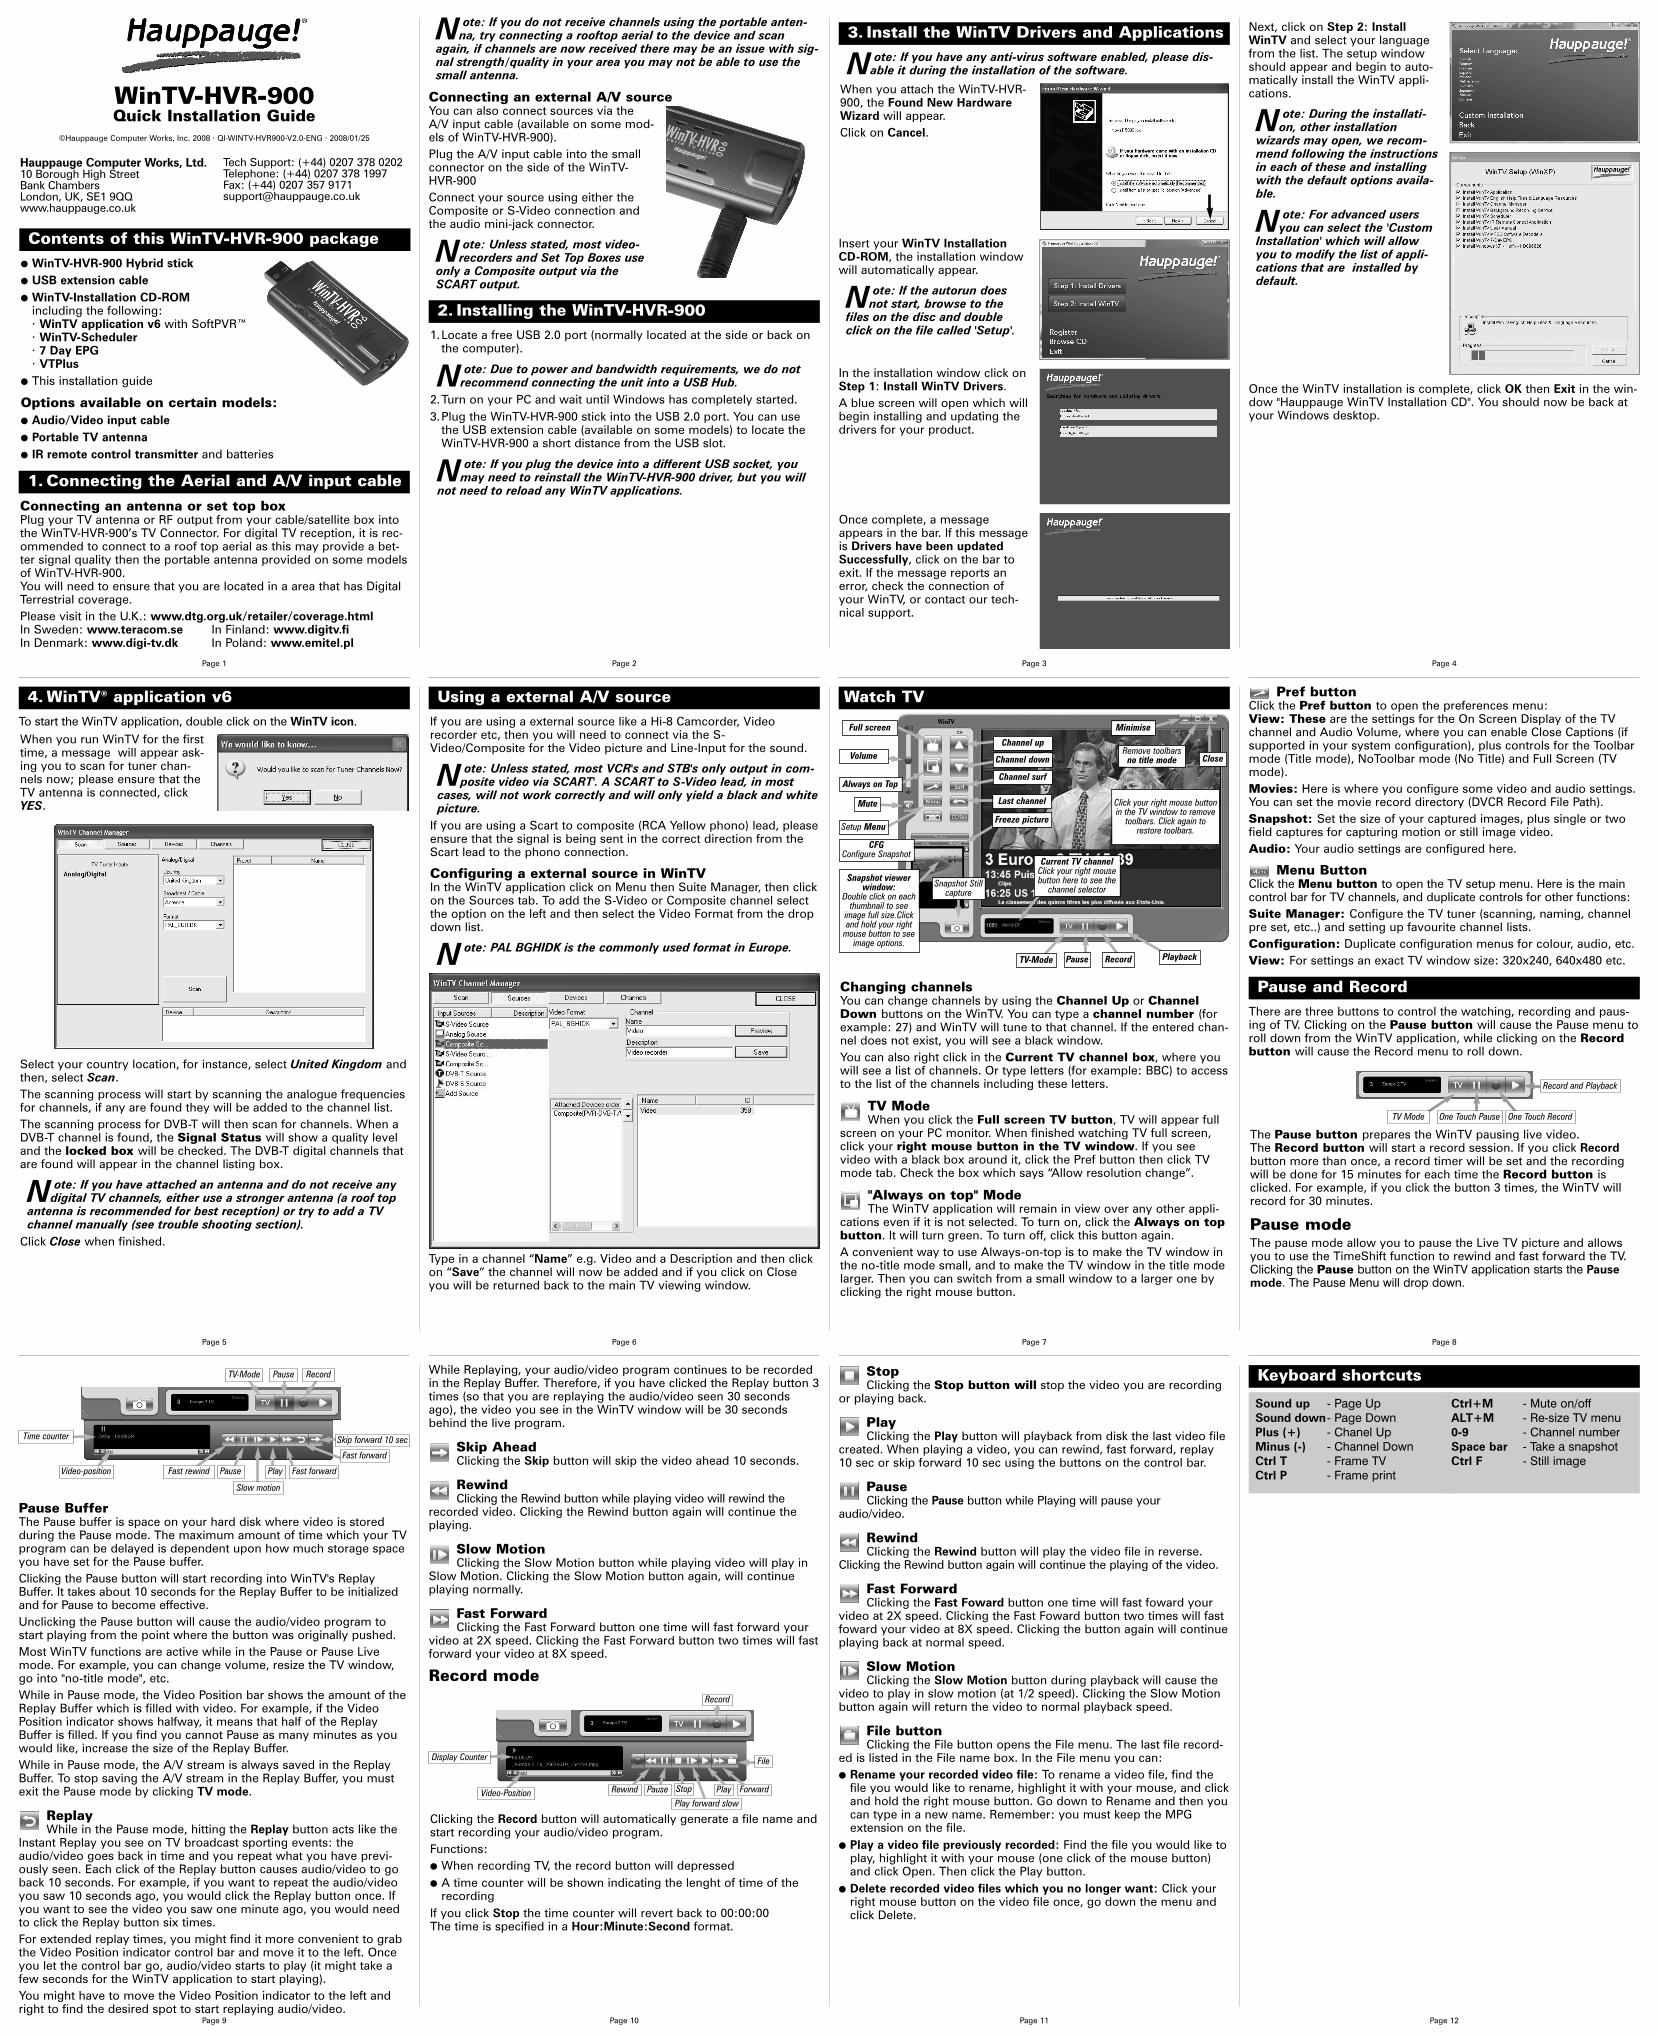
Using a external A/V source
Snapshot Stillcapture
Freeze picture
CFGConfigure Snapshot
Mute
Setup Menu
Full screen
Remove toolbarsno title mode
Minimise
Close
Channel surf
Channel down
Channel up
Last channel
Current TV channelClick your right mousebutton here to see the
channel selector
Click your right mouse buttonin the TV window to remove
toolbars. Click again torestore toolbars.
Record Playback
Volume
Always on Top
Snapshot viewerwindow:
Double click on eachthumbnail to see
image full size.Clickand hold your right
mouse button to seeimage options.
PauseTV-Mode
Watch TV
Changing channelsYou can change channels by using the Channel Up or ChannelDown buttons on the WinTV. You can type a channel number (forexample: 27) and WinTV will tune to that channel. If the entered chan-nel does not exist, you will see a black window.You can also right click in the Current TV channel box, where youwill see a list of channels. Or type letters (for example: BBC) to accessto the list of the channels including these letters.
TV ModeWhen you click the Full screen TV button, TV will appear full
screen on your PC monitor. When finished watching TV full screen,click your right mouse button in the TV window. If you seevideo with a black box around it, click the Pref button then click TVmode tab. Check the box which says “Allow resolution change”.
"Always on top" ModeThe WinTV application will remain in view over any other appli-
cations even if it is not selected. To turn on, click the Always on topbutton. It will turn green. To turn off, click this button again.A convenient way to use Always-on-top is to make the TV window inthe no-title mode small, and to make the TV window in the title modelarger. Then you can switch from a small window to a larger one byclicking the right mouse button.
Pref buttonClick the Pref button to open the preferences menu:View: These are the settings for the On Screen Display of the TVchannel and Audio Volume, where you can enable Close Captions (ifsupported in your system configuration), plus controls for the Toolbarmode (Title mode), NoToolbar mode (No Title) and Full Screen (TVmode).Movies: Here is where you configure some video and audio settings.You can set the movie record directory (DVCR Record File Path).Snapshot: Set the size of your captured images, plus single or twofield captures for capturing motion or still image video.Audio: Your audio settings are configured here.
Menu ButtonClick the Menu button to open the TV setup menu. Here is the maincontrol bar for TV channels, and duplicate controls for other functions:Suite Manager: Configure the TV tuner (scanning, naming, channelpre set, etc..) and setting up favourite channel lists.Configuration: Duplicate configuration menus for colour, audio, etc.View: For settings an exact TV window size: 320x240, 640x480 etc.
There are three buttons to control the watching, recording and paus-ing of TV. Clicking on the Pause button will cause the Pause menu toroll down from the WinTV application, while clicking on the Recordbutton will cause the Record menu to roll down.
Pause and Record
TV Mode One Touch Pause One Touch Record
The Pause button prepares the WinTV pausing live video.The Record button will start a record session. If you click Recordbutton more than once, a record timer will be set and the recordingwill be done for 15 minutes for each time the Record button isclicked. For example, if you click the button 3 times, the WinTV willrecord for 30 minutes.
Pause modeThe pause mode allow you to pause the Live TV picture and allowsyou to use the TimeShift function to rewind and fast forward the TV.Clicking the Pause button on the WinTV application starts the Pausemode. The Pause Menu will drop down.
Record and Playback
Clicking the Record button will automatically generate a file name andstart recording your audio/video program.Functions:● When recording TV, the record button will depressed● A time counter will be shown indicating the lenght of time of the
recordingIf you click Stop the time counter will revert back to 00:00:00 The time is specified in a Hour:Minute:Second format.
Rewind
Record
Pause PlayStop
Display Counter
Forward
File
Video-PositionPlay forward slow
Record mode
StopClicking the Stop button will stop the video you are recording
or playing back.
PlayClicking the Play button will playback from disk the last video file
created. When playing a video, you can rewind, fast forward, replay10 sec or skip forward 10 sec using the buttons on the control bar.
PauseClicking the Pause button while Playing will pause your
audio/video.
RewindClicking the Rewind button will play the video file in reverse.
Clicking the Rewind button again will continue the playing of the video.
Fast ForwardClicking the Fast Foward button one time will fast foward your
video at 2X speed. Clicking the Fast Foward button two times will fastfoward your video at 8X speed. Clicking the button again will continueplaying back at normal speed.
Slow MotionClicking the Slow Motion button during playback will cause the
video to play in slow motion (at 1/2 speed). Clicking the Slow Motionbutton again will return the video to normal playback speed.
File buttonClicking the File button opens the File menu. The last file record-
ed is listed in the File name box. In the File menu you can: ● Rename your recorded video file: To rename a video file, find the
file you would like to rename, highlight it with your mouse, and clickand hold the right mouse button. Go down to Rename and then youcan type in a new name. Remember: you must keep the MPGextension on the file.
● Play a video file previously recorded: Find the file you would like toplay, highlight it with your mouse (one click of the mouse button)and click Open. Then click the Play button.
● Delete recorded video files which you no longer want: Click yourright mouse button on the video file once, go down the menu andclick Delete.
Record
PlayPause
Time counter
Pause
Video-position Fast forward
Fast forward
Slow motion
Fast rewind
Skip forward 10 sec
TV-Mode
Pause BufferThe Pause buffer is space on your hard disk where video is storedduring the Pause mode. The maximum amount of time which your TVprogram can be delayed is dependent upon how much storage spaceyou have set for the Pause buffer.Clicking the Pause button will start recording into WinTV's ReplayBuffer. It takes about 10 seconds for the Replay Buffer to be initializedand for Pause to become effective.Unclicking the Pause button will cause the audio/video program tostart playing from the point where the button was originally pushed.Most WinTV functions are active while in the Pause or Pause Livemode. For example, you can change volume, resize the TV window,go into "no-title mode", etc.While in Pause mode, the Video Position bar shows the amount of theReplay Buffer which is filled with video. For example, if the VideoPosition indicator shows halfway, it means that half of the ReplayBuffer is filled. If you find you cannot Pause as many minutes as youwould like, increase the size of the Replay Buffer.While in Pause mode, the A/V stream is always saved in the ReplayBuffer. To stop saving the A/V stream in the Replay Buffer, you mustexit the Pause mode by clicking TV mode.
ReplayWhile in the Pause mode, hitting the Replay button acts like the
Instant Replay you see on TV broadcast sporting events: theaudio/video goes back in time and you repeat what you have previ-ously seen. Each click of the Replay button causes audio/video to goback 10 seconds. For example, if you want to repeat the audio/videoyou saw 10 seconds ago, you would click the Replay button once. Ifyou want to see the video you saw one minute ago, you would needto click the Replay button six times.For extended replay times, you might find it more convenient to grabthe Video Position indicator control bar and move it to the left. Onceyou let the control bar go, audio/video starts to play (it might take afew seconds for the WinTV application to start playing).You might have to move the Video Position indicator to the left andright to find the desired spot to start replaying audio/video.
While Replaying, your audio/video program continues to be recordedin the Replay Buffer. Therefore, if you have clicked the Replay button 3times (so that you are replaying the audio/video seen 30 secondsago), the video you see in the WinTV window will be 30 secondsbehind the live program.
Skip AheadClicking the Skip button will skip the video ahead 10 seconds.
RewindClicking the Rewind button while playing video will rewind the
recorded video. Clicking the Rewind button again will continue theplaying.
Slow MotionClicking the Slow Motion button while playing video will play in
Slow Motion. Clicking the Slow Motion button again, will continueplaying normally.
Fast ForwardClicking the Fast Forward button one time will fast forward your
video at 2X speed. Clicking the Fast Forward button two times will fastforward your video at 8X speed.
Hauppauge Computer Works, Ltd.10 Borough High StreetBank ChambersLondon, UK, SE1 9QQwww.hauppauge.co.uk
Tech Support: (+44) 0207 378 0202Telephone: (+44) 0207 378 1997Fax: (+44) 0207 357 [email protected]
N ote: If you do not receive channels using the portable anten-na, try connecting a rooftop aerial to the device and scan
again, if channels are now received there may be an issue with sig-nal strength/quality in your area you may not be able to use thesmall antenna.
Connecting an external A/V sourceYou can also connect sources via theA/V input cable (available on some mod-els of WinTV-HVR-900). Plug the A/V input cable into the smallconnector on the side of the WinTV-HVR-900Connect your source using either theComposite or S-Video connection andthe audio mini-jack connector.
N ote: Unless stated, most video-recorders and Set Top Boxes use
only a Composite output via theSCART output.
Insert your WinTV InstallationCD-ROM, the installation windowwill automatically appear.
N ote: If the autorun doesnot start, browse to the
files on the disc and doubleclick on the file called 'Setup'.
In the installation window click onStep 1: Install WinTV Drivers.A blue screen will open which willbegin installing and updating thedrivers for your product.
Once complete, a messageappears in the bar. If this messageis Drivers have been updatedSuccessfully, click on the bar toexit. If the message reports anerror, check the connection ofyour WinTV, or contact our tech-nical support.
N ote: If you have any anti-virus software enabled, please dis-able it during the installation of the software.
When you attach the WinTV-HVR-900, the Found New HardwareWizard will appear.Click on Cancel.
3. Install the WinTV Drivers and Applications Next, click on Step 2: InstallWinTV and select your languagefrom the list. The setup windowshould appear and begin to auto-matically install the WinTV appli-cations.
N ote: During the installati-on, other installation
wizards may open, we recom-mend following the instructionsin each of these and installingwith the default options availa-ble.
N ote: For advanced usersyou can select the 'Custom
Installation' which will allowyou to modify the list of appli-cations that are installed bydefault.
Once the WinTV installation is complete, click OK then Exit in the win-dow "Hauppauge WinTV Installation CD". You should now be back atyour Windows desktop.
Page 13 Page 14 Page 15 Page 16
Page 17 Page 18 Page 19 Page 20
Page 21 Page 22 Page 23 Page 24
● Source selection: leave set at WinTV to bring up the WinTV at therequested time and on the requested channel. Select Reminder tojust pop-up a text file as reminder.
● Time to Begin Program: set to the desired start time. The defaulttime is about 3 minutes from the current time. Click on the hour toset the hour, the minute to set the minute to start the program.
N ote: It is always possible that your TV show will be transmit-ted in advance or late, and it takes about 10 seconds to launch
the WinTV and set up for recording. Please set the Time to BeginProgam few minutes before the time your TV show should starts.
● Program Duration: set the duration of this event, using the arrows(steps of 30 minutes) or directly the keyboard. This will update theTime to End Program window.
● Date to Begin: today's date is the default. Change this if you want toschedule on another date.
● Program Period: One Time Only, Every day or Weekly are the choic-es. If you select the Weekly option, select the day you would havethe show recorded too.
● Date to End: If you have selected the Every Day or Weekly option,you can specify the date at which it will stop this task.
● Channel selection: choose one of your scanned channels.● Recording options: click on Record to File to record your show.
Leave this button unchecked to watch TV at the requested time. Youcan also name your file to record.
Once these are set, click Set Program. You can add more Events,clicking Set Program after each event is set. When you are finishedclick Close.
N ote: You cannot access the Wing settings until you have pur-chased the optional transcoder software, for more informations
see www.hauppauge.com/wing. Please refer to the Wing manualfor information on using the Wing settings.
The WinTV program does not have to be running for the Schedular towork, but you PC need to be turn on. If WinTV is not running, it takesabout 10 seconds to start WinTV and to start the recording of TV.
To uninstall the Driver and SoftwareTo uninstall the software simply run hcwclear.exe from the installationCD-ROM and select the last 2 options 'remove all WinTV drivers andapplications (total removal)' and 'search all INF files'. If you nowselect OK a black screen will briefly appear and once it has disap-peared the software will be removed. If you now re-start the comput-er you will be at Step 3 on page 3 of this document and can now re-install the software.
Only some channels are found during DVB-T channelscanCheck if there are transmitter works on your local transmitter here:www.bbc.co.uk/reception/transmitters/today.shtml as this couldeffect the reception of certain channel.
Adding a TV channel manuallyIf the scan did not succeed, you can add a channel manually by enter-ing the LCN number for your local transmitter. Enter your post code inthis link: www.wolfbane.com/cgi-bin/tvd.exe? to be presented withinformation on your local transmitters.
Note: Your local transmitter should be the closest transmitterwith a H in the 'Pol' column. You need to write down the LCN
numbers.
TroubleshootingRadio Interference Statement:WinTV have been tested and found to comply with the limits for aClass B digital device, pursuant to part 15 of the FCC Rules. Theselimits are designed to provide reasonable protection against harmfulinterference in a residential installation. This equipment generates,uses, and can radiate radio frequency energy and cause harmfulinterference to radio communications. However, there is no guaranteethat interference will not occur in a particular installation. If this equip-ment does cause harmful interference to radio or television reception,which can be determined by turning the equipment off and on, theuser is encouraged to try to correct the interference by one or moreof the following measures:● reorient or relocate the receiving antenna.● increase the separation between the equipment and receiver.● connect the equipment into an outlet on a circuit different from that
to which the receiver is connected.● consult the dealer or an experienced radio/TV technician for help.FCC ID: H90WINTVCAUTION: Changes or modifications not expressly approved by theparty responsible for compliance to the FCC Rules could void theuser's authority to operate the equipment.CE Statement: This equipment has been tested and complies withEN 55013, EN 55020 and IEC 801-3 part 3 standards.
FCC Statement
The device may not be disposed of with household rubbish. Thisappliance is labeled in accordance with European Directive2002/96/EG concerning used electrical and electronic appliances(Waste Electrical and Electronic Equipment - WEEE). The guidelinedetermines the framework for the return and recycling of used appli-ances as applicable throughout the EU. To return your used device,please use the return and collection systems available to you.
Waste Electrical and Electronic Equipment(WEEE)
TV display has problems (e.g. no picture but withsound or blurred image)With the WinTV application closed click on the WinTV program group(Start / Programs / Hauppauge WinTV) there is a utility called “Primary”.Within Primary, select a different option from the main list of four items(Allow VMR/Allow Overlay/Force Primary/DIB Draw), close the applica-tion using the X in the top right hand corner then restart the TV program.Repeat this process for all four options to determine the best option foryour computer.
“Error code 10” during installationThis is caused by a failure to load the WinTV-HVR drivers. Uninstallthe software (as above) and then follow the instructions from page 3.If this still give you an error message move the WinTV-HVR-900 to adifferent USB port and re-install the drivers again.
Under Windows XP Media Center application, I get theerror message “Decoder Error”This message is normally caused by missing or incorrectly installed MCEcompatible DVD Decoder software. Please insure you have the latest MCEcompatible DVD Decoder from one of the following recommended ven-dors: Cyberlink, Nvidia, Intervideo.
Under the Media Center application I am unable to setupmy TV from analogue source.This problem occurs as the WinTV-HVR-900 does not have a built inhardware encoder which is required by MCE, you will need to installthe MCE Soft Encoder from our installation CD-ROM or softwaredownload.
What is 7 Day EPG for WinTV Certain digital DVB-T channels, along with their TV programmes, con-tain a TV channel guide. This guide is a listing of the programs beingshown for the next 7 days, and includes the TV programme name,programme start times and length. The 7 Day EPG for WinTV extractsTV guide data from a DVB-T channel which contains this data. It cre-ates a database on your computer. When the Hauppauge 7 Day EPG opens up with its chart of times andTV programs, it reads the EPG database and formats the 7 Day EPGguide window. If you would like to record one of these TV pro-grammes listed in the 7 Day EPG for WinTV window, you simply clickthe "Record" button and at the correct time your TV show will berecorded on your PC.
6. The 7 Day EPG 2. Select Open Client Tool to seethe EPG Service window: It showsthe status of the EPG service.The buttons below the windowgive you the following controls:• Start/stop the EPG Service • Modify the current settings • Open the EPG help file • Exit the EPG applicationTo view the EPG guide click 'ViewEPG' See Step 4 for more infor-mation.
3. Viewing the EPG informationFrom the EPG application window, click 'View EPG' this will open aweb page showing the EPG information, initially the application willneed to scan and update the EPG information. The amount of time ittakes to read the data is related to the number of channels in yourDVB-T transmission area. The more channels, the longer it takes toread all of the data, this may take several minutes:
Once the scanning is complete you will be able to see the EPG guide:
4. Scheduling a recordingTo schedule a recording, simplyclick on the Program title, this willgive you more information aboutthat program, from there you canclick on 'Schedule for recording', When you click a "record" button,the 7 Day EPG schedules a task torecord your TV show from a DVB-Tchannel. The scheduled task isadded to Windows ScheduledTasks.
Note: You need to have auser name and password
on your PC in order for thescheduled recordings to recordthrough Windows SheduledTasks.
The scheduled recordings can be viewed and modified through theWinTV-Scheduler.The format of the file name is [Programme title]_[Time]_[Date].mpg
In the WinTV Channel Manager, click on Sources then DVB-T Source,enter the LCN numbers into the space under Channel Number andclick on the Tune button. The channel number will then be scannedand any channels found will be listed in the channel list below.
How to use 7 Day EPG for WinTV 1. You should see an icon of aglobe close to the Windowsclock. Right click on this icon togive a list of options.
The WinTV’s remote control software is installed automatically duringthe installation of the WinTV applications. The installation will add theshortcut “AutoStart IR” to the Start-up group. If this is not the case,you can manually install the WinTV’s remote control software fromthe installation CD-ROM / IR32 folder. Double click on IR32.exe.1. Insert the batterie into the the Infrared Remote control.2.Ensure the IR icon is on the start bar - IR.exe is loaded when
Windows starts only if your WinTV is connected.
N ote: If you don’t see the WinTV Remote icon in the systemtray or if you need to reset the remote control application,
select “Restart IR” from the Start / All programs / HauppaugeWinTV directory. You should restart the IR program each time youplug your WinTV – except if it was plugged before Windows started.
Checking the function of the IR RemoteMake sure you see the black remote icon in the system tray (the areanext to the clock in the taskbar).Point the Remote transmitter at the Remote control receiver (the littleeye on your WinTV Stick) and press the “Go” button. This shouldopen the “WinTV Remote” menu. Press the “OK” button to startWINTV.EXE or use the “Up” and “Down” arrows on the remote toselect another option.
N ote: The WinTV application only responds to the remote con-trol if it is the active window. If the WinTV application is not
the active Window, press the TV button on the remote to bring theWinTV window into the foreground.
N ote: If you have a Windows Media Center PC and you do nothave a Media Center Remote you can use the Hauppauge
Remote instead (the remote is not Media Center certified and somefunctionality may not be available).
N ote: The credit card sized remote can be stored in a laptop'sPCMCIA bay while not in use.
7. Installing the Remote Control(on some models)
Remote Control Buttons during a Recording
N ote: Most WinTV functions and remote buttons are disabledwhen recording
Record button: Set the duration of the recording, by steps of 15 min-utes up to 2 hours, then by steps of 30 minutes up to 4 hours. Clickingagain will disable recording duration. This information is displayed inthe Pause/Record tray.Stop button: Stop recording and close the Pause/Record tray (as theBack/Exit button)Pause button: Freeze the video. Press the Play or Pause button againto unfreeze the video. The Pause button has no effect on the record-ing itself. While the video is frozen, the recording is continued in thebackground, there is no Rewind, Forward, Skip, Replay function.
Remote Control Buttons when Pausing TV or Playing aVideo
N ote: You cannot change channels when Pausing TV
Record button: Stop current action and start a recordingStop button: Stop playing or Exit pause mode and close thePause/Record tray (as the Back/Exit button)Play button: Play the recorded TV or TV from the pause buffer (ifPause/Record tray opened). Play and Pause button have alternatively thesame function.<< (Rewind): Play backwards at 8x speed. Clicking again will playpaused TV or recorded TV at 1x>> (Forward): Play forward at 2x speed. Clicking again will play for-ward at 8x, then back to 1xPause button: Start Pause-Mode (TimeShift). Press Play or Pauseagain to continue watching from where you left off>I (Skip): Skips ahead in the Pause buffer by 10 seconds per click.Holding the Skip button will auto-repeat, and advances the videoabout 10 minutes per 15 seconds the button is depressedI< (Replay): Skips backward in the Pause buffer by 10 seconds perclick. Holding the Replay button will auto-repeat, and advances thevideo about 10 minutes per 15 seconds the button is depressedQuick Jump 0 to 9 buttons: When playing a video, you can quicklyskip through the video by pressing the 0-9 buttons. When you pressone of these buttons, you will skip to, for example, 10% of the videofile when you press '1', 20% of the video file when you press '2' and soforth (% of the length of the file).During Pause-Mode, any key skips ahead in the Pause buffer to -2 sec-onds.
When watching live TVGo: Open the “WinTV Remote”menu, allowing you to start theWinTV applicationPower: Exit the WinTV applica-tionTV: Bring WinTV to the fore-ground (if not currently active) /Full screen TV mode on/offArrows & OK: Select and confirmoptions in the WinTV Remotemenu or the Windows task list.Back/Exit: Stop a recording / Exitpause mode and close thePause/Record tray (as the Stopbutton)Menu: Brings up the Windowstask list. Use the left and rightarrows to change to otherWindows tasks, and click OK.Menu is an always active button.Vol+ and Vol-: Control the audio volumeMute: Audio on/offCh+ and Ch- buttons: Select the next/previous channelPrev.Ch: Swap to last viewed channelRecord button: Open the Pause/Record tray & start a recording. Seesection Remote Control Buttons during a Recording Stop button: Stop a recording / Exit pause mode and close thePause/Record tray (as the Back/Exit button)Play button: Open the Pause/Record tray & play back the last record-ing. If you didn’t record any TV shows recently, it will open theMyVideos folder. See section Remote Control Buttons during PauseTV or Playback<< (Rewind): Swap between Title and No-Title mode>>: Turn to Full screen TV modePause button: Open the Pause/Record tray & pause live TV (pausemode). Clicking again will play from the point where the button wasoriginally pushed0-9: Direct access to channel number Text (*): Start VTPlus teletext application (if installed)
Remote Control Buttons
WinTV-Scheduler allows you to schedule the recording of TV shows.WinTV-Scheduler, once it is set, can be closed, and the WinTV applica-tion will “wake up” at the desired time and tuned to the desired channel.WinTV-Scheduler works by using the Windows Task Scheduler tolaunch WinTV at the chosen time. WinTV-Scheduler sets up a com-mand line in Task Scheduler to run WinTV, specifying a TV channeland a length of time to record.After installation, WinTV-Scheduler can be found by going toStart / Program files / Hauppauge WinTV.To set up an event for timed watching or recording, click on the AddProgram.
5. WinTV-Scheduler
The items that need to be set for each event are: