WinGL General Ledger Users Guide - HAB INC General Ledger Users Guide . 2 ... Posting Period Table...
68
Documentation Manual Date: August 2011 WinGL General Ledger Users Guide
Transcript of WinGL General Ledger Users Guide - HAB INC General Ledger Users Guide . 2 ... Posting Period Table...

Documentation Manual
Date: August 2011
WinGL General Ledger Users Guide

2
winGL Table of Contents
winGL Table of Contents ................................................................................................. 2
General Information ......................................................................................................... 6
Purpose ............................................................................................................................ 6
Getting Started with winGL ............................................................................................ 6
Applications Main Menu ................................................................................................ 6
Starting winGL Options .................................................................................................. 6
Quitting winGL ............................................................................................................... 6
Chapter 1, General Ledger Setup.................................................................................... 7
General Information ........................................................................................................ 7
File Setup Submenu ........................................................................................................ 7
Chart of Accounts Setup ................................................................................................. 8
Modifying an Existing Account .................................................................................. 8
Adding a New Account ............................................................................................... 9
Account Copy/Explosion .............................................................................................. 10
Account Alias Setup ..................................................................................................... 13
Distribution Setup ......................................................................................................... 14
Distribution Types .................................................................................................... 15
Create a New Distribution Table .............................................................................. 15
Modify an Existing Distribution Table ..................................................................... 16
Test a Distribution Table .......................................................................................... 16
Account Prefix Setup .................................................................................................... 17
Bank/GL Account Cross Reference Setup .................................................................... 18
HMS Financial Defaults Setup ..................................................................................... 20
AP - A/P Default Bank Account ............................................................................... 20
AP - Accounting Basis .............................................................................................. 20
AP – Auto Save Dist. Invoice ................................................................................... 21
GL – Fund Length ..................................................................................................... 21
GL – G/L Acct Length .............................................................................................. 21
GL – G/L Prefix Length ............................................................................................ 21
GL – Omit JV Pre-Screen ......................................................................................... 21
PR – Default PR Check Style ................................................................................... 21
PR – PR Check Sort .................................................................................................. 22
PR – Fringe On All Earnings .................................................................................... 22
PR – HMS Payroll Check ......................................................................................... 22
PR – P/R Default Bank Acct ..................................................................................... 22
PR – Cash Offset ....................................................................................................... 22
Tenant DB ................................................................................................................. 22
Linking Funds to Different Fiscal Year Ends ............................................................... 23
Setting Up PILOT Calculation ..................................................................................... 25
Setting Up Statement Formats ...................................................................................... 26
Creating a New Format ............................................................................................. 27
Adding new format lines ....................................................................................... 27
Adding accounts to format lines ........................................................................... 28
Modify an Existing Format ....................................................................................... 30

3
Copying an Existing Format to a New Format ......................................................... 30
Statement Format Fields ........................................................................................... 31
Cycle Setup ................................................................................................................... 33
Posting Period Table Setup ........................................................................................... 34
Closing a Month ........................................................................................................ 35
Adding Additional Periods ....................................................................................... 35
Bank Account Setup ..................................................................................................... 36
Chapter 2, Journal Entries............................................................................................. 39
General Information ...................................................................................................... 39
Journal Entry Menu ...................................................................................................... 39
Journal Entries .............................................................................................................. 39
Entering/Modifying Journal Entry Information ........................................................ 40
Searching for a Journal Entry ................................................................................... 43
Additional Journal Entry Maintenance Options ....................................................... 44
Buttons .................................................................................................................. 44
Menu Items ........................................................................................................... 44
Changing Posting Periods of Journal Entries ............................................................... 45
PILOT Calculation/Posting ........................................................................................... 46
Chapter 3, Budgets.......................................................................................................... 48
General Information ...................................................................................................... 48
Budgets Menu ............................................................................................................... 48
Budget Entry and Maintenance ..................................................................................... 48
Creating and Editing Budgets ................................................................................... 49
Copying and Deleting Budgets ................................................................................. 52
Posting Budgets ........................................................................................................ 52
Chapter 4, Interfacing from winAP and winPAY ....................................................... 54
General Information ...................................................................................................... 54
Interfaces Menu ............................................................................................................ 54
Interfacing from A/P and Payroll .............................................................................. 55
Exporting Check Information ....................................................................................... 57
Chapter 5, Reports .......................................................................................................... 62
Financial Statements ..................................................................................................... 62
Batch Printing Financial Statements ......................................................................... 63
Creating Statement Filters......................................................................................... 63
Chapter 6, Updates ......................................................................................................... 66
General Information and the Updates Menu ................................................................. 66
Updating Transactions to Summary ............................................................................. 66
Closing the Month ........................................................................................................ 68
Closing the Year ........................................................................................................... 68

4
winGL Table of Figures
Figure 1. winGL Main Menu ............................................ Error! Bookmark not defined.
Figure 2. File Setup Submenu ............................................................................................ 7
Figure 3. G/L Accounts Table Maintenance ...................................................................... 8
Figure 4. G/L Accounts Table Maintenance - Form Window ........................................... 9
Figure 5. Account Copy/Explosion Window .................... Error! Bookmark not defined.
Figure 6. Distribution Table Maintenance ....................................................................... 15
Figure 7. Distribution Table Test Window ...................................................................... 16
Figure 8. Account Prefix Setup Window ......................................................................... 18
Figure 9. Bank/GL Account Cross Reference ................................................................. 19
Figure 10. HMS Financial Defaults Window .................................................................. 20
Figure 11. Link Funds to Months Window ...................................................................... 24
Figure 12. PILOT Calculation Setup ............................................................................... 25
Figure 13. G/L Format Table Maintenance Tool Bar ....... Error! Bookmark not defined.
Figure 14. G/L Format Table Maintenance - Entry Menu Error! Bookmark not defined.
Figure 15. G/L Format Table Maintenance - Form Window ........................................... 28
Figure 16. Statement Format Setup - Account Code Ranges Window............................ 29
Figure 17. Copy Statement Format Window ................................................................... 30
Figure 18. Cycle Setup Window ...................................................................................... 33
Figure 19. Posting Period Table Maintenance Window .................................................. 34
Figure 20. Posting Period Entry Window ........................................................................ 36
Figure 21. Add Year to Posting Period Table .................................................................. 36
Figure 22. Bank Accounts Setup Window ....................................................................... 37
Figure 23. Journal Entry Menu ......................................... Error! Bookmark not defined.
Figure 24. Journal Entries - New/Recall/Open Window ................................................. 40
Figure 25. Journal Entry Maintenance Window .............................................................. 41
Figure 26. G/L Entry Account Search Window............................................................... 42
Figure 27. Journal Entry Due to/Due from Selection ...................................................... 43
Figure 28. Journal Entry Search Window (1) .................................................................. 43
Figure 29. Journal Entry Search Window (2) .................................................................. 44
Figure 30. Change Posting Period Window ..................................................................... 46
Figure 31. Calculate PILOT Window .............................................................................. 47
Figure 32. Budgets Menu ................................................................................................. 48
Figure 33. Budget Maintenance Window ........................................................................ 49
Figure 34. New Budget Window ..................................................................................... 49
Figure 35. Budget Calculator ........................................................................................... 51
Figure 36. Copy Budgets Window................................................................................... 52
Figure 37. Budget Posting Parameters ............................................................................. 53
Figure 38. Interfaces Menu .............................................................................................. 54
Figure 39. Interface Window - Invoices (1)..................................................................... 55
Figure 40. Change Post Period Window .......................................................................... 55
Figure 41. Interface Window -Invoices (2)...................................................................... 57
Figure 42. Fix Errors Window .......................................... Error! Bookmark not defined.
Figure 43. Create Check Export Files .............................................................................. 58
Figure 44. Create Check Export Files .............................................................................. 59

5
Figure 45. Export File Creation ....................................................................................... 60
Figure 46. Export File Creation ....................................................................................... 61
Figure 47. Statement Filter Window ................................................................................. 62
Figure 48. Batch Reporter for Financial Statements ........................................................ 63
Figure 49. Filter Setup Window....................................................................................... 64
Figure 50. Updates Menu ................................................................................................. 66
Figure 51. Update to Summary Window ......................................................................... 67
Figure 52. Close a Month Window .................................................................................. 68

6
General Information
Purpose The General Ledger (winGL) system is one of three components of H.M.S.
Financials, a group of fully integrated Housing Management Solutions (H.M.S.)
software products that combine expert knowledge of housing financial functions
with recent advances in computer technology. H.M.S. Financials represents the
culmination of years of housing, fee accounting and computer experience,
providing a complete set of financial software products that meets the needs of
housing authorities.
Getting Started with winGL
Applications Main Menu Upon accessing the system, the winGL main window is displayed. The General
Ledger options are displayed as tabs across the top of the screen. From this
screen, the user can access any option that needs to be performed.
Figure 1. winGL Main Window
Starting winGL Options To start one of the winGL options, click on the tab of one of the items. A list of
related groups for that tab will be displayed. Then click on the item you wish to
access.
Quitting winGL To preserve file integrity, it is recommended that you use the File tab and then
Exit winGL to exit out of the program.

7
Chapter 1, General Ledger Setup
General Information This chapter describes the information that must be established before the General
Ledger system can be used. Some options pertain only to the General Ledger
system. Others are used by all three financial applications, and can be set up in
any of the applications. The information will flow through automatically to the
others. Briefly, these options include.
Setting up your Chart of Accounts
Copying a range of account numbers from one ledger to another, and copying
filters and reports.
Setting up standard distribution tables.
Setting up account aliases used in distribution tables
Setting up various options used in interfacing, including account prefix names
and due to/due from setup.
Defining various default items such as your general ledger account structure.
Posting period and fiscal year end set up, including setting up multiple fiscal
year ends in the same database.
Setting up the necessary information for you to use in automatically
calculating and creating PILOT journal entries.
Setting up cycles used in recurring entries.
Defining formats for your financial statements.
Setting up bank account information.
File Tab
From the winGL click on the File tab, then the Setup group that you want to
access. The following options are available.
Figure 2. Setup Groups on File Tab
To start any of the options, click on the desired one. This brings up the window
for the selected option.
The remainder of this chapter contains instructions for the use of the options on
the File/Setup tab.

8
GL Account Codes Setup Your initial chart of accounts will be set up for you prior to training on the
software. You may find it necessary to add new accounts or modify existing
account information once you begin to use winGL.
You can access this area of the software by choosing the File tab, then the
General Ledger Setup Group/GL Account Codes. Or by clicking the GL
Accounts option from the Journal Entry maintenance screen.
Figure 3. G/L Accounts Table Maintenance
The window will display the existing account information. The following
sections explain how to modify existing accounts and how to add new accounts.
To print a listing of your accounts, click on Listing. To export to Excel simply
click the button.
To retain data integrity, you are not allowed to delete an account that has had
activity posted to it. You may, however, inactivate accounts so that they do not
appear on financial statements and selected reports.
Modifying an Existing Account An account number of an existing account cannot be changed. An account’s
description, type and status can be changed. You can make modifications directly

9
in the G/L Accounts Table Maintenance window. Use the scroll bar on the right
to move down through the list of accounts.
When the desired account is found, click with your mouse anywhere on that line
and use the Tab key to move through the fields. Type in any modifications that
are necessary, then click on Save. You can now continue modifying another
account, or click on Close to return to the Main Menu.
Adding a New Account To add a new account, click on the Form button at the top of the screen. The
following window will open.
Figure 4. G/L Accounts Table Maintenance - Form Window
Click on New to clear the entry fields for new account information. Enter the
“Account Code” and “Description”, being aware that once saved, the code cannot
be changed. Select the correct “Type” from those listed. Note that Asset and
Liability are used for accounts that are not closed at the end of the fiscal year.
Income and Expense types are used for accounts that are normally closed at the
end of the fiscal year.
10
Accounts to be used for posting and printed on financial statements should be left
as “Active” for Status. “Department” and “Consol” are not used at this time. The
date fields at the bottom are updated by the software automatically.
Once all data is entered, click on Save. To enter another account, click on New
and fill in the applicable data. Save after entering each new account. Once all
accounts are entered, click Close to return to the main GL Accounts Table
Maintenance Window.
All new accounts added will appear at the bottom of the list of accounts. From
here, click Save again. The new accounts will then be put in their proper order
and will be completely saved to your Chart of Accounts. Click on Close to return
to the Main Menu.
To add multiple accounts using existing accounts as a template (such as Comp
Grant programs), see the section in this manual titled “Account/Copy Explosion”.
If a new distinct account prefix is created as a result of adding a new account, it is
recommended to also set up the prefix name in the system. See “Account Prefix
Setup” later in this manual.
Account Copy/Explode This option can be used to create new accounts using existing account
information, substituting specified prefix characters. An example of this would
be creating a new comp grant program. Accounts can also be copied from a
secondary database if applicable. This area can also be used to copy reports and
filters from another database.
Upon accessing this option, the following window will open.

11
Figure 5. Copy/Search/Replace Accounts Window
All existing Accounts in the current database will be displayed. Multiple
accounts can be highlighted and need not be in a specific range. Hold the Shift
key on the keyboard as you select accounts in the list. For a range of accounts,
you may highlight the first account, and hold the Shift key while using the Down
Arrow on the keyboard. (A “click and drag” method can also be used, but the
speed of some machines makes this difficult to stop at the end of the range.)
Once accounts are highlighted, enter the Prefix (or as much of the prefix needed)
in the “Find” field in the middle bottom area of this window. Tab to the “Replace
With” field and enter the new Prefix. Note that the number of Prefix characters in
each field should be the same, including the dashes (-). Hit the Tab key on your
keyboard again and you should notice the Replace button darken so that you can
use it.
As a default, a check mark appears in “Create Transaction For Each Account”.
Any new account added will have no transaction history and therefore will not
appear on a financial report. This option creates a $.01 debit entry and credit
entry for all new accounts in the period you specify. This will cause the
account(s) to appear on a financial report. A journal entry/transaction number of
500 will be assigned to any transactions created with this option, and must be
updated to summary in order for the account to appear on a financial report.
Once all criteria have been entered and chosen, click on Replace. The system
will ask you to verify this action. Accounts being added will scroll at the bottom
of the screen.

12
If “Create Transaction” has been checked, the system will ask you for a Posting
Period to be used.
The current system year and month is the default, but can be changed to any
year/month before clicking Ok. If you do not wish to create transactions, click
Cancel. Your new accounts will still be created.
When the transaction creation is complete, the system will tell you the number of
Accounts and Transactions Created. Click Ok to confirm.
Since transactions must be “Updated to Summary”, the system will allow you to
do so at this time.
Choose Yes to be taken automatically to the “Update” area or No if you choose
not to Update to Summary at this time. For instructions on this function of the
software, see the section “Update/Post Transactions” later in this manual.
After completing this process, the new accounts that you created will appear in
the list of accounts in the Account/Copy Explosion Window, and you will be able
to access them through the “G/L Account Code” menu option.

13
When copying accounts, all information from the existing accounts will carry
through to the newly created accounts, except for the new Prefix. It may be
necessary for you to modify the new accounts’ “Descriptions” to reflect the new
Prefix created. Do this through the “G/L Account Code” menu option.
If a new distinct Account Prefix is created as a result of creating new accounts, it
is recommended to also add the Prefix Name to the system. See “Setting up
Account Prefix Names”.
Account Alias Setup Account Aliases are used to identify invalid accounts created with a partial
distribution table (See “Distribution Setup). This is very useful if a development
or CGP program is allocated a percent on an employee’s payroll distribution.
If a partial distribution would split Low Rent 10%, Section 8 10%, Development
40%, and Comp Grant 40%, and the employee’s distribution setup uses 4110 for
HUD Account and 4540 for Fringe, an invalid account would be created, since
development and CGP do not use 4110 as a valid HUD Account. The account
alias table would convert the HUD Account number if a matching prefix was
found.
Example: The prefix for Low Rent is 1-1-000-, Section 8 is 2-1-000-,
Development is 1-4-001-, and CGP is 1-3-904-. Low Rent 1-1-000-4110 is a
valid account, but Development 1-4-001-4110 is an invalid account, and should
be 1-4-001-1410. For this example you would enter 1-4-001- as the prefix, 4110
as the HUD Account, and 1410 as the Alias.
Any time the computer finds 1-4-001-4110 it will automatically correct it to 1-4-
001-1410. The aliases setup can be used in both Accounts Payable and Payroll
without having to be duplicated in each program. A separate alias would be
needed for each HUD Account to be used.
Access this option by choosing the File tab, then Account Alias in the Financial
Setup group.
If an alias is to be changed, highlight the appropriate line, make the change, and
then click Save and Exit.
If an alias is to be added, click Insert and complete each column. Then click
Save and Exit.

14
Map Account Codes to CMS
Figure 6. Map GL Accounts to CMS
Distribution Setup Use this option to set up tables to use when distributing the expenses related to an
invoice. These tables can be used during invoice entry to automatically spread
expense amounts across different funds. A default table can be assigned to a
vendor so it can be used automatically when entering invoices for that vendor.

15
Figure 7. Distribution Table Maintenance
Distribution Types A Full distribution table includes Account Prefixes, HUD Account Numbers and
Percents. A Partial distribution table includes only the Account Prefixes and
Percentages. You choose the desired HUD Account number when entering the
invoice.
Create a New Distribution Table To create a new table, change the name that appears in the Distribution Table
Name field to the new name you wish to use. This name can be up to 40
characters long. This will not change the existing table in any way. It will simply
create a new table with the new name.
Indicate the Distribution Type by choosing either Full or Partial. Click on Clear
to remove all the existing account information and percentages. To enter a new
line of information to be used, click on Insert and enter the appropriate data. To
Delete a line, click with your mouse anywhere in that line and then click Delete.
Click on Save to save the changes you’ve made. Click on Cancel to exit without
saving.

16
Modify an Existing Distribution Table If you wish to make changes to an existing table, select the desired Distribution
Table Name from the dropdown box, and the current breakdown for that table will
appear. Make any necessary changes to account numbers or percentages by
clicking in the area you need to change and typing in the correct information.
Click on Insert to enter a new line of information to be used. Click on Delete to
remove the line that the cursor is currently on. The Clear button will remove all
the lines of the distribution table. Click on Save to save the changes you’ve
made. Click on Cancel to exit without saving.
Test a Distribution Table To test a distribution table, click on the Try It! button. The following window
will appear.
Figure 8. Distribution Table Test Window
If your table is a Full Distribution Table, type in an amount, and click on
Distribute. If your table is a Partial Distribution Table, choose a HUD account
number from the dropdown box. You can then type in an amount and click on
Distribute. The display area will show how the distribution table will allocate this

17
amount based on the account information and percentages you set up. Also, the
credit offset to your default A/P Cash Account will show as the last line of your
distribution so that the debits and credits proof out to zero.
There are two additional Options available to you in this window. ‘Use Percents’
lets you choose whether or not to use the percentages that are set up in this table.
If you unclick this option, and click on Distribute, the percentages will not be
used and the amount distributed to each account will be zero. You can then enter
any amount you desire for each line of the distribution. ‘Debit Default’ lets you
decide whether or not to create debit entries to the expense accounts in the table.
If you unclick this option, credit entries will be created to the expense accounts,
and the default cash account will be debited.
Use the Insert button to add a new line to the distribution. Click on Delete to
delete the line your cursor is currently on. The Swap button will reverse the debit
and credit amounts. Click on Save to save any changes you’ve made to the table.
Click on Cancel to exit out of this window without saving any changes you’ve
made.
Account Prefix Setup This option will identify the names of the different prefixes used in your General
Ledger Chart of Accounts. The prefix length is defined in the HMS Financial
Defaults table, explained later in this chapter.
When accessing the Account Prefix Names item, all unique prefixes will be
displayed in the column identified as Account Prefix. Any Prefix Names
previously assigned will appear in the column called Prefix Name. If any Prefix
Name is blank, click in that field and type the name to be assigned to that prefix.
Also check the appropriate column(s) if this prefix can be used in any of the
identified financial applications (e.g. Include in A/P Distribution).

18
Figure 9. Account Prefix Setup Window
A check mark will appear to the left of any row that has been modified. When
finished making changes, click on Save then Exit. Upon exiting, a small window
will appear asking whether you want to update the bank cross reference table for
due to/due from prefixes.
Clicking on Yes will take you automatically to the setup table for this option
(explained next in this manual). Clicking No will take you back to the Main
Menu.
Bank/GL Account Cross Reference Setup This option is used to set up the information used to create the offset entry (due
to/due from) required when a bank account has paid expenses for multiple
ledgers. This information must be established for each bank account used in the
Accounts Payable and Payroll applications. The General Ledger application can

19
also use these tables to create an offset entry for a manually entered journal
voucher.
Banks and bank accounts must be set up prior to creating the cross reference. See
“Bank Account Setup” for instructions. Prefix Names must also be created. See
“Account Prefix Setup” for instructions.
Select the name of a bank account from the dropdown box. The bank account
number, GL cash account number and GL AP account number will be displayed
at the top of the window.
All Prefix Names established will be shown in the maintenance window. If a
Prefix Name has not been established for a particular prefix it will not appear in
this window, so it is imperative for the Prefix Names to be set up prior to
accessing this menu option.
For the selected bank account, if an offset entry is needed for the prefix, enter the
Accounts Receivable account number in the A/R Account column, and the
Accounts Payable account number in the A/P Account column. The A/R Account
should be in the same ledger as the bank account. The A/P Account should be in
the same ledger as the prefix. If the prefix is in the same ledger as the bank
account, normally an offset entry is not made and the columns for these prefixes
can be left blank. Note that these accounts must be set up in your General Ledger
Chart of Accounts for the due to/due from entry to be created correctly.
See the picture of the entry screen below for an example.
Figure 10. Bank/GL Account Cross Reference
Once you’ve completed all the entries, click Save. You can now select another
bank account or Exit to return to the main menu.

20
HMS Financial Defaults Setup This table is used to store default values for all three financial applications. These
options will be discussed with you and set up for you by HAB, Inc. staff prior to
or during your training on our software. Because this information is critical to the
working of your financial software, we strongly encourage you to consult the
HAB, Inc. support staff before making any changes to this table.
Below is a brief description of each item in the defaults table.
Figure 11. HMS Financial Defaults Window
AP - A/P Default Bank Account The default value is the bank account number that was established in the Bank
Account Setup. It needs to be entered here exactly as it was entered in the Bank
Account Table. If only one bank account is set up, the ‘Change’ box is left
unchecked, eliminating the dropdown box in Accounts Payable. If multiple bank
accounts are established and will be used in Accounts Payable, the change box
should be checked.
AP - Accounting Basis The default value can be either Cash or Accrual. If Cash is selected, interface
batches in Accounts Payable will be only after checks have been written. If
Accrual is selected, interface batches are created for invoices as they are created
and checks as they are written. The Accrual option requires two separate
interface processes.
21
AP – Auto Save Dist. Invoice The default value can be either ‘Y’ or ‘N’. If the default is set to ‘Y’, the system
will “auto-save” after doing a distribution on an invoice. After using a
Distribution Table using the Distribute button in the invoice entry screen, the
system will ask once if you would like to Save the invoice and its distribution. If
you click on Yes, the invoice will be saved and you will able to immediately enter
another invoice.
If the default is set to ‘N’, you will be required to Save the distribution, and return
to the invoice entry screen to completely Save the invoice.
GL – Fund Length The default value is the number of characters that designate the fund in your
General Ledger Chart of Accounts, including the dash. For example, a common
fund length is three: two digits indicating the fund plus the dash that separates the
fund from the rest of the account number (e.g. 10-, 20-, 30-).
GL – G/L Acct Length The default value here is the HUD account number plus the suffix, including the
period. For example, a common account length is eight: four digits for the HUD
account, a three digit suffix and the period separating the two (e.g. 1111.010).
GL – G/L Prefix Length The default value here is the number of digits in your General Ledger account
structure before the HUD account number, including any dashes. For example, a
G/L Prefix Length of 13 would be calculated by counting the characters in the
following prefix: 10-0-000-000-.
GL – Omit JV Pre-Screen The default can be either ‘Y’ or ‘N’. If set to ‘Y’, you will go directly into the
Journal Voucher Entry Screen in the New Mode, ready to enter a new journal
voucher. If ‘N’ is chosen, you will see the screen below and be able to choose
any of the options that are available.
PR – Default PR Check Style The default value is HMS Payroll Check. There is also a stub/stub/check style,
with 2 check stubs followed by the check portion at the bottom. Please call the
HAB, Inc. support staff for information regarding setting up check styles.

22
PR – PR Check Sort The default here can be either ‘Name’ or ‘Code’. ‘Name’ will sort checks by
Employee Name when printed. ‘Code’ will sort checks by Employee Code. The
Payroll Pre-Run Register report will also be sorted by this value.
PR – Fringe on All Earnings A default of ‘Y’ will calculate the distribution of employer paid amounts (Fringe
amounts) based on temporary tables that are created with each payrun. These
tables total all salaries and unique cost centers and computes percentages to
utilize. During processing of the Labor Distribution, these temporary tables are
used to allocate Fringe amounts based exactly on how the total salary expense
was allocated.
If you do not want to use this procedure to allocate Fringe amounts, and instead
use the Standard Distribution Tables in winPAY, then set this default value to
‘N’.
PR – HMS Payroll Check The default value should be set to ‘New’.
PR – P/R Default Bank Acct The default value is the bank account number that was established in the Bank
Account Setup. It needs to be entered here exactly as it was entered in the Bank
Account Table. If only one bank account is set up, the ‘Change’ box is left
unchecked, eliminating the dropdown box in Payroll. If multiple bank accounts
are established and will be used in Payroll, the change box should be checked.
PR – Cash Offset The default value is the full General Ledger Account number for the Payroll Cash
Account.
Tenant DB Enter the tenant database name in the Function column. This is the name of the
database where the bank account is set up (See Bank Account Setup later in this
manual). The Default column is left blank.

23
Linking Funds to Different Fiscal Year Ends There are four SPFC G/L reports that rely on the Posting Period table to determine
which twelve months to include in a fiscal year (Detail by Code, Trial Balance, 12
Period Spread and Statements). The beginning balances and YTD amounts are
based on the posting periods assigned to G/L Month 1 through G/L month 12.
These twelve months are not necessarily January through December, but could
span different calendar months (i.e.: 199910 through 200009 for fiscal year-end
September).
But what if you’d like some of your funds to reflect a different 12-month span
than the ‘usual’ fiscal year? In the past you would’ve had to set up a separate
financial database having another posting period table. But now you can ‘link’ the
account funds that are out-of-the-ordinary to a different fiscal year-end!
There is a critical piece of information that the system must know in order to
utilize the new fund linking feature. Check your HMS Financial Defaults to make
sure you have the Fund Length set up. See the section in this manual titled “HMS
Financial Defaults Setup”.
If the Fund Length was not set up, you will encounter this message box as a
reminder that it must be done.
When you access the “Link Funds FYE” option in the General Ledger Setup
group, the following window will open. This screen shows non-linked funds on
the left-hand side. If the month selected in the list box has any funds linked to it,
you will see them on the right-hand side of the screen. You can unlink a fund at
any time to have it revert back to the regular 12-month span in the posting period
table, or to link it to a different year-end month.
You only need to link the funds that you want summed differently than the
posting table setup. In other words, if your 12-month posting periods are Jan –
Dec, you will not have to link all your normal funds to the Fiscal Year-End Month
of December.
In this example our fund 140- has been linked to the fiscal year-end month
September. When we run a report having a filter or account range with this fund,
the beginning balance will be for October, and the YTD amount will be the sum
of the amounts in months October through September (or till Current).

24
Figure 12. Link Funds to Months Window
You will now be able to run financial reports for this fund and they will correctly
reflect your fiscal year end of September.

25
Setting Up PILOT Calculation
This setup will be used in automatically creating the journal entry for PILOT
(Payment In Lieu of Taxes). Setup data is required for each prefix which is
subject to a PILOT expense. Prefix Names must be created before the setup can
be entered. See “Account Prefix Setup” for instructions on how to do this.
When accessing the PILOT Params on the File tab in the General Ledger Setup
group, the following window will open.
Figure 13. PILOT Calculation Setup
Select the prefix name from the dropdown box for which a PILOT Entry will be
made.

26
Enter the PILOT Percent to Use as a decimal number. 10% is entered as .10 and
the system will display it as 10.00 percent.
Enter the full account number for the PILOT Expense and PILOT Liability
Accounts.
The ranges to sum can be entered, using the wild card character of ‘%’. To add a
line to the range table, click Insert. Enter the prefix that is specific for the range,
using % where applicable, and the HUD account number as applicable, also using
% where applicable. The number of accounts that match the entry will be
displayed in the far right column.
Example: If the Low Rent Operating Prefix is used in a PILOT Calculation, the
following accounts would be used.
10-1-000-000-3110.000 Dwelling Rental
10-1-000-000-3120.000 Excess Utilities
10-1-000-000-3190.000 Nondwelling Rental
10-1-000-000-4310.000 Water
10-1-000-000-4320.000 Electric
10-1-000-000-4330.000 Gas
10% of the sum of the above accounts is used as the PILOT Expense. The
Ranges to sum for the above account can be entered as follows:
10-1-%31% ‘3’ will appear in the Acct Count column
10-1-%43% ‘3’ will appear in the Acct Count column
Once the data is complete, click Save.
Select another prefix or Exit to return to the main menu.
Setting Up Statement Formats This option is used to customize your financial statements. This formatting
includes page headings, group headings and totaling features such as subtotals,
control totals and grand totals.
Each financial statement needs a format created for it, and this record is given a
unique format number by the winGL system.

27
Figure 14. G/L Format Table Maintenance
You can access the various options in the Format Table Maintenance Window by
choosing the correct button on the tool bar, or choosing the option on the Entry
tab at the top of the window.
The following sections explain the proper setup procedures and the different
options available to you when formatting your statements.
Creating a New Format A new format can be created by choosing New from the Entry tab at the top of the
screen. Enter a new unique format number in the screen that follows. The blank
table is now available to insert lines into a new statement format.
Adding new format lines
To add lines to a format, click on the Form button, and click New. The blank
form is now available to be completed. See “Statement Format Fields” for
information on what each field means.

28
Figure 15. G/L Format Table Maintenance - Form Window
Required information is indicated by red lettering. We suggest leaving the default
values as they are for the Normal Balance, Add/Subtract and Type fields.
As each line is complete in the Form Window, click on Save. Continue this
process until all lines are entered. Choose Close to return to the main Statement
Format Window. All new lines or lines that have been modified will appear with
a check in the far left column. Any new lines are inserted at the end of the table
and will be sorted in line number order after the table is saved by clicking on
Save.
Adding accounts to format lines
Accounts to be included in a total or control line must be added to the lines.
Always Save prior to adding accounts. To add accounts to be included in the line,
click on the line, then click the Accounts button. An accounts table for each line
is stored with the format. Multiple lines can be inserted into the account table to
include multiple accounts and account ranges. The account numbers entered here
must use the exact character strings as set up in the database, including dashes (-)
and decimals (.). Question marks (?) can be used for wildcards in place of a
character to specify multiple accounts. A range of accounts can be used by
entering the first account, then a colon (:), then the last account.

29
Figure 16. Statement Format Setup - Account Code Ranges Window
To enter accounts to another line, click Next or Previous to move up and down
the format table without returning to the main setup window.
The Accounts button can be used to find an account using the G/L Search routine.
Enter any part of the criteria fields, then click on Search. Once the account is
located, highlight it and click OK. The selected account will then be inserted into
the Account Table of the statement format. This search can also be used to verify
the account characters entered with a wildcard. After entering the account
number with the wildcard characters, click on Accounts then Search. All
accounts matching the wildcard string will be displayed. Do NOT click on OK,
but rather choose Cancel so as not to overwrite the entered characters.
After all accounts are entered for a particular line, click OK to return to the main
Statement Format Setup Window, then Save your entries. Always save after
entering accounts and before continuing to modify the table.
When you have completed your statement formatting and saved your work, click
on Close to return to the Main Menu.

30
Modify an Existing Format To modify an existing format, click on Open on the Entry tab at the top of the
screen. Choose the desired format from the list that appears. The Format Table
Maintenance Window will be populated with the chosen format’s information.
You can now modify any information that you require. For more information
about adding line information, see the section titled “Create a New Format”. For
information regarding the fields in the format window, see the section titled
“Statement Format fields.
Copying an Existing Format to a New Format An existing format can be copied and modified as needed rather than starting
from scratch. Choose Copy from the Entry tab at the top of the Statement
Format Setup Window. The following window will open.
Figure 17. Copy Statement Format Window
Select the desired format to copy from by clicking on the name in the dropdown
box. Enter a unique format number in the Copy To field. An option to Renumber
Lines can be selected by clicking in the check box. This will set all lines in the
new format to start at line 10 and increment each line by 10 (10, 20, 30 . . .).
The new format can then be Opened and modified as necessary. See the section
“Creating a New Format” for information about adding lines and accounts. See
the section titled “Statement Format Fields” for information regarding the fields
in the format setup area.

31
Statement Format Fields This section contains information about the fields available to you in formatting
your statements. Use this as a reference when you are setting up your statements.
Please note that several fields are set up in a certain way for our software. Be
careful when changing these fields from the default setup. You may not get the
results you want!
Line number: Enter any unique number not in the format. This will put that line
in the order you wish it to appear. When saved, the format lines will be in line
number order and the report will be printed in that order.
Description: Enter the text to be printed on that line of the report. Text is case
sensitive and can be UPPER CASE, lower case, or Title Case.
Summary Level: Use the following information to determine which Summary
Level to use:
0 – What is entered on this line will appear at the top of every page. It is
recommended to have only one zero level per report. An example would
be ‘LOW RENT BALANCE SHEET’. Level 0 will also appear as the
name of the format.
1 – The information on this line will appear as a description line only.
Level 1 is used for group headings, page breaks and special format lines,
such as gray lines. For page breaks and gray lines, the description should
be a space character.
2 - will allow accounts to be included in the line as a total line or control
total. It is not required to have a level 2 in the report, and for further
subtotals to be inserted, it is recommended to start at least at level 3.
3 and higher – will allow accounts to be included in the line, in addition
to summing all totals/control on the next lowest level.
Level 3 will sum all level 2 lines,
Level 4 will sum all level 3 lines, etc.
Normal Balance: This is used to determine how the account balance for that line
will be printed.
Debit – will print all debit balances as a positive amount and print all
credit balances as a negative (-) amount.
Credit – will print all debit balances as a negative (-) amount and print all
credit balances as a positive amount.
All HAB setups use Debit for all reports, allowing Liabilities and Income
accounts to appear with the negative sign (-)

32
Add/Subtract is used to determine how the account balance will be treated in the
next summary level.
Add – will add this line into the next level.
Subtract – will subtract this line from the next summary level.
All HAB setups use Add for all lines in all reports, causing positive account
balances and negative account balances to be net to actual balance. For example,
totaling income and expenses would net a negative balance (-) if income
(Negative) is greater than expense (Positive).
Type is used to determine which stored balance will be reported in the Current
Period and Current Year columns of the report.
Begin – will print the beginning balance for the period.
Change – will print the sum of transactions for the period in the Current
Period column, and the sum of transactions for the year in the Current
Year column. Selecting Current Year on an operating statement will not
include prior years, so no closing entries are required at the fiscal year
end. For statements that require an on-going balance, such as comp grant
and balance sheet accounts, the Cumulative column can be selected and is
not affected by the type selected.
End – will print the ending balance for the period.
All HAB setups use Change for all lines in all reports, allowing the balance sheet
to show the period change, and using cumulative to show actual to-date balance.
Indent is used to cause this line to be offset from the left edge by the number of
characters entered here.
Spacing lines is used to enter blank lines after this line. Usually 1 space is used
after total lines. A spacing line can also be used on a gray line (Special Handling
flag of ‘G’ or ‘Z’) to widen the gray width.
Total is used to calculate percentage of all lines after this line number. ‘X’ can be
used for percentages, ‘P’ is used to calculate PUM columns on an operating
statement. With ‘P’ used, the PUM account is used and will reset the PUM
account with a new ‘P’ total in the statement. This is needed for multiple project
operating statements in the same format.
Special Handling is used with report formats (*.qrp) to determine special
characters to be printed. HAB has established the following special handling
flags in all current formats (*.qrp).
C – is used for a Control Total. This will cause only the sum of all
accounts attached to this line to be printed, without the individual account
balances being printed. An example is Income/Expense Clearing on the

33
balance sheet. All income/expense accounts are attached to the line, but
only the sum of those accounts prints.
P – is used for a Page Break. Always use P on a separate line by itself
with a space character as the description, and a Summary Level of 1. This
will cause a new page to start.
G – is used to insert a Gray Line, usually at the top of each page. G is
used on a separate line by itself, with a space character for a description,
and a Summary Level of 1.
Z – is used to insert a Gray Line with Bold Text on the line. Z is normally
used on a Summary Level 1 for a program/project heading in lieu of a
plain gray line.
U – is used to Underline the amounts/text in each column.
B – is used to Bold the amounts/text in each column. If a line with several
accounts attached to the line is Bolded, all accounts attached will be bold.
Normally used for group headings or a summary level without accounts
attached.
Spreadsheet Label name is used to link the total of this line to a label name,
which can then be exported into a file that can be used in a spreadsheet program
such as Excel. Currently you can enter a name in this field and when you run the
report through the menu option Reports/SPFC/Statements, a CSV (Comma
Separated Value) file will be created. The file can then be used to import into a
spreadsheet.
Cycle Setup Use this option to set up cycles to which any recurring invoices can be assigned.
This option is also used by the General Ledger application to set up cycles for
recurring journal vouchers.
Figure 18. Cycle Setup Window
Click on Form and New to add a new cycle. The “Cycle Code” is a unique
identifier that can be up to six characters long. A cycle’s “Name” can be up to 30
characters long. The “Date Last Posted” will be filled in automatically for you

34
after each posting of that cycle’s entries. The “Module” is the financial
application to be used by the cycle. “Type” is Weekly, Daily or Monthly.
“Frequency” is how often the cycle needs to be run per type. For example, a
“Frequency” of one (1) means once per Week or Month. Setting up the recurring
journal entries that will use these cycles will be covered later in this manual.
Posting Period Table Setup This option will set up a table with posting period information that is used by all
three financial applications, winAP, winGL and winPAY. This information will
be set up for you either prior to or during training on our software applications.
You may find it necessary, however, to modify the information here, close
months in the different applications, or add additional years to the Posting Period
Table. Information about each of the fields in the table and how to modify and
add information is included in this section.
Figure 19. Posting Period Table Maintenance Window
The “Posting Period” identifier is a six-character code comprised of the four-digit
year and two-digit month (e.g. June 1999 would have the identifier 199906).
The “G/L Month” identifies what place that particular month has in your fiscal
year (e.g. If your fiscal year ends in June, then these month identifiers for June
would be 12, July would be 1, etc.).
The “G/L Year” identifies which fiscal year the posting period is in. For example,
if your fiscal year ends in 1999, the “G/L Year” will be 1999 for Posting Periods
199807 through 199906.
The “P/R Month” and “P/R Year” follows what is set up for “G/L Month” and
“G/L Year”.

35
The “P/R Current Month”, “G/L Current Month”, and “A/P Current Month”
columns indicate which Posting Period is currently open in each of the
applications. An ‘X’ indicates that a period is closed; a ‘C’ indicates a posting
period is open. For more information on how to close a month, see the following
section.
Closing a Month Closing a month in the Posting Period Table is a simple task. To close a month,
simply click in the field that coincides with the Posting Period and application,
and type in an ‘X’. Then click in the field for the next Posting Period and enter a
‘C’. Click on Save to save the changes you made.
Please note that you can have different periods open in the different applications.
For example, in winAP you can have July open, and in winGL you can have June
open. However, please be aware that you cannot post to a closed Posting Period.
Interfaces from winAP and winPAY and any manual Journal Vouchers must have
a posting period equal to or later than the G/L Current Month.
Adding Additional Periods When adding additional periods, you have the option of adding one period at a
time or adding a whole year at one time. To add a single period, click on the
Form button at the top of the screen. The following entry window will open.

36
Figure 20. Posting Period Entry Window
Click on New to enter a new record. This clears the entry fields so they are ready
for you to enter new information. All required information is indication by red
lettering and yellow boxes. Fill in the necessary data and click on Save and then
Close. This will bring you back to the Posting Period Table Maintenance
Window. From here, click on Save to completely save your new entry.
To add an entire year of posting periods, click on the Add Year button at the top
of the main Posting Period Table Maintenance Window. The following window
will open.
Figure 21. Add Year to Posting Period Table
The “New Fiscal Year” will default to the next year that should be entered in your
Posting Period Table. The “Fiscal Year Month” will default to your current fiscal
year end month. Once you verify that this information is correct, click on Save
and then Exit. The twelve months of the new year have now been added to your
Posting Period Table.
From the Posting Period Table Maintenance Window, click on Save to save your
changes. Click on Listing to print out a listing of your posting periods. Click on
Close to exit to the Main Menu.
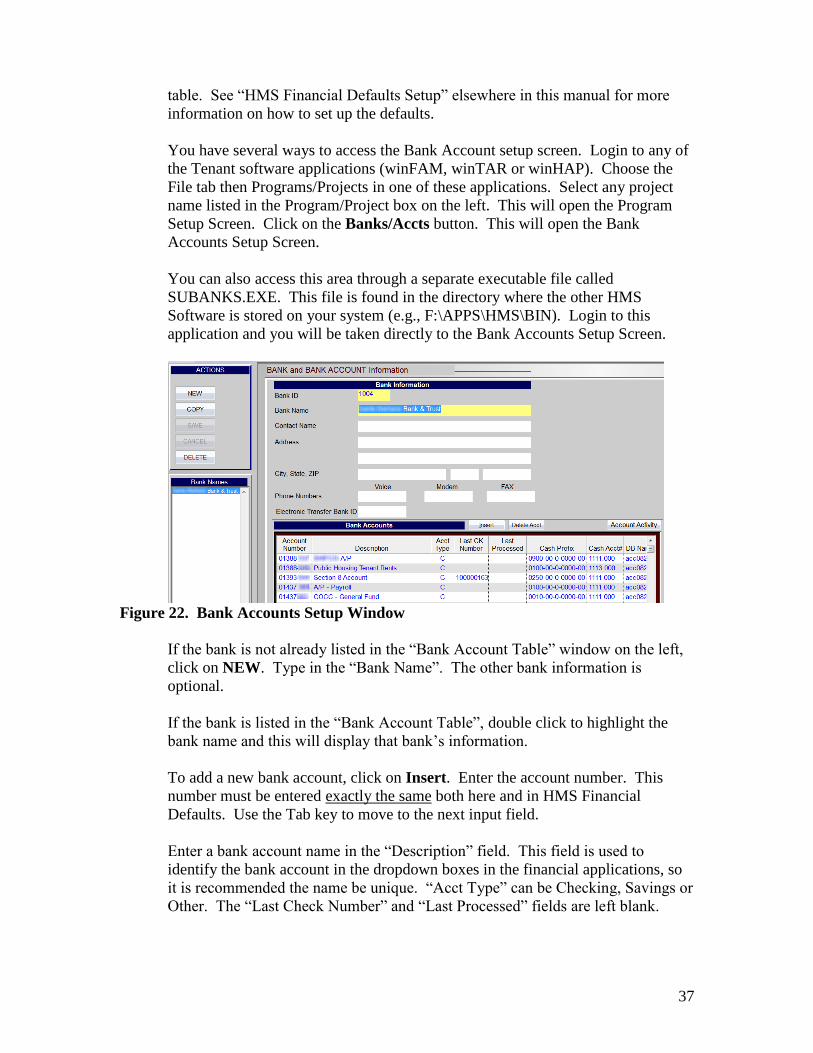
Bank Account Setup Bank information is set up and maintained in the Tenant database and mapped to
the Financial database using HMS Financial Defaults and the Bank Accounts
37
table. See “HMS Financial Defaults Setup” elsewhere in this manual for more
information on how to set up the defaults.
You have several ways to access the Bank Account setup screen. Login to any of
the Tenant software applications (winFAM, winTAR or winHAP). Choose the
File tab then Programs/Projects in one of these applications. Select any project
name listed in the Program/Project box on the left. This will open the Program
Setup Screen. Click on the Banks/Accts button. This will open the Bank
Accounts Setup Screen.
You can also access this area through a separate executable file called
SUBANKS.EXE. This file is found in the directory where the other HMS
Software is stored on your system (e.g., F:\APPS\HMS\BIN). Login to this
application and you will be taken directly to the Bank Accounts Setup Screen.
Figure 22. Bank Accounts Setup Window
If the bank is not already listed in the “Bank Account Table” window on the left,
click on NEW. Type in the “Bank Name”. The other bank information is
optional.
If the bank is listed in the “Bank Account Table”, double click to highlight the
bank name and this will display that bank’s information.
To add a new bank account, click on Insert. Enter the account number. This
number must be entered exactly the same both here and in HMS Financial
Defaults. Use the Tab key to move to the next input field.
Enter a bank account name in the “Description” field. This field is used to
identify the bank account in the dropdown boxes in the financial applications, so
it is recommended the name be unique. “Acct Type” can be Checking, Savings or
Other. The “Last Check Number” and “Last Processed” fields are left blank.

38
Enter the “Cash Prefix” for the bank account. Do NOT include the final dash (‘-‘)
of the prefix. For example, if the General Ledger account number of the bank
account is 10-0-000-000-1111.010, enter 10-0-000-000 as the prefix.
The “Cash Acct #” is the HUD account number for the cash account. For
example, if the General Ledger account number of the bank account is
10-0-000-1111.010, enter 1111.010 as the “Cash Acct #”.
Enter the “A/P Prefix” and the “A/P Acct #” in the same way.
The “DB Name” is the name of your financial database. This name begins with
‘acc’. Enter this name in the “DB Name” field.
Click on Insert to add additional accounts. To delete a bank account, place your
cursor anywhere in the line of the account you wish to delete and click the Delete
Acct button. Click on Exit to leave the Bank Account Setup Window.

39
Chapter 2, Journal Entries
General Information This chapter contains information regarding entering and maintaining journal
entries (or journal vouchers) in the winGL application. Topics covered include:
Entering new journal entries
Modifying existing entries prior to updating to summary
Creating a new journal entry from an existing one using the Recall feature
Changing the Posting Period of previously entered journal entries
Posting recurring journal entries
Posting the automatic PILOT calculation entry
Journal Entry Menu From the winGL Main Menu, click on Journal Entry. The following options are
listed.
Figure 23. Journal Entry Tab
To start any of the options, click on the desired one. This brings up the window
for the selected option.
The remainder of this chapter contains instructions for the use of the options on
the Journal Entry menu.
Journal Entries Upon accessing the Journal Entries menu option, the following window will
appear.

40
Figure 24. Journal Entries - New/Recall/Open Window
New or Continue will open a blank entry screen to create a new transaction.
Open will provide a search box to select an entry to be viewed or modified.
Entries “updated to summary” cannot be modified!
Recall will provide a search box to select an entry to be copied, modified as
needed and saved as a NEW transaction.
If you would like to go directly into the JV without this initial screen, it can be
turned off in HMS Financial Defaults.
Entering/Modifying Journal Entry Information Use the appropriate button from the New/Recall/Open window, depending on
whether you want to create a new transaction, open and modify an existing
transaction or copy (Recall) an existing transaction. See the section titled
“Searching for a Journal Entry” for information regarding the search function.
The following Journal Entry Maintenance Window will open.

41
Figure 25. Journal Entry Maintenance Window
Select the correct Posting Period from the dropdown box. The Current month is
the default. A future month can be selected but closed months cannot. To change
the current month, use Updates/Close Month from the Main Menu.
Select JV Type, if desired. Standard JV is the default and can be used for all
transactions. If other types are selected, a report is available which will sort all
transactions by JV Type. Once an entry has been Updated to Summary, this field
cannot be changed.
Enter User Ref #, if desired. This field is a numeric field that will be incremented
automatically for each JV Type. This is optional and does not affect the system
transaction (Xact) number assigned. Once an entry has been Updated to
Summary, this field cannot be changed.
Enter the first account of the entry by clicking in G/L Account Code column on
the first line. Enter a valid account. TAB or use your mouse to move to next
column. If the account is valid the account description will appear.
If an invalid account is entered a search box will open. The entry made on the
previous screen appears as the default under GL Acct Code. This can be used as
is or modified for the search. Complete any other criteria on the right side, then
click on Search. The system will return results of accounts matching ALL
Criteria. If no results show up, click Criteria to return to search. If the account
does not exist, use the New Acct button. See “Adding New Accounts” for further
instructions.

42
Figure 26. G/L Entry Account Search Window
Once the account is found, highlight the account and click OK. The system then
returns to the journal entry screen and the description will now appear for the
selected account.
Enter the appropriate debit or credit for each line. Only one debit or credit may
be entered for each line.
Comment is used for the transaction description. A comment is required on the
first line. The system will copy the description from the point it is entered until a
new comment line is inserted.
The system will display the remaining balance to be distributed at the bottom left
of the window and in the next entry line as you proceed. Once in balance, no
amount will appear on the next line and the “Journal Entry Balance” at the bottom
of the window will be $0.00. The transaction must balance to $0.00 in order to
Save.
If an entry crosses multiple ledgers, the Due To/From button can be used to
create offsetting entries in each ledger. This requires that a bank account table is
set up and the Bank GL Acct Cross Reference has been established. Select the
desired bank account to use from the dropdown box that appears, and then click
OK.

43
Figure 27. Journal Entry Due to/Due from Selection
The additional lines for the offsetting entries will be added to the journal entry
window. See “Bank GL Acct Cross Reference Setup” and “Bank Account
Setup” for more information.
Once complete and balanced, click on Save. The system will assign a
consecutive transaction number (Xact No).
Once all transactions have been entered, click on Close to return to the Main
Menu.
Searching for a Journal Entry You can access an existing journal entry by clicking on Open. Use the Recall
button to create a NEW transaction based on an already existing one. When
clicking either of these buttons, the following search window will open.
Figure 28. Journal Entry Search Window (1)
Enter the desired criteria in the fields on the right, then click Search. The
transactions that match the criteria entered will appear in the results window on
the left.

44
Figure 29. Journal Entry Search Window (2)
If the transactions that appear are not what you wanted, click on Criteria to return
to the first search window. Otherwise, highlight the desired transaction by
clicking on it with your mouse, then click OK. The journal entry will now appear
in the journal entry maintenance window. You can now modify the transaction as
needed and Save.
Please note that you cannot modify any transactions that have been “Updated to
Summary”. Also, if you need to modify the Posting Period of a journal entry
that’s already been entered and saved, use the Change Post Period option on the
Journal Entry Menu.
Additional Journal Entry Maintenance Options In addition to the features explained in the previous sections, the following
options are also available.
Buttons
Distribute will take you to the Distribution Table set up area. See the section
titled “Distribution Setup” for instructions on this feature.
Accounts will take you to the account code set up area. See the section titled
“Chart of Accounts Setup” for instructions on this feature.
Reverse will switch all debits to credits, and credits to debits. If an entry was
posted and needs to be reversed, Recall the original entry, use this button, change
the posting period if needed and Save.
Clear Amts will clear out all dollar amounts showing in the debit and credit
columns, leaving just the account numbers and descriptions.
Menu Items
Entry- Exit Will EXIT winGL totally. To return to main menu, use Close.

45
Entry-New-Import Will allow you to import journal entries from other
applications. Manual Import is used to import entries from a spreadsheet
program. AP/Payroll Import is used to import entries created from the Export
option under the Interfaces menu in winGL. You should only use this option if
you don’t interface from winAP or winPAY. Use Section 8 winHAP Import
when importing the interface files created from the winHAP application. See the
appropriate section in the winHAP User’s Manual
Edit-Copy Previous Will repeat the value from the line above for that particular
column. If the line above is blank, no value will be inserted.
Edit-Copy (or shortcut Ctrl-Insert) Will copy any highlighted text into
memory to be used as you continue. Only one highlight may be stored at a time.
Edit-Paste(or shortcut Shift-Insert) Will paste text copied into memory at the
point of the cursor.
Edit-Reverse Credit/Debits Will switch all debits to credits, and credits to
debits. If an entry was posted and needs to be reversed, Recall original entry, use
this option, change post period if needed, and then Save.
Edit-GL Search Will open the chart of accounts search window to use if you’re
looking for a specific account.
Related Programs-Detail/Summary Query Displays the detail transactions for
a specific account for a range of month(s).
Update-Update Summary Will post the transactions selected to the GL
Summary. Once posted transactions appear as part the account balance and can
no longer be modified. This option is also available on the main menu. See
“Update/Post Transactions”.
Changing Posting Periods of Journal Entries Use Journal Entry/Change Post Period to change the posting period of an existing
Journal Entry. You cannot change the Posting Period of an entry that has been
Updated to Summary.
When accessing this menu option, the following window will open.

46
Figure 30. Change Posting Period Window
Highlight the desired journal entry by clicking anywhere on the line that it is on.
Click in the Change to Post Period box and enter the six character posting period
you want to change to, and then click Change. A confirmation window will
open, asking you if you are sure you want to change. Click Yes and the
transaction will show in the list with the new posting period. Exit will return to
the Main Menu.
PILOT Calculation/Posting This option will calculate and create the entry needed for PILOT (Payment In
Lieu of Taxes) expense.
Before using this option, you will need to complete the setup procedures
described in the section titled “Setting Up PILOT Calculation” in Chapter 1 of
this manual.
This option will use balances included in GL Summary, so it is recommended that
all entries for the same period be already updated to summary. See “Update/Post
Transactions”.
Upon accessing this menu option, the following window will open.

47
Figure 31. Calculate PILOT Window
Select the desired Posting Period. The current month will appear as the default.
All transactions for the same period should be updated to summary before
proceeding to insure an accurate calculation.
Select a specific PILOT Group, or click the All button to select all groups at once.
Once group(s) are highlighted, click Calculate PILOT. The system will
calculate the entry needed to bring the YTD PILOT expense to the correct current
balance. A separate transaction will be created for each PILOT Group.
To create the transaction(s), click Post> at the bottom right of the window.
The system will ask for verification to post the entry, and then will inform you of
the transaction (Xact) number assigned to each entry. The system will then go
directly to the “Update to Summary” screen, and from there allow you to update
those transactions to GL Summary.
If additional entries are added after the PILOT Calculation is made, this option
can be run again. A transaction will be created for the adjustment needed to bring
the current YTD PILOT expense up to date.
48
Chapter 3, Budgets
General Information This chapter contains information about entering and posting budgets in the
winGL application. Topics included are:
Entering and maintaining budget information.
Copying new budgets from already existing ones.
Using the auto-calc feature to automatically calculate allocations to different
periods.
Posting budgets to G/L Summary so they can be used for reporting purposes.
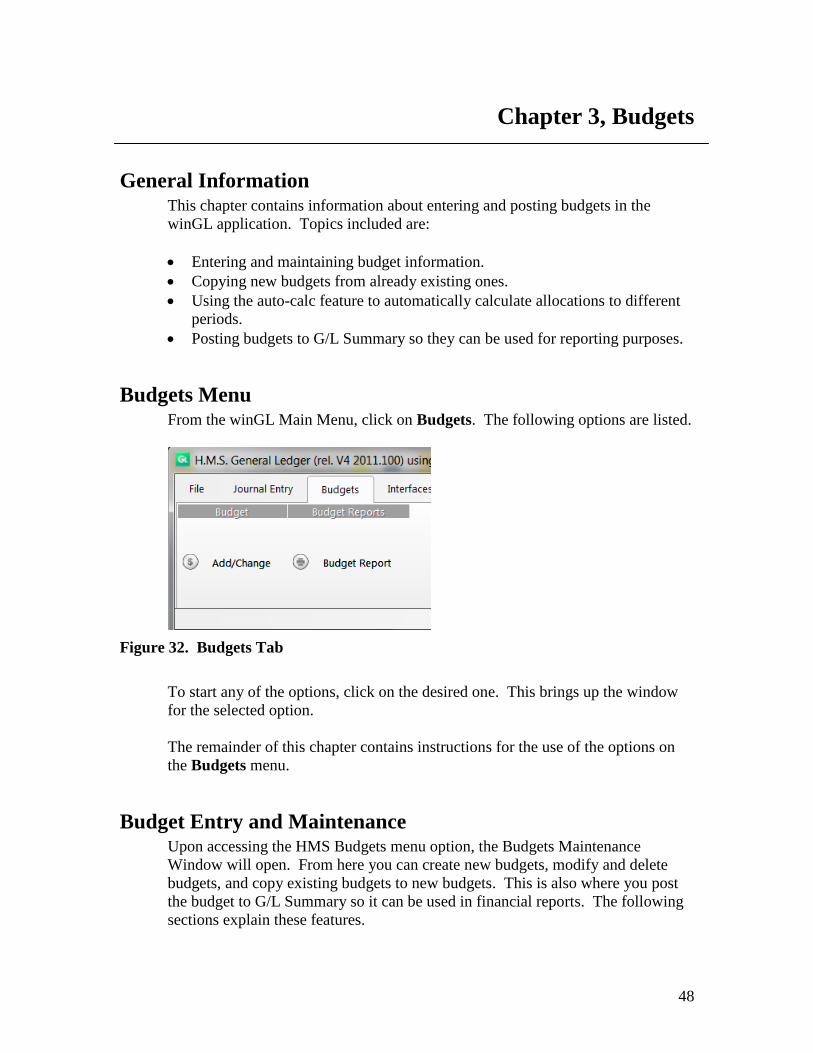
Budgets Menu From the winGL Main Menu, click on Budgets. The following options are listed.
Figure 32. Budgets Tab
To start any of the options, click on the desired one. This brings up the window
for the selected option.
The remainder of this chapter contains instructions for the use of the options on
the Budgets menu.
Budget Entry and Maintenance Upon accessing the HMS Budgets menu option, the Budgets Maintenance
Window will open. From here you can create new budgets, modify and delete
budgets, and copy existing budgets to new budgets. This is also where you post
the budget to G/L Summary so it can be used in financial reports. The following
sections explain these features.

49
Figure 33. Budget Maintenance Window
Creating and Editing Budgets To create a new budget, click on New. The following window will open.
Figure 34. New Budget Window

50
Enter a name for the new budget. In the “All Accounts Like” field enter
characters to specify the account numbers desired for the budget, using a %
symbol as a wildcard. For example, a Low Rent budget’s accounts can be
specified as “10%”, which will insert all accounts into the budget table with that
prefix.
After the table is filled with the correct accounts, enter the annual budget in the
“Annual” column. Credit accounts must be entered with a minus (-). The total
annual budget must net to zero in order for the budget to be posted. You can Save
the budget before the total net annual budget is zero.
In order for the budget to appear correctly on financial statements, the annual
amount must be allocated across the periods of your fiscal year. To spread the
annual amount evenly over all twelve periods of the fiscal year, click on Auto
Calc. This will allocate the annual amounts for all accounts evenly over the
entire fiscal year.
To use different percentages for different periods, click on the word “Calculate”
to the left of the line that the account appears on. The following window will
open.

51
Figure 35. Budget Calculator
From this window, you can enter percentages in the “Percent” column, and then
click on Calculate Using PCTs. The system will calculate the amounts based on
those percentages and enter them into the amount column.
If you don’t wish to use percentages, simply enter specific amounts into specific
periods. The “Total Amount” must equal the “Annual Amount”, and if
percentages are used those must add to 100. Click on Save. The amounts will
then be pulled into the budget table.
The period columns do not need to net to zero in order for the budget to be posted.
If an annual amount is modified after amounts have been entered in the period
columns, you must re-enter the period amounts either by using the Auto Calc
button or accessing the “Calculate” area.
Click on Save to save the budget. Exit will take you back to the main menu.
Report will print a report for the currently selected budget, showing totals and
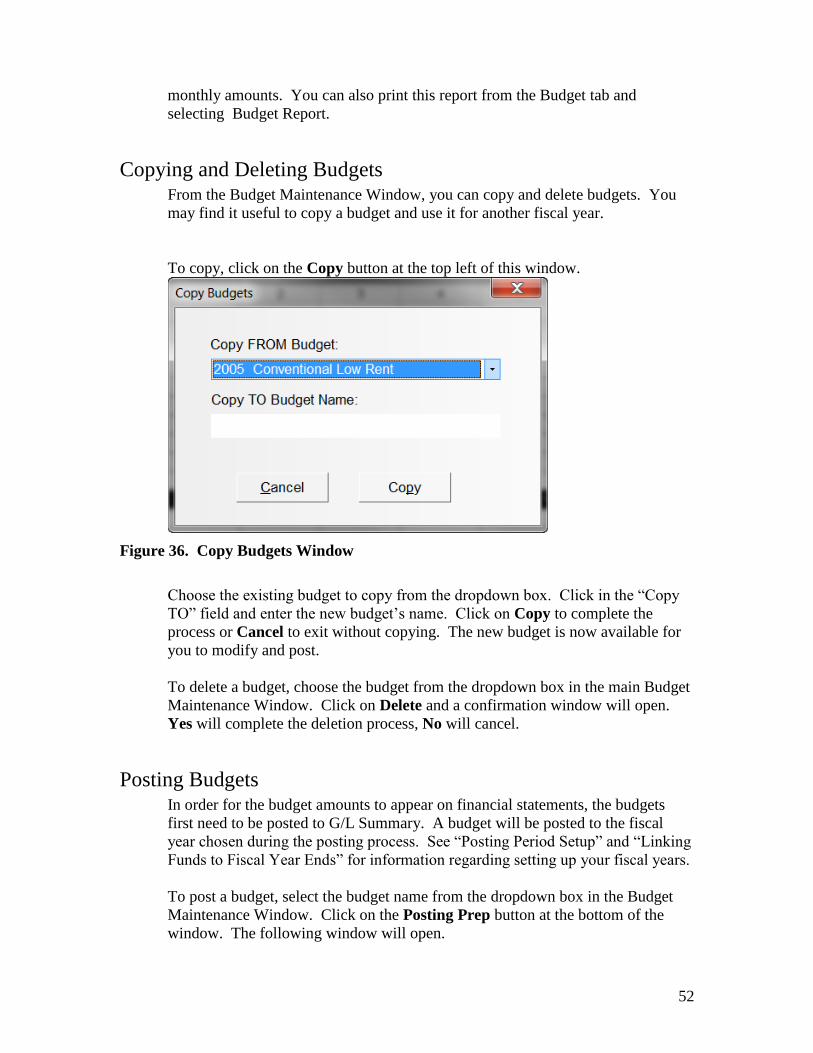
52
monthly amounts. You can also print this report from the Budget tab and
selecting Budget Report.
Copying and Deleting Budgets From the Budget Maintenance Window, you can copy and delete budgets. You
may find it useful to copy a budget and use it for another fiscal year.
To copy, click on the Copy button at the top left of this window.
Figure 36. Copy Budgets Window
Choose the existing budget to copy from the dropdown box. Click in the “Copy
TO” field and enter the new budget’s name. Click on Copy to complete the
process or Cancel to exit without copying. The new budget is now available for
you to modify and post.
To delete a budget, choose the budget from the dropdown box in the main Budget
Maintenance Window. Click on Delete and a confirmation window will open.
Yes will complete the deletion process, No will cancel.
Posting Budgets In order for the budget amounts to appear on financial statements, the budgets
first need to be posted to G/L Summary. A budget will be posted to the fiscal
year chosen during the posting process. See “Posting Period Setup” and “Linking
Funds to Fiscal Year Ends” for information regarding setting up your fiscal years.
To post a budget, select the budget name from the dropdown box in the Budget
Maintenance Window. Click on the Posting Prep button at the bottom of the
window. The following window will open.

53
Figure 37. Budget Posting Parameters
The Fiscal Year shown defaults to the next fiscal year in your Posting Period
Table. This can be changed to any year that has been set up in that table. The
Fiscal Year-End Month defaults to the twelfth posting period in the Posting
Period Table, or the Posting Period that this fund has been linked to using the
“Link Funds” option. This cannot be changed from this posting area.
You can choose to post this budget to “Budget 1”, “Budget 2” or “Budget 3”.
This allows you to have different versions of a budget. These different budgets
can be chosen to print on the financial statements when creating the statement
filters.
After you’ve verified the posting information, click on Post to G/L. A
confirmation window will appear. After clicking Yes, you will see the accounts
being posted scrolling across the bottom of the window. An information window
will open telling you when the procedure is complete. Click on OK to return the
Budget Maintenance Window.

54
Chapter 4, Interfacing from winAP and winPAY
General Information This chapter contains information about interfacing transactions from winAP and
winPAY to winGL. The interface process takes batches of invoices (accrual
basis) and checks (accrual and cash basis) and creates files that are taken over to
winGL and created into journal vouchers. The first steps of processing the
interface and creating the interface files can be completed in winAP and winPAY.
The entire process can be done in winGL.
Several key items need to be set up in order for the interface process to work
properly. First, the “Accounting Basis” needs to be set up in HMS Financial
Defaults. The default value can be either “Cash” or “Accrual”. If “Cash” is
selected, interface batches in Accounts Payable will be created only after checks
have been written. If “Accrual” is selected, interface batches are created for
invoices as they are entered and for checks as they are written. The Accrual
option requires two separate interface processes.
Second, bank information must be set up. Your default bank accounts for A/P
and Payroll must be defined in HMS Financial Defaults. Also, the “Bank-G/L
Cross Reference” information must be set up. This will create correct due to and
due from entries when paying expenses for multiple funds.
Information about how to set up items in the HMS Financial Default Table can be
found in the section titled “HMS Financial Defaults Setup” in Chapter 1 of this
manual. The correct procedures regarding setting up Bank G/L Cross Reference
information is also found in Chapter 1, in the section titled “Bank G/L Cross
Reference Setup”.
Interfaces Tab By clicking on “Interfaces” tab, you will see the following options.
Figure 38. Interfaces Menu
To start any of the options on the Interfaces tab, click on the desired selection.
This brings up the window for the selected item.
The remainder of this chapter contains instructions for the use of the options on
the Interfaces tab.

55
Interfacing from A/P and Payroll The interface procedure from winAP and winPAY is basically the same for both
applications. The following instructions pertain to interfacing in general.
Upon accessing the Interface option for A/P or Payroll, a window similar to the
following will open.
Figure 39. Interface Window - Invoices (1)
Choose a Bank Account from the dropdown box at the top. All Unprocessed
batches will show on the left. At this point you have the option of changing the
Posting Period of a batch. Simply highlight a batch by clicking on it, and click
Change Post Period.
Figure 40. Change Post Period Window

56
Enter the new Posting Period and click on Save. Click on Cancel to go back to
the Interface Window.
To process a batch, highlight it by clicking on it and choose Process. A
confirmation window will open. Choose Yes to create the interface file. You will
see the status of processing the batch at the bottom of the window. When
complete, the batch will show on the right hand side.
The next step is to print any reports that are needed for your records. Highlight a
Processed batch by clicking on it. Click on the Report button that appears above
the Processed window. You will have three reports to choose from: Summary,
Detail, and By Batch Line #. Click on the button of the desired report and it will
be displayed on your screen. You can now print it to your printer or close the
report window. For more information on these reports, see Chapter 5 in this
manual.

57
Figure 41. Interface Window -Invoices (2)
To send the batch to winGL, highlight the batch by clicking on it and choose the
Send to GL button. The batch will be sent to the General Ledger, and will no
longer appear in the Processed area unless you click the “Sent” check box at the
bottom of the window. This will show all the batches “Sent” to winGL but not
posted yet.
At any time during the interface process you can “Un-process” a batch or “Un-
send” a batch by highlighting the batch and clicking on the appropriate button. A
batch must be “Unprocessed” to change the Posting Period, or “Unsent” to fix any
errors.
To Post batches to G/L, make sure the “Sent” check box at the bottom of the
window is checked. This will show all batches “Sent” but not posted yet.
Highlight the batch (es) to post by clicking on them, and then click the Post G/L
button at the bottom right of the Interface Window. For each batch, a unique
transaction (Xact) number will be assigned.
The next step is to update the transactions to summary. See Chapter 6 for more
information.
Exporting Check Information This option gives you the ability to export check information into formats that are
compatible with other software applications such as Excel, HMSCash, Quicken or
QuickBooks. After exporting and creating these files, you will then have the
ability to import them into these other applications.

58
The Excel “exporter” is provided to you free of charge. The “exporter” for
Quicken and QuickBooks can be purchased for an additional cost. Contact HAB
Inc. for more information about this extra capability.
The procedure to export checks is the same for Accounts Payable, Payroll and
HAP Checks. To use the export function, select Interfaces/Export and the desired
types of checks you wish to interface from the Main Menu. The following
window will appear.
Figure 42. Create Check Export Files
After exporting and creating these files, you will then have the ability to import
them into these other applications including our HMS Cash application.
The Excel “exporter” is provided to you free of charge. The “exporter” for
Quicken and QuickBooks can be purchased for an additional cost. Contact HAB
Inc. for more information about this extra capability.
To use the export function of the winAP application, select Interfaces/Export A/P
Checks from the Main Menu. The following window will appear.

59
Figure 43. Create Check Export Files
Highlight a check batch by clicking on it. Click on the Export button that will
appear at the bottom of the window.
A confirmation window will open. Click Yes to continue with the file creation
process. The following window will then open.

60
Figure 44. Export File Creation
The default directory to which this file will be saved is shown. You can change
the drive and/or directory if desired. Once you choose where the file will be
saved, click on Create File. Another confirmation window will appear showing
again the name of the file and where it was saved. Click on OK to return to the
Export Window. Click on Exit to return to the main menu. The file is now
available for you to import into another software application. Refer to that
application’s documentation for instructions on how to import these files.
Highlight a check batch by clicking on it. Click on the Export button that will
appear at the bottom of the window.
A confirmation window will open. Click Yes to continue with the file creation
process. The following window will then open.

61
Figure 45. Export File Creation
The default directory to which this file will be saved is shown. You can change
the drive and/or directory if desired. Once you choose where the file will be
saved, click on Create File. Another confirmation window will appear showing
again the name of the file and where it was saved. Click on OK to return to the
Export Window. Click on Exit to return to the main menu. The file is now
available for you to import into another software application. Refer to that
application’s documentation for instructions on how to import these files.

62
Chapter 5, Reports
Financial Statements Financial Statements use formats created by the User. See “Setting up Statement
Formats” for instructions regarding setting these formats up.
Columns to be used on a financial statement are specified in the Statement Filter.
See “Creating Statement Filters” for instructions.
Once a filter is created and saved, it can be used repeatedly to print a statement.
To print a statement, choose Reports/SPFC G/L Reports/Statements from the
Main Menu of winGL. The following window will open.
Figure 46. Statement Filter Window
Click on Recall to use a previously created statement filter. Choose the Posting
Period from the dropdown box. Click on View to see the report on the screen or
Print to send it to the printer.

63
Batch Printing Financial Statements You can use this option to group multiple statement filters to print at one time.
From the Statement Filter Window, click on Batch Print. The following window
will open.
Figure 47. Batch Reporter for Financial Statements
A batch is created by entering a name, clicking the report filters to be included in
the batch and clicking Save. Once saved the batch can then be selected from the
drop-down box. Then click Print to print that batch of reports.
Creating Statement Filters Filters are used to specify the information to appear in the columns of a financial
statement. Filters can be created from scratch, or you can recall an existing filter
and modify as needed.

64
To create a filter from scratch, from the Statement Filter Window click Filter.
The following window will open.
Figure 48. Filter Setup Window
Enter the Report Title as it will appear at the top of the statement. Department
and Places is not used for HMS Statements. Select a Format Number, from the
dropdown box. Select columns to be printed on the statement. Up to 8 columns
can be used, if the report template (QRP) is formatted to support 8 columns. Note
the results of the following columns:

65
Column Name Results
(CM) Current Period Sum of transactions for Current Period
(CMB) Period Budget Budget for month stored in Budget 1
(LM) Last Year Same Period Sum of transactions for same month, last
year. Transaction history must exist, before
this can be used.
(CY) Current Year Sum of transactions for Current Year
(CYTDB) Year to Date Budget Sum of budget amounts stored from first
month to current month of current year in
Budget 1.
(CYB) Year Budget Annual Budget for current year in Budget 1
(sum of 12 periods).
(LYTD) Last Year to Period Sum of transactions from first month to
current month of last fiscal year.
Transaction history must exist before this
can be used.
(LY) All Last Year Sum of all transactions for last fiscal year.
Transaction history must exist before this
can be used.
(CUM) Cumulative Sum of all transactions to current. This is
used for YTD balances of accounts that are
not closed at fiscal yearend, as in balance
sheet accounts.
(%x) Percent Column x Used for PUM of a specific column (x
indicates the column).
Report Template File (QRP) is used to determine fonts, special handling, and
number of columns to be printed on the report. You MUST specify a QRP name
in order for the statement to be printed correctly. Some common templates used
are:
GLSTMNBS.QRP Has 2 columns for a balance sheet, uses special
handling flags B=Bold, G=Gray line, Z=Gray line
with Bold text, P=Page Break, U=Underline,
C=Control total only
GLFE8PV.QRP Has 8 columns for an operating statement, and uses
the above special handling Flags
GLSTMGRT.QRP Has 3 columns for a grant statement, and above
special handling flags.
GLSTMSSP.QRP Has 7 columns to show current year, last year and
cumulative, and above special handling flags.
Once all selections are made, click on Save, enter the filter name, and click OK.
It now may be recalled at any time.

66
Chapter 6, Updates
General Information and the Updates Menu This chapter contains information regarding posting transactions to GL Summary
and closing the current month in winGL.
From the winGL Main Menu, click on Updates. The following options are listed.
Figure 49. Updates Tab
To start any of the options, click on the desired one. This brings up the window
for the selected option.
The remainder of this chapter contains instructions for the use of the options on
the Updates Menu.
Updating Transactions to Summary Transactions and interfaces from winAP and winPAY are not included in the
general ledger account balances until they are posted to GL Summary. This
option can be performed as often as desired: after each entry is completed or at
the end of the month before reports are created.
Upon accessing this menu option, the following window will open.

67
Figure 50. Update to Summary Window
The current month’s transactions will be displayed. You can leave the Posting
Period as is or choose another from the dropdown box. You can update
transactions for the current and future periods, but not for periods that have been
closed.
In the Post To Summary column, each transaction has a check mark. If any
transaction is not to be posted, remove the check mark by clicking in it. Only
those transactions checked will be posted. Once transactions are marked, click
Post. Any unmarked transactions will reappear with a check mark, and all
marked transactions will disappear. You can now select another Posting Period or
Exit to return to the Main Menu.

68
Closing the Month Once all journal entries have been posted and reports for the month have been
printed and verified, the month can be closed to set the Default month ahead to
the next month.
Upon accessing this menu option, the following window will open.
Figure 51. Close a Month Window
The current month will be displayed in the dropdown box. Click OK and the
month will be closed and you will return to the Main Menu.
Closing the Year At the close of your fiscal year the General Ledger application will zero out all of
your income and expense accounts automatically. This requires no input from
you.
What you must do is look at the last Income Statement for your fiscal year and
take the ending balance to do a JV, entering that amount into your Retained
Earnings and offset it to an Income and Expense Clearing account (usually the
2700 account). This must be done for each fund.
After this is done, you will want to change your posting period to the first period
of your new fiscal year so no more entries can be posted to the prior year.