Map Skills Review SOL 3.5 & 3.6 By Terry Smith Driver Elementary Adapted from D. Showker.

TornadoGetting Started Guide
(Windows Version)
™
2.0
Edition 1
Copyright 1984 – 1999 Wind River Systems, Inc.
ALL RIGHTS RESERVED. No part of this publication may be copied in any form, by photocopy,
microfilm, retrieval system, or by any other means now known or hereafter invented without the
prior written permission of Wind River Systems, Inc.
VxWorks, IxWorks,Wind River Systems, the Wind River Systems logo, wind, and Embedded Internet
are registered trademarks of Wind River Systems, Inc. Tornado, CrossWind, Personal JWorks, VxMP,
VxSim, VxVMI, WindC++, WindConfig,Wind Foundation Classes, WindNet, WindPower, WindSh,and
WindView are trademarks of Wind River Systems, Inc.
All other trademarks used in this document are the property of their respective owners.
Corporate HeadquartersWind River Systems, Inc.
500 Wind River Way
Alameda, CA 94501-1153
USA
toll free (US): 800/545-WIND
telephone: 510/748-4100
facsimile: 510/749-2010
EuropeWind River Systems, S.A.R.L.
19, Avenue de Norvège
Immeuble B4, Bâtiment 3
Z.A. de Courtaboeuf 1
91953 Les Ulis Cédex
FRANCE
telephone: 33-1-60-92-63-00
facsimile: 33-1-60-92-63-15
JapanWind River Systems K.K.
Ebisu Prime Square Tower 5th Fl.
1-1-39 Hiroo
Shibuya-ku
Tokyo 150-0012
JAPAN
telephone: 81-3-5778-6001
facsimile: 81-3-5778-6002
Tornado Getting Started Guide, 2.0 (Windows Version)Edition 1
14 May 99
Part #: DOC-12611-8D-01
CUSTOMER SUPPORT
Telephone E-mail Fax
Corporate: 800/872-4977 toll free, U.S. & Canada
510/748-4100 direct
[email protected] 510/749-2164
Europe: 33-1-69-07-78-78 [email protected] 33-1-69-07-08-26
Japan: 011-81-3-5467-5900 [email protected] 011-81-3-5467-5877
If you purchased your Wind River Systems product from a distributor, please contact your
distributor to determine how to reach your technical support organization.
Please provide your license number when contacting Customer Support.

Contents
1 Overview ........................................................................................................................... 1
1.1 Introduction ...................................................................................................... 1
1.2 Terminology and Conventions ....................................................................... 2
2 Installing Tornado ............................................................................................................ 3
2.1 Introduction ...................................................................................................... 3
2.2 Locate the Installation Key .............................................................................. 4
2.3 Select a User Account for Installation ........................................................... 4
2.4 Run SETUP ........................................................................................................ 4
2.5 Uninstalling Tornado ....................................................................................... 13
3 Tornado Tutorial ............................................................................................................... 15
3.1 Introduction ...................................................................................................... 15
3.2 Start Tornado ..................................................................................................... 17
3.3 Create a Project ................................................................................................. 18
3.4 Add the Sample Source File to the Project .................................................... 22
iii

Tornado 2.0Getting Started Guide
3.5 Build the Project ............................................................................................... 24
3.6 Download the Project to the VxWorks Target Simulator ........................... 27
3.7 Run the Application from the Tornado Shell ............................................... 30
3.8 Examine Target Memory Consumption ....................................................... 32
3.9 Examine Task Activity ..................................................................................... 33
3.10 Fix Task Priorities and Find the Next Bug .................................................... 35
3.11 Fix the Last Bug and Take it for a Spin ......................................................... 37
3.12 What Next? ....................................................................................................... 40
iv

1Overview
1.1 Introduction
Thank you for purchasing Tornado!
Tornado 2.0 provides a greater level of accessibility for users unfamiliar with
Tornado, and increased productivity for experienced developers. Key features of
this release are:
■ an integrated version of the VxWorks target simulator (VxSim)
■ an integrated version of the WindView logic analyzer for the target simulator
■ a new project facility
■ a new debugger engine and GUI
The target simulator allows you to experience Tornado — as well as begin
developing hardware-independent modules — without target hardware. The
integrated version of WindView provides dynamic visualization of application
behavior on the simulator. The new project facility provides automated graphical
features for managing project files, configuring VxWorks, and building
applications. The new debugger GUI is easier to use and provides more direct
access to debug information.
This guide describes how to install Tornado and other compatible products. It also
provides a simple tutorial that demonstrates the use of the project facility, the
integrated versions of the target simulator and WindView, and the Tornado
debugger. The tutorial is designed to provide new users with an accessible
introduction to the key features of Tornado and their use in application
development. It is also intended to provide experienced Tornado users with an
introduction to major innovations in the development environment.
1

Tornado 2.0Getting Started Guide
1.2 Terminology and Conventions
The following terms are used in this document:
hostA computer on which the Tornado IDE runs.
targetA processor board that runs VxWorks (Tornado’s real-time operating system)
and applications developed with Tornado.
target serverA service that runs on the host and manages communications between host
tools (such as the Tornado shell, debugger, and browser), and the target system
itself. One target server is required for each target.
Tornado registryA Tornado service that keeps track of, and provides access to, target servers.
Only one registry is required on a network, but registries may be run on each
Tornado host.
The following conventions are used in this document:
■ As a convenience, the drive and root installation directory are identified as
c:\tornado in this document, but the location is determined by the user at
installation.
■ A series of items to be selected from the GUI is denoted by A>B>C. The
elements A, B, and C may be menu items, buttons, or tabs.
NOTE: The integrated target simulator (VxSim-Lite) runs as a single instance per
user, without networking support. Optional products such as STREAMS, SNMP,
and Wind Foundation Classes are not available for this version. The full-scale
version of the simulator, VxSim, is available as an optional product. It supports
multiple-instance use, networking, and all other optional products.
The integrated version of WindView is designed solely for use with the VxWorks
target simulator. WindView is available as an optional product for all supported
target architectures.
2

2Installing Tornado
2.1 Introduction
In brief, installing Tornado involves:
(1) Locating the Tornado installation key.
(2) Selecting a user account to use for installation.
(3) Running the SETUP installation program, which requires an installation key,
as well as some additional information about the user(s) and the project for
which Tornado has been licensed.
These steps are described in detail below.
! CAUTION: Before you install Tornado, see the Tornado Release Notes for information
about host operating system requirements, including release levels, required
patches, and upgrade methods.
NOTE: The installation instructions in this section also apply to any
Tornado-compatible Wind River Systems product (such as WindView) that you
may purchase separately. Optional products should be installed in the same
directory tree as the version of Tornado for which they have been released.
3

Tornado 2.0Getting Started Guide
2.2 Locate the Installation Key
If you have purchased Tornado, your installation key is printed on a leaflet in the
Getting Started packet that includes the CD-ROM and this guide. For the evaluation
version of Tornado, the installation key is printed on the CD-ROM liner notes.
If you cannot find the installation key, contact Wind River Systems by e-mail at
[email protected]. Please include your sales order number if you have purchased
Tornado; otherwise indicate that you want to install the evaluation version of
Tornado.
You can also call 1–800–545–WIND (1–800–545–9463) in North America and ask for
Key Administration. In other locations, contact the nearest Wind River office.
2.3 Select a User Account for Installation
For Windows NT hosts, choose a user account to use for the installation procedure,
and sign on to the host system as that user.
You may wish to use an account with administrative privileges. Doing so creates a
common program group that is accessible by every user who signs onto that host.
2.4 Run SETUP
! CAUTION: Before you install Tornado on your Windows host, TCP/IP networking
must be installed. Tornado can operate over a raw serial connection between the
host and target systems, and can operate on standalone systems that have no
network connection with other hosts. However, the Tornado tools use the TCP/IP
protocol to communicate with one another, and you must therefore have TCP/IP
on your host even if it is not on a networked system. The Windows TCP/IP
package is generally installed with the operating system. Consult your Windows
documentation for information on installing and configuring TCP/IP.
4

2
2Installing Tornado
Step 1: Start SETUP
Insert the Tornado CD-ROM in the CD-ROM drive. The SETUP program starts
automatically.1
The Welcome dialog box appears. To continue, click Next.
! CAUTION: Before you install Tornado, long file names must be enabled on your
Windows host (the default for Windows installations).
1. If you have cancelled or completed an installation, you can start SETUP again by displaying
the contents of the CD-ROM drive (using Windows Explorer or a comparable file manager)
and double-clicking on SETUP.EXE, which is at the root of the CD-ROM file system.
NOTE: The SETUP GUI has context-sensitive help that provides detailed
information about using SETUP and about the installation process. Click on the ?(question mark) in the title bar and then click on the object you want help with.
NOTE: Each SETUP dialog box has a Cancel button, which you can use to quit
installing Tornado. To continue to the next box, click the Next button. To return to
the previous box to review or change information you have entered, click the Backbutton (which is grayed-out if it cannot be used).
5

Tornado 2.0Getting Started Guide
Step 2: Review the Readme Information
The README.TXT window appears, which contains important information
developed after the Tornado Release Notes were completed. When you have finished
reviewing this information, click Next.
Step 3: Review the License Agreement
Read the license agreement. If you agree with its conditions, click I Accept and Nextto proceed with installation. If not, click Cancel.
Step 4: Enter User Information and Installation Key
Enter the primary user name, your company name, and the installation key in the
User Registration dialog box. To continue, click Next.
If you have already installed other Tornado products from the same CD-ROM, you
can select the installation key from the drop-down list. Otherwise, copy it from the
installation key leaflet.
If you are installing the evaluation version of Tornado, the installation key is
printed on the CD-ROM liner notes.
Step 5: Choose the Type of Installation
You have the choice of installing Tornado on the local host, or of providing access
to Tornado installed on a remote server. The first option installs the full Tornado
program on the local host. The second option installs only the Tornado program
6

2
2Installing Tornado
group in the local Start menu, so that the copy of Tornado on the remote server can
be run from the local host. The second option can also be used to provide access to
Tornado installed locally under a different version of Windows (for a dual-boot
system).
If you want to install on the local host, select Full Install and click Next.
If you want to provide access to Tornado installed on a server, or installed locally
under another version of Windows, select Program Group and click Next. The SelectDirectory window appears. Enter the drive and directory path, or click Browse and
use the browser to identify the drive and path. To continue, click Next.
NOTE: If you selected Program Group, rather than Full Install, go to Step 9: Select aName for the Start Menu Program Folder, p.10, and skip the intervening steps in the
installation process.
7

Tornado 2.0Getting Started Guide
Step 6: Enter Project Information
Enter your project name and the number of users in the Project Information dialog
box. The license number field is completed automatically. To continue, click Next.
Step 7: Specify the Installation Directory
Tornado and its related products are designed to be installed in a single directory
tree. Specify the drive and root directory for that tree in the Select Directory dialog
box.
You can use the Browse button to display a file browser to locate and identify the
installation directory. If the directory you specify does not exist, you will be
prompted with the option to create it.
To continue, click Next.
! WARNING: Do not install Tornado in a directory whose path includes embedded
spaces (for example, c:\Program Files\Tornado). Installing Tornado in such a path
causes make and other essential utilities to malfunction.
! WARNING: Do not install Tornado in the same directory as a previous release of
Tornado, or in the same directory as versions of Tornado for other target operating
systems (such as Tornado for I2O). Unpredictable behavior may result. To remove
a previous release or another version of Tornado, see 2.5 Uninstalling Tornado, p.13.
8

2
2Installing Tornado
Step 8: Review Product List for Installation
All of the products you ordered are marked as selected in the Select Products dialog
box by a check in the box to the left of the product name.
If a product has more than one part, the Details button can be used to display
information about them and modify the default selection.
To select or omit a product, click in the check-box next to the product name.
The Select Products dialog box displays both the approximate amount of disk space
required and the disk space available.
9

Tornado 2.0Getting Started Guide
To continue, click Next.
If there is not enough room for the products that are selected, SETUP warns you
that there is not enough disk space and provides you with the option of going back
to specify a directory on a larger disk or partition. You can also go back and omit
some products. Click Go Back to return to the Select Directory dialog box, or No to
continue.2
Step 9: Select a Name for the Start Menu Program Folder
Select a Windows Start menu program-folder name for Tornado with the SelectFolder dialog box. By default, a Tornado entry is created under Programs in the Startmenu. To continue, click Next.
Step 10: Set Up the Tornado Registry
The Tornado registry is a service that keeps track of all available target servers. A
target server is a service that runs on the host and manages communications
between host tools such as the Tornado shell, debugger, and browser, and the
target system itself. A Tornado registry must be running before target servers can
be started and before Tornado tools can communicate with a target.
Tornado hosts can be configured to access a local Tornado registry or a registry on
a remote host that is on a shared network. Only one registry is required on a
network, and if a single network registry is used it provides access to all targets
from all Tornado hosts.
2. If you click No and continue, you will later be prompted to free up disk space.
10

2
2Installing Tornado
The Registry dialog box offers the following options:
Install Tornado Registry locally in the Startup GroupSelect this option to have the Tornado registry started automatically on the
local host when the current user logs on.
Install Tornado Registry locally as a ServiceSelect this option to have the Tornado registry started on the local host at boot
time. This option is available only for Windows NT.
Install Tornado Registry manuallyThis option makes no arrangements for the Tornado registry. You must start
the registry on the local host manually before you run Tornado.
Configure to use a remote Tornado RegistrySelect this option to use a Tornado registry on another networked host. If you
select this option, the Tornado Registry dialog box is displayed. Enter the name
of the network host on which the registry runs.
To continue, click Next.
Step 11: Configure for Tornado 1.0.1 Tools Compatibility
If plan to use Tornado 1.0.1 and Tornado 2.0 tools in the same development
environment, select yes in the Backward Compatibility dialog box. See the TornadoRelease Notes for information about mixed-release development environments and
portmapper usage.
NOTE: If you selected to install the Tornado registry as a service in Step 10, you will
be unable to use Tornado 1.0.1 tools with Tornado 2.0. You can use the Back button
to return to the Tornado Registry dialog box, and change your selection.
11

Tornado 2.0Getting Started Guide
To continue, click Next.
SETUP begins installing Tornado. During installation, it displays information
about Tornado, as well as the names of the files being installed and the progress of
installation. Then SETUP updates the VxWorks libraries, registers Tornado DLLs,
and displays progress information. The installation process may take several
minutes.
When SETUP has finished installing Tornado, a final dialog box confirms
installation of the products you selected.
Click OK to close the box. You have successfully installed Tornado!
For an introductory tutorial on Tornado usage, see 3. Tornado Tutorial. For
information about Tornado and VxWorks, see 3.12 What Next?, p.40.
! WARNING: If you set up your Tornado registry to run on your local host and to
start automatically (in Step 10), you need to reboot your PC before automatic
startup will take effect. Otherwise, you must start a Tornado registry manually
before you can use Tornado.
12

2
2Installing Tornado
2.5 Uninstalling Tornado
To remove Tornado from your host system, you can use standard Windows
facilities or the Tornado Uninstall program. Before you remove Tornado, you must
shut down all Tornado programs, including those you may have arranged to start
automatically, such as the Tornado target server registry and the FTP server.
■ To use Windows to remove Tornado, select Start>Settings>Control Panel. Then
double-click Add/Remove Programs, select Tornado Version 2.0 from the list, and
click the Add/Remove button.
■ To use the Tornado Uninstall program, select the Tornado program folder from
the Start menu under the Programs folder.3 Then select Tornado Uninstall.
! WARNING: Before uninstalling Tornado, make copies of any Tornado files you
have modified. Uninstalling Tornado removes all files that were part of the original
distribution list. You are likely to have modified files in the BSP directories under
c:\tornado\target\config, the initialization files in c:\tornado\.wind, and the
sample programs under c:\tornado\target\src\demo.
3. This is the default folder name and location; others may have been selected at installation.
13

Tornado 2.0Getting Started Guide
14

3Tornado Tutorial
3.1 Introduction
This tutorial is designed to introduce you to key features of Tornado 2.0 using the
integrated VxWorks target simulator. It does not require any target hardware or
special configuration of your host system. It is not a programming tutorial; the
sample program was written to exercise Tornado in illustrative ways.
While simply reading the tutorial may be edifying, we encourage you to perform
the steps described in this chapter so that you can experience Tornado first hand.
In the course of the tutorial, you will:
■ Use the project facility to create a workspace and project for a sample program.
■ Build the program from the project facility GUI.
■ Download the program to the VxWorks target simulator on your host system.
■ Use the Tornado shell to run the sample program.
■ Use the browser to observe memory usage on the target simulator.
■ Use the WindView software logic analyzer to graphically display the execution
flow of the sample program and to identify a problem with task prioritization.
■ Use the debugger to identify a runtime application error.
Naturally, you will have several opportunities to modify the program to correct its
runtime behavior, rebuild it, download it, and run it again.
The tutorial assumes minimal knowledge of multi-threaded programming in C,
and basic Windows usage.
15

Tornado 2.0Getting Started Guide
You might approach the tutorial with the following scenario in mind:
A colleague has abruptly announced that he is going on vacation, and the VP ofEngineering has handed you the delinquent’s portion of The Project. You are alarmed.His code is typically cryptic, poorly documented, and full of run-time mischief. Thethought of reading his source gives you a headache. And the target hardware seems tohave gone on vacation with him. You decide to use Tornado’s target simulator andanalytical tools to see how the code behaves ...
16

3
3Tornado Tutorial
3.2 Start Tornado
To start Tornado, use the Start button on the Windows task bar and select Programs.
Then select the Tornado program group (which is called Tornado with a default
installation) and click on Tornado.
If Tornado is unable to connect to a Tornado registry, you will be prompted to start
one. See Step 10: Set Up the Tornado Registry, p.10 for information about registry
configuration options at installation. You can start a registry manually by selecting
the Tornado Registry option from the Tornado program group menu.
When you first start Tornado, the main Tornado window appears with the CreateProject dialog box open by default:
You can use the toolbars as floating palettes or dock them on the sides, top, or
bottom of the main Tornado window.
17

Tornado 2.0Getting Started Guide
3.3 Create a Project
If the Create Project in New/Existing Workspace dialog box is not displayed, click
File>New Project.
Then select the option for a downloadable application:
Click OK to continue.
The Tornado application wizard appears. This wizard guides you through the
steps of creating a new project. In the first step, the wizard prompts you for:
■ A name for the project.
■ The full path and name of the directory you want to use for the project files.
■ An optional description of the project.
■ The name and location of the workspace file, which contains information
about the workspace, including which projects belong to it.
A project consists of the source code files, build settings, and binaries that are used
to create an application.
A workspace is simply a grouping of one or more projects, which provides a useful
means of working with related material, sharing code between projects, and
associating related applications. Once a project and workspace have been created,
a workspace window displays information about the projects that it contains.
You can accept the wizard’s defaults for the project and workspace, but it is
preferable to set them up outside of the Tornado installation tree. (If you do so, you
won’t have to untangle your work from the Tornado tree when you upgrade
Tornado.)
18

3
3Tornado Tutorial
In the wizard dialog displayed below, the project name is gizmo; the project
directory is d:\projects\gizmo; the project description is lightning gizmo; and the
path and file name for the workspace are d:\projects\lightning.wsp:
Click Next to continue.
In the second wizard dialog, you identify the toolchain with which the
downloadable application will be built.
A toolchain is a set of cross-development tools used to build applications for a
specific target processor. The toolchains provided with Tornado are based on the
GNU preprocessor, compiler, assembler, and linker. The default toolchain names
for target simulators take the form SIMhostOsgnu (for example, SIMNTgnu).
NOTE: The base directory (or directories) for the project and workspace must exist
before the wizard can create the project directory and workspace file. In this
example, d:\projects must exist for project creation to continue.
19

Tornado 2.0Getting Started Guide
Select A toolchain and the default option for the target simulator from the
drop-down list, as illustrated below:
Click Next to continue.
The final wizard dialog confirms your selections:
20

3
3Tornado Tutorial
Click Finish to continue.
The Workspace window appears. The workspace window title includes the name
of the workspace, and the window itself includes a folder for the project:
NOTE: Context menus provide access to all commands that can be used with the
objects displayed in, and the pages that make up, the Workspace window. Use the
right mouse button to display an object’s context menu.
21

Tornado 2.0Getting Started Guide
3.4 Add the Sample Source File to the Project
The sample program is cobble.c. It is a simple multi-task application that simulates
a data collection system in which data is retrieved from an external source (for
example, a device that generates interrupts as data comes in). One task simulates
an ISR and generates new data. A second task collects the data. A third task
performs calculations on the data to obtain a result value. The result is monitored
by a fourth task, which prints a warning message whenever it is out of the safety
range.
Before you add the sample program to the project, copy it from the Tornado
installation tree to another location, such as the project directory you have set up
with the Tornado project wizard.
The sample file cobble.c is located in c:\tornado\target\src\demo\start(assuming you have used the default c:\tornado directory for your installation).
In the examples provided thus far in the tutorial, d:\projects has been used as the
base directory for our project work, and subsequent examples are based on
cobble.c being copied to that directory.
After you have copied cobble.c to another location, add it to the project. Select AddFiles from the context menu in the File view of the workspace:
Then use the file browser that appears to select cobble.c.
22

3
3Tornado Tutorial
Open the Object Modules folder in the Files view to display the names of both the
source file and the object files that can be built from it:
The Tornado project facility automatically creates the file projectName.out as a
single, partially linked module when a project is built. It comprises all of the
individual object modules in a downloadable application project, and provides for
downloading them all to the target simultaneously.
23

Tornado 2.0Getting Started Guide
3.5 Build the Project
To review the default build settings defined when you created the project, select
the Builds tab on the Workspace window, open the gizmo Builds folder, and
double-click on the default build name (for example, SIMNTgnu).
The properties sheet for the build appears, which you can use to review makefile
rules and macros, as well as the compiler, assembler, and linker options used for
the build.
When you display the C/C++ compiler page, you will note that the Include debug infocheckbox is selected by default. This selection ensures that optimization is turned
off when the project is compiled with debug information:
Close the property sheet by clicking on the Cancel button.
24

3
3Tornado Tutorial
Build the project by selecting Build 'gizmo.out' from the context menu:
The option Build 'projectName.out' builds all project modules as a single, partially
linked module that is optimal for downloading to a target.
Before Tornado builds the project, the Dependencies dialog box warns you that
makefile dependencies have not been calculated for cobble.c:
Click OK to continue.
Tornado calculates makefile dependencies and proceeds with building the project.
If any external dependencies are found, they are automatically included in the
project and listed in the External Dependencies folder in the Files view of the
workspace.
25

Tornado 2.0Getting Started Guide
The build output window displays any errors and warnings. In this case, the
compiler has detected an extraneous variable:
If you double-click on an error or warning message, the source file is opened in the
editor, and a context pointer marks the offending line:
If you wish to, remove the unused integer variable isNot, save the file with
CTRL+S or File>Save, and rebuild the project. The Tornado editor includes
standard Windows text manipulation capabilities.
Close the Build Output window with the window control.
26

3
3Tornado Tutorial
3.6 Download the Project to the VxWorks Target Simulator
You can download your project from the Files view of the workspace, and start the
integrated simulator, all as part of the same process.
First display the Files view of the workspace window.
Then select the project folder name with the right mouse button and select the
Download 'gizmo.out' option from the context menu:
Tornado prompts you to start a simulator:
Click Yes to continue.
27

Tornado 2.0Getting Started Guide
The VxSim-Lite Launch dialog box appears:
Leave Standard Simulator selected, and click OK to continue.
The target simulator window opens, and Tornado prompts you to start a target
server. Click OK in the VxSim-Lite Launch dialog to continue:
A target server manages all communication between Tornado host tools, such as
the debugger, and the target. The convention for target server names is
targetName@hostName. In this example, the name of the target is vxsim (the default
for the integrated simulator), and the name of the PC host is badger.
NOTE: Only one instance of the integrated VxWorks target simulator (VxSim-Lite)
can be run at a time. (To stop the simulator, close the VxWorks Simulator window.)
28

3
3Tornado Tutorial
The name of the target server is displayed in the Tornado launch toolbar:
The toolbar includes buttons for starting Tornado tools such as the browser, shell,
and debugger. The buttons are activated when the target server is started.
NOTE: Both the browser button and the shell button both have the letter i in them,
which may be confusing. The i in the shell button follows the -> shell command
prompt, where it is a shell command that displays target system information. The
i in the browser button stands for information about the target.
29

Tornado 2.0Getting Started Guide
3.7 Run the Application from the Tornado Shell
Before you run an application, it is often useful to configure and start the Tornado
debugger first, so that the debugger can respond automatically to any program
exception.
The Tornado debugger (CrossWind) combines the best features of graphical and
command-line debugging interfaces. The most common debugging activities, such
as setting breakpoints and controlling program execution, are available through
convenient point-and-click interfaces. Similarly, program listings and
data-inspection windows provide an immediate visual context for the crucial
portions of your application.
To configure the debugger, select Tools>Options>Debugger from the main Tornadowindow. When the Options dialog appears, select Always under Auto attach to tasks,so that the debugger will automatically attach to a task when an exception occurs:
Click OK to continue.
To start the debugger, use the debugger button in the Tornado launch toolbar.
After a few seconds, the status line at the bottom of the main Tornado window
announces that the debugger is running:
30
3
3Tornado Tutorial
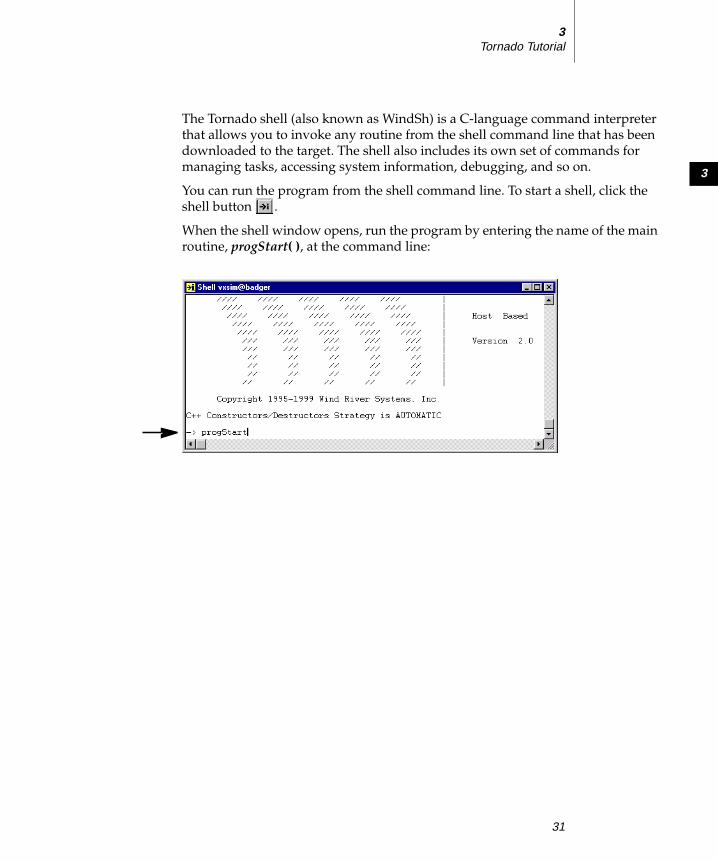
The Tornado shell (also known as WindSh) is a C-language command interpreter
that allows you to invoke any routine from the shell command line that has been
downloaded to the target. The shell also includes its own set of commands for
managing tasks, accessing system information, debugging, and so on.
You can run the program from the shell command line. To start a shell, click the
shell button .
When the shell window opens, run the program by entering the name of the main
routine, progStart( ), at the command line:
31

Tornado 2.0Getting Started Guide
3.8 Examine Target Memory Consumption
The Tornado browser is a system-object viewer that is a graphical companion to
the Tornado shell. The browser provides display facilities to monitor the state of
the target system, including summaries of active tasks, memory allocation, and so
on.
To start the browser, click the browser button in the Tornado launch toolbar.
When the browser appears, Select Memory Usage from the drop down list and click
the periodic refresh button . This will update the display every few seconds,
and you will note that cobble.c has a voracious appetite for memory:
Stop the browser with the window control in the title bar.
32

3
3Tornado Tutorial
3.9 Examine Task Activity
WindView is the Tornado logic analyzer for real-time applications. It is a dynamic
visualization tool that provides information about context switches, and the events
that lead to them, as well as information about instrumented objects such as
semaphores, message queues, and watchdog timers.
Click the WindView button in the Tornado launch toolbar to display the
WindView Control window. The WindView Collection Configuration dialog box also
appears. Select Additional Instrumentation from the drop-down list and click OK:
To begin data collection, click the GO button in the WindView Control window.
Wait a few seconds, and then click the update button in the WindView Controlwindow to update the status of data collection:
NOTE: Except where otherwise specified, the default configuration of WindView
is used for this exercise. If WindView settings have been changed during another
session, the behavior may vary from the description below.
33

Tornado 2.0Getting Started Guide
Once you have roughly fifty percent or so of the data buffer filled, click the Stopbutton to end data collection.
You may notice a certain sluggishness in your machine’s performance, which is
due to the sample program’s runtime misbehavior on the integrated simulator.
Before you upload the WindView data from the simulator target to the host, stop
the sample program by entering progStop at the shell command line.
Then use the upload button to upload the data.
A view graph is displayed while the data is uploaded, and a message box
announces completion of the upload. Click OK to continue.
When you maximize the view graph window, the data display should look
something like the following:1
1. The color of the view graph display can be changed with Tools>WindView>Options.
34
3
3Tornado Tutorial
You can use the zoom buttons on the WindView toolbar to enlarge or
decrease the size of the scope of the display, and scroll bar at the bottom of the view
graph to display the rest of the data. (The zoom 100% button displays all of the
data at once.) The flag-shaped icons indicate semaphore gives and takes. The
horizontal lines indicate task states (executing, pending, ready, and so on). For
information about the meaning of the WindView icons, select
Help>WindView Help>Legend.
Note that tCrunch, the task that processes data and removes nodes from a linked
list, never runs.
Close the view graph and click No in response to the dialog that prompts you to
save the data with: Save changes to hostName?
Close the WindView Control window as well.
3.10 Fix Task Priorities and Find the Next Bug
Open the source in the editor by double-clicking on cobble.c in the workspace Filesview. Then find the progStart( ) routine, where you’ll discover that tCrunch is
assigned a lower priority (240) than tMonitor (230), which never allows it to run.
As a consequence, data is never processed, and nodes are never deleted from the
linked list.
Edit the source file to reverse the priorities between the two tasks:
■ Change the 240 argument in the taskSpawn( ) call for tCrunch to 230.
■ Change the 230 argument in the taskSpawn( ) call for tMonitor to 240.
Then save the file.
Use the context menu in the Files view of the workspace, select the
ReBuild All (gizmo.out) option to rebuild the project. When it is done, close the
Build Output window.
Then download the project to the target with the Download 'gizmo.out' option from
the context menu.
NOTE: Do not forget to download the new gizmo.out to the target! And if you
have stopped the debugger, restart it with the debugger button .
35

Tornado 2.0Getting Started Guide
Start the program again from the Tornado shell with the command progStart.
You will see application output in the simulator window. And after a few seconds
both the simulator and shell windows announce a divide error:
In addition, the debugger opens the editor window automatically with a context
pointer marking the position in the crunch( ) routine where the error was
generated:
36

3
3Tornado Tutorial
Before you proceed, you might want to stop the program from going on a memory
binge again.
To do so, enter the reboot command in the shell window (press ENTER to display
the prompt). A message box announces that the target connection has been lost,
and that the debugger is being stopped. Click OK.
If you use the i command in the shell window after you have rebooted the
simulator, you see that only VxWorks system tasks are now running:
3.11 Fix the Last Bug and Take it for a Spin
Fix the source of the divide-by-zero error in the crunch( ) routine by using the
commented code immediately below the division operation (or something more
interesting!), and save the file.
Then use the context menu in the Files view of the workspace to select the
ReBuild All (gizmo.out) option. When the build is done, close the Build Output window.
Download the application to the target with the Download 'gizmo.out' option from
the context menu.
To be sure that everything is working, start the debugger with the debugger button
.
Start the program again from the Tornado shell with the command progStart.
37

Tornado 2.0Getting Started Guide
Click on the Windview button to display the WindView Control window. Then
click the GO button in the WindView Control window to begin data collection.
Wait a few seconds, and click the update button in the WindView Control window
to update the status of data collection.
Once you have roughly fifty percent of the data buffer filled, click the Stop button
to end data collection. Then use the upload button to upload the data.
A view graph is displayed while the data is uploaded, and a message box
announces completion of the upload. Click OK to continue.
Maximize the view graph window and scroll through the WindView data. You
should find that all tasks, including tCrunch, are running in an orderly manner,
and the view graph data should look like the following:
You can check memory consumption once again with the browser by clicking the
browser button in the Tornado launch toolbar.
38

3
3Tornado Tutorial
When the browser appears, select Memory Usage from the drop-down list and click
the browser’s periodic refresh button . Every few seconds the display will be
updated.
Notice that memory consumption fluctuates modestly within a constant range:
Moreover, output in the simulator window indicates that the program is humming
along nicely, providing you with information about when it’s hot and when it’s
not:
Stop the program by entering progStop at the shell command line to restore full
vigor to your host system.
39

Tornado 2.0Getting Started Guide
3.12 What Next?
For detailed information about using features of the Tornado IDE such as the
project facility, shell, browser, and debugger, see the Tornado User’s Guide. The
guide also provides information about setting up your Tornado development
environment with target hardware.
For information about integrating existing development work with the Tornado
2.0 project facility, using BSPs from previous releases, and so on, see the TornadoRelease Notes.2
For information about VxWorks itself, see the VxWorks Programmer’s Guide, the
VxWorks Network Programmer’s Guide, and the VxWorks Reference Manual.
Most of the Tornado documentation set is available online in HTML format from
the main Tornado menu Help>Manuals Contents, or directly from the top level
HTML file c:\tornado\docs\books.html.
See the Tornado User’s Guide: Documentation Guide for a full description of the
Tornado documentation set.
2. A Board Support Package (BSP) consists primarily of the hardware-specific VxWorks code
(much of it in source code) for a particular target board. A BSP includes facilities for hard-
ware initialization, interrupt handling and generation, hardware clock and timer manage-
ment, mapping of local and bus memory space, and so on.
40