Windows 7 Troubleshooting Tips · Expert Reference Series of White Papers 1-800-COURSES Windows®...
22
Expert Reference Series of White Papers 1-800-COURSES www.globalknowledge.com Windows ® 7 Troubleshooting Tips
Transcript of Windows 7 Troubleshooting Tips · Expert Reference Series of White Papers 1-800-COURSES Windows®...

Expert Reference Series of White Papers
1-800-COURSES www.globalknowledge.com
Windows® 7Troubleshooting Tips
Copyright ©2010 Global Knowledge Training LLC. All rights reserved. 2
Windows® 7 Troubleshooting TipsMark Wilkins, Global Knowledge Instructor, MCSE 2003, MCITP Server 2008, MCITP Windows 7
IntroductionSo, your company has finally migrated to Windows 7. Congratulations! And now you have your first support call. Relax. This white paper will tell you all you need to know about the new troubleshooting tools that are bundled with Windows 7 and provide you, an IT Professional, with the knowledge to quickly figure out what’s happening “under the hood” on a Windows 7 computer.
The tools selected for this white paper are a subset of the tools available on Windows 7, but the focus is on timely troubleshooting of the operating system and software applications. The tools are in two sections: the first part deals with system troubleshooting tools and the latter part with application troubleshooting tools. Boot-up a Windows 7 computer and test out each tool to become an expert in Windows troubleshooting. Tips are listed in bold typeface throughout the white paper, with the following explanation in italics.
Check Out System ReliabilityTip: The first place to start looking for answers on a Windows 7 computer is by opening the Action Center. The Action Center is the central portal for all everything good and bad that happens on a Windows 7 computer system.
Looking on the taskbar, to the left of the clock, you’ll see a white flag, (possibly marked with a red X indicating that there are some issues to review). Selecting the white flag and clicking the Open Action Center link displays the two major sections, Security, and Maintenance. Expanding the Security section displays the current health policy of Windows 7. By expanding the Maintenance section, we can take a look at the reliability history of the computer by clicking the Reliability Monitor link as shown on the next page in Figure 1.
Copyright ©2010 Global Knowledge Training LLC. All rights reserved. 3
Figure 1: Using the Reliability Monitor is the first step when troubleshooting Windows 7
The Reliability Monitor displays what has happened on your computer for a full calendar year since installation, in a day or week grid display. The displayed information is gathered and updated from event logs and event trace data due to a scheduled task executed by the Task Scheduler every hour. Tip: Take a look at what tasks are executing right now on your Windows 7 computer; open the Task Scheduler and review the Task Status display. The information displayed includes Application failures and Windows failures, in addition to Warnings and perti-nent Information showing when drivers were last updated. The chart cannot be deleted by an end user.
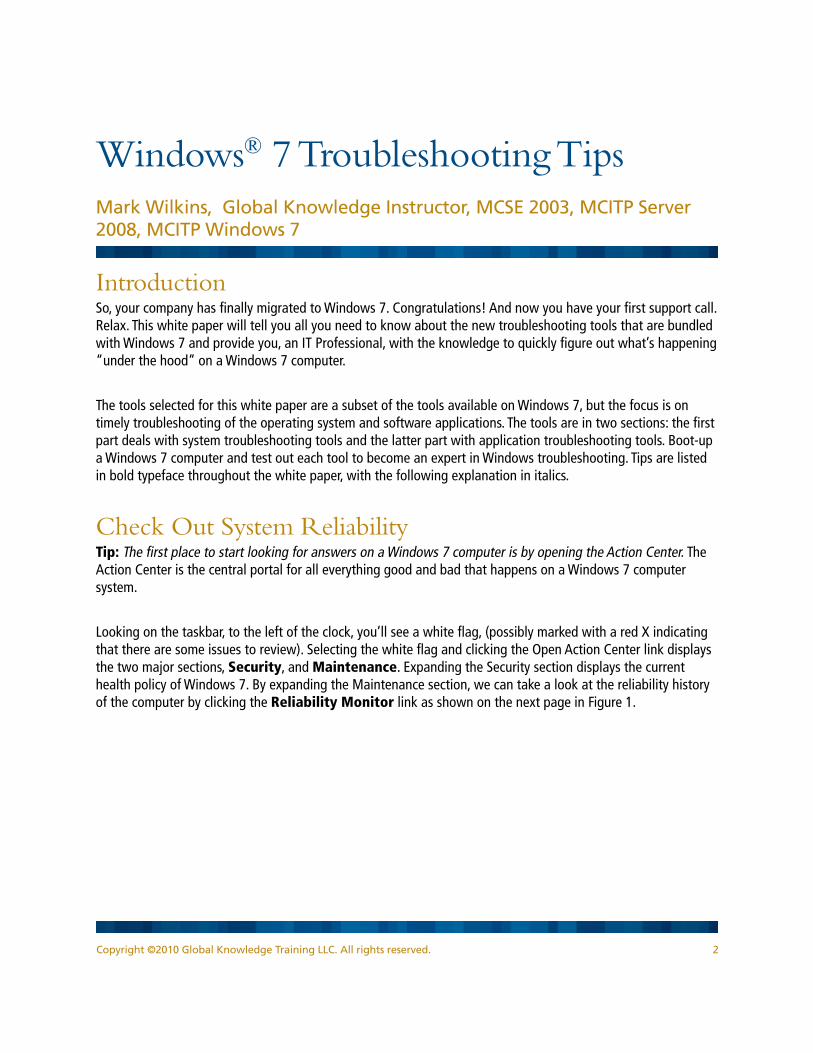
After selecting a component from the chart, a summary of the reliability details is displayed; further details can be reviewed by clicking the link View all problem reports. Tip: From this location, we can drill down and view technical details from each report, finding out, for, example, what executable or DLL file is failing as shown in Figure 2.
Figure 2: Internet Explorer details shown in Problem Details
Using Device Manager Although device manager has been around since Windows 95, it’s worth checking out the state of the installed hardware. Tip: Because the computer hardware is very highly integrated, after opening Device Manager from
Copyright ©2010 Global Knowledge Training LLC. All rights reserved. 4
Control Panel, make sure to select the View menu and turn on Show Hidden Devices. This will show you a wealth of integrated software and hardware components that are normally not shown. Expanding the Non-PNP node also shows you motherboard devices that are not plug and play; potentially a system component could be faulty, and not be visible by default.
Check Signed Drivers with SigverifIf you find that there is a red or yellow icon indicating a problem with an installed driver, open an elevated com-mand prompt and type sigverif, to produce a report that will indicate what drivers are digitally signed. Tip: After reviewing the report, if there are unsigned drivers, take a moment to search the manufactures web site to see if an updated driver solves your driver problem.
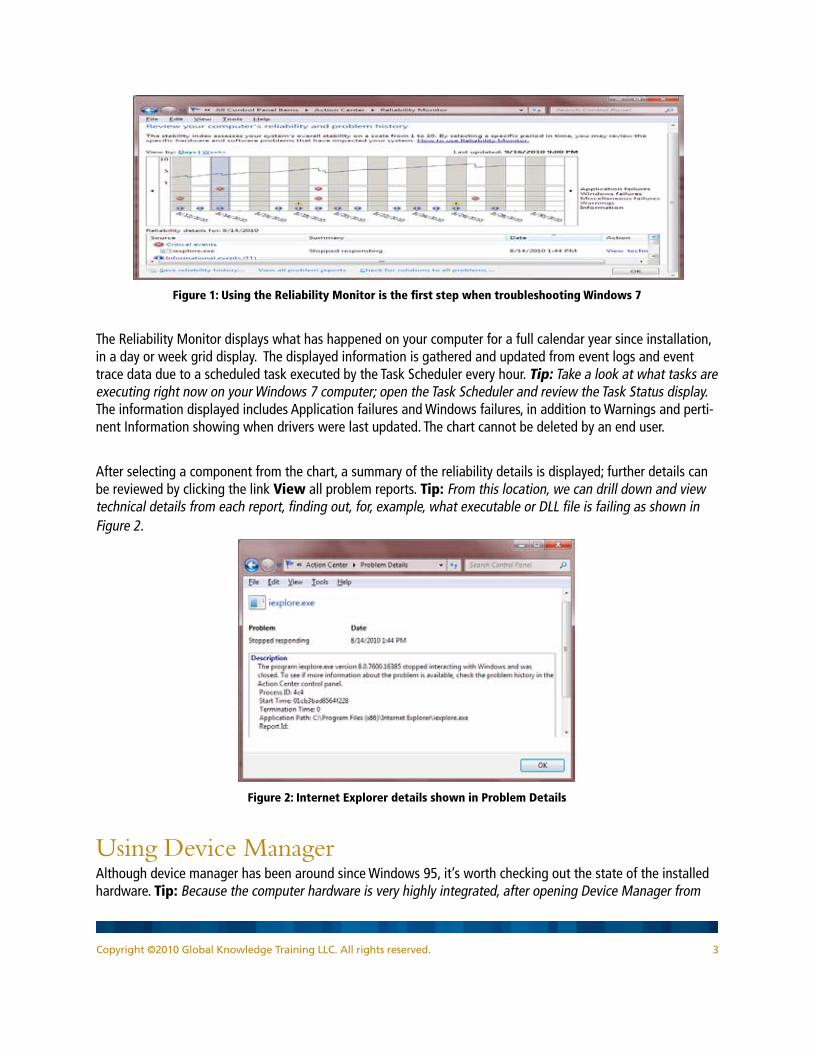
Dive Deeper with the Driver VerifierWindows 7 also has an additional tool called Driver Verifier. Its job is to monitor kernel-mode drivers detect-ing incorrect function calls or other actions that might corrupt your Windows 7 system. Run Driver Verifier from an elevated command-prompt by typing Verifier. Reports can be generated providing details on the current state of the installed drivers, and also allow you to test IRQ and I/O settings as shown in Figure 3. Using this tool allows you to provide additional details to manufactures, or yourself, when drivers are the issue. More details can be found here: http://www.microsoft.com/whdc/devtools/tools/win7driverver.mspx
Figure 3: Using the Driver Verifier Manager
Research with the System Configuration UtilityThe System Configuration Utility (msconfig.exe) has been a part of Windows for several versions, and can be quite helpful when you want to diagnose or change your Windows 7 computer system’s boot process.
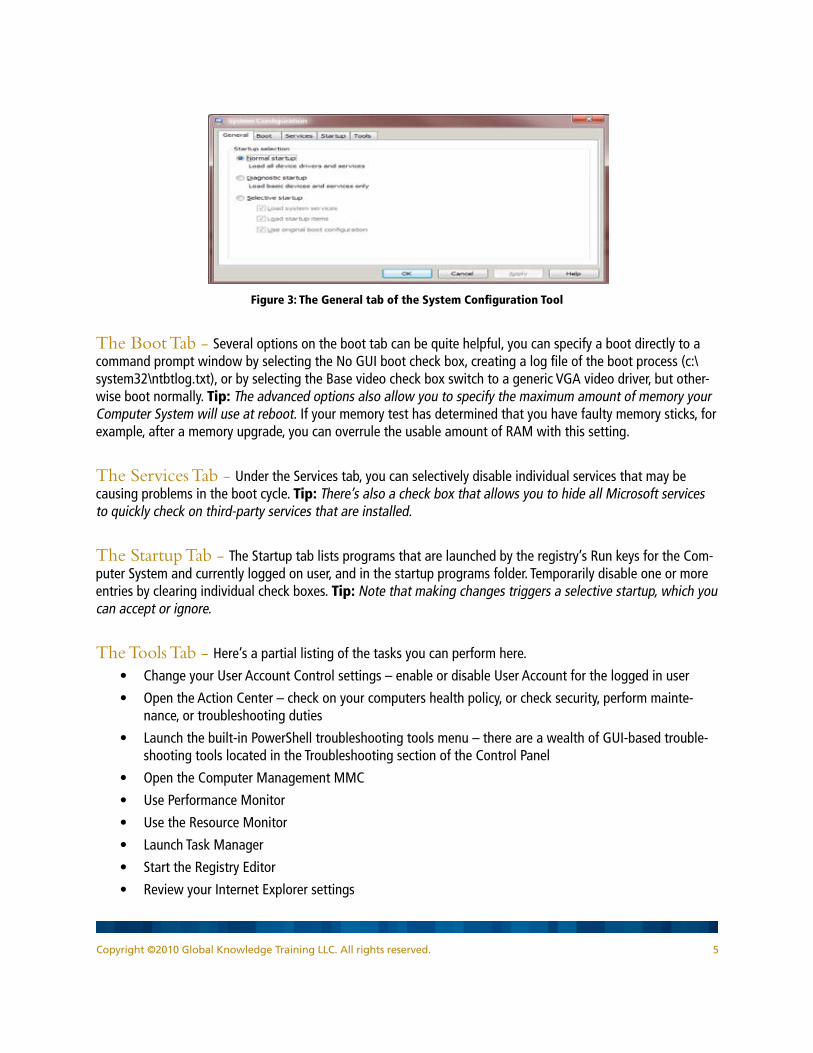
The General Tab - This is where the boot process from normal mode into diagnostic, in effect forcing a Windows 7 system into a safe mode boot cycle. We also have the option of selected setup; as shown in Figure 3, this option allows you to specify whether you would like to load system services, load startup items from the registry, or modify the original boot configuration.
Copyright ©2010 Global Knowledge Training LLC. All rights reserved. 5
Figure 3: The General tab of the System Configuration Tool
The Boot Tab - Several options on the boot tab can be quite helpful, you can specify a boot directly to a command prompt window by selecting the No GUI boot check box, creating a log file of the boot process (c:\system32\ntbtlog.txt), or by selecting the Base video check box switch to a generic VGA video driver, but other-wise boot normally. Tip: The advanced options also allow you to specify the maximum amount of memory your Computer System will use at reboot. If your memory test has determined that you have faulty memory sticks, for example, after a memory upgrade, you can overrule the usable amount of RAM with this setting.
The Services Tab - Under the Services tab, you can selectively disable individual services that may be causing problems in the boot cycle. Tip: There’s also a check box that allows you to hide all Microsoft services to quickly check on third-party services that are installed.
The Startup Tab - The Startup tab lists programs that are launched by the registry’s Run keys for the Com-puter System and currently logged on user, and in the startup programs folder. Temporarily disable one or more entries by clearing individual check boxes. Tip: Note that making changes triggers a selective startup, which you can accept or ignore.
The Tools Tab - Here’s a partial listing of the tasks you can perform here.
• ChangeyourUserAccountControlsettings–enableordisableUserAccountfortheloggedinuser
• OpentheActionCenter–checkonyourcomputershealthpolicy,orchecksecurity,performmainte-nance, or troubleshooting duties
• Launchthebuilt-inPowerShelltroubleshootingtoolsmenu–thereareawealthofGUI-basedtrouble-shooting tools located in the Troubleshooting section of the Control Panel
• OpentheComputerManagementMMC
• UsePerformanceMonitor
• UsetheResourceMonitor
• LaunchTaskManager
• StarttheRegistryEditor
• ReviewyourInternetExplorersettings
Copyright ©2010 Global Knowledge Training LLC. All rights reserved. 6
Note: More details on some of these tools will be discussed later in this white paper. Tip: From the Tools tab, you can launch most troubleshooting utilities that are bundled with Windows 7.
Checkout Your System InformationThe System Information (msinfo32.exe)This tool is useful when you need to see more details on system hardware and software in a report format.
System Summary - The system summary allows you to see details on system model, BIOS version, OS ver-sion, processor type, and installed memory, etc.
Hardware Resources - This shows you low-level details on which I/O addresses particular devices are using, and, motherboard and additional hardware resources.
Components - This category includes details on audio and video codecs, CD-ROMs, digital audio, video, keyboard and mouse, modems, NICs, ports, drives, printer drives, and USB. Pay special attention to the Problem Devices category, which lists drivers that did not load.
Software Environment - This provides details on all system drivers, running tasks, loaded DLLs, services listing, and startup programs.
The System Configuration tool can also be used to remotely connect to another Windows 7 computer for com-parison. By choosing the View menu and then selecting Remote Computer, you can specify the name of a remote node to which you would like to connect and view system information for. Tip: You must also have an account with access rights on the remote computer, and an enabled incoming exception on the firewall of the remote computer.
Capture with the Problems Steps Recorder (PSR)What can you do when a user has a problem on Windows 7, and you can’t be there to assist them? Tip: Have them open the Problem Steps recorder (PSR), which will record every step they take when running Windows 7, or an application, recording their steps both graphically, and by command’s used. Clicking Start and typing record steps into the Search dialog box and pressing Enter will launch the Problem Step Recorder. Tip: While the PSR is recording, you can also add additional comments by clicking Add Comment and using your mouse to highlight the screen location that you want to comment on. Then type your text in the Highlight Problem and Comment box, and click OK.
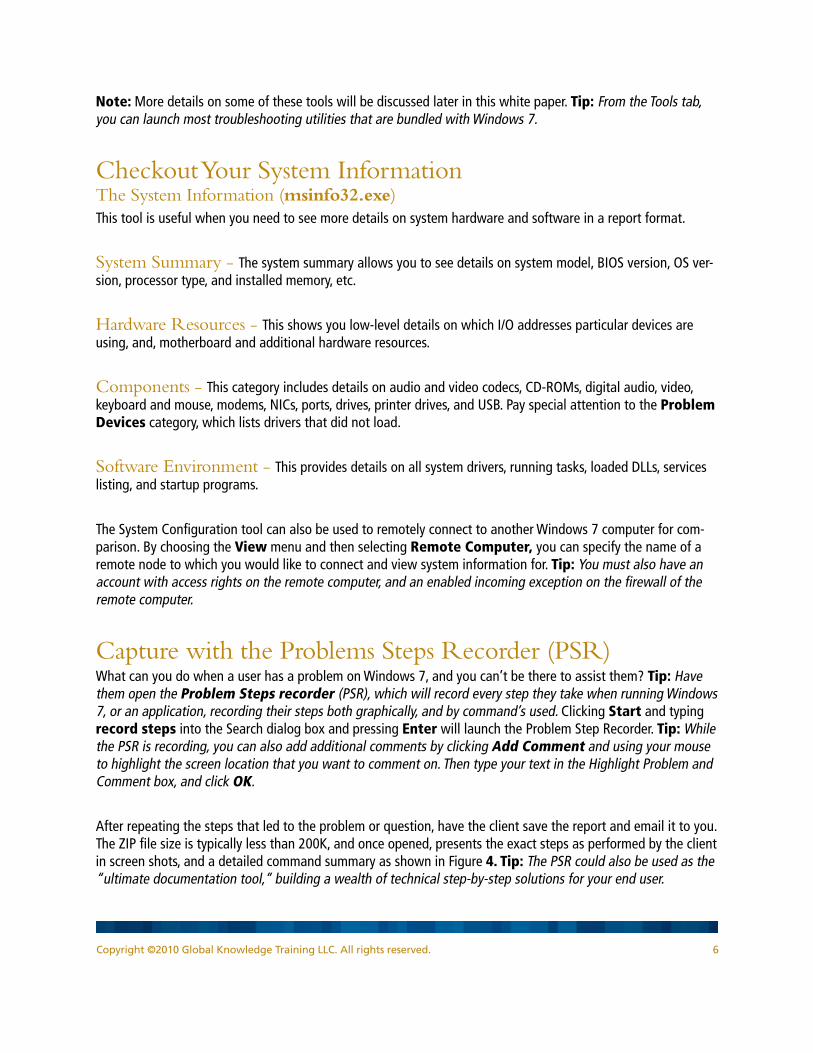
After repeating the steps that led to the problem or question, have the client save the report and email it to you. The ZIP file size is typically less than 200K, and once opened, presents the exact steps as performed by the client in screen shots, and a detailed command summary as shown in Figure 4. Tip: The PSR could also be used as the “ultimate documentation tool,” building a wealth of technical step-by-step solutions for your end user.
Copyright ©2010 Global Knowledge Training LLC. All rights reserved. 7
Figure 4: Viewing recorded steps using the Problem Steps Recorder
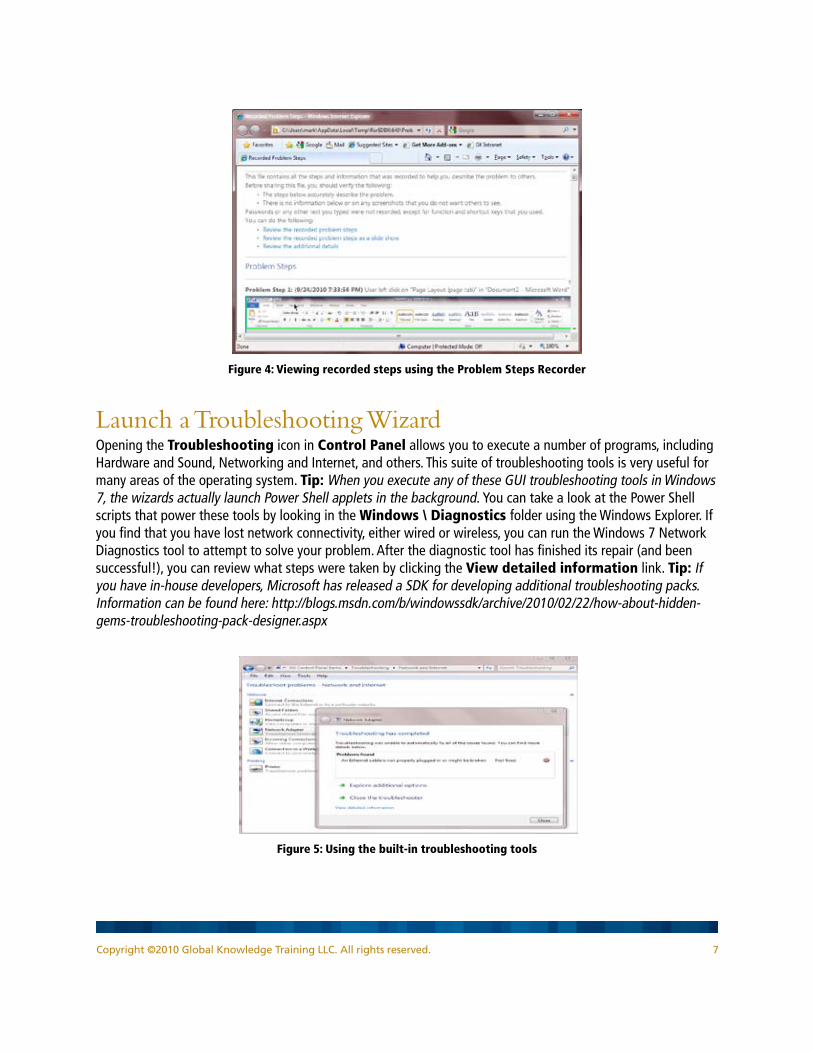
Launch a Troubleshooting WizardOpening the Troubleshooting icon in Control Panel allows you to execute a number of programs, including Hardware and Sound, Networking and Internet, and others. This suite of troubleshooting tools is very useful for many areas of the operating system. Tip: When you execute any of these GUI troubleshooting tools in Windows 7, the wizards actually launch Power Shell applets in the background. You can take a look at the Power Shell scripts that power these tools by looking in the Windows \ Diagnostics folder using the Windows Explorer. If you find that you have lost network connectivity, either wired or wireless, you can run the Windows 7 Network Diagnostics tool to attempt to solve your problem. After the diagnostic tool has finished its repair (and been successful!), you can review what steps were taken by clicking the View detailed information link. Tip: If you have in-house developers, Microsoft has released a SDK for developing additional troubleshooting packs. Information can be found here: http://blogs.msdn.com/b/windowssdk/archive/2010/02/22/how-about-hidden-gems-troubleshooting-pack-designer.aspx
Figure 5: Using the built-in troubleshooting tools
Copyright ©2010 Global Knowledge Training LLC. All rights reserved. 8
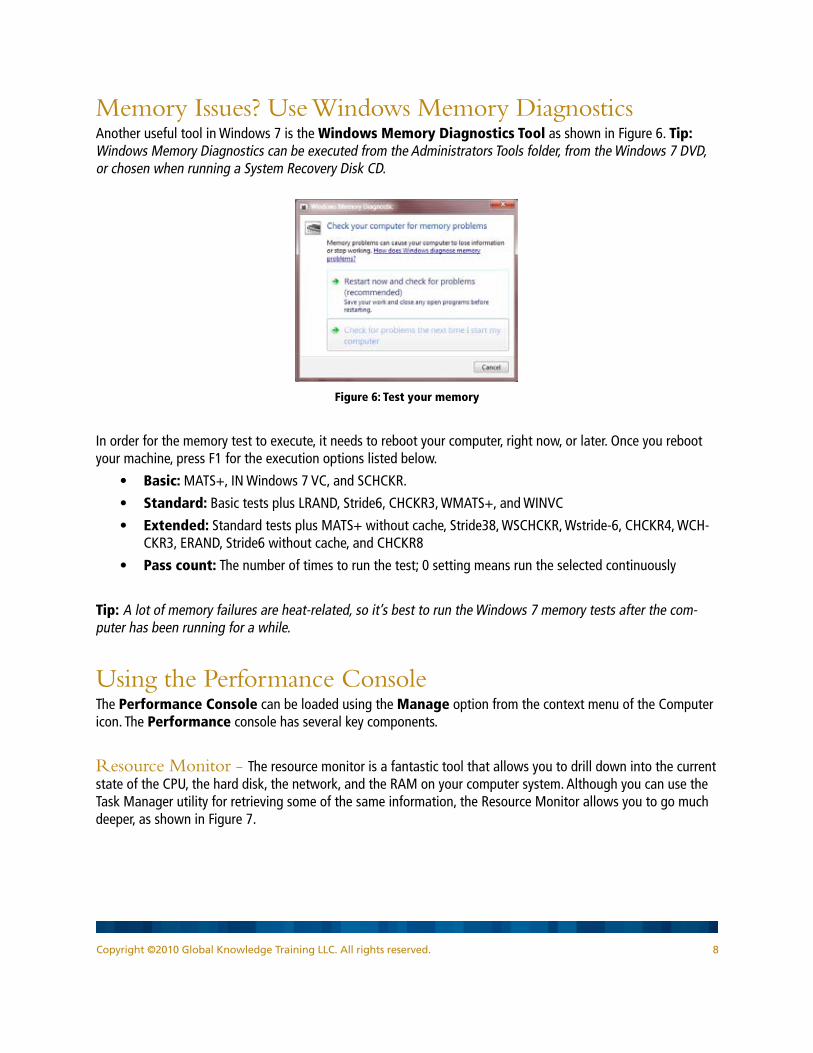
Memory Issues? Use Windows Memory DiagnosticsAnother useful tool in Windows 7 is the Windows Memory Diagnostics Tool as shown in Figure 6. Tip: Windows Memory Diagnostics can be executed from the Administrators Tools folder, from the Windows 7 DVD, or chosen when running a System Recovery Disk CD.
Figure 6: Test your memory
In order for the memory test to execute, it needs to reboot your computer, right now, or later. Once you reboot your machine, press F1 for the execution options listed below.
• Basic: MATS+, IN Windows 7 VC, and SCHCKR.
• Standard: Basic tests plus LRAND, Stride6, CHCKR3, WMATS+, and WINVC
• Extended: Standard tests plus MATS+ without cache, Stride38, WSCHCKR, Wstride-6, CHCKR4, WCH-CKR3, ERAND, Stride6 without cache, and CHCKR8
• Pass count: The number of times to run the test; 0 setting means run the selected continuously
Tip: A lot of memory failures are heat-related, so it’s best to run the Windows 7 memory tests after the com-puter has been running for a while.
Using the Performance ConsoleThe Performance Console can be loaded using the Manage option from the context menu of the Computer icon. The Performance console has several key components.
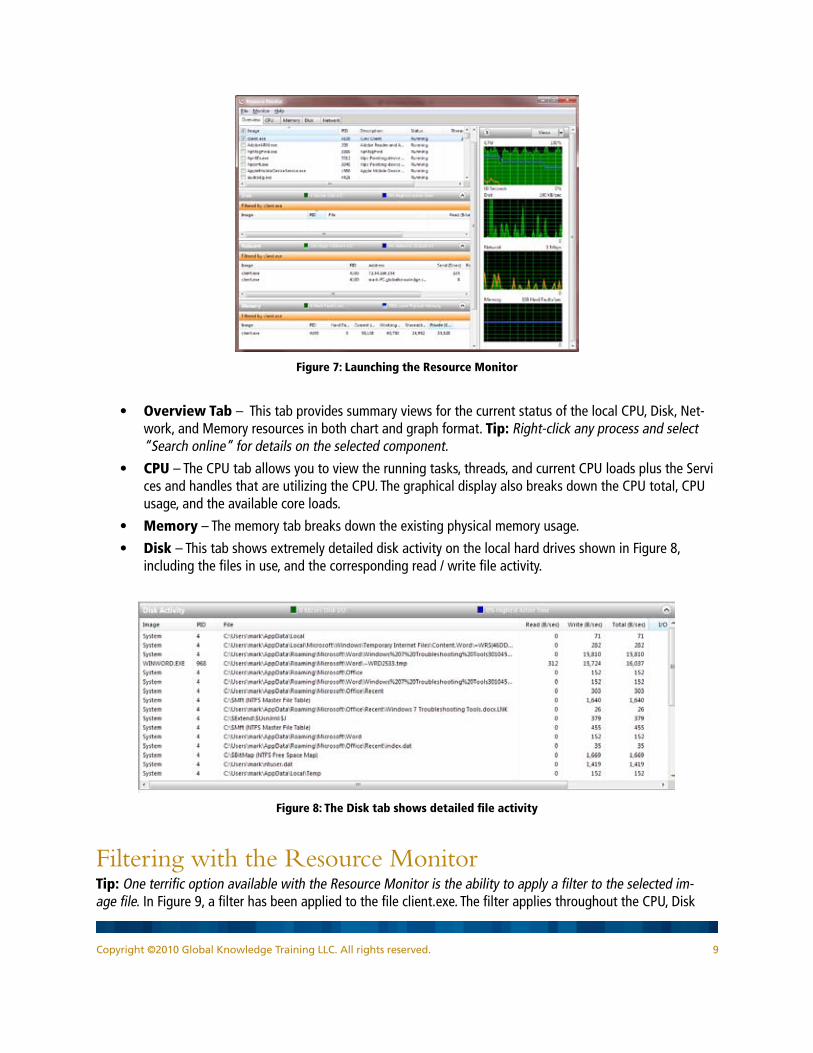
Resource Monitor - The resource monitor is a fantastic tool that allows you to drill down into the current state of the CPU, the hard disk, the network, and the RAM on your computer system. Although you can use the Task Manager utility for retrieving some of the same information, the Resource Monitor allows you to go much deeper, as shown in Figure 7.
Copyright ©2010 Global Knowledge Training LLC. All rights reserved. 9
Figure 7: Launching the Resource Monitor
• Overview Tab –ThistabprovidessummaryviewsforthecurrentstatusofthelocalCPU,Disk,Net-work, and Memory resources in both chart and graph format. Tip: Right-click any process and select “Search online” for details on the selected component.
• CPU –TheCPUtaballowsyoutoviewtherunningtasks,threads,andcurrentCPUloadsplustheServices and handles that are utilizing the CPU. The graphical display also breaks down the CPU total, CPU usage, and the available core loads.
• Memory–Thememorytabbreaksdowntheexistingphysicalmemoryusage.
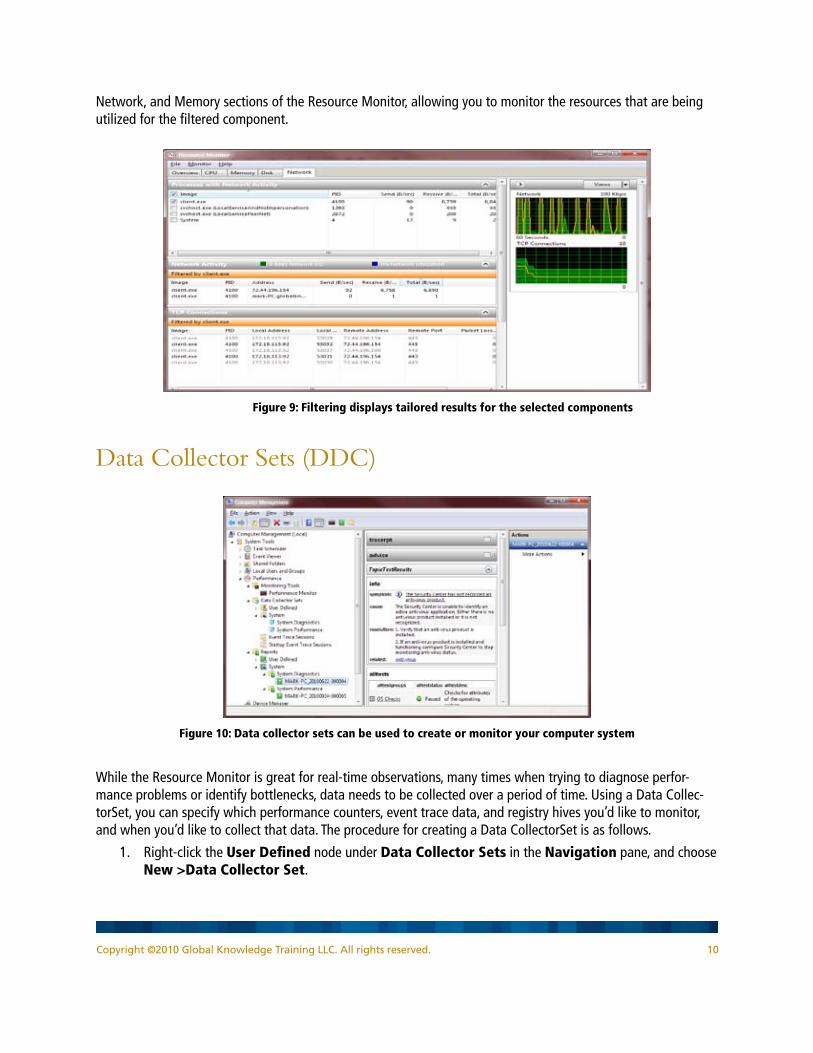
• Disk –ThistabshowsextremelydetaileddiskactivityonthelocalharddrivesshowninFigure8,including the files in use, and the corresponding read / write file activity.
Figure 8: The Disk tab shows detailed file activity
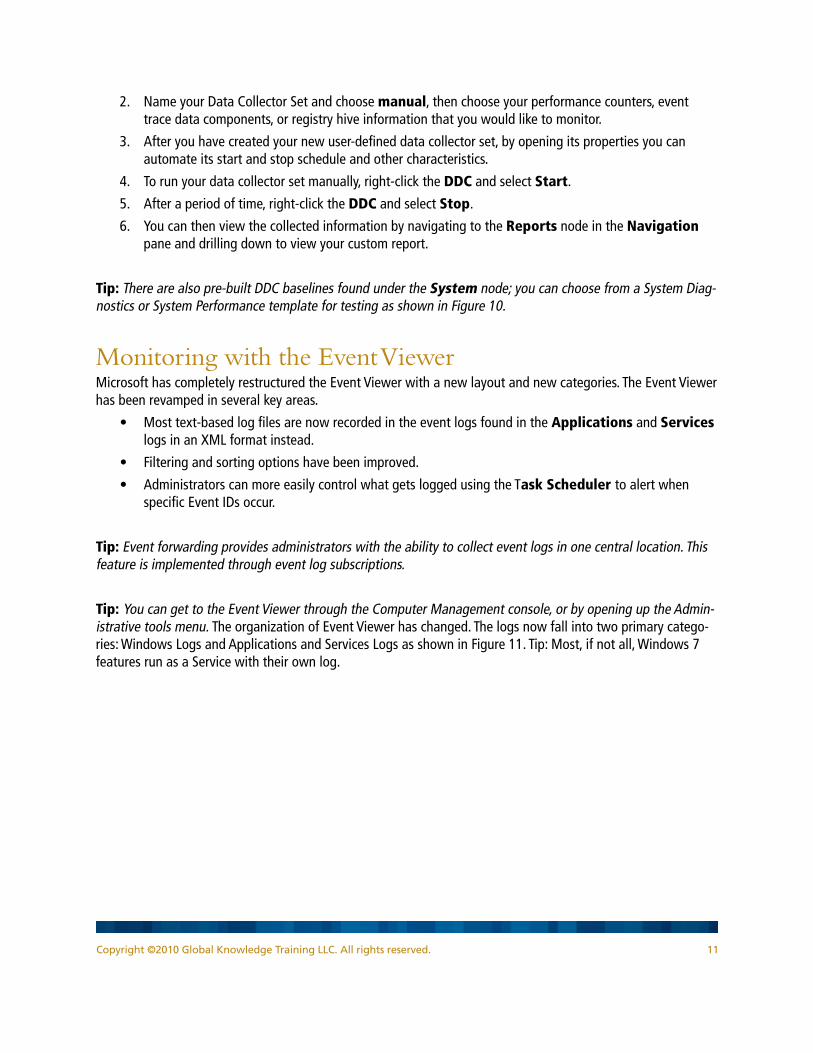
Filtering with the Resource MonitorTip: One terrific option available with the Resource Monitor is the ability to apply a filter to the selected im-age file. In Figure 9, a filter has been applied to the file client.exe. The filter applies throughout the CPU, Disk
Copyright ©2010 Global Knowledge Training LLC. All rights reserved. 10
Network, and Memory sections of the Resource Monitor, allowing you to monitor the resources that are being utilized for the filtered component.
Figure 9: Filtering displays tailored results for the selected components
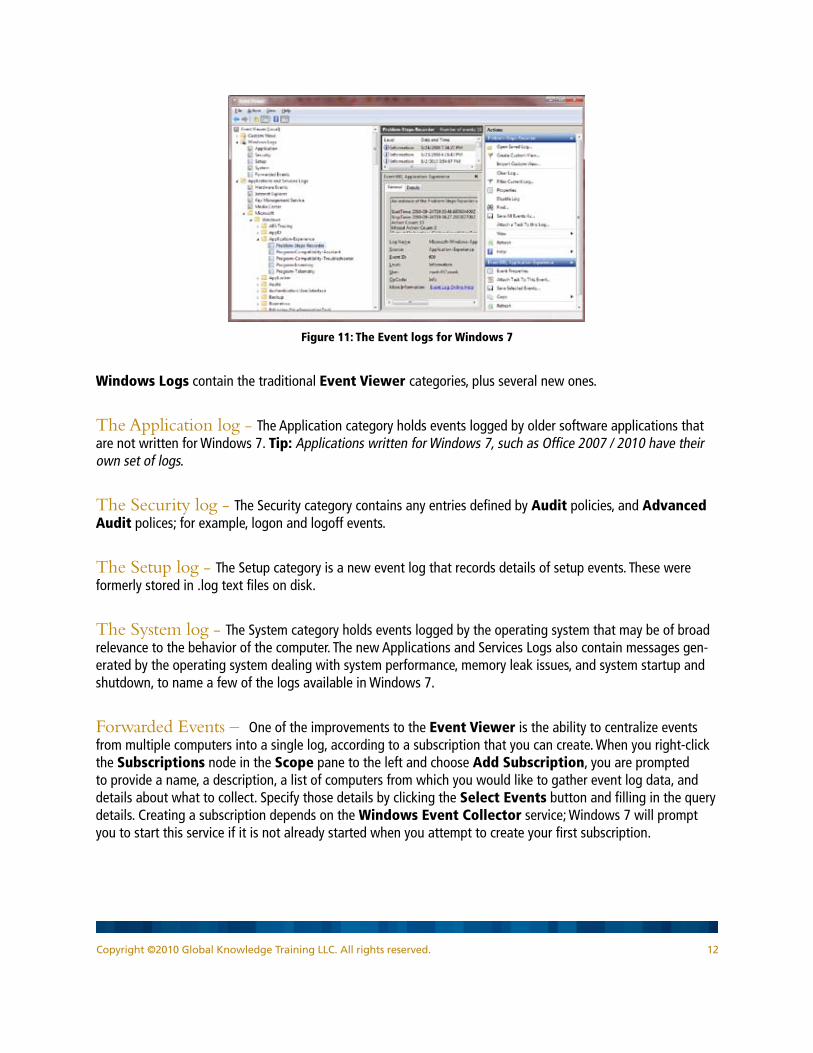
Data Collector Sets (DDC)
Figure 10: Data collector sets can be used to create or monitor your computer system
While the Resource Monitor is great for real-time observations, many times when trying to diagnose perfor-mance problems or identify bottlenecks, data needs to be collected over a period of time. Using a Data Collec-torSet, you can specify which performance counters, event trace data, and registry hives you’d like to monitor, and when you’d like to collect that data. The procedure for creating a Data CollectorSet is as follows.
1. Right-click the User Defined node under Data Collector Sets in the Navigation pane, and choose New >Data Collector Set.
Copyright ©2010 Global Knowledge Training LLC. All rights reserved. 11
2. Name your Data Collector Set and choose manual, then choose your performance counters, event trace data components, or registry hive information that you would like to monitor.
3. After you have created your new user-defined data collector set, by opening its properties you can automate its start and stop schedule and other characteristics.
4. To run your data collector set manually, right-click the DDC and select Start.
5. After a period of time, right-click the DDC and select Stop.
6. You can then view the collected information by navigating to the Reports node in the Navigation pane and drilling down to view your custom report.
Tip: There are also pre-built DDC baselines found under the System node; you can choose from a System Diag-nostics or System Performance template for testing as shown in Figure 10.
Monitoring with the Event ViewerMicrosoft has completely restructured the Event Viewer with a new layout and new categories. The Event Viewer has been revamped in several key areas.
• Mosttext-basedlogfilesarenowrecordedintheeventlogsfoundintheApplications and Services logs in an XML format instead.
• Filteringandsortingoptionshavebeenimproved.
• AdministratorscanmoreeasilycontrolwhatgetsloggedusingtheTask Scheduler to alert when specific Event IDs occur.
Tip: Event forwarding provides administrators with the ability to collect event logs in one central location. This feature is implemented through event log subscriptions.
Tip: You can get to the Event Viewer through the Computer Management console, or by opening up the Admin-istrative tools menu. The organization of Event Viewer has changed. The logs now fall into two primary catego-ries: Windows Logs and Applications and Services Logs as shown in Figure 11. Tip: Most, if not all, Windows 7 features run as a Service with their own log.
Copyright ©2010 Global Knowledge Training LLC. All rights reserved. 12
Figure 11: The Event logs for Windows 7
Windows Logs contain the traditional Event Viewer categories, plus several new ones.
The Application log - The Application category holds events logged by older software applications that are not written for Windows 7. Tip: Applications written for Windows 7, such as Office 2007 / 2010 have their own set of logs.
The Security log - The Security category contains any entries defined by Audit policies, and Advanced Audit polices; for example, logon and logoff events.
The Setup log - The Setup category is a new event log that records details of setup events. These were formerly stored in .log text files on disk.
The System log - The System category holds events logged by the operating system that may be of broad relevance to the behavior of the computer. The new Applications and Services Logs also contain messages gen-erated by the operating system dealing with system performance, memory leak issues, and system startup and shutdown, to name a few of the logs available in Windows 7.
Forwarded Events – One of the improvements to the Event Viewer is the ability to centralize events from multiple computers into a single log, according to a subscription that you can create. When you right-click the Subscriptions node in the Scope pane to the left and choose Add Subscription, you are prompted to provide a name, a description, a list of computers from which you would like to gather event log data, and details about what to collect. Specify those details by clicking the Select Events button and filling in the query details. Creating a subscription depends on the Windows Event Collector service; Windows 7 will prompt you to start this service if it is not already started when you attempt to create your first subscription.
Copyright ©2010 Global Knowledge Training LLC. All rights reserved. 13
Applications and Services Logs Applications and Services Logs store data from individual applications or operating system components. Many subcategories exist, especially in the Microsoft, Windows node. These logs have four base subtypes: Admin, Operational, Analytic, and Debug; there are many additional logs that are not fully documented, in addi-tion, Admin, Analytic, and Debug logs have to be enabled before they will start logging entries as they can get very large. The first two types, Admin and Operational are the logs that you will most likely gravitate to; some of the log types are not so user-friendly.
Tip: You can email EventIDs to yourself by selecting an Event ID and choosing the option Attach a task to this Event ID launching the Task Scheduler.
Averting Disaster Using the Windows Recovery Environment(WinRE)One handy troubleshooting option that is part of the Windows 7 startup process is the Windows Recovery Environment (Win RE). Tip: During installation, Win RE is installed on a hidden system partition and will start automatically if Windows 7 fails to start properly.
Options allow you to carry out several options including using System Restore to roll your computer system back to an earlier time, performing a Startup Repair of essential system files, carry out a memory test, or per-form an image restore. The recovery tools combined with the command-line tools available allow you to analyze and fix a variety of startup problems related to boot sector problems, boot record problems, or issues with the default boot configuration data store.
Tip: To launch the System Recovery tools, start your Windows 7 computer in Safe Mode by pressing F8 at bootup. Choose the first option, Repair Your Computer from the listed options. The System Recovery tools can also be started by booting your computer using the Windows 7 DVD. Tip: You can create a System Repair Disk through the Action Center in the Backup and Repair section. Use these steps for using the System Repair Disk:
1. Boot your system from the Windows 7 Recovery Disk.
2. At the boot screen, select the language in which you want to work.
3. Choose System Recovery options.
4. Select the keyboard layout (usually US).
5. Windows 7 will spend a little time looking for operating systems on your hard drive.
6. At the b dialog box, select Microsoft Windows and click Next.
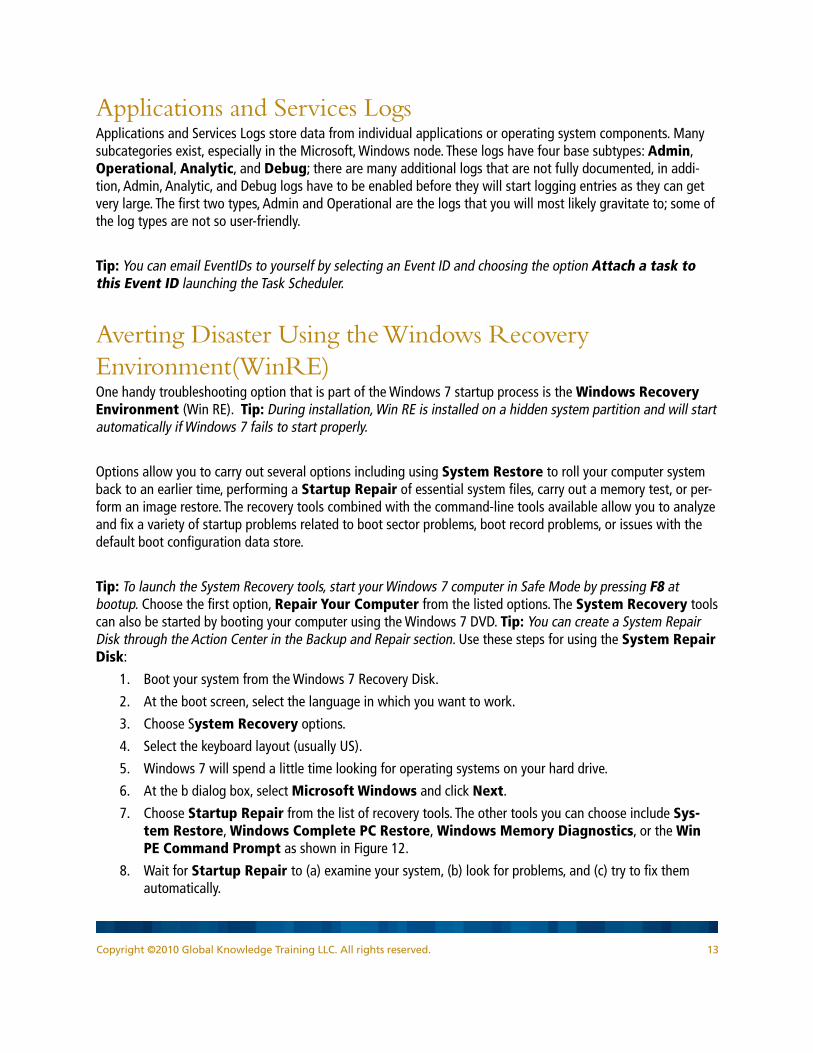
7. Choose Startup Repair from the list of recovery tools. The other tools you can choose include Sys-tem Restore, Windows Complete PC Restore, Windows Memory Diagnostics, or the Win PE Command Prompt as shown in Figure 12.
8. Wait for Startup Repair to (a) examine your system, (b) look for problems, and (c) try to fix them automatically.
Copyright ©2010 Global Knowledge Training LLC. All rights reserved. 14
9. If Startup Repair is unable to repair the computer, you will be prompted to send information to Microsoft. Click the View diagnostic and repair details link to see what the Startup Repair tool did, or tried to do.
Figure 12:Windows Recovery options
Remote Troubleshooting Using Windows Remote Session (WinRS)There is a powerful command-line remote session built into Windows 7 and Server 2008 R2. You first have to enable the service, the listener, and the firewall using the command winrmqc. Here’s how to use the command-line remote shell in Windows 7.
1. From an elevated command prompt….run winrmqc on your Windows 7 computer system. This com-mand initializes remote management and enables the required exceptions in the firewall. Carry out this command on both Windows 7 computers.
2. Once these steps are done, you can use the command WinRS at an elevated command prompt to carry out most any command you want to through a remote session controlled from your computer, running on the remote Windows 7 computer. Full syntax can be discovered by typing Winre /?
3. To run the Task Manager on the remote host, enter the following command Winrs –r:<computer><command>. To use Task Manager on a computer called wk7100 you would type winrs –r:wk7100tasklist /svc.
Tip: For additional details on WinRM goto http://msdn.microsoft.com/en-us/library/aa384372.aspx
Application Compatibility Tools for Windows 7Application issues have been an ongoing problem for administrators. Applications are built to work with specific operating systems, and when an operating system is upgraded, application issues can arise. The main reason for application issues is the change in the code that the operating system is built on and in the security levels.

Copyright ©2010 Global Knowledge Training LLC. All rights reserved. 15
These changes can result in the application not working or becoming unstable due to changes in the operating system itself and to core DLLs that are required by the application software. As a result, when an older applica-tion makes API calls to the operating system, the operating system may not respond as the application expects; therefore, the application freezes or stops working. Windows 7 addresses some of these compatibility issues by providing some built-inand some downloadable tools that will help ensure that an older program will work under Windows 7.
The Program Compatibility Wizard – This built-in tool allows you to fine-tune older software ap-plications that still have a problem even with file and registry virtualization.
File and Registry virtualization – This approach redirects local system registry and file writes to a virtual store in the user profile. This method allows many older applications to work with no fixes required.
User Account Control – All Administrative tasks require administrative credentials to run.
The Standard User Analyzer – Test your standard users file, registry, and token requirements when run-ning older software applications.
Program Compatibility Wizard The Program Compatibility Wizard is located in the Action center; click the Windows Program Com-patibility Troubleshooter link, and the wizard will search and display all programs that are locally installed.
Figure 13: Running the Program Compatibility Wizard
Copyright ©2010 Global Knowledge Training LLC. All rights reserved. 16
Choose the offending program from the list and click Next. The wizard will then prompt you for the preferred operating system for the application, and optionally allow you to select the best display settings, and whether to disable visual themes, desktop composition, and display scaling. Tip: You’ll also be asked whether the program requires administrator privileges and whether you should select Run this program as an administrator if the application needs to be run with Administrative credentials.
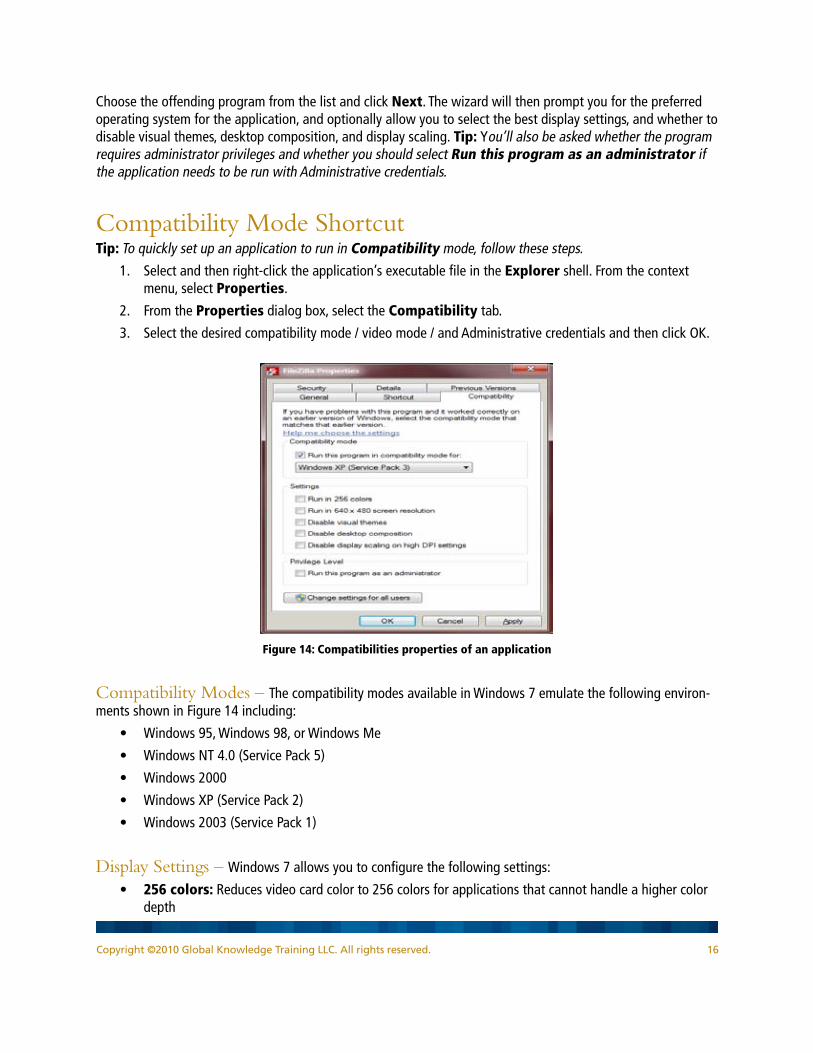
Compatibility Mode ShortcutTip: To quickly set up an application to run in Compatibility mode, follow these steps.
1. Select and then right-click the application’s executable file in the Explorer shell. From the context menu, select Properties.
2. From the Properties dialog box, select the Compatibility tab.
3. Select the desired compatibility mode / video mode / and Administrative credentials and then click OK.
Figure 14: Compatibilities properties of an application
Compatibility Modes – The compatibility modes available in Windows 7 emulate the following environ-ments shown in Figure 14 including:
• Windows95,Windows98,orWindowsMe
• WindowsNT4.0(ServicePack5)
• Windows2000
• WindowsXP(ServicePack2)
• Windows2003(ServicePack1)
Display Settings – Windows 7 allows you to configure the following settings:
• 256 colors: Reduces video card color to 256 colors for applications that cannot handle a higher color depth
Copyright ©2010 Global Knowledge Training LLC. All rights reserved. 17
• 640x480 screen resolution: Limits screen resolution to 640x480 for applications that cannot deal with a higher resolution
• Disable visual themes: Removes all additional video themes that may conflict with the older ap-plication
• Disable desktop composition: select this setting if you are experiencing problems with the display of graphics
• Disable display scaling on high DPI settings: select this option if your program is not displaying properly when a high dpi setting (1024X768 or higher) is being used.
• Privilege Level: Set the following privilege level: Run this program as administrator
File and Registry VirtualizationIn order to ease the application compatibility problems that the release of Windows 7 may generate, Microsoft has introduced a technology called file and registry virtualization.
This technology makes it possible to run many applications as a standard user, even when the applications re-quired either Administrator or Power User rights on Windows XP. This is accomplished by redirecting application writes from secured areas of the operating system to a virtual store located under the user’s profile. Therefore, with file and registry virtualization, many off-the-shelf and custom in-house applications will work with no tweaks needed.
Tip: Keep in mind that older applications may want to write to these specific locations, which are now pro-tected.
• Thelocalsystemregistry(HKEY_LOCAL_MACHINE)
• FilesthatstoredintheProgramFilesfolder
File Virtualization – Ifyou’restillusingapplicationsthatwritetoC:\ProgramFilesorHKEY_LOCAL_MA-CHINE when an application attempts to do something “incorrect,” such as writing to the INI file C:\Program Files\OldApp\Options.ini, Windows 7 will determine that the users’ token does not grant them access to save to thatlocation.Thefileandvirtualizationprocesswillcopytheexistingfile(ifitalreadyexists)toC:\Users\<your_account>\AppData\Local\VirtualStore\Program Files\OldApp\Options.ini. It will then allow the write operation to succeed to this new file location in the VirtualStore folder.
Tip: Additional read operations for that file or any other files linked to this application will, from this point forward, use the copy in the VirtualStore.
Registry Virtualization – The same type of redirect will be used with the off-limits system registry. If an application writes to HKLM\Software\OldApp\1.0\Settings, Windows 7 will send that write operation to HKCR\VirtualStore\Machine\Software\OldApp\1.0\Settings. Subsequent registry read operations will now read from the user’s VirtualStore in the same manner that is used with the file virtualization process.
Copyright ©2010 Global Knowledge Training LLC. All rights reserved. 18
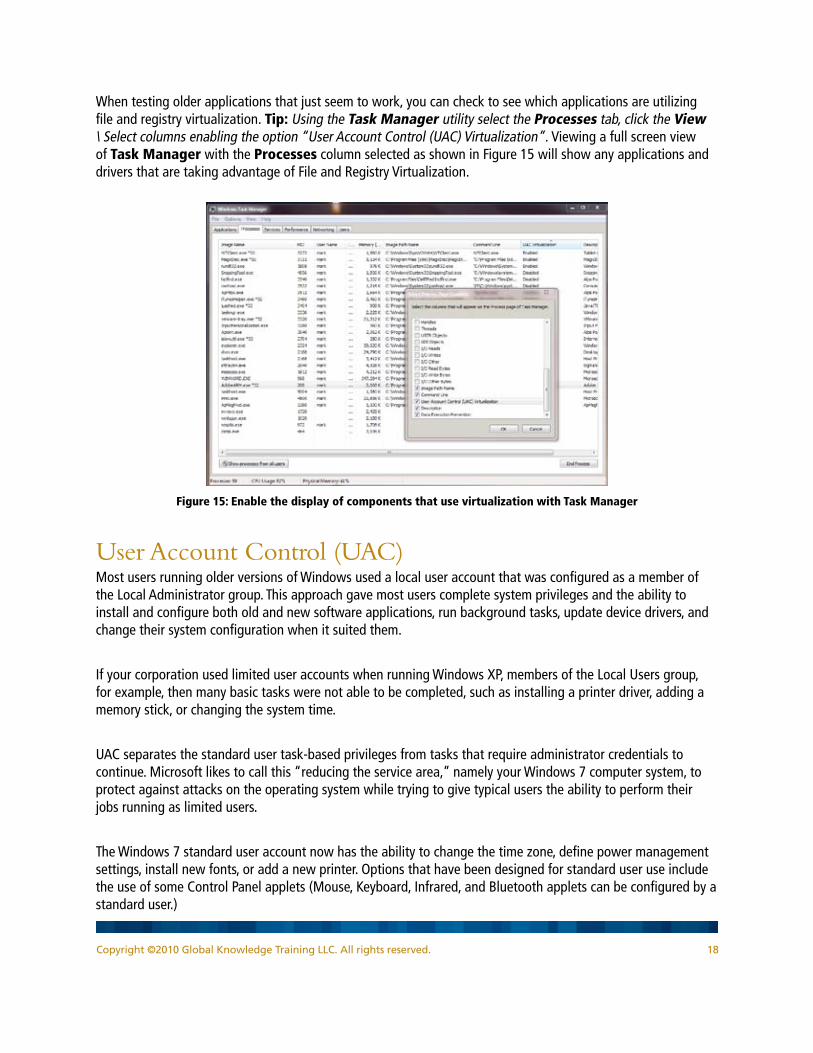
When testing older applications that just seem to work, you can check to see which applications are utilizing file and registry virtualization. Tip: Using the Task Manager utility select the Processes tab, click the View \ Select columns enabling the option “User Account Control (UAC) Virtualization”. Viewing a full screen view of Task Manager with the Processes column selected as shown in Figure 15 will show any applications and drivers that are taking advantage of File and Registry Virtualization.
Figure 15: Enable the display of components that use virtualization with Task Manager
User Account Control (UAC)Most users running older versions of Windows used a local user account that was configured as a member of the Local Administrator group. This approach gave most users complete system privileges and the ability to install and configure both old and new software applications, run background tasks, update device drivers, and change their system configuration when it suited them.
If your corporation used limited user accounts when running Windows XP, members of the Local Users group, for example, then many basic tasks were not able to be completed, such as installing a printer driver, adding a memory stick, or changing the system time.
UAC separates the standard user task-based privileges from tasks that require administrator credentials to continue. Microsoft likes to call this “reducing the service area,” namely your Windows 7 computer system, to protect against attacks on the operating system while trying to give typical users the ability to perform their jobs running as limited users.
The Windows 7 standard user account now has the ability to change the time zone, define power management settings, install new fonts, or add a new printer. Options that have been designed for standard user use include the use of some Control Panel applets (Mouse, Keyboard, Infrared, and Bluetooth applets can be configured by a standard user.)
Copyright ©2010 Global Knowledge Training LLC. All rights reserved. 19
Tip: Always open an elevated command prompt when performing Administrative tasks on Windows 7.
Standard Users DetailsWhen an application is installed on Windows 7 computer, the logged-on user account performing the installa-tion must be a member of the local’s Administrator’s group. Tip: When we run applications on Windows 7, if the default security is left intact, the application will be executed as a Standard User, even if you are logged in as a member of the Local Administrative group.
The definition of a Standard User is a “locked down user”; they have access to their user profile (Full Control) and List Folder Contents and Read and Execute access to the rest of the files and folders outside of their User Profile. Tip: If an application has been designed for Windows 7, then running the application as a locked down Standard User will be problem-free.
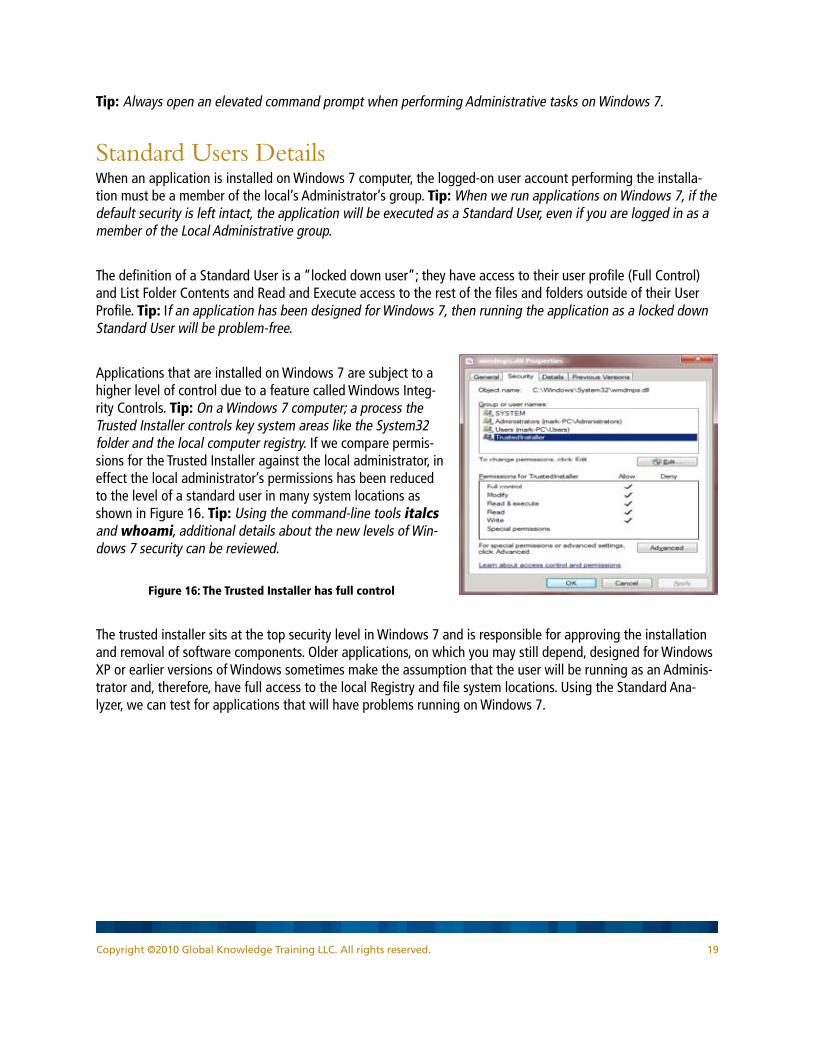
Applications that are installed on Windows 7 are subject to a higher level of control due to a feature called Windows Integ-rity Controls. Tip: On a Windows 7 computer; a process the Trusted Installer controls key system areas like the System32 folder and the local computer registry. If we compare permis-sions for the Trusted Installer against the local administrator, in effect the local administrator’s permissions has been reduced to the level of a standard user in many system locations as shown in Figure 16. Tip: Using the command-line tools italcs and whoami, additional details about the new levels of Win-dows 7 security can be reviewed.
Figure 16: The Trusted Installer has full control
The trusted installer sits at the top security level in Windows 7 and is responsible for approving the installation and removal of software components. Older applications, on which you may still depend, designed for Windows XP or earlier versions of Windows sometimes make the assumption that the user will be running as an Adminis-trator and, therefore, have full access to the local Registry and file system locations. Using the Standard Ana-lyzer, we can test for applications that will have problems running on Windows 7.
Copyright ©2010 Global Knowledge Training LLC. All rights reserved. 20
Testing Applications with the Standard User Analyzer (SUA)
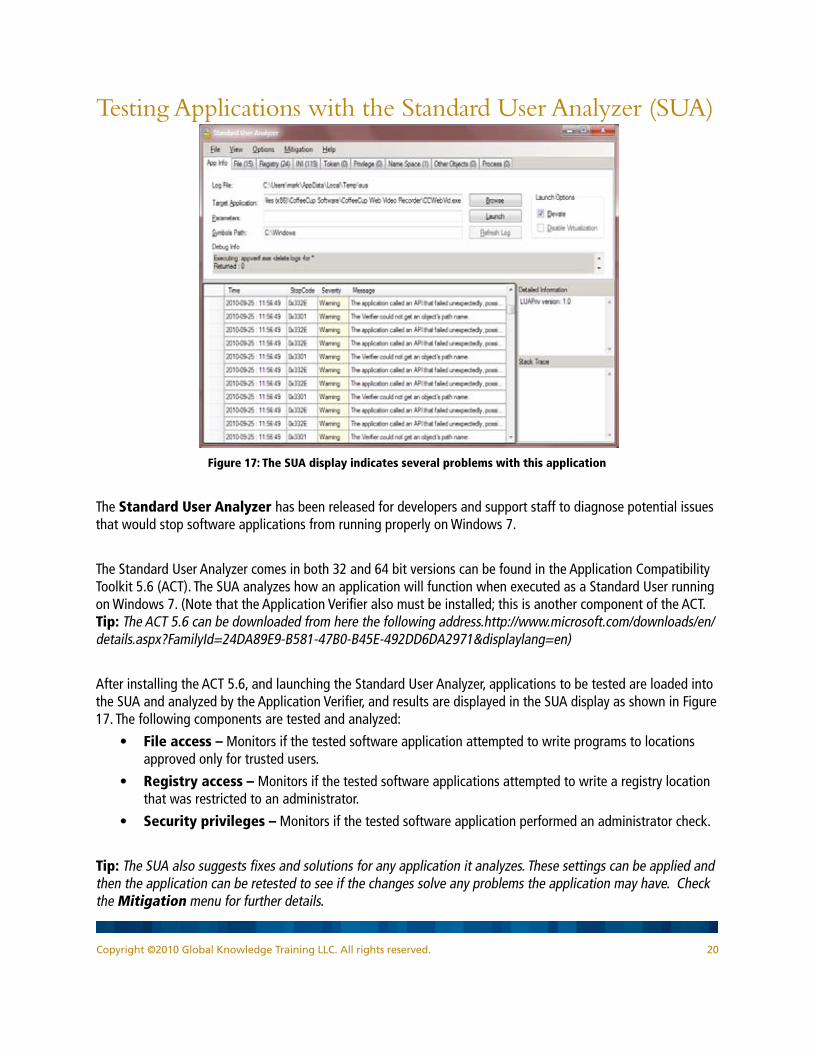
Figure 17: The SUA display indicates several problems with this application
The Standard User Analyzer has been released for developers and support staff to diagnose potential issues that would stop software applications from running properly on Windows 7.
The Standard User Analyzer comes in both 32 and 64 bit versions can be found in the Application Compatibility Toolkit 5.6 (ACT). The SUA analyzes how an application will function when executed as a Standard User running on Windows 7. (Note that the Application Verifier also must be installed; this is another component of the ACT. Tip: The ACT 5.6 can be downloaded from here the following address.http://www.microsoft.com/downloads/en/details.aspx?FamilyId=24DA89E9-B581-47B0-B45E-492DD6DA2971&displaylang=en)
After installing the ACT 5.6, and launching the Standard User Analyzer, applications to be tested are loaded into the SUA and analyzed by the Application Verifier, and results are displayed in the SUA display as shown in Figure 17. The following components are tested and analyzed:
• File access – Monitors if the tested software application attempted to write programs to locations approved only for trusted users.
• Registry access – Monitors if the tested software applications attempted to write a registry location that was restricted to an administrator.
• Security privileges – Monitors if the tested software application performed an administrator check.
Tip: The SUA also suggests fixes and solutions for any application it analyzes. These settings can be applied and then the application can be retested to see if the changes solve any problems the application may have. Check the Mitigation menu for further details.
Copyright ©2010 Global Knowledge Training LLC. All rights reserved. 21
Setting Environment VariablesIf you are having problems with software compatibility for a very old software application, the installed set val-ues may have to be checked and modified for your software to run successfully in the Windows 7 environment. Here’s how to test if environmental variables should be added to Windows 7.
1. On the older system where your software is working, exit to the command prompt and type set. Com-pare the environment variables listing on the older system with the variable listing on the Windows 7 computer system where the software is installed but doesn’t work properly.
2. Any variables that are displayed on the older computer system but not on the Windows 7 computer system should be added to the environment list for Windows 7.
3. To add an environment variable in Windows 7, open the System applet in Control Panel, and then select the Advanced tab.
4. Click the Environment Variables button and add the required set variables for either the user or the computer system, as applicable.
ConclusionI hope you now feel confident about using these new Windows 7 tools and are impressed by how many good troubleshooting tools are available in Windows 7. For more troubleshooting tips, checkout Seven Forums for lots of additional tricks and tips on Windows 7. http://www.sevenforums.com/
Learn MoreLearn more about how you can improve productivity, enhance efficiency, and sharpen your competitive edge. Check out the following Global Knowledge course(s):
Administering and Maintaining Windows 7 (M50292)
Planning and Managing Windows 7 Desktop Deployments and Environments (M6294)
For more information or to register, visit www.globalknowledge.com or call 1-800-COURSES to speak with a sales representative.
Our courses and enhanced, hands-on labs and exercises offer practical skills and tips that you can immediately put to use. Our expert instructors draw upon their experiences to help you understand key concepts and how to apply them to your specific work situation. Choose from our more than 1,200 courses, delivered through Class-rooms, e-Learning, and On-site sessions, to meet your IT and business training needs.
About the AuthorMark Wilkins has been involved with computer systems and local area networks since 1984 since he graduated fromSt.LawrenceCollege–ElectronicTechnologyDivisionatKingston,Ontario,Canada,withtwodegrees:Electronic Engineering Technician with Distinction and Electronic Engineering Technologist with a specialty in digital design. He is also a certified as a MCSE 2003, MCITP Server 2008, and Windows 7 MCITP.

Copyright ©2010 Global Knowledge Training LLC. All rights reserved. 22
Mark keeps busy through his consulting company Wilkins Solutions, providing services for many corporate cus-tomers throughout North America including Ernst and Young, Bell Canada, SaskTel, and Telsat Canada, as well as teaching for Global Knowledge.
He has extensive experience in the testing, deployment, and troubleshooting of Windows 7 and Server 2008.
Marks latest book is Administering Active Directory 2003 for McGraw-Hill. He also recently co-wrote 6432 Managing and Maintaining Windows Server 2008 Active Directory Servers and 6431 Managing and Maintaining Windows Server 2008 Network Infrastructure Servers for Microsoft Education Services.