Windmill Tutorial 13b
43
SolidWorks ® tutorial 13-12 “Exciting” Pre-vocational Secondary Education and Senior Secondary Vocational Education For use with SolidWorks ® Educational Release 2009-2010
-
Upload
andrei-ciungan -
Category
Documents
-
view
114 -
download
6
Transcript of Windmill Tutorial 13b
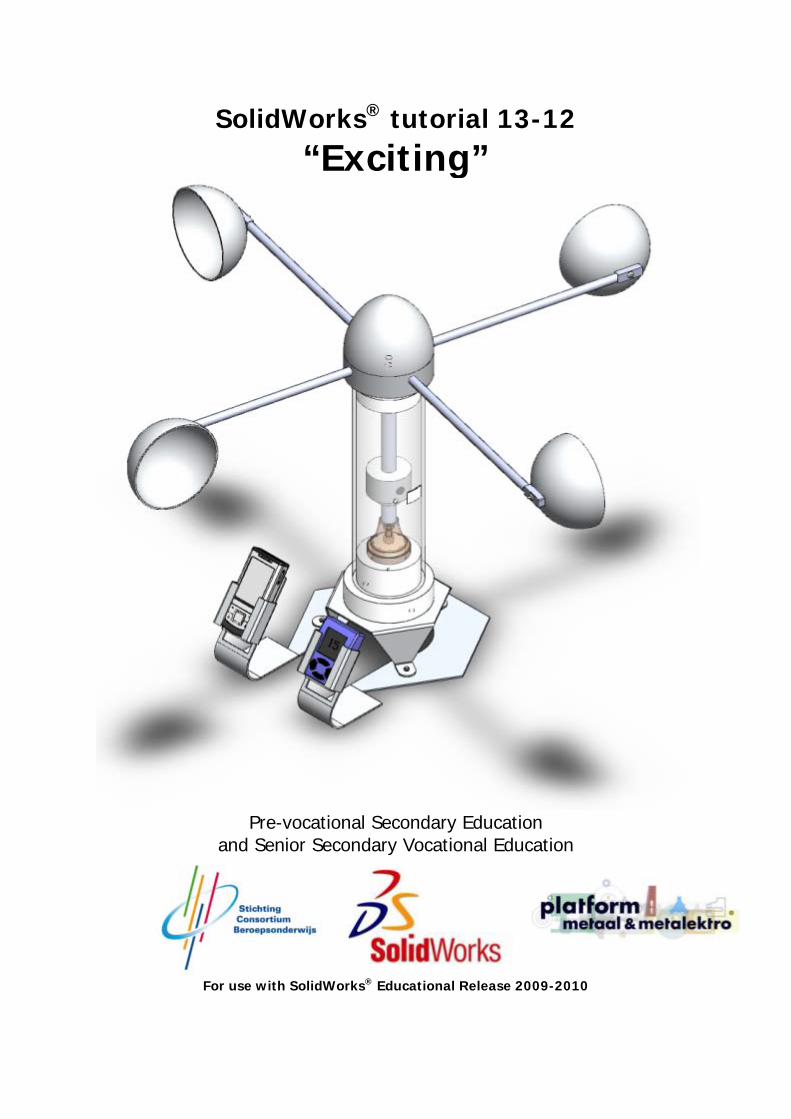
SolidWorks® tutorial 13-12
“Exciting”
Pre-vocational Secondary Education
and Senior Secondary Vocational Education
For use with SolidWorks® Educational Release 2009-2010
2 SolidWorks for Pre-vocational Secondary Education and Senior Secondary Vocational Education Tutorial 13-8: Assembling a windmill
© 1995-2005, SolidWorks Corporation 300 Baker Avenue Concord, Massachusetts 01742 USA All Rights Reserved
U.S. Patents 5,815,154; 6,219,049; 6,219,055 SolidWorks Corporation is a Dassault Systemes S.A. (Nasdaq:DASTY) company. The information and the software discussed in this document are subject to change without notice and should not be considered commitments by SolidWorks Corporation. No material may be reproduced or transmitted in any form or by any means, electronic or mechanical, for any purpose without the express written permission of SolidWorks Corporation. The software discussed in this document is furnished under a license and may be used or copied only in accordance with the terms of this license. All warranties given by SolidWorks Corporation as to the software and documentation are set forth in the SolidWorks Corporation License and Subscription Service Agreement, and nothing stated in, or implied by, this document or its contents shall be considered or deemed a modification or amendment of such warranties. SolidWorks® is a registered trademark of SolidWorks Corporation. SolidWorks 2005 is a product name of SolidWorks Corporation. FeatureManager® is a jointly owned registered trademark of SolidWorks Corporation. Feature Palette™, PhotoWorks™, and PDMWorks™ are trademarks of SolidWorks Corporation. ACIS® is a registered trademark of Spatial Corporation. FeatureWorks® is a registered trademark of Geometric Software Solutions Co. Limited. GLOBEtrotter® and FLEXlm® are registered trademarks of Globetrotter Software, Inc. Other brand or product names are trademarks or registered trademarks of their respective holders.
COMMERCIAL COMPUTER SOFTWARE - PROPRIETARY U.S. Government Restricted Rights. Use, duplication, or disclosure by the government is subject to restrictions as set forth in FAR 52.227-19 (Commercial Computer Software - Restricted Rights), DFARS 227.7202 (Commercial Computer Software and Commercial Computer Software Documentation), and in the license agreement, as applicable. Contractor/Manufacturer: SolidWorks Corporation, 300 Baker Avenue, Concord, Massachusetts 01742 USA Portions of this software are copyrighted by and are the property of Electronic Data Systems Corporation or its subsidiaries, copyright© 2005 Portions of this software © 1999, 2002-2005 ComponentOne Portions of this software © 1990-2005 D-Cubed Limited. Portions of this product are distributed under license from DC Micro Development, Copyright © 1994-2002 DC Micro Development, Inc. All rights reserved Portions © eHelp Corporation. All rights reserved. Portions of this software © 1998-2005 Geometric Software Solutions Co. Limited. Portions of this software © 1986-2005 mental images GmbH & Co. KG Portions of this software © 1996 Microsoft Corporation. All Rights Reserved. Portions of this software © 2001, SIMULOG. Portions of this software © 1995-2005 Spatial Corporation. Portions of this software © 2005, Structural Research & Analysis Corp. Portions of this software © 1997-2005 Tech Soft America. Portions of this software © 1999-2005 Viewpoint Corporation. Portions of this software © 1994-2005, Visual Kinematics, Inc. All Rights Reserved
This tutorial was developed for SolidWorks Benelux and may be used by anyone who needs to learn how to use the 3D CAD software SolidWorks. Any other use of this tutorial or any portion thereof is prohibited. If you have questions, please contact your retailer. Intitiative: Jack van den Broek and Nenad Raskovic Adaptation to the educational level: Jack van den Broek (Technical school Dr. Knippenberg). Completed by: Nenad Raskovic

Tutorial 13-12 “Assembling a windmill”
3 SolidWorks for Pre-vocational Secondary Education and Senior Secondary Vocational Education Tutorial 13-8: Assembling a windmill
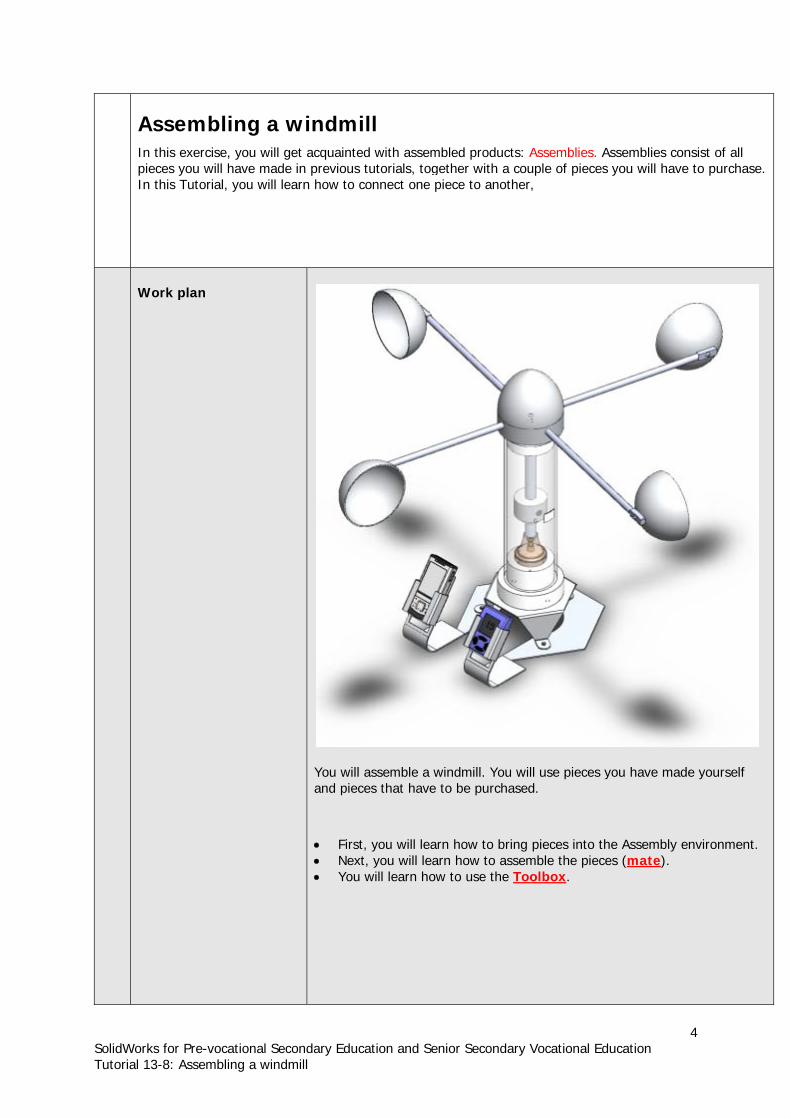
Assembling a windmill
In this exercise, you will get acquainted with assembled products: Assemblies. Assemblies consist of all pieces you will have made in previous tutorials, together with a couple of pieces you will have to purchase. In this Tutorial, you will learn how to connect one piece to another,
4 SolidWorks for Pre-vocational Secondary Education and Senior Secondary Vocational Education Tutorial 13-8: Assembling a windmill
Work plan
You will assemble a windmill. You will use pieces you have made yourself and pieces that have to be purchased.
• First, you will learn how to bring pieces into the Assembly environment. • Next, you will learn how to assemble the pieces (mate).
You will learn how to use the Toolbox• .
5 SolidWorks for Pre-vocational Secondary Education and Senior Secondary Vocational Education Tutorial 13-8: Assembling a windmill
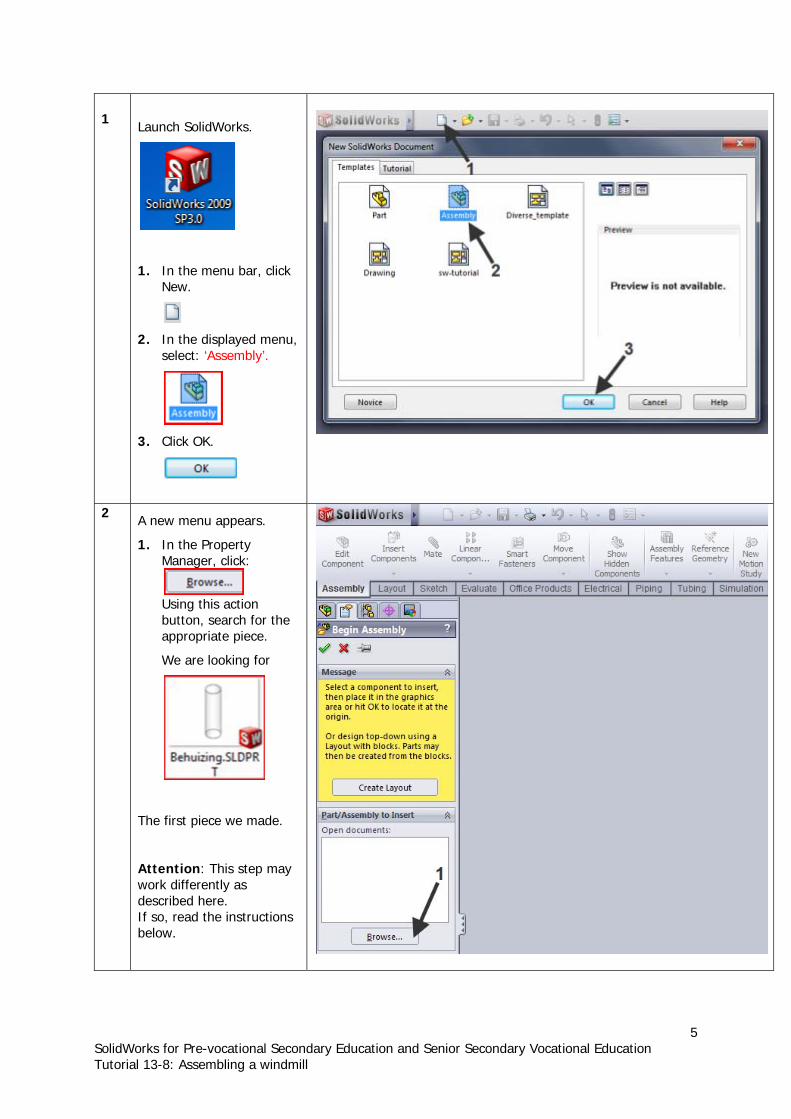
1
Launch SolidWorks.
1. In the menu bar, click New.
2. In the displayed menu, select: ‘Assembly’.
3. Click OK.
2 A new menu appears.
1. In the Property k:
on
button, search for the appropriate piece.
We are looking for
The first piece we made.
Attention: This step may work differently as described here. If so, read the instructions below.
Manager, clic
Using this acti
6 SolidWorks for Pre-vocational Secondary Education and Senior Secondary Vocational Education Tutorial 13-8: Assembling a windmill
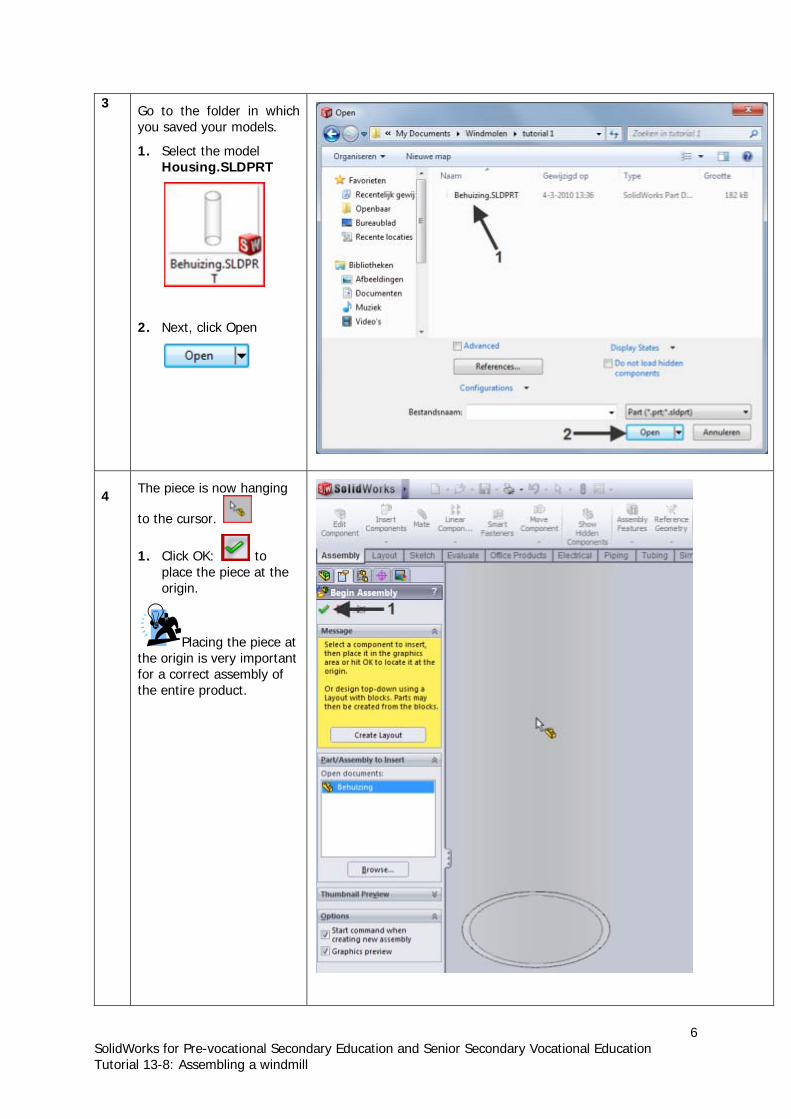
ich els.
Housing.SLDPRT
2. Next, click Open
3 Go to the folder in whyou saved your mod
1. Select the model
4 hanging
1. Click OK: to place the piece at the origin.
ce at nt
for a correct assembly of the entire product.
The piece is now
to the cursor.
Placing the piethe origin is very importa
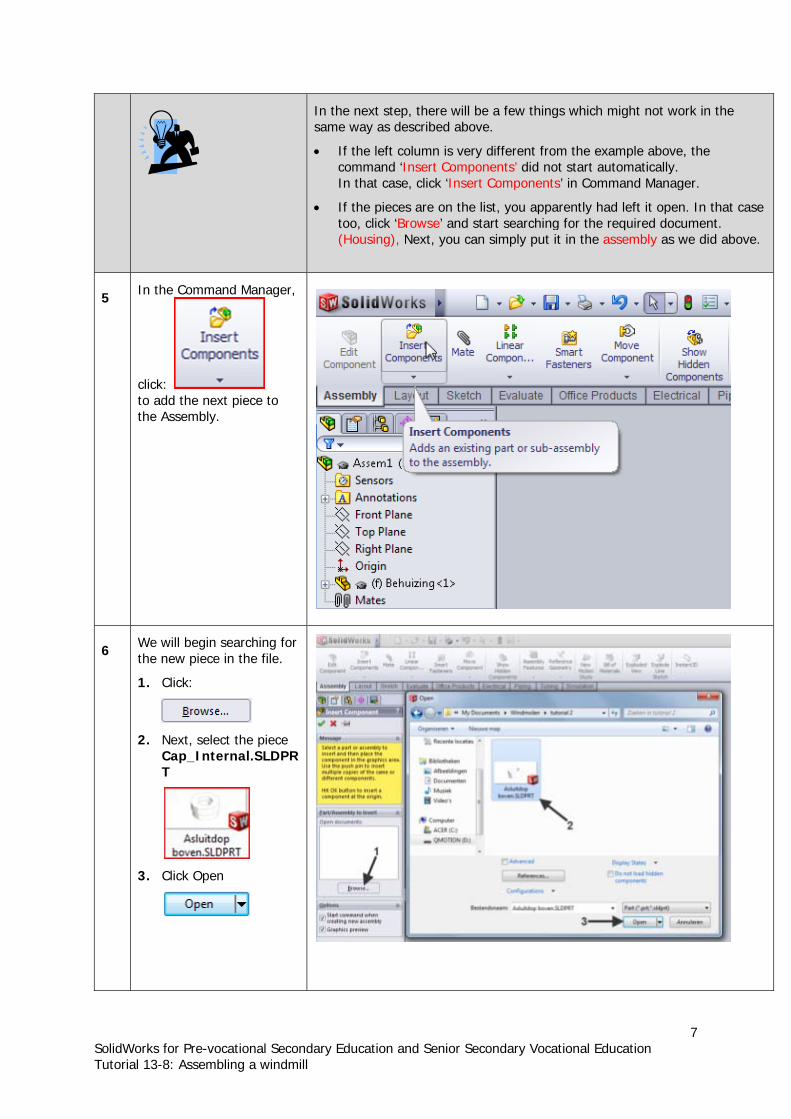
In the next step, there will be a few things which might not work in the same way as described above.
• If the left column is very different from the example above, the command ‘Insert Components’ did not start automatically. In that case, click ‘Insert Components’ in Command Manager.
• If the pieces are on the list, you apparently had left it open. In that case too, click ‘Browse’ and start searching for the required document.
(Housing), Next, you can simply put it in the assembly as we did above.
5 ,
click: o
the Assembly.
In the Command Manager
to add the next piece t
6 We will begin searching for
e in the file.
1. Click:
2. Next, t the pieceCap_Internal.SLDT
the new piec
selec PR
3. Click Open
7 SolidWorks for Pre-vocational Secondary Education and Senior Secondary Vocational Education Tutorial 13-8: Assembling a windmill
8 SolidWorks for Pre-vocational Secondary Education and Senior Secondary Vocational Education Tutorial 13-8: Assembling a windmill
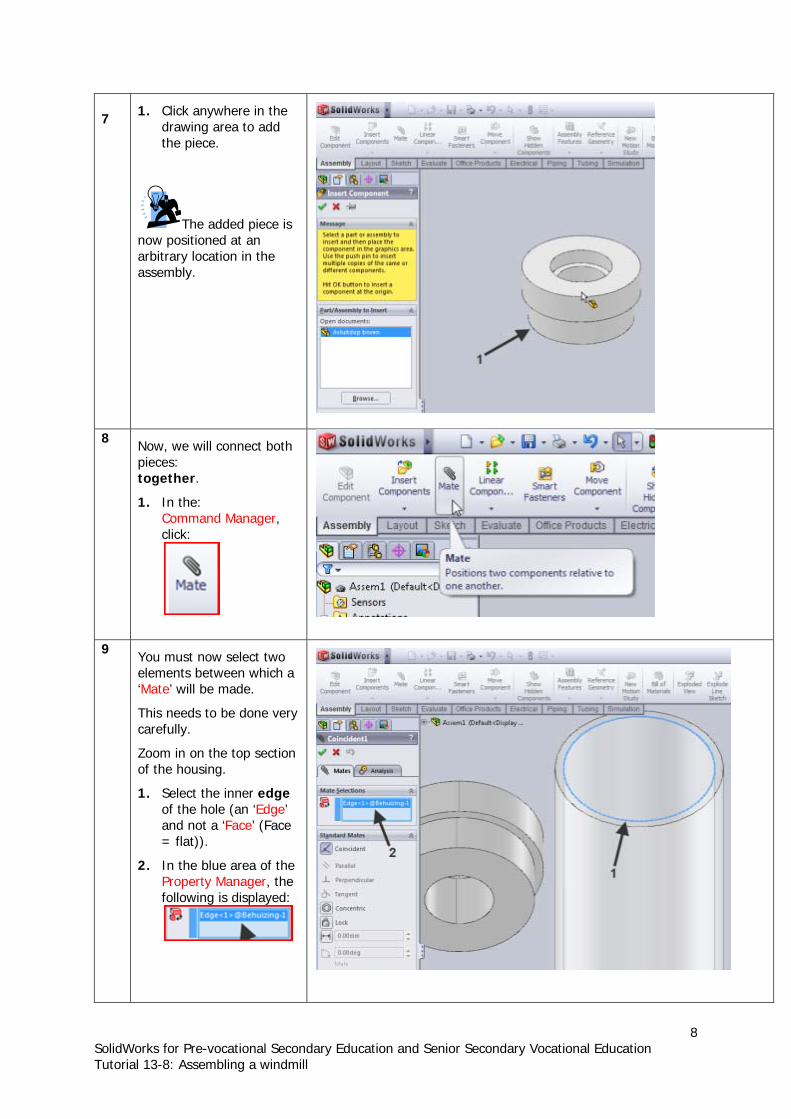
7 . Click anywhere in the
drawing area to add the piece.
The added piece is sitioned at an
rbitrary location in the ssembly.
1
now poaa
8 Now, we will connect both
Command Manager, click:
pieces: together.
1. In the:
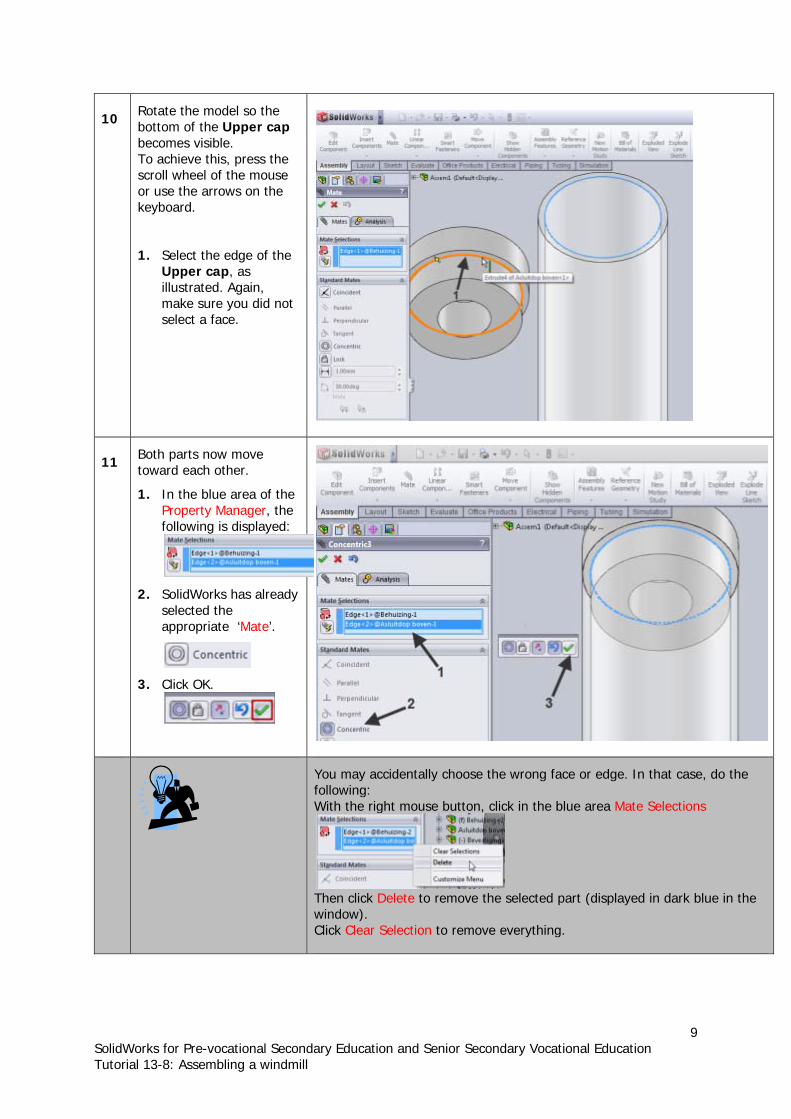
9 You must now select two elements between which a
de.
This needs to be done very carefully.
Zoom in on the top section of the housing.
1. Select the inner edge of the hole (an ‘Edge’ and not a ‘Face’ (Face = flat)).
2. In the blue area of the Property Manager, the following is displayed:
‘Mate’ will be ma
9 SolidWorks for Pre-vocational Secondary Education and Senior Secondary Vocational Education Tutorial 13-8: Assembling a windmill
.
o achieve this, press the roll wheel of the mouse
or use the arrows on the keyboard.
e ap, as
illustrated. Again, make sure you did not select a face.
10 Rotate the model so the
bottom of the Upper capbecomes visibleTsc
1. Select the edge of thUpper c
lue area of the , the
:
2. SolidWorks has already selected the appropriate ‘Mate’.
11 Both parts now move toward each other.
1. In the bProperty Managerfollowing is displayed
3. Click OK.
You may accidentally choose the wrong face or edge. In that case, do the following: With the right mouse button, click in the blue area Mate Selections
Then click Delete to remove the selected part (displayed in dark blue in the window). Click Clear Selection to remove everything.
10 SolidWorks for Pre-vocational Secondary Education and Senior Secondary Vocational Education Tutorial 13-8: Assembling a windmill
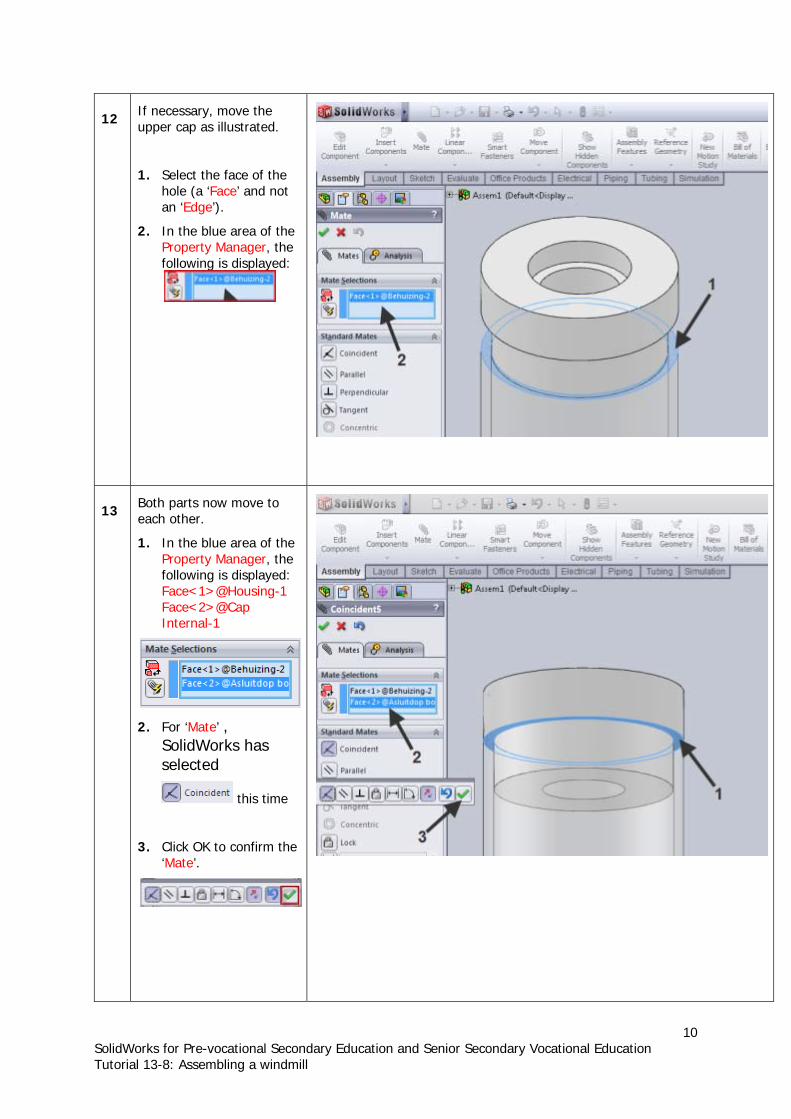
12 If necessary, move the
upper cap as illustrated.
g is displayed:
1. Select the face of the hole (a ‘Face’ and not an ‘Edge’).
2. In the blue area of theProperty Manager, the followin
13 Both parts now move to
each other.
the r, the
Internal-1
2. For ‘Mate’ , SolidWorks has
ted
this time
3. Click OK to confirm the ‘Mate’.
1. In the blue area ofProperty Managefollowing is displayed: Face<1>@Housing-1 Face<2>@Cap
selec

11 SolidWorks for Pre-vocational Secondary Education and Senior Secondary Vocational Education Tutorial 13-8: Assembling a windmill
14 The selection area in the:
Property Manager is emptied, so you can immediately enter the next
e Front Plane standard ce. However, it cannot be
is have to use
the Feature Manager displayed in the diagram area
1. Click the plus sign in front of the file name.
mate.
To fasten the cap, we use thfaselected in the model, but only in the Feature Manager.
Since the Property Manager and not the Feature Manager displayed, you
.
15 1. Click the plus signs for both pieces.
Attention! After having clicked the first +, the list
scrolls.
12 SolidWorks for Pre-vocational Secondary Education and Senior Secondary Vocational Education Tutorial 13-8: Assembling a windmill
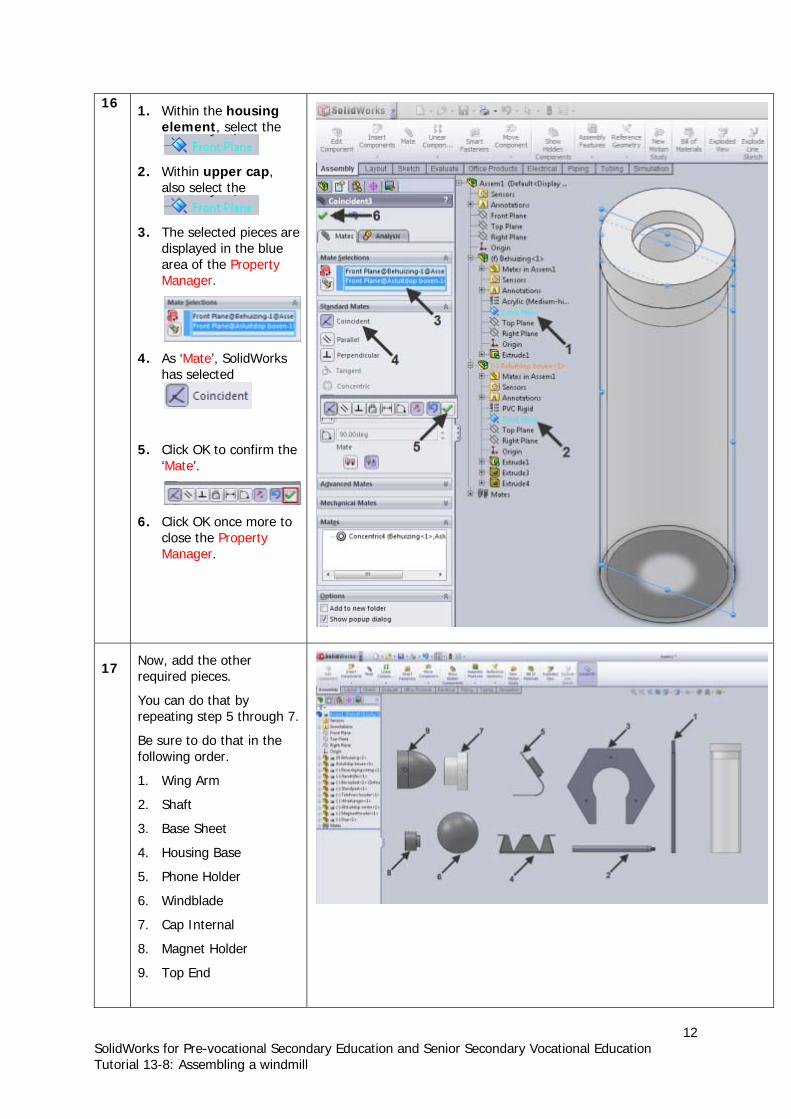
16 . Within the housing element, select the
2. Within upper cap, also select the
3. The selected pieces are displayed in the blue area of the Property
to confirm the
1
Manager.
4. As ‘Mate’, SolidWorks has selected
5. Click OK‘Mate’.
6. Click OK once more to close the PropertyManager.
17
Now, add the other required pieces.
You can do that by repeating step 5 through 7.
Be sure to do that in the following order.
1. Wing Arm
2. Shaft
3. Base Sheet
4. Housing Base
5. Phone Holder
6. Windblade
7. Cap Internal
8. Magnet Holder
9. Top End
13 SolidWorks for Pre-vocational Secondary Education and Senior Secondary Vocational Education Tutorial 13-8: Assembling a windmill
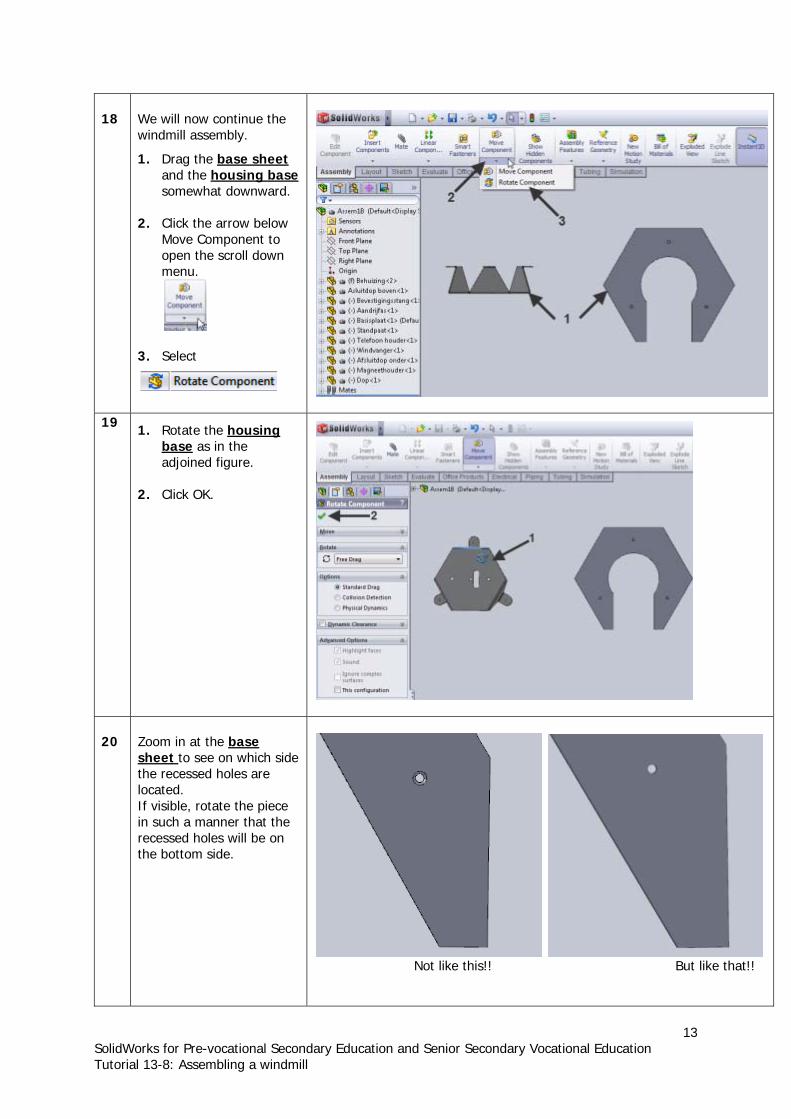
. Drag the base sheet
18
We will now continue the windmill assembly.
1 eand the housing bas
. Click the arrow below Move Component to open the scroll down menu.
3. Select
somewhat downward.
2
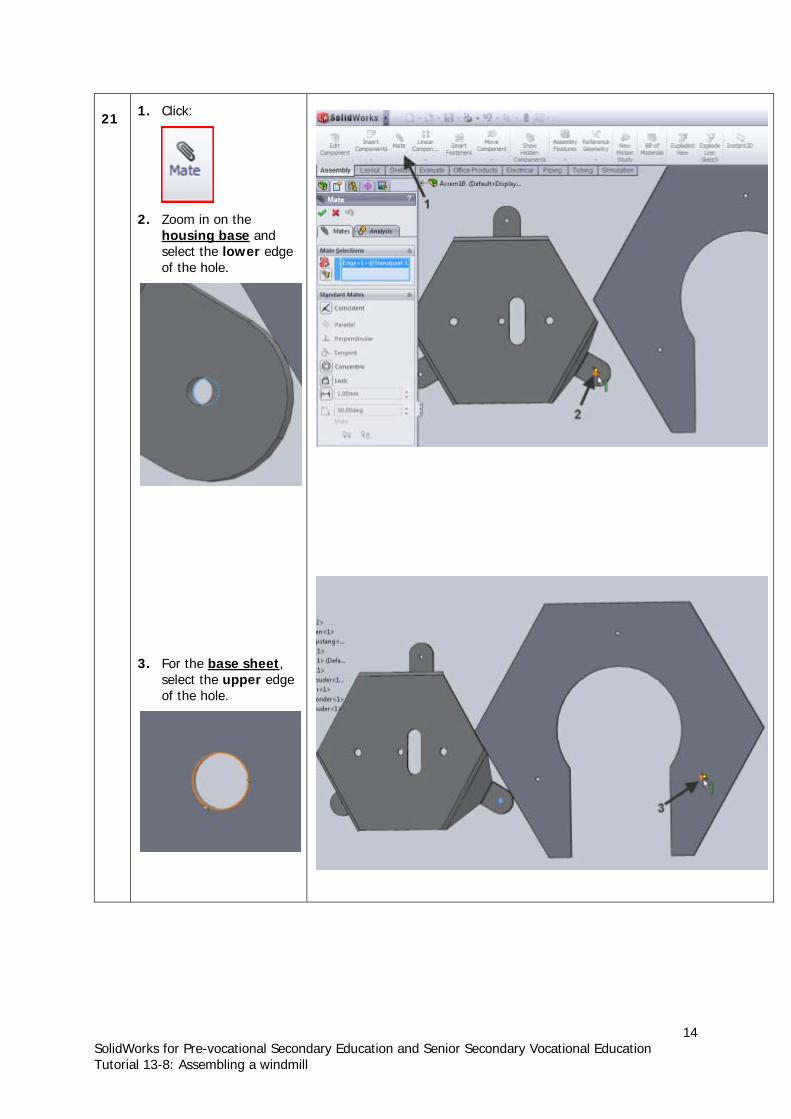
19 1. Rotate the housing
base as in the adjoined figure.
2. Click OK.
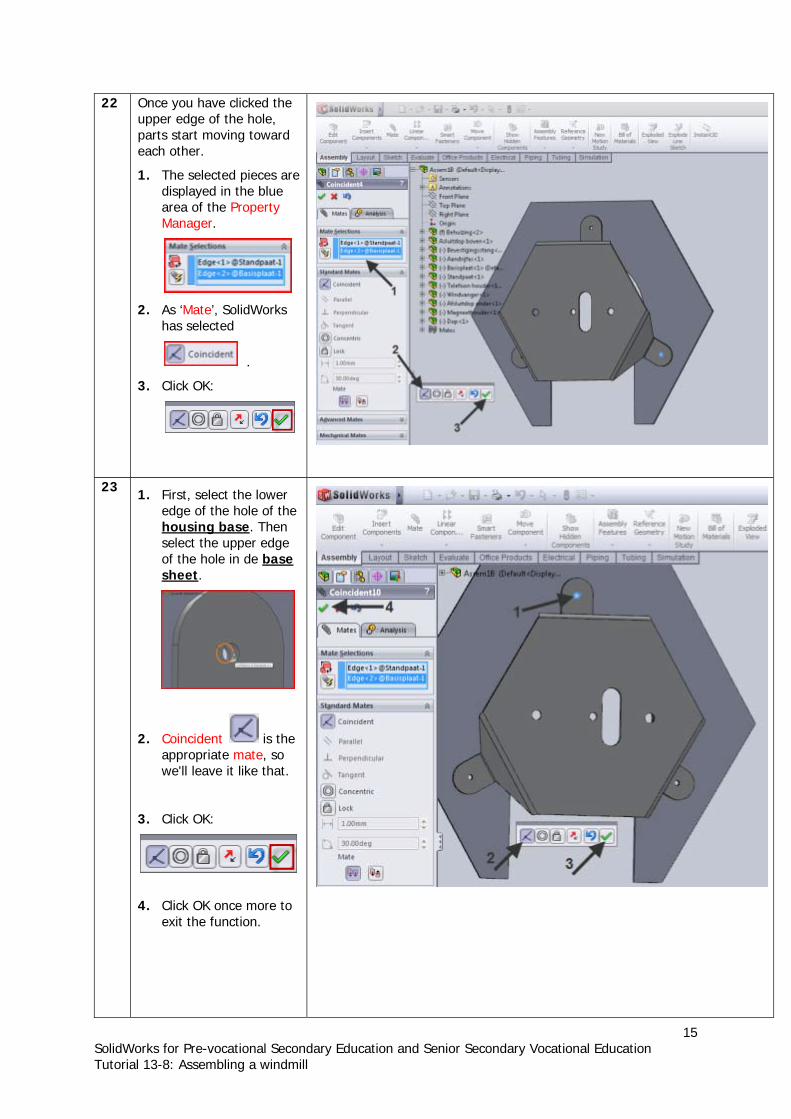
20
Zoom in at the base sheet to see on which side the recessed holes are located. If visible, rotate the piece in such a manner that the recessed holes will be on the bottom side.
But like that!! Not like this!!
14 SolidWorks for Pre-vocational Secondary Education and Senior Secondary Vocational Education Tutorial 13-8: Assembling a windmill
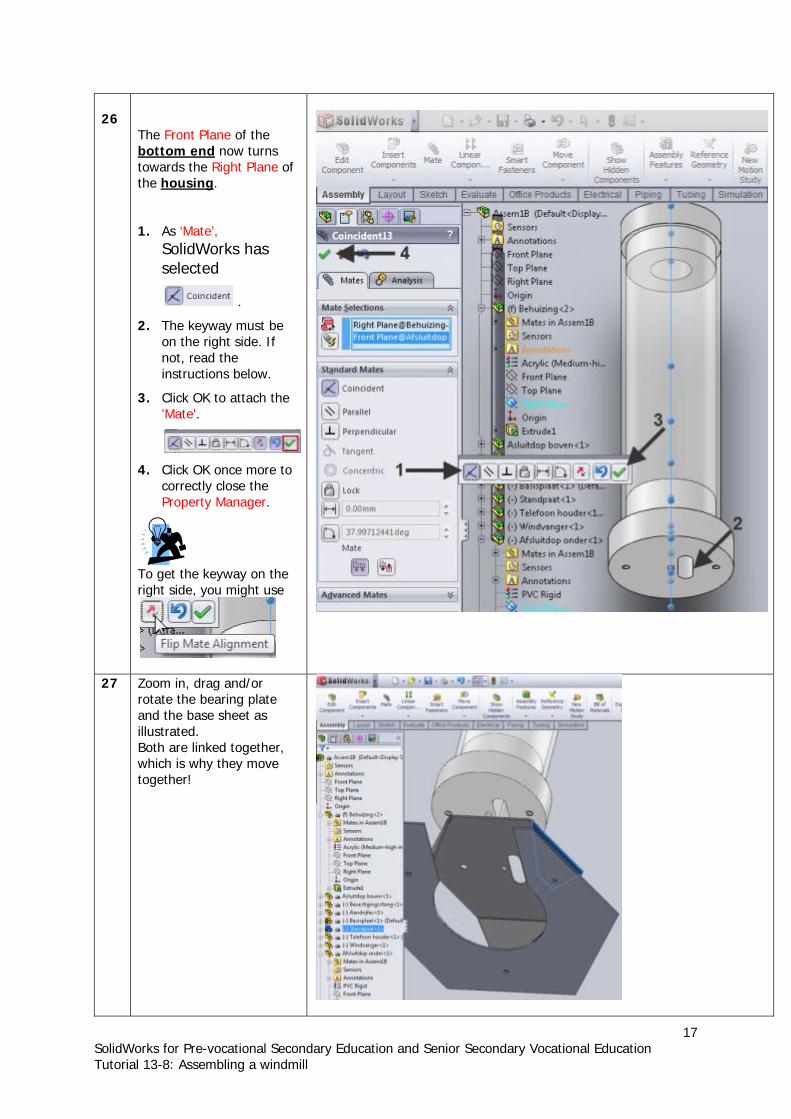
2. Zoom in on th
21 1. Click:
ehousing base and select the lower edgeof the hole.
3. For the base sheet
, edge
select the upperof the hole.
15 SolidWorks for Pre-vocational Secondary Education and Senior Secondary Vocational Education Tutorial 13-8: Assembling a windmill
22 nce you have clicked the pper edge of the hole, arts start moving toward
each other.
ces are displayed in the blue
.
3. Click OK:
Oup
1. The selected pie
area of the Property Manager.
2. As ‘Mate’, SolidWorks has selected
23 e
1. First, select the loweredge of the hole of thhousing base. Tselect the upper edge
hen
f the hole in de base osheet.
2. is the appropriate , so we'll leave it like that.
. Click OK:
Coincident mate
3
4. Click OK once more to
exit the function.

16 SolidWorks for Pre-vocational Secondary Education and Senior Secondary Vocational Education Tutorial 13-8: Assembling a windmill
24
rag the piece: Cap DInternal toward the ousing. ee the example opposite.
hS
25
Mate! the housing and
cap internal the as in s 8 thro h 13.
1.
2. Within the piece:
now select the
3. Within the piece:
then select the
, click the plus
ign to open the list of oth pieces.
step ug
Click:
If necessarysb
17 SolidWorks for Pre-vocational Secondary Education and Senior Secondary Vocational Education Tutorial 13-8: Assembling a windmill
26
The Front Plane of the bottom end
now turns towards the Right Plane of the housing.
1. As ‘Mate’, SolidWorks has selected
.
2. The keyway must be on the right side. If not, read the instructions below.
3. Click OK to attach the 'Mate'.
ight use
4. Click OK once more to correctly close the Property Manager.
To get the keyway on theright side, you m
27 /or rotate the bearing plate and the base sh illustrated.
, which is why they move
her!
Zoom in, drag and
eet as
Both are linked together
toget
18 SolidWorks for Pre-vocational Secondary Education and Senior Secondary Vocational Education Tutorial 13-8: Assembling a windmill
1. 2.
the housing base.
bottom .
g OK.
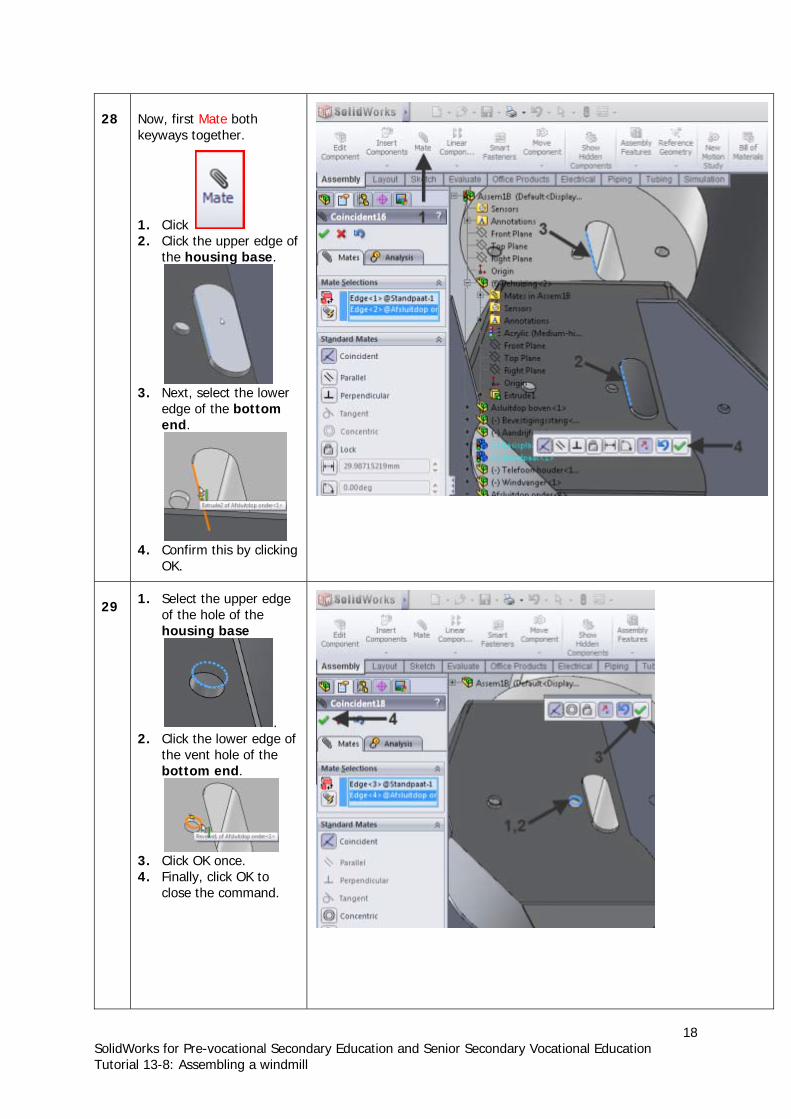
28
Now, first Mate both keyways together.
Click Click the upper edge of
3. Next, select the lower
edge of the end
4. Confirm this by clickin
29 1. Select the upper edge
of the hole of the housing base
. e of e
end.
3. 4. Finally, click OK to
close the command.
2. Click the lower edgthe vent hole of thbottom
Click OK once.
19 SolidWorks for Pre-vocational Secondary Education and Senior Secondary Vocational Education Tutorial 13-8: Assembling a windmill
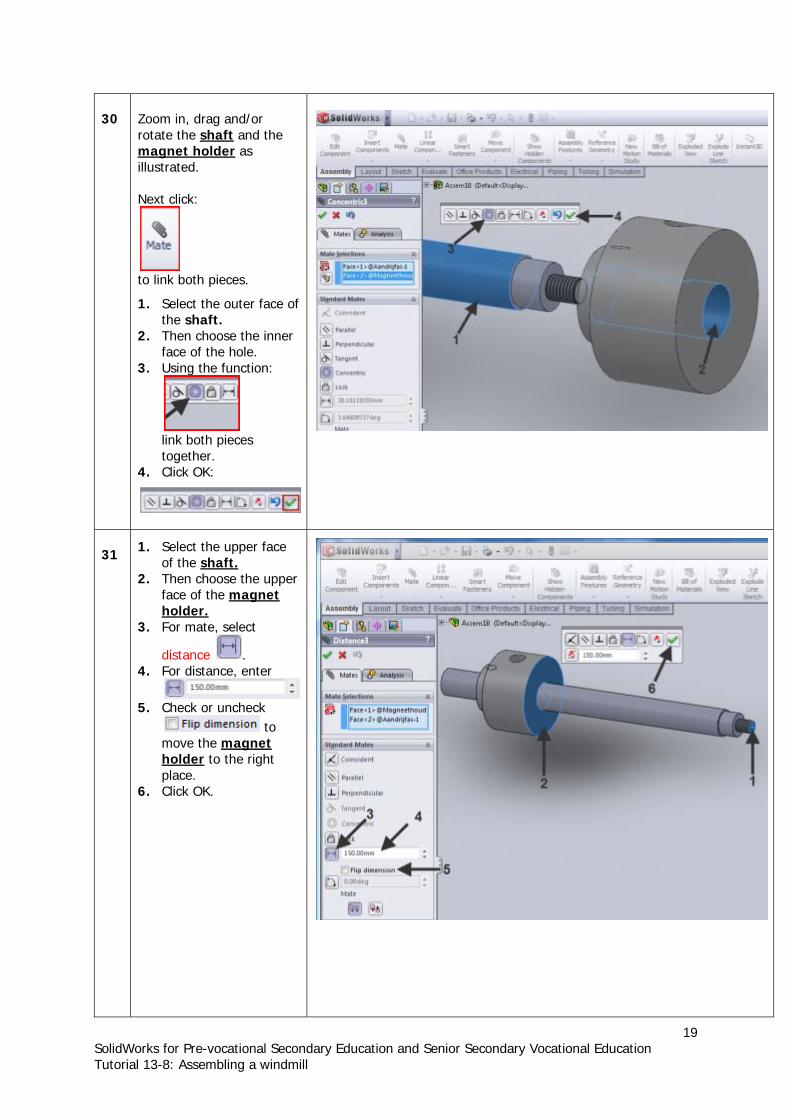
30
Zoom in, drag and/or
tate the shaftro and the magnet holder as illustrated. Next click:
eces.
hshaft.
2. hen choose the inner
Using th
es
together.
to link both pi
1. Select t e outer face of the Tface of the hole.
3. e function:
link both piec
4. Click OK:
31 1. Select the upper face
of the shaft. 2. Then choose the upper
face of the magnet holder.
enter
.
to
3. For mate, select
distance . 4. For distance,
5 Check or uncheck
move the magnet holder to the right place.
. Click OK.
6
20 SolidWorks for Pre-vocational Secondary Education and Senior Secondary Vocational Education Tutorial 13-8: Assembling a windmill
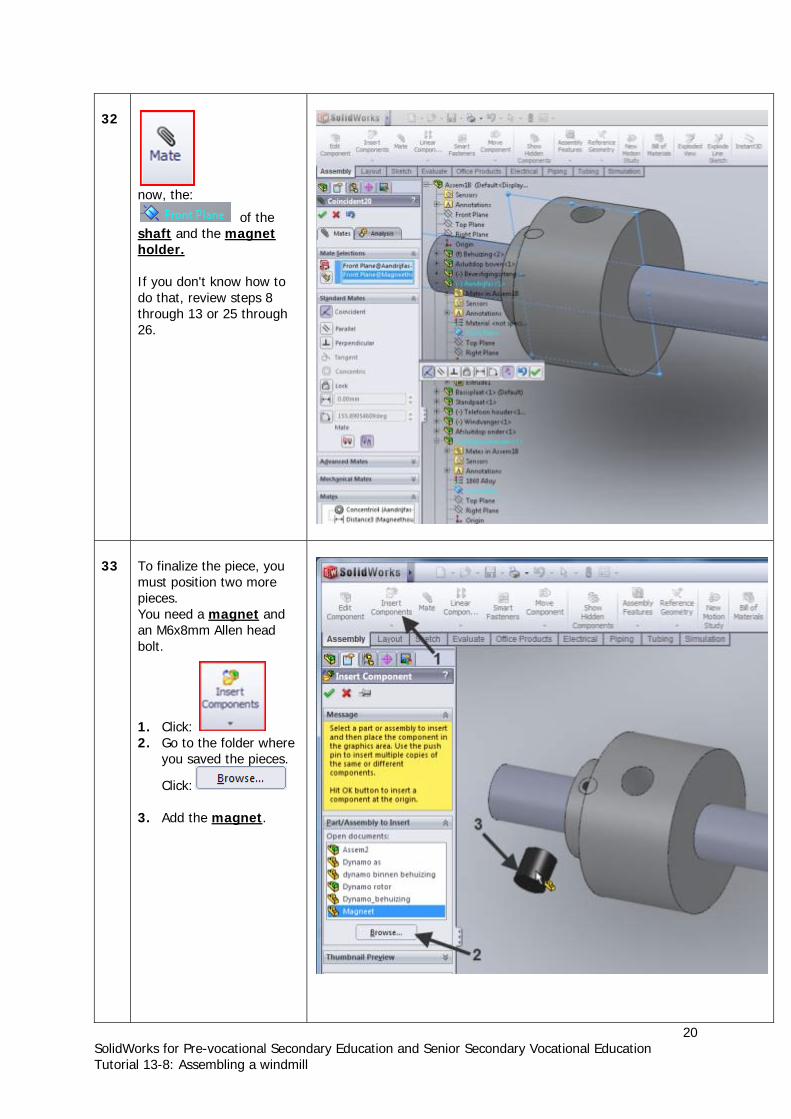
32
now, the:
of the shaft and the magnet holder. If you don't know how to
do that, review steps 8 through 13 or 25 through 26.
33
To finalize the piece, you must position two more pieces. You need a magnet and an M6x8mm Allen head
e ved the pieces.
Click:
3. Add the magnet
bolt.
1. Click: 2. Go to the folder wher
you sa
.
21 SolidWorks for Pre-vocational Secondary Education and Senior Secondary Vocational Education Tutorial 13-8: Assembling a windmill
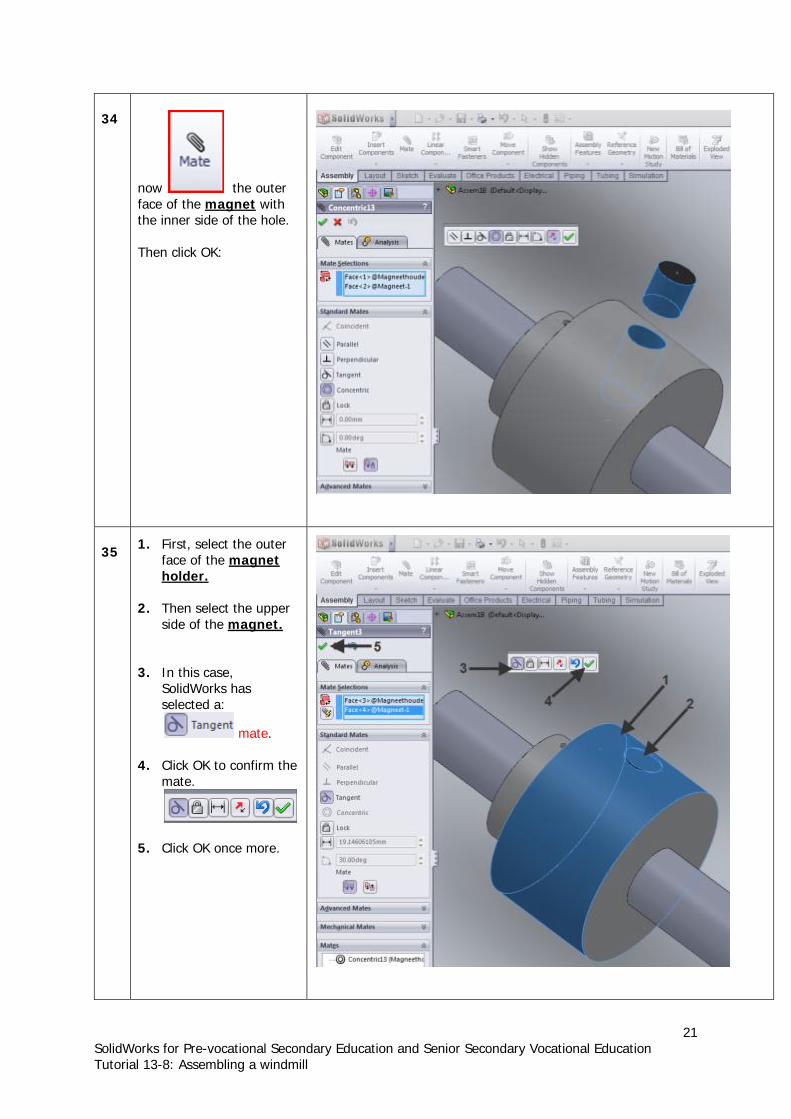
4
now the outer magnet
3
face of the with the inner side of the hole.
OK
Then click :
35 1. First, select the outer
face of the magnet holder.
select the upper side of the magnet.
2. Then
e, orks has
selected a:
mate.
4. Click OK to confirm the mate.
5. Click OK once more.
3. In this casSolidW
22 SolidWorks for Pre-vocational Secondary Education and Senior Secondary Vocational Education Tutorial 13-8: Assembling a windmill
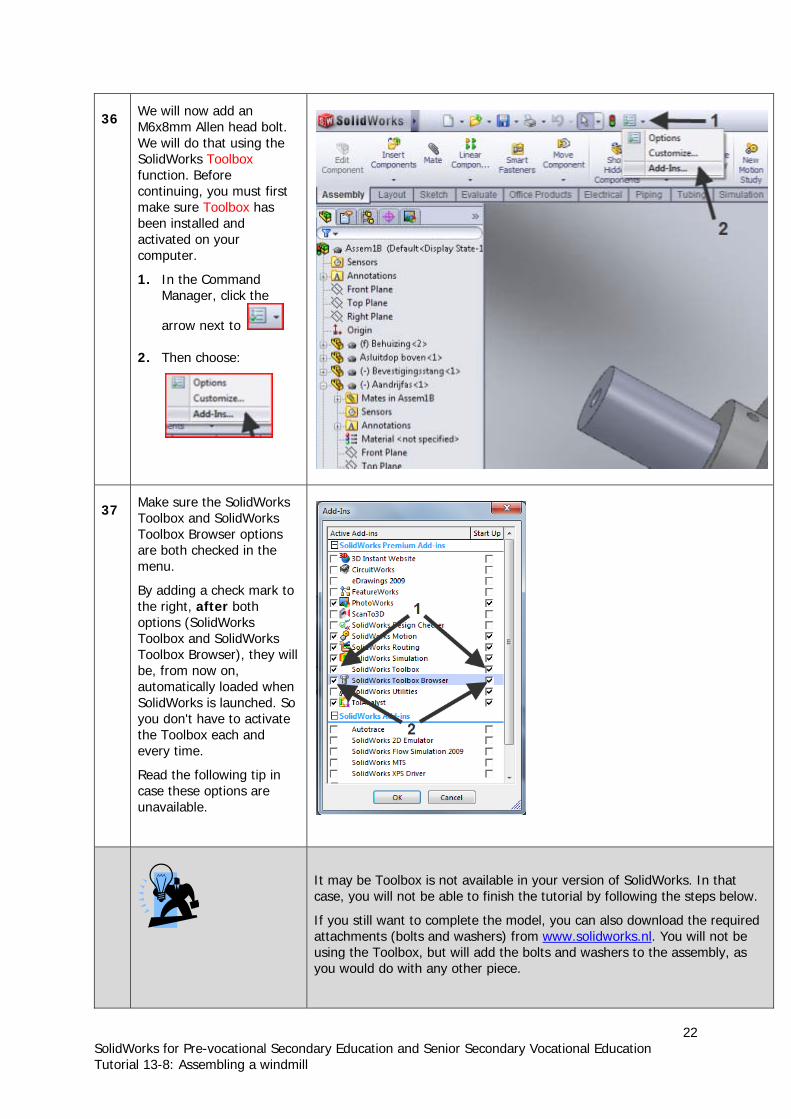
36 We will now add an
M6x8mm Allen head bolt. We will do that using the SolidWorks Toolbox function. Before continuing, you must first
ake sure Toolbox has
ommand Manager, click the
xt to
2. Then choose:
mbeen installed and activated on your computer.
1. In the C
arrow ne
Ma37 orks
are both checked in the menu.
orks orks
Toolbox Browser), they will be, from now on,
atically loaded when olidWorks is launched. So
you don't have to activate the Toolbox each and every time. Read the following tip in case these options are unavailable.
ke sure the SolidWToolbox and SolidWorks Toolbox Browser options
By adding a check mark to the right, after both options (SolidWToolbox and SolidW
automS
It may be Toolbox is not available in your version of SolidWorks. In that case, you will not be able to finish the tutorial by following the steps below.
If you still want to complete the model, you can also download the required attachments (bolts and washers) from www.solidworks.nl
. You will not be
using the Toolbox, but will add the bolts and washers to the assembly, as you would do with any other piece.
23 SolidWorks for Pre-vocational Secondary Education and Senior Secondary Vocational Education Tutorial 13-8: Assembling a windmill
on the
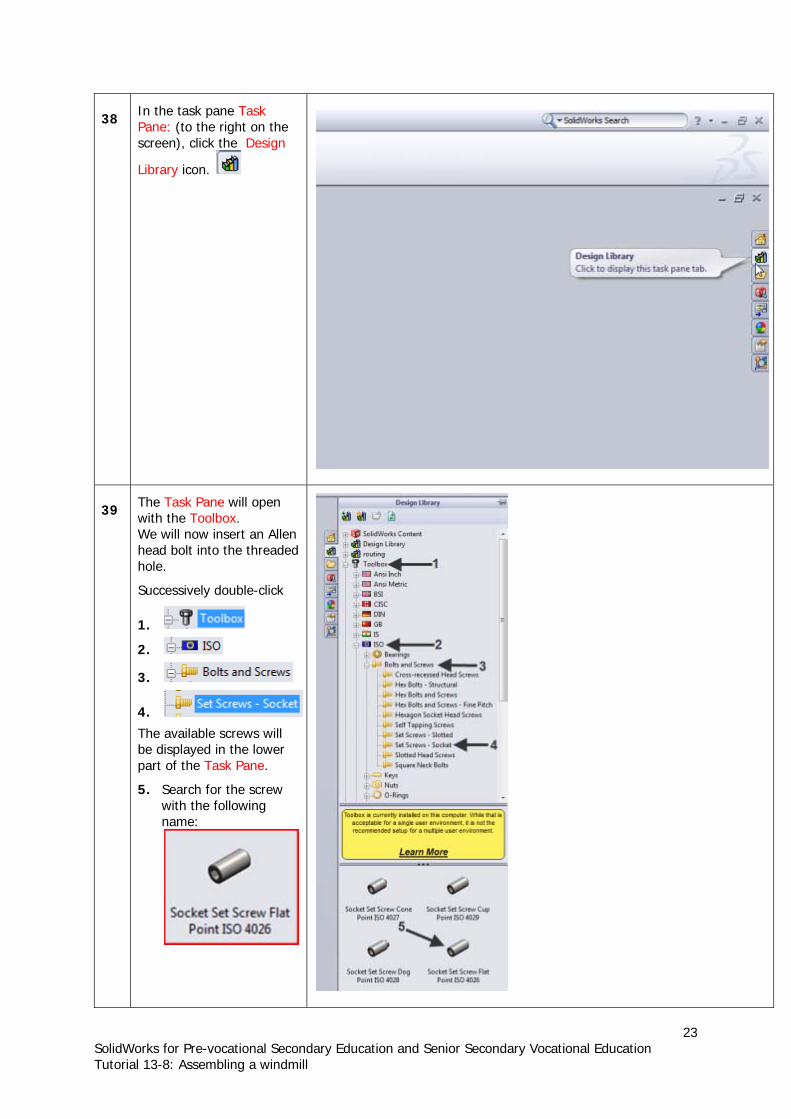
38 In the task pane Task
Pane: (to the right screen), click the Design
Library icon.
39 The Task Pane will open
with the Toolbox. We will now insert an Allen head bolt into the threaded hole.
Successively double-click
1.
.
3.
4.
The avail
k
the following
name:
2
able screws will be displayed in the lower part of the Tas Pane.
5. Search for the screwwith
24 SolidWorks for Pre-vocational Secondary Education and Senior Secondary Vocational Education Tutorial 13-8: Assembling a windmill
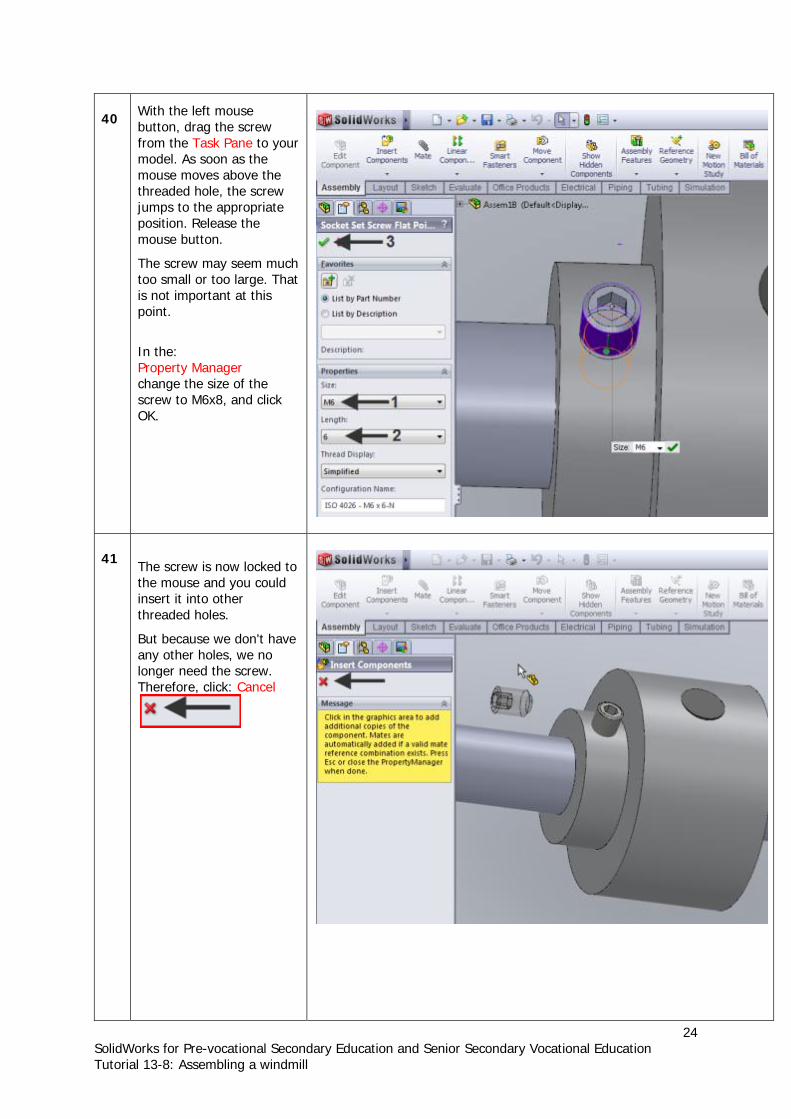
40 With the left mouse
button, drag the screw from the Task Pane to your model. As soon as the mouse moves above the threaded hole, the screw jumps to the appropriate position. Release the mouse button.
The screw may seem much too small or too large. That is not important at this point.
In the: Property Manager change the size of the screw to M6x8, and click OK.
1
he screw is now locked to
holes.
need the screw. Therefore, click: Cancel
4 Tthe mouse and you could insert it into other threaded
But because we don't haveany other holes, we no longer
25 SolidWorks for Pre-vocational Secondary Education and Senior Secondary Vocational Education Tutorial 13-8: Assembling a windmill
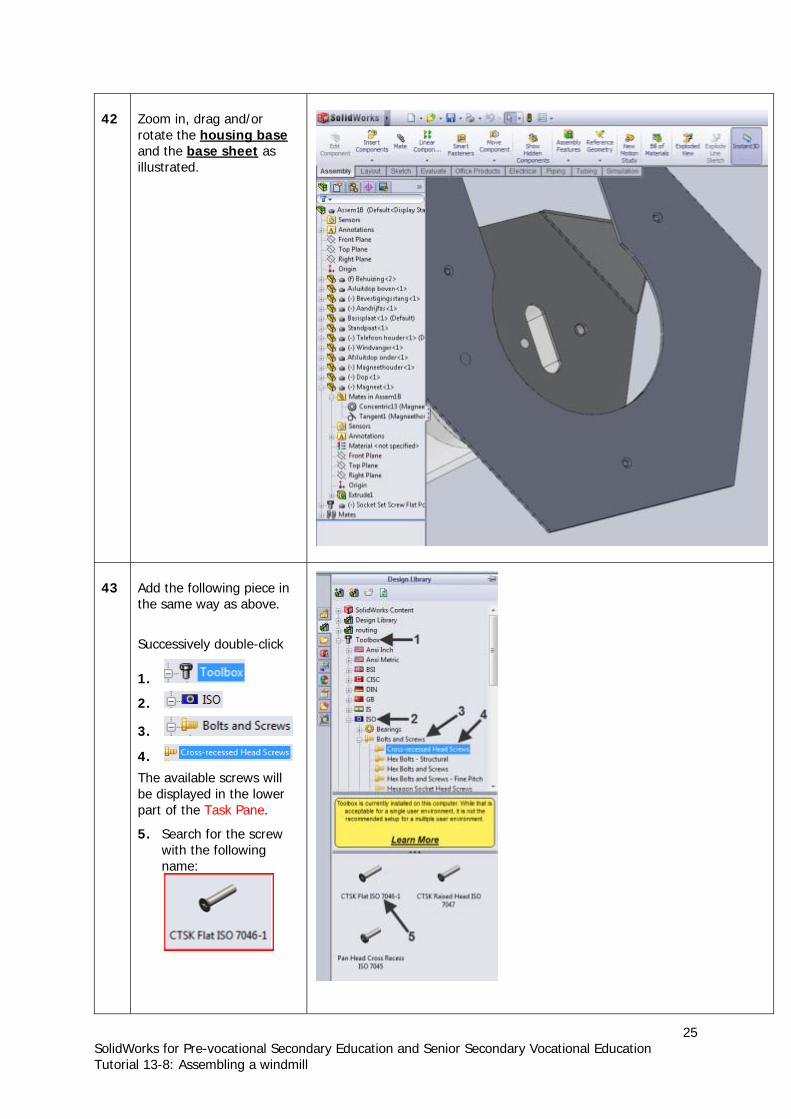
42
Zoom in, drag and/or rotate the housing base nd the base sheeta as lustrated.
il
43
Add the following piece in the same way as above.
Successively double-click
1.
2.
3.
4.
The available screws will be displayed in the lower part of the Task Pane.
5. Search for the screw with the following name:
26 SolidWorks for Pre-vocational Secondary Education and Senior Secondary Vocational Education Tutorial 13-8: Assembling a windmill
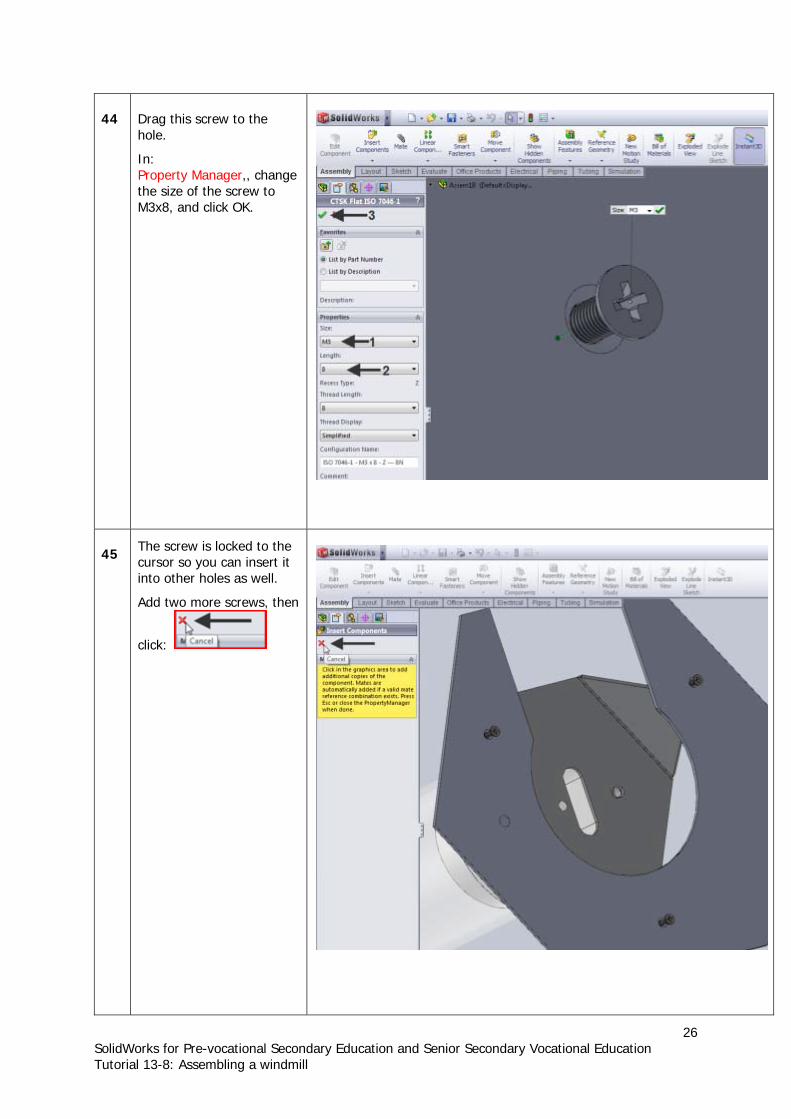
In: Property Manager,, change
44
Drag this screw to the hole.
the size of the screw to M3x8, and click OK.
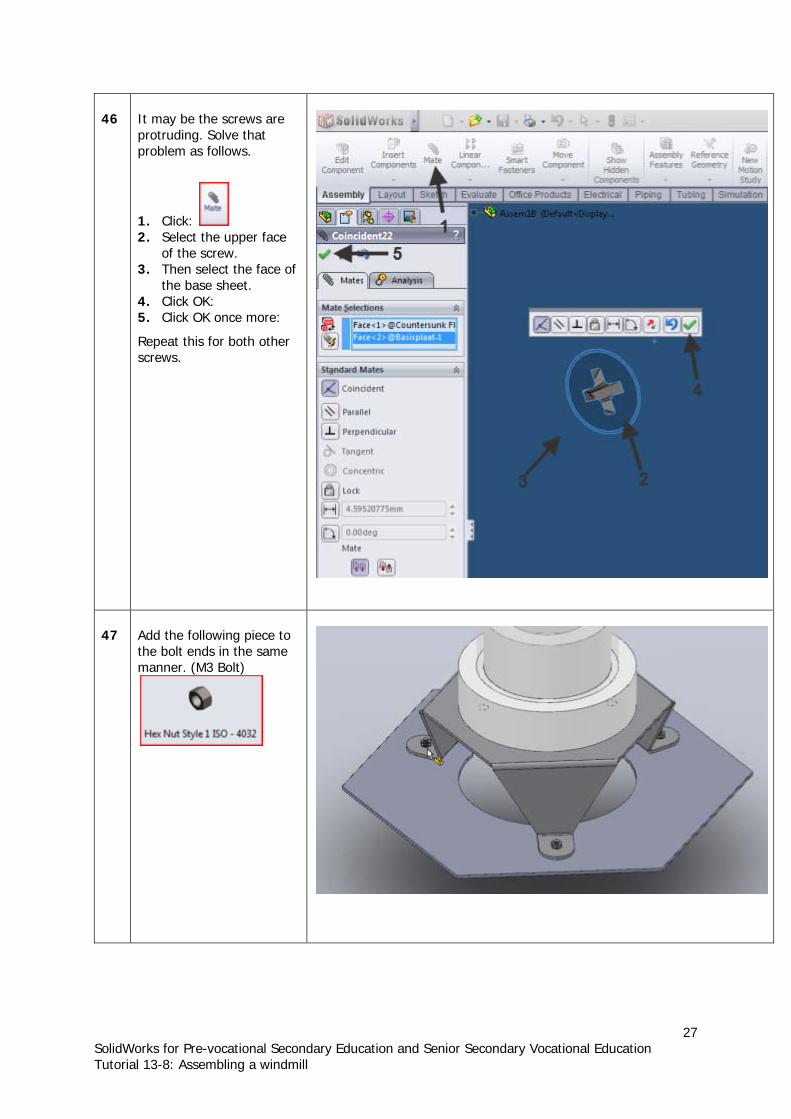
45 The screw is locked to the
cursor so you can insert it into other holes as well.
, then
Add two more screws
click:
27 SolidWorks for Pre-vocational Secondary Education and Senior Secondary Vocational Education Tutorial 13-8: Assembling a windmill
6
er
4
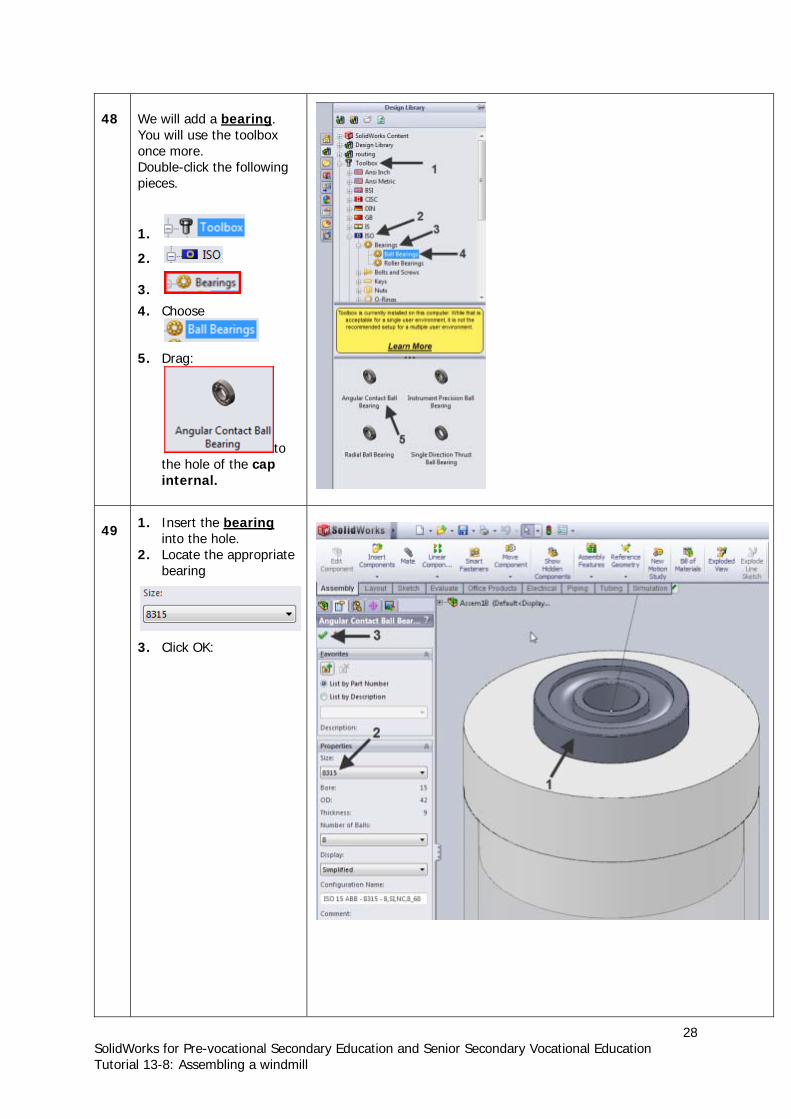
It may be the screws are protruding. Solve that problem as follows.
1. Click: 2. Select the upper face
of the screw. 3. Then select the face of
the base sheet. 4. Click OK: 5. Click OK once more:
Repeat this for both othscrews.
47 dd the following piece to
the bolt ends in the same manner. (M3 Bolt)
A
28 SolidWorks for Pre-vocational Secondary Education and Senior Secondary Vocational Education Tutorial 13-8: Assembling a windmill
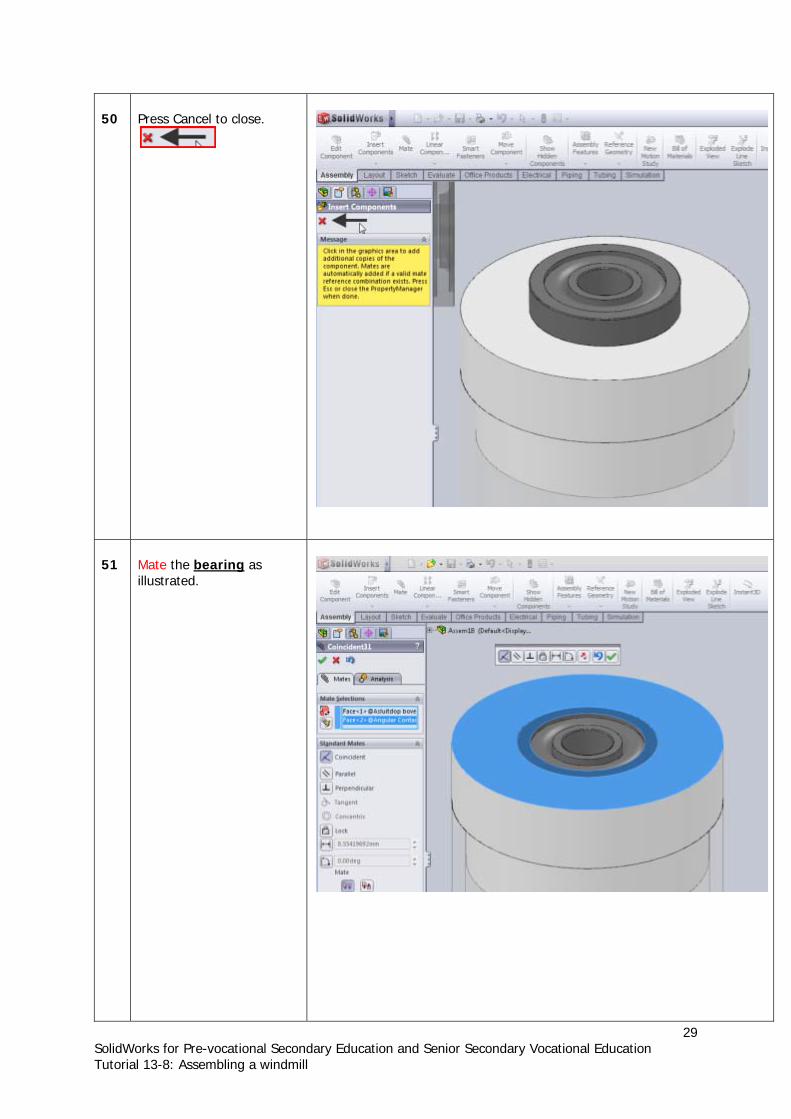
48
We will add a bearing. You will use the toolbox once more. Double-click the following pieces.
1.
2.
3.
4. Choose
5. Drag:
to
internal.
the hole of the cap
49 1. Insert the bearing
into the hole. 2. Locate the appropriate
bearing
Click OK:
3.
29 SolidWorks for Pre-vocational Secondary Education and Senior Secondary Vocational Education Tutorial 13-8: Assembling a windmill
50
Press Cancel to close.
51
Mate the bearing as illustrated.
30 SolidWorks for Pre-vocational Secondary Education and Senior Secondary Vocational Education Tutorial 13-8: Assembling a windmill
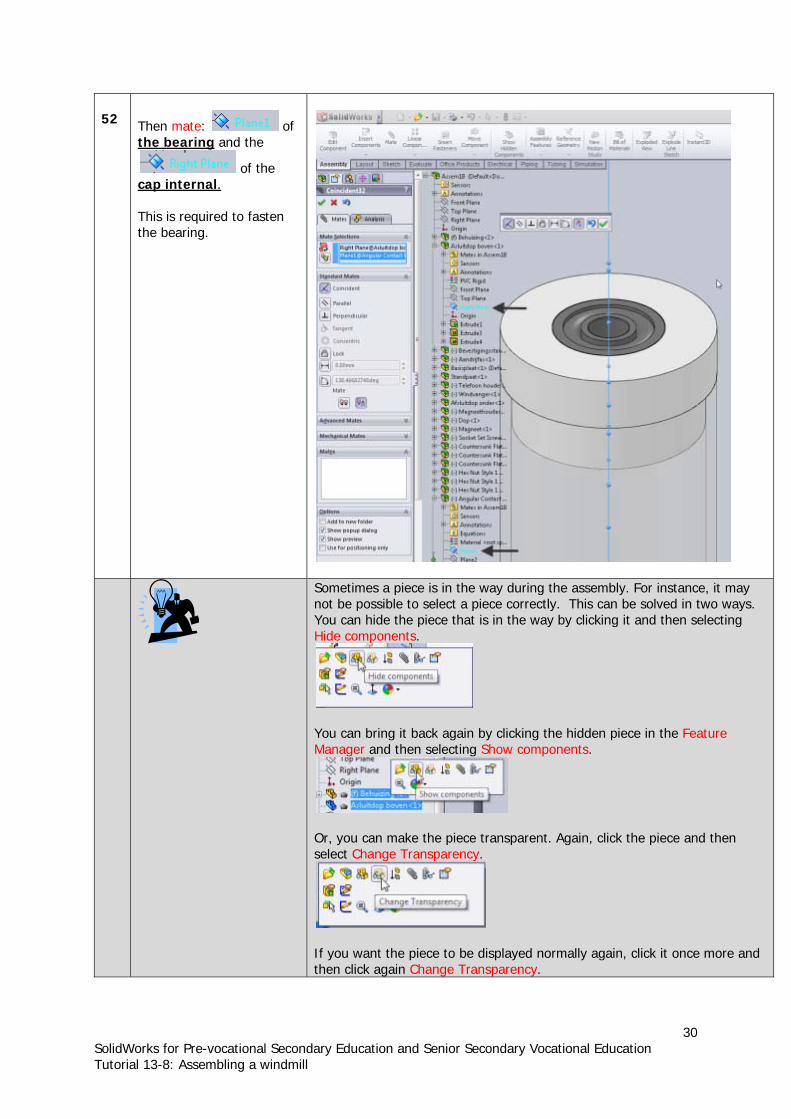
52
Then matethe bearing
: of and the
of the cap internal. This is required to fasten the bearing.
Sometimes a piece is in the way during the assembly. For instance, it may not be possible to select a piece correctly. This can be solved in two ways. You can hide the piece that is in the way by clicking it and then selecting Hide components.
You can bring it back again by clicking the hidden piece in the Feature Manager and then selecting Show components.
Or, you can make the piece transparent. Again, click the piece and then select Change Transparency.
If you want the piece to be displayed normally again, click it once more and then click again Change Transparency.
31 SolidWorks for Pre-vocational Secondary Education and Senior Secondary Vocational Education Tutorial 13-8: Assembling a windmill
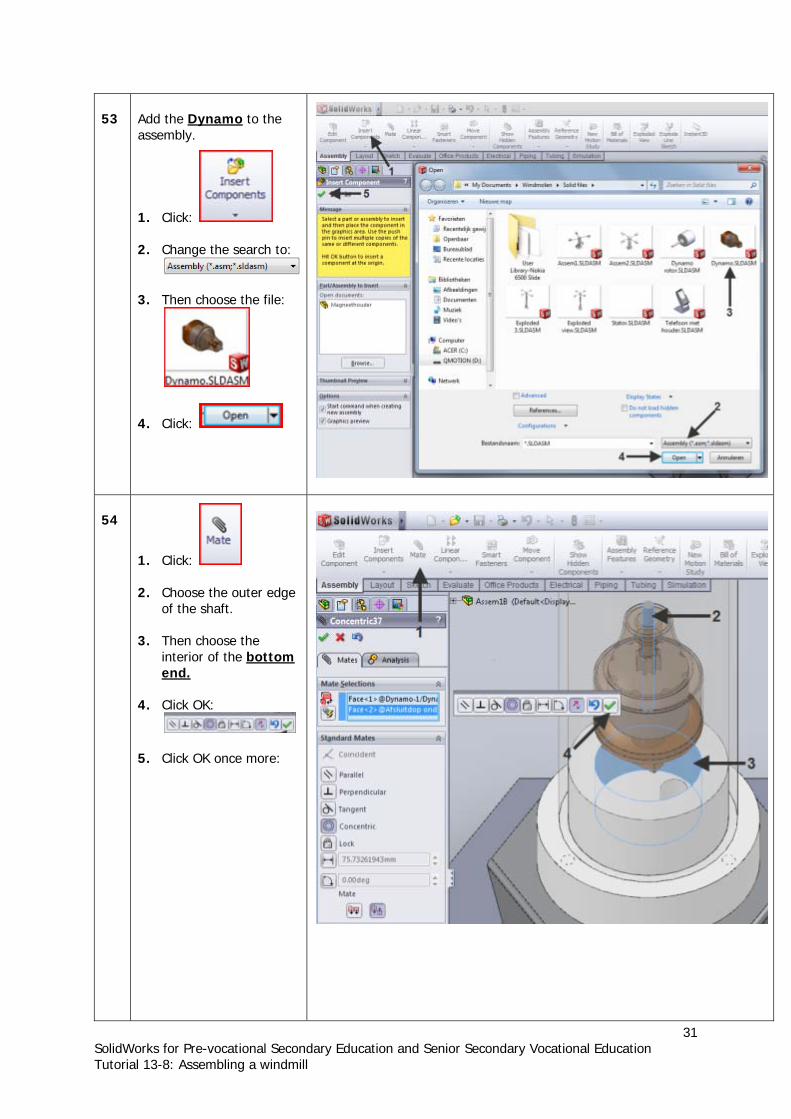
3 dd the Dynamo 5
A to the
1. Change the search to:
Then choose
assembly.
Click:
2.
3. the file:
4. Click:
54
1.
. Choose the outer edge
se the
Click:
2of the shaft.
3. Then choointerior of the bottom end.
4. Click OK:
Click OK once more:
5.
32 SolidWorks for Pre-vocational Secondary Education and Senior Secondary Vocational Education Tutorial 13-8: Assembling a windmill
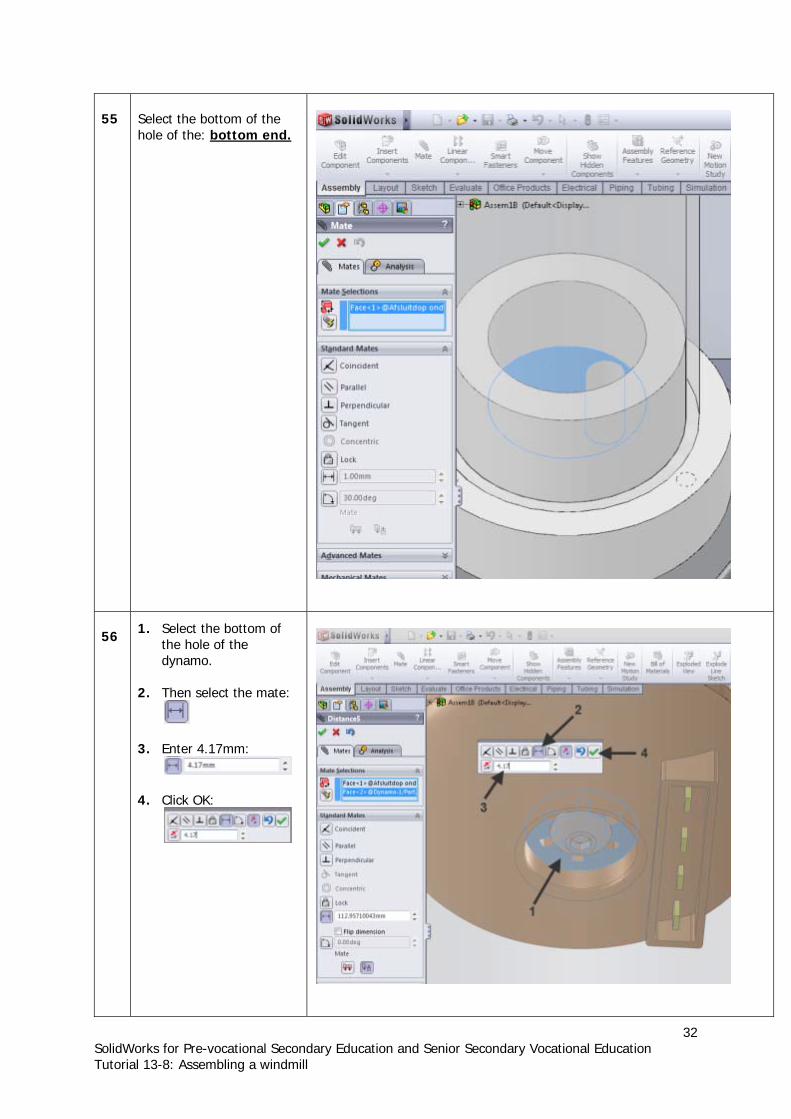
55
Select the bottom of the hole of the: bottom end.
56 1. Select the bottom of
the hole of the dynamo.
. Then select the mate:
4. Click OK:
2
3. Enter 4.17mm:
33 SolidWorks for Pre-vocational Secondary Education and Senior Secondary Vocational Education Tutorial 13-8: Assembling a windmill
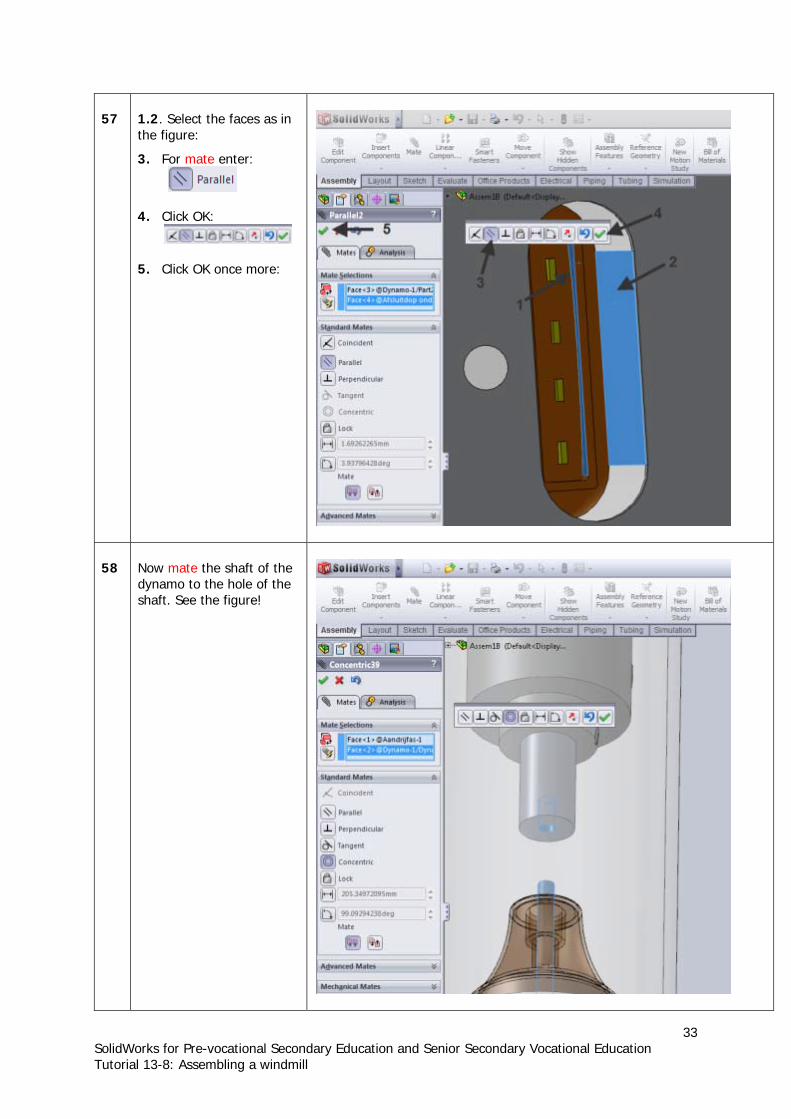
57 1.2. Select the faces as in
the figure:
3. For mate enter:
4. Click OK:
5. Click OK once more:
58
Now mate the shaft of the dynamo to the hole of the shaft. See the figure!
34 SolidWorks for Pre-vocational Secondary Education and Senior Secondary Vocational Education Tutorial 13-8: Assembling a windmill
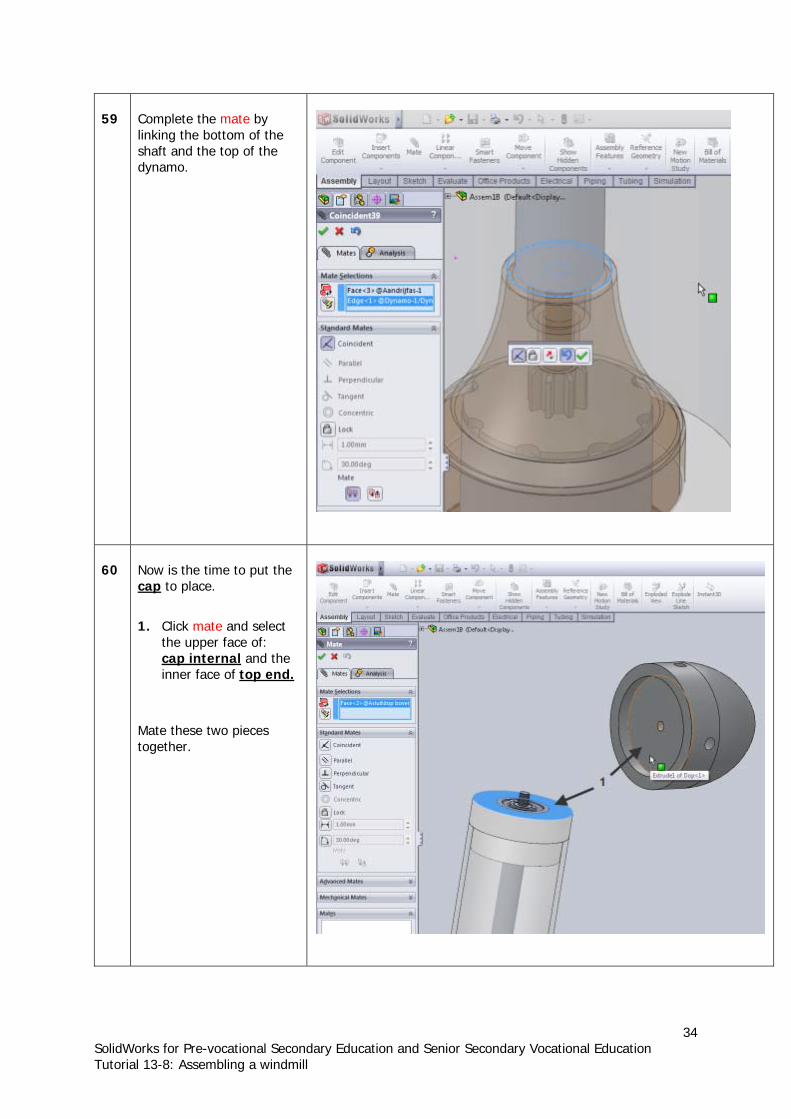
9 omplete the mate by
5
Clinking the bottom of theshaft and the top of the dynamo.
60
Now is the time to put the cap to place.
1. Click mate and select the upper face of: cap internal and the
of top end.inner face
ate these two pieces together.
M
35 SolidWorks for Pre-vocational Secondary Education and Senior Secondary Vocational Education Tutorial 13-8: Assembling a windmill
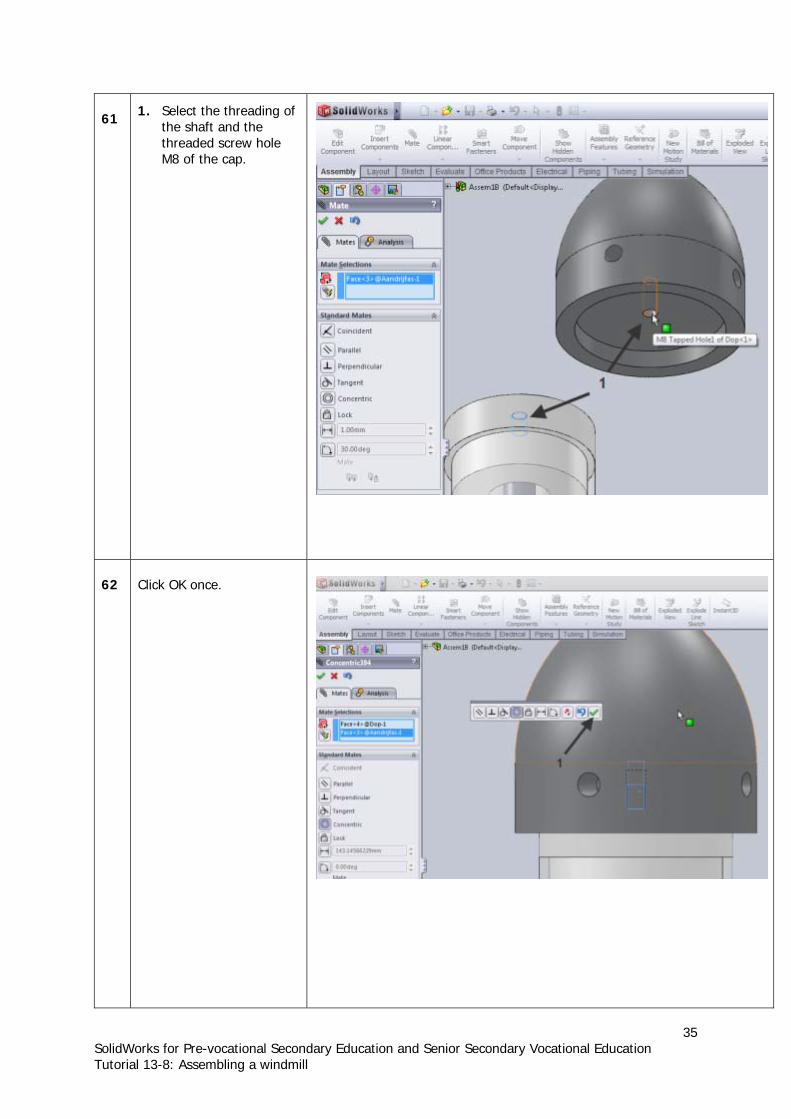
61 1. Select the threading of
the shaft and the threaded screw hole M8 of the cap.
62
Click OK once.
36 SolidWorks for Pre-vocational Secondary Education and Senior Secondary Vocational Education Tutorial 13-8: Assembling a windmill
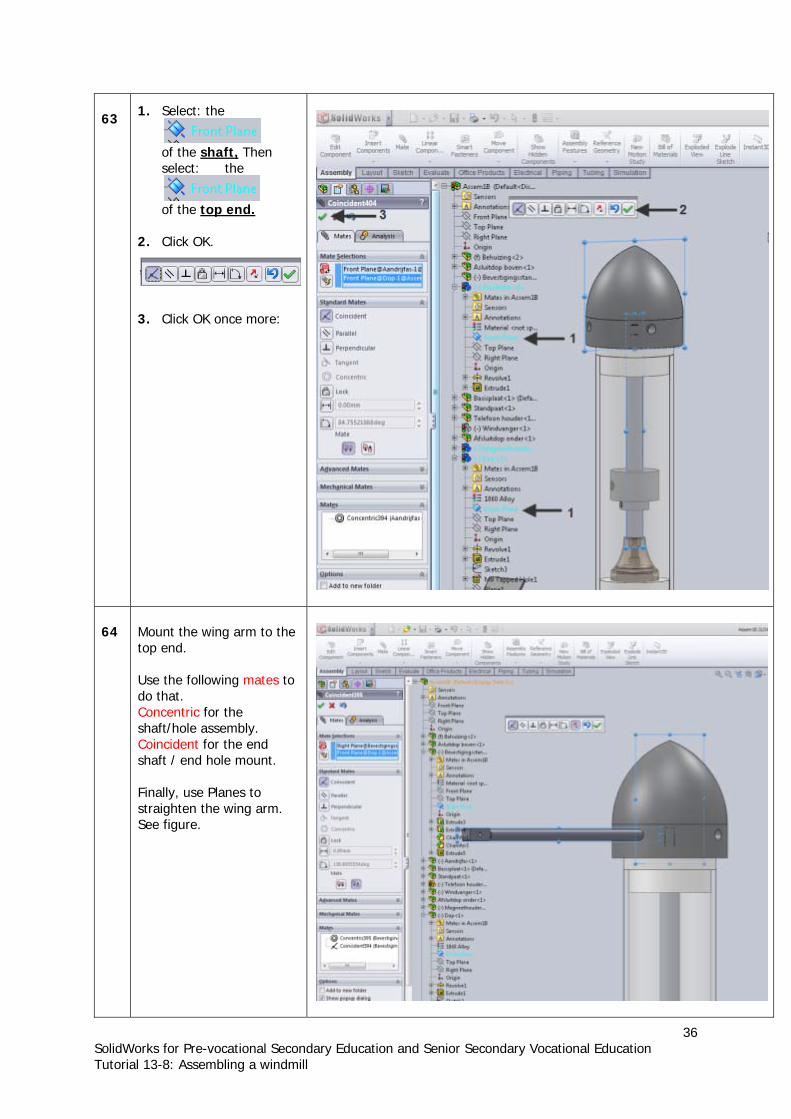
63 1. Select: the
of the shaft, Then select: the
of the top end.
2. Click OK.
3. Click OK once more:
64
Mount the wing arm to the
p end.
ing mate
Concentric for thmhe end
haft / end hole mount.
See figure.
to
Use the follow s to do that.
e shaft/hole asse bly. Coincident for ts Finally, use Planes to straighten the wing arm.
37 SolidWorks for Pre-vocational Secondary Education and Senior Secondary Vocational Education Tutorial 13-8: Assembling a windmill
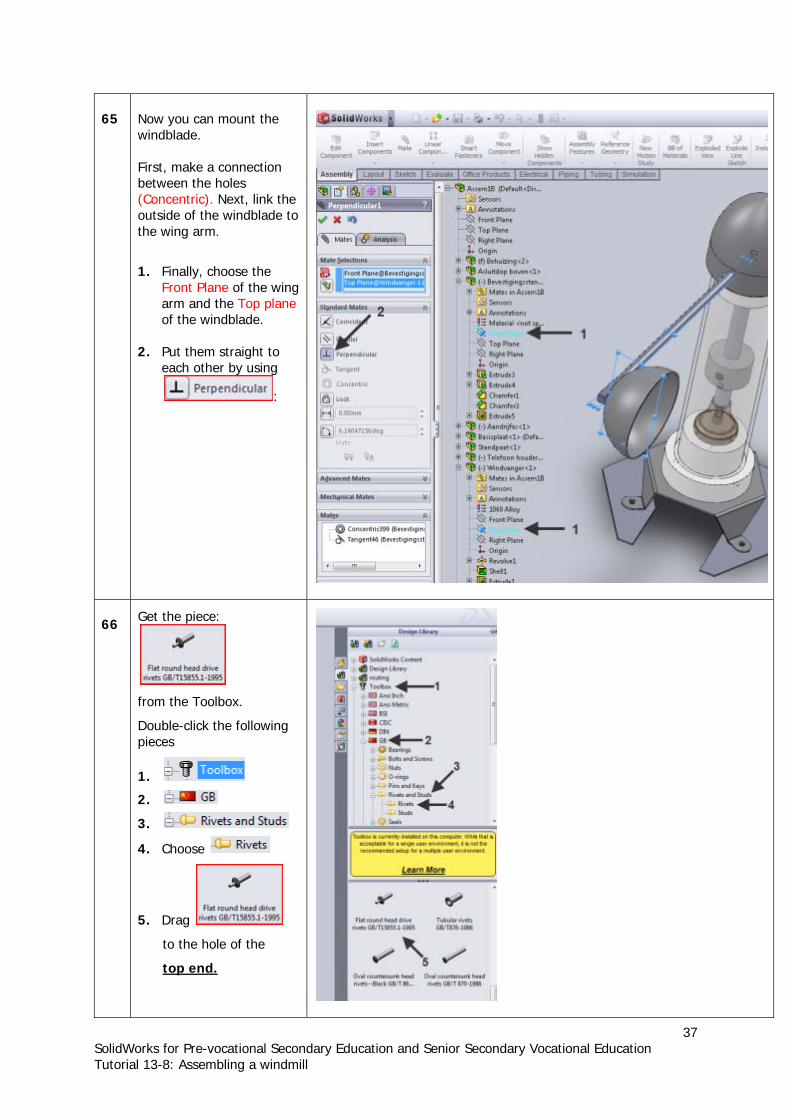
65
Now you can mount the windblade. First, make a connection between the holes (Concentric). Next, link the outside of the windblade to the wing arm.
1. Finally, choose the Front Plane of the wing arm and the Top plane of the windblade.
2. Put them straight to each other by using
:
66 Get the piece:
from the Toolbox.
Double-click the following pieces
1.
2.
3.
4. Choose
5. Drag
to the hole of the
top end.

38 SolidWorks for Pre-vocational Secondary Education and Senior Secondary Vocational Education Tutorial 13-8: Assembling a windmill
67 Choose the following:
1. Rivet size:
ngth:
3. Click OK. In the next , click
2. Rivet le
screen Cancel.
68 Mate the rivet and the
wing arm.
39 SolidWorks for Pre-vocational Secondary Education and Senior Secondary Vocational Education Tutorial 13-8: Assembling a windmill
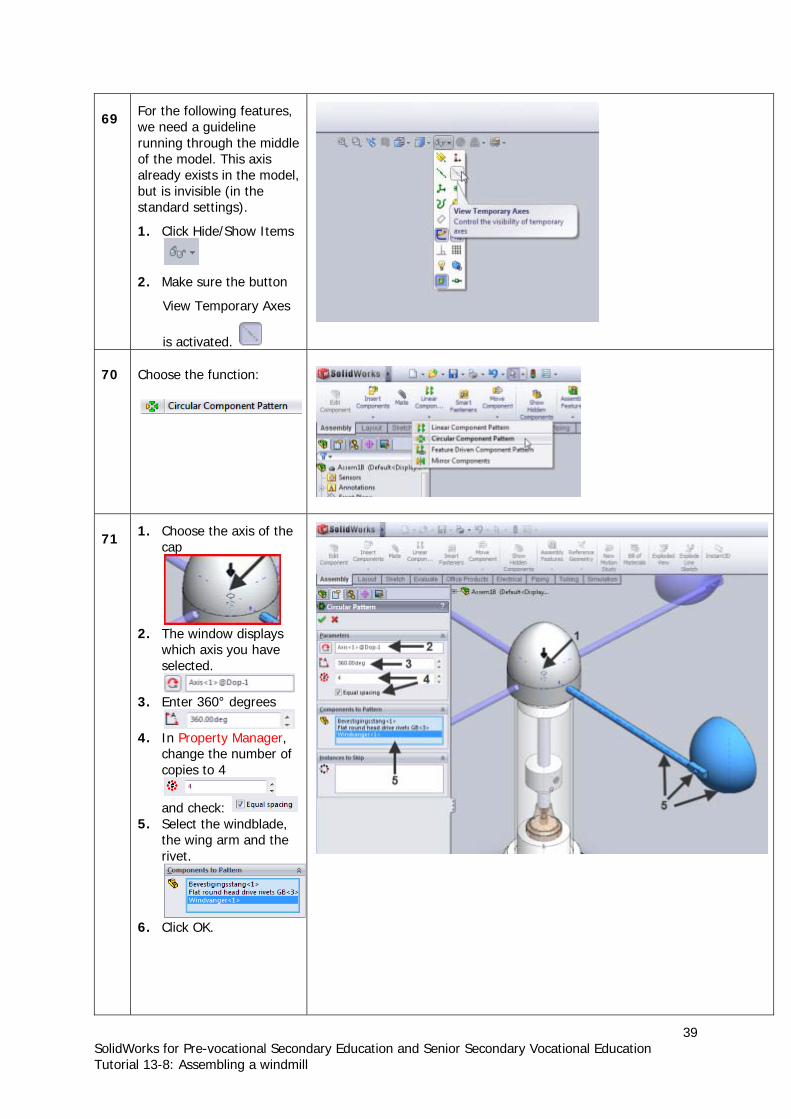
69 For the following features,
we need a guideline running through the middle of the model. This axis already exists in the model, but is invisible (in the standard settings).
1. Click Hide/Show Items
2. Make sure the button
View Temporary Axes
is activated.
70
Choose the function:
71 1. Choose the axis of the
cap
2.
which axis you have selected.
. change the number of copies to 4
5. the wing arm and the rivet.
6.
The window displays
3. Enter 360° degrees
4 In Property Manager,
and check: Select the windblade,
Click OK.
40 SolidWorks for Pre-vocational Secondary Education and Senior Secondary Vocational Education Tutorial 13-8: Assembling a windmill
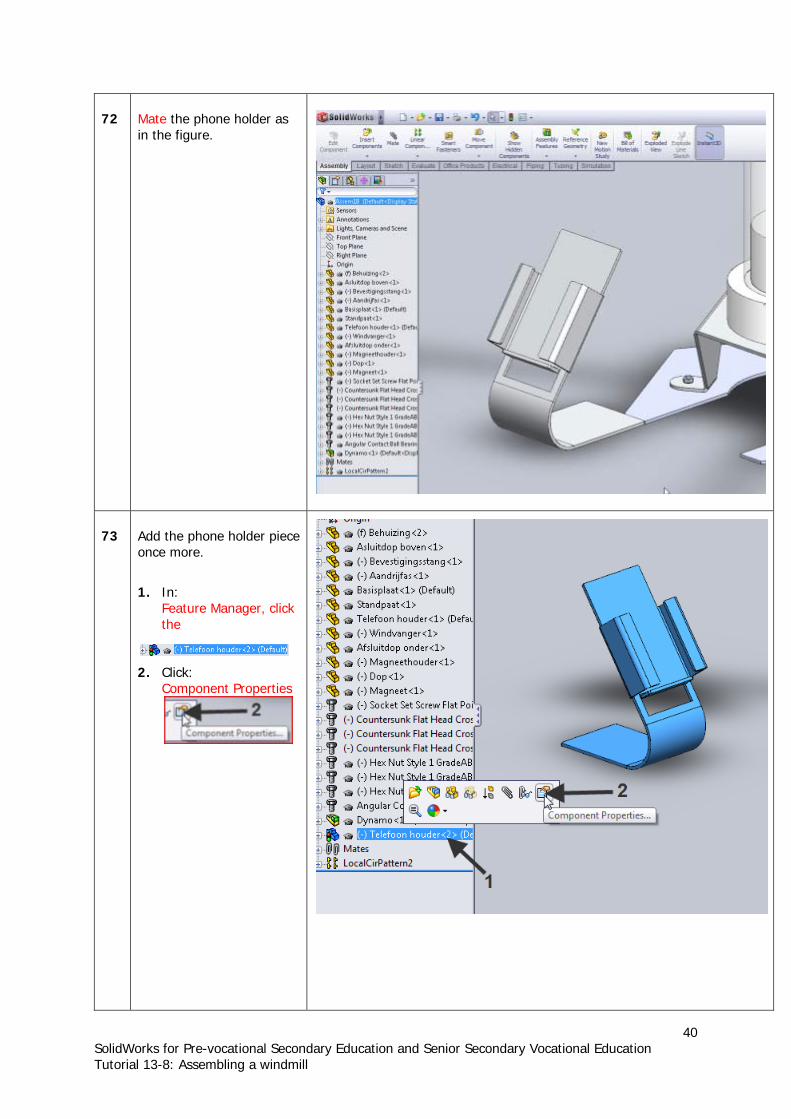
72
Mate the phone holder as in the figure.
73
Add the phone holder piece once more.
1. In: Feature Manager, click the
omponent Properties
2. Click: C
41 SolidWorks for Pre-vocational Secondary Education and Senior Secondary Vocational Education Tutorial 13-8: Assembling a windmill
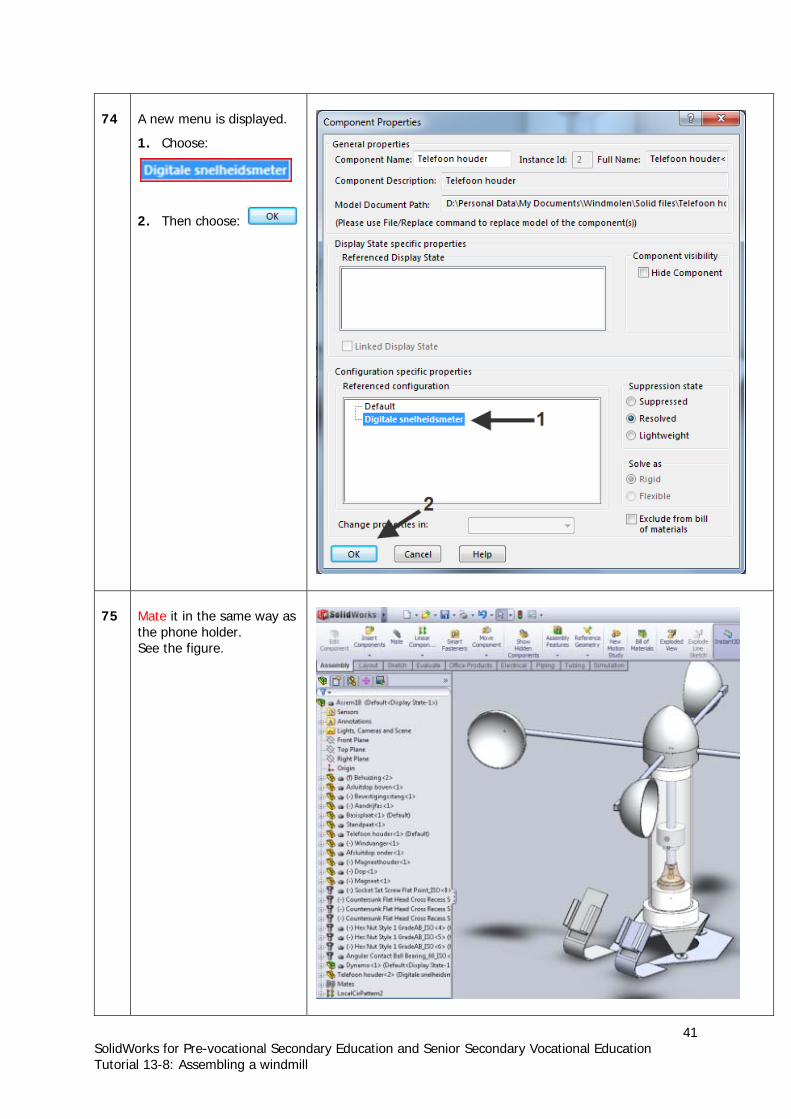
74
A new menu is displayed.
1. Choose:
2. Then choose:
75
Mate it in the same way as
e phone holder. ee the figure.
thS
42 SolidWorks for Pre-vocational Secondary Education and Senior Secondary Vocational Education Tutorial 13-8: Assembling a windmill
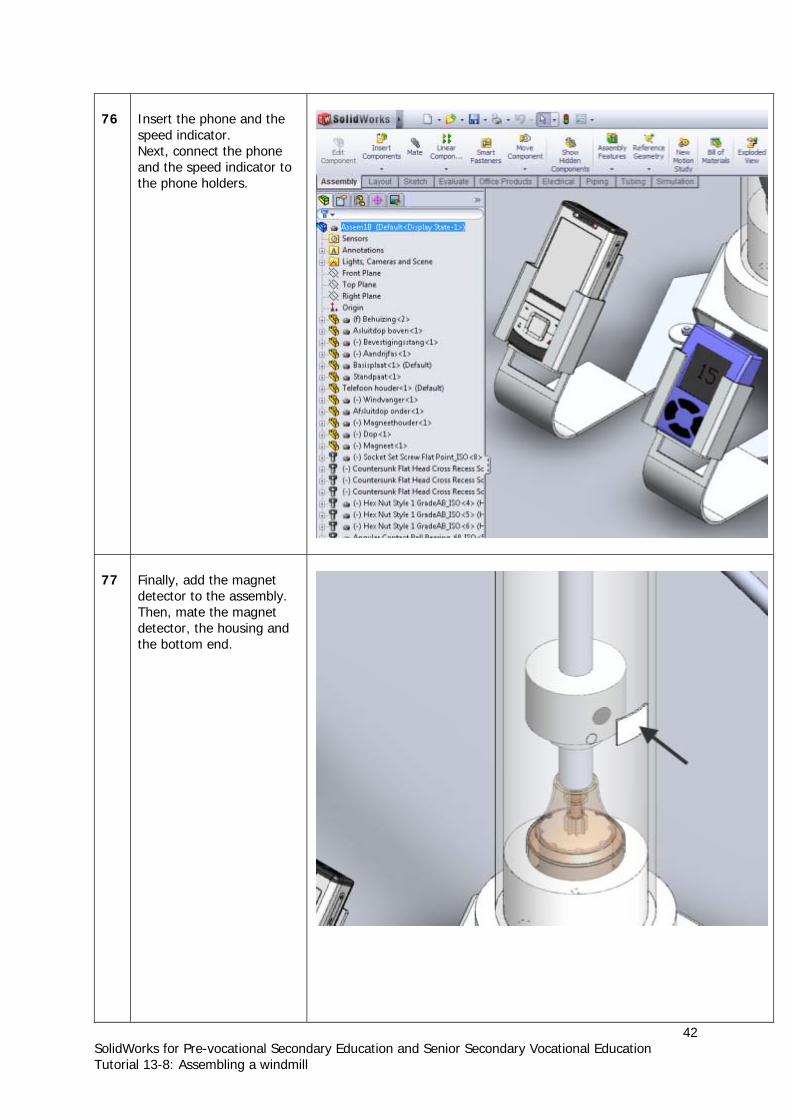
76
Insert the phone and the speed indicator. Next, connect the phone and the speed indicator to the phone holders.
7 inally, add the magnet
y.
7 Fdetector to the assemblThen, mate the magnet detector, the housing andthe bottom end.
43 SolidWorks for Pre-vocational Secondary Education and Senior Secondary Vocational Education Tutorial 13-8: Assembling a windmill
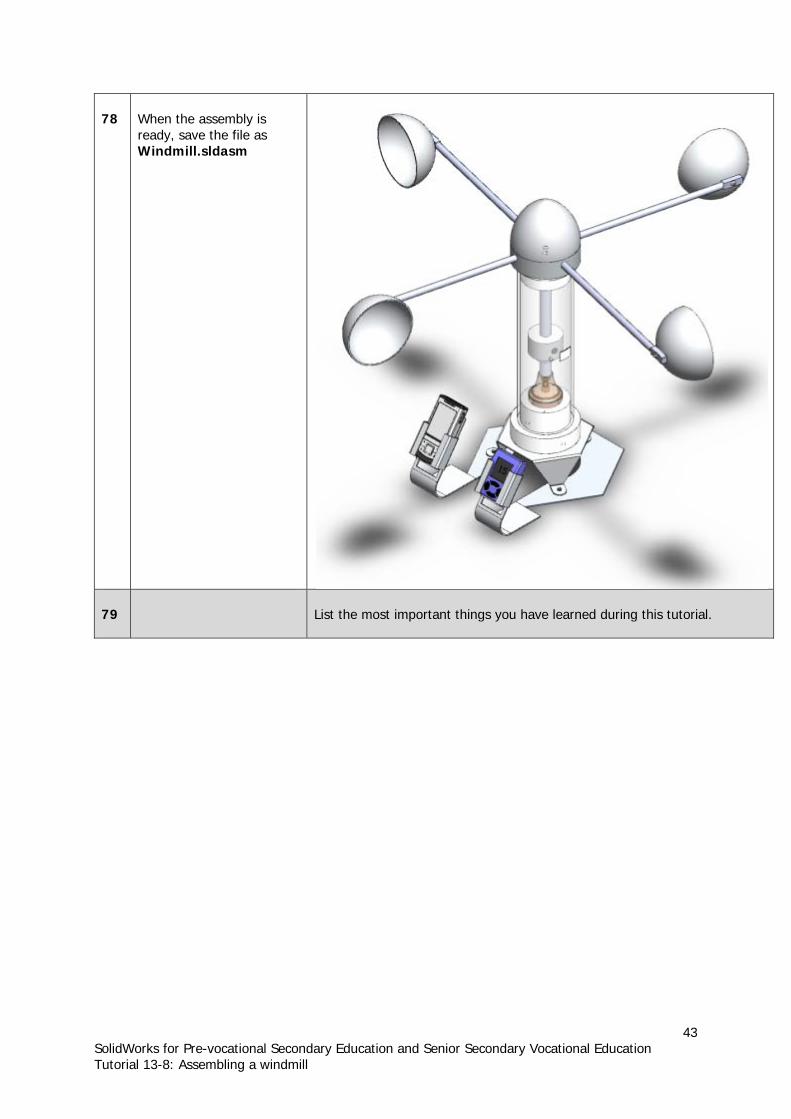
78
When the assembly is ready, save the file as
indmill.sldasm W
79
List the most important things you have learned during this tutorial.