![IEEE 802.16: WiMAX Overview, WiMAX · PDF filevs. 3G. The common Misconceptions about WiMAX & 3G CDMA are [5]: 1) Cost . c. ... IEEE 802.16: WiMAX Overview, WiMAX Architecture . Mojtaba](https://static.fdocuments.in/doc/165x107/5a752f217f8b9ad22a8c6f07/ieee-80216-wimax-overview-wimax-architecture-vs-3g-the-common-misconceptions.jpg)
WiMAX - FreeHostiapoptopcamper.freehostia.com/TVWS Base Station Manual.pdf · maintenance of this...
73
, our product manager WiMAX RNU4000BS Base Station User Manual Doc: RUNCOM RNU4000BS USER MANUAL –RN–PMG-190515 V-3.91
Transcript of WiMAX - FreeHostiapoptopcamper.freehostia.com/TVWS Base Station Manual.pdf · maintenance of this...

, our product manager
WiMAX RNU4000BS Base Station User Manual
Doc: RUNCOM RNU4000BS USER MANUAL –RN–PMG-190515 V-3.91

Preface Material RNU4000BS User Manual
II Runcom Technologies Ltd.
About this Guide
This User Manual describes the procedures for commissioning, mounting, installing and managing the RNU4000BS Base Station.
Notice
This document contains proprietary and confidential material of Runcom Ltd. Any unauthorized
reproduction, use or disclosure of this material, or any part thereof, is strictly prohibited. This document
is solely for the use of Runcom Ltd. employees and authorized Runcom Ltd. customers. The material furnished in this document is believed to be accurate and reliable. However, no
responsibility is assumed by Runcom Ltd. for the use of this material. Runcom Ltd. reserves the right to make changes to the material at any time and without notice.
All other trademarks are the property of their respective owners. Other company and brand products and
service names are trademarks or registered trademarks of their respective holders.
Safety Precautions
To avoid injury and to prevent equipment damage, observe the safety precautions below.
Only qualified personnel should be allowed to install, replace, and service the
equipment. The device cannot be sold retail, to the general public or by mail order. It
must be sold to dealers. Installation must be controlled. Installation must be performed
by licensed professionals. Installation requires special training. The Runcom radios and antennas should be installed ONLY by experienced installation professionals who are
familiar with local building and safety codes and, wherever applicable, are licensed by the appropriate government regulatory authorities. Failure to do so may void product
warranty and may expose the end user or the service provider to legal and financial
liabilities.
Always observe standard safety precautions during installation, operation and
maintenance of this product.
This equipment must be installed according to country national electrical codes.
Any changes and modifications to the device and the accessories must be approved by
Runcom.
All equipment and accessories must be installed in a restricted access area.
Observe all the labels on the equipment, providing operation details and warnings.
Read and follow the installation instructions provided in this manual.
The outdoor base station should be positioned more than 2 meters from humans.
In case of using cables that are not provided with the equipment package, ensure these
cables comply with the regulatory inspection authorities and are the responsibility of the customer.
Do not move or ship equipment unless it is properly packed in its original wrapping and
shipping containers.
Electrical Shock Prevention
When connecting equipment to the AC and DC voltage supplies, ensure proper polarity.
Disconnect the power source before installing or maintaining the power wiring.
Do not operate the equipment if there is any failure or damage to electrical components.
Do not touch exposed connections, components or wiring when power is on.
Install the equipment and the grounded DC supply circuits in adjacent cabinets.

RNU4000BS User Manual Preface Material
Runcom Technologies Ltd. L III
Protect the DC power source with an adjacent circuit breaker.
The equipment must be properly grounded before attempting to operate or perform any
repairs.
RF Exposure
To comply with FCC Section 1.310 for human exposure to radio frequency electromagnetic
fields, implement the following instruction:
A distance of at least 100cm between the equipment and all persons should be
maintained during the operation of the equipment.
Radio Interference
This equipment generates and radiates radio frequency energy and if not installed and used
in accordance with the instruction manual, may cause interference to radio communications.
To avoid interferences:
Avoid conjunction with any other antenna or transmitter.
In case of Radio Interference: Relocate the antenna and Increase separation between
the equipment and the receiver (e.g. connect to a separate circuit or outlet).
When using an external antenna, the external antenna must not be co-located or
operating in conjunction with any other antenna or transmitter
NOTE: This equipment has been tested and found to comply with the limits for a Class B digital device,
pursuant to part 15 of the FCC Rules. These limits are designed to provide reasonable protection against
harmful interference in a residential installation. This equipment generates uses and can radiate radio
frequency energy and, if not installed and used in accordance with the instructions, may cause harmful
interference to radio communications. However, there is no guarantee that interference will not occur in
a particular installation. If this equipment does cause harmful interference to radio or television
reception, which can be determined by turning the equipment off and on, the user is encouraged to try
to correct the interference by one or more of the following measures:
-Reorient or relocate the receiving antenna.
-Increase the separation between the equipment and receiver.
-Connect the equipment into an outlet on a circuit different from that to which the receiver is connected.
-Consult the dealer or an experienced radio/TV technician for help.
Note: Contention Based Protocol (CBP) MUST be activated for the specified band (3.675-3.700GHz)
wherever FCC rules and regulations are enforced. Failure to comply makes the operation of this device
illegal.


RNU4000BS User Manual Table of Contents
Runcom Technologies Ltd. V
Table of Contents
1 Introducing the RNU4000BS BS ...................................................................................... 1
1.1 Coverage Configurations ............................................................................................................. 3
1.2 RNU4000BS Interfaces and Accessories ........................................................................................ 5
1.2.1 GPS, Power and Communication Interfaces ......................................................................... 5
1.2.2 BS RF Antenna Interfaces .................................................................................................. 7
1.3 Supported Antennas .................................................................................................................... 7
1.3.1 RF Antennas ..................................................................................................................... 7
1.3.1.1 Internal Antennas .................................................................................................. 7
1.3.1.2 External Antenna ................................................................................................... 7
1.4 Optional Accessories ................................................................................................................... 8
2 WEB GUI description ....................................................................................................... 9
2.1 WEB GUI Menu description ........................................................................................................ 10
2.2 WEB GUI working screens description ........................................................................................ 10
3 Commissioning Procedure ............................................................................................ 24
3.1 Overview .................................................................................................................................. 24
3.2 Connect BS to Power and Computer ........................................................................................... 25
3.2.1 Configure the Computer's Network Parameters ................................................................. 25
3.2.1.1 Configure Computer IP Address............................................................................ 25
3.2.1.2 Disable Firewall ................................................................................................... 28
4 Installing the RNU4000BS BS ........................................................................................ 29
4.1 Mounting the Base Station ......................................................................................................... 29
4.1.1 BS Installation Location.................................................................................................... 29
4.1.2 Mounting Bracket Description ........................................................................................... 30
4.1.3 Mounting On a Pole ......................................................................................................... 32
4.1.4 Mounting On a Wall ......................................................................................................... 34
4.2 Overview of the Cable and Power Connections ........................................................................... 36
4.3 Mounting the RF Antennas ........................................................................................................ 38
4.3.1 Mounting the RF Antenna ................................................................................................ 38
4.3.1.1 RF Antenna Location Criteria ................................................................................ 38
4.3.1.2 RF Antenna Mounting .......................................................................................... 38
4.3.1.3 4x4 antennas Outdoor Connection Requirements .................................................. 39
4.4 Pole Mounted GPS Antenna ....................................................................................................... 40
4.4.1 GPS Antenna Installation.................................................................................................. 41
4.4.2 Criteria for selecting the GPS antenna location .................................................................. 41
4.4.3 GPS antenna mounted to the RNU4000BS body ................................................................ 41

Table of Contents RNU4000BS User Manual
VI Runcom Technologies Ltd.
4.4.4 Multi-sector Daisy-chained GPS Antennas .......................................................................... 42
4.4.4.1 Hardware Interconnections .................................................................................. 42
4.4.4.2 Configuration Parameters ..................................................................................... 42
4.5 End-to-End Traffic Test ............................................................................................................. 42
4.5.1 Performing a PING Test ................................................................................................... 43
5 Field Test Performance Evaluation ............................................................................... 44
5.1 Field Test Overview ................................................................................................................... 44
5.2 Field Test Setup ........................................................................................................................ 45
5.3 Field Test Procedure ................................................................................................................. 47
6 Technical Specifications ............................................................................................... 49
6.1 RNU4000BS BS Specifications .................................................................................................... 49
6.2 External Single RF Antennas Specifications ................................................................................. 51
6.2.1 470-678MHz, Single Polarized 90° Sector Antennas Fixed Tilt ............................................. 51
6.3 External Dual-Slant RF Antennas Specifications ........................................................................... 52
6.3.1 698-806MHz, Dual Polarized 65° Sector Antennas Fixed Tilt (AW3052) ............................... 52
6.3.2 698-806MHz, Dual Polarized 90° Sector Antennas Fixed Tilt (AW3054) ............................... 53
6.3.3 Dual-Slant Antenna 2.3-2.7 GHz; 17 dBi;65° (MT-364054/ND) ........................................... 53
6.3.4 Double-dual Slant 2300-2700 MHz Remote Tilt-Panel Antenna ........................................... 55
6.3.5 Dual-Slant Antenna 2.3-2.7 GHz; 16 dBi;60° (SP2327-16XP60NUF) .................................. 56
6.3.6 Dual-Slant Antenna 2.3-2.7 GHz; 15 dBi;90° (SP2327-15XP90NUF) .................................. 57
6.3.7 Dual-Slant Antenna 3.3-3.8 GHz; 17 dBi;65° (MT-404067/ND) ........................................... 58
6.3.8 Dual-Slant Antenna 3.3-3.8 GHz; 17 dBi;65° (SP3338-17XP65) ........................................... 59
6.3.8.1 Radiation Patterns ............................................................................................... 60
SP3338-17XP65 elevation plane ................................................................................................. 60
6.3.9 Dual-Slant Antenna 3.3-3.8 GHz; 17 dBi;90° (SP3338-17XP90) ........................................... 61
6.3.9.1 Radiation Patterns ............................................................................................... 62
SP3338-16XP90 elevation plane ................................................................................................. 62
6.3.10 Dual-Slant Antenna 4.9-5.95 GHz; 16 dBi;90º (MT-464018/ND) ......................................... 63
6.3.11 Dual-Slant Antenna 470-700 MHz; .................................................................................... 64
6.4 RNU4000BS Internal Antenna Specifications ............................................................................... 66
6.5 GPS Antenna Specifications ....................................................................................................... 67

RNU4000BS Base Station User Manual
Runcom Technologies Ltd. 1
1 Introducing the RNU4000BS BS
Runcom's RNU4000BS fully integrated outdoor WiMAX BS provides flexible, cost-effective
WiMAX network deployment solutions where increased capacity and coverage is required.
‘All-in-one’ architecture combined with simple, single-handed installation and fast rollout
make these BSs an ideal solution for operators that want to get in on the ground floor of WiMAX
deployment at significant CAPEX reductions and maximum return on their network deployment.
The RNU4000BS is designed for coverage flexibility: depending on the required scenario,
the same BS can be configured to cover more sectors with relatively sparse concurrent user
requirements or fewer sectors with higher needs.
RNU4000BS BSs provide adaptable solutions, allowing interoperability with other MSS
devices as well as ASN-GW vendors.

RNU4000BS Base Station User Manual
2 Runcom Technologies Ltd.
Features
All in one integrated packaging of RF and Baseband components.
Full compliance with IEEE802.16e-2005according to the WiMAX Forum profiles.
Frequency Bands (model dependent): 705–745MHz, 1.6-1.8GHz, 2.3-2.7GHz, 3.3-3.8GHz (CBP
capability for band 3.675-3.700GHz is required), 4.9-5.0GHz other bands are optional.
Supports MIMO 2x2, HARQ, and other state of the art features, which increase performance.
4 channels ready unit – 2 channels supplied by default can be license-key activated for 4 channels.
Transition Power – 2 or 4 x Tx, 28dBm each.
Antenna support - model dependent: four either external or internal antennas.
Integrated GPS receiver for time and clock synchronization with holdover for satellite signal loss.
Flexible coverage capabilities – greater coverage area or greater penetration capabilities
Small footprint, single-handed quick installation and simple provisioning
Fast roll-out for service providers
Seamless and cost-effective integration with a Backhaul network
Optional integrated backhaul link via WiMAX R1 interface
High performance with Quality of Service (QoS) settings, according to WiMAX standards.
Support for the latest R6 interface and GRE tunneling to ASN-GW
Remote NMS management via Runcom’s NMS application

RNU4000BS Base Station User Manual
Runcom Technologies Ltd. 3
1.1 Coverage Configurations
RNU4000BS supports either two or four RF channels and can provide coverage for either
one, two or four sectors depending on the sector density (throughput capacity) and radio performance
requirements (note that internal antenna can be used for single sector coverage only):
Single-Sector solution of 4x4 – (for internal and external antennas) – used for
higher density sites: four channels for Tx and four channels for Rx MRC. This
configuration improves coverage through diversity and improve throughput through
MIMO 4x2.
Dual-Sector solution of 2x2 (only relevant for external antennas) – used for lower
populated sites: two channels for Tx channels and two channels for Rx MRC. MIMO
of 2x2 can be perform if signal to noise ratio is good.
Quad-Sector solution of 1x4 (only relevant for external antennas) – used for more
sparsely populated sites: single channel for Tx and single channel for Rx. This
configuration is highly cost effective but suffer from lower performance and
coverage area per sector (totally it covers more space)
The overall capacity, of single base station unit, with respect to the maximum number of
connected users, supported bands and throughput is constant; however, in a dual-sector installation, the
BS will transmit to two separate sectors in a cell, where each sector is serviced by two antennas. In quad
sector installation the BS will transmit to four sectors in a cell (Usually covers the entire cell 3600), where
each sector is serviced by one antenna. These two configurations reduceCAPEX and OPAX for operators
by covering cells with relatively low densityor sparsely populations, which have low requirements for
concurrent user’s and / or lower data traffic.
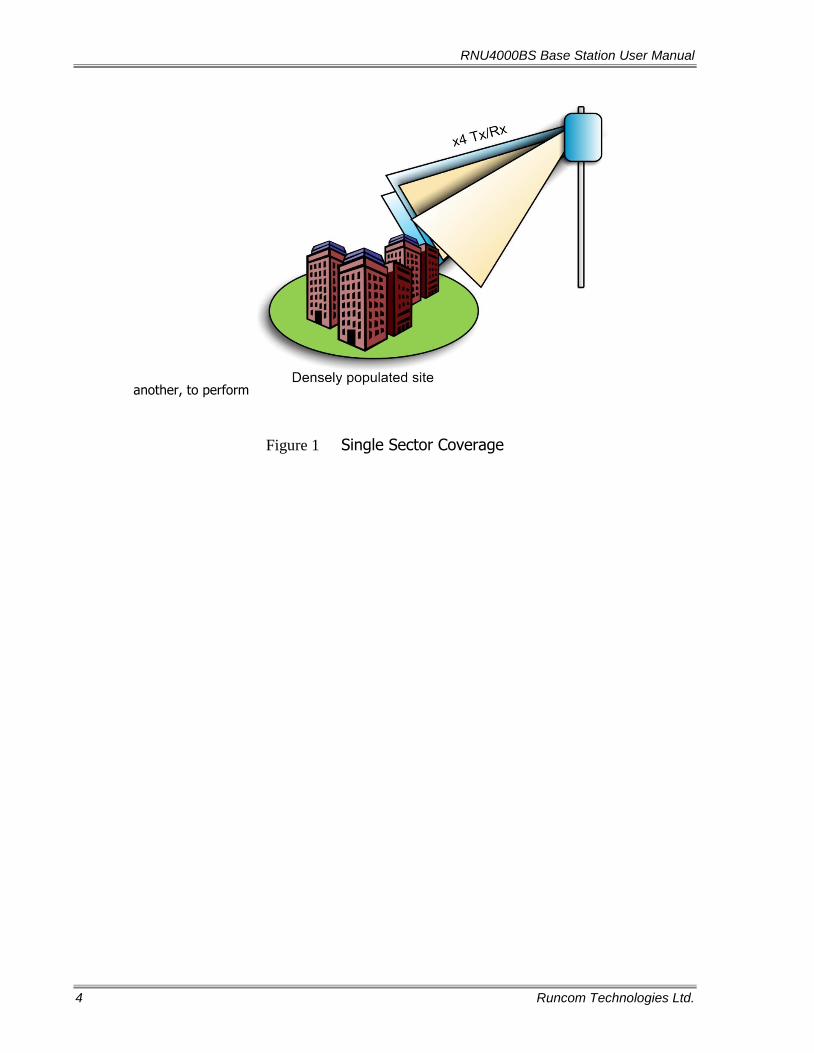
The following figure shows a single sector covered by 4x Tx/Rx channels. Several of these sectors (within the same site) should be installed, using the corresponding number of RNU4000BSs, to complete site
coverage. Each site can use single GPS antenna, installed on one of the BS, daisy-chained from BS to
RNU4000BS Base Station User Manual
4 Runcom Technologies Ltd.
another, to perform
Figure 1 Single Sector Coverage

RNU4000BS Base Station User Manual
Runcom Technologies Ltd. 5
The following figure illustrates dual-sector coverage of two sites by a single RNU4000BS
unit.
Figure 2 Dual Sector Coverage
1.2 RNU4000BS Interfaces and Accessories
The interfaces of the RNU4000BS BS are distributed over two panels. Each of these panels is
referred to according to the corresponding interfaces.
Note: Install the BS so the power, GPS and communication interfaces face DOWN.
1.2.1 GPS, Power and Communication Interfaces
Note: Install the BS on the wall or pole with this panel facing DOWN.

RNU4000BS Base Station User Manual
6 Runcom Technologies Ltd.
Connector Description
GPS Connects to an external (optional) GPS antenna. The GPS antenna is ordered separately. Connector Type: ITT CANNON APD DIN 72585
ETH1 Primary Fast Ethernet connector. Used for initial setup (and standalone tests), and for connection to the backhaul network (in normal installations). Connector Type: RJ-45 TYCO part no 1546907-1
ETH2 Second Ethernet port for local and out-of-band management.
In future versions, you will be able to daisy-chain this port to ETH1 in an adjacent Base Station (located in the same BS site) in order to allow a single
Ethernet connection to the Backhaul.
ETH2 port can also function as a serial port (connection through the cable
supplied in the kit). This function is useful if the unit is not accessible via an IP address connection.
PPS PPS In and PPS Out can be used for synchronization of multiple sectors, where the PPS Out of one sector is connected to the PPS In of the next BS (daisy
chained). This is relevant only for adjacent sectors at the same BS site. See “Multi - Sector Daisy - Chained GPS antennas” section
Connector Type: SMA sealed Industrial
48VDC Power connector. External DC power connector (48VDC) for outdoor deployment. Connector Type: RJ-45
GND Ground blind hole connector. In normal installations, connect to the pole on which the unit is mounted. (The BS unit does not include a lightning arrester.)

RNU4000BS Base Station User Manual
Runcom Technologies Ltd. 7
1.2.2 BS RF Antenna Interfaces
RNU4000BS supports either four external or four internal antennas. The unit below
shows a model supporting four external antennas.
All antennas (internal and external) are 1W each
Connector Description
ANT1/2/3/4 External RF connector for the Main external antenna. Connector Type: RJ-45 TYCO part no 1546907 1
1.3 Supported Antennas
Depending on the model, the RNU4000BS is supplied with four external or four internal
dependent.
1.3.1 RF Antennas
1.3.1.1 Internal Antennas
Four internal antennas: 12dBi each at an azimuth beam-width of 90 degrees. Refer to
specifications in section 6.3.
1.3.1.2 External Antenna
Four external antennas: 15 to 18dBi, azimuth beam-width dependent.
Note: Specs for dual-slant antennas described in section 6.2.
You may use any other antenna type or model, keeping in mind that the antenna type or
model should be based on the RF planning that was performed in preparation for deployment
at the specific site and is dependent upon the coverage and throughput requirements of the
site.

RNU4000BS Base Station User Manual
8 Runcom Technologies Ltd.
1.4 Optional Accessories
The following accessories are not provided with the basic kit, and can be ordered as an option.
Element Description
Power Supply 110-220v AC/DC converter for 48VDC power supply
RF Antenna External directional antenna with pole mounting kit

RNU4000BS Base Station User Manual
Runcom Technologies Ltd. 9
2 WEB GUI description Follow by the next steps for BS WEB GUI menu access:
Open Internet Explorer for access to BS WEB GUI using the BS IP address path
Figure 3 BS WEB GUI access path
Use the BS WEB GUI credential (user name and password) to obtain the BS WEB GUI menu
User name Password
user password
Figure 4 BS WEB GUI ID
This section describes the WEB GUI RNU 4000 Base Station management options and theirs functionalities indented to provide to user the next necessary abilities:
General information (BS HW/SW info, IP status)
Monitoring (Synchronization and BS Sector operation status, CPE Connection list info and
their link status)
Configuration (General RF parameters settings, max. MCS settings and IP settings)
Maintenance (Upgrade, Recovery and Default)

RNU4000BS Base Station User Manual
10 Runcom Technologies Ltd.
2.1 WEB GUI Menu description
The table below describes the WEB GUI Menu options and their functionalities
Menu Section Description
General Information General Provides BS related HW/SW info
IP Status Provides BS ETH interface IP addresses status
Configuration
General General Provides RF parameters and MCS settings
IP Configuration
IP Configuration Provides BS related IP addresses settings
Monitoring
Status Synchronization Provides BS synchronization status
BS Status Provides BS sector configuration status
Connection Connection Provides BS RF parameters configuration status
Antenna Status Provides BS antenna configuration status
CPE Info CPE Info Query Provides ability to obtain fast link status connection parameters of specific CPE
CPE List Provides list of connected CPE’s and theirs ID and more detailed connection parameters as link status parameters and theirs SF connection
Maintenance
Upgrade SW Upgrade Provides BS SW upgrade including all SW components
Recovery Change Version Provides swap between BS SW version (current running and the previous one)
Default
Reset to Default Provides ability to set the BS to default parameters related to the SW version
Erase Configuration File
Provides ability to erase the configuration file in case if such file was downloaded to BS
2.2 WEB GUI working screens description
General Information Screen – The figure below represent the “General Information” working screenand provides the next info as described in the table below:
Menu Section Description
General Information General Provides BS ID related info: HW – Product Type SW – FW /FPAGA version BS ID – BS MAC address
IP Status Provides BS ETH interface IP addresses status: BS ETH interface LAN configuration –
IP /subnet/ GW address ASN GW interface configuration - GW IP and Authentication address for connection with BS ASN BS DHCP client – ENB/DSB

RNU4000BS Base Station User Manual
Runcom Technologies Ltd. 11
Figure 5 General Information –working screen

RNU4000BS Base Station User Manual
12 Runcom Technologies Ltd.
Monitoring screen –The figures below represent the “Monitoring” working screensand provides the next info as described in the table below:
Menu Section Description
Monitoring Status Synchronization Provides the BS synchronization operational and configuration status:
1PPS lock status– “Lock” or “Unlock” indicates the 1PPS BS GPS synchronization status Modem status – indicates the BS RF status: - “running” BS RF activated / normal BS operation - “Not running” BS RF inactivated / BS is not
operational, management is available
1PPS source – indicates the 1PPS source
configuration (see figure “1PPS synchronization source configuration” below) - “GPS via Antenna” default configuration Physical connection status – “Connected” or “Not Connected”- indicates physical connection status of BS external connectors “1PPS input” or “GPS” GPS lock status – “Lock” or “Unlock” indicates the BS GPS lock status GPS initialization status – “Initialized” or “Failed” indicates the BS GPS initialization status Hold over time – “0sec to 14400sec indicates the time of Hold over timer. The timer starts once the BS GPS loss the 1PPS synchronization “Unlock” - “14400 sec” default
Hold over time expired – “Not expired” or “expired” indicates the Hold over timer status
- Once the timer is expired (14400sec), the BS RF becomes inactivated and that is in order to prevent interference to other BS’s.
Sync change state counter – counting indicates the BS GPS 1PPS synchronization “unlock” states number “
Radio Status Provides BS sector configuration status info: Max DL Modulation Max DL Modulation Initial Noise – BS receiver initial noise indicates spectrum radio channel quality of the BS working frequency
Note: Desirable is to obtain initial noise figure less than -117dbm
Initial TX power
WiMAX Connection Provides BS connection status info: BS ID – indicates the BS ID Frequency – indicates the BS central working frequency Bandwidth Profile – indicates the radio BW and the TX/RX symbols ration Preamble ID – indicates the BS preamble ID No. connected UT’s – indicates the quantity of connected CPE’s to the BS
No. of known NBR Bases – Handover feature /
indicates the quantity of recognized by BS other neighbor BS’s
Note: N/A for current BS WEB GUI version

RNU4000BS Base Station User Manual
Runcom Technologies Ltd. 13
Menu Section Description
Antenna Status Provides BS antenna configuration status: TX ON/OFF – indicates the BS configuration status of each one transmitter
(4 independent transmitters)
RX ON/OFF – indicates the BS configuration status of each one receiver
(4 independent receivers)
CPE Info CPE Info Query Provides ability to obtain fast link status connection parameters of specific CPE per CPE MAC address:
UL/DL FEC code type (see table below) UL/DL CINR UL RSSI
Max UL subchannel and slots UL Repetition no. UL Headroom – remaining CPE TX power
CPE List Provides list of connected CPE’s ,theirs ID’s and more detailed connection info as link status and SF connection parameters:
Double click on “INFO” in order to obtain Radio Link status parameters and SF parameters
FEC Code
Type
Modulation
13 QPSK 1/2
15 QPSK 3/4
16 QAM 16 1/2
17 QAM 16 3/4
18 QAM 64 1/2
19 QAM 64 2/3
20 QAM 64 3/4
21 QAM 64 5/6

RNU4000BS Base Station User Manual
14 Runcom Technologies Ltd.
Figure 6 Monitoring Status– working screen
Figure 7 Monitoring WiMAX– working screen

RNU4000BS Base Station User Manual
Runcom Technologies Ltd. 15
Figure 8 Monitoring CPE info /CPE list – working screen
Figure 9 Monitoring CPE info / link status – working screen

RNU4000BS Base Station User Manual
16 Runcom Technologies Ltd.
Configuration screen –The figures below represent the “Configuration” working screensand provides the next info as described in the table below:
Menu Section Description
Configuration
General General Provides RF parameters and MCS settings Provides defined neighbors BS for HO
Double click on one of the defined neighbors BS from the list in order to obtain the dialog box for define or update the neighbors BS
IP Configuration
IP Configuration Provides BS ETH interface IP addresses settings: BS ETH interface LAN configuration –
IP /subnet/ GW address ASN GW interface configuration - GW IP and Authentication address for connection with BS
Note: - All ASN related IP configuration in BS should
be accordantly to ASN GW configuration - Recommended default BS ASN GW and
Authentication IP static address is 192.168.0.3
BS DHCP client – ENB/DSB(ASN GW is DHCP server)
Note: Normal configuration /static IP configuration DHCP is “DSB”
Stand Alone General Provide the ability to set the BS network interface operation mode
Service Flow Profile
Double click on one of the defined Service Flow profiles from the list in order to obtain the dialog box for define or update the Service Flow profiles
CPE Binding Double click on one of the defined CPE binding list in order to obtain the dialog box for binding or update the desirable Service Flow profile with CPE
Multicast Binding Double click on one of the defined Multicast Binding CPE list in order to obtain the dialog box for Multicast binding or update

RNU4000BS Base Station User Manual
Runcom Technologies Ltd. 17
Figure 10 Configuration - General screen
Figure 11 Configuration – HO neighbors BS definition screen

RNU4000BS Base Station User Manual
18 Runcom Technologies Ltd.
Figure 12 Configuration - IP Configuration screen
Figure 13 Configuration – Stand Alone screen

RNU4000BS Base Station User Manual
Runcom Technologies Ltd. 19
Figure 14 Configuration – Multicast user definition screen
Figure 15 Configuration – CPE network connection screen

RNU4000BS Base Station User Manual
20 Runcom Technologies Ltd.
Figure 16 Configuration – Service flow profile definition screen
Figure 17 Configuration – CPE to Service flow profile setting screen

RNU4000BS Base Station User Manual
Runcom Technologies Ltd. 21
Maintenance screen –The figures below represent the “Maintenance” working screensand provides the next info as described in the table below:
Menu Section Description
Maintenance
Upgrade SW Upgrade Allows BS SW upgrade including all SW components: SW bin – BS SW FW file (required) FPGA – (required) HTML bundle – (required) WEB GUI application file Cfg. file – (Optional) BS configuration file which includes the all BS configuration parameters to be set to obtain BS required configuration
Banks Change Version Allows swap between BS SW version (current running and the previous one)
Default
Reset to Default Allows ability to set the BS to default parameters related to the SW version
Erase Configuration File
Allows to erase the configuration file in case if such file was downloaded to BS
Configuration File
Configuration File Allows to upload and viewing the configuration file
Figure 18 Maintenance Upgrade screen

RNU4000BS Base Station User Manual
22 Runcom Technologies Ltd.
Figure 19 Maintenance Banks screen
Figure 20 Maintenance Default screen

RNU4000BS Base Station User Manual
Runcom Technologies Ltd. 23
Figure 21 Maintenance – Configuration profile file screen

RNU4000BS Base Station User Manual
24 Runcom Technologies Ltd.
3 Commissioning Procedure
3.1 Overview
Before mounting the RNU4000BS BS on a pole or wall, power should be connected to the BS
and the basic parameters configured with the basic parameters using the BS WEB GUI.
ATTENTION!!! BE SURE THE RF ANTENNAS ARE CONNECTED OR THE RF
PORTS ARE TERMINATED BEFORE CONNECTING POWER TO THE UNIT.
The BS commissioning procedure consists of the following steps:
Connect Base Station
to Power and Computer
Configure computer to
communicate with Base Station
Download configuration file
to Base Station via WEB GUI
(optional)
Configure Base Station
other parameters Via WEB GUI
Base Station
Commissioning Completed

RNU4000BS Base Station User Manual
Runcom Technologies Ltd. 25
3.2 Connect BS to Power and Computer
ATTENTION!!! BE SURE THE RF ANTENNAS ARE CONNECTED OR THE RF
PORTS ARE TERMINATED BEFORE CONNECTING POWER TO THE UNIT.
To commission the BS unit two setup connections are required:
Power - Use the provided (BS) power cable to connect the BS VDC Power connector to
an indoor 48 VDC power supply.
Computer – Connect the BS ETHER port to the computer running the WEB GUI
application.
Figure 22 BS Commissioning Setup
3.2.1 Configure the Computer's Network Parameters
In order to establish communication between the computer and the BS perform the following:
Assign computer IP address in the same subnet as the BS
Disable Firewall
3.2.1.1 Configure Computer IP Address
To configure IP address follows the next steps:
Note: The procedure may vary slightly depending on the operating system installed on the
computer. The following procedure is for Windows XP.
1. Click the Start menu and choose Network Connections.
2. Right-click the Local Area Connectioncorresponding to the BS connection and select
Properties.
48VDC

RNU4000BS Base Station User Manual
26 Runcom Technologies Ltd.
The Local Area Connections Properties dialog appears with the General tab displayed by
default.
3. In the Items list, select “Internet Protocol (TCP*IP)” and click the Properties button.
The “Internet Protocol (TCP/IP) Properties” dialog appears.

RNU4000BS Base Station User Manual
Runcom Technologies Ltd. 27
4. In the IP Address display area:
In the IP address field assign an IP address other than the BS IP address (Default BS
IP Address: 192.168.0.20).
In the Subnet mask – set the subnet to the same subnet as the BS (Default BS Subnet:
255.255.255.0).
(It is not required to define the Default Gateway).
5. Click OK.

RNU4000BS Base Station User Manual
28 Runcom Technologies Ltd.
3.2.1.2 Disable Firewall
To disable firewall follow the next steps:
1. In the Local Area Connection dialog, click the Advanced tab. The following dialog
appears.
2. In the Windows Firewall display area click the Settings button.
The Windows Firewall dialog appears.
3. Select the Off option and click OK.
Settings button
Advanced tab

RNU4000BS Base Station User Manual
Runcom Technologies Ltd. 29
4 Installing the RNU4000BS BS After commissioning the RNU4000BS BS, the unit is ready for installation.
The procedure consists of the following steps:
Choosing the installation location and mounting the BS on a pole or on a wall
For models with external RF antennas, mounting the RF antennas in the appropriate
locations
Mounting the GPS antennas in the appropriate locations
Connecting the RF antenna to the BS
Assembling the GPS antennas to the BS using the provided bracket
Connecting Ground, Power and ETH cables to the BS
Performing an End-to-End traffic test
4.1 Mounting the Base Station
The RNU4000BS BS is provided with a mounting kit which includes all the mounting elements
(e.g. mounting-bracket, torques, screws etc.). The BS can be mounted either on a pole or on
a wall.
Note: The same mounting bracket is used for the wall and the pole installation.
When mounting the BS, note the following
The RNU4000BS BS is typically installed in an upright vertically aligned position with the
power, Ethernet and GPS connectors facing DOWN.
The RNU4000BS BS should be installed on the rear side of the RF antenna to prevent self-reflections.
4.1.1 BS Installation Location
This section describes the criteria that should be considered when selecting the RNU4000BS
BS installation location. The BS can be mounted on either a pole or a wall.
To choose BS Installation location
Verify that the pole/wall location corresponds to the site plan and takes into account local
regulations and maintenance access.
The unit should be mounted in the highest possible point. Reception will increase
according to the height of the antennas.
The diameter of the pole on which the base station and antenna are to be mounted is
either:
1.00-1.75” or
1.75-3.00”
Verify that the pole is properly grounded.
Verify that the pole has lightening protection.
Verify that there is safe access to the pole, free of any obstacles or other danger for
installers of the RNU4000BS BS.

RNU4000BS Base Station User Manual
30 Runcom Technologies Ltd.
Verify that there are no power lines near the pole.
4.1.2 Mounting Bracket Description
The figure below shows the BS mounting bracket.
Note: The same mounting bracket is used for the wall and the pole installation.
The Bracket elements are described in the following table.
Element Description
BRACKET BASE.
This part is connected to the BS.
BRACKET ARM.
This part provides the tilt ability, and connects between the
Bracket BASE and MAIN SUPPORT.
WALL/POLE RACKET
ARM
BASE
CLAMPING BRACKET Use for securing bracket to pole

RNU4000BS Base Station User Manual
Runcom Technologies Ltd. 31
Element Description
WALL/POLE BRACKET
Used for connecting the bracket to the wall.
CLAMPING BRACKET
Used for securing the bracket to the pole.
Provided screws, nuts and washers:
A. 4x flat washer M5
B. 4x nut M5
C. 4x spring washer M5 (seems as flat washers)
D. 4x bolt M8x50
E. 4x washer spring M8
F. 4x washer flat M8
G. 2x nut M8
H. 2x bolt M8x70
I. 4x bolt M5x16 - missing
H
C A
D
G B E
F

RNU4000BS Base Station User Manual
32 Runcom Technologies Ltd.
4.1.3 Mounting On a Pole
Note: When installing on a pole, leave at least 40cm space between the BS and the top of the
pole for lightning protection.
To install the BS on a pole
1. Secure the BracketBase to the BS underside:
Secure the Bracket Base to the underside of the BS, using the provided screws, as
shown below:
Verify that the orientation of the hole in the BASE is aligned with the elevation axis.
Use a tightening torque of 5.7N/m to tighten.
BASE Secure to BS Underside

RNU4000BS Base Station User Manual
Runcom Technologies Ltd. 33
2. Assemble the bracket elements:
Secure the WALL/POLE BRACKET to the Bracket Arm and then to the
BracketBase using the provided screws, as shown below:
Note: The bolt head should be positioned in the socket on the Bracket BASE.
Use a tightening torque of 24 N/m to tighten.
3. Mount the BS on the pole, where the procedure varies slightly according to the pole
diameter:
For poles with a diameter of 1.75-3.00”:
Mount the BS on the pole using the bracket Pole Support as shown above. Assemble
the bracket CONVEX as shown.
Tighten the bracket using the provided screws, according to the pole diameter.
Use a tightening torque of 14N/m to tighten.
WALL/POLE BRACKET
ARM
BASE - connect to BS
Washers and bolt
Ridges to ridges
POLE SUPPORT Assembled CONVEX on the pole

RNU4000BS Base Station User Manual
34 Runcom Technologies Ltd.
For poles with a diameter of 1.00-1.75”:
Mount the BS on the pole using the Clamping Bracket as shown above. Assemble
the bracket CONCAVE as shown.
Tighten the bracket using the provided screws.
Use a tightening torque of 14N/m to tighten.
4.1.4 Mounting On a Wall
1. Secure the BracketBase to the BS underside:
Secure Bracket Base to the underside of the BS, using the provided screws, as
shown below:
Verify that the orientation of the hole in the BASE is aligned with the elevation axis.
Use a tightening torque of 5.7N/m to tighten.
2. Assemble the bracket elements:
Secure the Bracket Arm to the BracketBase using the provided screws, as shown
below:
CLAMPING BRACKET Assembled CONCAVE on the pole
BASE Secure to BS Underside

RNU4000BS Base Station User Manual
Runcom Technologies Ltd. 35
Note: The bolt head should be positioned in the socket on the Bracket BASE.
3. Mount the BS on the wall:
Mount the WALL/POLE BRACKET on the wall in the appropriate position. Note the
azimuth orientation when doing so.
Washers and bolt
Ridges to ridges
i ARM
BASE Assemble to BS
WALL/POLE BRACKET Secure to a wall
Secure to wall

RNU4000BS Base Station User Manual
36 Runcom Technologies Ltd.
Attach the Bracket Arm to the WALL/POLE BRACKET using the provided screws.
Note: The bolt head should be positioned in the ARM socket.
Use a tightening torque of 24 N/m to the azimuth and elevation hardware.
4.2 Overview of the Cable and Power Connections
This section provides a summary of the cable connections. Mounting and connections are
described in detail in the following sections.
BS Connections:
ATTENTION!!! BE SURE THE RF ANTENNAS ARE CONNECTED OR THE RF
PORTS ARE TERMINATED BEFORE CONNECTING POWER TO THE UNIT.
RF Antennas:(For models with external RF antennas). Connect coax cables from each
RF antenna to the base station ports ANT1/ANT2/ANT3/ANT4.
GPS Antenna: Connect a coax cable (10 meters max) from the GPS antenna to the BS
GPS connector.
Ground: Use the provided grounding cable to ground the BS to the pole (if pole is
grounded), or to a grounding point.
Power: Run the 5-10 meter power cable from the BS Power connector down the pole,
to the provided 48 V power converter that is located indoors (i.e. in a building or in a caravan).
Note: It is recommended to connect a battery (for backup) to the 48VDC power supply.
Ethernet: Run the 5-10 meter Ethernet cable of the base station from the ETH connector
at the bottom of the base station down the pole and connect it to an indoor Ethernet connector, such as in a building or in a caravan
WALL/POLE BRACKET
ARM

RNU4000BS Base Station User Manual
Runcom Technologies Ltd. 37
If necessary, secure the cables to the pole so that it is not loose using plastic strips.
Figure 23 Overview BS Connections
ETH: Indoor Ethernet Connection
48VDC
5-10 Meters Power Cable
5-10 Meters ETH Cable
Grounding Cable (connected to pole – if grounded, or to other grounding point)
GPS Antenna
Cables for 4 RF Antennas
BUILDING
Double Dual-Slant RF Antennas
GPS Cable(10 meters max)
Building ROOF
40cm from TOP of pole
GPS GND ETH
BS
48VDC Battery
X4 Antennas

RNU4000BS Base Station User Manual
38 Runcom Technologies Ltd.
4.3 Mounting the RF Antennas
After mounting the base station on a pole or wall:
For models with external RF antennas, mount the RF antennas in the selected locations
according to the instructions given in this section.
Mount the GPS Antenna in the selected locations according to the instructions given in
this section.
4.3.1 Mounting the RF Antenna
Note: This section is relevant only for installations of BSs with external antennas.
Refer to section 1.1 for more information on antenna configurations.
4.3.1.1 RF Antenna Location Criteria
To avoid frequency reuse problems caused by unwanted reflections, the main part of the
antenna must be clear of any metal objects for a range of parameter to 20 meters.
Make sure that there are no obstacles located in front of the RF antenna, such s poles,
transmission equipment from other vendors or another Runcom RF antenna.
4.3.1.2 RF Antenna Mounting
Note: The antenna is mounted and adjusted using the provided antenna mounting kit.
To mount the RF Antennas:
Use the supplied RF antenna (pole) mounting kit to attach the antenna to the pole.
Connect the antennas to the BS using the provided 0.5 -1 meter coax cables.
Tilt the antenna as required. The antenna’s mounting kit enables the antenna to be tilted
along two axes.
The antenna position can be fine-tuned at a later stage.
Figure 24 RF Antennas Mounting

RNU4000BS Base Station User Manual
Runcom Technologies Ltd. 39
4.3.1.3 4x4 antennas Outdoor Connection Requirements
Pico BS 4x4 antennas require using Antennas Dual Slant type (with polarization).
Antennas connection should be accordantly:
BS “Ant 1” connector → connected via RF cable →to Antenna 1 “Port 1” or “ANT1”
connector
BS “Ant 2” connector → connected via RF cable →to Antenna 2 “Port 1” or “ANT1”
connector
BS “Ant 3” connector → connected via RF cable →to Antenna 1 “Port 2” or “ANT2”
connector
BS “Ant 4” connector → connected via RF cable →to Antenna 2 “Port 2”or “ANT2”
connector
Note: Reason for Requirement is to obtain proper downlink throughput ,each BS TX stream
should be with different polarity
Figure 25 BS Antennas Connection
Figure 26 BS Antennas Polarization Connection Description

RNU4000BS Base Station User Manual
40 Runcom Technologies Ltd.
4.4 Pole Mounted GPS Antenna
The following is an example of a pole mounted GPS antenna for single-sector coverage.
GPS Antenna
Double Dual-Slant RF Antennas
GPS Cable(10 meters max)
Building ROOF
40cm from TOP of pole
GPS GND ETH
BS
X4 Antennas

RNU4000BS Base Station User Manual
Runcom Technologies Ltd. 41
4.4.1 GPS Antenna Installation
The GPS active antenna may be mounted using two different methods:
Attached to a pole or other hosting surface using a magnet
Mounted to the RNU4000 unit using the supplied bracket.
For coverage of multi-sector sites using a number of BSs, one GPS antennas can serve a
number of interconnected and synchronized BSs.
The Pole and bracket mounting methods as well as the multi-sector GPS coverage are
described in this section.
Note: The Holdover time (duration that BS synchronization is retained – from the point in time
in which the GPS antenna is disconnected) is determined by the internal GPS. Currently –
approximately 8 hours.
4.4.2 Criteria for selecting the GPS antenna location
The whole antenna area is exposed to the sky.
GPS antenna should not be more than 10 meters from the RNU4000BS (excessive cable
length may cause interference).Bracket Mounted GPS Antenna
The GPS antenna can be assembled on to the RNU4000BS unit using the supplied.
4.4.3 GPS antenna mounted to the RNU4000BS body
Assemble the bracket to the underside of the unit as illustrated in the following image.
Connect the GPS antenna to the RNU4000BS GPS connector using a coax cable.
Assemble the GPS antenna to the bracket as illustrated.
Figure 27 GPS Antenna to Bracket Connections

RNU4000BS Base Station User Manual
42 Runcom Technologies Ltd.
4.4.4 Multi-sector Daisy-chained GPS Antennas
This section describes how to connect and synchronize GPS antennas for multi-sector sites
covered by a dedicated RNU4000BS unit per site (x4 Tx/Rx channels per site).
The BSs can be connected in two configurations:
One GPS antenna can serve all the BSs
For redundancy - each BS can operate with a dedicated GPS antenna.
4.4.4.1 Hardware Interconnections
The figure below illustrates a daisy-chain configuration for a four-sector base station site with
four RNU4000 units. Each unit has an integrated GPS module, and an internal holdover circuit
responsible for providing a 1PPS signal in case of loss of PPS source (from either the integrated
GPS unit or the PPS IN port).
Figure 28 GPS Synchronization Connection - (daisy-chain)
4.4.4.2 Configuration Parameters
For synchronization configuration and indication details description parameters refer to “WEB
GUI” section.
4.5 End-to-End Traffic Test
After the system is installed, it is recommended to perform an End to End (E2E) test to test
communication and traffic transference over the link.
In this test, a computer connected to a CPE (that is configured to operate with the BS) sends
a ping message towards the NOC (Network Operations Center) and AAA (Authentication,
Authorization and Accounting center). Receiving an answer from the NOC/AAA side by the
CPE's PC assures that the system is configured and operating properly.
The following figure shows the end-to-end test elements.

RNU4000BS Base Station User Manual
Runcom Technologies Ltd. 43
To perform the test
1. Ensure that the BS is configured with the:
Center frequency
ASN-GW IP address and security parameters
2. Connect the BS to a CPE configured with the:
Center Frequency
3. Connect a computer configured to communicate with the CPE– using the CPE IP address
subnet) to the CPE Ethernet port using a cross-cable.
4. Use Telnet to send a ping command from the CPE computer to the NOC IP Address.
4.5.1 Performing a PING Test
To verify connectivity
1. Open a Command Prompt window from the computer connected to the CPE
2. Select Start Run and enter cmd.
3. Enter a Ping command that pings the NOC.
The following shows a Ping command:
4. Verify that the link has been established properly according to the reply received from the
NOC.
5. If no 'ping' reply is received, check connections and required configuration parameters.
RNU4000BS Base Station User Manual
44 Runcom Technologies Ltd.
5 Field Test Performance Evaluation The purpose of this document is to validate in the field performance of Runcom system that includes
base station and CPEs (with or without NOC) in the operation modes. The field tests cover MIMO-A
(Matrix A or SISO) and MIMO B (Matrix B).
This document contains the following main sections that describe the test performance:
Throughput performance per CINR and MCS (modulation coding scheme)
The table below describes the test equipment list and the associated accessories in order to perform the
test as described in this document
Equipment QTY Parameters
Outdoor Compact BTS 4x4 1 4x30dbm, 65 or 90 degrees sector antenna 16dbi
IDU CPE 2 2x24dbm, panel antenna 2x7dbi or 2x15dbi
ODU CPE 2 2x24dbi, omni antennas 2x5dbi
USB 2 1x17-20dbm, on board antenna
CNOC 1 License for 100 subscribers
RF Configuration
BW 10MHz (or 5MHz)
TX/RX symbols ratio 32/15 (or 26:21 for higher UL)
TX power 4x0dB MAX 4X30dB MAX
for Lab test for field test
DL Modulation max QAM 64 2/3 For mobile
UL Modulation max QAM 16 ¾ For mobile
Network Configuration
Service Flow Default
BE, UGS, nRTPS CIR 64Kb MIR DL 40Mbs/UL 40Mbs
All users
Advance Configuration
Special settings MIMO-B mode
BS CINR Threshold table
parameters
BS Synch Configuration GPS for external use
Internal clock
For field test
For Lab test
5.1 Field Test Overview
The field test testing procedures is used to evaluate the throughput performance and the base station
sector coverage performance in LOS and N-LOS environment. To get more robust reliable measurements
results for better analysis the recommended conditions for the testing points are LOS environment.
Note:
1. For MIMO B operation mode the DL CINR should be 25db

RNU4000BS Base Station User Manual
Runcom Technologies Ltd. 45
2. For maintaining the MIMO B mode the recommended set up is LOS or Near-LOS.
5.2 Field Test Setup The setup presented here is a suggestion for a general setup which allows the operation of the tests as
described in this document.
Figure 29 Test Setup Diagram
Figure 30 Field Test Setup

RNU4000BS Base Station User Manual
46 Runcom Technologies Ltd.
Figure 31 Field Test Point
Figure 32 Sector Radio Coverage
Sector 1 120°
BS
Site

RNU4000BS Base Station User Manual
Runcom Technologies Ltd. 47
5.3 Field Test Procedure Preliminary preparation 1. Establish the test setup and the outdoor installation according to the figure “Field Test Setup” or equivalent 2. Establish connection between the BS and the CPE and required settings to obtain proper connection
Perform PC to PC TCP throughput performance using measurement tools:
FTP “FileZilla Server” (Setting Buffer size = 491520/Socet buffer size=983040)
5 sessions (file size 80 Mb each) running simultaneously on CPE in complete LOS
DL Throughput performance SISO/ MIMO B
DL link Modulation RSSI[dB] CINR
[dB]
DL Throughput (max) [Mb/s]
Radio BW 10MHz
TX/RX symbols ratio 32:15
64 QAM 5/6 (MIMO-B) -55 27 37
64 QAM 2/3 (MIMO-B) -58 25 30
16 QAM ¾ (MIMO-B) -65 22 22
64 QAM 2/3 (SISO) -70 20 14.5
16QAM ¾ (SISO) -75 17 11
16QAM ½ (SISO) -78 14 7.5
QPSK ¾ (SISO) -80 11 5.5
QPSK ½ (SISO) -83 8 3.5
Note:
1. Throughput performance measurements values tolerance -5%
2. CINR measure values tolerance ±2dBm
3. RSSI values tolerance ±3dBm
DL Throughput performance SISO table - theoretical calculation / symbol ratio 32:15
DL Modulation DL CINR
threshold
DL Throughput
(max)
BW 10MHz
[Mb/s]
DL Throughput (max)
[Mb/s]
Radio BW 5MHz
TX/RX symbols ratio
32:15
QPSK 1/2 8 4 2
QPSK 3/4 11 6 3
QAM 16 1/2 14 8 4
QAM 16 3/4 17 12 6
QAM 64 1/2 20 12 6
QAM 64 2/3 22 16 8
QAM 64 3/4 24 18 9
QAM 64 5/6 25 20 10

RNU4000BS Base Station User Manual
48 Runcom Technologies Ltd.
UL Throughput performance SISO - theoretical calculation / symbol ratio 32:15
DL Modulation DL CINR
threshold
DL Throughput
(max)
BW 10MHz
[Mb/s]
DL Throughput (max)
BW 5MHz
[Mb/s]
QPSK 1/2 3 1.34 0.6
QPSK 3/4 6 2 1
QAM 16 1/2 9 2.68 1.34
QAM 16 3/4 12 4 2
DL Throughput performance MIMO B table - theoretical calculation / symbol ratio 32:15
DL Modulation DL CINR
threshold
DL Throughput
(max)
BW 10MHz
[Mb/s]
DL Throughput (max)
BW 5MHz
[Mb/s]
QAM 16 3/4 20 24 12
QAM 64 2/3 22 32 16
QAM 64 5/6 25 40 20

RNU4000BS Base Station User Manual
Runcom Technologies Ltd. 49
6 Technical Specifications The RNU4000BS BS installation procedure involves the following accessories:
RF Antennas
GPS Antenna (Optional)
Mounting kit
This section details the specifications for the RNU4000BS BS and accessories.
6.1 RNU4000BS BS Specifications
Radio
Standard compliance complies with 802.16e according to the WiMAX Forum profiles.
WiMax Fixed and Mobile
Number of sectors 1, 2 or 4 sectors
System Capability LOS, Near LOS, Non LOS
Frequency 470-698MHz (white space), 700 – 750MHz, 1.6-1.8GHz, 2.3-
2.7GHz, 3.3-3.8GHz (CBP capability for band 3.675-3.700GHz is
required),4.9-5.0GHz, 5.0-5.15GHz, 5.7-5.8GHz, 5.9-
6.4GHz(Model Dependent) other frequencies are optional
FFT 512, 1024, 2048
FEC Convolution Code and Turbo Code
Channel bandwidth 3.5 MHz, 5 MHz, 7 MHz, 8.75 MHz, 10 MHz, optional 20 MHz
Duplex method TDD, optional FDD/HFDD
Central frequency resolution 125 KHz
Maximum output power (on antenna
connector)
+30dBm
+28 dBm per antenna in 4.9GHz and above
+26dBm per antenna in white space spectrum
Antennas:
Type Integrated Sectored 11dbi (90°)
External dual slant
External Single antenna
Number 2 dual-slant; 4 Single
Connectors 4x N-Type, 50 ohm, lightning protected (Optional)
Modulation and coding rates DL/UL: QPSK (1/2, 3/4) , 16 QAM (1/2, 3/4), 64 QAM (2/3 , 3/4,
5/6 )
(64 QAM is optional for UL)
Diversity Supported MIMO A/B , STC, MRC, SISO,
GPS Integrated
Synchronization Integrated GPS module with on board synchronization unit

RNU4000BS Base Station User Manual
50 Runcom Technologies Ltd.
Management
Network Management SNMPv2/v3, standard and proprietary MIB
System Configuration SNMP, FTP, CLI
Software Upgrade Remote TFTP upgrade of firmware and programming
Interfaces
Network Interfaces 2x10/100 Base-T, Optional 1xGE and optical interface SX/LX
Northbound Interface Profile C, R6 per SF GRE tunnel, Profile B is optional
Connectors 2xN-Type for external antenna 50 ohm, External
synchronization option, external GPS antenna option, power
connector, 2xRJ-45
Electrical Characteristics
Power Source -36 to -72 VDC < 60Watt
Physical and Environmental
Dimensions 39cm (L) x 24cm (W) x 12cm (H)
Weight 5000 grams / not including mounting kit
Operating external temperature Industrial -40°C to 55° C
Operating humidity 95% non-condensing
Standards Compliance*
Safety EN 60950-1, EN 60950-22
Environmental IEC 60529-1, IP66
Radio FCC Part 27 , Part 90; EN302 623 , EN302 544
EMC FCC part 15, class B ; ETSI EN 301489-1

RNU4000BS Base Station User Manual
Runcom Technologies Ltd. 51
6.2 External Single RF Antennas Specifications
6.2.1 470-678MHz, Single Polarized 90° Sector Antennas Fixed Tilt
Electrical
Frequency Range 470MHz – 700MHz
Gain 12 dBi
Return Loss (VSWR) <1.3
Azimuth Beam width @ 13.5dBi Vertical 90º (typ)
Polarization Horizontal or Vertical
Power Handling 50W
Front-to-Back Ratio >15dB
Input Impedance 50 (ohm)
Electrical Downtilt 0 º
Lightning Protection Direct Ground
Mechanical
DIMENSIONS (LxWxD) 850mm
WEIGHT 0.4 kg
Connector / Cable Cable mount, F connector
Connection Location Center

RNU4000BS Base Station User Manual
52 Runcom Technologies Ltd.
6.3 External Dual-Slant RF Antennas Specifications
6.3.1 698-806MHz, Dual Polarized 65° Sector Antennas Fixed Tilt (AW3052)
Electrical
Frequency Range 698MHz – 806MHz
Gain 13.5 dBi
Return Loss (VSWR) >14dB (1.5:1)
Azimuth Beam width @ 13.5dBi 65º (typ)
Polarization Dual Slant (+/-45°)
Upper Side lobe Suppression >18dB
Horizontal 3dB BW 65º
Vertical 3dB BW 17º
Power Handling 300W
Front-to-Back Ratio >25dB
Isolation >30dB
Input Impedance 50 (ohm)
Electrical Downtilt 4 º
Lightning Protection DC grounded
Mechanical
DIMENSIONS (LxWxD) 1220 x 300 x 150mm
WEIGHT 13 kg
Connector 2 x 7/16 DIN Female
Connection Location Bottom
RADOME UV Stabilized Styrosun

RNU4000BS Base Station User Manual
Runcom Technologies Ltd. 53
6.3.2 698-806MHz, Dual Polarized 90° Sector Antennas Fixed Tilt (AW3054)
Electrical
Frequency Range 698MHz – 806MHz
Gain 12.5 dBi
Return Loss (VSWR) >14dB (1.5:1)
Azimuth Beam width @ 13.5dBi 90º (typ)
Polarization Dual Slant (+/-45°)
Upper Sidelobe Suppression >18dB
Horizontal 3dB BW 65º
Vertical 3dB BW 17º
Power Handling 300W
Front-to-Back Ratio >25dB
Isolation >30dB
Input Impedance 50 (ohm)
Electrical Downtilt 4 º
Lightning Protection DC grounded
Mechanical
DIMENSIONS (LxWxD) 1220 x 300 x 150mm
WEIGHT 13 kg
Connector 2 x N Female
Connection Location Bottom
RADOME UV Stabilized Styrosun
6.3.3 Dual-Slant Antenna 2.3-2.7 GHz; 17 dBi;65° (MT-364054/ND)
Electrical
Gain 16 dBi (min) @ 2.3 - 2.5 GHz
17.5±0.5 dBi @ 2.5 - 2.7 GHz
VSWR 1.5:1 (typ), 1.7 :1(max)
Azimuth Beam width @ 13.5dBi 65º (typ)
Elevation Beam width @ -3 dB 7º (typ)
Polarization Dual Linear, ± 45º
Cross-polarization -20 dB (max) @ 2.3 - 2.5 GHz
-17 dB (max) @ 2.5 - 2.7 GHz
Side Lobes Level Azimuth and Elevation Meets ETSI EN 302 326- V1.1.2 (2006-03)
Side Lobes Level for Azimuth in the range -20 dB (max) @ 2.3 - 2.5 GHz

RNU4000BS Base Station User Manual
54 Runcom Technologies Ltd.
(± 100 to ± 180 from Boresight) -25 dB (max) @ 2.5 - 2.7 GHz
Front-to-Back Ratio -30 dB (max)
Port-to-Port Isolation 23 dB (min), 30 dB (typ)
Input Impedance 50 (ohm)
Input Power 20 W (CW), 250 W (peak)
Lightning Protection DC grounded
Mechanical
DIMENSIONS (LxWxD) 945 x 126 x 37mm (max)
WEIGHT 3.0 kg (max)
CONNECTOR 2 x N-Type Female
RADOME Plastic UV Resistant
BASE PLATE Aluminum with chemical conversion coating
MECHANICAL DOWN TILT 0º to (-10º)

RNU4000BS Base Station User Manual
Runcom Technologies Ltd. 55
6.3.4 Double-dual Slant 2300-2700 MHz Remote Tilt-Panel Antenna
Electrical
Frequency Range 2300-2700 MHz
Gain 17.1 dBi @ 2.4 GHz
17.8 dBi @ 2.6 GHz
Return Loss > 15 dB
Polarization Dual Slant ± 45°
Horizontal Beamwidth 65°
Vertical Beamwidth 7° with nullfill
Electrical Downtilt 0° - 10° independently continuously adjustable
Upper Sidelobe Level < -18 dB
Front to Back Ratio > 30 dB
Isolation Between Ports > 30 dB
Power Rating 250 W
Impedance 50 ohm
Lightening Protection DC Grounded
Connector Type N-Type Female
RET Type Internal motor & manual override
RET Interface AISG 2 Remotely upgradeable
RET Connector Single AISG 8 pin male
Mechanical
Antenna Dimensions 1070x300x115 mm
Packed Dimensions 1200x330x200 mm
Antenna Weight 13 kg
Radom Material Polyester Fiberglass

RNU4000BS Base Station User Manual
56 Runcom Technologies Ltd.
6.3.5 Dual-Slant Antenna 2.3-2.7 GHz; 16 dBi;60° (SP2327-16XP60NUF)
Electrical
Gain 16 dBi @ 2.3-2.5 GHz
16.5 dBi @ 2.5-2.7 GHz
VSWR 1.5 : 1 (max)
Azimuth Beamwidth @ 13.5dBi 60º +/- 5º
Elevation Beamwidth @ -3 dB 9º (typ)
Polarization Dual Linear, ± 45º
Front-to-Back Ratio
EN 302 326 V.1.1.2 (2006-03)
-25 dB (Min)
Port-to-Port Isolation 30 dB (typ) @ 2.3-2.7 GHz
Null Fill 1st Sidelobe: -15dB
2nd Sidelobe: -18dB
Input Impedance 50 (ohm)
Input Power 20 W (CW), 250 W (peak)
Lightning Protection DC grounded
Mechanical
DIMENSIONS (LxWxD) 711x171x90mm (max)
WEIGHT 3.1 kg (max)
CONNECTOR 2 x N-Type Female
RADOME Gray UV resistant plastic
MECHANICAL DOWN TILT 0º to (-10º)

RNU4000BS Base Station User Manual
Runcom Technologies Ltd. 57
6.3.6 Dual-Slant Antenna 2.3-2.7 GHz; 15 dBi;90° (SP2327-15XP90NUF)
Electrical
Gain 14.5 dBi @ 2.3-2.5 GHz
15 dBi @ 2.5-2.7 GHz
VSWR 1.5 : 1 (max)
Azimuth Beamwidth @ 13.5dBi 90º +/- 5º
Elevation Beamwidth @ -3 dB 9º (typ)
Polarization Dual Linear, ± 45º
Front-to-Back Ratio
EN 302 326 V.1.1.2 (2006-03)
-25 dB (Min)
Port-to-Port Isolation 30 dB (typ) @ 2.3-2.7 GHz
Null Fill 1st Sidelobe: -15dB
2nd Sidelobe: -18dB
Input Impedance 50 (ohm)
Input Power 20 W (CW), 250 W (peak)
Lightning Protection DC grounded
Mechanical
DIMENSIONS (LxWxD) 711x171x90mm (max)
WEIGHT 3.1 kg (max)
CONNECTOR 2 x N-Type Female
RADOME Gray UV resistant plastic
MECHANICAL DOWN TILT 0º to (-10º)

RNU4000BS Base Station User Manual
58 Runcom Technologies Ltd.
6.3.7 Dual-Slant Antenna 3.3-3.8 GHz; 17 dBi;65° (MT-404067/ND)
Electrical
Gain 16 dBi (min) @ 3.3-3.4 GHz
17.5 ±0.5 dBi @ 3.5-3.8 GHz
VSWR 1.5 : 1 (typ) 1.8:1 (max)
Azimuth Beamwidth @ 13.5dBi 65º (typ)
Elevation Beamwidth @ -3 dB 7.5º (typ)
Polarization Dual Linear, ± 45º
Cross-polarization ETSI EN 302 326 V.1.1.2 (2006-03)
Side Lobes Level Azimuth and Elevation Meets ETSI EN 302 326- V1.1.2 (2006-03)
Side Lobes Level for Azimuth in the range
(± 100 to ± 180 from Boresight)
-25dB (max) @ 3.3-3.5 GHz
-30dB (max) @ 3.5-3.8 GHz
Front-to-Back Ratio
EN 302 326 V.1.1.2 (2006-03)
-30 dB (max)
Port-to-Port Isolation 25 dB (min) @ 3.3-3.7 GHz
20 dB (min) @ 3.7-3.8 GHz
Input Impedance 50 (ohm)
Input Power 20 W (CW), 250 W (peak)
Lightning Protection DC grounded
Mechanical
DIMENSIONS (LxWxD) 600x130x63mm (max)
WEIGHT 2.5 kg (max)
CONNECTOR 2 x N-Type Female
RADOME Plastic UV Resistant
BASE PLATE Aluminum with chemical conversion coating
MECHANICAL DOWN TILT 0º to (-10º)

RNU4000BS Base Station User Manual
Runcom Technologies Ltd. 59
6.3.8 Dual-Slant Antenna 3.3-3.8 GHz; 17 dBi;65° (SP3338-17XP65)
Electrical
Gain 16.5 dBi @ 3.3-3.5 GHz
17dBi @ 3.5-3.8 GHz
VSWR 1.5 : 1 (max)
Azimuth Beamwidth @ 13.5dBi 65º +/- 5º
Elevation Beamwidth @ -3 dB 7º (typ)
Polarization Dual Linear, ± 45º
Upper Side Lobe Suppression
30 degrees above horizon
-15dB @ 3.3-3.8 GHz
Front-to-Back Ratio
EN 302 326 V.1.1.2 (2006-03)
-25 dB (Min)
Port-to-Port Isolation 30 dB (typ) @ 3.3-3.8 GHz
Input Impedance 50 (ohm)
Input Power 20 W (CW), 250 W (peak)
Lightning Protection DC grounded
Mechanical
DIMENSIONS (LxWxD) 711x171x90mm (max)
WEIGHT 3.1 kg (max)
CONNECTOR 2 x N-Type Female
RADOME Gray UV resistant plastic
MECHANICAL DOWN TILT 0º to (-10º)

RNU4000BS Base Station User Manual
60 Runcom Technologies Ltd.
6.3.8.1 Radiation Patterns
SP3338-17XP65 azimuth plane
SP3338-17XP65 elevation plane

RNU4000BS Base Station User Manual
Runcom Technologies Ltd. 61
6.3.9 Dual-Slant Antenna 3.3-3.8 GHz; 17 dBi;90° (SP3338-17XP90)
Electrical
Gain 15.5 dBi @ 3.3-3.5 GHz
16 dBi @ 3.5-3.8 GHz
VSWR 1.5 : 1 (max)
Azimuth Beamwidth @ 13.5dBi 90º +/- 5º
Elevation Beamwidth @ -3 dB 7º (typ)
Polarization Dual Linear, ± 45º
Upper Side Lobe Suppression
30 degrees above horizon
-15dB @ 3.3-3.8 GHz
Front-to-Back Ratio
EN 302 326 V.1.1.2 (2006-03)
-25 dB (Min)
Port-to-Port Isolation 30 dB (typ) @ 3.3-3.8 GHz
Input Impedance 50 (ohm)
Input Power 20 W (CW), 250 W (peak)
Lightning Protection DC grounded
Mechanical
DIMENSIONS (LxWxD) 711x171x90mm (max)
WEIGHT 3.1 kg (max)
CONNECTOR 2 x N-Type Female
RADOME Gray UV resistant plastic
MECHANICAL DOWN TILT 0º to (-10º)

RNU4000BS Base Station User Manual
62 Runcom Technologies Ltd.
6.3.9.1 Radiation Patterns
SP3338-17XP90 azimuth plane
SP3338-16XP90 elevation plane

RNU4000BS Base Station User Manual
Runcom Technologies Ltd. 63
6.3.10 Dual-Slant Antenna 4.9-5.95 GHz; 16 dBi;90º (MT-464018/ND)
Electrical
Gain 16 dBi (min) @ 4.9-5.95 GHz
VSWR 2 : 1 (max) 1.7:1 (typ)
4dB Azimuth Beam width 90º (typ)
Elevation Beam width @ -3 dB 6.0º (typ)
Polarization Dual Linear, ± 45º
Cross-polarization ETSI EN 302 326 V.1.1.2 (2006-03)
EL upper side lobes level 25dB (typ
Front-to-Back Ratio -25 dB (max)
Port-to-Port Isolation 25 dB (typ) 22dB (min)
Input Impedance 50 (ohm)
Input Power 20 W (CW), 250 W (peak)
Lightning Protection DC grounded
Mechanical
Antenna Dimensions 550x250x17 mm
Connector 2xN-Type Female
Antenna Weight 2.5 kg
Radom Material Plastic

RNU4000BS Base Station User Manual
64 Runcom Technologies Ltd.
6.3.11 Dual-Slant Antenna 470-700 MHz;
Electrical
Gain 10.0 dBi
VSWR < 1.8:1
Horizontal Beamwidth (at -3 dB, depends on frequency)
90°
Vertical Beamwidth (at -3 dB, depends on frequency )
33° - 21°
Elevation Beam width @ -3 dB 0
Polarization Vertical
Cross-polarization isolation 30 dB
Front-to-Back Ratio 20dB
Port-to-Port Isolation 30dB
Input Impedance 50 ohm
Input Power 10W max.
Lightning Protection DC Grounded Elements
Mechanical
Antenna Dimensions 1050x500x200 mm
Connector N Type
Antenna Weight TBD
Radom Material Plastic

RNU4000BS Base Station User Manual
Runcom Technologies Ltd. 65

RNU4000BS Base Station User Manual
66 Runcom Technologies Ltd.
6.4 RNU4000BS Internal Antenna Specifications
Specifications for 2.5 GHz / 3.5 GHz/4.9GHz
Electrical 2.5 GHz 3.5 GHz 4.9 GHz
Antenna Model 4x Sector 4 x Sector 4 x Sector
Frequency Range 2.3 – 2.7 GHz 3.3 – 3.8 GHz 4.9 - 5.1 GHz
Gain + 11.5 dBi x 2 + 11.5 dBi x 2 +12dBi x 2
VSWR 1.6:1 1.6:1 1.7:1
3 dB Azimuth Beam width 110° 110° 90°
3 dB Elevation Beam width 30° 20° 22°
Polarization Dual Slant ± 45° Dual Slant ± 45° Dual Slant ± 45°
Cross Polarization -30 dB -27 ± 3 dB -35dB
F/B Ratio -25 dB -25 dB -23dB
Mechanical
Form Factor RNU4000BS Enclosure Integrated
Dimensions 236.0 x 79.5 x 48.2 mm (without connectors)

RNU4000BS Base Station User Manual
Runcom Technologies Ltd. 67
6.5 GPS Antenna Specifications
GPS Active Antenna (BY/GPS/06)
Dielectric
Center Frequency 1575.42 MHz ± 3 MHz
VSWR 1.5:1
Bandwidth ±5 MHz
Impedance 50 ohm
Peak Gain >3 dBic Based on 7×7cm ground plane
Gain Coverage >- 4 dBic at –90°<0<+90°(over 75% Volume)
Polarization RHCP
LNA Filter
LNA Gain (without cable) 28 dB Typical
Noise Figure 1.5 dB
Filter Out of Band Attenuation (f0=1575.42 MHz) 7dB Min f0+/-20MHZ
20dB Min f0+/-50MHZ
30dB Min f0+/-100MHZ
VSWR < 2.0
DC Voltage 3.0V to 5.0V
DC Current 10mA Max
Mechanical
Weight < 110 gr
Dimensions D x H 46 mm x 15 mm
Cable RG174 3m or other
Connector SMA/SMB/SMC/BNC/FME/TNC/MCX/MMCX or other
Mounting Screw Mount
Housing Black
Environmental
Operating Temperature -40° ~ +85°C
Storage Temperature -45° ~ +100°C
Vibration Sine sweep 1g(0-p)10~50~10Hz each axis
Humidity 95%~100% RH
Weatherproof 100% Weatherproof


![PAPER Measurement-Based Spectrum Database for ......(Ofcom) in the UK started a TVWS pilot program for database-aided TVWS utilization in July, 2014 [10], [14]. For the TVWS pilot,](https://static.fdocuments.in/doc/165x107/5fcf0d759f274140c51ed668/paper-measurement-based-spectrum-database-for-ofcom-in-the-uk-started.jpg)