2013 wi app 2 court of appeals of wisconsin published opinion

WI-BIKE APP MANUAL
Piaggio Wi-Bike is equipped with a Bluetooth low energy device that turns your smartphone into a smart-
key for starting the bike enabling advanced features for data visualization and vehicle management.
CONNECTION TO THE VEHICLE
In order to pair your smartphone with the Wi-Bike, the following steps are needed :
- Activate the Bluetooth function of your smartphone
- Start the app
- Carefully read and accept the notes about data processing and the terms and conditions for using the app, the Wi-Bike
and the satellite alarm system installed in the bike battery
- Turn on the Wi-Bike dashboard
- Enter the 'Settings > Connection’ menu on the dashboard and activate 'Smartphone’ tab *
- Search for your Wi-Bike in the list of Bluetooth devices displayed by the app: to select the right one go to 'Settings > SW
Version’ menu of the dashboard and read the last four digits identifying the Bluetooth module version installed on the bike
(BLE YYXXXX).
- Select the Wi-Bike and enter the PIN you found by scratching the silver strip on the CODE CARD supplied with the
vehicle**
After the first successful connection, once the app is launched, the system will connect automatically when
you start the bike.
Warning:
*After starting the Bluetooth module (or after starting the bike if the module has already been enabled), the connection is
possible within three minutes as testified by the flashing of Bluetooth icon on the dashboard.
**The code provided with the bike is used to start the bike and turn off the satellite alarm. Therefore, it must be guarded with
the greatest care, it should not be revealed to strangers and it must be provided to the future owner in case you will sell the
bike.
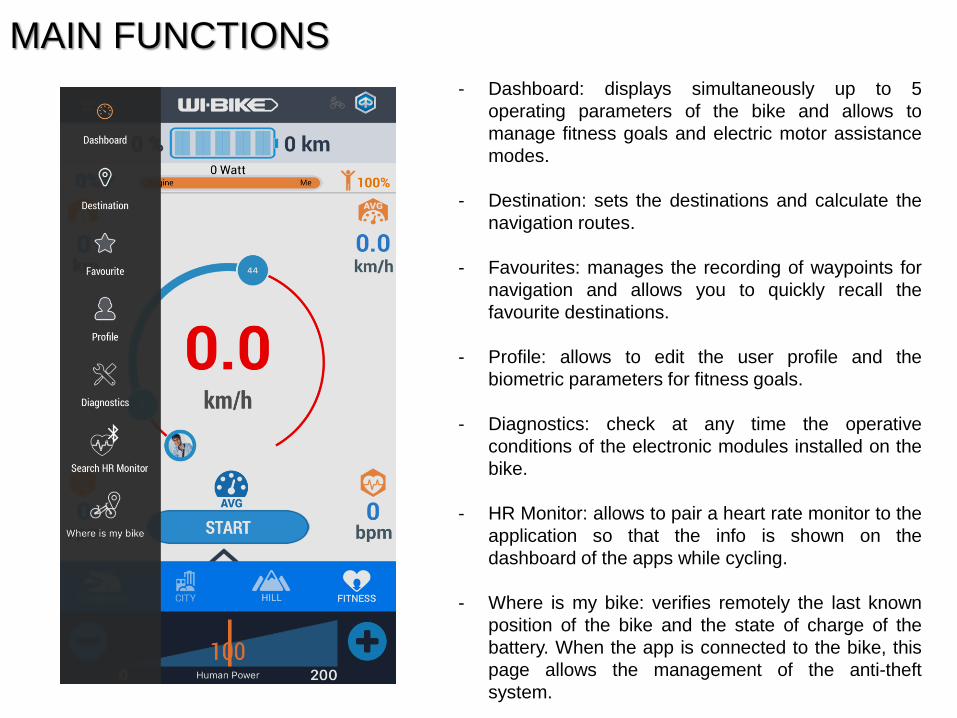
- Dashboard: displays simultaneously up to 5
operating parameters of the bike and allows to
manage fitness goals and electric motor assistance
modes.
- Destination: sets the destinations and calculate the
navigation routes.
- Favourites: manages the recording of waypoints for
navigation and allows you to quickly recall the
favourite destinations.
- Profile: allows to edit the user profile and the
biometric parameters for fitness goals.
- Diagnostics: check at any time the operative
conditions of the electronic modules installed on the
bike.
- HR Monitor: allows to pair a heart rate monitor to the
application so that the info is shown on the
dashboard of the apps while cycling.
- Where is my bike: verifies remotely the last known
position of the bike and the state of charge of the
battery. When the app is connected to the bike, this
page allows the management of the anti-theft
system.
MAIN FUNCTIONS
DASHBOARD – MAIN FUNCTIONS
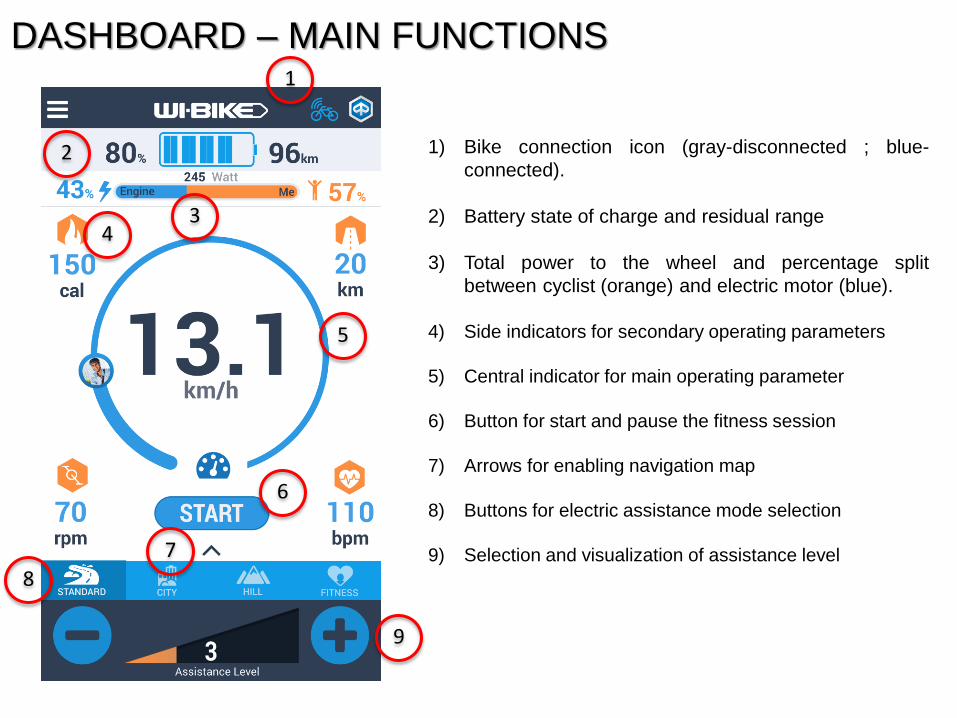
1) Bike connection icon (gray-disconnected ; blue-
connected).
2) Battery state of charge and residual range
3) Total power to the wheel and percentage split
between cyclist (orange) and electric motor (blue).
4) Side indicators for secondary operating parameters
5) Central indicator for main operating parameter
6) Button for start and pause the fitness session
7) Arrows for enabling navigation map
8) Buttons for electric assistance mode selection
9) Selection and visualization of assistance level
1
2
3
5
4
6
7
8
9
DASHBOARD – PARAMETERS SELECTION
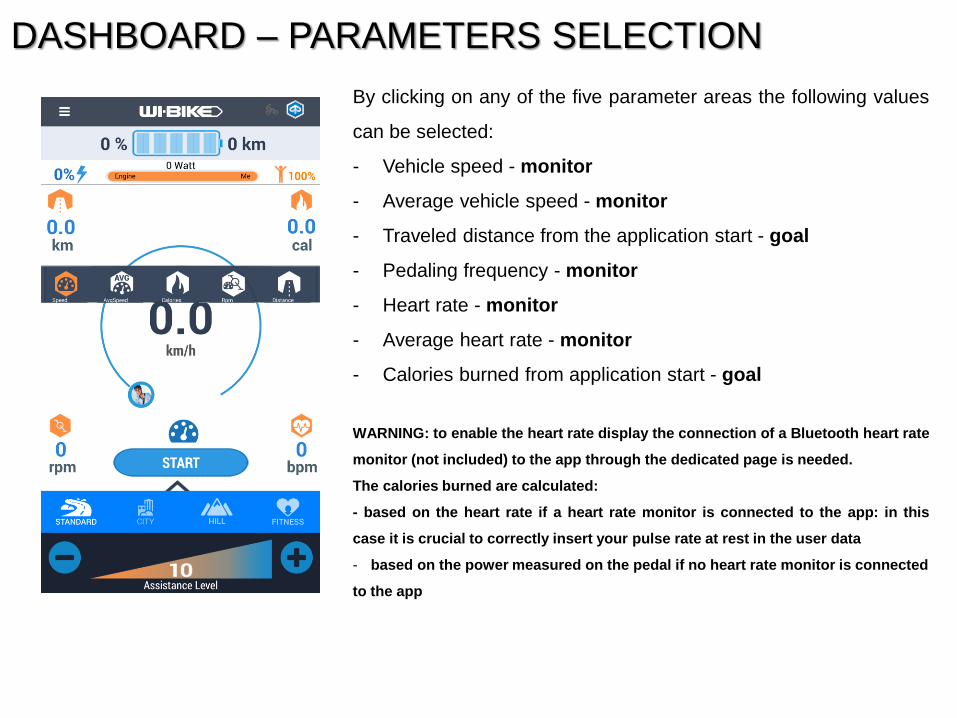
By clicking on any of the five parameter areas the following values
can be selected:
- Vehicle speed - monitor
- Average vehicle speed - monitor
- Traveled distance from the application start - goal
- Pedaling frequency - monitor
- Heart rate - monitor
- Average heart rate - monitor
- Calories burned from application start - goal
WARNING: to enable the heart rate display the connection of a Bluetooth heart rate
monitor (not included) to the app through the dedicated page is needed.
The calories burned are calculated:
- based on the heart rate if a heart rate monitor is connected to the app: in this
case it is crucial to correctly insert your pulse rate at rest in the user data
- based on the power measured on the pedal if no heart rate monitor is connected
to the app

DASHBOARD – SETTING OF MONITORS AND GOALS
Once the preferred data to be displayed has been selected, it
is possible to ignore (‘skip’) or fix (‘set’):
- upper and lower limits for parameters visualization
(monitor)
- target value to be achieved (goal)
For monitored parameters the data are displayed in green or
red whether within or outside the selected range.
The parameters associated to goals are increased while
using the app and the completed percentage is shown.
The split of the parameters between goals and monitors is
described on the previous page.
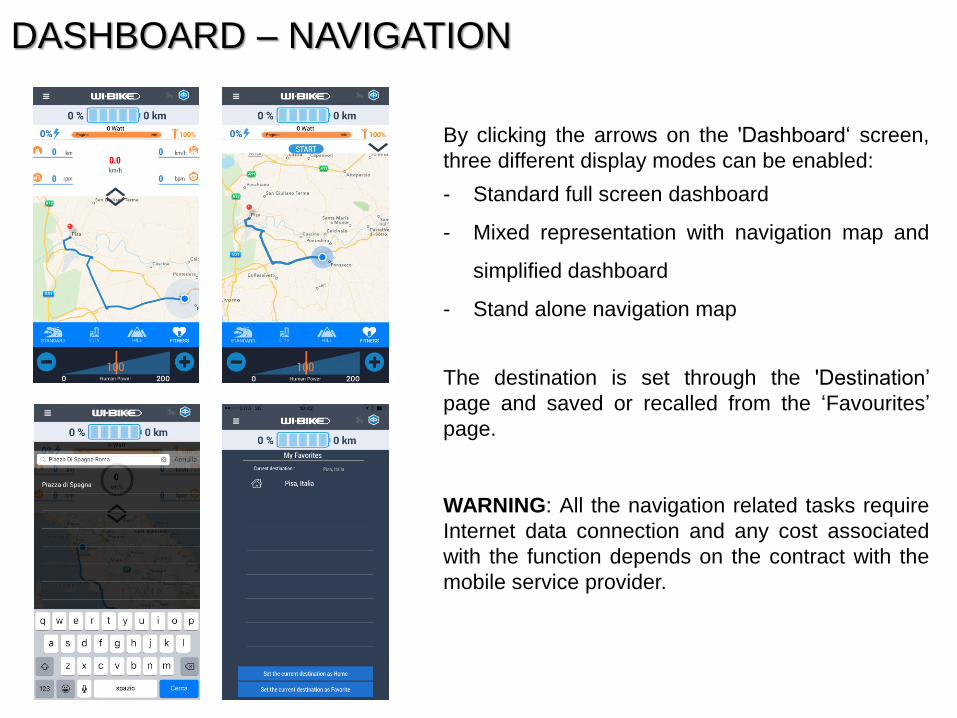
DASHBOARD – NAVIGATION
By clicking the arrows on the 'Dashboard‘ screen,
three different display modes can be enabled:
- Standard full screen dashboard
- Mixed representation with navigation map and
simplified dashboard
- Stand alone navigation map
The destination is set through the 'Destination’
page and saved or recalled from the ‘Favourites’
page.
WARNING: All the navigation related tasks require
Internet data connection and any cost associated
with the function depends on the contract with the
mobile service provider.
ASSISTANCE MODES
STANDARD: The pedal torque multiplier factor is constant and proportional to the assistance level
selected. '0‘ value corresponds to electric motor switched off and '10‘ value allows increasing the pedal
torque by a factor about 3.5. WARNING: the usage of high assistance levels may significantly reduce the
achievable range down to 40km for a fully charged battery.
CITY: The pedal torque multiplier factor is function of the vehicle speed and of the selected assistance
level. Electric assistance is high while starting and gradually decreases approaching 25km/h. This mode
optimizes battery range while maintaining a high reactivity of the electric motor in standing start.
HILL: The pedal torque multiplier factor is an increasing function of the pedal torque and of the selected
assistance level: the electric support is dynamically reduced when low efforts are detected (constant speed
on flat road or downhill) but it is immediately increased in case of relevant torque request (acceleration,
uphill). This mode optimizes the battery range by using the electric motor only when necessary.
FITNESS: Turns the Wi-Bike into a true mobile fitness machine: the rider selects its pedal power level to
be maintained along the route (i.e. 100 Watt) and the electric motor dynamically adjusts the assistance
level to maintain as constant as possible the effort close to the user selected target. In the graphic
representation of the strategy behavior, the orange bar and the related number indicate the target power
level; the blue area shows the instantaneous power of the cyclist.
WARNING: In order to safely use the app it is recommended to change the assistance level and
power target only through the buttons on the handlebar of your Wi-Bike (up / increases; down /
decreases). Any other interaction with the app while riding is strongly discouraged.
ASSISTANCE MODES – READ CAREFULLY!
When the app is connected to the Wi-Bike, the assistance mode on the LCD installed on the
vehicle is no longer shown beside when the electric motor is in 'OFF‘ condition (e.g. when
assistance level on the app is set to zero).
While using the dynamic assistance modes (CITY-HILL-FITNESS), the electric motor may be
in ‘OFF‘ condition even if non-zero assistance levels are selected on the app (e.g. when in
‘FITNESS’ mode the cyclist is delivering much lower power respect to the selected target).
These conditions are in line with the desired behavior of the system.
In dynamic assistance modes and, in particular, in FITNESS mode, the pedal torque
multiplier factor is calculated in real time by the app and sent to the Wi-Bike.
Therefore sudden changes in pedaling assistance over time shall be expected.
Although a minimum level of assistance is guaranteed at low speed for standing
starts, extreme caution is recommended while using the vehicle and potentially
dangerous maneuvers such as intersections, railway crossings etc. must be
appropriately planned.
The connection to the Wi-Bike depends on factors beyond the control of the vehicle (operating system, state of
charge of the mobile device, sharing of system resources with other active apps on the mobile device, etc.) and
thus can NOT be guaranteed. In order to prevent undesired shut down of the electric motor, a recovery mode has
been implemented with the following behavior:
- The recovery mode is automatically activated after 2 seconds in case of loss of connection or
inconsistent data sent by the app to the Wi-Bike.
- The Bluetooth connection icon on the instrument panel, previously on, starts to blink.
- During the recovery mode, the electric motor is put in 'TOUR' assistance mode and it is still possible to
change the assistance mode as usual with the buttons on the handlebar.
- If the Bluetooth connection with the bike is lost it can’t be restored until the Wi-Bike is switched off.
If the app is put in background mode (for example in case of incoming phone calls or when the
smartphone screen is locked), after some minutes the Wi-Bike may go into recovery mode since the
background Bluetooth communication between devices it is not guaranteed by some operating systems.
In this case the Wi-Bike will automatically exit from recovery mode as soon as the application comes back
in foreground.
WARNING! After the shut down of the Wi-Bike, the app can reconnect to the Wi-Bike
both in foreground and in background mode as soon as the Wi-Bike is started again.
Please be very careful and cancel the app from background following the rules of your
operating system in order to avoid unwanted bike activations.
ASSISTANCE MODES – READ CAREFULLY!
APP USE WITHOUT DASHBOARD LCD – 1
Thanks to the unique identifier code saved into the app, the smartphone can be used as an
electronic key for starting the vehicle without the dashboard removable LCD.
In order to make the operation successful, the smartphone connection mode must be
previously activated through the dashboard LCD menu as described in the section 'DEVICE
CONNECTION'. This operation must be performed when the vehicle is turned on for the first
time or if the function has been voluntarily deactivated.
Without the dashboard LCD, if the smartphone connection is enabled, once the bike is turned
on, the backlight of the vehicle dashboard base will start to blink indicating the possibility to
activate the bike through exchange of codes on Bluetooth channel.
It will remain in that state for three minutes after which the backlight will turn off and no
connection can be established until a bike restart.*
*WARNING: The backlight turn-off is not representative of the actual vehicle condition.
The only way to check the bike status is to verify the LED on the battery button. The
Wi-Bike must be always turned off by the button on the handlebar or on the battery.
APP USE WITHOUT DASHBOARD LCD – 2 Once the app is correctly connected to the bike, the backlight will turn off and the app goes to the
DASHBOARD screen showing the bike data.
If the code exchange fails, the backlight will turn off anyway, but the app will be disconnected.
If the ‘recovery’ mode is triggered, the backlight start blinking indicating the lack of control of the bike from
the smartphone. Even in this situation it is possible to modify (until switch off) the assistance level of the
electric motor (Power, Tour, Eco, Off) through the buttons on the handlebars but, obviously, nothing can be
displayed.
WARNING: The data exchange over Bluetooth channel may be influenced by several factors not related to
the systems installed on the Wi-Bike. For this reason the vehicle start up by smartphone connection can’t
be guaranteed in any condition.
In case of missing activation it is suggested to perform one or all of the listed actions in the following order:
- Turn off and restart the Wi-Bike vehicle
- Close and restart the Wi-Bike app
- Turn off and restart the Bluetooth module on the smartphone
- Turn off and restart the smartphone
Anyway Piaggio recommends to bring the LCD of the Wi-Bike in order to ensure the operation of
Wi-Bike.
If the battery of the smartphone drains out, no connection whit the bike will be possible, thus it is
strongly recommended to bring a power recharge cable suitable for the USB port of the Wi-Bike
dashboard.
WHERE IS MY BIKE
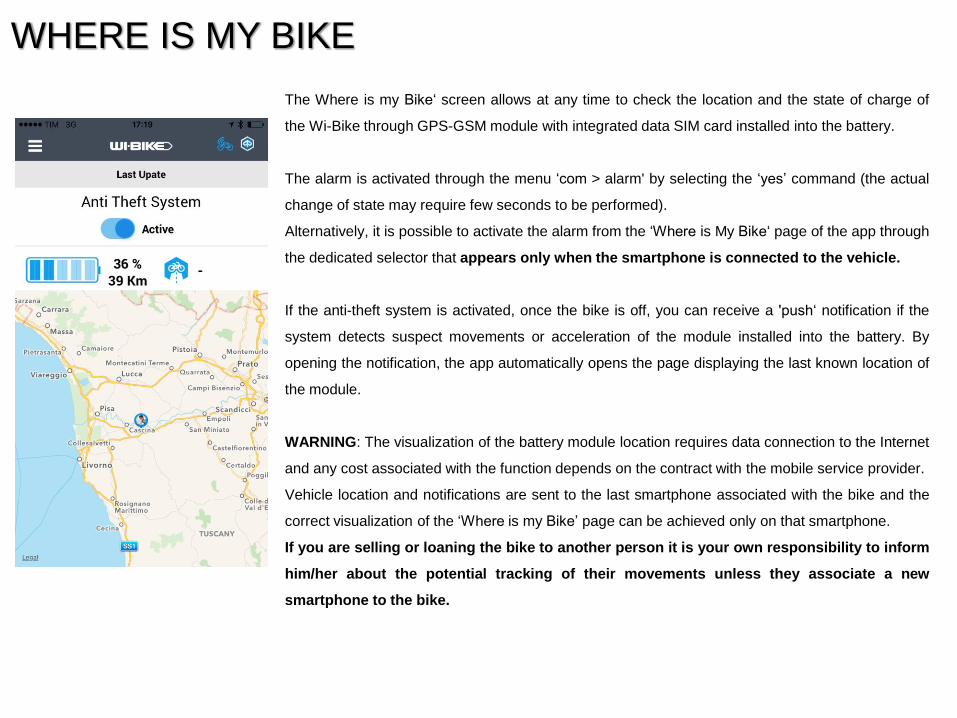
The Where is my Bike‘ screen allows at any time to check the location and the state of charge of
the Wi-Bike through GPS-GSM module with integrated data SIM card installed into the battery.
The alarm is activated through the menu ‘com > alarm' by selecting the ‘yes’ command (the actual
change of state may require few seconds to be performed).
Alternatively, it is possible to activate the alarm from the ‘Where is My Bike‘ page of the app through
the dedicated selector that appears only when the smartphone is connected to the vehicle.
If the anti-theft system is activated, once the bike is off, you can receive a 'push‘ notification if the
system detects suspect movements or acceleration of the module installed into the battery. By
opening the notification, the app automatically opens the page displaying the last known location of
the module.
WARNING: The visualization of the battery module location requires data connection to the Internet
and any cost associated with the function depends on the contract with the mobile service provider.
Vehicle location and notifications are sent to the last smartphone associated with the bike and the
correct visualization of the ‘Where is my Bike’ page can be achieved only on that smartphone.
If you are selling or loaning the bike to another person it is your own responsibility to inform
him/her about the potential tracking of their movements unless they associate a new
smartphone to the bike.
ANTI THEFT SYSTEM – READ CAREFULLY!
To preserve battery life and ensure the ability to recharge it even after long stops, the anti-
theft feature is turned off automatically if any of the following conditions occurs:
- Seven days after the vehicle turn off
- Critical discharge of the battery
The event is reported by push notification on the smartphone and the reactivation of the
function must be performed manually by the dashboard LCD or by the app when connected
to the vehicle.
Notifications of any possible theft attempt and about the deactivation of the services are sent
only to the last smartphone correctly associated to the vehicle.
Similarly, only the last smartphone associated with the vehicle can verify the location of
the battery GPS-GSM module.
The pairing of the smartphone with the battery GPS-GSM module can be checked in the
'Diagnostic‘ page by verifying if a numeric code (identification number of the SIM card
installed on the vehicle battery) is associated with the SIM card icon.
ANTI THEFT SYSTEM – READ CAREFULLY!
The activation of the alarm implies the automatic transmission to the Piaggio servers of some
operation data while the vehicle is running.
These data are used by Piaggio in order to increase the safety of customers and improve
product quality through preventive diagnostic strategies and statistical analysis.
For further details please refer to the privacy note accepted at the first start of the app.
If you want to send vehicle data to Piaggio servers when the anti-theft function is turned off,
you must explicitly enable remote communication by entering the menu ‘com > notification’
on the dashboard LCD and then select the 'yes‘ command.
The communication with the server is turned off automatically if any of the following
conditions occurs:
- Seven days after the vehicle turn off
- Critical discharge of the battery
The event is reported by push notification and the reactivation of the function must be
performed manually by the dashboard LCD.
The use of anti-theft system is guaranteed at no extra cost by Piaggio in partnership
with Vodafone for a period of 24 months from the vehicle purchase. After 24 months it
is needed contact Piaggio or Vodafone customer services to verify the renewal costs
and the service conditions.
ANTI THEFT SYSTEM – READ CAREFULLY!
The anti-theft module is installed inside the battery, so the function is active when the battery
is properly positioned on the vehicle.
If the alarm function is activated, the following task must be performed to obtain the proper
bike monitoring:
- turn off the bike by the button on the handlebar or on the battery
- keep the battery in the correct position on the vehicle.
After the bike shut down you have one minute to remove the battery from the vehicle without
triggering the alarm. During that minute the battery is potentially vulnerable to
tampering and therefore the utmost attention is recommended while going away from
the vehicle.
In the same manner, in order to avoid undesired notifications, the communication of a
possible theft event is sent with a three minutes delay. If within the three minutes the bike is
correctly started (with authentication by LCD or app), the dispatch of notifications triggered in
that period of time is canceled.
The dispatch of alert notifications is subject to Vodafone Global M2M GPRS network
coverage.
DIAGNOSTIC
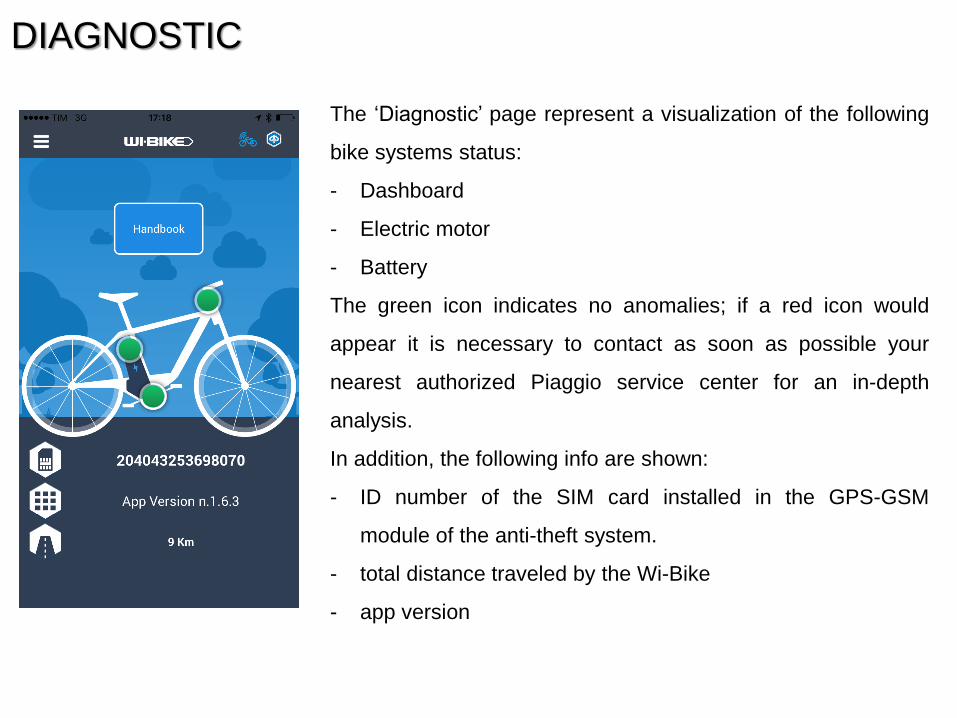
The ‘Diagnostic’ page represent a visualization of the following
bike systems status:
- Dashboard
- Electric motor
- Battery
The green icon indicates no anomalies; if a red icon would
appear it is necessary to contact as soon as possible your
nearest authorized Piaggio service center for an in-depth
analysis.
In addition, the following info are shown:
- ID number of the SIM card installed in the GPS-GSM
module of the anti-theft system.
- total distance traveled by the Wi-Bike
- app version