WHY IS SPECTRAL CALIBRATION NECESSARY · • ABI . Prism 7300 • ABI . Prism 7900 ... ABI Prism...
22
Page 1 of 22 UN-101217.02 CAL FLUOR ® AND QUASAR ® DYES Thermal Cycler Spectral Calibration Instructions WHY IS SPECTRAL CALIBRATION NECESSARY? In order to successfully use dual-labeled probes containing CAL Fluor® and/or Quasar® dyes in real-time, quantitative PCR (qPCR) multiplexed assays, certain real-time PCR instruments must first be calibrated to recognize the pure dye spectra. Although unnecessary for simple singleplex amplifications, spectral calibration is critical for multiplexed assays so that overlapping fluorescent signals can be resolved from one another. This document provides detailed, step-by-step instructions for calibrating these instruments. REAL-TIME INSTRUMENTS CURRENTLY SUPPORTED • ABI Prism ® 7700 • ABI Prism 7500 • Bio-Rad Laboratories iCycler ® iQ • Bio-Rad Laboratories iQ ™ 5 • Bio-Rad Laboratories Opticon ® 2 • Cepheid SmartCycler ® II • Eppendorf Mastercycler® ep Realplex • Roche LightCycler ® 480 REAL-TIME INSTRUMENTS NOT SUPPORTED • ABI Prism 7000 • ABI Prism 7300 • ABI Prism 7900 • Cepheid SmartCycler • Bio-Rad Laboratories Chromo4™ NORMALIZED EMISSION SPECTRA OF CAL FLUOR AND QUASAR DYES
Transcript of WHY IS SPECTRAL CALIBRATION NECESSARY · • ABI . Prism 7300 • ABI . Prism 7900 ... ABI Prism...

Page 1 of 22
UN-101217.02
CAL FLUOR® AND QUASAR® DYES
Thermal Cycler Spectral Calibration Instructions
WHY IS SPECTRAL CALIBRATION NECESSARY?
In order to successfully use dual-labeled probes containing CAL Fluor® and/or Quasar® dyes in real-time, quantitative PCR (qPCR) multiplexed assays, certain real-time PCR instruments must first be calibrated to recognize the pure dye spectra. Although unnecessary for simple singleplex amplifications, spectral calibration is critical for multiplexed assays so that overlapping fluorescent signals can be resolved from one another. This document provides detailed, step-by-step instructions for calibrating these instruments.
REAL-TIME INSTRUMENTS CURRENTLY SUPPORTED
• ABI Prism® 7700 • ABI Prism 7500 • Bio-Rad Laboratories iCycler® iQ • Bio-Rad Laboratories iQ™5 • Bio-Rad Laboratories Opticon® 2 • Cepheid SmartCycler® II • Eppendorf Mastercycler® ep Realplex • Roche LightCycler® 480
REAL-TIME INSTRUMENTS NOT SUPPORTED
• ABI Prism 7000 • ABI Prism 7300 • ABI Prism 7900 • Cepheid SmartCycler • Bio-Rad Laboratories Chromo4™
NORMALIZED EMISSION SPECTRA OF CAL FLUOR AND QUASAR DYES
Page 2 of 22
UN-101217.02
CALIBRATION DYE—TUBE CONTENTS
Each calibration dye is supplied in an individual tube containing 5 nmol of lyophilized calibration dye covalently linked to a 10 base oligonucleotide comprised of poly T residues (T10). Biosearch Technologies provides calibration dyes in the specifications shown below:
Calibration Dye Product Number Amount Provided US Price
FAM RD-5025 5 nmol $95.00 CAL Fluor Gold 540 RD-5080 5 nmol $95.00
CAL Fluor Orange 560 RD-5081 5 nmol $95.00 CAL Fluor Red 590 RD-5083 5 nmol $95.00 CAL Fluor Red 610 RD-5082 5 nmol $95.00 CAL Fluor Red 635 RD-5084 5 nmol $95.00
Quasar 570 RD-5063 5 nmol $95.00 Quasar 670 RD-5065 5 nmol $95.00
CALIBRATION CONCENTRATIONS
Commercially available real-time thermal cycler models differ substantially in their optics. Furthermore, several instruments of the same model can also differ in fluorescence detection sensitivity. Calibration concentrations required for each of the CAL Fluor and Quasar dyes will therefore vary according to instrument. Recommended concentrations (determined empirically at Biosearch and with selected scientific collaborators working in the field) are provided within the instrument-specific instructions included below. We suggest that you “fine-tune” these values using the procedure specified by your instrument manufacturer. If your model is not included in this document, please consult the instruction manual that came with your instrument for guidelines on custom dye calibration.
PREPARATION FOR USE After determining the final working concentration within your instrument-specific instructions, create a stock solution at a higher concentration by resuspending this calibration dye in a 1 x dilution buffer containing: 10 mM Tris-HCl pH 8.0, 50 mM NaCl, and 5 mM MgCl2. This dilution buffer should not contain an internal reference dye (without ROX). Store at -20 °C until you are ready to dilute to the working concentration and perform spectral calibration.
STORAGE AND HANDLING Calibration dyes should be subjected to a minimum number of freeze-thaw cycles. Therefore, we recommend that you prepare microvials, each having sufficient material for one dye calibration and store them frozen at -20 °C or -80 °C. Calibration dyes can be stored frozen in solution for over one year.
PROTECTION FROM PHOTOBLEACHING To ensure optimum activity and to safeguard maximum performance lifetime, calibration dyes should always be protected from light to avoid photobleaching.
Page 3 of 22
UN-101217.02
OPTIONAL REACTION PLATE CENTRIFUGATION
When dispensing calibration dyes into a reaction plate, care should be taken to ensure that bubbles are not introduced and that solution has not collected on the side of any wells. A brief centrifugation of the plate (<1500 xg for 5 seconds) may correct these problems, but is otherwise not required.
STORING AND SAVING CALIBRATION PLATES FOR FUTURE USE
After successfully calibrating your real-time PCR instrument, the reaction plate containing your calibration dye can be frozen at -20 ˚C and re-used in the future for subsequent calibrations. Most instruments recommend periodic recalibration. Consult your instrument’s manual for the recommended frequency of recalibration.
CALIBRATION INFORMATION FOR UNSUPPORTED INSTRUMENTS For certain real-time PCR instruments we are unable to provide specific calibration instructions or recommended concentrations. If your instrument is one of the following, please refer to the resources below or contact your instrument manufacturer directly. ABI Prism 7000 Sequence Detection System
Please refer to the ABI Prism 7000 Sequence Detection System User Guide, Part Number: 4330228.
ABI Prism 7300 Sequence Detection System
Please refer to the Applied Biosystems 7300/7500/7500 FAST Installation and Maintenance Guide,, Part Number: 4347828 Rev. E.
ABI Prism 7900 Sequence Detection System
Please refer to the document ABI Prism 7900HT Maintenance and Trouble-shooting Guide, Part Number: 4365542.
SmartCycler I
Please refer to the Operator’s Manual SC LS 2.0, Part Number: 900-0079 (available by purchase only) CUSTOMER SERVICE AND TECHNICAL SUPPORT
If you require additional information or technical assistance, please feel free to e-mail our Technical Support group at:
[email protected] For immediate assistance, our knowledgeable staff is available for telephone consultation from 8:00 AM to 5:00 PM, Monday through Friday, Pacific Coast time. Please contact us at:
1.800.GENOME.1 (436.6631) U.S./Canada only +1.415.883.8400 telephone +1.415.883.8488 fax
Page 4 of 22
UN-101217.02
INSTRUMENT-SPECIFIC CALIBRATION INSTRUCTIONS
ABI PRISM 7700 SEQUENCE DETECTION SYSTEM
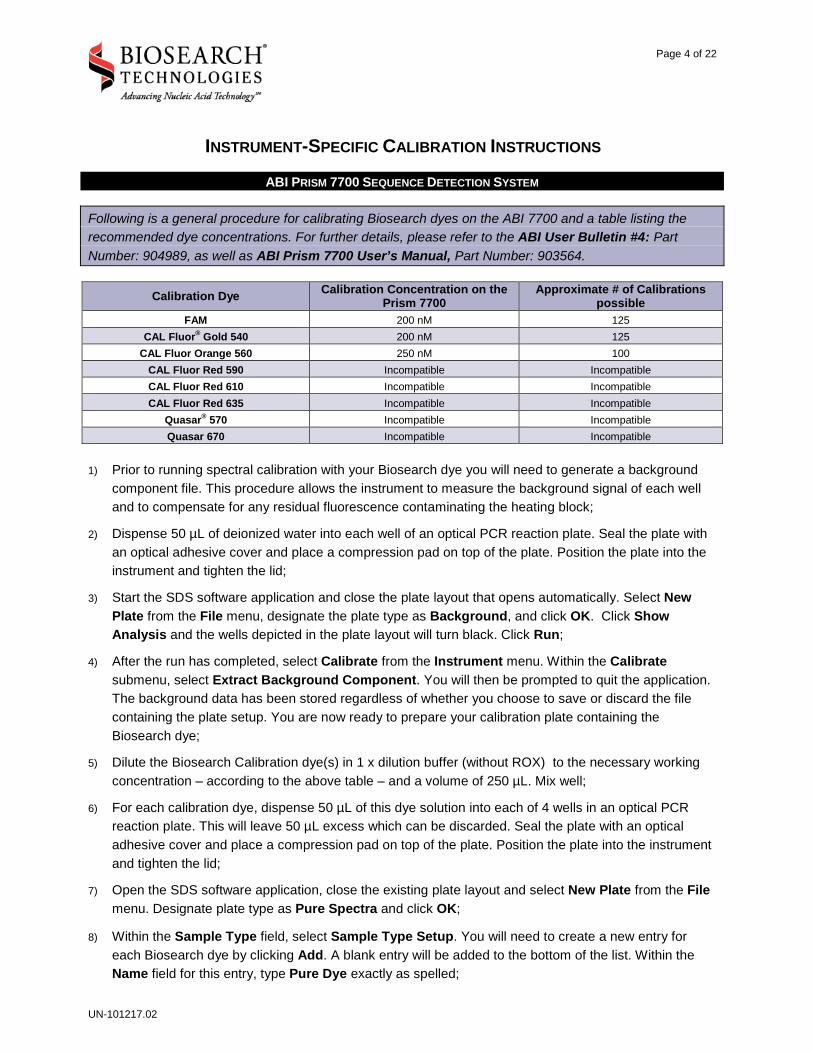
Following is a general procedure for calibrating Biosearch dyes on the ABI 7700 and a table listing the recommended dye concentrations. For further details, please refer to the ABI User Bulletin #4: Part Number: 904989, as well as ABI Prism 7700 User’s Manual, Part Number: 903564.
Calibration Dye Calibration Concentration on the Prism 7700
Approximate # of Calibrations possible
FAM 200 nM 125 CAL Fluor® Gold 540 200 nM 125
CAL Fluor Orange 560 250 nM 100 CAL Fluor Red 590 Incompatible Incompatible CAL Fluor Red 610 Incompatible Incompatible CAL Fluor Red 635 Incompatible Incompatible
Quasar® 570 Incompatible Incompatible Quasar 670 Incompatible Incompatible
1) Prior to running spectral calibration with your Biosearch dye you will need to generate a background
component file. This procedure allows the instrument to measure the background signal of each well and to compensate for any residual fluorescence contaminating the heating block;
2) Dispense 50 µL of deionized water into each well of an optical PCR reaction plate. Seal the plate with
an optical adhesive cover and place a compression pad on top of the plate. Position the plate into the instrument and tighten the lid;
3) Start the SDS software application and close the plate layout that opens automatically. Select New
Plate from the File menu, designate the plate type as Background, and click OK. Click Show Analysis and the wells depicted in the plate layout will turn black. Click Run;
4) After the run has completed, select Calibrate from the Instrument menu. Within the Calibrate
submenu, select Extract Background Component. You will then be prompted to quit the application. The background data has been stored regardless of whether you choose to save or discard the file containing the plate setup. You are now ready to prepare your calibration plate containing the Biosearch dye;
5) Dilute the Biosearch Calibration dye(s) in 1 x dilution buffer (without ROX) to the necessary working
concentration – according to the above table – and a volume of 250 µL. Mix well; 6) For each calibration dye, dispense 50 µL of this dye solution into each of 4 wells in an optical PCR
reaction plate. This will leave 50 µL excess which can be discarded. Seal the plate with an optical adhesive cover and place a compression pad on top of the plate. Position the plate into the instrument and tighten the lid;
7) Open the SDS software application, close the existing plate layout and select New Plate from the File
menu. Designate plate type as Pure Spectra and click OK;
8) Within the Sample Type field, select Sample Type Setup. You will need to create a new entry for each Biosearch dye by clicking Add. A blank entry will be added to the bottom of the list. Within the Name field for this entry, type Pure Dye exactly as spelled;
Page 5 of 22
UN-101217.02
9) Within the Acronym field, type a short name for the new dye name using the following conventions: the letter “Z” followed by the acronym that you wish to use. For example, ZORG could be used to describe CAL Fluor Orange 560;
Note: This naming convention is important for the following reasons: the ABI 7700 allows you to calibrate for an unlimited number of custom dyes, but a software bug requires users to maintain FAM, TAMRA, and ROX within the first seven entries alphabetically. This list of calibrated dyes can be viewed by selecting Edit Pure Dye within the InstrumentCalibrate menus. Adding a Z in front of your dye acronym ensures that this custom entry will be appended to the end of the list and not prevent the software from recognizing the previously mentioned dyes;
10) Make sure that the Quencher box is unchecked. Create entries for any additional Biosearch dyes you will calibrate on the same reaction plate, and then exit Sample Type Setup by clicking OK;
11) In the plate layout, select the wells that correspond to the wells in your reaction plate containing your
dye calibration solution. Once these wells are selected, label them as the appropriate Biosearch Pure Dye that is now an entry in the Sample Type pop-up menu. Repeat for any other Biosearch dyes. Click the Show Analysis button and your plate layout will turn entirely black. Click Run and the instrument will begin collecting the calibration data;
12) When the instrument has completed the data collection, select the four wells in the plate layout that
correspond to a calibration dye. Select Calibrate from the Instrument menu, and then select Extract Pure Dye. Click OK on the following confirmation screen;
13) You will now be presented with a screen showing the emission spectra of each of your four replicate
wells, as well as an emission spectrum representing the average of these replicates. If any of the spectra deviate from the rest of the group, remove these from the average and then click OK. Repeat for the other dyes you are calibrating simultaneously. Quit the application;
14) Calibration has been completed and a file titled Pure Dye has now been updated to include the new
dye(s) in addition to the previous standard dyes. This file is stored in the following directory: System Folder/Preferences/SDS/Spectra Components. Importantly, backup this Pure Dye file with an appropriate name such as Master Pure Dye;
15) The Pure Dye file will serve as your ‘dye palette’ when running future experiments and can be viewed
by selecting Edit Pure Dye within the InstrumentCalibrate menus. Just prior to performing a real-time PCR experiment with the Biosearch dye(s), you will need to delete dye entries that will remain unused during the experiment, using the Edit Pure Dye window;
IMPORTANT NOTE: filtering out unused dyes places the Biosearch dye within the first seven entries, enabling the SDS software to recognize it. This will permanently modify the Pure Dye file, which is why the backup described in step 16 is essential. IF THE PURE DYE FILE HAS NOT BEEN BACKED UP, DELETED ENTRIES CAN ONLY BE REGAINED THROUGH RECALIBRATION! Due to the software limitation described in step 9 above, the entries for FAM, TAMRA, and ROX should NEVER be removed or the application will not open properly;
16) Once you have completed real-time PCR with your Biosearch custom dye, you must restore the dye entries that were removed. Quit the SDS application and replace the current Pure Dye file with the Master Pure Dye backup file, making the appropriate name changes. Always keep a copy of the Master Pure Dye file elsewhere on the computer for future use.
Page 6 of 22
UN-101217.02
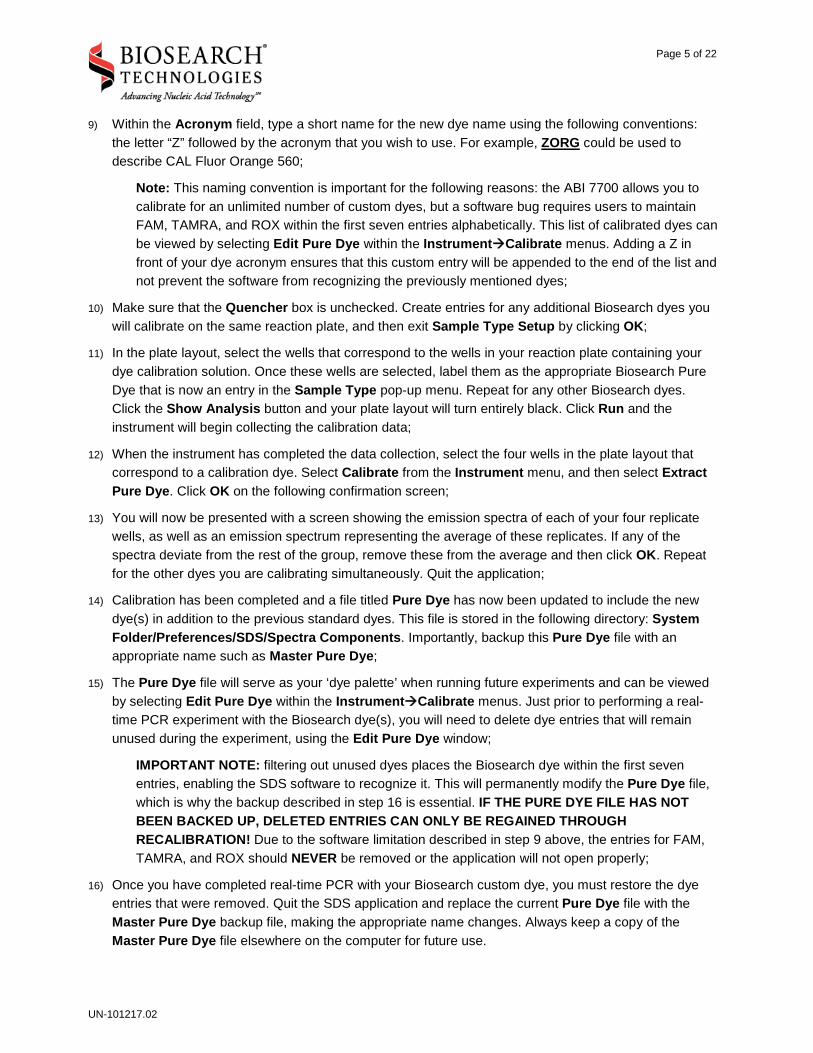
ABI 7500 SEQUENCE DETECTION SYSTEM Following is a general procedure for calibrating Biosearch dyes on the ABI 7500 and a table listing the recommended dye concentrations. For further details, please refer to the ABI 7300/7500/7500 Fast Real Time PCR System Installation and Maintenance Guide, Part Number: 4347828 Rev. E.
Calibration Dye Calibration Concentration on the 7500
Approximate # of Calibrations possible
FAM Pre-Calibrated Pre-Calibrated CAL Fluor Gold 540 100 nM 25
CAL Fluor Orange 560 75 nM 33 CAL Fluor Red 590 100 nM 25 CAL Fluor Red 610 60 nM 41 CAL Fluor Red 635 40 nM 62
Quasar 570 Unknown Unknown Quasar 670 75 nM 33
1) Before calibrating your Biosearch dyes, a background and optical calibration must be performed.
Please refer to the ABI 7300/7500/7500 Fast Real Time PCR System Installation and Maintenance Guide for further instructions. The background calibration allows the software to measure the fluorescence intrinsic to the 7500 instrument and subtract this out from the raw spectral data of future runs. The optical calibration is unique to the ABI 7500 and is required because of the optical effects of the additional Cy 5 filter. Once these calibrations have been completed, begin preparing the Biosearch dye calibration plate(s), as described below;
2) For each of the Biosearch dyes that you wish to calibrate, dilute an aliquot of the stock dye(s) into 1 x dilution buffer (without ROX) and to the recommended working concentration indicated in the table above. The total volume of this dilution should be 2.0 mL;
3) Starting with one Biosearch Calibration Dye, dispense 20 µL from this dilution into all wells of an optical PCR reaction plate. Seal the plate with an optical adhesive seal. Prepare additional plates in the same manner for each additional dye that you with to calibrate;
4) Open the 7500 SDS software application. In the Quick Startup dialog box, click Create New Document. Under the Assay drop-down menu, select Pure Spectra, choose 96-well clear as the container and designate Blank Document as the template;
5) Once the Pure Spectra Calibration Manager opens, click Add Dye to create a new entry for this custom dye. Enter the name of the appropriate Biosearch dye and click OK. Repeat this procedure to add a new entry for each Biosearch dye that will be calibrated;
6) Next, select one of these new entries in the Dye List field and click Calibrate. When prompted to disconnect the plate document, click Yes. Load the reaction plate containing the proper calibration dye into the instrument when directed by the software. Then click Yes. The software will automatically begin the calibration run;
7) Upon completion of the calibration run, remove the reaction plate from the instrument. Repeat step 6 for all remaining Biosearch dyes;
Page 7 of 22
UN-101217.02
8) After completing all calibrations, it is important to examine the calibration data in order to screen for inconsistencies in dye spectra. Select the Results tab and then the Spectra sub-tab. Highlight all of the wells by clicking the upper-left corner box of the plate map. Under the Analysis menu, choose Extract Pure Spectra and click OK. The software will now present a plot of the emission spectra for each of the 96 replicate wells. Verify that the peak of the spectra occurs in the correct filter.
9) The calibration is complete and the data is automatically saved as an SDS document titled Pure Dye in the following directory: Applied Biosystems/SDS Documents;
10) Repeat steps 8-9 to analyze the calibration data for the remaining Biosearch dyes, which are presented in plate documents beneath the active one, and then quit the application;
11) Before the Biosearch dyes can be added to a plate document, a detector must be created for each dye. Within the 7500 SDS Software, select Detector Manager under the Tools menu. Under the File menu, choose New. Enter a name and select a detector color. Make sure to select None within the Quencher Dye field. After a detector has been created for each dye, click Done. You are now ready to run your Biosearch dyes on the 7500 instrument.

Page 8 of 22
UN-101217.02
BIO-RAD LABORATORIES iCYCLER IQ Following is a general procedure for calibrating Biosearch dyes on the Bio-Rad iCycler For further details, please refer to the iCycler iQ Real-Time Detection System Instruction Manual, Part Number: 170-8740, and the following table for recommended concentrations.
Calibration Dye Calibration Concentration on the iCycler
Approximate # of Calibrations possible
FAM 300 nM 33 CAL Fluor Gold 540 300 nM 33
CAL Fluor Orange 560 300 nM 33 CAL Fluor Red 590 300 nM 33 CAL Fluor Red 610 300 nM 33 CAL Fluor Red 635 300 nM 33
Quasar 570 300 nM 33 Quasar 670 300 nM 33
1) Calibration data for the iCycler is saved to the file RME.ini located in the directory C:\Program
Files\Bio-Rad\iCycler\ini. By opening this file in a word processor you can view the spectral profile for each of the dyes that are currently calibrated. More information on this file is available in Appendix I of the Resource Guide. Before performing calibration of any Biosearch dyes, it is important to make a backup copy of this file with an appropriate name such as Original RME.ini;
2) To ensure that the iCycler collects spectral data on all relevant channels, it is necessary to anticipate which fluorescent dyes you might use together on a reaction plate and calibrate for all of those simultaneously in one run. For example, if you multiplex a FAM, CAL Fluor Orange 560, and CAL Fluor Red 610 assay, but had calibrated for each of these dyes on separate days, an error message might result stating, “Response Matrix element not found in RME database…” Recalibration is then necessary;
3) Dilute each Biosearch Calibration dye in 1 x dilution buffer (without ROX)to the working concentration of 300nM and a volume of 550 µL. Mix well;
4) For each dye, dispense 50 µL of the Biosearch calibration solution into each of 10 wells in an optical PCR reaction plate. This will leave you with a 50 µL excess for each calibration solution, which you can discard. Seal the plate with an optical adhesive cover and then save it until you are prompted to place it into the iCycler;
5) Start the iCycler software application. In the Library mode, check to make sure that you are in the View Protocol pane and select the PureDyeCalibration.tmo thermal cycling protocol;
6) Switch to the View Plate Setup pane and select the Pure Dye.pts plate setup. Click the button Edit this Plate Setup and you will be transferred to the Workshop mode of the application;
7) Clear the existing well labels by selecting the Erase function and clicking the top left corner of the plate layout;
8) Next, select the Pure Dye button and label the wells on the plate layout that correspond to the wells in the reaction plate containing the calibration dye(s);
Page 9 of 22
UN-101217.02
9) Switch to the Select and load fluorophores pane and deselect any of the fluorophore entries that are currently checked;
10) The fluorophore entries are labeled with standard dye names followed by the excitation filter through which they are detected. Make a note of those standard dye entries that are coupled with excitation filters appropriate for the Biosearch dye(s) you will be calibrating. Ideally, your choice should be an entry that is infrequently used and whose calibration information can be overwritten to accommodate the Biosearch dye. CAL Fluor Gold 540, CAL Fluor Orange 560, and Quasar 570 are each optimally excited using the 530/30X filter. CAL Fluor Red 590 is optimally excited using the 545/30X filter. CAL Fluor Red 610 is optimally excited using the 575/30X filter. CAL Fluor Red 635 and Quasar 670 are each optimally excited using the 635/30X filter.
IMPORTANT NOTE: the iCycler does not permit you to create new dye entries beyond their list of standard dyes. Therefore, to use a custom dye on this instrument requires calibrating a standard entry using the custom dye calibration solution. It will be a good idea to leave a note near the instrument outlining the dyes that have been calibrated for the various entries. This calibration will overwrite the previous settings for that entry, which is why the backup described in step 1 is essential! If the need ever arises to use the original dye that was replaced by the Biosearch dye, the backup RME.ini file can be substituted for the modified one.
11) Check the box of the standard dye entry for which you will calibrate the Biosearch dye. You will be immediately prompted to select a color representing this dye. On the plate layout, select the wells that you designated as Pure Dye and they will be filled in with the color of this entry. Repeat for any additional Biosearch dyes that you will be calibrating simultaneously;
12) After you have designated the location of the calibration dye on your plate layout, click Save this plate setup and finally, Run with selected protocol;
13) The screen will switch to the Run Prep pane, and at this point you should place an external well factor plate into the instrument. Preparation of an external well factor plate is described on page 54 of the Resource Guide. Select Begin Run and the instrument will prompt you to enter a name for the optical data file that will be generated. The iCycler will first collect optical data for the well factors. When the iCycler pauses, open the instrument, remove the well factor plate, and replace it with the reaction plate containing your calibration dyes. Click Continue Running Protocol;
14) When calibration has completed, you need to make a backup of the now-modified RME.ini file with an appropriate name such as Current RME.ini. You are now prepared to run real-time PCR using your custom Biosearch dye on the iCycler. In setting up the plate layouts for these future reactions, remember to use the standard dye entries upon which your Biosearch dyes are calibrated.
Page 10 of 22
UN-101217.02
BIO-RAD LABORATORIES iQ5
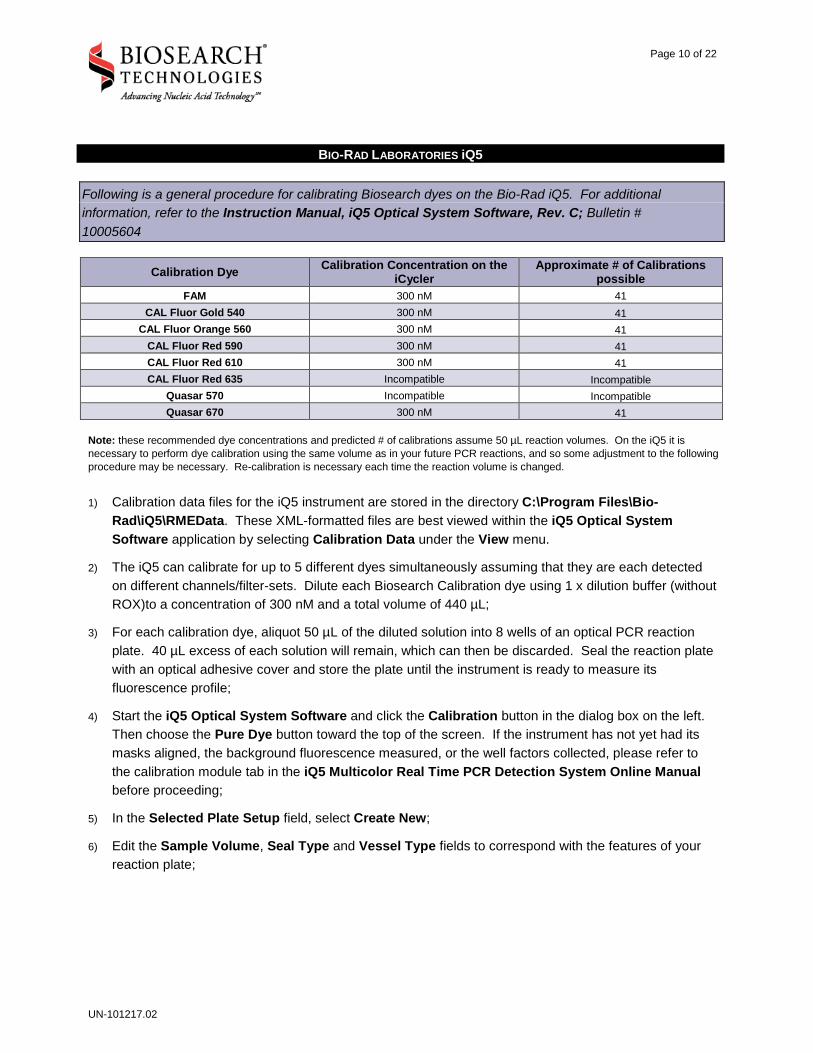
Following is a general procedure for calibrating Biosearch dyes on the Bio-Rad iQ5. For additional information, refer to the Instruction Manual, iQ5 Optical System Software, Rev. C; Bulletin # 10005604
Calibration Dye Calibration Concentration on the iCycler
Approximate # of Calibrations possible
FAM 300 nM 41 CAL Fluor Gold 540 300 nM 41
CAL Fluor Orange 560 300 nM 41 CAL Fluor Red 590 300 nM 41 CAL Fluor Red 610 300 nM 41 CAL Fluor Red 635 Incompatible Incompatible
Quasar 570 Incompatible Incompatible Quasar 670 300 nM 41
Note: these recommended dye concentrations and predicted # of calibrations assume 50 µL reaction volumes. On the iQ5 it is necessary to perform dye calibration using the same volume as in your future PCR reactions, and so some adjustment to the following procedure may be necessary. Re-calibration is necessary each time the reaction volume is changed. 1) Calibration data files for the iQ5 instrument are stored in the directory C:\Program Files\Bio-
Rad\iQ5\RMEData. These XML-formatted files are best viewed within the iQ5 Optical System Software application by selecting Calibration Data under the View menu.
2) The iQ5 can calibrate for up to 5 different dyes simultaneously assuming that they are each detected on different channels/filter-sets. Dilute each Biosearch Calibration dye using 1 x dilution buffer (without ROX)to a concentration of 300 nM and a total volume of 440 µL;
3) For each calibration dye, aliquot 50 µL of the diluted solution into 8 wells of an optical PCR reaction plate. 40 µL excess of each solution will remain, which can then be discarded. Seal the reaction plate with an optical adhesive cover and store the plate until the instrument is ready to measure its fluorescence profile;
4) Start the iQ5 Optical System Software and click the Calibration button in the dialog box on the left. Then choose the Pure Dye button toward the top of the screen. If the instrument has not yet had its masks aligned, the background fluorescence measured, or the well factors collected, please refer to the calibration module tab in the iQ5 Multicolor Real Time PCR Detection System Online Manual before proceeding;
5) In the Selected Plate Setup field, select Create New;
6) Edit the Sample Volume, Seal Type and Vessel Type fields to correspond with the features of your reaction plate;
Page 11 of 22
UN-101217.02
7) Click the Select/Add Fluorophores button. Choose a name for the fluorophore up to 8 characters long, and carefully choose the filter-set through which it should be detected. CAL Fluor Gold 540 and CAL Fluor Orange 560 are optimally detected using filter position 3. CAL Fluor Red 590 is optimally detected using filter position 4, while CAL Fluor Red 610 is optimally detected using filter position 5. Quasar 670 is optimally excited using filter position 6. Finally, Click Add New Fluor to make this Biosearch dye a permanent entry. Repeat this process for the remaining custom fluors you wish to calibrate;
8) Before leaving the Fluor Selector screen, check the box corresponding to each fluorophore that will be calibrated during this run. Select a color to identify each fluorophore on the plate map. Label the wells on the plate layout that correspond to the reaction plate wells that contain the calibration dyes;
9) Select Save and Exit Plate Editing. The window will revert back to the Pure Dye Plate Setup screen;
10) Load the reaction plate containing the Biosearch Calibration Dyes into the iQ5 instrument console. Click the Run Pure Dye Calibration button. The program will prompt you to name the calibration data file that will be produced;
11) When the pure dye run has finished, a dialog box will appear stating Pure Dye Calibration Run Complete. Click OK. You are now able to run real-time PCR using your Biosearch dyes on the iQ5.
Page 12 of 22
UN-101217.02
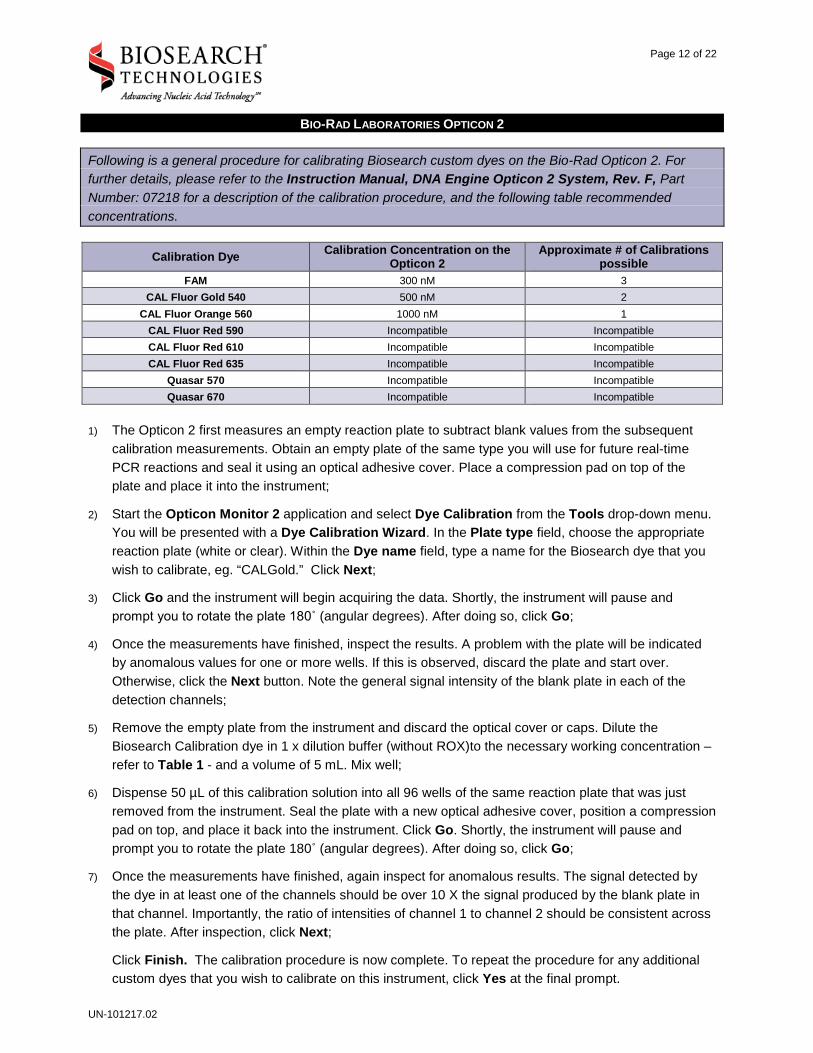
BIO-RAD LABORATORIES OPTICON 2 Following is a general procedure for calibrating Biosearch custom dyes on the Bio-Rad Opticon 2. For further details, please refer to the Instruction Manual, DNA Engine Opticon 2 System, Rev. F, Part Number: 07218 for a description of the calibration procedure, and the following table recommended concentrations.
Calibration Dye Calibration Concentration on the Opticon 2
Approximate # of Calibrations possible
FAM 300 nM 3 CAL Fluor Gold 540 500 nM 2
CAL Fluor Orange 560 1000 nM 1 CAL Fluor Red 590 Incompatible Incompatible CAL Fluor Red 610 Incompatible Incompatible CAL Fluor Red 635 Incompatible Incompatible
Quasar 570 Incompatible Incompatible Quasar 670 Incompatible Incompatible
1) The Opticon 2 first measures an empty reaction plate to subtract blank values from the subsequent
calibration measurements. Obtain an empty plate of the same type you will use for future real-time PCR reactions and seal it using an optical adhesive cover. Place a compression pad on top of the plate and place it into the instrument;
2) Start the Opticon Monitor 2 application and select Dye Calibration from the Tools drop-down menu. You will be presented with a Dye Calibration Wizard. In the Plate type field, choose the appropriate reaction plate (white or clear). Within the Dye name field, type a name for the Biosearch dye that you wish to calibrate, eg. “CALGold.” Click Next;
3) Click Go and the instrument will begin acquiring the data. Shortly, the instrument will pause and prompt you to rotate the plate 180˚ (angular degrees). After doing so, click Go;
4) Once the measurements have finished, inspect the results. A problem with the plate will be indicated by anomalous values for one or more wells. If this is observed, discard the plate and start over. Otherwise, click the Next button. Note the general signal intensity of the blank plate in each of the detection channels;
5) Remove the empty plate from the instrument and discard the optical cover or caps. Dilute the Biosearch Calibration dye in 1 x dilution buffer (without ROX)to the necessary working concentration – refer to Table 1 - and a volume of 5 mL. Mix well;
6) Dispense 50 µL of this calibration solution into all 96 wells of the same reaction plate that was just removed from the instrument. Seal the plate with a new optical adhesive cover, position a compression pad on top, and place it back into the instrument. Click Go. Shortly, the instrument will pause and prompt you to rotate the plate 180˚ (angular degrees). After doing so, click Go;
7) Once the measurements have finished, again inspect for anomalous results. The signal detected by the dye in at least one of the channels should be over 10 X the signal produced by the blank plate in that channel. Importantly, the ratio of intensities of channel 1 to channel 2 should be consistent across the plate. After inspection, click Next;
8) Click Finish. The calibration procedure is now complete. To repeat the procedure for any additional custom dyes that you wish to calibrate on this instrument, click Yes at the final prompt.
Page 13 of 22
UN-101217.02
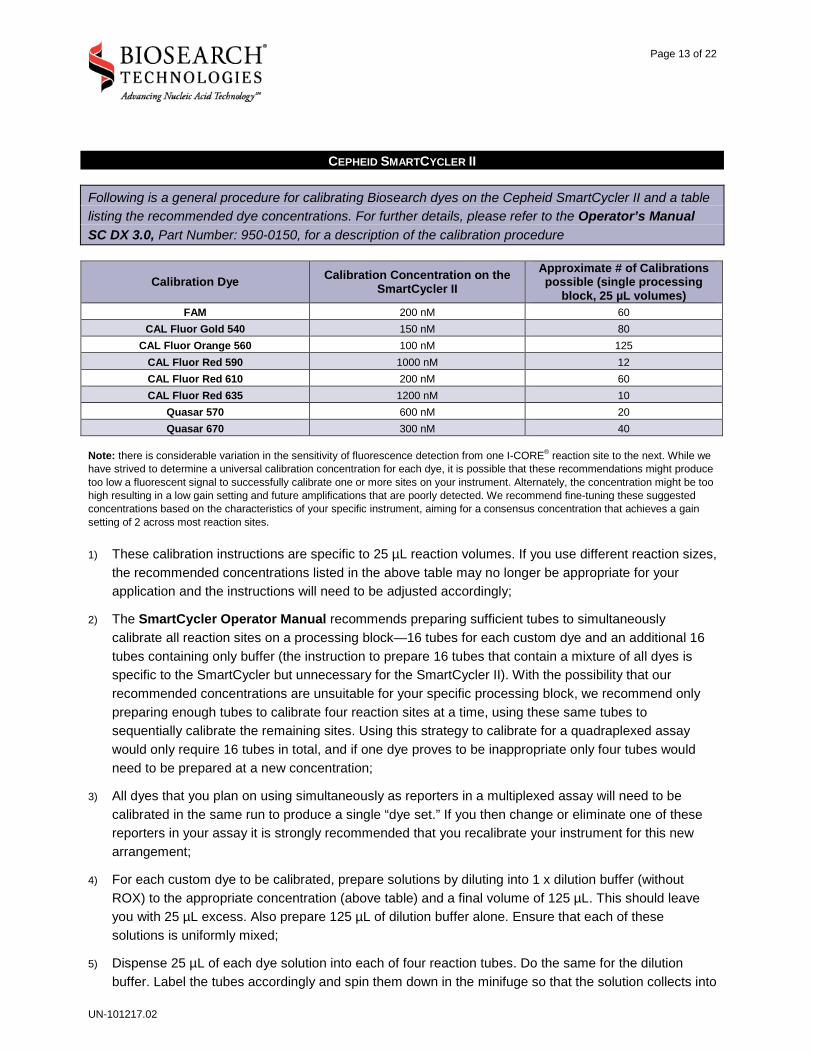
CEPHEID SMARTCYCLER II Following is a general procedure for calibrating Biosearch dyes on the Cepheid SmartCycler II and a table listing the recommended dye concentrations. For further details, please refer to the Operator’s Manual SC DX 3.0, Part Number: 950-0150, for a description of the calibration procedure
Calibration Dye Calibration Concentration on the SmartCycler II
Approximate # of Calibrations possible (single processing
block, 25 µL volumes) FAM 200 nM 60
CAL Fluor Gold 540 150 nM 80 CAL Fluor Orange 560 100 nM 125
CAL Fluor Red 590 1000 nM 12 CAL Fluor Red 610 200 nM 60 CAL Fluor Red 635 1200 nM 10
Quasar 570 600 nM 20 Quasar 670 300 nM 40
Note: there is considerable variation in the sensitivity of fluorescence detection from one I-CORE® reaction site to the next. While we have strived to determine a universal calibration concentration for each dye, it is possible that these recommendations might produce too low a fluorescent signal to successfully calibrate one or more sites on your instrument. Alternately, the concentration might be too high resulting in a low gain setting and future amplifications that are poorly detected. We recommend fine-tuning these suggested concentrations based on the characteristics of your specific instrument, aiming for a consensus concentration that achieves a gain setting of 2 across most reaction sites. 1) These calibration instructions are specific to 25 µL reaction volumes. If you use different reaction sizes,
the recommended concentrations listed in the above table may no longer be appropriate for your application and the instructions will need to be adjusted accordingly;
2) The SmartCycler Operator Manual recommends preparing sufficient tubes to simultaneously calibrate all reaction sites on a processing block—16 tubes for each custom dye and an additional 16 tubes containing only buffer (the instruction to prepare 16 tubes that contain a mixture of all dyes is specific to the SmartCycler but unnecessary for the SmartCycler II). With the possibility that our recommended concentrations are unsuitable for your specific processing block, we recommend only preparing enough tubes to calibrate four reaction sites at a time, using these same tubes to sequentially calibrate the remaining sites. Using this strategy to calibrate for a quadraplexed assay would only require 16 tubes in total, and if one dye proves to be inappropriate only four tubes would need to be prepared at a new concentration;
3) All dyes that you plan on using simultaneously as reporters in a multiplexed assay will need to be calibrated in the same run to produce a single “dye set.” If you then change or eliminate one of these reporters in your assay it is strongly recommended that you recalibrate your instrument for this new arrangement;
4) For each custom dye to be calibrated, prepare solutions by diluting into 1 x dilution buffer (without ROX) to the appropriate concentration (above table) and a final volume of 125 µL. This should leave you with 25 µL excess. Also prepare 125 µL of dilution buffer alone. Ensure that each of these solutions is uniformly mixed;
5) Dispense 25 µL of each dye solution into each of four reaction tubes. Do the same for the dilution buffer. Label the tubes accordingly and spin them down in the minifuge so that the solution collects into
Page 14 of 22
UN-101217.02
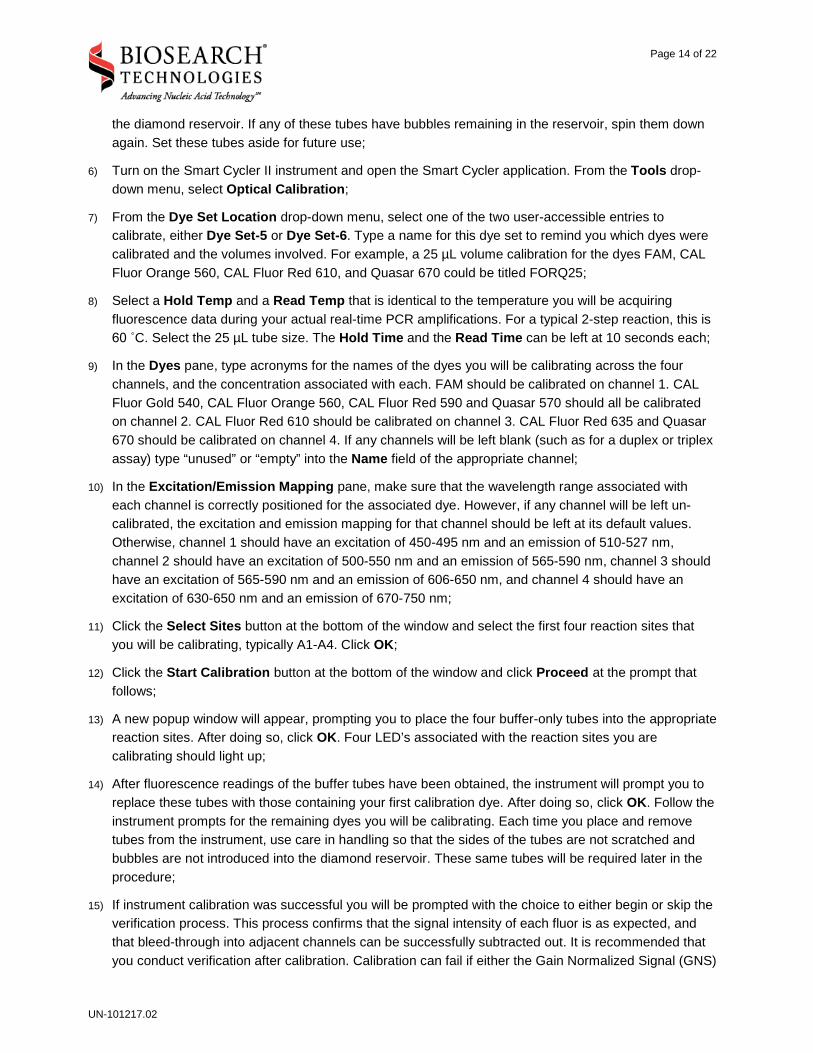
the diamond reservoir. If any of these tubes have bubbles remaining in the reservoir, spin them down again. Set these tubes aside for future use;
6) Turn on the Smart Cycler II instrument and open the Smart Cycler application. From the Tools drop-down menu, select Optical Calibration;
7) From the Dye Set Location drop-down menu, select one of the two user-accessible entries to calibrate, either Dye Set-5 or Dye Set-6. Type a name for this dye set to remind you which dyes were calibrated and the volumes involved. For example, a 25 µL volume calibration for the dyes FAM, CAL Fluor Orange 560, CAL Fluor Red 610, and Quasar 670 could be titled FORQ25;
8) Select a Hold Temp and a Read Temp that is identical to the temperature you will be acquiring fluorescence data during your actual real-time PCR amplifications. For a typical 2-step reaction, this is 60 ˚C. Select the 25 µL tube size. The Hold Time and the Read Time can be left at 10 seconds each;
9) In the Dyes pane, type acronyms for the names of the dyes you will be calibrating across the four channels, and the concentration associated with each. FAM should be calibrated on channel 1. CAL Fluor Gold 540, CAL Fluor Orange 560, CAL Fluor Red 590 and Quasar 570 should all be calibrated on channel 2. CAL Fluor Red 610 should be calibrated on channel 3. CAL Fluor Red 635 and Quasar 670 should be calibrated on channel 4. If any channels will be left blank (such as for a duplex or triplex assay) type “unused” or “empty” into the Name field of the appropriate channel;
10) In the Excitation/Emission Mapping pane, make sure that the wavelength range associated with each channel is correctly positioned for the associated dye. However, if any channel will be left un-calibrated, the excitation and emission mapping for that channel should be left at its default values. Otherwise, channel 1 should have an excitation of 450-495 nm and an emission of 510-527 nm, channel 2 should have an excitation of 500-550 nm and an emission of 565-590 nm, channel 3 should have an excitation of 565-590 nm and an emission of 606-650 nm, and channel 4 should have an excitation of 630-650 nm and an emission of 670-750 nm;
11) Click the Select Sites button at the bottom of the window and select the first four reaction sites that you will be calibrating, typically A1-A4. Click OK;
12) Click the Start Calibration button at the bottom of the window and click Proceed at the prompt that follows;
13) A new popup window will appear, prompting you to place the four buffer-only tubes into the appropriate reaction sites. After doing so, click OK. Four LED’s associated with the reaction sites you are calibrating should light up;
14) After fluorescence readings of the buffer tubes have been obtained, the instrument will prompt you to replace these tubes with those containing your first calibration dye. After doing so, click OK. Follow the instrument prompts for the remaining dyes you will be calibrating. Each time you place and remove tubes from the instrument, use care in handling so that the sides of the tubes are not scratched and bubbles are not introduced into the diamond reservoir. These same tubes will be required later in the procedure;
15) If instrument calibration was successful you will be prompted with the choice to either begin or skip the verification process. This process confirms that the signal intensity of each fluor is as expected, and that bleed-through into adjacent channels can be successfully subtracted out. It is recommended that you conduct verification after calibration. Calibration can fail if either the Gain Normalized Signal (GNS)
Page 15 of 22
UN-101217.02
or the Signal-to-Background ratio (S/B) is too low. Both of these errors indicate that calibration needs to be repeated with the concentration of one of the dyes boosted to a higher value;
16) The verification procedure will require the same set of tubes to be placed into the instrument again, but it is highly recommended that you shuffle their placement so that the same exact tube will not be placed back into the same exact reaction site. Before beginning verification, we recommend taking this moment to spin them down in the minifuge so that any bubbles introduced during the previous steps can be removed;
17) Follow the prompts during the verification procedure. Upon completion you will be prompted to restart the SmartCycler II application;
18) After the application has finished starting up, we recommend returning to the Optical Calibration window and clicking the Report button to view the results of the last calibration procedure. Make a note of the Gains associated with each channel to understand the intensity of your calibration dyes within the instrument’s range of detection. The gains run from 0 3. If you ever witness amplifications that abruptly plateau in your future PCR reactions, this is a sign that the optics have been saturated and that the gain setting was too high for your amplification on that channel. If endpoint fluorescence is important for your data analysis then it will be necessary to recalibrate that channel using a lower concentration that elicits a reduced gain setting;
19) Repeat this calibration procedure (step 6 step 17) for the remaining 12 reactions sites on the instrument. Once again, use care to not scratch the tubes or introduce bubbles. It is also important to keep all dye names and settings the same as with your previous calibration;
20) Once these are complete you are ready to run your multiplexed assay on the calibrated reaction sites.
Page 16 of 22
UN-101217.02
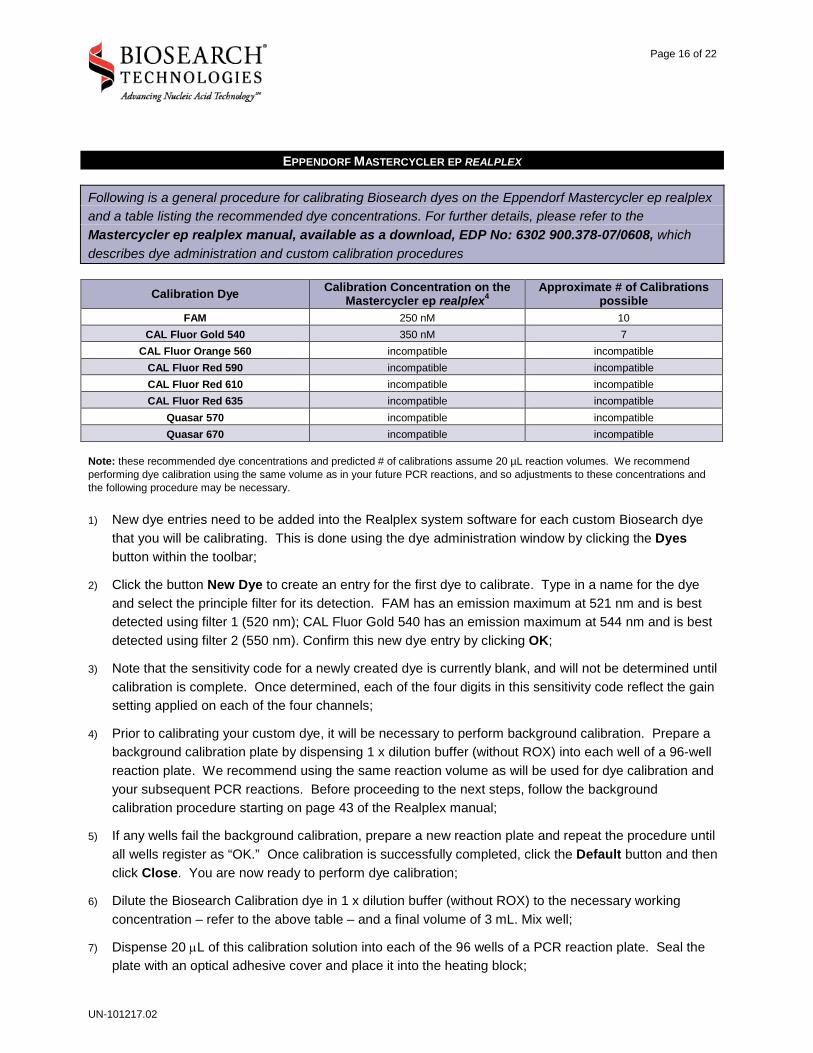
EPPENDORF MASTERCYCLER EP REALPLEX
Following is a general procedure for calibrating Biosearch dyes on the Eppendorf Mastercycler ep realplex and a table listing the recommended dye concentrations. For further details, please refer to the Mastercycler ep realplex manual, available as a download, EDP No: 6302 900.378-07/0608, which describes dye administration and custom calibration procedures
Calibration Dye Calibration Concentration on the Mastercycler ep realplex4
Approximate # of Calibrations possible
FAM 250 nM 10 CAL Fluor Gold 540 350 nM 7
CAL Fluor Orange 560 incompatible incompatible CAL Fluor Red 590 incompatible incompatible CAL Fluor Red 610 incompatible incompatible CAL Fluor Red 635 incompatible incompatible
Quasar 570 incompatible incompatible Quasar 670 incompatible incompatible
Note: these recommended dye concentrations and predicted # of calibrations assume 20 µL reaction volumes. We recommend performing dye calibration using the same volume as in your future PCR reactions, and so adjustments to these concentrations and the following procedure may be necessary. 1) New dye entries need to be added into the Realplex system software for each custom Biosearch dye
that you will be calibrating. This is done using the dye administration window by clicking the Dyes button within the toolbar;
2) Click the button New Dye to create an entry for the first dye to calibrate. Type in a name for the dye and select the principle filter for its detection. FAM has an emission maximum at 521 nm and is best detected using filter 1 (520 nm); CAL Fluor Gold 540 has an emission maximum at 544 nm and is best detected using filter 2 (550 nm). Confirm this new dye entry by clicking OK;
3) Note that the sensitivity code for a newly created dye is currently blank, and will not be determined until calibration is complete. Once determined, each of the four digits in this sensitivity code reflect the gain setting applied on each of the four channels;
4) Prior to calibrating your custom dye, it will be necessary to perform background calibration. Prepare a background calibration plate by dispensing 1 x dilution buffer (without ROX) into each well of a 96-well reaction plate. We recommend using the same reaction volume as will be used for dye calibration and your subsequent PCR reactions. Before proceeding to the next steps, follow the background calibration procedure starting on page 43 of the Realplex manual;
5) If any wells fail the background calibration, prepare a new reaction plate and repeat the procedure until all wells register as “OK.” Once calibration is successfully completed, click the Default button and then click Close. You are now ready to perform dye calibration;
6) Dilute the Biosearch Calibration dye in 1 x dilution buffer (without ROX) to the necessary working concentration – refer to the above table – and a final volume of 3 mL. Mix well;
7) Dispense 20 µL of this calibration solution into each of the 96 wells of a PCR reaction plate. Seal the plate with an optical adhesive cover and place it into the heating block;
Page 17 of 22
UN-101217.02
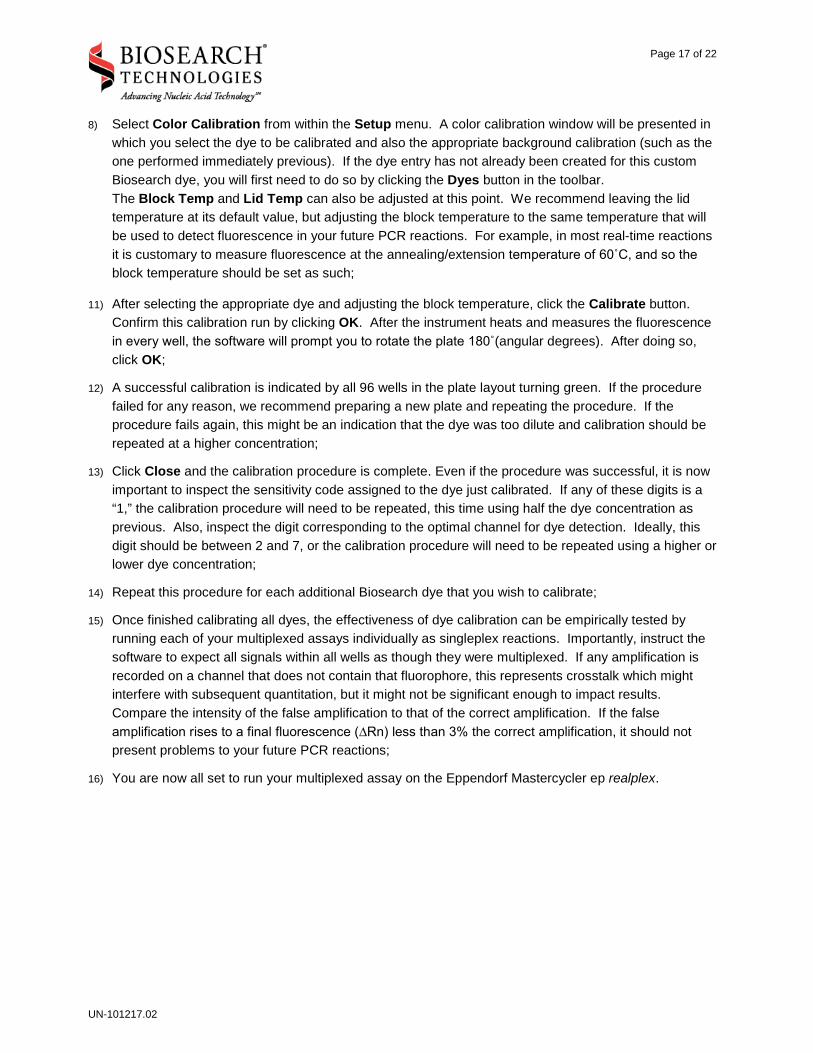
8) Select Color Calibration from within the Setup menu. A color calibration window will be presented in which you select the dye to be calibrated and also the appropriate background calibration (such as the one performed immediately previous). If the dye entry has not already been created for this custom Biosearch dye, you will first need to do so by clicking the Dyes button in the toolbar.
9) The Block Temp and Lid Temp can also be adjusted at this point. We recommend leaving the lid temperature at its default value, but adjusting the block temperature to the same temperature that will be used to detect fluorescence in your future PCR reactions. For example, in most real-time reactions it is customary to measure fluorescence at the annealing/extension temperature of 60˚C, and so the block temperature should be set as such;
10) 11) After selecting the appropriate dye and adjusting the block temperature, click the Calibrate button.
Confirm this calibration run by clicking OK. After the instrument heats and measures the fluorescence in every well, the software will prompt you to rotate the plate 180˚(angular degrees). After doing so, click OK;
12) A successful calibration is indicated by all 96 wells in the plate layout turning green. If the procedure failed for any reason, we recommend preparing a new plate and repeating the procedure. If the procedure fails again, this might be an indication that the dye was too dilute and calibration should be repeated at a higher concentration;
13) Click Close and the calibration procedure is complete. Even if the procedure was successful, it is now important to inspect the sensitivity code assigned to the dye just calibrated. If any of these digits is a “1,” the calibration procedure will need to be repeated, this time using half the dye concentration as previous. Also, inspect the digit corresponding to the optimal channel for dye detection. Ideally, this digit should be between 2 and 7, or the calibration procedure will need to be repeated using a higher or lower dye concentration;
14) Repeat this procedure for each additional Biosearch dye that you wish to calibrate;
15) Once finished calibrating all dyes, the effectiveness of dye calibration can be empirically tested by running each of your multiplexed assays individually as singleplex reactions. Importantly, instruct the software to expect all signals within all wells as though they were multiplexed. If any amplification is recorded on a channel that does not contain that fluorophore, this represents crosstalk which might interfere with subsequent quantitation, but it might not be significant enough to impact results. Compare the intensity of the false amplification to that of the correct amplification. If the false amplification rises to a final fluorescence (∆Rn) less than 3% the correct amplification, it should not present problems to your future PCR reactions;
16) You are now all set to run your multiplexed assay on the Eppendorf Mastercycler ep realplex.
Page 18 of 22
UN-101217.02
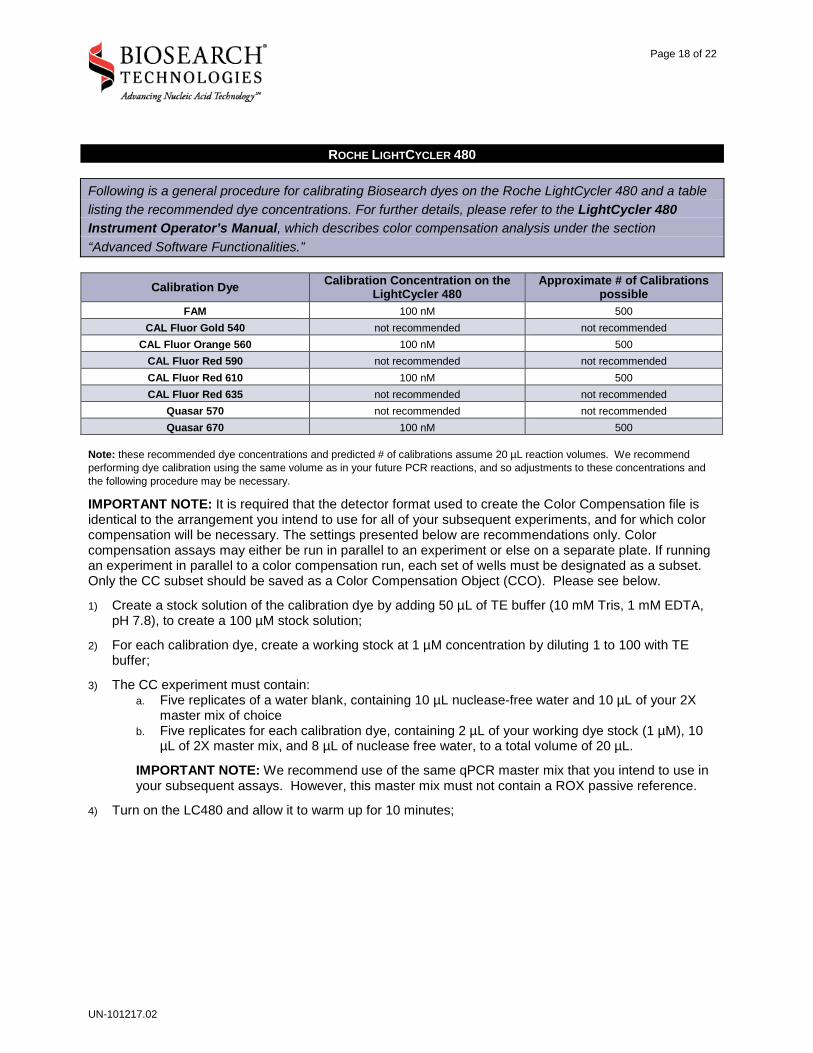
ROCHE LIGHTCYCLER 480
Following is a general procedure for calibrating Biosearch dyes on the Roche LightCycler 480 and a table listing the recommended dye concentrations. For further details, please refer to the LightCycler 480 Instrument Operator’s Manual, which describes color compensation analysis under the section “Advanced Software Functionalities.”
Calibration Dye Calibration Concentration on the LightCycler 480
Approximate # of Calibrations possible
FAM 100 nM 500 CAL Fluor Gold 540 not recommended not recommended
CAL Fluor Orange 560 100 nM 500 CAL Fluor Red 590 not recommended not recommended CAL Fluor Red 610 100 nM 500 CAL Fluor Red 635 not recommended not recommended
Quasar 570 not recommended not recommended Quasar 670 100 nM 500
Note: these recommended dye concentrations and predicted # of calibrations assume 20 µL reaction volumes. We recommend performing dye calibration using the same volume as in your future PCR reactions, and so adjustments to these concentrations and the following procedure may be necessary.
IMPORTANT NOTE: It is required that the detector format used to create the Color Compensation file is identical to the arrangement you intend to use for all of your subsequent experiments, and for which color compensation will be necessary. The settings presented below are recommendations only. Color compensation assays may either be run in parallel to an experiment or else on a separate plate. If running an experiment in parallel to a color compensation run, each set of wells must be designated as a subset. Only the CC subset should be saved as a Color Compensation Object (CCO). Please see below.
1) Create a stock solution of the calibration dye by adding 50 µL of TE buffer (10 mM Tris, 1 mM EDTA, pH 7.8), to create a 100 µM stock solution;
2) For each calibration dye, create a working stock at 1 µM concentration by diluting 1 to 100 with TE buffer;
3) The CC experiment must contain:
a. Five replicates of a water blank, containing 10 µL nuclease-free water and 10 µL of your 2X master mix of choice
b. Five replicates for each calibration dye, containing 2 µL of your working dye stock (1 µM), 10 µL of 2X master mix, and 8 µL of nuclease free water, to a total volume of 20 µL.
IMPORTANT NOTE: We recommend use of the same qPCR master mix that you intend to use in your subsequent assays. However, this master mix must not contain a ROX passive reference.
4) Turn on the LC480 and allow it to warm up for 10 minutes;
Page 19 of 22
UN-101217.02
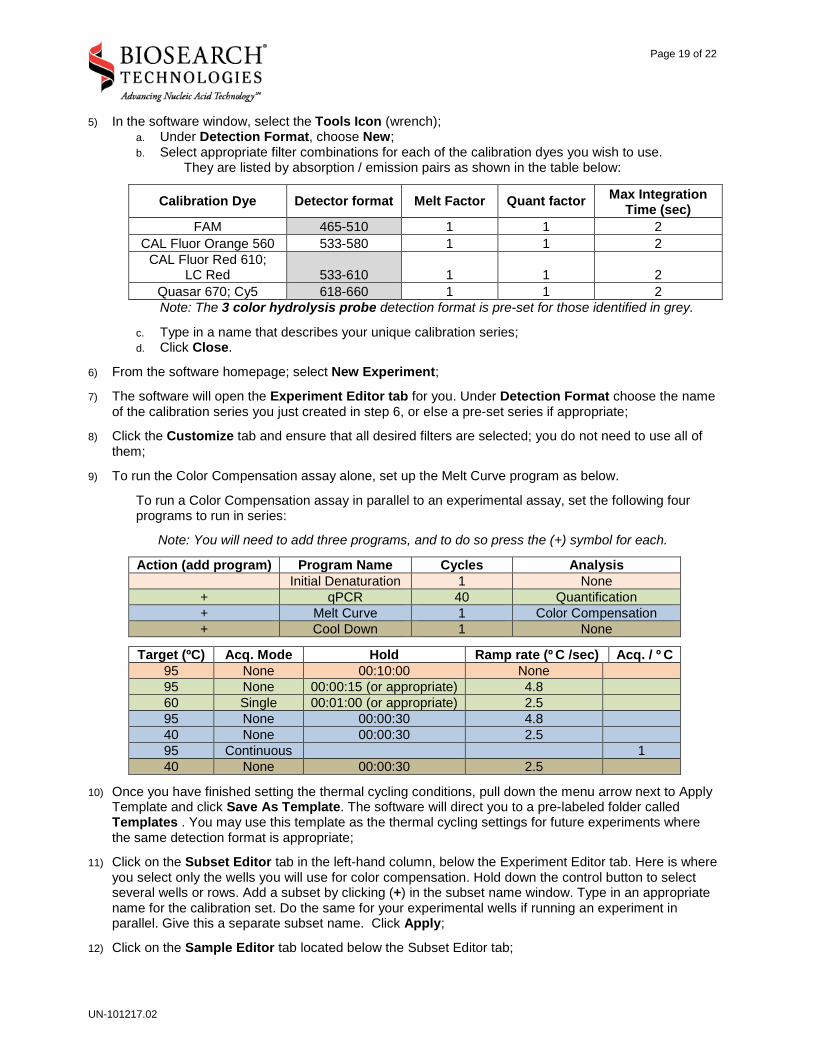
5) In the software window, select the Tools Icon (wrench); a. Under Detection Format, choose New; b. Select appropriate filter combinations for each of the calibration dyes you wish to use.
They are listed by absorption / emission pairs as shown in the table below:
Calibration Dye Detector format Melt Factor Quant factor Max Integration Time (sec)
FAM 465-510 1 1 2 CAL Fluor Orange 560 533-580 1 1 2
CAL Fluor Red 610; LC Red 533-610 1 1 2
Quasar 670; Cy5 618-660 1 1 2 Note: The 3 color hydrolysis probe detection format is pre-set for those identified in grey.
c. Type in a name that describes your unique calibration series; d. Click Close.
6) From the software homepage; select New Experiment;
7) The software will open the Experiment Editor tab for you. Under Detection Format choose the name of the calibration series you just created in step 6, or else a pre-set series if appropriate;
8) Click the Customize tab and ensure that all desired filters are selected; you do not need to use all of them;
9) To run the Color Compensation assay alone, set up the Melt Curve program as below.
To run a Color Compensation assay in parallel to an experimental assay, set the following four programs to run in series:
Note: You will need to add three programs, and to do so press the (+) symbol for each.
Action (add program) Program Name Cycles Analysis Initial Denaturation 1 None
+ qPCR 40 Quantification + Melt Curve 1 Color Compensation + Cool Down 1 None
Target (ºC) Acq. Mode Hold Ramp rate (º C /sec) Acq. / º C 95 None 00:10:00 None 95 None 00:00:15 (or appropriate) 4.8 60 Single 00:01:00 (or appropriate) 2.5 95 None 00:00:30 4.8 40 None 00:00:30 2.5 95 Continuous 1 40 None 00:00:30 2.5
10) Once you have finished setting the thermal cycling conditions, pull down the menu arrow next to Apply Template and click Save As Template. The software will direct you to a pre-labeled folder called Templates . You may use this template as the thermal cycling settings for future experiments where the same detection format is appropriate;
11) Click on the Subset Editor tab in the left-hand column, below the Experiment Editor tab. Here is where you select only the wells you will use for color compensation. Hold down the control button to select several wells or rows. Add a subset by clicking (+) in the subset name window. Type in an appropriate name for the calibration set. Do the same for your experimental wells if running an experiment in parallel. Give this a separate subset name. Click Apply;
12) Click on the Sample Editor tab located below the Subset Editor tab;
Page 20 of 22
UN-101217.02
13) In the Sample Editor window, find the Select Workflow window and click either: Color Compensation – if the assay is for color compensation purposes only; or Absolute Quantitation – if the assay includes a qPCR run; a. In the Select Filter Combinations, ensure all desired channels are checked; b. In the Select Samples window, select the subset you are using.
14) The table to the right allows you to assign sample names and to designate wells as replicates if you desire;
15) While all the channels listed will be collecting data, it is recommended that you select the dominant channel for each calibration dye using the pull down menu next to each sample name. The water blanks for the color calibration set must use ‘Water’ as the dominant channel;
16) To start, the run a plate must be inserted into the machine. Well A-1 must be located in the top left-hand corner;
17) In the right-hand column, click on the Save icon (floppy disk) to save the experiment; a. The software will direct you to a pre-labeled folder called Experiments; b. Save the experiment with a name representative of the calibration set and/or experimental
assay; c. Click Start Run.
18) Once the run is completed, open the Analysis tab located below the Sample Editor tab; a. In the Select Analysis window, select Color Compensation; b. If necessary, in the Subset Editor select only the calibration series of wells; c. Click Calculate.
19) Press the Save As CCO (Color Compensation Object). This will save the color compensation run in a pre-labeled folder named Special Data and a subfolder named CCC. Once saved, you may use the CCO to color compensate for an experimental assay with the same detector format, as described below;
To create a new experiment for which color compensation is available 1) From the software main window select New Experiment From Template;
a. Select the template you created for subsequent experimental assays; b. Click OK.
2) In the Experiment Editor; a. Make no changes to the Detection Format. This must remain unchanged; b. Add or modify the programs suitable to your experimental design.
3) In the Subset Editor, create one large subset which includes those wells to be used in the experiment; a. Click (+) to add a new subset if desired; b. Click Apply to save it to the experiment.
4) In the Sample Editor, select Absolute Quantitation in the Select Workflow window; a. Select the subset you just created which should represent the wells containing sample; b. Assign sample names, or designate as replicates, for each well.
5) Click on the Experiment Editor tab; a. Insert the sealed qPCR plate, (plate should be centrifuged to remove bubbles); b. Save the file by clicking on the Floppy disk icon; c. Press Start Run.
Page 21 of 22
UN-101217.02
To analyze a run using a CCO file 1) Open the Analysis tab after the run is complete;
2) Choose Absolute Quantitation in the Select Workflow window;
3) Press Calculate;
4) Press the Filter Combination tab. Select the filters you wish to compensate (must select at least two);
5) Press the Color Comp tab and select In Database to call up the CCO files you have saved earlier;
6) Choose the CCO file which contains the dye compensation information appropriate for the current experiment;
7) Click OK;
Cross-talk of fluorescent reporters will be subtracted out of their non-dominant channels and allow the results to be quantified more precisely.
Page 22 of 22
UN-101217.02
LEGAL DISCLAIMERS, TRADEMARK & COPYRIGHT INFORMATION
Copyright Information ©2014 Biosearch Technologies, Inc. Biosearch Technologies Trademarks and Applications Information
Biosearch, the Biosearch Technologies logo, CAL Fluor and Quasar are registered trademarks of Biosearch Technologies, Inc. Advancing Nucleic Acid Technology is a service mark of Biosearch Technologies, Inc. Biosearch Technologies is the holder of record of patent applications or patents for CAL Fluor® and Quasar® dyes. Commercial use of these technologies require a license from Biosearch. For further information, please contact Biosearch Technologies, Inc. at [email protected]. Other Disclaimers Prism is a registered trademark of Applied Biosystems Inc. iCycler is a registered trademark of Bio-Rad Laboratories. Opticon, iQ, and Chromo4 are a trademarks of Bio-Rad Laboratories. SmartCycler and SmartCycler II are registered trademarks of Cepheid, Inc. Mastercycler is a registered trademark of Eppendorf AG. LightCycler is a registered trademark of Roche Molecular Systems, Inc.
![Real-time quantitative PCR array to study drug-induced ... · Primer Express 2.0 Abi Prism software (PE Applied Biosystem, Foster City, CA, USA) as previously described,[12] employing](https://static.fdocuments.in/doc/165x107/5f06fb2a7e708231d41ab357/real-time-quantitative-pcr-array-to-study-drug-induced-primer-express-20-abi.jpg)