
WHEEL PULLDOWN FAUCET Model #: 5100...
4
Model #: 5100 WHEEL PULLDOWN FAUCET INSTALLATION INSTRUCTIONS 5100
Transcript of WHEEL PULLDOWN FAUCET Model #: 5100...
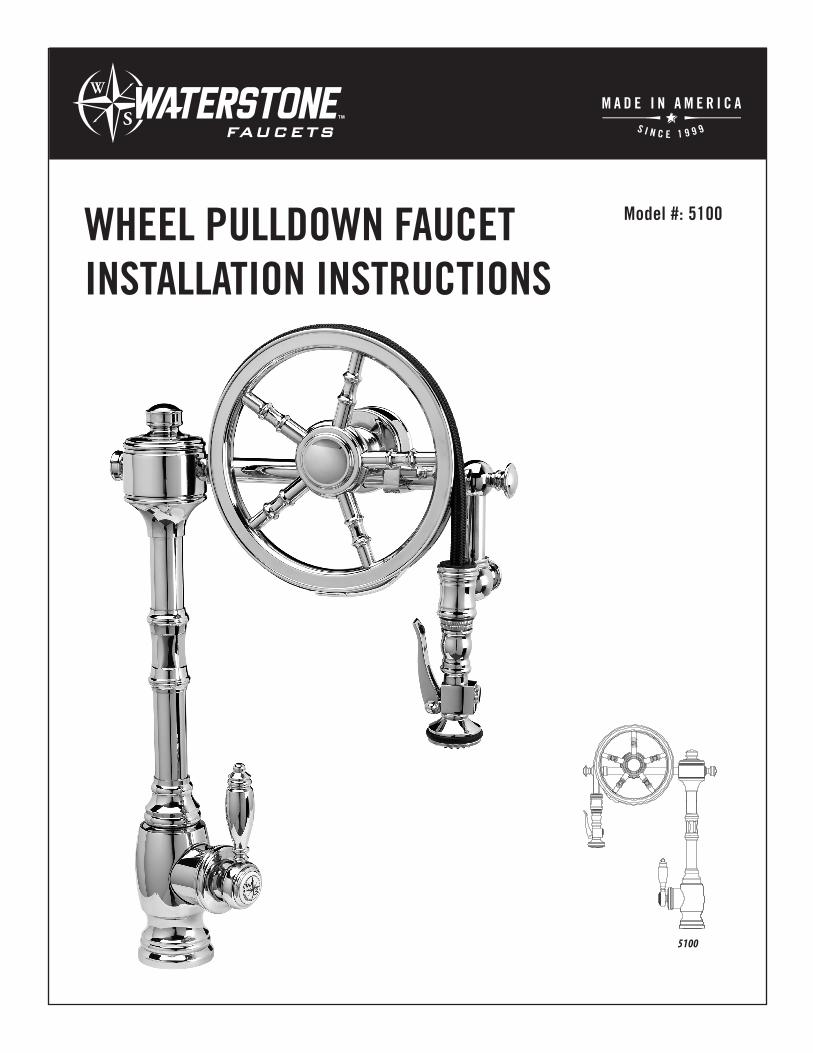
Model #: 5100WHEEL P ULLDOWN FAUCET INSTALLATION INSTRUCTIONS
5100

1 2 3 4
Turn o� water supply. Observe all local plumbing codes.
Inspect waste and water supplies for signs of damage.
Replace as necessary.
DO NOT use petroleum based products on this
faucet.
REQUIRED TOOLS: PARTS INCLUDED:
2. Phillips Screwdriver1. Adjustable Wrench
BEFORE YOU BEGIN YOUR INSTALLATION:
I N S T A L L A T I O N G U I D E
HK-THC-XX*TRADITIONAL HANDLE BUTTON KIT
HK-USM1375UNDER SINK MOUNTING HARDWARE KIT (1-3/8”)
*XX represents finish
LIFETIME WARRANTY
All Waterstone products manufactured by Waterstone carry a Limited Lifetime Guarantee against functional defect in material or workmanship in a residential application. Consult with an authorized Waterstone dealer for complete information about our warranty.
For any questions or concerns about your faucet’s warranty, contact Waterstone.
Waterstone Faucets41180 Raintree Court • Murrieta, CA 925621-888-304-0660www.waterstoneco.com

ECOUNTEROR SINK
1. 2. 3. 4.
A
B
C
D
WHEEL FAUCET INSTALLATION
Remove the clamp nut (A) and washer (B) from the threaded shroud (C).
Slide washer and thread the clamp nut onto threaded shroud. Tighten nut snug to underside of sink or counter.
Turn faucet to the desired handle position. Securely tighten clamp screws (E).
Fit flexible hoses (D) through hole on counter or sink. (No plumbers putty is required. O-ring seals base).
H C HC
COMPASS H/C COMPASS C/H FINISH MATCH
Waterstone faucets are designed for 3 different faucet positions. Handle on left, front and right. Your faucet is configured for the most common installation (see right). To reverse this and have the handle positioned on the left, connect the hose for cold water to the hot supply and the hose for hot water to the cold supply. This will maintain the relationship of pulling the handle for hot water or pushing for cold water.
HANDLE ON LEFT HANDLE IN FRONT HANDLE ON RIGHT
ORIGINAL FACTORY POSITIONMAY HIT BACKSPLASH
NEW ADJUSTED POSITION CLEARS BACKSPLASH
H C
AB
C D
A B E
E
G
C D F
F
HANDLE POSITION
OPTIONAL DECORATIVE BUTTONS(3 INCLUDED)
1. To remove, place a small standard screwdriver in the slot at the bottom of metal ring that surrounds the handle buttons. Gently pry the button from faucet handle.2. To replace, position button and snap in with thumb.
VEN-038-WHEL Rev. C
B
C
D
A
1. 2. 3.
4.
HANDLE ON LEFT HANDLE IN FRONT HANDLE ON RIGHT
ORIGINAL FACTORY POSITIONMAY HIT BACKSPLASH
NEW ADJUSTED POSITION CLEARS BACKSPLASH
H C
AB
C D
A B E
E
G
C D F
F
ORIGINAL FACTORY POSITIONMAY HIT BACKSPLASH
NEW ADJUSTED POSITION CLEARS BACKSPLASH
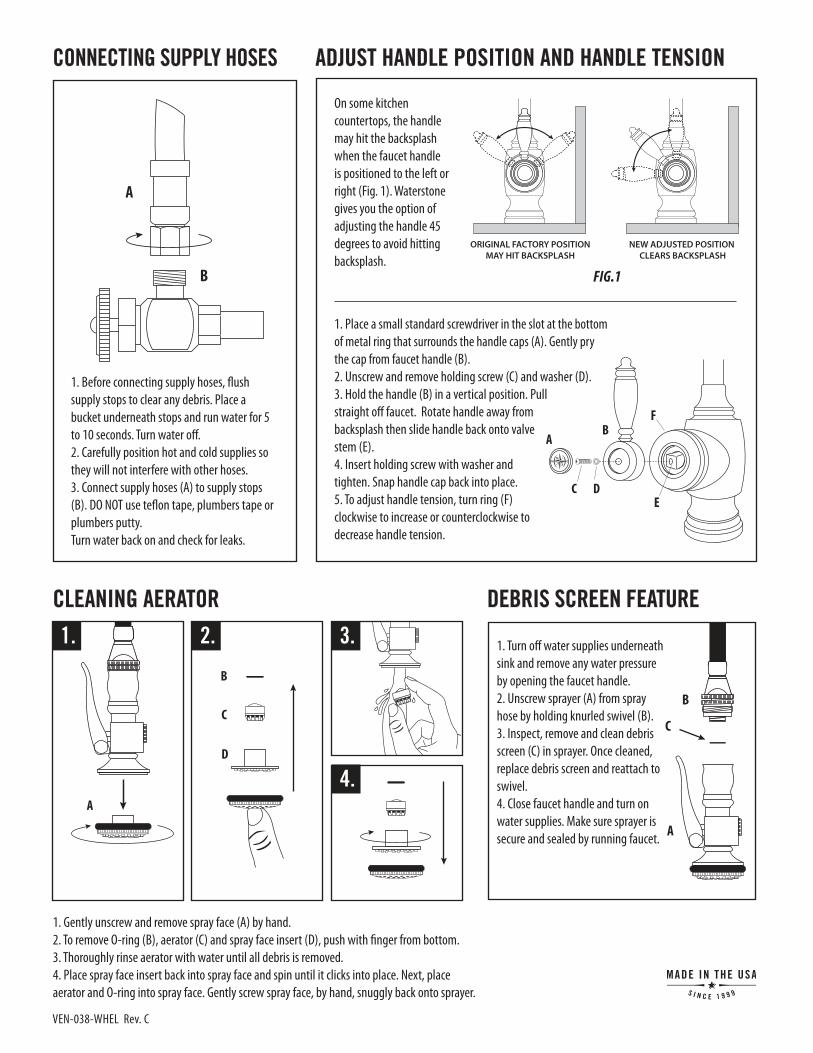
1. Place a small standard screwdriver in the slot at the bottom of metal ring that surrounds the handle caps (A). Gently pry the cap from faucet handle (B).2. Unscrew and remove holding screw (C) and washer (D).3. Hold the handle (B) in a vertical position. Pull straight off faucet. Rotate handle away from backsplash then slide handle back onto valve stem (E).4. Insert holding screw with washer and tighten. Snap handle cap back into place.5. To adjust handle tension, turn ring (F) clockwise to increase or counterclockwise to decrease handle tension.
ADJUST HANDLE POSITION AND HANDLE TENSION
On some kitchen countertops, the handle may hit the backsplash when the faucet handle is positioned to the left or right (Fig. 1). Waterstone gives you the option of adjusting the handle 45 degrees to avoid hitting backsplash.
FIG.1
1. Gently unscrew and remove spray face (A) by hand.2. To remove O-ring (B), aerator (C) and spray face insert (D), push with finger from bottom.3. Thoroughly rinse aerator with water until all debris is removed.4. Place spray face insert back into spray face and spin until it clicks into place. Next, place aerator and O-ring into spray face. Gently screw spray face, by hand, snuggly back onto sprayer.
CLEANING AERATOR
A
B
1. Before connecting supply hoses, flush supply stops to clear any debris. Place a bucket underneath stops and run water for 5 to 10 seconds. Turn water off.2. Carefully position hot and cold supplies so they will not interfere with other hoses.3. Connect supply hoses (A) to supply stops (B). DO NOT use teflon tape, plumbers tape or plumbers putty.Turn water back on and check for leaks.
CONNECTING SUPPLY HOSES
DEBRIS SCREEN FEATURE
B
C
A
1. Turn off water supplies underneath sink and remove any water pressure by opening the faucet handle.2. Unscrew sprayer (A) from spray hose by holding knurled swivel (B).3. Inspect, remove and clean debris screen (C) in sprayer. Once cleaned, replace debris screen and reattach to swivel.4. Close faucet handle and turn on water supplies. Make sure sprayer is secure and sealed by running faucet.


![DEVELOPING FEATURES OF WATER FAUCET BY ...arpnjournals.org/jeas/research_papers/rp_2016/jeas_0416...design [7], design of coconut fiber tablet case [8], innovative design of wheel](https://static.fdocuments.in/doc/165x107/5ff640d560809f5a1d1a2213/developing-features-of-water-faucet-by-design-7-design-of-coconut-fiber.jpg)


