What's New In ScreenOS 3.0? -
158
What’s New In ScreenOS 3.0 31 5HY$
Transcript of What's New In ScreenOS 3.0? -

What’s New In ScreenOS 3.0
�������������� �� ���
���

������������ Copyright © 1998-2001 NetScreen Technologies, Inc. NetScreen Technologies, Inc., the NetScreen logo, NetScreen-5, NetScreen-5XP, NetScreen-10, NetScreen-25, NetScreen-50, NetScreen-100, NetScreen-500, NetScreen-1000, NetScreen-Global Manager, NetScreen-Global PRO, NetScreen-Remote, GigaScreen ASIC, and NetScreen ScreenOS are trademarks and NetScreen is a registered trademark of NetScreen Technologies, Inc. All other trademarks and registered trademarks are the property of their respective companies.
NetScreen Technologies, Inc. 350 Oakmead Parkway, Suite 500 Sunnyvale, CA 94085 U.S.A.www.netscreen.com
����� � �This equipment has been tested and found to comply with the limits for a Class A digital device, pursuant to part 15 of the FCC rules. These limits are designed to provide reasonable protection against harmful interference in a light commercial installation. This equipment generates, uses and can radiate radio frequency energy, and, if not installed and used in accordance with the instruction, may cause harmful interference to radio communications. However, there is no guarantee that interference will not occur in a particular installation. If this equipment does cause harmful interference to radio or television reception, which can be determined by turning the equipment off and on, the user is encouraged to try to correct the interference by one or more of the following measures:
•Reorient or relocate the receiving antenna.•Increase the separation between the equipment and receiver.
•Consult the dealer or an experienced radio/TV technician for help.
•Connect the equipment to an outlet on a circuit different from that to which the receiver is con-nected.
Caution: Changes or modifications to this product could void the user's warranty and authority to oper-ate this device.
�������� �THE SPECIFICATIONS REGARDING THE PRODUCTS IN THIS MANUAL ARE SUBJECT TO CHANGE WITHOUT NOTICE. ALL STATEMENTS, INFORMATION, AND RECOMMENDATIONS IN THIS MANUAL ARE BELIEVED TO BE ACCURATE BUT ARE PRESENTED WITHOUT WARRANTY OF ANY KIND, EXPRESS OR IMPLIED. USERS MUST TAKE FULL RESPONSIBILITY FOR THEIR APPLICATION OF ANY PRODUCTS. NO PART OF THIS DOCUMENT MAY BE REPRODUCED OR TRANSMITTED IN ANY FORM OR BY ANY MEANS, ELECTRONIC OR MECHANICAL, FOR ANY PURPOSE, WITHOUT RECEIVING WRITTEN PERMISSION FROM NETSCREEN TECHNOLOGIES INC.
��������� �� ��� � �PLEASE READ THIS LICENSE AGREEMENT (“AGREEMENTS”) CAREFULLY BEFORE USING THIS PRODUCT. BY INSTALLING AND OPERATING, YOU INDICATE YOUR ACCEPTANCE OF THE TERMS OF THIS LEGAL AND BINDING AGREEMENT AND ARE CONSENTING TO BE BOUND BY AND ARE BECOMING A PART TO THIS AGREEMENT. IF YOU DO NOT AGREE TO ALL OF THE TERMS OF THIS AGREEMENT, DO NOT START THE INSTALLATION PROCESS.
1. License Grant. This is a license, not a sales agreement, between you, the end user, and
NetScreen Technologies, Inc. (“NetScreen”). The term “Software” includes all NetScreen and third party Software provided to you with the NetScreen product, and includes any accompanying documentation, any updates and enhancements of the Software provided to you by NetScreen, at its option. NetScreen grants to you a non-transferable (except as provided in section 3 (“Transfer”) below), non-exclusive license to use the Software in accordance with the terms set forth in this License Agreement. The Software is “in use” on the product when it is loaded into temporary memory (i.e. RAM).
2. Limitation on Use. You may not attempt and if you are a corporation, you will use best efforts to prevent your employees and contractors from attempting to, (a) modify, translate, reverse engineer, decompile, disassemble, create, derivative works based on, sublicense, or distribute the Software or the accompanying documentation; (b) rent or lease any rights in the Software or accompanying documentation in any form to any person; or (c) remove any proprietary notice, labels, or marks on the Software, documentation, and containers.
3. Transfer. You may transfer (not rent or lease) the Software to the end user on a permanent basis, provided that: (i) the end user receives a copy of this Agreement and agrees in writing to be bound by its terms and conditions, and (ii) you at all times comply with all applicable United States export control laws and regulations.
4. Proprietary Rights. All rights and title and interest in and to, and all intellectual property rights, including copyrights, to the software, and documentation, remain with NetScreen. You acknowledge that no title to the intellectual property in the Software is transferred to you and you will not acquire any rights to the Software except for the license as specifically set forth herein.
5. Term and Termination. The term of the license is for the duration of NetScreen's copyright in the Software. NetScreen may terminate this Agreement immediately without notice if you breach or fail to comply with any of the terms and conditions of this Agreement. You agree that, upon such termination, you will either destroy all copies of the documentation or return all materials to NetScreen. The provisions of this Agreement, other than the license granted in Section 1 (“License Grant”) shall survive termination.
6. Limited Warranty. For a period of ninety (90) days after delivery to Customer, NetScreen will repair or replace any defective software product shipped to Customer, provided it is returned to NetScreen at Customer’s expense within that period. NetScreen warrants to Customer that such product will substantially conform with NetScreen’s published specifications for that product if properly used in accordance with the procedures described in documentation supplied by NetScreen. NetScreen’s exclusive obligation with respect to non-conforming product shall be, at NetScreen’s option, to replace the product or use commercially reasonable efforts to provide Customer with a correction of the defect, or to refund to customer the purchase price paid for the unit. Defects in the product will be reported to NetScreen in a form and with supporting information reasonably requested by NetScreen to enable it to verify, diagnose, and correct the defect. For returned product, the customer shall notify NetScreen of any nonconforming product during the warranty period, obtain a return authorization for the nonconforming product, from NetScreen, and return the nonconforming product to NetScreen’s factory of origin with a statement describing the nonconformance.
NOTWITHSTANDING ANYTHING HEREIN TO THE CONTRARY, THE FOREGOING IS CUSTOMER’S SOLE AND EXCLUSIVE REMEDY FOR BREACH OF WARRANTY BY NETSCREEN WITH RESPECT TO THE PRODUCT.
The warranties set forth above shall not apply to any Product or Hardware which has been modified, repaired or altered, except by NetScreen, or which has not been maintained in accordance with any

handling or operating instructions supplied by NetScreen, or which has been subjected to unusual physical or electrical stress, misuse, abuse, negligence or accidents.
THE FOREGOING WARRANTIES ARE THE SOLE AND EXCLUSIVE WARRANTIES EXPRESS OR IMPLIED GIVEN BY NETSCREEN IN CONNECTION WITH THE PRODUCT AND HARDWARE, AND NETSCREEN DISCLAIMS ALL IMPLIED WARRANTIES, INCLUDING IMPLIED WARRANTIES OF MERCHANTABILITY, FITNESS FOR A PARTICULAR PURPOSE AND NONINFRINGEMENT OF THIRD PARTY RIGHTS. NETSCREEN DOES NOT PROMISE THAT THE PRODUCT IS ERROR-FREE OR WILL OPERATE WITHOUT INTERRUPTION.
7. Limitation of Liability. IN NO EVENT SHALL NETSCREEN OR ITS LICENSORS BE LIABLE UNDER ANY THEORY FOR ANY INDIRECT, INCIDENTAL, COLLATERAL, EXEMPLARY, CONSEQUENTIAL OR SPECIAL DAMAGES OR LOSSES SUFFERED BY YOU OR ANY THIRD PARTY, INCLUDING WITHOUT LIMITATION LOSS OF USE, PROFITS, GOODWILL, SAVINGS, LOSS OF DATA, DATA FILES OR PROGRAMS THAT MAY HAVE BEEN STORED BY ANY USER OF THE SOFTWARE. IN NO EVENT WILL NETSCREEN’S OR ITS LICENSORS’ AGGREGATE LIABILITY CLAIM BY YOU, OR ANYONE CLAIMING THROUGH OR ON BEHALF OF YOU, EXCEED THE ACTUAL AMOUNT PAID BY YOU TO NETSCREEN FOR SOFTWARE. Some jurisdictions do not allow the exclusions and limitations of incidental, consequential or special damages, so the above exclusions and limitations may not apply to you.
8. Export Law Assurance. You understand that the Software is subject to export control laws and regulations. YOU MAY NOT DOWNLOAD OR OTHERWISE EXPORT OR RE-EXPORT THE SOFTWARE OR ANY UNDERLYING INFORMATION OR TECHNOLOGY EXCEPT IN FULL COMPLIANCE WITH ALL UNITED STATES AND OTHER APPLICABLE LAWS AND REGULATIONS.
9. U.S. Government Restricted Rights. If this Product is being acquired by the U.S. Government, the Product and related documentation is commercial computer Product and documentation developed exclusively at private expense, and (a) if acquired by or on behalf of civilian agency, shall be subject to the terms of this computer Software, and (b) if acquired by or on behalf of units of the Department of Defense (“DoD”) shall be subject to terms of this commercial computer Software license Supplement and its successors.
10. Tax Liability. You agree to be responsible for the payment of any sales or use taxes imposed at any time whatsoever on this transaction.
11. General. If any provisions of this Agreement are held invalid, the remainder shall continue in full force and effect. The laws of the State of California, excluding the application of its conflicts of law rules shall govern this License Agreement. This Agreement will not be governed by the United Nations Convention on the Contracts for the International Sale of Goods. This Agreement is the entire agreement between the parties as to the subject matter hereof and supersedes any other Technologies, advertisements, or understandings with respect to the Software and documentation. This Agreement may not be modified or altered, except by written amendment, which expressly refers to this Agreement and which, is duly executed by both parties.
You acknowledge that you have read this Agreement, understand it, and agree to be bound by its terms and conditions.


�����������������������������������������������������������������������������������������
!"���#������ ���������������������������������������������������������������������������������
����������$��%������� �������������������������������������������������������������������� �
&����'�(����!������������������������������������������������������������������������������������������������������ �&�&
)!��*�+,-�+.������������������������������������������������������������������������������� &�&
��/������"�����!��0�%��������1���%���2� ������������������������������������ &�
���%3��"�0�!��� �%������4���"� ������������������������������������������� &�5���0�"�!��"�0�!� ���������������������������������������������������������� �&�5
+���%������!� �!������������������������������������������������������������������������ &�6����-00�%��� ��+���%�7��������������������������������������������������� �&��4.��-�%�*�������� ���������������������������������������������������������� �&��4.�����%3��1 ���������������������������������������������������������������� �&������,��*��� ��(!�/���%2�7���������������������������������������� �&�&���!0�!1��"������!� �!��� ����������������������������������������������� �&�&�+���%������!� �!��������+�������!����*����!��211��!2�� �&�&&
������+8�(������������������������������������������������������������������������������ &�&������!�1�!2�9� ����+8�(����(����!����������������������������������� �&�&���%����!2�9� ����+8�(����!������������������������������������������ �&�&:
���0�"�!��"�0�!�;�����!���%���7��%�� �!�+����11���%���������������������������������������������������������������������������� &�&
�!�����������)���3��*�!��<�!���*�!�����!�����������=����������������������������������������� �&�&���0�"�!��"�0�!����!� ����)���3��*�!�+���������� ������ �&�&64��!�����������)���3��*�!��<�!���*�!�����!�����������=����������������������������������������� �&�&����0�"�!��"�0�!�����$��%�)���3��*�!������������ ������� �&��
��%�!�������� ���������������������������������������������������������������������������� &�&
��%����!2�+�����!���������������������������������������������������������������� &�:��%����!2����!�����!�*�!������������������������������������������� �&�:�!�����"�����.������"���%����!2�+�����!����� ����������� �&�:
����%�����4�9�.���%��������������������������������������������������������������� &�>-��$���"�����.���$���"�����%�����4�9�.���%���� ���������� �&�>����%�����4�9�.���%��������!1�������������������������������������� �&�5������!�*� �������������������������������������������������������������������� �&�5����������!���������!����!%��+�����!��� ������������������������ �&�5
9HUVLRQ������ L
���
���9+��2���?�(�!1�������"����������������������������������������������������������������������������������&
.�*�����%2�.���1���!�� ������������������������������������������������������������ �&
�!� ������2���?��!�����������(�!1�������������������������������������������� �
��'��2���?��!�����������(�!1�������������������������������������������������� �
� ����$����2��0��9+���11����@��'��%���@�������!�1���!�� �������� ��
���������11��������������������������������������������������������������������������������������������������������&
4�%���"���������11����� ����������������������������������������������������� ��&
��1� ���������11����� ��������������������������������������������������������� ��&
����"���������11�������������������������������������������������������������� ��������1�� ������������������������������������������������������������������������ �����������$������!1������������������������������������������������������������ ����������%* ������������������������������������������������������������������������ ���&&����0�!�'������������������������������������������������������������������������� ���&������ ���������������������������������������������������������������������������� ���:�����3� ���������������������������������������������������������������������������� ��������*3� ���������������������������������������������������������������������������� ���:�����*���%2 ����������������������������������������������������������������������� ���:������%����������������������������������������������������������������������������� ���>>�������! �������������������������������������������������������������������������� ���>6���� *���������������������������������������������������������������������������� ���5�
��'�������11����� ��������������������������������������������������������������� ��56
:��)�����11�����������������������������������������������������������������������������������������������������:�&
��'�(����!� *������ ��������������������������������������������������������������������� :�&
4�%���"���"�����11����� ���������������������������������������������������� :�&
��1� ���"�����11����� �������������������������������������������������������� :�
����"���"�����11����� �������������������������������������������������������� :��"�����1�������������������������������������������������������������������������� �:��"������!1������������������������������������������������������������������������� �:�>"��������������������������������������������������������������������������������� �:�&&"�������!0�%� ����������������������������������������������������������������� �:�&�"�����"��������������������������������������������������������������������������� �:�&>"���1�1�!2������������������������������������������������������������������� �:��"���*3� ��������������������������������������������������������������������������� �:�"����%� ��������������������������������������������������������������������������� �:�>
��'�"�����11����� �������������������������������������������������������������� :�
LL :KDW·V�1HZ�,Q�6FUHHQ26�����
���

�&RQWHQWV
>������!���11������������������������������������������������������������������������������������������������� �>�&
4�%���"���%���!���11������������������������������������������������������� >�&
��1� ���%���!���11����� ����������������������������������������������������� >�&
����"���%���!���11����� ����������������������������������������������������� >�%���!�����A��%!�� ����������������������������������������������������������� �>�%���!���������������������������������������������������������������������������� �>�:
��'�%���!���11������������������������������������������������������������������� >�
5�����%������������11����������������������������������������������������������������������������������� �5�&
4�%���"�����11���������������������������������������������������������������� 5�&
��1� �����11����� �������������������������������������������������������������� 5�&
����"�����11����� �������������������������������������������������������������� 5��?�%�*3���������������������������������������������������������������������������� �5�
��'���11���������������������������������������������������������������������������� 5�:�?�%��%� �������������������������������������������������������������������������� �5�:
+���?� ����������������������������������������������������������������������������� +B�&
9HUVLRQ������ LLL
���

LY :KDW·V�1HZ�,Q�6FUHHQ26�����
���

�!�0�%�
The What’s New In ScreenOS 3.0 describes all new features in ScreenOS 3.0.0. In addition, it lists all commands that have been removed since version 2.61 and all commands that have remained the same. It also presents full descriptions of all new commands, and all commands that have undergone modification.
�; ��; 49.��-�.��;+�����4�9�This document is used by system and network administrators who have experience configuring a NetScreen device using the Web interface, and who will use the newest version of the CLI.
�)��+C��+ �The What’s New In ScreenOS 3.0 guide is organized into the following chapters:
2 “CLI Syntax Format Changes,” describes the changes made to syntax presentations in this version of the CLI, providing an example to compare the new style with the previous style. The chapter also provides descriptions of dependency delimiters and language element parameter names used in the new version.
3 “Set Commands,” lists the set commands that are unchanged in this version, or have been removed. In addition, this chapter lists and describes all set commands that are new, or that have undergone modification since version 2.61.
4 “Get Commands,” lists the get commands that are unchanged in this version, or have been removed. In addition, this chapter lists and describes all get commands that are new, or that have undergone modification since version 2.61.
5 “Clear Commands,” lists the clear commands that are unchanged in this version, or have been removed. In addition, this chapter lists and describes all clear commands that are new, or that have undergone modification since version 2.61.
6 “Miscellaneous Commands,” lists miscellaneous commands that are unchanged in this version, or have been removed. In addition, this chapter lists and describes all miscellaneous commands that are new, or that have undergone modification since version 2.61.
:KDW·V�1HZ�,Q�6FUHHQ26����
���
�-9��-.��489+���+ ��In addition to the What’s New In ScreenOS 3.0 guide, there are other technical publications available from NetScreen. These publications are as follows:
NetScreen Concepts & Examples ScreenOS Reference Guide
This manual is a guide to managing and configuring ScreenOS™, the operating system for allNetScreen security devices. This guide describes the concepts behind NetScreen product features, and provides examples illustrating those concepts in practice.
NetScreen WebUI Reference Guide
This manual presents a brief introduction to the WebUI management application, with a glossary of important technical terms, and general instructions on how to use the application.
NetScreen CLI Reference Guide
This manual provides descriptions of all command line interface (CLI) commands. Each command description presents the command’s syntax and basic elements, including options, parameters, switches, and element dependencies. The descriptions also provide practical examples of command execution.
NetScreen-5XP Installer’s Guide, NetScreen-10 Installer’s Guide, NetScreen-25 Installer’s Guide, NetScreen-50 Installer’s Guide
These manuals provide instructions for connecting a NetScreen-5XP, -10, -25, and -50 device respectively to a network, and performing an initial configuration. The instructions explain how to set up the device in Transparent, NAT, or Route mode, how to configure an access policy permitting outbound traffic only, and how to change the admin’s login name and password. Each manual also provides an overview of the hardware for each specific platform.
NetScreen-100 Installer’s Guide
This manual provides instructions for connecting a NetScreen-100 device to a network, and performing an initial configuration. The instructions explain how to set up the device in Transparent, NAT, or Route mode, how to configure an access policy permitting outbound traffic only, and how to change the admin’s login name and password. The manual also provides an overview of the hardware. This manual also provides cabling and configuration instructions for single appliances and redundant appliances using High Availability (HA).
YL :KDW·V�1HZ�,Q�6FUHHQ26����

3UHIDFH�
NetScreen-500 Installer’s Guide
This manual provides instructions for connecting a NetScreen-500 device to a network, and performing an initial configuration. The instructions explain to set up the device in Transparent, NAT, or Route mode, how to configure an access policy permitting outbound traffic only, and how to change the admin’s login name and password. The manual also provides an overview of the hardware. This manual also provides cabling and configuration instructions for single appliances and redundant appliances using High Availability (HA).
NetScreen-Remote Administrator’s Guide
This manual provides instructions for installing and using the NetScreen-Remote client software, which allows a remote user to connect with a NetScreen security device through a virtual private network (VPN) tunnel.
NetScreen Message Log Reference Guide
This manual documents the log messages that appear in ScreenOS 3.0.0. Each log message entry includes the message text, its meaning, and any recommended action to take upon receiving the message.
:KDW·V�1HZ�,Q�6FUHHQ26���� YLL
���

YLLL :KDW·V�1HZ�,Q�6FUHHQ26����

&�
��'�(����!��This chapter describes new features in the 3.0 version of ScreenOS.
)!��*�+,-�+.Some organizations have many hosts that need to exchange traffic through a single NetScreen device. For example, a Marketing department might have hundreds of users, each requiring secure Internet communication through a NetScreen 100. With so many users, it is impractical to create a separate user definition for each host machine.
To avoid this difficulty, the Group IKE ID method makes one user definition available to multiple hosts. This user definition applies to all hosts having certificates with specified values in the distinguished name (DN).
In the following example, a user’s certificate has “O=ACME” and “OU=Marketing” in the distinguished name:
C =USST=CAL =Santa ClaraO =ACMEOU=MarketingCN=Michael ZhangCN=a2010002CN=ns500CN=(408) 555-7800CN=rsa-keyCN=10.10.5.44
Using Group IKE ID, you can configure a user definition to automatically accept tunnel connections from any host having such a certificate. The hosts can establish secure communication through the NetScreen device, without a separate user definition for each host. Because these users have valid, non-revoked certificates containing the necessary distinguished name values, authentication of these users is implicit.
Note: It is impossible to use Group IKE ID while using a Preshared Key.
Note: The user in this example must be in a dial-up group, and must setup the VPN gateway using this dial-up group.
9HUVLRQ������ ������
5HTXHVWLQJ�D�&HUWLILFDWH�$XWRPDWLFDOO\
-?�1*��D�.�0����"���4��!�.�0�����������4���)!��*�+,-�+.In this example, you create a new user definition named Market_Dept, and configure it to concurrently accept tunnels from up to 10 hosts having certificates that match specific distinguished name fields. This user definition recognizes any host with a certificate containing “O=ACME” and “OU=Marketing” in the O and OU fields respectively.
�����
1. Users >> Users >> New Auth/IKE/L2TP User: Enter the following, then click OK :
User Name: Market_Dept
Status: Enable
IKE User: Enabled
Numbers of Multiple Login with same ID: 10
2. Select the Use Distinguished Name For ID radio button. This displays the distinguished name fields for the certificate.
3. Enter ACME in the O field.
4. Enter Marketing in the OU field.
5. Click OK.
���
ns-> set user “marketing” ike-id asn1-dn wildcard “o=ACME,ou=Marketing” share-limit 10
��/������"�����!��0�%��������1���%���2To use a digital certificate to authenticate your identity when establishing a secure VPN connection, you must first do the following:
• Obtain a personal certificate (also known as a local certificate) from a certificate authority (CA), and load the certificate in the NetScreen device.
• Obtain a CA certificate for the CA that issued the personal certificate (basically verifying the identity of the CA verifying you), and load the CA certificate in the NetScreen device. You can perform this task manually, or automatically using Simple Certificate Enrollment Protocol (SCEP).
Note: This command is only applicable to systems that use IKE dial-up.
��� :KDW·V�1HZ�,Q�6FUHHQ26������
���

5HTXHVWLQJ�D�&HUWLILFDWH�$XWRPDWLFDOO\
Because the manual method of requesting CA certificates has steps requiring you to copy information from one certificate to another, it can be a somewhat lengthy process. To bypass these steps, use the automatic method.
�����
1. Certificates >> Local >> Certificate Request: Enter the following, and then click Generate :
Name: Michael ZhangPhone: (408) 330-7800Unit/Department: DevelopmentOrganization: NetScreen TechnologiesCounty/Locality: Santa ClaraState: CACountry: USEmail: (leave blank; some CAs do not support
this field)
IP Address: 10.10.5.44Automatically Enroll to CA: (select radio
button)Create new key pair of 10241 length: (select)
The NetScreen device generates a PKCS #10 file and prompts you to open the file or save it to disk.
2. Contact your certificate authority to inform them of your certificate request. They must authorize the certificate request before you can download the certificate.
Note Note: If no e-mail address appears in the local certificate, you cannot use an e-mail address as the local IKE ID when configuring the NetScreen device as a dynamic peer. Instead, you can use an IP address (if it is in the local certificate), or you can leave the local ID field empty. By default the NetScreen device sends its hostname.domainname. If you do not specify a local ID for a dynamic peer, enter the hostname.domainname of that peer on the device at the other end of the IPSec tunnel in the peer ID field.
1. The value 1024 indicates the bit length of the key pair. If you are using the certificate for SSL, be sure to use a bit length that your Web browser also supports.
:KDW·V�1HZ�,Q�6FUHHQ26������ ���
5HTXHVWLQJ�D�&HUWLILFDWH�$XWRPDWLFDOO\
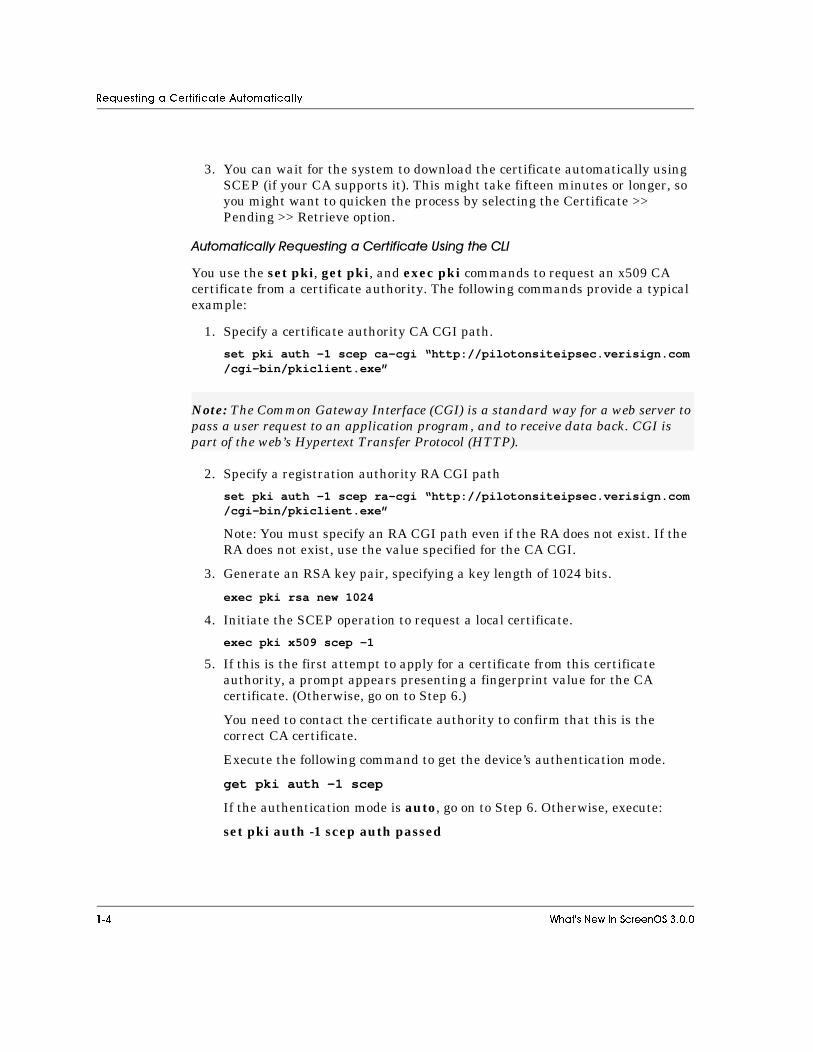
3. You can wait for the system to download the certificate automatically using SCEP (if your CA supports it). This might take fifteen minutes or longer, so you might want to quicken the process by selecting the Certificate >> Pending >> Retrieve option.
��� �� ������������� �������� ��������������
You use the set pki, get pki, and exec pki commands to request an x509 CA certificate from a certificate authority. The following commands provide a typical example:
1. Specify a certificate authority CA CGI path.
set pki auth -1 scep ca-cgi “http://pilotonsiteipsec.verisign.com/cgi-bin/pkiclient.exe”
2. Specify a registration authority RA CGI path
set pki auth -1 scep ra-cgi “http://pilotonsiteipsec.verisign.com/cgi-bin/pkiclient.exe”
Note: You must specify an RA CGI path even if the RA does not exist. If the RA does not exist, use the value specified for the CA CGI.
3. Generate an RSA key pair, specifying a key length of 1024 bits.
exec pki rsa new 1024
4. Initiate the SCEP operation to request a local certificate.
exec pki x509 scep -1
5. If this is the first attempt to apply for a certificate from this certificate authority, a prompt appears presenting a fingerprint value for the CA certificate. (Otherwise, go on to Step 6.)
You need to contact the certificate authority to confirm that this is the correct CA certificate.
Execute the following command to get the device’s authentication mode.
get pki auth -1 scep
If the authentication mode is auto, go on to Step 6. Otherwise, execute:
set pki auth -1 scep auth passed
Note: The Common Gateway Interface (CGI) is a standard way for a web server to pass a user request to an application program, and to receive data back. CGI is part of the web’s Hypertext Transfer Protocol (HTTP).
��� :KDW·V�1HZ�,Q�6FUHHQ26������
���

5HTXHVWLQJ�D�&HUWLILFDWH�$XWRPDWLFDOO\
6. When the confirmation prompt appears, contact your certificate authority administrator to approve the local certificate request.
7. (Optional) Display a list of pending certificates. This allows you to see and record the index number identifying the certificate.
get pki x509 list pending-cert
8. (Optional) Obtain the local certificate from the CA (using the index number obtained in Step 7) to identify the certificate.
exec pki x509 scep 1
If you do not execute Steps 7 and 8, the NetScreen device will still retrieve the certificate automatically from the CA. However, there will be a time delay of at least 15 minutes. This delay period depends upon how you configured the device. The configuration command for this feature is:
set pki auth -1 scep polling-int <number>
where <number> is time in minutes. The minimum is 15.
:KDW·V�1HZ�,Q�6FUHHQ26������ ���

&KHFNLQJ�IRU�5HYRFDWLRQ�8VLQJ�2&63
�;-�,+�)�( ���-7 ���+ ��4�+�)� ���When a NetScreen device performs an operation that uses a certificate, it may be necessary to check the certificate for premature revocation. The default way to check the revocation status of a digital certificate is to use CRL.
Online Certificate Status Protocol (OCSP) is an alternative way to check the status of a digital certificate. OCSP may provide additional information about the certificate. It may also provide the certificate status in a more timely manner.
When a NetScreen device uses OCSP, it is referred to as the OCSP client (or requester). This client sends a verification request to a server device called the OCSP responder. The client’s request contains the identity of the certificate to check. Before the NetScreen device can perform any OCSP operation, you must configure it to recognize the location of the OCSP responder.
After receiving the request, the OCSP responder confirms that the status information for the certificate is available, then returns the current status to the client. Besides the certificate’s revocation status, the generated response includes the name of the responder and the validity interval of the response. Unless the response is an error message, the responder signs the response using the responder’s private key. The OCSP client verifies the validity of the response signature.
���0�"�!��"�0�!� ���You can use CLI commands to configure a NetScreen device to support OCSP operation. Most of these commands use an identification number to associate the revocation reference URL with the CA certificate. You can obtain this ID number using the following CLI command:
ns-> get pki x509 list ca-cert
�*�%�02��"�-����!���9��!� ����0�!��� �%���������%3��"To specify the revocation check method (CRL, OCSP, both, or none) for a certificate of a particular CA, use the following CLI syntax:
ns-> set pki authority <id_num> cert-status revoc { CRL | OCSP | all | none }
where <id_num> is the identification number for the certificate.
Note: The NetScreen device dynamically assigns the ID number to the CA certificate when you list the CA certificates. This number might change after you modify the certificate store.
��� :KDW·V�1HZ�,Q�6FUHHQ26������
���

&KHFNLQJ�IRU�5HYRFDWLRQ�8VLQJ�2&63
The following example specifies OCSP revocation checking.
ns-> set pki authority 3 cert-status revocation-check ocsp
The ID number 3 identifies the certificate of the CA.
.��*��2��"���!��0�%������ �%����������������!�$����To display the revocation check attributes for a particular CA, use the following CLI syntax:
ns-> get pki authority <id_num> cert-status
where <id_num> is the identification number for the certificate issued by the CA.
To display the revocation status attributes for the CA that issued certificate 7:
ns-> get pki authority 7 cert-status
�*�%�02��"�����4�9��0���� �������*����!�0�!�����!��0�%���To specify the URL string of an OCSP responder for a particular certificate, use the following CLI syntax:
ns-> set pki authority <id_num> cert-status ocsp url <url_str>
To specify the URL string of an OCSP responder (http:\\192.168.10.10) for the CA with certificate at index 5, use the following CLI syntax:
ns-> set pki authority 5 cert-status ocsp url http:\\192.168.10.10
To remove the URL (http:\\192.168.2.1) of a CRL server for a certificate 5:
ns-> unset pki authority 5 cert-status ocsp url http:\\192.168.2.1
��1� ��"���!��0�%������ �%���������%3����!�$����To remove all attributes related to a certificate revocation check for a CA that issued a particular certificate, use the following syntax:
ns-> unset pki authority <id_num> cert-status
To remove all revocation attributes related to certificate 1:
ns-> unset pki authority 1 cert-status
:KDW·V�1HZ�,Q�6FUHHQ26������ ���
,3VHF�1$7�7UDYHUVDO
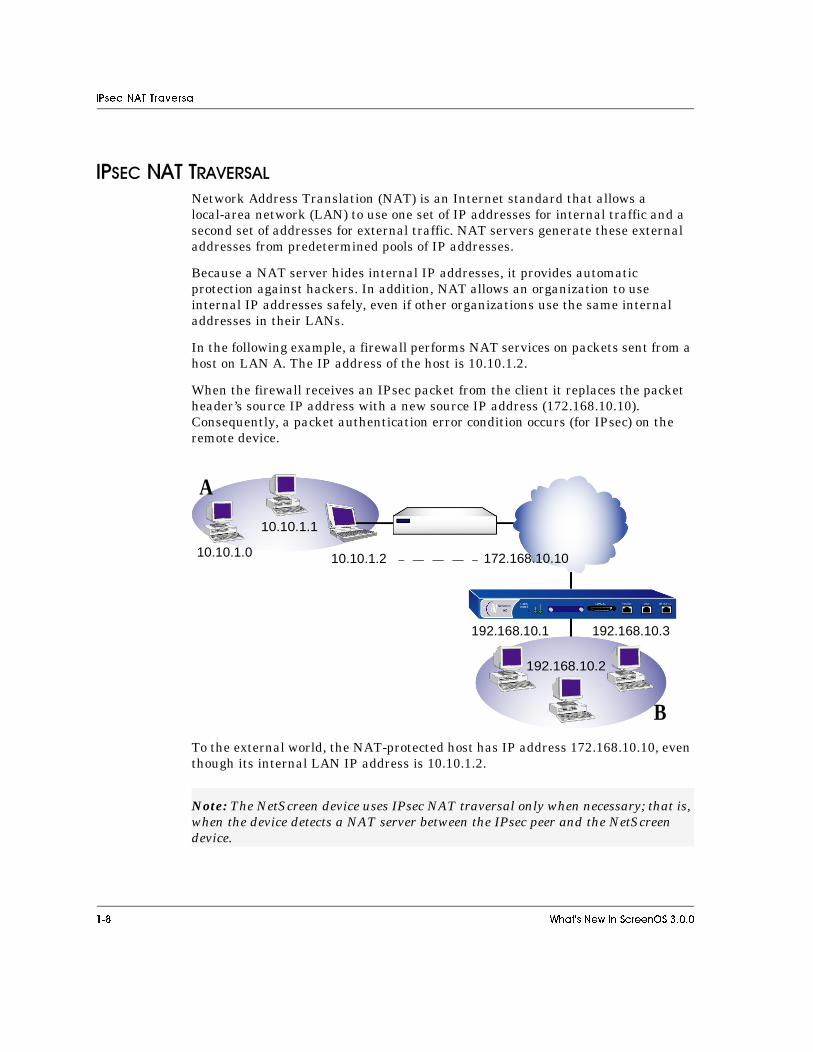
+��-���������7-���9Network Address Translation (NAT) is an Internet standard that allows a local-area network (LAN) to use one set of IP addresses for internal traffic and a second set of addresses for external traffic. NAT servers generate these external addresses from predetermined pools of IP addresses.
Because a NAT server hides internal IP addresses, it provides automatic protection against hackers. In addition, NAT allows an organization to use internal IP addresses safely, even if other organizations use the same internal addresses in their LANs.
In the following example, a firewall performs NAT services on packets sent from a host on LAN A. The IP address of the host is 10.10.1.2.
When the firewall receives an IPsec packet from the client it replaces the packet header’s source IP address with a new source IP address (172.168.10.10). Consequently, a packet authentication error condition occurs (for IPsec) on the remote device.
To the external world, the NAT-protected host has IP address 172.168.10.10, even though its internal LAN IP address is 10.10.1.2.
Note: The NetScreen device uses IPsec NAT traversal only when necessary; that is, when the device detects a NAT server between the IPsec peer and the NetScreen device.
10.10.1.0
10.10.1.1
10.10.1.2
192.168.10.1
192.168.10.2
192.168.10.3
A
B
172.168.10.10
��� :KDW·V�1HZ�,Q�6FUHHQ26������
���

,3VHF�1$7�7UDYHUVDO
����-00�%��� ��+���%�7���Because the NAT server replaces the IPsec packet’s original source IP address, authentication problems occur when a host sends an ESP or AH packet through a NAT device. This is due to the hashing value placed within the packet by the IPsec host.
Because of the NAT-generated IP address, the hashing value generated by the client does not match the hashing value generated by the NetScreen device when it receives the packet. This causes an authentication error, and the NetScreen device rejects the packet.
To solve this problem, the host and the NetScreen device may use User Datagram Protocol (UDP) to encapsulate the IPsec packet so it can traverse the NAT device.
4.��-�%�*��������NetScreen devices use UDP to provide low-overhead encapsulation of IPsec packets. Each encapsulated packet gets an additional header containing the real source IP address. In effect, this hides the IPsec header and protects it from modification by the NAT device.
When the NAT device receives the packet, it replaces the source IP address in this UDP packet instead of modifying the address in the inner IP address header. When the NetScreen device receives the packet, it strips off the modified UDP header, leaving the original IPsec packet unchanged. Consequently, the device receives the original IPsec packet without detecting hashing errors.
4.�����%3��1All UDP packets contain a UDP checksum, a calculated value that ensures UDP packets are free of transmission errors. A NetScreen device does not require use of the UDP checksum for NAT Traversal, so the WebUI presents the checksum as an optional setting. Even so, some NAT devices require a checksum, so you might have to enable this setting.
Note: For IPsec NAT Traversal to work, the NetScreen devices must have ScreenOS version 3.00 or higher, and both IPsec peers must have IPsec NAT Traversal enabled for the tunnel.
IPheader ESP Data Payload ESP
trailerheader
IPheader header
UDP ESPheader
Data Payload ESPtrailer
:KDW·V�1HZ�,Q�6FUHHQ26������ ���

,3VHF�1$7�7UDYHUVDO
����,��*��� ��(!�/���%2�7����When a NAT server assigns an IP address to a host, the server must decide how long the new address remains valid when no traffic occurs. For example, a NAT device might invalidate any generated IP address that remains unused for 20 seconds. Therefore, it is often necessary to send periodic Keepalive packets through the NAT device, to keep the NAT mapping current.
��!0�!1��"������!� �!���You can disable or enable NAT traversal using the WebUI or the Command Line Interface (CLI).
4���"�������$4+To create a new ESP tunnel configuration for NAT traversal:
1. VPN >> Gateway(P1) >> New Remote Tunnel Gateway
2. Enter the necessary parameters for the new tunnel gateway as described in “Example VPN Scenarios” in the NetScreen Concepts & Examples ScreenOS Reference Guide .
3. Enter the following, then click OK.
Nat-Traversal: EnableUDP Checksum: EnableKeepalive Frequency: <value smaller than
timeout length specified on NAT server>
To modify an existing ESP tunnel configuration for NAT traversal:
1. VPN >> Gateway(P1) >> Configure >> Edit: Enter the following, then click OK.
Nat-Traversal: EnableUDP Checksum: EnableKeepalive Frequency:<value less than the timeout value specified
on NAT server>
Note: NAT servers have different session timeout intervals, depending upon manufacturer and model. It is important to determine what the interval is for your server, and to set the keepalive frequency value below that value.
Note: The NetScreen device enables NAT traversal automatically for dial-up VPNs.
���� :KDW·V�1HZ�,Q�6FUHHQ26������
���

,3VHF�1$7�7UDYHUVDO
4���"������9+To enable NAT traversal for a gateway named mktg:
ns-> set ike gateway mktg nat-traversal
To enable the UDP checksum setting:
ns-> set ike gateway mktg nat-traversal enable-udp-checksum
To disable the UDP checksum setting:
ns-> set ike gateway mktg nat-traversal disable-udp-checksum
To set the Keepalive setting to 25 seconds:
ns-> set ike gateway mktg nat-traversal keepalive-frequency 25
+���%������!� �!��������+�������!����*����!��211��!2When two NetScreen devices establish a tunnel in the absence of a NAT device, either device can serve as initiator or responder. However, if either host resides behind a NAT device, such initiator/responder symmetry may be impossible. This happens whenever the NAT device generates IP addresses dynamically.
In the example above, NetScreen B resides in a subnet located behind a NAT device. If the NAT device generates the new IP address (172.168.10.10) dynamically from a pool of IP addresses, NetScreen A cannot unambiguously identify NetScreen B. Therefore, A cannot successfully initiate a tunnel with NetScreen B. NetScreen A must be the responder, NetScreen B must be the initiator, and both must run in aggressive mode.
NAT
NetScreen-5xp BNetScreen-5xp A
172.168.10.10 10.10.1.2
Internet
Host B 10.10.1.2
Host A
:KDW·V�1HZ�,Q�6FUHHQ26������ ����

,3VHF�1$7�7UDYHUVDO
However, if the NAT device generates the new IP address using mapped IP (MIP), or some other one-to-one addressing method, NetScreen A can unambiguously identify NetScreen B. This is because each NAT-generated address can have only one corresponding real address, thus eliminating ambiguity. Consequently, either NetScreen A or NetScreen B can be the initiator, and both can run in main mode.
Note: If you enable NAT Traversal on the responder and configure it to view the initiator as a static peer, then peers of the following types must use the same P1 proposal.
• peers using dynamic-IP
• dial-up users
• NAT Traversal-enabled static-IP peers
���� :KDW·V�1HZ�,Q�6FUHHQ26������
���

6103�0,%�)LOHV
������+8�(����NetScreen provides MIB files to support SNMP communication between your organization’s applications and the SNMP Agent in the NetScreen device. To obtain the latest MIB files, download them from www.netscreen.support.
The MIB files for this ScreenOS version are fully compatible with SNMP agents in previous versions of ScreenOS.
�����!�1�!2�9� ����+8�(����(����!�The MIB files are arranged in a hierarchical folder structure. The primary-level MIB folders are as follows.
Each folder contains a category of MIB files.
netscreenProducts Assigns Object Identifiers (OIDs) to different NetScreen product series.
netscreenTrapInfo Defines enterprise traps sent by the NetScreen device.
netscreenIDS Defines the NetScreen device intrusion detection service (IDS) configuration.
:KDW·V�1HZ�,Q�6FUHHQ26������ ����

6103�0,%�)LOHV
��%����!2�9� ����+8�(����!�Most of the primary-level MIB folders contain secondary-level folders.
����%!���+��
netscreenVpn Defines NetScreen device VPN configuration and runtime information.
netscreenQos Defines NetScreen device Quality of Service configuration.
netscreenSetting Defines miscellaneous NetScreen device configuration settings, such as DHCP, email, authentication, and administrator.
netscreenZone Defines zone information residing in the NetScreen Device.
netscreenInterface Defines the NetScreen device’s interface configuration, including the virtual interface.
netscreenPolicy Defines the outgoing and incoming policy configuration for the NetScreen device.
netscreenNAT Defines NAT configuration, including Map IP, Dynamic IP and Virtual IP.
netscreenAddr Represents the address table on a NetScreen interface.
netscreenService Describes services (including user-defined) recognized by the NetScreen device.
netscreenSchedule Defines NetScreen device task schedule information, configured by the user.
netscreenVsys Defines NetScreen device virtual system (VSYS) configuration.
netscreenResource Accesses information regarding the NetScreen device’s resource utilization.
netscreenIp Accesses NetScreen device private IP-related information.
nsldsProtect IDS service on NetScreen device
nsldsProtectSetTable IDS service enabled on NetScreen device
nsldsProtectThreshTable IDS service threshold configuration
nsldsAttkMonTable Statistical Information about intrusion attempt
���� :KDW·V�1HZ�,Q�6FUHHQ26������
���

6103�0,%�)LOHV
����%!���7*�
����%!���E��
����%!���������"
netscreenVpnMon Show SA information of vpn tunnel
nsVpnManualKey Manual key configuration
nsVpnIke IKE configuration
nsVpnGateway VPN tunnel gateway configuration
nsVpnPhaseOneCfg IPSec Phase One configuration
nsVpnPhaseTwoCfg IPSec Phase Two configuration
nsVpnCert Certification configuration
nsVpnL2TP L2TP configuration
nsVpnPool IP pool configuration
nsVpnUser VPN user configuration
nsQosPly QoS configuration on policy
nsSetGeneral General configuration of NS device
nsSetAuth Authentication method configuration
nsSetDNS DNS server setting
nsSetURLFilter URL filter setting
nsSetDHCP DHCP server setting
nsSetSysTime System time setting
nsSetEmail Email setting
nsSetLog Syslog setting
nsSetSNMP SNMP agent configuration
nsSetGlbMng Global management configuration
nsSetAdminUser Administration user configuration
nsSetWebUI Web UI configuration
:KDW·V�1HZ�,Q�6FUHHQ26������ ����

6103�0,%�)LOHV
����%!�������%2
����%!������
����%!�����! �%�
����%!����%������
����%!��������!%�
����%!���+*
NsPlyTable Policy configuration
NsPlyMonTable Statistical Information about each policy
nsNatMipTable Mapped IP configuration
nsNatDipTable Dynamic IP configuration
nsNatVip Virtual IP Configuration
nsServiceTable Service Information
nsServiceGroupTable Service Group Information
nsServiceGrpMemberTable Service Group Member Info
nschOnceTable One-time schedule information
nschRecurTable Re-occur schedule information
nsresCPU CPU utilization
nsresMem Memory utilization
nsresSession Session utilization
nslpArp ARP table
���� :KDW·V�1HZ�,Q�6FUHHQ26������
���

&RQILJXULQJ�IRU�+�����3URWRFRO�9RLFH�2YHU�,3�&RPPXQLFDWLRQ
���0�"�!��"�0�!�;�����!���%���7��%�� �!�+����11���%�����To allow secure voice-over IP communication between terminal hosts, NetScreen devices support H.323 protocol. Gatekeeper devices manage call registration, admission, and call status for voice-over IP calls. Such devices can reside on either the Trusted or Untrusted side of a NetScreen device.
�!�����������)���3��*�!��<�!���*�!�����!�����������=In the following example, two endpoint hosts (such as IP phone hosts) exchange H.323 traffic through a NetScreen device in Transparent mode or route mode.
The following set policy commands allow traffic from the host and the gatekeeper on the Trusted side to go through the NetScreen device to hosts on the Untrusted side.
Note: In previous versions of ScreenOS, the telephony terminals had to reside on the same side of the NetScreen device as the gatekeeper device. Consequently, only a gatekeeper on the Trusted side could perform gatekeeping services for voice-over traffic between internal terminals. Terminals on the Trusted side could not work with a gatekeeper on the Untrusted side.
Allowed
Allowed
Endpoints Endpoints
Trusted Untrusted
Internet
side side
Endpoints
Trusted Untrusted
Internet
Endpoints
:KDW·V�1HZ�,Q�6FUHHQ26������ ����

&RQILJXULQJ�IRU�+�����3URWRFRO�9RLFH�2YHU�,3�&RPPXQLFDWLRQ
ns-> set policy outgoing “inside any” “outside any” “H.323” permit
ns-> set policy incoming “outside any” “inside any” “H.323” permit
���0�"�!��"�0�!����!� ����)���3��*�!�+����������When the NetScreen device is in NAT mode, a gatekeeper or endpoint device is said to be private when it resides on the Trusted side, and public when it resides on the Untrusted side. When you set a NetScreen device to NAT mode, you must map a public IP address to each private device. In this example, the private devices include the endpoint host (192.168.1.20) and the gatekeeper device (192.168.1.10).
The following steps configure the NetScreen device to allow traffic between the private endpoint host and gatekeeper through the NetScreen device to endpoint hosts on the public side.
1. Map a public IP address to the private IP address of the private host device (on the Trusted side).
ns-> set mip 10.0.0.20 host 192.168.1.20
2. Map a public IP address to the private IP address of the gatekeeper device (on the Trusted side).
ns-> set mip 10.0.0.10 host 192.168.1.10
3. (Optional) Confirm that the mapped IP addresses exist by executing the get mip command.
4. Create a policy for all incoming H.323 traffic received on the Untrusted side and sent to the host device.
ns-> set policy incoming “outside any” mip(10.0.0.20) “H.323” permit
5. Create a policy for all incoming H.323 traffic received from the Untrusted side and sent to the gatekeeper device.
EP. Host EP Host
Trusted Untrusted
Internet
192.168.1.20 10.0.0.10
192.168.1.250 10.0.0.250192.168.1.10
���� :KDW·V�1HZ�,Q�6FUHHQ26������
���

&RQILJXULQJ�IRU�+�����3URWRFRO�9RLFH�2YHU�,3�&RPPXQLFDWLRQ
ns-> set policy incoming “outside any” mip(10.0.0.10) “H.323” permit
6. Create a policy for all outgoing traffic, sent through the Trusted interface to the Untrusted interface.
ns-> set policy outgoing “inside any” “outside any” “H.323” permit
7. (Optional) Confirm that the policies exist by executing the get policy command.
4��!�����������)���3��*�!��<�!���*�!�����!�����������=Because Transparent mode and route mode do not require address mapping of any kind, NetScreen device configuration for a gatekeeper on the Untrusted side is usually identical to configuration for a gatekeeper on the Trusted side.
The following commands create the necessary policies.
ns-> set policy outgoing “inside any” “outside any” “H.323” permit log
ns-> set policy incoming “outside any” “inside any” “H.323” permit log
EP Host EP Host
Trusted Untrusted
Internet
:KDW·V�1HZ�,Q�6FUHHQ26������ ����

&RQILJXULQJ�IRU�+�����3URWRFRO�9RLFH�2YHU�,3�&RPPXQLFDWLRQ
���0�"�!��"�0�!�����$��%�)���3��*�!������������When you set a NetScreen device to NAT mode, you must assign a public IP address to each device that resides on the Trusted side.
In this example the gatekeeper device (10.0.0.30) resides on the Untrusted side of the NetScreen device, and is in public space. Therefore, it does not require a mapped IP address.
The following steps configure the NetScreen device to allow traffic to the private endpoint host through from the endpoint host and the gatekeeper on the public side.
1. Map a public IP address to the IP address of the private host device (on the Trusted side).
ns-> set mip 10.0.0.20 host 192.168.1.20
2. (Optional) Confirm that the mapped IP address exists by executing the get mip command.
3. Create a policy for any incoming traffic received from the Untrusted side and sent to the private host device.
ns-> set policy incoming “outside any” mip(10.0.0.20) “H.323” permit
4. Create a policy for outgoing traffic, sent through the Trusted interface out through the Untrusted interface to any public device.
ns-> set policy outgoing “inside any” “outside any” “H.323” permit
5. (Optional) Confirm that the policies exist by executing the get policy command.
10.0.0.10192.168.1.20EP Host EP Host
10.0.0.30
192.168.1.250 10.0.0.250
Trusted Untrusted
Internet
���� :KDW·V�1HZ�,Q�6FUHHQ26������
���

6HFXUH�6KHOO
��%�!�������You can use secure shell (SSH™) for secure CLI access over insecure channels. On UNIX platforms and on other hosts, SSH allows you to open a remote command shell securely, execute commands, and copy files to or from the remote device. Secure Command Shell (SCS) is a SSH-compatible agent in the NetScreen device that allows you to remotely manage your NetScreen device without establishing a VPN.
The built-in SCS server on the NetScreen device allows the SSH client, installed on the administrator’s workstation, to open a secure connection to the NetScreen device console, which makes secure configuration and management possible.
You can connect to a NetScreen device with SSH in two ways.
• Through a user name and password authentication
This is the method commonly used by network administrators, security administrators, and other users who need to access, configure, or manage the NetScreen device. (The SSH client sends the user name and password to the NetScreen device. In response to an attempt to open SSH, the NetScreen device presents a prompt requiring the user name and password.)
• Using SCS Public Key Authentication (PKA)
This is the method commonly used by clients such as intrusion detection devices or organizations which use application programs or script routines to access the NetScreen device. SCS Public Key makes this possible by allowing the application or a script to initiate SSH without entering a password, using public/private key pairs for authentication.
ScreenOSAdministrator’sWorkstation
SCS serverSSH Client(Remote)
Internet
Encrypted Administrative Traffic
:KDW·V�1HZ�,Q�6FUHHQ26������ ����
6HFXUH�6KHOO
The process for initiating SCS PKA is as follows.
1. The client host generates a public and private key pair.
2. From the client host, the user manually logs into the NetScreen device as admin.
3. Using the CLI, WebUI or TFTP, the admin user uploads the public key to the NetScreen device.
4. Thereafter, the client can connect to the NetScreen device automatically.
Because the NetScreen device can have 4 public keys per admin account, there can be only 4 corresponding private keys per account.
To set up SCS, complete the following steps using the Command Line Interface (CLI)
1. From the public key file for your host, obtain the key length, exponent, and modulus.
2. Enable SCS PKA for the current admin user, specifying the key length, exponent, and modulus, as with the following example.
ns-> set scs pka-rsa key 512 65537 9687527248844895807195605409339193503321372461558279681375742271564397062612879336559999265828980111611537652715077837089019119296718115311887359071551679
This command binds the specified public key to the admin user’s login name.
The command must not exceed 256 characters in length. If the modulus value requires the command to be of greater length, use the set command instead. The following example uses key length, exponent, and modulus values from a public key file named ourkeyfile.pub.
ns-> set scs pka-rsa tftp file-name ourkeyfile.pub ip-addr 172.16.10.10
3. (Optional) Display the list of SSH public keys bound to the current admin user.
ns-> get scs pka-rsa
4. (Optional) Display the list of SSH public keys bound to the login name of the specified user (mkt_admin).
ns-> get scs pka-rsa username mkt_admin
Note: It is possible to keep and use your private key on multiple clients, but be sure to keep it protected from potential intruders.
���� :KDW·V�1HZ�,Q�6FUHHQ26������
���

6HFXUH�6KHOO
Note: Only the root administrator can execute this command.
:KDW·V�1HZ�,Q�6FUHHQ26������ ����

6HFRQGDU\�,3�$GGUHVVHV
�-� �.��F�+���..�-��-�Each NetScreen interface has a single, unique primary IP address. However, some situations demand that an interface have multiple IP addresses. For example, an organization might have additional IP address assignments, and might not wish to add a router to accommodate them. In addition, an organization might have more network devices than its subnet can handle, as when there are more than 254 hosts connected to a LAN. To solve such problems, you can add secondary IP addresses to a Trusted or DMZ interface.
��%����!2����!�����!�*�!����Secondary addresses have certain properties that affect how you can implement such addresses. These properties are as follows.
• There can be no subnet address overlap between any two secondary IPs. In addition, there can be no subnet address overlap between a secondary IP and any existing subnet on the NetScreen device.
• When you manage a NetScreen device through a secondary IP address, the address always has the same management properties as the primary IP address. Consequently, you cannot specify a separate management configuration for the secondary IP address.
• You cannot configure a gateway for a secondary IP address.
• You cannot configure a secondary IP address in transparent mode. For example, if you configure the secondary IP in NAT or route mode and then attempt to change the mode to transparent mode, the action fails.
• Whenever you create a new secondary IP address, the NetScreen device automatically creates a corresponding routing table entry. When you delete a secondary IP address, the device automatically deletes its routing table entry.
Enabling or disabling routing between two secondary IP addresses causes no changes in the routing table. For example, if you disable routing between two such addresses, the NetScreen device drops any packets directed from one interface to the other, but no changes occur in the routing table.
�!�����"�����.������"���%����!2�+�����!�����You can create or delete a secondary IP address using the WebUI application or the command line interface (CLI).
��$4+To set up a secondary IP address 192.168.1.2 for the Trusted interface:
���� :KDW·V�1HZ�,Q�6FUHHQ26������
���
0DOLFLRXV�85/�'HWHFWLRQ
1. Interface >> Trusted >> Secondary IP >> New Entry: Enter the following:
IP Address: 192.168.1.2
Netmask 255.255.255.0
2. Click OK.
The new secondary IP address appears in the Secondary IP Table.
To remove a secondary IP address for the Trusted interface:
1. Interface >> Trusted >> Secondary IP >> Remove.
2. At the confirmation prompt, click Yes.
The secondary IP address is gone from the Secondary IP Table.
�9+To set up a secondary IP address 172.16.10.11 for the Trusted interface and display the new IP address:
ns-> set interface <trust> ip <172.16.10.11> <255.255.255.0> secondary
ns-> get interface trust secondary
Part of the display generated by the get command displays:
secondary subnet: 172.16.10.11/24
To remove secondary IP address 172.16.4.5 from the Trusted interface:
ns-> unset interface trust ip 172.16.4.5
����%�����4�9�.���%����When you enable Malicious URL Detection, the NetScreen device monitors each HTTP packet and detects any URL that could exploit a target web server. The device automatically drops any such packet.
You can configure the Malicious URL Detection feature using Command Line Interface (CLI) commands.
-��$���"�����.���$���"�����%�����4�9�.���%����The following command enables Malicious URL Detection.
ns-> set firewall malicious-URL code-red-worm
The following command disables Malicious URL Detection.
:KDW·V�1HZ�,Q�6FUHHQ26������ ����

0DOLFLRXV�85/�'HWHFWLRQ
ns-> unset firewall malicious-URL code-red-worm
The following command displays the current settings for Malicious URL Detection. You may wish to do this to confirm that this feature is currently enabled or disabled.
ns-> get firewall
Among other firewall settings displayed by this command, the following information appears.
Malicious URL Protection:Code-Red-Worm Protection: On
����%�����4�9�.���%��������!1�When you enable Malicious URL Detection and the NetScreen device detects a Malicious URL in a packet, it drops the packet and generates the following alarm.
<date> <time> ATTACK ALARM: malicious URL from <SRC IP Address>/<Port> to <DST IP Address>/80 prot TCP (trust)
������!�*�When the NetScreen device detects a Malicious URL, it generates and transmits a SNMP trap (as with all alarms).
����������!���������!����!%��+�����!���With the Malicious URL Detection feature enabled, the NetScreen device limits the number of sessions that can exist on any single Trusted or DMZ IP address. This prevents the NetScreen device’s session table from filling when a Web server, infected with the Code Red worm, attempts to access and infect other web servers.
The following command enables the Session Threshold Per Source IP feature:
ns-> set firewall session-threshold source-ip-based <val>
where <val> is the designated number of sessions.
The following command disables the Session Threshold Per Source IP feature:
ns-> unset firewall session-threshold source-ip-based
Note: This feature limits all IP addresses to the same value.
���� :KDW·V�1HZ�,Q�6FUHHQ26������
���

0DOLFLRXV�85/�'HWHFWLRQ
To confirm that the feature is enabled or disabled, execute the get firewall command.
Among other firewall settings, the following information appears.
Session limitation: OnSource-IP-based threshold = <val>
:KDW·V�1HZ�,Q�6FUHHQ26������ ����

0DOLFLRXV�85/�'HWHFWLRQ
���� :KDW·V�1HZ�,Q�6FUHHQ26������
���

�
�9+��2���?�(�!1�������"��In previous and current versions of the Command Line Interface (CLI) manuals, each CLI command description contains a section titled Syntax, which displays the command’s syntax, including all of its options, switches, and parameters.
Starting with ScreenOS versions after version 2.61, all syntax descriptions use a more hierarchical, structured, and visually edifying format. This format displays each command’s features in a treelike arrangement that more clearly reveals the syntactical order and the possible permutations offered by the command.
.�*�����%2�.���1���!�As with all previous versions of the CLI manual, the Syntax sections show the dependencies between command options, switches, and parameters by using the following special characters.
• The { and } symbols denote a mandatory feature. Features enclosed by these symbols are essential for execution of the command.
• The [ and ] symbols denote an optional feature. Features enclosed by these symbols are not essential for execution of the command, although omitting such features might adversely affect the outcome.
• The | symbol denotes an “if” relationship between two features. When this symbol appears between two features on the same line, you can use either feature (but not both). When this symbol appears at the end of a line, you can use the feature on that line, or the one below it.
Many CLI commands have embedded dependencies, which makes features optional in some contexts, and mandatory in others. The two hypothetical features shown below demonstrate this principle.
[ feature_1 { feature_2 } ]
In this example, the delimiters [ and ] surround the entire clause. Consequently, you can omit both feature_1 and feature_2, and still execute the command successfully. However, the mandatory delimiters { and } surround feature_2. Consequently, if you include feature_1, you cannot successfully execute the command without including feature_2.
9HUVLRQ������ ������
3UHYLRXV�6\QWD[�3UHVHQWDWLRQ�)RUPDW
�!� ������2���?��!�����������(�!1��All NetScreen CLI manuals for version 2.61 (and before) displayed command syntax in a linear style that resembled a paragraph. In this structure, each command feature followed another sequentially, delimited only by the dependency symbols.
The example below shows the syntax description for the set route command, using the old syntax presentation format.
set route <a.b.c.d> <A.B.C.D> interface { trust [ gateway <a.b.c.d> [ metric <number> ] ] | untrust [ gateway <a.b.c.d> [ metric <number> ] ] | mgt [ gateway <a.b.c.d> [ metric <number> ] ] | tunnel/ <number> [ gateway <a.b.c.d> [ metric <number> ] ] }
While this format presents the command syntax accurately and completely, it can be difficult to decipher the structure of the command, especially if it contains many delimiters, features, and complex feature dependencies.
��'��2���?��!�����������(�!1��All NetScreen CLI manuals for ScreenOS versions later than 2.61 display command syntax using a hierarchical, structured presentation format.
The example below shows the syntax description for the set route command.
set route <ip_addr> <mask>[gateway <ip_addr>
[ metric <number> ] |interface
{trust |untrust |mgt |tunnel/<number>}
[ gateway <ip_addr> [ metric <number> ] ]]
This new structure more clearly reveals the command’s syntax, feature dependencies, and basic structure. The following example defines a static route for an internal subnet with IP address 172.16.15.0/ 24 using an internal router with IP address 172.16.10.4.
ns-> set route 172.16.15.0 255.255.255.0 interface trust gateway 172.16.10.4
��� :KDW·V�1HZ�,Q�6FUHHQ26����
���

$YDLODELOLW\�RI�&/,�&RPPDQGV��6ZLWFKHV��DQG�3DUDPHWHUV
� ����$����2��0��9+���11����@��'��%���@�������!�1���!�As you execute CLI commands using the syntax descriptions in this manual, you may find that certain commands and command features are unavailable for your NetScreen device model.
A good example is the set vsys command, which is available on a NetScreen-500 device, but not on a NetScreen-5xp device. Similarly, some command options are unavailable on certain models, as with the df-bit option of the set vpn command. This option is available on the NetScreen-500, but not on the NetScreen-5xp.
Because NetScreen devices treat unavailable features as improper syntax, attempting to use such a feature usually generates the unknown keyword error message. When this message appears, confirm the feature’s availability using the ? switch. For example, the following commands list available options for the set vpn command:
ns-> set vpn ?
ns-> set vpn vpn_name ?
ns-> set vpn gateway gate_name ?
9HUVLRQ������ ���

$YDLODELOLW\�RI�&/,�&RPPDQGV��6ZLWFKHV��DQG�3DUDPHWHUV
��� :KDW·V�1HZ�,Q�6FUHHQ26����
���
��
������11����This chapter lists the set commands that are unchanged in this version, or have been removed. In addition, this chapter lists and describes all set commands that are new or have undergone modification since version 2.61.
All command changes described in this chapter are relative to version 2.61 syntax and functionality.
4�%���"���������11����The following set commands have not changed since version 2.61.
��1� ���������11����No set CLI commands are removed since version 2.61.
set address set alarm set arp
set clock set console set dbuf
set dialup-group set dip set dns
set domain set envar set ffilter
set fips enable set flow set ftp
set global set global-pro set group
set hostname set interface set intervlan-traffic deny
set ip tftp set ippool set l2tp
set lcd set mac set mip
set ntp set pppoe set route
set scheduler set service set snmp
set ssl set syslog set temperature-threshold
set timer set traffic-shaping set url
set vip set vpnmonitor set vsys
set vsys-traffic set webtrends
9HUVLRQ������ ������

&KDQJHG�VHW�&RPPDQGV
����"���������11����The following commands have changed since version 2.61.
� �����
Description: Use the set admin command to configure the administrative parameters for the NetScreen device.
�2���?set admin
{auth
{radius-port <port_num> |secret <shar_secr> | server-name { <name_str> | <ip_addr> } |timeout <number> |type { local | radius} |
device-reset |format { dos | unix } |mail
{alert |mail-addr1 <ip_addr> |mail-addr2 <ip_addr> |server-name { <ip_addr> | <name_str> } |traffic-log} |
manager-ip <ip_addr> [ <mask> ] |name <name_str> |password <pswd_str> |port <port_num> |
Note: This command has the following change:
• Added password <pswd_str> suboption to the scs option.
• Added disable and enable suboptions to the password suboption.
• Added the username setting to the password suboption.
��� :KDW·V�1HZ�,Q�6FUHHQ26����
&KDQJHG�VHW�&RPPDQGV
scs{password
{ disable | enable{ username <name_str> }
} |port <port_num>} |
sys-ip <ip_addr> |telnet port <port_num> |user <name_str>
{ password <pswd_str> }[ privilege { all | read-only } ]
}
unset admin{auth
{radius-port |secret |server-name |timeout |type} |
device-reset |format |mail
{alert |mail-addr1 |mail-addr2 |server-name |traffic-log} |
manager-ip { <ip_addr> | all } |name |password |port |scs port |sys-ip |telnet port |user <name_str>}
9HUVLRQ������ ���

&KDQJHG�VHW�&RPPDQGV
�!"�1����
auth radius-port <port_num>
Server port for a RADIUS server. The possible range of port numbers is from 1024 to 65535.
secret <shar_secr>
Shared secret for a RADIUS server.
server-name <name_str>
The IP address or the server name (DNS configured and enabled) of the RADIUS server.
timeout <number>
Specifies the length of idle time in minutes before automatically closing the administrative session. The value can be up 999 minutes. A <number> value of 0 indicates that an inactive administrative session never times out.
type { local | radius }
• local: Checks the admin name in the internal database only.
• radius: Checks for the admin name in the internal database. If the admin name is not found, checks in the RADIUS server.
device-reset Enables device reset for asset recovery.
format { dos | unix } Applies to all NetScreen devices. This switch determines the format used to generate a configuration file. On some Netscreen device models, you can download this file to a TFTP server or PCMCIA card using the CLI, and to a local directory using WebUI.
��� :KDW·V�1HZ�,Q�6FUHHQ26����

&KDQJHG�VHW�&RPPDQGV
mail Enables email for sending alerts and traffic logs.
alert
Collects system alarms from the device for sending to an email address.
traffic-log
Collects a log of network traffic handled by the NetScreen device. The traffic log can contain a maximum of 4,096 entries. The NetScreen device sends a copy of the log file to each specified email address (see the mail-addr1 and mail-addr2 switches below). This happens when the log is full, or every 24 hours, depending upon which occurs first.
mail-addr1 <ip_addr>
Sets the first email address for sending alert and traffic logs.
mail-addr2 <ip_addr>
Sets a second email address for sending alert and traffic logs.
server-name { <ip_addr> | <name_str> }
The IP address or name of the Simple Mail Transfer Protocol (SMTP) server that receives email notification of system alarms and traffic logs.
manager-ip <ip_addr> | <mask>
Restricts management to an IP address for a remote host or subnet. The default IP address is 0.0.0.0, which allows management from any workstation. All NetScreen devices allow you to specify up to six hosts or subnets at once.
When using the unset admin manager-ip command, specify one or all of the six possible management IP addresses.
name <name_str> The login name of the root user for the NetScreen device. The maximum length of the name is 31 characters, including all symbols except ?. The name is case-sensitive.
password <pswd_str> Specifies the password of the root user. The maximum length of the password is 31 characters, including all symbols except ?
9HUVLRQ������ ���

&KDQJHG�VHW�&RPPDQGV
.�0�����The default admin name and password are netscreen.
port <port_num> Sets the port number for detecting configuration changes when using the web. Use any number between 1024 and 32767, or use the default port number—80.
Changing the admin port number might require resetting the device (see the reset command).
scs Provides access to the Secure Command Shell (SCS) utility. SCS allows you to administer NetScreen devices from an Ethernet connection or a dial-in modem, thus providing CLI access over unsecure channels.
port <port_num> Specifies the logical SSH port through which the SCS communication occurs.
password Sets the password for the user that establishes the SCS session. The enable | disable switch enables or disables password authentication. The username <name_str> option specifies the admin user name.
sys-ip <ip_addr> The system IP address for managing the NetScreen device. If the NetScreen device is in NAT or Route mode, the system IP address must be in the same subnet as the physical interface through which you plan to access the system IP address.
telnet port <port_num> Provides CLI access through a TELNET connection.
user <name_str> The login name of non-root administrators (super- administrators and sub-administrators) for the NetScreen device. The maximum length of the user name is 31 characters, including all symbols except ?. The user name is case-sensitive.
privilege { all | read-only } Defines the administrative privilege level:
• all is for a super-administrator. This administrator can execute all commands except those that modify the root user or other super-administrators. A super-administrator cannot change his or her own name.
• read-only is for a sub-administrator, who can only execute the enter, trace-route, exit, get, and ping commands.
��� :KDW·V�1HZ�,Q�6FUHHQ26����

&KDQJHG�VHW�&RPPDQGV
The default manager-ip is 0.0.0.0, and the default subnet mask is 255.255.255.255.
The default sys-ip is 192.168.1.1 (it is 209.125.148.254 before firmware 1.61).
The default privilege for a super-administrator is read only.
The default admin port is 80.
The default mail alert setting is off.
-?�1*���To change the root administrator user name to “paul”:
ns-> set admin name paul
To change the root administrator login password to “build4you”:
ns-> set admin password build4you
To assign a level-2 administrator named joe with the password “angel”:
ns-> set admin user joe password angel privilege all
To generate the configuration file in UNIX format:
ns-> set admin format unix
To change the port number for the Web administrative interface to 8000:
ns-> set admin port 8000
To enable email notification for system alarms:
ns-> set admin mail alert
To enable email notification of traffic logging:
ns-> set admin mail traffic-log
To configure [email protected] as the email address to receive updates on administrative issues:
ns-> set admin mail mail-addr1 [email protected]
To specify 172.16.34.100 as the email server to receive administrative email notification:
ns-> set admin mail server-ip 172.16.34.100
9HUVLRQ������ ���

&KDQJHG�VHW�&RPPDQGV
To set the administrator password back to netscreen:
ns-> unset admin password
To disable email notification of system alarms:
ns-> unset admin mail alert
��������See the get admin and reset commands.
��� :KDW·V�1HZ�,Q�6FUHHQ26����

&KDQJHG�VHW�&RPPDQGV
� ������ ������
Description: Use the set audible-alarm command to activate the audible alarm feature.
�2���?set audible-alarm
{all |fan-failed |module-failed |power-failed |temperature}
unset audible-alarm{all |fan-failed |module-failed |power-failed |temperature}
�!"�1����
Note: This command has the following changes:
• Removed module-removed option.
• Removed power-removed option.
all Enables the audible alarm in the event of a fan failure, a interface module failure, a power supply failure, or a temperature increase above an admin-defined threshold.
fan-failed Enables the audible alarm in the event of a fan failure.
module-failed Enables the audible alarm in the event of an interface module failure.
power-failed Enables the audible alarm in the event of a power supply failure.
9HUVLRQ������ ���
&KDQJHG�VHW�&RPPDQGV
.�0�����The audible alarm is inactive by default.
-?�1*���To enable the audible alarm to sound in the event that one or more of the fans in the fan assembly fails:
ns500-> set audible-alarm fan-failed
��������See the set temperature-threshold , get temperature , get audible-alarm , and clear audible-alarm commands.
temperature Enables the audible alarm if the temperature rises above an admin-defined threshold.
���� :KDW·V�1HZ�,Q�6FUHHQ26����

&KDQJHG�VHW�&RPPDQGV
� ����
Description: Use the set dhcp command to enable and configure a NetScreen device to act as a Dynamic Host Control Protocol (DHCP) server or relay agent. The set dhcp command can also set DHCP parameters to make the device act as a DHCP client.
�2���?set dhcp
{client
{autoconfig |lease <number> |server <ip_addr> |update-dhcpserver |vendor <name_str>}
server{ip <ip_addr> [ mac <mac_addr> | to <ip_addr> ] |service |option
{dns1 <ip_addr> |dns2 <ip_addr> |dns3 <ip_addr> |domainname <name_str> |gateway <ip_addr> |lease <number> |netmask <mask> |news <ip_addr> |nis1 <ip_addr> |nis2 <ip_addr> |nistag <string> |pop3 <ip_addr> |smtp <ip_addr> |wins1 <ip_addr> |
Note: This command has the following change:
• Added the service option.
9HUVLRQ������ ����

&KDQJHG�VHW�&RPPDQGV
wins2 <ip_addr>}
} |relay
{server-name { <name_str> | <ip_addr> } |service |vpn} |
}
unset dhcp{client
{autoconfig |lease |server |update-dhcpserver |vendor} |
server{ip <ip_addr>option
{dns1 |dns2 |dns3 |domainname |gateway |lease |netmask |news |nis1 |nis2 |nistag |pop3 |smtp |wins1 |wins2
} |service}
relay
���� :KDW·V�1HZ�,Q�6FUHHQ26����

&KDQJHG�VHW�&RPPDQGV
{server-name |service |vpn}
�!"�1����
client Specifies the NetScreen device as a DHCP client.
autoconfig
Determines whether to load configuration files automatically when an IP address is requested. The DHCP server must have a database of configuration information for the clients it serves.
lease <number>
Defines the length of time the NetScreen device (acting as a DHCP server) leases an IP address to a host on the trusted LAN. Length of time <number> is in minutes. For an unlimited lease, enter 0.
server <ip_addr>
Defines the IP address <ip_addr> of the DHCP server from which the NetScreen device obtains its IP address and TCP/IP settings.
update-dhcpserver
Enables automatic updating of DHCP server parameters.
vendor <name_str>
Identifies the DHCP client as a NetScreen device to the DHCP server. The server can then supply an appropriately specific set of configurations.
server Makes the NetScreen device a DHCP server.
ip <ip_addr> mac <mac_addr>
(In Reserved mode) The DHCP server assigns a designated IP address (<ip_addr>) to a machine specified by its MAC address (<mac_addr>).
9HUVLRQ������ ����

&KDQJHG�VHW�&RPPDQGV
ip <ip_addr> to <ip_addr>
(In Dynamic mode) Defines a range of IP addresses to use when the DHCP server is filling client requests. Enter the starting IP address and the ending IP address.
The IP pool can include up to 64 entries, and can support up to 255 IP addresses.
service
Enables DHCP operation.
option Specifies the DHCP server options for which you can define settings.
dns1 <ip_addr> | dns2 <ip_addr> | dns3 <ip_addr>
Defines the IP addresses of the primary, secondary, and tertiary Domain Name Service (DNS) servers.
domainname <name_str>
Defines the registered domain name of the network.
gateway <ip_addr>
Defines the IP address of the default trusted gateway used by the clients.
lease <number>
Defines the length of time in minutes for which an IP address supplied by the DHCP server is leased. For an unlimited lease, enter 0.
netmask <ip_addr>
Defines the netmask of the default gateway on the trusted side.
news <ip_addr>
Specifies the IP address of a news server for receiving and storing postings for news groups.
nis1 <ip_addr> | nis2 <ip_addr>
Defines the IP addresses of the primary and secondary NetInfo® servers, which provide the distribution of administrative data within a LAN.
���� :KDW·V�1HZ�,Q�6FUHHQ26����
&KDQJHG�VHW�&RPPDQGV
.�0�����The service is off (disabled) by default.
The default IP address for the DHCP server is 0.0.0.0. It means that NetScreen device accepts its IP address from any DHCP server.
The default vendor identification is set to netscreen-5xp or netscreen-10.
The default lease time is seven days, which equals 10080 minutes.
On the NetScreen-5XP, the autoconfiguration feature is off (disabled) by default.
nistag <string>
Defines the identifying tag used by the Apple® NetInfo database.
pop3 <ip_addr>
Specifies the IP address of a Post Office Protocol version 3 (POP3) mail server.
smtp <ip_addr>
Defines the IP address of a Simple Mail Transfer Protocol (SMTP) mail server.
wins1 <ip_addr> | wins2 <ip_addr>
Specifies the IP address of the primary and secondary Windows Internet Naming Service (WINS) servers.
relay Designates the NetScreen device as a DHCP relay agent.
relay server-name <name_str> | <ip_addr>
Defines the domain name or IP address of the DHCP server from which the NetScreen device receives the IP addresses and TCP/IP settings that it relays to hosts on the trusted LAN.
relay service
Enables the the NetScreen device to act as a DHCP relay agent.
relay vpn
Allows the DHCP communications to pass through a VPN tunnel. You must first set up a VPN tunnel between the NetScreen device and the DHCP server.
9HUVLRQ������ ����
&KDQJHG�VHW�&RPPDQGV
-?�1*���To enable the DHCP server:
ns-> set dhcp server service
To reserve an IP address for a specific machine:
ns-> set dhcp server ip 10.10.10.23 mac aabbccddeeff
To assign a range of IP addresses for use in Dynamic mode:
ns-> set dhcp server ip 10.10.10.10 to 10.10.10.20
To designate a specific DHCP server with IP address 172.16.40.1 for a NetScreen device acting as a DHCP client:
ns-> set dhcp client server 172.16.40.1
��������See the get dhcp, clear dhcp, and exec dhcp commands.
���� :KDW·V�1HZ�,Q�6FUHHQ26����
&KDQJHG�VHW�&RPPDQGV
� ��� ����
Description: Use the set firewall command to protect your network against various attacks, to allow specified kinds of traffic to pass the firewall, and to log dropped packets destined for a NetScreen device.
�2���?set firewall
{icmp-flood | ip-sweep | port-scan | udp-flood
[ threshold <number> ] |syn-flood
[alarm-threshold <number> |attack-threshold <number> |queue-size <number> |timeout <number> |source-threshold <number>] |
applet |bypass-non-ip |bypass-others-ipsec |default-deny |ip-spoofing |ip-sweep threshold <number> |land |log-self [ ike | snmp ] |malicious-URL
code-red-worm |{ <name_str>
{ [ pattern <string> ] length <number> }} |
Note: This command has the following change:
• Removed the key setting from encrypt option.
• Added the malicious-URL option.
• Added the code-red-worm switch to the malicious-URL option.
• Added the [ pattern <string> ] length <number> suboption of the malicious-URL option.
9HUVLRQ������ ����
&KDQJHG�VHW�&RPPDQGV
ping-of-death |session-threshold { source-ip-based <number> } |src-route |tear-drop |udp-flood threshold <number> |winnuke}
unset firewall{icmp-flood | ip-sweep | port-scan | udp-flood
[ threshold <number> ] |syn-flood
[alarm-threshold <number> |attack-threshold <number> |queue-size <number> |timeout <number>]
applet |bypass-non-ip |bypass-others-ipsec |default-deny |ip-spoofing |ip-sweep |land |log-self |malicious-URL <name_str> |code-red-worm |ping-of-death |session-threshold { source-ip-based } |port-scan |src-route |tear-drop |udp-flood |winnuke}
���� :KDW·V�1HZ�,Q�6FUHHQ26����
&KDQJHG�VHW�&RPPDQGV
�!"�1����
icmp-flood [threshold <number>]
Detects Internet Control Message Protocol (ICMP) floods. An ICMP flood occurs when ICMP echo requests are broadcast with the purpose of flooding a system with so much data that it first slows down, and then times out and is disconnected.
The threshold defines the number of ICMP packets per second allowed to ping the same destination address before the NetScreen device rejects further ICMP packets. The range is 1 to 1,000,000.
ip-sweep threshold <number> Detects and prevents an IP Sweep attack.
An IP Sweep attack occurs when an attacker sends ICMP echo requests (pings) to multiple destination addresses. If a target host replies, it reveals the target’s IP address to the attacker.
Set the IP Sweep threshold to between 1 and 1,000,000 microseconds. Each time ICMP echo requests occur with greater frequency than this limit, the NetScreen device drops further echo requests from the remote source address.
port-scan threshold <number>
Prevents port scan attacks. A port scan attack occurs when an attacker sends packets with different port numbers to scan available services. The attack succeeds if a port responds.
To prevent this attack, the NetScreen device internally logs the number of different ports scanned from a single remote source. For example, if a remote host scans 10 ports in 0.05 seconds (the default threshold setting), the NetScreen device flags this as a port scan attack, and rejects further packets from the remote source.
The port-scan threshold <number> value determines the threshold setting, which can be from 1000 to 1,000,000 milliseconds.
9HUVLRQ������ ����

&KDQJHG�VHW�&RPPDQGV
udp-flood threshold <number>
UDP flooding occurs when UDP packets are sent with the purpose of slowing down the system to the point that it can no longer process valid connection requests.
The number of packets allowed per second to the same destination IP address/port pair. When this number is exceeded, the NetScreen device generates an alarm and drops subsequent packets. The valid range is from 1 to 1,000,000.
syn-flood SYN flood attacks occur when the connecting host continuously sends TCP SYN requests without replying to the corresponding ACK responses. Detects SYN Flood attacks.
[ alarm-threshold <number> ] defines the number of proxied, half-complete connections per second at which the NetScreen device makes enteries in the event alarm log.
[ attack_threshold <number> ] defines the number of SYN packets per second required to trigger the SYN proxying mechanism.
[queue-size <number>] defines the number of proxied connection requests held in the proxied connection queue before the system starts rejecting new connection requests.
[timeout <number>] defines the maximum length of time before a half-completed connection is dropped from the queue. You can set it between 1 and 50 seconds.
syn-flood [source-threshold <number>] defines the number of SYN packets received (per second) from a single source IP address, before the NetScreen device executes the SYN proxing mechanism.
applet Blocks all embedded Java and ActiveX applets, DOS .exe files, .dll files, and compressed files of types .zip, .gzip, and .tar.
bypass-non-ip Allows non-IP traffic, such as IPX, to pass through a NetScreen device in Transparent mode. (ARP is a special case for non-IP traffic. It is always passed, even if when feature is disabled.)
bypass-others-ipsec Openly passes all IPSec traffic through a NetScreen device in Transparent mode. The NetScreen device does not act as a VPN tunnel gateway but passes the IPSec packets onward to other gateways.
���� :KDW·V�1HZ�,Q�6FUHHQ26����
&KDQJHG�VHW�&RPPDQGV
default-deny Denies all traffic not specifically allowed by an Access Policy.
ip-spoofing Prevents spoofing attacks.
Spoofing attacks occur when unauthorized agents attempt to bypass firewall security by imitating valid client IP addresses. Using the ip-spoofing option invalidates such false source IP address connections. Only NetScreen devices running in NAT or Route mode can use this option.
land Prevents Land attacks by combining the SYN flood defense mechanism with IP spoofing protection.
Land attacks occur when an attacker sends spoofed IP packets with headers containing the target’s IP address for both the source and destination IP addresses. The attacker sends these packets with the SYN flag set to any available port. This induces the target to create empty sessions with itself, filling its session table and overwhelming its resources.
log-self Enables the feature that logs dropped packets and pings destined for the NetScreen device.
malicious-URL <name_str> Sets up a filter that scans HTTP packets for suspect URLs. The NetScreen device drops packets that contain such URLs.
code-red-worm Enables blocking of the code-red-worm virus.
pattern Specifies the starting pattern to search for in the HTTP packet. Typically, this starting pattern begins with the HTTP command GET, followed by at least one space, plus the beginning of a URL. (The NetScreen device treats multiple spaces between the command “GET” and the character “/” at the start of the URL as a single space.)
length Specifies a minimum length for the URL before the CR-LF.
ping-of-death Detects and rejects oversized and irregular ICMP packet sizes.
Although the TCP/IP specification requires a specific packet size, many ping implementations allow larger packet sizes. This can trigger a range of adverse system reactions including crashing, freezing, and rebooting.
9HUVLRQ������ ����

&KDQJHG�VHW�&RPPDQGV
.�0�����The following firewall features are enabled by default:
• src-route
• syn-flood
• tear-drop
• ping-of-death
• ip-spoofing
• land
• applets
Default firewall option values for all NetScreen device models:
session-threshold source-ip-based <number>
Limits the number of sessions that any particular source-IP entity can intiate.
src-route Blocks all IP traffic that uses the IP Source Route Option.
Some attackers change the source IP addresses in packet headers, thus routing the packets to a false address. Using the src-route option prevents this attack.
tear-drop Blocks the Teardrop attack.
Teardrop attacks occur when fragmented IP packets overlap and cause the host attempting to reassemble the packets to crash. The tear-drop option directs the NetScreen device to drop any packets that have such a discrepancy.
winnuke Detects attacks on Windows NetBios communications, modifies the packet as necessary, and passes it on. (Each WinNuke attack triggers an attack log entry in the event alarm log.)
SYN Flood Protection
Alarm threshold: 1024 SYN packets/secondAttack threshold: 200 SYN packets/secondQueue size: 10,240 uncompleted SYN connections (1024 for the NetScreen-5 and-10)Source threshold: 4000 SYN packets/second from the same source IP addressTimeout value: 20 seconds
Port Scan Protection
Threshold: 30,000 microseconds per scan attempting to elicit responses from port numbers
���� :KDW·V�1HZ�,Q�6FUHHQ26����

&KDQJHG�VHW�&RPPDQGV
-?�1*���To enable the default-deny firewall protection:
ns-> set firewall default-deny
To enable detection of ICMP Flood attacks and set the threshold at 2000 ICMP packets/second:
ns-> set firewall icmp-flood threshold 2000
To disable the ip-spoofing firewall protection:
ns-> unset firewall ip-spoofing
To disable logging of dropped packets and pings destined for the NetScreen device:
ns-> unset firewall log-self
To set up a malicious-URL filter named “hacker 2” that detects suspect HTTP packets containing URLs beginning with “/ira.world”:
ns-> set firewall malicious-URL "hacker 2" pattern "get /ira.world" length 205
��������See the get firewall command.
ICMP Flood Protection
Threshold: 1000 ICMP packets/second to the same IP address
IP Sweep Protection
Threshold: 30,000 microseconds per scan attempting to elicit responsesfrom IP addresses
UDP Flood Protection
Threshold: 1000 UDP packets/second to the same destination IP address/port pair
9HUVLRQ������ ����

&KDQJHG�VHW�&RPPDQGV
� ��
Description: Use the set ha command to enable and configure High Availability (HA) for a NetScreen device.
�2���?set ha
{arp <number> |auth password <pswd> |encrypt { password <pswd> }fast-mode |group <id_num> |interface { dmz | ha2 | trust | untrust } |link-up-on-slave |monitor [ trust | untrust ] |priority <number> |second-path [ trust | untrust ] |session off |track
{ip
[<ip_addr>
[interface
{dmz |trust |untrust |mgt |ha1 |ha2} |
interval <number> |method { arp | ping } |threshold <number> |weight <number>
Note: This command has the following change:
• Removed the key setting from encrypt option.
���� :KDW·V�1HZ�,Q�6FUHHQ26����
&KDQJHG�VHW�&RPPDQGV
]] |
threshold <number>}
}
unset ha{arp <number> |auth |encrypt |fast-mode |group |interface |link-up-on-slave |monitor
[ dmz | trust | untrust ] |priority |second-path |session off}
�!"�1����
arp Sets the number of ARP requests that a newly elected master unit sends out, notifying other network devices of its presence. The default is 2.
auth password Specifies that the NetScreen device performs HA communications authentication using the specified password. Valid passwords contain from 1 to 16 characters.
encrypt password Specifies that the NetScreen device encrypts HA communications using the specified password. Valid passwords contain from 1 to 16 characters.
fast-mode When a redundant group has only two members (a master and a slave) you can quicken the failover procedure by using the fast-mode option. This option essentially eliminates the election process. Because there is only one possible candidate to become the master, there is no need to determine which unit to promote.
group Defines an identification number for the redundant group, where <number> can be between 0 and 255. If you specify 0, high availability (HA) is disabled.
9HUVLRQ������ ����

&KDQJHG�VHW�&RPPDQGV
interface Specifies the interface on which the NetScreen devices are linked for HA communication. Because of the sensitive nature of HA communication, it is advisable to use either the Trusted or DMZ interface.
link-up-on-slave Sets the slave unit to the link-up state such that, when the unit becomes the master, it is unnecessary to execute the Spanning Tree Protocol (STP) operation. This saves from 30 to 50 seconds when a failover occurs.
monitor Initiates a failover if the master unit’s Trusted, Untrusted, or DMZ interface loses network connectivity.
priority Assigns a number to define:
• which unit is the master unit when two NetScreen devices in a redundant group power up simultaneously
• which slave unit becomes the next master during a failover
The unit with the number closest to 1 becomes the master unit.
second-path Specifies a slave unit path for HA communication, should the primary link fail.
session off Stops the master HA from propagating a session’s services to the other members of the redundant group.
slave Makes the NetScreen device a backup unit in the VSD group cluster.
track ip <ip_addr> Enables path tracking, which is a means for checking the network connection between a NetScreen interface and that of another device. The IP address <ip_addr> indicates the the other network device to be checked.
interface [ dmz | trust | untrust | mgt | ha1 | ha2 ]
Speficies the physical interface from which the device pings or ARPs to the other device. If you do not specify an interface, the NetScreen device tries every interface in turn.
interval <number> Defines the frequency for checking an IP address. You can set the interval between 1 and 200 seconds.
method { arp | ping } Determines the method to perform path tracking.
���� :KDW·V�1HZ�,Q�6FUHHQ26����
&KDQJHG�VHW�&RPPDQGV
.�0�����The default group ID number is 0, which means that HA is disabled.
The default priority number is 100.
The default method for path tracking is pinging.
The default interval for path tracking is 1 second.
The default number of unanswered requests considered as a failed attempt is 3.
The default weight is 1.
The default track threshold required to initiate a failover is 255.
-?�1*����To define the HA group ID as 3:
ns-> set ha group 3
To disable high availability:
ns-> unset ha group
or
ns-> set ha group 0
To enable path tracking to IP address 172.16.66.170 every 5 seconds:
ns-> set ha track ip 172.16.66.170 interval 5
�����The color of the Status LED indicates whether a NetScreen device is operating as a master or a slave unit. Green indicates the device is running in master mode, and yellow indicates the slave mode.
threshold <number> Specifies the number of consecutive unanswered requests required to constitute a failed attempt at reaching a remote network device.
weight <number> Assigns an importance to the tracked remote address. A value of 16 denotes the most important, and 1 the least. For example, if a NetScreen device fails to get 3 consecutive responses from an IP address with a weight of 16, the number of failed attempts is 48.
track threshold <number> Sets the number of failed attempts required to initiate a failover. The range is between 1 and 255.
9HUVLRQ������ ����

&KDQJHG�VHW�&RPPDQGV
The key <hex_key> and the password <pswd> option are both available when the device is in FIPS mode. The key <hex_key> option is unavailable when the NetScreen device is not in FIPS mode.
��������See the get ha and exec ha commands.
���� :KDW·V�1HZ�,Q�6FUHHQ26����

&KDQJHG�VHW�&RPPDQGV
� ��
Definition: Use the set ike command to define the Phase 1 and Phase 2 proposals and the gateway for an AutoKey IKE (Internet Key Exchange) VPN tunnel, and to specify other IKE parameters.
�2���?
�� ����������� �
set ike p1-proposal <name_str>[ DSA-Sig | RSA-Sig | preshare
[ group1 | group2 | group5 ][ group1 | group2 | group5 ]
]{ esp
{ 3des | des | aes128{ md5 | sha-1
[days <number> |hours <number> |minutes <number> |seconds <number>]
}}
}
Note: This command has the following changes:
• Added the aes128 encryption switch to the p1-proposal esp option.
• Added the aes128 encryption switch to the p2-proposal esp option.
• Added the nat-traversal settings to the gateway option, including udp-checksum and keepalive-frequency switches.
• Added heartbeat option, including hello <number> and threshold <number> switches.
9HUVLRQ������ ����

&KDQJHG�VHW�&RPPDQGV
�� ����������� �
set ike p2-proposal <name_str>[ group1 | group2 | group5 | no-pfs ]
{esp { 3des | des | aes128 | null } |ah}
[ md5 | null | sha-1[days <number> |hours <number> |minutes <number> |seconds <number> ]]
[ kbyte <number> ]]
}
� � �
set ike gateway <name_str>{dialup <name_str> |dynamic <name_str> |heartbeat
{hello <number> |threshold <number>} |
ip <ip_addr> [ id <id_str> ]}
[ aggressive | main ][ local-id <id_str> ]
[ preshare <key_str> ]{ proposal <name_str>
[ <name_str> ][ <name_str> ]
[ <name_str> ]} |
{cert
{my-cert <id_num> |peer-ca <id_num> |peer-cert-type
���� :KDW·V�1HZ�,Q�6FUHHQ26����

&KDQJHG�VHW�&RPPDQGV
{pkcs7 |x509-sig}
} |nat-traversal
[udp-checksum |keepalive-frequency <number>] |
disable-udp-checksum | enable-udp-checksum}
!�����"#����� �$�% �����
set ike{accept-all-proposal |heartbeat |policy-checking |single-ike-tunnel <name_str> |soft-lifetime-buffer <number> |respond-bad-spi <spi_num> |initiator-set-commit |responder-set-commit |id-mode
{ ip | subnet }}
set ike initial-contact[all-peers |single-gateway <name_str> |single-user <name_str>]
unset ike{p1-proposal <name_str> |p2-proposal <name_str> |accept-all-proposal |policy-checking |heartbeat |initial-contact |initiator-set-commit |
9HUVLRQ������ ����

&KDQJHG�VHW�&RPPDQGV
respond-bad-spi |responder-set-commit |single-ike-tunnel <name_str>}
unset ike gateway <name>[my-cert |peer-ca |peer-cert-type |nat-traversal [ udp-checksum ]]
�!"�1����
p1-proposal <name_str> Names the IKE Phase 1 proposal, which contains parameters for creating and exchanging session keys and establishing security associations. You can specify up to four Phase 1 proposals.
DSA-Sig | RSA-Sig | preshare Specifies the method to authenticate the source of IKE messages. preshare refers to a Preshared key; that is, a key for encryption and decryption that both participants have before beginning tunnel negotiations.
RSA-Sig and DSA-Sig refer to two kinds of digital signatures which are certificates testifying that the certificate holder is who he or she claims to be. Preshared key is the default method.
esp Specifies Encapsulating Security Payload, a protocol that provides both encryption and authentication.
des | 3des | aes128 Specifies the encryption algorithm used in ESP protocol.
md5 | null | sha-1 Specifies the authentication (hashing) algorithm used in ESP protocol. The default algorithm is SHA-1, the stronger of the two algorithms.
group1 | group2 | group5 Identifies the Diffie-Hellman group, a technique that allows two parties to negotiate encryption keys over an insecure medium; such as, the Internet. Group2 is the default group.
days <number>hours <number>minutes <number>seconds <number>
Defines the elapsed time between each attempt to renegotiate another security association. The minimum allowable lifetime is 180 seconds. The default lifetime is 28800 seconds.
���� :KDW·V�1HZ�,Q�6FUHHQ26����

&KDQJHG�VHW�&RPPDQGV
p2-proposal <name_str> Names the IKE Phase 2 proposal, which defines the parameters for creating and exchanging session key and security association for securing data to be sent through the IPSec tunnel. You can specify up to four Phase 2 proposals.
group1 | group2 | group5 | no-pfs
Defines how the NetScreen device generates the encryption key.
Perfect Forward Secrecy (PFS) is a method for generating each new encryption key independently from the previous key. Selecting no-pfs turns this feature off, specifying that IKE generates the Phase 2 key from the key generated in the Phase 1 exchange.
If you specify one of the Diffie-Hellman groups, IKE automatically uses PFS when generating the encryption key. The default is Group 2.
ah | esp In a Phase 2 proposal, identifies the IPSec protocol—either Authentication Header (AH), which provides authentication, or Encapsulating Security Payload (ESP), which provides encryption (and/or authentication).
null Specifies that either no encryption or no authentication applies. You cannot select null for both encryption and authentication.
kbytes <number> Indicates the maximum allowable data flow in kilobytes before NetScreen renegotiates another security association. The default value is 0 (infinity).
gateway <name_str> Specifies the name of the remote tunnel gateway.
heartbeat Specifies the IKE heartbeat protocol parameters.
hello <number> Sets the IKE heartbeat protocol interval in seconds.
threshold <number> Sets the number of retries before the NetScreen device forces renegotiation of the Phase 1 and Phase 2 keys.
dialup <name_str> Identifies an IKE dialup user or dialup group. To specify a user’s attributes, use the set user command. To specify a dialup group’s attributes, use the set dialup command.
dynamic <name_str> Specifies that the remote gateway has a dynamically assigned IP address. <name_str> defines the IKE identity of the remote peer device.
9HUVLRQ������ ����

&KDQJHG�VHW�&RPPDQGV
ip <ip_addr> Defines the static IP address of the remote gateway.
nat-traversal Enables or disables IPsec NAT-Traversal, a feature that allows transmission of encrypted traffic through a NAT device. The NAT Traversal feature encapsulates ESP packets into UDP packets. This prevents the NAT device from altering ESP packet headers in transit, thus preventing authentication failure on the peer NetScreen device.
• udp-checksum enables the NAT-Traversal UDP checksum operation (used for UDP packet authentication).
• keepalive-frequency specifies how many seconds of inactivity the NetScreen device allows before disabling NAT Traversal.
id <id_str> (Optional) Identifies the remote gateway. Identification can be in one of the following three forms:
• an IP address
• a fully qualified domain name (FQDN); for example, www.netscreen.com
• a RFC822 name; that is, an email name such as [email protected].
Include the peer ID only when you want to enforce identifying the peer gateway with the specified ID. The NetScreen device checks the peer’s ID payload to see if it matches the specified ID.
aggressive | main Defines the mode used for Phase 1 negotiations. Use Aggressive mode only when you need to initiate an IKE key exchange without ID protection such as when one of the participants has a dynamically assigned IP address. Main mode is the recommended key-exchange method because it conceals the identities of the parties during the key exchange.
local-id <id_str> Defines the IKE NetScreen identity of the local device. Use only when the local NetScreen device has a dynamically assigned IP address (Note: If either of the participants has a dynamically assigned IP address, use Aggressive mode for Phase 1).
preshare <key_str> Defines the Preshared key used in the Phase 1 proposal. (If you use an RSA- or DSA-signature in the Phase 1 proposal, do not include this reference).
���� :KDW·V�1HZ�,Q�6FUHHQ26����

&KDQJHG�VHW�&RPPDQGV
proposal <name_str> Specifies the name of a proposal. You can specify up to four Phase 1 proposals.
cert Uses a digital certificate to authenticate the VPN initiator and receipient.
my-cert <name_str> Specifies one certificate if the local NetScreen device has multiple certificates loaded.
peer-ca <name_str> Specifies a preferred certificate authority (CA).
peer-cert-type { pkcs7 | x509 } Specifies a preferred type of certificate—PKCS7 or X509.
accept-all-proposal Accepts all incoming proposals. The default is to accept only those proposals matching predefined or user-defined proposals.
policy-checking Checks if the access policies of the two VPN participants match before establishing a connection.
Use policy checking when multiple tunnels are supported between two peer gateways. Otherwise, the IKE session fails.
For backwards compatibility with ScreenOS 2.0 and earlier, you can disable policy checking when only one policy is configured between two peers.
single-ike-tunnel <name_str> Specifies a single Phase 2 SA for all policies to the same remote peer. (Note: This feature has been implemented to ensure backward compatibility with ScreenOS 2.0.)
soft-lifetime-buffer <number> Sets a time in seconds to initiate a rekeying operation before the current IPSec SA key lifetime expires.
respond-bad-spi <spi_num> Responds to a specified number of packets with a bad security parameter index (SPI) value after a reboot.
initiator-set-commit Requests the responder to confirm that the new IPSec SA is established. The initiator will not use the new SA until this confirmation is received. The default is unset.
responder-set-commit Requests the initiator to confirm that the new IPSec SA is established before using it. The default is unset.
id-mode { ike ip | subnet } Defines the IKE ID mode in the Phase 2 exchange as either a host (IP) address or a gateway (subnet). If you choose ip , no Phase 2 ID is sent. If you choose subnet, proxy Phase 2 IDs are sent. (Use IP when setting up a VPN tunnel between a NetScreen device and a CheckPoint 4.0 device. Otherwise, use the subnet option.)
9HUVLRQ������ ����

&KDQJHG�VHW�&RPPDQGV
.�0�����Main mode is the default method for Phase 1 negotiations.
3DES and SHA-1 are the default algorithms for encryption and authentication.
The default time intervals before the NetScreen mechanism renegotiates another security association are 28,800 seconds in a Phase 1 proposal, and 3600 seconds in a Phase 2 proposal.
The default ID mode is subnet. (Changing the ID mode to IP is only necessary if the data traffic is between two security gateways, one of which is a CheckPoint 4.0 device.)
The default soft-lifetime-buffer size is 10 seconds.
By default, the single-ike-tunnel flag is not set.
By default, the commit bit is not set when initiating or responding to a Phase 2 proposal.
-?�1*���To define a Phase 1 proposal named pre-gl-3des-md5 with the following attributes:
• Preshared key and a group 1 Diffie-Hellman exchange
• Encapsulating Security Payload (ESP) protocol using the 3DES and MD5 algorithms
• Lifetime of 3 minutes:
ns-> set ike p1-proposal sf1 preshare group1 esp 3des md5 minutes 3
To define a Phase 2 proposal named g2-esp-3des-null with the following attributes:
initial-contact { all-peers | single-gateway <name_str> | single-user <user_name> }
By specifying all-peers , the NetScreen device deletes all SAs, and sends an initial contact notification to each IKE peer. If you do not specify anything, the NetScreen device sends an initial contact notification to all peers during the first IKE single-user session with that peer after a system reset.
By specifying single-gateway <name_str> or single-user <string>, the NetScreen device deletes all SAs associated with the specified IKE gateway or IKE user, then sends an initial contact notification.
The default is unset.
���� :KDW·V�1HZ�,Q�6FUHHQ26����
&KDQJHG�VHW�&RPPDQGV
• Group 2 Diffie-Hellman exchange
• ESP using 3DES without authentication
• Lifetime of 15 minutes:
ns-> set ike p2-proposal g2-esp-3des-null group2 esp 3des null minutes 15
To define a remote gateway named “san_fran” with the following attributes:
• Main mode
• Preshared Key with the value bi273T1L
• Reference to the Phase 1 proposal pre-g2-3des-md5
ns-> set ike gateway san_fran ip 172.16.10.11 preshare bi273T1L proposal pre-g2-3des-md5
For an example of the complete procedure for setting up a VPN tunnel, see the Notes section below.
To enable NAT traversal for a gateway named mktg:
ns-> set ike gateway mktg nat-traversal
To enable the UDP checksum setting:
ns-> set ike gateway mktg nat-traversal udp-checksum
To disable the UDP checksum setting:
ns-> unset ike gateway mktg nat-traversal udp-checksum
To set the Keepalive setting to 25 seconds:
ns-> set ike gateway mktg nat-traversal keepalive-frequency 25
��������See the clear ike, get ike, set policy, set user, set vpn, and get sa commands.
�����Setting up a VPN tunnel for a remote gateway with a static IP address requires up to five steps. To set up one end of a VPN tunnel gateway 1 (GW1) in the illustration for bidirectional traffic, follow the steps below.
9HUVLRQ������ ����

&KDQJHG�VHW�&RPPDQGV
1. Set the addresses for the trusted and untrusted parties at the two ends of the VPN tunnel:
ns-> set address trust host1 10.0.1.1 255.255.255.255
ns-> set address untrust host2 10.0.2.1 255.255.255.255
2. Define the IKE Phase 1 proposal and Phase 2 proposal. If you use the default proposals, you do not need to define Phase 1 and Phase 2 proposals.
3. Define the remote gateway:
ns-> set ike gateway gw2 ip 204.0.0.2 preshare netscreen proposal pre-g2-3des-md5
4. Define the VPN tunnel as AutoKey IKE:
ns-> set vpn vpn1 gateway gw2 proposal g2-esp-des-md5
5. Define an outgoing incoming access policy:
ns-> set policy outgoing host1 host2 any tunnel vpn vpn1
ns-> set policy incoming host2 host1 any tunnel vpn vpn1
The procedure for setting up a VPN tunnel for a dialup user with IKE constitutes up to five steps.
1. Define the trusted address that the user will access. (See the set address command.)
2. Define the user as an IKE user. See the set user command on page 2-122.
3. Define the IKE Phase 1 proposal, Phase 2 proposal, and remote gateway. (Note: If you use the default proposals, you do not need to define a Phase 1 or Phase 2 proposal.)
���� :KDW·V�1HZ�,Q�6FUHHQ26����

&KDQJHG�VHW�&RPPDQGV
4. Define the VPN tunnel as AutoKey IKE. See the set vpn command on page 2-131.
5. Define an incoming access policy, with Dial-Up VPN as the source address and the VPN tunnel you configured in step 3 specified. See the set policy command on page 2-92.
��������See the get ike and clear ike-cookie commands.
9HUVLRQ������ ����
&KDQJHG�VHW�&RPPDQGV
� ���
Definition: Use the set pki command to designate the certificate authority server’s IP and e-mail addresses, to retrieve local certificate requests, and to create new RSA key pairs for public key encryption.
�2���?set pki
{authority <id_num>
{cert-status
{crl
{refresh
{daily |default |monthly |weekly} |
url <url_str>}
ocsp{refresh <number> |url <url_str>
[id-type
{certhash |certid |
Note: This command has the following changes:
• Added the authority option.
• Added the cert-status suboption of the authority option.
• Added the scep suboption of the authority option.
• Added the raw-cn { enable } option.
���� :KDW·V�1HZ�,Q�6FUHHQ26����
&KDQJHG�VHW�&RPPDQGV
issuer-serial |name |pkcert}
[ l-sign-request ] [ no-nonce ][ no-response-type ]
[ not-verify-resp-cert ]]
} |revocation-check
{all |crl |ocsp}
} |scep
{authentication { failed | passed } |ca-cgi <string> |ca-id <name_str> |challenge <pswd_str> |current |mode { auto | manual } |polling-int <number> |ra-cgi <string> |renew-start <number>}
} |ldap
{server-name { <name_str> | <ip_addr> } |crl-url <name_str>} |
x509{default
{cert-path { full | partial } |crl-refresh
{daily |default |monthly |
9HUVLRQ������ ����
&KDQJHG�VHW�&RPPDQGV
weekly} |
send-to <string>} |
dn{country-name <name_str> |email <string> |ip <ip_addr> |local-name <name_str> |name <name_str> |org-name <name_str> |org-unit-name <name_str> |phone <string> |state-name <name_str>} |
raw-cn { enable }}
}
unset pki{authority <id_num>
{cert-status
{crl
{refresh
{daily |default |monthly |weekly |}
url <name_str>}
ocsp{refresh <number> |url <url_str>
[id-type
{certhash |
���� :KDW·V�1HZ�,Q�6FUHHQ26����

&KDQJHG�VHW�&RPPDQGV
certid |issuer-serial |name |pkcert}
[ l-sign-request ] [ no-nonce ][ no-response-type ]
[ not-verify-resp-cert ]]
}revocation-check
{all |crl |ocsp}
} |scep
{authentication |ca-cgi |ca-id |challenge |current |mode |polling-int |ra-cgi |renew-start}
} |ldap
{crl-url |server-name} |
x509{default |dn |raw-cn}
}
9HUVLRQ������ ����
&KDQJHG�VHW�&RPPDQGV
�!"�1����
authority <id_num> Defines how the NetScreen device uses the CA’s autho-rization services.
cert-status Defines how the NetScreen device verifies certificate status. The revocation-check option directs the NetScreen device to check certificates to see if they are currently revoked.
crl Uses the Certificate Revocation List (CRL) to deter-mine the certificate’s revokation status.
The both option of the revocation-check directs the NetScreen device to use both the CRL and the OCSP.
The refresh setting determines how often the NetScreen device checks for revocation.
The url <url_str> setting specifies the URL for access-ing the Certificate Revocation List.
ocsp Uses Online Certificate Status Protocol (OSCP) to determine the certificate’s revokation status.
The refresh setting determines how often the NetScreen device uses OCSP to check for revocation.
The url <url_str> setting specifies the URL for access-ing the OCSP responder.
id-type The id-type is the type of certificate ID used to identify the certificate. The certhash type specifies the hash-ing value for the certificate. The certid type specifies the certificate identification value, which includes the hash algorithm, the hash of the issuer distinguished name (DN), the hash of the issuer’s public key, and the certificate’s serial number. The issuer-serial type specifies the CA issuer name and serial number. The name type specifies the general name of the certificate. The pkcert type specifies the entire certificate.
l-sign-request Specifies that the NetScreen device signs the request for revocation verification.
no-nonce Prevents the NetScreen device from sending a nonce value with the request.
no-response-type Prevents the NetScreen device from specifying an acceptable response type.
not-verify-resp-cert Prevents the NetScreen device from verifying the responder’s certificate.
���� :KDW·V�1HZ�,Q�6FUHHQ26����

&KDQJHG�VHW�&RPPDQGV
scep Sets Simple Certificate Enrollment Protocol (SCEP) parameters.
authentication sets the result of the CA authentica-tion, failed or passed.
ca-cgi <url-str> specifies the path to the CA’s SCEP server.
ca-id <string> specifies the identity of the CA’s SCEP server.
challenge <pswd_str> specifies the Challenge pass-word.
current directs the NetScreen device to use the cur-rent SCEP setting as default.
mode { auto | manual } specifies the authentication mode for CA’s SCEP server.
polling-int <number> Determines the retrieval poll-ing interval (in minutes).
ra-cgi <url_str> specifies the CGI path to the RA’s SCEP server.
renew-start <number> specifies the number of days before starting the renewal process.
ldap Specifies settings for the LDAP server.
server-name { <name_str> | <ip_addr> } Defines the domain name or IP address of the default Light-weight Directory Access Protocol (LDAP) server for the certificate authority (CA) that validates the X.509 cer-tificate.
crl-url <url-str> Sets the default LDAP URL for the CA certificate revocation list (CRL) to be used for X.509 CRL retrieval purposes.
x509 Specifies settings for the x509 certificate.
default Specifies a type of digital certificate with the default X.509 certificate settings.
The cert-path option configures the path to the X.509 CRL. The full | partial option determines if the NetScreen device uses the full path to the X.509 CRL or only a part of the path.
crl-refresh Sets the refreshment frequency of the X.509 CRL. The default option uses the validation date decided by each CRL.
9HUVLRQ������ ����
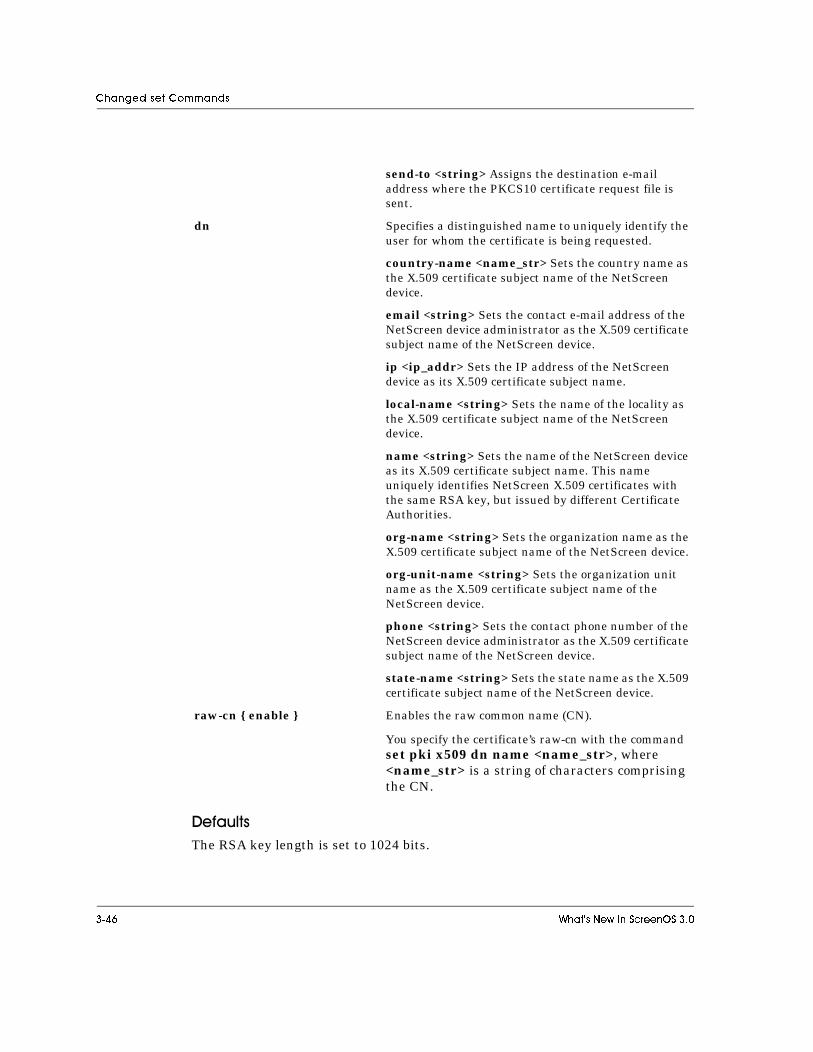
&KDQJHG�VHW�&RPPDQGV
.�0�����The RSA key length is set to 1024 bits.
send-to <string> Assigns the destination e-mail address where the PKCS10 certificate request file is sent.
dn Specifies a distinguished name to uniquely identify the user for whom the certificate is being requested.
country-name <name_str> Sets the country name as the X.509 certificate subject name of the NetScreen device.
email <string> Sets the contact e-mail address of the NetScreen device administrator as the X.509 certificate subject name of the NetScreen device.
ip <ip_addr> Sets the IP address of the NetScreen device as its X.509 certificate subject name.
local-name <string> Sets the name of the locality as the X.509 certificate subject name of the NetScreen device.
name <string> Sets the name of the NetScreen device as its X.509 certificate subject name. This name uniquely identifies NetScreen X.509 certificates with the same RSA key, but issued by different Certificate Authorities.
org-name <string> Sets the organization name as the X.509 certificate subject name of the NetScreen device.
org-unit-name <string> Sets the organization unit name as the X.509 certificate subject name of the NetScreen device.
phone <string> Sets the contact phone number of the NetScreen device administrator as the X.509 certificate subject name of the NetScreen device.
state-name <string> Sets the state name as the X.509 certificate subject name of the NetScreen device.
raw-cn { enable } Enables the raw common name (CN).
You specify the certificate’s raw-cn with the command set pki x509 dn name <name_str>, where <name_str> is a string of characters comprising the CN.
���� :KDW·V�1HZ�,Q�6FUHHQ26����

&KDQJHG�VHW�&RPPDQGV
-?�1*���To identify 162.128.20.12 as the CA server’s IP address:
ns-> set pki ldap server-name 162.128.20.12
To specify the destination e-mail address where the NetScreen device sends the PKCS10 certificate request:
ns-> set pki x509 default send-to [email protected]
To refresh the certificate revocation list on a daily basis:
ns-> set pki x509 default crl-refresh daily
To define a distinguished name for Ed Jones, who works in marketing at NetScreen Technologies in Santa Clara, California:
ns-> set pki x509 dn country-name “US”
ns-> set pki x509 dn state-name CA
ns-> set pki x509 dn local-name “santa clara”
ns-> set pki x509 dn org-name “netscreen technologies”
ns-> set pki x509 dn org-unit-name marketing
ns-> set pki x509 dn name “ed jones”
You use the set pki, get pki, and exec pki commands to request an x509 CA certificate from a certificate authority. The following commands provide a typical example:
1. Specify a certificate authority CA CGI path.
set pki auth -1 scep ca-cgi “http://pilotonsiteipsec.verisign.com/cgi-bin/pkiclient.exe”
2. Specify a registration authority RA CGI path
set pki auth -1 scep ra-cgi “http://pilotonsiteipsec.verisign.com/cgi-bin/pkiclient.exe”
Note: The Common Gateway Interface (CGI) is a standard way for a web server to pass a user request to an application program, and to receive data back. CGI is part of the web’s Hypertext Transfer Protocol (HTTP).
9HUVLRQ������ ����
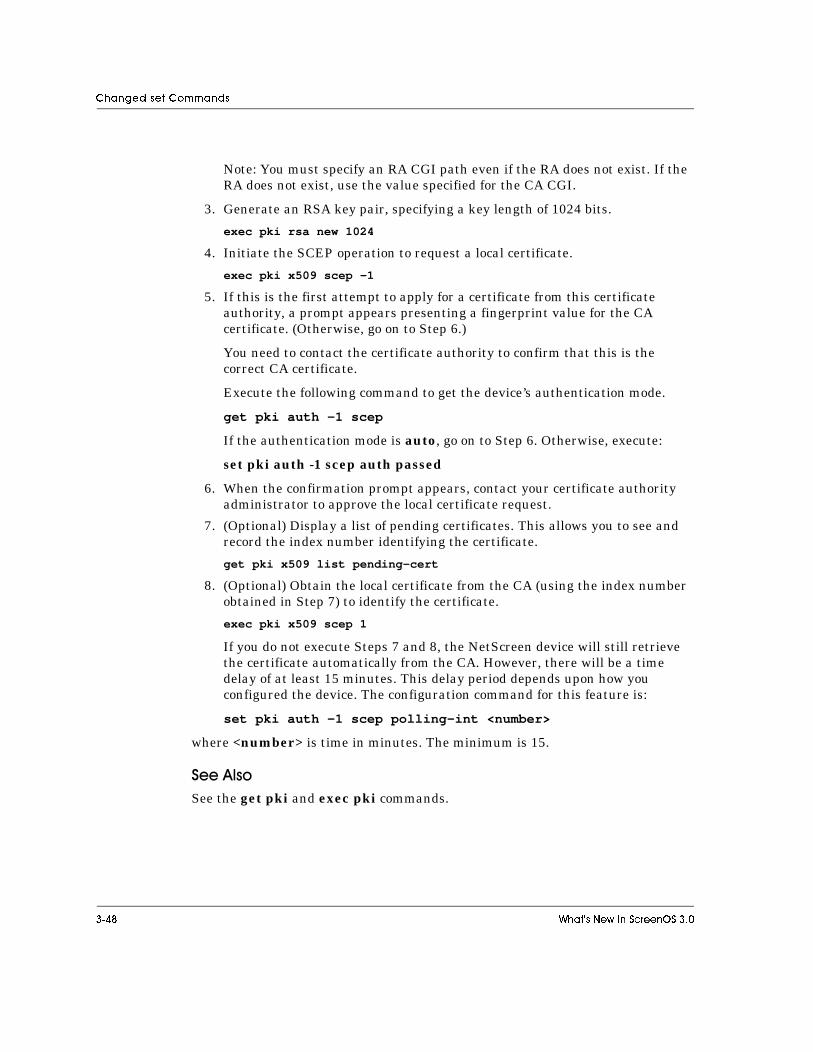
&KDQJHG�VHW�&RPPDQGV
Note: You must specify an RA CGI path even if the RA does not exist. If the RA does not exist, use the value specified for the CA CGI.
3. Generate an RSA key pair, specifying a key length of 1024 bits.
exec pki rsa new 1024
4. Initiate the SCEP operation to request a local certificate.
exec pki x509 scep -1
5. If this is the first attempt to apply for a certificate from this certificate authority, a prompt appears presenting a fingerprint value for the CA certificate. (Otherwise, go on to Step 6.)
You need to contact the certificate authority to confirm that this is the correct CA certificate.
Execute the following command to get the device’s authentication mode.
get pki auth -1 scep
If the authentication mode is auto, go on to Step 6. Otherwise, execute:
set pki auth -1 scep auth passed
6. When the confirmation prompt appears, contact your certificate authority administrator to approve the local certificate request.
7. (Optional) Display a list of pending certificates. This allows you to see and record the index number identifying the certificate.
get pki x509 list pending-cert
8. (Optional) Obtain the local certificate from the CA (using the index number obtained in Step 7) to identify the certificate.
exec pki x509 scep 1
If you do not execute Steps 7 and 8, the NetScreen device will still retrieve the certificate automatically from the CA. However, there will be a time delay of at least 15 minutes. This delay period depends upon how you configured the device. The configuration command for this feature is:
set pki auth -1 scep polling-int <number>
where <number> is time in minutes. The minimum is 15.
��������See the get pki and exec pki commands.
���� :KDW·V�1HZ�,Q�6FUHHQ26����
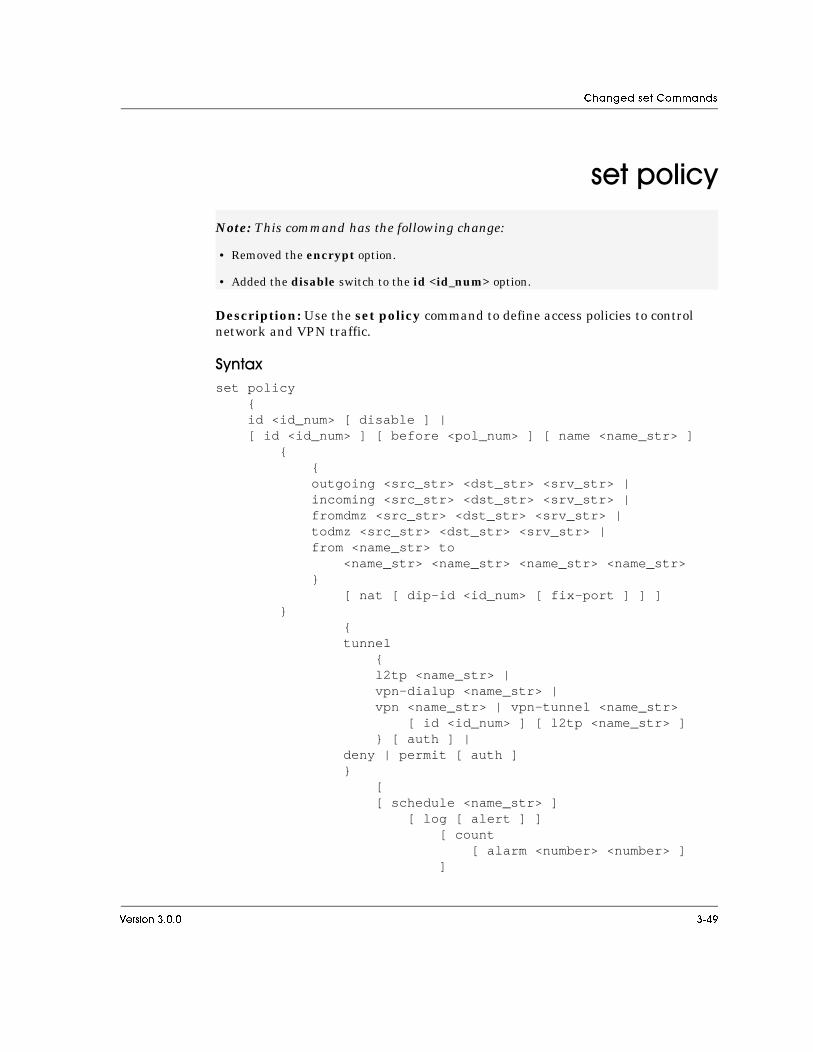
&KDQJHG�VHW�&RPPDQGV
� ������
Description: Use the set policy command to define access policies to control network and VPN traffic.
�2���?set policy
{id <id_num> [ disable ] |[ id <id_num> ] [ before <pol_num> ] [ name <name_str> ]
{{outgoing <src_str> <dst_str> <srv_str> |incoming <src_str> <dst_str> <srv_str> |fromdmz <src_str> <dst_str> <srv_str> |todmz <src_str> <dst_str> <srv_str> |from <name_str> to
<name_str> <name_str> <name_str> <name_str>}
[ nat [ dip-id <id_num> [ fix-port ] ] ]}
{tunnel
{l2tp <name_str> |vpn-dialup <name_str> |vpn <name_str> | vpn-tunnel <name_str>
[ id <id_num> ] [ l2tp <name_str> ]} [ auth ] |
deny | permit [ auth ]}
[[ schedule <name_str> ]
[ log [ alert ] ][ count
[ alarm <number> <number> ]]
Note: This command has the following change:
• Removed the encrypt option.
• Added the disable switch to the id <id_num> option.
9HUVLRQ������ ����

&KDQJHG�VHW�&RPPDQGV
][ traffic { gbw <number> }
{ priority <number> }{ mbw [ <number> ]
dscp{disable |enable}
}]
} |move <number>
{before <id_num> |after <id_num>} |
default-permit-all |}
unset policy{<id_number> [ disable ] |default-permit-all}
�!"�1����
id <id_num> Specifies an access policy ID number.
disable Disables the policy.
before <pol_num> Specifies the position of the access policy in the access control list (ACL) before another policy.
name <name_str> Names the access policy.
outgoing Defines outbound traffic from the trusted network to the untrusted network.
incoming Defines inbound traffic from the untrusted network to the trusted network.
fromdmz Defines outbound traffic from the DMZ network to either the trusted or untrusted networks.
todmz Defines inbound traffic to the DMZ network from either the trusted or untrusted networks.
���� :KDW·V�1HZ�,Q�6FUHHQ26����

&KDQJHG�VHW�&RPPDQGV
<src_str> specifies the name of the source address.
<dst_str> specifies the name of the destination address.
<srv_str> specifies the name of a service. (Note: “any” is a predefined term that represents all predefined and user-defined services.)
from <name_str1> to <name_str2> <name_str3> <name_str4>
Specifies two zones between which the policies apply.
<name_str1> is the name of the security zone.
<name_str2> is the name of the source address.
<name_str3> is the name of the destination address.
<name_str4> is the service name.
nat Enables or disables Network Address Translation policies.
dip-id <id_num> Specifies the ID number of the Dynamic IP (DIP) pool. This number can be between 4 and 255.
fix-port Keeps the original source port number in the packet header; that is, Port Address Translation (PAT) is not applied.
tunnel Encapsulates and encrypts outgoing IP packets, and decapsulates and decrypts incoming IP packets.
l2tp <id_num> Specifies a Layer 2 Tunneling Protocol (L2TP) tunnel.
vpn-dialup <name_str> For an incoming dialup VPN tunnel connection, specify vpn-dialup and the name of the dialup user or dialup group.
vpn [ l2tp <name_str> ] For an IPSec VPN tunnel, specify vpn and the name of the VPN tunnel. For IPSec-over-L2TP, specify both vpn (and the name of the VPN tunnel) and l2tp (and the name of the L2TP tunnel).
vpn-tunnel Specifies an active tunnel.
permit | deny permit allows the specified service to pass from the source address across the firewall to the destination address.
deny blocks the service at the firewall.
auth Requires the user to provide a login name and password to authenticate his or her identity before access to cross the firewall is granted.
9HUVLRQ������ ����

&KDQJHG�VHW�&RPPDQGV
.�0�����No access policy is defined except on the NetScreen-5, which ships with an outgoing access policy: “inside any” “outside any” any permit.
schedule <name_str> Applies the access policy only at times defined in the specified schedule.
log [ alert ] Maintains a log of all connections to which the access policy applies. alert enables the Syslog alert feature.
count Maintains a count in bytes of all network traffic to which the access policy is applied.
alarm <number> <number> Enables the alarm feature so that you can view alarms. You must enter the number of bytes per second (<number>) and the number of bytes per minute (<number>) required to trigger an alarm.
traffic gbw <number> Defines the guaranteed bandwidth (gbw) in kilobits per second. The NetScreen device passes traffic below this threshold with the highest priority, without being subject to traffic shaping.
priority <number> Specifies one of the eight traffic priority levels. When traffic falls between the guaranteed and maximum bandwidth settings, the NetScreen device passes traffic with higher priority first. Lower priority traffic is passed only if there is no higher priority traffic.
mbw <number> Defines the maximum bandwidth (mbw) in kilobits per second. Traffic beyond this limit is throttled and dropped.
dscp { enable | disable } Enables or disables a mapping of the NetScreen priority levels to the Differentiated Services Codepoint (DSCP) marking system.
move <id_num> { before | after } <id_num>
Repositions an access policy with one ID number before or after another policy with another ID number in the access control list (ACL).
default-permit-all Allows access without checking the access control list (ACL) for a matching policy.
disable Disables the policy without removing it from the configuration.
���� :KDW·V�1HZ�,Q�6FUHHQ26����

&KDQJHG�VHW�&RPPDQGV
-?�1*���To define an incoming access policy for an IPSec-over-L2TP tunnel (where the VPN tunnel name is “home2office” and the L2TP tunnel name is “home-office”) for a dialup VPN group named “home_office”:
ns-> set policy incoming “dial-up vpn” “inside any” any tunnel vpn home2office l2tp home-office
To create an outgoing access policy from the Sales department on the trusted network using NAT and the DIP pool with ID #7:
ns-> set policy outgoing sales “outside any” any nat dip-id 7 permit
To define the DIP with a fixed port on the trusted interface:
ns-> set policy outgoing 10.1.1.9 10.150.42.41 any nat dip-id 7 fix
The following steps configure a NetScreen device to allow traffic between a private telephony endpoint host with an H.323 gatekeeper through a NetScreen device to telephony endpoint hosts on the public side.
1. Map a public IP address to the private IP address of the private host device (on the Trusted side).
ns-> set mip 10.0.0.20 host 192.168.1.20
2. Map a public IP address to the private IP address of the gatekeeper device (on the Trusted side).
ns-> set mip 10.0.0.10 host 192.168.1.10
3. (Optional) Confirm that the mapped IP addresses exist by executing the get mip command.
4. Create a policy for all incoming H.323 traffic received on the Untrusted side and sent to the host device.
ns-> set policy incoming “outside any” mip(10.0.0.20) “H.323” permit
5. Create a policy for all incoming H.323 traffic received from the Untrusted side and sent to the gatekeeper device.
ns-> set policy incoming “outside any” mip(10.0.0.10) “H.323” permit
6. Create a policy for all outgoing traffic, sent through the Trusted interface to the Untrusted interface.
9HUVLRQ������ ����

&KDQJHG�VHW�&RPPDQGV
ns-> set policy outgoing “inside any” “outside any” “H.323” permit
7. (Optional) Confirm that the policies exist by executing the get policy command.
��������See the get policy, set address, set vpn, set l2tp, set user, set schedule, and set traffic-shaping commands.
���� :KDW·V�1HZ�,Q�6FUHHQ26����

&KDQJHG�VHW�&RPPDQGV
� ���
Description: Use the set scs command to enable a secure command shell (SCS) to display information or configure a NetScreen device from a remote system.
�2���?set scs
{enable |key-gen-time <number> |pka-rsa
{tftp
{file name |username <name_str> file-name <filename>}
{ ip-addr <ip_addr> }[ username <name_str> ] key <number> <number> <number>} |
}
unset scs{enable |hash <name_str> <name_str> |key-gen-time |pka-rsa
{all |username <name_str>
{
Note: This command has the following changes:
• Changed pka_rsa option name to pka-rsa.
• Added the key suboption to the pka-rsa option.
• Added the username suboption to the pka-rsa option.
• Moved tftp option to suboption of pka-rsa.
• Removed delete option.
9HUVLRQ������ ����

&KDQJHG�VHW�&RPPDQGV
all |index <id_num>} |
}}
�!"�1����
.�0�����This feature is disabled by default.
The default key generation time is 60 minutes.
enable Enables the Secure Command Shell (SCS) shell.
key-gen-time <number> Specifies the SCS key regenerating time (in minutes).
pka-rsa Public Key Authenticaion (PKA) using RSA.
tftp Loads and binds the PKA key using TFTP.
key <number> <number> <number> Binds a PKA key to the current user. The <number> values represent the key length, the exponent, and the modulus, respectively. Read-only users cannot execute this option.
username <name_str> Specifies the name of the user to bind the PKA key. file-name <filename> Specifies the file containing the key to bind to the user.
unset scs pka-rsa Unsets Public Key Authenticaion (PKA) using RSA.
all Deletes all keys bound to all users in the active root/VSYS. Admin users and read-only users cannot execute this option.
username <name_str> Unbinds and deletes all keys bound to the specified user, but only if <name_str> is the name of the current admin user. Read-only users cannot execute this option.
The index option unbinds and deletes the key identified by <id_num>. This option allows the root admin user to unbind a key for any user (identified by user <name_str>). Read-only users cannot execute this option.
���� :KDW·V�1HZ�,Q�6FUHHQ26����

&KDQJHG�VHW�&RPPDQGV
-?�1*���To enable Secure Command Shell (SCS) on a NetScreen device:
ns-> set scs enable
To set the key regeneration time to 15 minutes:
ns-> set scs key-gen-time 15
To bind a hypothetical key to a user named “chris”:
ns-> set scs pka-rsa username chris key 512 65537 687527248844895807195605409339193503321372461558279681375742271564397062612879336559999265828980111611537652715077837089019119296718115311887359071551679
��������See the get scs and exec scs commands.
9HUVLRQ������ ����

&KDQJHG�VHW�&RPPDQGV
� �� �
Description: Use the set user command to create entries in the internal user authentication database. There are the four basic categories of users:
• Dialup users (for using Manual Key VPNs)
• Authentication users (for using network connections)
• IKE users (for using AutoKey IKE VPNs)
• Authentication/IKE users
�2���?set user <name_str>
{dialup <spi_num> <spi_num>
{ah { md5 | sha-1 }
{ key <key_hex> | password <pswd_str> } |esp
{3des | des | aes128
{ key <key_hex> | password <pswd_str> } |null
[ auth{ md5 | sha-1
{key <key_hex> |password <pswd_str>}
}]
}} |
disable |
Note: This command has the following change:
• Added the ike-id fqdn <name_str> option.
• Added the u-fqdn <name_str> option.
• Added the asn1-dn { wildcard <name_str> } option.
���� :KDW·V�1HZ�,Q�6FUHHQ26����

&KDQJHG�VHW�&RPPDQGV
enable |ike-id
{ip <ip_addr> |fqdn <name_str> |u-fqdn <name_str> |asn1-dn { wildcard <name_str> }}
[ share-limit <number> ] |password <pswd-str> |remote-settings
{dns1 <ip_addr> |dns2 <ip_addr> |ipaddr <ip_addr> |ippool <name_str> |wins1 <ip_addr> |wins2 <ip_addr>} |
type{ [ auth ] [ ike ] [ l2tp ] }
}
unset user <string> [ type { auth [ ike ] } ]
�!"�1����
user <name_str> Defines the user’s name.
dialup <spi_num> <spi-num> For Manual Key VPN method only. Defines local and remote security parameter index (SPI) numbers that uniquely distinguish a particular encrypted tunnel from any others. This parameter must be a hexidecimal value between 1000 and 2fffffff. The local SPI number at one end serves as the remote SPI number at the other end and vice-versa.
esp For VPN dialup users and dynamic peers. Defines the use of the Encapsulating Security Payload (ESP) protocol.
3des Specifies the Triple Data Encryption Standard (3DES) algorithm.
aes128 Specifies the Advanced Encryption Standard (AES), 128-bit encryption.
9HUVLRQ������ ����

&KDQJHG�VHW�&RPPDQGV
key <key_hex> Defines the 192-bit hexidecimal key used in the 3DES algorithm. This value must be between 1000 and 2fffffff.
password <pswd_str> Defines a password for the generation of a hexidecimal key. The NetScreen device creates a hexidecimal key for the user based upon the password string that the user provides.
des Specifies the DES encryption algorithm.
key <key_hex> Defines the 64-bit hexidecimal key used in the DES algorithm.
null Defines “no encryption method” for the ESP protocol.
auth Defines the use of an authentication method. Choices are MD5 or SHA-1. (Note: Some NetScreen devices do not support SHA-1.)
ah Defines the use of the Authentication Header (AH) protocol. Choices are MD5 and SHA-1. (Note: Some NetScreen devices do not support SHA-1.)
md5 Sets the device to use the Message Digest version 5 (MD5) algorithm for authentication.
key <key_hex> Defines the 16-byte hexidecimal key used in the MD5 algorithm.
sha-1 Sets the device to use the Secure Hash Algorithm (SHA-1) algorithm for authentication.
key <key_hex> Defines the 20-byte hexidecimal key used in the SHA-1 algorithm.
type { [ auth ] [ ike ] [ l2tp ] } Sets the user type, which can be one of the following: authentication, IKE, L2TP, authentication/IKE, authentication/L2TP, authentication/IKE/L2TP, or IKE/L2TP.
disable | enable Disables or enables the user in the internal database. By default, the user is enabled.
���� :KDW·V�1HZ�,Q�6FUHHQ26����
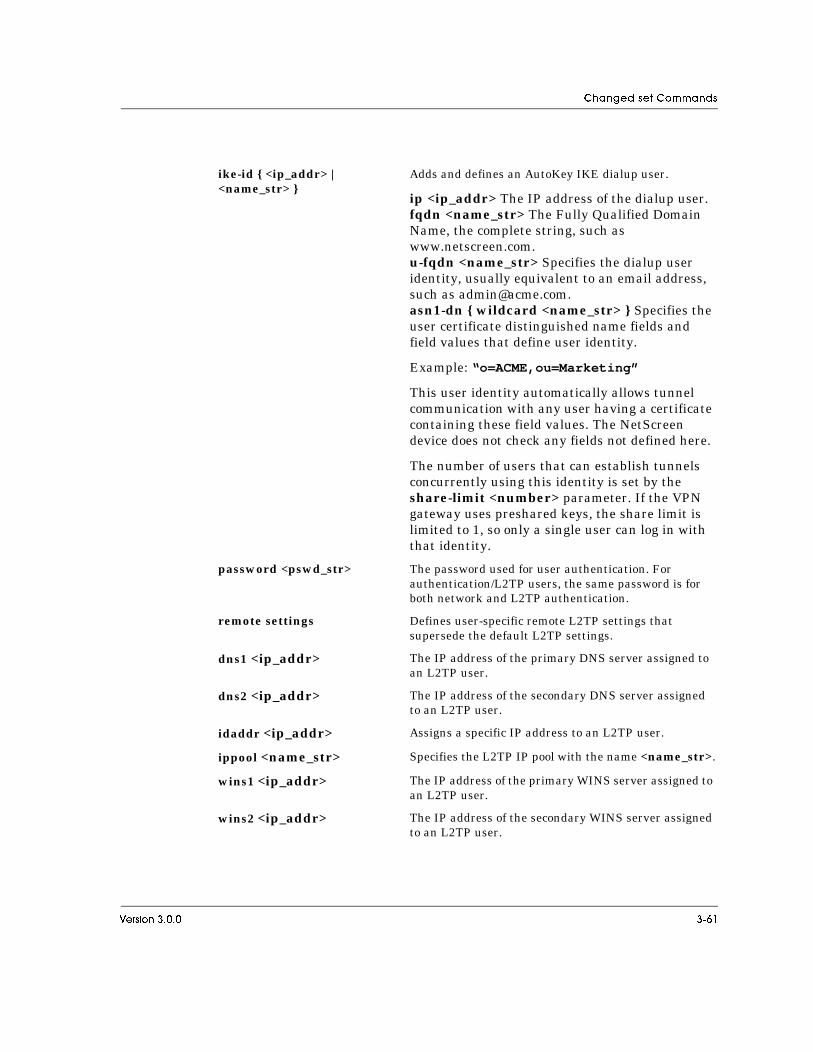
&KDQJHG�VHW�&RPPDQGV
ike-id { <ip_addr> | <name_str> }
Adds and defines an AutoKey IKE dialup user.
ip <ip_addr> The IP address of the dialup user.fqdn <name_str> The Fully Qualified Domain Name, the complete string, such as www.netscreen.com.u-fqdn <name_str> Specifies the dialup user identity, usually equivalent to an email address, such as [email protected] { wildcard <name_str> } Specifies the user certificate distinguished name fields and field values that define user identity.
Example: “o=ACME,ou=Marketing”
This user identity automatically allows tunnel communication with any user having a certificate containing these field values. The NetScreen device does not check any fields not defined here.
The number of users that can establish tunnels concurrently using this identity is set by the share-limit <number> parameter. If the VPN gateway uses preshared keys, the share limit is limited to 1, so only a single user can log in with that identity.
password <pswd_str> The password used for user authentication. For authentication/L2TP users, the same password is for both network and L2TP authentication.
remote settings Defines user-specific remote L2TP settings that supersede the default L2TP settings.
dns1 <ip_addr> The IP address of the primary DNS server assigned to an L2TP user.
dns2 <ip_addr> The IP address of the secondary DNS server assigned to an L2TP user.
idaddr <ip_addr> Assigns a specific IP address to an L2TP user.
ippool <name_str> Specifies the L2TP IP pool with the name <name_str>.
wins1 <ip_addr> The IP address of the primary WINS server assigned to an L2TP user.
wins2 <ip_addr> The IP address of the secondary WINS server assigned to an L2TP user.
9HUVLRQ������ ����

&KDQJHG�VHW�&RPPDQGV
.�0�����Users are enabled by default.
-?�1*���To create an authentication user in the NetScreen internal database for user guest with the password JnPc3g12:
ns-> set user guest password JnPc3g12
To change the user guest to an authentication/L2TP user:
ns-> set user guest type auth l2tp
To create a dialup user named maryj using DES encryption based on the password ipsecmaryj, and with a local-spi defined as 3456 and remote-spi defined as 7890:
ns-> set user maryj dialup 3456 7890 esp des password ipsecmaryj
To create an IKE user named branchsf with the IKE-ID number 2.2.2.2:
ns-> set user branchsf ike-id 2.2.2.2
To delete the user named jane:
ns-> unset user jane
To create a new user definition named “marketing” that recognizes up to 10 hosts possessing certificates containing “ACME” in the O field, and “Marketing” in the OU field:
ns-> set user “marketing” ike-id asn1-dn wildcard “o=ACME,ou=Marketing” share-limit 10
This command uses Group IKE ID, which allows multiple hosts to use a single user definition.
��������See the get user, set ike, set l2tp, set ippool, and set vpn commands.
���� :KDW·V�1HZ�,Q�6FUHHQ26����

&KDQJHG�VHW�&RPPDQGV
� ��
Description: Use the set vpn command to create a Virtual Private Network (VPN) tunnel.
NetScreen devices support two key methods for VPNs, AutoKey IKE and Manual Key. AutoKey IKE (Internet Key Exchange) is a standard protocol that automatically regenerates encryption keys at user-defined intervals. By contrast, Manual Key VPNs use predefined keys that are unchanged until the participants change them explicitly.
Attempting to use the SHA-1 parameter with a NetScreen device that does not support it generates the error message This device doesn’t support SHA-1 Authentication.
Entering the set vpn <name_str> trust gateway command generates the error message AutoKey VPN is not supported on trust interface.
�2���?set vpn <name_str>
[ trust ]{monitor |gateway { <name_str> | <ip_addr> }
{[ replay | no-replay ]
[ transport | tunnel ][ idletime <number> ]
[ proposal[ <name_str>
[ <name_str>[ <name_str>
[ <name_str> ]]
]]
]} |
manual <32_bit_hex> <32_bit_hex>
Note: This command has the following changes:
• Added the aes128 setting to the gateway esp option.
9HUVLRQ������ ����

&KDQJHG�VHW�&RPPDQGV
{ gateway { <ip_addr> }{ah { md5 | sha-1 } |
{key <16_byte_hex> |password <pswd-str>}
esp {3des
{key <192-bit_hex> |password <pswd_str>}
des{key <64-bit_hex> |password <pswd_str>}
aes128{key <128-bit_hex> |password <pswd_str>
null[ auth
md5 | sha-1{key <16_byte_hex> |password <pswd-str>}
]{
}df-bit
{clear |copy |set}
}
unset vpn <vpn_name> [ monitor ]
���� :KDW·V�1HZ�,Q�6FUHHQ26����

&KDQJHG�VHW�&RPPDQGV
�!"�1����
vpn <name_str> Defines a name for the VPN.
trust Specifies the Trusted interface.
gateway <name_str> Specifies the name of the remote security gateway. (This can be a NetScreen unit or any other IPSec-com-patible device).
replay | no-replay Enables or disables replay protection. The default set-ting is no-replay.
transport | tunnel Defines the IPSec mode. In tunnel mode, the active IP packet is encapsulated. In transport mode, no encapsu-lation occurs. Tunnel mode is appropriate when both of end points in an exchange lie beyond gateway devices. Transport mode is appropriate when either end point is a gateway.
idletime<number> The length of time in minutes that a connection can remain inactive before the NetScreen device terminates it.
proposal <name_str> Defines up to four Phase 2 proposals. A Phase 2 pro-posal determines how a NetScreen device sends VPN session traffic.
manual <32_bit_hex> <32_bit_hex>
Specifies a Manual Key VPN. When the NetScreen device is in Manual mode, you can encrypt and authen-ticate by HEX key or password.
<32_bit_hex> and <32_bit_hex> are 32-bit local and remote specurity parameters index (SPI) numbers. Each SPI number uniquely distinguishes a particular tunnel from any other active tunnel. Each must be a hexidecimal value between 3000 and 2fffffff.
The local SPI corresponds to the remote SPI at the other end of the tunnel, and vice-versa.
gateway <ip_addr> Defines the Untrusted IP address of the remote secu-rity gateway. This can be a NetScreen unit or any other IPSec-compatible device.
ah Specifies Authentication Header (AH) protocol to authenticate IP packet content. Hashing algorithm choices are MD5 and SHA-1.
local-interface Specifies the local interface of the NetScreen device.
md5 Specifies the Message Digest 5 (MD5) algorithm for authentication.
9HUVLRQ������ ����

&KDQJHG�VHW�&RPPDQGV
key <16_byte_hex> Defines a 16-byte hexidecimal key, which the NetScreen device uses to produce a 128-bit message digest (or hash) from the message.
sha-1 Specifies the Secure Hash Algorithm (version) 1 (SHA-1) algorithm for authentication.
esp Specifies the use of the Encapsulating Security Payload (ESP) protocol, which the NetScreen device uses to encrypt and authenticate IP packets. Encryption algo-rithm choices are DES, 3DES and Null (for “no encryp-tion”).
3des Specifies the Triple Data Encryption Standard (3DES) encryption algorithm.
key <192_bit_hex> Defines a 192-bit hexadecimal key for 3DES encryp-tion.
des Specifies the Data Encryption Standard (DES) encryp-tion algorithm.
key <64-bit hex> Defines a 64-bit hexidecimal key for DES encryption.
aes128 Specifies the Advanced Encryption Standard (AES), 128-bit encryption.
key <128-bit hex> Defines a 128-bit hexidecimal key for DES encryption.
null When used with ESP, specifies “no encryption method.” When used with auth, specifies “no authentication method.”
password <pswd_str> Specifies a password that the NetScreen device uses to generate an encryption or authentication key automati-cally.
auth Specifies the use of an authentication (hashing) method. The available choices are MD5 or SHA-1. (Some NetScreen devices do not support SHA-1. See below for more information.)
monitor Monitors the specified VPN sending SNMP MIB3 data and traps to an SNMP community.
df-bit Determines how the NetScreen device handles the Don't Fragment (DF) bit in the outer header.
• clear clears (disables) DF bit from the outer header.
• copy copies the DF bit to the outer header.
• set sets (enables) the DF bit in the outer header.
���� :KDW·V�1HZ�,Q�6FUHHQ26����

&KDQJHG�VHW�&RPPDQGV
.�0�����The key lifetime is set to 3600 seconds.
The ESP authentication algorithm is NONE when not specified otherwise.
-?�1*���To create a manual VPN named “judy” with the following features:
• local and remote SPIs defined as 00001111 and 00002222
• the remote gateway IP address set at 172.16.33.2
• ESP with DES and MD5 using keys generated from the password “judyvpn”
ns-> set vpn judy manual 00001111 00002222 gateway 172.16.33.2 esp des password judyvpn auth md5 password judyvpn
To create an AutoKey IKE VPN named “tuval” with the following features:
• remote gateway “funaf” (previously specified using the set ike gateway command)
• replay protection enabled
• a Phase 2 proposal consisting of a Diffie-Hellman Group 2 exchange
• ESP with Triple DES and SHA-1
ns-> set vpn tuval gateway funaf.com replay proposal g2-esp-3des-sha
��������See the get vpn, set vpnmonitor, and set ike commands. The set ike command section contains the complete steps for setting up a VPN tunnel.
9HUVLRQ������ ����

1HZ�VHW�&RPPDQGV
��'�������11����There are no new set CLI commands since version 2.61.
���� :KDW·V�1HZ�,Q�6FUHHQ26����

:�
)�����11����This chapter lists the get commands that are unchanged in this version, or have been removed. In addition, this chapter lists and describes all get commands that are new, or that have undergone modification since version 2.61.
All command changes described in this chapter are relative to version 2.61 syntax and functionality.
��'�(����!� *�����Each get command includes options for filtering and redirecting command output.
���������(����!� *����If you wish to limit the output of a get command to information that applies to a designated slot number, use the # slot <dev_num> option.
#& ����
ns-> get address # slot 2
����7�F��(����!� *����If you wish to limit the output of a get command to information that applies to a designated virtual system (VSYS), use the # vsys <name_str> option.
#& ����
ns-> get address # vsys sales
4�%���"���"�����11����For the following commands have not changed since version 2.61, other than the implementation of new filter options (described above).
get address get admin get arp
get audible-alarm get auth get chassis
get clock get config get console
get counter get dhcp get dialup-group
get dip get dns get domain
get envar get file get firewall
9HUVLRQ������ ������
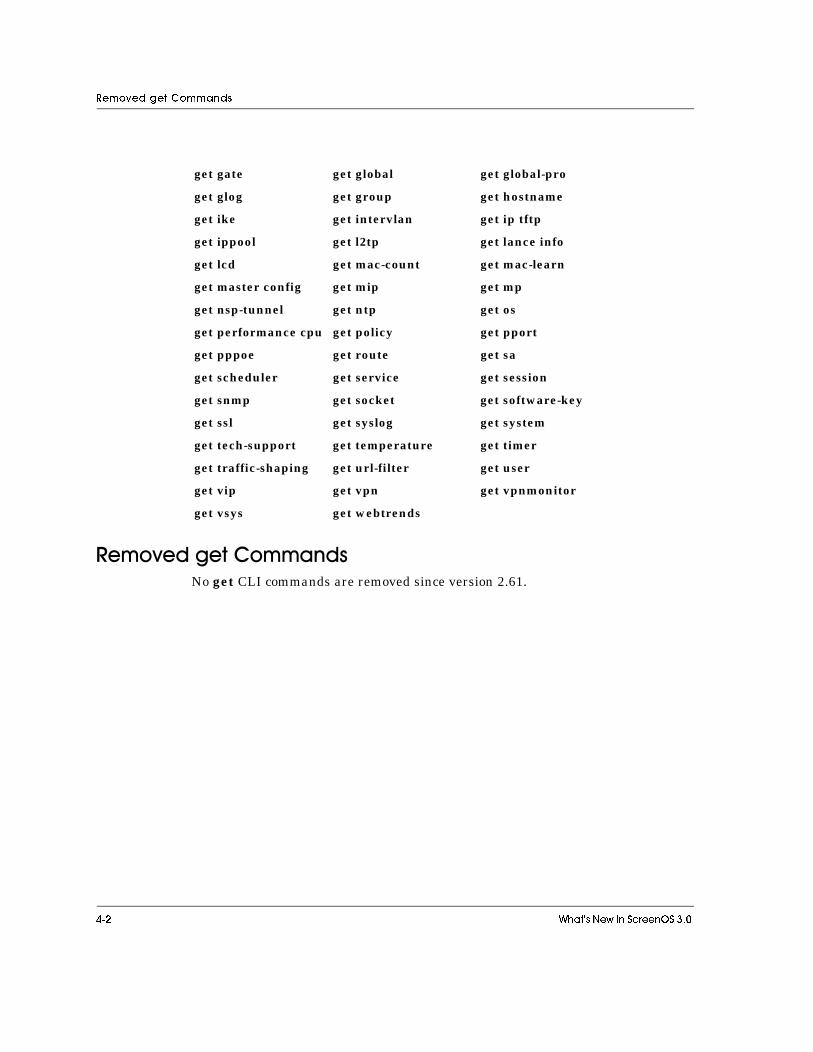
5HPRYHG�JHW�&RPPDQGV
��1� ���"�����11����No get CLI commands are removed since version 2.61.
get gate get global get global-pro
get glog get group get hostname
get ike get intervlan get ip tftp
get ippool get l2tp get lance info
get lcd get mac-count get mac-learn
get master config get mip get mp
get nsp-tunnel get ntp get os
get performance cpu get policy get pport
get pppoe get route get sa
get scheduler get service get session
get snmp get socket get software-key
get ssl get syslog get system
get tech-support get temperature get timer
get traffic-shaping get url-filter get user
get vip get vpn get vpnmonitor
get vsys get webtrends
��� :KDW·V�1HZ�,Q�6FUHHQ26�����

&KDQJHG�JHW�&RPPDQGV
����"���"�����11����The following commands have changed since version 2.61.
� �����
Description: Use the get admin command to display the system administration parameters.
The display for each address book entry shows the name, IP address, and netmask, or domain name, flag, and comments for the entry.
�2���?get admin
[auth [ settings ] |current-user |manager-ip |user
[cache |login] |
scs { all }]
[ > tftp <ip_addr> <filename> ]
�!"�1����
Note: This command has the following change:
• Added the scs { all } option.
auth [ settings ] Displays authentication settings for administrators. (Compare this command with the get auth command, which displays the authentication settings for users.) For admin authentication, you can use the internal database or a RADIUS server. For user authentication, you can use the internal database, a RADIUS server or an LDAP server.
:KDW·V�1HZ�,Q�6FUHHQ26���� ���

&KDQJHG�JHW�&RPPDQGV
-?�1*���To show all the administrative parameters for the NetScreen device:
ns-> get admin
To show the names of the administrators:
ns-> get admin user
��������See the set admin command.
�����The get admin command displays the following system administration and configuration parameters:
• The system IP address and port number for Web management
• The e-mail alert status
• The e-mail server IP address or server name
• The remote e-mail address or addresses for the recipients of e-mail alerts
• The remote e-mail address or addresses for the recipients of e-mail alert notification
• The configuration format—DOS or UNIX
current-user Lists only the name of the current user; that is, the one entering the command.
manager-ip Displays the IP address and netmask of the management workstation.
user Lists the names of the administrators for the device:
• cache: Lists all remote admin users.
• login: Lists current users of all login sessions.
scs { all } Lists all admin users, and indicates which users are SCS password authentication (PWA) enabled.
> tftp <ip_addr> <filename> Directs generated output to a file (<filename>) on the TFTP server (<ip_addr>).
��� :KDW·V�1HZ�,Q�6FUHHQ26�����

&KDQJHG�JHW�&RPPDQGV
� �����
Description: Use the get alarm command to display alarm entries.
�2���?�get alarm
{event
[type <number> [ -<number> ] |module { system | all-modules } |
[ level{emergency |alert |critical |error |warning |notification |information |debugging |all-levels}
]]
[ type ][ start-time <string> ]
[ end-time <string> ][ include <string> ]
[ exclude <string> ] |traffic
[ policy { <pol_num> [ -<pol_num> ] } ][ service <name_str> ]
Note: This command has the following changes:
• Added the module option.
• Added the type option.
• Added the level option.
• Removed the begin option.
:KDW·V�1HZ�,Q�6FUHHQ26���� ���

&KDQJHG�JHW�&RPPDQGV
[ src-address <ip_addr> ][ dst-address <ip_addr> ]
[ detail [ start-time <string> ]
[ end-time <string> ][ minute | second
[ threshold <number>[ -<number> ]
][ rate <number>
[ -<number> ]]
]] |
threshold}
[ > tftp <ip_addr> <filename> ]
�!"�1����
event Specifies event alarm entries.
level Specifies the security level of alarms to display. The all-levels option display all security levels.
module Specifies alarms to display according to the ScreenOS module that generated them.
type <number> [ -<number> ] Message type. Enter a specific type, or a range of types.
begin <string> Displays event alarm entries that follow a specified alarm event.
end-time <string> Displays event alarm entries or traffic alarm entries that occurred at and before the time specified. The for-mat for <string> is:
mm/dd[/yy-hh:mm:ss.
You can omit the year (the current year is the default), or express the year using the last two digits or all four digits. The hour, minute, and second are optional. The delimiter between the date and the time can be a space, a dash, or an underscore:
• 12/31/2001-23:59:00
• 12/31/2001_23:59:00
��� :KDW·V�1HZ�,Q�6FUHHQ26�����

&KDQJHG�JHW�&RPPDQGV
exclude <string> Displays event alarm entries that exclude the detail specified.
include <string> Displays event alarm entries that include the detail specified.
start-time <string> Displays event alarm entries or traffic alarm entries that occurred at the specified time or after. The format for <string> is:
mm/dd[/yy-hh:mm:ss.
You can omit the year (the current year is the default), or express the year using the last two digits or all four digits. The hour, minute, and second are optional. The delimiter between the date and the time can be a space, a dash, or an underscore:
• 12/31/2001-23:59:00
• 12/31/2001_23:59:00
traffic Specifies traffic alarm entries.
policy { <pol_num> | <pol_num> | <pol_num> }
Displays traffic alarm entries for an Access Policy spec-ified by its ID number or for several Access Policies specified by a range of ID numbers. The ID number can be any value between 0 and the total number of estab-lished Access Policies. To define a range, enter the starting and ending ID numbers as follows: <pol_num> - <pol_num>
service <name_str> Displays traffic alarm entries for a specified Service, such as TCP, ICMP, or FTP. (To display all services, make the <name_str> value Any.) The name does not have to be complete; for example, both TC and CP are recognized as TCP. Although you cannot specify a Ser-vice group, note that because TP is recognized as FTP, HTTP, and TFTP, entering TP displays traffic alarm entries for all three of these Services.
src-address <ip_addr> Displays traffic alarm entries originating from a speci-fied IP address or from a specified direction, such as Inside_Any or Outside_Any.
dst-address <ip_addr> Displays traffic alarm entries destined for a specified IP address or for a specified direction, such as inside_any or outside_any.
:KDW·V�1HZ�,Q�6FUHHQ26���� ���

&KDQJHG�JHW�&RPPDQGV
.�0�����If you execute get alarm without options or parameters, the command displays all alarm entries and Access Policy information. The get alarm event command displays all event alarm entries, and the get alarm traffic command displays all traffic alarm entries.
-?�1*���To display all alarm entries:
ns-> get alarm
To show event alarm entries:
ns-> get alarm event
To show all traffic alarm entries:
ns-> get alarm traffic
To show traffic alarm entries for an Access Policy with ID number 4:
ns-> get alarm traffic policy 4
To show all event alarm entries from 1:30 P.M. on February 28, 2000:
ns-> get alarm event start-time 02/28/2000-13:30
detail Displays detailed information for each Access Policy, including all traffic alarm entries that occurred under the policy. If you omit this option, the output contains only general information and the time of the most recent alarm for each policy.
second | minute Displays traffic alarm entries for Access Policies with threshold settings at bytes/second or bytes/minute.
threshold { <number> | <number>-<number> }
Displays traffic alarm entries for Access Policies with threshold settings at a specified value or within a spec-ified range.
rate { <number> | <number>-<number> }
Displays traffic alarm entries for Access Policies with a flow rate at a specified value or within a specified range.
> tftp <ip_addr> <filename> Directs generated output to a file <filename> on the TFTP server <ip_addr>.
��� :KDW·V�1HZ�,Q�6FUHHQ26�����
&KDQJHG�JHW�&RPPDQGV
To show all event alarm entries from 1:30 P.M. to 1:39:59 P.M. on February 28, 2000:
ns-> get alarm event start-time 02/28/00_13:30 end-time 02/28_13:39:59
To show all event alarm entries from 1:30 P.M. to 1:39:59 P.M. on February 28, 2000 except for Access Policy changes:
ns-> get alarm event start-time 02/28/00_13:30 end-time 02/28_13:39:59 exclude “policy change”
To show all event alarm entries on traffic originating from the Trusted side:
ns-> get alarm event include trust exclude untrust
To show traffic alarm entries for HTTP service:
ns-> get alarm traffic service http
To show traffic alarm entries for all traffic originating from the Untrusted side:
ns-> get alarm traffic src outside_any
To show traffic alarm entries for all incoming traffic destined for the server with IP address 172.16.1.24:
ns-> get alarm traffic src outside_any dst 172.16.1.24
To show emergency-level alarms:
ns-> get alarm event level emergency
To show detailed information on all traffic alarm entries:
ns-> get alarm traffic detail
To show detailed information on traffic alarm entries for all Access Policies with alarm thresholds set within the range of 1000 to 20,000 bytes/second:
ns-> get alarm traffic detail second threshold 1000-20000
To show detailed information on all traffic alarm entries with the following characteristics:
Important: Because strings are not considered whole words, include trust shows all events for the Trusted as well as Untrusted interfaces. To restrict the display to events from the Trusted side, add the exclude untrust string.
:KDW·V�1HZ�,Q�6FUHHQ26���� ���

&KDQJHG�JHW�&RPPDQGV
• outgoing traffic
• using TCP
• operating under Access Policies
• within the ID range of 3 to 7
• on May 27, 2000 from 4:00 P.M. to 4:59:59 P.M
ns-> get alarm traffic policy 3-7 service TCP src inside_any detail start-time 05/27/00_16:00 end-time 05/27_16:59:59
��������See the clear alarm command.
�����The console displays the maximum number of alarms that the NetScreen device can maintain and the current number of entries in the table.
When you executie get alarm from within a Virtual System or from within the main system on the NetScreen-1000, the command displays only entries from that system. Alarm entries from other Virtual Systems do not appear.
���� :KDW·V�1HZ�,Q�6FUHHQ26�����

&KDQJHG�JHW�&RPPDQGV
� ��
Description: Use the get ha command to display the status and configuration settings for high availability (HA).
�2���?get ha [ counter | detail | track ip ]
[ > tftp <ip_addr> <filename> ]
�!"�1����
-?�1*���To display the high availability group information:
ns-> get ha
�����The get ha command displays:
• The software version
• The redundant group to which the NetScreen device belongs
• Whether the NetScreen device is designated as master or slave
• The MAC addresses for all devices in the group
• Whether encryption and authentication are enabled or not
• The arp count
• The monitor port(s)
• The ha mode
Note: This command has the following changes:
• Added detail option.
counter Displays the number of sent, received, and dropped HA packets.
detail Displays general high availability information.
track ip Displays the path tracking status and settings.
> tftp <ip_addr> <filename> Directs generated output to a file <filename> on the TFTP server <ip_addr>.
:KDW·V�1HZ�,Q�6FUHHQ26���� ����

&KDQJHG�JHW�&RPPDQGV
• The session synchronization
• The slave linkup
��������See the set ha and exec ha commands.
���� :KDW·V�1HZ�,Q�6FUHHQ26�����
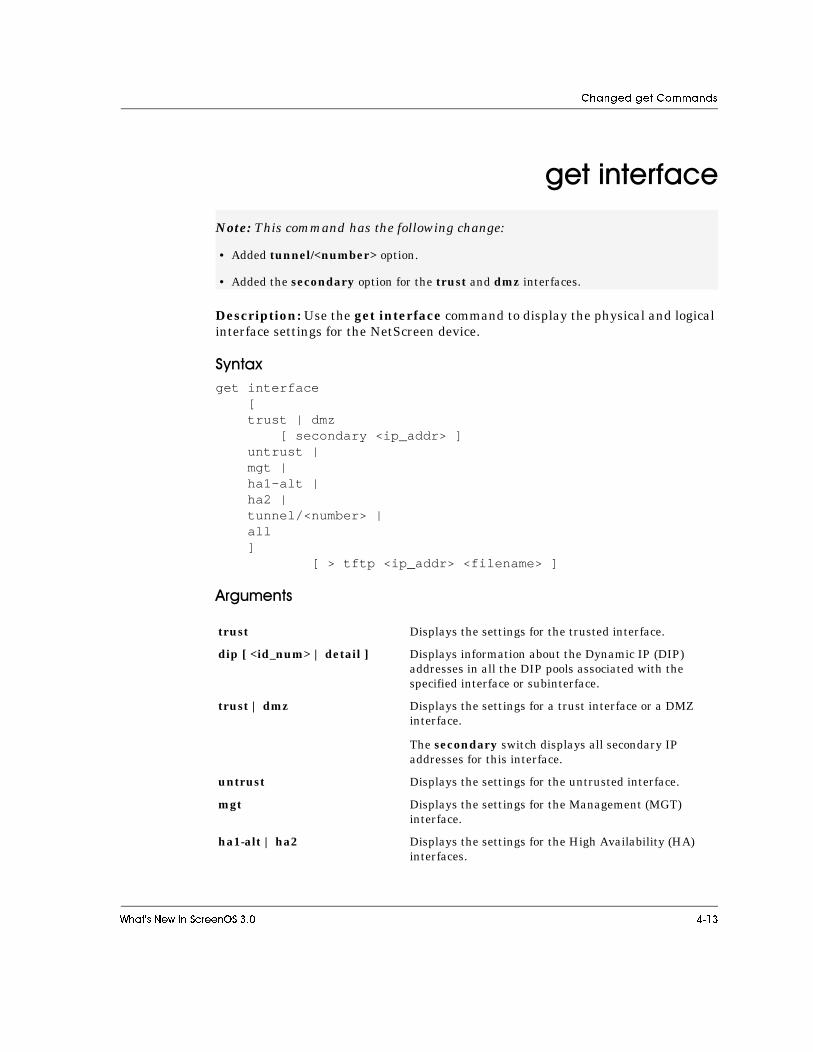
&KDQJHG�JHW�&RPPDQGV
� �� ����
Description: Use the get interface command to display the physical and logical interface settings for the NetScreen device.
�2���?get interface
[trust | dmz
[ secondary <ip_addr> ]untrust |mgt |ha1-alt |ha2 |tunnel/<number> |all]
[ > tftp <ip_addr> <filename> ]
�!"�1����
Note: This command has the following change:
• Added tunnel/<number> option.
• Added the secondary option for the trust and dmz interfaces.
trust Displays the settings for the trusted interface.
dip [ <id_num> | detail ] Displays information about the Dynamic IP (DIP) addresses in all the DIP pools associated with the specified interface or subinterface.
trust | dmz Displays the settings for a trust interface or a DMZ interface.
The secondary switch displays all secondary IP addresses for this interface.
untrust Displays the settings for the untrusted interface.
mgt Displays the settings for the Management (MGT) interface.
ha1-alt | ha2 Displays the settings for the High Availability (HA) interfaces.
:KDW·V�1HZ�,Q�6FUHHQ26���� ����

&KDQJHG�JHW�&RPPDQGV
-?�1*���To display general information for all physical and logical interfaces at the level (root or virtual system) in which you issue the command:
ns-> get interface
To display detailed information for the trusted interface:
ns-> get interface trust
To display information on secondary interfaces for the DMZ interface:
ns-> get interface dmz secondary
��������See the set interface command.
tunnel/<id_num> Displays the interface settings for an established ESP tunnel, specified by the tunnel’s index value <id_num>.
all Displays the settings for all the interfaces. If you use the get interface command by itself, it displays the settings for interfaces only in the system in which you enter the command.
> tftp <ip_addr> <filename> Directs generated output to a file <filename> on the TFTP server <ip_addr>.
���� :KDW·V�1HZ�,Q�6FUHHQ26�����

&KDQJHG�JHW�&RPPDQGV
� ���
Description: Use the get log command to display all the entries in the log table.
�2���?get log
{device-reset |event
[type <number> [ -<number> ] |module { system | all-modules } |
[ level{emergency |alert |critical |error |warning |notification |information |debugging |all-levels}
][ start-time <string> ]
[ end-time <string> ][ include <string> ]
[ exclude <string> ]] |
self | traffic [ policy <pol_num> | <pol_num>-<pol_num> ][ start-time <string> ] [ end-time <string> ]
[ min-duration <string> ] [ max-duration <string> ]
Note: This command has the following changes:
• Added the module option.
• Added the type option.
• Added the level option.
• Removed the begin option.
:KDW·V�1HZ�,Q�6FUHHQ26���� ����

&KDQJHG�JHW�&RPPDQGV
[ service <name_str> ][ src-ip <ip_addr> [ -<ip_addr> ]
[ src-netmask <mask> ][ src-port <port_num> ]
][ dst-ip <ip_addr> [ -<ip_addr> ]
[ dst-netmask <mask> ]]
[ no-rule-displayed ] |system [ reversely | saved ] |setting [ module { system | all } ]}
[ > tftp <ip_addr> <filename> ]
�!"�1����
event Specifies event log entries.
level Specifies the security level of log entries to display. The all-levels option display all security levels.
module Specifies log entries to display according to the ScreenOS module that generated them.
type <number> [ -<number> ] Message type. Enter a specific type, or a range of types.
start time <string> Displays event log entries that occurred at or after the time specified—day/month/year hour:minute:second. You can omit the year, in which case the current year is assumed, and you can choose to write the year with either just the last two digits or with all four. The hour, minute, and second can be omitted. Separate the date from the time with a space, a dash, or an underscore:
• 12/31/2001-23:59:00
• 12/31/2001_23:59:00
end-time <string> Displays event log entries that occurred at and before the time specified.
include <string> Displays event log entries that include the detail specified.
exclude <string> Displays event log entries that exclude the detail specified.
begin <string> Displays event log entries that follow a specified event.
traffic Specifies traffic log entries.
���� :KDW·V�1HZ�,Q�6FUHHQ26�����

&KDQJHG�JHW�&RPPDQGV
policy { <pol_num> | <pol_num> - <pol_num> }
Displays traffic log entries for an Access Policy specified by its ID number or for several Access Policies specified by a range of ID numbers. The ID number can be any value between 0 and the total number of established Access Policies. To define a range, enter the starting and ending ID numbers using this syntax:
<pol_num> - <pol_num>
min-duration <string> Displays traffic log entries for traffic whose duration was longer than or equal to the minimum duration specified.
max-duration <string> Displays traffic log entries for traffic whose duration was shorter than or equal to the maximum duration specified.
service <name_str> Displays traffic log entries for a specified Service, such as TCP, ICMP, FTP, or Any. The name does not have to be complete; for example, both TC and CP are recognized as TCP. Although you cannot specify a Service group, note that because TP is recognized as FTP, HTTP, and TFTP, entering TP displays log entries for all three Services.
src-ip { <ip_addr> [ <ip_addr> - <ip_addr> ] }
Displays traffic log entries for a specified source IP address or range of source IP addresses. Include the subnet mask for a source IP address to display traffic entries for all IP addresses in the same subnet as the specified source IP address.
A source IP range and a source subnet mask cannot be specified simultaneously.
src-port { <port_num> | <port_num> - <port_num> }
Displays traffic log entries for a specified port number or range of source port numbers.
dst-ip { <ip_addr> [ <ip_addr> - <ip_addr> ] }
Displays traffic log entries for a specified destination IP address or range of destination IP addresses. You can specify the subnet mask for a destination IP address, but you cannot specify a destination IP range and destination subnet mask simultaneously.
no-rule-displayed Displays traffic log entries, but does not display Access Policy information.
system Displays current system log information.
system saved Displays saved system log information.
> tftp <ip_addr> <filename> Directs generated output to a file <filename> on the TFTP server <ip_addr>.
:KDW·V�1HZ�,Q�6FUHHQ26���� ����
&KDQJHG�JHW�&RPPDQGV
.�0�����If no arguments are entered, the get log command displays all log entries.
-?�1*���To display all entries in the log table:
ns-> get log
To display the entries in the traffic log table for an Access Policy with ID 3:
ns-> get log traffic policy 3
To display event log entries from 3:00 P.M. on March 4, 2001:
ns-> get log event start-time 03/04/01_15:00
To display event log entries from 3:00 P.M. on March 4, 2001 to 2:59:59 P.M. on March 6:
ns-> get log event start-time 03/04/01_15:00 end-time 03/06_14:59:59
To display traffic log entries for traffic for a period between 5 minutes and 1 hour:
ns-> get log traffic min-duration 00:05:00 max-duration 01:00:00
To display traffic log entries for the range of destination IP addresses 172.16.20.5–172.16.20.200:
ns-> get log traffic dst-ip 172.16.20.5-172.16.20.200
To display traffic log entries from the source port 8081:
ns-> get log traffic src-port 8081
To display traffic log entries without displaying Access Policy information:
ns-> get log traffic no-rule-displayed
��������See the clear log command.
setting Displays log setting information. The module <string> value specifies the name of the module for which the log settings apply.
���� :KDW·V�1HZ�,Q�6FUHHQ26�����

&KDQJHG�JHW�&RPPDQGV
:KDW·V�1HZ�,Q�6FUHHQ26���� ����

&KDQJHG�JHW�&RPPDQGV
� � ����
Description: Use the get memory command to display the memory allocation status.
�2���?get memory
[<id_num> |all |error |free |mempool |used]
[ > tftp <ip_addr> <filename> ]
�!"�1����
-?�1*���To display the memory usage status:
ns-> get memory
Note: This command has the following changes:
• Added the mempool option.
<id_num> Displays the task ID number.
all Displays memory fragments.
error Displays erroneous memory fragments.
free Displays free memory.
mempool Displays pooled memory.
used Displays used memory.
minsize <number> Show all memory fragments that are larger than <number>.
> tftp <ip_addr> <filename> Directs generated output to a file <filename> on the TFTP server <ip_addr>.
���� :KDW·V�1HZ�,Q�6FUHHQ26�����

&KDQJHG�JHW�&RPPDQGV
To display all erroneous memory fragments:
ns-> get memory error
�����The get memory command displays information about the amount of memory allocated, the amount remaining, and the number of fragments.
:KDW·V�1HZ�,Q�6FUHHQ26���� ����

&KDQJHG�JHW�&RPPDQGV
� ���
Description: Use the get pki command to show the CA (certificate authority) server’s IP address and e-mail address, the certificate administrator’s e-mail address, and the RSA key length.
�2���?get pki
{authority <id_num>
{cert-status |scep} |
ldap |x509
{cert-path |crl-refresh |dn |list
{ca-cert |cert |local-cert} |
ns-cert |pkcs10 |raw-cn}
}[ > tftp <ip_addr> <filename> ]
Note: This command has the following changes:
• Added the authority option.
• Added the cert-status option.
• Added the scep option.
• Added the raw-cn option.
���� :KDW·V�1HZ�,Q�6FUHHQ26�����
&KDQJHG�JHW�&RPPDQGV
�!"�1����
authority <id_num> Shows authority references for the Certificat Authority (CA). The cert-status option displays information on the x509 CA certificate. the scep option displays infor-mation on the SCEP server.
ldap Shows the default certificate authority server’s address and the default LDAP URL for the certificate revocation list (CRL) retrieval.
x509 Specifies an International Telecommunications Union (ITU-T) X.509/PKCS digital certificate for these types:
cert-path Displays the default X509 certificate path validation level.
crl-refresh Displays the X.509 CRL refresh frequency rate.
dn Displays the distinguished name on the NetScreen X.509 digital certificate.
list Displays the X.509 object list loaded in the NetScreen device.
ca-cert Displays the certificate authority (CA) X.509 certificates currently loaded in the NetScreen device.
cert Displays the X.509 certificates currently loaded in the NetScreen device.
local-cert Displays the local (non-CA) X.509 certificates currently loaded in the NetScreen device.
ns-cert Displays the NetScreen device’s X509 certifi-cate.
pkcs10 Shows the destination of the PKCS10 file and generates the file in that location. (PKCS is the Public Key Cryptography Standard.)
raw-cn Shows if the raw-certificate name feature is enabled or disabled.
The raw-cn is the CN value you specify with the command set pki x509 dn name <name_str>, where <name_str> is a string of characters comprising the CN.
> tftp <ip_addr> <filename> Directs generated output to a file <filename> on the TFTP server <ip_addr>.
:KDW·V�1HZ�,Q�6FUHHQ26���� ����

&KDQJHG�JHW�&RPPDQGV
-?�1*���To display the URL and the IP address or name of the default certificate authority’s LDAP server:
ns-> get pki ldap
To display a list of certificate authority (CA) certificates loaded in the NetScreen device:
ns-> get pki x509 list ca-cert
��������See the set pki command.
���� :KDW·V�1HZ�,Q�6FUHHQ26�����

&KDQJHG�JHW�&RPPDQGV
� ���
Description: Use the get scs command to display the SCS keys used to establish a secure command shell to a NetScreen device from a remote system.
�2���?get scs
[ host-key ] |[ pka-rsa ]
[all |username <name_str> [ index <number> ]
[ > tftp <ip_addr> <filename> ]]
�!"�1����
Note: This command has the following changes:
• Added pka-rsa option.
• Added all suboption of pka-rsa option.
• Added username suboption of pka-rsa option.
• Added index <number> option.
scs Displays these items:
• If SCS is enabled or not
• SCS status
• Key regeneration time
• Current number of SCS connections
• Details of current connections
host-key Shows the SCS host key (RSA public key) for the active root/VSYS, including the fingerprint of the host key.
pka-rsa Shows current user-specific information on Public Key Authenticaion (PKA) using RSA.
:KDW·V�1HZ�,Q�6FUHHQ26���� ����

&KDQJHG�JHW�&RPPDQGV
-?�1*���To display all users and keys for the secure command shell feature on a NetScreen device:
ns-> get scs pka-rsa all
To display PKA public keys for a user named “chris”:
ns-> get scs pka-rsa username chris
��������See the set scs command.
all Shows all PKA public keys bound to all users. You must be the root user to execute this option; admin users and read-only users cannot execute this command.
username Shows all PKA public keys bound to a specified user <name_str>. Admin users and read-only users can execute this option only if <name_str> identifies the current admin user or read-only user.
The index <number> parameter allows the admin user and read-only user to view the details of a key bound to the user name. It also allows the root user to view the details of a key bound to the specified user.
> tftp <ip_addr> <filename> Directs generated output to a file <filename> on the TFTP server <ip_addr>.
���� :KDW·V�1HZ�,Q�6FUHHQ26�����

1HZ�JHW�&RPPDQGV
��'�"�����11����There are no new get CLI commands since version 2.61.
:KDW·V�1HZ�,Q�6FUHHQ26���� ����

1HZ�JHW�&RPPDQGV
���� :KDW·V�1HZ�,Q�6FUHHQ26�����
>�
����!���11����This chapter lists the clear commands that are unchanged in this version, or have been removed. In addition, this chapter lists and describes all clear commands that are new or that have undergone modification since version 2.61.
All command changes described in this chapter are relative to version 2.61 syntax and functionality.
4�%���"���%���!���11����The following clear commands have not changed since version 2.61.
��1� ���%���!���11����No clear CLI commands are removed since version 2.61.
clear admin clear alarm clear arp
clear audible-alarm clear auth clear crypto
clear dbuf clear dhcp clear dns
clear file clear ike-cookie clear l2tp
clear led clear log clear mac-learn
clear pppoe clear sa clear sa-stat
9HUVLRQ������ ������

&KDQJHG�FOHDU�&RPPDQGV
����"���%���!���11����The following command has changed since version 2.61.
�� ����� !� ��
Description: Use the clear node_secret command when the NetScreen device is using SecurID to authenticate users and is not communicating properly with the ACE Server. If the system IP or interface IP address changes, it is necessary to clear and reset the node secret on both the NetScreen device and the ACE server.
�2���?clear node_secret
[ ipaddr <ip_addr> ]
�!"�1����
.�0�����None.
-?�1*���To clear and prompt the NetScreen device to request the node secret from the ACE server:
ns-> clear node_secret
�����If you remove, move, or reconfigure a NetScreen device, it might stop communicating with the ACE Server. If this happens, the ACE Server log displays a message saying that the node secret is invalid. Use the clear node_secret command to resynchronize communication between the two.
Note: This command has the following changes:
• Added the ipaddr option.
ipaddr <ip_addr> Specifies the outgoing IP address for communicating with the SecurID server.
��� :KDW·V�1HZ�,Q�6FUHHQ26����
���
&KDQJHG�FOHDU�&RPPDQGV
The node secret bit tells the ACE server to negotiate an encryption secret as soon as possible. When the first successful authentication occurs, the ACE server negotiates an encryption secret. The NetScreen device stores the node secret in nonvolatile memory.
Caution
Because the node secret does not reside in the configuration, the unset all command does not clear it.
Reset the node secret whenever you change the NetScreen IP address or if the ACE server administrator deletes and recreates the client.
:KDW·V�1HZ�,Q�6FUHHQ26���� ���

&KDQJHG�FOHDU�&RPPDQGV
�� ��� �����
Description: Use the clear session command to clear entries in the NetScreen device’s session table.
�2���?clear session
[all |id <id_num> |[ src-ip <ip_addr> [ netmask <mask> ] ]
[ dst-ip <ip_addr> [ netmask <mask> ] ][ src-mac <mac_addr> ]
[ dst-mac <mac_addr> ][ protocol <ptcl_num> [ <ptcl_num> ] ]
[ src-port <port_num>[ <port_num> ]
][ dst-port <port_num>
[ <port_num> ]]
[ vsd-id <id_num> ]]
�!"�1����
Note: This command has the following changes:
• Added the all option.
• Added the id option.
• Added the src-ip and netmask options
• Added the src-mac and dst-mac options.
• Added the protocol option.
• Added the src-port and dst-port options.
• Added the vsd-id option.
all Directs the NetScreen device to clear all sessions.
��� :KDW·V�1HZ�,Q�6FUHHQ26����
���

&KDQJHG�FOHDU�&RPPDQGV
-?�1*���To clear all entries in the session table:
ns-> clear session
id <id_num> Directs the NetScreen device to clear a specific session with Session Identification number <id_num>.
src-ip <ip_addr> Directs the NetScreen device to clear all sessions intitated by packets containing source IP address <ip_addr>. For example, <ip_addr> could be the source IP address in the first TCP SYN packet.
dst-ip <ip_addr> Directs the NetScreen device to clear all sessions intitated by packets containing destination IP address <ip_addr>.
src-mac <mac_addr> Directs the NetScreen device to clear all sessions intitated by packets containing source MAC address <mac_addr>.
dst-mac <mac_addr> Directs the NetScreen device to clear all sessions intitated by packets containing destination MAC address <mac_addr>.
protocol <ptcl_num>[ <ptcl_num> ]
Directs the NetScreen device to clear all sessions that use protocol <ptcl_num>.
You can also specify any protocol within a range (<ptcl_num> <ptcl_num>).
src-port <port_num>[ <port_num> ]
Directs the NetScreen device to clear all sessions intitated by packets that contain the layer 4 source port <port_num> in the layer 4 protocol header.
You can also specify any layer 4 destination port within a range (<port_num> <port_num>).
dst-port <port_num>[ <port_num> ]
Directs the NetScreen device to clear all sessions intitated by packets that contain the layer 4 destination port <port_num> in the layer 4 protocol header.
You can also specify any layer 4 destination port within a range (<port_num> <port_num>).
vsd-id <id_num> Directs the NetScreen device to clear all sessions that belong the VSD group <id_num>.
:KDW·V�1HZ�,Q�6FUHHQ26���� ���

&KDQJHG�FOHDU�&RPPDQGV
To clear all sessions belonging to VSD group 2001, and initiated from the host at IP address 172.16.10.12:
ns-> clear session src-ip 172.16.10.12 vsd-id 2001
��������See the get session command.
��� :KDW·V�1HZ�,Q�6FUHHQ26����
���

1HZ�FOHDU�&RPPDQGV
��'�%���!���11����There are no new clear CLI commands since version 2.61.
:KDW·V�1HZ�,Q�6FUHHQ26���� ���

1HZ�FOHDU�&RPPDQGV
��� :KDW·V�1HZ�,Q�6FUHHQ26����
���

5�
���%������������11����This chapter lists miscellaneous commands that are unchanged in this version, or have been removed. In addition, this chapter lists and describes all miscellaneous commands that are new, or that have undergone modification since version 2.61.
All command changes described in this chapter are relative to version 2.61 syntax and functionality.
4�%���"�����11����The following commands have not changed since version 2.61.
��1� �����11����None of the miscellaneous CLI commands are removed since version 2.61.
enter vsys exec dhcp exec dns
exec ha file-sync exec ntp update exec pppoe
exec software-key exec trace-route exit
ping reset save
snoop trace-route
9HUVLRQ������ ������
&KDQJHG�&RPPDQGV
����"�����11����The following command has changed since version 2.61.
" ����
Description: Use the exec pki commands to manage RSA key pair generation and X.509 certificate requests and removals for public-key infrastructure (PKI).
�2���?exec pki
{dsa new-key <key_num> |rsa new-key <key_num> |x509
{delete <number> |pkcs10 |tftp <ip_addr>
{cert-name <name_str> |crl-name <name_str>} |
scep <number>}
}
�!"�1����
Note: This command has the following change:
• Added the scep setting to the x509 option.
dsa new-key Generates a new DSA public/private key pair with a specified bit length. Key length is 512, 786, 1024, or 2048.
rsa new-key Generates a new RSA public/private key pair with a specified bit length. Key length is 512, 786, 1024, or 2048.
��� :KDW·V�1HZ�,Q�6FUHHQ26����
���
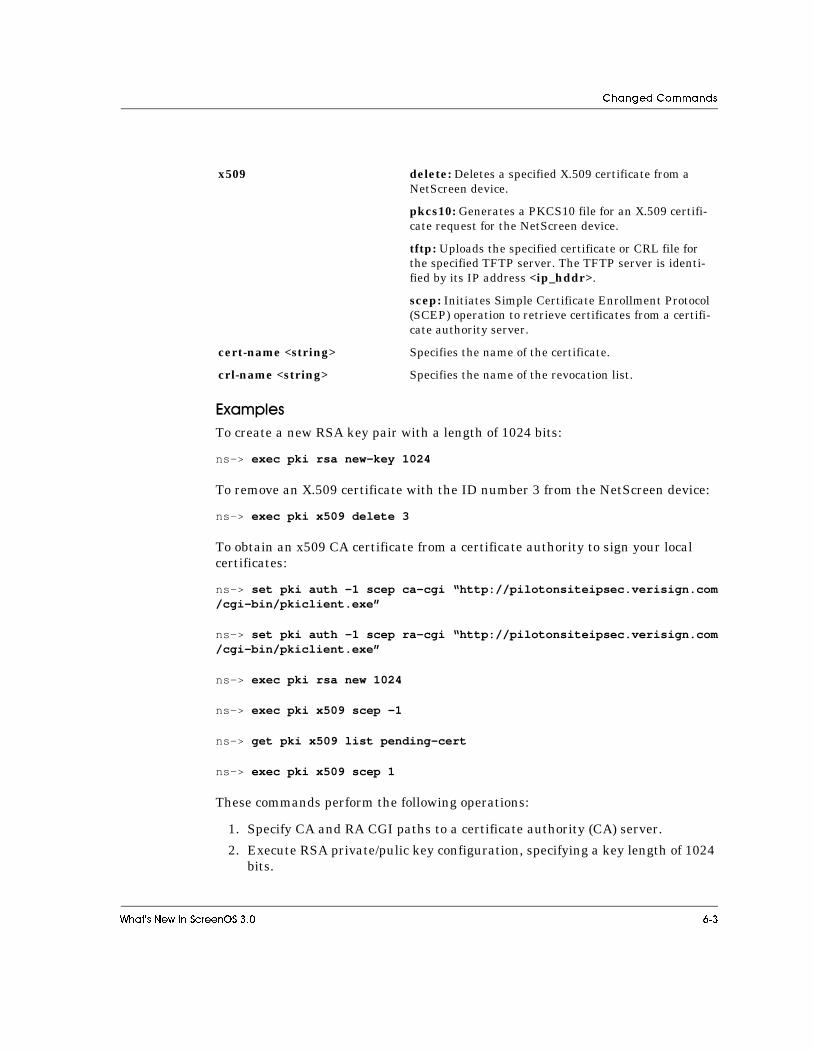
&KDQJHG�&RPPDQGV
-?�1*���To create a new RSA key pair with a length of 1024 bits:
ns-> exec pki rsa new-key 1024
To remove an X.509 certificate with the ID number 3 from the NetScreen device:
ns-> exec pki x509 delete 3
To obtain an x509 CA certificate from a certificate authority to sign your local certificates:
ns-> set pki auth -1 scep ca-cgi “http://pilotonsiteipsec.verisign.com/cgi-bin/pkiclient.exe”
ns-> set pki auth -1 scep ra-cgi “http://pilotonsiteipsec.verisign.com/cgi-bin/pkiclient.exe”
ns-> exec pki rsa new 1024
ns-> exec pki x509 scep -1
ns-> get pki x509 list pending-cert
ns-> exec pki x509 scep 1
These commands perform the following operations:
1. Specify CA and RA CGI paths to a certificate authority (CA) server.
2. Execute RSA private/pulic key configuration, specifying a key length of 1024 bits.
x509 delete: Deletes a specified X.509 certificate from a NetScreen device.
pkcs10: Generates a PKCS10 file for an X.509 certifi-cate request for the NetScreen device.
tftp: Uploads the specified certificate or CRL file for the specified TFTP server. The TFTP server is identi-fied by its IP address <ip_hddr>.
scep: Initiates Simple Certificate Enrollment Protocol (SCEP) operation to retrieve certificates from a certifi-cate authority server.
cert-name <string> Specifies the name of the certificate.
crl-name <string> Specifies the name of the revocation list.
:KDW·V�1HZ�,Q�6FUHHQ26���� ���

1HZ�&RPPDQGV
3. Initiate the SCEP operation to retrieve certificates.
4. Display a list of pending certificates, allowing you to see and record the index number identifying the certificate.
5. Obtain a CA certificate from the CA server (using the index number obtained in Step 4) to identify the certificate.
��������See also the set pki, unset pki, and get pki commands.
��'���11����The following command is new, added since version 2.6.1.
" ����Description: Use the exec scs command to load a key from a file on a TFTP server and bind the key to a user.
�2���?exec scs
{ tftp {pka-rsa }[ username <name_str> ]
{ file-name <filename> ip-addr <ip_addr> }
�!"�1����
-?�1*���
tftp { pka-rsa } Specifies a TFTP server from which to load and bind a pka-rsa key from a file.
username <name_str> Loads and binds the key to a specific user.
file-name <filename> and ip-addr <ip_addr> Loads and binds the key to the current user, specifies the IP address (<ip_addr>) of the TFTP server, and specifies the file name (<filename>) of the file containing the key.
��� :KDW·V�1HZ�,Q�6FUHHQ26����
���

1HZ�&RPPDQGV
To load and bind a key contained in a file named “key_file” to a user named “chris” from a server at IP address 172.16.10.11:
ns-> exec scs tftp pka-rsa username chris file-name key_file ip-addr 172.16.10.11
��������See the set scs and get scs commands.
:KDW·V�1HZ�,Q�6FUHHQ26���� ���

1HZ�&RPPDQGV
��� :KDW·V�1HZ�,Q�6FUHHQ26����
���

�,QGH[
+���?
�access policies
defining 49
ACE Server 2ACE Server log 2address book entry 3
domain name 3flag 3IP address 3name 3netmask 3
admin authentication 3administration parameters 2alarms, displaying 5
�CA (certificate authority) 2, 22
CGI path 4, 47
certificate
requesting automatically 2revocation 6
CheckPoint 35
clear commands
session 4command
clear node_secret 2clear session 4exec dhcp client renew 4exec pki 2get alarm 5get ha 11
get interface 13
get log 15
get mip 22
get ssh 25
set admin 2set audible-alarm 9set firewall 17
set ha 24
set ike 29
set mip 40
set policy 49
set ssh 55
set user 58
set vpn 63
CRL (Certificate Revocation List) 6
.Defining
new user dialup groups 2defining
access policies 49
users for authentication 58
DHCP
client, renewing an IP address 4Dialup groups
creating 2displaying
alarms 5entries in the log table 15
high availability settings 11
interface settings 13
mapped IPs 22
DN (distinguished name) 1DNS entries 4
-encryption secret 3exec dhcp client renew command 4exec pki command 2
:KDW·V�1HZ�,Q�6FUHHQ26������ ,;��
���

�,QGH[
)gatekeeper devices 17
get 3get admin command 3
display system administration parameters 3get alarm command 5
display alarm entries 5get commands
alarm 5ha 11
interface 13
log 15
mip 22
ssh 25
Groupuser dialup 2, 62
Group IKE ID 1
;H.323 protocol 17
high availabilitydefining a group 24
displaying 11
HTTP packets 25
+id-mode 35
IKE (Internet Key Exchange) 29
interface settings, displaying 13
internal database 3
9log table, displaying 15
logical interface 14
�Malicious URL 25
mapped IPsdisplaying 22
memory allocation status 20
memory usage status 20
�NAT (Network Address Translation) 8
effect on IPsec VPNs 9NAT Traversal
User Datagram Protocol (UDP) 9node secret 2nonvolatile memory 3
�physical interface 14
�RADIUS server 3RSA key length 22
�SCEP (Simple Certificate Enrollment Protocol) 2SCS (Secure Command Shell) 21
secondary IP addresses 24
secure shell 55, 25
SecurID, resetting communication 2Server 3server
LDAP 3RADIUS 3
Session tableclearing 4
set commandsadmin 2audible-alarm 9firewall 17
ha 24
ike 29
mip 40
policy 49
ssh 55
,;�� :KDW·V�1HZ�,Q�6FUHHQ26������
���

�,QGH[
user 58
vpn 63
SNMP MIB Files 13
SSH (Secure Shell) 21
system administration configuration parameters 4addresses for the recipients of e-mail alerts 4configuration format 4domain name 4e-mail alert status 4e-mail server IP address 4port number for Web management 4remote e-mail address 4system IP address 4
�trusted interface 14
4UDP (User Datagram Protocol) 9Users
dialup groups 2users, creating 58
7voice-over IP communication 17
VPN (Virtual Private Network) 63
VPNs 21
:KDW·V�1HZ�,Q�6FUHHQ26������ ,;��
���

�,QGH[
,;�� :KDW·V�1HZ�,Q�6FUHHQ26������
���